Kelty ALL INN 2 3 2019
1
r \.. 1 All Inn 2 & 3 All Inn-clusive backcountry comfort! In order to familiarize yourself with your new tent, we recommend you "test pitch" before your first adventure. For additional information please visit www.kelty.com. Package includes: Shark Mouth carry bag, tent body, tent fly, one hubbed main pole set, one ridge pole, guy cords, and tent stakes. Footprint and other accessories sold separately. 1 Lay out tent body and stake out corners. Assemble hubbed main pole and lay on top of tent. Ensure that all pole segments are fully seated. Please note color coding on pole segments & PP-cord at each corner for correct pole set and tent body orientation. Shortest pole on hubbed set should be positioned at the foot of tent. Note, main hubbed pole “spine” should be on top of front & rear hoops, not underneath. TIP: Do not shake out poles during assembly, take care of your gear and it will take care of you! 2 Insert front hoop pole tip into lightweight foot connector at corner of tent, gently flex pole and insert other tip of front hoop into opposite lightweight foot connector. Repeat same process for the rear hoop pole & lightweight foot connectors. Gently lift mesh tent body and connect 2 pole clips to main pole near main hubs as shown. Then connect main pole “spine” end to the Ball cap connectors above front door. Move to rear of tent and repeat process to attach Ball Cap connectors to main pole “spine” as shown. Main Pole & Ridge pole Ball Cap & rain fly D-ring connectors Lightweight Foot connector & Rain fly PP-cord attachment Rain Fly & Guy out hook & loop pole wrap. Pole clips 3 Connect all remaining pole clips to main hubbed pole set. Locate ridge pole. Attach one end of ridge pole to Ball cap connectors above side door zipper. Then lay ridge pole accors main spine pole directly on pole clip. Gently flex ridge pole accros main pole spine and attach seconnd ball cap connector on the other side. 4 Drape tent fly over tent body, note matching colored PP-cord on rain fly coners & tent body corners for correct orientation. Attach all guy out hook & loop pole wraps (inside rainfly) to poles. Attach rain fly D-ring connector to main pole tip above front door, D-ring slides over the ball cap connector as shown above. Move to the rear of tent & gently pull rain fly twoards you and repeat for rear D-ring connector & ball cap. Repeat same process for ridge pole by attaching 2 additional rain fly D-rings (inside rain fly) to ball caps connectors. Each corner of the rain fly has a PP-cord tied in a small fixed loop with a tension adjuster. Wrap fixed loop around the tip of each pole (under each lightweigh foot connector). Repeat this step for the other 3 corners, then gently tighten all tension adjusters equally. 5 Zip rain ˜y door closed and stake out side vestibule. Affix all guylines to guy out points on rainfly. Stake out all guylines and tension equally as needed. Practice makes perfect! Thank you for your buniess! If you have any questions please visit www.kelty.com or contact customer service.
Transcript of Kelty ALL INN 2 3 2019
r
\..
1
All Inn 2 & 3
All Inn-clusive backcountry comfort!
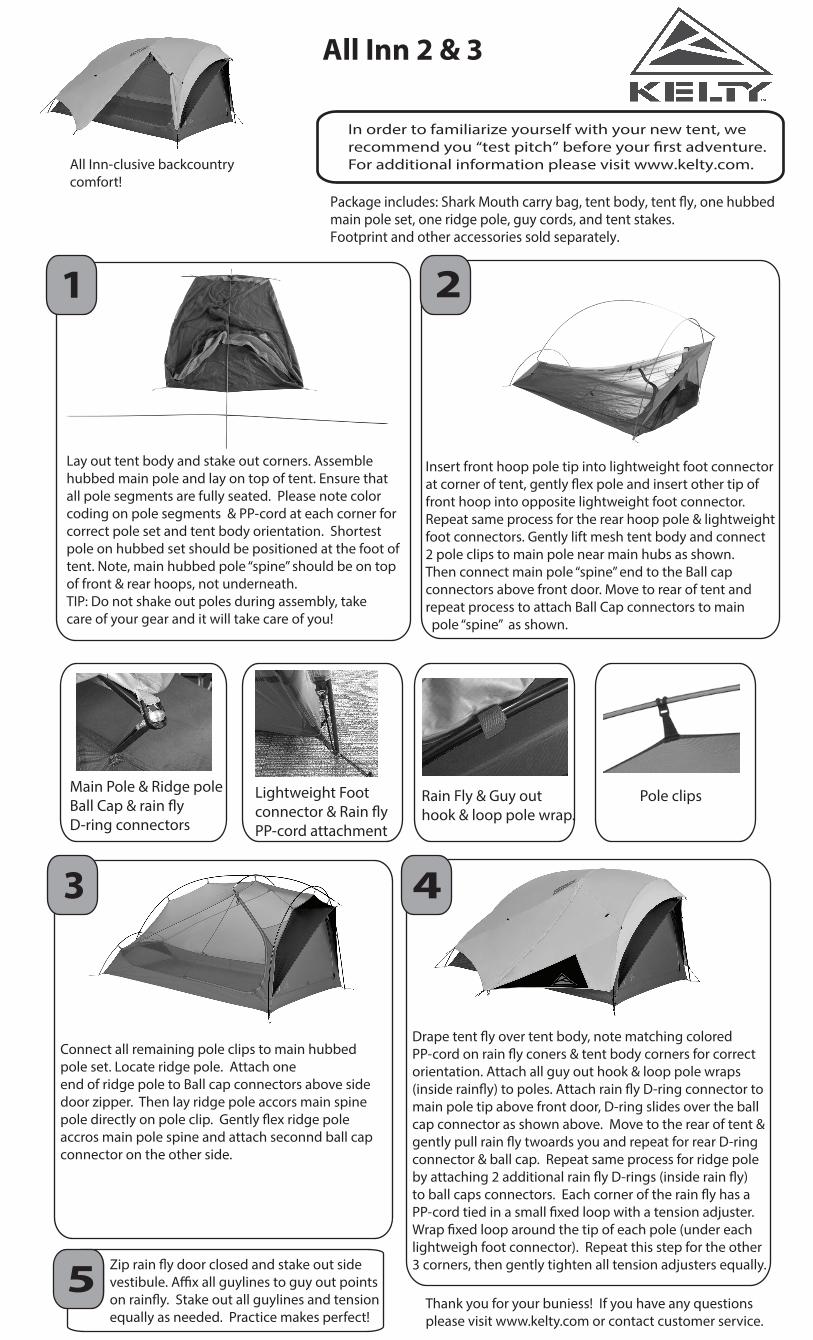
In order to familiarize yourself with your new tent, we recommend you "test pitch" before your first adventure.For additional information please visit www.kelty.com.
Package includes: Shark Mouth carry bag, tent body, tent fly, one hubbed main pole set, one ridge pole, guy cords, and tent stakes. Footprint and other accessories sold separately.
1
Lay out tent body and stake out corners. Assemble hubbed main pole and lay on top of tent. Ensure that all pole segments are fully seated. Please note color coding on pole segments & PP-cord at each corner for correct pole set and tent body orientation. Shortest pole on hubbed set should be positioned at the foot of tent. Note, main hubbed pole “spine” should be on top of front & rear hoops, not underneath. TIP: Do not shake out poles during assembly, take care of your gear and it will take care of you!
2
Insert front hoop pole tip into lightweight foot connector at corner of tent, gently flex pole and insert other tip of front hoop into opposite lightweight foot connector. Repeat same process for the rear hoop pole & lightweightfoot connectors. Gently lift mesh tent body and connect 2 pole clips to main pole near main hubs as shown. Then connect main pole “spine” end to the Ball cap connectors above front door. Move to rear of tent and repeat process to attach Ball Cap connectors to main pole “spine” as shown.
Main Pole & Ridge poleBall Cap & rain fly
D-ring connectors
Lightweight Foot connector & Rain fly
PP-cord attachment
Rain Fly & Guy out hook & loop pole wrap.
Pole clips
3
Connect all remaining pole clips to main hubbed pole set. Locate ridge pole. Attach one end of ridge pole to Ball cap connectors above side door zipper. Then lay ridge pole accors main spine pole directly on pole clip. Gently flex ridge pole accros main pole spine and attach seconnd ball cap connector on the other side.
4
Drape tent fly over tent body, note matching colored PP-cord on rain fly coners & tent body corners for correct orientation. Attach all guy out hook & loop pole wraps (inside rainfly) to poles. Attach rain fly D-ring connector tomain pole tip above front door, D-ring slides over the ball cap connector as shown above. Move to the rear of tent & gently pull rain fly twoards you and repeat for rear D-ring connector & ball cap. Repeat same process for ridge pole by attaching 2 additional rain fly D-rings (inside rain fly) to ball caps connectors. Each corner of the rain fly has a PP-cord tied in a small fixed loop with a tension adjuster. Wrap fixed loop around the tip of each pole (under each lightweigh foot connector). Repeat this step for the other 3 corners, then gently tighten all tension adjusters equally.5 Zip rain ˜y door closed and stake out side
vestibule. Affix all guylines to guy out pointson rainfly. Stake out all guylines and tensionequally as needed. Practice makes perfect!
Thank you for your buniess! If you have any questions please visit www.kelty.com or contact customer service.