KELCO F60 MK3
51
KELCO F60 MK3 DIGITAL PUMP CONTROLLER INSTALLATION & PROGRAMMING MANUAL KELCO Engineering Pty Ltd Sydney Australia www.kelco.com.au
Transcript of KELCO F60 MK3

KELCO F60 MK3DIGITAL PUMP CONTROLLER
INSTALLATION & PROGRAMMING MANUAL
KELCO Engineering Pty LtdSydney Australia
www.kelco.com.au

2
ELECTRICAL AND MECHANICAL LIMITS OF THIS CONTROLLERDO NOT EXCEED THESE LIMITS UNDER ANY CIRCUMSTANCES
Ambient temperature T50 (0°C ~50°C)Ingress Protection IP64Feature of automatic action Type 1.BNumber of automatic cycles (A) for each automatic action
5,000 cycles
Type of terminal Screw terminal block, type Y attachmentLoad Termination FunctionInput Input 1 HD /A /N AC 220-240V, 50Hz/60Hz
Input 2 A /N AC 220-240V, 50Hz/60HzInput 3 LV/N AC18-24V, 50Hz/60Hz; DC18-24VInput 4 RMT1 /RMT2 Remote inputs sourced from LV terminal
Output Relay 1 (SPDT pump control relay)
R1NO/R1COM/R1NC VDE 40015012
NO contacts, AC240V, 50Hz, 10ANC contacts AC240V,50Hz 3.5ADuty factor, 5s ON, 5s OFF
Ralay 2 (SPST alarm relay)
R1NO/R2COMVDE 40015012
AC240V, 50Hz/60Hz; 3.5ADuty factor, 5s ON, 5s OFF
Motor load Single phase motors (Single phase pump motors up to 2.4kW maximum)
Three phase motor Via a suitable interposing contactor
IMPORTANT: Input 1 or 2 shall not be connected while the input 3 or 4 are connected
TEMPERATURE LIMITSThis F60 MK3 Pump Controller is designed to operate in an ambient temperature range 1°C to 50°C. Process liquid temperature must not exceed 60°C. Operation of this pump controller outside these temperature limits may damage the controller and void any warranty on the product.
PRESSURE LIMITSThis F60 MK3 Pump Controller is designed to operate in the pressure range 0 to 2000kPa, 0 to 20 Bars, 0 to 290 psi. It must never be exposed to static or dynamic pressures in excess of 20 bars, 290 psi. The F60 MK3 must never be exposed to negative pressure. Never install the F60 MK3 on the suction pipe work of a pump. Operation outside the stated pressure limits may damage this product and void any warranty,

3
IMPORTANT: READ THIS FIRSTDO NOT EXPOSE THE F60 MK3 TO VIBRATION. INSTALL ONLY IN PIPEWORK THAT DOES NOT VIBRATE. Vibration will damage the electronics within the F60 MK3 and will void your product warranty.
This F60 MK3 pump controller has been fully tested and calibrated. It is set to mode 1 and it has its start-up and run-on timers both set to 5 seconds. All other functions are turned off. On start up the F60 MK3 will run the pump using its start-up timer. If it finds flow in the pipe system it will continue to run the pump. If flow stops the pump will continue to run for 5 seconds, held on by the F60 MK3’s run-on timer. If flow fails to return, the pump will be shut down after the run-on period. Pressing and releasing the (R) button on the F60 MK3 will repeat this basic process.
THE BUTTONSThe F60 MK3 is controlled and configured using 4 onboard buttons.
(R) Reset button. Stops the pump(s) and restarts the F60 MK3 when released. (˄) Up arrow button. For increasing program settings.(˅) Down arrow button. For decreasing program settings.(P) Programming button. For stepping through the menu and entering settings into memory.
THE LIGHTSThe F60 MK3 includes 4 multicolour lights to indicate activity.
Flow: This light is GREEN when the F60 MK3 detects flow and RED when no flow is detected.Pump: This light is GREEN when a pump is running and RED when the pump is stopped.Timer: This light may be GREEN or RED when a timer or special function is running.Remote: This light is BLUE when remote input No. 1 is closed and off when the remote is open. The light is RED when remote input No. 2 is closed and off when the remote is open. This light is PURPLE when both remote inputs 1 & 2 are closed.

4
LCD SCREEN BACKLIGHTThe LCD backlight can be turned on or off. To turn the light off press and hold down the (˅) button. Press and release the (R) button. Release the (˅) button. Repeat to turn the light on. The light remembers the state it was last left in if power is turned off. The light can be left permanently on or off as required.
TEMPERATUREThe F60 MK3 monitors its internal temperature when running. Pressing the (˅) button while the controller is powered up displays the current internal temperature of the F60 MK3.
PRESS (and release) THE (P) BUTTONWhen the F60 MK3 is powered up, pressing the (P) button, holding it down for 1 second and releasing it takes you to the top of the menu. Pressing and releasing the (P) button loads whatever the screen is displaying into the F60 MK3’s memory. The memory is non-volatile and settings are retained when power is off. You can exit the menu at any time by pressing and releasing the (R) button. Any settings you have made up to that point will be retained. There is no need to step all the way through the menu when making a change to a setting.
INSTALLING THE F60 MK31) Do not install the F60 MK3 in a fully exposed outdoor location. The F60 MK3 is weatherproof, however, to ensure a long reliable life from it we recommend it be protected from direct exposure to the sun and rain. A skull cap is provided with the F60 MK3 and we recommend it be used to protect the F60 MK3 when direct observation of the LCD screen is not required.
2) Do not expose the F60 MK3 to freezing. If the pipework in which the F60 MK3 is installed freezes, the pressure sensor in the controller may fail. If the F60 MK3 is to be used in areas where low temperatures will be encountered, always lag the pipework for several metres either side of the F60 MK3. Also lag the base of the F60 MK3 to prevent the unit and any adjacent pipework from freezing.
3) Do not use this controller in hot water applications. The F60 MK3 is not designed to be used in water hotter than 60ºC.

5
4) Never expose the F60 MK3 to static or dynamic pressures greater than 20 Bars, 290 psi.
5) Do not install the F60 MK3 in a section of pipe that is subject to vibration. Vibration will cause premature failure of the electronic components within the F60 MK3.
6) Never install the F60 MK3 in the suction pipe of the pump or in any location where it may be subject to partial vacuum conditions.

6
LOCATION The F60 MK3 should be installed in a straight section of pipe preferably with 5 diameters of straight pipe either side of the paddle. The F60 MK3 can be installed in a suitable pipe socket, tapping saddle or pipe tee. The F60 MK3 should be installed in the discharge pipework of the pumping system, either before or after the system’s air cell. If the system does include an air cell a decision must be made as to which side of the air cell to locate the F60 MK3. The fundamental way the system operates will depend on this decision. The F60 MK3 should not be installed in the suction pipe of a pump as it requires positive pressure to operate properly. The F60 MK3 can be installed in either horizontal or vertical pipe. If it is installed in vertical pipe the flow should preferably be in an upward direction. Do not install the F60 MK3 on the underside of horizontal pipework.
WARNING: Never install the F60 MK3 in the suction pipe of the pump or in any location where it may be subject to partial vacuum conditions.

7
BEFORE THE AIR CELL If the F60 MK3 is installed before the air cell in the system it will only start the pump on pressure since the initial flow will be supplied from the air cell. The only change in state the controller will see will be the falling pressure. Choose this arrangement if you want to keep pump starts to a minimum and you are prepared to accept the delay in starting associated with the slow pressure fall from the air cell.

8
AFTER THE AIR CELLIf you install the F60 MK3 in the pipework after the air cell it will start the pump each time flow pushes its paddle forward or each time pressure falls to whatever pressure you have set the controller to start at. Choose this arrangement if you want the system to deliver a steady pressure and to start each time flow is sensed.

9
INSTALLATIONThe F60 MK3 pump controller is supplied as two separate assemblies, the paddle assembly and the electrical housing. The paddle assembly should be installed in the pipework first.

10
VERY IMPORTANT SAFETY NOTE :A pressure relief valve should be fitted to any system that can exceed the pressure rating of any component on that system. Alternately, always confirm that the pressure safety limits of individual items are compatible and not compromised without the fitting of appropriate safety devices, i.e. a Pressure Relief Valve (PRV). A PRV should be fitted to every system toensure the system can not run against a shutoff head. A correctly set PRV will ensure the system can’t overheat the pump in the event of this F60 MK3 or any other part of the system locking the pump on.

11
TRIMMING THE PADDLEThe paddle of the F60 MK3 can be cut down to suit the specific pipe size and intended application. Cut the paddle using a hacksaw or tin snips so it clears the sides of the pipe socket and protrudes approximately half to two thirds of the way across the pipe when the controller is screwed into the pipework. If the flow rate will only ever be fairly low, the paddle should be cut longer, perhaps until it only clears the bottom of the pipe by 3 to 5mm. If you are unsure as to what length the paddle should be, a paddle trimming calculator is available at.
https://www.kelco.com.au/paddle-trimming-calculator/
If you know what the expected flow rate is the calculator allows you to enter your pipe diameter and paddle dimensions. It will then determine if the selected paddle dimensions are adequate for the application. Spare paddles to suit the F60 MK3 are available from Kelco or from your distributor.
To fit the paddle assembly into the pipework, apply Teflon tape or thread sealing compound to the thread and use a suitable spanner and the spanner flats provided on the paddle assembly (directly above the process connection thread). Under no circumstances should the electrical housing be twisted or used to screw the paddle assembly into the pipework, or to align the controller with the axis of the pipework. To do so will irreparably damage the controller and void its warranty. When correctly installed there should be a minimum 4mm gap between the top of the pipe socket and the top of the thread on the F60 MK3. Never apply water pressure to the F60 MK3 unless the electrical head is fitted and the M4 locking screw is in place and fully tightened. The F60 MK3 can be installed in either vertical or horizontal pipe. When installed in vertical pipework flow should preferably be in an upward direction past the controller’s paddle. The F60 MK3 has a 1” BSP process connection. A matching female threaded socket, pipe saddle or pipe tee must be provided to fit the controller into pipework.
ATTACHING THE ELECTRICAL HOUSINGOnce the paddle assembly has been installed, fit the electrical housing onto the spigot on top of the paddle assembly. Take care that the sealing O-ring is on the top stem of the paddle assembly is in location and in good order.

12
There is a flat keying face on the cylindrical body of the paddle assembly that keys the electrical housing onto the paddle assembly and aligns it correctly. It is critical that the keying flat is on the downstream side and at 90 degrees to the axis of the pipework. To secure the electrical housing onto the paddle assembly, an Allen head cap screw is supplied. The controller must be square to the axis of the pipework with the direction of flow arrow pointing in the direction of flow.
With the electrical housing located on the spigot and in position, press down with the flat of your hand on the top face of the electrical enclosure. While pressing down, screw the 4mm Allen screw fully through the housing using the 3mm Allen Key (supplied). Tighten the screw and then release your hand from the top of the housing.
DETACHING THE ELECTRICAL HOUSING
WARNING: Always switch off the power and fully de-pressurise the pipe system before attempting to remove the electrical housing.
To allow easy access to the controller’s paddle, the electrical housing of the F60 MK3 can be detached from the paddle assembly. Removing the electrical housing allows access to the paddle without the need to disconnect wiring. To remove the electrical assembly undo and completely remove the M4 Allen head locking screw. Once the locking screw is removed, lift the electrical housing straight off, do not twist it when doing this. Once the electrical housing has been removed, the paddle assembly can be unscrewed from the pipework using the spanner flats on the body of the paddle housing. Simply reverse this procedure to refit the electrical housing to the controller, taking care to ensure the O-ring on the top of the paddle assembly is in place and is clean and in good condition.
SENSITIVITY ADJUSTMENTUnder the end of the electrical housing on the F60 MK3 is a red hexagonal dust cap. If you remove this dust cap you gain access to an adjustment screw that allows the paddle preload to be reduced. As supplied the sensitivity adjustment screw is wound fully in. In this position, the paddle is at its least sensitive. In this position, it takes a substantial force from the moving water to move the paddle.

13
If you wind the sensitivity adjustment screw anti-clockwise (outward) the force against the paddle that resists flow will be reduced. The paddle will become increasingly more sensitive and will respond to progressively lower flows the further out you wind the adjusting screw. The total adjustment range is 10 turns of the screw. If you wind the adjustment screw out beyond 10 turns there will not be enough residual force to return the paddle to the off position when flow stops.
The range of sensitivity adjustment will also be affected by the orientation of the controller. In horizontal pipework with the F60 MK3 mounted vertically the useable range of adjustment is approximately 8 turns. In vertical pipework with the F60 MK3 installed horizontally the full 10 turn range can be utilised.
DUAL PUMP CONTROL Mode 5The F60 MK3 is capable of controlling 2 pumps simultaneously. The pumps can be of any required size and can be configured as a duty and standby set or as a dual alternating set. The starting and stopping pressures for both pumps can be set independently of each other in any required configuration within the overall pressure limits of the F60 MK3. The F60 MK3 detects flow at one location in the pipework. This will normally dictate the location of the F60 MK3 in the overall system. For example, when used alone the F60 MK3 would normally be mounted in the systems common discharge manifold. When set up this way the F60 MK3 will not offer loss of flow protection to the individual pumps, only to the overall system. A far better arrangement is to monitor flow from each pump independently. To give each pump individual loss of flow protection the F60 MK3 should be installed in the discharge pipe of one pump and a basic flow switch installed in the discharge pipe of the second pump.
Dual flow sensing can then be implemented by connecting the remote mounted flow switch into the remote input terminal No1 of the F60 MK3. When configured this way, The F60 MK3 can monitor flow at the two locations simultaneously. Loss of flow from either or both pumps will shut the pumps down if flow is lost.

14
TYPICAL DUAL PUMP SET A typical dual pump set is depicted in the accompanying sketch. The F60 MK3 and the F Series paddle flow switch are installed in the discharge pipes from the pumps prior to their entry into the common discharge manifold.
The remote flow switch can be a paddle switch, as illustrated, or an in line flow switch. It must have normally open voltage free contacts.
Kelco F Series Flow Switch

15
All electrical work associated with the F60 MK3 must be carried out by qualified electrical personnel and all electrical work must conform to AS/NZ standards and to local wiring rules.
WARNING
ELECTRICAL INSTALLATIONA means for disconnection of the F60 MK3 must be incorporated in the fixed wiring in accordance with the wiring rules. External preliminary protection is required under all circumstances. We suggest a maximum C10 Amp breaker be used for the supply isolation.
INTRODUCTIONWhen used with its HD terminal link in place, the F60 MK3 can directly control single-phase pump motors up to 2.4kW via Relay 1 normally open contacts. No interposing contactor is required for such applications. The F60 MK3 can also be used to control 3 phase pump motors of any size via an appropriate interposing contactor.
WARNING: The contactor control circuit must never exceed 240VAC. Never connect the F60 MK3 and contactor coil directly across 2 phases of a 3 phase supply.
The F60 MK3 requires a stable 220V to 240V AC 50Hz supply when operated from the mains. It can also be operated from an 18 to 24V AC or DC supply by utilising the low voltage active terminal LV and neutral terminal N (see the included wiring diagrams). When operated from a low voltage DC supply the terminals LV and neutral N are not polarity sensitive. Pay attention to cable sizes and ensure cables are adequate for the specific pump motor load. This is particularly important where long cable runs are to be used in the installation. If the voltage drop associated with the starting of the pump motor is excessive the F60 MK3 may repeatedly reset and not operate properly.

16
THE HD (Heavy Duty) TERMINALThe F60 MK3 pump controller contains a solid-state switch (HD Heavy Duty drive) that can be used to protect the normally open contacts of Relay 1 by eliminating the destructive arcing caused by the starting and stopping of motors. The solid-state switch is accessible from the HD terminal on the terminal block. We recommend the HD terminal be used whenever the controller is used to directly control a single phase motor. The HD terminal should not be used when the F60 MK3 is connected to a contactor, external timer, low wattage relay or to any other external device where voltage free contacts are required. It is strictly intended for the direct control of highly inductive AC motor loads. The HD terminal and the controller’s built in relays must never be directly connected to a DC motor under any circumstances.
When the HD terminal is linked to the normally open terminal of Relay 1, the HD drive parallels a 42 Amp solid state switch across the relay’s Normally Open contacts. This increases the momentary current carrying capacity of the relay’s contacts to over 60 Amps. The solid-state HD drive is only activated for a brief period when the motor starts and stops. It effectively handles the high inrush current associated with the motor starting, and it provides a current path for the destructive back EMF associated with the motor stopping.
To use the HD drive, place a heavy link wire between the HD terminal and the Normally Open terminal of Relay 1.
WARNINGThe HD terminal must be left unused or only ever linked to Relay 1 Normally Open. It must never be used for any other purpose and it must never be connected to any external device. Under no circumstances connect the HD terminal to the terminals of Relay 2. The HD terminal must be regarded as live at all times and at full mains potential.
17
BROWNOUT OR BLACKOUTIf a blackout or brownout occurs the F60 MK3 will not retain any memory of where in its run or stop cycle it may have been, it will simply shut down the pump. When power resumes, the F60 MK3 will attempt to reboot, restart and run any timer settings from the beginning. A manual reboot may be required if the supply is unstable on startup and and can be done at any time by pressing and releasing the F60 MK3’s reset button.
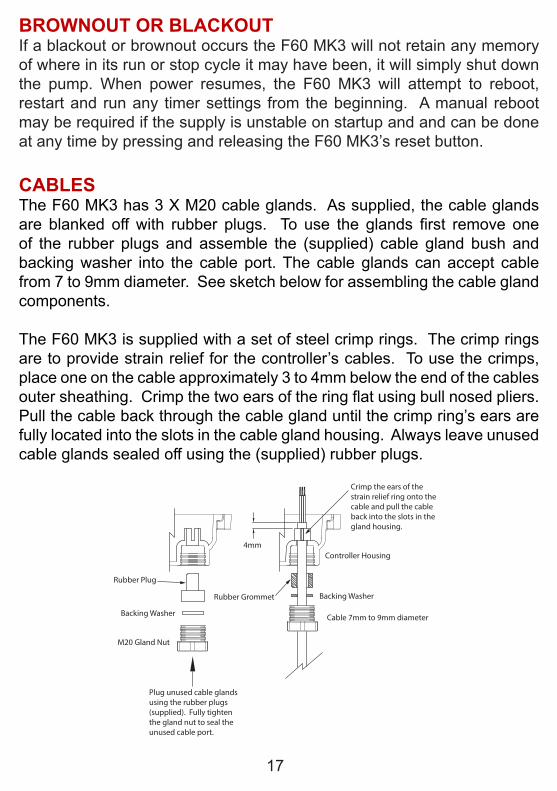
CABLESThe F60 MK3 has 3 X M20 cable glands. As supplied, the cable glands are blanked off with rubber plugs. To use the glands first remove one of the rubber plugs and assemble the (supplied) cable gland bush and backing washer into the cable port. The cable glands can accept cable from 7 to 9mm diameter. See sketch below for assembling the cable gland components.
The F60 MK3 is supplied with a set of steel crimp rings. The crimp rings are to provide strain relief for the controller’s cables. To use the crimps, place one on the cable approximately 3 to 4mm below the end of the cables outer sheathing. Crimp the two ears of the ring flat using bull nosed pliers. Pull the cable back through the cable gland until the crimp ring’s ears are fully located into the slots in the cable gland housing. Always leave unused cable glands sealed off using the (supplied) rubber plugs.
Rubber Plug
Backing Washer
M20 Gland Nut
Plug unused cable glandsusing the rubber plugs (supplied). Fully tighten the gland nut to seal the unused cable port.
Crimp the ears of the strain relief ring onto the cable and pull the cable back into the slots in the gland housing.
Cable 7mm to 9mm diameter
Controller Housing
Rubber Grommet Backing Washer
4mm

18
SUPPLY VOLTAGE LIMITSVOLTAGE LIMITS ON TERMINALS LV & N
Maximum Supply Voltage 25VAC 50Hz or 25VDCMinimum Supply Voltage 18VAC 50Hz or 18VDC
VOLTAGE LIMITS ON TERMINALS A & NMaximum Supply Voltage 260VAC 50HzMinimum Supply Voltage 110VAC 50Hz
RELAYSThe F60 MK3 houses 2 relays. Relay 1 has S.P.D.T contacts. Relay 2 has S.P.S.T Normally Open contacts. Relay 1 is normally regarded as the pump control relay and relay 2 is normally regarded as the alarm relay. When operating the F60 MK3 as a dual pump controller, relay 2 can be used to control the second pump via a suitable interposing contactor.
With the HD terminal linked to the Normally Open terminal of Relay 1, the F60 MK3 can directly control a single phase motor up to 2.4kW. Without the HD link in place the relay 1 Normally Open contacts can be used to control a pump motor via a suitable contactor. Both relays can control motors of any required size via interposing contactors.
CONTACT RATINGS FOR RELAYS 1 & 2Relay 1 normally open contacts 10A at 240VAC
Resistive Load PF > 0.9
Relay 1 normally closed contacts 3.5A at 240VAC
Resistive Load PF > 0.9
Relay 2 normally open contacts 3.5A at 240VAC
Resistive Load PF > 0.9
50mA at 5VDC Minimum Load both relays
IMPORTANT: When directly controlling a pump motor through relay 1, always link the HD terminal to relay 1 Normally Open terminal and make sure the maximum steady state motor current never exceeds 10 Amps. Ona pump motor P1 must not exceed 2.4kW.

19
POWERING THE F60 MK3
IMPORTANTA means for disconnection of the F60 MK3 must be incorporated in the fixed wiring in accordance with the wiring rules. External preliminary protection is required under all circumstances. We suggest a maximum C10 Amp breaker be used for the supply isolation.
The power required to drive the F60 MK3 depends on the supply, AC or DC and on temperature. The table below gives the maximum power required from various supplies at 25°C. The measurements expressed represent the maximum power required with the LCD backlight and all indicator lights on.
POWER REQUIRED TO DRIVE THE STANDARD F60 MK324VDC Supply to LV & N Maximum 68mA 1.63Watts
24VAC 50Hz Supply to the LV & N Terminals
Maximum 108mA 2.34Watts
220VAC 50Hz Supply to A & N Maximum 87mA 2.00Watts240VAC 50Hz Supply to A & N Maximum 94mA 2.54Watts
POWER REQUIRED TO DRIVE THE 12VDC F60 MK3-12With Both Relays Closed Maximum 68mA 0.81WattsWith One Relay Closed Maximum 52mA 0.62Watts
Quiescent State (relays open) Maximum 25mA 0.30Watts

20
REMOTE INPUTS
WARNING: The low voltage source available at the LV terminal is non-isolated and must be regarded as operating at full mains potential whenever the F60 MK3 is powered from the mains. Relative to earth the LV terminal is at full mains potential. All remote wiring and remote devices connected to the LV terminal must be mains voltage rated.
The F60 MK3 has two remote inputs marked RMT1 and RMT2. Remote input 1 can be configured to operate in various ways in the program such as start and stop for connection to tank level switches or for connection to a remote flow switch in dual pump mode. Remote input 2 has a fixed function, it replicates the main reset button on the F60 MK3. A normally open remote reset switch can be used to reboot the F60 MK3 by connecting it to RMT2.
An external switch with voltage free contacts such as a tank level switch or a set of external relay contacts can be used to control the F60 MK3. The supply to the external switch must be taken from the LV terminal on the F60 MK3 when the controller is powered from the mains or from a 24VAC source. The F60 MK3 must always be powered from the same source as the supply to the external switch. The supply to the remote switch on the F60 MK3-12 (low voltage DC model) must be taken from the supply positive terminal. In all cases the external switch return wire must be connected to the correct remote input terminal on the F60 MK3. Relative to neutral, the supply to the external switch will range from 12 to 24 VDC or from 20 to 35V AC depending on the supply voltage.
WARNING: Never connect an external power source of any kind to the F60 MK3’s remote input terminals.
The remote switch can be installed some distance from the F60 MK3. The maximum distance is limited by cable resistance and capacitance. The total cable resistance must not exceed 5K Ohms with the remote switch closed. The total capacitance of the cable must not exceed 25nF with the remote switch open. Wires to the remote switch should be run separately from power carrying cables. Do not run the remote switch wires in a conduit that also contains power cables.

21
Capacitive coupling between the adjacent cables may cause false triggering of the F60 MK3’s remote inputs. For cable runs longer than 150 metres we suggest using 2 separate wires to reduce capacitive coupling between the adjacent wires. When set up this way cable resistance becomes the limiting factor for distance. The table below sets out the resistance of typical copper wire of various diameters.
Note that the cable resistance refers to the total resistance out to the remote switch and back, as measured at the controller across the 2 remote connection wires with the external remote switch closed.
EXAMPLEA water tank is located 2000 metres from the F60 MK3. Two separate wires each 0.2mm^2 are run to the remote tank (total wire length is 4000 meters). The resistance as measured across the 2 wires back at the F60 MK3 (with the tank level switch closed) is 382 Ohms. This is well under the 5,000 Ohm limit. The remote input to the F60 MK3 will operate properly provide the wires are separated by sufficient distance that the capacitance between them is less than 25nF. Capacitance should be measured between the wires when the remote switch is open and it must be less than 25nF.
Cable Size Square mm Resistance in Ohms per 1000 Metres
0.2 95.300.5 36.200.75 24.131.0 18.101.5 12.10
Note: Use table as a guide only, cable resistance may vary depending on the wire standard and construction.

22
WIRING DIAGRAMS
PLUG AND LEAD WIRING
All electrical wiring associated with this controller must be carried our by
a qualified electrician
Optional voltage freeexternal input
Earth Link
CONNECTIONS FOR A SINGLE PHASE PUMPControl of a Single Phase Pump with an Alarm and two remote inputs
Remote switches with NO or NC voltage free contacts
This link wire must be used whenever the controller is directly controlling a single
phase pump motor, as shown. Do NOT use the HD link in 3 phase or single phase control circuit
applications
Active
Pump Motor 1110 ~ 240VAC 50/60Hz Pump Motor 2.4kW
Max. when the HD terminal is linked
Neutral
Supply110 ~ 240VAC 50/60Hz.
Audible or Visual Alarm

23
LOW VOLTAGE SUPPLY
Negative
Positive
Supply18 to 24 Volts AC or DC
BASIC 3 PHASE PUMP CONTROLBASIC THREE PHASE PUMP CONTROL
3 Phase Pump Motor
N
L3
L2
L1
Contactor
WARNINGContactor coil rating must not
exceed 240VAC

24
DUAL 3 PHASE PUMP CONTROLDUAL 3 PHASE PUMP CONTROL
3 Phase Pump Motor 1
N
L3
L2L1
3 Phase Pump Motor 2WARNING
Contactor coil rating must not exceed 240VAC
Contactor 1
Contactor 2
DUAL 3 PHASE PUMP CONTROL
3 Phase Pump Motor 1
N
L3
L2L1
3 Phase Pump Motor 2WARNING
Contactor coil rating must not exceed 240VAC
Contactor 1
Contactor 2

25
DUAL 3 PHASE PUMPS WITH DUAL FLOW SENSINGDUAL 3 PHASE PUMPS WITH DUAL FLOW SENSING
3 Phase Pump Motor 1
N
L3
L2L1
3 Phase Pump Motor 2WARNING
Contactor coil rating must not exceed 240VAC
Contactor 1
Contactor 2
Remote Mounted Kelco F Series
Flow SwitchLV to F21 Common
R to F21 Nornally Open
In the diagram above, the F60 MK3 would normally be installed in the discharge pipe of pump 1. The remote flow switch would normally be installed in the discharge pipe of pump 2. The remote flow switch can be a paddle style switch such as the Kelco F Series as depicted or an in line style flow switch such as a Kelco C25-B. The remote flow switch must have voltage free normally open contacts.

26
3 PHASE CONTROL WITH ALARM & REMOTE INPUTTHREE PHASE PUMP CONTROL WITH ALARM AND REMOTE INPUT
Remote switch with NO or NC
voltage free contacts
3 Phase Pump Motor
Alarm16A 240V Maximum
resistive load
N
L3
L2
L1
Contactor
WARNINGContactor coil rating must not
exceed 240VAC
THE 12VDC F60 MK3-12 PUMP CONTROLLERA low voltage DC version of the F60 MK3 is available for battery operation and for use in solar pumping systems. Functionally the F60 MK3-12 model is the same as the mains voltage model except for the terminal block markings.
On the 12VDC model the active and neutral terminals are replaced by a positive (+) and negative (–) terminal. Supply voltage across the positive and negative terminals must never exceed 24VDC or the flow switch will be damaged. The supply terminals are reverse polarity protected, however, the F60 MK3-12 will simply not operate unless the supply polarity is correct.
F60 MK3-12 REMOTE INPUTSIf a remote switch is connected to the 12V DC F60 MK3-12, the supply to the remote switch must be taken from the positive terminal on the F60 MK3. The remote switch and its circuit will then operate at 12VDC.

27
12VDC F60 MK3-12 CONTROLLING A SINGLE PHASE PUMP
12VDC Controlling a Single Phase Pump
Remote switch with NO or NC voltage free contacts
IMPORTANTRemote input must be sourced
from the supply positive terminal
This link wire must be used whenever the controller is directly controlling a single
phase pump motor, as shown. Do NOT use the HD link in 3 phase or single phase control circuit
applications Positive
Pump Motor120 ~ 240VAC 50/60Hz Pump Motor 2.4kW
Max. when the HD terminal is linked
Negative
Supply 11 - 24VDCSupply Active
Supply Neutral
Supply: 120 ~ 240VAC 50/60Hz
Alternate Positive 14 ~ 40VDC

28
PROGRAMMING THE F60 MK3 For a description of the functions of the buttons and lights, please read pages 2 and 3 of this manual before proceeding.
RESTORING FACTORY DEFAULTS (Purging the Settings)Provided the F60 MK3 is unlocked, you can restore its default factory settings at any time by pressing and holding down the (P) button and pressing and then releasing the (R) button. Once the (R) button has been released, release the (P) button. The screen then displays SETTINGS CLEARED PRESS P Doing this removes any settings you may have entered and restores the controller to its default state.
LOCKING & UNLOCKING THE F60 MK3The F60 MK3 is supplied by the factory in an unlocked state and can be programmed using its buttons. To prevent unauthorised personnel from altering its settings, the programming button (P) can be locked.
LOCKING THE F60 MK3To activate the lock, press and hold down the (˄) and (˅) buttons and then press and release the (R) button. Continue to hold the (˄) and (˅) buttons down until the screen displays LOCKED (Takes about 2 seconds), release the (˄) and (˅) buttons. The F60 MK3 is now locked. When locked, pressing the (P) button will not allow access to the F60 MK3’s menu, instead a message PROGRAM LOCKED PRESS RESET is displayed on the screen.
UNLOCKING THE F60 MK3To unlock the F60 MK3 repeat the above procedure, press and hold down the (˄) and (˅) buttons and then press and release the (R) button. Continue to hold the (˄) and (˅) buttons down until the screen displays UNLOCKED (Takes about 2 seconds), release the (˄) and (˅) buttons.

29
GETTING STARTED1) Use the least number of functions possible. Do not program in functions you do not specifically require, as to do so will make the system’s operation unnecessarily complicated and may introduce unpredictable interactions between the various functions.
2) When changing modes always start by purging the previous settings, by restoring to factory defaults, before proceeding. This ensues no conflicts occur between previously set functions and new functions.
3) Set realistic and sensible values into the various functions. For example, do not set a pump to stop at a lower pressure than it is set to start at. Always set the controller’s starting and stopping pressure differential to as wide a difference as possible.
With the F60 MK3 powered up, Press the (P) button. Hold it down for 1 second and then release it.“KELCO www.kelco.com.au” This is the first screen in the menuPress and release (P) again.“PUMP CONTROLLER MODEL F60 MK3” Displays the model numberPress and release (P) again.“VERSION 000000” The version number must match the version number on the cover of this book.Press and release (P) again.“SELECT PRESSURE UNITS: kPa” Press and release the (˅) button to change kPa to psi. Press the (˄) button to change back to kPa. Press and release (P) again to lock in your selection
SELECTING A SUITABLE OPERATING MODESelecting a suitable operating mode is critical to the use of the F60 MK3. The mode you choose will depend on exactly what the pump system is required to do and how you want it controlled. Step through the modes by pressing the (˅) and (˄) buttons. Highlight the mode you want to use and press and release (P) to lock it into the F60 MK3’s memory and to advance to the next screen.

30
Mode 1 Timer ControlIn mode 1 the F60 MK3 operates on flow only. Mode 1 provides you with a set of basic timers that includes a start-up timer to allow the pump to initially start regardless of lack of flow and a run-on timer to ignore short term interruptions to flow. The controller’s pressure sensor is used to display the system’s line pressure on its LCD screen during normal operation. Mode 1 is commonly used in transfer pumping applications where loss of flow is the main concern. It is also suitable for use in solar pumping applications.
Mode 2 Flow ControlMode 2 is pressure start flow stop. In mode 2 the F60 MK3 will start the pump each time the pressure falls below a set level or each time its paddle is pushed into the on position by flow. It will then run the pump entirely on flow. Once started, the F60 MK3 runs the pump while ever flow is present. The pump is only shut down when flow stops. Mode 2 is commonly used for conventional and solar powered transfer and tank filling applications.
Mode 3 Pressure ControlMode 3 will start and stop the pump based on pressure. A high-pressure cut-out point and low pressure cut-in point are programmed into the F60 MK3, thereafter the pump is run within these pressure limits. If the pump runs dry it will be shut down based on a combination of loss of flow and a low pressure. Mode 3 is commonly used to control pressure systems and to provide dry run protection to any system it is used in.
Mode 4 Pump GuardMode 4 monitors flow and pressure and shuts the pump down if any of the monitored conditions move outside preset limits. The pump will be shut down if it runs dry, if flow is lost or if the system pressure rises above or falls below precise set points. One of the main applications for the pump guard is for protecting helical rotor pumps. It also finds application as a system guard in centrifugal pump and transfer pumping systems.

31
Mode 5 Dual Pump ControlMode 5 configures the F60 MK3 to control 2 independent pumps. The 2 pumps can be set to operate as a duty and standby set or as a dual alternating pump set. It can also be set up as a duty and line boosting or jockey pump set. Typical applications include line jacking systems, duty and standby pump sets and dual alternating pump sets.
OPTIONAL FUNCTIONSEach mode includes optional functions enabling the F60 MK3 to be configured to suit a specific application. A description of the functions follows. Some options are mode specific and do not operate in all modes. The relevant modes for each function are indicated by number in the functions heading.
PRE-START DELAY TIMER Modes 1 2 3 4 5The pre-start delay timer delays the starting of the pump for a settable period. It can be used to sequence or stage the starting of multiple pumps in sequential or cascaded transfer pumping systems. Starting pumps sequentially rather than all at once in such systems greatly reduces the current draw on the power supply and ensures each pump spins up to full speed before the following pump starts. The delay can be set from zero to 64800 seconds (18 hours) in one second increments. The count increments up in 60 second steps and down in 1 second steps. If you elect to use the pre-start delay timer you are presented with 2 options. DELAY THE START AT POWER UP YES
Delay period applies to the initial start and if selected, to the remote input closing. DELAY THE START AT POWER UP OFF Does not delay the pump starting on reset or power up but works in conjunction with the remote input, RMT1, to delay the start when the remote closes.
USE REMOTE INPUT NUMBER 1 Modes 1 2 3 4 5 A remote switch with voltage free Normally Open contacts can be connected to the remote input terminals No. 1 on the F60 MK3 and configured in various ways. Use the (˅) and (˄) buttons to highlight a suitable selection.

32
USE REMOTE 1 FOR START ONLY Suitable for connecting to a remote pressure switch or relay contacts.
USE REMOTE 1 FOR START & STOP Select this option if you are using a remote high and low level tank level switch.
LOCAL FLOW OFF - USE REMOTE FLOW (In mode 5 only) This option disables the F60 MK3’s flow sensing paddle. It allows a remotely mounted flow switch to monitor flow using the F60 MK3’s remote input terminal. The F60 MK3 can then monitor pressure at a convenient location in the pipework and monitor flow at a separate and perhaps less convenient location in the same system.
USE DUAL FLOW SENSING (In mode 5 only) Enabling this option means a second flow switch with normally open contacts can be connected to the F60 MK3’s remote input terminal. The F60 MK3 then uses both its own paddle and the remote flow switch to monitor flow at 2 locations in the pipework simultaneously, for example, in the discharge pipes of both pumps in a dual pump system.
USE REMOTE 2 FOR REBOOTING Modes 1 2 3 4 5A remote switch with voltage free Normally Open contacts can be connected to the remote input terminal No. 2, RMT2. Closing this switch causes the F60 MK3 to stop whatever it is doing and reboot. In effect it acts in the same way as pressing the red Reset button on the F60 MK3. If the remote button is held closed the screen on the F60 MK3 displays RELEASE THE RESET BUTTON The F60 MK3 will remain frozen until the remote switchopens. It will then reboot the F60 MK3.
USE ALARM RELAY Modes 1 2 3 4The F60 MK3 includes 2 output relays. Relay one is normally used for pump control. Relay 2 can be used as an alarm relay or to control a second pump. If you select yes to this question you are presented with the first option in a list of ways the alarm relay can be configured. Use the (˅) and (˄) buttons to step through the list. Press and release the (P) button once you have highlighted the option you want to use.

33
CLOSED IF ANY FAULT DEVELOPS Closes relay 2 if the F60 MK3 detects a problem.
CLOSED ONLY IF FLOW STOPS Relay 2 closes each time flow stops.
CLOSED WHENEVER PUMP IS OFF Relay 2 is closed while the pump is off, provided the F60 MK3 is powered.
CLOSED WHENEVER PUMP IS ON Relay 2 is closed while the pump is on, provided the F60 MK3 is powered.
CLOSED DURING PRE-START DELAY Relay 2 can be used to run peripheral equipment such as a mixer prior to the pump starting. Relay 2 opens when the pre-start timer times out and turns off the peripheral equipment.
CLOSED ON ANTI-CYCLING FAULT If you select the anti-cycling feature from the menu and the pump shuts down because the number of starts per hour has been exceeded, relay 2 will close its contacts.
CLOSED IF PUMP RUNS DRY Dry-run is identified as no flow and low pressure. This option only provides a dry run alarm in modes that monitor both flow and pressure.
CLOSED IF PIPE BURSTS This option only operates if you have elected to use burst pipe detection.
START ADDITIONAL EQUIPMENT This option only appears in the menu if you previously elected to use pre-start delay timer. This option works in conjunction with the pre-start delay timer to allow control of staged equipment such as a generator set powering a pump.
START-UP TIMER Modes 1 2 3 4 5 The start-up timer operates when the F60 MK3 is first turned on. Its purpose is to ignore any initial lack of flow and to allow time for the pump to start and for flow to be detected. The timer is auto self-terminating and terminates its run as soon as flow is detected. The start-up timer is factory set to 5 seconds. It can be set between 1 second and 900 seconds using the (˅) and (˄) buttons.

34
RUN-ON TIMER Modes 1 2 3 4 5The F60 MK3 includes a run-on timer that can be set to ignore minor interruptions to flow. Once triggered, the run-on timer tries to keep the pump running for whatever time you have set it to, regardless of lack of flow. The run-on timer is auto self-terminating and terminates its run as soon as flow is detected. The run-on timer is factory set to 5 seconds. It can be set between 1 second and 900 seconds using the (˅) and (˄) buttons.
PRESSURE TIMER Mode 4In mode 4 the pressure timer is a single shot timer that only runs once each time the F60 MK3 boots up and starts the pump. Its purpose is to allow time for the system pressure to rise to above whatever low pressure trip point you may have set. The pressure timer can be set to any time from zero to 900 seconds. The pressure timer is self-terminating.
It monitors system pressure and terminates its run as soon as pressure above your low-pressure trip point is detected. The F60 MK3 is supplied with the pressure timer pre-set to 5 seconds.
DELAYED RESTART Modes 1 2 3 5Once stopped, the F60 MK3 can be prevented from restarting the pump for a settable period. If you set this option to yes, each time the pump stops, due to flow stopping or pressure rising above your set point, the F60 MK3 controller will prevent the pump from restarting for the set period. The delay time can be set from 1 minute to 99 hours 59 minutes in increments of 1 minute. A typical application is in tank filling. Tank fills, float valve closes, F60 MK3 detects flow stopping and shuts the pump down. Delayed restart then prevents the pump from restarting for a set period. If you select yes to this function and enter a suitable delay, the question that follows asks:-
AUTO START AFTER DELAYAt the end of the delay the pump will only restart under conditions it would normally start under. For example, in modes 2 or 3 it will only start when pressure falls to below the normal set starting pressure. If the remote input options are set to start only and the remote switch closes, it will override the delayed restart and instantly start the pump, provided the system pressure allows starting at the time the remote switch closes.

35
BURST PIPE DETECTOR Modes 1 2 3 If a pressure system bursts its discharge pipe the pressure will fall and the pump will start at its low-pressure setting. The pump will then run continuously until the water source is depleted. The burst pipe detector is a timer that runs for a settable period each time the pump runs.
The timer resets each time the pump stops. The timer can be set from zero to 99 hours 59 minutes in steps of 1 minute. In a typical application, the burst pipe detector would be set to a time that was marginally longer than the longest time the pump would ordinarily run. Each time the pump switches on the burst pipe detector begins to count down. In normal circumstances the pump will shut down in less than the burst pipe detector’s set time. This resets the burst pipe detector’s timer back to its original setting. If, however, the pump continues to run, due perhaps to a burst pipe, it will eventually reach the set point. The pump will then be instantly shut down preserving whatever source water remains, or at least reducing the discharge flow by an amount equal to the pump’s capacity. The F60 MK3 will then display “burst pipe detected” on its LCD screen.
CYCLIC RUNNING Modes 1 2 4 The F60 MK3 can be programmed to run and stop a pump for set periods of time. Both the running and stopping times can be set to any value you choose from 1 minute to 99 hours 59 minutes in increments of 1 minute. The run and stop timers are independent of each other. If a set running and stopping time are programmed in then the F60 MK3 will run the pump for whatever time it is set to and then stop for the time set on its stop timer. If the stop time is left set at zero, the F60 MK3 will behave as a one-shot batch controller. On pressing the reset button or switching the pump on, the pump will run for the set period and then shut down. It will not then restart until you again press the reset button or reset the power to the unit. In cyclic running the F60 MK3 monitors the elapsed time and displays the remaining time on its LCD screen in hours and minutes.
Cyclic running allows low yield bores to be pumped to their maximum capacity. A bore pump running under cyclic control can be set to pump the bore down to a low level, stop and wait for the standing water level to recover and then repeat the process endlessly all the while protecting it if it runs dry. For transfer pumping applications, cyclic running can be used

36
to automatically top up remote tanks without the need for float valves or level control at the tank. It can also be used for one-shot tank filling. Press the reset button and pump a set number of hours or minutes of water to a tank, and then stop until the reset button is again pressed.
ANTI-CYCLING Modes 1 2 3 Electric motors are often limited in the number of times they can be safely started in any one hour. This is particularly important in the operation of submersible bore pumps. When a motor starts there is an initial inrush of current that produces heat in the coils and iron rotor of the motor. If the frequency of starts is excessive the accumulation of heat within the motor can cause severe damage and eventual failure of the motor. Submersible bore pump motors are particularly prone to damage from excessive cycling (starting and stopping).
MAXIMUM STARTS PER HOUR The anti-cycling option built into the F60 MK3 allows the user to set the maximum number of times the pump can be safely started in any one hour period. If you select yes to using anti-cycling the screen that follows will ask you to enter the maximum number of times the pump can be started in any one hour. The number of starts can be set from 1 start per hour to 1800 starts per hour. Please contact your pump supplier to obtain the correct figure for your specific pump. In operation, the anti-cycling system monitors both time and the number of starts and compares the two. If the starts per hour rate is exceeded for a settable number of consecutive times in any one hour period the pump will be automatically shut down and the F60 MK3 will display a message indicating the starts per hour rate was exceeded.
NUMBER OF STARTS IN SEQUENCE After setting the required number of starts per hour and pressing (P) you are asked how many starts in a row you are prepared to accept. The default setting is 5 starts. This can be adjusted between 2 and 50 starts. Assuming you accept the default of 5 sequential starts then as a simple example of the way the anti-cycling system works, if starts per hour rate is set to 360 (one start every 10 seconds maximum) and the pump started 4 times in a row at less than 10 seconds between each start and then did not start again for 12 seconds the anti-cycling shutdown will not be invoked. If,

37
however, the pump were to start 5 times in a row with less than 10 seconds between the starts the anti-cycling system would be invoked and the pump would be shut down. In a conventional pressure system, the anti-cycling function can be used to protect the pump from damage in the event of the system’s air cell losing its air charge.
If air is lost from a system’s air cell due to a ruptured diaphragm or leaking air valve, the pump will hunt on and off rapidly. Such rapid cycling will cause the pump to overheat very quickly. Anti-cycling can also be used in conjunction with burst pipe detection. Burst pipe detection is an effective guard against a burst pipe. Anti-cycling is effective at detecting a split pipe situation that causes a pump to cycle on and off.
SET A LOW TRIP PRESSURE POINT Modes 2 3 5The low trip pressure allows you to set a pressure trip point that can be used to shut a pump down if it is operating at an unusually low pressure. The low trip pressure is a pressure point that will sit below the normal cut in pressure. In normal operation, it will have no effect on the pump. If a situation develops where there is sufficient flow to keep the pump running but the actual line pressure is lower than would be expected in normal operation, the low-pressure trip can be used to shut the pump down. Such situations may develop when a pump is running on the snore or due to a split pipe. If you elect to use the low trip pressure function then the question that follows asks you to enter a suitable pressure trip point. In most applications, this will be a pressure that is well below your intended normal starting pressure.
TRIP PRESSURE TIMER The trip pressure timer allows you to set a time that the pressure can be below the previously set trip pressure and not cause the pump to shut down. The range of adjustment is 0 to 900 seconds in one second increments. If the system pressure falls to below the low trip pressure, the trip pressure timer will actuate automatically and will display:-
LOW PRESSURE DETECTED. The pump will continue to run and the F60 MK3 will monitor the pressure. If the pressure rises to above the low trip pressure setting, the controller will return to normal operation.

38
If the pressure remains below the low trip pressure point when the trip pressure timer times out, the pump will be shut down and the F60 MK3 screen will display PRESSURE TOO LOW.
LOW PRESSURE TRIP Mode 4Mode 4 asks you to enter a low trip pressure. The low trip pressure is the lowest pressure you want the system to operate at.
If the pressure falls below this point the pressure dip timer is invoked and at the end of its run, given pressure has not recovered, the pump will be shut down. The range of adjustment is 0 to 2000 kPa or 0 to 290 psi.
PRESSURE DIP TIMER Mode 4In mode 4 the pressure dip timer allows the pump to continue running for a set period while the pressure is lower than the trip pressure. The dip timer is factory set to 5 seconds. This can be adjusted between 0 and 900 seconds using the (˅) or (˄) button. If the dip timer is set to 0 the pump will be shut down the instant pressure falls to below the low trip pressure.
HIGH PRESSURE TRIP Mode 4Mode 4 asks you to enter a high-pressure trip point. The high-pressure trip point is the highest pressure you want the system to operate at. If the pressure exceeds this point, the pump will be instantly shut down and the F60 MK3 will display PRESSURE 2 HIGH. In addition, the screen displays the time the pump ran for in minutes.
START PRESSURE Modes 2 3 Allows you to enter a starting pressure for the pump. The range of adjustment is 0 to 2000 kPa or 0 to 290 psi. The pump will normally start when the pressure falls to the starting pressure.
STOP PRESSURE Mode 3 The stopping pressure can be any value from 0 to 2000 kPa or 0 to 290 psi. When the pump is running and the pressure rises for any reason, the pump stops at whatever pressure you set as the stopping pressure.

39
The stopping pressure must be set higher than the starting pressure and the starting pressure must be set higher than the low trip pressure (if used). Failure to set the pressures correctly generates an on-screen error message.
HIGH PRESSURE RUN-ON Mode 3If you set high pressure run-on to “YES” (ON) the question that follows asks you to enter a time limit that the pump can operate above the normal stop pressure. When operating a high volume centrifugal pump that exhibits a relatively small pressure change across a wide range of flow (a flat Q-H curve) the high pressure run-on can prevent the pump from cycling by establishing a high pressure zone rather than a fixed stopping pressure. Within the defined pressure zone and for a limited time the pump can be allowed to continue running thus preventing it from cycling on and off on a low draw off.
WARNING: Never apply this function to a helical rotor pump or to any positive displacement pump. Helical rotor pumps and PD pumps in general may be damaged by the application of this function.
Take great care in using the high pressure run-on and its associated settings. Always set the high pressure limit to a pressure that is well below the pumps shut off head. Keep the high pressure run-on time to a minimum to avoid overheating the pump due to recirculation.
HIGH PRESSURE RUN-ON (Time)If you previously set high pressure run-on to YES, the question that follows asks you to set a run-on time. The time can be set from 0 to 900 seconds in one second increments. The time you set will be the maximum time the pump can operate for above its normal stop pressure. The high pressure run-on timer is self terminating and terminates its run if pressure drops below the normal stop pressure.
HIGH PRESSURE LIMIT The high pressure limit is the absolute highest pressure the system can operate at. It must be set to a pressure higher than the previously set stop pressure. The available range is 0 to 2000 kPa or 0 to 290 psi. If the high pressure limit is set to a pressure less than the normal stop pressure an

40
error message is invoked advising you to check the pressures. On a rising pressure the F60 MK3 will start the high pressure run-on timer as soon as it detects pressure higher than the normal stop pressure.
The high pressure run-on timer will run for whatever you set it to and expect pressure to fall back below the normal stop pressure before it times out. It the high pressure run-on timer times out, it shuts the pump down and reverts to a normal waiting state. The pump will not then start until pressure falls to below the set starting pressure. Given pressure falls to below the set stop pressure before the high pressure run-on timer times out, the pump may stop or continue to run, dependent on flow. It the pump stops it will wait for pressure to fall to the set starting pressure.
In effect the high pressure run-on and its associated pressure settings create a shut down pressure zone rather than a single shut down point. The pump can continue to operate in this zone for a period of time using the high pressure run-on timer.
As pressure rises flow reduces and in some situations the flow may have reduced to a point where the F60 MK3’s paddle can no longer detect flow. In such situations the pump may be running, held on by the (flow based) run-on timer. If the normal shutoff pressure is reached while running on the run-on timer, the F60 MK3 simply switches over to running on the high pressure run-on timer. If the pressure then falls to below the normal shutoff pressure, the F60 MK3 will continue to run the pump provided there is sufficient flow to actuate the paddle. If there is less flow that can be detected by the paddle, the F60 MK3 shuts the pump down and waits until pressure falls to below the normal starting pressure.
This flow detection process ensures the pump can’t operate against a shutoff head for longer than the time set on the high pressure run-on timer.
ALTERNATE THE PUMPS Mode 5Pumps 1 and 2 can be set to start alternately. If you elect to use this function the screen that follows asks you to set the frequency of alternation. The range of alternations is 2 to 240. Setting a high number means pump 2 will start less frequently. Set to a high number, this function is useful in duty standby applications to ensure the least used pump does not seize from

41
lack of use. ALTERNATE THE PUMPS EVERY 000 STARTS Use the (˅) and (˄) buttons to set the required alternation frequency. When running, the F60 MK3 displays which of the 2 pumps is running and counts down the alternations.
SET THE PRESSURE PUMP ONE Mode 5In mode 5, set the starting and stopping pressure for pump 1. Pump 1 refers to the pump controlled by relay 1 in the F60 MK3. The start pressure for pump 1 must be set higher than the low-pressure trip point (if used) and must also be lower than the stop pressure for pump 1.
START PRESSURE 1 Set the starting pressure for pump 1 in the range 0 to 2000 kPa or 0 to 290 psi.
STOP PRESSURE 1 Set the stopping pressure for pump 1 in the range 0 to 2000 kPa or 0 to 290 psi.
SET THE PRESSURE PUMP TWO Mode 5In mode 5, set the starting and stopping pressure for pump 2. Pump 2 refers to the pump controlled by relay 2 in the F60 MK3. The start pressure for pump 2 must be set higher than the low-pressure trip point (if used) and must also be lower than the stop pressure for pump 2.
START PRESSURE 2 Set the starting pressure for pump 2 in the range 0 to 2000 kPa or 0 to 290 psi.
STOP PRESSURE 2 Set the stopping pressure for pump 2 in the range 0 to 2000 kPa or 0 to 290 psi.
Pumps 1 and 2 can be set to turn on and off anywhere within the overall pressure range and can overlap each other in terms of their individual starting and stopping pressures. Individually, each pump must be set to stop at a higher pressure than it is set to start at.

42
TURN ON FLOW DETECTION Mode 5In mode 5 flow detection can be applied to the pumps individually or to both pumps or it can be left turned off. This function allows the F60 MK3 to be installed at various locations in the dual pipe system and to monitor flow at the specific location or in 2 locations simultaneously. If you elect to use flow detection and press (P) you are presented with 4 options. Press the (˅) or (˄) buttons to highlight a specific option then press (P) to lock your selection into memory.
DETECT FLOW FROM PUMP 1 Monitors flow from pump 1, ignores flow from pump 2
DETECT FLOW FROM PUMP 2 Monitors flow from pump 2, ignores flow from pump 1
DETECT FLOW FROM BOTH PUMPS Monitors flow from both pumps at one point in the pipework, for example, in the common discharge pipe.
USE DUAL FLOW SENSING Select this option if you have a flow switch connected to the F60 MK3’s remote input and intend using the F60 MK3’s paddle and the remote flow switch to monitor flow at 2 locations simultaneously. The F60 MK3’s paddle will monitor flow from the pump controlled by relay 1 (Pump 1). The remote flow switch will monitor flow from the pump controlled by relay 2 (Pump 2). The F60 MK3 must be mounted in the discharge pipe of pump 1. The remote flow switch can be mounted in either the suction or discharge pipework of pump 2. The remote flow switch must have normally open voltage free contacts.
HOW FLOW DETECTION WORKSFlow detection works with the run-on timer and shuts the pump(s) down at the end of the run-on time if flow has failed to recover. If you alternate the pumps or, if flow is lost and pressure is above the starting pressure of the currently running pump, the pump will be shut down and the F60 MK3 will revert to a waiting state displaying WAITING TO START. It will then remain in this state until pressure falls to below the pump’s set starting pressure. Once the pressure has fallen to below the starting pressure the alternate pump will start and expect to find flow before the start-up timer times out.

43
At the end of the run-on time, if pressure is below the set starting pressure of the applicable pump, the pump will be shut down and the F60 MK3 will display PUMP RAN DRY. It will not restart unless the reset buttonis pressed.
If you elect not to alternate the pumps, then if loss of flow is detected the pump that lost flow will be shut down after the run-on timer times out. The system will not revert to a waiting state, instead it will continue to operate using the remaining pump only.
The pump that lost flow will only resume normal operation if the system pressure falls to below its set starting pressure. This process applies if you use individual flow sensing or dual flow sensing.
In non-alternating mode, if, at the end of the run-on time the system pressure is lower than the set starting pressure of both pumps, the F60 MK3 will identify a dry run situation and shut the running pump down and display PUMP RAN DRY. It will not restart either pump unless the reset button is pressed.
AUTO RESTART IF RUN DRY Modes 2 3 4The F60 MK3 will identify a dry run situation as a loss of both pressure and flow. If the pump shuts down because it has run dry, it can be set to try to restart using the auto restart function after a settable delay. The range of the delay is 1 minute to 99 hours 59 minutes in one minute increments.
SINGLE RESTART ON A FAULT YES. Select this option if you want the pump to try restarting one time only. If it fails to restart after the single attempt, or subsequently shuts down on dry run, it reverts to a permanent alarm condition. In this situation, the alarm can be cancelled by pressing and releasing the (R) button.
REPEATED RESTARTS ON A FAULT YES. Select this option if you want the pump to repeatedly try to restart after the delay period.

44
LEAK DETECTOR Mode 3 The F60 MK3 includes a tool to analyse suspected leakage in a pressurised pumping system. To use the leak detector, open all valves feeding into the pipe system to be tested. Close all valves at the far ends of the pipework so the pipe system can be pressurised. Press the reset button on the F60 MK3, this will zero the leak detector screen and run the pump until the system is fully pressurised. Leave the system unattended for at least an hour. On returning to the system, the controller’s LCD screen will be displaying the number of times the pump started and the total run time in hours minutes and seconds since the time the leak detector was zeroed.
If the leak detector screen displays no starts and no run time, then no leak has occurred from the system in the interim period. If the screen displays a number of starts and a total run time, a leak has occurred and the magnitude of the leak can be assessed by considering the total run time displayed and the capacity of the specific pump. The leak detector can be used in any pressurised pumping system.
ACCEPT SETTINGS Modes 1 2 3 4 5This is the end of the menu. Select yes to confirm all your previous settings or use the (˅) and (˄) buttons to select no to return to the top of the menu. If you accept yes and press (P), you are then asked to press the reset button to start the pump. The F60 MK3 will start the pump and attempt to run the system using the settings you have programmed in. If the settings you have initially made prove unsatisfactory then simply pressing and holding down the (P) button for about 1 second and then releasing it will shut the pump down and take you to the top of the menu where you can step through the settings and make appropriate changes.
MAINTENANCEThe F60 MK3 is a minimal maintenance device. If it is correctly installed in a location that is out of direct exposure to the elements it should give a long and reliable life and require no maintenance at all. Factors that may reduce its life are lightning strikes or power surges, failure to fully tighten its lid and cable glands, exposure to pressures or temperatures in excess of its ratings and operation outside its electrical limitations in terms of supply voltage and motor loads.

SPARE PARTSSpare paddles and replacement process connector kits are available for the F60 MK3 pump controller from your supplier.
PLEASE NOTE: Kelco Engineering Pty Ltd reserves the right to change the specification of this product without notice. Users will use their own judgment to determine the appropriateness of using of Kelco Products in an application, any safety measures required and that the product is properly installed for that application .
To the extent permitted by law Kelco Engineering Pty Ltd disclaims and excludes all and any liability for the use of this product in any particular application or for defective installation.

Warranty and Limitation of Liability Thank you for purchasing Kelco Engineering Pty Ltd, (ABN 200 002 834 844) (“Kelco”) products (Kelco Products). This document sets out the terms and conditions of the product warranty and Limitation of Liability for Kelco Products. It is an important document. Please keep it with your proof of purchase documents in a safe place for future reference should you need to lodge a claim.
This Warranty and Limitation of Liability (or any more recent version in effect when you purchase a Kelco Product) (“Warranty”) applies to all Kelco Products regardless of where you purchased the Kelco Products. When you place an order, you are deemed to agree to the Warranty, unless otherwise agreed in writing with Kelco.
Kelco is located at 9/9 Powells Road, Brookvale, NSW 2100, AUSTRALIA and may be contacted by calling 61 2 99056425 or emailing: [email protected]
1. Definition
The following terms used herein are defined as follows:
(1) Australian Consumer Law or ACL: Schedule 2 to the Competition and Consumer Act 2010 (Cth).
(2) Brochures and Technical data sheets: Kelco brochures, including, without limitation, sales brochures and technical data sheets, whether or not provided electronically.
(3) Customer Application: Any application of Kelco Products or component parts by a you including, but not limited to, embedding and/or using Kelco Products in your parts/components, electronic substrates, devices, equipment and /or systems manufactured by customers.
(4) Non- Excludable Guarantee: a Consumer Guarantee applicable to these Warranty Terms under the Australian Consumer Law or New Zealand Consumer Guarantee Act 1993.
(5) Fitness: (a) fitness for a particular purpose, (b) performance, (c) compliance with laws and regulations and (d) conformity to standards of a Kelco Product.
(6) Kelco Products: flow switches, level switches and float switches, related products and electronic/mechanical components under the Kelco brand.
(7) ‘you’ or “customer” means the purchaser of the Kelco Products not having purchased the Kelco Products for re-sale, and ‘your’ has a corresponding meaning.
(8) Usage Conditions: Usage conditions, rating, performance, operating environment, handling instructions, warnings, restrictions on use, etc. of Kelco Products described in the Brochures and technical data sheets.
2. Descriptions
You are deemed to accept the following terms and conditions regarding the descriptions provided of Kelco Products in the Brochures and technical data sheets when you adopt or use a Kelco Product or component thereof.
(1) Rated values and performance values are based on average performance established from batch production runs and Kelco does NOT warrant any rated values and performance values for multiple composite conditions.
(2) Reference data is provided for your reference only. Kelco does NOT warrant that Kelco Products work properly at all times or continuously as provided in the reference data.
(3) Application examples ( if any) are provided for your reference only. Kelco does NOT warrant the Fitness of Kelco Products under such applications.
(4) Kelco may discontinue the production of Kelco Products or change their specifications for the purpose of improving such products or for other reasons entirely at its own discretion and is under no obligation to notify you of any such change.
3. Precautions
You are deemed to accept the following terms and conditions when you purchase Kelco Products:
(1) You will use Kelco Products in compliance with Usage Conditions including rating and performance.
(2) You will confirm Fitness and use your own judgment to determine the appropriateness of using of Kelco Products in a Customer Application. Kelco products are unlike conventional flow and level switches and pump controllers in that they can be applied to virtually any fluid or pumping system in any manner defined by an original equipment manufacturer, a wholesaler or end user or their agents. The knowledge and experience of such parties is outside the control of Kelco, and their having relevant knowledge and experience is critical to the successful application and operation of the Kelco Products. Kelco does NOT warrant the Fitness of Kelco Products in a Customer Application.
(3) You will confirm that Kelco Products are properly wired and installed for their intended use in your overall system. In the case of Kelco pump controllers, the flexibility of their operating system means it requires an extensive knowledge of pumps and their characteristics and the intended overall goal of the system in order to select the correct functions and settings. Failure to understand the ramifications of incorrect settings may result in a system that fails to perform to your expectations and or may even damage the pump or system itself. It is therefore critical that correct settings are used to achieve a stable and reliable overall system and to provide any such system with appropriate pressure and or flow protection the pump controller is intended to provide. Kelco does NOT warrant Kelco Products against defective installation, incorrect programming, incorrect wiring or electrical overload in any form.
(4) When using Kelco Products, you will make sure to (i) maintain a margin of safety in relation to the published rated and performance values, (ii) design to minimize risks to any Customer Application in case of failure of any Kelco Products, such as introducing redundancy i.e. critical systems

should include double redundancy of all controls, (iii) adopt system-wide safety measures to notify risks to users such as independent backup protection. Such backup may consist of a simple or complex independent alarm system to alert an operator to any issue with the system, and (iv) conduct regular maintenance on Kelco Products and the Customer Application.
(5) It will be your sole responsibility as user to determine and use adequate measures and checkpoints to satisfy your particular requirements for (i) data input and output, (ii) maintaining a means for reconstruction of lost data, (iv) preventing Kelco Products installed thereon from being infected with computer viruses and (v) protecting Kelco Products from unauthorized access. Kelco shall not be responsible and/or liable for any loss, damage, or expenses directly or indirectly resulting from any third-party software or hardware not contained in the product as originally configured by the manufacturer, the infection of Kelco products, or any computer equipment, computer programs, networks, databases or other proprietary material connected thereto, by service attack, computer viruses, other technologically harmful material and/or unauthorized access.
(6) Kelco Products are designed and manufactured as general-purpose products for use in general industrial products. They are not intended to be used in the applications described in subsection 3.(5)(a), (b), and (c). If you are using Kelco Products in the applications described below, Kelco does not provide any warranty for such Kelco Products, except for specific applications where Kelco has specified that it intends to provide a warranty or by separate written agreement between the customer and Kelco.
a. Applications with stringent safety requirements and applications that could cause physical injury to a person or result in loss of life.
b. Applications under severe conditions or in severe environment, including but not limited to outdoor equipment, equipment exposed to chemical contamination, equipment exposed to electromagnetic interference and equipment exposed to vibration and shocks.
c. Applications under conditions or environments not described in any of the Brochures and Technical data sheets.
d. Kelco Products are not intended for use in Hydrocarbons other than Dieseline.
4. Warranty
Kelco warrants that Kelco Products will perform in accordance with the specifications set out in the Technical data sheets, subject to and in accordance with the following:
(1) Warranty period: The Warranty shall apply for 12 months from the date of original purchase of Kelco Products by the customer .
(2) Sole Remedy: Unless required to do otherwise as a result of statutory guarantees applicable under ACL, Kelco will provide, at its own discretion, either of the following two services as the sole remedy for a malfunctioning Kelco Product:
a. Repair of the malfunctioning Kelco Product(s) or components by Kelco or Kelco authorised dealer at no charge to the customer, or
b. Replacement of the malfunctioning Kelco Product(s) or components by Kelco or Kelco authorised dealer with the same number of replacement/alternative products or components at no charge to the customer.
(3) Exceptions: This Warranty of Kelco Products does not apply if the cause of the malfunction falls under any of the following:
a. Usage in a manner other than the original intended use for the Kelco Products or component thereof.
b. Usage other than as described in the Usage Conditions.
c. Usage that is not in accordance with Section 2 (Descriptions) and Section 3 (Precautions) above.
d. Modification or repair made to the Kelco Products by persons other than Kelco.
e. Causes which could not have been foreseen with the level of science and technology at the time of shipping from Kelco.
f. Replacement or repair of any (1) consumables (including cables, paddles and circuit boards), or (2) lost parts or accessories.
g. Service of any product whilst it is outside Australia.
h. Causes originating from other than Kelco or Kelco Products (including force majeure such as but not limited to natural disasters)
i. Causes from any environmental factors. Such factors may include but are not limited to water or chemical ingress, fire damage, lightning damage, mechanical damage, sun damage or degradation, failure due to over-heating, freezing or vibration. Failure due to customers over tightening threads or fittings. Failure due to power supply fluctuations, surges, spikes, brown outs. or AC supplies that do not provide a pure sine wave output.
(4) If you intend to make a claim under this Warranty you must contact Kelco to register your claim by telephone on (02)99056425 and provide the following details to enable Kelco to assess the claim: (i) proof of purchase; (ii) evidence of the particulars of the claim that gives rise to the application of the Warranty ; (iii) confirmation that the cause of the malfunction was not an Exception set out above; and (iv) your phone number, email and address details.
You must provide or make the Kelco product available to Kelco for evaluation. If you are required to return the product to Kelco for repair replacement or evaluation, Kelco will provide delivery details and a return goods authorisation number to you. The Kelco Products will be at the owner’s risk whilst in transit to and from Kelco, unless transported by Kelco or its authorised representatives.
The Kelco Product presented for repair may be replaced by refurbished products of the same type rather than being repaired. Refurbished parts may be used to repair the product.


To the extent permitted by law replacement of the product or a part does not extend or restart the Warranty Term.
Kelco may seek reimbursement of any costs incurred by them when the Kelco product is found to be in good working order.
5. Non-excludable Statutory Guarantees
(1) The Warranty is given by Kelco in addition to other rights and remedies which you may be entitled to under by law, nothing contained in this agreement excludes, restricts or modifies any condition, guarantee, warranty or other obligation which is applicable to or is conferred on Kelco pursuant to law where to exclude, restrict or modify any such condition, warranty or other obligation is unlawful. (2) Australia: To the extent that you are a consumer for the purposes of the ACL, Kelco Products come with guarantees that cannot be excluded under the ACL. You are entitled to a replacement or refund for a major failure and compensation for any other reasonably foreseeable loss or damage. You are also entitled to have the goods repaired or replaced if the goods fail to be of acceptable quality and the failure does not amount to a major failure. “Acceptable Quality” and “major failure” have the meaning they have in the ACL.(3) New Zealand: For Kelco Products provided by Kelco in New Zealand, the Kelco Products come with a guarantee by Kelco pursuant to the provisions of the Consumer Guarantees Act, section 345(1)(i) of the Contract and Commercial Law Act 2017 and the Fair Trading Act. Where the Kelco Product was purchased in New Zealand for commercial purposes the Consumer Guarantee Act does not apply.
6. Disclaimer and Limitation of Liability
TO THE EXTENT PERMITTED BY APPLICABLE LAW:
(1) SELLER MAKES NO WARRANTY, EXPRESS OR IMPLIED, OTHER THAN AS STATED IN SECTION 4 ABOVE AND SELLER DISCLAIMS AND EXCLUDES ANY WARRANTY OF ANY OTHER KIND.
(2) THE SOLE AND EXCLUSIVE REMEDY FOR MALFUNCTIONING KELCO PRODUCTS SHALL BE AS SET FORTH IN SECTION 4. ABOVE.
(3) KELCO AND THE DISTRIBUTORS OF KELCO PRODUCTS ARE NOT LIABLE FOR ANY DAMAGES WHICH MAY ARISE FROM OR BE RELATED TO KELCO PRODUCTS.
7. Confidentiality: You accept that if you make a Warranty claim, Kelco and its agents may exchange information in relation to you to enable Kelco to meet its obligations under this Warranty.8. Export/ Import ControlsCustomers of Kelco Products shall comply with all applicable laws and regulations of Australia and/or other relevant countries with regard to security export/import control, when exporting/importing Kelco Products and/or technical documents or providing such products and/or documents to a non-resident of Australia. At its discretion Kelco may not provide customers with Kelco Products and/or technical documents should they fail to comply with such laws and regulations.
Designed and Manufactured in Australia by
KELCO Engineering Pty LtdA.B.N. 20 002 834 844Head Office and Factory: 9/9 Powells Road Brookvale 2100 AustraliaPostal Address: PO Box 7485 Warringah Mall NSW 2100 Phone: +61 2 99056425 Fax: +61 2 99056420 Email: [email protected] Web: www.kelco.com.au All rights reserved copyright Kelco Engineering Pty Ltd © 2021