K 2.50 M - SBR24.de · master switch is switched on. ... 6b Spray lance with dirt blaster 6c Wash...
12
K 2.50 M 5.960–643 05/03_2004246 Operating Instructions PRESSURE WASHER Before first use of the unit read these operating instructions and act in accordance with them
-
Upload
nguyenthien -
Category
Documents
-
view
215 -
download
0
Transcript of K 2.50 M - SBR24.de · master switch is switched on. ... 6b Spray lance with dirt blaster 6c Wash...

K 2.50 M
5.960–64305/03_2004246
Operating Instructions
PRESSURE WASHER
Before first use of the unit read these operating instructionsand act in accordance with them
2
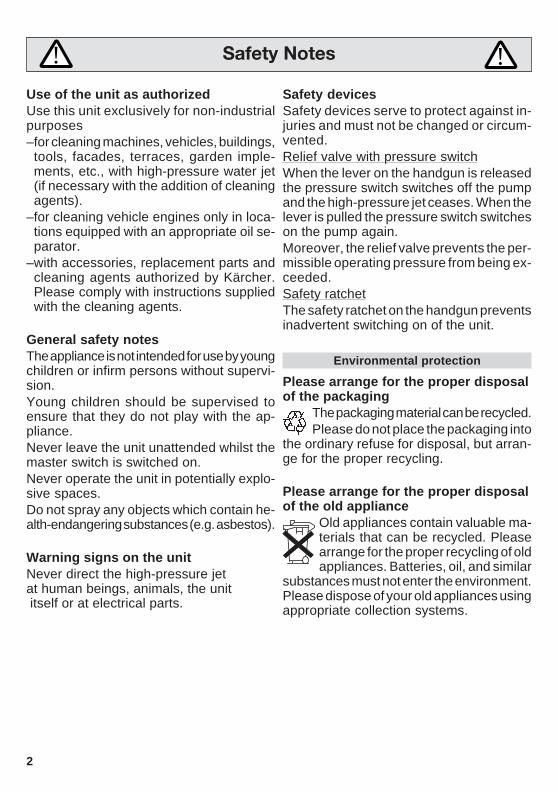
Safety Notes
Use of the unit as authorizedUse this unit exclusively for non-industrialpurposes–for cleaning machines, vehicles, buildings,
tools, facades, terraces, garden imple-ments, etc., with high-pressure water jet(if necessary with the addition of cleaningagents).
–for cleaning vehicle engines only in loca-tions equipped with an appropriate oil se-parator.
–with accessories, replacement parts andcleaning agents authorized by Kärcher.Please comply with instructions suppliedwith the cleaning agents.
General safety notesThe appliance is not intended for use by youngchildren or infirm persons without supervi-sion.Young children should be supervised toensure that they do not play with the ap-pliance.Never leave the unit unattended whilst themaster switch is switched on.Never operate the unit in potentially explo-sive spaces.Do not spray any objects which contain he-alth-endangering substances (e.g. asbestos).
Warning signs on the unitNever direct the high-pressure jetat human beings, animals, the unit itself or at electrical parts.
Safety devicesSafety devices serve to protect against in-juries and must not be changed or circum-vented.Relief valve with pressure switchWhen the lever on the handgun is releasedthe pressure switch switches off the pumpand the high-pressure jet ceases. When thelever is pulled the pressure switch switcheson the pump again.Moreover, the relief valve prevents the per-missible operating pressure from being ex-ceeded.Safety ratchetThe safety ratchet on the handgun preventsinadvertent switching on of the unit.
Environmental protection
Please arrange for the proper disposalof the packaging
The packaging material can be recycled.Please do not place the packaging into
the ordinary refuse for disposal, but arran-ge for the proper recycling.
Please arrange for the proper disposalof the old appliance
Old appliances contain valuable ma-terials that can be recycled. Pleasearrange for the proper recycling of oldappliances. Batteries, oil, and similar
substances must not enter the environment.Please dispose of your old appliances usingappropriate collection systems.
! !

3
Before first use of the unit read these operating instructions and act in accordance withthem. Keep these operating instructions in a safe place for later use or for a subsequentowner.
Contents
1 Detergent suction hose2 Appliance switch (ON/OFF)3 High-pressure outlet4 Water connection with filter5 Coupling6a Spray lance with double nozzle
6b Spray lance with dirt blaster6c Wash brush7 High-pressure hose8 Spray gun with safety ratchet (A)9 Power plug10 Transport cart

4
For additionalinformationsee page 8and following
Preparation
� Transport cart assembly�� Spray gun assembly� Attach spray lance� Screw on high-pressure hose
� Connect to water inlet� Open water tap fully� Plug in power plug

5
Operation with high pressure
� Choose spray lance� Unit switch on ”1”� Release safety ratchet on handgun
� Press lever� Caution: recoil� Safety instructions
6
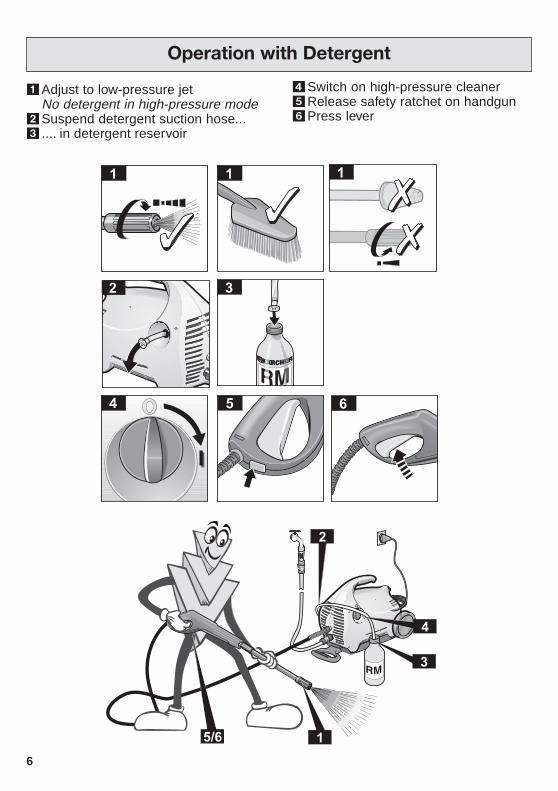
Operation with Detergent
� Adjust to low-pressure jetNo detergent in high-pressure mode
� Suspend detergent suction hose...� .... in detergent reservoir
� Switch on high-pressure cleaner� Release safety ratchet on handgun� Press lever

7
� Unit switch to ”0”� Unplug power plug� Turn off water tap� Press lever (to de-pressurise)� Engage safety catch on handgun
Care, storageFinishing the operation
� Clean detergent filter� Clean water filter� Frost protection

8
Before first use
Assembly (page 4)When unpacking check the contents. In-form your dealer of any damage in trans-portation.Connection requirementsElectrical connectionThe voltage shown on the rating plate mustmatch the supply voltage. The current sourcemust be properly earthed.Only use splash-protected extension ca-ble with a sufficient conductor cross-sec-tion (10 m: 3 x 1.5 mm², 30 m: 3 x 2.5 mm²)and unwind completely from the cable drum.Connection to water lineComply with the stipulations of the watersupply company.Only use supply hoses (not supplied) withthe following dimensions: length at least 7.5m, diameter at least ½”.See rating plate or Technical Data for con-nected values.
Operation
! Serious danger!Vehicle tyres and tyre valves can be da-maged by the high-pressure jet and beco-me perforated. The first sign of this is a dis-coloration of the tyre. When cleaning themmaintain a distance of at least 30 cm.Never grasp the power plug with wet hands.Before each use check the power cord andpower plug for damage. Have a damagedpower cord replaced immediately by anauthorized Kärcher service point or an elec-trical specialist.Before each use check the high-pressurehose for damage. Replace a damaged high-pressure hose immediately.
! Danger of injury!Owing to the water jet emerging from thehigh-pressure nozzle a recoil force opera-tes on the handgun. Ensure you have asecure footing and hold the handgun andspray lance firmly.
If necessary wear protective clothing forprotection against return spray.
Water supplyCaution! Impurities in the intake waterdamage the pump. To prevent this we ex-pressly urge you to use the Kärcher waterfilter (not included, order no. 4.730-097).The operation of the high-pressure clea-ner with a closed water supply line causesdamage to the pump. Please never ope-rate the high-pressure cleaner with a clo-sed water supply tap.
The unit can either be supplied from thewater main or from water in an open con-tainer.Water supply from the water main• Connect a supply hose (not included) to
the water inlet of the unit and to the watersupply (e.g. water tap).
• Open the water supply.Water supply from an open container• Unscrew the coupling part for the water
inlet.• Screw the suction hose with filter (not inclu-
ded, order-no. 4.440-238) onto the waterconnection of the unit.
• Hang the filter in the container.• Vent the unit before operation.
– Unscrew the high-pressure line at thehigh-pressure outlet of the unit.
– Switch on the unit and let it run until waterfree of bubbles emerges at the high-pressure outlet.
– Switch off the unit and screw on the high-pressure hose again.
Preparation• Insert power plug.• Turn master switch to “I”.
Switching on• Press safety ratchet on the handgun and
pull the lever.

9
Switching off• Release the lever.During breaks in work and when leavingthe unit secure it against inadvertent swit-ching on by pressing the safety ratchet.
Regulate operating pressureHigh operating pressure:twist spray lance in direction “ ”.Low operating pressure:twist spray lance in direction “ ”.
Adding the cleaning agent• Draw the cleaning agent suction hose out
of the housing to the required length.• Hang the cleaning agent suction hose in
the cleaning agent container.• Twist spray lance to low operating pres-
sure “ ”.No detergent in high-pressure mode
If cleaning agent has been added:• Hang the cleaning agent suction hose in
a container of clear water, switch on theunit for about one minute and flush throu-gh.
Recommended cleaning method1. Spray the cleaning agent on the dry
surface sparingly and let it react (but notdry out).
2. Wash off the loosened dirt with the high-pressure jet.
Connect accessoriesThe following accessories are included inthe scope of delivery.Wash brushfor large, smooth surfaces – e.g. on theautomobile, caravan or boat.Cleaning agentcan be added.Rotary nozzlefor stubborn accumulations of grime – e.g.moss-covered promenade tiles or facades.Work without cleaning agent and with thehighest operating pressure.
Finishing operations
• Master switch to “0”.• Draw out power plug.
Water supplied from the water main• Close the water supply tap.• Separate the unit from the water connec-
tion.Water supplied from an open container• Unscrew the suction hose with filter at the
water inlet of the unit.• Pull the lever on the handgun until the unit
is without pressure.• Press in the safety ratchet to protect the
unit against inadvertent switching on.
SafekeepingCaution! Frost can destroy an incomple-tely emptied unit. In the winter keep the unitin a frost-free room.• Separate the spray lance from the hand-
gun.• Wind up the power cord and, for example,
hang it around the handgun.
Transportation
• Switch off the unit before transporting it.• To transport it over stairs or obstacles lift
the unit at the transportation handle.• To transport the unit over even surfaces
draw it by the drawing bar.

Cleaning agents
For trouble-free operation and for matchingto the relevant cleaning task we recommendour Kärcher cleaning agents and care ran-ge. Please let us advise you or ask for in-formation about them. Here is a small sel-ection:Universal cleaner- Profi RM 555 ULTRAAutomobile cleaner- Profi RM 565 ULTRAHouse and garden cleaner- Profi RM 570 ULTRABoat cleaner- Profi RM 575 ULTRA
Care and Maintenance
CleaningBefore long periods of storage, e.g. in win-ter:• Pull out the strainer in the water inlet with
flat-nose pliers and clean it under runningwater.
MaintenanceThe unit is maintenance-free.
Help with faults
Faults often have simple causes which youcan rectify yourself with the aid of the follo-wing summary. In case of doubt or of faultsor remedies not mentioned here apply tothe authorized customer service.
! Danger of electric shock!Repair work on the unit can only be carriedout by the authorized customer service.
Appliance does not work- Please check whether the voltage speci-
fied on the typeplate corresponds to thatof the power source.
- Check the power cord for damages.
Appliance does not achieve the opera-tional pressure- Deaerate the appliance: allow the pump
to operate without the high-pressure hoseuntil bubble-free water emerges from thehigh-pressure outlet. Then reconnect thehigh-pressure hose.
- Clean the sieve in the water connection (itcan be easily removed using flat pliers).
- Check the inlet water flow rate.- Check all supply lines to the pump for leaks
or clogging-up.
Strong pressure variations- Clean the high-pressure nozzle. Remove
dirt from the nozzle boring using a need-le, and then rinse the nozzle with water.
Pump leakage- A slight leakage of the pump is normal. If
you detect an excessive leakage, pleasecontact the authorized customer service.
Detergent is not taken in- Clean filter of detergent suction hose- Set to low-pressure jet
No detergent in high-pressure mode
Replacement partsUse exclusively Kärcher original replace-ment parts. You will find a replacement partssummary at the end of these operatinginstructions.
10

Technical Data
Power supplyVoltage (at 1~50 Hz) 230 - 240 VConnected load 1,3 kWSupply fuses (time-lag) 10 ASafety class 1
Water connectionSupply temperature, max. 40 °CSupply volume,min. (500 l/h) 8 l/minSupply pressure, max. (12 bar) 1,2 MPa
Performance dataOperating pressure (85 bar) 8,5 MPaMax. permissible pumppressure (100 bar) 10 MPaFlow volume (300 l/h) 5 l/minCleaning agent metering 0,3 l/minRecoil force of the handgun 10 NUnit vibrations 0.8 m/s²
Sound levelL
PA(EN 60704-1) 74 dB(A)
LWA
(EN 4871) 87 dB(A)
DimensionsLength/Width/Height 555/260/310 mmWeight 11 kg
Circuit DiagramC1 CapacitorM1 MotorQ1 SwitchT Temperature limiterS1 Pressure switch
Service
GuaranteeIn each country the guarantee conditionsissued by our responsible sales companyare applicable. We clear any faults occur-ring in the unit free of charge during the periodof guarantee providing the cause is a faultin a material or in the manufacture.In the case of a claim under the guaranteeplease contact your dealer or the nearestauthorized customer service point, accom-panying your claim with accessories andpurchase voucher.
Customer ServiceIn the case of questions or faults our Kär-cher branches will be pleased to assist youfurther.
Karcher Pty Ltd40 Koornang RoadScoresby 3179Victoria, AustraliaTel. 61 3 9765 2300
11

A
A
A
5.960-643.0
05/03
9.084-057.0
6.389-870.0
9.011-656.0
9.011-422.0
2.883-111.0
2.883-111.0
9.011-390.0
5.332-464.0
4.775-389.05.037-137.0
6.363-198.0
6.390-871.0
6.362-498.0
2.880-296.0
6.903-276.0
2.883-111.0
A
Karcher Pty Ltd40 Koornang RoadScoresby 3179Victoria, AustraliaTel. 61 3 9765 2300