JupyterLab Documentation emacs, and Sublime Text in the text editor. JupyterLab extensions can...
129
JupyterLab Documentation Release 0.18.4 Project Jupyter Sep 10, 2018
Transcript of JupyterLab Documentation emacs, and Sublime Text in the text editor. JupyterLab extensions can...

JupyterLab DocumentationRelease 0.18.4
Project Jupyter
Sep 10, 2018


Getting Started
1 Overview 3
2 Installation 5
3 Starting JupyterLab 7
4 Frequently Asked Questions (FAQ) 9
5 JupyterLab Changelog 11
6 The JupyterLab Interface 25
7 JupyterLab URLs 31
8 Working with Files 33
9 Text Editor 37
10 Notebooks 39
11 Code Consoles 41
12 Terminals 43
13 Managing Kernels and Terminals 45
14 Command Palette 47
15 Documents and Kernels 49
16 File and Output Formats 51
17 Extensions 59
18 JupyterLab on JupyterHub 63
19 General Codebase Orientation 65
20 Extension Developer Guide 67
i

21 Documents 75
22 Overview of document architecture 77
23 Notebook 81
24 Design Patterns 87
25 CSS Patterns 91
26 Writing Documentation 95
27 Virtual DOM and React 99
28 Adding Content 101
29 Examples 103
30 Terminology 107
31 Let’s Make an xkcd JupyterLab Extension 109
32 Indices and Tables 125
ii

JupyterLab Documentation, Release 0.18.4
JupyterLab is the next-generation web-based user interface for Project Jupyter. Try it on Binder.
Getting Started 1

JupyterLab Documentation, Release 0.18.4
2 Getting Started

CHAPTER 1
Overview
JupyterLab is the next-generation web-based user interface for Project Jupyter.
JupyterLab enables you to work with documents and activities such as Jupyter notebooks, text editors, terminals,and custom components in a flexible, integrated, and extensible manner. You can arrange multiple documents andactivities side by side in the work area using tabs and splitters. Documents and activities integrate with each other,enabling new workflows for interactive computing, for example:
• Code Consoles provide transient scratchpads for running code interactively, with full support for rich output. Acode console can be linked to a notebook kernel as a computation log from the notebook, for example.
3
JupyterLab Documentation, Release 0.18.4
• Kernel-backed documents enable code in any text file (Markdown, Python, R, LaTeX, etc.) to be run interactivelyin any Jupyter kernel.
• Notebook cell outputs can be mirrored into their own tab, side by side with the notebook, enabling simpledashboards with interactive controls backed by a kernel.
• Multiple views of documents with different editors or viewers enable live editing of documents reflected in otherviewers. For example, it is easy to have live preview of Markdown, Delimiter-separated Values, or Vega/Vega-Lite documents.
JupyterLab also offers a unified model for viewing and handling data formats. JupyterLab understands many fileformats (images, CSV, JSON, Markdown, PDF, Vega, Vega-Lite, etc.) and can also display rich kernel output in theseformats. See File and Output Formats for more information.
To navigate the user interface, JupyterLab offers customizable keyboard shortcuts and the ability to use key maps fromvim, emacs, and Sublime Text in the text editor.
JupyterLab extensions can customize or enhance any part of JupyterLab, including new themes, file editors, and customcomponents.
JupyterLab is served from the same server and uses the same notebook document format as the classic Jupyter Note-book.
1.1 JupyterLab Releases
The current release of JupyterLab is suitable for general daily use. Please review the JupyterLab Changelog fordetailed descriptions of each release.
The extension developer API is evolving, and we also are currently iterating on UI/UX improvements. We appreciatefeedback on our GitHub issues page as we evolve towards a stable extension development API.
JupyterLab will eventually replace the classic Jupyter Notebook. Throughout this transition, the same notebook docu-ment format will be supported by both the classic Notebook and JupyterLab.
4 Chapter 1. Overview

CHAPTER 2
Installation
JupyterLab can be installed using conda, pip, or pipenv.
2.1 conda
If you use conda, you can install it with:
conda install -c conda-forge jupyterlab
2.2 pip
If you use pip, you can install it with:
pip install jupyterlab
If installing using pip install --user, you must add the user-level bin directory to your PATH environmentvariable in order to launch jupyter lab.
2.3 pipenv
If you use pipenv, you can install it as:
pipenv install jupyterlabpipenv shell
or from a git checkout:
pipenv install git+git://github.com/jupyterlab/jupyterlab.git#egg=jupyterlabpipenv shell
5

JupyterLab Documentation, Release 0.18.4
When using pipenv, in order to launch jupyter lab, you must activate the project’s virtualenv. For example, inthe directory where pipenv’s Pipfile and Pipfile.lock live (i.e., where you ran the above commands):
pipenv shelljupyter lab
2.4 Installing with Previous Versions of Notebook
If you are using a version of Jupyter Notebook earlier than 5.3, then you must also run the following command toenable the JupyterLab server extension:
jupyter serverextension enable --py jupyterlab --sys-prefix
2.5 Prerequisites
JupyterLab requires the Jupyter Notebook version 4.3 or later. To check the version of the notebook package thatyou have installed:
jupyter notebook --version
2.6 Supported browsers
The latest versions of the following browsers are currently known to work:
• Firefox
• Chrome
• Safari
Earlier browser versions may also work, but come with no guarantees.
JupyterLab uses CSS Variables for styling, which is one reason for the minimum versions listed above. IE 11+ orEdge 14 do not support CSS Variables, and are not directly supported at this time. A tool like postcss can be used toconvert the CSS files in the jupyterlab/build directory manually if desired.
6 Chapter 2. Installation

CHAPTER 3
Starting JupyterLab
Start JupyterLab using:
jupyter lab
JupyterLab will open automatically in your browser.
You may access JupyterLab by entering the notebook server’s URL into the browser. JupyterLab sessions alwaysreside in a workspace. The default workspace is the main /lab URL:
http(s)://<server:port>/<lab-location>/lab
Because JupyterLab is a server extension of the classic Jupyter Notebook server, you can launch JupyterLab by callingjupyter notebook and visiting the /lab URL.
Like the classic notebook, JupyterLab provides a way for users to copy URLs that open a specific notebook or file.Additionally, JupyterLab URLs are an advanced part of the user interface that allows for managing workspaces. Tolearn more about URLs in Jupyterlab, visit JupyterLab URLs.
To open the classic Notebook from JupyterLab, select “Launch Classic Notebook” from the JupyterLab Help menu,or you can change the URL from /lab to /tree.
JupyterLab has the same security model as the classic Jupyter Notebook; for more information see the security sectionof the classic Notebook’s documentation.
7

JupyterLab Documentation, Release 0.18.4
8 Chapter 3. Starting JupyterLab

CHAPTER 4
Frequently Asked Questions (FAQ)
Below are some frequently asked questions. Click on a question to be directed to relevant information in our docu-mentation or our GitHub repo.
4.1 General
• What is JupyterLab?
• Is JupyterLab ready to use?
• What will happen to the classic Jupyter Notebook?
• Where is the official online documentation for JupyterLab?
4.2 Development
• How can you report a bug or provide feedback?
• How can you contribute?
• How can you extend or customize JupyterLab?
9

JupyterLab Documentation, Release 0.18.4
10 Chapter 4. Frequently Asked Questions (FAQ)

CHAPTER 5
JupyterLab Changelog
5.1 v0.34.0
5.1.1 August 18, 2018
See the JupyterLab 0.34.0 milestone on GitHub for the full list of pull requests and issues closed.
5.1.2 Key Features
• Notebooks, consoles, and text files now have access to completions for local tokens.
• Python 3.5+ is now required to use JupyterLab. Python 2 kernels can still be run within JupyterLab.
• Added the pipe (|) character as a CSV delimiter option.
• Added “Open From Path. . . ”” to top level File menu.
• Added “Copy Download Link” to context menu for files.
5.1.3 Changes for Developers
• Notebooks, consoles, and text files now have access to completions for local tokens. If a text file has a runningkernel associated with its path (as happens with an attached console), it also gets completions and tooltips fromthat kernel. (#5049)
• The FileBrowser widget has a new constructor option refreshInterval, allowing the creator to cus-tomize how often the widget polls the storage backend. This can be useful to prevent rate-limiting in certaincontexts. (#5048)
• The application shell now gets a pair of CSS data attributes indicating the current theme, and whether it is lightor dark. Extension authors can write CSS rules targeting these to have their extension UI elements respond tothe application theme. For instance, to write a rule targeting whether the theme is overall light or dark, you canuse
11

JupyterLab Documentation, Release 0.18.4
[data-theme-light="true"] your-ui-class {background-color: white;
}[data-theme-light="false"] your-ui-class {background-color: black;
}
The theme name can also be targeted by writing CSS rules for data-theme-name. (#5078)
• The IThemeManager interface now exposes a signal for themeChanged, allowing extension authors toreact to changes in the theme. Theme extensions must also provide a new boolean property isLight, declaringwhether they are broadly light colored. This data allows third-party extensions to react better to the activeapplication theme. (#5078)
• Added a patch to update the uploads for each FileBrowserModel instantly whenever a file upload errors.Previously, the upload that erred was only being removed from uploads upon an update. This would allow thestatus bar component and other extensions that use the FileBrowserModel to be more precise. (#5077)
• Cell IDs are now passed in the shell message as part of the cell metadata when a cell is executed. This helps indeveloping reactive kernels. (#5033)
• The IDs of all deleted cells since the last run cell are now passed as part of the cell metadata on execution. TheIDs of deleted cells since the last run cell are stored as deletedCells in NotebookModel. This helps indeveloping reactive kernels. (#5037)
• The ToolbarButton in apputils has been refactored with an API change and now uses a React componentToolbarButtonComponent to render its children. It is now a div with a single button child, which inturn as two span elements for an icon and text label. Extensions that were using the className optionsshould rename it as iconClassName. The className options still exists, but it used as the CSS class onthe button element itself. The API changes were done to accommodate styling changes to the button. (#5117)
• The Toolbar.createFromCommand function has been replaced by a dedicated ToolbarButton sub-class called CommandToolbarButton, that wraps a similarly named React component. (#5117)
• The design and styling of the right and left sidebars tabs has been improved to address #5054. We are nowusing icons to render tabs for the extensions we ship with JupyterLab and extension authors are encouraged todo the same (text labels still work). Icon based tabs can be used by removing widget.caption and addingwidget.iconClass = '<youriconclass> jp-SideBar-tabIcon';. (#5117)
• The style of buttons in JupyterLab has been updated to a borderless design. (#5117)
• A new series of helper CSS classes for stying SVG-based icons at different sizes has been added: jp-Icon,jp-Icon-16, jp-Icon-18, jp-Icon-20.
• The rank of the default sidebar widget has been updated. The main change is giving the extension manager arank of 1000 so that it appears at the end of the default items.
• Python 3.5+ is now required to use JupyterLab. Python 2 kernels can still be run within JupyterLab. (#5119)
• JupyterLab now uses yarn 1.9.4 (aliased as jlpm), which now allows uses to use Node 10+. (#5121)
• Clean up handling of baseUrl and wsURL for PageConfig and ServerConnection. (#5111)
5.1.4 Other Changes
• Added the pipe (|) character as a CSV delimiter option. (#5112)
• Added Open From Path... to top level File menu. (#5108)
• Added a saveState signal to the document context object. (#5096)
12 Chapter 5. JupyterLab Changelog

JupyterLab Documentation, Release 0.18.4
• Added “Copy Download Link” to context menu for files. (#5089)
• Extensions marked as deprecated are no longer shown in the extension manager. (#5058)
• Remove In and Out text from cell prompts. Shrunk the prompt width from 90px to 64px. In the light theme,set the prompt colors of executed console cells to active prompt colors and reduced their opacity to 0.5. In thedark theme, set the prompt colors of executed console cells to active prompt colors and set their opacity to 1.(#5097 and #5130)
5.1.5 Bug Fixes
• Fixed a bug in the rendering of the “New Notebook” item of the command palette. (#5079)
• We only create the extension manager widget if it is enabled. This prevents unnecessary network requests tonpmjs.com. (#5075)
• The running panel now shows the running sessions at startup. (#5118)
• Double clicking a file in the file browser always opens it rather than sometimes selecting it for a rename. (#5101)
5.2 v0.33.0
5.2.1 July 26, 2018
See the JupyterLab 0.33.0 milestone on GitHub for the full list of pull requests and issues closed.
5.2.2 Key Features:
• No longer in beta
• Workspaces
• Menu items
• Keyboard shortcuts
• Command palette items
• Settings
• Larger file uploads
• Extension management and installation
• Interface changes
• Renderers
• Changes for developers
• Other fixes
5.2.3 No longer in beta
In JupyterLab 0.33, we removed the “Beta” label to better signal that JupyterLab is ready for users to use on a dailybasis. The extension developer API is still being stabilized. See the release blog post for details. (#4898, #4920)
5.2. v0.33.0 13

JupyterLab Documentation, Release 0.18.4
5.2.4 Workspaces
We added new workspace support, which enables you to have multiple saved layouts, including in different browserwindows. See the workspace documentation for more details. (#4502, #4708, #4088, #4041 #3673, #4780)
5.2.5 Menu items
• “Activate Previously Used Tab” added to the Tab menu (Ctrl/Cmd Shift ') to toggle between the previ-ously active tabs in the main area. (#4296)
• “Reload From Disk” added to the File menu to reload an open file from the state saved on disk. (#4615)
• “Save Notebook with View State” added to the File menu to persist the notebook collapsed andscrolled cell state. We now read the collapsed, scrolled, jupyter.source_hidden andjupyter.outputs_hidden notebook cell metadata when opening. collapsed and jupyter.outputs_hidden are redundant and the initial collapsed state is the union of both of them. When the stateis persisted, if an output is collapsed, both will be written with the value true, and if it is not, both will not bewritten. (#3981)
• “Increase/Decrease Font Size” added to the text editor settings menu. (#4811)
• “Show in File Browser” added to a document tab’s context menu. (#4500)
• “Open in New Browser Tab” added to the file browser context menu. (#4315)
• “Copy Path” added to file browser context menu to copy the document’s path to the clipboard. (#4582)
• “Show Left Area” has been renamed to “Show Left Sidebar” for consistency (same for right sidebar). (#3818)
5.2.6 Keyboard shortcuts
• “Save As. . . ” given the keyboard shortcut Ctrl/Cmd Shift S. (#4560)
• “Run All Cells” given the keyboard shortcut Ctrl/Cmd Shift Enter. (#4558)
• “notebook:change-to-cell-heading-X” keyboard shortcuts (and commands) renamed to “notebook:change-cell-to-heading-X” for X=1. . . 6. This fixes the notebook command-mode keyboard shortcuts for changing headings.(#4430)
• The console execute shortcut can now be set to either Enter or Shift Enter as a Console setting. (#4054)
5.2.7 Command palette items
• “Notebook” added to the command palette to open a new notebook. (#4812)
• “Run Selected Text or Current Line in Console” added to the command palette to run the selected text or currentline from a notebook in a console. A default keyboard shortcut for this command is not yet provided, but canbe added by users with the notebook:run-in-console command. To add a keyboard shortcut Ctrl Gfor this command, use the “Settings” | “Advanced Settings Editor” menu item to open the “Keyboard Shortcuts”advanced settings, and add the following JSON in the shortcut JSON object in the User Overrides pane (adjustthe actual keyboard shortcut if you wish). (#3453, #4206, #4330)
"notebook:run-in-console": {"command": "notebook:run-in-console","keys": ["Ctrl G"],"selector": ".jp-Notebook.jp-mod-editMode"
}
14 Chapter 5. JupyterLab Changelog

JupyterLab Documentation, Release 0.18.4
• The command palette now renders labels, toggled state, and keyboard shortcuts in a more consistent and correctway. (#4533, #4510)
5.2.8 Settings
• “fontFamily”, “fontSize”, and “lineHeight” settings added to the text editor advanced settings. (#4673)
• Solarized dark and light text editor themes from CodeMirror. (#4445)
5.2.9 Larger file uploads
• Support for larger file uploads (>15MB) when using Jupyter notebook server version >= 5.1. (#4224)
5.2.10 Extension management and installation
• New extension manager for installing JupyterLab extensions from npm within the JupyterLab UI. You canenable this from the Advanced Settings interface. (#4682, #4925)
• Please note that to install extensions in JupyterLab, you must use NodeJS version 9 or earlier (i.e., not NodeJSversion 10). We will upgrade yarn, with NodeJS version 10 support, when a bug in yarn is fixed. (#4804)
5.2.11 Interface changes
• Wider tabs in the main working area to show longer filenames. (#4801)
• Initial kernel selection for a notebook or console can no longer be canceled: the user must select a kernel.(#4596)
• Consoles now do not display output from other clients by default. A new “Show All Kernel Activity” consolecontext menu item has been added to show all activity from a kernel in the console. (#4503)
• The favicon now shows the busy status of the kernels in JupyterLab. (#4361, #3957, #4966)
5.2.12 Renderers
• JupyterLab now ships with a Vega4 renderer by default (upgraded from Vega3). (#4806)
• The HTML sanitizer now allows some extra tags in rendered HTML, including kbd, sup, and sub. (#4618)
• JupyterLab now recognizes the .tsv file extension as tab-separated files. (#4684)
• Javascript execution in notebook cells has been re-enabled. (#4515)
5.2.13 Changes for developers
• A new signal for observing application dirty status state changes. (#4840)
• A new signal for observing notebook cell execution. (#4740, #4744)
• A new anyMessage signal for observing any message a kernel sends or receives. (#4437)
• A generic way for different widgets to register a “Save with extras” command that appears in the File menuunder save. (#3981)
5.2. v0.33.0 15
JupyterLab Documentation, Release 0.18.4
• A new API for removing groups from a JupyterLab menu. addGroup now returns an IDisposable whichcan be used to remove the group. removeGroup has been removed. (#4890)
• The Launcher now uses commands from the application CommandRegistry to launch new activities. Ex-tension authors that add items to the launcher will need to update them to use commands. (#4757)
• There is now a top-level addToBottomArea function in the application, allowing extension authors to addbottom panel items like status bars. (#4752)
• Rendermime extensions can now indicate that they are the default rendered widget factory for a file-type. Forinstance, the default widget for a markdown file is a text editor, but the default rendered widget is the markdownviewer. (#4692)
• Add new workspace REST endpoints to jupyterlab_launcher and make them available in@jupyterlab/services. (#4841)
• Documents created with a mimerenderer extension can now be accessed using an IInstanceTrackerwhich tracks them. Include the token IMimeDocumentTracker in your plugin to access this. TheIInstanceTracker interface has also gained convenience functions find and filter to simplify iter-ating over instances. (#4762)
• RenderMime render errors are now displayed to the user. (#4465)
• getNotebookVersion is added to the PageConfig object. (#4224)
• The session kernelChanged signal now contains both the old kernel and the new kernel to make it easy tounregister things from the old kernel. (#4834)
• The connectTo functions for connecting to kernels and sessions are now synchronous (returning a connectionimmediately rather than a promise). The DefaultSession clone and update methods are also synchronousnow. (#4725)
• Kernel message processing is now asynchronous, which guarantees the order of processing even if a handleris asynchronous. If a kernel message handler returns a promise, kernel message processing is paused until thepromise resolves. The kernel’s anyMessage signal is emitted synchronously when a message is received be-fore asynchronous message handling, and the iopubMessage and unhandledMessage signals are emittedduring asynchronous message handling. These changes mean that the comm onMsg and onClose handlersand the kernel future onReply, onIOPub, and onStdin handlers, as well as the comm target and messagehook handlers, may be asynchronous and return promises. (#4697)
• Kernel comm targets and message hooks now are unregistered with removeCommTarget andremoveMessageHook, instead of using disposables. The corresponding registerCommTarget andregisterMessageHook functions now return nothing. (#4697)
• The kernel connectToComm function is synchronous, and now returns the comm rather than a promise to thecomm. (#4697)
• The KernelFutureHandler class expectShell constructor argument is renamed to expectReply.(#4697)
• The kernel future done returned promise now resolves to undefined if there is no reply message. (#4697)
• The IDisplayDataMsg is updated to have the optional transient key, and a newIUpdateDisplayDataMsg type was added for update display messages. (#4697)
• The uuid function from @jupyterlab/coreutils is removed. Instead import UUID from @phosphor/coreutils and use UUID.uuid4() . (#4604)
• Main area widgets like the launcher and console inherit from a common MainAreaWidget class which pro-vides a content area (.content) and a toolbar (.toolbar), consistent focus handling and activation behavior,and a spinner displayed until the given reveal promise is resolved. Document widgets, like the notebook and
16 Chapter 5. JupyterLab Changelog

JupyterLab Documentation, Release 0.18.4
text editor and other documents opened from the document manager, implement the IDocumentWidget in-terface (instead of DocumentRegistry.IReadyWidget), which builds on MainAreaWidget and addsa .context attribute for the document context and makes dirty handling consistent. Extension authors mayconsider inheriting from the MainAreaWidget or DocumentWidget class for consistency. Several effectsfrom these changes are noted below. (#3499, #4453)
– The notebook panel .notebook attribute is renamed to .content.
– The text editor is now the .content of a DocumentWidget, so the top-level editor widget has atoolbar and the editor itself is widget.content.editor rather than just widget.editor.
– Mime documents use a MimeContent widget embedded inside of a DocumentWidget now.
– Main area widgets and document widgets now have a revealed promise which resolves when the widgethas been revealed (i.e., the spinner has been removed). This should be used instead of the ready promise.
Changes in the JupyterLab code infrastructure include:
• The JupyterLab TypeScript codebase is now compiled to ES2015 (ES6) using TypeScript 2.9. We also turned onthe TypeScript esModuleInterop flag to enable more natural imports from non-es2015 JavaScript modules.With the update to ES2015 output, code generated from async/await syntax became much more manageable,so we have started to use async/await liberally throughout the codebase, especially in tests. Because we useTypedoc for API documentation, we still use syntax compatible with TypeScript 2.7 where Typedoc is used.Extension authors may have some minor compatibility updates to make. If you are writing an extension inTypeScript, we recommend updating to TypeScript 2.9 and targeting ES2015 output as well. (#4462, #4675,#4714, #4797)
• The JupyterLab codebase is now formatted using Prettier. By default the development environment installs apre-commit hook that formats your staged changes. (#4090)
• Updated build infrastructure using webpack 4 and better typing. (#4702, #4698)
• Upgraded yarn to version 1.6. Please note that you must use NodeJS version 9 or earlier with JupyterLab (i.e.,not NodeJS version 10). We will upgrade yarn, with NodeJS version 10 support, when a bug in yarn is fixed.(#4804)
• Various process utilities were moved to jupyterlab_launcher. (#4696)
5.2.14 Other fixes
• Fixed a rendering bug with the Launcher in single-document mode. (#4805)
• Fixed a bug where the native context menu could not be triggered in a notebook cell in Chrome. (#4720)
• Fixed a bug where the cursor would not show up in the dark theme. (#4699)
• Fixed a bug preventing relative links from working correctly in alternate IDrives. (#4613)
• Fixed a bug breaking the image viewer upon saving the image. (#4602)
• Fixed the font size for code blocks in notebook Markdown headers. (#4617)
• Prevented a memory leak when repeatedly rendering a Vega chart. (#4904)
• Support dropped terminal connection re-connecting. (#4763, #4802)
• Use require.ensure in vega4-extension to lazily load vega-embed and its dependencies on firstrender. (#4706)
• Relative links to documents that include anchor tags will now correctly scroll the document to the right place.(#4692)
• Fix default settings JSON in setting editor. (#4591, #4595)
5.2. v0.33.0 17

JupyterLab Documentation, Release 0.18.4
• Fix setting editor pane layout’s stretch factor. (#2971, #4772)
• Programmatically set settings are now output with nicer formatting. (#4870)
• Fixed a bug in displaying one-line CSV files. (#4795, #4796)
• Fixed a bug where JSON arrays in rich outputs were collapsed into strings. (#4480)
5.3 Beta 2 (v0.32.0)
5.3.1 Apr 16, 2018
This is the second in the JupyterLab Beta series of releases. It contains many enhancements, bugfixes, and refinements,including:
• Better handling of a corrupted or invalid state database. (#3619, #3622, #3687, #4114).
• Fixing file dirty status indicator. (#3652).
• New option for whether to autosave documents. (#3734).
• More commands in the notebook context menu. (#3770, #3909)
• Defensively checking for completion metadata from kernels. (#3888)
• New “Shutdown all” button in the Running panel. (#3764)
• Performance improvements wherein non-focused documents poll the server less. (#3931)
• Changing the keyboard shortcut for singled-document-mode to something less easy to trigger. (#3889)
• Performance improvements for rendering text streams, especially around progress bars. (#4045).
• Canceling a “Restart Kernel” now functions correctly. (#3703).
• Defer loading file contents until after the application has been restored. (#4087).
• Ability to rotate, flip, and invert images in the image viewer. (#4000)
• Major performance improvements for large CSV viewing. (#3997).
• Always show the context menu in the file browser, even for an empty directory. (#4264).
• Handle asynchronous comm messages in the services library more correctly (Note: this means @jupyterlab/services is now at version 2.0!) ([#4115](https://github.com/jupyterlab/jupyterlab/issues/4115)).
• Display the kernel banner in the console when a kernel is restarted to mark the restart([#3663](https://github.com/jupyterlab/jupyterlab/issues/3663)).
• Many tweaks to the UI, as well as better error handling.
5.4 Beta 1 (v0.31.0)
5.4.1 Jan 11, 2018
• Add a /tree handler and Copy Shareable Link to file listing right click menu: https://github.com/jupyterlab/jupyterlab/pull/3396
• Experimental support for saved workspaces: #3490, #3586
• Added types information to the completer: #3508
18 Chapter 5. JupyterLab Changelog

JupyterLab Documentation, Release 0.18.4
• More improvements to the top level menus: https://github.com/jupyterlab/jupyterlab/pull/3344
• Editor settings for notebook cells: https://github.com/jupyterlab/jupyterlab/pull/3441
• Simplification of theme extensions: https://github.com/jupyterlab/jupyterlab/pull/3423
• New CSS variable naming scheme: https://github.com/jupyterlab/jupyterlab/pull/3403
• Improvements to cell selection and dragging: https://github.com/jupyterlab/jupyterlab/pull/3414
• Style and typography improvements: https://github.com/jupyterlab/jupyterlab/pull/3468 https://github.com/jupyterlab/jupyterlab/pull/3457 https://github.com/jupyterlab/jupyterlab/pull/3445 https://github.com/jupyterlab/jupyterlab/pull/3431 https://github.com/jupyterlab/jupyterlab/pull/3428 https://github.com/jupyterlab/jupyterlab/pull/3408 https://github.com/jupyterlab/jupyterlab/pull/3418
5.5 v0.30.0
5.5.1 Dec 05, 2017
• Semantic menus: https://github.com/jupyterlab/jupyterlab/pull/3182
• Settings editor now allows comments and provides setting validation: https://github.com/jupyterlab/jupyterlab/pull/3167
• Switch to Yarn as the package manager: https://github.com/jupyterlab/jupyterlab/pull/3182
• Support for carriage return in outputs: #2761
• Upgrade to TypeScript 2.6: https://github.com/jupyterlab/jupyterlab/pull/3288
• Cleanup of the build, packaging, and extension systems. jupyter labextension install is now therecommended way to install a local directory. Local directories are considered linked to the application. cfhttps://github.com/jupyterlab/jupyterlab/pull/3182
• --core-mode and --dev-mode are now semantically different. --core-mode is a version of JupyterLabusing released JavaScript packages and is what we ship in the Python package. --dev-mode is for unreleasedJavaScript and shows the red banner at the top of the page. https://github.com/jupyterlab/jupyterlab/pull/3270
5.6 v0.29.2
5.6.1 Nov 17, 2017
Bug fix for file browser right click handling. https://github.com/jupyterlab/jupyterlab/issues/3019
5.7 v0.29.0
5.7.1 Nov 09, 2017
• Create new view of cell in cell context menu. #3159
• New Renderers for VDOM and JSON mime types and files. #3157
• Switch to React for our VDOM implementation. Affects the VDomRenderer class. #3133
• Standalone Cell Example. #3155
5.5. v0.30.0 19

JupyterLab Documentation, Release 0.18.4
5.8 v0.28.0
5.8.1 Oct 16, 2017
This release generally focuses on developer and extension author enhancements and general bug fixes.
• Plugin id and schema file conventions change. https://github.com/jupyterlab/jupyterlab/pull/2936.
• Theme authoring conventions change. #3061
• Enhancements to enabling and disabling of extensions. #3078
• Mime extensions API change (name -> id and new naming convention). #3078
• Added a jupyter lab --watch mode for extension authors. #3077
• New comprehensive extension authoring tutorial. #2921
• Added the ability to use an alternate LaTeX renderer. #2974
• Numerous bug fixes and style enhancements.
5.9 v0.27.0
5.9.1 Aug 23, 2017
• Added support for dynamic theme loading. https://github.com/jupyterlab/jupyterlab/pull/2759
• Added an application splash screen. https://github.com/jupyterlab/jupyterlab/pull/2899
• Enhancements to the settings editor. https://github.com/jupyterlab/jupyterlab/pull/2784
• Added a PDF viewer. #2867
• Numerous bug fixes and style improvements.
5.10 v0.26.0
5.10.1 Jul 21, 2017
• Implemented server side handling of users settings: https://github.com/jupyterlab/jupyterlab/pull/2585
• Revamped the handling of file types in the application - affects document and mime renderers: https://github.com/jupyterlab/jupyterlab/pull/2701
• Updated dialog API - uses virtual DOM instead of raw DOM nodes and better use of the widget lifecycle:https://github.com/jupyterlab/jupyterlab/pull/2661
5.11 v0.25.0
5.11.1 Jul 07, 2017
• Added a new extension type for mime renderers, with the vega2-extension as a built-in example. Alsooverhauled the rendermime interfaces. https://github.com/jupyterlab/jupyterlab/pull/2488 https://github.com/
20 Chapter 5. JupyterLab Changelog

JupyterLab Documentation, Release 0.18.4
jupyterlab/jupyterlab/pull/2555 https://github.com/jupyterlab/jupyterlab/pull/2595
• Finished JSON-schema based settings system, using client-side storage for now. https://github.com/jupyterlab/jupyterlab/pull/2411
• Overhauled the launcher design. https://github.com/jupyterlab/jupyterlab/pull/2506 https://github.com/jupyterlab/jupyterlab/pull/2580
• Numerous bug fixes and style updates.
5.12 v0.24.0
5.12.1 Jun 16, 2017
• Overhaul of the launcher. #2380
• Initial implementation of client-side settings system. #2157
• Updatable outputs. #2439
• Use new Phosphor Datagrid for CSV viewer. #2433
• Added ability to enable/disable extensions without rebuilding. #2409
• Added language and tab settings for the file viewer. #2406
• Improvements to real time collaboration experience. #2387 #2333
• Compatibility checking for extensions. #2410
• Numerous bug fixes and style improvements.
5.13 v0.23.0
5.13.1 Jun 02, 2017
• Chat box feature. https://github.com/jupyterlab/jupyterlab/pull/2118
• Collaborative cursors. https://github.com/jupyterlab/jupyterlab/pull/2139
• Added concept of Drive to ContentsManager. https://github.com/jupyterlab/jupyterlab/pull/2248
• Refactored to enable switching the theme. https://github.com/jupyterlab/jupyterlab/pull/2283
• Clean up the APIs around kernel execution. https://github.com/jupyterlab/jupyterlab/pull/2266
• Various bug fixes and style improvements.
5.14 v0.22.0
5.14.1 May 18, 2017
• Export To. . . for notebooks. https://github.com/jupyterlab/jupyterlab/pull/2200
• Change kernel by clicking on the kernel name in the notebook. https://github.com/jupyterlab/jupyterlab/pull/2195
5.12. v0.24.0 21

JupyterLab Documentation, Release 0.18.4
• Improved handling of running code in text editors. https://github.com/jupyterlab/jupyterlab/pull/2191
• Can select file in file browser by typing: https://github.com/jupyterlab/jupyterlab/pull/2190
• Ability to open a console for a notebook. https://github.com/jupyterlab/jupyterlab/pull/2189
• Upgrade to Phosphor 1.2 with Command Palette fuzzy matching improvements. #1182
• Rename of widgets that had Widget in the name and associated package names. https://github.com/jupyterlab/jupyterlab/pull/2177
• New jupyter labhub command to launch JupyterLab on JupyterHub: https://github.com/jupyterlab/jupyterlab/pull/2222
• Removed the utils from @jupyterlab/services in favor of PageConfig andServerConnection. https://github.com/jupyterlab/jupyterlab/pull/2173 https://github.com/jupyterlab/jupyterlab/pull/2185
• Cleanup, bug fixes, and style updates.
5.15 v0.20.0
5.15.1 Apr 21, 2017
Release Notes:
• Overhaul of extension handling, see updated docs for users and developers. https://github.com/jupyterlab/jupyterlab/pull/2023
• Added single document mode and a Tabs sidebar. https://github.com/jupyterlab/jupyterlab/pull/2037
• More work toward real time collaboration - implemented a model database interface that can be in-memory byreal time backends. https://github.com/jupyterlab/jupyterlab/pull/2039
Numerous bug fixes and improvements.
5.16 v0.19.0
5.16.1 Apr 04, 2017
Mainly backend-focused release with compatibility with Phosphor 1.0 and a big refactor of session handling (theClientSession class) that provides a simpler object for classes like notebooks, consoles, inspectors, etc. to use tocommunicate with the API. Also includes improvements to the development workflow of JupyterLab itself after thebig split.
https://github.com/jupyterlab/jupyterlab/pull/1984 https://github.com/jupyterlab/jupyterlab/pull/1927
5.17 v0.18.0
5.17.1 Mar 21, 2017
• Split the repository into multiple packages that are managed using the lerna build tool. https://github.com/jupyterlab/jupyterlab/issues/1773
• Added restoration of main area layout on refresh. https://github.com/jupyterlab/jupyterlab/pull/1880
22 Chapter 5. JupyterLab Changelog
JupyterLab Documentation, Release 0.18.4
• Numerous bug fixes and style updates.
5.18 v0.17.0
5.18.1 Mar 01, 2017
• Upgrade to new @phosphor packages - brings a new Command Palette interaction that should be more intu-itive, and restores the ability to drag to dock panel edges https://github.com/jupyterlab/jupyterlab/pull/1762.
• Refactor of RenderMime and associated renders to use live models. See https://github.com/jupyterlab/jupyterlab/pull/1709 and https://github.com/jupyterlab/jupyterlab/issues/1763.
• Improvements and bug fixes for the completer widget: https://github.com/jupyterlab/jupyterlab/pull/1778
• Upgrade CodeMirror to 5.23: https://github.com/jupyterlab/jupyterlab/pull/1764
• Numerous style updates and bug fixes.
5.19 v0.16.0
5.19.1 Feb 09, 2017
• Adds a Cell Tools sidebar that allows you to edit notebook cell metadata. #1586.
• Adds keyboard shortcuts to switch between tabs (Cmd/Ctrl LeftArrow and Cmd/Ctrl RightArrow). #1647
• Upgrades to xterm.js 2.3. #1664
• Fixes a bug in application config, but lab extensions will need to be re-enabled. #1607
• Numerous other bug fixes and style improvements.
5.18. v0.17.0 23

JupyterLab Documentation, Release 0.18.4
24 Chapter 5. JupyterLab Changelog

CHAPTER 6
The JupyterLab Interface
JupyterLab provides flexible building blocks for interactive, exploratory computing. While JupyterLab has many fea-tures found in traditional integrated development environments (IDEs), it remains focused on interactive, exploratorycomputing.
The JupyterLab interface consists of a main work area containing tabs of documents and activities, a collapsible leftsidebar, and a menu bar. The left sidebar contains a file browser, the list of running kernels and terminals, thecommand palette, the notebook cell tools inspector, and the tabs list.
JupyterLab sessions always reside in a workspace. Workspaces contain the state of JupyterLab: the files that arecurrently open, the layout of the application areas and tabs, etc. Workspaces can be saved on the server with named
25

JupyterLab Documentation, Release 0.18.4
workspace URLs. To learn more about URLs in Jupyterlab, visit JupyterLab URLs.
6.1 Menu Bar
The menu bar at the top of JupyterLab has top-level menus that expose actions available in JupyterLab with theirkeyboard shortcuts. The default menus are:
• File: actions related to files and directories
• Edit: actions related to editing documents and other activities
• View: actions that alter the appearance of JupyterLab
• Run: actions for running code in different activities such as notebooks and code consoles
• Kernel: actions for managing kernels, which are separate processes for running code
• Tabs: a list of the open documents and activities in the dock panel
• Settings: common settings and an advanced settings editor
• Help: a list of JupyterLab and kernel help links
JupyterLab extensions can also create new top-level menus in the menu bar.
6.2 Left Sidebar
The left sidebar contains a number of commonly-used tabs, such as a file browser, a list of running kernels andterminals, the command palette, and a list of tabs in the main work area:
26 Chapter 6. The JupyterLab Interface

JupyterLab Documentation, Release 0.18.4
The left sidebar can becollapsed or expanded by selecting “Show Left Sidebar” in the View menu or by clicking on the active sidebar tab:
JupyterLab extensions can add additional panels to the left sidebar.
6.3 Main Work Area
The main work area in JupyterLab enables you to arrange documents (notebooks, text files, etc.) and other activities(terminals, code consoles, etc.) into panels of tabs that can be resized or subdivided. Drag a tab to the center of a tabpanel to move the tab to the panel. Subdivide a tab panel by dragging a tab to the left, right, top, or bottom of thepanel:
The work area has a single current activity. The tab for the current activity is marked with a colored top border (blueby default).
6.3. Main Work Area 27

JupyterLab Documentation, Release 0.18.4
6.4 Tabs and Single-Document Mode
The Tabs panel in the left sidebar lists the open documents or activities in the main work area:
The same information is also available in the Tabs menu:
28 Chapter 6. The JupyterLab Interface

JupyterLab Documentation, Release 0.18.4
It is often useful to focus on a single document or activity without closing other tabs in the main work area. Single-document mode enable this, while making it simple to return to your multi-activity layout in the main work area.Toggle single-document mode using the View menu:
When you leave single-document mode, the original layout of the main area is restored.
6.5 Context Menus
Many parts of JupyterLab, such as notebooks, text files, code consoles, and tabs, have context menus that can beaccessed by right-clicking on the element:
The browser’s native context menu can be accessed by holding down Shift and right-clicking:
6.6 Keyboard Shortcuts
As in the classic Notebook, you can navigate the user interface through keyboard shortcuts. You can find and customizethe current list of keyboard shortcuts by selecting the Advanced Settings Editor item in the Settings menu, thenselecting Keyboard Shortcuts in the Settings tab.
You can also customize the text editor to use vim, emacs, or Sublime Text keyboard maps by using the Text EditorKey Map submenu in the Settings menu:
6.5. Context Menus 29

JupyterLab Documentation, Release 0.18.4
30 Chapter 6. The JupyterLab Interface

CHAPTER 7
JupyterLab URLs
Like the classic notebook, JupyterLab provides a way for users to copy URLs that open a specific notebook or file.Additionally, JupyterLab URLs are an advanced part of the user interface that allows for managing workspaces. Thesetwo functions – file paths and workspaces – can be combined in URLs that open a specific file in a specific workspace.
7.1 File Navigation with /tree
JupyterLab’s file navigation URLs adopts the nomenclature of the classic notebook; these URLs are /tree URLs:
http(s)://<server:port>/<lab-location>/lab/tree/path/to/notebook.ipynb
Entering this URL will open the notebook in JupyterLab in single-document mode.
7.2 Managing Workspaces
JupyterLab sessions always reside in a workspace. Workspaces contain the state of JupyterLab: the files that arecurrently open, the layout of the application areas and tabs, etc. When the page is refreshed, the workspace is restored.
The default workspace is not named and only saves its state on the user’s local browser:
http(s)://<server:port>/<lab-location>/lab
Named workspaces save their state on the server and can be shared between multiple users (or browsers) as long asthey have access to the same server:
http(s)://<server:port>/<lab-location>/lab/workspaces/foo
A workspace should only be open in a single browser tab at a time. If JupyterLab detects that a workspace is beingopened multiple times simultaneously, it will prompt for a new workspace name. Opening a document in two differentbrowser tabs simultaneously is also not supported.
31

JupyterLab Documentation, Release 0.18.4
7.3 Cloning Workspaces
You can copy the contents of a workspace into another workspace with the clone url parameter.
To copy the contents of the workspace foo into the workspace bar:
http(s)://<server:port>/<lab-location>/lab/workspaces/bar?clone=foo
To copy the contents of the default workspace into the workspace foo:
http(s)://<server:port>/<lab-location>/lab/workspaces/foo?clone
To copy the contents of the workspace foo into the default workspace:
http(s)://<server:port>/<lab-location>/lab?clone=foo
7.4 Resetting a Workspace
Use the reset url parameter to clear a workspace of its contents.
To reset the contents of the workspace foo:
http(s)://<server:port>/<lab-location>/lab/workspaces/foo?reset
To reset the contents of the default workspace:
http(s)://<server:port>/<lab-location>/lab/workspaces/lab?reset
7.5 Combining URL Functions
These URL functions can be used separately, as above, or in combination.
To reset the workspace foo and load a specific notebook afterward:
http(s)://<server:port>/<lab-location>/lab/workspaces/foo/tree/path/to/notebook.ipynb?→˓reset
To clone the contents of the workspace bar into the workspace foo and load a notebook afterward:
http(s)://<server:port>/<lab-location>/lab/workspaces/foo/tree/path/to/notebook.ipynb?→˓clone=bar
To reset the contents of the default workspace and load a notebook:
http(s)://<server:port>/<lab-location>/lab/tree/path/to/notebook.ipynb?reset
32 Chapter 7. JupyterLab URLs

CHAPTER 8
Working with Files
8.1 Opening Files
The file browser and File menu enable you to work with files and directories on your system. This includes opening,creating, deleting, renaming, downloading, copying, and sharing files and directories.
The file browser is in the left sidebar Files tab:
Many actions on files can also be carried out in the File menu:
33

JupyterLab Documentation, Release 0.18.4
To open any file, double-click on its name in the file browser:
You can also drag a file into the main work area to create a new tab:
Many files types have multiple viewers/editors. For example, you can open a Markdown file in a text editor oras rendered HTML. A JupyterLab extension can also add new viewers/editors for files. To open a file in a non-default viewer/editor, right-click on its name in the file browser and use the “Open With. . . ” submenu to select theviewer/editor:
A single file can be open simultaneously in multiple viewer/editors and they will remain in sync:
The file system can be navigated by double-clicking on folders in the listing or clicking on the folders at the top of thedirectory listing:
Right-click on a file or directory and select “Copy Shareable Link” to copy a URL that can be used to open JupyterLabwith that file or directory open.
Right-click on a file or directory and select “Copy
34 Chapter 8. Working with Files

JupyterLab Documentation, Release 0.18.4
Path” to copy the filesystem relative path. This can be used for passing arguments to open files in functions called invarious kernels.
8.2 Creating Files and Activities
Create new files or activities by clicking the + button at the top of the file browser. This will open a new Launcher tabin the main work area, which enables you to pick an activity and kernel:
You can also create new documents or activities using the File menu:
The currentworking directory of a new activity or document will be the directory listed in the file browser (except for a terminal,which always starts in the root directory of the file browser):
A new file is created with a default name. Rename a file by right-clicking on its name in the file browser and selecting“Rename” from the context menu:
8.3 Uploading and Downloading
Files can be uploaded to the current directory of the file browser by dragging and dropping files onto the file browser,or by clicking the “Upload Files” button at the top of the file browser:
Any file in JupyterLab can be downloaded by right-clicking its name in the file browser and selecting “Download”from the context menu:
8.2. Creating Files and Activities 35

JupyterLab Documentation, Release 0.18.4
36 Chapter 8. Working with Files

CHAPTER 9
Text Editor
The text editor in JupyterLab enables you to edit text files in JupyterLab:
The text editor includes syntax highlighting, configurable indentation (tabs or spaces), key maps and basic theming.These settings can be found in the Settings menu:
37

JupyterLab Documentation, Release 0.18.4
To edit an existing text file, double-click on its name in the file browser or drag it into the main work area:
To create a new text file in the current directory of the file browser, click the + button at the top of the file browser tocreate a new Launcher tab, and click the “Text Editor” card in the Launcher:
You can also create a new text file with the File menu:
A new file is created with a default name. Rename a file by right-clicking on its name in the file browser and selecting“Rename” from the context menu:
38 Chapter 9. Text Editor

CHAPTER 10
Notebooks
Jupyter notebooks are documents that combine live runnable code with narrative text (Markdown), equations (LaTeX),images, interactive visualizations and other rich output:
Jupyter notebooks (.ipynb files) are fully supported in JupyterLab. The notebook document format used inJupyterLab is the same as in the classic Jupyter Notebook. Your existing notebooks should open correctly in Jupyter-Lab. If they don’t, please open an issue on our GitHub issues page.
Create a notebook by clicking the + button in the file browser and then selecting a kernel in the new Launcher tab:
A new file is created with a default name. Rename a file by right-clicking on its name in the file browser and selecting“Rename” from the context menu:
39

JupyterLab Documentation, Release 0.18.4
The user interface for notebooks in JupyterLab closely follows that of the classic Jupyter Notebook. The keyboardshortcuts of the classic Notebook continue to work (with command and edit mode). However, a number of new thingsare possible with notebooks in JupyterLab.
Drag and drop cells to rearrange your notebook:
Drag cells between notebooks to quickly copy content:
Create multiple synchronized views of a single notebook:
Collapse and expand code and output using the View menu or the blue collapser button on left of each cell:
Enable scrolling for long outputs by right-clicking on a cell and selecting “Enable Scrolling for Outputs”:
Create a new synchronized view of a cell’s output:
Tab completion (activated with the Tab key) can now include additional information about the types of the matcheditems:
Note: IPython 6.3.1 has temporarily disabled type annotations. To re-enable them, add c.Completer.use_jedi= True to an ipython_config.py file.
The tooltip (activated with Shift Tab) contains additional information about objects:
You can connect a code console to a notebook kernel to have a log of computations done in the kernel, in the order inwhich they were done. The attached code console also provides a place to interactively inspect kernel state withoutchanging the notebook. Right-click on a notebook and select “New Console for Notebook”:
40 Chapter 10. Notebooks

CHAPTER 11
Code Consoles
Code consoles enable you to run code interactively in a kernel. The cells of a code console show the order in whichcode was executed in the kernel, as opposed to the explicit ordering of cells in a notebook document. Code consolesalso display rich output, just like notebook cells.
Create a new code console by clicking the + button in the file browser and selecting the kernel:
Run code using Shift Enter. Use the up and down arrows to browse the history of previously-run code:
Tab completion (Tab) and tooltips (Shift Tab) work as in the notebook:
Clear the cells of the code console without restarting the kernel by right-clicking on the code console and selecting“Clear Console Cells”:
Creating a code console from the file menu lets you select an existing kernel for the code console. The code consolethen acts as a log of computations in that kernel, and a place you can interactively inspect and run code in the kernel:
41

JupyterLab Documentation, Release 0.18.4
42 Chapter 11. Code Consoles
CHAPTER 12
Terminals
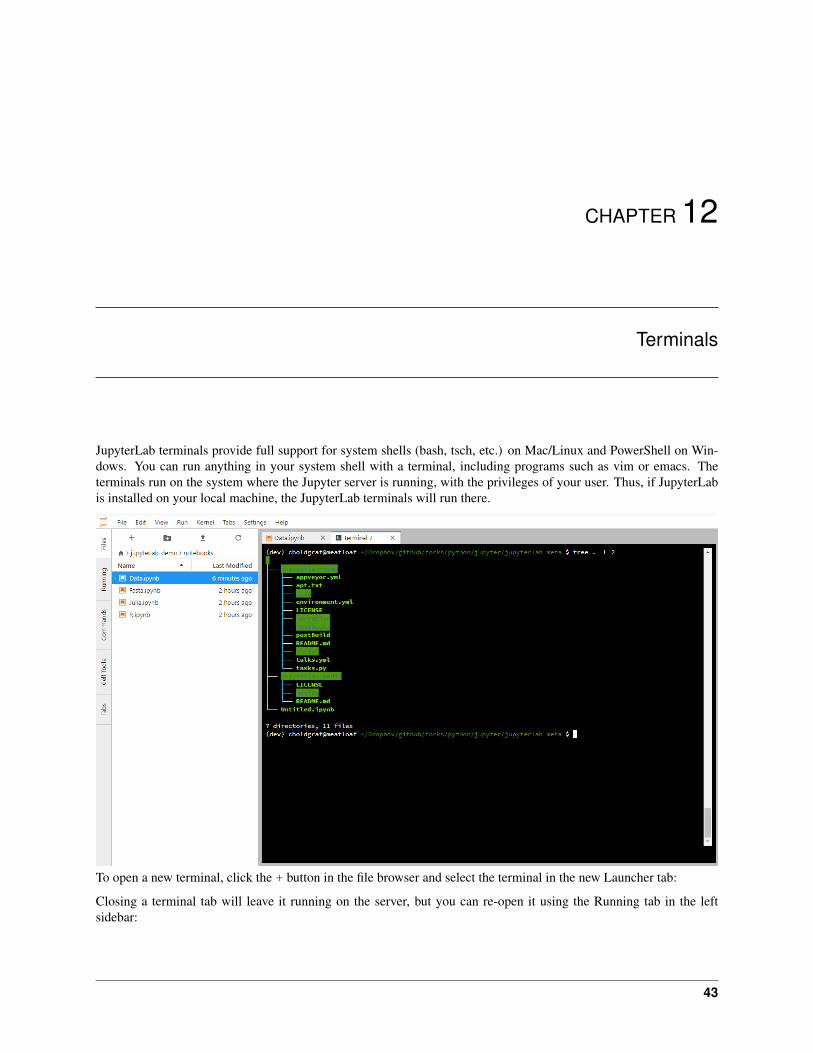
JupyterLab terminals provide full support for system shells (bash, tsch, etc.) on Mac/Linux and PowerShell on Win-dows. You can run anything in your system shell with a terminal, including programs such as vim or emacs. Theterminals run on the system where the Jupyter server is running, with the privileges of your user. Thus, if JupyterLabis installed on your local machine, the JupyterLab terminals will run there.
To open a new terminal, click the + button in the file browser and select the terminal in the new Launcher tab:
Closing a terminal tab will leave it running on the server, but you can re-open it using the Running tab in the leftsidebar:
43

JupyterLab Documentation, Release 0.18.4
44 Chapter 12. Terminals

CHAPTER 13
Managing Kernels and Terminals
The Running panel in the left sidebar shows a list of all the kernels and terminals currently running across all note-books, code consoles, and directories:
As withthe classic Jupyter Notebook, when you close a notebook document, code console, or terminal, the underlying kernelor terminal running on the server continues to run. This enables you to perform long-running actions and return later.
45

JupyterLab Documentation, Release 0.18.4
The Running panel enables you to re-open or focus the document linked to a given kernel or terminal:
Kernels or terminals can be shut down from the Running panel:
You can shut down all kernels and terminals by clicking the X button:
46 Chapter 13. Managing Kernels and Terminals

CHAPTER 14
Command Palette
All user actions in JupyterLab are processed through a centralized command system. These commands are sharedand used throughout JupyterLab (menu bar, context menus, keyboard shortcuts, etc.). The command palette in the leftsidebar provides a keyboard-driven way to search for and run JupyterLab commands:
47
JupyterLab Documentation, Release 0.18.4
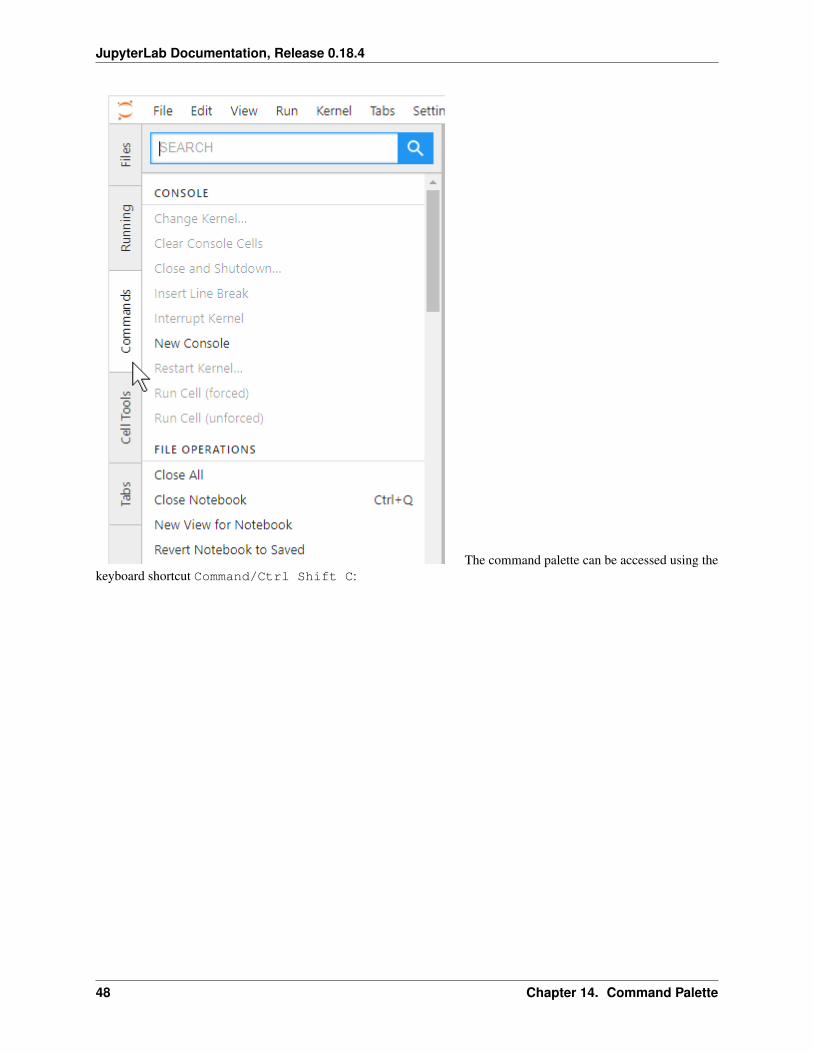
The command palette can be accessed using thekeyboard shortcut Command/Ctrl Shift C:
48 Chapter 14. Command Palette

CHAPTER 15
Documents and Kernels
In the Jupyter architecture, kernels are separate processes started by the server that run your code in different program-ming languages and environments. JupyterLab enables you to connect any open text file to a code console and kernel.This means you can easily run code from the text file in the kernel interactively.
Right-click on a document and select “Create Console for Editor”:
Once the code console is open, send a single line of code or select a block of code and send it to the code console byhitting Shift Enter:
In a Markdown document, Shift Enter will automatically detect if the cursor is within a code block, and run theentire block if there is no selection:
Any text file (Markdown, Python, R, LaTeX, C++, etc.) in a text file editor can be connected to a code console andkernel in this manner.
49

JupyterLab Documentation, Release 0.18.4
50 Chapter 15. Documents and Kernels

CHAPTER 16
File and Output Formats
JupyterLab provides a unified architecture for viewing and editing data in a wide variety of formats. This modelapplies whether the data is in a file or is provided by a kernel as rich cell output in a notebook or code console.
For files, the data format is detected by the extension of the file (or the whole filename if there is no extension). Asingle file extension may have multiple editors or viewers registered. For example, a Markdown file (.md) can beedited in the file editor or rendered and displayed as HTML. You can open different editors and viewers for a file byright-clicking on the filename in the file browser and using the “Open With” submenu:
51

JupyterLab Documentation, Release 0.18.4
To use these different data formats as output in a notebook or code console, you can use the relevant display API forthe kernel you are using. For example, the IPython kernel provides a variety of convenience classes for displaying richoutput:
from IPython.display import display, HTMLdisplay(HTML('<h1>Hello World</h1>'))
Running this code will display the HTML in the output of a notebook or code console cell:
52 Chapter 16. File and Output Formats

JupyterLab Documentation, Release 0.18.4
The IPython display function can also construct a raw rich output message from a dictionary of keys (MIME types)and values (MIME data):
from IPython.display import displaydisplay({'text/html': '<h1>Hello World</h1>', 'text/plain': 'Hello World'}, raw=True)
Other Jupyter kernels offer similar APIs.
The rest of this section highlights some of the common data formats that JupyterLab supports by default. JupyterLabextensions can also add support for other file formats.
16.1 Markdown
• File extension: .md
• MIME type: text/markdown
Markdown is a simple and popular markup language used for text cells in the Jupyter Notebook.
Markdown documents can be edited as text files or rendered inline:
The Markdown syntax supported in this mode is the same syntax used in the Jupyter Notebook (for example, LaTeXequations work). As seen in the animation, edits to the Markdown source are immediately reflected in the renderedversion.
16.2 Images
• File extensions: .bmp, .gif, .jpeg, .jpg, .png, .svg
• MIME types: image/bmp, image/gif, image/jpeg, image/png, image/svg+xml
16.1. Markdown 53

JupyterLab Documentation, Release 0.18.4
JupyterLab supports image data in cell output and as files in the above formats. In the image file viewer, you can usekeyboard shortcuts such as + and - to zoom the image, [ and ] to rotate the image, and H and V to flip the imagehorizontally and vertically. Use I to invert the colors, and use 0 to reset the image.
To edit an SVG image as a text file, right-click on the SVG filename in the file browser and select the “Editor” item inthe “Open With” submenu:
16.3 Delimiter-separated Values
• File extension: .csv
• MIME type: None
Files with rows of delimiter-separated values, such as CSV files, are a common format for tabular data. The defaultviewer for these files in JupyterLab is a high-performance data grid viewer which can display comma-separated, tab-separated, and semicolon-separated values:
While tab-separated value files can be read by the grid viewer, it currently does not automatically recognize .tsvfiles. To view, you must change the extension to .csv and set the delimiter to tabs.
To edit a CSV file as a text file, right-click on the file in the file browser and select the “Editor” item in the “OpenWith” submenu:
JupyterLab’s grid viewer can open large files, up to the maximum string size of the particular browser. Below is a tablethat shows the sizes of the largest test files we successfully opened in each browser we support:
Browser Max SizeFirefox 250MBChrome 730MBSafari 1.8GB
The actual maximum size of files that can be successfully loaded will vary depending on the browser version and filecontent.
16.4 JSON
• File extension: .json
• MIME type: application/json
JavaScript Object Notation (JSON) files are common in data science. JupyterLab supports displaying JSON data incell output or viewing a JSON file using a searchable tree view:
To edit the JSON as a text file, right-click on the filename in the file browser and select the “Editor” item in the “OpenWith” submenu:
16.5 HTML
• File extension: .html
• MIME type: text/html
JupyterLab supports rendering HTML in cell output and editing HTML files as text in the file editor.
54 Chapter 16. File and Output Formats

JupyterLab Documentation, Release 0.18.4
16.6 LaTeX
• File extension: .tex
• MIME type: text/latex
JupyterLab supports rendering LaTeX equations in cell output and editing LaTeX files as text in the file editor.
16.7 PDF
• File extension: .pdf
• MIME type: application/pdf
PDF is a common standard file format for documents. To view a PDF file in JupyterLab, double-click on the file in thefile browser:
16.8 Vega/Vega-Lite
Vega:
• File extensions: .vg, .vg.json
• MIME type: application/vnd.vega.v2+json
Vega-Lite:
• File extensions: .vl, .vl.json
• MIME type: application/vnd.vegalite.v1+json
Vega and Vega-Lite are declarative visualization grammars that enable visualizations to be encoded as JSON data. Formore information, see the documentation of Vega or Vega-Lite. JupyterLab supports rendering Vega 2.x and Vega-Lite1.x data in files and cell output.
Vega-Lite 1.x files, with a .vl or .vl.json file extension, can be opened by double-clicking the file in the filebrowser:
The files can also be opened in the JSON viewer or file editor through the “Open With. . . ” submenu in the file browsercontent menu:
As with other files in JupyterLab, multiple views of a single file remain synchronized, enabling you to interactivelyedit and render Vega/Vega-Lite visualizations:
The same workflow also works for Vega 2.x files, with a .vg or .vg.json file extension.
Output support for Vega/Vega-Lite in a notebook or code console is provided through third-party libraries such asAltair (Python), the vegalite R package, or Vegas (Scala/Spark).
16.6. LaTeX 55

JupyterLab Documentation, Release 0.18.4
A JupyterLab extension that supports Vega 3.x and Vega-Lite 2.x can be found here.
16.9 Virtual DOM
• File extensions: .vdom, .json
• MIME type: application/vdom.v1+json
Virtual DOM libraries such as react.js have greatly improved the experience of rendering interactive content in HTML.The nteract project, which collaborates closely with Project Jupyter, has created a declarative JSON format for virtualDOM data. JupyterLab can render this data using react.js. This works for both VDOM files with the .vdom extension,or within notebook output.
Here is an example of a .vdom file being edited and rendered interactively:
The nteract/vdom library provides a Python API for creating VDOM output that is rendered in nteract and JupyterLab:
56 Chapter 16. File and Output Formats

JupyterLab Documentation, Release 0.18.4
16.9. Virtual DOM 57

JupyterLab Documentation, Release 0.18.4
58 Chapter 16. File and Output Formats

CHAPTER 17
Extensions
Fundamentally, JupyterLab is designed as an extensible environment. JupyterLab extensions can customize or enhanceany part of JupyterLab. They can provide new themes, file viewers and editors, or renderers for rich outputs innotebooks. Extensions can add items to the menu or command palette, keyboard shortcuts, or settings in the settingssystem. Extensions can provide an API for other extensions to use and can depend on other extensions. In fact, thewhole of JupyterLab itself is simply a collection of extensions that are no more powerful or privileged than any customextension.
JupyterLab extensions are npm packages (the standard package format in Javascript development). There are manycommunity-developed extensions being built on GitHub. You can search for the GitHub topic jupyterlab-extension tofind extensions. For information about developing extensions, see the developer documentation.
Note: If you are a JupyterLab extension developer, please note that the extension developer API is not stable and willevolve in the near future.
In order to install JupyterLab extensions, you need to have Node.js installed.
If you use conda, you can get it with:
conda install -c conda-forge nodejs
If you use Homebrew on Mac OS X:
brew install node
You can also download Node.js from the Node.js website and install it directly.
17.1 Installing Extensions
The base JupyterLab application includes a core set of extensions, which provide the features described in this userguide (notebook, terminal, text editor, etc.) You can install new extensions into the application using the command:
59
JupyterLab Documentation, Release 0.18.4
jupyter labextension install my-extension
where my-extension is the name of a valid JupyterLab extension npm package on npm. Use themy-extension@version syntax to install a specific version of an extension, for example:
jupyter labextension install [email protected]
You can also install an extension that is not uploaded to npm, i.e., my-extension can be a local directory containingthe extension, a gzipped tarball, or a URL to a gzipped tarball.
We encourage extension authors to add the jupyterlab-extension GitHub topic to any repository with aJupyterLab extension to facilitate discovery. You can see a list of extensions by searching GitHub for the jupyterlab-extension topic.
You can list the currently installed extensions by running the command:
jupyter labextension list
Uninstall an extension by running the command:
jupyter labextension uninstall my-extension
where my-extension is the name of the extension, as printed in the extension list. You can also uninstall coreextensions using this command (you can always re-install core extensions later).
Installing and uninstalling extensions can take some time, as they are downloaded, bundled with the core extensions,and the whole application is rebuilt. You can install/uninstall more than one extension in the same command by listingtheir names after the install command.
If you are installing/uninstalling several extensions in several stages, you may want to defer rebuilding the applicationby including the flag --no-build in the install/uninstall step. Once you are ready to rebuild, you can run thecommand:
jupyter lab build
17.2 Disabling Extensions
You can disable specific JupyterLab extensions (including core extensions) without rebuilding the application by run-ning the command:
jupyter labextension disable my-extension
This will prevent the extension from loading in the browser, but does not require a rebuild.
You can re-enable an extension using the command:
jupyter labextension enable my-extension
17.3 Advanced Usage
Any information that JupyterLab persists is stored in its application directory, including settings and built assets. Thisis separate from where the Python package is installed (like in site_packages) so that the install directory isimmutable.
60 Chapter 17. Extensions

JupyterLab Documentation, Release 0.18.4
The application directory can be overridden using --app-dir in any of the JupyterLab commands, or by setting theJUPYTERLAB_DIR environment variable. If not specified, it will default to <sys-prefix>/share/jupyter/lab, where <sys-prefix> is the site-specific directory prefix of the current Python environment. You can querythe current application path by running jupyter lab path.
17.3.1 JupyterLab Build Process
To rebuild the app directory, run jupyter lab build. By default, the jupyter labextension installcommand builds the application, so you typically do not need to call build directly.
Building consists of:
• Populating the staging/ directory using template files
• Handling any locally installed packages
• Ensuring all installed assets are available
• Bundling the assets
• Copying the bundled assets to the static directory
Note that building will always use the latest JavaScript packages that meet the dependency requirements of JupyterLabitself and any installed extensions. If you wish to run JupyterLab with the set of pinned requirements that was shippedwith the Python package, you can launch as jupyter lab –core-mode.
17.3.2 JupyterLab Application Directory
The JupyterLab application directory contains the subdirectories extensions, schemas, settings, staging,static, and themes.
extensions
The extensions directory has the packed tarballs for each of the installed extensions for the app. If the applicationdirectory is not the same as the sys-prefix directory, the extensions installed in the sys-prefix directory willbe used in the app directory. If an extension is installed in the app directory that exists in the sys-prefix directory,it will shadow the sys-prefix version. Uninstalling an extension will first uninstall the shadowed extension, andthen attempt to uninstall the sys-prefix version if called again. If the sys-prefix version cannot be uninstalled,its plugins can still be ignored using ignoredPackages metadata in settings.
schemas
The schemas directory contains JSON Schemas that describe the settings used by individual extensions. Users mayedit these settings using the JupyterLab Settings Editor.
settings
The settings directory contains page_config.json and build_config.json files.
page_config.json
The page_config.json data is used to provide config data to the application environment.
Two important fields in the page_config.json file enable control of which plugins load:
1. disabledExtensions for extensions that should not load at all.
17.3. Advanced Usage 61

JupyterLab Documentation, Release 0.18.4
2. deferredExtensions for extensions that do not load until they are required by something, irrespective ofwhether they set autostart to true.
The value for each field is an array of strings. The following sequence of checks are performed against the patterns indisabledExtensions and deferredExtensions.
• If an identical string match occurs between a config value and a package name (e.g., "@jupyterlab/apputils-extension"), then the entire package is disabled (or deferred).
• If the string value is compiled as a regular expression and tests positive against a package name (e.g.,"disabledExtensions": ["@jupyterlab/apputils*$"]), then the entire package is disabled(or deferred).
• If an identical string match occurs between a config value and an individual plugin ID within a package(e.g., "disabledExtensions": ["@jupyterlab/apputils-extension:settings"]), thenthat specific plugin is disabled (or deferred).
• If the string value is compiled as a regular expression and tests positive against an individual plugin ID withina package (e.g., "disabledExtensions": ["^@jupyterlab/apputils-extension:set.
*$"]), then that specific plugin is disabled (or deferred).
build_config.json
The build_config.json file is used to track the local directories that have been installed using jupyterlabextension install <directory>, as well as core extensions that have been explicitly uninstalled. Anexample of a build_config.json file is:
{"uninstalled_core_extensions": [
"@jupyterlab/markdownwidget-extension"],"local_extensions": {
"@jupyterlab/python-tests": "/path/to/my/extension"}
}
staging and static
The static directory contains the assets that will be loaded by the JuptyerLab application. The staging directoryis used to create the build and then populate the static directory.
Running jupyter lab will attempt to run the static assets in the application directory if they exist. You can runjupyter lab --core-mode to load the core JupyterLab application (i.e., the application without any extensions)instead.
themes
The themes directory contains assets (such as CSS and icons) for JupyterLab theme extensions.
62 Chapter 17. Extensions

CHAPTER 18
JupyterLab on JupyterHub
JupyterLab works out of the box with JupyterHub, and can even run side by side with the classic Notebook.
18.1 Use JupyterLab by Default
If you install JupyterLab on a system running JupyterHub, it will immediately be available at the /lab URL, butusers will still be directed to the classic Notebook (/tree) by default. To change the user’s default user interface toJupyterLab, set the following configuration option in your jupyterhub_config.py file:
c.Spawner.default_url = '/lab'
In this configuration, users can still access the classic Notebook at /tree, by either typing that URL into the browser,or by using the “Launch Classic Notebook” item in JupyterLab’s Help menu.
18.2 Further Integration
Additional integration between JupyterLab and JupyterHub is offered by the jupyterlab-hub extension for JupyterLab.It provides a Hub menu with items to access the JupyterHub control panel or logout of the hub.
To install the jupyterlab-hub extension, run:
jupyter labextension install @jupyterlab/hub-extension
Further directions are provided on the jupyterlab-hub GitHub repository.
18.3 Example Configuration
For a fully-configured example of using JupyterLab with JupyterHub, see the jupyterhub-deploy-teaching repository.The JupyterLab Developer Guide is for developing JupyterLab extensions or developing JupyterLab itself.
63

JupyterLab Documentation, Release 0.18.4
64 Chapter 18. JupyterLab on JupyterHub

CHAPTER 19
General Codebase Orientation
The jupyterlab/jupyterlab repository contains two packages:
• an npm package indicated by a package.json file in the repo’s root directory
• a Python package indicated by a setup.py file in the repo’s root directory
The npm package and the Python package are both named jupyterlab.
See the Contributing Guidelines for developer installation instructions.
19.1 Directories
19.1.1 NPM package: src/, lib/, typings/, buildutils/
• src/: the source typescript files.
– jlpm run build builds the source files into javascript files in lib/.
– jlpm run clean deletes the lib/ directory.
• typings/: type definitions for external libraries that typescript needs.
• buildutils/: Utilities for managing the repo
19.1.2 Examples: examples/
The examples/ directory contains stand-alone examples of components, such as a simple notebook on a page, aconsole, terminal, and a filebrowser. The lab example illustrates a simplified combination of components used inJupyterLab. This example shows multiple stand-alone components combined to create a more complex application.
19.1.3 Testing: test/
The tests are stored and run in the test/ directory. The source files are in test/src/.
65

JupyterLab Documentation, Release 0.18.4
19.1.4 Notebook extension: jupyterlab/
The jupyterlab/ directory contains the Jupyter server extension.
The server extension includes a private npm package in order to build the webpack bundle which the extension serves.The private npm package depends on the jupyterlab npm package found in the repo’s root directory.
19.1.5 Git hooks: git-hooks/
The git-hooks/ directory stores some convenience git hooks that automatically rebuild the npm package and serverextension every time you check out or merge (via pull request or direct push to master) in the git repo.
19.1.6 Documentation: docs/
After building the docs (jlpm run docs), docs/index.html is the entry point to the documentation.
66 Chapter 19. General Codebase Orientation

CHAPTER 20
Extension Developer Guide
Warning: The extension developer API is not stable and will evolve in JupyterLab releases in the near future.
JupyterLab can be extended in four ways via:
• application plugins (top level): Application plugins extend the functionality of JupyterLab itself.
• mime renderer extensions (top level): Mime Renderer extensions are a convenience for creating an extensionthat can render mime data and potentially render files of a given type.
• theme extensions (top level): Theme extensions allow you to customize the appearance of JupyterLab byadding your own fonts, CSS rules, and graphics to the application.
• document widget extensions (lower level): Document widget extensions extend the functionality of documentwidgets added to the application, and we cover them in Documents.
See Let’s Make an xkcd JupyterLab Extension to learn how to make a simple JupyterLab extension.
To understand how to wrap an Angular application as a JupyterLab extension, see the “Create your own AngularJupyerLab extension” guide provided by Scripted Forms.
A JupyterLab application is comprised of:
• A core Application object
• Plugins
20.1 Plugins
A plugin adds a core functionality to the application:
• A plugin can require other plugins for operation.
• A plugin is activated when it is needed by other plugins, or when explicitly activated.
67

JupyterLab Documentation, Release 0.18.4
• Plugins require and provide Token objects, which are used to provide a typed value to the plugin’sactivate() method.
• The module providing plugin(s) must meet the JupyterLab.IPluginModule interface, by exporting a plugin objector array of plugin objects as the default export.
We provide two cookie cutters to create JuptyerLab plugin extensions in CommonJS and TypeScript.
The default plugins in the JupyterLab application include:
• Terminal - Adds the ability to create command prompt terminals.
• Shortcuts - Sets the default set of shortcuts for the application.
• Images - Adds a widget factory for displaying image files.
• Help - Adds a side bar widget for displaying external documentation.
• File Browser - Creates the file browser and the document manager and the file browser to the side bar.
• Editor - Add a widget factory for displaying editable source files.
• Console - Adds the ability to launch Jupyter Console instances for interactive kernel console sessions.
A dependency graph for the core JupyterLab plugins (along with links to their source) is shown here:
20.2 Application Object
The JupyterLab Application object is given to each plugin in its activate() function. The Application object hasa:
• commands - used to add and execute commands in the application.
• keymap - used to add keyboard shortcuts to the application.
• shell - a JupyterLab shell instance.
20.3 JupyterLab Shell
The JupyterLab shell is used to add and interact with content in the application. The application consists of:
• A top area for things like top level menus and toolbars
• Left and right side bar areas for collapsible content
• A main work area for user activity.
• A bottom area for things like status bars
20.4 Phosphor
The Phosphor library is used as the underlying architecture of JupyterLab and provides many of the low level primitivesand widget structure used in the application. Phosphor provides a rich set of widgets for developing desktop-likeapplications in the browser, as well as patterns and objects for writing clean, well-abstracted code. The widgets inthe application are primarily Phosphor widgets, and Phosphor concepts, like message passing and signals, are usedthroughout. Phosphor messages are a many-to-one interaction that enables information like resize events to flowthrough the widget hierarchy in the application. Phosphor signals are a one-to-many interaction that enable listenersto react to changes in an observed object.
68 Chapter 20. Extension Developer Guide

JupyterLab Documentation, Release 0.18.4
20.5 Extension Authoring
An Extension is a valid npm package that meets the following criteria:
• Exports one or more JupyterLab plugins as the default export in its main file.
• Has a jupyterlab key in its package.json which has "extension" metadata. The value can be trueto use the main module of the package, or a string path to a specific module (e.g. "lib/foo").
While authoring the extension, you can use the command:
npm install # install npm package dependenciesnpm run build # optional build step if using TypeScript, babel, etc.jupyter labextension install # install the current directory as an extension
This causes the builder to re-install the source folder before building the application files. You can re-build at anytime using jupyter lab build and it will reinstall these packages. You can also link other local npm packagesthat you are working on simultaneously using jupyter labextension link; they will be re-installed but notconsidered as extensions. Local extensions and linked packages are included in jupyter labextension list.
When using local extensions and linked packages, you can run the command
jupyter lab --watch
This will cause the application to incrementally rebuild when one of the linked packages changes. Note that onlycompiled JavaScript files (and the CSS files) are watched by the WebPack process. This means that if your extensionis in TypeScript you’ll have to run a jlpm run build before the changes will be reflected in JupyterLab. To avoid thisstep you can also watch the TypeScript sources in your extension which is usually assigned to the tsc -w shortcut.
Note that the application is built against released versions of the core JupyterLab extensions. If your extension dependson JupyterLab packages, it should be compatible with the dependencies in the jupyterlab/static/package.json file. Note that building will always use the latest JavaScript packages that meet the dependency requirementsof JupyterLab itself and any installed extensions. If you wish to test against a specific patch release of one of the coreJupyterLab packages you can temporarily pin that requirement to a specific version in your own dependencies.
If you must install a extension into a development branch of JupyterLab, you have to graft it into the source tree ofJupyterLab itself. This may be done using the command
jlpm run add:sibling <path-or-url>
in the JupyterLab root directory, where <path-or-url> refers either to an extension npm package on the local filesystem, or a URL to a git repository for an extension npm package. This operation may be subsequently reversed byrunning
jlpm run remove:package <extension-dir-name>
This will remove the package metadata from the source tree, but will not remove any files added by the addsiblingscript, which should be removed manually.
The package should export EMCAScript 5 compatible JavaScript. It can import CSS using the syntaxrequire('foo.css'). The CSS files can also import CSS from other packages using the syntax @importurl('~foo/index.css'), where foo is the name of the package.
The following file types are also supported (both in JavaScript and CSS): json, html, jpg, png, gif, svg, js.map, woff2,ttf, eot.
If your package uses any other file type it must be converted to one of the above types. If your JavaScript is written inany other dialect than EMCAScript 5 it must be converted using an appropriate tool.
20.5. Extension Authoring 69

JupyterLab Documentation, Release 0.18.4
If you publish your extension on npm.org, users will be able to install it as simply jupyter labextensioninstall <foo>, where <foo> is the name of the published npm package. You can alternatively provide ascript that runs jupyter labextension install against a local folder path on the user’s machine or a pro-vided tarball. Any valid npm install specifier can be used in jupyter labextension install (e.g.foo@latest, [email protected], path/to/folder, and path/to/tar.gz).
There are a number of helper functions in testutils in this repo (which is a public npm package called @jupyter-lab/testutils) that can be used when writing tests for an extension. See tests/test-application for an example of theinfrastructure needed to run tests. There is a karma config file that points to the parent directory’s karma config, and atest runner, run-test.py that starts a Jupyter server.
20.6 Mime Renderer Extensions
Mime Renderer extensions are a convenience for creating an extension that can render mime data and potentiallyrender files of a given type. We provide cookiecutters for Mime render extensions in JavaScript and TypeScript.
Mime renderer extensions are more declarative than standard extensions. The extension is treated the same fromthe command line perspective (jupyter labextension install ), but it does not directly create JupyterLabplugins. Instead it exports an interface given in the rendermime-interfaces package.
The JupyterLab repo has an example mime renderer extension for pdf files. It provides a mime renderer for pdf dataand registers itself as a document renderer for pdf file types.
The rendermime-interfaces package is intended to be the only JupyterLab package needed to create a mimerenderer extension (using the interfaces in TypeScript or as a form of documentation if using plain JavaScript).
The only other difference from a standard extension is that has a jupyterlab key in its package.json with"mimeExtension" metadata. The value can be true to use the main module of the package, or a string path to aspecific module (e.g. "lib/foo").
The mime renderer can update its data by calling .setData() on the model it is given to render. This can be usedfor example to add a png representation of a dynamic figure, which will be picked up by a notebook model and addedto the notebook document. When using IDocumentWidgetFactoryOptions, you can update the documentmodel by calling .setData() with updated data for the rendered MIME type. The document can then be saved bythe user in the usual manner.
20.7 Themes
A theme is a JupyterLab extension that uses a ThemeManager and can be loaded and unloaded dynamically. Thepackage must include all static assets that are referenced by url() in its CSS files. Local URLs can be used toreference files relative to the location of the referring CSS file in the theme directory. For example url('images/foo.png') or url('../foo/bar.css')can be used to refer local files in the theme. Absolute URLs (startingwith a /) or external URLs (e.g. https:) can be used to refer to external assets. The path to the theme assetsis specified package.json under the "jupyterlab" key as "themeDir". See the JupyterLab Light Themefor an example. Ensure that the theme files are included in the "files" metadata in package.json. A theme canoptionally specify an embed.css file that can be consumed outside of a JupyterLab application.
To quickly create a theme based on the JupyterLab Light Theme, follow the instructions in the contributing guideand then run jlpm run create:theme from the repository root directory. Once you select a name, title and adescription, a new theme folder will be created in the current directory. You can move that new folder to a location ofyour choice, and start making desired changes.
The theme extension is installed in the same way as a regular extension (see extension authoring).
70 Chapter 20. Extension Developer Guide

JupyterLab Documentation, Release 0.18.4
20.8 Standard (General-Purpose) Extensions
JupyterLab’s modular architecture is based around the idea that all extensions are on equal footing, and that theyinteract with each other through typed interfaces that are provided by Token objects. An extension can provide aToken to the application, which other extensions can then request for their own use.
20.8.1 Core Tokens
The core packages of JupyterLab provide a set of tokens, which are listed here, along with short descriptions of whenyou might want to use them in your extensions.
• @jupyterlab/application:ILayoutRestorer: An interface to the application layout restorationfunctionality. Use this to have your activities restored across page loads.
• @jupyterlab/application:IMimeDocumentTracker: An instance tracker for documents renderedusing a mime renderer extension. Use this if you want to list and interact with documents rendered by suchextensions.
• @jupyterlab/application:IRouter: The URL router used by the application. Use this to add customURL-routing for your extension (e.g., to invoke a command if the user navigates to a sub-path).
• @jupyterlab/apputils:ICommandPalette: An interface to the application command palette in theleft panel. Use this to add commands to the palette.
• @jupyterlab/apputils:ISplashScreen: An interface to the splash screen for the application. Usethis if you want to show the splash screen for your own purposes.
• @jupyterlab/apputils:IThemeManager: An interface to the theme manager for the application.Most extensions will not need to use this, as they can register a theme extension.
• @jupyterlab/apputils:IWindowResolver: An interface to a window resolver for the application.JupyterLab workspaces are given a name, which are determined using the window resolver. Require this if youwant to use the name of the current workspace.
• @jupyterlab/codeeditor:IEditorServices: An interface to the text editor provider for the appli-cation. Use this to create new text editors and host them in your UI elements.
• @jupyterlab/completer:ICompletionManager: An interface to the completion manager for theapplication. Use this to allow your extension to invoke a completer.
• @jupyterlab/console:IConsoleTracker: An instance tracker for code consoles. Use this if youwant to be able to iterate over and interact with code consoles created by the application.
• @jupyterlab/console:IContentFactory: A factory object that creates new code consoles. Use thisif you want to create and host code consoles in your own UI elements.
• @jupyterlab/coreutils:ISettingRegistry: An interface to the JupyterLab settings system. Usethis if you want to store settings for your application. See extension settings for more information.
• @jupyterlab/coreutils:IStateDB: An interface to the JupyterLab state database. Use this if youwant to store data that will persist across page loads. See state database for more information.
• @jupyterlab/docmanager:IDocumentManager: An interface to the manager for all documents usedby the application. Use this if you want to open and close documents, create and delete files, and otherwiseinteract with the file system.
• @jupyterlab/filebrowser:IFileBrowserFactory: A factory object that creates file browsers.Use this if you want to create your own file browser (e.g., for a custom storage backend), or to interact withother file browsers that have been created by extensions.
20.8. Standard (General-Purpose) Extensions 71

JupyterLab Documentation, Release 0.18.4
• @jupyterlab/fileeditor:IEditorTracker: An instance tracker for file editors. Use this if youwant to be able to iterate over and interact with file editors created by the application.
• @jupyterlab/imageviewer:IImageTracker: An instance tracker for images. Use this if you want tobe able to iterate over and interact with images viewed by the application.
• @jupyterlab/inspector:IInspector: An interface for adding variable inspectors to widgets. Usethis to add the ability to hook into the variable inspector to your extension.
• @jupyterlab/launcher:ILauncher: An interface to the application activity launcher. Use this to addyour extension activities to the launcher panel.
• @jupyterlab/mainmenu:IMainMenu: An interface to the main menu bar for the application. Use this ifyou want to add your own menu items.
• @jupyterlab/notebook:ICellTools: An interface to the Cell Tools panel in the application leftarea. Use this to add your own functionality to the panel.
• @jupyterlab/notebook:IContentFactory: A factory object that creates new notebooks. Use this ifyou want to create and host notebooks in your own UI elements.
• @jupyterlab/notebook:INotebookTracker: An instance tracker for code consoles. Use this if youwant to be able to iterate over and interact with notebooks created by the application.
• @jupyterlab/rendermime:IRenderMimeRegistry: An interface to the rendermime registry for theapplication. Use this to create renderers for various mime-types in your extension. Most extensions will notneed to use this, as they can register a mime renderer extension.
• @jupyterlab/rendermime:ILatexTypesetter: An interface to the LaTeX typesetter for the appli-cation. Use this if you want to typeset math in your extension.
• @jupyterlab/settingeditor:ISettingEditorTracker: An instance tracker for setting editors.Use this if you want to be able to iterate over and interact with setting editors created by the application.
• @jupyterlab/terminal:ITerminalTracker: An instance tracker for terminals. Use this if you wantto be able to iterate over and interact with terminals created by the application.
• @jupyterlab/tooltip:ITooltipManager: An interface to the tooltip manager for the application.Use this to allow your extension to invoke a tooltip.
20.8.2 Standard Extension Example
For a concrete example of a standard extension, see How to Extend the Notebook Plugin. Notice that the mimerenderer and themes extensions above use a limited, simplified interface to JupyterLab’s extension system. Modifyingthe notebook plugin requires the full, general-purpose interface to the extension system.
20.8.3 Storing Extension Data
In addition to the file system that is accessed by using the @jupyterlab/services package, JupyterLab offerstwo ways for extensions to store data: a client-side state database that is built on top of localStorage and a pluginsettings system that provides for default setting values and user overrides.
Extension Settings
An extension can specify user settings using a JSON Schema. The schema definition should be in a file that resides inthe schemaDir directory that is specified in the package.json file of the extension. The actual file name shoulduse is the part that follows the package name of extension. So for example, the JupyterLab apputils-extensionpackage hosts several plugins:
72 Chapter 20. Extension Developer Guide
JupyterLab Documentation, Release 0.18.4
• '@jupyterlab/apputils-extension:menu'
• '@jupyterlab/apputils-extension:palette'
• '@jupyterlab/apputils-extension:settings'
• '@jupyterlab/apputils-extension:themes'
And in the package.json for @jupyterlab/apputils-extension, the schemaDir field is a directorycalled schema. Since the themes plugin requires a JSON schema, its schema file location is: schema/themes.json. The plugin’s name is used to automatically associate it with its settings file, so this naming convention isimportant. Ensure that the schema files are included in the "files" metadata in package.json.
See the fileeditor-extension for another example of an extension that uses settings.
State Database
The state database can be accessed by importing IStateDB from @jupyterlab/coreutils and adding it to thelist of requires for a plugin:
const id = 'foo-extension:IFoo';
const IFoo = new Token<IFoo>(id);
interface IFoo {}
class Foo implements IFoo {}
const plugin: JupyterLabPlugin<IFoo> = {id,requires: [IStateDB],provides: IFoo,activate: (app: JupyterLab, state: IStateDB): IFoo => {const foo = new Foo();const key = `${id}:some-attribute`;
// Load the saved plugin state and apply it once the app// has finished restoring its former layout.Promise.all([state.fetch(key), app.restored])
.then(([saved]) => { /* Update `foo` with `saved`. */ });
// Fulfill the plugin contract by returning an `IFoo`.return foo;
},autoStart: true
};
20.8.4 Context Menus
JupyterLab has an application-wide context menu available as app.contextMenu. See the Phosphor docs forthe item creation options. If you wish to preempt the application context menu, you can use a ‘contextmenu’ eventlistener and call event.stopPropagation to prevent the application context menu handler from being called (itis listening in the bubble phase on the document). At this point you could show your own Phosphor contextMenu,or simply stop propagation and let the system context menu be shown. This would look something like the followingin a Widget subclass:
20.8. Standard (General-Purpose) Extensions 73

JupyterLab Documentation, Release 0.18.4
// In `onAfterAttach()`this.node.addEventListener('contextmenu', this);
// In `handleEvent()`case 'contextmenu':
event.stopPropagation();
74 Chapter 20. Extension Developer Guide

CHAPTER 21
Documents
JupyterLab can be extended in several ways:
• Extensions (top level): Application extensions extend the functionality of JupyterLab itself, and we cover themin the Extension Developer Guide.
• Document widget extensions (lower level): Document widget extensions extend the functionality of documentwidgets added to the application, and we cover them in this section.
For this section, the term ‘document’ refers to any visual thing that is backed by a file stored on disk (i.e. uses ContentsAPI).
75

JupyterLab Documentation, Release 0.18.4
76 Chapter 21. Documents
CHAPTER 22
Overview of document architecture
A ‘document’ in JupyterLab is represented by a model instance implementing the IModel interface. The modelinterface is intentionally fairly small, and concentrates on representing the data in the document and signaling changesto that data. Each model has an associated context instance as well. The context for a model is the bridge between theinternal data of the document, stored in the model, and the file metadata and operations possible on the file, such assave and revert. Since many objects will need both the context and the model, the context contains a reference to themodel as its .model attribute.
A single file path can have multiple different models (and hence different contexts) representing the file. For example,a notebook can be opened with a notebook model and with a text model. Different models for the same file path donot directly communicate with each other.
Document widgets represent a view of a document model. There can be multiple document widgets associated with asingle document model, and they naturally stay in sync with each other since they are views on the same underlyingdata model.
The Document Registry is where document types and factories are registered. Plugins can require a document registryinstance and register their content types and providers.
The Document Manager uses the Document Registry to create models and widgets for documents. The DocumentManager is only meant to be accessed by the File Browser itself.
22.1 Document Registry
Document widget extensions in the JupyterLab application can register:
• file types
• model factories for specific file types
• widget factories for specific model factories
• widget extension factories
• file creators
77

JupyterLab Documentation, Release 0.18.4
22.1.1 Widget Factories
Create a widget for a given file.
Example
• The notebook widget factory that creates NotebookPanel widgets.
22.1.2 Model Factories
Create a model for a given file.
Models are generally differentiated by the contents options used to fetch the model (e.g. text, base64, notebook).
22.1.3 Widget Extension Factories
Adds additional functionality to a widget type. An extension instance is created for each widget instance, enabling theextension to add functionality to each widget or observe the widget and/or its context.
Examples
• The ipywidgets extension that is created for NotebookPanel widgets.
• Adding a button to the toolbar of each NotebookPanel widget.
22.1.4 File Types
Intended to be used in a “Create New” dialog, providing a list of known file types.
22.1.5 File Creators
Intended for create quick launch file creators.
The default use will be for the “create new” dropdown in the file browser, giving list of items that can be created withdefault options (e.g. “Python 3 Notebook”).
22.1.6 Document Models
Created by the model factories and passed to widget factories and widget extension factories. Models are the way inwhich we interact with the data of a document. For a simple text file, we typically only use the to/fromString()methods. A more complex document like a Notebook contains more points of interaction like the Notebook metadata.
22.1.7 Document Contexts
Created by the Document Manager and passed to widget factories and widget extensions. The context contains themodel as one of its properties so that we can pass a single object around.
They are used to provide an abstracted interface to the session and contents API from @jupyterlab/servicesfor the given model. They can be shared between widgets.
The reason for a separate context and model is so that it is easy to create model factories and the heavy lifting of thecontext is left to the Document Manager. Contexts are not meant to be subclassed or re-implemented. Instead, thecontexts are intended to be the glue between the document model and the wider application.
78 Chapter 22. Overview of document architecture

JupyterLab Documentation, Release 0.18.4
22.2 Document Manager
The Document Manager handles:
• document models
• document contexts
The File Browser uses the Document Manager to open documents and manage them.
22.2. Document Manager 79

JupyterLab Documentation, Release 0.18.4
80 Chapter 22. Overview of document architecture

CHAPTER 23
Notebook
23.1 Background
A JupyterLab architecture walkthrough from June 16, 2016, provides an overview of the notebook architecture.
The most complicated plugin included in the JupyterLab application is the Notebook plugin.
The NotebookWidgetFactory constructs a new NotebookPanel from a model and populates the toolbar with defaultwidgets.
23.2 Structure of the Notebook plugin
The Notebook plugin provides a model and widgets for dealing with notebook files.
23.2.1 Model
The NotebookModel contains an observable list of cells.
A cell model can be:
• a code cell
• a markdown cell
• raw cell
A code cell contains a list of output models. The list of cells and the list of outputs can be observed for changes.
Cell operations
The NotebookModel cell list supports single-step operations such as moving, adding, or deleting cells. Compound celllist operations, such as undo/redo, are also supported by the NotebookModel. Right now, undo/redo is only supported
81

JupyterLab Documentation, Release 0.18.4
on cells and is not supported on notebook attributes, such as notebook metadata. Currently, undo/redo for individualcell input content is supported by the CodeMirror editor’s undo feature. (Note: CodeMirror editor’s undo does notcover cell metadata changes.)
Metadata
The notebook model and the cell model (i.e. notebook cells) support getting and setting metadata through an IOb-servableJSON object. You can use this to get and set notebook/cell metadata, as well as subscribe to changes toit.
23.2.2 Notebook widget
After the NotebookModel is created, the NotebookWidgetFactory constructs a new NotebookPanel from the model.The NotebookPanel widget is added to the DockPanel. The NotebookPanel contains:
• a Toolbar
• a Notebook widget.
The NotebookPanel also adds completion logic.
The NotebookToolbar maintains a list of widgets to add to the toolbar. The Notebook widget contains the renderingof the notebook and handles most of the interaction logic with the notebook itself (such as keeping track of interactionssuch as selected and active cells and also the current edit/command mode).
The NotebookModel cell list provides ways to do fine-grained changes to the cell list.
Higher level actions using NotebookActions
Higher-level actions are contained in the NotebookActions namespace, which has functions, when given a notebookwidget, to run a cell and select the next cell, merge or split cells at the cursor, delete selected cells, etc.
Widget hierarchy
A Notebook widget contains a list of cell widgets, corresponding to the cell models in its cell list.
• Each cell widget contains an InputArea,
– which contains n CodeEditorWrapper,
* which contains a JavaScript CodeMirror instance.
A CodeCell also contains an OutputArea. An OutputArea is responsible for rendering the outputs in the Out-putAreaModel list. An OutputArea uses a notebook-specific RenderMimeRegistry object to render display_dataoutput messages.
Rendering output messages
A Rendermime plugin provides a pluggable system for rendering output messages. Default renderers are providedfor markdown, html, images, text, etc. Extensions can register renderers to be used across the entire application byregistering a handler and mimetype in the rendermime registry. When a notebook is created, it copies the global Ren-dermime singleton so that notebook-specific renderers can be added. The ipywidgets widget manager is an exampleof an extension that adds a notebook-specific renderer, since rendering a widget depends on notebook-specific widgetstate.
82 Chapter 23. Notebook
http://jupyterlab.github.io/jupyterlab/modules/_observables_src_observablejson_.iobservablejson.html

JupyterLab Documentation, Release 0.18.4
23.3 How to extend the Notebook plugin
We’ll walk through two notebook extensions:
• adding a button to the toolbar
• adding an ipywidgets extension
23.3.1 Adding a button to the toolbar
Start from the cookie cutter extension template.
pip install cookiecuttercookiecutter https://github.com/jupyterlab/extension-cookiecutter-tscd my-cookie-cutter-name
Install the dependencies. Note that extensions are built against the released npm packages, not the developmentversions.
npm install --save @jupyterlab/notebook @jupyterlab/application @jupyterlab/apputils→˓@jupyterlab/docregistry @phosphor/disposable
Copy the following to src/index.ts:
import {IDisposable, DisposableDelegate
} from '@phosphor/disposable';
import {JupyterLab, JupyterLabPlugin
} from '@jupyterlab/application';
import {ToolbarButton
} from '@jupyterlab/apputils';
import {DocumentRegistry
} from '@jupyterlab/docregistry';
import {NotebookActions, NotebookPanel, INotebookModel
} from '@jupyterlab/notebook';
/*** The plugin registration information.
*/const plugin: JupyterLabPlugin<void> = {
activate,id: 'my-extension-name:buttonPlugin',autoStart: true
};
/**(continues on next page)
23.3. How to extend the Notebook plugin 83

JupyterLab Documentation, Release 0.18.4
(continued from previous page)
* A notebook widget extension that adds a button to the toolbar.
*/exportclass ButtonExtension implements DocumentRegistry.IWidgetExtension<NotebookPanel,→˓INotebookModel> {/*** Create a new extension object.
*/createNew(panel: NotebookPanel, context: DocumentRegistry.IContext<INotebookModel>
→˓): IDisposable {let callback = () => {
NotebookActions.runAll(panel.content, context.session);};let button = new ToolbarButton({
className: 'myButton',iconClassName: 'fa fa-fast-forward',onClick: callback,tooltip: 'Run All'
});
panel.toolbar.insertItem(0, 'runAll', button);return new DisposableDelegate(() => {button.dispose();
});}
}
/*** Activate the extension.
*/function activate(app: JupyterLab) {
app.docRegistry.addWidgetExtension('Notebook', new ButtonExtension());};
/*** Export the plugin as default.
*/export default plugin;
Run the following commands:
npm installnpm run buildjupyter labextension install .jupyter lab
Open a notebook and observe the new “Run All” button.
23.3.2 The ipywidgets third party extension
This discussion will be a bit confusing since we’ve been using the term widget to refer to phosphor widgets. In thediscussion below, ipython widgets will be referred to as ipywidgets. There is no intrinsic relation between phosphorwidgets and ipython widgets.
The ipywidgets extension registers a factory for a notebook widget extension using the Document Registry. The
84 Chapter 23. Notebook

JupyterLab Documentation, Release 0.18.4
createNew() function is called with a NotebookPanel and DocumentContext. The plugin then creates a ipywidgetmanager (which uses the context to interact the kernel and kernel’s comm manager). The plugin then registers anipywidget renderer with the notebook instance’s rendermime (which is specific to that particular notebook).
When an ipywidget model is created in the kernel, a comm message is sent to the browser and handled by the ipywidgetmanager to create a browser-side ipywidget model. When the model is displayed in the kernel, a display_data out-put is sent to the browser with the ipywidget model id. The renderer registered in that notebook’s rendermime is askedto render the output. The renderer asks the ipywidget manager instance to render the corresponding model, whichreturns a JavaScript promise. The renderer creates a container phosphor widget which it hands back synchronously tothe OutputArea, and then fills the container with the rendered ipywidget when the promise resolves.
Note: The ipywidgets third party extension has not yet been released.
23.3. How to extend the Notebook plugin 85

JupyterLab Documentation, Release 0.18.4
86 Chapter 23. Notebook

CHAPTER 24
Design Patterns
There are several design patterns that are repeated throughout the repository. This guide is meant to supplement theTypeScript Style Guide.
24.1 TypeScript
TypeScript is used in all of the source code. TypeScript is used because it provides features from the most recentEMCAScript 6 standards, while providing type safety. The TypeScript compiler eliminates an entire class of bugs,while making it much easier to refactor code.
24.2 Initialization Options
Objects will typically have an IOptions interface for initializing the widget. The use of this interface enables optionsto be later added while preserving backward compatibility.
24.3 ContentFactory Option
A common option for a widget is a IContentFactory, which is used to customize the child content in the widget.If not given, a defaultRenderer instance is used if no arguments are required. In this way, widgets can becustomized without subclassing them, and widgets can support customization of their nested content.
24.4 Static Namespace
An object class will typically have an exported static namespace sharing the same name as the object. The namespaceis used to declutter the class definition.
87
JupyterLab Documentation, Release 0.18.4
24.5 Private Module Namespace
The “Private” module namespace is used to group variables and functions that are not intended to be exported and mayhave otherwise existed as module-level variables and functions. The use of the namespace also makes it clear when avariable access is to an imported name or from the module itself. Finally, the namespace enables the entire section tobe collapsed in an editor if desired.
24.6 Disposables
JavaScript does not support “destructors”, so the IDisposable pattern is used to ensure resources are freed andcan be claimed by the Garbage Collector when no longer needed. It should always be safe to dispose() of anobject more than once. Typically the object that creates another object is responsible for calling the dispose methodof that object unless explicitly stated otherwise.To mirror the pattern of construction, super.dispose() should be called last in the dispose() method if thereis a parent class. Make sure any signal connections are cleared in either the local or parent dispose() method. Usea sentinel value to guard against reentry, typically by checking if an internal value is null, and then immediatelysetting the value to null. A subclass should never override the isDisposed getter, because it short-circuits theparent class getter. The object should not be considered disposed until the base class dispose() method is called.
24.7 Messages
Messages are intended for many-to-one communication where outside objects influence another object. Messages canbe conflated and processed as a single message. They can be posted and handled on the next animation frame.
24.8 Signals
Signals are intended for one-to-many communication where outside objects react to changes on another object. Sig-nals are always emitted with the sender as the first argument, and contain a single second argument with the payload.Signals should generally not be used to trigger the “default” behavior for an action, but to enable others to trigger addi-tional behavior. If a “default” behavior is intended to be provided by another object, then a callback should be providedby that object. Wherever possible as signal connection should be made with the pattern .connect(this._onFoo,this). Providing the this context enables the connection to be properly cleared by clearSignalData(this).Using a private method avoids allocating a closure for each connection.
24.9 Models
Some of the more advanced widgets have a model associated with them. The common pattern used is that the modelis settable and must be set outside of the constructor. This means that any consumer of the widget must account for amodel that may be null, and may change at any time. The widget should emit a modelChanged signal to enableconsumers to handle a change in model. The reason to enable a model to swap is that the same widget could be used todisplay different model content while preserving the widget’s location in the application. The reason the model cannotbe provided in the constructor is the initialization required for a model may have to call methods that are subclassed.The subclassed methods would be called before the subclass constructor has finished evaluating, resulting in undefinedstate.
88 Chapter 24. Design Patterns
JupyterLab Documentation, Release 0.18.4
24.10 Getters vs. Methods
Prefer a method when the return value must be computed each time. Prefer a getter for simple attribute lookup. Agetter should yield the same value every time.
24.11 Data Structures
For public API, we have three options: JavaScript Array, IIterator, and ReadonlyArray (an interface definedby TypeScript).
Prefer an Array for:
• A value that is meant to be mutable.
Prefer a ReadonlyArray
• A return value is the result of a newly allocated array, to avoid the extra allocation of an iterator.
• A signal payload - since it will be consumed by multiple listeners.
• The values may need to be accessed randomly.
• A public attribute that is inherently static.
Prefer an IIterator for:
• A return value where the value is based on an internal data structure but the value should not need to be accessedrandomly.
• A set of return values that can be computed lazily.
24.12 DOM Events
If an object instance should respond to DOM events, create a handleEvent method for the class andregister the object instance as the event handler. The handleEvent method should switch on the eventtype and could call private methods to carry out the actions. Often a widget class will add itself asan event listener to its own node in the onAfterAttach method with something like this.node.addEventListener('mousedown', this) and unregister itself in the onBeforeDetach method withthis.node.removeEventListener('mousedown', this)Dispatching events from the handleEventmethod makes it easier to trace, log, and debug event handling. For more information about the handleEventmethod, see the EventListener API.
24.13 Promises
We use Promises for asynchronous function calls, and a shim for browsers that do not support them. When handlinga resolved or rejected Promise, make sure to check for the current state (typically by checking an .isDisposedproperty) before proceeding.
24.10. Getters vs. Methods 89

JupyterLab Documentation, Release 0.18.4
24.14 Command Names
Commands used in the application command registry should be formatted as follows:package-name:verb-noun. They are typically grouped into a CommandIDs namespace in the extension thatis not exported.
90 Chapter 24. Design Patterns

CHAPTER 25
CSS Patterns
This document describes the patterns we are using to organize and write CSS for JupyterLab. JupyterLab is developedusing a set of npm packages that are located in packages. Each of these packages has its own style, but depend onCSS variables dfined in a main theme package.
25.1 CSS checklist
• CSS classnames are defined inline in the code. We used to put them as all caps file-level consts, but we aremoving away from that.
• CSS files for packages are located within the style subdirectory and imported into the plugin’s index.css.
• The JupyterLab default CSS variables in the theme-light-extension and theme-dark-extensionpackages are used to style packages where ever possible. Individual packages should not npm-depend on thesepackages though, to enable the theme to be swapped out.
• Additional public/private CSS variables are defined by plugins sparingly and in accordance with the conventionsdescribed below.
25.2 CSS variables
We are using native CSS variables in JupyterLab. This is to enable dynamic theming of built-in and third party plugins.As of December 2017, CSS variables are supported in the latest stable versions of all popular browsers, except for IE.If a JupyterLab deployment needs to support these browsers, a server side CSS preprocessor such as Myth or cssnextmay be used.
25.2.1 Naming of CSS variables
We use the following convention for naming CSS variables:
• Start all CSS variables with --jp-.
91

JupyterLab Documentation, Release 0.18.4
• Words in the variable name should be lowercase and separated with -.
• The next segment should refer to the component and subcomponent, such as --jp-notebook-cell-.
• The next segment should refer to any state modifiers such as active, not-active or focused:--jp-notebook-cell-focused.
• The final segment will typically be related to a CSS properties, such as color, font-size or background:--jp-notebook-cell-focused-background.
25.2.2 Public/private
Some CSS variables in JupyterLab are considered part of our public API. Others are considered private and should notbe used by third party plugins or themes. The difference between public and private variables is simple:
• All private variables begin with --jp-private-
• All variables without the private- prefix are public.
• Public variables should be defined under the :root pseudo-selector. This ensures that public CSS variablescan be inspected under the top-level <html> tag in the browser’s dev tools.
• Where possible, private variables should be defined and scoped under an appropriate selector other than :root.
25.2.3 CSS variable usage
JupyterLab includes a default set of CSS variables in the file:
packages/theme-light-extension/style/variables.css
To ensure consistent design in JupyterLab, all built-in and third party extensions should use these variables in theirstyles if at all possible. Documentation about those variables can be found in the variables.css file itself.
Plugins are free to define additional public and private CSS variables in their own index.css file, but should do sosparingly.
Again, we consider the names of the public CSS variables in this package to be our public API for CSS.
25.3 File organization
We are organizing our CSS files in the following manner:
• Each package in the top-level packages directory should contain any CSS files in a style subdirectory thatare needed to style itself.
• Multiple CSS files may be used and organized as needed, but they should be imported into a single index.cssat the top-level of the plugin as import ‘../style/index.css’;.
25.4 CSS class names
We have a fairly formal method for naming our CSS classes.
First, CSS class names are associated with TypeScript classes that extend phosphor.Widget:
The .node of each such widget should have a CSS class that matches the name of the TypeScript class:
92 Chapter 25. CSS Patterns

JupyterLab Documentation, Release 0.18.4
class MyWidget extends Widget {
constructor() {super();this.addClass('jp-MyWidget');
}
}
Second, subclasses should have a CSS class for both the parent and child:
class MyWidgetSubclass extends MyWidget {
constructor() {super(); // Adds `jp-MyWidget`this.addClass('jp-MyWidgetSubclass');
}
}
In both of these cases, CSS class names with caps-case are reserved for situations where there is a named TypeScriptWidget subclass. These classes are a way of a TypeScript class providing a public API for styling.
Third, children nodes of a Widget should have a third segment in the CSS class name that gives a semantic namingof the component, such as:
• jp-MyWidget-toolbar
• jp-MyWidget-button
• jp-MyWidget-contentButton
In general, the parent MyWidget should add these classes to the children. This applies when the children are plainDOM nodes or Widget instances/subclasses themselves. Thus, the general naming of CSS classes is of the formjp-WidgetName-semanticChild. This enables the styling of these children in a manner that is independent ofthe children implementation or CSS classes they have themselves.
Fourth, some CSS classes are used to modify the state of a widget:
• jp-mod-active: applied to elements in the active state
• jp-mod-hover: applied to elements in the hover state
• jp-mod-selected: applied to elements while selected
Fifth, some CSS classes are used to distinguish different types of a widget:
• jp-type-separator: applied to menu items that are separators
• jp-type-directory: applied to elements in the file browser that are directories
25.5 Edge cases
Over time, we have found that there are some edge cases that these rules don’t fully address. Here, we try to clarifythose edge cases.
When should a parent add a class to children?
25.5. Edge cases 93

JupyterLab Documentation, Release 0.18.4
Above, we state that a parent (MyWidget), should add CSS classes to children that indicate the semanticfunction of the child. Thus, the MyWidget subclass of Widget should add jp-MyWidget to itself andjp-MyWidget-toolbar to a toolbar child.
What if the child itself is a Widget and already has a proper CSS class name itself, such as jp-Toolbar? Why notuse selectors such as .jp-MyWidget .jp-Toolbar or .jp-MyWidget > .jp-Toolbar?
The reason is that these selectors are dependent on the implementation of the toolbar having the jp-Toolbar CSSclass. When MyWidget adds the jp-MyWidget-toolbar class, it can style the child independent of its imple-mentation. The other reason to add the jp-MyWidget-toolbar class is if the DOM structure is highly recursive,the usual descendant selectors may not be specific to target only the desired children.
When in doubt, there is little harm done in parents adding selectors to children.
94 Chapter 25. CSS Patterns

CHAPTER 26
Writing Documentation
This section provides information about writing documentation for JupyterLab. See our Contributor Guide for detailson installation and testing.
26.1 Writing Style
• The documentation should be written in the second person, referring to the reader as “you” and not using thefirst person plural “we.” The author of the documentation is not sitting next to the user, so using “we” can leadto frustration when things don’t work as expected.
• Avoid words that trivialize using JupyterLab such as “simply” or “just.” Tasks that developers find simple oreasy may not be for users.
• Write in the active tense, so “drag the notebook cells. . . ” rather than “notebook cells can be dragged. . . ”
• The beginning of each section should begin with a short (1-2 sentence) high-level description of the topic, featureor component.
• Use “enable” rather than “allow” to indicate what JupyterLab makes possible for users. Using “allow” connotesthat we are giving them permission, whereas “enable” connotes empowerment.
26.2 User Interface Naming Conventions
26.2.1 Documents, Files, and Activities
Files are referrred to as either files or documents, depending on the context.
Documents are more human centered. If human viewing, interpretation, interaction is an important part of the ex-perience, it is a document in that context. For example, notebooks and markdown files will often be referring to asdocuments unless referring to the file-ness aspect of it (e.g., the notebook filename).
Files are used in a less human-focused context. For example, we refer to files in relation to a file system or file name.
95

JupyterLab Documentation, Release 0.18.4
Activities can be either a document or another UI panel that is not file backed, such as terminals, consoles or theinspector. An open document or file is an activity in that it is represented by a panel that you can interact with.
26.2.2 Element Names
• The generic content area of a tabbed UI is a panel, but prefer to refer to the more specific name, such as “Filebrowser.” Tab bars have tabs which toggle panels.
• The menu bar contains menu items, which have their own submenus.
• The main work area can be referred to as the work area when the name is unambiguous.
• When describing elements in the UI, colloquial names are preferred (e.g., “File browser” instead of “Filespanel”).
The majority of names are written in lower case. These names include:
• tab
• panel
• menu bar
• sidebar
• file
• document
• activity
• tab bar
• main work area
• file browser
• command palette
• cell inspector
• code console
The following sections of the user interface should be in title case, directly quoting a word in the UI:
• File menu
• Files tab
• Running panel
• Tabs panel
• Single-Document Mode
The capitalized words match the label of the UI element the user is clicking on because there does not exist a goodcolloquial name for the tool, such as “file browser” or “command palette”.
See The JupyterLab Interface for descriptions of elements in the UI.
26.3 Keyboard Shortcuts
Typeset keyboard shortcuts as follows:
96 Chapter 26. Writing Documentation

JupyterLab Documentation, Release 0.18.4
• Monospace typeface, with spaces between individual keys: Shift Enter.
• For modifiers, use the platform independent word describing key: Shift.
• For the Accel key use the phrase: Command/Ctrl.
• Don’t use platform specific icons for modifier keys, as they are difficult to display in a platform specific way onSphinx/RTD.
26.4 Screenshots and Animations
Our documentation should contain screenshots and animations that illustrate and demonstrate the software. Here aresome guidelines for preparing them:
• Set screen resolution to non-hidpi (non-retina)
• Set browser viewport to 1280x720 px. The Firefox Web Developer extension and Chrome Developer Tools offerdevice specific rendering that enables you to set this viewport resolution.
• Capture the viewport, not the full browser window, using the capture software of your choice. Do not includeany of the desktop background.
• For PNGs, reduce their size using pngquant. For movies, upload them to the IPython/Juptyter YouTube channeland embed them in the docs with an iframe. The pngs can live in the main repository. The movies should beadded to the jupyterlab-media repository.
• Use www.youtube-nocookie.com website, which can be found by clicking on the ‘privacy-enhanced’ embeddingoption in the Share dialog on YouTube. Add the following parameters the end of the URL ?rel=0&showinfo=0. This disables the video title and related video suggestions.
• Screenshots or animations should be proceeded by a sentence describing the content, such as “To open a file,double-click on its name in the File Browser:”.
• We have custom CSS that will add box shadows, and proper sizing of screenshots and embedded YouTubevideos. See examples in the documentation for how to embed these assets.
To help us organize screenshots and animations, please name the files with a prefix that matches the names of thesource file in which they are used:
sourcefile.rstsourcefile_filebrowser.pngsourcefile_editmenu.png
This will help us to keep track of the images as documentation content evolves.
26.4. Screenshots and Animations 97

JupyterLab Documentation, Release 0.18.4
98 Chapter 26. Writing Documentation

CHAPTER 27
Virtual DOM and React
JupyterLab is based on PhosphorJS, which provides a flexible Widget class that handles the following:
• Resize events that propagate down the Widget hierarchy.
• Lifecycle events (onBeforeDetach, onAfterAttach, etc.).
• Both CSS-based and absolutely positioned layouts.
In situations where these features are needed, we recommend using Phosphor’s Widget class directly.
The idea of virtual DOM rendering, which became popular in the React community, is a very elegant and efficient wayof rendering and updating DOM content in response to model/state changes.
Phosphor’s Widget class integrates well with ReactJS and we are now using React in JupyterLab to render leafcontent when the above capabilities are not needed.
An example of using React with Phosphor can be found in the launcher of JupyterLab.
99

JupyterLab Documentation, Release 0.18.4
100 Chapter 27. Virtual DOM and React

CHAPTER 28
Adding Content
As an example: Add a leaflet viewer plugin for geoJSON files.
• Go to npm: search for leaflet (success!).
• Go to jupyterlab top level source directory: jlpm add leaflet. This adds the file to thedependencies in package.json.
• Next we see if there is a typing declaration for leaflet: jlpm add --dev @types/leaflet. Success!
• If there are no typings, we must create our own. An example typings file that exports functions is path-posix.An example with a class is xterm.
• Add a reference to the new library in src/typings.d.ts.
• Create a folder in src for the plugin.
• Add index.ts and plugin.ts files.
• If creating CSS, import them in src/default-themes/index.css.
• The index.ts file should have the core logic for the plugin. In this case, it should create a widget and widgetfactory for rendering geojson files (see Documents).
• The plugin.ts file should create the extension and add the content to the application. In this case registeringthe widget factory using the document registry.
• Run jlpm run build from jupyterlab/jupyterlab
• Run jupyter lab and verify changes.
101

JupyterLab Documentation, Release 0.18.4
102 Chapter 28. Adding Content

CHAPTER 29
Examples
The examples directory in the JupyterLab repo contains:
• several stand-alone examples (console, filebrowser, notebook, terminal)
• a more complex example (lab).
Installation instructions for the examples are found in the project’s README.
After installing the jupyter notebook server 4.2+, follow the steps for installing the development version of JupyterLab.To build the examples, enter from the jupyterlab repo root directory:
jlpm run build:examples
To run a particular example, navigate to the example’s subdirectory in the examples directory and enter:
python main.py
29.1 Dissecting the ‘filebrowser’ example
The filebrowser example provides a stand-alone implementation of a filebrowser. Here’s what the filebrowser’s userinterface looks like:
103

JupyterLab Documentation, Release 0.18.4
Let’s take a closer look at the source code in examples/filebrowser.
29.1.1 Directory structure of ‘filebrowser’ example
The filebrowser in examples/filebrowser is comprised by a handful of files and the src directory:
104 Chapter 29. Examples

JupyterLab Documentation, Release 0.18.4
The filebrowser example has two key source files:
• src/index.ts: the TypeScript file that defines the functionality
• main.py: the Python file that enables the example to be run
Reviewing the source code of each file will help you see the role that each file plays in the stand-alone filebrowserexample.
29.1. Dissecting the ‘filebrowser’ example 105

JupyterLab Documentation, Release 0.18.4
106 Chapter 29. Examples

CHAPTER 30
Terminology
Learning to use a new technology and its architecture can be complicated by the jargon used to describe components.We provide this terminology guide to help smooth the learning the components.
30.1 Terms
• Application - The main application object that hold the application shell, command registry, and keymap registry.It is provided to all plugins in their activate method.
• Plugin - An object that provides a service and or extends the application.
• Phosphor - The JavaScript library that provides the foundation of JupyterLab, enabling desktop-like applicationsin the browser.
• Standalone example - An example in the examples/ directory that demonstrates the usage of one or morecomponents of JupyterLab.
• TypeScript - A statically typed language that compiles to JavaScript.
107

JupyterLab Documentation, Release 0.18.4
108 Chapter 30. Terminology

CHAPTER 31
Let’s Make an xkcd JupyterLab Extension
Warning: The extension developer API is not stable and will evolve in JupyterLab releases in the near future.
JupyterLab extensions add features to the user experience. This page describes how to create one type of extension,an application plugin, that:
• Adds a “Random xkcd comic” command to the command palette sidebar
• Fetches the comic image and metadata when activated
• Shows the image and metadata in a tab panel
By working through this tutorial, you’ll learn:
• How to setup an extension development environment from scratch on a Linux or OSX machine.
– Windows users: You’ll need to modify the commands slightly.
• How to start an extension project from jupyterlab/extension-cookiecutter-ts
• How to iteratively code, build, and load your extension in JupyterLab
• How to version control your work with git
• How to release your extension for others to enjoy
109
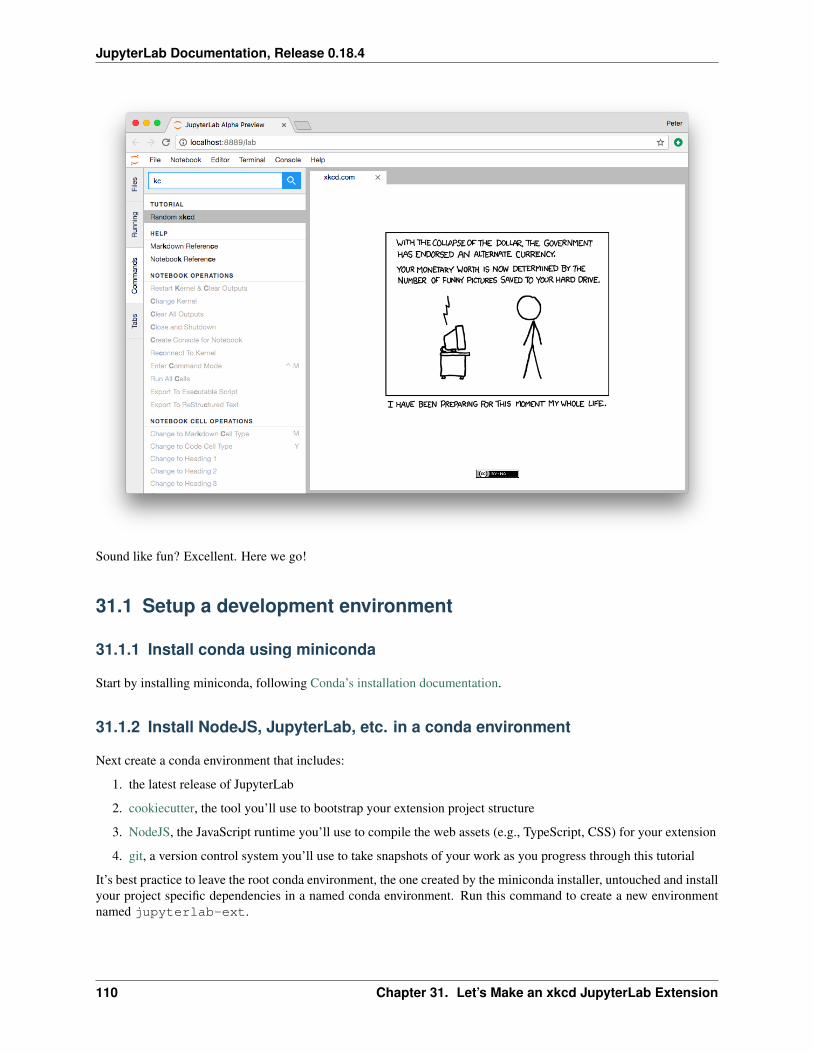
JupyterLab Documentation, Release 0.18.4
Sound like fun? Excellent. Here we go!
31.1 Setup a development environment
31.1.1 Install conda using miniconda
Start by installing miniconda, following Conda’s installation documentation.
31.1.2 Install NodeJS, JupyterLab, etc. in a conda environment
Next create a conda environment that includes:
1. the latest release of JupyterLab
2. cookiecutter, the tool you’ll use to bootstrap your extension project structure
3. NodeJS, the JavaScript runtime you’ll use to compile the web assets (e.g., TypeScript, CSS) for your extension
4. git, a version control system you’ll use to take snapshots of your work as you progress through this tutorial
It’s best practice to leave the root conda environment, the one created by the miniconda installer, untouched and installyour project specific dependencies in a named conda environment. Run this command to create a new environmentnamed jupyterlab-ext.
110 Chapter 31. Let’s Make an xkcd JupyterLab Extension

JupyterLab Documentation, Release 0.18.4
conda create -n jupyterlab-ext nodejs jupyterlab cookiecutter git -c conda-forge
Now activate the new environment so that all further commands you run work out of that environment.
conda activate jupyterlab-ext
Note: You’ll need to run the command above in each new terminal you open before you can work with the tools youinstalled in the jupyterlab-ext environment.
31.2 Create a repository
Create a new repository for your extension. For example, on GitHub. This is an optional step but highly recommendedif you want to share your extension.
31.3 Create an extension project
31.3.1 Initialize the project from a cookiecutter
Next use cookiecutter to create a new project for your extension. This will create a new folder for your extension inyour current directory.
cookiecutter https://github.com/jupyterlab/extension-cookiecutter-ts
When prompted, enter values like the following for all of the cookiecutter prompts.
author_name []: Your Nameextension_name [myextension]: jupyterlab_xkcdproject_short_description [A JupyterLab extension.]: Show a random xkcd.com comic in→˓a JupyterLab panelrepository [https://github.com/my_name/jupyterlab_myextension]: https://github.com/my_→˓name/jupyterlab_xkcd
Note: if not using a repository, leave the field blank. You can come back and edit the repository links in the package.json file later.
Change to the directory the cookiecutter created and list the files.
cd jupyterlab_xkcdls
You should see a list like the following.
README.md package.json src style tsconfig.json
31.3.2 Build and install the extension for development
Your new extension project has enough code in it to see it working in your JupyterLab. Run the following commandsto install the initial project dependencies and install it in the JupyterLab environment. We defer building since it willbe built in the next step.
31.2. Create a repository 111

JupyterLab Documentation, Release 0.18.4
Note: This tutorial uses jlpm to install Javascript packages and run build commands, which is JupyterLab’s bundledversion of yarn. If you prefer, you can use another Javascript package manager like npm or yarn itself.
jlpm installjupyter labextension install . --no-build
After the install completes, open a second terminal. Run these commands to activate the jupyterlab-ext en-vironment and to start a JupyterLab instance in watch mode so that it will keep up with our changes as we makethem.
conda activate jupyterlab-extjupyter lab --watch
31.3.3 See the initial extension in action
After building with your extension, JupyterLab should open in your default web browser.
In that window open the JavaScript console by following the instructions for your browser:
• Accessing the DevTools in Google Chrome
• Opening the Web Console in Firefox
After you reload the page with the console open, you should see a message that says JupyterLab extensionjupyterlab_xkcd is activated! in the console. If you do, congrats, you’re ready to start modifying the theextension! If not, go back, make sure you didn’t miss a step, and reach out if you’re stuck.
Note: Leave the terminal running the jupyter lab --watch command open.
31.3.4 Commit what you have to git
Run the following commands in your jupyterlab_xkcd folder to initialize it as a git repository and commit thecurrent code.
git initgit add .git commit -m 'Seed xkcd project from cookiecutter'
Note: This step is not technically necessary, but it is good practice to track changes in version control system incase you need to rollback to an earlier version or want to collaborate with others. For example, you can compareyour work throughout this tutorial with the commits in a reference version of jupyterlab_xkcd on GitHub athttps://github.com/jupyterlab/jupyterlab_xkcd.
31.4 Add an xkcd widget
31.4.1 Show an empty panel
The command palette is the primary view of all commands available to you in JupyterLab. For your first addition,you’re going to add a Random xkcd comic command to the palette and get it to show an xkcd tab panel when invoked.
Fire up your favorite text editor and open the src/index.ts file in your extension project. Add the followingimport at the top of the file to get a reference to the command palette interface.
112 Chapter 31. Let’s Make an xkcd JupyterLab Extension

JupyterLab Documentation, Release 0.18.4
import {ICommandPalette
} from '@jupyterlab/apputils';
You will also need to install this dependency. Run the following command in the repository root folder install thedependency and save it to your package.json:
jlpm add @jupyterlab/apputils
Locate the extension object of type JupyterLabPlugin. Change the definition so that it reads like so:
/*** Initialization data for the jupyterlab_xkcd extension.
*/const extension: JupyterLabPlugin<void> = {
id: 'jupyterlab_xkcd',autoStart: true,requires: [ICommandPalette],activate: (app: JupyterLab, palette: ICommandPalette) => {console.log('JupyterLab extension jupyterlab_xkcd is activated!');console.log('ICommandPalette:', palette);
}};
The requires attribute states that your plugin needs an object that implements the ICommandPalette interfacewhen it starts. JupyterLab will pass an instance of ICommandPalette as the second parameter of activatein order to satisfy this requirement. Defining palette: ICommandPalette makes this instance available toyour code in that function. The second console.log line exists only so that you can immediately check that yourchanges work.
Run the following to rebuild your extension.
jlpm run build
JupyterLab will rebuild after the extension does. You can see it’s progress in the jupyter lab --watch window.After that finishes, return to the browser tab that opened when you started JupyterLab. Refresh it and look in theconsole. You should see the same activation message as before, plus the new message about the ICommandPaletteinstance you just added. If you don’t, check the output of the build command for errors and correct your code.
JupyterLab extension jupyterlab_xkcd is activated!ICommandPalette: Palette {_palette: CommandPalette}
Note that we had to run npm run build in order for the bundle to update, because it is using the compiledJavaScript files in /lib. If you wish to avoid running npm run build after each change, you can open a thirdterminal, and run the npm run watch command from your extension directory, which will automatically compilethe TypeScript files as they change.
Now return to your editor. Add the following additional import to the top of the file.
import {Widget
} from '@phosphor/widgets';
Install this dependency as well:
jlpm add @phosphor/widgets
Then modify the activate function again so that it has the following code:
31.4. Add an xkcd widget 113

JupyterLab Documentation, Release 0.18.4
activate: (app: JupyterLab, palette: ICommandPalette) => {console.log('JupyterLab extension jupyterlab_xkcd is activated!');
// Create a single widgetlet widget: Widget = new Widget();widget.id = 'xkcd-jupyterlab';widget.title.label = 'xkcd.com';widget.title.closable = true;
// Add an application commandconst command: string = 'xkcd:open';app.commands.addCommand(command, {label: 'Random xkcd comic',execute: () => {
if (!widget.isAttached) {// Attach the widget to the main work area if it's not thereapp.shell.addToMainArea(widget);
}// Activate the widgetapp.shell.activateById(widget.id);
}});
// Add the command to the palette.palette.addItem({command, category: 'Tutorial'});
}
The first new block of code creates a Widget instance, assigns it a unique ID, gives it a label that will appear as itstab title, and makes the tab closable by the user. The second block of code add a new command labeled Random xkcdcomic to JupyterLab. When the command executes, it attaches the widget to the main display area if it is not alreadypresent and then makes it the active tab. The last new line of code adds the command to the command palette in asection called Tutorial.
Build your extension again using npm run build (unless you are using npm run watch already) and refreshthe browser tab. Open the command palette on the left side by clicking on Commands and type xkcd in the search box.Your Random xkcd comic command should appear. Click it or select it with the keyboard and press Enter. You shouldsee a new, blank panel appear with the tab title xkcd.com. Click the x on the tab to close it and activate the commandagain. The tab should reappear. Finally, click one of the launcher tabs so that the xkcd.com panel is still open but nolonger active. Now run the Random xkcd comic command one more time. The single xkcd.com tab should come to theforeground.
114 Chapter 31. Let’s Make an xkcd JupyterLab Extension

JupyterLab Documentation, Release 0.18.4
If your widget is not behaving, compare your code with the reference project state at the 01-show-a-panel tag. Onceyou’ve got everything working properly, git commit your changes and carry on.
git add .git commit -m 'Show xkcd command on panel'
31.4.2 Show a comic in the panel
You’ve got an empty panel. It’s time to add a comic to it. Go back to your code editor. Add the following code belowthe lines that create a Widget instance and above the lines that define the command.
// Add an image element to the panellet img = document.createElement('img');widget.node.appendChild(img);
// Fetch info about a random comicfetch('https:////egszlpbmle.execute-api.us-east-1.amazonaws.com/prod').then(response→˓=> {return response.json();
}).then(data => {img.src = data.img;img.alt = data.title;img.title = data.alt;
});
The first two lines create a new HTML <img> element and add it to the widget DOM node. The next lines make arequest using the HTML fetch API that returns information about a random xkcd comic, and set the image source,alternate text, and title attributes based on the response.
Rebuild your extension if necessary (npm run build), refresh your browser tab, and run the Random xkcd comiccommand again. You should now see a comic in the xkcd.com panel when it opens.
31.4. Add an xkcd widget 115

JupyterLab Documentation, Release 0.18.4
Note that the comic is not centered in the panel nor does the panel scroll if the comic is larger than the panel area. Alsonote that the comic does not update no matter how many times you close and reopen the panel. You’ll address both ofthese problems in the upcoming sections.
If you don’t see a comic at all, compare your code with the 02-show-a-comic tag in the reference project. When it’sworking, make another git commit.
git add .git commit -m 'Show a comic in the panel'
31.5 Improve the widget behavior
31.5.1 Center the comic and add attribution
Open style/index.css in our extension project directory for editing. Add the following lines to it.
.jp-xkcdWidget {display: flex;flex-direction: column;overflow: auto;
}
.jp-xkcdCartoon {margin: auto;
}
(continues on next page)
116 Chapter 31. Let’s Make an xkcd JupyterLab Extension

JupyterLab Documentation, Release 0.18.4
(continued from previous page)
.jp-xkcdAttribution {margin: 20px auto;
}
The first rule stacks content vertically within the widget panel and lets the panel scroll when the content overflows.The other rules center the cartoon and attribution badge horizontally and space them out vertically.
Return to the index.ts file. Note that there is already an import of the CSS file in the index.ts file. Modify thethe activate function to apply the CSS classes and add the attribution badge markup. The beginning of the functionshould read like the following:
activate: (app: JupyterLab, palette: ICommandPalette) => {console.log('JupyterLab extension jupyterlab_xkcd is activated!');
// Create a single widgetlet widget: Widget = new Widget();widget.id = 'xkcd-jupyterlab';widget.title.label = 'xkcd.com';widget.title.closable = true;widget.addClass('jp-xkcdWidget'); // new line
// Add an image element to the panellet img = document.createElement('img');img.className = 'jp-xkcdCartoon'; // new linewidget.node.appendChild(img);
// New: add an attribution badgeimg.insertAdjacentHTML('afterend',`<div class="jp-xkcdAttribution">
<a href="https://creativecommons.org/licenses/by-nc/2.5/" class="jp-→˓xkcdAttribution" target="_blank">
<img src="https://licensebuttons.net/l/by-nc/2.5/80x15.png" /></a>
</div>`);
// Keep all the remaining fetch and command lines the same// as before from here down ...
Build your extension if necessary (npm run build) and refresh your JupyterLab browser tab. Invoke the Randomxkcd comic command and confirm the comic is centered with an attribution badge below it. Resize the browser windowor the panel so that the comic is larger than the available area. Make sure you can scroll the panel over the entire areaof the comic.
31.5. Improve the widget behavior 117

JupyterLab Documentation, Release 0.18.4
If anything is misbehaving, compare your code with the reference project 03-style-and-attribute tag. When everythingis working as expected, make another commit.
git add .git commit -m 'Add styling, attribution'
31.5.2 Show a new comic on demand
The activate function has grown quite long, and there’s still more functionality to add. You should refactor thecode into two separate parts:
1. An XkcdWidget that encapsulates the xkcd panel elements, configuration, and soon-to-be-added update be-havior
2. An activate function that adds the widget instance to the UI and decide when the comic should refresh
Start by refactoring the widget code into the new XkcdWidget class. Add the following additional import to the topof the file.
import {Message
} from '@phosphor/messaging';
Install this dependency:
jlpm add @phosphor/messaging
118 Chapter 31. Let’s Make an xkcd JupyterLab Extension

JupyterLab Documentation, Release 0.18.4
Then add the class just below the import statements in the index.ts file.
/*** An xckd comic viewer.
*/class XkcdWidget extends Widget {
/*** Construct a new xkcd widget.
*/constructor() {super();
this.id = 'xkcd-jupyterlab';this.title.label = 'xkcd.com';this.title.closable = true;this.addClass('jp-xkcdWidget');
this.img = document.createElement('img');this.img.className = 'jp-xkcdCartoon';this.node.appendChild(this.img);
this.img.insertAdjacentHTML('afterend',`<div class="jp-xkcdAttribution">
<a href="https://creativecommons.org/licenses/by-nc/2.5/" class="jp-→˓xkcdAttribution" target="_blank">
<img src="https://licensebuttons.net/l/by-nc/2.5/80x15.png" /></a>
</div>`);
}
/*** The image element associated with the widget.
*/readonly img: HTMLImageElement;
/*** Handle update requests for the widget.
*/onUpdateRequest(msg: Message): void {fetch('https://egszlpbmle.execute-api.us-east-1.amazonaws.com/prod').
→˓then(response => {return response.json();
}).then(data => {this.img.src = data.img;this.img.alt = data.title;this.img.title = data.alt;
});}
};
You’ve written all of the code before. All you’ve done is restructure it to use instance variables and move the comicrequest to its own function.
Next move the remaining logic in activate to a new, top-level function just below the XkcdWidget class defini-tion. Modify the code to create a widget when one does not exist in the main JupyterLab area or to refresh the comicin the exist widget when the command runs again. The code for the activate function should read as follows afterthese changes:
31.5. Improve the widget behavior 119

JupyterLab Documentation, Release 0.18.4
/*** Activate the xckd widget extension.
*/function activate(app: JupyterLab, palette: ICommandPalette) {
console.log('JupyterLab extension jupyterlab_xkcd is activated!');
// Create a single widgetlet widget: XkcdWidget = new XkcdWidget();
// Add an application commandconst command: string = 'xkcd:open';app.commands.addCommand(command, {label: 'Random xkcd comic',execute: () => {
if (!widget.isAttached) {// Attach the widget to the main work area if it's not thereapp.shell.addToMainArea(widget);
}// Refresh the comic in the widgetwidget.update();// Activate the widgetapp.shell.activateById(widget.id);
}});
// Add the command to the palette.palette.addItem({ command, category: 'Tutorial' });
};
Remove the activate function definition from the JupyterLabPlugin object and refer instead to the top-levelfunction like so:
const extension: JupyterLabPlugin<void> = {id: 'jupyterlab_xkcd',autoStart: true,requires: [ICommandPalette],activate: activate
};
Make sure you retain the export default extension; line in the file. Now build the extension again andrefresh the JupyterLab browser tab. Run the Random xkcd comic command more than once without closing the panel.The comic should update each time you execute the command. Close the panel, run the command, and it should bothreappear and show a new comic.
If anything is amiss, compare your code with the 04-refactor-and-refresh tag to debug. Once it’s working properly,commit it.
git add .git commit -m 'Refactor, refresh comic'
31.5.3 Restore panel state when the browser refreshes
You may notice that every time you refresh your browser tab, the xkcd panel disappears, even if it was open beforeyou refreshed. Other open panels, like notebooks, terminals, and text editors, all reappear and return to where you leftthem in the panel layout. You can make your extension behave this way too.
120 Chapter 31. Let’s Make an xkcd JupyterLab Extension

JupyterLab Documentation, Release 0.18.4
Update the imports at the top of your index.ts file so that the entire list of import statements looks like the follow-ing:
import {JupyterLab, JupyterLabPlugin, ILayoutRestorer // new
} from '@jupyterlab/application';
import {ICommandPalette, InstanceTracker // new
} from '@jupyterlab/apputils';
import {JSONExt // new
} from '@phosphor/coreutils';
import {Message
} from '@phosphor/messaging';
import {Widget
} from '@phosphor/widgets';
import '../style/index.css';
Install this dependency:
jlpm add @phosphor/coreutils
Then, add the ILayoutRestorer interface to the JupyterLabPlugin definition. This addition passes theglobal LayoutRestorer to the third parameter of the activate.
const extension: JupyterLabPlugin<void> = {id: 'jupyterlab_xkcd',autoStart: true,requires: [ICommandPalette, ILayoutRestorer],activate: activate
};
Finally, rewrite the activate function so that it:
1. Declares a widget variable, but does not create an instance immediately
2. Constructs an InstanceTracker and tells the ILayoutRestorer to use it to save/restore panel state
3. Creates, tracks, shows, and refreshes the widget panel appropriately
function activate(app: JupyterLab, palette: ICommandPalette, restorer:→˓ILayoutRestorer) {console.log('JupyterLab extension jupyterlab_xkcd is activated!');
// Declare a widget variablelet widget: XkcdWidget;
// Add an application commandconst command: string = 'xkcd:open';app.commands.addCommand(command, {label: 'Random xkcd comic',execute: () => {
(continues on next page)
31.5. Improve the widget behavior 121

JupyterLab Documentation, Release 0.18.4
(continued from previous page)
if (!widget) {// Create a new widget if one does not existwidget = new XkcdWidget();widget.update();
}if (!tracker.has(widget)) {
// Track the state of the widget for later restorationtracker.add(widget);
}if (!widget.isAttached) {
// Attach the widget to the main work area if it's not thereapp.shell.addToMainArea(widget);
} else {// Refresh the comic in the widgetwidget.update();
}// Activate the widgetapp.shell.activateById(widget.id);
}});
// Add the command to the palette.palette.addItem({ command, category: 'Tutorial' });
// Track and restore the widget statelet tracker = new InstanceTracker<Widget>({ namespace: 'xkcd' });restorer.restore(tracker, {command,args: () => JSONExt.emptyObject,name: () => 'xkcd'
});};
Rebuild your extension one last time and refresh your browser tab. Execute the Random xkcd comic command andvalidate that the panel appears with a comic in it. Refresh the browser tab again. You should see an xkcd panel appearimmediately without running the command. Close the panel and refresh the browser tab. You should not see an xkcdtab after the refresh.
Refer to the 05-restore-panel-state tag if your extension is misbehaving. Make a commit when the state of yourextension persists properly.
git add .git commit -m 'Restore panel state'
Congrats! You’ve implemented all of the behaviors laid out at the start of this tutorial. Now how about sharing it withthe world?
31.6 Publish your extension to npmjs.org
npm is both a JavaScript package manager and the de facto registry for JavaScript software. You can sign up for anaccount on the npmjs.com site or create an account from the command line by running npm adduser and enteringvalues when prompted. Create an account now if you do not already have one. If you already have an account, loginby running npm login and answering the prompts.
Next, open the project package.json file in your text editor. Prefix the name field value
122 Chapter 31. Let’s Make an xkcd JupyterLab Extension

JupyterLab Documentation, Release 0.18.4
with @your-npm-username>/ so that the entire field reads "name": "@your-npm-username/jupyterlab_xkcd" where you’ve replaced the string your-npm-username with your real username. Reviewthe homepage, repository, license, and other supported package.json fields while you have the file open. Then openthe README.md file and adjust the command in the Installation section so that it includes the full, username-prefixedpackage name you just included in the package.json file. For example:
jupyter labextension install @your-npm-username/jupyterlab_xkcd
Return to your terminal window and make one more git commit:
git add .git commit -m 'Prepare to publish package'
Now run the following command to publish your package:
npm publish --access=public
Check that your package appears on the npm website. You can either search for it from the homepage or visithttps://www.npmjs.com/package/@your-username/jupyterlab_xkcd directly. If it doesn’t ap-pear, make sure you’ve updated the package name properly in the package.json and run the npm commandcorrectly. Compare your work with the state of the reference project at the 06-prepare-to-publish tag for furtherdebugging.
You can now try installing your extension as a user would. Open a new terminal and run the following commands,again substituting your npm username where appropriate (make sure to stop the existing jupyter lab --watch
31.6. Publish your extension to npmjs.org 123

JupyterLab Documentation, Release 0.18.4
command first):
conda create -n jupyterlab-xkcd jupyterlab nodejsconda activate jupyterlab-xkcdjupyter labextension install @your-npm-username/jupyterlab_xkcdjupyter lab
You should see a fresh JupyterLab browser tab appear. When it does, execute the Random xkcd comic command toprove that your extension works when installed from npm.
31.7 Learn more
You’ve completed the tutorial. Nicely done! If you want to keep learning, here are some suggestions about what to trynext:
• Assign a hotkey to the Random xkcd comic command.
• Make the image a link to the comic on https://xkcd.com.
• Push your extension git repository to GitHub.
• Give users the ability to pin comics in separate, permanent panels.
• Learn how to write other kinds of extensions.
124 Chapter 31. Let’s Make an xkcd JupyterLab Extension

CHAPTER 32
Indices and Tables
• genindex
• modindex
• search
125