Junior Arborist Activity Guide - SDSU Extensionthey have both male trees and female trees....
13
Page 1 © 2019, South Dakota Board of Regents Junior Arborist Activity Guide John Ball Professor & SDSU Extension Forestry Specialist Christina Lind-Thielke Assistant Gardener/Education Coordinator, McCrory Gardens, SDSU The ‘junior’ may include any age group from 8 to 18 years old. The level of involvement and activities are structured differently depending upon the age group of the participants. The following should be viewed as a general curriculum guide for Middle to High School students. The objective of this guide is to help organizations create, implement, and evaluate an arboriculture summer program focused on middle school students. It includes four days, or about 14 hours, of field and classroom modules designed to acquaint students with the opportunities and careers within the broad field of arboriculture. This has been prepared with input and direct involvement by University faculty and industry. The program was taught by University faculty, ISA (International Society of Arboriculture) Certified Arborist and Board Certified Master Arborists. Topics include: 1) How trees grow and function; 2) How to identify tree species; 3) Tree inventories; 4) Tree health care; 5) The root of the matter: The importance of soil; 6) Tree pruning; 7) Tree felling; 8) Tree climbing These topics relate to several science content standards such as 4th and 5th grade Life Science 4-LS1-1 and 5-LS1-1 Introduction to the Junior Arborist Program 1. Introduction of our program and presenters 2. Learning more about our students a. They provide their names, a little about themselves, and what they would like to gain from the program b. Take a pre-survey to find out students’ knowledge of trees and the professions of arboriculture 3. Brief introduction of the field of arboriculture a. What is arboriculture, and what types of careers are within the field: The various careers within the field of arboriculture can be found on http://www.isa-arbor.com, with an interactive chart of career paths in arboriculture found at: http://www.isa-arbor.com/education/ onlineresources/careersinarboriculture.aspx. Each career can be clicked to obtain a wealth of information about each. Module 1: How Trees Grow and Function 1. Objective: In order to successfully work with trees, you first need an understanding of how trees grow and function. The goal of this section is to educate students about the structure of trees, their nutritional needs and how they access and utilize them, and their survival techniques. | | gardens SOUTH DAKOTA STATE UNIVERSITY ® AGRONOMY, HORTICULTURE & PLANT SCIENCE DEPARTMENT JANUARY 2017
Transcript of Junior Arborist Activity Guide - SDSU Extensionthey have both male trees and female trees....
Page 1 © 2019, South Dakota Board of Regents
Junior Arborist Activity GuideJohn Ball Professor & SDSU Extension Forestry Specialist
Christina Lind-Thielke Assistant Gardener/Education Coordinator, McCrory Gardens, SDSU
The ‘junior’ may include any age group from 8 to 18 years old. The level of involvement and activities are structured differently depending upon the age group of the participants. The following should be viewed as a general curriculum guide for Middle to High School students.
The objective of this guide is to help organizations create, implement, and evaluate an arboriculture summer program focused on middle school students. It includes four days, or about 14 hours, of field and classroom modules designed to acquaint students with the opportunities and careers within the broad field of arboriculture. This has been prepared with input and direct involvement by University faculty and industry. The program was taught by University faculty, ISA (International Society of Arboriculture) Certified Arborist and Board Certified Master Arborists.
Topics include: 1) How trees grow and function; 2) How to identify tree species; 3) Tree inventories; 4) Tree health care; 5) The root of the matter: The importance of soil; 6) Tree pruning; 7) Tree felling; 8) Tree climbing
These topics relate to several science content standards such as 4th and 5th grade Life Science 4-LS1-1 and 5-LS1-1
Introduction to the Junior Arborist Program1. Introduction of our program and presenters
2. Learning more about our studentsa. They provide their names, a little about
themselves, and what they would like to gain from the program
b. Take a pre-survey to find out students’ knowledge of trees and the professions of arboriculture
3. Brief introduction of the field of arboriculturea. What is arboriculture, and what types of
careers are within the field: The various careers within the field of arboriculture can be found on http://www.isa-arbor.com, with an interactive chart of career paths in arboriculture found at: http://www.isa-arbor.com/education/onlineresources/careersinarboriculture.aspx. Each career can be clicked to obtain a wealth of information about each.
Module 1: How Trees Grow and Function
1. Objective: In order to successfully work with trees, you first need an understanding of how trees grow and function. The goal of this section is to educate students about the structure of trees, their nutritional needs and how they access and utilize them, and their survival techniques.
| |
gardensSOUTH DAKOTA STATE UNIVERSIT Y®
AGRONOMY, HORTICULTURE & PLANT SCIENCE DEPARTMENTJANUARY 2017
Page 2 © 2019, South Dakota Board of Regents
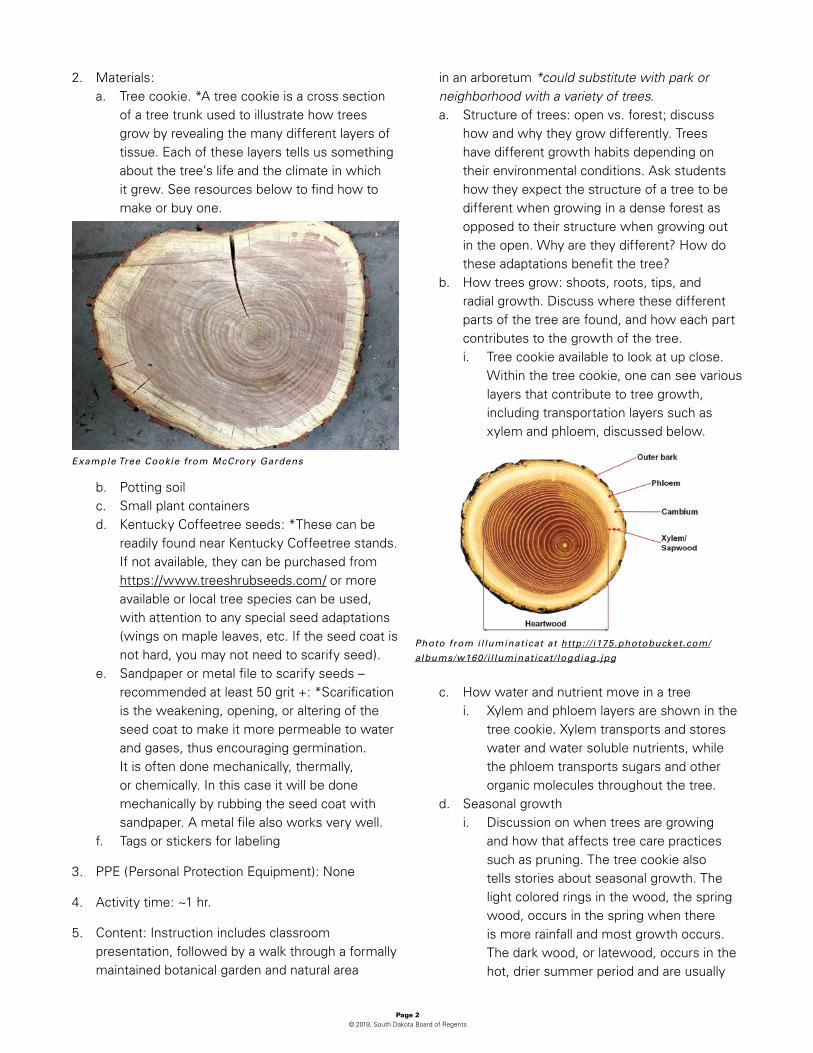
2. Materials:a. Tree cookie. *A tree cookie is a cross section
of a tree trunk used to illustrate how trees grow by revealing the many different layers of tissue. Each of these layers tells us something about the tree’s life and the climate in which it grew. See resources below to find how to make or buy one.
Example Tree Cookie from McCrory Gardens
b. Potting soilc. Small plant containersd. Kentucky Coffeetree seeds: *These can be
readily found near Kentucky Coffeetree stands. If not available, they can be purchased from https://www.treeshrubseeds.com/ or more available or local tree species can be used, with attention to any special seed adaptations (wings on maple leaves, etc. If the seed coat is not hard, you may not need to scarify seed).
e. Sandpaper or metal file to scarify seeds – recommended at least 50 grit +: *Scarification is the weakening, opening, or altering of the seed coat to make it more permeable to water and gases, thus encouraging germination. It is often done mechanically, thermally, or chemically. In this case it will be done mechanically by rubbing the seed coat with sandpaper. A metal file also works very well.
f. Tags or stickers for labeling
3. PPE (Personal Protection Equipment): None
4. Activity time: ~1 hr.
5. Content: Instruction includes classroom presentation, followed by a walk through a formally maintained botanical garden and natural area
in an arboretum *could substitute with park or neighborhood with a variety of trees.a. Structure of trees: open vs. forest; discuss
how and why they grow differently. Trees have different growth habits depending on their environmental conditions. Ask students how they expect the structure of a tree to be different when growing in a dense forest as opposed to their structure when growing out in the open. Why are they different? How do these adaptations benefit the tree?
b. How trees grow: shoots, roots, tips, and radial growth. Discuss where these different parts of the tree are found, and how each part contributes to the growth of the tree.i. Tree cookie available to look at up close.
Within the tree cookie, one can see various layers that contribute to tree growth, including transportation layers such as xylem and phloem, discussed below.
Photo from i l luminaticat at http: / / i175.photobucket.com/
albums/w160/i l luminaticat/ logdiag.jpg
c. How water and nutrient move in a treei. Xylem and phloem layers are shown in the
tree cookie. Xylem transports and stores water and water soluble nutrients, while the phloem transports sugars and other organic molecules throughout the tree.
d. Seasonal growthi. Discussion on when trees are growing
and how that affects tree care practices such as pruning. The tree cookie also tells stories about seasonal growth. The light colored rings in the wood, the spring wood, occurs in the spring when there is more rainfall and most growth occurs. The dark wood, or latewood, occurs in the hot, drier summer period and are usually
Page 3 © 2019, South Dakota Board of Regents
thinner. These rings can provide clues as to a year with very high or low precipitation, or can be thicker on one side if the tree began to lean and it was working to grow back upright, or was shaded from one side, for a few examples. Tree cookies can show scars from fires as well, telling a story of the tree’s life.
e. Tree agei. Age of tree from tree cookie determined–
students guess approximate age by counting rings. There are springwood and summerwood rings (light and dark) so students should only count one of the two – either all of the light lines or all of the dark lines to come with an approximate age.
f. Tree adaptation – winter, dormancy of trees and seedsi. Gymnocladus dioicus, or Kentucky
Coffeetree seeds passed around for hands-on examples. These seeds have a hard outer seed coat. This helps disperse the seeds before germinating right at the base of the tree, by keeping them dormant while they can be transported to other locations. Historically, the primary means of breaking the seed coat was the Mastodon. These mammals were believed to eat and disperse these seeds through chewing and digestion. Some additional interesting information on the evolutionary adaptations of Kentucky Coffeetree can be found here: https://www.amnh.org/learn/musings/FA01/h_mb.htm
g. Reproduction – male/female treesh. Discuss dioecious and monoecious trees.
Dioecious tree species have male or female reproductive parts on separate individuals, so they have both male trees and female trees. Monoecious trees have both male and female reproductive parts on one tree but in separate flowers. Provide some examples of dioecious and monoecious tree species and why one or the other may be desirable. One example is the male Ginkgo biloba trees are desirable as a landscape tree vs. the female Ginkgos, which are avoided due to smelly fleshy coated seeds that the female drops.
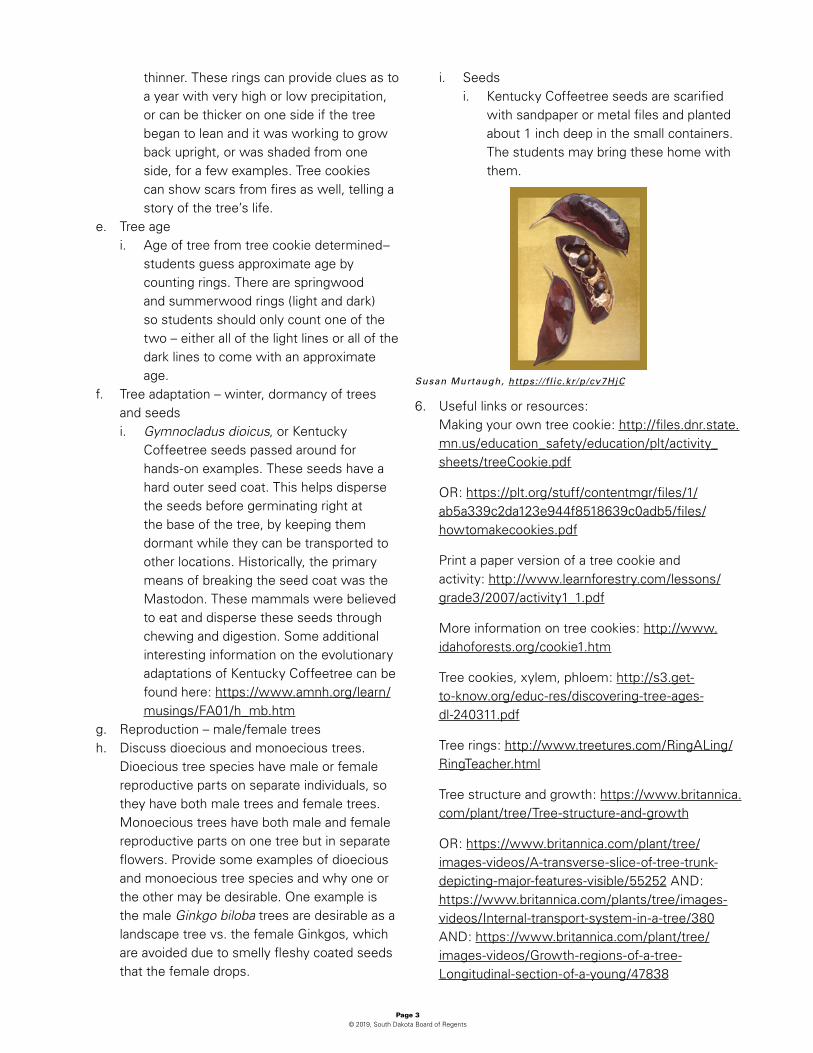
i. Seedsi. Kentucky Coffeetree seeds are scarified
with sandpaper or metal files and planted about 1 inch deep in the small containers. The students may bring these home with them.
Susan Murtaugh, https: / / f l ic.kr/p/cv7HjC
6. Useful links or resources: Making your own tree cookie: http://files.dnr.state.mn.us/education_safety/education/plt/activity_sheets/treeCookie.pdf
OR: https://plt.org/stuff/contentmgr/files/1/ab5a339c2da123e944f8518639c0adb5/files/howtomakecookies.pdf
Print a paper version of a tree cookie and activity: http://www.learnforestry.com/lessons/grade3/2007/activity1_1.pdf
More information on tree cookies: http://www.idahoforests.org/cookie1.htm
Tree cookies, xylem, phloem: http://s3.get-to-know.org/educ-res/discovering-tree-ages-dl-240311.pdf
Tree rings: http://www.treetures.com/RingALing/RingTeacher.html
Tree structure and growth: https://www.britannica.com/plant/tree/Tree-structure-and-growth
OR: https://www.britannica.com/plant/tree/images-videos/A-transverse-slice-of-tree-trunk-depicting-major-features-visible/55252 AND: https://www.britannica.com/plants/tree/images-videos/Internal-transport-system-in-a-tree/380 AND: https://www.britannica.com/plant/tree/images-videos/Growth-regions-of-a-tree-Longitudinal-section-of-a-young/47838
https://plt.org/stuff/contentmgr/files/1/ab5a339c2da123e944f8518639c0adb5/files/howtomakecookies.pdf
https://plt.org/stuff/contentmgr/files/1/ab5a339c2da123e944f8518639c0adb5/files/howtomakecookies.pdf
Page 4 © 2019, South Dakota Board of Regents
Module 2: How to Identify Tree Species
1. Objective: Another important aspect of arboriculture is the ability to correctly identify the tree species that you are working with. The goal of this module is to give students a background on the importance of proper Tree ID and provide a background of the techniques and methods used to have an accurate ID, as well as introduce the students to some of the common trees of our region.
2. Materials:a. Dichotomous Tree Identification Key: A
dichotomous key is a tool that can be used to identify trees. It will always provide two choices in each step, and following all of the steps will lead you to the name of the tree that you are identifying. For an online version, see: http://www.uwsp.edu/cnr-ap/leaf/Pages/TreeKey/treeToIdentify.aspx?feature=Main
3. PPE: None – comfortable walking shoes recommended
4. Activity time: ~ 1.5 hrs.
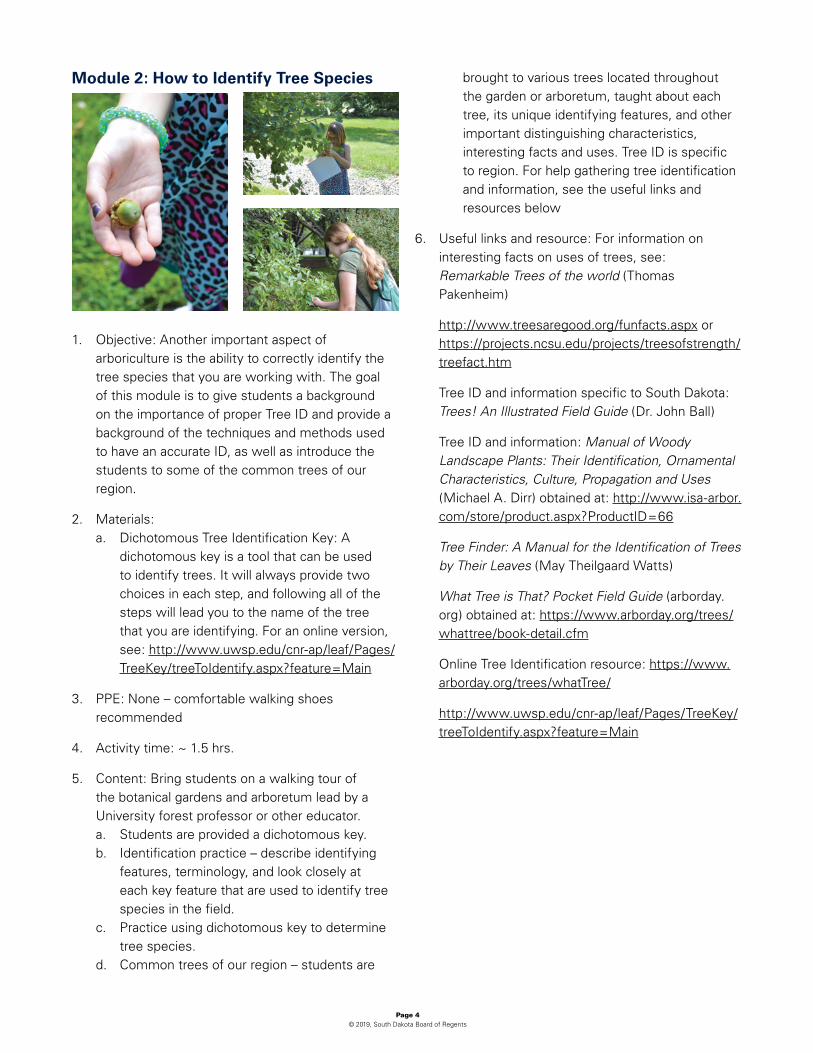
5. Content: Bring students on a walking tour of the botanical gardens and arboretum lead by a University forest professor or other educator.a. Students are provided a dichotomous key.b. Identification practice – describe identifying
features, terminology, and look closely at each key feature that are used to identify tree species in the field.
c. Practice using dichotomous key to determine tree species.
d. Common trees of our region – students are
brought to various trees located throughout the garden or arboretum, taught about each tree, its unique identifying features, and other important distinguishing characteristics, interesting facts and uses. Tree ID is specific to region. For help gathering tree identification and information, see the useful links and resources below
6. Useful links and resource: For information on interesting facts on uses of trees, see:Remarkable Trees of the world (Thomas Pakenheim)
http://www.treesaregood.org/funfacts.aspx or https://projects.ncsu.edu/projects/treesofstrength/treefact.htm
Tree ID and information specific to South Dakota: Trees! An Illustrated Field Guide (Dr. John Ball)
Tree ID and information: Manual of Woody Landscape Plants: Their Identification, Ornamental Characteristics, Culture, Propagation and Uses (Michael A. Dirr) obtained at: http://www.isa-arbor.com/store/product.aspx?ProductID=66
Tree Finder: A Manual for the Identification of Trees by Their Leaves (May Theilgaard Watts)
What Tree is That? Pocket Field Guide (arborday.org) obtained at: https://www.arborday.org/trees/whattree/book-detail.cfm
Online Tree Identification resource: https://www.arborday.org/trees/whatTree/
http://www.uwsp.edu/cnr-ap/leaf/Pages/TreeKey/treeToIdentify.aspx?feature=Main

Page 5 © 2019, South Dakota Board of Regents
Module 3: Tree Inventories
1. Objective: Street and park tree inventories provide information for planning, design, planting, maintenance, and removal of community trees. The goal of this module is to give students a background on the importance of proper data collection techniques needed to provide accurate community data.
2. Materials:a. Handheld GPS, such as Trimble – Ask your
local extension forest agent or geography organizations if they may have some available to use. If none are available, the GPS location section of this activity can be skipped.
b. TreeWorks or similar database software – *If your program does not have database software, the activity can be practiced by recording data into notebooks.
c. Cruiser stick – A Cruiser stick is a tool used to measure tree diameter (also see biltmore stick) and height (also see hypsometer scale). See how to use this tool at: http://forestry.usu.edu/htm/rural-forests/forest-management/forest-timber-management/measuring-tree-volume-with-a-biltmore-stick/. Most arborist or forestry
specialists will have one on hand, so contact your local extension forestry agent for more information.
To purchase a Cruiser stick: http://www.forestry-suppliers.com/product_pages/Products.asp?mi=14431
To make your own: https://www.agriculture.purdue.edu/fnr/stoutwoods/activities/Building%20a%20Biltmore%20Stick.pdf
3. PPE: None – comfortable walking shoes recommended
4. Activity time: ~1 hr.
5. Content: Walk students through the arboretum and show them how to collect data using TreeWorks software. An alternative is to walk them through a park or neighborhood, and record materials in whichever online database software your program has a license to. If your program does not have license to an online database, students may record data in notebook. The most commonly collected data in tree inventory are as follows:a. Location of tree by GPSb. Name of tree speciesc. DBH stands for “diameter at breast height”,
and is measured 4.5 feet above the ground measured with biltmore scale – Measure height with Hypsometer, using established chain measurement use established chain measurement to measure canopy spread.
d. Condition of tree (good, fair, poor, dead/dying)e. Diseases, cankers, or structural issues.f. Is urgent pruning or removal needed?g. Other concerns or notes
6. Useful links and resources: Best Management Practices – Tree Inventories, Second Edition (Jerry Bond) can be acquired at: http://www.isa-arbor.com/store/product.aspx?ProductID=137
Tree Inventory and Management Software: https://www.na.fs.fed.us/urban/inforesources/inventory/Tree%20Inventory%20Software%20List%20-%20%20January%202014.pdf

Page 6 © 2019, South Dakota Board of Regents
Module 4: Tree Health Care
1. Objective: Tree Health Care is a vital component of arboriculture, whether it be diagnosing pests, possible safety risks, or prevention and managing urban stresses. The goal of this module is to expose students to basic concepts of diagnosing, monitoring, and treatment of trees and safe practices in which to do so.
2. Materials:a. Pest and disease on tree to examine – In the
“off” season, pinned insects or Riker mounts are an option
b Insect trap for monitoring (e.g. pheromone trap, sticky card)
c. Personal Protection Equipment for demonstration and fitting studentsi. Eye protection: Safety glassesii. Ear protectioniii. Head protection: Helmetsiv. Hand protection: Gloves recommended
3. PPE: None for activity (see above for demonstration of PPE) – comfortable walking shoes recommended
4. Activity time: ~1.5 hrs.
5. Content: To prepare for this activity, scout the area that you will have students tour ahead of time. Select trees with various pests, signs or symptoms of tree stress and pests that you will discuss with them. Make note of where they are and what specifically the students will look for when they inspect the tree. You may take an example with to show the class when they inspect the tree in the pre-discussion. You can also set your own monitoring traps ahead of time with the instructions below. With the students, begin with a
discussion on tree health care, including: a. Signs and symptoms of tree stress: There
are many symptoms of tree disease or insect damage. Tree stress often develops more slowly than disease or insect damage and can include abnormally small leaves, pale green coloration of leaves, unusually slow growth, premature development of fall leaf coloration, early leaf drop, dieback of twigs and branches, wilting of leaves and tender new growth, peeling bark, and presence of fungi protruding from stem or branches. Tree diseases also develop slowly and are usually caused by fungi or bacteria. Symptoms include leaf spots, blights, yellowing of leaves, or wilting. Examine trees for peeling back, dieback of twigs and branches, and fungi growing out from the trunk. (https://ag.umass.edu/fact-sheets/helping-trees-to-manage-stress)
b. What type of organisms can be pests on trees? For South Dakota pests, see: https://sdda.sd.gov/conservation-forestry/forest-health/tree-pest-alerts/ and for U.S. pest visit: https://sdda.sd.gov/conservation-forestry/forest-health/tree-pest-alerts/
c. The importance of a certified professional diagnosing problems and diseases and recommended actions to prevent, mediate or treat them: ISA (International Society of Arboriculture) Certified Arborists are knowledgeable, trained and equipped to provide proper tree care. They must pass a comprehensive examination developed by some of the nation’s leading experts on tree care, adhere to a Code of Ethics, and continue their education in order to maintain their certification. (See http://www.isa-arbor.com/publicoutreach/whyhirecertifiedarborist/index.aspx and attached PDF)
d. Safe work practicesi. Explanation of the importance of Personal
Protection Equipment (PPE)ii. Describe which PPE are important to wear
for specific tasksiii. Individual equipment is in classroom,
demonstration, and passed aroundiv. Each student is provided with safety
glasses, helmets, hearing protection, and gloves
Page 7 © 2019, South Dakota Board of Regents
e. Now lead students through a tour of the gardens (or other selected area) to take a closer look at specific examples of tree stress and diseases.
i. Have the students investigate the trees that were chosen ahead of time. Do they notice anything? What signs or symptoms are apparent? Is the tree stressed? Are there any diseases evident? Can they find any organisms or evidence of organisms? What organisms that are found are pests? Are there any beneficial insects?
ii. Discuss the biotic and abiotic factors that may contribute to stress, disease, or insect infestations. Biotics problems are caused by living organisms like fungi, bacteria, viruses, nematodes, insects, mites, and animals. Abiotic disorders are caused by nonliving factors such as sunscald, freeze injury, wind injury, chemical drift, nutrient deficiency, drought stress, or improper cultural practices like overwatering or planting too deep. (http://www.ipm.iastate.edu/ipm/hortnews/2003/9-12-2003/stresses.html)
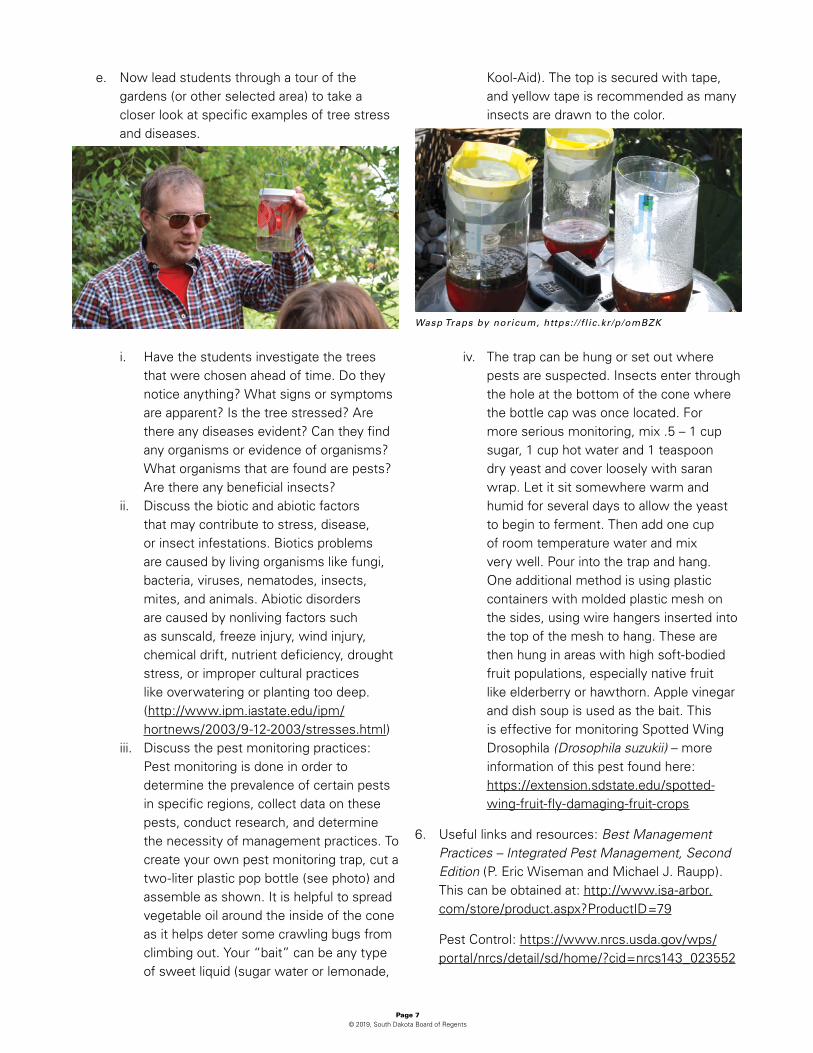
iii. Discuss the pest monitoring practices: Pest monitoring is done in order to determine the prevalence of certain pests in specific regions, collect data on these pests, conduct research, and determine the necessity of management practices. To create your own pest monitoring trap, cut a two-liter plastic pop bottle (see photo) and assemble as shown. It is helpful to spread vegetable oil around the inside of the cone as it helps deter some crawling bugs from climbing out. Your “bait” can be any type of sweet liquid (sugar water or lemonade,
Kool-Aid). The top is secured with tape, and yellow tape is recommended as many insects are drawn to the color.
Wasp Traps by noricum, https: / / f l ic.kr/p/omBZK
iv. The trap can be hung or set out where pests are suspected. Insects enter through the hole at the bottom of the cone where the bottle cap was once located. For more serious monitoring, mix .5 – 1 cup sugar, 1 cup hot water and 1 teaspoon dry yeast and cover loosely with saran wrap. Let it sit somewhere warm and humid for several days to allow the yeast to begin to ferment. Then add one cup of room temperature water and mix very well. Pour into the trap and hang. One additional method is using plastic containers with molded plastic mesh on the sides, using wire hangers inserted into the top of the mesh to hang. These are then hung in areas with high soft-bodied fruit populations, especially native fruit like elderberry or hawthorn. Apple vinegar and dish soup is used as the bait. This is effective for monitoring Spotted Wing Drosophila (Drosophila suzukii) – more information of this pest found here: https://extension.sdstate.edu/spotted-wing-fruit-fly-damaging-fruit-crops
6. Useful links and resources: Best Management Practices – Integrated Pest Management, Second Edition (P. Eric Wiseman and Michael J. Raupp). This can be obtained at: http://www.isa-arbor.com/store/product.aspx?ProductID=79
Pest Control: https://www.nrcs.usda.gov/wps/portal/nrcs/detail/sd/home/?cid=nrcs143_023552
Page 8 © 2019, South Dakota Board of Regents
OR https://extension.sdstate.edu/category/insect-pests
Beneficial insects: https://www.nrcs.usda.gov/wps/portal/nrcs/detail/sd/home/?cid=nrcs143_023526
Biotic vs. Abiotic stresses: http://www.ipm.iastate.edu/ipm/hortnews/2003/9-12-2003/stresses.html
OR http://hyg.ipm.illinois.edu/pastpest/200702b.html
Tree stress management: https://ag.umass.edu/fact-sheets/helping-trees-to-manage-stress
Module 5: The Root of the Matter: The Importance of Soil
1. Objective: In this activity participants will learn the importance of soil and proper planting techniques. This module covers differences in soil through hands on digging, the different types of trees from the nursery and the benefits and detriments of each planting type.
2. Materials:a. Shovels (5-10) – enough for at least half of the
group size.b. Garden rakes (2-3)c. Mulch (20 gallons volume for each tree)d. Bolt cutterse. Box cutter or sharp knifef. Container grown tree (1-2) – only use two trees
with a larger ground sizeg. Balled or burlap tree (B&B) tree (1)h. Bare root tree (optional – this will depend on
the season)i. Tape measurej. Peat moss (optional)k. Dry erase board and markerl. Staking materials, per tee 2 T-posts, 2 tree
ties, 5ft. or .25” nylon ropem. Samples of poor quality urban soils and clay
sub layers (optional)n. Tree spade (optional)
3. PPE:a. Safety glassesb. Glovesc. Ear plugs (if using tree spade or mechanical
equipment)
4. Activity time: ~2 hrs.
5. Content: There is some pre-planning required for this module.a. Group leaders should choose locations for
all of the trees beforehand and make sure to check for underground utilities at least 48 hours before you dig. In the United States, call your local utility 811 number.
b. Stage your peat moss by any area where very poor soil conditions exist. Have the mulch in a plastic trash can by the planting site.
c. The balled and burlap tree should also be staged prior to planting as this is often a mechanical process due to the weight of the trees. Make sure the ball is no more than 5 feet from where you plan to dig and plant.
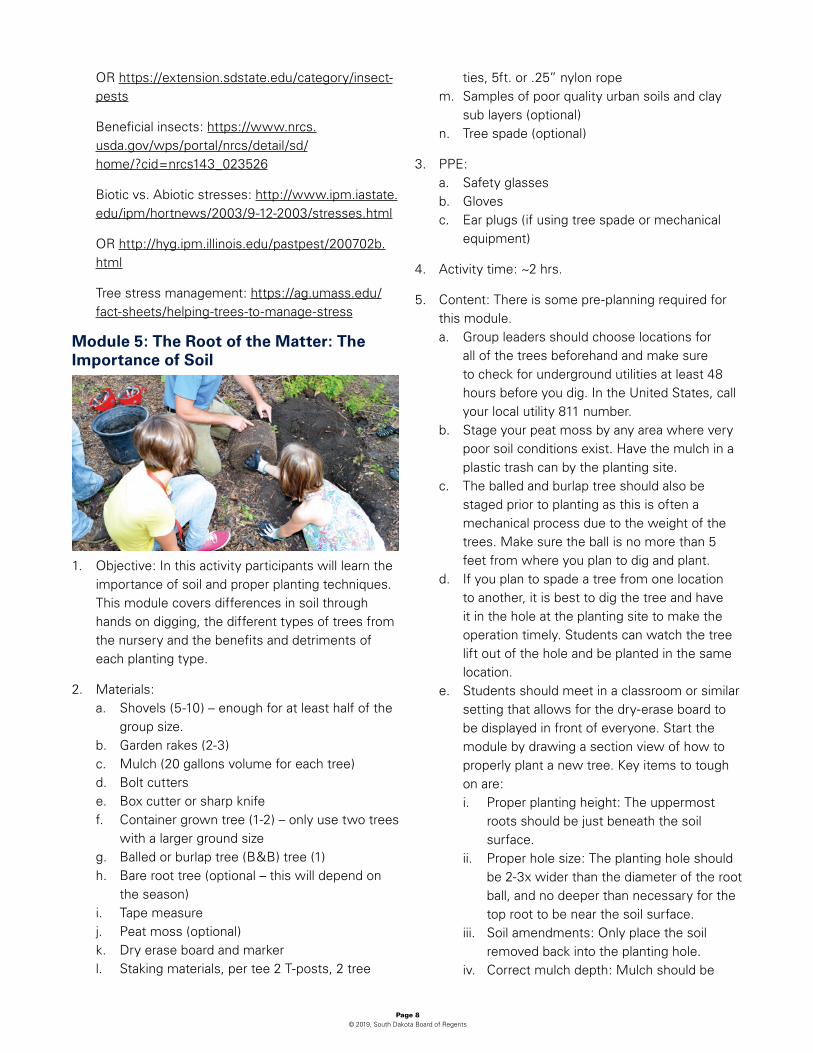
d. If you plan to spade a tree from one location to another, it is best to dig the tree and have it in the hole at the planting site to make the operation timely. Students can watch the tree lift out of the hole and be planted in the same location.
e. Students should meet in a classroom or similar setting that allows for the dry-erase board to be displayed in front of everyone. Start the module by drawing a section view of how to properly plant a new tree. Key items to tough on are:i. Proper planting height: The uppermost
roots should be just beneath the soil surface.
ii. Proper hole size: The planting hole should be 2-3x wider than the diameter of the root ball, and no deeper than necessary for the top root to be near the soil surface.
iii. Soil amendments: Only place the soil removed back into the planting hole.
iv. Correct mulch depth: Mulch should be
Page 9 © 2019, South Dakota Board of Regents
uniformly 2-4” deep, no closer than 6” from the trunk and spread out to at least 1-2 ft. beyond the planting hole.
f. Draw a diagram of soil horizons and discuss which layers are best for plant growth. This is a good time to talk about topsoil and the characteristics of suitable topsoil. After this primer, you are ready to hit the field.
g. Start with the container tree.i. Have the students dig a hole like you
discussed on the drawing board.ii. Have them occasionally stop and measure
the hole with the tape measure.iii. When half of the students are digging have
the other half take notes on what they are seeing. Is this quality topsoil like we talked about on the board? Why or why not? If the soil is not suitable then talk about amending and amend the soil with the students.
iv. Make sure to take notes of circling roots and other root characteristics in a container. This is a good time for you to compare roots to the bare root specimen. Look at the difference between the two. Make sure to discuss the root collar and root flares and where the soil should be compared to them. Cover the proper methods to remediate circling roots before they become girdling roots over time.
v. Plant the specimen like you talked about on the drawing board and have the students rake, tamp and mulch the newly planted tree.
vi. Stake properly if needed, make sure to discuss what is acceptable and what is not in staking.
h. Move on to the B&B tree, this will take considerably more time.i. Begin digging the hole with your students.
They will need to switch on and off with each other. Depending on the site you may dig in to and have the opportunity to discuss a different soil horizon.
ii. Use the tape measure to verify your hole depth prior to moving the tree into the hole. The students that are not digging should make observations on the B&B tree.
iii. The root collar can be buried quite deep inside the ball of the tree and this will affect your planting depth and hole depth.
iv. Cut the bottom one-third of the cage off of the tree once the hole is the proper depth. Use the bolt cutters to do this.
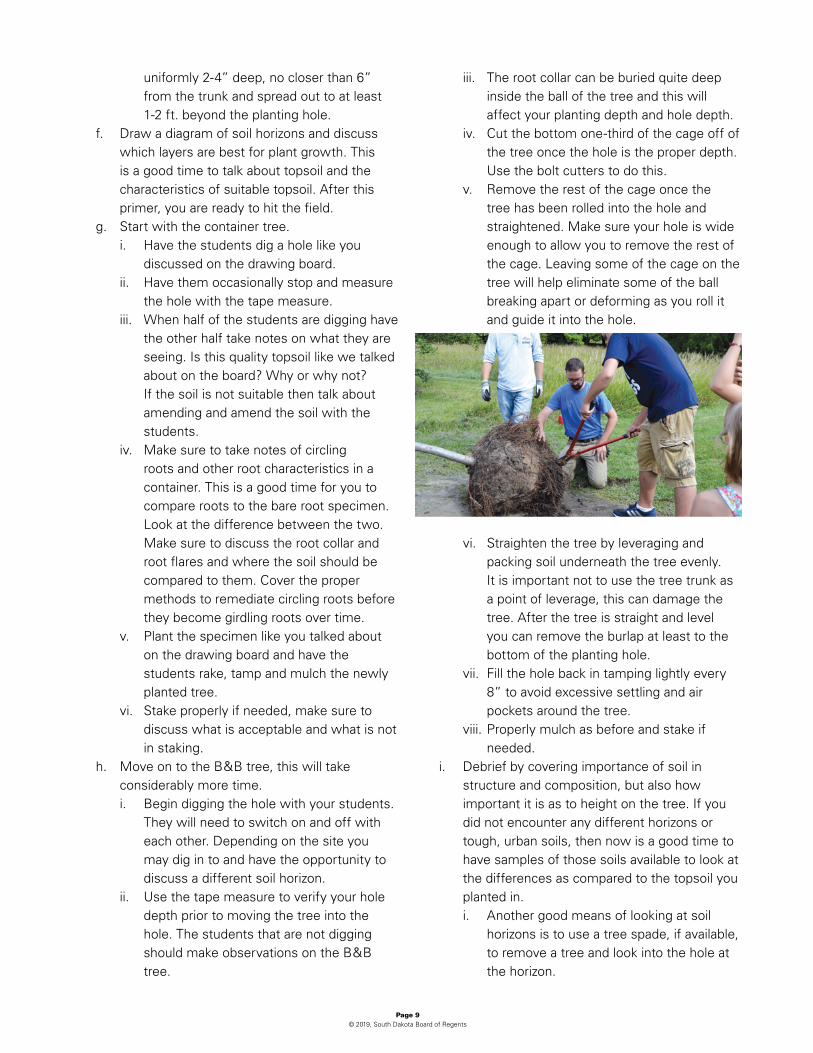
v. Remove the rest of the cage once the tree has been rolled into the hole and straightened. Make sure your hole is wide enough to allow you to remove the rest of the cage. Leaving some of the cage on the tree will help eliminate some of the ball breaking apart or deforming as you roll it and guide it into the hole.
vi. Straighten the tree by leveraging and packing soil underneath the tree evenly. It is important not to use the tree trunk as a point of leverage, this can damage the tree. After the tree is straight and level you can remove the burlap at least to the bottom of the planting hole.
vii. Fill the hole back in tamping lightly every 8” to avoid excessive settling and air pockets around the tree.
viii. Properly mulch as before and stake if needed.
i. Debrief by covering importance of soil in structure and composition, but also how important it is as to height on the tree. If you did not encounter any different horizons or tough, urban soils, then now is a good time to have samples of those soils available to look at the differences as compared to the topsoil you planted in.i. Another good means of looking at soil
horizons is to use a tree spade, if available, to remove a tree and look into the hole at the horizon.
Page 10 © 2019, South Dakota Board of Regents
j. Remind your students that a newly planted tree must always be watered even though it is not covered explicitly in this module.
6. Useful links and resources: Best Management Practices – Tree Planting, Second Edition (Gary Watson) obtained at: http://www.isa-arbor.com/store/product.aspx?ProductID=104
http://www.isa-arbor.com/education/onlineresources/cadplanningspecifications.aspx
Trees! An Illustrated Field Guide (Dr. John Ball)
Online PDF: http://www.treesaregood.com/treecare/resources/new_treeplanting.pdf
Tree planting information: https://www.arborday.org/trees/planting/
Module 6: Tree Pruning
1. Objectives: the objective of this module is to increase student awareness of the reason for pruning a tree and the proper methods and tools for this practice.
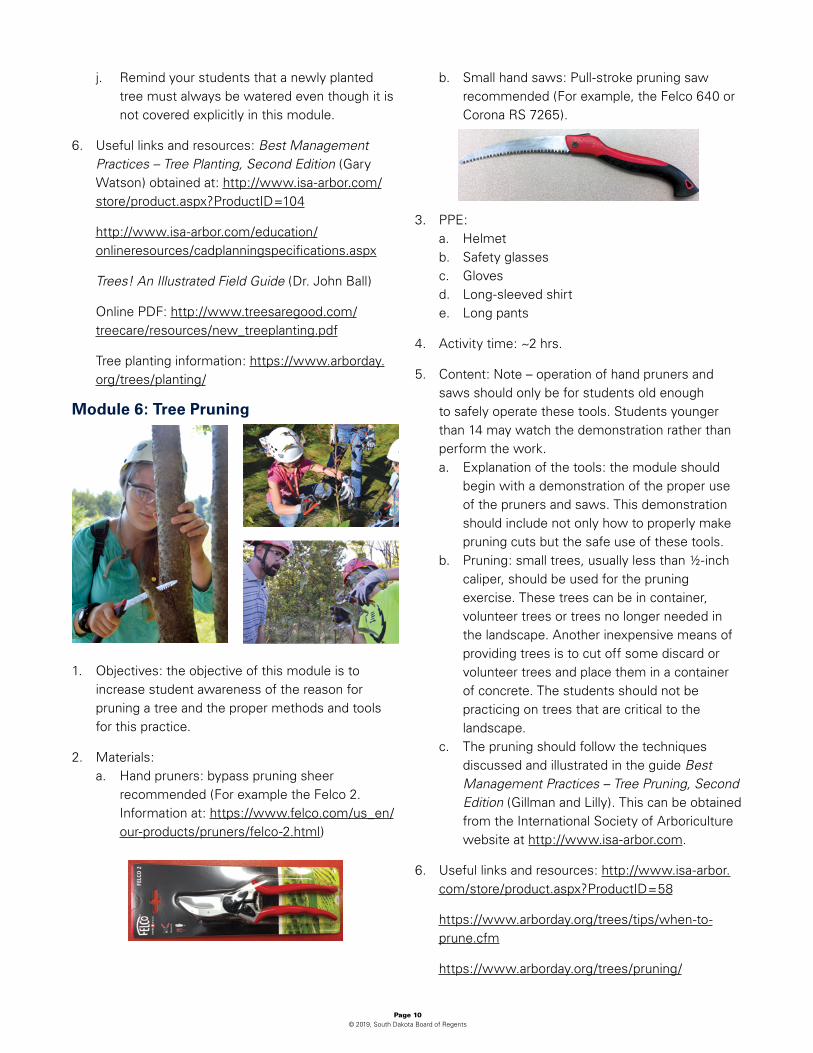
2. Materials:a. Hand pruners: bypass pruning sheer
recommended (For example the Felco 2. Information at: https://www.felco.com/us_en/our-products/pruners/felco-2.html)
b. Small hand saws: Pull-stroke pruning saw recommended (For example, the Felco 640 or Corona RS 7265).
3. PPE:a. Helmetb. Safety glassesc. Glovesd. Long-sleeved shirte. Long pants
4. Activity time: ~2 hrs.
5. Content: Note – operation of hand pruners and saws should only be for students old enough to safely operate these tools. Students younger than 14 may watch the demonstration rather than perform the work.a. Explanation of the tools: the module should
begin with a demonstration of the proper use of the pruners and saws. This demonstration should include not only how to properly make pruning cuts but the safe use of these tools.
b. Pruning: small trees, usually less than ½-inch caliper, should be used for the pruning exercise. These trees can be in container, volunteer trees or trees no longer needed in the landscape. Another inexpensive means of providing trees is to cut off some discard or volunteer trees and place them in a container of concrete. The students should not be practicing on trees that are critical to the landscape.
c. The pruning should follow the techniques discussed and illustrated in the guide Best Management Practices – Tree Pruning, Second Edition (Gillman and Lilly). This can be obtained from the International Society of Arboriculture website at http://www.isa-arbor.com.
6. Useful links and resources: http://www.isa-arbor.com/store/product.aspx?ProductID=58
https://www.arborday.org/trees/tips/when-to-prune.cfm
https://www.arborday.org/trees/pruning/
Page 11 © 2019, South Dakota Board of Regents
Online PDF: http://www.treesaregood.com/treecare/resources/Pruning_matureTrees.pdf
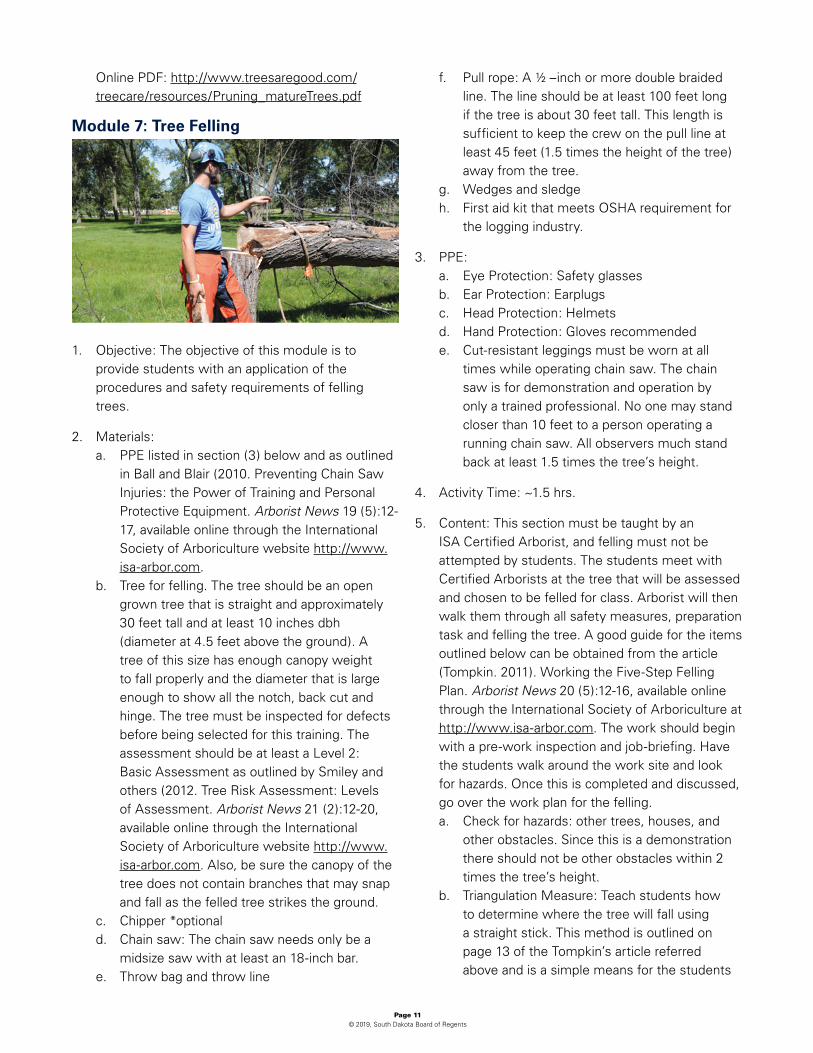
Module 7: Tree Felling
1. Objective: The objective of this module is to provide students with an application of the procedures and safety requirements of felling trees.
2. Materials:a. PPE listed in section (3) below and as outlined
in Ball and Blair (2010. Preventing Chain Saw Injuries: the Power of Training and Personal Protective Equipment. Arborist News 19 (5):12-17, available online through the International Society of Arboriculture website http://www.isa-arbor.com.
b. Tree for felling. The tree should be an open grown tree that is straight and approximately 30 feet tall and at least 10 inches dbh (diameter at 4.5 feet above the ground). A tree of this size has enough canopy weight to fall properly and the diameter that is large enough to show all the notch, back cut and hinge. The tree must be inspected for defects before being selected for this training. The assessment should be at least a Level 2: Basic Assessment as outlined by Smiley and others (2012. Tree Risk Assessment: Levels of Assessment. Arborist News 21 (2):12-20, available online through the International Society of Arboriculture website http://www.isa-arbor.com. Also, be sure the canopy of the tree does not contain branches that may snap and fall as the felled tree strikes the ground.
c. Chipper *optionald. Chain saw: The chain saw needs only be a
midsize saw with at least an 18-inch bar.e. Throw bag and throw line
f. Pull rope: A ½ –inch or more double braided line. The line should be at least 100 feet long if the tree is about 30 feet tall. This length is sufficient to keep the crew on the pull line at least 45 feet (1.5 times the height of the tree) away from the tree.
g. Wedges and sledgeh. First aid kit that meets OSHA requirement for
the logging industry.
3. PPE:a. Eye Protection: Safety glassesb. Ear Protection: Earplugsc. Head Protection: Helmetsd. Hand Protection: Gloves recommendede. Cut-resistant leggings must be worn at all
times while operating chain saw. The chain saw is for demonstration and operation by only a trained professional. No one may stand closer than 10 feet to a person operating a running chain saw. All observers much stand back at least 1.5 times the tree’s height.
4. Activity Time: ~1.5 hrs.
5. Content: This section must be taught by an ISA Certified Arborist, and felling must not be attempted by students. The students meet with Certified Arborists at the tree that will be assessed and chosen to be felled for class. Arborist will then walk them through all safety measures, preparation task and felling the tree. A good guide for the items outlined below can be obtained from the article (Tompkin. 2011). Working the Five-Step Felling Plan. Arborist News 20 (5):12-16, available online through the International Society of Arboriculture at http://www.isa-arbor.com. The work should begin with a pre-work inspection and job-briefing. Have the students walk around the work site and look for hazards. Once this is completed and discussed, go over the work plan for the felling.a. Check for hazards: other trees, houses, and
other obstacles. Since this is a demonstration there should not be other obstacles within 2 times the tree’s height.
b. Triangulation Measure: Teach students how to determine where the tree will fall using a straight stick. This method is outlined on page 13 of the Tompkin’s article referred above and is a simple means for the students
Page 12 © 2019, South Dakota Board of Regents
to determine tree height. Branches may be used but ¼ inch dowels are preferred. Cut the dowels into 30 inch lengths and have the students use these to determine the height. The students should be wearing safety glasses when doing this exercise. Once they have determined the height, have each student place the dowel into the ground along the path of the projected fall. See which student came closest to determine the height.
Back cut made at the same height as the point of the notch
Top cut made at 70º angle
Bottom cut made at 20º angle
c. Assess the Lean: is there a forward, backward, or side lean? Correct the lean using wedges and pull rope.
d. Establish retreat paths route and walk the students along these paths explaining the importance of keeping the area clear during the felling operation.
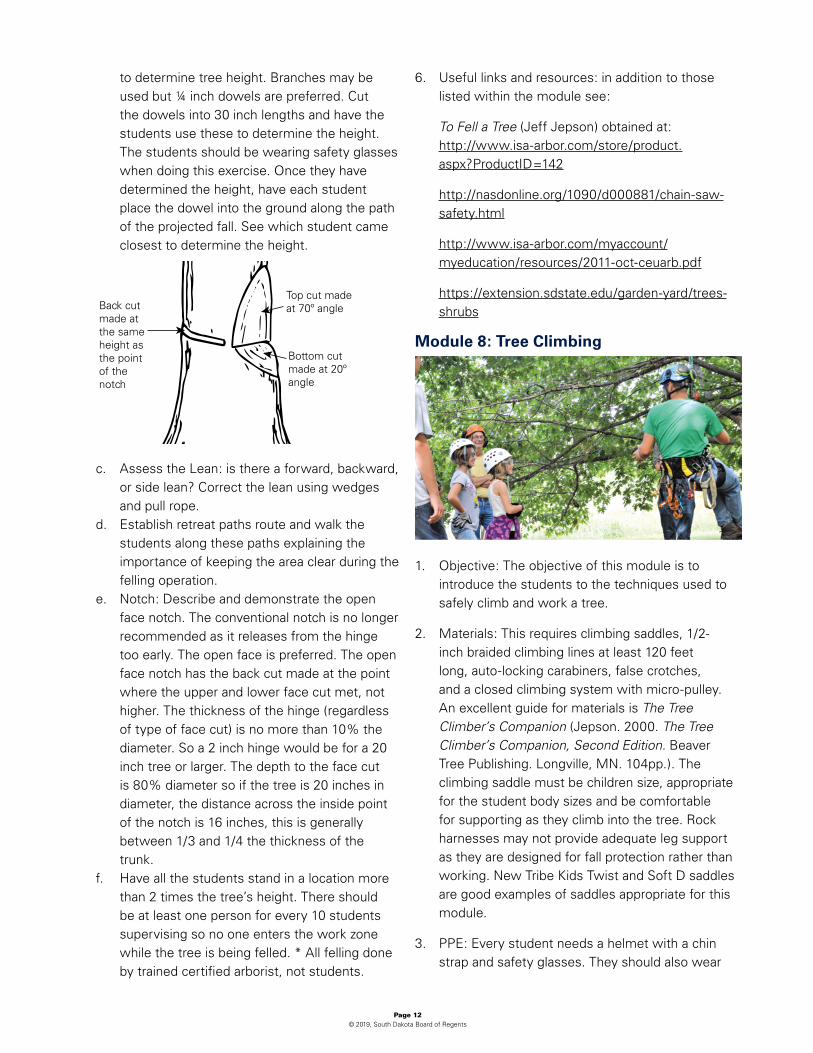
e. Notch: Describe and demonstrate the open face notch. The conventional notch is no longer recommended as it releases from the hinge too early. The open face is preferred. The open face notch has the back cut made at the point where the upper and lower face cut met, not higher. The thickness of the hinge (regardless of type of face cut) is no more than 10% the diameter. So a 2 inch hinge would be for a 20 inch tree or larger. The depth to the face cut is 80% diameter so if the tree is 20 inches in diameter, the distance across the inside point of the notch is 16 inches, this is generally between 1/3 and 1/4 the thickness of the trunk.
f. Have all the students stand in a location more than 2 times the tree’s height. There should be at least one person for every 10 students supervising so no one enters the work zone while the tree is being felled. * All felling done by trained certified arborist, not students.
6. Useful links and resources: in addition to those listed within the module see:
To Fell a Tree (Jeff Jepson) obtained at: http://www.isa-arbor.com/store/product.aspx?ProductID=142
http://nasdonline.org/1090/d000881/chain-saw-safety.html
http://www.isa-arbor.com/myaccount/myeducation/resources/2011-oct-ceuarb.pdf
https://extension.sdstate.edu/garden-yard/trees-shrubs
Module 8: Tree Climbing
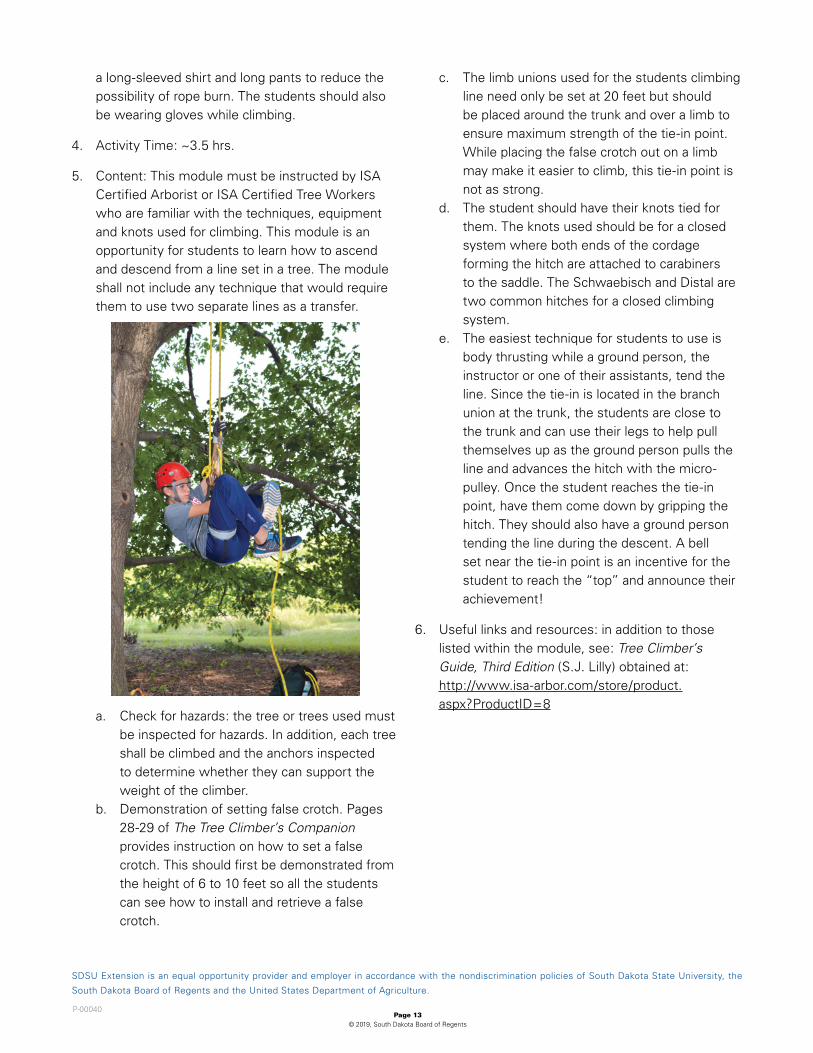
1. Objective: The objective of this module is to introduce the students to the techniques used to safely climb and work a tree.
2. Materials: This requires climbing saddles, 1/2-inch braided climbing lines at least 120 feet long, auto-locking carabiners, false crotches, and a closed climbing system with micro-pulley. An excellent guide for materials is The Tree Climber’s Companion (Jepson. 2000. The Tree Climber’s Companion, Second Edition. Beaver Tree Publishing. Longville, MN. 104pp.). The climbing saddle must be children size, appropriate for the student body sizes and be comfortable for supporting as they climb into the tree. Rock harnesses may not provide adequate leg support as they are designed for fall protection rather than working. New Tribe Kids Twist and Soft D saddles are good examples of saddles appropriate for this module.
3. PPE: Every student needs a helmet with a chin strap and safety glasses. They should also wear
Page 13 © 2019, South Dakota Board of Regents
a long-sleeved shirt and long pants to reduce the possibility of rope burn. The students should also be wearing gloves while climbing.
4. Activity Time: ~3.5 hrs.
5. Content: This module must be instructed by ISA Certified Arborist or ISA Certified Tree Workers who are familiar with the techniques, equipment and knots used for climbing. This module is an opportunity for students to learn how to ascend and descend from a line set in a tree. The module shall not include any technique that would require them to use two separate lines as a transfer.
a. Check for hazards: the tree or trees used must be inspected for hazards. In addition, each tree shall be climbed and the anchors inspected to determine whether they can support the weight of the climber.
b. Demonstration of setting false crotch. Pages 28-29 of The Tree Climber’s Companion provides instruction on how to set a false crotch. This should first be demonstrated from the height of 6 to 10 feet so all the students can see how to install and retrieve a false crotch.
c. The limb unions used for the students climbing line need only be set at 20 feet but should be placed around the trunk and over a limb to ensure maximum strength of the tie-in point. While placing the false crotch out on a limb may make it easier to climb, this tie-in point is not as strong.
d. The student should have their knots tied for them. The knots used should be for a closed system where both ends of the cordage forming the hitch are attached to carabiners to the saddle. The Schwaebisch and Distal are two common hitches for a closed climbing system.
e. The easiest technique for students to use is body thrusting while a ground person, the instructor or one of their assistants, tend the line. Since the tie-in is located in the branch union at the trunk, the students are close to the trunk and can use their legs to help pull themselves up as the ground person pulls the line and advances the hitch with the micro-pulley. Once the student reaches the tie-in point, have them come down by gripping the hitch. They should also have a ground person tending the line during the descent. A bell set near the tie-in point is an incentive for the student to reach the “top” and announce their achievement!
6. Useful links and resources: in addition to those listed within the module, see: Tree Climber’s Guide, Third Edition (S.J. Lilly) obtained at: http://www.isa-arbor.com/store/product.aspx?ProductID=8
SDSU Extension is an equal opportunity provider and employer in accordance with the nondiscrimination policies of South Dakota State University, the
South Dakota Board of Regents and the United States Department of Agriculture.
P-00040