José Crispiessay
50
josé crispim SME consulting, hardware, networks, systems, training Articles - Other Storage Devices NAS D-Link DNS-320 - Installation and Configuration RAID-1, Network Sharing, FTP Access and Media Server Introduction The NAS D-Link DNS-320 - version B1, allows 2 disks up to 8TB (total capacity) and aims to share documents, digital media files (music, photos / images and videos) in a home or office network. Have an FTP server that allows remote access to the content of the discs safely, through the definition of different users and permission levels. It also has a server that allows multimedia content available to equipment connected to the network, such as televisions. The main features are: Processador - Marvel 88F6281 800 MHz; RAM - 128 MB; Flash (accommodation for the NAS software) - 128 MB; Slots for Disks - 2; Interface and Form Factor of the disks - SATA II, 3,5"; Disks Management - RAID 0, RAID 1, JBOD; Maximum storage capacity - 8 TB (Total); LAN - 1 x Gigabit Ethernet - DHCP or static IP, NTP, Dynamic DNS, Bonjour; USB Ports- 1 (for USB pen disk, UPS or USB Printer); Limit of Users - 128; FTP Connections Limit - 10; Download Protocols - FTP, HTTP, P2P; The FTP server allows data encryption SSL/TLS; Servers - DLNA, iTunes, FTP, USB Print Server; Operating Systems Compatibility - compatible with Windows XP/Vista/7, Mac OSX 10.5, Linux This article is divided into two parts. At first, we address in detail the installation of disks, creating groups and users, configuration and network sharing in Windows environment and access to sharing via FTP. We will also configure the Media Server (UPnP AV).
-
Upload
marinell-aclan-del-mundo -
Category
Documents
-
view
217 -
download
0
description
noli
Transcript of José Crispiessay

josé crispim SME consulting, hardware, networks, systems, training
Articles - Other Storage Devices
NAS D-Link DNS-320 - Installation and Configuration
RAID-1, Network Sharing, FTP Access and Media Server
Introduction
The NAS D-Link DNS-320 - version B1, allows 2 disks up to 8TB (total capacity) and aims to share documents, digital
media files (music, photos / images and videos) in a home or office network. Have an FTP server that allows remote
access to the content of the discs safely, through the definition of different users and permission levels. It also has a
server that allows multimedia content available to equipment connected to the network, such as televisions. The
main features are:
Processador - Marvel 88F6281 800 MHz; RAM - 128 MB; Flash (accommodation for the NAS software) - 128 MB; Slots for Disks - 2; Interface and Form Factor of the disks - SATA II, 3,5"; Disks Management - RAID 0, RAID 1, JBOD; Maximum storage capacity - 8 TB (Total); LAN - 1 x Gigabit Ethernet - DHCP or static IP, NTP, Dynamic DNS, Bonjour; USB Ports- 1 (for USB pen disk, UPS or USB Printer); Limit of Users - 128; FTP Connections Limit - 10; Download Protocols - FTP, HTTP, P2P; The FTP server allows data encryption SSL/TLS; Servers - DLNA, iTunes, FTP, USB Print Server; Operating Systems Compatibility - compatible with Windows XP/Vista/7, Mac OSX 10.5, Linux
This article is divided into two parts. At first, we address in detail the installation of disks, creating groups and
users, configuration and network sharing in Windows environment and access to sharing via FTP. We will also
configure the Media Server (UPnP AV).
In the second part we will analyze in detail all the menus of the administration console of the NAS Unit.
Index
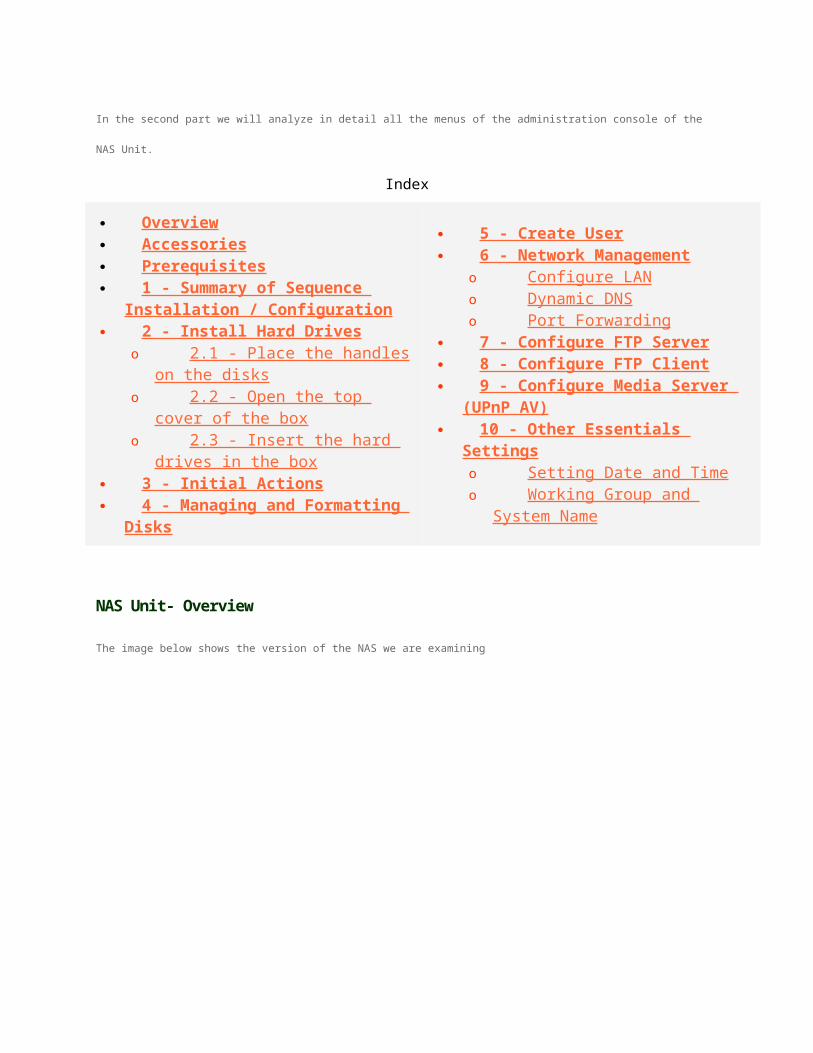
Overview Accessories Prerequisites 1 - Summary of Sequence Installation /
Configuration 2 - Install Hard Drives
o 2.1 - Place the handles on the disks o 2.2 - Open the top cover of the box o 2.3 - Insert the hard drives in the
box 3 - Initial Actions 4 - Managing and Formatting Disks
5 - Create User 6 - Network Management
o Configure LAN o Dynamic DNS o Port Forwarding
7 - Configure FTP Server 8 - Configure FTP Client 9 - Configure Media Server (UPnP AV) 10 - Other Essentials Settings
o Setting Date and Time o Working Group and System Name
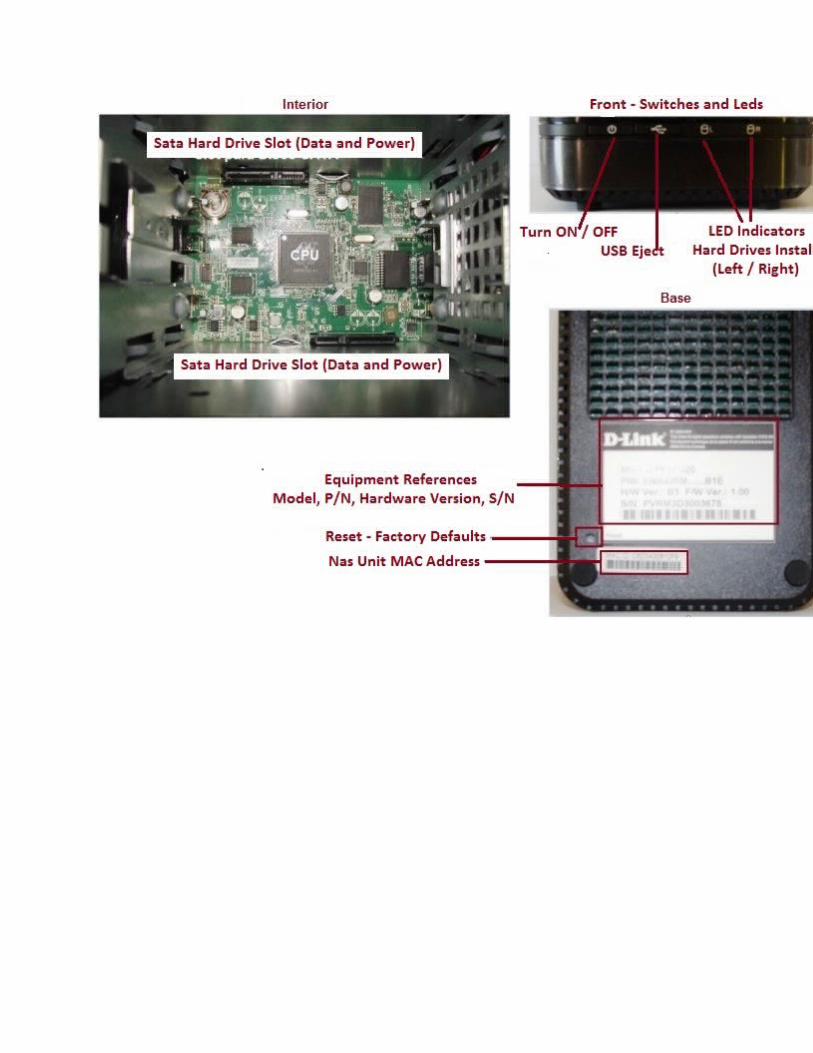
NAS Unit- Overview
The image below shows the version of the NAS we are examining

Accessories
Besides manual and Quick Start CD, packaging NAS Unit brings the following accessories:

Prerequisites for the example that we will use
Before turning to the initial configuration of the NAS, you should decide what kind of storage subsystem you will
use. This NAS enables the following:
Standard or No-RAID - the inserted discs will operate as usual. For those who want to have the total installed capacity;;
RAID-0 - Requires 2 drives of equal capacity and preferably the same brand and model - data blocks can be written in one or another unit. The disk drives are shown as a single. Although performance is improved, if one disk fails all data given array will be lost. Useful for those who want the best performance of Discs;
RAID-1 -Requires 2 drives of equal capacity and preferably the same brand and model - A disc is an image of the other, that is, data is duplicated. If one disk fails, the data is intact on the other. Useful for those who want to have an automatic backup system. The system displays a single unit. The other, which is the "mirror" is hidden;
JBOD (Just a Bunch Of Disks) - Need 2 discs, which can be of different capacities - Identical to RAID-0, but allowing different disks. The total size of the JBOD is the combined total of all the individual units in the set.

RAID-1 + JBOD - We can define certain capacity for RAID-1 and the remainder for JBOD. For example, on 2 discs 2 TB, 1 TB can set (each disk) RAID-1 and the remainder (Disk 1 TB each) for JBOD.
In this configuration, it is understood that you have a router for which you have all permissions management (a
situation that some ISPs do not allow) and that your Internet service provider (ISP) does not block FTP.
In this case we use two disks of 2TB Western Digital with the same model, ie, two disks are exactly alike. As we
intend that there is a backup of the data that exist in the NAS system, we use the system management RAID-1 (one
disk is an image of another).
1 - Summary of Sequence Installation / Configuration
Let us put two disks in RAID-1, share them on the network, create a user and configure access through FTP. We will
also set up the Media Server. The sequence of work shall be as follows:
Mount two identical disks in the NAS Unit; Configure a Static IP for the NAS drive; Set the Storage System as RAID-1 and format the disks; Create a User; Network Setup, Dynamic DNS (DDNS or Dynamic DNS) and UPnP; Creating a Folder for Sharing; Configure FTP Server; Configure FTP Client; Set up media server (UPnP AV);
2 - Install Hard Drives2.1 - Place the handles on the disks: The handles have an arrow drawn that should coincide with the frontal zone of the box; The position of the disks is with the label facing the inside of the box; As the box has a top angle, the angle of the handle shall coincide with the angle of the box; The figure below shows how must be placed handles.

2.2 - Open the top cover of the box

Press "PUSH" burron in rear case. Hold the button and drag it up.
2.3 - Insert the hard drives in the box.
3 - Initial Actions
That said, let's start the main settings of the NAS to later proceed to the configuration of the FTP server (NAS will
enable you to access through the outside via the Internet).
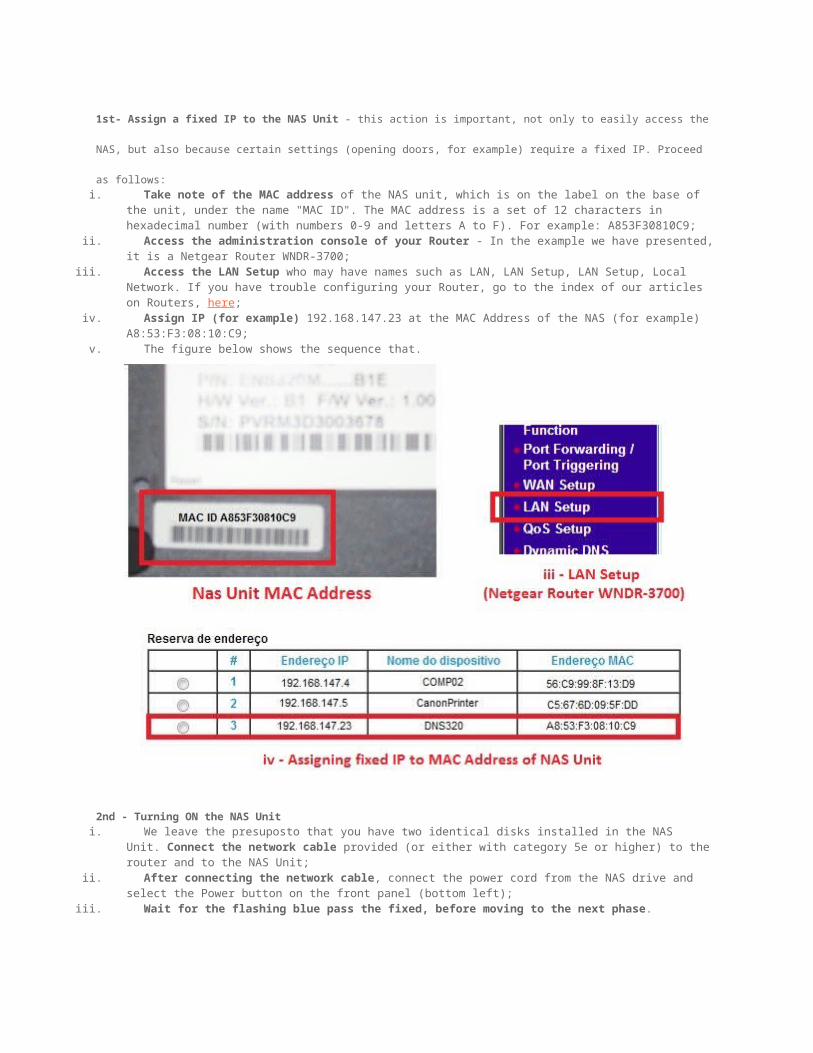
1st- Assign a fixed IP to the NAS Unit - this action is important, not only to easily access the NAS, but also
because certain settings (opening doors, for example) require a fixed IP. Proceed as follows:

i. Take note of the MAC address of the NAS unit, which is on the label on the base of the unit, under the name "MAC ID". The MAC address is a set of 12 characters in hexadecimal number (with numbers 0-9 and letters A to F). For example: A853F30810C9;
ii. Access the administration console of your Router - In the example we have presented, it is a Netgear Router WNDR-3700;
iii. Access the LAN Setup who may have names such as LAN, LAN Setup, LAN Setup, Local Network. If you have trouble configuring your Router, go to the index of our articles on Routers, here;
iv. Assign IP (for example) 192.168.147.23 at the MAC Address of the NAS (for example) A8:53:F3:08:10:C9;
v. The figure below shows the sequence that.
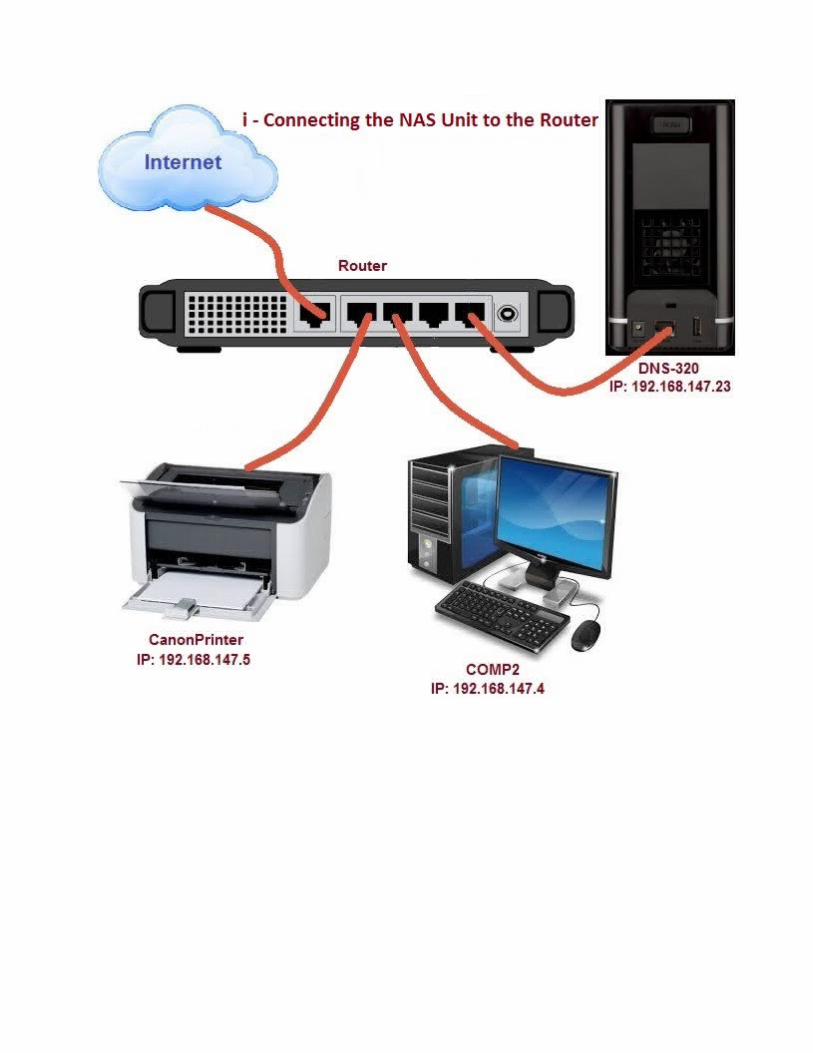
2nd - Turning ON the NAS Uniti. We leave the presuposto that you have two identical disks installed in the NAS Unit. Connect the
network cable provided (or either with category 5e or higher) to the router and to the NAS Unit;ii. After connecting the network cable, connect the power cord from the NAS drive and select the
Power button on the front panel (bottom left);iii. Wait for the flashing blue pass the fixed, before moving to the next phase.
3rd - Accessing to the Administration Console of NAS Unit - In the address bar of the browser, set the IP
address you assigned to the NAS and press Enter;
4th - Authentication for entry into the administration console - the first time you will have access to the
administration console, there is no password until you set one (we will see later). Leave the password field blank
and select login.

5th - Create a password for System Administrator (admin) - Let us first define a password for the
Administration of the NAS Unit (admin).
Note: This account (admin) only serves to access the administration console, and can not be used for
other purposes(for example, FTP access).
To create the administration password, do the following:
i. Select Management;ii. Select Account Management;iii. Select Admin Password;iv. Keep the field User Name as admin, Keep the field Password in blank and in New Password put
the password you want. Put the same password in the confirmation field Confirm Password.v. Select the button Save Settings.vi. There will arise a message confirming that the action was performed correctly. Select the
button Yes to finish.

The next time you need to access the NAS Administration console, select System Administrator Password field and
put the password you set.
Note: Only the Administrator can access the Management Console of the NAS unit.
The figure below indicates the purpose of each field of the Login window.

4 - Managing and Formatting Disks (Management / Disk Management)
To access this area, you need to enter the Administrator account.
If the NAS does not have disks installed is of no use, so the management of the disks give rise to other features of
the unit. Therefore, this is the first action to take, then we can configure the remaining features.
As mentioned earlier, in this case we will use the disks in RAID-1, because we want to have an automatic backup
disk. If you wish to review the records management systems mentioned above, see here.
To start the Disk Management and formatting, select from the administration console, the following:
1. Management;2. Disk Management;3. Hard Drive Configuration;4. Set RAID Type and Re-Format;

Will pop up a window which contains the operations that will be performed. Select Next.

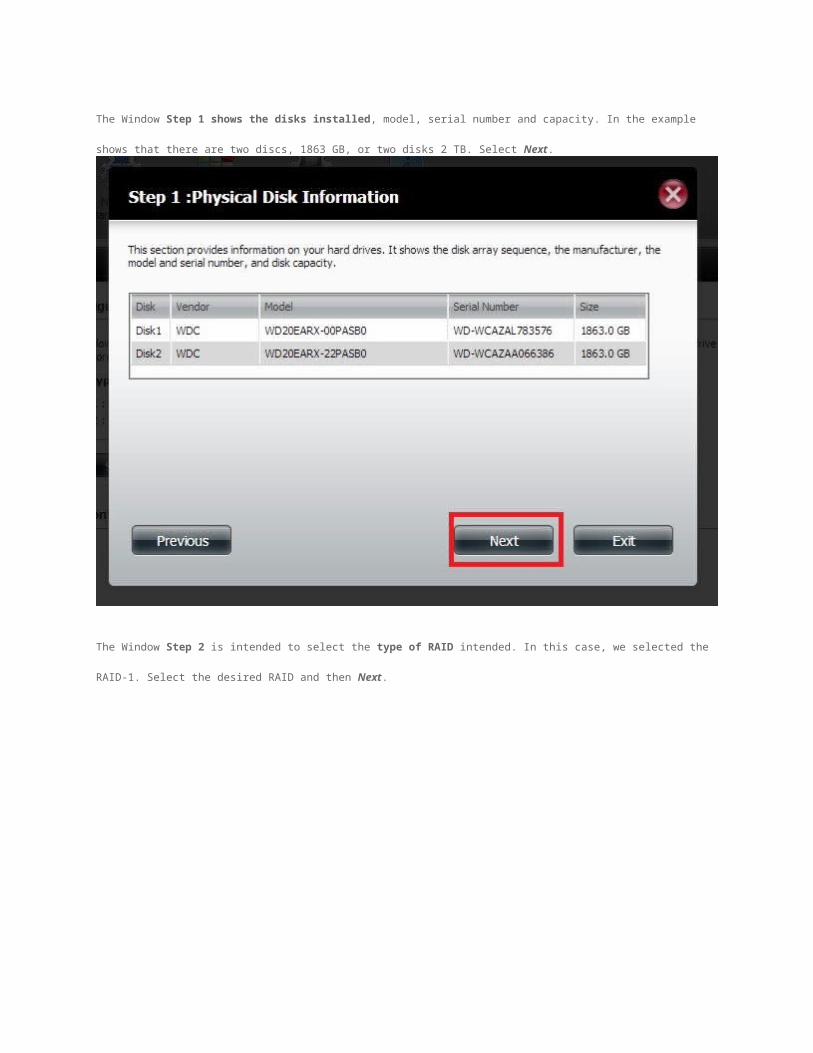
The Window Step 1 shows the disks installed, model, serial number and capacity. In the example shows that
there are two discs, 1863 GB, or two disks 2 TB. Select Next.
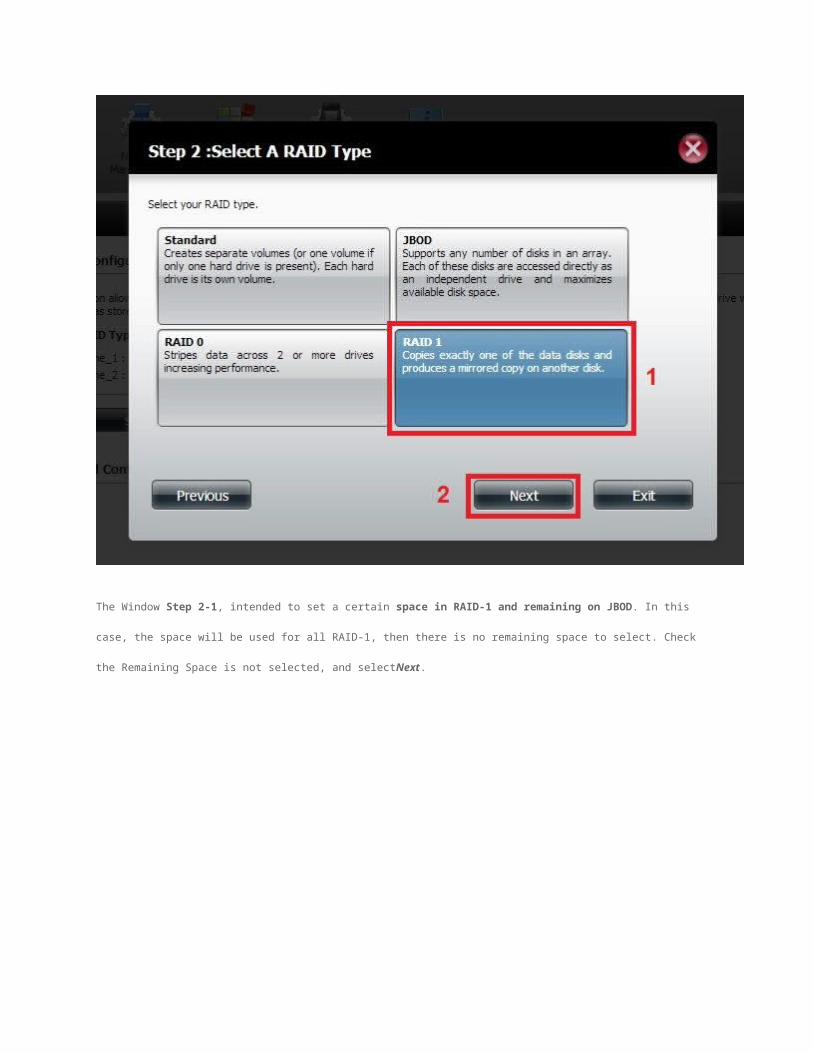
The Window Step 2 is intended to select the type of RAID intended. In this case, we selected the RAID-1. Select
the desired RAID and then Next.
The Window Step 2-1, intended to set a certain space in RAID-1 and remaining on JBOD. In this case, the
space will be used for all RAID-1, then there is no remaining space to select. Check the Remaining Space is not
selected, and selectNext.
The Window Step 2-2, is intended to select the the recovery of corrupted RAID, o que não é o caso presente.
which is not the case here. Check if it is selected Disable Auto-Rebuild and select Next.

In Step 3 shows the summary of the work that will be performed. The Volume Name will be called the
Volume_1, the type is RIDE-1, the file system is EXT 4 and the total size of the drive that will be visible is 1860 GB.
The operation will be performed on the discs 1 and 2. Select Format.

You see a confirmation message. If you are sure that everything is in line, select Yes.
Thw Step 4 initiates formatting the disks. Do not interrupt the operation, at risk of damage discs.

While formatting occurs, the LED indicators of the activity of disks will blink.
The Step 6 reports that Setup / Formatting Disks are Completed. select Finish.

As you can see, the NAS system currently has only one visible disk, because the disk "mirror" is hidden ".
The task of managing and Format disks is complete!

5 - Create a User (Management / Account Management)
To access this area, you need to enter the Administrator account..
The creation of at least one user is a mandatory condition for sharing folders / data network and if you want to
access the NAS drive through the exterior (FTP over the Internet, for example).
Creating groups is not mandatory. You can create groups and add users later already. For example, we will create a
user. During creation can set what type of access the user will have (read, read and write access or seal)
Let's create a user nemed f_luis_almeida.
Note: The names listed may not have spaces or any kind of accentuation.
The sequence for creating a user is as follows:
1st - Access Management / Account Management / Users - Groups and in User Settings select Create;
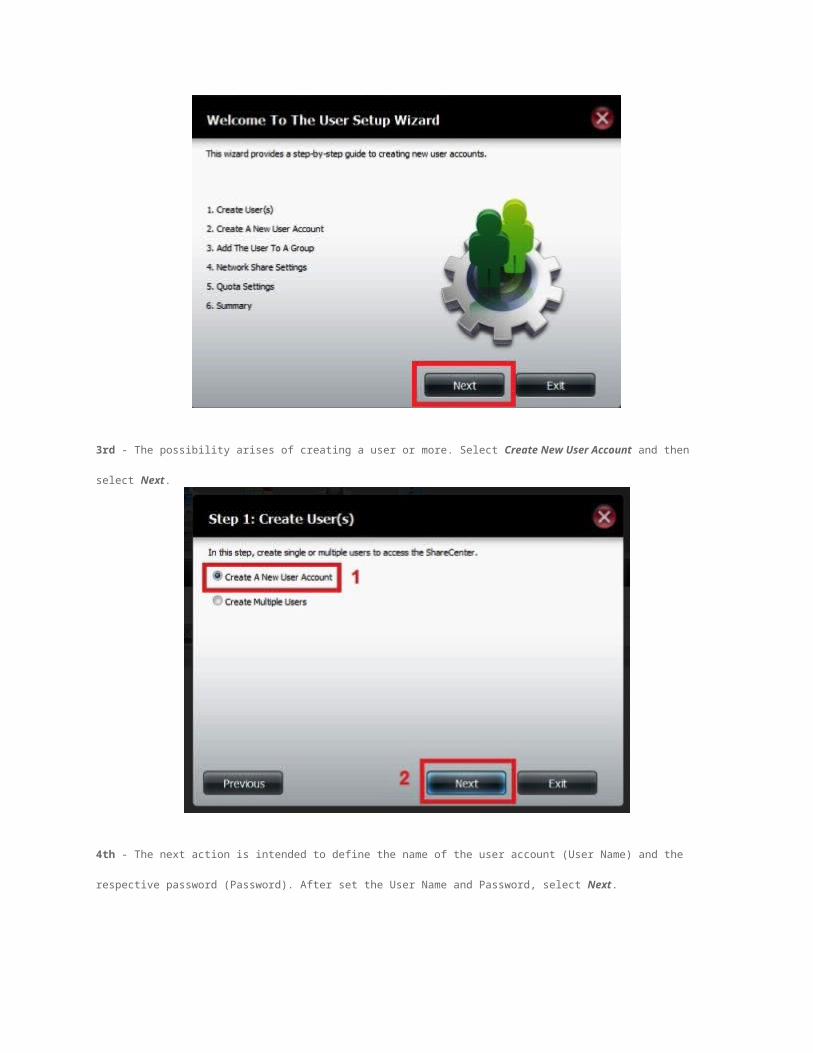
2nd - A window appears that informs the operations that will be performed. Select Next.

3rd - The possibility arises of creating a user or more. Select Create New User Account and then select Next.
4th - The next action is intended to define the name of the user account (User Name) and the respective password
(Password). After set the User Name and Password, select Next.
5th - The next step was to add the user to a group. As there are no groups created, the window that informs.
Select Next
6th - The next window is intended to set the type of permission to the disc that the user will have. There are three
possibilities: Read Only - can only see the content; Read /Write - can burn, copy, modify, delete and open; Deny Access - ncan not access the share (shared folder or volume, are hidden);
Select Read/Write and then Next.

7th - The next step is to define how we will access the share. The hypotheses are: CIFS (Common Internet File System) - Standard for sharing via Local Area Networks, Intranets and
Internet. For Windows systems, Unix / Linux and OS / 2; AFP (Apple Filling Protocol) - identical to the previous one but for Apple Systems; FTP (File Transfer Protocol) - Protocol for file transfer via Internet or Intranet; WebDAV -(Web-based Distributed Authoring and Versioning) - extension of the HTTP protocol to
transfer files. Supports blocking capabilities - eg when a user edits a file, it is locked, preventing other users from making changes simultaneously.
Select CIFS, AFP, FTP and then Next. If there will be more than one user, it should also select WebDAV.
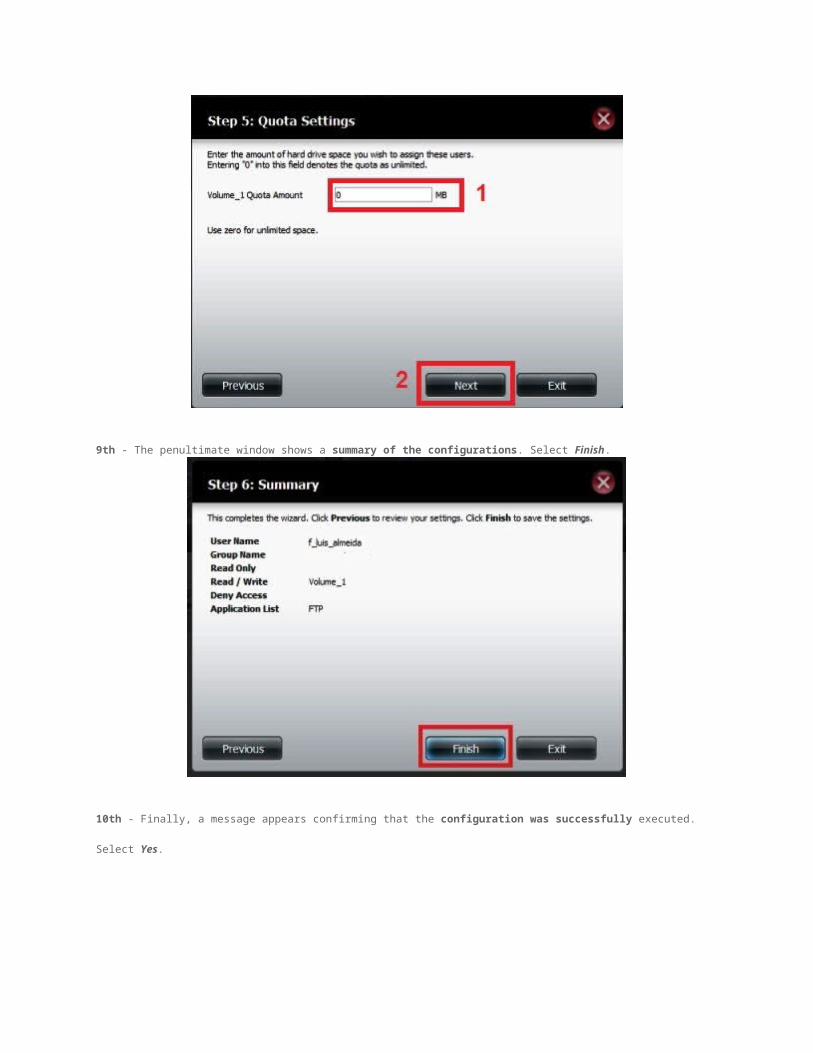
8th - In this window you can set usage quotas, ie limit the space that each user can use (eg 512 MB). If you want
the user to use the entire space of Shared Disk, put 0 (zero).
Keep in Value 0 and select Next.

9th - The penultimate window shows a summary of the configurations. Select Finish.
10th - Finally, a message appears confirming that the configuration was successfully executed. Select Yes.
6 - Network Management (Management / Network Management)
The Network Management menu is intended to make settings related to how the NAS unit connects to the network.
6.1 - Configuração da Rede (LAN Setup)
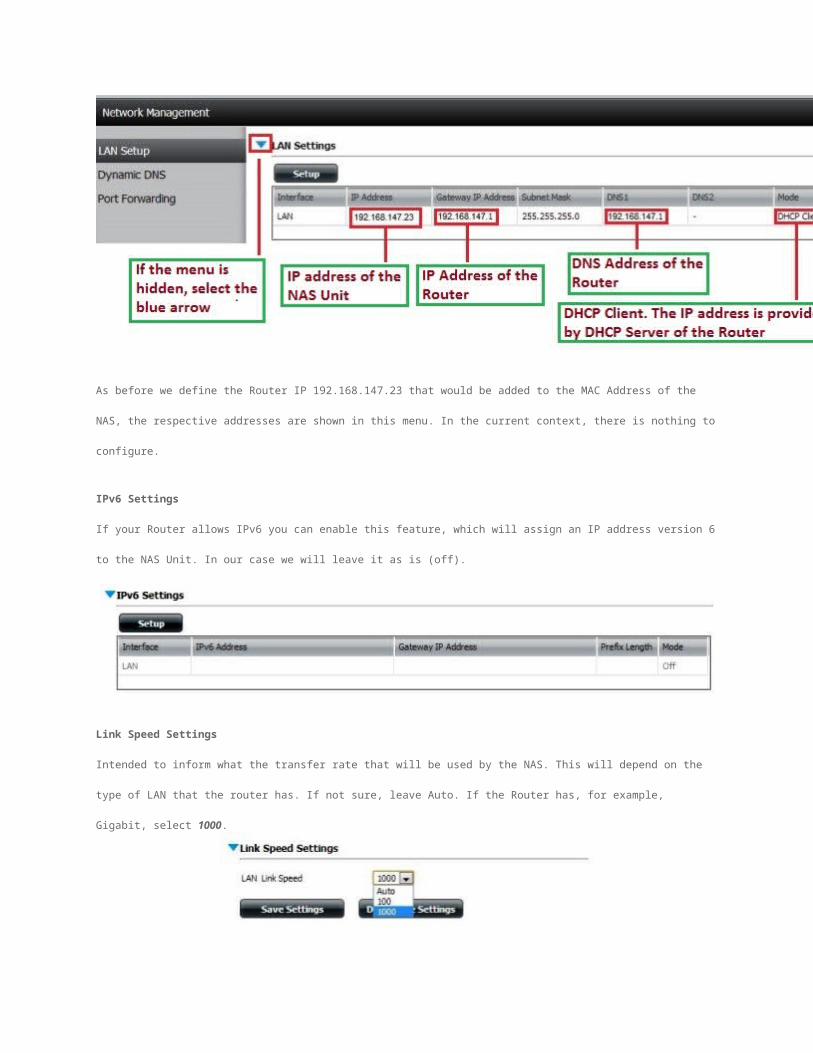
Since we already had previously set the router would assign a particular IP to the NAS unit, we just check if the
addresses are correct. Select LAN Setup / LAN Settings. If the LAN Settings menu is hidden, select the blue
arrow.
LAN Settings

As before we define the Router IP 192.168.147.23 that would be added to the MAC Address of the NAS, the
respective addresses are shown in this menu. In the current context, there is nothing to configure.
IPv6 Settings
If your Router allows IPv6 you can enable this feature, which will assign an IP address version 6 to the NAS Unit. In
our case we will leave it as is (off).
Link Speed Settings
Intended to inform what the transfer rate that will be used by the NAS. This will depend on the type of LAN that the
router has. If not sure, leave Auto. If the Router has, for example, Gigabit, select 1000.
LLTD Settings
LLTD (Link Layer Topology Discovery) is a feature for OS Windows Vista, Windows 7 and Windows 8. This feature
enables the graphical representation of the Local Area Network (Network Map). If you have Windows XP with
Service Pack 2, you can make the LLTD Download for Windows XP hear. Select Enable.
6.2 - Dynamic DNS (DDNS)
Access to a particular server is always done through an IP address, either directly or indirectly. The direct way is
when you put the IP address in the browser (http://253.124.3.23, for example). The indirect way is to put an address
"with words" in the Browser. In this case, the call is routed to a DNS server, which will assign the IP address refers
to the address entered. For example, when we type http://www.google.pt the DNS server will assign the address
173.194.41.215 which will allow access to the appropriate server.
In our case, we have a dynamic IP address provided by our ISP, which is eg 217.113.129.5. If we want to access the
NAS drive via FTP, we would have to enter ftp://217.113.129.5/partilha, where partilha is the main folder
shared. How to change the address given frequency, we would have access to the address mentioned above and
would need to know the new address, impossible situation if we were to access the FTP from the outside.
The Dynamic DNS server is used to "circumvent" this situation. Works as follows:
The user needs to hire the DDNS service to an entity that makes available (free or not); It supplied an access address; When the user types the address above, this will access the DDNS server; The DDNS server "refreshes" the Internet IP of the user, ie "will see" if the Internet IP changed and
forwards the user to the correct address; The address given is something like luis_fernando.dyndns.org, where "luis_fernando" is the name
that the user has defined and "dyndns.org" the DDNS server address (which has been free, but currently it is not).
Sample some free DDNS servers:o DtDNDS - http://www.dtdns.com/o no-ip - http://www.noip.com/o freeDNS - http://freedns.afraid.org/o Zonomi - http://www.zonomi.com/
In the case of NAS Unit D-Link DNS-320 it allows access to the following DDNS servers
D-Link DDNS - Free - https://www.dlinkddns.com/ Dyn - Paid - http://dyn.com no-ip - Free - http://www.noip.com/ tzo - Paid - acquired by Dyn

As the D-Link provides free access to a DDNS server (which after all is the Dyn), we will use this service. To
configure access to the DDNS server, follow these steps:
1st - Create Account
Go to address https://www.dlinkddns.com/login and in New D-Link Users select Get started!
Put your user name, password, e-mail and accept the conditions and select Create Account.

You will receive an e-mail to confirm your account. Select the link and enter the account created.

Place a Hostname, and Copy the IP address contained in Browser IP Address to New IP Address.
Select Save and the account is created.
2nd - Configuring DDNS on NAS Unit
Then we configure the DDNS Unit NAS. To do this go to Network Management / Dynamic DNS and in DDNS
Settingsplace according to the following figure: Dynamic DNS: Enable (2) Server Address: select from the dropdown menu www.dlinkddns.com (3) Host Name: ftp-luis.dlinkddns.com (4) Username or Key: luis_almeida (4) Password or Key: put the password you set (4) Verify Password or Key: repeat password (4) Select Save Settings (5) If everything is in compliance, the system will return a message: Updated Successfully (6)

O DNS Dinâmico está configurado!
6.3 - Port Forwarding / UPnP
The UPnP (Universal Plug and Play) is a set of networking protocols that allows devices to detect a network, such as
personal computers, printers, routers, etc., aiming to establish the functionality of network services for data
sharing, communications and entertainment. UPnP is designed primarily for home networks without enterprise class
devices.
To operate the UPnP devices that connect must be compatible with each other and both must have the UPnP
installed.
We first verify that the router has UPnP active and only then will select the button Test of the NAS Unit.
1st - Enable UPnP on the Router - as we stated above, we are using Netgear TouterWNDR-3700. Entering the
administration console, setup UPnP is given in the following image.

2nd - Test UPnP in NAS Unit - to test the UPnP NAS drive, just select the Test button on UPnP Router
Detection. If the message Found UPnP router on the network appears, all is ok.
7 - Configure FTP Server (Management / Aplication Management)
The FTP Server (File Transfer Protocol) allows access Disk Sharing from outside and send or receive files or folders.
It is not meant to open files but only to transfer (Download / Upload).
We'll have to open ports in router and then configure the FTP NAS Unit.
1st - Open Router Ports - We need to open ports 20, 21 and 990 in the Router.
Opening ports 20 and 21 on Netgear Router WNDR-3700

Opening port 990 on Netgear Router WNDR-3700.
Summary of the open ports.

2nd - Configure FTP Server of NAS Unit
The FTP server is disabled by default. The configuration of the FTP server requires only minor adjustments. After
setting conform to the needs of the user must connect to the FTP server on the button Start FTP Server.
FTP Server / FTP Server Settings - area configuration of the FTP server. Maximum Users - select how many users can simultaneously access the FTP. The maximum is 10; Idle Time - If the client (who accesses the FTP) is idle for more than x minutes, the server shuts he
down; Port - Port that the FTP will use. Port 21 is required when the unit is connected to a Router; Passive Mode - There are two ways to use FTP: active and passive;
o Active - the FTP client opens a dynamic port and transmits it to the FTP server port number that the FTP client is listening. Then the FTP client waits for a response for connection to the FTP server;
o Passive - the FTP server opens a dynamic port, sends the FTP client to the IP address of the FTP server where the client needs to connect to, and the port on which the server is listening. Then it waits for a connection from the FTP client.
Client Language - Select the language of your choice; Flow Control - You can limit the speed with which the client connects to the FTP; SSL/TLS - Secure Sockets Layer ( SSL) and Transport Layer Security (TLS) are two cryptographic
protocols that provide security and data integrity for communications over the Internet. It is helpful, but the certificates are outdated (ie August 2013). Until such time as D-Link fix the problem, it is not convenient to use this feature;
FXP (File Exchange Protocol) - To transfer between two servers;
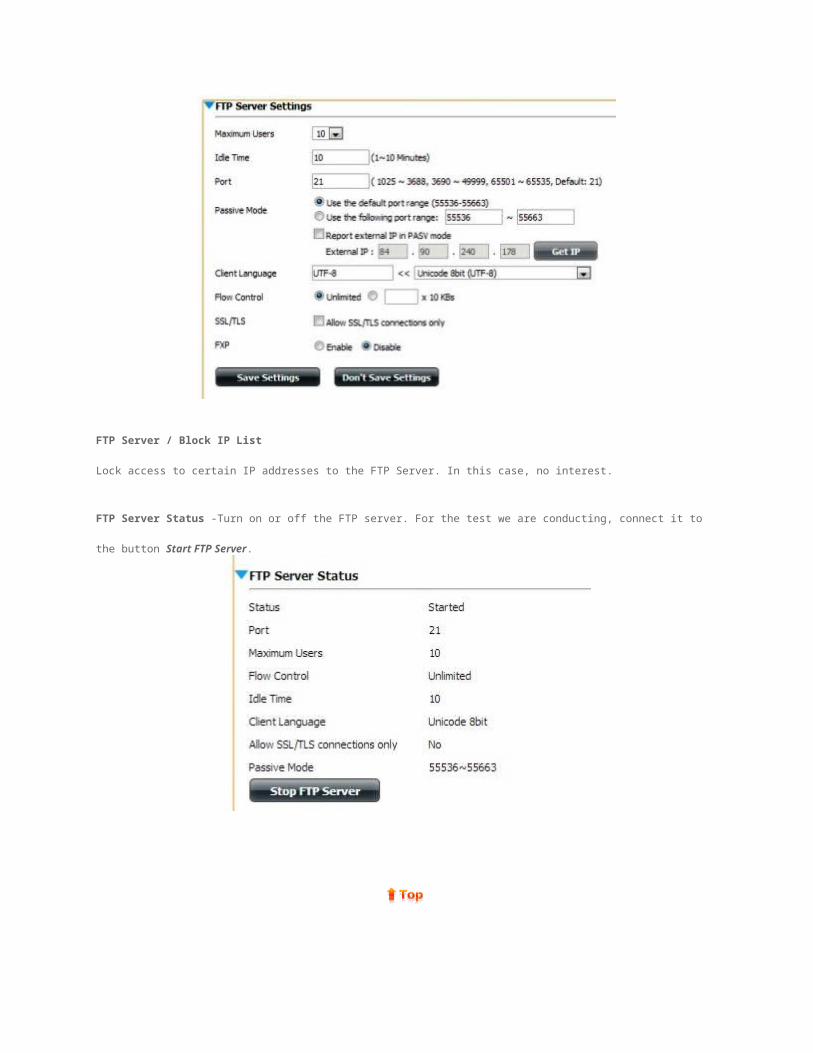
Configure the FTP server according to the following picture

FTP Server / Block IP List
Lock access to certain IP addresses to the FTP Server. In this case, no interest.
FTP Server Status -Turn on or off the FTP server. For the test we are conducting, connect it to the button Start
FTP Server.
8 - Configure FTP Client
You can access the FTP server in three ways:
Typing the address in a browser - in our case, the address is: ftp://ftp-luis.dlinkddns.com/Volume_1. In this case you can not upload files.
Typing the address in Windows Explorer - identical to the previous. In this case you can download or upload files.
Through Client Software - faster and easier to perform download / upload. Example of Free FTP Client Software:o FileZilla - https://filezilla-project.org/o CoffeeCup Free FTP - http://www.coffeecup.com/free-ftp/o CyberDuck - http://cyberduck.ch/o WinSCP - http://winscp.net/eng/download.php
In this case we use FileZilla, but the configuration is identical for all. Open the application and select File / Site
Mangerand in the window that opens select New Site. Give a name to the newly created.

On the left side of the window, on the General tab, enter the following settings:
Host: ftp-luis.dlinkddns.com; Protocol: FTP - File Transfer Protocol (select from the dropdown menu); Encryption: Use Plain FTP; Logon Type: Normal; User: f_luis_almeida (User created in step 5); Password: put the password you set for the user (created in step 5 / Create User).

Select Connect and the client will connect to your NAS unit.

9 - Configure Media Server (UPnP AV)
The purpose of a media server is to manage, share and deliver files automatically Audio, Video and Image, unlike
the manual option where the user must manually add the files to the computer's media player. That is, any media
file added to the server is automatically available in Media Players (Windows Media Player in Windows) of all users
connected to the network and with permission.

Another advantage is to allow the playback of multimedia content without the intervention of a PC. For example, if
the user has a receiver (a game console, or TV, for example) with a network (wired or wireless), you can play
content stored on the server from anywhere in the home and without connecting to a computer.
In the case of unit In which we are dealing, has included UPnP AV media server. Setup is very easy but requires
some customization efetuemos in order to make it faster and easier to use.
1st - Set Location of Media Files
The first decision to make is where we will store your multimedia files:
Anywhere on the disk - If we consider that the multimedia files podrão be anywhere on the disk, it has the advantage of not worrying about the location, but the initiation and subsequent updates Media Server will be much slower (it may take several hours):
In specific folders on disk - In this case, define one or more folders to store media files. The drawback is that if we put any media file out of those, the server does not update the / provide. The advantage is that the server creation and future updates will be much faster, and the system will be much more "tidy".
The decision we make, is to create three folders for media files:
Images - for image files - extensions bmp, png, jpeg, gif, eg; Music - for music files - extensions mp3, wav, wma, eg; Vídeos - for movies and videos - extensions avi, mpeg, divx, eg. In this case there are extensions
that are not allowed, for example, the MKV and FLAC; Note 1 - Do not put files in folders, ie, leave the empty folders for the creation of the server
process is faster (about 3 minutes). Note 2 - After the server is created, you can copy files and folders for folders mentioned
above. The server will find the respective files, even if they are in subfolders.2nd - Create Folders on NAS Unit
To create folders on the NAS unit, go to Home / My Folder / My Files, and select New

3th -Configuring UPnP-AV Server
Go to Aplication Management / UPnP AV Server and in UPnP AV Server Settings select Enable snd Add.
In the window UPnP Share Settings select the word Volume_1 to expand the contents. Check the
Boxes Images, Music and Videos and then select Apply (the box for the Volume_1 should be unchecked).

Starts the creation of libraries Server, which will be completed after the status bar reaches 100%. As this happens,
a message to Refreshed successfuly, in which you must select Yes to complete the process.
Note 1 - Do not interrupt the creation processof the Server - If you interrupt the process of creating the
server, this will not work correctly. It is preferable to re-format the disks in this case.
Note 2 - This action should be performed only once - Some users question always adding media files should
Refresh to make one. The answer is No, the system updates them automatically.
It may happen that a particular file you added does not appear or the system will not read. Analyze this case first
because it happens. If for example you put a video with mkv extension, the system will not read due to constraints
of the server itself. Do a Refresh only when absolutely necessary, as this will be much more time consuming the
more files you have on your system.
Note 3 - Copy the media files to the respective folders - After s server is created, copy the folders and media
files to the respective folders created previously. You can then verify that the system updated all the files that are
compatible with it.

10 - Other Important Settings
There are some settings that are important for the correct network operation.
10.1 - Time and Date- System Management / Time and Date
If the date and time are not according to your system (Computer, Router), communication with the network may
have flaws. Therefore, should you hit the Date and Time Unit NAS.
1st - Setting Date and Time - Set the Date And Time Manually - If the Date and Time of your computer is
properly configured, select Set Time From My Computer to copy the NAS Unit Date and Time that appears on
your computer. then select Save Settings.
2nd - Time Zone
Select the right arrow to select the time zone to the time zone for the country where you are. Then Select Save
Settings.
3rd - Date and Time Server- NTP Server
The NTP (Network Time Protocol) is a protocol for synchronizing the clocks of computers in data networks with
variable latency. NTP keeps watch from a computer with the right time and with great accuracy.
For the date and time remain synchronized, you must connect to a NTP server. In this case, we will connect us to
the NTP server's official time of the country in which we are(Portugal). The entity responsible for the legal time in
Portugal is theLisbon Astronomical Observatory of theUniversity of Lisbon.
In NTP Server type the following address: ntp02.oal.ul.pt and then Save Settings.With a certain frequency, the
NAS unit will contact the NTP server keeping the time and date certain. It is desirable that all devices on a network
that has to be synchronized in the same way.

10.2 - Working Group and System Name - System Management / Device
If the Working Group contained in its Operating System is not inserted in the NAS unit, it will not appear on the
Network. In our case, the operating system is Windows 7 and the Working Group is WORKGROUP.
To see what the Working Group in Windows 7, select the Start Menu and right-click Computer, select Properties.

You should put the name of the Working Group (exactly as it appears on Operating System) in Device Settings /
Workgroup.
Can can also define a name (the name that will appear on the network) and a description for the NAS unit.

Author: José JR CrispimPublished: 2013, August
Note: If you notice any inaccuracies in this article or want to add something more, you can send me an
E-Mail. I will publish a correction and put its author.
© José Crispim 1999-2013