Join Us in Using This Magic Machine!
48
Q- ro, . DOCUMENT COLLECTIOI4 OREGON COLLECTION LET'S LEARN TO O;EflON ST1TE L1ARY int NOV22 1960 SEW Join Us in Using This Magic Machine! Federal Cooperative Extension Service 4-H Clothing Project Oreon State College Club Series L-83 Corvallis, Oregon
Transcript of Join Us in Using This Magic Machine!

Q-ro,
.DOCUMENTCOLLECTIOI4
OREGON
COLLECTION LET'S LEARN TO
O;EflON ST1TE L1ARYint
NOV22 1960
SEW
Join Us in Using This Magic Machine!
Federal Cooperative Extension Service 4-H Clothing ProjectOreon State College Club Series L-83
Corvallis, Oregon

LET'S LEARN To SEW
Prepared byHildegarde Streufert, Extension Clothing Specialist
Oregon State College
This book has been written to help you learn to enjoy using your Mother'sMagic Sewing Machine. It will introduce you to many friends who will help you sewthe things we hope you will be happy to use.
Ask your mother and leader to help you to read the directions and understandthe pictures as you work on each project.
What will you make this year?
You will complete two projects - -
If you are a first year member, you will make - -
1. Barbeque Placemats2. Shears and Scissors Case
If you are a second year member, you may choose any two of thesefour projects --
1. Barbeq.ue Placemats2. Shears and Scissors Case
3. Petticoat Holder4. Bobby Socks Holder
What will you do as a 4-H Club Member?
1. Attend all the meetings.
2. Complete your projects so you can enjoy them.
3. Tell what projects you have done and how much you enjoyed using themin your record book.
4. Show others your "tricks" by giving a demonstration at one of yourclub meetings.
5. Invite your friends and neighbors to see what you have made.
.2

.
.
5
'1ij196/C/
J?
A magician might have a hat from which he can pull rabbits and scarves, butyou will have a sewing box and sewing machine with which you will be able to domore tricks than he could ever dream up.
For what can be more fun than to choose a piece of bright and beautiful plain-colored material, or one with a perky little design- -cut it into a pattern and sewit into something which can be worn by you or someone in your family? Or -- youmight also mate something which can be used in your home -- like ba.rbeque placematsor closet accessories, like petticoat holders, shoe bags, or many other items.
If you learn to sew, you also will discover that it really WORKS LIKE
MAGIC"
Wouldn't like to learn some of these tricks?
3

DURING YOUR FIRST YEAR Q 4mH CLOTHING.-.-
YOU WILL LEARN THESE TRICKS--Page 5-10 Trick I To choose the magic tools for
your sewing.
Page 11-12 Trick II
Page 13 Trick III
Page ili--i8 Trick IV
Page i8-18 Thick V
To organize a basket or box tomagically keep your tools handyand safe.
To enjoy having a "Headful ofTricks-of-the-Trade."
How to keep projects cleanHow to keep projects from wrinklingHow good posture helps you enjoy sewing
To use Mother's Magic Sewing Machine.
To sew "Like Magic."
YOU WILL DEVELOP YOUR "MAGIC SKILL" THROUGH
MAKING SIMPLE PROJECTS--Project Magic Skill
Page 18 1. Barbeque Placetnats Choose and match colors.Use a seam gauge.Make a 1/li--inch seam.
Top-stitch one piece of fabric onanother.
Page 25 2. Shears and Scissors Case
Page 33 3. Petticoat Holder )
+ )
Page Li4 i. Bobby Socks Holder )
4
Measure and cut accurately.Stitch a straight line.Use the stitch regulator.
Make a hem.Stitch a curved seam.Use a cloth guide.Use ?OSain ribbon for trim.

TRICK I: HOW ABOUT CHOOSING ThESE MAGIC TOOLS FOR YOUR SEWING BOX
/
THETA THREAD
THUMBALENATHIMBLE
IRON
SALLY ScIssoRs
5
MAGGIEMEASURING
TAPE
PINCUSHION
RUTHY MARGYRULER MEASURING
GAUGE

Measuring Tools:
Margy Measuring Gauge and Maggy Measuring Tape are sewing aids which aremarked like Ruthy Ruler or Yeta Yardstick.
You will use them often for finding the placement of buttonholes, correctwidth of seams, and the correct size of things you are sewing.
Margy Measuring Gauge or Ruthy Ruler will help you measure afraction of an inch -- or an inch.
1/8 inch
IIIJ'l
I inch
1/4 inch
''1
I inch
1/2 inch
I inch
Ruthy Ruler would like to be "12" inches tall.
Maggy Measuring Tape will help you measure inches or feet.
12 inchesI24 inches
I36 inches
I48 inches
I 60 inches
I foot 2 feet 3 feet 4 feet
I
I
/ 1 yard, /1
please!
II
; Material is sold by the yardor fraction of yard.
5 feet
I inch
i.:''''I inch
Yeta Yardstick will measure inches orfeet or yards for you.
I yard
21nich 1iiiflches1I foot feet 3 feet

.Cutting Tools:
Small Sally Scissors --
likes to .....
II?
You would use these for clippingthread, or cutting narrow thingslike ribbon, elastic, etc.
1/Scissors have two handles the samesize.
A pair of small scissors about 1i-inches in length is easy to handle.
When you cut With scissors, putyour thumb through one handle, andyour finger through the other.
7
Sharp Sharon Shears - -
l41,c +r.
You would use these for cuttinga pattern out of material.
Shears have one large handle andone small one.
A pair of shears with a 7-inchblade is a good size for you.
When you cut with shears, placeyour thumb through the small handle,and two or three fingers throughthe large handle.

Sewing Tools:
Penny Pincushion and her PinsNita Needle
Thumbalena ThimbleTheta Thread
aDric"' Pins are used to hold thePattern pattern and material together
while you cut out a pattern
. . . or . . .
To help you hold the pieces ofmaterial together when you aregetting ready to sew.
If you borrow some from your mother you will be a smart little girl if younotice whether they slip into your material easily. Avoid using pins that are toolarge or have a blunt point. They are likely to tear the material.
If you buy new pins, ask the saleslady for brass pins. These are strong pins,but fine in size.
When you sew - - remember to wearPenny Pincushion.
If you are right-handed, wear PennyPincushion near your wrist on yourleft arm.
If you are left-handed, wear it onyour right arm while you are sewing.

NEVER hold PINS in your mouth
Always keep an eye on Nita Needle I
She is small, slippery, and sharp. If she slipsaway, she may hurt someone. So let Penny Pincushiontake good care of her, too. Then she will alwaysbe easy to find, and ready to sew for you.
Since she will become your good friend, be very fussyabout which kind you choose to buy.
1. Look at Nita Needle's size:
Is she a nice length for youto handle?
2. Look at Nita Needle's Eye:
Is her eye long and slender,so that you can thread hereasily?
I
This Thumbalena Thimble is "smaller than yourthumb."
She would like to rest on your middle finger toprotect it from needle pricks when you areguiding Nita Needle through your material.
Buy the size that fits your finger comfortably.

Theta Thread comes in many colors and various sizes.
The color of thread is just like the color of yourhair. Look at your hair when you brush it. It isa much darker color than when you look at only onehair which has fallen out during brushing. Threadis just like hair. When you have many threadswrapped on a spool it also has more color and looksdarker than when you just use a single thread.
Therefore, when you buy thread, choose a colorwhich either - -
1. Matches your material exactly ... or
2. Is slightly darker than your material.It will look lighter when you sew.
Use Number 50 mercerized thread for most cottons.
- - -$TRiCKS FOR NEATNESS
Never hold your fingersunder Eileen's point. Thesteam will burn your finger.
Eileen Iron is also anxious to help you.
She knows that her pressing will helpyou become a neat seamstress, and makesewing much easier for you.
When you watched mother or sister ironor press, you most likely noticed howcarefully they handle an iron. You willneed some help to learn to use EileenIron gently and safely, so she willneither spoil your project or hurt you.
Patty Paper Bag says she wants to help you be neat, too, around your sewing tableand machine.
She will gladly hold and hide all of your cut threadsand fabric snippirgs if you just fasten her to the sideof your sewing machine table or cabinet.
Patty Paper Bag comes in many sizes -- from the grocerystores, drug stores, and many other stores. You choosethe size you would like, and don't ever forget her asone of your neatest sewing friends.
10
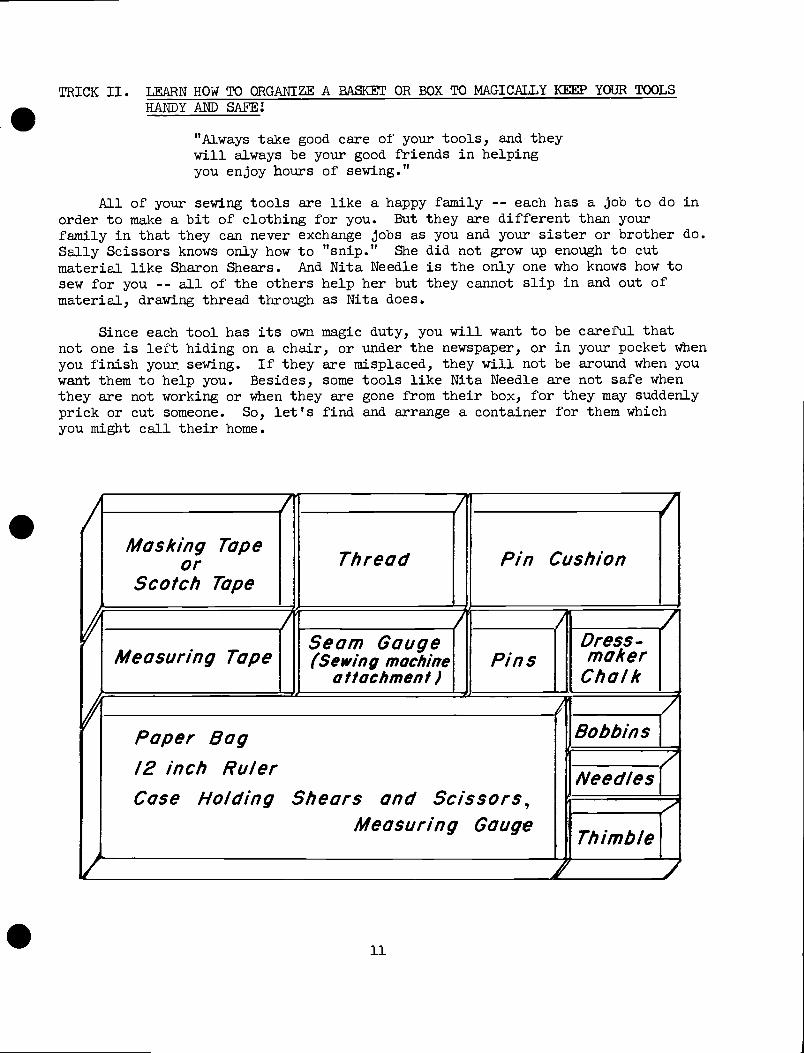
PRICK II LEARN HOW TO ORGANIZE A BASKET OR BOX TO MAGICALLY KEEP YOUR TOOLSHANDY AND SAFE
"PJ..ways take good care of your tools, and theywill always be your good friends in helpingyou enjoy hours of sewing."
All of your sewing tools are like a happy family - - each has a job to do inorder to make a bit of clothing for you. But they are different than yourfamily in that they can never exchange jobs as you and your sister or brother do.Sally Scissors knows only bow to "snip." She did not grow up enough to cut
material like Sharon Shears. And Nita Needle is the only one who knows how tosew for you -- all of the others help her but they cannot slip in and out ofmaterial, drawing thread through as Nita does.
Since each tool has its own magic duty, you will want to be careful thatnot one is left hiding on a chair, or under the newspaper, or in your pocket whenyou finish youx sewing. If they are misplaced, they will not be around when youwant them to help you. Besides, some tools like Nita Needle are not safe whenthey are not working or when they are gone from their box, for they may suddenlyprick or cut someone. So, let's find and arrange a container for them whichyou might call their home.
11

If you plan to use a box, this is fine, because you can store it in yourdresser drawer or even in the box in which you have the material for yourproject. Just be sure it is clean and strong enough to hold all the tools. Itmust also be long enough to hold your longest tool, and deep enough to hide thetallest one. (Sometimes Penny Pincushion becomes the tallest when she holdslong pins and needles.)
When you find a box which will hold all your new little sewing friends, askMother to help you divide it to keep them neat and orderly.
But - - before you ask her, your first job is to collect tiny paper boxes(like earring boxes or little match boxes) which are just large enough tohold one or two items. Example: A small earring box would be a good size tohold thread.
Separate the box tops from the boxes.
Arrange the boxes so they fit intoyour larger box.
Then have Mother help you staple orpaste the sides of the open boxestogether and into the large box.
* Since Susan Shears and Sally Scissors have sharp points,you will be making a case for them to protect these points.This case should fit into the longest part of your box.See page 27 for the size of the case.
If you would rather have a container which could be easily carried fromroom to room, you might like to buy a fishing tackle box like your brotheruses for his supplies. If you choose one with dividers in it, it will helpyou organize your sewing tools very nicely.
Other girls have used little doll suitcases, or a small cosmetic case likegrown-ups use when traveling. Either of these are very nice, because they areusually pretty in color, and will open up wide so you can see all your sewingtools at one time. They also have a latch to fasten the cover, and a handlewhich makes them easy to carry.
12

.TRICK III LEARN TO ENJOY HAVING A I*HJ)1JL OF TRICKS OF THE TRADE."
Every workman, in every tradeHas shortcuts and secrets in things he has made.Let's see what helpful hints you'll chooseTo add to your skill, from your head to your shoes.
The first important hint to knowIs - - "Join the Clean Clan Club" whenever you sewsHands freshly washed and nails clean, too.Will help keep your projects all looking like new.Clean clothes "a must" while handling cloth,For fear some of the dust and grime will rub off.Last of all - - your table must gleamTo protect your nice garments from soil unseen.So -- Clean Hands, Clean Clothes, Clean Table, too,Is one important trick in tbi trade for you.
The Clean Clan Clubs can boastful beOf their unsoiled projects, delightful to see.But here's another hint for you --To keep you from wrinkling your fabric so new.Your lap's too small and too far awayTo work on your project by night or by day.Your table clean would love to holdThe parts of your fabric, while you pin in that fold.So, - - Trick Number 2, in this sewing tradeIs -- Work on a Table to get your projects made.
Here's one last, special clue for youAnd something easy we would like you to do.Look at yourself - - as you start to sew.How do you sit? And look at your feet below
To build your interest more and moreYour back should be straight, wIth both feet on the floor.For you won't get tired so quickly thenAnd you'll be glad to stitch again and again.
Remember these "tricks" each time you sew.Then you'll look like a picture from head to toe.
13
TRICK IV. TO USE MOTHER'S MA&IC SEWING MACHINE
What could be more exciting than to learn to use a machine which has "magicpower." Of course, I know when you are grown up you are going to learn to drivethe family car (which you've heard Dad say has all sorts of magic power). Butdid you know that Mother's sewing machine has "magic power," too? The nicestthing is that you do not have to wait until you are grown up to use it. Eventhough you are only 9 or 10 years old, you are ready to learn the secrets of thatmagic sewing machine right now. You will no longer just stand by watching Motheror Sister sew. Instead, after you have learned some of the secrets which make itpurr, you and your magic sewing tools can make many exciting things for yourself,your family and friends.
So come -- let's get acquainted with this wonderful machineZ
A. Posture
Is your chair the right height for you?
Can you see the needle easily as it moves up and down?Are you able to reach behind the needle?Can you rest your arms on the table?Do your feet touch the floor?
If you cannot see the needle or rest your arms on the table, you willneed a taller chair or something to sit on to raise you up a bit. If yourfeet do not touch the floor (after you are sitting in the position to seethe needle) you will have to find a sturdy box, large enough to rest- both ofyour feet on it, as well as the foot control from the machine, if your sewingmachine has one.
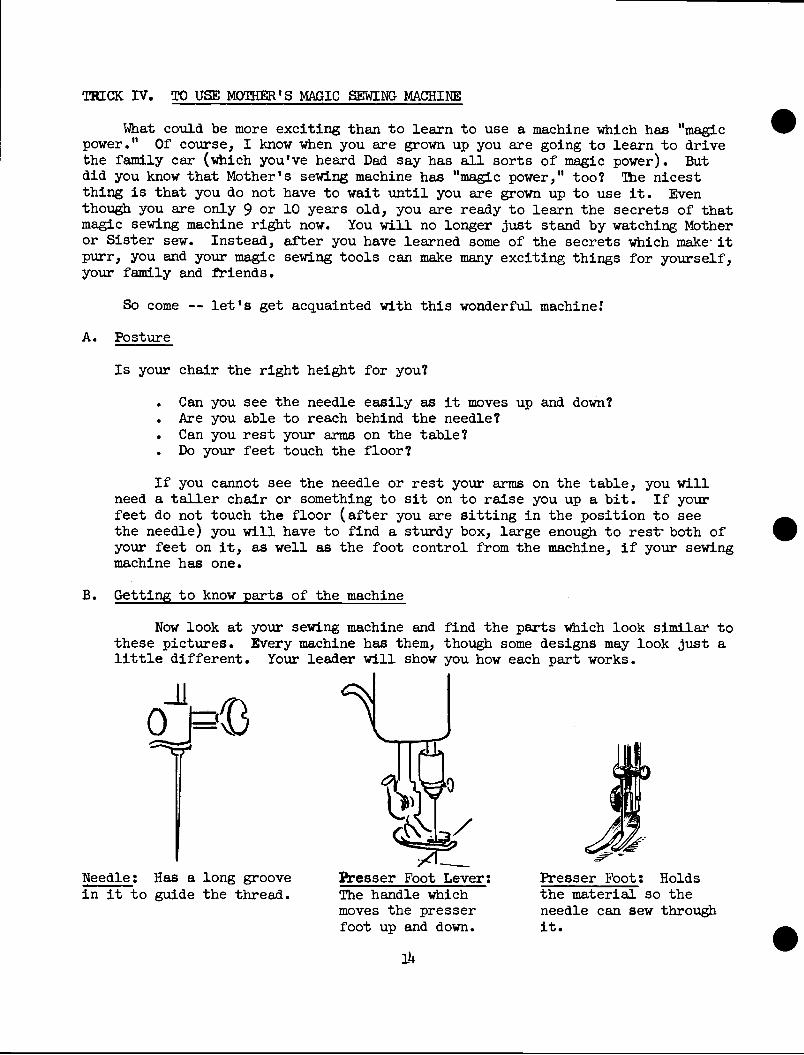
B. Getting to know parts of the machine
Nov look at your sewing machine and find the parts which look similar tothese pictures. Every machine has them, though some designs may look just alittle different. Your leader will show you how each part works.
Needle: Has a long groovein it to guide the thread.
Presser Foot Lever:The handle whichmoves the presserfoot up and down.
Presser Foot: Holdsthe material so theneedle can sew throughit.

S
c.
Cloth Guide: attachmentfor the machine. Helpsto stitch straight seams.
VI
\
Balance Wheel: movesthe needle in and outof your material.
Foot Control:
Thread Guides: hold thethread in place as it isbeing unwound from thespool during stitching.
IL,
A))
Bobbin Winder: winds thethread from the spool ontothe bobbin (spool whichholds thread in lowermachine).
$
(g
Take-up Lever: pulls thethread from the spool asit moves up and down withthe needle.
Stitch Regulator: makesstitches small or large.Also adjusts the machineto move your materialforward or backward.
__II
LI
Knee Lever: Treadle:
Your sewing machine will have one of these controls which you willuse to turn on the "magic power."
15

C. Let's learn to use the sewing machine!
1. How to start and stop it -- how to speed it up and slow it down.
(a.) With your machine unthreaded and the presser foot raised, it is readyfor you to start.
Place your right hand onthe balance wheel. (It willhelp you to start the machinein motion.)
Keep your left hand a distancefrom the needle.
Place your foot or knee onthe control or treadle.
(b) See how 3lowly you can make the needle go up and down. If the machineruns too fast for you, you can press your right hand against thebalance wheel to slow it down.
(c) Practice until your foot or knee can control the speed evenly fromfast to slow, without using your right hand on the balance wheel.
2. How to stitch correctly.
(a) Slip a piece of material under the presser foot. (Your leader willhave a piece for you.)
(b) Lower the needle into the material by rolling your right hand on thebalance wheel until the needle goes down as far as possible.
(c) Lower the presser foot onto the material.
(d) Let the machine run without touching the material. You will noticethat the material will slip and slide in many directions.
(e) To guide the material, holdyour left hand on it with yourfingers curved as if you wereholding a ball in your hand.If you hold it gently, you canguide the material as it slipsunder your fingers withoutinterrupting its movement asit is being sewn. Thy it!Pm sure you will soon dis-cover you will have to learnthe trick of sewing straight.
16

N N N>Your right hand will also help you to guide the material.
JDonot fufl oft' NAs soon as the machine is in motion, take your right hd
the EDGE of \off the balance wheel.
Imateriol. (t) low down your speed when you near the end of your materialso that you can stop when you reach the edge. Roll the
wheel to raise the needle - - then lift the presserfoot to remove the material.
(g) Slip the material under the presser foot again to practicestarting and stepping, as well as guiding the material
through the machine. This time also watch the take-uplever as it moves up and down with the needle. It shouldbe up as far as it will go when you start and stop themachine, otherwise it will unthread your needle.
3. How to use the stitch regulator.
If your sewing machine has the magic lever which makes itsew backward, try to use tt now. Move the stitch regulatorlever up as far as it will go. As you start the machine youwill see it moving backward. In order to stitch forward again,push the lever back down as ir as it will go. As you willlearn in your projects, you will always have to sew very slowlyand carefully when you sew backward in order to do it nicely.
Another reason this lever is on your machine is to make thestitches larger or smaller for you, whichever is best for thematerial with which you are working.
Directions for sewing your projectswill tell you how many stitches per inchyou will use. Some of your machineshave numbers next to the lever to tellyou the number of stitches per inch.If your machine does not have suchnumbers, Margy Measuring Gauge willtell you if you just put her next toa row of machine stitching and counthow many stitches were sewn in thatinch.
1 Practice stitching along a marked linewithout thread, going backward andforward with both small and largestitches. Mark some straight andcurved lines on your piece of material.roll the balance wheel to lower theneedle at the end of one of the lines.bower the presser foot and start themachine. Slowly stitch the entireline, guiding your material so the needlefollows the line as much as possible.
17

When you can control the speed of the machine and stitchstraight, you have learned some important secrets of Mother'sMagic Sewing Machine. Soon you will be ready to start on yourfirst project.
5. How to thread the machine.
But we can't sew without thread so we better learn thisspecial trick, too. Your leader threads the machine so easily,ask her to do it very slowly for you so you can learn it from her.Watch closely as she hooks the thread onto every finger of eachthread guide until she finally reaches the needle. She will alsoshow you where the bobbin hides (remember this is the flat spoolin the lower part of the machine) and how you will get its threadto the top of the machine.
Your leader will tell and show you many things about thread-ing the machine. Be sure you have her check yours before you tryto sew. If you want the machine to "Work like Magic" you willhave to have it threaded correctly.
Project I. Barbecjue Place Mats
For what will these be used?
1. When rolled and tied they are an easy carry-all for yournapkin and silverware for a barbeque meal.
2. When open, they will be your placemat.
What will you learn in this project?
1. To choose and match pretty colors.2. To use Nita Needle with Theta Thread in simple basting to hold
two pieces of material together before you stitch with thesewing machine.
3. To stitch a seam.

[I
To top-stitch (stitching one piece of material on top ofanother).
5. To stitch straight by following a line in the design of
the material.6. To backstitch to fasten the ends of your stitching
thread.
What will you do first?
1. You will need to go shopping with your mother to buy thetowels, washcloths, shoestrings, end thread.
- I
Wit! this color
look nice with
Mother's dishes?
I Finger Towels (terry cloth).Plain in color.
Does their
MATCH a ccthe WASH (
2 Pairs of shoestrings.Plain in color.27 Inches in length.
I----.,
Does one
color MATCHyour towel?.
2 Washcloths, striped orchecked. (Design will beyour guide in stitching.)
r-. '
Theta Thread's color matchesyour towels (1 spool).Theta Threadts friend matchesthe shoestrings.
2. You will also need to use tools from your sewing box to helpyou:
Sharon ShearsRuthy RulerPenny Pincushion
and Her Pins
19
Nita NeedleThumbalena ThimbleSally Scissors
Patty Paper Bag

Now yoi are ready to start your magic trick of changingtowels, washcloths, and shoestrings into Barbeque Place-mats If yu follow the pictures and directions care-fully, you will find the secret to your magic.
Here's how we'll start
A. Take another good peek at what your placemat will look like when you arefinished. (In order to clearly show how you will stitch the washcloth tothe towel, a plain washcloth is used in the illustrations, instead of achecked or striped one like you will be using in your project.)
Shoestringused as tie
B. Let's start with the washcloth!
1
I I ti: l 4
7?. . .'..
1. Fold each washcloth in half withthe stripes running up and down.
2. Pin open edges together with 3 orpins.
FOLD.
3. With Sharry Shears' help, cutthrougl the fold of the wasc1othto cut it in half. (Your leaderwill show you how to handle SharryShears so that you can take long anö..even cutting strokes.)
i. Fold each half washcloth again tofind the center. Mark the ceiterwith a pin at the cut edge and onthe hem edge. CUT EDGE
PIN
-J
0U.
PIN
-. CUT
.
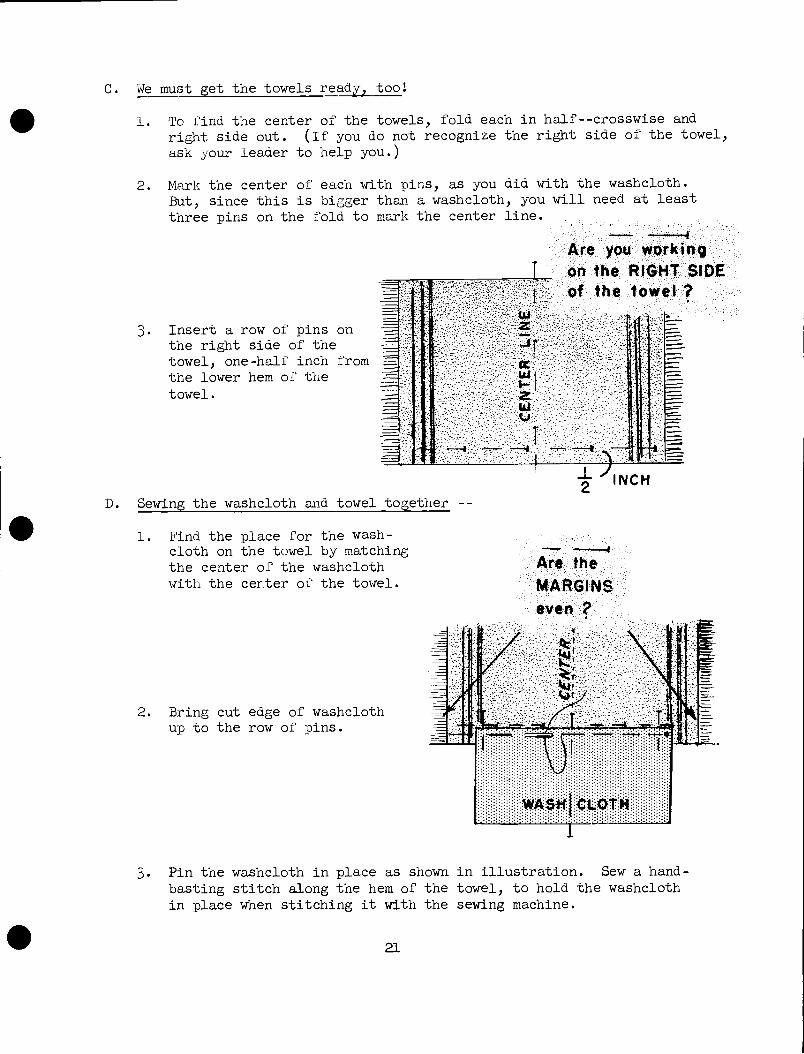
C. We must get the towels ready, tooi
1. To find the center of the towels, fold each in half--crosswise andright side out. (If you do not recognize the right side of the towel,ask your leader to help you.)
2. Mark the center of each with pins, as you did with the washcloth.But, since this is bigger than a washcloth, you will need at leastthree pins on the fold to mark the center line.
3. Insert a row of pins onthe right side of thetowel, one-half inch fromthe lower hem of the
towel.
Are you working
on the RIGHT SIDE.
of the towel ?
D. Sewing the washcloth and towel together --
1. Find the place for the wash-cloth on the towel by matchingthe center of the washclothwith the center of the towel.
2. Bring cut edge of washclothup to the row of pins.
- -1
Are the
MARGINS
even ?
3. Pin the washcloth in place as shown in illustration. Sew a hand-basting stitch along the hem of the towel, to hold the washclothin place when stitching it with the sewing machine.
21

+. Adjust the stitch regulator so it will stitch 12 stitches per inch.
5. Stitch the washcloth to the towel. You will be making a 1/14 inch seam.
a. Move the lever adjusting the stitchregulator to sew backward. If yoursewing machine cannot be adjusted tcgo in reverse, raise your presser fslightly above the fabric and takeor 5 stitches. This will knot thethread and fasten it.
b. Lower the needle into the washclothat a point 1/11. inch from the side hand cut edge. Keep both threads toback of the presser foot.
c. Lower the presser foot. Use it as a guideto stitch the 1/14 inch seam.
d. Turn the fly wheel by hand until the needlereaches the edge of the washcloth.
e. Then adjust the lever so the machine willsew forward again.
f. Stitch (using electricity) until you reachthe other side of the washcloth.
g. Readjust the lever for backstitching, andhand turn the flywheel as you did on theother side of the seam.
E. Sewing pockets into the washcloth.
1. Fold the washcloth up onto the towel, hiding the seam which you justfinished.
ARE YOUR _____ii MARGINS LUI h
EVEN ?
I1- -1
Ill
1
2. Pin the washcloth in place.
22

3. Stitch the side edges into place.If the hem on the washcloth is heavy,ask your leader to show you how tostitch just inside the hem to avoidbulk.
4. Pockets for napkin, knife, spoon, andfork are made by stitching the washclothto the towel as on page 21.
Fitch
Use Margy Measuring Gauge to measure these pockets. The large onewill be approximatey Ii. inches in width. The smaller ones each1-1/4 inches.
Since you are using the stripes in your washcloth as a guide institching, your pockets may not be this exact size. However, try tokeep them as near to these measurements as possible.
5. When you have decided which stripe you will use, begin by back-stitching at the lower seam and stitch up to the top of the wash-cloth.
One -- Two -- Three rows of stitching -- and your pockets arefinished. (That is, after Sally Scissors has clipped off all thelong threads.)
F. Attaching the tie (shoestring) to the towel.
1. Fold the shoestring in half.Pin the midpoint of the stringto the towel at the point
ich marked in the picture.
2. Fasten the string with very small stitches,by sewing back and forth across the width.
3. Clip threads close to stitching line.
23

G. Finding your MAGIC POWER SUCCESSFUL
1. Insert a napkin, knife, fork, and spoon into the pockets. S2. Fold the upper edge down to enclose the silverware.
3. Roll up the towel from the right to the left.
Ii-. Wrap the shoestring around it and tie it into a pretty bow.
HESTO!!Z Your simple towel, washcloth, and shoestringhave changed into BARBEQUE PLACEMATSI
0
21

Project II. Case for Sharry Shears, Sally Scissors, and Margy Measuring Gauge.
For what will this be used?
1. To protect the sharp points of Sally Scissors and Sharry Shearsfrom becomin.g blunt by hitting other sewing tools in the box.
2. To protect you from bruising your fingers when you reach forsomething in the sewing box.
3. To keep all three -- Sally Scissors, Sharry Shears, and MargyMeasuring Gauge -- in a handy, easily found place.
What will you learn in this project?
1. To recognize and buy pellon or felt.
2. To choose a colorful pair of shoestrings.
3. To measure accurately by reading markings on Ruthy Ruler orYeta Yardstick or Margy Measuring Gauge.
. To cut a paper pattern from measurements.
5. To use tailorts chalk.
6. To cut material accurately.
7. To stitch a hem without basting.
8. To stitch on a marked line.
9. To adjust size of stitch to weight of material.
25
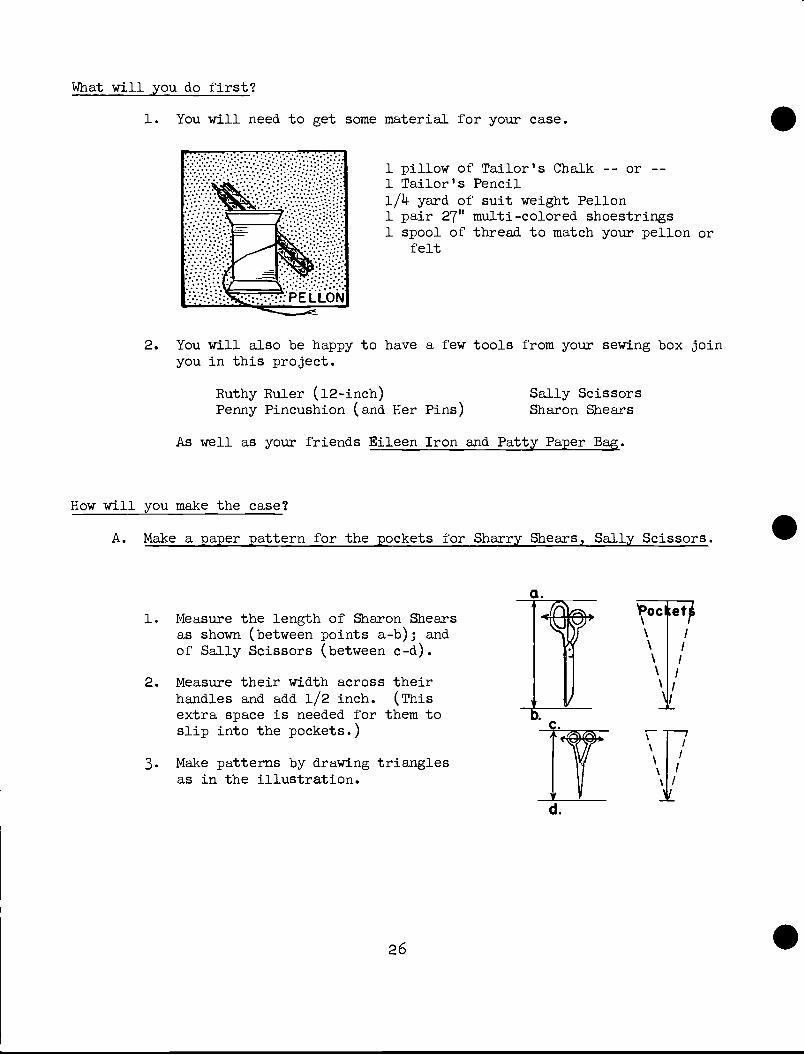
What will you do first?
1. You will need to get some material for your case.
1 pillow of Tailor's Chalk -- or --1 Tailor's Pencil1/11. yard of suit weight Pellon1 pair 27" multi-colored shoestrings1 spool of thread to match your pellon or
felt
2. You will also be happy to have a few tools from your sewing box joinyou in this project.
Ruthy Ruler (12-inch) Sally ScissorsPenny Pincushion (and Her Pins) Sharon Shears
As well as your friends Eileen Iron and Patty Paper Bag.
How will you make the case?
A. Make a paper pattern for the pockets for Sharry Shears, Sally Scissors.
1. Measure the length of Sharon Shearsas shown (between points a-b); andof Sally Scissors (between c-d).
2. Measure their width across theirhandles and add 1/2 inch. (Thisextra space is needed for them toslip into the pockets.)
3. Make patterns by drawing trianglesas in the illustration.
26
a.
ocetI,
'I,' Ij''''I,
b.C.
I
I/
/
I I
____ JL1
d.

B. Also make a pattern for a pocket forMargy Measuring Gauge.
1. Measure the length of Margy MeasuringGauge as shown in illustration, betweenpoints e and f.
2. Measure the width of the bottom of thegauge.
3. Draw a rectangle like illustration tomake her pocket pattern.
C. Marking the fabric for the case.
1. Follow the illustration to measurethe pattern for your case. YetaYardstick or Maggy Measuring Tapewill measure the size of the caseand the placement of the folds andhem for you.
2. Hold Yeta Yardstick between the marksyou made for size. In order to drawa straight and fine line you willhave to hold Yeta very firmly. Usetailor's chalk in cake or pencilform to mark the lines. Labelthese lines "fold11
3. Use Sharon Shears to cut case outof the pellon or felt. Since eitherfabric is heavy, you must cutespecially slowly and carefully. Youwill cut the best edge if you open theshears wide and take long, even strokes.
Practice on some scraps of material before youcut your case. Sharon Shears will do a nicejob for you if you hold her correctly and lether cut your fabric on the table.
e Pocket
ilit
-9'
14 inchesSection IFold8---- -,
Section 2
inches4
EFold
F
Section 3
7. inches
Hem HLinch'
27

-t. Measure 3/14. inches from sides. Markpoints A and C at upper edge ofSection #1.
Join A and B; C and D with a straightline.
5. Cut along A-B and. C-fl with long, even
strokes. (Removing these trianglesmakes the flap on your case moreinteresting.)
6. Lay the pocket patterns on Section 3of the case. The two smaller pocketpatterns are centered in one-half ofSection 3, and the large one is inthe other half.
7. Pin the patterns to the pellon, andfirmly mark the outlines on thepellon. The markings, if dark, willshow through to the outside and willserve as a guide to stitching. Keepmarkings fine and accurate.
* If you are using felt, the markingsare put on the right side of the case.
8. Turn the fabric over (right side ofcase) and mark the placement of thehem line G-H in Section 3. Use pinson the outside of the fabric as youdid when making the Barbeque Place-mats in Project I.
D. We are ready to sewZ
1. Making a hem.
a. Fold G-I-I to make a hem in the case.Keep the pins on the outside of thefabric when you fold it.
b. Press the fold along the pins.Eileen Iron will need to give yousteam to press even a slight creaseinto pellon. Both pellon and felt
will scorch easily. Ask your leader
to show you how to press.
A C
Section I
Br-- _H0I Section 2 I
E
El
FOLD
AnA
F
H
RIGHT SIDEOE.CASE 1F
Section 3
I--.
1 inch hem
Press QUICKLY
I Material
SCORCHESEasily I.
.
.
.28

c. Since the crease will not beshar pin the fold in additionto pressing it, in order tohold it in place duringstitching.
1I Use8 ST1TCHESPet Inch
d. Place your material under thepresser foot, with the cutedge touching the inside de edge of wideedge of the presser foot "Ntoe runs along cut edgetoe. See illustration.
If you guide your material so the cut edge conticues totouch the inside edge of the presser foot, you willlearn to stitch very straight and on the edge of material.
e. Remember to backstitch arid clip threads as you learnedto do in Project l.
2. Stitching the pockets.
a. Fold Section 3 up to Section 2on the fold line. (The fold linemarked with chalk, as well asthe hem you just stitched, and pocketmarkings will be folded to theinside.)
b. Pin the Section *3 and Section/2 together.
Side
29
\71TV7VSection 3 I Fold
________________/ Line
7/Zz77,7/77
Center Side
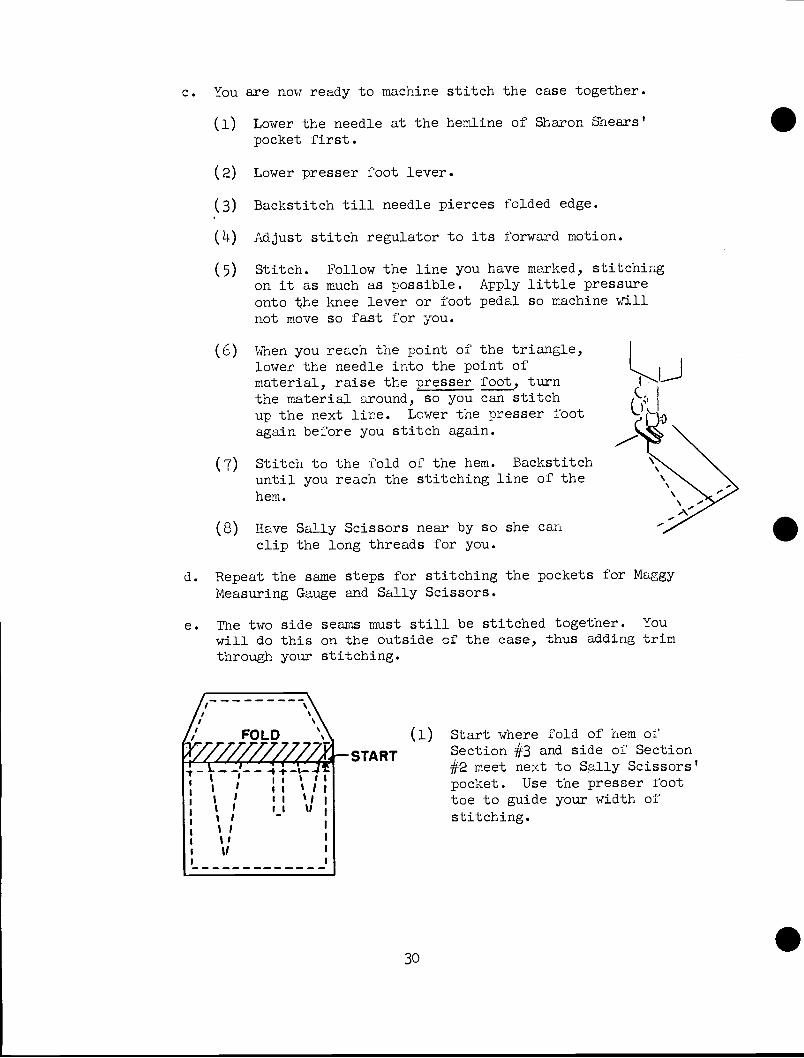
c. You are flOW ready to machine stitch the case together.
(1) Lower the needle at the hemline of Sharon Shears'pocket first.
(2) Lower presser foot lever.
(3) Backstitch till needle pierces folded edge.
(14) Adjust stitch regulator to its forward motion.
(5) Stitch. Follow the line you have marked, stitchingon it as much as possible. Apply little pressure
onto he knee lever or foot pedal so machine willnot move so fast for you.
(6) When you reach the point of the triangle,lower the needle into the point ofmaterial, raise the presser foot, turnthe material around, so you can stitchup the next lire. Lcwer the presser footagain before you stitch again.
(7) Stitch to the fold of the hem. Backstitchuntil you reach the stitching line of thehem.
(8) Have Sally Scissors near by so she canclip the long threads for you.
d. Repeat the same steps for stitching the pockets for MaggyMeasuring Gauge and Sally Scissors.
e. The two side seams must still be stitched together. Youwill do this on the outside of the case, thus adding trimthrough your stitching.
FOLD
I IlI IlI
'I I I
I I
I
I
I
I %I I
I I, I
I I
(1) Start where fold of hem of
START Section 3 and side of Section2 meet next to Sally Scissors'
pocket. Use the presser foottoe to guide your width ofstitching.
30
.

(2) Place the pellon into themachine, so that the cutedges are even with theoutside of the narrow toe.If you watch this edge andthe outside of the toe --NOT YOUR NEEDLE - - all theway around the outside ofyour case, you will have anice, even stitching linewhich holds your casetogether.
EI
(3) When you reach each cornerremember to turn your wheelby hand so the needle goesinto the material at theexact point. Stop. Turncorner as on page 30.
- -
Watch yourpresser foot
when you sews
Do not try to use the electricity when reaching or turningcorners until you know how to use the machine as easilyand as accurately as your mother or leader.
(1.) After you have stitched around the entire case, sew overthe first stitches you made in the hem. Clip the threads.(Are you remembering to let Patty Paper Bag hold yourclipped threads?)
f. To change Section I into a flap which willhold your tools in their pockets, one more
Start End row of stitching is necessary.
I I I
I I i
I I
'I
Where to use the shoestrings?
(1) Turn the flap down on the foldline B-D with chalk marking toinside.
(2) Press fold lightly and pin it intoposition.
(3) Machine stitch the fold on the flap,backstitching to the stitchingline and then moving forward.
The pair of shoestrings you chose will be sewn to thecase to keep Sharry Shears, Sally Scissors and Margy MeasuringTape tucked inside.
1. Find mid-point of shoestring by folding itin half. Mark it with a pin.
31

2. Use Ruthy Ruler to find the center line of the back of the case.Mark it with pins at the top and bottom of Margy Measuring Gaugetspocket.
You could also find and mark the center line by folding the casein half and placing pins on the fold.
/,/ 4-
--II
I I
Hem line , xji'iil /I
"1 Measuring : ' i____________
I' 1 -x '_ x i x
gauge I
I
II i
II I 'ILL... ---------- .1
FRONT BACK
3. Mark placement for attaching shoestrings, by using the hemline inthe front of case and the end of the measuring gauge pocket as aguide.
14 Match center of strings with center back of case. Pin into place.Then pin the strings to all "x" markings on the back of the case.
5. Attach the string by stitching back and forth onthe seam line. I
6. Clip your threads closely, remove pins from center 38
back, and you have completed another project. I
Making another case for Mother or friends
You have a pattern and have learned how simple it is tomake this handy case. Why not make a few more for gifts?
What magic trick could make this case colorful and maybe more fun to sew?
dNow that you have learned to measure and use your
sewing machine accurately, Theta Thread would like to giveyou a hint about her friends which she knows you wouldenjoy. Instead of using thread whichmtches the case, she would like youto choose one of her many threadfriends who is bright in color foryour stitching. If you are reallyable to stitch straight, stitcheach pocket twice each row 1/8
inch apart. This change is your- _j__ .1_It .2 - -- - si_sLUiC LILC1S. in IiIIg Tfli CU .
very special one.
32
.
.

Project III. Closet Accessories
Petticoat Holder
- ii;
Bobby Socks Holder
For what will these be used?
A. Petticoat Holder
1. Will keep the ruffles of your petticoat fluffy for you betweenwearings.
2. Will be a space saver in storing your petticoat in your closet.
3. Could be an unusual, but much appreciated gift to a friend.
B. Bobby Socks Holder
1. Will hold your soiled socks before they are laundered.
2. Could also be used for other small articles of soiled clothing.
3. Would make a nice gift to Mother for her hosiery.
'1hat will you learn in these projects?
1. To choose a cheerful, cleverly printed cotton material.
2. To match a color of plain grosgrain ribbon with printed material.
3.. To sew with two colors of thread.
-)-. To work with a smooth material.
33

5. To use a cloth guide in making straight and curved seams.
6. To trim a seam for smooth turning.
7. To turn and press a slightly curved hem.
How do you begin?
A. Notice the colors in your bedroom (walls, bedspread, draperies orcurtains, floor, rugs).
1. Which do you like best?
2. Which has been used most?
3. Which would you like to use more?
. Which would be pretty in your closet?
B. Decide which color is your favorite, and which other colors you likewith it.
C. Plan a shopping trip with your mother or older sister to choose thedesign and color of material which would make especially nice closetaccessories for you.
1. Since pert of this project is stitched to pellon, be sure that youalso notice if the colors in the material you choose will look nicewith plain colored pellon. Brighter colors would be better thanpastels or gray colors.
2. If you are still having difficulty in stitching evenly along anedge, you would be happier with your projects if you bought aprinted material instead of a plain one. Plain material is notvery kind in hiding uneven or crooked stitches.
Flowered designs, polka dots, or all over cotton prints would lookcheerful in your closet.
Go to the drapery department as well as dress fabric departmentwhen you go shopping. Many of the drapery designs and colors area gay and clear print. Do not plan to use plaids, checks, orstripes. They are difficult to use in curved seams and hemslike you will be making in these projects.
If your Mother has remnants of material left over from previoussewing, she might have some for you which you would enjoy using.If so, only buy the few extra items which you will need for theprojects.
31

How much material and what supplies will you need?
PetticoatHolder
2/3 yd. Pellon
in. Cotton material(Total: 8" * l6tt = 214")
Bobby SocksHolder
16 in.
L./3 yfi. Grosgrain ribbon 1-1/3 yd.
(1/2 inch width)
? spools Thread 1 spool(White, match ribbon, matchmaterial)
Cloth Guide or Masking Tape(This guide is a sewing machineattachment shown on page 15)
Which tools from your sewing box will change these materials into closet'snri s?
You will again use almost all of those you have tucked in your sewing box.
1. Sharon Shears ............... will cut out your projects for you.
2. Yeta Yardstick orMaggy Measuring Tape ...... will mark the size of the pattern,
and the center lines of patternpieces.
3. Penny Pincushion ........... . will be busy holding all her pins foryou so you can reach them easily.
11. Theta Threadand her friends ........... will be happy to help the sewing
machine stitch your pretty materialtogether.
5. Sally Scissors .............. has become a very good "thread clipper"after clipping so many threads tocomplete your other projects.
6. Margy Measuring Gauge ....... will be careful to measure the curvedhem accurately.
35

7. Eileen Iron and Patty Paper Bag ..... are most anxious to keep you theneat seamstress you were w1en youfirst learned to sew.
8. Thumbalena Thimble .................. will help push Nita Needlethrough some heavy seams whichyou will be basting.
Let's start with the "Petticoat Holder"1
B
A
A. To find the size of your pattern - -
1. Measure the length of one of your petticoats.
2. Wrap Maggy Measuring Tape around the fullest part of the ruffles orhem to measure the size needed to hold your petticoat. Pull it only
tight enough to hold ruffles in place - not to crush them.
3. Jot down the number of Maggy MeasuringTapes inches which are needed to wraparound the ruffles.
/ I__'tI/ 'c i5 incnes t iAI/I) S
B. To design and cut your pattern, study the following pictures, butuse your own measurements instead of those used in the diagram.
They are only used as ai example.
Find a large piece of paper from which to cutyour pattern for the petticoat holder. It
must be as long as your petticoat.
1. Draw a pencil line on the paper next toYeta Yardstick to straighten top and sides
of the paper.
2. Thim the paper carefully along these twopenciled lines. (Ask Mother for an oldpair of shears to cut this paper. Do not
use Sharry Shears for paper. It willmake her edges dull and she will not cut
fabric as well.)
S36
[IJ
.
IB
15"
KEEP EDGES EVEN
a-J
0U-
A
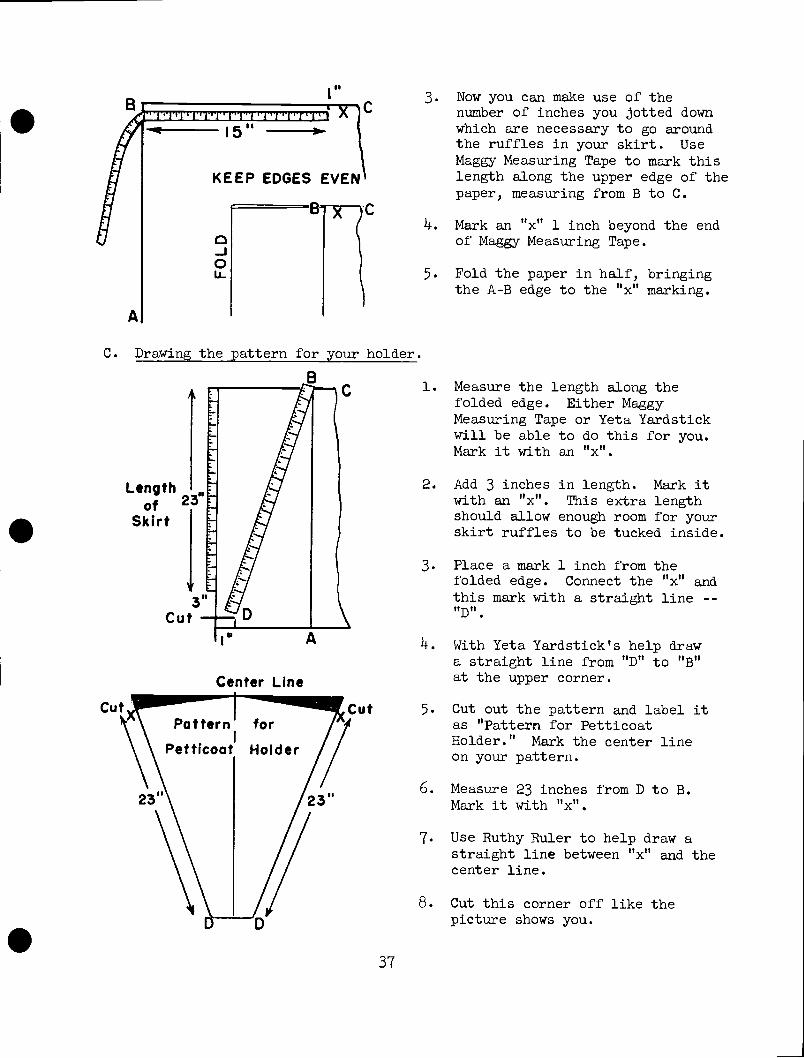
3. Now you can make use of theC number of inches you jotted down
which are necessary to go aroundthe ruffles in your skirt. UseMaggy Measuring Tape to mark thislength along the upper edge of thepaper, measuring from B to C.
C. Drawing the pattern for your holder.
Lengthof 23
Skirt
13
Cut
Cut .
23"
Center Line
Pattern forPetticoat Holder
23"
//
Cut
37
l-. Mark an "x" 1 inch beyond the endof Maggy Measuring Tape.
5. Fold the paper in half, bringingthe A-B edge to the "x" marking.
1. Measure the length along thefolded edge. Bither MaggyMeasuring Tape or Yeta Yardstickwill be able to do this for you.Mark it with an
2. Add 3 inches in length. Mark itwith an "x". This extra lengthshould allow enough room for yourskirt ruffles to be tucked inside.
3. Place a mark 1 inch from thefolded edge. Connect the "x" andthis mark with a straight line --"fl,t
I. With Yeta Yardstick's help drawa straight line from "fl" to 1tB"at the upper corner.
5. Cut out the pattern and label itas "Pattern for PetticoatHolder." Mark the center lineon your pattern.
6. Measure 23 inches from D to B.Mark it with "x".
7. Use Ruthy Ruler to help draw astraight line between "x" and thecenter line.
8. Cut this corner off like thepicture shows you.
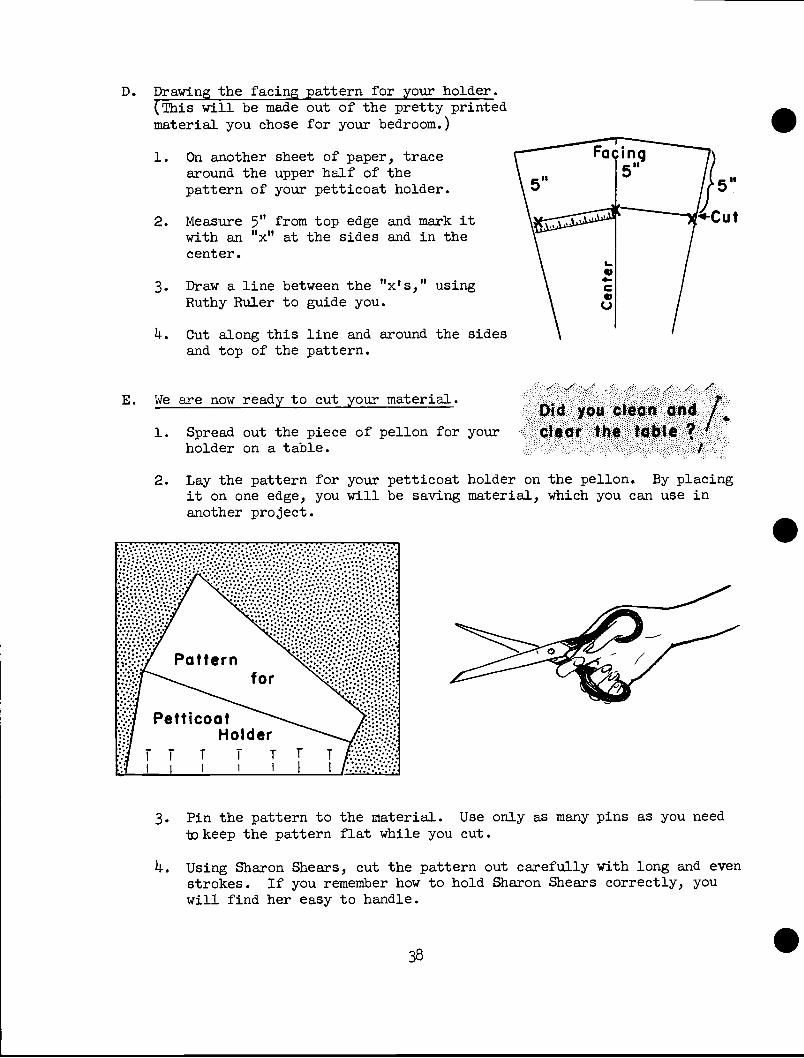
D. Drawing the facing pattern for your holder.(This will be made out of the pretty printedmaterial you chose for your bedroom.)
1. On another sheet of paper, tracearound the upper half of thepattern of your petticoat holder.
2. Measure 5" from top edge and mark itwith an 'tx" at the sides and in thecenter.
3. Draw a line between the "x's," usingRuthy Ruler to guide you.
11. Cut along this line and around the sidesand top of the pattern.
///E. We are now ready to cut your material.
Did you clean and
1. Spread out the piece of pellon for your deal' the table ?holder on a table.
H
u t
2. Lay the pattern for your petticoat holder on the pellon. By placingit on one edge, you will be saving material, which you can use inanother project.
Patternfor
Pet t ICOO tHolder
I I- 1 T
I I I
3. Pin the pattern to the material. Use only as many pins as you neediDkeep the pattern flat while you cut.
i. Using Sharon Shears, cut the pattern out carefully with long and evenstrokes. If you remember how to hold Sharon Shears correctly, youwill find her easy to handle.
[IJ
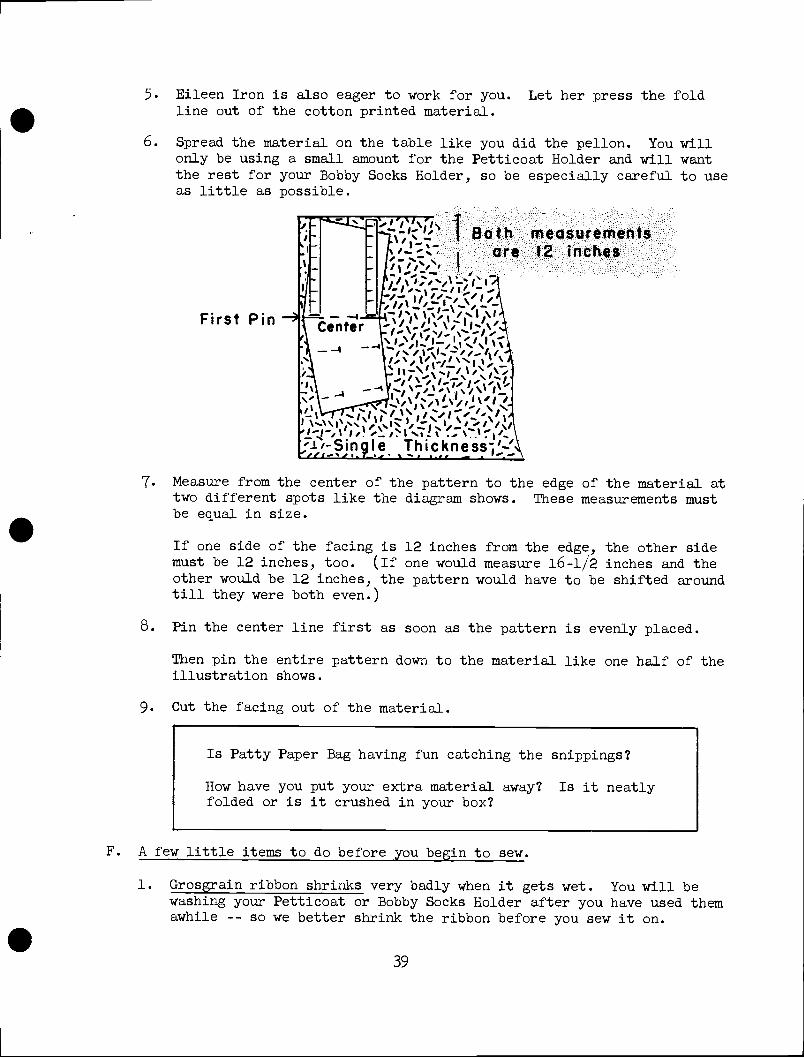
5. Eileen Iron is also eager to work for you. Let her press the foldline out of the cotton printed material.
6. Spread the material on the table like you did the pellon. You willonly be using a small amount for the Petticoat Holder and will wantthe rest for your Bobby Socks Holder, so be especially careful to useas little as possible.
-
;'.r i Both,1 are
-
Ft r St Pin
i-,''i'.! "':19Ie. Thickness'-''
measurements12 inches
7. Measure from the center of the pattern to the edge of the material attwo different spots like the diagram shows. These measurements mustbe equal in size.
If one side of the facing is 12 inches from the edge, the other sidemust be 12 inches, too. (ir one would measure 16-1/2 inches and theother would be 12 inches, the pattern would have to be shifted aroundtill they were both even.)
8. Pin the center line first as soon as the pattern is evenly placed.
Then pin the entire pattern down to the material like one half of theillustration shows.
9. Cut the facing out of the material.
Is Patty Paper Bag having fun catching the snippings?
How have you put your extra material away? Is it neatlyfolded or is it crushed in your box?
F. A few little items to do before you begin to sew.
1. Grosgrain ribbon shrinks very badly when it gets wet. You will bewashiag your Petticoat or Bobby Socks Holder after you have used themawhile -- so we better shrink the ribbon before you sew it on.
39

G.
To shrink the ribbon - -
Dip it in warm water till it is entirely wet.Remove it from water.Pat it with a towel to take most of the water out.Smooth the ribbon with your fingers.Hang it over a towel rack to dry.If it needs pressing, remember to use the steam fromEileen Iron.
2. Using two colors of thread. You will be using another color ofthread besides white when you sew on the ribbon loop. Wind a thinlayer of this color on a bobbin so that you will have it ready whenyou reach that step.
Let's make your project Use
1. Your first job is to sew your pretty 12 stitchesfabric on your pellon. per inch
a. Using the toe of 1he presser footon the sewing machine as a guide,sew a row of stitching 1/14. inch
from the lower edge of the facing.It is not necessary to backstitch.The thread does not have to befastened because this stitching isonly used as a guide.
b. Fold this edge to the wrongside of the fabric, keeping therow of stitching right on thefold. Press the fold with yourfingers, then have Eileen Ironpress it nicely for you.
c. Pin the facing to the pellonat the upper edge of the bolder(pins about every Ii"). Stitcha 1/11." seam along pinned edge.Again use the toe of your presserfoot as your guide.
If your sewing machine will notstitch over pins without break-ing the needle, you will needto baste (hand sew) the edgestogether before stitching.
Facjn
Wrong Side
- - - q-.---. I \ i'Seam

d. Stitch a l/1I-_inch seam from one side to the other.
e. Press the seam open.
f. Fold the facing down over thepellon. Your seam will now bein the inside of the fold. Pressthe facing again to help it lieperfectly smooth on the pellon.
g. Pin the facing in place.
h. If your printed material is darkcolored, you would be a smartgirl to change the top spool ofthread to the color which matchesthe ribbon. The bobbin can stilluse white thread because it willbe seen on the pellon.
ttlç 771 I ,,. -
.%__ 'I-..',
,7, Right Side '.4'/, --=---------- - I
i. Edge stitch the hem to the pellon, using the inside toe of thepresser foot as a guide. See page 29. (Aren't you glad youturned and pressed it earlier?)
2. To sew the seam in your petticoat holder, you must --
a. Pin the cut edges together.Be especially accurate in Does this stitchingpinning the facings to- Line match the onegether. They should be /;'2NN on the other side?even on each side of the /seam when you pin andafter you have stitchedthe seam together. (Yourholder will have many morepins than this diagramshows.) Be sure the pinheads do not stick outbeyond the cut edge.
If you prefer to stitch next to basting threads rather thanstitch over pins, now's the time to baste the seam. Yourstitched seam will be 1/2 inch wide. Sew your basting stitchesin about l/11 inch from the edge. Your leader will show you whatto do.
b. Place a chalk "x" mark 1/2 inchfrom the corner. This will showyou where to turn when youstitch the seam.
Cl
I,NQ
inch

c. Place the open end of the petticoat holder under the presserfoot so that the cut edges of the seam will lean against thecloth guide or fall on the half-inch mark on the masking tape.
d. Lower the presser foot and begin stitching. (or course, you'll
remember to backstitch first???)
e. You will sew straight if you watch that the cut edges lightlytouch the seam guide when the material moves along. (If yourmachine stitches over pins, you will not have to keep an eyeon them. You can remove them after you are finished stitchingthe seam.)
f. When you near the point of the holder, look for the chalk "x"mark so that you will stop stitching at the correct spot.When you reach it, lower the needle into the mark, raise thepresser foot, turn the material, till the cut edges rest againstthe cloth guide, or on the 1/2-inch mark again. Then lower
the presser foot and finish the seam. Backstitch.
g. To have a nice, flat seam on the outside, there are two thingsyou should do before you turn the holder right side out.
(1) Prim the corner and the shortseam in the lower part of theholder like the picture showsyou.
(2) Have Eileen Iron press theseam open as best she can.If your leader has a pressingroll for you to use, slip itinto the holder, and press.

If she does not have thisequipment, then try to pressthe seam open on the ironing Seamboard with the point of the Presseciron. Arrange the holder on Openthe ironing board with the seamlying in the center of the holder.Press from open end almost to the point
h. Before you turn the holder right sideout, fasten the loop used for hangingthe holder to the coat hanger.
(i) Baste the two sides of the seamin the facing together.
(2) Cut a 10-inch length from your pieceof grosgrain ribbon. (You did shrinkit earlier, didntt you?)
BASTINGSTITCH
(3) Baste the ends of the ribbon together for a 2-1/2 inch distance.
JYou wtl need to changethe color of your spool
and bobbin thread.
BACKSTITCH Machine stitchone side together.!
#) Slip the ribbon over the seam on theholder.
(5) Pin and baste the ribbon in place.
(6) Remove the pins and sew the ribbon to thseam with the sewing machine.
i. Turn the holder right side out. Work the lower point out from theinside with a flat tool (like the handle of a metal finger nailfile). Avoid any sharp tools -- they would tear both the stitchingthread and your pellon.
j. You may have to press the facing from the outside again to give itits final finished -- "brand new look"!
43
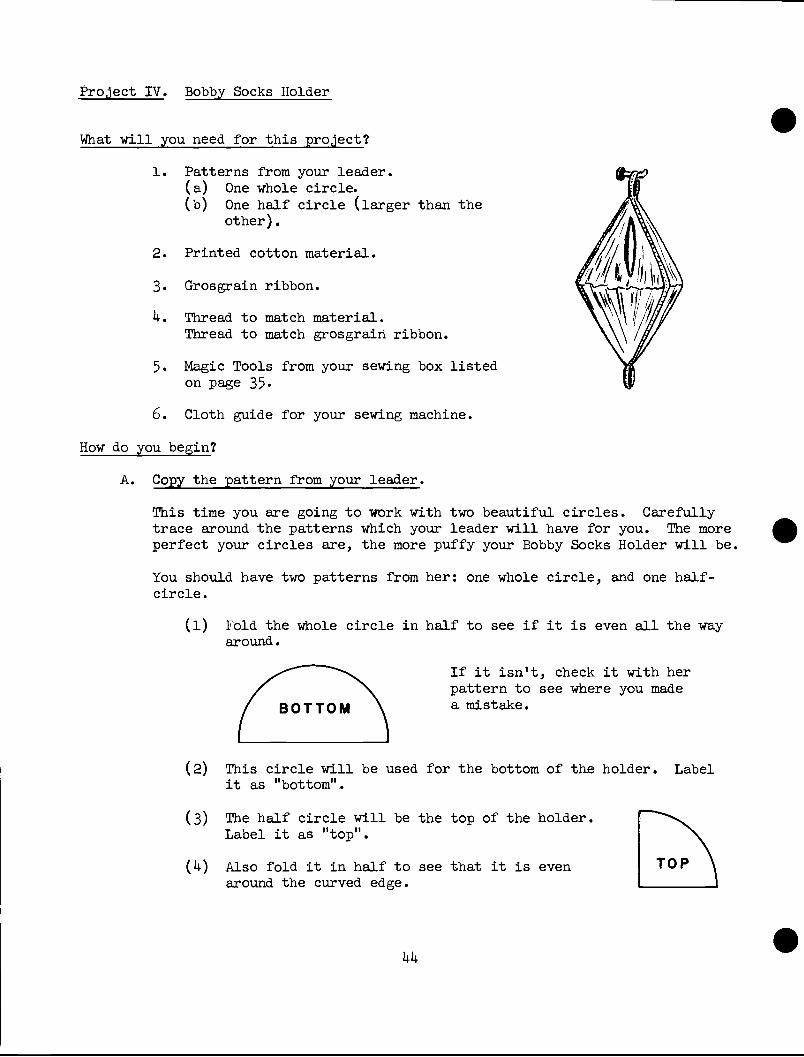
Project IV. Bobby Socks Holder
What will you need for this project?
1. Patterns from your leader.(a) One whole circle.(b) One la1f' circle (larger than the
other).
2. Printed cotton material.
3. Grosgrain ribbon.
4. Thread to match material.Thread to match grosgrain ribbon.
5. Magic Tools from your sewing box listedon page 35.
6. Cloth guide for your sewing machine.
How do you begin?
A. Copy the pattern from your leader.
This time you are going to work with two beautiful circles. Carefullytrace around the patterns which your leader will have for you. The moreperfect your circles are, the more puffy your Bobby Socks Holder will be.
You should have two patterns from her: one whole circle, and one half-circle.
(1) Fold the whole circle in half to see if it is even all the wayaround.
If it isn't, check it with herpattern to see where you madea mistake.
(2) This circle will be used for the bottom of the holder. Labelit as "bottom"
(3) The half circle will be the top of the bolder.Label it as "top".
(1,.) Also fold it in half to see that it is even TOParound the curved edge.
'a'.

B. Cut the Dattern out of material
1. Fold the material in half. To keep the open edges even (selvages),pin them together.
If this changed the place for the fold, iron the material to take outthe line of the old fold and put in a new one.
2. Fold the whole circle OPEN EDGES 7in half and place it on - FI f AI all these
the fold of the material. / edQes even?il\_' / -
Place the half circle onthe open edge of thefabric.
Pin both patterns to thematerial.
'1::'X!' 1 \\ _4,Ji
I'
'..7ic-ç ,.r"'-h-."tI,
L BOTTOM,"To be sure that you have '- '
pinned your patternscorrectly, ask your leader to check them before you cut them from thematerial.
3. You will need two 20-inch strips of grosgrain ribbon for the loops andtrim. If you have forgotten to shrink the ribbon, check back to page4-0 for directions. You must do this before using it.
C. Time to sew
1. Remove the pattern for the top of the holder from the material. Youwill need to sew a seam along a part of the straight edge to make anice opening for your bobby socks to slip into the holder.
FOLD
TFCENTER
2. Fold the half circle in halfagain -- one piece at a time --and press a sharp crease intothe fold.
3. You are now ready to think aboutmaking a seam.
(a) Attach the cloth guide to the sewingmachine 1/2 inch from the needle.
(b) With material wrong side out, pin thestraight edges together.
45
TOP
'wrong side out'

(c) Adjust the stitch regulator to 12 stitches per inch.
(d) Mark the "stop signs" with tailor's chalk. Then stitch betweenthese markings and the edge of the material.
- wrong side out
/ it is very important 7 ,o/ that you bacIstitch / f/ at each 'j4p" T <1 1
marking is'/ am14 STOP STOP 2se
(e) To stitch a nice straight seam, remember to keep your eye on the1/2 inch marking on the masking tape or along the cloth guide.
(f) Press the entire seam open.
Be careful in pressing the partwhich was not stitched. Toprevent it from slipping, pinit in place until you havetouched the fold with the iron.
(g) Edgestitch the seam to the holder.You have now finished the opening to yourholder. Wasn't that easy?
4-. It's pressing times
STITCH
Fold each circle, top and bottom, in half and press in the centerline with Eileen Iron. These fold lines will be your guides inattaching the ribbon trim.
(a) Press the top of the holder so the crease goes opposite to the
seam line.
Cent r Fold
(T(b) Fold another center line in the bottom of the holder. This will
be in opposite direction to the first fold. Press only at the
intersection.
(c) Also, press the grosgrain ribbon if you haven't already doneso.
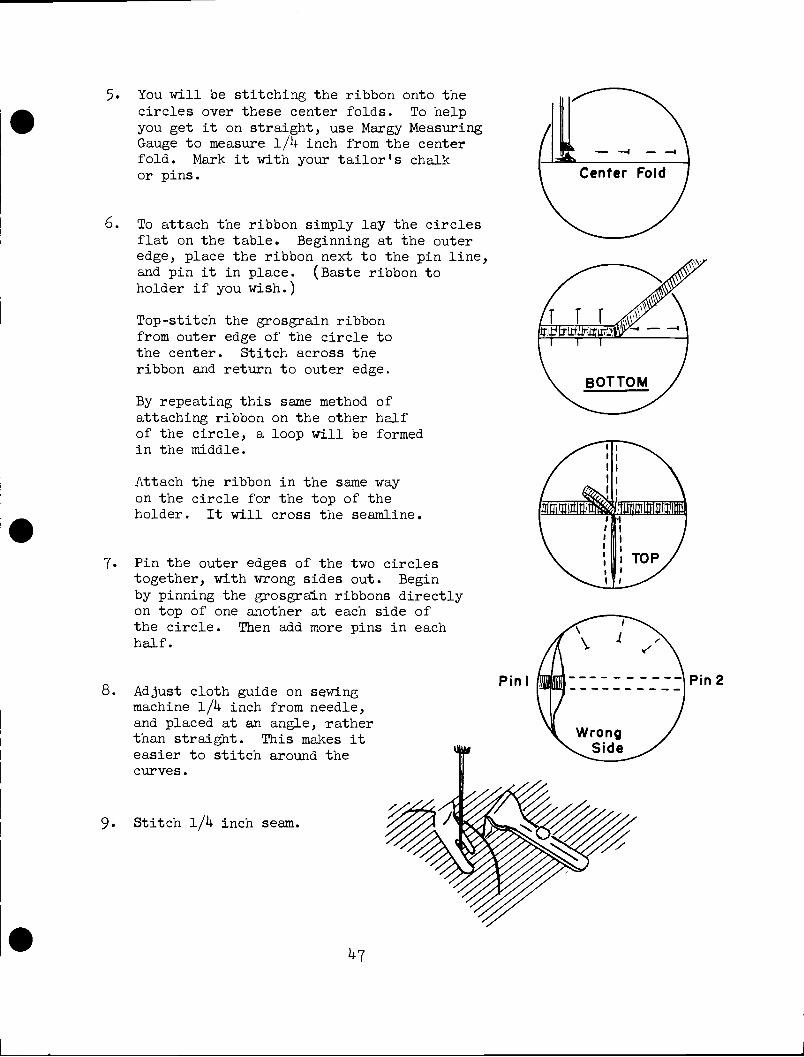
5. You will be stitching the ribbon onto thecircles over these center folds. To helpyou get it on straight, use Margy MeasuringGauge to measure i/)-l- inch from the centerfold. Mark it with your tailor's chalkor pins.
6. To attach the ribbon simply lay the circlesflat on the table. Beginning at the outeredge, place the ribbon next to the pin line,and pin it in place. (Baste ribbon toholder if you wish.)
Top-stitch the grosgrain ribbonfrom outer edge of the circle tothe center. Stitch across theribbon and return to outer edge.
By repeating this same method ofattaching ribbon on the other halfof the circle, a loop will be formedin the middle.
Attach the ribbon in the same wayon the circle for the top of theholder. It will cross the seaznline.
7. Pin the outer edges of the two circlestogether, with wrong sides out. Beginby pinning the osgra1n ribbons directlyon top of one another at each side ofthe circle. Then add more pins in eachhalf.
8. Adjust cloth guide on sewingmachine l/)4 inch from needle,and placed at an angle, ratherthan straight. This makes iteasier to stitch around thecurves.
9. Stitch l/!i inch seam.
47
--4 --4Center Fold
I ,\
Pini -----------\Pin2
Wrong

10. Press half the seani towards the center --of the holder by using only the pointof the iron in the seainline. Continuearound the entire seam. I
-
11. Turn holder right side out. Placeone band in the holder and run your \Wrongfinger around the curved seam. This \. sidewill shape it, so that you can press '-.._ -
it into a flat, neat circle.
12. After it is nicely pressed, pick it up by the top loop and bottomloop and pull it gently in opposite directions.
Isn't this fun? Just like magic you changed two flat circles
into a puffy holder!
N
Aren't you glad you joined your -H Club to learn to use "Mother's
Magic Sewing Machine"?
We hope you will continue to use it over and over again, so thatyou will not forget any of the "tricks" you have learned. Then you,
too, will be able to
"SEW ----- JUST LIKE MAGIC!"
FEDERAL COOPERATIVE EXTENSION SERVICE OREGON STATE COLLEGE CORVALLIS
Cooperative Extension work in Agriculture and Home Economics, F. E. Price, director. Oregon StateCollege, the United States Department of Agriculture, and the State Department of Education Co.
operating. Printed and distributed in furtherance of the Acts of Congress of May 8 and June 30, 1914.
IN]
S
S