JNBridge JMS Adapter for .NET User’s Guidejnbridge.com/guides/JNB_JMS_DotNET_UsersGuide.pdf ·...
53
JNBridge JMS Adapter for .NET User’s Guide Version 4.0 www.jnbridge.com
Transcript of JNBridge JMS Adapter for .NET User’s Guidejnbridge.com/guides/JNB_JMS_DotNET_UsersGuide.pdf ·...

JNBridge JMS Adapter for .NET User’s GuideVersion 4.0
www.jnbridge.com

JNBridge, LLC www.jnbridge.com
COPYRIGHT © 2008-2016 JNBridge, LLC. All rights reserved. JNBridge is a registered trademark and JNBridgePro and the JNBridge logo are trademarks of JNBridge, LLC. Oracle and Java are registered trademarks of Oracle and/or its affiliates.Microsoft, Windows, Windows Vista, Windows Server, Visual Studio, .NET and the Windows logo are trademarks, or registered trademarks of Microsoft Corporation in the United States and/or other countries. All other marks are the property of their respective owners. This product includes software developed by the Apache Software Foundation (www.apache.org).

3
USERS’ GUIDE
Version 4.0
Contents
How to use this guide ..........................................................................................................................5Additional resources ............................................................................................................................5
About the example code ...............................................................................................................................................5
Overview of the JNBridge JMS Adapter for .NET ................................................................................6How it works ................................................................................................................................................... 6
Installing, Licensing and Configuring the JMS Adapter .......................................................................8Supported Platforms for JNBridge JMS Adapter for .NET ............................................................................. 8Target Machine Prerequisites ......................................................................................................................... 8
Development Environment Prerequisites......................................................................................................................8Installing the JMS Adapter ............................................................................................................................. 9
Troubleshooting installation exceptions ......................................................................................................................10Configuring .NET 4.0 support .....................................................................................................................................10
Licensing ...................................................................................................................................................... 10License files ................................................................................................................................................................ 11Licensing and application configuration files............................................................................................................... 11Evaluation licenses .....................................................................................................................................................12On-line activation ........................................................................................................................................................12Off-line activation ........................................................................................................................................................13License managers.......................................................................................................................................................13
Getting Started: A simple console application ...................................................................................14Configuring the JNBridge JMS Adapter for .NET ......................................................................................... 14
Access privileges ........................................................................................................................................................1464-bit vs. 32-bit platforms ............................................................................................................................. 15
32-bit platforms ...........................................................................................................................................................1564-bit platforms ...........................................................................................................................................................15
Using the Design-Time Tool ......................................................................................................................... 16Opening the Add Adapter Service Reference dialog...................................................................................................16Choosing the JNBridge JMS Adapter for .NET ...........................................................................................................16
Connecting to a JMS Server ........................................................................................................................ 16Security tab .................................................................................................................................................................17URI Properties tab ......................................................................................................................................................17Binding Properties tab.................................................................................................................................................17
Creating a C# client API class ...................................................................................................................... 18Selecting operations ...................................................................................................................................................18Generate client classes...............................................................................................................................................19
JMS Adapter Design-Time Configuration ..........................................................................................22Security Properties ....................................................................................................................................... 22URI Properties .............................................................................................................................................. 22
Host property ..............................................................................................................................................................22Port property ...............................................................................................................................................................22

4
USERS’ GUIDE
Version 4.0
Binding Properties ........................................................................................................................................ 23JMS Properties ...........................................................................................................................................................23JNBridge properties ....................................................................................................................................................25Behavior properties .....................................................................................................................................................27Configuring Java when using the Binary TCP bridge .................................................................................................28
Inbound Service properties .......................................................................................................................... 30General properties ......................................................................................................................................................31
General and Specific Timeouts .................................................................................................................... 31Outbound Operations ........................................................................................................................32
Generic and Named Operations .................................................................................................................. 32Text, Byte and Map Message Operations .................................................................................................... 33
Binary Operations: signed vs. unsigned bytes ............................................................................................................33Map Operations ..........................................................................................................................................................34
Setting JMS Message Headers ................................................................................................................... 35Setting delivery delay in a JMS Message Header ......................................................................................................37
Using Message Selectors ............................................................................................................................ 37Using Durable Subscriptions ........................................................................................................................ 37
Unsubscribing from a durable subscription .................................................................................................................38Using Durable Shared Subscriptions ........................................................................................................... 38Blocking and Asynchronous Operations ...................................................................................................... 39
General and Specific Time-outs ..................................................................................................................................39Asynchronous Operations...........................................................................................................................................40
Inbound Operations and Services .....................................................................................................42Inbound Operations ...................................................................................................................................... 42
Configuring Inbound operations ..................................................................................................................................44Using an Exception Listener Inbound Service ............................................................................................................45
Transactions ......................................................................................................................................47Transaction Operations ................................................................................................................................ 47
Enable Transactions Operations .................................................................................................................................47Commit Transaction Operations .................................................................................................................................47Rollback Transaction Operations ................................................................................................................................48
Deploying Solutions ...........................................................................................................................49Run-time Security Credentials ..................................................................................................................... 49
The UriEncryptor .........................................................................................................................................................49
Tips and Tricks ..................................................................................................................................51Use the Generic Operations ......................................................................................................................... 51Work off-line ................................................................................................................................................. 51Debug connection or JNDI problems ........................................................................................................... 52When working on-line with the Add Adapter Service Reference design-time tool .................................... 52

5
USERS’ GUIDE
Version 4.0
How to use this guide
This guide contains information about installing, configuring, and using the JNBridge JMS Adapter for .NET. It is organized according to the particular task or tasks you wish to perform with the JMS Adapter.
Please read the section, Installing, Licensing and Configuring the JMS Adapter, before attempting to install and configure the adapter.
All users are encouraged to read the section, Overview of the JNBridge JMS Adapter for .NET. It gives information on the architecture of the JMS Adapter, how it works and the various scenarios in which it can be used.
The section, Getting Started: A simple console application, gives the developer a brief introduction on how to use the JNBridge JMS Adapter for .NET within Visual Studio including configuration, operation selection, code generation, application development and deployment.
Users who have purchased licenses or are planning a deployment of the JNBridge JMS Adapter for .NET, should read the section, Licensing the JNBridge JMS Adapter, which describes the various licensing mechanisms, and discusses the various ways of deploying license keys.
Additional resourcesFor specific configuration of several popular JMS implementations, please see the individual
configuration guides, e.g. UsingDotNetAdapterActiveMQ.pdf.
The JNBridge knowledge base, www.jnbridge.com/jn/kb, can also be searched for issues, work-arounds and general information.
About the example code
While the code examples within this guide are all written in C#, the JNBridge JMS Adapter for .NET supports VB .NET Visual Studio projects and VB .NET code generation.

6
USERS’ GUIDE
Version 4.0
Overview of the JNBridge JMS Adapter for .NET
The JNBridge JMS Adapter for .NET allows enterprise IT developers to integrate any Java Message Service (JMS) implementation into C# or VB .NET applications. The JMS Adapter uses the interoperability technology from JNBridge to integrate the Java implementation of any vendor’s 1.1 or 2.0 compliant JMS into .NET. This includes ActiveMQ, JBoss, IBM WebSphere, Tibco Enterprise Message Service, Oracle WebLogic, Oracle AQ, SonicMQ, Sun Glassfish and Open MQ. Additionally, the JMS Adapter uses the Windows Communication Foundation to encapsulate the resulting JMS client into a WCF Line of Business adapter. The WCF LOB adapter framework integrates into Visual Studio, providing a development environment to consume the JNBridge JMS Adapter as a WCF endpoint.
The JNBridge JMS Adapter for .NET exposes a simple interface for producing and consuming JMS messages to and from queues and topics. The complexities of building a JMS client from the Java class API are hidden from the developer. The JMS Adapter requires no modification to the JMS server. Nor does it require any specific .NET support from a JMS vendor—all that is required is a vendor’s standard Java implementation. The support for any vendor’s JMS implementation is accomplished through the JNBridge Java and .NET interoperability product, JNBridgePro. For more information on JNBridgePro, visit www.jnbridge.com.
How it works
At design time, the JNBridge JMS Adapter for .NET uses a Visual Studio plug-in interface to provide integration and configuration information. With this Add Adapter Service Reference plug-in, you can explore the available JMS queues and topics, select the send and receive operations to be performed and the optional queues and topics to be accessed. You can chose specific send and receive operations particular to the queues and topics found on any JMS implementation. Additionally, it is possible to work off-line, when access to a JMS server is impossible, and use generic send and receive operations.
Upon closing the Add Adapter Service Reference dialog, the plug-in will generate
Figure 1. Add Adapter Service Reference
7
USERS’ GUIDE
Version 4.0
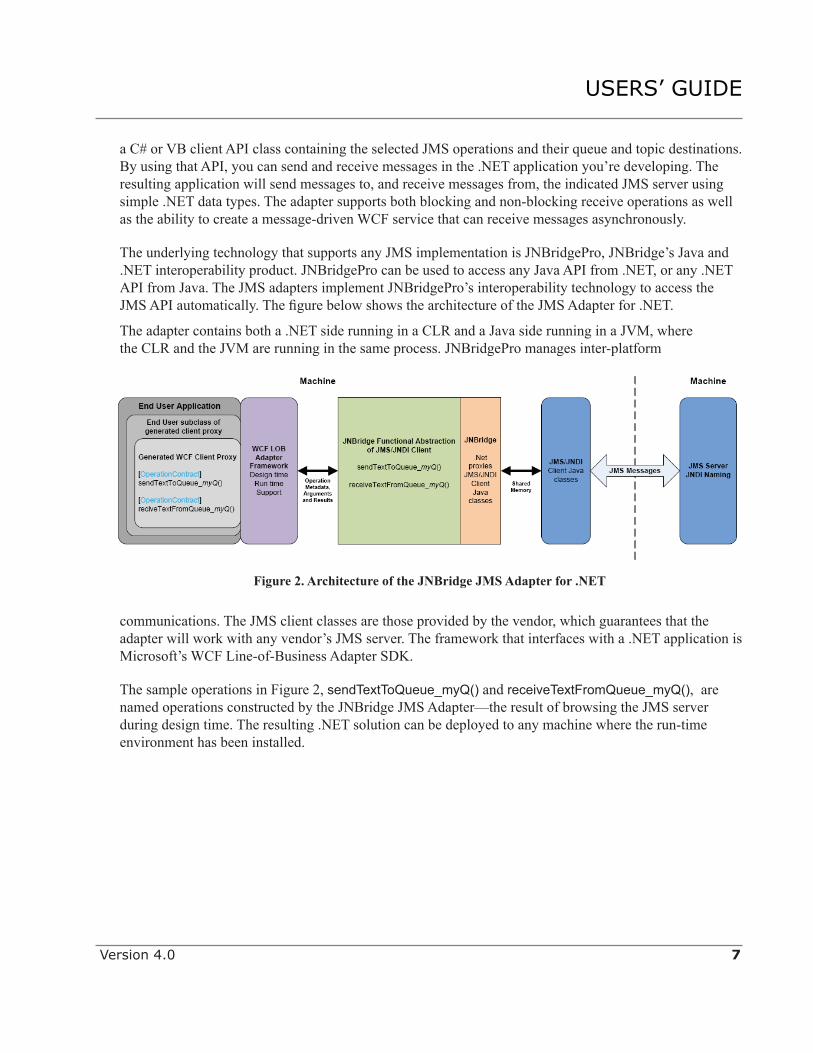
Figure 2. Architecture of the JNBridge JMS Adapter for .NET
a C# or VB client API class containing the selected JMS operations and their queue and topic destinations. By using that API, you can send and receive messages in the .NET application you’re developing. The resulting application will send messages to, and receive messages from, the indicated JMS server using simple .NET data types. The adapter supports both blocking and non-blocking receive operations as well as the ability to create a message-driven WCF service that can receive messages asynchronously.
The underlying technology that supports any JMS implementation is JNBridgePro, JNBridge’s Java and .NET interoperability product. JNBridgePro can be used to access any Java API from .NET, or any .NET API from Java. The JMS adapters implement JNBridgePro’s interoperability technology to access the JMS API automatically. The figure below shows the architecture of the JMS Adapter for .NET.
The adapter contains both a .NET side running in a CLR and a Java side running in a JVM, where the CLR and the JVM are running in the same process. JNBridgePro manages inter-platform
communications. The JMS client classes are those provided by the vendor, which guarantees that the adapter will work with any vendor’s JMS server. The framework that interfaces with a .NET application is Microsoft’s WCF Line-of-Business Adapter SDK.
The sample operations in Figure 2, sendTextToQueue_myQ() and receiveTextFromQueue_myQ(), are named operations constructed by the JNBridge JMS Adapter—the result of browsing the JMS server during design time. The resulting .NET solution can be deployed to any machine where the run-time environment has been installed.

8
USERS’ GUIDE
Version 4.0
Installing, Licensing and Configuring the JMS Adapter
The JNBridge JMS Adapter for .NET is automatically installed in two different configurations:
A development environment providing a Visual Studio plug-in enabling the Add Adapter Service Reference design-time capabilities. This configuration is installed if Visual Studio is found on the target machine
A run-time environment for solution deployment. This configuration is installed if Visual Studio is not found on the target machine.
Supported Platforms for JNBridge JMS Adapter for .NET
Windows Vista, x86 and x64.Windows 7, x86 and x64.Windows Server 2008, x86 and x64.Windows Server 2008/R2.Windows Server 2012/R2
Target Machine Prerequisites
The following minimum prerequisites are needed for either of the two environments.
The .NET 3.5 SP1 Framework must be installed on the target machine. The framework may be downloaded from Microsoft. For 64-bit platforms, if x64 processes are targeted, the x64 .NET framework must be installed. In addition, the adapter supports the NET 4.0, 4.5, 4.5.1 and 4.6.
A Java Run-time Environment (JRE) must be installed on the target machine. The JNBridge JMS Adapter supports the Standard Edition JRE 7 or above. For 64-bit platforms, if x64 processes are targeted, a x64 JRE and a x86 JRE must be installed.
On a 64-bit platform, the x86 java.exe must be in \Windows\SysWOW64 and the x64 java.exe must be in \Windows\system32.
For any given JMS implementation, the JMS Java client environment must be installed including all JAR files as well as any additional configuration such as environment variables or configuration files.
Development Environment PrerequisitesVisual Studio 2010, 2012, 2013 or 2015 must be installed prior to the installation of the JNBridge
JMS Adapter.
! All running instances of Visual Studio must be closed prior to installing the design-time plug-in.
9
USERS’ GUIDE
Version 4.0
Installing the JMS Adapter
The installation of the JMS Adapter requires administrator privileges on the target machine. The installation consists of a single installation.
Start the installation by executing the Windows Installer, e.g. InstallNetJMSAdapter_40.exe. This is a simple installation allowing the user to accept the EULA (End User License Agreement) and to choose either a deployment or development environment and a target installation directory.
If updating a previous version of the adapter, it is necessary to uninstall that previous version. If you are uninstalling an earlier development environment, please exit all instances of Visual Studio. If you have configuration information in the bind.properties file, please move that file from the installation directory before uninstalling the previous version. After installing version 4.0, you may copy the bind.properties file back to the installation directory.
The following runtime components are installed for a deployment environment: ● The assembly, JNBridgeDotNetJMSAdapter.dll is placed in the adapter’s \bin directory, e.g. C:\Program Files\JNBridge\JMSAdapters\DotNet\bin. The assembly, also installed in the GAC, provides core functionality.
● The assemblies, JNBShare.dll, JNBShareMem_x86.dll (and JNBSharedMem_x64.dll on a 64-bit platform) and JNBridgeJMSCore.dll, provide the .NET-to-Java bridge between the Java Virtual Machine and the Common Language Runtime. They are installed in the GAC. There are two versions of the assembly, jnbproxies.dll, one for JMS 1.1 and one for JMS 2.0, installed under the \bin directory.
● The library, jnbauth_x86.dll and/or jnsauth_x64.dll, contains licensing functionality and is placed in the \bin directory.
● The assemblies, Microsoft.ServiceModel.Channels.dll and Microsoft.ServiceModel.Channels.Tools.MetadataSearchBrowse.dll represent the runtime components of Microsoft’s WCF Line-Of-Business (LOB) adapter framework. These files are placed in the \bin directory and are also placed in the GAC.
● If a development environment is installed, then an additional assembly from Microsoft’s WCF LOB framework, Microsoft.ServiceModel.Channels.Tools.PlugInPackage.dll, is installed in the \bin directory and the GAC. This assembly provides the WCF LOB design tool, Add Adapter Service Reference, in Visual Studio.

10
USERS’ GUIDE
Version 4.0
Troubleshooting installation exceptions
If, when the adapter is first used in Visual Studio, a dialog appears complaining about the inability to find the assembly Microsoft.ServiceModel.Channels.dll, or the Add Adapter Service Reference dialog throws an exception when used, then a configuration line may not have been properly added to the machine.config files. Please follow these instructions.
1 Navigate to the directory \WINDOWS\Microsoft.NET\Framework\v2.0.50727\CONFIG and open the file machine.config in a text editor.
2 Find the XML element <bindingExtensions> and, if not present already, insert the <add> element for the custom WCF JNBridgeDotNetJMSAdapterBinding, shown below.
<system.serviceModel> <extensions> <bindingExtensions> <add name=”JNBridgeDotNetJMSAdapterBinding” type=”JNBridge.JMSAdapter.JMSAdapterBindingCollectionElement, JNBridgeDotNetJMSAdapter, Version=4.0.0.0, Culture=neutral, PublicKeyToken=b18a44fb28aea122” /> </bindingExtensions>
3 Repeat with the other machine.config file in ...\Framework\v4.0.30319\Config directory. If the platform is 64-bit, also check the configration files in the ...\Framework64\ hive. The element added to the 64-bit file is identical to the element added to the 32-bit files.
! The the adapter will install and work on a 64-bit platform using either 32-bit or 64-bit targeted processes. A 32-bit process requires a x86 JRE. A 64-bit process requires a x64 JRE.
Configuring .NET 4.0 support
When building a VS 2010, 2012 or 2013 project, the target framework run-time can be either be the .NET 2.0/3.5 or .NET 4.0 CLR. If the target is .NET 4.0, the following XML may have to be placed in the generated app.config file:
<startup useLegacyV2RuntimeActivationPolicy=”true”> <supportedRuntime version=”v4.0”/> </startup>
Licensing
The JMS adapter must be licensed on each machine on which it is installed. JNBridge supports a variety of license types. For more information, please visit www.jnbridge.com/JMS-NET-Adapter-licensing.htm.
!If you have used versions of the JMS adapter older than version 3.0, note that starting with v3.0 we have introduced a new licensing mechanism. The concepts and components described below will be different from those you might have used in previous versions.

11
USERS’ GUIDE
Version 4.0
License filesFor most types of licenses, the license is encapsulated in a license file, which is a text file whose suffix is .lic. (The file’s name is generally assigned by JNBridge’s license tracking mechanism.)
When a license file is present, the Visual Studio Plug-in, and your application that uses the JNBridge JMS adapter for .NET, will look for the license file in the following locations, in order, until a license file is found:
● The location specified in the application’s app.config file.
● The folder in which the application’s executable file resides.
● The adapter installation folder, e.g. C:\Program Files\JNBridge\JMSAdapters\DotNet.
If an invalid license file is found, an InvalidLicenseException is thrown. The adapter will register the exception in the system application event log. If error logging is enabled in the adapter, the InvalidLicenseException will also be logged. A license file can be invalid for a number of reasons, including:
● It has been tampered with.
● It is time-limited and has expired.
● It is node-locked, and is being used on a machine other than the one to which the original license was locked.
Licensing and application configuration filesYou have the option of specifying the location of your license file, or, if you are using a license server, the location (host and port) of the license server. This can be done by modifying the configuration file for the application you’re developing that uses the JMS adapter.
Inside the <configuration> section of the application’s configuration file, add the following section if it is not already there:
<configSections> <sectionGroup name=”jnbridge”> <section name=”licenseLocation” type=”System.Configuration.SingleTagSectionHandler”/> </sectionGroup> </configSections>
Inside the <jnbridge> section, add the following line:
<licenseLocation directory=”absolute/relative path to directory containing license file”/>
or<licenseLocation host=”license server machine” port=”license server port”/>
Choose the first variant if you are using a license file; choose the second variant if you are using a license server. Again, specifying this information is optional. If you omit it, the licensing mechanism will continue looking for the license in the adapter’s root installation directory. Here, it is also possible to

12
USERS’ GUIDE
Version 4.0
place the license manager’s host name and port number into a license file. The format of the file must be the following and the file must end in ‘.lic’: HOST [hostname] [port] ISV jnbridge
Evaluation licensesAs part of the download process, you will be emailed an activation key for a 30-day evaluation license. When you receive this key, enter it in the JMS adapter’s registration tool, shown in Figure 4, under the Online License Activation tab and click on the Activate License button. This will allow you to use the JMS adapter on a trial basis for 30 days. (See the section, On-line activation, below, for additional details.) You must perform this action before you can begin your evaluation.
The evaluation license file that is obtained through this activation is node-locked, and cannot be copied to other machines. If do you wish to place evaluation installations of the adapter on additional machines, you can enter the same activation key into the registration tool on the new machines at any time and receive 30-day evaluation licenses on those machines. Please note that any deployments and installations using evaluation licenses obtained through this activation key will stop working after the 30-day evaluation period expires. Also note that, under the terms of your JNBridge JMS adapter for .NET license, you may not use your evaluation license to run production applications.
It is important to note that this activation key cannot be used twice on any given machine. If you need an extension to your 30-day evaluation period, please visit www.jnbridge.com/swreg.htm and follow the instructions there, or contact [email protected].
In the event that your deployment does not have Internet connectivity, please follow the instructions in the section “Off-line activation,” below.
On-line activation
Once you have purchased adapter licenses, you will receive an activation key. If the machines on which you will be licensing the adapters have access to the Internet, you can use this activation key to claim your licenses. To do so, you must use the adapter registration tool (RegistrationTool.exe) on each of the machines to be licensed. The registration tool will be part of the installation. Launch the registration tool, and select the Online License Activation tab (Figure 4).
Paste the activation key into the Enter Activation Key slot Figure 4. The Registration Tool and online activation

13
USERS’ GUIDE
Version 4.0
and click on the Activate License button. If you have licenses left to activate, the operation will succeed and your installation will be licensed. The license file will be placed in the adapter’s root installation directory.
If you have no more licenses, or the operation otherwise fails, you will see an error message indicating the reason for the failure.
If you believe you have Internet access, an attempt to activate a license may result in this error message: This error may be the result of using a proxy server for internet access. If a proxy server is being used, then online activation requires that the environment variable HTTP_PROXY be set before running the Registration Tool. The syntax for setting the HTTP_PROXY environment variable is: HTTP_PROXY=http://[proxy_server_url]:[port]/
Alternatively, you may click on the button, Proxy Server URL, on the Online License Activation tab and set the proxy server’s hostname and port number.
Off-line activation
In the event that the machines on which you want to license the adapter do not have Internet connectivity, you can claim a license by launching the registration tool, then selecting the Offline License Activation tab (Figure 5a).
Click the Request License button and follow the instructions in the displayed page, or copy the displayed registration key into an email and mail the license request to [email protected], or visit www.jnbridge.com/swreg.htm and follow the instructions there, supplying the registration key when requested. In response, you will be emailed a license file that you should deploy to the adapter root installation directory, e.g. C:\Program Files\JNBridge\JMSAdapters\DotNet.
License managers
Certain types of licenses, including floating licenses, as well as licenses that will run on terminal servers and virtual machines, require the use of a license manager. If you have purchased these licenses, JNBridge will supply you with a license manager, which you should install and configure according to instructions that are included with the license manager.
To use a license served up by a license manager, you will need to configure the adapter to point to point the license manager. See Licensing and application configuration files, above, for a discussion of how to do this.
The registration tool provides some assistance in doing this. When the Use License Manager tab is selected (Figure 5b), the user has the option of entering the hostname and port of the license manager (that is, the hostname of the machine on which the license manager resides, and the port on which it is listening). Once those values are entered, clicking on the Load License button will test whether these values are correctly configured, and, if they are, clicking on the Export Config File button will cause a fragment of XML containing the configuration information to be output to a file. The contents of the file can be incorporated into the application configuration file.

14
USERS’ GUIDE
Version 4.0
Please note the following: ● Clicking the Load License button does not
obtain a license for the application being licensed. It is still necessary to add information to the application configuration file that points to the license manager.
● If you have clicked on the Load License button, we recommend that you exit the registration tool before running your application.
● Use of the functionality in the Use License Manager tab is completely optional and is provided as a convenience. It is entirely possible to configure the application manually, without the assistance of this tool.
Getting Started: A simple console application
What follows is a quick example of integrating JMS into a simple C# .NET console program using the JNBridge JMS Adapter for .NET, Visual Studio and the design-time features of the WCF Line-of-Business adapter framework.
The JNBridge JMS Adapter is encapsulated as a WCF custom transport and binding. The JMS Adapter uses WCF to present available operations specific to a JMS implementation. As a WCF
Figure 5b. Pointing to a license manager.
Figure 5a. Offline activation
Configuring the JNBridge JMS Adapter for .NET
The JMS Adapter requires very little configuration prior to development and deployment. Most configuration, such as connecting to a JMS server is done by interacting with the Add Adapter Service Reference development tool or by editing the application config file.
Access privileges
A developer or the account under which a .NET application will execute must have full access to the file bind.properties. This file is found in the target directory where the JMS Adapter is installed. The default location is \Program Files\JNBridge\JMSAdapters\DotNet\bin\bind.properties.

15
USERS’ GUIDE
Version 4.0
64-bit vs. 32-bit platforms
The JNBridge JMS Adapter for .NET targets x86 processes on a 32-bit platform. On a 64-bit platform, the adapter targets both x86 and x64 processes.
32-bit platforms
Required JRE
An x86 targeted application requires a 32-bit JRE.
Visual Studio build targets
When using the .NET adapter for JMS on a 32-bit platform, the project properties within Visual Studio can be set to Any CPU or x86. If the resulting application is used on a 64-bit platform, the build target must be set to x86.
64-bit platforms
Required JRE
If the adapter is installed on a 64-bit platform, both a x64 JRE and a x86 JRE are required.
The x86 JRE is required during development in Visual Studio when using the Add Adapter Service Reference wizard to connect to a JMS Server. During design-time, Visual Studio will look for the x86 Java bootstrap executable, java.exe, in \Windows\SysWOW64.
During run-time, the adapter will use the x64 JVM, jvm.dll, configured in the JVM Path property. The x64 version of the adapter will not work with a x86 JVM during run-time.
! The installation program for a x86 JRE may not correctly place the Java bootstrap executable, java.exe, in \Windows\SysWOW64. The executable may have to be copied manually. It will not be found in \Windows\system32 by Visual Studio.
! If the only available JRE is x64, it is possible to manually copy the x64 bootstrap executable, java.exe, into \Windows\SysWOW64. This is not recommended as other x86 programs may expect a 32-bit JRE.
Visual Studio build targets
The build target must be set to x86, x64 or AnyCPU. If it is set to x86, the application will require a 32-bit JVM. If it is set to x64, the application will require a 64-bit JVM. If the target is AnyCPU and the application is executed on a 64-bit platform, the JVM must be 64-bit. If the application is executed on a 32-bit platform, the JVM must be 32-bit. Please see the section JVM Path for more information on configuring JVMs.

16
USERS’ GUIDE
Version 4.0
endpoint, the Adapter—along with the metadata describing the interface chosen by the developer—can generate C# .NET client API classes that implement the chosen operations as class methods.
!While this console application example uses the C# language, the JNBridge JMS Adapter for .NET can generate VB code if the project is a VB project rather than a C# project.
Using the Design-Time Tool
Within a Visual Studio, the first step is to create a new C# Console application project and then invoke the Add Adapter Service Reference dialog.
Opening the Add Adapter Service Reference dialog
In the Solution Explorer find the References node and right-click to bring up the context menu. Choose the Add Adapter Service Reference menu choice. The dialog box, shown in Figure 6, is different than the one shown in Figure 1—it has not been configured or connected to a JMS Server.
Choosing the JNBridge JMS Adapter for .NET
Open the drop-down list control titled Select a binding and choose JNBridgeDotNetJMSAdapterBinding. The dialog will become active and enable the buttons Connect and Configure and place a default Uniform Resource Identifier (URI) in the editable text field Configure a URI.
Connecting to a JMS Server
The URI displayed in the Configure a URI text field is specific to the JNBridge JMS Adapter WCF custom binding—it is not the connect URL specific to the JMS server implementation. While the URI will contain information needed to ultimately connect to the server, such as host name and port, other configuration information is included specific to WCF and the JNBridge JMS Adapter. To properly connect to the JMS
Figure 6. An unconfigured, unconnected Add Adapter Service Reference dialog

17
USERS’ GUIDE
Version 4.0
server, the Configure Adapter dialog box, shown in Figure 7, must be opened by clicking on the button titled Configure. The Configure Adapter dialog box contains three tabs: Security, URI Properties and Binding Properties that will require some configuration.
Security tab
The Configure Adapter dialog box, Figure 7, is open to the Security tab. The drop-down control titled Client credential type contains four choices: None, Windows, Username or Certificate. The credential type chosen is dependent on the adapter binding. For the JNBridge JMS Adapter, the credential type is that of the JMS server security implementation—by default credential type Username.
URI Properties tab
Figure 8 shows the URI Properties tab open in the Configure Adapter dialog box. This tab requests the machine name and port number in order to connect to the JMS server.
Binding Properties tab
Figure 9 shows the Binding Properties tab open in the Configure Adapter dialog box. Bindings are properties whose values determine how the JNBridge JMS Adapter connects to a JMS server. There are five categories of binding properties.
General Binding properties are default time-outs for the operations Open, Close, Receive and Send. For more information on system time-outs, see the section titled General and Specific Time-outs.
Behavior Bindings determine the connection mode for on-line development and transaction enlistment.
Inbound Service bindings are used when building a WCF listener service to receive JMS messages. For more information on inbound services see the section titled Inbound Operations and Services.
Figure 8. The URI Properties tab
Figure 7. The Configure Adapter dialog open to the security tab

18
USERS’ GUIDE
Version 4.0
JMS Bindings are the J2EE properties required to connect to any JMS server. Figure 9 shows the JMS binding properties of a default configuration for a JBoss server. They are discussed in detail, below.
JNBridge Bindings are used by the .NET-to-Java inter-operability technology that allows the JNBridge JMS Adapter to support any JMS implementation.
For the purposes of this introduction to creating a simple console program to send and receive messages assume that the Configure Adapter dialog box has been fully configured for on-line development. For an extensive discussion of all binding properties, please see the section JMS Adapter Design-time Configuration.
To complete connecting to the JMS server, close the Configure Adapter dialog box by clicking on OK. In the Add Adapter Service Reference dialog the field Configure a URI will reflect the configured machine name and port. Finally, click the button Connect to connect to the JMS server.
! Hot Tip: Many times, connecting to the JMS server with the Add Adapter Service Reference dialog may be difficult due to server availability, configuration issues and network problems. Consider working off-line. See the section Tips and Tricks for more information.
Creating a C# client API class
The goal of the JNBridge JMS Adapter is to generate a C# client class containing an API of operations specifically selected by a developer targeting a JMS implementation. The API can be used to easily integrate any JMS implementation into a .NET solution.
Selecting operations
After clicking on Connect in the Add Adapter Service Reference dialog, the JNBridge JMS Adapter connects with the JMS server and searches for existing queues and topics. Using this information, the JMS Adapter constructs an operation interface for the JMS server. The operation interface consists of categories of specific and generic operations to send and receive messages between the .NET application
Figure 9. The Binding Properties tab.

19
USERS’ GUIDE
Version 4.0
and the JMS server. Operations can send and receive—to and from queues and topics—different types of JMS messages, set message headers and properties, receive specific messages based on headers and properties, and use durable topic subscriptions. These operations use simple .NET data types or simple data structures defined in the generated client class.
Figure 10 shows the Add Adapter Service Reference dialog. Categories of operations are shown on the left in the pane Select a category. Individual operations in each category are shown in the upper horizontal pane Available categories and operations. Operations that have been selected are shown in the pane Added categories and operations.
The two selected operations are generic operations—they are general to queues and topics, in this case, a shared topic, a feature only found in JMS 2.0. Generic operations are unnamed—they can send or receive messages to and from any queue or topic. Named operations—the operation name is qualified with the JMS destination name—are not as flexible as generic operations, where the targeted JMS destination is an argument to the operation. For greater detail concerning operations, see the sections Outbound Operations and Inbound Operations and Services.
Generate client classesAfter the operations have been selected by the developer, clicking OK will generate C# files containing the API classes and the application configuration file, app.config. Figure 11 shows a C# source file. The two underlined lines of code are the generic operations in the interface class JNBridgeJmsAdapter that will be executed by the JNBridge JMS Adapter. The implementation of the interface is in the class JNBridgeJmsAdapterClient. Both classes are in the file JmsAdapterBindingClient.cs. The generic class System.ServiceModel.ClientBase provides the public methods that constitute the interface that is called by WCF. Additionally, ClientBase provides public properties to the developer to set security credentials and get the WCF ChannelFactory, Endpoint and Channel. For an example of using public properties
Figure 10. The design tool connected to a JMS server showing operations

20
USERS’ GUIDE
Version 4.0
to set credentials, see Deploying Solutions.
Figure 12 shows the app.config file. This XML document contains all of the information required to create the JNBridge JMS Adapter WCF custom binding and transport. The XML document also contains the information to connect to the JMS server. This binding and connection information is used by the resulting .NET solution, written against the client classes contained in JMSAdapterBindingClient.cs, to correctly connect to the JMS server during runtime. The information in app.config is equivalent to the information contained in the Configure Adapter dialog during design-time. The file must be deployed with the application. For further information on using the app.config file, see Deploying Solutions.
Figure 11. The generated C# client classes

21
USERS’ GUIDE
Version 4.0
Figure 12. The app.config file
Figure 13. The completed console application

22
USERS’ GUIDE
Version 4.0
Figure 14. The Security tab
Figure 15. The URI Properties tab
Figure 13 completes this example by showing the application developed against the C# client API classes.
JMS Adapter Design-Time Configuration
In the previous section, Getting Started: A simple console application, configuring the Add Adapter Service Reference design-time tool to connect to a JMS server was briefly discussed. This section explores in detail the Configure Adapter dialog box and the security, connection and binding properties in its three tabs.
Security Properties
Figure 14 shows the Security tab of the Configure Adapter dialog box. The drop-down control Client credential type contains four choices: None, Windows, Username or Certificate. The credential type chosen is dependent on the adapter binding. For the JNBridge JMS Adapter, the credential type is that of the JMS server security implementation—by default credential type Username. Enter the login and pass word required to connect to the JMS server.
URI Properties
Figure 15 shows the URI Properties tab. This tab contains one category, Connection, with two property fields. This URL can be overridden with the Custom Connection String property in the Bindings tab.
Host property
This is a text-editable property field. Enter the name or IP address of the machine hosting the JMS server.
Port property
This is a text-editable field. Enter the port number where the JMS server is listening for connections. This port is usually configured for Remote Method Invocation (RMI) and the creation of contexts, factories, queues and topics.

23
USERS’ GUIDE
Version 4.0
Binding Properties
The Binding Properties tab, Figure 16, contains the configuration properties that determine how the JNBridge JMS Adapter connects to the JMS server and the configuration of the core inter-operability bridge between .NET and Java. The Binding Properties tab contains five categories of properties.
JMS Properties
The JMS property category are the J2EE properties required to connect to any JMS server. Figure 16 shows the JMS binding properties of a default configuration for a JBoss server. They are discussed in detail, below.
Choose JMS Vendor
This property is a drop-down editable list containing the names of several JMS implementations including Tibco EMS, Oracle EMS, JBoss, IBM WebSphere MQ and BEA WebLogic. Figure 16 shows that the current selection is JBoss. When a vendor is chosen, the remaining property fields in the category are automatically populated with the default configuration for that vendor. If the JMS implementation varies from the default location, then the remaining properties in the category may be modified to reflect the configuration of the JMS server.
If a JMS vendor does not appear in the list or it is necessary to maintain several configurations for a single vendor, the user may add a new entry by typing in the field. For each new entry it is necessary to edit the remaining properties with the correct values for the configuration.
JMS Bindings are stored in the file bind.properties located in the JNBridge JMS Adapter for .NET installation directory. Once a new entry has been configured or if the default entries have been modified, all additions and modifications will be saved. In addition, the last selected JMS vendor will be stored.
! This is a binary file and cannot be edited by the user other than interacting with the Binding Properties tab.
Figure 16. The Binding Properties tab

24
USERS’ GUIDE
Version 4.0
Client ID
This is a string that is a unique identifier for the JMS connection. This should only be used for JMS topics and durable subscriptions.
Custom Connection String
This is a text-editable field. This property is only used if the JMS implementation uses complex URLs containing query expressions, or some proprietary connection string. For example, ActiveMQ, supports a simple URL connection string, tcp://medtner:61616, that can be constructed from the Host and Port properties in the URI Properties tab.. However, if connection and protocol properties must be set, ActiveMQ supports URLs with query expressions:
failover:( tcp://scriabin:61616?wireFormat.maxInactivityDuration=30000, tcp://elgar:61616?wireFormat.maxInactivityDuration=30000, tcp://cage:61616?wireFormat.maxInactivityDuration=30000 )?randomize=false
If this property contains a value, then the Host and Port properties will be ignored.
Initial Context Factory
This is a text-editable field containing the name of the initial context factory. The initial context factory is a Java class that provides instances of a JNDI intial context that is used to lookup connection factories and JMS destinations. While the JNBridge JMS Adapter encapsulates the implementation details of a JMS client providing a simple abstraction of the message service, it is still necessary to choose among the various initial context factories configured for a particular JMS implementation. The default initial context factory for JBoss is org.jnp.interfaces.NamingContextFactory.
! Factory names are case sensitive—be sure the name (including the complete namespace, if necessary) is typed correctly.
JMS Acknowledge ModeThe Acknowledge Mode is a drop-down list containing the JMS specification that determines how a JMS client and server institute a reliable messaging protocol. The choices are AUTO_ACKNOWLEDGE, CLIENT_ACKNOWLEDGE and DUPS_OK_ACKNOWLEDGE. Regardless of the choice, the JNBridge JMS Adapter will correctly implement the protocol. For most JMS implementations, AUTO_ACKNOWLEDGE is the default configuration.
JMS SchemeThis is a text-editable field. The JMS Scheme is particular to each vendor’s JMS implementation and the types of connections supported. Each vendor may support several schemes such as http, rmi or jnp (the default for JBoss).

25
USERS’ GUIDE
Version 4.0
JMS Security ModeThe JMS Security Mode is a drop-down list that specifies the type of security required by the JMS server implementation. The choices are none and simple. If the choice is simple, then the server expects a user name and password.
! The JNBridge JMS Adapter for .NET supports security modes none and simple.
! If the JMS server implements simple security, it is not necessary to configure this property. Use the Security tab in the Configure Adapter dialog to enter a user name and password—the JNBridge JMS Adapter will automatically switch to the simple security mode.
JMS Version
This property tells the adapter which JMS implementation to expect when it loads the vendor’s client stack—the JAR files in the Class Path property. The drop-down list contains two choices, ‘JMS 1.1’ and ‘JMS 2.0’.
Queue FactoryThis is a text-editable field. The queue factory produces instances of classes used to connect to queues hosted on the JMS server. Each JMS vendor may have several queue factories implementing different aspects of the JMS 1.1 specification.
Topic FactoryThis is a text-editable field. The topic factory produces instances of classes used to connect to topics hosted on the JMS server. Each JMS vendor may have several topic factories implementing different aspects of the JMS 1.1 specification.
JNBridge properties
The JNBridge binding properties correctly configure the .NET-to-Java interoperability core components.
JNBridge Transport
This property determines the transport for the interoperability bridge between the .NET CLR and the JVM. The default choice is Shared Memory. For most cases, the shared memory bridge will provide the best performance as the CLR and JVM execute in the same process space. However, in some cases it may be necessary to use the Binary TCP bridge where the JVM executes in its own process.
The following three properties, Java class path, JVM Path and JVM Arguments, are used only by the shared memory bridge.

26
USERS’ GUIDE
Version 4.0
Java class path editorThe Java class path is a set of semicolon separated paths to the JAR or Class files required for a JMS client installation. The class path is used by the JNBridge Java and .NET interoperability components to locate the JMS and JNDI client Java classes so they can be instanced in the Java Virtual Machine. To edit the class path, click in the field to enable the browse button . Click on the button to launch the Edit Class Path dialog, Figure 17. The class path can be rearranged by selecting a class path element and clicking on the Move Up or Move Down buttons, or by selecting an element and clicking on the Delete button. The files and folders in the system CLASSPATH environment variable can be added to the class path list by clicking on the Add system CLASSPATH button. Note that only checked elements will be added to the Java class path when the dialog is dismissed. To add a folder or jar file to the class path, click on the Add… button. This causes a New Classpath Element dialog, shown in Figure 18, to be displayed. In this dialog, the user can navigate to the desired folders or jar files, or can enter a file path directly. The New Classpath Element dialog supports multiple selection—multiple folders and/or jar files may be selected by ctrl-clicking, while a range of folders and/or jar files may be selected by shift-clicking. Clicking on the OK button will cause the indicated folders or files to be added to the Edit Classpath dialog.
JVM Path
The JVM Path property is the absolute path to the Java Virtual Machine implementation, jvm.dll. To edit the JVM Path property, click in the field to enable the browse button. Click on the button to launch the standard File Open dialog. Navigate to jvm.dll and click OK.
JVM Arguments
These are arguments that are provided to the JVM. These arguments can be system properties using the -D argument, e.g. -Dcom.sonicsw.jndi.mfcontext.domain=TestDomain. Alternatively, the arguments can be specific to the JVM like the heap size
Figure 17. The Java class path editor
Figure 18. The New Classpath Element dialog

27
USERS’ GUIDE
Version 4.0
arguments -Xms and -Xmx. Each argument must be preceded by the dash ‘-’ which is used as a token to parse each JVM argument.
The following properties are used only if the JNBridgeTransport property is configured for Binary TCP.
Host Name
This property gives the location of the Java process used by the interoperability bridge. This property should not be confused with the Host property in the URI Properties tab, Figure 15 on page 21, which is the location of the JMS server.
Port Number
This property is the port number that the Java side bridge component is listening to waiting for a connection from the CLR side bridge component. This property should not be confused with the Port property in the URI Properties tab, Figure 15 on page 21, which is the port at which the JMS server is listening to for connections from clients. This value is usually 8085.
Use SSL
If this property is True, then the Binary TCP bridge will use the Secure Sockets Layer.
Behavior propertiesBehavior properties determine the connection mode for the Add Adapter Service Reference design-time tool. Behavior properties are not stored in the bind.properties file.
Work Off Line
This is a drop-down edit field with two choices: TRUE or FALSE. The default is FALSE; when the Connect button in the Add Adapter Service Reference dialog is clicked, the JNBridge JMS Adapter will try and connect to the JMS server.
If TRUE is selected, then the user can simply click on the Connect button to work off-line. In off-line mode, the JNBridge JMS Adapter will not connect to the JMS server. As such, the JMS Adapter will not construct specific (named) operations for any queues and topics that may exist on the JMS server. The only available operations will be generic. For more information on generic operations, see the section Outbound Operations.
For more information about the advantages of working off-line, see the section Tips and Tricks
If the developer is working off-line and generates the C# client API classes and the app.config file, a property in the file, OffLine, will be set to TRUE. If the C# classes and app.config file were created while working on-line (connected to the JMS server), then the

28
USERS’ GUIDE
Version 4.0
property, OffLine, will be set to FALSE.
If the Work Off Line property is set to FALSE and a connection exception occurs, the message box in Figure 19 will be displayed. Choosing OK will set the Work Off Line property to TRUE. Any subsequent generation of a C# client class will result in the app.config OffLine property being set to TRUE.
! If the finished .NET application is executed and the binding element OffLine in the app.config file has the value TRUE (see Fig. 12), the application will throw a ConnectionException. The deployer must edit the app.config file and change the value of the OffLine element to FALSE.
! If the Work Off Line binding property is explicitly set to TRUE in the Binding Properties tab or if a connection exception occurs and the developer chooses to work off-line by clicking OK on the above message box, then there is the possibility that the remaining binding properties may not be correct for a connection to the target JMS server as a connection was never attempted. When the deployer toggles the OffLine property to TRUE in the app.config file, she must check that the binding properties are correct and, if not, edit the values.
Transaction Enlistment
If this behavior property is set to true, then any JMS send or receive operations will automatically enlist in the current thread’s transaction, if one exists. If the transaction is rolled-back, the JMS operation will also be rolled-back. This type of transaction enlistment is called implicit. Explicit transaction operations, like CommitReceiveQueueTransaction(), are not allowed when implicit transaction enlistment is enabled. When transaction enlistment is enabled, use a System.TransactionScope to encapsulate JMS send and receive operations (along with other operations, like database updates).
Configuring Java when using the Binary TCP bridge
The JNBridge JMS Adapter uses an interoperability bridge between the .NET CLR and the Java Virtual Machine called the bridge transport. The JMS adapter uses the bridge to create and manage the Java JMS client class API allowing the adapter to connect to any JMS Server. By default, the interoperability bridge is set to Shared Memory. For most cases, the shared memory bridge will provide the best performance as the CLR and JVM execute in the same process space. However, in some cases it may be necessary to use the Binary TCP bridge where the JVM executes in its own process.
Figure 19. Connection Error message

29
USERS’ GUIDE
Version 4.0
If the bridge transport is configured for Binary TCP, then it is necessary to start the Java side manually using the following command line:
java.exe -cp classpath com.jnbridge.jnbcore.JNBMain /props jnbcore_tcp.properties
where classpath is the paths to the jar files for a particular JMS vendor’s implementation. The classpath must also point to the files jnbcore.jar and bcel-5.1-jnbridge.jar which are found in the jnbin directory, e.g. C:\Program Files\JNBridge\JMSAdapters\jnbin. The /props argument points to the file jnbcore_tcp.properties which contains information on how the Java side of the interoperability bridge is to configure itself. The contents of jnbcore_tcp.properties look like this:
# Java-side (.NET-to-Java) properties javaSide.serverType=tcp javaSide.workers=5 javaSide.timeout=10000 javaSide.port=8085
The jnbcore_tcp.properties file can be found in the JNBridge JMS adapter’s installation directory, e.g. C:\Program Files\JNBridge\JMSAdapters\DotNet\bin\jnbcore_tcp.properties.
Any JVM arguments can be added to this command line, as well.
! Do not confuse the Binary TCP transport properties with the properties used to connect to the JMS server. The transport properties only connect the .NET CLR with the JVM forming the bridge which allows the adapter to be a JMS client and connect to the JMS server.

30
USERS’ GUIDE
Version 4.0
Inbound Service properties
These properties, shown in Figure 16, are used only for inbound operations. Inbound operations are only used when constructing a WCF listener service to receive messages asynchronously in a hosted service process. The properties in this category are used to configure the listener service and reside in the generated app.config file (see Figure 12). As such, these property values do not need to be set to generate the C# inbound service client—they are not needed for a connection to the JMS server—however they will need to be set in the generated app.config file. Inbound service properties are not stored in the bind.properties file. For more information on inbound operations and services see the section Inbound Operations and Services.
Queue Name
This is a text-editable field containing the name of a queue hosted in a JMS server.
Topic Name
This is a text-editable field containing the name of a topic hosted in a JMS server.
! An inbound operation can only listen to either a queue or a topic. That means that if a topic is the target, then the Queue Name property must be empty. If a queue is the target, then the Topic Name property must be empty. If both a topic and queue name are present, the inbound service will throw an exception when the .NET application is executed. An exception will also be thrown if both properties are empty.
JMS Durable Subscription
This is a text-editable field and contains the name of a durable topic subscription. If the property is left empty, then any topic subscriptions will be nondurable, only.
JMS Message Selector
This is a text-editable field and contains a message selector expression. If the property is left empty, then no message selector is in place and all messages will be received.
Poll Period
This is the polling period, in milliseconds, that the inbound service uses when checking for messages on the JMS destination. If any messages are present, the inbound service will consume all messages immediately temporarily ignoring the polling period. If there are no subsequent messages available, the inbound service resumes polling.
During the polling period, the inbound service will relinquish CPU cycles to other threads, most notably the GC finalizer. If memory use increases for the inbound service process over time, consider increasing the polling period allowing the finalizer thread more cycles.
The minimum default poll period is 10 milliseconds. You cannot have a poll period less than 10 milliseconds

31
USERS’ GUIDE
Version 4.0
General properties
These properties deal with default time outs for opening, closing, sending and receiving operations.
Open TimeoutA period of time the JNBridge JMS Adapter will wait for the connection to the JMS server. If the connection wait time is greater than the value, the adapter will either post an error message box during design-time or throw an exception during run-time.
Close TimeoutA period of time the JNBridge JMS Adapter will wait for the graceful closing of the connection to the JMS server. If the wait period expires, the adapter will either post an error message box during design-time or throw an exception during run-time.
Send TimeoutA period of time the JNBridge JMS Adapter will wait for a send or publish operation to complete. If the wait period expires, the adapter will throw an exception during run-time.
Receive TimeoutA period of time the JNBridge JMS Adapter will wait for a blocking receive or subscribe operation to complete. If the wait period expires, the adapter will throw an exception during run-time.
General and Specific Timeouts
The JNBridge JMS Adapter provides operations that receive/subscribe messages. Excluding some asynchronous or inbound listener service operations, some blocking receive/subscriber operations provide the option of setting a timeout period as an argument.
The rules for the interaction between system time-outs and blocking consume operations are as follows:
The Receive System Timeout is always enforced, even for those operations that do not accept a timeout argument.
If the timeout argument is less than the system timeout, an exception is thrown when the timeout argument is reached. If the timeout argument is greater than the system timeout, an exception is thrown when the system timeout is reached.
! If a timeout argument is set to zero, the operation will block indefinitely, overriding the Receive System Timeout.

32
USERS’ GUIDE
Version 4.0
Outbound Operations
The JNBridge JMS Adapter for .NET has two broad categories of operations: Outbound Operations and Inbound Operations.
Outbound Operations send and receive messages to and from queues, or publish and subscribe messages to and from topics. All send and publish operations, generically referred to as producer operations, are outbound operations. Receive and subscribe operations, generically referred to as consumer operations, are blocking operations. It is possible to use asynchronous versions of receive and subscribe operations, leveraging the .NET Begin/End asynchronous pattern, to receive messages asynchronously.
Inbound Operations are all consumer operations that leverage WCF to create a listener service that receives messages from queues and topics using an event driven pattern. Inbound operations are discussed in the section Inbound Operations and Services.
Figure 10 on page 19 shows the Add Adapter Service Reference design-time dialog. The drop-down list box titled Select contract type is set to the value Client (Outbound operations). The resulting categories displayed in the Select a category pane, Figure 21 on page 33, fall into three top-level categories: Configuration, Queues and Topics.
The Configuration category contains just one operation, InitAdapter, used to force the JNBridge JMS Adapter to connect to a JMS server when executed. Usually the connection is delayed until the first consumer or producer operation executes. The Queues category contains all queue consumer and producer operations. The Topics category contains all topic consumer and producer operations.
Generic and Named Operations
Within the Queues and Topics categories, operations are categorized into Generic and Named operations. A Named operation is specific to a queue or topic: the operation contains the name of the queue or topic. Generic functions are not specific and can be used to produce and consume messages to and from any queue or topic. Figure 20 shows portions of the design-time tool containing selected named and generic queue operations to send and receive text messages. Figure 21 shows the generic and named categories in the Select a category pane from the Add Adapter Service Reference dialog.
Figure 20. Named and Generic operations

33
USERS’ GUIDE
Version 4.0
Text, Byte and Map Message Operations
Figure 21 displays categories for generic and named operations. The queue, denver_account_q, and the Generic Topics category have been expanded to display the subcategories Text, Binary and Map. These categories represent operations that produce and consume three types of JMS Messages.
Text operations produce and consume—use as arguments and results—System.String on the .NET side. This results in the JMS Adapter sending and receiving a javax.jms.TextMessage containing type java.lang.String. The JNBridge Java and .NET interoperability technology maps System.String to java.lang.String on the Java side.
Binary operations produce and consume—use as arguments and results—arrays of System.Byte on the .NET side. This results in the JMS Adapter sending and receiving a javax.jms.ByteMessage containg an array of byte.
Map operations produce and consume maps: associations of a name, a datatype and the datatype value. On the .NET side operations produce and consume—use as arguments and results—the class jnbridge.jmsadapter.JMSMessageMap. This results in the JMS Adapter sending and receiving javax.jms.MapMessage on the Java side. The JMS Adapter and the .NET-to-Java interoperability technology map between the JMS message and JMSMessageMap.
Binary Operations: signed vs. unsigned bytes
The Java datatype byte is a signed byte: its values are from -128 to 127. Instead of mapping the signed byte to the .NET type System.Sbyte, the JNBridge JMS Adapter instead maps the signed byte to System.Byte. This is an unsigned byte: its values are from 0 to 255. If it’s necessary, on the .NET side, to convert between signed and unsigned bytes, use the C# code shown in Figure 22, to convert between the two types. As there is no risk of overflow or truncation, the use of an unchecked block is not necessary. Figure 21. Operation categories
JNBridgeJmsAdapterClient client = new JNBridgeJmsAdapterClient();byte[] unsignedBytes = new byte[10]; sbyte[] signedBytes = new sbyte[10];
unsignedBytes = (byte[])((Array)signedBytes);client.SendBytesTo_denver_account_q(unsignedBytes);unsignedBytes = client.ReceiveBytesFrom_denver_account_q();signedBytes = (sbyte[])((Array)unsignedBytes);
Figure 22. sbyte, byte conversions

34
USERS’ GUIDE
Version 4.0
Map OperationsA Map is a set of named properties where each property associates a data type and value, such as an int and the number 42, with a given name, such as “The Answer”. Within a .NET application using the JNBridge JMS Adapter, a map is implemented by the classes JMSMessageMap, JMSProperty and an enumeration, JMSPropertyType, all in the namespace jnbridge.jmsadapter. The source definition of these classes and enumeration is generated in the C# client file along with the classes implementing the operations only if at least one of the operations produces or consumes a map. Figure 23 displays C# source code (note the use of generic operations) using the above classes and enumeration to produce and consume maps.
using System;using System.Collections.Generic;using System.Text;using jnbridge.jmsadapter;
namespace ConsoleApplication3{ class Program { static void Main(string[] args) { JNBridgeJmsAdapterClient client = new JNBridgeJmsAdapterClient(); JMSMessageMap aMap = new JMSMessageMap(); JMSProperty[] props = new JMSProperty[1]; //an array with one element props[0] = new JMSProperty(); props[0].propertyName = “The Question”; props[0].stringValue = “WHAT DO YOU GET IF YOU MULTIPLY SIX BY NINE?”; props[0].propertyType = JMSPropertyType.String; aMap.properties = props;
client..PublishMap(“question_tpc”, aMap); aMap = client.SubscribeMap(“answer_tpc”); props = aMap.properties;
if ( props[0].propertyType == JMSPropertyType.Int && props[0].propertyName == “The Answer” ) { // result: The answer is: 42 Console.WriteLine(String.Format(“The answer is: {0}”, props[0].intValue)); } } }}
Figure 23. Using Maps

35
USERS’ GUIDE
Version 4.0
The class JMSProperty is equivalent to the properties contained in the Java class javax.jms.MapMessage. On the Java side, MapMessages support the datatypes bool, byte, byte[], char, short, int, long, float, double and string. On the .NET side, the class JMSProperty supports the datatypes bool, byte[], char, int, long, float, double and string. Because of XML data representation in WCF, the datatypes byte and short are represented by the datatype, int.
On the Java side, a byte is signed, while on the .NET side, a byte is unsigned. For more complete discussion on signed and unsigned bytes, please see the previous section. On the .NET side, a string (System.String) is mapped to the Java class java.lang.String.
Setting JMS Message Headers
Like most messaging services, JMS allows access to a set of named properties known as a message header. The previous section discussed the string, byte array and map payload or body of a JMS message. This section discusses setting headers in producer operations. Consumer operations do not “read” message headers per se, rather they use filters, sometimes called selectors, that select messages based on header property values. Message selectors are discussed in the next section.
A JMS message header consists of a set of named properties. In addition, the sender of a message may add any number of arbitrary properties to the header. These properties are exactly the same as the properties that constitute a Map, discussed in the previous section.
Producer operations that allow the developer to set headers contain the word ‘Annotated’ in their signatures and take as an argument an instance of the class jnbridge.jmsadapter. JMSMessageHeader. Figure 24 shows the Added categories and operations pane from the Add Adapter Service Reference design-time tool containing producer operations that set message headers.
Figure 25 shows the named or reserved properties in a JMS Message header as implemented by the class JMSMessageMap. A majority of these header properties are set by the JMS Server, not the client producer. However, for completeness (and to mirror the capabilities of the Java Message class) setting of all reserved properties is allowed.
Figure 24. Annotated operations

36
USERS’ GUIDE
Version 4.0
Figure 26 shows C# source implementing creating and sending message headers. Only producer operations can set and send/publish message headers. The receive/subscribe consumer operations use selectors to select messages based on message header properties.
Figure 26. Using message headers, selectors and delivery delay
JMSMessageHeader header = new JMSMessageHeader();header.jmsCorrelationID = “myID”; // client set header.jmsCorrelationIDAsBytes = Encoding.UTF8.GetBytes(“myID”); // client setheader.jmsDeliveryMode = (int)42; // set by serverheader.jmsExpiration = (long)4200; // set by serverheader.jmsMessageID = “c22b8f0e-c3b3-1004-87a4-0ec38231890c”; // set by serverheader.jmsPriority = (int)42; // set by serverheader.jmsRedelivered = true; // set by serverheader.jmsTimestamp = (long)123456789; //set by serverheader.jmsType = “TextMessage”; // set by serverheader.deliverDelay = DateTime.Now.Add(TimeSpan.FromMinutes(10));
Figure 25. Reserved JMS header properties

37
USERS’ GUIDE
Version 4.0
Setting delivery delay in a JMS Message Header
New JMS 2.0 feature to delay the consumption of a published/sent message This example in Figure 26 ensures that any messages will not be available for consumption until 6:00 PM every day.
Using Message Selectors
Message selectors are used by consumer operations to filter or select messages from topics and queues based on JMS and custom message header properties. All consumer operations that use selectors have the word ”Select” in their signatures and take a string as an argument containing an expression that evaluates header properties. The expression is derived from a subset of the SQL92 standard.
Figure 27. Consumer operations that use selectors
Figure 27 shows the Added categories and operations pane from the Add Adapter Service Reference design tool. The pane shows a variety of consumer operations that use selectors. Figure 26 shows an example of using message selectors.
Using Durable Subscriptions
Durable subscriptions are particular to topic subscribers only. A durable subscription for a topic allows consumers to register a name with the JMS server such that whenever a subscribe operation uses that name, all messages in the topic will be received. In this way, a subscriber does not have to be continually connected to receive messages from a topic. Topic consumer operations that do not use durable subscriptions must be connected in order to subscribe to a topic—any messages published by the topic while a nondurable subscriber is not connected will not be available to that consumer when it reconnects to the server.
Figure 28 shows the Added categories and operations pane from the Add Adapter Service Reference design tool. The pane shows a variety of topic subscriber operations that use durable subscriptions. All subscribe operations that use durable
Figure 28. Subscribe operations using durable subscriptions

38
USERS’ GUIDE
Version 4.0
subscriptions have the word “Durable” in their signatures and accept an argument of type string containing the durable subscription name.
Unsubscribing from a durable subscription
Once a durable subscription has been created, at some point it may be necessary to unsubscribe from the durable subscription, in effect removing the durable name from the JMS server. Under the generic topics category as well as under each named topic category is a subcategory called Configuration containing an unsubscribe operation. Figure 29 shows the category tree and selected unsubscribe operations.
Figure 29. Unsubscribe operations
string durableSubscriptionName = “October”;string response = client.SubscribeDurableText(“chicago_report_tpc”, durableSubscriptionName);client.Unsubscribe(“chicago_report_tpc”, durableSubscriptionName);
Figure 30. Using durable subscriptions in code
Figure 30 shows a block of C# code that uses durable subscriptions in generic topic operations.
Using Durable Shared Subscriptions
The JMS 2.0 specification provides for sharing durable subscriptions among several consumers. In JMS 1.1 this is illegal, however, it prevented concurrent consumption of messages. Figure 28a shows several durable shared operations.
Figure 28a Shared Durable Topic operations

39
USERS’ GUIDE
Version 4.0
Blocking and Asynchronous Operations
All of the examples of consumer operations given so far have been blocking operations. All blocking consumer operations will eventually timeout and throw an exception. Timeout periods can either be set globally for all operations or set specifically in the operation using a timeout argument. Global or system time-outs are set in the Bind Properties tab of the Configure Adapter dialog. Operations that accept a timeout argument always contain the word “Timeout”. The timeout argument is of type long and represents a period in milliseconds.
General and Specific Time-outs
The rules for the interaction between system time-outs and blocking consumer operations that except a timeout argument are as follows:
The system receive timeout is always enforced, even for those operations that do not accept a timeout argument.
If the timeout argument is less than the system timeout, an exception is thrown when the timeout argument is reached. If the timeout argument is greater than the system timeout, an exception is thrown when the system timeout is reached.
! If a timeout argument is set to zero, the operation will block indefinitely, overriding the System Timeout.
Figure 31 shows a block of C# code that catches timeout exceptions.
string aSelector = “JMSCorrelationID = ‘myID’ AND DivisionNumber = 2701 AND DivisionName = ‘Ghost Division’”;string response = “”;try{ //2 second timeout response = client.ReceiveSelectTextTimeoutFrom_chicago_crm_q(2000, aSelector); }catch ( Exception e ){ if ( e is ConnectionException ) { if ( e.Message.IndexOf(“A timeout has occured”) > -1 ) { Console.WriteLine(“Subscribe to select text has timed-out”); } }}
Figure 31. Catching a timeout exception

40
USERS’ GUIDE
Version 4.0
Asynchronous Operations
All of the blocking outbound consumer operations can be used in an asynchronous fashion by leveraging the .NET asynchronous pattern using IAsyncResult. In order to use the operations in an asynchronous fashion, it is necessary to generate the .NET asynchronous operation signatures Begin[Operation Name] and End[Operation Name] by using the Advanced Options dialog box, Figure 32.
The Advanced Options dialog is accessed by clicking the button Advanced options in the Add Adapter Service Reference design-time tool, Figure 10, page 17. The button is located in the lower left corner of the design-time tool and is only enabled when operations have been selected and are in the Added categories and operations pane.
When developing an asynchronous application using the .NET asynchronous versions of the blocking consumer operations, remember that timeout values will still be in effect. Even though the operation will not block (as it is essentially in another thread) it will still timeout once either the system receive timeout or a specific timeout argument has expired. This will cause an exception. You should modify system time-outs or timeout arguments according to the requirements of the asynchronous application. If you do not want timeout exceptions thrown, then you can use those consumer operations that accept a timeout argument and set the timeout to 0 milliseconds.
To generate asynchronous operations in addition to the normal non-asynchronous operations, simply access the Advanced Options dialog box and check the box titled Generate asynchronous methods, click
Figure 32. The Advanced Options dialog
[System.CodeDom.Compiler.GeneratedCodeAttribute(“System.ServiceModel”, “4.0.0.0”)][System.ServiceModel.ServiceContractAttribute(Namespace=”jms://JNBridge.JMSAdapter” , ConfigurationName=”JNBridgeJmsAdapter”)]public interface JNBridgeJmsAdapter { [System.ServiceModel.OperationContractAttribute(AsyncPattern=true , Action=”/Queues/chicago_crm_q/Text/receive_text_specific_q_to” , ReplyAction=”/Queues/chicago_crm_q/Text/receive_text_specific_q_to/response”)] System.IAsyncResult BeginReceiveTextTimeoutFrom_chicago_crm_q(long timeout , System.AsyncCallback callback , object asyncState); string EndReceiveTextTimeoutFrom_chicago_crm_q(System.IAsyncResult result);}
Figure 33. Generated asynchronous operations

41
USERS’ GUIDE
Version 4.0
using System;using System.Collections.Generic;using System.Text;using System.Threading;using Microsoft.ServiceModel.Channels;using Microsoft.ServiceModel.Channels.Common;
namespace ConsoleApplication3{ class Program { public static JNBridgeJmsAdapterClient client = new JNBridgeJmsAdapterClient(); public static string response;
private static void asyncDemoCallBack(IAsyncResult ar) { try { response = client.EndReceiveTextTimeoutFrom_chicago_crm_q(ar); } catch ( Exception e ) { if ( e is ConnectionException ) { if ( e.Message.IndexOf(“A timeout has occured”) > -1 ) { Console.WriteLine(“A timeout has occured. Set the timeout to 0 to never let this happen”); } } } finally { Console.WriteLine(“Message received: “ + response); } }
static void Main(string[] args) { AsyncCallback callback = new AsyncCallback(asyncDemoCallBack); // using a timeout of 100 seconds, use zero (0) to never time out IAsyncResult ar = client.BeginReceiveTextTimeoutFrom_chicago_crm_q(100000, callback, null); // mimic doing something else by just spinning on IAsyncResult isCompleted flag while ( !ar.IsCompleted ) { Thread.Sleep(100); } // sleep a little more as the flag toggles to TRUE when the call back method is entered—not when it completes Thread.Sleep(100); } }}
Figure 34. Using asynchronous applications

42
USERS’ GUIDE
Version 4.0
OK, and then click on the OK button in the design-time tool. Figure 33 shows the asynchronous interface of the generated C# client class.
The following C# implementation in Figure 34 on the following page shows using the asynchronous form of a simple receive text from a queue operation. Note that the timeout version of the receive operation is used.
Inbound Operations and Services
The last section closed with a discussion of asynchronous operations using essentially a multi-threaded model based on the .NET asynchronous Begin/End pattern. This section discusses a more useful and more sophisticated method of continually consuming messages using an event driven listener pattern. The JNBridge JMS Adapter for .NET leverages the Windows Communication Foundation (WCF) service capabilities to support inbound operations.
Inbound Operations
In the last section, Outbound Operations, reference was made to a drop-down list control titled Select contract type in the Add Adapter Service Reference dialog. For outbound operations, the selected value was Client (Outbound operations). For inbound operations, change the contract type to Service (Inbound operations). Each of the different operation
categories discussed in the section Outbound Operations will contain only inbound operations—there will be no producer operations. Figure 35 shows the Added categories and operations pane from the Add Adapter Service Reference dialog with examples of inbound operations. All inbound operations start with ‘On’ and, like the naming conventions for outbound operations, contain words denoting message type, like ‘Map’, or words denoting subscriber options, like ‘Durable’ or ‘Select’.
[System.CodeDom.Compiler.GeneratedCodeAttribute(“System.ServiceModel”, “4.0.0.0”)][System.ServiceModel.ServiceContractAttribute(Namespace=”jms://JNBridge.JMSAdapter” , ConfigurationName=”JNBridgeJmsAdapter”)]public interface JNBridgeJmsAdapter { [System.ServiceModel.OperationContractAttribute(Action=”/Queues/Generic Queues/Text/receive_text_any_q_async” , ReplyAction=”/Queues/Generic Queues/Text/receive_text_any_q_async/response”)] void OnReceiveTextFromQueue(string name, string text); [System.ServiceModel.OperationContractAttribute( Action=”/Queues/chicago_crm_q/Binary/Message Selectors receive_select_bytes_specific_q_async” , ReplyAction=”/Queues/chicago_crm_q/Binary/Message Selectors/receive_select_bytes_specific_q_async/response”)] void OnReceiveSelectBytesFrom_chicago_crm_q(string selector, byte[] bytes);}
Figure 36. The generated WCF interface for two inbound operations
Figure 35. Examples of Inbound operations

43
USERS’ GUIDE
Version 4.0
When a C# client API class is generated, two source files will be created. One source file will contain the interface class, the other source file contains the stubbed implementations of the interface. The generated source in Figure 36 is the file JMSAdapterBindingInterface.cs containing the inbound operations interface. The implementation of the interface in Figure 38 is in the file JMSAdapterBindingService.cs shown in Figure 37. Note that several inbound operations can exist in one service.
Unlike outbound operations, these methods are not called by the developer, they’re called by the JNBridge JMS Adapter when messages arrive on the topics and queues being listened to. Figure 38 shows a completed implementation of the two service methods.
The two methods will be called by the JMS Adapter when incoming messages arrive on the respective
namespace JMSAdapterBindingNamespace { public class JMSAdapterBindingService : JNBridgeJmsAdapter { public virtual void OnReceiveTextFromQueue(string name, string text) { throw new System.NotImplementedException( “The method or operation is not implemented.”); } public virtual void OnReceiveSelectBytesFrom_chicago_crm_q(string selector , byte[] bytes) { throw new System.NotImplementedException( “The method or operation is not implemented.”); }}
Figure 37. Interface implementations
namespace JMSAdapterBindingNamespace { public class JMSAdapterBindingService : JNBridgeJmsAdapter { public virtual void OnReceiveTextFromQueue(string name, string text) { Console.WriteLine(“This message, “ + text + “, has been received from queue, “ + name); } public virtual void OnReceiveSelectBytesFrom_chicago_crm_q(string selector, byte[] bytes) { string format = “Using selector, {0}, a message containing {1} bytes received from queue chicago_crm_q”; Console.WriteLine(String.Format(format, selector, bytes.Length)); }}
Figure 38. Example implementations

44
USERS’ GUIDE
Version 4.0
queues. For the method OnReceiveSelectBytesFrom_chicago_crm_q the incoming messages are filtered by a selector. When the JMS Adapter calls these methods, it will pass arguments containing the payload of the received messages, in this case a string, text, for the method OnReceiveTextFromQueue, and an array of byte, bytes, for the method OnReceiveSelectBytesFrom_chicago_crm_q. The remaining arguments are the parameters that configured the listening service.
For the generic method OnReceiveTextFromQueue, the string name will contain the name of the queue being listened to. For the method OnReceiveSelectBytesFrom_chicago_crm_q the string selector will contain the selector used to filter messages.
Unlike outbound operations, there is no mechanism to supply outbound configuration arguments to the JMS Adapter. In this example, two arguments must be supplied. For OnReceiveTextFromQueue, a generic operation, the name of the queue must be supplied. For OnReceiveSelectBytesFrom_chicago_crm_q, the message selector expression must be supplied. Parameters that configure inbound operations are placed in the generated app.config file.
Configuring Inbound operations
Configuration parameters for inbound operations are supplied in the app.config file. The app.config file can be edited manually after all code is generated during design-time. Alternatively, the parameters can be entered in the Binding Properties tab of the Configure Adapter dialog, Figure 39.
In this example, the binding property, TopicName, will have the value java:/jms/topic/sharedTopic. This topic name will be used by the generic inbound operation, OnSubscribeDurableTextFromTopic. The binding property, JMS Message Selector, will have the value, ColorProperty = ‘blue’. This message selector will be used by the inbound operation OnSubscribeDurableTextFromTopic. For a description of the Inbound Service binding properties, please see the section Inbound Service Properties. The resulting app.config file is shown in Figure 40. During deployment, the four values that make up the inbound service properties can be modified according to the deployment environment.
The final task necessary to complete the example is creating the inbound service using the WCF class ServiceHost. Once the inbound service is executed, it will run continuously until stopped. If messages arrive on the topic java:/jms/topic/sharedTopic (and the messages in the topic have a property called ‘ColorProperty’ with a value of ‘blue’), then the respective methods are called in the interface. This is essentially an event driven asynchronous pattern. Figure 41b shows the WCF service.
Figure 39. Inbound Service properties

45
USERS’ GUIDE
Version 4.0
Figure 40. The app.config file for a inbound service.
Using an Exception Listener Inbound Service
The underlying JMS mechanism for all Inbound Services is a JMS MessageListener. Because a MessageListener is essentially a callback handler for receiving messages, there is no way to catch exceptions. The JMS specification provides an ExceptionListener mechanism for handling exceptions thrown by the JMS server. The server will notify all of its currently connected clients if it should detect any connection issues. The most common connection issue is when the server itself severs a connection prior to being shutdown.
Figure 41a shows configuring the Exception Listener, OnTopicConnectionException, in the Add Adapter Service Reference dialog. Figure 41b shows the binding service implementation and main program.
Figure 41a. Configuring an inbound exception listener

46
USERS’ GUIDE
Version 4.0
Figure 41b. An inbound service

47
USERS’ GUIDE
Version 4.0
Transactions
The JNBridge JMS Adapter for .NET supports local JMS transaction. Local transactions are controlled by executing a commit or rollback within the JMS client. A stand-alone JMS client cannot participate in distributed or global transactions using the Microsoft Distributed Transaction Coordinator.
Transaction Operations
Figures 42 and 43 show both generic and named transaction operations for queues. Transaction operations fall into three categories: enable transactions, commit transactions and rollback transactions. The three categories are further subdivided into send/publish (produce) and receive/subscribe (consume) transaction operations.
Enable Transactions Operations
Transaction operations that enable transactions must be called once prior to any produce or consume operations. It is best to enable transactions after the creation of the client class, JNBridgeJmsAdapterClient. Once transactions have been enabled, they cannot be disabled.
Commit Transaction Operations
Commit transactions are called after a message has been produced or consumed. If a message is produced but never committed, it will not be visible to consumers and will have a pending state in the JMS server. Likewise, if a message is consumed and never committed, it will still remain in the queue or topic.
Figure 42. Generic transactions Figure 43. Named transactions
Figure 44. Example enable transactions.
Figure 45. Example commit transactions.

48
USERS’ GUIDE
Version 4.0
Rollback Transaction Operations
If a transaction fails, a rollback operation can be called. If a produced message is rolled back, it is removed from the topic or queue. If a consumed message is rolled back, it is placed back on the topic or queue.
The simple program in Figure 47 enables produce and consume transactions using named operations for the topic, testTopic, and the queue, testQueue. Commit and rollback operations are predicated on an exception being thrown by the processing code represented by the call to processTransaction.
Figure 46. Example rollback transactions.
JNBridgeJmsAdapterClient client = new JNBridgeJmsAdapterClient(); // enable produce and consume transactions for testTopic client.EnablePublishTopicTransactionsFor_testTopic(); client.EnableSubscribeTopicTransactionsFor_testTopic(); // need to signal in final block whether to commit or rollback bool needToCommit = false; string doc; string processedDoc;
try { doc = client.SubscribeDurableTextFrom_testTopic(“myDurableID”); processedDoc = processTransaction(doc); // throws an exception if processing fails needToCommit = true; client.SendTextTo_testQueue(processedDoc); } catch (Exception ex) { if (needToCommit == false) client.RollbackSubscribeTopicTransactionFor_testTopic(); if (needToCommit == true) { needToCommit = false; client.RollbackSubscribeTopicTransactionFor_testTopic(); client.RollbackSendQueueTransactionFor_testQueue(); } } finally { if ( needToCommit == true) { client.CommitSubscribeTopicTransactionFor_testTopic(); client.CommitSendQueueTransactionFor_testQueue(); } }
Figure 47. An example of using transactions.

49
USERS’ GUIDE
Version 4.0
Deploying SolutionsOnce design-time selection of operations is complete, followed by implementation of interfaces and the completion of the client or service code, the solution is read for deployment. The following are required for a complete deployment.A deployment machine must have the software described in the section Installing, Licensing and
Configuring the JMS Adapter installed and configured.Once the target deployment machine has been configured, the finished application and its app.
config file must be moved to the environment and any run-time configuration must be done by modifying the app.config file.
Run-time Security Credentials
During design-time using the Add Adapter Service Reference dialog, credentials were entered into the Security tab of the Configure Adapter dialog. For deployment, security credentials must be provided in either the code making up the application or in the app.config file. Since clear text passwords are a security risk, the JNBridge JMS Adapter for .NET provides a password encryption utility.
The UriEncryptor
The UriEncryptor is shown in Figure 48. The UriEncryptor can be run from the Start menu.
This is a tool that will encrypt a pass word and build a URI that can be placed in the app.config file. Alternatively, the encrypted password may be placed in the application code.
The developer must first enter the pass word, typing it twice to confirm spelling and case. By clicking the button Encrypt, the text field Encrypted password will display the pass word securely encrypted and converted to a hexadecimal representation. By clicking the button Copy to clipboard, the user can paste the encrypted pass word into the client code shown in Figure 49, on the next page. This example shows accessing the public properties of the generic class System.ServiceModel.ClientBase.
Alternatively, the developer can enter the connection URI from the address element in the app.config file and the login name and click Build URI to construct a URI containing the login and encrypted pass word. Clicking the Copy to clipboard button allows the developer to paste the new URI into the app.config file, Figure 50.
Figure 48. The UriEncryptor utility

50
USERS’ GUIDE
Version 4.0
! If the application is using outbound operations, then the developer may choose to enter the credentials into either the application code or the app.config file. If the application is using inbound operations, the credentials must be entered into the app.config file.
namespace ConsoleApplication3{ class Program { static void Main(string[] args) { JNBridgeJmsAdapterClient client = new JNBridgeJmsAdapterClient(); // Access the public property defined by the interface of System.ServiceModel.ClientCase // Add the security credentials, login name first client.ClientCredentials.UserName.UserName = “nikolai”; // now encrypt the pass word using the UriEncryptor utility and // paste it into the code, below client.ClientCredentials.UserName.Password = “34CF0EE3F5B55DAF14B809F7994D05A34AD7BA699546D21C”;
client.SendText(“denver_account_q”, “Using encrypted passwords”); string response = client.ReceiveText(“denver_account_q”); } }}
Figure 49. Using login and encrypted pass words in the application code
<?xml version=”1.0” encoding=”utf-8”?> <system.serviceModel> <bindings> <JNBridgeDotNetJMSAdapterBinding> <binding BcelPath=”C:\Program Files\JNBridge\JMSAdapters\jnbin\bcel-5.1-jnbridge.jar” JnbCorePath=”C:\Program Files\JNBridge\JMSAdapters\jnbin\jnbcore.jar” JvmPath=”C:\Program Files\Java\jre1.6.0_01\bin\client\jvm.dll” name=”JMSAdapterBinding” closeTimeout=”00:01:00” openTimeout=”00:01:00” receiveTimeout=”00:10:00” sendTimeout=”00:01:00” AcknowledgeMode=”AUTO_ACKNOWLEDGE” SecurityAuthentication=”none” TopicConnectionFactory=”JmsTopicConnectionFactory” QueueConnectionFactory=”JmsQueueConnectionFactory” ClassPath=”C:\Program...” JMSScheme=”rmi” InitialContextFactory=”org.exolab.jms.jndi.InitialContextFactory” JmsVendor=”Tibco EMS” MessageSelector=”” DurableSubscription=”” QueueName=”” TopicName=”” OffLine=”false” RunTime=”true” /> </JNBridgeDotNetJMSAdapterBinding> </bindings> <client> <endpoint address=””jms://nikolai:34CF0EE3F5B55DAF14B809F7994D05A34AD7BA699546D21C@scriabin:1099/” binding=”JNBridgeDotNetJMSAdapterBinding” bindingConfiguration=”JMSAdapterBinding” contract=”JNBridgeJmsAdapter” name=”JMSAdapterBinding_JNBridgeJmsAdapter” /> </client> </system.serviceModel></configuration>
Figure 50. Placing a URI containing a login and encrypted password

51
USERS’ GUIDE
Version 4.0
Tips and Tricks
Use the Generic Operations
Part of the WCF Line-Of-Business Adapter Framework’s appeal is the real-time design capabilities and the ability to “query” a LOB application for meta-data concerning, for example, its API. The framework can then create specific “named functions”. This is of marginal use when using JMS. While the adapter will look for JMS destinations and create “named” operations, only those JMS destinations which reside in the initial JNDI context will result in named operations. Any destinations with a JNDI path will not be visible in the Add Adapter Service Reference dialog box because most JMS servers, particularly JEE servers, do not allow browsing of the JNDI tree without special privileges.
Recommendation: stick with the generic functions. Generic functions allow you to parameterize the destinations—convenient for deployments. So as an example coding a request/response scenario:
Work off-line
In many cases a developer will be unable to connect to a JMS server when using the Add Adapter Service Reference plug-in. Because of this, the adapter supports an off-line mode which supports only generic operations. If you wish to work on-line and connect to the JMS server, any exception that is thrown may be incomplete as a simple error dialog is used by the framework. It is not uncommon to have 3-4 nested exceptions, particularly when the exception is thrown in a J2EE app server’s JVM. Since the above recommendation is to use the generic functions, then there is no need to actually connect to the JMS server instance—instead work off-line. If you try and connect and have problems, the limited error information makes it hard to figure out what’s going on.
class JMSSendTextMain { public static JNBridgeJmsAdapterClient client = new JNBridgeJmsAdapterClient(); static void Main(string[] args) { client.SendText(args[0], “This is a request message—pretend it’s SOAP”); string response = client.ReceiveText(args[1]); Console.WriteLine(response); } }
Figure 51. Using generic functions

52
USERS’ GUIDE
Version 4.0
Debug connection or JNDI problems
Debug by creating a simple .NET console application to send or receive text using the generic operations to a JMS queue or topic. You can do this by setting the off-line option to true in the Configure Adapter dialog. Once you are in off-line mode, you can choose a simple SendText() operation and generate the WCF proxy and app.config file. Place code in Program.cs to instance an adapter client and send text to a test queue. Remember to edit the app.config file to turn the XML attribute Off line to False.
Build the console app in debug mode and run it in VS. Then any thrown exception will allow access to all the nested inner exceptions as well as both the .NET-side and J2EE-side stack traces. You’ll be able to find an inner exception with more germane information. Any possible solutions gleaned from complete exception information can then be implemented by editing the app.config file and rerunning the test app in debug mode.
When working on-line with the Add Adapter Service Reference design-time tool
If you ignore these practical suggestions regarding working off-line, be forewarned that if you have connection problems from, for example, typos, pointing to the wrong JAR files, pointing to the wrong connection factory or pointing to the wrong JVM, then you might have to exit Visual Studio, restart it, correct the error and try again. Visual Studio never unloads assemblies or dlls once they have been loaded by a plug-in. You must exit VS and restart it in order to unload the assemblies and dlls. This is because a Java Virtual Machine thread is part of the Visual Studio process when using the adapter during design-time. Once a JVM has been instanced (only one per process), it cannot be reconfigured.

53
USERS’ GUIDE
Version 4.0