Jeff Branch WOODWORKING Branch WOODWORKING By adding subtle design elements, a traditional furniture...
30
Jeff Branch WOODWORKING By adding subtle design elements, a traditional furniture style becomes decidedly modern. YOU CAN BUILD A
-
Upload
truongtram -
Category
Documents
-
view
218 -
download
2
Transcript of Jeff Branch WOODWORKING Branch WOODWORKING By adding subtle design elements, a traditional furniture...

Jeff Branch WOODWORKING
By adding subtle design elements, a traditional furniture style becomes decidedly modern.
YOU CAN BUILD A

2 - You Can Build A Modern Kitchen Cupboard
contents Main Dimensions 3
Cut List 4
Build the Case 7
Make the Face Frame 10
Build the Drawers 14
Door Construction 19
Final Assembly 24
Plywood Cutting Diagram 30
Jeff Branch WOODWORKING
Publisher: Jeff Branch
Editor: Jeff Branch
Art Direction: Jeff Branch
Contributing Editor: Jeff Branch
Illustration: Jeff Branch
Marketing: Jeff Branch
Basically, I created this document all by myself.
******
On the cover: The design for this cupboard started as a traditional, sort of primitive form, but changed when I added the detail at the bottom of the face frame center stile. That shape, which I like a lot, struck me as being more modern. Then the subtle curve of the feet was meant to be minimalistic and the design morphed further from there. The doors and drawer fronts are illustrated with birdseye maple. This wood strikes me as being perfectly at home in a modern design. The gray paint retains a primitive quality, but also is minimalistic since it hides the wood grain underneath. The cherry drawer pulls are definitely modern in design as is the molding below the cupboard top which is made from flat stock. One last modern detail: the top extends beyond the sides more than it does the front (easily seen on the cover) which is not a traditional detail, and the top ends are curved.

3 - You Can Build A Modern Kitchen Cupboard
main dimensions
© 2017 Jeff Branch

4 - You Can Build A Modern Kitchen Cupboard
construction methods
Face frame joinery is mortise and tenon, except for the center stile.
The case and cross members/shelves come together via dados. Back slats fit into rabbets at each side rear edge.
Center stile joins the face frame by way of lap joints.
Drawers slide in place with help from blocking which serves as guides.
Blue highlighted areas show examples of the joinery used during construction.

5 - You Can Build A Modern Kitchen Cupboard
construction methods
The drawer box is joined at the corners with dowels and glue.
The door rails and stiles come together with mortise and tenon joinery. Mortise locations in the stiles are highlighted in blue.
The drawer face is attached to the drawer box with screws.
The door panel floats in a groove milled in the rails and stiles (highlighted in blue).
The door panel is raised on the back. See the illustration on page 2.

6 - You Can Build A Modern Kitchen Cupboard
cutlist
Case ID Qty Description Length x width x thickness A 2 Case Side 60-1/4 x 16-3/4 x 3/4” B 3 Cross Member 37-1/4 x 15-7/8 x 3/4” C 1 Sub-Top 37-1/4 x 15-7/8 x 3/4” D 1 Top 42-1/2 x 18-1/2 x 3/4” E 2 Shelf 37-1/4 x 15-1/8 x 3/4” F 2 Shelf Banding 37-1/4 x 1/4 x 3/4” G 4 Drawer Kicker 15-7/8 x 3/4 x 1/8” Face Frame H 2 Face Frame Stile 60-1/4 x 3-3/4 x 3/4” I 1 Face Frame Center Stile 57-1/4 x 2 x 3/4” J 1 Face Frame Bottom Rail 32-1/2 x 1-3/4” x 3/4” K 2 Face Frame Drawer Rail 32-1/2 x 1 x 3/4” L 1 Face Frame Top Rail 32-1/2 x 1-3/4” x 3/4” Drawers M 12 Drawer Blocking 1 15-5/8 x 2-3/8 x 3/4” N 2 Drawer Blocking 2 15-7/8 x 3/4 x 3/4” O 4 Drawer Blocking 3 14 x 2-3/8 x 3/4” P 8 Drawer Side 15 x 6 x 1/2” Q 4 Drawer Front 13 x 6 x 3/4” R 4 Drawer Back 13 x 5-1/2 x 3/4” S 4 Drawer Bottom 14-1/2 x 13-1/2 x 1/4” T 4 Drawer Face 14-1/4 x 6 x 3/4” U 4 Pull 3 x 7/8 x 3/8” V 48 Dowel Pin 1/4” round x 1” length Doors W 2 Door Stile 1 39 x 2-1/8 x 3/4” X 2 Door Stile 2 39 x 2-1/2 x 3/4” Y 4 Door Rail 11-1/4 x 2-1/2 x 3/4” Z 2 Door Panel 34-3/4 x 10 x 3/4”
AA 2 Pull 3 x 7/8 x 3/8” AB 2 Door Offset 39 x 3/4 x 3/8” AC 1 Catch Blocking 1 7 x 1-3/4 x 3/4” AD 1 Catch Blocking 2 7 x 1-3/4 x 1/2” Back AE 2 Outer Slat 60-1/4 x 4-1/2 x 3/4” AF 6 Inner Slat 56-1/2 x 5 x 3/4” Miscellaneous AG 2 Shelf Support 1-1/2 x 1-3/8 x 3/4” AH 2 Top Molding Side 17-3/4 x 5/8 x 1/4” AI 1 Top Molding Front 38-1/2 x 5/8 x 1/4” With the drawer kicker, part G being so thin, I consider this part optional and a personal preference. If you don’t want your drawers to tip down as they are pulled out, use them. If a little downward movement is OK, then omit them. Sand all parts as you progress through the plan. Also consider adding finish to parts like the interior of the case sides as well as cross members, sub top, shelves and door panels prior to assembly. A Note About Workshop Safety Be sure to understand and practice safe workshop proceedures. Know and implement the safety instructions provided by your tool manufacturer. Wear eye and ear protection when appropriate and protect yourself from the fine dust generated by woodworking tools.
Never become complacent with your tools. They are potentially dangerous; use them with respect.

7 - You Can Build A Modern Kitchen Cupboard
build the case
Begin construction by making the case sides, parts A. Cut the sides to final size and begin fabricating the shelf and cross member dados as well as the sub-top and back rabbets. Their locations are shown in illustration 7A.
Illustration 7B shows dimensions for the sub top and back rabbets. Dados for the shelves and cross members are 1/2” x 3/8” deep.
Form the feet by cutting away the arched opening. See the detailed view in 7C.
Adjustable Shelves
An alternate to fixed shelves is to make the Modern Kitchen Cupboard with adjustable shelves.
I use the Kreg Shelf Pin Jig when adding adjustable shelves to furniture projects.
See 7B
7A
7B A
Case Side 60-1/4 x
16-3/4 x 3/4”
7C
Grid is spaced in 1/2” increments.
All dados are 1/2” in height and 3/8” deep.
Shelf dados are stopped 1/2” from front edge.
© 2017 Jeff Branch

8 - You Can Build A Modern Kitchen Cupboard
8A
E Self
37-1/4 x 15-1/8 x 3/4”
B Cross Member
37-1/4 x 15-7/8 x 3/4”
C Sub-Top 37-1/4 x
15-7/8 x 3/4”
F Shelf Banding
37-1/4 x 1/4 x 3/4”
See 8B
Tenon on the ends of B and E are 1/2 x 3/8”
8B
Create cross members, shelves and sub-top, parts B, C and E as shown. Parts B and E need a tenon on each end as shown in 8B. No tenon for part C.
Using a router equipped with a 1/2” straight cutting bit, form the tenons. Take off a little material with multiple passes with the router until you have a snug fit with the dados in the case sides, parts A (see 7A).
If making the shelves out of plywood, add shelf banding, part F to each shelf. Attach with glue and brads. Trim part F to be flush with the shelf.
Finally, pre-drill for pocket screws in parts B and C. For part C, the pocket screw hole is on the top surface, and on all of parts B, the pocket screw holes are on the bottom surface (indicated in blue).
© 2017 Jeff Branch

9 - You Can Build A Modern Kitchen Cupboard
Next, we’ll begin case glue-up accomplishing this in steps.
First, add glue to the tenons on the left end of each cross member, parts B. Position them in their corresponding dado in the left side, part A, (see 9B; the case is viewed from the back). Slide the right side in place without glue, clamp and allow the glue to dry. Once dry and since the right side did not get glue, remove it and move to the next step.
Second, add glue to the left end on both shelves, parts E; slide them into their dadoes in the left side. Position the right side in place, no glue. Clamp and allow the glue to dry. Remove the right side.
Next, add glue to the right ends of parts B and E. Position the right side in place. Clamp and allow the glue to dry.
Lastly, add glue to both ends of the sub top, part C. Position it in place. Drive brands through each case side into part C. Clamp and let dry. 9A - Case shown back facing up.
See 9B
B Cross Member
37-1/4 x 15-7/8 x 3/4”
E Shelf
37-1/4 x 15-3/8 x 3/4”
C Sub-Top 37-1/4 x
15-7/8 x 3/4”
The sub-top is joined to the case sides with brads and glue. See illustration 28A for more.
9B
All dados are 1/2” in height and 3/8” deep.
A Case Side
A Case Side
Pocket screw holes on parts B face down.
G Drawer Kicker
15-7/8 x 3/4 x 1/8”
Create the drawer kickers as shown (highlighted in blue) and add them as shown using brads and glue. Do this prior to case glue-up.
10 - You Can Build A Modern Kitchen Cupboard
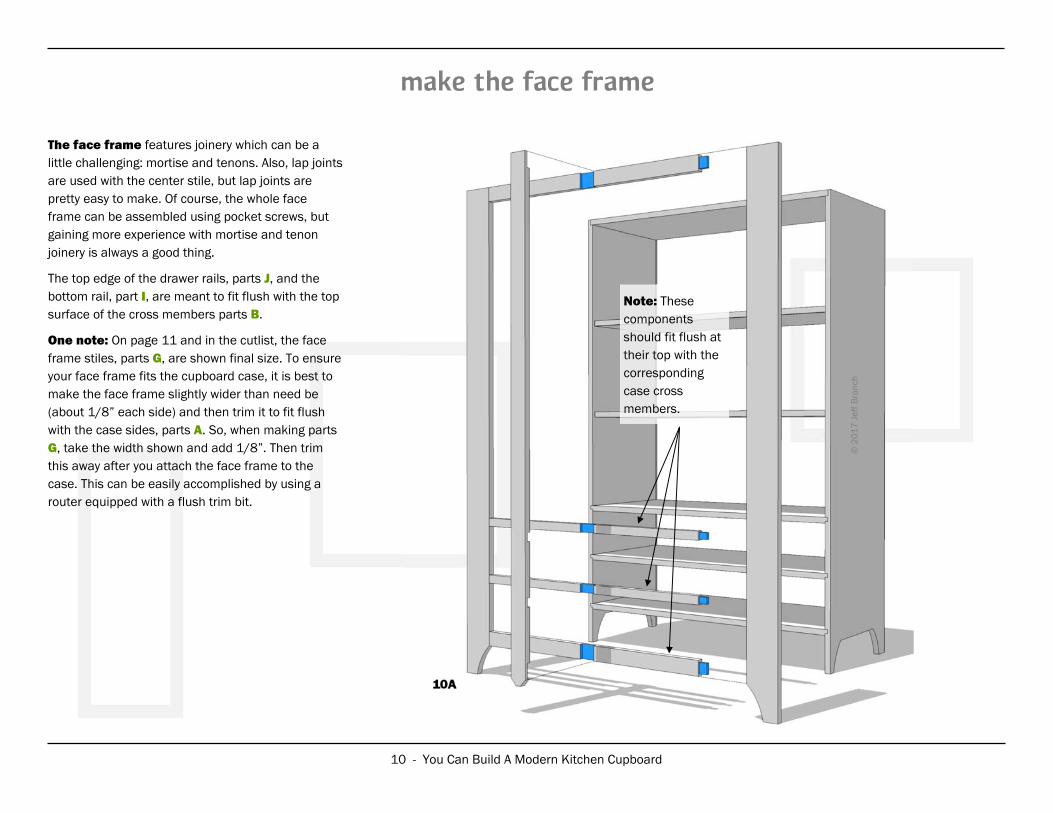
The face frame features joinery which can be a little challenging: mortise and tenons. Also, lap joints are used with the center stile, but lap joints are pretty easy to make. Of course, the whole face frame can be assembled using pocket screws, but gaining more experience with mortise and tenon joinery is always a good thing.
The top edge of the drawer rails, parts J, and the bottom rail, part I, are meant to fit flush with the top surface of the cross members parts B.
One note: On page 11 and in the cutlist, the face frame stiles, parts G, are shown final size. To ensure your face frame fits the cupboard case, it is best to make the face frame slightly wider than need be (about 1/8” each side) and then trim it to fit flush with the case sides, parts A. So, when making parts G, take the width shown and add 1/8”. Then trim this away after you attach the face frame to the case. This can be easily accomplished by using a router equipped with a flush trim bit.
10A
make the face frame
Note: These components should fit flush at their top with the corresponding case cross members.
© 2
017
Jef
f Bra
nch

11 - You Can Build A Modern Kitchen Cupboard
11A
G Face Frame Stile
60-1/4 x 3-3/4 x 3/4”
Make two.
This mortise (highlighted in blue) is 3/8 x 1-1/4 and 1” deep.
This mortise is 3/8 x 1-1/4 and 1” deep.
1-1/4”
3/4”
3/4”
These mortises are 3/8 x 3/4” and 1” deep.
Note: Cut the foot arch (highlighted in yellow) after you cut the mortises. Note the foot dimensions and follow the shape shown in 7C.
K Face Frame
Top Rail 32-1/2 x
1-3/4” x 3/4”
J Face Frame Drawer Rail
32-1/2 x 1 x 3/4”
Tenons on part J are 3/8 x 3/4” and 1” long.
Tenons on part I are 3/8 x 1-1/4” and 1” long.
Lap joint on part I is 2 x 1-3/4” and 3/8” deep.
Lap joint on parts J is 2 x 1” and 3/8” deep.
Lap joint on part K is 2 x 1-3/4” and 3/8” deep.
Tenons on part K are 3/8 x 1-1/4” and 1” long.
I Face Frame Bottom Rail
32-1/2 x 1-3/4” x 3/4”

12 - You Can Build A Modern Kitchen Cupboard
12B
Lap joint here is 2 x 1-3/4” and 3/8” deep.
12A
H Face Frame Center Stile
57-1/4 x 2 x 3/4”
1”
1”
Lap joints are 2 x 1” and 3/8” deep.
Lap joint here is 2 x 1-3/4” and 3/8” deep.
Begin work on the face frame by cutting the face frame stiles, parts G, to final length and width. Cut mortises as shown in 11A and then shape the foot as shown on page 11 following the profile in 7C.
Cut the rails, parts I, J and K, to size; create tenons on each end as seen on page 11. Add the lap joints.
Create the face frame center stile, part H as shown in 12A. Cut part H to final length and width, create the lap joints and shape the lower end as shown in 12B. This subtle curve is the same radius as on the leg cut out seen in 7C.

13 - You Can Build A Modern Kitchen Cupboard
G Face Frame
Stile
13A
H Face Frame Center Stile
K Face Frame
Top Rail
J Face Frame Drawer Rail
I Face Frame Bottom Rail
Complete the face frame by gluing all the components together.
Just as with the case glue-up, do a dry run of fitting all the parts together. Position clamps so you will know ahead of time what to expect. When you are happy how all the various parts fit together begin glue-up.
First, with glue, position the tenons of the four rails into their mortises in the left stile, part G.
Add glue to the right side tenons and mortises, then slide the right stile into place. Add clamps and pull everything tight. Make sure the face frame is square.
Finally add the center stile, part H by spreading glue in the lap joinery and clamping to the face frame rails.
Attach the completed face frame to the cupboard case by spreading glue along the front edge of the case sides, crossmembers and sub-top. Lay the face frame onto the cupboard case making sure the drawer rails and bottom rail align with the case cross members.
Since we made the face frame a little wider than need be, trim away any excess with on the face frame stiles with a router equipped with a flush cutting bit.
G Face Frame
Stile

14 - You Can Build A Modern Kitchen Cupboard
14A
The drawers are next. These drawers are simple boxes and in this example, with dowel pin joinery, construction is solid and easy. You could use dovetail joinery in place of the dowel pins or other method of your choosing, but these dowel pined box corners are quick, decorative and work amazingly well.
All four drawers are identical making a production style construction set-up possible. The drawer boxes have an applied “drawer face” shown in birdseye maple with modern, shop made drawer pulls in an alternative wood species such as the cherry shown.
First we will need to add the drawer guides and drawer kicker which will help establish the width, height and depth of the drawers. Let’s get started...
build the drawers
Doors and drawers are inset 1/8” from the face frame.
14B
© 2
017
Jef
f Bra
nch

15 - You Can Build A Modern Kitchen Cupboard
In this step, we will add drawer guides so the drawers have a fixed space to slide into. I recommend these components be made from a good quality plywood so there is little chance of expansion and contraction with changes in humidity.
Cut all parts to final size and sand as needed to get a smooth surface for the drawers to move against. Position these various parts as shown above and make sure the fit is satisfactory. You will need to position the rear edge of drawer blocking 1, parts M flush with
the rear edge of the cross members as shown above. The same goes for parts N as well as parts O.
Glue and brad together the drawer blocking 1 making the L shape shown and then glue and clamp them in place on their corresponding cross members. Next, cut and position the remaining blocking making adjustments as needed. Glue and clamp in place the remaining blocking. Add pocket screws to drawer blocking 3, parts O.
O Drawer
Blocking 3 14 x 2-3/8
x 3/4”
Note: Pocket screw holes.
N Drawer
Blocking 2 15-7/8 x 3/4
x 3/4”
M Drawer
Blocking 1 15-5/8 x
2-3/8 x 3/4”
© 2017 Jeff Branch
15A - View from the back.

16 - You Can Build A Modern Kitchen Cupboard
16A
P Drawer Side
15 x 6 x 1/2”
3/8” 3/8”
1”
1”
2”
2”
1/4”
16B
U Pull
3 x 7/8 x 3/8”
This image is full size.
Before we get started milling drawer parts, lets look at two components in detail: a drawer side and a drawer pull.
Note the dowel holes in the drawer side, part P shown above. The material between the dowel hole and the end of the board
needs to be as strong as possible, so I like using a hardwood here. I have illustrated the image above with red oak. These
drawer sides are 1/2” thick and most home centers will carry 1/2” red oak which is convenient. The highlighted blue strip is
the location of a 1/4 x 1/4” dado for the drawer bottom, also seen in illustration 17A.
The profile of the drawer pulls, parts U is shown in illustration 16B. It is illustrated in cherry and note the grain direction. The
pull is shown full size making it easy to copy.
Other options for modern drawer and door pulls would be items #1006760, #1006956 or #1007414 at Rockler.com.
Highlighted area shows a 1/4” tall by 1/4” deep dado.
Dowel holes are 1/4” round.
© 2
017
Jef
f Bra
nch

17 - You Can Build A Modern Kitchen Cupboard
17A
Dados are 1/4 x 1/4” and located 1/4” from component’s lower edge.
Note component sizes above and in the cutlist. These dimensions are based mostly on the face frame drawer opening and should be considered a starting point for determining final drawer size. In reality, you want your drawer sides, back, front and drawer face to be slightly smaller than their corresponding drawer opening. But not much smaller: for the drawer box (drawer box = the drawer without the drawer face), 1/8” smaller in final height and about 1/16” or less in width. Compare the cutlist component size with your face frame opening and cupboard depth. Make needed adjustments in component size and cut components as shown above. Remember the drawer face is inset from the face frame by 1/8” (see 14B).
Bring together the components to form one drawer box corner. Mark dowel hole locations on
the drawer sides. Position a drawer front with a drawer side and securely clamp in place. Drill 1/4” holes through the drawer side and into the drawer front. Drill to a depth of one inch (you will drill to 1/2” into the drawer front). Repeat for the remaining corners.
Begin assembly by joining one corner with 1/4” dowels. Test fit a dowel and sand as needed to get a snug fit. Add glue and tap the dowels in place. Repeat for the three remaining corners. Add clamps and allow the glue to set. Then, trim the dowels flush and slide the drawer bottom in place. Note that the drawer back sits on top of the drawer bottom. Secure the drawer bottom to the drawer back with a small screw.
We’ll add the drawer face and pulls on page 18.
Q Drawer Front 13 x 6 x 3/4”
T Drawer Face 14-1/4 x 6 x
3/4”
S Drawer Bottom
14-1/2 x 13-1/2 x 1/4”
P Drawer Side
15 x 6 x 1/2”
R Drawer Back 13 x 5-1/2 x
3/4”
U Pull
3 x 7/8 x 3/8”
V Dowel Pins
1/4” round x 1” length

18 - You Can Build A Modern Kitchen Cupboard
Last up for drawer construction: add the drawer pull to the drawer face, and attach the drawer face to the drawer box.
Temporarily place a spacer (example: a business card) on the face frame rail as shown, highlighted in yellow. Trim the drawer face, part T, to fit the drawer opening with an even gap on all drawer face edges.
After fitting the drawer face, add double sided tape to the back of the drawer face and press into place against the drawer box. Drive screws from the back of the drawer front, part Q and into the drawer face (shown in illustration 17A). Remove the screws, remove the drawer face and peel away the double sided tape. Re-attach the drawer face to the drawer box.
Mark the location of the pull, part U. Drill pilot holes for screws used to attach the pull. Drill from the drawer face through the drawer front. This gives you the location of the screws in the drawer front. Remove the drawer face.
Using these screw locations, drill a larger hole just in the drawer front, large enough to provide access to the pull screws should you ever need to tighten them in the future. Position the pull and pre-drill screw holes in the pull. Attach the drawer pull and then attach the drawer face to the drawer box.
Repeat for the remaining three drawers. Using a sander or hand plane, remove material from the drawer sides as needed to get a good drawer fit.
18A
Use a spacer to help position the
drawer face.
Double sided tape applied to the back of the drawer face.
Access holes for drawer pull
screws.
T Drawer Face 14-1/4 x 6 x
3/4”
U Pull, 3 x 7/8 x 3/8”
Q Drawer Front
© 2017 Jeff Branch

19 - You Can Build A Modern Kitchen Cupboard
door construction
Mortise and tenon joinery.
Door panel fits into a groove.
19A
Before we get to work on the doors, a few notes:
1) Just as with the drawers, the doors are inset from the face frame by 1/8”. When open, the doors will not lay flat against the face frame.
2) To help give the doors more swing, there is a spacer strip which the doors/hinges mount to. I call this part a door offset in the cut list.
3) The door panel is flat on the front, but has a raised back seen in the illustration on both pages 2 and 22. If you prefer a flat back, you will need to mill stock to 1/4” thick.
4) I call for mortise and tenon joinery for the door frame, but you could also use dowel joinery, domino, etc.
Turn the page and let’s make some doors.
Door pulls are the same size as the drawer pulls.
W Door Stile 1 39 x 2-1/8
x 3/4”
Y Door Rail
11-14 x 2-1/2 x 3/4” Make two per door.
Z Door Panel
34-3/4 x 10 x 3/4”
X Door Stile 2 39 x 2-1/2
x 3/4”
AA Pull
3 x 7/8 x 3/8”

20 - You Can Build A Modern Kitchen Cupboard
20A
Door construction begins with the addition of the door offsets, parts AB. These components are what the doors are actually mounted to. Because the doors are recessed 1/8” from the outer surface of the face frame, these slender spacer strips enable the doors to swing wider before they make contact with the face frame. The door offsets should be made from the same wood species as the doors.
Cut parts AB to final size. Next locate the position for the hinges. I have illustrated this plan with 2-1/2” hinges. Anything of similar size will work. Chisel a recess for hinges as shown (two per door).
Next, mount the door offset to the cupboard face frame as shown setting it back 1/8”. Attach with brads along with plenty of glue and clamps. We want an especially good bond here.
Having the door offset attached will help us determine the final size of the doors.
AB Door Offset
39 x 3/4 X 3/8”
Make two.
Note how part AB is recessed 1/8”. Also see
the hinge location.
20B
© 2
017
Jef
f Bra
nch

21 - You Can Build A Modern Kitchen Cupboard
Tenon is 1-3/4” tall, 1” long and
1/4” thick, centered on the
end of part Y.
Each door has two identical rails, parts Y, but the door stiles are not identical. The hinge side stile, called Door Stile 1, part W, is more slender than Door Stile 2, part X. Just as with the face frame, it is best to make the doors a little too big and then trim them to fit after assembly. I like to make the outer edge of each rail and stile about 1/8” too big.
Begin by cutting the enlarged door rails and stiles to size. First, using a plunge router equipped with a fence and a 1/4” straight bit, cut a groove in the rails and stiles (indicated in blue in illustrations 21A and 21B). This groove is centered along each component’s width. For the stiles, terminate the groove 3/8” from each stile end as shown.
Each rail tenon fits into a mortise in it’s corresponding stile. The mortise is 1-3/4” deep, 1” wide and 1/4” thick (same size as the tenons). A mortising machine is handy for this operation, but you could also use a drill press and a chisel to remove material for these mortises.
Form tenons on the ends of both rails as shown. Here, making a fat tenon which can then be trimmed to fit the mortise is a good method to ensure a snug fitting mortise and tenon joint.
21B
Groove on parts W, X and Y are 1/4” wide and
3/8” deep.
W Door Stile 1 39 x 2-1/8
x 3/4”
X Door Stile 2 39 x 2-1/2
x 3/4”
Y Door Rail (with tenons) 11-14 x 2-1/2 x 3/4”
3/8”
21A
© 2017 Jeff Branch
22 - You Can Build A Modern Kitchen Cupboard
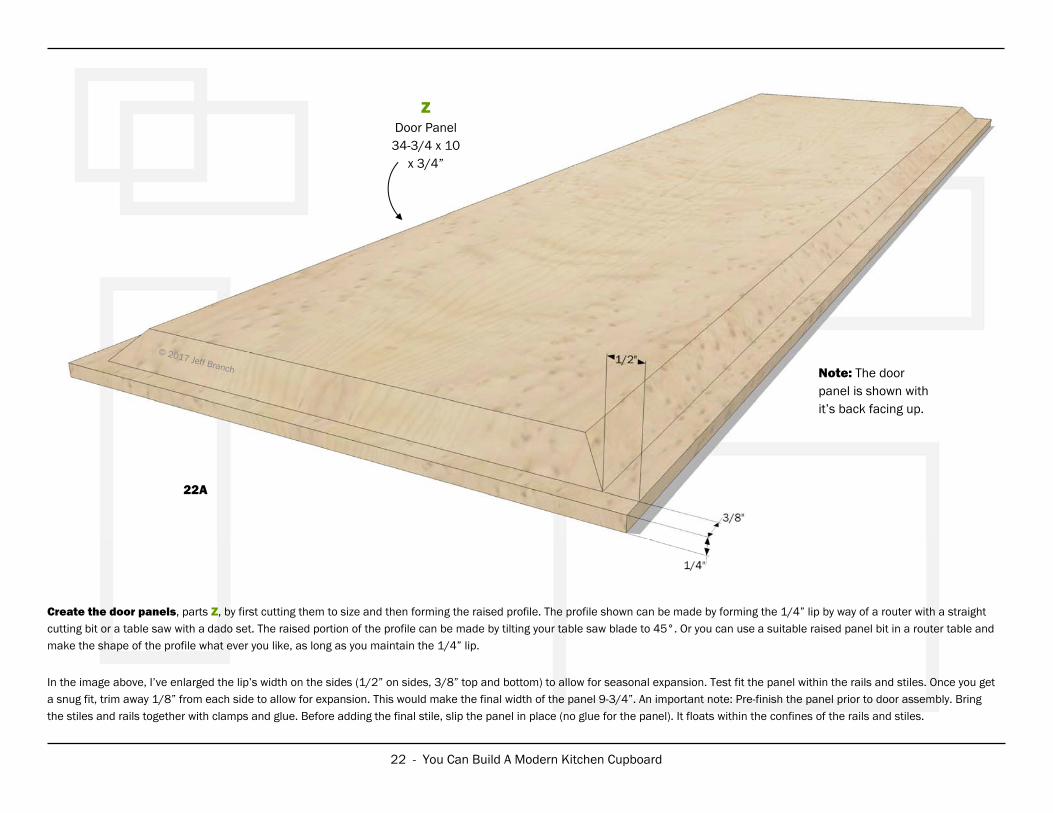
Create the door panels, parts Z, by first cutting them to size and then forming the raised profile. The profile shown can be made by forming the 1/4” lip by way of a router with a straight cutting bit or a table saw with a dado set. The raised portion of the profile can be made by tilting your table saw blade to 45°. Or you can use a suitable raised panel bit in a router table and make the shape of the profile what ever you like, as long as you maintain the 1/4” lip.
In the image above, I’ve enlarged the lip’s width on the sides (1/2” on sides, 3/8” top and bottom) to allow for seasonal expansion. Test fit the panel within the rails and stiles. Once you get a snug fit, trim away 1/8” from each side to allow for expansion. This would make the final width of the panel 9-3/4”. An important note: Pre-finish the panel prior to door assembly. Bring the stiles and rails together with clamps and glue. Before adding the final stile, slip the panel in place (no glue for the panel). It floats within the confines of the rails and stiles.
Z Door Panel
34-3/4 x 10 x 3/4”
Note: The door panel is shown with it’s back facing up.
22A

23 - You Can Build A Modern Kitchen Cupboard
A few final door details: Add the magnetic door catches and blocking; add the door pulls and lastly, mount the doors in the cupboard by adding hinges.
Illustration 23A shows typical magnetic catches commonly available at the home center. Glue the catch blocking together (parts AC and AD); add brads if you like while the glue dries. Mount the magnetic catches to the blocking and then glue into place inside the cupboard as shown in 23B, making sure you allow for the 1/8” door offset.
Illustration 19A shows the location of the door pulls, parts AA. They are the same size as the drawer pulls shown in 16B. Locate the center of the pull 14” from the door top edge and center on the door stile. Pre-drill screw holes in the door and pull, and attach with screws.
Just as with the drawers, use business cards as spacers between the bottom of the doors and the face frame and complete final fitting of the door within the door opening. Transfer the location of the hinge from the door offset, part AB seen in illustration 20B. Cut the needed recess for the hinge in the corresponding door stile. Complete the door installation by screwing the hinges in place in the door offset and then attach the doors to the hinges, highlighted in blue in see illustration 23C. 23A
AC Catch
Blocking 1 7 x 1-3/4
x 3/4”
AD Catch Blocking 2 7 x 1-3/4 x 1/2”
23B - View from the back.
Door catch assembly mounted behind face frame and against
the sub-top.
5”
23C
Hinge highlighted in blue.
© 2017 Jeff Branch

24 - You Can Build A Modern Kitchen Cupboard
final assembly
There are only a few steps left in this project: 1) Add the back slats, 2) make the top, 3) create the slender molding which resides just below the top, and 4) form small shelf supports for the center face frame stile.
The back slats are the most complex part of this step. These can be made from solid stock, but I prefer a good quality plywood. These components are added to the cupboard by way of nails.
The top has a sweeping curve at each end and is screwed in place.
24A - Currently.
24B
25 - You Can Build A Modern Kitchen Cupboard
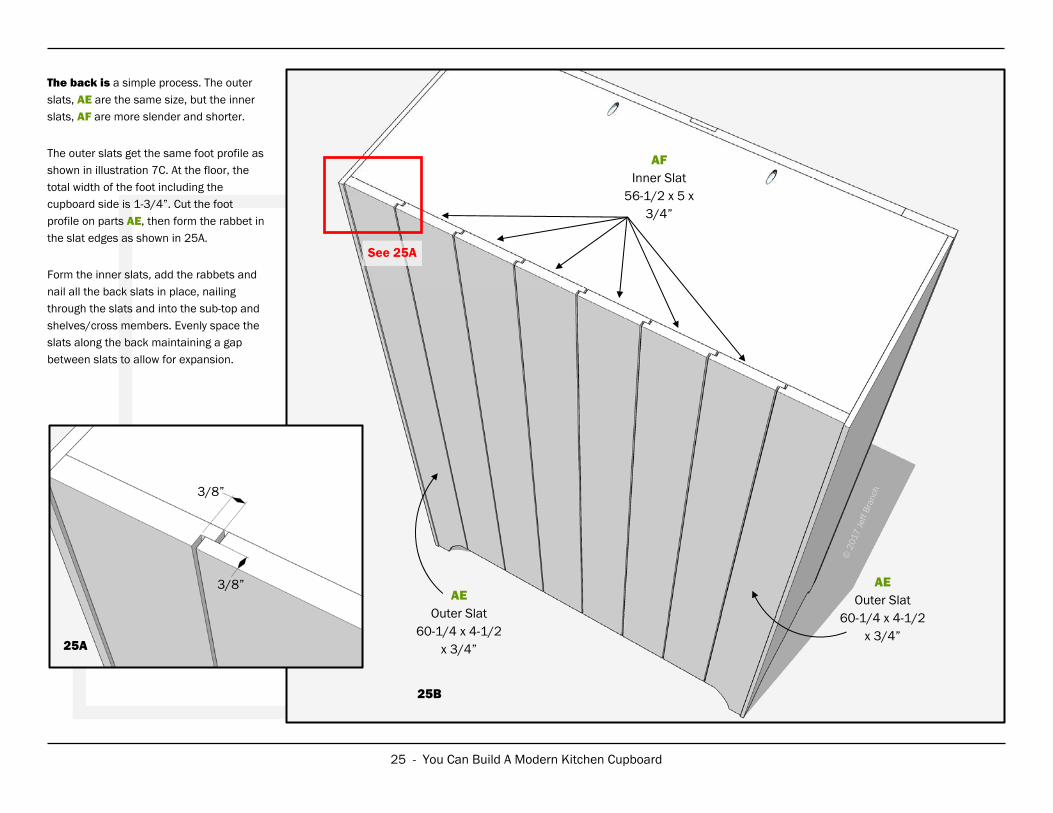
AE Outer Slat
60-1/4 x 4-1/2 x 3/4”
25B
The back is a simple process. The outer slats, AE are the same size, but the inner slats, AF are more slender and shorter.
The outer slats get the same foot profile as shown in illustration 7C. At the floor, the total width of the foot including the cupboard side is 1-3/4”. Cut the foot profile on parts AE, then form the rabbet in the slat edges as shown in 25A.
Form the inner slats, add the rabbets and nail all the back slats in place, nailing through the slats and into the sub-top and shelves/cross members. Evenly space the slats along the back maintaining a gap between slats to allow for expansion.
See 25A
3/8”
3/8”
25A
AE Outer Slat
60-1/4 x 4-1/2 x 3/4”
AF Inner Slat
56-1/2 x 5 x 3/4”

26 - You Can Build A Modern Kitchen Cupboard
D Top
42-1/2 x 18-1/2 x 3/4”
Wood screw
26B
A nice design feature of the Modern Kitchen Cupboard is the curved sides applied to the top, part D. The curved profile is shown in illustration 26A. Begin forming the top by cutting it to width, then form the curve on both ends. Smooth the curved cut as needed.
The top is attached to the cupboard using six wood screws shown in 26B (screws are highlighted in blue). These screws are driven from below the sub-top through elongated holes into the top. Note that the top fits flush with the rear edges of the cupboard sides and is centered along the cupboard width.
D Top
42-1/2 x 18-1/2 x 3/4”
Showing detail of the right edge.
7/8”
26A © 2
017
Jef
f Bra
nch

27 - You Can Build A Modern Kitchen Cupboard
27B
To ensure the shelves don’t sag under the weight of canned goods and such, let’s add shelf supports, parts AG, to the face frame center stile, part I.
First, see 27A; cut the 3/4 x 1/4” notch in a piece of 1-3/8” wide stock, then form two 1-1/2” supports.
Carefully pull the face frame center stile outward and with glue applied to the back of a support, slide it in place as shown in illustration 27B. Add a clamp and let the glue dry.
AG Shelf Support 1-1/2 x 1-3/8
x 3/4”
I
Face Frame Center Stile AG
Shelf Support 1-1/2 x 1-3/8
x 3/4”
27A
1/4”
3/4”
28 - You Can Build A Modern Kitchen Cupboard
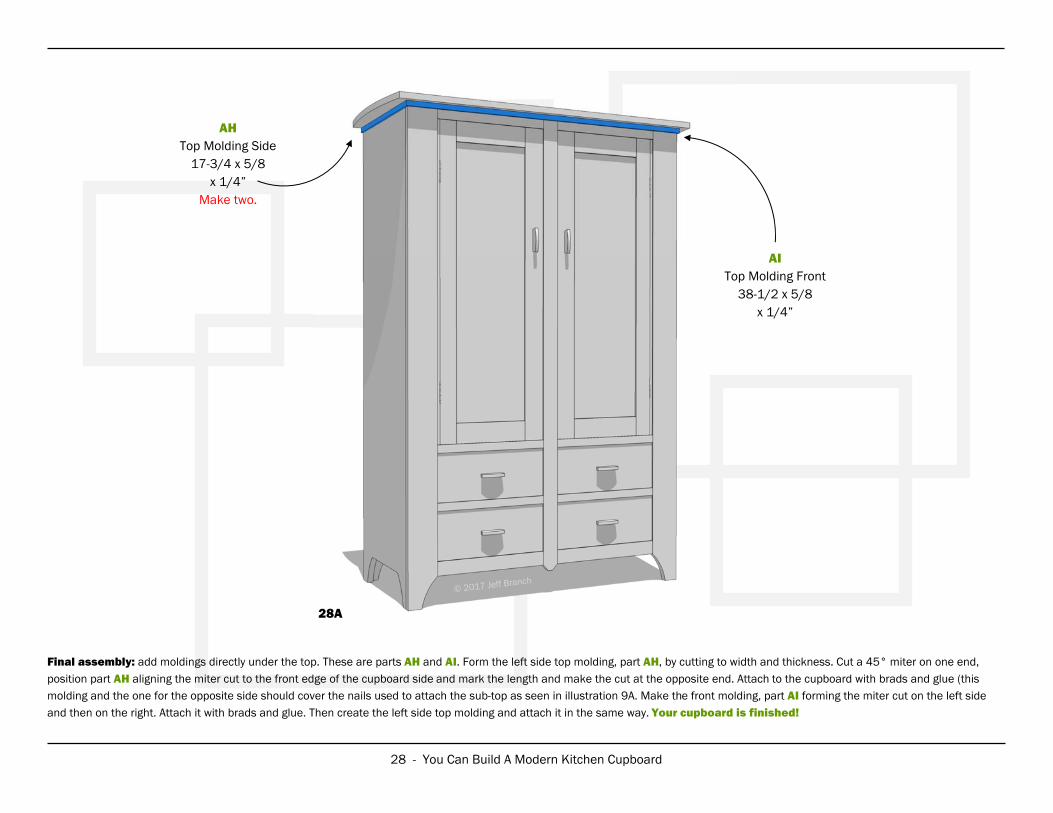
Final assembly: add moldings directly under the top. These are parts AH and AI. Form the left side top molding, part AH, by cutting to width and thickness. Cut a 45° miter on one end, position part AH aligning the miter cut to the front edge of the cupboard side and mark the length and make the cut at the opposite end. Attach to the cupboard with brads and glue (this molding and the one for the opposite side should cover the nails used to attach the sub-top as seen in illustration 9A. Make the front molding, part AI forming the miter cut on the left side and then on the right. Attach it with brads and glue. Then create the left side top molding and attach it in the same way. Your cupboard is finished!
28A
AH Top Molding Side
17-3/4 x 5/8 x 1/4”
Make two.
AI Top Molding Front
38-1/2 x 5/8 x 1/4”

29 - You Can Build A Modern Kitchen Cupboard
The suggested finish for the Modern Kitchen Cupboard is a medium gray paint and a clear finish for the birdseye maple.
I am a big fan of using a high quality latex paint because such paints brush on very well and cover quickly, often needing no primer coat.
For the clear finish, I like a wipe on polyurethane but other finishes like shellac would be a good choice as well. I recommend removing the doors and then removing the door pulls finishing the doors on a horizontal surface and the pulls by hanging them while drying using a modified wire coat hanger.
The drawer fronts can be finished still attached to the drawer boxes, but I recommend removing the drawer pulls and finishing them the same was as the door pulls.
© 2
017
Jef
f Bra
nch
30 - You Can Build A Modern Kitchen Cupboard
Jeff Branch WOODWORKING © 2017 by Jeff Branch. Unauthorized duplication is prohibited. See more woodworking plans at jeffbranchww.com.
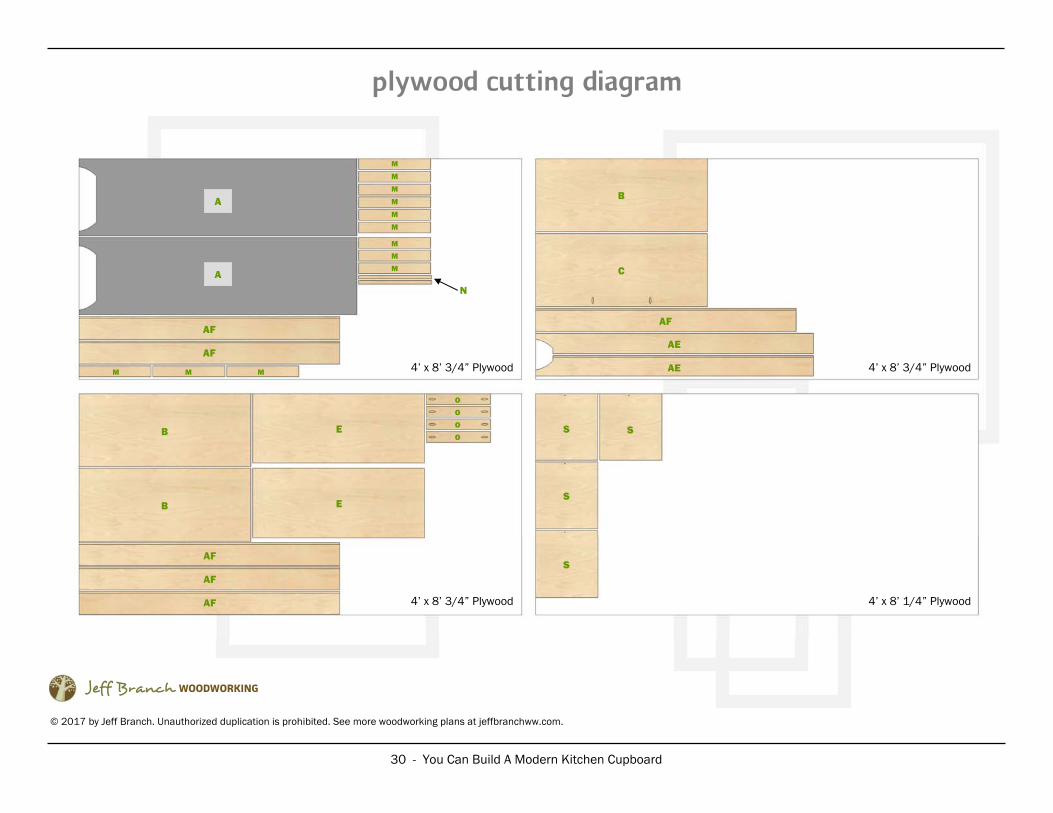
plywood cutting diagram
A
A
M
M
M
M
M
M
M
M
M
N
AF
AF 4’ x 8’ 3/4” Plywood
4’ x 8’ 3/4” Plywood
4’ x 8’ 3/4” Plywood
4’ x 8’ 1/4” Plywood
M M M
O
O
O
O E
E
B
B
B
C
AF
AF
AF
AE
AE
AF
S
S
S
S