2014 Assessment Update Deb Lindsey, Administrator State Assessment.
1
JCampus School Administrator Update StLandry Parish
714 Ashley Ridge Loop
Shreveport, Louisiana 71106
(318) 868-8000
(800) 509-7070
www.edgear.com

2
Contents
Logging In ......................................................................................................................................... 3 Basic Navigation ............................................................................................................................... 3 Navigator .......................................................................................................................................... 3 Student Master ................................................................................................................................ 4 Getting Started ................................................................................................................................. 4 Find a Student using the Find Button .............................................................................................. 4 Find a Student Using the Search Bar ................................................................................................ 4 Student Master Screen Features ..................................................................................................... 4 Using the Gear icon .......................................................................................................................... 5 Action Button ................................................................................................................................... 6 Log .................................................................................................................................................... 7 Adding a Log Note: ........................................................................................................................... 7 Reports ............................................................................................................................................. 8 Alpha Recruiter List .......................................................................................................................... 8 LEP Students – English Proficiency List ............................................................................................ 8 Special Ed Students – Complete Caseload ....................................................................................... 9 ....................................................................................................................................................... 10 Where Did My Students Come From? – Student Feeder Trends................................................... 10 Where Did My Students Go? Student Next School List ................................................................ 10 Student Counts - MFP Ethnic-Gender Lunch Report ..................................................................... 10 Example “Loader”: Club Code Loader ........................................................................................... 11 Attendance Overview .................................................................................................................... 12 Teacher Start of the Day Posting ................................................................................................... 12 Teacher During the Day Attendance Posting ................................................................................. 12 Office Posting of Attendance ......................................................................................................... 12 Roll Call Verification ....................................................................................................................... 13 Discipline ........................................................................................................................................ 13 Major vs Minor Incidents in JCampus ............................................................................................ 13 Discipline Posting Tries to Follow the Basic Parts of a Paper Referral:.......................................... 14 Basic Discipline Referral Posting: ................................................................................................... 14 Posting Bullying Referrals .............................................................................................................. 15 Posting Detentions (Regularly Scheduled Detentions) .................................................................. 15 Posting ISS or OSS Suspensions ...................................................................................................... 16 Posting Expulsion Hearing Results ................................................................................................. 17 Discipline Frequency Report .......................................................................................................... 17 Detention List ................................................................................................................................. 18 ISS / OSS List ................................................................................................................................... 18 Grades Overview ............................................................................................................................ 19 Gradebook: Where it Begins…. ..................................................................................................... 19 Assignment Audit: Checking for Count of Assignments ................................................................ 19 Grade Distribution: Monitor Marking Period Grades Before and After Report Cards ................. 20 Post Grades Master: Manage Marking Period Grades for Classes ............................................... 20 Test Scores by Roster ..................................................................................................................... 21 Transcript Overview ....................................................................................................................... 22 Master Schedule Overview ............................................................................................................ 23 Student Progress Center Overview ................................................................................................ 24 Mobile Software for Smart Devices Overview ............................................................................... 25

3
Logging In 1. JCampus works best in Google Chrome or Firefox.
2. For initial training, browse to https://stlandry.edgear.net/jcampus/
3. At the login screen, enter your username and password.
4. If you are using the “Live” dataset, click Login.
a. “Live” refers to current, active data.
5. To access the Training dataset later on in the summer, on the “Database:” field, click the dropdown arrow and select Training. Then click Login.
a. “Training” refers to a copy of data, usually a day or two old. It is usually overwritten each night, allowing the user to practice or “play” with the data.
Basic Navigation Menu Bar: The top of JCampus has a menu bar that contains several features.
1. Waffle: Click to toggle view of the navigation panel. Makes the viewable area of a screen, such as a gradebook
with many columns, wider.
2. Phone: If using the Call system, click to place an “Emergency” message to students and/or staff.
a. Can be used at any time but is needed when sending a message outside of normal call times.
b. Is not scheduled but goes out immediately to all phone numbers associated with a student/staff.
3. Favorites: Click to create up to 15 shortcuts to programs. To create a shortcut, do the following:
a. Click the Favorites icon. b. Select Configure. c. The window on the left shows all the different modules that can be added to favorites. Click and drag
the desired modules to the column on the right. d. Click Save. e. To remove, select the module from the window on the right, then click once on the trash can icon in the
middle of the two windows. Click Save.
4. Help: Click to access the help system of JCampus. A separate tab will open to allow the user to jump back and
forth between JCampus and the Help system.
a. Community Portal/StLandry: Place where handouts from trainings are stored.
Navigator
1. Search Box: Located in the upper left, entering a keyword will search the menu items and provide matching
programs. Click to run. Click the “Favorite” (heart) icon to save it as a Favorite.
Unblock Popups
Print jobs in JCampus open as popups. The first time a print job is attempted, it may appear that the job was not created. To allow popups from the JCampus software, on the first instance of an attempt at a print job, do the following:
1. The user will see a popup blocker icon in the upper right corner as shown below.
 OR OR http://wiki.edgear.net/wiki/w/index.php?title=File:Popupblock2.PNG

4
2. Click on the popup blocked icon. A dialog box will appear. Do the following:
a. Click "Always allow popups from....”
b. Click the hyperlink as shown below.
c. The print preview will now be displayed and will continue to open in Google Chrome from JCampus.
Student Master
The Student Master is the primary program for working with individual student data. It is used to maintain demographic
information on students and enroll/drop students.
Getting Started
1. On the navigation panel, go to Student Master / Entry / Student Master.
2. At the setup box, verify the current year.
3. Click on the “School” field to pick the site to work with or select “700” to work with all students in the district.
4. Click the “OK” button to begin.
Find a Student using the Find Button
1. Click the Find button located at the bottom of the Student Master screen. This brings up a list of students in alphabetical order.
2. Use the keyboard or the keypad at the top of the list to type the last name in the search box or scroll down the list and select the appropriate name.
3. Student names in a pink shade are student master records where the student dropped.
4. The student’s information will appear on the Student Master screen.
Find a Student Using the Search Bar
1. The search bar is the blank field to the left of Action at the top of the screen.
2. Search by typing all or part of the student’s last name, first name, social security number, student ID number, state ID, or phone number and hit Enter on the keyboard.
3. A list of possible matches is displayed and can be sorted using any column heading.
a. Need to find a student in a different year? In the search results, click the option “Search All Years”.
i. Selecting a previous year search result allows you to see data from that year.
4. Select the desired student. The student information will appear in the Student Master screen.
5. TIP: In this field, the user can search additional strings such as Father Name, Mother Name, Guardian Name, and any phone number. Simply type in what is being searched for. Any matches will show in bold.
Student Master Screen Features
1. Flags in the top will be shaded a color if a student has been classified as SPED, 504, LEP, or has a Health condition.
a. Click the button to see additional details.
2. If the student has exited, the name of the student will be shaded in red.

5 3. If the student is absent on the current day, the name of the student will be shaded in
yellow.
4. To get to the details of a field, click on it.
5. Tabs across the bottom contain additional details and entry screens for the student.
6. Save: To store any changed data on the student, be sure to click the SAVE button located at the lower center of the Student Master screen!!
Using the Gear icon
The Gear icon is a menu system that brings out further details about the student in a quick access format. The Gear icon can be found throughout the JCampus system. Typically, the user will see the icon near the student’s name on a screen and on some list report screens. In Gradebook, the Gear icon is accessed by the highlight of a name, then a click of the Gear icon.
1. After locating a student on the Student Master screen, or in any other location where the icon is present, click on the gear icon. A submenu of items to pick from will be displayed.
2. Categories with arrows on the right contain further subgroups of related items .
3. Student
a. Student Demographic: Creates a print out of main contact information of the student.
b. Special ED Information: Same as “SPED” button on main Stu Master screen.
c. 504 Information: Same as “504” on main Stu Master.
d. Health Information: Same as “Health” on main S
e. Student Enrollment History: Same as “Enrollment History” tab of Stu Master.
4. Attendance
a. Attendance by Day: Report of detail attendance and summary. Click “Setup” to change year.
b. Attendance by Course: If a Bell Schedule is setup, student’s attendance by course is displayed with counts per course. Cell click to get detail records for the class.
c. Tardies: Code 14 Tardy means student was present at school, but no in class on time. Typically posted by the teacher.
5. Discipline: Provides a summary of incidents/actions. Click the “Year” in lower right to see previous years information.
6. Schedule: If user permissions allow, these will allow for student schedule changes.
a. Schedule Maintenance: A simple manual student schedule program to quickly add/drop classes on the student’s schedule.
b. Pattern Board: Typically for high schools and large middle schools, this is a request-based student scheduler for entering requests, automatic scheduling for the student, or manually add /drop a class.
c. Block Fast Loader: Typically for elementary schools and smaller middle schools, this assigns a student to a homeroom, which also assigns a schedule associated with the homeroom.
d. Print Schedule: Quick preview/print out of student’s schedule.
7. Grades: Displays the current marking period grades, and any semester / final averages if calculated. Click the “Year” in the lower right to see previous year’s grades.
a. Click on the average to see the assignment grades that make the average.

6
8. Print Transcript: Displays the transcript of the high school student. Current year semester / final averages are merged and indicated with a “G” for “Grade Record”.
9. Student Test Analysis: Displays test score information for the student. Easiest way to view is to hit the “Print” button to do a print preview.
10. Communication
a. Parent Contact Log: Typically, a note posting entered by the teacher documenting time/date/contents of a communication with a parent/guardian.
b. Also contains any contact actions from discipline posting.
c. Click “Show JCall Messages” to see any phone call information that has been sent to the student.
d. Click “Show All Years” to see data from previous years. Default is to show only current year contact info.
e. SPC Login Information: Displays the last time a parent/guardian accessed information about the student on the Student Progress Center.
Action Button
The Action button appears in the major entry programs in the upper right corner. It has links to related programs for the application module.
1. In Student Master, clicking the Action button will bring up a menu that allows the user to perform Re-Enroll, Leave Entry Package, Enrollment Status Form, MFP Audit documentation, Fee Management, Letter System access to print letters related to the student, and other tasks.
2. Reenroll: Gain a Student
a. To Gain a student, click the “Clear” button, then enter some or part of the Student’s name information, or the SSN.
b. In the upper right, click “Action” then “Reenroll”.
c. Select the items to bring in if a match is found. If coming from a place that uses JCampus, redirect the District field to the district the student is coming from.
i. Otherwise, always leave for home district.

7
d. System will search for a match. If found, click “Import” to bring the student in.
e. If no match is found, begin entering student information from scratch.
3. Print Leave/Entry Package:: A Leave/Entry Package is handy when an administrator or counselor has a meeting on the student and needs a packet of information to summarize how the student is doing.
a. Locate the student in Student Master.
b. Click Action at the top right of the screen.
c. Choose Leave/Entry Package.
d. Check all appropriate boxes to print.
e. Click Print.
4. Access the Document Archive on the student (Currently used for IBC’s).
a. Click Action, Doc Archive, Student, IBC
b. Click on the IBC to see the scanned IBC document.
5. Print LEP Form: To print the LEP accomodation plan on the student, go to Action, then Print LEP Form.
Log
The log can be used by the school administration and counselors as a place to record notes on a student for tracking or
for documentation. Teaching and clerical staff do not have access to this component.
Note: Avoid placing highly confidential items here.
Adding a Log Note:
1. From either Student Master / Log tab, or Discipline Posting / Action / Log, or SBLC / Action / Log, click “Log”.
2. A prompt for password will appear. Enter the JCampus password provided at training.
3. Previous notes will appear. Click the New button. A section at the bottom will light up.
4. Enter notes in the bottom section, then click Save.

8
5. The new note will appear at the top along with any previous notes.
6. Need to edit the contents? Click on the row to edit. (Can only edit your notes).
7. Need to make it go away? Click the red delete cell to make the row go away.
8. Click “Print” to print the information.
9. The “Log” information can also be printed as part of the Court Report in the Discipline Posting / Action option.
Reports
Alpha Recruiter List
1. Go to Student Master / Lists / Alpha Recruiter List, or do a keyword search for the item.
2. In the Setup screen, set the “Year” and “School”.
3. On the right, locate the “Column” field. Click and select several fields such as student name, grade, DOB, etc…
4. Click the OK button.
5. The list of students meeting the settings will be displayed.
6. Clicking on the down arrow on the right side of any column header will display additional options.
• Sort Ascending-alphabetical order
• Sort Descending- reverse alphabetical order
• Configure Sort- custom sort using multiple columns
• Clear sort- clears the Configure sort option
• Auto Fit All Columns- adjust all columns’ width to fit the text in each field automatically
• Auto Fit- does the same but only in the column you are working in
• Column- uncheck columns to hide
• Group by-when grouping, all items are sorted and then collapsed into drop down items to make the information easier to access in an organized fashion. It is an expanded level of sorting.
o Ungroup- clears Group By
• Freeze- keeps the chosen column stationary while scrolling from left to right
7. Click Print. In the Print Document window, select the appropriate format to save or print.
a. Highlighting rows in the list and selecting Print will only print those selected rows.
LEP Students – English Proficiency List
1. Go to Student Master / Lists / English Proficiency Report or do a keyword search.
2. At the setup box, set for current year and any grade levels needed.
3. Set the “As of Date” to either the first day of school or the current date.
4. Place a check for “English Code is Limited”.
5. Click Ok to obtain the report.

9
Special Ed Students – Complete Caseload
1. Go to Special Education / Lists / Complete Caseload
2. Set for current year, grade.
3. Set the “As of Date” to first day of school or current date.
4. Place a check for “Print Exceptionality Details”.
5. Click OK to obtain the report. Click the “Legends” button to help with code interpretation.
6. Column “IS” contains the placement information:
a. 1 = Regular Class 80% or more of the day
b. 2 = Regular Class 40 – 79% of the day
c. 3 = Regular Class less than 40% of the day

10
Where Did My Students Come From? – Student Feeder
Trends
1. Go to Student Master / Lists / Student Feeder Trends.
2. Set for desired grade level and the “As of Date” for start of
school or current date.
3. Click Ok to obtain the results. A report of students showing
school from last year is displayed.
Where Did My Students Go? Student Next School List
Set the report to the last day of school last year to see what school site the students rolled up to.
1. Go to Student Master / Lists / Student Next School List
2. Set the Year to last year. Set to desired grade level(s).
3. Set the “As of Date” to the last day of school last year, then click the “Ok” button.
4. Focus on the column “Next School”.
Student Counts - MFP Ethnic-Gender Lunch Report
1. Go to Student Master / Count / MFP Ethnic-Gender Lunch.
2. At the setup box, click in the “School” field and select the schools sites to obtain a count for.
3. Set the “As of Date” to date of enrollment to check. Click “OK”.
4. A count by grade level for the school(s) will appear. Click on the count to see the students that comprise the count.
a. Tip: The resulting list can be sorted, manipulated as explained in the previous list section.
5. Column Definitions for commonly referred to areas are below:
a. MFP – number of students counted towards State Funding purposes. (State Membership)
b. Enroll – number of students enrolled in the school. (State Enrollment)
c. ? – number of prek special ed students in a grade that have a coding conflict between student master and SER data.
d. 22+ - number of students at age 22 or older
e. NR – number of student identified as not reported in SIS to state. Usually these are private school special education students.
6. The tabs at the bottom will break down the totals by Regular Ed, Special Ed, gender and race, Special Codes, and Lunch Codes
7. Click “Print” to print or save the report
11
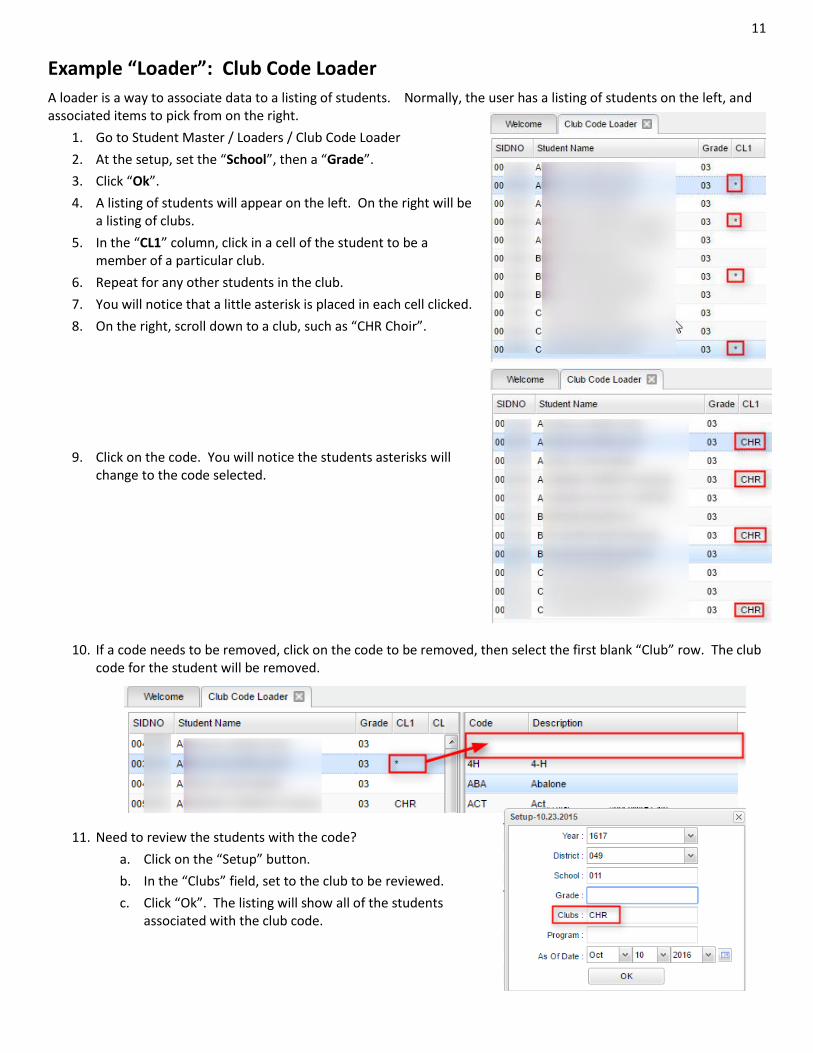
Example “Loader”: Club Code Loader
A loader is a way to associate data to a listing of students. Normally, the user has a listing of students on the left, and associated items to pick from on the right.
1. Go to Student Master / Loaders / Club Code Loader
2. At the setup, set the “School”, then a “Grade”.
3. Click “Ok”.
4. A listing of students will appear on the left. On the right will be a listing of clubs.
5. In the “CL1” column, click in a cell of the student to be a member of a particular club.
6. Repeat for any other students in the club.
7. You will notice that a little asterisk is placed in each cell clicked.
8. On the right, scroll down to a club, such as “CHR Choir”.
9. Click on the code. You will notice the students asterisks will change to the code selected.
10. If a code needs to be removed, click on the code to be removed, then select the first blank “Club” row. The club code for the student will be removed.
11. Need to review the students with the code?
a. Click on the “Setup” button.
b. In the “Clubs” field, set to the club to be reviewed.
c. Click “Ok”. The listing will show all of the students associated with the club code.

12
Attendance Overview
Updates for 1819:
1. Please send Tricia an updated bell schedule. 2. LA-15 forms are automated. Please send to Tricia the recipient at your site who handles LA-15. 3. Elementary and Junior High Letters will be automated and generated each evening after the end of the day.
Please send to Tricia the recipient at your site who handles attendance letters. 4. High School Attendance by Period Letters will be automated and generated each evening after then end of the
day. Please send to Tricia the recipient at your site who handles attendance letters.
Teacher Start of the Day Posting
1. Communicate whether teachers are to post start of the day posting in first period class or homeroom label of student master.
2. Open first period in his/her gradebook.
3. Click Attendance icon. If an elementary posting by student master homeroom, click the homeroom button.
4. For any student absent at the start of the day, click in the blue “1st” cell.
5. Click red “Sign Off Roll Call” button at top. Fill in any needed information. Click Ok.
6. “Sign Off Roll Call” button will no longer be red, signifying that the teacher is done with start of the day posting.
Teacher During the Day Attendance Posting
1. Open the class in gradebook. Click the attendance icon.
2. Review students marked “out” and “in”.
3. Post to the “In” column any student that came in “014 Tardy”.
4. Post a “08 Skip” to the “Out” column for any student not absent, but not in the classroom.
5. Middle School / High School: If a student was “08 Skipped” earlier, and is now in your room, check them back “In” with “Skipped” code, then send to the office to resolve skipping post.
Office Posting of Attendance
1. Go to Attendance / Entry / Post Attendance. Set for a “School”, then click “Ok”.
2. Click the “Student” button at bottom to bring up entire student listing.
3. If a student is checking in, click the “In” cell of the student, select an attendance code.
4. If a student is checking out, click the “Out” cell of the student, select an attendance code.
5. If an excuse is brought in for a previous attendance, click the “Dr” column to post the date excuse is brought in and attendance code for the excuse.

13
6. For large middle and high schools, it is a good idea to run the Daily Absentee List multiple
times during the day with the setting to show “skips”.
a. Go to Attendance / Lists / Daily Attendance List.
b. On the setup screen, in the section “Show Only” place a check for “skips”.
c. A listing of students who have been marked as “Skipped” will be displayed.
d. Start the search…..
Roll Call Verification
This is a very important report to run every day in the early morning. It performs two primary functions:
• Checks that all first hour teachers have confirmed start of the day attendance posting and lunch count entry.
• Allows the school Secretary to email the report showing lunch count summary to the cafeteria manager.
1. On the left navigation panel, select Attendance / Lists / RollCall Verification.
2. On the Setup, verify the Year, then set the From and To Date.
a. Normally, the From and To Date are the current date.
3. Place a check for “Roll Call Not Taken”.
4. Set Class Period to “01”.
5. Click Ok.
6. Work with these teachers to get them to post attendance for first period, and click “Sign off roll call”, then post a lunch count.
7. To send this report to the cafeteria manager:
a. Change the setting to “Roll Call Taken”.
b. Either click “Print” to print out, or click “Email Count” to email roll call verify to the cafeteria manager.
Discipline
Major vs Minor Incidents in JCampus
All referrals are broken down into two categories, Major and Minor.
1. Minor referrals are those referrals that are predominately done by teachers but not referred to the office.
2. Major referrals are those that have been referred to the office (code 06) using "Action Taken By Teacher" on referral page 2 or on which administrators have taken action by adding information on the Admin page of the referral using "Action Taken by Administrator".
14
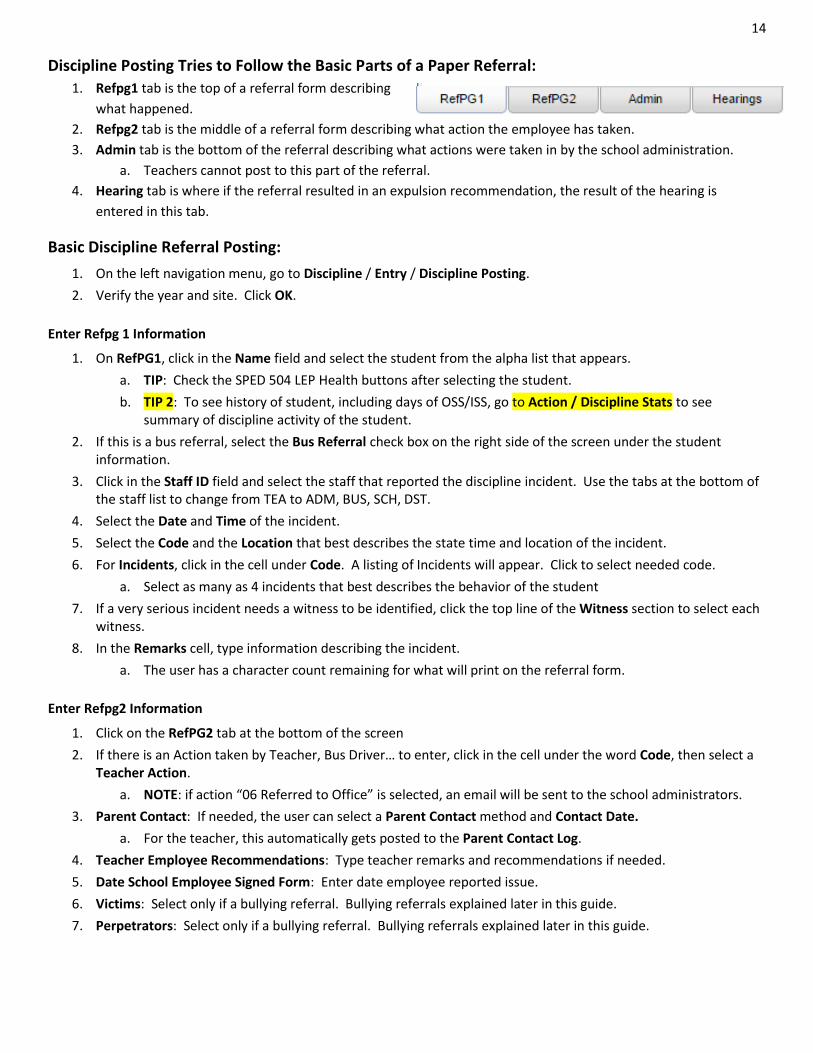
Discipline Posting Tries to Follow the Basic Parts of a Paper Referral:
1. Refpg1 tab is the top of a referral form describing
what happened.
2. Refpg2 tab is the middle of a referral form describing what action the employee has taken.
3. Admin tab is the bottom of the referral describing what actions were taken in by the school administration.
a. Teachers cannot post to this part of the referral.
4. Hearing tab is where if the referral resulted in an expulsion recommendation, the result of the hearing is
entered in this tab.
Basic Discipline Referral Posting:
1. On the left navigation menu, go to Discipline / Entry / Discipline Posting.
2. Verify the year and site. Click OK.
Enter Refpg 1 Information
1. On RefPG1, click in the Name field and select the student from the alpha list that appears.
a. TIP: Check the SPED 504 LEP Health buttons after selecting the student.
b. TIP 2: To see history of student, including days of OSS/ISS, go to Action / Discipline Stats to see summary of discipline activity of the student.
2. If this is a bus referral, select the Bus Referral check box on the right side of the screen under the student information.
3. Click in the Staff ID field and select the staff that reported the discipline incident. Use the tabs at the bottom of the staff list to change from TEA to ADM, BUS, SCH, DST.
4. Select the Date and Time of the incident.
5. Select the Code and the Location that best describes the state time and location of the incident.
6. For Incidents, click in the cell under Code. A listing of Incidents will appear. Click to select needed code.
a. Select as many as 4 incidents that best describes the behavior of the student
7. If a very serious incident needs a witness to be identified, click the top line of the Witness section to select each witness.
8. In the Remarks cell, type information describing the incident.
a. The user has a character count remaining for what will print on the referral form.
Enter Refpg2 Information
1. Click on the RefPG2 tab at the bottom of the screen
2. If there is an Action taken by Teacher, Bus Driver… to enter, click in the cell under the word Code, then select a Teacher Action.
a. NOTE: if action “06 Referred to Office” is selected, an email will be sent to the school administrators.
3. Parent Contact: If needed, the user can select a Parent Contact method and Contact Date.
a. For the teacher, this automatically gets posted to the Parent Contact Log.
4. Teacher Employee Recommendations: Type teacher remarks and recommendations if needed.
5. Date School Employee Signed Form: Enter date employee reported issue.
6. Victims: Select only if a bullying referral. Bullying referrals explained later in this guide.
7. Perpetrators: Select only if a bullying referral. Bullying referrals explained later in this guide.

15 Enter Admin Information
1. Click on the Admin tab at the bottom of the screen.
2. Click on the first cell/column for Action Taken by School Administration.
a. Select up to 4 actions taken by administrator.
3. Enter Administrative Comments.
4. Enter the Date Disciplinarian Signed The Discipline Form.
5. For Disciplinarian Signed Form, select administrator administering the action.
6. (Optional) Click on the Comments tab at the bottom of the referral page.
a. Enter comments made by the student and/or the parent.
b. Enter the date the comments were made.
c. Enter the student or parent’s name that made the comment.
7. *Save the referral using the Save button at the bottom of the screen.
Time Saver: Copy button
1. After saving a referral, if a user wishes to copy the referral to other students, click the “Copy” button.
2. Select the other student(s) to copy the referral to.
3. Note: If actions for the students were different, lookup the copied referrals and adjust the actions, then save.
Posting Bullying Referrals
1. Bullying incidents are entered the same as other incidents, but has the following exceptions explained below.
2. On RefPG1, click the Incident code of either 045 Bullying or 077 Cyberbullying.
3. A new window will appear and you will need to select a type code (aggression code) along with a motivation code. Click OK to close the bullying details entry screen.
a. If done correctly, the bullying code will have an asterisk (*) showing details have been entered.
4. If applicable, enter any witnesses to the event using the top line of the Witness section to select each witness.
5. Click on the RefPG2 tab at the bottom of the screen.
6. In the Victims section, click on the first row to select a victim.
a. Select the name of the student victim.
b. Enter any victim Comments to help document any special conditions related to the Victim.
c. Enter date the victim parent/guardian was contacted.
d. Place a check mark by the Counseling, Medical Treatment, or Other Support indicators.
7. Using the top line of the Perpetrators section enter additional perpetrators if applicable (after saving the record the name of the student on Pg 1 will also be displayed in the perpetrators list on Pg 2).
a. NOTE: By entering additional perpetrators, Pg1 and Pg2 info will be created for all perpetrators when the first student record is saved. Enter an Admin information for each after Save is created.
8. Click on the Admin tab at the bottom of the screen and enter any disciplinary actions taken for the bullying incident.
9. Save the referral using the Save button at the bottom of the screen.
Posting Detentions (Regularly Scheduled Detentions)
1. Fill in the Refpg 1 and Refpg2 as explained earlier in this guide.
2. On the Admin tab, click in the first cell of Action Taken By School Administration. Select either:
a. 03 999 Assigned to Detention

16
b. 046 043 After-School Detention
c. 047 047 Weekend Detention
3. A new window will appear for information related to the detention dates.
a. *If this is the first detention assignment for the year, select Set Times and enter the clock time and select the days on which detention will be held during the current year. Click OK.
4. Click to check the day on which the student must attend detention.
5. At the bottom, enter the number of Days the student will have Detention.
6. Enter the Start Date of the detention.
7. Click the Calc button and the system will determine the Return Date. This is the date the student is done with the detention action.
8. Select the Location of Detention. Click OK.
9. You should now see the number of days displayed under "Det" on the upper left side of the screen.
10. The Detention Notification letter, under Action→Letters, will now be available for choosing.
11. NOTE: Since the program allows multiple check boxes for different days of the week (Monday-Saturday), then you need to enter the first day of the week to allow the program to review the check box days and calculate the correct number of days. It says on the box to, "Please check off weekdays first to calculate date span below correctly". Three boxes have been placed above the dates for the assigned Saturday detention. These boxes are for dates to be skipped that would be classified as a holiday or a day that the administration does not want the student to attend detention. There are three date boxes that the administrator can use for one or more days.
Posting ISS or OSS Suspensions
1. Fill in the Refpg1 and Refpg2 as explained earlier in this guide.
2. Click on the "Admin" tab at the bottom of the screen
3. On the Admin tab, click in the first cell of Action Taken by School Administration. Select either :
a. 09 002 Out of School Suspension
b. 10 004 ISS on Site
4. A new window will appear for information related to the suspension days/dates.
5. Indicate whether or not the incident resulted in a recommended expulsion according to district discipline policy.
6. Enter the number of Days and the Start Date. Click the Calc button and the system will determine the Return Date.
7. If blank, enter the SIS Incident code.
a. If this is a weapon incident, you will be prompted to select the weapon type.
8. Click Ok. The OSS/ISS detail box will close and the user is back to the referral screen.
9. You should now see the number of days displayed under ISS or OSS on the upper left side of the screen.
a. If the count of days or dates is needed, click on the count of ISS or OSS. Make the change, then click OK button.
b. If the ISS or OSS has a “Recommend Expulsion” check off, the count of days will have an “E” in front. (Ex: “E5” for 5 days OSS with an expulsion recommendation”)
10. Save the referral using the Save button at the bottom of the screen.
11. Tip: If the ISS / OSS is resulting in an expulsion hearing, the user may want to print a “Court Report” to have a summary of student information ready for the hearing.
a. Click Action / Court Report. Select all the boxes, then Print.

17
Posting Expulsion Hearing Results
1. Click the Find Ref button at the bottom of the discipline window to locate the referral to post the hearing result.
2. Click on the referral to post the hearing result.
3. Tap the Admin tab of the referral. There will be an “E” in the cell that shows the number of days suspended either under the ISS or under the OSS column.
4. Select the Hearings tab at the bottom of the screen.
5. Click the Post Hearings button in the Hearing Results section.
a. Use “6 Alternate Site Suspension” when posting a 30-day suspension to CAPS.
b. Use “7 Alternate Site Expulsion” when posting a rest of the year expulsion to CAPS.
c. For the “1 Return to Class” option only enter a start date.
d. For all other results you will enter a Start Date and a Return Date and click the Days button to determine the number of days; if you know the number of days, enter the Start Date and click Calc to determine the return date.
e. If offered to adjust the OSS dates to fit the expulsion start date, click the Adjust button.
f. For the "Alternate Site Expulsion" option you will need to enter the Alternate Site code of 901 for CAPS.
6. Be sure to Save the referral.
7. Print the “Court Report” for documentation for the hearing.
Discipline Frequency Report
This report will give the user counts, lists, and graphs of discipline data for the school or district.
1. Go to Discipline / Trends / Discipline Frequency Report.
2. Set the “School”, then verify the “Date From” and “Date To”.
3. At the bottom, uncheck “Primary Inc/Action Only”. Click “Ok”.
4. On the left will be counts by Actions. On the right will be a graph of Actions.
a. Counts are clickable to see students that comprise the count.
5. On the right bottom, click “Inc” button to change data to “Incidents”. Data will now show Incident counts on the left, and graph of incidents on the right.
6. On the right bottom, click “Loc” to change data to “Locations”. Data will now show Location counts on the left, and graph of locations on the right.
7. Repeat for other buttons on the lower right such as “Time”, “Staff”, “Mo”-Month.

18
Detention List
1. In the left navigation panel, go to Discipline / Lists / Detention List.
2. Set for the current Year and verify the School.
3. Set the “From Date” and “To Date” to the dates for which students are to report to Detention.
4. Click Ok.
5. A listing of students who are assigned to Detention for the given date range will be displayed.
ISS / OSS List
This is a handy list to check which students are to report to ISS behavior room.
1. On the left navigation panel, go to Discipline / Lists / ISS-OSS List.
2. Set the normal Year and School setting.
3. Set the From Date and To Date to the date range of the ISS session that students are to report to.
4. For Discipline Type, set to “4 ISS on Site”.
5. Set List Type to “Detail”.
6. Click OK button to obtain list.
7. Listing will show students who are to be in ISS for the date range.
19
Grades Overview
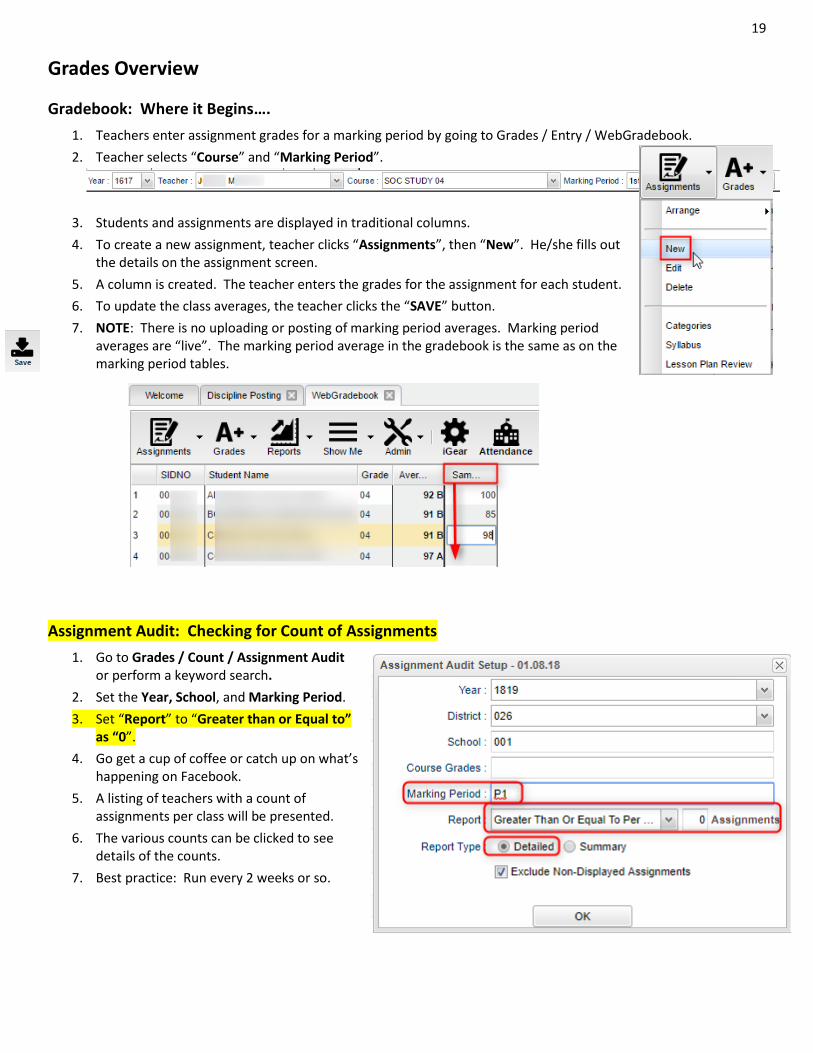
Gradebook: Where it Begins….
1. Teachers enter assignment grades for a marking period by going to Grades / Entry / WebGradebook.
2. Teacher selects “Course” and “Marking Period”.
3. Students and assignments are displayed in traditional columns.
4. To create a new assignment, teacher clicks “Assignments”, then “New”. He/she fills out the details on the assignment screen.
5. A column is created. The teacher enters the grades for the assignment for each student.
6. To update the class averages, the teacher clicks the “SAVE” button.
7. NOTE: There is no uploading or posting of marking period averages. Marking period averages are “live”. The marking period average in the gradebook is the same as on the marking period tables.
Assignment Audit: Checking for Count of Assignments
1. Go to Grades / Count / Assignment Audit or perform a keyword search.
2. Set the Year, School, and Marking Period.
3. Set “Report” to “Greater than or Equal to” as “0”.
4. Go get a cup of coffee or catch up on what’s happening on Facebook.
5. A listing of teachers with a count of assignments per class will be presented.
6. The various counts can be clicked to see details of the counts.
7. Best practice: Run every 2 weeks or so.

20
Grade Distribution: Monitor Marking Period Grades Before and After Report Cards
1. Go to Grades / Count / Grade Distribution or do a keyword search.
2. Set for current year and select School.
3. Set Marking Period to a grading period, then click OK.
4. Classes by Teacher will be displayed with counts and percentages of A, B, C’s.
5. Cell click to see list of students who makes up the count.
6. Each teacher has a summary count.
7. At the bottom, a Grand Total shows the summary for entire school.
8. Best Practice: Run every 2 weeks to see how things are going in various classes.
Post Grades Master: Manage Marking Period Grades for Classes
Sometimes there is a need to manage marking period grades for courses that do not use Gradebook, such as a DE course taught off campus. The Post Grades Master would be used for such a situation.
It is also the place where semester and final averages are calculated for either single courses or all courses.
1. Go to Grades / Entry / Post Grades Master.
2. At the setup, verify the year and set the school.
3. Initially, check “progress report mode”, then click OK.
4. At the bottom, select a Teacher, then select a Course.
5. A listing of students and respective marking period grades will appear.
6. Users can let the system calculate the semester / final averages or click “Admin” to have the entire school calculated.
7. Users can also hand enter grades, as in the DE class, or perform an override of a calculation, such as in a Virtual class final average.
21
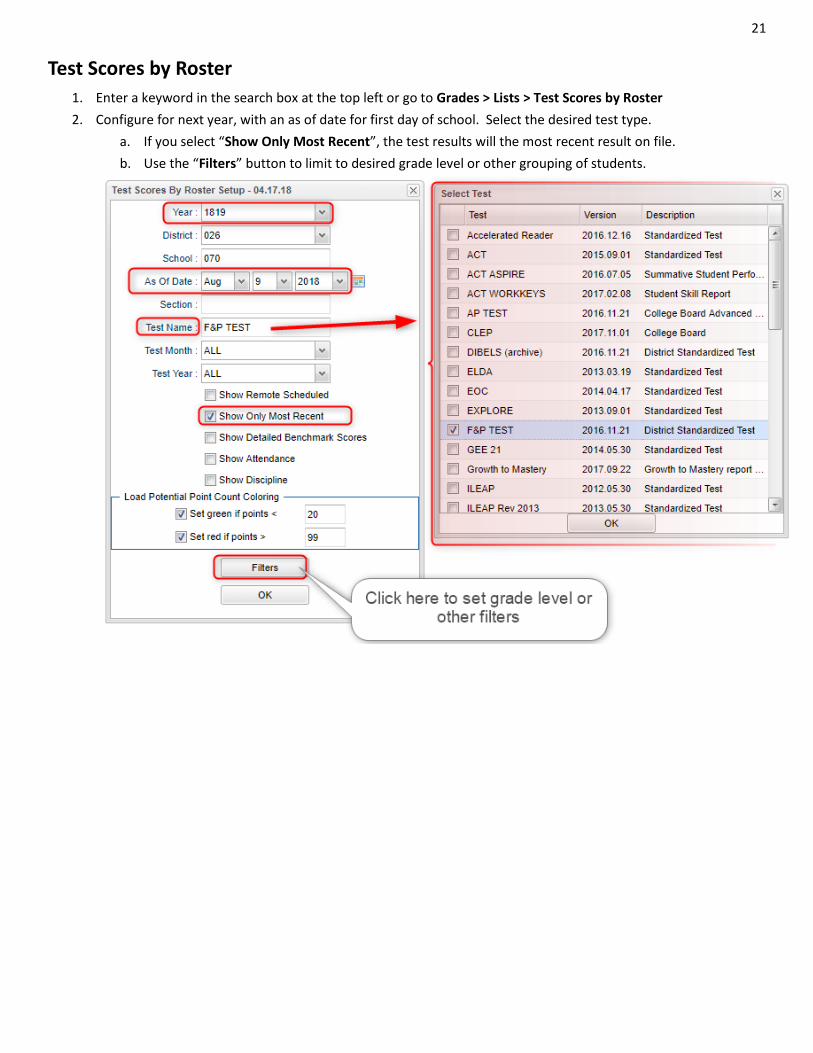
Test Scores by Roster
1. Enter a keyword in the search box at the top left or go to Grades > Lists > Test Scores by Roster
2. Configure for next year, with an as of date for first day of school. Select the desired test type.
a. If you select “Show Only Most Recent”, the test results will the most recent result on file.
b. Use the “Filters” button to limit to desired grade level or other grouping of students.

22
Transcript Overview
Transcripts can have a view of historical grades plus current year semester/final grade averages. Current year semester/final grade averages are noted with a “G”. At the end of the year, “grades” are copied to the transcript file.
1. Go to Transcripts / Entry / Transcript Workstation.
2. Set for the current year, then pick a school.
3. Set “Transcript Type” to “Official” or “College”.
4. Place a check mark for “Find Only Active Students”, then click Ok.
5. Click the “Find” button to select a student.
6. Courses are entered on the top row from left to right with a “Save” on the green cell at the far right.
7. Edits are performed on the cells directly in the table.
8. The Action button allows the user to update the Student’s individual GPA, check all various types of Gpa’s, and if needed, update the rank/calculation for entire school or selected grade level(s).
9. Click either Print Single or Print Multiple.

23
Master Schedule Overview
In JCampus, the Master Schedule Editor is where teachers/courses/periods are set and managed.
1. Go to Scheduling / Entry / Master Schedule Editor.
2. Tap the “Waffle” icon in the upper left to make your viewing screen wide.
3. Click the “Filters” button to limit the view of the master schedule.
a. Use Teacher, Transcript Group, Period, Grade to make the view of classes smaller.
b. Use Column to make the master schedule view show fields that are desired.
4. A vertical table of classes at the school will be displayed. Classes are sorted by Teacher, then period, then alpha course name.
5. Columns of Interest
a. Columns “C1, C2” contain student counts for semester 1 and semester 2. Click to get a quick roster.
b. State course code associations are in the “St Code” column.
c. The “NP” column represents the number of periods long the class is.
d. The “DS” column represents the Distance Learning code to report to the state.
e. “RSCH/RDIS” are the remote sites to report to state if the course is offered off campus.
f. “MREM” and “REM” is used if the host school wants to offer this course to other schools in the district.
g. “SE PSC” is the special ed placement to report to the state if a special ed course.
h. “C HRS” and “PSEC SITE” are used if a Dual Enrollment course is to report credit hours and post-secondary site.
i. “Fees” is used if the course has a fee that is to be assessed to any student in the course.
6. Searching can be done initially by Teacher. Type some of the last name of the teacher in the search bar and the list will move to that staff member.
7. Searching can also be done by click on a column header, such as “Course”, then typing part of the item being searched for in the column.
a. Ex… Tap “Course”, then enter “Wor” to go to the courses starting with “World”.
8. If more advanced filtering is needed, on the Setup box, tap the “Filters” button.
9. Changes are easy: Click n’ pick to make a change.
10. Additions are done in the top row, working from left to right. Click the “Save New” button to add the contents into the master schedule.

24
Student Progress Center Overview
Student Progress Center is the portal where students, parents, and school administration can view student information
related to grades, attendance, discipline, calendar, transcripts, and notes communications.
Administrators can login to see what parents and students see.
1. To get there, go https://stlandry.edgear.net/progress.
2. In the search at the top, begin entering some of the student’s name, then select the student.
3. If a parent, student shows on the right. Click on the picture to see the details.
4. Click the menu items to see details on the student.
25
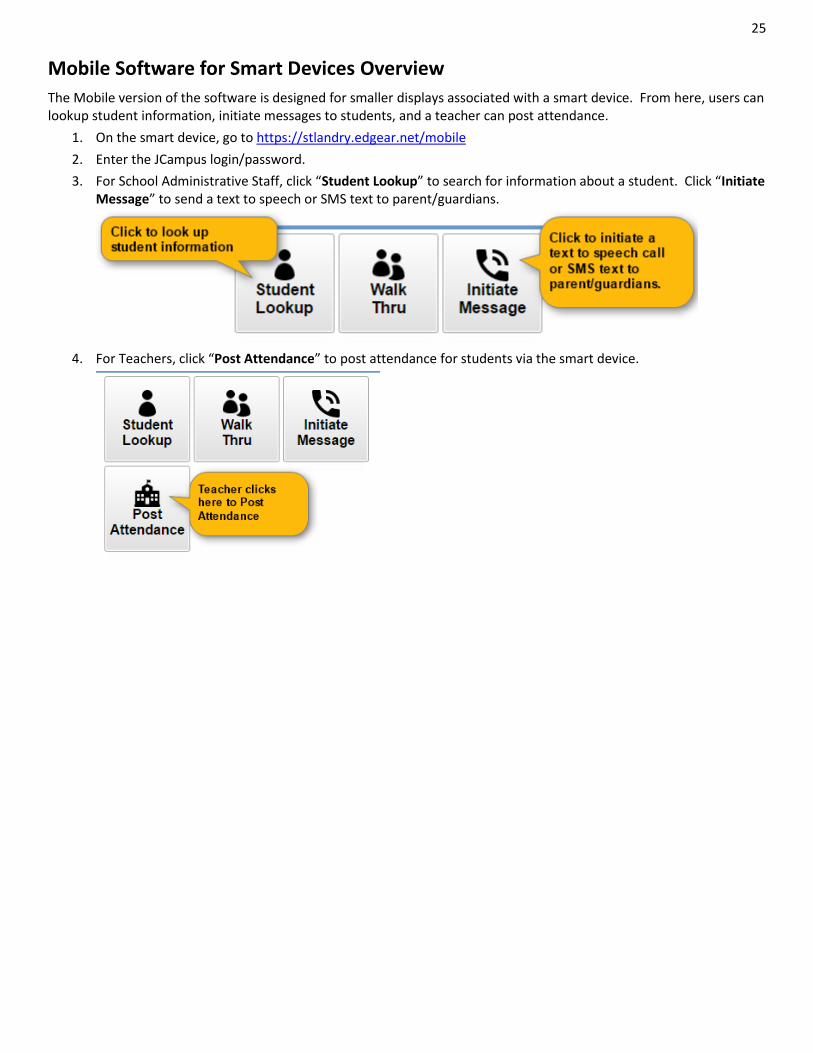
Mobile Software for Smart Devices Overview
The Mobile version of the software is designed for smaller displays associated with a smart device. From here, users can lookup student information, initiate messages to students, and a teacher can post attendance.
1. On the smart device, go to https://stlandry.edgear.net/mobile
2. Enter the JCampus login/password.
3. For School Administrative Staff, click “Student Lookup” to search for information about a student. Click “Initiate Message” to send a text to speech or SMS text to parent/guardians.
4. For Teachers, click “Post Attendance” to post attendance for students via the smart device.