Java Platform, Standard Edition Installation Guide · Installing the 64-Bit JDK 10 on Linux ......
57
Java Platform, Standard Edition Installation Guide Release 10 E91100-01 March 2018
Transcript of Java Platform, Standard Edition Installation Guide · Installing the 64-Bit JDK 10 on Linux ......

Java Platform, Standard Edition InstallationGuide
Release 10E91100-01March 2018

Java Platform, Standard Edition Installation Guide, Release 10
E91100-01
Copyright © 1993, 2018, Oracle and/or its affiliates. All rights reserved.
This software and related documentation are provided under a license agreement containing restrictions onuse and disclosure and are protected by intellectual property laws. Except as expressly permitted in yourlicense agreement or allowed by law, you may not use, copy, reproduce, translate, broadcast, modify,license, transmit, distribute, exhibit, perform, publish, or display any part, in any form, or by any means.Reverse engineering, disassembly, or decompilation of this software, unless required by law forinteroperability, is prohibited.
The information contained herein is subject to change without notice and is not warranted to be error-free. Ifyou find any errors, please report them to us in writing.
If this is software or related documentation that is delivered to the U.S. Government or anyone licensing it onbehalf of the U.S. Government, then the following notice is applicable:
U.S. GOVERNMENT END USERS: Oracle programs, including any operating system, integrated software,any programs installed on the hardware, and/or documentation, delivered to U.S. Government end users are"commercial computer software" pursuant to the applicable Federal Acquisition Regulation and agency-specific supplemental regulations. As such, use, duplication, disclosure, modification, and adaptation of theprograms, including any operating system, integrated software, any programs installed on the hardware,and/or documentation, shall be subject to license terms and license restrictions applicable to the programs.No other rights are granted to the U.S. Government.
This software or hardware is developed for general use in a variety of information management applications.It is not developed or intended for use in any inherently dangerous applications, including applications thatmay create a risk of personal injury. If you use this software or hardware in dangerous applications, then youshall be responsible to take all appropriate fail-safe, backup, redundancy, and other measures to ensure itssafe use. Oracle Corporation and its affiliates disclaim any liability for any damages caused by use of thissoftware or hardware in dangerous applications.
Oracle and Java are registered trademarks of Oracle and/or its affiliates. Other names may be trademarks oftheir respective owners.
Intel and Intel Xeon are trademarks or registered trademarks of Intel Corporation. All SPARC trademarks areused under license and are trademarks or registered trademarks of SPARC International, Inc. AMD, Opteron,the AMD logo, and the AMD Opteron logo are trademarks or registered trademarks of Advanced MicroDevices. UNIX is a registered trademark of The Open Group.
This software or hardware and documentation may provide access to or information about content, products,and services from third parties. Oracle Corporation and its affiliates are not responsible for and expresslydisclaim all warranties of any kind with respect to third-party content, products, and services unless otherwiseset forth in an applicable agreement between you and Oracle. Oracle Corporation and its affiliates will not beresponsible for any loss, costs, or damages incurred due to your access to or use of third-party content,products, or services, except as set forth in an applicable agreement between you and Oracle.

Contents
Preface
Audience vi
Documentation Accessibility vi
Related Documents vi
Conventions vi
1 Overview of JDK 10 and JRE 10 Installation
2 Version-String Format
3 Installation of JDK and JRE on Oracle Solaris
System Requirements for Installing the JDK and JRE on Oracle Solaris 3-1
JDK and JRE Installation Instruction Notation for Oracle Solaris 3-1
Installation of JDK on Oracle Solaris from Archive Binaries 3-2
Installing JDK on Oracle Solaris 11 from IPS Packages 3-3
Installing the JRE on Oracle Solaris from Archive Binaries 3-4
Installing the JRE on Oracle Solaris 11 from IPS Packages 3-4
Specifying the Default Java Platform 3-5
4 Installation of Server JRE 10 on Oracle Solaris
System Requirements for Installing Server JRE 10 on Oracle Solaris 4-1
Server JRE 10 Installation Instruction Notation for Oracle Solaris 4-1
Installing Server JRE 10 on Oracle Solaris 4-1
5 Installation of the JDK and JRE on Linux Platforms
General Notes About Installing the JDK and JRE on Linux Platforms 5-1
System Requirements for Installing JDK and JRE on Linux Platforms 5-2
JDK and JRE Installation Instruction Notation for Linux Platforms 5-2
iii

Installation of the JDK on Linux from Archive Binaries and RPM Packages 5-2
Installing the 64-Bit JDK 10 on Linux Platforms 5-3
Installing the 64-Bit JDK on RPM-Based Linux Platforms 5-3
Installation of the JRE on Linux from Archive Binaries and RPM Packages 5-4
Installing the 64-Bit JRE 10 on Linux Platforms 5-5
Installing the 64-Bit JRE 10 on RPM-Based Linux Platforms 5-5
6 Installation of Server JRE 10 on Linux
Server JRE 10 System Requirements on Linux 6-1
Server JRE 10 Installation Instruction Notation for Linux 6-1
Installing Server JRE 10 on Linux Platforms 6-1
7 Manual Installation and Registration of the Java Plug-in on Linux
Java Plug-in Installation 7-1
Installing the Java Plug-in on Linux 7-2
8 Installation of the JDK and the JRE on macOS
System Requirements for Installing the JDK and JRE on macOS 8-1
Determining the JRE Version Installed on macOS 8-2
Determining the Default JDK Version on macOS 8-2
Installing the JDK on macOS 8-3
Installing the JRE on macOS 8-3
Uninstalling the JDK on macOS 8-4
Uninstalling the JRE on macOS 8-4
Installation FAQ on macOS Platform 8-5
Notes for Users of macOS That Include the Apple Java 6 Plug-in 8-7
9 Installation of the JDK and the JRE on Microsoft Windows Platforms
System Requirements for Installing the JDK and the JRE on 64-Bit WindowsPlatform 9-1
JDK and JRE Installation Instruction Notation for Windows 9-2
JDK Installation Instructions for Windows 9-3
Downloading the JDK Installer 9-3
Running the JDK Installer 9-3
Installing the JDK Silently 9-4
Setting the PATH Environment Variable 9-4
JRE Installation Instructions for Windows 9-5
JRE Proxy Settings and Authentication 9-5
iv

Downloading the JRE Installer 9-6
Running the JRE Installer 9-6
Windows Registry Settings 9-7
Beginning to Use the JDK 9-8
Java Start Menu Installed by JDK 9-8
Java Start Menu Installed by JRE 9-9
Java Web Start 9-9
Java Plug-in 9-10
Option to Disable the JRE Out-of-Date Warning 9-11
Uninstalling the JDK on Windows 9-11
Uninstalling the JRE on Windows 9-11
JDK Installation Troubleshooting 9-12
Windows Online Installation and Java Update FAQ 9-13
10
Installed Directory Structure of JDK and JRE
Development Files and Directories 10-1
11
JRE Installation Options for Windows System Administrators andVendors
Introduction to JRE Installation Options 11-1
JRE Command-Line Installation 11-1
JRE Static Installation 11-2
Creating a Log File 11-2
12
Installation of the JRE with a Configuration File
Using a Configuration File 12-1
Configuration File Options 12-1
Sample Configuration File 12-4
System Runtime Configuration File 12-5
v

Preface
Java Platform, Standard Edition Installation Guide describes how to install the JavaDevelopment Kit (JDK), Java Runtime Environment (JRE), and Server JRE on OracleSolaris, Linux, Microsoft Windows, and macOS computers.
AudienceThis document is intended for users who are installing any variant of the Java SEplatform.
Documentation AccessibilityFor information about Oracle's commitment to accessibility, visit the OracleAccessibility Program website at http://www.oracle.com/pls/topic/lookup?ctx=acc&id=docacc.
Access to Oracle Support
Oracle customers that have purchased support have access to electronic supportthrough My Oracle Support. For information, visit http://www.oracle.com/pls/topic/lookup?ctx=acc&id=info or visit http://www.oracle.com/pls/topic/lookup?ctx=acc&id=trsif you are hearing impaired.
Related DocumentsSee JDK 10 Documentation.
ConventionsThe following text conventions are used in this document:
Convention Meaning
boldface Boldface type indicates graphical user interface elements associatedwith an action, or terms defined in text or the glossary.
italic Italic type indicates book titles, emphasis, or placeholder variables forwhich you supply particular values.
monospace Monospace type indicates commands within a paragraph, URLs, codein examples, text that appears on the screen, or text that you enter.
Preface
vi

1Overview of JDK 10 and JRE 10Installation
The type of installation depends on your requirement and the platform that you chooseto install.
Depending on the requirement, download and install JDK or JRE according to theinformation provided in Table 1–1:
Table 1-1 Installation Requirements and Related Tasks
Requirement Tasks
Run Java programs butnot develop them
Download and install the JRE for your platform
Develop Java applications Download and install the Java Development Kit (JDK) for yourplatform. The JDK includes the JRE, so you do not have todownload both separately.
Use JRE on a server butdo not want the ability torun rich internetapplications (RIAs)
Download the Java SE Server JRE for your platform
Version-String Format
To understand the version-string scheme that is used to distinguish various JDK andJRE releases, see Version-String Format.
Installation
JDK, JRE, and Server JRE can be installed on the following platforms:
• Oracle Solaris
• Microsoft Windows
• Linux
• macOS
You can download JDK and JRE from Java SE Development Kit Downloads page.
For supported processors and browsers, see Oracle JDK Certified SystemConfigurations.
Oracle Solaris
• Installation of JDK and JRE on Oracle Solaris: Instructions include installation fromImage Packaging System (IPS) and Archive binaries.
• Installing Server JRE 10 on Oracle Solaris: Instructions include steps to installServer JRE.
1-1

Microsoft Windows
• Installation of the JDK and the JRE on Microsoft Windows Platforms: Instructionsinclude steps to install JDK and JRE on 64-bit Microsoft Windows operatingsystems.
Linux
• Installation of the JDK and JRE on Linux Platforms: Instructions include installationfrom Archive binaries and Red Hat Package Manager (RPM).
• Installation of Server JRE 10 on Linux: Instructions include steps to install ServerJRE on Linux.
• Manual Installation and Registration of the Java Plug-in on Linux : Instructionsinclude steps to manually install the JRE plug-in, which is required to run Javaapplets in a browser. This procedure does not apply to Server JRE installation.
macOS
The installation of JRE 10 and JDK 10 requires macOS 10.10 or later.
• Installation of the JDK and the JRE on macOS: Instructions include steps to installJDK and JRE on macOS platform.
Directory Structure
To learn about the files and directories that are created after JDK and JRE installation,see Installed Directory Structure of JDK and JRE.
Chapter 1
1-2

2Version-String Format
Java SE platform has adopted time-based release model with the JDK being releasedevery six months.
As of JDK 10 and later, the format of the version string, which reflects the Java SEplatform's time-based release model, is $FEATURE.$INTERIM.$UPDATE.$PATCH.
• $FEATURE is the version number that is incremented for every feature release. Thefeature release contains new features and changes to the existing features asspecified by the Java SE platform specification. The version number isincremented every six months. For example, the version number for the March2018 release is 10, the version number for the September 2018 release is 11, andso on.
• $INTERIM is the version number that is incremented for every interim release, whichcontains bug fixes and enhancements. An interim release does not containincompatible changes, feature removals, nor any changes to the standard APIs.The version number for the interim release is always zero (0) as the six-monthrelease model does not include interim releases. However, this version number isreserved for future interim releases, if any.
• $UPDATE is the version number that is incremented for an update release, whichincludes fixes for security issues, regressions, and bugs in new features. Theversion number is incremented one month after the $FEATURE release and everythree months thereafter. For example, the full version string for the April updaterelease is 10.0.1, the full version string for the July update release is 10.0.2, andso on.
• $PATCH is the version number that is incremented for an emergency patch releaseto fix a critical issue.
The version string doesn't have trailing zero elements. For example, if the valueof $FEATURE is 10, the value of $INTERIM is 0, the value of $UPDATE is 1, and the valueof $PATCH is 0, then the full version string is 10.0.1.
2-1

3Installation of JDK and JRE on OracleSolaris
This topic includes the following sections:
• System Requirements for Installing the JDK and JRE on Oracle Solaris
• JDK and JRE Installation Instruction Notation for Oracle Solaris
• Installation of JDK on Oracle Solaris from Archive Binaries
• Installing JDK on Oracle Solaris 11 from IPS Packages
• Installing the JRE on Oracle Solaris from Archive Binaries
• Installing the JRE on Oracle Solaris 11 from IPS Packages
• Specifying the Default Java Platform
System Requirements for Installing the JDK and JRE onOracle Solaris
The Server JRE 10 is supported on the Oracle Solaris SPARC (64-bit), version 11 orlater.
For supported processors and browsers, see Oracle JDK Certified SystemsConfigurations.
JDK and JRE Installation Instruction Notation for OracleSolaris
Instructions for installing either the JDK or JRE contain the interim.update.patchnotation that represents the update version number.
For JDK and JRE installation instructions that contain the notationinterim.update.patch, substitute the appropriate update version number. For example,if you are installing JDK 10, Interim 0, Update 2, and Patch 1, then the following stringrepresents the name of the bundle:
JDK-10.interim.update.patch_solaris-sparcv9_bin.tar.gz
This string becomes:
JDK-10.0.2.1_solaris-sparcv9_bin.tar.gz
If you are installing JRE 10, Interim 0 and Update 2, and Patch 0, then the followingstring represents the name of the bundle:
jre-10.interim.update.patch_solaris-sparcv9_bin.tar.gz
3-1

This string becomes:
jre-10.0.2_solaris-sparcv9_bin.tar.gz
Installation of JDK on Oracle Solaris from Archive BinariesYou can install JDK 10 on an Oracle Solaris platform from archive binaries (.tar.gz)and Image Packaging System (IPS), which is the Solaris Update Repository.
The following list provides details about the download bundle:
• Download File: jdk-10.interim.update.patch_solaris-sparcv9_bin.tar.gz
• Architecture: 64-bit SPARC
• Who Can Install: Anyone
The installation instructions for using these files are organized by the .tar.gz file type.This technique allows you to install a private version of the JDK for the current user inany location without affecting other JDK installations. However, it involves manualsteps to get some features to work.
Note:
See Installing JDK on Oracle Solaris 11 from IPS Packages for therecommended approach.
Installing JDK on Oracle Solaris from Archive Binaries
You can install the JDK archive binary in any location that you can write to. It does notreplace the system version of the Java platform provided by the Oracle Solaris OS.
To install JDK from archive binaries (.tar.gz) on Oracle Solaris:
1. Download the bundle.
Ensure that you accept the license agreement before downloading the file. Thearchive binaries can be installed by anyone in any location that you can write to.
You can simultaneously uncompress and extract the .tar.gz archive file (alsocalled a tarball) in one step.
2. Change the directory to the location where you want the JDK to be installed.
3. Move the .tar.gz archive binaries to the current directory.
4. Unpack the tarball and install the JDK on SPARC processor:
$ gzip -dc jdk-10.interim.update.patch_solaris-sparcv9_bin.tar.gz | tar xf -
The JDK is installed in a directory called jdk–10.interim.update.patch in thecurrent directory. For example, the directory for the JDK 10 Interim 0, Update 1,and Patch 0 is named:
jdk-10.0.1.
The JDK documentation is a separate download. See Java SE Downloads.
Chapter 3Installation of JDK on Oracle Solaris from Archive Binaries
3-2
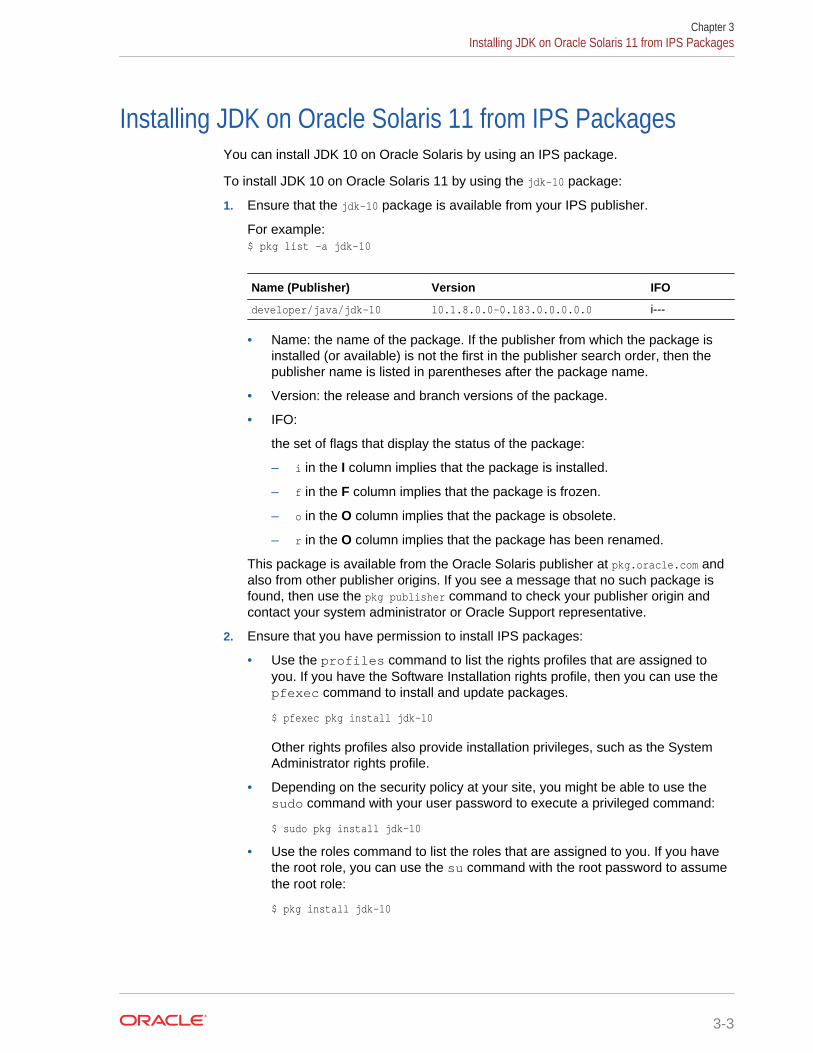
Installing JDK on Oracle Solaris 11 from IPS PackagesYou can install JDK 10 on Oracle Solaris by using an IPS package.
To install JDK 10 on Oracle Solaris 11 by using the jdk-10 package:
1. Ensure that the jdk-10 package is available from your IPS publisher.
For example:$ pkg list -a jdk-10
Name (Publisher) Version IFO
developer/java/jdk-10 10.1.8.0.0-0.183.0.0.0.0.0 i---
• Name: the name of the package. If the publisher from which the package isinstalled (or available) is not the first in the publisher search order, then thepublisher name is listed in parentheses after the package name.
• Version: the release and branch versions of the package.
• IFO:
the set of flags that display the status of the package:
– i in the I column implies that the package is installed.
– f in the F column implies that the package is frozen.
– o in the O column implies that the package is obsolete.
– r in the O column implies that the package has been renamed.
This package is available from the Oracle Solaris publisher at pkg.oracle.com andalso from other publisher origins. If you see a message that no such package isfound, then use the pkg publisher command to check your publisher origin andcontact your system administrator or Oracle Support representative.
2. Ensure that you have permission to install IPS packages:
• Use the profiles command to list the rights profiles that are assigned toyou. If you have the Software Installation rights profile, then you can use thepfexec command to install and update packages.
$ pfexec pkg install jdk-10
Other rights profiles also provide installation privileges, such as the SystemAdministrator rights profile.
• Depending on the security policy at your site, you might be able to use thesudo command with your user password to execute a privileged command:
$ sudo pkg install jdk-10
• Use the roles command to list the roles that are assigned to you. If you havethe root role, you can use the su command with the root password to assumethe root role:
$ pkg install jdk-10
Chapter 3Installing JDK on Oracle Solaris 11 from IPS Packages
3-3

Note:
The JDK 10 installation from the SVR4 package (through the pkgaddcommand) is not supported. Install JDK 10 using the IPS package.
Installing the JRE on Oracle Solaris from Archive BinariesYou can install a JRE 10 archive binary in any location that you can write to. Theinstallation does not replace the system version of the Java platform provided by theOracle Solaris OS.
To install the JRE 10 on Oracle Solaris from archive binaries (.tar.gz):
1. Download the bundle.
• Download File: jre-10.interim.update.patch_solaris-sparcv9_bin.tar.gz
• Architecture: 64-bit SPARC
• Who Can Install: Anyone
Ensure that you accept the license agreement before downloading the file. Thearchive binaries can be installed by anyone in any location that you can write to.
You can simultaneously uncompress and extract the .tar.gz archive file (alsocalled a tarball) in one step.
2. Change the directory to the location where you want the JRE to be installed.
3. Move the .tar.gz archive binaries to the current directory.
4. Unpack the tarball and install the JRE on SPARC processor:
$ gzip -dc jre-10.interim.update.patch_solaris-sparcv9_bin.tar.gz | tar xf -
The JRE is installed in a directory called jre-10.interim.update.patch in thecurrent directory. For example, the directory for the JRE 10, Interim 0, Update 2,and Patch 0 is named:
jre-10.0.2.
Installing the JRE on Oracle Solaris 11 from IPS PackagesYou can install JRE 10 on Oracle Solaris by using an IPS package.
To install JRE 10:
1. Ensure that the jre-10 package is available from your IPS publisher.
For example:$ pkg list -a jre-10
Name (Publisher) Version IFO
developer/java/jre-10 10.1.8.0.0-0.183.0.0.0.0.0
i---
If you see an i in the I column, then the package is already installed.
Chapter 3Installing the JRE on Oracle Solaris from Archive Binaries
3-4

This package is available from the Oracle Solaris publisher at pkg.oracle.com andalso from other publisher origins. If you see a message that no such package isfound, then use the pkg publisher command to check your publisher origin, andcontact your system administrator or Oracle Support representative.
2. Ensure that you have permission to install IPS packages.
• Use the profiles command to list the rights profiles that are assigned toyou. If you have the Software Installation rights profile, then use the pfexeccommand to install and update packages:
$ pfexec pkg install jre-10
Other rights profiles also provide installation privileges, such as the SystemAdministrator rights profile.
• While installing the updates, you need to accept the user license using thefollowing command:
$ pfexec pkg install jre-10 --accept
• Depending on the security policy at your site, use the sudo command withyour user password to execute a privileged command:
$ sudo pkg install jre-10
• Use the roles command to list the roles that are assigned to you. If you havethe root role, then use the su command with the root password to assume theroot role:
$ pkg install jre-10
Note:
The JDK 10 installation from SVR4 package (through the pkgaddcommand) is not supported. Install JDK 10 using the IPS package.
Specifying the Default Java PlatformIf there are multiple versions of Java installed on the same image, then you canspecify the default or preferred Java version using Mediator. A mediator contains a setof links to different implementations of an application, where every link has the samemediator name and link path, but different target link paths.
View the Current Default Version
Use pkg mediator command to display all mediators in the image and the currentdefault Java version.
$ /usr/bin/pkg mediator | grep java
Set the Default Java Version
Use the pkg set-mediator command to set Java 10 as the default or preferred version.
$ usr/bin/pkg set-mediator -V 10 java
Chapter 3Specifying the Default Java Platform
3-5

4Installation of Server JRE 10 on OracleSolaris
This topic describes Server JRE 10 system requirements for Oracle Solaris andprovides installation instructions.
This topic includes the following sections:
• System Requirements for Installing Server JRE 10 on Oracle Solaris
• Server JRE 10 Installation Instruction Notation for Oracle Solaris
• Installing Server JRE 10 on Oracle Solaris
System Requirements for Installing Server JRE 10 onOracle Solaris
The Server JRE 10 is supported on the Oracle Solaris SPARC (64-bit), version 11 orlater. For supported processors and browsers, see Oracle JDK Certified SystemsConfigurations.
Server JRE 10 Installation Instruction Notation for OracleSolaris
Instructions for installing Server JRE 10 contain interim.update.patch notation thatrepresents the Server JRE update version number.
Substitute the appropriate Server JRE update version number in instructions thatcontain the notation interim.update.patch. For example, if you are installing ServerJRE 10, Interim 0, Update 2, and Patch 1, then the following string represents thename of the bundle:
serverjre-10.interim.update.patch_solaris-sparcv9_bin.tar.gz
This string becomes:
serverjre-10.0.2.1_solaris-sparcv9_bin.tar.gz
Installing Server JRE 10 on Oracle SolarisYou can install a JRE archive binary in any location that you can write to. It does notreplace the system version of the Java platform provided by the Oracle Solaris OS.
To install Server JRE on Oracle Solaris:
1. Download the bundle:
• Download File: serverjre-10.interim.update.patch_solaris-sparcv9_bin.tar.gz
4-1

• Architecture: 64-bit SPARC
• Who Can Install: Anyone
Before a file can be downloaded, you must accept the license agreement. Thearchive binary can be installed by anyone (not only root users) in any location thatyou can write to.
The .tar.gz archive file (also called a tarball) is a file that can be simultaneouslyuncompressed and extracted in one step.
2. Change the directory to the location where you want to install Server JRE 10, thenmove the .tar.gz archive binary to the current directory.
3. Unpack the tarball and install the Server JRE on SPARC processor:
$ gzip -dc serverjre-10.interim.update.patch_solaris-sparcv9_bin.tar.gz | tar xf -
The Server JRE is installed in a directory called jdk-10.interim.update.patch in thecurrent directory.
4. Delete the .tar.gz file if you want to save disk space.
Chapter 4Installing Server JRE 10 on Oracle Solaris
4-2

5Installation of the JDK and JRE on LinuxPlatforms
This topic describes the installation procedures of the JDK and JRE on the Linuxplatform, along with the system requirements.
This topic includes the following sections:
• General Notes About Installing the JDK and JRE on Linux Platforms
• System Requirements for Installing JDK and JRE on Linux Platforms
• JDK and JRE Installation Instruction Notation for Linux Platforms
• Installation of the JDK on Linux from Archive Binaries and RPM Packages
• Installation of the JRE on Linux from Archive Binaries and RPM Packages
General Notes About Installing the JDK and JRE on LinuxPlatforms
This topic describes general information about installing JDK and JRE 10 on Linuxplatforms.
Root Access
Installing the JDK automatically creates a directory called jdk–10.interim.update.patch.For the JRE, the software automatically creates a directory called jre–10.interim.update.patch .
Note:
If you install Java SE Runtime Environment in a specific location suchas /usr/jdk (for JDK) or /usr/jre (for JRE), then you must log in with rootcredentials to gain the necessary permissions. If you do not have rootaccess, then either install the Java SE Runtime Environment into your homedirectory or a subdirectory for which you have write permissions.
Overwriting Files
If you install the software in a directory that contains a subdirectory named jdk–10.interim.update.patch (for JDK) or jre–10.interim.update.patch (for JRE), then thenew software overwrites files of the same name in that directory. Ensure that yourename the old directory if it contains files that you would like to keep.
5-1

System Preferences
By default, the installation script configures the system such that the backing store forsystem preferences is created inside the JDK or JRE's installation directory asapplicable. If the JDK or JRE is installed on a network-mounted drive, then the systempreferences can be exported for sharing with Java runtime environments on othermachines.
System Requirements for Installing JDK and JRE on LinuxPlatforms
See Oracle JDK Certified Systems Configurations for information about supportedplatforms, operating systems, and browsers.
To set up the Java plug-in, see Manual Installation and Registration of the Java Plug-in on Linux .
JDK and JRE Installation Instruction Notation for LinuxPlatforms
Instructions for installing either JDK or JRE contains a version notation that representsthe Feature, Interim, and Update version information.
For example, if you are installing JDK 10 Interim 0, Update 2, and Patch 1, then thefollowing string represents the name of the bundle:
jdk-10.interim.update.patch-linux-x64_bin.tar.gz
This string becomes:
jdk-10.0.2.1-linux-x64_bin.tar.gz
Installation of the JDK on Linux from Archive Binaries andRPM Packages
You can install the Java Development Kit (JDK) on a Linux platform from archivebinary files or from Red Hat Package Manager (RPM) packages.
Installation can be performed by using one of the following processes:
• From archive binaries (.tar.gz): This allows you to install a private version of theJDK for the current user into any location, without affecting other JDK installations.However, it may involve manual steps to get some of the features to work. See thefollowing table for the options available for downloading and installing the JDKfrom archive binaries.
• From RPM packages (.rpm): This allows you to perform a systemwide installationof the JDK for all users, and requires root access. RPM-based Linux platforms arebased on Red Hat and SuSE. See the following table for the options available fordownloading and installing the JDK from RPM packages.
Chapter 5System Requirements for Installing JDK and JRE on Linux Platforms
5-2

Note:
When you download and install the JDK, the associated Java RuntimeEnvironment (JRE) is also installed.
The following table lists the options and instructions for downloading and installing theJDK 10 release on a Linux platform:
Download File Instructions Architecture Who Can Install
jdk-10.interim.update.patch-linux-x64.tar.gz
Installing the 64-Bit JDK 10on Linux Platforms
64-bit Anyone
jdk-10.interim.update.patch-linux-x64.rpm
Installing the 64-Bit JDK onRPM-Based LinuxPlatforms
64-bit RPM-based Linux Root
Installing the 64-Bit JDK 10 on Linux PlatformsYou can install the JDK for 64-bit Linux, from an archive binary file (.tar.gz).
To install the 64-bit JDK on a Linux platform:
1. Download the file, jdk-10.interim.update.patch_linux-x64_bin.tar.gz.
Before you download a file, you must accept the license agreement. The archivebinary can be installed by anyone (not only by root users) in any location that youcan write to.
The .tar.gz archive file (also called a tarball) is a file that can be simultaneouslyuncompressed and extracted in one step.
2. Change the directory to the location where you want to install the JDK, then movethe .tar.gz archive binary to the current directory.
3. Unpack the tarball and install the JDK:
$ tar zxvf jdk-10.interim.update.patch_linux-x64_bin.tar.gz
The Java Development Kit files are installed in a directory calledjdk-10.interim.update.patch in the current directory.
4. Delete the .tar.gz file if you want to save disk space.
Installing the 64-Bit JDK on RPM-Based Linux PlatformsYou can install the JDK on 64-bit RPM-based Linux platforms, such as Red Hat andSuSE, by using an RPM binary file (.rpm) in the system location.
You must log in as a root user to perform this installation.
To install the 64-bit JDK on an RPM-based Linux platform:
1. Download the file, jdk-10.interim.update.patch_linux-x64_bin.rpm.
Before you download a file, you must accept the license agreement.
2. Ensure that you have root user access by running the command su and enteringthe superuser password.
Chapter 5Installation of the JDK on Linux from Archive Binaries and RPM Packages
5-3

3. Install the package using the following command:
$ rpm -ivh jdk-10.interim.update.patch_linux-x64_bin.rpm
Note:
JDK 10 can coexist with earlier versions of JDK. For each version, a newdirectory is created, the default directory being /usr/java/jdk.interim.update.patch.
Upgrade the package using the following command:
$ rpm -Uvh jdk-10.interim.update.patch_linux-x64_bin.rpm
4. Delete the .rpm file if you want to save disk space.
5. Exit the root shell.
It is not required to reboot.
The JDK installation is integrated with the alternatives framework. After installation, thealternatives framework is updated to reflect the binaries from the recently installedJDK. Java commands such as java, javac, javadoc, and javap can be called from thecommand line.
Using the java -version command, users can confirm the default (recently installed)JDK version.
In addition, users can check which specific RPM package provides the .java files:
$ rpm -q --whatprovides java
Installation of the JRE on Linux from Archive Binaries andRPM Packages
You can install the Java Runtime Environment (JRE) on a Linux platform from archivebinary files or from RPM packages.
Use one of the following processes to install JRE:
• From archive binaries (.tar.gz): This allows you to install a private version of theJRE for the current user into any location, without affecting other JRE installations.However, it may involve manual steps to get some of the features to work. See thefollowing table for the options available for downloading and installing the JREfrom archive binaries.
• From RPM packages (.tar.gz): This allows you to perform a systemwideinstallation of the JRE for all users using root access. RPM-based Linux platformsare based on Red Hat and SuSE. See the following table for the options availablefor downloading and installing the JRE from RPM packages.
Chapter 5Installation of the JRE on Linux from Archive Binaries and RPM Packages
5-4

Note:
When you download and install the Java Development Kit (JDK), theassociated JRE is also installed.
The following table lists the options and instructions for downloading and installing theJRE on a Linux platform.
Download File Instructions Architecture Who Can Install
jre-10.interim.update.patch_linux-x64_bin.tar.gz
Installing the 64-Bit JRE 10on Linux Platforms
64-bit Anyone
jre-10.interim.update.patch_linux-x64_bin.rpm
Installing the 64-Bit JRE 10on RPM-Based LinuxPlatforms
64-bit Anyone
Installing the 64-Bit JRE 10 on Linux PlatformsYou can install JRE 10 on a 64-bit Linux platform from an archive binary file (.tar.gz).
To install the 64-bit JRE 10 on a Linux Platform:
1. Download the file, jre-10.interim.update.patch_linux-x64_bin.tar.gz.
Before downloading a file, you must accept the license agreement. The archivebinary can be installed by anyone (not only root users) in any location that you canwrite to.
The .tar.gz archive file (also called a tarball) is a file that can be simultaneouslyuncompressed and extracted in one step.
2. Change the directory to the location where you want the JRE to be installed, thenmove the .tar.gz archive binary to the current directory.
3. Unpack the tarball and install the JRE using the following command:
$ tar zxvf jre-10.interim.update.patch_linux-x64_bin.tar.gz
The Java Development Kit files are installed in a directory calledjre-10.interim.update.patch.
4. Delete the .tar.gz file if you want to save disk space.
Installing the 64-Bit JRE 10 on RPM-Based Linux PlatformsYou can install JRE 10 on 64-bit RPM-based Linux platforms, such as Red Hat andSuSE, using an RPM binary file (.rpm) in the system location.
You must have root user privileges to install the JRE.
To install the 64-bit JRE on RPM-based Linux platforms:
1. Download the file, jre-10.interim.update.patch_linux-x64_bin.rpm.
Before you download a file, you must accept the license agreement.
Chapter 5Installation of the JRE on Linux from Archive Binaries and RPM Packages
5-5

2. Ensure that you have root user access by running the command su and enteringthe superuser password.
3. Uninstall all earlier installations of JRE packages using the following command:
$ rpm -e package_name
4. Install the package using the following command:
$ rpm -ivh jre-10.interim.update.patch_linux-x64_bin.rpm
Upgrade a package using the following command:
$ rpm -Uvh jre-10.interim.update.patch_linux-x64_bin.rpm
5. Delete the .rpm file if you want to save disk space.
6. Exit the root shell. Reboot is not required.
Chapter 5Installation of the JRE on Linux from Archive Binaries and RPM Packages
5-6

6Installation of Server JRE 10 on Linux
This topic provides the system requirements and instructions to install Server JRE 10on Linux.
This topic includes the following sections:
• Server JRE 10 System Requirements on Linux
• Server JRE 10 Installation Instruction Notation for Linux
• Installing Server JRE 10 on Linux Platforms
Note:
For RPM-based Linux distributions, such as Red Hat or SuSE, refer to theappropriate RPM-based installation instructions.
Server JRE 10 System Requirements on LinuxSee Oracle JDK Certified System Configurations for information about supportedplatforms, operating systems, and browsers.
Server JRE 10 Installation Instruction Notation for LinuxThe installation instructions of JRE contains the notation version, which represents theFeature, Interim, Update, and Patch version information. For example, if you areinstalling JRE 10 Interim 0, Update 2, and Patch 1, then the following string representsthe name of the bundle:
serverjre-10.interim.update.patch_linux-x64_bin.tar.gz
This string becomes:
serverjre-10.0.2.1_linux-x64_bin.tar.gz
Installing Server JRE 10 on Linux PlatformsYou can install Server JRE 10 on 64-bit Linux, from an archive binary file (.tar.gz).
To install Server JRE 10 on a Linux platform:
1. Download the file, serverjre-10.interim.update.patch_linux-x64_bin.tar.gz.
Before downloading a file, you must accept the license agreement. The archivebinary can be installed by anyone (not only root users) in any location that you canwrite to. However, user having the root access can install the Server JRE into thesystem location.
6-1

The .tar.gz archive file (also called a tarball) is a file that can be simultaneouslyuncompressed and extracted in one step.
2. Change the directory to the location where you want the Server JRE to beinstalled.
3. Move the .tar.gz archive binary to the current directory.
4. Unpack the tarball and install the Server JRE using the following command:
$ tar zxvf serverjre-10.interim.update.patch_linux-x64_bin.tar.gz
The Server JRE is installed in a directory called jdk–10.interim.update.patch.
5. Delete the .tar.gz file if you want to save disk space.
Chapter 6Installing Server JRE 10 on Linux Platforms
6-2

7Manual Installation and Registration of theJava Plug-in on Linux
You must manually install the Java plug-in to run the Java applets in a browser.
This topic includes the following sections:
• Java Plug-in Installation
• Installing the Java Plug-in on Linux
Java Plug-in InstallationWhen you install the Java platform, the Java plug-in file is included as part of thatinstallation.
To use Java within Firefox, manually create a symbolic link from the plug-in file in therelease to one of the locations that Firefox expects. To make the plug-in available to allusers, you must create the link inside of the Firefox application's directory, in the plug-ins subdirectory. Alternatively, you can create the symbolic link in your home directory,in ~/.mozilla/plug-ins. In the remainder of this document, the text, Firefox plug-ins directory implies either of these locations.
Note:
For Firefox version 21 and later, you must create the symbolic link in yourhome directory, ~/.mozilla/plugins. However, creating the symboliclink in the plug-ins subdirectory of the Firefox application's directory is notsupported in Firefox version 21 and later.
This release provides the Next-Generation Java plug-in. The plug-in file for Linux islocated at jre–10.interim.update.patch/lib/amd64/libnpjp2.so.
Note:
If you are using the classic plug-in file, which is located at ./plugin/i386/javaplugin-oji.so, then this file should no longer be used and allsymbolic links to it must be removed.
See Oracle JDK Certified Systems Configurations.
7-1

Installing the Java Plug-in on LinuxTo install the Java plug-in on Linux:
1. Exit Firefox.
2. Uninstall any previous installations of the Java plug-in.
Only one Java plug-in can be used at a time. When you want to use a differentplug-in, or version of a plug-in, remove the symbolic links to any other versionsand create a fresh symbolic link to the new one.
3. Remove the symbolic links (or move them to another directory) to javaplugin-oji.so and libnpjp2.so from the Firefox plug-ins directory.
4. Create a symbolic link to the 64-bit Java plug-in in the Firefox plug-ins directory:
$ cd Firefox/plugins
$ ln -s ./lib/amd64/libnpjp2.so .
5. Start the Firefox browser.
6. Enter about:plugins in the Location bar to confirm that the Java plug-in isloaded. Alternatively, click the Tools menu to confirm that the Java console isthere.
Chapter 7Installing the Java Plug-in on Linux
7-2

8Installation of the JDK and the JRE onmacOS
This topic includes the following sections:
• System Requirements for Installing the JDK and JRE on macOS
• Determining the JRE Version Installed on macOS
• Determining the Default JDK Version on macOS
• Installing the JDK on macOS
• Installing the JRE on macOS
• Uninstalling the JDK on macOS
• Uninstalling the JRE on macOS
• Installation FAQ on macOS Platform
• Notes for Users of macOS That Include the Apple Java 6 Plug-in
System Requirements for Installing the JDK and JRE onmacOS
The following are the system requirements for installing the JDK and the JRE onmacOS:
• Any Intel-based computer running macOS.
• Administrator privileges.
You cannot install Java for a single user. Installing the JDK and JRE on macOS isperformed on a systemwide basis for all users. Administrator privileges arerequired to install the JDK and JRE on macOS.
• When you install the JDK, it also installs the JRE. However, the system will notreplace the current JRE with a lower version.
To determine the current JRE version installed on your system, see Determiningthe JRE Version Installed on macOS. To install an earlier version of the JRE, youmust first uninstall the current version. See Uninstalling the JRE on macOS.
• When you install the JRE, you can install only one JRE on your system at a time.The system will not install a JRE that has an earlier version than the currentversion.
To determine the current JRE version installed on your system, see Determiningthe JRE Version Installed on macOS. To install an earlier version of the JRE, youmust first uninstall the current version. See Uninstalling the JRE on macOS.
8-1

Note:
Installing a JRE from Oracle will not update java -version symlinks oradd java to your path. To do this, you must install the JDK.
Determining the JRE Version Installed on macOSOnly one JRE can be installed on the system at any time. Installing a JRE removes thepreviously installed JRE.
The JRE version installed on the system can be determined in one of two ways:
• From System Preferences, and then the Other section, click the Java icon. Thisstarts the Java Control Panel. You then click About to display the versioninformation.
• Enter the following in a Terminal window (note the escaped space character,ignore line break):
% /Library/Internet\ Plug-Ins/JavaAppletPlugin.plugin/Contents/Home/bin/java -
version
Note:
If you have not yet installed Apple's Java OS X 2012-006 update, then youare still using a version of Apple Java 6 that includes the plug-in and theJava Preferences application. See Notes for Users of macOS That Includethe Apple Java 6 Plug-in.
The system will not install a JRE that has an earlier version than the current version. Ifyou want to install an earlier version, then you must first uninstall the existing version.
Determining the Default JDK Version on macOSWhen starting a Java application through the command line, the system uses thedefault JDK. It is possible for the version of the JRE to be different from the defaultversion of the JDK.
There can be multiple JDKs installed on the macOS system.
You can determine which version of the JDK is the default by entering java -version ina Terminal window. If the installed version is 10 Interim 0, Update 2, and Patch 1, thenyou see a string that includes the text 10.0.2.1. For example:
$ java -versionjava version "10.0.2.1-ea"Java(TM) SE Runtime Environment (build 10.0.2.1-ea+13)Java HotSpot(TM) 64-Bit Server VM (build 23.2-b04, mixed mode)
Chapter 8Determining the JRE Version Installed on macOS
8-2

Note:
If you have not yet installed Apple's Java OS X 2012-006 update, then youare still using a version of Apple Java 6 that includes the plug-in and theJava Preferences application. See Notes for Users of macOS That Includethe Apple Java 6 Plug-in.
To run a different version of Java, either specify the full path, or use the java_home tool:For example:
$ /usr/libexec/java_home -v 10.0.2.1 --exec javac -version
Installing the JDK on macOSWhen you install the JDK, the associated JRE is installed at the same time. TheJavaFX SDK and Runtime are also installed and integrated into the standard JDKdirectory structure.
To install the JDK on macOS:
1. Download the JDK .dmg file, jdk-10.interim.update.patch-macosx-x64.dmg.
Before the file can be downloaded, you must accept the license agreement.
2. From either the browser Downloads window or from the file browser, double-clickthe .dmg file to start it.
A Finder window appears that contains an icon of an open box and the name ofthe .pkg file.
3. Double-click the JDK 10.pkg icon to start the installation application.
The installation application displays the Introduction window.
4. Click Continue.
The Installation Type window appears.
5. Click Install.
A window appears that displays the message: Installer is trying toinstall new software. Enter your password to allow this.
6. Enter the Administrator user name and password and click Install Software.
The software is installed and a confirmation window is displayed.
After the software is installed, you can delete the .dmg file if you want to save diskspace.
Installing the JRE on macOSTo install the JRE on an macOS platform:
1. Download the JRE .dmg file, jre-10.interim.update.patch_osx-x64_bin.dmg.
Before the file can be downloaded, you must accept the license agreement.
Chapter 8Installing the JDK on macOS
8-3

2. From either the browser Downloads window or from the file browser, double-clickthe .dmg file to launch it.
A Finder window appears that contains an icon of an open box and the name ofthe .app file.
3. Double-click the Java 10.app icon to start the installation application.
The installation application displays the Welcome window.
4. Click Next.
The software is installed and a confirmation window is displayed.
5. Click Close.
Uninstalling the JDK on macOSTo uninstall the JDK on macOS:
You must have Administrator privileges.
Note:
Do not attempt to uninstall Java by removing the Java tools from /usr/bin.This directory is part of the system software and any changes will be reset byApple the next time that you perform an update of the OS.
1. Go to /Library/Java/JavaVirtualMachines.
2. Remove the directory whose name matches the following format by executing therm command as a root user or by using the sudo tool:
/Library/Java/JavaVirtualMachines/jdk-interim.update.patch.jdk
For example, to uninstall 10 Interim 0 Update 2 Patch 1:
$ rm -rf jdk-10.0.2.1.jdk
Uninstalling the JRE on macOSTo uninstall the JRE on macOS:
You must have Administrator privileges to remove one directory and one file (asymlink).
Note:
Do not uninstall Java by removing the Java tools from /usr/bin. Thisdirectory is part of the system software and any changes will be reset byApple the next time that you perform an update of the OS.
1. Go to /Library/Internet Plug-Ins.
Chapter 8Uninstalling the JDK on macOS
8-4

2. Remove the JavaAppletPlugin.plugin directory by executing the rm command as aroot user or by using the sudo tool.
3. Go to /Library/PreferencePanes.
4. Remove JavaControlPanel.prefpane by executing the rm command as a root useror by using the sudo tool.
Installation FAQ on macOS PlatformThis topic provides answers for the following frequently asked questions aboutinstalling JDK and JRE on macOS computers.
1. Should I install the JRE or the JDK?
If you only plan to run Java applications, then install the Java Runtime Environment(JRE). The JRE is also referred to as Oracle Java. After you have installed the JRE,you can start Java applets and applications by double-clicking JAR files, JNLP files,and by using the browser. Note that 32-bit browsers, such as Firefox in 32-bit mode,and Chrome, are not supported by the JRE.
If you also plan to create Java applications, then install the Java Development Kit(JDK).
2. How do I find out which version of Java is the system default?
When you start a Java application by clicking a JNLP file, or through the browser, ituses the installed JRE. Only one JRE can be installed. See Determining the JREVersion Installed on macOS.
When you run a Java application from the command line, it uses the default JDK. Ifyou do not develop Java applications, then you do not need to worry about this. See Determining the Default JDK Version on macOS.
Note:
If you have not yet installed Apple's Java macOS 2012-006 update, then youare still using a version of Apple Java 6 that includes the plug-in and theJava Preferences application. See Notes for Users of macOS That Includethe Apple Java 6 Plug-in.
3. How do I clear the Java cache?
Follow these steps:
1. From System Preferences, start the Java Control Panel from Other section byclicking the Java icon.
2. From the Java Control Panel, on the General tab, go to Temporary InternetFiles section and click Settings .
3. In the Temporary Files Settings window, click Delete File.
4. From the Delete Files and Applications dialog box, select Cached Applicationsand Applets and click OK to clear those files from the cache.
Chapter 8Installation FAQ on macOS Platform
8-5

To clear the applet and Web Start cache from a window, use the following command(note escaped space character):
$ rm -rf ~/Library/Application\ Support/Oracle/Java/Deployment/cache
4. How are Java updates managed on macOS?
Every time you start a Java applet or a Java Web Start (JWS) application, the systemstarts your program and determines in the background (so that performance of yourJava application is not affected) if it has checked for a Java update in the last 7 days.
If an update is available, then the Software Update window appears.
Select Next, and enter your user Name and Password.
The latest update gets downloaded and installed. Restart the browser and otherapplications to work on the new Java update.
5. How do I uninstall Java?
Depending on your installation, see the related link:
• Uninstalling the JDK on macOS
• Uninstalling the JRE on macOS
6. I have installed Java for macOS 2012-006 and Apple Java 6 can no longer beused for applets or Web Start. How do I get it back?
The Java for macOS 2012-006 update from Apple uninstalls the Apple-provided Javaapplet plug-in from all web browsers. You can download the latest version of Javafrom Java SE Downloads, which has improved security, reliability, and compatibility.
If you prefer to continue using Apple's Java 6 plug-in, follow the steps provided in the Java for OS X 2014-001 topic at the Apple Developer site.
7. After installing Java for macOS 2012-006, can I continue to use Apple's Java 6alongside the macOS JDK or JRE for Java 10?
If you want to continue to develop with Java 6 using command-line, then you canmodify the startup script for your favorite command environment. For bash, use this:
$ export JAVA_HOME=`/usr/libexec/java_home -v 1.6`
Some applications use /usr/bin/java to call Java. After installing Java for macOS2012-006, /usr/bin/java will find the newest JDK installed, and will use that for all ofthe Java-related command-line tools in /usr/bin. You may need to modify thoseapplications to find Java 6, or contact the developer for a newer version of theapplication.
8. Can I restore Apple Java after uninstalling Oracle Java?
Go back to Apple Java using the following instructions:
1. Uninstall Oracle Java by deleting the plug-in file. From a command-line, enter:
% sudo rm -rf “/Library/Internet Plug-Ins/JavaAppletPlugin.plugin”
2. Create a symlink using the following command, entered on a single line:
% sudo ln -s /System/Library/Java/Support/CoreDeploy.bundle/Contents/
JavaAppletPlugin.plugin ”/Library/Internet Plug-Ins/JavaAppletPlugin.plugin”
Chapter 8Installation FAQ on macOS Platform
8-6

9. I am running Mountain Lion (macOS 10.8) or later and Gatekeeper is blockingan app from launching. What is going on?
Gatekeeper, introduced in Mountain Lion (macOS 10.8), is designed to preventpotentially malicious application packages (apps) from starting. When you attempt tostart an app that does not meet certain criteria, Gatekeeper will block it. To overridethis, you can modify the Gatekeeper's default settings to App Store and identifieddevelopers from Settings, General, and Allow apps downloads from section.
To create a Java application that will start without interruption under the defaultGatekeeper settings, the app must be bundled with a JRE, use Oracle's launcher stub,and be signed with an Apple Developer ID. For details on creating an app that satisfiesthese requirements, see Self-Contained Application Packaging for OS X in the JavaPlatform, Standard Edition Deployment Guide.
10. What happened to the Java Preferences app in Application Utilities?
The Java Preferences app was part of the Apple Java installation and is not used byOracle Java. Therefore, macOS releases from Apple that do not include Apple Javawill not include Java Preferences.
One of the functions of Java Preferences was to set the current version of the JRE.Under Oracle Java, only a single version of the JRE can be installed at a time. See Installing the JRE on macOS.
To access the Java Control Panel, in the System Preferences panel, click the Javaicon. If you don’t see the Java icon in the System Preferences, in the Other section,then you do not have an Oracle JRE installed.
11. I have Oracle's version of the JRE installed, but it is not listed in JavaPreferences.
This is correct. The JRE will not show up in the Java Preferences list unless you installthe full JDK.
12. I have Oracle's version of the JRE installed, but when I try to run the javacommand from the command line, it does not work.
Installing a JRE from Oracle does not update java -version symlinks or add the javacommand to your path. For this functionality, you must install the full JDK.
Notes for Users of macOS That Include the Apple Java 6Plug-in
If you have not yet installed Apple's Java macOS 2012-006 update, then you are stillusing a version of Apple Java 6 that includes the plug-in and the Java Preferencesapplication.
There is an important difference about the installation of Oracle Java (both JRE andJDK) that you should be aware of. The Java Preferences application, started byselecting Applications and then Utilities, is part of Apple's implementation of Java.After Apple no longer distributes Java as part of their release, the Java Preferencesapplication is retired.
Chapter 8Notes for Users of macOS That Include the Apple Java 6 Plug-in
8-7

Under Apple's implementation of Java, it was possible to have multiple JREs installed.The Java Preferences application was used to determine the first compatible versionthat would be used. You can change the default JRE by starting Java Preferences andthen dragging Java SE 10 to the top of the list.
Note:
• The Java Preferences window contains a list of installed JREs. Javaapplications and command-line tools use the listed order to determinethe first compatible version to use. The Vendor column indicates whetherthe Java release is supplied by Apple or Oracle. The Version columnspecifies the version of Java that is installed.
• Reordering the list, by dragging Java SE 10 to the top, makes it thedefault version of Java.
• If you install only Oracle Java JRE 10, then it will not appear in this list.You must install the full JDK for JRE 10 to be listed.
Chapter 8Notes for Users of macOS That Include the Apple Java 6 Plug-in
8-8

9Installation of the JDK and the JRE onMicrosoft Windows Platforms
This topic includes the following sections:
• System Requirements for Installing the JDK and the JRE on 64-Bit WindowsPlatform
• JDK and JRE Installation Instruction Notation for Windows
• JDK Installation Instructions for Windows
• JRE Installation Instructions for Windows
• Windows Registry Settings
• Beginning to Use the JDK
• Uninstalling the JDK on Windows
• Uninstalling the JRE on Windows
• JDK Installation Troubleshooting
• Windows Online Installation and Java Update FAQ
System Requirements for Installing the JDK and the JRE on64-Bit Windows Platform
The JDK and the JRE have minimum processor, disk space, and memoryrequirements for 64-bit Windows platform.
Before installing the JDK or the JRE on your 64-bit Windows platform, you must verifythat it meets the following minimum processor, disk space, and memory requirements.
Processor Requirements
Both the JDK and JRE require at minimum a Pentium 2 266 MHz processor.
Disk Space Requirements
For JDK 10, you are given the option of installing the following features:
• Development Tools
• Source Code
• Public Java Runtime Environment
When you install 64-bit JDK, then 64-bit public JRE also gets installed. The followingtable provides the disk requirements for the installed features:
9-1

JDK Installed Image
Development Tools: 64-bit platform 500 MB
Source Code 54.2 MB
JRE Installed Image
Public Java Runtime Environment 200 MB
Java Update 2 MB
Memory Requirements
On Windows 64-bit operating systems, the Java runtime requires a minimum of 128MB of memory.
Note:
The minimum physical RAM is required to run graphically based applications.More RAM is recommended for applets running within a browser using theJava Plug-in. Running with less memory may cause disk swapping, whichhas a severe effect on performance. Very large programs may require moreRAM for adequate performance.
Note:
For supported processors and browsers, see Oracle JDK Certified SystemsConfigurations.
JDK and JRE Installation Instruction Notation for WindowsFor any text in this document that contains the following notation, you must substitutethe appropriate update version number:
interim.update.patch
For example:
• If you are downloading the JDK installer for 64-bit systems for update 10 Interim 0,Update 2, and Patch 1, then the file name jdk-10.interim.update.patch_windows-x64_bin.exe becomes jdk-10.0.2.1_windows-x64_bin.exe.
• If you are downloading the JRE installer for 64-bit systems for update 10 Interim 0,Update 2, and Patch 1, then the file name jre-10.interim.update.patch_windows-x64_bin.exe becomes jre-10.0.2.1_windows-x64_bin.exe.
Chapter 9JDK and JRE Installation Instruction Notation for Windows
9-2

JDK Installation Instructions for WindowsYou run a self-installing executable file to unpack and install the JDK on Windowscomputers.
Install JDK on Windows computers by performing the actions described in thefollowing topics:
• Downloading the JDK Installer
• Running the JDK Installer
• Installing the JDK Silently
• Setting the PATH Environment Variable
Downloading the JDK Installer
In a browser, go to the Java SE Development Kit 10 Downloads page and clickAccept License Agreement. Under the Download menu, click the Download linkthat corresponds to the .exe for your version of Windows.
Download the file jdk-10.interim.update.patch_windows-x64_bin.exe.
Note:
Verify the successful completion of file download by comparing the file sizeon the download page and your local drive.
Running the JDK Installer
You must have administrator privilage to install the JDK on Microsoft Windows.
To run the JDK installer:
1. Start the JDK 10 installer by double-clicking the installer's icon or file name in thedownload location.
2. Follow the instructions provided by the Installation wizard.
The JDK includes the JavaFX SDK, a private JRE, and the Java Mission Controltools suite. The installer integrates the JavaFX SDK into the JDK installationdirectory.
3. After the installation is complete, delete the downloaded file to recover the diskspace.
Chapter 9JDK Installation Instructions for Windows
9-3

Installing the JDK SilentlyInstead of double-clicking or opening the JDK installer, you can perform a silent,noninteractive, JDK installation by using command-line arguments.
The following table lists example installation scenarios and the commands required toperform them. The notation jdk stands for the downloaded installer file base name,such as jdk-10_windows-x64_bin.exe.
Installation Scenario Command
Install JDK and public JREin silent mode.
jdk.exe /s
Install development toolsand source code in silentmode but not the publicJRE.
jdk.exe /s ADDLOCAL="ToolsFeature,SourceFeature"
Install development tools,source code, and thepublic JRE in silent mode.
jdk.exe /s ADDLOCAL="ToolsFeature,SourceFeature,PublicjreFeature"
Install the public JRE in thespecified directory C:\testin silent mode.
jdk.exe /s /INSTALLDIRPUBJRE=C:\test
Setting the PATH Environment VariableIt is useful to set the PATH variable permanently for JDK 10 so that it is persistent afterrebooting.
Note:
The PATH variable is set automatically for the JRE. This topic only applies tothe JDK.
If you do not set the PATH variable, then you must specify the full path to the executablefile every time that you run it. For example:
C:\> "C:\Program Files\Java\jdk-10\bin\javac" MyClass.java
To set the PATH variable permanently, add the full path of the jdk-10\bin directory tothe PATH variable. Typically, the full path is:
C:\Program Files\Java\jdk-10\bin
To set the PATH variable on Microsoft Windows:
1. Select Control Panel and then System.
2. Click Advanced and then Environment Variables.
3. Add the location of the bin folder of the JDK installation to the PATH variable inSystem Variables.
Chapter 9JDK Installation Instructions for Windows
9-4

Note:
The PATH environment variable is a series of directories separated bysemicolons (;) and is not case-sensitive. Microsoft Windows looks forprograms in the PATH directories in order, from left to right.
You should only have one bin directory for a JDK in the path at a time.Those following the first instance are ignored.
If you are not sure where to add the JDK path, append it.
The new path takes effect in each new command window that you openafter setting the PATH variable.
The following is a typical value for the PATH variable:
C:\WINDOWS\system32;C:\WINDOWS;"C:\Program Files\Java\jdk-10\bin"
JRE Installation Instructions for WindowsWhen installing JRE on Windows computers, you must select the JRE installer that isappropriate for your Windows system.
The 64-bit Windows operating systems come with a 64-bit Internet Explorer (IE)browser as the standard (default) for viewing web pages.
Install JRE on Windows computers by performing the actions described in thefollowing topics:
• JRE Proxy Settings and Authentication
• Downloading the JRE Installer
• Running the JRE Installer
JRE Proxy Settings and AuthenticationTo use the Windows Online Installer, you must be connected to the internet.
If you are running behind a proxy server, then you must have your proxy settingscorrectly configured. If they are not configured, or are incorrectly configured, then theinstaller will terminate with the following message:
The installer cannot proceed with the current Internet Connection settings.
Please visit the following website for more information.
https://www.java.com/en/download/help/
If you see this message, check your proxy settings:
In the Control Panel , double-click Internet Options, select the Connections tab,and click the LAN Settings.
If you do not know what the correct settings should be, check with your internetprovider or system administrator.
Chapter 9JRE Installation Instructions for Windows
9-5

Downloading the JRE InstallerThe JRE Installer is located on the Java SE Runtime Environment 10 Downloadspage.
1. In a browser, go to the Java SE Runtime Environment 10 Downloads page.
The following JRE installers are available for you to download:
• Windows Offline: jre-10.interim.update.patch_windows-x64_bin.exe
• Windows Tar: jre-10.interim.update.patch_windows-x64_bin.tar.gz
2. Download the JRE installer according to your requirement.
Note:
The Windows Offline installer and Windows installer contains everythingthat is required to install the JRE.
The Microsoft Windows Installer (MSI) Enterprise JRE Installer is alsoavailable, which enables you to install the JRE across your enterprise. Itrequires a commercial license for use in production.
3. Click Accept License Agreement, and then, under the Download menu, click thelink that corresponds to the installer for your version of Windows.
4. Note the file size specified on the download page and, after the download hascompleted, verify that you have downloaded the complete file.
Running the JRE Installer
You must have Administrative privileges in order to install the JRE on MicrosoftWindows.
To run the JRE installer:
1. Start the JRE 10 Installer by double-clicking the installer's icon or file name in thedownload location.
2. Follow the instructions provided by the Installation wizard.
The installer notifies you if Java content is disabled in web browsers and providesinstructions for enabling it. If you previously chose to hide some of the securityprompts for applets and Java Web Start applications, then the installer provides anoption for restoring the prompts.
3. After the installation is complete, delete the downloaded file to recover disk space.
Chapter 9JRE Installation Instructions for Windows
9-6

Note:
The private JRE installed with the JDK is not registered. To register theJRE, you must set the PATH environment variable to point to JAVA_HOME\bin, where JAVA_HOME is the location where you installed the privateJRE . See Setting the PATH Environment Variable.
By default, the Java Access Bridge is disabled. To enable it, see Enabling and Testing Java Access Bridge in the Java Platform, StandardEdition Java Accessibility Guide.
To access essential Java information and functions in MicrosoftWindows 7 and Windows 10 machines, after installation, click the Startmenu and then select Java. The Java directory provides access to Help,Check for Updates, and Configure Java.
The Microsoft Windows 8 and Windows 8.1 do not have a Start menu.However, the Java information is available in the following Startdirectory: %ALLUSERSPROFILE%\Microsoft\Windows\Start Menu\Programs.
Windows Registry SettingsThe installation program for the Microsoft Windows version of the Java SE RuntimeEnvironment uses the registry to store path and version information.
It creates the following registry keys:
• HKEY_LOCAL_MACHINE\Software\JavaSoft\JRE
This key contains the string CurrentVersion, with a value that is the highestinstalled version on the system.
• HKEY_LOCAL_MACHINE\Software\JavaSoft\JRE\<version>
This key contains the following string values:
– JavaHome: the full path name of the directory in which the JRE is installed
– RuntimeLib: the full path name of the Java runtime DLL
• HKEY_LOCAL_MACHINE\Software\JavaSoft\Java Web Start\
This key is created for Java Web Start.
If there are two versions of JDK or JRE installed on a system, one with the newversion-string format introduced in JDK 10, and the other with the older version format,then there will be two different CurrentVersion registry key values. For example, if JDK1.8.0 and JDK 10 are installed, then the following registry keys are created:
"HKEY_LOCAL_MACHINE\SOFTWARE\JavaSoft\Java Development Kit" for JDK 1.8.0 and"HKEY_LOCAL_MACHINE\SOFTWARE\JavaSoft\JDK" for JDK 10.
The registry layout for this example is:
"HKEY_LOCAL_MACHINE\SOFTWARE\JavaSoft\JDK\10""HKEY_LOCAL_MACHINE\SOFTWARE\JavaSoft\JDK" "@CurrentVersion" = 10"HKEY_LOCAL_MACHINE\SOFTWARE\JavaSoft\Java Development Kit\1.8""HKEY_LOCAL_MACHINE\SOFTWARE\JavaSoft\Java Development Kit\1.8.0"
Chapter 9Windows Registry Settings
9-7

"HKEY_LOCAL_MACHINE\SOFTWARE\JavaSoft\Java Development Kit" "@CurrentVersion" = 1.8
The @CurrentVersion is a registry string in the "JDK" or "Java Development Kit" key.
For the same example, if the JRE is installed, then the registry layout is:
"HKEY_LOCAL_MACHINE\SOFTWARE\JavaSoft\JRE\10""HKEY_LOCAL_MACHINE\SOFTWARE\JavaSoft\JRE" "@CurrentVersion" = 10"HKEY_LOCAL_MACHINE\SOFTWARE\JavaSoft\Java Runtime Environment\1.8""HKEY_LOCAL_MACHINE\SOFTWARE\JavaSoft\Java Runtime Environment\1.8.0""HKEY_LOCAL_MACHINE\SOFTWARE\JavaSoft\Java Runtime Environment" "@CurrentVersion" = 1.8
The @CurrentVersion is a registry string in the "JRE" or "Java Runtime Environment"key.
Beginning to Use the JDKUse the Java item in the Windows Start menu to access essential Java informationand functions, including Help, API documentation, the Java Control Panel, checkingfor updates, and Java Mission Control.
Java Start Menu Installed by JDK
During JDK install, Java menu items are added to the Windows Start menu to provideeasy access to Java resources and a Java Development Kit folder is created in theWindows Start menu, which contains the following items:
• Reference Documentation: Opens the Online API documentation web page.
• Java Mission Control: Opens the Java Mission Control profiling and diagnosticstools suite.
Note:
Java Mission Control is a commercial feature available to users with a JavaSE Advanced license.
During JDK installation and uninstallation processes, the appropriate start menu itemsare updated so that they are associated with the latest JDK version on the system
Note:
The Windows 7 and Windows 10 have a Start menu; however, the menu isnot available in Windows 8 and Windows 8.1. The JDK and Java informationin Windows 8 and Windows 8.1 is available in the following Start directory:%ALLUSERSPROFILE%\Microsoft\Windows\Start Menu\Programs.
Chapter 9Beginning to Use the JDK
9-8

Java Start Menu Installed by JRE
During JRE installation, Java menu items are added to the Windows Start menu toprovide easy access to Java resources and a Java folder is created in the WindowsStart menu, which contains the following items:
• About Java: Opens the Java Control Panel with focus on the General tab. Thetab displays the latest JRE version installed on the system.
• Check for Updates: Opens the Java Control Panel with focus on the Update tab
• Configure Java: Opens the Java Control Panel with focus on the General tab
• Get Help: Opens the Java Help Center
• Visit Java.com: Opens the Java Download page
During JRE installation and uninstallation processes, the appropriate start menu itemsare updated so that they are associated with the latest JRE version on the system.
Note:
The Windows 7 and Windows 10 have Start menu, however the menu is notavailable in Windows 8 and Windows 8.1. The JRE and Java information inWindows 8 and Windows 8.1 is available in the following Start directory:%ALLUSERSPROFILE%\Microsoft\Windows\Start Menu\Programs.
Java Web StartJava Web Start is an application-deployment technology that gives you the power torun full-featured applications with a single click from your web browser.
With Java Web Start, you can download and run applications, such as a completespreadsheet program or an internet chat client, without going through complicatedinstallation procedures. With Java Web Start, you run applications simply by clicking aweb page link. If the application is not present on your computer, Java Web Startautomatically downloads all necessary files. It then caches the files on your computerso that the application is always ready to be run anytime that you want - either from anicon on your desktop or from the browser link. No matter which method you use to runthe application, the most current, available version of the application is alwayspresented to you.
Upgrading from Previous Versions
If you have a previous version of Java Web Start, do not uninstall it. Uninstalling it willcause the download cache to be cleared, and all previously installed Java Web Startapplication data will have to be downloaded again. The new version will write overprevious installations and automatically update browsers to use the new version. Theconfiguration files and the program files folder used by Java Web Start have changed,but all your settings will remain intact after the upgrade because Java Web Start willtranslate your settings to the new form.
Chapter 9Beginning to Use the JDK
9-9

Uninstallation
The only way to uninstall Java Web Start is to uninstall the JDK or JRE. Uninstallingthe JDK or JRE will not, however, remove the cache for previous versions of JavaWeb Start. Previous releases have separate uninstallation instructions for Java WebStart.
You may see a misleading message if you do the following:
• Download and cache a Java Web Start application with the JDK or JRE.
• Remove the JDK or JRE using Add or Remove Programs from the WindowsControl Panel.
• Remove the Java Web Start application using Add or Remove Programs.
When you remove the application, you see an Uninstaller Error dialog box saying:
An error occurred while trying to remove Java-Application:nameApp. It mayhave already been uninstalled. Would you like to remove Java-Application: nameApp from the Add or Remove program list?
If you say Yes to this, then you will see another Uninstaller Error dialog box saying:
You do not have sufficient access to remove Java-Application:nameApp fromthe Add or Remove Program list. Please contact your system administrator.
The message is displayed when you have removed the Java Web Start applicationwhile uninstallating the JDK or JRE, but this is not reflected in the Add or RemovePrograms. Refresh the Add or Remove Programs by pressing F5 or reopen the panel.
To avoid seeing the misleading message, either press F5 or reopen the dialog box.Any Java Web Start application that was downloaded and cached with the JDK or JREwill no longer appear in the list of currently installed programs.
Java Plug-inJava Plug-in technology, included as part of the JRE, establishes a connectionbetween popular browsers and the Java platform. This connection enables applets onwebsites to be run within a browser on the desktop.
The Java Plug-in is automatically enabled for supported web browsers duringinstallation of the JRE. No user intervention is necessary.
Note:
In Java SE 10, the version of the Java Plug-in that is available in versions ofthe JRE prior to Java SE 6 Update 10 has been deprecated. However, thisearlier version of the Java Plug-in is still shipped with Java SE 10 forcompatibility purposes but is no longer fully supported. It will be removed in afuture release.
Chapter 9Beginning to Use the JDK
9-10

Option to Disable the JRE Out-of-Date WarningWhen the installed JRE falls below the security baseline or passes its built-inexpiration date, an additional warning is shown to users to update their installed JREto the latest version. For businesses that manage the update process centrally, usersattempting to update their JRE individually, may cause problems.
A deployment property, deployment.expiration.check.enabled is available that can beused to disable the JRE out of date warning. To suppress this specific warningmessage, add the following entry in the deployment properties file:
deployment.expiration.check.enabled=false
To disable automatic updates, on the Update tab of the Java Control Panel, deselectthe Check for Updates Automatically check box.
Uninstalling the JDK on WindowsTo uninstall JDK 10, use the Add/Remove Programs utility in the Microsoft WindowsControl Panel.
Uninstalling the JRE on WindowsUse either of the following ways to uninstall JRE:
• Go to Add/Remove Programs utility in the Microsoft Windows Control Panel anduninstall the older versions of JRE.
• Remove JRE using the online Java Uninstall Tool.
The Java Removal Tool is integrated with the JRE installer. After JRE 10 is installed,the Java Removal Tool provides the list of outdated Java versions in the system andhelps you to remove them.
Note:
The Java Uninstall tool will not run if your system administrator specified adeployment rule set in your organization.
A deployment rule set enables enterprises to manage their Java desktopenvironment directly and continue using legacy business applications in anenvironment of ever-tightening Java applet and Java Web Start applicationsecurity policies. A deployment rule set enables administrators to specifyrules for applets and Java Web Start applications; these rules may specifythat a specific JRE version must be used. Consequently, the Java Uninstalltool will not run if it detects a deployment rule set to ensure that no requiredJREs are uninstalled.
See Deployment Rule Set in the Java Platform, Standard EditionDeployment Guide.
Chapter 9Uninstalling the JDK on Windows
9-11

JDK Installation TroubleshootingThe following sections provide tips for working around problems that are sometimesseen during or while following installation instructions.
System Error During Decompression
If you see the error message system error during decompression, then you might nothave enough space on the disk that contains your TEMP directory.
Program Cannot Be Run in DOS Mode
If you see the error message This program cannot be run in DOS mode, then do thefollowing:
1. Open the MS-DOS shell or command prompt window.
2. Right-click the title bar.
3. Select Properties.
4. Select the Program tab.
5. Click Advanced.
6. Ensure that the item Prevent MS-DOS-based programs from detectingWindows is not selected.
7. Select OK.
8. Select OK again.
9. Exit the MS-DOS shell.
10. Restart your computer.
Source Files in Notepad
In Microsoft Windows, when you create a new file in Microsoft Notepad and then saveit for the first time, Notepad usually adds the .txt extension to the file name.Therefore, a file that you name Test.java is actually saved as Test.java.txt. Note thatyou cannot see the .txt extension unless you turn on the viewing of file extensions (inMicrosoft Windows Explorer, deselect Hide file extensions for known file typesunder Folder Options). To prevent the .txt extension, enclose the file name inquotation marks, such as "Test.java" when entering information in the Save As dialogbox.
Characters That Are Not Part of the System Code Page
It is possible to name directories using characters that are not part of the systemlocale's code page. If such a directory is part of the installation path, then generic error1722 occurs, and installation is not completed. Error 1722 is a Windows installer errorcode. It indicates that the installation process has failed. The exact reason for thiserror is not known at this time.
To prevent this problem, ensure that the user and system locales are identical, andthat the installation path contains only characters that are part of the system locale'scode page. User and system locales can be set in the Regional Options or RegionalSettings control panel.
Chapter 9JDK Installation Troubleshooting
9-12

The associated bug number is 4895647.
Windows Online Installation and Java Update FAQThese are frequently asked questions about JDK 10 and JRE 10 online installationand Java updates on Windows computers.
1. I downloaded the installer and it is less than 1 megabyte. Why is it so small?
The Windows Online Installer for the JRE will download more installer files. Using thisinstaller helps users to avoid downloading unnecessary files.
2. I had the Java Control Panel open for Java Update and the About tab showedthe version of the JRE installed in my computer. Then I ran Java Update, and theversion of the JRE that the Java Control Panel is showing has not changed. Whyis this?
You need to close and restart the Java Control Panel to get the updated ControlPanel.
3. Netscape/Mozilla is not working correctly with Java Plug-in. Why?
First, close all the browsers sessions. If this does not work, reboot the system and tryagain.
4. I try to install on the D:\ drive and Java Update is still installing files onto theC:\ drive. Why?
Regardless of whether an alternate target directory was selected, Java Update needsto install some files on the Windows system drive.
5. How can I uninstall the Java Update version that I just installed?
If you want to uninstall the JRE, then use the Add/Remove Programs utility in theMicrosoft Windows . Select the Control Panel and then Add/Remove Programs.
6. After the JRE bootstrap installer is downloaded and executed, why does themessage "This installer cannot proceed with the current Internet Connectionsettings of your system. In your Windows Control Panel, please check InternetOptions -> Connections to make sure the settings and proxy information arecorrect." appear?
The JRE bootstrap installer uses the system Internet Connection settings to connect tothe web for downloading extra files. If you are behind a firewall and require proxysettings, then ensure that the proxy settings in Internet Options/Internet Properties areset up properly (select Start, then Control Panel, then Internet Options/InternetProperties, then Connections, and then LAN Settings). If you can browse theexternal web (for example, outside the firewall) with Internet Explorer, then your proxysettings are properly set up. The installer does not understand the proxy settingsspecified in Netscape/Mozilla.
7. I found the jusched.exe process running in the background of my system afterinstalling JRE. Is there a way to shut it down?
The jusched.exe is the scheduler process of Java Update. This process runsautomatically. To shut in the Java Control Panel on the Update tab, deselect theCheck for Updates Automatically check box.
Chapter 9Windows Online Installation and Java Update FAQ
9-13

8. When I click the Update Now button from the Java Control Panel, it complainsabout the system being "offline." What does that mean?
Java Update can be run only if the system is connected to the network. A system thatis not connected to the network is referred to as being offline. When the Update Nowis clicked, it will check the online/offline status of your system. If your computer doesnot have internet access, then the error message is displayed. Check that your systemis currently connected to the internet and try again.
9. I followed the instructions to install a specific version of the JRE. After theinstallation, a message is displayed from system tray saying an update isavailable for download. What should I do?
The message is part of the Java Auto Update mechanism, which detects at user logintime if a newer version of the JRE is available for download. In the system tray, clickthe Java Update icon to download and install the update.
10. I encountered the error "This installation package could not be opened.Contact the application vendor to verify that this is a valid Windows Installerpackage." when running the Java SE installer.
There are several possible reasons for this error to be displayed; a few are listed:
• Network connection fails.
• Download manager software interrupts the download process.
• Another application, such as an antivirus application, may interrupt the installationprocess.
To address these problems, ensure that the third-party downloader applications areturned off and the network connection is configured properly. Also, if a proxy is in use,then ensure that the proxy authentication is turned off.
11. I encountered the error "Error 1722. There is a problem with this Windowsinstaller package. A program run as part of the setup did not finish as expected.Contact your support personnel or package vendor."
See Error 1722: Problem with Windows Installer Package. If you encounter any othererrors or issues, then you can access Java Help Center, which contains solutions forissues that you might encounter when downloading and installing Java on yoursystem. In particular, you can search for solutions by error number. Searching for"Error 1722" returns a solution to this issue.
Chapter 9Windows Online Installation and Java Update FAQ
9-14

10Installed Directory Structure of JDK andJRE
When you install JDK 10, the public JRE (Release 10) also gets installedautomatically.
This section details the files and folders of the installed directory.
Development Files and DirectoriesThe modular runtime image of JDK 10 contains the following folders:
Note:
In macOS, the JDK installation path is/Library/Java/JavaVirtualMachines/jdk-10.jdk/Contents/Home.
/jdk-10The root directory of the JDK software installation. This directory also containscopyright, README, and src.zip files, which is the source code archive file of theJava platform.
/jdk-10.jdk/Contents/Home/The root directory of the JDK software installation on macOS.
/jdk-10/binThe executable and command-line launchers that are defined by the modules linkedto the image.
/jdk-10/confThe .properties, .policy, and other configuration files intended to be edited bydevelopers, deployers, and end users.
/jdk-10/libThe private implementation details of the runtime system. These files are not intendedfor external use and must not be modified.The lib directory on macOS or the lib/$ARCH directory on Linux and Solaris containsthe runtime system's dynamically linked native libraries.
/jdk-10/jmodsThe compiled module definitions.
/jdk-10/legalThe copyright and license files for each module.
10-1

/jdk-10/src.zipThe archive that contains the source code for the Java platform.
/jdk-10/includeThe C-language header files that support native-code programming with the JavaNative Interface and the Java Virtual Machine (JVM) Debugger Interface.
The runtime image of JRE 10 contains the following folders:
Note:
In macOS, the JRE installation path is/Library/Internet Plug-Ins/JavaAppletPlugin.plugin/Contents/Home/.
/jre-10The root directory of the JRE software installation. This directory contains README,and other JRE folders.
/JavaAppletPlugin.plugin/Contents/Home/The root directory of the JRE software installation on macOS.
/jre-10/binThe executable and command-line launchers that are defined by the modules linkedto the image.
/jre-10/confThe .properties, .policy, and other configuration files intended to be edited bydevelopers, deployers, and end users.
/jre-10/libThe private implementation details of the runtime system. These files are not intendedfor external use and must not be modified.The lib directory on macOS or the lib/$ARCH directory on Linux and Solaris containsthe runtime system's dynamically linked native libraries.
/jdk-10/legalThe copyright and license files for each module.
Chapter 10Development Files and Directories
10-2

11JRE Installation Options for WindowsSystem Administrators and Vendors
This topic describes the options for installing, configuring, and creating a log file for theWindows Java Runtime Environment.
This topic includes the following sections:
• Introduction to JRE Installation Options
• JRE Command-Line Installation
• JRE Static Installation
• Creating a Log File
Introduction to JRE Installation OptionsThis section describes the installation options for Java SE Runtime Environment (JRE)10 on the Windows platform and are intended for:
• System administrators who are deploying the JRE with Java Web Starttechnologies on multiple PCs in their intranet, without user interaction.
• Vendors having products requiring the JRE. The JRE can be silently(noninteractively from the command line) installed with their product.
JRE installers are built using Microsoft Window Installer (MSI) technology. MSIcontains built-in support for silent installations and contains instructions to manuallyinstall the JRE using the .exe file that runs the MSI.
JRE Command-Line InstallationThis section describes the command-line options for the JRE Windows OfflineInstaller.
Run the JRE installer as follows:
jre [INSTALLCFG=configuration_file_path] [options]
• jre refers to the JRE Windows Offline Installer base file name (for example,jre-10.0.1.1_windows-x64_bin.exe).
• INSTALLCFG=configuration_file_path specifies the path of the installer configurationfile. See Installation of the JRE with a Configuration File.
• options specified values separated by spaces. Use the options listed in Configuration File Options. To perform a silent installation, you can use theoption /s for the JRE Windows Offline Installer.
11-1

JRE Static InstallationIf you perform a static installation of the JRE (by specifying the command-line orconfiguration file option STATIC=1), then the Java Auto Update feature will leave thatJRE installed during a Java update.
The default installation directory of a static JRE is C:\Program Files\Java\jre-n, wheren is the full Java SE release and update number (for example, n=10.0.2.1 for release10 Interim 0, Update 2, and Patch 1).
Creating a Log FileUse a log file to verify that an installation succeeded.
To create a log file describing the installation, append /L C:\<path>\setup.log to theinstallation command and scroll to the end of the log file to verify the status of theinstallation.
The following is an example of creating a log file:
$ jre-10-windows-x64_bin.exe /s /L C:\<path>\setup.log
The log file is written to the C:\<path>\setup.log file.
Chapter 11JRE Static Installation
11-2

12Installation of the JRE with a ConfigurationFile
You can use a configuration file to standardize JRE installations and specify optionsthat are not available on the command line.
This topic describes the configuration file that supplements JDK command-lineinstallation options. An installer configuration file is an alternative to, and extension of,options specified on the installer command line.
Note:
Windows, macOS, and Linux command-line installers support theconfiguration file, but not every operating system supports all configurationfile options.
This topic includes the following sections:
• Using a Configuration File
• Configuration File Options
• Sample Configuration File
• System Runtime Configuration File
Using a Configuration FileIf you are installing the JRE on Windows, then use the INSTALLCFG command-lineoption to specify a configuration file:
jre INSTALLCFG=configuration_file_path
• jre is the installer base file name, for example, jre-10.0.1_windows-x64_bin.exe.
• configuration_file_path is the path to the configuration file.
If you are installing JRE on Solaris, Linux, or macOS, then create a configuration filewith the name /etc/java/config/jre-install.properties. When you start the JREinstaller, it looks for a configuration file with this specific path and name.
Configuration File OptionsThe Table lists the installer configuration file options that apply for each operatingsystem.
12-1

Note:
Substitute the value of Enable to1 and the value Disable to 0.
Use the same options at the command line when running the JRE WindowsOffline Installer. See JRE Command-Line Installation.
Table 12-1 Configuration File Options
Option OperatingSystems
Values Description JRE OfflineInstaller
Saved inRuntime ConfigFile
INSTALL_SILENT= Windows Enable,Disable
Silent (noninteractive)installation.
Default: Disable
Yes Yes
INSTALLDIR= Windows path Folder/directory intowhich the files areinstalled.
Default: Operatingsystem default path
For Windows, this willwork only for first timeinstallation. Linux andSolaris use operatingsystem tools for thispurpose andinstallation directoryrelocation will behandled by operatingsystem tools (forexample: rpm --prefix=path)]
Yes No
STATIC= Windows Enable,Disable
Perform a staticinstallation (see JREStatic Installation).
Default: Disable
Yes No
AUTO_UPDATE= Windows
macOS
Enable,Disable
Enable the auto updatefeature.
Default: Enable
Yes Yes
WEB_JAVA= Windows
macOS
Linux
Enable,Disable
Configure theinstallation sodownloaded Javaapplications are, or arenot, allowed to run in aweb browser or byJava Web Start.
Default: Enable
Yes No
Chapter 12Configuration File Options
12-2

Table 12-1 (Cont.) Configuration File Options
Option OperatingSystems
Values Description JRE OfflineInstaller
Saved inRuntime ConfigFile
WEB_JAVA_SECURITY_LEVEL=
Windows
macOS
Linux
H (high), VH(very high)
Configure theinstallation's securitylevel for Javaapplications running ina browser or run withJava Web Start.
Default: H
Yes No
WEB_ANALYTICS= Windows Enable,Disable
Allow or disallow theinstaller to sendinstallation-relatedstatistics to an Oracleserver.
Default: Enable
Yes Yes
EULA= Windows Enable,Disable
If a Java applet or JavaWeb Start applicationis launched, thenprompt the user toaccept the end-userlicense agreement(EULA).
Default: Disable
Yes Yes
REBOOT= Windows Enable,Disable
If disabled, then theinstaller will neverprompt you to restartyour computer afterinstalling the JRE.However, in mostcases, the installerdoes not need torestart your computerafter installing the JRE.
Default: Enable
Yes No
NOSTARTMENU= Windows Enable,Disable
Specify that theinstaller installs theJRE without setting upJava startup items.
Default: Disable
Yes No
Chapter 12Configuration File Options
12-3

Table 12-1 (Cont.) Configuration File Options
Option OperatingSystems
Values Description JRE OfflineInstaller
Saved inRuntime ConfigFile
REMOVEOUTOFDATEJRES= Windows 0, 1 NOTE: Applicable toonline and offlineinstallers only (.exesand wrappers).Enables uninstallationof existing out-of-dateJREs during the JREinstallation.
UsingREMOVEOUTOFDATEJRES=0 leaves all out-of-dateJava versions on thesystem.
UsingREMOVEOUTOFDATEJRES=1 removes all out-of-date Java versionsfrom the system.
For example, runningjre–10.1.1.1.exe /sREMOVEOUTOFDATEJRES=1 removes all JREsbelow the securitybaseline. JREs abovethe security baselineare not uninstalled.
Yes No
Sample Configuration FileThe following is a sample configuration file for Windows. It specifies the following:
• Perform a silent installation.
• Install the JRE in the directory C:\java\jre.
• Set the security level for unsigned Java applications running in a browser to veryhigh.
Example 12-1 Sample Configuration File for Windows
INSTALL_SILENT=EnableINSTALLDIR=C:\java\jreWEB_JAVA_SECURITY_LEVEL=VH
Chapter 12Sample Configuration File
12-4

System Runtime Configuration FileAfter installing the JRE with a configuration file, the installer saves the file (with asubset of options used during installation) in one of the following locations in yourcomputer, depending on your operating system:
• Windows: %PROGRAMDATA%\Oracle\Java\java.settings.cfg
• Solaris and Linux: /etc/Oracle/Java/java.settings.cfg
• macOS: /Library/Application/Support/Oracle/Java/java.settings.cfg
Chapter 12System Runtime Configuration File
12-5