
J2DIGWIS
42
Installation Guide Installation Guide Installation Guide Installation Guide SAP SAP SAP SAP ® J2EE Engine J2EE Engine J2EE Engine J2EE Engine Installation / Dialog Installation / Dialog Installation / Dialog Installation / Dialog Instance Installation Instance Installation Instance Installation Instance Installation on IBM eServer on IBM eServer on IBM eServer on IBM eServer iSeries for SAP Web iSeries for SAP Web iSeries for SAP Web iSeries for SAP Web Application Server Application Server Application Server Application Server 6.20 6.20 6.20 6.20 Document Version 1.00 - June 2002
description
J2DIGWIS
Transcript of J2DIGWIS

Installation GuideInstallation GuideInstallation GuideInstallation Guide
SAPSAPSAPSAP®®®® J2EE Engine J2EE Engine J2EE Engine J2EE Engine
Installation / DialogInstallation / DialogInstallation / DialogInstallation / DialogInstance InstallationInstance InstallationInstance InstallationInstance Installationon IBM eServeron IBM eServeron IBM eServeron IBM eServeriSeries for SAP WebiSeries for SAP WebiSeries for SAP WebiSeries for SAP WebApplication ServerApplication ServerApplication ServerApplication Server6.206.206.206.20
Document Version 1.00 - June 2002

© Copyright 2002 SAP AG. All rights reserved.
No part of this publication may be reproduced or transmitted in anyform or for any purpose without the express permission of SAP AG.The information contained herein may be changed without priornotice.
Some software products marketed by SAP AG and its distributorscontain proprietary software components of other software vendors.
Microsoft®, WINDOWS®, NT®, EXCEL®, Word®, PowerPoint® andSQL Server® are registered trademarks of Microsoft Corporation.
IBM®, DB2®, DB2 Universal Database, OS/2®, Parallel Sysplex®,MVS/ESA, AIX®, S/390®, AS/400®, OS/390®, OS/400®, iSeries,pSeries, xSeries, zSeries, z/OS, AFP, Intelligent Miner, WebSphere®,Netfinity®, Tivoli®, Informix and Informix® Dynamic Server
TM are
trademarks of IBM Corp. in USA and/or other countries.
ORACLE® is a registered trademark of ORACLE Corporation.
UNIX®, X/Open®, OSF/1®, and Motif ® are registered trademarks ofthe Open Group.
Citrix®, the Citrix logo, ICA®, Program Neighborhood ®, MetaFrame®,WinFrame®, VideoFrame®, MultiWin® and other Citrix product namesreferenced herein are trademarks of Citrix Systems, Inc.
HTML, DHTML, XML, XHTML are trademarks or registeredtrademarks of W3C®, World Wide Web Consortium, MassachusettsInstitute of Technology.
JAVA® is a registered trademark of Sun Microsystems, Inc.
J2EE™ is a registered trademark of Sun Microsystems, Inc.
JAVASCRIPT® is a registered trademark of Sun Microsystems, Inc.,used under license for technology invented and implemented byNetscape.
SAP, SAP Logo, R/2, RIVA, R/3, SAP ArchiveLink, SAP BusinessWorkflow, WebFlow, SAP EarlyWatch, BAPI, SAPPHIRE,Management Cockpit, mySAP, mySAP.com, and other SAP productsand services mentioned herein as well as their respective logos aretrademarks or registered trademarks of SAP AG in Germany and inseveral other countries all over the world. MarketSet and EnterpriseBuyer are jointly owned trademarks of SAP Markets and CommerceOne. All other product and service names mentioned are thetrademarks of their respective owners.
DisclaimerSome components of this product are based on Java™. Any codechange in these components may cause unpredictable and severemalfunctions and is therefore expressively prohibited, as is anydecompilation of these components.
Any Java™ Source Code delivered with this product is only to be usedby SAP’s Support Services and may not be modified or altered in anyway.
Documentation in the SAP Service MarketplaceYou can find this documentation at the following address:http://service.sap.com/xxxxxxxxhttp://service.sap.com/xxxxxxxxhttp://service.sap.com/xxxxxxxxhttp://service.sap.com/xxxxxxxx
SAP AGSAP AGSAP AGSAP AGNeurottstraße 1669190 WalldorfGermanyT +49/18 05/34 34 24F +49/18 05/34 34 20www.sap.comwww.sap.comwww.sap.comwww.sap.com

Typographic Conventions
Type Style Represents
Example Text Words or characters thatappear on the screen. Theseinclude field names, screentitles, pushbuttons as well asmenu names, paths andoptions.
Cross-references to otherdocumentation
Example text Emphasized words or phrasesin body text, titles of graphicsand tables
EXAMPLE TEXT Names of elements in thesystem. These include reportnames, program names,transaction codes, tablenames, and individual keywords of a programminglanguage, when surrounded bybody text, for example,SELECT and INCLUDE.
Example text Screen output. This includesfile and directory names andtheir paths, messages, namesof variables and parameters,source code as well as namesof installation, upgrade anddatabase tools.
Example text Exact user entry. These arewords or characters that youenter in the system exactly asthey appear in thedocumentation.
<Exampletext>
Variable user entry. Pointedbrackets indicate that youreplace these words andcharacters with appropriateentries.
EXAMPLE TEXT Keys on the keyboard, forexample, function keys (suchas F2) or the ENTER key.
Icons
Icon Meaning
Caution
Example
Note
Recommendation
Syntax
SAP J2EE Engine Installation / Dialog Instance Installation
4 June 2002
Contents
SAP J2EE Engine Installation / Dialog Instance Installation onIBM eServer iSeries for SAP Web Application Server 6.20 .......... 5
1 Installation Planning ........................................................................ 121.1 Required Documentation....................................................................121.2 Requirements Checklist for a Dialog Instance..................................14
2 Installation Preparations ................................................................. 162.1 Installing TMKSVR................................................................................162.2 Sharing the Windows CD Drive ...........................................................172.3 Connecting to iSeries Using QNTC.....................................................182.4 Preparing the Required CDs for the Installation................................192.5 Preparing the Host for the SAPinst GUI .............................................212.6 Setting up File Systems .......................................................................222.7 Creating the SAP Communication User SAPJSF ..............................23
3 Installation Procedures.................................................................... 253.1 Installing SAPinst on iSeries ...............................................................253.2 Setting up an Installation Directory ....................................................263.3 Input Parameters for the Installation ..................................................263.4 Running SAPinst ..................................................................................30
4 Post-Installation Activities .............................................................. 324.1 Installing a JDBC Driver.......................................................................324.2 Downloading the SAP Java Crypto Toolkit ........................................344.3 Installing Borland JBuilder ..................................................................354.4 Starting and Stopping the SAP System..............................................364.5 Logging on to the SAP System ...........................................................374.6 Removing the SAPinst Installation Files ............................................37
5 Additional Information ..................................................................... 395.1 Continuing an Interrupted Installation with SAPinst .........................395.2 Additional Information about the SAP J2EE Engine .........................40

SAP J2EE Engine Installation / Dialog Instance Installation
June 2002 5
SAP J2EE Engine Installation / DialogInstance Installation on IBM eServeriSeries for SAP Web Application Server6.20PurposeFor the upgrade of SAP systems from the SAP Web Application Server 6.10 to 6.20 thisdocumentation contains the procedures for:
• The SAP J2EE Engine installation for an existing central instance.
• The installation of additional (new) dialog instances (including the SAP J2EE Engine).
The installation procedures are performed with the SAP installation tool SAPinst.
Use the tables below as a checklist and to navigate through the installation procedure. Allnecessary installation phases (planning, preparations, installation procedures and post-installation activities) are listed in these tables.
Use the links to the general descriptions of the actions and to any additional information tohelp you perform the actions. This prevents you from missing important information.
Naming ConventionsThroughout this documentation the following naming conventions apply:
IBM eServer iSeriesIBM eServer iSeries is referred to as iSeries.
IBM eServer iSeries was formerly called IBM AS/400.
IBM DB2 Universal Database for iSeriesIBM DB2 Universal Database for iSeries is referred to as DB2 UDB for iSeries.
IBM DB2 Universal Database for iSeries was formerly called IBM DB2 Universal Database forAS/400 or DB2/400.
Abbreviations for the Different Installation TypesThroughout this documentation, the following abbreviations are used to mark if a section or aprompt is only valid for certain instance installations:
• JI: SAP J2EE Engine installation for an existing central instance
• DI: Installation of a dialog instance
Prerequisites
Make sure that the central instance (including its SAP J2EE Engine) is up andrunning before other instances (with their SAP J2EE Engines) are started orrestarted. This is also valid for the installation. If you want to install a dialoginstance, make sure that the SAP J2EE Engine installation for thecorresponding central instance is finished and that the central instance is upand running.

SAP J2EE Engine Installation / Dialog Instance Installation
6 June 2002
Before you perform the SAP J2EE Engine installation for an existing centralinstance, you must upgrade the central instance as described in thedocumentation Upgrade to SAP Web Application Server 6.20: IBM eServeriSeries.If you want to use an existing dialog instance with SAP Web ApplicationServer 6.20, perform a dialog instance installation on the dialog instance hostas described in this documentation.
Process FlowWe recommend that you proceed as follows to install your SAP system:
1. Print out the tables below.
− If you want to install the SAP J2EE Engine for an existing central instance, print thetables under SAP J2EE Engine Installation for an Existing Central Instance.
− If you want to install a dialog instance, print the tables listed under Dialog InstanceInstallation.
2. Follow the installation sequence exactly as shown in the tables:
a. If a step is required for your installation, follow the link for that step to thecorresponding section.
b. Perform the procedure described there.
c. After successfully completing the installation step, mark the corresponding entry inthe printed table with > to log the progress of your installation.
d. Proceed with the next step listed in the table.
SAP J2EE Engine Installation for an Existing Central InstanceInstallation PlanningCareful planning is a prerequisite for the successful installation of the system.>>>> Action
Check the required documentation [Page 12] for the installation.
Make sure you have obtained the current installation note.
Installation PreparationsBefore the installation, you have to perform the following actions:> Action
Update code page-specific entries. For more information, see SAP Note 15023.
Check that all necessary PTFs have been installed. For more information, seeSAP Note 83292.

SAP J2EE Engine Installation / Dialog Instance Installation
June 2002 7
Check that your Java environment is up-to-date.
In order for the SAP 6.20 J2EE Engine examples to work, the following PTFsshould be applied:
• If you have WebSphere 4.0x, you should order and apply appropriateV4.0.2 group PTF:− For WebSphere Advanced Edition, SF99241− For WebSphere Advanced Single Server Edition, SF99242
• If you do not have WebSphere 4.0x, you should order and apply PTFSI03440, product no. 5722JV1 (JAVA).
Check that TCP/IP has been configured correctly and is active.
Check the status of TCP/IP with iSeries command WRKACTJOB, subsystemQSYSWRK, job QTCPIP.
Start TCP/IP with iSeries command STRTCP.
To check if subsystem QSERVER subsystem job QPWFSERVSD is active oneach iSeries system, use ping to database server and the reverse. If it is notactive, use iSeries command STRSBS QSERVER to activate the job.
Install TMKSVR [Page 16].
Share your Windows CD drive [Page 17].
Connect to iSeries using QNTC [Page 18]
Prepare the required CDs for the installation [Page 19].
Prepare the host for SAPinst GUI [Page 21].
Create the SAP communication user SAPJSF [Page 23].
Installation Procedures>>>> Action
Insert the SAP kernel CD 1 into the CD drive on your Windows host whenasked for from SAPinst.
Install SAPinst [Page 25] on iSeries.
Perform this step once on every iSeries where you want toinstall the SAP J2EE Engine.
Set up an installation directory [Page 26].
Change the CDs. Insert the CD J2EE-JAVA-COMPONENTS into the drive onyour Windows host.
To prepare for the input phase of the installation, check the required inputparameters for the installation [Page 26].
Run SAPinst [Page 30] and select SAP Central Instance Java Core 6.20.

SAP J2EE Engine Installation / Dialog Instance Installation
8 June 2002
Post-Installation ActivitiesTo complete the installation, you have to perform a number of actions. These actions aremandatory.>>>> Action
If your SAP J2EE Engine directly wants to connect to the database withoutusing an RFC-connection, you have to install a JDBC driver [Page 32].
For the operation of the SAP J2EE Engine, download the SAP Java CryptoToolkit [Page 34].
To prepare the installation, you have created the communication user SAPJSF in SAP system client 000.
If you want to change the SAP system client of this user, see Creating the SAPCommunication User SAPJSF [Page 23] → Changing the SAP System Clientfor the SAP Communication User SAPJSF.
Change the password for the supplied profile <SID>OFR with iSeriescommands CHGPWD (to change your own password) or CHGUSRPRF (to changesomeone else’s password). Make sure that you do this on all iSeries systems.Passwords must be identical on all systems.
Make sure that there are active jobs with:WRKACTJOB SBS(R3_<instance_number>)
If there are no active job, start the SAP system with:STARTSAP
Check the Workbench Organizer.
Remove the SAPinst installation files [Page 37], that is:
• You remove SAPinst on the Windows host and on iSeries
• You delete the installation directory.
• You stop and delete TMSKVR on iSeries.
Additional InformationThe following sections contain additional and background information on the installation ofyour SAP J2EE Engine:>>>> Action
Continuing an Interrupted Installation with SAPinst [Page 39].
Additional Information on the SAP J2EE Engine [Page 40] providinginformation on:
• File system structure of the SAP J2EE Engine installation
• Ports used by SAP J2EE Engine
• Administration of the SAP J2EE Engine
• Deactivation of the SAP J2EE Engine
• Software delivery manager

SAP J2EE Engine Installation / Dialog Instance Installation
June 2002 9
Dialog Instance InstallationInstallation PlanningCareful planning is a prerequisite for the successful installation of the system.>>>> Action
Check the required documentation [Page 12] for the installation.
Make sure you have obtained the current installation note.Check the requirements checklist for a dialog instance [Page 14].
Installation PreparationsBefore the installation, you have to perform the following actions:> Action
Update code page-specific entries. For more information, see SAP Note 15023.
Check that all necessary PTFs have been installed. For more information, seeSAP Note 83292.
Check that your Java environment is up-to-date.
In order for the SAP 6.20 J2EE Engine examples to work, the following PTF(s)should be applied:
• If you have WebSphere 4.0x, you should order and apply the appropriateV4.0.2 group PTF:− For WebSphere Advanced Edition, SF99241− For WebSphere Advanced Single Server Edition, SF99242
• If you do not have WebSphere 4.0.x, you should order and apply PTFSIO3440, product number 5722JV1(JAVA).
Check that TCP/IP has been configured correctly and is active.
Check the status of TCP/IP with iSeries command WRKACTJOB, subsystemQSYSWRK, job QTCPIP.
Start TCP/IP with iSeries command STRTCP.
To check if subsystem QSERVER subsystem job QPWFSERVSD is active on eachiSeries system, use ping to database server and the reverse. If it is not active,use iSeries command STRSBS QSERVER to activate the job.
Install TMSKVR [Page 16].

SAP J2EE Engine Installation / Dialog Instance Installation
10 June 2002
Prepare the required CDs for the installation [Page 19].
Prepare the host for SAPinst GUI [Page 21].
Set up file systems [Page 22].
Installation Process>>>> Action
Insert the SAP Kernel CD 1 into the CD drive on your Windows host.
Set up an installation directory [Page 26].
Install SAPinst [Page 25] on iSeries .
Perform this step once on every iSeries where you want to installdialog instance and you had not yet installed a SAP J2EE Enginefor a existing central instance on that host.
To prepare for the input phase of the installation, check the required inputparameters for the installation [Page 26].
Run SAPinst [Page 30] and select SAP Web Application Server 6.20 DialogInstance for DB2 on iSeries.
Post-Installation ActivitiesTo complete the installation, you have to perform a number of actions. These actions aremandatory.>>>> Action
If the SAP J2EE Engine directly wants to connect to the database without usingan RFC-connection, you have to install a JDBC driver [Page 32].
For the operation of the SAP J2EE Engine, download the SAP Java CryptoToolkit [Page 34].
Check that you can start and stop the SAP system [Page 36].
Check that you can log on to the SAP system [Page 37].
Change the password for the supplied profile <SID>OFR with iSeries commandsCHGPWD (to change your own password) or CHGUSRPRF (to change someoneelse’s password). Make sure that you do this on all iSeries systems. Passwordsmust be identical on all systems.
Make sure that there are active jobs with:WRKACTJOB SBS(R3_<instance_number>)
If there are no active job, start the SAP system with:STARTSAP

SAP J2EE Engine Installation / Dialog Instance Installation
June 2002 11
Check the Workbench Organizer.
Remove the SAPinst installation files [Page 37], that is:
• You remove SAPinst on the Windows host and on iSeries
• You delete the installation directory
• You stop and delete TMSKVR on iSeries
Additional InformationThe following sections contain additional and background information on the installation ofyour SAP J2EE Engine:>>>> Action
Continuing an Interrupted Installation with SAPinst [Page 39].
Additional Information on the SAP J2EE Engine [Page 40] providing informationon:
• File system structure of the SAP J2EE Engine installation
• Ports used by SAP J2EE Engine
• Administration of the SAP J2EE Engine
• Deactivation of the SAP J2EE Engine
• Software delivery manager

1 Installation Planning
12 June 2002
1 Installation Planning
1.1 Required DocumentationBefore you start the installation, make sure that you have access to the following information:
• IBM Information APAR II12833 (for V5R1)
This Information APAR contains the latest information on CUM package release levelsand OS/400 corrections related to SAP system on IBM eServer iSeries. We recommendthat you load the PTF release level recommended by IBM in the Information APAR foryour OS/400 release.
• SAP Note 500040
• SAP Front End Installation GuideSAP Service Marketplace, alias instguides
• Network Integration of SAP ServersSAP Service Marketplace, alias network
• SAP Language Transport (if required)SAP Service Marketplace, alias instguides
SAP Installation NotesBefore you start the installation read the SAP notes. They contain the most recent informationregarding the installation, as well as corrections to the installation documentation.
Make sure that you have the most recent version of the SAP Note. You can find SAP Notesin the SAP Service Marketplace at:http://service.sap.com/notes
Number Description
500040 iSeries: SAP J2EE Engine / Dialog Instance Installation 6.20
492305 INST: SAP J2EE Engine / Dialog Instance Installation 6.20 General
492184 Additional Info: Upgrade to SAP Web Application Server 6.20 (DB2 UDB foriSeries)
503526 iSeries Latest News: SAP Web Application Server - Rel. 6.20
392165 iSeries: Known Problems on V5R1M0
445315 Why Install with Global Language Solution
83292 Releases and PTFs for SAP system on iSeries
419483 iSeries client copy
410783 Operating System Releases for SAP Kernel 6.x iSeries
363663 iSeries: NLS on AS/400 (ASCII)
49201 iSeries: Performance settings for the SAP System

1 Installation Planning
June 2002 13
47144 iSeries equivalents to UNIX commands
68732 iSeries: IBM tools EDTF, DSPSTMF, SQLUTIL...
93316 Starting and stopping all instances
84685 iSeries: RFC SDK in Release 4.x
443925 SAP Systems on DB2 UDB for iSeries vs. MCOD
88080 Archiving with different code pages
SAPinst Troubleshooting GuideRead the documentation SAPinst Troubleshooting Guide. It provides up-to-date informationabout how to avoid installation failure and what to do if a failure occurs.
You can find the SAPinst Troubleshooting Guide in the SAP Service Marketplace at:http://service.sap.com/sapinstfeedback
iSeries Documentation on the WebThe iSeries documentation is also viewable at:http://AS400bks.rochester.ibm.com
Additional DocumentationThe following list provides information on additional documentation that is available in theSAP Service Marketplace:
• Platforms released for mySAP.com, see the SAP Service Marketplace at:http://service.sap.com/platforms
• Installation of front ends for the SAP system, see the documentation Front EndInstallation Guide on the Presentation CD or in the SAP Service Marketplace at:http://service.sap.com/instguides
• Information about SAP Web AS security, see the SAP Service Marketplace at:http://service.sap.com/security

1 Installation Planning
14 June 2002
1.2 Requirements Checklist for a DialogInstanceThe dialog instance host must meet the following requirements:
Requirement Type Requirement
Hardwarerequirements
Before you upgrade a SAP system on iSeries, you must obtaindetailed sizing information from your IBM representative.
Software requirements Make sure you have installed TMKSVR before starting theinstallation. For more information, see Installing TMSKSVR [Page16].
Operating systemrequirements
SAP Web Application Server 6.20 is released for OS/400V5R1M0.
For information about which OS/400 versions have been releasedfor SAP on IBM iSeries, see SAP Note 156557. For informationabout V5R1, see SAP Note 392165.
PTF and Information APARFor the latest information on cumulative PTF package (CUMpackage) release levels and OS/400 corrections related to SAPWeb Application Server 6.20 on IBM eServer iSeries, refer to IBMInformation APAR II12833.
To load an APAR onto your iSeries system via the IBM ECS link,enter the command:SNDPTFORD PTFID((<Info APAR ID>))
To load the IBM Info APAR for V5R1, enterSNDPTFORD PTFID((II12833))
SAP Note 83292 gives an overview of releases and PTFs for theSAP system on iSeries and gives the URL of the IBM Web sitecontaining the Info APARs.
Make sure that English is installed as primary orsecondary language.
To be able to run an SAP system on iSeries with ASCII codepages, make sure that you have installed the following:
• 5722SS1 option 21 - Extended NLS SupportThis option is delivered to you by IBM with the installation CDsof the operating system.
• 5799AAS - ASCII Runtime for C/C++.You can order this product from IBM. After you have installedthis product you have to initialize the ASCII environment(PRPQ 5799AAS).For more information about how to initialize the ASCIIenvironment, see the readme file on your iSeries using thefollowing command:EDTF FILE(QADRT/README) MBR(README)

1 Installation Planning
June 2002 15
For more information about how to install the secondary language,see the IBM documentation AS/400 National Language Support(SC41-5101-01).
Other ProductsThe installation of the following products is required:
• 5722SS1 option *BASE Operating System/400
• 5722SS1 option 1 OS/400 - Extended BaseSupport
• 5722SS1 option 2 OS/400 - OnlineInformation
• 5722SS1 option 3 OS/400 - Extended BaseDir. Support
• 5722SS1 option 12 OS/400 - Host Servers
• 5722SS1 option 32 OS/400 - DirectoryServices
The installation of the following products is highly recommended:
• 5722SS1 option 33 OS/400 - PortableApplication Solutions Environment
• 5799AJC option *BASE Apply Journaled ChangesExtended
• 5722SS1 option 30 OS/400 - QshellInterpreter
Space requirements The amount of space required for an SAP system on iSeriesdepends on many variables, such as:
• Size of the database
• Number of work processes
• Number of users
Sizing recommendations are made by the IBM CompetenceCenter. However, approximately 25 GB DASD are required to startan SAP system. We recommend that ASP (auxiliary storage pool)usage in SAP production systems should not exceed 70%.

2 Installation Preparations
16 June 2002
2 Installation Preparations
2.1 Installing TMKSVRUseTMKSVR is the interface between iSeries and Windows for the installation with SAPinst.SAPinst is running on Windows but has to install on the iSeries. So all actions required foriSeries are initiated remotely on Windows but locally executed using TMKSVR. Thecommunication is done using TCP/IP.
Prerequisites• An FTP server running on iSeries
• A user with administrator rights that is the same user ID and password as the user thatyou are using for the installation on iSeries (a user with administrator rights similar toQSECOFR).
• The SAP kernel CD 1 must be inserted in the CD drive of your Windows host.
Procedure1. Log on to your Windows host as a user with administrator rights.
This user must have the same user ID and password as the user that you areusing for the installation on iSeries (a user with administrator rights similar toQSECOFR).
2. Run setup.exe from the CD located in \SAPINST\AS400\TMKSVR. You can start thesetup program from CD by double-clicking on it in the Windows Explorer.
The Setup - install SAP TMSKVR for iSeries dialog box appears:

2 Installation Preparations
June 2002 17
3. Enter the following values:
−−−− iSeries Hostname:Enter the name of the iSeries host where you want to install TMKSVR.
−−−− iSeries Administrator (QSECOFR or similar):You need this user to install TMKSVR and to start the server. Make sure that this userhas system administrator rights (QSECOFR or similar).
−−−− Update existing TMKSVR instances:Do not select this option.
−−−− Yes, create TMKSVR instance:Select this option.
−−−− TMKSVR instance number:Leave the value at “0”.
−−−− TMKSVR Instance Port (also referred to as the Dispatcher Port):Leave the value at “51515”, if possible. Only change this port number if youencounter problems during installation because the port is in use.
ResultThe installation uses FTP to install and start TMKSVR on the iSeries. During installation, theTMKSVR library is created on iSeries. If you want a TMKSVR instance to be created, a librarynamed TMKSVR<nn> also is created, with <nn> being the instance number (for example,TMKSVR00). In addition, netserver share named rootbin will be created. For furtherinformation, see the documentation install.pdf on the CD in directory\SAPINST\AS400\TMKSVR.
2.2 Sharing the Windows CD DriveProcedure1. Log on to your Windows host as a user with administrator rights.
This user must have the same user ID and password as the user that you areusing for the installation on iSeries (a user with administrator rights similar toQSECOFR).
2. Insert the SAP kernel CD 1 into the CD drive of your Windows host.
3. Open your Windows Explorer and change to the left most window, where the directorytree is displayed.
4. Click with the right mouse key on your CD drive.
5. In the following popup menu, select Sharing...
5. Now the Properties window of your CD drive opens. Select the Sharing tab and mark theentry Share this folder. There is no need to change the default values.
6. Now choose OK

2 Installation Preparations
18 June 2002
2.3 Connecting to iSeries Using QNTCTo be able to access the installation CDs located on your Windows host from your iSeries,you have to establish a connection using QNTC.
Prerequisites• A user with administrator rights that has the same user ID and password as the user that
you are using on the Windows host (a user with administrator rights similar to QSECOFR).
• The CD drive under Windows is shared.
• Before you can establish a connection between the Windows host and iSeries, you mustmake sure that the Windows host is known to iSeries. To check this, you can use thefollowing methods:
−−−− Method 1Check that the Wins Server is up and running correctly for iSeries.
−−−− Method 2Check that you can connect from iSeries to the Windows host using the followingcommand:ping <Windows hostname>
If you cannot ping your Windows machine, you have to add it to your host liston your iSeries machine using the following command and then try again:addtcphte intnetadr(‘<Windows TCP/IP address>’)hostname((<Windows hostname>))
Procedure1. Log on to iSeries as a user with administrator rights similar to QSECOFR.
This user must have the same user ID and password as the user that you areusing on the Windows host. Otherwise, the shared CD drive will not be visibleand accessible under QNTC.
2. To establish a connection to the Windows host using QNTC, create the followingdirectory, by entering:
mkdir '/QNTC/<Windows host name>'
If your newly created directory /QNTC/<Windows host name> is onlyvisible but you cannot access the Windows shared CD drive, that is, methods1 and 2 under Prerequisites failed. The information for the failed actions isstored in the iSeries cache and is reused by iSeries if you retry method 1 or 2before deleting the cache. To empty the cache, you must perform an IPL onyour iSeries before performing the given procedure again.

2 Installation Preparations
June 2002 19
ResultThe contents of your CDs in your shared Windows CD drive are now visible and accessiblefrom iSeries under /QNTC/<Windows host name>.
Keep this path in mind when SAPinst asks for the installation CDs. Do notuse your normal Windows CD drive but only the iSeries shared directory: forexample, X:\QNTC\<Windows host name>\<CD drive> instead of D:\.
2.4 Preparing the Required CDs for theInstallationThe following section provides information on:
• CDs that are required for the instance installation
• How to prepare the CDs
• How to use the CD browser dialog
Required CDs for the InstallationThe following table shows the CDs that are required for the installation:
SAP InstanceInstallation
Required CDs
SAP J2EE Engineinstallation for an existingcentral instance
• Kernel CD 1
You only need the Kernel CD1 to installTMKSVR and SAPinst.
• SAP J2EE Engine CD
If you are installing SAP J2EE Engine foran existing central instance, you do notneed to copy the CD to iSeries.
Dialog Instance Installation • Kernel CD 1
• Kernel CD 2
• SAP J2EE Engine CD
You must copy all CDs for the dialoginstance installation to iSeries beforestarting the installation, but after you haveinstalled TMKSVR and SAPinst. Each CDmust have its own directory, for example,X:\KRNL1, X:\KRNL2 and X:\J2EE.

2 Installation Preparations
20 June 2002
Preparing the CDUse the following method to make the required CDs available in parallel before you start theinstallation.
Do not use the option Copy Package to to copy a CD. It will decrease theperformance considerably. We recommend that you use drag & drop or copy& paste.
• Have the Windows CD drive ready for use
• Copy the required CD manually to local hard disks to your iSeries using your WindowsCD drive.
OS/400 does not support any other CD format than 8.3. Since the SAP J2EEEngine CD uses the Rockeridge format, you must use your Windows host tocopy the CD to iSeries using FTP or a direct copy into the IFS.Keep in mind that if you use local CD copies on your iSeries, you do not haveto establish a connection between the Windows host and iSeries usingQNTC.
Using the CD Browser DialogDuring the installation procedure SAPinst first checks and finally verifies the availabilityand location of the required installation CD. SAPinst does this by displaying a CD Serverdialog, asking for the file LABEL.ASC that contains the information of the software package tobe installed.
The following tells you how to handle the CD Server dialog. SAPinst displays this window infollowing situations:
• SAPinst wants to check the availability of the software package.
You can recognize this situation by the flag Check Location displayed on the CD ServerWindow.
Choose one of the following actions:
Action Result
Do not enter any PackageLocation and leave the flagCheck Location deselected.
SAPinst skips the check and you can continuethe installation procedure.However, SAPinst asks later for the missingLABEL.ASC (see second bullet point below).
Enter the path of the PackageLocation and leave the flagCheck Location deselected.
SAPinst skips checking the label location, butyour entered package locations are used laterfor the installation.SAPinst only asks again for a missingLABEL.ASC if the package location isincorrect (see second bullet point below).
Enter the path of the PackageLocation and select the flagCheck Package Location
SAPinst checks the label location and displaysan error message if the location is incorrect.
If all locations are correct, SAPinst does notask again for the LABEL.ASC files later.

2 Installation Preparations
June 2002 21
You might experience timeout errors when selecting the option PackageLocation in the CD Browser to search for the right location of the LABEL.ASCfile. However, Windows 2000 only detects a connection error withoutindication of the real problem. If a timeout error occurs, you must enter thecorrect location of the CD manually into the location field of the CD Browser,for example, X:\QNTC\<Windows_host>\D\WAPSCOMP. Afterwards, youshould be able to access the CDs without any further problems.
• SAPinst cannot find the correct LABEL.ASC but needs the location of the software toprocess the installation now.
You can recognize this situation by the missing flag Check Location on the CD Browserwindow. You now have to enter the path to the correct LABEL.ASC. Otherwise, theinstallation cannot continue.
In addition, you can copy the installation package by entering a location in the columnCopy Package to.
Do not use the option Copy Package to to copy a CD. It will decrease theperformance considerably. We recommend that you use drag & drop or copy& paste.
2.5 Preparing the Host SAPinst GUIUseThe Java-based SAPinst graphical user interface (GUI) called SAPinst GUI requires a JavaDevelopment Kit (Java™ 2 SDK, Standard Edition) with graphical capabilities (AWT, Swing).Since IBM eServer iSeries does not provide a graphical user interface, you must install theJDK on a Windows host to perform the installation with SAPinst.
Prerequisites• You can find the JDK versions that are released for the SAP Web Application Server and
the SAP J2EE Engine at:http://service.sap.com/platforms
SAPinst GUI requires the same JDK version as the SAP Web ApplicationServer 6.20.The JDK is not part of the SAP shipment.
• Make sure that your JAVA_HOME environment variable is set to<JAVA_HOME>.
• Make sure that $Java_Home/bin is included in your system path.• Make sure that your JAVA_HOME environment variable is set correctly. For more
information, see the JDK installation documentation.

2 Installation Preparations
22 June 2002
• To avoid an error when starting SAPinst GUI, you must make sure that there are no .jarfiles from an XML parser tool, such as Xerces or Xalan, in the JDK ext directory, asdescribed in the procedure below.
Procedure
Checking the JDK ext Directory1. Log on to the Windows host on as a user with administrator rights.
This user must have the same user ID and password as the user that you areusing for the installation on iSeries (a user with administrator rights similar toQSECOFR).
2. Check whether there are already <parser_name>.jar files, for example,xerces.jar, in your ext directory. The default path under Windows is:
<JAVA_HOME>\JRE\lib\ext
3. If you find any .jar files, rename them to, for example, xerces.xxx.
Do not forget to rename the files to their original names after the installationprocedure is complete.
2.6 Setting Up File Systems
This section is only valid for the dialog instance installation.
UseYou need to set up the file systems for the installation of a dialog instance.
The listed file system sizes are SAP requirements. Depending on youroperating system, you might have to add space for administrative purposes.

2 Installation Preparations
June 2002 23
ProcedureSAP File Systems
Before the installation set up file systems for the SAP system. The file systems are global,that is, they are accessed by all hosts in the SAP system.
File System Name Description Space Required
/usr/sap/<SID> Instance-specific data,symbolic links to the datafor one system
Dialog instance with sapcpe in use:680 MB (380 MB for the dialoginstance and 300 MB for the SAPJ2EE Engine)
Dialog instance without usingsapcpe: 1100 MB (800 MB for thedialog instance and 300 MB for theSAP J2EE Engine)
Global transport directoryfor all SAP systems
100 MB for each SAP instance/usr/sap/trans
You must make sure that the global transport directory exists.To check:
Log on to the central instance host on which /usr/sap/transresides as user QSECOFR.
If you are installing a dialog instance on a separate iSeries thanyour central instance, you must link the directory/usr/sap/trans to the iSeries where the central instance isrunning. To link to the central instance, enter the followingcommand:CHGR3SHLOC NEWHOST(<iSeries_name of the centralinstance>)
2.7 Creating the SAP Communication UserSAPJSF
This section is only valid for the SAP J2EE Engine installation for existingcentral instances.
UseThe communication user SAPJSF is required for the user authentication for RFCcommunication between the J2EE service Security and the SAP Web Application Server.
For the installation, create the communication user SAPJSF in your production SAP systemclient.
If you want to change this SAP system client afterwards, see Changing the SAP SystemClient for the SAP Communication User SAPJSF below.

2 Installation Preparations
24 June 2002
PrerequisitesIn the SAP system, you have user administrator permission (transaction SU01) andpermission to test function modules.
Procedure
Creating the SAP Communication User SAP JSF1. Log on to the production SAP system client.
2. In transaction SE37, call the function module PRGN_J2EE_CREATE_SERVICE_USER andchoose Single Test (F8).
3. Specify the import parameter IF_PASSWORD.
If you want to deactivate the password logon for the communication user and want to useSecure Network Communication (SNC) logon instead, leave the field blank.
Make sure that you write down the password of the communication userSAPJSF as SAPinst prompts for this password during the installation. Formore information, see Input Parameters for the Installation [Page 26].
4. Choose Execute.
The Test Function Module: Result Screen screen appears.
5. In the Result row of table parameter ET_RETURN, check that no errors occurred during the execution.
Changing the SAP System Client for the SAP Communication UserSAPJSFIf you want to change the SAP system client of the communication user SAPJSF later on, seethe SAP Library. To do so, choose Help � SAP Library in your SAP system�mySAPTechnology Components � SAP Web Application Server � SAP J2EE Engine � Integrationof the Security Functions of SAP Web Application Server and SAP J2EE Engine � UserAuthentication � Configuration of the Connection Between the SAP Web Application Serverand the SAP J2EE Engine
You can also access the SAP Library at:
http://help.sap.com � SAP Web Application Server

3 Installation Procedures
June 2002 25
3 Installation Procedures
3.1 Installing SAPinst on iSeries
You must install SAPinst on every iSeries for which you want to perform anupgrade for a central instance or on which you want to install a dialoginstance.
Prerequisites• A user with administrator rights that has the same user ID and password as the user that
you are using on iSeries (a user with administrator rights similar to QSECOFR).
• A TMKSVR, a shared directory and an installation directory must be available on theiSeries on which you want to run SAPinst. The Windows menu entry shows explicitly theiSeries target: Start � Programs � SAPinst DB2 400 Kernel on <iSeries name>.
• The SAP kernel CD 1 is inserted into the CD drive of your Windows host.
ProcedureTo install SAPinst and load the objects required for installation and configuration from the CD:
1. Log on to your Windows host as a user with administrator rights.
This user must have the same user ID and password as the user that you areusing for the installation on iSeries (a user with administrator rights similar toQSECOFR).
2. Run setup.cmd from the CD located in \SAPINST\AS400. You can start the CD bydouble-clicking on it in the Windows Explorer.
An initial dialog box appears that asks you for the target iSeries.
2. If prompted for, choose an unused drive name on your Windows host for a shareddirectory that is placed on the iSeries machine, for example X:
3. Use STANDARD as installation type.
ResultAll required files are copied from the SAP kernel CD 1 to iSeries. An entry is made in theWindows start menu: Start � Programs � SAPinst DB2 400 KERNEL on <iSeries name>.The new drive under Windows for the shared directory is now used as the access point forthe installation when SAPinst prompts for the CDs, for example : X:\QNTC\<Windows hostname>D.
3 Installation Procedures
26 June 2002
3.2 Setting Up an Installation DirectoryUseEvery installation service must have its own separate installation directory every time youstart SAPinst, except for the first time. That is, for each new installation (for every SAP J2EEEngine installation for an existing central instance and for every installation of a dialoginstance) and activation of the SAP J2EE Engine, you must create a separate installationdirectory.
Otherwise, your log and command files from previous installations might get lost.
ProcedureTo setup an installation directory, choose Start → Programs → SAPinst → DB2 400 Kernelon <iSeries_name> → Prepare New installation.
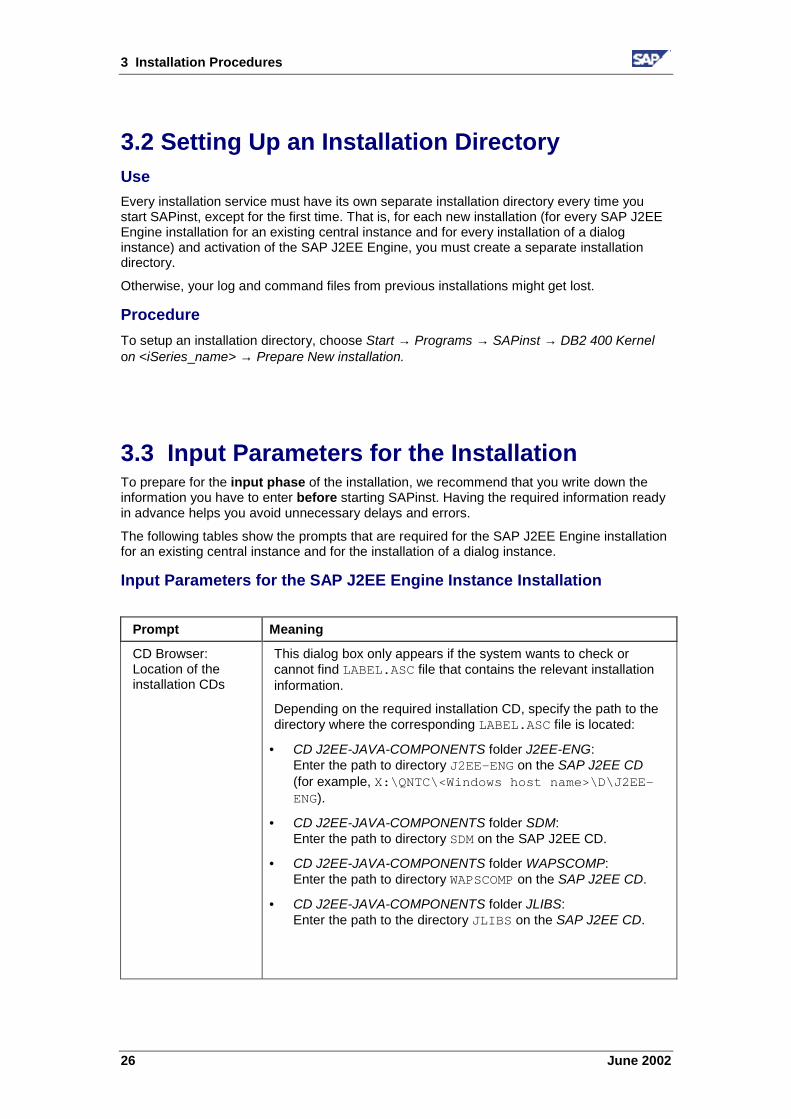
3.3 Input Parameters for the InstallationTo prepare for the input phase of the installation, we recommend that you write down theinformation you have to enter before starting SAPinst. Having the required information readyin advance helps you avoid unnecessary delays and errors.
The following tables show the prompts that are required for the SAP J2EE Engine installationfor an existing central instance and for the installation of a dialog instance.
Input Parameters for the SAP J2EE Engine Instance Installation
Prompt Meaning
CD Browser:Location of theinstallation CDs
This dialog box only appears if the system wants to check orcannot find LABEL.ASC file that contains the relevant installationinformation.
Depending on the required installation CD, specify the path to thedirectory where the corresponding LABEL.ASC file is located:
• CD J2EE-JAVA-COMPONENTS folder J2EE-ENG:Enter the path to directory J2EE-ENG on the SAP J2EE CD(for example, X:\QNTC\<Windows host name>\D\J2EE-ENG).
• CD J2EE-JAVA-COMPONENTS folder SDM:Enter the path to directory SDM on the SAP J2EE CD.
• CD J2EE-JAVA-COMPONENTS folder WAPSCOMP:Enter the path to directory WAPSCOMP on the SAP J2EE CD.
• CD J2EE-JAVA-COMPONENTS folder JLIBS:Enter the path to the directory JLIBS on the SAP J2EE CD.

3 Installation Procedures
June 2002 27
When you are prompted for the package location ofthe CD KERNEL Web Application Server 6.20 2/2you do not have to change CDs. The LABEL.ASCfile is located in the same directory on both kernelCDs. Deselect Check Location and use the samelocation for both CDs. The location check will beperformed later when the second kernel CD isneeded.
Select the profile ofthe central instance
Browse for the instance profile for the central instance or enter itincluding its path, for example,/usr/sap/C11/SYS/profile/C11_DVEBMGS00_<iSeries_name>
SAP J2EE EngineCommunicationUser SAPJSFInformation
To prepare the installation, you have created the communicationuser SAPJSF [Page 23 ] in your production client that is requiredfor the user authentication for RFC-communication between theJ2EE service Security and the SAP Web Application Server:
• Client:Enter the SAP system client in which you created thecommunication user SAPJSF.
• Password:Enter and confirm the Password that you have entered whenyou communication user SAPJSF.
JDK directory Enter the directory where the Java Development Kit (JDK) islocated on your iSeries.
Input Parameters for the Dialog Instance Installation
Prompt Meaning
SAP system ID Enter the name of the SAP system <SID> that you entered whenyou installed the central instance.
Instance number ofthe SAP dialoginstance
Enter an instance number for the dialog instance. You can specifya value from 0 to 97.
If several SAP instances are running on the same host, theseinstances must be assigned different numbers.
Instance number ofthe SAP centralinstance
Enter the instance number of the central instance. To find out thenumber, see the SAP directory usr\sap\<SID>\DVEBMGS<nn>.The value <nn> is the number assigned to the central instance.
Instance host of theSAP centralinstance
Enter the name of the central instance host that you have enteredduring the central instance installation.
Name of thedatabase instance
Enter the name of the database instance <SID> that you haveentered during the central instance installation.

3 Installation Procedures
28 June 2002
Name of thedatabase instancehost
Enter the name of the database instance host that you haveentered during the central instance installation.
LDAP support Select the type of LDAP integration you want to configure for theSAP system:
• Via Active Directory Service
Integrates Windows 2000 Active Directory services. An ActiveDirectory must be available on the network.
• Via Generic LDAP Directory
Configures the system to support LDAP directories that arerunning on Windows or UNIX machines. A generic LDAPdirectory must be available on the network.
• No LDAP Support
Configures the SAP system not to integrate LDAP services.
Required InputDepending on your selection the following information is required:
• Management DomainSpecify a container in the active directory where informationrelated to the new SAP system is to be stored. Use thedistinguished name syntax. The name of the container(management domain) can reflect the organizational structureof your company. For example, if the system is for corporatefinances and located in Walldorf, the name can be:CN=Finance,CN=Walldorf
• Container for all SAP-related entriesSpecify the SAP root container in the LDAP directory underwhich all future information related to SAP systems is to bestored. Use the distinguished name syntax that specifies boththe name of the container and the path to reach it.
• LDAP ServerEnter the DNS host name of the server on which the LDAPdirectory is running. If the directory is replicated on otherservers in the network, specify these as well. For example:ldapsrv1 ldapsrv2
• Windows 2000 domain of the ADS serverEnter or confirm the name of the Windows 2000 domain inwhich the SAP_LDAP Group is defined.
• Domain Containing group SAP_LDAPThe group was defined earlier, when the Active Directory wasconfigured for the SAP system.

3 Installation Procedures
June 2002 29
Password for user<SID>OFR
Enter the password of user <SID>OFR on your local system andconfirm it depending on the following:
• If you are installing a dialog instance on the same iSerieswhere the central instance is installed, user <SID>OFRalready exists and you must change the password.
• If you are installing a dialog instance on a different iSeriesthan the central instance, user <SID>OFR is created duringthe installation process and the default values should not bechanged.
CD Browser:Location of theinstallation CDs
This dialog box only appears if the system wants to check orcannot find the LABEL.ASC file that contains the relevantinstallation information.
Depending on the required installation CD, specify the path to thedirectory where the corresponding LABEL.ASC file is located:
• CD Kernel Web Application 6.20 (1/2 & 2/2):Enter the path and drive of the SAP kernel CD (X:\KRNL1 orX:\KRNL2).
When you are prompted for the package location ofthe CD KERNEL Web Application Server 6.20 2/2you do not have to change CDs. The LABEL.ASCfile is located in the same directory on both kernelCDs. Deselect Check Location and use the samelocation for both CDs. The location check will beperformed later when the second kernel CD isneeded.
SAP code page Enter your SAP code page, for example, in Western Europe andNorth America (wherever LATIN-1 is used), enter 1100.
Secondarylanguage library
On every iSeries where English is not the primary language, youmust install English as secondary language library, for example byentering the values 2924, 2938, 2959 or 3984.
This is a prerequisite for SAP to be able to provide support.
Port numbers Enter the port numbers of the message port.
The port numbers must be the same as on thecentral instance host.

3 Installation Procedures
30 June 2002
CD Browser:Location of theJ2EE CD
This dialog box only appears if the system wants to check orcannot find the LABEL.ASC file that contains the relevantinstallation information.
Depending on the required installation CD, specify the path to thedirectory where the corresponding LABEL.ASC file is located:
• CD J2EE-JAVA-COMPONENTS folder J2EE-ENG:Enter the path to directory J2EE-ENG on the SAP J2EE CD(for example, X:\J2EE\J2EE-ENG ).
• CD J2EE-JAVA-COMPONENTS folder JLIBS:Enter the path to directory JLIBS on the SAP J2EE CD.
SAP J2EE EngineCommunicationUser SAPJSFInformation
To prepare the installation, you have created the communicationuser SAPJSF [Page 23 ] in your production client that is requiredfor the user authentication for RFC communication between theJ2EE service Security and the SAP Web Application Server.
• Client: Enter the SAP system client in which you created thecommunication user SAPJSF.
• Password: Enter and confirm the password that you haveentered when you communication user SAPJSF.
3.4 Running SAPinstUseThis procedure tells you how to run SAPinst to install an SAP instance.
PrerequisitesBefore you start SAPinst, make sure that:
• The user profile for the user who performs the installation has the same authorization asuser QSECOFR.
• TMKSVR is up and running: wrkactjob sbs(TMKSVR00) (there must be a DISPATCHjob!)
• The CD J2EE-JAVA-COMPONENTS is inserted in the CD drive of your Windows host.
You must install SAPinst on every iSeries if you want to perform an upgradefor a central instance or if you want to install a dialog instance on. A TMKSVR,a shared directory and an installation directory must be available on theiSeries machine where you want to run SAPinst. The Windows menu entryexplicitly shows the iSeries target: Start→Programs→SAPinstDB2 400 Kernel on <iSeries_name>

3 Installation Procedures
June 2002 31
Procedure1. On your Windows host, start SAPinst by choosing: Start → Programs → SAPinst DB2
400 Kernel on <iSeries_name> → SAPinst Server with GUI.
2. Follow the dialog boxes and instructions of the SAPinst GUI.
3. In the initial dialog box, establish the connection to iSeries.
4. Enter the user name and password of an iSeries user with rights similar to QSECOFR. Inaddition, the service port for TMKSVR is needed (default: 51515).
5. If you want to install:
a. The SAP J2EE Engine for a central instance, select SAP Central Instance Java Core6.20.
b. A dialog instance, select SAP Web Application Server 6.20 Dialog Instance for DB2on iSeries.
6. Choose Next.
7. Follow the instructions in the SAPinst dialog boxes.
If you have entered all required information during the input phase, SAPinst starts theinstallation and displays the installation progress during the processing phase.
JI (SAP J2EE Engine installation for a central instance) only: After having changed the instance profile, SAPinst displays the Restart theSAP System with the SAP J2EE Engine screen. You now have to:1. Restart your SAP system.2. When the SAP system is up and running again, choose OK.Be aware that it might take a while until all processes are up and runningagain.
Troubleshooting• If an error occurs during the input phase, SAPinst:
a. Stops the installation.
b. Displays a dialog box that informs you about the error.
You can display the log file by choosing View Logs.
Finally you must abort the installation with O.K. and try to solve the problem.
• If an error occurs during the processing phase, SAPinst:
a. Stops the installation.
b. Displays a dialog that informs you about the error.
You can now:
a. Display the log file by choosing View Logs.
b. Try to solve the problem (see SAPinst Troubleshooting Guide at:http://service.sap.com/sapinstfeedback).
c. Retry the installation by choosing Retry.
d. Abort the installation by choosing O.K.
See also: Continuing an Interrupted Installation [Page 39].

4 Post-Installation Activities
32 June 2002
4 Post-Installation Activities
4.1 Installing a JDBC DriverYou must install a database-specific Java Database Connectivity (JDBC) driver when yourSAP J2EE Engine directly wants to connect to the database without using an RFC-connection.
On IBM eServer iSeries V5R1M0, you can install one of the following drivers:
• IBM Toolbox Driver, modification 4
• Native Driver, Version 5
We recommend that you use:• The IBM Toolbox Driver, modification 4 if you have one ore more remote
instances.• The Native Driver, Version 5 if all your instances run locally on the
database server.The following describes the installation procedures for the IBM Toolbox Driver, modification 4and the Native Driver, Version 5.
Installing the IBM Toolbox Driver, Modification 4
You must use the IBM Toolbox driver if you want to run one or more remoteinstances.
PrerequisitesMake sure that you have installed the following software on both your database server andthe SAP J2EE Engine host:
• IBM Toolbox for Java (license program 5722JC1)
• TCP/IP Connectivity Utility for iSeries (license program 5722TC1)
• Java Development Kit 1.3.1 (licensed program 5722JV1, option *BASE and option 5)
Procedure1. Make sure that the SAP system is not up and running (stopsap).
2. Log on to the database host and to the SAPJ2EE Engine host as user QSECOFR.
3. On the database server, check that the QUSER profile is enabled. Enter:
DSPUSRPRF(QUSER)
4. The DDM TCP/IP server and DATABASE and SIGNON host servers need to be startedat IPL. Add the following to the startup script identified by the SQSTRUPPEM systemvalue:
• To start the TCP/IP server, enter:STRTCPSVR SERVER(*DDM)
• To start special host servers, enter:

4 Post-Installation Activities
June 2002 33
STRHOSTSVR SERVER(*DATABASE *SIGNON) RQDPCL(*TCP)
5. On your SAP J2EE Engine host, add a symbolic link to the JDBC driver jar file:ADDLNK OBJ('/QIBM/ProdData/HTTP/Public/jt400/lib/jt400.jar')NEWLNK('/usr/sap/<SID>/<instance_name>/j2ee/cluster/server/services/dbpool/work/jt400.jar')
6. Restart your SAP system (startsap).
7. Start the SAP J2EE Engine Administrator from a Windows host. You can do one of thefollowing:
− Use the command line and enter:<J2EE_drive>:\usr\sap\<SID>\<instance_name>\j2ee\admin\go.bat
− Choose the following from the Windows Start menu:
Programs → SAP J2EE Engine 6.20 → Instance <instance_number> →Administrator
8. Log on to your SAP J2EE Engine host as user Administrator.
9. In the navigation frame of the SAP J2EE Engine Administrator, choose Services → DBPool.
10. Choose Add Driver.
11. Enter the class name of the driver:com.ibm.as400.access.AS400JDBCDriver
12. If required, specify the path for the JDBC driver as follows:/usr/sap/<SID>/<instance_name>/j2ee/cluster/server/services/dbpool/work/jt400.jar
If you want to add a DB pool (a symbolic connection to the database (datasource)) using the above installed JDBC driver, you must specify thedatabase URL as follows: jdbc:as400://<database_server>
Installing the Native Driver, Version 5
You can only use the Native Driver if your SAP J2EE Engine and thedatabase are running on the same host.
PrerequisitesMake sure you have installed the Java Development Kit 1.3.1 (license program 5722JV1,option *BASE and option 5) on your database server.
Procedure1. Make sure that the SAP system is not up and running (stopsap).
2. Log on to your database server as user QSECOFR.
3. Add a symbolic link to the JDBC driver jar file:ADDLNK OBJ('/QIBM/ProdData/OS400/Java400/ext/db2_classes.jar')NEWLNK('/usr/sap/<SID>/<instance_name>/j2ee/cluster/server/services/dbpool/work/db2_classes.jar')

4 Post-Installation Activities
34 June 2002
4. Restart your SAP system (startsap).
5. Start the SAP J2EE Engine Administrator from a Windows host. You can do one of thefollowing:
− Use the command line and enter:<J2EE_drive>:\usr\sap\<SID>\<instance_name>\j2ee\admin\go.bat
− Choose the following from the Windows Start menu:
Programs → SAP J2EE Engine 6.20 → Instance <instance_number> →Administrator
6. Log on to your SAP J2EE Engine host as user Administrator.
7. In the navigation frame of the SAP J2EE Engine Administrator, choose Services → DBPool.
8. Enter the class name of the driver:com.ibm.db2.jdbc.app.DB2Driver
9. If required, specify the path for the JDBC driver as follows:/usr/sap/<SID>/<instance_name>/j2ee/cluster/server/services/dbpool/work/db2_classes.jar
If you want to add a DB Pool (a symbolic connection to the database (datasource)) using the above installed JDBC driver, you must specify thedatabase URL as follows: jdbc:db2:LOCAL
4.2 Downloading the SAP Java Crypto ToolkitUseIf you require the SAP Java Crypto Toolkit, if:
• You want to configure Client SSL (Secure Sockets Layer) for the combined (that is,ABAP and J2EE) SAP system.
• You want to make Java encryption functions available for the SAP system.
Procedure1. For the operation of the SAP J2EE Engine, you require the SAP Java Crypto Toolkit.
For more information, see the SAP Service Marketplace at:http://service.sap.com/swcenter � SAP Cryptographic Library
The SAP Java Crypto Toolkit offered for downloading in the SAP ServiceMarketplace is subject to export control regulations in Germany as the countryof origin and import regulations of your own country. SAP may not yet have acorresponding export license for your user and or company.

4 Post-Installation Activities
June 2002 35
2. You must install the following programs on the iSeries to enable SSL for the OS/400:
• IBM Digital Certificate Manager (DCM), option 34 of OS/400 (5722-SS1)
• TCP/IP Connectivity Utilities for iSeries (5722-TC1)
• One of the IBM Cryptographic Access Provider products: 5722-AC2 (56 bit) or5722-AC3 (128 bit)
The IBM Cryptographic Access Provider product offered by IBM is subject toexport control regulations in the United States as the country of origin andimport regulation of your own country. Some of these products are notavailable in all countries due to government export and import regulations.
• You may also want to install and configure the 4758-023 Cryptographic Coprocessorto use with SSL to speed up SSL handshake processing. If you want to install licenseprogram 4758-023, you must also install option 35, Cryptographic Service Provider.Other requirements for the 4758 Cryptographic Coprocessor can be found on theIBM's web site.
If you use the IBM Toolbox for Java component you need to install at leastone of the iSeries Client encryption products: 5722-CE2 (56 bit) or 5722-CE3(128 bit). Client Access Express needs one of these products in order toestablish the secure connection.
3. After you have downloaded the SAP Java Crypto Toolkit, copy it to the following targetdirectories:
• /usr/sap/<SID>/<Instance Name>/j2ee/cluster/ \server/additional-lib
• /usr/sap/<SID>/<Instance Name>/j2ee/cluster/ \dispatcher/additional-lib
• /usr/sap/<SID>/<Instance Name>/j2ee/cluster/ \admin/lib
4.3 Installing Borland JBuilderFor Remote Support from SAP, you require Borland JBuilder 5 Enterprise on any Windowshost in your SAP system landscape, for example on a programmer's workstation.
You can download Borland JBuilder from http://www.borland.com.

4 Post-Installation Activities
36 June 2002
4.4 Starting and Stopping the SAP SystemUseThe procedures below explain how to start and stop the SAP system after the installation.
PrerequisitesThere are no active jobs for the instance that you have just installed. To check this enter:WRKACTJOB SBS(R3_<instance_number>)
If a job is displayed, stop it with the command:ENDSBS SBS(R3_<instance_number>) OPTION(*IMMED)
Procedure
Starting the SAP System1. Log on to your iSeries as <SID>OPR or <SID>OFR.
2. Enter STARTSAP and choose F4 to prompt for parameters.
3. Enter the SAP system ID (for example, C11) and instance number (for example 90). Werecommend that you retain the default value *ENV for both SAP system ID and theinstance number. *ENV will be replaced by the correct value for the SAP system ID. Inthe case of the instance number, the value *ENV represents the central instance number.A subsystem R3_nn will be started (where nn is the instance number), along with all theassociated SAP services (such as dispatcher, work processes, spool). SpecifyWAIT(*YES) to make sure that the system is up and running on termination ofSTARTSAP.
4. To check whether your SAP system started successfully, enter:WRKACTJOB SBS(R3_nn)
5. On the next screen, check the entry in the first line of the Status column on the right ofthe screen. If your SAP system started correctly, this field should contain the value RUN(running), SELW (select wait) SEMW (semaphore wait) or DEQW (waiting for the completionof a dequeue operation). It may take several minutes for the file system to reach thisstate.
Stopping the SAP System1. Log on your iSeries system as <SID>OFR or <SID>OPR.
2. Enter option 1 (General SAP Tasks on the SAP Main Menu. The General SAP Tasksmenu appears.
3. Enter option 3 (Stop SAP System).Alternatively, enter the iSeries command STOPSAP and choose F4 to prompt forparameters.
4. For SAP instance, enter the number of the instance to be stopped, for example, 90.
5. To make sure that the system has been shut down on termination of STOPSAP, specifyWAIT(*YES).

4 Post-Installation Activities
June 2002 37
4.5 Logging on to the SAP SystemEach SAP system contains the users SAP* and DDIC. They have the following initialpasswords:
User Initial PasswordSAP* 06071992
DDIC 19920706
For security reasons we strongly recommended that you change these SAP systempasswords as soon as possible.
ProcedureLog on as user SAP* (password: 06071992) and test the following:
1. Enter a new password and confirm it in the text boxes.
2. Call transaction SM50.
The services available for the instance should now be displayed, that is, dialog, update,enqueue, background, and spool.
If the display is empty, check whether the message server is running using the iSeriescommand WRKACTJOB (Work with Active Jobs). The process name is MSG_SERVER. Ifthe process is not running, /usr/sap/<SID>/DVEBMGS<no.>/work/dev_ms containsmore information.
3. Check the system log with transaction SM21.
4.6 Removing the SAPinst Installation FilesUseYou use this procedure to increase disk space after the installation by deleting the SAPinstinstallation directory and its subdirectories as well as TMSKVR.
The Setup.cmd program has created an installation directory and an entry into the WindowsStart menu. Beside that a new job is running on the iSeries: TMKSVR.
Prerequisites• You have completed the SAP system installation.
• The SAP system is up and running.

4 Post-Installation Activities
38 June 2002
Procedure
Do not delete the log files unless you are sure that you will not need themagain. Do not delete log files other than those in the paths given here.
1. Open the Windows task manager and check that all sapinst.exe processes areterminated. Otherwise, the sapinst.exe file cannot be deleted in the next step.
2. Remove SAPinst by choosing:
Start → Programs → SAPinst DB2 400 Kernel on <iSeries_name> → Remove SAPinstfiles.
3. Log on as an iSeries super user, for example, QSECOFR and add TMKSVR to your librarylist. Enter:addlible TMKSVR
4. Stop and delete job TMKSVR on iSeries. Enter:
dlttmksvr 0
5. Delete the TMSKSVR library from iSeries. Enter:
dltlib TMKSVR
6. Delete <instdir> recursively with the command:
rrm '<instdir>'
rrm '/usr/sap/SAPinst.

5 Additional Information
June 2002 39
5 Additional Information
5.1 Continuing an Interrupted Installation withSAPinstUseAs SAPinst does not abort the installation in error situations, you can continue an interruptedinstallation if:
• You have not canceled the installation.
• You have already canceled the installation.
Procedure• You have not canceled the installation.
The error dialog box is still displayed and SAPinst is waiting for your input.
Proceed as follows:
In the error dialog box, choose Retry.
SAPinst now retries the installation step.
• You have already canceled the installation.
That is, the installation was aborted and you want to continue it. Since SAPinst recordsthe installation progress in the keydb.xml file, it can continue the installation from thefailed step without repeating previous steps.
You have two alternatives:
a. Continue the installation.
b. Restart the installation from scratch, that is, start the installation with the keydb.xmldefault file as delivered.
These two alternatives are described in the tables below.
In some cases, you must uninstall installed components, before you repeatthe installation from scratch. For example, this applies to an SAP systeminstallation. For more information, see the uninstallation description in thecorresponding installation guide.
How to Proceed on the Windows HostContinuing the Installation1. Check if a SAPinst GUI Java process is still running, and if so, delete it by looking for
javaw.exe under Processes in your Task Manager.
2. Choose Start→Programs→<menu entry>→SAPinst Server with GUI (or SAPinst GUI ifyou want to start the GUI only or SAPinst Server only if you want to start SAPinst withoutthe GUI).

5 Additional Information
40 June 2002
Restarting from the Beginning1. Check if a SAPinst GUI Java process is still running, and if so, delete it by looking for
javaw.exe under Processes in your Task Manager.
2. Choose Start→Programs→<SAPinst...on<iSeries_name>→Prepare New InstallationCurrent log and command files are now copied to a backup directory that indicates thedate and time of the backup:
<SAPinst_dir>\log<month>_<date><time>
3. Choose Start→Programs→<menu entry>→SAPinst Server with GUI (or SAPinst GUI ifyou want to start the GUI only or SAPinst Server only if you want to start SAPinst withoutthe GUI).
5.2 Additional Information About the SAP J2EEEngine
For additional information in the SAP Library (choose Help � SAP Library inyour SAP system or access the SAP Library at: http://help.sap.com �SAP Web Application Server), choose mySAP Technology Components �SAP Web Application Server � SAP J2EE Engine.
File System Structure of the SAP J2EE Engine InstallationAfter the installation of the SAP J2EE Engine, the following file system structure applies forthe SAP J2EE Engine (j2ee) and its Software Delivery Manager (sdm, see The SoftwareDelivery Manager below):
/ or <DRIVE>
usr
sap
<SAPSID>
j2ee sdm
... ...
/ or <DRIVE>
usr
sap
<SAPSID>
<Instance Name>
j2ee
...
Central Instance Dialog Instance
<Instance Name>

5 Additional Information
June 2002 41
For example, the file system structure may look as follows:− On a central instance with SAP system ID C11 and instance name
DVEBMGS00 on iSeries, the SAP J2EE Engine is installed to/usr/sap/C11/DVEBMGS00/j2ee and the corresponding SDM isinstalled to /usr/sap/C11/DVEBMGS00/sdm.
− On a dialog instance with instance name D01 on Windows, the SAP J2EEEngine is installed to c:\usr\sap\C11\D01\j2ee. No SDM isinstalled.
Ports Used by the SAP J2EE EngineThe ports used by the SAP J2EE Engine are listed in the prepconf.log file located in theinstallation directory of the SAP J2EE Engine (see section above).
Administrating of the SAP J2EE EngineYou can administrate the SAP J2EE Engine from within the SAP Web Application Server.
1. Call transaction SMICM in the SAP Web Application Server.
2. Choose Administration � J2EE-Server.
The following functions are available:
• Send soft shutdown (with or without restart)
• Send hard shutdown (with or without restart)
• End the process (with or without a restart)
• Set the restart flag of the SAP J2EE Engine
For additional information, see the SAP Library (choose Help � SAP Libraryin your SAP System or access the SAP Library at: http://help.sap.com� SAP Web Application Server) and choose mySAP TechnologyComponents � SAP Web Application Server � SAP J2EE Engine.
Deactivation of the SAP J2EE EngineAfter the installation, the SAP J2EE Engine is activated. If you do not want to use the SAPJ2EE Engine, you can deactivate it by setting parameter rdisp/j2ee_start to 0 in theinstance profile of every installed SAP instance:
• On iSeries, log on as user QSECOFR and edit the file/<SAPSID_INSTANCENAME_HOSTNAME> in directory/usr/sap/<SID>/sys/profile

5 Additional Information
42 June 2002
The following is an exemplary extraction of an edited iSeries instance profile:...rdisp/max_priv_time = 0rdisp/j2ee_start = 0exe/j2ee = /usr/sap/MB2/DVEBMGS45/j2ee/cluster/dispatcher/gordisp/j2ee_timeout = 60rdisp/j2ee_error = 10icm/HTTP/j2ee_0 = PREFIX=/,HOST=localhost,CONN=0-10,PORT=33609rsdb/ntab/dblength2_wa = 1...
The Software Delivery ManagerEvery SAP J2EE Engine on a central instance and every SAP J2EE Engine installedstandalone requires a software delivery manager (SDM). SDM is a tool with which you canmanage and deploy software packages that you receive from SAP.
To manage and deploy SAP applications in programming languages otherthan ABAP, the SDM is integrated into the SAP installation tool SAPinst.Therefore, the current section only contains background information.
Software Delivery Catalog (SWC)
The software packages are delivered in a Software Delivery Catalog (SWC). The SWCcontains the meta descriptions of its Software Delivery Archives, which it bundles as logicaldeployment units.
Software Delivery Archive (SDA)
The Software Delivery Archive (SDA) is the delivery format for SAP applications inprogramming languages other than ABAP. It is a ZIP-compatible archive format that can beused as a container for other archives. The SDA contains the manifest information of itsarchives (such as jar, war, ear) and an SAP manifest, which contains additional softwarelogistics information.
SDAs can be nested recursively, with the manifest information being passed on to the SDA atthe highest level.
An SDA that does not contain any other archives is an atomic SDA. This is also the smallestunit that you can deploy on a local host. Furthermore, the SDA is the smallest unit for whichpatches can be created and delivered.
Deployment
The deployment is the final step in the software delivery process; it involves the deploymentof available software packages –Software Delivery Archives (SDAs)– in the runtimeenvironment of the SAP systems.
When deploying SDAs, the Software Delivery Manager stores the data in the SDMRepository, where it then manages the installed archives. The SDM recognizesdependencies between archives and provides support when you install and maintain sharedapplications.


