J-Synckerj-syncker.weebly.com/uploads/9/8/2/3/9823848/tutorialjsyncker-eng.pdf1. Getting started The...
14
J-Syncker A computational implementation of the Schillinger System of Musical Composition. Giuliana Silva Bezerra Departamento de Matemática e Informática Aplicada (DIMAp) Universidade Federal do Rio Grande do Norte (UFRN) Natal, Brasil E-mail: [email protected] 1
Transcript of J-Synckerj-syncker.weebly.com/uploads/9/8/2/3/9823848/tutorialjsyncker-eng.pdf1. Getting started The...

J-SynckerA computational implementation of the Schillinger System of Musical Composition.
Giuliana Silva BezerraDepartamento de Matemática e Informática Aplicada (DIMAp)Universidade Federal do Rio Grande do Norte (UFRN)Natal, BrasilE-mail: [email protected]
1

Sumário
1. Getting started...........................................................................................3
2. Rhythms.....................................................................................................4
2.1. Synchronization of generators............................................................4
2.2. Parcelling of duration units.................................................................5
2.3. Set rotation........................................................................................7
2.4. Free edition........................................................................................7
2.5. Classification of rhythms according to their densities (difficulty).......8
3. Melodies.....................................................................................................8
4. Playing......................................................................................................11
4.1. Tempo................................................................................................12
4.2. Instruments.......................................................................................12
5. Saving files...............................................................................................12
5.1. MIDI files............................................................................................12
5.2. Report files........................................................................................13
6. Shortcuts..................................................................................................13
2

1. Getting started
The J-Syncker allows to obtain pre-compositional material, using the techniques present in the Schillinger System of Musical Composition (SSCM). To run the application just has a Java virtual machine. It is available for download at https://sourceforge.net/projects/j-syncker/files/latest/download. The project, with its source code and documentation is hosted in the SVN repository https://mignone.musica.ufrn.br/repo6. You can also find the application on its official website (http://j-syncker.weebly.com), where there is news about the project, contact forms and tutorials.
After downloading the J-Syncker, you must extract the package and open the folder generated. It is possible to find the file with extension '. jar', which opens the application. If you are using Windows OS, just double click the mouse to open the file. Users who use the Linux OS should open the terminal, navigate to the application folder and type the command 'java-jar jsyncker0.4.0.jar'. The name of the file '.jar' depends on the version of the application (in this example the application version is 0.4.0). When starting the application the following screen will be displayed, varying slightly according to your operating system.
Main menubar
Display
Numeric buttons
Musical buttons
Functional buttons
Figure1 – J-Syncker's interface
The main menu contains reporting features of composition, MIDI files containing the melodies generated, choice of instruments and tempos, as well as the application language (English / Portuguese). The display is where the information is shown. All user-supplied data can be viewed on the display of the J-Syncker. The numeric buttons are used to specify the generators that make up rhythms and also to specify the heights
3
of a specific note. The music buttons allow the user to specify notes and accidents. Initially the music buttons are disabled because to provide a source of notes is necessary to generate a rhythm, both necessary for a melody. The functional buttons perform the main operations of the calculator, and additional operations that will be seen in the following sections.
2. Rhythms
The J-Syncker allows you to create rhythms using techniques from SSCM. One technique is the synchronization of pulse generators (see section 2.1), resulting in a set of attacks (rhythm). The rhythms are obtained by the interference between 'n' generators. The generators are represented by integers. For example, the generator represented by the number '2 'varies every two times, that is each attack takes 2 units. In J-Syncker, a unit by default, corresponds to an eighth. Another way to obtain a rhythm is the parceling of units. To perform the parceling, you must specify the number of units occupied by the rhythm to be generated. For example, given the number 4 as input to the parcelador, rhythms [4], [3.1] [2.2] and [2,1,1] are generated. Note that these rhythms are sums that have 1 to n-1 parcels. If you add up the portions of rhythms generated, their sum is equal to the number given as input.
2.1. Synchronization of generators
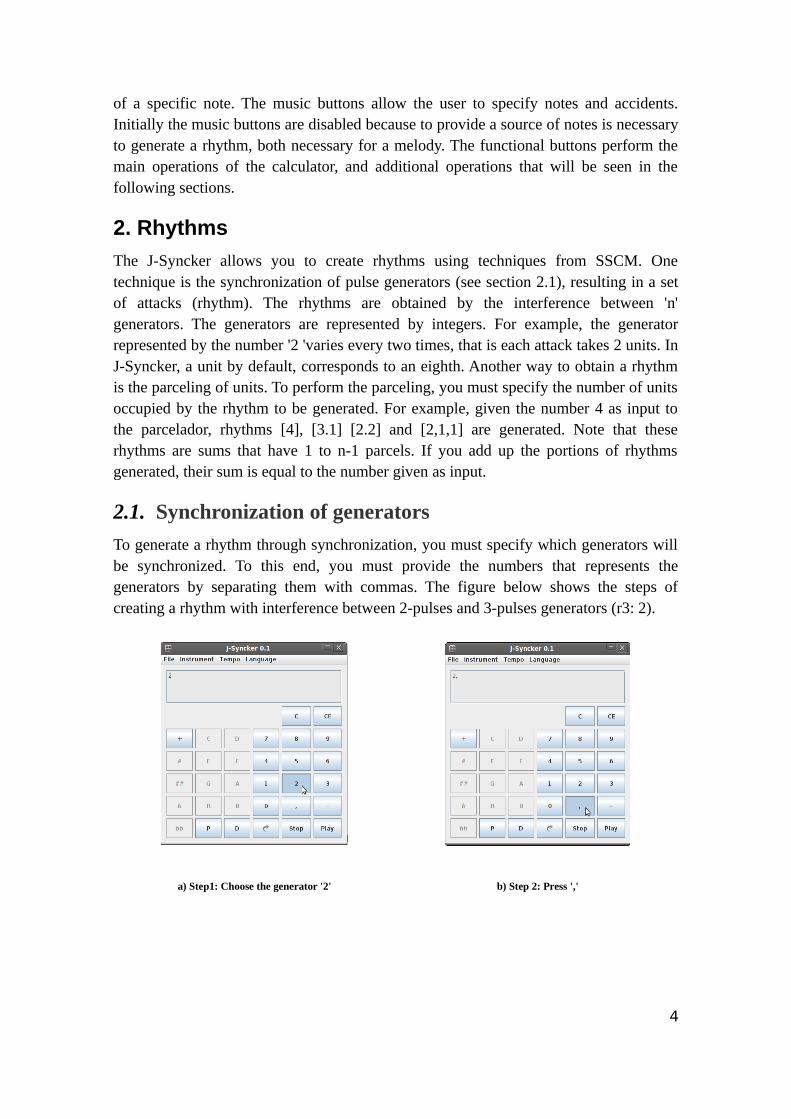
To generate a rhythm through synchronization, you must specify which generators will be synchronized. To this end, you must provide the numbers that represents the generators by separating them with commas. The figure below shows the steps of creating a rhythm with interference between 2-pulses and 3-pulses generators (r3: 2).
a) Step1: Choose the generator '2' b) Step 2: Press ','
4

c) Step 3: Choose the generator '3' d) Step 4: Press '='
Figure2 – Steps to rhythm creation through generators
To sync 'n' generators, just provide them, separating them with commas. The generation process is identical to that shown above.
2.2. Parcelling of duration units
Rhythms have a duration unit. For example, the rhythm [2,1,1,2] has four units, because the sum of their attack is 4. Through this number of units, the J-syncker generates rhythms that meet this requirement. The figure below shows the steps of the process of parceling.
a) Step1: Choose the number '6' b) Step2: Press '='
Figure3 – Steps for creating rhythms through the parcelling of units
The rhythms generated by the J-Syncker are displayed of peculiar way. In each line of the display are showed rhythms that have the same number of parcels. In the example
5

illustrated in the figure above, the first line of the display contains the rhythms that have only one parcel, the second contains rhythms with 2 parcels, and so on.
You can provide more restrictions about the desired rhythm, optimizing the search for solution. Through the use of 'P' button, you can specify the number of rhythm's parcels. The syntax for using this function is: P <number of unidades> <number of parcels>. The figure below shows the process of parceling with limited parcels number.
a) Step1: Choose the number '6' b) Step2: Press 'P'
c) Step3: Choose the parcel number '3' d) Step4: Press '='
Figure4 – Parcelling of units with limited parcels number.
As illustrated in the figure above, given the value '6P3' as input to the application, the result are the rhythms that have six units and three parcels.
2.3. Set rotation
The operations of rhythms generation have a constraint. They do not generate rhythms resulting from parcels rotation. For example, the result of the synchronizing between a
6

3-pulse and 2-pulse generators obtains the rhythm [2,1,1,2] but can not obtain the rhythm [2,2,1,1]. The operation of parceling has the same restriction. To avoid this, the J-Syncker has the rotate function, represented by the circular arrow symbol. Using this function you can get most of the existing rhythms with duration and number of parcels specified. For example, given the rhythm [2,1,1,2], through rotations is possible to get the rhythms [2,2,1,1] [1,2,2,1] and [1,1,2,2]. You can also rotate melodies (see section 3).
2.4. Free edition
The operations shown in the previous sections allow the generation of a large number of rhythms, but not all possible rhythms. For example, you can generate the rhythm [2,1,1,2], by synchronizing generators 2 and 3 units, you can rotate it getting several others, you can use the parceling of units, but not can generate all rhythms resulting from combination of the specified attacks. For example, the rhythms [1,2,1,2] and [2,1,2,1] can not be created through the operations shown in the previous sections. To solve this problem, the J-Syncker allows the user to freely edit the rhythm. Simply choose the rhythm's attacks using the numeric keys. The rhythm selected may be used later for melodies generation (see section 3).
2.5. Classification of rhythms according to their densities (difficulty)
One feature that distinguishes a rhythm of another is the degree of density. Denser rhythms are generally more difficult and so it is important evaluate the degree of rhythmic density during the composition process. The J-Syncker lets you sort the rhythms generated by the button labeled 'D'. The figure below shows the steps necessary to classify a rhythm.
a) Generates a rhythm b) Press 'D'
7

Figure5 – Classification of rhythms
The classifier rhythms from J-Syncker is still in testing phase, so it is not safe for users to use the results obtained without consulting other sources about these results.
3. Melodies
Melodies can be created by the synchronization of a rhythm and a motive of pitches. Schillinger illustrates the process using its famous square waves. The J-Syncker implements this process and produces the desired melody. To provide a rhythm, just use one of the methods described in the previous section. The motive of notes can be edited through the musical notes and rests ("R" button = rest). The process of creating melodies can be viewed in the figure below:
a) Step1: Generation of a rhythm by a method showed in section 2.
b) Step2: Press '+'
8

c) Step3: Choose a picth d) Step4: Choose the accidentals
e)Step5: Chooses the octave ( 5ª octave is default) f)Step6: Press ',' and choose another pitches
g)Step7: Press '='
Figure6 – Steps to melodies generation
You can create melodies providing rhythms directly. The process is similar to the above but it is not necessary to generate a previously rhythm. The first step would be to choose attacks that make up the rhythm, as shown in Figure 1. Then just press '+' and follow the remaining steps illustrated in the figure above. The results generated will be the same, because the rhythm provided is the same. This does not occur when the parceling operation is used to obtain a rhythm. In this case the user must choose which rhythm will be used for generating melodies. The figure below shows an example of generation of melodies using a rhythm generated by the operation of parceling of units.
9

a) Step1: Press '6' to generate rhythms with 6 units. b) Step2: Press '='
c) Step3: Select the desired rhythm and press 'CTRL+C' to copy it
d) Step 4: Press 'CTRL+V' to paste the rhythm previously copied
Figure7 – Steps to creation of melodies by parceling of attacks
After step 4, shown above, the other steps for generating melody are the same as Figure 6, from step 2.
4. Playing
When generating a rhythm or melody, the user of J-Syncker can execute them. Thus, it is possible to have a preview of compositional product. Simply press "Play". You can also pause or stop the execution, using the "Play" and "Stop" buttons.
10

Rhythms can be heard only by a percussion instrument, as the system default. When a user executes a rhythm, he hears it repeatedly, until the end the execution. All the rhythms generated in the ways described in section 2 can be executed.
Melodies can also be heard by the music player from J-Syncker. Performing melodies allows the choice of musical instruments. That way you can hear the same melody on piano and trumpet, for example (see section 4.1).
Additionally you can specify the tempo in which the melody or rhythm will be executed. The following section discusses the available settings for the music player application.
4.1. Tempo
The menu "Tempo" contains the classic tempos, along with its frequency in BPM. To choose a different tempo you can click two times in the text field located in the "Other" menu and press the "Enter". If the user decide to alter this tempo in the future, simply choose another tempo among those available, or edit a new one.
4.2. Instruments
There are 127 choices of musical instruments available on J-Syncker. These tools are organized into palettes, each containing eight palettes of musical instruments belonging to a specific category. The figure below shows the appearance of this menu of instruments.
Figure8 – Instruments
To access this menu, simply click the menu "Tools". The names given to these instruments follow the MIDI standard.
5. Saving files
The material generated by the application can be saved in different ways. All operations allow you to generate reports containing useful information about specific musical product. MIDI files can be generated through melodies, and later used for other tasks. The following sections show in detail the process of saving files.
11

5.1. MIDI files
When composing a melody, you can save it as a MIDI file. Besides being a simple and light format, it is very used by programs of musical notation generation and other more sophisticated operations. If you do not want to work with MIDI files, you can convert this file to other formats using an appropriate program.
To save a song simply click on File-> Save As and select the type of file as MIDI file. The figure below illustrates this process.
a) Step1: Generate a melody and choose the desired configurations (see section 4)
b) Step 2: Click in menu File->Save as, choose the MIDI file type and click in Save
Figure9 – Steps for MIDI files creation
5.2. Report files
Information about the composition process can be saved by the user of J-Syncker. This information is saved in TXT format and contains the relevant data of the operation done by the user. The saving process is the same as figure9, except that, instead of selecting the MIDI file type, the Text file type is chosen. The table below shows examples of these reports for each application operation.
12

J-Syncker 0.1.0 - 12/02/2012 09:42 PM
Generation of rhythms
Generators: 2,3
Rhythm: 2,1,1,2
Attacks: 4
Units: 6
J-Syncker 0.1.0 - 12/02/2012 09:48 PM
Generation of melodies
Rhythm: 2,1,1,2
Pitch: C,D,E
Melody: C52,D51,E51,C52,D52,E51,C51,D52,E52,C51,D51,E52
a) Rhythms generation b) Melodies generation
J-Syncker 0.1.0 - 12/02/2012 09:51 PM
Parceling of attacks
Units: 5
Rhythm:
5
4,1 3,2
3,1,1 2,2,1
2,1,1,1
J-Syncker 0.1.0 - 12/02/2012 09:57 PM
Classification of rhythms
Rhythm: 2,1,1,2
Degree of density: 0.10308819866892181 LOW
c) Parceling of units d) Rhythms classification
Figure10 – Composition reports
6. Shortcuts
The table below contains the list of all the shortcuts available in J-Syncker as a way to optimize the composition process.
Buttons / Menus Shortcuts
0 1 2 3 4 5 6 7 8 9 Same symbols from keyboard
13

C D E F G A B R Same symbols from keyboard
# Shift+3
b Shift+b
+ p , Same symbols from keyboard
C CE Delete Backspace
Stop Play End Space
Right
D Shift + d
= = ou Enter
Save as Ctrl + s
Instruments Ctrl + i
Table1 – Shortcuts
14