iWay Adapter for HL7 for BEA WebLogic User’s Guide … Adapter for HL7 for BEA WebLogic User’s...
240
iWay iWay Adapter for HL7 for BEA WebLogic User’s Guide Version 5 Release 5 DN3501517.0205 February 11, 2005
Transcript of iWay Adapter for HL7 for BEA WebLogic User’s Guide … Adapter for HL7 for BEA WebLogic User’s...

iWayiWay Adapter for HL7 for BEA WebLogic User’s GuideVersion 5 Release 5
DN3501517.0205
February 11, 2005

EDA, EDA/SQL, FIDEL, FOCCALC, FOCUS, FOCUS Fusion, FOCUS Vision, Hospital-Trac, Information Builders, the Information Builders logo, Parlay, PC/FOCUS, SmartMart, SmartMode, SNAPpack, TableTalk, WALDO, Web390, WebFOCUS and WorldMART are registered trademarks, and iWay and iWay Software are trademarks of Information Builders, Inc.
Due to the nature of this material, this document refers to numerous hardware and software products by their trademarks. In most, if not all cases, these designations are claimed as trademarks or registered trademarks by their respective companies. It is not this publisher’s intent to use any of these names generically. The reader is therefore cautioned to investigate all claimed trademark rights before using any of these names other than to refer to the product described.
Copyright © 2005, by Information Builders, Inc and iWay Software. All rights reserved. Patent Pending. This manual, or parts thereof, may not be reproduced in any form without the written permission of Information Builders, Inc.

PrefaceThis documentation describes how to use the iWay Adapter for HL7 for BEA WebLogic. It is intended for developers to enable them to parse, transform, validate, store, and integrate health care information into the existing enterprise and pass information electronically, to partners, in HL7 mandated form.
How This Manual Is OrganizedThe following table lists the numbers and titles of the chapters and the appendix for this manual with a brief description of the contents of each chapter and appendix.
Chapter/Appendix Contents
1 Introducing the iWay Adapter for HL7 for BEA WebLogic
Describes the components of the iWay Adapter for HL7 for BEA WebLogic and the process flow for the adapter.
2 Creating XML Schemas or Web Services for the iWay Adapter for HL7 for BEA WebLogic
Describes how to use iWay Application Explorer to create XML schemas and Web services for HL7.
3 Listening for Events in HL7
Describes how to use iWay Application Explorer to configure the adapter to listen for CICS events.
4 Using Web Services Policy-Based Security
Describes how to configure Web services policy-based security.
5 Management and Monitoring
Describes how you can use managing and monitoring tools provided by iBSE and JCA to gauge the performance of your run-time environment.
6 Customizing HL7 Messages
Describes customizing HL7 messages using the Reference Interface Model (RIM).
A Using Application Explorer in BEA WebLogic Workshop to Create XML Schemas and Web Services
Describes how to use iWay Java Swing Application Explorer running in BEA WebLogic Workshop to create XML schemas for CICS.
iWay Adapter for HL7 for BEA WebLogic User’s Guide iii

Documentation ConventionsThe following table lists the conventions that apply in this manual and a description of each.
B Using Application Explorer in BEA WebLogic Workshop for Event Handling
Describes how to use iWay Java Swing Application Explorer running in BEA WebLogic Workshop to create events for HL7. In addition, this section provides information on deploying events in a clustered BEA WebLogic environment.
C HL7 Document Index Documents the reference material supplied with the iWay Adapter for HL7.
Convention Description
THIS TYPEFACE or this typeface
Denotes syntax that you must enter exactly as shown.
this typeface Represents a placeholder (or variable) in syntax for a value that you or the system must supply.
underscore Indicates a default setting.
this typeface Represents a placeholder (or variable) in a text paragraph, a cross-reference, or an important term.
this typeface Highlights a file name or command in a text paragraph that must be lowercase.
this typeface Indicates a button, menu item, or dialog box option you can click or select.
Key + Key Indicates keys that you must press simultaneously.
{ } Indicates two or three choices; type one of them, not the braces.
| Separates mutually exclusive choices in syntax. Type one of them, not the symbol.
... Indicates that you can enter a parameter multiple times. Type only the parameter, not the ellipsis points (…).
iv iWay Software

Preface
Related PublicationsVisit our World Wide Web site, http://www.iwaysoftware.com, to view a current listing of our publications and to place an order. You can also contact the Publications Order Department at (800) 969-4636.
Customer SupportDo you have questions about the iWay Adapter for HL7 for BEA WebLogic?
If you bought the product from a vendor other than iWay Software, contact your distributor.
If you bought the product directly from iWay Software, call Information Builders Customer Support Service (CSS) at (800) 736-6130 or (212) 736-6130. Customer Support Consultants are available Monday through Friday between 8:00 a.m. and 8:00 p.m. EST to address all your iWay Adapter for HL7 for BEA WebLogic questions. Information Builders consultants can also give you general guidance regarding product capabilities and documentation. Please be ready to provide your six-digit site code (xxxx.xx) when you call.
You can also access support services electronically, 24 hours a day, with InfoResponse Online. InfoResponse Online is accessible through our World Wide Web site, http://www.informationbuilders.com. It connects you to the tracking system and known-problem database at the Information Builders support center. Registered users can open, update, and view the status of cases in the tracking system and read descriptions of reported software issues. New users can register immediately for this service. The technical support section of www.informationbuilders.com also provides usage techniques, diagnostic tips, and answers to frequently asked questions.
To learn about the full range of available support services, ask your Information Builders representative about InfoResponse Online, or call (800) 969-INFO.
.
.
.
Indicates that there are (or could be) intervening or additional commands.
Convention Description
iWay Adapter for HL7 for BEA WebLogic User’s Guide v

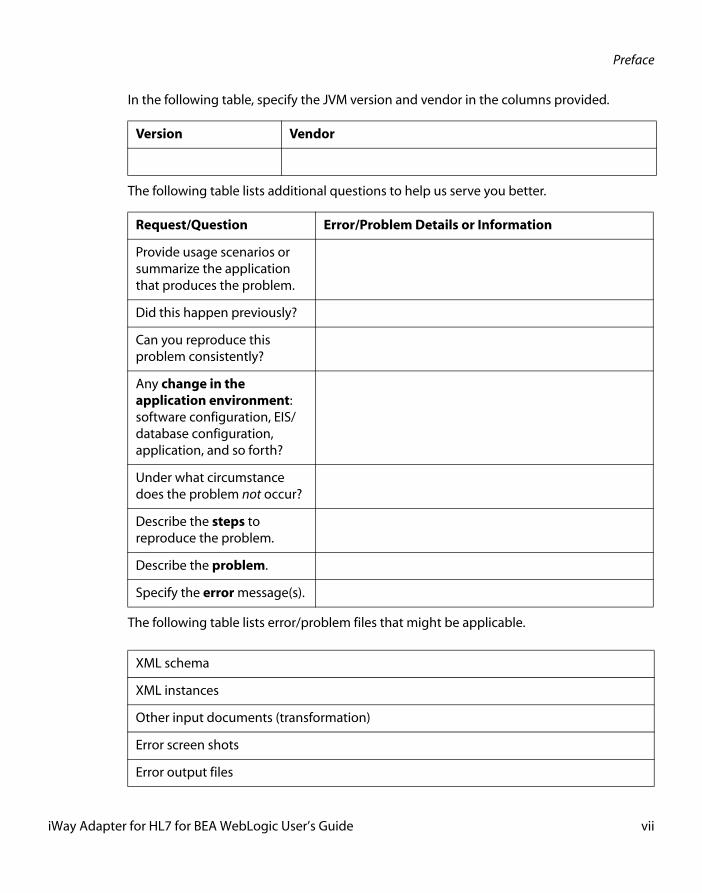
Help Us to Serve You BetterTo help our consultants answer your questions effectively, please be prepared to provide specifications and sample files and to answer questions about errors and problems.
The following tables list the specifications our consultants require.
The following table lists components. Specify the version in the column provided.
The following table lists the types of Application Explorer. Specify the version (and platform, if different than listed previously) in the columns provided.
Platform
Operating System
OS Version
Product List
Adapters
Adapter Deployment
For example, JCA, or Business Services Engine.
Container Version
Component Version
iWay Adapter
EIS (DBMS/APP)
HOTFIX / Service Pack
Application Explorer Type
Version Platform
Swing
Servlet
ASP
vi iWay Software
Preface
In the following table, specify the JVM version and vendor in the columns provided.
The following table lists additional questions to help us serve you better.
The following table lists error/problem files that might be applicable.
Version Vendor
Request/Question Error/Problem Details or Information
Provide usage scenarios or summarize the application that produces the problem.
Did this happen previously?
Can you reproduce this problem consistently?
Any change in the application environment: software configuration, EIS/database configuration, application, and so forth?
Under what circumstance does the problem not occur?
Describe the steps to reproduce the problem.
Describe the problem.
Specify the error message(s).
XML schema
XML instances
Other input documents (transformation)
Error screen shots
Error output files
iWay Adapter for HL7 for BEA WebLogic User’s Guide vii

User Feedback
User FeedbackIn an effort to produce effective documentation, the Documentation Services staff welcomes your opinions regarding this manual. Please use the Reader Comments form at the end of this manual to communicate suggestions for improving this publication or to alert us to corrections. You also can go to our Web site, http://www.iwaysoftware.com and use the Documentation Feedback form.
Thank you, in advance, for your comments.
iWay Software Training and Professional ServicesInterested in training? Our Education Department offers a wide variety of training courses for iWay Software and other Information Builders products.
For information on course descriptions, locations, and dates, or to register for classes, visit our World Wide Web site, http://www.iwaysoftware.com or call (800) 969-INFO to speak to an Education Representative.
Interested in technical assistance for your implementation? Our Professional Services department provides expert design, systems architecture, implementation, and project management services for all your business integration projects. For information, visit our World Wide Web site, http://www.iwaysoftware.com.
Trace and log files
Log transaction
XML schema
viii iWay Software

Contents1. Introducing the iWay Adapter for HL7 for BEA WebLogic . . . . . . . . . . . . . . . . . . . . .1-1
Process Flow for the iWay Adapter for HL7 for BEA WebLogic . . . . . . . . . . . . . . . . . . . . . . . . . . . . . . . . . . .1-2Inbound Processing . . . . . . . . . . . . . . . . . . . . . . . . . . . . . . . . . . . . . . . . . . . . . . . . . . . . . . . . . . . . . . . . . . . . .1-3Outbound Processing . . . . . . . . . . . . . . . . . . . . . . . . . . . . . . . . . . . . . . . . . . . . . . . . . . . . . . . . . . . . . . . . . . .1-4
Components of the iWay Adapter for HL7 for BEA WebLogic . . . . . . . . . . . . . . . . . . . . . . . . . . . . . . . . . . .1-5Data Dictionaries . . . . . . . . . . . . . . . . . . . . . . . . . . . . . . . . . . . . . . . . . . . . . . . . . . . . . . . . . . . . . . . . . . . . . . . .1-5Messages . . . . . . . . . . . . . . . . . . . . . . . . . . . . . . . . . . . . . . . . . . . . . . . . . . . . . . . . . . . . . . . . . . . . . . . . . . . . . . .1-5Segments . . . . . . . . . . . . . . . . . . . . . . . . . . . . . . . . . . . . . . . . . . . . . . . . . . . . . . . . . . . . . . . . . . . . . . . . . . . . . . .1-6Fields . . . . . . . . . . . . . . . . . . . . . . . . . . . . . . . . . . . . . . . . . . . . . . . . . . . . . . . . . . . . . . . . . . . . . . . . . . . . . . . . . . .1-6Data Types . . . . . . . . . . . . . . . . . . . . . . . . . . . . . . . . . . . . . . . . . . . . . . . . . . . . . . . . . . . . . . . . . . . . . . . . . . . . . .1-7
Deployment Information for the iWay Adapter for HL7 for BEA WebLogic . . . . . . . . . . . . . . . . . . . . . . .1-8Deployment Roadmap . . . . . . . . . . . . . . . . . . . . . . . . . . . . . . . . . . . . . . . . . . . . . . . . . . . . . . . . . . . . . . . . . .1-9iWay Application Explorer . . . . . . . . . . . . . . . . . . . . . . . . . . . . . . . . . . . . . . . . . . . . . . . . . . . . . . . . . . . . . . .1-9The Integration Business Services Engine (iBSE) . . . . . . . . . . . . . . . . . . . . . . . . . . . . . . . . . . . . . . . . . .1-9The iWay Enterprise Connector for J2EE Connector Architecture (JCA) . . . . . . . . . . . . . . . . . . . 1-10
2. Creating XML Schemas or Web Services for the iWay Adapter for HL7 for BEA We-bLogic 2-1
Overview . . . . . . . . . . . . . . . . . . . . . . . . . . . . . . . . . . . . . . . . . . . . . . . . . . . . . . . . . . . . . . . . . . . . . . . . . . . . . . . . . . . . .2-2Starting iWay Servlet Application Explorer . . . . . . . . . . . . . . . . . . . . . . . . . . . . . . . . . . . . . . . . . . . . . . . . . . . . .2-2Establishing a Target for HL7 . . . . . . . . . . . . . . . . . . . . . . . . . . . . . . . . . . . . . . . . . . . . . . . . . . . . . . . . . . . . . . . . . .2-4Creating an XML Schema . . . . . . . . . . . . . . . . . . . . . . . . . . . . . . . . . . . . . . . . . . . . . . . . . . . . . . . . . . . . . . . . . . . . 2-13Creating a Web Service . . . . . . . . . . . . . . . . . . . . . . . . . . . . . . . . . . . . . . . . . . . . . . . . . . . . . . . . . . . . . . . . . . . . . 2-17
Testing a Web Service for a Business Object . . . . . . . . . . . . . . . . . . . . . . . . . . . . . . . . . . . . . . . . . . . . 2-21
3. Listening for Events in HL7 . . . . . . . . . . . . . . . . . . . . . . . . . . . . . . . . . . . . . . . . . . . . . . . . .3-1Understanding iWay Event Functionality . . . . . . . . . . . . . . . . . . . . . . . . . . . . . . . . . . . . . . . . . . . . . . . . . . . . . .3-2Creating an Event Port . . . . . . . . . . . . . . . . . . . . . . . . . . . . . . . . . . . . . . . . . . . . . . . . . . . . . . . . . . . . . . . . . . . . . . . .3-2
Editing or Deleting an Event Port . . . . . . . . . . . . . . . . . . . . . . . . . . . . . . . . . . . . . . . . . . . . . . . . . . . . . . 3-12Creating a Channel . . . . . . . . . . . . . . . . . . . . . . . . . . . . . . . . . . . . . . . . . . . . . . . . . . . . . . . . . . . . . . . . . . . . . . . . . 3-14
4. Using Web Services Policy-Based Security . . . . . . . . . . . . . . . . . . . . . . . . . . . . . . . . . .4-1Integration Business Services Policy-Based Security . . . . . . . . . . . . . . . . . . . . . . . . . . . . . . . . . . . . . . . . . . . .4-2Configuring Integration Business Services Policy-Based Security . . . . . . . . . . . . . . . . . . . . . . . . . . . . . . . .4-3
5. Management and Monitoring . . . . . . . . . . . . . . . . . . . . . . . . . . . . . . . . . . . . . . . . . . . . . .5-1Managing and Monitoring Services and Events Using iBSE . . . . . . . . . . . . . . . . . . . . . . . . . . . . . . . . . . . . .5-2Managing and Monitoring Services and Events Using the JCA Test Tool . . . . . . . . . . . . . . . . . . . . . . 5-16Setting Engine Log Levels . . . . . . . . . . . . . . . . . . . . . . . . . . . . . . . . . . . . . . . . . . . . . . . . . . . . . . . . . . . . . . . . . . . 5-21Configuring Connection Pool Sizes . . . . . . . . . . . . . . . . . . . . . . . . . . . . . . . . . . . . . . . . . . . . . . . . . . . . . . . . . . 5-22
iWay Adapter for HL7 for BEA WebLogic User’s Guide ix
Contents
Migrating Repositories . . . . . . . . . . . . . . . . . . . . . . . . . . . . . . . . . . . . . . . . . . . . . . . . . . . . . . . . . . . . . . . . . . . . . . 5-23File Repositories . . . . . . . . . . . . . . . . . . . . . . . . . . . . . . . . . . . . . . . . . . . . . . . . . . . . . . . . . . . . . . . . . . . . . . . 5-23iBSE Repositories . . . . . . . . . . . . . . . . . . . . . . . . . . . . . . . . . . . . . . . . . . . . . . . . . . . . . . . . . . . . . . . . . . . . . . 5-23JCA Repositories . . . . . . . . . . . . . . . . . . . . . . . . . . . . . . . . . . . . . . . . . . . . . . . . . . . . . . . . . . . . . . . . . . . . . . 5-28Migrating Event Handling Configurations . . . . . . . . . . . . . . . . . . . . . . . . . . . . . . . . . . . . . . . . . . . . . . 5-28
Exporting or Importing Targets . . . . . . . . . . . . . . . . . . . . . . . . . . . . . . . . . . . . . . . . . . . . . . . . . . . . . . . . . . . . . . 5-32Retrieving or Updating Web Service Method Connection Information . . . . . . . . . . . . . . . . . . . . . . . . 5-36Starting or Stopping a Channel Programmatically . . . . . . . . . . . . . . . . . . . . . . . . . . . . . . . . . . . . . . . . . . . . 5-40
6. Customizing HL7 Messages . . . . . . . . . . . . . . . . . . . . . . . . . . . . . . . . . . . . . . . . . . . . . . . .6-1The HL7 Reference Interface Model (RIM) . . . . . . . . . . . . . . . . . . . . . . . . . . . . . . . . . . . . . . . . . . . . . . . . . . . . . .6-2Defining a Z Segment . . . . . . . . . . . . . . . . . . . . . . . . . . . . . . . . . . . . . . . . . . . . . . . . . . . . . . . . . . . . . . . . . . . . . . . . .6-5
A. Using Application Explorer in BEA WebLogic Workshop to CreateXML Schemas and Web Services A-1
Starting Application Explorer in BEA WebLogic Workshop . . . . . . . . . . . . . . . . . . . . . . . . . . . . . . . . . . . . . A-2Creating a New Configuration . . . . . . . . . . . . . . . . . . . . . . . . . . . . . . . . . . . . . . . . . . . . . . . . . . . . . . . . . . . . . . . . A-3Connecting to HL7 . . . . . . . . . . . . . . . . . . . . . . . . . . . . . . . . . . . . . . . . . . . . . . . . . . . . . . . . . . . . . . . . . . . . . . . . . . . A-5
Creating and Connecting to a Target . . . . . . . . . . . . . . . . . . . . . . . . . . . . . . . . . . . . . . . . . . . . . . . . . . . . A-5Managing a Target . . . . . . . . . . . . . . . . . . . . . . . . . . . . . . . . . . . . . . . . . . . . . . . . . . . . . . . . . . . . . . . . . . . . A-12
Creating an XML Schema . . . . . . . . . . . . . . . . . . . . . . . . . . . . . . . . . . . . . . . . . . . . . . . . . . . . . . . . . . . . . . . . . . . . A-14Creating an iWay Business Service . . . . . . . . . . . . . . . . . . . . . . . . . . . . . . . . . . . . . . . . . . . . . . . . . . . . . . . . . . . A-15
Exporting iWay WSDL for Use in BEA WebLogic Workshop Workflows . . . . . . . . . . . . . . . . . . . A-18Adding a Control for an iWay Resource in BEA WebLogic Workshop . . . . . . . . . . . . . . . . . . . . . . . . . . A-19
Adding a Web Service Control to a BEA WebLogic Workshop Application . . . . . . . . . . . . . . . A-19Adding an iWay Extensible CCI Control to a BEA WebLogic Workshop Application . . . . . . . . . . . . A-20
Overview . . . . . . . . . . . . . . . . . . . . . . . . . . . . . . . . . . . . . . . . . . . . . . . . . . . . . . . . . . . . . . . . . . . . . . . . . . . . . A-21Using the Extensible CCI Control . . . . . . . . . . . . . . . . . . . . . . . . . . . . . . . . . . . . . . . . . . . . . . . . . . . . . . . A-27
B. Using Application Explorer in BEA WebLogic Workshop for Event Handling . . .B-1Starting Application Explorer in BEA WebLogic Workshop . . . . . . . . . . . . . . . . . . . . . . . . . . . . . . . . . . . . . .B-2Understanding iWay Event Functionality . . . . . . . . . . . . . . . . . . . . . . . . . . . . . . . . . . . . . . . . . . . . . . . . . . . . . .B-3Creating an Event Port . . . . . . . . . . . . . . . . . . . . . . . . . . . . . . . . . . . . . . . . . . . . . . . . . . . . . . . . . . . . . . . . . . . . . . . .B-3Modifying an Event Port . . . . . . . . . . . . . . . . . . . . . . . . . . . . . . . . . . . . . . . . . . . . . . . . . . . . . . . . . . . . . . . . . . . . B-17Creating a Channel . . . . . . . . . . . . . . . . . . . . . . . . . . . . . . . . . . . . . . . . . . . . . . . . . . . . . . . . . . . . . . . . . . . . . . . . . B-19Modifying a Channel . . . . . . . . . . . . . . . . . . . . . . . . . . . . . . . . . . . . . . . . . . . . . . . . . . . . . . . . . . . . . . . . . . . . . . . . B-28Deploying iWay Components in a Clustered BEA WebLogic Environment . . . . . . . . . . . . . . . . . . . . . B-31
C. HL7 Document Index . . . . . . . . . . . . . . . . . . . . . . . . . . . . . . . . . . . . . . . . . . . . . . . . . . . . . .C-1Message Definition Files . . . . . . . . . . . . . . . . . . . . . . . . . . . . . . . . . . . . . . . . . . . . . . . . . . . . . . . . . . . . . . . . . . . . . .C-2
Messages.xsd . . . . . . . . . . . . . . . . . . . . . . . . . . . . . . . . . . . . . . . . . . . . . . . . . . . . . . . . . . . . . . . . . . . . . . . . . . .C-2Segments.xsd . . . . . . . . . . . . . . . . . . . . . . . . . . . . . . . . . . . . . . . . . . . . . . . . . . . . . . . . . . . . . . . . . . . . . . . . . . .C-4
Field Definitions . . . . . . . . . . . . . . . . . . . . . . . . . . . . . . . . . . . . . . . . . . . . . . . . . . . . . . . . . . . . . . . . . . . . . . . . . . . . C-14Data Type Definitions . . . . . . . . . . . . . . . . . . . . . . . . . . . . . . . . . . . . . . . . . . . . . . . . . . . . . . . . . . . . . . . . . . . . . . . C-30
x iWay Software

Contents
Lookup Validation . . . . . . . . . . . . . . . . . . . . . . . . . . . . . . . . . . . . . . . . . . . . . . . . . . . . . . . . . . . . . . . . . . . . . . . . . . C-31Sample Conversion . . . . . . . . . . . . . . . . . . . . . . . . . . . . . . . . . . . . . . . . . . . . . . . . . . . . . . . . . . . . . . . . . . . . . . . . . C-34Validation Rules File . . . . . . . . . . . . . . . . . . . . . . . . . . . . . . . . . . . . . . . . . . . . . . . . . . . . . . . . . . . . . . . . . . . . . . . . C-37Error Codes . . . . . . . . . . . . . . . . . . . . . . . . . . . . . . . . . . . . . . . . . . . . . . . . . . . . . . . . . . . . . . . . . . . . . . . . . . . . . . . . . C-38
iWay Adapter for HL7 for BEA WebLogic User’s Guide xi

Contents
xii iWay Software
CHAPTER 1
1.Introducing the iWay Adapter for HL7 for BEA WebLogic
Topics:
• Process Flow for the iWay Adapter for HL7 for BEA WebLogic
• Components of the iWay Adapter for HL7 for BEA WebLogic
• Deployment Information for the iWay Adapter for HL7 for BEA WebLogic
The iWay Adapter for Healthcare Level 7 (HL7) transforms documents into XML (Extensible Markup Language) format and transforms XML representations of HL7 documents back into HL7 format.After information is transformed into XML format, it can beintegrated into back or front office systems through iWayapplication and data adapters that are available from theiWay Adapter Suite of products.
J2EE™ standard interfaces and protocols such as JCA, JDBC™, and JMS are also supported with the iWay Adapter for HL7 for BEA WebLogic. The same adapters can be used to obtain the information required to populate HL7 messages. For example, using the iWay Adapter for RDBMS, data extracted from a back-end data source can be mapped to the iWay Adapter for HL7 for BEA WebLogic to produce a valid HL7 document.
Data dictionaries that describe XML format are used to map XML to HL7 format and HL7 format to XML format.
After structural integrity has been verified during the transformation stage, the Validation Engine performs validation, using a set of rules defined in an XML-formatted rules file.
Where applicable, acknowledgment documents are returned to the sending application, but only if the incoming document is structurally valid. If the content validation fails, the system returns an error code in the acknowledgement document if one is expected.
iWay Adapter for HL7 for BEA WebLogic User’s Guide 1-1
Process Flow for the iWay Adapter for HL7 for BEA WebLogic
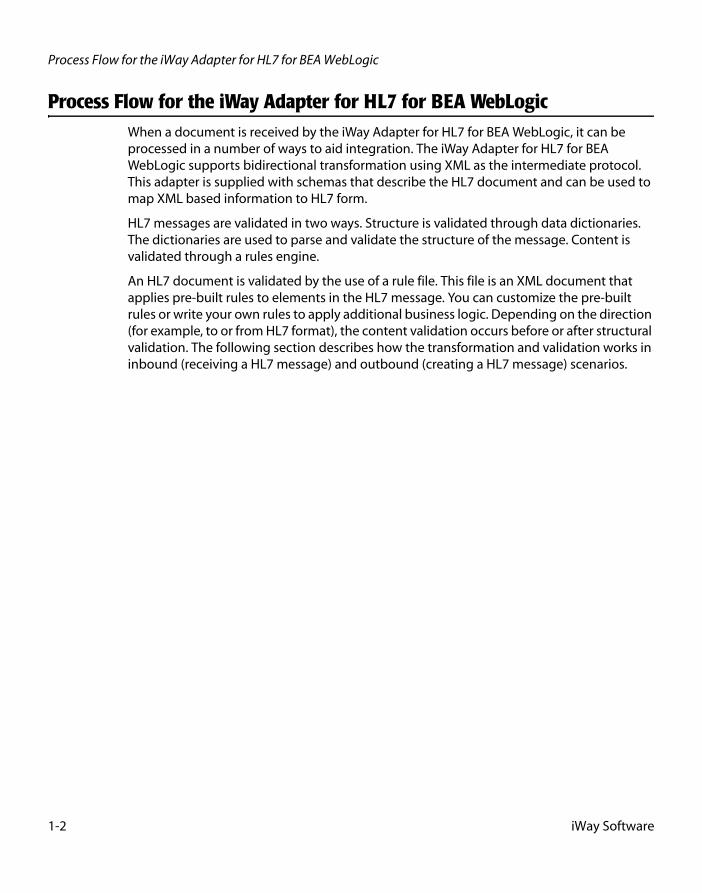
Process Flow for the iWay Adapter for HL7 for BEA WebLogicWhen a document is received by the iWay Adapter for HL7 for BEA WebLogic, it can be processed in a number of ways to aid integration. The iWay Adapter for HL7 for BEA WebLogic supports bidirectional transformation using XML as the intermediate protocol. This adapter is supplied with schemas that describe the HL7 document and can be used to map XML based information to HL7 form.
HL7 messages are validated in two ways. Structure is validated through data dictionaries. The dictionaries are used to parse and validate the structure of the message. Content is validated through a rules engine.
An HL7 document is validated by the use of a rule file. This file is an XML document that applies pre-built rules to elements in the HL7 message. You can customize the pre-built rules or write your own rules to apply additional business logic. Depending on the direction (for example, to or from HL7 format), the content validation occurs before or after structural validation. The following section describes how the transformation and validation works in inbound (receiving a HL7 message) and outbound (creating a HL7 message) scenarios.
1-2 iWay Software

Introducing the iWay Adapter for HL7 for BEA WebLogic
Inbound ProcessingThe following diagram illustrates inbound processing. The iWay Adapter for HL7 for BEA WebLogic can “listen” for messages. The first step in the process is decryption. This is followed by the pre-parse stage where documents are parsed and converted to XML format using data dictionaries to describe the document. These data dictionaries are in XML format and can be modified to tailor messages to the requirements of an installation (for example, Z segments).
iWay Adapter for HL7 for BEA WebLogic User’s Guide 1-3

Process Flow for the iWay Adapter for HL7 for BEA WebLogic
Outbound ProcessingOutbound processing mirrors (in reverse) the inbound process. A document can be received in XML format and have business logic applied. Then, the document can be validated by the rules engine and transformed into a HL7 document at the pre-emit stage in the process.
Inbound and outbound processes also can be run in one pass as illustrated in the following diagram.
1-4 iWay Software

Introducing the iWay Adapter for HL7 for BEA WebLogic
Components of the iWay Adapter for HL7 for BEA WebLogicThe following components are supplied with the iWay Adapter for HL7 for BEA WebLogic:
• Data dictionaries
• XML schemas
• Sample messages (in HL7 and XML form)
• Rules files and code set (lookup) files
Data DictionariesThe structure of the HL7 documents is described in a set of schema documents represented in XML format. The four schema files are:
messages_vnn.xsd
segments_vnn.xsd
fields_vnn.xsd
datatypes_vnn.xsd
vnn represents the version number of the messages: v23, v231, or v24.
Each dictionary describes the members of the next lower level that are expected to be present when constructing a valid member of the current level. For example, an A01 message is defined as a specific type of ADT message, where only certain segments are valid.
However, not all valid segments are required, and some may be repeated. A detailed example of the content of these files, the document ORU/R01, is included in Appendix C, HL7 Document Index.
The data dictionaries are accessed during the pre-parser and pre-emitter phases, during the time the document transformation occurs.
MessagesFor an HL7 message to be converted from HL7 format to XML format, a representation of that message must exist in the data dictionary. The following example describes an acknowledgement message (ACK). The message contains three segments, MSH, MSA, and ERR, but only the first two are mandatory. The third is optional.
None of these segments may be repeated in the message. If a field can be repeated, then the attribute, maxOccurs, is non-zero. If the number of repetitions is unlimited, the attribute is set to “unbounded.”
iWay Adapter for HL7 for BEA WebLogic User’s Guide 1-5

Components of the iWay Adapter for HL7 for BEA WebLogic
The iWay Adapter for HL7 for BEA WebLogic supplies a Rules Engine that uses rules files to validate messages.
<!-- MESSAGE ACK --><!-- .. message definition ACK --><element name="ACK"> <complexType> <sequence> <element minOccurs="1" maxOccurs="1" ref="MSH" /> <element minOccurs="1" maxOccurs="1" ref="MSA" /> <element minOccurs="0" maxOccurs="1" ref="ERR" /> </sequence> </complexType></element>
SegmentsThe segment sequence described in the previous topic shows the segments that constitute a valid message. Each segment is further divided into fields, that in turn are divided into components and sub-components.
The following example shows the fields that for the segment Accident Segment (ACC).
<!-- SEGMENT ACC --><element name="ACC"> <complexType> <sequence> <element minOccurs="0" maxOccurs="1" ref="ACC_DATETIME" /> <element minOccurs="0" maxOccurs="1" ref="ACC_CODE" /> <element minOccurs="0" maxOccurs="1" ref="ACC_LOCATION" /> <element minOccurs="0" maxOccurs="1" ref="ACC_AUTO_STATE" /> <element minOccurs="0" maxOccurs="1" ref="ACC_JOB_IND" /> <element minOccurs="0" maxOccurs="1" ref="ACC_DEATH_IND" /> </sequence> </complexType></element>
The same convention is used to identify fields that are required and those that can be repeated.
FieldsThe fields referred to in the previous segments are described in the fields section of the Data Dictionary. The ref attribute of the element tag contains a matching value to the reference in the segment document.
Additional attributes indicate whether the data in the field is derived from a lookup table. For example, lookupTab=“50” indicates that lookup table 50 holds all of the valid codes for this field.
1-6 iWay Software
Introducing the iWay Adapter for HL7 for BEA WebLogic
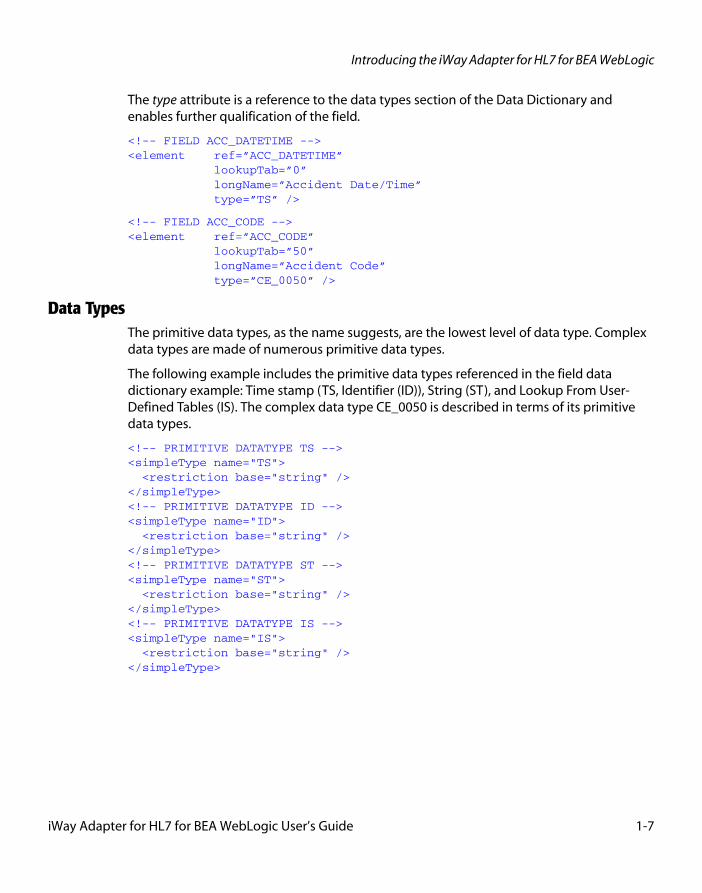
The type attribute is a reference to the data types section of the Data Dictionary and enables further qualification of the field.
<!-- FIELD ACC_DATETIME --><element ref=”ACC_DATETIME” lookupTab=”0” longName=”Accident Date/Time” type=”TS” />
<!-- FIELD ACC_CODE --><element ref=”ACC_CODE” lookupTab=”50” longName=”Accident Code” type=”CE_0050” />
Data TypesThe primitive data types, as the name suggests, are the lowest level of data type. Complex data types are made of numerous primitive data types.
The following example includes the primitive data types referenced in the field data dictionary example: Time stamp (TS, Identifier (ID)), String (ST), and Lookup From User-Defined Tables (IS). The complex data type CE_0050 is described in terms of its primitive data types.
<!-- PRIMITIVE DATATYPE TS --><simpleType name="TS"> <restriction base="string" /></simpleType><!-- PRIMITIVE DATATYPE ID --><simpleType name="ID"> <restriction base="string" /></simpleType><!-- PRIMITIVE DATATYPE ST --><simpleType name="ST"> <restriction base="string" /></simpleType><!-- PRIMITIVE DATATYPE IS --><simpleType name="IS"> <restriction base="string" /></simpleType>
iWay Adapter for HL7 for BEA WebLogic User’s Guide 1-7

Deployment Information for the iWay Adapter for HL7 for BEA WebLogic
<!-- COMPOSITE DATATYPE CE_0050 --><complexType name="CE_0050"> <sequence> <element minOccurs="0" maxOccurs="1" ref="CE_0050_ID" longName="identifier" lookupTab="50" type="ID" /> <element minOccurs="0" maxOccurs="1" ref="CE_0050_TXT" longName="text" lookupTab="0" type="ST" /> <element minOccurs="0" maxOccurs="1" ref="CE_0050_CODE_SYS" longName="name of coding system" lookupTab="396" type="IS" /> <element minOccurs="0" maxOccurs="1" ref="CE_0050_ALT_ID" longName="alternate identifier" lookupTab="0" type="ST" /> <element minOccurs="0" maxOccurs="1" ref="CE_0050_ALT_TXT" longName="alternate text" lookupTab="0" type="ST" /> <element minOccurs="0" maxOccurs="1" ref="CE_0050_ALT_CODE_SYS" longName="name of alternate coding sys" lookupTab="396" type="IS" /> </sequence></complexType>
Deployment Information for the iWay Adapter for HL7 for BEA WebLogicThe iWay Adapter for HL7 for BEA WebLogic works with iWay Application Explorer in conjunction with one of the following components:
• Integration Business Services Engine (iBSE)
• iWay Enterprise Connector for J2EE™ Connector Architecture (JCA)
Application Explorer, used to configure connections and create Web services and events, can be configured to work in a Web services environment in conjunction with the Integration Business Services Engine or with the iWay Enterprise Connector for J2EE Connector Architecture (JCA). When working in a JCA environment, the connector uses the Common Client Interface (CCI) to provide fast integration services using iWay Adapters instead of using Web services.
Both iBSE and the iWay connector for JCA are deployed to an application server such as BEA WebLogic Server with iWay Application Explorer.
1-8 iWay Software
Introducing the iWay Adapter for HL7 for BEA WebLogic
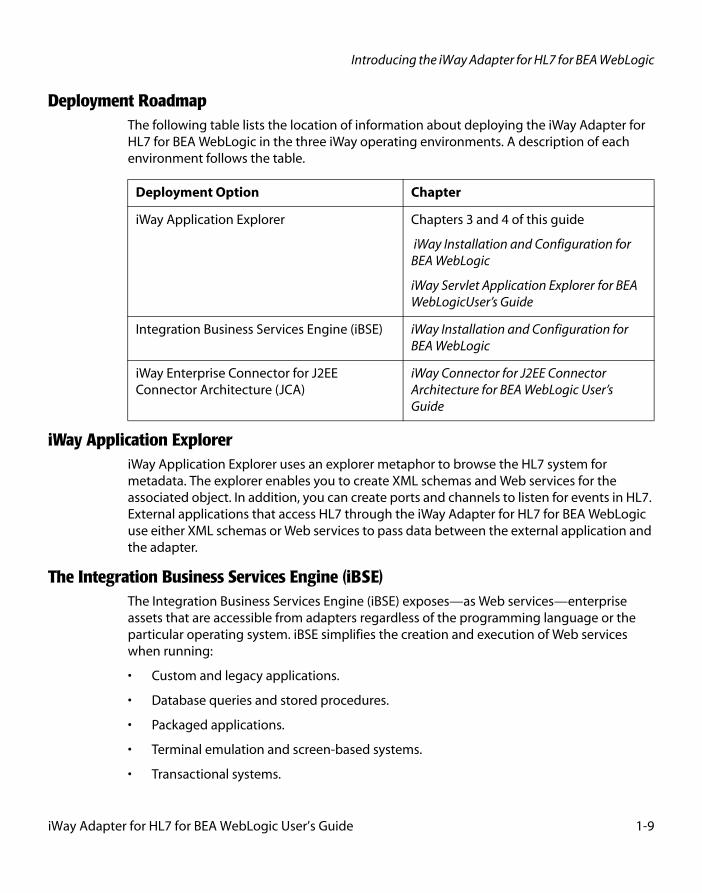
Deployment RoadmapThe following table lists the location of information about deploying the iWay Adapter for HL7 for BEA WebLogic in the three iWay operating environments. A description of each environment follows the table.
iWay Application ExploreriWay Application Explorer uses an explorer metaphor to browse the HL7 system for metadata. The explorer enables you to create XML schemas and Web services for the associated object. In addition, you can create ports and channels to listen for events in HL7. External applications that access HL7 through the iWay Adapter for HL7 for BEA WebLogic use either XML schemas or Web services to pass data between the external application and the adapter.
The Integration Business Services Engine (iBSE)The Integration Business Services Engine (iBSE) exposes—as Web services—enterprise assets that are accessible from adapters regardless of the programming language or the particular operating system. iBSE simplifies the creation and execution of Web services when running:
• Custom and legacy applications.
• Database queries and stored procedures.
• Packaged applications.
• Terminal emulation and screen-based systems.
• Transactional systems.
Deployment Option Chapter
iWay Application Explorer Chapters 3 and 4 of this guide
iWay Installation and Configuration for BEA WebLogic
iWay Servlet Application Explorer for BEA WebLogicUser’s Guide
Integration Business Services Engine (iBSE) iWay Installation and Configuration for BEA WebLogic
iWay Enterprise Connector for J2EE Connector Architecture (JCA)
iWay Connector for J2EE Connector Architecture for BEA WebLogic User’s Guide
iWay Adapter for HL7 for BEA WebLogic User’s Guide 1-9

Deployment Information for the iWay Adapter for HL7 for BEA WebLogic
Web services is a distributed programming architecture that promises to solve Enterprise Application Integration (EAI) hurdles that other programming models cannot. It enables programs to communicate with one another using a text-based, but platform and language independent message format called XML.
Coupled with a platform and language independent messaging protocol called SOAP (Simple Object Access Protocol), XML enables application development and integration by assembling previously built components from multiple Web services. iBSE includes a preconfigured SOAP listener for incoming SOAP requests.
The iWay Enterprise Connector for J2EE Connector Architecture (JCA)The iWay Enterprise Connector for J2EE Connector Architecture (JCA) enables developers of JCA-compliant applications to deploy iWay adapters as JCA resources. The connector is supported on J2EE-compliant application servers such as BEA WebLogic Server.
The iWay Connector for JCA is distributed as both a standard Resource Adapter Archive (RAR) for deployment to the application server and as a JAR file for stand-alone applications. Thus, the connector can be employed in systems that are non-compliant, although services such as pooled connections will not be available.
1-10 iWay Software
CHAPTER 2
2.Creating XML Schemas or Web Services for the iWay Adapter for HL7 for BEA WebLogic
Topics:
• Overview
• Starting iWay Servlet Application Explorer
• Establishing a Target for HL7
• Creating an XML Schema
• Creating a Web Service
This section describes how to use iWay Servlet Application Explorer to create XML schemas or Web services for the iWay Adapter for HL7 for BEA WebLogic.
Although this section describes the Java™ servlet implementation of Application Explorer, other implementations provide the same functionality by means of similar graphical user interfaces.
For more information, see Appendix A, Using Application Explorer in BEA WebLogic Workshop to Create XML Schemas and Web Services.
iWay Adapter for HL7 for BEA WebLogic User’s Guide 2-1

Overview
OverviewExternal applications that access HL7 through the adapter use either XML schemas or Web services to pass data between the external application and the adapter. You can use iWay Servlet Application Explorer to create the required XML schemas and Web services.
Application Explorer is a Web application running within a servlet container that is accessible through a Web browser. For more information on installing and configuring the iWay Servlet Application Explorer, see the iWay Installation and Configuration for BEA WebLogic documentation.
Starting iWay Servlet Application ExplorerBefore you can use iWay Servlet Application Explorer, you must start the BEA WebLogic Server. Then, you can open Application Explorer.
Procedure: How to Start BEA WebLogic Server on Windows or on UNIX
1. To start the BEA WebLogic Server on Windows:
a. Click the Windows Start menu.
b. Select Programs, BEA WebLogic Platform 8.1, User Projects, your domain for iWay, and then, click Start Server.
2. To start BEA WebLogic Server on UNIX or from a command line, type the following at the prompt:
BEA_HOME\user_projects\domains\DOMAIN_NAME\startWebLogic.cmd
where:
BEA_HOME
Is the directory where BEA WebLogic is installed.
DOMAIN_NAME
Is the domain you are using for iWay.
Procedure: How to Open iWay Servlet Application Explorer
To open Application Explorer:
1. Enter the following URL in your browser window:
http://hostname:port/iwae/index.html
where:
hostname
Is the name of the machine where your application server is running.
2-2 iWay Software

Creating XML Schemas or Web Services for the iWay Adapter for HL7 for BEA WebLogic
port
Is the port where the application server is listening.
After you start Application Explorer, the Welcome window with the Service Adapters, Event Adapters, and Integration Business Services tabs opens as shown in the following image. The Service Adapters node is highlighted in the left pane.
The Available Hosts drop-down menu in the upper right lists the iWay Connector for JCA or Servlet iBSE instance you can access.
For more information on adding instances, see the iWay Installation and Configuration for BEA WebLogic documentation.
You are now ready to create new targets for HL7.
iWay Adapter for HL7 for BEA WebLogic User’s Guide 2-3

Establishing a Target for HL7
Establishing a Target for HL7A target serves as your connection point and is automatically saved after you create it. You must establish a connection to HL7 every time you start iWay Application Explorer or after you disconnect from the system.
To connect to HL7 for the first time, you must create a new target. For information on creating a new target, see How to Create a New Target on page 2-5.
You must use the target you defined to connect to HL7. For information on connecting to an HL7 target, see How to Connect to a Target on page 2-10.
Although you can maintain multiple open connections to different application systems, it is a good practice to close connections when you are not using them. For information on disconnecting from a target, see How to Disconnect From a Target on page 2-12.
After you create a target for HL7 using iWay Servlet Application Explorer, you can edit any of the information that you provided previously. For information on editing a target, see How to Edit a Target on page 2-12.
In addition to closing a target, you can delete a target that is no longer required. You can delete it whether or not it is closed. If open, the target automatically closes before it is deleted. For information on deleting a target, see How to Delete a Target on page 2-12.
2-4 iWay Software
Creating XML Schemas or Web Services for the iWay Adapter for HL7 for BEA WebLogic
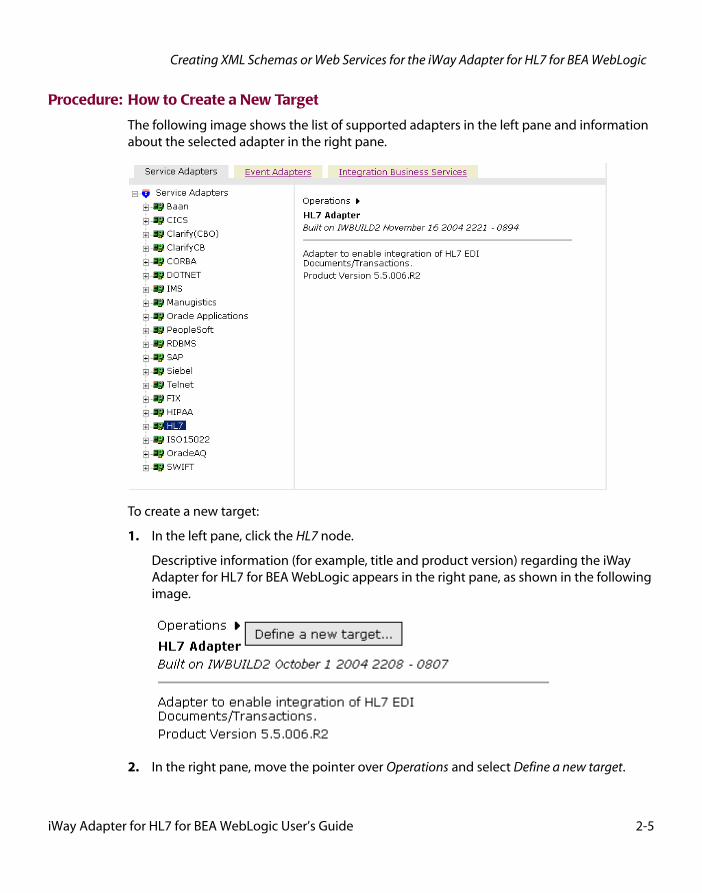
Procedure: How to Create a New Target
The following image shows the list of supported adapters in the left pane and information about the selected adapter in the right pane.
To create a new target:
1. In the left pane, click the HL7 node.
Descriptive information (for example, title and product version) regarding the iWay Adapter for HL7 for BEA WebLogic appears in the right pane, as shown in the following image.
2. In the right pane, move the pointer over Operations and select Define a new target.
iWay Adapter for HL7 for BEA WebLogic User’s Guide 2-5
Establishing a Target for HL7
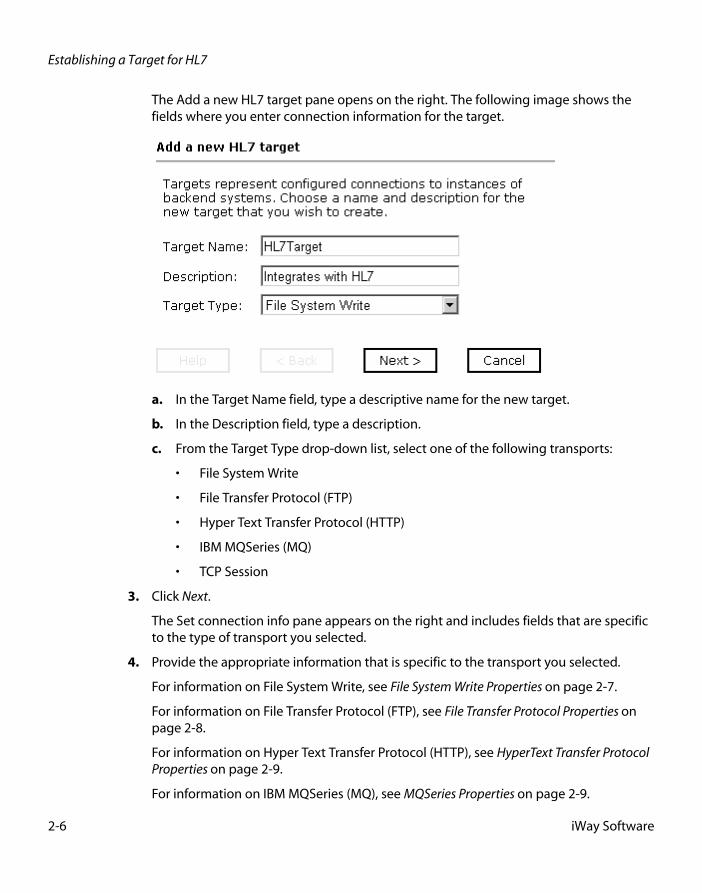
The Add a new HL7 target pane opens on the right. The following image shows the fields where you enter connection information for the target.
a. In the Target Name field, type a descriptive name for the new target.
b. In the Description field, type a description.
c. From the Target Type drop-down list, select one of the following transports:
• File System Write
• File Transfer Protocol (FTP)
• Hyper Text Transfer Protocol (HTTP)
• IBM MQSeries (MQ)
• TCP Session
3. Click Next.
The Set connection info pane appears on the right and includes fields that are specific to the type of transport you selected.
4. Provide the appropriate information that is specific to the transport you selected.
For information on File System Write, see File System Write Properties on page 2-7.
For information on File Transfer Protocol (FTP), see File Transfer Protocol Properties on page 2-8.
For information on Hyper Text Transfer Protocol (HTTP), see HyperText Transfer Protocol Properties on page 2-9.
For information on IBM MQSeries (MQ), see MQSeries Properties on page 2-9.
2-6 iWay Software

Creating XML Schemas or Web Services for the iWay Adapter for HL7 for BEA WebLogic
For information on TCP Session, see TCP Properties on page 2-10.
5. Click Finish.
The following image shows the HL7 target (HL7Target) that appears below the HL7 node in the left pane.
You are now ready to connect to your HL7 target.
Reference: File System Write Properties
The following table lists the properties with a definition for each for the File System Write target type.
Property Definition
HL7 Version Select the version of HL7 messages passed to this protocol. The options are:
• v2.4
• v2.3.1
• v2.3
Directory The directory to which output messages are emitted.
Filename Mask The output file name (can contain an asterisk) that is expanded to a timestamp.
A pound sign can be used as a mask for a sequence count. Each pound symbol represents a whole number integer value. For example, File## counts to 99 before restarting at 0, File### counts to 999 before restarting at 0, and so on.
iWay Adapter for HL7 for BEA WebLogic User’s Guide 2-7

Establishing a Target for HL7
Reference: File Transfer Protocol Properties
The following table lists the properties with a definition for each for the File Transfer Protocol target type on the Settings tab.
The following table lists the properties with a definition for each for the File Transfer Protocol target type on the Advanced tab.
Property Definition
HL7 Version From the drop-down list, select the version of HL7 messages passed to this protocol. The options are:
• v2.4
• v2.3.1
• v2.3
Host FTP target system.
Port FTP target system port.
User User ID when connecting to the FTP host.
Password Password associated with the user ID.
Directory The directory to which output messages are emitted.
Filename Mask The output file name (can contain an asterisk) that is expanded to a timestamp.
A pound sign can be used as a mask for a sequence count. Each pound symbol represents a whole number integer value. For example, File## counts to 99 before restarting at 0, File### counts to 999 before restarting at 0, and so on.
Property Definition
Retry Interval Maximum wait interval between retries when a connection fails. Retry interval duration in xxH:xxM:xxS format, for example, 1H:2M:3S is 1 hour, 2 minutes, and 3 seconds.
Maxtries Maximum number of retry attempts if a write failure occurs.
2-8 iWay Software

Creating XML Schemas or Web Services for the iWay Adapter for HL7 for BEA WebLogic
Reference: HyperText Transfer Protocol Properties
The following table lists the properties with a definition for each for the File Transfer Protocol target type.
Reference: MQSeries Properties
The following table lists the properties with a definition for each for the File Transfer Protocol target type on the Settings tab.
The following table lists the properties with a definition for each for the File Transfer Protocol target type in the MQ Client tab window.
Property Definition
HL7 Version From the drop-down list, select the version of HL7 messages passed to this protocol. The options are:
• v2.4
• v2.3.1
• v2.3
HTTP URL The HTTP URL.
Header The HTTP header field.
Property Definition
HL7 Version From the drop-down list, select the version of HL7 messages passed to this protocol. The options are:
• v2.4
• v2.3.1
• v2.3
Queue Manager Name of the MQSeries queue manager to be used.
Queue Name Queue on which request documents are received.
Correlation ID The correlation ID to set in the MQSeries message header.
Property Definition
Host Name of the MQSeries queue manager to be used.
Port Queue on which request documents are received.
iWay Adapter for HL7 for BEA WebLogic User’s Guide 2-9

Establishing a Target for HL7
Reference: TCP Properties
The following table lists the properties with a definition for each for the TCP target type.
Procedure: How to Connect to a Target
To connect to a target:
1. In the left pane, expand the HL7 node and select the target you defined, for example, HL7Target.
Channel The correlation ID to set in the MQSeries message header.
Property Definition
Property Definition
HL7 Version From the drop-down list, select the version of HL7 messages passed to this protocol. The options are:
• v2.4
• v2.3.1
• v2.3
Host Host name or host address.
Port TCP listening port.
Encoding Document character set.
2-10 iWay Software
Creating XML Schemas or Web Services for the iWay Adapter for HL7 for BEA WebLogic
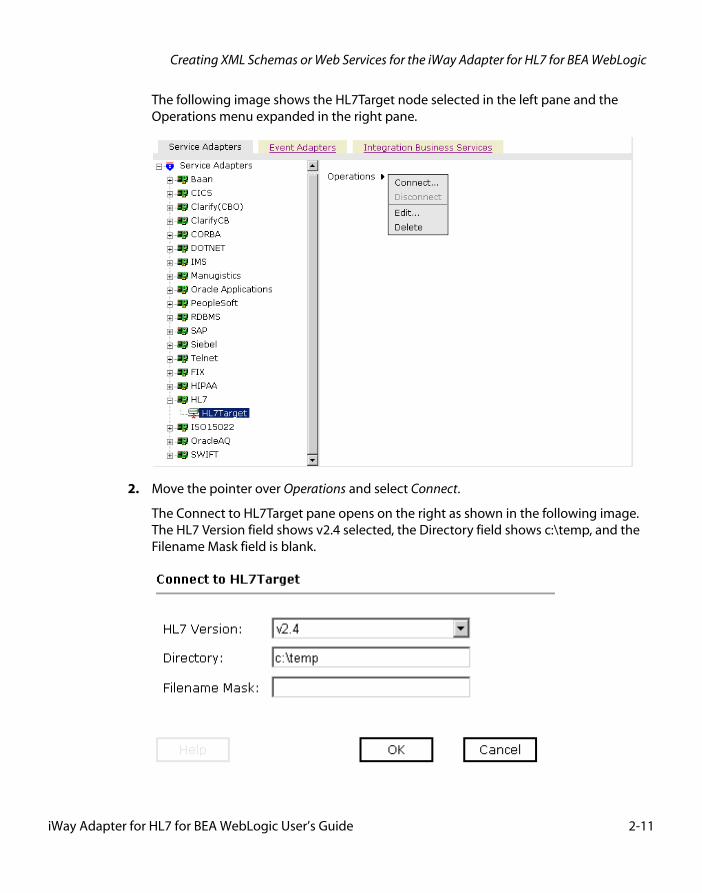
The following image shows the HL7Target node selected in the left pane and the Operations menu expanded in the right pane.
2. Move the pointer over Operations and select Connect.
The Connect to HL7Target pane opens on the right as shown in the following image. The HL7 Version field shows v2.4 selected, the Directory field shows c:\temp, and the Filename Mask field is blank.
iWay Adapter for HL7 for BEA WebLogic User’s Guide 2-11

Establishing a Target for HL7
3. Click OK.
The following image shows that the x icon that appeared previously to the left of the HL7Target node has disappeared, indicating that the node is now connected.
The following image shows the expanded HL7Target node.
Procedure: How to Disconnect From a Target
To disconnect from a target:
1. From the left pane, click the target, for example, HL7Target, to which you are connected.
2. Move the pointer over Operation and select Disconnect.
Disconnecting from the application system drops the connection, but the node remains.
Procedure: How to Edit a Target
To edit a target:
1. In the left pane, click the target, for example, HL7Target.
2. Move the pointer over Operations and select Edit.
3. Modify the connection information.
4. Click Next to continue editing additional fields.
5. When you have completed your edits, click Finish.
Procedure: How to Delete a Target
To delete a target:
1. In the left pane, click the target, for example, HL7Target.
2-12 iWay Software

Creating XML Schemas or Web Services for the iWay Adapter for HL7 for BEA WebLogic
The following image shows the target selected in the left pane, and the operations menu expanded in the right pane.
2. Move the pointer over Operations and select Delete.
3. To delete the target you selected, click OK.
The HL7Target node disappears from the left pane.
Creating an XML SchemaThis topic describes how to create schemas for the adapter when you deploy the iWay Adapter for HL7 for BEA WebLogic for use either in a JCA (iWay Enterprise Connector for J2EE Connector Architecture) environment or a Web services environment. You create schemas for HL7 using iWay Application Explorer.
Application Explorer stores the schemas it creates in subdirectories under the iWay home directory of the machine where it is installed. The exact location of the schemas differs depending on whether you deploy Application Explorer with an iBSE or a JCA configuration.
iWay Adapter for HL7 for BEA WebLogic User’s Guide 2-13

Creating an XML Schema
• When using the adapter with an iBSE configuration, the schemas are stored under a \schemas subdirectory of the iWay home directory, for example:
C:\Program Files\iway55\bea\ibse\wsdl\schemas\service\HL7\HL7Target
where:
HL7Target
Is the name of the connection to HL7 as defined in Application Explorer. Under this directory, Application Explorer creates subdirectories containing schemas.
• When using the adapter with a JCA configuration, the schemas are stored under a \schemas subdirectory of the iWay home directory, for example,
C:\Program Files\iWay55\sap\config\base\schemas\HL7\HL7Target
where:
HL7Target
Is the name of the connection to HL7 as defined in Application Explorer. Application Explorer stores the schemas in this directory.
Procedure: How to Create an XML Schema
To generate service request and response schemas:
1. If you have not started the explorer, start Application Explorer and connect to your HL7 system.
2. In the left pane, expand the HL7Target node.
3. Continue expanding nodes until you reach the service node.
2-14 iWay Software

Creating XML Schemas or Web Services for the iWay Adapter for HL7 for BEA WebLogic
The following image shows the XMLtoHL7 target selected in the left pane, and the operations menu expanded showing its options in the right pane.
4. In the right pane, move the cursor over Operations and select Generate Schema.
Application Explorer builds the schemas.
iWay Adapter for HL7 for BEA WebLogic User’s Guide 2-15
Creating an XML Schema
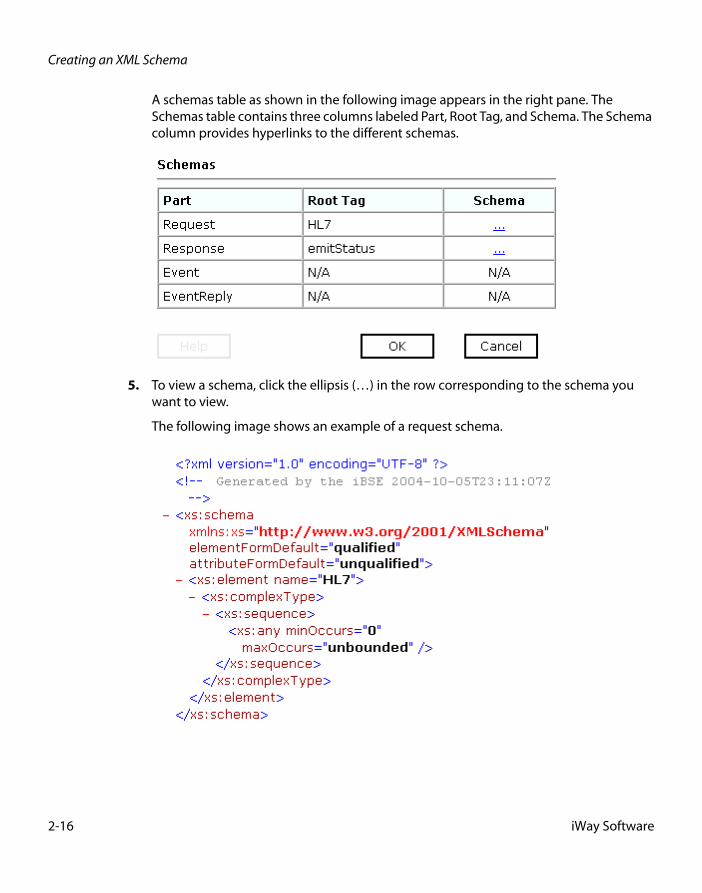
A schemas table as shown in the following image appears in the right pane. The Schemas table contains three columns labeled Part, Root Tag, and Schema. The Schema column provides hyperlinks to the different schemas.
5. To view a schema, click the ellipsis (…) in the row corresponding to the schema you want to view.
The following image shows an example of a request schema.
2-16 iWay Software

Creating XML Schemas or Web Services for the iWay Adapter for HL7 for BEA WebLogic
Creating a Web ServiceYou can generate Integration Business Services (also known as a Web services) for HL7 operations.
Ensure you properly configure the servlet iBSE. For more information on installing and deploying iWay components, see the iWay Installation and Configuration for BEA WebLogic documentation.
Note: In a J2EE Connector Architecture (JCA) implementation of iWay adapters, Web services are not available. When the adapters are deployed to use the iWay Connector for JCA, the Common Client Interface provides integration services using the iWay adapters.
Procedure: How to Generate a Web Service
To generate a Web service:
1. If you have not already connected, connect to HL7.
2. Expand the HL7 node.
3. Continue expanding nodes and then select, for example, XMLtoHL7.
The following image shows the target node selected in the left pane (XMLtoHL7) and the Operations menu expanded in the right pane.
iWay Adapter for HL7 for BEA WebLogic User’s Guide 2-17

Creating a Web Service
4. Move the pointer over Operations and select Create Integration Business Services.
The Create Web Service for XMLtoHL7 pane opens as shown in the following image.
You must choose whether to create a new service or use an existing service.
To use a previously created service:
a. Select the option called Use an existing service and click Next.
b. When a drop-down list appears, select the business service to which you want to add the new service and click Next.
To create a new service or if this is the first Web service you are creating:
a. Select the option called Create a new service and click Next.
2-18 iWay Software

Creating XML Schemas or Web Services for the iWay Adapter for HL7 for BEA WebLogic
The Create Web Service pane appears as shown in the following image.
a. In the Service Name field, type a name to identify the Web service (under the Service node in the left pane of the Integration Business Services tab).
b. In the Description field, type a brief description of the Web service.
c. In the License field, select the license(s) with which to associate this business service. To select more than one, hold down the Ctrl key and click the licenses.
5. Click Next.
iWay Adapter for HL7 for BEA WebLogic User’s Guide 2-19

Creating a Web Service
A second Create Web Service pane opens as shown in the following image.
a. In the Method Name field, type a name for the method to be added to the business service.
b. In the Description field, type a brief description of the method.
6. Click Finish.
2-20 iWay Software

Creating XML Schemas or Web Services for the iWay Adapter for HL7 for BEA WebLogic
The following image shows the Integration Business Services tab of Application Explorer active. The new business service appears in the left pane.
Testing a Web Service for a Business ObjectAfter you create a Web service, test it to ensure it functions properly. Application Explorer includes a test tool for testing a Web service.
iWay Adapter for HL7 for BEA WebLogic User’s Guide 2-21

Creating a Web Service
Procedure: How to Test a Web Service for a Business Object
To test a Web service:
1. If you are not on the Integration Business Services tab of Application Explorer, click the tab to access business services.
2. If it is not expanded, expand the Integration Business Services node.
3. Expand the Services node.
4. Select the name of the business service you want to test.
The business service name appears as a link in the right pane, as shown in the following image.
5. In the right pane, click the named business services link, for example, Get.
2-22 iWay Software

Creating XML Schemas or Web Services for the iWay Adapter for HL7 for BEA WebLogic
The test option appears in the right pane as shown in the following image. This pane provides a text field in which to paste the XML input. Alternatively, you can browse to a file that can be uploaded. In addition to the Browse button, the pane has three active buttons (Upload, More, and Invoke).
6. Provide the appropriate XML input.
7. Click Invoke.
Application Explorer displays the results in the results pane on the right.
iWay Adapter for HL7 for BEA WebLogic User’s Guide 2-23

Creating a Web Service
2-24 iWay Software

CHAPTER 3
3.Listening for Events in HL7
Topics:
• Understanding iWay Event Functionality
• Creating an Event Port
• Creating a Channel
iWay Servlet Application Explorer deployed to BEA WebLogic Server enables you to listen for events.
Although this section describes the Java™ servlet implementation of Application Explorer, other implementations provide the same functionality by means of similar graphical user interfaces.
For more information, see Appendix B, Using Application Explorer in BEA WebLogic Workshop for Event Handling.
iWay Adapter for HL7 for BEA WebLogic User’s Guide 3-1
Understanding iWay Event Functionality
Understanding iWay Event FunctionalityEvents are generated as a result of an HL7 document arriving at a particular queue. You can use documents arriving at a queue to trigger an action in your application. For example, information in a message arriving at a queue can be used to update customer information in a database. If your application must perform an action when this happens, your application is a consumer of this event.
After you create a connection to your application system, you can add events using iWay Servlet Application Explorer. To create an iWay event, you must create a port and a channel.
• Port
A port associates a particular business object exposed by an adapter with a particular disposition. A disposition defines the protocol and location of the event data. The port defines the end point of the event consumption. For more information, see Creating an Event Port on page 3-2.
• Channel
A channel represents configured connections to particular instances of back-end or other types of systems. A channel binds one or more event ports to a particular listener managed by an adapter. For more information, see Creating a Channel on page 3-14.
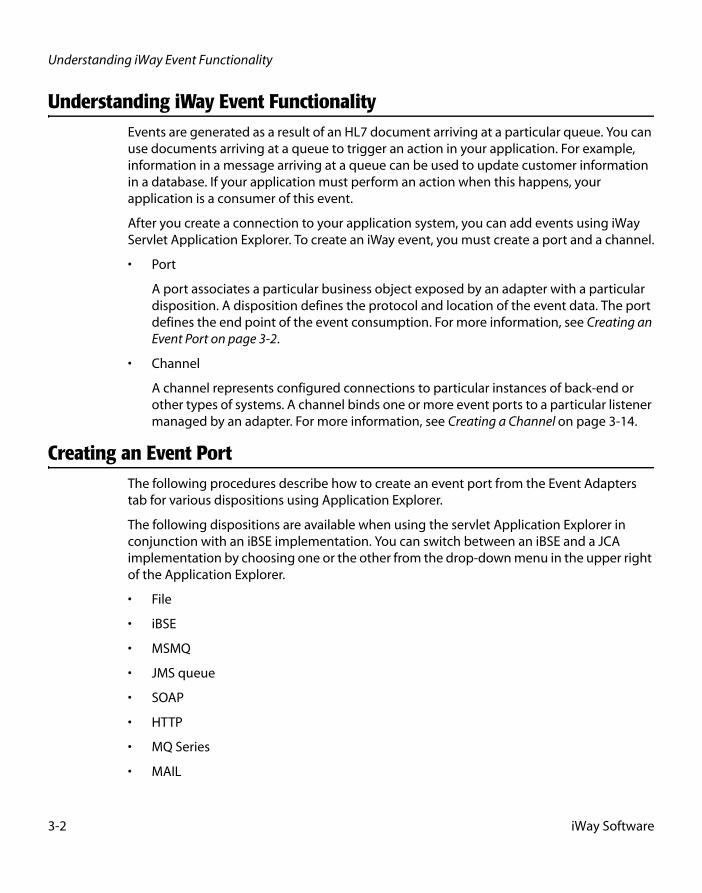
Creating an Event PortThe following procedures describe how to create an event port from the Event Adapters tab for various dispositions using Application Explorer.
The following dispositions are available when using the servlet Application Explorer in conjunction with an iBSE implementation. You can switch between an iBSE and a JCA implementation by choosing one or the other from the drop-down menu in the upper right of the Application Explorer.
• File
• iBSE
• MSMQ
• JMS queue
• SOAP
• HTTP
• MQ Series
3-2 iWay Software

Listening for Events in HL7
Note: The MAIL disposition option will be supported in a future release.
The following dispositions are available when using Application Explorer in conjunction with a JCA connector implementation.
• File
• HTTP
• JMS queue
• MQ Series
Procedure: How to Create an Event Port for the File Disposition
To create a specific event port for the File disposition:
1. Click the Event Adapters tab.
The Event Adapters window opens.
2. In the left pane, expand the HL7 node.
3. Select the ports node.
4. Move the pointer over Operations and select Add a new port.
The Create New Port pane appears on the right.
a. Type a name for the event port and provide a brief description.
b. From the Disposition Protocol drop-down list, select FILE.
c. In the Disposition field, provide a destination where the event data is written.
When pointing Application Explorer to an iBSE deployment, use the following format:
ifile://[location];errorTo=[pre-defined port name or another disposition url]
For example:
ifile://D:\in\x.txt;errorTo=ifile://D:\error
When pointing Application Explorer to a JCA deployment, provide the full path to the directory.
iWay Adapter for HL7 for BEA WebLogic User’s Guide 3-3

Creating an Event Port
The following table lists the parameters for the File disposition and provides a description of each.
5. Click OK.
The event port appears under the ports node in the left pane. A summary of the information associated with the event port appears in the right pane as shown in the following image.
You are ready to associate the event port with a channel. For more information, see Creating a Channel on page 3-14.
Procedure: How to Create an Event Port for iBSE
You can call a Web Service created through Integration Business Services Engine (iBSE).
To create an event port for iBSE:
1. Click the Event Adapters tab.
The Event Adapters window opens.
2. In the left pane, expand the HL7 node.
3. Select the ports node.
4. Move the pointer over Operations and select Add a new port.
The Create Event Port pane opens on the right.
a. In the Port Name field, type a name for the port.
The name is used to build a repository entry as well as to identify the port.
b. In the Description field, type a description for the port you just created.
Parameter Description
location The destination and filename of the document where event data is written, for example, C:\in\x.txt.
errorTo Predefined port name or another disposition URL to which error logs are sent. Optional.
3-4 iWay Software
Listening for Events in HL7
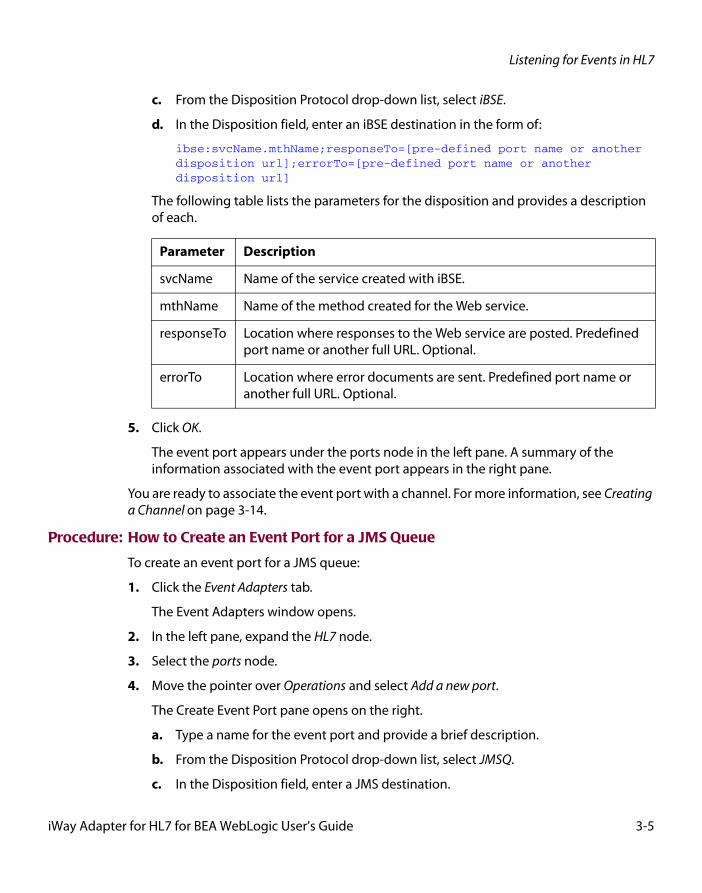
c. From the Disposition Protocol drop-down list, select iBSE.
d. In the Disposition field, enter an iBSE destination in the form of:
ibse:svcName.mthName;responseTo=[pre-defined port name or another disposition url];errorTo=[pre-defined port name or another disposition url]
The following table lists the parameters for the disposition and provides a description of each.
5. Click OK.
The event port appears under the ports node in the left pane. A summary of the information associated with the event port appears in the right pane.
You are ready to associate the event port with a channel. For more information, see Creating a Channel on page 3-14.
Procedure: How to Create an Event Port for a JMS Queue
To create an event port for a JMS queue:
1. Click the Event Adapters tab.
The Event Adapters window opens.
2. In the left pane, expand the HL7 node.
3. Select the ports node.
4. Move the pointer over Operations and select Add a new port.
The Create Event Port pane opens on the right.
a. Type a name for the event port and provide a brief description.
b. From the Disposition Protocol drop-down list, select JMSQ.
c. In the Disposition field, enter a JMS destination.
Parameter Description
svcName Name of the service created with iBSE.
mthName Name of the method created for the Web service.
responseTo Location where responses to the Web service are posted. Predefined port name or another full URL. Optional.
errorTo Location where error documents are sent. Predefined port name or another full URL. Optional.
iWay Adapter for HL7 for BEA WebLogic User’s Guide 3-5
Creating an Event Port
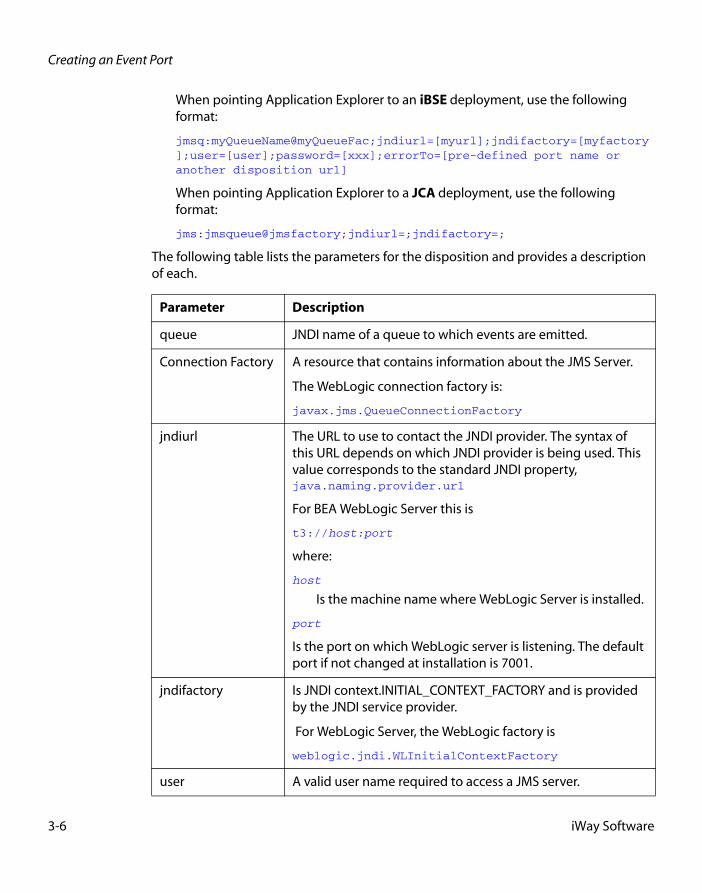
When pointing Application Explorer to an iBSE deployment, use the following format:
jmsq:myQueueName@myQueueFac;jndiurl=[myurl];jndifactory=[myfactory];user=[user];password=[xxx];errorTo=[pre-defined port name or another disposition url]
When pointing Application Explorer to a JCA deployment, use the following format:
jms:jmsqueue@jmsfactory;jndiurl=;jndifactory=;
The following table lists the parameters for the disposition and provides a description of each.
Parameter Description
queue JNDI name of a queue to which events are emitted.
Connection Factory A resource that contains information about the JMS Server.
The WebLogic connection factory is:
javax.jms.QueueConnectionFactory
jndiurl The URL to use to contact the JNDI provider. The syntax of this URL depends on which JNDI provider is being used. This value corresponds to the standard JNDI property, java.naming.provider.url
For BEA WebLogic Server this is
t3://host:port
where:
host
Is the machine name where WebLogic Server is installed.
port
Is the port on which WebLogic server is listening. The default port if not changed at installation is 7001.
jndifactory Is JNDI context.INITIAL_CONTEXT_FACTORY and is provided by the JNDI service provider.
For WebLogic Server, the WebLogic factory is
weblogic.jndi.WLInitialContextFactory
user A valid user name required to access a JMS server.
3-6 iWay Software

Listening for Events in HL7
5. Click OK.
The event port appears under the ports node in the left pane. A summary of the information associated with the event port appears in the right pane.
You are now ready to associate the event port with a channel. For more information, see Creating a Channel on page 3-14.
Procedure: How to Create an Event Port for MSMQ
To create an event port for MSMQ:
1. Click the Event Adapters tab.
The Event Adapters window opens.
2. In the left pane, expand the HL7 node.
3. Select the ports node.
4. Move the pointer over Operations and select Add a new port.
The Create Event Port pane opens on the right.
a. In the Port Name field, type a name for the port, for example, Queue1_on_NTK.
The name is used to build a repository entry as well as to identify the port.
b. In the Description field, type a description for the port you just created.
c. From the Disposition Protocol drop-down list, select MSMQ.
d. In the Disposition field, enter a MSMQ destination in the form of:
msmq:/host/private$/qName;errorTo=[pre-defined port name or another disposition url]
The following table lists the parameters for the disposition and provides a description of each.
password A valid password required to access a JMS server.
errorTo Location where error documents are sent. Predefined port name or another full URL. Optional.
Parameter Description
Parameter Description
host Machine name where the Microsoft Queuing system is running.
iWay Adapter for HL7 for BEA WebLogic User’s Guide 3-7

Creating an Event Port
5. Click OK.
In the left pane, the event port you created appears under the ports node with a summary of its information displaying in the right pane.
You are ready to associate the event port with a channel. For more information, see Creating a Channel on page 3-14.
Procedure: How to Create a Port for the SOAP Disposition
To create a port for a SOAP disposition:
1. Click the Event Adapters tab.
The Event Adapters window opens.
2. In the left pane, expand the HL7 node.
3. Select the ports node.
4. Move the pointer over Operations and select Add a new port.
The Create Event Port window opens in the right pane.
a. Type a name for the event port and provide a brief description.
b. From the Disposition Protocol drop-down list, select SOAP.
c. In the Disposition field, enter an SOAP destination, using the following format:
soap:[wsdl-url];soapaction=[myaction];method=[web service method];namespace=[namespace];responseTo=[pre-defined port name or another disposition URL];errorTo=[pre-defined port name or another disposition url]
Queue Type Private queues are queues that are not published in Active Directory. They appear only on the local computer that contains them. Private queues are accessible only by Message Queuing applications that recognize the full path name or format name of the queue.
For private queues, enter Private$.
qName Name of the private queue where messages are placed.
errorTo Location where error documents are sent. A predefined port name or another full URL. Optional.
Parameter Description
3-8 iWay Software

Listening for Events in HL7
The following table describes the parameters for the disposition.
Parameter Description
wsdl-url The URL to the WSDL file that is required to create the SOAP message. For example:
http://localhost:7001/ibse/IBSEServlet/test/webservice.ibs?wsdl
where:
webservice
Is the name of the Web service you created using Application Explorer.
This value can be found by navigating to the Integration Business Services tab and opening the Service Description link in a new window. The WSDL URL appears in the Address field.
You can also open the WSDL file in a third party XML editor (for example, XMLSPY) and view the SOAP request settings to find this value.
soapaction The method that will be called by the SOAP disposition. For example:
webservice.method@test@@
where:
webservice
Is the name of the Web service you created using Application Explorer.
method
Is the method being used.
test
Is the license that is being used by the Web service.
This value can be found in the WSDL file.
method The Web service method you are using. This value can be found in the WSDL file.
namespace The XML namespace you are using. This value can be found in the WSDL file.
iWay Adapter for HL7 for BEA WebLogic User’s Guide 3-9

Creating an Event Port
5. Click OK.
In the left pane, the event port you created appears under the ports node with a summary of its information displaying in the right pane.
Procedure: How to Create an Event Port for an HTTP Disposition
To create an event port for an HTTP disposition:
1. Click the Event Adapters tab.
The Event Adapters window opens.
2. In the left pane, expand the HL7 node.
3. Select the ports node.
4. Move the pointer over Operations and select Add a new port.
The Create iWay Event Port pane opens on the right.
a. Type an event port name and a brief description.
b. From the disposition protocol drop-down list, select HTTP.
c. From the Disposition field, enter an HTTP destination.
When pointing Application Explorer to an iBSE deployment, use the following format:
ihttp://[myurl];responseTo=[pre-defined port name or another disposition url];
where:
url
Is the URL target for the post operation, for example,
http://myhost:1234/docroot
responseTo
Is the location where responses are posted (optional).
responseTo The location to which responses are posted, which can be a predefined port name or another URL. Optional.
The URL must be complete, including the protocol.
errorTo The location to which error logs are sent. Optional.
A predefined port name or another disposition URL. The URL must be complete, including the protocol.
Parameter Description
3-10 iWay Software

Listening for Events in HL7
When pointing Application Explorer to a JCA deployment, use the following format:
http://host:port/uri
where:
host:port
Is the combination of the name of the host on which the Web server resides and the port on which the server is listening for the post operation.
uri
Is the universal resource identifier that completes the url specification.
5. Click OK.
The port appears under the ports node in the left pane.
Procedure: How to Create an Event Port for MQ Series Disposition
To create an event port for MQ Series using Application Explorer:
1. Click the Event Adapters tab.
The Event Adapters window opens.
2. In the left pane, expand the HL7 node.
3. Select the ports node.
4. Move the pointer over Operations and select Add a new port.
The Create iWay Event Port pane opens on the right.
a. Type an event port name and a brief description.
b. From the disposition protocol drop-down list, select MQ Series.
c. In the Disposition field, enter an MQ Series destination.
When pointing Application Explorer to an iBSE deployment, use the following format:
mqseries:/qManager/qName;host=[hostname];port=[port];channel=[channnelname];errorTo=[pre-defined port name or another disposition url]
When pointing Application Explorer to a JCA deployment, use the following format:
mq:qmanager@respqueue;host=;port=;channel=
iWay Adapter for HL7 for BEA WebLogic User’s Guide 3-11

Creating an Event Port
The following table describes the parameters for the disposition.
5. Click OK.
The newly created event port appears under the port section of the event adapter in the left pane.
Editing or Deleting an Event PortThe following procedures provide information on how to modify and delete an event port.
Procedure: How to Edit an Event Port
To edit an existing event port:
1. In the left pane, select the event port you want to edit.
2. In the right pane, move the pointer over Operations and select Edit.
Parameter Description
qManager Is the name of the queue manager to which the server must connect.
qName or respqueue
Name of the queue where messages are placed.
host The host on which the MQ Server is located (for the MQ Client only).
port The number to connect to an MQ Server queue manager (for the MQ client only).
channel The case-sensitive name of the channel that connects with the remote MQ Server queue manager (for the MQ client only). The default channel name for MQSeries is SYSTEM.DEF.SVRCONN.
errorTo Location where error documents are sent. This can be a predefined port name or another full URL. Optional.
3-12 iWay Software

Listening for Events in HL7
The Edit Port pane opens. The following image shows the Edit Port pane containing four fields, a help button, and two action buttons.
3. Make the required changes to the Description, Disposition Protocol, or Disposition fields, and click OK.
Note: The Edit Port pane does not allow you to change the name of the port, only the parameters.
Procedure: How to Delete an Event Port
To delete an existing event port:
1. Select the event port you want to delete.
2. In the right pane, move the pointer over Operations and select Delete.
A confirmation dialog box opens.
3. To delete the event port you selected, click OK.
The event port disappears from the list in the left pane.
iWay Adapter for HL7 for BEA WebLogic User’s Guide 3-13
Creating a Channel
Creating a ChannelThe following procedure describes how to create a HL7 channel for your iWay Event. You must associate a port to a channel before you can make the channel active.
Procedure: How to Create a HL7 Channel
To create a channel using iWay Application Explorer:
1. Click the Event Adapters tab.
The Event Adapters window opens. The adapters that appear in the left pane support events.
2. Expand the HL7 node.
The ports and channels nodes appear in the left pane. The following image shows the HL7 expanded with the channels node selected.
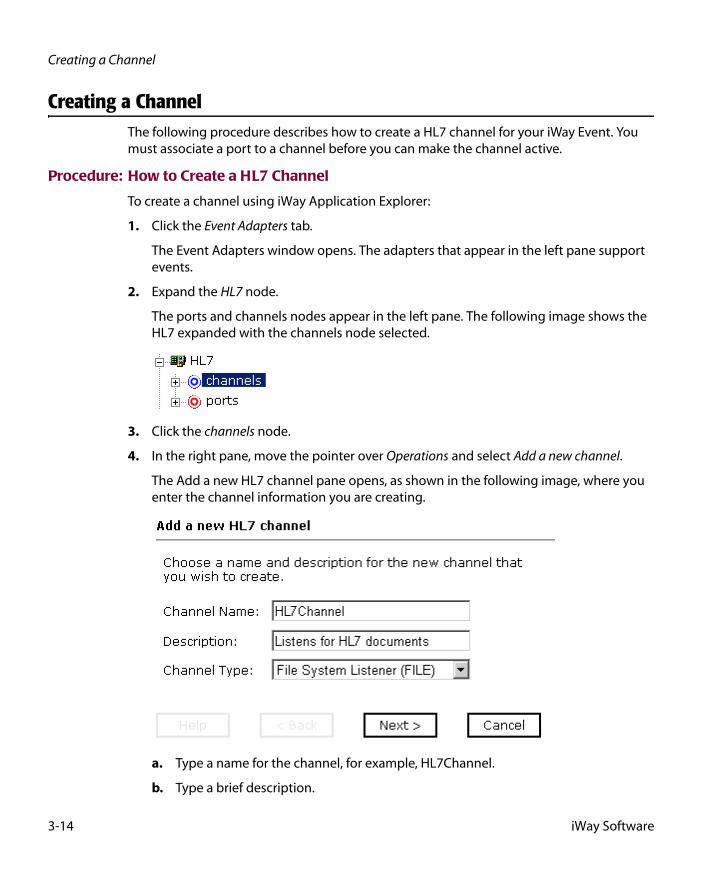
3. Click the channels node.
4. In the right pane, move the pointer over Operations and select Add a new channel.
The Add a new HL7 channel pane opens, as shown in the following image, where you enter the channel information you are creating.
a. Type a name for the channel, for example, HL7Channel.
b. Type a brief description.
3-14 iWay Software

Listening for Events in HL7
c. From the drop-down list, select a type of listener:
• File System Listener (FILE)
• HyperText Transfer Protocol
• TCP Listener (TCP)
• IBM MQ Series (MQ)
• File Transfer Protocol (FTP)
5. Click Next.
The Edit channels pane opens in the right pane and includes fields that are specific to the type of listener you selected.
The following image shows the Edit channels pane for configuring a FILE listener which consists of seven fields: Location, File Suffix, Encoding, Polling Interval, Sort, Scan Sub-directories, and File Read Limit. Also there are Help, Back, Next, and Cancel buttons.
6. Provide the appropriate information that is specific to the listener you selected:
For information on the parameters for a File System Listener (FILE) listener, see File System Listener (FILE) listener Configuration Parameters on page 3-17.
iWay Adapter for HL7 for BEA WebLogic User’s Guide 3-15

Creating a Channel
For information on the parameters for a HyperText Transfer Protocol listener, see HyperText Transfer Protocol Listener Configuration Parameters on page 3-18.
For information on the parameters for a TCP Listener, see TCP Listener Configuration Parameters on page 3-19.
For information on the parameters for an IBM MQ Series (MQ) listener, see IBM MQ Series (MQ) Listener Configuration Parameters on page 3-20.
For information on the parameters for a File Transfer Protocol (FTP) listener, see File Transfer Protocol (FTP) Listener Configuration Parameters on page 3-21.
7. Click Next.
The Select Ports pane opens, as shown in the following image. A list of available ports appears in the Available field on the left, and the ports that are currently associated appear in the Current field on the right. This pane also contains a help button and three action (Back, Finish, and Cancel) buttons.
a. Select an event port from the list of current ports.
b. Click the single right arrow button to transfer the port to the list of available ports. To associate all the event ports, click the double right arrow button.
8. Click Finish.
In the right pane is a summary of the channel description, channel status, and available ports which are associated with the channel you created.
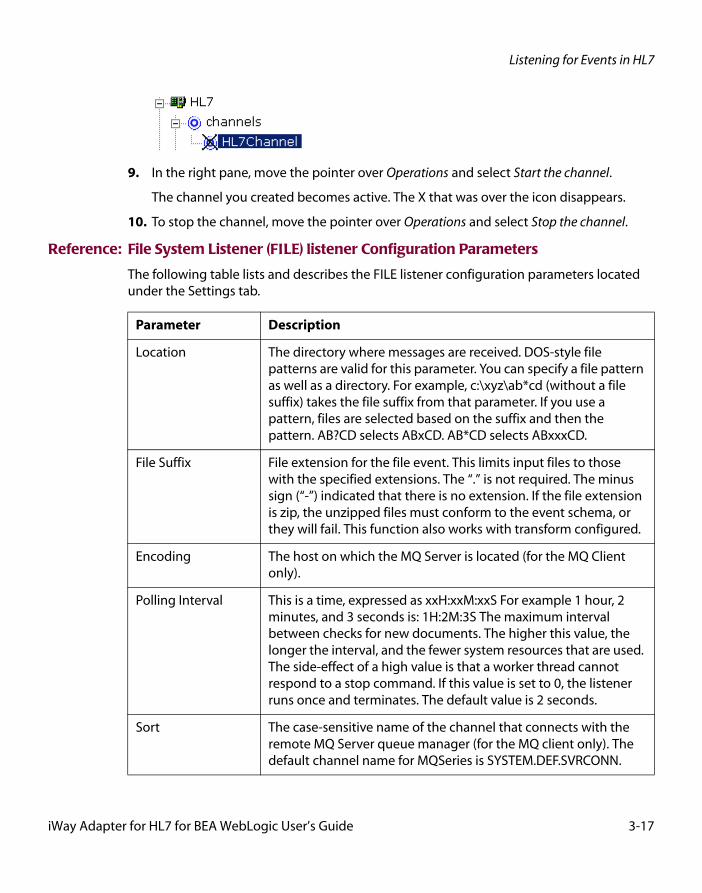
The following image shows the left pane displaying the channel you created under the channels node. An X over the node icon indicates that the channel is currently disconnected. You must start the channel to activate your event configuration.
3-16 iWay Software
Listening for Events in HL7
9. In the right pane, move the pointer over Operations and select Start the channel.
The channel you created becomes active. The X that was over the icon disappears.
10. To stop the channel, move the pointer over Operations and select Stop the channel.
Reference: File System Listener (FILE) listener Configuration Parameters
The following table lists and describes the FILE listener configuration parameters located under the Settings tab.
Parameter Description
Location The directory where messages are received. DOS-style file patterns are valid for this parameter. You can specify a file pattern as well as a directory. For example, c:\xyz\ab*cd (without a file suffix) takes the file suffix from that parameter. If you use a pattern, files are selected based on the suffix and then the pattern. AB?CD selects ABxCD. AB*CD selects ABxxxCD.
File Suffix File extension for the file event. This limits input files to those with the specified extensions. The “.” is not required. The minus sign (“-”) indicated that there is no extension. If the file extension is zip, the unzipped files must conform to the event schema, or they will fail. This function also works with transform configured.
Encoding The host on which the MQ Server is located (for the MQ Client only).
Polling Interval This is a time, expressed as xxH:xxM:xxS For example 1 hour, 2 minutes, and 3 seconds is: 1H:2M:3S The maximum interval between checks for new documents. The higher this value, the longer the interval, and the fewer system resources that are used. The side-effect of a high value is that a worker thread cannot respond to a stop command. If this value is set to 0, the listener runs once and terminates. The default value is 2 seconds.
Sort The case-sensitive name of the channel that connects with the remote MQ Server queue manager (for the MQ client only). The default channel name for MQSeries is SYSTEM.DEF.SVRCONN.
iWay Adapter for HL7 for BEA WebLogic User’s Guide 3-17

Creating a Channel
The following table lists and describes the FILE listener configuration parameters located under the Advanced tab.
Reference: HyperText Transfer Protocol Listener Configuration Parameters
The following table lists and describes the HTTP listener configuration parameters located under the Settings tab.
Scan Sub-directories
Location where error documents are sent. This can be a predefined port name or another full URL. Optional.
Parameter Description
Transform Type Select the pre-built transform template from the drop-down list. To enable batch processing, select BatchSplitter from the drop-down list.
The batch splitter pre-parses an entire EDI document and splits the document into individual transactions. Each transaction retains its Interchange Header/Trailer information. Once the batch splitter is finished splitting the EDI document, the transactions are ready to be transformed into XML.
Location for ack copies
The directory in which the acknowledgement document is placed.
Parameter Description
Parameter Description
Port The port where the adapter listens for the HTTP transfer.
Encoding The character set encoding for inbound documents. For example, UTF-8. The default is ISO-8859-1 US and Western Europe.
3-18 iWay Software
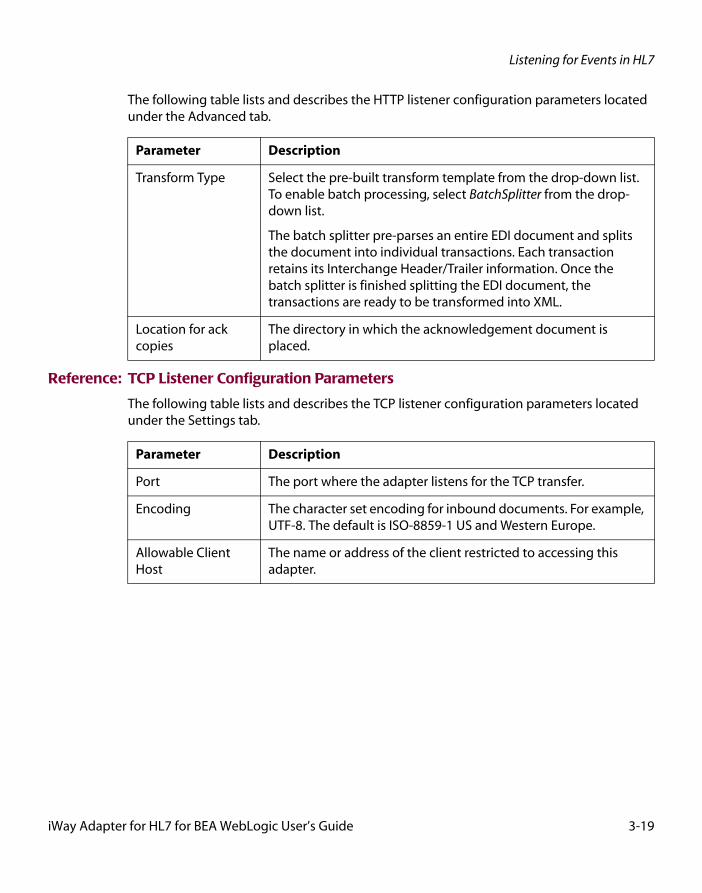
Listening for Events in HL7
The following table lists and describes the HTTP listener configuration parameters located under the Advanced tab.
Reference: TCP Listener Configuration Parameters
The following table lists and describes the TCP listener configuration parameters located under the Settings tab.
Parameter Description
Transform Type Select the pre-built transform template from the drop-down list. To enable batch processing, select BatchSplitter from the drop-down list.
The batch splitter pre-parses an entire EDI document and splits the document into individual transactions. Each transaction retains its Interchange Header/Trailer information. Once the batch splitter is finished splitting the EDI document, the transactions are ready to be transformed into XML.
Location for ack copies
The directory in which the acknowledgement document is placed.
Parameter Description
Port The port where the adapter listens for the TCP transfer.
Encoding The character set encoding for inbound documents. For example, UTF-8. The default is ISO-8859-1 US and Western Europe.
Allowable Client Host
The name or address of the client restricted to accessing this adapter.
iWay Adapter for HL7 for BEA WebLogic User’s Guide 3-19

Creating a Channel
The following table lists and describes the TCP listener configuration parameters located under the Advanced tab.
Reference: IBM MQ Series (MQ) Listener Configuration Parameters
The following table lists and describes the MQ Series listener configuration parameters located under the Settings tab.
The following table lists and describes the MQ Series listener configuration parameters located under the MQ Client tab.
Parameter Description
Transform Type Select the pre-built transform template from the drop-down list. To enable batch processing, select BatchSplitter from the drop-down list.
The batch splitter pre-parses an entire EDI document and splits the document into individual transactions. Each transaction retains its Interchange Header/Trailer information. Once the batch splitter is finished splitting the EDI document, the transactions are ready to be transformed into XML.
Location for ack copies
The directory in which the acknowledgement document is placed.
Parameter Description
Queue Manager The name of the MQ queue manager to be used.
Queue Name The name of the MQ Series or WebSphere MQ queue that the HL7 system polls.
Polling Interval The maximum wait interval (in the format nnH:nnM:nnS) between checks for new documents. The higher this value, the longer the interval, and the fewer system resources that are used. However, with a high value, the worker thread cannot respond to a stop command. If timeout is set to 0, the listener runs once and terminates. The default is 2 seconds.
Parameter Description
Host The host where the MQ Server is located.
Port The port number used to connect to an MQ Server.
3-20 iWay Software

Listening for Events in HL7
The following table lists and describes the MQ Series listener configuration parameters located under the Advanced tab.
Reference: File Transfer Protocol (FTP) Listener Configuration Parameters
The following table lists and describes the FTP listener configuration parameters located under the Settings tab.
Channel The channel between an MQ Client and an MQ Server.
Parameter Description
Transform Type Select the pre-built transform template from the drop-down list. To enable batch processing, select BatchSplitter from the drop-down list.
The batch splitter pre-parses an entire EDI document and splits the document into individual transactions. Each transaction retains its Interchange Header/Trailer information. Once the batch splitter is finished splitting the EDI document, the transactions are ready to be transformed into XML.
Location for ack copies
The directory in which the acknowledgement document is placed.
Parameter Description
Parameter Description
Host The name of the FTP host.
Port The port where the adapter listens on the FTP transfer.
User The user name to log onto the FTP Server.
Password The password for the FTP user.
Location The directory where messages are received. DOS-style file patterns are available for this parameter. You can specify a file pattern as well as a directory. For example, c:\xyz\ab*cd (without a file suffix) takes the file suffix from that parameter.
If you use a pattern, files are selected based on the suffix and then the pattern. AB?CD selects ABxCD. AB*CD selects ABxxxCD.
iWay Adapter for HL7 for BEA WebLogic User’s Guide 3-21

Creating a Channel
The following table lists and describes the FTP listener configuration parameters located under the Advanced tab.
Procedure: How to Edit a Channel
To edit an existing channel:
1. In the left pane, select the channel you want to edit.
2. In the right pane, move the pointer over Operations and select Edit.
The Edit channels pane opens.
3. Make the required changes to the channel configuration and click Finish.
Procedure: How to Delete a Channel
To delete an existing channel:
1. In the left pane, select the channel you want to delete.
Encoding The character set encoding for inbound documents. For example, UTF-8. The default is ISO-8859-1 US and Western Europe.
Polling Interval The maximum wait interval (in the format nnH:nnM:nnS) between checks for new documents. The higher this value, the longer the interval, and the fewer system resources that are used. However, with a high value, the worker thread cannot respond to a stop command. If timeout is set to 0, the listener runs once and terminates. The default is 2 seconds.
Parameter Description
Transform Type Select the pre-built transform template from the drop-down list. To enable batch processing, select BatchSplitter from the drop-down list.
The batch splitter pre-parses an entire EDI document and splits the document into individual transactions. Each transaction retains its Interchange Header/Trailer information. Once the batch splitter is finished splitting the EDI document, the transactions are ready to be transformed into XML.
Location for ack copies
The directory in which the acknowledgement document is placed.
Parameter Description
3-22 iWay Software

Listening for Events in HL7
2. In the right pane, move the pointer over Operations and select Delete.
A confirmation dialog box opens.
3. To delete the channel you selected, click OK.
The channel disappears from the list in the left pane.
iWay Adapter for HL7 for BEA WebLogic User’s Guide 3-23

Creating a Channel
3-24 iWay Software

CHAPTER 4
4.Using Web Services Policy-Based Security
Topics:
• Integration Business Services Policy-Based Security
• Configuring Integration Business Services Policy-Based Security
Servlet Application Explorer provides a security feature called Integration Business Services policy-based security. The following topics describe how this feature works and how to configure it.
Note: For the iWay 5.5 RG2 Release, it is recommended that policy-based security not be enabled.
iWay Adapter for HL7 for BEA WebLogic User’s Guide 4-1

Integration Business Services Policy-Based Security
Integration Business Services Policy-Based SecurityIntegration Business Services provide a layer of abstraction between the back-end business logic they invoke and the user or application running the business service. This enables easy application integration but raises the issue of controlling the use and execution of critical and sensitive business logic that is run as a business service.
Servlet Application Explorer controls the use of business services that use adapters with a feature called policy-based security. This feature enables an administrator to apply policies to Integration Business Services (iBS) to deny or permit their execution.
A policy is a set of privileges associated with the execution of a business service that can be applied to an existing or new iBS. When you assign specific rights or privileges inside a policy, you need not recreate privileges for every iBS that has security issues in common with other Integration Business Services. Instead, you can use one policy for many Integration Business Services.
The goal is to secure requests at both the transport and the SOAP request level that is transmitted on the wire. Some policies do not deal with security issues directly but affect the run-time behavior of the business services to which they are applied.
The iBSE administrator creates an instance of a policy type, names it, associates individual users and/or groups (a collection of users), and then applies the policy to one or more business services.
You can assign a policy to an iBS or to a method within an iBS. If a policy is applied only to a method, other methods in that iBS are not governed by it. However, if a policy is applied to the iBS, all methods are governed by it. At run time, the user ID and password that are sent to iBSE in the SOAP request message are checked against the list of users for all policies applied to the specific iBS. The Resource Execution policy type is supported and dictates who can or cannot execute the iBS.
When a policy is not applied, the default value for an iBS is to “grant all.” For example, anyone can execute the iBS until the Resource Execution policy is associated to the iBS. At that time, only users granted execution permission, or those who do not belong to a group that was denied execution permissions, have access to the iBS.
4-2 iWay Software

Using Web Services Policy-Based Security
Configuring Integration Business Services Policy-Based SecurityBefore you create instances of policies, you must have a minimum of one user or one group to associate to an instance. You can create users and groups using Servlet Application Explorer. For more information, see Create a User to Associate With a Policy on page 4-3 or Create a Group to Associate With a Policy on page 4-5.
An execution policy governs who can execute the business service to which the policy is applied. For more information, see Create an Execution Policy on page 4-7.
You configure the IP and Domain Restriction policy type slightly differently from other policy types. The IP and Domain Restriction policy type controls connection access to iBSE and therefore, need not be applied to an individual business service. You need not create a policy, however, you must enable the Security Policy option in Servlet Application Explorer. For more information, see Configure IP and Domain Restrictions on page 4-10.
Note: For the iWay 5.5 RG2 Release, it is recommended that policy-based security not be enabled.
Procedure: How to Create a User to Associate With a Policy
To create a user to associate with a policy:
1. Open Servlet Application Explorer.
The following image shows the window that opens and includes three tabs corresponding to Service Adapters, Event Adapters, and Integration Business Services. The Integration Business Services tab is active and displays a Welcome screen on the right. The image shows the Integration Business Services node expanded in the left pane.
a. Click the Integration Business Services tab.
b. Expand the Configuration node.
c. Expand the Security node.
iWay Adapter for HL7 for BEA WebLogic User’s Guide 4-3

Configuring Integration Business Services Policy-Based Security
d. Expand the Users and Groups node.
e. Select Users.
2. In the right pane, move the pointer over Operations and select Add.
The following image shows the Add a new user pane that opens and includes fields where you enter a user name, a password, and a description of the user. The pane includes a Help button, an OK button to instruct the system to accept inputs, and a Cancel button to escape from the pane.
a. In the Name field, type a user ID.
b. In the Password field, type the password associated with the user ID.
c. In the Description field, type a description of the user (optional).
3. Click OK.
4-4 iWay Software
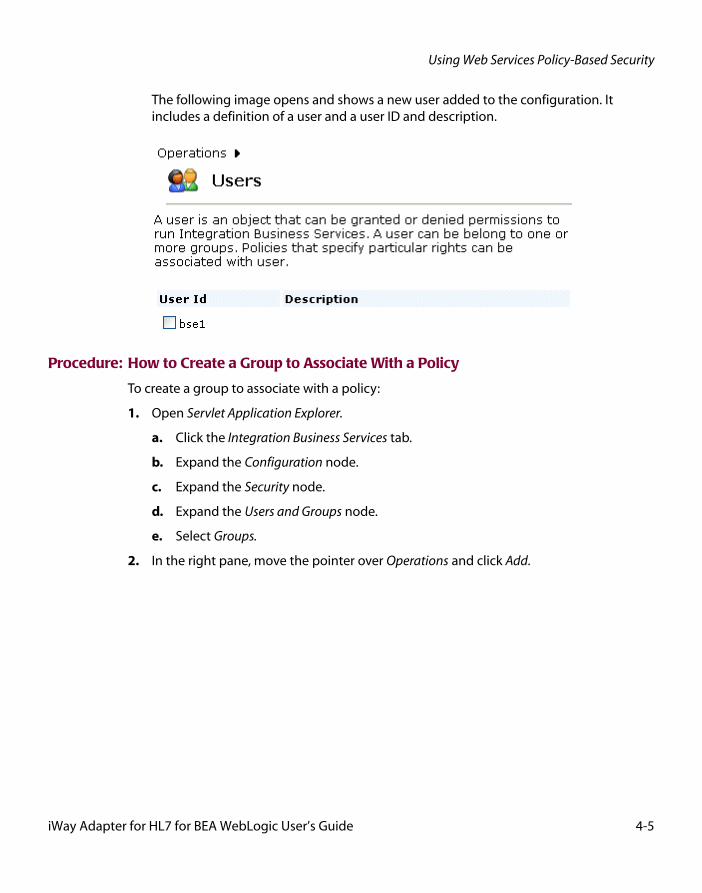
Using Web Services Policy-Based Security
The following image opens and shows a new user added to the configuration. It includes a definition of a user and a user ID and description.
Procedure: How to Create a Group to Associate With a Policy
To create a group to associate with a policy:
1. Open Servlet Application Explorer.
a. Click the Integration Business Services tab.
b. Expand the Configuration node.
c. Expand the Security node.
d. Expand the Users and Groups node.
e. Select Groups.
2. In the right pane, move the pointer over Operations and click Add.
iWay Adapter for HL7 for BEA WebLogic User’s Guide 4-5

Configuring Integration Business Services Policy-Based Security
The following image shows the Add new group pane that opens with fields where you enter a name and a description for the group. To continue after typing inputs, click the Next button. The pane also includes a Help button, a Back button to return to the previous screen, and a Cancel button to escape from the pane.
a. In the Name field, type a a name for the group.
b. In the Description field, type a description for the group (optional).
3. Click Next.
The following image shows the Modify Group Membership pane where you can move users to or from a group using the arrow keys to move them between the Current and Available lists and then clicking the Finish button. The pane includes a Help button, a Back button to return to the previous screen, and a Cancel button to escape from the pane.
4-6 iWay Software

Using Web Services Policy-Based Security
You can either highlight a single user in the list of available users and add it to the current list by clicking the left arrow, or you can click the double left arrow to add all users in the list of available users to the group.
4. After you select a minimum of one user, click Finish.
The new group is added.
The following image shows a pane with a new group added to the configuration. It includes a definition of a group and the group name and description.
Procedure: How to Create an Execution Policy
To create an execution policy:
1. Open Servlet Application Explorer.
a. Click the Integration Business Services tab.
b. Expand the Configuration node.
c. Select Policies.
iWay Adapter for HL7 for BEA WebLogic User’s Guide 4-7

Configuring Integration Business Services Policy-Based Security
The following image shows the Policies pane on the right where you apply a policy. The Operations menu becomes available with three options, Build/Rebuild, Add, and Refresh.
2. Move the pointer over Operations and click Add.
The following image shows the Add a new policy pane that opens with fields for entering the name, type, and description of the policy. To continue, click the Next button. The pane includes a Help button, a Back button to return to the previous screen, and a Cancel button to escape from the pane.
a. In the Name field, type a a name for the policy.
b. From the Type drop-down list, select Execution.
c. In the Description field, type a description for the policy (optional).
4-8 iWay Software
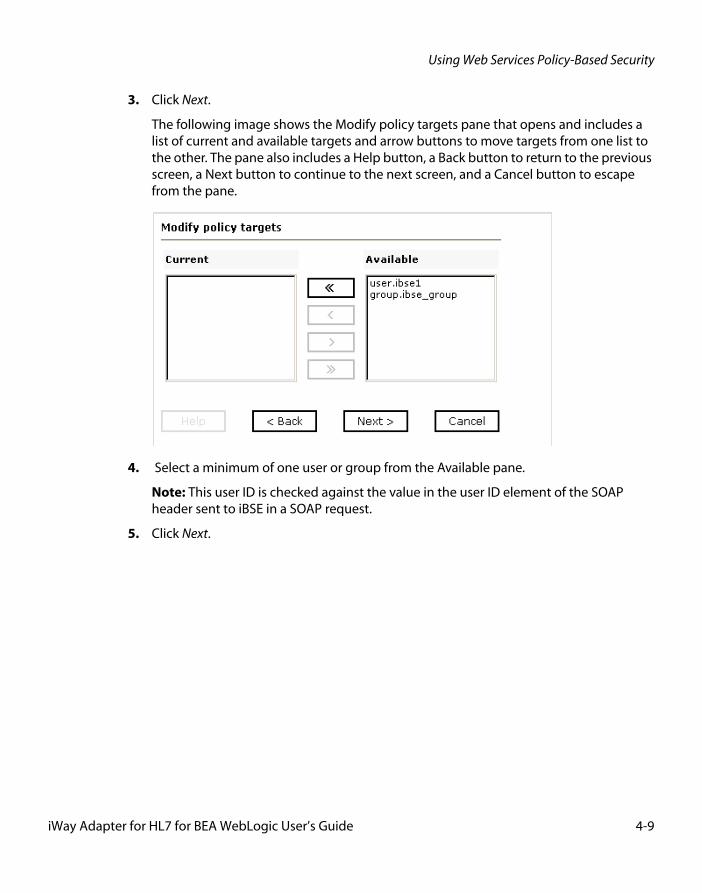
Using Web Services Policy-Based Security
3. Click Next.
The following image shows the Modify policy targets pane that opens and includes a list of current and available targets and arrow buttons to move targets from one list to the other. The pane also includes a Help button, a Back button to return to the previous screen, a Next button to continue to the next screen, and a Cancel button to escape from the pane.
4. Select a minimum of one user or group from the Available pane.
Note: This user ID is checked against the value in the user ID element of the SOAP header sent to iBSE in a SOAP request.
5. Click Next.
iWay Adapter for HL7 for BEA WebLogic User’s Guide 4-9
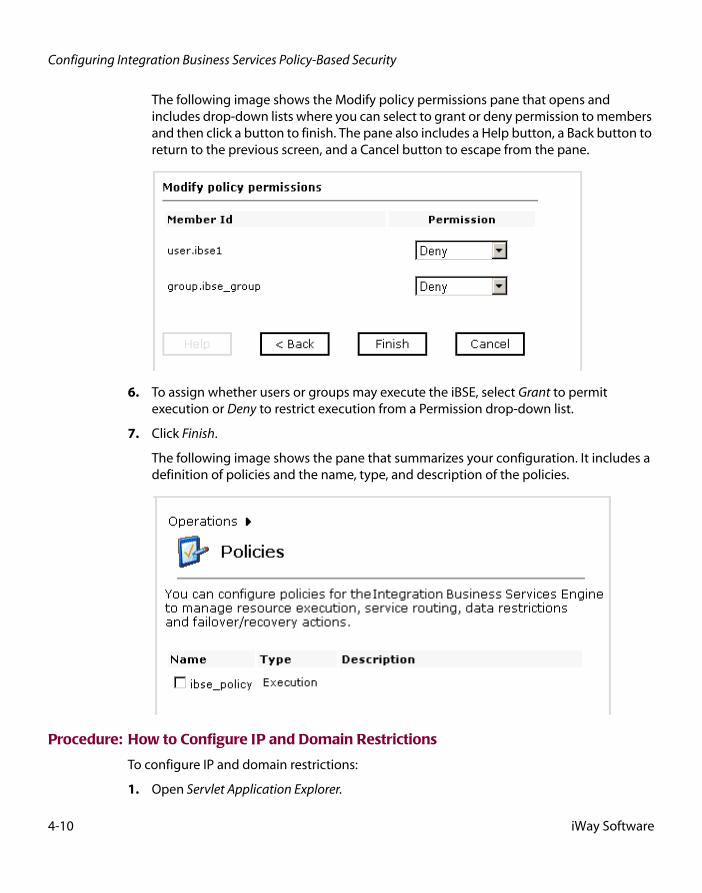
Configuring Integration Business Services Policy-Based Security
The following image shows the Modify policy permissions pane that opens and includes drop-down lists where you can select to grant or deny permission to members and then click a button to finish. The pane also includes a Help button, a Back button to return to the previous screen, and a Cancel button to escape from the pane.
6. To assign whether users or groups may execute the iBSE, select Grant to permit execution or Deny to restrict execution from a Permission drop-down list.
7. Click Finish.
The following image shows the pane that summarizes your configuration. It includes a definition of policies and the name, type, and description of the policies.
Procedure: How to Configure IP and Domain Restrictions
To configure IP and domain restrictions:
1. Open Servlet Application Explorer.
4-10 iWay Software
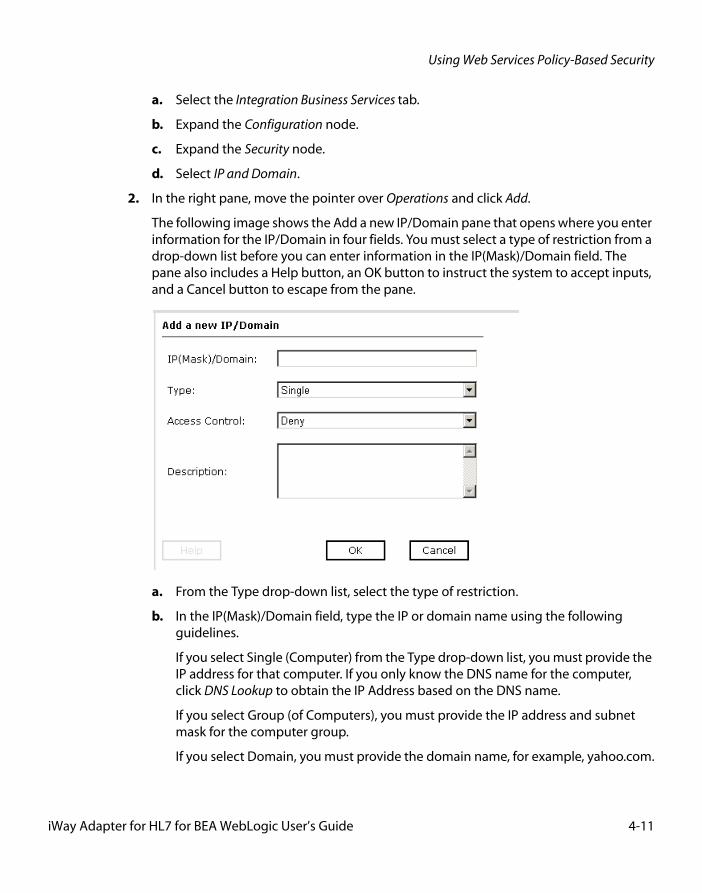
Using Web Services Policy-Based Security
a. Select the Integration Business Services tab.
b. Expand the Configuration node.
c. Expand the Security node.
d. Select IP and Domain.
2. In the right pane, move the pointer over Operations and click Add.
The following image shows the Add a new IP/Domain pane that opens where you enter information for the IP/Domain in four fields. You must select a type of restriction from a drop-down list before you can enter information in the IP(Mask)/Domain field. The pane also includes a Help button, an OK button to instruct the system to accept inputs, and a Cancel button to escape from the pane.
a. From the Type drop-down list, select the type of restriction.
b. In the IP(Mask)/Domain field, type the IP or domain name using the following guidelines.
If you select Single (Computer) from the Type drop-down list, you must provide the IP address for that computer. If you only know the DNS name for the computer, click DNS Lookup to obtain the IP Address based on the DNS name.
If you select Group (of Computers), you must provide the IP address and subnet mask for the computer group.
If you select Domain, you must provide the domain name, for example, yahoo.com.
iWay Adapter for HL7 for BEA WebLogic User’s Guide 4-11

Configuring Integration Business Services Policy-Based Security
3. From the Access Control drop-down list, select Grant to permit access or Deny to restrict access for the IP addresses and domain names you are adding.
4. Click OK.
The following image shows the pane that opens and summarizes your configuration including the domain name, whether access is granted or denied, and a description (optional).
4-12 iWay Software

CHAPTER 5
5.Management and Monitoring
Topics:
• Managing and Monitoring Services and Events Using iBSE
• Managing and Monitoring Services and Events Using the JCA Test Tool
• Setting Engine Log Levels
• Configuring Connection Pool Sizes
• Migrating Repositories
• Exporting or Importing Targets
• Retrieving or Updating Web Service Method Connection Information
• Starting or Stopping a Channel Programmatically
After you create services and events using Servlet Application Explorer, you can use managing and monitoring tools provided by the Integration Business Services Engine (iBSE) and the iWay Connector for JCA to measure the performance of your run-time environment. This section describes how to configure and use these features.
iWay Adapter for HL7 for BEA WebLogic User’s Guide 5-1

Managing and Monitoring Services and Events Using iBSE
Managing and Monitoring Services and Events Using iBSEIntegration Business Services Engine (iBSE) provides a console to manage and monitor services and events currently in use and to display resource usage and invocation statistics. These indicators can help you adjust your environment for optimum efficiency.
The following monitoring levels are available for services:
• System
• Service
• Method
The following monitoring levels are available for events:
• System
• Channel
• Port
Procedure: How to Configure Monitoring Settings
To configure monitoring settings:
1. Ensure that your BEA WebLogic Server is started.
2. To access the monitoring console, enter the following URL in your Web browser:
http://localhost:port/ibse/IBSEConfig
where:
localhost
Is the machine where the application server is running.
port
Is the HTTP port for the application server.
The following image shows the iBSE Settings window that opens. It lists property names and includes fields where you can enter values for each property. To configure system settings, the System pane contains drop-down lists for selecting language, encoding, the debug level, and the number of asynchronous processors. It also contains a field where you can enter a path to the adapters lib directory.
To configure security settings, the Security pane contains fields for typing the Admin User name and the associated password and a check box for specifying policy.
5-2 iWay Software

Management and Monitoring
To configure repository settings, the Repository pane contains a drop-down list for selecting the repository type, fields to type information for the repository URL, driver, user, and password, and a check box where you can enable repository pooling. In the upper and lower right of the window is a Save button. In the lower left of the window is an option to click to access more configuration settings.
3. Click More configuration.
Tip: To access the monitoring console directly, enter the following URL in your Web browser:
http://localhost:port/ibse/IBSEStatus
iWay Adapter for HL7 for BEA WebLogic User’s Guide 5-3
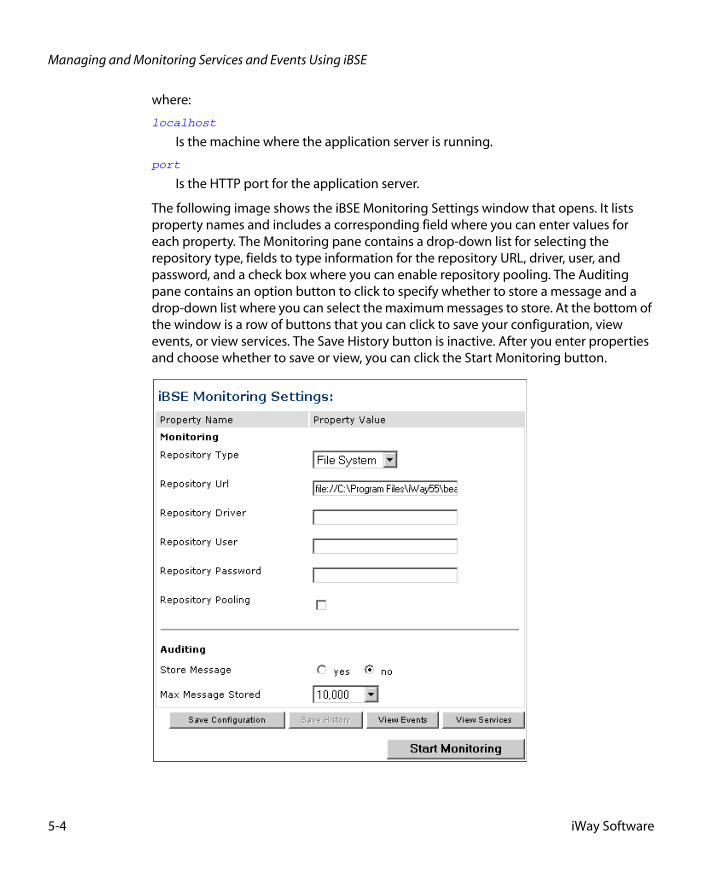
Managing and Monitoring Services and Events Using iBSE
where:
localhost
Is the machine where the application server is running.
port
Is the HTTP port for the application server.
The following image shows the iBSE Monitoring Settings window that opens. It lists property names and includes a corresponding field where you can enter values for each property. The Monitoring pane contains a drop-down list for selecting the repository type, fields to type information for the repository URL, driver, user, and password, and a check box where you can enable repository pooling. The Auditing pane contains an option button to click to specify whether to store a message and a drop-down list where you can select the maximum messages to store. At the bottom of the window is a row of buttons that you can click to save your configuration, view events, or view services. The Save History button is inactive. After you enter properties and choose whether to save or view, you can click the Start Monitoring button.
5-4 iWay Software
Management and Monitoring
a. In the Monitoring pane, from the Repository Type drop-down list, select the type of repository you are using.
b. To connect to the database in the Repository Url field, type a JDBC URL.
c. To connect to the database in the Repository Driver field, type a JDBC Class.
d. To access the monitoring repository database, type a user ID and password.
e. To enable pooling, click the Repository Pooling check box.
f. In the Auditing pane, select yes if you want to store messages.
This option is disabled by default.
Note: You must start and then, stop monitoring to enable this option.
g. Select the maximum number of messages you want to store.
By default, 10,000 is selected.
Note: Depending on your environment and the number of messages that are exchanged, storing a large number of messages may affect system performance. If you need more information about your system resources, consult your system administrator.
h. Click Save Configuration.
4. Click Start Monitoring.
iBSE begins to monitor all services and events currently in use. If you selected the option to store messages, iBSE stores messages.
5. To stop monitoring, click Stop Monitoring.
Procedure: How to Monitor Services
To monitor services:
1. Ensure that your BEA WebLogic Server is started.
2. From the iBSE Monitoring Settings window, click Start Monitoring.
3. Click View Services.
iWay Adapter for HL7 for BEA WebLogic User’s Guide 5-5

Managing and Monitoring Services and Events Using iBSE
The following image shows the System Level Summary (Service Statistics) window that opens. The Web Service Methods pane contains a drop-down list where you select a service. On the right, space is reserved for a drop-down list of methods that will appear. The Statistics pane contains a table with a summary of service statistics and two drop-down lists where you can select a successful or failed invocation to view more information about that service. At the bottom of the window is a home button to click to return to the iBSE Monitoring Settings window.
The system level summary provides services statistics at a system level.
5-6 iWay Software

Management and Monitoring
The following table consists of two columns, one that lists the name of each statistic and the other that describes the corresponding service statistic.
4. Select a service from the drop-down list.
Statistic Description
Total Time Total amount of time iBSE monitors services. The time starts after you click Start Monitoring in the iBSE Monitoring Settings window.
Total Request Count Total number of services requests that were made during the monitoring session.
Total Success Count Total number of successful service executions.
Total Error Count Total number of errors that were encountered.
Average Request Size Average size of an available service request.
Average Response Size Average size of an available service response size.
Average Execution Time Average execution time for a service.
Last Execution Time Last execution time for a service.
Average Back End Time Average back-end time for a service.
Last Back End Time Last back-end time for a service.
Successful Invocations A list of successful services arranged by correlation ID. To retrieve more information for a service, you can select the service from the drop-down list.
Failed Invocations A list of failed services arranged by correlation ID. To retrieve more information for a service, you can select the service from the drop-down list.
iWay Adapter for HL7 for BEA WebLogic User’s Guide 5-7

Managing and Monitoring Services and Events Using iBSE
The following image shows the System Level Summary (Service Statistics) window that opens. The Web Service Methods pane contains a drop-down list on the left where you select a service and a drop-down list on the right where you select a service method. The Statistics pane contains a table with a summary of service statistics and two drop-down lists. To view more information about that service, you can select it from the Successful Invocations or Failed Invocations drop-down list. To suspend or resume a service, you can click a button in the lower right. To return to the iBSE Monitoring Settings window, you click the home button (also located in the lower right).
a. To stop a service at any time, click Suspend Service.
b. To restart the service, click Resume Service.
5. Select a method for the service from the Method drop-down list.
5-8 iWay Software
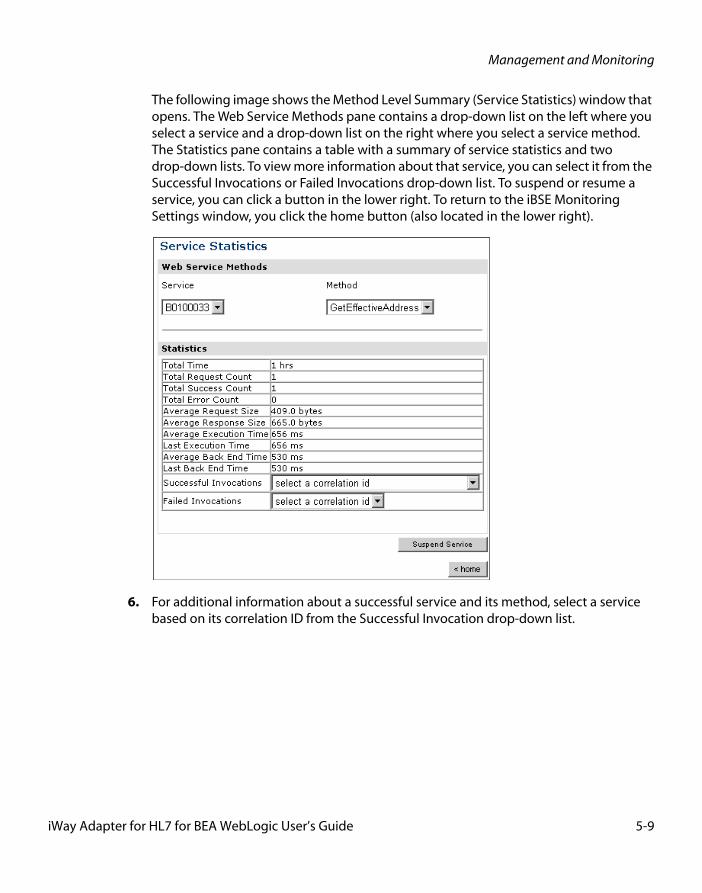
Management and Monitoring
The following image shows the Method Level Summary (Service Statistics) window that opens. The Web Service Methods pane contains a drop-down list on the left where you select a service and a drop-down list on the right where you select a service method. The Statistics pane contains a table with a summary of service statistics and two drop-down lists. To view more information about that service, you can select it from the Successful Invocations or Failed Invocations drop-down list. To suspend or resume a service, you can click a button in the lower right. To return to the iBSE Monitoring Settings window, you click the home button (also located in the lower right).
6. For additional information about a successful service and its method, select a service based on its correlation ID from the Successful Invocation drop-down list.
iWay Adapter for HL7 for BEA WebLogic User’s Guide 5-9
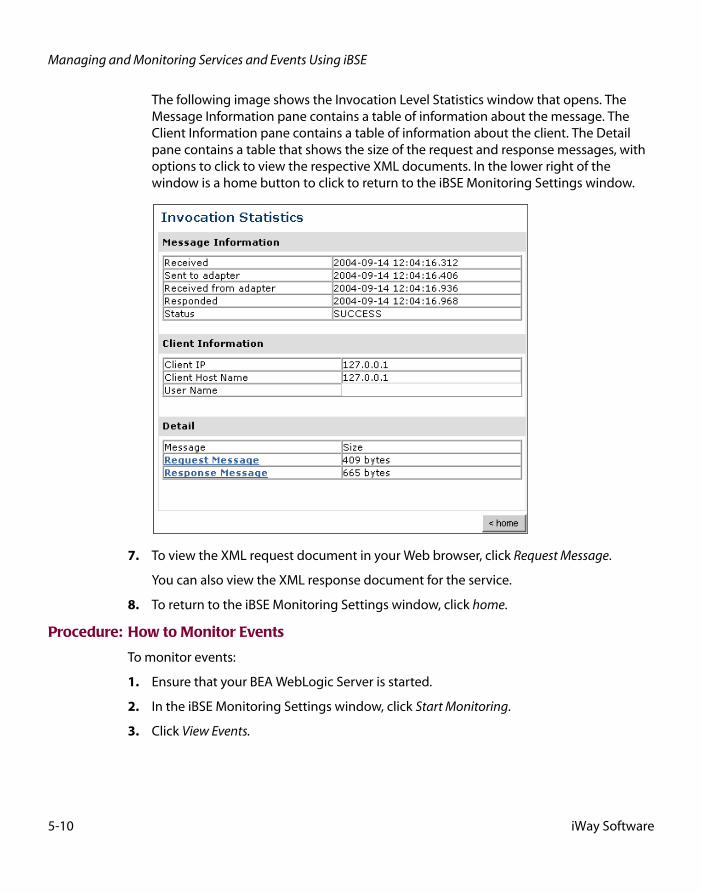
Managing and Monitoring Services and Events Using iBSE
The following image shows the Invocation Level Statistics window that opens. The Message Information pane contains a table of information about the message. The Client Information pane contains a table of information about the client. The Detail pane contains a table that shows the size of the request and response messages, with options to click to view the respective XML documents. In the lower right of the window is a home button to click to return to the iBSE Monitoring Settings window.
7. To view the XML request document in your Web browser, click Request Message.
You can also view the XML response document for the service.
8. To return to the iBSE Monitoring Settings window, click home.
Procedure: How to Monitor Events
To monitor events:
1. Ensure that your BEA WebLogic Server is started.
2. In the iBSE Monitoring Settings window, click Start Monitoring.
3. Click View Events.
5-10 iWay Software

Management and Monitoring
The following image shows the System Level Summary (Channel Statistics) window that opens. The Channels pane contains a drop-down list on the left where you select a channel. On the right, space is reserved for a drop-down list of ports that will appear. The Statistics pane contains a table with a summary of event statistics and two drop-down lists where you can select a successful or failed event to view more information about that event. In the lower right of the window is a home button to click to return to the iBSE Monitoring Settings window.
The system level summary provides event statistics at a system level.
iWay Adapter for HL7 for BEA WebLogic User’s Guide 5-11

Managing and Monitoring Services and Events Using iBSE
The following table consists of two columns, one that lists the name of each statistic and the other that describes the corresponding event statistic.
4. Select a channel from the drop-down list.
Statistic Description
Total Event Count Total number of events.
Total Success Count Total number of successful event executions.
Total Error Count Total number of errors that were encountered.
Average Event Size Average size of an available event request.
Average Event Reply Size Average size of an available event response.
Average Delivery Time Average delivery time for an event.
Last Delivery Time Last delivery time for an event.
Successful Events List of successful events arranged by correlation ID. To retrieve more information for an event, select the event from the drop-down list.
Failed Events List of failed events arranged by correlation ID. To retrieve more information for an event, select the event from the drop-down list.
5-12 iWay Software

Management and Monitoring
The following image shows the Channel Level Event Summary (Channel Statistics) window that opens. The Channels pane contains a drop-down list on the left where you select a channel and a drop-down list on the right where you select a port. The Statistics pane contains a table with a summary of event statistics and two drop-down lists where you can select a successful or failed event to view more information about that event. In the lower right of the window is a button to click to suspend or resume a channel and a home button to click to return to the iBSE Monitoring Settings window.
a. To stop a channel at any time, click Suspend Channel.
b. To start the channel, click Start Channel.
5. From the Ports drop-down list, select a port for the channel.
iWay Adapter for HL7 for BEA WebLogic User’s Guide 5-13

Managing and Monitoring Services and Events Using iBSE
The following image shows the Port Level Event Summary (Channel Statistics) window that opens. The Channels pane contains a drop-down list on the left where you select a channel and a drop-down list on the right where you select a port. The Statistics pane contains a table with a summary of event statistics and two drop-down lists where you can select a successful or failed event to view more information about that event. In the lower right of the window is a button to click to suspend or resume a channel and a home button to click to return to the iBSE Monitoring Settings window.
6. For more information about a successful event and its port, select an event based on its correlation ID from the Successful Events drop-down list.
5-14 iWay Software
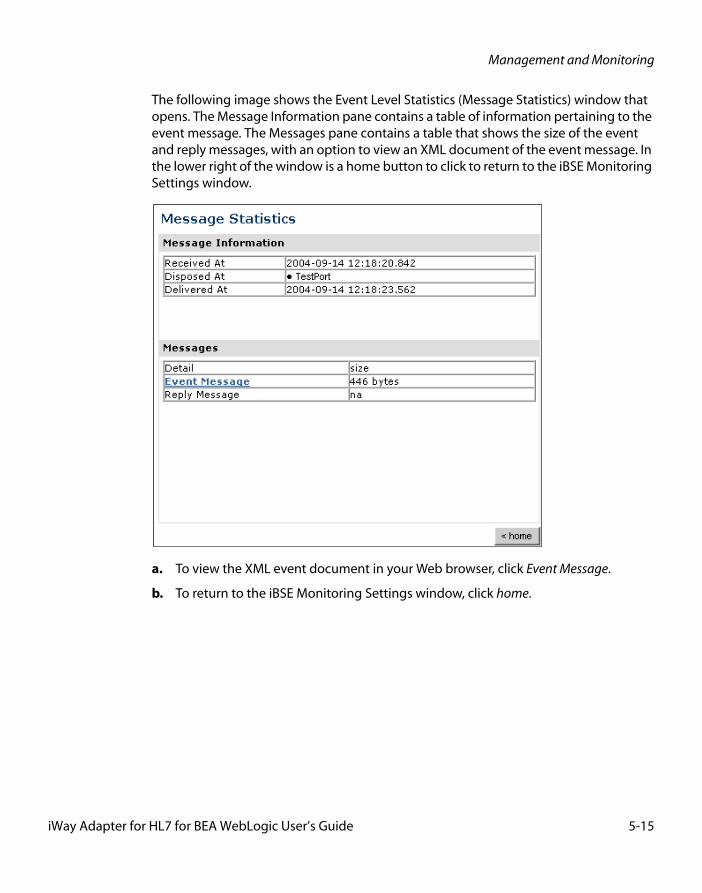
Management and Monitoring
The following image shows the Event Level Statistics (Message Statistics) window that opens. The Message Information pane contains a table of information pertaining to the event message. The Messages pane contains a table that shows the size of the event and reply messages, with an option to view an XML document of the event message. In the lower right of the window is a home button to click to return to the iBSE Monitoring Settings window.
a. To view the XML event document in your Web browser, click Event Message.
b. To return to the iBSE Monitoring Settings window, click home.
iWay Adapter for HL7 for BEA WebLogic User’s Guide 5-15

Managing and Monitoring Services and Events Using the JCA Test Tool
Managing and Monitoring Services and Events Using the JCA Test ToolThe JCA Test Tool, which is also known as the JCA Installation Verification Program (IVP), provides a console to manage and monitor services and events currently in use and to display resource usage and invocation statistics. These indicators can help you adjust your environment for optimum efficiency.
Procedure: How to Manage and Monitor Services Using the JCA Test Tool
To manage and monitor services using the JCA Test Tool:
1. Open a Web browser to:
http://localhost:port/iwjcaivp
where:
localhost
Is the name of the machine where your application server is running.
port
Is the port for the domain you are using. The port for the default domain is 7001.,for example:
http://localhost:7001/iwjcaivp
The following image shows the JCA Test Tool page that opens. The page contains a description of the function of the tool and configuration information, including options to change your connection settings. It also provides options for viewing service or event adapters.
The JCA Test Tool runs in managed mode by default.
2. Perform the following steps to monitor the latest service adapter configuration.
Note: You must perform these steps for every new adapter target that is created using a JCA implementation of Application Explorer. In addition, you also must perform these steps for every new JCA configuration that is created using Application Explorer.
5-16 iWay Software

Management and Monitoring
a. Click Destroy Connection Factory for redeployment.
b. Redeploy the JCA connector module using the BEA WebLogic Server console.
c. In the JCA Test Tool, click Refresh Connection Factory after redeployment.
3. Click Service adapters.
The following image shows the Service Adapters page that opens. The page provides a live list of available service adapters and a list of targets configured for a specific adapter. In the lower right is a Back button to click to return to the previous page.
4. Select a service adapter to monitor.
iWay Adapter for HL7 for BEA WebLogic User’s Guide 5-17

Managing and Monitoring Services and Events Using the JCA Test Tool
The following image shows the page that opens. The left side provides a live list of available service adapters and a list of any targets configured for a specific adapter. The upper right side shows statistics for a selected target. The middle right has a User field and a Password field. The lower right contains a box where you type or paste an input document. Below the input box is a Send button to click to send a request for a test service and a Reset button to click to reset the fields. In the lower right is a Back button to click to return to the previous page.
a. Click the desired target for your service adapter.
b. In the Request area, enter a user name and password.
c. In the Input Doc area, enter a request document that was created from the request schema for your service.
5. Click Send.
5-18 iWay Software
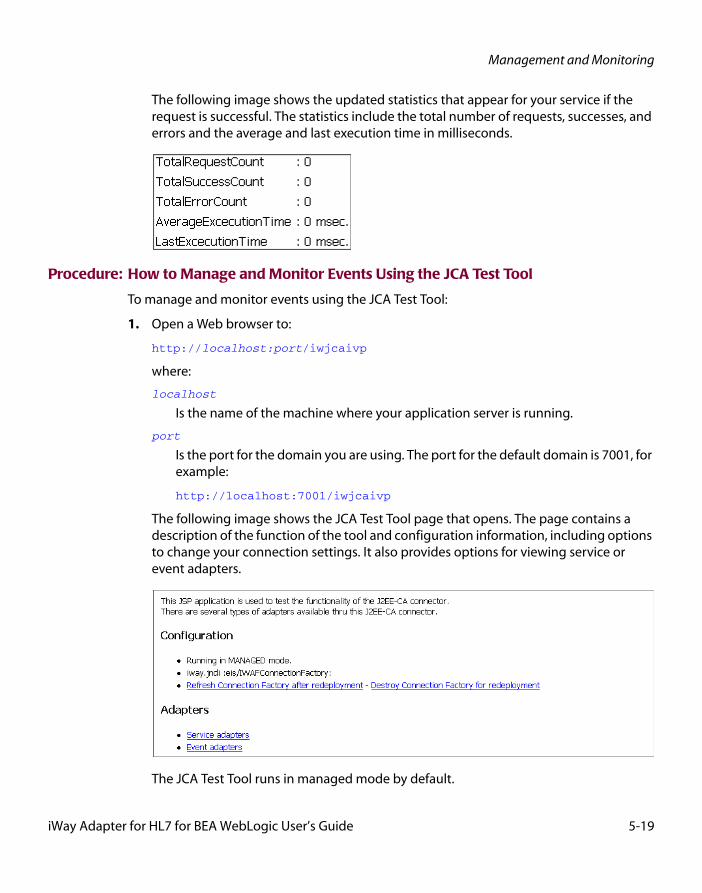
Management and Monitoring
The following image shows the updated statistics that appear for your service if the request is successful. The statistics include the total number of requests, successes, and errors and the average and last execution time in milliseconds.
Procedure: How to Manage and Monitor Events Using the JCA Test Tool
To manage and monitor events using the JCA Test Tool:
1. Open a Web browser to:
http://localhost:port/iwjcaivp
where:
localhost
Is the name of the machine where your application server is running.
port
Is the port for the domain you are using. The port for the default domain is 7001, for example:
http://localhost:7001/iwjcaivp
The following image shows the JCA Test Tool page that opens. The page contains a description of the function of the tool and configuration information, including options to change your connection settings. It also provides options for viewing service or event adapters.
The JCA Test Tool runs in managed mode by default.
iWay Adapter for HL7 for BEA WebLogic User’s Guide 5-19
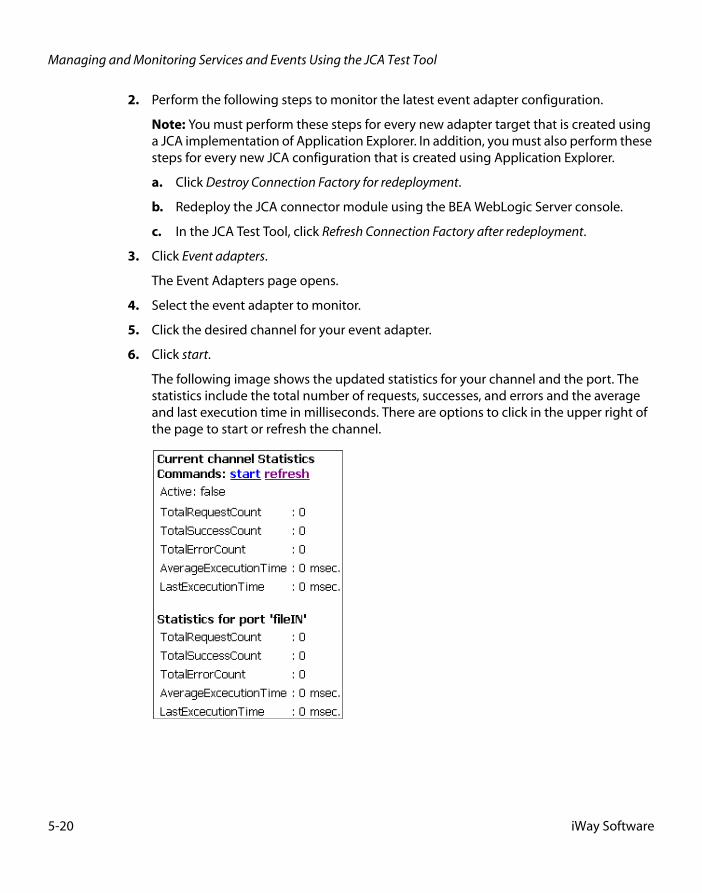
Managing and Monitoring Services and Events Using the JCA Test Tool
2. Perform the following steps to monitor the latest event adapter configuration.
Note: You must perform these steps for every new adapter target that is created using a JCA implementation of Application Explorer. In addition, you must also perform these steps for every new JCA configuration that is created using Application Explorer.
a. Click Destroy Connection Factory for redeployment.
b. Redeploy the JCA connector module using the BEA WebLogic Server console.
c. In the JCA Test Tool, click Refresh Connection Factory after redeployment.
3. Click Event adapters.
The Event Adapters page opens.
4. Select the event adapter to monitor.
5. Click the desired channel for your event adapter.
6. Click start.
The following image shows the updated statistics for your channel and the port. The statistics include the total number of requests, successes, and errors and the average and last execution time in milliseconds. There are options to click in the upper right of the page to start or refresh the channel.
5-20 iWay Software
Management and Monitoring
Setting Engine Log LevelsThe following section describes how to set engine log levels for Servlet iBSE and JCA. For more information, see the iWay Installation and Configuration for BEA WebLogic documentation.
Procedure: How to Enable Tracing for Servlet iBSE
To enable tracing for Servlet iBSE:
1. Open the Servlet iBSE configuration page at:
http://localhost:port/ibse/IBSEConfig
where:
localhost
Is the name of the machine where your application server is running.
port
Is the port for the domain you are using. The port for the default domain is 7001, for example:
http://localhost:7001/ibse/IBSEConfig
2. In the System pane, from the Debug drop-down list, select the level of tracing.
3. Click Save.
The default location for the trace information on Windows is:
C:\Program FIles\bea\ibse\ibselogs
Procedure: How to Enable Tracing for JCA
To enable tracing for JCA:
1. Open the extracted ra.xml file in a text editor.
2. Locate and change the following setting:
LogLevel. This setting can be set to DEBUG, INFO, or ERROR.
<context-param><config-property> <config-property-name>LogLevel</config-property-name> <config-property-type>java.lang.String</config-property-type> <config-property-value></config-property-value></config-property>
For example:
<config-property-value>DEBUG</config-property-value>
iWay Adapter for HL7 for BEA WebLogic User’s Guide 5-21

Configuring Connection Pool Sizes
A directory in the configuration directory contains the logs.
a. Review the logs generated by your application server.
b. Leave the remainder of the previous file unchanged.
3. Save the file and exit the editor.
4. Redeploy the connector.
Configuring Connection Pool SizesThe following topic describes how to configure connection pool sizes for the JCA connector.
Procedure: How to Configure Connection Pool Sizes
To configure connection pool sizes:
1. Open the extracted ra.xml file in a text editor.
2. Locate and change the following setting:
pool-params. The JCA Resource Connector has an initial capacity value of 0 by default and cannot be changed. The maximum capacity value is 10 by default and can be changed to a higher value.
<?xml version="1.0" encoding="UTF-8" ?> <!DOCTYPE weblogic-connection-factory-dd (View Source for full doctype...)>- <weblogic-connection-factory-dd> <weblogic-connection-factory-name>IWAFJCA</weblogic-connection-factory-name> <jndi-name>eis/IWAFConnectionFactory</jndi-name> - <pool-params> <initial-capacity>0</initial-capacity> <max-capacity>10</max-capacity> <capacity-increment>1</capacity-increment> <shrinking-enabled>false</shrinking-enabled> <shrink-period-minutes>200</shrink-period-minutes> </pool-params> <security-principal-map /></weblogic-connection-factory-dd>
3. Save the file and exit the editor.
4. Redeploy the connector.
5-22 iWay Software

Management and Monitoring
Migrating RepositoriesDuring design time, a repository is used to store metadata created when using Application Explorer to configure adapter connections, browse EIS objects, configure services, and configure listeners to listen for EIS events. For more information on configuring repositories, see the iWay Installation and Configuration for BEA WebLogic documentation.
The information in the repository also is referenced at run time. For management purposes, you can migrate iBSE and JCA repositories to new destinations without affecting your existing configuration. For example, you may want to migrate a repository from a development environment to a production environment. The BEA WebLogic Server must be restarted to detect new repository changes.
File RepositoriesIf you want to migrate a File repository to another destination, copy the ibserepo.xml file from the following path:
drive:\Program Files\iWay55\bea\ibse\ibserepo.xml
where:
drive
Is the location of your iWay 5.5 installation.
You can place the ibserepo.xml file in a new location that is a root directory of the iBSE Web application, for example:
drive:\ProductionConfig\bea\ibse\ibserepo.xml
iBSE RepositoriesThe following topic describes how to migrate an iBSE repository that is configured for Oracle. You can follow the same procedure if you want to migrate an iBSE repository that is configured for Microsoft SQL Server 2000, Sybase, or DB2. However, when you are configuring a new environment, you must execute the script that creates the repository tables for your database. In addition, verify that all required files and drivers for your database are in the class path. For more information on configuring repositories, see the iWay Installation and Configuration for BEA WebLogic documentation.
Note: The following procedure allows you to migrate only Web services. If migrating event handling information is one of your requirements, you must migrate at the database level. For more information, see Migrating Event Handling Configurations on page 5-28.
iWay Adapter for HL7 for BEA WebLogic User’s Guide 5-23

Migrating Repositories
Procedure: How to Migrate an iBSE Repository Configured for Oracle
To migrate an iBSE repository that is configured for Oracle:
1. Copy the iBSE configuration service URL, for example:
http://localhost:7777/ibse/IBSEServlet/admin/iwconfig.ibs?wsdl
2. Open a third party XML editor, for example, XMLSPY.
The following image shows the XMLSPY window. The upper left has a Project pane that contains a tree of sample files, and the lower left has a blank Info pane. The middle pane is blank. The right side is divided into three blank panes.
3. From the SOAP menu, select Create new SOAP request.
The following image shows the WSDL file location dialog box that opens, where you enter a local path or URL. The dialog includes Browse, Window, OK, and Cancel buttons.
5-24 iWay Software
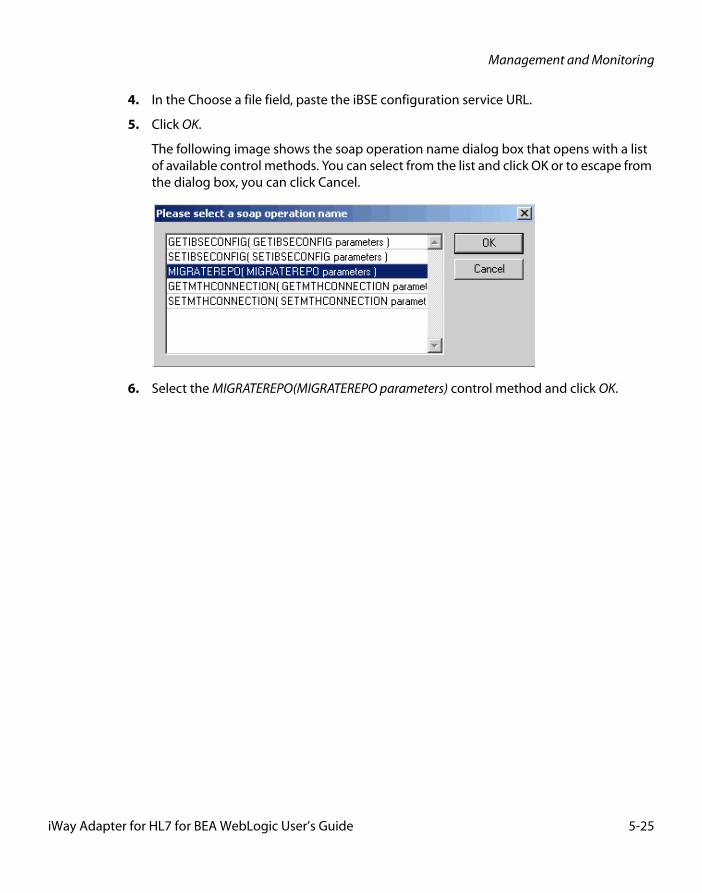
Management and Monitoring
4. In the Choose a file field, paste the iBSE configuration service URL.
5. Click OK.
The following image shows the soap operation name dialog box that opens with a list of available control methods. You can select from the list and click OK or to escape from the dialog box, you can click Cancel.
6. Select the MIGRATEREPO(MIGRATEREPO parameters) control method and click OK.
iWay Adapter for HL7 for BEA WebLogic User’s Guide 5-25
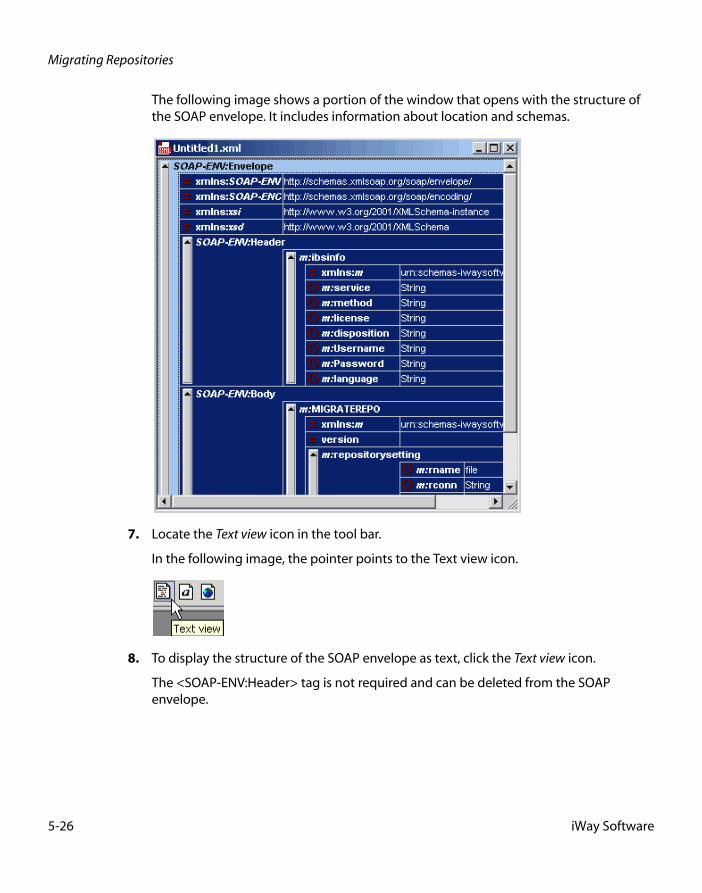
Migrating Repositories
The following image shows a portion of the window that opens with the structure of the SOAP envelope. It includes information about location and schemas.
7. Locate the Text view icon in the tool bar.
In the following image, the pointer points to the Text view icon.
8. To display the structure of the SOAP envelope as text, click the Text view icon.
The <SOAP-ENV:Header> tag is not required and can be deleted from the SOAP envelope.
5-26 iWay Software

Management and Monitoring
9. Locate the following section:
<m:MIGRATEREPO xmlns:m="urn:schemas-iwaysoftware-com:jul2003:ibse:config" version=""><m:repositorysetting><m:rname>oracle</m:rname><m:rconn>String</m:rconn><m:rdriver>String</m:rdriver><m:ruser>String</m:ruser><m:rpwd>String</m:rpwd></m:repositorysetting><m:servicename>String</m:servicename></m:MIGRATEREPO>
a. For the <m:rconn> tag, replace the String placeholder with the repository URL where you want to migrate your existing iBSE repository.
For example, the Oracle repository URL has the following format:
jdbc:oracle:thin:@[host]:[port]:[sid]
b. For the <m:rdriver> tag, replace the String placeholder with the location of your Oracle driver.
Note: This is an optional tag. If you do not specify a value, the default Oracle JDBC driver is used.
c. For the <m:ruser> tag, replace the String placeholder with a valid user name to access the Oracle repository.
d. For the <m:rpwd> tag, replace the String placeholder with a valid password to access the Oracle repository.
10. Perform one of the following migration options.
If you want to migrate a single Web service from the current iBSE repository, enter the Web service name in the <m:servicename> tag, for example:
<m:servicename>Service1</m:servicename>
If you want to migrate multiple Web services from the current iBSE repository, duplicate the <m:servicename> tag for each Web service, for example:
<m:servicename>Service1</m:servicename><m:servicename>Service2</m:servicename>
If you want to migrate all Web services from the current iBSE repository, remove the <m:servicename> tag.
11. From the SOAP menu, select Send request to server.
Your iBSE repository and the Web services you specified migrate to the new Oracle repository URL that you specified.
iWay Adapter for HL7 for BEA WebLogic User’s Guide 5-27

Migrating Repositories
JCA RepositoriesThe following procedure describes how to migrate a JCA repository. For more information on configuring JCA repositories, see the iWay Installation and Configuration for BEA WebLogic documentation.
Procedure: How to Migrate a JCA Repository
To migrate a JCA repository:
1. Navigate to the location of your JCA configuration directory where the repository schemas and other information is stored, for example:
C:\Program Files\iway55\config\base
2. Locate and copy the repository.xml file.
3. Place this file in a new JCA configuration directory to migrate the existing repository.
Your JCA repository migrates to the new JCA configuration directory.
Migrating Event Handling ConfigurationsThis topic describes how to migrate your iBSE repositories at a database level for Microsoft SQL Server 2000, Oracle, Sybase, or DB2. You can use this information to migrate event handling information, for example, port or channel configurations.
Procedure How to Migrate a Microsoft SQL Server 2000 Repository
To migrate a Microsoft SQL Server 2000 repository:
1. Open a command prompt and navigate to the iWay setup directory. The default location on Windows is:
C:\Program Files\iWay55\etc\setup
This directory contains SQL to create the repository tables in the following file:
iwse.sql
5-28 iWay Software
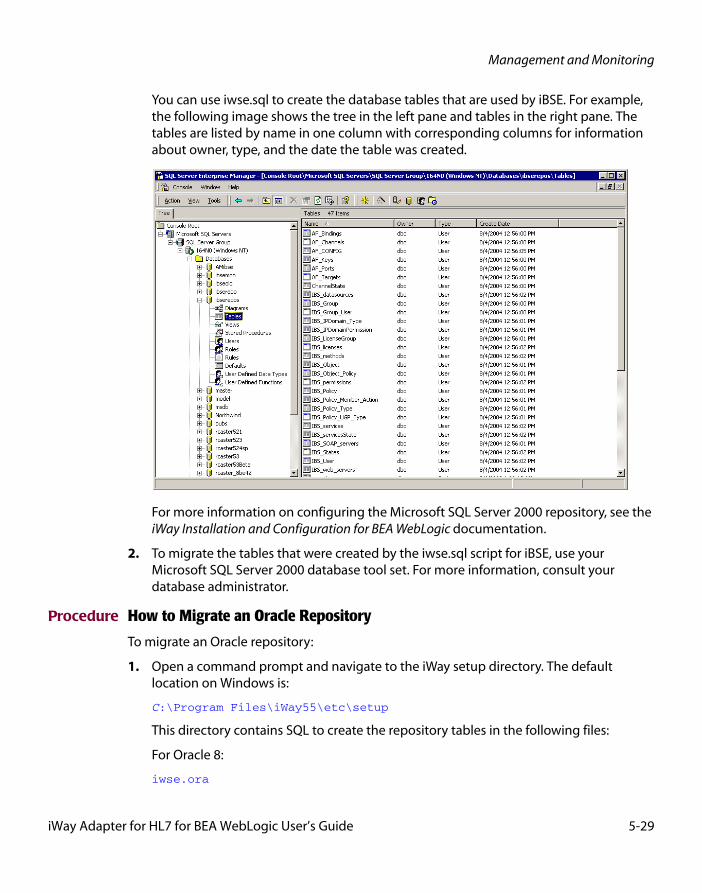
Management and Monitoring
You can use iwse.sql to create the database tables that are used by iBSE. For example, the following image shows the tree in the left pane and tables in the right pane. The tables are listed by name in one column with corresponding columns for information about owner, type, and the date the table was created.
For more information on configuring the Microsoft SQL Server 2000 repository, see the iWay Installation and Configuration for BEA WebLogic documentation.
2. To migrate the tables that were created by the iwse.sql script for iBSE, use your Microsoft SQL Server 2000 database tool set. For more information, consult your database administrator.
Procedure How to Migrate an Oracle Repository
To migrate an Oracle repository:
1. Open a command prompt and navigate to the iWay setup directory. The default location on Windows is:
C:\Program Files\iWay55\etc\setup
This directory contains SQL to create the repository tables in the following files:
For Oracle 8:
iwse.ora
iWay Adapter for HL7 for BEA WebLogic User’s Guide 5-29
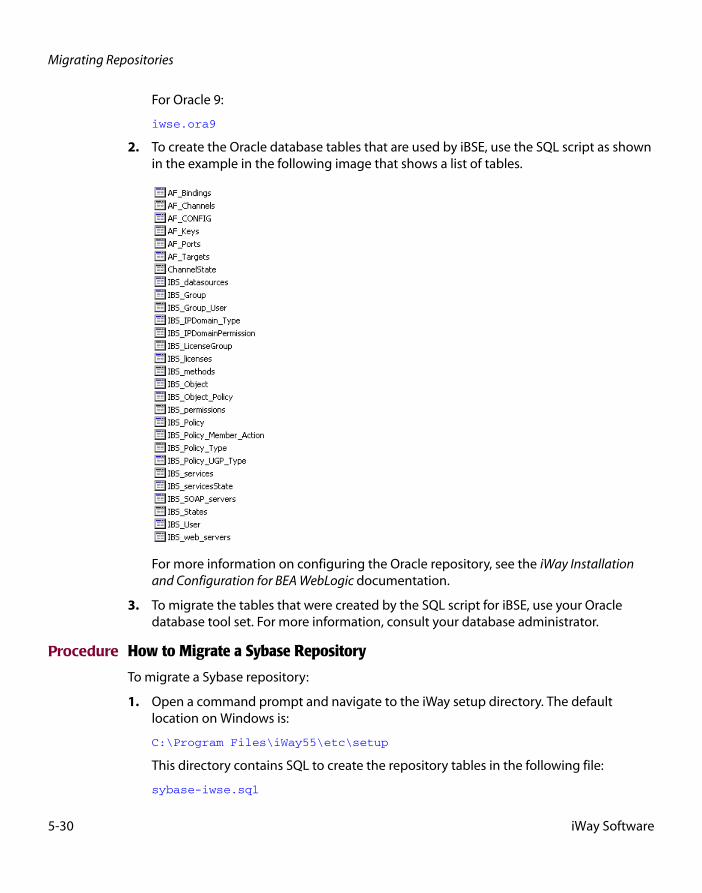
Migrating Repositories
For Oracle 9:
iwse.ora9
2. To create the Oracle database tables that are used by iBSE, use the SQL script as shown in the example in the following image that shows a list of tables.
For more information on configuring the Oracle repository, see the iWay Installation and Configuration for BEA WebLogic documentation.
3. To migrate the tables that were created by the SQL script for iBSE, use your Oracle database tool set. For more information, consult your database administrator.
Procedure How to Migrate a Sybase Repository
To migrate a Sybase repository:
1. Open a command prompt and navigate to the iWay setup directory. The default location on Windows is:
C:\Program Files\iWay55\etc\setup
This directory contains SQL to create the repository tables in the following file:
sybase-iwse.sql
5-30 iWay Software
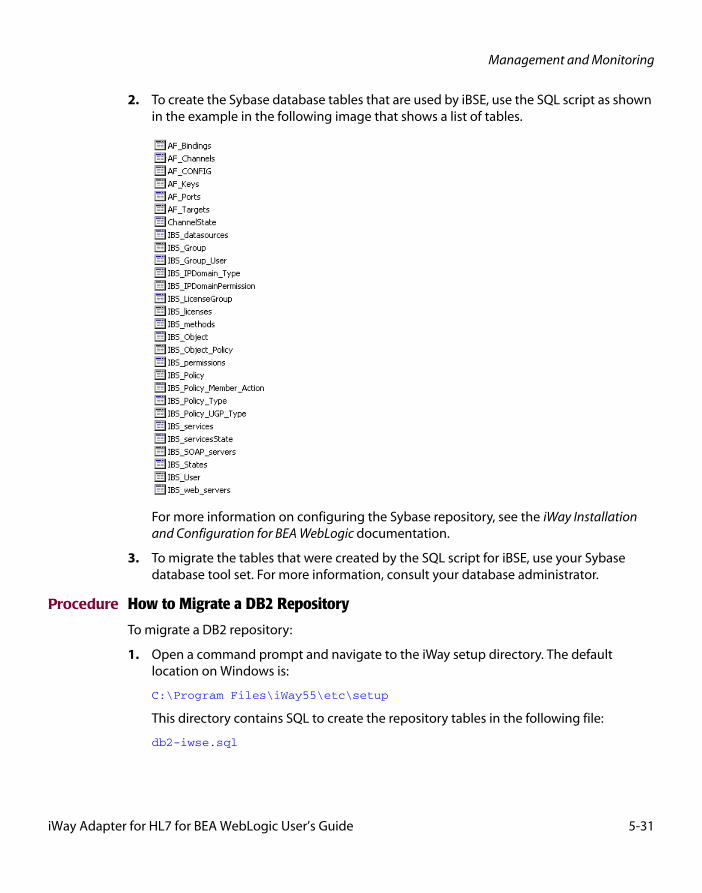
Management and Monitoring
2. To create the Sybase database tables that are used by iBSE, use the SQL script as shown in the example in the following image that shows a list of tables.
For more information on configuring the Sybase repository, see the iWay Installation and Configuration for BEA WebLogic documentation.
3. To migrate the tables that were created by the SQL script for iBSE, use your Sybase database tool set. For more information, consult your database administrator.
Procedure How to Migrate a DB2 Repository
To migrate a DB2 repository:
1. Open a command prompt and navigate to the iWay setup directory. The default location on Windows is:
C:\Program Files\iWay55\etc\setup
This directory contains SQL to create the repository tables in the following file:
db2-iwse.sql
iWay Adapter for HL7 for BEA WebLogic User’s Guide 5-31
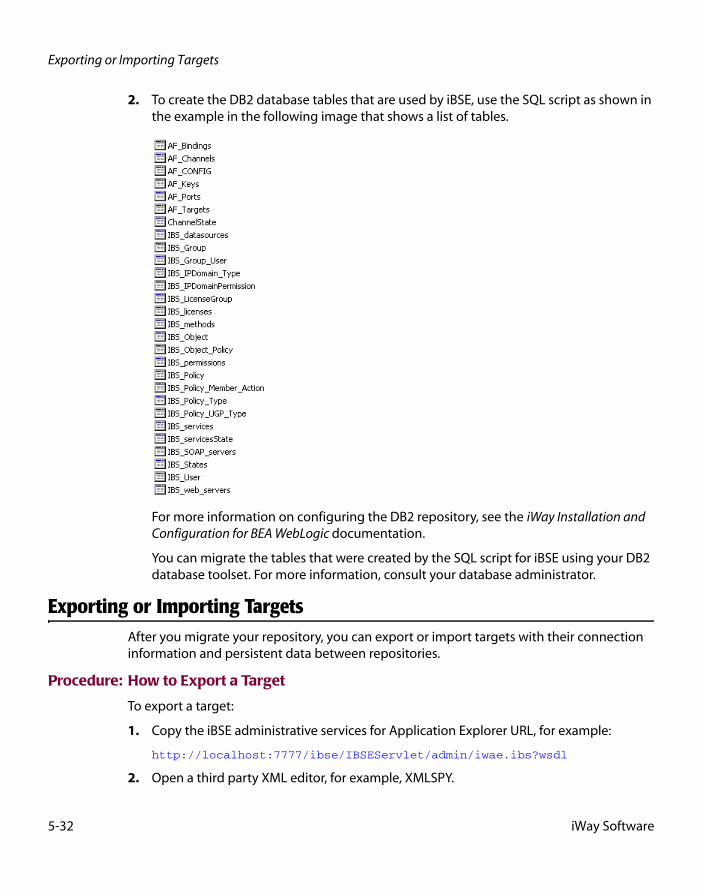
Exporting or Importing Targets
2. To create the DB2 database tables that are used by iBSE, use the SQL script as shown in the example in the following image that shows a list of tables.
For more information on configuring the DB2 repository, see the iWay Installation and Configuration for BEA WebLogic documentation.
You can migrate the tables that were created by the SQL script for iBSE using your DB2 database toolset. For more information, consult your database administrator.
Exporting or Importing TargetsAfter you migrate your repository, you can export or import targets with their connection information and persistent data between repositories.
Procedure: How to Export a Target
To export a target:
1. Copy the iBSE administrative services for Application Explorer URL, for example:
http://localhost:7777/ibse/IBSEServlet/admin/iwae.ibs?wsdl
2. Open a third party XML editor, for example, XMLSPY.
5-32 iWay Software
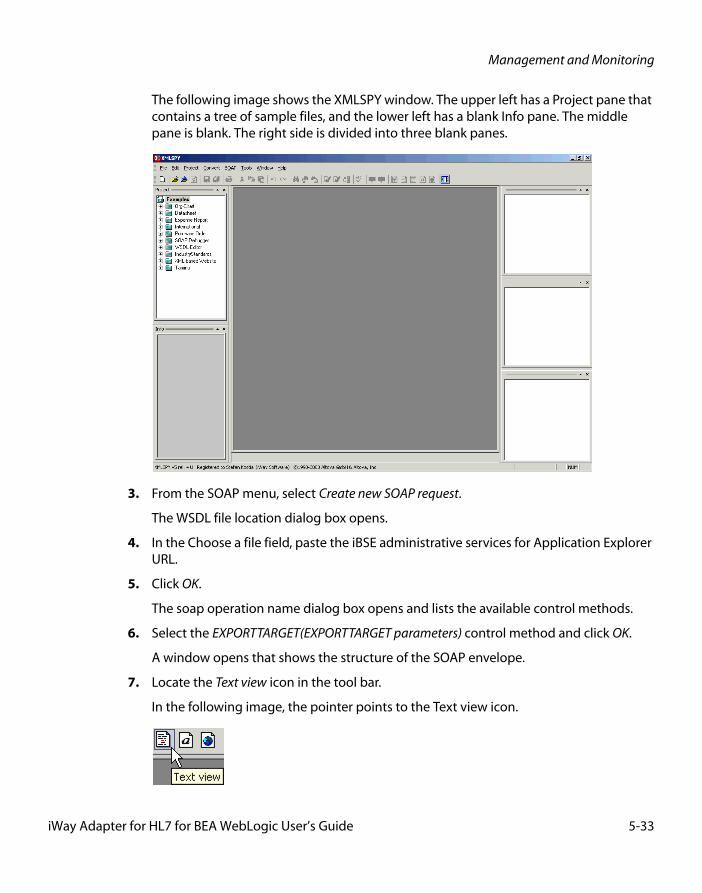
Management and Monitoring
The following image shows the XMLSPY window. The upper left has a Project pane that contains a tree of sample files, and the lower left has a blank Info pane. The middle pane is blank. The right side is divided into three blank panes.
3. From the SOAP menu, select Create new SOAP request.
The WSDL file location dialog box opens.
4. In the Choose a file field, paste the iBSE administrative services for Application Explorer URL.
5. Click OK.
The soap operation name dialog box opens and lists the available control methods.
6. Select the EXPORTTARGET(EXPORTTARGET parameters) control method and click OK.
A window opens that shows the structure of the SOAP envelope.
7. Locate the Text view icon in the tool bar.
In the following image, the pointer points to the Text view icon.
iWay Adapter for HL7 for BEA WebLogic User’s Guide 5-33

Exporting or Importing Targets
8. To display the structure of the SOAP envelope as text, click the Text view icon.
The <SOAP-ENV:Header> tag is not required and can be deleted from the SOAP envelope.
9. Locate the following section:
<m:EXPORTTARGET xmlns:m="urn:schemas-iwaysoftware-com:dec2002:iwse:af"><m:target>String</m:target><m:name>String</m:name></m:EXPORTTARGET>
a. For the <m:target> tag, replace the String placeholder with the EIS target system name as it appears in Application Explorer and verify whether this value is case sensitive.
b. For the <m:name> tag, replace the String placeholder with the name of the target you want to export.
10. From the SOAP menu, select Send request to server.
A response is returned that contains the <m: exporttime> and <m: contents> elements. You must use these elements when importing your target.
Procedure: How to Import a Target
To import a target:
1. Copy the iBSE administrative services for Application Explorer URL, for example:
http://localhost:7777/ibse/IBSEServlet/admin/iwae.ibs?wsdl
2. Open a third party XML editor, for example, XMLSPY.
5-34 iWay Software

Management and Monitoring
The following image shows the XMLSPY window. The upper left has a Project pane that contains a tree of sample files, and the lower left has a blank Info pane. The middle pane is blank. The right side is divided into three blank panes.
3. From the SOAP menu, select Create new SOAP request.
The WSDL file location dialog box opens.
4. In the Choose a file field, paste the iBSE administrative services for Application Explorer URL and click OK.
The soap operation name dialog box opens and lists the available control methods.
5. Select the IMPORTTARGET(IMPORTTARGET parameters) control method and click OK.
A window opens, which shows the structure of the SOAP envelope.
6. Locate the Text view icon in the toolbar.
In the following image, the pointer points to the Text view icon.
7. To display the structure of the SOAP envelope as text, click the Text view icon.
iWay Adapter for HL7 for BEA WebLogic User’s Guide 5-35

Retrieving or Updating Web Service Method Connection Information
The <SOAP-ENV:Header> tag is not required and can be deleted from the SOAP envelope.
8. Locate the following section:
<m:IMPORTTARGET xmlns:m="urn:schemas-iwaysoftware-com:dec2002:iwse:af"><m:targetinstance><m:target>String</m:target><m:name>String</m:name><m:description>String</m:description><m:repositoryid>String</m:repositoryid><m:exporttime>2001-12-17T09:30:47-05:00</m:exporttime><m:contents>R0lGODlhcgGSALMAAAQCAEMmCZtuMFQxDS8b</m:contents></m:targetinstance></m:IMPORTTARGET>
a. For the <m:target> tag, replace the String placeholder with the EIS target system name.
b. For the <m:name> tag, replace the String placeholder with the new name of the target you want to import.
c. For the <m:description> tag, replace the String placeholder with a description of the target.
d. For the <m:repositoryid> tag, copy and paste the contents of the <m:repositoryid> tag that was returned when you exported your target.
e. For the <m: exporttime> tag, copy and paste the contents of the <m: exporttime> tag that was returned when you exported your target.
f. For the <m: contents> tag, copy and paste the contents of the <m: contents> tag that was returned when you exported your target.
9. From the SOAP menu, select Send request to server.
Retrieving or Updating Web Service Method Connection InformationAfter you migrate your repository, you can retrieve or update connection information for your Web service methods.
Procedure: How to Retrieve Web Service Method Connection Information
To retrieve Web service method connection information:
1. Copy the iBSE configuration service URL, for example:
http://localhost:7777/ibse/IBSEServlet/admin/iwconfig.ibs?wsdl
2. Open a third party XML editor, for example, XMLSPY.
5-36 iWay Software

Management and Monitoring
The following image shows the XMLSPY window. The upper left has a Project pane that contains a tree of sample files, and the lower left has a blank Info pane. The middle pane is blank. The right side is divided into three blank panes.
3. From the SOAP menu, select Create new SOAP request.
The WSDL file location dialog box opens.
4. In the Choose a file field, paste the iBSE configuration service URL, and click OK.
The soap operation name dialog box opens and lists the available control methods.
5. Select the GETMTHCONNECTION(GETMTHCONNECTION parameters) control method and click OK.
A window opens, which shows the structure of the SOAP envelope.
6. Locate the Text view icon in the toolbar.
In the following image, the pointer points to the Text view icon.
7. To display the structure of the SOAP envelope as text, click the Text view icon.
iWay Adapter for HL7 for BEA WebLogic User’s Guide 5-37

Retrieving or Updating Web Service Method Connection Information
The <SOAP-ENV:Header> tag is not required and can be deleted from the SOAP envelope.
8. Locate the following section:
<m:GETMTHCONNECTION xmlns:m="urn:schemas-iwaysoftware-com:jul2003:ibse:config"><m:servicename>String</m:servicename><m:methodname>String</m:methodname></m:GETMTHCONNECTION>
a. For the <m:servicename> tag, replace the String placeholder with the name of the Web service.
b. For the <m:methodname> tag, replace the String placeholder with name of the Web service method.
9. From the SOAP menu, select Send request to server.
A response is returned that contains the <m: descriptor> element. You must use this element when updating your Web service method.
Procedure: How to Update Web Service Method Connection Information
To update Web service method connection information:
1. Copy the iBSE configuration service URL, for example:
http://localhost:7777/ibse/IBSEServlet/admin/iwconfig.ibs?wsdl
2. Open a third party XML editor, for example, XMLSPY.
5-38 iWay Software

Management and Monitoring
The following image shows the XMLSPY window. The upper left has a Project pane that contains a tree of sample files, and the lower left has a blank Info pane. The middle pane is blank. The right side is divided into three blank panes.
3. From the SOAP menu, select Create new SOAP request.
The WSDL file location dialog box opens.
4. In the Choose a file field, paste the iBSE configuration service URL, and click OK.
The soap operation name dialog box opens and lists the available control methods.
5. Select the SETMTHCONNECTION(SETMTHCONNECTION parameters) control method and click OK.
A window opens that shows the structure of the SOAP envelope.
6. Locate the Text view icon in the toolbar.
In the following image, the pointer points to the Text view icon.
7. To display the structure of the SOAP envelope as text, click the Text view icon.
iWay Adapter for HL7 for BEA WebLogic User’s Guide 5-39
Starting or Stopping a Channel Programmatically
The <SOAP-ENV:Header> tag is not required and can be deleted from the SOAP envelope.
8. Locate the following section:
<m:SETMTHCONNECTION xmlns:m="urn:schemas-iwaysoftware-com:jul2003:ibse:config"><m:servicename>String</m:servicename><m:methodname>String</m:methodname><m:descriptor format="" channel=""> <m:option title=""> <m:group title=""> <m:param/> </m:group> </m:option></m:descriptor></m:SETMTHCONNECTION>
a. For the <m:servicename> tag, replace the String placeholder with the name of the Web service.
b. For the <m:methodname> tag, replace the String placeholder with the name of the Web service method.
c. For the <m: descriptor> tag, copy and paste the contents of the <m: descriptor> tag that was returned when you retrieved Web Service method connection information.
9. Modify the contents of the <m: descriptor> tag to change the existing Web Service method connection information.
10. From the SOAP menu, select Send request to server.
Starting or Stopping a Channel ProgrammaticallyThe following topic describes how to start or stop a channel programmatically.
Procedure: How to Start a Channel Programmatically
To start a channel programmatically:
1. Copy the iBSE control event URL, for example:
http://localhost:7777/ibse/IBSEServlet/admin/iwevent.ibs?wsdl
2. Open a third party XML editor, for example, XMLSPY.
5-40 iWay Software
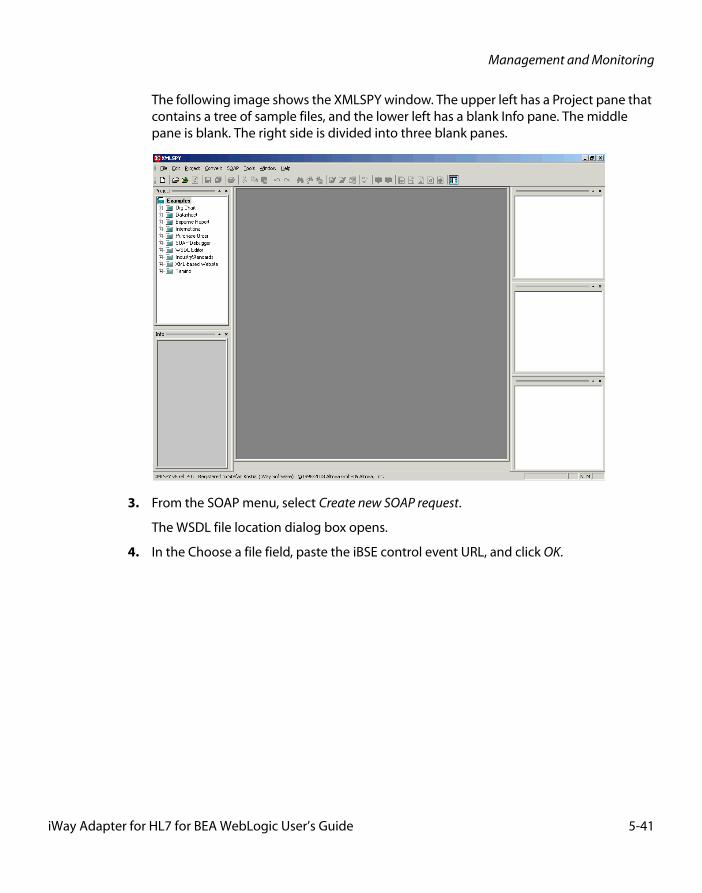
Management and Monitoring
The following image shows the XMLSPY window. The upper left has a Project pane that contains a tree of sample files, and the lower left has a blank Info pane. The middle pane is blank. The right side is divided into three blank panes.
3. From the SOAP menu, select Create new SOAP request.
The WSDL file location dialog box opens.
4. In the Choose a file field, paste the iBSE control event URL, and click OK.
iWay Adapter for HL7 for BEA WebLogic User’s Guide 5-41
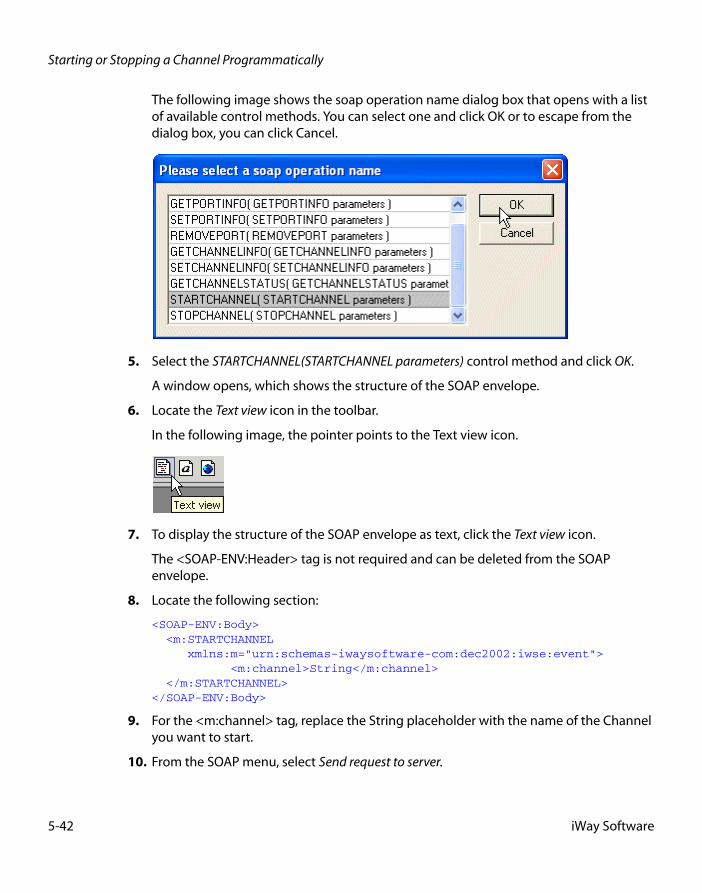
Starting or Stopping a Channel Programmatically
The following image shows the soap operation name dialog box that opens with a list of available control methods. You can select one and click OK or to escape from the dialog box, you can click Cancel.
5. Select the STARTCHANNEL(STARTCHANNEL parameters) control method and click OK.
A window opens, which shows the structure of the SOAP envelope.
6. Locate the Text view icon in the toolbar.
In the following image, the pointer points to the Text view icon.
7. To display the structure of the SOAP envelope as text, click the Text view icon.
The <SOAP-ENV:Header> tag is not required and can be deleted from the SOAP envelope.
8. Locate the following section:
<SOAP-ENV:Body> <m:STARTCHANNEL xmlns:m="urn:schemas-iwaysoftware-com:dec2002:iwse:event"> <m:channel>String</m:channel> </m:STARTCHANNEL></SOAP-ENV:Body>
9. For the <m:channel> tag, replace the String placeholder with the name of the Channel you want to start.
10. From the SOAP menu, select Send request to server.
5-42 iWay Software

Management and Monitoring
Procedure: How to Stop a Channel Programmatically
To stop a channel programmatically:
1. Copy the iBSE control event URL, for example:
http://localhost:7777/ibse/IBSEServlet/admin/iwevent.ibs?wsdl
2. Open a third party XML editor, for example, XMLSPY.
The following image shows the XMLSPY window. The upper left has a Project pane that contains a tree of sample files, and the lower left has a blank Info pane. The middle pane is blank. The right side is divided into three blank panes.
3. From the SOAP menu, select Create new SOAP request.
The WSDL file location dialog box opens.
4. In the Choose a file field, paste the iBSE control event URL, and click OK.
iWay Adapter for HL7 for BEA WebLogic User’s Guide 5-43
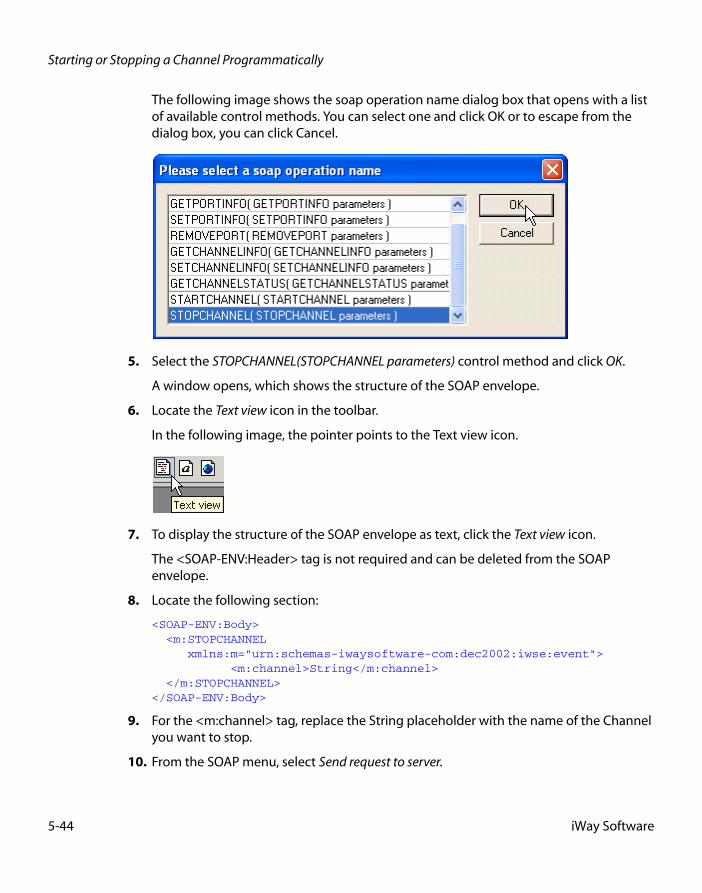
Starting or Stopping a Channel Programmatically
The following image shows the soap operation name dialog box that opens with a list of available control methods. You can select one and click OK or to escape from the dialog box, you can click Cancel.
5. Select the STOPCHANNEL(STOPCHANNEL parameters) control method and click OK.
A window opens, which shows the structure of the SOAP envelope.
6. Locate the Text view icon in the toolbar.
In the following image, the pointer points to the Text view icon.
7. To display the structure of the SOAP envelope as text, click the Text view icon.
The <SOAP-ENV:Header> tag is not required and can be deleted from the SOAP envelope.
8. Locate the following section:
<SOAP-ENV:Body> <m:STOPCHANNEL xmlns:m="urn:schemas-iwaysoftware-com:dec2002:iwse:event"> <m:channel>String</m:channel> </m:STOPCHANNEL></SOAP-ENV:Body>
9. For the <m:channel> tag, replace the String placeholder with the name of the Channel you want to stop.
10. From the SOAP menu, select Send request to server.
5-44 iWay Software
CHAPTER 6
6.Customizing HL7 Messages
Topics:
• The HL7 Reference Interface Model (RIM)
• Defining a Z Segment
This section describes customizing HL7 messages using the Reference Interface Model (RIM), including customizing existing HL7 messages using Z segments.
iWay Adapter for HL7 for BEA WebLogic User’s Guide 6-1

The HL7 Reference Interface Model (RIM)
The HL7 Reference Interface Model (RIM)The HL7 Reference Interface Model (RIM) documents the standards for the various types of HL7 messages, all of which can be used with the iWay Adapter for HL7.
As mentioned previously, the structure of an HL7 message is defined by the data dictionaries supplied (messages.xsd, segments.xsd, fields.xsd, and datatypes.xsd). For more information, see Chapter 1, Introducing the iWay Adapter for HL7 for BEA WebLogic.
The messages.xsd defines the shape of an HL7 message by defining the type and order of segments as in the following example:
<ADT_A01> <element maxOccurs="1" minOccurs="1" ref="MSH" group="0"/> <element maxOccurs="1" minOccurs="1" ref="EVN" group="0"/> <element maxOccurs="1" minOccurs="1" ref="PID" group="0"/> <element maxOccurs="1" minOccurs="0" ref="PD1" group="0"/> <element maxOccurs="unbounded" minOccurs="0" ref="NK1" group="0"/> <element maxOccurs="1" minOccurs="1" ref="PV1" group="0"/> <element maxOccurs="1" minOccurs="0" ref="PV2" group="0"/> <element maxOccurs="unbounded" minOccurs="0" ref="DB1" group="0"/> <element maxOccurs="unbounded" minOccurs="0" ref="OBX" group="0"/> <element maxOccurs="unbounded" minOccurs="0" ref="AL1" group="0"/> <element maxOccurs="unbounded" minOccurs="0" ref="DG1" group="0"/> <element maxOccurs="unbounded" minOccurs="0" ref="ADT_A01.GROUP.1" group="1"/> <element maxOccurs="unbounded" minOccurs="0" ref="GT1" group="0"/> <element maxOccurs="unbounded" minOccurs="0" ref="ADT_A01.GROUP.2" group="1"/> <element maxOccurs="1" minOccurs="0" ref="ACC" group="0"/> <element maxOccurs="1" minOccurs="0" ref="UB1" group="0"/> <element maxOccurs="1" minOccurs="0" ref="UB2" group="0"/></ADT_A01>
The previous example is an excerpt from the messages.xsd file that defines the structure of the ADT_A01 message. Each element definition defines a segment in the HL7 document and basic rules relating to that segment. For example, the first element (ref=MSH or the message header) is defined as only occurring once in a message (minoccurs and maxoccurs are set to 1). The group setting is set to zero to indicate that the message header is a core element in the message.
6-2 iWay Software

Customizing HL7 Messages
Groups of messages can be defined where rules (such as occurrence) can apply to a group of segments. Note there is an element reference of “ADT_A01.GROUP.1”; this group of segments can occur repeatedly as a group or not at all (maxOccurs=unbounded, minOccurs=0). However, there also can be rules that occur within that group. This is handled when defining the group as follows:
<ADT_A01.GROUP.1> <element maxOccurs="1" minOccurs="1" ref="PR1" group="0"/> <element maxOccurs="unbounded" minOccurs="0" ref="ROL" group="0"/></ADT_A01.GROUP.1>
The element referenced as PR1 must be present every time the group of segments is present (maxOccurs=”1” minOccurs=”1”), whereas the ROL segment need not be present when the group of segments occurs.
Note that groups can reference other groups, so complex looping segments can be managed using this process.
messages.xsd - The messages.xsd file defines the structure of the message by defining the segments present, as well as their order and cardinality. However, the segments are also data structures made of fields that also must be defined.
segments.xsd - The next level in a data dictionary is called segments.xsd. Using the following MSH (Message Header) segment as an example, note how each of the segments is defined in the segments.xsd file discussed in the previous example:
<MSH> <element maxOccurs="1" minOccurs="1" ref="MSH_FIELD_SEP"/> <element maxOccurs="1" minOccurs="1" ref="MSH_ENCDNG_CHRS"/> <element maxOccurs="1" minOccurs="0" ref="MSH_SND_APP"/> <element maxOccurs="1" minOccurs="0" ref="MSH_SND_FAC"/> <element maxOccurs="1" minOccurs="0" ref="MSH_RCV_APP"/> <element maxOccurs="1" minOccurs="0" ref="MSH_RCV_FAC"/> <element maxOccurs="1" minOccurs="0" ref="MSH_MSG_DATETIME"/> <element maxOccurs="1" minOccurs="0" ref="MSH_SECURITY"/> <element maxOccurs="1" minOccurs="1" ref="MSH_MSG_TYPE"/> <element maxOccurs="1" minOccurs="0" ref="MSH_MSG_CNTRL_ID"/> <element maxOccurs="1" minOccurs="1" ref="MSH_PRCSNG_ID"/> <element maxOccurs="1" minOccurs="1" ref="MSH_VRSN_ID"/> <element maxOccurs="1" minOccurs="0" ref="MSH_SQNC_NM"/> <element maxOccurs="1" minOccurs="0" ref="MSH_CNTN_PNTR"/> <element maxOccurs="1" minOccurs="0" ref="MSH_ACCPT_ACK_TYP"/> <element maxOccurs="1" minOccurs="0" ref="MSH_APP_ACK_TYP"/> <element maxOccurs="1" minOccurs="0" ref="MSH_CNTRY_CDE"/> <element maxOccurs="unbounded" minOccurs="0" ref="MSH_CHAR_SET"/> <element maxOccurs="1" minOccurs="0" ref="MSH_MSG_LANG"/></MSH>
iWay Adapter for HL7 for BEA WebLogic User’s Guide 6-3
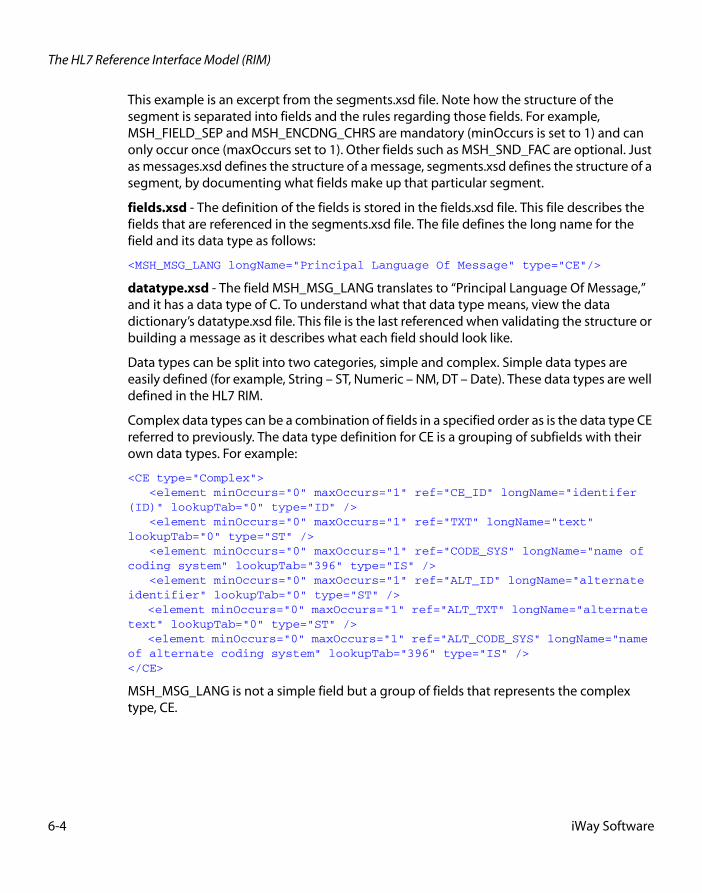
The HL7 Reference Interface Model (RIM)
This example is an excerpt from the segments.xsd file. Note how the structure of the segment is separated into fields and the rules regarding those fields. For example, MSH_FIELD_SEP and MSH_ENCDNG_CHRS are mandatory (minOccurs is set to 1) and can only occur once (maxOccurs set to 1). Other fields such as MSH_SND_FAC are optional. Just as messages.xsd defines the structure of a message, segments.xsd defines the structure of a segment, by documenting what fields make up that particular segment.
fields.xsd - The definition of the fields is stored in the fields.xsd file. This file describes the fields that are referenced in the segments.xsd file. The file defines the long name for the field and its data type as follows:
<MSH_MSG_LANG longName="Principal Language Of Message" type="CE"/>
datatype.xsd - The field MSH_MSG_LANG translates to “Principal Language Of Message,” and it has a data type of C. To understand what that data type means, view the data dictionary’s datatype.xsd file. This file is the last referenced when validating the structure or building a message as it describes what each field should look like.
Data types can be split into two categories, simple and complex. Simple data types are easily defined (for example, String – ST, Numeric – NM, DT – Date). These data types are well defined in the HL7 RIM.
Complex data types can be a combination of fields in a specified order as is the data type CE referred to previously. The data type definition for CE is a grouping of subfields with their own data types. For example:
<CE type="Complex"> <element minOccurs="0" maxOccurs="1" ref="CE_ID" longName="identifer (ID)" lookupTab="0" type="ID" /> <element minOccurs="0" maxOccurs="1" ref="TXT" longName="text" lookupTab="0" type="ST" /> <element minOccurs="0" maxOccurs="1" ref="CODE_SYS" longName="name of coding system" lookupTab="396" type="IS" /> <element minOccurs="0" maxOccurs="1" ref="ALT_ID" longName="alternate identifier" lookupTab="0" type="ST" /> <element minOccurs="0" maxOccurs="1" ref="ALT_TXT" longName="alternate text" lookupTab="0" type="ST" /> <element minOccurs="0" maxOccurs="1" ref="ALT_CODE_SYS" longName="name of alternate coding system" lookupTab="396" type="IS" /></CE>
MSH_MSG_LANG is not a simple field but a group of fields that represents the complex type, CE.
6-4 iWay Software

Customizing HL7 Messages
The Reference Interface Model describes data types in great detail. The following is an example of the HL7 definition of a CE data type:
<identifier (ST)> ^ <text (ST)> ^ <name of coding system (ST)> ^ <alternate identifier (ST)> ^<alternate text (ST)> ^ <name of alternate coding system (ST)>
The example of complex type also references simple data types when defining the subfields (in this case, the subfields are all ST or Strings).
Defining a Z SegmentThe HL7 Reference Interface Model (RIM) also enables you to customize messages in the form of Z segments.
Z segments are user-defined segments that enable you to add extra information to an existing HL7 message, that is not in the RIM. Often, common Z segments become defined as part of the RIM. However, the capability to define Z segments must be provided to customers in any case.
When defining a Z segment, you must amend three data dictionary files:
• messages.xsd: Modify the message definition to add the new Z segment.
• segments.xsd: Define the new segment.
• fields.xsd: Define a new set of fields (because you are defining a new segment).
The following is an example of how a Z segment was created and added to the ORU_R01 message.
MESSAGES.XSD
<ORU_R01.GROUP.2> <element maxOccurs="1" minOccurs="0" ref="ORC" group="0"/> <element maxOccurs="1" minOccurs="1" ref="OBR" group="0"/> <element maxOccurs="1" minOccurs="1" ref="ZLR" group="0"/> <element maxOccurs="unbounded" minOccurs="0" ref="NTE" group="0"/> <element maxOccurs="unbounded" minOccurs="1" ref="ORU_R01.GROUP.1" group="1"/> <element maxOccurs="unbounded" minOccurs="0" ref="CTI" group="0"/></ORU_R01.GROUP.2>
The ZLR segment was added to a group definition in the messages.xsd file. Wherever this group of segments occurs, a ZLR segment is present.
iWay Adapter for HL7 for BEA WebLogic User’s Guide 6-5

Defining a Z Segment
SEGMENTS.XSD
<ZLR> <element maxOccurs="1" minOccurs="0" ref="ZLR_ORD_PROVIDER_ADD" /> <element maxOccurs="1" minOccurs="0" ref="ZLR_ORD_FAC_NAME" /> <element maxOccurs="1" minOccurs="0" ref="ZLR_ORD_FAC_ADD" /> <element maxOccurs="1" minOccurs="0" ref="ZLR_ORD_FAC_PHONE" /> <element maxOccurs="1" minOccurs="0" ref="ZLR_PATIENT_AGE" /> <element maxOccurs="1" minOccurs="0" ref="ZLR_NEXT_KIN_NAME" /> <element maxOccurs="1" minOccurs="0" ref="ZLR_NEXT_KIN_RELATION" /> <element maxOccurs="1" minOccurs="0" ref="ZLR_NEXT_KIN_ADD" /> <element maxOccurs="1" minOccurs="0" ref="ZLR_NEXT_KIN_PHONE" /></ZLR>
In the segments.xsd file, you define each field that makes up the new ZLR segment.
FIELDS.XSD
<ZLR_ORD_PROVIDER_ADD longName="Ordering Providers Address" type="XAD" /><ZLR_ORD_FAC_NAME longName="Ordering Facility Name" type="XON" /><ZLR_ORD_FAC_ADD longName="Ordering Facility Address" type="XAD" /><ZLR_ORD_FAC_PHONE longName="Ordering Facility Phone" type="XTN" /><ZLR_PATIENT_AGE longName="Patient Age" type="SN" /><ZLR_NEXT_KIN_NAME longName="Next of Kin/Assoc. Name" type="XPN" /><ZLR_NEXT_KIN_RELATION longName="Next of Kin/Assoc. Relationship" type="CE" /><ZLR_NEXT_KIN_ADD longName="Next of Kin/Assoc. Address" type="XAD" /><ZLR_NEXT_KIN_PHONE longName="Next of Kin/Assoc. Phone" type="XTN" />
In the fields.xsd file, you define the fields and associate data types to each field. Note that all of the data types are defined in the HL7 RIM. It is unusual that new data types also are defined. By manipulating these three data dictionary files, any new Z segment can be defined and added to a number of messages.
6-6 iWay Software
APPENDIX A
A.Using Application Explorer in BEA WebLogic Workshop to CreateXML Schemas and Web Services
Topics:
• Starting Application Explorer in BEA WebLogic Workshop
• Creating a New Configuration
• Connecting to HL7
• Creating an XML Schema
• Creating an iWay Business Service
• Adding a Control for an iWay Resource in BEA WebLogic Workshop
• Adding an iWay Extensible CCI Control to a BEA WebLogic Workshop Application
This section describes how to use iWay Java Swing Application Explorer running in BEA WebLogic Workshop to create XML schemas for CICS.
iWay Adapter for HL7 for BEA WebLogic User’s Guide A-1

Starting Application Explorer in BEA WebLogic Workshop
Starting Application Explorer in BEA WebLogic WorkshopThe server must be started where iWay Application Explorer is running. Before you can use Application Explorer, you must start BEA WebLogic server.
Procedure How to Start Application Explorer in BEA WebLogic Workshop
To start Application Explorer running in BEA WebLogic Workshop:
1. Before starting Application Explorer, ensure that BEA WebLogic Server is running.
2. Start BEA WebLogic Workshop.
3. From the BEA WebLogic Workshop View menu, select Windows and then, iWay Application Explorer.
Application Explorer opens in BEA WebLogic Workshop.
You can resize and drag-and-drop the Application Explorer window within BEA WebLogic Workshop. For example, you can drag it to the upper part of BEA WebLogic Workshop.
A-2 iWay Software
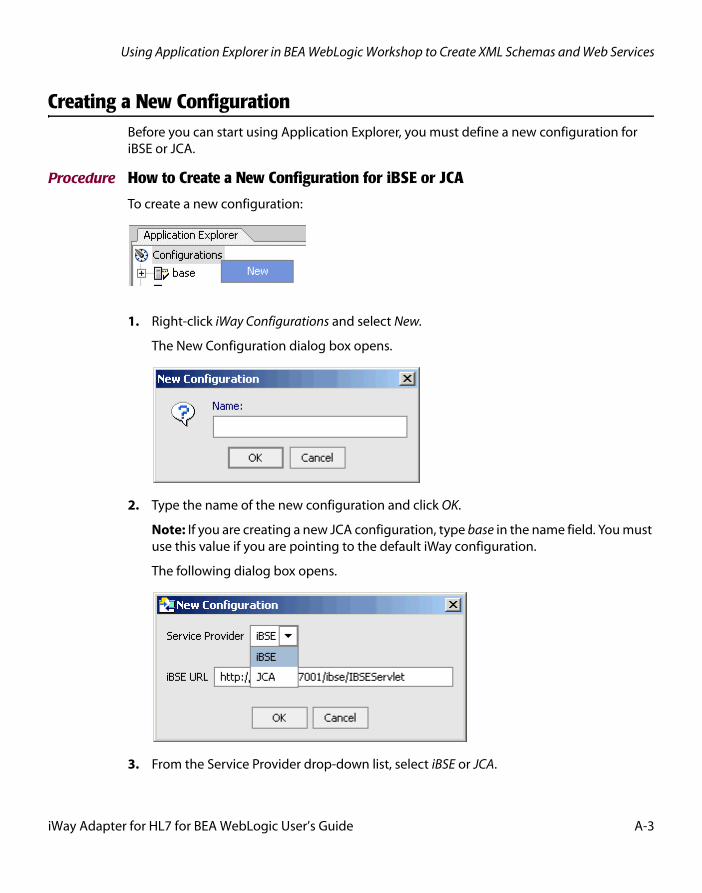
Using Application Explorer in BEA WebLogic Workshop to Create XML Schemas and Web Services
Creating a New ConfigurationBefore you can start using Application Explorer, you must define a new configuration for iBSE or JCA.
Procedure How to Create a New Configuration for iBSE or JCA
To create a new configuration:
1. Right-click iWay Configurations and select New.
The New Configuration dialog box opens.
2. Type the name of the new configuration and click OK.
Note: If you are creating a new JCA configuration, type base in the name field. You must use this value if you are pointing to the default iWay configuration.
The following dialog box opens.
3. From the Service Provider drop-down list, select iBSE or JCA.
iWay Adapter for HL7 for BEA WebLogic User’s Guide A-3

Creating a New Configuration
• If you select iBSE, type the URL for iBSE, for example,
http://localhost:7001/ibse/IBSEServlet
where:
localhost
Is where your application server is running.
• If you select JCA, enter the full path to the directory where iWay 5.5 is installed, for example,
C:\Program Files\iWay55
where:
iWay55
Is the full path to your iWay installation.
A node representing the new configuration appears under the iWay Configurations node. The right pane provides details of the configuration you created.
After you add your configuration, you must connect to it.
4. Right-click the configuration to which you want to connect, for example, base, and select Connect.
The iWay Adapters and iWay Events nodes appear.
A-4 iWay Software

Using Application Explorer in BEA WebLogic Workshop to Create XML Schemas and Web Services
When you connect to iBSE, the iWay Adapters, iWay Events, and iWay Business Services nodes appear.
5. To display the service and event adapters that are installed, expand each node.
The iWay Adapters list includes an HL7 node that enables you to connect to HL7 metadata and create XML request and response schemas to use to listen for events or create Web Services. For more information, see Creating an iWay Business Service on page A-15.
The iWay Events list includes an HL7 node that enables you to create ports and channels for HL7 event handling. For more information, see Understanding iWay Event Functionality on page B-3.
Connecting to HL7To browse HL7, you must create an HL7 target and connect to it. The target serves as your connection point. You must establish a connection to HL7 every time you start iWay Application Explorer or after you disconnect from HL7.
The left pane displays the application systems supported by Application Explorer. These are based on the iWay adapters you installed and are licensed to use.
Creating and Connecting to a TargetTo connect to HL7 for the first time, you must create a new target. The target is automatically saved after it is created.
iWay Adapter for HL7 for BEA WebLogic User’s Guide A-5

Connecting to HL7
Procedure How to Create a New Target
To create a target:
1. In the left pane, expand iWay Adapters and click the HL7 node.
Descriptive information (for example, title and product version) for the iWay Adapter for HL7 appears in the right pane.
2. To view the options, right-click the HL7 node.
3. Select Add Target.
A-6 iWay Software
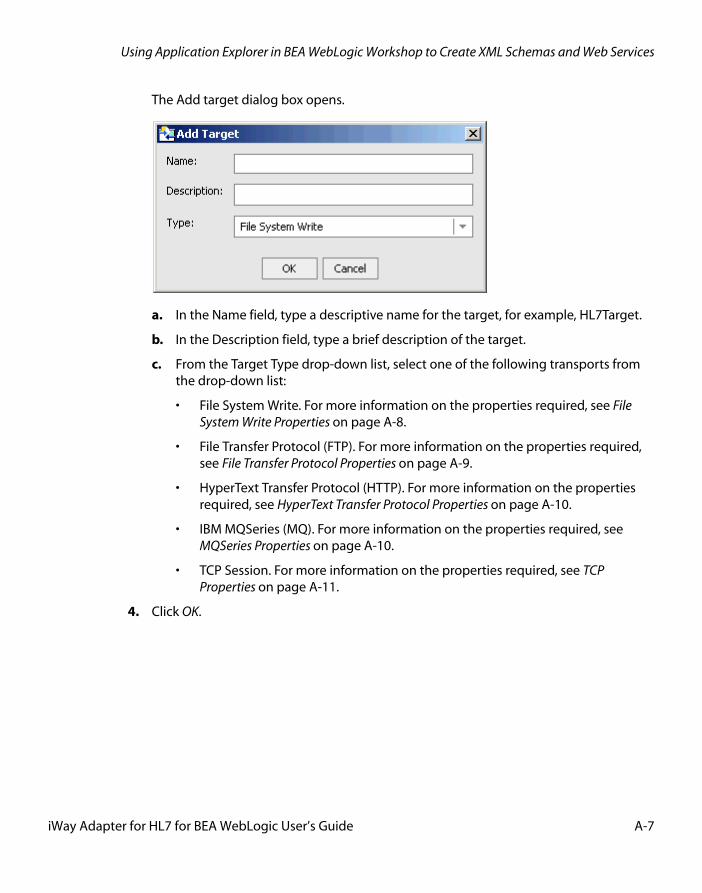
Using Application Explorer in BEA WebLogic Workshop to Create XML Schemas and Web Services
The Add target dialog box opens.
a. In the Name field, type a descriptive name for the target, for example, HL7Target.
b. In the Description field, type a brief description of the target.
c. From the Target Type drop-down list, select one of the following transports from the drop-down list:
• File System Write. For more information on the properties required, see File System Write Properties on page A-8.
• File Transfer Protocol (FTP). For more information on the properties required, see File Transfer Protocol Properties on page A-9.
• HyperText Transfer Protocol (HTTP). For more information on the properties required, see HyperText Transfer Protocol Properties on page A-10.
• IBM MQSeries (MQ). For more information on the properties required, see MQSeries Properties on page A-10.
• TCP Session. For more information on the properties required, see TCP Properties on page A-11.
4. Click OK.
iWay Adapter for HL7 for BEA WebLogic User’s Guide A-7

Connecting to HL7
The File System Write dialog box opens.
a. From the HL7 Version drop-down list, select the HL7 version you are using.
b. In the Directory field, type the location where the output of the service is placed.
c. In the Filename Mask field, type a file pattern, which can contain an asterisk which gets expanded to a fine timestamp.
5. Click OK.
In the left pane, the new target (HL7Target) appears below the HL7 node.
You can now connect to the target you defined.
Reference File System Write Properties
The following table provides definitions for the properties required for the File System Write target type.
Property Definition
HL7 Version From the drop-down list, select the version of HL7 messages passed to this protocol. The options are:
• v2.4
• v2.3.1
• v2.3
Directory The directory to which output messages are emitted.
A-8 iWay Software

Using Application Explorer in BEA WebLogic Workshop to Create XML Schemas and Web Services
Reference File Transfer Protocol Properties
The following table provides definitions for the properties required for the File Transfer Protocol target type.
Settings tab
Filename Mask The output file name (can contain an asterisk), which gets expanded to a timestamp.
A pound sign can be used as a mask for a sequence count. Each pound symbol represents a whole number integer value. For example, File## counts up to 99 before restarting at 0, File### counts up to 999 before restarting at 0, and so on.
Property Definition
Property Definition
HL7 Version From the drop-down list, select the version of HL7 messages passed to this protocol. The options are:
• v2.4
• v2.3.1
• v2.3
Host FTP target system.
Port FTP target system port.
User User ID to use when connecting to the FTP host.
Password Password associated with the user ID.
Directory The directory to which output messages are emitted.
Filename Mask The output file name (can contain an asterisk), which gets expanded to a timestamp.
A pound sign can be used as a mask for a sequence count. Each pound symbol represents a whole number integer value. For example, File## counts up to 99 before restarting at 0, File### counts up to 999 before restarting at 0, and so on.
iWay Adapter for HL7 for BEA WebLogic User’s Guide A-9

Connecting to HL7
Advanced tab
Reference HyperText Transfer Protocol Properties
The following table provides definitions for the properties required for the File Transfer Protocol target type.
Reference MQSeries Properties
The following table provides definitions for the properties required for the MQSeries target type.
Settings tab
Property Definition
Retry Interval The maximum wait interval between retries when a connection fails. Retry interval duration in xxH:xxM:xxS format. For example, 1H:2M:3S is 1 hour 2 minutes and 3 seconds.
Maxtries Maximum number of retry attempts if a write failure occurs.
Property Definition
HL7 Version From the drop-down list, select the version of HL7 messages passed to this protocol. The options are:
• v2.4
• v2.3.1
• v2.3
HTTP URL The HTTP URL.
Header The HTTP header field.
Property Definition
HL7 Version From the drop-down list, select the version of HL7 messages passed to this protocol. The options are:
• v2.4
• v2.3.1
• v2.3
A-10 iWay Software

Using Application Explorer in BEA WebLogic Workshop to Create XML Schemas and Web Services
MQ Client tab
Reference TCP Properties
The following table provides definitions for the properties required for the TCP target type.
Procedure How to Connect to a Target
To connect to an HL7 target:
1. In the left pane, expand the HL7 node and select the target to which you want to connect, for example, HL7Target.
Queue Manager Name of the MQSeries queue manager to be used.
Queue Name Queue on which request documents are received.
Correlation ID The correlation ID to set in the MQSeries message header.
Property Definition
Host Name of the MQSeries queue manager to be used.
Port Queue on which request documents are received.
Channel The correlation ID to set in the MQSeries message header.
Property Definition
Property Definition
HL7 Version From the drop-down list, select the version of HL7 messages passed to this protocol. The options are:
• v2.4
• v2.3.1
• v2.3
Host Host name or host address.
Port TCP listening port.
Encoding Document character set.
iWay Adapter for HL7 for BEA WebLogic User’s Guide A-11

Connecting to HL7
2. In the left pane, right-click the target and select Connect.
The HL7Target node in the left pane changes to reflect that a connection was made.
3. Expand the target node to reveal the list of HL7 interfaces.
Managing a TargetAlthough you can maintain multiple open connections to different application systems, iWay Software recommends that you close connections when they are not in use. After you disconnect, you can modify an existing target.
You can modify the connection parameters when your system properties change. You also can delete a target. The following procedures describe how to disconnect from a target, edit a target, and delete a target.
Procedure How to Disconnect From a Target
To disconnect from a target:
1. Right-click the HL7 target from which you want to disconnect.
2. Select Disconnect.
Disconnecting from the application system drops the connection, but the node remains. The HL7Target node in the left pane changes to reflect that you disconnected from the target.
A-12 iWay Software
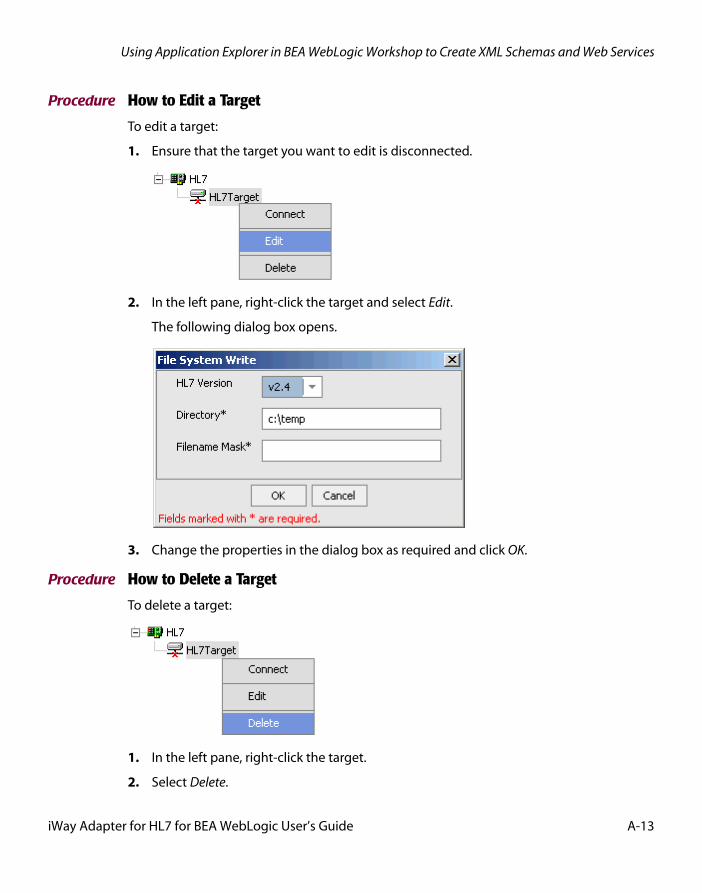
Using Application Explorer in BEA WebLogic Workshop to Create XML Schemas and Web Services
Procedure How to Edit a Target
To edit a target:
1. Ensure that the target you want to edit is disconnected.
2. In the left pane, right-click the target and select Edit.
The following dialog box opens.
3. Change the properties in the dialog box as required and click OK.
Procedure How to Delete a Target
To delete a target:
1. In the left pane, right-click the target.
2. Select Delete.
iWay Adapter for HL7 for BEA WebLogic User’s Guide A-13
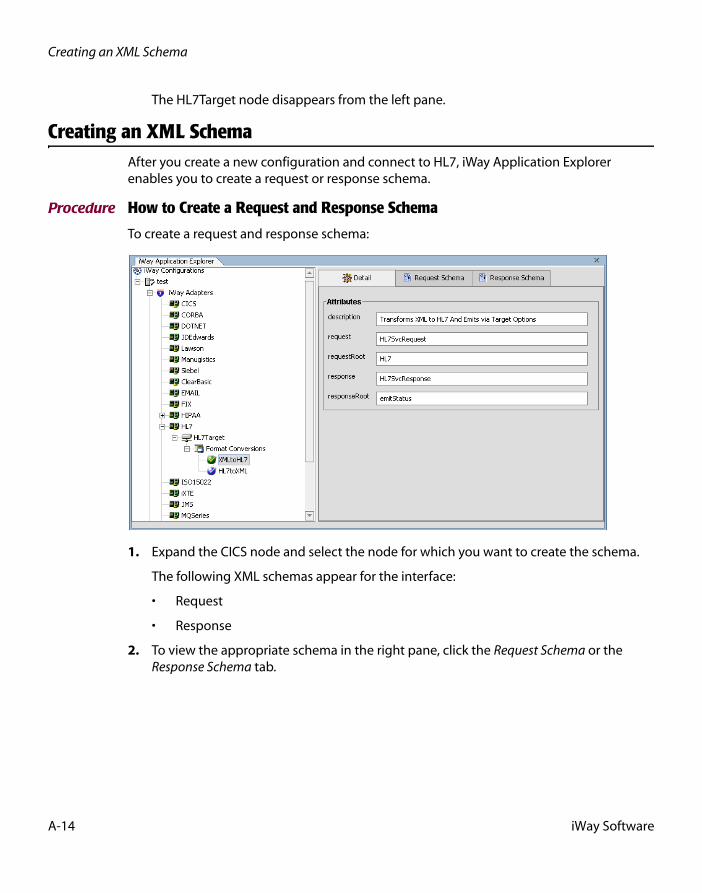
Creating an XML Schema
The HL7Target node disappears from the left pane.
Creating an XML SchemaAfter you create a new configuration and connect to HL7, iWay Application Explorer enables you to create a request or response schema.
Procedure How to Create a Request and Response Schema
To create a request and response schema:
1. Expand the CICS node and select the node for which you want to create the schema.
The following XML schemas appear for the interface:
• Request
• Response
2. To view the appropriate schema in the right pane, click the Request Schema or the Response Schema tab.
A-14 iWay Software

Using Application Explorer in BEA WebLogic Workshop to Create XML Schemas and Web Services
Reference Schema Location
After you browse the Component Interfaces and make a selection, the request and response XML schemas are automatically created for that Component Interface and stored in the repository you created, for example:
drive:\Program Files\iWay55\bea\ibse\wsdl\schemas\service\HL7\HL7Target\SA45280C
where:
HL7Target
Is the name of the HL7 target.
SA45280C
Is a randomly generated folder name indicating where the schemas are stored.
Creating an iWay Business ServiceYou can create an iWay Business Service (also known as a Web service) for objects you want to use with your adapter. To generate a business service, you must deploy the iWay Adapter for HL7 using the Integration Business Services Engine (iBSE). iBSE exposes functionality as Web services and serves as a gateway to heterogeneous back-end applications and databases.
A Web service is a self-contained, modularized function that can be published and accessed across a network using open standards. It is the implementation of an interface by a component and is an executable entity. For the caller or sender, a Web service can be considered as a “black box” that may require input and delivers a result. Web services integrate within an enterprise as well as across enterprises on any communication technology stack, whether asynchronous or synchronous, in any format.
You can make a Web service available to other services within a host server by generating WSDL (Web Services Description Language) from the Web service.
Because Application Explorer runs within BEA WebLogic Workshop, you can easily incorporate iWay Web services into BEA WebLogic Workflows. To enable BEA WebLogic Workshop to use iWay Web services, you export the WSDL to a directory accessible to BEA WebLogic Workshop.
Note: In a J2EE Connector Architecture (JCA) implementation of iWay adapters, Web services are not available. When the adapters are deployed to use the iWay Connector for JCA, the Common Client Interface provides integration services using the iWay adapters. For more information, see the iWay Installation and Configuration for BEA WebLogic manual and the iWay Connector for JCA for BEA WebLogic Server User’s Guide.
iWay Adapter for HL7 for BEA WebLogic User’s Guide A-15

Creating an iWay Business Service
Procedure How to Create an iWay Business Service
To create an iWay Business service:
1. Expand the HL7 node and select the interface for which you want to create a business service.
2. Right-click and select Create iWay Business Service.
The Create iWay Business Service dialog box opens.
a. From the Existing Service Names drop-down list, select whether you want to create a new service name or use an existing service name.
b. In the Service Name field, type a name for the business service, for example, HL7Service.
c. In the Service Description field, type a brief description of the business service.
3. Click Next.
A-16 iWay Software

Using Application Explorer in BEA WebLogic Workshop to Create XML Schemas and Web Services
The Create iWay Business Service dialog box displays additional fields.
a. From the License Name drop-down list, select a license.
b. In the Method Name field, type a name for the method.
c. In the Method Description field, type a brief description for the method.
4. Click OK.
The business service and method appear below the iWay Business Services node.
In the left pane, all the available business services that were created appear.
5. Click the node for which you created the business service in the right pane.
iWay Adapter for HL7 for BEA WebLogic User’s Guide A-17
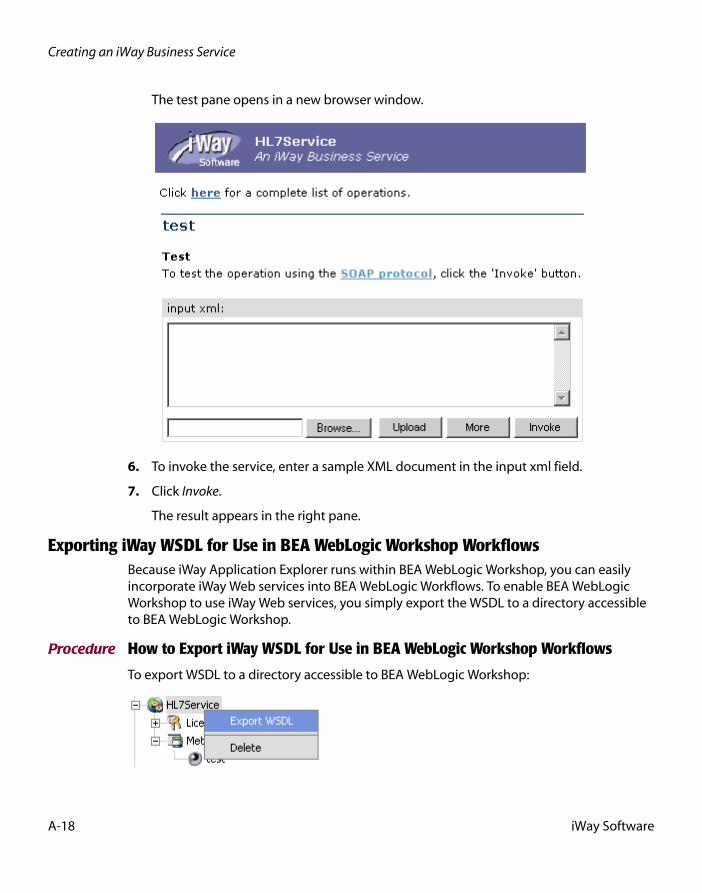
Creating an iWay Business Service
The test pane opens in a new browser window.
6. To invoke the service, enter a sample XML document in the input xml field.
7. Click Invoke.
The result appears in the right pane.
Exporting iWay WSDL for Use in BEA WebLogic Workshop WorkflowsBecause iWay Application Explorer runs within BEA WebLogic Workshop, you can easily incorporate iWay Web services into BEA WebLogic Workflows. To enable BEA WebLogic Workshop to use iWay Web services, you simply export the WSDL to a directory accessible to BEA WebLogic Workshop.
Procedure How to Export iWay WSDL for Use in BEA WebLogic Workshop Workflows
To export WSDL to a directory accessible to BEA WebLogic Workshop:
A-18 iWay Software
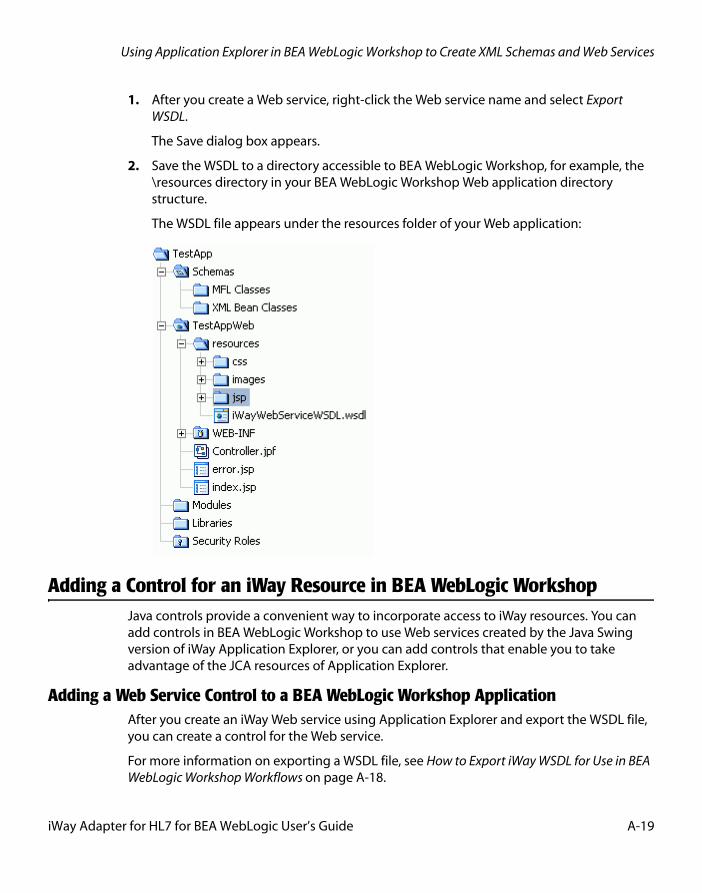
Using Application Explorer in BEA WebLogic Workshop to Create XML Schemas and Web Services
1. After you create a Web service, right-click the Web service name and select Export WSDL.
The Save dialog box appears.
2. Save the WSDL to a directory accessible to BEA WebLogic Workshop, for example, the \resources directory in your BEA WebLogic Workshop Web application directory structure.
The WSDL file appears under the resources folder of your Web application:
Adding a Control for an iWay Resource in BEA WebLogic WorkshopJava controls provide a convenient way to incorporate access to iWay resources. You can add controls in BEA WebLogic Workshop to use Web services created by the Java Swing version of iWay Application Explorer, or you can add controls that enable you to take advantage of the JCA resources of Application Explorer.
Adding a Web Service Control to a BEA WebLogic Workshop ApplicationAfter you create an iWay Web service using Application Explorer and export the WSDL file, you can create a control for the Web service.
For more information on exporting a WSDL file, see How to Export iWay WSDL for Use in BEA WebLogic Workshop Workflows on page A-18.
iWay Adapter for HL7 for BEA WebLogic User’s Guide A-19

Adding an iWay Extensible CCI Control to a BEA WebLogic Workshop Application
Procedure How to Add a Web Service Control
To add a Web service control:
1. After exporting the WSDL file from Application Explorer, locate the file in the Application tab of your BEA WebLogic Workshop application.
For example, a WSDL file saved to the \resources directory in your BEA WebLogic Workshop Web application directory structure appears as follows.
2. Right-click the WSDL file and select Generate Service Control.
The control for the WSDL appears below the WSDL file in the resources tree.
Adding an iWay Extensible CCI Control to a BEA WebLogic Workshop Application
An iWay control enables access to resources provided by Application Explorer when it is used in conjunction with a JCA deployment. You must add an iWay control before using it in a BEA WebLogic Workshop application workflow.
The following topic describes the enhanced CCI control, which is extensible and provides JCX with typed inputs and outputs for JCA in BEA WebLogic Workshop.
A-20 iWay Software
Using Application Explorer in BEA WebLogic Workshop to Create XML Schemas and Web Services
OverviewThe extensible iWay CCI control provides:
• Method and tag validation. BEA WebLogic Workshop provides warnings regarding invalid methods and tags.
• Improved error handling.
You can define new methods that rely on the generic service and authService methods. For example, you can define a JCX with a new method without writing casting code or explicit transformations such as the following:
public ResponseDataType MethodName(RequestDataType VariableName) throws Exception;
where:
ResponseDataType
Is the XML Bean Class value that is generated from the response schema.
MethodName
Is the method name used by the extensible CCI control.
RequestDataType
Is the XML Bean Class value that is generated from the request schema.
VariableName
Is the request variable that stores the request document, which is used as input by the extensible CCI control.
In addition, the extensible CCI control now generates a JCX file to which you can add your own methods. For more information, see Defining a Control Using the Extensible CCI Control on page A-21.
You can also use dynamic class casting to specify schema-based input or output XmlObjects to be casted into a pure XmlObject as a service method, which is expected by the CCI control. For more information, see Using Dynamic Class Casting on page A-28.
Example Defining a Control Using the Extensible CCI Control
The following sample JCX demonstrates how to define a control for HL7 using the extensible CCI control in BEA WebLogic Workshop.
iWay Adapter for HL7 for BEA WebLogic User’s Guide A-21

Adding an iWay Extensible CCI Control to a BEA WebLogic Workshop Application
1. Start BEA WebLogic Workshop and create a new project.
2. Click Add from the Controls section in the Data Palette tab, select Integration Controls, and click iWay 5.5 JCA.
The Insert Control message box opens.
3. Click Yes.
A-22 iWay Software

Using Application Explorer in BEA WebLogic Workshop to Create XML Schemas and Web Services
The Select dialog box opens.
4. Choose a subfolder for the CCI control and click Select.
iWay Adapter for HL7 for BEA WebLogic User’s Guide A-23
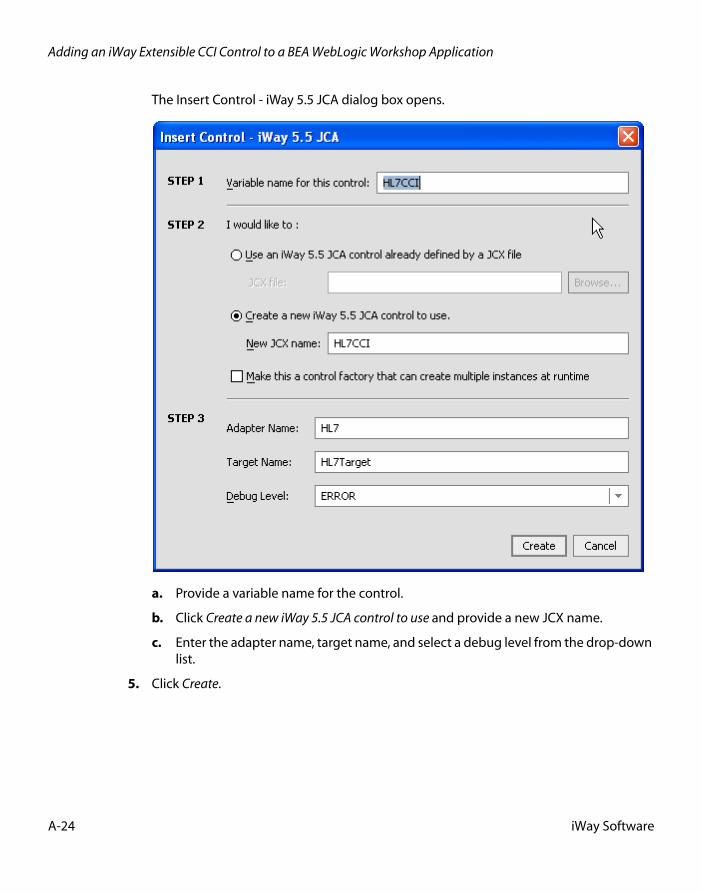
Adding an iWay Extensible CCI Control to a BEA WebLogic Workshop Application
The Insert Control - iWay 5.5 JCA dialog box opens.
a. Provide a variable name for the control.
b. Click Create a new iWay 5.5 JCA control to use and provide a new JCX name.
c. Enter the adapter name, target name, and select a debug level from the drop-down list.
5. Click Create.
A-24 iWay Software

Using Application Explorer in BEA WebLogic Workshop to Create XML Schemas and Web Services
A new JCX file is created.
6. Right-click the control, for example, HL7CCI, and select Edit.
The Design View for the control opens.
7. Click the Source View tab.
iWay Adapter for HL7 for BEA WebLogic User’s Guide A-25
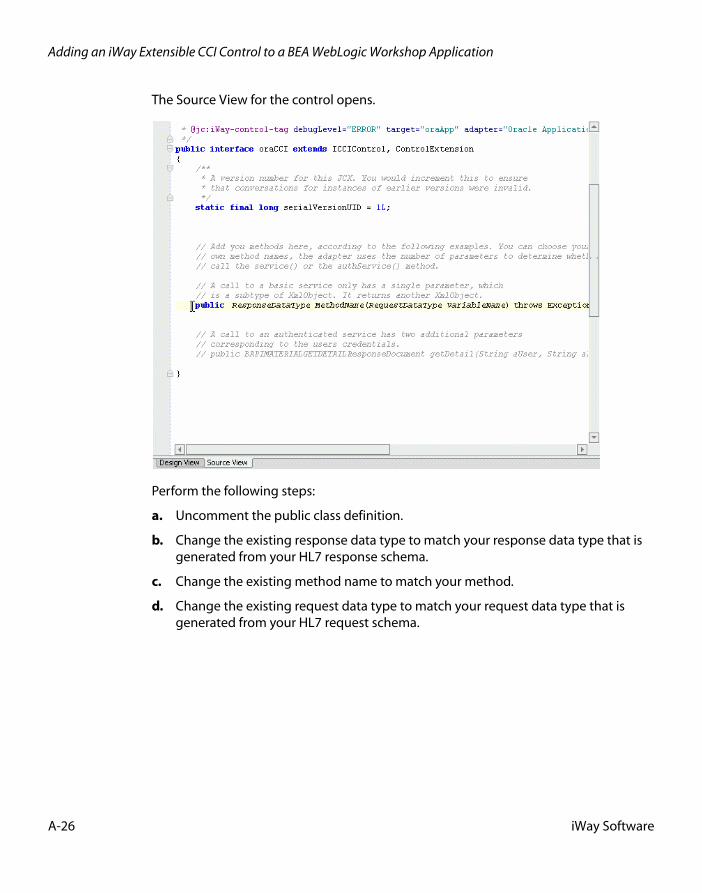
Adding an iWay Extensible CCI Control to a BEA WebLogic Workshop Application
The Source View for the control opens.
Perform the following steps:
a. Uncomment the public class definition.
b. Change the existing response data type to match your response data type that is generated from your HL7 response schema.
c. Change the existing method name to match your method.
d. Change the existing request data type to match your request data type that is generated from your HL7 request schema.
A-26 iWay Software
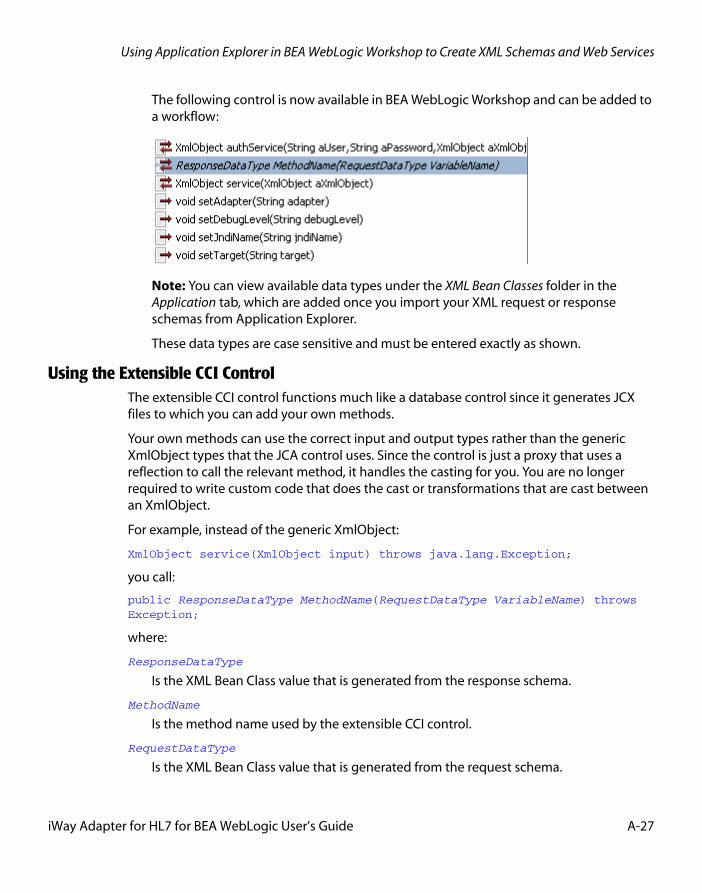
Using Application Explorer in BEA WebLogic Workshop to Create XML Schemas and Web Services
The following control is now available in BEA WebLogic Workshop and can be added to a workflow:
Note: You can view available data types under the XML Bean Classes folder in the Application tab, which are added once you import your XML request or response schemas from Application Explorer.
These data types are case sensitive and must be entered exactly as shown.
Using the Extensible CCI ControlThe extensible CCI control functions much like a database control since it generates JCX files to which you can add your own methods.
Your own methods can use the correct input and output types rather than the generic XmlObject types that the JCA control uses. Since the control is just a proxy that uses a reflection to call the relevant method, it handles the casting for you. You are no longer required to write custom code that does the cast or transformations that are cast between an XmlObject.
For example, instead of the generic XmlObject:
XmlObject service(XmlObject input) throws java.lang.Exception;
you call:
public ResponseDataType MethodName(RequestDataType VariableName) throws Exception;
where:
ResponseDataType
Is the XML Bean Class value that is generated from the response schema.
MethodName
Is the method name used by the extensible CCI control.
RequestDataType
Is the XML Bean Class value that is generated from the request schema.
iWay Adapter for HL7 for BEA WebLogic User’s Guide A-27
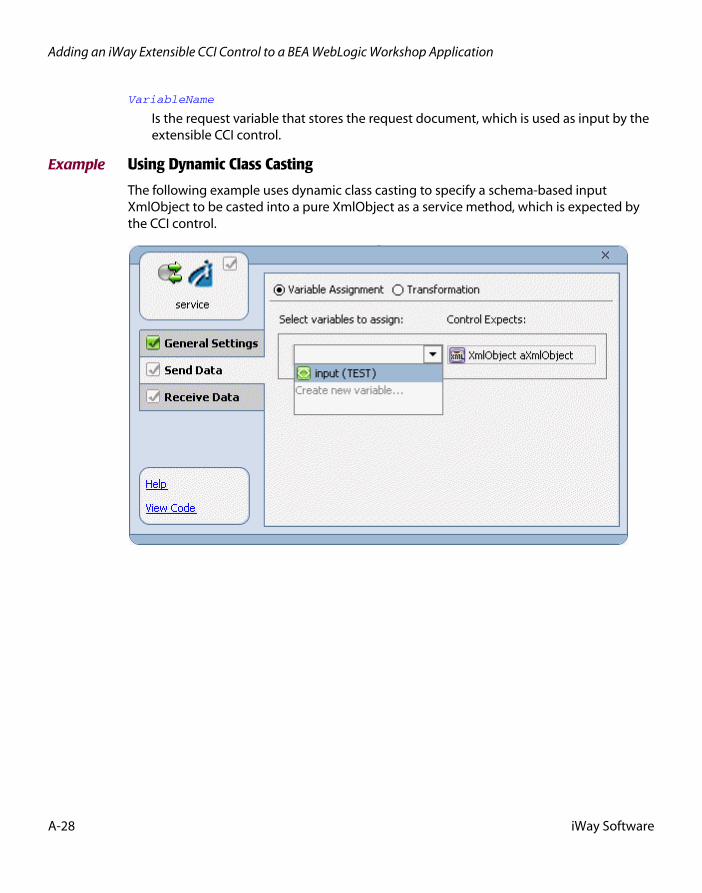
Adding an iWay Extensible CCI Control to a BEA WebLogic Workshop Application
VariableName
Is the request variable that stores the request document, which is used as input by the extensible CCI control.
Example Using Dynamic Class Casting
The following example uses dynamic class casting to specify a schema-based input XmlObject to be casted into a pure XmlObject as a service method, which is expected by the CCI control.
A-28 iWay Software

Using Application Explorer in BEA WebLogic Workshop to Create XML Schemas and Web Services
The following example uses dynamic class casting where the CCI control returns a pure XmlObject, which is casted dynamically into a schema-based output XmlObject.
iWay Adapter for HL7 for BEA WebLogic User’s Guide A-29

Adding an iWay Extensible CCI Control to a BEA WebLogic Workshop Application
A-30 iWay Software
APPENDIX B
B.Using Application Explorer in BEA WebLogic Workshop for Event Handling
Topics:
• Starting Application Explorer in BEA WebLogic Workshop
• Understanding iWay Event Functionality
• Creating an Event Port
• Modifying an Event Port
• Creating a Channel
• Modifying a Channel
• Deploying iWay Components in a Clustered BEA WebLogic Environment
This section describes how to use iWay Java Swing Application Explorer running in BEA WebLogic Workshop to create events for HL7. In addition, this section provides information on deploying events in a clustered BEA WebLogic environment.
iWay Adapter for HL7 for BEA WebLogic User’s Guide B-1

Starting Application Explorer in BEA WebLogic Workshop
Starting Application Explorer in BEA WebLogic WorkshopThe server must be started where iWay Application Explorer is running. Before you can use Application Explorer, you must start BEA WebLogic server.
Procedure How to Start Application Explorer in BEA WebLogic Workshop
To start Application Explorer running in BEA WebLogic Workshop:
1. Before starting Application Explorer, ensure that BEA WebLogic Server is running.
2. Start BEA WebLogic Workshop.
3. From the BEA WebLogic Workshop View menu, select Windows and then, iWay Application Explorer.
Application Explorer opens in BEA WebLogic Workshop.
You can resize and drag-and-drop the Application Explorer window within BEA WebLogic Workshop. For example, you can drag it to the upper part of BEA WebLogic Workshop.
B-2 iWay Software

Using Application Explorer in BEA WebLogic Workshop for Event Handling
Understanding iWay Event FunctionalityEvents are generated as a result of activity in an application system. You can use events to trigger an action in your application. For example, HL7 may generate an event when customer information is updated. If your application must perform in response to activity, your application is a consumer of this event.
After you create a connection to your application system, you can add events using Application Explorer. To define an iWay event, you must create a port and a channel.
• Port
A port associates a particular business object exposed by the adapter with a particular disposition. A disposition defines the protocol and location of the event data. The port defines the end point of the event consumption. For more information, see Creating an Event Port.
• Channel
A channel represents configured connections to particular instances of back-end systems. A channel binds one or more event ports to a particular listener managed by the adapter. For more information, see Creating a Channel on page B-19.
Creating an Event PortThe following procedures describe how to create an event port using iWay Application Explorer. The following port dispositions are available when using an iBSE implementation:
• File
• iBSE
• MSMQ
• JMSQ
• SOAP
• HTTP
• MQ Series
Note: The MAIL disposition option will be supported in a future release.
iWay Adapter for HL7 for BEA WebLogic User’s Guide B-3

Creating an Event Port
With a JCA implementation, the following port dispositions are available:
• File
• JMSQ
• MQ Series
• HTTP
Procedure How to Create an Event Port for File
To create an event port for File:
1. In the left pane of Application Explorer, expand the HL7 node under iWay Events, and then select Ports.
2. Right-click and select Add Port.
B-4 iWay Software

Using Application Explorer in BEA WebLogic Workshop for Event Handling
The Add Port dialog box opens.
a. In the Name field, type a name for the event port, for example, HL7File.
b. In the Description field, type a brief description.
c. From the Protocol drop-down list, select FILE.
d. In the URL field, type a destination file to which the event data is written, using the following format:
file://location[;errorTo=errorDest]
The following table describes the URL parameters.
3. Click OK.
Parameter Description
location The full directory path and file name to which the data is written.
errorTo Location where error logs are sent. Optional.
A predefined port name or another disposition URL. The URL must be complete, including the protocol.
iWay Adapter for HL7 for BEA WebLogic User’s Guide B-5

Creating an Event Port
In the left pane, the event port appears below the Ports node.
4. To review the port settings, select the port name.
In the right pane, a table appears that summarizes the information associated with the event port you created.
You are ready to associate the event port with a channel. For more information, see Creating a Channel on page B-19.
Procedure How to Create an Event Port for iBSE
To create an event port for iBSE:
1. In the left pane of Application Explorer, expand the HL7 node under iWay Events, and then select Ports.
2. Right-click and select Add Port.
B-6 iWay Software

Using Application Explorer in BEA WebLogic Workshop for Event Handling
The Add Port dialog box opens.
a. In the Name field, type a name for the event port, for example, HL7iBSE.
b. In the Description field, type a brief description.
c. From the Protocol drop-down list, select IBSE.
d. In the URL field, enter an iBSE destination using the following format:
ibse:/svcName.methName[;responseTo=respDest][;errorTo=errorDest]
The following table describes the disposition parameters.
Parameter Description
svcName Name of the service created with iBSE.
methName Name of the method created for the Web service.
respDest Location where responses to the Web service are posted. Optional.
A predefined port name or another disposition URL. The URL must be complete, including the protocol.
errorDest Location where error logs are sent. Optional.
A predefined port name or another disposition URL. The URL must be complete, including the protocol.
iWay Adapter for HL7 for BEA WebLogic User’s Guide B-7

Creating an Event Port
3. Click OK.
In the left pane, the event port appears below the Ports node.
4. To review the port settings, select the port name.
In the right pane, a table appears that summarizes the information associated with the event port you created.
You are ready to associate the event port with a channel. For more information, see Creating a Channel on page B-19.
Procedure How to Create an Event Port for MSMQ
To create an event port for a Microsoft Message Queuing (MSMQ) queue:
1. In the left pane of Application Explorer, expand the HL7 node under iWay Events, and then select Ports.
2. Right-click and select Add Port.
The Add Port dialog box opens.
a. In the Name field, type a name for the connection, for example, HL7MSMQ.
b. In the Description field, type a description for the target name you just created.
c. From the Protocol drop-down list, select MSMQ.
d. In the URL field, enter an MSMQ destination in the following format:
msmq:/host/queueType/queueName[;errorTo=errorDest]
B-8 iWay Software

Using Application Explorer in BEA WebLogic Workshop for Event Handling
The following table defines the disposition parameters.
3. Click OK.
In the left pane, the event port appears below the Ports node.
4. To review the port settings, select the port name.
In the right pane, a table appears that summarizes the information associated with the port you created. You are ready to associate the event port with a channel. For more information, see Creating a Channel on page B-19.
Procedure How to Create a Port for JMS
To create a port for a JMS queue:
1. In the left pane of Application Explorer, expand the HL7 node under iWay Events, and then select Ports.
2. Right-click and select Add Port.
Parameter Description
host Name of the host on which the Microsoft Queuing system runs.
queueType The type of queue. For private queues, enter Private$.
Private queues are queues that are not published in Active Directory. They appear only on the local computer that contains them. Private queues are accessible only by Message Queuing applications that recognize the full path name or format name of the queue.
queueName Name of the queue where messages are placed.
errorDest Location where error logs are sent. Optional.
A predefined port name or another disposition URL. The URL must be complete, including the protocol.
iWay Adapter for HL7 for BEA WebLogic User’s Guide B-9

Creating an Event Port
The Add Port dialog box opens.
a. In the Name field, type a name for the event port, for example, HL7JMSQ.
b. In the Description field, type a brief description.
c. From the Protocol drop-down list, select JMSQ.
d. In the URL field, enter a JMSQ destination using the following format:
jmsq:queue@conn_factory;jndiurl=jndi_url;jndifactory=jndi_factory;
user=userID;password=pass[;errorTo=errorDest]
The following table describes the URL parameters.
Parameter Description
queue Name of a queue to which events are emitted.
conn_factory The connection factory, a resource that contains information about the JMS Server. The WebLogic connection factory is:
javax.jms.QueueConnectionFactory
B-10 iWay Software

Using Application Explorer in BEA WebLogic Workshop for Event Handling
3. Click OK.
The event port appears below the Ports node in the left pane.
4. To review the port settings, select the port name.
In the right pane, a table appears that summarizes the information associated with the event port you created.
You are ready to associate the event port with a channel. For more information, see Creating a Channel on page B-19.
Procedure How to Create a Port for the SOAP Disposition
This topic describes how to configure the SOAP disposition for synchronous event processing.
The SOAP disposition allows an event response to launch a Web service specified by a WSDL file. A soapaction is optional, the default is "".
jndi_url The URL of the application server. For BEA WebLogic Server, the URL is
t3://host:port
where:
host
Is the machine name where BEA WebLogic Server resides.
port
Is the port on which BEA WebLogic Server is listening. The default port if not changed at installation, is 7001.
jndi_factory Is JNDI context.INITIAL_CONTEXT_FACTORY and is provided by the JNDI service provider. For BEA WebLogic Server, the WebLogic factory is weblogic.jndi.WLInitialContextFactory.
userID User ID associated with this queue.
pass Password associated with this user ID.
errorDest Location where error logs are sent. Optional.
A predefined port name or another disposition URL. The URL must be complete, including the protocol.
Parameter Description
iWay Adapter for HL7 for BEA WebLogic User’s Guide B-11
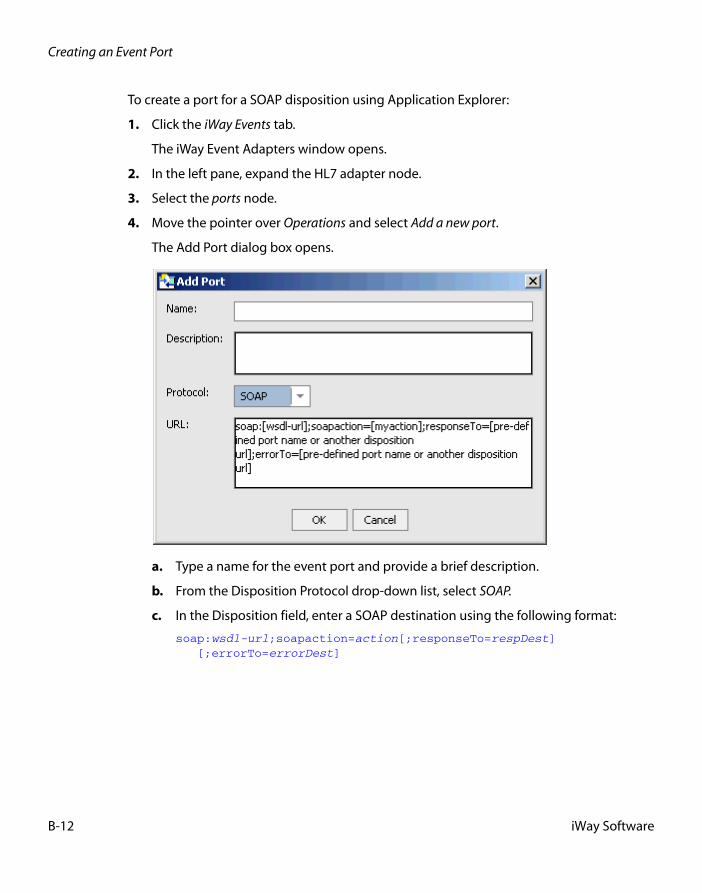
Creating an Event Port
To create a port for a SOAP disposition using Application Explorer:
1. Click the iWay Events tab.
The iWay Event Adapters window opens.
2. In the left pane, expand the HL7 adapter node.
3. Select the ports node.
4. Move the pointer over Operations and select Add a new port.
The Add Port dialog box opens.
a. Type a name for the event port and provide a brief description.
b. From the Disposition Protocol drop-down list, select SOAP.
c. In the Disposition field, enter a SOAP destination using the following format:
soap:wsdl-url;soapaction=action[;responseTo=respDest] [;errorTo=errorDest]
B-12 iWay Software

Using Application Explorer in BEA WebLogic Workshop for Event Handling
The following table lists and describes the disposition parameters for SOAP.
Parameter Description
wsdl-url The URL to the WSDL file that is required to create the SOAP message. For example:
http://localhost:7001/ibse/IBSEServlet/test/sw2xml2003MQ.ibs?wsdl
This value can be found by navigating to the Integration Business Services tab and opening the Service Description link in a new window. The WSDL URL appears in the Address field.
You can also open the WSDL file in a third party XML editor (for example, XMLSPY) and view the SOAP request settings to find this value.
action The method that will be called by the disposition. For example:
HL7.mt200Request@test@@
where
HL7
Is the name of the Web service you created using Application Explorer.
mt200
Is the method being used.
test
Is the license that is being used by the Web service.
This value can be found by navigating to the Integration Business Services tab and opening the Service Description link in a new window. Perform a search for soapAction.
You can also open the WSDL file in a third party XML editor (for example, XMLSPY) and view the SOAP request settings to find this value.
respDest The location to which responses are posted. A predefined port name or another full URL. Optional.
A predefined port name or another disposition URL. The URL must be complete, including the protocol.
iWay Adapter for HL7 for BEA WebLogic User’s Guide B-13

Creating an Event Port
5. Click OK.
The port appears under the ports node in the left pane. In the right pane, a table appears that summarizes the information associated with the port you created.
You are ready to associate the event port with a channel. For more information, see Creating a Channel on page B-19.
Procedure How to Create an Event Port for HTTP
The HTTP disposition uses an HTTP URL to specify an HTTP end point to which the event document is posted.
To create an event port for HTTP disposition:
1. In the left pane of Application Explorer, expand the HL7 node under iWay Events, and then select Ports.
2. Right-click and select Add Port.
The Add Port dialog box opens.
errorDest The location to which error logs are sent. Optional.
A predefined port name or another disposition URL. The URL must be complete, including the protocol.
Parameter Description
B-14 iWay Software
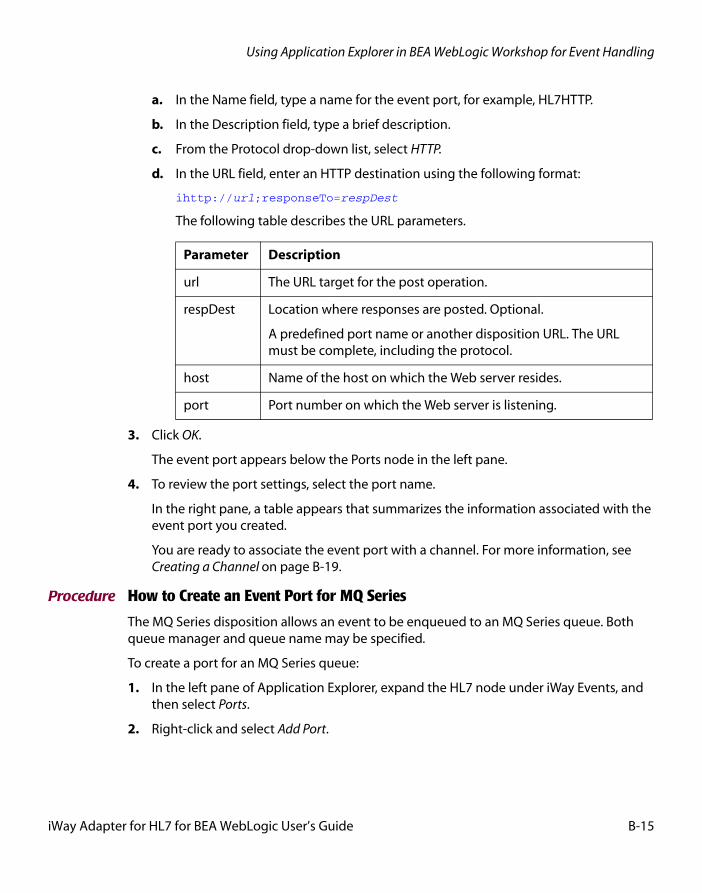
Using Application Explorer in BEA WebLogic Workshop for Event Handling
a. In the Name field, type a name for the event port, for example, HL7HTTP.
b. In the Description field, type a brief description.
c. From the Protocol drop-down list, select HTTP.
d. In the URL field, enter an HTTP destination using the following format:
ihttp://url;responseTo=respDest
The following table describes the URL parameters.
3. Click OK.
The event port appears below the Ports node in the left pane.
4. To review the port settings, select the port name.
In the right pane, a table appears that summarizes the information associated with the event port you created.
You are ready to associate the event port with a channel. For more information, see Creating a Channel on page B-19.
Procedure How to Create an Event Port for MQ Series
The MQ Series disposition allows an event to be enqueued to an MQ Series queue. Both queue manager and queue name may be specified.
To create a port for an MQ Series queue:
1. In the left pane of Application Explorer, expand the HL7 node under iWay Events, and then select Ports.
2. Right-click and select Add Port.
Parameter Description
url The URL target for the post operation.
respDest Location where responses are posted. Optional.
A predefined port name or another disposition URL. The URL must be complete, including the protocol.
host Name of the host on which the Web server resides.
port Port number on which the Web server is listening.
iWay Adapter for HL7 for BEA WebLogic User’s Guide B-15

Creating an Event Port
The Add Port dialog box opens.
a. In the Name field, type a name for the event port, for example, HL7MQSeries.
b. In the Description field, type a brief description.
c. From the Protocol drop-down list, select MQ Series.
d. In the URL field, enter an MQ Series destination using the following format:
mqseries:/qManager/qName;host=hostName;port=portNum;channel=chanName[;errorTo=errorDest]
The following table describes the URL parameters.
Parameter Description
qManager Name of queue manager to which the server must connect.
qName Name of the queue where messages are placed.
hostName Name of the host on which MQ Series resides (MQ client only).
portNum Port number for connecting to an MQ Server queue manager (MQ client only).
chanName Case-sensitive name of the channel that connects with the remote MQ Server queue manager (MQ client only). The default MQ Series channel name is SYSTEM.DEF.SVRCONN.
B-16 iWay Software

Using Application Explorer in BEA WebLogic Workshop for Event Handling
3. Click OK.
The event port appears below the Ports node in the left pane.
4. To review the port settings, select the port name.
In the right pane, a table appears that summarizes the information associated with the event port you created.
You are ready to associate the event port with a channel. For more information, see Creating a Channel on page B-19.
Modifying an Event PortThe following procedures describe how to edit and delete an event port using iWay Application Explorer. To review the port settings, select the port name. In the right pane, a table appears that summarizes the information associated with the event port you created.
Procedure How to Edit an Event Port
To edit an event port:
1. To view the available ports, click the Ports node in the left pane.
2. Right-click the port you want to edit, and select Edit.
errorDest Location where error logs are sent. Optional.
A predefined port name or another disposition URL. The URL must be complete, including the protocol.
Parameter Description
iWay Adapter for HL7 for BEA WebLogic User’s Guide B-17

Modifying an Event Port
The Edit Port dialog box opens.
3. Make the required changes and click OK.
Procedure How to Delete an Event Port
To delete an existing event port:
1. To view the available ports, click the Ports node in the left pane.
2. Right-click the port you want to remove, and select Delete.
The event port node disappears from the ports list in the left pane.
B-18 iWay Software

Using Application Explorer in BEA WebLogic Workshop for Event Handling
Creating a ChannelThe following procedure describes how to create a channel for a HL7 event. All defined event ports must be associated with a channel.
You can create the following types of channels using Application Explorer:
• File System Listener (File)
• Hypertext Transfer Protocol (HTTP)
• TCP Listener (TCP)
• IBM MQSeries (MQ)
• File Transfer Protocol (FTP)
Procedure How to Create a Channel for a File System Listener
To create a channel for a File System Listener (FILE):
1. In the left pane, below the configuration you created, expand the iWay Events node.
The list of adapters appears.
2. Click the adapter node, for example, HL7.
The node expands and displays the Ports and Channels nodes.Figure 0-1 Expanded Connection Node
3. Right-click the Channels node and select Add Channel.
iWay Adapter for HL7 for BEA WebLogic User’s Guide B-19

Creating a Channel
The Add Channel dialog box opens.
a. In the Name field, type a name for the channel, for example, HL7Channel.
b. In the Description field, type a brief description.
c. From the Protocol drop-down list, select a type of listener:
• File System Listener (FILE)
• HyperText Transfer Protocol
• TCP Listener (TCP)
• IBM MQ Series (MQ)
d. To associate one or more available ports with this channel, select the port in the Available box and click the double right arrow (>>) button to move it to the Selected box.
B-20 iWay Software

Using Application Explorer in BEA WebLogic Workshop for Event Handling
4. Click Next.
A dialog box opens that is specific to the protocol you selected.
5. Enter values for the parameters that are listed.
For information on the parameters for a File System Listener (FILE) listener, see File System Listener (FILE) listener Configuration Parameters on page B-23.
For information on the parameters for a HyperText Transfer Protocol listener, see HyperText Transfer Protocol Listener Configuration Parameters on page B-24.
For information on the parameters for a TCP Listener, see TCP Listener Configuration Parameters on page B-25.
For information on the parameters for an IBM MQ Series (MQ) listener, see IBM MQ Series (MQ) Listener Configuration Parameters on page B-25.
For information on the parameters for a File Transfer Protocol (FTP) listener, see File Transfer Protocol (FTP) Listener Configuration Parameters on page B-26.
6. Click OK.
iWay Adapter for HL7 for BEA WebLogic User’s Guide B-21
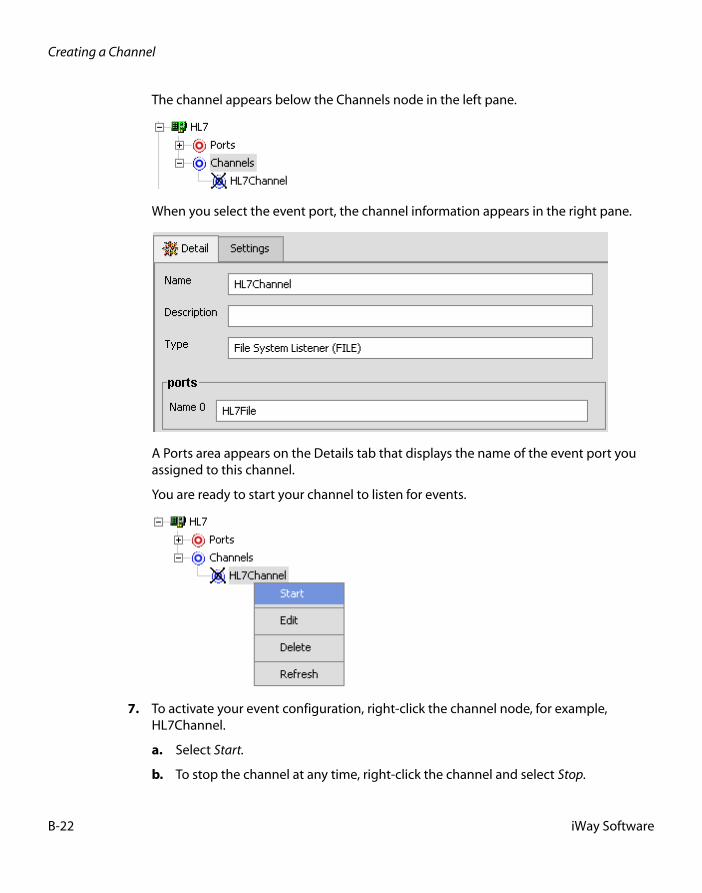
Creating a Channel
The channel appears below the Channels node in the left pane.
When you select the event port, the channel information appears in the right pane.
A Ports area appears on the Details tab that displays the name of the event port you assigned to this channel.
You are ready to start your channel to listen for events.
7. To activate your event configuration, right-click the channel node, for example, HL7Channel.
a. Select Start.
b. To stop the channel at any time, right-click the channel and select Stop.
B-22 iWay Software

Using Application Explorer in BEA WebLogic Workshop for Event Handling
Reference File System Listener (FILE) listener Configuration Parameters
On the Settings tab:
Parameter Description
Location The directory where messages are received. DOS-style file patterns are valid for this parameter. You can specify a file pattern as well as a directory. For example, c:\xyz\ab*cd (without a file suffix) takes the file suffix from that parameter. If you use a pattern, files are selected based on the suffix and then the pattern. AB?CD selects ABxCD. AB*CD selects ABxxxCD.
File Suffix File extension for the file event. This limits input files to those with the specified extensions. The “.” is not required. The minus sign (“-”) indicated that there is no extension. If the file extension is zip, the unzipped files must conform to the event schema, or they will fail. This function also works with transform configured.
Encoding The host on which the MQ Server is located (for the MQ Client only).
Polling Interval This is a time, expressed as xxH:xxM:xxS For example 1 hour, 2 minutes, and 3 seconds is: 1H:2M:3S The maximum interval between checks for new documents. The higher this value, the longer the interval, and the fewer system resources that are used. The side-effect of a high value is that a worker thread cannot respond to a stop command. If this value is set to 0, the listener runs once and terminates. The default value is 2 seconds.
Sort The case-sensitive name of the channel that connects with the remote MQ Server queue manager (for the MQ client only). The default channel name for MQSeries is SYSTEM.DEF.SVRCONN.
Scan Sub-directories
Location where error documents are sent. This can be a predefined port name or another full URL. Optional.
iWay Adapter for HL7 for BEA WebLogic User’s Guide B-23

Creating a Channel
On the Advanced tab:
Reference HyperText Transfer Protocol Listener Configuration Parameters
On the Settings tab:
On the Advanced tab:
Parameter Description
Transform Type Select the pre-built transform template from the drop-down list. To enable batch processing, select BatchSplitter from the drop-down list.
The batch splitter preparses an entire EDI document and splits the document into individual transactions. Each transaction retains its Interchange Header/Trailer information. Once the batch splitter is finished splitting the EDI document, the transactions are ready to be transformed into XML.
Location for ack copies
The directory in which the acknowledgement document is placed.
Parameter Description
Port The port where the adapter listens for the HTTP transfer.
Encoding The character set encoding for inbound documents. For example, UTF-8. The default is ISO-8859-1 US and Western Europe.
Parameter Description
Transform Type Select the pre-built transform template from the drop-down list. To enable batch processing, select BatchSplitter from the drop-down list.
The batch splitter preparses an entire EDI document and splits the document into individual transactions. Each transaction retains its Interchange Header/Trailer information. Once the batch splitter is finished splitting the EDI document, the transactions are ready to be transformed into XML.
Location for ack copies
The directory in which the acknowledgement document is placed.
B-24 iWay Software

Using Application Explorer in BEA WebLogic Workshop for Event Handling
Reference TCP Listener Configuration Parameters
On the Settings tab:
On the Advanced tab:
Reference IBM MQ Series (MQ) Listener Configuration Parameters
On the Settings tab:
Parameter Description
Port The port where the adapter listens for the TCP transfer.
Encoding The character set encoding for inbound documents. For example, UTF-8. The default is ISO-8859-1 US and Western Europe.
Allowable Client Host
The name or address of the client restricted to accessing this adapter.
Parameter Description
Transform Type Select the pre-built transform template from the drop-down list. To enable batch processing, select BatchSplitter from the drop-down list.
The batch splitter preparses an entire EDI document and splits the document into individual transactions. Each transaction retains its Interchange Header/Trailer information. Once the batch splitter is finished splitting the EDI document, the transactions are ready to be transformed into XML.
Location for ack copies
The directory in which the acknowledgement document is placed.
Parameter Description
Queue Manager The name of the MQ queue manager to be used.
Queue Name The name of the MQ Series or WebSphere MQ queue that the HL7 system polls.
iWay Adapter for HL7 for BEA WebLogic User’s Guide B-25

Creating a Channel
On the MQ Client tab:
On the Advanced tab:
Reference File Transfer Protocol (FTP) Listener Configuration Parameters
On the Settings tab:
Polling Interval The maximum wait interval (in the format nnH:nnM:nnS) between checks for new documents. The higher this value, the longer the interval, and the fewer system resources that are used. However, with a high value, the worker thread cannot respond to a stop command. If timeout is set to 0, the listener runs once and terminates. The default is 2 seconds.
Parameter Description
Host The host where the MQ Server is located.
Port The port number used to connect to an MQ Server.
Channel The channel between an MQ Client and an MQ Server.
Parameter Description
Transform Type Select the pre-built transform template from the drop-down list. To enable batch processing, select BatchSplitter from the drop-down list.
The batch splitter preparses an entire EDI document and splits the document into individual transactions. Each transaction retains its Interchange Header/Trailer information. Once the batch splitter is finished splitting the EDI document, the transactions are ready to be transformed into XML.
Location for ack copies
The directory in which the acknowledgement document is placed.
Parameter Description
Parameter Description
Host The name of the FTP host.
Port The port where the adapter listens on the FTP transfer.
B-26 iWay Software

Using Application Explorer in BEA WebLogic Workshop for Event Handling
On the Advanced tab:
User The user name to log onto the FTP Server.
Password The password for the FTP user.
Location The directory where messages are received. DOS-style file patterns are available for this parameter. You can specify a file pattern as well as a directory. For example, c:\xyz\ab*cd (without a file suffix) takes the file suffix from that parameter.
If you use a pattern, files are selected based on the suffix and then the pattern. AB?CD selects ABxCD. AB*CD selects ABxxxCD.
Encoding The character set encoding for inbound documents. For example, UTF-8. The default is ISO-8859-1 US and Western Europe.
Polling Interval The maximum wait interval (in the format nnH:nnM:nnS) between checks for new documents. The higher this value, the longer the interval, and the fewer system resources that are used. However, with a high value, the worker thread cannot respond to a stop command. If timeout is set to 0, the listener runs once and terminates. The default is 2 seconds.
Parameter Description
Transform Type Select the pre-built transform template from the drop-down list. To enable batch processing, select BatchSplitter from the drop-down list.
The batch splitter preparses an entire EDI document and splits the document into individual transactions. Each transaction retains its Interchange Header/Trailer information. Once the batch splitter is finished splitting the EDI document, the transactions are ready to be transformed into XML.
Location for ack copies
The directory in which the acknowledgement document is placed.
Parameter Description
iWay Adapter for HL7 for BEA WebLogic User’s Guide B-27

Modifying a Channel
Modifying a ChannelThe following procedures describe how to edit and delete a channel using Application Explorer. To review the channel settings, you select the channel name. In the right pane, a table appears that summarizes the information associated with the channel you created.
Procedure How to Edit a Channel
To edit a channel:
1. To view the available channels, click the Channels node in the left pane.
2. Right-click the channel you want to edit, for example, HL7Channel, and select Edit.
B-28 iWay Software
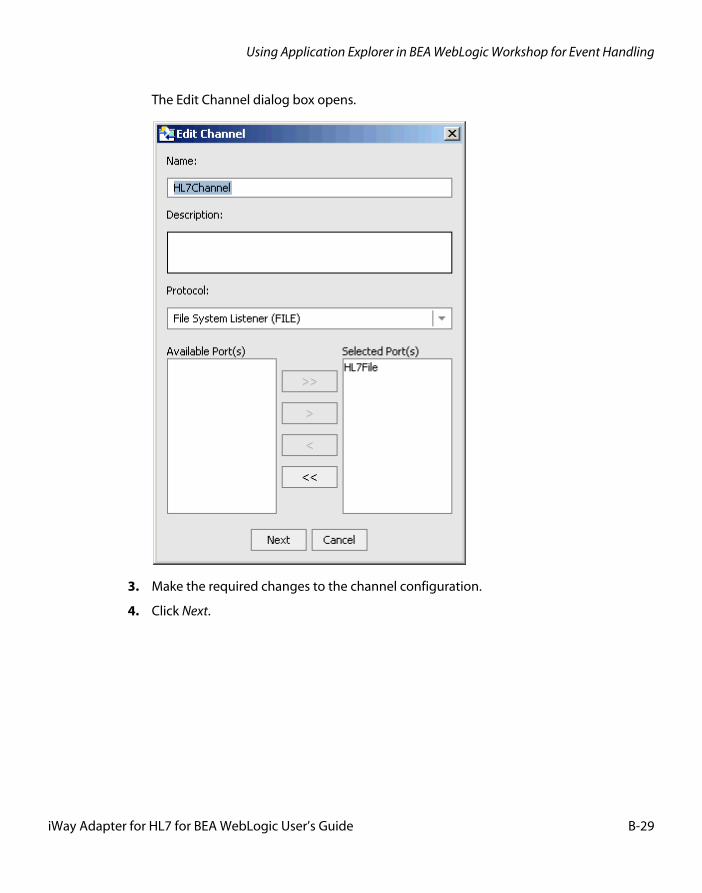
Using Application Explorer in BEA WebLogic Workshop for Event Handling
The Edit Channel dialog box opens.
3. Make the required changes to the channel configuration.
4. Click Next.
iWay Adapter for HL7 for BEA WebLogic User’s Guide B-29

Modifying a Channel
The following dialog box opens.
5. Make the required changes and click OK.
Procedure How to Delete a Channel
To delete an existing channel:
1. In the left pane, right-click the channel, for example, HL7Channel.
2. Select Delete.
The channel disappears from the Channels list.
B-30 iWay Software

Using Application Explorer in BEA WebLogic Workshop for Event Handling
Deploying iWay Components in a Clustered BEA WebLogic EnvironmentEvents can be configured in a clustered BEA WebLogic environment. You can deploy iBSE or JCA to this environment. This topic uses iBSE as an example, but you can follow the same procedures when deploying JCA. The only difference is that you need to deploy the JCA connector .RAR file to the clustered environment.
A cluster consists of multiple server instances running simultaneously, yet appears to clients to be a single server instance. The server instances that contain a cluster can be run on one machine, but are usually run on multiple machines.
Clustering provides the following benefits:
• Load balancing
• High availability
Service requests are processed through the HTTP router and routed to an available managed server.
Events are server-specific and are not processed through the HTTP router. You must configure each server separately.
Procedure How to Deploy iWay Components in a Clustered Environment
To deploy iWay components in a clustered environment:
1. Using the BEA Configuration Wizard:
a. Configure an administrative server to manage the managed servers.
b. Add and configure as many managed servers as required.
c. Add and configure an HTTP router. This does not have to be a part of WebLogic and can be an outside component.
d. If you configure the HTTP router within WebLogic, start it by entering the following command:
StartManagedWebLogic HTTPROUTER http://localhost:7001
where:
HTTPROUTER
Is the name of the server on which the HTTP router is running.
http://localhost:7001
Is the location of the admin console.
e. Add the managed servers to your cluster/clusters.
iWay Adapter for HL7 for BEA WebLogic User’s Guide B-31

Deploying iWay Components in a Clustered BEA WebLogic Environment
For more information on configuring WebLogic Integration for deployment in a clustered environment, see Deploying WebLogic Integration Solutions.
2. Start the WebLogic Server and open WebLogic Server Console.
3. Deploy iBSE to the cluster by selecting Web Application Modules from the Domain Configurations section, and clicking Deploy a new Web Application Module.
A page appears for you to specify where the Web application is located.
4. To deploy iBSE, select the option button next to the ibse directory and then click Target Module.
5. To deploy servlet Application Explorer, select the option button next to the iwae directory and then click Target Module.
If you are using servlet Application Explorer, deploy it only on the admin server or one of the managed servers.
B-32 iWay Software
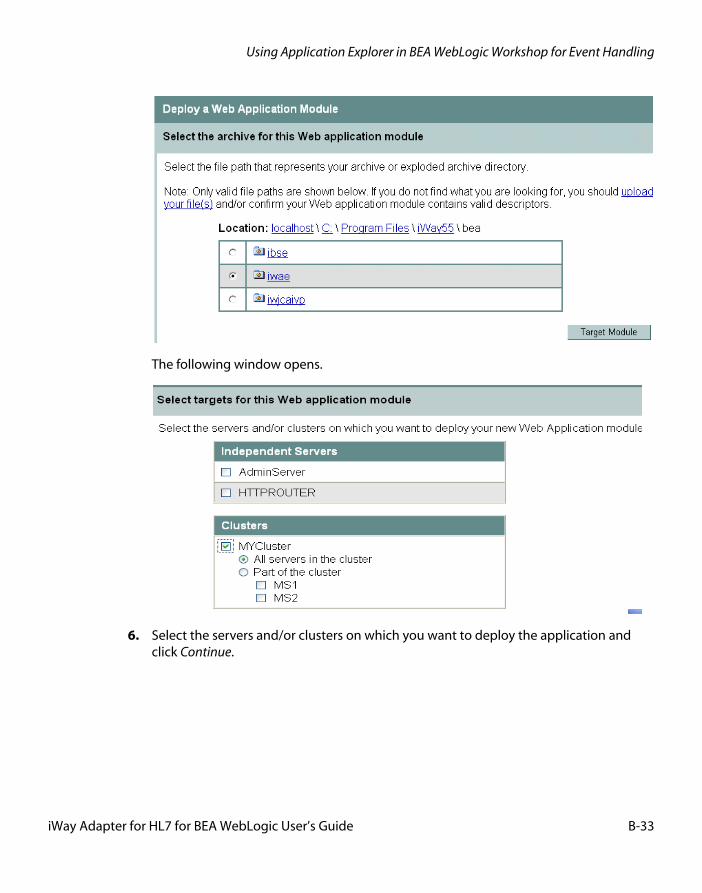
Using Application Explorer in BEA WebLogic Workshop for Event Handling
The following window opens.
6. Select the servers and/or clusters on which you want to deploy the application and click Continue.
iWay Adapter for HL7 for BEA WebLogic User’s Guide B-33

Deploying iWay Components in a Clustered BEA WebLogic Environment
The following window opens.
7. Select the I will make the Web Application module accessible from the following location option button and provide the location from which all targets will access iBSE.
iWay Software recommends that you use a single instance of iBSE, rather than copying iBSE onto every target.
Note: iBSE must use a database repository (SQL or Oracle). Do not use a file repository. You can select this in the Repository Type drop-down list in the iBSE monitoring page. After configuring a database repository, you must restart all of the managed servers.
http://hostname:port/ibse/IBSEConfig/
where:
hostname
Is where your application server is running. Use the IP address or machine name in the URL; do not use localhost.
port
Is the port specific to each server, since you deploy iBSE to an entire cluster. For example, 8001, 8002, or any other port that is specified for each managed node.
8. Click Deploy.
B-34 iWay Software
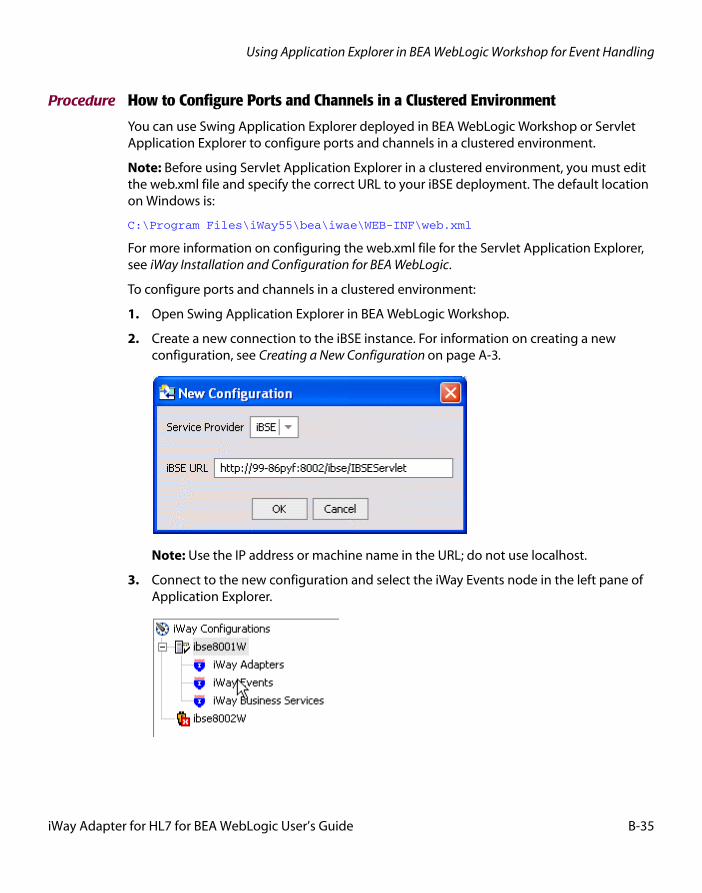
Using Application Explorer in BEA WebLogic Workshop for Event Handling
Procedure How to Configure Ports and Channels in a Clustered Environment
You can use Swing Application Explorer deployed in BEA WebLogic Workshop or Servlet Application Explorer to configure ports and channels in a clustered environment.
Note: Before using Servlet Application Explorer in a clustered environment, you must edit the web.xml file and specify the correct URL to your iBSE deployment. The default location on Windows is:
C:\Program Files\iWay55\bea\iwae\WEB-INF\web.xml
For more information on configuring the web.xml file for the Servlet Application Explorer, see iWay Installation and Configuration for BEA WebLogic.
To configure ports and channels in a clustered environment:
1. Open Swing Application Explorer in BEA WebLogic Workshop.
2. Create a new connection to the iBSE instance. For information on creating a new configuration, see Creating a New Configuration on page A-3.
Note: Use the IP address or machine name in the URL; do not use localhost.
3. Connect to the new configuration and select the iWay Events node in the left pane of Application Explorer.
iWay Adapter for HL7 for BEA WebLogic User’s Guide B-35

Deploying iWay Components in a Clustered BEA WebLogic Environment
4. Add a new port for the HL7 adapter. For more information, see Creating an Event Port on page B-3.
5. Create a channel and add the port you created. For more information, see Creating a Channel on page B-19.
6. Click Next and enter the application server parameters.
7. Start the channel.
8. Create a new configuration and connect to the second iBSE instance.
The connection to iBSE must be configured to each instance of the managed server.
B-36 iWay Software
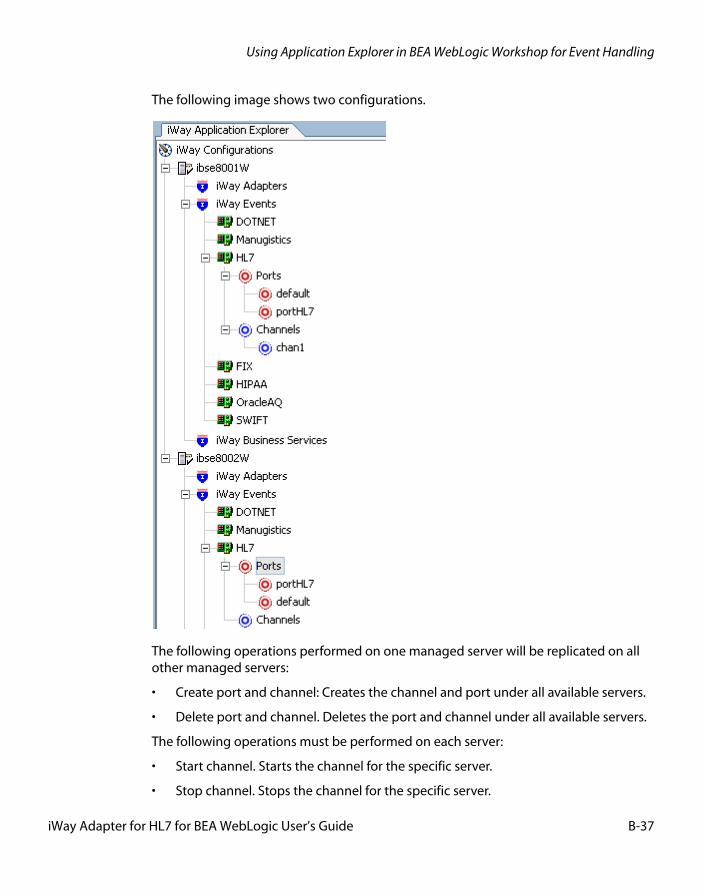
Using Application Explorer in BEA WebLogic Workshop for Event Handling
The following image shows two configurations.
The following operations performed on one managed server will be replicated on all other managed servers:
• Create port and channel: Creates the channel and port under all available servers.
• Delete port and channel. Deletes the port and channel under all available servers.
The following operations must be performed on each server:
• Start channel. Starts the channel for the specific server.
• Stop channel. Stops the channel for the specific server.
iWay Adapter for HL7 for BEA WebLogic User’s Guide B-37

Deploying iWay Components in a Clustered BEA WebLogic Environment
B-38 iWay Software

APPENDIX C
C.HL7 Document Index
Topics:
• Message Definition Files
• Field Definitions
• Data Type Definitions
• Lookup ValidationLookup Validation
• Sample Conversion
• Validation Rules File
• Error Codes
This appendix includes reference material that is supplied with the iWay Adapter for HL7 for BEA WebLogic.
iWay Adapter for HL7 for BEA WebLogic User’s Guide C-1

Message Definition Files
Message Definition FilesThe following section discusses the two main schema files that describe the HL7 messages (Message.xsd and Segments.xsd). These files describe to the HL7 parser how the HL7 messages are formatted.
Messages.xsdMessages.xsd
<?xml version = "1.0" encoding = "ISO-8859-1" ?> <schema> <!-- MESSAGE ORU_R01 --> <!-- .. groups used in message ORU_R01 --> <element name="ORU_R01.GROUP.1"> <complexType> <sequence> <element minOccurs="0" maxOccurs="1" ref="OBX" /> <element minOccurs="0" maxOccurs="unbounded" ref="NTE" /> </sequence> </complexType>
</element><element name="ORU_R01.GROUP.2"> <complexType> <sequence> <element minOccurs="0" maxOccurs="1" ref="ORC" /> <element minOccurs="1" maxOccurs="1" ref="OBR" /> <element minOccurs="0" maxOccurs="unbounded" ref="NTE" /> <element minOccurs="1" maxOccurs="unbounded" ref="ORU_R01.GROUP.1" /> <element minOccurs="0" maxOccurs="unbounded" ref="CTI" /> </sequence> </complexType></element>
<element name="ORU_R01.GROUP.3"> <complexType> <sequence> <element minOccurs="1" maxOccurs="1" ref="PID" /> <element minOccurs="0" maxOccurs="1" ref="PD1" /> <element minOccurs="0" maxOccurs="unbounded" ref="NK1" /> <element minOccurs="0" maxOccurs="unbounded" ref="NTE" /> <element minOccurs="0" maxOccurs="1" ref="ORU_R01.GROUP.5" /> </sequence> </complexType></element>
C-2 iWay Software

HL7 Document Index
<element name="ORU_R01.GROUP.4"> <complexType> <sequence> <element minOccurs="0" maxOccurs="1" ref="ORU_R01.GROUP.3" /> <element minOccurs="1" maxOccurs="unbounded" ref="ORU_R01.GROUP.2" /> </sequence> </complexType></element>
<element name="ORU_R01.GROUP.5"> <complexType> <sequence> <element minOccurs="1" maxOccurs="1" ref="PV1" /> <element minOccurs="0" maxOccurs="1" ref="PV2" /> </sequence> </complexType></element>
<!-- .. message definition ORU_R01 -->
<element name="ORU_R01"> <complexType> <sequence> <element minOccurs="1" maxOccurs="1" ref="MSH" /> <element minOccurs="1" maxOccurs="unbounded" ref="ORU_R01.GROUP.4" /> <element minOccurs="0" maxOccurs="1" ref="DSC" /> </sequence> </complexType></element>
</schema>
This section from the schema file defines the message type ORU of event R01. There are numerous groups and sub-groups, which detail the sub-sections of the message. Some of these sub-sections are required, for example, ORU_RO1.GROUP.4, and others are allowed to occur numerous times, for example, ORU_RO1.GROUP.2.
iWay Adapter for HL7 for BEA WebLogic User’s Guide C-3
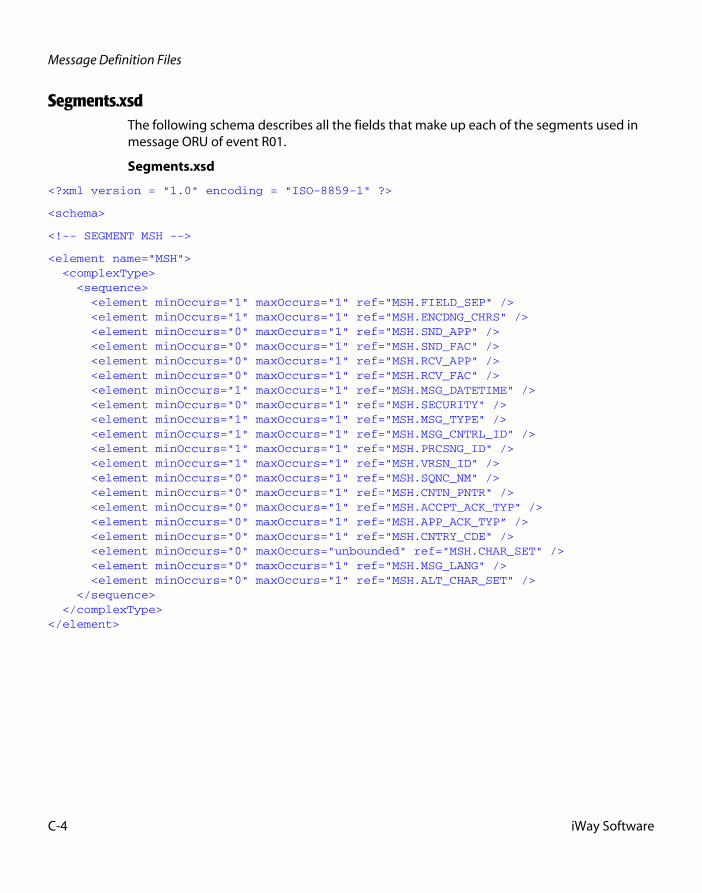
Message Definition Files
Segments.xsdThe following schema describes all the fields that make up each of the segments used in message ORU of event R01.
Segments.xsd
<?xml version = "1.0" encoding = "ISO-8859-1" ?>
<schema>
<!-- SEGMENT MSH -->
<element name="MSH"> <complexType> <sequence> <element minOccurs="1" maxOccurs="1" ref="MSH.FIELD_SEP" /> <element minOccurs="1" maxOccurs="1" ref="MSH.ENCDNG_CHRS" /> <element minOccurs="0" maxOccurs="1" ref="MSH.SND_APP" /> <element minOccurs="0" maxOccurs="1" ref="MSH.SND_FAC" /> <element minOccurs="0" maxOccurs="1" ref="MSH.RCV_APP" /> <element minOccurs="0" maxOccurs="1" ref="MSH.RCV_FAC" /> <element minOccurs="1" maxOccurs="1" ref="MSH.MSG_DATETIME" /> <element minOccurs="0" maxOccurs="1" ref="MSH.SECURITY" /> <element minOccurs="1" maxOccurs="1" ref="MSH.MSG_TYPE" /> <element minOccurs="1" maxOccurs="1" ref="MSH.MSG_CNTRL_ID" /> <element minOccurs="1" maxOccurs="1" ref="MSH.PRCSNG_ID" /> <element minOccurs="1" maxOccurs="1" ref="MSH.VRSN_ID" /> <element minOccurs="0" maxOccurs="1" ref="MSH.SQNC_NM" /> <element minOccurs="0" maxOccurs="1" ref="MSH.CNTN_PNTR" /> <element minOccurs="0" maxOccurs="1" ref="MSH.ACCPT_ACK_TYP" /> <element minOccurs="0" maxOccurs="1" ref="MSH.APP_ACK_TYP” /> <element minOccurs="0" maxOccurs="1" ref="MSH.CNTRY_CDE" /> <element minOccurs="0" maxOccurs="unbounded" ref="MSH.CHAR_SET" /> <element minOccurs="0" maxOccurs="1" ref="MSH.MSG_LANG" /> <element minOccurs="0" maxOccurs="1" ref="MSH.ALT_CHAR_SET" /> </sequence> </complexType></element>
C-4 iWay Software

HL7 Document Index
<!-- SEGMENT PID -->
<!-- Patient Identificaion segment -->
<element name="PID"> <complexType> <sequence> <element minOccurs="0" maxOccurs="1" ref="PID.SET_ID" /> <element minOccurs="0" maxOccurs="1" ref="PID.PATNT_ID" /> <element minOccurs="1" maxOccurs="unbounded" ref="PID.PATNT_ID_LST" /> <element minOccurs="0" maxOccurs="unbounded" ref="PID.ALT_PATNT_ID" /> <element minOccurs="1" maxOccurs="unbounded" ref="PID.PATNT_NAME" /> <element minOccurs="0" maxOccurs="unbounded" ref="PID.MTHR_MDN_NME" /> <element minOccurs="0" maxOccurs="1" ref="PID.DOB" /> <element minOccurs="0" maxOccurs="1" ref="PID.SEX" /> <element minOccurs="0" maxOccurs="unbounded" ref="PID.ALIAS" /> <element minOccurs="0" maxOccurs="unbounded" ref="PID.RACE" /> <element minOccurs="0" maxOccurs="unbounded" ref="PID.PATNT_ADDRSS" /> <element minOccurs="0" maxOccurs="1" ref="PID.COUNTY_CDE" /> <element minOccurs="0" maxOccurs="unbounded" ref="PID.PHNE_HME" /> <element minOccurs="0" maxOccurs="unbounded" ref="PID.PHNE_BUS" /> <element minOccurs="0" maxOccurs="1" ref="PID.PRMRY_LANG" /> <element minOccurs="0" maxOccurs="1" ref="PID.MRTL_STS" /> <element minOccurs="0" maxOccurs="1" ref="PID.RLGN” /> <element minOccurs="0" maxOccurs="1" ref="PID.PATNT_ACC_NM" /> <element minOccurs="0" maxOccurs="1" ref="PID.SSN_NM" /> <element minOccurs="0" maxOccurs="1" ref="PID.DRVR_LCNS_NM /> <element minOccurs="0" maxOccurs="unbounded" ref="PID.MTHR_ID" /> <element minOccurs="0" maxOccurs="unbounded" ref="PID.ETHNIC_GRP" /> <element minOccurs="0" maxOccurs="1" ref="PID.BRTH_PLC" /> <element minOccurs="0" maxOccurs="1" ref="PID.MLTPL_BRTH_IND" /> <element minOccurs="0" maxOccurs="1" ref="PID.BRTH_ORDR" /> <element minOccurs="0" maxOccurs="unbounded" ref="PID.CTZNSHP" /> <element minOccurs="0" maxOccurs="1" ref="PID.VTRNS_MIL_STS" /> <element minOccurs="0" maxOccurs="1" ref="PID.NTNLTY" /> <element minOccurs="0" maxOccurs="1" ref="PID.PATNT_DTH_DATETIME" /> <element minOccurs="0" maxOccurs="1" ref="PID.PATNT_DTH_IND" /> </sequence> </complexType></element>
iWay Adapter for HL7 for BEA WebLogic User’s Guide C-5

Message Definition Files
<!-- SEGMENT PD1 -->
<!-- Patient Additional Demographic segment -->
<element name="PD1"> <complexType> <sequence> <element minOccurs="0" maxOccurs="unbounded" ref="PD1.LVNG_DPNDCY" /> <element minOccurs="0" maxOccurs="1" ref="PD1.LVNG_ARRNGMNT" /> <element minOccurs="0" maxOccurs="unbounded" ref="PD1.PATNT_PRM_FAC" /> <element minOccurs="0" maxOccurs="unbounded" ref="PD1.PATNT_PRM_CARE_PRV" /> <element minOccurs="0" maxOccurs="1" ref="PD1.STDNT_IND" /> <element minOccurs="0" maxOccurs="1" ref="PD1.HANDICAP" /> <element minOccurs="0" maxOccurs="1" ref="PD1.LVNG_WILL" /> <element minOccurs="0" maxOccurs="1" ref="PD1.ORGN_DNR" /> <element minOccurs="0" maxOccurs="1" ref="PD1.SEPARATE_BILL" /> <element minOccurs="0" maxOccurs="unbounded" ref="PD1.DUP_PATNT" /> <element minOccurs="0" maxOccurs="1" ref="PD1.PBLCTY_CDE" /> <element minOccurs="0" maxOccurs="1" ref="PD1.PRTCTN_IND" /> </sequence> </complexType></element>
C-6 iWay Software

HL7 Document Index
<!-- SEGMENT NK1 -->
<!-- Next of kin / associated parties segment -->
<element name="NK1"> <complexType> <sequence> <element minOccurs="1" maxOccurs="1" ref="NK1.SET_ID" /> <element minOccurs="0" maxOccurs="unbounded" ref="NK1.NME" /> <element minOccurs="0" maxOccurs="1" ref="NK1.RLTNSHP" /> <element minOccurs="0" maxOccurs="unbounded" ref="NK1.ADDRSS" /> <element minOccurs="0" maxOccurs="unbounded" ref="NK1.PHNE_NM " /> <element minOccurs="0" maxOccurs="unbounded" ref="NK1.BUS_PHNE_NM" /> <element minOccurs="0" maxOccurs="1" ref="NK1.CNTCT_RLE" /> <element minOccurs="0" maxOccurs="1" ref="NK1.STRT_DTE" /> <element minOccurs="0" maxOccurs="1" ref="NK1.END_DTE" /> <element minOccurs="0" maxOccurs="1" ref="NK1.KIN_JOB_TITLE" /> <element minOccurs="0" maxOccurs="1" ref="NK1.KIN_JOB_CDE" /> <element minOccurs="0" maxOccurs="1" ref="NK1.KIN_EMP_NM" /> <element minOccurs="0" maxOccurs="unbounded" ref="NK1.ORG_NME" /> <element minOccurs="0" maxOccurs="1" ref="NK1.MRTL_STS" /> <element minOccurs="0" maxOccurs="1" ref="NK1.SEX" /> <element minOccurs="0" maxOccurs="1" ref="NK1.DOB" /> <element minOccurs="0" maxOccurs="unbounded" ref="NK1.LVNG_DPNDCY" /> <element minOccurs="0" maxOccurs="unbounded" ref="NK1.AMBLTRY_STS" /> <element minOccurs="0" maxOccurs="unbounded" ref="NK1.CTZNSHP" /> <element minOccurs="0" maxOccurs="1" ref="NK1.PRM_LANG" /> <element minOccurs="0" maxOccurs="1" ref="NK1.LVNG_ARNGMNT" /> <element minOccurs="0" maxOccurs="1" ref="NK1.PBLCTY_CDE" /> <element minOccurs="0" maxOccurs="1" ref="NK1.PRTCTN_IND" /> <element minOccurs="0" maxOccurs="1" ref="NK1.STDNT_IND" /> <element minOccurs="0" maxOccurs="1" ref="NK1.RLGN" /> <element minOccurs="0" maxOccurs="unbounded" ref="NK1.MOTH_MDN_NME" /> <element minOccurs="0" maxOccurs="1" ref="NK1.NTNLTY" /> <element minOccurs="0" maxOccurs="unbounded" ref="NK1.ETHNC_GRP" /> <element minOccurs="0" maxOccurs="unbounded" ref="NK1.CNTCT_RSN" /> <element minOccurs="0" maxOccurs="unbounded" ref="NK1.CNTCT_PRSN_NME" /> <element minOccurs="0" maxOccurs="unbounded" ref="NK1.CNTCT_PRSN_NUM" /> <element minOccurs="0" maxOccurs="unbounded" ref="NK1.CNTCT_PRSN_ADD" /> <element minOccurs="0" maxOccurs="unbounded" ref="NK1.KIN_ID" /> <element minOccurs="0" maxOccurs="1" ref="NK1.JOB_STS" /> <element minOccurs="0" maxOccurs="unbounded" ref="NK1.RACE" /> <element minOccurs="0" maxOccurs="1" ref="NK1.HANDICAP" /> <element minOccurs="0" maxOccurs="1" ref="NK1.CNTCT_PRSN_SSN" /> </sequence> </complexType></element>
iWay Adapter for HL7 for BEA WebLogic User’s Guide C-7

Message Definition Files
<!-- SEGMENT NTE -->
<!-- Notes and comments segment -->
<element name="NTE"> <complexType> <sequence> <element minOccurs="0" maxOccurs="1" ref="NTE.SET_ID" /> <element minOccurs="0" maxOccurs="1" ref="NTE.SRC" /> <element minOccurs="0" maxOccurs="unbounded" ref="NTE.CMNT" /> <element minOccurs="0" maxOccurs="1" ref="NTE.CMNT_TYP" /> </sequence> </complexType></element>
<!-- SEGMENT PV1 -->
<!-- Patient visit segment -->
<element name="PV1"> <complexType> <sequence> <element minOccurs="0" maxOccurs="1" ref="PV1.SET_ID" /> <element minOccurs="1" maxOccurs="1" ref="PV1.PATNT_CLSS" /> <element minOccurs="0" maxOccurs="1" ref="PV1.ASGND_PATNT_LCTN" /> <element minOccurs="0" maxOccurs="1" ref="PV1.ADMSN_TYP" /> <element minOccurs="0" maxOccurs="1" ref="PV1.PREADMT_NUM" /> <element minOccurs="0" maxOccurs="1" ref="PV1.PRIOR_PATNT_LOC" /> <element minOccurs="0" maxOccurs="unbounded" ref="PV1.ATNDNG_DCTR" /> <element minOccurs="0" maxOccurs="unbounded" ref="PV1.RFRNG_DCTR" /> <element minOccurs="0" maxOccurs="unbounded" ref="PV1.CNSLTNG_DCTR" /> <element minOccurs="0" maxOccurs="1" ref="PV1.HSPTL_SRVCE" /> <element minOccurs="0" maxOccurs="1" ref="PV1.TMP_LOC" /> <element minOccurs="0" maxOccurs="1" ref="PV1.PREADMIT_TST_IND" /> <element minOccurs="0" maxOccurs="1" ref="PV1.READMSSN_IND" /> <element minOccurs="0" maxOccurs="1" ref="PV1.ADMNT_SRC" /> <element minOccurs="0" maxOccurs="unbounded" ref="PV1.AMBLTRY_STS" /> <element minOccurs="0" maxOccurs="1" ref="PV1.VIP_IND" /> <element minOccurs="0" maxOccurs="unbounded" ref="PV1.ADMTTNG_DCTR" /> <element minOccurs="0" maxOccurs="1" ref="PV1.PATNT_TYP" /> <element minOccurs="0" maxOccurs="1" ref="PV1.VST_NUM" /> <element minOccurs="0" maxOccurs="unbounded" ref="PV1.FNCL_CLSS" /> <element minOccurs="0" maxOccurs="1" ref="PV1.CHRG_PRC_IND" /> <element minOccurs="0" maxOccurs="1" ref="PV1.CRTSY_CODE" /> <element minOccurs="0" maxOccurs="1" ref="PV1.CRDT_RTNG" /> <element minOccurs="0" maxOccurs="unbounded" ref="PV1.CNTRCT_CODE" /> <element minOccurs="0" maxOccurs="unbounded" ref="PV1.CNTRCT_EFFCTV_DTE" /> <element minOccurs="0" maxOccurs="unbounded" ref="PV1.CNTRCT_AMMNT" /> <element minOccurs="0" maxOccurs="unbounded" ref="PV1.CNTRCT_PRD" /> <element minOccurs="0" maxOccurs="1" ref="PV1.INTRST_CODE" /> <element minOccurs="0" maxOccurs="1" ref="PV1.TRNSFR_BAD_DEBT_CODE" />
C-8 iWay Software

HL7 Document Index
<element minOccurs="0" maxOccurs="1" ref="PV1.TRNSFR_BAD_DEBT_DTE" /> <element minOccurs="0" maxOccurs="1" ref="PV1.BAD_DEBT_AGNCY_CODE" /> <element minOccurs="0" maxOccurs="1" ref="PV1.BAD_DEBT_TRNSFR_AMNT" /> <element minOccurs="0" maxOccurs="1" ref="PV1.BAD_DEBT_RCVRY_AMNT" /> <element minOccurs="0" maxOccurs="1" ref="PV1.DLT_ACCNT_IND" /> <element minOccurs="0" maxOccurs="1" ref="PV1.DLT_ACCNT_DTE" /> <element minOccurs="0" maxOccurs="1" ref="PV1.DSCHRG_DSPSTN" /> <element minOccurs="0" maxOccurs="1" ref="PV1.DSCHRG_LOC" /> <element minOccurs="0" maxOccurs="1" ref="PV1.DIET_TYP" /> <element minOccurs="0" maxOccurs="1" ref="PV1.SRVCNG_FAC" /> <element minOccurs="0" maxOccurs="1" ref="PV1.BED_STS" /> <element minOccurs="0" maxOccurs="1" ref="PV1.ACCNT_STS" /> <element minOccurs="0" maxOccurs="1" ref="PV1.PNDNG_LOC" /> <element minOccurs="0" maxOccurs="1" ref="PV1.PRIOR_TMP_LOC" /> <element minOccurs="0" maxOccurs="1" ref="PV1.ADMT_DTE" /> <element minOccurs="0" maxOccurs="unbounded" ref="PV1.DSCHRG_DTE" /> <element minOccurs="0" maxOccurs="1" ref="PV1.CRRNT_PATNT_BLNC" /> <element minOccurs="0" maxOccurs="1" ref="PV1.TOT_CHRGS" /> <element minOccurs="0" maxOccurs="1" ref="PV1.TOT_ADJSMNTS" /> <element minOccurs="0" maxOccurs="1" ref="PV1.TOT_PYMNTS" /> <element minOccurs="0" maxOccurs="1" ref="PV1.ALTRNT_VST_ID" /> <element minOccurs="0" maxOccurs="1" ref="PV1.VST_IND" /> <element minOccurs="0" maxOccurs="unbounded" ref="PV1.OTHR_HLTHCR_PRVDR" /> </sequence> </complexType></element>
iWay Adapter for HL7 for BEA WebLogic User’s Guide C-9
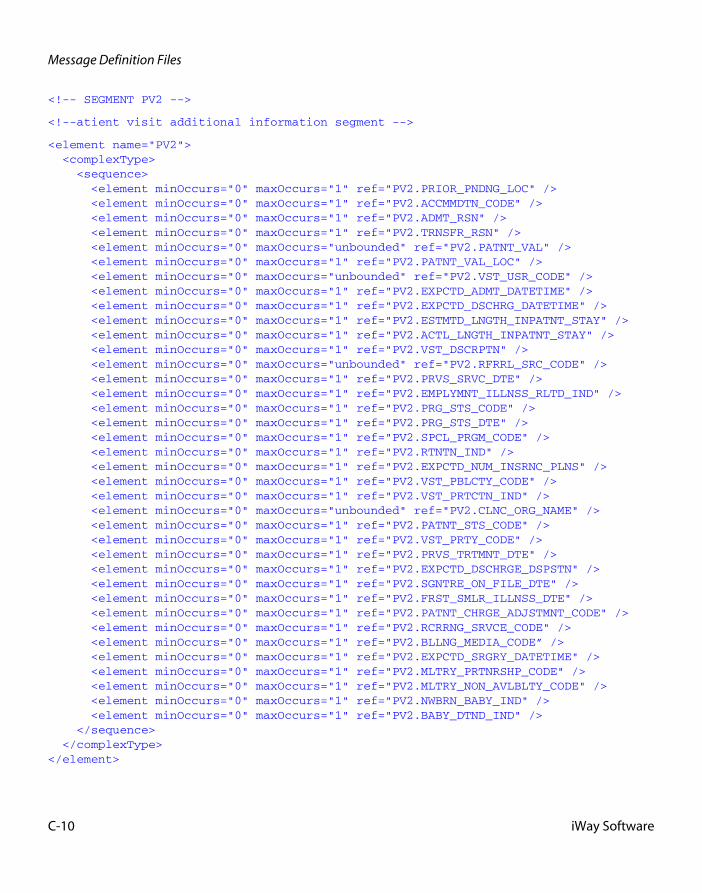
Message Definition Files
<!-- SEGMENT PV2 -->
<!--atient visit additional information segment -->
<element name="PV2"> <complexType> <sequence> <element minOccurs="0" maxOccurs="1" ref="PV2.PRIOR_PNDNG_LOC" /> <element minOccurs="0" maxOccurs="1" ref="PV2.ACCMMDTN_CODE" /> <element minOccurs="0" maxOccurs="1" ref="PV2.ADMT_RSN" /> <element minOccurs="0" maxOccurs="1" ref="PV2.TRNSFR_RSN" /> <element minOccurs="0" maxOccurs="unbounded" ref="PV2.PATNT_VAL" /> <element minOccurs="0" maxOccurs="1" ref="PV2.PATNT_VAL_LOC" /> <element minOccurs="0" maxOccurs="unbounded" ref="PV2.VST_USR_CODE" /> <element minOccurs="0" maxOccurs="1" ref="PV2.EXPCTD_ADMT_DATETIME" /> <element minOccurs="0" maxOccurs="1" ref="PV2.EXPCTD_DSCHRG_DATETIME" /> <element minOccurs="0" maxOccurs="1" ref="PV2.ESTMTD_LNGTH_INPATNT_STAY" /> <element minOccurs="0" maxOccurs="1" ref="PV2.ACTL_LNGTH_INPATNT_STAY" /> <element minOccurs="0" maxOccurs="1" ref="PV2.VST_DSCRPTN" /> <element minOccurs="0" maxOccurs="unbounded" ref="PV2.RFRRL_SRC_CODE" /> <element minOccurs="0" maxOccurs="1" ref="PV2.PRVS_SRVC_DTE" /> <element minOccurs="0" maxOccurs="1" ref="PV2.EMPLYMNT_ILLNSS_RLTD_IND" /> <element minOccurs="0" maxOccurs="1" ref="PV2.PRG_STS_CODE" /> <element minOccurs="0" maxOccurs="1" ref="PV2.PRG_STS_DTE" /> <element minOccurs="0" maxOccurs="1" ref="PV2.SPCL_PRGM_CODE" /> <element minOccurs="0" maxOccurs="1" ref="PV2.RTNTN_IND" /> <element minOccurs="0" maxOccurs="1" ref="PV2.EXPCTD_NUM_INSRNC_PLNS" /> <element minOccurs="0" maxOccurs="1" ref="PV2.VST_PBLCTY_CODE" /> <element minOccurs="0" maxOccurs="1" ref="PV2.VST_PRTCTN_IND" /> <element minOccurs="0" maxOccurs="unbounded" ref="PV2.CLNC_ORG_NAME" /> <element minOccurs="0" maxOccurs="1" ref="PV2.PATNT_STS_CODE" /> <element minOccurs="0" maxOccurs="1" ref="PV2.VST_PRTY_CODE" /> <element minOccurs="0" maxOccurs="1" ref="PV2.PRVS_TRTMNT_DTE" /> <element minOccurs="0" maxOccurs="1" ref="PV2.EXPCTD_DSCHRGE_DSPSTN" /> <element minOccurs="0" maxOccurs="1" ref="PV2.SGNTRE_ON_FILE_DTE" /> <element minOccurs="0" maxOccurs="1" ref="PV2.FRST_SMLR_ILLNSS_DTE" /> <element minOccurs="0" maxOccurs="1" ref="PV2.PATNT_CHRGE_ADJSTMNT_CODE" /> <element minOccurs="0" maxOccurs="1" ref="PV2.RCRRNG_SRVCE_CODE" /> <element minOccurs="0" maxOccurs="1" ref="PV2.BLLNG_MEDIA_CODE” /> <element minOccurs="0" maxOccurs="1" ref="PV2.EXPCTD_SRGRY_DATETIME" /> <element minOccurs="0" maxOccurs="1" ref="PV2.MLTRY_PRTNRSHP_CODE" /> <element minOccurs="0" maxOccurs="1" ref="PV2.MLTRY_NON_AVLBLTY_CODE" /> <element minOccurs="0" maxOccurs="1" ref="PV2.NWBRN_BABY_IND" /> <element minOccurs="0" maxOccurs="1" ref="PV2.BABY_DTND_IND" /> </sequence> </complexType></element>
C-10 iWay Software

HL7 Document Index
<!-- SEGMENT ORC -->
<!-- Common Order segment -->
<element name="ORC"> <complexType> <sequence> <element minOccurs="0" maxOccurs="1" ref="ORC.ORDR_CNTRL" /> <element minOccurs="0" maxOccurs="1" ref="ORC.PLCR_ORDR_NUM" /> <element minOccurs="0" maxOccurs="1" ref="ORC.FLLR_ORDR_NUM" /> <element minOccurs="0" maxOccurs="1" ref="ORC.PLCR_GRP_NUM" /> <element minOccurs="0" maxOccurs="1" ref="ORC.ORDR_STS" /> <element minOccurs="0" maxOccurs="1" ref="ORC.RSPNS_FLG" /> <element minOccurs="0" maxOccurs="1" ref="ORC.QNTY_TMNG" /> <element minOccurs="0" maxOccurs="1" ref="ORC.PARENT" /> <element minOccurs="0" maxOccurs="1" ref="ORC.XN_DATETIME" /> <element minOccurs="0" maxOccurs="unbounded" ref="ORC.ENTRD_BY" /> <element minOccurs="0" maxOccurs="unbounded" ref="ORC.VRFD_BY" /> <element minOccurs="0" maxOccurs="unbounded" ref="ORC.ORDRNG_PRVDR" /> <element minOccurs="0" maxOccurs="1" ref="ORC.ENTRS_LOC" /> <element minOccurs="0" maxOccurs="unbounded" ref="ORC.14" /> <element minOccurs="0" maxOccurs="1" ref="ORC.CLL_BCK_PHNE_NUM" /> <element minOccurs="0" maxOccurs="1" ref="ORC.ORDR_EFF_DATETIME" /> <element minOccurs="0" maxOccurs="1" ref="ORC.ORDR_CNTRL_CODE_RSN" /> <element minOccurs="0" maxOccurs="1" ref="ORC.ENTRNG_ORG” /> <element minOccurs="0" maxOccurs="unbounded" ref="ORC.ENTRNG_DVCE" /> <element minOccurs="0" maxOccurs="1" ref="ORC.ADNVCD_BNFCRY_NTCE_CODE" /> </sequence> </complexType></element>
iWay Adapter for HL7 for BEA WebLogic User’s Guide C-11

Message Definition Files
<!-- SEGMENT OBR --><!-- Observation request segment -->
<element name="OBR">
<complexType> <sequence> <element minOccurs="0" maxOccurs="1" ref="OBR.SET_ID" /> <element minOccurs="0" maxOccurs="1" ref="OBR.PLCR_ORDR_NUM" /> <element minOccurs="0" maxOccurs="1" ref="OBR.FLLR_ORDR_NUM" /> <element minOccurs="1" maxOccurs="1" ref="OBR.UNVRSL_SRVCE_ID" /> <element minOccurs="0" maxOccurs="1" ref="OBR.PRIORITY" /> <element minOccurs="0" maxOccurs="1" ref="OBR.RQSTD_DATETIME" /> <element minOccurs="0" maxOccurs="1" ref="OBR.OBSRVTN_DATETIME" /> <element minOccurs="0" maxOccurs="1" ref="OBR.OBSRVTN_END_DATETIME" /> <element minOccurs="0" maxOccurs="1" ref="OBR.CLLCTN_VLME" /> <element minOccurs="0" maxOccurs="unbounded" ref="OBR.CLLCTN_ID" /> <element minOccurs="0" maxOccurs="1" ref="OBR.SPCMN_ACTN_CODE" /> <element minOccurs="0" maxOccurs="1" ref="OBR.DNGR_CODE" /> <element minOccurs="0" maxOccurs="1" ref="OBR.RLVNT_CLNCL_INF" /> <element minOccurs="0" maxOccurs="1" ref="OBR.SPCMEN_RCVD_DATETIME" /> <element minOccurs="0" maxOccurs="1" ref="OBR.SPCMEN_SRC" /> <element minOccurs="0" maxOccurs="unbounded" ref=" OBR.ORDRNG_PRVDR " /> <element minOccurs="0" maxOccurs="unbounded" ref="OBR.ORDR_CLLBCK_PHNE_NUM" /> <element minOccurs="0" maxOccurs="1" ref="OBR.PLCR_FLD_1" /> <element minOccurs="0" maxOccurs="1" ref="OBR.PLCR_FLD_2" /> <element minOccurs="0" maxOccurs="1" ref="OBR.FLLR_FLD_1" /> <element minOccurs="0" maxOccurs="1" ref="OBR.FLLR_FLD_2" /> <element minOccurs="0" maxOccurs="1" ref="OBR.RPRT_DATETIME" /> <element minOccurs="0" maxOccurs="1" ref="OBR.CHRG_TO_PRCTCE" /> <element minOccurs="0" maxOccurs="1" ref="OBR.DGNSTC_SRV_SCT_ID" /> <element minOccurs="0" maxOccurs="1" ref="OBR.RSLT_STS" /> <element minOccurs="0" maxOccurs="1" ref="OBR.PRNT_RSLT" /> <element minOccurs="0" maxOccurs="unbounded" ref="OBR.QNTY_TMNG" /> <element minOccurs="0" maxOccurs="unbounded" ref="OBR.RSLT_COPIES_TO" /> <element minOccurs="0" maxOccurs="1" ref="OBR.PRNT" /> <element minOccurs="0" maxOccurs="1" ref="OBR.TRNSPRTN_MDE" /> <element minOccurs="0" maxOccurs="unbounded" ref="OBR.RSN_FOR_STDY" /> <element minOccurs="0" maxOccurs="1" ref="OBR.PRNCPL_RSLT_INTRPRTR" /> <element minOccurs="0" maxOccurs="unbounded" ref="OBR.ASSTNT_RSLT_INTRPRTR" /> <element minOccurs="0" maxOccurs="unbounded" ref="OBR.TCHNCN" /> <element minOccurs="0" maxOccurs="unbounded" ref="OBR.TRNSCRPTNST" /> <element minOccurs="0" maxOccurs="1" ref="OBR.SCHDLD_DATETIME" /> <element minOccurs="0" maxOccurs="1" ref="OBR.NUM_SMPL_CNTNRS" /> <element minOccurs="0" maxOccurs="unbounded" ref="OBR.TRNSPRT_LGSTCS" /> <element minOccurs="0" maxOccurs="unbounded" ref="OBR.CLLCTRS_CMMNT" /> <element minOccurs="0" maxOccurs="1" ref="OBR.TRNSPRT_ARRNGMNT_RSPNSBLTY" /> <element minOccurs="0" maxOccurs="1" ref="OBR.TRNSPRT_ARRNGD" /> <element minOccurs="0" maxOccurs="1" ref="OBR.ESCRT_RQRD" /> <element minOccurs="0" maxOccurs="unbounded" ref="OBR.PLNND_PATNT_TRNSPRT_CMMNT" /> </sequence> </complexType></element>
C-12 iWay Software

HL7 Document Index
<!-- SEGMENT OBX -->
<!-- Observation/result segment -->
<element name="OBX"> <complexType> <sequence> <element minOccurs="0" maxOccurs="1" ref="OBX.SET_ID" /> <element minOccurs="1" maxOccurs="1" ref="OBX.VALUE_TYP" /> <element minOccurs="1" maxOccurs="1" ref="OBX.OBSRVTN_ID" /> <element minOccurs="0" maxOccurs="1" ref="OBX.OBSRVTN_SUB_ID" /> <element minOccurs="1" maxOccurs="1" ref="OBX.OBSRVTN_VALUE" /> <element minOccurs="0" maxOccurs="1" ref="OBX.UNITS" /> <element minOccurs="0" maxOccurs="1" ref="OBX.RFRNCS_RNG" /> <element minOccurs="0" maxOccurs="1" ref="OBX.ABNRML_FLGS" /> <element minOccurs="0" maxOccurs="unbounded" ref="OBX.PRBLTY" /> <element minOccurs="0" maxOccurs="1" ref="OBX.NATURE_OF_ABNRML_TST" /> <element minOccurs="1" maxOccurs="1" ref="OBX.OBSRV_RSLT_STS" /> <element minOccurs="0" maxOccurs="1" ref="OBX.DATE_LST_OBS_NRML_VAL" /> <element minOccurs="0" maxOccurs="1" ref="OBX.USR_DFND_ACCSS_CHKS" /> <element minOccurs="0" maxOccurs="1" ref="OBX.OBSV_DATETIME" /> <element minOccurs="0" maxOccurs="1" ref="OBX.PRDCERS_ID" /> <element minOccurs="0" maxOccurs="1" ref="OBX.RSPNSBLE_OBSRVR" /> <element minOccurs="0" maxOccurs="unbounded" ref="OBX.OBSRVTN_MTHD" /> </sequence> </complexType></element>
<!-- SEGMENT CTI -->
<element name="CTI"> <complexType> <sequence> <element minOccurs="1" maxOccurs="1" ref="CTI.SPNSR_STDY_ID" /> <element minOccurs="0" maxOccurs="1" ref="CTI.STDY_PHSE_ID" /> <element minOccurs="0" maxOccurs="1" ref="CTI.STDY_SCHDLD_TIME_PNT" /> </sequence> </complexType></element>
<!-- SEGMENT DSC -->
<element name="DSC"> <complexType> <sequence> <element minOccurs="0" maxOccurs="1" ref="DSC.CNTNTN_PNTR" /> </sequence> </complexType></element>
</schema>
iWay Adapter for HL7 for BEA WebLogic User’s Guide C-13

Field Definitions
Field DefinitionsThe field definitions file, FIELDS.xsd, defines field definitions. The field definition includes a long name (descriptive definition) and a reference to the data type. For more information about the data type definition, see Data Type Definitions on page C-30.
<?xml version="1.0" encoding="ISO-8859-1"?>
<schema>
<ACC_DATE_TIME longName="Date Time" type="TS"/> <ACC_CODE longName="Code" type="CE"/> <ACC_LOCATION longName="Location Time" type="ST"/> <ACC_AUTO_STATE longName="State Auto Accident occured in" type="CE"/> <ACC_JOB_IND longName="Job Accident Indicator" type="ID"/> <ACC_DEATH_IND longName="Death Indicator" type="ID"/> <AL1_ID longName="ID" type="SI"/> <AL1_ALLERGEN_TYPE longName="Allergen Type Code" type="IS"/> <AL1_ALLERGEN_DESC longName="Allergen Code Description" type="CE"/> <AL1_ALLERGY_SEVERITY longName="Allergy severity code" type="IS"/> <AL1_ALLERGY_REACTION longName="Allergy Reacation code" type="ST"/> <AL1_ID_DATE longName="Identification Date" type="DT"/>
<DB1_ID longName="ID" type="SI"/> <DB1_PERSON_CODE longName="Disabled Person Code" type="IS"/> <DB1_PERSON_ID longName="Disabled Person Identifier" type="CX"/> <DB1_INDICATOR longName="Disability Indicator" type="ID"/> <DB1_START_DATE longName="Disability Start Date" type="DT"/> <DB1_END_DATE longName="Disability End Date" type="DT"/> <DB1_RETURN_WORK longName="Disability Return to Work Date" type="DT"/> <DB1_UNABLE_WORK longName="Disability Unable to Work Date" type="DT"/>
C-14 iWay Software
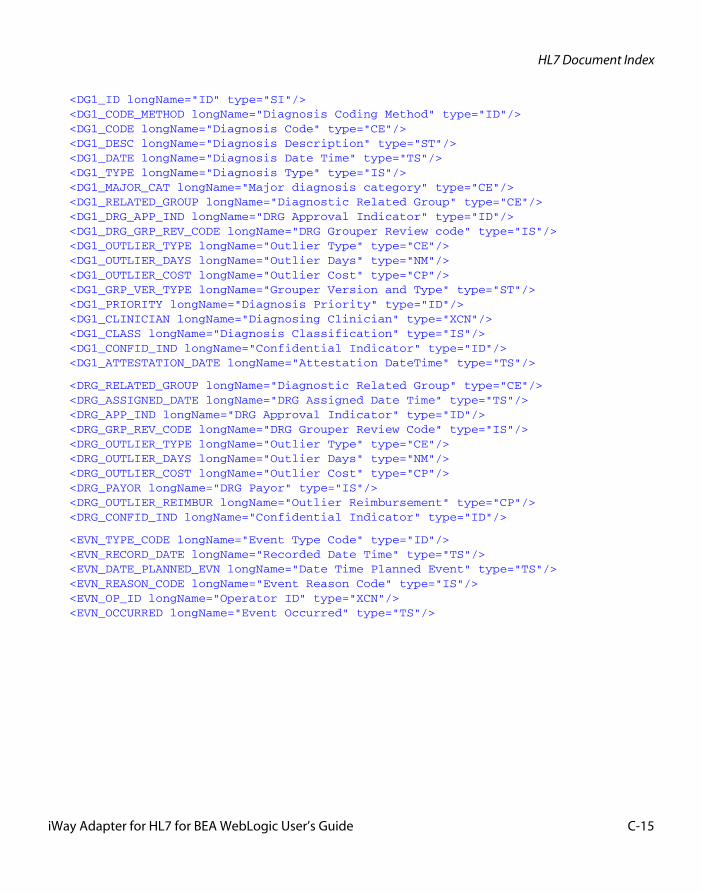
HL7 Document Index
<DG1_ID longName="ID" type="SI"/> <DG1_CODE_METHOD longName="Diagnosis Coding Method" type="ID"/> <DG1_CODE longName="Diagnosis Code" type="CE"/> <DG1_DESC longName="Diagnosis Description" type="ST"/> <DG1_DATE longName="Diagnosis Date Time" type="TS"/> <DG1_TYPE longName="Diagnosis Type" type="IS"/> <DG1_MAJOR_CAT longName="Major diagnosis category" type="CE"/> <DG1_RELATED_GROUP longName="Diagnostic Related Group" type="CE"/> <DG1_DRG_APP_IND longName="DRG Approval Indicator" type="ID"/> <DG1_DRG_GRP_REV_CODE longName="DRG Grouper Review code" type="IS"/> <DG1_OUTLIER_TYPE longName="Outlier Type" type="CE"/> <DG1_OUTLIER_DAYS longName="Outlier Days" type="NM"/> <DG1_OUTLIER_COST longName="Outlier Cost" type="CP"/> <DG1_GRP_VER_TYPE longName="Grouper Version and Type" type="ST"/> <DG1_PRIORITY longName="Diagnosis Priority" type="ID"/> <DG1_CLINICIAN longName="Diagnosing Clinician" type="XCN"/> <DG1_CLASS longName="Diagnosis Classification" type="IS"/> <DG1_CONFID_IND longName="Confidential Indicator" type="ID"/> <DG1_ATTESTATION_DATE longName="Attestation DateTime" type="TS"/>
<DRG_RELATED_GROUP longName="Diagnostic Related Group" type="CE"/> <DRG_ASSIGNED_DATE longName="DRG Assigned Date Time" type="TS"/> <DRG_APP_IND longName="DRG Approval Indicator" type="ID"/> <DRG_GRP_REV_CODE longName="DRG Grouper Review Code" type="IS"/> <DRG_OUTLIER_TYPE longName="Outlier Type" type="CE"/> <DRG_OUTLIER_DAYS longName="Outlier Days" type="NM"/> <DRG_OUTLIER_COST longName="Outlier Cost" type="CP"/> <DRG_PAYOR longName="DRG Payor" type="IS"/> <DRG_OUTLIER_REIMBUR longName="Outlier Reimbursement" type="CP"/> <DRG_CONFID_IND longName="Confidential Indicator" type="ID"/>
<EVN_TYPE_CODE longName="Event Type Code" type="ID"/> <EVN_RECORD_DATE longName="Recorded Date Time" type="TS"/> <EVN_DATE_PLANNED_EVN longName="Date Time Planned Event" type="TS"/> <EVN_REASON_CODE longName="Event Reason Code" type="IS"/> <EVN_OP_ID longName="Operator ID" type="XCN"/> <EVN_OCCURRED longName="Event Occurred" type="TS"/>
iWay Adapter for HL7 for BEA WebLogic User’s Guide C-15

Field Definitions
<GT1_ID longName="ID" type="SI"/> <GT1_NUMBER longName="Guarantor Number" type="CX"/> <GT1_NAME longName="Guarantor Name" type="XPN"/> <GT1_SPOUSE_NAME longName="Guarantor Spouse Name" type="XPN"/> <GT1_ADDRESS longName="Guarantor Address" type="XAD"/> <GT1_PHONE_HOME longName="Guarantor Phone number Home" type="XTN"/> <GT1_PHONE_BUSINESS longName="Guarantor Phone number business" type="XTN"/> <GT1_DOB longName="Guarantor Date Time of Birth" type="TS"/> <GT1_ADMIN_SEX longName="Guarantor Administrative sex" type="IS"/> <GT1_TYPE longName="Guarantor type" type="IS"/> <GT1_RELATIONSHIP longName="Guarantor relationship" type="CE"/> <GT1_SSN longName="Guarantor SSN" type="ST"/> <GT1_DATE_BEGIN longName="Guarantor Date Begin" type="DT"/> <GT1_DATE_END longName="Guarantor Date End" type="DT"/> <GT1_PRIORITY longName="Guarantor Priority" type="NM"/> <GT1_EMPLOYER_NAME longName="Guarantor Employer Name" type="XPN"/> <GT1_EMPLOYER_ADD longName="Guarantor Employer Address" type="XAD"/> <GT1_EMPLOYER_PHONE longName="Guarantor Employer Phone" type="XTN"/> <GT1_EMPLOYEE_ID longName="Guarantor Employee ID" type="CX"/> <GT1_EMPLOYMENT_STATUS longName="Guarantor Employment Status" type="IS"/> <GT1_ORG_NAME longName="Guarantor Organization Name" type="XON"/> <GT1_BILL_HOLD_FLG longName="Guarantor Billing Hold Flag" type="ID"/> <GT1_CREDIT_RATING longName="Guarantor Credit Rating Code" type="CE"/> <GT1_DEATH_DATE longName="Guarantor Death Date and Time" type="TS"/> <GT1_DEATH_FLG longName="Guarantor Death Flag" type="ID"/> <GT1_CHARGE_ADJ longName="Guarantor Charge Adjustment Code" type="CE"/> <GT1_HOUSEHOLD_INCOME longName="Guarantor Houshold annual income" type="CP"/> <GT1_HOUSEHOLD_SIZE longName="Guarantor Household size" type="NM"/> <GT1_EMPLOYER_ID longName="Guarantor Employer ID Number" type="CX"/> <GT1_MARITAL_STATUS longName="Guarantor Maritial Status code" type="CE"/> <GT1_HIRE_EFF_DATE longName="Guarantor Hire Effective Date" type="DT"/> <GT1_EMPLOY_STOP_DATE longName="Employment Stop Date" type="DT"/> <GT1_LIVING_DEPEND longName="Living Dependency" type="IS"/> <GT1_AMBULATORY_STAT longName="Ambulatory Status" type="IS"/> <GT1_CITIZEN longName="Citzenship" type="CE"/> <GT1_PRIMARY_LANG longName="Primary Language" type="CE"/> <GT1_LIVING_ARRANG longName="Living Arrangement" type="IS"/> <GT1_PUB_CODE longName="Publicity Code" type="CE"/> <GT1_PROTECT_IND longName="Protection Indicator" type="ID"/> <GT1_STUDENT_IND longName="Student Indicator" type="IS"/> <GT1_RELIGION longName="Religion" type="CE"/> <GT1_MOTHER_MAIDEN_NAME longName="Mother Maiden Name" type="XPN"/> <GT1_NATIONALITY longName="Nationality" type="CE"/> <GT1_ETHNIC_GROUP longName="Ethnic Group" type="CE"/> <GT1_CONTACT_NAME longName="Contact Persons Name" type="XPN"/> <GT1_CONTACT_PHONE longName="Contact Persons Phone number" type="XTN"/> <GT1_CONTACT_REASON longName="Contact Reason" type="CE"/> <GT1_CONTACT_RELATION longName="Contact relationship" type="IS"/>
C-16 iWay Software

HL7 Document Index
<GT1_JOB_TITLE longName="Job title" type="ST"/> <GT1_JOB_CODE longName="Job code" type="JCC"/> <GT1_EMP_ORG_NAME longName="Guarantor Employers Organization Name" type="XON"/> <GT1_HANDICAP longName="Handicap" type="IS"/> <GT1_JOB_STATUS longName="Job Status" type="IS"/> <GT1_FIN_CLASS longName="Guarantor Financial Class" type="FC"/> <GT1_RACE longName="Guarantor Race" type="CE"/>
<IN1_ID longName="ID" type="SI"/> <IN1_PLAN_ID longName="Insurance Plan ID" type="CE"/> <IN1_COMPANY_ID longName="Insurance Company ID" type="CX"/> <IN1_COMPANY_NAME longName="Insurance Company Name" type="XON"/> <IN1_COMPANY_ADD longName="Insurance Company Address" type="XAD"/> <IN1_COMPANY_CONTACT longName="Insurance Company Contact" type="XPN"/> <IN1_COMPANY_CONTACT_TEL longName="Insurance Company Tel No" type="XTN"/> <IN1_GROUP_NUMBER longName="Group Number" type="ST"/> <IN1_GROUP_NAME longName="Group Name" type="XON"/> <IN1_GROUP_EMP_ID longName="Insured Group Emp Id" type="CX"/> <IN1_GROUP_EMP_NAME longName="Insured Group Emp Name" type="XON"/> <IN1_PLAN_EFF_DATE longName="Plan Effective Date" type="DT"/> <IN1_PLAN_EXP_DATE longName="Plan Expiration Date" type="DT"/> <IN1_AUTH_INFO longName="Authorization Information" type="CM_AI"/> <IN1_PLAN_TYPE longName="Plan Type" type="IS"/>
<IN1_NAME_INSURED longName="Name of Insured" type="XPN"/> <IN1_INSURED_RELATION longName="Insured relationship to Patient" type="CE"/> <IN1_INSURED_DOB longName="Insured Date Of Birth" type="TS"/> <IN1_INSURED_ADD longName="Insured Address" type="XAD"/> <IN1_ASSIGN_BENEFIT longName="Assignment of Benefits" type="IS"/> <IN1_COORD_BENEFIT longName="Coordination of Benefits" type="IS"/> <IN1_COORD_BENEFIT_PRIOR longName="Coord of Benefits priority" type="ST"/> <IN1_NOTICE_ADMIS_FLG longName="Notice of Admission Flag" type="ID"/> <IN1_NOTICE_ADMIS_DATE longName="Notice of Admission Date" type="DT"/> <IN1_REP_ELIG_FLG longName="Report of Eligibility Flag" type="ID"/> <IN1_REP_ELIG_DATE longName="Report of Eligibility Date" type="DT"/> <IN1_RELEASE_INFO_CODE longName="Release Information Code" type="IS"/> <IN1_PREADMIT_CERT longName="PreAdmit Certificate" type="ST"/> <IN1_VERIFICATION_DATE longName="Verification Date Time" type="TS"/> <IN1_VERIFICATION_BY longName="Verificaiton By" type="XCN"/> <IN1_TYPE_AGREE_CODE longName="Type of Agreement code" type="IS"/> <IN1_BILLING_STATUS longName="Billing Status" type="IS"/>
iWay Adapter for HL7 for BEA WebLogic User’s Guide C-17

Field Definitions
<IN1_LIFETIME_RESERVE_DAYS longName="Lifetime Reserve Days" type="NM"/> <IN1_DELAY_BEFORE_LR_DAY longName="Delay Before LR Days" type="NM"/> <IN1_COMPANY_PLAN_CODE longName="Company Plan Code" type="IS"/> <IN1_POLICY_NUMBER longName="Policy Number" type="ST"/> <IN1_POLICY_DEDUCT longName="Policy Deductible" type="CP"/> <IN1_POLICY_LIMIT_AMT longName="Policy Limit Amount" type="CP"/> <IN1_POLICY_LIMIT_DAYS longName="Policy Limit Days" type="NM"/> <IN1_ROOM_RATE_SEMI_PRIV longName="Room Rate Semi private" type="CP"/> <IN1_ROOM_RATE_PRIV longName="Room Rate private" type="CP"/> <IN1_INSURED_EMPLOY_STAT longName="Insured Employment Status" type="CE"/> <IN1_INSURED_ADMIN_SEX longName="Insured Administrative Sex" type="IS"/> <IN1_INSURED_EMPLOYER_ADD longName="Insured Employers Address" type="XAD"/> <IN1_VERIFICATION_STAT longName="Verification Status" type="ST"/> <IN1_PRIOR_INS_PLAN longName="Prior Insurance Plan ID" type="IS"/> <IN1_COVER_TYPE longName="Coverage Type" type="IS"/> <IN1_HANDICAP longName="Handicap" type="IS"/> <IN1_INSURED_ID longName="Insured ID Number" type="CX"/>
<IN2_EMPLOYEE_ID longName="Insureds Employee ID" type="CX"/> <IN2_SSN longName="Insureds Social Security Number" type="ST"/> <IN2_EMPLOYER_NAME longName="Insureds Employers Name and ID" type="XCN"/> <IN2_EMPLOYER_INFO longName="Employer Information Data" type="IS"/> <IN2_MAIL_CLAIM_PARTY longName="Mail Claim Party" type="IS"/> <IN2_MEDICARE_CARD_NO longName="Medicare Health Ins Card Number" type="ST"/> <IN2_MEDICAID_CASE_NAME longName="Medicaid Case Name" type="XPN"/> <IN2_MEDICAID_CASE_NUMBER longName="Medicaid Case Number" type="ST"/> <IN2_MILITARY_SPONSOR longName="Military Sponsor Name" type="XPN"/> <IN2_MILITARY_ID longName="Military ID Number" type="ST"/> <IN2_DEP_MILITARY_RECIPIENT longName="Dependent Of Military Recipient" type="CE"/>
C-18 iWay Software

HL7 Document Index
<IN2_MILITARY_ORG longName="Military Organization" type="ST"/> <IN2_MILITARY_STATION longName="Military Station" type="ST"/> <IN2_MILITARY_SERVICE longName="Military Service" type="IS"/> <IN2_MILITARY_RANK longName="Military Rank" type="IS"/> <IN2_MILITARY_STATUS longName="Military Status" type="IS"/> <IN2_MILITARY_RETIRE_DATE longName="Military Retire Date" type="DT"/> <IN2_MILITARY_NON_AVAIL_COF longName="Military Non-Avail Cert On File" type="ID"/> <IN2_BABY_COVERAGE longName="Baby Coverage" type="ID"/> <IN2_COMBINE_BABY_BILL longName="Combine Baby Bill" type="ID"/> <IN2_BLOOD_DEUCT longName="Blood Deductible" type="ST"/> <IN2_SPEC_COVER_APP_NAME longName="Special Coverage Approval Name" type="XPN"/> <IN2_SPEC_COVER_APP_TITLE longName="Special Coverage Approval Title" type="ST"/> <IN2_NON_COVER_INS_CODE longName="Non-Covered Insurance Code" type="IS"/> <IN2_PAYOR_ID longName="Payor ID" type="CX"/> <IN2_PAYOR_SUBSCRIBE_ID longName="Payor Subscriber ID" type="CX"/> <IN2_ELIG_SOURCE longName="Eligibility Source" type="IS"/> <IN2_ROOM_COVER_TYPE longName="Room Coverage Type Amount" type="CM_RMC"/> <IN2_POLICY_TYPE longName="Policy Type Amount" type="CM_PTA"/> <IN2_DAILY_DEDUCT longName="Daily Deductible" type="CM_DDI"/> <IN2_LIVING_DEPEND longName="Living Dependency" type="IS"/> <IN2_AMBULATORY_STATUS longName="Ambulatory Status" type="IS"/> <IN2_CITIZEN longName="Citizenship" type="CE"/> <IN2_PRIMARY_LANG longName="Primary Language" type="CE"/> <IN2_LIVING_ARRANG longName="Living Arrangement" type="IS"/> <IN2_PUB_CODE longName="Publicity Code" type="CE"/> <IN2_PROTECT_IND longName="Protection Indicator" type="ID"/> <IN2_STUDENT_IND longName="Student Indicator" type="IS"/> <IN2_RELIGION longName="Religion" type="CE"/> <IN2_MOTHER_MAIDEN_NAME longName="Mothers Maiden Name" type="XPN"/> <IN2_NATIONALITY longName="Nationality" type="CE"/> <IN2_ETHNIC_GROUP longName="Ethnic Group" type="CE"/> <IN2_MARITAL_STATUS longName="Marital Status" type="CE"/> <IN2_EMPLOY_START_DATE longName="Insureds Employment Start Date" type="DT"/> <IN2_EMPLOY_STOP_DATE longName="Employment Stop Date" type="DT"/> <IN2_JOB_TITLE longName="Job Title" type="ST"/> <IN2_JOB_CODE longName="Job Code Class" type="JCC"/> <IN2_JOB_STATUS longName="Job Status" type="IS"/> <IN2_EMPLOYER_CONTACT_NAME longName="Employer Contact Person Name" type="XPN"/> <IN2_EMPLOYER_CONTACT_TEL longName="Employer Contact Person Phone Number" type="XTN"/> <IN2_EMPLOYER_CONTACT_REASON longName="Employer Contact Reason" type="IS"/> <IN2_INSURED_CONTACT_NAME longName="Insureds Contact Persons Name" type="XPN"/> <IN2_INSURED_CONTACT_TEL longName="Insureds Contact Person Phone Number" type="XTN"/> <IN2_INSURED_CONTACT_REASON longName="Insureds Contact Person Reason" type="IS"/> <IN2_RELATION_START_DATE longName="Relationship To The Patient Start Date" type="DT"/>
iWay Adapter for HL7 for BEA WebLogic User’s Guide C-19

Field Definitions
<IN2_RELATION_STOP_DATE longName="Relationship To The Patient Stop Date" type="DT"/> <IN2_INS_CONTACT_REASON longName="Insurance Co. Contact Reason" type="IS"/> <IN2_INS_CONTACT_TEL longName="Insurance Co Contact Phone Number" type="XTN"/> <IN2_POLICY_SCOPE longName="Policy Scope" type="IS"/> <IN2_POLICY_SOURCE longName="Policy Source" type="IS"/> <IN2_PATIENT_MEMBER_NO longName="Patient Member Number" type="CX"/> <IN2_GUARANTOR_RELATION longName="Guarantors Relationship To Insured" type="CE"/> <IN2_INSURED_TEL longName="Insureds Phone Number - Home" type="XTN"/> <IN2_INSURED_EMPLOYER_TEL longName="Insureds Employer Phone Number" type="XTN"/> <IN2_MILITARY_HANDICAP_PROG longName="Military Handicapped Program" type="CE"/> <IN2_SUSPEND_FLG longName="Suspend Flag" type="ID"/> <IN2_COPAY_LIMIT_FLG longName="Copay Limit Flag" type="ID"/> <IN2_STOPLOSS_LIMIT_FLG longName="Stoploss Limit Flag" type="ID"/> <IN2_INSURED_ORG_NAME longName="Insured Organization Name And ID" type="XON"/> <IN2_INSURED_EMPLOYER_ORG longName="Insured Employer Organization Name And ID" type="XON"/> <IN2_RACE longName="Race" type="CE"/> <IN2_HCFA_RELATION longName="HCFA Patients Relationship to Insured" type="CE"/>
<IN3_ID longName="Set ID - IN3" type="SI"/> <IN3_CERT_NO longName="Certification Number" type="CX"/> <IN3_CERT_BY longName="Certified By" type="XCN"/> <IN3_CERT_REQ longName="Certification Required" type="ID"/> <IN3_PENALTY longName="Penalty" type="CM_PEN"/> <IN3_CERT_DATE longName="Certification Date/Time" type="TS"/> <IN3_CERT_MOD_DATE longName="Certification Modify Date/Time" type="TS"/> <IN3_OPERATOR longName="Operator" type="XCN"/> <IN3_CERT_BEGIN_DATE longName="Certification Begin Date" type="DT"/> <IN3_CERT_END_DATE longName="Certification End Date" type="DT"/> <IN3_DAYS longName="Days" type="CM_DTN"/> <IN3_NONCONCUR_CODE longName="Non-Concur Code/Description" type="CE"/> <IN3_NONCONCUR_EFF_DATE longName="Non-Concur Effective Date/Time" type="TS"/> <IN3_PHYS_REV longName="Physician Reviewer" type="XCN"/> <IN3_CERT_CONTACT longName="Certification Contact" type="ST"/> <IN3_CERT_CONTACT_TEL longName="Certification Contact Phone Number" type="XTN"/> <IN3_APPEAL_REASON longName="Appeal Reason" type="CE"/> <IN3_CERT_AGENCY longName="Certification Agency" type="CE"/> <IN3_CERT_AGENCY_TEL longName="Certification Agency Phone Number" type="XTN"/> <IN3_PRECERT_REQ_WIN longName="Pre-Certification Req/Window" type="CM_PCF"/> <IN3_CASE_MANAGER longName="Case Manager" type="ST"/> <IN3_SEC_OPN_DATE longName="Second Opinion Date" type="DT"/> <IN3_SEC_OPN_STATUS longName="Second Opinion Status" type="IS"/> <IN3_SEC_OPN_DOC_RX longName="Second Opinion Documentation Received" type="IS"/> <IN3_SEC_OPN_PHYS longName="Second Opinion Physician" type="XCN"/>
C-20 iWay Software
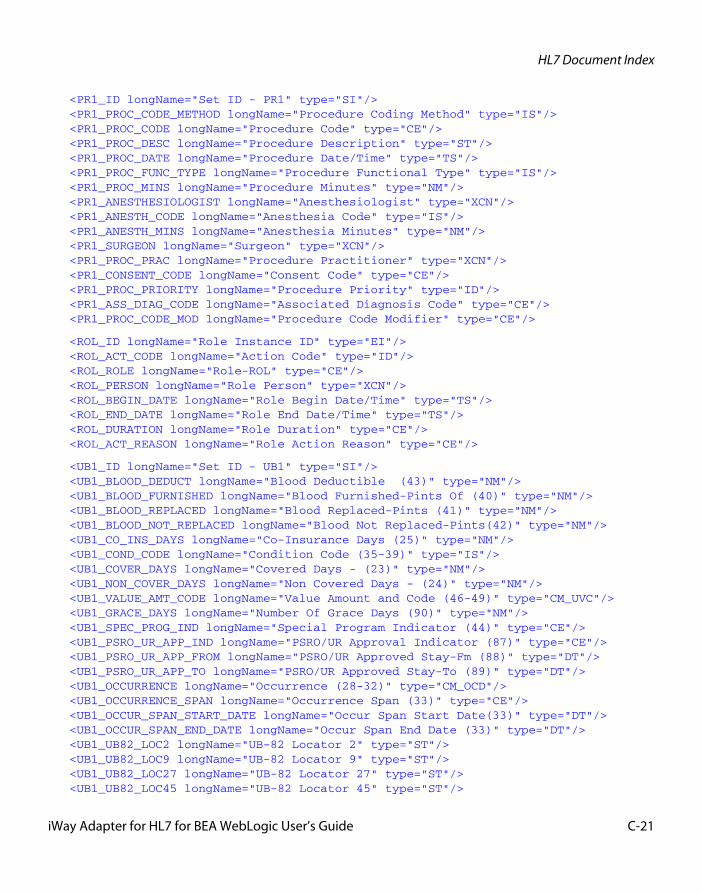
HL7 Document Index
<PR1_ID longName="Set ID - PR1" type="SI"/> <PR1_PROC_CODE_METHOD longName="Procedure Coding Method" type="IS"/> <PR1_PROC_CODE longName="Procedure Code" type="CE"/> <PR1_PROC_DESC longName="Procedure Description" type="ST"/> <PR1_PROC_DATE longName="Procedure Date/Time" type="TS"/> <PR1_PROC_FUNC_TYPE longName="Procedure Functional Type" type="IS"/> <PR1_PROC_MINS longName="Procedure Minutes" type="NM"/> <PR1_ANESTHESIOLOGIST longName="Anesthesiologist" type="XCN"/> <PR1_ANESTH_CODE longName="Anesthesia Code" type="IS"/> <PR1_ANESTH_MINS longName="Anesthesia Minutes" type="NM"/> <PR1_SURGEON longName="Surgeon" type="XCN"/> <PR1_PROC_PRAC longName="Procedure Practitioner" type="XCN"/> <PR1_CONSENT_CODE longName="Consent Code" type="CE"/> <PR1_PROC_PRIORITY longName="Procedure Priority" type="ID"/> <PR1_ASS_DIAG_CODE longName="Associated Diagnosis Code" type="CE"/> <PR1_PROC_CODE_MOD longName="Procedure Code Modifier" type="CE"/>
<ROL_ID longName="Role Instance ID" type="EI"/> <ROL_ACT_CODE longName="Action Code" type="ID"/> <ROL_ROLE longName="Role-ROL" type="CE"/> <ROL_PERSON longName="Role Person" type="XCN"/> <ROL_BEGIN_DATE longName="Role Begin Date/Time" type="TS"/> <ROL_END_DATE longName="Role End Date/Time" type="TS"/> <ROL_DURATION longName="Role Duration" type="CE"/> <ROL_ACT_REASON longName="Role Action Reason" type="CE"/>
<UB1_ID longName="Set ID - UB1" type="SI"/> <UB1_BLOOD_DEDUCT longName="Blood Deductible (43)" type="NM"/> <UB1_BLOOD_FURNISHED longName="Blood Furnished-Pints Of (40)" type="NM"/> <UB1_BLOOD_REPLACED longName="Blood Replaced-Pints (41)" type="NM"/> <UB1_BLOOD_NOT_REPLACED longName="Blood Not Replaced-Pints(42)" type="NM"/> <UB1_CO_INS_DAYS longName="Co-Insurance Days (25)" type="NM"/> <UB1_COND_CODE longName="Condition Code (35-39)" type="IS"/> <UB1_COVER_DAYS longName="Covered Days - (23)" type="NM"/> <UB1_NON_COVER_DAYS longName="Non Covered Days - (24)" type="NM"/> <UB1_VALUE_AMT_CODE longName="Value Amount and Code (46-49)" type="CM_UVC"/> <UB1_GRACE_DAYS longName="Number Of Grace Days (90)" type="NM"/> <UB1_SPEC_PROG_IND longName="Special Program Indicator (44)" type="CE"/> <UB1_PSRO_UR_APP_IND longName="PSRO/UR Approval Indicator (87)" type="CE"/> <UB1_PSRO_UR_APP_FROM longName="PSRO/UR Approved Stay-Fm (88)" type="DT"/> <UB1_PSRO_UR_APP_TO longName="PSRO/UR Approved Stay-To (89)" type="DT"/> <UB1_OCCURRENCE longName="Occurrence (28-32)" type="CM_OCD"/> <UB1_OCCURRENCE_SPAN longName="Occurrence Span (33)" type="CE"/> <UB1_OCCUR_SPAN_START_DATE longName="Occur Span Start Date(33)" type="DT"/> <UB1_OCCUR_SPAN_END_DATE longName="Occur Span End Date (33)" type="DT"/> <UB1_UB82_LOC2 longName="UB-82 Locator 2" type="ST"/> <UB1_UB82_LOC9 longName="UB-82 Locator 9" type="ST"/> <UB1_UB82_LOC27 longName="UB-82 Locator 27" type="ST"/> <UB1_UB82_LOC45 longName="UB-82 Locator 45" type="ST"/>
iWay Adapter for HL7 for BEA WebLogic User’s Guide C-21

Field Definitions
<UB2_ID longName="Set ID - UB2" type="SI"/> <UB2_CO_INS_DAYS longName="Co-Insurance Days (9)" type="ST"/> <UB2_COND_CODE longName="Condition Code (24-30)" type="IS"/> <UB2_COVER_DAYS longName="Covered Days (7)" type="ST"/> <UB2_NON_COVER_DAYS longName="Non-Covered Days (8)" type="ST"/> <UB2_VALUE_AMT_CODE longName="Value Amount and Code" type="CM_UVC"/> <UB2_OCCURRENCE_CODE longName="Occurrence Code and Date (32-35)" type="CM_OCD"/> <UB2_OCCURRENCE_SPAN longName="Occurrence Span Code/Dates (36)" type="CM_OSP"/> <UB2_UB92_LOC2 longName="UB92 Locator 2 (State)" type="ST"/> <UB2_UB92_LOC11 longName="UB92 Locator 11 (State)" type="ST"/> <UB2_UB92_LOC31 longName="UB92 Locator 31 (National)" type="ST"/> <UB2_DOC_CTRL_NO longName="Document Control Number" type="ST"/> <UB2_UB92_LOC49 longName="UB92 Locator 49 (National)" type="ST"/> <UB2_UB92_LOC56 longName="UB92 Locator 56 (State)" type="ST"/> <UB2_UB92_LOC57 longName="UB92 Locator 57 (National)" type="ST"/> <UB2_UB92_LOC78 longName="UB92 Locator 78 (State)" type="ST"/> <UB2_SPEC_VISIT_CNT longName="Special Visit Count" type="NM"/>
<CTI_SPNSR_STDY_ID longName="Sponsor Study ID" type="EI"/> <CTI_STDY_PHSE_ID longName="Study Phase Identifier" type="CE"/> <CTI_STDY_SCHDLD_TIME_PNT longName="Study Scheduled Time Point" type="CE"/>
<DSC_CNT_PNTR longName="Continuation Pointer" type="ST"/>
<MSH_FIELD_SEP longName="Field Separator" type="ST"/> <MSH_ENCDNG_CHRS longName="Encoding Characters" type="ST"/> <MSH_SND_APP longName="Sending Application" type="HD"/> <MSH_SND_FAC longName="Sending Facility" type="HD"/> <MSH_RCV_APP longName="Receiving Application" type="HD"/> <MSH_RCV_FAC longName="Receiving Facility" type="HD"/> <MSH_MSG_DATETIME longName="Date/Time Of Message" type="TS"/> <MSH_SECURITY longName="Security" type="ST"/> <MSH_MSG_TYPE longName="Message Type" type="CM"/> <MSH_MSG_CNTRL_ID longName="Message Control ID" type="ST"/> <MSH_PRCSNG_ID longName="Processing ID" type="PT"/> <MSH_VRSN_ID longName="Version ID" type="ID"/> <MSH_SQNC_NM longName="Sequence Number" type="NM"/> <MSH_CNTN_PNTR longName="Continuation Pointer" type="ST"/> <MSH_ACCPT_ACK_TYP longName="Accept Acknowledgment Type" type="ID"/> <MSH_APP_ACK_TYP longName="Application Acknowledgment Type" type="ID"/> <MSH_CNTRY_CDE longName="Country Code" type="ID"/> <MSH_CHAR_SET longName="Character Set" type="ID"/> <MSH_MSG_LANG longName="Principal Language Of Message" type="CE"/>
C-22 iWay Software

HL7 Document Index
<NK1_SET_ID longName="Set ID - NK1" type="SI"/> <NK1_NME longName="Name" type="XPN"/> <NK1_RLTNSHP longName="Relationship" type="CE"/> <NK1_ADDRSS longName="Address" type="XAD"/> <NK1_PHNE_NM longName="Phone Number" type="XTN"/> <NK1_BUS_PHNE_NM longName="Business Phone Number" type="XTN"/> <NK1_CNTCT_RLE longName="Contact Role" type="CE"/> <NK1_STRT_DTE longName="Start Date" type="DT"/> <NK1_END_DTE longName="End Date" type="DT"/> <NK1_KIN_JOB_TITLE longName="Next of Kin / Associated Parties Job Title" type="ST"/> <NK1_KIN_JOB_CDE longName="Next of Kin / Associated Parties Job Code/Class" type="JCC"/> <NK1_KIN_EMP_NM longName="Next of Kin / Associated Parties Employee Number" type="CX"/> <NK1_ORG_NME longName="Organization Name - NK1" type="XON"/> <NK1_MRTL_STS longName="Marital Status" type="CE"/> <NK1_SEX longName="Sex" type="IS"/> <NK1_DOB longName="Date/Time Of Birth" type="TS"/> <NK1_LVNG_DPNDCY longName="Living Dependency" type="IS"/> <NK1_AMBLTRY_STS longName="Ambulatory Status" type="IS"/> <NK1_CTZNSHP longName="Citizenship" type="CE"/> <NK1_PRM_LANG longName="Primary Language" type="CE"/> <NK1_LVNG_ARNGMNT longName="Living Arrangement" type="IS"/> <NK1_PBLCTY_CDE longName="Publicity Code" type="CE"/> <NK1_PRTCTN_IND longName="Protection Indicator" type="ID"/> <NK1_STDNT_IND longName="Student Indicator" type="IS"/> <NK1_RLGN longName="Religion" type="CE"/> <NK1_MOTH_MDN_NME longName="Mother?s Maiden Name" type="XPN"/> <NK1_NTNLTY longName="Nationality" type="CE"/> <NK1_ETHNC_GRP longName="Ethnic Group" type="CE"/> <NK1_CNTCT_RSN longName="Contact Reason" type="CE"/> <NK1_CNTCT_PRSN_NME longName="Contact Person?s Name" type="XPN"/> <NK1_CNTCT_PRSN_NUM longName="Contact Person?s Telephone Number" type="XTN"/> <NK1_CNTCT_PRSN_ADD longName="Contact Person?s Address" type="XAD"/> <NK1_KIN_ID longName="Next of Kin/Associated Party?s Identifiers" type="CX"/> <NK1_JOB_STS longName="Job Status" type="IS"/> <NK1_RACE longName="Race" type="CE"/> <NK1_HANDICAP longName="Handicap" type="IS"/> <NK1_CNTCT_PRSN_SSN longName="Contact Person Social Security Number" type="ST"/>
<NTE_SET_ID longName="Set ID - NTE" type="SI"/> <NTE_SRC longName="Source of Comment" type="ID"/> <NTE_CMNT longName="Comment" type="FT"/> <NTE_CMNT_TYP longName="Comment Type" type="CE"/>
iWay Adapter for HL7 for BEA WebLogic User’s Guide C-23

Field Definitions
<OBR_SET_ID longName="Set ID - OBR" type="SI"/> <OBR_PLCR_ORDR_NUM longName="Placer Order Number" type="EI"/> <OBR_FLLR_ORDR_NUM longName="Filler Order Number" type="EI"/> <OBR_UNVRSL_SRVCE_ID longName="Universal Service ID" type="CE"/> <OBR_PRIORITY longName="Priority-OBR" type="ID"/> <OBR_RQSTD_DATETIME longName="Requested Date/time" type="TS"/> <OBR_OBSRVTN_DATETIME longName="Observation Date/Time #" type="TS"/> <OBR_OBSRVTN_END_DATETIME longName="Observation End Date/Time #" type="TS"/> <OBR_CLLCTN_VLME longName="Collection Volume *" type="CQ"/> <OBR_CLLCTN_ID longName="Collector Identifier *" type="XCN"/> <OBR_SPCMN_ACTN_CODE longName="Specimen Action Code *" type="ID"/> <OBR_DNGR_CODE longName="Danger Code" type="CE"/> <OBR_RLVNT_CLNCL_INF longName="Relevant Clinical Info." type="ST"/> <OBR_SPCMEN_RCVD_DATETIME longName="Specimen Received Date/Time *" type="TS"/> <OBR_SPCMEN_SRC longName="Specimen Source *" type="CM_SPS"/> <OBR_ORDRNG_PRVDR longName="Ordering Provider" type="XCN"/> <OBR_ORDR_CLLBCK_PHNE_NUM longName="Order Callback Phone Number" type="XTN"/> <OBR_PLCR_FLD_1 longName="Placer Field 1" type="ST"/> <OBR_PLCR_FLD_2 longName="Placer Field 2" type="ST"/> <OBR_FLLR_FLD_1 longName="Filler Field 1 +" type="ST"/> <OBR_FLLR_FLD_2 longName="Filler Field 2 +" type="ST"/> <OBR_RPRT_DATETIME longName="Results Rpt/Status Chng - Date/Time +" type="TS"/> <OBR_CHRG_TO_PRCTCE longName="Charge to Practice +" type="CM"/> <OBR_DGNSTC_SRV_SCT_ID longName="Diagnostic Serv Sect ID" type="ID"/> <OBR_RSLT_STS longName="Result Status +" type="ID"/> <OBR_PRNT_RSLT longName="Parent Result +" type="CM_PRL"/> <OBR_QNTY_TMNG longName="Quantity/Timing" type="TQ"/> <OBR_RSLT_COPIES_TO longName="Result Copies To" type="XCN"/> <OBR_PRNT longName="Parent" type="CM"/> <OBR_TRNSPRTN_MDE longName="Transportation Mode" type="ID"/> <OBR_RSN_FOR_STDY longName="Reason for Study" type="CE"/> <OBR_PRNCPL_RSLT_INTRPRTR longName="Principal Result Interpreter +" type="CM_NDL"/> <OBR_ASSTNT_RSLT_INTRPRTR longName="Assistant Result Interpreter +" type="CM_NDL"/> <OBR_TCHNCN longName="Technician +" type="CM_NDL"/> <OBR_TRNSCRPTNST longName="Transcriptionist +" type="CM_NDL"/> <OBR_SCHDLD_DATETIME longName="Scheduled Date/Time +" type="TS"/> <OBR_NUM_SMPL_CNTNRS longName="Number of Sample Containers *" type="NM"/> <OBR_TRNSPRT_LGSTCS longName="Transport Logistics of Collected Sample *" type="CE"/> <OBR_CLLCTRS_CMMNT longName="Collector?s Comment *" type="CE"/> <OBR_TRNSPRT_ARRNGMNT_RSPNSBLTY longName="Transport Arrangement Responsibility" type="CE"/> <OBR_TRNSPRT_ARRNGD longName="Transport Arranged" type="ID"/> <OBR_ESCRT_RQRD longName="Escort Required" type="ID"/> <OBR_PLNND_PATNT_TRNSPRT_CMMNT longName="Planned Patient Transport Comment" type="CE"/>
C-24 iWay Software

HL7 Document Index
<OBX_SET_ID longName="Set ID - OBX" type="SI"/> <OBX_VALUE_TYP longName="Value Type" type="ID"/> <OBX_OBSRVTN_ID longName="Observation Identifier" type="CE"/> <OBX_OBSRVTN_SUB_ID longName="Observation Sub-ID" type="ST"/> <OBX_OBSRVTN_VALUE longName="Observation Value" type="@OBX_VALUE_TYP"/> <OBX_UNITS longName="Units" type="CE"/> <OBX_RFRNCS_RNG longName="References Range" type="ST"/> <OBX_ABNRML_FLGS longName="Abnormal Flags" type="ID"/> <OBX_PRBLTY longName="Probability" type="NM"/> <OBX_NATURE_OF_ABNRML_TST longName="Nature of Abnormal Test" type="ID"/> <OBX_OBSRV_RSLT_STS longName="Observation Result Status" type="ID"/> <OBX_DATE_LST_OBS_NRML_VAL longName="Date Last Obs Normal Values" type="TS"/> <OBX_USR_DFND_ACCSS_CHKS longName="User Defined Access Checks" type="ST"/> <OBX_OBSV_DATETIME longName="Date/Time of the Observation" type="TS"/> <OBX_PRDCERS_ID longName="Producer's ID" type="CE"/> <OBX_RSPNSBLE_OBSRVR longName="Responsible Observer" type="XCN"/> <OBX_OBSRVTN_MTHD longName="Observation Method" type="CE"/>
<ORC_ORDR_CNTRL longName="Order Control" type="ID"/> <ORC_PLCR_ORDR_NUM longName="Placer Order Number" type="EI"/> <ORC_FLLR_ORDR_NUM longName="Filler Order Number" type="EI"/> <ORC_PLCR_GRP_NUM longName="Placer Group Number" type="EI"/> <ORC_ORDR_STS longName="Order Status" type="ID"/> <ORC_RSPNS_FLG longName="Response Flag" type="ID"/> <ORC_QNTY_TMNG longName="Quantity/Timing" type="TQ"/> <ORC_PARENT longName="Parent" type="CM"/> <ORC_XN_DATETIME longName="Date/Time of Transaction" type="TS"/> <ORC_ENTRD_BY longName="Entered By" type="XCN"/> <ORC_VRFD_BY longName="Verified By" type="XCN"/> <ORC_ORDRNG_PRVDR longName="Ordering Provider" type="XCN"/> <ORC_ENTRS_LOC longName="Enterer?s Location" type="PL"/> <ORC_ENTRS_LOC longName="Call Back Phone Number" type="XTN"/> <ORC_CLL_BCK_PHNE_NUM longName="Order Effective Date/Time" type="TS"/> <ORC_ORDR_EFF_DATETIME longName="Order Control Code Reason" type="CE"/> <ORC_ORDR_CNTRL_CODE_RSN longName="Entering Organization" type="CE"/> <ORC_ENTRNG_ORG longName="Entering Device" type="CE"/> <ORC_ENTRNG_DVCE longName="Action By" type="XCN"/> <ORC_ADNVCD_BNFCRY_NTCE_CODE longName="Advanced Beneficiary Notice Code" type="CE"/> <ORC_ORD_FAC_NAME longName="Ordering Facility Name" type="XON"/> <ORC_ORD_FAC_ADD longName="Ordering Facility Address" type="XAD"/> <ORC_ORD_FAC_PHONE longName="Ordering Facility Phone Number" type="XTN"/> <ORC_ORD_PROV_ADD longName="Ordering Provider Address" type="XAD"/>
iWay Adapter for HL7 for BEA WebLogic User’s Guide C-25

Field Definitions
<PD1_LVNG_DPNDCY longName="Living Dependency" type="IS"/> <PD1_LVNG_ARRNGMNT longName="Living Arrangement" type="IS"/> <PD1_PATNT_PRM_FAC longName="Patient Primary Facility" type="XON"/> <PD1_PATNT_PRM_CARE_PRV longName="Patient Primary Care Provider Name " type="XCN"/> <PD1_STDNT_IND longName="Student Indicator" type="IS"/> <PD1_HANDICAP longName="Handicap" type="IS"/> <PD1_LVNG_WILL longName="Living Will" type="IS"/> <PD1_ORGN_DNR longName="Organ Donor" type="IS"/> <PD1_SEPARATE_BILL longName="Separate Bill" type="ID"/> <PD1_DUP_PATNT longName="Duplicate Patient" type="CX"/> <PD1_PBLCTY_CDE longName="Publicity Code" type="CE"/> <PD1_PRTCTN_IND longName="Protection Indicator" type="ID"/>
<PID_SET_ID longName="Set ID - PID" type="SI"/> <PID_PATNT_ID longName="Patient ID" type="CX"/> <PID_PATNT_ID_LST longName="Patient Identifier List" type="CX"/> <PID_ALT_PATNT_ID longName="Alternate Patient ID - PID" type="CX"/> <PID_PATNT_NAME longName="Patient Name" type="XPN"/> <PID_MTHR_MDN_NME longName="Mother?s Maiden Name" type="XPN"/> <PID_DOB longName="Date/Time Of Birth" type="TS"/> <PID_SEX longName="Sex" type="IS"/> <PID_ALIAS longName="Patient Alias" type="XPN"/> <PID_RACE longName="Race" type="CE"/> <PID_PATNT_ADDRSS longName="Patient Address" type="XAD"/> <PID_COUNTY_CDE longName="County Code" type="IS"/> <PID_PHNE_HME longName="Phone Number - Home" type="XTN"/> <PID_PHNE_BUS longName="Phone Number - Business" type="XTN"/> <PID_PRMRY_LANG longName="Primary Language" type="CE"/> <PID_MRTL_STS longName="Marital Status" type="CE"/> <PID_RLGN longName="Religion" type="CE"/> <PID_PATNT_ACC_NM longName="Patient Account Number" type="CX"/> <PID_SSN_NM longName="SSN Number - Patient" type="ST"/> <PID_DRVR_LCNS_NM longName="Driver's License Number - Patient" type="DLN"/> <PID_MTHR_ID longName="Mother's Identifier" type="CX"/> <PID_ETHNIC_GRP longName="Ethnic Group" type="CE"/> <PID_BRTH_PLC longName="Birth Place" type="ST"/> <PID_MLTPL_BRTH_IND longName="Multiple Birth Indicator" type="ID"/> <PID_BRTH_ORDR longName="Birth Order" type="NM"/> <PID_CTZNSHP longName="Citizenship" type="CE"/> <PID_VTRNS_MIL_STS longName="Veterans Military Status" type="CE"/> <PID_NTNLTY longName="Nationality" type="CE"/> <PID_PATNT_DTH_DATETIME longName="Patient Death Date and Time" type="TS"/> <PID_PATNT_DTH_IND longName="Patient Death Indicator" type="ID"/>
C-26 iWay Software

HL7 Document Index
<PV1_SET_ID longName="Set ID - PV1" type="SI"/> <PV1_PATNT_CLSS longName="Patient Class" type="IS"/> <PV1_ASGND_PATNT_LCTN longName="Assigned Patient Location" type="PL"/> <PV1_ADMSN_TYP longName="Admission Type" type="IS"/> <PV1_PREADMT_NUM longName="Preadmit Number" type="CX"/> <PV1_PRIOR_PATNT_LOC longName="Prior Patient Location" type="PL"/> <PV1_ATNDNG_DCTR longName="Attending Doctor" type="XCN"/> <PV1_RFRNG_DCTR longName="Referring Doctor" type="XCN"/> <PV1_CNSLTNG_DCTR longName="Consulting Doctor" type="XCN"/> <PV1_HSPTL_SRVCE longName="Hospital Service" type="IS"/> <PV1_TMP_LOC longName="Temporary Location" type="PL"/> <PV1_PREADMIT_TST_IND longName="Preadmit Test Indicator" type="IS"/> <PV1_READMSSN_IND longName="Re-admission Indicator" type="IS"/> <PV1_ADMNT_SRC longName="Admit Source" type="IS"/> <PV1_AMBLTRY_STS longName="Ambulatory Status" type="IS"/> <PV1_VIP_IND longName="VIP Indicator" type="IS"/> <PV1_ADMTTNG_DCTR longName="Admitting Doctor" type="XCN"/> <PV1_PATNT_TYP longName="Patient Type" type="IS"/> <PV1_VST_NUM longName="Visit Number" type="CX"/> <PV1_FNCL_CLSS longName="Financial Class" type="FC"/> <PV1_CHRG_PRC_IND longName="Charge Price Indicator" type="IS"/> <PV1_CRTSY_CODE longName="Courtesy Code" type="IS"/> <PV1_CRDT_RTNG longName="Credit Rating" type="IS"/> <PV1_CNTRCT_CODE longName="Contract Code" type="IS"/> <PV1_CNTRCT_EFFCTV_DTE longName="Contract Effective Date" type="DT"/> <PV1_CNTRCT_AMMNT longName="Contract Amount" type="NM"/> <PV1_CNTRCT_PRD longName="Contract Period" type="NM"/> <PV1_INTRST_CODE longName="Interest Code" type="IS"/> <PV1_TRNSFR_BAD_DEBT_CODE longName="Transfer to Bad Debt Code" type="IS"/> <PV1_TRNSFR_BAD_DEBT_DTE longName="Transfer to Bad Debt Date" type="DT"/> <PV1_BAD_DEBT_AGNCY_CODE longName="Bad Debt Agency Code" type="IS"/> <PV1_BAD_DEBT_TRNSFR_AMNT longName="Bad Debt Transfer Amount" type="NM"/> <PV1_BAD_DEBT_RCVRY_AMNT longName="Bad Debt Recovery Amount" type="NM"/> <PV1_DLT_ACCNT_IND longName="Delete Account Indicator" type="IS"/> <PV1_DLT_ACCNT_DTE longName="Delete Account Date" type="DT"/> <PV1_DSCHRG_DSPSTN longName="Discharge Disposition" type="IS"/> <PV1_DSCHRG_LOC longName="Discharged to Location" type="CM"/> <PV1_DIET_TYP longName="Diet Type" type="CE"/> <PV1_SRVCNG_FAC longName="Servicing Facility" type="IS"/> <PV1_BED_STS longName="Bed Status" type="IS"/> <PV1_ACCNT_STS longName="Account Status" type="IS"/> <PV1_PNDNG_LOC longName="Pending Location" type="PL"/> <PV1_PRIOR_TMP_LOC longName="Prior Temporary Location" type="PL"/> <PV1_ADMT_DTE longName="Admit Date/Time" type="TS"/> <PV1_DSCHRG_DTE longName="Discharge Date/Time" type="TS"/> <PV1_CRRNT_PATNT_BLNC longName="Current Patient Balance" type="NM"/> <PV1_TOT_CHRGS longName="Total Charges" type="NM"/> <PV1_TOT_ADJSMNTS longName="Total Adjustments" type="NM"/>
iWay Adapter for HL7 for BEA WebLogic User’s Guide C-27

Field Definitions
<PV1_TOT_PYMNTS longName="Total Payments" type="NM"/> <PV1_ALTRNT_VST_ID longName="Alternate Visit ID" type="CX"/> <PV1_VST_IND longName="Visit Indicator" type="IS"/> <PV1_OTHR_HLTHCR_PRVDR longName="Other Healthcare Provider" type="XCN"/>
<PV2_PRIOR_PNDNG_LOC longName="Prior Pending Location" type="PL"/> <PV2_ACCMMDTN_CODE longName="Accommodation Code" type="CE"/> <PV2_ADMT_RSN longName="Admit Reason" type="CE"/> <PV2_TRNSFR_RSN longName="Transfer Reason" type="CE"/> <PV2_PATNT_VAL longName="Patient Valuables" type="ST"/> <PV2_PATNT_VAL_LOC longName="Patient Valuables Location" type="ST"/> <PV2_VST_USR_CODE longName="Visit User Code" type="IS"/> <PV2_EXPCTD_ADMT_DATETIME longName="Expected Admit Date/Time" type="TS"/> <PV2_EXPCTD_DSCHRG_DATETIME longName="Expected Discharge Date/Time" type="TS"/> <PV2_ESTMTD_LNGTH_INPATNT_STAY longName="Estimated Length of Inpatient Stay" type="NM"/> <PV2_ACTL_LNGTH_INPATNT_STAY longName="Actual Length of Inpatient Stay" type="NM"/> <PV2_VST_DSCRPTN longName="Visit Description" type="ST"/> <PV2_RFRRL_SRC_CODE longName="Referral Source Code" type="XCN"/> <PV2_PRVS_SRVC_DTE longName="Previous Service Date" type="DT"/> <PV2_EMPLYMNT_ILLNSS_RLTD_IND longName="Employment Illness Related Indicator" type="ID"/> <PV2_PRG_STS_CODE longName="Purge Status Code" type="IS"/> <PV2_PRG_STS_DTE longName="Purge Status Date" type="DT"/> <PV2_SPCL_PRGM_CODE longName="Special Program Code" type="IS"/> <PV2_RTNTN_IND longName="Retention Indicator" type="ID"/> <PV2_EXPCTD_NUM_INSRNC_PLNS longName="Expected Number of Insurance Plans" type="NM"/> <PV2_VST_PBLCTY_CODE longName="Visit Publicity Code" type="IS"/> <PV2_VST_PRTCTN_IND longName="Visit Protection Indicator" type="ID"/> <PV2_CLNC_ORG_NAME longName="Clinic Organization Name" type="XON"/> <PV2_PATNT_STS_CODE longName="Patient Status Code" type="IS"/> <PV2_VST_PRTY_CODE longName="Visit Priority Code" type="IS"/> <PV2_PRVS_TRTMNT_DTE longName="Previous Treatment Date" type="DT"/> <PV2_EXPCTD_DSCHRGE_DSPSTN longName="Expected Discharge Disposition" type="IS"/> <PV2_SGNTRE_ON_FILE_DTE longName="Signature on File Date" type="DT"/> <PV2_FRST_SMLR_ILLNSS_DTE longName="First Similar Illness Date" type="DT"/> <PV2_PATNT_CHRGE_ADJSTMNT_CODE longName="Patient Charge Adjustment Code" type="CE"/> <PV2_RCRRNG_SRVCE_CODE longName="Recurring Service Code" type="IS"/> <PV2_BLLNG_MEDIA_CODE longName="Billing Media Code" type="ID"/> <PV2_EXPCTD_SRGRY_DATETIME longName="Expected Surgery Date " type="TS"/> <PV2_MLTRY_PRTNRSHP_CODE longName="Military Partnership Code" type="ID"/> <PV2_MLTRY_NON_AVLBLTY_CODE longName="Military Non-Availability Code" type="ID"/> <PV2_NWBRN_BABY_IND longName="Newborn Baby Indicator" type="ID"/> <PV2_BABY_DTND_IND longName="Baby Detained Indicator" type="ID"/>
C-28 iWay Software

HL7 Document Index
<ZLR_ORD_PROVIDER_ADD longName="Ordering Providers Address" type="XAD"/> <ZLR_ORD_FAC_NAME longName="Ordering Facility Name" type="XON"/> <ZLR_ORD_FAC_ADD longName="Ordering Facility Address" type="XAD"/> <ZLR_ORD_FAC_PHONE longName="Ordering Facility Phone" type="XTN"/> <ZLR_PATIENT_AGE longName="Patient Age" type="SN"/> <ZLR_NEXT_KIN_NAME longName="Next of Kin/Assoc. Name" type="XPN"/> <ZLR_NEXT_KIN_RELATION longName="Next of Kin/Assoc. Relationship" type="CE"/> <ZLR_NEXT_KIN_ADD longName="Next of Kin/Assoc. Address" type="XAD"/> <ZLR_NEXT_KIN_PHONE longName="Next of Kin/Assoc. Phone" type="XTN"/>
<!-- Batch control segments -->
<FHS_FIELD_SEP longName="Field Sparator" type="ST"/> <FHS_ENCDNG_CHRS longName="Encoding Characters" type="ST"/> <FHS_SND_APP longName="Sending Application" type="ST"/> <FHS_SND_FAC longName="Sending Facility" type="ST"/> <FHS_RCV_APP longName="Receiving Application" type="ST"/> <FHS_RCV_FAC longName="Receiving Facility" type="ST"/> <FHS_DATETIME longName="Creation timestamp" type="TS"/> <FHS_SECURITY longName="Security" type="ST"/> <FHS_NAME longName="file name/id/type" type="ST"/> <FHS_COMMENT longName="Comments" type="ST"/> <FHS_CONTROL_ID longName="Control ID" type="ST"/> <FHS_REF_CONTROL_ID longName="Reference file control id" type="ST"/>
<FTS_BATCH_COUNT longName="Batch Count" type="NM"/> <FTS_COMMENT longName="File trailer Comment" type="ST"/>
<BHS_FIELD_SEP longName="Field Sparator" type="ST"/> <BHS_ENCDNG_CHRS longName="Encoding Characters" type="ST"/> <BHS_SND_APP longName="Sending Application" type="ST"/> <BHS_SND_FAC longName="Sending Facility" type="ST"/> <BHS_RCV_APP longName="Receiving Application" type="ST"/> <BHS_RCV_FAC longName="Receiving Facility" type="ST"/> <BHS_DATETIME longName="Creation timestamp" type="TS"/> <BHS_SECURITY longName="Security" type="ST"/> <BHS_NAME longName="Batch name/id/type" type="ST"/> <BHS_COMMENT longName="Comments" type="ST"/> <BHS_CONTROL_ID longName="Control ID" type="ST"/> <BHS_REF_CONTROL_ID longName="Reference batch control id" type="ST"/>
<BTS_MSG_COUNT longName="Message Count" type="ST"/> <BTS_COMMENT longName="Batch Trailer Comment" type="ST"/> <BTS_TOTALS longName="Batch Totals" type="NM"/>
</schema>
iWay Adapter for HL7 for BEA WebLogic User’s Guide C-29
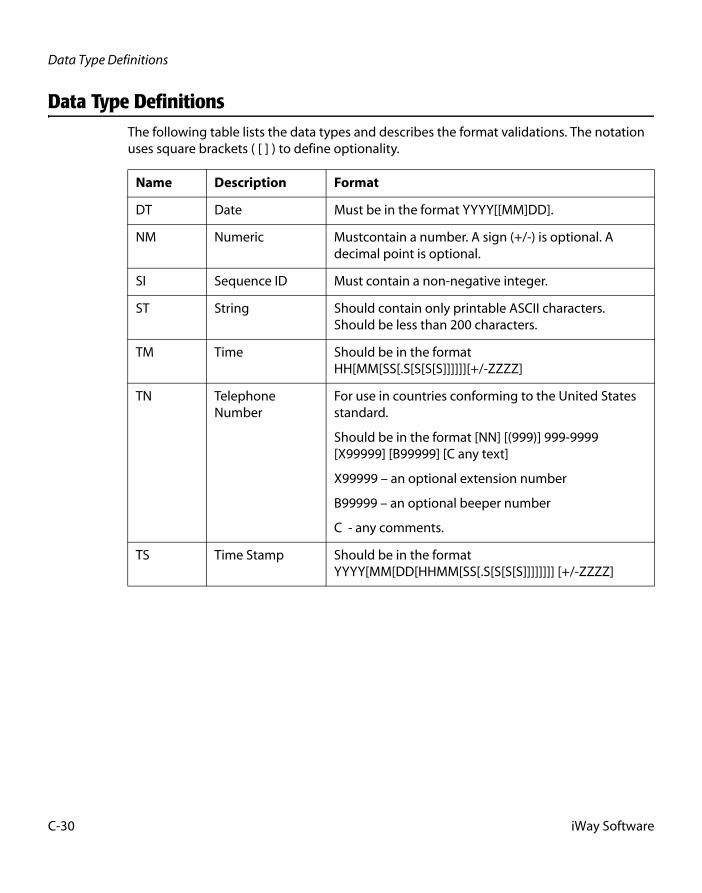
Data Type Definitions
Data Type DefinitionsThe following table lists the data types and describes the format validations. The notation uses square brackets ( [ ] ) to define optionality.
Name Description Format
DT Date Must be in the format YYYY[[MM]DD].
NM Numeric Mustcontain a number. A sign (+/-) is optional. A decimal point is optional.
SI Sequence ID Must contain a non-negative integer.
ST String Should contain only printable ASCII characters. Should be less than 200 characters.
TM Time Should be in the format HH[MM[SS[.S[S[S[S]]]]]][+/-ZZZZ]
TN Telephone Number
For use in countries conforming to the United States standard.
Should be in the format [NN] [(999)] 999-9999 [X99999] [B99999] [C any text]
X99999 – an optional extension number
B99999 – an optional beeper number
C - any comments.
TS Time Stamp Should be in the format YYYY[MM[DD[HHMM[SS[.S[S[S[S]]]]]]]] [+/-ZZZZ]
C-30 iWay Software
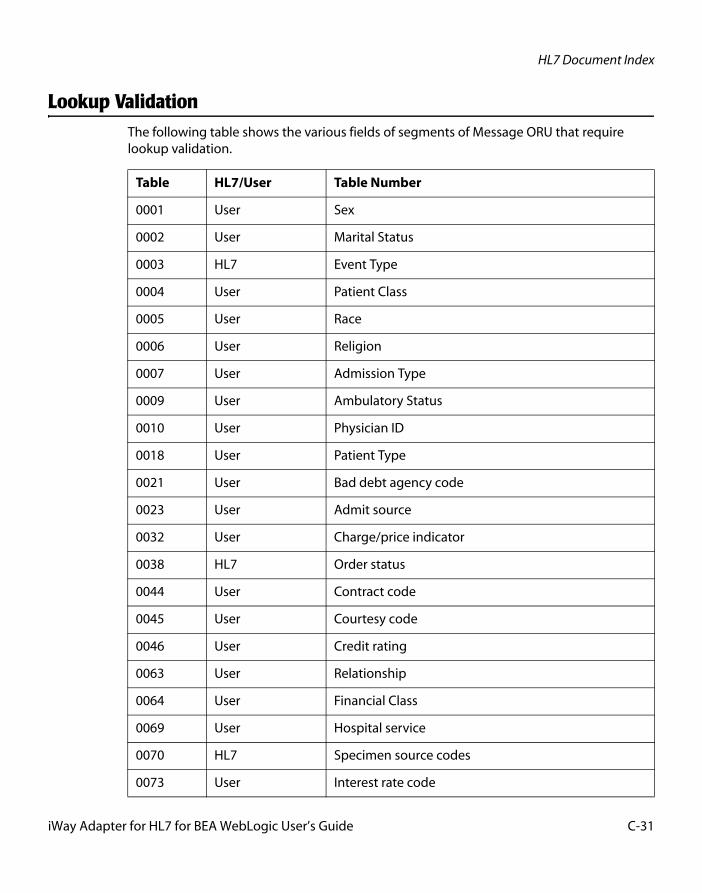
HL7 Document Index
Lookup ValidationThe following table shows the various fields of segments of Message ORU that require lookup validation.
Table HL7/User Table Number
0001 User Sex
0002 User Marital Status
0003 HL7 Event Type
0004 User Patient Class
0005 User Race
0006 User Religion
0007 User Admission Type
0009 User Ambulatory Status
0010 User Physician ID
0018 User Patient Type
0021 User Bad debt agency code
0023 User Admit source
0032 User Charge/price indicator
0038 HL7 Order status
0044 User Contract code
0045 User Courtesy code
0046 User Credit rating
0063 User Relationship
0064 User Financial Class
0069 User Hospital service
0070 HL7 Specimen source codes
0073 User Interest rate code
iWay Adapter for HL7 for BEA WebLogic User’s Guide C-31

Lookup Validation
0074 HL7 Diagnostic service section ID
0078 HL7 Abnormal flags
0080 HL7 Nature of abnormal testing
0085 HL7 Observation result status codes
0087 User Preadmit test indicator
0092 User Re-admission indicator
0099 User VIP indicator
0104 HL7 Version ID
0105 HL7 Source of comment
0110 User Transfer to bad debt code
0111 User Delete account code
0112 User Discharge disposition
0113 User Discharged to location
0114 User Diet type
0115 User Serving facility
0116 User Bed status
0117 User Account status
0119 HL7 Order control codes
0121 HL7 Response flag
0123 HL7 Result status
0124 HL7 Transportation mode
0125 HL7 Value type
0129 User Accommodation code
0130 User Visit user code
0131 User Contact role
Table HL7/User Table Number
C-32 iWay Software

HL7 Document Index
0136 HL7 Yes/no indicator
0155 HL7 Accept/application acknowledgment conditions
0171 User Citizenship
0172 User Veterans Military status
0189 User Ethnic group
0203 User Identifier type
0211 HL7 Alternate character sets
0212 User Nationality
0213 User Purge status
0215 User Publicity code
0216 User Patient status code
0217 User Visit priority code
0218 User Patient charge adjustment code
0219 User Recurring service code
0220 User Living arrangement
0222 User Contact reason
0223 User Living dependency
0224 HL7 Transport arranged
0225 HL7 Escort required
0231 User Student status
0295 User Handicap
0296 User Primary language
0311 User Job status
0315 User Living will
0316 User Organ donor
Table HL7/User Table Number
iWay Adapter for HL7 for BEA WebLogic User’s Guide C-33

Sample Conversion
Sample ConversionThis is a sample of an XML conversion from an HL7 ORU message.
<!-- MSH|^~\&|XRAY||CDB||||ORU^R01|K172|P<cr> -->
<!-- PID|1|0123456|1||ROBERTSON^JOHN^H|||||||9821111<cr> -->
<!-- OBR|1|X89?1501^OE|78912^RD|71020^CHEST XRAY AP & -->
<!-- LATERAL|R|198703291530|19873290800|||JBM|N<cr> -->
<!-- OBX|1|CE|71020^RADIOLOGIST'S IMPRESSION|4||^MASS LEFT LOWER LOBE|1||A||F<cr>-->
<!-- OBX|2|CE|71020|2|^INFILTRATE RIGHT LOWER LOBE|||A||F<cr> -->
<!-- OBX|3|CE|71020|3|^HEART SIZE NORMAL|||N||F<cr> -->
<!-- OBX|4|FT|71020|1|circular density (2 x 2 cm) is seen in the posterior segment -->
<!-- of the LLL.A second, less well?defined infiltrated circulation density -->
<!-- is seen in the R mid lung field and appears to cross the minor -->
<!-- fissure#||||||F<cr> -->
<!-- OBX|5|CE|71020||71020^Follow up CXR 1 month||30?45||||F<cr> -->
<!DOCTYPE ORU>
<ORU>
<MSH> <MSH.FIELD_SEP>|</MSH.FIELD_SEP> <MSH.ENCDNG_CHRS>^~\&</MSH.ENCDNG_CHRS> <MSH.SND_APP>XRAY</MSH.SND_APP> <MSH.RCV_APP>CDB</MSH.RCV_APP> <MSH.MSG_TYPE> <CM_MSG.MSG_TYP>ORU</CM_MSG.MSG_TYP> <CM_MSG.TRGR_TYP>R01</CM_MSG.TRGR_TYP> </MSH.MSG_TYPE> <MSH.MSG_CNTRL_ID>K172</MSH.MSG_CNTRL_ID> <MSH.PRCSNG_ID>P</MSH.PRCSNG_ID> </MSH>
0326 User Visit indicator
0327 User Job code/class
0328 User Employee classification
0339 User Advanced beneficiary notice code
Table HL7/User Table Number
C-34 iWay Software

HL7 Document Index
<PID> <PID.SET_ID>1</PID.SET_ID> <PID.PATNT_ID>0123456?1</PID.PATNT_ID> <PID.ALT_PATNT_ID_LIST>1</PID.ALT_PATNT_ID_LIST> <PID.PATNT_NAME> <PN.FMLY_NME>ROBERTSON</PN.FMLY_NME> <PN.GVN_NME>JOHN</PN.GVN_NME> <PN.MDDL_NME>H</PN.MDDL_NME> </PID.PATNT_NAME> <PID.COUNTY_CDE>9821111</PID.COUNTY_CDE> </PID>
<OBR> <OBR.SET_ID>1</OBR.SET_ID> <OBR.PLCR_ORDR_NUM> <EI.ENTY_ID>X89?1501</EI.ENTY_ID> <EI.NMSPC_ID>OE</EI.NMSPC_ID> </OBR.PLCR_ORDR_NUM> <OBR.FLLR_ORDR_NUM> <EI.ENTY_ID>78912</EI.ENTY_ID> <EI.NMSPC_ID>RD</EI.NMSPC_ID> </OBR.FLLR_ORDR_NUM> <OBR.UNVRSL_SRVCE_ID> <CE.ID>71020</CE.ID> <CE.TXT>CHEST XRAY AP & LATERAL</CE.TXT> </OBR.UNVRSL_SRVCE_ID> <OBR.PRIORITY>R</OBR.PRIORITY> <OBR.RQSTD_DATETIME>198703291530</OBR.RQSTD_DATETIME> <OBR.OBSRVTN_DATETIME>19873290800</OBR.OBSRVTN_DATETIME> <OBR.CLLCTN_ID>JBM</OBR.CLLCTN_ID> <OBR.SPCMN_ACTN_CODE>N</OBR.SPCMN_ACTN_CODE> </OBR>
<OBX> <OBX.SET_ID>1</OBX.SET_ID> <OBX.VALUE_TYP>CE</OBX.VALUE_TYP> <OBX.OBSRVTN_ID> <CE.ID>71020</CE.ID> <CE.TXT>RADIOLOGIST'S IMPRESSION</CE.TXT> </OBX.OBSRVTN_ID> <OBX.OBSRVTN_SUB_ID>4</OBX.OBSRVTN_SUB_ID> <OBX.UNITS> <CE.TXT>MASS LEFT LOWER LOBE</CE.TXT> </OBX.UNITS> <OBX.RFRNCS_RNG>1</OBX.RFRNCS_RNG> <OBX.PRBLTY>A</OBX.PRBLTY> <OBX.OBSRV_RSLT_STS>F</OBX.OBSRV_RSLT_STS> </OBX>
iWay Adapter for HL7 for BEA WebLogic User’s Guide C-35

Sample Conversion
<OBX> <OBX.SET_ID>2</OBX.SET_ID> <OBX.VALUE_TYP>CE</OBX.VALUE_TYP> <OBX.OBSRVTN_ID> <CE.ID>71020</CE.ID> </OBX.OBSRVTN_ID> <OBX.OBSRVTN_SUB_ID>2</OBX.OBSRVTN_SUB_ID> <OBX.OBSRVTN_VALUE> <CE.TXT>INFILTRATE RIGHT LOWER LOBE</CE.TXT> </OBX.OBSRVTN_VALUE> <OBX.ABNRML_FLGS>A</OBX.ABNRML_FLGS> <OBX.NATURE_OF_ABNRML_TST>F</OBX.NATURE_OF_ABNRML_TST> </OBX>
<OBX> <OBX.SET_ID>3</OBX.SET_ID> <OBX.VALUE_TYP>CE</OBX.VALUE_TYP> <OBX.OBSRVTN_ID> <CE.ID>71020</CE.ID> </OBX.OBSRVTN_ID> <OBX.OBSRVTN_SUB_ID>3</OBX.OBSRVTN_SUB_ID> <OBX.OBSRVTN_VALUE> <CE.TXT>HEART SIZE NORMAL</CE.TXT> </OBX.OBSRVTN_VALUE> <OBX.ABNRML_FLGS>N</OBX.ABNRML_FLGS> <OBX.NATURE_OF_ABNRML_TST>F</OBX.NATURE_OF_ABNRML_TST> </OBX>
<OBX> <OBX.SET_ID>4</OBX.SET_ID> <OBX.VALUE_TYP>FT</OBX.VALUE_TYP> <OBX.OBSRVTN_ID> <CE.ID>71020</CE.ID> </OBX.OBSRVTN_ID> <OBX.OBSRVTN_SUB_ID>1</OBX.OBSRVTN_SUB_ID> <OBX.OBSRVTN_VALUE> <CE.TXT>circular density (2 x 2 cm) is seen in the posterior segment of the LLL. A second, less well defined infiltrated circulation density is seen in the R mid lung field and appears to cross the minor fissure#</CE.TXT> </OBX.OBSRVTN_VALUE>
<OBX.NATURE_OF_ABNRML_TST>F</OBX.NATURE_OF_ABNRML_TST> </OBX>
C-36 iWay Software

HL7 Document Index
<OBX> <OBX.SET_ID>5</OBX.SET_ID> <OBX.VALUE_TYP>CE</OBX.VALUE_TYP> <OBX.OBSRVTN_ID> <CE.ID>71020</CE.ID> </OBX.OBSRVTN_ID> <OBX.OBSRVTN_VALUE> <CE.ID>71020</CE.ID> <CE.TXT>Follow up CXR 1 month</CE.TXT> </OBX.OBSRVTN_VALUE> <OBX.RFRNCS_RNG>30?45</OBX.RFRNCS_RNG> <OBX.OBSRV_RSLT_STS>F</OBX.OBSRV_RSLT_STS> </OBX>
</ORU>
Validation Rules FileThe following is a partial rules file that will be used to define the rules of HL7 validation. There are two table lookup methods; one for tables that are defined as part of HL7 and another for user tables that vary from implementation to implementation.
Rules File
<ORU> <using class="XDHL7Rules"> <rule tag="MSH.FIELD_SEP" method="isString" code=""> <rule tag="MSH.ENCDNG_CHRS" method="isString" code=""> <rule tag="MSH.SND_APP" method="isString" code=""> <rule tag="MSH.SND_FAC" method="isString" code=""> <rule tag="MSH.RCV_APP" method="isString" code=""> <rule tag="MSH.RCV_FAC" method="isString" code=""> <rule tag="MSH.MSG_DATETIME" method="isDateTime" code=""> <rule tag="MSH.SECURITY" method="isString" code=""> <rule tag="MSH.MSG_TYPE" method="inHL7Lookup" code="table=0076"> <rule tag="MSH.MSG_CNTRL_ID" method="isString" code=""> <rule tag="MSH.PRCSNG_ID" method="isString" code=""> <rule tag="MSH.VRSN_ID" method="inHL7Lookup" code="table=0104"> <rule tag="MSH.SQNC_NM" method="isNumeric" code=""> <rule tag="MSH.CNTN_PNTR" method="isString" code=""> <rule tag="MSH.ACCPT_ACK_TYP" method="inUserLookup" code="0155"> <rule tag="MSH.APP_ACK_TYP" method="inUserLookup" code="0155"> <rule tag="MSH.CNTRY_CDE" method="isString" code=""> <rule tag="MSH.CHAR_SET" method="inUserLookup" code="0211"> <rule tag="MSH.MSG_LANG" method="isString" code=""> <rule tag="MSH.ALT_CHAR_SET" method="isString" code=""> </using></ORU>
iWay Adapter for HL7 for BEA WebLogic User’s Guide C-37

Error Codes
Error CodesThe following table defines the error codes returned in acknowledgement documents for a HL7 table 0357.
Code Meaning
0 Message Accepted
100 Segment sequence error
101 Required field missing
102 Data type error
103 Table value not found
200 Unsupported message type
201 Unsupported event code
202 Unsupported processing id
203 Unsupported version id
204 Unknown key identifier
205 Duplicate key identifier
206 Application record locked
207 Application internal error
C-38 iWay Software

Reader Comments
In an ongoing effort to produce effective documentation, the Documentation Services staff at Information Builders welcomes any opinion you can offer regarding this manual.Please use this form to relay suggestions for improving this publication or to alert us to corrections. Identify specific pages where applicable. You can contact us through the following methods:
Name:_________________________________________________________________________________
Company:______________________________________________________________________________
Address:_______________________________________________________________________________
Telephone:____________________________________Date:_____________________________________
E-mail:_________________________________________________________________________________
Comments:
Mail: Documentation Services - Customer SupportInformation Builders, Inc. Two Penn Plaza New York, NY 10121-2898
Fax: (212) 967-0460
E-mail: [email protected]
Web form: http://www.informationbuilders.com/bookstore/derf.html
Information Builders, Two Penn Plaza, New York, NY 10121-2898 (212) 736-4433
iWay Adapter for HL7 for BEA WebLogic User’s Guide DN3501517.0205Version 5 Release 5

Reader Comments
Information Builders, Two Penn Plaza, New York, NY 10121-2898 (212) 736-4433
iWay Adapter for HL7 for BEA WebLogic User’s Guide DN3501517.0205Version 5 Release 5