
IUISER
96
Installation Guide Installation Guide Installation Guide Installation Guide Unicode SAP Unicode SAP Unicode SAP Unicode SAP ® Web Web Web Web Application Server Application Server Application Server Application Server 6.20 on IBM eServer 6.20 on IBM eServer 6.20 on IBM eServer 6.20 on IBM eServer iSeries (and AS/400) iSeries (and AS/400) iSeries (and AS/400) iSeries (and AS/400)
description
IUISER
Transcript of IUISER

Installation GuideInstallation GuideInstallation GuideInstallation Guide
Unicode SAPUnicode SAPUnicode SAPUnicode SAP®®®® Web Web Web Web
Application ServerApplication ServerApplication ServerApplication Server6.20 on IBM eServer6.20 on IBM eServer6.20 on IBM eServer6.20 on IBM eServeriSeries (and AS/400)iSeries (and AS/400)iSeries (and AS/400)iSeries (and AS/400)

© Copyright 2002 SAP AG. All rights reserved.
No part of this publication may be reproduced or transmitted in anyform or for any purpose without the express permission of SAP AG.The information contained herein may be changed without priornotice.
Some software products marketed by SAP AG and its distributorscontain proprietary software components of other software vendors.
Microsoft®, WINDOWS®, NT®, EXCEL®, Word®, PowerPoint® andSQL Server® are registered trademarks of Microsoft Corporation.
IBM®, DB2®, DB2 Universal Database, OS/2®, Parallel Sysplex®,MVS/ESA, AIX®, S/390®, AS/400®, OS/390®, OS/400®, iSeries,pSeries, xSeries, zSeries, z/OS, AFP, Intelligent Miner, WebSphere®,Netfinity®, Tivoli®, Informix and Informix® Dynamic Server
TM are
trademarks of IBM Corp. in USA and/or other countries.
ORACLE® is a registered trademark of ORACLE Corporation.
UNIX®, X/Open®, OSF/1®, and Motif ® are registered trademarks ofthe Open Group.
Citrix®, the Citrix logo, ICA®, Program Neighborhood ®, MetaFrame®,WinFrame®, VideoFrame®, MultiWin® and other Citrix product namesreferenced herein are trademarks of Citrix Systems, Inc.
HTML, DHTML, XML, XHTML are trademarks or registeredtrademarks of W3C®, World Wide Web Consortium, MassachusettsInstitute of Technology.
JAVA® is a registered trademark of Sun Microsystems, Inc.
J2EE™ is a registered trademark of Sun Microsystems, Inc.
JAVASCRIPT® is a registered trademark of Sun Microsystems, Inc.,used under license for technology invented and implemented byNetscape.
SAP, SAP Logo, R/2, RIVA, R/3, SAP ArchiveLink, SAP BusinessWorkflow, WebFlow, SAP EarlyWatch, BAPI, SAPPHIRE,Management Cockpit, mySAP, mySAP.com, and other SAP productsand services mentioned herein as well as their respective logos aretrademarks or registered trademarks of SAP AG in Germany and inseveral other countries all over the world. MarketSet and EnterpriseBuyer are jointly owned trademarks of SAP Markets and CommerceOne. All other product and service names mentioned are thetrademarks of their respective owners.
DisclaimerSome components of this product are based on Java™. Any codechange in these components may cause unpredictable and severemalfunctions and is therefore expressively prohibited, as is anydecompilation of these components.
Any Java™ Source Code delivered with this product is only to be usedby SAP’s Support Services and may not be modified or altered in anyway.
Documentation in the SAP Service MarketplaceYou can find this documentation at the following address:http://service.sap.com/instguides
SAP AGSAP AGSAP AGSAP AGNeurottstraße 1669190 WalldorfGermanyT +49/18 05/34 34 24F +49/18 05/34 34 20www.sap.comwww.sap.comwww.sap.comwww.sap.com

Typographic Conventions
Type Style Represents
Example Text Words or characters thatappear on the screen. Theseinclude field names, screentitles, pushbuttons as well asmenu names, paths andoptions.
Cross-references to otherdocumentation
Example text Emphasized words or phrasesin body text, titles of graphicsand tables
EXAMPLE TEXT Names of elements in thesystem. These include reportnames, program names,transaction codes, tablenames, and individual keywords of a programminglanguage, when surrounded bybody text, for example,SELECT and INCLUDE.
Example text Screen output. This includesfile and directory names andtheir paths, messages, namesof variables and parameters,source code as well as namesof installation, upgrade anddatabase tools.
Example text Exact user entry. These arewords or characters that youenter in the system exactly asthey appear in thedocumentation.
<Exampletext>
Variable user entry. Pointedbrackets indicate that youreplace these words andcharacters with appropriateentries.
EXAMPLE TEXT Keys on the keyboard, forexample, function keys (suchas F2) or the ENTER key.
Icons
Icon Meaning
Caution
Example
Note
Recommendation
Syntax

4 October 2002
Contents
SAP Web Application Server Installation: IBM eServer iSeries(and AS/400) ......................................................................................... 6
1 New Features .................................................................................... 102 Installation – Step by Step............................................................... 12
2.1 Installing a Database Instance ............................................................132.2 Installing a Central Instance................................................................152.3 Upgrading SAP Central Instance Java Core ......................................182.4 Installing a Dialog Instance .................................................................19
3 Installation Planning ........................................................................ 223.1 Required Documentation.....................................................................223.2 System Configuration ..........................................................................263.3 Multiple SAP Systems on a Single iSeries System ...........................273.4 Integration of LDAP Directory Services..............................................283.5 Hardware and Software Requirements...............................................31
4 Installation Preparations ................................................................. 334.1 Installing the Qshell .............................................................................334.2 Checking and Adjusting iSeries System Values................................334.3 Adjusting Startup Program QSTRUP..................................................374.4 Adding a User ASP...............................................................................394.5 Configuring TCP/IP...............................................................................404.6 Preparing the Active Directory for Use with the SAP System ..........424.7 Installing English as a Secondary Language.....................................444.8 Setting Up the Transport Directory.....................................................444.9 Preparing the Windows Host for the SAP System Installation.........454.10 Preparing a Windows 2000 User Account and iSeries UserProfile ..........................................................................................................464.11 Installing TMKSVR and Creating an Installation Share...................474.12 Creating the SAP Communication User SAPJSF ............................494.13 Required CDs for the Installation......................................................50
4.13.1 Preparing the CDs.....................................................................................................514.13.2 Using the CD Browser Dialog ...................................................................................52
5 Installation Process ......................................................................... 545.1 Input Parameters for the Installation ..................................................545.2 Running SAPinst ..................................................................................61
6 Post-Installation Activities .............................................................. 656.1 Installing Borland JBuilder ..................................................................656.2 Downloading the SAP Java Crypto Toolkit ........................................65
October 2002 5
6.3 Installing a JDBC Driver.......................................................................666.4 Granting Authorizations for Operating System CollectorPrograms.....................................................................................................686.5 Installing and Using the SAP License ................................................686.6 Starting and Stopping the SAP System..............................................706.7 Starting the SAP Presentation GUI .....................................................716.8 Logging on to the SAP System ...........................................................716.9 Changing Passwords for User Profiles ..............................................726.10 Removing the SAPinst Installation Files ..........................................726.11 Accessing a Remote Database..........................................................746.12 Installing the Online Documentation ................................................746.13 Configuring SAProuter and SAPNet - R/3 Frontend........................756.14 Configuring the Transport Management System.............................766.15 Performing Basic Operations ............................................................766.16 Installing Additional Languages .......................................................776.17 Importing Support Packages.............................................................786.18 Performing Client Copy......................................................................786.19 Performing a Full Backup ..................................................................79
7 Additional Information ..................................................................... 807.1 Continuing an Interrupted Installation with SAPinst .........................80
7.1.1 Troubleshooting During the Database Load ...............................................................817.1.2 Correcting Errors in RFC Steps ..................................................................................83
7.2 Additional Information about the SAP J2EE Engine .........................847.3 Deleting an SAP System ......................................................................877.4 SAP File Structure ................................................................................887.5 iSeries Library Structure......................................................................897.6 OS/400 Integrated File System ............................................................907.7 Restoring a Backup..............................................................................927.8 Editing Stream Files .............................................................................947.9 RFC SDK................................................................................................95

6 October 2002
Unicode SAP Web Application Server6.20 on IBM eServer iSeries (andAS/400)PurposeThis documentation explains how to install an Unicode SAP Web Application Server 6.20 onIBM eServer iSeries.
The SAP Web Application Server (SAP Web AS) is the underlying technology of almost allmySAP.com solutions. This is the new name for what has been referred to up until SAPRelease 4.6D as SAP Basis. The release number of the SAP Web Application Server reflectsthe independence of solutions and their underlying technology components provided by SAP.
For more information on the technology provided by the SAP Web AS, see the SAP ServiceMarketplace at:http://service.sap.com/technology
A minimum SAP system consists of a central instance and a database instance. Optionaldialog instances may be installed on different hosts once the installation of the centralinstance and the database instance has been completed.
When you set up an SAP system, you need to install the main components that enable thesystem to operate. These are:
• Central instance
• Database instance
• Dialog instances (if required)
• Front ends
The installation of front ends for the SAP system is described separately in thedocumentation SAP Front End Installation Guide.
Implementation ConsiderationsBefore you can begin with the installation of the main SAP components, you have to plan theconfiguration of the system. This involves deciding which components you need and workingout how these must be distributed to hosts. Normally an SAP hardware partner can assistyou with this task. The partner can recommend a feasible configuration based on informationabout the expected workload, set of applications and number of users.
As the system configuration fundamentally influences the installation procedure, it isimportant to have a clear configuration plan before you start the installation. There are twobasic configuration types:
• Central system (or 2-tier system)The central instance and database instance are installed on a single host.
• Standalone database system (or 3-tier system)The central instance and database instance are installed on two different hosts. This typeof configuration is often used when a large SAP system with a heavy workload and manyconcurrent users is set up.
October 2002 7
We recommend that you install the central instance and the databaseinstance on the same host. If you choose a standalone database systeminstallation you have to be aware that for an upgrade you will have to movethe central instance temporarily to the database instance host.
The configuration plan must specify whether a central or standalone database system is to beinstalled and how many dialog instances are required. Once the plan is complete and therequired hardware available, you can start with the installation process.
Information on Global Language Solution (GLS)From SAP Web AS 6.10 and higher, only the GLS version of the SAP Web ApplicationServer on IBM eServer iSeries is available. This implementation mainly differs in the codepages in which the data is stored and interpreted by the SAP system.
The GLS version, which comprises ASCII code pages, allows you to:
• Use double-byte languages such as Japanese, Taiwanese, Korean, and Chinese.
• Use MDMP (Multiple Display / Multiple Processing). For more information on MDMP, seeSAP Note 73606. With MDMP you can install more than one code page. For moreinformation on how to install additional code pages, see SAP Note 363663.
• Install an SAP dialog instance on a Windows 2000 application server.
This documentation is only valid for the installation of the GLS version of theSAP Web Application Server.
SAP Web AS and Support of UnicodeUnicode unifies the encoding systems for characters in computer systems by unifying allcharacters of all character sets into a single encoding scheme.
Without Unicode, there are hundreds of conflicting encoding systems. For example, twoencoding systems can use the same numeric representation for two different characters, oruse different numeric representations for the same character. Any given computer needs tosupport many different encoding systems. Whenever data is passed between differentencoding systems or platforms, data needs to be transformed from one encoding scheme toanother, causing a risk of data loss or corruption.
Unicode removes this risk by providing a unique numeric representation for every characterindependent of platform, program or language.
SAP uses a single-source approach for transparent Unicode support. The ABAP coding is thesame and runs identically on both non-Unicode and Unicode SAP systems. The SAP kerneland executables, however, are built differently for non-Unicode and Unicode SAP systems.
SAP provides the following SAP systems:
• Non-Unicode SAP system
All characters are represented with only one byte.
• Unicode SAP system
All characters are represented with two or four bytes.
This documentation describes the installation of a non-Unicode SAP system.

8 October 2002
You can find more information on Unicode SAP systems and their availability in SAP Note79991 and in the SAP Service Marketplace at:http://service.sap.com/unicode
Naming ConventionsIn this documentation, the following naming conventions apply:
TerminologySAP system and SAP Web Application ServerThe term SAP system is the same as SAP Web Application Server.
SAP system IDThe SAP system ID is abbreviated to SID or sid. For <sid>, substitute your SAP system ID inlower case characters, for example, prd. For <SID>, substitute your SAP system ID in uppercase characters, for example, PRD.
IBM eServer iSeriesIBM eServer iSeries is referred to as iSeries.
IBM eServer iSeries was formerly called IBM AS/400.
IBM DB2 Universal Database for iSeriesIBM DB2 Universal Database for iSeries is referred to as DB2 UDB for iSeries.
IBM DB2 Universal Database for iSeries was formerly called IBM Universal Database forAS/400.
VariablesVariables Description<SID> SAP system ID in uppercase letters
<sid> SAP system ID in lowercase letters
<INSTDIR> Installation directory
<CD-DIR> Directory on which CD-ROM is mounted
<OS> Operating system name within a path
The following is an example of how the variables are used:
Log on as user <sid>ofr and change to the directory /usr/sap/<SID>. Ifyour SAP system ID is C11, log on as user c11ofr and change to thedirectory /usr/sap/C11.
October 2002 9
ConstraintsThe SAP installation tools must only be used in accordance with the instructions and for thepurposes described in the SAP installation documentation. Improper use of the SAPinstallation tools can damage files and systems already installed.
This documentation only applies if you are installing a Unicode SAP system (see sectionNew Features [page 10] � Support of Unicode) on IBM eServer iSeries.
SAP system installations should only be performed by SAP TechnicalConsultants who are certified for your operating system, your database andthe SAP system you are installing.
Downward–Compatible Releases of DB/OS Platforms for SAP Products:SAP plans to regularly release the newest database (DB) and operatingsystem (OS) versions for mySAP.com products. These releases aredownward-compatible with earlier SAP system releases. For downwardcompatibility, you need to apply the latest kernel, which is available in theSAP Service Marketplace.

1 New Features
10 October 2002
1 New FeaturesSAP Web AS 6.20 has the following new features:
Area Description
NewInstallationTool
SAP provides a new installation tool called System LandscapeImplementation Manager, also known as SAPinst.
The main advantages compared with the previous installation toolR3SETUP are:
• SAPinst does not abort due to errors. Instead, it stops the installationand you can retry the installation after having solved the problem.Alternatively, you can abort the installation manually if you want.
• SAPinst records installation progress in a single log file,sapinst.log.
• SAPinst has a graphical user interface (GUI) called the SAPinst GUIthat allows you to watch the progress of the installation and see allmessages issued by SAPinst. As the SAPinst GUI is Java based,you need a Java Runtime Environment (JRE) or a Java DevelopmentKit (JDK).
For more information on SAPinst, see the documentation SAPinstTroubleshooting Guide at:http://service.sap.com/sapinstfeedback
Support ofUnicode
Unicode unifies the encoding systems for characters on computersystems.
Without Unicode, there are hundreds of conflicting encoding systems.That is, two encoding systems can use the same number for twodifferent characters, or use different numbers for the same character.Any given computer needs to support many different encoding systems.Whenever data is passed between different encoding systems orplatforms, there is a risk of corruption.
Unicode removes this risk by providing a unique number for everycharacter independent of:
• Platform,
• Program,
• Language.
We use the single-source approach for transparent Unicode support.That is, ABAP coding runs identically on non-Unicode and Unicode SAPsystems.
• Non-Unicode SAP systemAll characters are represented binary with only one Byte.
• Unicode SAP systemAll characters are represented binary with 2 or 4 Byte.
This documentation describes the installation of aUnicode SAP system.

1 New Features
October 2002 11
You can find more information about Unicode SAP systems and theiravailability in SAP Note 79991 and in the SAP Service Marketplace at:http://service.sap.com/unicode
Integration ofSAP J2EEEngine
A Java 2 Enterprise Edition (J2EE) standards-based engine is providedand supported by SAP as a runtime environment for the Java-basedcomponents of mySAP.com. It is an optional part of SAP Web AS as ofRelease 6.20, which delivers a reliable and scalable e-businessenvironment with native Java support that is fully J2EE compliant.
The SAP J2EE Engine integrated into the SAP Web AS provides thefollowing features:
• J2EE compliance
• Enterprise JavaBeans
• Web and Internet enabling
• XML support
For more information, see the SAP Library (choose Help � SAPLibrary in your SAP system or access the SAP Library at:http://help.sap.com) and choose mySAP TechnologyComponents � SAP Web Application Server � SAP J2EE Engine.
Documentation Due to the above changes, especially the introduction of SAPinst, wehave restructured and rewritten the documentation.

2 Installation – Step by Step
12 October 2002
2 Installation – Step by StepPurposeYou use the tables in the following sections as checklists to navigate through the installationprocedures when you install your SAP system.
The structure of the installation documentation and procedure how to use ithave changed. You must read this section before you start the installation.
The SAP system can be installed either as a central system or as a standalone databasesystem:
• Central system
The central instance and database instance are installed on the same host. This is usedfor nearly all systems on iSeries.
• Standalone database system
The central instance and database instance are installed on different hosts. This is rarelyused on iSeries.
For the installation of a central system and a standalone database system,the installation steps are identical. First of all, you must install the databaseinstance, and then the central instance. It does not matter if the instances areon the same host or not. Be aware that this is the opposite procedure to otherplatforms.There is no single-step procedure to install a central instance and a databaseinstance on the same host comparable to the CENTRDB.R3S installationservice of the former installation tool R3SETUP. Instead, you have to start theinstallation tool SAPinst more than once.
ProcedureTo install your SAP system:
Print out the relevant checklist for the SAP instance you want to install:
• To install the database instance, see Installing a Database Instance [Page 13].
• To install a central instance, see:
− ABAP only: Installing a Central Instance [Page 15].
− With SAP J2EE Engine: Installing a Central Instance [Page 15] and Upgrading SAPCentral Instance Java Core [Page 18].
• To install a dialog instance (with or without SAP J2EE Engine), see Installing a DialogInstance [Page 19].
You might need to refer to Additional Information [Page 80] for the installation.

2 Installation – Step by Step
October 2002 13
2. Follow the installation sequence exactly as shown in these tables:
a. If a step is required for your installation, follow the link for that step to thecorresponding section.
b. Perform the procedure described there.
c. After successfully completing the installation step, you mark the corresponding entryin the checklist with > to monitor the progress of your installation.
d. Proceed with the next step.
2.1 Installing a Database InstanceUseYou use the following tables as a checklist to navigate through the installation procedurewhen you want to install a database instance either for a central system or for a standalonedatabase system.
Procedure
For the installation of a central system and a standalone database systemthe installation steps are identical. First of all, you must install the databaseinstance, and then the central instance. It does not matter if they are on thesame host or not.
If you install a database and a central instance on the same host, some of thefollowing installation steps might be redundant.
Installation PlanningCareful planning is a prerequisite for the successful installation of the system.>>>> Action
Obtain the required documentation [Page 22] for the installation.
Make sure you have obtained the current SAP Notes for theinstallation.
Check your system configuration [Page 26].
Decide if you want to install multiple SAP Systems on a Single iSeries System[Page 27].
Decide if you want to use LDAP (Lightweight Directory Access Protocal) for SAPLogon or the Microsoft Management Console (MMC). For more information, seeIntegration of LDAP Directory Services [Page 28].
Check the hardware and software requirements [Page 31].

2 Installation – Step by Step
14 October 2002
Installation PreparationsBefore the installation, you have to perform the following actions:> Action
Check that all necessary PTFs have been installed. For more information, seeSAP Note 83292.
Check and adjust iSeries system values [Page 33].
Install the Qshell [Page 33].
Adjust startup program QSTRUP [Page 37].
Check that user ASP has been installed.
If this has not already been done, add a user ASP [Page 39].
Check that TCP/IP has been configured [Page 40] correctly and is active.
Check the status of TCP/IP with iSeries command WRKACTJOB, subsystemQSYSWRK, job QTCIPIP.
Start TCP/IP with iSeries command STRTCP.
To check if subsystem QSERVER subsystem job QPWFSERVSD is active on eachiSeries system, use ping to database server and the reverse. If it is not active,use iSeries command STRSBS QSERVER to activate the job.
If your primary language or any other secondary language on iSeries is notEnglish, install English as a secondary language [Page 44].
Set up the transport directory [Page 44].
Prepare the Windows host for the SAP installation [Page 44].
Prepare a Windows 2000 user account and iSeries user profile [Page 46].
Install TMKSVR and create an installation share [Page 47].
Prepare the required CDs for the installation [Page 50].
Installation Process>>>> Action
To prepare for the input phase of the installation, check the required inputparameters for the installation [Page 54].
Run SAPinst [page 61] to install the database instance select Unicode SAPWeb Application Server 6.20 for DB2 UDB for iSeries - Default. On the nextdialog box, select Database Instance.
2 Installation – Step by Step
October 2002 15
Post-Installation ActivitiesTo complete the installation, you have to perform a number of actions. These actions aremandatory.>>>> Action
Grant authorizations for operating system collector programs [Page 68].
Check the password for <SID>OFR. If you kept the default password for<SID>OFR during the SAPinst installation, you should change it now. For moreinformation, see Changing the Passwords for User Profiles [Page 72].
Remove the SAPinst installation files [Page 72], if necessary.
Access a remote database [Page 74].
Install the online documentation [Page 74].
Configure SAProuter and SAPNet − R/3 Frontend [Page 75].
If required, refer to the sections under Additional Information [Page 80] forbackground information on the installation.
Additional Steps>>>> Action
After the database instance installation, you should install a central instance. Formore information, see Installing a Central Instance [Page 15].
2.2 Installing a Central InstanceUseYou use the following tables as a checklist to navigate through the installation procedurewhen you want to install a central instance either for a central system or for a standalonedatabase system.
Procedure
For the installation of a central system and a standalone database system theinstallation steps are identical. First of all, you must install the database instance,and then the central instance. It does not matter if they are on the same host ornot.
Installation PlanningCareful planning is a prerequisite for the successful installation of the system.>>>> Action
Obtain the required documentation [Page 22] for the installation.
Make sure you have obtained the current SAP Notes for theinstallation.
2 Installation – Step by Step
16 October 2002
Check your system configuration [Page 26].
Decide if you want to use LDAP (Lightweight Directory Access Protocol) for SAPLogon or the Microsoft Management Console (MMC).For more information, see Integration of LDAP Directory Services [Page 28].
Check the hardware and software requirements [Page 31].
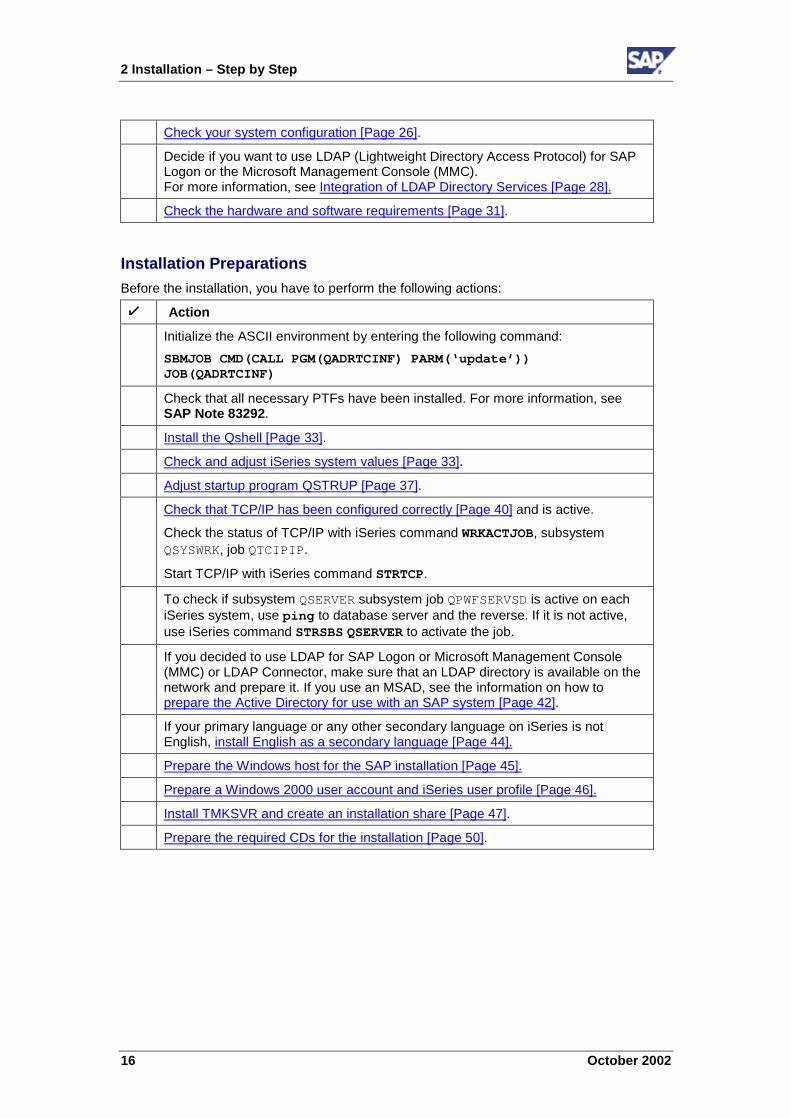
Installation PreparationsBefore the installation, you have to perform the following actions:> Action
Initialize the ASCII environment by entering the following command:SBMJOB CMD(CALL PGM(QADRTCINF) PARM(‘update’))JOB(QADRTCINF)
Check that all necessary PTFs have been installed. For more information, seeSAP Note 83292.
Install the Qshell [Page 33].
Check and adjust iSeries system values [Page 33].
Adjust startup program QSTRUP [Page 37].
Check that TCP/IP has been configured correctly [Page 40] and is active.
Check the status of TCP/IP with iSeries command WRKACTJOB, subsystemQSYSWRK, job QTCIPIP.
Start TCP/IP with iSeries command STRTCP.
To check if subsystem QSERVER subsystem job QPWFSERVSD is active on eachiSeries system, use ping to database server and the reverse. If it is not active,use iSeries command STRSBS QSERVER to activate the job.
If you decided to use LDAP for SAP Logon or Microsoft Management Console(MMC) or LDAP Connector, make sure that an LDAP directory is available on thenetwork and prepare it. If you use an MSAD, see the information on how toprepare the Active Directory for use with an SAP system [Page 42].
If your primary language or any other secondary language on iSeries is notEnglish, install English as a secondary language [Page 44].
Prepare the Windows host for the SAP installation [Page 45].
Prepare a Windows 2000 user account and iSeries user profile [Page 46].
Install TMKSVR and create an installation share [Page 47].
Prepare the required CDs for the installation [Page 50].

2 Installation – Step by Step
October 2002 17
Installation Process>>>> Action
To prepare for the input phase of the installation, check the required inputparameters for the installation [Page 54].
Run SAPinst [page 61] to install the central instance and select Unicode SAPWeb Application Server 6.20 for DB2 UDB for iSeries - Default. On the nextdialog box, select Central Instance.
Post-Installation ActivitiesTo complete the installation, you have to perform a number of actions. These actions aremandatory.>>>> Action
Grant authorizations for operating system collector programs [Page 68].
Install and use the SAP license [Page 68].
Check the password for <SID>OFR. If you kept the default password for<SID>OFR during the SAPinst installation, you should change it now. For moreinformation, see Changing Passwords for User Profiles [Page 72].
Remove the SAPinst installation files [Page 72], if necessary.
Set up the transport directory [Page 44].
Access a remote database [Page 74].
Check that you can start and stop the SAP system [Page 70].
Start the SAP Presentation GUI [Page 71].
Check that you can log on to the SAP system [Page 71].
After the installation, the SAP J2EE Engine is activated. If you do not want to useit, you deactivate it. For more information, see Deactivation of the SAP J2EEEngine in section Additional Information about the SAP J2EE Engine [Page 84].
Perform a full backup of the installation [Page 79].
Check the Workbench Organizer.
If required, refer to the sections under Additional Information [Page 80] forbackground information on the installation.

2 Installation – Step by Step
18 October 2002
Additional Steps>>>> Action
After the central instance installation, you can install a dialog instance ifrequired. For more information, see Installing a Dialog Instance [Page 19].
Once you have completed and checked the SAP system installation, youneed to prepare the SAP system for using business applications. Thisprocess includes customizing the basis system and the various businesscomponents. The procedure for implementing the business processes andorganizational structure of your SAP system is not described in thisdocumentation. For more information on Customizing, see the SAP Library(choose Help � SAP Library in your SAP system or access the SAP Libraryat: http://help.sap.com) and choose mySAP Technology Components→=SAP Web Application Server → Customizing.
2.3 Upgrading SAP Central Instance Java CoreUseYou use these tables as a checklist to navigate through the installation procedure when youwant to install the SAP J2EE Engine for an SAP central instance.
Procedure
Installation PlanningCareful planning is a prerequisite for the successful installation of the system.>>>> Action
Obtain the required documentation [Page 22] for the installation.
Make sure you have obtained the current SAP Notes for theinstallation.
Installation PreparationsBefore the installation, you have to perform the following actions:> Action
Create the SAP Communication User SAPJSF [Page 49] in your SAP productionclient.
Prepare the required CDs for the installation [Page 50].

2 Installation – Step by Step
October 2002 19
Installation Process>>>> Action
Run SAPinst [page 61] to upgrade to the Central Instance Java Core. SelectUpgrade SAP Central Instance Java Core 6.20.
Post-Installation ActivitiesTo complete the installation, you have to perform a number of actions. These actions aremandatory.>>>> Action
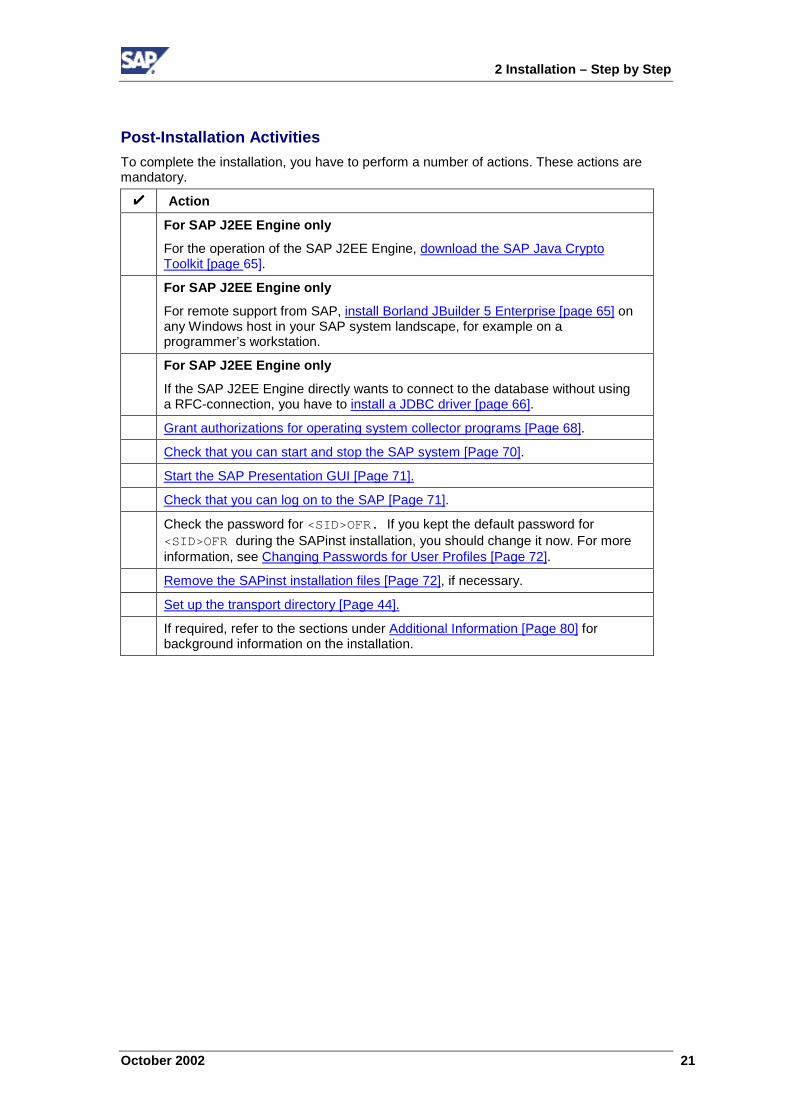
For the operation of the SAP J2EE Engine, download the SAP Java CryptoToolkit [Page 65].
For remote support from SAP, install Borland JBuilder 5 Enterprise [Page 65] onany Windows host in your SAP system landscape, for example on aprogrammer’s workstation.
If the SAP J2EE Engine directly wants to connect to the database without usinga RFC-connection, you have to install a JDBC driver [Page 66].
Create the SAP Communication User SAPJSF [Page 49] in your SAP productionclient.
2.4 Installing a Dialog InstanceInstallation PlanningCareful planning is a prerequisite for the successful installation of the system.>>>> Action
Obtain the required documentation [Page 22] for the installation.
Make sure you have obtained the current SAP Notes for theinstallation.
Check your system configuration [Page 26].
Decide if you want to use LDAP (Lightweight Directory Access Protocol) for SAPLogon or the Microsoft Management Console (MMC).For more information, see Integration of LDAP Directory Services [Page 28].
Check the hardware and software requirements checklist [Page 31].

2 Installation – Step by Step
20 October 2002
Installation PreparationsBefore the installation, you have to perform the following actions:> Action
Initialize the ASCII environment by entering the following command:SBMJOB CMD(CALL PGM(QADRTCINF) PARM(‘update’))JOB(QADRTCINF).
Check that all necessary PTFs have been installed. For more information, seeSAP Note 83292.
Install the Qshell [Page 33].
Adjust startup program QSTRUP [Page 37].
Check that TCP/IP has been configured [Page 40] correctly and is active.
Check the status of TCP/IP with iSeries command WRKACTJOB, subsystemQSYSWRK, job QTCIPIP.
Start TCP/IP with iSeries command STRTCP.
To check if subsystem QSERVER subsystem job QPWFSERVSD is active on eachiSeries system, use ping to database server and the reverse. If it is not active,use iSeries command STRSBS QSERVER to activate the job.
If your primary language or any other secondary language on iSeries is notEnglish, install English as a secondary language [Page 44].
Prepare the Windows host for the SAP installation [Page 45].
Prepare a Windows 2000 user account and iSeries user profile [Page 46].
Install TMKSVR and create an installation share [Page 47].
Prepare the required CDs for the installation [Page 50].
Installation Process>>>> Action
To prepare for the input phase of the installation, check the required inputparameters for the installation [Page 54].
ABAP onlyRun SAPinst [page 61] to install the dialog instance (ABAP only) select UnicodeSAP Web Application Server 6.20 for DB2 UDB for iSeries - Default. On the nextdialog screen, select Dialog Instance.
Including SAP J2EE EngineRun SAPinst [page 61] to install the dialog instance (including SAP J2EEEngine). Select Unicode SAP Web Application Server 6.20 for DB2 UDB foriSeries - Java.
2 Installation – Step by Step
October 2002 21
Post-Installation ActivitiesTo complete the installation, you have to perform a number of actions. These actions aremandatory.>>>> Action
For SAP J2EE Engine onlyFor the operation of the SAP J2EE Engine, download the SAP Java CryptoToolkit [page 65].
For SAP J2EE Engine onlyFor remote support from SAP, install Borland JBuilder 5 Enterprise [page 65] onany Windows host in your SAP system landscape, for example on aprogrammer’s workstation.
For SAP J2EE Engine onlyIf the SAP J2EE Engine directly wants to connect to the database without usinga RFC-connection, you have to install a JDBC driver [page 66].
Grant authorizations for operating system collector programs [Page 68].
Check that you can start and stop the SAP system [Page 70].
Start the SAP Presentation GUI [Page 71].
Check that you can log on to the SAP [Page 71].
Check the password for <SID>OFR. If you kept the default password for<SID>OFR during the SAPinst installation, you should change it now. For moreinformation, see Changing Passwords for User Profiles [Page 72].
Remove the SAPinst installation files [Page 72], if necessary.
Set up the transport directory [Page 44].
If required, refer to the sections under Additional Information [Page 80] forbackground information on the installation.
3 Installation Planning
22 October 2002
3 Installation Planning
3.1 Required Documentation
The structure of the installation documentation and procedure have changedsignificantly. You must read Installation – Step by Step [Page 12].
Before starting the installation, make sure you have access to the following information:
• IBM Information APAR II12833 (for V5R1) or APAR II13337 (for V5R2).
This Information APAR contains the latest information on CUM package release levelsand OS/400 corrections related to SAP on IBM eServer iSeries. We recommend that youload the PTF release level recommended by IBM in the Information APAR for yourOS/400 release level.
• SAP Note 568024
• SAP Front End Installation GuideSAP Service Marketplace, alias instguides
• Network Integration of SAP ServersSAP Service Marketplace, alias network
• SAP Language Transport (if required)SAP Service Marketplace, alias instguides
SAP NotesRead the SAP Installation Notes before you begin the installation. These SAP Notes containthe most recent information regarding the installation, as well as corrections to the installationdocumentation.
Make sure that you have the most recent version of each SAP Note. You can find the SAPNotes in the SAP Service Marketplace at:http://service.sap.com/notes
NoteNumber
Note Title
568024 INST: Unicode 6.20 SAP Web Application Server Installation on IBMeServer iSeries
503526 iSeries Latest News: SAP Web Application Server - Rel. 6.20
445315 Why Install with Global Language Solution
83292 Releases and PTFs for R/3 on AS/400
419483 AS/400 Client Copy
410783 Operating System Releases for SAP Kernel 6.x iSeries
392165 iSeries: Known Problems on V5R1M0
39510 iSeries: ASCII-EBCDIC
363663 AS/400: NLS on AS/400 (ASCII)

3 Installation Planning
October 2002 23
49201 AS/400: Performance Settings for the SAP System
47144 AS/400 equivalents to UNIX commands
68732 AS/400: IBM tools EDTF, DSPSTMF, SQLUTIL...
93316 Starting/stopping all instances
84685 AS/400: RFC SDK in Release 4.x
443925 SAP Systems on DB2 UDB for iSeries vs. MCOD
88080 Archiving with different code pages
SAPinst Troubleshooting GuideRead the documentation SAPinst Troubleshooting Guide. It provides up-to-date informationabout how to avoid installation failure and what to do if a failure occurs.
You can find the SAPinst Troubleshooting Guide in the SAP Service Marketplace at:http://service.sap.com/sapinstfeedback
Additional InformationThe following list provides an overview of the additional documentation that is available in theSAP Service Marketplace:
Documents that are also part of the delivered Installation/UpgradeDocumentation CD-ROM are marked with "[CD]".
• For OS dependencies, see the documentation SAP Software on UNIX: OSDependencies [CD] in the SAP Service Marketplace at:
http://service.sap.com/instguides
• For Unicode SAP systems and their availability, see SAP Note 79991 and the SAPService MarketPlace at:http://service.sap.com/unicode
• For platforms released for mySAP.com, see the SAP Service Marketplace at:http://service.sap.com/platforms
• For technical infrastructure (like configuration scenarios and related aspects such assecurity, load balancing, availability and caching), see the SAP Service Marketplace at:http://service.sap.com/network
• For installation of front ends for the SAP system, see the documentation Front EndInstallation Guide [Presentation CD] or the SAP Service Marketplace at:
http://service.sap.com/instguides
• For mySAP.com Workplace, see the SAP Service Marketplace at:http://service.sap.com/workplace

3 Installation Planning
24 October 2002
• For SAP systems for high availability purposes, see:
− SAP online documentation BC SAP High Availability in the SAP Library (choose Help� SAP Library in your SAP system) or access the SAP Library at:http://help.sap.com
− SAP Service Marketplace at:http://service.sap.com/ha
• For homogeneous system copy, see SAP Note 516246.
• For heterogeneous system copy, see the SAP Service Marketplace at:http://service.sap.com/osdbmigration
• For information about SAP Web AS Security, see the SAP Service Marketplace at:http://service.sap.com/security
SAP DocumentationOnce you have installed the SAP documentation CD, you can access the SAP Library bychoosing Help � SAP Library in your SAP system or access the SAP Library at:http://help.sap.com
The following documentation is referred to in this installation documentation:
Documentation Path
Computing CenterManagement System
mySAP Technology Components → SAP Web Application Server→ Computing Center Management System → Computer CenterManagement System
SAP High Availability mySAP Technology Components → SAP Web Application Server→ Computing Center Management System → SAP HighAvailability
SAP Printing Guide mySAP Technology Components → SAP Web Application Server→ Computing Center Management System → SAP Printing Guide
Client Copy andTransport
mySAP Technology Components → SAP Web Application Server→ Change and Transport System → Client Copy and Transport
The SAPCommunication Server
mySAP Technology Components → SAP Web Application Server→ Basis Services / Communication Interfaces → CommunicationInterfaces → The SAP Communication Server
SAPconnect mySAP Technology Components → SAP Web Application Server→ Basis Services / Communication Interfaces → CommunicationInterfaces → SAPconnect
SAProuter mySAP Technology Components →SAP Web Application Server→ Client/Server Technology → SAProuter
SAP License mySAP Technology Components → SAP Web Application Server→ Client/Server Technology → SAP License
3 Installation Planning
October 2002 25
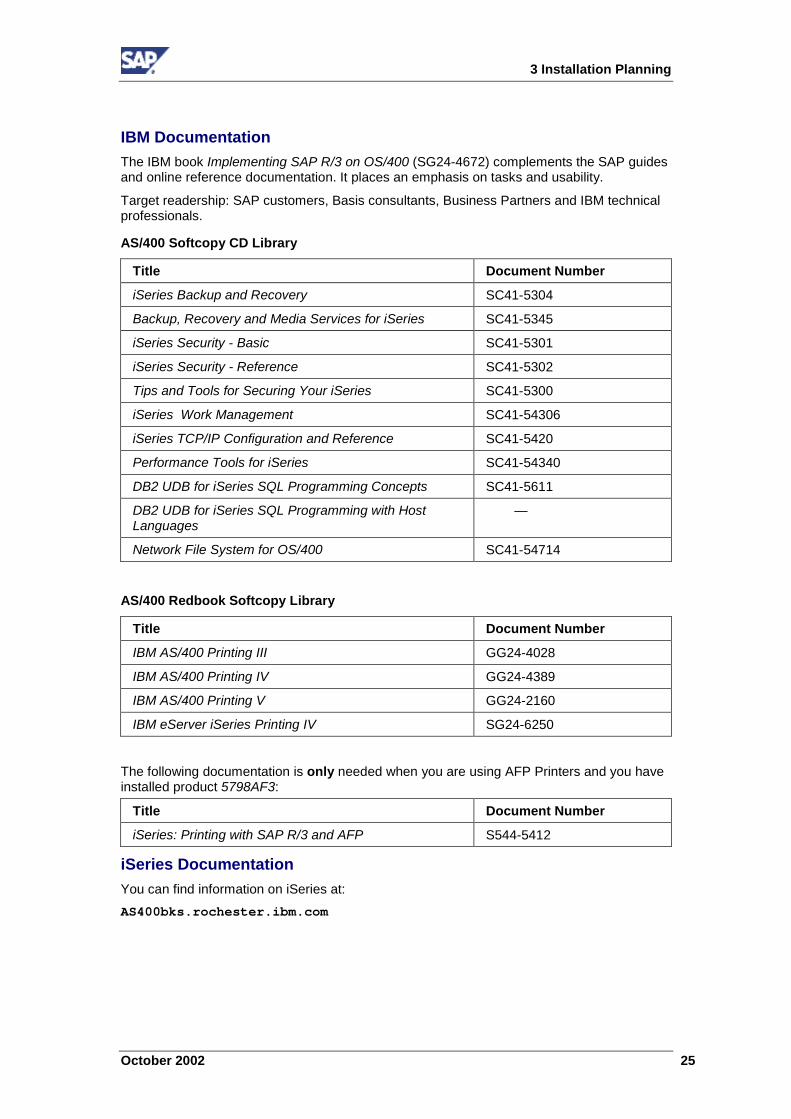
IBM DocumentationThe IBM book Implementing SAP R/3 on OS/400 (SG24-4672) complements the SAP guidesand online reference documentation. It places an emphasis on tasks and usability.
Target readership: SAP customers, Basis consultants, Business Partners and IBM technicalprofessionals.
AS/400 Softcopy CD Library
Title Document Number
iSeries Backup and Recovery SC41-5304
Backup, Recovery and Media Services for iSeries SC41-5345
iSeries Security - Basic SC41-5301
iSeries Security - Reference SC41-5302
Tips and Tools for Securing Your iSeries SC41-5300
iSeries Work Management SC41-54306
iSeries TCP/IP Configuration and Reference SC41-5420
Performance Tools for iSeries SC41-54340
DB2 UDB for iSeries SQL Programming Concepts SC41-5611
DB2 UDB for iSeries SQL Programming with HostLanguages
—
Network File System for OS/400 SC41-54714
AS/400 Redbook Softcopy Library
Title Document Number
IBM AS/400 Printing III GG24-4028
IBM AS/400 Printing IV GG24-4389
IBM AS/400 Printing V GG24-2160
IBM eServer iSeries Printing IV SG24-6250
The following documentation is only needed when you are using AFP Printers and you haveinstalled product 5798AF3:
Title Document Number
iSeries: Printing with SAP R/3 and AFP S544-5412
iSeries DocumentationYou can find information on iSeries at:AS400bks.rochester.ibm.com

3 Installation Planning
26 October 2002
3.2 System ConfigurationThe configuration of the system is generally planned well in advance of the installationtogether with the hardware vendor. Configuration planning involves deciding whether acentral system or standalone database system is to be installed, and how many dialoginstances are required.
The configuration is worked out with the hardware partner on the basis of sizing informationthat reflects the system workload. Details such as the set of applications that are to bedeployed, how intensively these are to be used, and the number of users enable thehardware vendor to recommend a configuration that performs well.
An SAP system consists of a database server, additional application servers (optional), and anumber of front end computers. The graphic below shows a typical distribution of theinstances of an SAP system over several computers.
The database server is the computer on which the database is installed. It is namedDBSERVER in the graphic. This server can also accommodate the central instance (the SAPinstance that includes the message server and enqueue server processes). If the centralinstance is installed on a separate application server, the database server is called astandalone database server.
Additional dialog instances (SAP instances including only dialog, batch, spool, or updateprocesses) are installed on application servers. These servers are named D1 and D2 in thegraphic.
It is possible to install an SAP instance exclusively as a standalone gateway (not shown inthe graphic). This type of instance does not contain normal work process types (dialog,background, update, enqueue or spool). Only the gateway process (gwrd) is started.
You can think of an SAP instance (central or dialog instance, or standalone gateway) as agroup of processes that are started and stopped at the same time. Every instance has a two-digit identifier between 00 and 97 that must be unique on a computer.
SAPSAPSAPSystemSystemSystem
SAP GUISAP GUISAP GUISAP GUI SAP GUISAP GUISAP GUISAP GUI
. . .. . . . . .. . .
SAPSAPInstanceInstance
(DVEBMGS00)(DVEBMGS00)
Hos
t DB
SER
VER
Hos
t DBS
ERVE
R
DatabaseServer
Application Serverwith
Central Instance
Application Serverwith two
Dialog Instances
Application Serverwith one
Dialog Instance
SAPSAPInstanceInstance
(D00)(D00)
Hos
t D1
Hos
t D1
SAPSAPInstancesInstances(D00+D01)(D00+D01)
Hos
t D2
Hos
t D2
DB
3 Installation Planning
October 2002 27
Typical Configuration of an SAP systemWhen planning the configuration of your SAP system, consider the followingrecommendations:
• Install only one SAP system on each computer. You can install several SAP systems onthe same computer, but if you upgrade one of them a new version of the operatingsystem might be required. In this case, you cannot run SAP systems that have differentreleases on this computer.
• Install only one central instance per computer. You should only install more instances ifthe computer has enough RAM available.
3.3 Multiple SAP Systems on a Single iSeriesSystemSAP on iSeries allows installation of multiple SAP systems on a single iSeries machine(provided space exists). However, we recommend that you isolate your SAP productionsystem as far as possible from your test and development systems. The degree of isolationyou opt for can range from running each SAP system on a separate iSeries to having all theenvironments on a single machine.
If you decide to implement multiple SAP systems on a single iSeries system, you need to beaware of the risks involved.
Multiple SAP systems on a single iSeries is similar to MCOD. For more information, see SAPNote 443925.
Importance of an Independent Testing EnvironmentIf you have both your production and development/test systems on the same machine, youwill not be able to test PTFs (IBM program temporary fixes) and CUM packages (cumulativepackages) in an independent testing environment without immediately affecting theproduction system.
The same applies to operating system (OS/400) upgrades. If these initially take place in anindependent test environment, it allows you to identify any customer-specific problems (suchas problems resulting from any modifications you might have made to the standard system)away from the live environment.
If you have more than one SAP system on a single iSeries machine, you can test SAPupgrades independently. However, if you test an SAP upgrade on a separate iSeriesmachine, it has the advantage that a test SAP upgrade will not take away resources from theproduction system.
Possibilities for Resource Distribution• LPAR: Logical Partitioning of the iSeries System
On iSeries, you can divide your complete iSeries system into several entirelyindependent servers. This means that you install different copies of OS/400 on each ofthe servers. You can decide on the CPU, memory and DASD splitting. Only the serialnumber is the same, and all the other elements are separate and cannot interfere with asystem in another LPAR. This is the best (but most expensive) way to separate SAPsystems.
3 Installation Planning
28 October 2002
• Memory: Running SAP Instances in Separate Subsystems
Each SAP system with its associated database can have multiple instances. Eachinstance runs in a separate OS/400 subsystem. (A subsystem is an operatingenvironment in which the system coordinates processing and resources.) The subsystemdefinition allows you to define and allocate individual memory pools to the subsystem.These memory pools cannot be accessed by users from any other SAP instance.
• Disks: Separate ASPs for Each SAP System
On iSeries systems the installed disk capacity can be segmented to provide a separateauxiliary storage pool (ASP) for each SAP system. You can then allocate specific diskdrives to each user ASP created. This helps to minimize the impact of disk activity of oneSAP environment on other SAP environments.
• Processors: Long-Running Tasks Can Slow Down the Production Environment
Regardless of the number of processors involved, the iSeries system manages them allas a single entity. It dispatches tasks to its processors and ensures that usage isbalanced. A long-running program or other task encountered during development ortesting can have an impact on production activity if these SAP systems are running onthe same machine. You can minimize the potential impact of this by running developmentand test systems at a lower priority than the production system.
Using a Shared Kernel LibraryYou can opt to run SAP systems with either shared or separate kernel libraries. If you areinstalling a second production system, you may decide to share the kernel library to savespace. If you have a production system and are now installing a test system, it is advisable touse separate kernel libraries.
The installation does not currently support sharing of a kernel library at installation time. Youalways have to load the kernel that is on the SAP kernel CD.
If you want to share a kernel after the installation, run the commands:RMVR3KRN <SID> DLTKRNLIB(*YES)
APYR3KRN <SID> KRNLIB<kernel_library_name> DLTSQLPKG(*YES)
3.4 Integration of LDAP Directory ServicesPurposeThe Lightweight Directory Access Protocol (LDAP) is a feature of Windows 2000 that allowsimportant information within a corporate network to be stored centrally on a server where itcan be easily accessed and administered. Storing information centrally for the entire networkhas the advantage that data must be maintained only once and therefore will not beredundant or inconsistent.
If an LDAP directory is available in the corporate network, you can configure the SAP systemso as to make the most of this feature. For example, a configured SAP system can readinformation from the directory and also store information there.
The following text explains the benefits of using the SAP system with the LDAP directory. Inaddition, the text also gives an overview of the configuration steps necessary before the SAPsystem can be used with the directory.

3 Installation Planning
October 2002 29
The SAP system is able to interact with the Active Directory using the LDAPprotocol. This defines how communication between the SAP system and thedirectory is conducted and how data in the directory is structured, accessed,or modified. If a directory other than the Active directory also supports theLDAP protocol, the SAP system can take advantage of the information storedthere. For example, if there is an LDAP directory on a UNIX or Windowsserver, the SAP system can be configured to use the information availablethere. In the following text, directories other than the Active Directory thatimplement the LDAP protocol are referred to as generic LDAP directories.
In the SAP environment, the information stored in an Active Directory or generic LDAPdirectory can be exploited by using:
• SAP Logon
• The Microsoft Management Console (MMC)
For more information on the automatic registration of SAP components in LDAP directoriesand the benefits of using it in SAP Logon and MMC, read the documentation R/3 SystemInformation in Directory Services in the SAP Service Marketplace at:http://service.sap.com/msplatforms → =Microsoft → Core Technology
The SAP LogonInstead of using a fixed list of systems and message servers, you can configure the SAPLogon in the sapmsg.ini configuration file to find SAP systems and their message serversfrom the directory. If you configure SAP Logon to use the LDAP directory, it will query thedirectory each time Server or Group selection is chosen as a means of getting up-to-dateinformation on available SAP systems.
To use the LDAP operation mode, the sapmsg.ini file must contain the following Addresssection:
[Address]Mode=LDAPdirectory
LDAPserver=
LDAPnode=
LDAPoptions=
If you use an Active Directory, you must set LDAPoptions=“DirType=NT5ADS” (see SAPsystem profile parameter ldap/options). If the client is not located in the same domainforest as the Active Directory, or the operating system does not have a directory service client(NT4.0 and Win9X without installed dsclient), you must specify the directory servers (forexample, LDAPserver=pcintel6 p24709). For more information, refer to the SAP systemprofile parameter ldap/servers. For other directory services, you can use LDAPnode tospecify the distinguished name of the SAP root node (see SAP system profile parameterldap/saproot).
The MMCThe MMC is a graphical user interface for administering and monitoring SAP systems from acentral location. It presents and analyzes system information that is gathered from varioussources, including the Active Directory, if the SAP system has been prepared appropriately.When the Active Directory is integrated as a source of information this has advantages for theMMC. It can read system information straight from the directory that automatically registerschanges to the system landscape. As a result, up-to-date information about all SAPapplication servers, their status, and parameter settings is always available in the MMC.

3 Installation Planning
30 October 2002
The use of the MMC in combination with Active Directory services is particularlyrecommended for the administration of distributed systems. For example, in a distributedenvironment that implements the mySAP.com components SAP BW, SAP EBP, SAP APO,and SAP CRM, this simplifies administration. It is possible to keep track of significant eventsin all of the systems from a single MMC interface. Changes within the system configurationdo not have to be registered manually; they are automatically updated in the directory andsubsequently reflected in the MMC.
PrerequisitesThe SAP system can only be configured for Active Directory services or other LDAPdirectories if these are already available on the network. The Active Directory is a feature ofWindows 2000 and is automatically available on all domain controllers. A generic LDAPdirectory is an additional component that must be installed separately on a UNIX or Windowsserver.
Process Flow
Active DirectoryTo enable an SAP system to make use of the features offered by the Active Directory, youmust configure both the Active Directory and the SAP system.
• In a first step, the Active Directory must be prepared so that it can store SAP data. Thisinvolves extending the schema for the SAP data types, creating a root container for thestorage of SAP-specific information, and defining accounts that allow directory access.These tasks are all performed using the R3SETUP tool that offers the option ConfigureActive directory for SAP.
For more information, see Preparing the Active Directory for Use with the SAP System[Page 42].
• In a second step, the SAP system must be configured to enable interaction with theActive Directory. This is carried out during the installation of the SAP central instanceusing the SAPinst tool. The SAPinst tool prompts for information related to the ActiveDirectory and then configures the system accordingly.
Generic LDAP DirectoriesThe process of preparing the SAP system for the use of generic LDAP services involves anumber of manual steps. Again, both the LDAP directory and the SAP system must beconfigured appropriately:
• The LDAP directory must be configured to store SAP data. This involves extending thedirectory schema and creating a container for the SAP data.
• The SAP system must be configured to enable interaction with the LDAP directory. Theconfiguration steps are carried out by the SAPinst tool during the installation of the SAPcentral instance. The SAPinst tool configures the system correctly using the directoryinformation that must be entered before the installation procedure begins.
• A user with a password must be set up on the server where the SAP system is running topermit the system to access and modify the LDAP directory. This is carried out byrunning the script ldappasswd.
For more information on how to enable interaction between a generic LDAP directory and theSAP system, see Directory Access Services at:http://service.sap.com/systemmanagement.

3 Installation Planning
October 2002 31
3.5 Hardware and Software RequirementsThe following table lists the requirements for an SAP system installation on IBM eServeriSeries:
Requirement How to check
HardwareRequirements
Before installing an SAP system on iSeries, you must obtain detailedsizing information from your IBM representative.
SoftwareRequirements
Make sure you have installed TMKSVR before starting the installation.For more information, see Installing TMKSVR and Creating anInstallation Share [Page 47].
OperatingSystemRequirements
SAP Web AS Release 6.20 is released for OS/400 V5R1M0.
For information about which OS/400 versions have been released forSAP on IBM iSeries, see SAP Note 156557. For information on V5R1and V5R2, see SAP Note 392165.
PTF and Information APARFor the latest information on cumulative PTF package (CUM package)release levels and OS/400 corrections related to Release 6.10 of SAPon IBM eServer iSeries, refer to IBM Information APAR II12833:
To load an APAR onto your iSeries system via the IBM ECS link, enter:SNDPTFORD PTFID((<Info APAR ID>))
To load the IBM Info APAR, enter:SNDPTFORD PTFID((II12833)) for V5R1SNDPTFORD PTFID((II13337)) for V5R2
SAP Note 83292 gives an overview of releases and PTFs for SAP oniSeries and provides you with the address where you can find the InfoAPARs.
Make sure that English is installed as the primary orsecondary language. For more information, see InstallingEnglish as a Secondary Language [Page 44].
To be able to run an SAP system on iSeries with ASCII code pages,make sure that you have installed the following: 5722SS1 option 21 –Extended NLS Support. This option is delivered to you by IBM with theinstallation CDs of the operating system.
For more information about how to install the secondary language, seethe IBM documentation AS/400 National Language Support (SC41-5101-01).
Other ProductsThe installation of the following product is required:
• 5722SS1 option *BASE Operating System/400
• 5722SS1 option 1 OS/400 - Extended Base Support
• 5722SS1 option 2 OS/400 - Online Information
3 Installation Planning
32 October 2002
• 5722SS1 option 3 OS/400 - Extended Base Dir. Support
• 5722SS1 option 12 OS/400 - Host Servers
• 5722SS1 option 32 OS/400 - Directory Services
The installation of the following products is highly recommended:
• 5799AJC option *BASE Apply Journaled Changes Extended
Only on V5R1! Later, it is included in the *BASE OS/400• 5722SS1 option 30 OS/400 - Qshell Interpreter
SpaceRequirements
The amount of space required for an SAP system on iSeries isdependent on many variables, such as:
• Size of the database
• Number of work processes
• Number of users
Sizing recommendations are made by the IBM Competency Center.However, approximately 25 GB DASD are required to start an SAPsystem. We recommend that ASP (auxiliary storage pool) usage in SAPproduction systems should not exceed 70%.
Front EndRequirements
SAP systems on iSeries supports the following front end products:
• Windows NT/2000/XP
• Windows 95/98/Me
• Linux
• IBM Network Station with WinCenter
To connect front ends, you require an Ethernet LAN adapter.
DB2 UDB for iSeriesThe DB2 Universal Database for iSeries is fully integrated into the OS/400 operating system.No separate installation phase is required for the database code and database tools.
If you perform an installation with the Global Language Solution, heterogeneousenvironments are also supported. That means, you can also run Windows 2000 as anapplication server.
4 Installation Preparations
October 2002 33
4 Installation Preparations
4.1 Installing the QshellUseSAP Web AS requires an installed Qshell.
Qshell is compatible with ksh scripts in UNIX.
Procedure1. Install the Qshell Utilities.
2. Install option 30 of the Qshell Interpreter (license program 5722SS1).
You can find more information on Qshell and installing the Qshell Utilities and the QshellInterpreter at:http://www.iSeries.ibm.com/as400/developer/qshell
4.2 Checking and Adjusting iSeries SystemValuesUseTo allow the SAP system to run optimally on iSeries, you have to adjust a number of iSeriessystem values.
Prerequisites• You have entered the following command to switch on work control block compression:
CHGIPLA CPRJOBTBL(*ALL)This allows work control block space to be reused.
• The recommendations given below for system values QACTJOB, QTOTJOB, QADLACTJ,and QADLTOTJ assume that only the SAP system is running on the iSeries. If you arealso running other applications, you might need to pre-allocate more jobs. The valuesQACTJOB and QTOTJOB are used for initial space allocation at IPL (initial program load)time for the number of active jobs and the total number of jobs that will be in the systemat any one time. If or when the allocated number of either type is reached, the systemvalues QADLACTJ and QADLTOTJ determine how many additional jobs of that type are tohave space allocated. Check and adapt your TCP/IP configuration on iSeries. For moreinformation, see SAP Note 92589. Do not forget to perform an IPL after any change,otherwise your change will not work.
• You have applied all installed PTFs on your iSeries. To check this, enter:DSPPTFPTFs with the state Permanently applied, Temporarily applied or Superseded areintegrated in the system or are superseded by a newer PTF. PTFs with another statesuch as Not applied, Save file only, Damaged, Cover letter only are not currently active.We recommend that all installed and required PTFs are applied and active.
4 Installation Preparations
34 October 2002
Procedure• To display all system values, enter:
WRKSYSVAL SYSVAL(*ALL) OUTPUT(*PRINT)
• To display or change individual system values, enter:WRKSYSVAL SYSVAL(<system_value_name>)
and enter option 5 (Display) or option 2 (Change).
After changing a system value, enter option 5 (Display) to check your changes.
To avoid having to run an IPL (initial program load) several times, werecommend that you delay the IPL until you have made all the necessarychanges to the system values and, if necessary, have added a user ASP[Page 39] (auxiliary storage pool).
SystemValue
RecommendedValue
Description
QACTJOB 1000 Set system value QACTJOB to a value close to thenumber of jobs usually on your system. (To find outthe number of jobs, use the commandWRKACTJOB. For a 2-tier system, this is normallyabout 1000).
QTOTJOB 2000 To begin with set system value QTOTJOB to 2000.When you have worked with the SAP system for awhile, adjust this value to the value you usually seein the field Jobs in system on the WRKSYSSTScommand.
QADLACTJandQADLTOTJ
500
1000
Set system value QADLACTJ to 500 and systemvalue QADLTOTJ to 1000.
QSECURITY 30 or 40 System value QSECURITY controls the level ofsecurity enforced on your system. Set QSECURITYto at least 30 to ensure object security for the SAPobjects to be installed.
Security levels 10 and 20 are theoreticallypossible. However, we do not recommend that youuse either of these values. Security level 10provides neither password nor object protection.Security level 20 provides no object protection.
To activate this system value, you must perform anIPL (initial program load).
QCTLSBSD QCTL When you start your iSeries system, the programspecified in system value QSTRUPPGM(QSTRUP) iscalled. This startup program is responsible forstarting the subsystems.
When this startup program runs, system valueQCTLSBSD is queried. The specifications made forthis value decide whether subsystem QBASE or

4 Installation Preparations
October 2002 35
subsystems QCTL, QINTER, QBATCH, QSPL, QCMN,and QSERVER are started.
Two settings are possible for system valueQCTLSBSD (controlling subsystem).
• QBASE
The controlling subsystem is QBASE.Subsystem QBASE is started.
• QCTL
The controlling subsystem is QCTL.Subsystems QCTL, QINTER, QBATCH, QSPL,QCMN, QSERVER are started. Your change isactivated the next time the iSeries is started. Toactivate the subsystems, you have to restart theiSeries system.
QDATE Check the system date and adjust if necessary.(The date format is determined by system valueQDATFMT.)
QTIME Check the system time and adjust if necessary.
QJOBMSGQFL *WRAP or*PRTWRAP
System value QJOBMSGQFL allows you to specifyhow you wish the job message queue to behandled if it overflows. The default value is*NOWRAP. If this value is set, the iSeries systemsends a message when the queue is full and endsthe job that is currently running. When an SAPsystem is installed, a large amount of information issent to the job message queue. For this reason,system value QJOBMSGQFL is automaticallychanged to *WRAP during installation. If the queuebecomes full, the oldest entries will be deleted andthe current job will not be interrupted. Onceinstallation is complete, the system value isautomatically returned to its original value.
QPFRADJ 0 If you have adjusted the size of the iSeries poolsas described in SAP Note 49201, you have to setsystem value QPFRADJ to 0 to deactivateautomatic performance adjustment to prevent yoursettings from being lost after an IPL.
QSTRUPPGM To cause your adjusted startup program to bestarted after an IPL (initial program load), changeStartup program to QSTRUP and Library to QGPL.
QAUTOCFG 1 Set system value QAUTOCFG to 1 to allow devicedescriptions to be configured automatically.

4 Installation Preparations
36 October 2002
QBASACTLVL Use the followingformulas:
Database server:(number of SAPwork processes onDB server +number of SAPwork processes oneach remoteapplication server )* 1.20.
Applicationserver: (number ofSAP workprocesses onapplication server )* 1.20.
Database serverand applicationserver: (number ofSAP workprocesses) * 1.20.
QBASACTLVL is the base storage pool activity level.This value indicates how many system and userthreads can compete at the same time for storage inthe base storage pool. This pool is specified in thesubsystem descriptions as *BASE. QBASACTLVLdepends on the types of jobs being run in thisstorage pool. The lower limit for QBASACTLVL is 1.
The Query Optimizer uses that value to determine afair share of memory to use when calculating thebest way to optimize a query. It takes the amount ofmemory in the Pool and divides by QBASACTLVLand will not pick an optimization that would use morethan this value.
QBASACTLVL should therefore be set as low aspossible. It must be larger than the total number ofwork processes, but not much larger.
Be aware that this value does not affect only SAP-work processes but also processes which belongto other applications running on your system.
QSYSLIBL Change the system value QSYSLIBL by enteringQADRT as the last entry in the system library list.
ResultYou have made the necessary adjustments to iSeries system values to enable the SAPsystem to run correctly on iSeries.

4 Installation Preparations
October 2002 37
4.3 Adjusting Startup Program QSTRUPUse
Starting TCP/IP AutomaticallyTo run an SAP system on iSeries you require TCP/IP. Since it would be inconvenient to haveto start TCP/IP manually after each IPL (initial program load), we recommend that you insertthe command for start TCP/IP into your startup program.
Starting the Job QXDAEDRSQL AutomaticallyThe job QXDAEDRSQL is a prerequisite for working with the SAP system. It is required for thefollowing tasks:
• Calling APIs from the ABAP Dictionary and from CCMS (Computing Center ManagementSystem)
• Transports between different iSeries systems
To cause the job QXDAEDRSQL to be started automatically after each IPL, enter the followingcode into program QSTRUP:
STRTCPSVR SERVER(*EDRSQL)MONMSG MSGID(CPF0000)
ProcedureAs no source statements are provided for startup program QSTRUP, you have to retrieve theCL (control language) source statements from CL program QSTRUP. This is possible as theparameter RTVCLSRC(*YES) was specified when the program was created.
1. To retrieve the CL source statements, enter:RTVCLSRC PGM(QSYS/QSTRUP) SRCFILE(QGPL/QCLSRC) SRCMBR(QSTRUP)
If the source statements are retrieved successfully, this message is displayed:
CL source retrieved for program QSTRUP in QSYS.
2. If you are editing the program with EDTF, enter:
EDTF FILE(QGPL/QCLSRC) MBR(QSTRUP)
3. To start TCP/IP automatically, enter the command:STRTCP
Start TCP/IP before you start subsystem QSERVER. The parameter DLYJOBDLY(30) gives TCP/IP time to start before the subsystem is started.If you decide not to or are unable to edit program QSTRUP, you can startTCP/IP manually. At this point, QSERVER is normally already running. Beforestarting TCP/IP, shut down the subsystem with command ENDSBS.
4. To start the job QXDAEDRSQL automatically, enter the following into program QSTRUP:
STRTCPSVR SERVER(*EDRSQL)MONMSG MSGID(CPF0000)

4 Installation Preparations
38 October 2002
The following is an example of how the program modifications might look:
/**//* START ADDITIONAL PROGRAM*//**/STARTTCP: /* INSERT*/
QSYS/STRTCP /* INSERT*/
MONMSG MSGID(CPF0000) /* INSERT*//* START TCP/IP BEFORE QSERVER SO THAT ALL JOBS IN QSERVER*//* ARE UP AND RUNNING*/
DLYJOB DLY(30) /* INSERT*/
QSYS/STRSBS SBSD(QSERVER)MONMSG MSGID(CPF0000)STRTCPSVR SERVER(*EDRSQL) /* INSERT
*/MONMSG MSGID(CPF0000) /* INSERT */
/**/
5. To leave the editor, choose F3.
6. After you have made your changes to the source statements in program QSTRUP, youhave to create the CL program from the source code.
Do not change the original QSTRUP program supplied by IBM. Instead, createa modified version of QSTRUP in library QGPL. If you do this, the program willnot be overwritten when an IBM system upgrade is performed.
To do so, enter:CRTCLPGM PGM(QGPL/QSTRUP) SRCFILE(QGPL/QCLSRC) SRCMBR(QSTRUP)
If the program is created successfully, you receive this message:Program QSTRUP created in library QGPL.
7. To make sure that your adjusted startup program (and not the default startup program) isstarted after an IPL, adjust system value QSTRUPPGM. For additional information, seeChecking and Adjusting iSeries System Values [Page 33].
ResultThe programs and jobs you have included in your startup program are started automaticallywhen you perform an IPL (initial program load) of your iSeries system.
To check if TCP/IP is running, enter WRKACTJOB. Look for subsystem QSYSWRK, job QTCPIP.If the job is running, the entry in the status column is normally DEQW.

4 Installation Preparations
October 2002 39
4.4 Adding a User ASPUseWe strongly recommend that you keep your journal receivers in a separate user ASP(auxiliary storage pool).
We recommend that you allow 4 to 72 GB (the minimum size is 4 GB) for your user ASP. Ifyou have a very busy system, you can allow more disk units. However, we recommend thatyou select at least 2 disks or in a busy system 4-6 disks and increase the size later if you findthat journal receiver switches are taking place too frequently or your user ASP is being filledup too quickly. The procedure consists of two stages:
1. You check that a user ASP has been set up and, if so, that it has been assigned sufficientspace (see the recommendations above).
2. You add a user ASP (if required).
Checking the User ASP1. Enter STRSST (Start System Service Tools).
2. Enter option 3 (Work with disk units).
3. Enter option 2 (Work with disk configuration).
4. Enter option 1 (Display disk configuration).
5. Enter option 2 (Display disk configuration capacity).You can see whether a user ASP exists and, if so, make sure that it still contains enoughspace (see the recommended values given above).
You will encounter problems during installation if you have an existing userASP that contains journal receivers or save files belonging to libraries that arelocated in another ASP. In this case, you will not be able to create additionallibraries in this user ASP and the installation will fail.If you have sufficient disk space, we recommend that you work around thisproblem by adding a second user ASP (for example, ASP 3). The alternativewould be to leave the journal receivers in the system ASP. However, we donot recommend this for security and performance reasons.For detailed information, see the IBM documentation OS/400 Backup andRecovery (SC41-5304).
Adding a User ASP1. Perform a manual IPL (Initial Program Load) of your iSeries.
− Set the mode to manual on the control panel
− Enter the iSeries command:PWRDWNSYS *IMMED RESTART(*YES)
2. Enter option 3 (Use Dedicated Service Tools (DST)) from the menu that appears.
3. Sign on by entering your DST user and password.
4. Enter option 4 (Work with disk units).
5. Enter option 1 (Work with disk configuration).
6. Enter option 3 (Work with ASP configuration).

4 Installation Preparations
40 October 2002
7. Enter option 6 (Move units from one ASP to another).
8. Specify the ASP to which you wish to move specific units by entering the number of theASP next to the relevant unit in the column New ASP.
9. Choose ENTER.
10. In the next screen, choose ENTER to confirm that you wish to continue.
11. The Confirm Move of Units display appears. To confirm your choices, choose ENTER.Moving units will take several minutes.
12. Continue the procedure and complete the IPL.
13. Switch back to normal mode.
4.5 Configuring TCP/IPUseFollow this procedure to integrate the iSeries machine into your TCP/IP network.
PrerequisitesBefore configuring TCP/IP, do the following:
• Make sure that you have the following information:
− The interface of your iSeries machine to which the Local Area Network is attached
− The IP addresses of your iSeries, subnet mask, and router or gateway
− The local domain name
− The iSeries host name
• Decide on your iSeries host name. The host name cannot be longer than 8 characters.
The TCP/IP configuration on iSeries is case sensitive. Do not enter your hostname once in uppercase and then in lowercase. It is important that youenclose your host name entry in single quotation marks. Otherwise the iSerieswill read the characters as upper-case characters.
Procedure
An IP address is a unique address in a TCP/IP network for a particular iSeriessystem.A subnet mask is a mask used to divide a single network address into multiplelogical networks.
1. To call the TCP/IP configuration menu, enter:CFGTCP
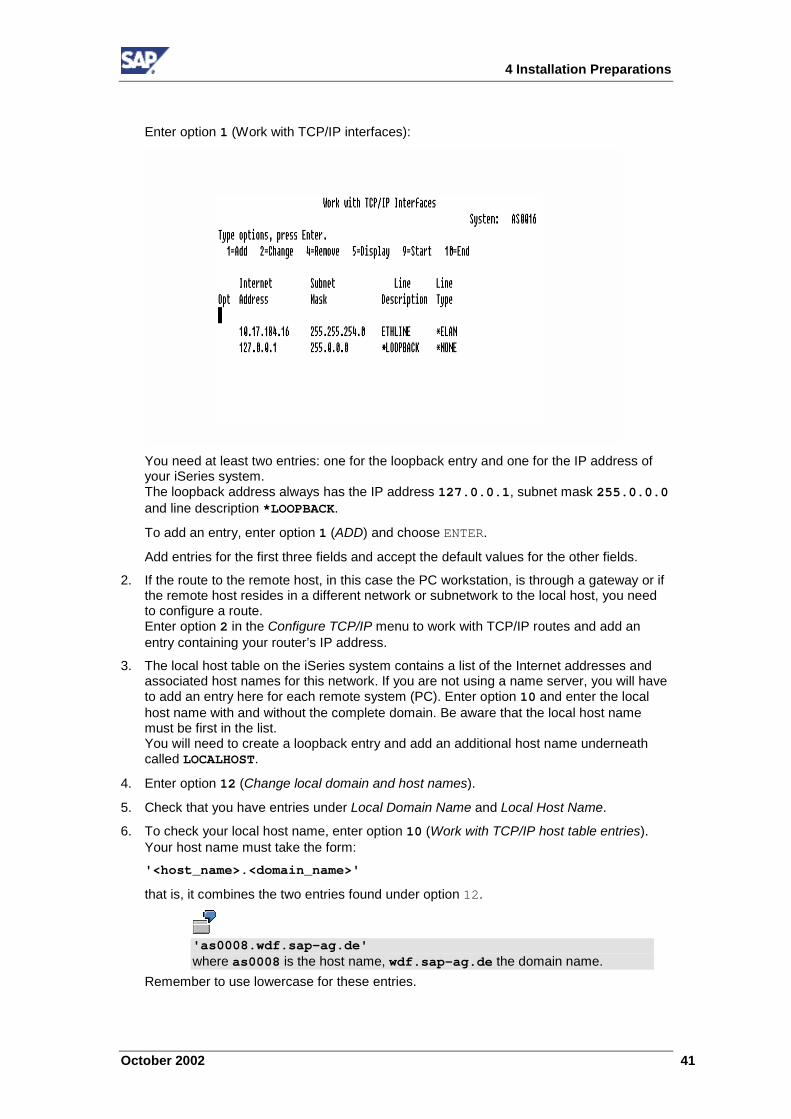
4 Installation Preparations
October 2002 41
Enter option 1 (Work with TCP/IP interfaces):
You need at least two entries: one for the loopback entry and one for the IP address ofyour iSeries system.The loopback address always has the IP address 127.0.0.1, subnet mask 255.0.0.0and line description *LOOPBACK.
To add an entry, enter option 1 (ADD) and choose ENTER.
Add entries for the first three fields and accept the default values for the other fields.
2. If the route to the remote host, in this case the PC workstation, is through a gateway or ifthe remote host resides in a different network or subnetwork to the local host, you needto configure a route.Enter option 2 in the Configure TCP/IP menu to work with TCP/IP routes and add anentry containing your router’s IP address.
3. The local host table on the iSeries system contains a list of the Internet addresses andassociated host names for this network. If you are not using a name server, you will haveto add an entry here for each remote system (PC). Enter option 10 and enter the localhost name with and without the complete domain. Be aware that the local host namemust be first in the list.You will need to create a loopback entry and add an additional host name underneathcalled LOCALHOST.
4. Enter option 12 (Change local domain and host names).
5. Check that you have entries under Local Domain Name and Local Host Name.
6. To check your local host name, enter option 10 (Work with TCP/IP host table entries).Your host name must take the form:'<host_name>.<domain_name>'
that is, it combines the two entries found under option 12.
'as0008.wdf.sap-ag.de'where as0008 is the host name, wdf.sap-ag.de the domain name.
Remember to use lowercase for these entries.

4 Installation Preparations
42 October 2002
7. If the domain name is empty (and your iSeries is not in a domain), enter your host namea second time in place of the domain name(that is, '<host_name>.<host_name>')‘as0008.as0008’
It is important that you enclose your host name entry in single quotationmarks. If you do not, the iSeries will read the characters as uppercasecharacters.
8. Enter option 12 (Change remote name server).
If you have one or more remote name servers, you need to define the IP address here.Note that the Host name server priority must be set to *LOCAL.
ResultThe iSeries machine is integrated into your TCP/IP network.
Testing the TCP/IP ConnectionBefore proceeding with the kernel installation (that is, the installation of the executableprograms), check that this TCP/IP connection has been set up correctly. To do so, entercommand ping (Verify TCP/IP Connection) specifying your own system as Remote system.Do this twice, once specifying only <host_name>, and once<host_name>.<domain_name>.
In this example it is assumed that the host name is as0008 and the domainname wdf.sap-ag.de. In this case, your entries would be as follows:ping ‘as0008’ping ‘as0008.wdf.sap-ag.de’
After installing the SAP system kernel, check the TCP/IP connection again with thecommand:WRKLNK ‘/QFileSvr.400/<host_name>’
Your host name should be displayed under Object link, for example, as0008 for the host inthe example given above.
For more information about TCP/IP configuration, see the IBM documentation TCP/IPConfiguration and Reference (SC41-5420).
4.6 Preparing the Active Directory for Use withthe SAP SystemUseThe SAP system can only store and access data in the Active Directory if the directory hasbeen prepared appropriately. To prepare the directory, you use the R3SETUP tool toautomatically perform the following tasks:
• Extend the Active Directory schema to include the SAP-specific data types
• Create domain accounts that are a prerequisite for enabling the SAP system to accessand modify the Active Directory. These are the group SAP_LDAP and the user sapldap.
4 Installation Preparations
October 2002 43
• Create the root container where information related to SAP is stored.
• Control access to the container for SAP data by giving members of the SAP_LDAP grouppermission to read and write to the directory.
For more information on how to set up a Netscape / iPlanet directory server,see the documentation R/3 System Information in Directory Services in theSAP Service Marketplace at:service.sap.com/msplatforms → Microsoft → Core Technology.
Prerequisites• A Windows 2000 domain controller with an Active Directory must be installed on the
network.
• You must have an SAP Kernel CD 1 of an SAP system installation that is based on SAPWeb AS 6.10, SAP Basis 4.6D, or below and contains the previous installation toolR3SETUP.
If you do not have an SAP Kernel CD with R3SETUP, you can download onefrom the SAP Service Marketplace at:service.sap.com/swcenter-inst→ SAP Web AS → SAP Web AS 6.10 → Installation
Procedure
Installing the R3SETUP ToolWith this procedure you install the R3SETUP tool on the domain controller where the ActiveDirectory is located.
1. Log on to the domain controller as domain administrator.
2. Check that the TEMP environment variable has been set by right-clicking the MyComputer icon and choosing Properties → Advanced → Environment Variables. TEMP isnormally set to:%userprofile%\Local Settings\Temp
For more information, see SAP Note 387745.
3. Insert the Kernel CD 1.
4. Start the program R3SETUP.BAT from the directory
<CD_DRIVE>:\NT\COMMON
The R3SETUP window opens.
5. When you are prompted, enter the following:
− The name of your SAP system <SAPSID>
− The directory on your hard disk that the R3SETUP files are to be copied to. Thedefault directory is <DRIVE>:\USERS\<SAPSID>ADM\INSTALL
When you have made all the required entries, the R3SETUP tool is automaticallyinstalled.
6. Enter Yes when a dialog box appears prompting you to log off or reboot.
The R3SETUP tool now automatically logs off or reboots.

4 Installation Preparations
44 October 2002
Configuring the Active Directory1. Log on as the same user that installed the R3SETUP tool.
2. From the Windows Start menu choose Start → Programs → SAP system Setup for<SAPSID> → Configure Active Directory for SAP.
3. When you are prompted:
− Confirm the name of the domain where the SAP_LDAP group is to be created. This isthe domain that you are logged on to.
− Enter the password of the sapldap user.
When you have made these entries, the R3SETUP tool automatically configures the ActiveDirectory.
4.7 Installing English as a Secondary LanguageUseOn every iSeries where English is not the primary language, you must install English as thesecondary language library. This is necessary for SAP to be able to provide support.
To check if English is already installed on your iSeries as a secondarylanguage, enter WRKLIB QSYS29* on the iSeries command line. If one ofthe following secondary language libraries is displayed, you have alreadyinstalled English as a secondary language library: QSYS2924, QSYS2938,QSYS2959 or QSYS2984.
Procedure1. On the iSeries command line, enter GO LICPGM
2. Enter option 21 (Install secondary languages).
3. Enter option 1 to select any of the following libraries QSYS2924, QSYS2938, QSYS2959or QSYS2984.
4.8 Setting Up the Transport DirectoryUseYou need to set up the transport directory for your SAP system.
PrerequisitesUsing a shared system transport directory(/usr/sap/trans)makes it easier to maintainyour SAP system and instance configuration data. We recommend that you link/usr/sap/trans to the IFS directory /sapmnt/trans on the central instance host of anSAP system. If the central instance is on a different host, the directory should be linked usingQFileSvr.400.

4 Installation Preparations
October 2002 45
By default, the installation creates directory /sapmnt/trans and link /usr/sap/trans,which points to /sapmnt/trans, provided the directories do not exist on the host yet. It ispossible to let the SAPinst installation change the /usr/sap/trans link to point to thecentral instance host of the newly installed system. If you want that directory/usr/sap/trans points to any other host, you have to change it manually.
ProcedureTo change the /usr/sap/trans link to /sapmnt/trans of any other host, proceed asfollows:
1. Log on to the iSeries host as a user with administrator rights similar to QSECOFR.
2. To link to another host, enter the following command:CHGR3SHLOC NEWHOST(<hostname>)
4.9 Preparing the Windows Host for the SAPSystem InstallationUseThe Java-based SAPinst graphical user interface (GUI) called SAPinst GUI requires a JavaDevelopment Kit (Java™ 2 SDK, Standard Edition) with graphical capabilities (AWT, Swing).Since IBM eServer iSeries does not provide a graphical user interface, you must install theJDK on a Windows host to perform the installation with SAPinst.
Prerequisites• Operating system of at least Windows 2000 is necessary.
• The current Java™ 2 SDK version needed is 1.3.1. The JDK is not part of the SAPshipment. You have to download it from the SUN homepage to install it on your system.You can find the information at http://java.sun.com/j2se/1.3/download.html.
To check the version of an already installed JDK, enter java –version.
Make sure that:• Your JAVA_HOME environment variable is set for example to C:\jdk
1.3.1_04. The main version is 1.3.1. The postfix _04 indicates a fixlevel, which will change from time to time. However, this fix level is notimportant, only the main version is important. For more information, seethe JDK installation documentation.
• $JAVA_HOME\bin is included in your system path.You can find the JDK versions that are released for the SAP Web Application Server in theSAP Service Marketplace at: http://service.sap.com/platforms. Choose Availabilityfor SAP Web AS / Basis / Kernel � Planned OS / DB / JDK Releases for SAP Web AS 6.20.Check database release DB2/400 and operating system release Windows 2000 to determinethe right JDK release.

4 Installation Preparations
46 October 2002
ProcedureTo avoid an error when starting the SAPinst GUI, you must make sure that there are no .jarfiles from an XML parser tool, such as Xerces or Xalan, in the JDK ext directory.
1. Log on to the host on which you intend to run the SAPinst GUI.
2. Check whether there are already <parser_name>.jar files, for example, xerces.jarin your ext directory. The default path under Windows is:
<JAVA_HOME>\JRE\lib\ext
3. If you find any .jar files, rename them to, for example, xerces.xxx.
Do not forget to rename the files to their original names after the installationprocedure is complete.
4.10 Preparing a Windows 2000 User Accountand iSeries User ProfileUseFor the installation you need to create a user account on your Windows installation host anda user profile on the iSeries you want to install.
The following requirements apply:
• The iSeries user profile and the Windows user account must have the same name andpassword.
• The iSeries user profile must have user class *SECOFR and all special authorities thatbelong to user QSECOFR.
• The Windows user account must have administrator rights on the Windows installationhost.
Procedure
The user name SAPINST and the password sap are used in the proceduresas examples.
Windows :
1. Choose Start → Settings → Control Panel.
2. Choose Users and Passwords.
3. Choose Advanced → Advanced User Management.
The Local User and Groups screen appears. This screen contains the Users and Groupsfolders.
4. Click the Users folder with the right mouse button.
5. Choose New User.
The New User dialog box appears.
4 Installation Preparations
October 2002 47
6. In the field User name, enter your installation user name, for example, SAPINST.
7. In the fields Password and Confirm password, enter the password sap.
8. Deselect User must change password at next logon.
9. To create your new installation user, choose Create.
10. To close the New User dialog box, choose Close.
11. To add the new user SAPINST to group Administrators, double-click the Users folder onthe Local Users and Groups screen.
All local users of your Windows 2000 system and SAPINST are displayed.
12. Click SAPINST with the right mouse button.
The context menu appears.
13. Choose Properties.
The sapINST Properties screen appears.
14. Choose Member Of and then Add.
The Select Groups screen appears.
15. Select Administrators and choose Add.
16. Choose OK.
User SAPINST is now displayed in the Administrators group.
17. Close the sapINST Properties dialog box by choosing OK.
18. Close the Local Users and Groups screen and the Control Panel.
iSeries:Execute the following command:
CRTUSRPRF USRPRF(SAPINST) PASSWORD(sap) USRCLS(*SECOFR) TEXT('TestUser for SAP Installation') SPCAUT(*USRCLS)
4.11 Installing TMKSVR and Creating anInstallation ShareUseThe TMKSVR is the interface between iSeries and Windows for the installation with SAPinst.SAPinst is running on Windows, but has to install the product on iSeries. This means that allactions required for iSeries are initiated remotely on Windows but executed locally using theTMKSVR. The communication is done using TCP/IP.
In addition, an installation share on the iSeries host needs to be created and mapped to theWindows installation host, which is done automatically by the TMKSVR.
The TMKSVR has to be installed and an installation share has to be created on all iSerieshosts where instances of an SAP system should be installed.

4 Installation Preparations
48 October 2002
Prerequisites• An FTP server running on iSeries
• You must prepare a user. For more information on how users are prepared, seePreparing a Windows 2000 User Account and iSeries User Profile [Page 46].
• The SAP Kernel CD 1 must be inserted in the CD drive of your Windows host.
Procedure1. Log on to your Windows host as the installation user. For more information, see
Preparing a Windows 2000 User Account and iSeries User Profile [Page 46].
This user must have the same user ID and password as the user that you areusing for the installation on iSeries (a user with administrator rights similar toQSECOFR).
2. Run setup.exe from the CD located in \SAPINST\AS400\TMKSVR. You can start thesetup program from CD by double-clicking on it in the Windows Explorer.
The following dialog box appears:
3. Enter the following values:
− iSeries Hostname:Enter the name of the iSeries host where you want to install TMKSVR.
− iSeries Administrator (QSECOFR or similar):Enter iSeries user. For more information, see Preparing a Windows 2000 UserAccount and iSeries User Profile [Page 46].
− Update existing TMKSVR instances:Do not select this option.
− Yes, create TMKSVR instance:Select this option.
− TMKSVR instance number:Leave the value at 0.

4 Installation Preparations
October 2002 49
− TMKSVR Instance Port (also referred to as the Dispatcher Port):Leave the value at 51515, if possible. Only change this port number if you encounterproblems during installation because the port is in use.
ResultThe installation uses FTP to install and start TMKSVR on iSeries. During installation, theTMKSVR library is created on iSeries. If you want a TMKSVR instance to be created, a librarynamed TMKSVR<nn> also is created, with <nn> being the instance number (for example,TMKSVR00).
A NetServer share named rootbin will be created on the iSeries host. You can map it nowto your Windows PC or let SAPinst do it during the installation.
For more information, see the documentation install.pdf on the CD in directory\SAPINST\AS400\TMKSVR.
4.12 Creating the SAP Communication UserSAPJSFUseThe communication user SAPJSF is required for the user authentication for RFCcommunication between the J2EE service Security and the SAP system.
For the installation, create the communication user SAPJSF in your production SAP systemclient.
If you want to change this SAP system client afterwards, see section Changing the SAPSystem Client for the SAP Communication User SAPJSF below.
PrerequisitesIn the SAP system, you have user administrator permission (usage of transaction SU01) andpermission to test function modules.
ProcedureCreating the SAP Communication User SAPJSF
1. Log on to the production SAP system client.
2. In transaction SE37, enter the function module PRGN_J2EE_CREATE_SERVICE_USERand choose Single Test (F8).
3. Specify the import parameter IF_PASSWORD.
If you want to deactivate the password logon for the communication user and want to useSecure Network Communication (SNC) logon instead, leave the field blank.
Be sure to write down the password of the communication user SAPJSFbecause SAPinst prompts for this parameter during the installation. For moreinformation, see Input Parameters for the Installation [Page 54].
4. Choose Execute.
The system displays the screen Test Function Module: Result Screen.

4 Installation Preparations
50 October 2002
5. In the Result row of the table parameter ET_RETURN, check that no errors occurredduring the execution.
Changing the SAP System Client for the SAP Communication User SAPJSF
If you want to change the SAP system client of the communication user SAPJSF later on, seethe SAP Library :
1. Choose Help → SAP Library in your SAP system.
2. Choose mySAP Technology Components →=SAP Web Application Server → SAP J2EEEngine →=Integration of the Security Functions of SAP Web Application Server and SAPJ2EE Engine →=User Authentication → Configuration of the Connection Between theSAP Web Application Server and the SAP J2EE Engine.
Alternatively you can access the SAP Library at http://help.sap.com:
1. Choose SAP Web Application Server → SAP Web Application Server 6.20.
2. Select the required language.
3. Choose mySAP Technology Components →=SAP Web Application Server → SAP J2EEEngine →=Integration of the Security Functions of SAP Web Application Server and SAPJ2EE Engine →=User Authentication → Configuration of the Connection Between theSAP Web Application Server and the SAP J2EE Engine.
4.13 Required CDs for the InstallationYou need several CDs during an SAP system installation. Some of the CDs must beavailable in parallel, others must only be available sequentially.
The following table lists the required CDs for the different types of SAP instance installationon iSeries:
SAP InstanceInstallation
Required CDs
Kernel CD 1Kernel CD 2
Database Instance
Export CD 1Export CD 2
Central Instance (includesSAP J2EE Installation andJava deployment)
Kernel CD 1Kernel CD 2
SAP J2EE Engine CD
Upgrade SAP CentralInstance Java Core
SAP J2EE Engine CD
Dialog Instance(ABAP only)
Kernel CD 1Kernel CD 2
Dialog Instance(including the SAP J2EEEngine)
Kernel CD 1Kernel CD 2SAP J2EE Engine CD

4 Installation Preparations
October 2002 51
For more information on how to prepare the CDs and how to use the CD browser dialog, seethe following sections:
• Preparing the CDs [Page 51]
• Using the CD Browser Dialog [Page 52]
4.13.1 Preparing the CDsUseYou need several CDs during an SAP system installation. You have to copy all relevant CDsfor an instance installation to the IFS of the iSeries host before you can install that instance.
PrerequisitesMake sure you have configured your TCP/IP as described in SAP Note 92589. Do not forgetafterwards to perform an IPL to make the change effective. Otherwise, you will notice verypoor copy performance from your local Windows 2000 CD drive to your IFS on your iSeries.
Procedure
The following procedure uses the user name SAPINST and the password sapas examples.
1. To open the MS DOS screen under Windows 2000, choose Start � Run.
2. Enter cmd.exe.
3. Choose OK.
The MS DOS screen appears.
4. In the command line of the MS DOS screen, enter net use.
All network connections to shared resources are displayed.
5. Check if you have a connection to your iSeries.
If you find \\<iSeries Hostname>\rootbin in the column Remote and a drive directory letter inthe column Local , you have already established the required connection to your iSeries.
Otherwise, you have to establish this connection. To do this, enter:net use X: \\<iSeries Hostname>\rootbin sap /USER:SAPINST
X: is now your new network drive to share \\<iSeries Hostname>\rootbin sap to your IFSon the iSeries. If X: is already in use, choose another drive letter that is free.
For more information, see Preparing a Windows 2000 User Account and iSeries UserProfile [Page 46].
6. To change to the new network drive, enter X: in the command line of your MS DOSscreen.

4 Installation Preparations
52 October 2002
7. Create the subdirectories in your IFS where you want to copy the required CDs.
− For each kernel CD, enter:mkdir \tmp\<sid>\krn<number>
− For each export CD, enter:mkdir \tmp\<sid>\exp<number>
8. Copy the installation CDs from your Windows 2000 CD drive (for example D:\) to the IFSof your iSeries host. Insert the required installation CD and enter the following command:
− For each kernel CD, enter:xcopy D:\ X:\tmp\<sid>\krn<number> /E
xcopy D:\ X:\tmp\<sid>\exp<number> /E
9. Repeat steps 7 and 8 for every required CD.
4.13.2 Using the CD Browser DialogDuring the installation procedure SAPinst first checks and finally verifies the availabilityand location of the required installation CDs. SAPinst does this by displaying a CD Browserdialog, which prompts you for the file LABEL.ASC that contains the information of thesoftware package to be installed.
SAPinst displays this dialog in the following situations:
• SAPinst wants to check the availability of the software package.
You can recognize this situation by the flag Check Location displayed on the CD Serverdialog.
Choose one of the following actions:
Action Result
You enter the path of the PackageLocation and leave the flag CheckLocation.
SAPinst checks the label location and displaysan error message if the location is incorrect.
If all locations are correct, SAPinst does notask again for the LABEL.ASC files later.
You do not enter any PackageLocation and leave the flag CheckLocation deselected.
SAPinst skips the check and you can continuethe installation procedure.
However, SAPinst asks later for the missingLABEL.ASC (see final bullet point below).
You enter the path of the PackageLocation and leave the flag CheckLocation deselected.
SAPinst skips checking the label location, butyour entered package locations are used laterfor the installation.
SAPinst only asks again for a missingLABEL.ASC if the package location isincorrect (see final bullet point below).
We recommend that you use the option Check Location at the beginning ofyour installation, so that you see if there are problems as soon as possible.

4 Installation Preparations
October 2002 53
• SAPinst cannot find the correct LABEL.ASC but needs the location of the software toprocess the installation now.
You can recognize this situation because Check Location on the CD Browser window isempty. You now have to enter the path to the correct LABEL.ASC. Otherwise, theinstallation cannot continue.
You can ignore the column Copy Package to, because you have alreadycopied the CDs to the iSeries host before the installation.
When the CD Browser asks for the installation CDs, you must always enterthe path manually to the CDs residing on the iSeries host in Windowsnotation, using the drive letter to your installation share. For example, usex:\tmp\<sid>\krn<number> instead of /tmp/<sid>/krn<number>. Donot select the option Package Location in the CD Browser to browse for filesas this could lead to errors. If your installation share was not mapped to yourWindows installation host before, it will be done the first time you run aSAPinst installation on an iSeries host. Do not select the option PackageLocation in the CD Browser to browse for files as this could lead to errors.Instead, enter the path to the Package Location manually.

5 Installation Process
54 October 2002
5 Installation Process
The structure of the installation documentation has changed significantly. Youmust read Installation – Step by Step [Page 12] before starting the installation.
5.1 Input Parameters for the InstallationBefore you start SAPinst, make a note of the information you will need to enter during theinstallation of your SAP instance with SAPinst. This will help you to avoid unnecessary delaysand errors.
Naming ConventionsThroughout this table the following abbreviations are used:
• CI → Central Instance
• DB → Database Instance
• DI → Dialog Instance
The Windows hour glass is sometimes not displayed during the installationprocess. This enables you to choose Log during the installation to display thelog files.
The following table lists the prompts from SAPinst and provides you with a description of theprompt or outlines the information you might need to enter to continue with the installation ofyour SAP instance.
Window Prompt Meaning
CD Browser CD Name:(CI/DB/DI)
This dialog box only appears if thesystem wants to check or cannot findLABEL.ASC file that contains therelevant installation information.
Depending on the currentinstallation, the CDBrowser comes up severaltimes and at differentplaces. For moreinformation on the CDBrowser dialog, seeRequired CDs for theInstallation [Page 50].
Depending on the required installationCD, specify the path to the directorywhere the corresponding LABEL.ASC fileis located.

5 Installation Process
October 2002 55
When the CD Browserasks for the installationCDs, you must alwaysenter the path to the CDsresiding on the iSeries hostin Windows notation, usingthe drive letter to yourinstallation share. Forexample, usex:\tmp\<sid>\krn<number> instead of/tmp/<sid>/krn<number>. As an example for thekernel CD, use 1/2:x:\temp\C11\krn1. If yourinstallation share was notmapped to your Windowsinstallation host before, itwill be done the first timeyou run a SAPinstinstallation on an iSerieshost.
Welcome to theSystem LandscapeImplementationManager(DB/CI/DI/JC)
• DB/CI/DI (ABAP) only:Choose Unicode SAP Web ApplicationServer 6.20 for DB2 UDB for iSeries –Default
• DI (with Java):Choose Unicode SAP Web ApplicationServer 6.20 Dialog Instance for DB2UDB for iSeries – Java
• JC:Choose Upgrade SAP CentralInstance Java Core 6.20
Choose the option youwant. Only if an option isselected, can you chooseNext and continue yourinstallation.
Welcome
Installation Task(DB/CI/DI)
Choose Install Server Components
SAP SystemCommonParameters
SAP System:SAP System ID(DB/CI/DI)
• CI:Enter the SAP system <SID>, forexample, C11.
Enter always the same SIDfor one system.

5 Installation Process
56 October 2002
Instance Type(DB/CI/DI)
• DB:Choose Database instance.
• CI:Choose Central instance.
• DI:Choose Dialog instance.
Database:Database SystemID(DB/CI/DI)
Enter the SAP system ID <SID>.
Database Host ID(CI/DI)
Enter the name of the database host.
Central Instance:Instance number(DB/CI/DI)
• CI :Enter the number of the centralinstance of your system. You canassign a value from 0 to 97.
• If more than one SAP instance isrunning on the same host, theseinstances must be assigned differentnumbers.
• DB/DI :You have to enter the same value asyou entered for the CI installation.
Central Instance:host(DB/CI/DI)
Enter the name of the central instancehost.
Dialog Instance:Instance number
(DI)
Enter an instance number for the dialoginstance. You can specify a value from 0to 97.
If more than one SAP instance is runningon the same host, these instances mustbe assigned different numbers.
SAP System LDAPParameters
LDAP support(CI/DI/)
Choose the type of LDAP integration youwant to configure for the SAP system.
• Via Active Directory ServiceSelect this option to integrateWindows 2000 Active Directoryservices. An Active Directory must beavailable on the network.
• Via Generic LDAP DirectorySelect this option to configure thesystem to support LDAP directoriesthat are running on Windows or UNIXmachines. A generic LDAP directorymust be available on the network.
• No LDAP SupportSelect this if you do not want toconfigure the SAP system to integrateLDAP services.

5 Installation Process
October 2002 57
Required InputDepending on your selection thefollowing information is required:
• Management DomainSpecify a container in the ActiveDirectory where information related tothe new SAP system is to be stored.Use the distinguished name syntax.The name of the container(management domain) can reflect theorganizational structure of yourcompany.
For example, if the system is for corporatefinances and located in Walldorf, thename can be: CN=Finance,CN=Walldorf
Profile parameter: ldap / saprdn
You need not specify this.
However in a large system landscape, werecommend setting this parameter toreflect the structure of multiple SAPinstallations.
• Container for all SAP-related entriesSpecify the SAP root container in theLDAP Directory under which all futureinformation related to SAP systems isto be stored. Use the distinguishedname syntax that specifies both thename of the container and the path toreach it.
Profile parameter: 1dap / saproot
− Via Active Directory Service:We do not recommend setting thisparameter. If you do not set thisparameter, the systemautomatically calculates thedefault value to store informationin the configuration context forActive Directory Service (ADS).
− Via Generic LDAP DirectoryYou must specify this parameter.
• LDAP ServersEnter the DNS host name of the serveron which the LDAP directory isrunning. If the directory is replicated onother servers in the network, specifythese as well. For example:ldapsrv1 ldapsrv2Profile parameter: ldap / servers.
5 Installation Process
58 October 2002
Note that the replica must bewriteable.
− Via Active Directory Service:We do not recommend setting thisparameter. If you do not set thisparameter, the systemautomatically finds the best ADSServer.
− Via Generic LDAP Directory:You must specify one or moreLDAP servers, separated byblanks.
• Windows 2000 domain of the ADSserverEnter or confirm the name of theWin2000 domain in which theSAP_LDAP Group is defined.
• Domain Containing group SAP_LDAPThe group was defined earlier, whenthe Active Directory was configured forthe SAP system.
Information forCreating UserProfile
Password(DB/CI/DI)
Enter the password of the existingprofile. If you do not enter a password,the default password sapofr is used.
Make sure that thepassword of the same userprofile on different hosts isthe same.
Password(DB/CI/DI)
Enter the password of the existingprofile. If you do not enter a password,the default password sapofr is used.
Make sure that thepassword of the same userprofile on different hosts isthe same.
Information forExisting UserProfile
Change passwordof the user profile
If you select this option, the password ofthe user profile is changed to the valuethat you have entered above.
User Information SAP systemAdministratorInformation(<SID>OFR)(DB/CI/DI)
• DB:Enter and confirm the password ofuser <SID>OFR.
• CI/DIEnter and confirm the password foruser <SID>OFR. Make sure that thepasswords on the central and dialoginstance are the same.

5 Installation Process
October 2002 59
SAP Codepage(CI/DI)
Enter your SAP code page, for example,in Western Europe and North America(wherever LATIN-1 is used), enter 1100.
Language Options:SAP SystemLanguage Options
Secondarylanguage library(CI/DI)
If your primary language on iSeries is notEnglish, enter an English secondarylanguage library. For more information,see Installing English as a SecondaryLanguage [Page 44].
Location ofTransport Directory
Link Transportdirectory to centralinstance(CI/DI)
Select this option if you want SAPinst tolink the transport directory to the centralinstance. If you do not select this option,you have to take care of/usr/sap/trans manually.
If you select this option,your /usr/sap/trans will bemodified. This could bedangerous if you alreadyhave SAP systemsinstalled on the host.
Library Name(DB/CI/DI) This prompt only appears if
you are installing the firstinstance of an SAP systemon a host.
Specify the name of the kernel library, forexample, R3620AOPT.
Clear Library ifExisting
If you select this option, SAPinst deletesthe entered library, if it exists and loadsthe kernel into this library.
SAP System KernelLibrary
Use library ifexisting
If you check this option, SAPinst usesthe entered library as the kernel library.
You have to specify a validSAP 6.20 kernel library,otherwise this installationwill fail.
SAP System ASPs SAP System ASPs(DB)
Depending on your configuration, youhave to specify the SAP system ASPs.
For more information, see Adding a UserASP [Page 39].

5 Installation Process
60 October 2002
Import Settings(DB)
• If you are installing a new SAPsystem, choose Load Packages fromEXPORT CD.
• If you want to import the databasedump of another SAP system as partof a homogeneous SAP system copy(see documentation SAP WebApplication Server HomogeneousSystem Copy), choose LoadPackages from MIGRATION CD andenter the following parameters:
− Migration Key:Leave this field blank.
− Migration Export Directory:Enter the export directory<EXPDIR> containing thedatabase export files (seedocumentation SAP WebApplication Server HomogeneousSystem Copy).
• If you want to import the databasedump of another SAP system as partof a heterogeneous SAP system copy(see documentation SAP WebApplication Server HeterogeneousSystem Copy), choose Load Packagesfrom Migration CD and enter thefollowing parameters:
− Migration Key:Enter the migration key (seedocumentation SAP WebApplication ServerHeterogeneous System Copy).
− Migration Export Directory:Enter the export directory<EXPDIR> containing thedatabase export files (seedocumentation SAP WebApplication ServerHeterogeneous System Copy).
General LoadParameters
General Settings(DB)
These settings are for experts only.

5 Installation Process
October 2002 61
AdvancedConfiguration ofPackages(DB)
Decide whether you want to performAdvanced package configuration.
Advanced packageconfiguration should onlybe performed by certifieddatabase administrators.We recommend that youuse the default settings ifpossible.
SAP SystemService Ports
Port numbers(CI/DI)
• CI:Enter the port numbers of theMessage Port.
• DI:The port number of the MessagePort must be the same as the oneon the central instance host.
SAP J2EE EngineCommunicationUser SAPJSF
CommunicationUser SAPJSF(CI/DI)
Enter and confirm the Password for thecommunication user SAPJSF.This user is required for the userauthentication for RFC communicationbetween the J2EE service Security andthe SAP Web Application Server.SAPinst creates this user in SAP systemclient 000.
RFC LogonVerification
Password(CI/DI)
This prompt only appears if the DDICpassword is not set to its default valueduring the installation.
For example, when you logged on to theSAP system during the installation andthe SAP system prompted youautomatically for a new password. In thiscase, enter the changed password ofuser DDIC.
5.2 Running SAPinstUseYou use this procedure to run SAPinst if you want to install an SAP instance. Make sure youcreate a new installation directory for every SAP instance you want to install.
Prerequisites• TMKSVR is up and running: wrkactjob sbs (TMKSVR00) (there must be a DISPATCH
job)
• The Windows host is set up. For more information, see Preparing the Windows Host forthe SAP System Installation [Page 45].
• The users required for the installation are prepared. For more information, see Preparinga Windows 2000 User Account and iSeries User Profile [Page 45].

5 Installation Process
62 October 2002
• The relevant installation CDs are copied to iSeries
• SAP Kernel CD 1 is inserted into the CD drive of the Windows host
• If you start the SAPinst GUI on your host, make sure that the JAVA_HOME environmentvariable is set correctly.
• As the SAPinst installation directory contains important log and command files for theinstallation, make sure that you use a separate installation directory for every instanceyou are going to install. Otherwise, you might lose previous log and command files storedin the SAPinst installation directory.
Before you start the installation, be aware of the following:
− When you install an SAP instance with SAPinst for the very first time on your host,you have to start SAPinst from the Kernel CD 1 with the setup.cmd command.SAPinst is copied to the directory you have specified. This directory is also used asthe installation directory for the instance you are installing.
− If you want to install an SAP instance on the host where a previous SAP instance hasnot been successfully installed, you must run SAPinst again from the Kernel CD 1 tocreate a new installation directory for the SAPinst log and command files.
− For every additional SAP instance that you want to install on the same host or fordeployment of the Java core central instance (after successful installation of anotherinstance), we recommend that you start SAPinst from the Kernel CD 1. By doing so,you make sure that every instance installation has its own log and command files.
However, you can start the new installation by entering:
1. Start → Programs → <menu_entry> → Prepare New Installation
2. Start → Programs → <menu_entry> → SAPinst server with GUI
Be aware that the installation directory of the previously installed instance onthat host will be overwritten when you use the Start menu to start the newinstallation. For this reason, you should only use it if you are sure that you donot need the log and command files of the previously successfully installedinstance.
The Prepare New Installation Window disappears after a short period of time.Nevertheless, the preparation for the new installation was completedsuccessfully.
Procedure1. Log on to the Windows host as the installation user. For more information, see Preparing
a Windows 2000 User Account and iSeries User Profile [Page 46].
If you have already installed an SAP instance on iSeries, you can use theStart menu entries to start SAPinst as described under Prerequisites. In thiscase, you can continue the installation with step 8.
2. Insert the Kernel CD 1 in your CD drive.
3. Run setup.cmd from the CD located in \SAPINST\AS400.
The SAPinst Installation Host dialog box appears and prompts you for the target iSeries.
4. Enter the host name and choose Next.

5 Installation Process
October 2002 63
5. If you have not yet mapped your installation share to your Windows host, the SAPinstInstallation Drive dialog box appears asking you for the SAPinst installation drive. Choosea drive and enter the prepared user and password. Then, choose Next. For moreinformation, see Preparing a Windows 2000 User Account and iSeries User Profile[Page 46].
6. The SAPinst Installation Default Parameters dialog box appears. SAPinst asks if youwant to perform a Standard or Custom installation.
If you choose a Custom installation, you can define:
− Installation directory for SAPinst
You can choose any name for the installation directory. In thisdocumentation,<INSTDIR> refers to the installation directory.
− SAPinst folder in the Start menu
The Start menu entry is used to create unique Start menu entries.The defaultname is: SAPinst DB2 400 KERNEL <iSeries_Hostname> . The defaultStart menu entry created by SAPinst is: Start → Programs → SAPinst DB2400 KERNEL <iSeries_Hostname> → <enter option>. For example, youenter the following for the Start menu during the installation:SAP Web AS Instance
− Connection parameters (not relevant)
Select Standard or Custom and choose Next.
SAPinst is now copied to your <INSTDIR> and the following Start menu entries arecreated under Start � Programs � <menu_entry>
Start Menu Entry Description
Prepare New Installation Prepares SAPinst to install an additional instance onthis host.
Current log and command files are copied to a backupdirectory (under the current SAPinst directory)indicating the date and time of the backup:<SAPinst_Dir>\log_<date>_<time>
Remove SAPinst Files Deletes the whole SAPinst installation directory.
SAPinst GUI Only relevant for a remote installation.Starts the SAPinst GUI only. A further dialog thenprompts you for parameters (host and port) to connectto the SAPinst server host.
SAPinst Server only Only relevant for a remote installation.
Starts the SAPinst server only and waits for aconnection to the SAPinst GUI.
SAPinst server with GUI Starts the SAPinst server and the SAPinst GUI. TheWelcome screen is displayed and you can perform theinstallation.
7. After the installation of SAPinst, the installation of the SAP system is startedautomatically. The SAPinst –iSeries User Authentication dialog box appears.

5 Installation Process
64 October 2002
8. Enter the user name and password of the installation user. For more information, seePreparing a Windows 2000 User Account and iSeries User Profile [Page 46]. By default,the value 51515 is needed for the service port for TMKSVR.
Check if PUBLIC has all object and data authorities for directory‘usr/sap/sapinst. To do this, enter:WRKAUT ‘/usr/sap/sapinst’.If you do not have this set up, enter:CHGAUTOBJ(‘/usr/sap/sapinst’)USER(*PUBLIC)DTAAUT(*RWX)OBJAUT(*ALL)
The SAPinst GUI now starts and the Welcome screen is displayed.
SAPinst uses the ports 21212 and 21213 during the installation forcommunication with the SAPinst GUI. You get an error message if one ofthese ports is already in use. In this case, you must do the following:a. Open a command prompt.b. Change to your <INSTDIR> and run:.\sapinst.exe SAPINST_DIALOG_PORT=<port> where <port> is
an unused port on your Windows installation host.
9. If you want to install:
− A central, database, or dialog instance (without SAP J2EE Engine), select UnicodeSAP Web Application Server 6.20 for DB2 UDB for iSeries - Default.
− Upgrade SAP Central Instance Java Core, select Upgrade SAP Central InstanceJava Core 6.20.
− Dialog instance (including SAP J2EE Engine), select Unicode SAP Web ApplicationServer 6.20 for DB2 UDB for iSeries - Java.
10. Accept the License Agreement for STL port.
11. Follow the instructions in the SAPinst dialogs. For more information, see InputParameters for the Installation [Page 54].
There is a box in the background, in which SAPinst is running and the outputof the SAPinst is displayed (trace). If you click on this box while theinstallation is running, the execution of SAPinst is no longer carried out. Youcan recognize this state by the word Select in the title bar of the box. If this isthe case, click the box with the right mouse button and the installation processwill resume.
If you have entered all required information during the input phase, SAPinst starts theinstallation and displays installation progress during the processing phase.
For information regarding troubleshooting, see the following sections in the documentation:
• Continuing an Interrupted Installation with SAPinst [Page 80]
• Troubleshooting During the Database Load [Page 81]
• Correcting Errors in RFC Steps [Page 83]

6 Post-Installation Activities
October 2002 65
6 Post-Installation Activities
6.1 Installing Borland JBuilderFor Remote Support from SAP, you require Borland JBuilder 5 Enterprise on any Windowshost in your SAP system landscape, for example on a programmer's workstation.
You can download Borland JBuilder from http://www.borland.com.
6.2 Downloading the SAP Java Crypto ToolkitUseYou require the SAP Java Crypto Toolkit, if you want to:
• Configure Client SSL (Secure Sockets Layer) for the combined (that is, ABAP and J2EE)SAP system.
• Make Java encryption functions available for the SAP system.
ProcedureFor the operation of the SAP J2EE Engine, you require the SAP Java Crypto Toolkit.
For more information, see the SAP Service Marketplace at:http://service.sap.com/swcenterChoose SAP Cryptographic Library
The SAP Java Crypto Toolkit offered for downloading in the SAP ServiceMarketplace is subject to export control regulations in Germany as the countryof origin and import regulations of your own country. SAP may not yet have acorresponding export license for your user and or company.
After you have downloaded the SAP Java Crypto Toolkit files, copy them to the followingdirectories:
The cluster version of the SAP J2EE Engine:
Platform Target Directory
/usr/sap/<System_Name>/j2ee/cluster/ \j2ee_<Instance_Number>/cluster/server/ \additional-lib
/usr/sap/<System_Name>/j2ee/cluster/ \j2ee_<Instance_Number>/cluster/dispatcher/ \additional-lib
iSeries
/usr/sap/<System_Name>/j2ee/ \j2ee_<Instance_Number>/admin/lib

6 Post-Installation Activities
66 October 2002
6.3 Installing a JDBC DriverUseYou must install a database-specific Java Database Connectivity (JDBC) driver when yourSAP J2EE Engine directly wants to connect to the database without using an RFC-connection.
On IBM eServer iSeries V5R1M0, you can install one of the following drivers:
• IBM Toolbox Driver, modification 4
• Native Driver, Version 5
The following describes the installation procedures for the IBM Toolbox Driver, modification 4and the Native Driver, Version 5.
Installing the IBM Toolbox Driver, Modification 4
You must use the IBM Toolbox driver if you want to run one or more remoteinstances.
PrerequisitesMake sure that you have installed the following software on both your database server andthe SAP J2EE Engine host:
• IBM Toolbox for Java (license program 5722JC1)
• TCP/IP Connectivity Utility for iSeries (license program 5722TC1)
• Java Development Kit 1.3.1 (licensed program 5722JV1, option *BASE and option 5)
Procedure1. Make sure that the SAP system is not up and running (stopsap).
2. Log on to the database host and to the SAP J2EE Engine host as user QSECOFR.
3. On the database server, check that the QUSER profile is enabled. Enter:
DSPUSRPRF(QUSER)
4. The DDM TCP/IP server and DATABASE and SIGNON host servers need to be startedat IPL. Add the following to the startup script identified by the SQSTRUPPEM systemvalue:
− To start the TCP/IP server, enter:STRTCPSVR SERVER(*DDM)
− To start special host servers, enter:STRHOSTSVR SERVER(*DATABASE *SIGNON) RQDPCL(*TCP)
5. On your SAP J2EE Engine host, add a symbolic link to the JDBC driver jar file:ADDLNK OBJ('/QIBM/ProdData/HTTP/Public/jt400/lib/jt400.jar')NEWLNK('/usr/sap/<SID>/<instance_name>/j2ee/cluster/server/services/dbpool/work/jt400.jar')
6. Restart your SAP system (startsap).

6 Post-Installation Activities
October 2002 67
7. Start the SAP J2EE Engine Administrator from a Windows host. You can do one of thefollowing:
− Use the command line and enter:<J2EE_drive>:\usr\sap\<SID>\<instance_name>\j2ee\admin\go.bat
− Choose the following from the Windows Start menu:
Programs → SAP J2EE Engine 6.20 → Instance <instance_number> →Administrator
8. Log on to your SAP J2EE Engine host as user Administrator.
9. In the navigation frame of the SAP J2EE Engine Administrator, choose Services → DBPool.
10. Choose Add Driver.
11. Enter the class name of the driver:com.ibm.as400.access.AS400JDBCDriver
12. If required, specify the path for the JDBC driver as follows:/usr/sap/<SID>/<instance_name>/j2ee/cluster/server/services/dbpool/work/jt400.jar
If you want to add a DB pool (a symbolic connection to the database (datasource)) using the above installed JDBC driver, you must specify thedatabase URL as follows: jdbc:as400://<database_server>
Installing the Native Driver, Version 5
You can only use the Native Driver if your SAP J2EE Engine and thedatabase are running on the same host.
PrerequisitesMake sure you have installed the Java Development Kit 1.3.1 (license program 5722JV1,option *BASE and option 5) on your database server.
Procedure1. Make sure that the SAP system is not up and running (stopsap).
2. Log on to your database server as user QSECOFR.
3. Add a symbolic link to the JDBC driver jar file:ADDLNK OBJ('/QIBM/ProdData/OS400/Java400/ext/db2_classes.jar')NEWLNK('/usr/sap/<SID>/<instance_name>/j2ee/cluster/server/services/dbpool/work/db2_classes.jar')
4. Restart your SAP system (startsap).

6 Post-Installation Activities
68 October 2002
5. Start the SAP J2EE Engine Administrator from a Windows host. You can do one of thefollowing:
− Use the command line and enter:<J2EE_drive>:\usr\sap\<SID>\<instance_name>\j2ee\admin\go.bat
− Choose the following from the Windows Start menu:
Programs → SAP J2EE Engine 6.20 → Instance <instance_number> →Administrator
6. Log on to your SAP J2EE Engine host as user Administrator.
7. In the navigation frame of the SAP J2EE Engine Administrator, choose Services → DBPool.
8. Enter the class name of the driver:com.ibm.db2.jdbc.app.DB2Driver
9. If required, specify the path for the JDBC driver as follows:/usr/sap/<SID>/<instance_name>/j2ee/cluster/server/services/dbpool/work/db2_classes.jar
If you want to add a DB Pool (a symbolic connection to the database (datasource)) using the above installed JDBC driver, you must specify thedatabase URL as follows: jdbc:db2:LOCAL
6.4 Granting Authorizations for OperatingSystem Collector ProgramsUseIf your primary language is not English, you must enable SAP Support to activate the newlyinstalled secondary language.
ProcedureEnter the command:GRTOBJAUT OBJ(QSYS/CHGSYSLIBL) OBJTYPE(*CMD) USER(R3OWNER) AUT(*USE)
You also have the option of granting authorization to USER(*PUBLIC).
6.5 Installing and Using the SAP LicenseUseTo work with the SAP system, you need an SAP license. After the installation of the centralinstance, a temporary license is active for four weeks only. During this period, you mustinstall a permanent license.

6 Post-Installation Activities
October 2002 69
You can install several licenses, one for each host running the message server. You mustperform this procedure on each host running the message server. The SAP system thensearches for the current license.
You can request license keys for SAP system using:
• SAP Service Marketplace
• SAPNet R/3 – Frontend
• Telefax
For more information about the SAP license, see SAP Note 94998.
To see the online help for the license installation, enter the following command:saplicense '-help'
You can also call transaction SLICENSE in your SAP system to manage your SAP license.For more information about the SAP license, see the SAP online documentation: SAP Library→ SAP Web Application Server → Client/Server Technology (BC-CST) → SAP License (BC-CST-SL).
PrerequisitesYou need to install a new permanent license if you are:
• Performing a new SAP system installation
• Renaming your SAP system ID (that is, <SID>)
• Changing the message server host (that is, the central instance)
• Changing an existing hardware configuration
Procedure1. To find the hardware key (that is, the customer key) needed for the license request, enter
the following command on the host where the message server is running:saplicense '-get'
The system displays an 11-character hardware key, for example, D1903055560.
2. Using the fax form in the installation package, send a fax with the following information toSAP:
− Hardware key from previous step
− Name of the installed SAP system (that is, the value of <SID>)
− The date when you installed the database

6 Post-Installation Activities
70 October 2002
3. After you have received your license key from SAP, install it as follows, making sure youenter the license key exactly as shown in the SAP reply to your fax:saplicense '-install'
− If the license installation is successful, you see the following message:license successfully installed
You now have a permanent license for your SAP system
− If the license installation is not successful, you see the following message:check failed, no license installed
– Repeat again after deleting the SQL Package. For more information, see SAP Note63037.
6.6 Starting and Stopping the SAP SystemUseThe procedures below explain how to start and stop the SAP system after the installation.
PrerequisitesYou have checked that there are no active jobs for the instance that you have just installed.To do so, enter:WRKACTJOB SBS(R3_<instance_number>)
If a job is displayed, stop it with the command:ENDSBS SBS(R3_<instance_number>) OPTION(*IMMED)
Procedure
Starting the SAP system1. Log on to your iSeries system as <SID>OPR or <SID>OFR.
2. Enter STARTSAP and choose F4 to prompt for parameters.
3. Enter the SAP system ID (for example, C11) and instance number (for example 90). Werecommend that you retain the default value *ENV for both SAP system ID and theinstance number. *ENV will be replaced by the correct value for the SAP system ID. Inthe case of the instance number, the value *ENV represents the central instance number.A subsystem R3_nn will be started (where nn is the instance number), along with all theassociated SAP services (such as dispatcher, work processes, spool). SpecifyWAIT(*YES) to make sure that the system is up and running on termination ofSTARTSAP.
4. To check whether your SAP system started successfully, enter:WRKACTJOB SBS(R3_nn)
5. On the next screen, check the entry in the first line of the Status column on the right ofthe screen. If your SAP system started correctly, this field should contain the value RUN(running), SELW (select wait) SEMW (semaphore wait) or DEQW (waiting for the completionof a dequeue operation). It may take several minutes for the file system to reach thisstate.

6 Post-Installation Activities
October 2002 71
Stopping the SAP system1. Log on to the iSeries system as <SID>OFR or <SID>OPR.
2. Enter STOPSAP and choose F4 to prompt for parameters.
3. Enter the SAP system ID (for example, C11) and instance number (for example 90). Werecommend that you retain the default value *ENV for both SAP system ID and theinstance number. *ENV will be replaced by the correct value for the SAP system ID. Inthe case of the instance number, the value *ENV represents the central instance number.
4. For SAP instance, enter the number of the instance to be stopped, for example 90.
5. To make sure that the system has been shut down on termination of STOPSAP, specifyWAIT(*YES).
6.7 Starting the SAP Presentation GUI1. Call the SAP Logon screen.
2. Choose New.
3. Enter a description for your application server, for example C11. This text will appear inthe SAP Logon screen.
4. Enter the host name of the application server, for example as0001.
5. Enter the system or instance number, for example 90.
6. When you have entered all this information, choose OK.
If the information is valid, a new entry is added to the displayed list on the SAP Logonscreen. If you have defined several systems, they will be displayed in alphabetical order.
6.8 Logging on to the SAP SystemUseEach SAP system contains the users SAP* and DDIC. They have the following initialpasswords:
User Initial PasswordSAP* 06071992
DDIC 19920706
For security reasons we recommend that you change these SAP system passwordsas soon as possible. For more information on how to change the passwords, seeChanging Passwords for User Profiles [Page 72].

6 Post-Installation Activities
72 October 2002
ProcedureLog on as user SAP* (password: 06071992) and test the following:
1. Enter a new password and confirm it in the text boxes.
2. Call transaction SM50.
The services available for the instance should now be displayed, that is, dialog, update,enqueue, background, and spool.
If the display is empty, check whether the message server is running using the iSeriescommand WRKACTJOB (Work with Active Jobs). The process name is MSG_SERVER. Ifthe process is not running, /usr/sap/<SID>/DVEBMGS<no.>/work/dev_ms containsmore information.
3. Check the system log calling transaction SM21.
6.9 Changing Passwords for User ProfilesUseFor security reasons, you should change the passwords of the user profiles supplied withyour SAP system. The user profiles are as follows:
User Profile Initial Password<SID>OFR SAPOFR
<SID>OPR SAPOPR
<SID><nn> SAPnnPWD (nn is the instance number.)
In 3-tier systems, these three users must have the same password on alliSeries systems.
ProcedureTo change passwords at OS/400 level, use the command CHGPWD or CHGUSRPRF.
6.10 Removing the SAPinst Installation FilesUseYou use this procedure to gain disk space after the installation by deleting the SAPinst.
On the iSeries host you should remove the installation directory and its subdirectories, thetemporarily copied CDs and the libraries TMKSVR and SISAPCAR62.
From your Windows installation host you should remove the TMKSVR logfiles and the SAPinstStart menu entries.
You also might want to disconnect from the installation share and remove it from the iSeries.
You should not do this procedure until all instances of the SAP system on the iSeries hosthave been installed.

6 Post-Installation Activities
October 2002 73
Prerequisites• You have completed the SAP system installation.
• The SAP system is up and running.
Procedure
Do not delete the log files unless you are sure that you will not need themagain. Do not delete log files other than those in the paths given here.
On Windows:1. Remove the SAPinst Start menu entries by choosing:
Start → Programs → SAPinst DB2 400 Kernel <iSeries_name> → Remove SAPinst files
Make sure that there is no hanging sapinst process from a formerinterrupted installation on Windows 2000. A hanging sapinst process wouldprevent the file sapinst.exe in the installation path from being deleted.
Disconnect the installation share by entering:net use <installation drive letter>: /DELETE
2. Remove temporary TMKSVR log files by entering:del c:\temp\tmksvr*
On iSeries:1. Get the required environment:
CALL R3<SID>400/R3INLPGM
2. Remove the installation CDs by entering:RRM ‘/tmp/<SID>‘
3. Remove the installation share by entering:ADDLIBLE TMKSVR
DLTSHARE ‘rootbin’
RMVLIBLE TMKSVR
4. Stop and delete TMKSVR by entering:
ADDLIBLE TMKSVR
ENDTMKSVR 0
DLTTMKSVR 0
RMVLIBLE TMKSVR
DLTLIB TMKSVR
5. Delete the library SISAPCAR62 by entering:DLTLIB SISAPCAR62

6 Post-Installation Activities
74 October 2002
6.11 Accessing a Remote DatabaseUseWe only recommend the use of 100 MB Ethernet connections to a remote database for smalltest environments or in some special circumstances. For production environments, westrongly recommend that you use GB Ethernet or HSL for iSeries. Make sure that thecomplete traffic from the application server to the DB server and vice versa runs by GBEthernet or HSL, especially if you have 100 MB Ethernet installed as well.
Procedure
Accessing a Remote Database via TCP/IP Sockets
If you have both an SAP system with Release 6.20 and SAP systems withreleases lower than 4.6A running on a single iSeries system, you should notethe following:In SAP Release 6.20 the command STARTSAP *DB does not start thedatabase server job R3RMTDB, which is required for releases prior to 4.6A. Tostart these SAP systems, you should continue to use the commandSTARTSAP *DB from the older SAP release.
QXDAEDRSQL, the job necessary for accessing a remote database, is normally startedautomatically. It runs in subsystem QSYSWRK. If it is not running, you can start it with theiSeries command STARTSAP *DB.
When a work process connects to the QXDAEDRSQL job, the job spawns a second shadowjob. This shadow job is switched to run under the user profile running on the local system.
If <SID>00 connects to the QXDAEDRSQL job, the job will spawn another jobunder user profile QUSER. This new job is switched immediately to run underuser profile <SID>00.
6.12 Installing the Online DocumentationUseSAP currently provides an HTML-based solution for the SAP online documentation. TheApplication Help, Glossary, Implementation Guide (IMG) and Release Notes are delivered inHTML format. You can display the documentation with a Java-compatible Web browser on allfront end platforms supported by SAP.
Procedure1. Install the online documentation. For more information, see Installing the Online
Documentation contained in the root directory of the SAP Library - Online DocumentationCD, delivered as part of the installation package.
2. Log on to your SAP system [Page 71].
3. Choose Help → SAP Library.

6 Post-Installation Activities
October 2002 75
You can also directly access the help files on the Online Documentation CD without startingyour SAP system. You need a PC running Microsoft Windows to install the HTML HelpViewer for the Online Documentation CD.
The SAP Library can also be accessed at:http://help.sap.com
6.13 Configuring SAProuter and SAPNet - R/3FrontendUseSAProuter increases network security and simplifies network configuration. SAProuter allowsyou to make indirect network connections. The SAProuter software is included in thestandard SAP system. No additional installation is required. The network administratornormally configures SAProuter.
You require SAProuter if you are using any of the following:
• SAPNet – R/3 Frontend
SAPNet – R/3 Frontend is the SAP-based service system and provides the technical linkbetween SAP customers and SAP. SAPNet – R/3 Frontend was formerly known as theOnline Service System (OSS).
For more information on setting up and using SAPNet – R/3 Frontend, see thedocumentation in the:
− SAP Service Marketplace at: http://service.sap.com/sapnet-guide
− SAP Library choose Help � SAP Library in your SAP system or access the SAPLibrary at: http://help.sap.com
• EarlyWatch
For more information, see the SAP Service Marketplace at:http://service.sap.com/earlywatch
• Remote Consulting
For more information, see the SAP Service Marketplace at:http://service.sap.com/remoteconsulting
ProcedureTo get a complete list of SAProuter parameters, enter the following at the command lineprompt:
saprouter
For more information, see the SAP Library:
1. Choose Help � SAP Library in your SAP system.
2. Choose mySAP Technology Components � SAP Web Application Server �Client/Server Technology → SAProuter.
6 Post-Installation Activities
76 October 2002
Alternatively you can access the SAP Library at http://help.sap.com:
1. Choose SAP Web Application Server → SAP Web Application Server 6.20.
2. Select the required language.
3. Choose mySAP Technology Components � SAP Web Application Server →Client/Server Technology → SAProuter.
For information on installing SAProuter as a Microsoft Windows service, see SAP Note41054.
6.14 Configuring the Transport ManagementSystemUseYou configure the domain controller in the Transport Management System (TMS) by callingtransaction STMS.
Procedure1. In your SAP system, call transaction STMS.
2. Enter the required information to configure the domain controller.
If you are not sure how to configure the domain controller, choose Save andconfigure the controller later or choose Information to display the TMS onlinedocumentation.
6.15 Performing Basic OperationsA number of operations that you need to perform are described in the SAP OnlineDocumentation.
For instructions on how to set up the operations listed in the table below, see the SAPLibrary:
1. Choose Help � SAP Library in your SAP system.
2. Choose mySAP Technology Components � SAP Web Application Server �Client/Server Technology → SAProuter.
Alternatively you can access the SAP Library at http://help.sap.com
1. Choose SAP Web Application Server → SAP Web Application Server 6.20.
2. Select the required language.
3. Choose mySAP Technology Components � SAP Web Application Server →Client/Server Technology → SAProuter.

6 Post-Installation Activities
October 2002 77
ProcedureChoose the relevant section to perform the following operations:>>>> Operation Section in SAP Help Library
Set up operation modes –transaction RZ04
Computing Center Management System → Computing CenterManagement System → Configuration → Operation Modes
Set up logon groups –transaction SMLG
Computing Center Management System → Computing CenterManagement System → Configuration → Dynamic Logon LoadDistribution → The SAP Logon
Set up administrators Computing Center Management System → Computing CenterManagement System → Background Processing → Authorizationsfor Background Processing
Plan background jobs Computing Center Management System → Computing CenterManagement System → Background Processing
Install a printer Computing Center Management System → Computing CenterManagement System → SAP Printing Guide
Configure the system log Client/Server Technology → System Services → Tools forMonitoring the System → System log → Configuring the SystemLog
6.16 Installing Additional LanguagesIf you want to install an additional language, you need to perform the following steps:
• Classification of the language
• Scheduling of the language transport
• Scheduling of the language supplementation
For instructions on how to transport an additional language, see the following documentation:
• SAP documentation Language Transport (English version) or Sprachentransport(German version)
• SAP Library
a. Choose Help → SAP Library in your SAP system.
b. Choose mySAP Technology Components → SAP Web Application Server → Changeand Transport System → Language Transport.
Alternatively you can access the SAP Library at:http://help.sap.com
a. Choose SAP Web Application Server → SAP Web Application Server 6.20.
b. Select the required language.
c. Choose mySAP Technology Components � SAP Web Application Server → Changeand Transport System → Language Transport.

6 Post-Installation Activities
78 October 2002
6.17 Importing Support PackagesAvailability of Support PackagesSupport Packages are available through in the SAP Service Marketplace and throughSAPNet – R/3 Frontend. Support Package Collections are also shipped regularly on CD-ROM. Information on the availability of Support Packages is available in the SAP ServiceMarketplace at:http://service.sap.com/ocs-schedules
Support Packages are available for download in the SAP Service Marketplace at:http://service.sap.com/swcenter-main
The Support Package Manager (formerly called SAP Patch Manager, transaction SPAM)helps you apply Support Packages to your SAP system.
The SAP Note Assistant lets you load, implement and organize individualSAP Notes efficiently. It also recognizes dependencies between SAP Notes,Support Packages and modifications. You can find more information in theSAP Service Marketplace at:http://service.sap.com/noteassistant
6.18 Performing Client CopyPerform the client copy. The client copy consists of the following procedures:
• Maintenance of the client (transaction SCC4)
• Copy of the client (local – transaction SCCL)
• Copy of the log files (transaction SCC3)
For instructions on how to perform the client copy, see the SAP Library:
1. Choose Help � SAP Library in your SAP system.
2. Choose mySAP Technology Components � SAP Web Application Server � Changeand Transport System → Client Copy and Transport.
Alternatively you can access the SAP Library at: http://help.sap.com
1. Choose SAP Web Application Server → SAP Web Application Server 6.20.
2. Select the required language.
3. Choose mySAP Technology Components � SAP Web Application Server � Changeand Transport System → Client Copy and Transport.

6 Post-Installation Activities
October 2002 79
6.19 Performing a Full BackupUseYou can use this procedure to make a full backup of your SAP system.
During the backup, your SAP system is unavailable to other users.
Procedure1. On the iSeries command line, enter GO SAVE
2. Enter option 21.
For detailed information, see the IBM documentation OS/400 Backup and Recovery (SC41-5304).
How to Back Up Your System
Parts of the System CommandModel- or Feature-UniqueLicensed Internal CodeModel- or Feature-UniqueLicensed Internal Code
Licensed Internal CodeLicensed Internal Code
OS/400 Objects in QSYS OS/400 Objects in QSYS
User ProfilesUser Profiles
Private AuthoritiesPrivate Authorities
Configuration ObjectsConfiguration Objects SAVCFGSAVCFG
SAVSAV
OS/400 Optional LibrariesOS/400 Optional Libraries
Licensed Program LibrariesLicensed Program Libraries
IBM Libraries With User Data IBM Libraries With User Data
User Libraries User Libraries
Filed Documents and FoldersFiled Documents and Folders
Distribution ObjectsDistribution Objects
Objects in DirectoriesObjects in Directories
SAVDLOSAVDLO
SAVSYS
SAVLIB(*ALLUSR)SAVOBJSAVCHGOBJ
SAVLIB(*ALLUSR)SAVOBJSAVCHGOBJ
SAVLIB(*IBM)
SAVLIB(*IBM)
SAVSECDTASAVSECDTA
SAVLIB
See also:Restoring a Backup [Page 92].

7 Additional Information
80 October 2002
7 Additional Information
7.1 Continuing an Interrupted Installation withSAPinstUseAs SAPinst does not necessarily abort the installation in error situations, you might be able tocontinue an interrupted installation. You have to distinguish between errors in the input phaseand the process phase:
• Errors during the input phaseIf an error occurs during the input phase, SAPinst:
− Stops the installation.
− Displays a dialog that informs you about the error.
You can now :
− Directly view the log file by choosing View Logs.
− Try to solve the problem.
− Finally you have to abort the installation by choosing O.K.
Then you have to restart from the beginning.
• Errors during the processing phaseIf an error occurs during the processing phase, SAPinst:
− Stops the installation.
− Displays a dialog that informs you about the error.
You can now:
− Directly view the log file by choosing View Logs.
− Try to solve the problem.
− Retry the installation by choosing Retry.
− Abort the installation by choosing O.K.
Then you have two alternatives:
a. Continuing the installation from the point it stopped.
b. Restarting from scratch.
In some cases, you must uninstall already installed components, beforerepeating the installation from scratch. For example, this applies to an SAPsystem installation.

7 Additional Information
October 2002 81
ProcedureContinuing the Installation1. Check if a SAPinst GUI Java process is still running on your Windows host, and if so,
delete it by looking for javaw.exe under Processes in your Task Manager.
2. Check if a SAPinst process is still running on your Windows host, and if so delete it bylooking for any processes starting with sapinst under Processes in your Task Managerand ending them.
3. Choose Start → Programs → <SAPinst...on<iSeries_name>> → SAPinst Server withGUI.
Restarting from scratch1. Check if a SAPinst GUI Java process is still running, and if so, delete it by looking for
javaw.exe under Processes in your Task Manager.
2. Check if a SAPinst process is still running on your Windows host, and if so delete it bylooking for any processes starting with sapinst under Processes in your Task Manager.
3. Choose Start →Programs →<SAPinst...on<iSeries_name>Prepare New Installation.Current log and command files are now copied to a backup directory that indicates thedate and time of the backup.<SAPinst_dir>\log_<date>_<time>
4. Choose Start→ Programs → <SAPinst...on<iSeries_name>> → SAPinst Server withGUI.
7.1.1 Troubleshooting During the Database LoadUseThe database load is divided into several sections, which are performed in parallel. Eachsection writes a log file to your installation directory. The names of these files are as follows:
• SAP000.log
• SAPUSER.log
• SAPSSRC.log
• SAPSSEXC.log
• SAPSPROT.log
• SAPSLOAD.log
• SAPSLEXC.log
• SAPSDIC.log
• SAPSDOCU.log
• SAPPOOL.log
• SAPCLUST.log
• SAPAPPL2.log
7 Additional Information
82 October 2002
• SAPAPPL1.log
• SAPAPPL0.log
• SAPVIEW.log
Procedure1. If errors occur during database load find out which load process failed by checking the
log files. You can do this by entering:EDTF ‘/usr/sap/sapinst/SAPinst_DB2_400_KERNEL_1_2/<log_file>.log’
EDTF ‘/usr/sap/sapinst/SAPinst_DB2_400_KERNEL_1_2/SAPSDIC.log´
The log file contains additional information about the status of the job and thecorresponding iSeries job.
2. Scroll to the bottom of this file and check the error message.
The start of each import attempt is logged to this file and looks like this:TS61CEO34/R3LOADDB4: START OF LOG: 20010926170456
TS61CEO34/R3LOADDB4: sccsid @(#) $Id://bas/620_COR/src/R3ld/R3load/R3ldmain.c#4 $ SAP
TS61CEO34/R3LOADDB4: version R6.10/V1.
TS61CEO34/R3LOADDB4 -i SAPSDIC.cmd -p SAPSDIC.log -nojournal -datacodepage 1100 -dbcodepage 0120
...
No Journaling During the Database LoadKeep in mind that the new tables are not journaled during the database load. Therefore, youreceive the following message:SQL7905 Information 20 10/21/01 17:18:38 QSQCRTT QSYS 1013QSQCRTT
Message . . . . : Table <table_name> in R3<SID>DATA created butcould not be journaled.
You can ignore this message. Journaling will be switched on later.

7 Additional Information
October 2002 83
7.1.2 Correcting Errors in RFC StepsUse
RFC steps have step names starting with RFC, for example,RFCADDBDIF_IND_DB4.
RFC steps can fail for several reasons:
• The SAP system has not been started up correctly.
• The DDIC user has entered the wrong password.
• The jobs started by user DDIC cannot be executed.
• The SAP job cannot be started or executed in the SAP system.
ProcedureErrors in RFC Steps and Required User Actions
Cause of the Error User Actions
The SAP system has notbeen started up correctly
(This is indicated by errormessages in the filesdev_w* and dev_disp.These files are located inthe work directory.)
To check if the SAP work processes are running, enter:WRKACTJOB SBS(R3_<nn>)
The DDIC user has enteredthe wrong password
Check whether you can log on to the SAP system as userDDIC.
Check whether the password for DDIC is the default password(19920706).
The jobs started by userDDIC cannot be executed
To monitor the jobs started by user DDIC (paying particularattention to the job RADDBDIF), use transaction SM37.
To look at the system log for detailed information, usetransaction SM21.
The SAP job cannot bestarted or executed in theSAP system.
Check whether user <SID><nn> has write permissions fordirectories /usr/sap/trans and /usr/sap/trans/tmp.
If directory /usr/sap/trans is located on another iSeries andis shared via QFileSvr.400, make sure that users <SID><nn>and <SID>OFR exist on the remote system and have the samepasswords on both systems.
Step RFCRADDBDIF_IND_DB4 also writes log file/usr/sap/trans/tmp/RADDBDIF.<SID>, which contains additionalinformation about the status of the executed reports.

7 Additional Information
84 October 2002
7.2 Additional Information about the SAP J2EEEngine
For more information, see the SAP Library:a. Choose Help � SAP Library in your SAP system.b. Choose mySAP Technology Components → SAP Web Application
Server → SAP J2EE Engine.
Alternatively you can access the SAP Library athttp://help.sap.com:a. Choose SAP Web Application Server → SAP Web Application Server
6.20.b. Select the required language.c. Choose mySAP Technology Components � SAP Web Application
Server � SAP J2EE Engine.
File System Structure of the SAP J2EE Engine InstallationAfter the installation of the SAP J2EE Engine, the following file system structure applies forthe SAP J2EE Engine (j2ee) and its Software Delivery Manager (sdm, see "The SoftwareDelivery Manager" below):
/ or <DRIVE>
usr
sap
<SAPSID>
j2ee sdm
... ...
/ or <DRIVE>
usr
sap
<SAPSID>
<Instance Name>
j2ee
...
Central Instance Dialog Instance
<Instance Name>
7 Additional Information
October 2002 85
For example, the file system structure may look as follows:• On a central instance with SAP system ID C11 and instance name
DVEBMGS00 on UNIX, the SAP J2EE Engine is installed to/usr/sap/C11/DVEBMGS00/j2ee and the corresponding SDM isinstalled to /usr/sap/C11/DVEBMGS00/sdm.
• On a dialog instance with instance name D01 on Windows, the SAP J2EEEngine is installed to c:\usr\sap\C11\D01\j2ee. No SDM isinstalled.
Ports used by the SAP J2EE EngineThe ports used by the SAP J2EE Engine are listed in the file prepconf.log located in theinstallation directory of the SAP J2EE Engine (see section above).
Administration of the SAP J2EE EngineYou can administer the SAP J2EE Engine from within the SAP Web Application Server.
To administer the SAP J2EE Engine:
1. Call transaction SMICM in the SAP Web Application Server.
2. Choose Administration � J2EE-Server.
The following functions are available:
• Send soft shutdown with or without restart
• Send hard shutdown with or without restart
• Set the restart flag of the SAP J2EE Engine
Updating the SAP J2EE EngineFor information about how to update the SAP J2EE Engine, see SAP Note 529088.
Deactivation of the SAP J2EE EngineAfter the installation, the SAP J2EE Engine is activated. If you do not want to use the SAPJ2EE Engine, you can deactivate it by setting the parameter rdisp/j2ee_start to 0 in theinstance profile of every installed SAP instance. To do this, edit the correct file for yourplatform:
• UNIX – log on first as user root
<sapmnt>/profile/<SAPSID_INSTANCENAME_HOSTNAME>
• Windows<DRIVE>:\usr\sap\<SAPSID>\sys\profile\<SAPSID_INSTANCENAME_HOSTNAME>
• IBM eServer iSeries/sapmnt/<SAPSID>/profile/<SAPSID_INSTANCENAME_HOSTNAME>
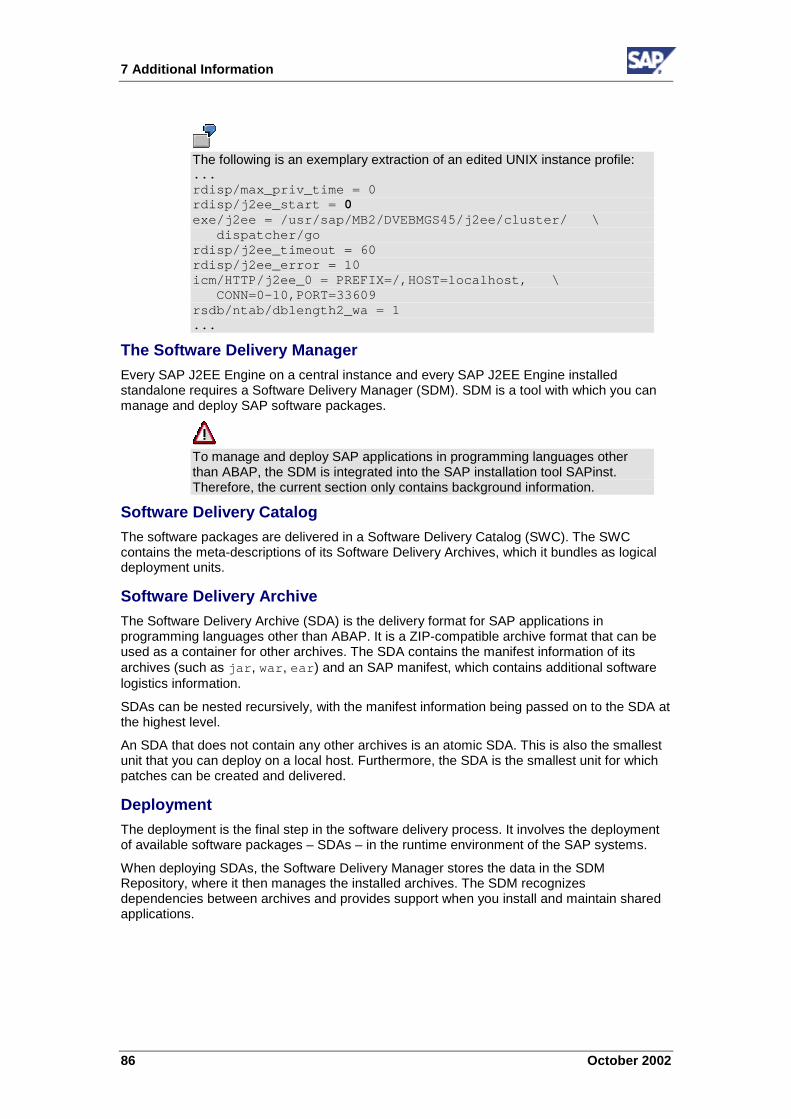
7 Additional Information
86 October 2002
The following is an exemplary extraction of an edited UNIX instance profile:...rdisp/max_priv_time = 0rdisp/j2ee_start = 0exe/j2ee = /usr/sap/MB2/DVEBMGS45/j2ee/cluster/ \
dispatcher/gordisp/j2ee_timeout = 60rdisp/j2ee_error = 10icm/HTTP/j2ee_0 = PREFIX=/,HOST=localhost, \
CONN=0-10,PORT=33609rsdb/ntab/dblength2_wa = 1...
The Software Delivery ManagerEvery SAP J2EE Engine on a central instance and every SAP J2EE Engine installedstandalone requires a Software Delivery Manager (SDM). SDM is a tool with which you canmanage and deploy SAP software packages.
To manage and deploy SAP applications in programming languages otherthan ABAP, the SDM is integrated into the SAP installation tool SAPinst.Therefore, the current section only contains background information.
Software Delivery CatalogThe software packages are delivered in a Software Delivery Catalog (SWC). The SWCcontains the meta-descriptions of its Software Delivery Archives, which it bundles as logicaldeployment units.
Software Delivery ArchiveThe Software Delivery Archive (SDA) is the delivery format for SAP applications inprogramming languages other than ABAP. It is a ZIP-compatible archive format that can beused as a container for other archives. The SDA contains the manifest information of itsarchives (such as jar, war, ear) and an SAP manifest, which contains additional softwarelogistics information.
SDAs can be nested recursively, with the manifest information being passed on to the SDA atthe highest level.
An SDA that does not contain any other archives is an atomic SDA. This is also the smallestunit that you can deploy on a local host. Furthermore, the SDA is the smallest unit for whichpatches can be created and delivered.
DeploymentThe deployment is the final step in the software delivery process. It involves the deploymentof available software packages – SDAs – in the runtime environment of the SAP systems.
When deploying SDAs, the Software Delivery Manager stores the data in the SDMRepository, where it then manages the installed archives. The SDM recognizesdependencies between archives and provides support when you install and maintain sharedapplications.

7 Additional Information
October 2002 87
7.3 Deleting an SAP SystemUseThis section describes how to delete an SAP system that is installed on an iSeries.
This description assumes that the installation of your SAP system has beenperformed using SAP standard tools according to the installationdocumentation.
Procedure1. Log on with the user profile QSECOFR.
2. Add the kernel library to ADDLIBLE, for example R3620AOPT.
3. Call command DLTR3INST with the system name and instance number. This commandmust be called for all instances of the SAP system you want to delete.
4. Call the command DLTR3SYS using the system name.
5. If the following directories and files exist, delete them using the command WRKLNKSAP:
− usr/sap/<SID>where <SID> is the SAP system ID
− usr/sap/trans/config/<SID>
− In the directory buffer (usr/sap/trans/buffer/*<SID>*) you have to deleteall files that contain <SID>.To restrict command WRKLNKSAP, use Subset in the on the upper right part on thescreen.
− usr/sap/trans/cofiles/*<SID>*
− usr/sap/trans/data/*<SID>*
− usr/sap/trans/log/*<SID>*
− sapmnt/<SID>
6. Delete the kernel library using the command DLTLIB if this library was only used for theSAP system you now want to deleted.
ResultAll the SAP systems are now deleted. If you want to reinstall a SAP system you can use thesame <SID> as the one of the SAP system you deleted.

7 Additional Information
88 October 2002
7.4 SAP File StructureThe graphic shows part of the SAP file structure. The files in the shaded box are located bydefault on the database server.
USR
sap
<SID>
inst
data log work profile
run
transtranstranstrans
sapmnt
<hostname>
QFileSvr.400 QSYS.LIB
R3<REL>AOPT.LIB
TPOS4.PGMR3trans.PGMDW.PGM
tpR3trans
Disp+work
exe
exeglobalprofile
<SID>
global
sys
Keysoft linkhard link
To display the file structure:
1. Enter WRKLNK and choose F4 to display possible entries.
2. Change the value entered for parameter Detail from *PRV to *EXTENDED.
3. Change the value entered for parameter Display option from *PRV to *ALL.
You only have to change these values once. The system remembers the values lastused. These parameters control how much information is displayed in the Work withObject Links list.
Important SAP File SystemsFile System Name Description/usr/sap/trans Used for SAP network-wide area data,
such as for transport between SAPsystems.
/usr/sap/<SID>/<role><instance>/log
Contains system log entries.
/sapmnt Accessed remotely via QfileSvr.400.
/sapmnt/<SID>/profile Contains all startup, instance and defaultprofiles.
/tmp/<SID> Contains all your installation guides bydefault.
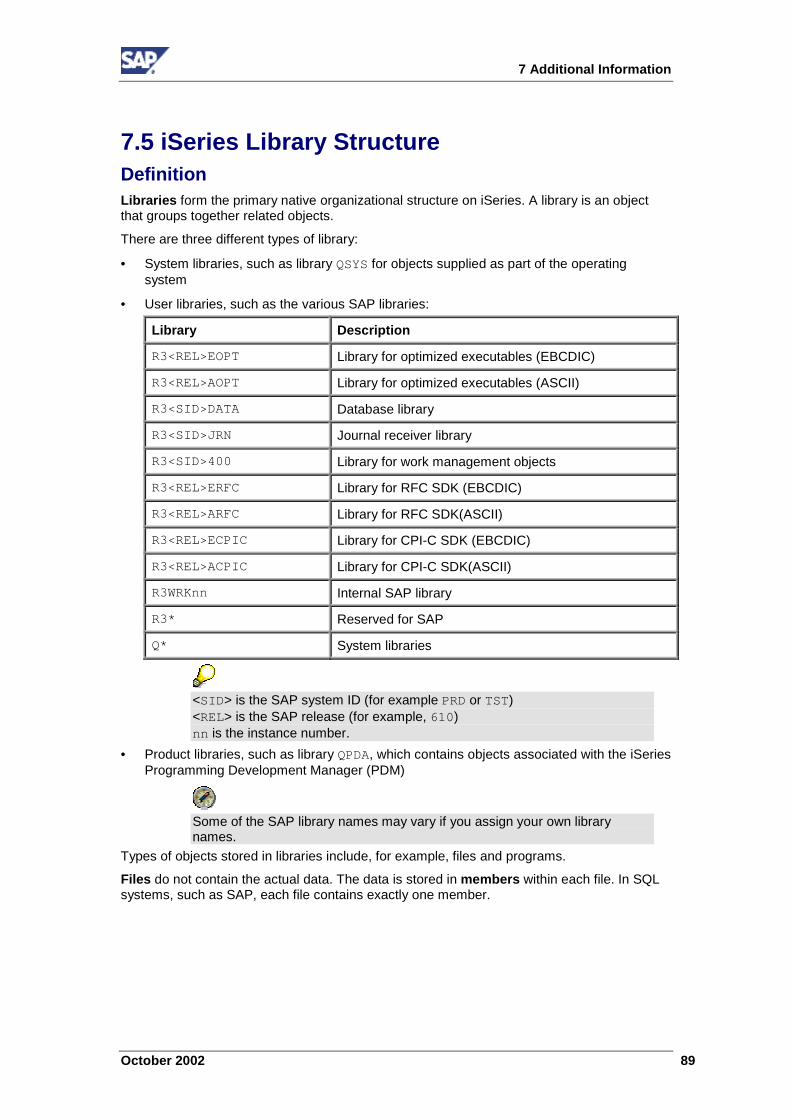
7 Additional Information
October 2002 89
7.5 iSeries Library StructureDefinitionLibraries form the primary native organizational structure on iSeries. A library is an objectthat groups together related objects.
There are three different types of library:
• System libraries, such as library QSYS for objects supplied as part of the operatingsystem
• User libraries, such as the various SAP libraries:
Library Description
R3<REL>EOPT Library for optimized executables (EBCDIC)
R3<REL>AOPT Library for optimized executables (ASCII)
R3<SID>DATA Database library
R3<SID>JRN Journal receiver library
R3<SID>400 Library for work management objects
R3<REL>ERFC Library for RFC SDK (EBCDIC)
R3<REL>ARFC Library for RFC SDK(ASCII)
R3<REL>ECPIC Library for CPI-C SDK (EBCDIC)
R3<REL>ACPIC Library for CPI-C SDK(ASCII)
R3WRKnn Internal SAP library
R3* Reserved for SAP
Q* System libraries
<SID> is the SAP system ID (for example PRD or TST)<REL> is the SAP release (for example, 610)nn is the instance number.
• Product libraries, such as library QPDA, which contains objects associated with the iSeriesProgramming Development Manager (PDM)
Some of the SAP library names may vary if you assign your own librarynames.
Types of objects stored in libraries include, for example, files and programs.
Files do not contain the actual data. The data is stored in members within each file. In SQLsystems, such as SAP, each file contains exactly one member.

7 Additional Information
90 October 2002
7.6 OS/400 Integrated File SystemDefinitionThe iSeries also provides a UNIX-style and PC-style integrated file system that providesenhanced capabilities for managing new types of information processing includingclient/server, open systems, and multimedia.
UseThe integrated file system supports the use of stream files for storing and operating on data.Stream files are files containing a continuous stream of data. This data might take the form oftext files or images, for example. Stream files are system objects with object type *STMF.
For information about displaying or editing stream files, see Editing Stream Files [Page 94].
StructureThe OS/400 integrated file system has a hierarchy comparable to that used by UNIX. Theintegrated file system treats the different types of support for accessing the various objecttypes as separate file systems. These file systems are:
File System Description
“/” This file system corresponds to the UNIX root directory. This PC-stylefile system is not case-sensitive.
QOpenSys The open systems file system. This UNIX-style file system is case-sensitive (not used by the SAP system).
QSYS.LIB The library file system allowing the user to access objects residing innative iSeries libraries using IFS commands.
QDLS The document library services file system (not used by the SAP system).
QLANSrv The LAN Server/400 file system (not used by the SAP system).
QOPT The optical file system; this file system is mainly used during installationand contains all CDs that have been inserted so far.
QFileSvr.400 This file system provides access to other file systems on remote iSeriessystems. It is used by several SAP functions, for example correction andtransport, to access remote stream files.
Take care with upper- and lowercase notation. The “/” file system is not case-sensitive, but QOpenSys and the contents of SAP profiles are.
IntegrationThe integrated file system distinguishes between two different types of link: hard links andsoft links. A link is a named connection between a directory and an object.

7 Additional Information
October 2002 91
Hard and Soft Links
Type of Link Description
Hard link, also known as link,absolute link
• Indicated by a separate directory entry
• Cannot exist unless linked to an object
• Cannot cross file systems
Soft link, also known as symboliclink
• Takes the form of a path name contained in a file
• Can exist without pointing to an existing object.(Is an object of type *SYMLNK.)
• Can be removed without affecting the object
• Can cross file systems
• Only allowed in the IFS
To see the contents of a symbolic link, use WRKLNK with Detail option*EXTENDED. (This command corresponds to the UNIX command ls -l.)Enter option 12 (Work with links).
The SAP system uses soft links by default.
7 Additional Information
92 October 2002
7.7 Restoring a BackupUseYou can restore a backup in the sequence given below.
PrerequisitesYou have a full backup.
Procedure1. Control the panel function.
2. Perform an IPL (initial program load) or Install System Menu.
3. To restore a user profile or profiles saved with the SAVSYS (Save System) or SAVSECDTA(Save Security Data) command, enter:RSTUSRPRF (Restore User Profile)
4. To restore to the system a configuration object saved with the SAVSYS (Save System) orSAVCFG (Save Configuration) command, enter:
RSTCFG (Restore Configuration)
5. To restore libraries saved with the SAVLIB command with LIB(*NONSYS) specified,enter:
RSTLIB (*NONSYS) (Restore Library)
6. To restore documents, folders, and distribution objects, enter:
RSTDLO (Restore Document Library Object)
7. To restore a copy of an object or objects that can be used in the Integrated File System,enter:RST DEV('/qsys.lib/tap01.devd')OBJ(('*' *INCLUDE) ('\qsys.lib' *OMIT) ('\qdls' *OMIT)
8. To restore saved changes in libraries, documents, and directories, enter:
RSTLIB, RSTOBJ, RSTDLO, RST.
9. To apply journaled changes (for a particular database file member) to recover the file,enter:
APYJRNCHG (Apply Journaled Changes)
10. To restore private authorities to user profiles, enter:
RSTAUT (Restore Authority)

7 Additional Information
October 2002 93
Methods for Restoring a Backup
Parts of the System CommandModel- or Feature-Unique Licensed Internal CodeModel- or Feature-Unique Licensed Internal Code
Licensed Internal CodeLicensed Internal Code
OS/400 Objects in QSYSOS/400 Objects in QSYS
User ProfilesUser Profiles
Configuration ObjectsConfiguration Objects
OS/400 Optional LibrariesOS/400 Optional Libraries
IBM Libraries With User DataIBM Libraries With User Data
User LibrariesUser Libraries
Filed Documents and FoldersDistribution ObjectsFiled Documents and FoldersDistribution Objects
Objects in DirectoriesObjects in Directories
Saved Changes in Libraries,Documents, and DirectoriesSaved Changes in Libraries,Documents, and Directories
Journaled ChangesJournaled Changes
Private AuthoritiesPrivate Authorities
RSTLIB*IBMRSTLIB*IBM
Function from Control PanelFunction from Control Panel
IPL or Install the System MenuIPL or Install the System Menu
RSTUSRPRFRSTUSRPRF
RSTCFGRSTCFG
RSTLIB*ALLUSRRSTLIB*ALLUSR
RSTDLORSTDLO
RSTLIB, RSTOBJ, RSTDLO, RSTRSTLIB, RSTOBJ, RSTDLO, RST
APYJRNCHGAPYJRNCHG
RSTAUTRSTAUT
RSTLIB*NONSYSRSTLIB*NONSYS
Licensed Program LibrariesLicensed Program Libraries
RSTRST

7 Additional Information
94 October 2002
7.8 Editing Stream FilesUseStream files are files containing a continuous stream of data. Stream files are used, forexample, to store documents and images. On an iSeries system, SAP profiles are stored instream files.
ProcedureYou can access iSeries stream files and directories in a number of different ways.
• Using the command EDTF
EDTF is an editor similar to SEU (Source Entry Unit). The prefix area of each record willaccept edit command. To display the edit commands available, choose F1.
• Using Netserver/400
The Netserver/400 is included in OS/400 since V4R2M0. This provides, similar toWindows, shares that can be mapped with every Windows client. You can configurethese shares with a free-of-charge option of the operation navigator on Client AccessExpress. Since V4R4M0 you can configure a character-by-character conversion fromASCII to EBCDIC and vice-versa.
• Using Client Access
If you have Client Access, you can also access stream files using this product. UsingCA/400’s Network Drive feature and the capability of CA/400 to perform a character-by-character conversion from ASCII to EBCDIC and vice-versa, you can work on the iSeriesIFS in the same way as on the PC file system. That is, you can create, edit, and deletefiles and directories with all the restrictions that apply to CA/400.
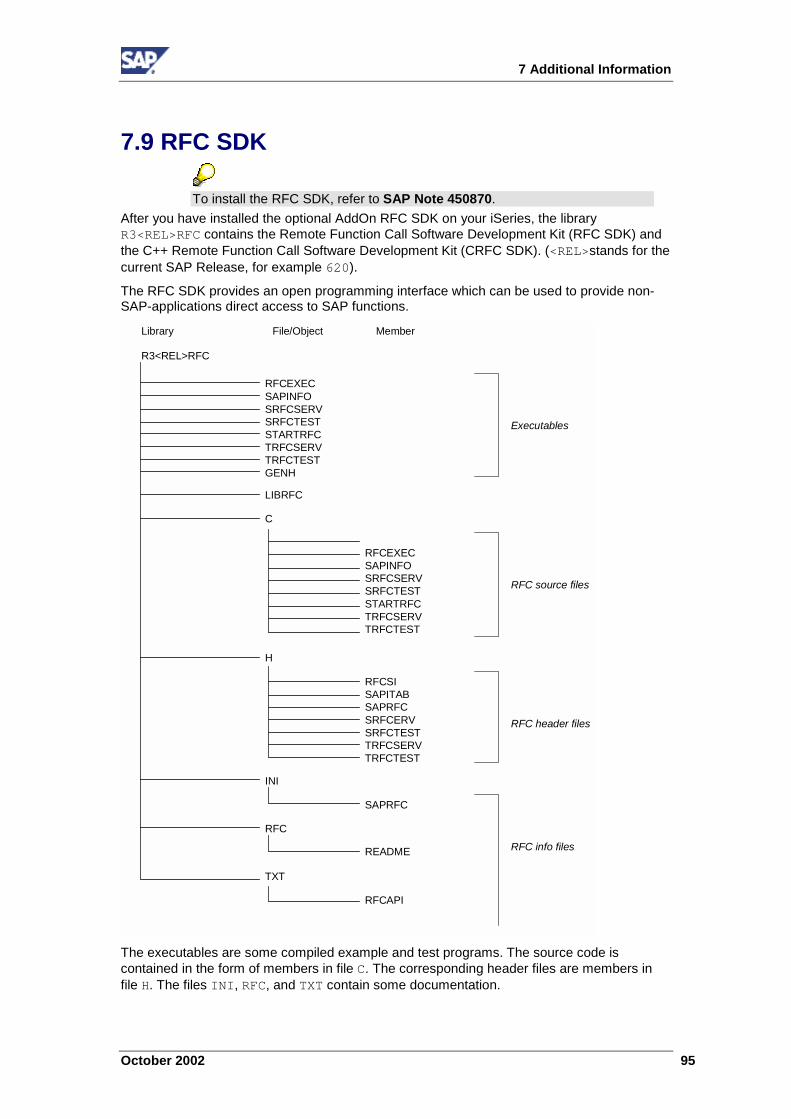
7 Additional Information
October 2002 95
7.9 RFC SDK
To install the RFC SDK, refer to SAP Note 450870.After you have installed the optional AddOn RFC SDK on your iSeries, the libraryR3<REL>RFC contains the Remote Function Call Software Development Kit (RFC SDK) andthe C++ Remote Function Call Software Development Kit (CRFC SDK). (<REL>stands for thecurrent SAP Release, for example 620).
The RFC SDK provides an open programming interface which can be used to provide non-SAP-applications direct access to SAP functions.
R3<REL>RFC
RFCEXECSAPINFOSRFCSERVSRFCTESTSTARTRFCTRFCSERVTRFCTESTGENH
LIBRFC
C
RFCEXECSAPINFOSRFCSERVSRFCTESTSTARTRFCTRFCSERVTRFCTEST
H
RFCSISAPITABSAPRFCSRFCERVSRFCTESTTRFCSERVTRFCTEST
INI
SAPRFC
RFC
README
TXT
RFCAPI
File/Object MemberLibrary
Executables
RFC source files
RFC header files
RFC info files
The executables are some compiled example and test programs. The source code iscontained in the form of members in file C. The corresponding header files are members infile H. The files INI, RFC, and TXT contain some documentation.

7 Additional Information
96 October 2002
Activities
Compiling and Linking an RFC Program on iSeriesTo create an executable, use the iSeries commands CRTMOD, CRTPGM.
How to create the executable sapinfo:ADDLIBLE LIB(R3<REL>RFC)CRTCMOD MODULE(SAPINFO) SRCFILE(R3<REL>RFC/C)OUTPUT(*PRINT)
OPTION(*SYSINCPATH *SHOWUSR *EXPMAC)DBGVIEW(*SOURCE) DEFINE(‘SAPonOS400’)
SYSIFCOPT(*IFSIO)CRTPGM PGM(SAPINFO) MODULE(SAPINFO) BNDSRVPGM(LIBRFC)DETAIL(*FULL)
To obtain the latest information about RFC SDK functionality on iSeries, seeSAP Note 84685.


