ITTI ITII IT .0 I IT I ONE WAY FOR CREATING VISUAL EFFECTS
4
ONE WAY FOR CREATING VISUAL EFFECTS ЕДИН НАЧИН ЗА СЪЗДАВАНЕ НА ВИЗУАЛНИ ЕФЕКТИ Georgiev, I., Stoyanova V. PhD National Military University, Faculty of Artillery, AAD and KIS, 1 Karel Shkorpil Str., 9700 Shumen, Bulgaria [email protected], [email protected] Abstract: In this article is exposed one way for creating digital illustrations for commercial purpose. The method combines traditional drawing and calligraphy, 3Ds Max, VRay and Photoshop. The idea of the article is to demonstrate how to build an entire project from the scratch. The purpose of the article is to show how different software for graphic designing with different purpose can be combined together with a traditional art in order to achieve maximum as a result Keywords: IMAGE, PHOTOSHOP, 3D STUDIO MAX 1. Introduction The images and illustrations take big part in the modern world. But in order them to be successful and to attract the attention of the crowd it is needed to be created to different and creative way. All of the commercial worlds need illustrations for their purpose. In the article I chose to talk about how to make an illustration for a book cover. The cover shows different kind of arts – calligraphy, tinted glass, gems and wooden box. The purpose of is to be a contrast of the created missing art in the world of the book. 2. Main part – Creation of an illustration for books, magazines and other commercial activities. I decided to start the book cover with a hand drawing and later to continue with two different soft wares – Photoshop and 3Ds Max. And finally I mixed the work together in the final result. The idea of the cover is to do a calligram with a circular calligraphy with several rings. Then placing a wooden box in the middle of the canvas and disperse gems around the letters. The viewport of everything will be from above. The first part of the project is doing a calligraphy. The needed materials for it are 100x75mm paper sheet, pilot parallel pens – 2.4mm and 6mm (can be found everywhere) and calligraphy ink. The idea is to make a circular calligraphy. To do this we first need to do a calligraphy web. To draw it we need to measure the length of each of the circles by using the formula p=dπ (where p is the length, d is the diameter). After calculating the lengths of each circle we draw a calligraphy line with the same length as the circle. To build the calligraphy line we draw lines for the capital letters, the small letters, the ascending and the descending letters. After calculating the lengths, the connections between the different circles and the space between them we draw the circles (including circles for the capital letters, small letters, ascending and descending) on the paper sheet (100x75mm) and then draw lines that divide the circles into sectors. After the calligraphy web is done we need to work on the preferable design and to choose a calligraphy font (for example Fraktur, Textura, Copperplate, etc). Modern varieties of the fond Fraktur are used in the project. The final step in this part is to do a scan of the calligraphy. For the second part we will use 3Ds Max and VRay. Autodesk 3Ds Max, formerly 3D Studio and 3D Studio Max, is a professional 3D computer graphics program for making 3D animations, models, games and images. It is developed and produced by Autodesk Media and Entertainment [1]. 1 It has modeling capabilities and a flexible plugin architecture and can be used on the Microsoft Windows platform. It is frequently used by video game developers, 1 http://slideplayer.com/slide/10560987/ many TV commercial studios and architectural visualization studios. It is also used for movie effects and movie pre- visualization. For its modeling and animation tools, the latest version of 3ds Max also features shaders (such as ambient occlusion and subsurface scattering), dynamic simulation, particle systems, radiosity, normal map creation and rendering, global illumination, a customizable user interface, new icons, and its own scripting language [2]. 2 Vray is a render plugin. It's a plugin, which means that it adds functionality to an existing program. Vray's features mainly aim at creating photorealistic images, together with improving rendering speed. Currently, VRay exist for 3D Studio Max, Maya, Rhinoceros 3D, Sketchup, Softimage, Blender and there's even a standalone version available [3]. 3 It is developed by the Bulgarian company Chaos Group and you can find the plugin in their official site. In 3Ds Max we will create the wooden box and the gems but we will work on two different projects for them. That’s why I will divide this part in two smaller parts. The chosen design for the wooden box is a hexagon. The lid is built with different colored small pieces of glass. To do it we start with building a cylinder and we set the sides to 6 so we can get a hexagon, cap segments – 1 and chose the radius and the height (in the project r=50, h=45). Afterwards we convert it in editable poly and start modifying the hexagon. We mark the face and use the inset tool (amount 5) to make 1 polygon inside then we use extrude to make the shape concave. This is our box (Fig. 1). Fig. 1. Тhe wooden box is a hexagon Then we create another hexagon with the same radius and smaller height (in the project h=10). This will be our lid. Again we need to convert it to editable poly. This time we work on the two faces beginning with inset two times in a roll (used amount 1 for the first time and 32 for the second). The idea is with one of them to create the edge and with the other one the center, that’s why one of them should be with small amount and the other with proper larger 2 https://www.autodesk.com/products/3ds-max/overview 3 http://www.aversis.be/tutorials/vray/vray-20-what-is- vray.htm 90 INTERNATIONAL SCIENTIFIC JOURNAL "INDUSTRY 4.0" WEB ISSN 2534-997X; PRINT ISSN 2534-8582 YEAR III, ISSUE 2, P.P. 90-93 (2018)
Transcript of ITTI ITII IT .0 I IT I ONE WAY FOR CREATING VISUAL EFFECTS

ONE WAY FOR CREATING VISUAL EFFECTS
ЕДИН НАЧИН ЗА СЪЗДАВАНЕ НА ВИЗУАЛНИ ЕФЕКТИ
Georgiev, I., Stoyanova V. PhD
National Military University, Faculty of Artillery, AAD and KIS,
1 Karel Shkorpil Str., 9700 Shumen, Bulgaria
[email protected], [email protected]
Abstract: In this article is exposed one way for creating digital illustrations for commercial purpose. The method combines
traditional drawing and calligraphy, 3Ds Max, VRay and Photoshop. The idea of the article is to demonstrate how to build an entire project
from the scratch. The purpose of the article is to show how different software for graphic designing with different purpose can be combined
together with a traditional art in order to achieve maximum as a result
Keywords: IMAGE, PHOTOSHOP, 3D STUDIO MAX
1. Introduction
The images and illustrations take big part in the modern world.
But in order them to be successful and to attract the attention of the
crowd it is needed to be created to different and creative way. All of
the commercial worlds need illustrations for their purpose. In the
article I chose to talk about how to make an illustration for a book
cover. The cover shows different kind of arts – calligraphy, tinted
glass, gems and wooden box. The purpose of is to be a contrast of
the created missing art in the world of the book.
2. Main part – Creation of an illustration for
books, magazines and other commercial
activities.
I decided to start the book cover with a hand drawing and later
to continue with two different soft wares – Photoshop and 3Ds Max.
And finally I mixed the work together in the final result. The idea of
the cover is to do a calligram with a circular calligraphy with
several rings. Then placing a wooden box in the middle of the
canvas and disperse gems around the letters. The viewport of
everything will be from above.
The first part of the project is doing a calligraphy. The needed
materials for it are 100x75mm paper sheet, pilot parallel pens –
2.4mm and 6mm (can be found everywhere) and calligraphy ink.
The idea is to make a circular calligraphy. To do this we first need
to do a calligraphy web. To draw it we need to measure the length
of each of the circles by using the formula p=dπ (where p is the
length, d is the diameter). After calculating the lengths of each
circle we draw a calligraphy line with the same length as the circle.
To build the calligraphy line we draw lines for the capital letters,
the small letters, the ascending and the descending letters. After
calculating the lengths, the connections between the different circles
and the space between them we draw the circles (including circles
for the capital letters, small letters, ascending and descending) on
the paper sheet (100x75mm) and then draw lines that divide the
circles into sectors.
After the calligraphy web is done we need to work on the
preferable design and to choose a calligraphy font (for example
Fraktur, Textura, Copperplate, etc). Modern varieties of the fond
Fraktur are used in the project. The final step in this part is to do a
scan of the calligraphy.
For the second part we will use 3Ds Max and VRay. Autodesk
3Ds Max, formerly 3D Studio and 3D Studio Max, is a professional
3D computer graphics program for making 3D animations, models,
games and images. It is developed and produced by Autodesk
Media and Entertainment [1]. 1It has modeling capabilities and a
flexible plugin architecture and can be used on the Microsoft
Windows platform. It is frequently used by video game developers,
1 http://slideplayer.com/slide/10560987/
many TV commercial studios and architectural visualization
studios. It is also used for movie effects and movie pre-
visualization. For its modeling and animation tools, the latest
version of 3ds Max also features shaders (such as ambient occlusion
and subsurface scattering), dynamic simulation, particle systems,
radiosity, normal map creation and rendering, global illumination, a
customizable user interface, new icons, and its own scripting
language [2].2
Vray is a render plugin. It's a plugin, which means that it adds
functionality to an existing program. Vray's features mainly aim at
creating photorealistic images, together with improving rendering
speed. Currently, VRay exist for 3D Studio Max, Maya, Rhinoceros
3D, Sketchup, Softimage, Blender and there's even a standalone
version available [3]. 3It is developed by the Bulgarian company
Chaos Group and you can find the plugin in their official site.
In 3Ds Max we will create the wooden box and the gems but we
will work on two different projects for them. That’s why I will
divide this part in two smaller parts.
The chosen design for the wooden box is a hexagon. The lid is
built with different colored small pieces of glass. To do it we start
with building a cylinder and we set the sides to 6 so we can get a
hexagon, cap segments – 1 and chose the radius and the height (in
the project r=50, h=45). Afterwards we convert it in editable poly
and start modifying the hexagon. We mark the face and use the
inset tool (amount 5) to make 1 polygon inside then we use extrude
to make the shape concave. This is our box (Fig. 1).
Fig. 1. Тhe wooden box is a hexagon
Then we create another hexagon with the same radius and
smaller height (in the project h=10). This will be our lid. Again we
need to convert it to editable poly. This time we work on the two
faces beginning with inset two times in a roll (used amount 1 for the
first time and 32 for the second). The idea is with one of them to
create the edge and with the other one the center, that’s why one of
them should be with small amount and the other with proper larger
2 https://www.autodesk.com/products/3ds-max/overview
3 http://www.aversis.be/tutorials/vray/vray-20-what-is-
vray.htm
90
INTERNATIONAL SCIENTIFIC JOURNAL "INDUSTRY 4.0" WEB ISSN 2534-997X; PRINT ISSN 2534-8582
YEAR III, ISSUE 2, P.P. 90-93 (2018)

amount. Then we use it again on each segment of the hexagon as
well as the center segment. We need to use again small amount
(amount – 2). Then we mark the inner polygons on the two faces
and delete them. We have a concave figure with empty trapezoids
and an empty hexagon in the center. Afterwards we delete the edges
that are not needed by marking them and using the Remove tool.
We select the edges that are not connected and with Bridge tool we
connect them (Fig. 2).
Fig. 2. Bridge tool
To design the glass pieces for the lid we need to create a simple
box shape with less height than the lid (used Parameters: Length –
40, width – 40 height – 7; L, W, H Segs – 1). We place the box
shape in one of the trapezoids of the figure and convert it to editable
poly and by selecting the vertexes we modify it to a trapezoid. Then
we make copies and rotate each copy in 60° on the Z axis from the
previous and place them in the next trapezoid of the lid. Then we
create a small hexagon with the same height as the box shape and
place it on the proper place in the lid (Fig. 3).
Fig. 3. The designing of glass pieces for the lid
To create the wooden material we need a prepared wooden
texture in advance. Than we turn the render and light options to
VRay mode so we can use VRay materials. We open the Material
editor and from the Material/Map Browser we choose VRayMtl to
create a VRay material. From the options we change the Reflect
color to middle grey (R: 35; G: 35; B: 35; H: 0; S: 0; V: 35);
HGlossiness – 0,9; RGlossiness – 0,9; turn on Fresnel reflections;
IQR Fresnel – 1,6; Max depth – 5; Refract color – black; Glossiness
– 1,0; IQR – 1,6; turn on affect shadows. Afterwards we need to go
to the button of the menu on Maps section. Then we set the Diffuse
to our prepared wooden texture, picking it from the hard drive
location. We drag the diffuse map with the mouse and drop it on
Bump and we use as a method – copy. The bump amount should be
50 (Fig. 4). To finish this step we need to drag the material from the
Material panel and drop it on the hexagon box and on the lid for it.
Fig. 4. Advance preparation of wooden texture
To create the tinted glass material we need to use again
VRayMtl. From the options we need to change the Reflect color –
white; HGlossiness – 0,9; RGlossiness – 0,9; turn on Fresnel
reflections; Refract color – white; turn on Exit color (on the Refract
section) and change it to blue (R: 17; G: 5; B: 255; H: 172; S: 250;
V: 255); Fog color – blue (R: 17; G: 5; B: 255; H: 172; S: 250; V:
255); Fog multiplier – 0,9 (Fig. 5).
Fig. 5. Creation the tinted glass material
Since we want our glass pieces to be tinted in different colors
we copy our material 6 times and change the Exit color and Fog
color in each of the copies. (Used colors: Red – R: 255; G: 8; B: 8;
H: 255; S: 247; V: 255; Purple: R: 83; G: 5; B: 170; H: 190; S: 248;
V: 170; Orange: R: 255; G: 123; B: 5; H: 20; S: 250; V: 255; Green:
R: 3; G: 181; B: 32; H: 92; S: 251; V: 181; Turquoise: R: 3; G: 227;
B: 247; H: 131; S: 252; V: 247; Yellow: R: 252; G: 255; B: 9; H:
43; S: 246; V: 255;)
We move the lid on top of the box and design hinges by
creating 2 little cylinders and placing them properly.
One of the most useful tools in producing computer animation
is the ability to link objects together to form a chain. By linking one
object to another, you create a parent-child relationship. Transforms
applied to the parent are also transmitted to child objects. A chain is
also referred to as a hierarchy[4].4 Common Uses for Hierarchies -
Link a large collection of objects to a single parent so they can be
easily animated and transformed by moving, rotating, or scaling the
parent; link the target of a camera or light to another object so it
tracks the object through the scene; link objects to dummy objects
to create complex motions by combining multiple simple motions;
link objects to simulate jointed structures to animate characters or
mechanical assemblies [5].5
4 https://knowledge.autodesk.com/support/3ds-max/learn-
explore/caas/CloudHelp/cloudhelp/2017/ENU/3DSMax/files
/GUID-0AE92021-9E16-4616-840B-B19773AD9A6E-
htm.html 5 https://knowledge.autodesk.com/support/3ds-max/learn-
explore/caas/CloudHelp/cloudhelp/2017/ENU/3DSMax/files
91
INTERNATIONAL SCIENTIFIC JOURNAL "INDUSTRY 4.0" WEB ISSN 2534-997X; PRINT ISSN 2534-8582
YEAR III, ISSUE 2, P.P. 90-93 (2018)

We want to link the lid with the glasses and the box in a
hierarchy so the lid can open freely. To do that we need to click on
the Select And Link icon on the toolbar, select the glass pieces as
children and then drag the link cursor to the wooden lid as a parent
object. We do another link between the lid and the box. We select
the lid and the hinges and drop the link cursor on the wooden box.
(Fig. 6) Now we can open and close the lid. In the design the box is
open so the light rays can go through the glass pieces of the lid.
Fig. 6. Select And Link Tool in creation of the hierarchy links
We adjust the light by creating 2 VRayIES light and place them
sideways. To design a studio scene we create a plane on the Z axis
and change its color to white and leave the viewport on TopView
(Fig. 7).
Fig.7. Scene adjustments in preparation for rendering
The final step is to open the Render setup and choose a
resolution (used 1400x1050) and render the image and use to render
the viewport.
The second 3Ds Max project is designing the gems. In order to
do this we start a new project and create 7 box shapes (used
Parameters: Length – 30, width – 30 height – 10; Length Segs: 1,
Width Segs: 10, Height Segs – 1). We need to work on them one by
one by converting them into editable poly and modifying their
vertexes so we can get a shape similar to gems. (Fig. 8) We apply
the same VRay glass materials. We adjust the light by creating 2
VRayIES light and place them sideways. To design a studio scene
we create a plane on the Z axis and change its color to white and
leave the viewport on TopView.
Then we open the Render setup and choose a resolution (used
1400x1050) and render the image and use to render the viewport.
/GUID-0AE92021-9E16-4616-840B-B19773AD9A6E-htm.html
Fig.8. Modifying vertexes from box shape into different form
The final part of the project is in Photoshop where we will
connect everything in one and finalize the project. Photoshop is
Adobe's photo editing, image creation and graphic design software.
The software provides many image editing features for raster (pixel-
based) images as well as vector graphics. It uses a layer-based
editing system that enables image creation and altering with
multiple overlays that support transparency. Layers can also act as
masks or filters, altering underlying colors. Shadows and other
effects can be added to the layers. Photoshop actions include
automation features to reduce the need for repetitive tasks. An
option known as Photoshop CC (Creative Cloud) allows users to
work on content from any computer. Photoshop is used by
photographers, graphic designers, video game artists, advertising
and meme designers. The software is available for a monthly fee.
Photoshop CC is compatible with Intel-based Mac computers and
Windows PCs[6].6 It can be found on their official web site.
First we open the image with the calligraphy and we need to
erase the white background. In order to do it we click on the eraser
tool from the Tool panel with the right button and a window with
eraser tools will show. From there we need to select the Magic
Eraser Tool. With it we erase the background with a simple click.
We repeat the process in every closed space until the background is
erased. After that we make color corrections from Layer – New
Adjustment Layer – Curves and then Layer – New Adjustment
Layer – Hue/Saturation. By that we add 2 adjustment levels for the
colors and the contrast.
Than we open the image with the box and make color
corrections from Curves. We drag it and drop in on the picture with
the calligraphy which is our main picture and rename the layer to
Box. We change the Blend Mode to Multiple and if needed erase
and blur the background of the layer (Fig. 9).
Fig.9. Converted Blend Mode into Multiple on the Box layer
6 https://whatis.techtarget.com/definition/Photoshop
92
INTERNATIONAL SCIENTIFIC JOURNAL "INDUSTRY 4.0" WEB ISSN 2534-997X; PRINT ISSN 2534-8582
YEAR III, ISSUE 2, P.P. 90-93 (2018)
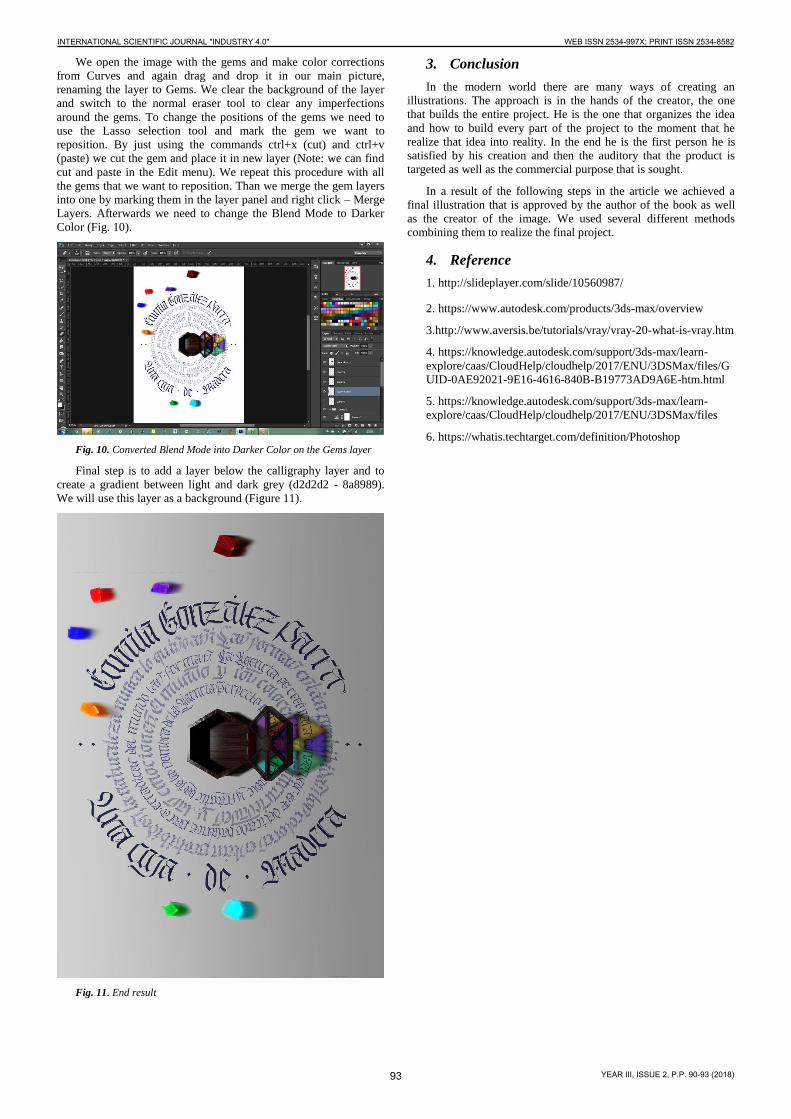
We open the image with the gems and make color corrections
from Curves and again drag and drop it in our main picture,
renaming the layer to Gems. We clear the background of the layer
and switch to the normal eraser tool to clear any imperfections
around the gems. To change the positions of the gems we need to
use the Lasso selection tool and mark the gem we want to
reposition. By just using the commands ctrl+x (cut) and ctrl+v
(paste) we cut the gem and place it in new layer (Note: we can find
cut and paste in the Edit menu). We repeat this procedure with all
the gems that we want to reposition. Than we merge the gem layers
into one by marking them in the layer panel and right click – Merge
Layers. Afterwards we need to change the Blend Mode to Darker
Color (Fig. 10).
Fig. 10. Converted Blend Mode into Darker Color on the Gems layer
Final step is to add a layer below the calligraphy layer and to
create a gradient between light and dark grey (d2d2d2 - 8a8989).
We will use this layer as a background (Figure 11).
Fig. 11. End result
3. Conclusion
In the modern world there are many ways of creating an
illustrations. The approach is in the hands of the creator, the one
that builds the entire project. He is the one that organizes the idea
and how to build every part of the project to the moment that he
realize that idea into reality. In the end he is the first person he is
satisfied by his creation and then the auditory that the product is
targeted as well as the commercial purpose that is sought.
In a result of the following steps in the article we achieved a
final illustration that is approved by the author of the book as well
as the creator of the image. We used several different methods
combining them to realize the final project.
4. Reference
1. http://slideplayer.com/slide/10560987/
2. https://www.autodesk.com/products/3ds-max/overview
3.http://www.aversis.be/tutorials/vray/vray-20-what-is-vray.htm
4. https://knowledge.autodesk.com/support/3ds-max/learn-
explore/caas/CloudHelp/cloudhelp/2017/ENU/3DSMax/files/G
UID-0AE92021-9E16-4616-840B-B19773AD9A6E-htm.html
5. https://knowledge.autodesk.com/support/3ds-max/learn-
explore/caas/CloudHelp/cloudhelp/2017/ENU/3DSMax/files
6. https://whatis.techtarget.com/definition/Photoshop
93
INTERNATIONAL SCIENTIFIC JOURNAL "INDUSTRY 4.0" WEB ISSN 2534-997X; PRINT ISSN 2534-8582
YEAR III, ISSUE 2, P.P. 90-93 (2018)