ITConnect - e | This is IT April 2016.pdf · Technology made practical for home ITConnect APRIL...
10
Technology made practical for home ITConnect APRIL 2016 KEEPING TRACK OF YOUR EXPENSES WITH YNAB YNAB helps your stick to your budget. Edit PDF files with Word Word is the best tool we have at hand to edit PDFs without having to purchase extra software. Outlook Distribution lists Do you send regular emails to the same group of people? Save time with Distributions lists! Viruses distributed by email Learn about viruses distributed as email attachments and how to deal with them.
Transcript of ITConnect - e | This is IT April 2016.pdf · Technology made practical for home ITConnect APRIL...

Technology made practical for home
ITConnectAPRIL 2016
KEEPING TRACK OF YOUR EXPENSES WITH YNABYNAB helps your stick to your budget.
Edit PDF files with Word
Word is the best tool we have at hand to edit PDFs without having to
purchase extra software.
Outlook Distribution listsDo you send regular
emails to the same group of people? Save time with
Distributions lists!
Viruses distributed by email
Learn about viruses distributed as email
attachments and how to deal with them.
Outlook Distribution lists
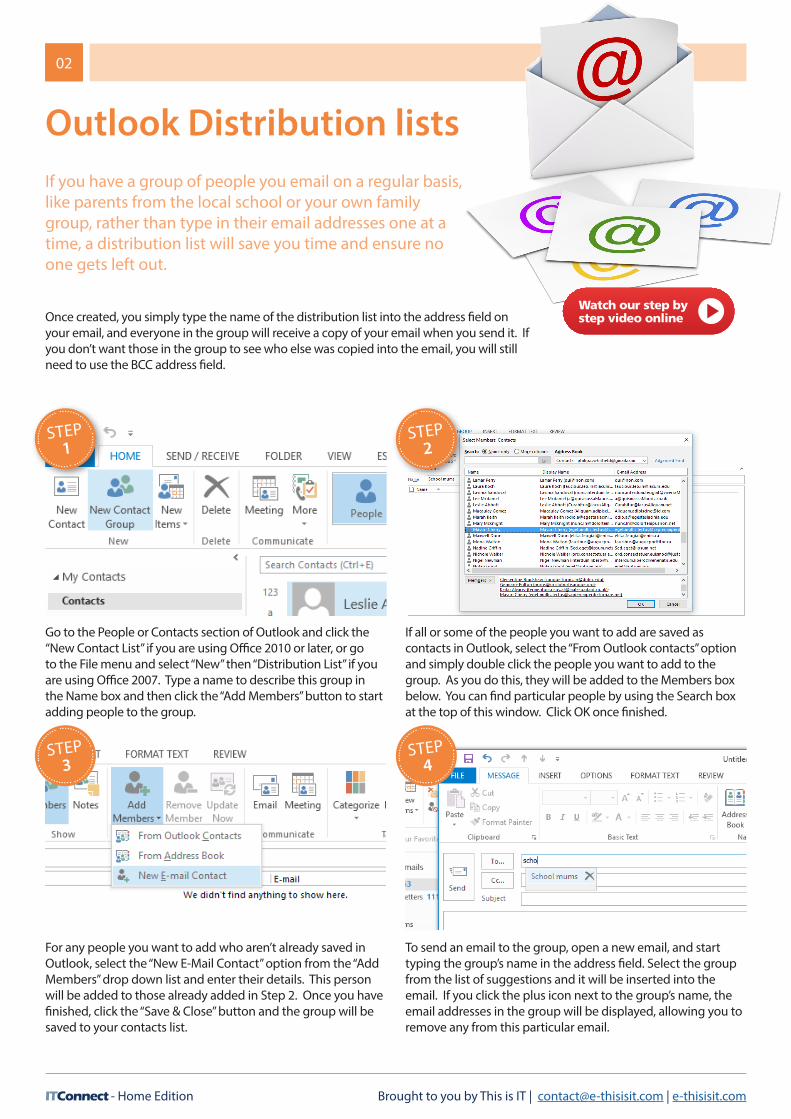
Go to the People or Contacts section of Outlook and click the “New Contact List” if you are using Office 2010 or later, or go to the File menu and select “New” then “Distribution List” if you are using Office 2007. Type a name to describe this group in the Name box and then click the “Add Members” button to start adding people to the group.
For any people you want to add who aren’t already saved in Outlook, select the “New E-Mail Contact” option from the “Add Members” drop down list and enter their details. This person will be added to those already added in Step 2. Once you have finished, click the “Save & Close” button and the group will be saved to your contacts list.
If all or some of the people you want to add are saved as contacts in Outlook, select the “From Outlook contacts” option and simply double click the people you want to add to the group. As you do this, they will be added to the Members box below. You can find particular people by using the Search box at the top of this window. Click OK once finished.
To send an email to the group, open a new email, and start typing the group’s name in the address field. Select the group from the list of suggestions and it will be inserted into the email. If you click the plus icon next to the group’s name, the email addresses in the group will be displayed, allowing you to remove any from this particular email.
STEP1
STEP3
STEP2
STEP4
02
Brought to you by This is IT | [email protected] | e-thisisit.comITConnect - Home Edition
If you have a group of people you email on a regular basis, like parents from the local school or your own family group, rather than type in their email addresses one at a time, a distribution list will save you time and ensure no one gets left out.
Once created, you simply type the name of the distribution list into the address field on your email, and everyone in the group will receive a copy of your email when you send it. If you don’t want those in the group to see who else was copied into the email, you will still need to use the BCC address field.

03
Brought to you by This is IT | [email protected] | e-thisisit.comITConnect - Home Edition
Keeping track of your expenses with YNABYNAB or, “You Need a Budget”, is one of the most popular personal finance tools that not only helps you budget, but also helps you keep track of your spending. YNAB is an online tool, making collaboration very easy.
First of all, security. Because your own personal finances are involved, YNAB has taken security very seriously, and used the best protection and encryption techniques available, meaning your data is very safe. Possibly the easiest way for someone to hack your account is to guess your password, so make sure you use a secure password.
Now set up your accounts. YNAB has two types of accounts, Budget Accounts which represent accounts that hold money, and Tracking Accounts which represent accounts such as loans. Click the “Add Account” button and add your first account, such as your checking account. Enter a name, then select an account type from the drop down list.
YNAB has the option to connect up with your bank account and automatically import transactions into YNAB to save you having to enter any expenses from the bank account manually. We won’t activate that feature just yet, so remove the tick from the Transaction Import option, enter the current balance of this account, and click the “Add Account” button.
STEP3
STEP4
CONT’D ON NEXT PAGE...
YNAB costs USD5.00 per month, or USD50.00 per year, but you can try it free for 34 days before you have to provide your payment details if you wish to continue using it. Signing up is really easy, just go to www.ynab.com, click the blue free trial button, then enter your email address and a secure password, that’s it.
An email will be sent to your address with a link you need to click to confirm your email address, do this now. Once confirmed, the YNAB website will open ready for you to start setting up your budget. Click the green “Create a new budget” button, enter a name for your budget and set the other settings, then click the “Create Budget” button.
STEP1
STEP2
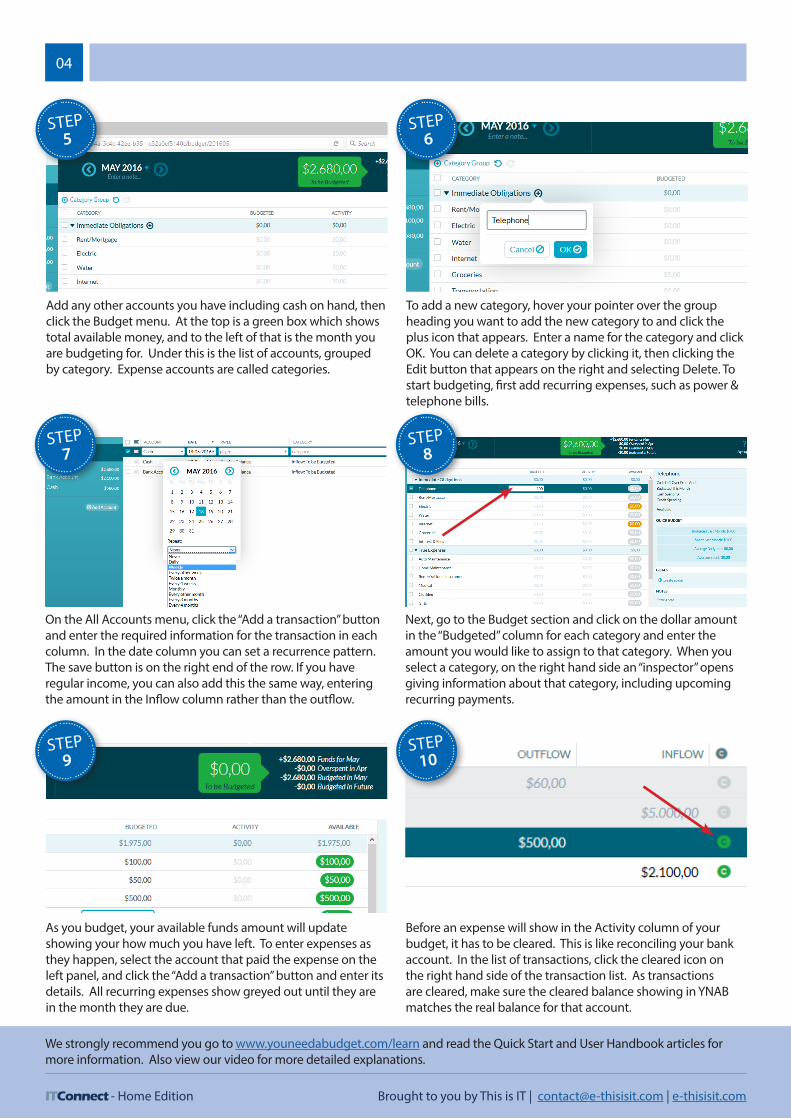
On the All Accounts menu, click the “Add a transaction” button and enter the required information for the transaction in each column. In the date column you can set a recurrence pattern. The save button is on the right end of the row. If you have regular income, you can also add this the same way, entering the amount in the Inflow column rather than the outflow.
Next, go to the Budget section and click on the dollar amount in the “Budgeted” column for each category and enter the amount you would like to assign to that category. When you select a category, on the right hand side an “inspector” opens giving information about that category, including upcoming recurring payments.
STEP7
STEP8
04
Brought to you by This is IT | [email protected] | e-thisisit.comITConnect - Home Edition
As you budget, your available funds amount will update showing your how much you have left. To enter expenses as they happen, select the account that paid the expense on the left panel, and click the “Add a transaction” button and enter its details. All recurring expenses show greyed out until they are in the month they are due.
Before an expense will show in the Activity column of your budget, it has to be cleared. This is like reconciling your bank account. In the list of transactions, click the cleared icon on the right hand side of the transaction list. As transactions are cleared, make sure the cleared balance showing in YNAB matches the real balance for that account.
STEP9
STEP10
Add any other accounts you have including cash on hand, then click the Budget menu. At the top is a green box which shows total available money, and to the left of that is the month you are budgeting for. Under this is the list of accounts, grouped by category. Expense accounts are called categories.
To add a new category, hover your pointer over the group heading you want to add the new category to and click the plus icon that appears. Enter a name for the category and click OK. You can delete a category by clicking it, then clicking the Edit button that appears on the right and selecting Delete. To start budgeting, first add recurring expenses, such as power & telephone bills.
STEP5
STEP6
We strongly recommend you go to www.youneedabudget.com/learn and read the Quick Start and User Handbook articles for more information. Also view our video for more detailed explanations.

Printing settingsAlthough most times, simply pressing the print button, selecting the printer and clicking the ok button is good enough to print out a document, but you can change the settings to print particular pages, or save ink by using a lower quality print.
When you print a document, a printer is selected by default. If this isn’t the printer you often use, press the Windows button and type Control Panel, then click the Control Panel icon in the search results to open in. Next, click “Devices and Printers” and a list of your installed printers will be displayed. Right the one you want to set as default and select “Set as default printer”
05
Brought to you by This is IT | [email protected] | e-thisisit.comITConnect - Home Edition
STEP1
When printing a document, especially with a colour printer, you may not need a high quality print, which uses a lot of ink. There is usually a “Printer Properties” button or link on the print menu. Click this button then locate the “Print Quality” setting and set it to Draft. Some printers have advanced settings with the option to print in black and white only, or in a grey scale.
STEP3
If you have a large document and only want to print some of the pages in it, look for the pages setting and enter the page number you want to print. You can specify multiple pages by separating them with a comma, like this: 2,5,7,10, or you can print a range by specifying the first and last page with a hyphen in between, like this: 5-15.
STEP2
Another setting to save paper is to print multiple pages on a single sheet. Usually two pages per sheet is the most practical because anything more than this will make the print very small. Most programs have a setting for this in the print menu. In Word there is a drop down list at the bottom of the settings page, with several different configurations to choose from.
There will be settings that are specific to your printer, for example a colour printer usually has the option to print in black and white, which wouldn’t apply if your printer only prints in black and white. If your printer came with a user manual, it should cover settings specific to your printer, but here are some common ones.
STEP4

Brought to you by This is IT | [email protected] | e-thisisit.comITConnect - Home Edition
06
STEP1
STEP2
Open a new Excel sheet and type the number 5 in cell A1. In cell B1, enter this formula: =A1*10. The result should be 50. Now copy cell B1, and paste it in cell B2 – just below it. Cell B2 should display a 0. Click on cell B2 and observe the formula. You will notice that the formula no longer refers to cell A1, but instead is pointing to cell A2.
This is because by default formulas treat cell references as relative to the position of the cell with the formula – in this case, the original formula pointed to the cell to the left of the cell with the formula, and when you copy and paste this cell, it will always refer to the cell to the left, and in most cases, this behaviour is ok.
Absolute & Relative cell references in ExcelAlthough Excel may not be used as heavily in the home as it is in the business, learning this fundamental tip about cell references in formulas will help you avoid mistakes when creating Excel formulas.
Absolute & Relative References are important to know if you copy and paste cells that contain formulas, which is what a lot of us do in the business world to save time. Surprisingly enough, a lot of users are not aware of what we are going to show you, which is why they take longer to create an Excel spreadsheet, or worse, decisions are made using data with errors in the formulas. The best way to teach this is with this example:
STEP3
STEP4
For example, if we created a sum formula at the bottom of a list and then copied it across multiple columns, the formulas update to give us a total of each list. If you need to create a formula that refers to a particular cell regardless of where you copy it to, then you need to use an absolute reference. Go back to cell B1 and edit the formula so it looks like this: =$A$1*10.
Now copy and paste the formula anywhere you like, and again, observe the formula of the pasted cell. You will notice it still points to cell A1, it is an absolute reference, because it has the dollar signs in it. You can use just one $ sign, such as $A1, which will keep the column reference fixed, but the row reference will still be relative to the copied cell.

The Function (F) keysThe F keys at the top of your keyboard are shortcut keys which are used for different commands depending on the program you are using, or when used together with the FN key, next to the CTRL key, can be used for changing settings on your computer.
07
Brought to you by This is IT | [email protected] | e-thisisit.comITConnect - Home Edition
Key Windows Outlook Excel Word
F1 F1 is universally recognized as the shortcut for opening the help menu for the program you are using.
F2 Select a file and press the F2 key to edit its name.
Click on a cell and press the F2 button to edit it’s contents.
CTRL + F2 displays the print preview window (Works for Excel too).
F3 Selects the Search box ready for you to type in a search term.
Selects the Search box ready for you to type in a search term.
Press the F3 key in Excel to insert a named range in a formula (advanced).
Shift + F3 key changesthe case of the selected text (uppercase, lowercase).
F4 Press the ALT and F4 keys to close the current win-dow or program.
Opens the find and re-place box
Repeats the last action you performed on your Spreadsheet.
Repeats the last action you performed on your document.
F5 Will reload the page in internet browsers.
Displays the Go To dialog box.
Displays the Go To dialog box.
F6 Will select the address bar in most internet browers.
Loops through the main menu items and work-space.
Loops through the main menu items and spread-sheet.
Loops through the main menu items and docu-ment.
F7 Runs spell check. Runs spell check. Runs spell check.
F8 Press ALT + F8 to open the Macro menu.
Press ALT + F8 to open the Macro menu.
Press ALT + F8 to open the Macro menu.
F9 Will send/receive emails. Recalculates all formulas in open Excel workbooks.
F10 Displays the menu bar for some browsers.
F11 Opens browser window in full screen view.
Will create a chart with the data currently select-ed.
F12 Opens the Save As menu. Opens the Save As menu. Opens the Save As menu.
Most of the function keys have an extra icon on them that indicates settings you can change by pressing the FN button together with that function keys. The FN key is usually located between the CTRL and ALT key on the bottom row of keys, and you can usually change settings such as the brightness of the screen or the volume of the speakers.
There are 12 function keys along the top of your keyboard, numbered F1 through to F12. Function keys can be used by themselves, or as part of a shortcut together with the shift or CTRL keys. When used together with the FN key, it will perform actions on your computer, such as changing the speaker volume or brightness of your screen.

08
Brought to you by This is IT | [email protected] | e-thisisit.comITConnect - Home Edition
STEP1
STEP2
Click on the File menu in Word, select the Open menu and browse to the folder that contains the PDF file. Once you have located the PDF file, double click it to open it. Word will display a message warning that the process to convert the file into Word could take a while. How long depends on the complexity and size of the file.
What you have now is a copy of your PDF file in Word format so any changes you make to this file will not affect your original PDF file. The first step should be to save your file in Word format so any changes you make are saved. Press the F12 button to open the Save As dialog box and save the file on your computer.
Edit PDF files with Word
PDF files never start off as a PDF file, they are digital print outs of another file created in a program such as Word, Excel or a graphic design program. There are expensive programs available to edit PDFs, but Word does a good job for basic edits.
The best way to edit a PDF is not to edit it at all, but make changes to the original file the PDF was created from, and then create a new PDF file once the changes are made. If the PDF file is all you have, it can be edited using Word with reasonable results, without having to pay for expensive professional software for this purpose.
STEP3
STEP4
Not all PDFs will open up perfectly, and it make take some work to adjust and maybe redo parts of the file, as well as the changes you want to make to the file itself. If the PDF contains text in an image, you will not be able to edit that text. Another issue you may find is that the font type in the PDF will not match the fonts in Word.
Once you have completed the edits, save the Word file and then save it a second time but this time choosing PDF as the file type to save the file back into PDF format. If you ever need to make changes to the same file again, go back to the Word version of it rather than trying to convert the PDF file back to word again.

09
ITConnect - Home Edition Brought to you by This is IT | [email protected] | e-thisisit.com
Changing clock and regional settings
The regional settings on your computer actually impacts other programs as well, for example the thousand and decimal separator used in Excel is actually set in the regional settings, as well as how dates and times are displayed in Outlook.
The regional settings on your computer control how things such as the time and currencies are displayed on your computer. For example, if you wanted to change your computer time to display in the 24 hour format, this is where you go to change it.
Press the Windows button and type “Control Panel”, then click the Control Panel icon in the search results to open it. Next, click the Region option on the control panel to open the dialog box for these settings. A quick way to set these settings is to select your region from the format drop down list.
Below the format drop down list are two more drop down lists which allow you to set the format of the date. A “d” by itself represents the Day in a single or double digit, so the first of the month would show as 1, without a preceding 0. dd represents the day in a double digit format, so the first of the month would show as 01. The same applies for the month (m).
In the long date settings, 4 letters in a row indicate the day or month spelled out, rather than in number form, and three letters in a row indicate an abbreviated version of the day or month. The time format is similar, with the difference that a lowercase h indicates the 12 hour format, and a capital H, the 24 hour time format.
STEP1
STEP3
STEP2
STEP4
By clicking the “Additional Settings” button, you can access extra settings, including customized settings for the date and time, as well as how numbers are displayed and the default currency sign, which would impact how numbers are displayed by default in Excel. If at any time you want to undo any changes you have made, click the Reset button at the bottom of this window.

10
Brought to you by This is IT | [email protected] | e-thisisit.comITConnect - Home Edition
Viruses distributed by email
This article is based on the ESET antivirus, but the instructions will be similar for most other professional anti-viruses as well.
A Virus as an attachmentUnlike many people think, as long as you are using an up to date version of Outlook, simply opening or reading an email in the preview pane is unlikely to infect your computer, but opening an attachment with a virus will certainly infect your computer. The emails themselves are designed to trick you into opening the attachment using all sorts of different stories and techniques. Some examples are emails making out to be from a post office with a form attached you need to fill out to receive a package that has been sent to you, or another common email is one with an invoice or statement attached saying payment is overdue. There are many variations, but the one thing in common is that they have an attachment with a virus in it.
Make sure Email protection is turned on
If you have a good internet filter in place, it is very unlikely you will be able to access a website that could infect your computer with a virus, but viruses can be distributed by email in attachments, which what we look at in this article.
STEP1
STEP2
If one gets through, scan it manuallyIf you receive an email with a suspect attachment, do not open it. Instead right click the attachment and select “Save As” and save it to your desktop. Now go to your desktop, do not open the file, but right click it and select “Scan with Eset”. The antivirus will check the file and very quickly tell you whether the file is safe to open or not. If the file does contain a virus, it will most likely be deleted by the antivirus program, but it will need to be immediately deleted from Outlook manually. When deleting the email in Outlook, press the Shift key with the Delete key so it is completely removed rather than just sent to the Deleted Items folder.
ESET and many other antivirus programs can scan your emails in Outlook and detect a dangerous email as it is received and delete the attachment. To make sure this is working on your computer, locate the antivirus icon next to the time on your computer and double click it to open the antivirus settings. In Eset click on the Setup menu and select the “Web and email” tab.
Now click the cog icon next to the “Email client protection” option and make sure the “Integrate into Microsoft Outlook” and “Enable email protection by client plugins” options are ticked. Next go to Outlook and click on the File menu and select Options. On the left side, select Add-Ins and select “COM Add-ins” from the “Manage” drop down list, then click the “Go” button and make sure the “ESET Outlook Add-in” item is ticked.