issue ever - GolfSoftwareweb4.golfsoftware.net/14394/Documents/60 Greatest Tips2.pdf · GOLF DIGEST...
17
GOLF DIGEST is published by Condé Nast Editorial/Executive offices: 20 Westport Rd, Wilton, CT 06897 © 2010 The Golf Digest Companies. All rights reserved. to order a subscription visit GoLFdiGest.coM PHOTOGRAPHY * doM Furore PGA Tour player Webb Simpson helped re-create our all-time best tips. since our First issue in 1950, one mission has per- sisted: Find the teachers and players with the best instruc- tion, and deliver it in ways that will help golfers play bet- ter and enjoy the game more. When we set out to identify the 60 greatest tips from our 60 years, we again turned to the experts: Golf Digest’s 50 Best Teachers in America. After a panel of editors searched the archives, creating a list of finalists, we surveyed the teachers, asking them to grade the tips on a scale of 1 to 10 for: (1) effectiveness (2) originality (3) presentation (4) author prominence We counted the votes and got our 60. (See golfdigest. com/go/60besttips) for the complete list. We’re so confident about the Top-60 tips you see here, we guaran- tee you they really work. TOP -60 best tips FroM the Last 60 years! best tips ever
Transcript of issue ever - GolfSoftwareweb4.golfsoftware.net/14394/Documents/60 Greatest Tips2.pdf · GOLF DIGEST...

GOLF DIGEST is published by Condé Nast
Editorial/Executive offices: 20 Westport Rd, Wilton, CT 06897
© 2010 The Golf Digest Companies. All rights reserved.
to order a subscription visit
GoLFdiGest.coM
P H O T O G R A P H y * d o M F u r o r e
PGA Tour player Webb Simpson
helped re-create our all-time best tips.
since our First issue in 1950, one mission has per-sisted: Find the teachers and players with the best instruc-tion, and deliver it in ways that will help golfers play bet-ter and enjoy the game more.
When we set out to identify the 60 greatest tips from our 60 years, we again turned to the experts: Golf Digest’s 50 Best Teachers in America.
After a panel of editors searched the archives, creating a list of finalists, we surveyed the teachers, asking them to grade the tips on a scale of 1 to 10 for:
(1) effectiveness(2) originality(3) presentation(4) author prominence
We counted the votes and got our 60. (See golfdigest.com/go/60besttips) for the complete list. We’re so confident about the Top-60 tips you see here, we guaran-tee you they really work.
top-60 best tips FroM the Last 60 years!
best tipse ve r

If you’re hooking your shots too much and would like more control of your ball flight, try this tip.
In a good grip, both hands act as one unit. To ensure yourself a firm two-handed grip, get your left hand on the club absolutely correctly: The club is placed in the left hand so that the shaft is pressed up under the muscular pad at the inside heel of the palm and the shaft also lies directly across the top joint of the forefinger. Now just close the left hand—close the fingers before you close the thumb—and the club will be just where it should be.
The top photograph shows the proper positioning of the right hand, with the grip in the fingers, not in the palm. The two middle fingers apply the most pressure.
octben hoGan 1960
uniFy your hands
1
tipsplus To see video on this lesson, click golfdigest.com/go/tipsplus. Or visit gettag.mobi from your current smart-phone and download the free app to snap a photo of this coded image. For help, go to golfdigest.com/go/tag.
SNAP IT
B E ST T I P S e v e r * 2

A good way to build strength in your hands and wrists is to take newspaper pages and roll them up into balls with each hand. To use that strength, try for a bigger turn on your backswing. That’s what I did in the driving contests or when I wanted a bit more steam off the tee to reach a par-5 green in two.
To increase your turn, make your left hip and left shoulder turn together on your backswing. Do it rather slowly, and keep your hands and arms light. Swinging too fast can tighten them and cut off your flexibility. As you turn away from the ball, let your
left knee swing inward to the right so your legs form a “K.” Then start your downswing with your right knee swinging to the left to form a backward “K” in the opposite direction.
FEBsaM snead 1982
ForM a ‘K’ With your LeGs
2
tipsplus To see video on this lesson, click golfdigest.com/go/tipsplus. Or visit gettag.mobi from your current smart-phone and download the free app to snap a photo of this coded image. For help, go to golfdigest.com/go/tag.
SNAP IT
B E ST T I P S e v e r * 3

sEparnoLd paLMer 2009
point the shouLder toWard the baLL
3
ARNOLD PALMER
K E E P I T CO M PACT F O R CO N T RO LTry to keep the club under control at all times, especially at the top of the backswing. Each of us has physical limits. We can take the club back just so far. You’ve got to keep the backswing compact and well within your natural capa-bilities. Because the minute you’re stretching yourself as you swing back, the minute
POINT THE SHOULDER TOWARD THE BALLThe shoulder turn occurs on a tilted plane, so the left shoul-der should move down as well as around on the backswing. If you’ve properly tilted and turned your shoulders going back, your left shoulder should point toward the ball at the top of the swing. This back-swing turn will put you in the right position to strike the ball squarely and forcefully.
CHECK OUT MORE ARNIE TIPS ONLINE To watch a slideshow of bonus instruction, go to golfdigest.com/go/arnold palmer. For video demonstrations of a couple of Palmer’s favor-ite tips on the short game, click golfdigest.com/go/tipsplus. n
you’re fighting the weight of the club instead of remaining easily in control of it, you’ve swung too far. When you go too far, one of two things hap-pens: You bend your left elbow, or the grip gets loose in your hands. Either way, you’re lost.
W H AT I T H I N K TO DAYLong and loose is still a bad idea. There aren’t very many good players like John Daly.
Many average golfers, espe-cially those who have played baseball, turn their shoulders on too much of a level plane. Rotation like this makes the swing too flat and limits your chances of hitting the ball with a square clubface.
W H AT I T H I N K TO DAYI love this illustration—take an-other look. Turning level is a big problem, just like it was in the ’60s when I wrote this tip.
•••
•••
•••
The shoulder turn occurs on a tilted plane, so the left shoulder should move down as well as around on the backswing.
If you’ve properly tilted and turned your shoulders going back, your left shoulder should point toward the ball at the top of the swing. This backswing turn will put you in the right position to strike the ball squarely and forcefully.
Many average golfers, especially those who have played baseball, turn their shoulders on too much of a level plane. Rotation like this makes the swing too flat and limits your chances of hitting the ball with a square clubface.
B E ST T I P S e v e r * 4

sEpcL aude harMon 1972
Get out oF the sand With one hand
4
The sand wedge is built with a flanged sole that extends downward from the leading edge of the clubface. This flange acts as a rudder to keep the club from cutting too deeply into the sand. If, however, you allow your hands to lead the clubhead through the hitting area, you’ll take loft off the club, reduce the depth of the flange and minimize the bounce or rudder effect.
My system requires that your hands be trailing the clubhead when it passes under the ball. A relatively thin cut of sand results. When you practice with just one hand, the hand has to trail the clubhead. That’s the feeling you want in your real sand shots.
B E ST T I P S e v e r * 5

Y N
➞➞
MARJiM McLean 2008
‘KnucKLes doWn’ For Great irons
5
Do you ever wonder how PGA Tour players can hit a 7-iron 180 yards and you hit yours 140? The biggest reason is, a tour pro changes the loft of his 7-iron into a 5-iron by getting into a powerful impact position.
To take loft off an iron, you must keep your left wrist bowed through impact. As your big muscles rotate to the left through the shot, your left-hand knuckles should be
facing the ground. This puts you in position to deliver a descending blow, with less loft than you had at address.
Many high-handicappers do just the opposite: They cup the left wrist and turn their knuckles toward the sky. That produces a weak shot.
by Jim McLean Golf Digest Teaching Professional
Ranked No. 4 by his peers among
Golf Digest’s 50 Greatest Teachers, McLean is
based at Doral Golf Resort & Spa in Miami.
For more tips, click golfdigest.com.
Do you ever wonder why PGA Tour players can hit a 7-iron 180 yards, and you hit yours 140? Technique and swing speed have a lot to do with it, but the biggest reason is, a tour pro can change the loft of his 7-iron into a 5-iron by getting into a powerful impact position.
Of course, the pros don’t often manipulate the club like this, but they do deloft the face
KEEp IT bOwEDpretend you’re holding a club, and practice bowing your left wrist so the knuckles point down (top). Most amateurs cup the wrist and add loft through impact (bottom).
to some degree on every iron shot they hit. To understand this, look no further than the wrists. Maintaining wrist hinge is the key to delofting—and producing a penetrating flight.
To take loft off an iron, you must keep the left wrist (for right-handers) bowed through impact. As your big muscles rotate to the left through the shot, your left-hand knuckles
should be facing the ground (above). This puts you in a great position to deliver a descending blow, with less loft than you had at address.
Many high-handicappers do just the opposite: They cup the left wrist and turn their knuckles toward the sky to lift the ball. That produces a weak shot. Try bowing your wrist, and see the difference. ‹›
/ L E S S O n T E E /jim mclean
knuckles down’ for great ironsBow your left wrist through impact to pinch iron shots off the turf
‘
Y
n
B E ST T I P S e v e r * 6

step-in driLL heLps the body WorK in the correct seQuence
octbob tosKi 1991
6
A B
To obtain the right combina-tion of lateral and rotary motion, initiate the down-swing with your feet and legs, your weight shifting to your left. This puts your hands and arms into position to deliver the clubhead from the inside. To ingrain the physical sensation that accompanies the proper sequence of motion, try the Step-in Drill. Start by addressing the ball
and then drawing your left foot back to your right (A). Next, swing to the top as far as you can without losing your balance (B). Now stride to your left slowly and smoothly, keeping your torso relaxed so your hands and arms swing down close to your body (C). You should sense your hands and arms are chasing your lower body until they finally catch up through impact (D).
c D
B E ST T I P S e v e r * 7

FeeLinG connection in the GoLF sWinG
JulJiMMy baLL ard 1981
7
Stand in your normal address position holding something fairly heavy, such as a shag bag full of balls, and try throwing it with some authority toward a target about 15 feet away. How do you naturally perform this action? With your weight equally distributed on the insides of your feet and legs, you would coil your entire upper body—hands, arms, shoulders and torso together—against the “brace” or set of your right leg. Your
head moves marginally to the right, simply following the spine. As the bag reaches a point just above your waist going back, your weight moves onto the inside of your right foot and right leg. From here, you reverse the thrust of your legs from the ground up. In throwing the shag bag, you have used natural rhythm and coordination in a totally connected tossing action. It is precisely the action in the swing of every great striker of the golf ball.
B E ST T I P S e v e r * 8
sEpdavid Love Jr. 1983
Learn to reLease by throWinG a baLL
8
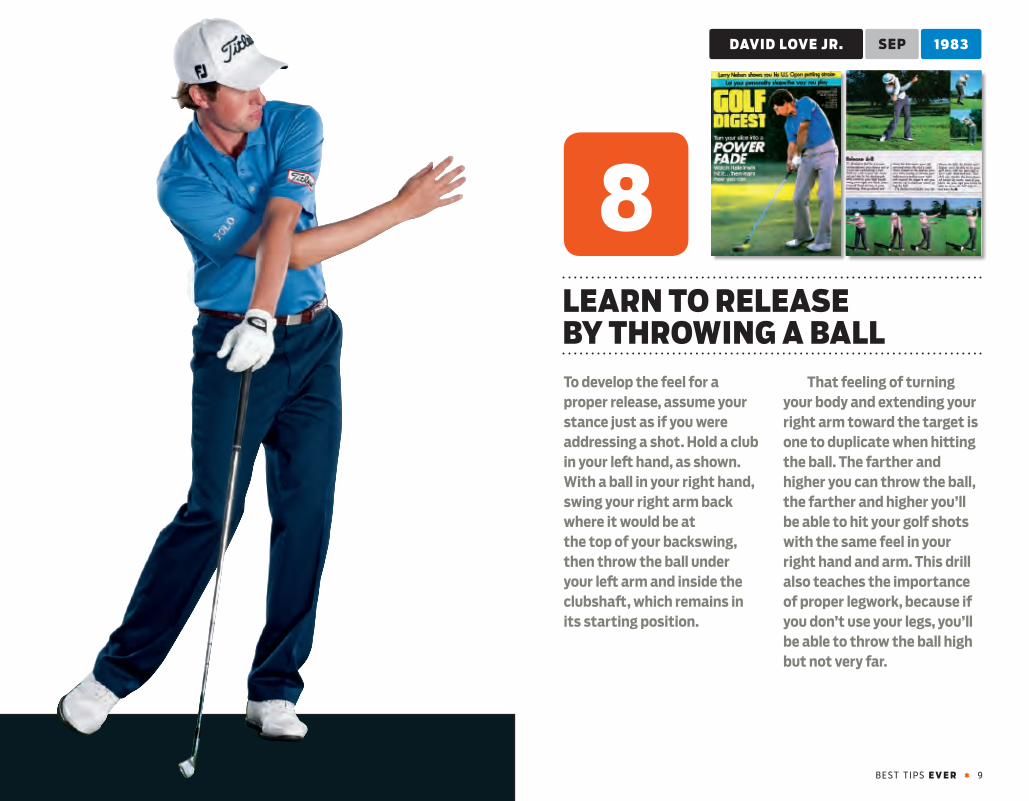
To develop the feel for a proper release, assume your stance just as if you were addressing a shot. Hold a club in your left hand, as shown. With a ball in your right hand, swing your right arm back where it would be at the top of your backswing, then throw the ball under your left arm and inside the clubshaft, which remains in its starting position.
That feeling of turning your body and extending your right arm toward the target is one to duplicate when hitting the ball. The farther and higher you can throw the ball, the farther and higher you’ll be able to hit your golf shots with the same feel in your right hand and arm. This drill also teaches the importance of proper legwork, because if you don’t use your legs, you’ll be able to throw the ball high but not very far.
B E ST T I P S e v e r * 9

FEBbutch harMon 2007
putt With your LeFt ear
9
LessonTee
LessonTee
Butch’s Basics By Butch HarmonGolf Digest Teaching Professional
42 GolfDigest.com february 2007
1. Aim the putterBefore you take your stance, set the putterface perpendicular to the line you want to start on.
LPutt with
your left ear
Keep your head still and listen for the ball to drop
Looking up too soon is the main reason golfers miss short putts. When you peek, your head moves, which often causes the putterface to open or close—just a touch, but that’s all it takes. With short putts, there’s not much room for error: If you start the ball off line, you’ve missed the putt.
Focus on two points. First, aim the putterface pre-cisely. After you read the break, make every putt a straight putt by looking only at the starting line. This four-footer (below) breaks a few inches to the right, but I see it as a straight putt down the starting line.
The second point is, keep your eyes down until you hear the ball drop into the cup with your left ear (right). Keep your head perfectly still is the best thought you can have while standing over the ball. ‹›
Butch Harmon, ranked No. 1 by his peers among Golf Digest’s 50 Greatest Teachers, runs the Butch Harmon School of Golf at Rio Secco Golf Club, in Henderson, Nev. For more tips from Harmon, click golfdigest.com/harmon.
2. set your feetBuild a stance that’s comfortable for you. You have to feel good to have good feel. heAr the rAttle
Don’t look up until your ear tells you the good news.
Looking up too soon is the main reason golfers miss short putts. When you peek, your head moves, which often causes the putterface to open or close—just a touch, but that’s all it takes. With short putts, there’s not much room for error: If you start the ball off line, you’ve missed the
putt. Focus on two points. First, aim the putterface precisely. After you read the break, make every putt a straight putt by looking only at the starting line. Second, keep your eyes down until you hear the ball with your left ear drop into the cup. You’ll keep your head perfectly still.
B E ST T I P S e v e r * 1 0

JANJacK nicKL aus 1991
sWinG Within your Feet
10
Golfers who’ve developed “good hands” through years of practice err toward too little use of the body. Less “trained” players try to make up for their lack of hand speed with excessive body action. As you swing, picture yourself coiling and uncoiling so no
part of your torso moves beyond the confines of your feet. In other words, only your hands and arms move beyond the outer edge of your right foot on the backswing and the same goes on the downswing in relation to your left foot.
B E ST T I P S e v e r * 1 1

Hitting a 40- or 50-yard pitch shot is tricky business even for tour players. The only way to do it consistently is to have a long, shallow impact zone. Even good players have a tendency to come into these shots too steeply. To groove that shallower path, break a tee in half and stick the pointy end in the ground an inch
behind the ball, angled at the target. Take another tee and stick it in the ground an inch in front, also angled at the target. Hit practice shots clipping both tees from the grass. If you’re too steep, you’ll catch only the one after the ball. If you scoop, you’ll hit just the one before it. Hit both, and you’re hitting it pure.
11. cLip both tees to eXtend the iMpact Zone
12. For a draW, spiLL Water to the LeFt
To draw the ball the club-face has to be closed or closing through impact. To do this, your right hand must roll over your left through impact. A good mental
picture to produce this drawing action is to imagine spilling a bucket of water to your left.
13. chippinG FeeL, hit a bacKhand
It’s hard for the average player to resist the urge to try to lift the ball on a chip, or to hold the face open to create loft. Imagine a Ping-Pong paddle in your left hand. The face of the paddle represents the face of
the club. Instead of scooping or holding the face open, picture the face of the paddle turning to the ball, like a topspin backhand -- the secret to crisp contact on chip shots.
14. pretend your puttershaFt is GLass
I putt my best when I have a sense of gentleness in my hands, my stroke and the way the ball comes off the putterface. Then the ball rolls consistently, which might just be the secret to fine putting.
To promote those feelings I visualize the putterface as being extremely limber, almost as flexible as a length of rope, which means the only way I can get the clubhead to swing truly is to stroke very softly, smoothly and slowly. If the limber shaft image doesn’t seem to be working,
I’ll replace it in my mind’s eye with a delicate glass shaft that will shatter if I’m even a tiny bit harsh at the ball.
Vital to swinging the putter this gently, but with sufficient speed to roll the ball the required distance, is a very light grip. Equally important is retaining that softness in the fingers throughout the stroke -- in other words, no involuntary grabbing once you’ve set the club in motion.
holding the hoop with your regular grip and the arms parallel with the ground in a backswing position. (Make sure you use a large-size hoop.) Now swing your hands to the top, making sure the hoop stays on that same plane. Then bring your hands down as you would on the downswing, still keeping the hoop on the same plane.
Stop when your hands are even with your right thigh. If your right shoulder has rotated out toward the ball, and the hoop hits your left side or comes close to hitting it, you’re over the top. Focus on moving the hoop around your shoulders so it stays on plane, as I’m doing in the photo to the right, and you’ll feel how to keep the club on a good inside track.
15. huLa-hoop driLL reinForces proper pLane
yes, I do know how to use a Hula-Hoop the right way -- though I’m not too good at it! I’m better at showing how the hoop can be used to train the right shoulder
not to go over the top.The Hula-Hoop Drill creates the
feeling of the club swinging back and down along the proper plane. Begin by
BILL MORETTI, AUG. 2008
CHUCK COOK, NOV. 1990
STAN UTLEY, JUNE 2009
JACK NICKLAUS, SEPT. 1988
TODD ANDERSON, FEB. 2002
Think of the golf swing as a big, tilted circle around the body. The clubhead travels around the outside of the circle. To deliver the clubhead to the ball properly, a player must swing the club at the correct tilt. That’s called swing plane. It’s one of the most important, yet misunderstood, aspects of the swing.
One of the worst moves amateurs make in the full swing is swinging down from outside the target line to inside that line. To get your swing on the right plane, start by placing something small, such as
a piece of popcorn, in the middle of two clubs lying on the target line. Then set up with soft chairs to either side of you.
your goal is to swing the club up the front of the first chair on the backswing and up the front of the other chair on the through-swing, just missing the edge of each seat cushion. If you come through the impact area from outside in, you’ll hit the second chair. Why hit popcorn?
It makes you concentrate more on the motion than the outcome, and it doesn’t break anything.
16. WorK on your sWinG pLane
17. see yourseLF in the Mirror
The key to successful sand shots from greenside bunkers is to keep the clubface open throughout the swing. Any closing of the clubface causes it to dig into the sand, resulting in poor shots.
Here’s a visual reminder I often give to students who are having difficulty with bunker shots: On the finish, swing
the club to eye level. If the clubface were a mirror, you would be able to see your reflection in it. It’s proof that you’ve kept the clubface open at impact and allowed the sand wedge to glide under the ball, propelling it out of the bunker on a thin “divot” of sand.
TOM NESS, MARCH 2005
DAVID LEADBETTER, JUN 1998
18. hit the baLL hiGh
If there are trouble spots ahead, I always set my eyes on something in the sky, such as a cloud formation, or on a
group of trees beyond the trouble. In this way I find I am always able to get the ball over such hazards.
JACK BURKE, JULY 1954
B E ST T I P S e v e r * 1 2

Most players have problems in the sand because of an incorrect approach -- both mentally and physically. They try to hit an “explosion” shot, which causes them to swing down too steeply and dig out too much sand. As a result, they have to swing harder than is necessary and usually leave the ball in the sand or hit it way too far.
On normal shots I pretend to think of slicing the ball out of the sand with a slightly open clubface, much as you would peel an apple. If the clubface stays
slightly open into the sand, the flange or “bounce” of the club comes into play and allows it to slide readily through the sand under the ball.
you don’t need a big, hard swing -- halfway back and through is a good starting point for most greenside shots, with slight variations for different distances.
Sand consistency varies at different courses, so it’s a good idea to hit a few practice shots before you play to find out just how thick or thin you should slice that peeling off the apple.
19. sLice, don’t bLast, baLL FroM sandBYRON NELSON, FEB. 1983
To be sure your grip is correctly positioned on the club, first place a tee in the V of both hands and then take your grip. If your grip is correct, the tees will be in line, slightly to the right of center as you look down the shaft.
This stronger grip makes it easier to keep your hands “quiet” through impact
while keeping the face square to the target line, a necessary ingredient for a reliable swing.
you can practice gripping a club at home, in front of the television, even at the office while you’re on the telephone. And keep a couple of tees handy to check your V’s.
20. driLL: checK your Grip With teesCHUCK COOK, MARCH 1996
All good putters keep the lower body and the head during the putting stroke. Although I’ve found it easy to keep my head still, my lower body sometimes sways a little and makes me hit putts off-
line. That’s when I use this visualization: I pretend my legs have tree roots growing out of them. This keeps my lower body nice and still so I can take the putter back and through on the path I intended.
21. stay rooted on the puttinG GreenJOSH ZANDER, AUG. 2003
I’ve found that most golfers have trouble with long putts because they don’t let the putter swing freely. They become as ball-bound on putts as they are on full shots. They’re too aware of the stroke, 100 conscious of the mechanics. They tend to have a short backswing and they over accelerate through the ball, breeding erratic rhythm and inconsistent results.
One good drill I recommend to improve feel for distance is to look at the hole while
you putt. That’s right. Focus your eyes on the target at address and keep them there when hitting the ball. Feel the putter swing back and through like a pendulum, changing direction at the same speed. Practice this on the putting green from about 10 feet and then gradually work back to longer putts. This drill helps you use your eyes better to judge distance and teaches you to trust what you feel.
22. Keep your eyes on the hoLe to iMprove FeeL For distanceDAVID GLENZ, NOV. 1980
Over the course of my teaching, I’ve often used swing images to make a point, especially when the student responds well to visual cues. One such image is a rope tied from your left knee to your left arm.
As you take the club back with your hands and arms, think of the rope as pulling your left knee back and inward. Then as the forward swing starts with the lower body--your left foot, knee and thigh moving toward the target--think of your knee pulling your left arm down. The parts of your swing will work in unison for consistent shots.
My colleague Bob Toski would often ask students if they were trying to create a golf swing or a golf turn. To swing the club, you must use the parts of your body that can move freely--your legs and arms. But they must swing in sync. The rope image encourages that.
23. ‘tie’ your Knee to your arMJIM FLICK, MAY 2009
In chipping, as in putting, the goal is to all but assure solid contact and directional accuracy before stroking, so you can focus on distance as you stroke. As in putting, the hands face midway between directly upward and directly inward, so the forearms angle to the shaft at 45 degrees. The upper
arms rest lightly against the rib cage. Neither forearm is higher or lower than the imaginary upward extension of the clubshaft. The eyes are directly over the line, which demands that you grip well down on the club and, perhaps, set it lightly on the ground toward the toe end of the sole.
24. basic chippinG setupPAUL RUNYAN, MARCH 1980
Weekend golfers underplay breaking putts and tour pros overplay them. The faster the green, the more the ball is going to break. you will wind up closer to the hole more often if you overplay the break. Keeping the ball on the high side of the cup--or the “pro side” as it’s called will help it die down to the hole.
Changing the ball position in your
stance can help on breaking putts. Generally the ball should be just ahead of the center of your stance. From there, try moving the ball one ball forward in your stance for left-to-right putts, and moving it one ball back in your stance for right-to-left putts. you’ll have a better chance of playing enough break.
25. chanGe baLL position to pLay enouGh breaKTOM WATSON, NOV. 1991
B E ST T I P S e v e r * 1 3

When you practice on range mats, focus on swinging down into the ball with your weight rotating toward the target onto a firm left leg. The hands and wrists pass over the ball before the clubhead makes impact. It should feel
like you are “trapping” the ball with the clubhead, with the clubface remaining square at impact. This move ensures that the club will reach the bottom of its arc at the ball, not before it.
31. What you need to KnoW When hittinG oFF artiFiciaL turFRICK SMITH, MARCH 2004
This will help you understand -- and feel -- the down in downswing. It counteracts the slicer’s tendency to start the downswing with a shoulder twist to the left of the target that throws the arms and club outside the line of play. you want your first move from the top of the backswing to be with your arms, wrists and hands swinging the club straight down. A good way to ingrain that feeling is by imagining you’re going to drive a stake into the ground from the top of the backswing.
While this is more of a mental image than a drill, you might actually want to place a stake or clubshaft in the ground to help you achieve this downward feeling.
Position it about a club-length off your right foot, at a height even with the middle of your body, along a line running through the arches of your feet and parallel to the target line. To pound that stake right into the ground, you would have to use your arms, wrists and hands (don’t actually try it; you’ll break your driver). Just return the club gently to the top of the stake or shaft to get the proper feel. Keeping that stake in mind should give you a feeling for “downward.” It also will encourage the proper blending of your arms, wrists and hands to bring the clubface back to its original aim.
27. thinK oF drivinG a staKe doWn FroM top oF bacKsWinGDAVIS LOVE JR, MARCH 1985
If you’re trying to hook the ball or learning to overcome a bad slice, try this visual key. Imagine hitting a multicolored beach ball and spinning it counterclockwise. Then try striking a
golf ball with that same image in mind. Hit the inside corner of the ball and make it spin. That will move the ball from right to left. The more you spin the ball, the more it will move from right to left.
28. spin a beach baLL to hit it riGht to LeFtJAY GOLDEN, DEC. 1986
I place my right hand on the putter and then apply my left hand below it in a position where the fingers of my right hand can gently clasp my left forearm. When I first experimented with this method, almost two years ago, I had a small block of wood attached to the puttershaft between the grip and my
left forearm, but that was somewhat cumbersome and now that I have refined the grip it is no longer necessary either.
Although this method may cause your friends to raise their eyebrows at first, the beauty of it is that all extraneous motion is eliminated -- there is absolutely no movement in my wrists or hands; it all
29. riGht hand Grips cLub and LeFt ForearMBERNHARD LANGER, AUG. 1989
I see the bad move in the picture on the left more than any other. Instead of taking the club back with the arms as a unit, I’m letting my right arm collapse toward my body. This makes for a short, narrow backswing and a poor turn. Take the rubber band from the
asparagus and place it over the middle of your forearms. Hit some soft shots with the rubber band in place.
If you want to keep the skin on your arms, you’ll have to make a smooth, one-piece backswing. you’ll hit it longer and straighter.
30. diaL up soMe eXtension With a rubber bandRANDY SMITH, FEB. 2001
To help square the face at impact and hit straighter shots, keep the clubface looking at the ball when you start back. Then, as you reach the top of your swing, have the face point to the sky.
Getting in these two positions will greatly improve your chance of swinging down from the inside and squaring the club at impact -- you might even start hitting draws.
32. Give your sLice a Face-LiFtDAVID LEADBETTER, JUNE 2009
“To maintain good tempo, you have to be totally relaxed,” Miller says.
“Also, there’s no such thing as too slow a backswing. If the average player would remember those two points, he’d improve his game immediately. If you
take the club back slowly, you’ll start it down slowly. I even think that if you can learn to pause at the top of the swing it’s a great thing. If you rush it at the top you never know where your clubface is.”
33. GrippinG LiGhtLy, reLaXinG body produces Good teMpoJOHNNY MILLER, OCT. 1974
One way of insuring that you don’t leave a putt short is to visualize a mythical hole about a foot behind the real hole. If you don’t make the putt, it’s a lot better to leave it a foot long than a foot short. I try to set up square to the target, and in my mind I feel that I’m square to the target. But you’ll see here that I’m ever-
so-slightly closed. The main thing is that I’m comfortable and have a good look at the path to the hole. Note the target lines on the putterface. They really help in my setup. I line the ball up between the two vertical lines and watch so that the cross line is square to the hole. Then I stroke it firmly into the cup.
26. visuaLiZe a hoLe behind the hoLeNANCY LOPEZ, MAY 1979
stems from my arms and shoulders.One important point to remember: As
with full shots, do not grip the club too tightly.
That leads to tension in your arms, which in turn disrupts the rhythm of your stroke.
B E ST T I P S e v e r * 1 4

When you release the club throughout impact, the back of your left hand -- and by extension the clubface -- is square. That translates into the bottom of the swing being in the right place, the loft on the club being correct and the ball leaving the target. In
other words, release is the unhinging and re-rotation of your hands from where they were at the top of the backswing. What does that feel like? The bottom of your right hand is pushing down as the bottom of your left hand is pulling up.
36. hoW to checK your reLeaseHANK HANEY, JULY 2009
To avoid straightening the right leg and rolling your weight to the outside of the right foot on your backswing--common faults among higher handicappers--try this simple practice-tee exercise. Place a golf ball under the outside of your right foot, just forward of the heel. This will concentrate your weight on the inside of your right foot and leg. Hit several full shots with a 7-iron in this manner,
being sure to keep your right knee flexed on the backswing.
After you acquire the feeling of keeping your knee flexed and the weight on the inside of the right-foot, remove the ball and hit several more shots. you’ll find you will be making a better body turn and will be in a more balanced and powerful position to begin the downswing.
37. Get on the baLL to stop sWayinGKENNETH GIOVANDO, MAY 1974
Uphill and downhill lies needn’t be a problem to a golfer if he simply remembers to “play the ball off the ‘high’ foot.”
Because of the terrain, when playing from an uphill lie your clubhead reaches
the ground a bit later in the swing--so you should position the ball toward your left foot. On a downhill lie the clubhead reaches the ground earlier in the swing--so play the ball back toward your right foot.
41. on hiLLy Lies hit FroM ‘hiGh’ FootHARRY LOUDERMILK, MAY 1964
This is what I call my “walk-through” swing. I use my whole body here, shifting my weight completely through the ball. And, to make sure that I complete
that weight shift, I slide my right foot at impact. Almost all of my weight is concentrated on my left foot as I move into the follow-through.
42. sLide riGht Foot at iMpactGARY PLAYER, AUG. 1988
When I was 16 years old, my teacher, Jim Ferree, had me hit some balls with heavy work gloves on. It really helped me
make sure I was swinging the club on the proper path and not manipulating the clubhead to get it in position at impact.
43. put the GLoves on to taKe the hands outRICK SMITH, MAR. 2000
A common error in addressing a pitch shot is to ground the clubhead (setting the club on the ground too far below the bottom of the ball) and to get too bent over at address-to overreach, in effect. When this happens, you tend to resist the law of gravity, killing the roundness and centrifugal force of your swing. Usually you hit the ground first or, as a reaction, pull up and top the ball.
To overcome this, feel that you are standing a little taller than you normally might at address and make sure your arms
are fully extended with whatever length grip you have on the club. At this point, the club head should be a quarter of an inch or so off the ground, just barely brushing the grass. The leading edge of the club is still more than half an inch below the center of the ball, so you need not worry about topping the shot and you have reduced the likelihood of striking the ground first. Under reaching in this manner tends to make you help the law of gravity, swinging downward instead of upward, increasing clubhead acceleration and making the swing more accurate.
35. never overreachPAUL RUNYAN, MAY 1985
We often say golfers have gotten “line drunk.” They focus too much on finding the line and not enough on finding a feel for distance. Putt with your eyes closed, or wearing a blindfold, and estimate
where the ball stops. you’ll quickly build trust in your stroke and a better awareness of the target. Placing a glove in the cup limits auditory feedback and helps you rely even more on feel.
34. try puttinG With your eyes cLosed or bLindFoLdedLYNN MARRIOTT, JUNE 2005
The evolution of the golf swing has made forearm rotation less of an issue than when the Bobby Jones-style around-the-body swing was in vogue. For the modern player,
whose hands stay more in front of his chest throughout the swing, less forearm rotation means more control of the clubface and more accurate shots.
38. increase your accuracy With Less ForearM rotationTIGER WOODS, DEC. 2000
When I’m swinging well, I feel like I’m using my left side to bring the club back, and that my right is more active on the downswing. To reinforce that feel, I’ll hole a heavy club--I’m using a sand wedge here--in my right hand and take small swings, holding it lightly in my fingers.
I use my right hand, arm, shoulder and hip to swing the club through and feel the weight of the club itself promoting the release position. There’s no holding on or manipulation to try to square the clubface.
39. hoW to FeeL the cLubhead reLeaseERNIE ELS, OCT. 2003
The No.1 greenside tendency for a long-shooter is to fall away from the target on chip shot and try to help the ball up in the air. That’s why golfers hit fat and thin chips.
By standing with your back foot on a
paint can, you force your weight to stay forward during the entire shot, promoting a descending blow through impact. I’ve never seen a player supporting the weight on the front leg like this scoop at the ball. It’s an instant fix.
40. Keep your WeiGht ForWard to can More chip shots KEVIN WEEKS, OCT. 2007
B E ST T I P S e v e r * 1 5
Runyan anchors his left hand and wrist against his waist line, maintaining a very firm grip with this hand. Right arm is almost fully extended down the shaft, with right palm directly behind the shaft, facing down the putting line. The right forefinger is extended
down the back of the shaft. Care must be taken to position the clubshaft exactly perpendicular to the ground. For uphill and downhill putts the shaft should be leaned toward the lower foot so that it is still perpendicular to slanted terrain.
46. spLit-hand puttinG techniQuePAUL RUNYAN, OCT. 1966
The position of the right index finger and thumb is crucial to developing a sound grip. The index finger should be hooked around the underside of the grip, with the thumb just touching the tip of the finger. Imagine the feel of holding a needle--that’s similar to the “trigger” position you want to form.
The trigger reduces tension in the right hand and increases feeL Compare the sensitivity of this right-hand position with that of a hammer-like grip in which the
thumb is lying more over the fingers and you’ll see what I mean.
Forming a trigger position reduces the tendency to snatch the club back on the takeaway and enables you to retain the angle in the back of your right wrist as you swing down. It also helps you maintain some lag in your swing and keeps the right side moving down and under through impact, which leads to more power and control.
50. thread the needLe For better FeeL and controLDAVID LEADBETTER, JAN. 1998
Too many amateurs fail to shift the weight from their right side to their left on the downswing. It’s a serious error, because to generate power complete weight shift is essential.
Here’s a swing thought that will solve the problem: When you set up to the ball, think of how you’d skip a stone across a
lake. you’d step into the throw and use a sidearm motion.
Use this image to get the right knee, shoulder and arm to move through the ball as you shift your weight from the right foot to the left foot. The right side must fully release to generate maximum clubhead speed at impact.
47. ‘sKip a stone’ For a better WeiGht shiFtJAY SIGEL, JULY 1997
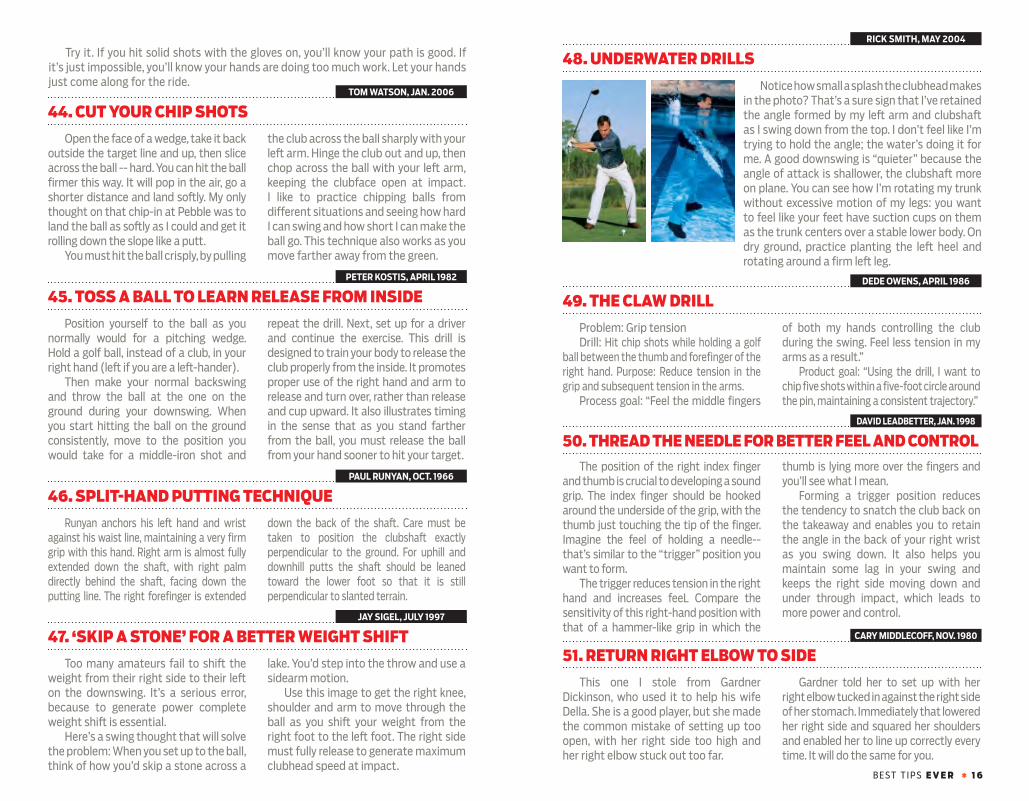
48. underWater driLLs RICK SMITH, MAY 2004
Problem: Grip tensionDrill: Hit chip shots while holding a golf
ball between the thumb and forefinger of the right hand. Purpose: Reduce tension in the grip and subsequent tension in the arms.
Process goal: “Feel the middle fingers
of both my hands controlling the club during the swing. Feel less tension in my arms as a result.”
Product goal: “Using the drill, I want to chip five shots within a five-foot circle around the pin, maintaining a consistent trajectory.”
49. the cLaW driLLDEDE OWENS, APRIL 1986
This one I stole from Gardner Dickinson, who used it to help his wife Della. She is a good player, but she made the common mistake of setting up too open, with her right side too high and her right elbow stuck out too far.
Gardner told her to set up with her right elbow tucked in against the right side of her stomach. Immediately that lowered her right side and squared her shoulders and enabled her to line up correctly every time. It will do the same for you.
51. return riGht eLboW to sideCARY MIDDLECOFF, NOV. 1980
Notice how small a splash the clubhead makes in the photo? That’s a sure sign that I’ve retained the angle formed by my left arm and clubshaft as I swing down from the top. I don’t feel like I’m trying to hold the angle; the water’s doing it for me. A good downswing is “quieter” because the angle of attack is shallower, the clubshaft more on plane. you can see how I’m rotating my trunk without excessive motion of my legs: you want to feel like your feet have suction cups on them as the trunk centers over a stable lower body. On dry ground, practice planting the left heel and rotating around a firm left leg.
Open the face of a wedge, take it back outside the target line and up, then slice across the ball -- hard. you can hit the ball firmer this way. It will pop in the air, go a shorter distance and land softly. My only thought on that chip-in at Pebble was to land the ball as softly as I could and get it rolling down the slope like a putt.
you must hit the ball crisply, by pulling
the club across the ball sharply with your left arm. Hinge the club out and up, then chop across the ball with your left arm, keeping the clubface open at impact. I like to practice chipping balls from different situations and seeing how hard I can swing and how short I can make the ball go. This technique also works as you move farther away from the green.
44. cut your chip shotsTOM WATSON, JAN. 2006
Position yourself to the ball as you normally would for a pitching wedge. Hold a golf ball, instead of a club, in your right hand (left if you are a left-hander).
Then make your normal backswing and throw the ball at the one on the ground during your downswing. When you start hitting the ball on the ground consistently, move to the position you would take for a middle-iron shot and
repeat the drill. Next, set up for a driver and continue the exercise. This drill is designed to train your body to release the club properly from the inside. It promotes proper use of the right hand and arm to release and turn over, rather than release and cup upward. It also illustrates timing in the sense that as you stand farther from the ball, you must release the ball from your hand sooner to hit your target.
45. toss a baLL to Learn reLease FroM insidePETER KOSTIS, APRIL 1982
Try it. If you hit solid shots with the gloves on, you’ll know your path is good. If it’s just impossible, you’ll know your hands are doing too much work. Let your hands just come along for the ride.
B E ST T I P S e v e r * 1 6

To take the tension out of your legs at address and to promote good balance throughout the swing, imagine you’re standing on thin ice. you want to feel light-footed as you prepare to swing, not dug into the ground like some sumo wrestler girding for battle.
After setting up to the ball, gently waggle your feet as though you’re testing the ice to see if it will support you. This thought will help keep you relaxed and ready to begin the motion of your swing from a well-balanced, athletic position.
54. For better baLance, set up on thin iceDAVID LEADBETTER, SEPT. 1996
To learn the feel of the correct position at the top and the feel of a free arm swing, take your address position, pick the club straight up and lay it on your left shoulder (1). Turn your hips
and shoulders fully until you can see the clubhead out of the corner of your left eye (2). Extend your hands upward until your left arm is stretched (3). Swing your arms (4).
55. Four-step driLL Gives you the FeeLJIM FLICK, JUNE 1988
If you have a tendency to mis-hit chips and short pitches, the likely culprit is too much body movement.
It may be a little extreme, but here’s an image that will help you maintain better posture position during the swing. Pretend
there’s a spear coming out of the ground with the point just inches from your chin. If you move down, you’ll be impaled. This image will force you to stay still and swing your arms for better contact.
56. chin up For crisp shots RANDY SMITH, JAN. 1999
Here is how the Basic Movement gets the ball in air. At left, golfer squares sole to ground, aims with right edge only. In center, forward stroke of hands permits clubface to loft ball over book as bottom edge of clubhead grazes ground. At right, faulty scooping action causes ball to strike book.
57. Learn the ‘basic MoveMent’J. VICTOR EAST, MAR 1957
Getting wristy and trying to scoop a chip shot into the air is the No. 1 problem of amateurs. Mark Calcavecchia’s “paint-brush” grip for putting can help you learn to hinge and hold. Try this at the range:
Place the lower hand on the club. Hinge the club slightly in the backswing, then allow the grip to serve as a reminder to hold that position past impact.
59. try the ‘paintbrush’ Grip driLL to prevent Wristy chips
RICK SMITH, JUNE 2002
To create width in the back swing, the right arm needs freedom to move back and up into the proper position at the top.
Think of how you fire up a lawn mower: Without any thought you simply draw the cord back with a free-flowing motion that begins with the right hand, then the right elbow, followed by the right shoulder. This image helps you synchronize your body action with your
arm movement in your golf swing.Check in a mirror to see that freeing
your right arm helps position the left arm and club on a good plane at the top. Thinking of the lawn-mower move will add coil and stretch to your backswing, providing more power as well as a downswing path from the inside-- “cutting” shots off your scores.
58. start the MoWer to start the sWinGDAVID LEADBETTER, FEB. 2000
The grip that may be best for you is the unlap grip, or baseball grip as it is called in some quarters. It is the overlapping grip
in every detail of position except for the overlapping of the small finger of the right hand onto the left forefinger.
60. try the unLap GripBETTY HICKS, MARCH 1956
Next, your thought should be to return your right elbow to that position during the forward swing. This helps you return the club to the ball from the inside of your target line instead of forcing the
right arm and shoulder out and around as so many players do. you then will be swinging on the proper path to produce a right-to-Ieft draw instead of a slice.
From the greenside bunker, explode the ball out on a cushion of sand. Some teachers tell you to hit the sand just one or two inches behind the ball, actually you have more margin of error than that. Make a footprint in the sand and place the ball in the middle of it. Now
just erase the footprint with your swing. you’ll find you can still hit a good shot entering the sand well behind the ball. The perfect distance is about three to four inches behind it, but you don’t have to be perfect.
52. erase the FootprintJIM MCLEAN, OCT. 2001
To be sure that your forward swing path is in-to-out, stand your golf bag just inside the target line three or four feet in front of you and make a few practice swings with the broom. As long as your swing path is in-to-out, the bag will stand undisturbed. If you spin or twist your hips and shoulders, and thereby swing the club out-to-in, you’ll knock over the bag.
Try this drill a few times with the broom and then with your 5-iron. On the practice field you may want to use an umbrella stuck into the ground so you can hit balls without damaging your bag. Place the umbrella about 10 feet down your target line. Try to hit shots so they start to the right of the umbrella and then curve to the left.
53. sWeep aWay your sLiceHANK JOHNSON, AUG. 1982
B E ST T I P S e v e r * 1 7