Issue 29 Product Review · 2011-11-16 · Why not get involved... Get involved with the Specialist...
2
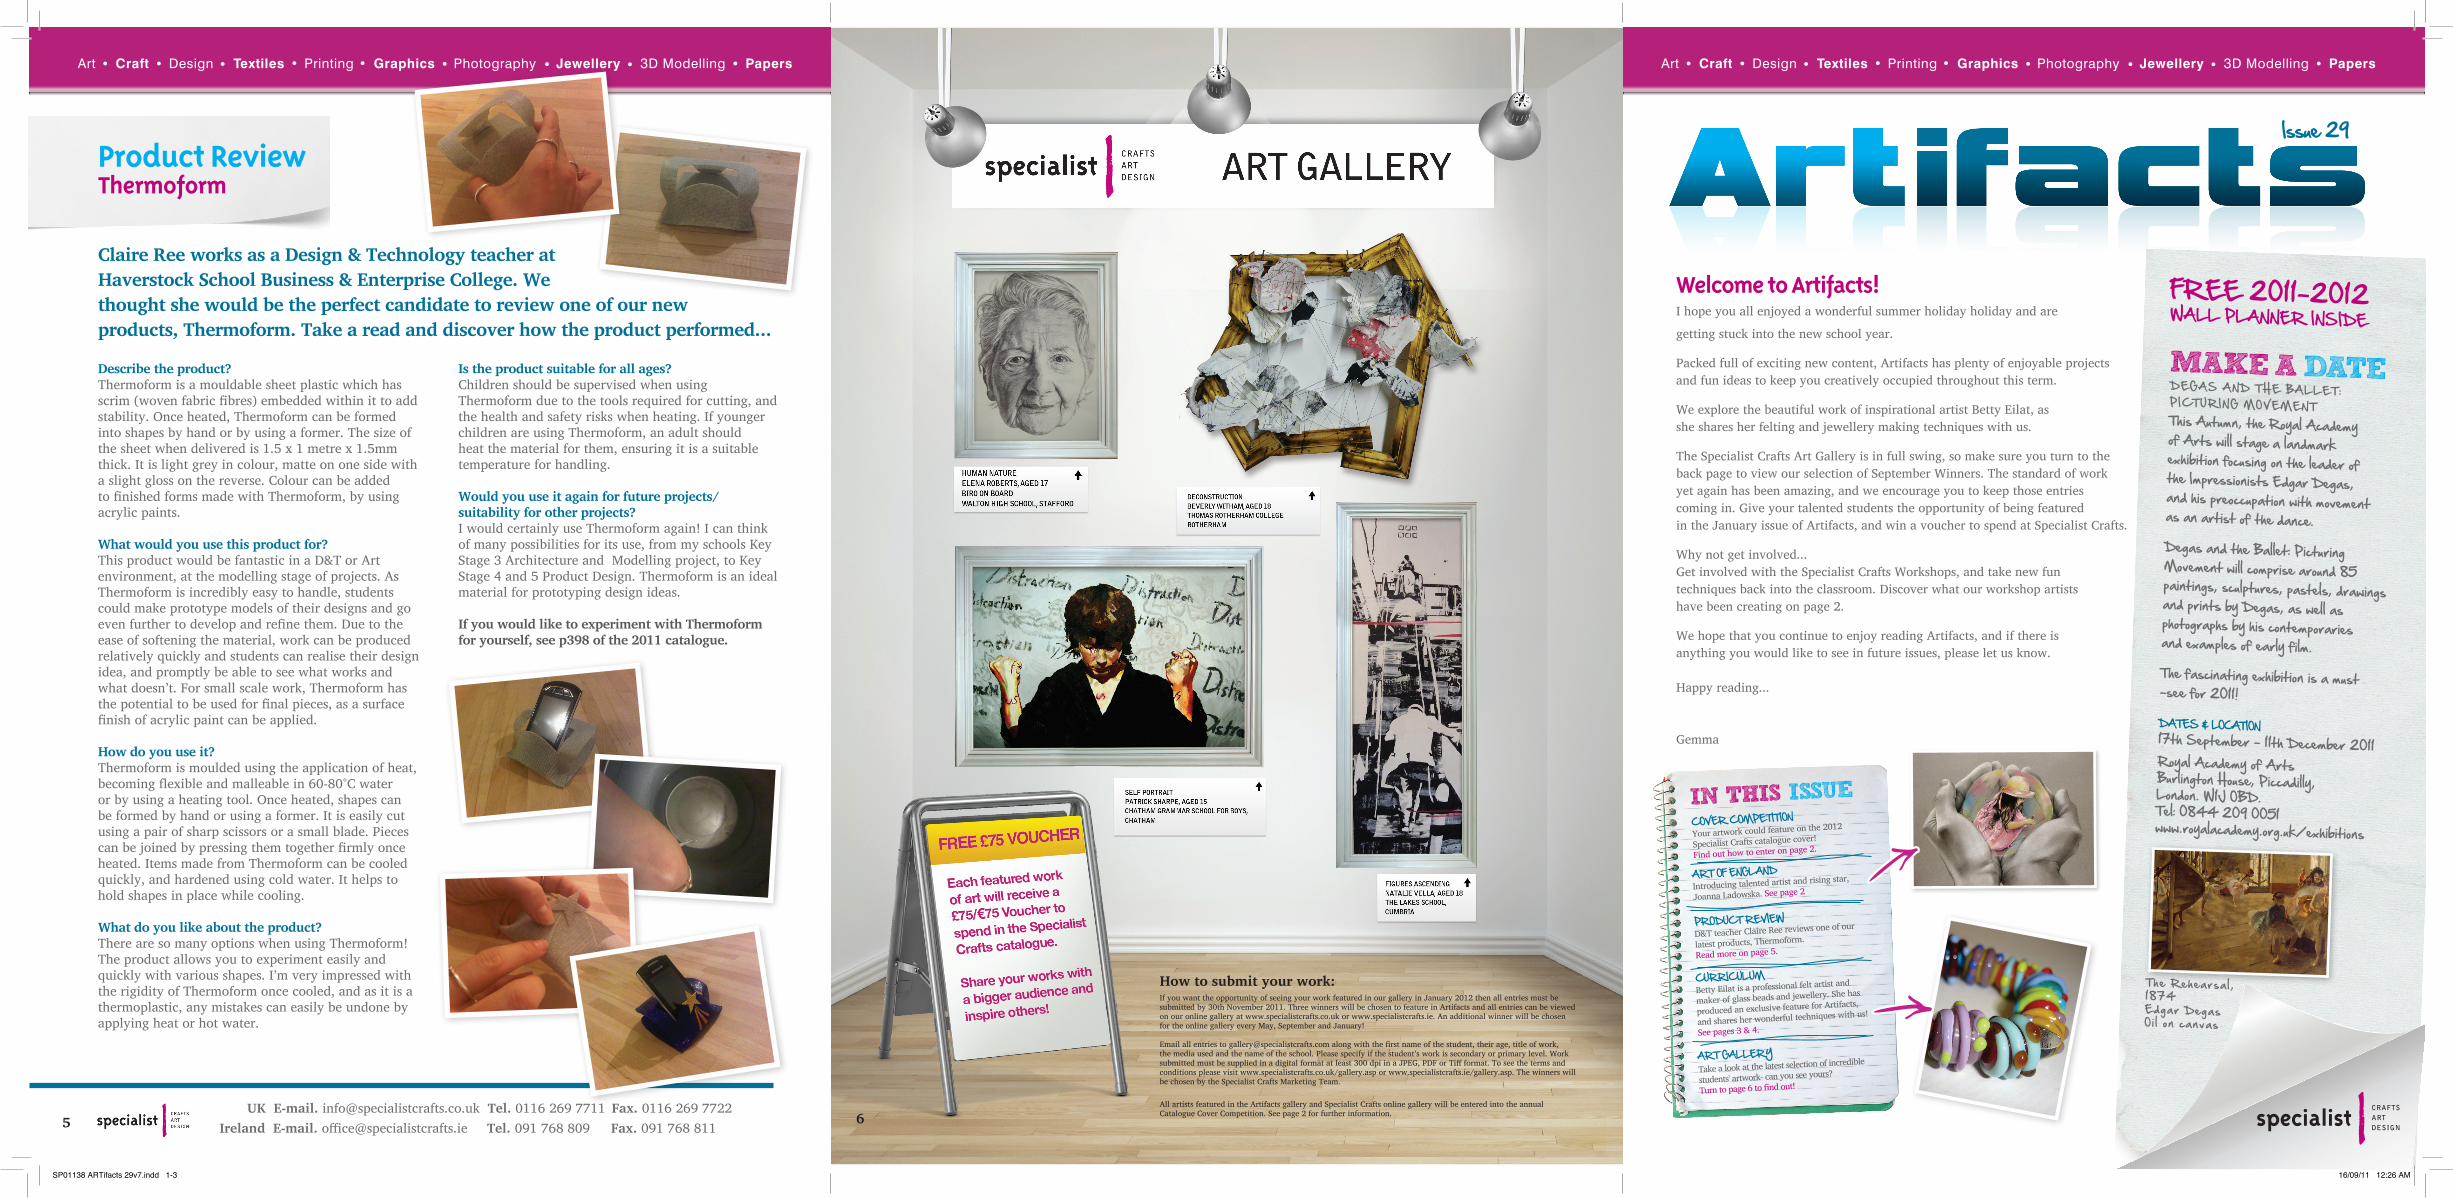
Welcome to Artifacts! I hope you all enjoyed a wonderful summer holiday holiday and are getting stuck into the new school year. Packed full of exciting new content, Artifacts has plenty of enjoyable projects and fun ideas to keep you creatively occupied throughout this term. We explore the beautiful work of inspirational artist Betty Eilat, as she shares her felting and jewellery making techniques with us. The Specialist Crafts Art Gallery is in full swing, so make sure you turn to the back page to view our selection of September Winners. The standard of work yet again has been amazing, and we encourage you to keep those entries coming in. Give your talented students the opportunity of being featured in the January issue of Artifacts, and win a voucher to spend at Specialist Crafts. Why not get involved... Get involved with the Specialist Crafts Workshops, and take new fun techniques back into the classroom. Discover what our workshop artists have been creating on page 2. We hope that you continue to enjoy reading Artifacts, and if there is anything you would like to see in future issues, please let us know. Happy reading... Gemma MAKE A DATE DEGAS AND THE BALLET: PICTURING MOVEMENT This Autumn, the Royal Academy of Arts will stage a landmark exhibition focusing on the leader of the Impressionists Edgar Degas, and his preoccupation with movement as an artist of the dance. Degas and the Ballet: Picturing Movement will comprise around 85 paintings, sculptures, pastels, drawings and prints by Degas, as well as photographs by his contemporaries and examples of early film. The fascinating exhibition is a must -see for 2011! DATES & LOCATION 17th September - 11th December 2011 Royal Academy of Arts Burlington House, Piccadilly, London. W1J OBD. Tel: 0844 209 0051 www.royalacademy.org.uk/exhibitions The Rehearsal, 1874 Edgar Degas Oil on canvas Describe the product? Thermoform is a mouldable sheet plastic which has scrim (woven fabric fibres) embedded within it to add stability. Once heated, Thermoform can be formed into shapes by hand or by using a former. The size of the sheet when delivered is 1.5 x 1 metre x 1.5mm thick. It is light grey in colour, matte on one side with a slight gloss on the reverse. Colour can be added to finished forms made with Thermoform, by using acrylic paints. What would you use this product for? This product would be fantastic in a D&T or Art environment, at the modelling stage of projects. As Thermoform is incredibly easy to handle, students could make prototype models of their designs and go even further to develop and refine them. Due to the ease of softening the material, work can be produced relatively quickly and students can realise their design idea, and promptly be able to see what works and what doesn’t. For small scale work, Thermoform has the potential to be used for final pieces, as a surface finish of acrylic paint can be applied. How do you use it? Thermoform is moulded using the application of heat, becoming flexible and malleable in 60-80°C water or by using a heating tool. Once heated, shapes can be formed by hand or using a former. It is easily cut using a pair of sharp scissors or a small blade. Pieces can be joined by pressing them together firmly once heated. Items made from Thermoform can be cooled quickly, and hardened using cold water. It helps to hold shapes in place while cooling. What do you like about the product? There are so many options when using Thermoform! The product allows you to experiment easily and quickly with various shapes. I’m very impressed with the rigidity of Thermoform once cooled, and as it is a thermoplastic, any mistakes can easily be undone by applying heat or hot water. Is the product suitable for all ages? Children should be supervised when using Thermoform due to the tools required for cutting, and the health and safety risks when heating. If younger children are using Thermoform, an adult should heat the material for them, ensuring it is a suitable temperature for handling. Would you use it again for future projects/ suitability for other projects? I would certainly use Thermoform again! I can think of many possibilities for its use, from my schools Key Stage 3 Architecture and Modelling project, to Key Stage 4 and 5 Product Design. Thermoform is an ideal material for prototyping design ideas. If you would like to experiment with Thermoform for yourself, see p398 of the 2011 catalogue. Claire Ree works as a Design & Technology teacher at Haverstock School Business & Enterprise College. We thought she would be the perfect candidate to review one of our new products, Thermoform. Take a read and discover how the product performed... How to submit your work: If you want the opportunity of seeing your work featured in our gallery in January 2012 then all entries must be submitted by 30th November 2011. Three winners will be chosen to feature in Artifacts and all entries can be viewed on our online gallery at www.specialistcrafts.co.uk or www.specialistcrafts.ie. An additional winner will be chosen for the online gallery every May, September and January! Email all entries to [email protected] along with the first name of the student, their age, title of work, the media used and the name of the school. Please specify if the student’s work is secondary or primary level. Work submitted must be supplied in a digital format at least 300 dpi in a JPEG, PDF or Tiff format. To see the terms and conditions please visit www.specialistcrafts.co.uk/gallery.asp or www.specialistcrafts.ie/gallery.asp. The winners will be chosen by the Specialist Crafts Marketing Team. All artists featured in the Artifacts gallery and Specialist Crafts online gallery will be entered into the annual Catalogue Cover Competition. See page 2 for further information. Issue 29 Art Craft Design Textiles Printing Graphics Photography Jewellery 3D Modelling Papers ● ● ● ● ● ● ● ● ● Art Craft Design Textiles Printing Graphics Photography Jewellery 3D Modelling Papers ● ● ● ● ● ● ● ● ● IN THIS ISSUE ART OF ENGLAND Introducing talented artist and rising star, Joanna Ladowska. See page 2 Betty Eilat is a professional felt artist and maker of glass beads and jewellery. She has produced an exclusive feature for Artifacts, and shares her wonderful techniques with us! See pages 3 & 4. CURRICULUM D&T teacher Claire Ree reviews one of our latest products, Thermoform. Read more on page 5. PRODUCT REVIEW ART GALLERY Take a look at the latest selection of incredible students' artwork- can you see yours? Turn to page 6 to find out! COVER COMPETITION Your artwork could feature on the 2012 Specialist Crafts catalogue cover! Find out how to enter on page 2. FREE 2011-2012 WALL PLANNER INSIDE 6 UK E-mail. [email protected] Tel. 0116 269 7711 Fax. 0116 269 7722 Ireland E-mail. offi[email protected] Tel. 091 768 809 Fax. 091 768 811 5 Product Review Thermoform SP01138 ARTifacts 29v7.indd 1-3 16/09/11 12:26 AM
Transcript of Issue 29 Product Review · 2011-11-16 · Why not get involved... Get involved with the Specialist...
Welcome to Artifacts!I hope you all enjoyed a wonderful summer holiday holiday and are
getting stuck into the new school year.
Packed full of exciting new content, Artifacts has plenty of enjoyable projects and fun ideas to keep you creatively occupied throughout this term.
We explore the beautiful work of inspirational artist Betty Eilat, asshe shares her felting and jewellery making techniques with us.
The Specialist Crafts Art Gallery is in full swing, so make sure you turn to the back page to view our selection of September Winners. The standard of work yet again has been amazing, and we encourage you to keep those entries coming in. Give your talented students the opportunity of being featured in the January issue of Artifacts, and win a voucher to spend at Specialist Crafts.
Why not get involved... Get involved with the Specialist Crafts Workshops, and take new funtechniques back into the classroom. Discover what our workshop artists have been creating on page 2.
We hope that you continue to enjoy reading Artifacts, and if there isanything you would like to see in future issues, please let us know.
Happy reading...
Gemma
MAKE A DATEDEGAS AND THE BALLET : P ICTURING MOVEMENT This Autumn, the Royal Academy of Arts will stage a landmark exhibition focusing on the leader of the Impressionists Edgar Degas, and his preoccupation with movement as an artist of the dance. Degas and the Ballet: Picturing Movement will comprise around 85paintings, sculptures, pastels, drawings and prints by Degas, as well asphotographs by his contemporaries and examples of early film.The fascinating exhibition is a must -see for 2011!
DATES & LOCATION 17th September - 11th December 2011Royal Academy of ArtsBurlington House, Piccadilly, London. W1J OBD.Tel: 0844 209 0051www.royalacademy.org.uk/exhibitions
The Rehearsa l , 1874Edgar DegasO i l o n canvas
Describe the product?Thermoform is a mouldable sheet plastic which has scrim (woven fabric fibres) embedded within it to add stability. Once heated, Thermoform can be formed into shapes by hand or by using a former. The size of the sheet when delivered is 1.5 x 1 metre x 1.5mm thick. It is light grey in colour, matte on one side with a slight gloss on the reverse. Colour can be added to finished forms made with Thermoform, by using acrylic paints.
What would you use this product for?This product would be fantastic in a D&T or Art environment, at the modelling stage of projects. As Thermoform is incredibly easy to handle, students could make prototype models of their designs and go even further to develop and refine them. Due to the ease of softening the material, work can be produced relatively quickly and students can realise their design idea, and promptly be able to see what works and what doesn’t. For small scale work, Thermoform has the potential to be used for final pieces, as a surface finish of acrylic paint can be applied.
How do you use it?Thermoform is moulded using the application of heat, becoming flexible and malleable in 60-80°C water or by using a heating tool. Once heated, shapes can be formed by hand or using a former. It is easily cut using a pair of sharp scissors or a small blade. Pieces can be joined by pressing them together firmly once heated. Items made from Thermoform can be cooled quickly, and hardened using cold water. It helps to hold shapes in place while cooling.
What do you like about the product? There are so many options when using Thermoform! The product allows you to experiment easily and quickly with various shapes. I’m very impressed with the rigidity of Thermoform once cooled, and as it is a thermoplastic, any mistakes can easily be undone by applying heat or hot water.
Is the product suitable for all ages? Children should be supervised when using Thermoform due to the tools required for cutting, and the health and safety risks when heating. If younger children are using Thermoform, an adult should heat the material for them, ensuring it is a suitable temperature for handling.
Would you use it again for future projects/ suitability for other projects? I would certainly use Thermoform again! I can think of many possibilities for its use, from my schools Key Stage 3 Architecture and Modelling project, to Key Stage 4 and 5 Product Design. Thermoform is an ideal material for prototyping design ideas.
If you would like to experiment with Thermoform for yourself, see p398 of the 2011 catalogue.
Claire Ree works as a Design & Technology teacher at Haverstock School Business & Enterprise College. We thought she would be the perfect candidate to review one of our new products, Thermoform. Take a read and discover how the product performed...
How to submit your work: If you want the opportunity of seeing your work featured in our gallery in January 2012 then all entries must be submitted by 30th November 2011. Three winners will be chosen to feature in Artifacts and all entries can be viewed on our online gallery at www.specialistcrafts.co.uk or www.specialistcrafts.ie. An additional winner will be chosen for the online gallery every May, September and January!
Email all entries to [email protected] along with the first name of the student, their age, title of work, the media used and the name of the school. Please specify if the student’s work is secondary or primary level. Work submitted must be supplied in a digital format at least 300 dpi in a JPEG, PDF or Tiff format. To see the terms and conditions please visit www.specialistcrafts.co.uk/gallery.asp or www.specialistcrafts.ie/gallery.asp. The winners will be chosen by the Specialist Crafts Marketing Team.
All artists featured in the Artifacts gallery and Specialist Crafts online gallery will be entered into the annual Catalogue Cover Competition. See page 2 for further information.
Issue 29
Art Craft Design Textiles Printing Graphics Photography Jewellery 3D Modelling Papers●● ●● ●● ● ●●Art Craft Design Textiles Printing Graphics Photography Jewellery 3D Modelling Papers●● ●● ●● ● ●●
IN THIS ISSUE
ART OF ENGLAND Introducing talented artist and rising star,
Joanna Ladowska. See page 2
Betty Eilat is a professional felt artist and
maker of glass beads and jewellery. She has
produced an exclusive feature for Artifacts,
and shares her wonderful techniques with us!
See pages 3 & 4.
CURRICULUM
D&T teacher Claire Ree reviews one of our
latest products, Thermoform.
Read more on page 5.
PRODUCT REVIEW
ART GALLERYTake a look at the latest selection of incredible
students' artwork- can you see yours?
Turn to page 6 to find out!
COVER COMPETITIONYour artwork could feature on the 2012
Specialist Crafts catalogue cover!
Find out how to enter on page 2.
FREE 2011-2012WALL PLANNER INSIDE
6UK E-mail. [email protected] Tel. 0116 269 7711 Fax. 0116 269 7722
Ireland E-mail. [email protected] Tel. 091 768 809 Fax. 091 768 8115
Product Review Thermoform
SP01138 ARTifacts 29v7.indd 1-3 16/09/11 12:26 AM
Art Craft Design Textiles Printing Graphics Photography Jewellery 3D Modelling Papers●● ●● ●● ● ●● Art Craft Design Textiles Printing Graphics Photography Jewellery 3D Modelling Papers●● ●● ●● ● ●●
The technique used for my music project is the wet felting technique. This may be adopted to felt many projects, whether garments, upholstery or even fashion accessories including beautiful handbags, unique necklaces, earrings, bracelets and scarves. There is also the dry felting technique which involves special felting needles, but for now we'll concentrate on the wet felting process.
The wool fibres are laid down on a waterproof working surface such as a plastic covered table, and wet with water that contains a little soap solution. Ideally, you will use olive oil-based soap that won't harm your skin.
After wetting the fibres; little pressure is applied and massage, that will cause the fibres to entangle with each other. Now comes the process of shrinking.
Imagine you have just finished washing your clothes, and your favourite sweater comes out from the laundry shrunk to half its size - as if it could fit a small child? That is the consequence of washing the wool with hot water. Shrinking is favourable in the process of felting. It brings the fibres much closer together, avoiding them breaking apart. The piece of felt that was massaged will now be washed in hot water, thrown onto the table a few times, washed in cold water and then shaped and air dried. The outcome is a strong and dense material.
This process will lead to a miracle that happens - you create a wonderful piece of textile art without stitching, knitting or weaving!
CurriculumCreative inspiration
t
Feature on the cover of the 2012 catalogue
Discover what our inspiring artists are creating…
Art of England magazine is working in unison with Artifacts to provide art teachers with an insight into the contemporary artists and their work. In this article, Ben Kelly, Senior Lecturer and Tutor at the University of Wolverhampton, discusses the work of talented artist and rising star, Joanna Ladowska:
‘Joanna has applied her talent for drawing and painting to a wide variety of briefs. She has a particular interest in drawing from life, both in classes and on location. She can draw and paint whatever she wants to, and that is pretty impressive. I have seen a few of her works, inter alia an almost finished oil painting of ‘Lady with an Ermine’, it looks like the original, believe me. I can’t wait to see the finished version. We predict a bright future for her as she continues to develop her illustrative style.
Joanna reflects on her art...‘I can draw everything’- that’s the immediate response I give to everyone who asks me about style or the medium I am in. And, certainly, I am not lying. Whatever it is - a portrait, landscape, abstract art or still - life – in oils, acrylic, pencils or pastels, collage - drawn from life model, photograph, and other piece of art or completely from my imaginary – nothing is a big deal for me. The only criterion is that it must exhilarate, cause a smile
Take part in the Specialist Crafts Catalogue Competition and win €200 to spend on materials!Would you like your students’ work to feature on the front cover of our 2012 Specialist Crafts catalogue? We’ll send your school and student a £100/€100 voucher to spend with us, redeemable on our range of over 15,000 quality arts & crafts products!
How it works… The three chosen winners will feature in both our Artifacts and Online Art Gallery, and will each receive a £75/€75 voucher to spend with Specialist Crafts! The lucky winners will become part of the panel of finalists to be entered into our annual Catalogue Cover Competition! Email us an image of the artwork to [email protected]
All entries must be submitted by 30th September 2011, so there's not much time left! We will notify the winner of the Catalogue Cover Competition in December 2011. Please visit us at www.specialistcrafts.co.uk for further information and competition details.
The Specialist Crafts Workshops cover a wide range of techniques and will always feature two inspirational artists, providing expert tuition. The workshops, located across the UK and Ireland, offer teachers the opportunity to get “hands on” and be inspired by professional artists.
One of the UK’s most prolific new young artists, Ian Cook, works with a range of paints to create stunning masterpieces, but doesn’t use traditional brushes. Instead, Ian chooses car tyres and remote control cars as his way of transferring paint to paper, and has created auto drawings for iconic vehicles including Land Rover, Aston Martin, Jaguar and MG.
Ian has demonstrated his unusual technique at high profile events including Autosport International, Goodwood Festival of Speed and the British Grand Prix. He now works alongside the Ford World Rally Team creating Championship artwork. Experiment using Ian’s unusual technique back in the classroom, and get the boys engaged in the exciting world of art!
For more information on our workshop artists, or to book your place, please visit www.specialistworkshops.co.uk
on someone’s face. All I do is for people, less for me, and certainly not for shelving it secretly away.
That is why drawing portraits give me biggest pleasure- face details, eyes, hair. This is how I get to know people and how I try to take them closer to the art. I focus on eyes the most when drawing because I am more than sure that eyes are the mirror of spirit. The goal is to make them look alive. I always have high goals.
The full article is available online at www.artofengland.uk.com March 2011 issue. You can view back copies of Art of England online, or to subscribe to your monthly 84 page glossy hard copy at just £35 for 12 issues. Call us now on +44 (0) 1785 851660 or email [email protected]
My first encounter with a wide range of materials, textures, colours and scents began in the workshop at boarding school. The open and encouraging approach marked the beginning of a new and exciting path for me.
The powers of the experience combined with the need to create have been with me ever since, and my artistic approach is still ignited by the never ending search for materials, techniques, shapes and colours.
Throughout history, felting was the method of making boots, rugs, yurts (the habitation of Central Asian nomads) and warm clothing for cold weather. The most ancient felters discovered that felt withstands wind and damp air, and was perfect when used for insulation. The industrial use of felt is varied and wide ranging. It is often used for carpeting airplanes, insulation for walls in rooms that require acoustic properties, in pianos, footwear and many more.
I often carry a small sketchbook with me, where I draw images and write down ideas. It may be something simple like a print or pattern, plant, sunset, seeds, sea shells, boats or even just thoughts that stimulate my imagination and take me on an exciting voyage of colour. I then realise the sketches into striking pieces of jewellery, a fashion accessory such as a scarf or even a vest.
There are certain projects in particular that require keeping colours calm though, as in my last felted project where natural colour merino wool fibres were used for felting musical instruments, a piece of work dedicated to my mum, who absolutely loved music! Guitar strings hold the felted instruments in place, which are hung from the ceiling.
DO YOU HEAR THE MUSIC?
HERE, THE STUDENTS MAY SEE THE PROCESS OF MAKING A SCARF:
Our 2011 catalogue features the w
ork of O
liver Durcan from
Stratton High School.
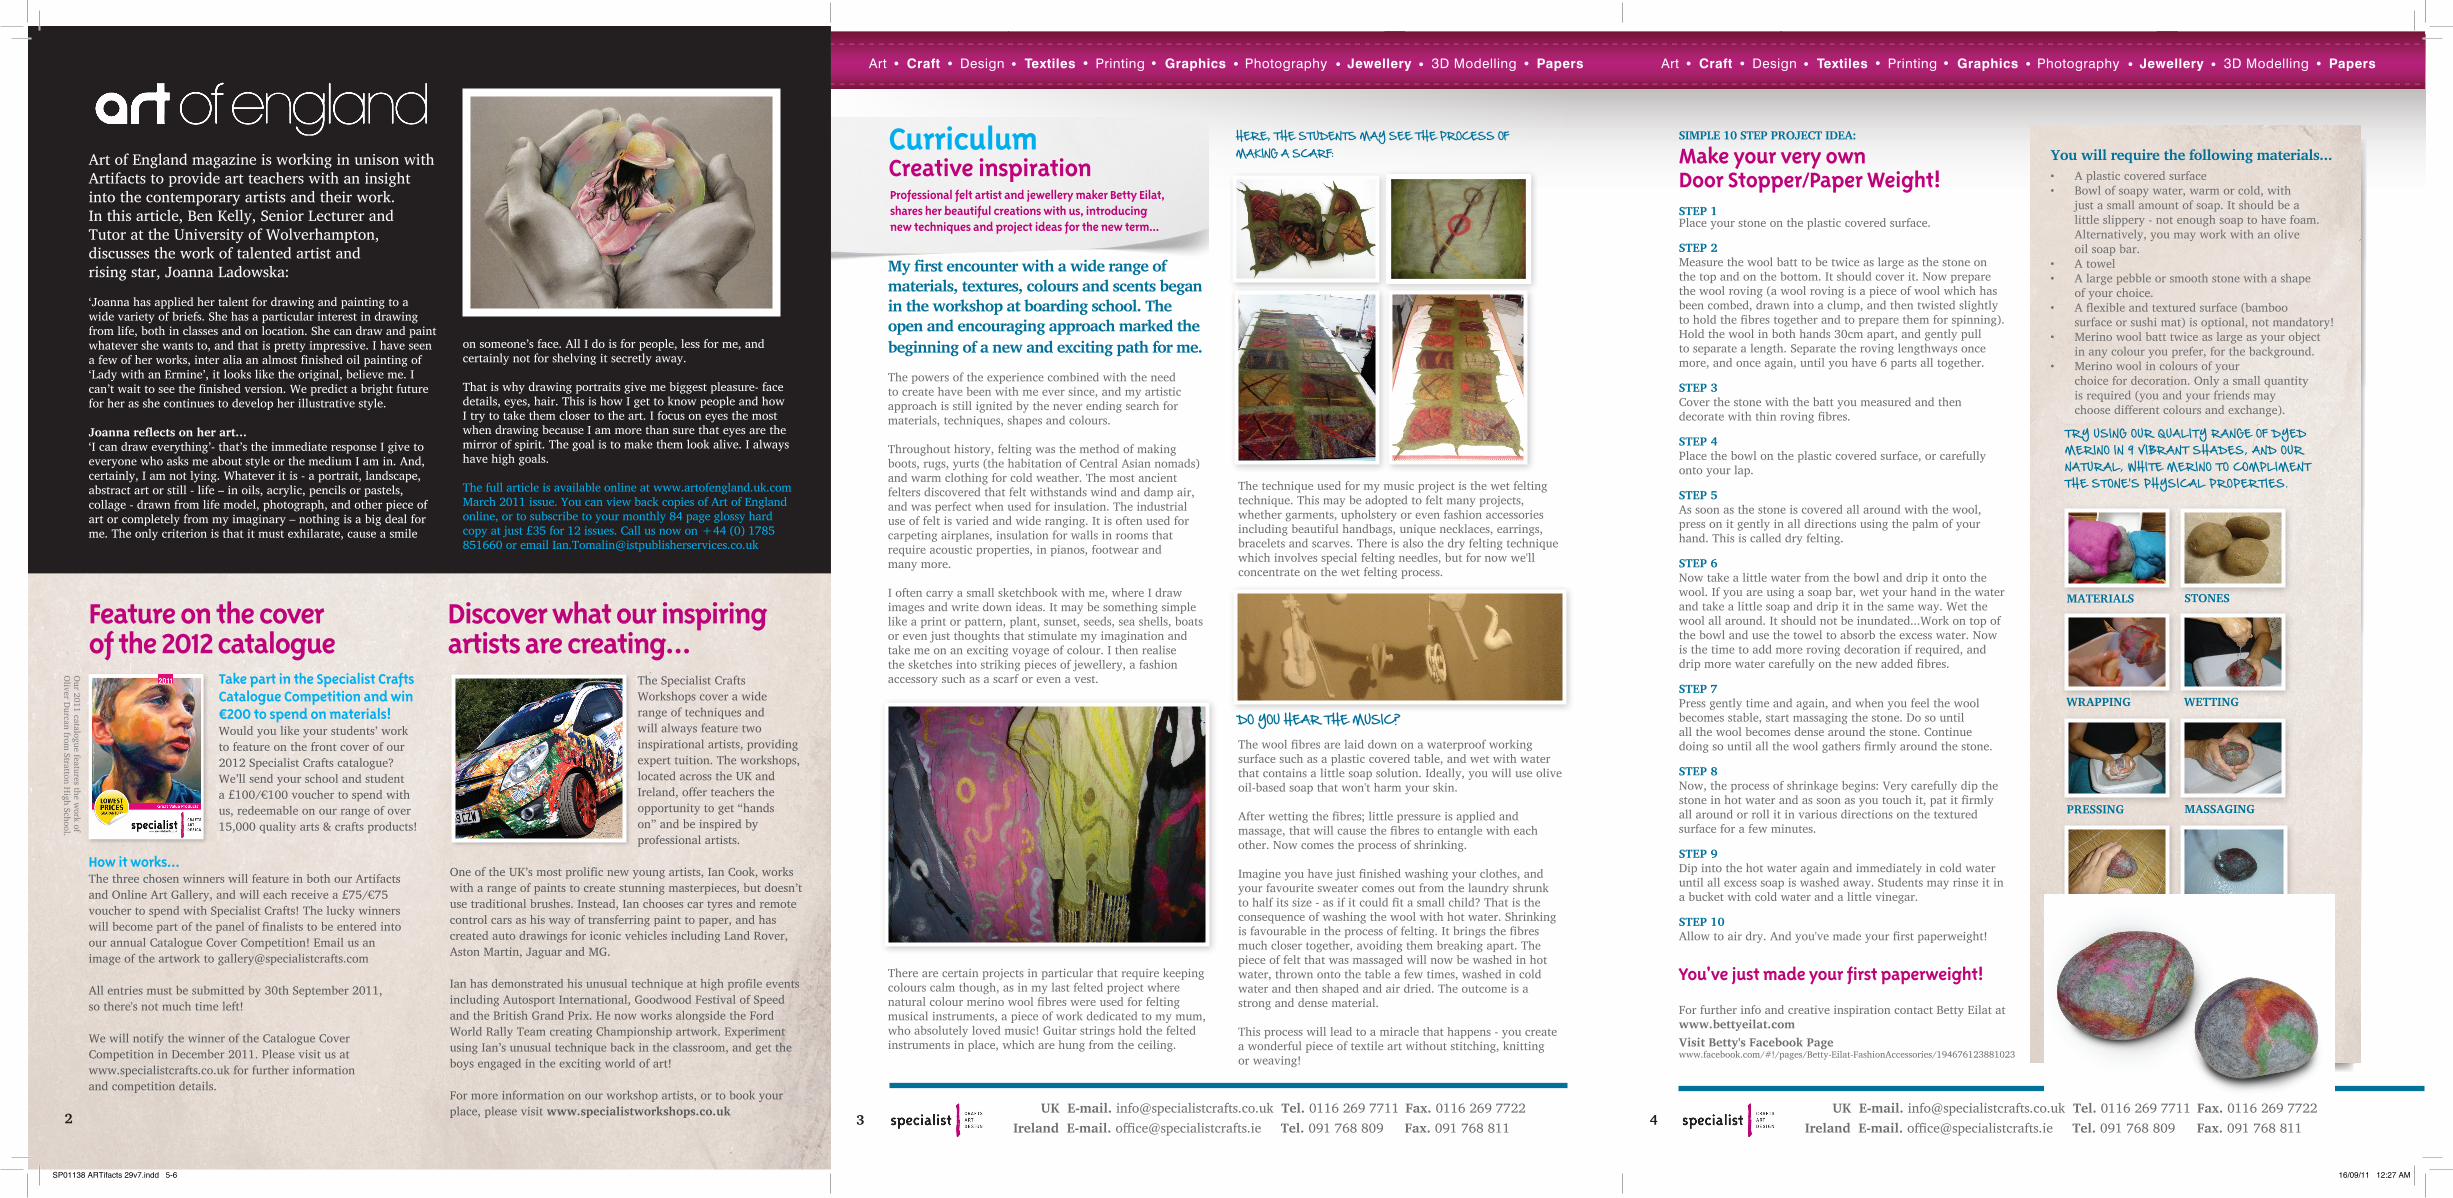
STEP 1 Place your stone on the plastic covered surface.
STEP 2 Measure the wool batt to be twice as large as the stone on the top and on the bottom. It should cover it. Now prepare the wool roving (a wool roving is a piece of wool which has been combed, drawn into a clump, and then twisted slightly to hold the fibres together and to prepare them for spinning). Hold the wool in both hands 30cm apart, and gently pull to separate a length. Separate the roving lengthways once more, and once again, until you have 6 parts all together.
STEP 3 Cover the stone with the batt you measured and then decorate with thin roving fibres.
STEP 4 Place the bowl on the plastic covered surface, or carefully onto your lap.
STEP 5 As soon as the stone is covered all around with the wool, press on it gently in all directions using the palm of your hand. This is called dry felting.
STEP 6 Now take a little water from the bowl and drip it onto the wool. If you are using a soap bar, wet your hand in the water and take a little soap and drip it in the same way. Wet the wool all around. It should not be inundated...Work on top of the bowl and use the towel to absorb the excess water. Now is the time to add more roving decoration if required, and drip more water carefully on the new added fibres.
STEP 7 Press gently time and again, and when you feel the wool becomes stable, start massaging the stone. Do so until all the wool becomes dense around the stone. Continue doing so until all the wool gathers firmly around the stone.
STEP 8Now, the process of shrinkage begins: Very carefully dip the stone in hot water and as soon as you touch it, pat it firmly all around or roll it in various directions on the textured surface for a few minutes.
STEP 9 Dip into the hot water again and immediately in cold water until all excess soap is washed away. Students may rinse it in a bucket with cold water and a little vinegar.
STEP 10 Allow to air dry. And you've made your first paperweight!
SIMPLE 10 STEP PROJECT IDEA: Make your very own Door Stopper/Paper Weight!
You've just made your first paperweight!
FELTED PAPERWEIGHTS
For further info and creative inspiration contact Betty Eilat at www.bettyeilat.comVisit Betty's Facebook Pagewww.facebook.com/#!/pages/Betty-Eilat-FashionAccessories/194676123881023
RINSING
MASSAGING
STONESMATERIALS
PRESSING
WRAPPING WETTING
ROLLING
You will require the following materials...• A plastic covered surface• Bowl of soapy water, warm or cold, with
just a small amount of soap. It should be a little slippery - not enough soap to have foam. Alternatively, you may work with an olive oil soap bar.
• A towel• A large pebble or smooth stone with a shape
of your choice.• A flexible and textured surface (bamboo
surface or sushi mat) is optional, not mandatory!• Merino wool batt twice as large as your object
in any colour you prefer, for the background.• Merino wool in colours of your
choice for decoration. Only a small quantity is required (you and your friends may choose different colours and exchange).
TRY USING OUR QUALITY RANGE OF DYED MERINO IN 9 VIBRANT SHADES, AND OUR NATURAL, WHITE MERINO TO COMPLIMENT THE STONE'S PHYSICAL PROPERTIES.
Professional felt artist and jewellery maker Betty Eilat, shares her beautiful creations with us, introducing new techniques and project ideas for the new term...
UK E-mail. [email protected] Tel. 0116 269 7711 Fax. 0116 269 7722Ireland E-mail. [email protected] Tel. 091 768 809 Fax. 091 768 811
UK E-mail. [email protected] Tel. 0116 269 7711 Fax. 0116 269 7722Ireland E-mail. [email protected] Tel. 091 768 809 Fax. 091 768 811 432
SP01138 ARTifacts 29v7.indd 5-6 16/09/11 12:27 AM