Ips Report
144
Cisco Systems, Inc. Cisco Confidential Page 1 of 144 Test Plan Report 10/15/2013 03:49:52 UTC Project: CX & PRSM Raptor-Threat Defense contains 309 test cases. # Entity Title Description 1. Verify that the threat ids of the threat objects/entries in the taxonomy file do not change after a software image upgrade. Verify that the threat ids of the threat objects/entries in the taxonomy file do not change after a software image upgrade. 2. Verify that threats may be deprecated, but should never be deleted from the threat taxonomy file. Verify that threats may be deprecated, but should never be deleted from the threat taxonomy file (Thetotal number of entries/ threat objects in the threat taxonomy file after a software image upgrade can only be equal or greater than the previous number). 3. Verify that the Global Threat Profile is set to default threat profile object. Verify that the default threat profile object gets automatically created and cannot be deleted. 4. Verify that a threat profile object can be created and it is possible to create more than one threat profile object Also verify that more than one threat profile object with the same name cannot be created. 5. Verify that a threat profile object can be edited. 6. Verify that a threat profile object can be deleted. 7. Verify filtering of search results for threat profile objects 8. Verify that a threat profile object can be created during policy creation. 9. Verify Access Policy Threat Profile, User Created Use the same threat and try different settings on the slider bar. Traffic should be allowed, denied or ignored as expected. 10. Verify Multiple threat profiles attached to access policies 3 different profiles, each attached to an access policy. Run 3 different PCAPs and verify allow/denied/ignored. Then change the slider bar in each profile to cause the next action. 11. Verify Same Profile attached to multiple access policies 3 different access policies with same threat profile attached. Run 3 different PCAPS and check allowed/denied/ignored. Then change slider bar in the profile to cause the next action.
Transcript of Ips Report

Cisco Systems, Inc. Cisco ConfidentialPage 1 of 144
Test Plan Report10/15/2013 03:49:52 UTC
Project: CX & PRSM
Raptor-Threat Defense contains 309 test cases.
# Entity Title Description
1. Verify that the threat ids of the threat objects/entriesin the taxonomy file do not change after a softwareimage upgrade.
Verify that the threat ids of the threat objects/entriesin the taxonomy file do not change after a softwareimage upgrade.
2. Verify that threats may be deprecated, but shouldnever be deleted from the threat taxonomy file.
Verify that threats may be deprecated, but shouldnever be deleted from the threat taxonomy file(Thetotal number of entries/ threat objects in thethreat taxonomy file after a software image upgradecan only be equal or greater than the previousnumber).
3. Verify that the Global Threat Profile is set to defaultthreat profile object. Verify that the default threatprofile object gets automatically created and cannotbe deleted.
4. Verify that a threat profile object can be created andit is possible to create more than one threat profileobject
Also verify that more than one threat profileobject with the same name cannot be created.
5. Verify that a threat profile object can be edited.
6. Verify that a threat profile object can be deleted.
7. Verify filtering of search results for threat profileobjects
8. Verify that a threat profile object can be createdduring policy creation.
9. Verify Access Policy Threat Profile, User Created Use the same threat and try different settings onthe slider bar. Traffic should be allowed, denied orignored as expected.
10. Verify Multiple threat profiles attached to accesspolicies
3 different profiles, each attached to an accesspolicy. Run 3 different PCAPs and verifyallow/denied/ignored. Then change the slider bar ineach profile to cause the next action.
11. Verify Same Profile attached to multiple accesspolicies
3 different access policies with same threat profileattached. Run 3 different PCAPS and checkallowed/denied/ignored. Then change slider bar inthe profile to cause the next action.

Cisco Systems, Inc. Cisco ConfidentialPage 2 of 144
12. Verify Default Profile attached to access policies 2 access policies each with a different user createdthreat profile plus an any/any access policy withdefault threat profile attached. Run PCAPs andcheck allowed/denied/ignored. Then change asecond profile to also use the default profile.
13. Verify Worst Action is picked in the case of severalthreats firing at once.
Procedure:1. Configure a threat protection object withDeny/Alert boundary at 12.2. Enable Intrusion Protection at the device Level(and apply license if necessary).3. Pass pcap 22579-0.pcap (which has one threatwith score of 15 and another threat socre of 10)with wireplay.4. Edit the threat protection object and configure thealert/ignore boundary at 12.
Expected Result:1, 2 & 3. Verify the threat is detected in event tabfor Threats, and the event is an HTTP Deny.4. Verify the threat is detected, and the event is anHTTP Complete (a.k.a Alert)
14. Verify Multiple Exception Types in a Threat Profilein a Single access policy
In threat profile, have multiple exceptions of eachtype, and verify expected action for each threat
15. Verify Global Threat Profile set to Default ThreatProfile
Access policy with a threat profile configured,Global is left as default. Send a threat thatdoesn@t match the access policy. Global profileshould take effect since nothing in access policiesmatches. Then add more access policies whichwon@t match the threat & try again.
16. Verify Global threat Profile set to User CreatedProfile
Access policy with a threat profile configured,Global is set to a user created threat profile. Senda threat that doesn@t match the access policy.Global profile should take effect since nothing inaccess policies matches. Then add more accesspolicies which won@t match the threat & try again
17. Verify Threat Profile Configured for both AccessPolicy and Global; traffic matches Access policy.
Have a threat profile associated with one accesspolicy, and also a global threat profile. Traffic whichmatches the access policy should trigger on theaccess policy, not the global profile.
18. Verify Global threat profile takes effect with latestage matches on 2 Access policies with threatprofiles.
Pending match on 2 Access Policy Threat Profiles(matches on a later stage), then threat is identified,Global Profile should be used. Then multiple latestage Access Policies. Then change the action inthe Global Threat profile to the next action andverify it takes effect.
Cisco Systems, Inc. Cisco ConfidentialPage 3 of 144
19. Verify Access policies with threat profiles, #1matches in response body, #2 matches on sourceIP, and global profile defined.
Access policy matches in response body(application), #2 access policy matches Source IP.And there is global profile. Traffic going to the DestURL with a threat in the req URL (or req header orresponse header) should use Global threat profile. Note: The PCAPs which aren@t firing yet (in thebody) are the ones which should let us havepending matches on info in the body, such asdifferent layers of application type.
20. Verify Exceptions for a global threat profile (userdefined profile has exceptions)
Should alert, but entered in blocked (only). Shouldalert, but entered in None (only). Should alert, butentered in Alert (only) Should deny, but entered in alert (only).Should deny, but entered in None (only). Shoulddeny, but entered in Deny (only).
21. Verify threats with encoding in the http body,chunked
chunked-8010.pcapchunked.pcap
22. Verify threats with encoding in the http body,deflate.
deflate.pcap
23. Verify threats with encoding in the http body, gzip gzip-8888.pcapgzip.pcap
24. Verify threats with encoding in the http body, utf-7 utf-7.pcaputf-7-all.pcap
25. Verify threats with encoding in the http body, utf-8 utf-8.pcap
26. Verify threats with encoding in the http body, utf-16 utf-16be.pcaputf-16be-marker.pcaputf-16le.pcaputf-16le-marker.pcaputf-16le-marker-8000.pcaputf-16le-tcp-3128.pcaputf-16le-tcp-8080.pcap
27. Verify threats with encoding in the http body, utf-32 utf-32be.pcaputf-32be-marker.pcaputf-32le.pcaputf-32le-marker.pcap
28. Verify threats with encoding in the http body, morethan one encoding at once
chunked-gzip.pcaputf-7-chunked-gzip.pcaputf-16be-chunked.pcaputf-16be-chunked-24326.pcaputf-32le-chunked-gzip.pcap
29. Verify HTTP related threat events in Event ViewerDisplay.
Verify HTTP related threat events in Event ViewerDisplay (in the new Threat Defense View). Verifythreat events can be expanded and details seen.
30. Verify the threat events by switching between realtime and historic views.
31. Verify pause and play buttons on real time view forthreat events.
32. Verify threat events displayed within the selectedcustom time range.
Cisco Systems, Inc. Cisco ConfidentialPage 4 of 144
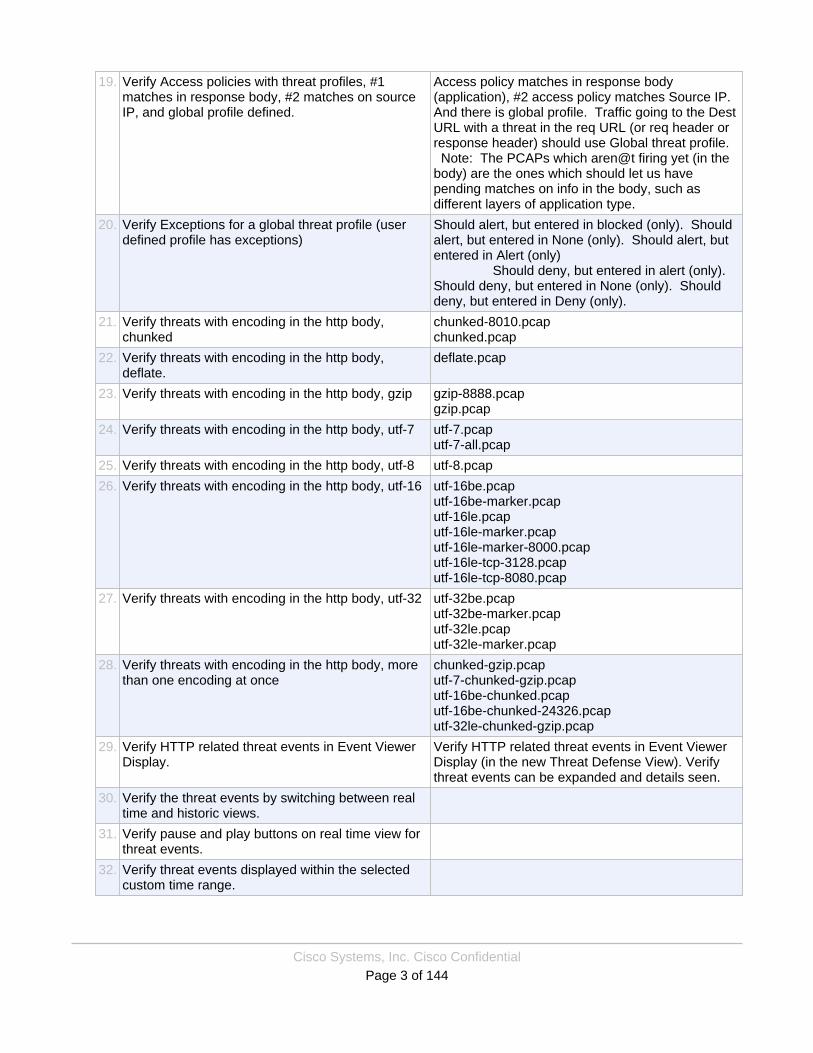
33. Verify creation,deletion and application of filteringfor threat events
34. Verify custom view creation by addiing the threatrelated columns to existing views
35. Verify the functionality of non threat related eventsin threat defense view in event viewer.
Generate some events with threats and someevents without threats and validate that the eventswithout threats are not seen in the threat defensetab.
36. Verify that the user is able edit an access policyand corresponding threat objects from the eventviewer.
37. Verify that a new tab named Threat Defense existsin the Devices page.
38. Verify that a drop down menu of threat profiles willbe available for the user to choose from, for theGlobal threat profile and a Submit button.
39. Verify that the user can pick any of the previouslyconfigured threat profiles, including the defaultthreat profile and None as the Global Threat profileand apply it.
40. Verify that the addition/deletion of a threat profileobject gets reflected in the available options forGlobal threat profile.
41. Verify that a fresh software install on the devicecomes with a pre-selected/enabled Global ThreatProfile.
42. Verify that the new attacker/victim fields arepopulated in the events when threats are detectedfrom the source/client.
Verify that the new attacker/victim fields (4 fields tovalidate: attacker, victim, attacker hostname, andvictim hostname) are populated in the events whenthreats are detected from the source/client.
43. Verify that the new attacker/victim fields arepopulated in the events when threats are detectedfrom the destination/server.
Verify that the new attacker/victim fields (4 fields tovalidate: attacker, victim, attacker hostname, andvictim hostname) are populated in the events whenthreats are detected from the destination/server.
To swap the attacker/victim fields in the events inevent viewer, go to/var/data/updater/threat_defense/td_http_sigs.xml,look for a pcap such as 1060 and change the<swap-attacker-victim> field to "true" from thedefault value of "false" and restart the services.
44. Verify that the new attacker/victim fields are notpopulated in the events when no threats aredetected.
Verify that the new attacker/victim fields (4 fields tovalidate: attacker, victim, attacker hostname, andvictim hostname) are not populated in the events inthreat defense view and all events view by addingthose columns when no threats are detected.
45. Verify that the new attacker/victim fields arepopulated in the TLS complete/Flow deny eventswhen TLS decryption is configured.
Verify that the new attacker/victim fields (4 fields tovalidate: attacker, victim, attacker hostname, andvictim hostname)are populated in the TLScomplete/Flow deny events when TLS decryption isenabled and a decryption policy is configured.

Cisco Systems, Inc. Cisco ConfidentialPage 5 of 144
46. Verify the functionality of full updates for threatprevention component when an update becomesavailable..
Verify the functionality of full updates for threatprevention component when an update becomesavailable. Check the event viewer for thecorresponding events in System Event View andthe updater_connector.log.
47. Verify the default behavior for threat preventionupdates.
Verify the default behavior for threat preventionupdates. (i.e., threat prevention component getupdated by default on a fresh software install on thedevice and when the user has not explicitlydisabled updates).
48. Verify the functionality when the user has explicitlydisabled threat prevention updates.
Verify the functionality when the user has explicitlydisabled threat prevention updates in the GUI byselecting "Never check" option for Updates in theDevice>>Updates page.
49. Verify the functionality of threat prevention updateswith traffic passing through the device.
Verify the functionality of threat prevention updateswith traffic running through falcon.
50. Verify the functionality of threat prevention updateswhen the device reloads in middle of updateprocess.
Verify the functionality of threat prevention updateswhen falcon reloads (or restart the services) inmiddle of update process.
51. Verify that the drill down page of Top Threats arepopulated accurately.
Verify that the drill down page of Top Threats arepopulated with Threats summary, Top Policies,TopAttackers and Top Victims dashlets and accurately.
52. Verify top threats reporting data changesaccordingly with different time ranges in the drilldown page.
Verify that reporting data for Top Threats changesaccordingly with different time ranges in the drilldown page.
53. Verify the navigation to event viewer from thedashlets in Top Threats drilldown page.
Verify the navigation to event viewer from from thedashlets (Top Policies, Top Attackers and TopVictims) in the Top Threats drilldown page.
54. Verify that traffic that Threat Prevention identifies asnot being of interest is not scanned by the scanner.
Verify that traffic that Threat Prevention identifies asnot being of interest is not scanned by the scanner. - Send some traffic/pcaps with magic/mime-typethat the engines have no signatures for, thru falconand set the logs to debug level. - Check logs to verify that threatdefense engines do not inspect the traffic and adebug message of the format "DEBUGScanners.HttpThreatProtectionPlugin - Skippingthreat scanning@due to nextStage mismatch" isseen.
55. Verify that traffic with magic/mime-type recognizedby threat prevention engines still gets scanned bythe scanner and threats generated accurately.
Verify that traffic with magic/mime-type recognizedby threat prevention engines still gets scanned bythe scanner and threats generated accurately.

Cisco Systems, Inc. Cisco ConfidentialPage 6 of 144
56. Verify threats in non-http-tcp (tls) traffic, accesspolicy.
Configure aggressive, alert only, and ignore allthreat profile objects.Configure access policy with threat aggressivethreat profile.Add cert used by stunnel as a root cert. Enabledecryption and configure a decryption policy thatdecrypts all tls traffic.Use stunnel and wireplay to replay a pcap of non-http-tcp traffic (tls) containing a threat. Verify thatthreats are scanned in tls_proxy.log (DEBUGLEVEL). Verify that threat events (Flow Deny) areseen in the threat defense events tab with threatfields filled in. Test several pcap files.
Change the access policy to use the alert onlythreat profile & replay the pcap. Verify scanningoccurs and that a TLS Complete event is seen withthreat fields filled in. Test several pcap files.
Change the access policy to use the ignore allthreat profile & replay the pcap. Verify scanningoccurs and that a TLS Complete event is seen onlyin the Context Aware tab with no threat fields filledin. Verify there is no event in the Threat Protectiontab. Test several pcap files.
57. Verify threats in non-http-tcp (tls) traffic usingGlobal threat profiles
Repeat above test case Txw1201278c, except usethe Global threat profile instead of an Access policy
58. Verify header de-obfuscation of percent encoding. Use wireplay to replay 5035-0_whisker_I1-M2.pcap. Verify threat fires.
59. Verify header de-obfuscation of reverse traversal. Use wireplay to replay 5035-0_whisker_I2-M2.pcap. Verify signature fires.
60. Verify header de-obfuscation of premature requestending.
Use wireplay to replay 5035-0_whisker_I3-M2.pcap. Check monocle log (at TRACE level) toensure full string was scanned.
61. Verify header de-obfuscation of long URL@s. Use netcat to send @GET /<~2000 character longstring>/../faxsurvey? HTTP/1.0. (Found in file2000ish_chars_long_url) Verify signature fires.
62. Verify header de-obfuscation of parameter hiding. Use wireplay to replay 5035-0_whisker_I5-M2.pcap. Verify signature fires
63. Verify header de-obfuscation of HTTP mis-encoding (tabs).
Use wireplay to replay 5035-0_whisker_I6-M2.pcap. Verify signature fires.
64. Verify header de-obfuscation of case sensitivity. Use wireplay to replay 5035-0_whisker_I7-M2.pcap. Verify signature fires.
65. Verify header de-obfuscation of windows \ delimiter. Use wireplay to replay 5035-0_whisker_I8-M2.pcap. Verify signature fires.
66. Verify header de-obfuscation of session splicing. Use wireplay to replay 5035-0_whisker_I9-M2.pcap. Verify signature fires
67. Verify header de-obfuscation of Microsoft %uencoding.
Use netcat to send @GET/%u0066axsurve%u0065yHTTP/1.0@<enter><enter> from the client. Verifysignature fires.
Cisco Systems, Inc. Cisco ConfidentialPage 7 of 144
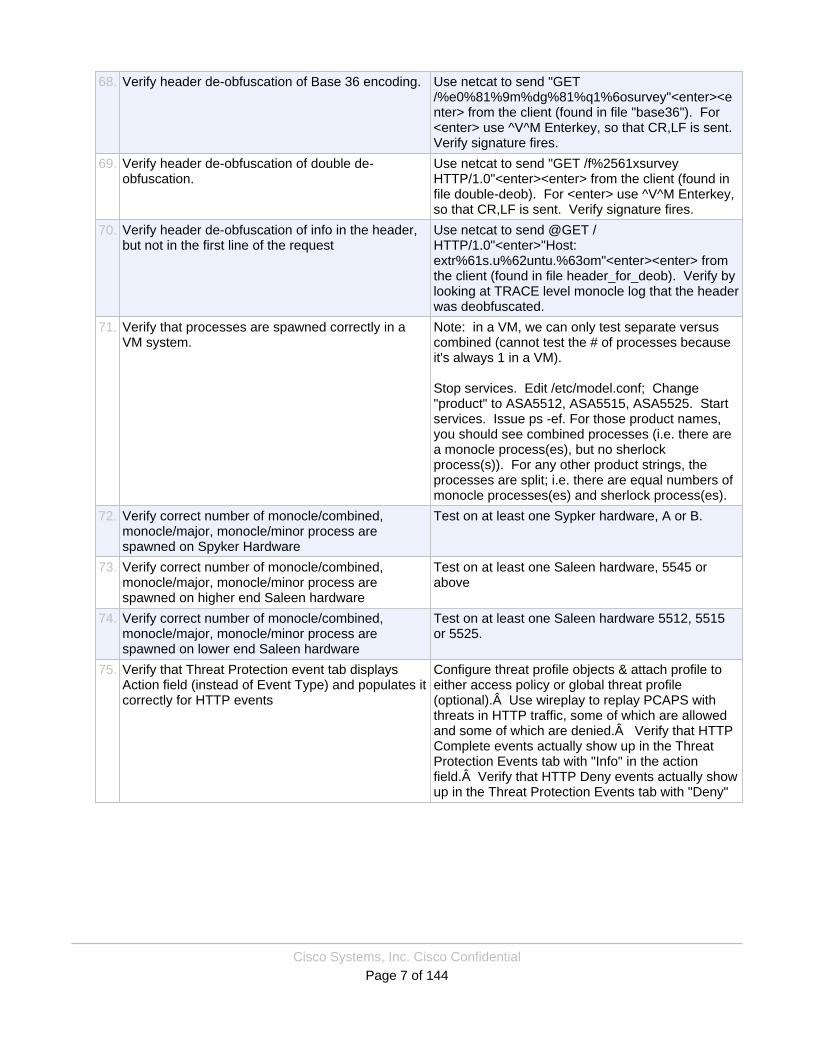
68. Verify header de-obfuscation of Base 36 encoding. Use netcat to send "GET/%e0%81%9m%dg%81%q1%6osurvey"<enter><enter> from the client (found in file "base36"). For<enter> use ^V^M Enterkey, so that CR,LF is sent.Verify signature fires.
69. Verify header de-obfuscation of double de-obfuscation.
Use netcat to send "GET /f%2561xsurveyHTTP/1.0"<enter><enter> from the client (found infile double-deob). For <enter> use ^V^M Enterkey,so that CR,LF is sent. Verify signature fires.
70. Verify header de-obfuscation of info in the header,but not in the first line of the request
Use netcat to send @GET /HTTP/1.0"<enter>"Host:extr%61s.u%62untu.%63om"<enter><enter> fromthe client (found in file header_for_deob). Verify bylooking at TRACE level monocle log that the headerwas deobfuscated.
71. Verify that processes are spawned correctly in aVM system.
Note: in a VM, we can only test separate versuscombined (cannot test the # of processes becauseit's always 1 in a VM).
Stop services. Edit /etc/model.conf; Change"product" to ASA5512, ASA5515, ASA5525. Startservices. Issue ps -ef. For those product names,you should see combined processes (i.e. there area monocle process(es), but no sherlockprocess(s)). For any other product strings, theprocesses are split; i.e. there are equal numbers ofmonocle processes(es) and sherlock process(es).
72. Verify correct number of monocle/combined,monocle/major, monocle/minor process arespawned on Spyker Hardware
Test on at least one Sypker hardware, A or B.
73. Verify correct number of monocle/combined,monocle/major, monocle/minor process arespawned on higher end Saleen hardware
Test on at least one Saleen hardware, 5545 orabove
74. Verify correct number of monocle/combined,monocle/major, monocle/minor process arespawned on lower end Saleen hardware
Test on at least one Saleen hardware 5512, 5515or 5525.
75. Verify that Threat Protection event tab displaysAction field (instead of Event Type) and populates itcorrectly for HTTP events
Configure threat profile objects & attach profile toeither access policy or global threat profile(optional). Use wireplay to replay PCAPS withthreats in HTTP traffic, some of which are allowedand some of which are denied. Verify that HTTPComplete events actually show up in the ThreatProtection Events tab with "Info" in the actionfield. Verify that HTTP Deny events actually showup in the Threat Protection Events tab with "Deny"
Cisco Systems, Inc. Cisco ConfidentialPage 8 of 144
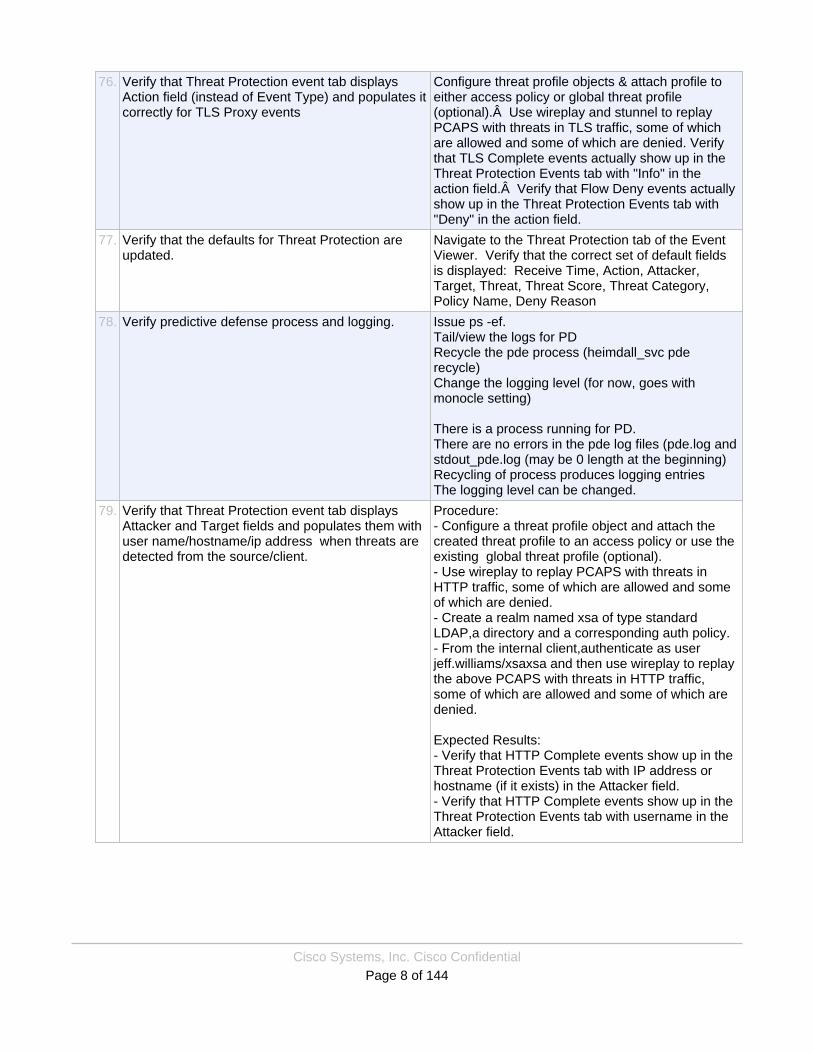
76. Verify that Threat Protection event tab displaysAction field (instead of Event Type) and populates itcorrectly for TLS Proxy events
Configure threat profile objects & attach profile toeither access policy or global threat profile(optional). Use wireplay and stunnel to replayPCAPS with threats in TLS traffic, some of whichare allowed and some of which are denied. Verifythat TLS Complete events actually show up in theThreat Protection Events tab with "Info" in theaction field. Verify that Flow Deny events actuallyshow up in the Threat Protection Events tab with"Deny" in the action field.
77. Verify that the defaults for Threat Protection areupdated.
Navigate to the Threat Protection tab of the EventViewer. Verify that the correct set of default fieldsis displayed: Receive Time, Action, Attacker,Target, Threat, Threat Score, Threat Category,Policy Name, Deny Reason
78. Verify predictive defense process and logging. Issue ps -ef.Tail/view the logs for PDRecycle the pde process (heimdall_svc pderecycle)Change the logging level (for now, goes withmonocle setting)
There is a process running for PD.There are no errors in the pde log files (pde.log andstdout_pde.log (may be 0 length at the beginning)Recycling of process produces logging entriesThe logging level can be changed.
79. Verify that Threat Protection event tab displaysAttacker and Target fields and populates them withuser name/hostname/ip address when threats aredetected from the source/client.
Procedure:- Configure a threat profile object and attach thecreated threat profile to an access policy or use theexisting global threat profile (optional).- Use wireplay to replay PCAPS with threats inHTTP traffic, some of which are allowed and someof which are denied.- Create a realm named xsa of type standardLDAP,a directory and a corresponding auth policy.- From the internal client,authenticate as userjeff.williams/xsaxsa and then use wireplay to replaythe above PCAPS with threats in HTTP traffic,some of which are allowed and some of which aredenied.
Expected Results:- Verify that HTTP Complete events show up in theThreat Protection Events tab with IP address orhostname (if it exists) in the Attacker field.- Verify that HTTP Complete events show up in theThreat Protection Events tab with username in theAttacker field.

Cisco Systems, Inc. Cisco ConfidentialPage 9 of 144
80. Verify that Threat Protection event tab displaysAttacker and Target fields and populates them withuser name/hostname/ip address when threats aredetected from the destination/server.
Procedure:- Configure a threat profile object and attach thecreated threat profile to an access policy or use theexisting global threat profile (optional).- To originate the threats from destination/server,go to/var/data/updater/threat_defense/sigs/td_http_sigs.xml and change swap-attacker-victim flag to trueinstead of false and restart the services.Usewireplay to replay PCAPS with threats in HTTPtraffic, some of which are allowed and some ofwhich are denied.- Create a realm named xsa of type standardLDAP,a directory and a corresponding auth policy.- From the internal client,authenticate as userjeff.williams/xsaxsa and then use wireplay to replaythe above PCAPS with threats in HTTP traffic,some of which are allowed and some of which aredenied.
Expected Results:- Verify that HTTP Complete events show up in theThreat Protection Events tab with IP address orhostname (if it exists) in the Target field.- Verify that HTTP Complete events show up in theThreat Protection Events tab with username in theTarget field.

Cisco Systems, Inc. Cisco ConfidentialPage 10 of 144
81. Verify that the Attacker/Target dashlets in theThreat protection report are accurately populatedwith user name/hostname/ipaddress.
Procedure:- Configure a threat profile object and attach thecreated threat profile to an access policy or use theexisting global threat profile (optional).- Use wireplay to replay PCAPS with threats inHTTP traffic, some of which are allowed and someof which are denied.- Create a realm named xsa of type standardLDAP,a directory and a corresponding auth policy.- From the internal client,authenticate as userjeff.williams/xsaxsa and then use wireplay to replaythe above PCAPS with threats in HTTP traffic,some of which are allowed and some of which aredenied. - To originate the threats fromdestination/server, go to/var/data/updater/threat_defense/sigs/td_http_sigs.xml and change swap-attacker-victim flag to trueinstead of false and restart the services. ReplayPCAPS using wire play with threats in HTTP traffic,some of which are allowed and some of which aredenied.
Expected Results:- Verify that the Top Attackers dashlet in ThreatPrevention report landing page is populatedcorrectly with IP address or hostname (if it exists).- Verify that the Top Attackers dashlet in ThreatPrevention report landing page is populatedcorrectly with username.- Verify that the Top Targets dashlet in ThreatPrevention report landing page is populatedcorrectly with username.
82. Verify threats in non-http-tcp, non-tls traffic (but stilltcp) access policy.
Configure aggressive, alert only and ignore allthreat profile objects.Configure access policy with threat aggressivethreat profile.Use wireplay to replay a pcap of non-http-tcp, non-tls (but still tcp) traffic containing a threat.Verify that threat events ( Deny) are seen in thethreat defense events tab with threat fields filled in.Test several pcap files.Change the access policy to use the alert onlythreat profile & replay the pcap. Verify scanningoccurs and that an Info Action is seen with threatfields filled in. Test several pcap files.
Change the access policy to use the ignore allthreat profile & replay the pcap. Verify scanningoccurs and that a Flow Complete event is seenonly in the Context Aware tab with no threat fieldsfilled in. Verify there is no event in the ThreatProtection tab. Test several pcap files.

Cisco Systems, Inc. Cisco ConfidentialPage 11 of 144
83. Verify threats in non-http-tcp, non-tls (but still tcp)traffic using Global threat profiles
Repeat above test case Txw1363273c, except usethe Global threat profile instead of an Access policy
84. Verify threats in http traffic, access policy. Configure aggressive, alert only and ignore allthreat profile objects.Configure access policy with threat aggressivethreat profile.Use wireplay to replay a pcap of http trafficcontaining a threat.Verify that threat events ( Deny) are seen in thethreat defense events tab with threat fields filled in.Test several pcap files.Change the access policy to use the alert onlythreat profile & replay the pcap. Verify scanningoccurs and that an Info Action is seen with threatfields filled in. Test several pcap files.
Change the access policy to use the ignore allthreat profile & replay the pcap. Verify scanningoccurs and that an HTTP Complete event is seenonly in the Context Aware tab with no threat fieldsfilled in. Verify there is no event in the ThreatProtection tab. Test several pcap files.
85. Verify threats in http traffic using Global threatprofiles
Repeat above test case Txw1363277c, except usethe Global threat profile instead of an Access policy

Cisco Systems, Inc. Cisco ConfidentialPage 12 of 144
86. Verify that the Top attackers dashlet in the ThreatProtection report are accurately populated.
Procedure:- Configure a threat profile object and attach thecreated threat profile to an access policy or use theexisting global threat profile (optional).- Use wireplay to replay PCAPS with threats inHTTP traffic, some of which are allowed and someof which are denied.- Create a realm named xsa of type standardLDAP,a directory and a corresponding auth policy.- From the internal client,authenticate as userjeff.williams/xsaxsa and then use wireplay to replaythe above PCAPS with threats in HTTP traffic,some of which are allowed and some of which aredenied.- To originate the threats from destination/server,go to/var/data/updater/threat_defense/sigs/td_http_sigs.xmland change swap-attacker-victim flag to trueinstead of false and restart the services. ReplayPCAPS using wire play with threats in HTTP traffic,some of which are allowed and some of which aredenied.- Click on Transactions and Data Usage tabs in theTop attackers dashlet.- Click on the available options for Transactions pulldown menu in the Top attackers dashlet.- Select different options available in the TimeRange pull down menu in the Threat Protectionreport landing page.
Expected Results:- Verify that the Top Attackers dashlet in ThreatPrevention report landing page is populatedcorrectly with IP address or hostname (if it exists).- Verify that the Top Attackers dashlet in ThreatPrevention report landing page is populatedcorrectly with username.- Verify that the Top Targets dashlet in ThreatPrevention report landing page is populatedcorrectly with username.- Verify that the report data changes accordinglyand accurately with the selection of Transactionsand Data Usage tabs in the Top Attackers dashlet.- Verify that the report data changes accordinglyand accurately with the selection of All, Denied andAllowed for Transactions pull down menu Top Attackers dashlet.- Verify that the reporting data in the Top attackersdashlet changes accordingly with different timeranges.

Cisco Systems, Inc. Cisco ConfidentialPage 13 of 144
87. Verify the drill down functionality for report datafrom Top Attackers dashlet in Threat Protectionreport landing page.
Procedure:- Configure a threat profile object and attach thecreated threat profile to an access policy or use theexisting global threat profile (optional).- Use wireplay to replay PCAPS with threats inHTTP traffic, some of which are allowed and someof which are denied.- Click on the ipaddress/username/username/graphical bar in theTop attackers dashlet.- Use wireplay to replay PCAPS with threats inHTTP traffic, some of which are allowed and someof which are denied.- Click on Transactions and Data Usage tabs ineach of the dashlets.- Click on the available options for Transactions pulldown menu in each of the dash lets in the drilldown page.- Select different options available in the TimeRange pull down menu in the Top Attackers drilldown page.
Expected Results:- Verify that the Top attackers dashlet in ThreatPrevention report landing page is populatedcorrectly with IP address or hostname or username(if it exists).- Verify that the drill down page specific to theattacker is displayed. Verify that the drill downreport page is populated with Attackers summary,Policies detecting maximum threats,Top Targetsand Threats dash lets and and accurately.- Verify that the report data changes accordinglyand accurately with the selection of Transactionsand Data Usage tabs in each of the dash lets in the drill down page.- Verify that the report data changes accordinglyand accurately with the selection of All,Denied and Allowed options forTransactions in each of the dash lets in the drilldown page.- Verify that the reporting data in the drill downpage changes accordingly with different timeranges in all the dash lets.
Cisco Systems, Inc. Cisco ConfidentialPage 14 of 144
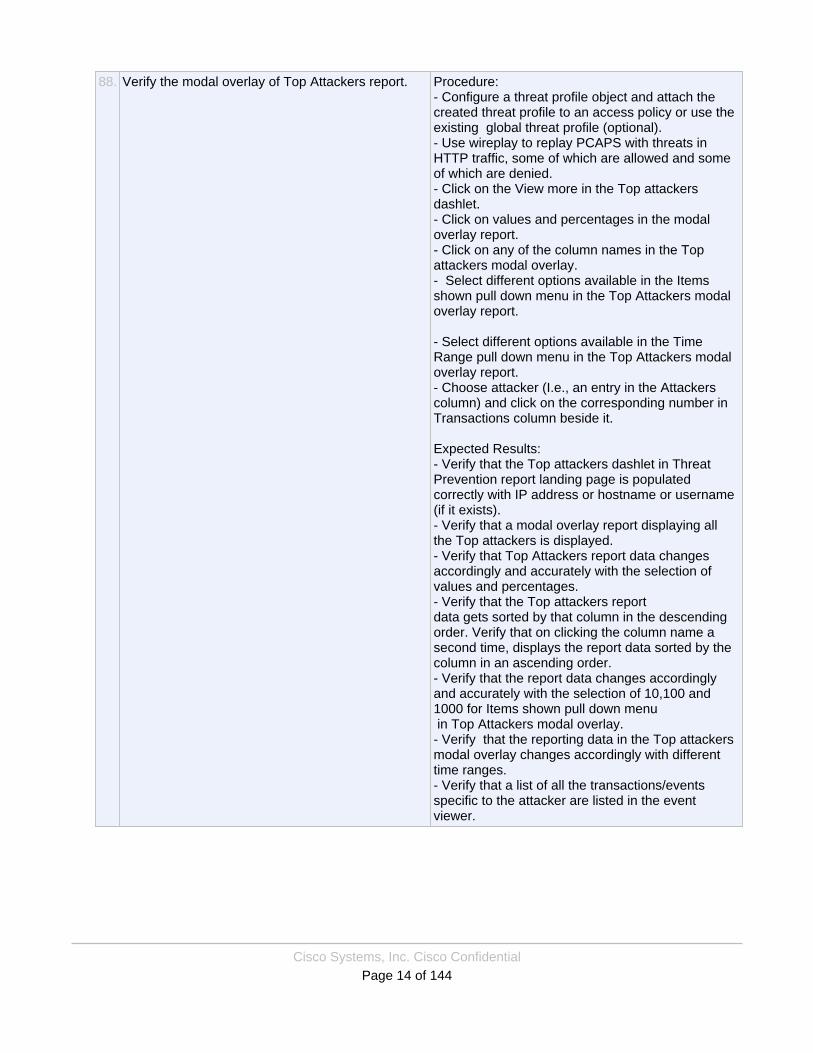
88. Verify the modal overlay of Top Attackers report. Procedure:- Configure a threat profile object and attach thecreated threat profile to an access policy or use theexisting global threat profile (optional).- Use wireplay to replay PCAPS with threats inHTTP traffic, some of which are allowed and someof which are denied.- Click on the View more in the Top attackersdashlet.- Click on values and percentages in the modaloverlay report.- Click on any of the column names in the Topattackers modal overlay.- Select different options available in the Itemsshown pull down menu in the Top Attackers modaloverlay report.
- Select different options available in the TimeRange pull down menu in the Top Attackers modaloverlay report.- Choose attacker (I.e., an entry in the Attackerscolumn) and click on the corresponding number inTransactions column beside it.
Expected Results:- Verify that the Top attackers dashlet in ThreatPrevention report landing page is populatedcorrectly with IP address or hostname or username(if it exists).- Verify that a modal overlay report displaying allthe Top attackers is displayed.- Verify that Top Attackers report data changesaccordingly and accurately with the selection ofvalues and percentages.- Verify that the Top attackers reportdata gets sorted by that column in the descendingorder. Verify that on clicking the column name asecond time, displays the report data sorted by thecolumn in an ascending order.- Verify that the report data changes accordinglyand accurately with the selection of 10,100 and1000 for Items shown pull down menu in Top Attackers modal overlay.- Verify that the reporting data in the Top attackersmodal overlay changes accordingly with differenttime ranges.- Verify that a list of all the transactions/eventsspecific to the attacker are listed in the eventviewer.
Cisco Systems, Inc. Cisco ConfidentialPage 15 of 144
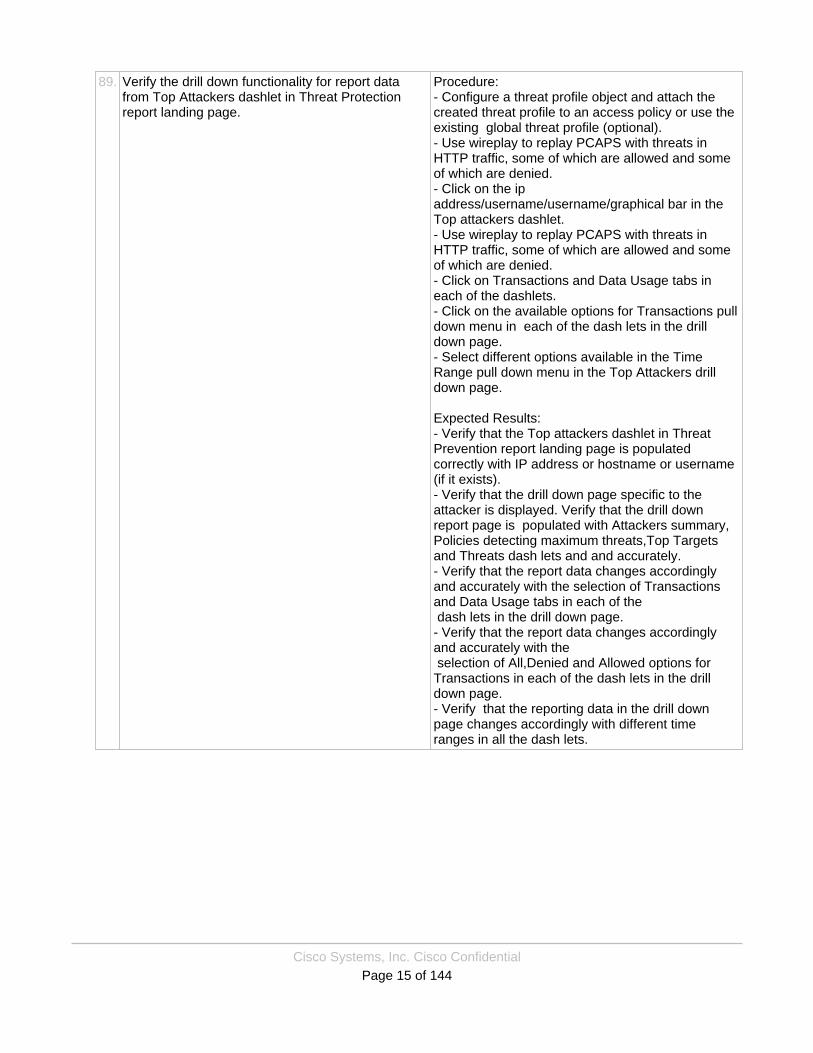
89. Verify the drill down functionality for report datafrom Top Attackers dashlet in Threat Protectionreport landing page.
Procedure:- Configure a threat profile object and attach thecreated threat profile to an access policy or use theexisting global threat profile (optional).- Use wireplay to replay PCAPS with threats inHTTP traffic, some of which are allowed and someof which are denied.- Click on the ipaddress/username/username/graphical bar in theTop attackers dashlet.- Use wireplay to replay PCAPS with threats inHTTP traffic, some of which are allowed and someof which are denied.- Click on Transactions and Data Usage tabs ineach of the dashlets.- Click on the available options for Transactions pulldown menu in each of the dash lets in the drilldown page.- Select different options available in the TimeRange pull down menu in the Top Attackers drilldown page.
Expected Results:- Verify that the Top attackers dashlet in ThreatPrevention report landing page is populatedcorrectly with IP address or hostname or username(if it exists).- Verify that the drill down page specific to theattacker is displayed. Verify that the drill downreport page is populated with Attackers summary,Policies detecting maximum threats,Top Targetsand Threats dash lets and and accurately.- Verify that the report data changes accordinglyand accurately with the selection of Transactionsand Data Usage tabs in each of the dash lets in the drill down page.- Verify that the report data changes accordinglyand accurately with the selection of All,Denied and Allowed options forTransactions in each of the dash lets in the drilldown page.- Verify that the reporting data in the drill downpage changes accordingly with different timeranges in all the dash lets.

Cisco Systems, Inc. Cisco ConfidentialPage 16 of 144
90. Verify the modal overlay of Top Attackers report. Procedure:- Configure a threat profile object and attach thecreated threat profile to an access policy or use theexisting global threat profile (optional).- Use wireplay to replay PCAPS with threats inHTTP traffic, some of which are allowed and someof which are denied.- Click on the View more in the Top attackersdashlet.- Click on values and percentages in the modaloverlay report.- Click on any of the column names in the Topattackers modal overlay.- Select different options available in the Itemsshown pull down menu in the Top Attackers modaloverlay report.
- Select different options available in the TimeRange pull down menu in the Top Attackers modaloverlay report.- Choose attacker (I.e., an entry in the Attackerscolumn) and click on the corresponding number inTransactions column beside it.
Expected Results:- Verify that the Top attackers dashlet in ThreatPrevention report landing page is populatedcorrectly with IP address or hostname or username(if it exists).- Verify that a modal overlay report displaying allthe Top attackers is displayed.- Verify that Top Attackers report data changesaccordingly and accurately with the selection ofvalues and percentages.- Verify that the Top attackers reportdata gets sorted by that column in the descendingorder. Verify that on clicking the column name asecond time, displays the report data sorted by thecolumn in an ascending order.- Verify that the report data changes accordinglyand accurately with the selection of 10,100 and1000 for Items shown pull down menu in Top Attackers modal overlay.- Verify that the reporting data in the Top attackersmodal overlay changes accordingly with differenttime ranges.- Verify that a list of all the transactions/eventsspecific to the attacker are listed in the eventviewer.
Cisco Systems, Inc. Cisco ConfidentialPage 17 of 144
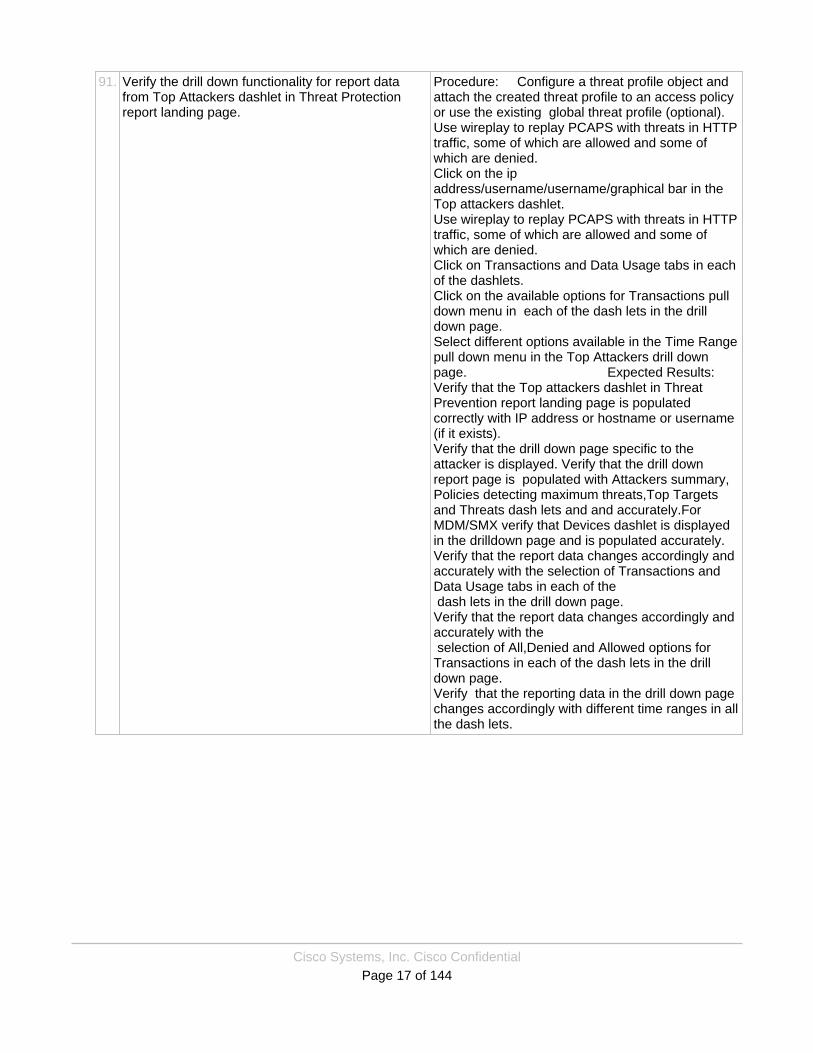
91. Verify the drill down functionality for report datafrom Top Attackers dashlet in Threat Protectionreport landing page.
Procedure: Configure a threat profile object andattach the created threat profile to an access policyor use the existing global threat profile (optional).Use wireplay to replay PCAPS with threats in HTTPtraffic, some of which are allowed and some ofwhich are denied.Click on the ipaddress/username/username/graphical bar in theTop attackers dashlet.Use wireplay to replay PCAPS with threats in HTTPtraffic, some of which are allowed and some ofwhich are denied.Click on Transactions and Data Usage tabs in eachof the dashlets.Click on the available options for Transactions pulldown menu in each of the dash lets in the drilldown page.Select different options available in the Time Rangepull down menu in the Top Attackers drill downpage. Expected Results:Verify that the Top attackers dashlet in ThreatPrevention report landing page is populatedcorrectly with IP address or hostname or username(if it exists).Verify that the drill down page specific to theattacker is displayed. Verify that the drill downreport page is populated with Attackers summary,Policies detecting maximum threats,Top Targetsand Threats dash lets and and accurately.ForMDM/SMX verify that Devices dashlet is displayedin the drilldown page and is populated accurately.Verify that the report data changes accordingly andaccurately with the selection of Transactions andData Usage tabs in each of the dash lets in the drill down page.Verify that the report data changes accordingly andaccurately with the selection of All,Denied and Allowed options forTransactions in each of the dash lets in the drilldown page.Verify that the reporting data in the drill down pagechanges accordingly with different time ranges in allthe dash lets.
Cisco Systems, Inc. Cisco ConfidentialPage 18 of 144
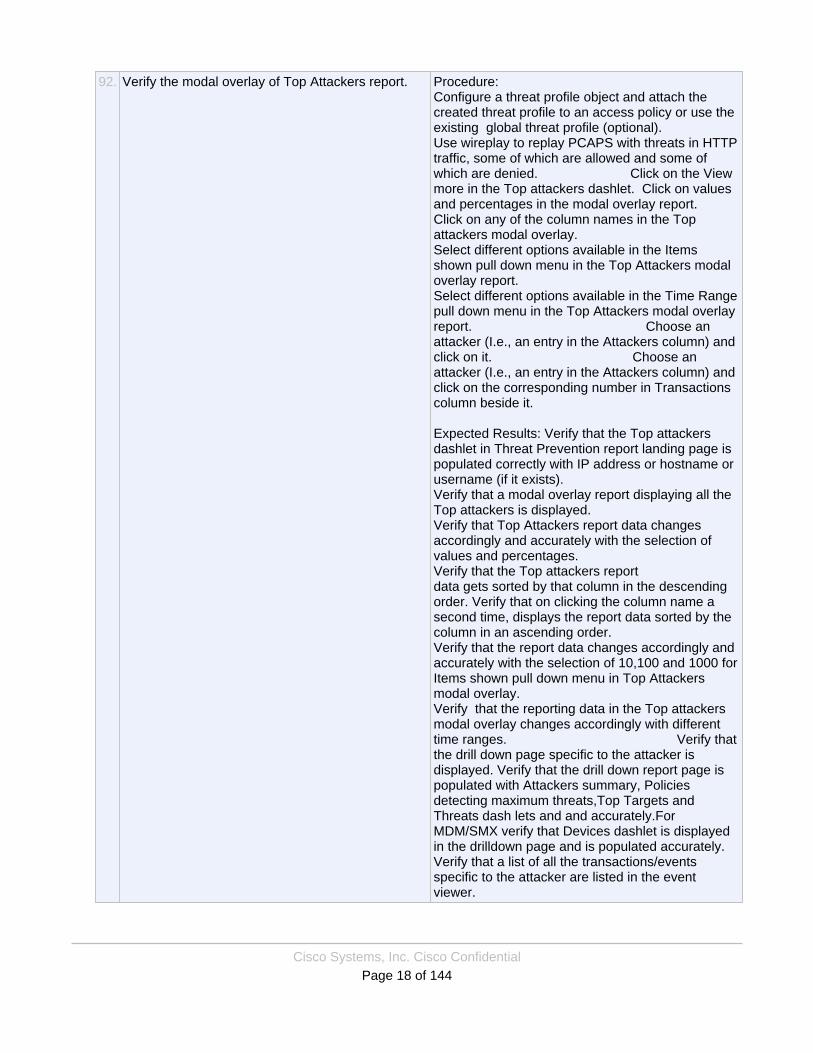
92. Verify the modal overlay of Top Attackers report. Procedure:Configure a threat profile object and attach thecreated threat profile to an access policy or use theexisting global threat profile (optional).Use wireplay to replay PCAPS with threats in HTTPtraffic, some of which are allowed and some ofwhich are denied. Click on the Viewmore in the Top attackers dashlet. Click on valuesand percentages in the modal overlay report.Click on any of the column names in the Topattackers modal overlay.Select different options available in the Itemsshown pull down menu in the Top Attackers modaloverlay report.Select different options available in the Time Rangepull down menu in the Top Attackers modal overlayreport. Choose anattacker (I.e., an entry in the Attackers column) andclick on it. Choose anattacker (I.e., an entry in the Attackers column) andclick on the corresponding number in Transactionscolumn beside it.
Expected Results: Verify that the Top attackersdashlet in Threat Prevention report landing page ispopulated correctly with IP address or hostname orusername (if it exists).Verify that a modal overlay report displaying all theTop attackers is displayed.Verify that Top Attackers report data changesaccordingly and accurately with the selection ofvalues and percentages.Verify that the Top attackers reportdata gets sorted by that column in the descendingorder. Verify that on clicking the column name asecond time, displays the report data sorted by thecolumn in an ascending order.Verify that the report data changes accordingly andaccurately with the selection of 10,100 and 1000 forItems shown pull down menu in Top Attackersmodal overlay.Verify that the reporting data in the Top attackersmodal overlay changes accordingly with differenttime ranges. Verify thatthe drill down page specific to the attacker isdisplayed. Verify that the drill down report page ispopulated with Attackers summary, Policiesdetecting maximum threats,Top Targets andThreats dash lets and and accurately.ForMDM/SMX verify that Devices dashlet is displayedin the drilldown page and is populated accurately.Verify that a list of all the transactions/eventsspecific to the attacker are listed in the eventviewer.

Cisco Systems, Inc. Cisco ConfidentialPage 19 of 144
93. Verify that we can skip scanning traffic for threatsbased on the NBAR verdict (bittorrent)
Tail the Sherlock log file (at DEBUG level; currentlyfollows HTTP). Default configuration is fine. Passa pcap containing bittorrent traffic
Verify a single copy of a message along the lines of"Skipping threat scanning of body. BAVC verdict:1022" is seen in the log. Also verify the message"Not submitting event: event was sent back to dataplane" is seen. Verify that a Flow Completemessage is seen in the Context Aware Security tabof the Event Viewer.
94. Verify Threat protection Overall view is displayedproperly
Threat Protection page shows all necessarydashlets properly and all links work properly
95. Generate Report Verify that you can generate a report when clickingon Generate report
96. Time range reports proper threat defense alarms Verify that the proper report generated showing theproper threat defense components based onprovided time range
97. Clicking on different links in Dashlets Verify that all the links in the dashlets work properlyand that proper information is displayed.
98. Policies detecting maximum threats Verify that the maximum threats works properly
99. Policies dashlet Verify that the Policies dashlet report the properthreats
100.
Data Usage in Policies dashlet verify Data usage in the Policies dashlet worksproperly.
101.
Top attackers Dashlet Verify Top attackers dashlet in Threat Protectionpage works properly.
102.
Top attackers drop down list Verify that the Top attackers drop down list worksproperly
103.
View More in Top attacker dashlet Verify that the View More button in Top attackerworks properly
104.
data usage in Top attackers dashlet Verify that the Data usage button is workingproperly in top Attackers dashlet.
105.
Top target dashlet Verify that the Top target dashlet is workingproperly.
106.
Top target dashlet functionality Verify that the Top target dashlet components andlinks work properly
107.
Data usage in Top target Verify that Data usage works properly in Top target
108.
Threats Verify that threats are displayed properly
109.
Top threats Verify that top threats works properly
110.
Top threats Verify that top threats works properly
Cisco Systems, Inc. Cisco ConfidentialPage 20 of 144
111.
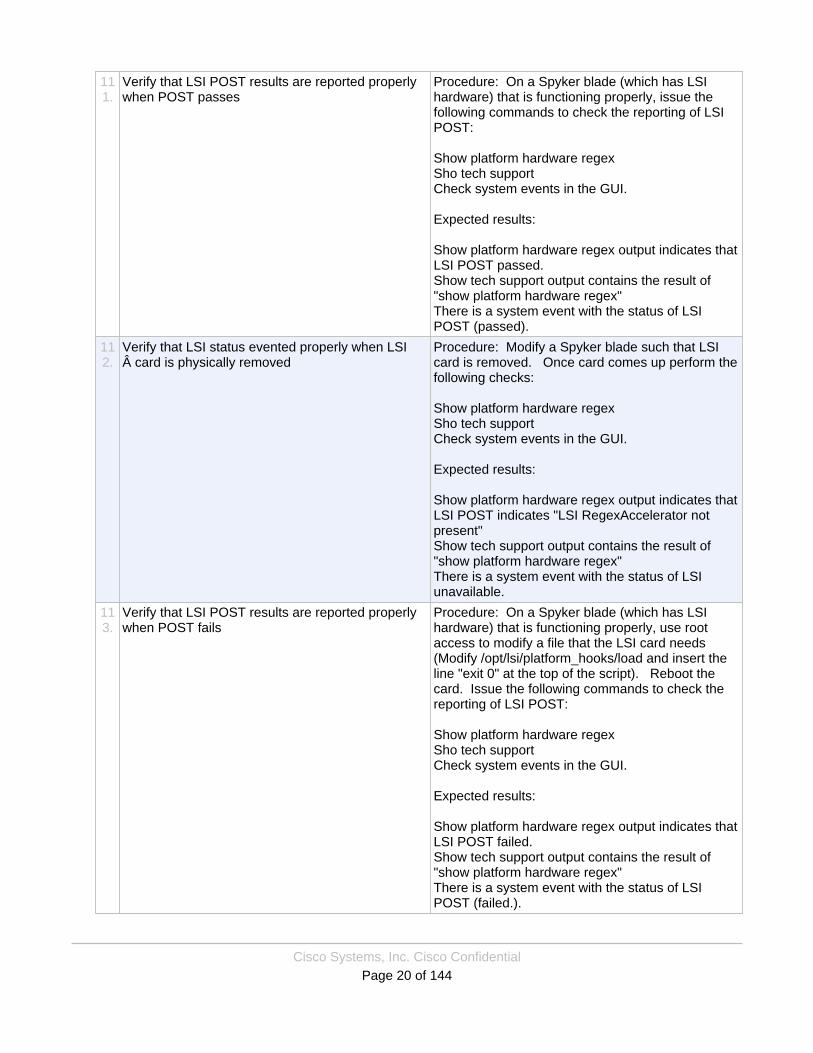
Verify that LSI POST results are reported properlywhen POST passes
Procedure: On a Spyker blade (which has LSIhardware) that is functioning properly, issue thefollowing commands to check the reporting of LSIPOST:
Show platform hardware regexSho tech supportCheck system events in the GUI.
Expected results:
Show platform hardware regex output indicates thatLSI POST passed.Show tech support output contains the result of"show platform hardware regex"There is a system event with the status of LSIPOST (passed).
112.
Verify that LSI status evented properly when LSIÂ card is physically removed
Procedure: Modify a Spyker blade such that LSIcard is removed. Once card comes up perform thefollowing checks:
Show platform hardware regexSho tech supportCheck system events in the GUI.
Expected results:
Show platform hardware regex output indicates thatLSI POST indicates "LSI RegexAccelerator notpresent"Show tech support output contains the result of"show platform hardware regex"There is a system event with the status of LSIunavailable.
113.
Verify that LSI POST results are reported properlywhen POST fails
Procedure: On a Spyker blade (which has LSIhardware) that is functioning properly, use rootaccess to modify a file that the LSI card needs(Modify /opt/lsi/platform_hooks/load and insert theline "exit 0" at the top of the script). Reboot thecard. Issue the following commands to check thereporting of LSI POST:
Show platform hardware regexSho tech supportCheck system events in the GUI.
Expected results:
Show platform hardware regex output indicates thatLSI POST failed.Show tech support output contains the result of"show platform hardware regex"There is a system event with the status of LSIPOST (failed.).
Cisco Systems, Inc. Cisco ConfidentialPage 21 of 144
114.
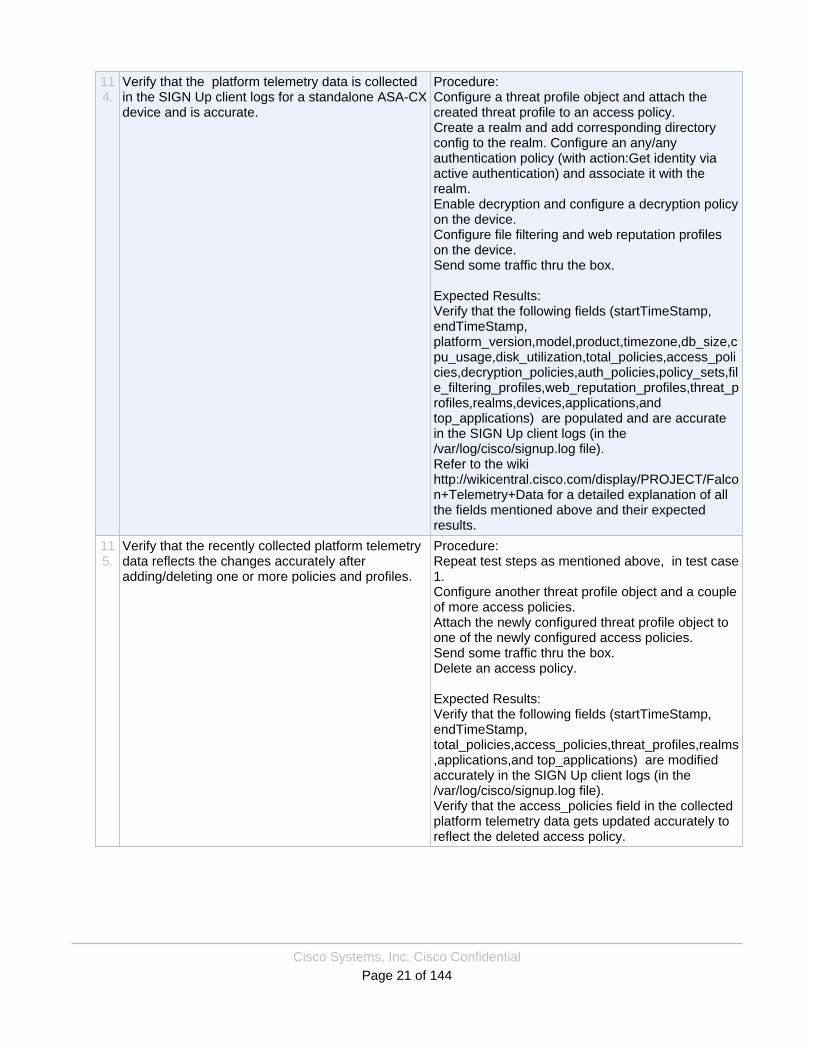
Verify that the platform telemetry data is collectedin the SIGN Up client logs for a standalone ASA-CXdevice and is accurate.
Procedure:Configure a threat profile object and attach thecreated threat profile to an access policy.Create a realm and add corresponding directoryconfig to the realm. Configure an any/anyauthentication policy (with action:Get identity viaactive authentication) and associate it with therealm.Enable decryption and configure a decryption policyon the device.Configure file filtering and web reputation profileson the device.Send some traffic thru the box.
Expected Results:Verify that the following fields (startTimeStamp,endTimeStamp,platform_version,model,product,timezone,db_size,cpu_usage,disk_utilization,total_policies,access_policies,decryption_policies,auth_policies,policy_sets,file_filtering_profiles,web_reputation_profiles,threat_profiles,realms,devices,applications,andtop_applications) are populated and are accuratein the SIGN Up client logs (in the/var/log/cisco/signup.log file).Refer to the wikihttp://wikicentral.cisco.com/display/PROJECT/Falcon+Telemetry+Data for a detailed explanation of allthe fields mentioned above and their expectedresults.
115.
Verify that the recently collected platform telemetrydata reflects the changes accurately afteradding/deleting one or more policies and profiles.
Procedure:Repeat test steps as mentioned above, in test case1.Configure another threat profile object and a coupleof more access policies.Attach the newly configured threat profile object toone of the newly configured access policies.Send some traffic thru the box.Delete an access policy.
Expected Results:Verify that the following fields (startTimeStamp,endTimeStamp,total_policies,access_policies,threat_profiles,realms,applications,and top_applications) are modifiedaccurately in the SIGN Up client logs (in the/var/log/cisco/signup.log file).Verify that the access_policies field in the collectedplatform telemetry data gets updated accurately toreflect the deleted access policy.
Cisco Systems, Inc. Cisco ConfidentialPage 22 of 144
116.
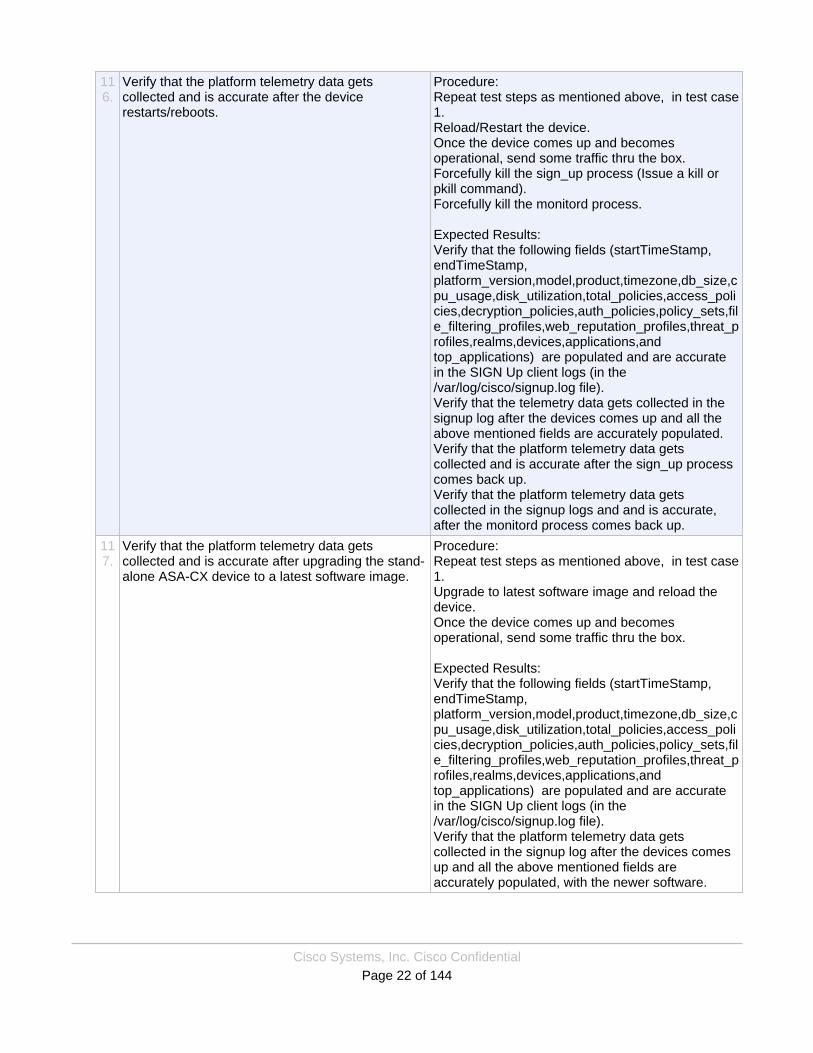
Verify that the platform telemetry data getscollected and is accurate after the devicerestarts/reboots.
Procedure:Repeat test steps as mentioned above, in test case1.Reload/Restart the device.Once the device comes up and becomesoperational, send some traffic thru the box.Forcefully kill the sign_up process (Issue a kill orpkill command).Forcefully kill the monitord process.
Expected Results:Verify that the following fields (startTimeStamp,endTimeStamp,platform_version,model,product,timezone,db_size,cpu_usage,disk_utilization,total_policies,access_policies,decryption_policies,auth_policies,policy_sets,file_filtering_profiles,web_reputation_profiles,threat_profiles,realms,devices,applications,andtop_applications) are populated and are accuratein the SIGN Up client logs (in the/var/log/cisco/signup.log file).Verify that the telemetry data gets collected in thesignup log after the devices comes up and all theabove mentioned fields are accurately populated.Verify that the platform telemetry data getscollected and is accurate after the sign_up processcomes back up.Verify that the platform telemetry data getscollected in the signup logs and and is accurate,after the monitord process comes back up.
117.
Verify that the platform telemetry data getscollected and is accurate after upgrading the stand-alone ASA-CX device to a latest software image.
Procedure:Repeat test steps as mentioned above, in test case1.Upgrade to latest software image and reload thedevice.Once the device comes up and becomesoperational, send some traffic thru the box.
Expected Results:Verify that the following fields (startTimeStamp,endTimeStamp,platform_version,model,product,timezone,db_size,cpu_usage,disk_utilization,total_policies,access_policies,decryption_policies,auth_policies,policy_sets,file_filtering_profiles,web_reputation_profiles,threat_profiles,realms,devices,applications,andtop_applications) are populated and are accuratein the SIGN Up client logs (in the/var/log/cisco/signup.log file).Verify that the platform telemetry data getscollected in the signup log after the devices comesup and all the above mentioned fields areaccurately populated, with the newer software.
Cisco Systems, Inc. Cisco ConfidentialPage 23 of 144
118.
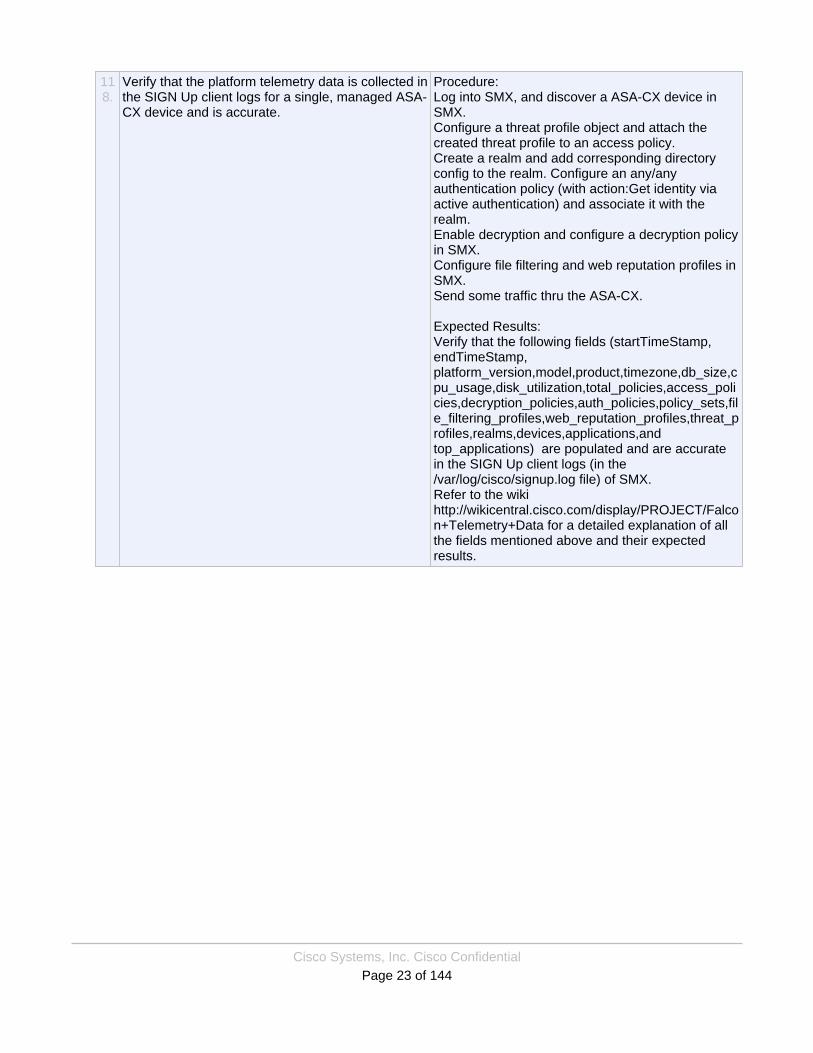
Verify that the platform telemetry data is collected inthe SIGN Up client logs for a single, managed ASA-CX device and is accurate.
Procedure:Log into SMX, and discover a ASA-CX device inSMX.Configure a threat profile object and attach thecreated threat profile to an access policy.Create a realm and add corresponding directoryconfig to the realm. Configure an any/anyauthentication policy (with action:Get identity viaactive authentication) and associate it with therealm.Enable decryption and configure a decryption policyin SMX.Configure file filtering and web reputation profiles inSMX.Send some traffic thru the ASA-CX.
Expected Results:Verify that the following fields (startTimeStamp,endTimeStamp,platform_version,model,product,timezone,db_size,cpu_usage,disk_utilization,total_policies,access_policies,decryption_policies,auth_policies,policy_sets,file_filtering_profiles,web_reputation_profiles,threat_profiles,realms,devices,applications,andtop_applications) are populated and are accuratein the SIGN Up client logs (in the/var/log/cisco/signup.log file) of SMX.Refer to the wikihttp://wikicentral.cisco.com/display/PROJECT/Falcon+Telemetry+Data for a detailed explanation of allthe fields mentioned above and their expectedresults.
Cisco Systems, Inc. Cisco ConfidentialPage 24 of 144
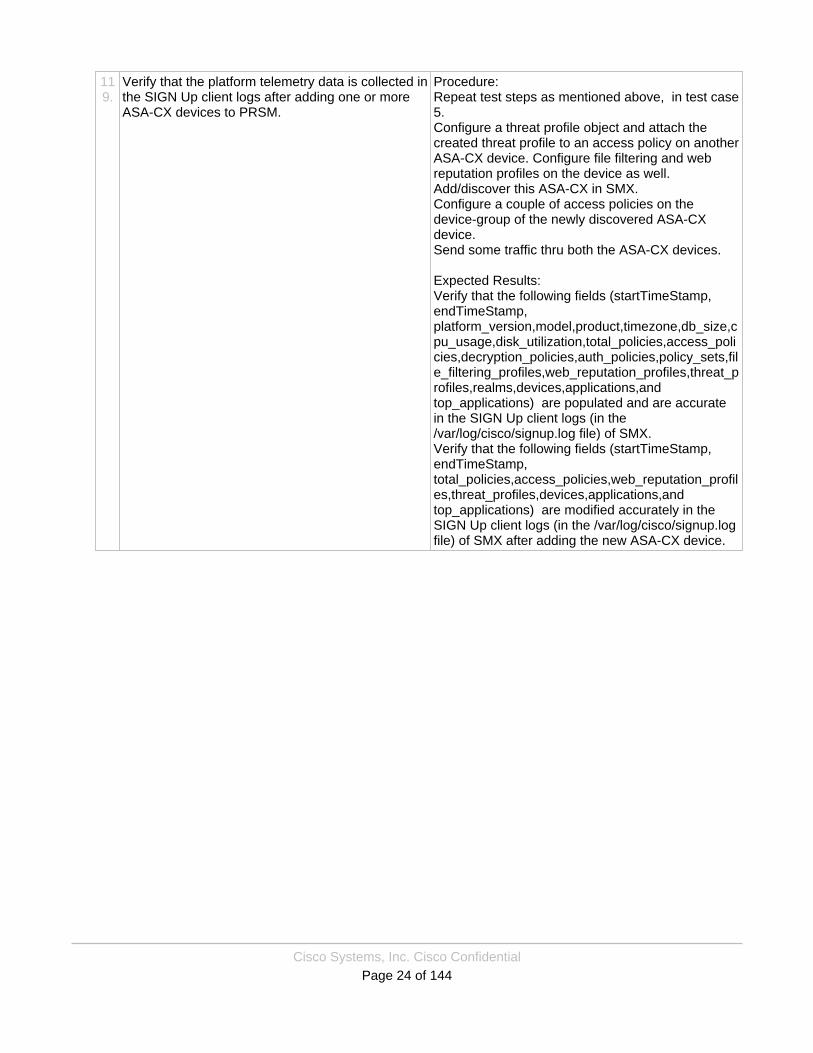
119.
Verify that the platform telemetry data is collected inthe SIGN Up client logs after adding one or moreASA-CX devices to PRSM.
Procedure:Repeat test steps as mentioned above, in test case5.Configure a threat profile object and attach thecreated threat profile to an access policy on anotherASA-CX device. Configure file filtering and webreputation profiles on the device as well.Add/discover this ASA-CX in SMX.Configure a couple of access policies on thedevice-group of the newly discovered ASA-CXdevice.Send some traffic thru both the ASA-CX devices.
Expected Results:Verify that the following fields (startTimeStamp,endTimeStamp,platform_version,model,product,timezone,db_size,cpu_usage,disk_utilization,total_policies,access_policies,decryption_policies,auth_policies,policy_sets,file_filtering_profiles,web_reputation_profiles,threat_profiles,realms,devices,applications,andtop_applications) are populated and are accuratein the SIGN Up client logs (in the/var/log/cisco/signup.log file) of SMX.Verify that the following fields (startTimeStamp,endTimeStamp,total_policies,access_policies,web_reputation_profiles,threat_profiles,devices,applications,andtop_applications) are modified accurately in theSIGN Up client logs (in the /var/log/cisco/signup.logfile) of SMX after adding the new ASA-CX device.

Cisco Systems, Inc. Cisco ConfidentialPage 25 of 144
120.
Verify that the recently collected platform telemetrydata reflects the changes accurately afteradding/deleting one or more policies and profiles inPRSM.
Procedure:Repeat test steps as mentioned above, in test case5.Configure another threat profile object and a coupleof more access policies.Attach the newly configured threat profile object toone of the newly configured access policies.Send some traffic thru the box.Delete an access policy and a threat profile.
Expected Results:Verify that the following fields (startTimeStamp,endTimeStamp,platform_version,model,product,timezone,db_size,cpu_usage,disk_utilization,total_policies,access_policies,decryption_policies,auth_policies,policy_sets,file_filtering_profiles,web_reputation_profiles,threat_profiles,realms,devices,applications,andtop_applications) are populated and are accuratein the SIGN Up client logs (in the/var/log/cisco/signup.log file) of SMX.Verify that the following fields (startTimeStamp,endTimeStamp,total_policies,access_policies,threat_profiles,realms,applications,and top_applications) are modifiedaccurately in the SIGN Up client logs (in the/var/log/cisco/signup.log file) of SMX/PRSM.Verify that the access_policies and thethreat_profiles fields in the collected platformtelemetry data gets updated accurately to reflectthe deleted policies and profiles.
Cisco Systems, Inc. Cisco ConfidentialPage 26 of 144
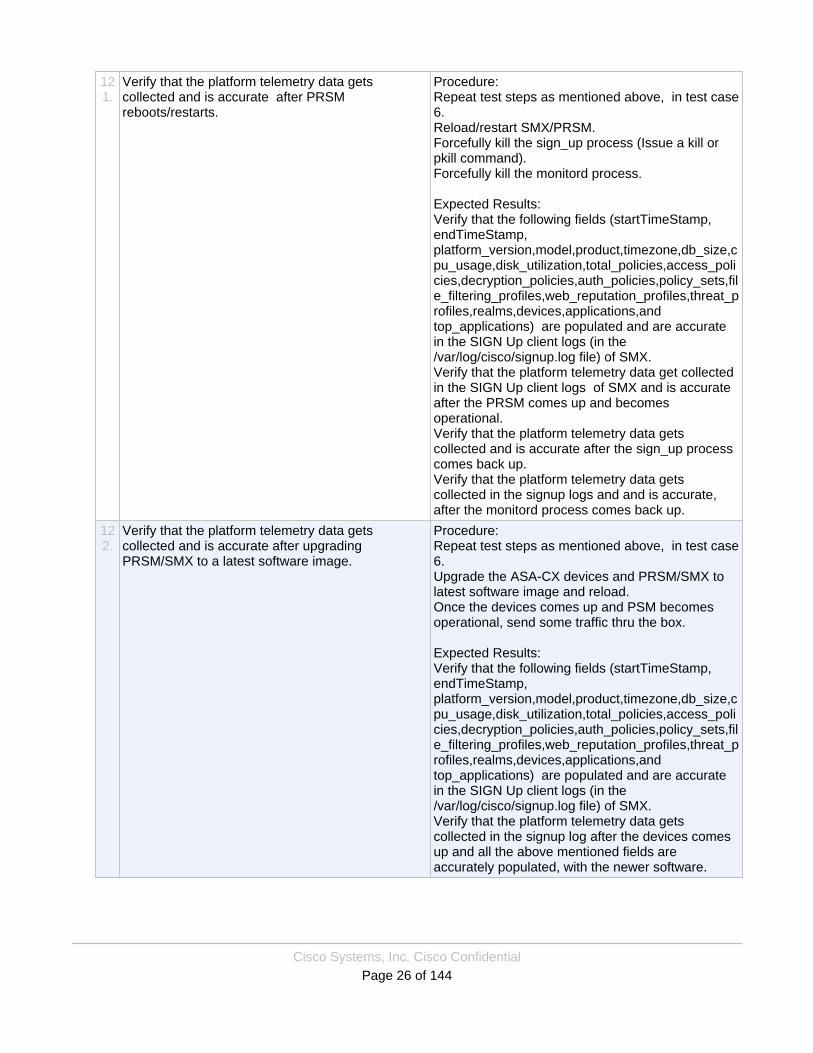
121.
Verify that the platform telemetry data getscollected and is accurate after PRSMreboots/restarts.
Procedure:Repeat test steps as mentioned above, in test case6.Reload/restart SMX/PRSM.Forcefully kill the sign_up process (Issue a kill orpkill command).Forcefully kill the monitord process.
Expected Results:Verify that the following fields (startTimeStamp,endTimeStamp,platform_version,model,product,timezone,db_size,cpu_usage,disk_utilization,total_policies,access_policies,decryption_policies,auth_policies,policy_sets,file_filtering_profiles,web_reputation_profiles,threat_profiles,realms,devices,applications,andtop_applications) are populated and are accuratein the SIGN Up client logs (in the/var/log/cisco/signup.log file) of SMX.Verify that the platform telemetry data get collectedin the SIGN Up client logs of SMX and is accurateafter the PRSM comes up and becomesoperational.Verify that the platform telemetry data getscollected and is accurate after the sign_up processcomes back up.Verify that the platform telemetry data getscollected in the signup logs and and is accurate,after the monitord process comes back up.
122.
Verify that the platform telemetry data getscollected and is accurate after upgradingPRSM/SMX to a latest software image.
Procedure:Repeat test steps as mentioned above, in test case6.Upgrade the ASA-CX devices and PRSM/SMX tolatest software image and reload.Once the devices comes up and PSM becomesoperational, send some traffic thru the box.
Expected Results:Verify that the following fields (startTimeStamp,endTimeStamp,platform_version,model,product,timezone,db_size,cpu_usage,disk_utilization,total_policies,access_policies,decryption_policies,auth_policies,policy_sets,file_filtering_profiles,web_reputation_profiles,threat_profiles,realms,devices,applications,andtop_applications) are populated and are accuratein the SIGN Up client logs (in the/var/log/cisco/signup.log file) of SMX.Verify that the platform telemetry data getscollected in the signup log after the devices comesup and all the above mentioned fields areaccurately populated, with the newer software.
Cisco Systems, Inc. Cisco ConfidentialPage 27 of 144
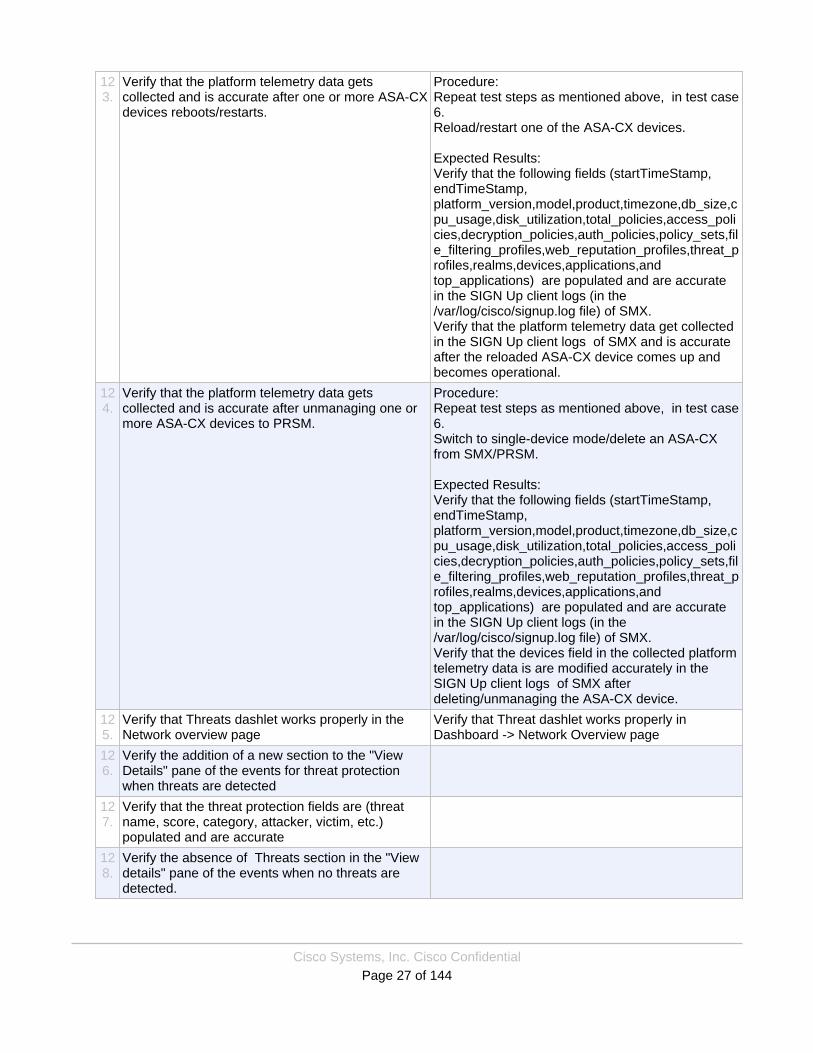
123.
Verify that the platform telemetry data getscollected and is accurate after one or more ASA-CXdevices reboots/restarts.
Procedure:Repeat test steps as mentioned above, in test case6.Reload/restart one of the ASA-CX devices.
Expected Results:Verify that the following fields (startTimeStamp,endTimeStamp,platform_version,model,product,timezone,db_size,cpu_usage,disk_utilization,total_policies,access_policies,decryption_policies,auth_policies,policy_sets,file_filtering_profiles,web_reputation_profiles,threat_profiles,realms,devices,applications,andtop_applications) are populated and are accuratein the SIGN Up client logs (in the/var/log/cisco/signup.log file) of SMX.Verify that the platform telemetry data get collectedin the SIGN Up client logs of SMX and is accurateafter the reloaded ASA-CX device comes up andbecomes operational.
124.
Verify that the platform telemetry data getscollected and is accurate after unmanaging one ormore ASA-CX devices to PRSM.
Procedure:Repeat test steps as mentioned above, in test case6.Switch to single-device mode/delete an ASA-CXfrom SMX/PRSM.
Expected Results:Verify that the following fields (startTimeStamp,endTimeStamp,platform_version,model,product,timezone,db_size,cpu_usage,disk_utilization,total_policies,access_policies,decryption_policies,auth_policies,policy_sets,file_filtering_profiles,web_reputation_profiles,threat_profiles,realms,devices,applications,andtop_applications) are populated and are accuratein the SIGN Up client logs (in the/var/log/cisco/signup.log file) of SMX.Verify that the devices field in the collected platformtelemetry data is are modified accurately in theSIGN Up client logs of SMX afterdeleting/unmanaging the ASA-CX device.
125.
Verify that Threats dashlet works properly in theNetwork overview page
Verify that Threat dashlet works properly inDashboard -> Network Overview page
126.
Verify the addition of a new section to the "ViewDetails" pane of the events for threat protectionwhen threats are detected
127.
Verify that the threat protection fields are (threatname, score, category, attacker, victim, etc.)populated and are accurate
128.
Verify the absence of Threats section in the "Viewdetails" pane of the events when no threats aredetected.
Cisco Systems, Inc. Cisco ConfidentialPage 28 of 144
129.
Verify that threat protection events are sent toSystemEventView
This Test case verifies that a series of events aresent to SystemEventView
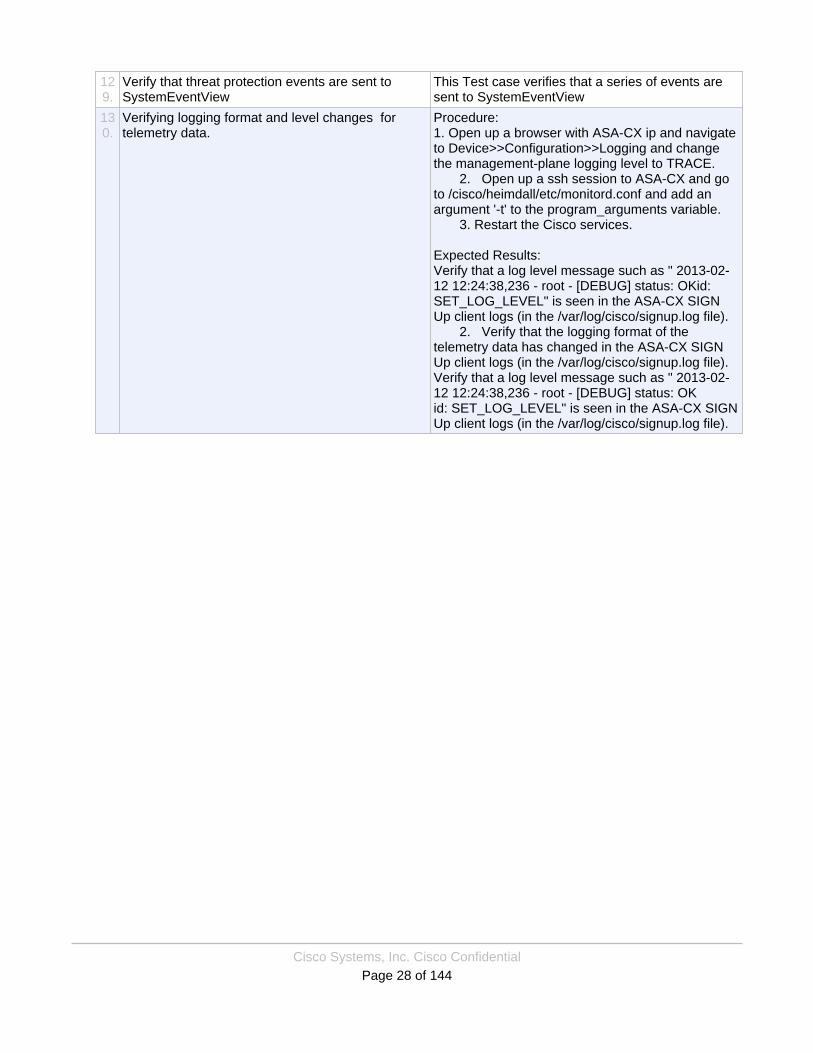
130.
Verifying logging format and level changes fortelemetry data.
Procedure:1. Open up a browser with ASA-CX ip and navigateto Device>>Configuration>>Logging and changethe management-plane logging level to TRACE. 2. Open up a ssh session to ASA-CX and goto /cisco/heimdall/etc/monitord.conf and add anargument '-t' to the program_arguments variable. 3. Restart the Cisco services.
Expected Results:Verify that a log level message such as " 2013-02-12 12:24:38,236 - root - [DEBUG] status: OKid:SET_LOG_LEVEL" is seen in the ASA-CX SIGNUp client logs (in the /var/log/cisco/signup.log file). 2. Verify that the logging format of thetelemetry data has changed in the ASA-CX SIGNUp client logs (in the /var/log/cisco/signup.log file).Verify that a log level message such as " 2013-02-12 12:24:38,236 - root - [DEBUG] status: OKid: SET_LOG_LEVEL" is seen in the ASA-CX SIGNUp client logs (in the /var/log/cisco/signup.log file).
Cisco Systems, Inc. Cisco ConfidentialPage 29 of 144
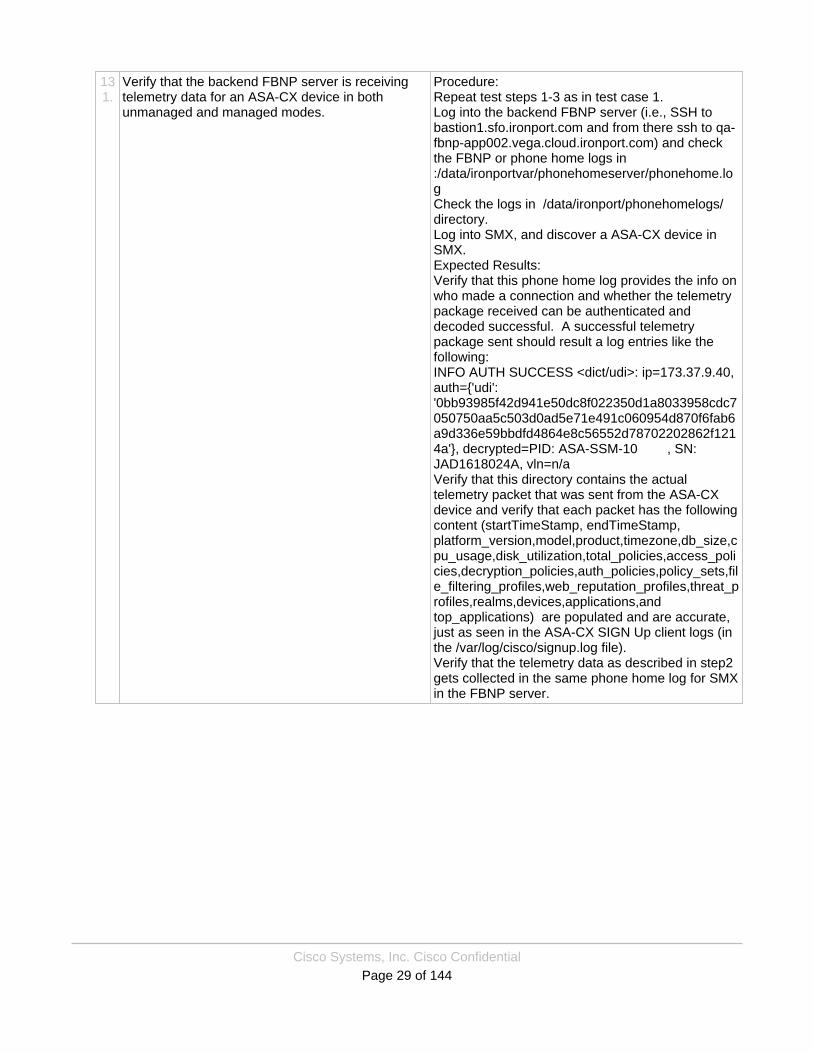
131.
Verify that the backend FBNP server is receivingtelemetry data for an ASA-CX device in bothunmanaged and managed modes.
Procedure:Repeat test steps 1-3 as in test case 1.Log into the backend FBNP server (i.e., SSH tobastion1.sfo.ironport.com and from there ssh to qa-fbnp-app002.vega.cloud.ironport.com) and checkthe FBNP or phone home logs in:/data/ironportvar/phonehomeserver/phonehome.logCheck the logs in /data/ironport/phonehomelogs/directory.Log into SMX, and discover a ASA-CX device inSMX.Expected Results:Verify that this phone home log provides the info onwho made a connection and whether the telemetrypackage received can be authenticated anddecoded successful. A successful telemetrypackage sent should result a log entries like thefollowing:INFO AUTH SUCCESS <dict/udi>: ip=173.37.9.40,auth={'udi':'0bb93985f42d941e50dc8f022350d1a8033958cdc7050750aa5c503d0ad5e71e491c060954d870f6fab6a9d336e59bbdfd4864e8c56552d78702202862f1214a'}, decrypted=PID: ASA-SSM-10 , SN:JAD1618024A, vln=n/aVerify that this directory contains the actualtelemetry packet that was sent from the ASA-CXdevice and verify that each packet has the followingcontent (startTimeStamp, endTimeStamp,platform_version,model,product,timezone,db_size,cpu_usage,disk_utilization,total_policies,access_policies,decryption_policies,auth_policies,policy_sets,file_filtering_profiles,web_reputation_profiles,threat_profiles,realms,devices,applications,andtop_applications) are populated and are accurate,just as seen in the ASA-CX SIGN Up client logs (inthe /var/log/cisco/signup.log file).Verify that the telemetry data as described in step2gets collected in the same phone home log for SMXin the FBNP server.
Cisco Systems, Inc. Cisco ConfidentialPage 30 of 144
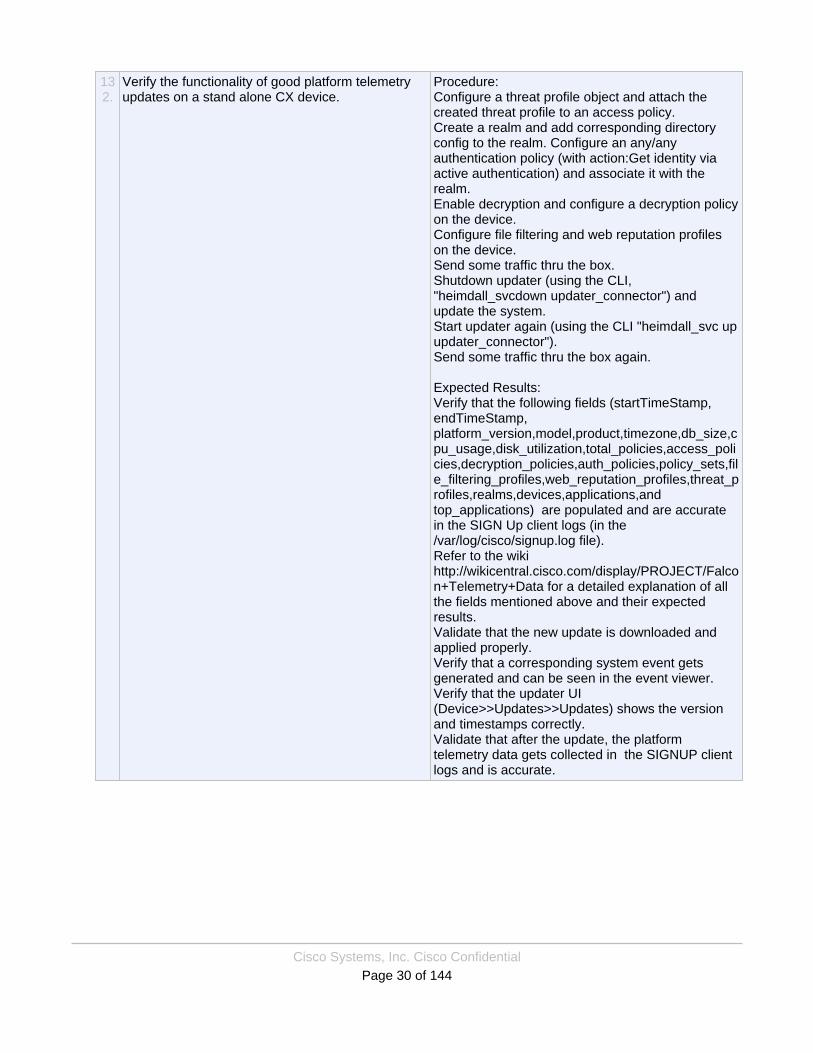
132.
Verify the functionality of good platform telemetryupdates on a stand alone CX device.
Procedure:Configure a threat profile object and attach thecreated threat profile to an access policy.Create a realm and add corresponding directoryconfig to the realm. Configure an any/anyauthentication policy (with action:Get identity viaactive authentication) and associate it with therealm.Enable decryption and configure a decryption policyon the device.Configure file filtering and web reputation profileson the device.Send some traffic thru the box.Shutdown updater (using the CLI,"heimdall_svcdown updater_connector") andupdate the system.Start updater again (using the CLI "heimdall_svc upupdater_connector").Send some traffic thru the box again.
Expected Results:Verify that the following fields (startTimeStamp,endTimeStamp,platform_version,model,product,timezone,db_size,cpu_usage,disk_utilization,total_policies,access_policies,decryption_policies,auth_policies,policy_sets,file_filtering_profiles,web_reputation_profiles,threat_profiles,realms,devices,applications,andtop_applications) are populated and are accuratein the SIGN Up client logs (in the/var/log/cisco/signup.log file).Refer to the wikihttp://wikicentral.cisco.com/display/PROJECT/Falcon+Telemetry+Data for a detailed explanation of allthe fields mentioned above and their expectedresults.Validate that the new update is downloaded andapplied properly.Verify that a corresponding system event getsgenerated and can be seen in the event viewer.Verify that the updater UI(Device>>Updates>>Updates) shows the versionand timestamps correctly.Validate that after the update, the platformtelemetry data gets collected in the SIGNUP clientlogs and is accurate.
Cisco Systems, Inc. Cisco ConfidentialPage 31 of 144
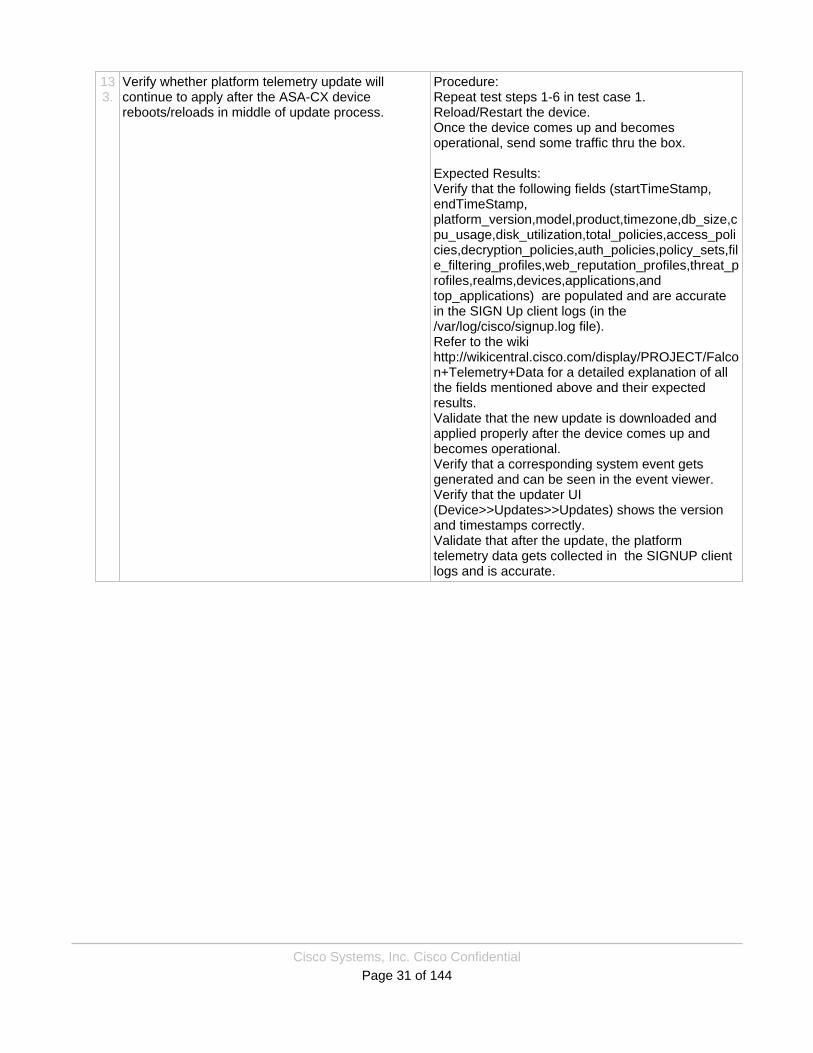
133.
Verify whether platform telemetry update willcontinue to apply after the ASA-CX devicereboots/reloads in middle of update process.
Procedure:Repeat test steps 1-6 in test case 1.Reload/Restart the device.Once the device comes up and becomesoperational, send some traffic thru the box.
Expected Results:Verify that the following fields (startTimeStamp,endTimeStamp,platform_version,model,product,timezone,db_size,cpu_usage,disk_utilization,total_policies,access_policies,decryption_policies,auth_policies,policy_sets,file_filtering_profiles,web_reputation_profiles,threat_profiles,realms,devices,applications,andtop_applications) are populated and are accuratein the SIGN Up client logs (in the/var/log/cisco/signup.log file).Refer to the wikihttp://wikicentral.cisco.com/display/PROJECT/Falcon+Telemetry+Data for a detailed explanation of allthe fields mentioned above and their expectedresults.Validate that the new update is downloaded andapplied properly after the device comes up andbecomes operational.Verify that a corresponding system event getsgenerated and can be seen in the event viewer.Verify that the updater UI(Device>>Updates>>Updates) shows the versionand timestamps correctly.Validate that after the update, the platformtelemetry data gets collected in the SIGNUP clientlogs and is accurate.
Cisco Systems, Inc. Cisco ConfidentialPage 32 of 144
134.
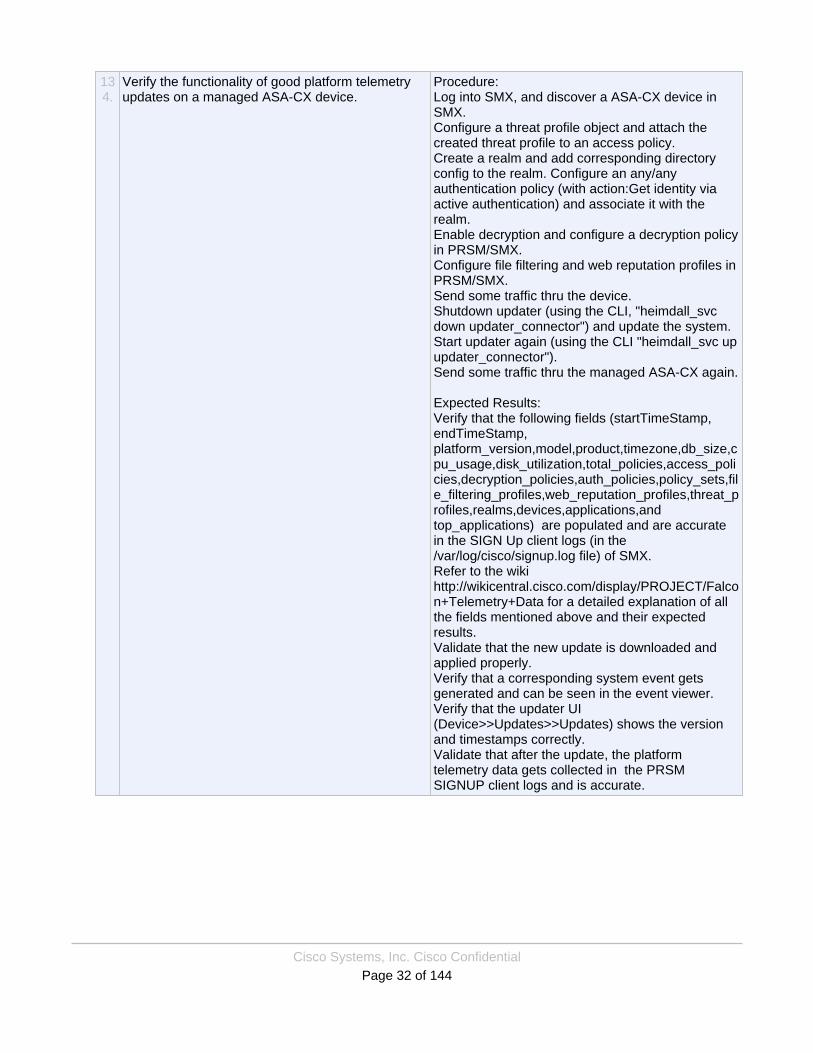
Verify the functionality of good platform telemetryupdates on a managed ASA-CX device.
Procedure:Log into SMX, and discover a ASA-CX device inSMX.Configure a threat profile object and attach thecreated threat profile to an access policy.Create a realm and add corresponding directoryconfig to the realm. Configure an any/anyauthentication policy (with action:Get identity viaactive authentication) and associate it with therealm.Enable decryption and configure a decryption policyin PRSM/SMX.Configure file filtering and web reputation profiles inPRSM/SMX.Send some traffic thru the device.Shutdown updater (using the CLI, "heimdall_svcdown updater_connector") and update the system.Start updater again (using the CLI "heimdall_svc upupdater_connector").Send some traffic thru the managed ASA-CX again.
Expected Results:Verify that the following fields (startTimeStamp,endTimeStamp,platform_version,model,product,timezone,db_size,cpu_usage,disk_utilization,total_policies,access_policies,decryption_policies,auth_policies,policy_sets,file_filtering_profiles,web_reputation_profiles,threat_profiles,realms,devices,applications,andtop_applications) are populated and are accuratein the SIGN Up client logs (in the/var/log/cisco/signup.log file) of SMX.Refer to the wikihttp://wikicentral.cisco.com/display/PROJECT/Falcon+Telemetry+Data for a detailed explanation of allthe fields mentioned above and their expectedresults.Validate that the new update is downloaded andapplied properly.Verify that a corresponding system event getsgenerated and can be seen in the event viewer.Verify that the updater UI(Device>>Updates>>Updates) shows the versionand timestamps correctly.Validate that after the update, the platformtelemetry data gets collected in the PRSMSIGNUP client logs and is accurate.

Cisco Systems, Inc. Cisco ConfidentialPage 33 of 144
135.
Verify whether platform telemetry update willcontinue to apply after PRSM reboots/reloads inmiddle of update process.
Procedure:Repeat test steps 1-7 in test case 5.Reload/Restart the PRSM.Once PRSM/SMX comes up and becomesoperational, send some traffic thru the managedASA-CX.
Expected Results:Verify that the following fields (startTimeStamp,endTimeStamp,platform_version,model,product,timezone,db_size,cpu_usage,disk_utilization,total_policies,access_policies,decryption_policies,auth_policies,policy_sets,file_filtering_profiles,web_reputation_profiles,threat_profiles,realms,devices,applications,andtop_applications) are populated and are accuratein the SIGN Up client logs (in the/var/log/cisco/signup.log file) of SMX.Refer to the wikihttp://wikicentral.cisco.com/display/PROJECT/Falcon+Telemetry+Data for a detailed explanation of allthe fields mentioned above and their expectedresults.Validate that the new update is downloaded andapplied properly after PRSM comes up and themanaged ASA-CX becomes operational.Verify that a corresponding system event getsgenerated and can be seen in the event viewer.Verify that the updater UI(Device>>Updates>>Updates) shows the versionand timestamps correctly.Validate that after the update, the platformtelemetry data gets collected in the PRSMSIGNUP client logs and is accurate.

Cisco Systems, Inc. Cisco ConfidentialPage 34 of 144
136.
Verify that threat profiles work correctly with 3 ormore Alert, Deny, and Ignore exceptions.
Steps:1-Navigate to Policies, Policies and under Accessclick on Add new policy2-Enter a name for Policy Name3-Expand profile and click on Create new profile4-Enter a name for the Profile Name and take bothslider bars to 0. Here all traffic will be blocked andmonitored. Click on Save Object.5-Click on Save Policy and commit6-Pass some traffic using at least 3 pcaps and notethe names of the threats.7-Create an exception for the pcaps by going toPolicies, Objects, and click on Profile Edit Object.8-Expand Advanced threat settings. Enter the nameof the threats noted down in Exceptions and selectIgnore for Action and click on Apply, Save Object,and commit object.9-Now pass the same traffic10-Change the Action for the same threats to Denyand pass the same pcaps.11-Change the Action for the same threats to Alertand pass the same pcaps.
Expected Result:1-6: Access policy, and Threat Profile, is created.Traffic is blocked. Verify in Events and Dashboard,Threat protection7-9: Traffic is ignored.10-Traffic is blocked and monitored11-Traffic is allowed and monitored
Cisco Systems, Inc. Cisco ConfidentialPage 35 of 144
137.
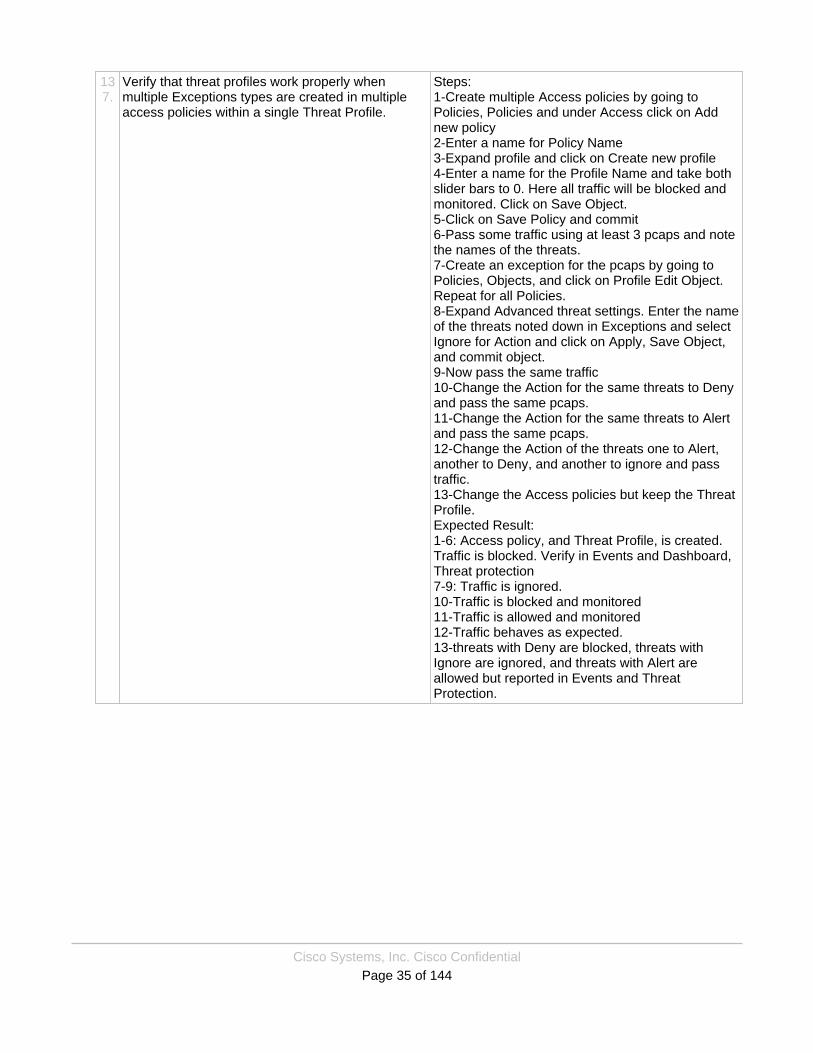
Verify that threat profiles work properly whenmultiple Exceptions types are created in multipleaccess policies within a single Threat Profile.
Steps:1-Create multiple Access policies by going toPolicies, Policies and under Access click on Addnew policy2-Enter a name for Policy Name3-Expand profile and click on Create new profile4-Enter a name for the Profile Name and take bothslider bars to 0. Here all traffic will be blocked andmonitored. Click on Save Object.5-Click on Save Policy and commit6-Pass some traffic using at least 3 pcaps and notethe names of the threats.7-Create an exception for the pcaps by going toPolicies, Objects, and click on Profile Edit Object.Repeat for all Policies.8-Expand Advanced threat settings. Enter the nameof the threats noted down in Exceptions and selectIgnore for Action and click on Apply, Save Object,and commit object.9-Now pass the same traffic10-Change the Action for the same threats to Denyand pass the same pcaps.11-Change the Action for the same threats to Alertand pass the same pcaps.12-Change the Action of the threats one to Alert,another to Deny, and another to ignore and passtraffic.13-Change the Access policies but keep the ThreatProfile.Expected Result:1-6: Access policy, and Threat Profile, is created.Traffic is blocked. Verify in Events and Dashboard,Threat protection7-9: Traffic is ignored.10-Traffic is blocked and monitored11-Traffic is allowed and monitored12-Traffic behaves as expected.13-threats with Deny are blocked, threats withIgnore are ignored, and threats with Alert areallowed but reported in Events and ThreatProtection.
Cisco Systems, Inc. Cisco ConfidentialPage 36 of 144
138.
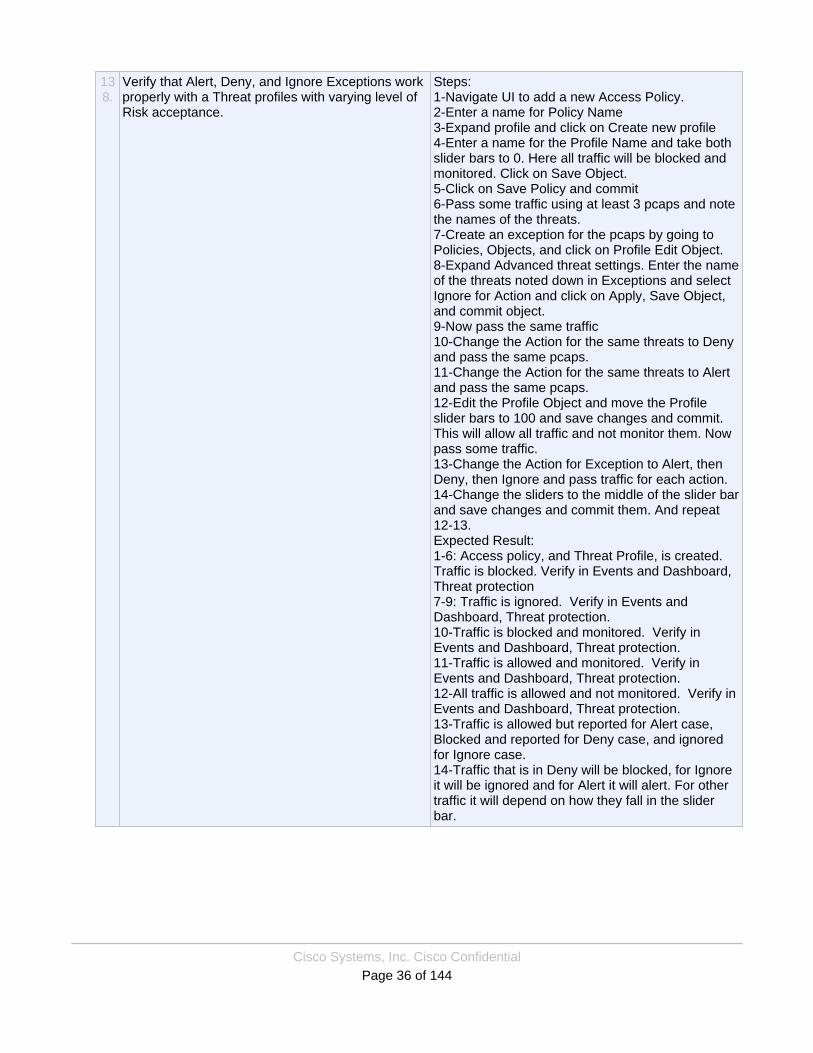
Verify that Alert, Deny, and Ignore Exceptions workproperly with a Threat profiles with varying level ofRisk acceptance.
Steps:1-Navigate UI to add a new Access Policy.2-Enter a name for Policy Name3-Expand profile and click on Create new profile4-Enter a name for the Profile Name and take bothslider bars to 0. Here all traffic will be blocked andmonitored. Click on Save Object.5-Click on Save Policy and commit6-Pass some traffic using at least 3 pcaps and notethe names of the threats.7-Create an exception for the pcaps by going toPolicies, Objects, and click on Profile Edit Object.8-Expand Advanced threat settings. Enter the nameof the threats noted down in Exceptions and selectIgnore for Action and click on Apply, Save Object,and commit object.9-Now pass the same traffic10-Change the Action for the same threats to Denyand pass the same pcaps.11-Change the Action for the same threats to Alertand pass the same pcaps.12-Edit the Profile Object and move the Profileslider bars to 100 and save changes and commit.This will allow all traffic and not monitor them. Nowpass some traffic.13-Change the Action for Exception to Alert, thenDeny, then Ignore and pass traffic for each action.14-Change the sliders to the middle of the slider barand save changes and commit them. And repeat12-13.Expected Result:1-6: Access policy, and Threat Profile, is created.Traffic is blocked. Verify in Events and Dashboard,Threat protection7-9: Traffic is ignored. Verify in Events andDashboard, Threat protection.10-Traffic is blocked and monitored. Verify inEvents and Dashboard, Threat protection.11-Traffic is allowed and monitored. Verify inEvents and Dashboard, Threat protection.12-All traffic is allowed and not monitored. Verify inEvents and Dashboard, Threat protection.13-Traffic is allowed but reported for Alert case,Blocked and reported for Deny case, and ignoredfor Ignore case.14-Traffic that is in Deny will be blocked, for Ignoreit will be ignored and for Alert it will alert. For othertraffic it will depend on how they fall in the sliderbar.
Cisco Systems, Inc. Cisco ConfidentialPage 37 of 144
139.
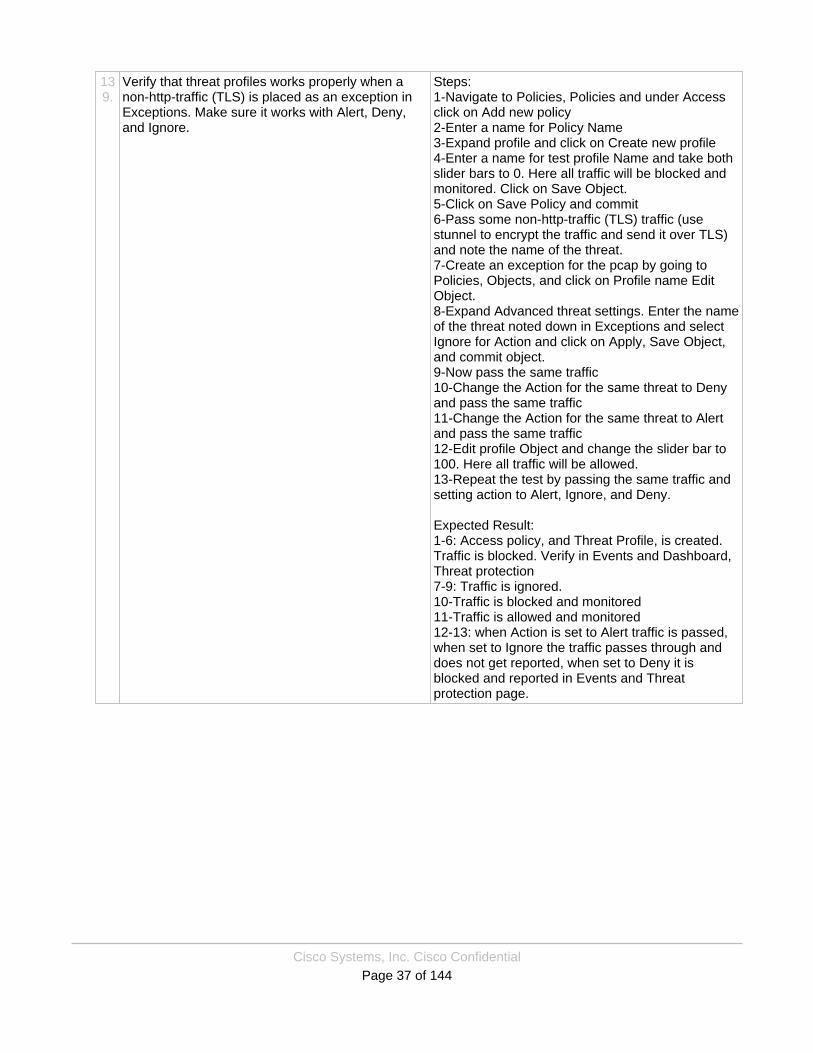
Verify that threat profiles works properly when anon-http-traffic (TLS) is placed as an exception inExceptions. Make sure it works with Alert, Deny,and Ignore.
Steps:1-Navigate to Policies, Policies and under Accessclick on Add new policy2-Enter a name for Policy Name3-Expand profile and click on Create new profile4-Enter a name for test profile Name and take bothslider bars to 0. Here all traffic will be blocked andmonitored. Click on Save Object.5-Click on Save Policy and commit6-Pass some non-http-traffic (TLS) traffic (usestunnel to encrypt the traffic and send it over TLS)and note the name of the threat.7-Create an exception for the pcap by going toPolicies, Objects, and click on Profile name EditObject.8-Expand Advanced threat settings. Enter the nameof the threat noted down in Exceptions and selectIgnore for Action and click on Apply, Save Object,and commit object.9-Now pass the same traffic10-Change the Action for the same threat to Denyand pass the same traffic11-Change the Action for the same threat to Alertand pass the same traffic12-Edit profile Object and change the slider bar to100. Here all traffic will be allowed.13-Repeat the test by passing the same traffic andsetting action to Alert, Ignore, and Deny.
Expected Result:1-6: Access policy, and Threat Profile, is created.Traffic is blocked. Verify in Events and Dashboard,Threat protection7-9: Traffic is ignored.10-Traffic is blocked and monitored11-Traffic is allowed and monitored12-13: when Action is set to Alert traffic is passed,when set to Ignore the traffic passes through anddoes not get reported, when set to Deny it isblocked and reported in Events and Threatprotection page.
Cisco Systems, Inc. Cisco ConfidentialPage 38 of 144
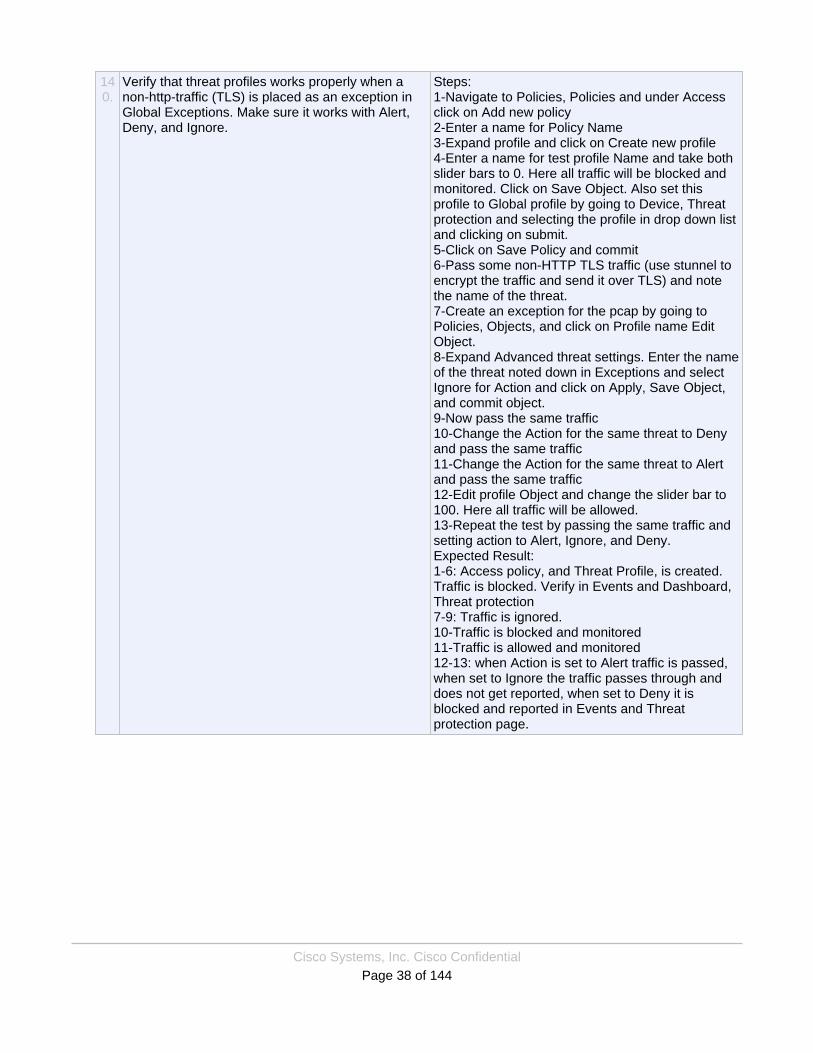
140.
Verify that threat profiles works properly when anon-http-traffic (TLS) is placed as an exception inGlobal Exceptions. Make sure it works with Alert,Deny, and Ignore.
Steps:1-Navigate to Policies, Policies and under Accessclick on Add new policy2-Enter a name for Policy Name3-Expand profile and click on Create new profile4-Enter a name for test profile Name and take bothslider bars to 0. Here all traffic will be blocked andmonitored. Click on Save Object. Also set thisprofile to Global profile by going to Device, Threatprotection and selecting the profile in drop down listand clicking on submit.5-Click on Save Policy and commit6-Pass some non-HTTP TLS traffic (use stunnel toencrypt the traffic and send it over TLS) and notethe name of the threat.7-Create an exception for the pcap by going toPolicies, Objects, and click on Profile name EditObject.8-Expand Advanced threat settings. Enter the nameof the threat noted down in Exceptions and selectIgnore for Action and click on Apply, Save Object,and commit object.9-Now pass the same traffic10-Change the Action for the same threat to Denyand pass the same traffic11-Change the Action for the same threat to Alertand pass the same traffic12-Edit profile Object and change the slider bar to100. Here all traffic will be allowed.13-Repeat the test by passing the same traffic andsetting action to Alert, Ignore, and Deny.Expected Result:1-6: Access policy, and Threat Profile, is created.Traffic is blocked. Verify in Events and Dashboard,Threat protection7-9: Traffic is ignored.10-Traffic is blocked and monitored11-Traffic is allowed and monitored12-13: when Action is set to Alert traffic is passed,when set to Ignore the traffic passes through anddoes not get reported, when set to Deny it isblocked and reported in Events and Threatprotection page.
Cisco Systems, Inc. Cisco ConfidentialPage 39 of 144
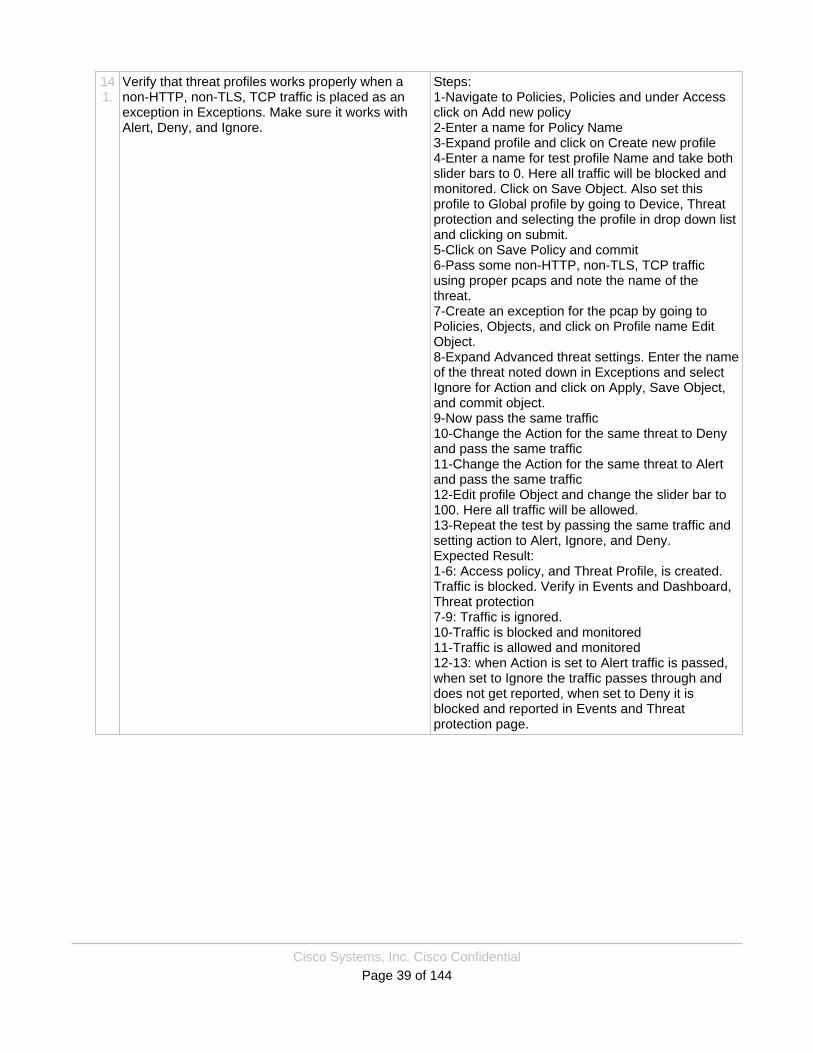
141.
Verify that threat profiles works properly when anon-HTTP, non-TLS, TCP traffic is placed as anexception in Exceptions. Make sure it works withAlert, Deny, and Ignore.
Steps:1-Navigate to Policies, Policies and under Accessclick on Add new policy2-Enter a name for Policy Name3-Expand profile and click on Create new profile4-Enter a name for test profile Name and take bothslider bars to 0. Here all traffic will be blocked andmonitored. Click on Save Object. Also set thisprofile to Global profile by going to Device, Threatprotection and selecting the profile in drop down listand clicking on submit.5-Click on Save Policy and commit6-Pass some non-HTTP, non-TLS, TCP trafficusing proper pcaps and note the name of thethreat.7-Create an exception for the pcap by going toPolicies, Objects, and click on Profile name EditObject.8-Expand Advanced threat settings. Enter the nameof the threat noted down in Exceptions and selectIgnore for Action and click on Apply, Save Object,and commit object.9-Now pass the same traffic10-Change the Action for the same threat to Denyand pass the same traffic11-Change the Action for the same threat to Alertand pass the same traffic12-Edit profile Object and change the slider bar to100. Here all traffic will be allowed.13-Repeat the test by passing the same traffic andsetting action to Alert, Ignore, and Deny.Expected Result:1-6: Access policy, and Threat Profile, is created.Traffic is blocked. Verify in Events and Dashboard,Threat protection7-9: Traffic is ignored.10-Traffic is blocked and monitored11-Traffic is allowed and monitored12-13: when Action is set to Alert traffic is passed,when set to Ignore the traffic passes through anddoes not get reported, when set to Deny it isblocked and reported in Events and Threatprotection page.
Cisco Systems, Inc. Cisco ConfidentialPage 40 of 144
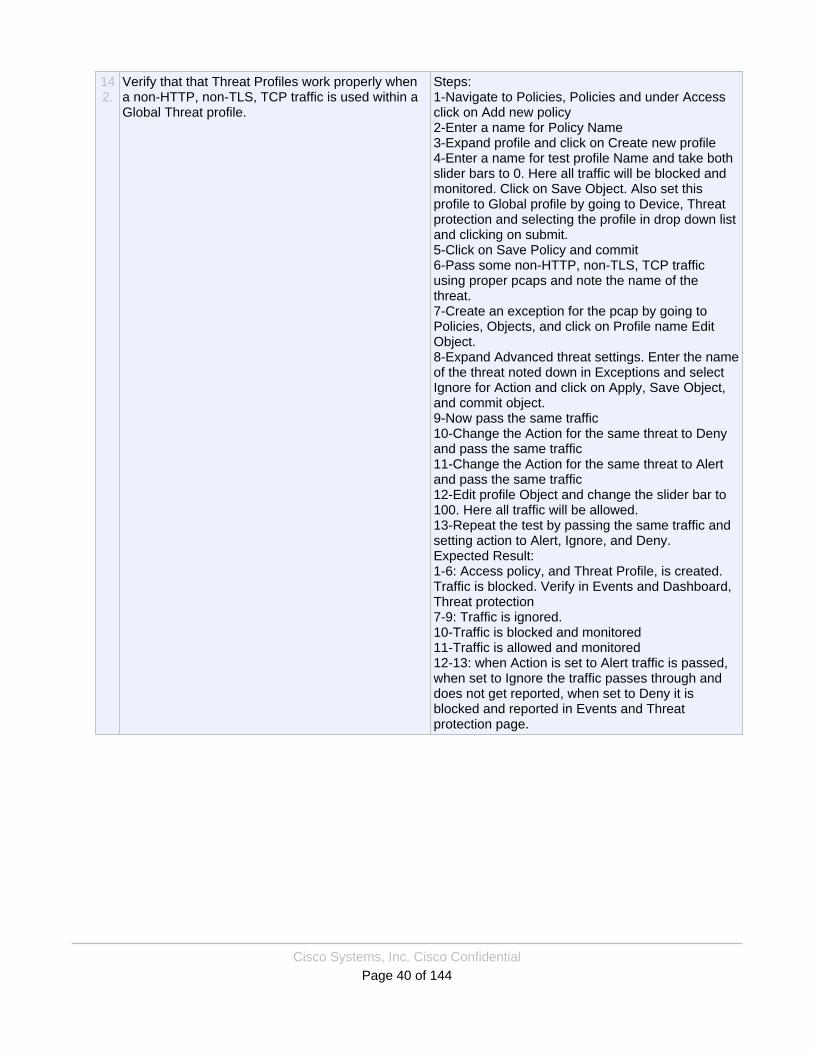
142.
Verify that that Threat Profiles work properly whena non-HTTP, non-TLS, TCP traffic is used within aGlobal Threat profile.
Steps:1-Navigate to Policies, Policies and under Accessclick on Add new policy2-Enter a name for Policy Name3-Expand profile and click on Create new profile4-Enter a name for test profile Name and take bothslider bars to 0. Here all traffic will be blocked andmonitored. Click on Save Object. Also set thisprofile to Global profile by going to Device, Threatprotection and selecting the profile in drop down listand clicking on submit.5-Click on Save Policy and commit6-Pass some non-HTTP, non-TLS, TCP trafficusing proper pcaps and note the name of thethreat.7-Create an exception for the pcap by going toPolicies, Objects, and click on Profile name EditObject.8-Expand Advanced threat settings. Enter the nameof the threat noted down in Exceptions and selectIgnore for Action and click on Apply, Save Object,and commit object.9-Now pass the same traffic10-Change the Action for the same threat to Denyand pass the same traffic11-Change the Action for the same threat to Alertand pass the same traffic12-Edit profile Object and change the slider bar to100. Here all traffic will be allowed.13-Repeat the test by passing the same traffic andsetting action to Alert, Ignore, and Deny.Expected Result:1-6: Access policy, and Threat Profile, is created.Traffic is blocked. Verify in Events and Dashboard,Threat protection7-9: Traffic is ignored.10-Traffic is blocked and monitored11-Traffic is allowed and monitored12-13: when Action is set to Alert traffic is passed,when set to Ignore the traffic passes through anddoes not get reported, when set to Deny it isblocked and reported in Events and Threatprotection page.
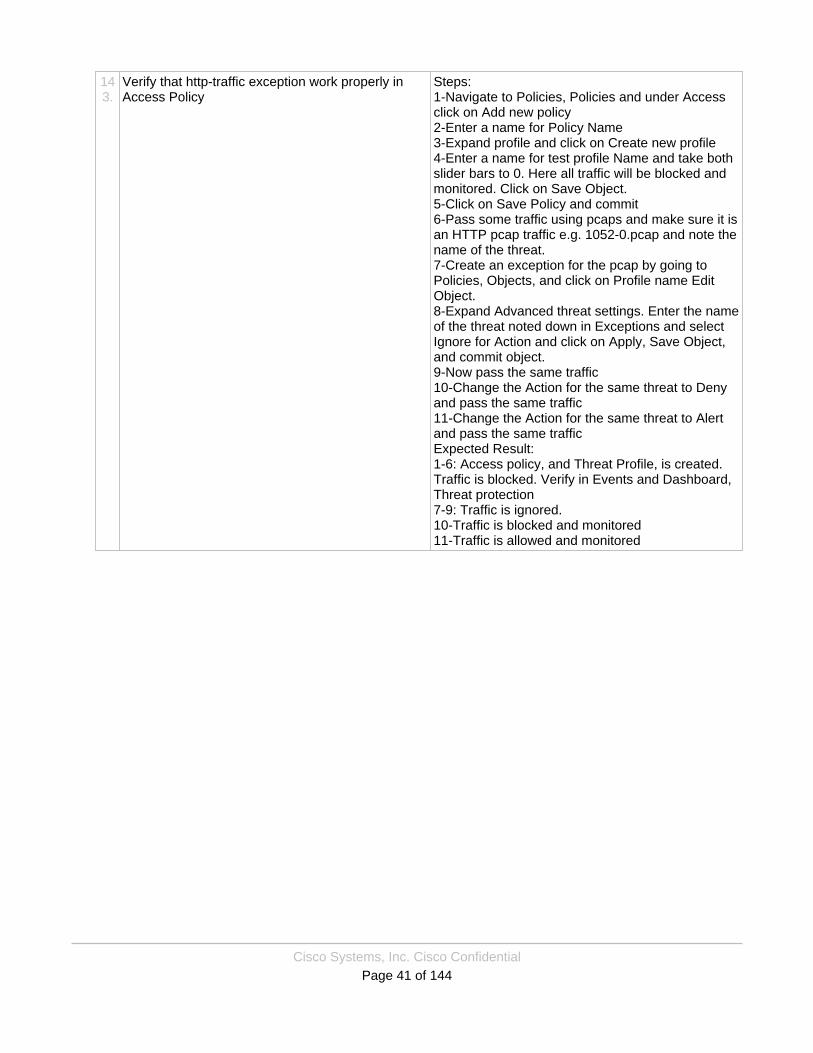
Cisco Systems, Inc. Cisco ConfidentialPage 41 of 144
143.
Verify that http-traffic exception work properly inAccess Policy
Steps:1-Navigate to Policies, Policies and under Accessclick on Add new policy2-Enter a name for Policy Name3-Expand profile and click on Create new profile4-Enter a name for test profile Name and take bothslider bars to 0. Here all traffic will be blocked andmonitored. Click on Save Object.5-Click on Save Policy and commit6-Pass some traffic using pcaps and make sure it isan HTTP pcap traffic e.g. 1052-0.pcap and note thename of the threat.7-Create an exception for the pcap by going toPolicies, Objects, and click on Profile name EditObject.8-Expand Advanced threat settings. Enter the nameof the threat noted down in Exceptions and selectIgnore for Action and click on Apply, Save Object,and commit object.9-Now pass the same traffic10-Change the Action for the same threat to Denyand pass the same traffic11-Change the Action for the same threat to Alertand pass the same trafficExpected Result:1-6: Access policy, and Threat Profile, is created.Traffic is blocked. Verify in Events and Dashboard,Threat protection7-9: Traffic is ignored.10-Traffic is blocked and monitored11-Traffic is allowed and monitored
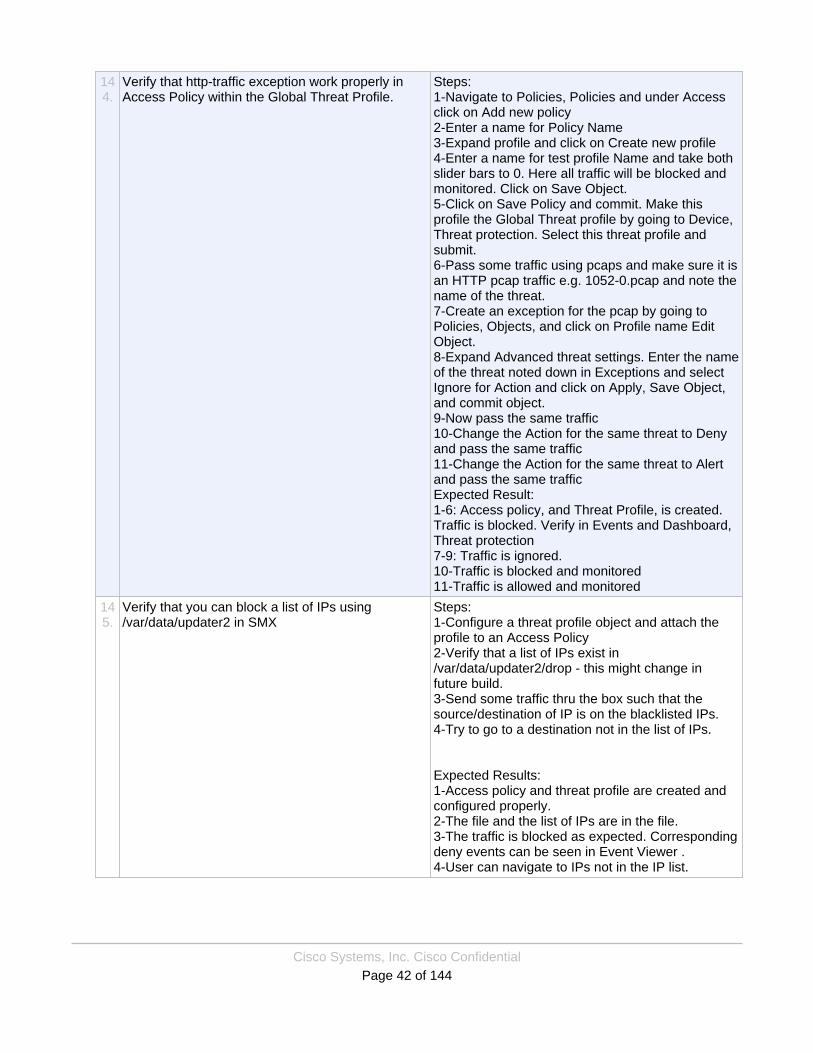
Cisco Systems, Inc. Cisco ConfidentialPage 42 of 144
144.
Verify that http-traffic exception work properly inAccess Policy within the Global Threat Profile.
Steps:1-Navigate to Policies, Policies and under Accessclick on Add new policy2-Enter a name for Policy Name3-Expand profile and click on Create new profile4-Enter a name for test profile Name and take bothslider bars to 0. Here all traffic will be blocked andmonitored. Click on Save Object.5-Click on Save Policy and commit. Make thisprofile the Global Threat profile by going to Device,Threat protection. Select this threat profile andsubmit.6-Pass some traffic using pcaps and make sure it isan HTTP pcap traffic e.g. 1052-0.pcap and note thename of the threat.7-Create an exception for the pcap by going toPolicies, Objects, and click on Profile name EditObject.8-Expand Advanced threat settings. Enter the nameof the threat noted down in Exceptions and selectIgnore for Action and click on Apply, Save Object,and commit object.9-Now pass the same traffic10-Change the Action for the same threat to Denyand pass the same traffic11-Change the Action for the same threat to Alertand pass the same trafficExpected Result:1-6: Access policy, and Threat Profile, is created.Traffic is blocked. Verify in Events and Dashboard,Threat protection7-9: Traffic is ignored.10-Traffic is blocked and monitored11-Traffic is allowed and monitored
145.
Verify that you can block a list of IPs using/var/data/updater2 in SMX
Steps:1-Configure a threat profile object and attach theprofile to an Access Policy2-Verify that a list of IPs exist in/var/data/updater2/drop - this might change infuture build.3-Send some traffic thru the box such that thesource/destination of IP is on the blacklisted IPs.4-Try to go to a destination not in the list of IPs.
Expected Results:1-Access policy and threat profile are created andconfigured properly.2-The file and the list of IPs are in the file.3-The traffic is blocked as expected. Correspondingdeny events can be seen in Event Viewer .4-User can navigate to IPs not in the IP list.
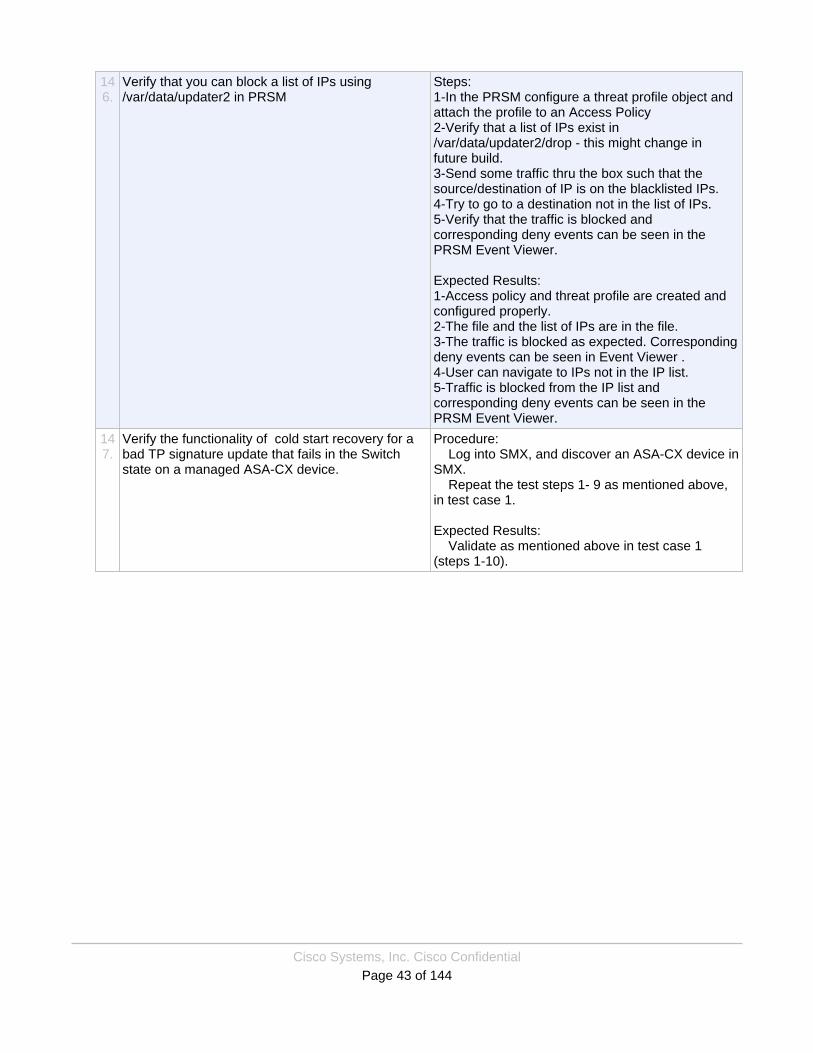
Cisco Systems, Inc. Cisco ConfidentialPage 43 of 144
146.
Verify that you can block a list of IPs using/var/data/updater2 in PRSM
Steps:1-In the PRSM configure a threat profile object andattach the profile to an Access Policy2-Verify that a list of IPs exist in/var/data/updater2/drop - this might change infuture build.3-Send some traffic thru the box such that thesource/destination of IP is on the blacklisted IPs.4-Try to go to a destination not in the list of IPs.5-Verify that the traffic is blocked andcorresponding deny events can be seen in thePRSM Event Viewer.
Expected Results:1-Access policy and threat profile are created andconfigured properly.2-The file and the list of IPs are in the file.3-The traffic is blocked as expected. Correspondingdeny events can be seen in Event Viewer .4-User can navigate to IPs not in the IP list.5-Traffic is blocked from the IP list andcorresponding deny events can be seen in thePRSM Event Viewer.
147.
Verify the functionality of cold start recovery for abad TP signature update that fails in the Switchstate on a managed ASA-CX device.
Procedure: Log into SMX, and discover an ASA-CX device inSMX. Repeat the test steps 1- 9 as mentioned above,in test case 1.
Expected Results: Validate as mentioned above in test case 1(steps 1-10).

Cisco Systems, Inc. Cisco ConfidentialPage 44 of 144
148.
Verify the functionality of cold start recoverymanually on an unmanaged ASA-CX device.
Procedure: Manually clear out all the bad tp signatures, bydeleting the files:(/var/data/updater/threat_defense/sigs/td_http_sigs.xml
/var/data/updater/threat_defense/sigs/td_stream_sigs.xml
/var/data/updater/threat_defense/etc/td_http_config.xml
/var/data/updater/threat_defense/etc/td_stream_config.xml
/cisco/updater/updates/threat_defense/threat_defense_taxonomy.conf) Send some traffic thru the box. Configure a threat profile object and set it to bethe most aggressive. Create an access policy and attach the createdthreat profile to the access policy. Send some pcaps thru the device.
Expected Results: Verify that traffic passes thru the boxsuccessfully and corresponding events can be seenin the event viewer. Validate that threats cannot be detected andcorresponding events are not displayed in thethreat protection tab in the event viewer.
149.
Verify the functionality of cold start recoverymanually on a managed ASA-CX device.
Procedure: Log into SMX, and discover an ASA-CX device inSMX. Repeat test steps 2-5 as mentioned above, intest case 3.
Expected Results: Validate as mentioned above in test case 3.
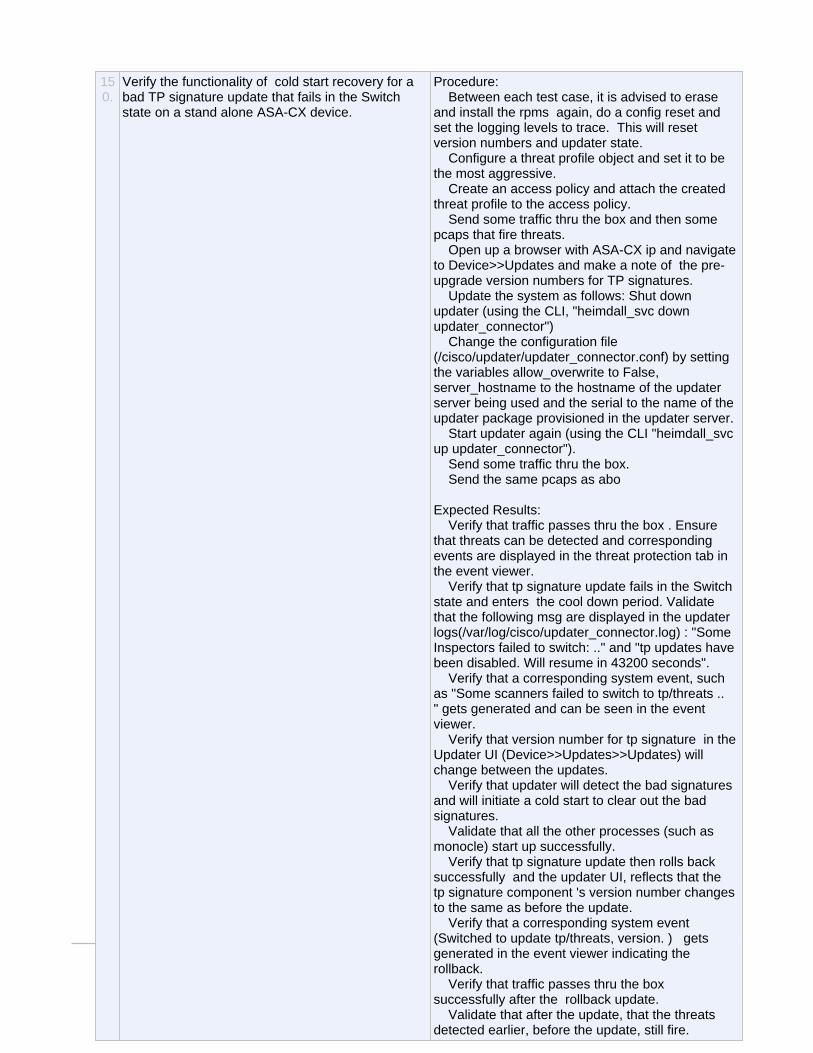
Cisco Systems, Inc. Cisco ConfidentialPage 45 of 144
150.
Verify the functionality of cold start recovery for abad TP signature update that fails in the Switchstate on a stand alone ASA-CX device.
Procedure: Between each test case, it is advised to eraseand install the rpms again, do a config reset andset the logging levels to trace. This will resetversion numbers and updater state. Configure a threat profile object and set it to bethe most aggressive. Create an access policy and attach the createdthreat profile to the access policy. Send some traffic thru the box and then somepcaps that fire threats. Open up a browser with ASA-CX ip and navigateto Device>>Updates and make a note of the pre-upgrade version numbers for TP signatures. Update the system as follows: Shut downupdater (using the CLI, "heimdall_svc downupdater_connector") Change the configuration file(/cisco/updater/updater_connector.conf) by settingthe variables allow_overwrite to False,server_hostname to the hostname of the updaterserver being used and the serial to the name of theupdater package provisioned in the updater server. Start updater again (using the CLI "heimdall_svcup updater_connector"). Send some traffic thru the box. Send the same pcaps as abo
Expected Results: Verify that traffic passes thru the box . Ensurethat threats can be detected and correspondingevents are displayed in the threat protection tab inthe event viewer. Verify that tp signature update fails in the Switchstate and enters the cool down period. Validatethat the following msg are displayed in the updaterlogs(/var/log/cisco/updater_connector.log) : "SomeInspectors failed to switch: .." and "tp updates havebeen disabled. Will resume in 43200 seconds". Verify that a corresponding system event, suchas "Some scanners failed to switch to tp/threats .." gets generated and can be seen in the eventviewer. Verify that version number for tp signature in theUpdater UI (Device>>Updates>>Updates) willchange between the updates. Verify that updater will detect the bad signaturesand will initiate a cold start to clear out the badsignatures. Validate that all the other processes (such asmonocle) start up successfully. Verify that tp signature update then rolls backsuccessfully and the updater UI, reflects that thetp signature component 's version number changesto the same as before the update. Verify that a corresponding system event(Switched to update tp/threats, version. ) getsgenerated in the event viewer indicating therollback. Verify that traffic passes thru the boxsuccessfully after the rollback update. Validate that after the update, that the threatsdetected earlier, before the update, still fire.
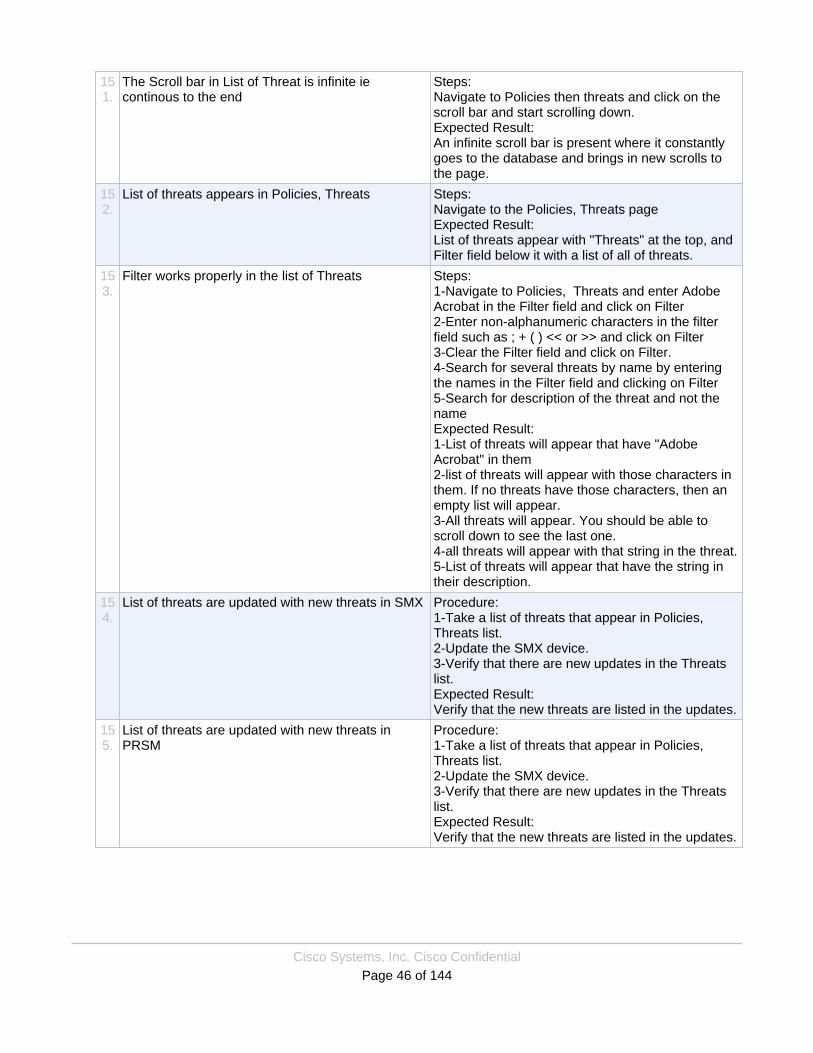
Cisco Systems, Inc. Cisco ConfidentialPage 46 of 144
151.
The Scroll bar in List of Threat is infinite iecontinous to the end
Steps:Navigate to Policies then threats and click on thescroll bar and start scrolling down.Expected Result:An infinite scroll bar is present where it constantlygoes to the database and brings in new scrolls tothe page.
152.
List of threats appears in Policies, Threats Steps:Navigate to the Policies, Threats pageExpected Result:List of threats appear with "Threats" at the top, andFilter field below it with a list of all of threats.
153.
Filter works properly in the list of Threats Steps:1-Navigate to Policies, Threats and enter AdobeAcrobat in the Filter field and click on Filter2-Enter non-alphanumeric characters in the filterfield such as ; + ( ) << or >> and click on Filter3-Clear the Filter field and click on Filter.4-Search for several threats by name by enteringthe names in the Filter field and clicking on Filter5-Search for description of the threat and not thenameExpected Result:1-List of threats will appear that have "AdobeAcrobat" in them2-list of threats will appear with those characters inthem. If no threats have those characters, then anempty list will appear.3-All threats will appear. You should be able toscroll down to see the last one.4-all threats will appear with that string in the threat.5-List of threats will appear that have the string intheir description.
154.
List of threats are updated with new threats in SMX Procedure:1-Take a list of threats that appear in Policies,Threats list.2-Update the SMX device.3-Verify that there are new updates in the Threatslist.Expected Result:Verify that the new threats are listed in the updates.
155.
List of threats are updated with new threats inPRSM
Procedure:1-Take a list of threats that appear in Policies,Threats list.2-Update the SMX device.3-Verify that there are new updates in the Threatslist.Expected Result:Verify that the new threats are listed in the updates.
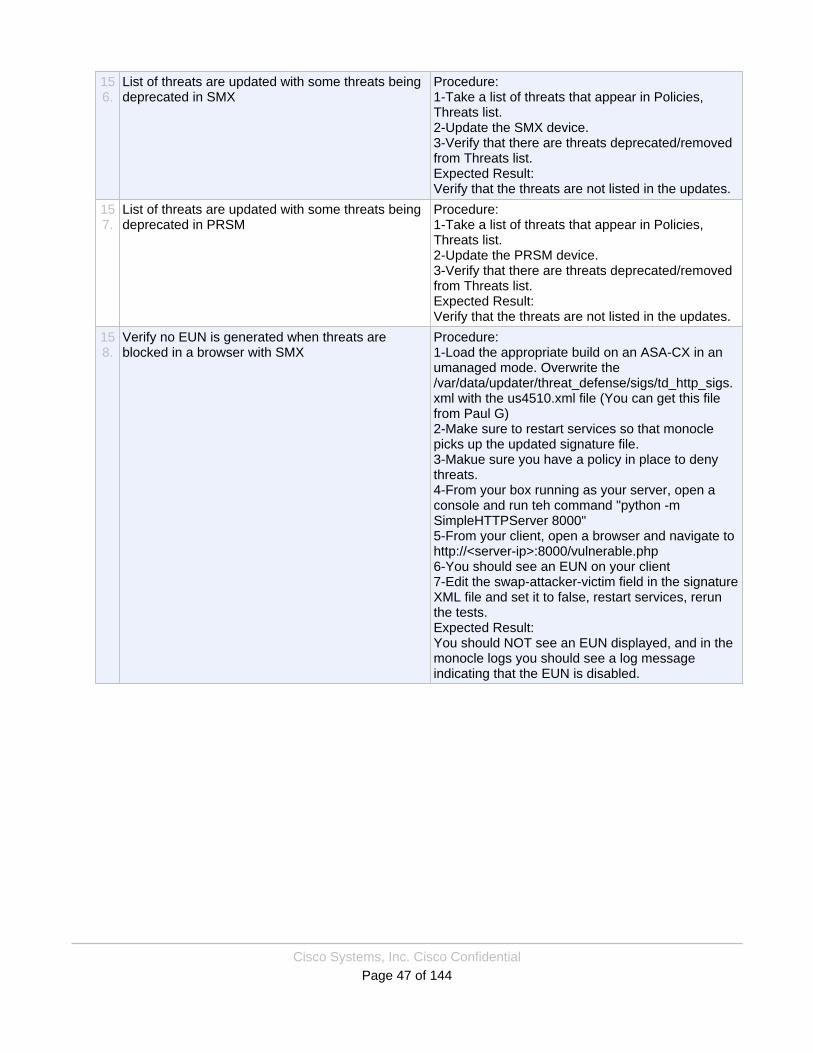
Cisco Systems, Inc. Cisco ConfidentialPage 47 of 144
156.
List of threats are updated with some threats beingdeprecated in SMX
Procedure:1-Take a list of threats that appear in Policies,Threats list.2-Update the SMX device.3-Verify that there are threats deprecated/removedfrom Threats list.Expected Result:Verify that the threats are not listed in the updates.
157.
List of threats are updated with some threats beingdeprecated in PRSM
Procedure:1-Take a list of threats that appear in Policies,Threats list.2-Update the PRSM device.3-Verify that there are threats deprecated/removedfrom Threats list.Expected Result:Verify that the threats are not listed in the updates.
158.
Verify no EUN is generated when threats areblocked in a browser with SMX
Procedure:1-Load the appropriate build on an ASA-CX in anumanaged mode. Overwrite the/var/data/updater/threat_defense/sigs/td_http_sigs.xml with the us4510.xml file (You can get this filefrom Paul G)2-Make sure to restart services so that monoclepicks up the updated signature file.3-Makue sure you have a policy in place to denythreats.4-From your box running as your server, open aconsole and run teh command "python -mSimpleHTTPServer 8000"5-From your client, open a browser and navigate tohttp://<server-ip>:8000/vulnerable.php6-You should see an EUN on your client7-Edit the swap-attacker-victim field in the signatureXML file and set it to false, restart services, rerunthe tests.Expected Result:You should NOT see an EUN displayed, and in themonocle logs you should see a log messageindicating that the EUN is disabled.
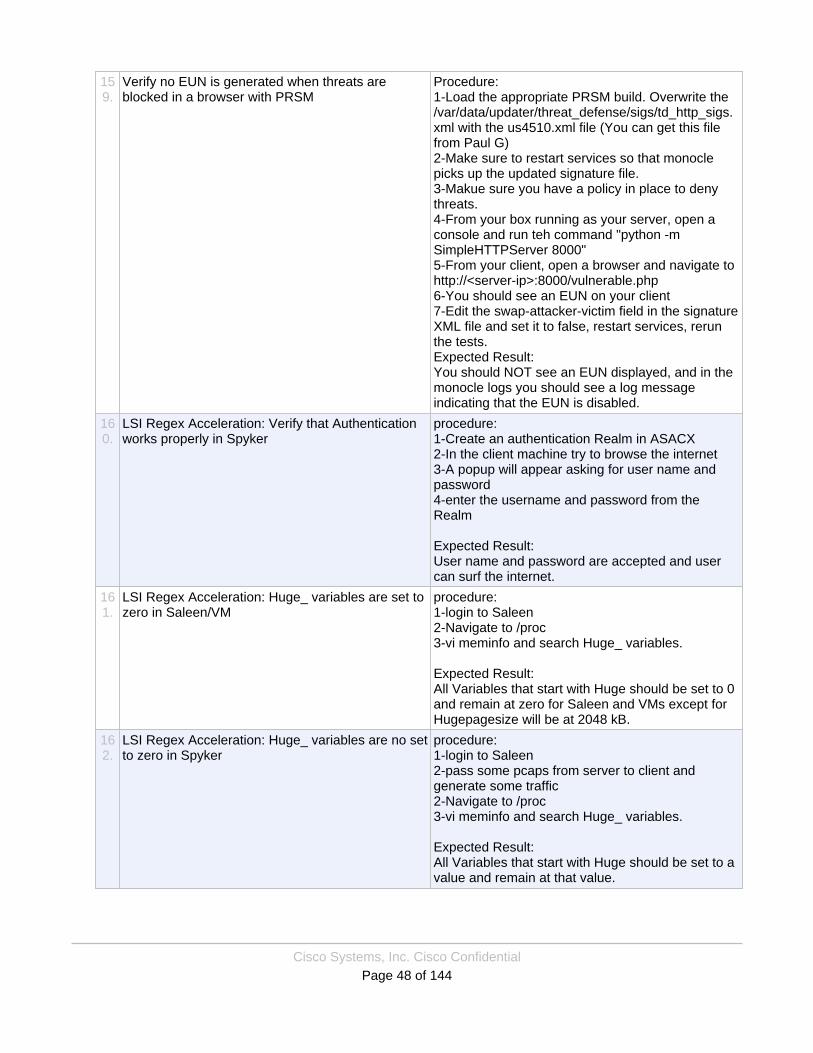
Cisco Systems, Inc. Cisco ConfidentialPage 48 of 144
159.
Verify no EUN is generated when threats areblocked in a browser with PRSM
Procedure:1-Load the appropriate PRSM build. Overwrite the/var/data/updater/threat_defense/sigs/td_http_sigs.xml with the us4510.xml file (You can get this filefrom Paul G)2-Make sure to restart services so that monoclepicks up the updated signature file.3-Makue sure you have a policy in place to denythreats.4-From your box running as your server, open aconsole and run teh command "python -mSimpleHTTPServer 8000"5-From your client, open a browser and navigate tohttp://<server-ip>:8000/vulnerable.php6-You should see an EUN on your client7-Edit the swap-attacker-victim field in the signatureXML file and set it to false, restart services, rerunthe tests.Expected Result:You should NOT see an EUN displayed, and in themonocle logs you should see a log messageindicating that the EUN is disabled.
160.
LSI Regex Acceleration: Verify that Authenticationworks properly in Spyker
procedure:1-Create an authentication Realm in ASACX2-In the client machine try to browse the internet3-A popup will appear asking for user name andpassword4-enter the username and password from theRealm
Expected Result:User name and password are accepted and usercan surf the internet.
161.
LSI Regex Acceleration: Huge_ variables are set tozero in Saleen/VM
procedure:1-login to Saleen2-Navigate to /proc3-vi meminfo and search Huge_ variables.
Expected Result:All Variables that start with Huge should be set to 0and remain at zero for Saleen and VMs except forHugepagesize will be at 2048 kB.
162.
LSI Regex Acceleration: Huge_ variables are no setto zero in Spyker
procedure:1-login to Saleen2-pass some pcaps from server to client andgenerate some traffic2-Navigate to /proc3-vi meminfo and search Huge_ variables.
Expected Result:All Variables that start with Huge should be set to avalue and remain at that value.
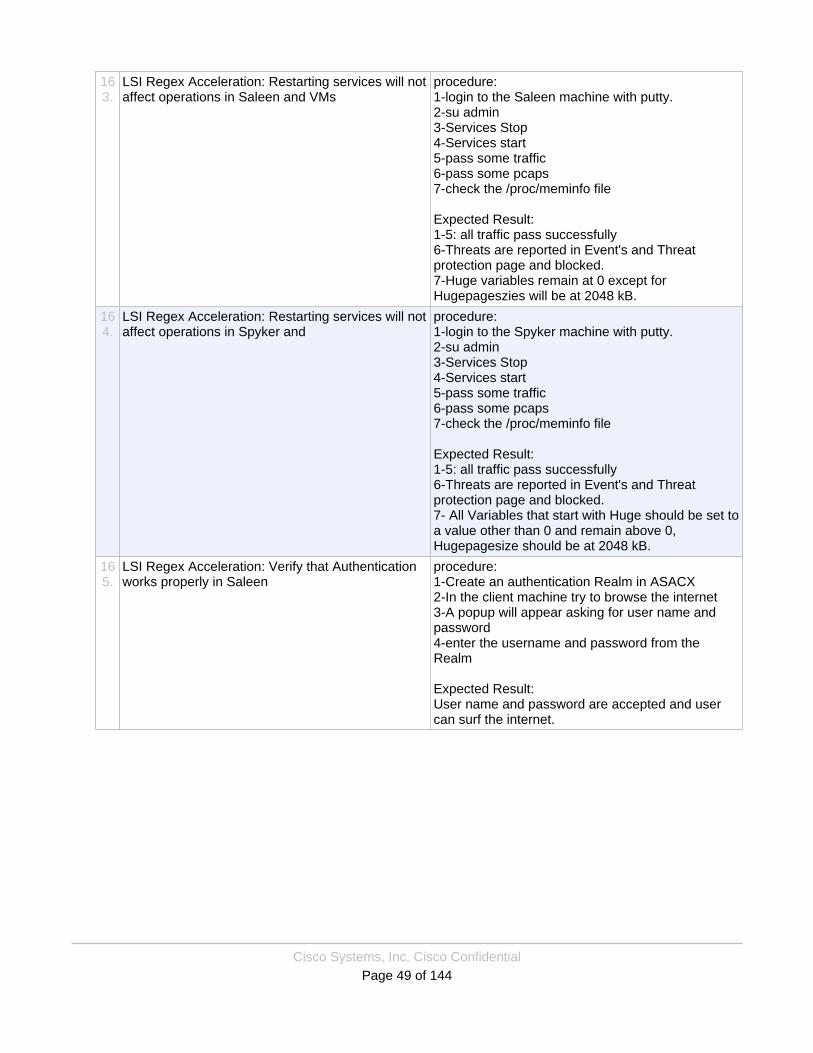
Cisco Systems, Inc. Cisco ConfidentialPage 49 of 144
163.
LSI Regex Acceleration: Restarting services will notaffect operations in Saleen and VMs
procedure:1-login to the Saleen machine with putty.2-su admin3-Services Stop4-Services start5-pass some traffic6-pass some pcaps7-check the /proc/meminfo file
Expected Result:1-5: all traffic pass successfully6-Threats are reported in Event's and Threatprotection page and blocked.7-Huge variables remain at 0 except forHugepageszies will be at 2048 kB.
164.
LSI Regex Acceleration: Restarting services will notaffect operations in Spyker and
procedure:1-login to the Spyker machine with putty.2-su admin3-Services Stop4-Services start5-pass some traffic6-pass some pcaps7-check the /proc/meminfo file
Expected Result:1-5: all traffic pass successfully6-Threats are reported in Event's and Threatprotection page and blocked.7- All Variables that start with Huge should be set toa value other than 0 and remain above 0,Hugepagesize should be at 2048 kB.
165.
LSI Regex Acceleration: Verify that Authenticationworks properly in Saleen
procedure:1-Create an authentication Realm in ASACX2-In the client machine try to browse the internet3-A popup will appear asking for user name andpassword4-enter the username and password from theRealm
Expected Result:User name and password are accepted and usercan surf the internet.
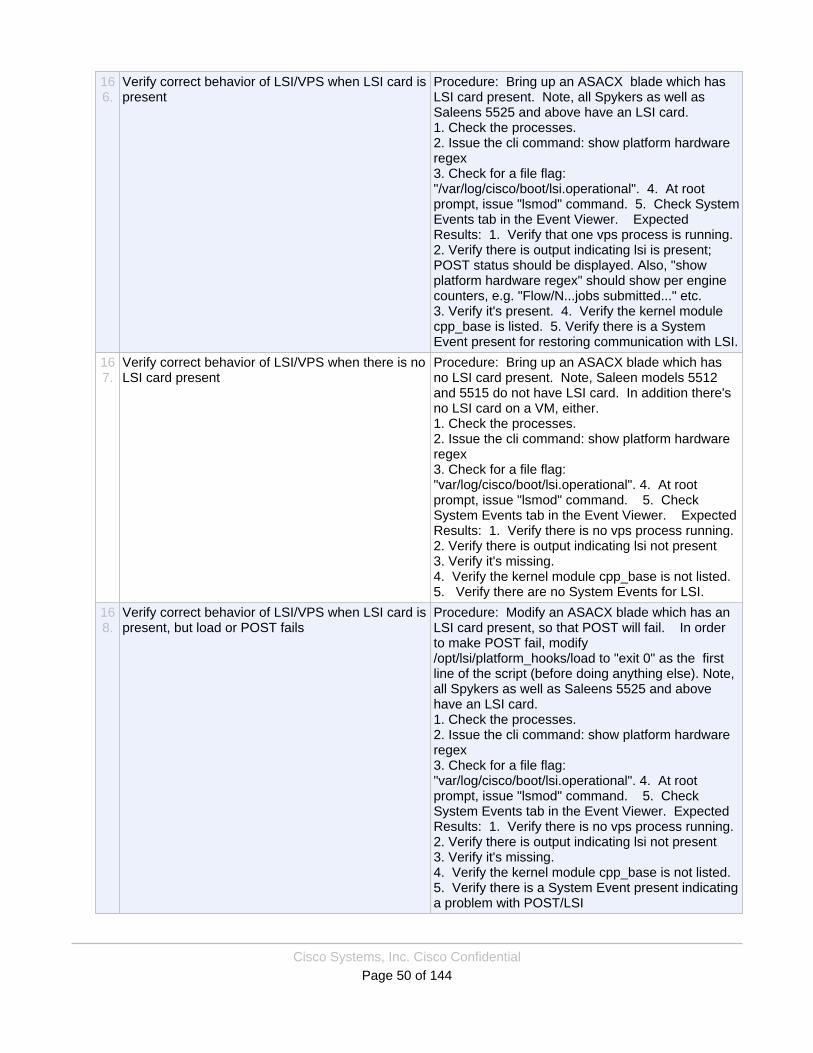
Cisco Systems, Inc. Cisco ConfidentialPage 50 of 144
166.
Verify correct behavior of LSI/VPS when LSI card ispresent
Procedure: Bring up an ASACX blade which hasLSI card present. Note, all Spykers as well asSaleens 5525 and above have an LSI card.1. Check the processes.2. Issue the cli command: show platform hardwareregex3. Check for a file flag:"/var/log/cisco/boot/lsi.operational". 4. At rootprompt, issue "lsmod" command. 5. Check SystemEvents tab in the Event Viewer. ExpectedResults: 1. Verify that one vps process is running.2. Verify there is output indicating lsi is present;POST status should be displayed. Also, "showplatform hardware regex" should show per enginecounters, e.g. "Flow/N...jobs submitted..." etc.3. Verify it's present. 4. Verify the kernel modulecpp_base is listed. 5. Verify there is a SystemEvent present for restoring communication with LSI.
167.
Verify correct behavior of LSI/VPS when there is noLSI card present
Procedure: Bring up an ASACX blade which hasno LSI card present. Note, Saleen models 5512and 5515 do not have LSI card. In addition there'sno LSI card on a VM, either.1. Check the processes.2. Issue the cli command: show platform hardwareregex3. Check for a file flag:"var/log/cisco/boot/lsi.operational". 4. At rootprompt, issue "lsmod" command. 5. CheckSystem Events tab in the Event Viewer. ExpectedResults: 1. Verify there is no vps process running.2. Verify there is output indicating lsi not present3. Verify it's missing.4. Verify the kernel module cpp_base is not listed.5. Verify there are no System Events for LSI.
168.
Verify correct behavior of LSI/VPS when LSI card ispresent, but load or POST fails
Procedure: Modify an ASACX blade which has anLSI card present, so that POST will fail. In orderto make POST fail, modify/opt/lsi/platform_hooks/load to "exit 0" as the firstline of the script (before doing anything else). Note,all Spykers as well as Saleens 5525 and abovehave an LSI card.1. Check the processes.2. Issue the cli command: show platform hardwareregex3. Check for a file flag:"var/log/cisco/boot/lsi.operational". 4. At rootprompt, issue "lsmod" command. 5. CheckSystem Events tab in the Event Viewer. ExpectedResults: 1. Verify there is no vps process running.2. Verify there is output indicating lsi not present3. Verify it's missing.4. Verify the kernel module cpp_base is not listed.5. Verify there is a System Event present indicatinga problem with POST/LSI
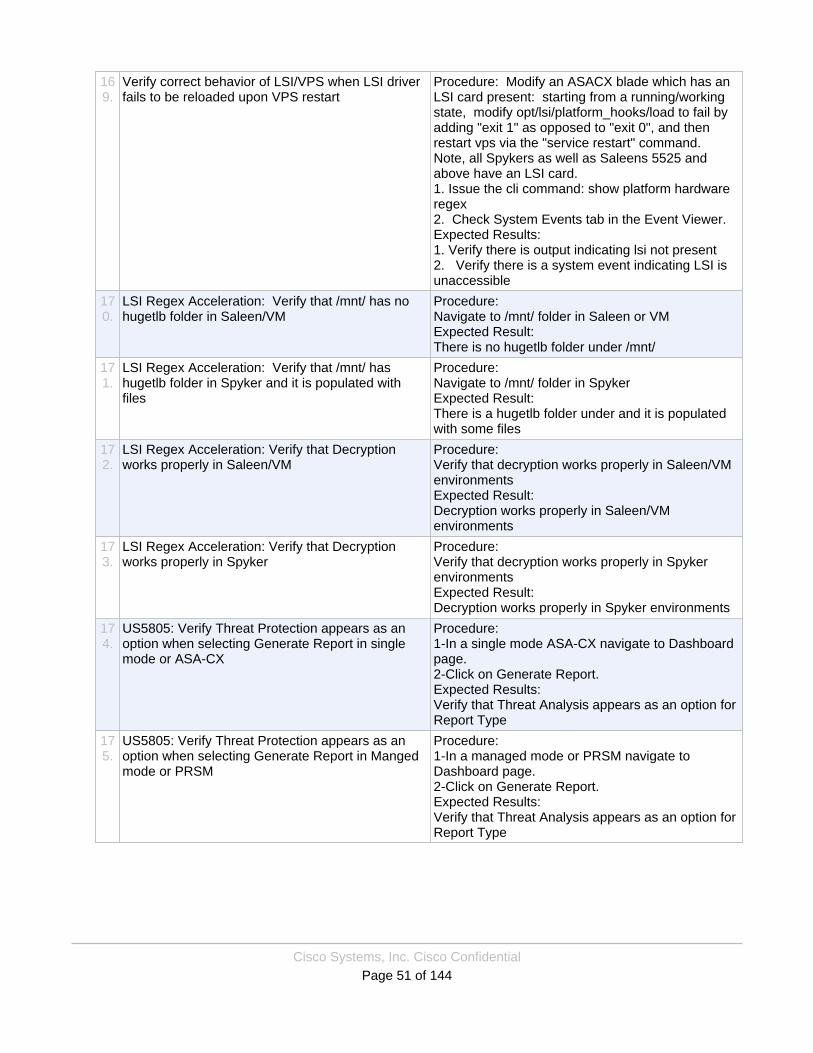
Cisco Systems, Inc. Cisco ConfidentialPage 51 of 144
169.
Verify correct behavior of LSI/VPS when LSI driverfails to be reloaded upon VPS restart
Procedure: Modify an ASACX blade which has anLSI card present: starting from a running/workingstate, modify opt/lsi/platform_hooks/load to fail byadding "exit 1" as opposed to "exit 0", and thenrestart vps via the "service restart" command.Note, all Spykers as well as Saleens 5525 andabove have an LSI card.1. Issue the cli command: show platform hardwareregex2. Check System Events tab in the Event Viewer.Expected Results:1. Verify there is output indicating lsi not present2. Verify there is a system event indicating LSI isunaccessible
170.
LSI Regex Acceleration: Verify that /mnt/ has nohugetlb folder in Saleen/VM
Procedure:Navigate to /mnt/ folder in Saleen or VMExpected Result:There is no hugetlb folder under /mnt/
171.
LSI Regex Acceleration: Verify that /mnt/ hashugetlb folder in Spyker and it is populated withfiles
Procedure:Navigate to /mnt/ folder in SpykerExpected Result:There is a hugetlb folder under and it is populatedwith some files
172.
LSI Regex Acceleration: Verify that Decryptionworks properly in Saleen/VM
Procedure:Verify that decryption works properly in Saleen/VMenvironmentsExpected Result:Decryption works properly in Saleen/VMenvironments
173.
LSI Regex Acceleration: Verify that Decryptionworks properly in Spyker
Procedure:Verify that decryption works properly in SpykerenvironmentsExpected Result:Decryption works properly in Spyker environments
174.
US5805: Verify Threat Protection appears as anoption when selecting Generate Report in singlemode or ASA-CX
Procedure:1-In a single mode ASA-CX navigate to Dashboardpage.2-Click on Generate Report.Expected Results:Verify that Threat Analysis appears as an option forReport Type
175.
US5805: Verify Threat Protection appears as anoption when selecting Generate Report in Mangedmode or PRSM
Procedure:1-In a managed mode or PRSM navigate toDashboard page.2-Click on Generate Report.Expected Results:Verify that Threat Analysis appears as an option forReport Type

Cisco Systems, Inc. Cisco ConfidentialPage 52 of 144
176.
US5805: Verify Threat Protection appears as anoption when selecting Generate Report in singlemode or ASA-CX everywhere Generate Reportappears.
Procedure:1-In a single mode or ASA-CX navigate to all pagesthat have Generate report eg Network overview,Malicious traffic, Threat protection, Users, Webdestinations, Web categories, Policies, Userdevices, Applications, Application types2-Click on Generate Report.Expected Results:Verify that Threat Analysis appears as an option forReport Type
177.
US5805: Verify Threat Protection appears as anoption when selecting Generate Report in ManagedMode or PRSM everywhere Generate Reportappears.
Procedure:1-In a managed mode or PRSM navigate to allpages that have Generate report eg Networkoverview, Malicious traffic, Threat protection, Users,Web destinations, Web categories, Policies, Userdevices, Applications, Application types2-Click on Generate Report.Expected Results:Verify that Threat Analysis appears as an option forReport Type
178.
US5805: Verify that a report can be successfullygenerated using Threat protection in single mode orASA-CX
Procedure:1-In a single mode or ASA-CX navigate toDashboard.2-Click on Generate report.3-Select Threat Analysis and generate a report.Expected Results:A report is generated succesfully.
179.
US5805: Verify that a report can be successfullygenerated using Threat protection in managedmode or PRSM
Procedure:1-In a single mode or ASA-CX navigate toDashboard.2-Click on Generate report.3-Select Threat Analysis and generate a report.Expected Results:A report is generated succesfully.
180.
US5805: Verify that a report can be successfullygenerated using Threat protection in single mode orASA-CX for all pre-defined Time Ranges
Procedure:1-In a single mode or ASA-CX navigate toDashboard.2-Click on Generate report.3-Select Threat Analysis and generate a report forall pre-defined Time Ranges.Expected Results:A report is generated succesfully.
181.
US5805: Verify that a report can be successfullygenerated using Threat protection in managedmode or PRSM for all pre-defined Time Ranges
Procedure:1-In a single mode or ASA-CX navigate toDashboard.2-Click on Generate report.3-Select Threat Analysis and generate a report forall pre-defined Time Ranges.Expected Results:A report is generated succesfully.

Cisco Systems, Inc. Cisco ConfidentialPage 53 of 144
182.
US5805: Verify that a report can be successfullygenerated using Threat protection in single mode orASA-CX using custom ranges.
Procedure:1-In a single mode or ASA-CX navigate toDashboard.2-Click on Generate report.3-Select Threat Analysis and generate a report forcustom time ranges taking hours, days, andmonths.Expected Results:A report is generated succesfully.
183.
US5805: Verify that a report can be successfullygenerated using Threat protection in managedmode or PRSM using custom Time Ranges
Procedure:1-In managed mode or PRSM navigate toDashboard.2-Click on Generate report.3-Select Threat Analysis and generate a report forcustom time ranges taking hours, days, andmonths.Expected Results:A report is generated succesfully.
184.
US5805: Verify that after passing HTTP, and non-HTTP traffic that these are properly generated inthe report in single mode or ASA-CX
Procedure:1-Pass some HTTP Traffic thorugh ASA-CX(singlemode)2-Pass some non-HTTP traffic through ASA-CX.3-Generate a Threat Analysis Report in the ASA-CX mode.Expected Results:1-Generated report reflects the HTTP and non-HTTP traffic correctly and accurately.
185.
US5805: Verify that after passing HTTP, and non-HTTP traffic that these are properly generated inthe report in managed mode or PRSM
Procedure:1-Pass some HTTP Traffic thorugh a managedmode or PRSM.2-Pass some non-HTTP traffic through a managedmode device or PRSM.3-Generate a Threat Analysis Report in the PRSM.Expected Results:1-Generated report reflects the HTTP and non-HTTP traffic correctly and accurately.
186.
US5805: Verify that when threats are placed asexceptions they are properly reported in singlemode or ASA-CX
Procedure:1-In a single mode or ASA-CX create a fewexceptions for threats to Deny, Allow, and ingorethreats.2-Pass several pcaps that are not included in theexceptions in the profile.3-Pass the traffic in the exceptions.4-Generate a Threat Analysis report.Expected Results:The report reflects all the passed pcaps correctlyand accurately.
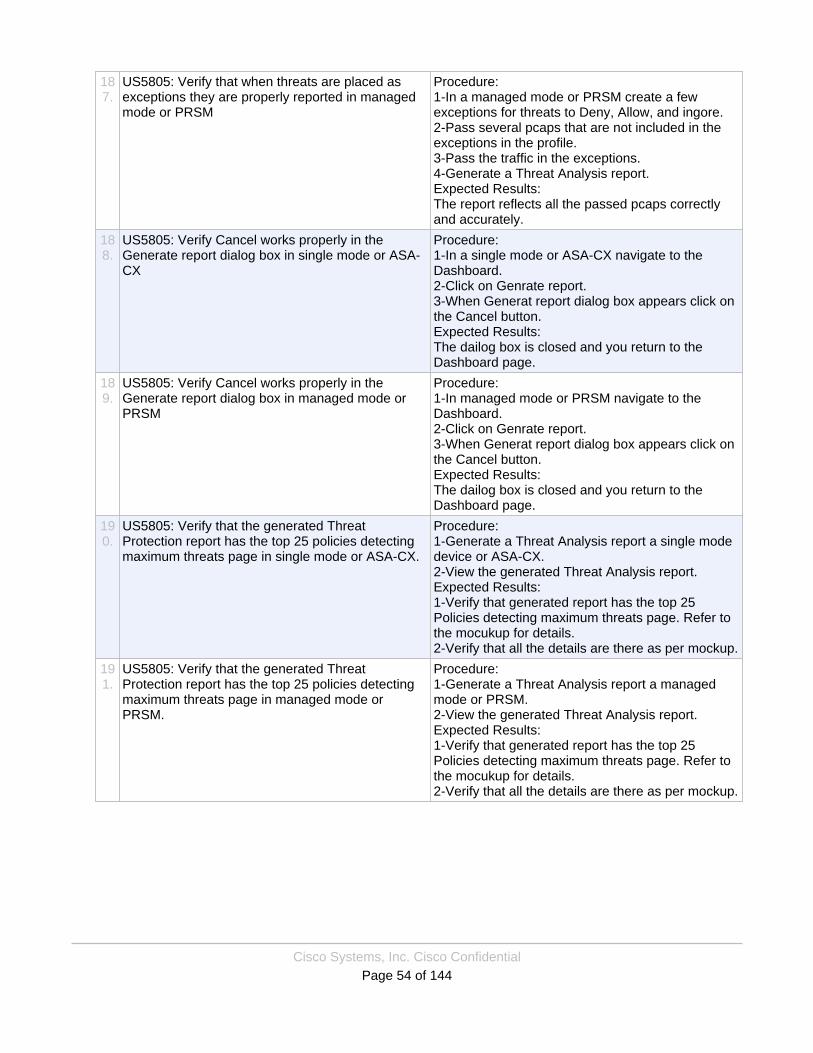
Cisco Systems, Inc. Cisco ConfidentialPage 54 of 144
187.
US5805: Verify that when threats are placed asexceptions they are properly reported in managedmode or PRSM
Procedure:1-In a managed mode or PRSM create a fewexceptions for threats to Deny, Allow, and ingore.2-Pass several pcaps that are not included in theexceptions in the profile.3-Pass the traffic in the exceptions.4-Generate a Threat Analysis report.Expected Results:The report reflects all the passed pcaps correctlyand accurately.
188.
US5805: Verify Cancel works properly in theGenerate report dialog box in single mode or ASA-CX
Procedure:1-In a single mode or ASA-CX navigate to theDashboard.2-Click on Genrate report.3-When Generat report dialog box appears click onthe Cancel button.Expected Results:The dailog box is closed and you return to theDashboard page.
189.
US5805: Verify Cancel works properly in theGenerate report dialog box in managed mode orPRSM
Procedure:1-In managed mode or PRSM navigate to theDashboard.2-Click on Genrate report.3-When Generat report dialog box appears click onthe Cancel button.Expected Results:The dailog box is closed and you return to theDashboard page.
190.
US5805: Verify that the generated ThreatProtection report has the top 25 policies detectingmaximum threats page in single mode or ASA-CX.
Procedure:1-Generate a Threat Analysis report a single modedevice or ASA-CX.2-View the generated Threat Analysis report.Expected Results:1-Verify that generated report has the top 25Policies detecting maximum threats page. Refer tothe mocukup for details.2-Verify that all the details are there as per mockup.
191.
US5805: Verify that the generated ThreatProtection report has the top 25 policies detectingmaximum threats page in managed mode orPRSM.
Procedure:1-Generate a Threat Analysis report a managedmode or PRSM.2-View the generated Threat Analysis report.Expected Results:1-Verify that generated report has the top 25Policies detecting maximum threats page. Refer tothe mocukup for details.2-Verify that all the details are there as per mockup.
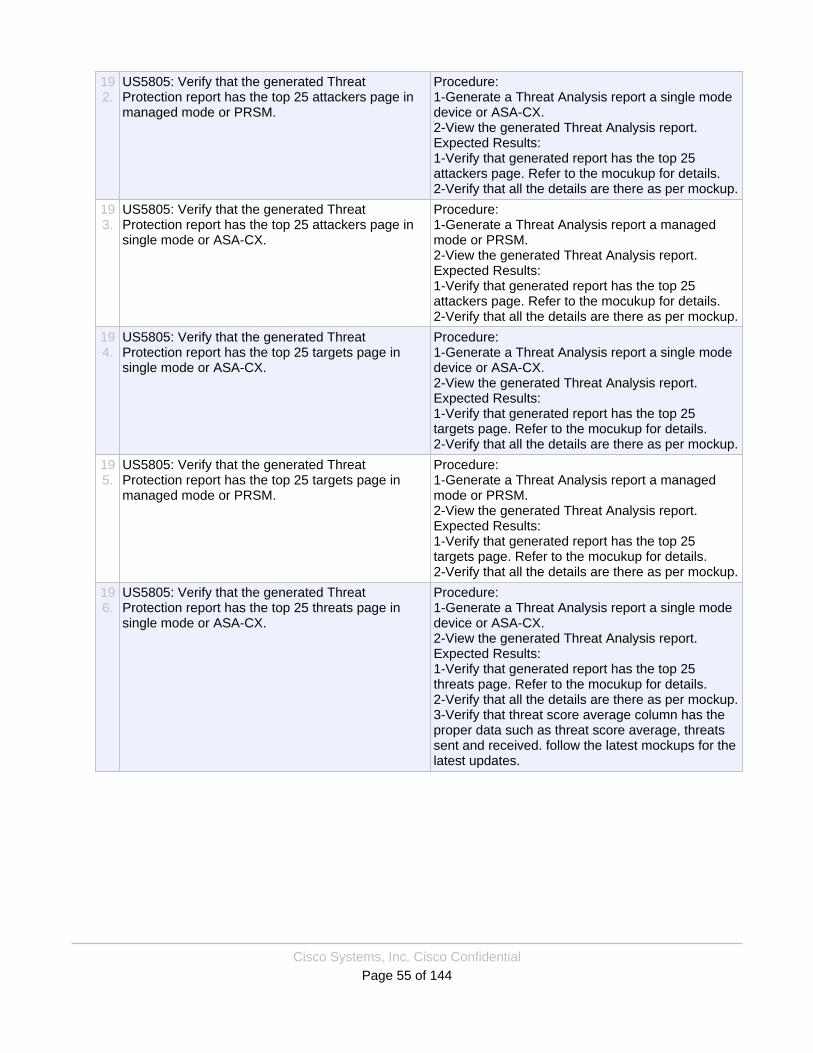
Cisco Systems, Inc. Cisco ConfidentialPage 55 of 144
192.
US5805: Verify that the generated ThreatProtection report has the top 25 attackers page inmanaged mode or PRSM.
Procedure:1-Generate a Threat Analysis report a single modedevice or ASA-CX.2-View the generated Threat Analysis report.Expected Results:1-Verify that generated report has the top 25attackers page. Refer to the mocukup for details.2-Verify that all the details are there as per mockup.
193.
US5805: Verify that the generated ThreatProtection report has the top 25 attackers page insingle mode or ASA-CX.
Procedure:1-Generate a Threat Analysis report a managedmode or PRSM.2-View the generated Threat Analysis report.Expected Results:1-Verify that generated report has the top 25attackers page. Refer to the mocukup for details.2-Verify that all the details are there as per mockup.
194.
US5805: Verify that the generated ThreatProtection report has the top 25 targets page insingle mode or ASA-CX.
Procedure:1-Generate a Threat Analysis report a single modedevice or ASA-CX.2-View the generated Threat Analysis report.Expected Results:1-Verify that generated report has the top 25targets page. Refer to the mocukup for details.2-Verify that all the details are there as per mockup.
195.
US5805: Verify that the generated ThreatProtection report has the top 25 targets page inmanaged mode or PRSM.
Procedure:1-Generate a Threat Analysis report a managedmode or PRSM.2-View the generated Threat Analysis report.Expected Results:1-Verify that generated report has the top 25targets page. Refer to the mocukup for details.2-Verify that all the details are there as per mockup.
196.
US5805: Verify that the generated ThreatProtection report has the top 25 threats page insingle mode or ASA-CX.
Procedure:1-Generate a Threat Analysis report a single modedevice or ASA-CX.2-View the generated Threat Analysis report.Expected Results:1-Verify that generated report has the top 25threats page. Refer to the mocukup for details.2-Verify that all the details are there as per mockup.3-Verify that threat score average column has theproper data such as threat score average, threatssent and received. follow the latest mockups for thelatest updates.
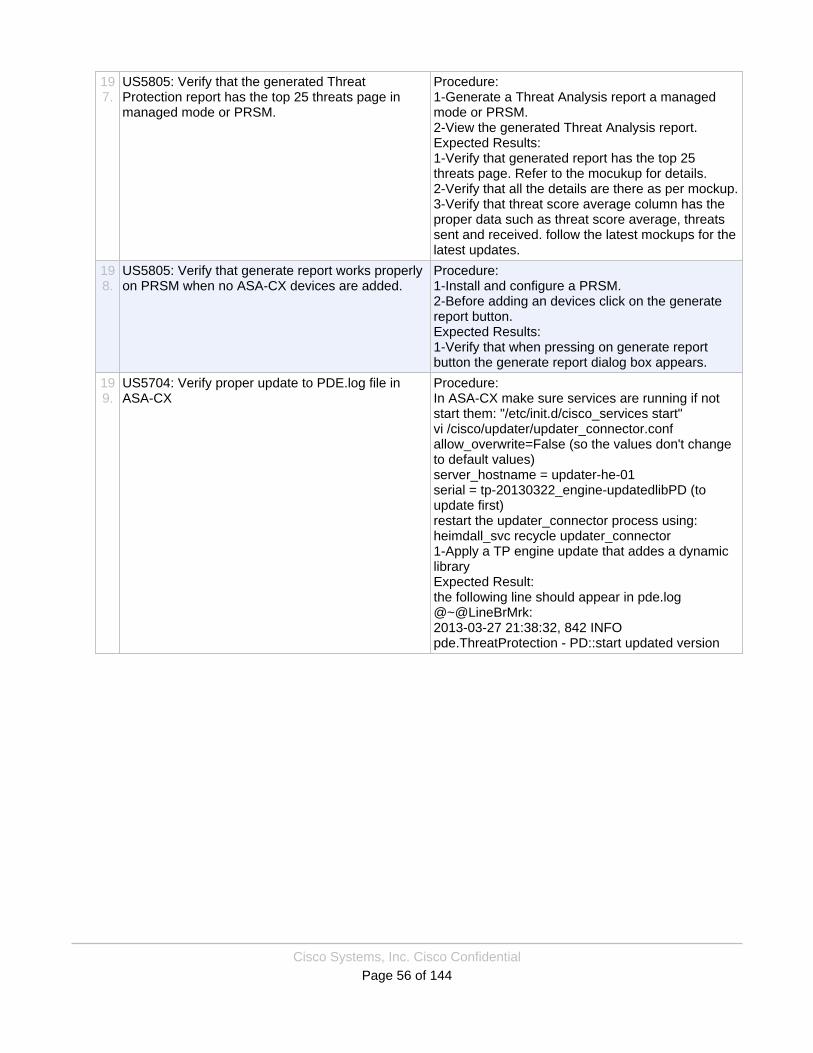
Cisco Systems, Inc. Cisco ConfidentialPage 56 of 144
197.
US5805: Verify that the generated ThreatProtection report has the top 25 threats page inmanaged mode or PRSM.
Procedure:1-Generate a Threat Analysis report a managedmode or PRSM.2-View the generated Threat Analysis report.Expected Results:1-Verify that generated report has the top 25threats page. Refer to the mocukup for details.2-Verify that all the details are there as per mockup.3-Verify that threat score average column has theproper data such as threat score average, threatssent and received. follow the latest mockups for thelatest updates.
198.
US5805: Verify that generate report works properlyon PRSM when no ASA-CX devices are added.
Procedure:1-Install and configure a PRSM.2-Before adding an devices click on the generatereport button.Expected Results:1-Verify that when pressing on generate reportbutton the generate report dialog box appears.
199.
US5704: Verify proper update to PDE.log file inASA-CX
Procedure:In ASA-CX make sure services are running if notstart them: "/etc/init.d/cisco_services start"vi /cisco/updater/updater_connector.confallow_overwrite=False (so the values don't changeto default values)server_hostname = updater-he-01serial = tp-20130322_engine-updatedlibPD (toupdate first)restart the updater_connector process using:heimdall_svc recycle updater_connector1-Apply a TP engine update that addes a dynamiclibraryExpected Result:the following line should appear in pde.log@~@LineBrMrk:2013-03-27 21:38:32, 842 INFOpde.ThreatProtection - PD::start updated version
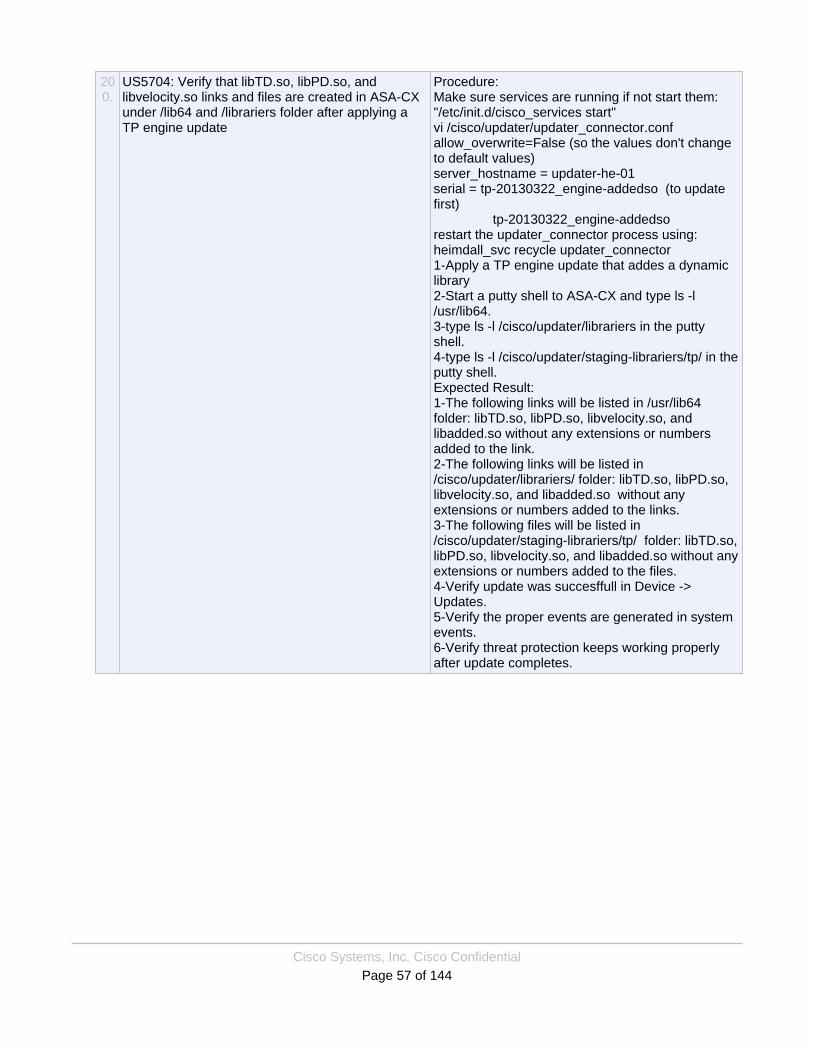
Cisco Systems, Inc. Cisco ConfidentialPage 57 of 144
200.
US5704: Verify that libTD.so, libPD.so, andlibvelocity.so links and files are created in ASA-CXunder /lib64 and /librariers folder after applying aTP engine update
Procedure:Make sure services are running if not start them:"/etc/init.d/cisco_services start"vi /cisco/updater/updater_connector.confallow_overwrite=False (so the values don't changeto default values)server_hostname = updater-he-01serial = tp-20130322_engine-addedso (to updatefirst) tp-20130322_engine-addedsorestart the updater_connector process using:heimdall_svc recycle updater_connector1-Apply a TP engine update that addes a dynamiclibrary2-Start a putty shell to ASA-CX and type ls -l/usr/lib64.3-type ls -l /cisco/updater/librariers in the puttyshell.4-type ls -l /cisco/updater/staging-librariers/tp/ in theputty shell.Expected Result:1-The following links will be listed in /usr/lib64folder: libTD.so, libPD.so, libvelocity.so, andlibadded.so without any extensions or numbersadded to the link.2-The following links will be listed in/cisco/updater/librariers/ folder: libTD.so, libPD.so,libvelocity.so, and libadded.so without anyextensions or numbers added to the links.3-The following files will be listed in/cisco/updater/staging-librariers/tp/ folder: libTD.so,libPD.so, libvelocity.so, and libadded.so without anyextensions or numbers added to the files.4-Verify update was succesffull in Device ->Updates.5-Verify the proper events are generated in systemevents.6-Verify threat protection keeps working properlyafter update completes.
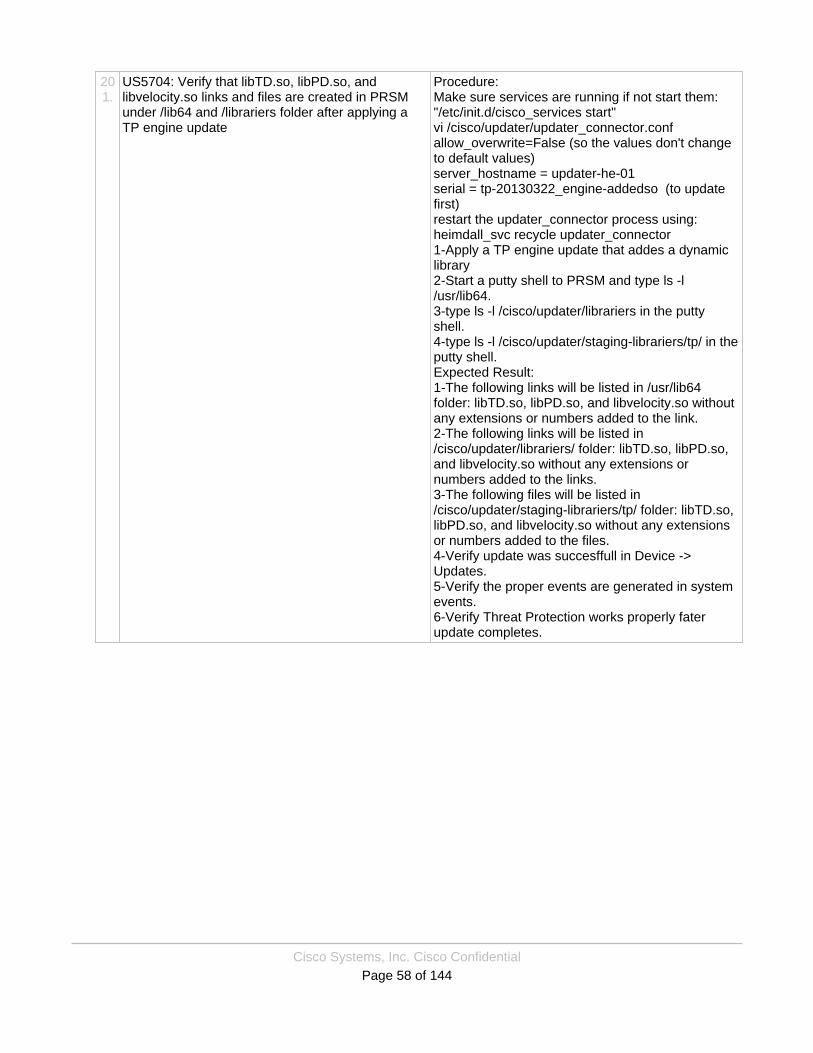
Cisco Systems, Inc. Cisco ConfidentialPage 58 of 144
201.
US5704: Verify that libTD.so, libPD.so, andlibvelocity.so links and files are created in PRSMunder /lib64 and /librariers folder after applying aTP engine update
Procedure:Make sure services are running if not start them:"/etc/init.d/cisco_services start"vi /cisco/updater/updater_connector.confallow_overwrite=False (so the values don't changeto default values)server_hostname = updater-he-01serial = tp-20130322_engine-addedso (to updatefirst)restart the updater_connector process using:heimdall_svc recycle updater_connector1-Apply a TP engine update that addes a dynamiclibrary2-Start a putty shell to PRSM and type ls -l/usr/lib64.3-type ls -l /cisco/updater/librariers in the puttyshell.4-type ls -l /cisco/updater/staging-librariers/tp/ in theputty shell.Expected Result:1-The following links will be listed in /usr/lib64folder: libTD.so, libPD.so, and libvelocity.so withoutany extensions or numbers added to the link.2-The following links will be listed in/cisco/updater/librariers/ folder: libTD.so, libPD.so,and libvelocity.so without any extensions ornumbers added to the links.3-The following files will be listed in/cisco/updater/staging-librariers/tp/ folder: libTD.so,libPD.so, and libvelocity.so without any extensionsor numbers added to the files.4-Verify update was succesffull in Device ->Updates.5-Verify the proper events are generated in systemevents.6-Verify Threat Protection works properly faterupdate completes.

Cisco Systems, Inc. Cisco ConfidentialPage 59 of 144
202.
US5704: Verify that libTD.so, libPD.so, andlibvelocity.so links and files are deleted in ASA-CXunder /lib64 and /librariers folder after applying aTP engine rollback
Procedure:This test case must be ran after the test case whereserial number was tp-20130322_engine-addedsoMake sure services are running if not start them:"/etc/init.d/cisco_services start"vi /cisco/updater/updater_connector.confallow_overwrite=False (so the values don't changeto default values)server_hostname = updater-he-01serial = tp-20130322_engine-good (for rollback toupdated version)restart the updater_connector process using:heimdall_svc recycle updater_connector1-Apply a TP engine rollback that rollbacks to theprevious version.2-Start a putty shell to ASA-CX and type ls -l/usr/lib64.3-type ls -l /cisco/updater/librariers in the puttyshell.4-type ls -l /cisco/updater/staging-librariers/tp/ in theputty shell.Expected Result:1-The following linsk will be listed in /usr/lib64folder: libTD.so, libPD.so, and libvelocity.so withoutany extensions or numbers added to the link.2-The following links will be deleted from/cisco/updater/librariers/ folder: libTD.so, libPD.so,and libvelocity.so without any extensions ornumbers added to the links.3-The following files will be deleted and replacedwith the previous versions in /cisco/updater/staging-librariers/tp/ folder: libTD.so, libPD.so, andlibvelocity.so without any extensions or numbersadded to the files.4-Verify rollback was succesffull in Device ->Updates.5-Verify the proper events are generated in systemevents.6-Verify Threat protection keeps on working afterrollback completes.

Cisco Systems, Inc. Cisco ConfidentialPage 60 of 144
203.
US5704: Verify that libTD.so, libPD.so, andlibvelocity.so links and files are deleted in PRSMunder /lib64 and /librariers folder after applying aTP engine rollback
Procedure:This test case must be ran after the test case whereserial number was tp-20130322_engine-addedsoMake sure services are running if not start them:"/etc/init.d/cisco_services start"vi /cisco/updater/updater_connector.confallow_overwrite=False (so the values don't changeto default values)server_hostname = updater-he-01serial = tp-20130322_engine-good (for rollback toupdated version)restart the updater_connector process using:heimdall_svc recycle updater_connector1-Apply a TP engine rollback that rollbacks to theprevious version.2-Start a putty shell to PRSM and type ls -l/usr/lib64.3-type ls -l /cisco/updater/librariers in the puttyshell.4-type ls -l /cisco/updater/staging-librariers/tp/ in theputty shell.Expected Result:1-The following linsk will be listed in /usr/lib64folder: libTD.so, libPD.so, and libvelocity.so withoutany extensions or numbers added to the link.2-The following links will be listed in/cisco/updater/librariers/ folder: libTD.so, libPD.so,and libvelocity.so without any extensions ornumbers added to the links.3-The following files will be listed in/cisco/updater/staging-librariers/tp/ folder: libTD.so,libPD.so, and libvelocity.so without any extensionsor numbers added to the files.4-Verify update was succesffull in Device ->Updates.5-Verify the proper events are generated in systemevents.6-Verify Threat Protection works properly afterrollback completes.
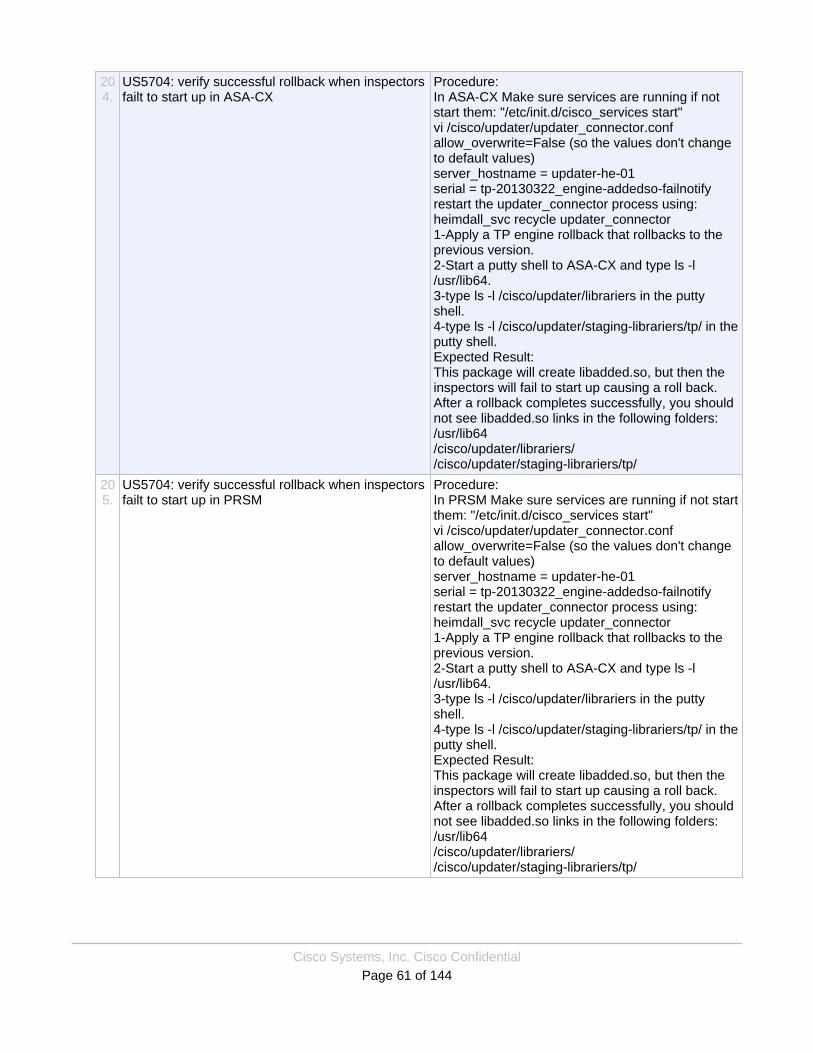
Cisco Systems, Inc. Cisco ConfidentialPage 61 of 144
204.
US5704: verify successful rollback when inspectorsfailt to start up in ASA-CX
Procedure:In ASA-CX Make sure services are running if notstart them: "/etc/init.d/cisco_services start"vi /cisco/updater/updater_connector.confallow_overwrite=False (so the values don't changeto default values)server_hostname = updater-he-01serial = tp-20130322_engine-addedso-failnotifyrestart the updater_connector process using:heimdall_svc recycle updater_connector1-Apply a TP engine rollback that rollbacks to theprevious version.2-Start a putty shell to ASA-CX and type ls -l/usr/lib64.3-type ls -l /cisco/updater/librariers in the puttyshell.4-type ls -l /cisco/updater/staging-librariers/tp/ in theputty shell.Expected Result:This package will create libadded.so, but then theinspectors will fail to start up causing a roll back.After a rollback completes successfully, you shouldnot see libadded.so links in the following folders:/usr/lib64/cisco/updater/librariers//cisco/updater/staging-librariers/tp/
205.
US5704: verify successful rollback when inspectorsfailt to start up in PRSM
Procedure:In PRSM Make sure services are running if not startthem: "/etc/init.d/cisco_services start"vi /cisco/updater/updater_connector.confallow_overwrite=False (so the values don't changeto default values)server_hostname = updater-he-01serial = tp-20130322_engine-addedso-failnotifyrestart the updater_connector process using:heimdall_svc recycle updater_connector1-Apply a TP engine rollback that rollbacks to theprevious version.2-Start a putty shell to ASA-CX and type ls -l/usr/lib64.3-type ls -l /cisco/updater/librariers in the puttyshell.4-type ls -l /cisco/updater/staging-librariers/tp/ in theputty shell.Expected Result:This package will create libadded.so, but then theinspectors will fail to start up causing a roll back.After a rollback completes successfully, you shouldnot see libadded.so links in the following folders:/usr/lib64/cisco/updater/librariers//cisco/updater/staging-librariers/tp/
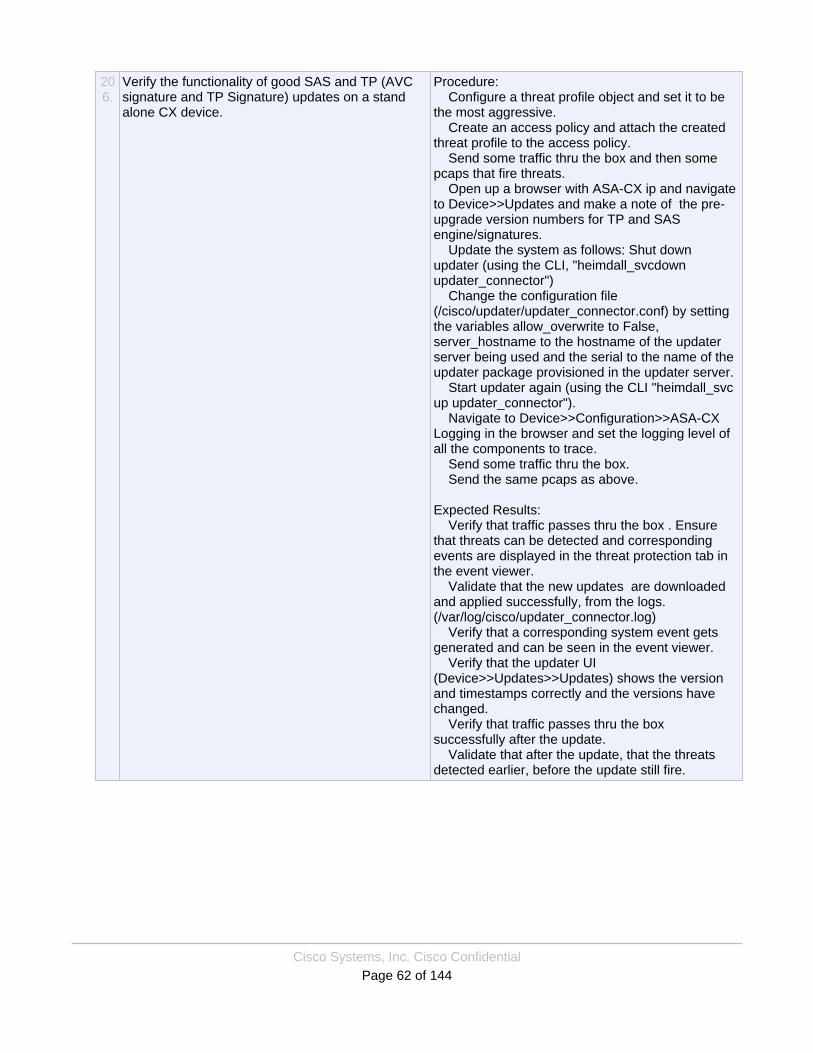
Cisco Systems, Inc. Cisco ConfidentialPage 62 of 144
206.
Verify the functionality of good SAS and TP (AVCsignature and TP Signature) updates on a standalone CX device.
Procedure: Configure a threat profile object and set it to bethe most aggressive. Create an access policy and attach the createdthreat profile to the access policy. Send some traffic thru the box and then somepcaps that fire threats. Open up a browser with ASA-CX ip and navigateto Device>>Updates and make a note of the pre-upgrade version numbers for TP and SASengine/signatures. Update the system as follows: Shut downupdater (using the CLI, "heimdall_svcdownupdater_connector") Change the configuration file(/cisco/updater/updater_connector.conf) by settingthe variables allow_overwrite to False,server_hostname to the hostname of the updaterserver being used and the serial to the name of theupdater package provisioned in the updater server. Start updater again (using the CLI "heimdall_svcup updater_connector"). Navigate to Device>>Configuration>>ASA-CXLogging in the browser and set the logging level ofall the components to trace. Send some traffic thru the box. Send the same pcaps as above.
Expected Results: Verify that traffic passes thru the box . Ensurethat threats can be detected and correspondingevents are displayed in the threat protection tab inthe event viewer. Validate that the new updates are downloadedand applied successfully, from the logs.(/var/log/cisco/updater_connector.log) Verify that a corresponding system event getsgenerated and can be seen in the event viewer. Verify that the updater UI(Device>>Updates>>Updates) shows the versionand timestamps correctly and the versions havechanged. Verify that traffic passes thru the boxsuccessfully after the update. Validate that after the update, that the threatsdetected earlier, before the update still fire.
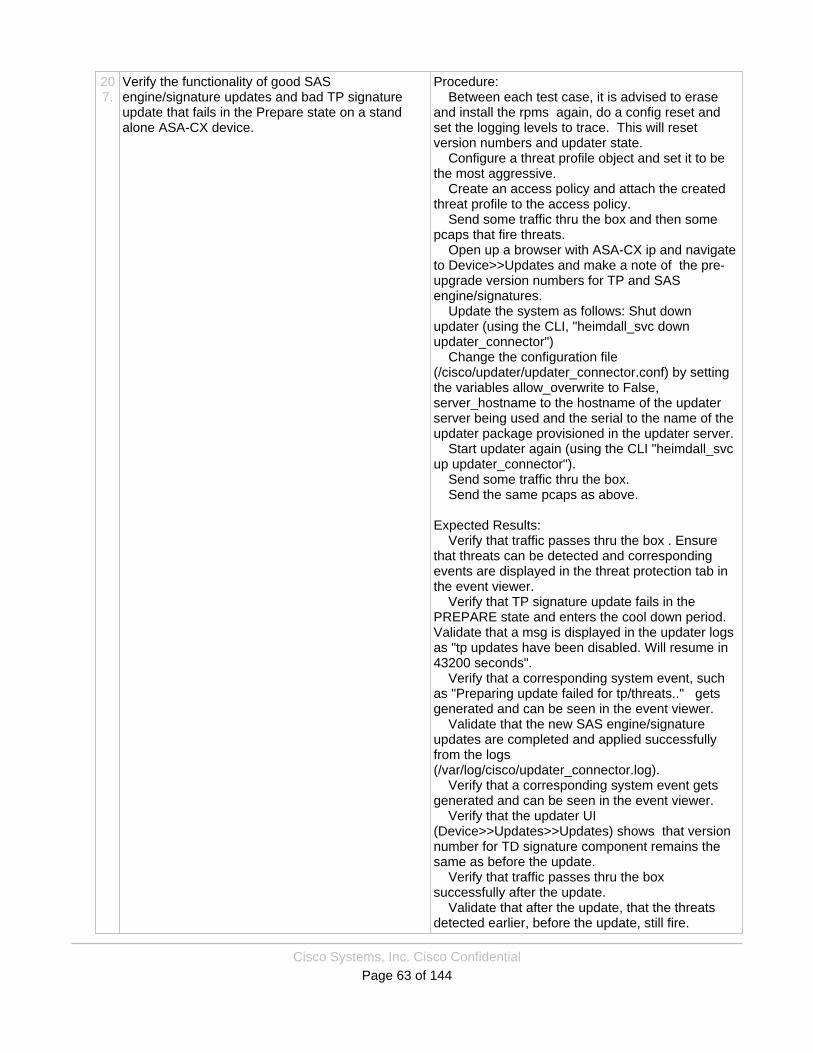
Cisco Systems, Inc. Cisco ConfidentialPage 63 of 144
207.
Verify the functionality of good SASengine/signature updates and bad TP signatureupdate that fails in the Prepare state on a standalone ASA-CX device.
Procedure: Between each test case, it is advised to eraseand install the rpms again, do a config reset andset the logging levels to trace. This will resetversion numbers and updater state. Configure a threat profile object and set it to bethe most aggressive. Create an access policy and attach the createdthreat profile to the access policy. Send some traffic thru the box and then somepcaps that fire threats. Open up a browser with ASA-CX ip and navigateto Device>>Updates and make a note of the pre-upgrade version numbers for TP and SASengine/signatures. Update the system as follows: Shut downupdater (using the CLI, "heimdall_svc downupdater_connector") Change the configuration file(/cisco/updater/updater_connector.conf) by settingthe variables allow_overwrite to False,server_hostname to the hostname of the updaterserver being used and the serial to the name of theupdater package provisioned in the updater server. Start updater again (using the CLI "heimdall_svcup updater_connector"). Send some traffic thru the box. Send the same pcaps as above.
Expected Results: Verify that traffic passes thru the box . Ensurethat threats can be detected and correspondingevents are displayed in the threat protection tab inthe event viewer. Verify that TP signature update fails in thePREPARE state and enters the cool down period.Validate that a msg is displayed in the updater logsas "tp updates have been disabled. Will resume in43200 seconds". Verify that a corresponding system event, suchas "Preparing update failed for tp/threats.." getsgenerated and can be seen in the event viewer. Validate that the new SAS engine/signatureupdates are completed and applied successfullyfrom the logs(/var/log/cisco/updater_connector.log). Verify that a corresponding system event getsgenerated and can be seen in the event viewer. Verify that the updater UI(Device>>Updates>>Updates) shows that versionnumber for TD signature component remains thesame as before the update. Verify that traffic passes thru the boxsuccessfully after the update. Validate that after the update, that the threatsdetected earlier, before the update, still fire.
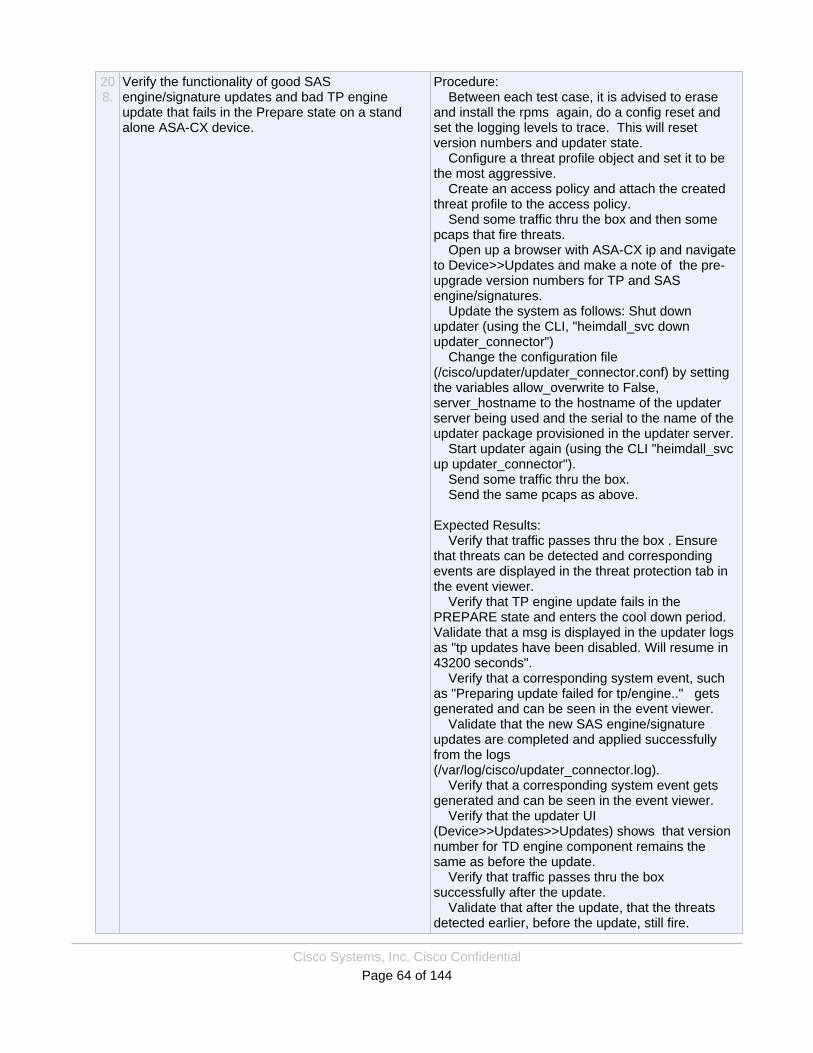
Cisco Systems, Inc. Cisco ConfidentialPage 64 of 144
208.
Verify the functionality of good SASengine/signature updates and bad TP engineupdate that fails in the Prepare state on a standalone ASA-CX device.
Procedure: Between each test case, it is advised to eraseand install the rpms again, do a config reset andset the logging levels to trace. This will resetversion numbers and updater state. Configure a threat profile object and set it to bethe most aggressive. Create an access policy and attach the createdthreat profile to the access policy. Send some traffic thru the box and then somepcaps that fire threats. Open up a browser with ASA-CX ip and navigateto Device>>Updates and make a note of the pre-upgrade version numbers for TP and SASengine/signatures. Update the system as follows: Shut downupdater (using the CLI, "heimdall_svc downupdater_connector") Change the configuration file(/cisco/updater/updater_connector.conf) by settingthe variables allow_overwrite to False,server_hostname to the hostname of the updaterserver being used and the serial to the name of theupdater package provisioned in the updater server. Start updater again (using the CLI "heimdall_svcup updater_connector"). Send some traffic thru the box. Send the same pcaps as above.
Expected Results: Verify that traffic passes thru the box . Ensurethat threats can be detected and correspondingevents are displayed in the threat protection tab inthe event viewer. Verify that TP engine update fails in thePREPARE state and enters the cool down period.Validate that a msg is displayed in the updater logsas "tp updates have been disabled. Will resume in43200 seconds". Verify that a corresponding system event, suchas "Preparing update failed for tp/engine.." getsgenerated and can be seen in the event viewer. Validate that the new SAS engine/signatureupdates are completed and applied successfullyfrom the logs(/var/log/cisco/updater_connector.log). Verify that a corresponding system event getsgenerated and can be seen in the event viewer. Verify that the updater UI(Device>>Updates>>Updates) shows that versionnumber for TD engine component remains thesame as before the update. Verify that traffic passes thru the boxsuccessfully after the update. Validate that after the update, that the threatsdetected earlier, before the update, still fire.

Cisco Systems, Inc. Cisco ConfidentialPage 65 of 144
209.
Verify the functionality of good TP engine/signatureupdates and bad SAS signature update that fails inthe Prepare state on a stand alone ASA-CX device.
Procedure: Between each test case, it is advised to eraseand install the rpms again, do a config reset andset the logging levels to trace. This will resetversion numbers and updater state. Configure a threat profile object and set it to bethe most aggressive. Create an access policy and attach the createdthreat profile to the access policy. Send some traffic thru the box and then somepcaps that fire threats. Open up a browser with ASA-CX ip and navigateto Device>>Updates and make a note of the pre-upgrade version numbers for TP and SASengine/signatures. Update the system as follows: Shut downupdater (using the CLI, "heimdall_svc downupdater_connector") Change the configuration file(/cisco/updater/updater_connector.conf) by settingthe variables allow_overwrite to False,server_hostname to the hostname of the updaterserver being used and the serial to the name of theupdater package provisioned in the updater server. Start updater again (using the CLI "heimdall_svcup updater_connector"). Send some traffic thru the box. Send the same pcaps as above.
Expected Results: Verify that traffic passes thru the box . Ensurethat threats can be detected and correspondingevents are displayed in the threat protection tab inthe event viewer. Verify that SAS (in this case, AVC signature)update fails in the PREPARE state and enters thecool down period. Validate that a msg is displayedin the updater logs as "sas updates have beendisabled. Will resume in 43200 seconds". Verify that a corresponding system event, suchas "Preparing update failed for avc/dat.." getsgenerated and can be seen in the event viewer. Validate that the new tp engine/signatureupdates are completed and applied successfullyfrom the logs(/var/log/cisco/updater_connector.log). Verify that a corresponding system event getsgenerated and can be seen in the event viewer. Verify that the updater UI(Device>>Updates>>Updates) shows that versionnumber for SAS (in this case, AVC signature)component remains the same as before the update. Verify that traffic passes thru the boxsuccessfully after the update. Validate that after the update, that the threatsdetected earlier, before the update, still fire.
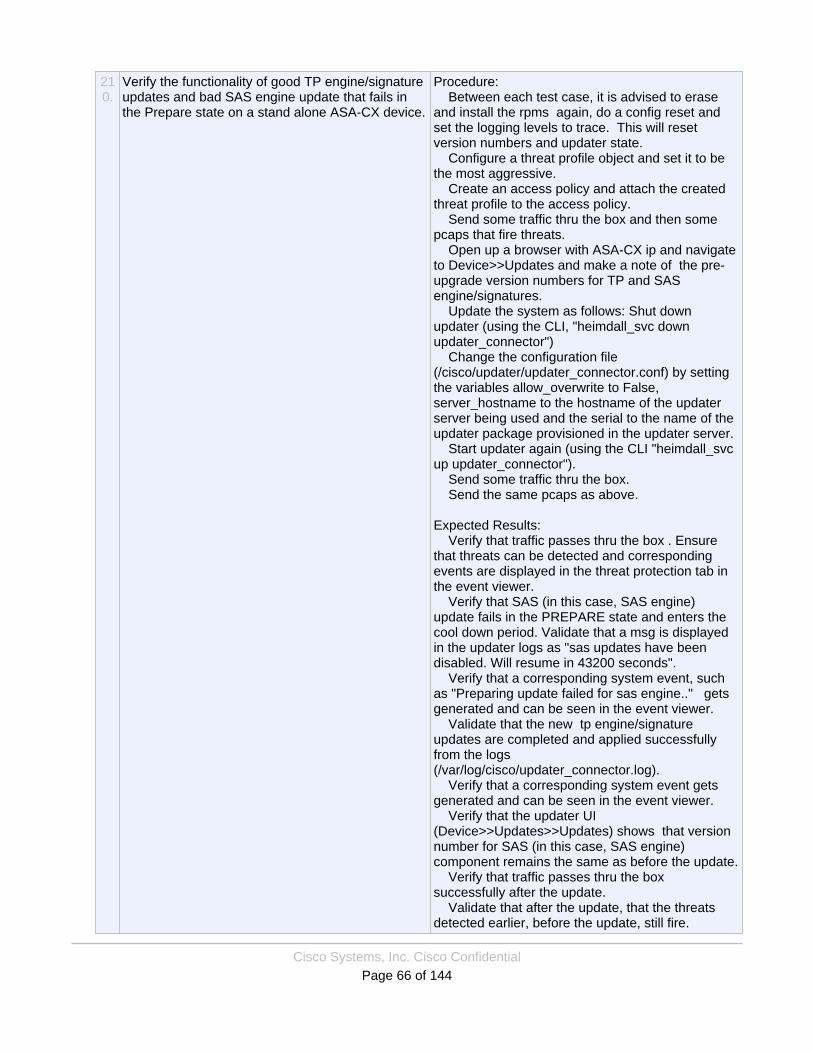
Cisco Systems, Inc. Cisco ConfidentialPage 66 of 144
210.
Verify the functionality of good TP engine/signatureupdates and bad SAS engine update that fails inthe Prepare state on a stand alone ASA-CX device.
Procedure: Between each test case, it is advised to eraseand install the rpms again, do a config reset andset the logging levels to trace. This will resetversion numbers and updater state. Configure a threat profile object and set it to bethe most aggressive. Create an access policy and attach the createdthreat profile to the access policy. Send some traffic thru the box and then somepcaps that fire threats. Open up a browser with ASA-CX ip and navigateto Device>>Updates and make a note of the pre-upgrade version numbers for TP and SASengine/signatures. Update the system as follows: Shut downupdater (using the CLI, "heimdall_svc downupdater_connector") Change the configuration file(/cisco/updater/updater_connector.conf) by settingthe variables allow_overwrite to False,server_hostname to the hostname of the updaterserver being used and the serial to the name of theupdater package provisioned in the updater server. Start updater again (using the CLI "heimdall_svcup updater_connector"). Send some traffic thru the box. Send the same pcaps as above.
Expected Results: Verify that traffic passes thru the box . Ensurethat threats can be detected and correspondingevents are displayed in the threat protection tab inthe event viewer. Verify that SAS (in this case, SAS engine)update fails in the PREPARE state and enters thecool down period. Validate that a msg is displayedin the updater logs as "sas updates have beendisabled. Will resume in 43200 seconds". Verify that a corresponding system event, suchas "Preparing update failed for sas engine.." getsgenerated and can be seen in the event viewer. Validate that the new tp engine/signatureupdates are completed and applied successfullyfrom the logs(/var/log/cisco/updater_connector.log). Verify that a corresponding system event getsgenerated and can be seen in the event viewer. Verify that the updater UI(Device>>Updates>>Updates) shows that versionnumber for SAS (in this case, SAS engine)component remains the same as before the update. Verify that traffic passes thru the boxsuccessfully after the update. Validate that after the update, that the threatsdetected earlier, before the update, still fire.
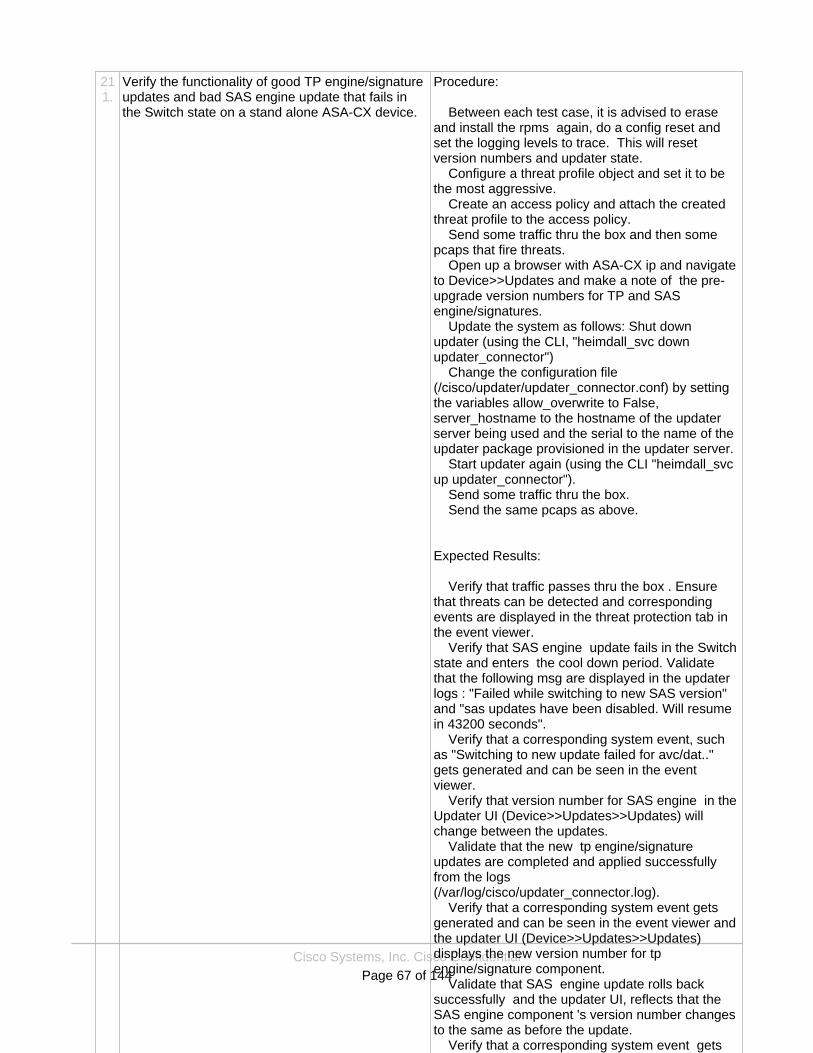
Cisco Systems, Inc. Cisco ConfidentialPage 67 of 144
211.
Verify the functionality of good TP engine/signatureupdates and bad SAS engine update that fails inthe Switch state on a stand alone ASA-CX device.
Procedure:
Between each test case, it is advised to eraseand install the rpms again, do a config reset andset the logging levels to trace. This will resetversion numbers and updater state. Configure a threat profile object and set it to bethe most aggressive. Create an access policy and attach the createdthreat profile to the access policy. Send some traffic thru the box and then somepcaps that fire threats. Open up a browser with ASA-CX ip and navigateto Device>>Updates and make a note of the pre-upgrade version numbers for TP and SASengine/signatures. Update the system as follows: Shut downupdater (using the CLI, "heimdall_svc downupdater_connector") Change the configuration file(/cisco/updater/updater_connector.conf) by settingthe variables allow_overwrite to False,server_hostname to the hostname of the updaterserver being used and the serial to the name of theupdater package provisioned in the updater server. Start updater again (using the CLI "heimdall_svcup updater_connector"). Send some traffic thru the box. Send the same pcaps as above.
Expected Results:
Verify that traffic passes thru the box . Ensurethat threats can be detected and correspondingevents are displayed in the threat protection tab inthe event viewer. Verify that SAS engine update fails in the Switchstate and enters the cool down period. Validatethat the following msg are displayed in the updaterlogs : "Failed while switching to new SAS version"and "sas updates have been disabled. Will resumein 43200 seconds". Verify that a corresponding system event, suchas "Switching to new update failed for avc/dat.."gets generated and can be seen in the eventviewer. Verify that version number for SAS engine in theUpdater UI (Device>>Updates>>Updates) willchange between the updates. Validate that the new tp engine/signatureupdates are completed and applied successfullyfrom the logs(/var/log/cisco/updater_connector.log). Verify that a corresponding system event getsgenerated and can be seen in the event viewer andthe updater UI (Device>>Updates>>Updates)displays the new version number for tpengine/signature component. Validate that SAS engine update rolls backsuccessfully and the updater UI, reflects that theSAS engine component 's version number changesto the same as before the update. Verify that a corresponding system event getsgenerated in the event viewer indicating therollback. Verify that traffic passes thru the boxsuccessfully after the update. Validate that after the update, that the threatsdetected earlier, before the update, still fire.
Cisco Systems, Inc. Cisco ConfidentialPage 68 of 144
212.
Verify the functionality of good TP engine/signatureupdates and bad SAS signature update that fails inthe Switch/Commit state on a stand alone ASA-CXdevice.
Procedure:
Between each test case, it is advised to eraseand install the rpms again, do a config reset andset the logging levels to trace. This will resetversion numbers and updater state. Configure a threat profile object and set it to bethe most aggressive. Create an access policy and attach the createdthreat profile to the access policy. Send some traffic thru the box and then somepcaps that fire threats. Open up a browser with ASA-CX ip and navigateto Device>>Updates and make a note of the pre-upgrade version numbers for TP and SASengine/signatures. Update the system as follows: Shut downupdater (using the CLI, "heimdall_svc downupdater_connector") Change the configuration file(/cisco/updater/updater_connector.conf) by settingthe variables allow_overwrite to False,server_hostname to the hostname of the updaterserver being used and the serial to the name of theupdater package provisioned in the updater server. Start updater again (using the CLI "heimdall_svcup updater_connector"). Send some traffic thru the box. Send the same pcaps as above.
Expected Results:
Verify that traffic passes thru the box . Ensurethat threats can be detected and correspondingevents are displayed in the threat protection tab inthe event viewer. Verify that SAS (in this case, AVC Signature)update fails in the Switch state and enters the cooldown period. Validate that the following msg aredisplayed in the updater logs : "Some Inspectorsfailed to switch: .." and "tp updates have beendisabled. Will resume in 43200 seconds". Verify that a corresponding system event getsgenerated and can be seen in the event viewer. Verify that version number for AVC signature inthe Updater UI (Device>>Updates>>Updates) willchange between the updates. Validate that the new tp engine/signatureupdates are completed and applied successfullyfrom the logs(/var/log/cisco/updater_connector.log). Verify that a corresponding system event getsgenerated and can be seen in the event viewer andthe updater UI (Device>>Updates>>Updates)displays the new version number for tpengine/signature component. Validate that SAS (in this case AVC signature)update rolls back successfully and the updater UI,reflects that the tp engine and SAS (in this case,AVC signature) component 's version numberschange to the same as before the update. Verify that a corresponding system event getsgenerated in the event viewer indicating therollback. Verify that traffic passes thru the boxsuccessfully after the update. Validate that after the update, that the threatsdetected earlier, before the update, still fire.
Cisco Systems, Inc. Cisco ConfidentialPage 69 of 144
213.
Verify the functionality of bad TP and bad engineupdates that fails in the Switch/Commit state on astand alone ASA-CX device.
Procedure: Between each test case, it is advised to eraseand install the rpms again, do a config reset andset the logging levels to trace. This will resetversion numbers and updater state. Configure a threat profile object and set it to bethe most aggressive. Create an access policy and attach the createdthreat profile to the access policy. Send some traffic thru the box and then somepcaps that fire threats. Open up a browser with ASA-CX ip and navigateto Device>>Updates and make a note of the pre-upgrade version numbers for TP and SASengine/signatures. Update the system as follows: Shut downupdater (using the CLI, "heimdall_svc downupdater_connector") Change the configuration file(/cisco/updater/updater_connector.conf) by settingthe variables allow_overwrite to False,server_hostname to the hostname of the updaterserver being used and the serial to the name of theupdater package provisioned in the updater server. Start updater again (using the CLI "heimdall_svcup updater_connector"). Send some traffic thru the box. Send the same pcaps as above.
Expected Results: Verify that traffic passes thru the box . Ensurethat threats can be detected and correspondingevents are displayed in the threat protection tab inthe event viewer. Verify that both tp and sas engine updates fails inthe Switch state and enters the cool down period. Verify that a corresponding system event getsgenerated and can be seen in the event viewer. Verify that version numbers for tp and sas enginein the Updater UI (Device>>Updates>>Updates)will change between the updates. Validate that both SAS and tp engines roll backsuccessfully along with both tp and sas signaturesand the updater UI, reflects that all thecorresponding component version numbers changeto the same as before the update. Verify that a corresponding system event getsgenerated in the event viewer indicating therollback. Verify that traffic passes thru the boxsuccessfully after the update. Validate that after the update, that the threatsdetected earlier, before the update, still fire.
Cisco Systems, Inc. Cisco ConfidentialPage 70 of 144
214.
Verify the functionality of good WBRS incrementalupdates and good TP signature/engine update on astand alone ASA-CX device.
Procedure: Between each test case, it is advised to eraseand install the rpms again, do a config reset andset the logging levels to trace. This will resetversion numbers and updater state. Configure a threat profile object and set it to bethe most aggressive. Create an access policy and attach the createdthreat profile to the access policy. Send some traffic thru the box and then somepcaps that fire threats. Open up a browser with ASA-CX ip and navigateto Device>>Updates and make a note of the pre-upgrade version numbers for TP and SASengine/signatures. Update the system as follows: Shut downupdater (using the CLI, "heimdall_svc downupdater_connector") Change the configuration file(/cisco/updater/updater_connector.conf) by settingthe variables allow_overwrite to False,server_hostname to the hostname of the updaterserver being used and the serial to the name of theupdater package provisioned in the updater server. Start updater again (using the CLI "heimdall_svcup updater_connector"). Send some traffic thru the box. Send the same pcaps as above.
Expected Results: Verify that traffic passes thru the box . Ensurethat threats can be detected and correspondingevents are displayed in the threat protection tab inthe event viewer. Validate that the new updates are downloadedand applied successfully, from the logs.(/var/log/cisco/updater_connector.log).Verify that acorresponding system event gets generated andcan be seen in the event viewer. Verify that the updater UI(Device>>Updates>>Updates) shows the versionand timestamps correctly and the versions havechanged. Verify that traffic passes thru the boxsuccessfully after the update. Validate that after the update, that the threatsdetected earlier, before the update still fire.
Cisco Systems, Inc. Cisco ConfidentialPage 71 of 144
215.
Verify that telemetry is disabled by default on anunmanaged ASA-CX device.
Procedure: Load the latest software image on the device andopen a browser with the ip address of the device. Configure a threat profile object and attach thecreated threat profile to an access policy. Create a realm and add corresponding directoryconfig to the realm. Configure an any/anyauthentication policy (with action:Get identity viaactive authentication) and associate it with therealm. Enable decryption and configure a decryptionpolicy on the device. Configure file filtering and web reputation profileson the device. Send some traffic thru the box.
Expected Results: Verify that a welcome screen listing the optionfor telemetry is displayed. Verify that on clicking the link beneath Telemetry,the user is redirected to a page displaying all thethree options for telemetry(Standard/Full,partial,None). Verify that by default the none option is selectedfor telemetry. Verify that no telemetry data is being collected inthe SIGN Up client logs (in the/var/log/cisco/signup.log file) and in the monitordlog (/var/log/cisco/monitord.log)
Cisco Systems, Inc. Cisco ConfidentialPage 72 of 144
216.
Verify that all telemetry data (including merlintelemetry) gets collected when Standard/Full optionis selected for telemetry in the NetworkParticipation page on an unmanaged ASA-CXdevice.
Procedure: Open a browser with the ip address of thedevice. Configure a threat profile object and attach thecreated threat profile to an access policy. Create a realm and add corresponding directoryconfig to the realm. Configure an any/anyauthentication policy (with action:Get identity viaactive authentication) and associate it with therealm. Enable decryption and configure a decryptionpolicy on the device. Configure file filtering and web reputation profileson the device. Navigate to Administration>Network participationand click on the button named Partial and save thechanges. Send some traffic thru the box.
Expected Results: Verify that the following platform telemetry fields(startTimeStamp, endTimeStamp,platform_version,model,product,timezone,db_size,cpu_usage,disk_utilization,total_policies,access_policies,decryption_policies,auth_policies,policy_sets,file_filtering_profiles,web_reputation_profiles,threat_profiles,realms,devices,applications,andtop_applications) are populated and are accuratein the ASA-CX SIGN Up client logs (in the/var/log/cisco/signup.log file). Verify that the following merlin telemetry data(startTimeStamp,endTimeStamp,graph_count,graph_bytes,pattern_count for each of the http,stream and udp enginesandSigID,ThreatID,ThreatLevel,AttackerIP,WebAVC,WebCAT and WebREP from the Predictive Defenseprocess) is collected and is accurate in the ASA-CX SIGN Up client logs (in the/var/log/cisco/signup.log file). Refer to the wikishttp://wikicentral.cisco.com/display/PROJECT/Falcon+Telemetry+Data andhttp://wikicentral.cisco.com/display/PROJECT/Merlin+Telemetry for a detailed explanation of all thefields mentioned above and their expected results.
Cisco Systems, Inc. Cisco ConfidentialPage 73 of 144
217.
Verify that telemetry is disabled by default inPRSM.
Procedure: Log into SMX. Discover an ASA-CX device. Configure a threat profile object and attach thecreated threat profile to an access policy. Create a realm and add corresponding directoryconfig to the realm. Configure an any/anyauthentication policy (with action:Get identity viaactive authentication) and associate it with therealm. Enable decryption and configure a decryptionpolicy in PRSM. Configure file filtering and web reputation profilesin PRSM. Send some traffic thru PRSM.
Expected Results: Verify that a welcome screen listing the option fortelemetry is displayed. Verify that on clicking the link beneath Telemetry,the user is redirected to a page displaying all thethree options for telemetry(Standard/Full,partial,None). Verify that by default the none option is selectedfor telemetry. Verify that no telemetry data is being collected inthe PRSM on in the managed ASA-CX SIGN Upclient logs (in the /var/log/cisco/signup.log file) andin the monitord log (/var/log/cisco/monitord.log)
Cisco Systems, Inc. Cisco ConfidentialPage 74 of 144
218.
Verify that all telemetry data (including merlintelemetry ) gets collected when Standard/Fulloption is selected for telemetry in the NetworkParticipation page in PRSM.
Procedure: Open a browser with the ip address of PRSMand ensure that an ASA-CX is discovered in PRSM. Configure a threat profile object and attach thecreated threat profile to an access policy. Create a realm and add corresponding directoryconfig to the realm. Configure an any/anyauthentication policy (with action:Get identity viaactive authentication) and associate it with therealm. Enable decryption and configure a decryptionpolicy on the device. Configure file filtering and web reputation profileson the device. Navigate to Administration>Network participationand click on the button named Partial and save thechanges. Send some traffic thru the box.
Expected Results: Verify that the following platform telemetry fields(startTimeStamp, endTimeStamp,platform_version,model,product,timezone,db_size,cpu_usage,disk_utilization,total_policies,access_policies,decryption_policies,auth_policies,policy_sets,file_filtering_profiles,web_reputation_profiles,threat_profiles,realms,devices,applications,andtop_applications) are populated and are accuratein the PRSM SIGN Up client logs (in the/var/log/cisco/signup.log file). Verify that the following merlin telemetry data(startTimeStamp,endTimeStamp,graph_count,graph_bytes,pattern_count for each of the http,stream and udp enginesandSigID,ThreatID,ThreatLevel,AttackerIP,WebAVC,WebCAT and WebREP from the Predictive Defenseprocess) is collected and is accurate in the PRSMSIGN Up client logs (in the /var/log/cisco/signup.logfile). Refer to the wikishttp://wikicentral.cisco.com/display/PROJECT/Falcon+Telemetry+Data andhttp://wikicentral.cisco.com/display/PROJECT/Merlin+Telemetry for a detailed explanation of all thefields mentioned above and their expected results.
Cisco Systems, Inc. Cisco ConfidentialPage 75 of 144
219.
Verify that only platform telemetry data getscollected when Partial option is selected fortelemetry in the Network Participation page inPRSM.
Procedure:
Open a browser with the ip address of PRSMand ensure that an ASA-CX is discovered in PRSM. Configure a threat profile object and attach thecreated threat profile to an access policy. Create a realm and add corresponding directoryconfig to the realm. Configure an any/anyauthentication policy (with action:Get identity viaactive authentication) and associate it with therealm. Enable decryption and configure a decryptionpolicy on the device. Configure file filtering and web reputation profileson the device. Navigate to Administration>Network participationand click on the button named Partial and save thechanges. Send some traffic thru the box.
Expected Results:
Verify that only following platform telemetry fields(startTimeStamp, endTimeStamp,platform_version,model,product,timezone,db_size,cpu_usage,disk_utilization,total_policies,access_policies,decryption_policies,auth_policies,policy_sets,file_filtering_profiles,web_reputation_profiles,threat_profiles,realms,devices,applications,andtop_applications) are populated and are accuratein the PRSM SIGN Up client logs (in the/var/log/cisco/signup.log file). Verify that only platform telemetry data getscollected in the PRSM signup logs and no merlintelemetry data is present in the logs.
Cisco Systems, Inc. Cisco ConfidentialPage 76 of 144
220.
US5697: Verify that these strings do not exist inASA-CX: num_asacx_managed,num_k2_managed, num_asa_managed,num_ha_asa, num_sc_asa, num_transparent_asa,num_routed_asa
Pre-requisite:1-To allow telemetry to work or enabled you needto go to Administration then Network Participationselect Standard (Full) and click on Save andcommit changes.2-You need to go to the file /cisco/heimdall/etc/monitord.conf and add '-t' to program argument assuch:Program_arguments = ['-t'] (this will enabletelemetry to gather every minute instead ofeveryday.)3-Save the file and run heimdall_svc recyclemonitord4-Set the Management Plane log level to Debug.5-Run tail -F /cisco/heimdall/etc/monitord.log orsimply search the contents of the file.Procedure:1-Install and configure an ASA-CX.2-Verify that the following strings do not exist in/var/log/cisco/monitord.log file in an ASA-CX Box:num_asacx_managed, num_k2_managed,num_asa_managed, num_ha_asa, num_sc_asa,num_transparent_asa, num_routed_asa.Expected Results:1-The above values do not exist in the/var/log/cisco/monitord.log file.
221.
US5697: Verify ad_agent_configured is updatedproperly when AD Agent is configured in ASA-CX
Pre-requisite:1-To allow telemetry to work or enabled you needto go to Administration then Network Participationselect Standard (Full) and click on Save andcommit changes.2-You need to go to the file /cisco/heimdall/etc/monitord.conf and add '-t' to program argument assuch:Program_arguments = ['-t'] (this will enabletelemetry to gather every minute instead ofeveryday.)3-Save the file and run heimdall_svc recyclemonitord4-Set the Management Plane log level to Debug.5-Run tail -F /cisco/heimdall/etc/monitord.log orsimply search the contents of the file.Procedure:1-Enable AD Agent in ASA-CX configuration.2-View the contents of /var/log/cisco/monitord.log.Expected Results:Verify that the value of ad_agent_configured haschanged to 1 from 0.

Cisco Systems, Inc. Cisco ConfidentialPage 77 of 144
222.
US5697: Verify num_ldap_realms reflects tenumber of LDAP Realms configured in ASA-CX
Pre-requisite:1-To allow telemetry to work or enabled you needto go to Administration then Network Participationselect Standard (Full) and click on Save andcommit changes.2-You need to go to the file /cisco/heimdall/etc/monitord.conf and add '-t' to program argument assuch:Program_arguments = ['-t'] (this will enabletelemetry to gather every minute instead ofeveryday.)3-Save the file and run heimdall_svc recyclemonitord4-Set the Management Plane log level to Debug.5-Run tail -F /cisco/heimdall/etc/monitord.log orsimply search the contents of the file.Procedure:1-Configure and enable LDAP realm in PRSM.2-View the contents of /var/log/cisco/monitord.logand3-Try adding more LDAP realms in PRSM up to 3.4-Delete The LDAP Realms.Expected Results:1-Verify that the value of num_ldap_realms haschanged to 1 from 0.2-Verify that num_ldap_realms increments witheach ldap added.3-Verify that the numbers decrease by 1 everytimean LDAP realm is removed.

Cisco Systems, Inc. Cisco ConfidentialPage 78 of 144
223.
US5697: Verify num_ad_realms reflects thenumber of AD Realms configured in ASA-CX
Pre-requisite:1-To allow telemetry to work or enabled you needto go to Administration then Network Participationselect Standard (Full) and click on Save andcommit changes.2-You need to go to the file /cisco/heimdall/etc/monitord.conf and add '-t' to program argument assuch:Program_arguments = ['-t'] (this will enabletelemetry to gather every minute instead ofeveryday.)3-Save the file and run heimdall_svc recyclemonitord4-Set the Management Plane log level to Debug.5-Run tail -F /cisco/heimdall/etc/monitord.log orsimply search the contents of the file.Procedure:1-Configure and enable an AD Realm in ASA-CX2-Add an AD realm in ASA-CX and view thecontents of /var/log/cisco/monitord.log.3-Remove the AD Realm in ASA-CX and view thecontents of /var/log/cisco/monitord.logExpected Results:1-Verify the value of num_ad_realms is changed to1 in /var/log/cisco/monitord.log when an AD Realmis added in ASA-CX.2-Verify the value of num_ad_realms is changed to0 in /var/log/cisco/monitord.log when an AD Realmis removed in ASA-CX.
224.
US5697: Verify num_sso_realms correctly reflectsthe total number of SSO Realms configured inASA-CX.
Pre-requisite:1-To allow telemetry to work or enabled you needto go to Administration then Network Participationselect Standard (Full) and click on Save andcommit changes.2-You need to go to the file /cisco/heimdall/etc/monitord.conf and add '-t' to program argument assuch:Program_arguments = ['-t'] (this will enabletelemetry to gather every minute instead ofeveryday.)3-Save the file and run heimdall_svc recyclemonitord4-Set the Management Plane log level to Debug.5-Run tail -F /cisco/heimdall/etc/monitord.log orsimply search the contents of the file.Procedure:1-Configure and enable few SSO Realms in ASA-CX2-Every time an SSO Realm is added in ASA-CXview the contents of /var/log/cisco/monitord.logExpected Results:1-Every time an SSO realm is added in ASA-CX thevalue of num_ad_realms increments by 1.
Cisco Systems, Inc. Cisco ConfidentialPage 79 of 144
225.
US5697: Verify is_managed is updated properly inASA-CX when not joined to PRSM.
Pre-requisite:1-To allow telemetry to work or enabled you needto go to Administration then Network Participationselect Standard (Full) and click on Save andcommit changes.2-You need to go to the file /cisco/heimdall/etc/monitord.conf and add '-t' to program argument assuch:Program_arguments = ['-t'] (this will enabletelemetry to gather every minute instead ofeveryday.)3-Save the file and run heimdall_svc recyclemonitord4-Set the Management Plane log level to Debug.5-Run tail -F /cisco/heimdall/etc/monitord.log orsimply search the contents of the file.Procedure:1-Install and configure an ASA-CX.2-On the ASA-CX box check for is_managed valuein /var/log/cisco/monitord.log file.Expected Results:1-is_managed is set to 0 when not joined to PRSM.
226.
US5697: Verify ui_config_version on ASA-CX iscorrect.
Pre-requisite:1-To allow telemetry to work or enabled you needto go to Administration then Network Participationselect Standard (Full) and click on Save andcommit changes.2-You need to go to the file /cisco/heimdall/etc/monitord.conf and add '-t' to program argument assuch:Program_arguments = ['-t'] (this will enabletelemetry to gather every minute instead ofeveryday.)3-Save the file and run heimdall_svc recyclemonitord4-Set the Management Plane log level to Debug.5-Run tail -F /cisco/heimdall/etc/monitord.log orsimply search the contents of the file.Procedure:1-On an ASA-CX check for the value ofui_config_version in /var/log/cisco/monitord.log2-make some changes to the Database likecreating a new policy.3-check the value of ui_confg_version.Expected Results:1-The value of ui_config_version is incremented by1 in ASA-CX everytime a change is made to thedatabase.

Cisco Systems, Inc. Cisco ConfidentialPage 80 of 144
227.
US5697: Verify core_dumps on a ASA-CX isupdated properly when a new core_dumps iscreated.
Pre-requisite:1-To allow telemetry to work or enabled you needto go to Administration then Network Participationselect Standard (Full) and click on Save andcommit changes.2-You need to go to the file /cisco/heimdall/etc/monitord.conf and add '-t' to program argument assuch:Program_arguments = ['-t'] (this will enabletelemetry to gather every minute instead ofeveryday.)3-Save the file and run heimdall_svc recyclemonitord4-Set the Management Plane log level to Debug.5-Run tail -F /cisco/heimdall/etc/monitord.log orsimply search the contents of the file.Procedure:1-Install an ASA-CX and navigate to/var/log/cisco/monitord.log.2-check the value of core_dumps in monitord.logfile.3-Navigate to /var/data/cores and create a new fileand wait for a minute.Expected Results:1-Verify that the value of core_dumps will beincremented each time a new file is created in the/var/data/cores by 1 since the last collection time.2-Verify that the value of core_dumps will go backto 0 after a core dump collection time.3-Verify that the names of core_dumps is logged aswell.
Cisco Systems, Inc. Cisco ConfidentialPage 81 of 144
228.
US5697: Verify core_dumps on a ASA-CX isupdated properly after the 24 hour period.
Pre-requisite:1-To allow telemetry to work or enabled you needto go to Administration then Network Participationselect Standard (Full) and click on Save andcommit changes.2-You need to go to the file /cisco/heimdall/etc/monitord.conf and add '-t' to program argument assuch:Program_arguments = ['-t'] (this will enabletelemetry to gather every minute instead ofeveryday.)3-Save the file and run heimdall_svc recyclemonitord4-Set the Management Plane log level to Debug.5-Run tail -F /cisco/heimdall/etc/monitord.log orsimply search the contents of the file.Procedure:1-Install an ASA-CX and navigate to/var/log/cisco/monitord.log.2-check the value of core_dumps in monitord.logfile.3-Navigate to /var/data/cores and create and createseveral files and observe the log.4- observe the log after 24 hours.Expected Results:1-Verify that the value of core_dumps will beincremented each time a new file is created in the/var/data/cores by 1 in less than 2 minutes and thename of files will be in the log as well.2-Verify that the total number of files created in thelast 24 hours is reflected correctly and the name offiles is in the log as well that have been added inthe last 24 hours.
Cisco Systems, Inc. Cisco ConfidentialPage 82 of 144
229.
US5697: Verify ad_agent_configured is updatedproperly when AD Agent is configured in PRSM
Pre-requisite:1-To allow telemetry to work or enabled you needto go to Administration then Network Participationselect Standard (Full) and click on Save andcommit changes.2-You need to go to the file /cisco/heimdall/etc/monitord.conf and add '-t' to program argument assuch:Program_arguments = ['-t'] (this will enabletelemetry to gather every minute instead ofeveryday.)3-Save the file and run heimdall_svc recyclemonitord4-Set the Management Plane log level to Debug.5-Run tail -F /cisco/heimdall/etc/monitord.log orsimply search the contents of the file.Procedure:1-Enable AD Agent in PRSM configuration.2-View the contents of /var/log/cisco/monitord.log.Expected Results:Verify that the value of ad_agent_configured haschanged to 1 from 0.
230.
US5697: Verify num_ldap_realms reflects tenumber of LDAP Realms configured in PRSM.
Pre-requisite:1-To allow telemetry to work or enabled you needto go to Administration then Network Participationselect Standard (Full) and click on Save andcommit changes.2-You need to go to the file /cisco/heimdall/etc/monitord.conf and add '-t' to program argument assuch:Program_arguments = ['-t'] (this will enabletelemetry to gather every minute instead ofeveryday.)3-Save the file and run heimdall_svc recyclemonitord4-Set the Management Plane log level to Debug.5-Run tail -F /cisco/heimdall/etc/monitord.log orsimply search the contents of the file.Procedure:1-Configure and enable LDAP realm in ASA-CX2-View the contents of /var/log/cisco//monitord.logand3-Try adding more LDAP realms in ASA-CXExpected Results:1-Verify that the value of num_ldap_realms haschanged to 1 from 0.2-Verify that num_ldap_realms increments witheach ldap added.
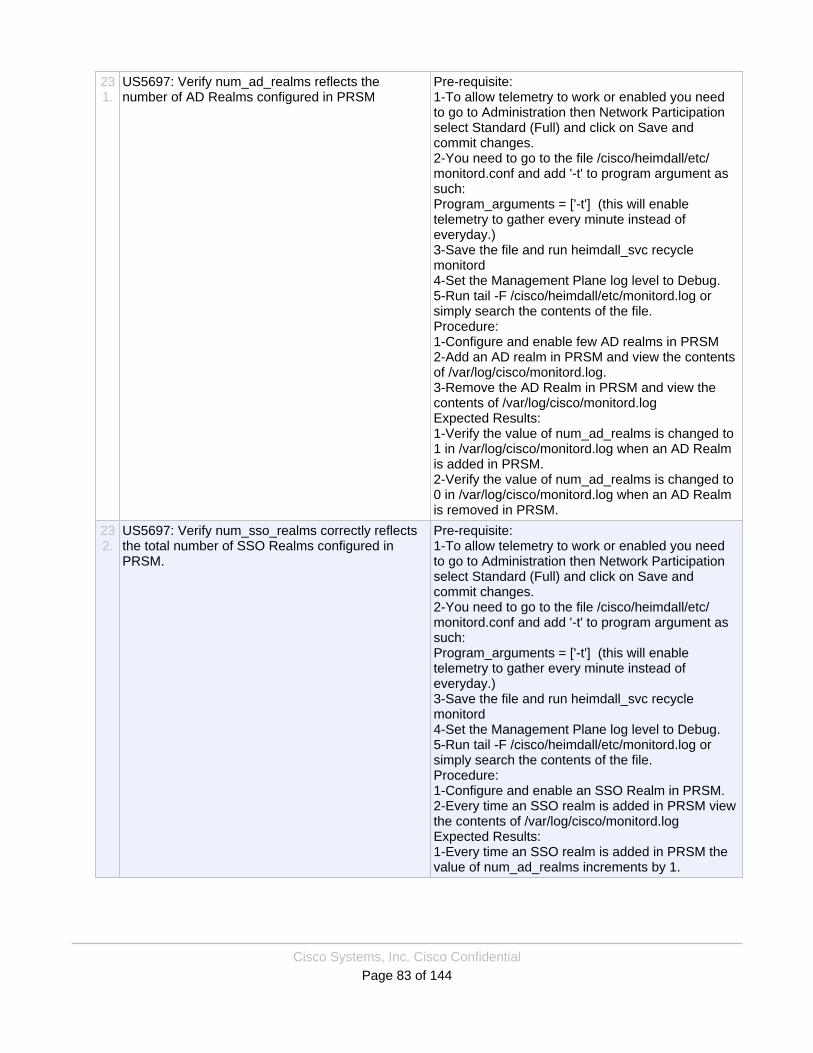
Cisco Systems, Inc. Cisco ConfidentialPage 83 of 144
231.
US5697: Verify num_ad_realms reflects thenumber of AD Realms configured in PRSM
Pre-requisite:1-To allow telemetry to work or enabled you needto go to Administration then Network Participationselect Standard (Full) and click on Save andcommit changes.2-You need to go to the file /cisco/heimdall/etc/monitord.conf and add '-t' to program argument assuch:Program_arguments = ['-t'] (this will enabletelemetry to gather every minute instead ofeveryday.)3-Save the file and run heimdall_svc recyclemonitord4-Set the Management Plane log level to Debug.5-Run tail -F /cisco/heimdall/etc/monitord.log orsimply search the contents of the file.Procedure:1-Configure and enable few AD realms in PRSM2-Add an AD realm in PRSM and view the contentsof /var/log/cisco/monitord.log.3-Remove the AD Realm in PRSM and view thecontents of /var/log/cisco/monitord.logExpected Results:1-Verify the value of num_ad_realms is changed to1 in /var/log/cisco/monitord.log when an AD Realmis added in PRSM.2-Verify the value of num_ad_realms is changed to0 in /var/log/cisco/monitord.log when an AD Realmis removed in PRSM.
232.
US5697: Verify num_sso_realms correctly reflectsthe total number of SSO Realms configured inPRSM.
Pre-requisite:1-To allow telemetry to work or enabled you needto go to Administration then Network Participationselect Standard (Full) and click on Save andcommit changes.2-You need to go to the file /cisco/heimdall/etc/monitord.conf and add '-t' to program argument assuch:Program_arguments = ['-t'] (this will enabletelemetry to gather every minute instead ofeveryday.)3-Save the file and run heimdall_svc recyclemonitord4-Set the Management Plane log level to Debug.5-Run tail -F /cisco/heimdall/etc/monitord.log orsimply search the contents of the file.Procedure:1-Configure and enable an SSO Realm in PRSM.2-Every time an SSO realm is added in PRSM viewthe contents of /var/log/cisco/monitord.logExpected Results:1-Every time an SSO realm is added in PRSM thevalue of num_ad_realms increments by 1.
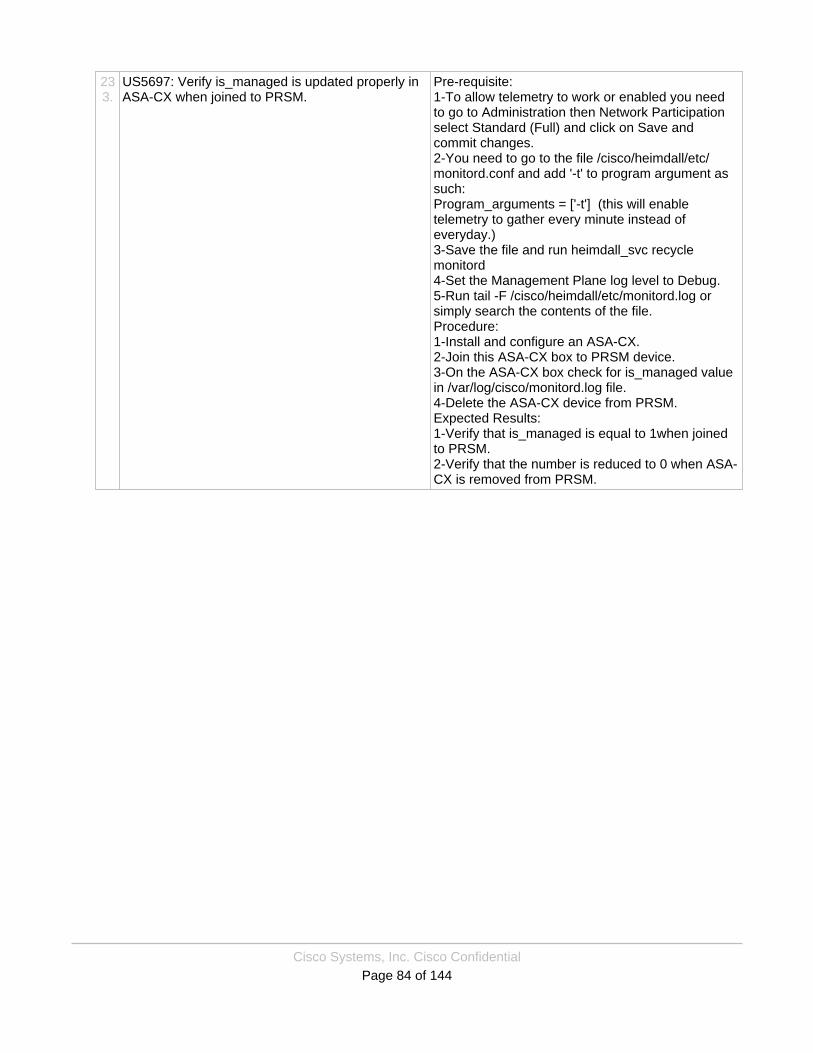
Cisco Systems, Inc. Cisco ConfidentialPage 84 of 144
233.
US5697: Verify is_managed is updated properly inASA-CX when joined to PRSM.
Pre-requisite:1-To allow telemetry to work or enabled you needto go to Administration then Network Participationselect Standard (Full) and click on Save andcommit changes.2-You need to go to the file /cisco/heimdall/etc/monitord.conf and add '-t' to program argument assuch:Program_arguments = ['-t'] (this will enabletelemetry to gather every minute instead ofeveryday.)3-Save the file and run heimdall_svc recyclemonitord4-Set the Management Plane log level to Debug.5-Run tail -F /cisco/heimdall/etc/monitord.log orsimply search the contents of the file.Procedure:1-Install and configure an ASA-CX.2-Join this ASA-CX box to PRSM device.3-On the ASA-CX box check for is_managed valuein /var/log/cisco/monitord.log file.4-Delete the ASA-CX device from PRSM.Expected Results:1-Verify that is_managed is equal to 1when joinedto PRSM.2-Verify that the number is reduced to 0 when ASA-CX is removed from PRSM.
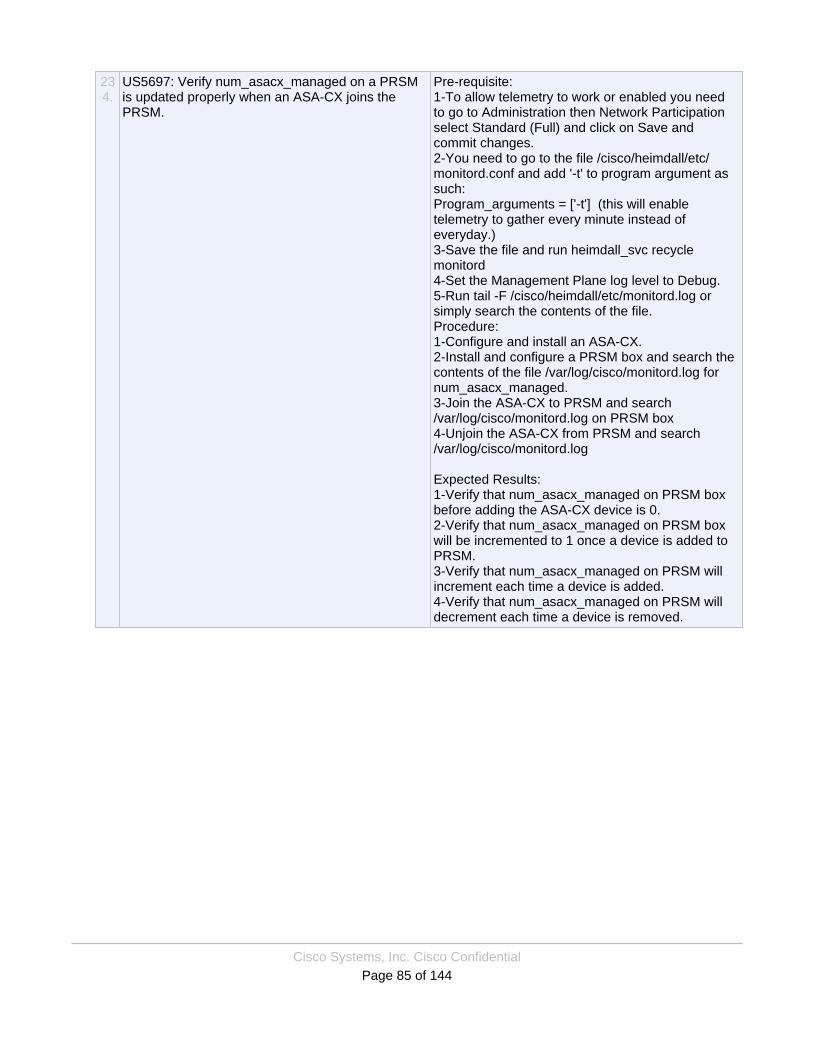
Cisco Systems, Inc. Cisco ConfidentialPage 85 of 144
234.
US5697: Verify num_asacx_managed on a PRSMis updated properly when an ASA-CX joins thePRSM.
Pre-requisite:1-To allow telemetry to work or enabled you needto go to Administration then Network Participationselect Standard (Full) and click on Save andcommit changes.2-You need to go to the file /cisco/heimdall/etc/monitord.conf and add '-t' to program argument assuch:Program_arguments = ['-t'] (this will enabletelemetry to gather every minute instead ofeveryday.)3-Save the file and run heimdall_svc recyclemonitord4-Set the Management Plane log level to Debug.5-Run tail -F /cisco/heimdall/etc/monitord.log orsimply search the contents of the file.Procedure:1-Configure and install an ASA-CX.2-Install and configure a PRSM box and search thecontents of the file /var/log/cisco/monitord.log fornum_asacx_managed.3-Join the ASA-CX to PRSM and search/var/log/cisco/monitord.log on PRSM box4-Unjoin the ASA-CX from PRSM and search/var/log/cisco/monitord.log
Expected Results:1-Verify that num_asacx_managed on PRSM boxbefore adding the ASA-CX device is 0.2-Verify that num_asacx_managed on PRSM boxwill be incremented to 1 once a device is added toPRSM.3-Verify that num_asacx_managed on PRSM willincrement each time a device is added.4-Verify that num_asacx_managed on PRSM willdecrement each time a device is removed.
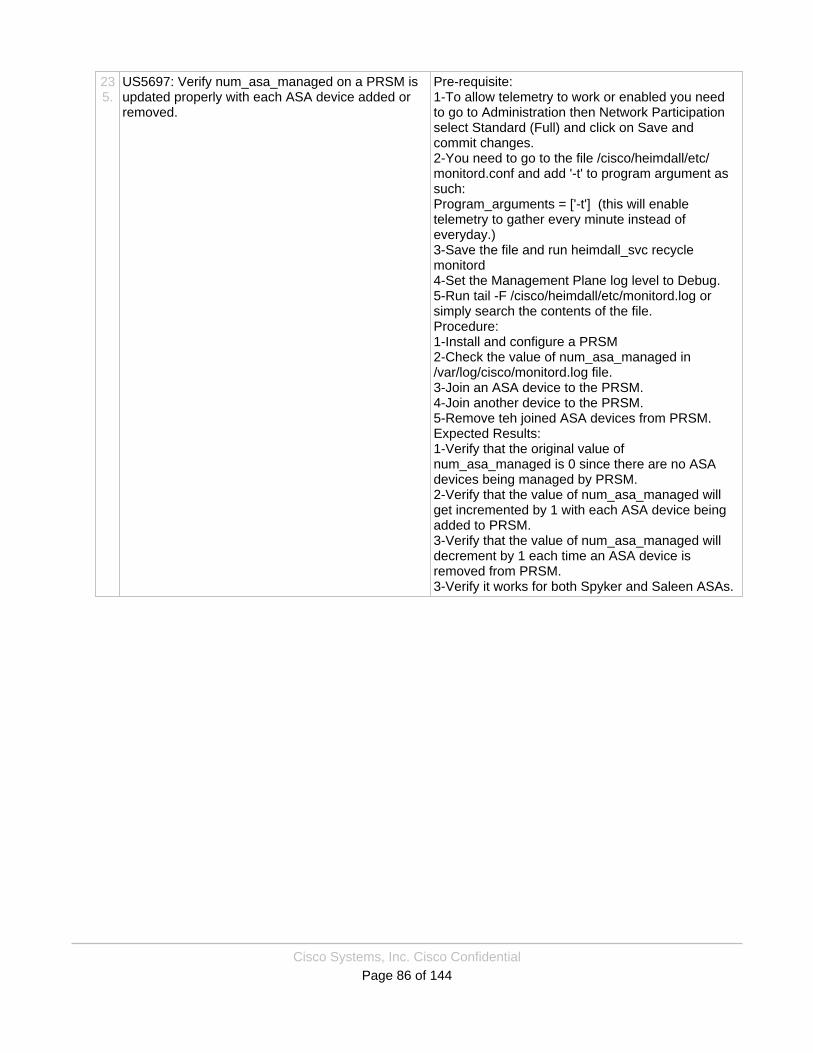
Cisco Systems, Inc. Cisco ConfidentialPage 86 of 144
235.
US5697: Verify num_asa_managed on a PRSM isupdated properly with each ASA device added orremoved.
Pre-requisite:1-To allow telemetry to work or enabled you needto go to Administration then Network Participationselect Standard (Full) and click on Save andcommit changes.2-You need to go to the file /cisco/heimdall/etc/monitord.conf and add '-t' to program argument assuch:Program_arguments = ['-t'] (this will enabletelemetry to gather every minute instead ofeveryday.)3-Save the file and run heimdall_svc recyclemonitord4-Set the Management Plane log level to Debug.5-Run tail -F /cisco/heimdall/etc/monitord.log orsimply search the contents of the file.Procedure:1-Install and configure a PRSM2-Check the value of num_asa_managed in/var/log/cisco/monitord.log file.3-Join an ASA device to the PRSM.4-Join another device to the PRSM.5-Remove teh joined ASA devices from PRSM.Expected Results:1-Verify that the original value ofnum_asa_managed is 0 since there are no ASAdevices being managed by PRSM.2-Verify that the value of num_asa_managed willget incremented by 1 with each ASA device beingadded to PRSM.3-Verify that the value of num_asa_managed willdecrement by 1 each time an ASA device isremoved from PRSM.3-Verify it works for both Spyker and Saleen ASAs.
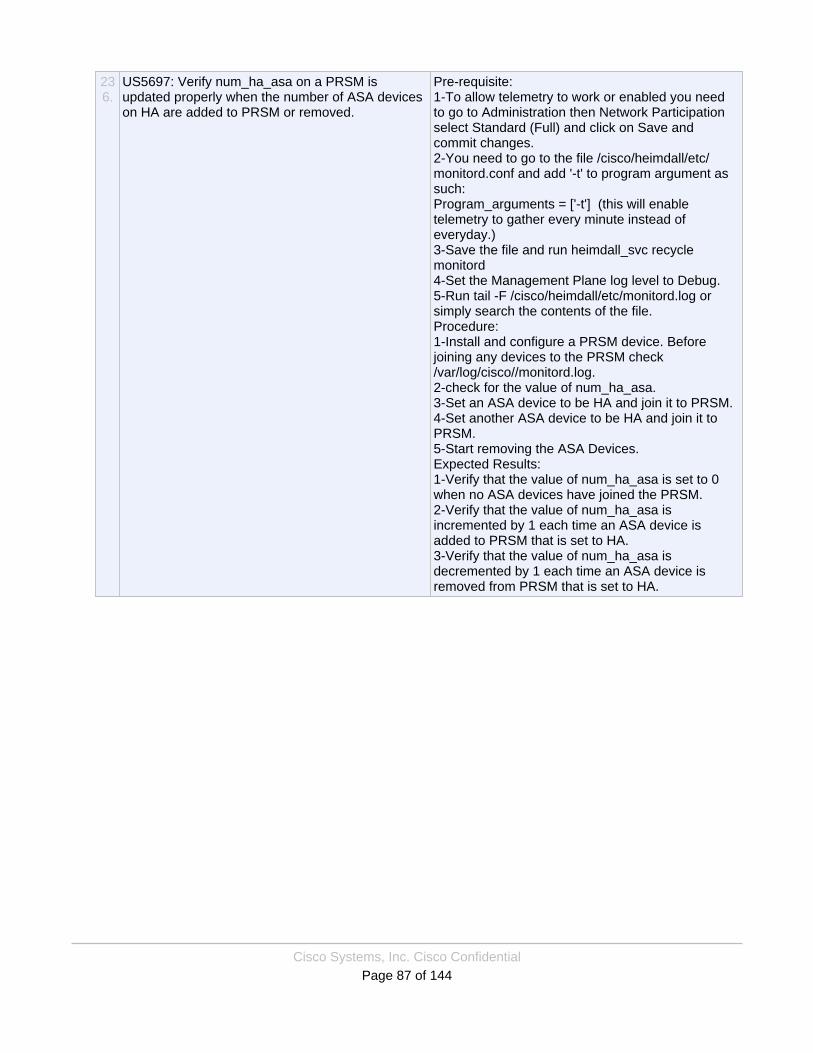
Cisco Systems, Inc. Cisco ConfidentialPage 87 of 144
236.
US5697: Verify num_ha_asa on a PRSM isupdated properly when the number of ASA deviceson HA are added to PRSM or removed.
Pre-requisite:1-To allow telemetry to work or enabled you needto go to Administration then Network Participationselect Standard (Full) and click on Save andcommit changes.2-You need to go to the file /cisco/heimdall/etc/monitord.conf and add '-t' to program argument assuch:Program_arguments = ['-t'] (this will enabletelemetry to gather every minute instead ofeveryday.)3-Save the file and run heimdall_svc recyclemonitord4-Set the Management Plane log level to Debug.5-Run tail -F /cisco/heimdall/etc/monitord.log orsimply search the contents of the file.Procedure:1-Install and configure a PRSM device. Beforejoining any devices to the PRSM check/var/log/cisco//monitord.log.2-check for the value of num_ha_asa.3-Set an ASA device to be HA and join it to PRSM.4-Set another ASA device to be HA and join it toPRSM.5-Start removing the ASA Devices.Expected Results:1-Verify that the value of num_ha_asa is set to 0when no ASA devices have joined the PRSM.2-Verify that the value of num_ha_asa isincremented by 1 each time an ASA device isadded to PRSM that is set to HA.3-Verify that the value of num_ha_asa isdecremented by 1 each time an ASA device isremoved from PRSM that is set to HA.
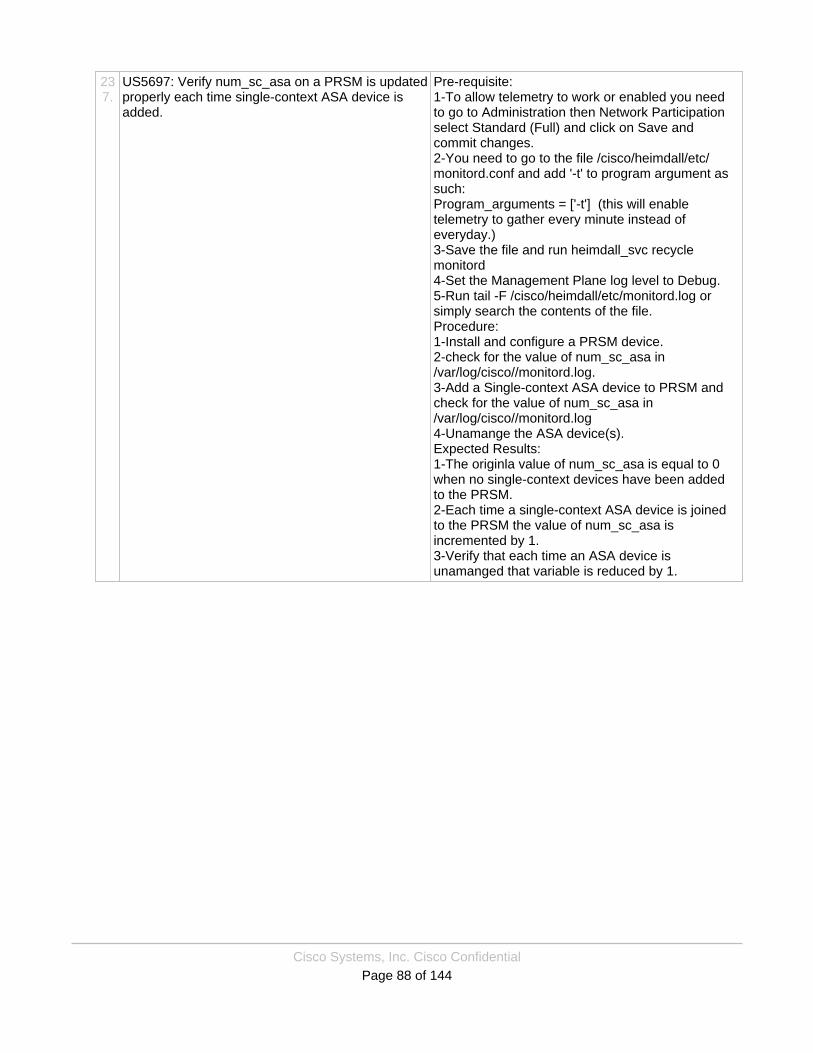
Cisco Systems, Inc. Cisco ConfidentialPage 88 of 144
237.
US5697: Verify num_sc_asa on a PRSM is updatedproperly each time single-context ASA device isadded.
Pre-requisite:1-To allow telemetry to work or enabled you needto go to Administration then Network Participationselect Standard (Full) and click on Save andcommit changes.2-You need to go to the file /cisco/heimdall/etc/monitord.conf and add '-t' to program argument assuch:Program_arguments = ['-t'] (this will enabletelemetry to gather every minute instead ofeveryday.)3-Save the file and run heimdall_svc recyclemonitord4-Set the Management Plane log level to Debug.5-Run tail -F /cisco/heimdall/etc/monitord.log orsimply search the contents of the file.Procedure:1-Install and configure a PRSM device.2-check for the value of num_sc_asa in/var/log/cisco//monitord.log.3-Add a Single-context ASA device to PRSM andcheck for the value of num_sc_asa in/var/log/cisco//monitord.log4-Unamange the ASA device(s).Expected Results:1-The originla value of num_sc_asa is equal to 0when no single-context devices have been addedto the PRSM.2-Each time a single-context ASA device is joinedto the PRSM the value of num_sc_asa isincremented by 1.3-Verify that each time an ASA device isunamanged that variable is reduced by 1.
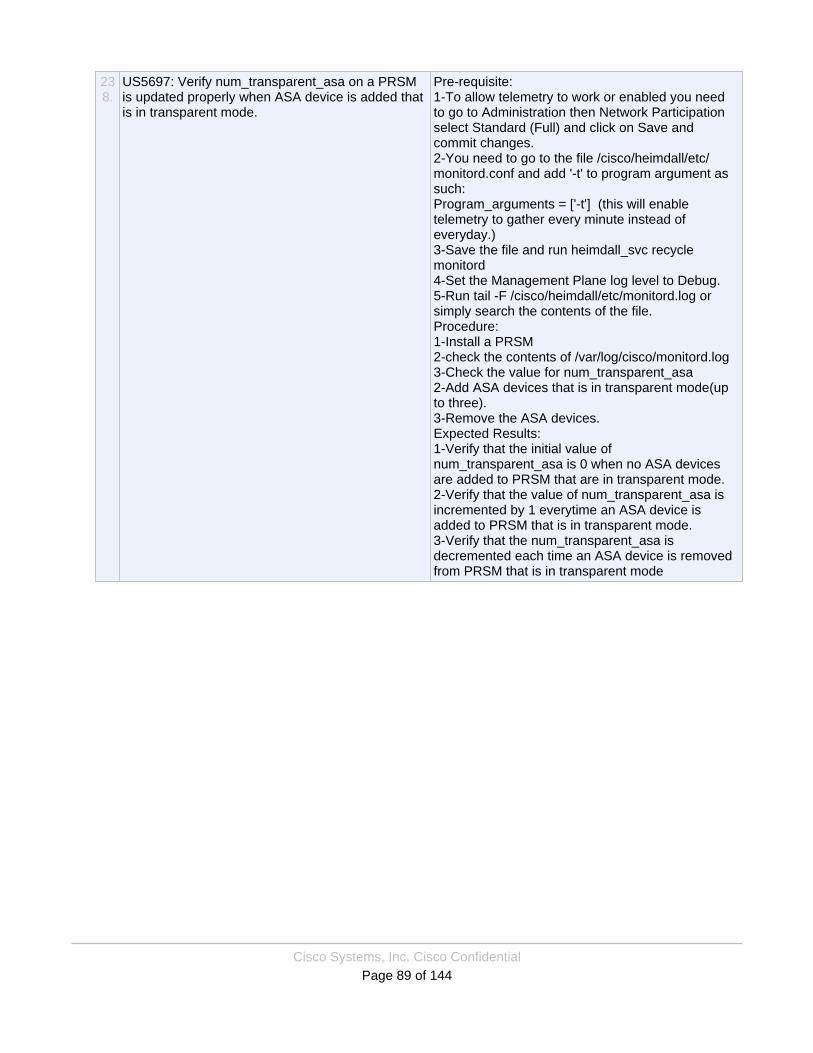
Cisco Systems, Inc. Cisco ConfidentialPage 89 of 144
238.
US5697: Verify num_transparent_asa on a PRSMis updated properly when ASA device is added thatis in transparent mode.
Pre-requisite:1-To allow telemetry to work or enabled you needto go to Administration then Network Participationselect Standard (Full) and click on Save andcommit changes.2-You need to go to the file /cisco/heimdall/etc/monitord.conf and add '-t' to program argument assuch:Program_arguments = ['-t'] (this will enabletelemetry to gather every minute instead ofeveryday.)3-Save the file and run heimdall_svc recyclemonitord4-Set the Management Plane log level to Debug.5-Run tail -F /cisco/heimdall/etc/monitord.log orsimply search the contents of the file.Procedure:1-Install a PRSM2-check the contents of /var/log/cisco/monitord.log3-Check the value for num_transparent_asa2-Add ASA devices that is in transparent mode(upto three).3-Remove the ASA devices.Expected Results:1-Verify that the initial value ofnum_transparent_asa is 0 when no ASA devicesare added to PRSM that are in transparent mode.2-Verify that the value of num_transparent_asa isincremented by 1 everytime an ASA device isadded to PRSM that is in transparent mode.3-Verify that the num_transparent_asa isdecremented each time an ASA device is removedfrom PRSM that is in transparent mode
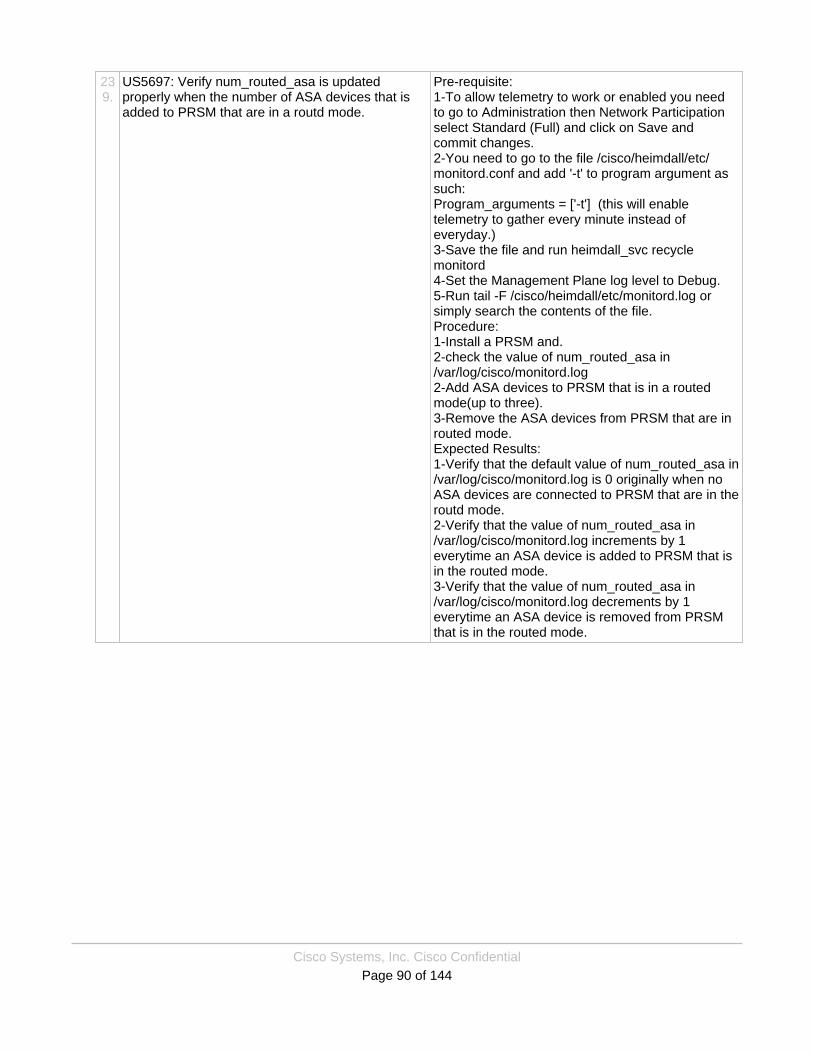
Cisco Systems, Inc. Cisco ConfidentialPage 90 of 144
239.
US5697: Verify num_routed_asa is updatedproperly when the number of ASA devices that isadded to PRSM that are in a routd mode.
Pre-requisite:1-To allow telemetry to work or enabled you needto go to Administration then Network Participationselect Standard (Full) and click on Save andcommit changes.2-You need to go to the file /cisco/heimdall/etc/monitord.conf and add '-t' to program argument assuch:Program_arguments = ['-t'] (this will enabletelemetry to gather every minute instead ofeveryday.)3-Save the file and run heimdall_svc recyclemonitord4-Set the Management Plane log level to Debug.5-Run tail -F /cisco/heimdall/etc/monitord.log orsimply search the contents of the file.Procedure:1-Install a PRSM and.2-check the value of num_routed_asa in/var/log/cisco/monitord.log2-Add ASA devices to PRSM that is in a routedmode(up to three).3-Remove the ASA devices from PRSM that are inrouted mode.Expected Results:1-Verify that the default value of num_routed_asa in/var/log/cisco/monitord.log is 0 originally when noASA devices are connected to PRSM that are in theroutd mode.2-Verify that the value of num_routed_asa in/var/log/cisco/monitord.log increments by 1everytime an ASA device is added to PRSM that isin the routed mode.3-Verify that the value of num_routed_asa in/var/log/cisco/monitord.log decrements by 1everytime an ASA device is removed from PRSMthat is in the routed mode.

Cisco Systems, Inc. Cisco ConfidentialPage 91 of 144
240.
US5697: Verify ui_config_version on PRSM iscorrect.
Pre-requisite:1-To allow telemetry to work or enabled you needto go to Administration then Network Participationselect Standard (Full) and click on Save andcommit changes.2-You need to go to the file /cisco/heimdall/etc/monitord.conf and add '-t' to program argument assuch:Program_arguments = ['-t'] (this will enabletelemetry to gather every minute instead ofeveryday.)3-Save the file and run heimdall_svc recyclemonitord4-Set the Management Plane log level to Debug.5-Run tail -F /cisco/heimdall/etc/monitord.log orsimply search the contents of the file.Procedure:1-On a PRSM check for the value of ui_config in/var/log/cisco/monitord.log2-Make some changes for example add a policy.3-check the value of ui_confi again.Expected Results:1-The value of ui_config is incremented everytime achange is made to the database in PRSM.

Cisco Systems, Inc. Cisco ConfidentialPage 92 of 144
241.
US5697: Verify core_dumps on a PRSM is updatedproperly when a new core_dumps is created andafter the passage of 24 hours.
Pre-requisite:1-To allow telemetry to work or enabled you needto go to Administration then Network Participationselect Standard (Full) and click on Save andcommit changes.2-You need to go to the file /cisco/heimdall/etc/monitord.conf and add '-t' to program argument assuch:Program_arguments = ['-t'] (this will enabletelemetry to gather every minute instead ofeveryday.)3-Save the file and run heimdall_svc recyclemonitord4-Set the Management Plane log level to Debug.5-Run tail -F /cisco/heimdall/etc/monitord.log orsimply search the contents of the file.Procedure:1-Install an ASA-CX and navigate to/var/log/cisco/monitord.log.2-check the value of core_dumps in monitord.logfile.3-Navigate to /var/data/cores and create and createseveral files and observe the log.4- observe the log after 24 hours.Expected Results:1-Verify that the value of core_dumps will beincremented each time a new file is created in the/var/data/cores by 1 in less than 2 minutes and thename of files will be in the log as well.2-Verify that the total number of files created in thelast 24 hours is reflected correctly and the name offiles is in the log as well that have been added inthe last 24 hours.
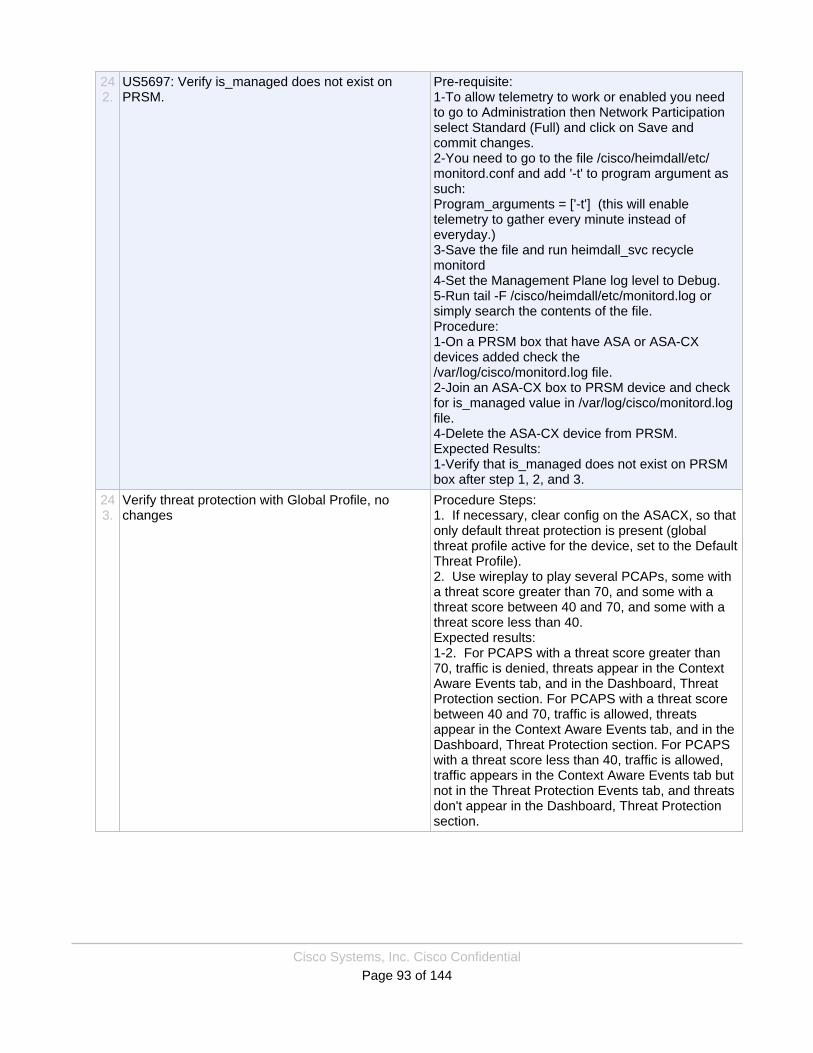
Cisco Systems, Inc. Cisco ConfidentialPage 93 of 144
242.
US5697: Verify is_managed does not exist onPRSM.
Pre-requisite:1-To allow telemetry to work or enabled you needto go to Administration then Network Participationselect Standard (Full) and click on Save andcommit changes.2-You need to go to the file /cisco/heimdall/etc/monitord.conf and add '-t' to program argument assuch:Program_arguments = ['-t'] (this will enabletelemetry to gather every minute instead ofeveryday.)3-Save the file and run heimdall_svc recyclemonitord4-Set the Management Plane log level to Debug.5-Run tail -F /cisco/heimdall/etc/monitord.log orsimply search the contents of the file.Procedure:1-On a PRSM box that have ASA or ASA-CXdevices added check the/var/log/cisco/monitord.log file.2-Join an ASA-CX box to PRSM device and checkfor is_managed value in /var/log/cisco/monitord.logfile.4-Delete the ASA-CX device from PRSM.Expected Results:1-Verify that is_managed does not exist on PRSMbox after step 1, 2, and 3.
243.
Verify threat protection with Global Profile, nochanges
Procedure Steps:1. If necessary, clear config on the ASACX, so thatonly default threat protection is present (globalthreat profile active for the device, set to the DefaultThreat Profile).2. Use wireplay to play several PCAPs, some witha threat score greater than 70, and some with athreat score between 40 and 70, and some with athreat score less than 40.Expected results:1-2. For PCAPS with a threat score greater than70, traffic is denied, threats appear in the ContextAware Events tab, and in the Dashboard, ThreatProtection section. For PCAPS with a threat scorebetween 40 and 70, traffic is allowed, threatsappear in the Context Aware Events tab, and in theDashboard, Threat Protection section. For PCAPSwith a threat score less than 40, traffic is allowed,traffic appears in the Context Aware Events tab butnot in the Threat Protection Events tab, and threatsdon't appear in the Dashboard, Threat Protectionsection.
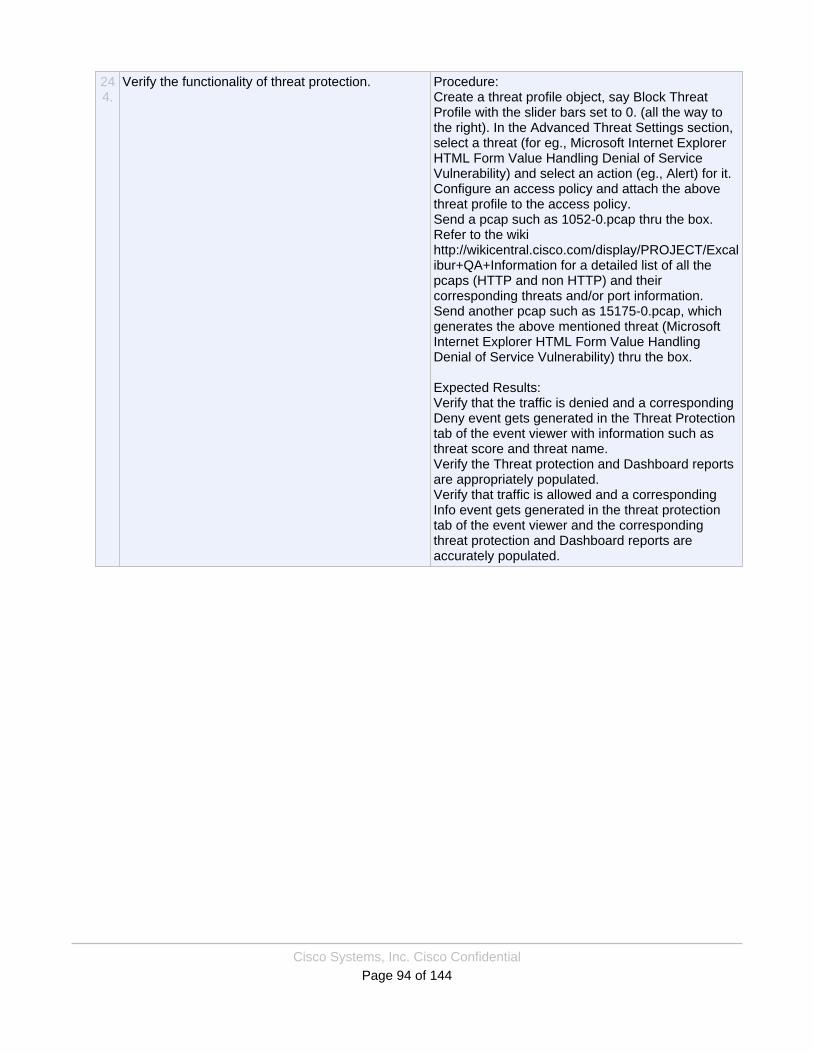
Cisco Systems, Inc. Cisco ConfidentialPage 94 of 144
244.
Verify the functionality of threat protection. Procedure:Create a threat profile object, say Block ThreatProfile with the slider bars set to 0. (all the way tothe right). In the Advanced Threat Settings section,select a threat (for eg., Microsoft Internet ExplorerHTML Form Value Handling Denial of ServiceVulnerability) and select an action (eg., Alert) for it.Configure an access policy and attach the abovethreat profile to the access policy.Send a pcap such as 1052-0.pcap thru the box.Refer to the wikihttp://wikicentral.cisco.com/display/PROJECT/Excalibur+QA+Information for a detailed list of all thepcaps (HTTP and non HTTP) and theircorresponding threats and/or port information.Send another pcap such as 15175-0.pcap, whichgenerates the above mentioned threat (MicrosoftInternet Explorer HTML Form Value HandlingDenial of Service Vulnerability) thru the box.
Expected Results:Verify that the traffic is denied and a correspondingDeny event gets generated in the Threat Protectiontab of the event viewer with information such asthreat score and threat name.Verify the Threat protection and Dashboard reportsare appropriately populated.Verify that traffic is allowed and a correspondingInfo event gets generated in the threat protectiontab of the event viewer and the correspondingthreat protection and Dashboard reports areaccurately populated.

Cisco Systems, Inc. Cisco ConfidentialPage 95 of 144
245.
US7590: Verify that Threat list appears when goingto Components and then Threats
Procedure:1-Install and configure an ASA-CX.2-Navigate to Components and then Threats.3-Hover over the Threats.4-scroll down as far as possible.5-enter a criteria for search in the Filter textbox.6-Repeat the same test for PRSM with and withoutan ASA-CX managed.Expected Results:1-Verify that a list of threats will appear.2-Verify that to the right of each threat a Referenceand a desc/reference will appear for each threat asper taxonomy doc. Clicking on the links will sendyou to the proper websiet.3-Once you hover over a threat Read More and Goto information site appears. Once you click on thelinks they will appear on a new browser/popup.4-The scroll bar is infinite i.e. new threats appear asyou scroll down to the last one.5-The list of threats will appear with the filtercriteria.6-Results are the same for PRSM as with ASA-CXumanaged
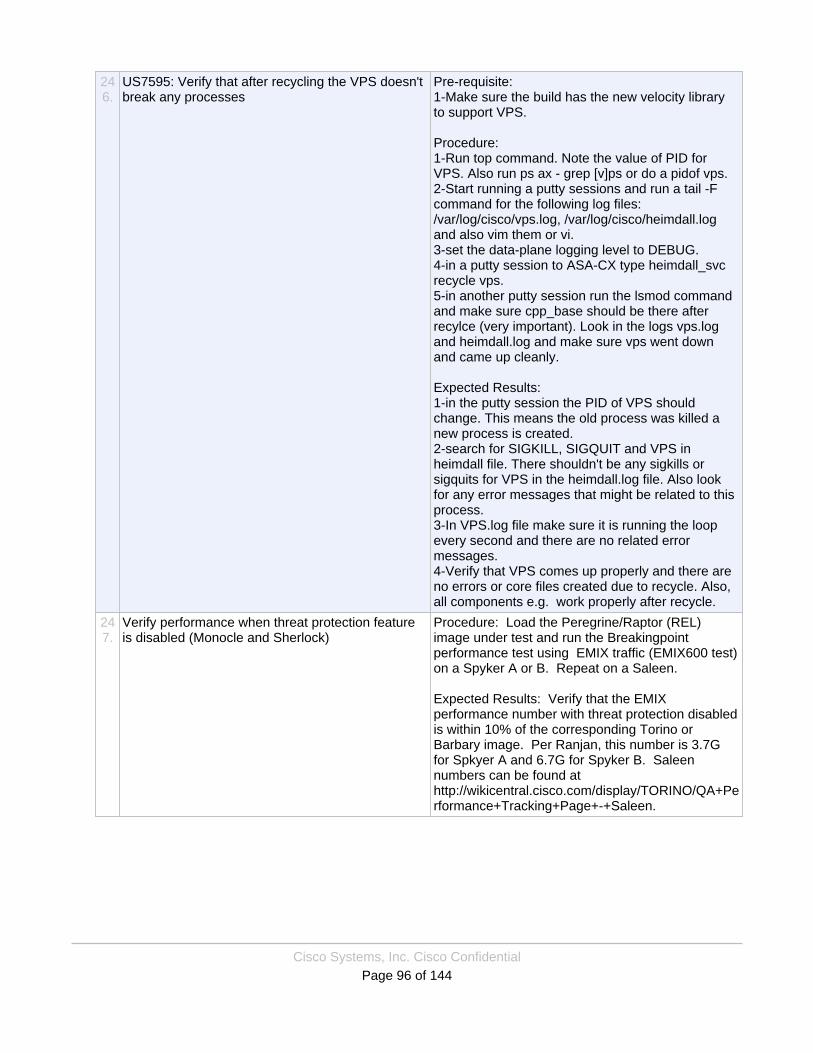
Cisco Systems, Inc. Cisco ConfidentialPage 96 of 144
246.
US7595: Verify that after recycling the VPS doesn'tbreak any processes
Pre-requisite:1-Make sure the build has the new velocity libraryto support VPS.
Procedure:1-Run top command. Note the value of PID forVPS. Also run ps ax - grep [v]ps or do a pidof vps.2-Start running a putty sessions and run a tail -Fcommand for the following log files:/var/log/cisco/vps.log, /var/log/cisco/heimdall.logand also vim them or vi.3-set the data-plane logging level to DEBUG.4-in a putty session to ASA-CX type heimdall_svcrecycle vps.5-in another putty session run the lsmod commandand make sure cpp_base should be there afterrecylce (very important). Look in the logs vps.logand heimdall.log and make sure vps went downand came up cleanly.
Expected Results:1-in the putty session the PID of VPS shouldchange. This means the old process was killed anew process is created.2-search for SIGKILL, SIGQUIT and VPS inheimdall file. There shouldn't be any sigkills orsigquits for VPS in the heimdall.log file. Also lookfor any error messages that might be related to thisprocess.3-In VPS.log file make sure it is running the loopevery second and there are no related errormessages.4-Verify that VPS comes up properly and there areno errors or core files created due to recycle. Also,all components e.g. work properly after recycle.
247.
Verify performance when threat protection featureis disabled (Monocle and Sherlock)
Procedure: Load the Peregrine/Raptor (REL)image under test and run the Breakingpointperformance test using EMIX traffic (EMIX600 test)on a Spyker A or B. Repeat on a Saleen.
Expected Results: Verify that the EMIXperformance number with threat protection disabledis within 10% of the corresponding Torino orBarbary image. Per Ranjan, this number is 3.7Gfor Spkyer A and 6.7G for Spyker B. Saleennumbers can be found athttp://wikicentral.cisco.com/display/TORINO/QA+Performance+Tracking+Page+-+Saleen.

Cisco Systems, Inc. Cisco ConfidentialPage 97 of 144
248.
Verify the functionality of good reputation updateson a stand alone CX device.
Procedure:Configure a threat profile object and attach thecreated threat profile to an access policy.Ensure that a file containing a black list of ip 's ispresent at the location /var/data/updater2/drop.Send some traffic thru the box, such that theoriginating/source ip is from the list of blacklistedip's.Shutdown updater (using the CLI, "heimdall_svcdown updater_connector") and update the system.Start updater again (using the CLI "heimdall_svc upupdater_connector").Send some traffic thru the box again.
Expected Results:Verify that the traffic gets blocked andcorresponding deny events can be seen in theevent viewer.Verify that all the other traffic, (not originating fromthe black listed ip) gets allowed.Validate that the new update is downloaded andapplied properly.Verify that a corresponding system event getsgenerated and can be seen in the event viewer.Verify that the updater UI(Configurations>>Updates) shows the version andtimestamps correctly.Validate that after the update, traffic that wasblocked earlier still gets blocked and correspondingdeny events can be seen in the event viewer.Verify that all the other traffic, (not originating fromthe black listed ip) gets allowed.Ensure that the user can send some more trafficthru the box such that the originating/source ip isfrom the newly added ip's in the blacklist and getsblocked.
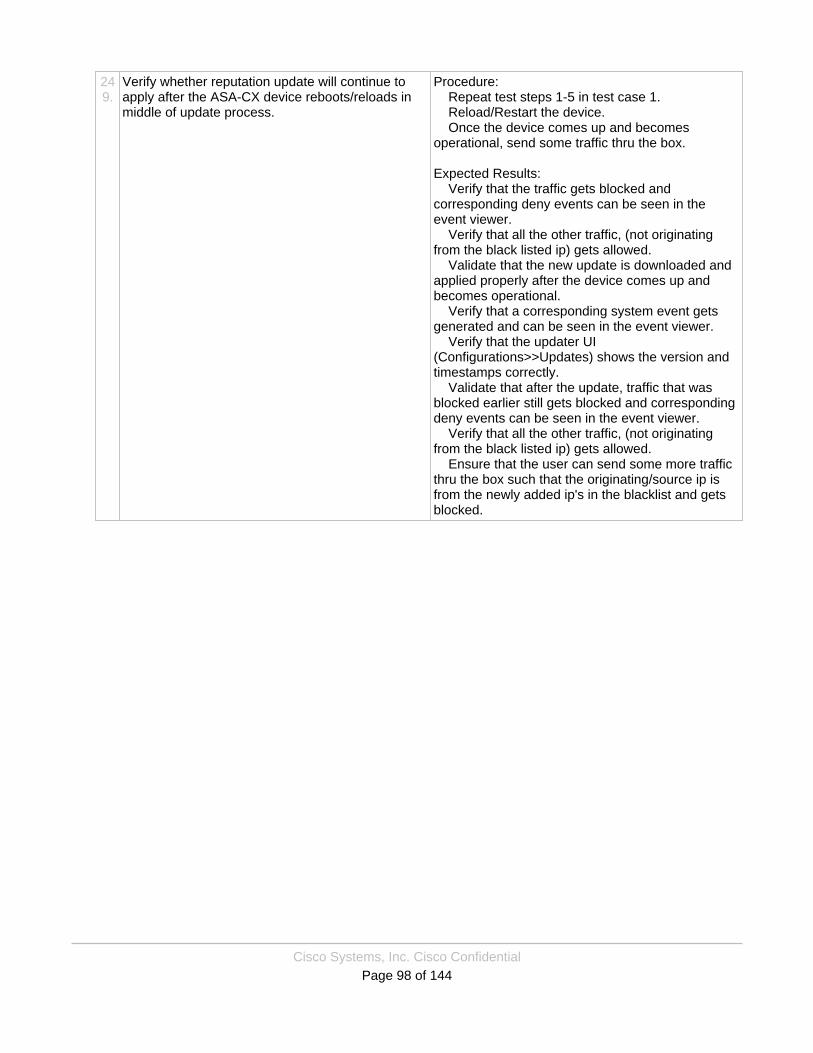
Cisco Systems, Inc. Cisco ConfidentialPage 98 of 144
249.
Verify whether reputation update will continue toapply after the ASA-CX device reboots/reloads inmiddle of update process.
Procedure: Repeat test steps 1-5 in test case 1. Reload/Restart the device. Once the device comes up and becomesoperational, send some traffic thru the box.
Expected Results: Verify that the traffic gets blocked andcorresponding deny events can be seen in theevent viewer. Verify that all the other traffic, (not originatingfrom the black listed ip) gets allowed. Validate that the new update is downloaded andapplied properly after the device comes up andbecomes operational. Verify that a corresponding system event getsgenerated and can be seen in the event viewer. Verify that the updater UI(Configurations>>Updates) shows the version andtimestamps correctly. Validate that after the update, traffic that wasblocked earlier still gets blocked and correspondingdeny events can be seen in the event viewer. Verify that all the other traffic, (not originatingfrom the black listed ip) gets allowed. Ensure that the user can send some more trafficthru the box such that the originating/source ip isfrom the newly added ip's in the blacklist and getsblocked.

Cisco Systems, Inc. Cisco ConfidentialPage 99 of 144
250.
Verify the functionality of good reputation updateson a managed ASA-CX device.
Procedure:· Log into SMX, and discover a ASA-CXdevice in SMX/PRSM.· Configure a threat profile object and attachthe created threat profile to an access policy.· Send some traffic thru the box, such thatthe originating/source ip is from the list ofblacklisted ip's.· Shutdown updater (using the CLI,"heimdall_svc down updater_connector") andupdate the system.· Start updater again (using the CLI"heimdall_svc up updater_connector").· Send some traffic thru the managed ASA-CX again.
Expected Results:· Verify that the traffic gets blocked andcorresponding deny events can be seen in PRSMevent viewer.· Verify that all the other traffic, (notoriginating from the black listed ip) gets allowed.· Validate that the new update is downloadedand applied properly.· Verify that a corresponding system eventgets generated and can be seen in PRSM eventviewer.· Verify that the updater UI(Configurations>>Updates) shows the version andtimestamps correctly.· Validate that after the update, traffic thatwas blocked earlier still gets blocked andcorresponding deny events can be seen in theevent viewer.· Verify that all the other traffic, (notoriginating from the black listed ip) gets allowed.· Ensure that the user can send some moretraffic thru the box such that the originating/sourceip is from the newly added ip's in the blacklist andgets blocked.
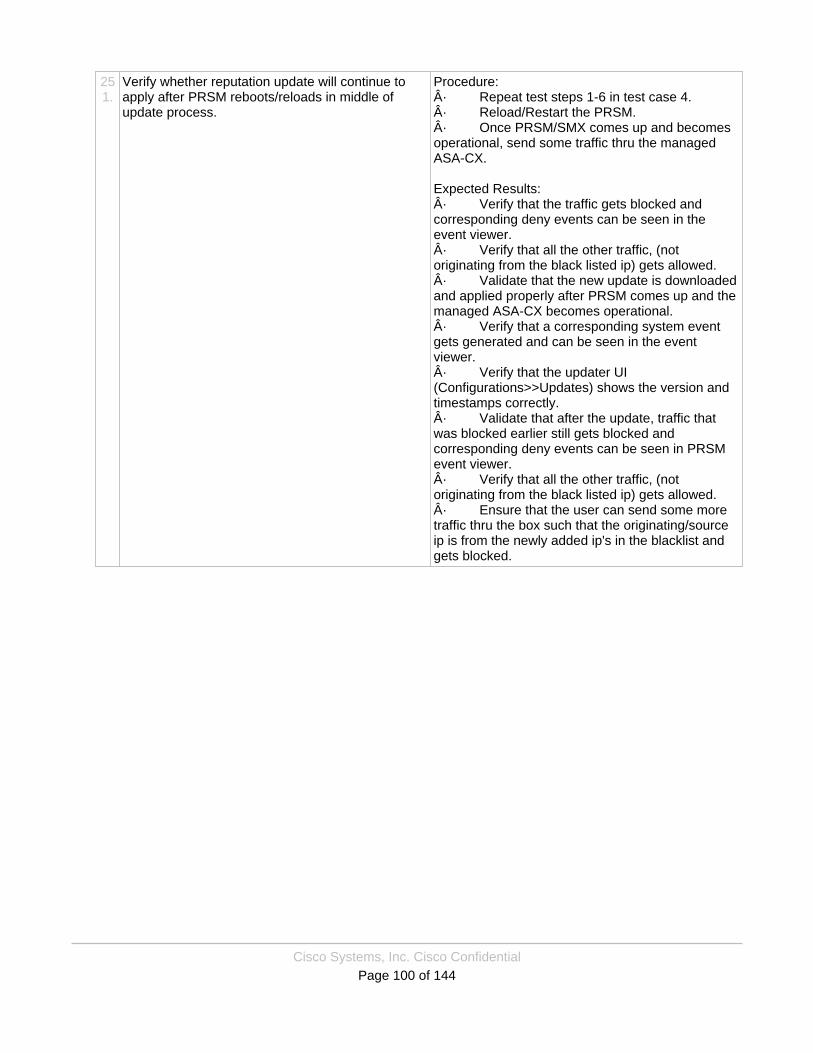
Cisco Systems, Inc. Cisco ConfidentialPage 100 of 144
251.
Verify whether reputation update will continue toapply after PRSM reboots/reloads in middle ofupdate process.
Procedure:· Repeat test steps 1-6 in test case 4.· Reload/Restart the PRSM.· Once PRSM/SMX comes up and becomesoperational, send some traffic thru the managedASA-CX.
Expected Results:· Verify that the traffic gets blocked andcorresponding deny events can be seen in theevent viewer.· Verify that all the other traffic, (notoriginating from the black listed ip) gets allowed.· Validate that the new update is downloadedand applied properly after PRSM comes up and themanaged ASA-CX becomes operational.· Verify that a corresponding system eventgets generated and can be seen in the eventviewer.· Verify that the updater UI(Configurations>>Updates) shows the version andtimestamps correctly.· Validate that after the update, traffic thatwas blocked earlier still gets blocked andcorresponding deny events can be seen in PRSMevent viewer.· Verify that all the other traffic, (notoriginating from the black listed ip) gets allowed.· Ensure that the user can send some moretraffic thru the box such that the originating/sourceip is from the newly added ip's in the blacklist andgets blocked.
Cisco Systems, Inc. Cisco ConfidentialPage 101 of 144
252.
Verify that sas telemetry data gets collected whentelemetry is enabled and Standard(recommended)option is selected on an unmanaged ASA-CXdevice.
Procedure:Open a browser with the ip address of the device.Navigate to Administration>Network participation,click on the option Yes to enable Cisco networkparticipation.Select the participation level asStandard(recommended), click on save and committhe changes.Send some traffic thru the box.Log into the backend FBNP server (i.e., SSH tobastion1.sfo.ironport.com and from there ssh to qa-fbnp-app002.vega.cloud.ironport.com) and checkthe FBNP or phone home logs in:/data/ironportvar/phonehomeserver/phonehome.logCheck the logs in /data/ironport/phonehomelogs/directory.
Expected Results:Verify that a log level message indicating that theSAS endpoint is registered with the SIGN Up clientis seen in the ASA-CX SIGN Up client logs (in the/var/log/cisco/signup.log file).Verify that sas telemetry data is collected and isaccurate in the ASA-CX SIGN Up client logs (in the/var/log/cisco/signup.log file).Verify that this phone home log provides the info onwho made a connection and whether the telemetrypackage received can be authenticated anddecoded successful.Verify that this directory contains the actualtelemetry packet that was sent from the ASA-CXdevice and verify that each packet has theappropriate and accurate SAS telemetry data, justas seen in the ASA-CX SIGN Up client logs (in the/var/log/cisco/signup.log file).

Cisco Systems, Inc. Cisco ConfidentialPage 102 of 144
253.
Verify that sas telemetry data gets collected whentelemetry is enabled and Limited option is selectedfor telemetry on an unmanaged ASA-CX device.
Procedure:Repeat test steps 1-3 in test case 1.Select the participation level as Limited, click onsave and commit the changes.Send some traffic thru the box. Loginto the backend FBNP server (i.e., SSH tobastion1.sfo.ironport.com and from there ssh to qa-fbnp-app002.vega.cloud.ironport.com) and checkthe FBNP or phone home logs in:/data/ironportvar/phonehomeserver/phonehome.logCheck the logs in /data/ironport/phonehomelogs/directory.
Expected Results:Verify that a log level message indicating that theSAS endpoint is registered with the SIGN Up clientis seen in the ASA-CX SIGN Up client logs (in the/var/log/cisco/signup.log file).Verify that sas telemetry data is collected and isaccurate in the ASA-CX SIGN Up client logs (in the/var/log/cisco/signup.log file).Verify that this phone home log provides the info onwho made a connection and whether the telemetrypackage received can be authenticated anddecoded successful.Verify that this directory contains the actualtelemetry packet that was sent from the ASA-CXdevice and verify that each packet has theappropriate and accurate SAS telemetry data, justas seen in the ASA-CX SIGN Up client logs (in the/var/log/cisco/signup.log file).

Cisco Systems, Inc. Cisco ConfidentialPage 103 of 144
254.
Verify that sas telemetry data does not get collectedwhen telemetry is disabled on an unmanaged ASA-CX device.
Procedure:Open a browser with the ip address of the device.Configure a threat profile object and attach thecreated threat profile to an access policy.Navigate to Administration>Network participation,click on the option No to disable Cisco networkparticipation/telemetry.Click on save and commit the changes.Send some traffic thru the box.Log into the backend FBNP server (i.e., SSH tobastion1.sfo.ironport.com and from there ssh to qa-fbnp-app002.vega.cloud.ironport.com) and checkthe FBNP or phone home logs in:/data/ironportvar/phonehomeserver/phonehome.logCheck the logs in /data/ironport/phonehomelogs/directory.
Expected Results:Verify that no log level message indicating that theSAS endpoint is registered with the SIGN Up clientis seen in the ASA-CX SIGN Up client logs (in the/var/log/cisco/signup.log file).Verify that no sas telemetry data is collected in theASA-CX SIGN Up client logs (in the/var/log/cisco/signup.log file).Verify that this directory does not contain anytelemetry packet sent from the ASA-CX device.

Cisco Systems, Inc. Cisco ConfidentialPage 104 of 144
255.
Verify that sas telemetry data gets collected whentelemetry is enabled and Standard(recommended)option is selected in an ASA-CX device managedby PRSM.
Procedure:· Log into SMX, and discover a ASA-CXdevice in SMX/PRSM.· Configure a threat profile object and attachthe created threat profile to an access policy inPRSM.· Navigate to Administration>Networkparticipation, click on the option Yes to enableCisco network participation.· Select the participation level asStandard(recommended), click on save and committhe changes.· Send some traffic thru the managed ASA-CX.· Log into the backend FBNP server (i.e.,SSH to bastion1.sfo.ironport.com and from theressh to qa-fbnp-app002.vega.cloud.ironport.com)and check the FBNP or phone home logs in:/data/ironportvar/phonehomeserver/phonehome.log· Check the logs in/data/ironport/phonehomelogs/ directory.
Expected Results:· Verify that a log level message indicatingthat the SAS endpoint is registered with the SIGNUp client is seen in PRSM SIGN Up client logs (inthe /var/log/cisco/signup.log file).· Verify that sas telemetry data is collectedand is accurate in PRSM SIGN Up client logs (inthe /var/log/cisco/signup.log file).· Verify that this phone home log provides theinfo on who made a connection and whether thetelemetry package received can be authenticatedand decoded successful.· Verify that this directory contains the actualtelemetry packet that was sent from the managedASA-CX device and verify that each packet has theappropriate and accurate SAS telemetry data, justas seen in the PRSM SIGN Up client logs (in the/var/log/cisco/signup.log file).
Cisco Systems, Inc. Cisco ConfidentialPage 105 of 144
256.
Verify that sas telemetry data gets collected whentelemetry is enabled and Limited option is selectedfor telemetry in an ASA-CX device managed byPRSM.
Procedure:· Repeat test steps 1-3 in test case 4.· Select the participation level as Limited, clickon save and commit the changes.· Send some traffic thru the managed ASA-CX.· Log into the backend FBNP server (i.e.,SSH to bastion1.sfo.ironport.com and from theressh to qa-fbnp-app002.vega.cloud.ironport.com)and check the FBNP or phone home logs in:/data/ironportvar/phonehomeserver/phonehome.log· Check the logs in/data/ironport/phonehomelogs/ directory.
Expected Results:· Verify that a log level message indicatingthat the SAS endpoint is registered with the SIGNUp client is seen in PRSM SIGN Up client logs (inthe /var/log/cisco/signup.log file).· Verify that sas telemetry data is collectedand is accurate in PRSM SIGN Up client logs (inthe /var/log/cisco/signup.log file).· Verify that this phone home log provides theinfo on who made a connection and whether thetelemetry package received can be authenticatedand decoded successful.· Verify that this directory contains the actualtelemetry packet that was sent from the managedASA-CX device and verify that each packet has theappropriate and accurate SAS telemetry data, justas seen in the PRSM SIGN Up client logs (in the/var/log/cisco/signup.log file).
Cisco Systems, Inc. Cisco ConfidentialPage 106 of 144
257.
Verify that sas telemetry data does not get collectedwhen telemetry is disabled in an ASA-CX devicemanaged by PRSM.
Procedure:· Log into SMX, and discover a ASA-CXdevice in SMX/PRSM.· Configure a threat profile object and attachthe created threat profile to an access policy inPRSM.· Navigate to Administration>Networkparticipation, click on the option No to disable Cisconetwork participation/telemetry.· Click on save and commit the changes.· Send some traffic thru the managed ASA-CX.· Log into the backend FBNP server (i.e.,SSH to bastion1.sfo.ironport.com and from theressh to qa-fbnp-app002.vega.cloud.ironport.com)and check the FBNP or phone home logs in:/data/ironportvar/phonehomeserver/phonehome.log· Check the logs in/data/ironport/phonehomelogs/ directory.
Expected Results:· Verify that no log level message indicatingthat the SAS endpoint is registered with the SIGNUp client is seen in the managed ASA-CX/ PRSMSIGN Up client logs (in the /var/log/cisco/signup.logfile).· Verify that no sas telemetry data is collectedin the managed ASA-CX/PRSM SIGN Up clientlogs (in the /var/log/cisco/signup.log file).· Verify that this directory does not containany telemetry packet sent from the managed ASA-CX device.
Cisco Systems, Inc. Cisco ConfidentialPage 107 of 144
258.
Verify the functionality of good velocity updates ona stand alone CX device.
Procedure: Configure a threat profile object and attach thecreated threat profile to an access policy. Send some traffic thru the box. Shutdown updater (using the CLI, "heimdall_svcdown updater_connector") and update the system. Start updater again (using the CLI "heimdall_svcup updater_connector"). Send some traffic thru the box again.
Expected Results: Verify that threats get detected andcorresponding events are seen in the event viewer. Validate that the new update is downloaded andapplied properly. Verify that a corresponding system event getsgenerated and can be seen in the event viewer. Verify that the updater UI(Configurations>>Updates), specifically tp engineshows the version and timestamps correctly. Ensure that VPS process gets recycled by theupdater from vps log (located at/var/log/cisco/vps.log) and the version in the testupdate package is seen in the log after vps isrecycled. Validate that after the update, threats still getdetected and corresponding events can be seen inthe event viewer.
259.
Verify whether velocity update will continue to applyafter the ASA-CX device reboots/reloads in middleof update process.
Procedure: Repeat test steps 1-4 in test case 1. Reload/Restart the device. Once the device comes up and becomesoperational, send some traffic thru the box.
Expected Results: Verify that threats get detected andcorresponding events are seen in the event viewer. Validate that the new update is downloaded andapplied properly after the device comes up andbecomes operational. Verify that a corresponding system event getsgenerated and can be seen in the event viewer. Verify that the updater UI(Configurations>>Updates), specifically tp engineshows the version and timestamps correctly. Ensure that VPS process gets recycled by theupdater from vps log (located at/var/log/cisco/vps.log) and the version in the testupdate package is seen in the log after vps isrecycled. Validate that after the update, threats still getdetected and corresponding events can be seen inthe event viewer.
Cisco Systems, Inc. Cisco ConfidentialPage 108 of 144
260.
Verify the functionality of velocity update and makesure that it fails to apply and rolls back successfullyon a stand-alone CX device.
Procedure:· Repeat test steps 1-4 in test case 1.· Send some traffic thru the box again.
Expected Results:· Verify that threats get detected andcorresponding events are seen in the event viewer.· Validate that the new update fails to applyand gets rolled back to the old version successfully.· Verify that a corresponding system eventgets generated and can be seen in the eventviewer.· Verify that the updater UI(Configurations>>Updates), specifically tp engineshows the version and timestamps correctly.· Ensure that VPS process gets recycled bythe updater from vps log (located at/var/log/cisco/vps.log) and the version in the testupdate package is seen in the log after vps isrecycled.· Validate that after the failed update androllback, threats still get detected andcorresponding events can be seen in the eventviewer.
Cisco Systems, Inc. Cisco ConfidentialPage 109 of 144
261.
Verify the functionality of good velocity updates ona managed ASA-CX device.
Procedure:· Log into SMX, and discover a ASA-CXdevice in SMX/PRSM.· Configure a threat profile object and attachthe created threat profile to an access policy.· Send some traffic thru the box.· Shutdown updater (using the CLI,"heimdall_svc down updater_connector") andupdate the system.· Start updater again (using the CLI"heimdall_svc up updater_connector").· Send some traffic thru the managed ASA-CX again.
Expected Results:· Verify that threats get detected andcorresponding events can be seen in PRSM eventviewer.· Validate that the new update is downloadedand applied properly.· Verify that a corresponding system eventgets generated and can be seen in PRSM eventviewer.· Verify that the updater UI(Configurations>>Updates), specifically tp engineshows the version and timestamps correctly.· Ensure that VPS process gets recycled bythe updater from vps log (located at/var/log/cisco/vps.log)and the version in the testupdate package is seen in the log after vps isrecycled.· Validate that after the update, threats stillget detected and corresponding events can beseen in PRSM event viewer.
Cisco Systems, Inc. Cisco ConfidentialPage 110 of 144
262.
Verify whether velocity update will continue to applyafter PRSM reboots/reloads in middle of updateprocess.
Procedure:· Repeat test steps 1-5 in test case 4.· Reload/Restart the PRSM.· Once PRSM/SMX comes up and becomesoperational, send some traffic thru the managedASA-CX.
Expected Results:· Verify that threats get detected andcorresponding events can be seen in PRSM eventviewer.· Validate that the new update is downloadedand applied properly after PRSM comes up and themanaged ASA-CX becomes operational.· Verify that a corresponding system eventgets generated and can be seen in PRSM eventviewer.· Verify that the updater UI(Configurations>>Updates), specifically tp engineshows the version and timestamps correctly.· Ensure that VPS process gets recycled bythe updater from vps log (located at/var/log/cisco/vps.log)and the version in the testupdate package is seen in the log after vps isrecycled.· Validate that after the update, threats stillget detected and corresponding events can beseen in PRSM event viewer.
263.
Verify the functionality of velocity update and makesure that it fails to apply and rolls back successfullyon a managed ASA-CX device.
Procedure:· Repeat test steps 1-5 in test case 4.· Send some traffic thru the managed ASA-CX device again.
Expected Results:· Verify that threats get detected andcorresponding events can be seen in PRSM eventviewer.· Validate that the new update fails to applyon PRSM and gets rolled back to the old versionsuccessfully.· Verify that a corresponding system eventgets generated and can be seen in PRSM eventviewer.· Verify that the updater UI(Configurations>>Updates), specifically tp engineshows the version and timestamps correctly.· Ensure that VPS process gets recycled bythe updater from vps log (located at/var/log/cisco/vps.log)and the version in the testupdate package is seen in the log after vps isrecycled.· Validate that after the failed update, threatsstill get detected and corresponding events can beseen in PRSM event viewer.
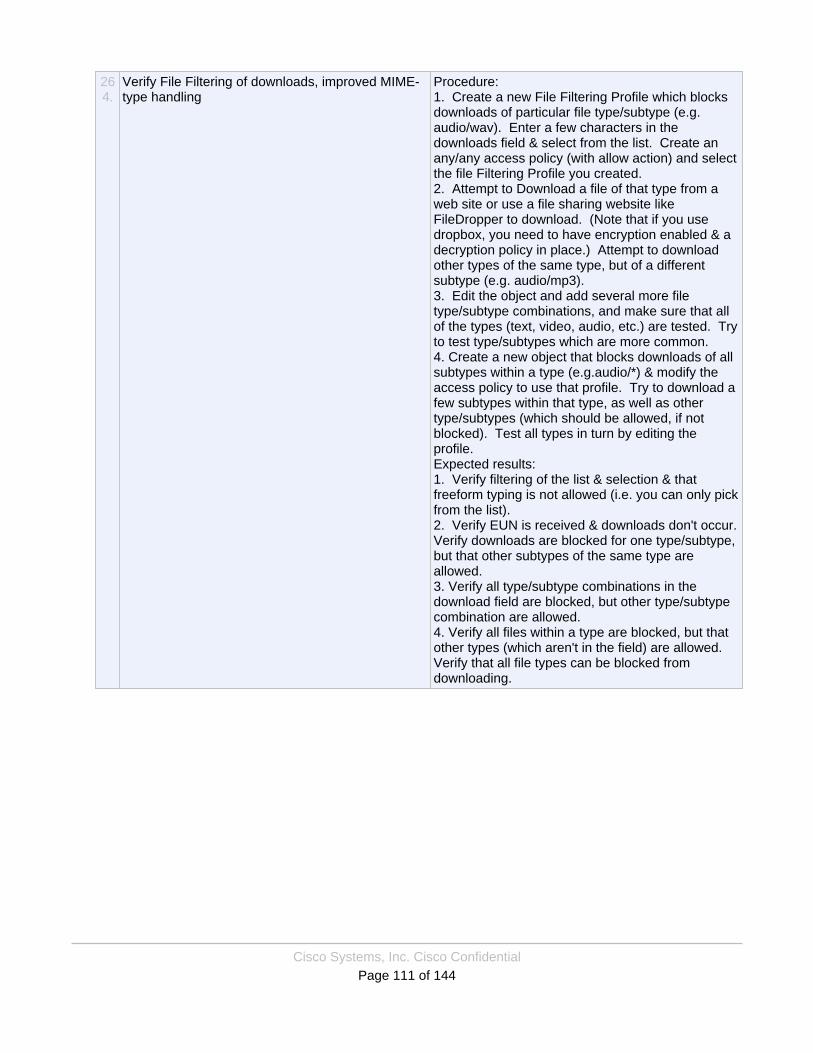
Cisco Systems, Inc. Cisco ConfidentialPage 111 of 144
264.
Verify File Filtering of downloads, improved MIME-type handling
Procedure:1. Create a new File Filtering Profile which blocksdownloads of particular file type/subtype (e.g.audio/wav). Enter a few characters in thedownloads field & select from the list. Create anany/any access policy (with allow action) and selectthe file Filtering Profile you created.2. Attempt to Download a file of that type from aweb site or use a file sharing website likeFileDropper to download. (Note that if you usedropbox, you need to have encryption enabled & adecryption policy in place.) Attempt to downloadother types of the same type, but of a differentsubtype (e.g. audio/mp3).3. Edit the object and add several more filetype/subtype combinations, and make sure that allof the types (text, video, audio, etc.) are tested. Tryto test type/subtypes which are more common.4. Create a new object that blocks downloads of allsubtypes within a type (e.g.audio/*) & modify theaccess policy to use that profile. Try to download afew subtypes within that type, as well as othertype/subtypes (which should be allowed, if notblocked). Test all types in turn by editing theprofile.Expected results:1. Verify filtering of the list & selection & thatfreeform typing is not allowed (i.e. you can only pickfrom the list).2. Verify EUN is received & downloads don't occur.Verify downloads are blocked for one type/subtype,but that other subtypes of the same type areallowed.3. Verify all type/subtype combinations in thedownload field are blocked, but other type/subtypecombination are allowed.4. Verify all files within a type are blocked, but thatother types (which aren't in the field) are allowed.Verify that all file types can be blocked fromdownloading.

Cisco Systems, Inc. Cisco ConfidentialPage 112 of 144
265.
Verify File Filtering of uploads, improved MIME-typehandling
Procedure:1. Create a new File Filtering Profile which blocksuploads of particular file type/subtype (e.g.audio/wav). Enter a few characters in the uploadsfield & select from the list. Create an any/anyaccess policy (with allow action) and select the fileFiltering Profile you created.2. Attempt to Upload a file of that type to a web siteor use a file sharing website like FileDropper toupload. (Note that if you use dropbox, you need tohave encryption enabled & a decryption policy inplace.) Attempt to upload other types of the sametype, but of a different subtype (e.g. audio/mp3).3. Edit the object and add several more filetype/subtype combinations, and make sure that allof the types (text, video, audio, etc.) are tested. Tryto test type/subtypes which are more common.4. Create a new object that blocks uploads of allsubtypes within a type (e.g.audio/*) & modify theaccess policy to use that profile. Try to download afew subtypes within that type, as well as othertype/subtypes (which should be allowed if notblocked). Test all types in turn by editing theprofile.Expected results:1. Verify filtering of the list & selection & thatfreeform typing is not allowed (i.e. you can only pickfrom the list).2. Verify EUN is received (is this always true foruploads?) and uploads don't occur. Verify uploadsare blocked for one type/subtype, but that othersubtypes of the same type are allowed.3. Verify all type/subtype combinations in theupload field are blocked, but other type/subtypecombination are allowed.4. Verify all files within a type are blocked, but thatother types (which aren't in the field) are allowed.Verify that all file types can be blocked fromuploading.
266.
Verify File Filtering of mix of uploads anddownloads, improved MIME-type handling
Procedure:1. Create a File Filtering profile that contains amixture of several download types/subtypes(includings type/*) and several upload types(including type/*). Create an any/any access policy(with allow action) and select the file Filtering Profileyou created.2. Edit the File Filtering profile a few times and mixup the types/subtypes that you are testing.Expected Results:1 & 2. All combinations of uploads and downloadsblock the files that they should and don't block filesthat they shouldn't. The profile can be edited andthose edits take effect.
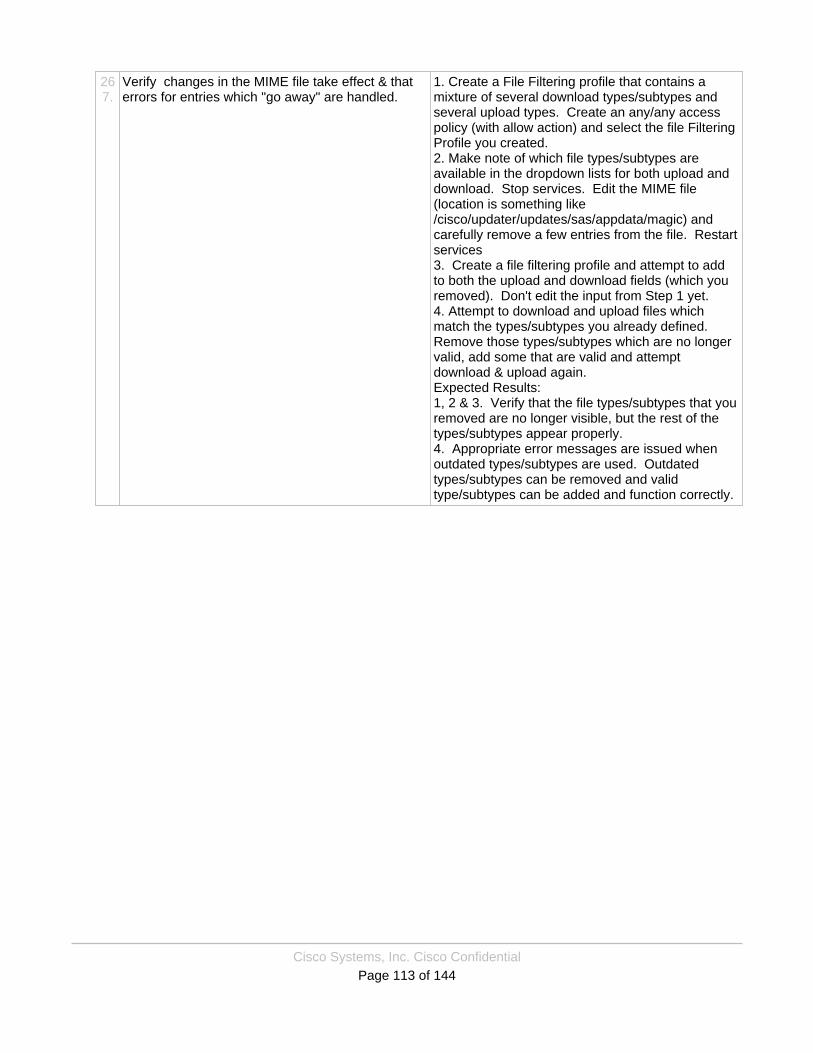
Cisco Systems, Inc. Cisco ConfidentialPage 113 of 144
267.
Verify changes in the MIME file take effect & thaterrors for entries which "go away" are handled.
1. Create a File Filtering profile that contains amixture of several download types/subtypes andseveral upload types. Create an any/any accesspolicy (with allow action) and select the file FilteringProfile you created.2. Make note of which file types/subtypes areavailable in the dropdown lists for both upload anddownload. Stop services. Edit the MIME file(location is something like/cisco/updater/updates/sas/appdata/magic) andcarefully remove a few entries from the file. Restartservices3. Create a file filtering profile and attempt to addto both the upload and download fields (which youremoved). Don't edit the input from Step 1 yet.4. Attempt to download and upload files whichmatch the types/subtypes you already defined.Remove those types/subtypes which are no longervalid, add some that are valid and attemptdownload & upload again.Expected Results:1, 2 & 3. Verify that the file types/subtypes that youremoved are no longer visible, but the rest of thetypes/subtypes appear properly.4. Appropriate error messages are issued whenoutdated types/subtypes are used. Outdatedtypes/subtypes can be removed and validtype/subtypes can be added and function correctly.
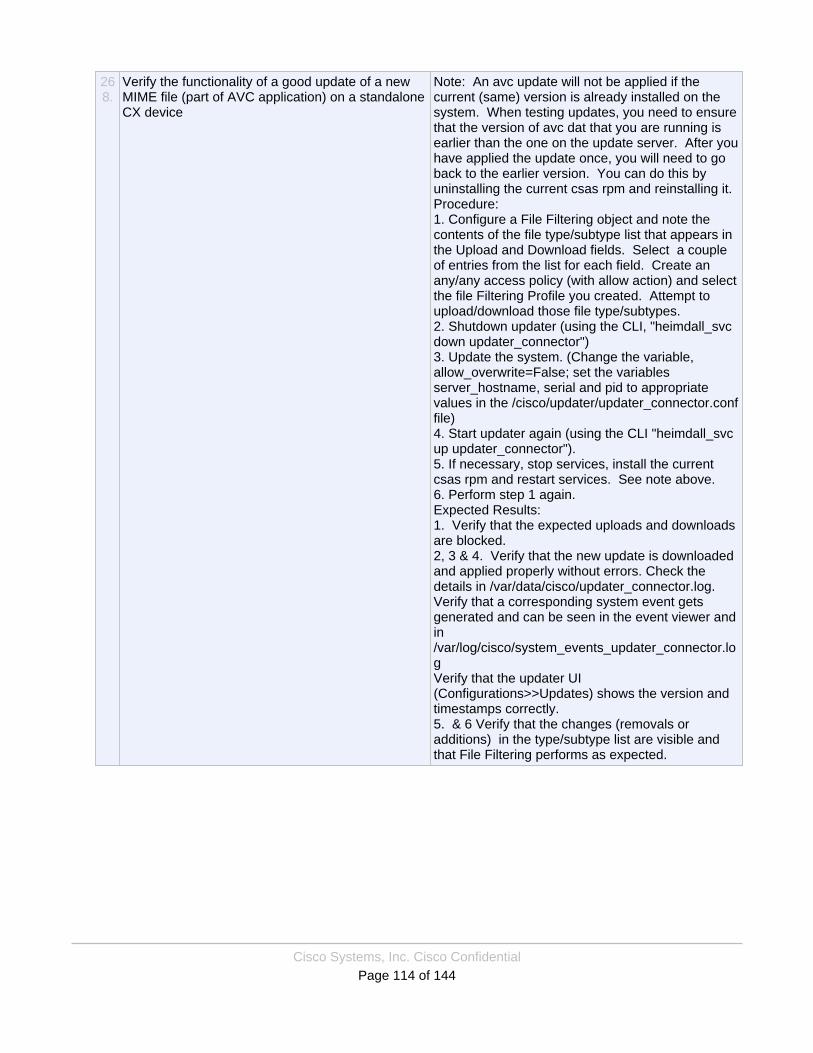
Cisco Systems, Inc. Cisco ConfidentialPage 114 of 144
268.
Verify the functionality of a good update of a newMIME file (part of AVC application) on a standaloneCX device
Note: An avc update will not be applied if thecurrent (same) version is already installed on thesystem. When testing updates, you need to ensurethat the version of avc dat that you are running isearlier than the one on the update server. After youhave applied the update once, you will need to goback to the earlier version. You can do this byuninstalling the current csas rpm and reinstalling it.Procedure:1. Configure a File Filtering object and note thecontents of the file type/subtype list that appears inthe Upload and Download fields. Select a coupleof entries from the list for each field. Create anany/any access policy (with allow action) and selectthe file Filtering Profile you created. Attempt toupload/download those file type/subtypes.2. Shutdown updater (using the CLI, "heimdall_svcdown updater_connector")3. Update the system. (Change the variable,allow_overwrite=False; set the variablesserver_hostname, serial and pid to appropriatevalues in the /cisco/updater/updater_connector.conffile)4. Start updater again (using the CLI "heimdall_svcup updater_connector").5. If necessary, stop services, install the currentcsas rpm and restart services. See note above.6. Perform step 1 again.Expected Results:1. Verify that the expected uploads and downloadsare blocked.2, 3 & 4. Verify that the new update is downloadedand applied properly without errors. Check thedetails in /var/data/cisco/updater_connector.log.Verify that a corresponding system event getsgenerated and can be seen in the event viewer andin/var/log/cisco/system_events_updater_connector.logVerify that the updater UI(Configurations>>Updates) shows the version andtimestamps correctly.5. & 6 Verify that the changes (removals oradditions) in the type/subtype list are visible andthat File Filtering performs as expected.

Cisco Systems, Inc. Cisco ConfidentialPage 115 of 144
269.
Verify the functionality of a bad update of a newMIME file (part of AVC application) on a standaloneCX device and make sure that it fails to apply androll back is successful
Note: An avc update will not be applied if thecurrent (same) version is already installed on thesystem. When testing updates, you need to ensurethat the version of avc dat that you are running isearlier than the one on the update server. After youhave applied the update once, you will need to goback to the earlier version. You can do this byuninstalling the current csas rpm and reinstalling it.Procedure:1. Configure a File Filtering object and note thecontents of the file type/subtype list that appears inthe Upload and Download fields. Select a coupleof entries from the list for each field. Create anany/any access policy (with allow action) and selectthe file Filtering Profile you created. Attempt toupload/download those file type/subtypes.2. Shutdown updater (using the CLI, "heimdall_svcdown updater_connector")3. Update the system. (Change the variable,allow_overwrite=False; set the variablesserver_hostname, serial and pid to appropriatevalues in the /cisco/updater/updater_connector.conffile)4. Start updater again (using the CLI "heimdall_svcup updater_connector").5. If necessary, stop services, install the currentcsas rpm and restart services. See note above.6. Repeat step 1.Expected Results:1. Verify that the expected uploads and downloadsare blocked.2, 3 and 4. Verify that the new update fails to applyand gets rolled back to the old version successfully.Verify that a corresponding system event getsgenerated and can be seen in the event viewer.Verify that the updater UI(Configurations>>Updates), specifically avc datshows the version and timestamps correctly.5. & 6. Verify that the type/subtype lists for uploadand download didn't change and that the expecteduploads and downloads are blocked
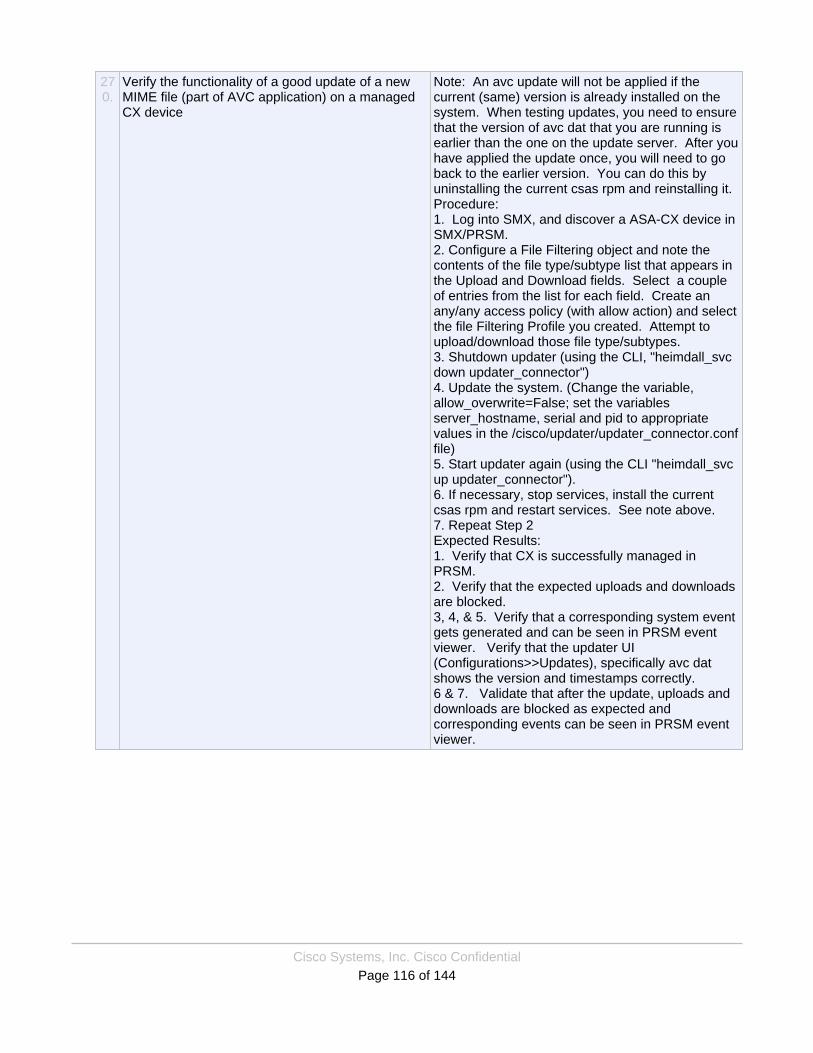
Cisco Systems, Inc. Cisco ConfidentialPage 116 of 144
270.
Verify the functionality of a good update of a newMIME file (part of AVC application) on a managedCX device
Note: An avc update will not be applied if thecurrent (same) version is already installed on thesystem. When testing updates, you need to ensurethat the version of avc dat that you are running isearlier than the one on the update server. After youhave applied the update once, you will need to goback to the earlier version. You can do this byuninstalling the current csas rpm and reinstalling it.Procedure:1. Log into SMX, and discover a ASA-CX device inSMX/PRSM.2. Configure a File Filtering object and note thecontents of the file type/subtype list that appears inthe Upload and Download fields. Select a coupleof entries from the list for each field. Create anany/any access policy (with allow action) and selectthe file Filtering Profile you created. Attempt toupload/download those file type/subtypes.3. Shutdown updater (using the CLI, "heimdall_svcdown updater_connector")4. Update the system. (Change the variable,allow_overwrite=False; set the variablesserver_hostname, serial and pid to appropriatevalues in the /cisco/updater/updater_connector.conffile)5. Start updater again (using the CLI "heimdall_svcup updater_connector").6. If necessary, stop services, install the currentcsas rpm and restart services. See note above.7. Repeat Step 2Expected Results:1. Verify that CX is successfully managed inPRSM.2. Verify that the expected uploads and downloadsare blocked.3, 4, & 5. Verify that a corresponding system eventgets generated and can be seen in PRSM eventviewer. Verify that the updater UI(Configurations>>Updates), specifically avc datshows the version and timestamps correctly.6 & 7. Validate that after the update, uploads anddownloads are blocked as expected andcorresponding events can be seen in PRSM eventviewer.
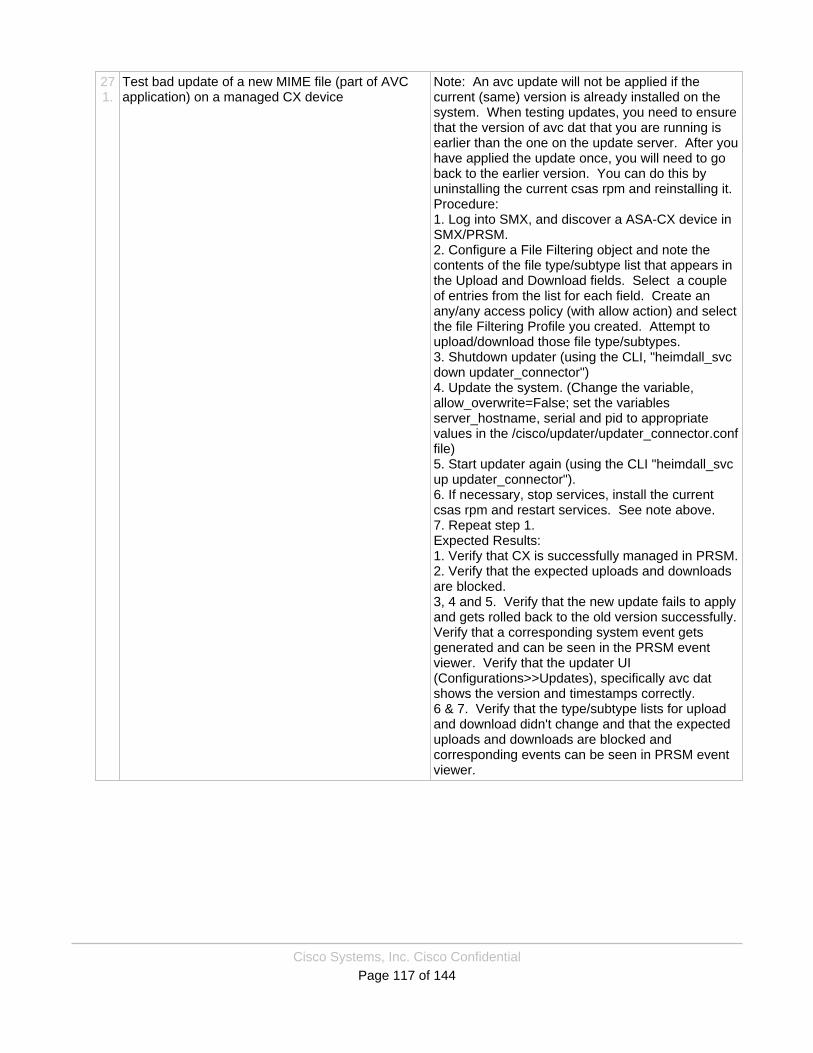
Cisco Systems, Inc. Cisco ConfidentialPage 117 of 144
271.
Test bad update of a new MIME file (part of AVCapplication) on a managed CX device
Note: An avc update will not be applied if thecurrent (same) version is already installed on thesystem. When testing updates, you need to ensurethat the version of avc dat that you are running isearlier than the one on the update server. After youhave applied the update once, you will need to goback to the earlier version. You can do this byuninstalling the current csas rpm and reinstalling it.Procedure:1. Log into SMX, and discover a ASA-CX device inSMX/PRSM.2. Configure a File Filtering object and note thecontents of the file type/subtype list that appears inthe Upload and Download fields. Select a coupleof entries from the list for each field. Create anany/any access policy (with allow action) and selectthe file Filtering Profile you created. Attempt toupload/download those file type/subtypes.3. Shutdown updater (using the CLI, "heimdall_svcdown updater_connector")4. Update the system. (Change the variable,allow_overwrite=False; set the variablesserver_hostname, serial and pid to appropriatevalues in the /cisco/updater/updater_connector.conffile)5. Start updater again (using the CLI "heimdall_svcup updater_connector").6. If necessary, stop services, install the currentcsas rpm and restart services. See note above.7. Repeat step 1.Expected Results:1. Verify that CX is successfully managed in PRSM.2. Verify that the expected uploads and downloadsare blocked.3, 4 and 5. Verify that the new update fails to applyand gets rolled back to the old version successfully.Verify that a corresponding system event getsgenerated and can be seen in the PRSM eventviewer. Verify that the updater UI(Configurations>>Updates), specifically avc datshows the version and timestamps correctly.6 & 7. Verify that the type/subtype lists for uploadand download didn't change and that the expecteduploads and downloads are blocked andcorresponding events can be seen in PRSM eventviewer.

Cisco Systems, Inc. Cisco ConfidentialPage 118 of 144
272.
Verify access policy when set to Follow Global(Device-Level) threat profile, standalone CX
Procedure:1. Create Deny all, Alert all and Ignore all threatprofiles.2. Configure Intrusion Protection (currently atConfigurations->Devices, Basic Device properties,Threat Protection) to On3. Select the Deny all Profile.4. Play a PCAP with wireplay.5. Create an any/any access policy. Leave thedefault profile for the policy at Follow Global(Device-Level) Profile6. Play a PCAP with wireplay.7. Change Global (Device-Level) Profile to Alertonly. Play a PCAP with Wireplay.8. Change Global (Device-Level) Profile to Ignoreonly. Play a PCAP with Wireplay.Expected Results:1. Verify Profiles can be created.2. Verify Intrusion Protection defaulted to Off butcan be turned on.3. Verify Profile choices are Default, plus the 3 youcreated.4. Verify threat is denied.5. Verify Profile default is Follow Global (Device-Level) Profile. Verify Profile choices are Default,Follow Global, plus the 3 you created.6. Verify threat is denied.7. Verify threat is alerted.8. Verify threat is ignored.
273.
Verify access policy when set to None profile,standalone CX
Procedure:1. Create Deny all threat profile.2. Configure Intrusion Protection (currently atConfigurations->Devices, Basic Device properties,Threat Protection) to On3. Select the Deny all Profile (as the Global(Device-Level) Profile)4. Play a PCAP with wireplay5. Create an any/any access policy. For threatprofile, select none.6. Play a PCAP with wireplay.Expected Results:1. Verify Profile can be created.2,3 & 4. Verify threat is detected and eventedaccording to the Default Threat Profile (and theparticular PCAP that is played).5 & 6. Verify threat is ignored & the Access policyname shows in the event for the traffic in theContext Aware Events tab.

Cisco Systems, Inc. Cisco ConfidentialPage 119 of 144
274.
Verify setting global (Device-Level) threat profilepolicy to None (as the default & when setting ischanged to none), standalone CX
Procedure:1. Configure Intrusion Protection (currently atConfigurations->Devices, Basic Device properties,Threat Protection) to On2. Leave the global (Device-Level) setting at itsdefault3. Play a PCAP with wireplay4. Select the Default Threat profile (for global(Device-Level)))5. Play a PCAP with wireplay6. Select none (or blank) as the global (Device-Level) threat profile7. Play a PCAP with wireplayExpected Results:1, 2, and 3. Verify the default setting is none (orblank). Verify the threat is ignored & the ImplicitAllow policy name shows in the event for the trafficin the Context Aware Events tab.4 & 5. Verify threat is detected and eventedaccording to the Default Threat Profile (and theparticular PCAP that is played).6 & 7. Verify the threat is ignored & the ImplicitAllow policy name shows in the event for the trafficin the Context Aware Events tab.
275.
Verify disabling of Threat Protection, standalone CX Procedure:1. Create Deny all threat profile.2. Configure Intrusion Protection (currently atConfigurations->Devices, Basic Device properties,Threat Protection) to On3. Select the Deny all Profile.4. Play a PCAP with wireplay5. Configure Intrustion Protection to Off.6. Play a PCAP with wireplay.Expected Results:1, 2, 3 & 4. Verify threat is denied.5 & 6. Verify threat is ignored.
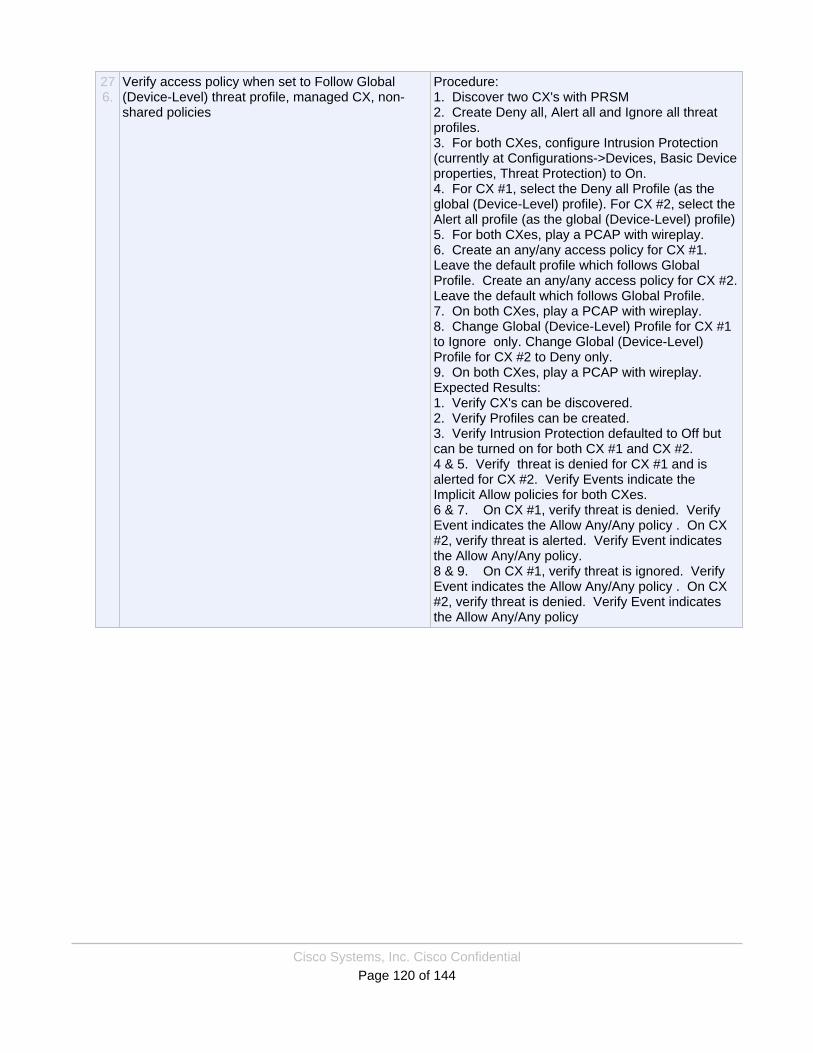
Cisco Systems, Inc. Cisco ConfidentialPage 120 of 144
276.
Verify access policy when set to Follow Global(Device-Level) threat profile, managed CX, non-shared policies
Procedure:1. Discover two CX's with PRSM2. Create Deny all, Alert all and Ignore all threatprofiles.3. For both CXes, configure Intrusion Protection(currently at Configurations->Devices, Basic Deviceproperties, Threat Protection) to On.4. For CX #1, select the Deny all Profile (as theglobal (Device-Level) profile). For CX #2, select theAlert all profile (as the global (Device-Level) profile)5. For both CXes, play a PCAP with wireplay.6. Create an any/any access policy for CX #1.Leave the default profile which follows GlobalProfile. Create an any/any access policy for CX #2.Leave the default which follows Global Profile.7. On both CXes, play a PCAP with wireplay.8. Change Global (Device-Level) Profile for CX #1to Ignore only. Change Global (Device-Level)Profile for CX #2 to Deny only.9. On both CXes, play a PCAP with wireplay.Expected Results:1. Verify CX's can be discovered.2. Verify Profiles can be created.3. Verify Intrusion Protection defaulted to Off butcan be turned on for both CX #1 and CX #2.4 & 5. Verify threat is denied for CX #1 and isalerted for CX #2. Verify Events indicate theImplicit Allow policies for both CXes.6 & 7. On CX #1, verify threat is denied. VerifyEvent indicates the Allow Any/Any policy . On CX#2, verify threat is alerted. Verify Event indicatesthe Allow Any/Any policy.8 & 9. On CX #1, verify threat is ignored. VerifyEvent indicates the Allow Any/Any policy . On CX#2, verify threat is denied. Verify Event indicatesthe Allow Any/Any policy
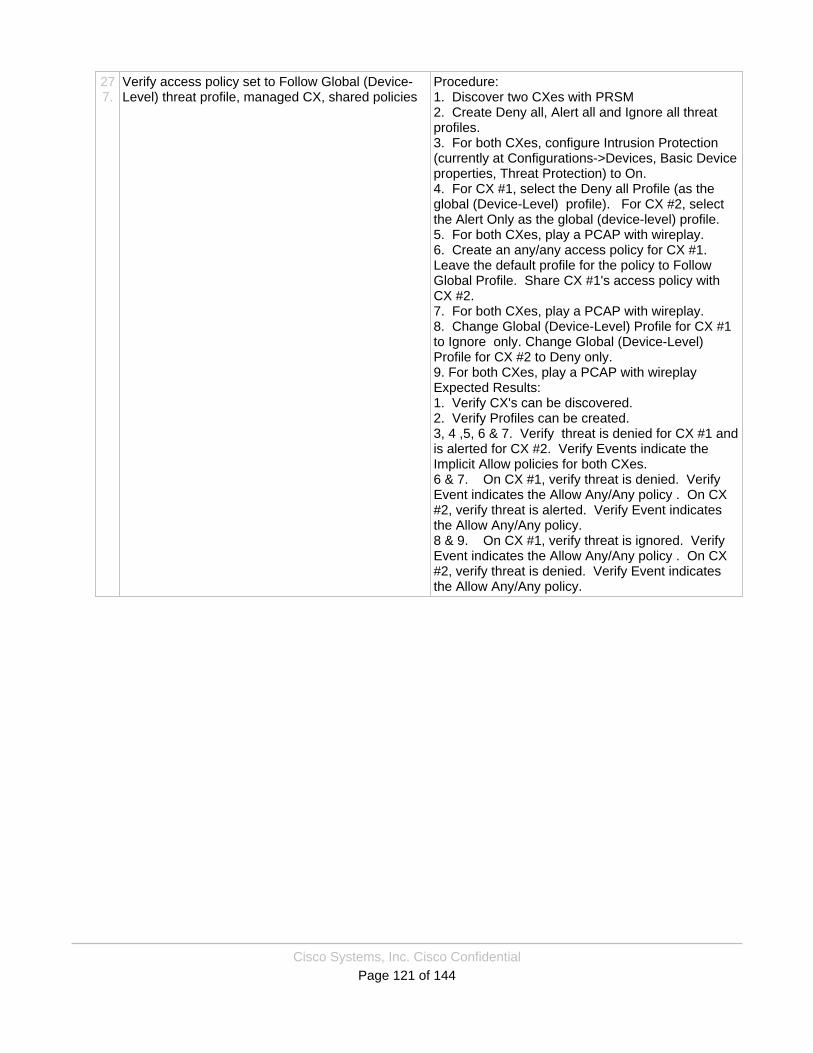
Cisco Systems, Inc. Cisco ConfidentialPage 121 of 144
277.
Verify access policy set to Follow Global (Device-Level) threat profile, managed CX, shared policies
Procedure:1. Discover two CXes with PRSM2. Create Deny all, Alert all and Ignore all threatprofiles.3. For both CXes, configure Intrusion Protection(currently at Configurations->Devices, Basic Deviceproperties, Threat Protection) to On.4. For CX #1, select the Deny all Profile (as theglobal (Device-Level) profile). For CX #2, selectthe Alert Only as the global (device-level) profile.5. For both CXes, play a PCAP with wireplay.6. Create an any/any access policy for CX #1.Leave the default profile for the policy to FollowGlobal Profile. Share CX #1's access policy withCX #2.7. For both CXes, play a PCAP with wireplay.8. Change Global (Device-Level) Profile for CX #1to Ignore only. Change Global (Device-Level)Profile for CX #2 to Deny only.9. For both CXes, play a PCAP with wireplayExpected Results:1. Verify CX's can be discovered.2. Verify Profiles can be created.3, 4 ,5, 6 & 7. Verify threat is denied for CX #1 andis alerted for CX #2. Verify Events indicate theImplicit Allow policies for both CXes.6 & 7. On CX #1, verify threat is denied. VerifyEvent indicates the Allow Any/Any policy . On CX#2, verify threat is alerted. Verify Event indicatesthe Allow Any/Any policy.8 & 9. On CX #1, verify threat is ignored. VerifyEvent indicates the Allow Any/Any policy . On CX#2, verify threat is denied. Verify Event indicatesthe Allow Any/Any policy.
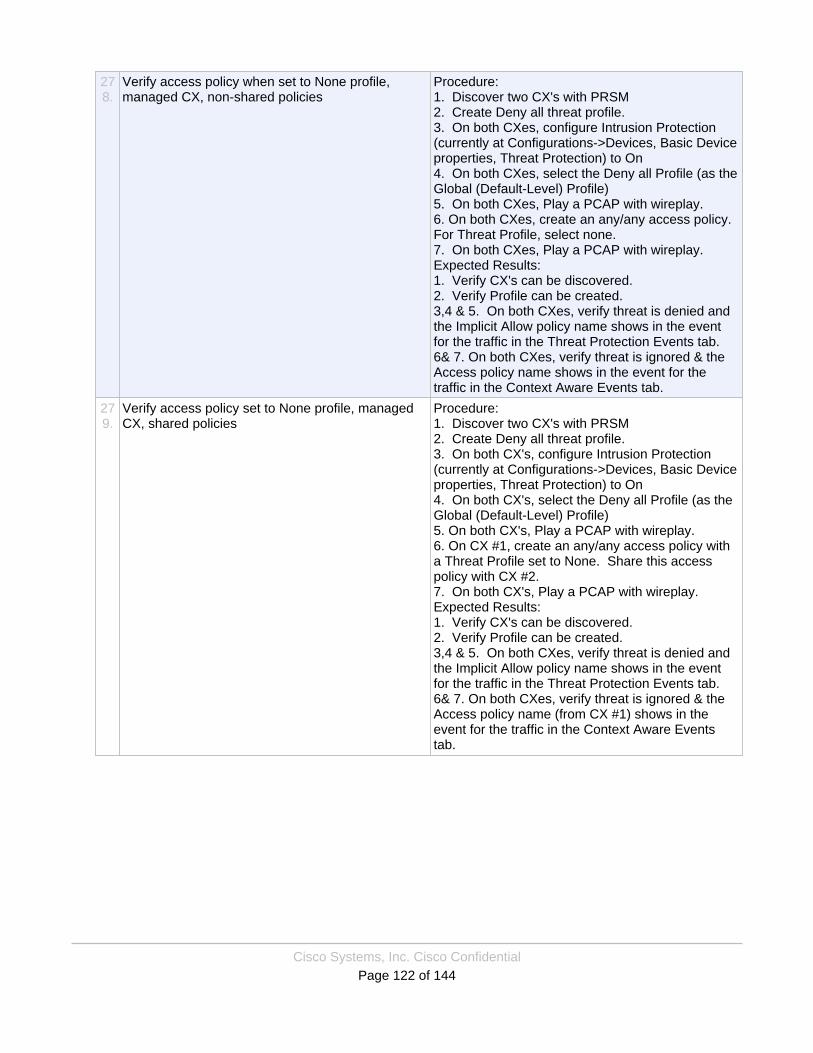
Cisco Systems, Inc. Cisco ConfidentialPage 122 of 144
278.
Verify access policy when set to None profile,managed CX, non-shared policies
Procedure:1. Discover two CX's with PRSM2. Create Deny all threat profile.3. On both CXes, configure Intrusion Protection(currently at Configurations->Devices, Basic Deviceproperties, Threat Protection) to On4. On both CXes, select the Deny all Profile (as theGlobal (Default-Level) Profile)5. On both CXes, Play a PCAP with wireplay.6. On both CXes, create an any/any access policy.For Threat Profile, select none.7. On both CXes, Play a PCAP with wireplay.Expected Results:1. Verify CX's can be discovered.2. Verify Profile can be created.3,4 & 5. On both CXes, verify threat is denied andthe Implicit Allow policy name shows in the eventfor the traffic in the Threat Protection Events tab.6& 7. On both CXes, verify threat is ignored & theAccess policy name shows in the event for thetraffic in the Context Aware Events tab.
279.
Verify access policy set to None profile, managedCX, shared policies
Procedure:1. Discover two CX's with PRSM2. Create Deny all threat profile.3. On both CX's, configure Intrusion Protection(currently at Configurations->Devices, Basic Deviceproperties, Threat Protection) to On4. On both CX's, select the Deny all Profile (as theGlobal (Default-Level) Profile)5. On both CX's, Play a PCAP with wireplay.6. On CX #1, create an any/any access policy witha Threat Profile set to None. Share this accesspolicy with CX #2.7. On both CX's, Play a PCAP with wireplay.Expected Results:1. Verify CX's can be discovered.2. Verify Profile can be created.3,4 & 5. On both CXes, verify threat is denied andthe Implicit Allow policy name shows in the eventfor the traffic in the Threat Protection Events tab.6& 7. On both CXes, verify threat is ignored & theAccess policy name (from CX #1) shows in theevent for the traffic in the Context Aware Eventstab.
Cisco Systems, Inc. Cisco ConfidentialPage 123 of 144
280.
Verify setting global threat profile policy to None (asthe default & when setting is changed to none),managed CX, non-shared policies.
Procedure:1. Discover two CX's with PRSM2. On both CXes, configure Intrusion Protection(currently at Configurations->Devices, Basic Deviceproperties, Threat Protection) to On3. On both CXes, select the None Profile (or justleave it blank)4. On both CXes, Play a PCAP with wireplay5. On both CXes ,select the Default Threat profile(for global (Device-Level))6. On both CXes, play a PCAP with wireplay7. On both CXes, select none (or blank) as theglobal (Device-Level) threat profile8. On both CXes, Play a PCAP with wireplayExpected Results:1. Verify CXes can be discovered.2, 3, and 4. On both CXes, verify the threat isignored & the Implicit Allow policy name shows inthe event for the traffic in the Context Aware Eventstab.5 & 6. On both CXes, verify threat is detected andevented according to the Default Threat Profile (andthe particular PCAP that is played).7 & 8. On both CXes, verify the threat is ignored &the Implicit Allow policy name shows in the eventfor the traffic in the Context Aware Events tab.
281.
Verify setting global threat profile policy to None (asthe default & when setting is changed to none),managed CX, shared policies.
Procedure:1. Discover two CXes with PRSM2. On CX #1, configure Intrusion Protection(currently at Configurations->Devices, Basic Deviceproperties, Threat Protection) to On, and select theNone Profile (or just leave it blank)3. Share the Instrusion Protection settings of CX#1 with CX #2.4. On both CXes, Play a PCAP with wireplay5. On CX #1 ,select the Default Threat profile (forglobal (Device-Level))6. On both CXes, Play a PCAP with wireplay7. On CX #1, select none (or blank) as the global(Default-Level) threat profile8. On both CXes, Play a PCAP with wireplayExpected Results:1. Verify CXes can be discovered.2, 3, and 4. On both CXes, verify the threat isignored on both CXes & the Implicit Allow policyname shows in the events for the traffic in theContext Aware Events tab.5 & 6. On both CXes, verify threat is detected andevented according to the Default Threat Profile (andthe particular PCAP that is played).7 & 8. On both CXes, verify the threat is ignored &the Implicit Allow policy name shows in the eventfor the traffic in the Context Aware Events tab.

Cisco Systems, Inc. Cisco ConfidentialPage 124 of 144
282.
Verify disabling of Threat Protection, managed CX,non-shared policies
Procedure:1. Discover two CXes with PRSM2. Create Deny all threat profile.3. On both CXes, configure Intrusion Protection(currently at Configurations->Devices, Basic Deviceproperties, Threat Protection) to On4. On both CXes, select the Deny all Profile (as theDevice-Level profile)5. On both CXes, Play a PCAP with wireplay6. On both CXes, configure Intrustion Protection toOff.7. On both CXes, Play a PCAP with wireplay.Expected Results:1. Verify both CXes can be discovered2, 3, 4 & 5. On both CXes, verify threat is denied.6 & 7. On both CXes, verify threat is ignored.
283.
Verify disabling of Threat Protection, managed CX,shared policies
Procedure:1. Discover two CXes with PRSM2. Create Deny all threat profile.3. On CX #1, configure Intrusion Protection(currently at Configurations->Devices, Basic Deviceproperties, Threat Protection) to On4. On CX #1, select the Deny all Profile (as theDevice-Level profile)5. Share the Instrusion Protection settings of CX #1with CX #2.6. On both CXes, Play a PCAP with wireplay7. On CX #1, configure Intrustion Protection to Off.8. On both CXes, Play a PCAP with wireplay.Expected Results:1. Verify both CXes can be discovered2, 3, 4 , 5 & 6. On both CXes, verify threat isdenied.7 & 8. On both CXes, verify threat is ignored.
284.
US7591: Verify the removal of current telemetryoption in the welcome screen.
Procedure:1-Install a new ASA-CX build with the latesttelemetry features.2-Login to ASA-CX.3-Repat test with PRSM.
Expected Result:1-Verify that the new telemetry options pop-up assoon as the admin logs in.2-Verify that the old telemetry options in thewelcome screen has been removed.3-Verify that when you navigate to Administration,Network participation you see the new telemetryscreen.3-Verify that this works properly with PRSM as well.
Cisco Systems, Inc. Cisco ConfidentialPage 125 of 144
285.
US7591: Verify the addition of new pop-up prior towelcome screen that asks customers to configuretheir telemetry setting
Procedure:1-Install and configure a new ASA-CX box.2-Login to ASA-CX.3-Verify that all the buttons are functional and notbroken: Yes, No button, Standard, Limited, Viewterms of agreement, and save.4-Verify that the save and commit work properly bylogging out and back in and making sure it savedthe changes.
Expected Result:1-Verify that immediately after login the pop-upscreen appears that asks customers to configuretheir telemetry settings.2-All button and features are working properly: Yes,No, Standard, Limited, View terms of agreement,and Save.3-Verify that settings are saved after logging outand back in.4-When clicking on View terms of agreement theterms of agreements appear.5-When selecting No for enable telemetry andsaving and committing, it will stay saved andtelemetry data will not be sent.6-when selecting Yes for enable telemetry and savechanges and committing, it will send telemetry dataas requested.
286.
US7591: Verify the addition of a new defaulttelemetry level(unconfigured) and backend changesto support it.
Procedure:1-Install and configure a new ASA-CX device andleave the telemetry level to the default level and itneeds to be in that state without any changes.2-In order to verify telemetry data is sent properlylogin to the backend FBNP server (i.e. SSH tobastion1.sfo.ironport.com and from there ssh to qa-fbnp-app002.vega.cloud.ironport.com and checkthe FBNP or phone home logs in:/data/ironportvar/phonehomeserver/phonehome.log Check teh logs in /data/ironport/phonehomelogs/directory)
Expected Result:1-Verify the addition of the new telemetry levelswhen unconfigured and verify the back end cansupport it.2-Verify that the data is sent correclty to thebackend FBNP server.
Cisco Systems, Inc. Cisco ConfidentialPage 126 of 144
287.
US7591: Verify the Telemetry screen should pop-up every time the UI is opened until a user changestheir level from unconfigured.
Procedure:1-Install and configure a new ASA-CX and navigateto telemetry screen but don't configure thetelemetry screen. Save but don't commit changes.2-login to the ASA-CX.3-Repeat for PRSM.
Expected Result:1-Verify that telemetry pops-up every time the userlogs in without committing changes.2-Result is the same for PRSM.
288.
US7591: Verify that the new UI works properly andpops up properly.
Procedure:1-Install and configure a new ASA-CX and login.2-Test with PRSM as well.
Expected Result:1-Verify that it pops-up properly and has allcomponents: Standard, Limited, Save, viewagreement, and Yes-No button2-Verify that PRSM works as well.
289.
US7591: Verify that the new pop-up stopsappearing once telemetry changes have beencommitted.
Procedure:1-Install and configure a new ASA-CX andconfigure the telemetry page.2-Repeat test case for PRSM.3-Reboot the ASA-CX verify that changes havebeen saved and the pop-up doesn't appear again.4-Reboot the PRSM and verify that changes havebeen saved and pop-up doesn't appear again.
Expected Result:1-Verify that the pop-up doesn't appear again afterconfiguration is complete once.2-Verify that reboot doesn't erase the savedconfiguration on ASA-CX and PRSM.
Cisco Systems, Inc. Cisco ConfidentialPage 127 of 144
290.
US7591: Verify that the telemetry change is appliedproperly.
Procedure:1-Install and configure an ASA-CX and login.2-Select Standard and Save and Commit changes.Test in PRSM as well.3-Navigate to Administration, and then NetworkParticipation and select Limited and save andCommit Changes. Test in PRSM as well.4-Navigate to Administrator, and then NetworkParticipation and then turn OFF the networkparticipation.5-In order to verify telemetry data is sent properlylogin to the backend FBNP server (i.e. SSH tobastion1.sfo.ironport.com and from there ssh to qa-fbnp-app002.vega.cloud.ironport.com and checkthe FBNP or phone home logs in:/data/ironportvar/phonehomeserver/phonehome.log Check teh logs in /data/ironport/phonehomelogs/directory)
Expected Result:1-Verify that on the first login the telemetry pop-upscreen appears.2-Verify that standard telemetry is applied andconfigured properly.3-Verify that the Limited telemetry is applied andconfigured properly.4-Verify that the user can opt out of providingtelemetry information.5-Verify that the pop-up does not appear after initialconfiguration, save and commit.6-Verify that the data is sent correclty to thebackend FBNP server.
291.
US7591: Verify that the new telemetry pop-upbehaves properly for an upgrade.
Procedure:1-Install and configure an old version of ASA-CXthat doesn't have the new pop-up feature andconfigure the telemetry page as not enablingtelemetry.2-perform an upgrade.3-Repeat test case for PRSM.
Expected Result:1-Telemetry pop-up should not appear.2-Result is the same for PRSM.
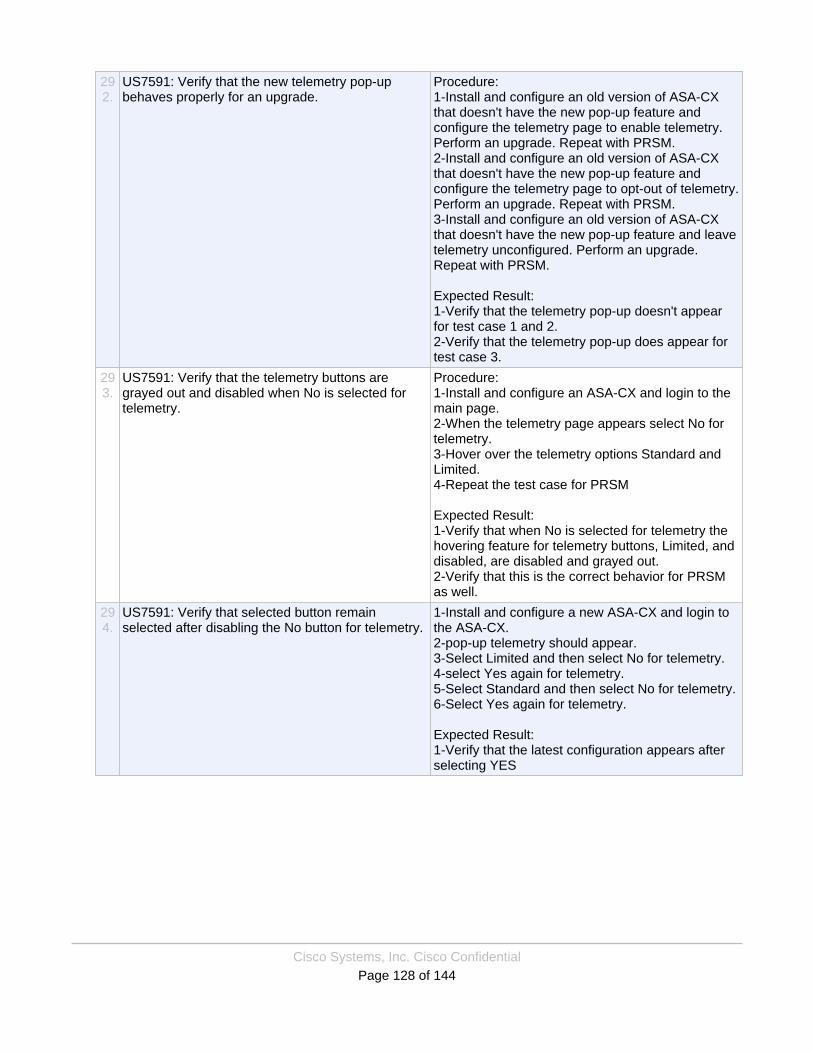
Cisco Systems, Inc. Cisco ConfidentialPage 128 of 144
292.
US7591: Verify that the new telemetry pop-upbehaves properly for an upgrade.
Procedure:1-Install and configure an old version of ASA-CXthat doesn't have the new pop-up feature andconfigure the telemetry page to enable telemetry.Perform an upgrade. Repeat with PRSM.2-Install and configure an old version of ASA-CXthat doesn't have the new pop-up feature andconfigure the telemetry page to opt-out of telemetry.Perform an upgrade. Repeat with PRSM.3-Install and configure an old version of ASA-CXthat doesn't have the new pop-up feature and leavetelemetry unconfigured. Perform an upgrade.Repeat with PRSM.
Expected Result:1-Verify that the telemetry pop-up doesn't appearfor test case 1 and 2.2-Verify that the telemetry pop-up does appear fortest case 3.
293.
US7591: Verify that the telemetry buttons aregrayed out and disabled when No is selected fortelemetry.
Procedure:1-Install and configure an ASA-CX and login to themain page.2-When the telemetry page appears select No fortelemetry.3-Hover over the telemetry options Standard andLimited.4-Repeat the test case for PRSM
Expected Result:1-Verify that when No is selected for telemetry thehovering feature for telemetry buttons, Limited, anddisabled, are disabled and grayed out.2-Verify that this is the correct behavior for PRSMas well.
294.
US7591: Verify that selected button remainselected after disabling the No button for telemetry.
1-Install and configure a new ASA-CX and login tothe ASA-CX.2-pop-up telemetry should appear.3-Select Limited and then select No for telemetry.4-select Yes again for telemetry.5-Select Standard and then select No for telemetry.6-Select Yes again for telemetry.
Expected Result:1-Verify that the latest configuration appears afterselecting YES
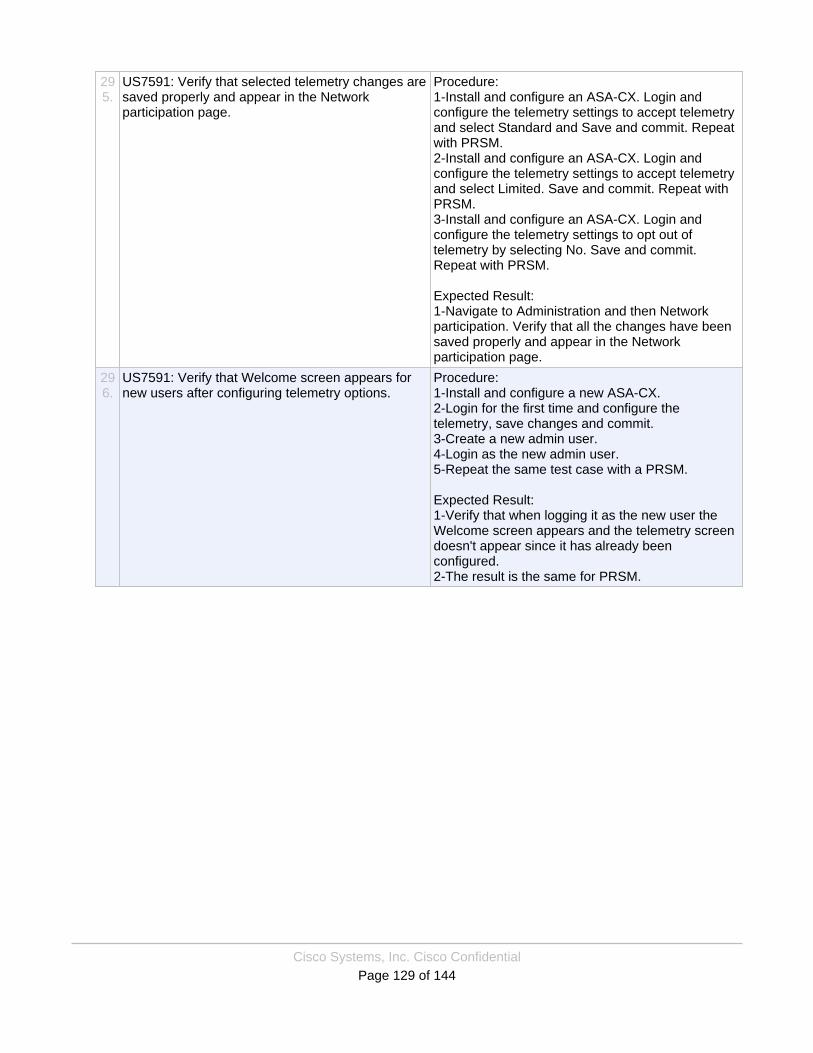
Cisco Systems, Inc. Cisco ConfidentialPage 129 of 144
295.
US7591: Verify that selected telemetry changes aresaved properly and appear in the Networkparticipation page.
Procedure:1-Install and configure an ASA-CX. Login andconfigure the telemetry settings to accept telemetryand select Standard and Save and commit. Repeatwith PRSM.2-Install and configure an ASA-CX. Login andconfigure the telemetry settings to accept telemetryand select Limited. Save and commit. Repeat withPRSM.3-Install and configure an ASA-CX. Login andconfigure the telemetry settings to opt out oftelemetry by selecting No. Save and commit.Repeat with PRSM.
Expected Result:1-Navigate to Administration and then Networkparticipation. Verify that all the changes have beensaved properly and appear in the Networkparticipation page.
296.
US7591: Verify that Welcome screen appears fornew users after configuring telemetry options.
Procedure:1-Install and configure a new ASA-CX.2-Login for the first time and configure thetelemetry, save changes and commit.3-Create a new admin user.4-Login as the new admin user.5-Repeat the same test case with a PRSM.
Expected Result:1-Verify that when logging it as the new user theWelcome screen appears and the telemetry screendoesn't appear since it has already beenconfigured.2-The result is the same for PRSM.
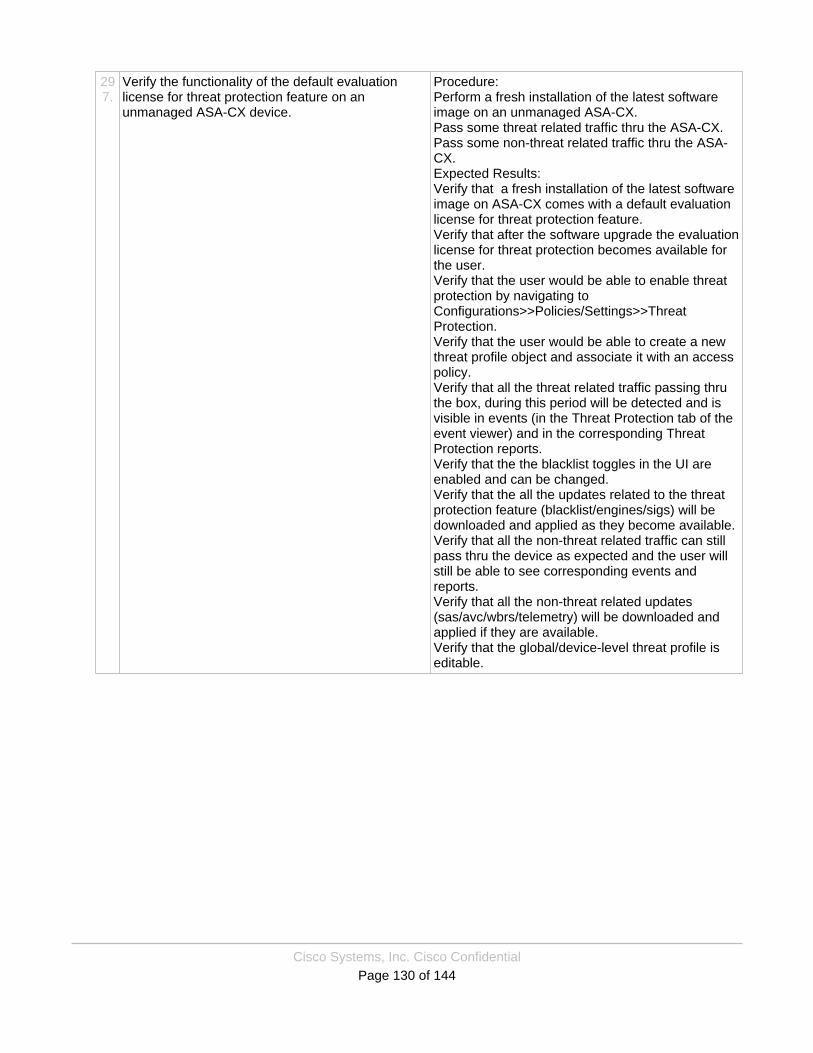
Cisco Systems, Inc. Cisco ConfidentialPage 130 of 144
297.
Verify the functionality of the default evaluationlicense for threat protection feature on anunmanaged ASA-CX device.
Procedure:Perform a fresh installation of the latest softwareimage on an unmanaged ASA-CX.Pass some threat related traffic thru the ASA-CX.Pass some non-threat related traffic thru the ASA-CX.Expected Results:Verify that a fresh installation of the latest softwareimage on ASA-CX comes with a default evaluationlicense for threat protection feature.Verify that after the software upgrade the evaluationlicense for threat protection becomes available forthe user.Verify that the user would be able to enable threatprotection by navigating toConfigurations>>Policies/Settings>>ThreatProtection.Verify that the user would be able to create a newthreat profile object and associate it with an accesspolicy.Verify that all the threat related traffic passing thruthe box, during this period will be detected and isvisible in events (in the Threat Protection tab of theevent viewer) and in the corresponding ThreatProtection reports.Verify that the the blacklist toggles in the UI areenabled and can be changed.Verify that the all the updates related to the threatprotection feature (blacklist/engines/sigs) will bedownloaded and applied as they become available.Verify that all the non-threat related traffic can stillpass thru the device as expected and the user willstill be able to see corresponding events andreports.Verify that all the non-threat related updates(sas/avc/wbrs/telemetry) will be downloaded andapplied if they are available.Verify that the global/device-level threat profile iseditable.
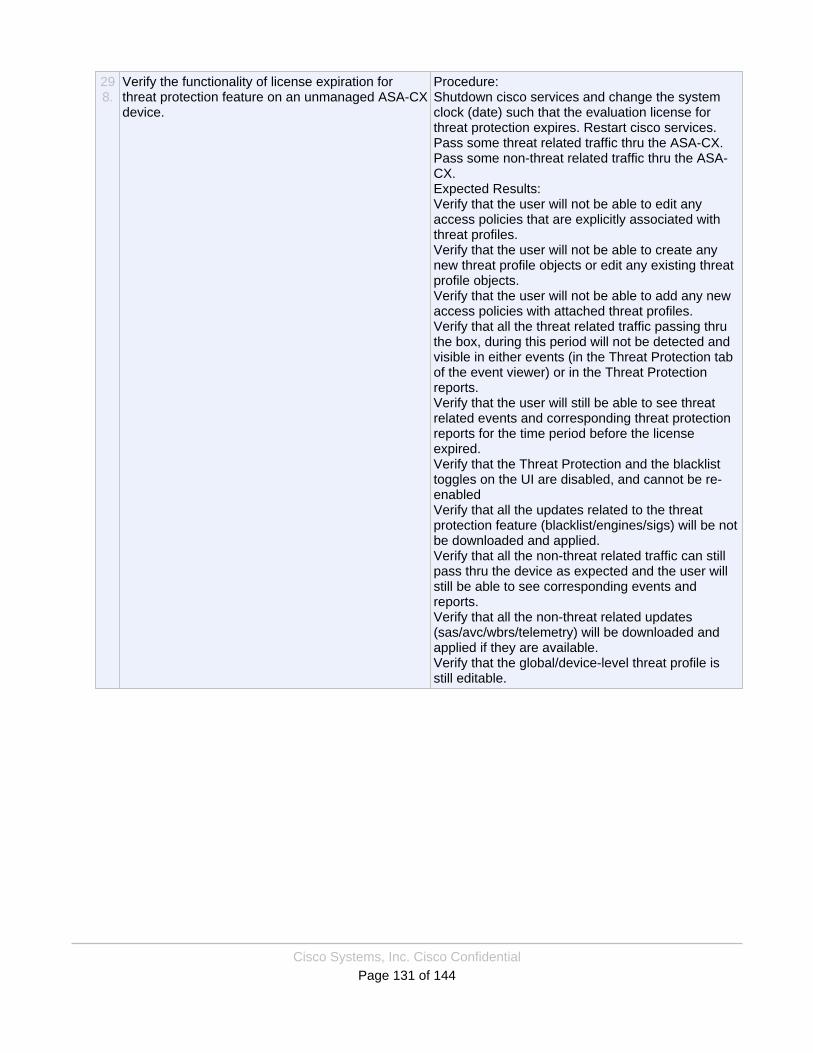
Cisco Systems, Inc. Cisco ConfidentialPage 131 of 144
298.
Verify the functionality of license expiration forthreat protection feature on an unmanaged ASA-CXdevice.
Procedure:Shutdown cisco services and change the systemclock (date) such that the evaluation license forthreat protection expires. Restart cisco services.Pass some threat related traffic thru the ASA-CX.Pass some non-threat related traffic thru the ASA-CX.Expected Results:Verify that the user will not be able to edit anyaccess policies that are explicitly associated withthreat profiles.Verify that the user will not be able to create anynew threat profile objects or edit any existing threatprofile objects.Verify that the user will not be able to add any newaccess policies with attached threat profiles.Verify that all the threat related traffic passing thruthe box, during this period will not be detected andvisible in either events (in the Threat Protection tabof the event viewer) or in the Threat Protectionreports.Verify that the user will still be able to see threatrelated events and corresponding threat protectionreports for the time period before the licenseexpired.Verify that the Threat Protection and the blacklisttoggles on the UI are disabled, and cannot be re-enabledVerify that all the updates related to the threatprotection feature (blacklist/engines/sigs) will be notbe downloaded and applied.Verify that all the non-threat related traffic can stillpass thru the device as expected and the user willstill be able to see corresponding events andreports.Verify that all the non-threat related updates(sas/avc/wbrs/telemetry) will be downloaded andapplied if they are available.Verify that the global/device-level threat profile isstill editable.
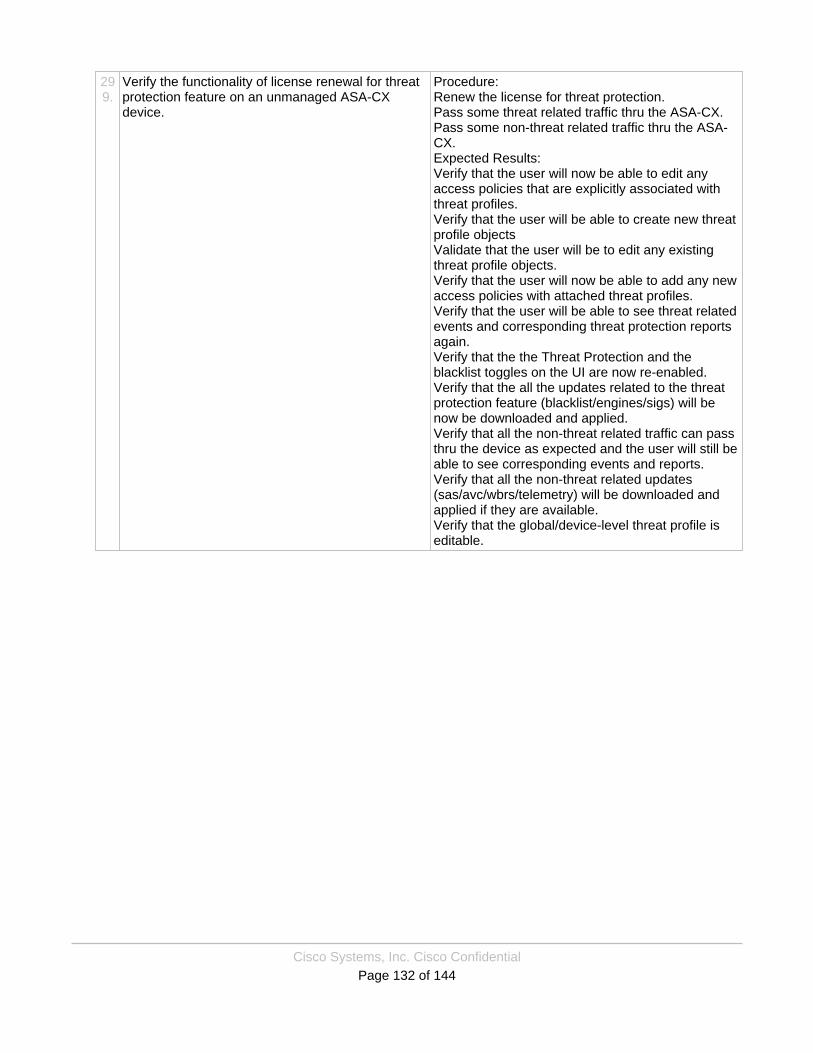
Cisco Systems, Inc. Cisco ConfidentialPage 132 of 144
299.
Verify the functionality of license renewal for threatprotection feature on an unmanaged ASA-CXdevice.
Procedure:Renew the license for threat protection.Pass some threat related traffic thru the ASA-CX.Pass some non-threat related traffic thru the ASA-CX.Expected Results:Verify that the user will now be able to edit anyaccess policies that are explicitly associated withthreat profiles.Verify that the user will be able to create new threatprofile objectsValidate that the user will be to edit any existingthreat profile objects.Verify that the user will now be able to add any newaccess policies with attached threat profiles.Verify that the user will be able to see threat relatedevents and corresponding threat protection reportsagain.Verify that the the Threat Protection and theblacklist toggles on the UI are now re-enabled.Verify that the all the updates related to the threatprotection feature (blacklist/engines/sigs) will benow be downloaded and applied.Verify that all the non-threat related traffic can passthru the device as expected and the user will still beable to see corresponding events and reports.Verify that all the non-threat related updates(sas/avc/wbrs/telemetry) will be downloaded andapplied if they are available.Verify that the global/device-level threat profile iseditable.
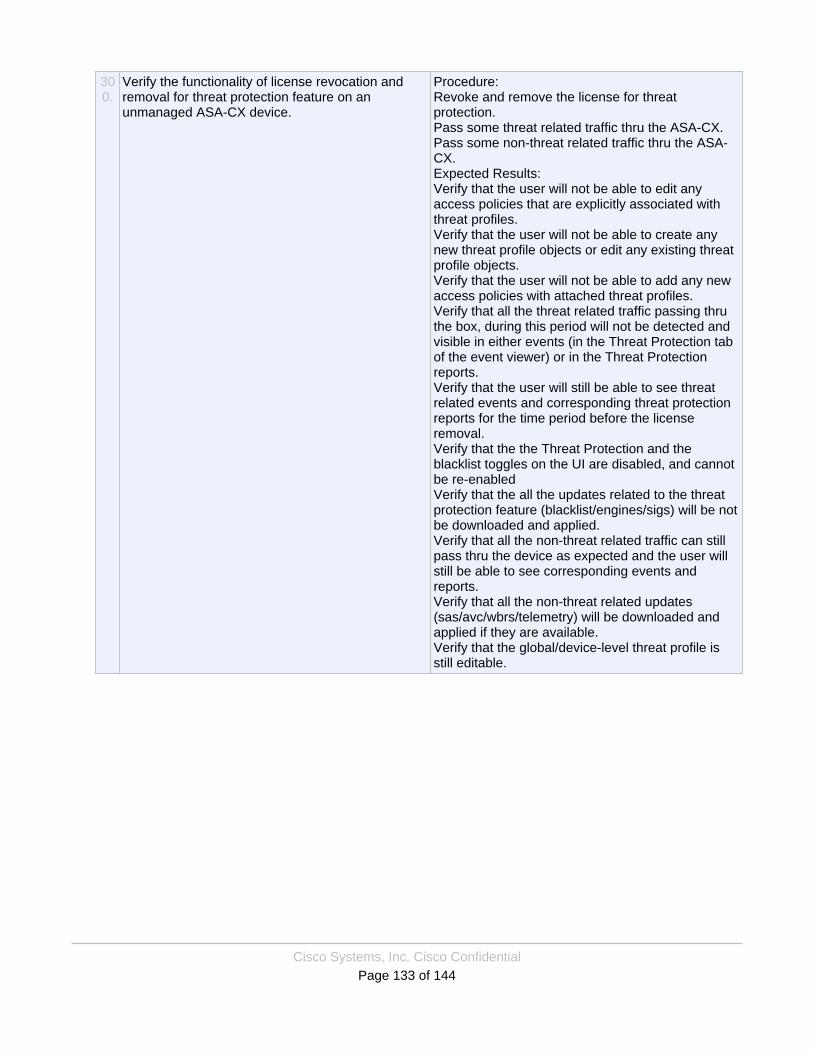
Cisco Systems, Inc. Cisco ConfidentialPage 133 of 144
300.
Verify the functionality of license revocation andremoval for threat protection feature on anunmanaged ASA-CX device.
Procedure:Revoke and remove the license for threatprotection.Pass some threat related traffic thru the ASA-CX.Pass some non-threat related traffic thru the ASA-CX.Expected Results:Verify that the user will not be able to edit anyaccess policies that are explicitly associated withthreat profiles.Verify that the user will not be able to create anynew threat profile objects or edit any existing threatprofile objects.Verify that the user will not be able to add any newaccess policies with attached threat profiles.Verify that all the threat related traffic passing thruthe box, during this period will not be detected andvisible in either events (in the Threat Protection tabof the event viewer) or in the Threat Protectionreports.Verify that the user will still be able to see threatrelated events and corresponding threat protectionreports for the time period before the licenseremoval.Verify that the the Threat Protection and theblacklist toggles on the UI are disabled, and cannotbe re-enabledVerify that the all the updates related to the threatprotection feature (blacklist/engines/sigs) will be notbe downloaded and applied.Verify that all the non-threat related traffic can stillpass thru the device as expected and the user willstill be able to see corresponding events andreports.Verify that all the non-threat related updates(sas/avc/wbrs/telemetry) will be downloaded andapplied if they are available.Verify that the global/device-level threat profile isstill editable.
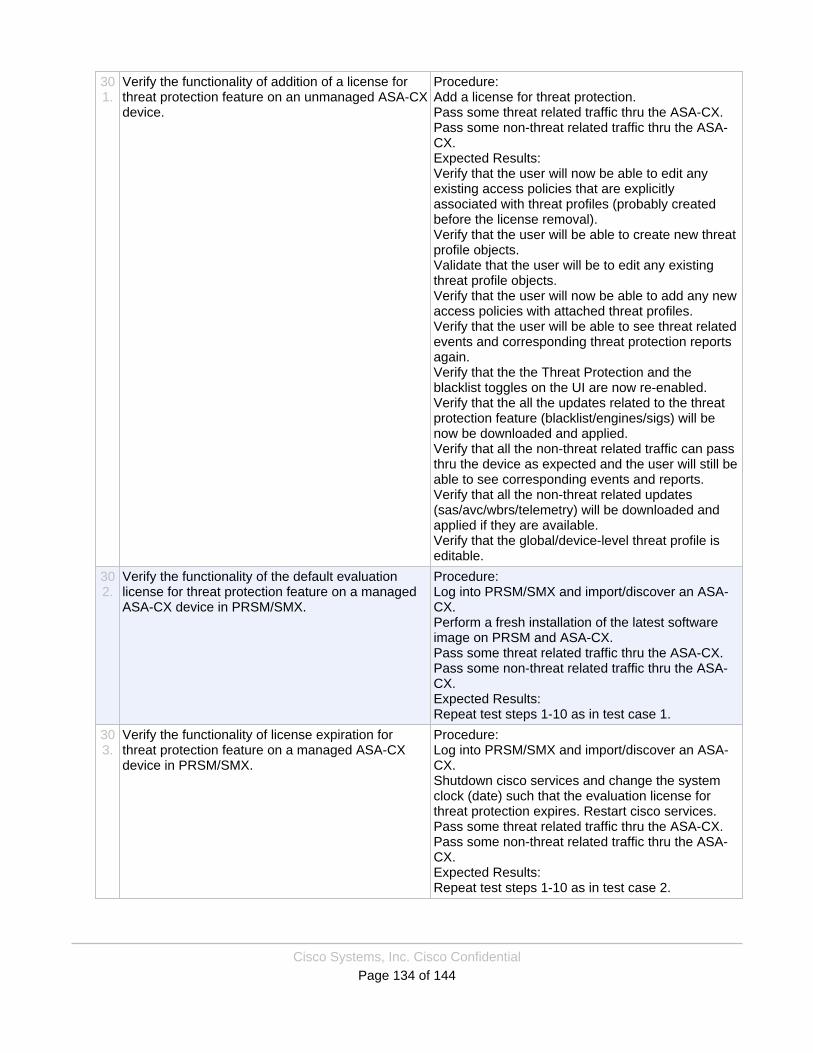
Cisco Systems, Inc. Cisco ConfidentialPage 134 of 144
301.
Verify the functionality of addition of a license forthreat protection feature on an unmanaged ASA-CXdevice.
Procedure:Add a license for threat protection.Pass some threat related traffic thru the ASA-CX.Pass some non-threat related traffic thru the ASA-CX.Expected Results:Verify that the user will now be able to edit anyexisting access policies that are explicitlyassociated with threat profiles (probably createdbefore the license removal).Verify that the user will be able to create new threatprofile objects.Validate that the user will be to edit any existingthreat profile objects.Verify that the user will now be able to add any newaccess policies with attached threat profiles.Verify that the user will be able to see threat relatedevents and corresponding threat protection reportsagain.Verify that the the Threat Protection and theblacklist toggles on the UI are now re-enabled.Verify that the all the updates related to the threatprotection feature (blacklist/engines/sigs) will benow be downloaded and applied.Verify that all the non-threat related traffic can passthru the device as expected and the user will still beable to see corresponding events and reports.Verify that all the non-threat related updates(sas/avc/wbrs/telemetry) will be downloaded andapplied if they are available.Verify that the global/device-level threat profile iseditable.
302.
Verify the functionality of the default evaluationlicense for threat protection feature on a managedASA-CX device in PRSM/SMX.
Procedure:Log into PRSM/SMX and import/discover an ASA-CX.Perform a fresh installation of the latest softwareimage on PRSM and ASA-CX.Pass some threat related traffic thru the ASA-CX.Pass some non-threat related traffic thru the ASA-CX.Expected Results:Repeat test steps 1-10 as in test case 1.
303.
Verify the functionality of license expiration forthreat protection feature on a managed ASA-CXdevice in PRSM/SMX.
Procedure:Log into PRSM/SMX and import/discover an ASA-CX.Shutdown cisco services and change the systemclock (date) such that the evaluation license forthreat protection expires. Restart cisco services.Pass some threat related traffic thru the ASA-CX.Pass some non-threat related traffic thru the ASA-CX.Expected Results:Repeat test steps 1-10 as in test case 2.
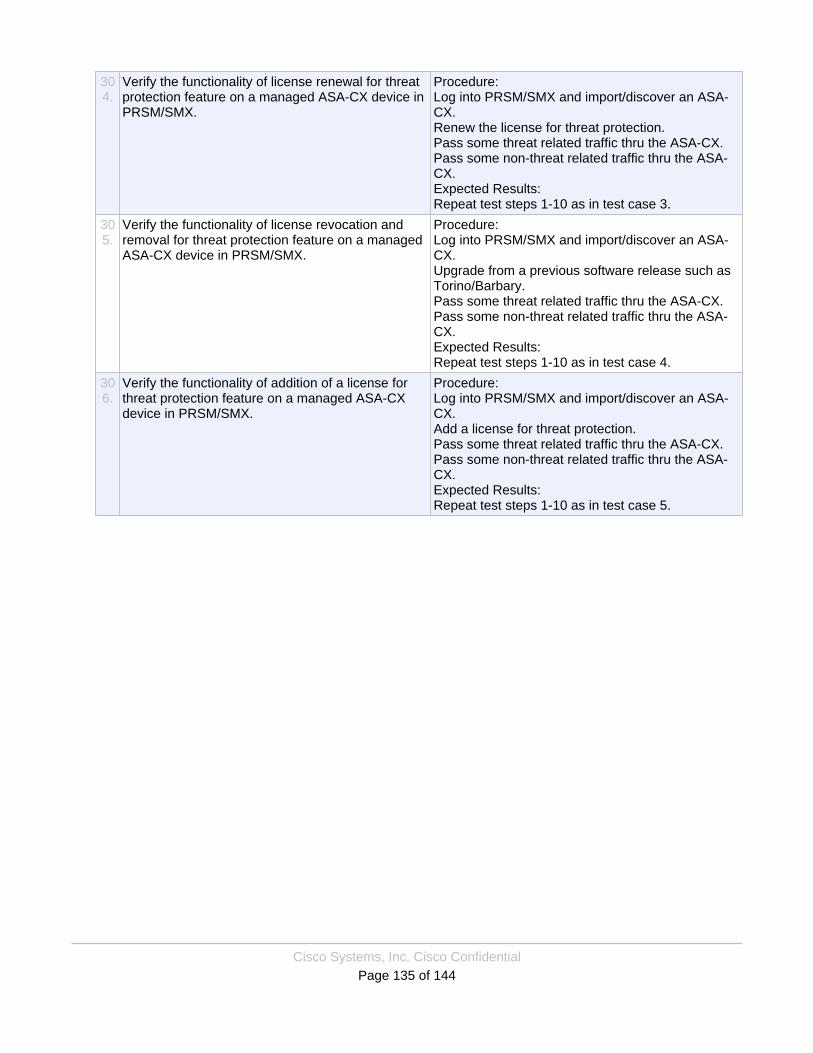
Cisco Systems, Inc. Cisco ConfidentialPage 135 of 144
304.
Verify the functionality of license renewal for threatprotection feature on a managed ASA-CX device inPRSM/SMX.
Procedure:Log into PRSM/SMX and import/discover an ASA-CX.Renew the license for threat protection.Pass some threat related traffic thru the ASA-CX.Pass some non-threat related traffic thru the ASA-CX.Expected Results:Repeat test steps 1-10 as in test case 3.
305.
Verify the functionality of license revocation andremoval for threat protection feature on a managedASA-CX device in PRSM/SMX.
Procedure:Log into PRSM/SMX and import/discover an ASA-CX.Upgrade from a previous software release such asTorino/Barbary.Pass some threat related traffic thru the ASA-CX.Pass some non-threat related traffic thru the ASA-CX.Expected Results:Repeat test steps 1-10 as in test case 4.
306.
Verify the functionality of addition of a license forthreat protection feature on a managed ASA-CXdevice in PRSM/SMX.
Procedure:Log into PRSM/SMX and import/discover an ASA-CX.Add a license for threat protection.Pass some threat related traffic thru the ASA-CX.Pass some non-threat related traffic thru the ASA-CX.Expected Results:Repeat test steps 1-10 as in test case 5.
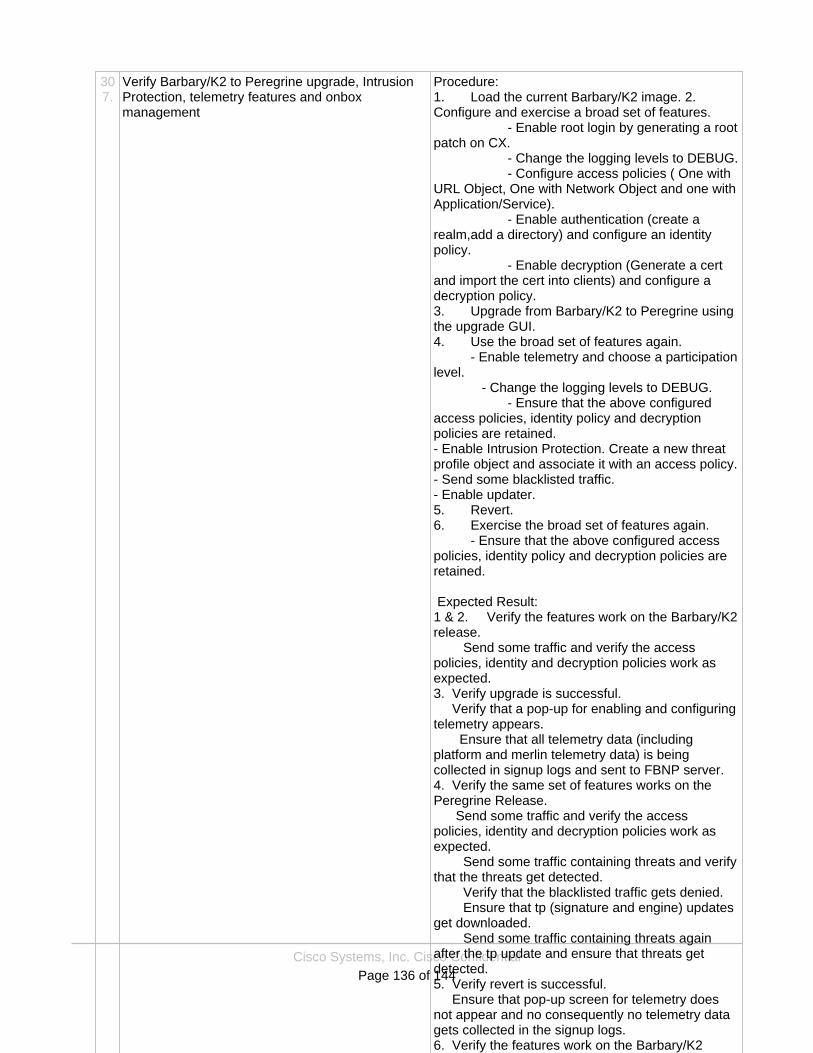
Cisco Systems, Inc. Cisco ConfidentialPage 136 of 144
307.
Verify Barbary/K2 to Peregrine upgrade, IntrusionProtection, telemetry features and onboxmanagement
Procedure:1. Load the current Barbary/K2 image. 2.Configure and exercise a broad set of features. - Enable root login by generating a rootpatch on CX. - Change the logging levels to DEBUG. - Configure access policies ( One withURL Object, One with Network Object and one withApplication/Service). - Enable authentication (create arealm,add a directory) and configure an identitypolicy. - Enable decryption (Generate a certand import the cert into clients) and configure adecryption policy.3. Upgrade from Barbary/K2 to Peregrine usingthe upgrade GUI.4. Use the broad set of features again. - Enable telemetry and choose a participationlevel. - Change the logging levels to DEBUG. - Ensure that the above configuredaccess policies, identity policy and decryptionpolicies are retained.- Enable Intrusion Protection. Create a new threatprofile object and associate it with an access policy.- Send some blacklisted traffic.- Enable updater.5. Revert.6. Exercise the broad set of features again. - Ensure that the above configured accesspolicies, identity policy and decryption policies areretained.
Expected Result:1 & 2. Verify the features work on the Barbary/K2release. Send some traffic and verify the accesspolicies, identity and decryption policies work asexpected.3. Verify upgrade is successful. Verify that a pop-up for enabling and configuringtelemetry appears. Ensure that all telemetry data (includingplatform and merlin telemetry data) is beingcollected in signup logs and sent to FBNP server.4. Verify the same set of features works on thePeregrine Release. Send some traffic and verify the accesspolicies, identity and decryption policies work asexpected. Send some traffic containing threats and verifythat the threats get detected. Verify that the blacklisted traffic gets denied. Ensure that tp (signature and engine) updatesget downloaded. Send some traffic containing threats againafter the tp update and ensure that threats getdetected.5. Verify revert is successful. Ensure that pop-up screen for telemetry doesnot appear and no consequently no telemetry datagets collected in the signup logs.6. Verify the features work on the Barbary/K2release again. Send some traffic and verify the accesspolicies, identity and decryption policies work asexpected. Ensure that threat protection could not beenabled. Verify that a threat profile cannot becreated and consequently associated with anaccess policy. Verify that the blacklisted traffic is no longerdenied by CX. Verify that the configured access policies withthreat profiles should still appear but in theoryshould not be able to detect threats on sendingthreat traffic.

Cisco Systems, Inc. Cisco ConfidentialPage 137 of 144
308.
Verify Torino to Peregrine upgrade, IntrusionPrevention,telemetry features and onboxmanagement.
Procedure:1. Load the current Torino image.2. Configure and exercise a broad set offeatures. - Enable root login by generating a rootpatch on CX. - Change the logging levels to DEBUG. - Configure access policies ( One withURL Object, One with Network Object and one withApplication/Service). - Enable authentication (create arealm,add a directory) and configure an identitypolicy. - Enable decryption (Generate a certand import the cert into clients) and configure adecryption policy.3. Upgrade from Torino to Peregrine using theupgrade GUI.4. Use the broad set of features again. - Enable telemetry and choose a participationlevel. - Change the logging levels to DEBUG. - Ensure that the above configuredaccess policies, identity policy and decryptionpolicies are retained.- Enable Intrusion Protection. Create a new threatprofile object and associate it with an access policy.- Send some blacklisted traffic.- Enable updater.5. Revert.6. Exercise the broad set of features again. - Ensure that the above configured accesspolicies, identity policy and decryption policies areretained.
Expected Result:1 & 2. Verify the features work on the Torinorelease. Send some traffic and verify the accesspolicies, identity and decryption policies work asexpected.3. Verify upgrade is successful. Verify that a pop-up for enabling and configuringtelemetry appears. Ensure that all telemetry data (includingplatform and merlin telemetry data) is beingcollected in signup logs and sent to FBNP server.4. Verify the same set of features works on thePeregrine Release. Send some traffic and verify the accesspolicies, identity and decryption policies work asexpected. Send some traffic containing threats and verifythat the threats get detected. Verify that the blacklisted traffic gets denied. Ensure that tp (signature and engine) updatesget downloaded. Send some traffic containing threats againafter the tp update and ensure that threats getdetected.5. Verify revert is successful. Ensure that pop-up screen for telemetry doesnot appear and no consequently no telemetry datagets collected in the signup logs.6. Verify the features work on the Torino releaseagain. Send some traffic and verify the accesspolicies, identity and decryption policies work asexpected. Ensure that threat protection could not beenabled. Verify that a threat profile cannot becreated and consequently associated with anaccess policy. Verify that the blacklisted traffic is no longerdenied by CX. Verify that the configured access policies withthreat profiles should still appear but in theoryshould not be able to detect threats on sendingthreat traffic.
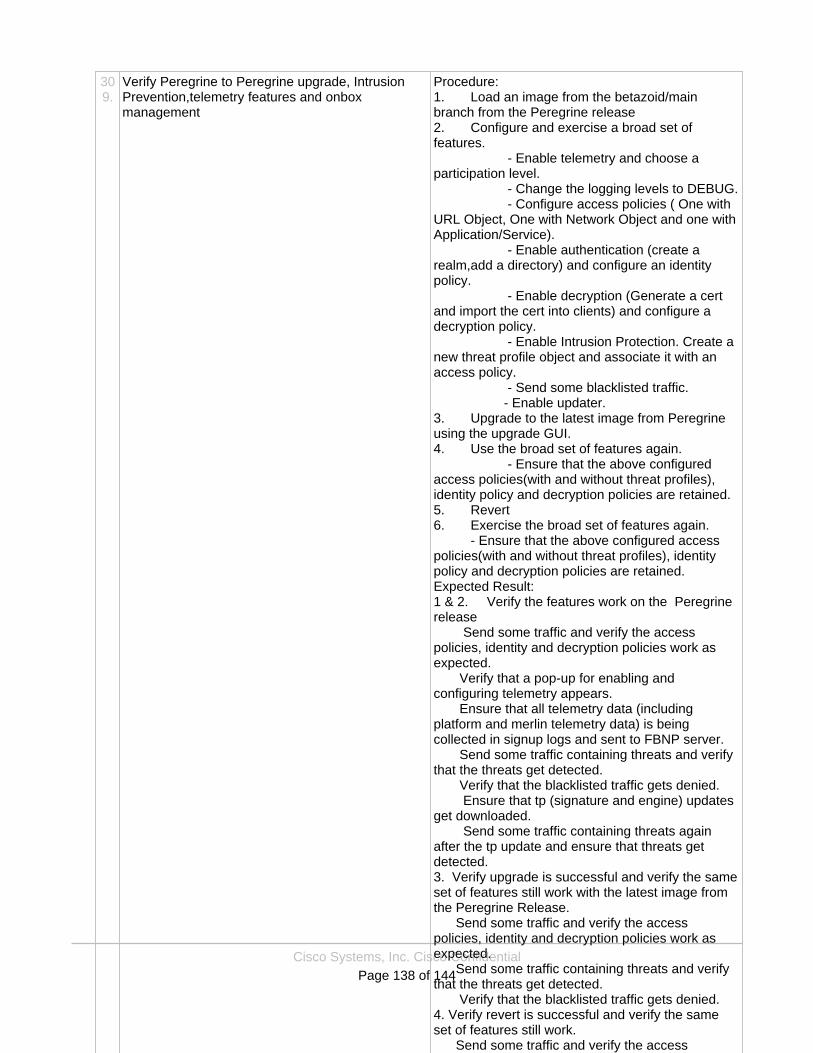
Cisco Systems, Inc. Cisco ConfidentialPage 138 of 144
309.
Verify Peregrine to Peregrine upgrade, IntrusionPrevention,telemetry features and onboxmanagement
Procedure:1. Load an image from the betazoid/mainbranch from the Peregrine release2. Configure and exercise a broad set offeatures. - Enable telemetry and choose aparticipation level. - Change the logging levels to DEBUG. - Configure access policies ( One withURL Object, One with Network Object and one withApplication/Service). - Enable authentication (create arealm,add a directory) and configure an identitypolicy. - Enable decryption (Generate a certand import the cert into clients) and configure adecryption policy. - Enable Intrusion Protection. Create anew threat profile object and associate it with anaccess policy. - Send some blacklisted traffic. - Enable updater.3. Upgrade to the latest image from Peregrineusing the upgrade GUI.4. Use the broad set of features again. - Ensure that the above configuredaccess policies(with and without threat profiles),identity policy and decryption policies are retained.5. Revert6. Exercise the broad set of features again. - Ensure that the above configured accesspolicies(with and without threat profiles), identitypolicy and decryption policies are retained.Expected Result:1 & 2. Verify the features work on the Peregrinerelease Send some traffic and verify the accesspolicies, identity and decryption policies work asexpected. Verify that a pop-up for enabling andconfiguring telemetry appears. Ensure that all telemetry data (includingplatform and merlin telemetry data) is beingcollected in signup logs and sent to FBNP server. Send some traffic containing threats and verifythat the threats get detected. Verify that the blacklisted traffic gets denied. Ensure that tp (signature and engine) updatesget downloaded. Send some traffic containing threats againafter the tp update and ensure that threats getdetected.3. Verify upgrade is successful and verify the sameset of features still work with the latest image fromthe Peregrine Release. Send some traffic and verify the accesspolicies, identity and decryption policies work asexpected. Send some traffic containing threats and verifythat the threats get detected. Verify that the blacklisted traffic gets denied.4. Verify revert is successful and verify the sameset of features still work. Send some traffic and verify the accesspolicies, identity and decryption policies work asexpected. Send some traffic containing threats and verifythat the threats get detected. Verify that the blacklisted traffic gets denied.
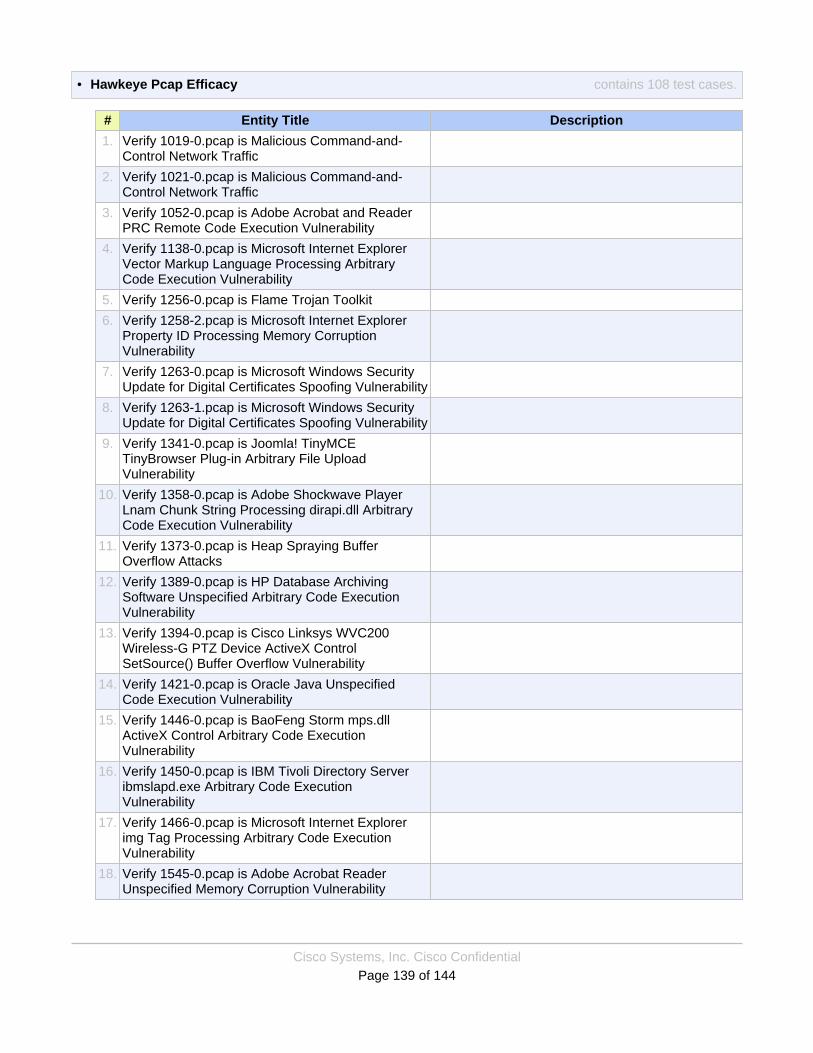
Cisco Systems, Inc. Cisco ConfidentialPage 139 of 144
Hawkeye Pcap Efficacy contains 108 test cases.•
# Entity Title Description
1. Verify 1019-0.pcap is Malicious Command-and-Control Network Traffic
2. Verify 1021-0.pcap is Malicious Command-and-Control Network Traffic
3. Verify 1052-0.pcap is Adobe Acrobat and ReaderPRC Remote Code Execution Vulnerability
4. Verify 1138-0.pcap is Microsoft Internet ExplorerVector Markup Language Processing ArbitraryCode Execution Vulnerability
5. Verify 1256-0.pcap is Flame Trojan Toolkit
6. Verify 1258-2.pcap is Microsoft Internet ExplorerProperty ID Processing Memory CorruptionVulnerability
7. Verify 1263-0.pcap is Microsoft Windows SecurityUpdate for Digital Certificates Spoofing Vulnerability
8. Verify 1263-1.pcap is Microsoft Windows SecurityUpdate for Digital Certificates Spoofing Vulnerability
9. Verify 1341-0.pcap is Joomla! TinyMCETinyBrowser Plug-in Arbitrary File UploadVulnerability
10. Verify 1358-0.pcap is Adobe Shockwave PlayerLnam Chunk String Processing dirapi.dll ArbitraryCode Execution Vulnerability
11. Verify 1373-0.pcap is Heap Spraying BufferOverflow Attacks
12. Verify 1389-0.pcap is HP Database ArchivingSoftware Unspecified Arbitrary Code ExecutionVulnerability
13. Verify 1394-0.pcap is Cisco Linksys WVC200Wireless-G PTZ Device ActiveX ControlSetSource() Buffer Overflow Vulnerability
14. Verify 1421-0.pcap is Oracle Java UnspecifiedCode Execution Vulnerability
15. Verify 1446-0.pcap is BaoFeng Storm mps.dllActiveX Control Arbitrary Code ExecutionVulnerability
16. Verify 1450-0.pcap is IBM Tivoli Directory Serveribmslapd.exe Arbitrary Code ExecutionVulnerability
17. Verify 1466-0.pcap is Microsoft Internet Explorerimg Tag Processing Arbitrary Code ExecutionVulnerability
18. Verify 1545-0.pcap is Adobe Acrobat ReaderUnspecified Memory Corruption Vulnerability
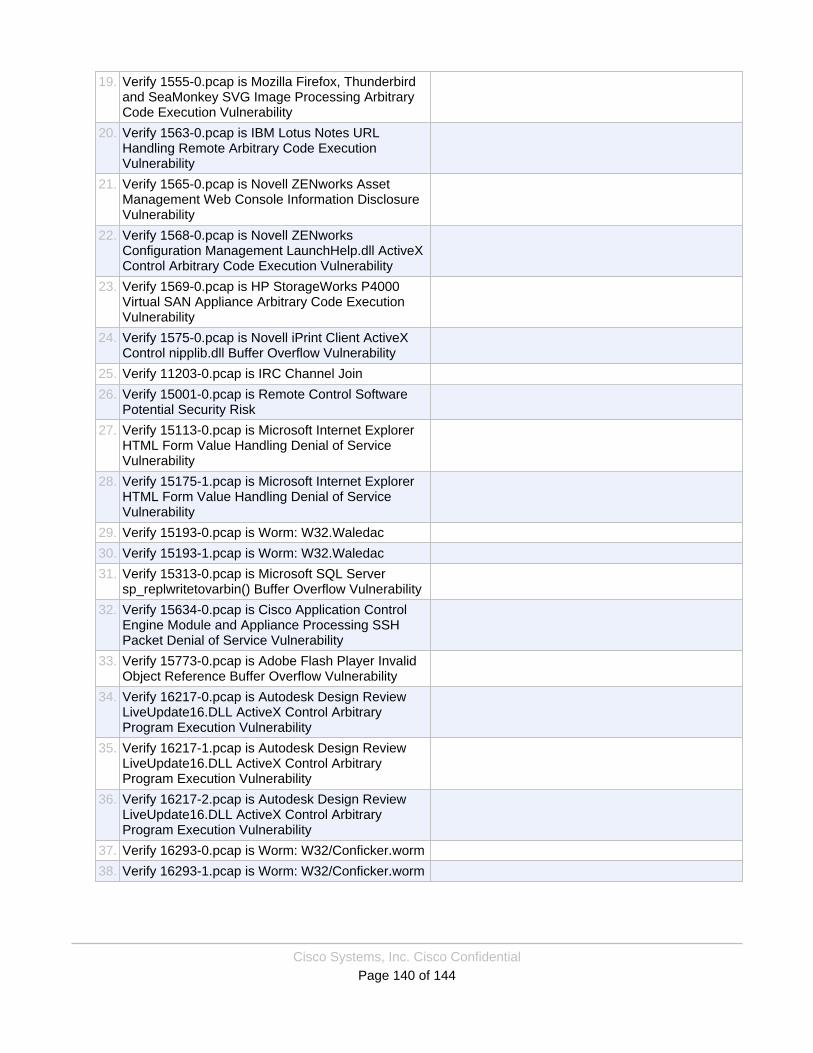
Cisco Systems, Inc. Cisco ConfidentialPage 140 of 144
19. Verify 1555-0.pcap is Mozilla Firefox, Thunderbirdand SeaMonkey SVG Image Processing ArbitraryCode Execution Vulnerability
20. Verify 1563-0.pcap is IBM Lotus Notes URLHandling Remote Arbitrary Code ExecutionVulnerability
21. Verify 1565-0.pcap is Novell ZENworks AssetManagement Web Console Information DisclosureVulnerability
22. Verify 1568-0.pcap is Novell ZENworksConfiguration Management LaunchHelp.dll ActiveXControl Arbitrary Code Execution Vulnerability
23. Verify 1569-0.pcap is HP StorageWorks P4000Virtual SAN Appliance Arbitrary Code ExecutionVulnerability
24. Verify 1575-0.pcap is Novell iPrint Client ActiveXControl nipplib.dll Buffer Overflow Vulnerability
25. Verify 11203-0.pcap is IRC Channel Join
26. Verify 15001-0.pcap is Remote Control SoftwarePotential Security Risk
27. Verify 15113-0.pcap is Microsoft Internet ExplorerHTML Form Value Handling Denial of ServiceVulnerability
28. Verify 15175-1.pcap is Microsoft Internet ExplorerHTML Form Value Handling Denial of ServiceVulnerability
29. Verify 15193-0.pcap is Worm: W32.Waledac
30. Verify 15193-1.pcap is Worm: W32.Waledac
31. Verify 15313-0.pcap is Microsoft SQL Serversp_replwritetovarbin() Buffer Overflow Vulnerability
32. Verify 15634-0.pcap is Cisco Application ControlEngine Module and Appliance Processing SSHPacket Denial of Service Vulnerability
33. Verify 15773-0.pcap is Adobe Flash Player InvalidObject Reference Buffer Overflow Vulnerability
34. Verify 16217-0.pcap is Autodesk Design ReviewLiveUpdate16.DLL ActiveX Control ArbitraryProgram Execution Vulnerability
35. Verify 16217-1.pcap is Autodesk Design ReviewLiveUpdate16.DLL ActiveX Control ArbitraryProgram Execution Vulnerability
36. Verify 16217-2.pcap is Autodesk Design ReviewLiveUpdate16.DLL ActiveX Control ArbitraryProgram Execution Vulnerability
37. Verify 16293-0.pcap is Worm: W32/Conficker.worm
38. Verify 16293-1.pcap is Worm: W32/Conficker.worm

Cisco Systems, Inc. Cisco ConfidentialPage 141 of 144
39. Verify 1651-0.pcap is HP StorageWorks FileMigration Agent HsmCfgSvc.exe Remote ArbitraryCode Execution Vulnerability
40. Verify 1654-0.pcap is Multiple Cisco IronportAppliances Sophos Threat Engine Vulnerabilities
41. Verify 1787-0.pcap is Binary Planting Vulnerability
42. Verify 1975-0 is Self-Signed SSL Certificates Usedin Spear-Phishing Attacks
43. Verify 1975-1 is Self-Signed SSL Certificates Usedin Spear-Phishing Attacks
44. Verify 1975-2 is Self-Signed SSL Certificates Usedin Spear-Phishing Attacks
45. Verify 1975-3 is Self-Signed SSL Certificates Usedin Spear-Phishing Attacks
46. Verify 1975-4 is Self-Signed SSL Certificates Usedin Spear-Phishing Attacks
47. Verify 1975-5 is Self-Signed SSL Certificates Usedin Spear-Phishing Attacks
48. Verify 1975-6 is Self-Signed SSL Certificates Usedin Spear-Phishing Attacks
49. Verify 1975-7 is Self-Signed SSL Certificates Usedin Spear-Phishing Attacks
50. Verify 1975-8 is Self-Signed SSL Certificates Usedin Spear-Phishing Attacks
51. Verify 1975-9 is Self-Signed SSL Certificates Usedin Spear-Phishing Attacks
52. Verify 1975-10 is Self-Signed SSL CertificatesUsed in Spear-Phishing Attacks
53. Verify 1975-11 is Self-Signed SSL CertificatesUsed in Spear-Phishing Attacks
54. Verify 1975-12 is Self-Signed SSL CertificatesUsed in Spear-Phishing Attacks
55. Verify 1646-0 is Oracle Java SE Critical PatchUpdate October 2012
56. Verify 16473-1 is Microsoft Internet ExplorerUninitialized Memory Access Code ExecutionVulnerability
57. Verify 16933-0 is Microsoft Office PowerPoint DataOut of Bounds Memory Corruption Vulnerability
58. Verify 16956-0 is Microsoft Office PowerPoint DataOut of Bounds Memory Corruption Vulnerability
59. Verify 1791-0 is Heap Spraying Buffer OverflowAttacks
60. Verify 1872-0 is IrfanView JPEG2000 PluginRemote Stack Based Buffer Overflow Vulnerability
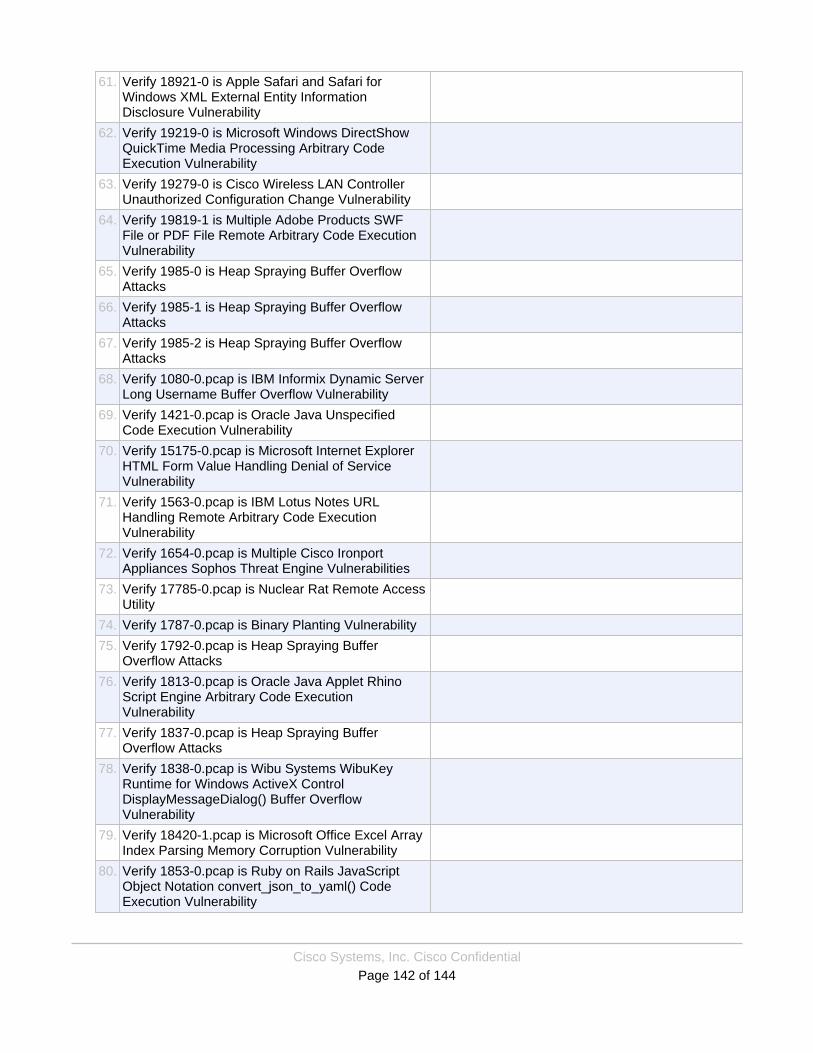
Cisco Systems, Inc. Cisco ConfidentialPage 142 of 144
61. Verify 18921-0 is Apple Safari and Safari forWindows XML External Entity InformationDisclosure Vulnerability
62. Verify 19219-0 is Microsoft Windows DirectShowQuickTime Media Processing Arbitrary CodeExecution Vulnerability
63. Verify 19279-0 is Cisco Wireless LAN ControllerUnauthorized Configuration Change Vulnerability
64. Verify 19819-1 is Multiple Adobe Products SWFFile or PDF File Remote Arbitrary Code ExecutionVulnerability
65. Verify 1985-0 is Heap Spraying Buffer OverflowAttacks
66. Verify 1985-1 is Heap Spraying Buffer OverflowAttacks
67. Verify 1985-2 is Heap Spraying Buffer OverflowAttacks
68. Verify 1080-0.pcap is IBM Informix Dynamic ServerLong Username Buffer Overflow Vulnerability
69. Verify 1421-0.pcap is Oracle Java UnspecifiedCode Execution Vulnerability
70. Verify 15175-0.pcap is Microsoft Internet ExplorerHTML Form Value Handling Denial of ServiceVulnerability
71. Verify 1563-0.pcap is IBM Lotus Notes URLHandling Remote Arbitrary Code ExecutionVulnerability
72. Verify 1654-0.pcap is Multiple Cisco IronportAppliances Sophos Threat Engine Vulnerabilities
73. Verify 17785-0.pcap is Nuclear Rat Remote AccessUtility
74. Verify 1787-0.pcap is Binary Planting Vulnerability
75. Verify 1792-0.pcap is Heap Spraying BufferOverflow Attacks
76. Verify 1813-0.pcap is Oracle Java Applet RhinoScript Engine Arbitrary Code ExecutionVulnerability
77. Verify 1837-0.pcap is Heap Spraying BufferOverflow Attacks
78. Verify 1838-0.pcap is Wibu Systems WibuKeyRuntime for Windows ActiveX ControlDisplayMessageDialog() Buffer OverflowVulnerability
79. Verify 18420-1.pcap is Microsoft Office Excel ArrayIndex Parsing Memory Corruption Vulnerability
80. Verify 1853-0.pcap is Ruby on Rails JavaScriptObject Notation convert_json_to_yaml() CodeExecution Vulnerability
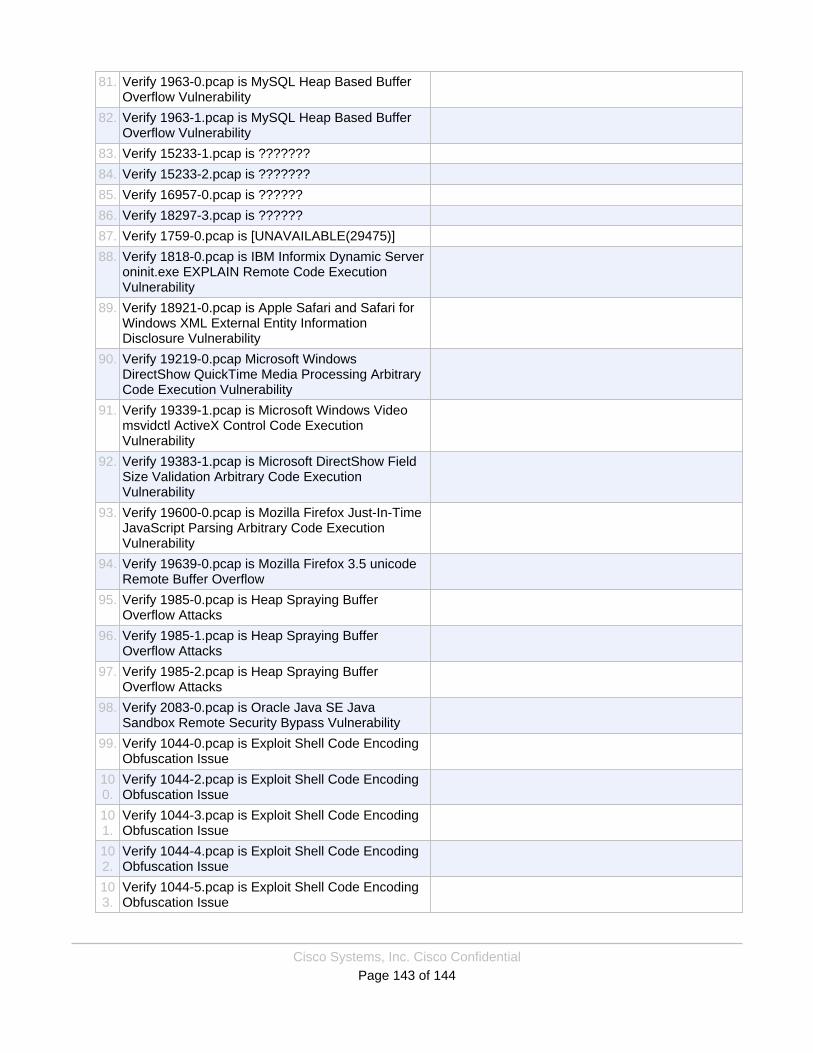
Cisco Systems, Inc. Cisco ConfidentialPage 143 of 144
81. Verify 1963-0.pcap is MySQL Heap Based BufferOverflow Vulnerability
82. Verify 1963-1.pcap is MySQL Heap Based BufferOverflow Vulnerability
83. Verify 15233-1.pcap is ???????
84. Verify 15233-2.pcap is ???????
85. Verify 16957-0.pcap is ??????
86. Verify 18297-3.pcap is ??????
87. Verify 1759-0.pcap is [UNAVAILABLE(29475)]
88. Verify 1818-0.pcap is IBM Informix Dynamic Serveroninit.exe EXPLAIN Remote Code ExecutionVulnerability
89. Verify 18921-0.pcap is Apple Safari and Safari forWindows XML External Entity InformationDisclosure Vulnerability
90. Verify 19219-0.pcap Microsoft WindowsDirectShow QuickTime Media Processing ArbitraryCode Execution Vulnerability
91. Verify 19339-1.pcap is Microsoft Windows Videomsvidctl ActiveX Control Code ExecutionVulnerability
92. Verify 19383-1.pcap is Microsoft DirectShow FieldSize Validation Arbitrary Code ExecutionVulnerability
93. Verify 19600-0.pcap is Mozilla Firefox Just-In-TimeJavaScript Parsing Arbitrary Code ExecutionVulnerability
94. Verify 19639-0.pcap is Mozilla Firefox 3.5 unicodeRemote Buffer Overflow
95. Verify 1985-0.pcap is Heap Spraying BufferOverflow Attacks
96. Verify 1985-1.pcap is Heap Spraying BufferOverflow Attacks
97. Verify 1985-2.pcap is Heap Spraying BufferOverflow Attacks
98. Verify 2083-0.pcap is Oracle Java SE JavaSandbox Remote Security Bypass Vulnerability
99. Verify 1044-0.pcap is Exploit Shell Code EncodingObfuscation Issue
100.
Verify 1044-2.pcap is Exploit Shell Code EncodingObfuscation Issue
101.
Verify 1044-3.pcap is Exploit Shell Code EncodingObfuscation Issue
102.
Verify 1044-4.pcap is Exploit Shell Code EncodingObfuscation Issue
103.
Verify 1044-5.pcap is Exploit Shell Code EncodingObfuscation Issue
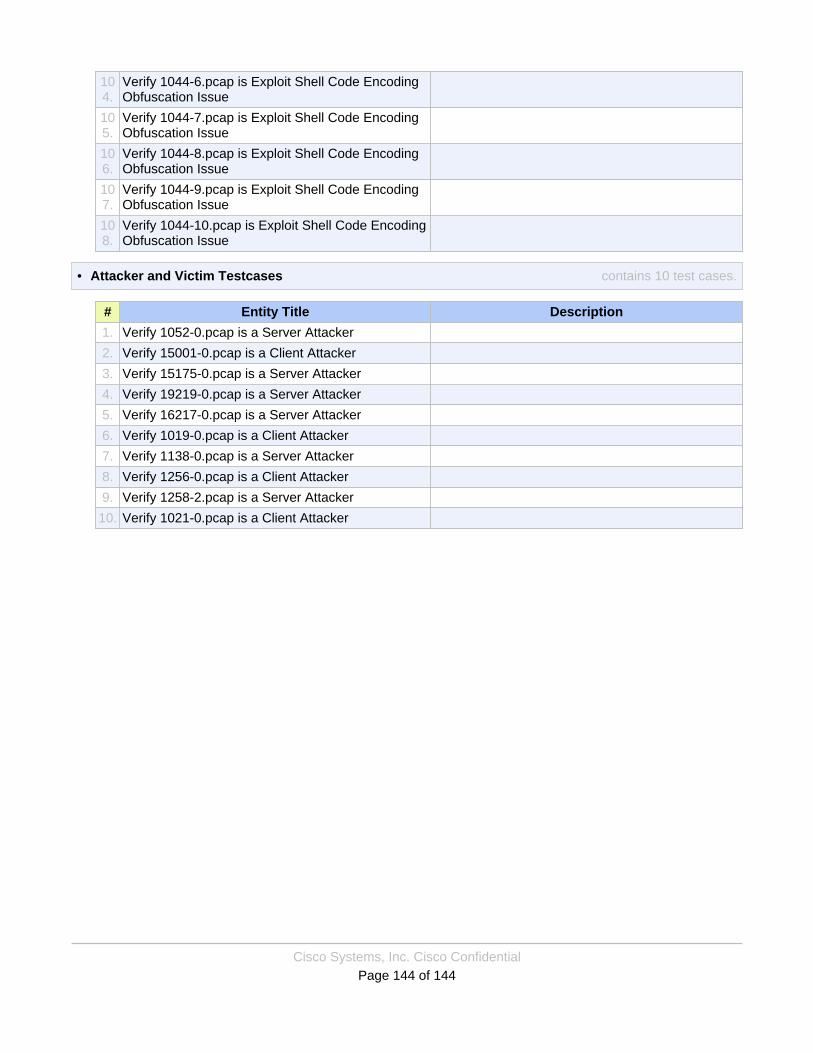
Cisco Systems, Inc. Cisco ConfidentialPage 144 of 144
104.
Verify 1044-6.pcap is Exploit Shell Code EncodingObfuscation Issue
105.
Verify 1044-7.pcap is Exploit Shell Code EncodingObfuscation Issue
106.
Verify 1044-8.pcap is Exploit Shell Code EncodingObfuscation Issue
107.
Verify 1044-9.pcap is Exploit Shell Code EncodingObfuscation Issue
108.
Verify 1044-10.pcap is Exploit Shell Code EncodingObfuscation Issue
Attacker and Victim Testcases contains 10 test cases.•
# Entity Title Description
1. Verify 1052-0.pcap is a Server Attacker
2. Verify 15001-0.pcap is a Client Attacker
3. Verify 15175-0.pcap is a Server Attacker
4. Verify 19219-0.pcap is a Server Attacker
5. Verify 16217-0.pcap is a Server Attacker
6. Verify 1019-0.pcap is a Client Attacker
7. Verify 1138-0.pcap is a Server Attacker
8. Verify 1256-0.pcap is a Client Attacker
9. Verify 1258-2.pcap is a Server Attacker
10. Verify 1021-0.pcap is a Client Attacker