iPhone Location Aware Apps by Example Beginner's Guide 1, The Location-Based World, explains...
48
iPhone Location Aware Apps by Example Beginner's Guide Zeeshan Chawdhary Chapter No. 5 "Weather App—WeatherPackt"
Transcript of iPhone Location Aware Apps by Example Beginner's Guide 1, The Location-Based World, explains...
iPhone Location Aware Apps
by Example Beginner's Guide
Zeeshan Chawdhary
Chapter No. 5
"Weather App—WeatherPackt"

In this package, you will find: A Biography of the author of the book
A preview chapter from the book, Chapter NO.5 "Weather App—WeatherPackt"
A synopsis of the book’s content
Information on where to buy this book
About the Author Zeeshan Chawdhary has been a keen developer for the last six years, and has worked
in the location-based space for the past five years. He is currently the Chief Technology
Officer of Wcities Inc, a San Francisco-based Location Content Provider. He is currently
experimenting with PostGIS, PhoneGap, and iOS 5, and is currently trying his hand at
blogging again at
I would like to thank all the lovely people at PacktPub, especially Mary
Nadar for having introduced me to the PacktPub family.
A special thanks to Leena, Susmita, Lubna, and Llewellyn for working
with me tirelessly on the book.
I would also thank Christopher D. Sloop from WeatherBug, Lauren
Sperber and Janine Iamunno from AOL Patch.com, Tim Breidigan, and
Robert Martindale from Eventful.com – for having allowed me to use
their respective APIs in the book, you guys rock man!
For More Information:
www.packtpub.com/iphone-location-aware-apps-beginners-guide/book

iPhone Location Aware Apps
by Example Beginner's Guide iPhone Location Aware Apps Beginner's Guide is probably the first book from any
technical publisher that teaches you to build real world applications (five of them).
That's a bold step from PacktPub - by undertaking more lively practical examples,
rather than 400 pages of text! The book lays emphasis on location services, due to
the ever-increasing role of location in our day-to-day lives and increased geo-referenced
content being produced/consumed on the Internet and Mobiles. Be it news, sports or
gossip, consumers no longer want to read/ search about content happening far off from
their current location. If it is news – it has to be local, similarly neighborhood gossip
and news is more relevant to consumers seeking information on their smartphones.
Applications such as foursquare confirm this behavior.
This book will help you learn location based techniques using iOS 5 as well as solutions
to common location and mapping problems, ranging from simple location usage to
caching user's last position, from simple Google maps examples to using
OpenStreetMaps. Find five full working apps as a part of the book (along with the source
code and business logic).
In this book, we have covered everything to make your next killer app, from app design
to using free icons and background from the Internet (of course with due attribution to the
author/designers), from integrating Twitter in your iOS 5 app to using the Nuance Speech
SDK. This book is a practical beginners guide for new comers to the Apple iOS world.
Happy Reading.
What This Book Covers Chapter 1, The Location-Based World, explains location-based services, how it works,
and the role of GPS in Location Services. We also learn how Apple uses location-based
Services in iOS. Buzzwords in the industry are also explored.
Chapter 2, The Xcoder's World, explains the Xcode tool, introduction to HTML5 with
Phonegap, Appcelerator Titanium, and Sencha Touch. We also have a look at a couple of
location-based APIs/ SDK including FourSquare, EventFul, and Last.fm.
For More Information:
www.packtpub.com/iphone-location-aware-apps-beginners-guide/book
Chapter 3, Using Location in your iOS Apps—Core Location, explains a number of
techniques used to read location information from your iPhone. This includes reading
location information on an event, and receiving location updates in your app
automatically. We also look at Region monitoring with Core Location framework.
Example apps using Foursquare, Eventful, and Last.fm are also included.
Chapter 4, Using Maps in your iOS apps—MapKit, brings us to Maps—We learn to use
the MapKit Framework in our app. We go behind the scenes with a small review of Map
Geometry. We also explore annotations and overlays along with their customizations.
Chapter 5, Weather App—WeatherPackt, builds a complete Weather App using
WeatherBug API. It also provides a Settings page in the app to customize the Weather
display. As a bonus to the readers, we also included the Nuance Speech SDK for reading
out the weather!
Chapter 6, Events App—PacktEvents, builds an Events app that shows us nearby events,
concerts, and gigs by Artists, by using the excellent Eventful.com API. This chapter also
shows how to use the Twitter API in iOS 5, and gives us a taste of Augmented Reality
with the Layar Player SDK.
Chapter 7, Advanced Topics, teaches us using directions with location background
services including background location. It also explores the Motion Manager in iOS
SDK, along with Push and Local notifications.
Chapter 8, Local Search—PacktLocal, works with the foursquare API to build a local
search app, with geo-fencing support.
Chapter 9, Location Aware News—PacktNews, uses the AOL's Patch News API to build
a hyperlocal news app. It uses the new iOS 5 Storyboarding feature in this application,
with support for offline content using SQLite.
Chapter 10, Social Governance—TweetGovern. Twitter provides the backbone for this
chapter and the accompanying app. We use Twitter and hashtags for building the
business logic for our social governance app titled . We learn to use the
twitter re-tweeting concept as well, building upon our business logic.
For More Information:
www.packtpub.com/iphone-location-aware-apps-beginners-guide/book

5Weather App—WeatherPackt
A Weather app is a nift y app for mobile phone devices. It is a default app that is bundled with most phones. We will learn how to build our own Weather App for iOS devices, using the WeatherBug API. You need to register for a key at the following URL: http://weather.weatherbug.com/desktop-weather/api.html.
ProgrammableWeb lists a collecti on of Weather APIs. You can choose any Weather API provider from: http://www.programmableweb.com/apis/directory/1?apicat=Weather&sort=date
In this chapter, we will cover the following topics:
Storing and retrieving the user's locati on data with SQLite
Converti ng locati on data into city name, using GeoNames API
Consuming the WeatherBug API in your app
Building your Weather app
Customizing Weather content display
App setti ngs pages
Using PhoneGap to build WeatherPackt
Bonus: text to speech
So let's get on with it...
For More Information:
www.packtpub.com/iphone-location-aware-apps-beginners-guide/book
Weather App—WeatherPackt
[ 136 ]
Storing and retrieving the user's location with SQLiteWe will use an SQLite database to store and retrieve the user's locati on. In additi on to this, we will also store the place informati on through the GeoNames API . We can use the Core Data framework of the iOS SDK for similar purposes, but since our data will not be overwhelmingly large, SQLite is a good choice of storing the same. If you have used databases, such as MySQL or Postgres before, you will fi nd the SQL statements among them to be similar. For performance-based apps, you should read the Core Data Performance Guide at the Apple developer site: http://developer.apple.com/library/ios/#documentation/Cocoa/Conceptual/CoreData/Articles/cdPerformance.html.
This should help you best prepare for using Core Data versus SQLite in your applicati ons.
Time for action – storing and retrieving the user's location with SQLite
We use the Hello Location – Location update example from Chapter 3, Using Locati on in your iOS Apps – Core Locati on, to demonstrate the SQLite functi onality.
1. Open the Hello Location – Location update example , and add the SQLite library to your project. The library is named libsqlite3.0.dylib. Alternati vely, you can include the libsqlite3.dylib library (which is a symbolic link to the libsqlite3.0.dylib library).
2. In the Hello_LocationViewController.h fi le, we include the sqlite3 header by importi ng the sqlite3.h fi le as follows:
#import <sqlite3.h>
3. Next, we declare a variable database of type sqlite3, and a string to hold the full fi lename with the following path:
sqlite3 *database;
NSString *sqliteFileName;
4. Next, we defi ne a method named getDatabaseFullPath that returns the full path to the user's Document folder on his iPhone. This path will be used to store the SQLite database that we will create and use in our applicati on.
-(NSString *) getDatabaseFullPath;
5. We then create an IBAction that will use the SQLite database to retrieve the user's last positi on, by reading it from the SQLite database using the SQL statements.
-(IBAction)getSqliteLocation:(id)sender;
For More Information:
www.packtpub.com/iphone-location-aware-apps-beginners-guide/book

Chapter 5
[ 137 ]
6. In the Hello_LocationViewController.m fi le, we declare a character variable that holds the errors received by SQLite within our applicati on code.
char *sqliteError;
We also declare a variable to hold the database table name.
NSString *tableName = @"user_position";
7. Before creati ng or using our database, we need to defi ne the full path where the database fi le will reside on the iOS device. For this purpose, we use the NSDocumentDirectory foundati on data type, which is declared in Foundation.h fi le.
8. We defi ne the getDatabaseFullPath method as follows:
{
NSArray *directoryPath = NSSearchPathForDirectoriesInDomains(NSDocumentDirectory, NSUserDomainMask,TRUE);
NSString *documentsDirectory = [directoryPath objectAtIndex:0];
return [documentsDirectory stringByAppendingPathComponent:@"location.db"];
}
9. The NSArray directoryPath variable contains the list of directory search paths, in this case, the directory path of the user's Documents directory, specifi ed by the NSDocumentDirectory parameter in the NSSearchPathForDirectoriesInDomains method. We use this path, and append the fi lename of our SQLite database location.db, and return it back to the calling method.
10. Next, in our didUpdateToLocation method , we open the SQLite fi le, create the table to store the user's locati on, and start inserti ng rows (holding the user locati on informati on variables newLatitude and newLongitude).
11. The sqlite3_open method is used to open a database. If the database is present, this method will open the database, otherwise if there is no database, it will create one and open it. The functi on will return a response type to indicate the status of the database asked for. The results code also applies for other SQLite methods.
SQLITE_OK 0 Successful result
SQLITE_ERROR 1 SQL error or missing database
SQLITE_INTERNAL 2 Internal logic error in SQLite
SQLITE_PERM 3 Access permission denied
SQLITE_ABORT 4 Callback routine requested an abort
SQLITE_BUSY 5 The database file is locked
SQLITE_LOCKED 6 A table in the database is locked
For More Information:
www.packtpub.com/iphone-location-aware-apps-beginners-guide/book

Weather App—WeatherPackt
[ 138 ]
SQLITE_NOMEM 7 A malloc() failed
SQLITE_READONLY 8 Attempt to write a readonly database
SQLITE_INTERRUPT 9 Operation terminated by
sqlite3_interrupt()
SQLITE_IOERR 10 Some kind of disk I/O error occurred
SQLITE_CORRUPT 11 The database disk image is malformed
SQLITE_NOTFOUND 12 Unknown opcode in sqlite3_file_control()
SQLITE_FULL 13 Insertion failed because database is full
SQLITE_CANTOPEN 14 Unable to open the database file
SQLITE_PROTOCOL 15 Database lock protocol error
SQLITE_EMPTY 16 Database is empty
SQLITE_SCHEMA 17 The database schema changed
SQLITE_TOOBIG 18 String or BLOB exceeds size limit
SQLITE_CONSTRAINT 19 Abort due to constraint violation
SQLITE_MISMATCH 20 Data type mismatch
SQLITE_MISUSE 21 Library used incorrectly
SQLITE_NOLFS 22 Uses OS features not supported on host
SQLITE_AUTH 23 Authorization denied
SQLITE_FORMAT 24 Auxiliary database format error
SQLITE_RANGE 25 2nd parameter to sqlite3_bind out of range
SQLITE_NOTADB 26 File opened that is not a database file
SQLITE_ROW 100 sqlite3_step() has another row ready
SQLITE_DONE 101 sqlite3_step() has finished executing
12. Once the database is created, we create a table called user_position, having the following columns: position_id, latitude, longitude, and placeName. We create this using the sqlite3_exec() method , and on success, we insert the locati on values obtained through the locati on manager. Here is the code for the full didUpdateToLocation method :
- (void) locationManager:(CLLocationManager *)manager didUpdateToLocation:(CLLocation *)newLocation fromLocation:(CLLocation *)oldLocation
{
NSString *newLatitude =[[NSString alloc]initWithFormat:@"%g",
newLocation.coordinate.latitude];
NSString *newLongitude=[[NSString alloc]initWithFormat:@"%g",
newLocation.coordinate.longitude];
For More Information:
www.packtpub.com/iphone-location-aware-apps-beginners-guide/book

Chapter 5
[ 139 ]
latitudeTextData = newLatitude;
longitudeTextData = newLongitude;
latitudeText.text = latitudeTextData;
longitudeText.text = longitudeTextData;
if(sqlite3_open([sqliteFileName UTF8String],
&database)==SQLITE_OK)
{
NSString *sql = [[NSString alloc]initWithFormat:
@"CREATE TABLE IF NOT EXISTS '%@' ('position_id' INTEGER PRIMARY
KEY,'latitude' DOUBLE, 'longitude' DOUBLE, 'placeName'
VARCHAR)",tableName];
if(sqlite3_exec(database, [sql UTF8String], NULL, NULL,
&sqliteError)==SQLITE_OK)
{
insertStatement = [[NSString alloc]initWithFormat:
@"INSERT OR REPLACE INTO '%@'('%@','%@')
VALUES('%@','%@')",tableName,@"latitude",@"longitude",
newLatitude,newLongitude];
if(sqlite3_exec(database, [insertStatement UTF8String],
NULL, NULL, &sqliteError)==SQLITE_OK)
{
NSLog(@"Location Inserted");
}
}
}
}
13. Now that we have successfully inserted the values in the database table, lets write some code to retrieve these values.
For More Information:
www.packtpub.com/iphone-location-aware-apps-beginners-guide/book

Weather App—WeatherPackt
[ 140 ]
14. Open your Hello_LocationViewController.xib fi le, create another round rect butt on, name it Read Sqlite Data, and connect it to IBAction getSqliteLocation by pressing Control key, and clicking-and-dragging the pointer to fi le 's owner in the Interface Builder.
15. We declare the getSqliteLocation method as follows:
-(IBAction)getSqliteLocation:(id)sender
{
NSString *sql = [[NSString alloc]initWithFormat:
@"SELECT * FROM '%@' where position_id =
(select max(position_id) from '%@')",tableName,tableName];
sqlite3_stmt *sqlStatement;
if(sqlite3_prepare_v2(database, [sql UTF8String], -1,
&sqlStatement, NULL)==SQLITE_OK)
{
while(sqlite3_step(sqlStatement)==SQLITE_ROW)
{
double latitudeData = sqlite3_column_double(sqlStatement, 1);
double longitudeData= sqlite3_column_double(sqlStatement, 2);
For More Information:
www.packtpub.com/iphone-location-aware-apps-beginners-guide/book

Chapter 5
[ 141 ]
NSString *returnLat = [NSString stringWithFormat:
@"Your double value is %f", latitudeData];
NSString *returnLon = [NSString stringWithFormat:
@"Your
double value is %f", longitudeData];
NSLog(returnLat);
NSLog(returnLon);
}
}
}
16. We retrieve the user's last locati on inserted in the table, by using a nested SQL query that retrieves the last row. The combined sqlite3_prepare and sqlite3_step method s are used to loop through the results of the SQL query. The sqlite3_column_text method retrieves the column specifi ed. We use the fi rst and second columns' values for retrieving the latitude and longitude value s. Note the table structure, since the column numbers (starti ng with index 0) will be defi ned by the sequence of your SQL Create statement.
17. Run the app in the iOS simulator, try changing a couple of locati on values through the Product | Debug | Simulate Locati on menu opti on, and observe the values in the Debug window.
2011-08-28 17:05:47.643 Hello Location Sqlite[1651:f203] Location Inserted
2011-08-28 17:05:49.978 Hello Location Sqlite [1651:f203] 37.7874
2011-08-28 17:05:49.980 Hello Location Sqlite [1651:f203] -122.408
2011-08-28 17:05:59.681 Hello Location Sqlite [1651:f203] Location Inserted
2011-08-28 17:06:01.626 Hello Location Sqlite [1651:f203] 19.0176
2011-08-28 17:06:01.628 Hello Location Sqlite [1651:f203] 72.8562
2011-08-28 17:06:15.131 Hello Location Sqlite [1651:f203] Location Inserted
2011-08-28 17:06:17.145 Hello Location Sqlite [1651:f203] -33.8634
2011-08-28 17:06:17.147 Hello Location Sqlite [1651:f203] 151.211
Find the code for this example on the book's website: project ti tled Hello Locati on - Locati on Updates - SQLite.
For More Information:
www.packtpub.com/iphone-location-aware-apps-beginners-guide/book

Weather App—WeatherPackt
[ 142 ]
What just happened?We extended the Hello Locati on app again, and created a SQLite database - location.db that resides on our iOS device user's Document directory, and holds the table called user_position, which in turn, contains the user's raw locati on values.
When we read the SQLite database, we retrieve the user's last locati on, since this will be the user's last and most updated positi on, and it makes good app behavior to conti nue from there.
Our approach to storing the locati on is similar to the consolidated.db approach that Apple took with its locati on tracking Fiasco. This was detected by Pete Warden, and published at: http://petewarden.github.com/iPhoneTracker/. It caused a lot of security uproar for Apple, so it is a good idea to encrypt this fi le, and keep it private to your applicati on alone.
Converting location data into city name – using Geonames API Now that we have the user's locati on stored in our iOS device, we assume that the user does not change his locati on oft en, or does not oft en move out of city. We use the GeoNames API to convert the user's positi on into a meaningful city name or area name, as returned by the GeoNames API. We could also use the reverse Geocoding method provided by the new CLGeocoder class in iOS 5. Time to revisit the Geocoding example we did in Chapter 3, where we covered forward geocoding. Now, we will look at reverse geocoding and converti ng lati tude/longitude values to meaningful address.
A bit on GeoNames GeoNames is a worldwide geographical database, with a creati ve common license, containing more than 10 million geographical names that could include city, street, administrati ve areas, mountains, lakes, canals, and so on . A full list is available at: http://www.geonames.org/export/codes.html. The database is available for download, and there is a web service as well.
For More Information:
www.packtpub.com/iphone-location-aware-apps-beginners-guide/book
Chapter 5
[ 143 ]
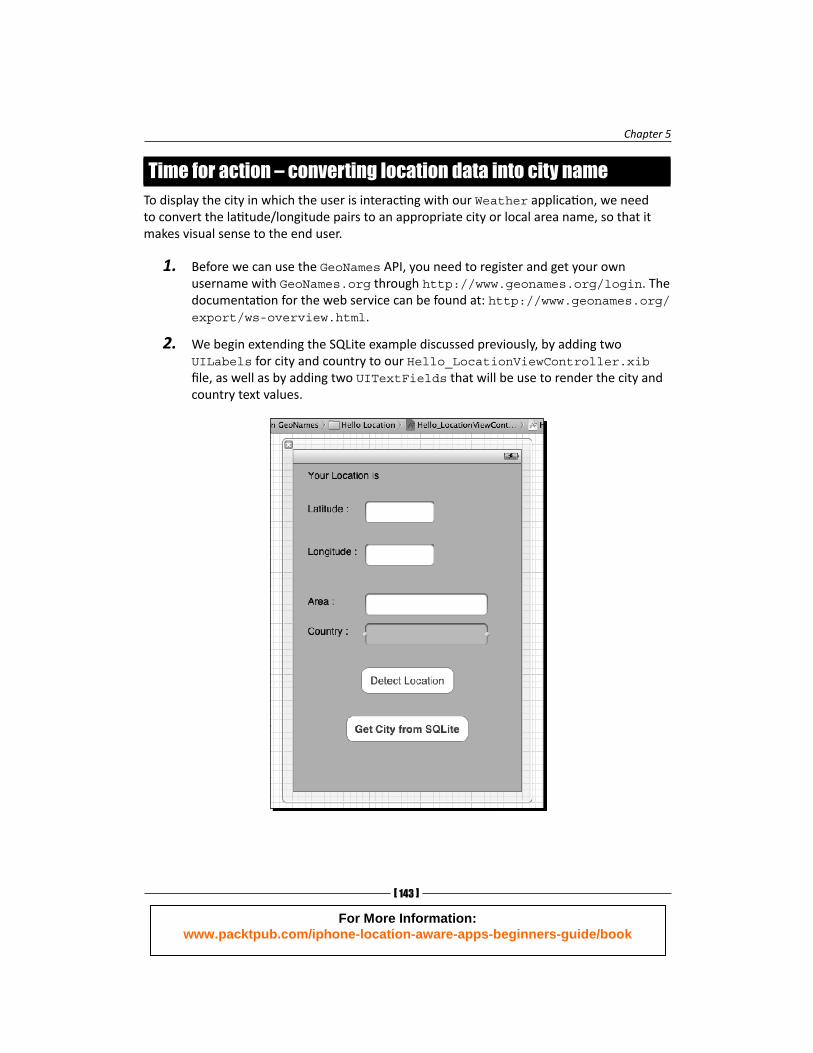
Time for action – converting location data into city nameTo display the city in which the user is interacti ng with our Weather applicati on, we need to convert the lati tude/longitude pairs to an appropriate city or local area name, so that it makes visual sense to the end user.
1. Before we can use the GeoNames API, you need to register and get your own username with GeoNames.org through http://www.geonames.org/login. The documentati on for the web service can be found at: http://www.geonames.org/export/ws-overview.html.
2. We begin extending the SQLite example discussed previously, by adding two UILabels for city and country to our Hello_LocationViewController.xib fi le, as well as by adding two UITextFields that will be use to render the city and country text values.
For More Information:
www.packtpub.com/iphone-location-aware-apps-beginners-guide/book

Weather App—WeatherPackt
[ 144 ]
3. We will need an XMLParser object to parse the XML response from GeoNames. We created a similar example when we used the Last.FM API in Chapter 3, and we will reuse most of the code here as well. Our Hello_LocationViewController.h fi le now looks as follows:
#import <UIKit/UIKit.h>
#import <CoreLocation/CoreLocation.h>
#import <sqlite3.h>
@interface Hello_LocationViewController : UIViewController
<CLLocationManagerDelegate,NSXMLParserDelegate>
{
IBOutletUITextField *latitudeText;
IBOutletUITextField *longitudeText;
CLLocationManager *locMgr;
CLLocation *userLocation;
NSString *message;
sqlite3 *database;
NSString *sqliteFileName;
NSXMLParser *xmlParser;
NSURLConnection *urlConnection;
}
@property (retain,nonatomic) IBOutletUITextField *latitudeText;
@property (retain,nonatomic) IBOutletUITextField *longitudeText;
@property (strong, nonatomic) IBOutletUITextField *area;
@property (strong, nonatomic) IBOutletUITextField *country;
-(NSString *) getDatabaseFullPath;
- (IBAction)locationDetect:(id)sender;
- (IBAction)getSqliteLocation:(id)sender;
@end
4. The area and country variables are required to hold the values of city and country, respecti vely. The getSqliteLocation method will be used to retrieve the user's last locati on and city/country values.
For More Information:
www.packtpub.com/iphone-location-aware-apps-beginners-guide/book
Chapter 5
[ 145 ]
5. In our Hello_LocationViewController.m fi le, as soon as the didUpdateToLocationevent is called when the device locati on is updated, we do the following:
Call the GeoNames API through a NSURLRequest. We use the http://api.geonames.org/findNearbyPlaceName GeoNames API to fi nd the place nearest to the lati tude/longitude values provided.
On success of the place nearest to the lati tude/longitude values provided, the XMLParser takes over, using the didStartElementand didEndElement method, to parse the XML data for city and country values contained in the fi elds name and countryName.
Aft er the XML parsing fi nishes, we use the SQLite insert statements to insert the user's lati tude, longitude, place (read city), and country values into the SQLite database table named user_position.
6. Open the XIB fi le in Interface Builder, and Control+drag the mouse pointer from the Get City from SQLite butt on to the File's Owner, and select the event getSqliteLocation.
7. We now defi ne the acti ons for getSqliteLocation as follows:
-(IBAction)getSqliteLocation:(id)sender
{
NSString *sql = @"SELECT * FROM user_position where position_id =(select max(position_id) from user_position)";
sqlite3_stmt *sqlStatement;
if(sqlite3_prepare_v2(database, [sql UTF8String], -1,
&sqlStatement, NULL)==SQLITE_OK)
{
while(sqlite3_step(sqlStatement)==SQLITE_ROW)
{
const unsignedchar *latitudeData =
sqlite3_column_text(sqlStatement, 1);
const unsignedchar *longitudeData =
sqlite3_column_text(sqlStatement, 2);
const unsigned char *placeData =
sqlite3_column_text(sqlStatement, 3);
For More Information:
www.packtpub.com/iphone-location-aware-apps-beginners-guide/book
Weather App—WeatherPackt
[ 146 ]
NSString *returnLat = [[NSStringalloc]initWithFormat:
@"",latitudeData];
NSString *returnLon = [[NSStringalloc]initWithUTF8String:
longitudeData];
NSString *returnPlace = [[NSStringalloc]initWithUTF8String:
placeData];
NSLog(returnLat);
NSLog(returnLon);
NSLog(returnPlace);
}
}
}
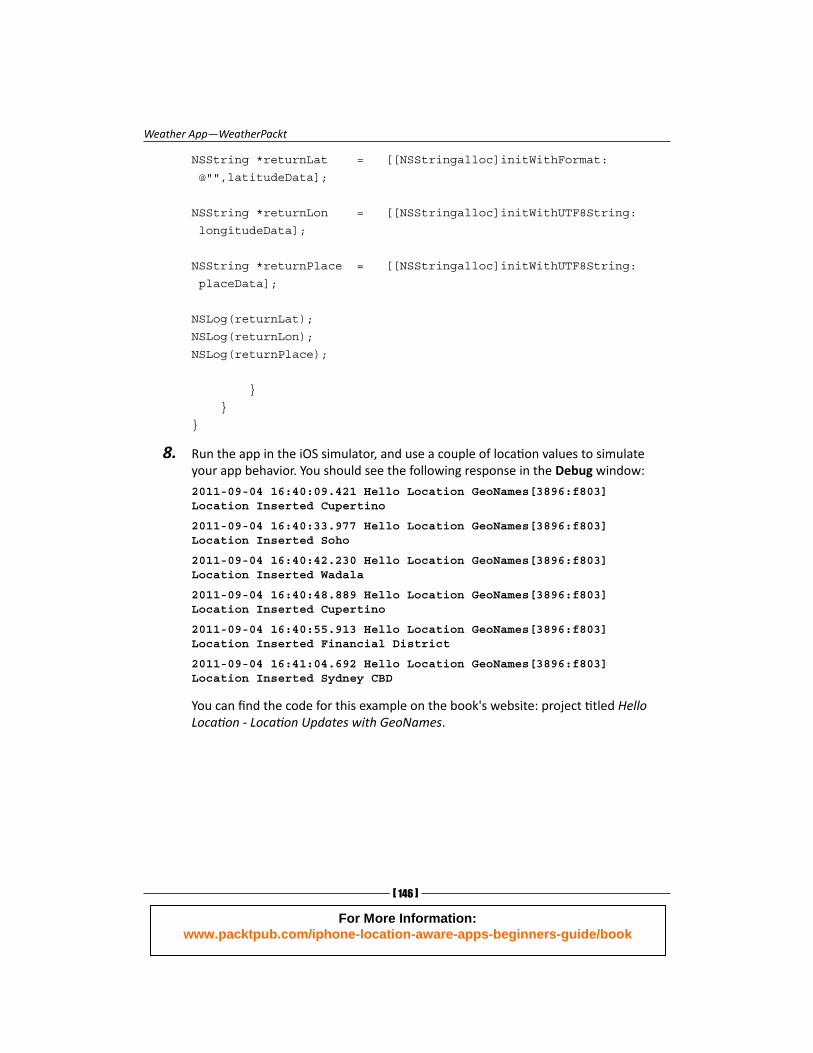
8. Run the app in the iOS simulator, and use a couple of locati on values to simulate your app behavior. You should see the following response in the Debug window:
2011-09-04 16:40:09.421 Hello Location GeoNames[3896:f803] Location Inserted Cupertino
2011-09-04 16:40:33.977 Hello Location GeoNames[3896:f803] Location Inserted Soho
2011-09-04 16:40:42.230 Hello Location GeoNames[3896:f803] Location Inserted Wadala
2011-09-04 16:40:48.889 Hello Location GeoNames[3896:f803] Location Inserted Cupertino
2011-09-04 16:40:55.913 Hello Location GeoNames[3896:f803] Location Inserted Financial District
2011-09-04 16:41:04.692 Hello Location GeoNames[3896:f803] Location Inserted Sydney CBD
You can fi nd the code for this example on the book's website: project ti tled Hello Locati on - Locati on Updates with GeoNames.
For More Information:
www.packtpub.com/iphone-location-aware-apps-beginners-guide/book

Chapter 5
[ 147 ]
The GeoNames API that we used (http://api.geonames.org/findNearbyPlaceName), return to us the closest place, which need not necessarily be a city name; it could be the name of a street, locality, or another administrati ve area. If you need the city name compulsorily, then the new CLGeocoder class in iOS 5, specifi cally the reverse geocoder would be helpful. It does the same task as the GeoNames API, but returns a bett er place informati on through the CLPlacemark object .
For More Information:
www.packtpub.com/iphone-location-aware-apps-beginners-guide/book

Weather App—WeatherPackt
[ 148 ]
What just happened?We enhanced the Hello Location SQLite exampl e, by not only storing the user's lati tude and longitude pair, but also by converti ng the same into readable city and country values. These values can further be used in our Weather App project .
We also extended the SQLite database by adding the place and country fi elds in the user_position table . So, a row in the database table now contains the user's lati tude, longitude, place name, and country name.
You can verify the data inserted in this table, by using the Xcode | Organizer tool. With the new features of iOS 5, you can download your app data, modify it, and then re-insert it on your device. With your device selected in Organizer, select the Applicati on name; in our example it should be Hello Location Sqlite 1.0, and then in the Documents Tree View , you should see the location.db fi le.
Use the Download butt on to download the fi le on your desktop; the fi le should be named as com.packt.Hello-Location-Sqlite 2011-09-04 17.46.40.751.xcappdata. Open the fi le by right-clicking the Context Menu and selecti ng the Show Package Contents opti on . Find the location.db fi le in the AppData | Documents folder, and modify it with the Firefox SQLite manager (available at https://addons.mozilla.org/en-US/firefox/addon/sqlite-manager/) or any SQLite database editor . Once done, just upload the com.packt.Hello-Location-Sqlite 2011-09-04 17.46.40.751.xcappdata fi le to your iOS device again.
Consuming the WeatherBug API Now that we have secured our foundati on for building the Weather app, it's ti me to look at the WeatherBug API, understand the API calls, and understand how we can build our app around it. For the purpose of our Weather App, we are considered about the following Weather API calls: Live Weather, Forecast, and Alerts. Let us look at how the WeatherBug API solves our requirement for the three menti oned Weather queries .
Important things to know before we begin Register for the WeatherBug API at http://weather.weatherbug.com/desktop-weather/api-register.html.
The documentati on can be found at http://weather.weatherbug.com/desktop-weather/api-documents.html.
Keep the API key handy.
For More Information:
www.packtpub.com/iphone-location-aware-apps-beginners-guide/book

Chapter 5
[ 149 ]
The following Weather services are off ered by WeatherBug:
Locati on search Weather Camera search Live Weather
Compact Live Weather Forecast Weather Alerts
Weather Stati on search
We will focus on the API calls for
Live Weather: http://api.wxbug.net/getLiveWeatherRSS.aspx?ACode=xxxxxxxxxxx&lat=latitude&long=longitude&unittype=0|1
Forecast: http://api.wxbug.net/getForecastRSS.aspx?ACode=xxxxxxxxxxx&lat=latitude&long=longitude&unittype=0|1
Weather Alerts: http://api.wxbug.net/getAlertsRSS.aspx?ACode=xxxxxxxxxxx&lat=latitude&long=longitude
Here
xxxxxxxxxxx is the API key
latitude is our iOS device's lati tude value
longitude is our iOS device's longitude value
unittype=0 is for Fahrenheit display
unittype=1 is for Celsius display
You can check out the API URLs in a browser. Since the API output is RSS, it should render well on any browser; the idea is to get a rough image on how the output is organized. We ran the API URL on Firefox to constantly monitor and compare it with the data that we receive in the app. This helped us verify our applicati on logic as well.
For More Information:
www.packtpub.com/iphone-location-aware-apps-beginners-guide/book

Weather App—WeatherPackt
[ 150 ]
Time for action – using WeatherBug API Let's create a barebones app that uses the three WeatherBug API discussed in the previous secti on. We will use the Hello Location example again, but this ti me, we make the UI a bit of a run-of-the-mill iOS app UI.
We will create an app that will detect the locati on, convert the locati on to city name, fetch weather informati on, and forecast and display the same in a UITableView.
1. We begin declaring the variables that will be used in our app, open Hello_LocationViewController.h, and add a variable, weatherTable, for the UITableView - UITableView *weatherTable;
2. Next, we declare the variables that will be used to hold the Live Weather informati on:
NSString *weatherIcon;
NSString *weatherConditions;
NSString *weatherTemperature;
NSString *weatherTemperatureUnit;
NSString *weatherHumidity;
NSString *weatherHumidityUnit;
NSString *weatherWindSpeed;
NSString *weatherWindSpeedUnit;
NSString *weatherPressure;
NSString *weatherPressureUnit;
NSString *weatherDewPoint;
NSString *weatherDewPointUnit;
NSString *weatherGusts;
NSString *weatherGustsUnit;
NSString *weatherRainToday;
NSString *weatherRainTodayUnit;
For More Information:
www.packtpub.com/iphone-location-aware-apps-beginners-guide/book

Chapter 5
[ 151 ]
3. We then declare an array of the type NSMutableArray, which will hold the weather informati on in an array format to be rendered on the UITableView.
NSMutableArray *weatherDataArray;
4. For the Forecast data, we declare the following variables:
NSString *dayTitle;
NSString *dayPrediction;
NSString *mondayForeCast;
NSString *tuesdayForeCast;
NSString *wednesdayForeCast;
NSString *thursdayForeCast;
NSString *fridayForeCast;
NSString *saturdayForeCast;
NSString *sundayForeCast;
5. We declare individual functi ons for Live Weather, Forecast, and Alerts as follows:
-(IBAction)showLiveWeather:(id)sender;
-(IBAction)showForeCast:(id)sender;
-(IBAction)showAlerts:(id)sender;
6. Do not forget to include the NSXMLParserDelegate and the UITableViewDataSource delegate in your header fi le.
7. Now, let's design our UI. Open the Hello_LocationViewController.xib fi le. To make our app visually appealing, we incorporate some icons. We have used icons designed by Joseph Wain: http://glyphish.com. He has put up some nice icons for both: the iPhone and the iPad applicati ons. Download the free icons with Creati ve Commons License from http://glyphish.com/download/glyphish-icons.zipand, and unzip it in your applicati on's main folder.
For More Information:
www.packtpub.com/iphone-location-aware-apps-beginners-guide/book

Weather App—WeatherPackt
[ 152 ]
8. Next, we create a toolbar at the header of the View, and add four bar butt on items, one butt on each for refresh, Live Weather, forecast, and Alert, respecti vely. We also place a UITableView that will hold our dynamic Weather data, as well as some labels and textboxes to show the locati on informati on. Here is how our fi nal app should look like:
9. Time to connect the dots; Control+drag the mouse pointer from the refresh butt on to the File's Owner, and select the getSqliteLocation acti on . Similarly, connect the Live Weather butt on to the showLiveWeather acti on , the Forecast butt on to the showForeCast acti on, and Alert butt on to the showAlerts acti on . Noti ce the Bar Item carefully, where we have used the icons we downloaded before. Xcode automati cally allows you to choose from the icons downloaded. So, for the Forecast butt on, we choose the 25-weather.png fi le, and similarly for the other butt ons.
For More Information:
www.packtpub.com/iphone-location-aware-apps-beginners-guide/book
Chapter 5
[ 153 ]
10. Having created the UI, we now proceed to write the implementati on for the showLiveWeather , showForeCast , and showAlert method s. Open the Hello_LocationViewController.m fi le to detect which method of the Weather we are accessing. We create three Boolean variables to keep a track, as well as add one variable for the WeatherBug API key.
NSString *apiCode=@"xxxxxxxxxxx";
bool inGeoNames = FALSE;
bool inLiveWeather = FALSE;
bool inForeCast = FALSE;
11. In the ViewDidLoad method , we initi alize the variables needed for the weather display.
weatherIcon = [[NSString alloc]initWithString:@""];
12. In the didUpdateToLocation event method in the LocationManager, we make a request to the WeatherBug API for Live Weather conditi ons. This is the default home screen for our app. We initi ate UIActivityIndicatorView, to show the loading… eff ect, while our app fetches the Weather Info over the Web service. We also change its visibility to hidden, when we stop the loadingIcon aft er our Web service calls completes successfully.
loadingIcon.hidesWhenStopped=TRUE;
[loadingIconstartAnimating];
[selfshowLiveWeather:self];
13. In the showLiveWeather method , we initi alize the weatherDataArray, and set the inLiveWeather fl ag to true. We then call the Weather Bug Live Weather API, open a NSURLconnection, and proceed to complete the URL request.
-(IBAction)showLiveWeather:(id)sender
{
[loadingIconstartAnimating];
weatherDataArray = [[NSMutableArrayalloc]init];
[weatherTablereloadData];
inGeoNames = FALSE;
inLiveWeather= TRUE;
weatherBugUrl= [[NSStringalloc] initWithFormat:
@"http://api.wxbug.net/getLiveWeatherRSS.aspx? ACode=%@&lat=%@&long=%@&unittype=1",
apiCode,latitudeText.text,longitudeText.text];
NSURL *urlToRequest = [[NSURLalloc]
For More Information:
www.packtpub.com/iphone-location-aware-apps-beginners-guide/book

Weather App—WeatherPackt
[ 154 ]
initWithString:weatherBugUrl];
NSURLRequest *request = [NSURLRequest
requestWithURL:urlToRequest];
urlConnection = [[NSURLConnectionalloc]
initWithRequest:request
delegate:selfstartImmediately:YES];
}
14. We use the didStartElement , didEndElement , and foundCharacters method of the NSXMLParser, to populate our variables used for the weather display, and pass it on to the WeatherDataArray, which in turn renders it on the UITableView.
-(void)parser:(NSXMLParser *)parser didStartElement:(NSString *)elementName namespaceURI:(NSString *)namespaceURI qualifiedName:(NSString *)qName attributes:(NSDictionary *)attributeDict
{
currentXMLTitle=[elementName copy];
if([currentXMLTitleisEqualToString:@"name"]
{
cityText = [[NSMutableStringalloc]init];
}
if([currentXMLTitleisEqualToString:@"countryName"])
{
countryText = [[NSMutableStringalloc]init];
}
// In Live Weather
if(inLiveWeather)
{
if([currentXMLTitleisEqualToString:@"aws:current-condition"])
{
currentConditionsText = [[NSMutableStringalloc]init];
weatherIcon=[attributeDict objectForKey:@"icon"];
}
if([currentXMLTitleisEqualToString:@"aws:temp"])
{
weatherTemperatureUnit=[attributeDict objectForKey:@"units"];
For More Information:
www.packtpub.com/iphone-location-aware-apps-beginners-guide/book

Chapter 5
[ 155 ]
weatherTemperatureUnit=[weatherTemperatureUnit
stringByReplacingOccurrencesOfString:@"°" withString:@"°"];
}
…………
…………// Parse other RSS fields for humidity,wind-speed,etc
}
// End of Live Weather
}
-(void)parser:(NSXMLParser *)parser didEndElement:(NSString *)elementName namespaceURI:(NSString *)namespaceURI qualifiedName:(NSString *)qName
{
if([currentXMLTitleisEqualToString:@"name"])
{
area.text = cityText;
cityText = [[NSMutableStringalloc]init];
}
if([currentXMLTitleisEqualToString:@"countryName"])
{
country.text = countryText;
countryText = [[NSMutableStringalloc]init];
}
if([currentXMLTitleisEqualToString:@"aws:current-condition"])
{
currentConditionsText = [[NSMutableStringalloc]init];
}
}
-(void)parser:(NSXMLParser *)parser foundCharacters:(NSString *)string
{
if([currentXMLTitleisEqualToString:@"name"])
{
[cityTextappendString:string];
For More Information:
www.packtpub.com/iphone-location-aware-apps-beginners-guide/book

Weather App—WeatherPackt
[ 156 ]
}
if([currentXMLTitleisEqualToString:@"countryName"])
{
[countryTextappendString:string];
}
// For Live Weather
if(inLiveWeather)
{
inForeCast=FALSE;
if([currentXMLTitleisEqualToString:@"aws:current-condition"])
{
weatherConditions=string;
}
if([currentXMLTitleisEqualToString:@"aws:temp"])
{
weatherTemperature=[string
stringByTrimmingCharactersInSet:[NSCharacterSet
whitespaceAndNewlineCharacterSet]];
}
if([currentXMLTitleisEqualToString:@"aws:humidity"])
{
weatherHumidity=[string
stringByTrimmingCharactersInSet:[NSCharacterSet
whitespaceAndNewlineCharacterSet]];;
}
………..
………..
}
// End of Live Weather
// In ForeCast
if(inForeCast)
{
inLiveWeather=FALSE;
if([currentXMLTitleisEqualToString:@"aws:forecast"])
For More Information:
www.packtpub.com/iphone-location-aware-apps-beginners-guide/book

Chapter 5
[ 157 ]
{
}
if([currentXMLTitleisEqualToString:@"aws:title"])
{
dayTitle = [string
stringByTrimmingCharactersInSet:[NSCharacterSet
whitespaceAndNewlineCharacterSet]];
}
if([currentXMLTitleisEqualToString:@"aws:short-prediction"])
{
dayPrediction=[string
stringByTrimmingCharactersInSet:[NSCharacterSet
whitespaceAndNewlineCharacterSet]];
if([dayTitleisEqualToString:@"Monday"])
{
mondayForeCast =[[dayTitlestringByAppendingFormat:@": "]
stringByAppendingFormat:dayPrediction];
}
if([dayTitleisEqualToString:@"Tuesday"])
{
tuesdayForeCast =[[dayTitlestringByAppendingFormat:@":
"] stringByAppendingFormat:dayPrediction];
}
………..
………..
}
}
// End of ForeCast
}
-(void)parserDidEndDocument:(NSXMLParser *)parser
{
if(inLiveWeather)
{
For More Information:
www.packtpub.com/iphone-location-aware-apps-beginners-guide/book
Weather App—WeatherPackt
[ 158 ]
[loadingIconstartAnimating];
NSString *temp = weatherConditions;
if(![weatherDataArraycontainsObject:temp])
{
[weatherDataArrayaddObject:temp];
}
temp=[@"Temperature: "
stringByAppendingFormat:[weatherTemperature
stringByAppendingFormat:weatherTemperatureUnit]];
if(![weatherDataArraycontainsObject:temp] ||
![weatherTemperatureisEqualToString:@""])
{
[weatherDataArrayaddObject:temp];
}
temp=[@"Humidity: "stringByAppendingFormat:[weatherHumidity
stringByAppendingFormat:weatherHumidityUnit]];
if(![weatherDataArraycontainsObject:temp] ||
![weatherHumidityisEqualToString:@""])
{
[weatherDataArrayaddObject:temp];
}
// Prepare similar statement for Pressure, Wind Speed,etc
………..
[loadingIconstopAnimating];
[weatherTablereloadData];
}
if(inForeCast)
{
[loadingIconstopAnimating];
if(![mondayForeCastisEqualToString:@""])
{
For More Information:
www.packtpub.com/iphone-location-aware-apps-beginners-guide/book

Chapter 5
[ 159 ]
[weatherDataArrayaddObject:mondayForeCast];
}
if(![tuesdayForeCastisEqualToString:@""])
{
[weatherDataArrayaddObject:tuesdayForeCast];
}
// Add forecast variables for wed, thurs, Friday, etc
………..
[loadingIconstopAnimating];
[weatherTablereloadData];}
}
15. And fi nally, we defi ne the showForeCast method that loads the forecast data from the WeatherBug API as follows:
-(IBAction)showForeCast:(id)sender
{
inLiveWeather = FALSE;
weatherIcon = [[NSStringalloc]initWithString:@""];
weatherConditions = [[NSStringalloc]initWithString:@""];
weatherTemperature= [[NSStringalloc]initWithString:@""];
weatherTemperatureUnit = [[NSStringalloc]initWithString:@""];
weatherHumidity = [[NSStringalloc]initWithString:@""];
weatherHumidityUnit = [[NSStringalloc]initWithString:@""];
weatherWindSpeed = [[NSStringalloc]initWithString:@""];
weatherWindSpeedUnit = [[NSStringalloc]initWithString:@""];
weatherPressure = [[NSStringalloc]initWithString:@""];
weatherPressureUnit = [[NSStringalloc]initWithString:@""];
weatherDewPoint = [[NSStringalloc]initWithString:@""];
weatherDewPointUnit = [[NSStringalloc]initWithString:@""];
weatherGusts = [[NSStringalloc]initWithString:@""];
weatherGustsUnit = [[NSStringalloc]initWithString:@""];
weatherRainToday = [[NSStringalloc]initWithString:@""];
For More Information:
www.packtpub.com/iphone-location-aware-apps-beginners-guide/book
Weather App—WeatherPackt
[ 160 ]
weatherRainTodayUnit = [[NSStringalloc]initWithString:@""];
[loadingIconstartAnimating];
weatherDataArray = [[NSMutableArrayalloc]init];
[weatherTablereloadData];
inGeoNames = FALSE;
inForeCast = TRUE;
weatherBugUrl = [[NSString
alloc]initWithFormat:@"http://api.wxbug.net/getForecastRSS.aspx?
ACode=%@&lat=%@&long=%@&unittype=1",apiCode,latitudeText.text,
longitudeText.text];
NSURL *urlToRequest = [[NSURL
alloc]initWithString:weatherBugUrl];
NSURLRequest *request = [NSURLRequest
requestWithURL:urlToRequest];
urlConnection = [[NSURLConnectionalloc]
initWithRequest:request
delegate:selfstartImmediately:YES];
}
16. Run the app in the emulator. Try changing a couple of locati on values through the Locati on icon over the Debug window. Your output should be similar to the following screenshot:
For More Information:
www.packtpub.com/iphone-location-aware-apps-beginners-guide/book

Chapter 5
[ 161 ]
What just happened?We created a nift y Weather app using GeoNames and WeatherBug. We also used some free icons for our app UI. We learnt how to use the WeatherBug API calls for Live Weather and Forecast, and how to call them dynamically.
We also learnt how to control the XML parsing with fl ags in our code. The inForeCast and inLiveWeather fl ags used in the code, helps us keep track of the XML parsing for elements, and help us parse the XML smartly. This does away the purpose of having tree-driven XML parsing in our apps (which is memory hogging).
You can fi nd the code for this example on the book's website: project ti tled Hello Location WeatherBug.
For More Information:
www.packtpub.com/iphone-location-aware-apps-beginners-guide/book

Weather App—WeatherPackt
[ 162 ]
Have a go hero – creating the Weather Alert function
Try your hands at adding the Weather Alert in the app. From our initi al discussion, use the following API URL: http://api.wxbug.net/getAlertsRSS.aspx?ACode=xxxxxxxxxxx&lat=latitude&long=longitude.
Building your Weather App: WeatherPacktHaving looked at the Live Weather and the Forecast API, and understanding how to parse the XML response received from the WeatherBug API, let's use our previous example to build our fi nal WeatherPackt applicati on. Once done building the app, we will also submit our app to the Apple iTunes Store!!
For our WeatherPackt app, we will use the iOS 5 reverse geocoder as the primary source of converti ng the lati tude/longitude to city and country name. You can use the GeoNames API as well, but the CLGeocoder class included in iOS 5 helps us obtain the same results easily, in a bett er-organized format.
Also, keep in mind the response format of the Weather API. Depending upon your country or locati on, the appropriate metric of display (Celsius or Fahrenheit) should be used. We accomplish this by using a Setti ngs page in our app, which gets registered in the global Settings app on your iOS device.
Start a new Xcode project We begin our fi rst iOS app by creati ng a new Xcode project, unlike reusing the Hello Location template as before. We will also use the Google AdMob Ads iOS SDK to show mobile ads in our applicati on. Follow the as-simple-as-always Google documentati on for the same at: http://code.google.com/mobile/ads/docs/ios/fundamentals.html.
Before we begin our app coding, we need a couple of things to make our app presentable. These include having a nice app Icon and a splash image, which will be used as the default app launch image. We source our images from the World Wide Web, using the free-to-use and Creati ve Commons images in our app. Go through the image licenses carefully; we are using images that are either Creati ve Commons or free, and have the license to be modifi ed and used commercially.
Images that we will use for our Weather app (henceforth referenced as WeatherPackt) are as follows:
App icon : We use this image by Jackie Tran (http://365psd.com/day/2-139/), and crop the PSD in Photoshop to include on the icon with the rainbow over it as the main app icon. Make sure that each icon fi ts the size defi ned by Apple for iPhone display, iPhone reti na display, and iPad display. Similarly, for the Splash iImages, you need to have the right sizes and resoluti on.
For More Information:
www.packtpub.com/iphone-location-aware-apps-beginners-guide/book
Chapter 5
[ 163 ]
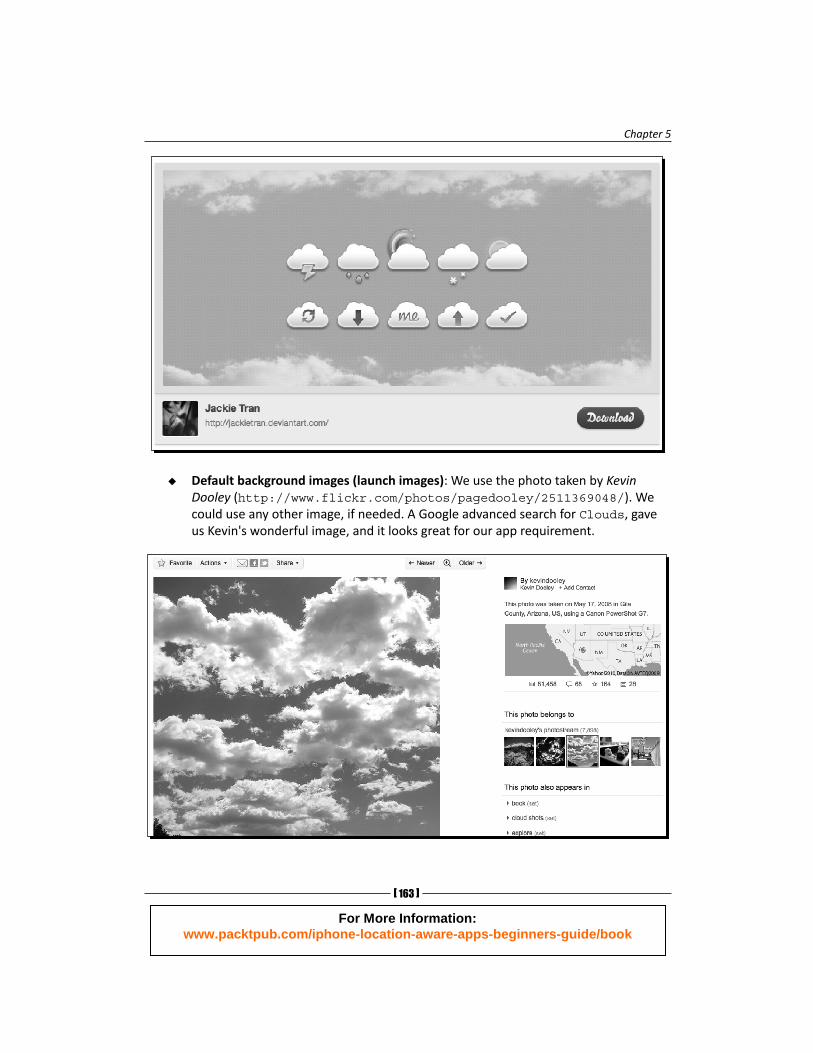
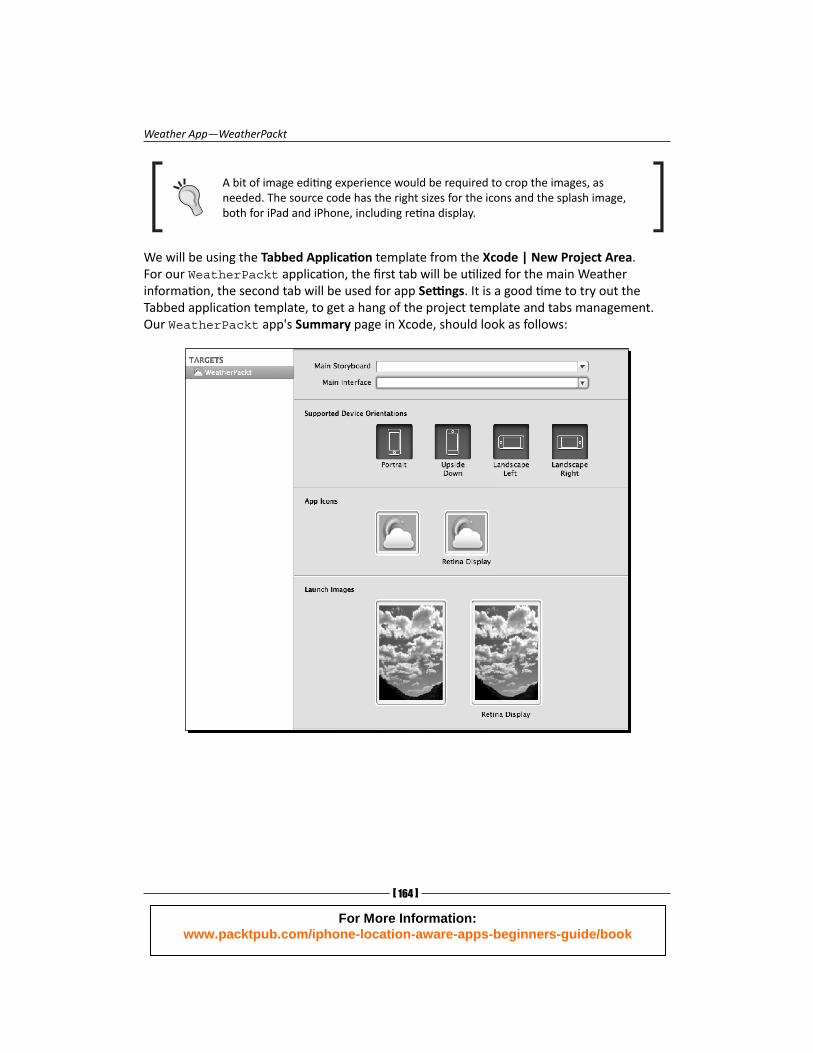
Default background images (launch images): We use the photo taken by Kevin Dooley (http://www.flickr.com/photos/pagedooley/2511369048/). We could use any other image, if needed. A Google advanced search for Clouds, gave us Kevin's wonderful image, and it looks great for our app requirement.
For More Information:
www.packtpub.com/iphone-location-aware-apps-beginners-guide/book
Weather App—WeatherPackt
[ 164 ]
A bit of image editi ng experience would be required to crop the images, as needed. The source code has the right sizes for the icons and the splash image, both for iPad and iPhone, including reti na display.
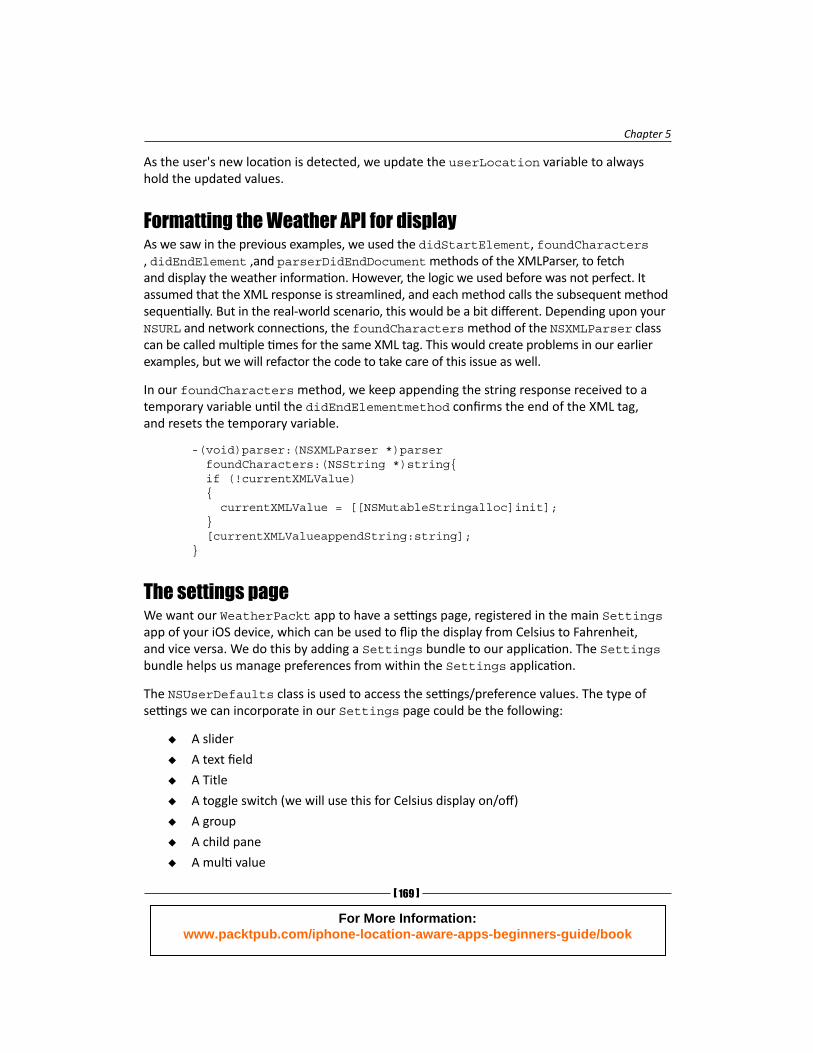
We will be using the Tabbed Applicati on template from the Xcode | New Project Area. For our WeatherPackt applicati on, the fi rst tab will be uti lized for the main Weather informati on, the second tab will be used for app Setti ngs. It is a good ti me to try out the Tabbed applicati on template, to get a hang of the project template and tabs management. Our WeatherPackt app's Summary page in Xcode, should look as follows:
For More Information:
www.packtpub.com/iphone-location-aware-apps-beginners-guide/book

Chapter 5
[ 165 ]
The app icon should look similar to this iPhone Simulator:
Defi ne the Home screenWe create a new Tabbed applicati on with Xcode, however, the default template for the Tabbed applicati on has only two screens. For our Weather app we need three screens: one for the Live Weather, another for the Forecast, and the third for Weather Alerts. So, we add another UIViewController subclass to our project, and name it ThirdViewController. We also add an extra XIB fi le for the iPad template, since the UIViewController subclass additi on to our project only gives us the iPhone XIB fi le.
Time for action – defi ning the Home screen
1. Open the AppDelegate.m fi le in your newly created WeatherPackt applicati on project. Modify the didFinishLaunchingWithOptions method to include the third view controller in the TabBarController.
if ([[UIDevicecurrentDevice] userInterfaceIdiom] == UIUserInterfaceIdiomPhone)
{
viewController1 = [[FirstViewControlleralloc] initWithNibName:@"FirstViewController_iPhone"bundle:nil];
viewController2 = [[SecondViewControlleralloc] initWithNibName:@"SecondViewController_iPhone"bundle:nil];
For More Information:
www.packtpub.com/iphone-location-aware-apps-beginners-guide/book

Weather App—WeatherPackt
[ 166 ]
viewController3 = [[ThirdViewControlleralloc] initWithNibName:@"ThirdViewController_iPhone"bundle:nil];
}
else {
viewController1 = [[FirstViewControlleralloc] initWithNibName:@"FirstViewController_iPad"bundle:nil];
viewController2 = [[SecondViewControlleralloc] initWithNibName:@"SecondViewController_iPad"bundle:nil];
viewController3 = [[ThirdViewControlleralloc] initWithNibName:@"ThirdViewController_iPad"bundle:nil];
}
2. In each individual ViewController main fi le , for example in your SecondViewController.m fi le, add the following code for the AdMob ads integrati on in your viewDidLoad method :
- (void)viewDidLoad
{
[superviewDidLoad];
deviceType =@"iPhone";
NSString *model= [[UIDevicecurrentDevice] model];
NSRange range = [model rangeOfString:@"iPhone"];
if(range.location == NSNotFound)
{
deviceType =@"iPad";
}
else
{
deviceType =@"iPhone";
}
responseData = [[NSMutableDataalloc] init];
// AdMob Code Starts
// Create a view of the standard size at the bottom of the screen.
if([deviceTypeisEqualToString:@"iPhone"]){
bannerAdView = [[GADBannerViewalloc]
For More Information:
www.packtpub.com/iphone-location-aware-apps-beginners-guide/book

Chapter 5
[ 167 ]
initWithFrame:CGRectMake(0.0,43.0,
GAD_SIZE_320x50.width,GAD_SIZE_320x50.height)];
}else{
bannerAdView = [[GADBannerViewalloc]
initWithFrame:CGRectMake(20.0,43.0,
GAD_SIZE_728x90.width,GAD_SIZE_728x90.height)];
}
bannerAdView.adUnitID = @"xxxxxxxxxxxxxxx ";
bannerAdView.rootViewController = self;
[self.viewaddSubview:bannerAdView];
// Initiate a generic request to load it with an ad.
[bannerAdViewloadRequest:[GADRequestrequest]];
// AdMob Code Ends
}
Where xxxxxxxxxxxxxxx is your publisher ID from http://admob.com.
Based on the device type and the app UI, we adjust the AdMob code accordingly.
3. Time to use the icons for the tab bars in the SecondViewController.m fi le. Modify the initWithNibName method to include the icon images from http://glyphish.com. Note that you also need to add the glyphish-icons folder to your Xcode project.
- (id)initWithNibName:(NSString *)nibNameOrNil bundle:(NSBundle *)nibBundleOrNil
{
self = [superinitWithNibName:nibNameOrNil bundle:nibBundleOrNil];
if (self) {
self.title = NSLocalizedString(@"Forecast", @"Forecast");
self.tabBarItem.image = [UIImageimageNamed:@"99-umbrella"];
}
returnself;
}
For More Information:
www.packtpub.com/iphone-location-aware-apps-beginners-guide/book

Weather App—WeatherPackt
[ 168 ]
4. If all goes well, your Home screen should now look as the one shown in the following screenshot:
5. We create a similar layout for the Forecast page in the SecondViewController_iPhone.xib fi le.
Set up a default locationTo make sure that our app works well in case the user has not allowed the locati on services or in case the user's locati on has not been determined or could not be determined, we initi ate the app loading process with a default locati on; in this case, we load San Francisco by using the following code:
newLatitude =@"37.33";newLongitude =@"-122.03";
locationManager = [[CLLocationManageralloc]init];locationManager.desiredAccuracy = kCLLocationAccuracyBest;locationManager.distanceFilter = 1000.0f;locationManager.delegate = self;userLocation = [[CLLocationalloc] initWithLatitude:[newLatitudedoubleValue] longitude:[newLongitudedoubleValue]];
For More Information:
www.packtpub.com/iphone-location-aware-apps-beginners-guide/book
Chapter 5
[ 169 ]
As the user's new locati on is detected, we update the userLocation variable to always hold the updated values.
Formatting the Weather API for display As we saw in the previous examples, we used the didStartElement , foundCharacters , didEndElement ,and parserDidEndDocument method s of the XMLParser, to fetch and display the weather informati on. However, the logic we used before was not perfect. It assumed that the XML response is streamlined, and each method calls the subsequent method sequenti ally. But in the real-world scenario, this would be a bit diff erent. Depending upon your NSURL and network connecti ons, the foundCharacters method of the NSXMLParser class can be called multi ple ti mes for the same XML tag. This would create problems in our earlier examples, but we will refactor the code to take care of this issue as well.
In our foundCharacters method , we keep appending the string response received to a temporary variable unti l the didEndElementmethod confi rms the end of the XML tag, and resets the temporary variable.
-(void)parser:(NSXMLParser *)parser foundCharacters:(NSString *)string{ if (!currentXMLValue) { currentXMLValue = [[NSMutableStringalloc]init]; } [currentXMLValueappendString:string];}
The settings page We want our WeatherPackt app to have a setti ngs page, registered in the main Settings app of your iOS device, which can be used to fl ip the display from Celsius to Fahrenheit, and vice versa. We do this by adding a Settings bundle to our applicati on. The Settings bundle helps us manage preferences from within the Settings applicati on.
The NSUserDefaults class is used to access the setti ngs/preference values. The type of setti ngs we can incorporate in our Settings page could be the following:
A slider
A text fi eld
A Title
A toggle switch (we will use this for Celsius display on/off )
A group
A child pane
A multi value
For More Information:
www.packtpub.com/iphone-location-aware-apps-beginners-guide/book
Weather App—WeatherPackt
[ 170 ]
More details can be found at Apple's rich documentati on available at: http://developer.apple.com/library/ios/#DOCUMENTATION/iPhone/Conceptual/iPhoneOSProgrammingGuide/Preferences/Preferences.html.
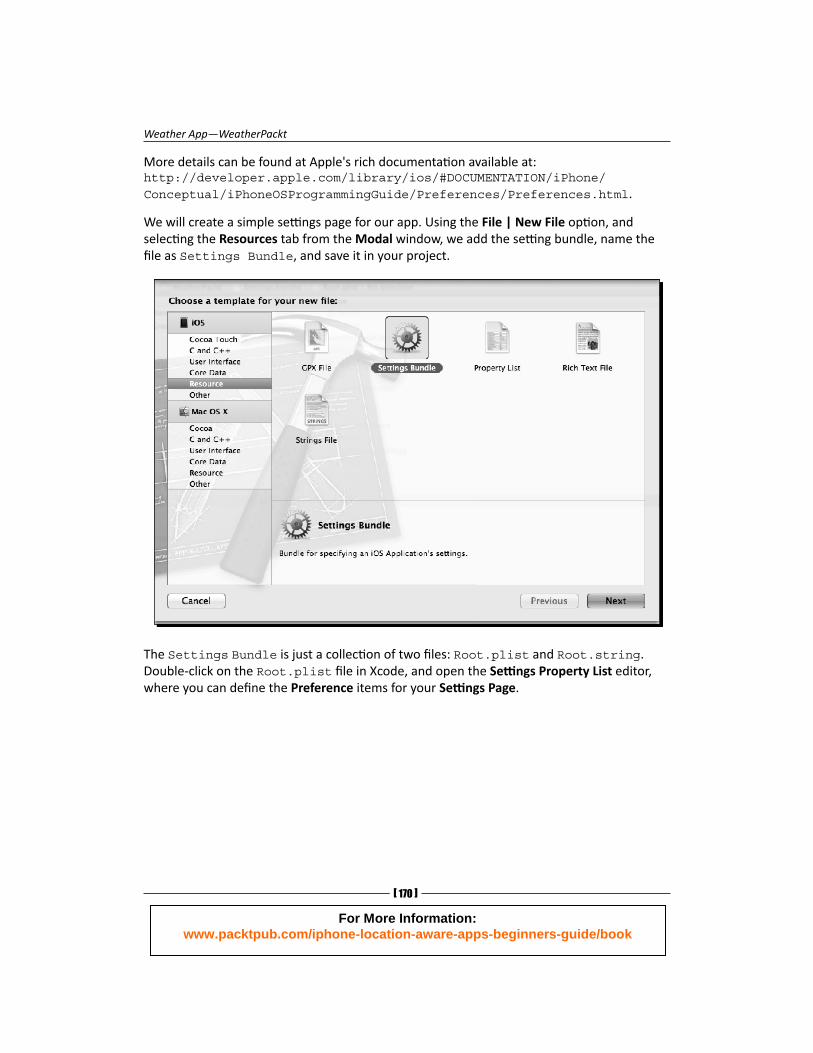
We will create a simple setti ngs page for our app. Using the File | New File opti on, and selecti ng the Resources tab from the Modal window, we add the setti ng bundle, name the fi le as Settings Bundle, and save it in your project.
The Settings Bundle is just a collecti on of two fi les: Root.plist and Root.string . Double-click on the Root.plist fi le in Xcode, and open the Setti ngs Property List editor, where you can defi ne the Preference items for your Setti ngs Page.
For More Information:
www.packtpub.com/iphone-location-aware-apps-beginners-guide/book
Chapter 5
[ 171 ]
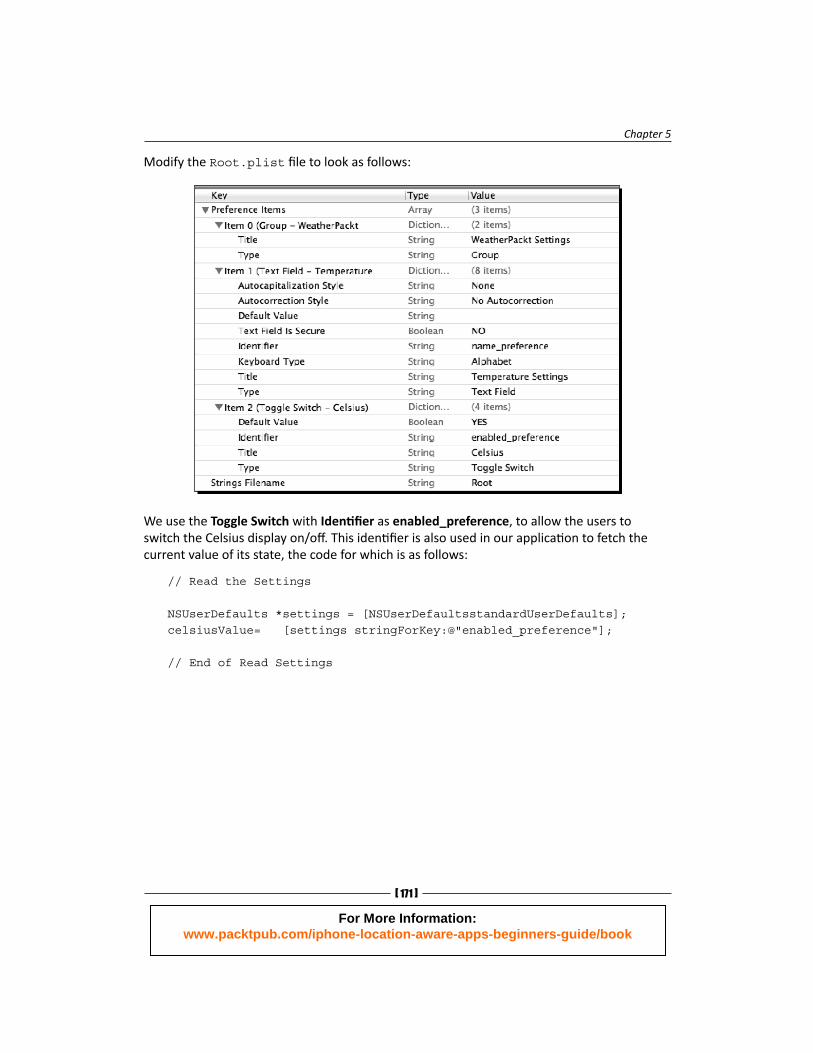
Modify the Root.plist fi le to look as follows:
We use the Toggle Switch with Identi fi er as enabled_preference , to allow the users to switch the Celsius display on/off . This identi fi er is also used in our applicati on to fetch the current value of its state, the code for which is as follows:
// Read the Settings
NSUserDefaults *settings = [NSUserDefaultsstandardUserDefaults];celsiusValue= [settings stringForKey:@"enabled_preference"];
// End of Read Settings
For More Information:
www.packtpub.com/iphone-location-aware-apps-beginners-guide/book
Weather App—WeatherPackt
[ 172 ]
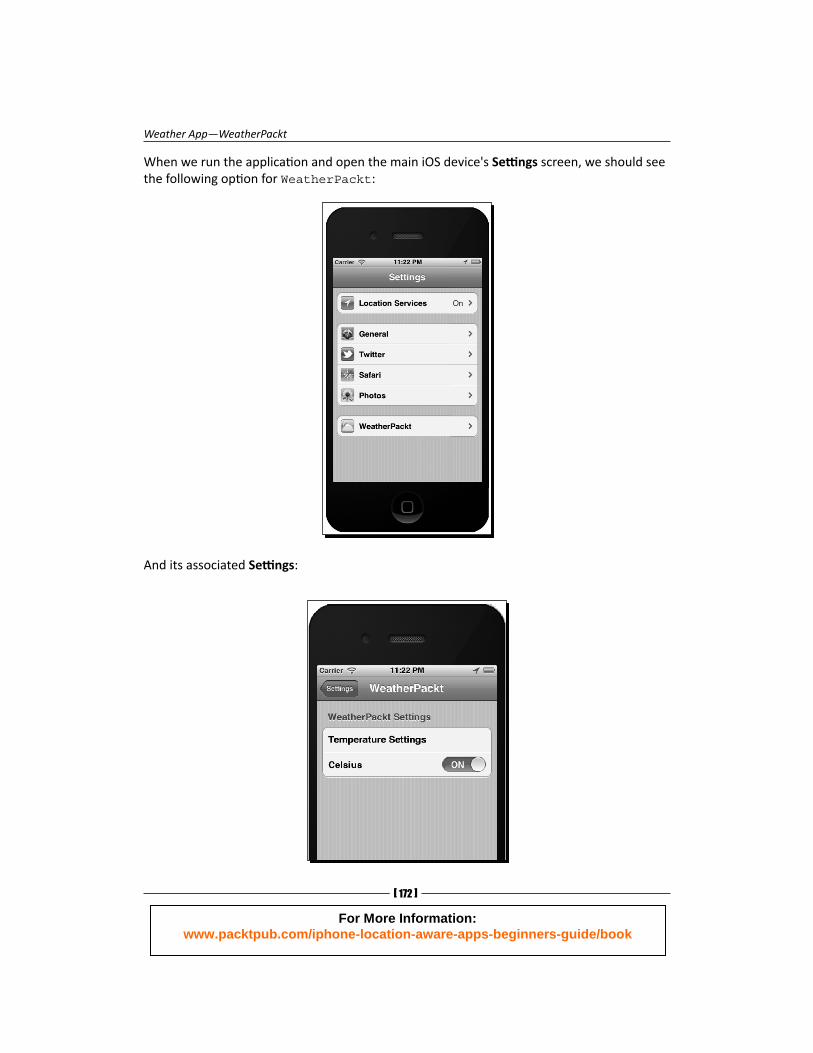
When we run the applicati on and open the main iOS device's Setti ngs screen, we should see the following opti on for WeatherPackt:
And its associated Setti ngs:
For More Information:
www.packtpub.com/iphone-location-aware-apps-beginners-guide/book

Chapter 5
[ 173 ]
The full code for the WeatherPackt app can be found on the book's website: project ti tled WeatherPackt.
Have a go hero – adding the Alerts page to WeatherPackt
We showed you how to build a Live Weather and Forecast page. The app framework also supports a third view for displaying Weather Alerts. We have made provisions for both the iPhone and iPad View in the applicati on. Using your knowledge of what you have learnt so far, complete the third page. Feel free to share the code; who knows your page could end up in the fi nal app and on iTunes !!
Here is how the WeatherPackt app should look, when you run it in the iOS simulator:
For More Information:
www.packtpub.com/iphone-location-aware-apps-beginners-guide/book

Weather App—WeatherPackt
[ 174 ]
Bonus: building WeatherPackt with PhoneGapAs a bonus, also fi nd the WeatherPackt app done with PhoneGap on the book's website: project ti tled WeatherPackt-PhoneGap. Here is how it looks:
Bonus: text-to-speechIn our WeatherPackt app, we add the Nuance Mobile SDK to enable text-to-speech conversion within our app. You need to register with Nuance (http://dragonmobile.nuancemobiledeveloper.com) to get a development and producti on key to be used in your applicati on. Here is how the text-to-speech functi on will look in our app.
For More Information:
www.packtpub.com/iphone-location-aware-apps-beginners-guide/book

Chapter 5
[ 175 ]
Follow the easy to use documentati on at: http://dragonmobile.nuancemobiledeveloper.com/public/Help/DragonMobileSDKReference_iOS/Introduction.html, to start using the Nuance SDK. Here is how we ti ed the microphone UIButton to a simple IBAction that has only two lines of code:
- (IBAction)speakText:(id)sender { NSString *stringToSpeak = [[NSString alloc]initWithFormat: @"Weather Today is %@",weatherConditions]; [vocalizer speakString:stringToSpeak ];}
For More Information:
www.packtpub.com/iphone-location-aware-apps-beginners-guide/book
Weather App—WeatherPackt
[ 176 ]
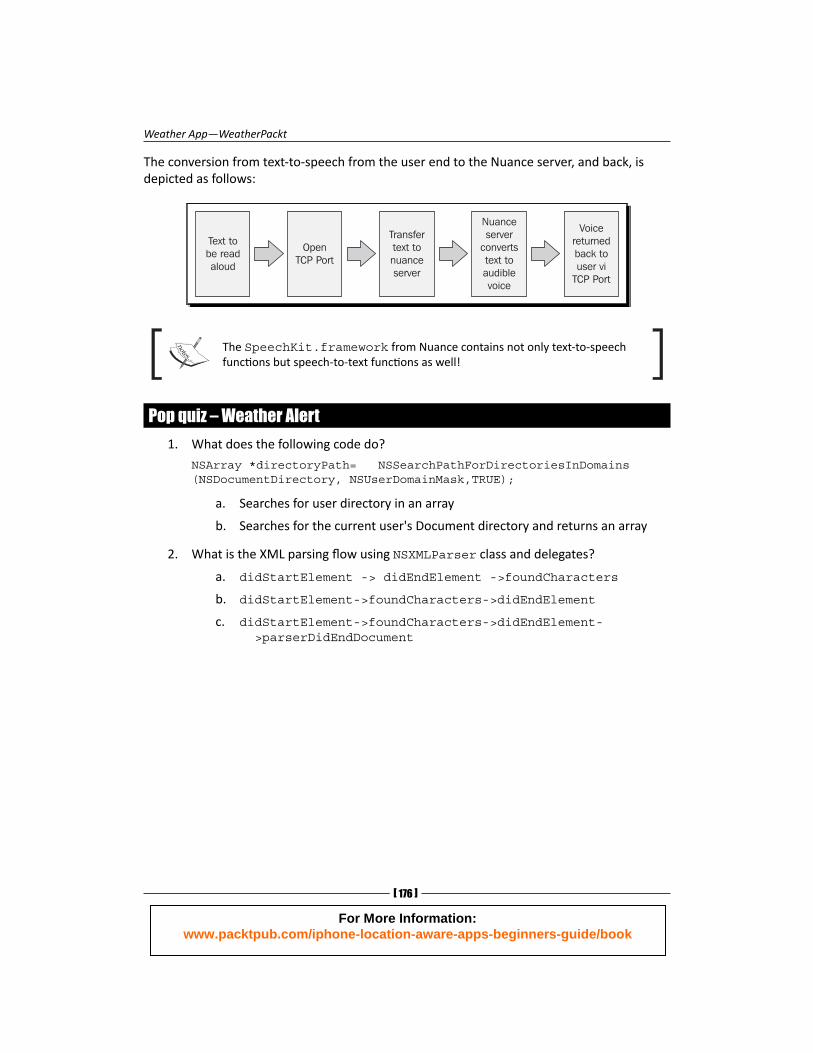
The conversion from text-to-speech from the user end to the Nuance server, and back, is depicted as follows:
Text to
be read
aloud
Open
TCP Port
Transfer
text to
nuance
server
Nuance
server
converts
text to
audible
voice
Voice
returned
back to
user vi
TCP Port
The SpeechKit.framework from Nuance contains not only text-to-speech functi ons but speech-to-text functi ons as well!
Pop quiz – Weather Alert
1. What does the following code do?
NSArray *directoryPath= NSSearchPathForDirectoriesInDomains(NSDocumentDirectory, NSUserDomainMask,TRUE);
a. Searches for user directory in an array
b. Searches for the current user's Document directory and returns an array
2. What is the XML parsing fl ow using NSXMLParser class and delegates?
a. didStartElement -> didEndElement ->foundCharacters
b. didStartElement->foundCharacters->didEndElement
c. didStartElement->foundCharacters->didEndElement- >parserDidEndDocument
For More Information:
www.packtpub.com/iphone-location-aware-apps-beginners-guide/book

Chapter 5
[ 177 ]
SummaryIn this chapter, we learned how to store locati on data into a SQLite database for offl ine support. We also looked at GeoNames and WeatherBug API to build our WeatherPackt applicati on. We also showed a PhoneGap Applicati on for WeatherPackt, so that we can make HTML developers happy. The PacktPub website has an excellent cookbook for building web applicati ons with JavaScript, ti tled iPhone JavaScript Cookbook. Get it from http://www.packtpub.com/iphone-javascript-cookbook/book.
Specifi cally, we covered:
SQLite.
GeoNames API.
WeatherBug API – Live Weather and Forecast.
Creati ng a WeatherApp from scratch with setti ngs.
Creati ng a WeatherApp with PhoneGap.
In the next chapter, we will look at building an Events applicati on with the Eventful API.
For More Information:
www.packtpub.com/iphone-location-aware-apps-beginners-guide/book

Where to buy this book You can buy iPhone Location Aware Apps by Example Beginner's Guide from the Packt
Publishing website: http://www.packtpub.com/iphone-location-aware-
apps-beginners-guide/book.
Free shipping to the US, UK, Europe and selected Asian countries. For more information, please
read our shipping policy.
Alternatively, you can buy the book from Amazon, BN.com, Computer Manuals and
most internet book retailers.
www.PacktPub.com
For More Information:
www.packtpub.com/iphone-location-aware-apps-beginners-guide/book