IP Wireless / Wired Camera IPP mCCaameerraa User Manual · IPCAM User Manual 11 4 Visit IP camera...
64
IP Wireless / Wired Camera IP Camera User Manual (For Windows OS)
-
Upload
duongkhanh -
Category
Documents
-
view
228 -
download
4
Transcript of IP Wireless / Wired Camera IPP mCCaameerraa User Manual · IPCAM User Manual 11 4 Visit IP camera...
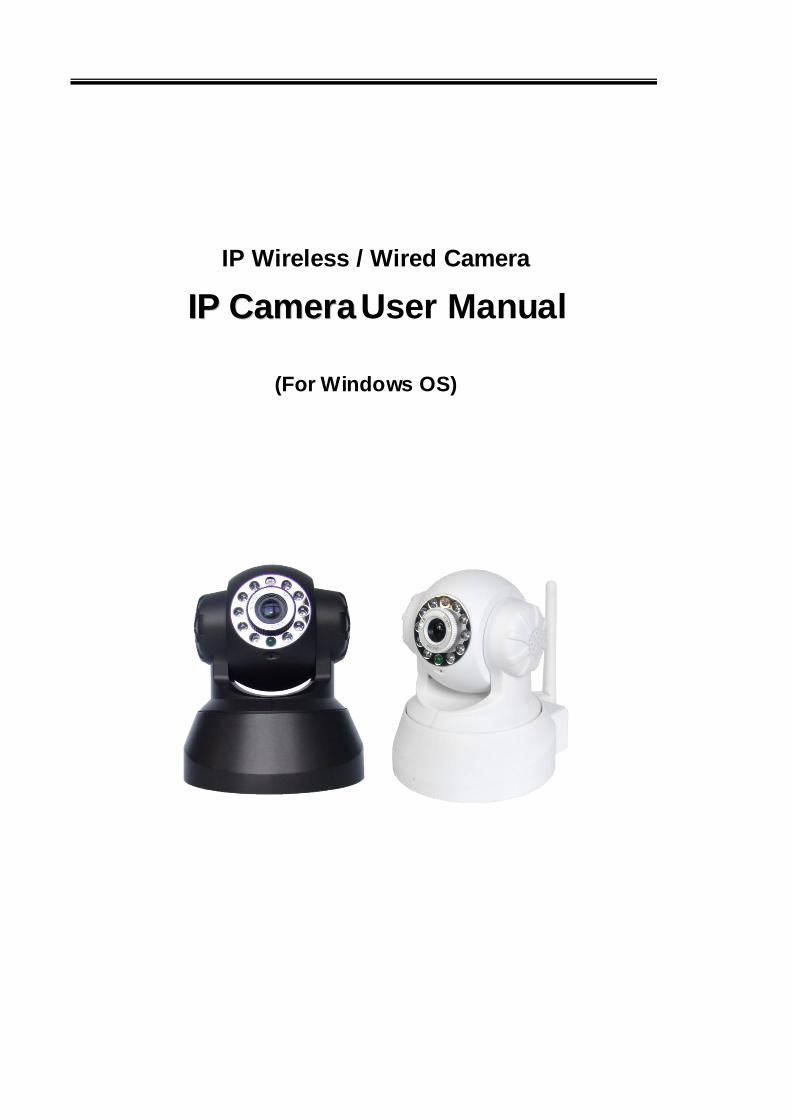
IP Wireless Wired Camera
IIPP CCaammeerraa User Manual
(For Windows OS)
IPCAM User Manual
2
Content 1 Product Overview 4
11 PRO DUCT PACKAG E 4
12 Product Characteristics 4
2 Device apprearance and interface installation 5
21 DEVIC E APPREARANC E 5
22 INTERFAC E INS TALLATIO N 6
3 Device installation 6
31 HARDWARE INS TALLATIO N 7
32 SO FTWARE INS TALLATIO N 10
4 Visit IP CAMERA IN LAN 11
41 CO NNEC TIO N WAYS IN LAN 11
42 SEARCH AND SET DEVIC E IP ADDRESS 11
43 LOGIN IP CAMERA 14
44 IP CAMERA O PERATIO N 17
5 Visit IP CAMERA IN INTERNET 20
51 CO NNEC TIO N WAY IN INTERNET 20
52 RELATE AND S ETIING AND VISIT IP CAMERA 20
6 The device like Mobile phone PAD Etc visit IP CAMERA 24
61 INPUT IP ADDRESS IN TH E BRO WSER TO VISIT 24
62 INSTALL CLIENT-SIDE SO FTWARE TO ACCESS IPCAMERA 28
7 Other setting 33
71 NETWO RK SETTING 33
711 Basic network setting 33
712 WIFI Setting 33
713 Adhoc P to P wireless connection setting 35
72 MULTI-DEVIC E SETTING 38
73 MS N SETTING 39
74 DDNS SETTING 41
741 Factory DDNS 42
742 The third part DDNS 42
75 E-MAIL AND FTP SERVICE 43
76 MO TIO N DETEC TIO N 47
77 TIME O F DEVIC E AND PTZ SETTING 51
IPCAM User Manual
3
78 UPGRADE DEVIC E FIRMWARE 51
79 BACKUP AND RES TO RE SETTING 51
8 APPENDIX 52
81 REGIS TER AND APPLY FO R DDNS SERVIC E 52
82 SO ME SPECIAL APPLICATIO N FO R IPCAMERA 57
821 Open IP Camera though flow-media player 57
83 FREQ UENTLY ASKED QUES TIO NS 60
831 I have forgetten the user and or password 60
832 IP Address configuration 60
833 Network configuration 60
834 No pictures show 61
835 Network bandwidth problems 61
836 Why pop-up the promptFail to connect the device 61
837 IP camera has connected with internet why it cant visit though IP camera 62
84 TH E SO LUTIO N FO R OPERATIO N CO MMO N PROBLEMS 62
85 TH E DEFAULT PARAMETERS 63
86 TECHNICAL PARAMETERS 64
IPCAM User Manual
4
4
1 Products overviewIP Camera is a IP integrated camera solution For the user based on the local network ( LAN ) and
wide area network ( WAN ) remote video surveillance products provides a clear high integration low
cost solution Integrated network and web service function the shooting of the video can be transmitted
through the network to any place you simply through web browser can readily access live video It can
be applied in large stores schools factories families and a series of places Easy to install easy to
operate
11 Product package list
Remarkif you choose Wifi fuction device The package should be contained Wi-Fi Antenna
Before you install the IP camera please check the whether it contains all of the
accessories If it lacks of something please contact with agents
12 Product Features
Powerful high-speed video protocol processor
High-sensitivity 15 CMOS sensor
It uses MJPEG Compression and has VGAQVGAQQVGA video definition for us to choose And it
support for adjusting video parameter and adapt users many kinds of browser demand
Inner microphone can achieve audio collection and two ways audio function
IR night vision to support long distance night vision scope and achieve monitor for the whole days
Embeded WEB SERVER to support multi-page browser to viewing
Multi-level users management and passwords definition
Support wifi network (Wi-Fi80211bg)Inner Wifi module can flexibly create wi-fi monitoring
environment
Support motion detection which can achieve spot all-round monitoring It can e-mailFTP and send
alarm message though alarm server etcs so achieve many kinds of alarm function
PanTilt Pan 270degTilt 120deg It is tiny and convenient installation which is suitable for all kinds of
places
Support UPNP It can support to achieve auto port map in the router
Support mobile phone viewing
Support remote upgrade
Factory set every device unique device serial number unique factory DDNS and burn it to d evice and
when it connect with public internet then it can visit though DDNS
Factory can provide free client software and multi-pictures long time recording and video playback
Etcs
Remindera complete set of network monitoring equipment comprises the following parts this product has good with the following parts
IPCAM User Manual
5
2 Device appearance and interface
21 Device appearance
Picture 1
Device appearance
Sensitive hole
HD Glass Lens Build-in Microphone
Network indicator LED
Infrared LED
1 Sensitive Hole According to outside of light decide whether open infrared LED
2 Infrared LED
3 Lens CMOS Sensor You can turn around the lens manually to adjust the focus range
4 Build-in Microphone
Warning please dont forcibly manual translationlifting cameras because it is
likely that damaged internal component
IPCAM User Manual
6
22 Device interface
Picture 2 Device interface
LAN RJ-4510-100 Base T
DC5V 5V2A Power supply
IO PINS 1)Output(GND) 2)Output (+5V) 3)Alarm input 4)Input (GND) (you can see 356
For more information)
Picture 3 Reset Button
RESET BUTTON Press and hold down the RESET BUTTON for 5 secondsRelease the
power button and IP camera will be reset back to the factory default parameter
3 Device installation System configuration requirements ( Example for view four IP Camera )
CPU 206GHZ or above Memory 512M or above
Network Card 10M or above Display Card Microsoft DirectX 9 Pictur device or above memory
Recommendable Operating System WindowsXPVista Windows 7Windows 8
Support web browser IE Firefox Safari Chrome etc
RESET BUTTON
IO Alarm inputoutput
DC5V Power adapter
WIFI antenna
RJ-45 Ethernet Port
Audio output
IPCAM User Manual
7
31 Install hardware
You should install your IP Cameras hardware according to the following step in order to make sure
the IP camera can work properly Especially pay attention to IP cameras installation environment
1) IPCAM Plug DC adapter with IP camera
INote Please use Dc adapter which is the standard configuration of IP camera Using DC adapter
without any certificate may destroy IP camera
2) Plug cable with IP camera and another side of cable should connect with DSL or route r In additional
make sure power of IP camera work properly and IP camera and PC are in the same Subnet( it can be
LAN and it also can use cable to connect PC and IP camera)
Picture 4 Network connection sketch map
3) When you use IP camera for the first time IP Address of IP camera obtain
automatically(Before using please make sure DHCP Server function in LANs router has
been opened or Server system open DHCP Server function) It is very convenient for users
to use because It is suitable for different LAN NETWORK environment
IPCAM User Manual
8
Picture 5
4) You can search PC IP and DNS Server as belows
Picture 6
This is DNS Server
address which is provided
by network server
IPCAM User Manual
9
5) The device IP Address can be changed but Its IP address should be at the same with PCs
subnet
Picture 7
When we test IP camera and check whether it starts smoothly or it connects properly we can
operate in the Windows(START- RUN-CMD) and then input ping 1921681111 in the order windows
Picture 8 ping IP Camera
Check whether it can Ping IP camera If yes then it means IP Camera has been worked properly
and connected correctly
Network server provide
DNS server Address
Device IP address can
be changed by yourself
IPCAM User Manual
10
32 Software installation
Software installation
It is very easy to install software You just need to run installation programme then it can
work properly
Please put CD in the PC driver and the CD will automatically run to the software installation
interface
If no such an interface please click ldquoautorunexerdquoin the CD
And then findldquosearchexerdquo Clink and install LAN Tool to PC systemthen you
can view IP Camera Tool in Computer desktop for LAN Search toolldquoIP Camera Toolrdquo
G
Picture9 Software installation interface
MinOpen user manual ExitUser manual
Search tool in LAN Application Tool box Quick installation guide Open CD
IPCAM User Manual
11
4 Visit IP camera in LAN 41 Connection ways in LAN
Picture 10 Connection between Several IP camera and router
42 Search and set device IP address Please note before searching IP camera
1Make sure IP camera has a good connection with power and network
2Te router should be opened DHCP(Dynamic host configuration protocol) because the factory setting status of
IP camera is to obtain automatically IP camera
3When we power IP camera we should wait 20 second then it can works
Search IP camera
When we run Search tool IP camera Tool we can find the IP camera showing IP address Port
Name If we use Wi-fi connection we will find Wi-fi IP address For the details we can view
the following picture
Picture 11
NoteldquoIP Camera ToolexerdquoProgramme only use to search IP camera address and port in the
LAN The tool cant search IP camera IP address and port in the WAN
There are 3 cases
1 No IP Camera found within LAN After about 1 minute search the Result Field will
show ldquonot found IP Serverrdquo
2 IP Cameras having been installed within LAN All the IP Cameras will be listed and the
total number is displayed in the result field as shown in Picture 20
3 The IP Cameras installed within LAN do not share the same subnet with the monitoring
PC A prompt as shown in result field (prompt Subnet doesnrsquot match dbclick to change)
Click the left mouse button to choose the prompt and click the right mouse choose
Network Configuration to set the IP address of the Camera to the same subnet as LAN
IPCAM User Manual
12
SIX Options
Choose the IP Camera list and Click right mouse button there are six options Basic
Properties Network Configuration Upgrade Firmware Refresh Camera List Flush Arp About IP camera tool as
shown Picture 12
Picture 12
Basic Properties
There is some device information in the Bas ic Properties such as Device ID System
Firmware Version Web UI Version
Picture 13
Network Configuration
In this page you can configure the Network parameter
Picture 14
IP address Fill in the IP address assigned and make sure it is in the same subnet as the
Subnet Mask The default subnet mask of the equipment is 2552552550
Gateway Make sure it is in the same subnet with PC IP address Default Gateway
IPCAM User Manual
13
address is 19216811
DNSServer IP address of IPS network provider ( It also can view from network card local area connection
status) As blows picture
Picture 15
Http Port LAN port assigned for the equipment usually 80
User amp Password Default administrator usernamepassword adminNo password
Enable Using DHCPthe system will assign a reasonable IP address for your equipment
only if your gateway supports DHCP (It is the case with most gateways)
DHCP checkbox if checked the device will obtain IP from DHCP server (To be make
sure the Router which the device connect with has DHCP function)
NOTE when the prompt rdquosubnet doesn‟ t match double click to changerdquo please set the
IP Camera IP address once again
Upgrade Firmware
Enter the correct User and Password to upgrade system Firmware and Web UI (User should have administering
authority
Picture 16
This is the server provide the
service of DNS
IPCAM User Manual
14
Refresh Camera List
Refresh camera list manually
Flush Arp Buffer
When cable network and wireless network of the device both are fixed IP address There
is a problem you may encounter is can search the camera IP but canot open the camera
web pageyou may try to use flush arp buffer
About IP Camera tool
You can view IP camera tool version and ActiveX version
43 Login IP camera
Double click the IP address of the IP Camera listed IE will be opened automatically and display the camera login
page Or Access the camera by IE browser directly type in the camera‟ s IP address For
example http19216811118999 ( We suggest you use IE browser for it has more function
Picture 17
IP camera Default username is admin no password And Click ldquoSign inrdquo to enter the monitoring page
Default usernameadmin
Default passwordNo password
IPCAM User Manual
15
Picture 18
Picture 19
middot When Users login inthey can view images At the same time users(Administrator Operator or Visitor) can operate according to their permissions
By Firefox and sofari browser as below
Language options you can
choose operation language
according to your demand
IPCAM User Manual
16
Picture 20
Picture21
IPCAM User Manual
17
44 IP camera operation
441 For Visitor
For example if is bright the first route is at status of Detection(Only IE Broswer can view it)
Picture 22
The right upper is statuss indicator area which can show 9 IP camera status
When the button is gray it means IP camera didnt connect
Green means IP camera has connected
Yellow means there is something wrong with connection
Red means it is the status of alarm
If you want to detect 4 views need to click this icon
OSD Display date and time on the video You can disable the OSD function or choice other color
(OSDon-screen display)
Snapshot Click icon to snap the picture
REC Click icon into REC mode is stop
Audio Click icon into Audio mode can listen the voice in monitoring range
Talk Click icon into Talk mode and the icon will become Visitor can talk with whom is in the
monitoring range
Note the record file name is device Alias_ Current timeAvi
For example IPCAM_20101011134442Avi
It means the device alias is IPCAM and its recordrsquos end time is At 134442 on
October 11 2010When use motion detection and checked Send Mail on Alarm
Buttom for taking picture
S top monitor video
Open vedio
Record
Two way audio Monitor audio
IPCAM User Manual
18
The name of the picture received in mailbox is like this device id(Alias)_ Current
timejpg
442 For operator
When login as operator you can operate PanTilt and adjust video parameter
Picture 23
Direction control click the different arrow will get different direction view
Vertical patrol
Horizontal patrol
Stop patrol
IO output Switch on off
Infrared light software control switch
Image fluctuation flip(up and down)
Image around flip (right and left)
Set Preset (can set 4 preset)
ResolutionVGA(640 X 480) QVGA(320 X 240)
Work Mode 50Hz60HzOutdoor
color parameterClick or can adjust brightness and contrast
Stop patrol
Vertical patrol
Horizontal
patrol
Image fluctuation flip
Image around flip
IO output S witch on off
Set Preset
Infrared light s witch
IPCAM User Manual
19
443 For Administrator
When you login as administrator
you can set all parameters Please
click ldquoFor Administratorrdquo
and enter into
setting interface
Picture 24
Alias Settings You can Input the new name as you like
Data ampTime Settings Data ampTime Settings page
Users Settings Eight accounts are acceptable for this system Here the eight users can configure their
user names and password as Administrator Operator or Visitor
Visitor In this mode you can only view
Operator You can control the direction of IP Camera and set some parameter
Administrator You can setup the advanced configurations of the IP Camera
UpnP Settings If you access IP Camera to be make sure UpnP Status is Succeed
Upgrade Device Firmware Upgrade Device Firmware and device embeded web UI software in this
page
Restore Factory Settings Restore factory settings of the device
Reboot Device Reboot the device
Back Back to Monitoring Mode
View Device IDDevice Firmware
Version and Device Embedded
Web UI Version
Check Device all kinds of
status
Carry on Settings and
operation function
IPCAM User Manual
20
5 Visit IP Camera in internet
51 Connection way in Internet
Picture 25
52 Related setting and login IP camera
1 If the network your IP camera using is using static IP you just need to input this IP address and IP cameras port in the browser then it can visit Ip camera
2 If you are using ADSL to dial-up and surf on line you should obtain IP Camera Current WAN IP Address or configured DDNS
1)There are four ways for you to obtain WAN IP Address
①Using mail to send internet IP function
After setting mail successfully IP will send mail to your receiver e-mail box when Internet IP or port
has changed If it is dynamical IP users need to input this IP address to visit this IP camera
②Obtain from some website
It is very easy for you to obtain WANS IP address You can open browser on the computer on the
condition that IP camera and PC are the same subnet For example httpwwwwhatismyipcomor
httpwwwmyipcn etcsIt will tell you WANS IP address as shows below
Picture 26
③Obtain from MSN and IP cameras MSN ACCOUNT( Details 73)
IPCAM User Manual
21
④ Obtain from router
We take Nur8555M from Xinxiang s router as example
AAccording to routers manual we get Routers IP is 19216811
BLogin in router Input 19216811 in the browser Find the status of Router and find Routers
WAN( In this example WANS IP is 11624235122 As shows Picture 27
Picture 27
Now you can visit IP Cam from Internet What you should do is to Input correct IP address For
example Http 116242351228999
Note Make sure the Ports UPNS is available You can open UPNP via the following ways
Enter into Routers setting page( Details Routers user manual) to make UPNP available
Or enable virtual mapping function Add equipment IP address and port to the virtual mapping list
Picture 28
Users can access the Internet from IPCAM device Input address For example Http 116242351228999
2)DDNS (dynamic DNS) service is the Internet domain name can be fixed and dynamic IP address real-time
corresponding (analysis) service Simplely said whenever user surf on internet or what kind of way you are
using the Internet get a what kind of IP address IP address whether it will change DDMS can ensure that a
fixed domain name can access to a users device
IPCAM User Manual
22
Our products have been configured the DDNS services of course you can also apply for the domain name in
registration website for one of your own domain name to configuration For example wwwdyndnsorg
Picture 30
You need fill in DDNS and port for example(httpicam0001ihome365org8999) The browser will jump
to IP camerarsquos login page
Picture 31
DDNS inside
Factory DDNS
IPCAM User Manual
23
The input device user name and password to login to equipment
Picture 32
middotIf input domain name but cant open IP camera in the browser such as the situation is as blows
middotPlease open the device and check status of IP camera in the local area network confirm whether UPNP
function and DDNS is successful or not
Picture 34
IPCAM User Manual
24
middotYou need to set port mapping function successfully to check whether the router UPNP function is
available if It was unavailable please make it available refer to the routers user manual
If you use TPLINK router please refer to these instructions
middotThrough the upnp automatic mapping port to the network input router IP address in the browser (such
as http19216811 gt the router IP addresses are written on paper label on the router house---- please set
according to your own IP address) open the routers page forward rules gt gt upnp set to ensure that the
current state of upnp is already available as below
Note some of the router interface without UPNP Settings option then need to open the virtual server IP
cameras in the local area network of mapping the connection IP address and port number
Picture 36
6 Access IP camera via mobile equipment
such as mobile phoneIpad Etcs There are two kinds of ways to access IP camera One is to input IP address in browser directly It can be IP
address and also can be DDNS Another is to use clients to visit
61 Input IP address in browser
1 We take IPAD as example as blows
IPCAM User Manual
25
middotOpen browser Safari
Input IP cameras IP address for example( httpicam0001ihome365org8999)
Choose language according to your demand and choose login mode according to your browser
Picture39
Choose manual settings
Open browser Safari
Enter the IP address of the IP camera
(httpicam0001ihome365org8999)
IPCAM User Manual
26
enter your account and password on the login page as shown By defaultadministratorrsquos username is
admin and no password
Select Server Refresh mode landing
Picture42
Input the username and password of
the network camera
Here you can choose between two
modes landing
Here to select the
operating language
Default passwordNo password
IPCAM User Manual
27
Select Server Push mode landing
Picture 43
2 Now we take Android system device as example
Open menu and firstly open the browser and input IP camera s IP address in the
browser for example(httpicam0001ihome365org8999)
Picture 44
Input IP cameras username and password and click sign in and then enter into
browser model to choose login-in interface
Open menu
IPCAM User Manual
28
Picture 45
62 Install client-side software to access IPCamera
There are many client software support IP camera several third-party software support our IP cameras too
The following are our manufacture software setup process(the Android version)
1 Pls get the install applications in the CD or you can download from the website
httpsplaygooglecomstoresearchq=reecamampc=apps Choose the right
①installation file-ipcameraapk
running environment Android version 16 or above
Note Please ensure that mobile phones can connect to the Internet before install
② Install method
21 Insert SD card into Android mobile phone
22 Connect the cellphone to computer via USB data cable
23 Choose the USB connection model on your cellphone you can see the SD driver in ldquomy computerrdquo
24 Copy the ipcameraapk into SD card
25 Disconnect the device pls find the ipcameraapk in ldquoFile Managementrdquo and run it
26 The ipcamera application will be show up on the home screen after you successfully installed
③Software operating processes
First ensure that the Internet open WIFI connection the search in the Play in The Googl Android
application reecam
Open the WiFi
connection
Download and install
the application
Search reecam
IPCAM User Manual
29
middotYou can edit the camera modify camere configuration and delete camera operation
Click here to add
a video camera
Select to add to the
client camera
Refresh LAN cameras
View or change the
configuration of the
camera the camera
name at random
IP address
Http port
The default password is blank
Camera name
Prev iew camera
Preview the
camera screen
save the camera
Editor has added
cameras
Edit camera
configuration
Delete the camera Edit camera of the
configuration
IPCAM User Manual
30
middotFor the camera added to the camera list you can watch camera in real time
Control cameras PTZ and set swith-on and switch-off of the cameras audio int
ercom and video
Picture 51
2 The IPCamera setting process for iPhone iPad
Firmware requirements compatible with iPhone iPod touch and iPad
Systerm requirements Requires iOS 42 or above
You can download the genuine
software
(ipcameraapp) form the App Store
httpitunesapplecomcnappreecamid479468959mt=8
middotSoftware operating process is as follows
Continue to add
the camera
Add external network
camera domain
Cameras have
been added
Audiointercom video switch
A list of cameras and
video can be switched to
view
Fingers sliding PTZ control
Click on the picture to stop
rotation
IPCAM User Manual
31
Open the App Store search
reecam
Download and install
reecam
The run has been
installed good reecam
program
Click to add cameras
Search reecam
IPCAM User Manual
32
Fill in the domain address
or IP address
Fill in the Http port of the
camera login user name
and password click next
to open the camera
Completed please
click here
Preview videoclick on the
next save
Save the camera added
Selected camera to
view images
Click image to expand
more cameras
operating functions
IPCAM User Manual
33
7 Other setting
71 Network Setting
711 Basic Network Settings
If the router that the IP camera connect has DHCP function you can choice ldquoObain IP from DHCP Serverrdquo
else fill in the network parameters manually
Http Port In most cases you can leave this value as 80 however if your Internet
Service Provider blocks this port you may switch to another port number such as 85808088889000 Etcs
(Range from 0 to 65535 pay attention to the same segment of multiple devices must set up different port The
port t canrsquot have any conflict with other software or equipment
a Search tools modification in LAN
Figure58
brdquoFor administorrdquo ldquoBasic network settingrdquo -Change the port
Figure59
712 WIFI Setting
1) Please enter the wireless net setting page of the wireless Router to find out SSID
Channel(less than 10) Encryption Authentication as below
Selec IP Camera clickright mouse button choice network configurat ion
Set port number
Set Network IP
Set Http Port Number
IPCAM User Manual
34
Figure 61
As Administrator to Login camera open wireless LAN Settings page fill in every
Setting (ensure keep the same as routerrsquos ) and then pulled out of the cable wireless network function can be
used For example as shown in belows
Figure62
Pls click the scan buttom twice
IPCAM User Manual
35
Figure 63
713 Adhoc point to point Wireless connection Setting
1) Open the basic network setting interfacecheck the device status
Picture 64
2) Open the wireless lan setting interface choose Adhoc for network type you
can define SSID such as 001
remember the IP address of
IP camera and Http port
Click the Settings Ip Camera will
restart and save
Double click to choose
Fill the encryption and
routers and key in the
same way
IPCAM User Manual
36
Picture 65
3) Unplug the RJ45 from IP camera Use laptop or other devices which are with
wifi function( include smart phoneipad and so on) searching the SSID you defined
on proccess 2then make a connection
Picture 66
middotClick wireless network and check the link status of ip camera Please note IP
address of your connected laptop must be the subset of your ip camera if not
please reset the ip address of your laptop manually
Picture 67
4) Now we can use the ip camera tool or enter ip address of camera derectly in
browser blank to visit
1 visit by ip camera tool
Picture 68
IPCAM User Manual
37
2Enter ip address in the browser
Enter user name and password in the login interface
Picture 69
Click ldquoSign inrdquoand vis it
Picture 70
IPCAM User Manual
38
72 Multi-Device Settings
Add cameras in LAN
In the Multi-Device Settings page you can see all devices searched in LAN The 1
St Device is this device in default You can add more cameras list in LAN for monitoring This Web software
supports up to 9 IP Cameras online simultaneous ly Click ldquoThe 2ND
Devicerdquo and Double click the item in the ldquoDevice List in LANrdquo AliasHost and Http Port
will fill in automatically Enter the correct username and password then click ldquoaddrdquoAdd
more cameras in the same way At last please donrsquot forget the ldquo settingrdquo Button
Picture 71
Add cameras in the Internet
Firstly make sure the camera added can access in the Internet with the IP address or
DDNS domain Like this http2191332001669999or httpIPcamdyndnsorg9999You can enter the
Host 219133200166 Http port 9999 or Host IPcamdyndnsorg Http port 9999 Enter the correct
username and password then click ldquoaddrdquo Add more cameras in the
same way
Picture 72
IPCAM User Manual
39
Picture 73
73 MSN Settings
Fill in your MSN account and password then add account which need to receive
IPCAMrsquoS ip address to IPCAM‟ S MSN list (Picture 67)click submit then yoursquod better
restart IP camera After it login your MSN to add IPCAMrsquos MSN account to MSN List that
you can receive IPCAMrsquos ip address
Picture 74
First login and click add contacts choose Add Contact then fill IPCAMrsquos MSN account in instant
messaging address click next then send offers
Aplly for MSN account and passworf for IP cam
Add about 10 MSN Accout
IPCAM User Manual
40
Figure75
Next
Figure76
Figure77
When IPCAMrsquos MSN account shows online you can chat with it input path command url camera
account will show its IP address in chatting box promptly as below
IPCAM User Manual
41
Picture 78
You can input the IP address to browser then can browse ip camera as below
Figure79
AttentionYou should fill MSN account in IPCAM first
74 DDNS Service Settings
DDNS Service The system supports protocols from some DDNS providers Dyndnsorg System support
DDNS such as topipcamorgpeanut shell3322orgDynDNS
provided IP
IPCAM User Manual
42
User and Password the user name and password used when applying for the domain
name (details 432)
DDNS Host the Domain Name
741 Factory DDNS
Device had distributed one DDNS to every productwhich was sticked the bottom
of the product Such as
manufacturer had already give every device a DDNS address which is unique Users only need to fill in this
DDNS IP ADDRESS and port in the browser then they can monitor remote IP camera
Picture 80 Factory DDNS
Note When use the domain name access to the camera and UPNP is not successful you must set port
mapping function on routers
742 The third part DDNS
Users can use not only Factory DDSN but also can use third part DDNS System Such as domain name
wwwdyndnsorg The only thing the user need to do is to apply a free DDNS and then fill in ldquoset boxrdquo as below
Save this setting and this DDNS can be used
DDNS Hostname
Factory DDNS
IPCAM User Manual
43
Note the third party domain name is the realization of analytical way input the domain in the browser it will
keep this string of characters If the port of the device isnrsquot 80 then need to add colon and port number For
example httpwell888dyndnsorg8999
75 Mail and FTP Service
1)Configure the E-mail box to receive and send mails The E-mail box is used for receiving
the images sent after alarm and the system IP address after successful dial-up
Note When Alarm Service Settings-gt Send Mail on Alarm is check the Mail
Service takes effect
Picture82
Configure the E-mail box to receive and send mails The E-mail box is used for receiving the images sent
after alarm and the system IP address after successful dial-up
Sender This device use the sender mailbox to send mails
Receiver To receive the mail from the Sender You can set up to 4 receiver mailbox
SMTP Server the SMTP server for the sender mailbox
Need Authentication if the sender mailbox need authentication you should check it then
input the SMTP username amp Password
Mail test Please set the Mail parameter and click Submit first There are Mail test result
Picture 83
video Local storage in PC after alarm monitoring
IPCAM User Manual
44
Gmail also set as the same It only needs you to fill in correct SMTP Sever address user and password
Picture 84
Mail notes Internet IP address In this option When Internet IP and port have changed IP Will be sent via
1Can not connect to the server
2Network Error Please try later
3Server Error
4Incorrect user or password
5The sender is denied by the server Maybe the server need to authenticate the user please check it
and try again
6The receiver is denied by the server Maybe because of the anti-spam privacy of the server
7The message is denied by the server Maybe because of the anti-spam privacy of the server
8The server does not support the authentication mode used by the device
Report Internet IP by Mail When ipcam port or Internet IP changed it will send the internet IP by
mail(for example IPCAM s url is http119123207969002) Make sure the port is map to the router
correctly by UPNP or Virtual Map function
2) FTP Server use and settings
middotIf you already have an FTP Server (ipcam com)and email ipcam you can fill the
parameters as below
Picture 85
IPCAM User Manual
45
middotFTP Server of LAN as below
1 Create an account
2 Step by step setting until finish it
Picture 88
IPCAM User Manual
46
3Start Server
Continue to finish it
Picture 89
4IPCAMrsquoS account can be used
Picture 90
Save path
This is a FTP
server address
IPCAM User Manual
47
5 IP camerarsquos FTP Server set like this
Picture 91
6 Set up and complete testing is successfulwhen it alarms IP camera will upload
pictures to the FTP server Settings of main directory path (as shown )
Picture 92
FTP Server the FTP server address
FTP port the port usually is 21
FTP Mode support standard(POST) mode and passive(PASV) mode
Upload Image Now it will upload image now when checkbox is not checked When checked you can
input upload interval(Seconds)
76 Motion Detection
Enter Alarm Service Settings page to configure Motion Detection function
1) Motion Detect Armed
Each alarm triggers in the protection of time the device will take various measures to alarm
IO linkage alarm output relay closure external alarm device began to alarm
IPCAM User Manual
48
Send E-mail alarm informatio
Transmit pictures to the FTP server and can set the time interval of sending pictures
2) Alarm t ime Settings
Only in the alarm period detection device to alarm will only have alarm action All the time (not check the
schedule) also can alarm within specified time For the specified time alarm firstly need to set up the system
time time zone and then to choose period of alarm in the state of alarm setting as shown in Picture 19
Picture93 Alarm of time Settings interface
Motion Detect Armed
When you enable motion detect armed the camera can be triggered to send email alerts
and record images In the camera monitoring page the green icon turn to red and an
alert sound you will hear
Motion Detect Sensibility
You can choose from low to high 10 level alarm sensitivity The greater the number the higher the
sensitivity
Alarm Input Armed
IO PINS1) Output(+5V) 2) Output 3) Alarm input 4) Input (GND)
Input Pins The input pins can be used for 1-way external sensor input(pin3 and pin4) For example
you may connect a Person Infrared Sensor (PIR) to it for motion detection When external sensor
triggered IPCAM can be programmed to send an email with picture or control the internal relay output
IPCAM User Manual
49
Picture94
IO Linkage on Alarm
Enable IO linkage on alarmPin1 will output +5V when alarm triggered and output LOW
when alarm release automatically
Switch onoff buttons control Pin1 output manually
Send Mail on Alarm
Sent picture and mail inform to customers e-mail after alarmed(firstly you should finish
the Mail Service Settings)
Picture 95
Upload Image on Alarm
Enable upload image on alarm and set upload interval(Seconds)
Tick send to your setted mails
IPCAM User Manual
50
Picture 96
REC automatically and save to PC
When you enable motion detect and open the camera monitoring page on the PC If
there is an alarm triggered REC will start automatically for several seconds and save to
the PC
Picture 97
REC save to pcrsquos position
Picture 98
Storage path can be changed
After Setting up later when have the
alarm the image will send to
designated email and FTP server
IPCAM User Manual
51
77 IP cameras Time amp Date setting and PTZ Setting
If IP camera connected with Internet it can automatically check the time amp date via running NTP Server And
need to choose properly IP cameras Time zone Otherwise it need PC Time to check IP camera time amp Date
Pre-set and Speed of PT
78 UPGRADE DEVICE FIRMWARE
Picture 101 Firmware upgrade
IP CAMERA has two kinds of programme One is system firmware another is application firmware It can be
upgraded separately
79 BACKUP AND RESTORE SETTING
Click Set in the Backup will lead to a BIN file and choose this file to restore setting
The huger the Number is The
slower it will be
IPCAM User Manual
52
8 APPENDIX
81 REGISTER AND APPLY FOR DDNS SERVICE
1Users use DDNS management system first timeUsers need to apply account to manage
and inquire the domain state
Step1 enter httpwwwdyndnscom and Create Account( Fill in Domain Name dyndnsorg then Click
Add)
Figure103
Step2 enter your information
Figure104
IPCAM User Manual
53
Figure105
Step3 After a minute you will receive an E-mail from DynDNS Support and it will give you a
confirmation address
(eg httpsaccountdyncomemlcreateconflILHMZHRje5oF_6YXTYv1A
Figure106
IPCAM User Manual
54
Step4 Open the link to active your Domain Name as belowLogin in your account after it is activated
Figure107
Step5 Check all the DDNS serviceswe choose the 14-day-trial
Figure108
Step6 Click the linkand user will see as below
IPCAM User Manual
55
middotenter your information
Figure109
Step7 Now you obtained a Dynamic Domain Name(Figure 105)and can use it in the DDNS Service
Settings(details 74)
Figure110
IPCAM User Manual
56
2For DDNS which is applied successfully you can fill in the IP CAMERA When set successfully the status
of IP will be shown as blows
picture 111
picture 112
3How to set DDNS on line
The first wayMenu rdquostartrdquo- ldquorunrdquomdashgt Input CMDClink rdquoenterrdquoIt can check DDNS Statas
via As shown below
Picture 113
IPCAM User Manual
57
Through the PING command this dynamic domain name can be back in the network response information It
proves that the domain name has been online
If the domain name update not success Possible reasons
(1) DDNS parameter is not correct (2) may cause DNS address configuration is wrong
82 Some special application for IPCAMERA
IPCamUse some grammar parameter control and Use IPCam
useruser
pwdpassword
priThe current access (1 visitors 23 operator managers)
resolutionImage resolution(832024 0qvga32640480 vga)
ratemage transmission speed and scope 0-23
brightnessbrightness0~255
contrastcontrast0~6
mode
Mode 050 hz For
60 hz 2 outdoor
flip
Flip rotation 0 primitive 1 vertical reverses 2 horizontal 3 vertical flip + horizontal
821 The flow media player VLC player and mplayer can real-time broadcast ipcamera and send
of streaming media format video data
(Grammar parametersvideostreamasfuser=amppwd=ampresolution=amprate=)
As shown Picture 113 rdquoIpcamrdquo
Picture 114
IPCAM User Manual
58
From the following picture we can view that Ipcam local IP address ishttp19216811118999
WAN IP Address is httpwell888dyndnsorg8999 we can inputrdquoIPcamrdquorsquoS IP address to
open in the player
Picture 115
the CLC media player open play position
Picture 116
LAN play address
Picture 117
IPCAM User Manual
59
Picture 118
Open the Internet play position
Picture 119
As shown in the following picture It can see the ipcamera send video streaming format
Size 640X480
User
IPCAM User Manual
60
Picture 120
83 Frequently Asked Questions
Note1) Any question you would meet please check Network connections firstly
2)Check the working status revealed by the indicators on the network server hub exchange and
network card If abnormal check the network connections
831 I have forgotten the administrator username andor password
To reset the administrator username and password Press and hold down the RESET
BUTTON for 5 seconds Release the power button and the username and password
will be reset back to the factory default administrator username and password
Default administrator username admin
Default administrator password No password
832 IP Address configuration
Check whether IP address of the IP Camera server shares the same subnet as your
work station Click My Computer gt Control PanelgtNetwork amp Dial-up Connections gt
LAN gt Attributes gtInternet Protocols (TCPIP) and check IP Address and Subnet
Mask Make sure they are in the same subnet when configuring IP Camera IP
address manuallyUnable to access IP Camera via web browser
833 Network Configuration
Double Check to ensure that your HTTP server software is configured and running
properly If you are running any firewall software make sure it is allowing inbound
connections to port 80Also if you happen to be using a cableDSL router make sure
IPCAM User Manual
61
you are set up port forwarding properly ( consult your router is documentation for more
information ) If none of these seem to be the problem it is also possible that your
ISP is blocking inbound connections to port 80 ndashmany IPSs have done this because
of internet worms such as Code Red If this is the case you bdquoll have to setup your
HTTP server on an alternate port (such as 8080)
834 No Monitoring picture
It has four reasons Images of the abnormal factors
1If its not use Directx function and lead to not normal to display the color imagePlease
install DirectX and open the start menu then input the command
Picture 121
You use the DirectX function and it will expedite the DirectDrawDirect3D and AGP if its can not maybe the
connect issues or hardware not read it
2The issues of hardware canrsquot support the card expedite image
3The antivirus software will influence the network it will be stoped or closedIf you install fireproof software
please close it and try again
4 ActiveX controller is not installed correctly
If its not image on the first time to use and will display to the user through the ActiveXIf its can not
display of the image maybe it fail of install about this issues please follow as
1Install ldquoIP Camera Toolrdquo ActiveX control at the same time
2Please install ActiveX control and keep the security settings for IE browser
835 Problems with network bandwidth
The image frame rate is subjected to the following factors 1network bandwidth 2 PC
performancenetwork environment and display preference setting (brightness theme
etc) 3 the number of visitors (Too many visitors will slow down the image frame rate) 4
choice of switch or hub (Use a switch for multiple IP Camera Servers rather than a HUB)
The Device use MJEPT Compression it needs good network bandwidth If it is too narrow it will lead to slowly
browser Typical video parameter occupy network bandwidth as blows
640x48030fps 40 Megabits ~ 50 Megabits
320x24030fps 12 Megabits ~ 16 Megabits
IPCAM User Manual
62
middot836 Why pop-up the prompt ldquoFail to connect to the devicehelliprdquo
This prompt only appeared in the case of using multiple cameras
Enter the Multi-Device Settings page(login as administrator) to check the
Device setting is correct or not
When one of the multiple cameras disconnected the color changed to
yellow and pop-up the promptldquoFail to connect to the devicehelliprdquo
Picture 122
837 Canrsquot access the IPCAM in the internet
There are some reasons
1 ActiveX controller is not installed correctly(see more details 514)
2 The port IPCAM used is blocked by Firewall or Anti-virus software Please change a
port number and try again
3 Port mapping is not success You can do port mapping by two ways
Enter setting page of the router which IPCAM connect with to enable UPnP function
Enter IPCAM ldquoUPnP Settingsrdquo to enable UPnP and make sure the state is ldquoUPnP
successrdquo
‟ s IP
and port to the Virtual map list
When use ADSL the IP is dynamic You should set DDNS(see more details 74 amp 80)
and also make sure port mapping success
84 Operate common problem solving
IP camera tool canrsquot find the camera
Except of the camera broken
1 Make sure the cable connector no problem recommend connector
(AMP)it is with international standard Another note IPCAMrsquos data
transmission channel require higher than computerrsquos so maybe the
IPCAM User Manual
63
computer can run normally but IPCAM canrsquot Please press heavily when making the cable connector
2 Confirm the power supply normally First check whether power indication
light turn on or not If it is onthen check the yellow light on RJ45 Port
(power indication light) and green light (network indication light) are on or
notIf they are onso power supply and cable runs normally
3 Confirm all the firwall and antivirus software are closeThe firewall often
block unrecognized data so if the firewall is running so maybe the IPCAM
TOOL canrsquot find the deviceSuggest to close firewall and antivirus
software temporarily before searching
How to solve the camera blank screen
1 Check if you are using the wrong power adaptorplease use original one
2 Close antivirus software
How to solve the camera canrsquot login by Internet
1 Check if you set DDNS success or not
2 Check the current IPCAMrsquos port number is the same as routerrsquosThey need to keep same
Canrsquot view the monitoring picture
1 Reason canrsquot connect with network
SolutionCheck if the network connect well exclude cable fault and PC virus
cause network fault until can be used between PC and PING
2 ReasonIP address occupy by other device
Solution Choose automatic gain
3 Reason IP address located within different subnet
Solution Check IPCAMrsquoS ip address and subnet mask address and gateway settings
4 ReasonWeb port has been modified
Solutioncontact network administrator to obtain port information
5 Reasonunknown
SolutionPress reset button to factory default statethen reconnectingsysten
default to gain ip address automaticsubnet mask is 2552552550
85 Default Parameters
middotDefault network Parameters
IP address dynamic obtain
Subnet mask 2552552550
Gateway dynamic obtain
DDNS Factory provide
middotUsername and password
Default administrator username admin
Default administrator password No password
IPCAM User Manual
64
86 Technical Parameters
ITEM IP CAM (NIP-02BGPWA2)
Image Sensor
Mage sensor 15 Color CMOS Sensor
Display 640 x 480 (300K Pixels)
Lens f36mm F24 (IR Lens)
Miniillumination 05 Lux
Lens Lens Type Glass Lens
Viewing Angle 60 Degree
Audio Microphone Audio of two way
Domain name Server MSN server DDNS server
Video
Image Compression MJPEG
Image Frame Rate 15 FPS(VGA)30FPS(QVGA)
Resolution 640 x 480(VGA) 320 x 240(QVGA)
Flip Mirror Images rtical Horizontal
mode 50Hz 60Hz or Outdoor
Video Parameters Brightness Contrast
Communication
Ethernet One 10100Mbps RJ-45
Supported Protocol HTTPDHCPIPTCPUDPFTPSMTPDDNSPPPoEUPnP
Mobilephone monitor Support IphoneIpad3G phonesmartphone
Wireless Standard IEEE 80211bg
Wireless Standard 80211b11Mbps(max) 80211g54Mbps(max)
Wireless Security 64128-bitWEP Encryption
Physical
PanTilt Angle Horizontal270deg amp Vertical 120deg
Infrared Light 10 IR LEDs Night visibility up to 15 Mete
Product size 100(L) x100(W) x125mm(H)
Gross Weight 6465gpcs (packing size196x165x123mm)
Net Weight 2547gpcs (only product)
Power Specification DC 5V25A 18 meter
Power Consumption 5 Watts
Environment
Operate Temper 0deg~ 55degC (14degF~122degF)
Operating Humidity 20 ~ 85 non-condensing
Storage Temper -10degC ~ 60deg (14degF ~140degF)
Storage Humidity 0 ~ 90 non-condensing
PC Requirements
CPU 20GHZ or above (suggested 30GHz)
Memory Size 512MB or above (suggested 10GB)
Display card 64M or above
Supported OS Microsoft Windows XPVistaWindows7
Supported browsers IEfirefoxGoogle
Certification CEFCCRoHS
Warranty Limited 1-year warranty

IPCAM User Manual
3
78 UPGRADE DEVIC E FIRMWARE 51
79 BACKUP AND RES TO RE SETTING 51
8 APPENDIX 52
81 REGIS TER AND APPLY FO R DDNS SERVIC E 52
82 SO ME SPECIAL APPLICATIO N FO R IPCAMERA 57
821 Open IP Camera though flow-media player 57
83 FREQ UENTLY ASKED QUES TIO NS 60
831 I have forgetten the user and or password 60
832 IP Address configuration 60
833 Network configuration 60
834 No pictures show 61
835 Network bandwidth problems 61
836 Why pop-up the promptFail to connect the device 61
837 IP camera has connected with internet why it cant visit though IP camera 62
84 TH E SO LUTIO N FO R OPERATIO N CO MMO N PROBLEMS 62
85 TH E DEFAULT PARAMETERS 63
86 TECHNICAL PARAMETERS 64
IPCAM User Manual
4
4
1 Products overviewIP Camera is a IP integrated camera solution For the user based on the local network ( LAN ) and
wide area network ( WAN ) remote video surveillance products provides a clear high integration low
cost solution Integrated network and web service function the shooting of the video can be transmitted
through the network to any place you simply through web browser can readily access live video It can
be applied in large stores schools factories families and a series of places Easy to install easy to
operate
11 Product package list
Remarkif you choose Wifi fuction device The package should be contained Wi-Fi Antenna
Before you install the IP camera please check the whether it contains all of the
accessories If it lacks of something please contact with agents
12 Product Features
Powerful high-speed video protocol processor
High-sensitivity 15 CMOS sensor
It uses MJPEG Compression and has VGAQVGAQQVGA video definition for us to choose And it
support for adjusting video parameter and adapt users many kinds of browser demand
Inner microphone can achieve audio collection and two ways audio function
IR night vision to support long distance night vision scope and achieve monitor for the whole days
Embeded WEB SERVER to support multi-page browser to viewing
Multi-level users management and passwords definition
Support wifi network (Wi-Fi80211bg)Inner Wifi module can flexibly create wi-fi monitoring
environment
Support motion detection which can achieve spot all-round monitoring It can e-mailFTP and send
alarm message though alarm server etcs so achieve many kinds of alarm function
PanTilt Pan 270degTilt 120deg It is tiny and convenient installation which is suitable for all kinds of
places
Support UPNP It can support to achieve auto port map in the router
Support mobile phone viewing
Support remote upgrade
Factory set every device unique device serial number unique factory DDNS and burn it to d evice and
when it connect with public internet then it can visit though DDNS
Factory can provide free client software and multi-pictures long time recording and video playback
Etcs
Remindera complete set of network monitoring equipment comprises the following parts this product has good with the following parts
IPCAM User Manual
5
2 Device appearance and interface
21 Device appearance
Picture 1
Device appearance
Sensitive hole
HD Glass Lens Build-in Microphone
Network indicator LED
Infrared LED
1 Sensitive Hole According to outside of light decide whether open infrared LED
2 Infrared LED
3 Lens CMOS Sensor You can turn around the lens manually to adjust the focus range
4 Build-in Microphone
Warning please dont forcibly manual translationlifting cameras because it is
likely that damaged internal component
IPCAM User Manual
6
22 Device interface
Picture 2 Device interface
LAN RJ-4510-100 Base T
DC5V 5V2A Power supply
IO PINS 1)Output(GND) 2)Output (+5V) 3)Alarm input 4)Input (GND) (you can see 356
For more information)
Picture 3 Reset Button
RESET BUTTON Press and hold down the RESET BUTTON for 5 secondsRelease the
power button and IP camera will be reset back to the factory default parameter
3 Device installation System configuration requirements ( Example for view four IP Camera )
CPU 206GHZ or above Memory 512M or above
Network Card 10M or above Display Card Microsoft DirectX 9 Pictur device or above memory
Recommendable Operating System WindowsXPVista Windows 7Windows 8
Support web browser IE Firefox Safari Chrome etc
RESET BUTTON
IO Alarm inputoutput
DC5V Power adapter
WIFI antenna
RJ-45 Ethernet Port
Audio output
IPCAM User Manual
7
31 Install hardware
You should install your IP Cameras hardware according to the following step in order to make sure
the IP camera can work properly Especially pay attention to IP cameras installation environment
1) IPCAM Plug DC adapter with IP camera
INote Please use Dc adapter which is the standard configuration of IP camera Using DC adapter
without any certificate may destroy IP camera
2) Plug cable with IP camera and another side of cable should connect with DSL or route r In additional
make sure power of IP camera work properly and IP camera and PC are in the same Subnet( it can be
LAN and it also can use cable to connect PC and IP camera)
Picture 4 Network connection sketch map
3) When you use IP camera for the first time IP Address of IP camera obtain
automatically(Before using please make sure DHCP Server function in LANs router has
been opened or Server system open DHCP Server function) It is very convenient for users
to use because It is suitable for different LAN NETWORK environment
IPCAM User Manual
8
Picture 5
4) You can search PC IP and DNS Server as belows
Picture 6
This is DNS Server
address which is provided
by network server
IPCAM User Manual
9
5) The device IP Address can be changed but Its IP address should be at the same with PCs
subnet
Picture 7
When we test IP camera and check whether it starts smoothly or it connects properly we can
operate in the Windows(START- RUN-CMD) and then input ping 1921681111 in the order windows
Picture 8 ping IP Camera
Check whether it can Ping IP camera If yes then it means IP Camera has been worked properly
and connected correctly
Network server provide
DNS server Address
Device IP address can
be changed by yourself
IPCAM User Manual
10
32 Software installation
Software installation
It is very easy to install software You just need to run installation programme then it can
work properly
Please put CD in the PC driver and the CD will automatically run to the software installation
interface
If no such an interface please click ldquoautorunexerdquoin the CD
And then findldquosearchexerdquo Clink and install LAN Tool to PC systemthen you
can view IP Camera Tool in Computer desktop for LAN Search toolldquoIP Camera Toolrdquo
G
Picture9 Software installation interface
MinOpen user manual ExitUser manual
Search tool in LAN Application Tool box Quick installation guide Open CD
IPCAM User Manual
11
4 Visit IP camera in LAN 41 Connection ways in LAN
Picture 10 Connection between Several IP camera and router
42 Search and set device IP address Please note before searching IP camera
1Make sure IP camera has a good connection with power and network
2Te router should be opened DHCP(Dynamic host configuration protocol) because the factory setting status of
IP camera is to obtain automatically IP camera
3When we power IP camera we should wait 20 second then it can works
Search IP camera
When we run Search tool IP camera Tool we can find the IP camera showing IP address Port
Name If we use Wi-fi connection we will find Wi-fi IP address For the details we can view
the following picture
Picture 11
NoteldquoIP Camera ToolexerdquoProgramme only use to search IP camera address and port in the
LAN The tool cant search IP camera IP address and port in the WAN
There are 3 cases
1 No IP Camera found within LAN After about 1 minute search the Result Field will
show ldquonot found IP Serverrdquo
2 IP Cameras having been installed within LAN All the IP Cameras will be listed and the
total number is displayed in the result field as shown in Picture 20
3 The IP Cameras installed within LAN do not share the same subnet with the monitoring
PC A prompt as shown in result field (prompt Subnet doesnrsquot match dbclick to change)
Click the left mouse button to choose the prompt and click the right mouse choose
Network Configuration to set the IP address of the Camera to the same subnet as LAN
IPCAM User Manual
12
SIX Options
Choose the IP Camera list and Click right mouse button there are six options Basic
Properties Network Configuration Upgrade Firmware Refresh Camera List Flush Arp About IP camera tool as
shown Picture 12
Picture 12
Basic Properties
There is some device information in the Bas ic Properties such as Device ID System
Firmware Version Web UI Version
Picture 13
Network Configuration
In this page you can configure the Network parameter
Picture 14
IP address Fill in the IP address assigned and make sure it is in the same subnet as the
Subnet Mask The default subnet mask of the equipment is 2552552550
Gateway Make sure it is in the same subnet with PC IP address Default Gateway
IPCAM User Manual
13
address is 19216811
DNSServer IP address of IPS network provider ( It also can view from network card local area connection
status) As blows picture
Picture 15
Http Port LAN port assigned for the equipment usually 80
User amp Password Default administrator usernamepassword adminNo password
Enable Using DHCPthe system will assign a reasonable IP address for your equipment
only if your gateway supports DHCP (It is the case with most gateways)
DHCP checkbox if checked the device will obtain IP from DHCP server (To be make
sure the Router which the device connect with has DHCP function)
NOTE when the prompt rdquosubnet doesn‟ t match double click to changerdquo please set the
IP Camera IP address once again
Upgrade Firmware
Enter the correct User and Password to upgrade system Firmware and Web UI (User should have administering
authority
Picture 16
This is the server provide the
service of DNS
IPCAM User Manual
14
Refresh Camera List
Refresh camera list manually
Flush Arp Buffer
When cable network and wireless network of the device both are fixed IP address There
is a problem you may encounter is can search the camera IP but canot open the camera
web pageyou may try to use flush arp buffer
About IP Camera tool
You can view IP camera tool version and ActiveX version
43 Login IP camera
Double click the IP address of the IP Camera listed IE will be opened automatically and display the camera login
page Or Access the camera by IE browser directly type in the camera‟ s IP address For
example http19216811118999 ( We suggest you use IE browser for it has more function
Picture 17
IP camera Default username is admin no password And Click ldquoSign inrdquo to enter the monitoring page
Default usernameadmin
Default passwordNo password
IPCAM User Manual
15
Picture 18
Picture 19
middot When Users login inthey can view images At the same time users(Administrator Operator or Visitor) can operate according to their permissions
By Firefox and sofari browser as below
Language options you can
choose operation language
according to your demand
IPCAM User Manual
16
Picture 20
Picture21
IPCAM User Manual
17
44 IP camera operation
441 For Visitor
For example if is bright the first route is at status of Detection(Only IE Broswer can view it)
Picture 22
The right upper is statuss indicator area which can show 9 IP camera status
When the button is gray it means IP camera didnt connect
Green means IP camera has connected
Yellow means there is something wrong with connection
Red means it is the status of alarm
If you want to detect 4 views need to click this icon
OSD Display date and time on the video You can disable the OSD function or choice other color
(OSDon-screen display)
Snapshot Click icon to snap the picture
REC Click icon into REC mode is stop
Audio Click icon into Audio mode can listen the voice in monitoring range
Talk Click icon into Talk mode and the icon will become Visitor can talk with whom is in the
monitoring range
Note the record file name is device Alias_ Current timeAvi
For example IPCAM_20101011134442Avi
It means the device alias is IPCAM and its recordrsquos end time is At 134442 on
October 11 2010When use motion detection and checked Send Mail on Alarm
Buttom for taking picture
S top monitor video
Open vedio
Record
Two way audio Monitor audio
IPCAM User Manual
18
The name of the picture received in mailbox is like this device id(Alias)_ Current
timejpg
442 For operator
When login as operator you can operate PanTilt and adjust video parameter
Picture 23
Direction control click the different arrow will get different direction view
Vertical patrol
Horizontal patrol
Stop patrol
IO output Switch on off
Infrared light software control switch
Image fluctuation flip(up and down)
Image around flip (right and left)
Set Preset (can set 4 preset)
ResolutionVGA(640 X 480) QVGA(320 X 240)
Work Mode 50Hz60HzOutdoor
color parameterClick or can adjust brightness and contrast
Stop patrol
Vertical patrol
Horizontal
patrol
Image fluctuation flip
Image around flip
IO output S witch on off
Set Preset
Infrared light s witch
IPCAM User Manual
19
443 For Administrator
When you login as administrator
you can set all parameters Please
click ldquoFor Administratorrdquo
and enter into
setting interface
Picture 24
Alias Settings You can Input the new name as you like
Data ampTime Settings Data ampTime Settings page
Users Settings Eight accounts are acceptable for this system Here the eight users can configure their
user names and password as Administrator Operator or Visitor
Visitor In this mode you can only view
Operator You can control the direction of IP Camera and set some parameter
Administrator You can setup the advanced configurations of the IP Camera
UpnP Settings If you access IP Camera to be make sure UpnP Status is Succeed
Upgrade Device Firmware Upgrade Device Firmware and device embeded web UI software in this
page
Restore Factory Settings Restore factory settings of the device
Reboot Device Reboot the device
Back Back to Monitoring Mode
View Device IDDevice Firmware
Version and Device Embedded
Web UI Version
Check Device all kinds of
status
Carry on Settings and
operation function
IPCAM User Manual
20
5 Visit IP Camera in internet
51 Connection way in Internet
Picture 25
52 Related setting and login IP camera
1 If the network your IP camera using is using static IP you just need to input this IP address and IP cameras port in the browser then it can visit Ip camera
2 If you are using ADSL to dial-up and surf on line you should obtain IP Camera Current WAN IP Address or configured DDNS
1)There are four ways for you to obtain WAN IP Address
①Using mail to send internet IP function
After setting mail successfully IP will send mail to your receiver e-mail box when Internet IP or port
has changed If it is dynamical IP users need to input this IP address to visit this IP camera
②Obtain from some website
It is very easy for you to obtain WANS IP address You can open browser on the computer on the
condition that IP camera and PC are the same subnet For example httpwwwwhatismyipcomor
httpwwwmyipcn etcsIt will tell you WANS IP address as shows below
Picture 26
③Obtain from MSN and IP cameras MSN ACCOUNT( Details 73)
IPCAM User Manual
21
④ Obtain from router
We take Nur8555M from Xinxiang s router as example
AAccording to routers manual we get Routers IP is 19216811
BLogin in router Input 19216811 in the browser Find the status of Router and find Routers
WAN( In this example WANS IP is 11624235122 As shows Picture 27
Picture 27
Now you can visit IP Cam from Internet What you should do is to Input correct IP address For
example Http 116242351228999
Note Make sure the Ports UPNS is available You can open UPNP via the following ways
Enter into Routers setting page( Details Routers user manual) to make UPNP available
Or enable virtual mapping function Add equipment IP address and port to the virtual mapping list
Picture 28
Users can access the Internet from IPCAM device Input address For example Http 116242351228999
2)DDNS (dynamic DNS) service is the Internet domain name can be fixed and dynamic IP address real-time
corresponding (analysis) service Simplely said whenever user surf on internet or what kind of way you are
using the Internet get a what kind of IP address IP address whether it will change DDMS can ensure that a
fixed domain name can access to a users device
IPCAM User Manual
22
Our products have been configured the DDNS services of course you can also apply for the domain name in
registration website for one of your own domain name to configuration For example wwwdyndnsorg
Picture 30
You need fill in DDNS and port for example(httpicam0001ihome365org8999) The browser will jump
to IP camerarsquos login page
Picture 31
DDNS inside
Factory DDNS
IPCAM User Manual
23
The input device user name and password to login to equipment
Picture 32
middotIf input domain name but cant open IP camera in the browser such as the situation is as blows
middotPlease open the device and check status of IP camera in the local area network confirm whether UPNP
function and DDNS is successful or not
Picture 34
IPCAM User Manual
24
middotYou need to set port mapping function successfully to check whether the router UPNP function is
available if It was unavailable please make it available refer to the routers user manual
If you use TPLINK router please refer to these instructions
middotThrough the upnp automatic mapping port to the network input router IP address in the browser (such
as http19216811 gt the router IP addresses are written on paper label on the router house---- please set
according to your own IP address) open the routers page forward rules gt gt upnp set to ensure that the
current state of upnp is already available as below
Note some of the router interface without UPNP Settings option then need to open the virtual server IP
cameras in the local area network of mapping the connection IP address and port number
Picture 36
6 Access IP camera via mobile equipment
such as mobile phoneIpad Etcs There are two kinds of ways to access IP camera One is to input IP address in browser directly It can be IP
address and also can be DDNS Another is to use clients to visit
61 Input IP address in browser
1 We take IPAD as example as blows
IPCAM User Manual
25
middotOpen browser Safari
Input IP cameras IP address for example( httpicam0001ihome365org8999)
Choose language according to your demand and choose login mode according to your browser
Picture39
Choose manual settings
Open browser Safari
Enter the IP address of the IP camera
(httpicam0001ihome365org8999)
IPCAM User Manual
26
enter your account and password on the login page as shown By defaultadministratorrsquos username is
admin and no password
Select Server Refresh mode landing
Picture42
Input the username and password of
the network camera
Here you can choose between two
modes landing
Here to select the
operating language
Default passwordNo password
IPCAM User Manual
27
Select Server Push mode landing
Picture 43
2 Now we take Android system device as example
Open menu and firstly open the browser and input IP camera s IP address in the
browser for example(httpicam0001ihome365org8999)
Picture 44
Input IP cameras username and password and click sign in and then enter into
browser model to choose login-in interface
Open menu
IPCAM User Manual
28
Picture 45
62 Install client-side software to access IPCamera
There are many client software support IP camera several third-party software support our IP cameras too
The following are our manufacture software setup process(the Android version)
1 Pls get the install applications in the CD or you can download from the website
httpsplaygooglecomstoresearchq=reecamampc=apps Choose the right
①installation file-ipcameraapk
running environment Android version 16 or above
Note Please ensure that mobile phones can connect to the Internet before install
② Install method
21 Insert SD card into Android mobile phone
22 Connect the cellphone to computer via USB data cable
23 Choose the USB connection model on your cellphone you can see the SD driver in ldquomy computerrdquo
24 Copy the ipcameraapk into SD card
25 Disconnect the device pls find the ipcameraapk in ldquoFile Managementrdquo and run it
26 The ipcamera application will be show up on the home screen after you successfully installed
③Software operating processes
First ensure that the Internet open WIFI connection the search in the Play in The Googl Android
application reecam
Open the WiFi
connection
Download and install
the application
Search reecam
IPCAM User Manual
29
middotYou can edit the camera modify camere configuration and delete camera operation
Click here to add
a video camera
Select to add to the
client camera
Refresh LAN cameras
View or change the
configuration of the
camera the camera
name at random
IP address
Http port
The default password is blank
Camera name
Prev iew camera
Preview the
camera screen
save the camera
Editor has added
cameras
Edit camera
configuration
Delete the camera Edit camera of the
configuration
IPCAM User Manual
30
middotFor the camera added to the camera list you can watch camera in real time
Control cameras PTZ and set swith-on and switch-off of the cameras audio int
ercom and video
Picture 51
2 The IPCamera setting process for iPhone iPad
Firmware requirements compatible with iPhone iPod touch and iPad
Systerm requirements Requires iOS 42 or above
You can download the genuine
software
(ipcameraapp) form the App Store
httpitunesapplecomcnappreecamid479468959mt=8
middotSoftware operating process is as follows
Continue to add
the camera
Add external network
camera domain
Cameras have
been added
Audiointercom video switch
A list of cameras and
video can be switched to
view
Fingers sliding PTZ control
Click on the picture to stop
rotation
IPCAM User Manual
31
Open the App Store search
reecam
Download and install
reecam
The run has been
installed good reecam
program
Click to add cameras
Search reecam
IPCAM User Manual
32
Fill in the domain address
or IP address
Fill in the Http port of the
camera login user name
and password click next
to open the camera
Completed please
click here
Preview videoclick on the
next save
Save the camera added
Selected camera to
view images
Click image to expand
more cameras
operating functions
IPCAM User Manual
33
7 Other setting
71 Network Setting
711 Basic Network Settings
If the router that the IP camera connect has DHCP function you can choice ldquoObain IP from DHCP Serverrdquo
else fill in the network parameters manually
Http Port In most cases you can leave this value as 80 however if your Internet
Service Provider blocks this port you may switch to another port number such as 85808088889000 Etcs
(Range from 0 to 65535 pay attention to the same segment of multiple devices must set up different port The
port t canrsquot have any conflict with other software or equipment
a Search tools modification in LAN
Figure58
brdquoFor administorrdquo ldquoBasic network settingrdquo -Change the port
Figure59
712 WIFI Setting
1) Please enter the wireless net setting page of the wireless Router to find out SSID
Channel(less than 10) Encryption Authentication as below
Selec IP Camera clickright mouse button choice network configurat ion
Set port number
Set Network IP
Set Http Port Number
IPCAM User Manual
34
Figure 61
As Administrator to Login camera open wireless LAN Settings page fill in every
Setting (ensure keep the same as routerrsquos ) and then pulled out of the cable wireless network function can be
used For example as shown in belows
Figure62
Pls click the scan buttom twice
IPCAM User Manual
35
Figure 63
713 Adhoc point to point Wireless connection Setting
1) Open the basic network setting interfacecheck the device status
Picture 64
2) Open the wireless lan setting interface choose Adhoc for network type you
can define SSID such as 001
remember the IP address of
IP camera and Http port
Click the Settings Ip Camera will
restart and save
Double click to choose
Fill the encryption and
routers and key in the
same way
IPCAM User Manual
36
Picture 65
3) Unplug the RJ45 from IP camera Use laptop or other devices which are with
wifi function( include smart phoneipad and so on) searching the SSID you defined
on proccess 2then make a connection
Picture 66
middotClick wireless network and check the link status of ip camera Please note IP
address of your connected laptop must be the subset of your ip camera if not
please reset the ip address of your laptop manually
Picture 67
4) Now we can use the ip camera tool or enter ip address of camera derectly in
browser blank to visit
1 visit by ip camera tool
Picture 68
IPCAM User Manual
37
2Enter ip address in the browser
Enter user name and password in the login interface
Picture 69
Click ldquoSign inrdquoand vis it
Picture 70
IPCAM User Manual
38
72 Multi-Device Settings
Add cameras in LAN
In the Multi-Device Settings page you can see all devices searched in LAN The 1
St Device is this device in default You can add more cameras list in LAN for monitoring This Web software
supports up to 9 IP Cameras online simultaneous ly Click ldquoThe 2ND
Devicerdquo and Double click the item in the ldquoDevice List in LANrdquo AliasHost and Http Port
will fill in automatically Enter the correct username and password then click ldquoaddrdquoAdd
more cameras in the same way At last please donrsquot forget the ldquo settingrdquo Button
Picture 71
Add cameras in the Internet
Firstly make sure the camera added can access in the Internet with the IP address or
DDNS domain Like this http2191332001669999or httpIPcamdyndnsorg9999You can enter the
Host 219133200166 Http port 9999 or Host IPcamdyndnsorg Http port 9999 Enter the correct
username and password then click ldquoaddrdquo Add more cameras in the
same way
Picture 72
IPCAM User Manual
39
Picture 73
73 MSN Settings
Fill in your MSN account and password then add account which need to receive
IPCAMrsquoS ip address to IPCAM‟ S MSN list (Picture 67)click submit then yoursquod better
restart IP camera After it login your MSN to add IPCAMrsquos MSN account to MSN List that
you can receive IPCAMrsquos ip address
Picture 74
First login and click add contacts choose Add Contact then fill IPCAMrsquos MSN account in instant
messaging address click next then send offers
Aplly for MSN account and passworf for IP cam
Add about 10 MSN Accout
IPCAM User Manual
40
Figure75
Next
Figure76
Figure77
When IPCAMrsquos MSN account shows online you can chat with it input path command url camera
account will show its IP address in chatting box promptly as below
IPCAM User Manual
41
Picture 78
You can input the IP address to browser then can browse ip camera as below
Figure79
AttentionYou should fill MSN account in IPCAM first
74 DDNS Service Settings
DDNS Service The system supports protocols from some DDNS providers Dyndnsorg System support
DDNS such as topipcamorgpeanut shell3322orgDynDNS
provided IP
IPCAM User Manual
42
User and Password the user name and password used when applying for the domain
name (details 432)
DDNS Host the Domain Name
741 Factory DDNS
Device had distributed one DDNS to every productwhich was sticked the bottom
of the product Such as
manufacturer had already give every device a DDNS address which is unique Users only need to fill in this
DDNS IP ADDRESS and port in the browser then they can monitor remote IP camera
Picture 80 Factory DDNS
Note When use the domain name access to the camera and UPNP is not successful you must set port
mapping function on routers
742 The third part DDNS
Users can use not only Factory DDSN but also can use third part DDNS System Such as domain name
wwwdyndnsorg The only thing the user need to do is to apply a free DDNS and then fill in ldquoset boxrdquo as below
Save this setting and this DDNS can be used
DDNS Hostname
Factory DDNS
IPCAM User Manual
43
Note the third party domain name is the realization of analytical way input the domain in the browser it will
keep this string of characters If the port of the device isnrsquot 80 then need to add colon and port number For
example httpwell888dyndnsorg8999
75 Mail and FTP Service
1)Configure the E-mail box to receive and send mails The E-mail box is used for receiving
the images sent after alarm and the system IP address after successful dial-up
Note When Alarm Service Settings-gt Send Mail on Alarm is check the Mail
Service takes effect
Picture82
Configure the E-mail box to receive and send mails The E-mail box is used for receiving the images sent
after alarm and the system IP address after successful dial-up
Sender This device use the sender mailbox to send mails
Receiver To receive the mail from the Sender You can set up to 4 receiver mailbox
SMTP Server the SMTP server for the sender mailbox
Need Authentication if the sender mailbox need authentication you should check it then
input the SMTP username amp Password
Mail test Please set the Mail parameter and click Submit first There are Mail test result
Picture 83
video Local storage in PC after alarm monitoring
IPCAM User Manual
44
Gmail also set as the same It only needs you to fill in correct SMTP Sever address user and password
Picture 84
Mail notes Internet IP address In this option When Internet IP and port have changed IP Will be sent via
1Can not connect to the server
2Network Error Please try later
3Server Error
4Incorrect user or password
5The sender is denied by the server Maybe the server need to authenticate the user please check it
and try again
6The receiver is denied by the server Maybe because of the anti-spam privacy of the server
7The message is denied by the server Maybe because of the anti-spam privacy of the server
8The server does not support the authentication mode used by the device
Report Internet IP by Mail When ipcam port or Internet IP changed it will send the internet IP by
mail(for example IPCAM s url is http119123207969002) Make sure the port is map to the router
correctly by UPNP or Virtual Map function
2) FTP Server use and settings
middotIf you already have an FTP Server (ipcam com)and email ipcam you can fill the
parameters as below
Picture 85
IPCAM User Manual
45
middotFTP Server of LAN as below
1 Create an account
2 Step by step setting until finish it
Picture 88
IPCAM User Manual
46
3Start Server
Continue to finish it
Picture 89
4IPCAMrsquoS account can be used
Picture 90
Save path
This is a FTP
server address
IPCAM User Manual
47
5 IP camerarsquos FTP Server set like this
Picture 91
6 Set up and complete testing is successfulwhen it alarms IP camera will upload
pictures to the FTP server Settings of main directory path (as shown )
Picture 92
FTP Server the FTP server address
FTP port the port usually is 21
FTP Mode support standard(POST) mode and passive(PASV) mode
Upload Image Now it will upload image now when checkbox is not checked When checked you can
input upload interval(Seconds)
76 Motion Detection
Enter Alarm Service Settings page to configure Motion Detection function
1) Motion Detect Armed
Each alarm triggers in the protection of time the device will take various measures to alarm
IO linkage alarm output relay closure external alarm device began to alarm
IPCAM User Manual
48
Send E-mail alarm informatio
Transmit pictures to the FTP server and can set the time interval of sending pictures
2) Alarm t ime Settings
Only in the alarm period detection device to alarm will only have alarm action All the time (not check the
schedule) also can alarm within specified time For the specified time alarm firstly need to set up the system
time time zone and then to choose period of alarm in the state of alarm setting as shown in Picture 19
Picture93 Alarm of time Settings interface
Motion Detect Armed
When you enable motion detect armed the camera can be triggered to send email alerts
and record images In the camera monitoring page the green icon turn to red and an
alert sound you will hear
Motion Detect Sensibility
You can choose from low to high 10 level alarm sensitivity The greater the number the higher the
sensitivity
Alarm Input Armed
IO PINS1) Output(+5V) 2) Output 3) Alarm input 4) Input (GND)
Input Pins The input pins can be used for 1-way external sensor input(pin3 and pin4) For example
you may connect a Person Infrared Sensor (PIR) to it for motion detection When external sensor
triggered IPCAM can be programmed to send an email with picture or control the internal relay output
IPCAM User Manual
49
Picture94
IO Linkage on Alarm
Enable IO linkage on alarmPin1 will output +5V when alarm triggered and output LOW
when alarm release automatically
Switch onoff buttons control Pin1 output manually
Send Mail on Alarm
Sent picture and mail inform to customers e-mail after alarmed(firstly you should finish
the Mail Service Settings)
Picture 95
Upload Image on Alarm
Enable upload image on alarm and set upload interval(Seconds)
Tick send to your setted mails
IPCAM User Manual
50
Picture 96
REC automatically and save to PC
When you enable motion detect and open the camera monitoring page on the PC If
there is an alarm triggered REC will start automatically for several seconds and save to
the PC
Picture 97
REC save to pcrsquos position
Picture 98
Storage path can be changed
After Setting up later when have the
alarm the image will send to
designated email and FTP server
IPCAM User Manual
51
77 IP cameras Time amp Date setting and PTZ Setting
If IP camera connected with Internet it can automatically check the time amp date via running NTP Server And
need to choose properly IP cameras Time zone Otherwise it need PC Time to check IP camera time amp Date
Pre-set and Speed of PT
78 UPGRADE DEVICE FIRMWARE
Picture 101 Firmware upgrade
IP CAMERA has two kinds of programme One is system firmware another is application firmware It can be
upgraded separately
79 BACKUP AND RESTORE SETTING
Click Set in the Backup will lead to a BIN file and choose this file to restore setting
The huger the Number is The
slower it will be
IPCAM User Manual
52
8 APPENDIX
81 REGISTER AND APPLY FOR DDNS SERVICE
1Users use DDNS management system first timeUsers need to apply account to manage
and inquire the domain state
Step1 enter httpwwwdyndnscom and Create Account( Fill in Domain Name dyndnsorg then Click
Add)
Figure103
Step2 enter your information
Figure104
IPCAM User Manual
53
Figure105
Step3 After a minute you will receive an E-mail from DynDNS Support and it will give you a
confirmation address
(eg httpsaccountdyncomemlcreateconflILHMZHRje5oF_6YXTYv1A
Figure106
IPCAM User Manual
54
Step4 Open the link to active your Domain Name as belowLogin in your account after it is activated
Figure107
Step5 Check all the DDNS serviceswe choose the 14-day-trial
Figure108
Step6 Click the linkand user will see as below
IPCAM User Manual
55
middotenter your information
Figure109
Step7 Now you obtained a Dynamic Domain Name(Figure 105)and can use it in the DDNS Service
Settings(details 74)
Figure110
IPCAM User Manual
56
2For DDNS which is applied successfully you can fill in the IP CAMERA When set successfully the status
of IP will be shown as blows
picture 111
picture 112
3How to set DDNS on line
The first wayMenu rdquostartrdquo- ldquorunrdquomdashgt Input CMDClink rdquoenterrdquoIt can check DDNS Statas
via As shown below
Picture 113
IPCAM User Manual
57
Through the PING command this dynamic domain name can be back in the network response information It
proves that the domain name has been online
If the domain name update not success Possible reasons
(1) DDNS parameter is not correct (2) may cause DNS address configuration is wrong
82 Some special application for IPCAMERA
IPCamUse some grammar parameter control and Use IPCam
useruser
pwdpassword
priThe current access (1 visitors 23 operator managers)
resolutionImage resolution(832024 0qvga32640480 vga)
ratemage transmission speed and scope 0-23
brightnessbrightness0~255
contrastcontrast0~6
mode
Mode 050 hz For
60 hz 2 outdoor
flip
Flip rotation 0 primitive 1 vertical reverses 2 horizontal 3 vertical flip + horizontal
821 The flow media player VLC player and mplayer can real-time broadcast ipcamera and send
of streaming media format video data
(Grammar parametersvideostreamasfuser=amppwd=ampresolution=amprate=)
As shown Picture 113 rdquoIpcamrdquo
Picture 114
IPCAM User Manual
58
From the following picture we can view that Ipcam local IP address ishttp19216811118999
WAN IP Address is httpwell888dyndnsorg8999 we can inputrdquoIPcamrdquorsquoS IP address to
open in the player
Picture 115
the CLC media player open play position
Picture 116
LAN play address
Picture 117
IPCAM User Manual
59
Picture 118
Open the Internet play position
Picture 119
As shown in the following picture It can see the ipcamera send video streaming format
Size 640X480
User
IPCAM User Manual
60
Picture 120
83 Frequently Asked Questions
Note1) Any question you would meet please check Network connections firstly
2)Check the working status revealed by the indicators on the network server hub exchange and
network card If abnormal check the network connections
831 I have forgotten the administrator username andor password
To reset the administrator username and password Press and hold down the RESET
BUTTON for 5 seconds Release the power button and the username and password
will be reset back to the factory default administrator username and password
Default administrator username admin
Default administrator password No password
832 IP Address configuration
Check whether IP address of the IP Camera server shares the same subnet as your
work station Click My Computer gt Control PanelgtNetwork amp Dial-up Connections gt
LAN gt Attributes gtInternet Protocols (TCPIP) and check IP Address and Subnet
Mask Make sure they are in the same subnet when configuring IP Camera IP
address manuallyUnable to access IP Camera via web browser
833 Network Configuration
Double Check to ensure that your HTTP server software is configured and running
properly If you are running any firewall software make sure it is allowing inbound
connections to port 80Also if you happen to be using a cableDSL router make sure
IPCAM User Manual
61
you are set up port forwarding properly ( consult your router is documentation for more
information ) If none of these seem to be the problem it is also possible that your
ISP is blocking inbound connections to port 80 ndashmany IPSs have done this because
of internet worms such as Code Red If this is the case you bdquoll have to setup your
HTTP server on an alternate port (such as 8080)
834 No Monitoring picture
It has four reasons Images of the abnormal factors
1If its not use Directx function and lead to not normal to display the color imagePlease
install DirectX and open the start menu then input the command
Picture 121
You use the DirectX function and it will expedite the DirectDrawDirect3D and AGP if its can not maybe the
connect issues or hardware not read it
2The issues of hardware canrsquot support the card expedite image
3The antivirus software will influence the network it will be stoped or closedIf you install fireproof software
please close it and try again
4 ActiveX controller is not installed correctly
If its not image on the first time to use and will display to the user through the ActiveXIf its can not
display of the image maybe it fail of install about this issues please follow as
1Install ldquoIP Camera Toolrdquo ActiveX control at the same time
2Please install ActiveX control and keep the security settings for IE browser
835 Problems with network bandwidth
The image frame rate is subjected to the following factors 1network bandwidth 2 PC
performancenetwork environment and display preference setting (brightness theme
etc) 3 the number of visitors (Too many visitors will slow down the image frame rate) 4
choice of switch or hub (Use a switch for multiple IP Camera Servers rather than a HUB)
The Device use MJEPT Compression it needs good network bandwidth If it is too narrow it will lead to slowly
browser Typical video parameter occupy network bandwidth as blows
640x48030fps 40 Megabits ~ 50 Megabits
320x24030fps 12 Megabits ~ 16 Megabits
IPCAM User Manual
62
middot836 Why pop-up the prompt ldquoFail to connect to the devicehelliprdquo
This prompt only appeared in the case of using multiple cameras
Enter the Multi-Device Settings page(login as administrator) to check the
Device setting is correct or not
When one of the multiple cameras disconnected the color changed to
yellow and pop-up the promptldquoFail to connect to the devicehelliprdquo
Picture 122
837 Canrsquot access the IPCAM in the internet
There are some reasons
1 ActiveX controller is not installed correctly(see more details 514)
2 The port IPCAM used is blocked by Firewall or Anti-virus software Please change a
port number and try again
3 Port mapping is not success You can do port mapping by two ways
Enter setting page of the router which IPCAM connect with to enable UPnP function
Enter IPCAM ldquoUPnP Settingsrdquo to enable UPnP and make sure the state is ldquoUPnP
successrdquo
‟ s IP
and port to the Virtual map list
When use ADSL the IP is dynamic You should set DDNS(see more details 74 amp 80)
and also make sure port mapping success
84 Operate common problem solving
IP camera tool canrsquot find the camera
Except of the camera broken
1 Make sure the cable connector no problem recommend connector
(AMP)it is with international standard Another note IPCAMrsquos data
transmission channel require higher than computerrsquos so maybe the
IPCAM User Manual
63
computer can run normally but IPCAM canrsquot Please press heavily when making the cable connector
2 Confirm the power supply normally First check whether power indication
light turn on or not If it is onthen check the yellow light on RJ45 Port
(power indication light) and green light (network indication light) are on or
notIf they are onso power supply and cable runs normally
3 Confirm all the firwall and antivirus software are closeThe firewall often
block unrecognized data so if the firewall is running so maybe the IPCAM
TOOL canrsquot find the deviceSuggest to close firewall and antivirus
software temporarily before searching
How to solve the camera blank screen
1 Check if you are using the wrong power adaptorplease use original one
2 Close antivirus software
How to solve the camera canrsquot login by Internet
1 Check if you set DDNS success or not
2 Check the current IPCAMrsquos port number is the same as routerrsquosThey need to keep same
Canrsquot view the monitoring picture
1 Reason canrsquot connect with network
SolutionCheck if the network connect well exclude cable fault and PC virus
cause network fault until can be used between PC and PING
2 ReasonIP address occupy by other device
Solution Choose automatic gain
3 Reason IP address located within different subnet
Solution Check IPCAMrsquoS ip address and subnet mask address and gateway settings
4 ReasonWeb port has been modified
Solutioncontact network administrator to obtain port information
5 Reasonunknown
SolutionPress reset button to factory default statethen reconnectingsysten
default to gain ip address automaticsubnet mask is 2552552550
85 Default Parameters
middotDefault network Parameters
IP address dynamic obtain
Subnet mask 2552552550
Gateway dynamic obtain
DDNS Factory provide
middotUsername and password
Default administrator username admin
Default administrator password No password
IPCAM User Manual
64
86 Technical Parameters
ITEM IP CAM (NIP-02BGPWA2)
Image Sensor
Mage sensor 15 Color CMOS Sensor
Display 640 x 480 (300K Pixels)
Lens f36mm F24 (IR Lens)
Miniillumination 05 Lux
Lens Lens Type Glass Lens
Viewing Angle 60 Degree
Audio Microphone Audio of two way
Domain name Server MSN server DDNS server
Video
Image Compression MJPEG
Image Frame Rate 15 FPS(VGA)30FPS(QVGA)
Resolution 640 x 480(VGA) 320 x 240(QVGA)
Flip Mirror Images rtical Horizontal
mode 50Hz 60Hz or Outdoor
Video Parameters Brightness Contrast
Communication
Ethernet One 10100Mbps RJ-45
Supported Protocol HTTPDHCPIPTCPUDPFTPSMTPDDNSPPPoEUPnP
Mobilephone monitor Support IphoneIpad3G phonesmartphone
Wireless Standard IEEE 80211bg
Wireless Standard 80211b11Mbps(max) 80211g54Mbps(max)
Wireless Security 64128-bitWEP Encryption
Physical
PanTilt Angle Horizontal270deg amp Vertical 120deg
Infrared Light 10 IR LEDs Night visibility up to 15 Mete
Product size 100(L) x100(W) x125mm(H)
Gross Weight 6465gpcs (packing size196x165x123mm)
Net Weight 2547gpcs (only product)
Power Specification DC 5V25A 18 meter
Power Consumption 5 Watts
Environment
Operate Temper 0deg~ 55degC (14degF~122degF)
Operating Humidity 20 ~ 85 non-condensing
Storage Temper -10degC ~ 60deg (14degF ~140degF)
Storage Humidity 0 ~ 90 non-condensing
PC Requirements
CPU 20GHZ or above (suggested 30GHz)
Memory Size 512MB or above (suggested 10GB)
Display card 64M or above
Supported OS Microsoft Windows XPVistaWindows7
Supported browsers IEfirefoxGoogle
Certification CEFCCRoHS
Warranty Limited 1-year warranty
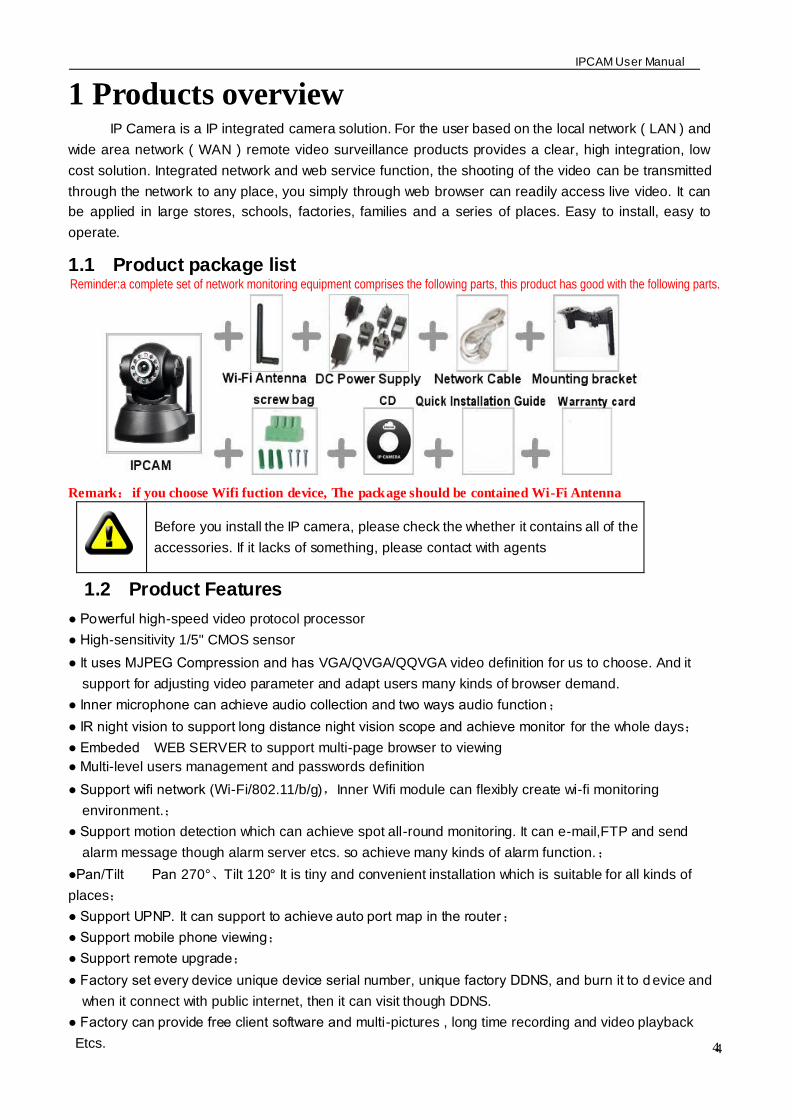
IPCAM User Manual
4
4
1 Products overviewIP Camera is a IP integrated camera solution For the user based on the local network ( LAN ) and
wide area network ( WAN ) remote video surveillance products provides a clear high integration low
cost solution Integrated network and web service function the shooting of the video can be transmitted
through the network to any place you simply through web browser can readily access live video It can
be applied in large stores schools factories families and a series of places Easy to install easy to
operate
11 Product package list
Remarkif you choose Wifi fuction device The package should be contained Wi-Fi Antenna
Before you install the IP camera please check the whether it contains all of the
accessories If it lacks of something please contact with agents
12 Product Features
Powerful high-speed video protocol processor
High-sensitivity 15 CMOS sensor
It uses MJPEG Compression and has VGAQVGAQQVGA video definition for us to choose And it
support for adjusting video parameter and adapt users many kinds of browser demand
Inner microphone can achieve audio collection and two ways audio function
IR night vision to support long distance night vision scope and achieve monitor for the whole days
Embeded WEB SERVER to support multi-page browser to viewing
Multi-level users management and passwords definition
Support wifi network (Wi-Fi80211bg)Inner Wifi module can flexibly create wi-fi monitoring
environment
Support motion detection which can achieve spot all-round monitoring It can e-mailFTP and send
alarm message though alarm server etcs so achieve many kinds of alarm function
PanTilt Pan 270degTilt 120deg It is tiny and convenient installation which is suitable for all kinds of
places
Support UPNP It can support to achieve auto port map in the router
Support mobile phone viewing
Support remote upgrade
Factory set every device unique device serial number unique factory DDNS and burn it to d evice and
when it connect with public internet then it can visit though DDNS
Factory can provide free client software and multi-pictures long time recording and video playback
Etcs
Remindera complete set of network monitoring equipment comprises the following parts this product has good with the following parts
IPCAM User Manual
5
2 Device appearance and interface
21 Device appearance
Picture 1
Device appearance
Sensitive hole
HD Glass Lens Build-in Microphone
Network indicator LED
Infrared LED
1 Sensitive Hole According to outside of light decide whether open infrared LED
2 Infrared LED
3 Lens CMOS Sensor You can turn around the lens manually to adjust the focus range
4 Build-in Microphone
Warning please dont forcibly manual translationlifting cameras because it is
likely that damaged internal component
IPCAM User Manual
6
22 Device interface
Picture 2 Device interface
LAN RJ-4510-100 Base T
DC5V 5V2A Power supply
IO PINS 1)Output(GND) 2)Output (+5V) 3)Alarm input 4)Input (GND) (you can see 356
For more information)
Picture 3 Reset Button
RESET BUTTON Press and hold down the RESET BUTTON for 5 secondsRelease the
power button and IP camera will be reset back to the factory default parameter
3 Device installation System configuration requirements ( Example for view four IP Camera )
CPU 206GHZ or above Memory 512M or above
Network Card 10M or above Display Card Microsoft DirectX 9 Pictur device or above memory
Recommendable Operating System WindowsXPVista Windows 7Windows 8
Support web browser IE Firefox Safari Chrome etc
RESET BUTTON
IO Alarm inputoutput
DC5V Power adapter
WIFI antenna
RJ-45 Ethernet Port
Audio output
IPCAM User Manual
7
31 Install hardware
You should install your IP Cameras hardware according to the following step in order to make sure
the IP camera can work properly Especially pay attention to IP cameras installation environment
1) IPCAM Plug DC adapter with IP camera
INote Please use Dc adapter which is the standard configuration of IP camera Using DC adapter
without any certificate may destroy IP camera
2) Plug cable with IP camera and another side of cable should connect with DSL or route r In additional
make sure power of IP camera work properly and IP camera and PC are in the same Subnet( it can be
LAN and it also can use cable to connect PC and IP camera)
Picture 4 Network connection sketch map
3) When you use IP camera for the first time IP Address of IP camera obtain
automatically(Before using please make sure DHCP Server function in LANs router has
been opened or Server system open DHCP Server function) It is very convenient for users
to use because It is suitable for different LAN NETWORK environment
IPCAM User Manual
8
Picture 5
4) You can search PC IP and DNS Server as belows
Picture 6
This is DNS Server
address which is provided
by network server
IPCAM User Manual
9
5) The device IP Address can be changed but Its IP address should be at the same with PCs
subnet
Picture 7
When we test IP camera and check whether it starts smoothly or it connects properly we can
operate in the Windows(START- RUN-CMD) and then input ping 1921681111 in the order windows
Picture 8 ping IP Camera
Check whether it can Ping IP camera If yes then it means IP Camera has been worked properly
and connected correctly
Network server provide
DNS server Address
Device IP address can
be changed by yourself
IPCAM User Manual
10
32 Software installation
Software installation
It is very easy to install software You just need to run installation programme then it can
work properly
Please put CD in the PC driver and the CD will automatically run to the software installation
interface
If no such an interface please click ldquoautorunexerdquoin the CD
And then findldquosearchexerdquo Clink and install LAN Tool to PC systemthen you
can view IP Camera Tool in Computer desktop for LAN Search toolldquoIP Camera Toolrdquo
G
Picture9 Software installation interface
MinOpen user manual ExitUser manual
Search tool in LAN Application Tool box Quick installation guide Open CD
IPCAM User Manual
11
4 Visit IP camera in LAN 41 Connection ways in LAN
Picture 10 Connection between Several IP camera and router
42 Search and set device IP address Please note before searching IP camera
1Make sure IP camera has a good connection with power and network
2Te router should be opened DHCP(Dynamic host configuration protocol) because the factory setting status of
IP camera is to obtain automatically IP camera
3When we power IP camera we should wait 20 second then it can works
Search IP camera
When we run Search tool IP camera Tool we can find the IP camera showing IP address Port
Name If we use Wi-fi connection we will find Wi-fi IP address For the details we can view
the following picture
Picture 11
NoteldquoIP Camera ToolexerdquoProgramme only use to search IP camera address and port in the
LAN The tool cant search IP camera IP address and port in the WAN
There are 3 cases
1 No IP Camera found within LAN After about 1 minute search the Result Field will
show ldquonot found IP Serverrdquo
2 IP Cameras having been installed within LAN All the IP Cameras will be listed and the
total number is displayed in the result field as shown in Picture 20
3 The IP Cameras installed within LAN do not share the same subnet with the monitoring
PC A prompt as shown in result field (prompt Subnet doesnrsquot match dbclick to change)
Click the left mouse button to choose the prompt and click the right mouse choose
Network Configuration to set the IP address of the Camera to the same subnet as LAN
IPCAM User Manual
12
SIX Options
Choose the IP Camera list and Click right mouse button there are six options Basic
Properties Network Configuration Upgrade Firmware Refresh Camera List Flush Arp About IP camera tool as
shown Picture 12
Picture 12
Basic Properties
There is some device information in the Bas ic Properties such as Device ID System
Firmware Version Web UI Version
Picture 13
Network Configuration
In this page you can configure the Network parameter
Picture 14
IP address Fill in the IP address assigned and make sure it is in the same subnet as the
Subnet Mask The default subnet mask of the equipment is 2552552550
Gateway Make sure it is in the same subnet with PC IP address Default Gateway
IPCAM User Manual
13
address is 19216811
DNSServer IP address of IPS network provider ( It also can view from network card local area connection
status) As blows picture
Picture 15
Http Port LAN port assigned for the equipment usually 80
User amp Password Default administrator usernamepassword adminNo password
Enable Using DHCPthe system will assign a reasonable IP address for your equipment
only if your gateway supports DHCP (It is the case with most gateways)
DHCP checkbox if checked the device will obtain IP from DHCP server (To be make
sure the Router which the device connect with has DHCP function)
NOTE when the prompt rdquosubnet doesn‟ t match double click to changerdquo please set the
IP Camera IP address once again
Upgrade Firmware
Enter the correct User and Password to upgrade system Firmware and Web UI (User should have administering
authority
Picture 16
This is the server provide the
service of DNS
IPCAM User Manual
14
Refresh Camera List
Refresh camera list manually
Flush Arp Buffer
When cable network and wireless network of the device both are fixed IP address There
is a problem you may encounter is can search the camera IP but canot open the camera
web pageyou may try to use flush arp buffer
About IP Camera tool
You can view IP camera tool version and ActiveX version
43 Login IP camera
Double click the IP address of the IP Camera listed IE will be opened automatically and display the camera login
page Or Access the camera by IE browser directly type in the camera‟ s IP address For
example http19216811118999 ( We suggest you use IE browser for it has more function
Picture 17
IP camera Default username is admin no password And Click ldquoSign inrdquo to enter the monitoring page
Default usernameadmin
Default passwordNo password
IPCAM User Manual
15
Picture 18
Picture 19
middot When Users login inthey can view images At the same time users(Administrator Operator or Visitor) can operate according to their permissions
By Firefox and sofari browser as below
Language options you can
choose operation language
according to your demand
IPCAM User Manual
16
Picture 20
Picture21
IPCAM User Manual
17
44 IP camera operation
441 For Visitor
For example if is bright the first route is at status of Detection(Only IE Broswer can view it)
Picture 22
The right upper is statuss indicator area which can show 9 IP camera status
When the button is gray it means IP camera didnt connect
Green means IP camera has connected
Yellow means there is something wrong with connection
Red means it is the status of alarm
If you want to detect 4 views need to click this icon
OSD Display date and time on the video You can disable the OSD function or choice other color
(OSDon-screen display)
Snapshot Click icon to snap the picture
REC Click icon into REC mode is stop
Audio Click icon into Audio mode can listen the voice in monitoring range
Talk Click icon into Talk mode and the icon will become Visitor can talk with whom is in the
monitoring range
Note the record file name is device Alias_ Current timeAvi
For example IPCAM_20101011134442Avi
It means the device alias is IPCAM and its recordrsquos end time is At 134442 on
October 11 2010When use motion detection and checked Send Mail on Alarm
Buttom for taking picture
S top monitor video
Open vedio
Record
Two way audio Monitor audio
IPCAM User Manual
18
The name of the picture received in mailbox is like this device id(Alias)_ Current
timejpg
442 For operator
When login as operator you can operate PanTilt and adjust video parameter
Picture 23
Direction control click the different arrow will get different direction view
Vertical patrol
Horizontal patrol
Stop patrol
IO output Switch on off
Infrared light software control switch
Image fluctuation flip(up and down)
Image around flip (right and left)
Set Preset (can set 4 preset)
ResolutionVGA(640 X 480) QVGA(320 X 240)
Work Mode 50Hz60HzOutdoor
color parameterClick or can adjust brightness and contrast
Stop patrol
Vertical patrol
Horizontal
patrol
Image fluctuation flip
Image around flip
IO output S witch on off
Set Preset
Infrared light s witch
IPCAM User Manual
19
443 For Administrator
When you login as administrator
you can set all parameters Please
click ldquoFor Administratorrdquo
and enter into
setting interface
Picture 24
Alias Settings You can Input the new name as you like
Data ampTime Settings Data ampTime Settings page
Users Settings Eight accounts are acceptable for this system Here the eight users can configure their
user names and password as Administrator Operator or Visitor
Visitor In this mode you can only view
Operator You can control the direction of IP Camera and set some parameter
Administrator You can setup the advanced configurations of the IP Camera
UpnP Settings If you access IP Camera to be make sure UpnP Status is Succeed
Upgrade Device Firmware Upgrade Device Firmware and device embeded web UI software in this
page
Restore Factory Settings Restore factory settings of the device
Reboot Device Reboot the device
Back Back to Monitoring Mode
View Device IDDevice Firmware
Version and Device Embedded
Web UI Version
Check Device all kinds of
status
Carry on Settings and
operation function
IPCAM User Manual
20
5 Visit IP Camera in internet
51 Connection way in Internet
Picture 25
52 Related setting and login IP camera
1 If the network your IP camera using is using static IP you just need to input this IP address and IP cameras port in the browser then it can visit Ip camera
2 If you are using ADSL to dial-up and surf on line you should obtain IP Camera Current WAN IP Address or configured DDNS
1)There are four ways for you to obtain WAN IP Address
①Using mail to send internet IP function
After setting mail successfully IP will send mail to your receiver e-mail box when Internet IP or port
has changed If it is dynamical IP users need to input this IP address to visit this IP camera
②Obtain from some website
It is very easy for you to obtain WANS IP address You can open browser on the computer on the
condition that IP camera and PC are the same subnet For example httpwwwwhatismyipcomor
httpwwwmyipcn etcsIt will tell you WANS IP address as shows below
Picture 26
③Obtain from MSN and IP cameras MSN ACCOUNT( Details 73)
IPCAM User Manual
21
④ Obtain from router
We take Nur8555M from Xinxiang s router as example
AAccording to routers manual we get Routers IP is 19216811
BLogin in router Input 19216811 in the browser Find the status of Router and find Routers
WAN( In this example WANS IP is 11624235122 As shows Picture 27
Picture 27
Now you can visit IP Cam from Internet What you should do is to Input correct IP address For
example Http 116242351228999
Note Make sure the Ports UPNS is available You can open UPNP via the following ways
Enter into Routers setting page( Details Routers user manual) to make UPNP available
Or enable virtual mapping function Add equipment IP address and port to the virtual mapping list
Picture 28
Users can access the Internet from IPCAM device Input address For example Http 116242351228999
2)DDNS (dynamic DNS) service is the Internet domain name can be fixed and dynamic IP address real-time
corresponding (analysis) service Simplely said whenever user surf on internet or what kind of way you are
using the Internet get a what kind of IP address IP address whether it will change DDMS can ensure that a
fixed domain name can access to a users device
IPCAM User Manual
22
Our products have been configured the DDNS services of course you can also apply for the domain name in
registration website for one of your own domain name to configuration For example wwwdyndnsorg
Picture 30
You need fill in DDNS and port for example(httpicam0001ihome365org8999) The browser will jump
to IP camerarsquos login page
Picture 31
DDNS inside
Factory DDNS
IPCAM User Manual
23
The input device user name and password to login to equipment
Picture 32
middotIf input domain name but cant open IP camera in the browser such as the situation is as blows
middotPlease open the device and check status of IP camera in the local area network confirm whether UPNP
function and DDNS is successful or not
Picture 34
IPCAM User Manual
24
middotYou need to set port mapping function successfully to check whether the router UPNP function is
available if It was unavailable please make it available refer to the routers user manual
If you use TPLINK router please refer to these instructions
middotThrough the upnp automatic mapping port to the network input router IP address in the browser (such
as http19216811 gt the router IP addresses are written on paper label on the router house---- please set
according to your own IP address) open the routers page forward rules gt gt upnp set to ensure that the
current state of upnp is already available as below
Note some of the router interface without UPNP Settings option then need to open the virtual server IP
cameras in the local area network of mapping the connection IP address and port number
Picture 36
6 Access IP camera via mobile equipment
such as mobile phoneIpad Etcs There are two kinds of ways to access IP camera One is to input IP address in browser directly It can be IP
address and also can be DDNS Another is to use clients to visit
61 Input IP address in browser
1 We take IPAD as example as blows
IPCAM User Manual
25
middotOpen browser Safari
Input IP cameras IP address for example( httpicam0001ihome365org8999)
Choose language according to your demand and choose login mode according to your browser
Picture39
Choose manual settings
Open browser Safari
Enter the IP address of the IP camera
(httpicam0001ihome365org8999)
IPCAM User Manual
26
enter your account and password on the login page as shown By defaultadministratorrsquos username is
admin and no password
Select Server Refresh mode landing
Picture42
Input the username and password of
the network camera
Here you can choose between two
modes landing
Here to select the
operating language
Default passwordNo password
IPCAM User Manual
27
Select Server Push mode landing
Picture 43
2 Now we take Android system device as example
Open menu and firstly open the browser and input IP camera s IP address in the
browser for example(httpicam0001ihome365org8999)
Picture 44
Input IP cameras username and password and click sign in and then enter into
browser model to choose login-in interface
Open menu
IPCAM User Manual
28
Picture 45
62 Install client-side software to access IPCamera
There are many client software support IP camera several third-party software support our IP cameras too
The following are our manufacture software setup process(the Android version)
1 Pls get the install applications in the CD or you can download from the website
httpsplaygooglecomstoresearchq=reecamampc=apps Choose the right
①installation file-ipcameraapk
running environment Android version 16 or above
Note Please ensure that mobile phones can connect to the Internet before install
② Install method
21 Insert SD card into Android mobile phone
22 Connect the cellphone to computer via USB data cable
23 Choose the USB connection model on your cellphone you can see the SD driver in ldquomy computerrdquo
24 Copy the ipcameraapk into SD card
25 Disconnect the device pls find the ipcameraapk in ldquoFile Managementrdquo and run it
26 The ipcamera application will be show up on the home screen after you successfully installed
③Software operating processes
First ensure that the Internet open WIFI connection the search in the Play in The Googl Android
application reecam
Open the WiFi
connection
Download and install
the application
Search reecam
IPCAM User Manual
29
middotYou can edit the camera modify camere configuration and delete camera operation
Click here to add
a video camera
Select to add to the
client camera
Refresh LAN cameras
View or change the
configuration of the
camera the camera
name at random
IP address
Http port
The default password is blank
Camera name
Prev iew camera
Preview the
camera screen
save the camera
Editor has added
cameras
Edit camera
configuration
Delete the camera Edit camera of the
configuration
IPCAM User Manual
30
middotFor the camera added to the camera list you can watch camera in real time
Control cameras PTZ and set swith-on and switch-off of the cameras audio int
ercom and video
Picture 51
2 The IPCamera setting process for iPhone iPad
Firmware requirements compatible with iPhone iPod touch and iPad
Systerm requirements Requires iOS 42 or above
You can download the genuine
software
(ipcameraapp) form the App Store
httpitunesapplecomcnappreecamid479468959mt=8
middotSoftware operating process is as follows
Continue to add
the camera
Add external network
camera domain
Cameras have
been added
Audiointercom video switch
A list of cameras and
video can be switched to
view
Fingers sliding PTZ control
Click on the picture to stop
rotation
IPCAM User Manual
31
Open the App Store search
reecam
Download and install
reecam
The run has been
installed good reecam
program
Click to add cameras
Search reecam
IPCAM User Manual
32
Fill in the domain address
or IP address
Fill in the Http port of the
camera login user name
and password click next
to open the camera
Completed please
click here
Preview videoclick on the
next save
Save the camera added
Selected camera to
view images
Click image to expand
more cameras
operating functions
IPCAM User Manual
33
7 Other setting
71 Network Setting
711 Basic Network Settings
If the router that the IP camera connect has DHCP function you can choice ldquoObain IP from DHCP Serverrdquo
else fill in the network parameters manually
Http Port In most cases you can leave this value as 80 however if your Internet
Service Provider blocks this port you may switch to another port number such as 85808088889000 Etcs
(Range from 0 to 65535 pay attention to the same segment of multiple devices must set up different port The
port t canrsquot have any conflict with other software or equipment
a Search tools modification in LAN
Figure58
brdquoFor administorrdquo ldquoBasic network settingrdquo -Change the port
Figure59
712 WIFI Setting
1) Please enter the wireless net setting page of the wireless Router to find out SSID
Channel(less than 10) Encryption Authentication as below
Selec IP Camera clickright mouse button choice network configurat ion
Set port number
Set Network IP
Set Http Port Number
IPCAM User Manual
34
Figure 61
As Administrator to Login camera open wireless LAN Settings page fill in every
Setting (ensure keep the same as routerrsquos ) and then pulled out of the cable wireless network function can be
used For example as shown in belows
Figure62
Pls click the scan buttom twice
IPCAM User Manual
35
Figure 63
713 Adhoc point to point Wireless connection Setting
1) Open the basic network setting interfacecheck the device status
Picture 64
2) Open the wireless lan setting interface choose Adhoc for network type you
can define SSID such as 001
remember the IP address of
IP camera and Http port
Click the Settings Ip Camera will
restart and save
Double click to choose
Fill the encryption and
routers and key in the
same way
IPCAM User Manual
36
Picture 65
3) Unplug the RJ45 from IP camera Use laptop or other devices which are with
wifi function( include smart phoneipad and so on) searching the SSID you defined
on proccess 2then make a connection
Picture 66
middotClick wireless network and check the link status of ip camera Please note IP
address of your connected laptop must be the subset of your ip camera if not
please reset the ip address of your laptop manually
Picture 67
4) Now we can use the ip camera tool or enter ip address of camera derectly in
browser blank to visit
1 visit by ip camera tool
Picture 68
IPCAM User Manual
37
2Enter ip address in the browser
Enter user name and password in the login interface
Picture 69
Click ldquoSign inrdquoand vis it
Picture 70
IPCAM User Manual
38
72 Multi-Device Settings
Add cameras in LAN
In the Multi-Device Settings page you can see all devices searched in LAN The 1
St Device is this device in default You can add more cameras list in LAN for monitoring This Web software
supports up to 9 IP Cameras online simultaneous ly Click ldquoThe 2ND
Devicerdquo and Double click the item in the ldquoDevice List in LANrdquo AliasHost and Http Port
will fill in automatically Enter the correct username and password then click ldquoaddrdquoAdd
more cameras in the same way At last please donrsquot forget the ldquo settingrdquo Button
Picture 71
Add cameras in the Internet
Firstly make sure the camera added can access in the Internet with the IP address or
DDNS domain Like this http2191332001669999or httpIPcamdyndnsorg9999You can enter the
Host 219133200166 Http port 9999 or Host IPcamdyndnsorg Http port 9999 Enter the correct
username and password then click ldquoaddrdquo Add more cameras in the
same way
Picture 72
IPCAM User Manual
39
Picture 73
73 MSN Settings
Fill in your MSN account and password then add account which need to receive
IPCAMrsquoS ip address to IPCAM‟ S MSN list (Picture 67)click submit then yoursquod better
restart IP camera After it login your MSN to add IPCAMrsquos MSN account to MSN List that
you can receive IPCAMrsquos ip address
Picture 74
First login and click add contacts choose Add Contact then fill IPCAMrsquos MSN account in instant
messaging address click next then send offers
Aplly for MSN account and passworf for IP cam
Add about 10 MSN Accout
IPCAM User Manual
40
Figure75
Next
Figure76
Figure77
When IPCAMrsquos MSN account shows online you can chat with it input path command url camera
account will show its IP address in chatting box promptly as below
IPCAM User Manual
41
Picture 78
You can input the IP address to browser then can browse ip camera as below
Figure79
AttentionYou should fill MSN account in IPCAM first
74 DDNS Service Settings
DDNS Service The system supports protocols from some DDNS providers Dyndnsorg System support
DDNS such as topipcamorgpeanut shell3322orgDynDNS
provided IP
IPCAM User Manual
42
User and Password the user name and password used when applying for the domain
name (details 432)
DDNS Host the Domain Name
741 Factory DDNS
Device had distributed one DDNS to every productwhich was sticked the bottom
of the product Such as
manufacturer had already give every device a DDNS address which is unique Users only need to fill in this
DDNS IP ADDRESS and port in the browser then they can monitor remote IP camera
Picture 80 Factory DDNS
Note When use the domain name access to the camera and UPNP is not successful you must set port
mapping function on routers
742 The third part DDNS
Users can use not only Factory DDSN but also can use third part DDNS System Such as domain name
wwwdyndnsorg The only thing the user need to do is to apply a free DDNS and then fill in ldquoset boxrdquo as below
Save this setting and this DDNS can be used
DDNS Hostname
Factory DDNS
IPCAM User Manual
43
Note the third party domain name is the realization of analytical way input the domain in the browser it will
keep this string of characters If the port of the device isnrsquot 80 then need to add colon and port number For
example httpwell888dyndnsorg8999
75 Mail and FTP Service
1)Configure the E-mail box to receive and send mails The E-mail box is used for receiving
the images sent after alarm and the system IP address after successful dial-up
Note When Alarm Service Settings-gt Send Mail on Alarm is check the Mail
Service takes effect
Picture82
Configure the E-mail box to receive and send mails The E-mail box is used for receiving the images sent
after alarm and the system IP address after successful dial-up
Sender This device use the sender mailbox to send mails
Receiver To receive the mail from the Sender You can set up to 4 receiver mailbox
SMTP Server the SMTP server for the sender mailbox
Need Authentication if the sender mailbox need authentication you should check it then
input the SMTP username amp Password
Mail test Please set the Mail parameter and click Submit first There are Mail test result
Picture 83
video Local storage in PC after alarm monitoring
IPCAM User Manual
44
Gmail also set as the same It only needs you to fill in correct SMTP Sever address user and password
Picture 84
Mail notes Internet IP address In this option When Internet IP and port have changed IP Will be sent via
1Can not connect to the server
2Network Error Please try later
3Server Error
4Incorrect user or password
5The sender is denied by the server Maybe the server need to authenticate the user please check it
and try again
6The receiver is denied by the server Maybe because of the anti-spam privacy of the server
7The message is denied by the server Maybe because of the anti-spam privacy of the server
8The server does not support the authentication mode used by the device
Report Internet IP by Mail When ipcam port or Internet IP changed it will send the internet IP by
mail(for example IPCAM s url is http119123207969002) Make sure the port is map to the router
correctly by UPNP or Virtual Map function
2) FTP Server use and settings
middotIf you already have an FTP Server (ipcam com)and email ipcam you can fill the
parameters as below
Picture 85
IPCAM User Manual
45
middotFTP Server of LAN as below
1 Create an account
2 Step by step setting until finish it
Picture 88
IPCAM User Manual
46
3Start Server
Continue to finish it
Picture 89
4IPCAMrsquoS account can be used
Picture 90
Save path
This is a FTP
server address
IPCAM User Manual
47
5 IP camerarsquos FTP Server set like this
Picture 91
6 Set up and complete testing is successfulwhen it alarms IP camera will upload
pictures to the FTP server Settings of main directory path (as shown )
Picture 92
FTP Server the FTP server address
FTP port the port usually is 21
FTP Mode support standard(POST) mode and passive(PASV) mode
Upload Image Now it will upload image now when checkbox is not checked When checked you can
input upload interval(Seconds)
76 Motion Detection
Enter Alarm Service Settings page to configure Motion Detection function
1) Motion Detect Armed
Each alarm triggers in the protection of time the device will take various measures to alarm
IO linkage alarm output relay closure external alarm device began to alarm
IPCAM User Manual
48
Send E-mail alarm informatio
Transmit pictures to the FTP server and can set the time interval of sending pictures
2) Alarm t ime Settings
Only in the alarm period detection device to alarm will only have alarm action All the time (not check the
schedule) also can alarm within specified time For the specified time alarm firstly need to set up the system
time time zone and then to choose period of alarm in the state of alarm setting as shown in Picture 19
Picture93 Alarm of time Settings interface
Motion Detect Armed
When you enable motion detect armed the camera can be triggered to send email alerts
and record images In the camera monitoring page the green icon turn to red and an
alert sound you will hear
Motion Detect Sensibility
You can choose from low to high 10 level alarm sensitivity The greater the number the higher the
sensitivity
Alarm Input Armed
IO PINS1) Output(+5V) 2) Output 3) Alarm input 4) Input (GND)
Input Pins The input pins can be used for 1-way external sensor input(pin3 and pin4) For example
you may connect a Person Infrared Sensor (PIR) to it for motion detection When external sensor
triggered IPCAM can be programmed to send an email with picture or control the internal relay output
IPCAM User Manual
49
Picture94
IO Linkage on Alarm
Enable IO linkage on alarmPin1 will output +5V when alarm triggered and output LOW
when alarm release automatically
Switch onoff buttons control Pin1 output manually
Send Mail on Alarm
Sent picture and mail inform to customers e-mail after alarmed(firstly you should finish
the Mail Service Settings)
Picture 95
Upload Image on Alarm
Enable upload image on alarm and set upload interval(Seconds)
Tick send to your setted mails
IPCAM User Manual
50
Picture 96
REC automatically and save to PC
When you enable motion detect and open the camera monitoring page on the PC If
there is an alarm triggered REC will start automatically for several seconds and save to
the PC
Picture 97
REC save to pcrsquos position
Picture 98
Storage path can be changed
After Setting up later when have the
alarm the image will send to
designated email and FTP server
IPCAM User Manual
51
77 IP cameras Time amp Date setting and PTZ Setting
If IP camera connected with Internet it can automatically check the time amp date via running NTP Server And
need to choose properly IP cameras Time zone Otherwise it need PC Time to check IP camera time amp Date
Pre-set and Speed of PT
78 UPGRADE DEVICE FIRMWARE
Picture 101 Firmware upgrade
IP CAMERA has two kinds of programme One is system firmware another is application firmware It can be
upgraded separately
79 BACKUP AND RESTORE SETTING
Click Set in the Backup will lead to a BIN file and choose this file to restore setting
The huger the Number is The
slower it will be
IPCAM User Manual
52
8 APPENDIX
81 REGISTER AND APPLY FOR DDNS SERVICE
1Users use DDNS management system first timeUsers need to apply account to manage
and inquire the domain state
Step1 enter httpwwwdyndnscom and Create Account( Fill in Domain Name dyndnsorg then Click
Add)
Figure103
Step2 enter your information
Figure104
IPCAM User Manual
53
Figure105
Step3 After a minute you will receive an E-mail from DynDNS Support and it will give you a
confirmation address
(eg httpsaccountdyncomemlcreateconflILHMZHRje5oF_6YXTYv1A
Figure106
IPCAM User Manual
54
Step4 Open the link to active your Domain Name as belowLogin in your account after it is activated
Figure107
Step5 Check all the DDNS serviceswe choose the 14-day-trial
Figure108
Step6 Click the linkand user will see as below
IPCAM User Manual
55
middotenter your information
Figure109
Step7 Now you obtained a Dynamic Domain Name(Figure 105)and can use it in the DDNS Service
Settings(details 74)
Figure110
IPCAM User Manual
56
2For DDNS which is applied successfully you can fill in the IP CAMERA When set successfully the status
of IP will be shown as blows
picture 111
picture 112
3How to set DDNS on line
The first wayMenu rdquostartrdquo- ldquorunrdquomdashgt Input CMDClink rdquoenterrdquoIt can check DDNS Statas
via As shown below
Picture 113
IPCAM User Manual
57
Through the PING command this dynamic domain name can be back in the network response information It
proves that the domain name has been online
If the domain name update not success Possible reasons
(1) DDNS parameter is not correct (2) may cause DNS address configuration is wrong
82 Some special application for IPCAMERA
IPCamUse some grammar parameter control and Use IPCam
useruser
pwdpassword
priThe current access (1 visitors 23 operator managers)
resolutionImage resolution(832024 0qvga32640480 vga)
ratemage transmission speed and scope 0-23
brightnessbrightness0~255
contrastcontrast0~6
mode
Mode 050 hz For
60 hz 2 outdoor
flip
Flip rotation 0 primitive 1 vertical reverses 2 horizontal 3 vertical flip + horizontal
821 The flow media player VLC player and mplayer can real-time broadcast ipcamera and send
of streaming media format video data
(Grammar parametersvideostreamasfuser=amppwd=ampresolution=amprate=)
As shown Picture 113 rdquoIpcamrdquo
Picture 114
IPCAM User Manual
58
From the following picture we can view that Ipcam local IP address ishttp19216811118999
WAN IP Address is httpwell888dyndnsorg8999 we can inputrdquoIPcamrdquorsquoS IP address to
open in the player
Picture 115
the CLC media player open play position
Picture 116
LAN play address
Picture 117
IPCAM User Manual
59
Picture 118
Open the Internet play position
Picture 119
As shown in the following picture It can see the ipcamera send video streaming format
Size 640X480
User
IPCAM User Manual
60
Picture 120
83 Frequently Asked Questions
Note1) Any question you would meet please check Network connections firstly
2)Check the working status revealed by the indicators on the network server hub exchange and
network card If abnormal check the network connections
831 I have forgotten the administrator username andor password
To reset the administrator username and password Press and hold down the RESET
BUTTON for 5 seconds Release the power button and the username and password
will be reset back to the factory default administrator username and password
Default administrator username admin
Default administrator password No password
832 IP Address configuration
Check whether IP address of the IP Camera server shares the same subnet as your
work station Click My Computer gt Control PanelgtNetwork amp Dial-up Connections gt
LAN gt Attributes gtInternet Protocols (TCPIP) and check IP Address and Subnet
Mask Make sure they are in the same subnet when configuring IP Camera IP
address manuallyUnable to access IP Camera via web browser
833 Network Configuration
Double Check to ensure that your HTTP server software is configured and running
properly If you are running any firewall software make sure it is allowing inbound
connections to port 80Also if you happen to be using a cableDSL router make sure
IPCAM User Manual
61
you are set up port forwarding properly ( consult your router is documentation for more
information ) If none of these seem to be the problem it is also possible that your
ISP is blocking inbound connections to port 80 ndashmany IPSs have done this because
of internet worms such as Code Red If this is the case you bdquoll have to setup your
HTTP server on an alternate port (such as 8080)
834 No Monitoring picture
It has four reasons Images of the abnormal factors
1If its not use Directx function and lead to not normal to display the color imagePlease
install DirectX and open the start menu then input the command
Picture 121
You use the DirectX function and it will expedite the DirectDrawDirect3D and AGP if its can not maybe the
connect issues or hardware not read it
2The issues of hardware canrsquot support the card expedite image
3The antivirus software will influence the network it will be stoped or closedIf you install fireproof software
please close it and try again
4 ActiveX controller is not installed correctly
If its not image on the first time to use and will display to the user through the ActiveXIf its can not
display of the image maybe it fail of install about this issues please follow as
1Install ldquoIP Camera Toolrdquo ActiveX control at the same time
2Please install ActiveX control and keep the security settings for IE browser
835 Problems with network bandwidth
The image frame rate is subjected to the following factors 1network bandwidth 2 PC
performancenetwork environment and display preference setting (brightness theme
etc) 3 the number of visitors (Too many visitors will slow down the image frame rate) 4
choice of switch or hub (Use a switch for multiple IP Camera Servers rather than a HUB)
The Device use MJEPT Compression it needs good network bandwidth If it is too narrow it will lead to slowly
browser Typical video parameter occupy network bandwidth as blows
640x48030fps 40 Megabits ~ 50 Megabits
320x24030fps 12 Megabits ~ 16 Megabits
IPCAM User Manual
62
middot836 Why pop-up the prompt ldquoFail to connect to the devicehelliprdquo
This prompt only appeared in the case of using multiple cameras
Enter the Multi-Device Settings page(login as administrator) to check the
Device setting is correct or not
When one of the multiple cameras disconnected the color changed to
yellow and pop-up the promptldquoFail to connect to the devicehelliprdquo
Picture 122
837 Canrsquot access the IPCAM in the internet
There are some reasons
1 ActiveX controller is not installed correctly(see more details 514)
2 The port IPCAM used is blocked by Firewall or Anti-virus software Please change a
port number and try again
3 Port mapping is not success You can do port mapping by two ways
Enter setting page of the router which IPCAM connect with to enable UPnP function
Enter IPCAM ldquoUPnP Settingsrdquo to enable UPnP and make sure the state is ldquoUPnP
successrdquo
‟ s IP
and port to the Virtual map list
When use ADSL the IP is dynamic You should set DDNS(see more details 74 amp 80)
and also make sure port mapping success
84 Operate common problem solving
IP camera tool canrsquot find the camera
Except of the camera broken
1 Make sure the cable connector no problem recommend connector
(AMP)it is with international standard Another note IPCAMrsquos data
transmission channel require higher than computerrsquos so maybe the
IPCAM User Manual
63
computer can run normally but IPCAM canrsquot Please press heavily when making the cable connector
2 Confirm the power supply normally First check whether power indication
light turn on or not If it is onthen check the yellow light on RJ45 Port
(power indication light) and green light (network indication light) are on or
notIf they are onso power supply and cable runs normally
3 Confirm all the firwall and antivirus software are closeThe firewall often
block unrecognized data so if the firewall is running so maybe the IPCAM
TOOL canrsquot find the deviceSuggest to close firewall and antivirus
software temporarily before searching
How to solve the camera blank screen
1 Check if you are using the wrong power adaptorplease use original one
2 Close antivirus software
How to solve the camera canrsquot login by Internet
1 Check if you set DDNS success or not
2 Check the current IPCAMrsquos port number is the same as routerrsquosThey need to keep same
Canrsquot view the monitoring picture
1 Reason canrsquot connect with network
SolutionCheck if the network connect well exclude cable fault and PC virus
cause network fault until can be used between PC and PING
2 ReasonIP address occupy by other device
Solution Choose automatic gain
3 Reason IP address located within different subnet
Solution Check IPCAMrsquoS ip address and subnet mask address and gateway settings
4 ReasonWeb port has been modified
Solutioncontact network administrator to obtain port information
5 Reasonunknown
SolutionPress reset button to factory default statethen reconnectingsysten
default to gain ip address automaticsubnet mask is 2552552550
85 Default Parameters
middotDefault network Parameters
IP address dynamic obtain
Subnet mask 2552552550
Gateway dynamic obtain
DDNS Factory provide
middotUsername and password
Default administrator username admin
Default administrator password No password
IPCAM User Manual
64
86 Technical Parameters
ITEM IP CAM (NIP-02BGPWA2)
Image Sensor
Mage sensor 15 Color CMOS Sensor
Display 640 x 480 (300K Pixels)
Lens f36mm F24 (IR Lens)
Miniillumination 05 Lux
Lens Lens Type Glass Lens
Viewing Angle 60 Degree
Audio Microphone Audio of two way
Domain name Server MSN server DDNS server
Video
Image Compression MJPEG
Image Frame Rate 15 FPS(VGA)30FPS(QVGA)
Resolution 640 x 480(VGA) 320 x 240(QVGA)
Flip Mirror Images rtical Horizontal
mode 50Hz 60Hz or Outdoor
Video Parameters Brightness Contrast
Communication
Ethernet One 10100Mbps RJ-45
Supported Protocol HTTPDHCPIPTCPUDPFTPSMTPDDNSPPPoEUPnP
Mobilephone monitor Support IphoneIpad3G phonesmartphone
Wireless Standard IEEE 80211bg
Wireless Standard 80211b11Mbps(max) 80211g54Mbps(max)
Wireless Security 64128-bitWEP Encryption
Physical
PanTilt Angle Horizontal270deg amp Vertical 120deg
Infrared Light 10 IR LEDs Night visibility up to 15 Mete
Product size 100(L) x100(W) x125mm(H)
Gross Weight 6465gpcs (packing size196x165x123mm)
Net Weight 2547gpcs (only product)
Power Specification DC 5V25A 18 meter
Power Consumption 5 Watts
Environment
Operate Temper 0deg~ 55degC (14degF~122degF)
Operating Humidity 20 ~ 85 non-condensing
Storage Temper -10degC ~ 60deg (14degF ~140degF)
Storage Humidity 0 ~ 90 non-condensing
PC Requirements
CPU 20GHZ or above (suggested 30GHz)
Memory Size 512MB or above (suggested 10GB)
Display card 64M or above
Supported OS Microsoft Windows XPVistaWindows7
Supported browsers IEfirefoxGoogle
Certification CEFCCRoHS
Warranty Limited 1-year warranty
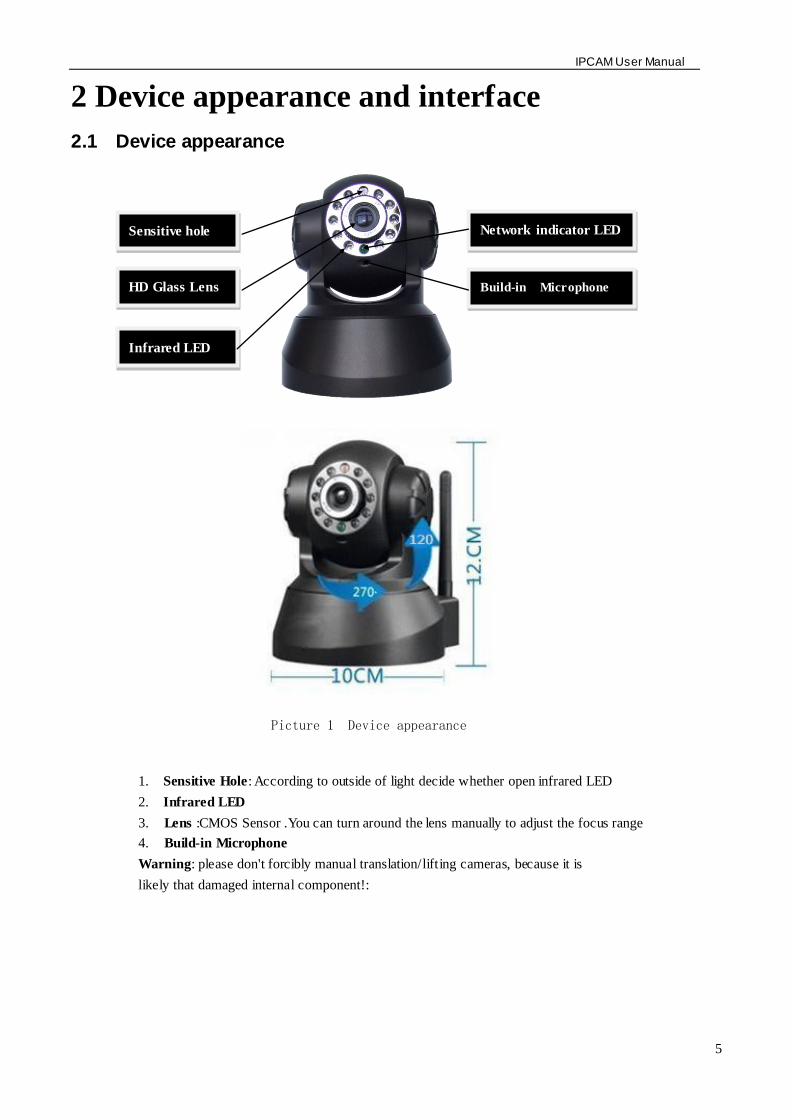
IPCAM User Manual
5
2 Device appearance and interface
21 Device appearance
Picture 1
Device appearance
Sensitive hole
HD Glass Lens Build-in Microphone
Network indicator LED
Infrared LED
1 Sensitive Hole According to outside of light decide whether open infrared LED
2 Infrared LED
3 Lens CMOS Sensor You can turn around the lens manually to adjust the focus range
4 Build-in Microphone
Warning please dont forcibly manual translationlifting cameras because it is
likely that damaged internal component
IPCAM User Manual
6
22 Device interface
Picture 2 Device interface
LAN RJ-4510-100 Base T
DC5V 5V2A Power supply
IO PINS 1)Output(GND) 2)Output (+5V) 3)Alarm input 4)Input (GND) (you can see 356
For more information)
Picture 3 Reset Button
RESET BUTTON Press and hold down the RESET BUTTON for 5 secondsRelease the
power button and IP camera will be reset back to the factory default parameter
3 Device installation System configuration requirements ( Example for view four IP Camera )
CPU 206GHZ or above Memory 512M or above
Network Card 10M or above Display Card Microsoft DirectX 9 Pictur device or above memory
Recommendable Operating System WindowsXPVista Windows 7Windows 8
Support web browser IE Firefox Safari Chrome etc
RESET BUTTON
IO Alarm inputoutput
DC5V Power adapter
WIFI antenna
RJ-45 Ethernet Port
Audio output
IPCAM User Manual
7
31 Install hardware
You should install your IP Cameras hardware according to the following step in order to make sure
the IP camera can work properly Especially pay attention to IP cameras installation environment
1) IPCAM Plug DC adapter with IP camera
INote Please use Dc adapter which is the standard configuration of IP camera Using DC adapter
without any certificate may destroy IP camera
2) Plug cable with IP camera and another side of cable should connect with DSL or route r In additional
make sure power of IP camera work properly and IP camera and PC are in the same Subnet( it can be
LAN and it also can use cable to connect PC and IP camera)
Picture 4 Network connection sketch map
3) When you use IP camera for the first time IP Address of IP camera obtain
automatically(Before using please make sure DHCP Server function in LANs router has
been opened or Server system open DHCP Server function) It is very convenient for users
to use because It is suitable for different LAN NETWORK environment
IPCAM User Manual
8
Picture 5
4) You can search PC IP and DNS Server as belows
Picture 6
This is DNS Server
address which is provided
by network server
IPCAM User Manual
9
5) The device IP Address can be changed but Its IP address should be at the same with PCs
subnet
Picture 7
When we test IP camera and check whether it starts smoothly or it connects properly we can
operate in the Windows(START- RUN-CMD) and then input ping 1921681111 in the order windows
Picture 8 ping IP Camera
Check whether it can Ping IP camera If yes then it means IP Camera has been worked properly
and connected correctly
Network server provide
DNS server Address
Device IP address can
be changed by yourself
IPCAM User Manual
10
32 Software installation
Software installation
It is very easy to install software You just need to run installation programme then it can
work properly
Please put CD in the PC driver and the CD will automatically run to the software installation
interface
If no such an interface please click ldquoautorunexerdquoin the CD
And then findldquosearchexerdquo Clink and install LAN Tool to PC systemthen you
can view IP Camera Tool in Computer desktop for LAN Search toolldquoIP Camera Toolrdquo
G
Picture9 Software installation interface
MinOpen user manual ExitUser manual
Search tool in LAN Application Tool box Quick installation guide Open CD
IPCAM User Manual
11
4 Visit IP camera in LAN 41 Connection ways in LAN
Picture 10 Connection between Several IP camera and router
42 Search and set device IP address Please note before searching IP camera
1Make sure IP camera has a good connection with power and network
2Te router should be opened DHCP(Dynamic host configuration protocol) because the factory setting status of
IP camera is to obtain automatically IP camera
3When we power IP camera we should wait 20 second then it can works
Search IP camera
When we run Search tool IP camera Tool we can find the IP camera showing IP address Port
Name If we use Wi-fi connection we will find Wi-fi IP address For the details we can view
the following picture
Picture 11
NoteldquoIP Camera ToolexerdquoProgramme only use to search IP camera address and port in the
LAN The tool cant search IP camera IP address and port in the WAN
There are 3 cases
1 No IP Camera found within LAN After about 1 minute search the Result Field will
show ldquonot found IP Serverrdquo
2 IP Cameras having been installed within LAN All the IP Cameras will be listed and the
total number is displayed in the result field as shown in Picture 20
3 The IP Cameras installed within LAN do not share the same subnet with the monitoring
PC A prompt as shown in result field (prompt Subnet doesnrsquot match dbclick to change)
Click the left mouse button to choose the prompt and click the right mouse choose
Network Configuration to set the IP address of the Camera to the same subnet as LAN
IPCAM User Manual
12
SIX Options
Choose the IP Camera list and Click right mouse button there are six options Basic
Properties Network Configuration Upgrade Firmware Refresh Camera List Flush Arp About IP camera tool as
shown Picture 12
Picture 12
Basic Properties
There is some device information in the Bas ic Properties such as Device ID System
Firmware Version Web UI Version
Picture 13
Network Configuration
In this page you can configure the Network parameter
Picture 14
IP address Fill in the IP address assigned and make sure it is in the same subnet as the
Subnet Mask The default subnet mask of the equipment is 2552552550
Gateway Make sure it is in the same subnet with PC IP address Default Gateway
IPCAM User Manual
13
address is 19216811
DNSServer IP address of IPS network provider ( It also can view from network card local area connection
status) As blows picture
Picture 15
Http Port LAN port assigned for the equipment usually 80
User amp Password Default administrator usernamepassword adminNo password
Enable Using DHCPthe system will assign a reasonable IP address for your equipment
only if your gateway supports DHCP (It is the case with most gateways)
DHCP checkbox if checked the device will obtain IP from DHCP server (To be make
sure the Router which the device connect with has DHCP function)
NOTE when the prompt rdquosubnet doesn‟ t match double click to changerdquo please set the
IP Camera IP address once again
Upgrade Firmware
Enter the correct User and Password to upgrade system Firmware and Web UI (User should have administering
authority
Picture 16
This is the server provide the
service of DNS
IPCAM User Manual
14
Refresh Camera List
Refresh camera list manually
Flush Arp Buffer
When cable network and wireless network of the device both are fixed IP address There
is a problem you may encounter is can search the camera IP but canot open the camera
web pageyou may try to use flush arp buffer
About IP Camera tool
You can view IP camera tool version and ActiveX version
43 Login IP camera
Double click the IP address of the IP Camera listed IE will be opened automatically and display the camera login
page Or Access the camera by IE browser directly type in the camera‟ s IP address For
example http19216811118999 ( We suggest you use IE browser for it has more function
Picture 17
IP camera Default username is admin no password And Click ldquoSign inrdquo to enter the monitoring page
Default usernameadmin
Default passwordNo password
IPCAM User Manual
15
Picture 18
Picture 19
middot When Users login inthey can view images At the same time users(Administrator Operator or Visitor) can operate according to their permissions
By Firefox and sofari browser as below
Language options you can
choose operation language
according to your demand
IPCAM User Manual
16
Picture 20
Picture21
IPCAM User Manual
17
44 IP camera operation
441 For Visitor
For example if is bright the first route is at status of Detection(Only IE Broswer can view it)
Picture 22
The right upper is statuss indicator area which can show 9 IP camera status
When the button is gray it means IP camera didnt connect
Green means IP camera has connected
Yellow means there is something wrong with connection
Red means it is the status of alarm
If you want to detect 4 views need to click this icon
OSD Display date and time on the video You can disable the OSD function or choice other color
(OSDon-screen display)
Snapshot Click icon to snap the picture
REC Click icon into REC mode is stop
Audio Click icon into Audio mode can listen the voice in monitoring range
Talk Click icon into Talk mode and the icon will become Visitor can talk with whom is in the
monitoring range
Note the record file name is device Alias_ Current timeAvi
For example IPCAM_20101011134442Avi
It means the device alias is IPCAM and its recordrsquos end time is At 134442 on
October 11 2010When use motion detection and checked Send Mail on Alarm
Buttom for taking picture
S top monitor video
Open vedio
Record
Two way audio Monitor audio
IPCAM User Manual
18
The name of the picture received in mailbox is like this device id(Alias)_ Current
timejpg
442 For operator
When login as operator you can operate PanTilt and adjust video parameter
Picture 23
Direction control click the different arrow will get different direction view
Vertical patrol
Horizontal patrol
Stop patrol
IO output Switch on off
Infrared light software control switch
Image fluctuation flip(up and down)
Image around flip (right and left)
Set Preset (can set 4 preset)
ResolutionVGA(640 X 480) QVGA(320 X 240)
Work Mode 50Hz60HzOutdoor
color parameterClick or can adjust brightness and contrast
Stop patrol
Vertical patrol
Horizontal
patrol
Image fluctuation flip
Image around flip
IO output S witch on off
Set Preset
Infrared light s witch
IPCAM User Manual
19
443 For Administrator
When you login as administrator
you can set all parameters Please
click ldquoFor Administratorrdquo
and enter into
setting interface
Picture 24
Alias Settings You can Input the new name as you like
Data ampTime Settings Data ampTime Settings page
Users Settings Eight accounts are acceptable for this system Here the eight users can configure their
user names and password as Administrator Operator or Visitor
Visitor In this mode you can only view
Operator You can control the direction of IP Camera and set some parameter
Administrator You can setup the advanced configurations of the IP Camera
UpnP Settings If you access IP Camera to be make sure UpnP Status is Succeed
Upgrade Device Firmware Upgrade Device Firmware and device embeded web UI software in this
page
Restore Factory Settings Restore factory settings of the device
Reboot Device Reboot the device
Back Back to Monitoring Mode
View Device IDDevice Firmware
Version and Device Embedded
Web UI Version
Check Device all kinds of
status
Carry on Settings and
operation function
IPCAM User Manual
20
5 Visit IP Camera in internet
51 Connection way in Internet
Picture 25
52 Related setting and login IP camera
1 If the network your IP camera using is using static IP you just need to input this IP address and IP cameras port in the browser then it can visit Ip camera
2 If you are using ADSL to dial-up and surf on line you should obtain IP Camera Current WAN IP Address or configured DDNS
1)There are four ways for you to obtain WAN IP Address
①Using mail to send internet IP function
After setting mail successfully IP will send mail to your receiver e-mail box when Internet IP or port
has changed If it is dynamical IP users need to input this IP address to visit this IP camera
②Obtain from some website
It is very easy for you to obtain WANS IP address You can open browser on the computer on the
condition that IP camera and PC are the same subnet For example httpwwwwhatismyipcomor
httpwwwmyipcn etcsIt will tell you WANS IP address as shows below
Picture 26
③Obtain from MSN and IP cameras MSN ACCOUNT( Details 73)
IPCAM User Manual
21
④ Obtain from router
We take Nur8555M from Xinxiang s router as example
AAccording to routers manual we get Routers IP is 19216811
BLogin in router Input 19216811 in the browser Find the status of Router and find Routers
WAN( In this example WANS IP is 11624235122 As shows Picture 27
Picture 27
Now you can visit IP Cam from Internet What you should do is to Input correct IP address For
example Http 116242351228999
Note Make sure the Ports UPNS is available You can open UPNP via the following ways
Enter into Routers setting page( Details Routers user manual) to make UPNP available
Or enable virtual mapping function Add equipment IP address and port to the virtual mapping list
Picture 28
Users can access the Internet from IPCAM device Input address For example Http 116242351228999
2)DDNS (dynamic DNS) service is the Internet domain name can be fixed and dynamic IP address real-time
corresponding (analysis) service Simplely said whenever user surf on internet or what kind of way you are
using the Internet get a what kind of IP address IP address whether it will change DDMS can ensure that a
fixed domain name can access to a users device
IPCAM User Manual
22
Our products have been configured the DDNS services of course you can also apply for the domain name in
registration website for one of your own domain name to configuration For example wwwdyndnsorg
Picture 30
You need fill in DDNS and port for example(httpicam0001ihome365org8999) The browser will jump
to IP camerarsquos login page
Picture 31
DDNS inside
Factory DDNS
IPCAM User Manual
23
The input device user name and password to login to equipment
Picture 32
middotIf input domain name but cant open IP camera in the browser such as the situation is as blows
middotPlease open the device and check status of IP camera in the local area network confirm whether UPNP
function and DDNS is successful or not
Picture 34
IPCAM User Manual
24
middotYou need to set port mapping function successfully to check whether the router UPNP function is
available if It was unavailable please make it available refer to the routers user manual
If you use TPLINK router please refer to these instructions
middotThrough the upnp automatic mapping port to the network input router IP address in the browser (such
as http19216811 gt the router IP addresses are written on paper label on the router house---- please set
according to your own IP address) open the routers page forward rules gt gt upnp set to ensure that the
current state of upnp is already available as below
Note some of the router interface without UPNP Settings option then need to open the virtual server IP
cameras in the local area network of mapping the connection IP address and port number
Picture 36
6 Access IP camera via mobile equipment
such as mobile phoneIpad Etcs There are two kinds of ways to access IP camera One is to input IP address in browser directly It can be IP
address and also can be DDNS Another is to use clients to visit
61 Input IP address in browser
1 We take IPAD as example as blows
IPCAM User Manual
25
middotOpen browser Safari
Input IP cameras IP address for example( httpicam0001ihome365org8999)
Choose language according to your demand and choose login mode according to your browser
Picture39
Choose manual settings
Open browser Safari
Enter the IP address of the IP camera
(httpicam0001ihome365org8999)
IPCAM User Manual
26
enter your account and password on the login page as shown By defaultadministratorrsquos username is
admin and no password
Select Server Refresh mode landing
Picture42
Input the username and password of
the network camera
Here you can choose between two
modes landing
Here to select the
operating language
Default passwordNo password
IPCAM User Manual
27
Select Server Push mode landing
Picture 43
2 Now we take Android system device as example
Open menu and firstly open the browser and input IP camera s IP address in the
browser for example(httpicam0001ihome365org8999)
Picture 44
Input IP cameras username and password and click sign in and then enter into
browser model to choose login-in interface
Open menu
IPCAM User Manual
28
Picture 45
62 Install client-side software to access IPCamera
There are many client software support IP camera several third-party software support our IP cameras too
The following are our manufacture software setup process(the Android version)
1 Pls get the install applications in the CD or you can download from the website
httpsplaygooglecomstoresearchq=reecamampc=apps Choose the right
①installation file-ipcameraapk
running environment Android version 16 or above
Note Please ensure that mobile phones can connect to the Internet before install
② Install method
21 Insert SD card into Android mobile phone
22 Connect the cellphone to computer via USB data cable
23 Choose the USB connection model on your cellphone you can see the SD driver in ldquomy computerrdquo
24 Copy the ipcameraapk into SD card
25 Disconnect the device pls find the ipcameraapk in ldquoFile Managementrdquo and run it
26 The ipcamera application will be show up on the home screen after you successfully installed
③Software operating processes
First ensure that the Internet open WIFI connection the search in the Play in The Googl Android
application reecam
Open the WiFi
connection
Download and install
the application
Search reecam
IPCAM User Manual
29
middotYou can edit the camera modify camere configuration and delete camera operation
Click here to add
a video camera
Select to add to the
client camera
Refresh LAN cameras
View or change the
configuration of the
camera the camera
name at random
IP address
Http port
The default password is blank
Camera name
Prev iew camera
Preview the
camera screen
save the camera
Editor has added
cameras
Edit camera
configuration
Delete the camera Edit camera of the
configuration
IPCAM User Manual
30
middotFor the camera added to the camera list you can watch camera in real time
Control cameras PTZ and set swith-on and switch-off of the cameras audio int
ercom and video
Picture 51
2 The IPCamera setting process for iPhone iPad
Firmware requirements compatible with iPhone iPod touch and iPad
Systerm requirements Requires iOS 42 or above
You can download the genuine
software
(ipcameraapp) form the App Store
httpitunesapplecomcnappreecamid479468959mt=8
middotSoftware operating process is as follows
Continue to add
the camera
Add external network
camera domain
Cameras have
been added
Audiointercom video switch
A list of cameras and
video can be switched to
view
Fingers sliding PTZ control
Click on the picture to stop
rotation
IPCAM User Manual
31
Open the App Store search
reecam
Download and install
reecam
The run has been
installed good reecam
program
Click to add cameras
Search reecam
IPCAM User Manual
32
Fill in the domain address
or IP address
Fill in the Http port of the
camera login user name
and password click next
to open the camera
Completed please
click here
Preview videoclick on the
next save
Save the camera added
Selected camera to
view images
Click image to expand
more cameras
operating functions
IPCAM User Manual
33
7 Other setting
71 Network Setting
711 Basic Network Settings
If the router that the IP camera connect has DHCP function you can choice ldquoObain IP from DHCP Serverrdquo
else fill in the network parameters manually
Http Port In most cases you can leave this value as 80 however if your Internet
Service Provider blocks this port you may switch to another port number such as 85808088889000 Etcs
(Range from 0 to 65535 pay attention to the same segment of multiple devices must set up different port The
port t canrsquot have any conflict with other software or equipment
a Search tools modification in LAN
Figure58
brdquoFor administorrdquo ldquoBasic network settingrdquo -Change the port
Figure59
712 WIFI Setting
1) Please enter the wireless net setting page of the wireless Router to find out SSID
Channel(less than 10) Encryption Authentication as below
Selec IP Camera clickright mouse button choice network configurat ion
Set port number
Set Network IP
Set Http Port Number
IPCAM User Manual
34
Figure 61
As Administrator to Login camera open wireless LAN Settings page fill in every
Setting (ensure keep the same as routerrsquos ) and then pulled out of the cable wireless network function can be
used For example as shown in belows
Figure62
Pls click the scan buttom twice
IPCAM User Manual
35
Figure 63
713 Adhoc point to point Wireless connection Setting
1) Open the basic network setting interfacecheck the device status
Picture 64
2) Open the wireless lan setting interface choose Adhoc for network type you
can define SSID such as 001
remember the IP address of
IP camera and Http port
Click the Settings Ip Camera will
restart and save
Double click to choose
Fill the encryption and
routers and key in the
same way
IPCAM User Manual
36
Picture 65
3) Unplug the RJ45 from IP camera Use laptop or other devices which are with
wifi function( include smart phoneipad and so on) searching the SSID you defined
on proccess 2then make a connection
Picture 66
middotClick wireless network and check the link status of ip camera Please note IP
address of your connected laptop must be the subset of your ip camera if not
please reset the ip address of your laptop manually
Picture 67
4) Now we can use the ip camera tool or enter ip address of camera derectly in
browser blank to visit
1 visit by ip camera tool
Picture 68
IPCAM User Manual
37
2Enter ip address in the browser
Enter user name and password in the login interface
Picture 69
Click ldquoSign inrdquoand vis it
Picture 70
IPCAM User Manual
38
72 Multi-Device Settings
Add cameras in LAN
In the Multi-Device Settings page you can see all devices searched in LAN The 1
St Device is this device in default You can add more cameras list in LAN for monitoring This Web software
supports up to 9 IP Cameras online simultaneous ly Click ldquoThe 2ND
Devicerdquo and Double click the item in the ldquoDevice List in LANrdquo AliasHost and Http Port
will fill in automatically Enter the correct username and password then click ldquoaddrdquoAdd
more cameras in the same way At last please donrsquot forget the ldquo settingrdquo Button
Picture 71
Add cameras in the Internet
Firstly make sure the camera added can access in the Internet with the IP address or
DDNS domain Like this http2191332001669999or httpIPcamdyndnsorg9999You can enter the
Host 219133200166 Http port 9999 or Host IPcamdyndnsorg Http port 9999 Enter the correct
username and password then click ldquoaddrdquo Add more cameras in the
same way
Picture 72
IPCAM User Manual
39
Picture 73
73 MSN Settings
Fill in your MSN account and password then add account which need to receive
IPCAMrsquoS ip address to IPCAM‟ S MSN list (Picture 67)click submit then yoursquod better
restart IP camera After it login your MSN to add IPCAMrsquos MSN account to MSN List that
you can receive IPCAMrsquos ip address
Picture 74
First login and click add contacts choose Add Contact then fill IPCAMrsquos MSN account in instant
messaging address click next then send offers
Aplly for MSN account and passworf for IP cam
Add about 10 MSN Accout
IPCAM User Manual
40
Figure75
Next
Figure76
Figure77
When IPCAMrsquos MSN account shows online you can chat with it input path command url camera
account will show its IP address in chatting box promptly as below
IPCAM User Manual
41
Picture 78
You can input the IP address to browser then can browse ip camera as below
Figure79
AttentionYou should fill MSN account in IPCAM first
74 DDNS Service Settings
DDNS Service The system supports protocols from some DDNS providers Dyndnsorg System support
DDNS such as topipcamorgpeanut shell3322orgDynDNS
provided IP
IPCAM User Manual
42
User and Password the user name and password used when applying for the domain
name (details 432)
DDNS Host the Domain Name
741 Factory DDNS
Device had distributed one DDNS to every productwhich was sticked the bottom
of the product Such as
manufacturer had already give every device a DDNS address which is unique Users only need to fill in this
DDNS IP ADDRESS and port in the browser then they can monitor remote IP camera
Picture 80 Factory DDNS
Note When use the domain name access to the camera and UPNP is not successful you must set port
mapping function on routers
742 The third part DDNS
Users can use not only Factory DDSN but also can use third part DDNS System Such as domain name
wwwdyndnsorg The only thing the user need to do is to apply a free DDNS and then fill in ldquoset boxrdquo as below
Save this setting and this DDNS can be used
DDNS Hostname
Factory DDNS
IPCAM User Manual
43
Note the third party domain name is the realization of analytical way input the domain in the browser it will
keep this string of characters If the port of the device isnrsquot 80 then need to add colon and port number For
example httpwell888dyndnsorg8999
75 Mail and FTP Service
1)Configure the E-mail box to receive and send mails The E-mail box is used for receiving
the images sent after alarm and the system IP address after successful dial-up
Note When Alarm Service Settings-gt Send Mail on Alarm is check the Mail
Service takes effect
Picture82
Configure the E-mail box to receive and send mails The E-mail box is used for receiving the images sent
after alarm and the system IP address after successful dial-up
Sender This device use the sender mailbox to send mails
Receiver To receive the mail from the Sender You can set up to 4 receiver mailbox
SMTP Server the SMTP server for the sender mailbox
Need Authentication if the sender mailbox need authentication you should check it then
input the SMTP username amp Password
Mail test Please set the Mail parameter and click Submit first There are Mail test result
Picture 83
video Local storage in PC after alarm monitoring
IPCAM User Manual
44
Gmail also set as the same It only needs you to fill in correct SMTP Sever address user and password
Picture 84
Mail notes Internet IP address In this option When Internet IP and port have changed IP Will be sent via
1Can not connect to the server
2Network Error Please try later
3Server Error
4Incorrect user or password
5The sender is denied by the server Maybe the server need to authenticate the user please check it
and try again
6The receiver is denied by the server Maybe because of the anti-spam privacy of the server
7The message is denied by the server Maybe because of the anti-spam privacy of the server
8The server does not support the authentication mode used by the device
Report Internet IP by Mail When ipcam port or Internet IP changed it will send the internet IP by
mail(for example IPCAM s url is http119123207969002) Make sure the port is map to the router
correctly by UPNP or Virtual Map function
2) FTP Server use and settings
middotIf you already have an FTP Server (ipcam com)and email ipcam you can fill the
parameters as below
Picture 85
IPCAM User Manual
45
middotFTP Server of LAN as below
1 Create an account
2 Step by step setting until finish it
Picture 88
IPCAM User Manual
46
3Start Server
Continue to finish it
Picture 89
4IPCAMrsquoS account can be used
Picture 90
Save path
This is a FTP
server address
IPCAM User Manual
47
5 IP camerarsquos FTP Server set like this
Picture 91
6 Set up and complete testing is successfulwhen it alarms IP camera will upload
pictures to the FTP server Settings of main directory path (as shown )
Picture 92
FTP Server the FTP server address
FTP port the port usually is 21
FTP Mode support standard(POST) mode and passive(PASV) mode
Upload Image Now it will upload image now when checkbox is not checked When checked you can
input upload interval(Seconds)
76 Motion Detection
Enter Alarm Service Settings page to configure Motion Detection function
1) Motion Detect Armed
Each alarm triggers in the protection of time the device will take various measures to alarm
IO linkage alarm output relay closure external alarm device began to alarm
IPCAM User Manual
48
Send E-mail alarm informatio
Transmit pictures to the FTP server and can set the time interval of sending pictures
2) Alarm t ime Settings
Only in the alarm period detection device to alarm will only have alarm action All the time (not check the
schedule) also can alarm within specified time For the specified time alarm firstly need to set up the system
time time zone and then to choose period of alarm in the state of alarm setting as shown in Picture 19
Picture93 Alarm of time Settings interface
Motion Detect Armed
When you enable motion detect armed the camera can be triggered to send email alerts
and record images In the camera monitoring page the green icon turn to red and an
alert sound you will hear
Motion Detect Sensibility
You can choose from low to high 10 level alarm sensitivity The greater the number the higher the
sensitivity
Alarm Input Armed
IO PINS1) Output(+5V) 2) Output 3) Alarm input 4) Input (GND)
Input Pins The input pins can be used for 1-way external sensor input(pin3 and pin4) For example
you may connect a Person Infrared Sensor (PIR) to it for motion detection When external sensor
triggered IPCAM can be programmed to send an email with picture or control the internal relay output
IPCAM User Manual
49
Picture94
IO Linkage on Alarm
Enable IO linkage on alarmPin1 will output +5V when alarm triggered and output LOW
when alarm release automatically
Switch onoff buttons control Pin1 output manually
Send Mail on Alarm
Sent picture and mail inform to customers e-mail after alarmed(firstly you should finish
the Mail Service Settings)
Picture 95
Upload Image on Alarm
Enable upload image on alarm and set upload interval(Seconds)
Tick send to your setted mails
IPCAM User Manual
50
Picture 96
REC automatically and save to PC
When you enable motion detect and open the camera monitoring page on the PC If
there is an alarm triggered REC will start automatically for several seconds and save to
the PC
Picture 97
REC save to pcrsquos position
Picture 98
Storage path can be changed
After Setting up later when have the
alarm the image will send to
designated email and FTP server
IPCAM User Manual
51
77 IP cameras Time amp Date setting and PTZ Setting
If IP camera connected with Internet it can automatically check the time amp date via running NTP Server And
need to choose properly IP cameras Time zone Otherwise it need PC Time to check IP camera time amp Date
Pre-set and Speed of PT
78 UPGRADE DEVICE FIRMWARE
Picture 101 Firmware upgrade
IP CAMERA has two kinds of programme One is system firmware another is application firmware It can be
upgraded separately
79 BACKUP AND RESTORE SETTING
Click Set in the Backup will lead to a BIN file and choose this file to restore setting
The huger the Number is The
slower it will be
IPCAM User Manual
52
8 APPENDIX
81 REGISTER AND APPLY FOR DDNS SERVICE
1Users use DDNS management system first timeUsers need to apply account to manage
and inquire the domain state
Step1 enter httpwwwdyndnscom and Create Account( Fill in Domain Name dyndnsorg then Click
Add)
Figure103
Step2 enter your information
Figure104
IPCAM User Manual
53
Figure105
Step3 After a minute you will receive an E-mail from DynDNS Support and it will give you a
confirmation address
(eg httpsaccountdyncomemlcreateconflILHMZHRje5oF_6YXTYv1A
Figure106
IPCAM User Manual
54
Step4 Open the link to active your Domain Name as belowLogin in your account after it is activated
Figure107
Step5 Check all the DDNS serviceswe choose the 14-day-trial
Figure108
Step6 Click the linkand user will see as below
IPCAM User Manual
55
middotenter your information
Figure109
Step7 Now you obtained a Dynamic Domain Name(Figure 105)and can use it in the DDNS Service
Settings(details 74)
Figure110
IPCAM User Manual
56
2For DDNS which is applied successfully you can fill in the IP CAMERA When set successfully the status
of IP will be shown as blows
picture 111
picture 112
3How to set DDNS on line
The first wayMenu rdquostartrdquo- ldquorunrdquomdashgt Input CMDClink rdquoenterrdquoIt can check DDNS Statas
via As shown below
Picture 113
IPCAM User Manual
57
Through the PING command this dynamic domain name can be back in the network response information It
proves that the domain name has been online
If the domain name update not success Possible reasons
(1) DDNS parameter is not correct (2) may cause DNS address configuration is wrong
82 Some special application for IPCAMERA
IPCamUse some grammar parameter control and Use IPCam
useruser
pwdpassword
priThe current access (1 visitors 23 operator managers)
resolutionImage resolution(832024 0qvga32640480 vga)
ratemage transmission speed and scope 0-23
brightnessbrightness0~255
contrastcontrast0~6
mode
Mode 050 hz For
60 hz 2 outdoor
flip
Flip rotation 0 primitive 1 vertical reverses 2 horizontal 3 vertical flip + horizontal
821 The flow media player VLC player and mplayer can real-time broadcast ipcamera and send
of streaming media format video data
(Grammar parametersvideostreamasfuser=amppwd=ampresolution=amprate=)
As shown Picture 113 rdquoIpcamrdquo
Picture 114
IPCAM User Manual
58
From the following picture we can view that Ipcam local IP address ishttp19216811118999
WAN IP Address is httpwell888dyndnsorg8999 we can inputrdquoIPcamrdquorsquoS IP address to
open in the player
Picture 115
the CLC media player open play position
Picture 116
LAN play address
Picture 117
IPCAM User Manual
59
Picture 118
Open the Internet play position
Picture 119
As shown in the following picture It can see the ipcamera send video streaming format
Size 640X480
User
IPCAM User Manual
60
Picture 120
83 Frequently Asked Questions
Note1) Any question you would meet please check Network connections firstly
2)Check the working status revealed by the indicators on the network server hub exchange and
network card If abnormal check the network connections
831 I have forgotten the administrator username andor password
To reset the administrator username and password Press and hold down the RESET
BUTTON for 5 seconds Release the power button and the username and password
will be reset back to the factory default administrator username and password
Default administrator username admin
Default administrator password No password
832 IP Address configuration
Check whether IP address of the IP Camera server shares the same subnet as your
work station Click My Computer gt Control PanelgtNetwork amp Dial-up Connections gt
LAN gt Attributes gtInternet Protocols (TCPIP) and check IP Address and Subnet
Mask Make sure they are in the same subnet when configuring IP Camera IP
address manuallyUnable to access IP Camera via web browser
833 Network Configuration
Double Check to ensure that your HTTP server software is configured and running
properly If you are running any firewall software make sure it is allowing inbound
connections to port 80Also if you happen to be using a cableDSL router make sure
IPCAM User Manual
61
you are set up port forwarding properly ( consult your router is documentation for more
information ) If none of these seem to be the problem it is also possible that your
ISP is blocking inbound connections to port 80 ndashmany IPSs have done this because
of internet worms such as Code Red If this is the case you bdquoll have to setup your
HTTP server on an alternate port (such as 8080)
834 No Monitoring picture
It has four reasons Images of the abnormal factors
1If its not use Directx function and lead to not normal to display the color imagePlease
install DirectX and open the start menu then input the command
Picture 121
You use the DirectX function and it will expedite the DirectDrawDirect3D and AGP if its can not maybe the
connect issues or hardware not read it
2The issues of hardware canrsquot support the card expedite image
3The antivirus software will influence the network it will be stoped or closedIf you install fireproof software
please close it and try again
4 ActiveX controller is not installed correctly
If its not image on the first time to use and will display to the user through the ActiveXIf its can not
display of the image maybe it fail of install about this issues please follow as
1Install ldquoIP Camera Toolrdquo ActiveX control at the same time
2Please install ActiveX control and keep the security settings for IE browser
835 Problems with network bandwidth
The image frame rate is subjected to the following factors 1network bandwidth 2 PC
performancenetwork environment and display preference setting (brightness theme
etc) 3 the number of visitors (Too many visitors will slow down the image frame rate) 4
choice of switch or hub (Use a switch for multiple IP Camera Servers rather than a HUB)
The Device use MJEPT Compression it needs good network bandwidth If it is too narrow it will lead to slowly
browser Typical video parameter occupy network bandwidth as blows
640x48030fps 40 Megabits ~ 50 Megabits
320x24030fps 12 Megabits ~ 16 Megabits
IPCAM User Manual
62
middot836 Why pop-up the prompt ldquoFail to connect to the devicehelliprdquo
This prompt only appeared in the case of using multiple cameras
Enter the Multi-Device Settings page(login as administrator) to check the
Device setting is correct or not
When one of the multiple cameras disconnected the color changed to
yellow and pop-up the promptldquoFail to connect to the devicehelliprdquo
Picture 122
837 Canrsquot access the IPCAM in the internet
There are some reasons
1 ActiveX controller is not installed correctly(see more details 514)
2 The port IPCAM used is blocked by Firewall or Anti-virus software Please change a
port number and try again
3 Port mapping is not success You can do port mapping by two ways
Enter setting page of the router which IPCAM connect with to enable UPnP function
Enter IPCAM ldquoUPnP Settingsrdquo to enable UPnP and make sure the state is ldquoUPnP
successrdquo
‟ s IP
and port to the Virtual map list
When use ADSL the IP is dynamic You should set DDNS(see more details 74 amp 80)
and also make sure port mapping success
84 Operate common problem solving
IP camera tool canrsquot find the camera
Except of the camera broken
1 Make sure the cable connector no problem recommend connector
(AMP)it is with international standard Another note IPCAMrsquos data
transmission channel require higher than computerrsquos so maybe the
IPCAM User Manual
63
computer can run normally but IPCAM canrsquot Please press heavily when making the cable connector
2 Confirm the power supply normally First check whether power indication
light turn on or not If it is onthen check the yellow light on RJ45 Port
(power indication light) and green light (network indication light) are on or
notIf they are onso power supply and cable runs normally
3 Confirm all the firwall and antivirus software are closeThe firewall often
block unrecognized data so if the firewall is running so maybe the IPCAM
TOOL canrsquot find the deviceSuggest to close firewall and antivirus
software temporarily before searching
How to solve the camera blank screen
1 Check if you are using the wrong power adaptorplease use original one
2 Close antivirus software
How to solve the camera canrsquot login by Internet
1 Check if you set DDNS success or not
2 Check the current IPCAMrsquos port number is the same as routerrsquosThey need to keep same
Canrsquot view the monitoring picture
1 Reason canrsquot connect with network
SolutionCheck if the network connect well exclude cable fault and PC virus
cause network fault until can be used between PC and PING
2 ReasonIP address occupy by other device
Solution Choose automatic gain
3 Reason IP address located within different subnet
Solution Check IPCAMrsquoS ip address and subnet mask address and gateway settings
4 ReasonWeb port has been modified
Solutioncontact network administrator to obtain port information
5 Reasonunknown
SolutionPress reset button to factory default statethen reconnectingsysten
default to gain ip address automaticsubnet mask is 2552552550
85 Default Parameters
middotDefault network Parameters
IP address dynamic obtain
Subnet mask 2552552550
Gateway dynamic obtain
DDNS Factory provide
middotUsername and password
Default administrator username admin
Default administrator password No password
IPCAM User Manual
64
86 Technical Parameters
ITEM IP CAM (NIP-02BGPWA2)
Image Sensor
Mage sensor 15 Color CMOS Sensor
Display 640 x 480 (300K Pixels)
Lens f36mm F24 (IR Lens)
Miniillumination 05 Lux
Lens Lens Type Glass Lens
Viewing Angle 60 Degree
Audio Microphone Audio of two way
Domain name Server MSN server DDNS server
Video
Image Compression MJPEG
Image Frame Rate 15 FPS(VGA)30FPS(QVGA)
Resolution 640 x 480(VGA) 320 x 240(QVGA)
Flip Mirror Images rtical Horizontal
mode 50Hz 60Hz or Outdoor
Video Parameters Brightness Contrast
Communication
Ethernet One 10100Mbps RJ-45
Supported Protocol HTTPDHCPIPTCPUDPFTPSMTPDDNSPPPoEUPnP
Mobilephone monitor Support IphoneIpad3G phonesmartphone
Wireless Standard IEEE 80211bg
Wireless Standard 80211b11Mbps(max) 80211g54Mbps(max)
Wireless Security 64128-bitWEP Encryption
Physical
PanTilt Angle Horizontal270deg amp Vertical 120deg
Infrared Light 10 IR LEDs Night visibility up to 15 Mete
Product size 100(L) x100(W) x125mm(H)
Gross Weight 6465gpcs (packing size196x165x123mm)
Net Weight 2547gpcs (only product)
Power Specification DC 5V25A 18 meter
Power Consumption 5 Watts
Environment
Operate Temper 0deg~ 55degC (14degF~122degF)
Operating Humidity 20 ~ 85 non-condensing
Storage Temper -10degC ~ 60deg (14degF ~140degF)
Storage Humidity 0 ~ 90 non-condensing
PC Requirements
CPU 20GHZ or above (suggested 30GHz)
Memory Size 512MB or above (suggested 10GB)
Display card 64M or above
Supported OS Microsoft Windows XPVistaWindows7
Supported browsers IEfirefoxGoogle
Certification CEFCCRoHS
Warranty Limited 1-year warranty
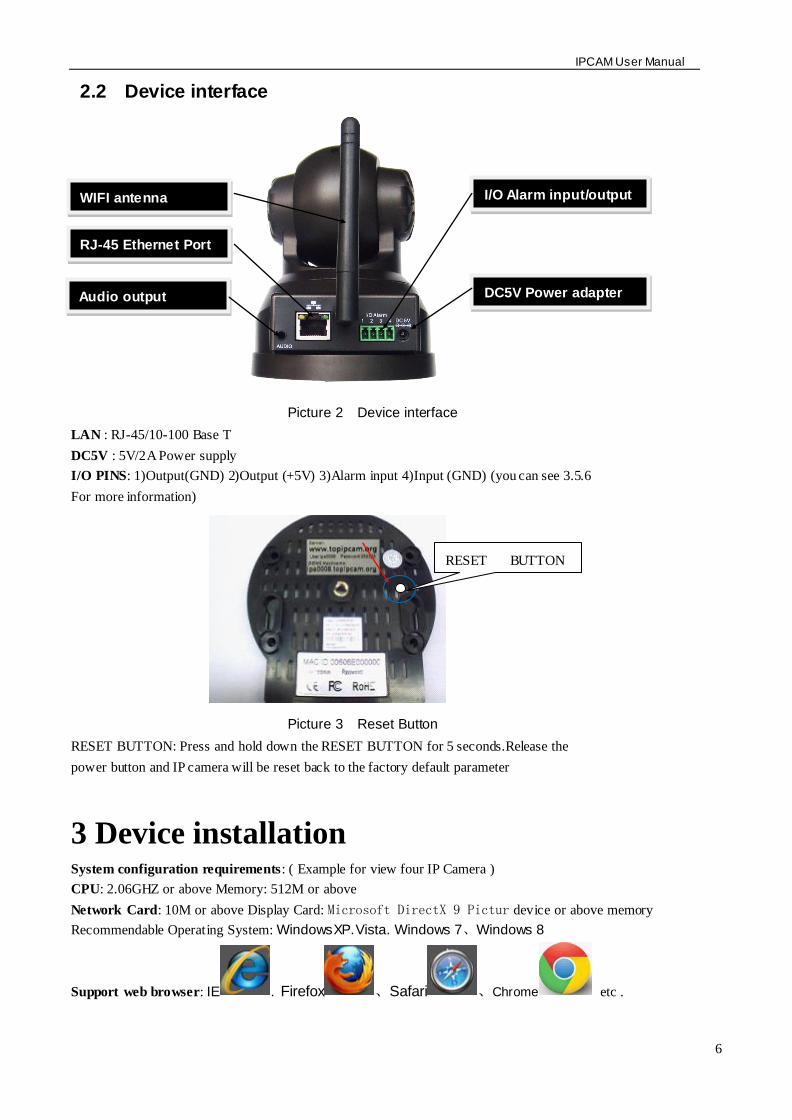
IPCAM User Manual
6
22 Device interface
Picture 2 Device interface
LAN RJ-4510-100 Base T
DC5V 5V2A Power supply
IO PINS 1)Output(GND) 2)Output (+5V) 3)Alarm input 4)Input (GND) (you can see 356
For more information)
Picture 3 Reset Button
RESET BUTTON Press and hold down the RESET BUTTON for 5 secondsRelease the
power button and IP camera will be reset back to the factory default parameter
3 Device installation System configuration requirements ( Example for view four IP Camera )
CPU 206GHZ or above Memory 512M or above
Network Card 10M or above Display Card Microsoft DirectX 9 Pictur device or above memory
Recommendable Operating System WindowsXPVista Windows 7Windows 8
Support web browser IE Firefox Safari Chrome etc
RESET BUTTON
IO Alarm inputoutput
DC5V Power adapter
WIFI antenna
RJ-45 Ethernet Port
Audio output
IPCAM User Manual
7
31 Install hardware
You should install your IP Cameras hardware according to the following step in order to make sure
the IP camera can work properly Especially pay attention to IP cameras installation environment
1) IPCAM Plug DC adapter with IP camera
INote Please use Dc adapter which is the standard configuration of IP camera Using DC adapter
without any certificate may destroy IP camera
2) Plug cable with IP camera and another side of cable should connect with DSL or route r In additional
make sure power of IP camera work properly and IP camera and PC are in the same Subnet( it can be
LAN and it also can use cable to connect PC and IP camera)
Picture 4 Network connection sketch map
3) When you use IP camera for the first time IP Address of IP camera obtain
automatically(Before using please make sure DHCP Server function in LANs router has
been opened or Server system open DHCP Server function) It is very convenient for users
to use because It is suitable for different LAN NETWORK environment
IPCAM User Manual
8
Picture 5
4) You can search PC IP and DNS Server as belows
Picture 6
This is DNS Server
address which is provided
by network server
IPCAM User Manual
9
5) The device IP Address can be changed but Its IP address should be at the same with PCs
subnet
Picture 7
When we test IP camera and check whether it starts smoothly or it connects properly we can
operate in the Windows(START- RUN-CMD) and then input ping 1921681111 in the order windows
Picture 8 ping IP Camera
Check whether it can Ping IP camera If yes then it means IP Camera has been worked properly
and connected correctly
Network server provide
DNS server Address
Device IP address can
be changed by yourself
IPCAM User Manual
10
32 Software installation
Software installation
It is very easy to install software You just need to run installation programme then it can
work properly
Please put CD in the PC driver and the CD will automatically run to the software installation
interface
If no such an interface please click ldquoautorunexerdquoin the CD
And then findldquosearchexerdquo Clink and install LAN Tool to PC systemthen you
can view IP Camera Tool in Computer desktop for LAN Search toolldquoIP Camera Toolrdquo
G
Picture9 Software installation interface
MinOpen user manual ExitUser manual
Search tool in LAN Application Tool box Quick installation guide Open CD
IPCAM User Manual
11
4 Visit IP camera in LAN 41 Connection ways in LAN
Picture 10 Connection between Several IP camera and router
42 Search and set device IP address Please note before searching IP camera
1Make sure IP camera has a good connection with power and network
2Te router should be opened DHCP(Dynamic host configuration protocol) because the factory setting status of
IP camera is to obtain automatically IP camera
3When we power IP camera we should wait 20 second then it can works
Search IP camera
When we run Search tool IP camera Tool we can find the IP camera showing IP address Port
Name If we use Wi-fi connection we will find Wi-fi IP address For the details we can view
the following picture
Picture 11
NoteldquoIP Camera ToolexerdquoProgramme only use to search IP camera address and port in the
LAN The tool cant search IP camera IP address and port in the WAN
There are 3 cases
1 No IP Camera found within LAN After about 1 minute search the Result Field will
show ldquonot found IP Serverrdquo
2 IP Cameras having been installed within LAN All the IP Cameras will be listed and the
total number is displayed in the result field as shown in Picture 20
3 The IP Cameras installed within LAN do not share the same subnet with the monitoring
PC A prompt as shown in result field (prompt Subnet doesnrsquot match dbclick to change)
Click the left mouse button to choose the prompt and click the right mouse choose
Network Configuration to set the IP address of the Camera to the same subnet as LAN
IPCAM User Manual
12
SIX Options
Choose the IP Camera list and Click right mouse button there are six options Basic
Properties Network Configuration Upgrade Firmware Refresh Camera List Flush Arp About IP camera tool as
shown Picture 12
Picture 12
Basic Properties
There is some device information in the Bas ic Properties such as Device ID System
Firmware Version Web UI Version
Picture 13
Network Configuration
In this page you can configure the Network parameter
Picture 14
IP address Fill in the IP address assigned and make sure it is in the same subnet as the
Subnet Mask The default subnet mask of the equipment is 2552552550
Gateway Make sure it is in the same subnet with PC IP address Default Gateway
IPCAM User Manual
13
address is 19216811
DNSServer IP address of IPS network provider ( It also can view from network card local area connection
status) As blows picture
Picture 15
Http Port LAN port assigned for the equipment usually 80
User amp Password Default administrator usernamepassword adminNo password
Enable Using DHCPthe system will assign a reasonable IP address for your equipment
only if your gateway supports DHCP (It is the case with most gateways)
DHCP checkbox if checked the device will obtain IP from DHCP server (To be make
sure the Router which the device connect with has DHCP function)
NOTE when the prompt rdquosubnet doesn‟ t match double click to changerdquo please set the
IP Camera IP address once again
Upgrade Firmware
Enter the correct User and Password to upgrade system Firmware and Web UI (User should have administering
authority
Picture 16
This is the server provide the
service of DNS
IPCAM User Manual
14
Refresh Camera List
Refresh camera list manually
Flush Arp Buffer
When cable network and wireless network of the device both are fixed IP address There
is a problem you may encounter is can search the camera IP but canot open the camera
web pageyou may try to use flush arp buffer
About IP Camera tool
You can view IP camera tool version and ActiveX version
43 Login IP camera
Double click the IP address of the IP Camera listed IE will be opened automatically and display the camera login
page Or Access the camera by IE browser directly type in the camera‟ s IP address For
example http19216811118999 ( We suggest you use IE browser for it has more function
Picture 17
IP camera Default username is admin no password And Click ldquoSign inrdquo to enter the monitoring page
Default usernameadmin
Default passwordNo password
IPCAM User Manual
15
Picture 18
Picture 19
middot When Users login inthey can view images At the same time users(Administrator Operator or Visitor) can operate according to their permissions
By Firefox and sofari browser as below
Language options you can
choose operation language
according to your demand
IPCAM User Manual
16
Picture 20
Picture21
IPCAM User Manual
17
44 IP camera operation
441 For Visitor
For example if is bright the first route is at status of Detection(Only IE Broswer can view it)
Picture 22
The right upper is statuss indicator area which can show 9 IP camera status
When the button is gray it means IP camera didnt connect
Green means IP camera has connected
Yellow means there is something wrong with connection
Red means it is the status of alarm
If you want to detect 4 views need to click this icon
OSD Display date and time on the video You can disable the OSD function or choice other color
(OSDon-screen display)
Snapshot Click icon to snap the picture
REC Click icon into REC mode is stop
Audio Click icon into Audio mode can listen the voice in monitoring range
Talk Click icon into Talk mode and the icon will become Visitor can talk with whom is in the
monitoring range
Note the record file name is device Alias_ Current timeAvi
For example IPCAM_20101011134442Avi
It means the device alias is IPCAM and its recordrsquos end time is At 134442 on
October 11 2010When use motion detection and checked Send Mail on Alarm
Buttom for taking picture
S top monitor video
Open vedio
Record
Two way audio Monitor audio
IPCAM User Manual
18
The name of the picture received in mailbox is like this device id(Alias)_ Current
timejpg
442 For operator
When login as operator you can operate PanTilt and adjust video parameter
Picture 23
Direction control click the different arrow will get different direction view
Vertical patrol
Horizontal patrol
Stop patrol
IO output Switch on off
Infrared light software control switch
Image fluctuation flip(up and down)
Image around flip (right and left)
Set Preset (can set 4 preset)
ResolutionVGA(640 X 480) QVGA(320 X 240)
Work Mode 50Hz60HzOutdoor
color parameterClick or can adjust brightness and contrast
Stop patrol
Vertical patrol
Horizontal
patrol
Image fluctuation flip
Image around flip
IO output S witch on off
Set Preset
Infrared light s witch
IPCAM User Manual
19
443 For Administrator
When you login as administrator
you can set all parameters Please
click ldquoFor Administratorrdquo
and enter into
setting interface
Picture 24
Alias Settings You can Input the new name as you like
Data ampTime Settings Data ampTime Settings page
Users Settings Eight accounts are acceptable for this system Here the eight users can configure their
user names and password as Administrator Operator or Visitor
Visitor In this mode you can only view
Operator You can control the direction of IP Camera and set some parameter
Administrator You can setup the advanced configurations of the IP Camera
UpnP Settings If you access IP Camera to be make sure UpnP Status is Succeed
Upgrade Device Firmware Upgrade Device Firmware and device embeded web UI software in this
page
Restore Factory Settings Restore factory settings of the device
Reboot Device Reboot the device
Back Back to Monitoring Mode
View Device IDDevice Firmware
Version and Device Embedded
Web UI Version
Check Device all kinds of
status
Carry on Settings and
operation function
IPCAM User Manual
20
5 Visit IP Camera in internet
51 Connection way in Internet
Picture 25
52 Related setting and login IP camera
1 If the network your IP camera using is using static IP you just need to input this IP address and IP cameras port in the browser then it can visit Ip camera
2 If you are using ADSL to dial-up and surf on line you should obtain IP Camera Current WAN IP Address or configured DDNS
1)There are four ways for you to obtain WAN IP Address
①Using mail to send internet IP function
After setting mail successfully IP will send mail to your receiver e-mail box when Internet IP or port
has changed If it is dynamical IP users need to input this IP address to visit this IP camera
②Obtain from some website
It is very easy for you to obtain WANS IP address You can open browser on the computer on the
condition that IP camera and PC are the same subnet For example httpwwwwhatismyipcomor
httpwwwmyipcn etcsIt will tell you WANS IP address as shows below
Picture 26
③Obtain from MSN and IP cameras MSN ACCOUNT( Details 73)
IPCAM User Manual
21
④ Obtain from router
We take Nur8555M from Xinxiang s router as example
AAccording to routers manual we get Routers IP is 19216811
BLogin in router Input 19216811 in the browser Find the status of Router and find Routers
WAN( In this example WANS IP is 11624235122 As shows Picture 27
Picture 27
Now you can visit IP Cam from Internet What you should do is to Input correct IP address For
example Http 116242351228999
Note Make sure the Ports UPNS is available You can open UPNP via the following ways
Enter into Routers setting page( Details Routers user manual) to make UPNP available
Or enable virtual mapping function Add equipment IP address and port to the virtual mapping list
Picture 28
Users can access the Internet from IPCAM device Input address For example Http 116242351228999
2)DDNS (dynamic DNS) service is the Internet domain name can be fixed and dynamic IP address real-time
corresponding (analysis) service Simplely said whenever user surf on internet or what kind of way you are
using the Internet get a what kind of IP address IP address whether it will change DDMS can ensure that a
fixed domain name can access to a users device
IPCAM User Manual
22
Our products have been configured the DDNS services of course you can also apply for the domain name in
registration website for one of your own domain name to configuration For example wwwdyndnsorg
Picture 30
You need fill in DDNS and port for example(httpicam0001ihome365org8999) The browser will jump
to IP camerarsquos login page
Picture 31
DDNS inside
Factory DDNS
IPCAM User Manual
23
The input device user name and password to login to equipment
Picture 32
middotIf input domain name but cant open IP camera in the browser such as the situation is as blows
middotPlease open the device and check status of IP camera in the local area network confirm whether UPNP
function and DDNS is successful or not
Picture 34
IPCAM User Manual
24
middotYou need to set port mapping function successfully to check whether the router UPNP function is
available if It was unavailable please make it available refer to the routers user manual
If you use TPLINK router please refer to these instructions
middotThrough the upnp automatic mapping port to the network input router IP address in the browser (such
as http19216811 gt the router IP addresses are written on paper label on the router house---- please set
according to your own IP address) open the routers page forward rules gt gt upnp set to ensure that the
current state of upnp is already available as below
Note some of the router interface without UPNP Settings option then need to open the virtual server IP
cameras in the local area network of mapping the connection IP address and port number
Picture 36
6 Access IP camera via mobile equipment
such as mobile phoneIpad Etcs There are two kinds of ways to access IP camera One is to input IP address in browser directly It can be IP
address and also can be DDNS Another is to use clients to visit
61 Input IP address in browser
1 We take IPAD as example as blows
IPCAM User Manual
25
middotOpen browser Safari
Input IP cameras IP address for example( httpicam0001ihome365org8999)
Choose language according to your demand and choose login mode according to your browser
Picture39
Choose manual settings
Open browser Safari
Enter the IP address of the IP camera
(httpicam0001ihome365org8999)
IPCAM User Manual
26
enter your account and password on the login page as shown By defaultadministratorrsquos username is
admin and no password
Select Server Refresh mode landing
Picture42
Input the username and password of
the network camera
Here you can choose between two
modes landing
Here to select the
operating language
Default passwordNo password
IPCAM User Manual
27
Select Server Push mode landing
Picture 43
2 Now we take Android system device as example
Open menu and firstly open the browser and input IP camera s IP address in the
browser for example(httpicam0001ihome365org8999)
Picture 44
Input IP cameras username and password and click sign in and then enter into
browser model to choose login-in interface
Open menu
IPCAM User Manual
28
Picture 45
62 Install client-side software to access IPCamera
There are many client software support IP camera several third-party software support our IP cameras too
The following are our manufacture software setup process(the Android version)
1 Pls get the install applications in the CD or you can download from the website
httpsplaygooglecomstoresearchq=reecamampc=apps Choose the right
①installation file-ipcameraapk
running environment Android version 16 or above
Note Please ensure that mobile phones can connect to the Internet before install
② Install method
21 Insert SD card into Android mobile phone
22 Connect the cellphone to computer via USB data cable
23 Choose the USB connection model on your cellphone you can see the SD driver in ldquomy computerrdquo
24 Copy the ipcameraapk into SD card
25 Disconnect the device pls find the ipcameraapk in ldquoFile Managementrdquo and run it
26 The ipcamera application will be show up on the home screen after you successfully installed
③Software operating processes
First ensure that the Internet open WIFI connection the search in the Play in The Googl Android
application reecam
Open the WiFi
connection
Download and install
the application
Search reecam
IPCAM User Manual
29
middotYou can edit the camera modify camere configuration and delete camera operation
Click here to add
a video camera
Select to add to the
client camera
Refresh LAN cameras
View or change the
configuration of the
camera the camera
name at random
IP address
Http port
The default password is blank
Camera name
Prev iew camera
Preview the
camera screen
save the camera
Editor has added
cameras
Edit camera
configuration
Delete the camera Edit camera of the
configuration
IPCAM User Manual
30
middotFor the camera added to the camera list you can watch camera in real time
Control cameras PTZ and set swith-on and switch-off of the cameras audio int
ercom and video
Picture 51
2 The IPCamera setting process for iPhone iPad
Firmware requirements compatible with iPhone iPod touch and iPad
Systerm requirements Requires iOS 42 or above
You can download the genuine
software
(ipcameraapp) form the App Store
httpitunesapplecomcnappreecamid479468959mt=8
middotSoftware operating process is as follows
Continue to add
the camera
Add external network
camera domain
Cameras have
been added
Audiointercom video switch
A list of cameras and
video can be switched to
view
Fingers sliding PTZ control
Click on the picture to stop
rotation
IPCAM User Manual
31
Open the App Store search
reecam
Download and install
reecam
The run has been
installed good reecam
program
Click to add cameras
Search reecam
IPCAM User Manual
32
Fill in the domain address
or IP address
Fill in the Http port of the
camera login user name
and password click next
to open the camera
Completed please
click here
Preview videoclick on the
next save
Save the camera added
Selected camera to
view images
Click image to expand
more cameras
operating functions
IPCAM User Manual
33
7 Other setting
71 Network Setting
711 Basic Network Settings
If the router that the IP camera connect has DHCP function you can choice ldquoObain IP from DHCP Serverrdquo
else fill in the network parameters manually
Http Port In most cases you can leave this value as 80 however if your Internet
Service Provider blocks this port you may switch to another port number such as 85808088889000 Etcs
(Range from 0 to 65535 pay attention to the same segment of multiple devices must set up different port The
port t canrsquot have any conflict with other software or equipment
a Search tools modification in LAN
Figure58
brdquoFor administorrdquo ldquoBasic network settingrdquo -Change the port
Figure59
712 WIFI Setting
1) Please enter the wireless net setting page of the wireless Router to find out SSID
Channel(less than 10) Encryption Authentication as below
Selec IP Camera clickright mouse button choice network configurat ion
Set port number
Set Network IP
Set Http Port Number
IPCAM User Manual
34
Figure 61
As Administrator to Login camera open wireless LAN Settings page fill in every
Setting (ensure keep the same as routerrsquos ) and then pulled out of the cable wireless network function can be
used For example as shown in belows
Figure62
Pls click the scan buttom twice
IPCAM User Manual
35
Figure 63
713 Adhoc point to point Wireless connection Setting
1) Open the basic network setting interfacecheck the device status
Picture 64
2) Open the wireless lan setting interface choose Adhoc for network type you
can define SSID such as 001
remember the IP address of
IP camera and Http port
Click the Settings Ip Camera will
restart and save
Double click to choose
Fill the encryption and
routers and key in the
same way
IPCAM User Manual
36
Picture 65
3) Unplug the RJ45 from IP camera Use laptop or other devices which are with
wifi function( include smart phoneipad and so on) searching the SSID you defined
on proccess 2then make a connection
Picture 66
middotClick wireless network and check the link status of ip camera Please note IP
address of your connected laptop must be the subset of your ip camera if not
please reset the ip address of your laptop manually
Picture 67
4) Now we can use the ip camera tool or enter ip address of camera derectly in
browser blank to visit
1 visit by ip camera tool
Picture 68
IPCAM User Manual
37
2Enter ip address in the browser
Enter user name and password in the login interface
Picture 69
Click ldquoSign inrdquoand vis it
Picture 70
IPCAM User Manual
38
72 Multi-Device Settings
Add cameras in LAN
In the Multi-Device Settings page you can see all devices searched in LAN The 1
St Device is this device in default You can add more cameras list in LAN for monitoring This Web software
supports up to 9 IP Cameras online simultaneous ly Click ldquoThe 2ND
Devicerdquo and Double click the item in the ldquoDevice List in LANrdquo AliasHost and Http Port
will fill in automatically Enter the correct username and password then click ldquoaddrdquoAdd
more cameras in the same way At last please donrsquot forget the ldquo settingrdquo Button
Picture 71
Add cameras in the Internet
Firstly make sure the camera added can access in the Internet with the IP address or
DDNS domain Like this http2191332001669999or httpIPcamdyndnsorg9999You can enter the
Host 219133200166 Http port 9999 or Host IPcamdyndnsorg Http port 9999 Enter the correct
username and password then click ldquoaddrdquo Add more cameras in the
same way
Picture 72
IPCAM User Manual
39
Picture 73
73 MSN Settings
Fill in your MSN account and password then add account which need to receive
IPCAMrsquoS ip address to IPCAM‟ S MSN list (Picture 67)click submit then yoursquod better
restart IP camera After it login your MSN to add IPCAMrsquos MSN account to MSN List that
you can receive IPCAMrsquos ip address
Picture 74
First login and click add contacts choose Add Contact then fill IPCAMrsquos MSN account in instant
messaging address click next then send offers
Aplly for MSN account and passworf for IP cam
Add about 10 MSN Accout
IPCAM User Manual
40
Figure75
Next
Figure76
Figure77
When IPCAMrsquos MSN account shows online you can chat with it input path command url camera
account will show its IP address in chatting box promptly as below
IPCAM User Manual
41
Picture 78
You can input the IP address to browser then can browse ip camera as below
Figure79
AttentionYou should fill MSN account in IPCAM first
74 DDNS Service Settings
DDNS Service The system supports protocols from some DDNS providers Dyndnsorg System support
DDNS such as topipcamorgpeanut shell3322orgDynDNS
provided IP
IPCAM User Manual
42
User and Password the user name and password used when applying for the domain
name (details 432)
DDNS Host the Domain Name
741 Factory DDNS
Device had distributed one DDNS to every productwhich was sticked the bottom
of the product Such as
manufacturer had already give every device a DDNS address which is unique Users only need to fill in this
DDNS IP ADDRESS and port in the browser then they can monitor remote IP camera
Picture 80 Factory DDNS
Note When use the domain name access to the camera and UPNP is not successful you must set port
mapping function on routers
742 The third part DDNS
Users can use not only Factory DDSN but also can use third part DDNS System Such as domain name
wwwdyndnsorg The only thing the user need to do is to apply a free DDNS and then fill in ldquoset boxrdquo as below
Save this setting and this DDNS can be used
DDNS Hostname
Factory DDNS
IPCAM User Manual
43
Note the third party domain name is the realization of analytical way input the domain in the browser it will
keep this string of characters If the port of the device isnrsquot 80 then need to add colon and port number For
example httpwell888dyndnsorg8999
75 Mail and FTP Service
1)Configure the E-mail box to receive and send mails The E-mail box is used for receiving
the images sent after alarm and the system IP address after successful dial-up
Note When Alarm Service Settings-gt Send Mail on Alarm is check the Mail
Service takes effect
Picture82
Configure the E-mail box to receive and send mails The E-mail box is used for receiving the images sent
after alarm and the system IP address after successful dial-up
Sender This device use the sender mailbox to send mails
Receiver To receive the mail from the Sender You can set up to 4 receiver mailbox
SMTP Server the SMTP server for the sender mailbox
Need Authentication if the sender mailbox need authentication you should check it then
input the SMTP username amp Password
Mail test Please set the Mail parameter and click Submit first There are Mail test result
Picture 83
video Local storage in PC after alarm monitoring
IPCAM User Manual
44
Gmail also set as the same It only needs you to fill in correct SMTP Sever address user and password
Picture 84
Mail notes Internet IP address In this option When Internet IP and port have changed IP Will be sent via
1Can not connect to the server
2Network Error Please try later
3Server Error
4Incorrect user or password
5The sender is denied by the server Maybe the server need to authenticate the user please check it
and try again
6The receiver is denied by the server Maybe because of the anti-spam privacy of the server
7The message is denied by the server Maybe because of the anti-spam privacy of the server
8The server does not support the authentication mode used by the device
Report Internet IP by Mail When ipcam port or Internet IP changed it will send the internet IP by
mail(for example IPCAM s url is http119123207969002) Make sure the port is map to the router
correctly by UPNP or Virtual Map function
2) FTP Server use and settings
middotIf you already have an FTP Server (ipcam com)and email ipcam you can fill the
parameters as below
Picture 85
IPCAM User Manual
45
middotFTP Server of LAN as below
1 Create an account
2 Step by step setting until finish it
Picture 88
IPCAM User Manual
46
3Start Server
Continue to finish it
Picture 89
4IPCAMrsquoS account can be used
Picture 90
Save path
This is a FTP
server address
IPCAM User Manual
47
5 IP camerarsquos FTP Server set like this
Picture 91
6 Set up and complete testing is successfulwhen it alarms IP camera will upload
pictures to the FTP server Settings of main directory path (as shown )
Picture 92
FTP Server the FTP server address
FTP port the port usually is 21
FTP Mode support standard(POST) mode and passive(PASV) mode
Upload Image Now it will upload image now when checkbox is not checked When checked you can
input upload interval(Seconds)
76 Motion Detection
Enter Alarm Service Settings page to configure Motion Detection function
1) Motion Detect Armed
Each alarm triggers in the protection of time the device will take various measures to alarm
IO linkage alarm output relay closure external alarm device began to alarm
IPCAM User Manual
48
Send E-mail alarm informatio
Transmit pictures to the FTP server and can set the time interval of sending pictures
2) Alarm t ime Settings
Only in the alarm period detection device to alarm will only have alarm action All the time (not check the
schedule) also can alarm within specified time For the specified time alarm firstly need to set up the system
time time zone and then to choose period of alarm in the state of alarm setting as shown in Picture 19
Picture93 Alarm of time Settings interface
Motion Detect Armed
When you enable motion detect armed the camera can be triggered to send email alerts
and record images In the camera monitoring page the green icon turn to red and an
alert sound you will hear
Motion Detect Sensibility
You can choose from low to high 10 level alarm sensitivity The greater the number the higher the
sensitivity
Alarm Input Armed
IO PINS1) Output(+5V) 2) Output 3) Alarm input 4) Input (GND)
Input Pins The input pins can be used for 1-way external sensor input(pin3 and pin4) For example
you may connect a Person Infrared Sensor (PIR) to it for motion detection When external sensor
triggered IPCAM can be programmed to send an email with picture or control the internal relay output
IPCAM User Manual
49
Picture94
IO Linkage on Alarm
Enable IO linkage on alarmPin1 will output +5V when alarm triggered and output LOW
when alarm release automatically
Switch onoff buttons control Pin1 output manually
Send Mail on Alarm
Sent picture and mail inform to customers e-mail after alarmed(firstly you should finish
the Mail Service Settings)
Picture 95
Upload Image on Alarm
Enable upload image on alarm and set upload interval(Seconds)
Tick send to your setted mails
IPCAM User Manual
50
Picture 96
REC automatically and save to PC
When you enable motion detect and open the camera monitoring page on the PC If
there is an alarm triggered REC will start automatically for several seconds and save to
the PC
Picture 97
REC save to pcrsquos position
Picture 98
Storage path can be changed
After Setting up later when have the
alarm the image will send to
designated email and FTP server
IPCAM User Manual
51
77 IP cameras Time amp Date setting and PTZ Setting
If IP camera connected with Internet it can automatically check the time amp date via running NTP Server And
need to choose properly IP cameras Time zone Otherwise it need PC Time to check IP camera time amp Date
Pre-set and Speed of PT
78 UPGRADE DEVICE FIRMWARE
Picture 101 Firmware upgrade
IP CAMERA has two kinds of programme One is system firmware another is application firmware It can be
upgraded separately
79 BACKUP AND RESTORE SETTING
Click Set in the Backup will lead to a BIN file and choose this file to restore setting
The huger the Number is The
slower it will be
IPCAM User Manual
52
8 APPENDIX
81 REGISTER AND APPLY FOR DDNS SERVICE
1Users use DDNS management system first timeUsers need to apply account to manage
and inquire the domain state
Step1 enter httpwwwdyndnscom and Create Account( Fill in Domain Name dyndnsorg then Click
Add)
Figure103
Step2 enter your information
Figure104
IPCAM User Manual
53
Figure105
Step3 After a minute you will receive an E-mail from DynDNS Support and it will give you a
confirmation address
(eg httpsaccountdyncomemlcreateconflILHMZHRje5oF_6YXTYv1A
Figure106
IPCAM User Manual
54
Step4 Open the link to active your Domain Name as belowLogin in your account after it is activated
Figure107
Step5 Check all the DDNS serviceswe choose the 14-day-trial
Figure108
Step6 Click the linkand user will see as below
IPCAM User Manual
55
middotenter your information
Figure109
Step7 Now you obtained a Dynamic Domain Name(Figure 105)and can use it in the DDNS Service
Settings(details 74)
Figure110
IPCAM User Manual
56
2For DDNS which is applied successfully you can fill in the IP CAMERA When set successfully the status
of IP will be shown as blows
picture 111
picture 112
3How to set DDNS on line
The first wayMenu rdquostartrdquo- ldquorunrdquomdashgt Input CMDClink rdquoenterrdquoIt can check DDNS Statas
via As shown below
Picture 113
IPCAM User Manual
57
Through the PING command this dynamic domain name can be back in the network response information It
proves that the domain name has been online
If the domain name update not success Possible reasons
(1) DDNS parameter is not correct (2) may cause DNS address configuration is wrong
82 Some special application for IPCAMERA
IPCamUse some grammar parameter control and Use IPCam
useruser
pwdpassword
priThe current access (1 visitors 23 operator managers)
resolutionImage resolution(832024 0qvga32640480 vga)
ratemage transmission speed and scope 0-23
brightnessbrightness0~255
contrastcontrast0~6
mode
Mode 050 hz For
60 hz 2 outdoor
flip
Flip rotation 0 primitive 1 vertical reverses 2 horizontal 3 vertical flip + horizontal
821 The flow media player VLC player and mplayer can real-time broadcast ipcamera and send
of streaming media format video data
(Grammar parametersvideostreamasfuser=amppwd=ampresolution=amprate=)
As shown Picture 113 rdquoIpcamrdquo
Picture 114
IPCAM User Manual
58
From the following picture we can view that Ipcam local IP address ishttp19216811118999
WAN IP Address is httpwell888dyndnsorg8999 we can inputrdquoIPcamrdquorsquoS IP address to
open in the player
Picture 115
the CLC media player open play position
Picture 116
LAN play address
Picture 117
IPCAM User Manual
59
Picture 118
Open the Internet play position
Picture 119
As shown in the following picture It can see the ipcamera send video streaming format
Size 640X480
User
IPCAM User Manual
60
Picture 120
83 Frequently Asked Questions
Note1) Any question you would meet please check Network connections firstly
2)Check the working status revealed by the indicators on the network server hub exchange and
network card If abnormal check the network connections
831 I have forgotten the administrator username andor password
To reset the administrator username and password Press and hold down the RESET
BUTTON for 5 seconds Release the power button and the username and password
will be reset back to the factory default administrator username and password
Default administrator username admin
Default administrator password No password
832 IP Address configuration
Check whether IP address of the IP Camera server shares the same subnet as your
work station Click My Computer gt Control PanelgtNetwork amp Dial-up Connections gt
LAN gt Attributes gtInternet Protocols (TCPIP) and check IP Address and Subnet
Mask Make sure they are in the same subnet when configuring IP Camera IP
address manuallyUnable to access IP Camera via web browser
833 Network Configuration
Double Check to ensure that your HTTP server software is configured and running
properly If you are running any firewall software make sure it is allowing inbound
connections to port 80Also if you happen to be using a cableDSL router make sure
IPCAM User Manual
61
you are set up port forwarding properly ( consult your router is documentation for more
information ) If none of these seem to be the problem it is also possible that your
ISP is blocking inbound connections to port 80 ndashmany IPSs have done this because
of internet worms such as Code Red If this is the case you bdquoll have to setup your
HTTP server on an alternate port (such as 8080)
834 No Monitoring picture
It has four reasons Images of the abnormal factors
1If its not use Directx function and lead to not normal to display the color imagePlease
install DirectX and open the start menu then input the command
Picture 121
You use the DirectX function and it will expedite the DirectDrawDirect3D and AGP if its can not maybe the
connect issues or hardware not read it
2The issues of hardware canrsquot support the card expedite image
3The antivirus software will influence the network it will be stoped or closedIf you install fireproof software
please close it and try again
4 ActiveX controller is not installed correctly
If its not image on the first time to use and will display to the user through the ActiveXIf its can not
display of the image maybe it fail of install about this issues please follow as
1Install ldquoIP Camera Toolrdquo ActiveX control at the same time
2Please install ActiveX control and keep the security settings for IE browser
835 Problems with network bandwidth
The image frame rate is subjected to the following factors 1network bandwidth 2 PC
performancenetwork environment and display preference setting (brightness theme
etc) 3 the number of visitors (Too many visitors will slow down the image frame rate) 4
choice of switch or hub (Use a switch for multiple IP Camera Servers rather than a HUB)
The Device use MJEPT Compression it needs good network bandwidth If it is too narrow it will lead to slowly
browser Typical video parameter occupy network bandwidth as blows
640x48030fps 40 Megabits ~ 50 Megabits
320x24030fps 12 Megabits ~ 16 Megabits
IPCAM User Manual
62
middot836 Why pop-up the prompt ldquoFail to connect to the devicehelliprdquo
This prompt only appeared in the case of using multiple cameras
Enter the Multi-Device Settings page(login as administrator) to check the
Device setting is correct or not
When one of the multiple cameras disconnected the color changed to
yellow and pop-up the promptldquoFail to connect to the devicehelliprdquo
Picture 122
837 Canrsquot access the IPCAM in the internet
There are some reasons
1 ActiveX controller is not installed correctly(see more details 514)
2 The port IPCAM used is blocked by Firewall or Anti-virus software Please change a
port number and try again
3 Port mapping is not success You can do port mapping by two ways
Enter setting page of the router which IPCAM connect with to enable UPnP function
Enter IPCAM ldquoUPnP Settingsrdquo to enable UPnP and make sure the state is ldquoUPnP
successrdquo
‟ s IP
and port to the Virtual map list
When use ADSL the IP is dynamic You should set DDNS(see more details 74 amp 80)
and also make sure port mapping success
84 Operate common problem solving
IP camera tool canrsquot find the camera
Except of the camera broken
1 Make sure the cable connector no problem recommend connector
(AMP)it is with international standard Another note IPCAMrsquos data
transmission channel require higher than computerrsquos so maybe the
IPCAM User Manual
63
computer can run normally but IPCAM canrsquot Please press heavily when making the cable connector
2 Confirm the power supply normally First check whether power indication
light turn on or not If it is onthen check the yellow light on RJ45 Port
(power indication light) and green light (network indication light) are on or
notIf they are onso power supply and cable runs normally
3 Confirm all the firwall and antivirus software are closeThe firewall often
block unrecognized data so if the firewall is running so maybe the IPCAM
TOOL canrsquot find the deviceSuggest to close firewall and antivirus
software temporarily before searching
How to solve the camera blank screen
1 Check if you are using the wrong power adaptorplease use original one
2 Close antivirus software
How to solve the camera canrsquot login by Internet
1 Check if you set DDNS success or not
2 Check the current IPCAMrsquos port number is the same as routerrsquosThey need to keep same
Canrsquot view the monitoring picture
1 Reason canrsquot connect with network
SolutionCheck if the network connect well exclude cable fault and PC virus
cause network fault until can be used between PC and PING
2 ReasonIP address occupy by other device
Solution Choose automatic gain
3 Reason IP address located within different subnet
Solution Check IPCAMrsquoS ip address and subnet mask address and gateway settings
4 ReasonWeb port has been modified
Solutioncontact network administrator to obtain port information
5 Reasonunknown
SolutionPress reset button to factory default statethen reconnectingsysten
default to gain ip address automaticsubnet mask is 2552552550
85 Default Parameters
middotDefault network Parameters
IP address dynamic obtain
Subnet mask 2552552550
Gateway dynamic obtain
DDNS Factory provide
middotUsername and password
Default administrator username admin
Default administrator password No password
IPCAM User Manual
64
86 Technical Parameters
ITEM IP CAM (NIP-02BGPWA2)
Image Sensor
Mage sensor 15 Color CMOS Sensor
Display 640 x 480 (300K Pixels)
Lens f36mm F24 (IR Lens)
Miniillumination 05 Lux
Lens Lens Type Glass Lens
Viewing Angle 60 Degree
Audio Microphone Audio of two way
Domain name Server MSN server DDNS server
Video
Image Compression MJPEG
Image Frame Rate 15 FPS(VGA)30FPS(QVGA)
Resolution 640 x 480(VGA) 320 x 240(QVGA)
Flip Mirror Images rtical Horizontal
mode 50Hz 60Hz or Outdoor
Video Parameters Brightness Contrast
Communication
Ethernet One 10100Mbps RJ-45
Supported Protocol HTTPDHCPIPTCPUDPFTPSMTPDDNSPPPoEUPnP
Mobilephone monitor Support IphoneIpad3G phonesmartphone
Wireless Standard IEEE 80211bg
Wireless Standard 80211b11Mbps(max) 80211g54Mbps(max)
Wireless Security 64128-bitWEP Encryption
Physical
PanTilt Angle Horizontal270deg amp Vertical 120deg
Infrared Light 10 IR LEDs Night visibility up to 15 Mete
Product size 100(L) x100(W) x125mm(H)
Gross Weight 6465gpcs (packing size196x165x123mm)
Net Weight 2547gpcs (only product)
Power Specification DC 5V25A 18 meter
Power Consumption 5 Watts
Environment
Operate Temper 0deg~ 55degC (14degF~122degF)
Operating Humidity 20 ~ 85 non-condensing
Storage Temper -10degC ~ 60deg (14degF ~140degF)
Storage Humidity 0 ~ 90 non-condensing
PC Requirements
CPU 20GHZ or above (suggested 30GHz)
Memory Size 512MB or above (suggested 10GB)
Display card 64M or above
Supported OS Microsoft Windows XPVistaWindows7
Supported browsers IEfirefoxGoogle
Certification CEFCCRoHS
Warranty Limited 1-year warranty
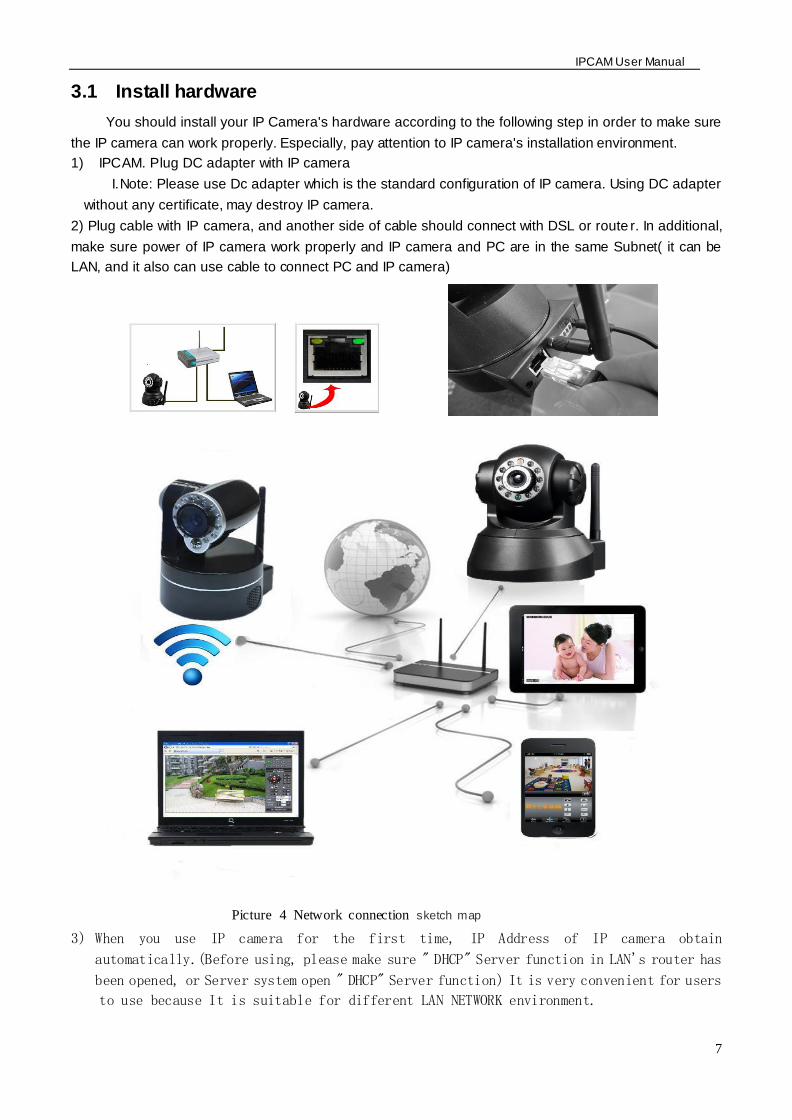
IPCAM User Manual
7
31 Install hardware
You should install your IP Cameras hardware according to the following step in order to make sure
the IP camera can work properly Especially pay attention to IP cameras installation environment
1) IPCAM Plug DC adapter with IP camera
INote Please use Dc adapter which is the standard configuration of IP camera Using DC adapter
without any certificate may destroy IP camera
2) Plug cable with IP camera and another side of cable should connect with DSL or route r In additional
make sure power of IP camera work properly and IP camera and PC are in the same Subnet( it can be
LAN and it also can use cable to connect PC and IP camera)
Picture 4 Network connection sketch map
3) When you use IP camera for the first time IP Address of IP camera obtain
automatically(Before using please make sure DHCP Server function in LANs router has
been opened or Server system open DHCP Server function) It is very convenient for users
to use because It is suitable for different LAN NETWORK environment
IPCAM User Manual
8
Picture 5
4) You can search PC IP and DNS Server as belows
Picture 6
This is DNS Server
address which is provided
by network server
IPCAM User Manual
9
5) The device IP Address can be changed but Its IP address should be at the same with PCs
subnet
Picture 7
When we test IP camera and check whether it starts smoothly or it connects properly we can
operate in the Windows(START- RUN-CMD) and then input ping 1921681111 in the order windows
Picture 8 ping IP Camera
Check whether it can Ping IP camera If yes then it means IP Camera has been worked properly
and connected correctly
Network server provide
DNS server Address
Device IP address can
be changed by yourself
IPCAM User Manual
10
32 Software installation
Software installation
It is very easy to install software You just need to run installation programme then it can
work properly
Please put CD in the PC driver and the CD will automatically run to the software installation
interface
If no such an interface please click ldquoautorunexerdquoin the CD
And then findldquosearchexerdquo Clink and install LAN Tool to PC systemthen you
can view IP Camera Tool in Computer desktop for LAN Search toolldquoIP Camera Toolrdquo
G
Picture9 Software installation interface
MinOpen user manual ExitUser manual
Search tool in LAN Application Tool box Quick installation guide Open CD
IPCAM User Manual
11
4 Visit IP camera in LAN 41 Connection ways in LAN
Picture 10 Connection between Several IP camera and router
42 Search and set device IP address Please note before searching IP camera
1Make sure IP camera has a good connection with power and network
2Te router should be opened DHCP(Dynamic host configuration protocol) because the factory setting status of
IP camera is to obtain automatically IP camera
3When we power IP camera we should wait 20 second then it can works
Search IP camera
When we run Search tool IP camera Tool we can find the IP camera showing IP address Port
Name If we use Wi-fi connection we will find Wi-fi IP address For the details we can view
the following picture
Picture 11
NoteldquoIP Camera ToolexerdquoProgramme only use to search IP camera address and port in the
LAN The tool cant search IP camera IP address and port in the WAN
There are 3 cases
1 No IP Camera found within LAN After about 1 minute search the Result Field will
show ldquonot found IP Serverrdquo
2 IP Cameras having been installed within LAN All the IP Cameras will be listed and the
total number is displayed in the result field as shown in Picture 20
3 The IP Cameras installed within LAN do not share the same subnet with the monitoring
PC A prompt as shown in result field (prompt Subnet doesnrsquot match dbclick to change)
Click the left mouse button to choose the prompt and click the right mouse choose
Network Configuration to set the IP address of the Camera to the same subnet as LAN
IPCAM User Manual
12
SIX Options
Choose the IP Camera list and Click right mouse button there are six options Basic
Properties Network Configuration Upgrade Firmware Refresh Camera List Flush Arp About IP camera tool as
shown Picture 12
Picture 12
Basic Properties
There is some device information in the Bas ic Properties such as Device ID System
Firmware Version Web UI Version
Picture 13
Network Configuration
In this page you can configure the Network parameter
Picture 14
IP address Fill in the IP address assigned and make sure it is in the same subnet as the
Subnet Mask The default subnet mask of the equipment is 2552552550
Gateway Make sure it is in the same subnet with PC IP address Default Gateway
IPCAM User Manual
13
address is 19216811
DNSServer IP address of IPS network provider ( It also can view from network card local area connection
status) As blows picture
Picture 15
Http Port LAN port assigned for the equipment usually 80
User amp Password Default administrator usernamepassword adminNo password
Enable Using DHCPthe system will assign a reasonable IP address for your equipment
only if your gateway supports DHCP (It is the case with most gateways)
DHCP checkbox if checked the device will obtain IP from DHCP server (To be make
sure the Router which the device connect with has DHCP function)
NOTE when the prompt rdquosubnet doesn‟ t match double click to changerdquo please set the
IP Camera IP address once again
Upgrade Firmware
Enter the correct User and Password to upgrade system Firmware and Web UI (User should have administering
authority
Picture 16
This is the server provide the
service of DNS
IPCAM User Manual
14
Refresh Camera List
Refresh camera list manually
Flush Arp Buffer
When cable network and wireless network of the device both are fixed IP address There
is a problem you may encounter is can search the camera IP but canot open the camera
web pageyou may try to use flush arp buffer
About IP Camera tool
You can view IP camera tool version and ActiveX version
43 Login IP camera
Double click the IP address of the IP Camera listed IE will be opened automatically and display the camera login
page Or Access the camera by IE browser directly type in the camera‟ s IP address For
example http19216811118999 ( We suggest you use IE browser for it has more function
Picture 17
IP camera Default username is admin no password And Click ldquoSign inrdquo to enter the monitoring page
Default usernameadmin
Default passwordNo password
IPCAM User Manual
15
Picture 18
Picture 19
middot When Users login inthey can view images At the same time users(Administrator Operator or Visitor) can operate according to their permissions
By Firefox and sofari browser as below
Language options you can
choose operation language
according to your demand
IPCAM User Manual
16
Picture 20
Picture21
IPCAM User Manual
17
44 IP camera operation
441 For Visitor
For example if is bright the first route is at status of Detection(Only IE Broswer can view it)
Picture 22
The right upper is statuss indicator area which can show 9 IP camera status
When the button is gray it means IP camera didnt connect
Green means IP camera has connected
Yellow means there is something wrong with connection
Red means it is the status of alarm
If you want to detect 4 views need to click this icon
OSD Display date and time on the video You can disable the OSD function or choice other color
(OSDon-screen display)
Snapshot Click icon to snap the picture
REC Click icon into REC mode is stop
Audio Click icon into Audio mode can listen the voice in monitoring range
Talk Click icon into Talk mode and the icon will become Visitor can talk with whom is in the
monitoring range
Note the record file name is device Alias_ Current timeAvi
For example IPCAM_20101011134442Avi
It means the device alias is IPCAM and its recordrsquos end time is At 134442 on
October 11 2010When use motion detection and checked Send Mail on Alarm
Buttom for taking picture
S top monitor video
Open vedio
Record
Two way audio Monitor audio
IPCAM User Manual
18
The name of the picture received in mailbox is like this device id(Alias)_ Current
timejpg
442 For operator
When login as operator you can operate PanTilt and adjust video parameter
Picture 23
Direction control click the different arrow will get different direction view
Vertical patrol
Horizontal patrol
Stop patrol
IO output Switch on off
Infrared light software control switch
Image fluctuation flip(up and down)
Image around flip (right and left)
Set Preset (can set 4 preset)
ResolutionVGA(640 X 480) QVGA(320 X 240)
Work Mode 50Hz60HzOutdoor
color parameterClick or can adjust brightness and contrast
Stop patrol
Vertical patrol
Horizontal
patrol
Image fluctuation flip
Image around flip
IO output S witch on off
Set Preset
Infrared light s witch
IPCAM User Manual
19
443 For Administrator
When you login as administrator
you can set all parameters Please
click ldquoFor Administratorrdquo
and enter into
setting interface
Picture 24
Alias Settings You can Input the new name as you like
Data ampTime Settings Data ampTime Settings page
Users Settings Eight accounts are acceptable for this system Here the eight users can configure their
user names and password as Administrator Operator or Visitor
Visitor In this mode you can only view
Operator You can control the direction of IP Camera and set some parameter
Administrator You can setup the advanced configurations of the IP Camera
UpnP Settings If you access IP Camera to be make sure UpnP Status is Succeed
Upgrade Device Firmware Upgrade Device Firmware and device embeded web UI software in this
page
Restore Factory Settings Restore factory settings of the device
Reboot Device Reboot the device
Back Back to Monitoring Mode
View Device IDDevice Firmware
Version and Device Embedded
Web UI Version
Check Device all kinds of
status
Carry on Settings and
operation function
IPCAM User Manual
20
5 Visit IP Camera in internet
51 Connection way in Internet
Picture 25
52 Related setting and login IP camera
1 If the network your IP camera using is using static IP you just need to input this IP address and IP cameras port in the browser then it can visit Ip camera
2 If you are using ADSL to dial-up and surf on line you should obtain IP Camera Current WAN IP Address or configured DDNS
1)There are four ways for you to obtain WAN IP Address
①Using mail to send internet IP function
After setting mail successfully IP will send mail to your receiver e-mail box when Internet IP or port
has changed If it is dynamical IP users need to input this IP address to visit this IP camera
②Obtain from some website
It is very easy for you to obtain WANS IP address You can open browser on the computer on the
condition that IP camera and PC are the same subnet For example httpwwwwhatismyipcomor
httpwwwmyipcn etcsIt will tell you WANS IP address as shows below
Picture 26
③Obtain from MSN and IP cameras MSN ACCOUNT( Details 73)
IPCAM User Manual
21
④ Obtain from router
We take Nur8555M from Xinxiang s router as example
AAccording to routers manual we get Routers IP is 19216811
BLogin in router Input 19216811 in the browser Find the status of Router and find Routers
WAN( In this example WANS IP is 11624235122 As shows Picture 27
Picture 27
Now you can visit IP Cam from Internet What you should do is to Input correct IP address For
example Http 116242351228999
Note Make sure the Ports UPNS is available You can open UPNP via the following ways
Enter into Routers setting page( Details Routers user manual) to make UPNP available
Or enable virtual mapping function Add equipment IP address and port to the virtual mapping list
Picture 28
Users can access the Internet from IPCAM device Input address For example Http 116242351228999
2)DDNS (dynamic DNS) service is the Internet domain name can be fixed and dynamic IP address real-time
corresponding (analysis) service Simplely said whenever user surf on internet or what kind of way you are
using the Internet get a what kind of IP address IP address whether it will change DDMS can ensure that a
fixed domain name can access to a users device
IPCAM User Manual
22
Our products have been configured the DDNS services of course you can also apply for the domain name in
registration website for one of your own domain name to configuration For example wwwdyndnsorg
Picture 30
You need fill in DDNS and port for example(httpicam0001ihome365org8999) The browser will jump
to IP camerarsquos login page
Picture 31
DDNS inside
Factory DDNS
IPCAM User Manual
23
The input device user name and password to login to equipment
Picture 32
middotIf input domain name but cant open IP camera in the browser such as the situation is as blows
middotPlease open the device and check status of IP camera in the local area network confirm whether UPNP
function and DDNS is successful or not
Picture 34
IPCAM User Manual
24
middotYou need to set port mapping function successfully to check whether the router UPNP function is
available if It was unavailable please make it available refer to the routers user manual
If you use TPLINK router please refer to these instructions
middotThrough the upnp automatic mapping port to the network input router IP address in the browser (such
as http19216811 gt the router IP addresses are written on paper label on the router house---- please set
according to your own IP address) open the routers page forward rules gt gt upnp set to ensure that the
current state of upnp is already available as below
Note some of the router interface without UPNP Settings option then need to open the virtual server IP
cameras in the local area network of mapping the connection IP address and port number
Picture 36
6 Access IP camera via mobile equipment
such as mobile phoneIpad Etcs There are two kinds of ways to access IP camera One is to input IP address in browser directly It can be IP
address and also can be DDNS Another is to use clients to visit
61 Input IP address in browser
1 We take IPAD as example as blows
IPCAM User Manual
25
middotOpen browser Safari
Input IP cameras IP address for example( httpicam0001ihome365org8999)
Choose language according to your demand and choose login mode according to your browser
Picture39
Choose manual settings
Open browser Safari
Enter the IP address of the IP camera
(httpicam0001ihome365org8999)
IPCAM User Manual
26
enter your account and password on the login page as shown By defaultadministratorrsquos username is
admin and no password
Select Server Refresh mode landing
Picture42
Input the username and password of
the network camera
Here you can choose between two
modes landing
Here to select the
operating language
Default passwordNo password
IPCAM User Manual
27
Select Server Push mode landing
Picture 43
2 Now we take Android system device as example
Open menu and firstly open the browser and input IP camera s IP address in the
browser for example(httpicam0001ihome365org8999)
Picture 44
Input IP cameras username and password and click sign in and then enter into
browser model to choose login-in interface
Open menu
IPCAM User Manual
28
Picture 45
62 Install client-side software to access IPCamera
There are many client software support IP camera several third-party software support our IP cameras too
The following are our manufacture software setup process(the Android version)
1 Pls get the install applications in the CD or you can download from the website
httpsplaygooglecomstoresearchq=reecamampc=apps Choose the right
①installation file-ipcameraapk
running environment Android version 16 or above
Note Please ensure that mobile phones can connect to the Internet before install
② Install method
21 Insert SD card into Android mobile phone
22 Connect the cellphone to computer via USB data cable
23 Choose the USB connection model on your cellphone you can see the SD driver in ldquomy computerrdquo
24 Copy the ipcameraapk into SD card
25 Disconnect the device pls find the ipcameraapk in ldquoFile Managementrdquo and run it
26 The ipcamera application will be show up on the home screen after you successfully installed
③Software operating processes
First ensure that the Internet open WIFI connection the search in the Play in The Googl Android
application reecam
Open the WiFi
connection
Download and install
the application
Search reecam
IPCAM User Manual
29
middotYou can edit the camera modify camere configuration and delete camera operation
Click here to add
a video camera
Select to add to the
client camera
Refresh LAN cameras
View or change the
configuration of the
camera the camera
name at random
IP address
Http port
The default password is blank
Camera name
Prev iew camera
Preview the
camera screen
save the camera
Editor has added
cameras
Edit camera
configuration
Delete the camera Edit camera of the
configuration
IPCAM User Manual
30
middotFor the camera added to the camera list you can watch camera in real time
Control cameras PTZ and set swith-on and switch-off of the cameras audio int
ercom and video
Picture 51
2 The IPCamera setting process for iPhone iPad
Firmware requirements compatible with iPhone iPod touch and iPad
Systerm requirements Requires iOS 42 or above
You can download the genuine
software
(ipcameraapp) form the App Store
httpitunesapplecomcnappreecamid479468959mt=8
middotSoftware operating process is as follows
Continue to add
the camera
Add external network
camera domain
Cameras have
been added
Audiointercom video switch
A list of cameras and
video can be switched to
view
Fingers sliding PTZ control
Click on the picture to stop
rotation
IPCAM User Manual
31
Open the App Store search
reecam
Download and install
reecam
The run has been
installed good reecam
program
Click to add cameras
Search reecam
IPCAM User Manual
32
Fill in the domain address
or IP address
Fill in the Http port of the
camera login user name
and password click next
to open the camera
Completed please
click here
Preview videoclick on the
next save
Save the camera added
Selected camera to
view images
Click image to expand
more cameras
operating functions
IPCAM User Manual
33
7 Other setting
71 Network Setting
711 Basic Network Settings
If the router that the IP camera connect has DHCP function you can choice ldquoObain IP from DHCP Serverrdquo
else fill in the network parameters manually
Http Port In most cases you can leave this value as 80 however if your Internet
Service Provider blocks this port you may switch to another port number such as 85808088889000 Etcs
(Range from 0 to 65535 pay attention to the same segment of multiple devices must set up different port The
port t canrsquot have any conflict with other software or equipment
a Search tools modification in LAN
Figure58
brdquoFor administorrdquo ldquoBasic network settingrdquo -Change the port
Figure59
712 WIFI Setting
1) Please enter the wireless net setting page of the wireless Router to find out SSID
Channel(less than 10) Encryption Authentication as below
Selec IP Camera clickright mouse button choice network configurat ion
Set port number
Set Network IP
Set Http Port Number
IPCAM User Manual
34
Figure 61
As Administrator to Login camera open wireless LAN Settings page fill in every
Setting (ensure keep the same as routerrsquos ) and then pulled out of the cable wireless network function can be
used For example as shown in belows
Figure62
Pls click the scan buttom twice
IPCAM User Manual
35
Figure 63
713 Adhoc point to point Wireless connection Setting
1) Open the basic network setting interfacecheck the device status
Picture 64
2) Open the wireless lan setting interface choose Adhoc for network type you
can define SSID such as 001
remember the IP address of
IP camera and Http port
Click the Settings Ip Camera will
restart and save
Double click to choose
Fill the encryption and
routers and key in the
same way
IPCAM User Manual
36
Picture 65
3) Unplug the RJ45 from IP camera Use laptop or other devices which are with
wifi function( include smart phoneipad and so on) searching the SSID you defined
on proccess 2then make a connection
Picture 66
middotClick wireless network and check the link status of ip camera Please note IP
address of your connected laptop must be the subset of your ip camera if not
please reset the ip address of your laptop manually
Picture 67
4) Now we can use the ip camera tool or enter ip address of camera derectly in
browser blank to visit
1 visit by ip camera tool
Picture 68
IPCAM User Manual
37
2Enter ip address in the browser
Enter user name and password in the login interface
Picture 69
Click ldquoSign inrdquoand vis it
Picture 70
IPCAM User Manual
38
72 Multi-Device Settings
Add cameras in LAN
In the Multi-Device Settings page you can see all devices searched in LAN The 1
St Device is this device in default You can add more cameras list in LAN for monitoring This Web software
supports up to 9 IP Cameras online simultaneous ly Click ldquoThe 2ND
Devicerdquo and Double click the item in the ldquoDevice List in LANrdquo AliasHost and Http Port
will fill in automatically Enter the correct username and password then click ldquoaddrdquoAdd
more cameras in the same way At last please donrsquot forget the ldquo settingrdquo Button
Picture 71
Add cameras in the Internet
Firstly make sure the camera added can access in the Internet with the IP address or
DDNS domain Like this http2191332001669999or httpIPcamdyndnsorg9999You can enter the
Host 219133200166 Http port 9999 or Host IPcamdyndnsorg Http port 9999 Enter the correct
username and password then click ldquoaddrdquo Add more cameras in the
same way
Picture 72
IPCAM User Manual
39
Picture 73
73 MSN Settings
Fill in your MSN account and password then add account which need to receive
IPCAMrsquoS ip address to IPCAM‟ S MSN list (Picture 67)click submit then yoursquod better
restart IP camera After it login your MSN to add IPCAMrsquos MSN account to MSN List that
you can receive IPCAMrsquos ip address
Picture 74
First login and click add contacts choose Add Contact then fill IPCAMrsquos MSN account in instant
messaging address click next then send offers
Aplly for MSN account and passworf for IP cam
Add about 10 MSN Accout
IPCAM User Manual
40
Figure75
Next
Figure76
Figure77
When IPCAMrsquos MSN account shows online you can chat with it input path command url camera
account will show its IP address in chatting box promptly as below
IPCAM User Manual
41
Picture 78
You can input the IP address to browser then can browse ip camera as below
Figure79
AttentionYou should fill MSN account in IPCAM first
74 DDNS Service Settings
DDNS Service The system supports protocols from some DDNS providers Dyndnsorg System support
DDNS such as topipcamorgpeanut shell3322orgDynDNS
provided IP
IPCAM User Manual
42
User and Password the user name and password used when applying for the domain
name (details 432)
DDNS Host the Domain Name
741 Factory DDNS
Device had distributed one DDNS to every productwhich was sticked the bottom
of the product Such as
manufacturer had already give every device a DDNS address which is unique Users only need to fill in this
DDNS IP ADDRESS and port in the browser then they can monitor remote IP camera
Picture 80 Factory DDNS
Note When use the domain name access to the camera and UPNP is not successful you must set port
mapping function on routers
742 The third part DDNS
Users can use not only Factory DDSN but also can use third part DDNS System Such as domain name
wwwdyndnsorg The only thing the user need to do is to apply a free DDNS and then fill in ldquoset boxrdquo as below
Save this setting and this DDNS can be used
DDNS Hostname
Factory DDNS
IPCAM User Manual
43
Note the third party domain name is the realization of analytical way input the domain in the browser it will
keep this string of characters If the port of the device isnrsquot 80 then need to add colon and port number For
example httpwell888dyndnsorg8999
75 Mail and FTP Service
1)Configure the E-mail box to receive and send mails The E-mail box is used for receiving
the images sent after alarm and the system IP address after successful dial-up
Note When Alarm Service Settings-gt Send Mail on Alarm is check the Mail
Service takes effect
Picture82
Configure the E-mail box to receive and send mails The E-mail box is used for receiving the images sent
after alarm and the system IP address after successful dial-up
Sender This device use the sender mailbox to send mails
Receiver To receive the mail from the Sender You can set up to 4 receiver mailbox
SMTP Server the SMTP server for the sender mailbox
Need Authentication if the sender mailbox need authentication you should check it then
input the SMTP username amp Password
Mail test Please set the Mail parameter and click Submit first There are Mail test result
Picture 83
video Local storage in PC after alarm monitoring
IPCAM User Manual
44
Gmail also set as the same It only needs you to fill in correct SMTP Sever address user and password
Picture 84
Mail notes Internet IP address In this option When Internet IP and port have changed IP Will be sent via
1Can not connect to the server
2Network Error Please try later
3Server Error
4Incorrect user or password
5The sender is denied by the server Maybe the server need to authenticate the user please check it
and try again
6The receiver is denied by the server Maybe because of the anti-spam privacy of the server
7The message is denied by the server Maybe because of the anti-spam privacy of the server
8The server does not support the authentication mode used by the device
Report Internet IP by Mail When ipcam port or Internet IP changed it will send the internet IP by
mail(for example IPCAM s url is http119123207969002) Make sure the port is map to the router
correctly by UPNP or Virtual Map function
2) FTP Server use and settings
middotIf you already have an FTP Server (ipcam com)and email ipcam you can fill the
parameters as below
Picture 85
IPCAM User Manual
45
middotFTP Server of LAN as below
1 Create an account
2 Step by step setting until finish it
Picture 88
IPCAM User Manual
46
3Start Server
Continue to finish it
Picture 89
4IPCAMrsquoS account can be used
Picture 90
Save path
This is a FTP
server address
IPCAM User Manual
47
5 IP camerarsquos FTP Server set like this
Picture 91
6 Set up and complete testing is successfulwhen it alarms IP camera will upload
pictures to the FTP server Settings of main directory path (as shown )
Picture 92
FTP Server the FTP server address
FTP port the port usually is 21
FTP Mode support standard(POST) mode and passive(PASV) mode
Upload Image Now it will upload image now when checkbox is not checked When checked you can
input upload interval(Seconds)
76 Motion Detection
Enter Alarm Service Settings page to configure Motion Detection function
1) Motion Detect Armed
Each alarm triggers in the protection of time the device will take various measures to alarm
IO linkage alarm output relay closure external alarm device began to alarm
IPCAM User Manual
48
Send E-mail alarm informatio
Transmit pictures to the FTP server and can set the time interval of sending pictures
2) Alarm t ime Settings
Only in the alarm period detection device to alarm will only have alarm action All the time (not check the
schedule) also can alarm within specified time For the specified time alarm firstly need to set up the system
time time zone and then to choose period of alarm in the state of alarm setting as shown in Picture 19
Picture93 Alarm of time Settings interface
Motion Detect Armed
When you enable motion detect armed the camera can be triggered to send email alerts
and record images In the camera monitoring page the green icon turn to red and an
alert sound you will hear
Motion Detect Sensibility
You can choose from low to high 10 level alarm sensitivity The greater the number the higher the
sensitivity
Alarm Input Armed
IO PINS1) Output(+5V) 2) Output 3) Alarm input 4) Input (GND)
Input Pins The input pins can be used for 1-way external sensor input(pin3 and pin4) For example
you may connect a Person Infrared Sensor (PIR) to it for motion detection When external sensor
triggered IPCAM can be programmed to send an email with picture or control the internal relay output
IPCAM User Manual
49
Picture94
IO Linkage on Alarm
Enable IO linkage on alarmPin1 will output +5V when alarm triggered and output LOW
when alarm release automatically
Switch onoff buttons control Pin1 output manually
Send Mail on Alarm
Sent picture and mail inform to customers e-mail after alarmed(firstly you should finish
the Mail Service Settings)
Picture 95
Upload Image on Alarm
Enable upload image on alarm and set upload interval(Seconds)
Tick send to your setted mails
IPCAM User Manual
50
Picture 96
REC automatically and save to PC
When you enable motion detect and open the camera monitoring page on the PC If
there is an alarm triggered REC will start automatically for several seconds and save to
the PC
Picture 97
REC save to pcrsquos position
Picture 98
Storage path can be changed
After Setting up later when have the
alarm the image will send to
designated email and FTP server
IPCAM User Manual
51
77 IP cameras Time amp Date setting and PTZ Setting
If IP camera connected with Internet it can automatically check the time amp date via running NTP Server And
need to choose properly IP cameras Time zone Otherwise it need PC Time to check IP camera time amp Date
Pre-set and Speed of PT
78 UPGRADE DEVICE FIRMWARE
Picture 101 Firmware upgrade
IP CAMERA has two kinds of programme One is system firmware another is application firmware It can be
upgraded separately
79 BACKUP AND RESTORE SETTING
Click Set in the Backup will lead to a BIN file and choose this file to restore setting
The huger the Number is The
slower it will be
IPCAM User Manual
52
8 APPENDIX
81 REGISTER AND APPLY FOR DDNS SERVICE
1Users use DDNS management system first timeUsers need to apply account to manage
and inquire the domain state
Step1 enter httpwwwdyndnscom and Create Account( Fill in Domain Name dyndnsorg then Click
Add)
Figure103
Step2 enter your information
Figure104
IPCAM User Manual
53
Figure105
Step3 After a minute you will receive an E-mail from DynDNS Support and it will give you a
confirmation address
(eg httpsaccountdyncomemlcreateconflILHMZHRje5oF_6YXTYv1A
Figure106
IPCAM User Manual
54
Step4 Open the link to active your Domain Name as belowLogin in your account after it is activated
Figure107
Step5 Check all the DDNS serviceswe choose the 14-day-trial
Figure108
Step6 Click the linkand user will see as below
IPCAM User Manual
55
middotenter your information
Figure109
Step7 Now you obtained a Dynamic Domain Name(Figure 105)and can use it in the DDNS Service
Settings(details 74)
Figure110
IPCAM User Manual
56
2For DDNS which is applied successfully you can fill in the IP CAMERA When set successfully the status
of IP will be shown as blows
picture 111
picture 112
3How to set DDNS on line
The first wayMenu rdquostartrdquo- ldquorunrdquomdashgt Input CMDClink rdquoenterrdquoIt can check DDNS Statas
via As shown below
Picture 113
IPCAM User Manual
57
Through the PING command this dynamic domain name can be back in the network response information It
proves that the domain name has been online
If the domain name update not success Possible reasons
(1) DDNS parameter is not correct (2) may cause DNS address configuration is wrong
82 Some special application for IPCAMERA
IPCamUse some grammar parameter control and Use IPCam
useruser
pwdpassword
priThe current access (1 visitors 23 operator managers)
resolutionImage resolution(832024 0qvga32640480 vga)
ratemage transmission speed and scope 0-23
brightnessbrightness0~255
contrastcontrast0~6
mode
Mode 050 hz For
60 hz 2 outdoor
flip
Flip rotation 0 primitive 1 vertical reverses 2 horizontal 3 vertical flip + horizontal
821 The flow media player VLC player and mplayer can real-time broadcast ipcamera and send
of streaming media format video data
(Grammar parametersvideostreamasfuser=amppwd=ampresolution=amprate=)
As shown Picture 113 rdquoIpcamrdquo
Picture 114
IPCAM User Manual
58
From the following picture we can view that Ipcam local IP address ishttp19216811118999
WAN IP Address is httpwell888dyndnsorg8999 we can inputrdquoIPcamrdquorsquoS IP address to
open in the player
Picture 115
the CLC media player open play position
Picture 116
LAN play address
Picture 117
IPCAM User Manual
59
Picture 118
Open the Internet play position
Picture 119
As shown in the following picture It can see the ipcamera send video streaming format
Size 640X480
User
IPCAM User Manual
60
Picture 120
83 Frequently Asked Questions
Note1) Any question you would meet please check Network connections firstly
2)Check the working status revealed by the indicators on the network server hub exchange and
network card If abnormal check the network connections
831 I have forgotten the administrator username andor password
To reset the administrator username and password Press and hold down the RESET
BUTTON for 5 seconds Release the power button and the username and password
will be reset back to the factory default administrator username and password
Default administrator username admin
Default administrator password No password
832 IP Address configuration
Check whether IP address of the IP Camera server shares the same subnet as your
work station Click My Computer gt Control PanelgtNetwork amp Dial-up Connections gt
LAN gt Attributes gtInternet Protocols (TCPIP) and check IP Address and Subnet
Mask Make sure they are in the same subnet when configuring IP Camera IP
address manuallyUnable to access IP Camera via web browser
833 Network Configuration
Double Check to ensure that your HTTP server software is configured and running
properly If you are running any firewall software make sure it is allowing inbound
connections to port 80Also if you happen to be using a cableDSL router make sure
IPCAM User Manual
61
you are set up port forwarding properly ( consult your router is documentation for more
information ) If none of these seem to be the problem it is also possible that your
ISP is blocking inbound connections to port 80 ndashmany IPSs have done this because
of internet worms such as Code Red If this is the case you bdquoll have to setup your
HTTP server on an alternate port (such as 8080)
834 No Monitoring picture
It has four reasons Images of the abnormal factors
1If its not use Directx function and lead to not normal to display the color imagePlease
install DirectX and open the start menu then input the command
Picture 121
You use the DirectX function and it will expedite the DirectDrawDirect3D and AGP if its can not maybe the
connect issues or hardware not read it
2The issues of hardware canrsquot support the card expedite image
3The antivirus software will influence the network it will be stoped or closedIf you install fireproof software
please close it and try again
4 ActiveX controller is not installed correctly
If its not image on the first time to use and will display to the user through the ActiveXIf its can not
display of the image maybe it fail of install about this issues please follow as
1Install ldquoIP Camera Toolrdquo ActiveX control at the same time
2Please install ActiveX control and keep the security settings for IE browser
835 Problems with network bandwidth
The image frame rate is subjected to the following factors 1network bandwidth 2 PC
performancenetwork environment and display preference setting (brightness theme
etc) 3 the number of visitors (Too many visitors will slow down the image frame rate) 4
choice of switch or hub (Use a switch for multiple IP Camera Servers rather than a HUB)
The Device use MJEPT Compression it needs good network bandwidth If it is too narrow it will lead to slowly
browser Typical video parameter occupy network bandwidth as blows
640x48030fps 40 Megabits ~ 50 Megabits
320x24030fps 12 Megabits ~ 16 Megabits
IPCAM User Manual
62
middot836 Why pop-up the prompt ldquoFail to connect to the devicehelliprdquo
This prompt only appeared in the case of using multiple cameras
Enter the Multi-Device Settings page(login as administrator) to check the
Device setting is correct or not
When one of the multiple cameras disconnected the color changed to
yellow and pop-up the promptldquoFail to connect to the devicehelliprdquo
Picture 122
837 Canrsquot access the IPCAM in the internet
There are some reasons
1 ActiveX controller is not installed correctly(see more details 514)
2 The port IPCAM used is blocked by Firewall or Anti-virus software Please change a
port number and try again
3 Port mapping is not success You can do port mapping by two ways
Enter setting page of the router which IPCAM connect with to enable UPnP function
Enter IPCAM ldquoUPnP Settingsrdquo to enable UPnP and make sure the state is ldquoUPnP
successrdquo
‟ s IP
and port to the Virtual map list
When use ADSL the IP is dynamic You should set DDNS(see more details 74 amp 80)
and also make sure port mapping success
84 Operate common problem solving
IP camera tool canrsquot find the camera
Except of the camera broken
1 Make sure the cable connector no problem recommend connector
(AMP)it is with international standard Another note IPCAMrsquos data
transmission channel require higher than computerrsquos so maybe the
IPCAM User Manual
63
computer can run normally but IPCAM canrsquot Please press heavily when making the cable connector
2 Confirm the power supply normally First check whether power indication
light turn on or not If it is onthen check the yellow light on RJ45 Port
(power indication light) and green light (network indication light) are on or
notIf they are onso power supply and cable runs normally
3 Confirm all the firwall and antivirus software are closeThe firewall often
block unrecognized data so if the firewall is running so maybe the IPCAM
TOOL canrsquot find the deviceSuggest to close firewall and antivirus
software temporarily before searching
How to solve the camera blank screen
1 Check if you are using the wrong power adaptorplease use original one
2 Close antivirus software
How to solve the camera canrsquot login by Internet
1 Check if you set DDNS success or not
2 Check the current IPCAMrsquos port number is the same as routerrsquosThey need to keep same
Canrsquot view the monitoring picture
1 Reason canrsquot connect with network
SolutionCheck if the network connect well exclude cable fault and PC virus
cause network fault until can be used between PC and PING
2 ReasonIP address occupy by other device
Solution Choose automatic gain
3 Reason IP address located within different subnet
Solution Check IPCAMrsquoS ip address and subnet mask address and gateway settings
4 ReasonWeb port has been modified
Solutioncontact network administrator to obtain port information
5 Reasonunknown
SolutionPress reset button to factory default statethen reconnectingsysten
default to gain ip address automaticsubnet mask is 2552552550
85 Default Parameters
middotDefault network Parameters
IP address dynamic obtain
Subnet mask 2552552550
Gateway dynamic obtain
DDNS Factory provide
middotUsername and password
Default administrator username admin
Default administrator password No password
IPCAM User Manual
64
86 Technical Parameters
ITEM IP CAM (NIP-02BGPWA2)
Image Sensor
Mage sensor 15 Color CMOS Sensor
Display 640 x 480 (300K Pixels)
Lens f36mm F24 (IR Lens)
Miniillumination 05 Lux
Lens Lens Type Glass Lens
Viewing Angle 60 Degree
Audio Microphone Audio of two way
Domain name Server MSN server DDNS server
Video
Image Compression MJPEG
Image Frame Rate 15 FPS(VGA)30FPS(QVGA)
Resolution 640 x 480(VGA) 320 x 240(QVGA)
Flip Mirror Images rtical Horizontal
mode 50Hz 60Hz or Outdoor
Video Parameters Brightness Contrast
Communication
Ethernet One 10100Mbps RJ-45
Supported Protocol HTTPDHCPIPTCPUDPFTPSMTPDDNSPPPoEUPnP
Mobilephone monitor Support IphoneIpad3G phonesmartphone
Wireless Standard IEEE 80211bg
Wireless Standard 80211b11Mbps(max) 80211g54Mbps(max)
Wireless Security 64128-bitWEP Encryption
Physical
PanTilt Angle Horizontal270deg amp Vertical 120deg
Infrared Light 10 IR LEDs Night visibility up to 15 Mete
Product size 100(L) x100(W) x125mm(H)
Gross Weight 6465gpcs (packing size196x165x123mm)
Net Weight 2547gpcs (only product)
Power Specification DC 5V25A 18 meter
Power Consumption 5 Watts
Environment
Operate Temper 0deg~ 55degC (14degF~122degF)
Operating Humidity 20 ~ 85 non-condensing
Storage Temper -10degC ~ 60deg (14degF ~140degF)
Storage Humidity 0 ~ 90 non-condensing
PC Requirements
CPU 20GHZ or above (suggested 30GHz)
Memory Size 512MB or above (suggested 10GB)
Display card 64M or above
Supported OS Microsoft Windows XPVistaWindows7
Supported browsers IEfirefoxGoogle
Certification CEFCCRoHS
Warranty Limited 1-year warranty
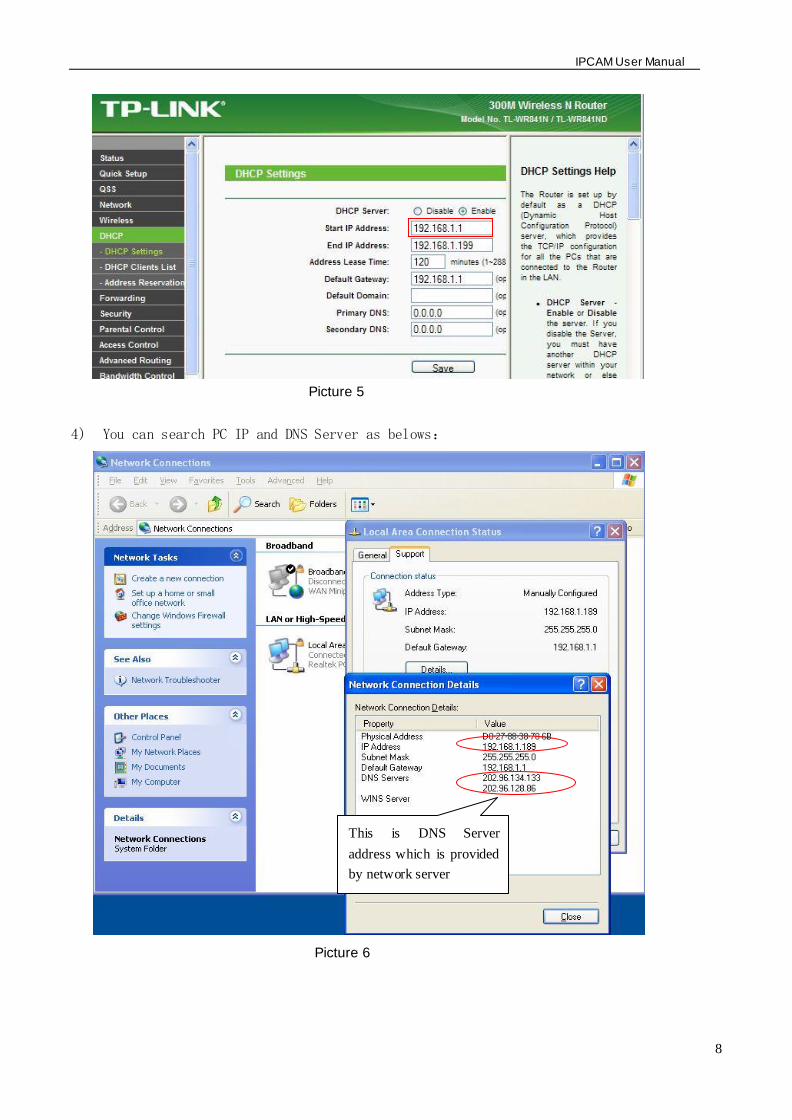
IPCAM User Manual
8
Picture 5
4) You can search PC IP and DNS Server as belows
Picture 6
This is DNS Server
address which is provided
by network server
IPCAM User Manual
9
5) The device IP Address can be changed but Its IP address should be at the same with PCs
subnet
Picture 7
When we test IP camera and check whether it starts smoothly or it connects properly we can
operate in the Windows(START- RUN-CMD) and then input ping 1921681111 in the order windows
Picture 8 ping IP Camera
Check whether it can Ping IP camera If yes then it means IP Camera has been worked properly
and connected correctly
Network server provide
DNS server Address
Device IP address can
be changed by yourself
IPCAM User Manual
10
32 Software installation
Software installation
It is very easy to install software You just need to run installation programme then it can
work properly
Please put CD in the PC driver and the CD will automatically run to the software installation
interface
If no such an interface please click ldquoautorunexerdquoin the CD
And then findldquosearchexerdquo Clink and install LAN Tool to PC systemthen you
can view IP Camera Tool in Computer desktop for LAN Search toolldquoIP Camera Toolrdquo
G
Picture9 Software installation interface
MinOpen user manual ExitUser manual
Search tool in LAN Application Tool box Quick installation guide Open CD
IPCAM User Manual
11
4 Visit IP camera in LAN 41 Connection ways in LAN
Picture 10 Connection between Several IP camera and router
42 Search and set device IP address Please note before searching IP camera
1Make sure IP camera has a good connection with power and network
2Te router should be opened DHCP(Dynamic host configuration protocol) because the factory setting status of
IP camera is to obtain automatically IP camera
3When we power IP camera we should wait 20 second then it can works
Search IP camera
When we run Search tool IP camera Tool we can find the IP camera showing IP address Port
Name If we use Wi-fi connection we will find Wi-fi IP address For the details we can view
the following picture
Picture 11
NoteldquoIP Camera ToolexerdquoProgramme only use to search IP camera address and port in the
LAN The tool cant search IP camera IP address and port in the WAN
There are 3 cases
1 No IP Camera found within LAN After about 1 minute search the Result Field will
show ldquonot found IP Serverrdquo
2 IP Cameras having been installed within LAN All the IP Cameras will be listed and the
total number is displayed in the result field as shown in Picture 20
3 The IP Cameras installed within LAN do not share the same subnet with the monitoring
PC A prompt as shown in result field (prompt Subnet doesnrsquot match dbclick to change)
Click the left mouse button to choose the prompt and click the right mouse choose
Network Configuration to set the IP address of the Camera to the same subnet as LAN
IPCAM User Manual
12
SIX Options
Choose the IP Camera list and Click right mouse button there are six options Basic
Properties Network Configuration Upgrade Firmware Refresh Camera List Flush Arp About IP camera tool as
shown Picture 12
Picture 12
Basic Properties
There is some device information in the Bas ic Properties such as Device ID System
Firmware Version Web UI Version
Picture 13
Network Configuration
In this page you can configure the Network parameter
Picture 14
IP address Fill in the IP address assigned and make sure it is in the same subnet as the
Subnet Mask The default subnet mask of the equipment is 2552552550
Gateway Make sure it is in the same subnet with PC IP address Default Gateway
IPCAM User Manual
13
address is 19216811
DNSServer IP address of IPS network provider ( It also can view from network card local area connection
status) As blows picture
Picture 15
Http Port LAN port assigned for the equipment usually 80
User amp Password Default administrator usernamepassword adminNo password
Enable Using DHCPthe system will assign a reasonable IP address for your equipment
only if your gateway supports DHCP (It is the case with most gateways)
DHCP checkbox if checked the device will obtain IP from DHCP server (To be make
sure the Router which the device connect with has DHCP function)
NOTE when the prompt rdquosubnet doesn‟ t match double click to changerdquo please set the
IP Camera IP address once again
Upgrade Firmware
Enter the correct User and Password to upgrade system Firmware and Web UI (User should have administering
authority
Picture 16
This is the server provide the
service of DNS
IPCAM User Manual
14
Refresh Camera List
Refresh camera list manually
Flush Arp Buffer
When cable network and wireless network of the device both are fixed IP address There
is a problem you may encounter is can search the camera IP but canot open the camera
web pageyou may try to use flush arp buffer
About IP Camera tool
You can view IP camera tool version and ActiveX version
43 Login IP camera
Double click the IP address of the IP Camera listed IE will be opened automatically and display the camera login
page Or Access the camera by IE browser directly type in the camera‟ s IP address For
example http19216811118999 ( We suggest you use IE browser for it has more function
Picture 17
IP camera Default username is admin no password And Click ldquoSign inrdquo to enter the monitoring page
Default usernameadmin
Default passwordNo password
IPCAM User Manual
15
Picture 18
Picture 19
middot When Users login inthey can view images At the same time users(Administrator Operator or Visitor) can operate according to their permissions
By Firefox and sofari browser as below
Language options you can
choose operation language
according to your demand
IPCAM User Manual
16
Picture 20
Picture21
IPCAM User Manual
17
44 IP camera operation
441 For Visitor
For example if is bright the first route is at status of Detection(Only IE Broswer can view it)
Picture 22
The right upper is statuss indicator area which can show 9 IP camera status
When the button is gray it means IP camera didnt connect
Green means IP camera has connected
Yellow means there is something wrong with connection
Red means it is the status of alarm
If you want to detect 4 views need to click this icon
OSD Display date and time on the video You can disable the OSD function or choice other color
(OSDon-screen display)
Snapshot Click icon to snap the picture
REC Click icon into REC mode is stop
Audio Click icon into Audio mode can listen the voice in monitoring range
Talk Click icon into Talk mode and the icon will become Visitor can talk with whom is in the
monitoring range
Note the record file name is device Alias_ Current timeAvi
For example IPCAM_20101011134442Avi
It means the device alias is IPCAM and its recordrsquos end time is At 134442 on
October 11 2010When use motion detection and checked Send Mail on Alarm
Buttom for taking picture
S top monitor video
Open vedio
Record
Two way audio Monitor audio
IPCAM User Manual
18
The name of the picture received in mailbox is like this device id(Alias)_ Current
timejpg
442 For operator
When login as operator you can operate PanTilt and adjust video parameter
Picture 23
Direction control click the different arrow will get different direction view
Vertical patrol
Horizontal patrol
Stop patrol
IO output Switch on off
Infrared light software control switch
Image fluctuation flip(up and down)
Image around flip (right and left)
Set Preset (can set 4 preset)
ResolutionVGA(640 X 480) QVGA(320 X 240)
Work Mode 50Hz60HzOutdoor
color parameterClick or can adjust brightness and contrast
Stop patrol
Vertical patrol
Horizontal
patrol
Image fluctuation flip
Image around flip
IO output S witch on off
Set Preset
Infrared light s witch
IPCAM User Manual
19
443 For Administrator
When you login as administrator
you can set all parameters Please
click ldquoFor Administratorrdquo
and enter into
setting interface
Picture 24
Alias Settings You can Input the new name as you like
Data ampTime Settings Data ampTime Settings page
Users Settings Eight accounts are acceptable for this system Here the eight users can configure their
user names and password as Administrator Operator or Visitor
Visitor In this mode you can only view
Operator You can control the direction of IP Camera and set some parameter
Administrator You can setup the advanced configurations of the IP Camera
UpnP Settings If you access IP Camera to be make sure UpnP Status is Succeed
Upgrade Device Firmware Upgrade Device Firmware and device embeded web UI software in this
page
Restore Factory Settings Restore factory settings of the device
Reboot Device Reboot the device
Back Back to Monitoring Mode
View Device IDDevice Firmware
Version and Device Embedded
Web UI Version
Check Device all kinds of
status
Carry on Settings and
operation function
IPCAM User Manual
20
5 Visit IP Camera in internet
51 Connection way in Internet
Picture 25
52 Related setting and login IP camera
1 If the network your IP camera using is using static IP you just need to input this IP address and IP cameras port in the browser then it can visit Ip camera
2 If you are using ADSL to dial-up and surf on line you should obtain IP Camera Current WAN IP Address or configured DDNS
1)There are four ways for you to obtain WAN IP Address
①Using mail to send internet IP function
After setting mail successfully IP will send mail to your receiver e-mail box when Internet IP or port
has changed If it is dynamical IP users need to input this IP address to visit this IP camera
②Obtain from some website
It is very easy for you to obtain WANS IP address You can open browser on the computer on the
condition that IP camera and PC are the same subnet For example httpwwwwhatismyipcomor
httpwwwmyipcn etcsIt will tell you WANS IP address as shows below
Picture 26
③Obtain from MSN and IP cameras MSN ACCOUNT( Details 73)
IPCAM User Manual
21
④ Obtain from router
We take Nur8555M from Xinxiang s router as example
AAccording to routers manual we get Routers IP is 19216811
BLogin in router Input 19216811 in the browser Find the status of Router and find Routers
WAN( In this example WANS IP is 11624235122 As shows Picture 27
Picture 27
Now you can visit IP Cam from Internet What you should do is to Input correct IP address For
example Http 116242351228999
Note Make sure the Ports UPNS is available You can open UPNP via the following ways
Enter into Routers setting page( Details Routers user manual) to make UPNP available
Or enable virtual mapping function Add equipment IP address and port to the virtual mapping list
Picture 28
Users can access the Internet from IPCAM device Input address For example Http 116242351228999
2)DDNS (dynamic DNS) service is the Internet domain name can be fixed and dynamic IP address real-time
corresponding (analysis) service Simplely said whenever user surf on internet or what kind of way you are
using the Internet get a what kind of IP address IP address whether it will change DDMS can ensure that a
fixed domain name can access to a users device
IPCAM User Manual
22
Our products have been configured the DDNS services of course you can also apply for the domain name in
registration website for one of your own domain name to configuration For example wwwdyndnsorg
Picture 30
You need fill in DDNS and port for example(httpicam0001ihome365org8999) The browser will jump
to IP camerarsquos login page
Picture 31
DDNS inside
Factory DDNS
IPCAM User Manual
23
The input device user name and password to login to equipment
Picture 32
middotIf input domain name but cant open IP camera in the browser such as the situation is as blows
middotPlease open the device and check status of IP camera in the local area network confirm whether UPNP
function and DDNS is successful or not
Picture 34
IPCAM User Manual
24
middotYou need to set port mapping function successfully to check whether the router UPNP function is
available if It was unavailable please make it available refer to the routers user manual
If you use TPLINK router please refer to these instructions
middotThrough the upnp automatic mapping port to the network input router IP address in the browser (such
as http19216811 gt the router IP addresses are written on paper label on the router house---- please set
according to your own IP address) open the routers page forward rules gt gt upnp set to ensure that the
current state of upnp is already available as below
Note some of the router interface without UPNP Settings option then need to open the virtual server IP
cameras in the local area network of mapping the connection IP address and port number
Picture 36
6 Access IP camera via mobile equipment
such as mobile phoneIpad Etcs There are two kinds of ways to access IP camera One is to input IP address in browser directly It can be IP
address and also can be DDNS Another is to use clients to visit
61 Input IP address in browser
1 We take IPAD as example as blows
IPCAM User Manual
25
middotOpen browser Safari
Input IP cameras IP address for example( httpicam0001ihome365org8999)
Choose language according to your demand and choose login mode according to your browser
Picture39
Choose manual settings
Open browser Safari
Enter the IP address of the IP camera
(httpicam0001ihome365org8999)
IPCAM User Manual
26
enter your account and password on the login page as shown By defaultadministratorrsquos username is
admin and no password
Select Server Refresh mode landing
Picture42
Input the username and password of
the network camera
Here you can choose between two
modes landing
Here to select the
operating language
Default passwordNo password
IPCAM User Manual
27
Select Server Push mode landing
Picture 43
2 Now we take Android system device as example
Open menu and firstly open the browser and input IP camera s IP address in the
browser for example(httpicam0001ihome365org8999)
Picture 44
Input IP cameras username and password and click sign in and then enter into
browser model to choose login-in interface
Open menu
IPCAM User Manual
28
Picture 45
62 Install client-side software to access IPCamera
There are many client software support IP camera several third-party software support our IP cameras too
The following are our manufacture software setup process(the Android version)
1 Pls get the install applications in the CD or you can download from the website
httpsplaygooglecomstoresearchq=reecamampc=apps Choose the right
①installation file-ipcameraapk
running environment Android version 16 or above
Note Please ensure that mobile phones can connect to the Internet before install
② Install method
21 Insert SD card into Android mobile phone
22 Connect the cellphone to computer via USB data cable
23 Choose the USB connection model on your cellphone you can see the SD driver in ldquomy computerrdquo
24 Copy the ipcameraapk into SD card
25 Disconnect the device pls find the ipcameraapk in ldquoFile Managementrdquo and run it
26 The ipcamera application will be show up on the home screen after you successfully installed
③Software operating processes
First ensure that the Internet open WIFI connection the search in the Play in The Googl Android
application reecam
Open the WiFi
connection
Download and install
the application
Search reecam
IPCAM User Manual
29
middotYou can edit the camera modify camere configuration and delete camera operation
Click here to add
a video camera
Select to add to the
client camera
Refresh LAN cameras
View or change the
configuration of the
camera the camera
name at random
IP address
Http port
The default password is blank
Camera name
Prev iew camera
Preview the
camera screen
save the camera
Editor has added
cameras
Edit camera
configuration
Delete the camera Edit camera of the
configuration
IPCAM User Manual
30
middotFor the camera added to the camera list you can watch camera in real time
Control cameras PTZ and set swith-on and switch-off of the cameras audio int
ercom and video
Picture 51
2 The IPCamera setting process for iPhone iPad
Firmware requirements compatible with iPhone iPod touch and iPad
Systerm requirements Requires iOS 42 or above
You can download the genuine
software
(ipcameraapp) form the App Store
httpitunesapplecomcnappreecamid479468959mt=8
middotSoftware operating process is as follows
Continue to add
the camera
Add external network
camera domain
Cameras have
been added
Audiointercom video switch
A list of cameras and
video can be switched to
view
Fingers sliding PTZ control
Click on the picture to stop
rotation
IPCAM User Manual
31
Open the App Store search
reecam
Download and install
reecam
The run has been
installed good reecam
program
Click to add cameras
Search reecam
IPCAM User Manual
32
Fill in the domain address
or IP address
Fill in the Http port of the
camera login user name
and password click next
to open the camera
Completed please
click here
Preview videoclick on the
next save
Save the camera added
Selected camera to
view images
Click image to expand
more cameras
operating functions
IPCAM User Manual
33
7 Other setting
71 Network Setting
711 Basic Network Settings
If the router that the IP camera connect has DHCP function you can choice ldquoObain IP from DHCP Serverrdquo
else fill in the network parameters manually
Http Port In most cases you can leave this value as 80 however if your Internet
Service Provider blocks this port you may switch to another port number such as 85808088889000 Etcs
(Range from 0 to 65535 pay attention to the same segment of multiple devices must set up different port The
port t canrsquot have any conflict with other software or equipment
a Search tools modification in LAN
Figure58
brdquoFor administorrdquo ldquoBasic network settingrdquo -Change the port
Figure59
712 WIFI Setting
1) Please enter the wireless net setting page of the wireless Router to find out SSID
Channel(less than 10) Encryption Authentication as below
Selec IP Camera clickright mouse button choice network configurat ion
Set port number
Set Network IP
Set Http Port Number
IPCAM User Manual
34
Figure 61
As Administrator to Login camera open wireless LAN Settings page fill in every
Setting (ensure keep the same as routerrsquos ) and then pulled out of the cable wireless network function can be
used For example as shown in belows
Figure62
Pls click the scan buttom twice
IPCAM User Manual
35
Figure 63
713 Adhoc point to point Wireless connection Setting
1) Open the basic network setting interfacecheck the device status
Picture 64
2) Open the wireless lan setting interface choose Adhoc for network type you
can define SSID such as 001
remember the IP address of
IP camera and Http port
Click the Settings Ip Camera will
restart and save
Double click to choose
Fill the encryption and
routers and key in the
same way
IPCAM User Manual
36
Picture 65
3) Unplug the RJ45 from IP camera Use laptop or other devices which are with
wifi function( include smart phoneipad and so on) searching the SSID you defined
on proccess 2then make a connection
Picture 66
middotClick wireless network and check the link status of ip camera Please note IP
address of your connected laptop must be the subset of your ip camera if not
please reset the ip address of your laptop manually
Picture 67
4) Now we can use the ip camera tool or enter ip address of camera derectly in
browser blank to visit
1 visit by ip camera tool
Picture 68
IPCAM User Manual
37
2Enter ip address in the browser
Enter user name and password in the login interface
Picture 69
Click ldquoSign inrdquoand vis it
Picture 70
IPCAM User Manual
38
72 Multi-Device Settings
Add cameras in LAN
In the Multi-Device Settings page you can see all devices searched in LAN The 1
St Device is this device in default You can add more cameras list in LAN for monitoring This Web software
supports up to 9 IP Cameras online simultaneous ly Click ldquoThe 2ND
Devicerdquo and Double click the item in the ldquoDevice List in LANrdquo AliasHost and Http Port
will fill in automatically Enter the correct username and password then click ldquoaddrdquoAdd
more cameras in the same way At last please donrsquot forget the ldquo settingrdquo Button
Picture 71
Add cameras in the Internet
Firstly make sure the camera added can access in the Internet with the IP address or
DDNS domain Like this http2191332001669999or httpIPcamdyndnsorg9999You can enter the
Host 219133200166 Http port 9999 or Host IPcamdyndnsorg Http port 9999 Enter the correct
username and password then click ldquoaddrdquo Add more cameras in the
same way
Picture 72
IPCAM User Manual
39
Picture 73
73 MSN Settings
Fill in your MSN account and password then add account which need to receive
IPCAMrsquoS ip address to IPCAM‟ S MSN list (Picture 67)click submit then yoursquod better
restart IP camera After it login your MSN to add IPCAMrsquos MSN account to MSN List that
you can receive IPCAMrsquos ip address
Picture 74
First login and click add contacts choose Add Contact then fill IPCAMrsquos MSN account in instant
messaging address click next then send offers
Aplly for MSN account and passworf for IP cam
Add about 10 MSN Accout
IPCAM User Manual
40
Figure75
Next
Figure76
Figure77
When IPCAMrsquos MSN account shows online you can chat with it input path command url camera
account will show its IP address in chatting box promptly as below
IPCAM User Manual
41
Picture 78
You can input the IP address to browser then can browse ip camera as below
Figure79
AttentionYou should fill MSN account in IPCAM first
74 DDNS Service Settings
DDNS Service The system supports protocols from some DDNS providers Dyndnsorg System support
DDNS such as topipcamorgpeanut shell3322orgDynDNS
provided IP
IPCAM User Manual
42
User and Password the user name and password used when applying for the domain
name (details 432)
DDNS Host the Domain Name
741 Factory DDNS
Device had distributed one DDNS to every productwhich was sticked the bottom
of the product Such as
manufacturer had already give every device a DDNS address which is unique Users only need to fill in this
DDNS IP ADDRESS and port in the browser then they can monitor remote IP camera
Picture 80 Factory DDNS
Note When use the domain name access to the camera and UPNP is not successful you must set port
mapping function on routers
742 The third part DDNS
Users can use not only Factory DDSN but also can use third part DDNS System Such as domain name
wwwdyndnsorg The only thing the user need to do is to apply a free DDNS and then fill in ldquoset boxrdquo as below
Save this setting and this DDNS can be used
DDNS Hostname
Factory DDNS
IPCAM User Manual
43
Note the third party domain name is the realization of analytical way input the domain in the browser it will
keep this string of characters If the port of the device isnrsquot 80 then need to add colon and port number For
example httpwell888dyndnsorg8999
75 Mail and FTP Service
1)Configure the E-mail box to receive and send mails The E-mail box is used for receiving
the images sent after alarm and the system IP address after successful dial-up
Note When Alarm Service Settings-gt Send Mail on Alarm is check the Mail
Service takes effect
Picture82
Configure the E-mail box to receive and send mails The E-mail box is used for receiving the images sent
after alarm and the system IP address after successful dial-up
Sender This device use the sender mailbox to send mails
Receiver To receive the mail from the Sender You can set up to 4 receiver mailbox
SMTP Server the SMTP server for the sender mailbox
Need Authentication if the sender mailbox need authentication you should check it then
input the SMTP username amp Password
Mail test Please set the Mail parameter and click Submit first There are Mail test result
Picture 83
video Local storage in PC after alarm monitoring
IPCAM User Manual
44
Gmail also set as the same It only needs you to fill in correct SMTP Sever address user and password
Picture 84
Mail notes Internet IP address In this option When Internet IP and port have changed IP Will be sent via
1Can not connect to the server
2Network Error Please try later
3Server Error
4Incorrect user or password
5The sender is denied by the server Maybe the server need to authenticate the user please check it
and try again
6The receiver is denied by the server Maybe because of the anti-spam privacy of the server
7The message is denied by the server Maybe because of the anti-spam privacy of the server
8The server does not support the authentication mode used by the device
Report Internet IP by Mail When ipcam port or Internet IP changed it will send the internet IP by
mail(for example IPCAM s url is http119123207969002) Make sure the port is map to the router
correctly by UPNP or Virtual Map function
2) FTP Server use and settings
middotIf you already have an FTP Server (ipcam com)and email ipcam you can fill the
parameters as below
Picture 85
IPCAM User Manual
45
middotFTP Server of LAN as below
1 Create an account
2 Step by step setting until finish it
Picture 88
IPCAM User Manual
46
3Start Server
Continue to finish it
Picture 89
4IPCAMrsquoS account can be used
Picture 90
Save path
This is a FTP
server address
IPCAM User Manual
47
5 IP camerarsquos FTP Server set like this
Picture 91
6 Set up and complete testing is successfulwhen it alarms IP camera will upload
pictures to the FTP server Settings of main directory path (as shown )
Picture 92
FTP Server the FTP server address
FTP port the port usually is 21
FTP Mode support standard(POST) mode and passive(PASV) mode
Upload Image Now it will upload image now when checkbox is not checked When checked you can
input upload interval(Seconds)
76 Motion Detection
Enter Alarm Service Settings page to configure Motion Detection function
1) Motion Detect Armed
Each alarm triggers in the protection of time the device will take various measures to alarm
IO linkage alarm output relay closure external alarm device began to alarm
IPCAM User Manual
48
Send E-mail alarm informatio
Transmit pictures to the FTP server and can set the time interval of sending pictures
2) Alarm t ime Settings
Only in the alarm period detection device to alarm will only have alarm action All the time (not check the
schedule) also can alarm within specified time For the specified time alarm firstly need to set up the system
time time zone and then to choose period of alarm in the state of alarm setting as shown in Picture 19
Picture93 Alarm of time Settings interface
Motion Detect Armed
When you enable motion detect armed the camera can be triggered to send email alerts
and record images In the camera monitoring page the green icon turn to red and an
alert sound you will hear
Motion Detect Sensibility
You can choose from low to high 10 level alarm sensitivity The greater the number the higher the
sensitivity
Alarm Input Armed
IO PINS1) Output(+5V) 2) Output 3) Alarm input 4) Input (GND)
Input Pins The input pins can be used for 1-way external sensor input(pin3 and pin4) For example
you may connect a Person Infrared Sensor (PIR) to it for motion detection When external sensor
triggered IPCAM can be programmed to send an email with picture or control the internal relay output
IPCAM User Manual
49
Picture94
IO Linkage on Alarm
Enable IO linkage on alarmPin1 will output +5V when alarm triggered and output LOW
when alarm release automatically
Switch onoff buttons control Pin1 output manually
Send Mail on Alarm
Sent picture and mail inform to customers e-mail after alarmed(firstly you should finish
the Mail Service Settings)
Picture 95
Upload Image on Alarm
Enable upload image on alarm and set upload interval(Seconds)
Tick send to your setted mails
IPCAM User Manual
50
Picture 96
REC automatically and save to PC
When you enable motion detect and open the camera monitoring page on the PC If
there is an alarm triggered REC will start automatically for several seconds and save to
the PC
Picture 97
REC save to pcrsquos position
Picture 98
Storage path can be changed
After Setting up later when have the
alarm the image will send to
designated email and FTP server
IPCAM User Manual
51
77 IP cameras Time amp Date setting and PTZ Setting
If IP camera connected with Internet it can automatically check the time amp date via running NTP Server And
need to choose properly IP cameras Time zone Otherwise it need PC Time to check IP camera time amp Date
Pre-set and Speed of PT
78 UPGRADE DEVICE FIRMWARE
Picture 101 Firmware upgrade
IP CAMERA has two kinds of programme One is system firmware another is application firmware It can be
upgraded separately
79 BACKUP AND RESTORE SETTING
Click Set in the Backup will lead to a BIN file and choose this file to restore setting
The huger the Number is The
slower it will be
IPCAM User Manual
52
8 APPENDIX
81 REGISTER AND APPLY FOR DDNS SERVICE
1Users use DDNS management system first timeUsers need to apply account to manage
and inquire the domain state
Step1 enter httpwwwdyndnscom and Create Account( Fill in Domain Name dyndnsorg then Click
Add)
Figure103
Step2 enter your information
Figure104
IPCAM User Manual
53
Figure105
Step3 After a minute you will receive an E-mail from DynDNS Support and it will give you a
confirmation address
(eg httpsaccountdyncomemlcreateconflILHMZHRje5oF_6YXTYv1A
Figure106
IPCAM User Manual
54
Step4 Open the link to active your Domain Name as belowLogin in your account after it is activated
Figure107
Step5 Check all the DDNS serviceswe choose the 14-day-trial
Figure108
Step6 Click the linkand user will see as below
IPCAM User Manual
55
middotenter your information
Figure109
Step7 Now you obtained a Dynamic Domain Name(Figure 105)and can use it in the DDNS Service
Settings(details 74)
Figure110
IPCAM User Manual
56
2For DDNS which is applied successfully you can fill in the IP CAMERA When set successfully the status
of IP will be shown as blows
picture 111
picture 112
3How to set DDNS on line
The first wayMenu rdquostartrdquo- ldquorunrdquomdashgt Input CMDClink rdquoenterrdquoIt can check DDNS Statas
via As shown below
Picture 113
IPCAM User Manual
57
Through the PING command this dynamic domain name can be back in the network response information It
proves that the domain name has been online
If the domain name update not success Possible reasons
(1) DDNS parameter is not correct (2) may cause DNS address configuration is wrong
82 Some special application for IPCAMERA
IPCamUse some grammar parameter control and Use IPCam
useruser
pwdpassword
priThe current access (1 visitors 23 operator managers)
resolutionImage resolution(832024 0qvga32640480 vga)
ratemage transmission speed and scope 0-23
brightnessbrightness0~255
contrastcontrast0~6
mode
Mode 050 hz For
60 hz 2 outdoor
flip
Flip rotation 0 primitive 1 vertical reverses 2 horizontal 3 vertical flip + horizontal
821 The flow media player VLC player and mplayer can real-time broadcast ipcamera and send
of streaming media format video data
(Grammar parametersvideostreamasfuser=amppwd=ampresolution=amprate=)
As shown Picture 113 rdquoIpcamrdquo
Picture 114
IPCAM User Manual
58
From the following picture we can view that Ipcam local IP address ishttp19216811118999
WAN IP Address is httpwell888dyndnsorg8999 we can inputrdquoIPcamrdquorsquoS IP address to
open in the player
Picture 115
the CLC media player open play position
Picture 116
LAN play address
Picture 117
IPCAM User Manual
59
Picture 118
Open the Internet play position
Picture 119
As shown in the following picture It can see the ipcamera send video streaming format
Size 640X480
User
IPCAM User Manual
60
Picture 120
83 Frequently Asked Questions
Note1) Any question you would meet please check Network connections firstly
2)Check the working status revealed by the indicators on the network server hub exchange and
network card If abnormal check the network connections
831 I have forgotten the administrator username andor password
To reset the administrator username and password Press and hold down the RESET
BUTTON for 5 seconds Release the power button and the username and password
will be reset back to the factory default administrator username and password
Default administrator username admin
Default administrator password No password
832 IP Address configuration
Check whether IP address of the IP Camera server shares the same subnet as your
work station Click My Computer gt Control PanelgtNetwork amp Dial-up Connections gt
LAN gt Attributes gtInternet Protocols (TCPIP) and check IP Address and Subnet
Mask Make sure they are in the same subnet when configuring IP Camera IP
address manuallyUnable to access IP Camera via web browser
833 Network Configuration
Double Check to ensure that your HTTP server software is configured and running
properly If you are running any firewall software make sure it is allowing inbound
connections to port 80Also if you happen to be using a cableDSL router make sure
IPCAM User Manual
61
you are set up port forwarding properly ( consult your router is documentation for more
information ) If none of these seem to be the problem it is also possible that your
ISP is blocking inbound connections to port 80 ndashmany IPSs have done this because
of internet worms such as Code Red If this is the case you bdquoll have to setup your
HTTP server on an alternate port (such as 8080)
834 No Monitoring picture
It has four reasons Images of the abnormal factors
1If its not use Directx function and lead to not normal to display the color imagePlease
install DirectX and open the start menu then input the command
Picture 121
You use the DirectX function and it will expedite the DirectDrawDirect3D and AGP if its can not maybe the
connect issues or hardware not read it
2The issues of hardware canrsquot support the card expedite image
3The antivirus software will influence the network it will be stoped or closedIf you install fireproof software
please close it and try again
4 ActiveX controller is not installed correctly
If its not image on the first time to use and will display to the user through the ActiveXIf its can not
display of the image maybe it fail of install about this issues please follow as
1Install ldquoIP Camera Toolrdquo ActiveX control at the same time
2Please install ActiveX control and keep the security settings for IE browser
835 Problems with network bandwidth
The image frame rate is subjected to the following factors 1network bandwidth 2 PC
performancenetwork environment and display preference setting (brightness theme
etc) 3 the number of visitors (Too many visitors will slow down the image frame rate) 4
choice of switch or hub (Use a switch for multiple IP Camera Servers rather than a HUB)
The Device use MJEPT Compression it needs good network bandwidth If it is too narrow it will lead to slowly
browser Typical video parameter occupy network bandwidth as blows
640x48030fps 40 Megabits ~ 50 Megabits
320x24030fps 12 Megabits ~ 16 Megabits
IPCAM User Manual
62
middot836 Why pop-up the prompt ldquoFail to connect to the devicehelliprdquo
This prompt only appeared in the case of using multiple cameras
Enter the Multi-Device Settings page(login as administrator) to check the
Device setting is correct or not
When one of the multiple cameras disconnected the color changed to
yellow and pop-up the promptldquoFail to connect to the devicehelliprdquo
Picture 122
837 Canrsquot access the IPCAM in the internet
There are some reasons
1 ActiveX controller is not installed correctly(see more details 514)
2 The port IPCAM used is blocked by Firewall or Anti-virus software Please change a
port number and try again
3 Port mapping is not success You can do port mapping by two ways
Enter setting page of the router which IPCAM connect with to enable UPnP function
Enter IPCAM ldquoUPnP Settingsrdquo to enable UPnP and make sure the state is ldquoUPnP
successrdquo
‟ s IP
and port to the Virtual map list
When use ADSL the IP is dynamic You should set DDNS(see more details 74 amp 80)
and also make sure port mapping success
84 Operate common problem solving
IP camera tool canrsquot find the camera
Except of the camera broken
1 Make sure the cable connector no problem recommend connector
(AMP)it is with international standard Another note IPCAMrsquos data
transmission channel require higher than computerrsquos so maybe the
IPCAM User Manual
63
computer can run normally but IPCAM canrsquot Please press heavily when making the cable connector
2 Confirm the power supply normally First check whether power indication
light turn on or not If it is onthen check the yellow light on RJ45 Port
(power indication light) and green light (network indication light) are on or
notIf they are onso power supply and cable runs normally
3 Confirm all the firwall and antivirus software are closeThe firewall often
block unrecognized data so if the firewall is running so maybe the IPCAM
TOOL canrsquot find the deviceSuggest to close firewall and antivirus
software temporarily before searching
How to solve the camera blank screen
1 Check if you are using the wrong power adaptorplease use original one
2 Close antivirus software
How to solve the camera canrsquot login by Internet
1 Check if you set DDNS success or not
2 Check the current IPCAMrsquos port number is the same as routerrsquosThey need to keep same
Canrsquot view the monitoring picture
1 Reason canrsquot connect with network
SolutionCheck if the network connect well exclude cable fault and PC virus
cause network fault until can be used between PC and PING
2 ReasonIP address occupy by other device
Solution Choose automatic gain
3 Reason IP address located within different subnet
Solution Check IPCAMrsquoS ip address and subnet mask address and gateway settings
4 ReasonWeb port has been modified
Solutioncontact network administrator to obtain port information
5 Reasonunknown
SolutionPress reset button to factory default statethen reconnectingsysten
default to gain ip address automaticsubnet mask is 2552552550
85 Default Parameters
middotDefault network Parameters
IP address dynamic obtain
Subnet mask 2552552550
Gateway dynamic obtain
DDNS Factory provide
middotUsername and password
Default administrator username admin
Default administrator password No password
IPCAM User Manual
64
86 Technical Parameters
ITEM IP CAM (NIP-02BGPWA2)
Image Sensor
Mage sensor 15 Color CMOS Sensor
Display 640 x 480 (300K Pixels)
Lens f36mm F24 (IR Lens)
Miniillumination 05 Lux
Lens Lens Type Glass Lens
Viewing Angle 60 Degree
Audio Microphone Audio of two way
Domain name Server MSN server DDNS server
Video
Image Compression MJPEG
Image Frame Rate 15 FPS(VGA)30FPS(QVGA)
Resolution 640 x 480(VGA) 320 x 240(QVGA)
Flip Mirror Images rtical Horizontal
mode 50Hz 60Hz or Outdoor
Video Parameters Brightness Contrast
Communication
Ethernet One 10100Mbps RJ-45
Supported Protocol HTTPDHCPIPTCPUDPFTPSMTPDDNSPPPoEUPnP
Mobilephone monitor Support IphoneIpad3G phonesmartphone
Wireless Standard IEEE 80211bg
Wireless Standard 80211b11Mbps(max) 80211g54Mbps(max)
Wireless Security 64128-bitWEP Encryption
Physical
PanTilt Angle Horizontal270deg amp Vertical 120deg
Infrared Light 10 IR LEDs Night visibility up to 15 Mete
Product size 100(L) x100(W) x125mm(H)
Gross Weight 6465gpcs (packing size196x165x123mm)
Net Weight 2547gpcs (only product)
Power Specification DC 5V25A 18 meter
Power Consumption 5 Watts
Environment
Operate Temper 0deg~ 55degC (14degF~122degF)
Operating Humidity 20 ~ 85 non-condensing
Storage Temper -10degC ~ 60deg (14degF ~140degF)
Storage Humidity 0 ~ 90 non-condensing
PC Requirements
CPU 20GHZ or above (suggested 30GHz)
Memory Size 512MB or above (suggested 10GB)
Display card 64M or above
Supported OS Microsoft Windows XPVistaWindows7
Supported browsers IEfirefoxGoogle
Certification CEFCCRoHS
Warranty Limited 1-year warranty
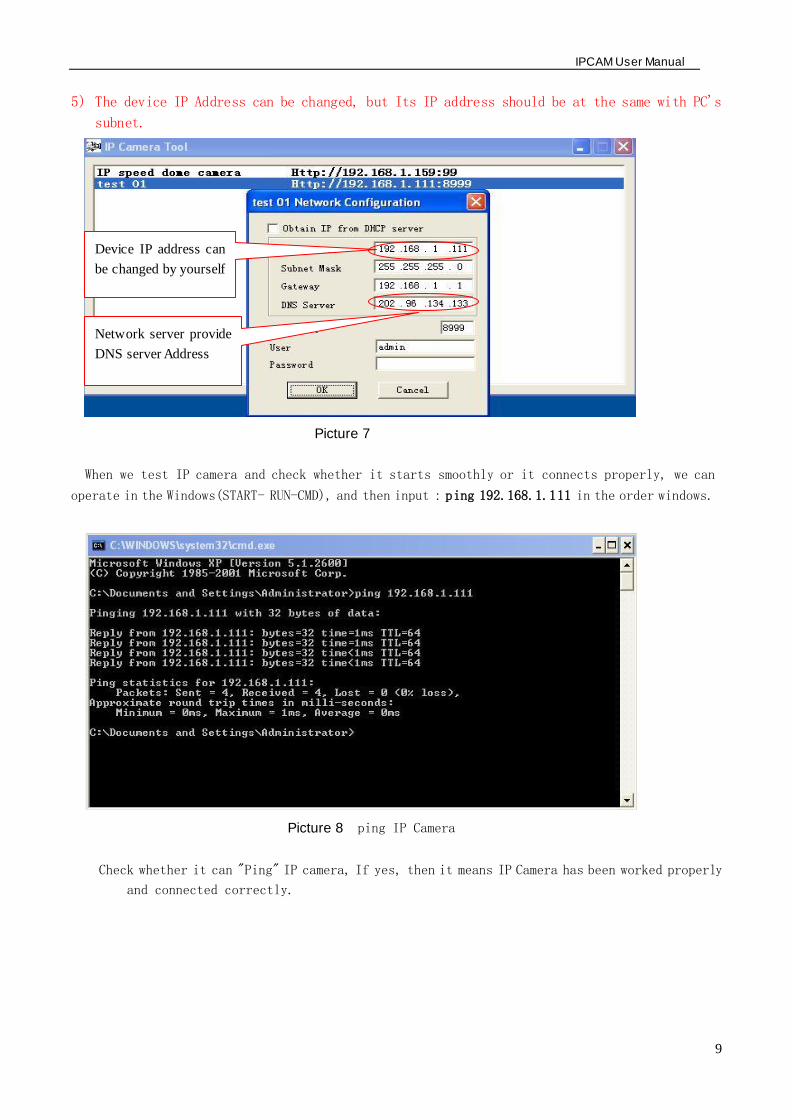
IPCAM User Manual
9
5) The device IP Address can be changed but Its IP address should be at the same with PCs
subnet
Picture 7
When we test IP camera and check whether it starts smoothly or it connects properly we can
operate in the Windows(START- RUN-CMD) and then input ping 1921681111 in the order windows
Picture 8 ping IP Camera
Check whether it can Ping IP camera If yes then it means IP Camera has been worked properly
and connected correctly
Network server provide
DNS server Address
Device IP address can
be changed by yourself
IPCAM User Manual
10
32 Software installation
Software installation
It is very easy to install software You just need to run installation programme then it can
work properly
Please put CD in the PC driver and the CD will automatically run to the software installation
interface
If no such an interface please click ldquoautorunexerdquoin the CD
And then findldquosearchexerdquo Clink and install LAN Tool to PC systemthen you
can view IP Camera Tool in Computer desktop for LAN Search toolldquoIP Camera Toolrdquo
G
Picture9 Software installation interface
MinOpen user manual ExitUser manual
Search tool in LAN Application Tool box Quick installation guide Open CD
IPCAM User Manual
11
4 Visit IP camera in LAN 41 Connection ways in LAN
Picture 10 Connection between Several IP camera and router
42 Search and set device IP address Please note before searching IP camera
1Make sure IP camera has a good connection with power and network
2Te router should be opened DHCP(Dynamic host configuration protocol) because the factory setting status of
IP camera is to obtain automatically IP camera
3When we power IP camera we should wait 20 second then it can works
Search IP camera
When we run Search tool IP camera Tool we can find the IP camera showing IP address Port
Name If we use Wi-fi connection we will find Wi-fi IP address For the details we can view
the following picture
Picture 11
NoteldquoIP Camera ToolexerdquoProgramme only use to search IP camera address and port in the
LAN The tool cant search IP camera IP address and port in the WAN
There are 3 cases
1 No IP Camera found within LAN After about 1 minute search the Result Field will
show ldquonot found IP Serverrdquo
2 IP Cameras having been installed within LAN All the IP Cameras will be listed and the
total number is displayed in the result field as shown in Picture 20
3 The IP Cameras installed within LAN do not share the same subnet with the monitoring
PC A prompt as shown in result field (prompt Subnet doesnrsquot match dbclick to change)
Click the left mouse button to choose the prompt and click the right mouse choose
Network Configuration to set the IP address of the Camera to the same subnet as LAN
IPCAM User Manual
12
SIX Options
Choose the IP Camera list and Click right mouse button there are six options Basic
Properties Network Configuration Upgrade Firmware Refresh Camera List Flush Arp About IP camera tool as
shown Picture 12
Picture 12
Basic Properties
There is some device information in the Bas ic Properties such as Device ID System
Firmware Version Web UI Version
Picture 13
Network Configuration
In this page you can configure the Network parameter
Picture 14
IP address Fill in the IP address assigned and make sure it is in the same subnet as the
Subnet Mask The default subnet mask of the equipment is 2552552550
Gateway Make sure it is in the same subnet with PC IP address Default Gateway
IPCAM User Manual
13
address is 19216811
DNSServer IP address of IPS network provider ( It also can view from network card local area connection
status) As blows picture
Picture 15
Http Port LAN port assigned for the equipment usually 80
User amp Password Default administrator usernamepassword adminNo password
Enable Using DHCPthe system will assign a reasonable IP address for your equipment
only if your gateway supports DHCP (It is the case with most gateways)
DHCP checkbox if checked the device will obtain IP from DHCP server (To be make
sure the Router which the device connect with has DHCP function)
NOTE when the prompt rdquosubnet doesn‟ t match double click to changerdquo please set the
IP Camera IP address once again
Upgrade Firmware
Enter the correct User and Password to upgrade system Firmware and Web UI (User should have administering
authority
Picture 16
This is the server provide the
service of DNS
IPCAM User Manual
14
Refresh Camera List
Refresh camera list manually
Flush Arp Buffer
When cable network and wireless network of the device both are fixed IP address There
is a problem you may encounter is can search the camera IP but canot open the camera
web pageyou may try to use flush arp buffer
About IP Camera tool
You can view IP camera tool version and ActiveX version
43 Login IP camera
Double click the IP address of the IP Camera listed IE will be opened automatically and display the camera login
page Or Access the camera by IE browser directly type in the camera‟ s IP address For
example http19216811118999 ( We suggest you use IE browser for it has more function
Picture 17
IP camera Default username is admin no password And Click ldquoSign inrdquo to enter the monitoring page
Default usernameadmin
Default passwordNo password
IPCAM User Manual
15
Picture 18
Picture 19
middot When Users login inthey can view images At the same time users(Administrator Operator or Visitor) can operate according to their permissions
By Firefox and sofari browser as below
Language options you can
choose operation language
according to your demand
IPCAM User Manual
16
Picture 20
Picture21
IPCAM User Manual
17
44 IP camera operation
441 For Visitor
For example if is bright the first route is at status of Detection(Only IE Broswer can view it)
Picture 22
The right upper is statuss indicator area which can show 9 IP camera status
When the button is gray it means IP camera didnt connect
Green means IP camera has connected
Yellow means there is something wrong with connection
Red means it is the status of alarm
If you want to detect 4 views need to click this icon
OSD Display date and time on the video You can disable the OSD function or choice other color
(OSDon-screen display)
Snapshot Click icon to snap the picture
REC Click icon into REC mode is stop
Audio Click icon into Audio mode can listen the voice in monitoring range
Talk Click icon into Talk mode and the icon will become Visitor can talk with whom is in the
monitoring range
Note the record file name is device Alias_ Current timeAvi
For example IPCAM_20101011134442Avi
It means the device alias is IPCAM and its recordrsquos end time is At 134442 on
October 11 2010When use motion detection and checked Send Mail on Alarm
Buttom for taking picture
S top monitor video
Open vedio
Record
Two way audio Monitor audio
IPCAM User Manual
18
The name of the picture received in mailbox is like this device id(Alias)_ Current
timejpg
442 For operator
When login as operator you can operate PanTilt and adjust video parameter
Picture 23
Direction control click the different arrow will get different direction view
Vertical patrol
Horizontal patrol
Stop patrol
IO output Switch on off
Infrared light software control switch
Image fluctuation flip(up and down)
Image around flip (right and left)
Set Preset (can set 4 preset)
ResolutionVGA(640 X 480) QVGA(320 X 240)
Work Mode 50Hz60HzOutdoor
color parameterClick or can adjust brightness and contrast
Stop patrol
Vertical patrol
Horizontal
patrol
Image fluctuation flip
Image around flip
IO output S witch on off
Set Preset
Infrared light s witch
IPCAM User Manual
19
443 For Administrator
When you login as administrator
you can set all parameters Please
click ldquoFor Administratorrdquo
and enter into
setting interface
Picture 24
Alias Settings You can Input the new name as you like
Data ampTime Settings Data ampTime Settings page
Users Settings Eight accounts are acceptable for this system Here the eight users can configure their
user names and password as Administrator Operator or Visitor
Visitor In this mode you can only view
Operator You can control the direction of IP Camera and set some parameter
Administrator You can setup the advanced configurations of the IP Camera
UpnP Settings If you access IP Camera to be make sure UpnP Status is Succeed
Upgrade Device Firmware Upgrade Device Firmware and device embeded web UI software in this
page
Restore Factory Settings Restore factory settings of the device
Reboot Device Reboot the device
Back Back to Monitoring Mode
View Device IDDevice Firmware
Version and Device Embedded
Web UI Version
Check Device all kinds of
status
Carry on Settings and
operation function
IPCAM User Manual
20
5 Visit IP Camera in internet
51 Connection way in Internet
Picture 25
52 Related setting and login IP camera
1 If the network your IP camera using is using static IP you just need to input this IP address and IP cameras port in the browser then it can visit Ip camera
2 If you are using ADSL to dial-up and surf on line you should obtain IP Camera Current WAN IP Address or configured DDNS
1)There are four ways for you to obtain WAN IP Address
①Using mail to send internet IP function
After setting mail successfully IP will send mail to your receiver e-mail box when Internet IP or port
has changed If it is dynamical IP users need to input this IP address to visit this IP camera
②Obtain from some website
It is very easy for you to obtain WANS IP address You can open browser on the computer on the
condition that IP camera and PC are the same subnet For example httpwwwwhatismyipcomor
httpwwwmyipcn etcsIt will tell you WANS IP address as shows below
Picture 26
③Obtain from MSN and IP cameras MSN ACCOUNT( Details 73)
IPCAM User Manual
21
④ Obtain from router
We take Nur8555M from Xinxiang s router as example
AAccording to routers manual we get Routers IP is 19216811
BLogin in router Input 19216811 in the browser Find the status of Router and find Routers
WAN( In this example WANS IP is 11624235122 As shows Picture 27
Picture 27
Now you can visit IP Cam from Internet What you should do is to Input correct IP address For
example Http 116242351228999
Note Make sure the Ports UPNS is available You can open UPNP via the following ways
Enter into Routers setting page( Details Routers user manual) to make UPNP available
Or enable virtual mapping function Add equipment IP address and port to the virtual mapping list
Picture 28
Users can access the Internet from IPCAM device Input address For example Http 116242351228999
2)DDNS (dynamic DNS) service is the Internet domain name can be fixed and dynamic IP address real-time
corresponding (analysis) service Simplely said whenever user surf on internet or what kind of way you are
using the Internet get a what kind of IP address IP address whether it will change DDMS can ensure that a
fixed domain name can access to a users device
IPCAM User Manual
22
Our products have been configured the DDNS services of course you can also apply for the domain name in
registration website for one of your own domain name to configuration For example wwwdyndnsorg
Picture 30
You need fill in DDNS and port for example(httpicam0001ihome365org8999) The browser will jump
to IP camerarsquos login page
Picture 31
DDNS inside
Factory DDNS
IPCAM User Manual
23
The input device user name and password to login to equipment
Picture 32
middotIf input domain name but cant open IP camera in the browser such as the situation is as blows
middotPlease open the device and check status of IP camera in the local area network confirm whether UPNP
function and DDNS is successful or not
Picture 34
IPCAM User Manual
24
middotYou need to set port mapping function successfully to check whether the router UPNP function is
available if It was unavailable please make it available refer to the routers user manual
If you use TPLINK router please refer to these instructions
middotThrough the upnp automatic mapping port to the network input router IP address in the browser (such
as http19216811 gt the router IP addresses are written on paper label on the router house---- please set
according to your own IP address) open the routers page forward rules gt gt upnp set to ensure that the
current state of upnp is already available as below
Note some of the router interface without UPNP Settings option then need to open the virtual server IP
cameras in the local area network of mapping the connection IP address and port number
Picture 36
6 Access IP camera via mobile equipment
such as mobile phoneIpad Etcs There are two kinds of ways to access IP camera One is to input IP address in browser directly It can be IP
address and also can be DDNS Another is to use clients to visit
61 Input IP address in browser
1 We take IPAD as example as blows
IPCAM User Manual
25
middotOpen browser Safari
Input IP cameras IP address for example( httpicam0001ihome365org8999)
Choose language according to your demand and choose login mode according to your browser
Picture39
Choose manual settings
Open browser Safari
Enter the IP address of the IP camera
(httpicam0001ihome365org8999)
IPCAM User Manual
26
enter your account and password on the login page as shown By defaultadministratorrsquos username is
admin and no password
Select Server Refresh mode landing
Picture42
Input the username and password of
the network camera
Here you can choose between two
modes landing
Here to select the
operating language
Default passwordNo password
IPCAM User Manual
27
Select Server Push mode landing
Picture 43
2 Now we take Android system device as example
Open menu and firstly open the browser and input IP camera s IP address in the
browser for example(httpicam0001ihome365org8999)
Picture 44
Input IP cameras username and password and click sign in and then enter into
browser model to choose login-in interface
Open menu
IPCAM User Manual
28
Picture 45
62 Install client-side software to access IPCamera
There are many client software support IP camera several third-party software support our IP cameras too
The following are our manufacture software setup process(the Android version)
1 Pls get the install applications in the CD or you can download from the website
httpsplaygooglecomstoresearchq=reecamampc=apps Choose the right
①installation file-ipcameraapk
running environment Android version 16 or above
Note Please ensure that mobile phones can connect to the Internet before install
② Install method
21 Insert SD card into Android mobile phone
22 Connect the cellphone to computer via USB data cable
23 Choose the USB connection model on your cellphone you can see the SD driver in ldquomy computerrdquo
24 Copy the ipcameraapk into SD card
25 Disconnect the device pls find the ipcameraapk in ldquoFile Managementrdquo and run it
26 The ipcamera application will be show up on the home screen after you successfully installed
③Software operating processes
First ensure that the Internet open WIFI connection the search in the Play in The Googl Android
application reecam
Open the WiFi
connection
Download and install
the application
Search reecam
IPCAM User Manual
29
middotYou can edit the camera modify camere configuration and delete camera operation
Click here to add
a video camera
Select to add to the
client camera
Refresh LAN cameras
View or change the
configuration of the
camera the camera
name at random
IP address
Http port
The default password is blank
Camera name
Prev iew camera
Preview the
camera screen
save the camera
Editor has added
cameras
Edit camera
configuration
Delete the camera Edit camera of the
configuration
IPCAM User Manual
30
middotFor the camera added to the camera list you can watch camera in real time
Control cameras PTZ and set swith-on and switch-off of the cameras audio int
ercom and video
Picture 51
2 The IPCamera setting process for iPhone iPad
Firmware requirements compatible with iPhone iPod touch and iPad
Systerm requirements Requires iOS 42 or above
You can download the genuine
software
(ipcameraapp) form the App Store
httpitunesapplecomcnappreecamid479468959mt=8
middotSoftware operating process is as follows
Continue to add
the camera
Add external network
camera domain
Cameras have
been added
Audiointercom video switch
A list of cameras and
video can be switched to
view
Fingers sliding PTZ control
Click on the picture to stop
rotation
IPCAM User Manual
31
Open the App Store search
reecam
Download and install
reecam
The run has been
installed good reecam
program
Click to add cameras
Search reecam
IPCAM User Manual
32
Fill in the domain address
or IP address
Fill in the Http port of the
camera login user name
and password click next
to open the camera
Completed please
click here
Preview videoclick on the
next save
Save the camera added
Selected camera to
view images
Click image to expand
more cameras
operating functions
IPCAM User Manual
33
7 Other setting
71 Network Setting
711 Basic Network Settings
If the router that the IP camera connect has DHCP function you can choice ldquoObain IP from DHCP Serverrdquo
else fill in the network parameters manually
Http Port In most cases you can leave this value as 80 however if your Internet
Service Provider blocks this port you may switch to another port number such as 85808088889000 Etcs
(Range from 0 to 65535 pay attention to the same segment of multiple devices must set up different port The
port t canrsquot have any conflict with other software or equipment
a Search tools modification in LAN
Figure58
brdquoFor administorrdquo ldquoBasic network settingrdquo -Change the port
Figure59
712 WIFI Setting
1) Please enter the wireless net setting page of the wireless Router to find out SSID
Channel(less than 10) Encryption Authentication as below
Selec IP Camera clickright mouse button choice network configurat ion
Set port number
Set Network IP
Set Http Port Number
IPCAM User Manual
34
Figure 61
As Administrator to Login camera open wireless LAN Settings page fill in every
Setting (ensure keep the same as routerrsquos ) and then pulled out of the cable wireless network function can be
used For example as shown in belows
Figure62
Pls click the scan buttom twice
IPCAM User Manual
35
Figure 63
713 Adhoc point to point Wireless connection Setting
1) Open the basic network setting interfacecheck the device status
Picture 64
2) Open the wireless lan setting interface choose Adhoc for network type you
can define SSID such as 001
remember the IP address of
IP camera and Http port
Click the Settings Ip Camera will
restart and save
Double click to choose
Fill the encryption and
routers and key in the
same way
IPCAM User Manual
36
Picture 65
3) Unplug the RJ45 from IP camera Use laptop or other devices which are with
wifi function( include smart phoneipad and so on) searching the SSID you defined
on proccess 2then make a connection
Picture 66
middotClick wireless network and check the link status of ip camera Please note IP
address of your connected laptop must be the subset of your ip camera if not
please reset the ip address of your laptop manually
Picture 67
4) Now we can use the ip camera tool or enter ip address of camera derectly in
browser blank to visit
1 visit by ip camera tool
Picture 68
IPCAM User Manual
37
2Enter ip address in the browser
Enter user name and password in the login interface
Picture 69
Click ldquoSign inrdquoand vis it
Picture 70
IPCAM User Manual
38
72 Multi-Device Settings
Add cameras in LAN
In the Multi-Device Settings page you can see all devices searched in LAN The 1
St Device is this device in default You can add more cameras list in LAN for monitoring This Web software
supports up to 9 IP Cameras online simultaneous ly Click ldquoThe 2ND
Devicerdquo and Double click the item in the ldquoDevice List in LANrdquo AliasHost and Http Port
will fill in automatically Enter the correct username and password then click ldquoaddrdquoAdd
more cameras in the same way At last please donrsquot forget the ldquo settingrdquo Button
Picture 71
Add cameras in the Internet
Firstly make sure the camera added can access in the Internet with the IP address or
DDNS domain Like this http2191332001669999or httpIPcamdyndnsorg9999You can enter the
Host 219133200166 Http port 9999 or Host IPcamdyndnsorg Http port 9999 Enter the correct
username and password then click ldquoaddrdquo Add more cameras in the
same way
Picture 72
IPCAM User Manual
39
Picture 73
73 MSN Settings
Fill in your MSN account and password then add account which need to receive
IPCAMrsquoS ip address to IPCAM‟ S MSN list (Picture 67)click submit then yoursquod better
restart IP camera After it login your MSN to add IPCAMrsquos MSN account to MSN List that
you can receive IPCAMrsquos ip address
Picture 74
First login and click add contacts choose Add Contact then fill IPCAMrsquos MSN account in instant
messaging address click next then send offers
Aplly for MSN account and passworf for IP cam
Add about 10 MSN Accout
IPCAM User Manual
40
Figure75
Next
Figure76
Figure77
When IPCAMrsquos MSN account shows online you can chat with it input path command url camera
account will show its IP address in chatting box promptly as below
IPCAM User Manual
41
Picture 78
You can input the IP address to browser then can browse ip camera as below
Figure79
AttentionYou should fill MSN account in IPCAM first
74 DDNS Service Settings
DDNS Service The system supports protocols from some DDNS providers Dyndnsorg System support
DDNS such as topipcamorgpeanut shell3322orgDynDNS
provided IP
IPCAM User Manual
42
User and Password the user name and password used when applying for the domain
name (details 432)
DDNS Host the Domain Name
741 Factory DDNS
Device had distributed one DDNS to every productwhich was sticked the bottom
of the product Such as
manufacturer had already give every device a DDNS address which is unique Users only need to fill in this
DDNS IP ADDRESS and port in the browser then they can monitor remote IP camera
Picture 80 Factory DDNS
Note When use the domain name access to the camera and UPNP is not successful you must set port
mapping function on routers
742 The third part DDNS
Users can use not only Factory DDSN but also can use third part DDNS System Such as domain name
wwwdyndnsorg The only thing the user need to do is to apply a free DDNS and then fill in ldquoset boxrdquo as below
Save this setting and this DDNS can be used
DDNS Hostname
Factory DDNS
IPCAM User Manual
43
Note the third party domain name is the realization of analytical way input the domain in the browser it will
keep this string of characters If the port of the device isnrsquot 80 then need to add colon and port number For
example httpwell888dyndnsorg8999
75 Mail and FTP Service
1)Configure the E-mail box to receive and send mails The E-mail box is used for receiving
the images sent after alarm and the system IP address after successful dial-up
Note When Alarm Service Settings-gt Send Mail on Alarm is check the Mail
Service takes effect
Picture82
Configure the E-mail box to receive and send mails The E-mail box is used for receiving the images sent
after alarm and the system IP address after successful dial-up
Sender This device use the sender mailbox to send mails
Receiver To receive the mail from the Sender You can set up to 4 receiver mailbox
SMTP Server the SMTP server for the sender mailbox
Need Authentication if the sender mailbox need authentication you should check it then
input the SMTP username amp Password
Mail test Please set the Mail parameter and click Submit first There are Mail test result
Picture 83
video Local storage in PC after alarm monitoring
IPCAM User Manual
44
Gmail also set as the same It only needs you to fill in correct SMTP Sever address user and password
Picture 84
Mail notes Internet IP address In this option When Internet IP and port have changed IP Will be sent via
1Can not connect to the server
2Network Error Please try later
3Server Error
4Incorrect user or password
5The sender is denied by the server Maybe the server need to authenticate the user please check it
and try again
6The receiver is denied by the server Maybe because of the anti-spam privacy of the server
7The message is denied by the server Maybe because of the anti-spam privacy of the server
8The server does not support the authentication mode used by the device
Report Internet IP by Mail When ipcam port or Internet IP changed it will send the internet IP by
mail(for example IPCAM s url is http119123207969002) Make sure the port is map to the router
correctly by UPNP or Virtual Map function
2) FTP Server use and settings
middotIf you already have an FTP Server (ipcam com)and email ipcam you can fill the
parameters as below
Picture 85
IPCAM User Manual
45
middotFTP Server of LAN as below
1 Create an account
2 Step by step setting until finish it
Picture 88
IPCAM User Manual
46
3Start Server
Continue to finish it
Picture 89
4IPCAMrsquoS account can be used
Picture 90
Save path
This is a FTP
server address
IPCAM User Manual
47
5 IP camerarsquos FTP Server set like this
Picture 91
6 Set up and complete testing is successfulwhen it alarms IP camera will upload
pictures to the FTP server Settings of main directory path (as shown )
Picture 92
FTP Server the FTP server address
FTP port the port usually is 21
FTP Mode support standard(POST) mode and passive(PASV) mode
Upload Image Now it will upload image now when checkbox is not checked When checked you can
input upload interval(Seconds)
76 Motion Detection
Enter Alarm Service Settings page to configure Motion Detection function
1) Motion Detect Armed
Each alarm triggers in the protection of time the device will take various measures to alarm
IO linkage alarm output relay closure external alarm device began to alarm
IPCAM User Manual
48
Send E-mail alarm informatio
Transmit pictures to the FTP server and can set the time interval of sending pictures
2) Alarm t ime Settings
Only in the alarm period detection device to alarm will only have alarm action All the time (not check the
schedule) also can alarm within specified time For the specified time alarm firstly need to set up the system
time time zone and then to choose period of alarm in the state of alarm setting as shown in Picture 19
Picture93 Alarm of time Settings interface
Motion Detect Armed
When you enable motion detect armed the camera can be triggered to send email alerts
and record images In the camera monitoring page the green icon turn to red and an
alert sound you will hear
Motion Detect Sensibility
You can choose from low to high 10 level alarm sensitivity The greater the number the higher the
sensitivity
Alarm Input Armed
IO PINS1) Output(+5V) 2) Output 3) Alarm input 4) Input (GND)
Input Pins The input pins can be used for 1-way external sensor input(pin3 and pin4) For example
you may connect a Person Infrared Sensor (PIR) to it for motion detection When external sensor
triggered IPCAM can be programmed to send an email with picture or control the internal relay output
IPCAM User Manual
49
Picture94
IO Linkage on Alarm
Enable IO linkage on alarmPin1 will output +5V when alarm triggered and output LOW
when alarm release automatically
Switch onoff buttons control Pin1 output manually
Send Mail on Alarm
Sent picture and mail inform to customers e-mail after alarmed(firstly you should finish
the Mail Service Settings)
Picture 95
Upload Image on Alarm
Enable upload image on alarm and set upload interval(Seconds)
Tick send to your setted mails
IPCAM User Manual
50
Picture 96
REC automatically and save to PC
When you enable motion detect and open the camera monitoring page on the PC If
there is an alarm triggered REC will start automatically for several seconds and save to
the PC
Picture 97
REC save to pcrsquos position
Picture 98
Storage path can be changed
After Setting up later when have the
alarm the image will send to
designated email and FTP server
IPCAM User Manual
51
77 IP cameras Time amp Date setting and PTZ Setting
If IP camera connected with Internet it can automatically check the time amp date via running NTP Server And
need to choose properly IP cameras Time zone Otherwise it need PC Time to check IP camera time amp Date
Pre-set and Speed of PT
78 UPGRADE DEVICE FIRMWARE
Picture 101 Firmware upgrade
IP CAMERA has two kinds of programme One is system firmware another is application firmware It can be
upgraded separately
79 BACKUP AND RESTORE SETTING
Click Set in the Backup will lead to a BIN file and choose this file to restore setting
The huger the Number is The
slower it will be
IPCAM User Manual
52
8 APPENDIX
81 REGISTER AND APPLY FOR DDNS SERVICE
1Users use DDNS management system first timeUsers need to apply account to manage
and inquire the domain state
Step1 enter httpwwwdyndnscom and Create Account( Fill in Domain Name dyndnsorg then Click
Add)
Figure103
Step2 enter your information
Figure104
IPCAM User Manual
53
Figure105
Step3 After a minute you will receive an E-mail from DynDNS Support and it will give you a
confirmation address
(eg httpsaccountdyncomemlcreateconflILHMZHRje5oF_6YXTYv1A
Figure106
IPCAM User Manual
54
Step4 Open the link to active your Domain Name as belowLogin in your account after it is activated
Figure107
Step5 Check all the DDNS serviceswe choose the 14-day-trial
Figure108
Step6 Click the linkand user will see as below
IPCAM User Manual
55
middotenter your information
Figure109
Step7 Now you obtained a Dynamic Domain Name(Figure 105)and can use it in the DDNS Service
Settings(details 74)
Figure110
IPCAM User Manual
56
2For DDNS which is applied successfully you can fill in the IP CAMERA When set successfully the status
of IP will be shown as blows
picture 111
picture 112
3How to set DDNS on line
The first wayMenu rdquostartrdquo- ldquorunrdquomdashgt Input CMDClink rdquoenterrdquoIt can check DDNS Statas
via As shown below
Picture 113
IPCAM User Manual
57
Through the PING command this dynamic domain name can be back in the network response information It
proves that the domain name has been online
If the domain name update not success Possible reasons
(1) DDNS parameter is not correct (2) may cause DNS address configuration is wrong
82 Some special application for IPCAMERA
IPCamUse some grammar parameter control and Use IPCam
useruser
pwdpassword
priThe current access (1 visitors 23 operator managers)
resolutionImage resolution(832024 0qvga32640480 vga)
ratemage transmission speed and scope 0-23
brightnessbrightness0~255
contrastcontrast0~6
mode
Mode 050 hz For
60 hz 2 outdoor
flip
Flip rotation 0 primitive 1 vertical reverses 2 horizontal 3 vertical flip + horizontal
821 The flow media player VLC player and mplayer can real-time broadcast ipcamera and send
of streaming media format video data
(Grammar parametersvideostreamasfuser=amppwd=ampresolution=amprate=)
As shown Picture 113 rdquoIpcamrdquo
Picture 114
IPCAM User Manual
58
From the following picture we can view that Ipcam local IP address ishttp19216811118999
WAN IP Address is httpwell888dyndnsorg8999 we can inputrdquoIPcamrdquorsquoS IP address to
open in the player
Picture 115
the CLC media player open play position
Picture 116
LAN play address
Picture 117
IPCAM User Manual
59
Picture 118
Open the Internet play position
Picture 119
As shown in the following picture It can see the ipcamera send video streaming format
Size 640X480
User
IPCAM User Manual
60
Picture 120
83 Frequently Asked Questions
Note1) Any question you would meet please check Network connections firstly
2)Check the working status revealed by the indicators on the network server hub exchange and
network card If abnormal check the network connections
831 I have forgotten the administrator username andor password
To reset the administrator username and password Press and hold down the RESET
BUTTON for 5 seconds Release the power button and the username and password
will be reset back to the factory default administrator username and password
Default administrator username admin
Default administrator password No password
832 IP Address configuration
Check whether IP address of the IP Camera server shares the same subnet as your
work station Click My Computer gt Control PanelgtNetwork amp Dial-up Connections gt
LAN gt Attributes gtInternet Protocols (TCPIP) and check IP Address and Subnet
Mask Make sure they are in the same subnet when configuring IP Camera IP
address manuallyUnable to access IP Camera via web browser
833 Network Configuration
Double Check to ensure that your HTTP server software is configured and running
properly If you are running any firewall software make sure it is allowing inbound
connections to port 80Also if you happen to be using a cableDSL router make sure
IPCAM User Manual
61
you are set up port forwarding properly ( consult your router is documentation for more
information ) If none of these seem to be the problem it is also possible that your
ISP is blocking inbound connections to port 80 ndashmany IPSs have done this because
of internet worms such as Code Red If this is the case you bdquoll have to setup your
HTTP server on an alternate port (such as 8080)
834 No Monitoring picture
It has four reasons Images of the abnormal factors
1If its not use Directx function and lead to not normal to display the color imagePlease
install DirectX and open the start menu then input the command
Picture 121
You use the DirectX function and it will expedite the DirectDrawDirect3D and AGP if its can not maybe the
connect issues or hardware not read it
2The issues of hardware canrsquot support the card expedite image
3The antivirus software will influence the network it will be stoped or closedIf you install fireproof software
please close it and try again
4 ActiveX controller is not installed correctly
If its not image on the first time to use and will display to the user through the ActiveXIf its can not
display of the image maybe it fail of install about this issues please follow as
1Install ldquoIP Camera Toolrdquo ActiveX control at the same time
2Please install ActiveX control and keep the security settings for IE browser
835 Problems with network bandwidth
The image frame rate is subjected to the following factors 1network bandwidth 2 PC
performancenetwork environment and display preference setting (brightness theme
etc) 3 the number of visitors (Too many visitors will slow down the image frame rate) 4
choice of switch or hub (Use a switch for multiple IP Camera Servers rather than a HUB)
The Device use MJEPT Compression it needs good network bandwidth If it is too narrow it will lead to slowly
browser Typical video parameter occupy network bandwidth as blows
640x48030fps 40 Megabits ~ 50 Megabits
320x24030fps 12 Megabits ~ 16 Megabits
IPCAM User Manual
62
middot836 Why pop-up the prompt ldquoFail to connect to the devicehelliprdquo
This prompt only appeared in the case of using multiple cameras
Enter the Multi-Device Settings page(login as administrator) to check the
Device setting is correct or not
When one of the multiple cameras disconnected the color changed to
yellow and pop-up the promptldquoFail to connect to the devicehelliprdquo
Picture 122
837 Canrsquot access the IPCAM in the internet
There are some reasons
1 ActiveX controller is not installed correctly(see more details 514)
2 The port IPCAM used is blocked by Firewall or Anti-virus software Please change a
port number and try again
3 Port mapping is not success You can do port mapping by two ways
Enter setting page of the router which IPCAM connect with to enable UPnP function
Enter IPCAM ldquoUPnP Settingsrdquo to enable UPnP and make sure the state is ldquoUPnP
successrdquo
‟ s IP
and port to the Virtual map list
When use ADSL the IP is dynamic You should set DDNS(see more details 74 amp 80)
and also make sure port mapping success
84 Operate common problem solving
IP camera tool canrsquot find the camera
Except of the camera broken
1 Make sure the cable connector no problem recommend connector
(AMP)it is with international standard Another note IPCAMrsquos data
transmission channel require higher than computerrsquos so maybe the
IPCAM User Manual
63
computer can run normally but IPCAM canrsquot Please press heavily when making the cable connector
2 Confirm the power supply normally First check whether power indication
light turn on or not If it is onthen check the yellow light on RJ45 Port
(power indication light) and green light (network indication light) are on or
notIf they are onso power supply and cable runs normally
3 Confirm all the firwall and antivirus software are closeThe firewall often
block unrecognized data so if the firewall is running so maybe the IPCAM
TOOL canrsquot find the deviceSuggest to close firewall and antivirus
software temporarily before searching
How to solve the camera blank screen
1 Check if you are using the wrong power adaptorplease use original one
2 Close antivirus software
How to solve the camera canrsquot login by Internet
1 Check if you set DDNS success or not
2 Check the current IPCAMrsquos port number is the same as routerrsquosThey need to keep same
Canrsquot view the monitoring picture
1 Reason canrsquot connect with network
SolutionCheck if the network connect well exclude cable fault and PC virus
cause network fault until can be used between PC and PING
2 ReasonIP address occupy by other device
Solution Choose automatic gain
3 Reason IP address located within different subnet
Solution Check IPCAMrsquoS ip address and subnet mask address and gateway settings
4 ReasonWeb port has been modified
Solutioncontact network administrator to obtain port information
5 Reasonunknown
SolutionPress reset button to factory default statethen reconnectingsysten
default to gain ip address automaticsubnet mask is 2552552550
85 Default Parameters
middotDefault network Parameters
IP address dynamic obtain
Subnet mask 2552552550
Gateway dynamic obtain
DDNS Factory provide
middotUsername and password
Default administrator username admin
Default administrator password No password
IPCAM User Manual
64
86 Technical Parameters
ITEM IP CAM (NIP-02BGPWA2)
Image Sensor
Mage sensor 15 Color CMOS Sensor
Display 640 x 480 (300K Pixels)
Lens f36mm F24 (IR Lens)
Miniillumination 05 Lux
Lens Lens Type Glass Lens
Viewing Angle 60 Degree
Audio Microphone Audio of two way
Domain name Server MSN server DDNS server
Video
Image Compression MJPEG
Image Frame Rate 15 FPS(VGA)30FPS(QVGA)
Resolution 640 x 480(VGA) 320 x 240(QVGA)
Flip Mirror Images rtical Horizontal
mode 50Hz 60Hz or Outdoor
Video Parameters Brightness Contrast
Communication
Ethernet One 10100Mbps RJ-45
Supported Protocol HTTPDHCPIPTCPUDPFTPSMTPDDNSPPPoEUPnP
Mobilephone monitor Support IphoneIpad3G phonesmartphone
Wireless Standard IEEE 80211bg
Wireless Standard 80211b11Mbps(max) 80211g54Mbps(max)
Wireless Security 64128-bitWEP Encryption
Physical
PanTilt Angle Horizontal270deg amp Vertical 120deg
Infrared Light 10 IR LEDs Night visibility up to 15 Mete
Product size 100(L) x100(W) x125mm(H)
Gross Weight 6465gpcs (packing size196x165x123mm)
Net Weight 2547gpcs (only product)
Power Specification DC 5V25A 18 meter
Power Consumption 5 Watts
Environment
Operate Temper 0deg~ 55degC (14degF~122degF)
Operating Humidity 20 ~ 85 non-condensing
Storage Temper -10degC ~ 60deg (14degF ~140degF)
Storage Humidity 0 ~ 90 non-condensing
PC Requirements
CPU 20GHZ or above (suggested 30GHz)
Memory Size 512MB or above (suggested 10GB)
Display card 64M or above
Supported OS Microsoft Windows XPVistaWindows7
Supported browsers IEfirefoxGoogle
Certification CEFCCRoHS
Warranty Limited 1-year warranty
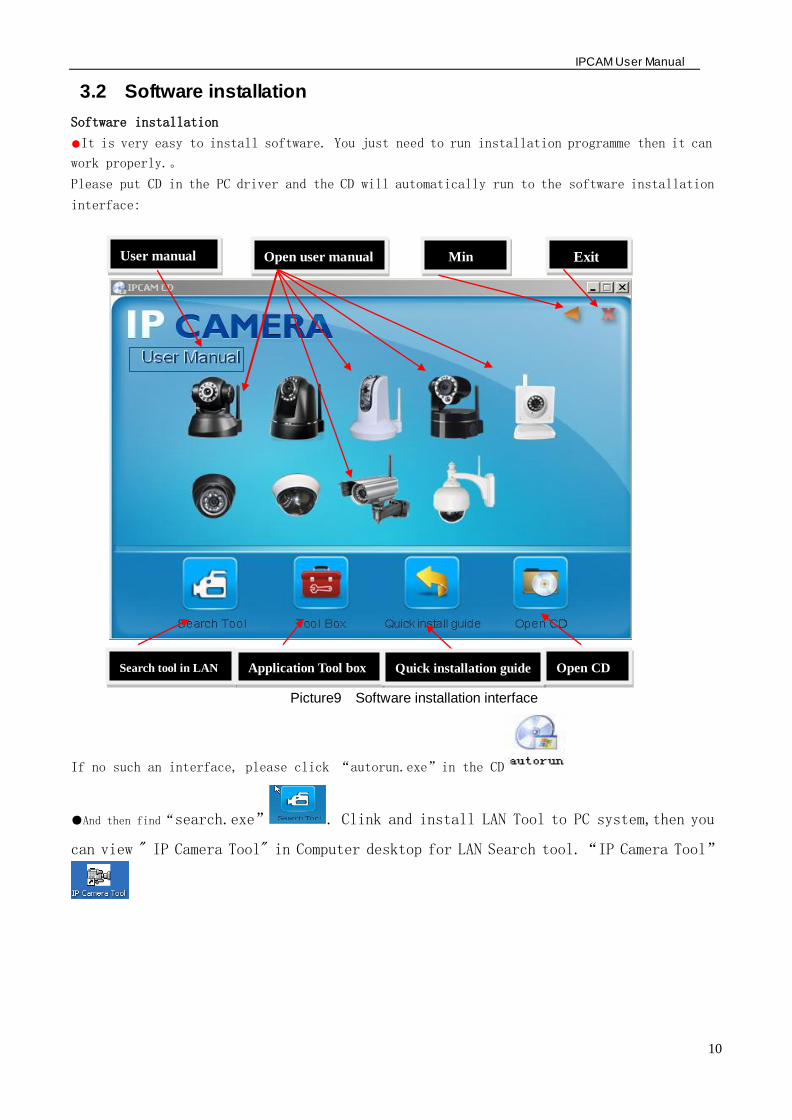
IPCAM User Manual
11
4 Visit IP camera in LAN 41 Connection ways in LAN
Picture 10 Connection between Several IP camera and router
42 Search and set device IP address Please note before searching IP camera
1Make sure IP camera has a good connection with power and network
2Te router should be opened DHCP(Dynamic host configuration protocol) because the factory setting status of
IP camera is to obtain automatically IP camera
3When we power IP camera we should wait 20 second then it can works
Search IP camera
When we run Search tool IP camera Tool we can find the IP camera showing IP address Port
Name If we use Wi-fi connection we will find Wi-fi IP address For the details we can view
the following picture
Picture 11
NoteldquoIP Camera ToolexerdquoProgramme only use to search IP camera address and port in the
LAN The tool cant search IP camera IP address and port in the WAN
There are 3 cases
1 No IP Camera found within LAN After about 1 minute search the Result Field will
show ldquonot found IP Serverrdquo
2 IP Cameras having been installed within LAN All the IP Cameras will be listed and the
total number is displayed in the result field as shown in Picture 20
3 The IP Cameras installed within LAN do not share the same subnet with the monitoring
PC A prompt as shown in result field (prompt Subnet doesnrsquot match dbclick to change)
Click the left mouse button to choose the prompt and click the right mouse choose
Network Configuration to set the IP address of the Camera to the same subnet as LAN
IPCAM User Manual
12
SIX Options
Choose the IP Camera list and Click right mouse button there are six options Basic
Properties Network Configuration Upgrade Firmware Refresh Camera List Flush Arp About IP camera tool as
shown Picture 12
Picture 12
Basic Properties
There is some device information in the Bas ic Properties such as Device ID System
Firmware Version Web UI Version
Picture 13
Network Configuration
In this page you can configure the Network parameter
Picture 14
IP address Fill in the IP address assigned and make sure it is in the same subnet as the
Subnet Mask The default subnet mask of the equipment is 2552552550
Gateway Make sure it is in the same subnet with PC IP address Default Gateway
IPCAM User Manual
13
address is 19216811
DNSServer IP address of IPS network provider ( It also can view from network card local area connection
status) As blows picture
Picture 15
Http Port LAN port assigned for the equipment usually 80
User amp Password Default administrator usernamepassword adminNo password
Enable Using DHCPthe system will assign a reasonable IP address for your equipment
only if your gateway supports DHCP (It is the case with most gateways)
DHCP checkbox if checked the device will obtain IP from DHCP server (To be make
sure the Router which the device connect with has DHCP function)
NOTE when the prompt rdquosubnet doesn‟ t match double click to changerdquo please set the
IP Camera IP address once again
Upgrade Firmware
Enter the correct User and Password to upgrade system Firmware and Web UI (User should have administering
authority
Picture 16
This is the server provide the
service of DNS
IPCAM User Manual
14
Refresh Camera List
Refresh camera list manually
Flush Arp Buffer
When cable network and wireless network of the device both are fixed IP address There
is a problem you may encounter is can search the camera IP but canot open the camera
web pageyou may try to use flush arp buffer
About IP Camera tool
You can view IP camera tool version and ActiveX version
43 Login IP camera
Double click the IP address of the IP Camera listed IE will be opened automatically and display the camera login
page Or Access the camera by IE browser directly type in the camera‟ s IP address For
example http19216811118999 ( We suggest you use IE browser for it has more function
Picture 17
IP camera Default username is admin no password And Click ldquoSign inrdquo to enter the monitoring page
Default usernameadmin
Default passwordNo password
IPCAM User Manual
15
Picture 18
Picture 19
middot When Users login inthey can view images At the same time users(Administrator Operator or Visitor) can operate according to their permissions
By Firefox and sofari browser as below
Language options you can
choose operation language
according to your demand
IPCAM User Manual
16
Picture 20
Picture21
IPCAM User Manual
17
44 IP camera operation
441 For Visitor
For example if is bright the first route is at status of Detection(Only IE Broswer can view it)
Picture 22
The right upper is statuss indicator area which can show 9 IP camera status
When the button is gray it means IP camera didnt connect
Green means IP camera has connected
Yellow means there is something wrong with connection
Red means it is the status of alarm
If you want to detect 4 views need to click this icon
OSD Display date and time on the video You can disable the OSD function or choice other color
(OSDon-screen display)
Snapshot Click icon to snap the picture
REC Click icon into REC mode is stop
Audio Click icon into Audio mode can listen the voice in monitoring range
Talk Click icon into Talk mode and the icon will become Visitor can talk with whom is in the
monitoring range
Note the record file name is device Alias_ Current timeAvi
For example IPCAM_20101011134442Avi
It means the device alias is IPCAM and its recordrsquos end time is At 134442 on
October 11 2010When use motion detection and checked Send Mail on Alarm
Buttom for taking picture
S top monitor video
Open vedio
Record
Two way audio Monitor audio
IPCAM User Manual
18
The name of the picture received in mailbox is like this device id(Alias)_ Current
timejpg
442 For operator
When login as operator you can operate PanTilt and adjust video parameter
Picture 23
Direction control click the different arrow will get different direction view
Vertical patrol
Horizontal patrol
Stop patrol
IO output Switch on off
Infrared light software control switch
Image fluctuation flip(up and down)
Image around flip (right and left)
Set Preset (can set 4 preset)
ResolutionVGA(640 X 480) QVGA(320 X 240)
Work Mode 50Hz60HzOutdoor
color parameterClick or can adjust brightness and contrast
Stop patrol
Vertical patrol
Horizontal
patrol
Image fluctuation flip
Image around flip
IO output S witch on off
Set Preset
Infrared light s witch
IPCAM User Manual
19
443 For Administrator
When you login as administrator
you can set all parameters Please
click ldquoFor Administratorrdquo
and enter into
setting interface
Picture 24
Alias Settings You can Input the new name as you like
Data ampTime Settings Data ampTime Settings page
Users Settings Eight accounts are acceptable for this system Here the eight users can configure their
user names and password as Administrator Operator or Visitor
Visitor In this mode you can only view
Operator You can control the direction of IP Camera and set some parameter
Administrator You can setup the advanced configurations of the IP Camera
UpnP Settings If you access IP Camera to be make sure UpnP Status is Succeed
Upgrade Device Firmware Upgrade Device Firmware and device embeded web UI software in this
page
Restore Factory Settings Restore factory settings of the device
Reboot Device Reboot the device
Back Back to Monitoring Mode
View Device IDDevice Firmware
Version and Device Embedded
Web UI Version
Check Device all kinds of
status
Carry on Settings and
operation function
IPCAM User Manual
20
5 Visit IP Camera in internet
51 Connection way in Internet
Picture 25
52 Related setting and login IP camera
1 If the network your IP camera using is using static IP you just need to input this IP address and IP cameras port in the browser then it can visit Ip camera
2 If you are using ADSL to dial-up and surf on line you should obtain IP Camera Current WAN IP Address or configured DDNS
1)There are four ways for you to obtain WAN IP Address
①Using mail to send internet IP function
After setting mail successfully IP will send mail to your receiver e-mail box when Internet IP or port
has changed If it is dynamical IP users need to input this IP address to visit this IP camera
②Obtain from some website
It is very easy for you to obtain WANS IP address You can open browser on the computer on the
condition that IP camera and PC are the same subnet For example httpwwwwhatismyipcomor
httpwwwmyipcn etcsIt will tell you WANS IP address as shows below
Picture 26
③Obtain from MSN and IP cameras MSN ACCOUNT( Details 73)
IPCAM User Manual
21
④ Obtain from router
We take Nur8555M from Xinxiang s router as example
AAccording to routers manual we get Routers IP is 19216811
BLogin in router Input 19216811 in the browser Find the status of Router and find Routers
WAN( In this example WANS IP is 11624235122 As shows Picture 27
Picture 27
Now you can visit IP Cam from Internet What you should do is to Input correct IP address For
example Http 116242351228999
Note Make sure the Ports UPNS is available You can open UPNP via the following ways
Enter into Routers setting page( Details Routers user manual) to make UPNP available
Or enable virtual mapping function Add equipment IP address and port to the virtual mapping list
Picture 28
Users can access the Internet from IPCAM device Input address For example Http 116242351228999
2)DDNS (dynamic DNS) service is the Internet domain name can be fixed and dynamic IP address real-time
corresponding (analysis) service Simplely said whenever user surf on internet or what kind of way you are
using the Internet get a what kind of IP address IP address whether it will change DDMS can ensure that a
fixed domain name can access to a users device
IPCAM User Manual
22
Our products have been configured the DDNS services of course you can also apply for the domain name in
registration website for one of your own domain name to configuration For example wwwdyndnsorg
Picture 30
You need fill in DDNS and port for example(httpicam0001ihome365org8999) The browser will jump
to IP camerarsquos login page
Picture 31
DDNS inside
Factory DDNS
IPCAM User Manual
23
The input device user name and password to login to equipment
Picture 32
middotIf input domain name but cant open IP camera in the browser such as the situation is as blows
middotPlease open the device and check status of IP camera in the local area network confirm whether UPNP
function and DDNS is successful or not
Picture 34
IPCAM User Manual
24
middotYou need to set port mapping function successfully to check whether the router UPNP function is
available if It was unavailable please make it available refer to the routers user manual
If you use TPLINK router please refer to these instructions
middotThrough the upnp automatic mapping port to the network input router IP address in the browser (such
as http19216811 gt the router IP addresses are written on paper label on the router house---- please set
according to your own IP address) open the routers page forward rules gt gt upnp set to ensure that the
current state of upnp is already available as below
Note some of the router interface without UPNP Settings option then need to open the virtual server IP
cameras in the local area network of mapping the connection IP address and port number
Picture 36
6 Access IP camera via mobile equipment
such as mobile phoneIpad Etcs There are two kinds of ways to access IP camera One is to input IP address in browser directly It can be IP
address and also can be DDNS Another is to use clients to visit
61 Input IP address in browser
1 We take IPAD as example as blows
IPCAM User Manual
25
middotOpen browser Safari
Input IP cameras IP address for example( httpicam0001ihome365org8999)
Choose language according to your demand and choose login mode according to your browser
Picture39
Choose manual settings
Open browser Safari
Enter the IP address of the IP camera
(httpicam0001ihome365org8999)
IPCAM User Manual
26
enter your account and password on the login page as shown By defaultadministratorrsquos username is
admin and no password
Select Server Refresh mode landing
Picture42
Input the username and password of
the network camera
Here you can choose between two
modes landing
Here to select the
operating language
Default passwordNo password
IPCAM User Manual
27
Select Server Push mode landing
Picture 43
2 Now we take Android system device as example
Open menu and firstly open the browser and input IP camera s IP address in the
browser for example(httpicam0001ihome365org8999)
Picture 44
Input IP cameras username and password and click sign in and then enter into
browser model to choose login-in interface
Open menu
IPCAM User Manual
28
Picture 45
62 Install client-side software to access IPCamera
There are many client software support IP camera several third-party software support our IP cameras too
The following are our manufacture software setup process(the Android version)
1 Pls get the install applications in the CD or you can download from the website
httpsplaygooglecomstoresearchq=reecamampc=apps Choose the right
①installation file-ipcameraapk
running environment Android version 16 or above
Note Please ensure that mobile phones can connect to the Internet before install
② Install method
21 Insert SD card into Android mobile phone
22 Connect the cellphone to computer via USB data cable
23 Choose the USB connection model on your cellphone you can see the SD driver in ldquomy computerrdquo
24 Copy the ipcameraapk into SD card
25 Disconnect the device pls find the ipcameraapk in ldquoFile Managementrdquo and run it
26 The ipcamera application will be show up on the home screen after you successfully installed
③Software operating processes
First ensure that the Internet open WIFI connection the search in the Play in The Googl Android
application reecam
Open the WiFi
connection
Download and install
the application
Search reecam
IPCAM User Manual
29
middotYou can edit the camera modify camere configuration and delete camera operation
Click here to add
a video camera
Select to add to the
client camera
Refresh LAN cameras
View or change the
configuration of the
camera the camera
name at random
IP address
Http port
The default password is blank
Camera name
Prev iew camera
Preview the
camera screen
save the camera
Editor has added
cameras
Edit camera
configuration
Delete the camera Edit camera of the
configuration
IPCAM User Manual
30
middotFor the camera added to the camera list you can watch camera in real time
Control cameras PTZ and set swith-on and switch-off of the cameras audio int
ercom and video
Picture 51
2 The IPCamera setting process for iPhone iPad
Firmware requirements compatible with iPhone iPod touch and iPad
Systerm requirements Requires iOS 42 or above
You can download the genuine
software
(ipcameraapp) form the App Store
httpitunesapplecomcnappreecamid479468959mt=8
middotSoftware operating process is as follows
Continue to add
the camera
Add external network
camera domain
Cameras have
been added
Audiointercom video switch
A list of cameras and
video can be switched to
view
Fingers sliding PTZ control
Click on the picture to stop
rotation
IPCAM User Manual
31
Open the App Store search
reecam
Download and install
reecam
The run has been
installed good reecam
program
Click to add cameras
Search reecam
IPCAM User Manual
32
Fill in the domain address
or IP address
Fill in the Http port of the
camera login user name
and password click next
to open the camera
Completed please
click here
Preview videoclick on the
next save
Save the camera added
Selected camera to
view images
Click image to expand
more cameras
operating functions
IPCAM User Manual
33
7 Other setting
71 Network Setting
711 Basic Network Settings
If the router that the IP camera connect has DHCP function you can choice ldquoObain IP from DHCP Serverrdquo
else fill in the network parameters manually
Http Port In most cases you can leave this value as 80 however if your Internet
Service Provider blocks this port you may switch to another port number such as 85808088889000 Etcs
(Range from 0 to 65535 pay attention to the same segment of multiple devices must set up different port The
port t canrsquot have any conflict with other software or equipment
a Search tools modification in LAN
Figure58
brdquoFor administorrdquo ldquoBasic network settingrdquo -Change the port
Figure59
712 WIFI Setting
1) Please enter the wireless net setting page of the wireless Router to find out SSID
Channel(less than 10) Encryption Authentication as below
Selec IP Camera clickright mouse button choice network configurat ion
Set port number
Set Network IP
Set Http Port Number
IPCAM User Manual
34
Figure 61
As Administrator to Login camera open wireless LAN Settings page fill in every
Setting (ensure keep the same as routerrsquos ) and then pulled out of the cable wireless network function can be
used For example as shown in belows
Figure62
Pls click the scan buttom twice
IPCAM User Manual
35
Figure 63
713 Adhoc point to point Wireless connection Setting
1) Open the basic network setting interfacecheck the device status
Picture 64
2) Open the wireless lan setting interface choose Adhoc for network type you
can define SSID such as 001
remember the IP address of
IP camera and Http port
Click the Settings Ip Camera will
restart and save
Double click to choose
Fill the encryption and
routers and key in the
same way
IPCAM User Manual
36
Picture 65
3) Unplug the RJ45 from IP camera Use laptop or other devices which are with
wifi function( include smart phoneipad and so on) searching the SSID you defined
on proccess 2then make a connection
Picture 66
middotClick wireless network and check the link status of ip camera Please note IP
address of your connected laptop must be the subset of your ip camera if not
please reset the ip address of your laptop manually
Picture 67
4) Now we can use the ip camera tool or enter ip address of camera derectly in
browser blank to visit
1 visit by ip camera tool
Picture 68
IPCAM User Manual
37
2Enter ip address in the browser
Enter user name and password in the login interface
Picture 69
Click ldquoSign inrdquoand vis it
Picture 70
IPCAM User Manual
38
72 Multi-Device Settings
Add cameras in LAN
In the Multi-Device Settings page you can see all devices searched in LAN The 1
St Device is this device in default You can add more cameras list in LAN for monitoring This Web software
supports up to 9 IP Cameras online simultaneous ly Click ldquoThe 2ND
Devicerdquo and Double click the item in the ldquoDevice List in LANrdquo AliasHost and Http Port
will fill in automatically Enter the correct username and password then click ldquoaddrdquoAdd
more cameras in the same way At last please donrsquot forget the ldquo settingrdquo Button
Picture 71
Add cameras in the Internet
Firstly make sure the camera added can access in the Internet with the IP address or
DDNS domain Like this http2191332001669999or httpIPcamdyndnsorg9999You can enter the
Host 219133200166 Http port 9999 or Host IPcamdyndnsorg Http port 9999 Enter the correct
username and password then click ldquoaddrdquo Add more cameras in the
same way
Picture 72
IPCAM User Manual
39
Picture 73
73 MSN Settings
Fill in your MSN account and password then add account which need to receive
IPCAMrsquoS ip address to IPCAM‟ S MSN list (Picture 67)click submit then yoursquod better
restart IP camera After it login your MSN to add IPCAMrsquos MSN account to MSN List that
you can receive IPCAMrsquos ip address
Picture 74
First login and click add contacts choose Add Contact then fill IPCAMrsquos MSN account in instant
messaging address click next then send offers
Aplly for MSN account and passworf for IP cam
Add about 10 MSN Accout
IPCAM User Manual
40
Figure75
Next
Figure76
Figure77
When IPCAMrsquos MSN account shows online you can chat with it input path command url camera
account will show its IP address in chatting box promptly as below
IPCAM User Manual
41
Picture 78
You can input the IP address to browser then can browse ip camera as below
Figure79
AttentionYou should fill MSN account in IPCAM first
74 DDNS Service Settings
DDNS Service The system supports protocols from some DDNS providers Dyndnsorg System support
DDNS such as topipcamorgpeanut shell3322orgDynDNS
provided IP
IPCAM User Manual
42
User and Password the user name and password used when applying for the domain
name (details 432)
DDNS Host the Domain Name
741 Factory DDNS
Device had distributed one DDNS to every productwhich was sticked the bottom
of the product Such as
manufacturer had already give every device a DDNS address which is unique Users only need to fill in this
DDNS IP ADDRESS and port in the browser then they can monitor remote IP camera
Picture 80 Factory DDNS
Note When use the domain name access to the camera and UPNP is not successful you must set port
mapping function on routers
742 The third part DDNS
Users can use not only Factory DDSN but also can use third part DDNS System Such as domain name
wwwdyndnsorg The only thing the user need to do is to apply a free DDNS and then fill in ldquoset boxrdquo as below
Save this setting and this DDNS can be used
DDNS Hostname
Factory DDNS
IPCAM User Manual
43
Note the third party domain name is the realization of analytical way input the domain in the browser it will
keep this string of characters If the port of the device isnrsquot 80 then need to add colon and port number For
example httpwell888dyndnsorg8999
75 Mail and FTP Service
1)Configure the E-mail box to receive and send mails The E-mail box is used for receiving
the images sent after alarm and the system IP address after successful dial-up
Note When Alarm Service Settings-gt Send Mail on Alarm is check the Mail
Service takes effect
Picture82
Configure the E-mail box to receive and send mails The E-mail box is used for receiving the images sent
after alarm and the system IP address after successful dial-up
Sender This device use the sender mailbox to send mails
Receiver To receive the mail from the Sender You can set up to 4 receiver mailbox
SMTP Server the SMTP server for the sender mailbox
Need Authentication if the sender mailbox need authentication you should check it then
input the SMTP username amp Password
Mail test Please set the Mail parameter and click Submit first There are Mail test result
Picture 83
video Local storage in PC after alarm monitoring
IPCAM User Manual
44
Gmail also set as the same It only needs you to fill in correct SMTP Sever address user and password
Picture 84
Mail notes Internet IP address In this option When Internet IP and port have changed IP Will be sent via
1Can not connect to the server
2Network Error Please try later
3Server Error
4Incorrect user or password
5The sender is denied by the server Maybe the server need to authenticate the user please check it
and try again
6The receiver is denied by the server Maybe because of the anti-spam privacy of the server
7The message is denied by the server Maybe because of the anti-spam privacy of the server
8The server does not support the authentication mode used by the device
Report Internet IP by Mail When ipcam port or Internet IP changed it will send the internet IP by
mail(for example IPCAM s url is http119123207969002) Make sure the port is map to the router
correctly by UPNP or Virtual Map function
2) FTP Server use and settings
middotIf you already have an FTP Server (ipcam com)and email ipcam you can fill the
parameters as below
Picture 85
IPCAM User Manual
45
middotFTP Server of LAN as below
1 Create an account
2 Step by step setting until finish it
Picture 88
IPCAM User Manual
46
3Start Server
Continue to finish it
Picture 89
4IPCAMrsquoS account can be used
Picture 90
Save path
This is a FTP
server address
IPCAM User Manual
47
5 IP camerarsquos FTP Server set like this
Picture 91
6 Set up and complete testing is successfulwhen it alarms IP camera will upload
pictures to the FTP server Settings of main directory path (as shown )
Picture 92
FTP Server the FTP server address
FTP port the port usually is 21
FTP Mode support standard(POST) mode and passive(PASV) mode
Upload Image Now it will upload image now when checkbox is not checked When checked you can
input upload interval(Seconds)
76 Motion Detection
Enter Alarm Service Settings page to configure Motion Detection function
1) Motion Detect Armed
Each alarm triggers in the protection of time the device will take various measures to alarm
IO linkage alarm output relay closure external alarm device began to alarm
IPCAM User Manual
48
Send E-mail alarm informatio
Transmit pictures to the FTP server and can set the time interval of sending pictures
2) Alarm t ime Settings
Only in the alarm period detection device to alarm will only have alarm action All the time (not check the
schedule) also can alarm within specified time For the specified time alarm firstly need to set up the system
time time zone and then to choose period of alarm in the state of alarm setting as shown in Picture 19
Picture93 Alarm of time Settings interface
Motion Detect Armed
When you enable motion detect armed the camera can be triggered to send email alerts
and record images In the camera monitoring page the green icon turn to red and an
alert sound you will hear
Motion Detect Sensibility
You can choose from low to high 10 level alarm sensitivity The greater the number the higher the
sensitivity
Alarm Input Armed
IO PINS1) Output(+5V) 2) Output 3) Alarm input 4) Input (GND)
Input Pins The input pins can be used for 1-way external sensor input(pin3 and pin4) For example
you may connect a Person Infrared Sensor (PIR) to it for motion detection When external sensor
triggered IPCAM can be programmed to send an email with picture or control the internal relay output
IPCAM User Manual
49
Picture94
IO Linkage on Alarm
Enable IO linkage on alarmPin1 will output +5V when alarm triggered and output LOW
when alarm release automatically
Switch onoff buttons control Pin1 output manually
Send Mail on Alarm
Sent picture and mail inform to customers e-mail after alarmed(firstly you should finish
the Mail Service Settings)
Picture 95
Upload Image on Alarm
Enable upload image on alarm and set upload interval(Seconds)
Tick send to your setted mails
IPCAM User Manual
50
Picture 96
REC automatically and save to PC
When you enable motion detect and open the camera monitoring page on the PC If
there is an alarm triggered REC will start automatically for several seconds and save to
the PC
Picture 97
REC save to pcrsquos position
Picture 98
Storage path can be changed
After Setting up later when have the
alarm the image will send to
designated email and FTP server
IPCAM User Manual
51
77 IP cameras Time amp Date setting and PTZ Setting
If IP camera connected with Internet it can automatically check the time amp date via running NTP Server And
need to choose properly IP cameras Time zone Otherwise it need PC Time to check IP camera time amp Date
Pre-set and Speed of PT
78 UPGRADE DEVICE FIRMWARE
Picture 101 Firmware upgrade
IP CAMERA has two kinds of programme One is system firmware another is application firmware It can be
upgraded separately
79 BACKUP AND RESTORE SETTING
Click Set in the Backup will lead to a BIN file and choose this file to restore setting
The huger the Number is The
slower it will be
IPCAM User Manual
52
8 APPENDIX
81 REGISTER AND APPLY FOR DDNS SERVICE
1Users use DDNS management system first timeUsers need to apply account to manage
and inquire the domain state
Step1 enter httpwwwdyndnscom and Create Account( Fill in Domain Name dyndnsorg then Click
Add)
Figure103
Step2 enter your information
Figure104
IPCAM User Manual
53
Figure105
Step3 After a minute you will receive an E-mail from DynDNS Support and it will give you a
confirmation address
(eg httpsaccountdyncomemlcreateconflILHMZHRje5oF_6YXTYv1A
Figure106
IPCAM User Manual
54
Step4 Open the link to active your Domain Name as belowLogin in your account after it is activated
Figure107
Step5 Check all the DDNS serviceswe choose the 14-day-trial
Figure108
Step6 Click the linkand user will see as below
IPCAM User Manual
55
middotenter your information
Figure109
Step7 Now you obtained a Dynamic Domain Name(Figure 105)and can use it in the DDNS Service
Settings(details 74)
Figure110
IPCAM User Manual
56
2For DDNS which is applied successfully you can fill in the IP CAMERA When set successfully the status
of IP will be shown as blows
picture 111
picture 112
3How to set DDNS on line
The first wayMenu rdquostartrdquo- ldquorunrdquomdashgt Input CMDClink rdquoenterrdquoIt can check DDNS Statas
via As shown below
Picture 113
IPCAM User Manual
57
Through the PING command this dynamic domain name can be back in the network response information It
proves that the domain name has been online
If the domain name update not success Possible reasons
(1) DDNS parameter is not correct (2) may cause DNS address configuration is wrong
82 Some special application for IPCAMERA
IPCamUse some grammar parameter control and Use IPCam
useruser
pwdpassword
priThe current access (1 visitors 23 operator managers)
resolutionImage resolution(832024 0qvga32640480 vga)
ratemage transmission speed and scope 0-23
brightnessbrightness0~255
contrastcontrast0~6
mode
Mode 050 hz For
60 hz 2 outdoor
flip
Flip rotation 0 primitive 1 vertical reverses 2 horizontal 3 vertical flip + horizontal
821 The flow media player VLC player and mplayer can real-time broadcast ipcamera and send
of streaming media format video data
(Grammar parametersvideostreamasfuser=amppwd=ampresolution=amprate=)
As shown Picture 113 rdquoIpcamrdquo
Picture 114
IPCAM User Manual
58
From the following picture we can view that Ipcam local IP address ishttp19216811118999
WAN IP Address is httpwell888dyndnsorg8999 we can inputrdquoIPcamrdquorsquoS IP address to
open in the player
Picture 115
the CLC media player open play position
Picture 116
LAN play address
Picture 117
IPCAM User Manual
59
Picture 118
Open the Internet play position
Picture 119
As shown in the following picture It can see the ipcamera send video streaming format
Size 640X480
User
IPCAM User Manual
60
Picture 120
83 Frequently Asked Questions
Note1) Any question you would meet please check Network connections firstly
2)Check the working status revealed by the indicators on the network server hub exchange and
network card If abnormal check the network connections
831 I have forgotten the administrator username andor password
To reset the administrator username and password Press and hold down the RESET
BUTTON for 5 seconds Release the power button and the username and password
will be reset back to the factory default administrator username and password
Default administrator username admin
Default administrator password No password
832 IP Address configuration
Check whether IP address of the IP Camera server shares the same subnet as your
work station Click My Computer gt Control PanelgtNetwork amp Dial-up Connections gt
LAN gt Attributes gtInternet Protocols (TCPIP) and check IP Address and Subnet
Mask Make sure they are in the same subnet when configuring IP Camera IP
address manuallyUnable to access IP Camera via web browser
833 Network Configuration
Double Check to ensure that your HTTP server software is configured and running
properly If you are running any firewall software make sure it is allowing inbound
connections to port 80Also if you happen to be using a cableDSL router make sure
IPCAM User Manual
61
you are set up port forwarding properly ( consult your router is documentation for more
information ) If none of these seem to be the problem it is also possible that your
ISP is blocking inbound connections to port 80 ndashmany IPSs have done this because
of internet worms such as Code Red If this is the case you bdquoll have to setup your
HTTP server on an alternate port (such as 8080)
834 No Monitoring picture
It has four reasons Images of the abnormal factors
1If its not use Directx function and lead to not normal to display the color imagePlease
install DirectX and open the start menu then input the command
Picture 121
You use the DirectX function and it will expedite the DirectDrawDirect3D and AGP if its can not maybe the
connect issues or hardware not read it
2The issues of hardware canrsquot support the card expedite image
3The antivirus software will influence the network it will be stoped or closedIf you install fireproof software
please close it and try again
4 ActiveX controller is not installed correctly
If its not image on the first time to use and will display to the user through the ActiveXIf its can not
display of the image maybe it fail of install about this issues please follow as
1Install ldquoIP Camera Toolrdquo ActiveX control at the same time
2Please install ActiveX control and keep the security settings for IE browser
835 Problems with network bandwidth
The image frame rate is subjected to the following factors 1network bandwidth 2 PC
performancenetwork environment and display preference setting (brightness theme
etc) 3 the number of visitors (Too many visitors will slow down the image frame rate) 4
choice of switch or hub (Use a switch for multiple IP Camera Servers rather than a HUB)
The Device use MJEPT Compression it needs good network bandwidth If it is too narrow it will lead to slowly
browser Typical video parameter occupy network bandwidth as blows
640x48030fps 40 Megabits ~ 50 Megabits
320x24030fps 12 Megabits ~ 16 Megabits
IPCAM User Manual
62
middot836 Why pop-up the prompt ldquoFail to connect to the devicehelliprdquo
This prompt only appeared in the case of using multiple cameras
Enter the Multi-Device Settings page(login as administrator) to check the
Device setting is correct or not
When one of the multiple cameras disconnected the color changed to
yellow and pop-up the promptldquoFail to connect to the devicehelliprdquo
Picture 122
837 Canrsquot access the IPCAM in the internet
There are some reasons
1 ActiveX controller is not installed correctly(see more details 514)
2 The port IPCAM used is blocked by Firewall or Anti-virus software Please change a
port number and try again
3 Port mapping is not success You can do port mapping by two ways
Enter setting page of the router which IPCAM connect with to enable UPnP function
Enter IPCAM ldquoUPnP Settingsrdquo to enable UPnP and make sure the state is ldquoUPnP
successrdquo
‟ s IP
and port to the Virtual map list
When use ADSL the IP is dynamic You should set DDNS(see more details 74 amp 80)
and also make sure port mapping success
84 Operate common problem solving
IP camera tool canrsquot find the camera
Except of the camera broken
1 Make sure the cable connector no problem recommend connector
(AMP)it is with international standard Another note IPCAMrsquos data
transmission channel require higher than computerrsquos so maybe the
IPCAM User Manual
63
computer can run normally but IPCAM canrsquot Please press heavily when making the cable connector
2 Confirm the power supply normally First check whether power indication
light turn on or not If it is onthen check the yellow light on RJ45 Port
(power indication light) and green light (network indication light) are on or
notIf they are onso power supply and cable runs normally
3 Confirm all the firwall and antivirus software are closeThe firewall often
block unrecognized data so if the firewall is running so maybe the IPCAM
TOOL canrsquot find the deviceSuggest to close firewall and antivirus
software temporarily before searching
How to solve the camera blank screen
1 Check if you are using the wrong power adaptorplease use original one
2 Close antivirus software
How to solve the camera canrsquot login by Internet
1 Check if you set DDNS success or not
2 Check the current IPCAMrsquos port number is the same as routerrsquosThey need to keep same
Canrsquot view the monitoring picture
1 Reason canrsquot connect with network
SolutionCheck if the network connect well exclude cable fault and PC virus
cause network fault until can be used between PC and PING
2 ReasonIP address occupy by other device
Solution Choose automatic gain
3 Reason IP address located within different subnet
Solution Check IPCAMrsquoS ip address and subnet mask address and gateway settings
4 ReasonWeb port has been modified
Solutioncontact network administrator to obtain port information
5 Reasonunknown
SolutionPress reset button to factory default statethen reconnectingsysten
default to gain ip address automaticsubnet mask is 2552552550
85 Default Parameters
middotDefault network Parameters
IP address dynamic obtain
Subnet mask 2552552550
Gateway dynamic obtain
DDNS Factory provide
middotUsername and password
Default administrator username admin
Default administrator password No password
IPCAM User Manual
64
86 Technical Parameters
ITEM IP CAM (NIP-02BGPWA2)
Image Sensor
Mage sensor 15 Color CMOS Sensor
Display 640 x 480 (300K Pixels)
Lens f36mm F24 (IR Lens)
Miniillumination 05 Lux
Lens Lens Type Glass Lens
Viewing Angle 60 Degree
Audio Microphone Audio of two way
Domain name Server MSN server DDNS server
Video
Image Compression MJPEG
Image Frame Rate 15 FPS(VGA)30FPS(QVGA)
Resolution 640 x 480(VGA) 320 x 240(QVGA)
Flip Mirror Images rtical Horizontal
mode 50Hz 60Hz or Outdoor
Video Parameters Brightness Contrast
Communication
Ethernet One 10100Mbps RJ-45
Supported Protocol HTTPDHCPIPTCPUDPFTPSMTPDDNSPPPoEUPnP
Mobilephone monitor Support IphoneIpad3G phonesmartphone
Wireless Standard IEEE 80211bg
Wireless Standard 80211b11Mbps(max) 80211g54Mbps(max)
Wireless Security 64128-bitWEP Encryption
Physical
PanTilt Angle Horizontal270deg amp Vertical 120deg
Infrared Light 10 IR LEDs Night visibility up to 15 Mete
Product size 100(L) x100(W) x125mm(H)
Gross Weight 6465gpcs (packing size196x165x123mm)
Net Weight 2547gpcs (only product)
Power Specification DC 5V25A 18 meter
Power Consumption 5 Watts
Environment
Operate Temper 0deg~ 55degC (14degF~122degF)
Operating Humidity 20 ~ 85 non-condensing
Storage Temper -10degC ~ 60deg (14degF ~140degF)
Storage Humidity 0 ~ 90 non-condensing
PC Requirements
CPU 20GHZ or above (suggested 30GHz)
Memory Size 512MB or above (suggested 10GB)
Display card 64M or above
Supported OS Microsoft Windows XPVistaWindows7
Supported browsers IEfirefoxGoogle
Certification CEFCCRoHS
Warranty Limited 1-year warranty
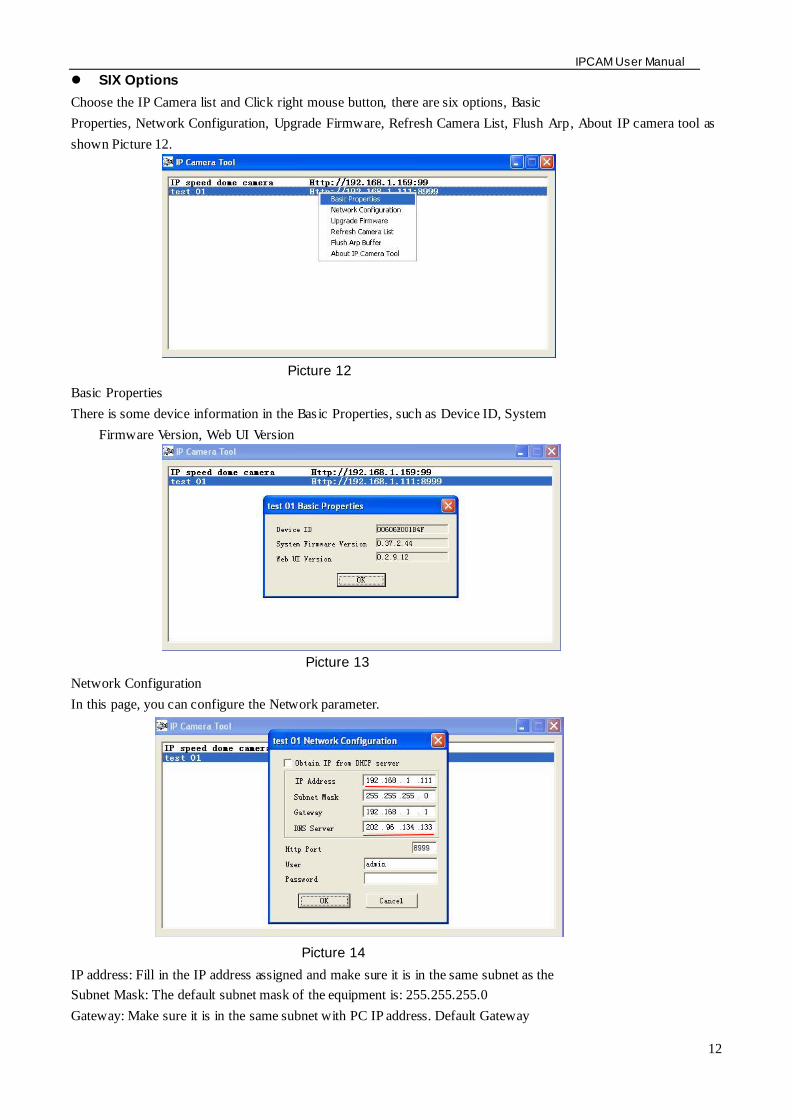
IPCAM User Manual
13
address is 19216811
DNSServer IP address of IPS network provider ( It also can view from network card local area connection
status) As blows picture
Picture 15
Http Port LAN port assigned for the equipment usually 80
User amp Password Default administrator usernamepassword adminNo password
Enable Using DHCPthe system will assign a reasonable IP address for your equipment
only if your gateway supports DHCP (It is the case with most gateways)
DHCP checkbox if checked the device will obtain IP from DHCP server (To be make
sure the Router which the device connect with has DHCP function)
NOTE when the prompt rdquosubnet doesn‟ t match double click to changerdquo please set the
IP Camera IP address once again
Upgrade Firmware
Enter the correct User and Password to upgrade system Firmware and Web UI (User should have administering
authority
Picture 16
This is the server provide the
service of DNS
IPCAM User Manual
14
Refresh Camera List
Refresh camera list manually
Flush Arp Buffer
When cable network and wireless network of the device both are fixed IP address There
is a problem you may encounter is can search the camera IP but canot open the camera
web pageyou may try to use flush arp buffer
About IP Camera tool
You can view IP camera tool version and ActiveX version
43 Login IP camera
Double click the IP address of the IP Camera listed IE will be opened automatically and display the camera login
page Or Access the camera by IE browser directly type in the camera‟ s IP address For
example http19216811118999 ( We suggest you use IE browser for it has more function
Picture 17
IP camera Default username is admin no password And Click ldquoSign inrdquo to enter the monitoring page
Default usernameadmin
Default passwordNo password
IPCAM User Manual
15
Picture 18
Picture 19
middot When Users login inthey can view images At the same time users(Administrator Operator or Visitor) can operate according to their permissions
By Firefox and sofari browser as below
Language options you can
choose operation language
according to your demand
IPCAM User Manual
16
Picture 20
Picture21
IPCAM User Manual
17
44 IP camera operation
441 For Visitor
For example if is bright the first route is at status of Detection(Only IE Broswer can view it)
Picture 22
The right upper is statuss indicator area which can show 9 IP camera status
When the button is gray it means IP camera didnt connect
Green means IP camera has connected
Yellow means there is something wrong with connection
Red means it is the status of alarm
If you want to detect 4 views need to click this icon
OSD Display date and time on the video You can disable the OSD function or choice other color
(OSDon-screen display)
Snapshot Click icon to snap the picture
REC Click icon into REC mode is stop
Audio Click icon into Audio mode can listen the voice in monitoring range
Talk Click icon into Talk mode and the icon will become Visitor can talk with whom is in the
monitoring range
Note the record file name is device Alias_ Current timeAvi
For example IPCAM_20101011134442Avi
It means the device alias is IPCAM and its recordrsquos end time is At 134442 on
October 11 2010When use motion detection and checked Send Mail on Alarm
Buttom for taking picture
S top monitor video
Open vedio
Record
Two way audio Monitor audio
IPCAM User Manual
18
The name of the picture received in mailbox is like this device id(Alias)_ Current
timejpg
442 For operator
When login as operator you can operate PanTilt and adjust video parameter
Picture 23
Direction control click the different arrow will get different direction view
Vertical patrol
Horizontal patrol
Stop patrol
IO output Switch on off
Infrared light software control switch
Image fluctuation flip(up and down)
Image around flip (right and left)
Set Preset (can set 4 preset)
ResolutionVGA(640 X 480) QVGA(320 X 240)
Work Mode 50Hz60HzOutdoor
color parameterClick or can adjust brightness and contrast
Stop patrol
Vertical patrol
Horizontal
patrol
Image fluctuation flip
Image around flip
IO output S witch on off
Set Preset
Infrared light s witch
IPCAM User Manual
19
443 For Administrator
When you login as administrator
you can set all parameters Please
click ldquoFor Administratorrdquo
and enter into
setting interface
Picture 24
Alias Settings You can Input the new name as you like
Data ampTime Settings Data ampTime Settings page
Users Settings Eight accounts are acceptable for this system Here the eight users can configure their
user names and password as Administrator Operator or Visitor
Visitor In this mode you can only view
Operator You can control the direction of IP Camera and set some parameter
Administrator You can setup the advanced configurations of the IP Camera
UpnP Settings If you access IP Camera to be make sure UpnP Status is Succeed
Upgrade Device Firmware Upgrade Device Firmware and device embeded web UI software in this
page
Restore Factory Settings Restore factory settings of the device
Reboot Device Reboot the device
Back Back to Monitoring Mode
View Device IDDevice Firmware
Version and Device Embedded
Web UI Version
Check Device all kinds of
status
Carry on Settings and
operation function
IPCAM User Manual
20
5 Visit IP Camera in internet
51 Connection way in Internet
Picture 25
52 Related setting and login IP camera
1 If the network your IP camera using is using static IP you just need to input this IP address and IP cameras port in the browser then it can visit Ip camera
2 If you are using ADSL to dial-up and surf on line you should obtain IP Camera Current WAN IP Address or configured DDNS
1)There are four ways for you to obtain WAN IP Address
①Using mail to send internet IP function
After setting mail successfully IP will send mail to your receiver e-mail box when Internet IP or port
has changed If it is dynamical IP users need to input this IP address to visit this IP camera
②Obtain from some website
It is very easy for you to obtain WANS IP address You can open browser on the computer on the
condition that IP camera and PC are the same subnet For example httpwwwwhatismyipcomor
httpwwwmyipcn etcsIt will tell you WANS IP address as shows below
Picture 26
③Obtain from MSN and IP cameras MSN ACCOUNT( Details 73)
IPCAM User Manual
21
④ Obtain from router
We take Nur8555M from Xinxiang s router as example
AAccording to routers manual we get Routers IP is 19216811
BLogin in router Input 19216811 in the browser Find the status of Router and find Routers
WAN( In this example WANS IP is 11624235122 As shows Picture 27
Picture 27
Now you can visit IP Cam from Internet What you should do is to Input correct IP address For
example Http 116242351228999
Note Make sure the Ports UPNS is available You can open UPNP via the following ways
Enter into Routers setting page( Details Routers user manual) to make UPNP available
Or enable virtual mapping function Add equipment IP address and port to the virtual mapping list
Picture 28
Users can access the Internet from IPCAM device Input address For example Http 116242351228999
2)DDNS (dynamic DNS) service is the Internet domain name can be fixed and dynamic IP address real-time
corresponding (analysis) service Simplely said whenever user surf on internet or what kind of way you are
using the Internet get a what kind of IP address IP address whether it will change DDMS can ensure that a
fixed domain name can access to a users device
IPCAM User Manual
22
Our products have been configured the DDNS services of course you can also apply for the domain name in
registration website for one of your own domain name to configuration For example wwwdyndnsorg
Picture 30
You need fill in DDNS and port for example(httpicam0001ihome365org8999) The browser will jump
to IP camerarsquos login page
Picture 31
DDNS inside
Factory DDNS
IPCAM User Manual
23
The input device user name and password to login to equipment
Picture 32
middotIf input domain name but cant open IP camera in the browser such as the situation is as blows
middotPlease open the device and check status of IP camera in the local area network confirm whether UPNP
function and DDNS is successful or not
Picture 34
IPCAM User Manual
24
middotYou need to set port mapping function successfully to check whether the router UPNP function is
available if It was unavailable please make it available refer to the routers user manual
If you use TPLINK router please refer to these instructions
middotThrough the upnp automatic mapping port to the network input router IP address in the browser (such
as http19216811 gt the router IP addresses are written on paper label on the router house---- please set
according to your own IP address) open the routers page forward rules gt gt upnp set to ensure that the
current state of upnp is already available as below
Note some of the router interface without UPNP Settings option then need to open the virtual server IP
cameras in the local area network of mapping the connection IP address and port number
Picture 36
6 Access IP camera via mobile equipment
such as mobile phoneIpad Etcs There are two kinds of ways to access IP camera One is to input IP address in browser directly It can be IP
address and also can be DDNS Another is to use clients to visit
61 Input IP address in browser
1 We take IPAD as example as blows
IPCAM User Manual
25
middotOpen browser Safari
Input IP cameras IP address for example( httpicam0001ihome365org8999)
Choose language according to your demand and choose login mode according to your browser
Picture39
Choose manual settings
Open browser Safari
Enter the IP address of the IP camera
(httpicam0001ihome365org8999)
IPCAM User Manual
26
enter your account and password on the login page as shown By defaultadministratorrsquos username is
admin and no password
Select Server Refresh mode landing
Picture42
Input the username and password of
the network camera
Here you can choose between two
modes landing
Here to select the
operating language
Default passwordNo password
IPCAM User Manual
27
Select Server Push mode landing
Picture 43
2 Now we take Android system device as example
Open menu and firstly open the browser and input IP camera s IP address in the
browser for example(httpicam0001ihome365org8999)
Picture 44
Input IP cameras username and password and click sign in and then enter into
browser model to choose login-in interface
Open menu
IPCAM User Manual
28
Picture 45
62 Install client-side software to access IPCamera
There are many client software support IP camera several third-party software support our IP cameras too
The following are our manufacture software setup process(the Android version)
1 Pls get the install applications in the CD or you can download from the website
httpsplaygooglecomstoresearchq=reecamampc=apps Choose the right
①installation file-ipcameraapk
running environment Android version 16 or above
Note Please ensure that mobile phones can connect to the Internet before install
② Install method
21 Insert SD card into Android mobile phone
22 Connect the cellphone to computer via USB data cable
23 Choose the USB connection model on your cellphone you can see the SD driver in ldquomy computerrdquo
24 Copy the ipcameraapk into SD card
25 Disconnect the device pls find the ipcameraapk in ldquoFile Managementrdquo and run it
26 The ipcamera application will be show up on the home screen after you successfully installed
③Software operating processes
First ensure that the Internet open WIFI connection the search in the Play in The Googl Android
application reecam
Open the WiFi
connection
Download and install
the application
Search reecam
IPCAM User Manual
29
middotYou can edit the camera modify camere configuration and delete camera operation
Click here to add
a video camera
Select to add to the
client camera
Refresh LAN cameras
View or change the
configuration of the
camera the camera
name at random
IP address
Http port
The default password is blank
Camera name
Prev iew camera
Preview the
camera screen
save the camera
Editor has added
cameras
Edit camera
configuration
Delete the camera Edit camera of the
configuration
IPCAM User Manual
30
middotFor the camera added to the camera list you can watch camera in real time
Control cameras PTZ and set swith-on and switch-off of the cameras audio int
ercom and video
Picture 51
2 The IPCamera setting process for iPhone iPad
Firmware requirements compatible with iPhone iPod touch and iPad
Systerm requirements Requires iOS 42 or above
You can download the genuine
software
(ipcameraapp) form the App Store
httpitunesapplecomcnappreecamid479468959mt=8
middotSoftware operating process is as follows
Continue to add
the camera
Add external network
camera domain
Cameras have
been added
Audiointercom video switch
A list of cameras and
video can be switched to
view
Fingers sliding PTZ control
Click on the picture to stop
rotation
IPCAM User Manual
31
Open the App Store search
reecam
Download and install
reecam
The run has been
installed good reecam
program
Click to add cameras
Search reecam
IPCAM User Manual
32
Fill in the domain address
or IP address
Fill in the Http port of the
camera login user name
and password click next
to open the camera
Completed please
click here
Preview videoclick on the
next save
Save the camera added
Selected camera to
view images
Click image to expand
more cameras
operating functions
IPCAM User Manual
33
7 Other setting
71 Network Setting
711 Basic Network Settings
If the router that the IP camera connect has DHCP function you can choice ldquoObain IP from DHCP Serverrdquo
else fill in the network parameters manually
Http Port In most cases you can leave this value as 80 however if your Internet
Service Provider blocks this port you may switch to another port number such as 85808088889000 Etcs
(Range from 0 to 65535 pay attention to the same segment of multiple devices must set up different port The
port t canrsquot have any conflict with other software or equipment
a Search tools modification in LAN
Figure58
brdquoFor administorrdquo ldquoBasic network settingrdquo -Change the port
Figure59
712 WIFI Setting
1) Please enter the wireless net setting page of the wireless Router to find out SSID
Channel(less than 10) Encryption Authentication as below
Selec IP Camera clickright mouse button choice network configurat ion
Set port number
Set Network IP
Set Http Port Number
IPCAM User Manual
34
Figure 61
As Administrator to Login camera open wireless LAN Settings page fill in every
Setting (ensure keep the same as routerrsquos ) and then pulled out of the cable wireless network function can be
used For example as shown in belows
Figure62
Pls click the scan buttom twice
IPCAM User Manual
35
Figure 63
713 Adhoc point to point Wireless connection Setting
1) Open the basic network setting interfacecheck the device status
Picture 64
2) Open the wireless lan setting interface choose Adhoc for network type you
can define SSID such as 001
remember the IP address of
IP camera and Http port
Click the Settings Ip Camera will
restart and save
Double click to choose
Fill the encryption and
routers and key in the
same way
IPCAM User Manual
36
Picture 65
3) Unplug the RJ45 from IP camera Use laptop or other devices which are with
wifi function( include smart phoneipad and so on) searching the SSID you defined
on proccess 2then make a connection
Picture 66
middotClick wireless network and check the link status of ip camera Please note IP
address of your connected laptop must be the subset of your ip camera if not
please reset the ip address of your laptop manually
Picture 67
4) Now we can use the ip camera tool or enter ip address of camera derectly in
browser blank to visit
1 visit by ip camera tool
Picture 68
IPCAM User Manual
37
2Enter ip address in the browser
Enter user name and password in the login interface
Picture 69
Click ldquoSign inrdquoand vis it
Picture 70
IPCAM User Manual
38
72 Multi-Device Settings
Add cameras in LAN
In the Multi-Device Settings page you can see all devices searched in LAN The 1
St Device is this device in default You can add more cameras list in LAN for monitoring This Web software
supports up to 9 IP Cameras online simultaneous ly Click ldquoThe 2ND
Devicerdquo and Double click the item in the ldquoDevice List in LANrdquo AliasHost and Http Port
will fill in automatically Enter the correct username and password then click ldquoaddrdquoAdd
more cameras in the same way At last please donrsquot forget the ldquo settingrdquo Button
Picture 71
Add cameras in the Internet
Firstly make sure the camera added can access in the Internet with the IP address or
DDNS domain Like this http2191332001669999or httpIPcamdyndnsorg9999You can enter the
Host 219133200166 Http port 9999 or Host IPcamdyndnsorg Http port 9999 Enter the correct
username and password then click ldquoaddrdquo Add more cameras in the
same way
Picture 72
IPCAM User Manual
39
Picture 73
73 MSN Settings
Fill in your MSN account and password then add account which need to receive
IPCAMrsquoS ip address to IPCAM‟ S MSN list (Picture 67)click submit then yoursquod better
restart IP camera After it login your MSN to add IPCAMrsquos MSN account to MSN List that
you can receive IPCAMrsquos ip address
Picture 74
First login and click add contacts choose Add Contact then fill IPCAMrsquos MSN account in instant
messaging address click next then send offers
Aplly for MSN account and passworf for IP cam
Add about 10 MSN Accout
IPCAM User Manual
40
Figure75
Next
Figure76
Figure77
When IPCAMrsquos MSN account shows online you can chat with it input path command url camera
account will show its IP address in chatting box promptly as below
IPCAM User Manual
41
Picture 78
You can input the IP address to browser then can browse ip camera as below
Figure79
AttentionYou should fill MSN account in IPCAM first
74 DDNS Service Settings
DDNS Service The system supports protocols from some DDNS providers Dyndnsorg System support
DDNS such as topipcamorgpeanut shell3322orgDynDNS
provided IP
IPCAM User Manual
42
User and Password the user name and password used when applying for the domain
name (details 432)
DDNS Host the Domain Name
741 Factory DDNS
Device had distributed one DDNS to every productwhich was sticked the bottom
of the product Such as
manufacturer had already give every device a DDNS address which is unique Users only need to fill in this
DDNS IP ADDRESS and port in the browser then they can monitor remote IP camera
Picture 80 Factory DDNS
Note When use the domain name access to the camera and UPNP is not successful you must set port
mapping function on routers
742 The third part DDNS
Users can use not only Factory DDSN but also can use third part DDNS System Such as domain name
wwwdyndnsorg The only thing the user need to do is to apply a free DDNS and then fill in ldquoset boxrdquo as below
Save this setting and this DDNS can be used
DDNS Hostname
Factory DDNS
IPCAM User Manual
43
Note the third party domain name is the realization of analytical way input the domain in the browser it will
keep this string of characters If the port of the device isnrsquot 80 then need to add colon and port number For
example httpwell888dyndnsorg8999
75 Mail and FTP Service
1)Configure the E-mail box to receive and send mails The E-mail box is used for receiving
the images sent after alarm and the system IP address after successful dial-up
Note When Alarm Service Settings-gt Send Mail on Alarm is check the Mail
Service takes effect
Picture82
Configure the E-mail box to receive and send mails The E-mail box is used for receiving the images sent
after alarm and the system IP address after successful dial-up
Sender This device use the sender mailbox to send mails
Receiver To receive the mail from the Sender You can set up to 4 receiver mailbox
SMTP Server the SMTP server for the sender mailbox
Need Authentication if the sender mailbox need authentication you should check it then
input the SMTP username amp Password
Mail test Please set the Mail parameter and click Submit first There are Mail test result
Picture 83
video Local storage in PC after alarm monitoring
IPCAM User Manual
44
Gmail also set as the same It only needs you to fill in correct SMTP Sever address user and password
Picture 84
Mail notes Internet IP address In this option When Internet IP and port have changed IP Will be sent via
1Can not connect to the server
2Network Error Please try later
3Server Error
4Incorrect user or password
5The sender is denied by the server Maybe the server need to authenticate the user please check it
and try again
6The receiver is denied by the server Maybe because of the anti-spam privacy of the server
7The message is denied by the server Maybe because of the anti-spam privacy of the server
8The server does not support the authentication mode used by the device
Report Internet IP by Mail When ipcam port or Internet IP changed it will send the internet IP by
mail(for example IPCAM s url is http119123207969002) Make sure the port is map to the router
correctly by UPNP or Virtual Map function
2) FTP Server use and settings
middotIf you already have an FTP Server (ipcam com)and email ipcam you can fill the
parameters as below
Picture 85
IPCAM User Manual
45
middotFTP Server of LAN as below
1 Create an account
2 Step by step setting until finish it
Picture 88
IPCAM User Manual
46
3Start Server
Continue to finish it
Picture 89
4IPCAMrsquoS account can be used
Picture 90
Save path
This is a FTP
server address
IPCAM User Manual
47
5 IP camerarsquos FTP Server set like this
Picture 91
6 Set up and complete testing is successfulwhen it alarms IP camera will upload
pictures to the FTP server Settings of main directory path (as shown )
Picture 92
FTP Server the FTP server address
FTP port the port usually is 21
FTP Mode support standard(POST) mode and passive(PASV) mode
Upload Image Now it will upload image now when checkbox is not checked When checked you can
input upload interval(Seconds)
76 Motion Detection
Enter Alarm Service Settings page to configure Motion Detection function
1) Motion Detect Armed
Each alarm triggers in the protection of time the device will take various measures to alarm
IO linkage alarm output relay closure external alarm device began to alarm
IPCAM User Manual
48
Send E-mail alarm informatio
Transmit pictures to the FTP server and can set the time interval of sending pictures
2) Alarm t ime Settings
Only in the alarm period detection device to alarm will only have alarm action All the time (not check the
schedule) also can alarm within specified time For the specified time alarm firstly need to set up the system
time time zone and then to choose period of alarm in the state of alarm setting as shown in Picture 19
Picture93 Alarm of time Settings interface
Motion Detect Armed
When you enable motion detect armed the camera can be triggered to send email alerts
and record images In the camera monitoring page the green icon turn to red and an
alert sound you will hear
Motion Detect Sensibility
You can choose from low to high 10 level alarm sensitivity The greater the number the higher the
sensitivity
Alarm Input Armed
IO PINS1) Output(+5V) 2) Output 3) Alarm input 4) Input (GND)
Input Pins The input pins can be used for 1-way external sensor input(pin3 and pin4) For example
you may connect a Person Infrared Sensor (PIR) to it for motion detection When external sensor
triggered IPCAM can be programmed to send an email with picture or control the internal relay output
IPCAM User Manual
49
Picture94
IO Linkage on Alarm
Enable IO linkage on alarmPin1 will output +5V when alarm triggered and output LOW
when alarm release automatically
Switch onoff buttons control Pin1 output manually
Send Mail on Alarm
Sent picture and mail inform to customers e-mail after alarmed(firstly you should finish
the Mail Service Settings)
Picture 95
Upload Image on Alarm
Enable upload image on alarm and set upload interval(Seconds)
Tick send to your setted mails
IPCAM User Manual
50
Picture 96
REC automatically and save to PC
When you enable motion detect and open the camera monitoring page on the PC If
there is an alarm triggered REC will start automatically for several seconds and save to
the PC
Picture 97
REC save to pcrsquos position
Picture 98
Storage path can be changed
After Setting up later when have the
alarm the image will send to
designated email and FTP server
IPCAM User Manual
51
77 IP cameras Time amp Date setting and PTZ Setting
If IP camera connected with Internet it can automatically check the time amp date via running NTP Server And
need to choose properly IP cameras Time zone Otherwise it need PC Time to check IP camera time amp Date
Pre-set and Speed of PT
78 UPGRADE DEVICE FIRMWARE
Picture 101 Firmware upgrade
IP CAMERA has two kinds of programme One is system firmware another is application firmware It can be
upgraded separately
79 BACKUP AND RESTORE SETTING
Click Set in the Backup will lead to a BIN file and choose this file to restore setting
The huger the Number is The
slower it will be
IPCAM User Manual
52
8 APPENDIX
81 REGISTER AND APPLY FOR DDNS SERVICE
1Users use DDNS management system first timeUsers need to apply account to manage
and inquire the domain state
Step1 enter httpwwwdyndnscom and Create Account( Fill in Domain Name dyndnsorg then Click
Add)
Figure103
Step2 enter your information
Figure104
IPCAM User Manual
53
Figure105
Step3 After a minute you will receive an E-mail from DynDNS Support and it will give you a
confirmation address
(eg httpsaccountdyncomemlcreateconflILHMZHRje5oF_6YXTYv1A
Figure106
IPCAM User Manual
54
Step4 Open the link to active your Domain Name as belowLogin in your account after it is activated
Figure107
Step5 Check all the DDNS serviceswe choose the 14-day-trial
Figure108
Step6 Click the linkand user will see as below
IPCAM User Manual
55
middotenter your information
Figure109
Step7 Now you obtained a Dynamic Domain Name(Figure 105)and can use it in the DDNS Service
Settings(details 74)
Figure110
IPCAM User Manual
56
2For DDNS which is applied successfully you can fill in the IP CAMERA When set successfully the status
of IP will be shown as blows
picture 111
picture 112
3How to set DDNS on line
The first wayMenu rdquostartrdquo- ldquorunrdquomdashgt Input CMDClink rdquoenterrdquoIt can check DDNS Statas
via As shown below
Picture 113
IPCAM User Manual
57
Through the PING command this dynamic domain name can be back in the network response information It
proves that the domain name has been online
If the domain name update not success Possible reasons
(1) DDNS parameter is not correct (2) may cause DNS address configuration is wrong
82 Some special application for IPCAMERA
IPCamUse some grammar parameter control and Use IPCam
useruser
pwdpassword
priThe current access (1 visitors 23 operator managers)
resolutionImage resolution(832024 0qvga32640480 vga)
ratemage transmission speed and scope 0-23
brightnessbrightness0~255
contrastcontrast0~6
mode
Mode 050 hz For
60 hz 2 outdoor
flip
Flip rotation 0 primitive 1 vertical reverses 2 horizontal 3 vertical flip + horizontal
821 The flow media player VLC player and mplayer can real-time broadcast ipcamera and send
of streaming media format video data
(Grammar parametersvideostreamasfuser=amppwd=ampresolution=amprate=)
As shown Picture 113 rdquoIpcamrdquo
Picture 114
IPCAM User Manual
58
From the following picture we can view that Ipcam local IP address ishttp19216811118999
WAN IP Address is httpwell888dyndnsorg8999 we can inputrdquoIPcamrdquorsquoS IP address to
open in the player
Picture 115
the CLC media player open play position
Picture 116
LAN play address
Picture 117
IPCAM User Manual
59
Picture 118
Open the Internet play position
Picture 119
As shown in the following picture It can see the ipcamera send video streaming format
Size 640X480
User
IPCAM User Manual
60
Picture 120
83 Frequently Asked Questions
Note1) Any question you would meet please check Network connections firstly
2)Check the working status revealed by the indicators on the network server hub exchange and
network card If abnormal check the network connections
831 I have forgotten the administrator username andor password
To reset the administrator username and password Press and hold down the RESET
BUTTON for 5 seconds Release the power button and the username and password
will be reset back to the factory default administrator username and password
Default administrator username admin
Default administrator password No password
832 IP Address configuration
Check whether IP address of the IP Camera server shares the same subnet as your
work station Click My Computer gt Control PanelgtNetwork amp Dial-up Connections gt
LAN gt Attributes gtInternet Protocols (TCPIP) and check IP Address and Subnet
Mask Make sure they are in the same subnet when configuring IP Camera IP
address manuallyUnable to access IP Camera via web browser
833 Network Configuration
Double Check to ensure that your HTTP server software is configured and running
properly If you are running any firewall software make sure it is allowing inbound
connections to port 80Also if you happen to be using a cableDSL router make sure
IPCAM User Manual
61
you are set up port forwarding properly ( consult your router is documentation for more
information ) If none of these seem to be the problem it is also possible that your
ISP is blocking inbound connections to port 80 ndashmany IPSs have done this because
of internet worms such as Code Red If this is the case you bdquoll have to setup your
HTTP server on an alternate port (such as 8080)
834 No Monitoring picture
It has four reasons Images of the abnormal factors
1If its not use Directx function and lead to not normal to display the color imagePlease
install DirectX and open the start menu then input the command
Picture 121
You use the DirectX function and it will expedite the DirectDrawDirect3D and AGP if its can not maybe the
connect issues or hardware not read it
2The issues of hardware canrsquot support the card expedite image
3The antivirus software will influence the network it will be stoped or closedIf you install fireproof software
please close it and try again
4 ActiveX controller is not installed correctly
If its not image on the first time to use and will display to the user through the ActiveXIf its can not
display of the image maybe it fail of install about this issues please follow as
1Install ldquoIP Camera Toolrdquo ActiveX control at the same time
2Please install ActiveX control and keep the security settings for IE browser
835 Problems with network bandwidth
The image frame rate is subjected to the following factors 1network bandwidth 2 PC
performancenetwork environment and display preference setting (brightness theme
etc) 3 the number of visitors (Too many visitors will slow down the image frame rate) 4
choice of switch or hub (Use a switch for multiple IP Camera Servers rather than a HUB)
The Device use MJEPT Compression it needs good network bandwidth If it is too narrow it will lead to slowly
browser Typical video parameter occupy network bandwidth as blows
640x48030fps 40 Megabits ~ 50 Megabits
320x24030fps 12 Megabits ~ 16 Megabits
IPCAM User Manual
62
middot836 Why pop-up the prompt ldquoFail to connect to the devicehelliprdquo
This prompt only appeared in the case of using multiple cameras
Enter the Multi-Device Settings page(login as administrator) to check the
Device setting is correct or not
When one of the multiple cameras disconnected the color changed to
yellow and pop-up the promptldquoFail to connect to the devicehelliprdquo
Picture 122
837 Canrsquot access the IPCAM in the internet
There are some reasons
1 ActiveX controller is not installed correctly(see more details 514)
2 The port IPCAM used is blocked by Firewall or Anti-virus software Please change a
port number and try again
3 Port mapping is not success You can do port mapping by two ways
Enter setting page of the router which IPCAM connect with to enable UPnP function
Enter IPCAM ldquoUPnP Settingsrdquo to enable UPnP and make sure the state is ldquoUPnP
successrdquo
‟ s IP
and port to the Virtual map list
When use ADSL the IP is dynamic You should set DDNS(see more details 74 amp 80)
and also make sure port mapping success
84 Operate common problem solving
IP camera tool canrsquot find the camera
Except of the camera broken
1 Make sure the cable connector no problem recommend connector
(AMP)it is with international standard Another note IPCAMrsquos data
transmission channel require higher than computerrsquos so maybe the
IPCAM User Manual
63
computer can run normally but IPCAM canrsquot Please press heavily when making the cable connector
2 Confirm the power supply normally First check whether power indication
light turn on or not If it is onthen check the yellow light on RJ45 Port
(power indication light) and green light (network indication light) are on or
notIf they are onso power supply and cable runs normally
3 Confirm all the firwall and antivirus software are closeThe firewall often
block unrecognized data so if the firewall is running so maybe the IPCAM
TOOL canrsquot find the deviceSuggest to close firewall and antivirus
software temporarily before searching
How to solve the camera blank screen
1 Check if you are using the wrong power adaptorplease use original one
2 Close antivirus software
How to solve the camera canrsquot login by Internet
1 Check if you set DDNS success or not
2 Check the current IPCAMrsquos port number is the same as routerrsquosThey need to keep same
Canrsquot view the monitoring picture
1 Reason canrsquot connect with network
SolutionCheck if the network connect well exclude cable fault and PC virus
cause network fault until can be used between PC and PING
2 ReasonIP address occupy by other device
Solution Choose automatic gain
3 Reason IP address located within different subnet
Solution Check IPCAMrsquoS ip address and subnet mask address and gateway settings
4 ReasonWeb port has been modified
Solutioncontact network administrator to obtain port information
5 Reasonunknown
SolutionPress reset button to factory default statethen reconnectingsysten
default to gain ip address automaticsubnet mask is 2552552550
85 Default Parameters
middotDefault network Parameters
IP address dynamic obtain
Subnet mask 2552552550
Gateway dynamic obtain
DDNS Factory provide
middotUsername and password
Default administrator username admin
Default administrator password No password
IPCAM User Manual
64
86 Technical Parameters
ITEM IP CAM (NIP-02BGPWA2)
Image Sensor
Mage sensor 15 Color CMOS Sensor
Display 640 x 480 (300K Pixels)
Lens f36mm F24 (IR Lens)
Miniillumination 05 Lux
Lens Lens Type Glass Lens
Viewing Angle 60 Degree
Audio Microphone Audio of two way
Domain name Server MSN server DDNS server
Video
Image Compression MJPEG
Image Frame Rate 15 FPS(VGA)30FPS(QVGA)
Resolution 640 x 480(VGA) 320 x 240(QVGA)
Flip Mirror Images rtical Horizontal
mode 50Hz 60Hz or Outdoor
Video Parameters Brightness Contrast
Communication
Ethernet One 10100Mbps RJ-45
Supported Protocol HTTPDHCPIPTCPUDPFTPSMTPDDNSPPPoEUPnP
Mobilephone monitor Support IphoneIpad3G phonesmartphone
Wireless Standard IEEE 80211bg
Wireless Standard 80211b11Mbps(max) 80211g54Mbps(max)
Wireless Security 64128-bitWEP Encryption
Physical
PanTilt Angle Horizontal270deg amp Vertical 120deg
Infrared Light 10 IR LEDs Night visibility up to 15 Mete
Product size 100(L) x100(W) x125mm(H)
Gross Weight 6465gpcs (packing size196x165x123mm)
Net Weight 2547gpcs (only product)
Power Specification DC 5V25A 18 meter
Power Consumption 5 Watts
Environment
Operate Temper 0deg~ 55degC (14degF~122degF)
Operating Humidity 20 ~ 85 non-condensing
Storage Temper -10degC ~ 60deg (14degF ~140degF)
Storage Humidity 0 ~ 90 non-condensing
PC Requirements
CPU 20GHZ or above (suggested 30GHz)
Memory Size 512MB or above (suggested 10GB)
Display card 64M or above
Supported OS Microsoft Windows XPVistaWindows7
Supported browsers IEfirefoxGoogle
Certification CEFCCRoHS
Warranty Limited 1-year warranty
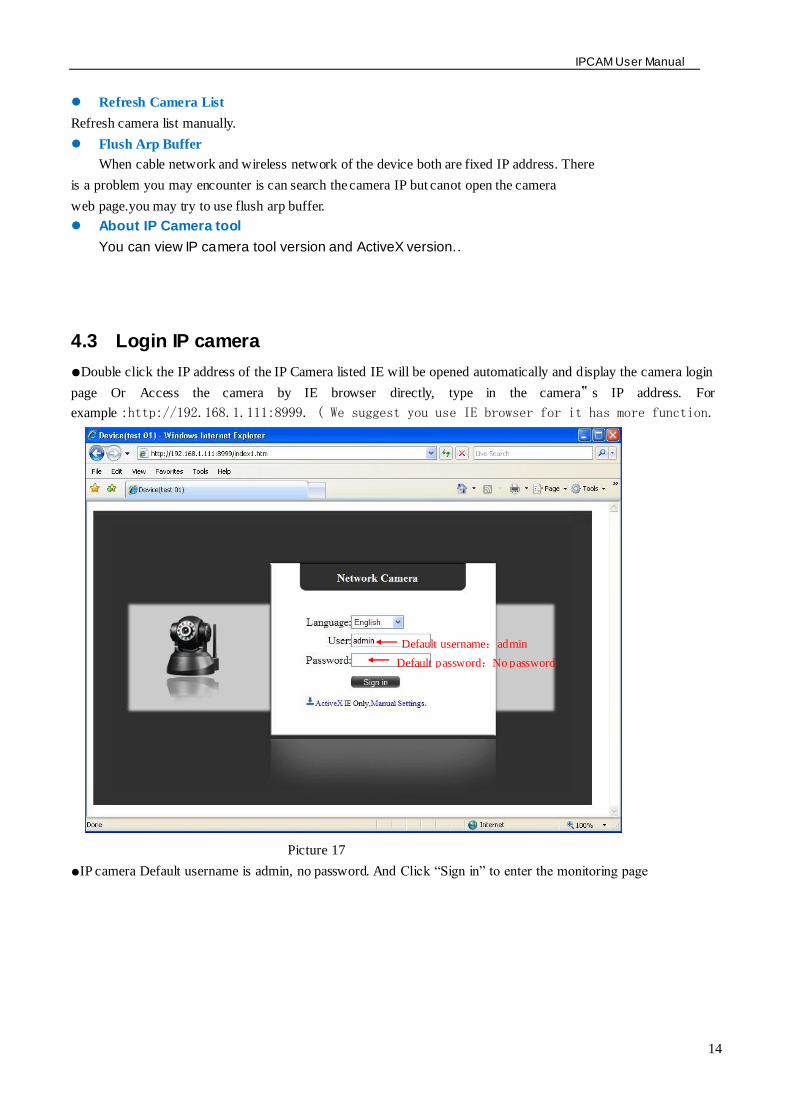
IPCAM User Manual
17
44 IP camera operation
441 For Visitor
For example if is bright the first route is at status of Detection(Only IE Broswer can view it)
Picture 22
The right upper is statuss indicator area which can show 9 IP camera status
When the button is gray it means IP camera didnt connect
Green means IP camera has connected
Yellow means there is something wrong with connection
Red means it is the status of alarm
If you want to detect 4 views need to click this icon
OSD Display date and time on the video You can disable the OSD function or choice other color
(OSDon-screen display)
Snapshot Click icon to snap the picture
REC Click icon into REC mode is stop
Audio Click icon into Audio mode can listen the voice in monitoring range
Talk Click icon into Talk mode and the icon will become Visitor can talk with whom is in the
monitoring range
Note the record file name is device Alias_ Current timeAvi
For example IPCAM_20101011134442Avi
It means the device alias is IPCAM and its recordrsquos end time is At 134442 on
October 11 2010When use motion detection and checked Send Mail on Alarm
Buttom for taking picture
S top monitor video
Open vedio
Record
Two way audio Monitor audio
IPCAM User Manual
18
The name of the picture received in mailbox is like this device id(Alias)_ Current
timejpg
442 For operator
When login as operator you can operate PanTilt and adjust video parameter
Picture 23
Direction control click the different arrow will get different direction view
Vertical patrol
Horizontal patrol
Stop patrol
IO output Switch on off
Infrared light software control switch
Image fluctuation flip(up and down)
Image around flip (right and left)
Set Preset (can set 4 preset)
ResolutionVGA(640 X 480) QVGA(320 X 240)
Work Mode 50Hz60HzOutdoor
color parameterClick or can adjust brightness and contrast
Stop patrol
Vertical patrol
Horizontal
patrol
Image fluctuation flip
Image around flip
IO output S witch on off
Set Preset
Infrared light s witch
IPCAM User Manual
19
443 For Administrator
When you login as administrator
you can set all parameters Please
click ldquoFor Administratorrdquo
and enter into
setting interface
Picture 24
Alias Settings You can Input the new name as you like
Data ampTime Settings Data ampTime Settings page
Users Settings Eight accounts are acceptable for this system Here the eight users can configure their
user names and password as Administrator Operator or Visitor
Visitor In this mode you can only view
Operator You can control the direction of IP Camera and set some parameter
Administrator You can setup the advanced configurations of the IP Camera
UpnP Settings If you access IP Camera to be make sure UpnP Status is Succeed
Upgrade Device Firmware Upgrade Device Firmware and device embeded web UI software in this
page
Restore Factory Settings Restore factory settings of the device
Reboot Device Reboot the device
Back Back to Monitoring Mode
View Device IDDevice Firmware
Version and Device Embedded
Web UI Version
Check Device all kinds of
status
Carry on Settings and
operation function
IPCAM User Manual
20
5 Visit IP Camera in internet
51 Connection way in Internet
Picture 25
52 Related setting and login IP camera
1 If the network your IP camera using is using static IP you just need to input this IP address and IP cameras port in the browser then it can visit Ip camera
2 If you are using ADSL to dial-up and surf on line you should obtain IP Camera Current WAN IP Address or configured DDNS
1)There are four ways for you to obtain WAN IP Address
①Using mail to send internet IP function
After setting mail successfully IP will send mail to your receiver e-mail box when Internet IP or port
has changed If it is dynamical IP users need to input this IP address to visit this IP camera
②Obtain from some website
It is very easy for you to obtain WANS IP address You can open browser on the computer on the
condition that IP camera and PC are the same subnet For example httpwwwwhatismyipcomor
httpwwwmyipcn etcsIt will tell you WANS IP address as shows below
Picture 26
③Obtain from MSN and IP cameras MSN ACCOUNT( Details 73)
IPCAM User Manual
21
④ Obtain from router
We take Nur8555M from Xinxiang s router as example
AAccording to routers manual we get Routers IP is 19216811
BLogin in router Input 19216811 in the browser Find the status of Router and find Routers
WAN( In this example WANS IP is 11624235122 As shows Picture 27
Picture 27
Now you can visit IP Cam from Internet What you should do is to Input correct IP address For
example Http 116242351228999
Note Make sure the Ports UPNS is available You can open UPNP via the following ways
Enter into Routers setting page( Details Routers user manual) to make UPNP available
Or enable virtual mapping function Add equipment IP address and port to the virtual mapping list
Picture 28
Users can access the Internet from IPCAM device Input address For example Http 116242351228999
2)DDNS (dynamic DNS) service is the Internet domain name can be fixed and dynamic IP address real-time
corresponding (analysis) service Simplely said whenever user surf on internet or what kind of way you are
using the Internet get a what kind of IP address IP address whether it will change DDMS can ensure that a
fixed domain name can access to a users device
IPCAM User Manual
22
Our products have been configured the DDNS services of course you can also apply for the domain name in
registration website for one of your own domain name to configuration For example wwwdyndnsorg
Picture 30
You need fill in DDNS and port for example(httpicam0001ihome365org8999) The browser will jump
to IP camerarsquos login page
Picture 31
DDNS inside
Factory DDNS
IPCAM User Manual
23
The input device user name and password to login to equipment
Picture 32
middotIf input domain name but cant open IP camera in the browser such as the situation is as blows
middotPlease open the device and check status of IP camera in the local area network confirm whether UPNP
function and DDNS is successful or not
Picture 34
IPCAM User Manual
24
middotYou need to set port mapping function successfully to check whether the router UPNP function is
available if It was unavailable please make it available refer to the routers user manual
If you use TPLINK router please refer to these instructions
middotThrough the upnp automatic mapping port to the network input router IP address in the browser (such
as http19216811 gt the router IP addresses are written on paper label on the router house---- please set
according to your own IP address) open the routers page forward rules gt gt upnp set to ensure that the
current state of upnp is already available as below
Note some of the router interface without UPNP Settings option then need to open the virtual server IP
cameras in the local area network of mapping the connection IP address and port number
Picture 36
6 Access IP camera via mobile equipment
such as mobile phoneIpad Etcs There are two kinds of ways to access IP camera One is to input IP address in browser directly It can be IP
address and also can be DDNS Another is to use clients to visit
61 Input IP address in browser
1 We take IPAD as example as blows
IPCAM User Manual
25
middotOpen browser Safari
Input IP cameras IP address for example( httpicam0001ihome365org8999)
Choose language according to your demand and choose login mode according to your browser
Picture39
Choose manual settings
Open browser Safari
Enter the IP address of the IP camera
(httpicam0001ihome365org8999)
IPCAM User Manual
26
enter your account and password on the login page as shown By defaultadministratorrsquos username is
admin and no password
Select Server Refresh mode landing
Picture42
Input the username and password of
the network camera
Here you can choose between two
modes landing
Here to select the
operating language
Default passwordNo password
IPCAM User Manual
27
Select Server Push mode landing
Picture 43
2 Now we take Android system device as example
Open menu and firstly open the browser and input IP camera s IP address in the
browser for example(httpicam0001ihome365org8999)
Picture 44
Input IP cameras username and password and click sign in and then enter into
browser model to choose login-in interface
Open menu
IPCAM User Manual
28
Picture 45
62 Install client-side software to access IPCamera
There are many client software support IP camera several third-party software support our IP cameras too
The following are our manufacture software setup process(the Android version)
1 Pls get the install applications in the CD or you can download from the website
httpsplaygooglecomstoresearchq=reecamampc=apps Choose the right
①installation file-ipcameraapk
running environment Android version 16 or above
Note Please ensure that mobile phones can connect to the Internet before install
② Install method
21 Insert SD card into Android mobile phone
22 Connect the cellphone to computer via USB data cable
23 Choose the USB connection model on your cellphone you can see the SD driver in ldquomy computerrdquo
24 Copy the ipcameraapk into SD card
25 Disconnect the device pls find the ipcameraapk in ldquoFile Managementrdquo and run it
26 The ipcamera application will be show up on the home screen after you successfully installed
③Software operating processes
First ensure that the Internet open WIFI connection the search in the Play in The Googl Android
application reecam
Open the WiFi
connection
Download and install
the application
Search reecam
IPCAM User Manual
29
middotYou can edit the camera modify camere configuration and delete camera operation
Click here to add
a video camera
Select to add to the
client camera
Refresh LAN cameras
View or change the
configuration of the
camera the camera
name at random
IP address
Http port
The default password is blank
Camera name
Prev iew camera
Preview the
camera screen
save the camera
Editor has added
cameras
Edit camera
configuration
Delete the camera Edit camera of the
configuration
IPCAM User Manual
30
middotFor the camera added to the camera list you can watch camera in real time
Control cameras PTZ and set swith-on and switch-off of the cameras audio int
ercom and video
Picture 51
2 The IPCamera setting process for iPhone iPad
Firmware requirements compatible with iPhone iPod touch and iPad
Systerm requirements Requires iOS 42 or above
You can download the genuine
software
(ipcameraapp) form the App Store
httpitunesapplecomcnappreecamid479468959mt=8
middotSoftware operating process is as follows
Continue to add
the camera
Add external network
camera domain
Cameras have
been added
Audiointercom video switch
A list of cameras and
video can be switched to
view
Fingers sliding PTZ control
Click on the picture to stop
rotation
IPCAM User Manual
31
Open the App Store search
reecam
Download and install
reecam
The run has been
installed good reecam
program
Click to add cameras
Search reecam
IPCAM User Manual
32
Fill in the domain address
or IP address
Fill in the Http port of the
camera login user name
and password click next
to open the camera
Completed please
click here
Preview videoclick on the
next save
Save the camera added
Selected camera to
view images
Click image to expand
more cameras
operating functions
IPCAM User Manual
33
7 Other setting
71 Network Setting
711 Basic Network Settings
If the router that the IP camera connect has DHCP function you can choice ldquoObain IP from DHCP Serverrdquo
else fill in the network parameters manually
Http Port In most cases you can leave this value as 80 however if your Internet
Service Provider blocks this port you may switch to another port number such as 85808088889000 Etcs
(Range from 0 to 65535 pay attention to the same segment of multiple devices must set up different port The
port t canrsquot have any conflict with other software or equipment
a Search tools modification in LAN
Figure58
brdquoFor administorrdquo ldquoBasic network settingrdquo -Change the port
Figure59
712 WIFI Setting
1) Please enter the wireless net setting page of the wireless Router to find out SSID
Channel(less than 10) Encryption Authentication as below
Selec IP Camera clickright mouse button choice network configurat ion
Set port number
Set Network IP
Set Http Port Number
IPCAM User Manual
34
Figure 61
As Administrator to Login camera open wireless LAN Settings page fill in every
Setting (ensure keep the same as routerrsquos ) and then pulled out of the cable wireless network function can be
used For example as shown in belows
Figure62
Pls click the scan buttom twice
IPCAM User Manual
35
Figure 63
713 Adhoc point to point Wireless connection Setting
1) Open the basic network setting interfacecheck the device status
Picture 64
2) Open the wireless lan setting interface choose Adhoc for network type you
can define SSID such as 001
remember the IP address of
IP camera and Http port
Click the Settings Ip Camera will
restart and save
Double click to choose
Fill the encryption and
routers and key in the
same way
IPCAM User Manual
36
Picture 65
3) Unplug the RJ45 from IP camera Use laptop or other devices which are with
wifi function( include smart phoneipad and so on) searching the SSID you defined
on proccess 2then make a connection
Picture 66
middotClick wireless network and check the link status of ip camera Please note IP
address of your connected laptop must be the subset of your ip camera if not
please reset the ip address of your laptop manually
Picture 67
4) Now we can use the ip camera tool or enter ip address of camera derectly in
browser blank to visit
1 visit by ip camera tool
Picture 68
IPCAM User Manual
37
2Enter ip address in the browser
Enter user name and password in the login interface
Picture 69
Click ldquoSign inrdquoand vis it
Picture 70
IPCAM User Manual
38
72 Multi-Device Settings
Add cameras in LAN
In the Multi-Device Settings page you can see all devices searched in LAN The 1
St Device is this device in default You can add more cameras list in LAN for monitoring This Web software
supports up to 9 IP Cameras online simultaneous ly Click ldquoThe 2ND
Devicerdquo and Double click the item in the ldquoDevice List in LANrdquo AliasHost and Http Port
will fill in automatically Enter the correct username and password then click ldquoaddrdquoAdd
more cameras in the same way At last please donrsquot forget the ldquo settingrdquo Button
Picture 71
Add cameras in the Internet
Firstly make sure the camera added can access in the Internet with the IP address or
DDNS domain Like this http2191332001669999or httpIPcamdyndnsorg9999You can enter the
Host 219133200166 Http port 9999 or Host IPcamdyndnsorg Http port 9999 Enter the correct
username and password then click ldquoaddrdquo Add more cameras in the
same way
Picture 72
IPCAM User Manual
39
Picture 73
73 MSN Settings
Fill in your MSN account and password then add account which need to receive
IPCAMrsquoS ip address to IPCAM‟ S MSN list (Picture 67)click submit then yoursquod better
restart IP camera After it login your MSN to add IPCAMrsquos MSN account to MSN List that
you can receive IPCAMrsquos ip address
Picture 74
First login and click add contacts choose Add Contact then fill IPCAMrsquos MSN account in instant
messaging address click next then send offers
Aplly for MSN account and passworf for IP cam
Add about 10 MSN Accout
IPCAM User Manual
40
Figure75
Next
Figure76
Figure77
When IPCAMrsquos MSN account shows online you can chat with it input path command url camera
account will show its IP address in chatting box promptly as below
IPCAM User Manual
41
Picture 78
You can input the IP address to browser then can browse ip camera as below
Figure79
AttentionYou should fill MSN account in IPCAM first
74 DDNS Service Settings
DDNS Service The system supports protocols from some DDNS providers Dyndnsorg System support
DDNS such as topipcamorgpeanut shell3322orgDynDNS
provided IP
IPCAM User Manual
42
User and Password the user name and password used when applying for the domain
name (details 432)
DDNS Host the Domain Name
741 Factory DDNS
Device had distributed one DDNS to every productwhich was sticked the bottom
of the product Such as
manufacturer had already give every device a DDNS address which is unique Users only need to fill in this
DDNS IP ADDRESS and port in the browser then they can monitor remote IP camera
Picture 80 Factory DDNS
Note When use the domain name access to the camera and UPNP is not successful you must set port
mapping function on routers
742 The third part DDNS
Users can use not only Factory DDSN but also can use third part DDNS System Such as domain name
wwwdyndnsorg The only thing the user need to do is to apply a free DDNS and then fill in ldquoset boxrdquo as below
Save this setting and this DDNS can be used
DDNS Hostname
Factory DDNS
IPCAM User Manual
43
Note the third party domain name is the realization of analytical way input the domain in the browser it will
keep this string of characters If the port of the device isnrsquot 80 then need to add colon and port number For
example httpwell888dyndnsorg8999
75 Mail and FTP Service
1)Configure the E-mail box to receive and send mails The E-mail box is used for receiving
the images sent after alarm and the system IP address after successful dial-up
Note When Alarm Service Settings-gt Send Mail on Alarm is check the Mail
Service takes effect
Picture82
Configure the E-mail box to receive and send mails The E-mail box is used for receiving the images sent
after alarm and the system IP address after successful dial-up
Sender This device use the sender mailbox to send mails
Receiver To receive the mail from the Sender You can set up to 4 receiver mailbox
SMTP Server the SMTP server for the sender mailbox
Need Authentication if the sender mailbox need authentication you should check it then
input the SMTP username amp Password
Mail test Please set the Mail parameter and click Submit first There are Mail test result
Picture 83
video Local storage in PC after alarm monitoring
IPCAM User Manual
44
Gmail also set as the same It only needs you to fill in correct SMTP Sever address user and password
Picture 84
Mail notes Internet IP address In this option When Internet IP and port have changed IP Will be sent via
1Can not connect to the server
2Network Error Please try later
3Server Error
4Incorrect user or password
5The sender is denied by the server Maybe the server need to authenticate the user please check it
and try again
6The receiver is denied by the server Maybe because of the anti-spam privacy of the server
7The message is denied by the server Maybe because of the anti-spam privacy of the server
8The server does not support the authentication mode used by the device
Report Internet IP by Mail When ipcam port or Internet IP changed it will send the internet IP by
mail(for example IPCAM s url is http119123207969002) Make sure the port is map to the router
correctly by UPNP or Virtual Map function
2) FTP Server use and settings
middotIf you already have an FTP Server (ipcam com)and email ipcam you can fill the
parameters as below
Picture 85
IPCAM User Manual
45
middotFTP Server of LAN as below
1 Create an account
2 Step by step setting until finish it
Picture 88
IPCAM User Manual
46
3Start Server
Continue to finish it
Picture 89
4IPCAMrsquoS account can be used
Picture 90
Save path
This is a FTP
server address
IPCAM User Manual
47
5 IP camerarsquos FTP Server set like this
Picture 91
6 Set up and complete testing is successfulwhen it alarms IP camera will upload
pictures to the FTP server Settings of main directory path (as shown )
Picture 92
FTP Server the FTP server address
FTP port the port usually is 21
FTP Mode support standard(POST) mode and passive(PASV) mode
Upload Image Now it will upload image now when checkbox is not checked When checked you can
input upload interval(Seconds)
76 Motion Detection
Enter Alarm Service Settings page to configure Motion Detection function
1) Motion Detect Armed
Each alarm triggers in the protection of time the device will take various measures to alarm
IO linkage alarm output relay closure external alarm device began to alarm
IPCAM User Manual
48
Send E-mail alarm informatio
Transmit pictures to the FTP server and can set the time interval of sending pictures
2) Alarm t ime Settings
Only in the alarm period detection device to alarm will only have alarm action All the time (not check the
schedule) also can alarm within specified time For the specified time alarm firstly need to set up the system
time time zone and then to choose period of alarm in the state of alarm setting as shown in Picture 19
Picture93 Alarm of time Settings interface
Motion Detect Armed
When you enable motion detect armed the camera can be triggered to send email alerts
and record images In the camera monitoring page the green icon turn to red and an
alert sound you will hear
Motion Detect Sensibility
You can choose from low to high 10 level alarm sensitivity The greater the number the higher the
sensitivity
Alarm Input Armed
IO PINS1) Output(+5V) 2) Output 3) Alarm input 4) Input (GND)
Input Pins The input pins can be used for 1-way external sensor input(pin3 and pin4) For example
you may connect a Person Infrared Sensor (PIR) to it for motion detection When external sensor
triggered IPCAM can be programmed to send an email with picture or control the internal relay output
IPCAM User Manual
49
Picture94
IO Linkage on Alarm
Enable IO linkage on alarmPin1 will output +5V when alarm triggered and output LOW
when alarm release automatically
Switch onoff buttons control Pin1 output manually
Send Mail on Alarm
Sent picture and mail inform to customers e-mail after alarmed(firstly you should finish
the Mail Service Settings)
Picture 95
Upload Image on Alarm
Enable upload image on alarm and set upload interval(Seconds)
Tick send to your setted mails
IPCAM User Manual
50
Picture 96
REC automatically and save to PC
When you enable motion detect and open the camera monitoring page on the PC If
there is an alarm triggered REC will start automatically for several seconds and save to
the PC
Picture 97
REC save to pcrsquos position
Picture 98
Storage path can be changed
After Setting up later when have the
alarm the image will send to
designated email and FTP server
IPCAM User Manual
51
77 IP cameras Time amp Date setting and PTZ Setting
If IP camera connected with Internet it can automatically check the time amp date via running NTP Server And
need to choose properly IP cameras Time zone Otherwise it need PC Time to check IP camera time amp Date
Pre-set and Speed of PT
78 UPGRADE DEVICE FIRMWARE
Picture 101 Firmware upgrade
IP CAMERA has two kinds of programme One is system firmware another is application firmware It can be
upgraded separately
79 BACKUP AND RESTORE SETTING
Click Set in the Backup will lead to a BIN file and choose this file to restore setting
The huger the Number is The
slower it will be
IPCAM User Manual
52
8 APPENDIX
81 REGISTER AND APPLY FOR DDNS SERVICE
1Users use DDNS management system first timeUsers need to apply account to manage
and inquire the domain state
Step1 enter httpwwwdyndnscom and Create Account( Fill in Domain Name dyndnsorg then Click
Add)
Figure103
Step2 enter your information
Figure104
IPCAM User Manual
53
Figure105
Step3 After a minute you will receive an E-mail from DynDNS Support and it will give you a
confirmation address
(eg httpsaccountdyncomemlcreateconflILHMZHRje5oF_6YXTYv1A
Figure106
IPCAM User Manual
54
Step4 Open the link to active your Domain Name as belowLogin in your account after it is activated
Figure107
Step5 Check all the DDNS serviceswe choose the 14-day-trial
Figure108
Step6 Click the linkand user will see as below
IPCAM User Manual
55
middotenter your information
Figure109
Step7 Now you obtained a Dynamic Domain Name(Figure 105)and can use it in the DDNS Service
Settings(details 74)
Figure110
IPCAM User Manual
56
2For DDNS which is applied successfully you can fill in the IP CAMERA When set successfully the status
of IP will be shown as blows
picture 111
picture 112
3How to set DDNS on line
The first wayMenu rdquostartrdquo- ldquorunrdquomdashgt Input CMDClink rdquoenterrdquoIt can check DDNS Statas
via As shown below
Picture 113
IPCAM User Manual
57
Through the PING command this dynamic domain name can be back in the network response information It
proves that the domain name has been online
If the domain name update not success Possible reasons
(1) DDNS parameter is not correct (2) may cause DNS address configuration is wrong
82 Some special application for IPCAMERA
IPCamUse some grammar parameter control and Use IPCam
useruser
pwdpassword
priThe current access (1 visitors 23 operator managers)
resolutionImage resolution(832024 0qvga32640480 vga)
ratemage transmission speed and scope 0-23
brightnessbrightness0~255
contrastcontrast0~6
mode
Mode 050 hz For
60 hz 2 outdoor
flip
Flip rotation 0 primitive 1 vertical reverses 2 horizontal 3 vertical flip + horizontal
821 The flow media player VLC player and mplayer can real-time broadcast ipcamera and send
of streaming media format video data
(Grammar parametersvideostreamasfuser=amppwd=ampresolution=amprate=)
As shown Picture 113 rdquoIpcamrdquo
Picture 114
IPCAM User Manual
58
From the following picture we can view that Ipcam local IP address ishttp19216811118999
WAN IP Address is httpwell888dyndnsorg8999 we can inputrdquoIPcamrdquorsquoS IP address to
open in the player
Picture 115
the CLC media player open play position
Picture 116
LAN play address
Picture 117
IPCAM User Manual
59
Picture 118
Open the Internet play position
Picture 119
As shown in the following picture It can see the ipcamera send video streaming format
Size 640X480
User
IPCAM User Manual
60
Picture 120
83 Frequently Asked Questions
Note1) Any question you would meet please check Network connections firstly
2)Check the working status revealed by the indicators on the network server hub exchange and
network card If abnormal check the network connections
831 I have forgotten the administrator username andor password
To reset the administrator username and password Press and hold down the RESET
BUTTON for 5 seconds Release the power button and the username and password
will be reset back to the factory default administrator username and password
Default administrator username admin
Default administrator password No password
832 IP Address configuration
Check whether IP address of the IP Camera server shares the same subnet as your
work station Click My Computer gt Control PanelgtNetwork amp Dial-up Connections gt
LAN gt Attributes gtInternet Protocols (TCPIP) and check IP Address and Subnet
Mask Make sure they are in the same subnet when configuring IP Camera IP
address manuallyUnable to access IP Camera via web browser
833 Network Configuration
Double Check to ensure that your HTTP server software is configured and running
properly If you are running any firewall software make sure it is allowing inbound
connections to port 80Also if you happen to be using a cableDSL router make sure
IPCAM User Manual
61
you are set up port forwarding properly ( consult your router is documentation for more
information ) If none of these seem to be the problem it is also possible that your
ISP is blocking inbound connections to port 80 ndashmany IPSs have done this because
of internet worms such as Code Red If this is the case you bdquoll have to setup your
HTTP server on an alternate port (such as 8080)
834 No Monitoring picture
It has four reasons Images of the abnormal factors
1If its not use Directx function and lead to not normal to display the color imagePlease
install DirectX and open the start menu then input the command
Picture 121
You use the DirectX function and it will expedite the DirectDrawDirect3D and AGP if its can not maybe the
connect issues or hardware not read it
2The issues of hardware canrsquot support the card expedite image
3The antivirus software will influence the network it will be stoped or closedIf you install fireproof software
please close it and try again
4 ActiveX controller is not installed correctly
If its not image on the first time to use and will display to the user through the ActiveXIf its can not
display of the image maybe it fail of install about this issues please follow as
1Install ldquoIP Camera Toolrdquo ActiveX control at the same time
2Please install ActiveX control and keep the security settings for IE browser
835 Problems with network bandwidth
The image frame rate is subjected to the following factors 1network bandwidth 2 PC
performancenetwork environment and display preference setting (brightness theme
etc) 3 the number of visitors (Too many visitors will slow down the image frame rate) 4
choice of switch or hub (Use a switch for multiple IP Camera Servers rather than a HUB)
The Device use MJEPT Compression it needs good network bandwidth If it is too narrow it will lead to slowly
browser Typical video parameter occupy network bandwidth as blows
640x48030fps 40 Megabits ~ 50 Megabits
320x24030fps 12 Megabits ~ 16 Megabits
IPCAM User Manual
62
middot836 Why pop-up the prompt ldquoFail to connect to the devicehelliprdquo
This prompt only appeared in the case of using multiple cameras
Enter the Multi-Device Settings page(login as administrator) to check the
Device setting is correct or not
When one of the multiple cameras disconnected the color changed to
yellow and pop-up the promptldquoFail to connect to the devicehelliprdquo
Picture 122
837 Canrsquot access the IPCAM in the internet
There are some reasons
1 ActiveX controller is not installed correctly(see more details 514)
2 The port IPCAM used is blocked by Firewall or Anti-virus software Please change a
port number and try again
3 Port mapping is not success You can do port mapping by two ways
Enter setting page of the router which IPCAM connect with to enable UPnP function
Enter IPCAM ldquoUPnP Settingsrdquo to enable UPnP and make sure the state is ldquoUPnP
successrdquo
‟ s IP
and port to the Virtual map list
When use ADSL the IP is dynamic You should set DDNS(see more details 74 amp 80)
and also make sure port mapping success
84 Operate common problem solving
IP camera tool canrsquot find the camera
Except of the camera broken
1 Make sure the cable connector no problem recommend connector
(AMP)it is with international standard Another note IPCAMrsquos data
transmission channel require higher than computerrsquos so maybe the
IPCAM User Manual
63
computer can run normally but IPCAM canrsquot Please press heavily when making the cable connector
2 Confirm the power supply normally First check whether power indication
light turn on or not If it is onthen check the yellow light on RJ45 Port
(power indication light) and green light (network indication light) are on or
notIf they are onso power supply and cable runs normally
3 Confirm all the firwall and antivirus software are closeThe firewall often
block unrecognized data so if the firewall is running so maybe the IPCAM
TOOL canrsquot find the deviceSuggest to close firewall and antivirus
software temporarily before searching
How to solve the camera blank screen
1 Check if you are using the wrong power adaptorplease use original one
2 Close antivirus software
How to solve the camera canrsquot login by Internet
1 Check if you set DDNS success or not
2 Check the current IPCAMrsquos port number is the same as routerrsquosThey need to keep same
Canrsquot view the monitoring picture
1 Reason canrsquot connect with network
SolutionCheck if the network connect well exclude cable fault and PC virus
cause network fault until can be used between PC and PING
2 ReasonIP address occupy by other device
Solution Choose automatic gain
3 Reason IP address located within different subnet
Solution Check IPCAMrsquoS ip address and subnet mask address and gateway settings
4 ReasonWeb port has been modified
Solutioncontact network administrator to obtain port information
5 Reasonunknown
SolutionPress reset button to factory default statethen reconnectingsysten
default to gain ip address automaticsubnet mask is 2552552550
85 Default Parameters
middotDefault network Parameters
IP address dynamic obtain
Subnet mask 2552552550
Gateway dynamic obtain
DDNS Factory provide
middotUsername and password
Default administrator username admin
Default administrator password No password
IPCAM User Manual
64
86 Technical Parameters
ITEM IP CAM (NIP-02BGPWA2)
Image Sensor
Mage sensor 15 Color CMOS Sensor
Display 640 x 480 (300K Pixels)
Lens f36mm F24 (IR Lens)
Miniillumination 05 Lux
Lens Lens Type Glass Lens
Viewing Angle 60 Degree
Audio Microphone Audio of two way
Domain name Server MSN server DDNS server
Video
Image Compression MJPEG
Image Frame Rate 15 FPS(VGA)30FPS(QVGA)
Resolution 640 x 480(VGA) 320 x 240(QVGA)
Flip Mirror Images rtical Horizontal
mode 50Hz 60Hz or Outdoor
Video Parameters Brightness Contrast
Communication
Ethernet One 10100Mbps RJ-45
Supported Protocol HTTPDHCPIPTCPUDPFTPSMTPDDNSPPPoEUPnP
Mobilephone monitor Support IphoneIpad3G phonesmartphone
Wireless Standard IEEE 80211bg
Wireless Standard 80211b11Mbps(max) 80211g54Mbps(max)
Wireless Security 64128-bitWEP Encryption
Physical
PanTilt Angle Horizontal270deg amp Vertical 120deg
Infrared Light 10 IR LEDs Night visibility up to 15 Mete
Product size 100(L) x100(W) x125mm(H)
Gross Weight 6465gpcs (packing size196x165x123mm)
Net Weight 2547gpcs (only product)
Power Specification DC 5V25A 18 meter
Power Consumption 5 Watts
Environment
Operate Temper 0deg~ 55degC (14degF~122degF)
Operating Humidity 20 ~ 85 non-condensing
Storage Temper -10degC ~ 60deg (14degF ~140degF)
Storage Humidity 0 ~ 90 non-condensing
PC Requirements
CPU 20GHZ or above (suggested 30GHz)
Memory Size 512MB or above (suggested 10GB)
Display card 64M or above
Supported OS Microsoft Windows XPVistaWindows7
Supported browsers IEfirefoxGoogle
Certification CEFCCRoHS
Warranty Limited 1-year warranty
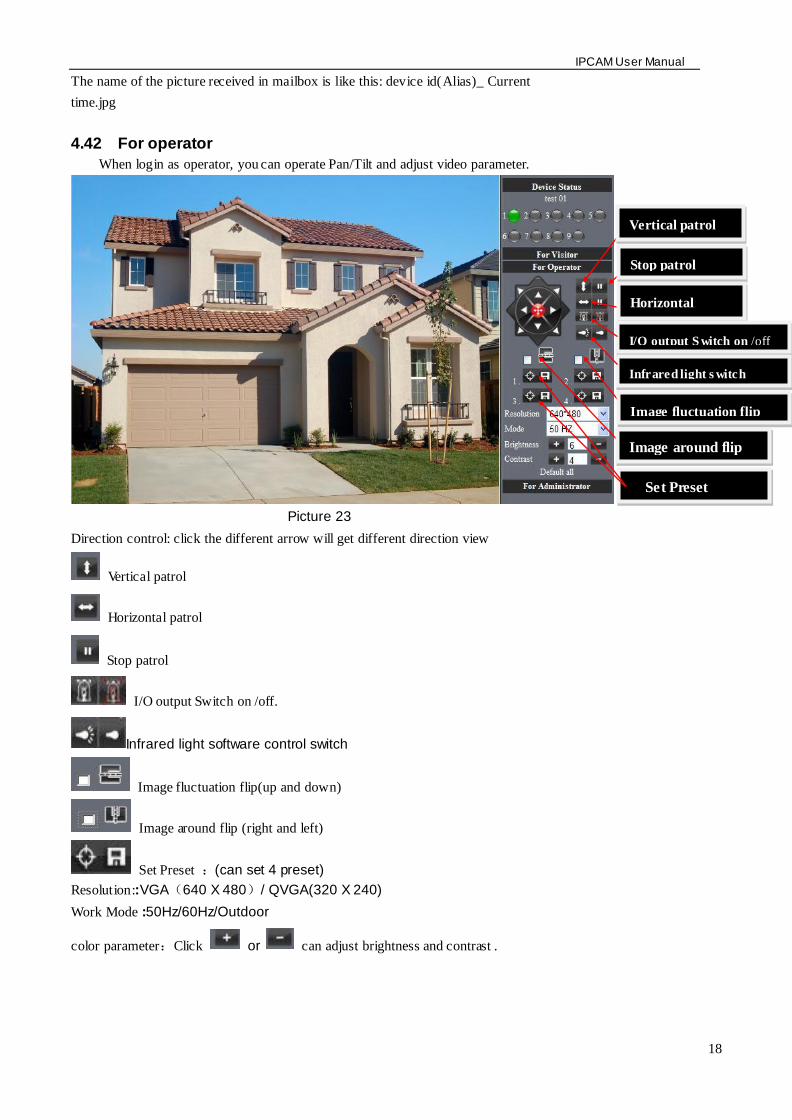
IPCAM User Manual
18
The name of the picture received in mailbox is like this device id(Alias)_ Current
timejpg
442 For operator
When login as operator you can operate PanTilt and adjust video parameter
Picture 23
Direction control click the different arrow will get different direction view
Vertical patrol
Horizontal patrol
Stop patrol
IO output Switch on off
Infrared light software control switch
Image fluctuation flip(up and down)
Image around flip (right and left)
Set Preset (can set 4 preset)
ResolutionVGA(640 X 480) QVGA(320 X 240)
Work Mode 50Hz60HzOutdoor
color parameterClick or can adjust brightness and contrast
Stop patrol
Vertical patrol
Horizontal
patrol
Image fluctuation flip
Image around flip
IO output S witch on off
Set Preset
Infrared light s witch
IPCAM User Manual
19
443 For Administrator
When you login as administrator
you can set all parameters Please
click ldquoFor Administratorrdquo
and enter into
setting interface
Picture 24
Alias Settings You can Input the new name as you like
Data ampTime Settings Data ampTime Settings page
Users Settings Eight accounts are acceptable for this system Here the eight users can configure their
user names and password as Administrator Operator or Visitor
Visitor In this mode you can only view
Operator You can control the direction of IP Camera and set some parameter
Administrator You can setup the advanced configurations of the IP Camera
UpnP Settings If you access IP Camera to be make sure UpnP Status is Succeed
Upgrade Device Firmware Upgrade Device Firmware and device embeded web UI software in this
page
Restore Factory Settings Restore factory settings of the device
Reboot Device Reboot the device
Back Back to Monitoring Mode
View Device IDDevice Firmware
Version and Device Embedded
Web UI Version
Check Device all kinds of
status
Carry on Settings and
operation function
IPCAM User Manual
20
5 Visit IP Camera in internet
51 Connection way in Internet
Picture 25
52 Related setting and login IP camera
1 If the network your IP camera using is using static IP you just need to input this IP address and IP cameras port in the browser then it can visit Ip camera
2 If you are using ADSL to dial-up and surf on line you should obtain IP Camera Current WAN IP Address or configured DDNS
1)There are four ways for you to obtain WAN IP Address
①Using mail to send internet IP function
After setting mail successfully IP will send mail to your receiver e-mail box when Internet IP or port
has changed If it is dynamical IP users need to input this IP address to visit this IP camera
②Obtain from some website
It is very easy for you to obtain WANS IP address You can open browser on the computer on the
condition that IP camera and PC are the same subnet For example httpwwwwhatismyipcomor
httpwwwmyipcn etcsIt will tell you WANS IP address as shows below
Picture 26
③Obtain from MSN and IP cameras MSN ACCOUNT( Details 73)
IPCAM User Manual
21
④ Obtain from router
We take Nur8555M from Xinxiang s router as example
AAccording to routers manual we get Routers IP is 19216811
BLogin in router Input 19216811 in the browser Find the status of Router and find Routers
WAN( In this example WANS IP is 11624235122 As shows Picture 27
Picture 27
Now you can visit IP Cam from Internet What you should do is to Input correct IP address For
example Http 116242351228999
Note Make sure the Ports UPNS is available You can open UPNP via the following ways
Enter into Routers setting page( Details Routers user manual) to make UPNP available
Or enable virtual mapping function Add equipment IP address and port to the virtual mapping list
Picture 28
Users can access the Internet from IPCAM device Input address For example Http 116242351228999
2)DDNS (dynamic DNS) service is the Internet domain name can be fixed and dynamic IP address real-time
corresponding (analysis) service Simplely said whenever user surf on internet or what kind of way you are
using the Internet get a what kind of IP address IP address whether it will change DDMS can ensure that a
fixed domain name can access to a users device
IPCAM User Manual
22
Our products have been configured the DDNS services of course you can also apply for the domain name in
registration website for one of your own domain name to configuration For example wwwdyndnsorg
Picture 30
You need fill in DDNS and port for example(httpicam0001ihome365org8999) The browser will jump
to IP camerarsquos login page
Picture 31
DDNS inside
Factory DDNS
IPCAM User Manual
23
The input device user name and password to login to equipment
Picture 32
middotIf input domain name but cant open IP camera in the browser such as the situation is as blows
middotPlease open the device and check status of IP camera in the local area network confirm whether UPNP
function and DDNS is successful or not
Picture 34
IPCAM User Manual
24
middotYou need to set port mapping function successfully to check whether the router UPNP function is
available if It was unavailable please make it available refer to the routers user manual
If you use TPLINK router please refer to these instructions
middotThrough the upnp automatic mapping port to the network input router IP address in the browser (such
as http19216811 gt the router IP addresses are written on paper label on the router house---- please set
according to your own IP address) open the routers page forward rules gt gt upnp set to ensure that the
current state of upnp is already available as below
Note some of the router interface without UPNP Settings option then need to open the virtual server IP
cameras in the local area network of mapping the connection IP address and port number
Picture 36
6 Access IP camera via mobile equipment
such as mobile phoneIpad Etcs There are two kinds of ways to access IP camera One is to input IP address in browser directly It can be IP
address and also can be DDNS Another is to use clients to visit
61 Input IP address in browser
1 We take IPAD as example as blows
IPCAM User Manual
25
middotOpen browser Safari
Input IP cameras IP address for example( httpicam0001ihome365org8999)
Choose language according to your demand and choose login mode according to your browser
Picture39
Choose manual settings
Open browser Safari
Enter the IP address of the IP camera
(httpicam0001ihome365org8999)
IPCAM User Manual
26
enter your account and password on the login page as shown By defaultadministratorrsquos username is
admin and no password
Select Server Refresh mode landing
Picture42
Input the username and password of
the network camera
Here you can choose between two
modes landing
Here to select the
operating language
Default passwordNo password
IPCAM User Manual
27
Select Server Push mode landing
Picture 43
2 Now we take Android system device as example
Open menu and firstly open the browser and input IP camera s IP address in the
browser for example(httpicam0001ihome365org8999)
Picture 44
Input IP cameras username and password and click sign in and then enter into
browser model to choose login-in interface
Open menu
IPCAM User Manual
28
Picture 45
62 Install client-side software to access IPCamera
There are many client software support IP camera several third-party software support our IP cameras too
The following are our manufacture software setup process(the Android version)
1 Pls get the install applications in the CD or you can download from the website
httpsplaygooglecomstoresearchq=reecamampc=apps Choose the right
①installation file-ipcameraapk
running environment Android version 16 or above
Note Please ensure that mobile phones can connect to the Internet before install
② Install method
21 Insert SD card into Android mobile phone
22 Connect the cellphone to computer via USB data cable
23 Choose the USB connection model on your cellphone you can see the SD driver in ldquomy computerrdquo
24 Copy the ipcameraapk into SD card
25 Disconnect the device pls find the ipcameraapk in ldquoFile Managementrdquo and run it
26 The ipcamera application will be show up on the home screen after you successfully installed
③Software operating processes
First ensure that the Internet open WIFI connection the search in the Play in The Googl Android
application reecam
Open the WiFi
connection
Download and install
the application
Search reecam
IPCAM User Manual
29
middotYou can edit the camera modify camere configuration and delete camera operation
Click here to add
a video camera
Select to add to the
client camera
Refresh LAN cameras
View or change the
configuration of the
camera the camera
name at random
IP address
Http port
The default password is blank
Camera name
Prev iew camera
Preview the
camera screen
save the camera
Editor has added
cameras
Edit camera
configuration
Delete the camera Edit camera of the
configuration
IPCAM User Manual
30
middotFor the camera added to the camera list you can watch camera in real time
Control cameras PTZ and set swith-on and switch-off of the cameras audio int
ercom and video
Picture 51
2 The IPCamera setting process for iPhone iPad
Firmware requirements compatible with iPhone iPod touch and iPad
Systerm requirements Requires iOS 42 or above
You can download the genuine
software
(ipcameraapp) form the App Store
httpitunesapplecomcnappreecamid479468959mt=8
middotSoftware operating process is as follows
Continue to add
the camera
Add external network
camera domain
Cameras have
been added
Audiointercom video switch
A list of cameras and
video can be switched to
view
Fingers sliding PTZ control
Click on the picture to stop
rotation
IPCAM User Manual
31
Open the App Store search
reecam
Download and install
reecam
The run has been
installed good reecam
program
Click to add cameras
Search reecam
IPCAM User Manual
32
Fill in the domain address
or IP address
Fill in the Http port of the
camera login user name
and password click next
to open the camera
Completed please
click here
Preview videoclick on the
next save
Save the camera added
Selected camera to
view images
Click image to expand
more cameras
operating functions
IPCAM User Manual
33
7 Other setting
71 Network Setting
711 Basic Network Settings
If the router that the IP camera connect has DHCP function you can choice ldquoObain IP from DHCP Serverrdquo
else fill in the network parameters manually
Http Port In most cases you can leave this value as 80 however if your Internet
Service Provider blocks this port you may switch to another port number such as 85808088889000 Etcs
(Range from 0 to 65535 pay attention to the same segment of multiple devices must set up different port The
port t canrsquot have any conflict with other software or equipment
a Search tools modification in LAN
Figure58
brdquoFor administorrdquo ldquoBasic network settingrdquo -Change the port
Figure59
712 WIFI Setting
1) Please enter the wireless net setting page of the wireless Router to find out SSID
Channel(less than 10) Encryption Authentication as below
Selec IP Camera clickright mouse button choice network configurat ion
Set port number
Set Network IP
Set Http Port Number
IPCAM User Manual
34
Figure 61
As Administrator to Login camera open wireless LAN Settings page fill in every
Setting (ensure keep the same as routerrsquos ) and then pulled out of the cable wireless network function can be
used For example as shown in belows
Figure62
Pls click the scan buttom twice
IPCAM User Manual
35
Figure 63
713 Adhoc point to point Wireless connection Setting
1) Open the basic network setting interfacecheck the device status
Picture 64
2) Open the wireless lan setting interface choose Adhoc for network type you
can define SSID such as 001
remember the IP address of
IP camera and Http port
Click the Settings Ip Camera will
restart and save
Double click to choose
Fill the encryption and
routers and key in the
same way
IPCAM User Manual
36
Picture 65
3) Unplug the RJ45 from IP camera Use laptop or other devices which are with
wifi function( include smart phoneipad and so on) searching the SSID you defined
on proccess 2then make a connection
Picture 66
middotClick wireless network and check the link status of ip camera Please note IP
address of your connected laptop must be the subset of your ip camera if not
please reset the ip address of your laptop manually
Picture 67
4) Now we can use the ip camera tool or enter ip address of camera derectly in
browser blank to visit
1 visit by ip camera tool
Picture 68
IPCAM User Manual
37
2Enter ip address in the browser
Enter user name and password in the login interface
Picture 69
Click ldquoSign inrdquoand vis it
Picture 70
IPCAM User Manual
38
72 Multi-Device Settings
Add cameras in LAN
In the Multi-Device Settings page you can see all devices searched in LAN The 1
St Device is this device in default You can add more cameras list in LAN for monitoring This Web software
supports up to 9 IP Cameras online simultaneous ly Click ldquoThe 2ND
Devicerdquo and Double click the item in the ldquoDevice List in LANrdquo AliasHost and Http Port
will fill in automatically Enter the correct username and password then click ldquoaddrdquoAdd
more cameras in the same way At last please donrsquot forget the ldquo settingrdquo Button
Picture 71
Add cameras in the Internet
Firstly make sure the camera added can access in the Internet with the IP address or
DDNS domain Like this http2191332001669999or httpIPcamdyndnsorg9999You can enter the
Host 219133200166 Http port 9999 or Host IPcamdyndnsorg Http port 9999 Enter the correct
username and password then click ldquoaddrdquo Add more cameras in the
same way
Picture 72
IPCAM User Manual
39
Picture 73
73 MSN Settings
Fill in your MSN account and password then add account which need to receive
IPCAMrsquoS ip address to IPCAM‟ S MSN list (Picture 67)click submit then yoursquod better
restart IP camera After it login your MSN to add IPCAMrsquos MSN account to MSN List that
you can receive IPCAMrsquos ip address
Picture 74
First login and click add contacts choose Add Contact then fill IPCAMrsquos MSN account in instant
messaging address click next then send offers
Aplly for MSN account and passworf for IP cam
Add about 10 MSN Accout
IPCAM User Manual
40
Figure75
Next
Figure76
Figure77
When IPCAMrsquos MSN account shows online you can chat with it input path command url camera
account will show its IP address in chatting box promptly as below
IPCAM User Manual
41
Picture 78
You can input the IP address to browser then can browse ip camera as below
Figure79
AttentionYou should fill MSN account in IPCAM first
74 DDNS Service Settings
DDNS Service The system supports protocols from some DDNS providers Dyndnsorg System support
DDNS such as topipcamorgpeanut shell3322orgDynDNS
provided IP
IPCAM User Manual
42
User and Password the user name and password used when applying for the domain
name (details 432)
DDNS Host the Domain Name
741 Factory DDNS
Device had distributed one DDNS to every productwhich was sticked the bottom
of the product Such as
manufacturer had already give every device a DDNS address which is unique Users only need to fill in this
DDNS IP ADDRESS and port in the browser then they can monitor remote IP camera
Picture 80 Factory DDNS
Note When use the domain name access to the camera and UPNP is not successful you must set port
mapping function on routers
742 The third part DDNS
Users can use not only Factory DDSN but also can use third part DDNS System Such as domain name
wwwdyndnsorg The only thing the user need to do is to apply a free DDNS and then fill in ldquoset boxrdquo as below
Save this setting and this DDNS can be used
DDNS Hostname
Factory DDNS
IPCAM User Manual
43
Note the third party domain name is the realization of analytical way input the domain in the browser it will
keep this string of characters If the port of the device isnrsquot 80 then need to add colon and port number For
example httpwell888dyndnsorg8999
75 Mail and FTP Service
1)Configure the E-mail box to receive and send mails The E-mail box is used for receiving
the images sent after alarm and the system IP address after successful dial-up
Note When Alarm Service Settings-gt Send Mail on Alarm is check the Mail
Service takes effect
Picture82
Configure the E-mail box to receive and send mails The E-mail box is used for receiving the images sent
after alarm and the system IP address after successful dial-up
Sender This device use the sender mailbox to send mails
Receiver To receive the mail from the Sender You can set up to 4 receiver mailbox
SMTP Server the SMTP server for the sender mailbox
Need Authentication if the sender mailbox need authentication you should check it then
input the SMTP username amp Password
Mail test Please set the Mail parameter and click Submit first There are Mail test result
Picture 83
video Local storage in PC after alarm monitoring
IPCAM User Manual
44
Gmail also set as the same It only needs you to fill in correct SMTP Sever address user and password
Picture 84
Mail notes Internet IP address In this option When Internet IP and port have changed IP Will be sent via
1Can not connect to the server
2Network Error Please try later
3Server Error
4Incorrect user or password
5The sender is denied by the server Maybe the server need to authenticate the user please check it
and try again
6The receiver is denied by the server Maybe because of the anti-spam privacy of the server
7The message is denied by the server Maybe because of the anti-spam privacy of the server
8The server does not support the authentication mode used by the device
Report Internet IP by Mail When ipcam port or Internet IP changed it will send the internet IP by
mail(for example IPCAM s url is http119123207969002) Make sure the port is map to the router
correctly by UPNP or Virtual Map function
2) FTP Server use and settings
middotIf you already have an FTP Server (ipcam com)and email ipcam you can fill the
parameters as below
Picture 85
IPCAM User Manual
45
middotFTP Server of LAN as below
1 Create an account
2 Step by step setting until finish it
Picture 88
IPCAM User Manual
46
3Start Server
Continue to finish it
Picture 89
4IPCAMrsquoS account can be used
Picture 90
Save path
This is a FTP
server address
IPCAM User Manual
47
5 IP camerarsquos FTP Server set like this
Picture 91
6 Set up and complete testing is successfulwhen it alarms IP camera will upload
pictures to the FTP server Settings of main directory path (as shown )
Picture 92
FTP Server the FTP server address
FTP port the port usually is 21
FTP Mode support standard(POST) mode and passive(PASV) mode
Upload Image Now it will upload image now when checkbox is not checked When checked you can
input upload interval(Seconds)
76 Motion Detection
Enter Alarm Service Settings page to configure Motion Detection function
1) Motion Detect Armed
Each alarm triggers in the protection of time the device will take various measures to alarm
IO linkage alarm output relay closure external alarm device began to alarm
IPCAM User Manual
48
Send E-mail alarm informatio
Transmit pictures to the FTP server and can set the time interval of sending pictures
2) Alarm t ime Settings
Only in the alarm period detection device to alarm will only have alarm action All the time (not check the
schedule) also can alarm within specified time For the specified time alarm firstly need to set up the system
time time zone and then to choose period of alarm in the state of alarm setting as shown in Picture 19
Picture93 Alarm of time Settings interface
Motion Detect Armed
When you enable motion detect armed the camera can be triggered to send email alerts
and record images In the camera monitoring page the green icon turn to red and an
alert sound you will hear
Motion Detect Sensibility
You can choose from low to high 10 level alarm sensitivity The greater the number the higher the
sensitivity
Alarm Input Armed
IO PINS1) Output(+5V) 2) Output 3) Alarm input 4) Input (GND)
Input Pins The input pins can be used for 1-way external sensor input(pin3 and pin4) For example
you may connect a Person Infrared Sensor (PIR) to it for motion detection When external sensor
triggered IPCAM can be programmed to send an email with picture or control the internal relay output
IPCAM User Manual
49
Picture94
IO Linkage on Alarm
Enable IO linkage on alarmPin1 will output +5V when alarm triggered and output LOW
when alarm release automatically
Switch onoff buttons control Pin1 output manually
Send Mail on Alarm
Sent picture and mail inform to customers e-mail after alarmed(firstly you should finish
the Mail Service Settings)
Picture 95
Upload Image on Alarm
Enable upload image on alarm and set upload interval(Seconds)
Tick send to your setted mails
IPCAM User Manual
50
Picture 96
REC automatically and save to PC
When you enable motion detect and open the camera monitoring page on the PC If
there is an alarm triggered REC will start automatically for several seconds and save to
the PC
Picture 97
REC save to pcrsquos position
Picture 98
Storage path can be changed
After Setting up later when have the
alarm the image will send to
designated email and FTP server
IPCAM User Manual
51
77 IP cameras Time amp Date setting and PTZ Setting
If IP camera connected with Internet it can automatically check the time amp date via running NTP Server And
need to choose properly IP cameras Time zone Otherwise it need PC Time to check IP camera time amp Date
Pre-set and Speed of PT
78 UPGRADE DEVICE FIRMWARE
Picture 101 Firmware upgrade
IP CAMERA has two kinds of programme One is system firmware another is application firmware It can be
upgraded separately
79 BACKUP AND RESTORE SETTING
Click Set in the Backup will lead to a BIN file and choose this file to restore setting
The huger the Number is The
slower it will be
IPCAM User Manual
52
8 APPENDIX
81 REGISTER AND APPLY FOR DDNS SERVICE
1Users use DDNS management system first timeUsers need to apply account to manage
and inquire the domain state
Step1 enter httpwwwdyndnscom and Create Account( Fill in Domain Name dyndnsorg then Click
Add)
Figure103
Step2 enter your information
Figure104
IPCAM User Manual
53
Figure105
Step3 After a minute you will receive an E-mail from DynDNS Support and it will give you a
confirmation address
(eg httpsaccountdyncomemlcreateconflILHMZHRje5oF_6YXTYv1A
Figure106
IPCAM User Manual
54
Step4 Open the link to active your Domain Name as belowLogin in your account after it is activated
Figure107
Step5 Check all the DDNS serviceswe choose the 14-day-trial
Figure108
Step6 Click the linkand user will see as below
IPCAM User Manual
55
middotenter your information
Figure109
Step7 Now you obtained a Dynamic Domain Name(Figure 105)and can use it in the DDNS Service
Settings(details 74)
Figure110
IPCAM User Manual
56
2For DDNS which is applied successfully you can fill in the IP CAMERA When set successfully the status
of IP will be shown as blows
picture 111
picture 112
3How to set DDNS on line
The first wayMenu rdquostartrdquo- ldquorunrdquomdashgt Input CMDClink rdquoenterrdquoIt can check DDNS Statas
via As shown below
Picture 113
IPCAM User Manual
57
Through the PING command this dynamic domain name can be back in the network response information It
proves that the domain name has been online
If the domain name update not success Possible reasons
(1) DDNS parameter is not correct (2) may cause DNS address configuration is wrong
82 Some special application for IPCAMERA
IPCamUse some grammar parameter control and Use IPCam
useruser
pwdpassword
priThe current access (1 visitors 23 operator managers)
resolutionImage resolution(832024 0qvga32640480 vga)
ratemage transmission speed and scope 0-23
brightnessbrightness0~255
contrastcontrast0~6
mode
Mode 050 hz For
60 hz 2 outdoor
flip
Flip rotation 0 primitive 1 vertical reverses 2 horizontal 3 vertical flip + horizontal
821 The flow media player VLC player and mplayer can real-time broadcast ipcamera and send
of streaming media format video data
(Grammar parametersvideostreamasfuser=amppwd=ampresolution=amprate=)
As shown Picture 113 rdquoIpcamrdquo
Picture 114
IPCAM User Manual
58
From the following picture we can view that Ipcam local IP address ishttp19216811118999
WAN IP Address is httpwell888dyndnsorg8999 we can inputrdquoIPcamrdquorsquoS IP address to
open in the player
Picture 115
the CLC media player open play position
Picture 116
LAN play address
Picture 117
IPCAM User Manual
59
Picture 118
Open the Internet play position
Picture 119
As shown in the following picture It can see the ipcamera send video streaming format
Size 640X480
User
IPCAM User Manual
60
Picture 120
83 Frequently Asked Questions
Note1) Any question you would meet please check Network connections firstly
2)Check the working status revealed by the indicators on the network server hub exchange and
network card If abnormal check the network connections
831 I have forgotten the administrator username andor password
To reset the administrator username and password Press and hold down the RESET
BUTTON for 5 seconds Release the power button and the username and password
will be reset back to the factory default administrator username and password
Default administrator username admin
Default administrator password No password
832 IP Address configuration
Check whether IP address of the IP Camera server shares the same subnet as your
work station Click My Computer gt Control PanelgtNetwork amp Dial-up Connections gt
LAN gt Attributes gtInternet Protocols (TCPIP) and check IP Address and Subnet
Mask Make sure they are in the same subnet when configuring IP Camera IP
address manuallyUnable to access IP Camera via web browser
833 Network Configuration
Double Check to ensure that your HTTP server software is configured and running
properly If you are running any firewall software make sure it is allowing inbound
connections to port 80Also if you happen to be using a cableDSL router make sure
IPCAM User Manual
61
you are set up port forwarding properly ( consult your router is documentation for more
information ) If none of these seem to be the problem it is also possible that your
ISP is blocking inbound connections to port 80 ndashmany IPSs have done this because
of internet worms such as Code Red If this is the case you bdquoll have to setup your
HTTP server on an alternate port (such as 8080)
834 No Monitoring picture
It has four reasons Images of the abnormal factors
1If its not use Directx function and lead to not normal to display the color imagePlease
install DirectX and open the start menu then input the command
Picture 121
You use the DirectX function and it will expedite the DirectDrawDirect3D and AGP if its can not maybe the
connect issues or hardware not read it
2The issues of hardware canrsquot support the card expedite image
3The antivirus software will influence the network it will be stoped or closedIf you install fireproof software
please close it and try again
4 ActiveX controller is not installed correctly
If its not image on the first time to use and will display to the user through the ActiveXIf its can not
display of the image maybe it fail of install about this issues please follow as
1Install ldquoIP Camera Toolrdquo ActiveX control at the same time
2Please install ActiveX control and keep the security settings for IE browser
835 Problems with network bandwidth
The image frame rate is subjected to the following factors 1network bandwidth 2 PC
performancenetwork environment and display preference setting (brightness theme
etc) 3 the number of visitors (Too many visitors will slow down the image frame rate) 4
choice of switch or hub (Use a switch for multiple IP Camera Servers rather than a HUB)
The Device use MJEPT Compression it needs good network bandwidth If it is too narrow it will lead to slowly
browser Typical video parameter occupy network bandwidth as blows
640x48030fps 40 Megabits ~ 50 Megabits
320x24030fps 12 Megabits ~ 16 Megabits
IPCAM User Manual
62
middot836 Why pop-up the prompt ldquoFail to connect to the devicehelliprdquo
This prompt only appeared in the case of using multiple cameras
Enter the Multi-Device Settings page(login as administrator) to check the
Device setting is correct or not
When one of the multiple cameras disconnected the color changed to
yellow and pop-up the promptldquoFail to connect to the devicehelliprdquo
Picture 122
837 Canrsquot access the IPCAM in the internet
There are some reasons
1 ActiveX controller is not installed correctly(see more details 514)
2 The port IPCAM used is blocked by Firewall or Anti-virus software Please change a
port number and try again
3 Port mapping is not success You can do port mapping by two ways
Enter setting page of the router which IPCAM connect with to enable UPnP function
Enter IPCAM ldquoUPnP Settingsrdquo to enable UPnP and make sure the state is ldquoUPnP
successrdquo
‟ s IP
and port to the Virtual map list
When use ADSL the IP is dynamic You should set DDNS(see more details 74 amp 80)
and also make sure port mapping success
84 Operate common problem solving
IP camera tool canrsquot find the camera
Except of the camera broken
1 Make sure the cable connector no problem recommend connector
(AMP)it is with international standard Another note IPCAMrsquos data
transmission channel require higher than computerrsquos so maybe the
IPCAM User Manual
63
computer can run normally but IPCAM canrsquot Please press heavily when making the cable connector
2 Confirm the power supply normally First check whether power indication
light turn on or not If it is onthen check the yellow light on RJ45 Port
(power indication light) and green light (network indication light) are on or
notIf they are onso power supply and cable runs normally
3 Confirm all the firwall and antivirus software are closeThe firewall often
block unrecognized data so if the firewall is running so maybe the IPCAM
TOOL canrsquot find the deviceSuggest to close firewall and antivirus
software temporarily before searching
How to solve the camera blank screen
1 Check if you are using the wrong power adaptorplease use original one
2 Close antivirus software
How to solve the camera canrsquot login by Internet
1 Check if you set DDNS success or not
2 Check the current IPCAMrsquos port number is the same as routerrsquosThey need to keep same
Canrsquot view the monitoring picture
1 Reason canrsquot connect with network
SolutionCheck if the network connect well exclude cable fault and PC virus
cause network fault until can be used between PC and PING
2 ReasonIP address occupy by other device
Solution Choose automatic gain
3 Reason IP address located within different subnet
Solution Check IPCAMrsquoS ip address and subnet mask address and gateway settings
4 ReasonWeb port has been modified
Solutioncontact network administrator to obtain port information
5 Reasonunknown
SolutionPress reset button to factory default statethen reconnectingsysten
default to gain ip address automaticsubnet mask is 2552552550
85 Default Parameters
middotDefault network Parameters
IP address dynamic obtain
Subnet mask 2552552550
Gateway dynamic obtain
DDNS Factory provide
middotUsername and password
Default administrator username admin
Default administrator password No password
IPCAM User Manual
64
86 Technical Parameters
ITEM IP CAM (NIP-02BGPWA2)
Image Sensor
Mage sensor 15 Color CMOS Sensor
Display 640 x 480 (300K Pixels)
Lens f36mm F24 (IR Lens)
Miniillumination 05 Lux
Lens Lens Type Glass Lens
Viewing Angle 60 Degree
Audio Microphone Audio of two way
Domain name Server MSN server DDNS server
Video
Image Compression MJPEG
Image Frame Rate 15 FPS(VGA)30FPS(QVGA)
Resolution 640 x 480(VGA) 320 x 240(QVGA)
Flip Mirror Images rtical Horizontal
mode 50Hz 60Hz or Outdoor
Video Parameters Brightness Contrast
Communication
Ethernet One 10100Mbps RJ-45
Supported Protocol HTTPDHCPIPTCPUDPFTPSMTPDDNSPPPoEUPnP
Mobilephone monitor Support IphoneIpad3G phonesmartphone
Wireless Standard IEEE 80211bg
Wireless Standard 80211b11Mbps(max) 80211g54Mbps(max)
Wireless Security 64128-bitWEP Encryption
Physical
PanTilt Angle Horizontal270deg amp Vertical 120deg
Infrared Light 10 IR LEDs Night visibility up to 15 Mete
Product size 100(L) x100(W) x125mm(H)
Gross Weight 6465gpcs (packing size196x165x123mm)
Net Weight 2547gpcs (only product)
Power Specification DC 5V25A 18 meter
Power Consumption 5 Watts
Environment
Operate Temper 0deg~ 55degC (14degF~122degF)
Operating Humidity 20 ~ 85 non-condensing
Storage Temper -10degC ~ 60deg (14degF ~140degF)
Storage Humidity 0 ~ 90 non-condensing
PC Requirements
CPU 20GHZ or above (suggested 30GHz)
Memory Size 512MB or above (suggested 10GB)
Display card 64M or above
Supported OS Microsoft Windows XPVistaWindows7
Supported browsers IEfirefoxGoogle
Certification CEFCCRoHS
Warranty Limited 1-year warranty
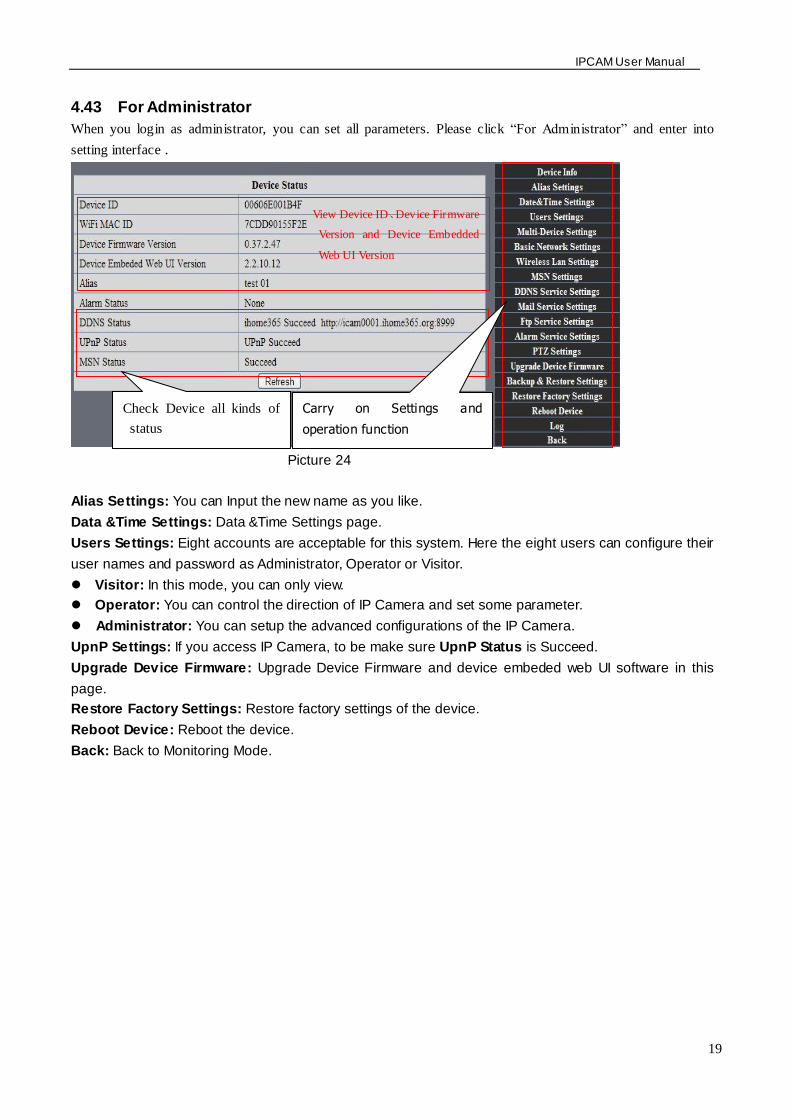
IPCAM User Manual
19
443 For Administrator
When you login as administrator
you can set all parameters Please
click ldquoFor Administratorrdquo
and enter into
setting interface
Picture 24
Alias Settings You can Input the new name as you like
Data ampTime Settings Data ampTime Settings page
Users Settings Eight accounts are acceptable for this system Here the eight users can configure their
user names and password as Administrator Operator or Visitor
Visitor In this mode you can only view
Operator You can control the direction of IP Camera and set some parameter
Administrator You can setup the advanced configurations of the IP Camera
UpnP Settings If you access IP Camera to be make sure UpnP Status is Succeed
Upgrade Device Firmware Upgrade Device Firmware and device embeded web UI software in this
page
Restore Factory Settings Restore factory settings of the device
Reboot Device Reboot the device
Back Back to Monitoring Mode
View Device IDDevice Firmware
Version and Device Embedded
Web UI Version
Check Device all kinds of
status
Carry on Settings and
operation function
IPCAM User Manual
20
5 Visit IP Camera in internet
51 Connection way in Internet
Picture 25
52 Related setting and login IP camera
1 If the network your IP camera using is using static IP you just need to input this IP address and IP cameras port in the browser then it can visit Ip camera
2 If you are using ADSL to dial-up and surf on line you should obtain IP Camera Current WAN IP Address or configured DDNS
1)There are four ways for you to obtain WAN IP Address
①Using mail to send internet IP function
After setting mail successfully IP will send mail to your receiver e-mail box when Internet IP or port
has changed If it is dynamical IP users need to input this IP address to visit this IP camera
②Obtain from some website
It is very easy for you to obtain WANS IP address You can open browser on the computer on the
condition that IP camera and PC are the same subnet For example httpwwwwhatismyipcomor
httpwwwmyipcn etcsIt will tell you WANS IP address as shows below
Picture 26
③Obtain from MSN and IP cameras MSN ACCOUNT( Details 73)
IPCAM User Manual
21
④ Obtain from router
We take Nur8555M from Xinxiang s router as example
AAccording to routers manual we get Routers IP is 19216811
BLogin in router Input 19216811 in the browser Find the status of Router and find Routers
WAN( In this example WANS IP is 11624235122 As shows Picture 27
Picture 27
Now you can visit IP Cam from Internet What you should do is to Input correct IP address For
example Http 116242351228999
Note Make sure the Ports UPNS is available You can open UPNP via the following ways
Enter into Routers setting page( Details Routers user manual) to make UPNP available
Or enable virtual mapping function Add equipment IP address and port to the virtual mapping list
Picture 28
Users can access the Internet from IPCAM device Input address For example Http 116242351228999
2)DDNS (dynamic DNS) service is the Internet domain name can be fixed and dynamic IP address real-time
corresponding (analysis) service Simplely said whenever user surf on internet or what kind of way you are
using the Internet get a what kind of IP address IP address whether it will change DDMS can ensure that a
fixed domain name can access to a users device
IPCAM User Manual
22
Our products have been configured the DDNS services of course you can also apply for the domain name in
registration website for one of your own domain name to configuration For example wwwdyndnsorg
Picture 30
You need fill in DDNS and port for example(httpicam0001ihome365org8999) The browser will jump
to IP camerarsquos login page
Picture 31
DDNS inside
Factory DDNS
IPCAM User Manual
23
The input device user name and password to login to equipment
Picture 32
middotIf input domain name but cant open IP camera in the browser such as the situation is as blows
middotPlease open the device and check status of IP camera in the local area network confirm whether UPNP
function and DDNS is successful or not
Picture 34
IPCAM User Manual
24
middotYou need to set port mapping function successfully to check whether the router UPNP function is
available if It was unavailable please make it available refer to the routers user manual
If you use TPLINK router please refer to these instructions
middotThrough the upnp automatic mapping port to the network input router IP address in the browser (such
as http19216811 gt the router IP addresses are written on paper label on the router house---- please set
according to your own IP address) open the routers page forward rules gt gt upnp set to ensure that the
current state of upnp is already available as below
Note some of the router interface without UPNP Settings option then need to open the virtual server IP
cameras in the local area network of mapping the connection IP address and port number
Picture 36
6 Access IP camera via mobile equipment
such as mobile phoneIpad Etcs There are two kinds of ways to access IP camera One is to input IP address in browser directly It can be IP
address and also can be DDNS Another is to use clients to visit
61 Input IP address in browser
1 We take IPAD as example as blows
IPCAM User Manual
25
middotOpen browser Safari
Input IP cameras IP address for example( httpicam0001ihome365org8999)
Choose language according to your demand and choose login mode according to your browser
Picture39
Choose manual settings
Open browser Safari
Enter the IP address of the IP camera
(httpicam0001ihome365org8999)
IPCAM User Manual
26
enter your account and password on the login page as shown By defaultadministratorrsquos username is
admin and no password
Select Server Refresh mode landing
Picture42
Input the username and password of
the network camera
Here you can choose between two
modes landing
Here to select the
operating language
Default passwordNo password
IPCAM User Manual
27
Select Server Push mode landing
Picture 43
2 Now we take Android system device as example
Open menu and firstly open the browser and input IP camera s IP address in the
browser for example(httpicam0001ihome365org8999)
Picture 44
Input IP cameras username and password and click sign in and then enter into
browser model to choose login-in interface
Open menu
IPCAM User Manual
28
Picture 45
62 Install client-side software to access IPCamera
There are many client software support IP camera several third-party software support our IP cameras too
The following are our manufacture software setup process(the Android version)
1 Pls get the install applications in the CD or you can download from the website
httpsplaygooglecomstoresearchq=reecamampc=apps Choose the right
①installation file-ipcameraapk
running environment Android version 16 or above
Note Please ensure that mobile phones can connect to the Internet before install
② Install method
21 Insert SD card into Android mobile phone
22 Connect the cellphone to computer via USB data cable
23 Choose the USB connection model on your cellphone you can see the SD driver in ldquomy computerrdquo
24 Copy the ipcameraapk into SD card
25 Disconnect the device pls find the ipcameraapk in ldquoFile Managementrdquo and run it
26 The ipcamera application will be show up on the home screen after you successfully installed
③Software operating processes
First ensure that the Internet open WIFI connection the search in the Play in The Googl Android
application reecam
Open the WiFi
connection
Download and install
the application
Search reecam
IPCAM User Manual
29
middotYou can edit the camera modify camere configuration and delete camera operation
Click here to add
a video camera
Select to add to the
client camera
Refresh LAN cameras
View or change the
configuration of the
camera the camera
name at random
IP address
Http port
The default password is blank
Camera name
Prev iew camera
Preview the
camera screen
save the camera
Editor has added
cameras
Edit camera
configuration
Delete the camera Edit camera of the
configuration
IPCAM User Manual
30
middotFor the camera added to the camera list you can watch camera in real time
Control cameras PTZ and set swith-on and switch-off of the cameras audio int
ercom and video
Picture 51
2 The IPCamera setting process for iPhone iPad
Firmware requirements compatible with iPhone iPod touch and iPad
Systerm requirements Requires iOS 42 or above
You can download the genuine
software
(ipcameraapp) form the App Store
httpitunesapplecomcnappreecamid479468959mt=8
middotSoftware operating process is as follows
Continue to add
the camera
Add external network
camera domain
Cameras have
been added
Audiointercom video switch
A list of cameras and
video can be switched to
view
Fingers sliding PTZ control
Click on the picture to stop
rotation
IPCAM User Manual
31
Open the App Store search
reecam
Download and install
reecam
The run has been
installed good reecam
program
Click to add cameras
Search reecam
IPCAM User Manual
32
Fill in the domain address
or IP address
Fill in the Http port of the
camera login user name
and password click next
to open the camera
Completed please
click here
Preview videoclick on the
next save
Save the camera added
Selected camera to
view images
Click image to expand
more cameras
operating functions
IPCAM User Manual
33
7 Other setting
71 Network Setting
711 Basic Network Settings
If the router that the IP camera connect has DHCP function you can choice ldquoObain IP from DHCP Serverrdquo
else fill in the network parameters manually
Http Port In most cases you can leave this value as 80 however if your Internet
Service Provider blocks this port you may switch to another port number such as 85808088889000 Etcs
(Range from 0 to 65535 pay attention to the same segment of multiple devices must set up different port The
port t canrsquot have any conflict with other software or equipment
a Search tools modification in LAN
Figure58
brdquoFor administorrdquo ldquoBasic network settingrdquo -Change the port
Figure59
712 WIFI Setting
1) Please enter the wireless net setting page of the wireless Router to find out SSID
Channel(less than 10) Encryption Authentication as below
Selec IP Camera clickright mouse button choice network configurat ion
Set port number
Set Network IP
Set Http Port Number
IPCAM User Manual
34
Figure 61
As Administrator to Login camera open wireless LAN Settings page fill in every
Setting (ensure keep the same as routerrsquos ) and then pulled out of the cable wireless network function can be
used For example as shown in belows
Figure62
Pls click the scan buttom twice
IPCAM User Manual
35
Figure 63
713 Adhoc point to point Wireless connection Setting
1) Open the basic network setting interfacecheck the device status
Picture 64
2) Open the wireless lan setting interface choose Adhoc for network type you
can define SSID such as 001
remember the IP address of
IP camera and Http port
Click the Settings Ip Camera will
restart and save
Double click to choose
Fill the encryption and
routers and key in the
same way
IPCAM User Manual
36
Picture 65
3) Unplug the RJ45 from IP camera Use laptop or other devices which are with
wifi function( include smart phoneipad and so on) searching the SSID you defined
on proccess 2then make a connection
Picture 66
middotClick wireless network and check the link status of ip camera Please note IP
address of your connected laptop must be the subset of your ip camera if not
please reset the ip address of your laptop manually
Picture 67
4) Now we can use the ip camera tool or enter ip address of camera derectly in
browser blank to visit
1 visit by ip camera tool
Picture 68
IPCAM User Manual
37
2Enter ip address in the browser
Enter user name and password in the login interface
Picture 69
Click ldquoSign inrdquoand vis it
Picture 70
IPCAM User Manual
38
72 Multi-Device Settings
Add cameras in LAN
In the Multi-Device Settings page you can see all devices searched in LAN The 1
St Device is this device in default You can add more cameras list in LAN for monitoring This Web software
supports up to 9 IP Cameras online simultaneous ly Click ldquoThe 2ND
Devicerdquo and Double click the item in the ldquoDevice List in LANrdquo AliasHost and Http Port
will fill in automatically Enter the correct username and password then click ldquoaddrdquoAdd
more cameras in the same way At last please donrsquot forget the ldquo settingrdquo Button
Picture 71
Add cameras in the Internet
Firstly make sure the camera added can access in the Internet with the IP address or
DDNS domain Like this http2191332001669999or httpIPcamdyndnsorg9999You can enter the
Host 219133200166 Http port 9999 or Host IPcamdyndnsorg Http port 9999 Enter the correct
username and password then click ldquoaddrdquo Add more cameras in the
same way
Picture 72
IPCAM User Manual
39
Picture 73
73 MSN Settings
Fill in your MSN account and password then add account which need to receive
IPCAMrsquoS ip address to IPCAM‟ S MSN list (Picture 67)click submit then yoursquod better
restart IP camera After it login your MSN to add IPCAMrsquos MSN account to MSN List that
you can receive IPCAMrsquos ip address
Picture 74
First login and click add contacts choose Add Contact then fill IPCAMrsquos MSN account in instant
messaging address click next then send offers
Aplly for MSN account and passworf for IP cam
Add about 10 MSN Accout
IPCAM User Manual
40
Figure75
Next
Figure76
Figure77
When IPCAMrsquos MSN account shows online you can chat with it input path command url camera
account will show its IP address in chatting box promptly as below
IPCAM User Manual
41
Picture 78
You can input the IP address to browser then can browse ip camera as below
Figure79
AttentionYou should fill MSN account in IPCAM first
74 DDNS Service Settings
DDNS Service The system supports protocols from some DDNS providers Dyndnsorg System support
DDNS such as topipcamorgpeanut shell3322orgDynDNS
provided IP
IPCAM User Manual
42
User and Password the user name and password used when applying for the domain
name (details 432)
DDNS Host the Domain Name
741 Factory DDNS
Device had distributed one DDNS to every productwhich was sticked the bottom
of the product Such as
manufacturer had already give every device a DDNS address which is unique Users only need to fill in this
DDNS IP ADDRESS and port in the browser then they can monitor remote IP camera
Picture 80 Factory DDNS
Note When use the domain name access to the camera and UPNP is not successful you must set port
mapping function on routers
742 The third part DDNS
Users can use not only Factory DDSN but also can use third part DDNS System Such as domain name
wwwdyndnsorg The only thing the user need to do is to apply a free DDNS and then fill in ldquoset boxrdquo as below
Save this setting and this DDNS can be used
DDNS Hostname
Factory DDNS
IPCAM User Manual
43
Note the third party domain name is the realization of analytical way input the domain in the browser it will
keep this string of characters If the port of the device isnrsquot 80 then need to add colon and port number For
example httpwell888dyndnsorg8999
75 Mail and FTP Service
1)Configure the E-mail box to receive and send mails The E-mail box is used for receiving
the images sent after alarm and the system IP address after successful dial-up
Note When Alarm Service Settings-gt Send Mail on Alarm is check the Mail
Service takes effect
Picture82
Configure the E-mail box to receive and send mails The E-mail box is used for receiving the images sent
after alarm and the system IP address after successful dial-up
Sender This device use the sender mailbox to send mails
Receiver To receive the mail from the Sender You can set up to 4 receiver mailbox
SMTP Server the SMTP server for the sender mailbox
Need Authentication if the sender mailbox need authentication you should check it then
input the SMTP username amp Password
Mail test Please set the Mail parameter and click Submit first There are Mail test result
Picture 83
video Local storage in PC after alarm monitoring
IPCAM User Manual
44
Gmail also set as the same It only needs you to fill in correct SMTP Sever address user and password
Picture 84
Mail notes Internet IP address In this option When Internet IP and port have changed IP Will be sent via
1Can not connect to the server
2Network Error Please try later
3Server Error
4Incorrect user or password
5The sender is denied by the server Maybe the server need to authenticate the user please check it
and try again
6The receiver is denied by the server Maybe because of the anti-spam privacy of the server
7The message is denied by the server Maybe because of the anti-spam privacy of the server
8The server does not support the authentication mode used by the device
Report Internet IP by Mail When ipcam port or Internet IP changed it will send the internet IP by
mail(for example IPCAM s url is http119123207969002) Make sure the port is map to the router
correctly by UPNP or Virtual Map function
2) FTP Server use and settings
middotIf you already have an FTP Server (ipcam com)and email ipcam you can fill the
parameters as below
Picture 85
IPCAM User Manual
45
middotFTP Server of LAN as below
1 Create an account
2 Step by step setting until finish it
Picture 88
IPCAM User Manual
46
3Start Server
Continue to finish it
Picture 89
4IPCAMrsquoS account can be used
Picture 90
Save path
This is a FTP
server address
IPCAM User Manual
47
5 IP camerarsquos FTP Server set like this
Picture 91
6 Set up and complete testing is successfulwhen it alarms IP camera will upload
pictures to the FTP server Settings of main directory path (as shown )
Picture 92
FTP Server the FTP server address
FTP port the port usually is 21
FTP Mode support standard(POST) mode and passive(PASV) mode
Upload Image Now it will upload image now when checkbox is not checked When checked you can
input upload interval(Seconds)
76 Motion Detection
Enter Alarm Service Settings page to configure Motion Detection function
1) Motion Detect Armed
Each alarm triggers in the protection of time the device will take various measures to alarm
IO linkage alarm output relay closure external alarm device began to alarm
IPCAM User Manual
48
Send E-mail alarm informatio
Transmit pictures to the FTP server and can set the time interval of sending pictures
2) Alarm t ime Settings
Only in the alarm period detection device to alarm will only have alarm action All the time (not check the
schedule) also can alarm within specified time For the specified time alarm firstly need to set up the system
time time zone and then to choose period of alarm in the state of alarm setting as shown in Picture 19
Picture93 Alarm of time Settings interface
Motion Detect Armed
When you enable motion detect armed the camera can be triggered to send email alerts
and record images In the camera monitoring page the green icon turn to red and an
alert sound you will hear
Motion Detect Sensibility
You can choose from low to high 10 level alarm sensitivity The greater the number the higher the
sensitivity
Alarm Input Armed
IO PINS1) Output(+5V) 2) Output 3) Alarm input 4) Input (GND)
Input Pins The input pins can be used for 1-way external sensor input(pin3 and pin4) For example
you may connect a Person Infrared Sensor (PIR) to it for motion detection When external sensor
triggered IPCAM can be programmed to send an email with picture or control the internal relay output
IPCAM User Manual
49
Picture94
IO Linkage on Alarm
Enable IO linkage on alarmPin1 will output +5V when alarm triggered and output LOW
when alarm release automatically
Switch onoff buttons control Pin1 output manually
Send Mail on Alarm
Sent picture and mail inform to customers e-mail after alarmed(firstly you should finish
the Mail Service Settings)
Picture 95
Upload Image on Alarm
Enable upload image on alarm and set upload interval(Seconds)
Tick send to your setted mails
IPCAM User Manual
50
Picture 96
REC automatically and save to PC
When you enable motion detect and open the camera monitoring page on the PC If
there is an alarm triggered REC will start automatically for several seconds and save to
the PC
Picture 97
REC save to pcrsquos position
Picture 98
Storage path can be changed
After Setting up later when have the
alarm the image will send to
designated email and FTP server
IPCAM User Manual
51
77 IP cameras Time amp Date setting and PTZ Setting
If IP camera connected with Internet it can automatically check the time amp date via running NTP Server And
need to choose properly IP cameras Time zone Otherwise it need PC Time to check IP camera time amp Date
Pre-set and Speed of PT
78 UPGRADE DEVICE FIRMWARE
Picture 101 Firmware upgrade
IP CAMERA has two kinds of programme One is system firmware another is application firmware It can be
upgraded separately
79 BACKUP AND RESTORE SETTING
Click Set in the Backup will lead to a BIN file and choose this file to restore setting
The huger the Number is The
slower it will be
IPCAM User Manual
52
8 APPENDIX
81 REGISTER AND APPLY FOR DDNS SERVICE
1Users use DDNS management system first timeUsers need to apply account to manage
and inquire the domain state
Step1 enter httpwwwdyndnscom and Create Account( Fill in Domain Name dyndnsorg then Click
Add)
Figure103
Step2 enter your information
Figure104
IPCAM User Manual
53
Figure105
Step3 After a minute you will receive an E-mail from DynDNS Support and it will give you a
confirmation address
(eg httpsaccountdyncomemlcreateconflILHMZHRje5oF_6YXTYv1A
Figure106
IPCAM User Manual
54
Step4 Open the link to active your Domain Name as belowLogin in your account after it is activated
Figure107
Step5 Check all the DDNS serviceswe choose the 14-day-trial
Figure108
Step6 Click the linkand user will see as below
IPCAM User Manual
55
middotenter your information
Figure109
Step7 Now you obtained a Dynamic Domain Name(Figure 105)and can use it in the DDNS Service
Settings(details 74)
Figure110
IPCAM User Manual
56
2For DDNS which is applied successfully you can fill in the IP CAMERA When set successfully the status
of IP will be shown as blows
picture 111
picture 112
3How to set DDNS on line
The first wayMenu rdquostartrdquo- ldquorunrdquomdashgt Input CMDClink rdquoenterrdquoIt can check DDNS Statas
via As shown below
Picture 113
IPCAM User Manual
57
Through the PING command this dynamic domain name can be back in the network response information It
proves that the domain name has been online
If the domain name update not success Possible reasons
(1) DDNS parameter is not correct (2) may cause DNS address configuration is wrong
82 Some special application for IPCAMERA
IPCamUse some grammar parameter control and Use IPCam
useruser
pwdpassword
priThe current access (1 visitors 23 operator managers)
resolutionImage resolution(832024 0qvga32640480 vga)
ratemage transmission speed and scope 0-23
brightnessbrightness0~255
contrastcontrast0~6
mode
Mode 050 hz For
60 hz 2 outdoor
flip
Flip rotation 0 primitive 1 vertical reverses 2 horizontal 3 vertical flip + horizontal
821 The flow media player VLC player and mplayer can real-time broadcast ipcamera and send
of streaming media format video data
(Grammar parametersvideostreamasfuser=amppwd=ampresolution=amprate=)
As shown Picture 113 rdquoIpcamrdquo
Picture 114
IPCAM User Manual
58
From the following picture we can view that Ipcam local IP address ishttp19216811118999
WAN IP Address is httpwell888dyndnsorg8999 we can inputrdquoIPcamrdquorsquoS IP address to
open in the player
Picture 115
the CLC media player open play position
Picture 116
LAN play address
Picture 117
IPCAM User Manual
59
Picture 118
Open the Internet play position
Picture 119
As shown in the following picture It can see the ipcamera send video streaming format
Size 640X480
User
IPCAM User Manual
60
Picture 120
83 Frequently Asked Questions
Note1) Any question you would meet please check Network connections firstly
2)Check the working status revealed by the indicators on the network server hub exchange and
network card If abnormal check the network connections
831 I have forgotten the administrator username andor password
To reset the administrator username and password Press and hold down the RESET
BUTTON for 5 seconds Release the power button and the username and password
will be reset back to the factory default administrator username and password
Default administrator username admin
Default administrator password No password
832 IP Address configuration
Check whether IP address of the IP Camera server shares the same subnet as your
work station Click My Computer gt Control PanelgtNetwork amp Dial-up Connections gt
LAN gt Attributes gtInternet Protocols (TCPIP) and check IP Address and Subnet
Mask Make sure they are in the same subnet when configuring IP Camera IP
address manuallyUnable to access IP Camera via web browser
833 Network Configuration
Double Check to ensure that your HTTP server software is configured and running
properly If you are running any firewall software make sure it is allowing inbound
connections to port 80Also if you happen to be using a cableDSL router make sure
IPCAM User Manual
61
you are set up port forwarding properly ( consult your router is documentation for more
information ) If none of these seem to be the problem it is also possible that your
ISP is blocking inbound connections to port 80 ndashmany IPSs have done this because
of internet worms such as Code Red If this is the case you bdquoll have to setup your
HTTP server on an alternate port (such as 8080)
834 No Monitoring picture
It has four reasons Images of the abnormal factors
1If its not use Directx function and lead to not normal to display the color imagePlease
install DirectX and open the start menu then input the command
Picture 121
You use the DirectX function and it will expedite the DirectDrawDirect3D and AGP if its can not maybe the
connect issues or hardware not read it
2The issues of hardware canrsquot support the card expedite image
3The antivirus software will influence the network it will be stoped or closedIf you install fireproof software
please close it and try again
4 ActiveX controller is not installed correctly
If its not image on the first time to use and will display to the user through the ActiveXIf its can not
display of the image maybe it fail of install about this issues please follow as
1Install ldquoIP Camera Toolrdquo ActiveX control at the same time
2Please install ActiveX control and keep the security settings for IE browser
835 Problems with network bandwidth
The image frame rate is subjected to the following factors 1network bandwidth 2 PC
performancenetwork environment and display preference setting (brightness theme
etc) 3 the number of visitors (Too many visitors will slow down the image frame rate) 4
choice of switch or hub (Use a switch for multiple IP Camera Servers rather than a HUB)
The Device use MJEPT Compression it needs good network bandwidth If it is too narrow it will lead to slowly
browser Typical video parameter occupy network bandwidth as blows
640x48030fps 40 Megabits ~ 50 Megabits
320x24030fps 12 Megabits ~ 16 Megabits
IPCAM User Manual
62
middot836 Why pop-up the prompt ldquoFail to connect to the devicehelliprdquo
This prompt only appeared in the case of using multiple cameras
Enter the Multi-Device Settings page(login as administrator) to check the
Device setting is correct or not
When one of the multiple cameras disconnected the color changed to
yellow and pop-up the promptldquoFail to connect to the devicehelliprdquo
Picture 122
837 Canrsquot access the IPCAM in the internet
There are some reasons
1 ActiveX controller is not installed correctly(see more details 514)
2 The port IPCAM used is blocked by Firewall or Anti-virus software Please change a
port number and try again
3 Port mapping is not success You can do port mapping by two ways
Enter setting page of the router which IPCAM connect with to enable UPnP function
Enter IPCAM ldquoUPnP Settingsrdquo to enable UPnP and make sure the state is ldquoUPnP
successrdquo
‟ s IP
and port to the Virtual map list
When use ADSL the IP is dynamic You should set DDNS(see more details 74 amp 80)
and also make sure port mapping success
84 Operate common problem solving
IP camera tool canrsquot find the camera
Except of the camera broken
1 Make sure the cable connector no problem recommend connector
(AMP)it is with international standard Another note IPCAMrsquos data
transmission channel require higher than computerrsquos so maybe the
IPCAM User Manual
63
computer can run normally but IPCAM canrsquot Please press heavily when making the cable connector
2 Confirm the power supply normally First check whether power indication
light turn on or not If it is onthen check the yellow light on RJ45 Port
(power indication light) and green light (network indication light) are on or
notIf they are onso power supply and cable runs normally
3 Confirm all the firwall and antivirus software are closeThe firewall often
block unrecognized data so if the firewall is running so maybe the IPCAM
TOOL canrsquot find the deviceSuggest to close firewall and antivirus
software temporarily before searching
How to solve the camera blank screen
1 Check if you are using the wrong power adaptorplease use original one
2 Close antivirus software
How to solve the camera canrsquot login by Internet
1 Check if you set DDNS success or not
2 Check the current IPCAMrsquos port number is the same as routerrsquosThey need to keep same
Canrsquot view the monitoring picture
1 Reason canrsquot connect with network
SolutionCheck if the network connect well exclude cable fault and PC virus
cause network fault until can be used between PC and PING
2 ReasonIP address occupy by other device
Solution Choose automatic gain
3 Reason IP address located within different subnet
Solution Check IPCAMrsquoS ip address and subnet mask address and gateway settings
4 ReasonWeb port has been modified
Solutioncontact network administrator to obtain port information
5 Reasonunknown
SolutionPress reset button to factory default statethen reconnectingsysten
default to gain ip address automaticsubnet mask is 2552552550
85 Default Parameters
middotDefault network Parameters
IP address dynamic obtain
Subnet mask 2552552550
Gateway dynamic obtain
DDNS Factory provide
middotUsername and password
Default administrator username admin
Default administrator password No password
IPCAM User Manual
64
86 Technical Parameters
ITEM IP CAM (NIP-02BGPWA2)
Image Sensor
Mage sensor 15 Color CMOS Sensor
Display 640 x 480 (300K Pixels)
Lens f36mm F24 (IR Lens)
Miniillumination 05 Lux
Lens Lens Type Glass Lens
Viewing Angle 60 Degree
Audio Microphone Audio of two way
Domain name Server MSN server DDNS server
Video
Image Compression MJPEG
Image Frame Rate 15 FPS(VGA)30FPS(QVGA)
Resolution 640 x 480(VGA) 320 x 240(QVGA)
Flip Mirror Images rtical Horizontal
mode 50Hz 60Hz or Outdoor
Video Parameters Brightness Contrast
Communication
Ethernet One 10100Mbps RJ-45
Supported Protocol HTTPDHCPIPTCPUDPFTPSMTPDDNSPPPoEUPnP
Mobilephone monitor Support IphoneIpad3G phonesmartphone
Wireless Standard IEEE 80211bg
Wireless Standard 80211b11Mbps(max) 80211g54Mbps(max)
Wireless Security 64128-bitWEP Encryption
Physical
PanTilt Angle Horizontal270deg amp Vertical 120deg
Infrared Light 10 IR LEDs Night visibility up to 15 Mete
Product size 100(L) x100(W) x125mm(H)
Gross Weight 6465gpcs (packing size196x165x123mm)
Net Weight 2547gpcs (only product)
Power Specification DC 5V25A 18 meter
Power Consumption 5 Watts
Environment
Operate Temper 0deg~ 55degC (14degF~122degF)
Operating Humidity 20 ~ 85 non-condensing
Storage Temper -10degC ~ 60deg (14degF ~140degF)
Storage Humidity 0 ~ 90 non-condensing
PC Requirements
CPU 20GHZ or above (suggested 30GHz)
Memory Size 512MB or above (suggested 10GB)
Display card 64M or above
Supported OS Microsoft Windows XPVistaWindows7
Supported browsers IEfirefoxGoogle
Certification CEFCCRoHS
Warranty Limited 1-year warranty
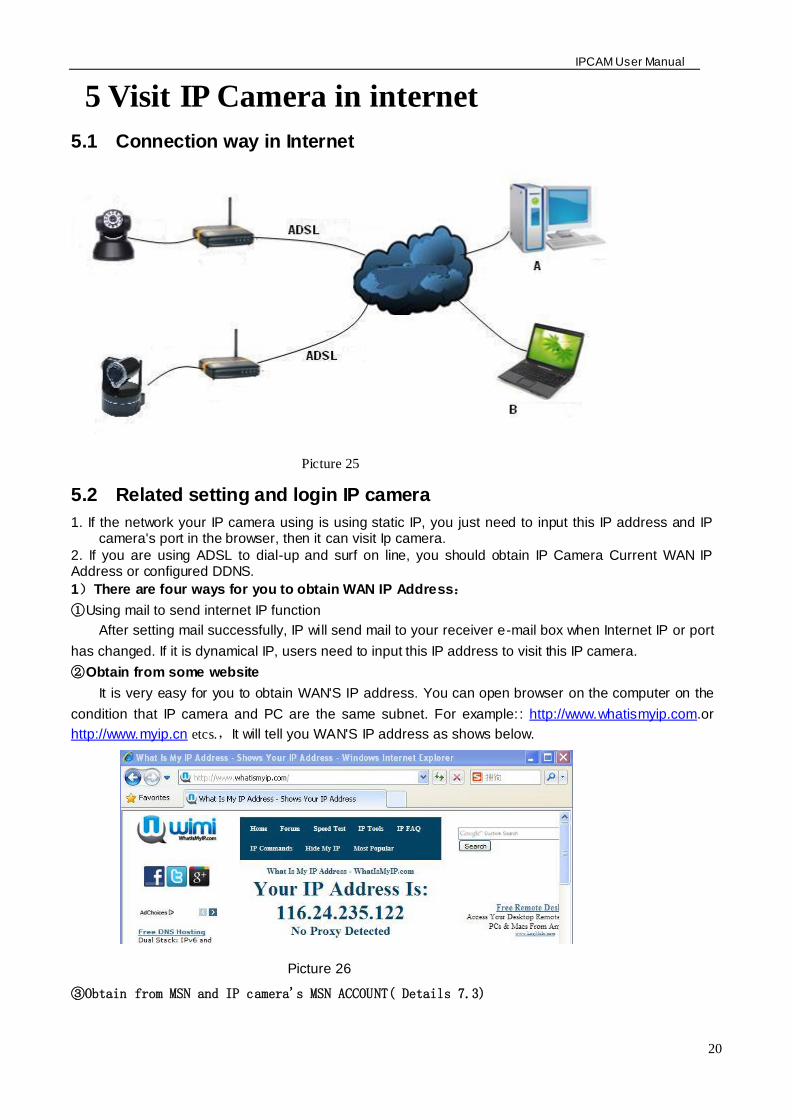
IPCAM User Manual
21
④ Obtain from router
We take Nur8555M from Xinxiang s router as example
AAccording to routers manual we get Routers IP is 19216811
BLogin in router Input 19216811 in the browser Find the status of Router and find Routers
WAN( In this example WANS IP is 11624235122 As shows Picture 27
Picture 27
Now you can visit IP Cam from Internet What you should do is to Input correct IP address For
example Http 116242351228999
Note Make sure the Ports UPNS is available You can open UPNP via the following ways
Enter into Routers setting page( Details Routers user manual) to make UPNP available
Or enable virtual mapping function Add equipment IP address and port to the virtual mapping list
Picture 28
Users can access the Internet from IPCAM device Input address For example Http 116242351228999
2)DDNS (dynamic DNS) service is the Internet domain name can be fixed and dynamic IP address real-time
corresponding (analysis) service Simplely said whenever user surf on internet or what kind of way you are
using the Internet get a what kind of IP address IP address whether it will change DDMS can ensure that a
fixed domain name can access to a users device
IPCAM User Manual
22
Our products have been configured the DDNS services of course you can also apply for the domain name in
registration website for one of your own domain name to configuration For example wwwdyndnsorg
Picture 30
You need fill in DDNS and port for example(httpicam0001ihome365org8999) The browser will jump
to IP camerarsquos login page
Picture 31
DDNS inside
Factory DDNS
IPCAM User Manual
23
The input device user name and password to login to equipment
Picture 32
middotIf input domain name but cant open IP camera in the browser such as the situation is as blows
middotPlease open the device and check status of IP camera in the local area network confirm whether UPNP
function and DDNS is successful or not
Picture 34
IPCAM User Manual
24
middotYou need to set port mapping function successfully to check whether the router UPNP function is
available if It was unavailable please make it available refer to the routers user manual
If you use TPLINK router please refer to these instructions
middotThrough the upnp automatic mapping port to the network input router IP address in the browser (such
as http19216811 gt the router IP addresses are written on paper label on the router house---- please set
according to your own IP address) open the routers page forward rules gt gt upnp set to ensure that the
current state of upnp is already available as below
Note some of the router interface without UPNP Settings option then need to open the virtual server IP
cameras in the local area network of mapping the connection IP address and port number
Picture 36
6 Access IP camera via mobile equipment
such as mobile phoneIpad Etcs There are two kinds of ways to access IP camera One is to input IP address in browser directly It can be IP
address and also can be DDNS Another is to use clients to visit
61 Input IP address in browser
1 We take IPAD as example as blows
IPCAM User Manual
25
middotOpen browser Safari
Input IP cameras IP address for example( httpicam0001ihome365org8999)
Choose language according to your demand and choose login mode according to your browser
Picture39
Choose manual settings
Open browser Safari
Enter the IP address of the IP camera
(httpicam0001ihome365org8999)
IPCAM User Manual
26
enter your account and password on the login page as shown By defaultadministratorrsquos username is
admin and no password
Select Server Refresh mode landing
Picture42
Input the username and password of
the network camera
Here you can choose between two
modes landing
Here to select the
operating language
Default passwordNo password
IPCAM User Manual
27
Select Server Push mode landing
Picture 43
2 Now we take Android system device as example
Open menu and firstly open the browser and input IP camera s IP address in the
browser for example(httpicam0001ihome365org8999)
Picture 44
Input IP cameras username and password and click sign in and then enter into
browser model to choose login-in interface
Open menu
IPCAM User Manual
28
Picture 45
62 Install client-side software to access IPCamera
There are many client software support IP camera several third-party software support our IP cameras too
The following are our manufacture software setup process(the Android version)
1 Pls get the install applications in the CD or you can download from the website
httpsplaygooglecomstoresearchq=reecamampc=apps Choose the right
①installation file-ipcameraapk
running environment Android version 16 or above
Note Please ensure that mobile phones can connect to the Internet before install
② Install method
21 Insert SD card into Android mobile phone
22 Connect the cellphone to computer via USB data cable
23 Choose the USB connection model on your cellphone you can see the SD driver in ldquomy computerrdquo
24 Copy the ipcameraapk into SD card
25 Disconnect the device pls find the ipcameraapk in ldquoFile Managementrdquo and run it
26 The ipcamera application will be show up on the home screen after you successfully installed
③Software operating processes
First ensure that the Internet open WIFI connection the search in the Play in The Googl Android
application reecam
Open the WiFi
connection
Download and install
the application
Search reecam
IPCAM User Manual
29
middotYou can edit the camera modify camere configuration and delete camera operation
Click here to add
a video camera
Select to add to the
client camera
Refresh LAN cameras
View or change the
configuration of the
camera the camera
name at random
IP address
Http port
The default password is blank
Camera name
Prev iew camera
Preview the
camera screen
save the camera
Editor has added
cameras
Edit camera
configuration
Delete the camera Edit camera of the
configuration
IPCAM User Manual
30
middotFor the camera added to the camera list you can watch camera in real time
Control cameras PTZ and set swith-on and switch-off of the cameras audio int
ercom and video
Picture 51
2 The IPCamera setting process for iPhone iPad
Firmware requirements compatible with iPhone iPod touch and iPad
Systerm requirements Requires iOS 42 or above
You can download the genuine
software
(ipcameraapp) form the App Store
httpitunesapplecomcnappreecamid479468959mt=8
middotSoftware operating process is as follows
Continue to add
the camera
Add external network
camera domain
Cameras have
been added
Audiointercom video switch
A list of cameras and
video can be switched to
view
Fingers sliding PTZ control
Click on the picture to stop
rotation
IPCAM User Manual
31
Open the App Store search
reecam
Download and install
reecam
The run has been
installed good reecam
program
Click to add cameras
Search reecam
IPCAM User Manual
32
Fill in the domain address
or IP address
Fill in the Http port of the
camera login user name
and password click next
to open the camera
Completed please
click here
Preview videoclick on the
next save
Save the camera added
Selected camera to
view images
Click image to expand
more cameras
operating functions
IPCAM User Manual
33
7 Other setting
71 Network Setting
711 Basic Network Settings
If the router that the IP camera connect has DHCP function you can choice ldquoObain IP from DHCP Serverrdquo
else fill in the network parameters manually
Http Port In most cases you can leave this value as 80 however if your Internet
Service Provider blocks this port you may switch to another port number such as 85808088889000 Etcs
(Range from 0 to 65535 pay attention to the same segment of multiple devices must set up different port The
port t canrsquot have any conflict with other software or equipment
a Search tools modification in LAN
Figure58
brdquoFor administorrdquo ldquoBasic network settingrdquo -Change the port
Figure59
712 WIFI Setting
1) Please enter the wireless net setting page of the wireless Router to find out SSID
Channel(less than 10) Encryption Authentication as below
Selec IP Camera clickright mouse button choice network configurat ion
Set port number
Set Network IP
Set Http Port Number
IPCAM User Manual
34
Figure 61
As Administrator to Login camera open wireless LAN Settings page fill in every
Setting (ensure keep the same as routerrsquos ) and then pulled out of the cable wireless network function can be
used For example as shown in belows
Figure62
Pls click the scan buttom twice
IPCAM User Manual
35
Figure 63
713 Adhoc point to point Wireless connection Setting
1) Open the basic network setting interfacecheck the device status
Picture 64
2) Open the wireless lan setting interface choose Adhoc for network type you
can define SSID such as 001
remember the IP address of
IP camera and Http port
Click the Settings Ip Camera will
restart and save
Double click to choose
Fill the encryption and
routers and key in the
same way
IPCAM User Manual
36
Picture 65
3) Unplug the RJ45 from IP camera Use laptop or other devices which are with
wifi function( include smart phoneipad and so on) searching the SSID you defined
on proccess 2then make a connection
Picture 66
middotClick wireless network and check the link status of ip camera Please note IP
address of your connected laptop must be the subset of your ip camera if not
please reset the ip address of your laptop manually
Picture 67
4) Now we can use the ip camera tool or enter ip address of camera derectly in
browser blank to visit
1 visit by ip camera tool
Picture 68
IPCAM User Manual
37
2Enter ip address in the browser
Enter user name and password in the login interface
Picture 69
Click ldquoSign inrdquoand vis it
Picture 70
IPCAM User Manual
38
72 Multi-Device Settings
Add cameras in LAN
In the Multi-Device Settings page you can see all devices searched in LAN The 1
St Device is this device in default You can add more cameras list in LAN for monitoring This Web software
supports up to 9 IP Cameras online simultaneous ly Click ldquoThe 2ND
Devicerdquo and Double click the item in the ldquoDevice List in LANrdquo AliasHost and Http Port
will fill in automatically Enter the correct username and password then click ldquoaddrdquoAdd
more cameras in the same way At last please donrsquot forget the ldquo settingrdquo Button
Picture 71
Add cameras in the Internet
Firstly make sure the camera added can access in the Internet with the IP address or
DDNS domain Like this http2191332001669999or httpIPcamdyndnsorg9999You can enter the
Host 219133200166 Http port 9999 or Host IPcamdyndnsorg Http port 9999 Enter the correct
username and password then click ldquoaddrdquo Add more cameras in the
same way
Picture 72
IPCAM User Manual
39
Picture 73
73 MSN Settings
Fill in your MSN account and password then add account which need to receive
IPCAMrsquoS ip address to IPCAM‟ S MSN list (Picture 67)click submit then yoursquod better
restart IP camera After it login your MSN to add IPCAMrsquos MSN account to MSN List that
you can receive IPCAMrsquos ip address
Picture 74
First login and click add contacts choose Add Contact then fill IPCAMrsquos MSN account in instant
messaging address click next then send offers
Aplly for MSN account and passworf for IP cam
Add about 10 MSN Accout
IPCAM User Manual
40
Figure75
Next
Figure76
Figure77
When IPCAMrsquos MSN account shows online you can chat with it input path command url camera
account will show its IP address in chatting box promptly as below
IPCAM User Manual
41
Picture 78
You can input the IP address to browser then can browse ip camera as below
Figure79
AttentionYou should fill MSN account in IPCAM first
74 DDNS Service Settings
DDNS Service The system supports protocols from some DDNS providers Dyndnsorg System support
DDNS such as topipcamorgpeanut shell3322orgDynDNS
provided IP
IPCAM User Manual
42
User and Password the user name and password used when applying for the domain
name (details 432)
DDNS Host the Domain Name
741 Factory DDNS
Device had distributed one DDNS to every productwhich was sticked the bottom
of the product Such as
manufacturer had already give every device a DDNS address which is unique Users only need to fill in this
DDNS IP ADDRESS and port in the browser then they can monitor remote IP camera
Picture 80 Factory DDNS
Note When use the domain name access to the camera and UPNP is not successful you must set port
mapping function on routers
742 The third part DDNS
Users can use not only Factory DDSN but also can use third part DDNS System Such as domain name
wwwdyndnsorg The only thing the user need to do is to apply a free DDNS and then fill in ldquoset boxrdquo as below
Save this setting and this DDNS can be used
DDNS Hostname
Factory DDNS
IPCAM User Manual
43
Note the third party domain name is the realization of analytical way input the domain in the browser it will
keep this string of characters If the port of the device isnrsquot 80 then need to add colon and port number For
example httpwell888dyndnsorg8999
75 Mail and FTP Service
1)Configure the E-mail box to receive and send mails The E-mail box is used for receiving
the images sent after alarm and the system IP address after successful dial-up
Note When Alarm Service Settings-gt Send Mail on Alarm is check the Mail
Service takes effect
Picture82
Configure the E-mail box to receive and send mails The E-mail box is used for receiving the images sent
after alarm and the system IP address after successful dial-up
Sender This device use the sender mailbox to send mails
Receiver To receive the mail from the Sender You can set up to 4 receiver mailbox
SMTP Server the SMTP server for the sender mailbox
Need Authentication if the sender mailbox need authentication you should check it then
input the SMTP username amp Password
Mail test Please set the Mail parameter and click Submit first There are Mail test result
Picture 83
video Local storage in PC after alarm monitoring
IPCAM User Manual
44
Gmail also set as the same It only needs you to fill in correct SMTP Sever address user and password
Picture 84
Mail notes Internet IP address In this option When Internet IP and port have changed IP Will be sent via
1Can not connect to the server
2Network Error Please try later
3Server Error
4Incorrect user or password
5The sender is denied by the server Maybe the server need to authenticate the user please check it
and try again
6The receiver is denied by the server Maybe because of the anti-spam privacy of the server
7The message is denied by the server Maybe because of the anti-spam privacy of the server
8The server does not support the authentication mode used by the device
Report Internet IP by Mail When ipcam port or Internet IP changed it will send the internet IP by
mail(for example IPCAM s url is http119123207969002) Make sure the port is map to the router
correctly by UPNP or Virtual Map function
2) FTP Server use and settings
middotIf you already have an FTP Server (ipcam com)and email ipcam you can fill the
parameters as below
Picture 85
IPCAM User Manual
45
middotFTP Server of LAN as below
1 Create an account
2 Step by step setting until finish it
Picture 88
IPCAM User Manual
46
3Start Server
Continue to finish it
Picture 89
4IPCAMrsquoS account can be used
Picture 90
Save path
This is a FTP
server address
IPCAM User Manual
47
5 IP camerarsquos FTP Server set like this
Picture 91
6 Set up and complete testing is successfulwhen it alarms IP camera will upload
pictures to the FTP server Settings of main directory path (as shown )
Picture 92
FTP Server the FTP server address
FTP port the port usually is 21
FTP Mode support standard(POST) mode and passive(PASV) mode
Upload Image Now it will upload image now when checkbox is not checked When checked you can
input upload interval(Seconds)
76 Motion Detection
Enter Alarm Service Settings page to configure Motion Detection function
1) Motion Detect Armed
Each alarm triggers in the protection of time the device will take various measures to alarm
IO linkage alarm output relay closure external alarm device began to alarm
IPCAM User Manual
48
Send E-mail alarm informatio
Transmit pictures to the FTP server and can set the time interval of sending pictures
2) Alarm t ime Settings
Only in the alarm period detection device to alarm will only have alarm action All the time (not check the
schedule) also can alarm within specified time For the specified time alarm firstly need to set up the system
time time zone and then to choose period of alarm in the state of alarm setting as shown in Picture 19
Picture93 Alarm of time Settings interface
Motion Detect Armed
When you enable motion detect armed the camera can be triggered to send email alerts
and record images In the camera monitoring page the green icon turn to red and an
alert sound you will hear
Motion Detect Sensibility
You can choose from low to high 10 level alarm sensitivity The greater the number the higher the
sensitivity
Alarm Input Armed
IO PINS1) Output(+5V) 2) Output 3) Alarm input 4) Input (GND)
Input Pins The input pins can be used for 1-way external sensor input(pin3 and pin4) For example
you may connect a Person Infrared Sensor (PIR) to it for motion detection When external sensor
triggered IPCAM can be programmed to send an email with picture or control the internal relay output
IPCAM User Manual
49
Picture94
IO Linkage on Alarm
Enable IO linkage on alarmPin1 will output +5V when alarm triggered and output LOW
when alarm release automatically
Switch onoff buttons control Pin1 output manually
Send Mail on Alarm
Sent picture and mail inform to customers e-mail after alarmed(firstly you should finish
the Mail Service Settings)
Picture 95
Upload Image on Alarm
Enable upload image on alarm and set upload interval(Seconds)
Tick send to your setted mails
IPCAM User Manual
50
Picture 96
REC automatically and save to PC
When you enable motion detect and open the camera monitoring page on the PC If
there is an alarm triggered REC will start automatically for several seconds and save to
the PC
Picture 97
REC save to pcrsquos position
Picture 98
Storage path can be changed
After Setting up later when have the
alarm the image will send to
designated email and FTP server
IPCAM User Manual
51
77 IP cameras Time amp Date setting and PTZ Setting
If IP camera connected with Internet it can automatically check the time amp date via running NTP Server And
need to choose properly IP cameras Time zone Otherwise it need PC Time to check IP camera time amp Date
Pre-set and Speed of PT
78 UPGRADE DEVICE FIRMWARE
Picture 101 Firmware upgrade
IP CAMERA has two kinds of programme One is system firmware another is application firmware It can be
upgraded separately
79 BACKUP AND RESTORE SETTING
Click Set in the Backup will lead to a BIN file and choose this file to restore setting
The huger the Number is The
slower it will be
IPCAM User Manual
52
8 APPENDIX
81 REGISTER AND APPLY FOR DDNS SERVICE
1Users use DDNS management system first timeUsers need to apply account to manage
and inquire the domain state
Step1 enter httpwwwdyndnscom and Create Account( Fill in Domain Name dyndnsorg then Click
Add)
Figure103
Step2 enter your information
Figure104
IPCAM User Manual
53
Figure105
Step3 After a minute you will receive an E-mail from DynDNS Support and it will give you a
confirmation address
(eg httpsaccountdyncomemlcreateconflILHMZHRje5oF_6YXTYv1A
Figure106
IPCAM User Manual
54
Step4 Open the link to active your Domain Name as belowLogin in your account after it is activated
Figure107
Step5 Check all the DDNS serviceswe choose the 14-day-trial
Figure108
Step6 Click the linkand user will see as below
IPCAM User Manual
55
middotenter your information
Figure109
Step7 Now you obtained a Dynamic Domain Name(Figure 105)and can use it in the DDNS Service
Settings(details 74)
Figure110
IPCAM User Manual
56
2For DDNS which is applied successfully you can fill in the IP CAMERA When set successfully the status
of IP will be shown as blows
picture 111
picture 112
3How to set DDNS on line
The first wayMenu rdquostartrdquo- ldquorunrdquomdashgt Input CMDClink rdquoenterrdquoIt can check DDNS Statas
via As shown below
Picture 113
IPCAM User Manual
57
Through the PING command this dynamic domain name can be back in the network response information It
proves that the domain name has been online
If the domain name update not success Possible reasons
(1) DDNS parameter is not correct (2) may cause DNS address configuration is wrong
82 Some special application for IPCAMERA
IPCamUse some grammar parameter control and Use IPCam
useruser
pwdpassword
priThe current access (1 visitors 23 operator managers)
resolutionImage resolution(832024 0qvga32640480 vga)
ratemage transmission speed and scope 0-23
brightnessbrightness0~255
contrastcontrast0~6
mode
Mode 050 hz For
60 hz 2 outdoor
flip
Flip rotation 0 primitive 1 vertical reverses 2 horizontal 3 vertical flip + horizontal
821 The flow media player VLC player and mplayer can real-time broadcast ipcamera and send
of streaming media format video data
(Grammar parametersvideostreamasfuser=amppwd=ampresolution=amprate=)
As shown Picture 113 rdquoIpcamrdquo
Picture 114
IPCAM User Manual
58
From the following picture we can view that Ipcam local IP address ishttp19216811118999
WAN IP Address is httpwell888dyndnsorg8999 we can inputrdquoIPcamrdquorsquoS IP address to
open in the player
Picture 115
the CLC media player open play position
Picture 116
LAN play address
Picture 117
IPCAM User Manual
59
Picture 118
Open the Internet play position
Picture 119
As shown in the following picture It can see the ipcamera send video streaming format
Size 640X480
User
IPCAM User Manual
60
Picture 120
83 Frequently Asked Questions
Note1) Any question you would meet please check Network connections firstly
2)Check the working status revealed by the indicators on the network server hub exchange and
network card If abnormal check the network connections
831 I have forgotten the administrator username andor password
To reset the administrator username and password Press and hold down the RESET
BUTTON for 5 seconds Release the power button and the username and password
will be reset back to the factory default administrator username and password
Default administrator username admin
Default administrator password No password
832 IP Address configuration
Check whether IP address of the IP Camera server shares the same subnet as your
work station Click My Computer gt Control PanelgtNetwork amp Dial-up Connections gt
LAN gt Attributes gtInternet Protocols (TCPIP) and check IP Address and Subnet
Mask Make sure they are in the same subnet when configuring IP Camera IP
address manuallyUnable to access IP Camera via web browser
833 Network Configuration
Double Check to ensure that your HTTP server software is configured and running
properly If you are running any firewall software make sure it is allowing inbound
connections to port 80Also if you happen to be using a cableDSL router make sure
IPCAM User Manual
61
you are set up port forwarding properly ( consult your router is documentation for more
information ) If none of these seem to be the problem it is also possible that your
ISP is blocking inbound connections to port 80 ndashmany IPSs have done this because
of internet worms such as Code Red If this is the case you bdquoll have to setup your
HTTP server on an alternate port (such as 8080)
834 No Monitoring picture
It has four reasons Images of the abnormal factors
1If its not use Directx function and lead to not normal to display the color imagePlease
install DirectX and open the start menu then input the command
Picture 121
You use the DirectX function and it will expedite the DirectDrawDirect3D and AGP if its can not maybe the
connect issues or hardware not read it
2The issues of hardware canrsquot support the card expedite image
3The antivirus software will influence the network it will be stoped or closedIf you install fireproof software
please close it and try again
4 ActiveX controller is not installed correctly
If its not image on the first time to use and will display to the user through the ActiveXIf its can not
display of the image maybe it fail of install about this issues please follow as
1Install ldquoIP Camera Toolrdquo ActiveX control at the same time
2Please install ActiveX control and keep the security settings for IE browser
835 Problems with network bandwidth
The image frame rate is subjected to the following factors 1network bandwidth 2 PC
performancenetwork environment and display preference setting (brightness theme
etc) 3 the number of visitors (Too many visitors will slow down the image frame rate) 4
choice of switch or hub (Use a switch for multiple IP Camera Servers rather than a HUB)
The Device use MJEPT Compression it needs good network bandwidth If it is too narrow it will lead to slowly
browser Typical video parameter occupy network bandwidth as blows
640x48030fps 40 Megabits ~ 50 Megabits
320x24030fps 12 Megabits ~ 16 Megabits
IPCAM User Manual
62
middot836 Why pop-up the prompt ldquoFail to connect to the devicehelliprdquo
This prompt only appeared in the case of using multiple cameras
Enter the Multi-Device Settings page(login as administrator) to check the
Device setting is correct or not
When one of the multiple cameras disconnected the color changed to
yellow and pop-up the promptldquoFail to connect to the devicehelliprdquo
Picture 122
837 Canrsquot access the IPCAM in the internet
There are some reasons
1 ActiveX controller is not installed correctly(see more details 514)
2 The port IPCAM used is blocked by Firewall or Anti-virus software Please change a
port number and try again
3 Port mapping is not success You can do port mapping by two ways
Enter setting page of the router which IPCAM connect with to enable UPnP function
Enter IPCAM ldquoUPnP Settingsrdquo to enable UPnP and make sure the state is ldquoUPnP
successrdquo
‟ s IP
and port to the Virtual map list
When use ADSL the IP is dynamic You should set DDNS(see more details 74 amp 80)
and also make sure port mapping success
84 Operate common problem solving
IP camera tool canrsquot find the camera
Except of the camera broken
1 Make sure the cable connector no problem recommend connector
(AMP)it is with international standard Another note IPCAMrsquos data
transmission channel require higher than computerrsquos so maybe the
IPCAM User Manual
63
computer can run normally but IPCAM canrsquot Please press heavily when making the cable connector
2 Confirm the power supply normally First check whether power indication
light turn on or not If it is onthen check the yellow light on RJ45 Port
(power indication light) and green light (network indication light) are on or
notIf they are onso power supply and cable runs normally
3 Confirm all the firwall and antivirus software are closeThe firewall often
block unrecognized data so if the firewall is running so maybe the IPCAM
TOOL canrsquot find the deviceSuggest to close firewall and antivirus
software temporarily before searching
How to solve the camera blank screen
1 Check if you are using the wrong power adaptorplease use original one
2 Close antivirus software
How to solve the camera canrsquot login by Internet
1 Check if you set DDNS success or not
2 Check the current IPCAMrsquos port number is the same as routerrsquosThey need to keep same
Canrsquot view the monitoring picture
1 Reason canrsquot connect with network
SolutionCheck if the network connect well exclude cable fault and PC virus
cause network fault until can be used between PC and PING
2 ReasonIP address occupy by other device
Solution Choose automatic gain
3 Reason IP address located within different subnet
Solution Check IPCAMrsquoS ip address and subnet mask address and gateway settings
4 ReasonWeb port has been modified
Solutioncontact network administrator to obtain port information
5 Reasonunknown
SolutionPress reset button to factory default statethen reconnectingsysten
default to gain ip address automaticsubnet mask is 2552552550
85 Default Parameters
middotDefault network Parameters
IP address dynamic obtain
Subnet mask 2552552550
Gateway dynamic obtain
DDNS Factory provide
middotUsername and password
Default administrator username admin
Default administrator password No password
IPCAM User Manual
64
86 Technical Parameters
ITEM IP CAM (NIP-02BGPWA2)
Image Sensor
Mage sensor 15 Color CMOS Sensor
Display 640 x 480 (300K Pixels)
Lens f36mm F24 (IR Lens)
Miniillumination 05 Lux
Lens Lens Type Glass Lens
Viewing Angle 60 Degree
Audio Microphone Audio of two way
Domain name Server MSN server DDNS server
Video
Image Compression MJPEG
Image Frame Rate 15 FPS(VGA)30FPS(QVGA)
Resolution 640 x 480(VGA) 320 x 240(QVGA)
Flip Mirror Images rtical Horizontal
mode 50Hz 60Hz or Outdoor
Video Parameters Brightness Contrast
Communication
Ethernet One 10100Mbps RJ-45
Supported Protocol HTTPDHCPIPTCPUDPFTPSMTPDDNSPPPoEUPnP
Mobilephone monitor Support IphoneIpad3G phonesmartphone
Wireless Standard IEEE 80211bg
Wireless Standard 80211b11Mbps(max) 80211g54Mbps(max)
Wireless Security 64128-bitWEP Encryption
Physical
PanTilt Angle Horizontal270deg amp Vertical 120deg
Infrared Light 10 IR LEDs Night visibility up to 15 Mete
Product size 100(L) x100(W) x125mm(H)
Gross Weight 6465gpcs (packing size196x165x123mm)
Net Weight 2547gpcs (only product)
Power Specification DC 5V25A 18 meter
Power Consumption 5 Watts
Environment
Operate Temper 0deg~ 55degC (14degF~122degF)
Operating Humidity 20 ~ 85 non-condensing
Storage Temper -10degC ~ 60deg (14degF ~140degF)
Storage Humidity 0 ~ 90 non-condensing
PC Requirements
CPU 20GHZ or above (suggested 30GHz)
Memory Size 512MB or above (suggested 10GB)
Display card 64M or above
Supported OS Microsoft Windows XPVistaWindows7
Supported browsers IEfirefoxGoogle
Certification CEFCCRoHS
Warranty Limited 1-year warranty
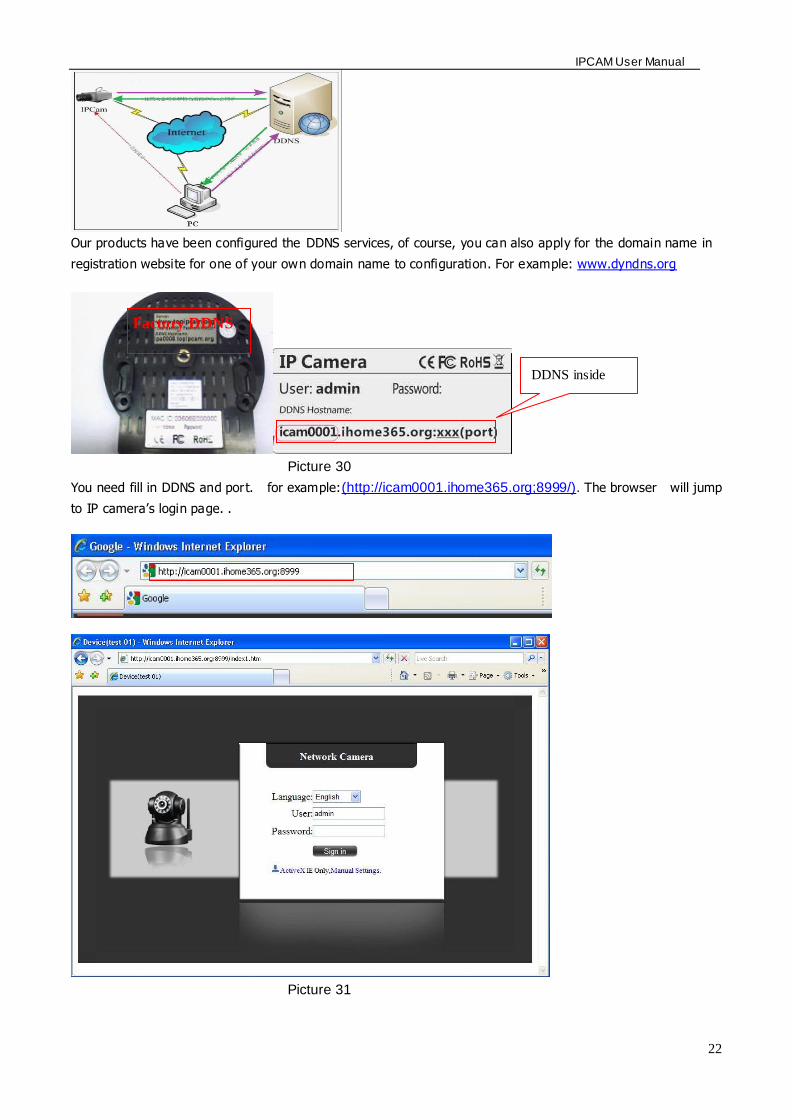
IPCAM User Manual
24
middotYou need to set port mapping function successfully to check whether the router UPNP function is
available if It was unavailable please make it available refer to the routers user manual
If you use TPLINK router please refer to these instructions
middotThrough the upnp automatic mapping port to the network input router IP address in the browser (such
as http19216811 gt the router IP addresses are written on paper label on the router house---- please set
according to your own IP address) open the routers page forward rules gt gt upnp set to ensure that the
current state of upnp is already available as below
Note some of the router interface without UPNP Settings option then need to open the virtual server IP
cameras in the local area network of mapping the connection IP address and port number
Picture 36
6 Access IP camera via mobile equipment
such as mobile phoneIpad Etcs There are two kinds of ways to access IP camera One is to input IP address in browser directly It can be IP
address and also can be DDNS Another is to use clients to visit
61 Input IP address in browser
1 We take IPAD as example as blows
IPCAM User Manual
25
middotOpen browser Safari
Input IP cameras IP address for example( httpicam0001ihome365org8999)
Choose language according to your demand and choose login mode according to your browser
Picture39
Choose manual settings
Open browser Safari
Enter the IP address of the IP camera
(httpicam0001ihome365org8999)
IPCAM User Manual
26
enter your account and password on the login page as shown By defaultadministratorrsquos username is
admin and no password
Select Server Refresh mode landing
Picture42
Input the username and password of
the network camera
Here you can choose between two
modes landing
Here to select the
operating language
Default passwordNo password
IPCAM User Manual
27
Select Server Push mode landing
Picture 43
2 Now we take Android system device as example
Open menu and firstly open the browser and input IP camera s IP address in the
browser for example(httpicam0001ihome365org8999)
Picture 44
Input IP cameras username and password and click sign in and then enter into
browser model to choose login-in interface
Open menu
IPCAM User Manual
28
Picture 45
62 Install client-side software to access IPCamera
There are many client software support IP camera several third-party software support our IP cameras too
The following are our manufacture software setup process(the Android version)
1 Pls get the install applications in the CD or you can download from the website
httpsplaygooglecomstoresearchq=reecamampc=apps Choose the right
①installation file-ipcameraapk
running environment Android version 16 or above
Note Please ensure that mobile phones can connect to the Internet before install
② Install method
21 Insert SD card into Android mobile phone
22 Connect the cellphone to computer via USB data cable
23 Choose the USB connection model on your cellphone you can see the SD driver in ldquomy computerrdquo
24 Copy the ipcameraapk into SD card
25 Disconnect the device pls find the ipcameraapk in ldquoFile Managementrdquo and run it
26 The ipcamera application will be show up on the home screen after you successfully installed
③Software operating processes
First ensure that the Internet open WIFI connection the search in the Play in The Googl Android
application reecam
Open the WiFi
connection
Download and install
the application
Search reecam
IPCAM User Manual
29
middotYou can edit the camera modify camere configuration and delete camera operation
Click here to add
a video camera
Select to add to the
client camera
Refresh LAN cameras
View or change the
configuration of the
camera the camera
name at random
IP address
Http port
The default password is blank
Camera name
Prev iew camera
Preview the
camera screen
save the camera
Editor has added
cameras
Edit camera
configuration
Delete the camera Edit camera of the
configuration
IPCAM User Manual
30
middotFor the camera added to the camera list you can watch camera in real time
Control cameras PTZ and set swith-on and switch-off of the cameras audio int
ercom and video
Picture 51
2 The IPCamera setting process for iPhone iPad
Firmware requirements compatible with iPhone iPod touch and iPad
Systerm requirements Requires iOS 42 or above
You can download the genuine
software
(ipcameraapp) form the App Store
httpitunesapplecomcnappreecamid479468959mt=8
middotSoftware operating process is as follows
Continue to add
the camera
Add external network
camera domain
Cameras have
been added
Audiointercom video switch
A list of cameras and
video can be switched to
view
Fingers sliding PTZ control
Click on the picture to stop
rotation
IPCAM User Manual
31
Open the App Store search
reecam
Download and install
reecam
The run has been
installed good reecam
program
Click to add cameras
Search reecam
IPCAM User Manual
32
Fill in the domain address
or IP address
Fill in the Http port of the
camera login user name
and password click next
to open the camera
Completed please
click here
Preview videoclick on the
next save
Save the camera added
Selected camera to
view images
Click image to expand
more cameras
operating functions
IPCAM User Manual
33
7 Other setting
71 Network Setting
711 Basic Network Settings
If the router that the IP camera connect has DHCP function you can choice ldquoObain IP from DHCP Serverrdquo
else fill in the network parameters manually
Http Port In most cases you can leave this value as 80 however if your Internet
Service Provider blocks this port you may switch to another port number such as 85808088889000 Etcs
(Range from 0 to 65535 pay attention to the same segment of multiple devices must set up different port The
port t canrsquot have any conflict with other software or equipment
a Search tools modification in LAN
Figure58
brdquoFor administorrdquo ldquoBasic network settingrdquo -Change the port
Figure59
712 WIFI Setting
1) Please enter the wireless net setting page of the wireless Router to find out SSID
Channel(less than 10) Encryption Authentication as below
Selec IP Camera clickright mouse button choice network configurat ion
Set port number
Set Network IP
Set Http Port Number
IPCAM User Manual
34
Figure 61
As Administrator to Login camera open wireless LAN Settings page fill in every
Setting (ensure keep the same as routerrsquos ) and then pulled out of the cable wireless network function can be
used For example as shown in belows
Figure62
Pls click the scan buttom twice
IPCAM User Manual
35
Figure 63
713 Adhoc point to point Wireless connection Setting
1) Open the basic network setting interfacecheck the device status
Picture 64
2) Open the wireless lan setting interface choose Adhoc for network type you
can define SSID such as 001
remember the IP address of
IP camera and Http port
Click the Settings Ip Camera will
restart and save
Double click to choose
Fill the encryption and
routers and key in the
same way
IPCAM User Manual
36
Picture 65
3) Unplug the RJ45 from IP camera Use laptop or other devices which are with
wifi function( include smart phoneipad and so on) searching the SSID you defined
on proccess 2then make a connection
Picture 66
middotClick wireless network and check the link status of ip camera Please note IP
address of your connected laptop must be the subset of your ip camera if not
please reset the ip address of your laptop manually
Picture 67
4) Now we can use the ip camera tool or enter ip address of camera derectly in
browser blank to visit
1 visit by ip camera tool
Picture 68
IPCAM User Manual
37
2Enter ip address in the browser
Enter user name and password in the login interface
Picture 69
Click ldquoSign inrdquoand vis it
Picture 70
IPCAM User Manual
38
72 Multi-Device Settings
Add cameras in LAN
In the Multi-Device Settings page you can see all devices searched in LAN The 1
St Device is this device in default You can add more cameras list in LAN for monitoring This Web software
supports up to 9 IP Cameras online simultaneous ly Click ldquoThe 2ND
Devicerdquo and Double click the item in the ldquoDevice List in LANrdquo AliasHost and Http Port
will fill in automatically Enter the correct username and password then click ldquoaddrdquoAdd
more cameras in the same way At last please donrsquot forget the ldquo settingrdquo Button
Picture 71
Add cameras in the Internet
Firstly make sure the camera added can access in the Internet with the IP address or
DDNS domain Like this http2191332001669999or httpIPcamdyndnsorg9999You can enter the
Host 219133200166 Http port 9999 or Host IPcamdyndnsorg Http port 9999 Enter the correct
username and password then click ldquoaddrdquo Add more cameras in the
same way
Picture 72
IPCAM User Manual
39
Picture 73
73 MSN Settings
Fill in your MSN account and password then add account which need to receive
IPCAMrsquoS ip address to IPCAM‟ S MSN list (Picture 67)click submit then yoursquod better
restart IP camera After it login your MSN to add IPCAMrsquos MSN account to MSN List that
you can receive IPCAMrsquos ip address
Picture 74
First login and click add contacts choose Add Contact then fill IPCAMrsquos MSN account in instant
messaging address click next then send offers
Aplly for MSN account and passworf for IP cam
Add about 10 MSN Accout
IPCAM User Manual
40
Figure75
Next
Figure76
Figure77
When IPCAMrsquos MSN account shows online you can chat with it input path command url camera
account will show its IP address in chatting box promptly as below
IPCAM User Manual
41
Picture 78
You can input the IP address to browser then can browse ip camera as below
Figure79
AttentionYou should fill MSN account in IPCAM first
74 DDNS Service Settings
DDNS Service The system supports protocols from some DDNS providers Dyndnsorg System support
DDNS such as topipcamorgpeanut shell3322orgDynDNS
provided IP
IPCAM User Manual
42
User and Password the user name and password used when applying for the domain
name (details 432)
DDNS Host the Domain Name
741 Factory DDNS
Device had distributed one DDNS to every productwhich was sticked the bottom
of the product Such as
manufacturer had already give every device a DDNS address which is unique Users only need to fill in this
DDNS IP ADDRESS and port in the browser then they can monitor remote IP camera
Picture 80 Factory DDNS
Note When use the domain name access to the camera and UPNP is not successful you must set port
mapping function on routers
742 The third part DDNS
Users can use not only Factory DDSN but also can use third part DDNS System Such as domain name
wwwdyndnsorg The only thing the user need to do is to apply a free DDNS and then fill in ldquoset boxrdquo as below
Save this setting and this DDNS can be used
DDNS Hostname
Factory DDNS
IPCAM User Manual
43
Note the third party domain name is the realization of analytical way input the domain in the browser it will
keep this string of characters If the port of the device isnrsquot 80 then need to add colon and port number For
example httpwell888dyndnsorg8999
75 Mail and FTP Service
1)Configure the E-mail box to receive and send mails The E-mail box is used for receiving
the images sent after alarm and the system IP address after successful dial-up
Note When Alarm Service Settings-gt Send Mail on Alarm is check the Mail
Service takes effect
Picture82
Configure the E-mail box to receive and send mails The E-mail box is used for receiving the images sent
after alarm and the system IP address after successful dial-up
Sender This device use the sender mailbox to send mails
Receiver To receive the mail from the Sender You can set up to 4 receiver mailbox
SMTP Server the SMTP server for the sender mailbox
Need Authentication if the sender mailbox need authentication you should check it then
input the SMTP username amp Password
Mail test Please set the Mail parameter and click Submit first There are Mail test result
Picture 83
video Local storage in PC after alarm monitoring
IPCAM User Manual
44
Gmail also set as the same It only needs you to fill in correct SMTP Sever address user and password
Picture 84
Mail notes Internet IP address In this option When Internet IP and port have changed IP Will be sent via
1Can not connect to the server
2Network Error Please try later
3Server Error
4Incorrect user or password
5The sender is denied by the server Maybe the server need to authenticate the user please check it
and try again
6The receiver is denied by the server Maybe because of the anti-spam privacy of the server
7The message is denied by the server Maybe because of the anti-spam privacy of the server
8The server does not support the authentication mode used by the device
Report Internet IP by Mail When ipcam port or Internet IP changed it will send the internet IP by
mail(for example IPCAM s url is http119123207969002) Make sure the port is map to the router
correctly by UPNP or Virtual Map function
2) FTP Server use and settings
middotIf you already have an FTP Server (ipcam com)and email ipcam you can fill the
parameters as below
Picture 85
IPCAM User Manual
45
middotFTP Server of LAN as below
1 Create an account
2 Step by step setting until finish it
Picture 88
IPCAM User Manual
46
3Start Server
Continue to finish it
Picture 89
4IPCAMrsquoS account can be used
Picture 90
Save path
This is a FTP
server address
IPCAM User Manual
47
5 IP camerarsquos FTP Server set like this
Picture 91
6 Set up and complete testing is successfulwhen it alarms IP camera will upload
pictures to the FTP server Settings of main directory path (as shown )
Picture 92
FTP Server the FTP server address
FTP port the port usually is 21
FTP Mode support standard(POST) mode and passive(PASV) mode
Upload Image Now it will upload image now when checkbox is not checked When checked you can
input upload interval(Seconds)
76 Motion Detection
Enter Alarm Service Settings page to configure Motion Detection function
1) Motion Detect Armed
Each alarm triggers in the protection of time the device will take various measures to alarm
IO linkage alarm output relay closure external alarm device began to alarm
IPCAM User Manual
48
Send E-mail alarm informatio
Transmit pictures to the FTP server and can set the time interval of sending pictures
2) Alarm t ime Settings
Only in the alarm period detection device to alarm will only have alarm action All the time (not check the
schedule) also can alarm within specified time For the specified time alarm firstly need to set up the system
time time zone and then to choose period of alarm in the state of alarm setting as shown in Picture 19
Picture93 Alarm of time Settings interface
Motion Detect Armed
When you enable motion detect armed the camera can be triggered to send email alerts
and record images In the camera monitoring page the green icon turn to red and an
alert sound you will hear
Motion Detect Sensibility
You can choose from low to high 10 level alarm sensitivity The greater the number the higher the
sensitivity
Alarm Input Armed
IO PINS1) Output(+5V) 2) Output 3) Alarm input 4) Input (GND)
Input Pins The input pins can be used for 1-way external sensor input(pin3 and pin4) For example
you may connect a Person Infrared Sensor (PIR) to it for motion detection When external sensor
triggered IPCAM can be programmed to send an email with picture or control the internal relay output
IPCAM User Manual
49
Picture94
IO Linkage on Alarm
Enable IO linkage on alarmPin1 will output +5V when alarm triggered and output LOW
when alarm release automatically
Switch onoff buttons control Pin1 output manually
Send Mail on Alarm
Sent picture and mail inform to customers e-mail after alarmed(firstly you should finish
the Mail Service Settings)
Picture 95
Upload Image on Alarm
Enable upload image on alarm and set upload interval(Seconds)
Tick send to your setted mails
IPCAM User Manual
50
Picture 96
REC automatically and save to PC
When you enable motion detect and open the camera monitoring page on the PC If
there is an alarm triggered REC will start automatically for several seconds and save to
the PC
Picture 97
REC save to pcrsquos position
Picture 98
Storage path can be changed
After Setting up later when have the
alarm the image will send to
designated email and FTP server
IPCAM User Manual
51
77 IP cameras Time amp Date setting and PTZ Setting
If IP camera connected with Internet it can automatically check the time amp date via running NTP Server And
need to choose properly IP cameras Time zone Otherwise it need PC Time to check IP camera time amp Date
Pre-set and Speed of PT
78 UPGRADE DEVICE FIRMWARE
Picture 101 Firmware upgrade
IP CAMERA has two kinds of programme One is system firmware another is application firmware It can be
upgraded separately
79 BACKUP AND RESTORE SETTING
Click Set in the Backup will lead to a BIN file and choose this file to restore setting
The huger the Number is The
slower it will be
IPCAM User Manual
52
8 APPENDIX
81 REGISTER AND APPLY FOR DDNS SERVICE
1Users use DDNS management system first timeUsers need to apply account to manage
and inquire the domain state
Step1 enter httpwwwdyndnscom and Create Account( Fill in Domain Name dyndnsorg then Click
Add)
Figure103
Step2 enter your information
Figure104
IPCAM User Manual
53
Figure105
Step3 After a minute you will receive an E-mail from DynDNS Support and it will give you a
confirmation address
(eg httpsaccountdyncomemlcreateconflILHMZHRje5oF_6YXTYv1A
Figure106
IPCAM User Manual
54
Step4 Open the link to active your Domain Name as belowLogin in your account after it is activated
Figure107
Step5 Check all the DDNS serviceswe choose the 14-day-trial
Figure108
Step6 Click the linkand user will see as below
IPCAM User Manual
55
middotenter your information
Figure109
Step7 Now you obtained a Dynamic Domain Name(Figure 105)and can use it in the DDNS Service
Settings(details 74)
Figure110
IPCAM User Manual
56
2For DDNS which is applied successfully you can fill in the IP CAMERA When set successfully the status
of IP will be shown as blows
picture 111
picture 112
3How to set DDNS on line
The first wayMenu rdquostartrdquo- ldquorunrdquomdashgt Input CMDClink rdquoenterrdquoIt can check DDNS Statas
via As shown below
Picture 113
IPCAM User Manual
57
Through the PING command this dynamic domain name can be back in the network response information It
proves that the domain name has been online
If the domain name update not success Possible reasons
(1) DDNS parameter is not correct (2) may cause DNS address configuration is wrong
82 Some special application for IPCAMERA
IPCamUse some grammar parameter control and Use IPCam
useruser
pwdpassword
priThe current access (1 visitors 23 operator managers)
resolutionImage resolution(832024 0qvga32640480 vga)
ratemage transmission speed and scope 0-23
brightnessbrightness0~255
contrastcontrast0~6
mode
Mode 050 hz For
60 hz 2 outdoor
flip
Flip rotation 0 primitive 1 vertical reverses 2 horizontal 3 vertical flip + horizontal
821 The flow media player VLC player and mplayer can real-time broadcast ipcamera and send
of streaming media format video data
(Grammar parametersvideostreamasfuser=amppwd=ampresolution=amprate=)
As shown Picture 113 rdquoIpcamrdquo
Picture 114
IPCAM User Manual
58
From the following picture we can view that Ipcam local IP address ishttp19216811118999
WAN IP Address is httpwell888dyndnsorg8999 we can inputrdquoIPcamrdquorsquoS IP address to
open in the player
Picture 115
the CLC media player open play position
Picture 116
LAN play address
Picture 117
IPCAM User Manual
59
Picture 118
Open the Internet play position
Picture 119
As shown in the following picture It can see the ipcamera send video streaming format
Size 640X480
User
IPCAM User Manual
60
Picture 120
83 Frequently Asked Questions
Note1) Any question you would meet please check Network connections firstly
2)Check the working status revealed by the indicators on the network server hub exchange and
network card If abnormal check the network connections
831 I have forgotten the administrator username andor password
To reset the administrator username and password Press and hold down the RESET
BUTTON for 5 seconds Release the power button and the username and password
will be reset back to the factory default administrator username and password
Default administrator username admin
Default administrator password No password
832 IP Address configuration
Check whether IP address of the IP Camera server shares the same subnet as your
work station Click My Computer gt Control PanelgtNetwork amp Dial-up Connections gt
LAN gt Attributes gtInternet Protocols (TCPIP) and check IP Address and Subnet
Mask Make sure they are in the same subnet when configuring IP Camera IP
address manuallyUnable to access IP Camera via web browser
833 Network Configuration
Double Check to ensure that your HTTP server software is configured and running
properly If you are running any firewall software make sure it is allowing inbound
connections to port 80Also if you happen to be using a cableDSL router make sure
IPCAM User Manual
61
you are set up port forwarding properly ( consult your router is documentation for more
information ) If none of these seem to be the problem it is also possible that your
ISP is blocking inbound connections to port 80 ndashmany IPSs have done this because
of internet worms such as Code Red If this is the case you bdquoll have to setup your
HTTP server on an alternate port (such as 8080)
834 No Monitoring picture
It has four reasons Images of the abnormal factors
1If its not use Directx function and lead to not normal to display the color imagePlease
install DirectX and open the start menu then input the command
Picture 121
You use the DirectX function and it will expedite the DirectDrawDirect3D and AGP if its can not maybe the
connect issues or hardware not read it
2The issues of hardware canrsquot support the card expedite image
3The antivirus software will influence the network it will be stoped or closedIf you install fireproof software
please close it and try again
4 ActiveX controller is not installed correctly
If its not image on the first time to use and will display to the user through the ActiveXIf its can not
display of the image maybe it fail of install about this issues please follow as
1Install ldquoIP Camera Toolrdquo ActiveX control at the same time
2Please install ActiveX control and keep the security settings for IE browser
835 Problems with network bandwidth
The image frame rate is subjected to the following factors 1network bandwidth 2 PC
performancenetwork environment and display preference setting (brightness theme
etc) 3 the number of visitors (Too many visitors will slow down the image frame rate) 4
choice of switch or hub (Use a switch for multiple IP Camera Servers rather than a HUB)
The Device use MJEPT Compression it needs good network bandwidth If it is too narrow it will lead to slowly
browser Typical video parameter occupy network bandwidth as blows
640x48030fps 40 Megabits ~ 50 Megabits
320x24030fps 12 Megabits ~ 16 Megabits
IPCAM User Manual
62
middot836 Why pop-up the prompt ldquoFail to connect to the devicehelliprdquo
This prompt only appeared in the case of using multiple cameras
Enter the Multi-Device Settings page(login as administrator) to check the
Device setting is correct or not
When one of the multiple cameras disconnected the color changed to
yellow and pop-up the promptldquoFail to connect to the devicehelliprdquo
Picture 122
837 Canrsquot access the IPCAM in the internet
There are some reasons
1 ActiveX controller is not installed correctly(see more details 514)
2 The port IPCAM used is blocked by Firewall or Anti-virus software Please change a
port number and try again
3 Port mapping is not success You can do port mapping by two ways
Enter setting page of the router which IPCAM connect with to enable UPnP function
Enter IPCAM ldquoUPnP Settingsrdquo to enable UPnP and make sure the state is ldquoUPnP
successrdquo
‟ s IP
and port to the Virtual map list
When use ADSL the IP is dynamic You should set DDNS(see more details 74 amp 80)
and also make sure port mapping success
84 Operate common problem solving
IP camera tool canrsquot find the camera
Except of the camera broken
1 Make sure the cable connector no problem recommend connector
(AMP)it is with international standard Another note IPCAMrsquos data
transmission channel require higher than computerrsquos so maybe the
IPCAM User Manual
63
computer can run normally but IPCAM canrsquot Please press heavily when making the cable connector
2 Confirm the power supply normally First check whether power indication
light turn on or not If it is onthen check the yellow light on RJ45 Port
(power indication light) and green light (network indication light) are on or
notIf they are onso power supply and cable runs normally
3 Confirm all the firwall and antivirus software are closeThe firewall often
block unrecognized data so if the firewall is running so maybe the IPCAM
TOOL canrsquot find the deviceSuggest to close firewall and antivirus
software temporarily before searching
How to solve the camera blank screen
1 Check if you are using the wrong power adaptorplease use original one
2 Close antivirus software
How to solve the camera canrsquot login by Internet
1 Check if you set DDNS success or not
2 Check the current IPCAMrsquos port number is the same as routerrsquosThey need to keep same
Canrsquot view the monitoring picture
1 Reason canrsquot connect with network
SolutionCheck if the network connect well exclude cable fault and PC virus
cause network fault until can be used between PC and PING
2 ReasonIP address occupy by other device
Solution Choose automatic gain
3 Reason IP address located within different subnet
Solution Check IPCAMrsquoS ip address and subnet mask address and gateway settings
4 ReasonWeb port has been modified
Solutioncontact network administrator to obtain port information
5 Reasonunknown
SolutionPress reset button to factory default statethen reconnectingsysten
default to gain ip address automaticsubnet mask is 2552552550
85 Default Parameters
middotDefault network Parameters
IP address dynamic obtain
Subnet mask 2552552550
Gateway dynamic obtain
DDNS Factory provide
middotUsername and password
Default administrator username admin
Default administrator password No password
IPCAM User Manual
64
86 Technical Parameters
ITEM IP CAM (NIP-02BGPWA2)
Image Sensor
Mage sensor 15 Color CMOS Sensor
Display 640 x 480 (300K Pixels)
Lens f36mm F24 (IR Lens)
Miniillumination 05 Lux
Lens Lens Type Glass Lens
Viewing Angle 60 Degree
Audio Microphone Audio of two way
Domain name Server MSN server DDNS server
Video
Image Compression MJPEG
Image Frame Rate 15 FPS(VGA)30FPS(QVGA)
Resolution 640 x 480(VGA) 320 x 240(QVGA)
Flip Mirror Images rtical Horizontal
mode 50Hz 60Hz or Outdoor
Video Parameters Brightness Contrast
Communication
Ethernet One 10100Mbps RJ-45
Supported Protocol HTTPDHCPIPTCPUDPFTPSMTPDDNSPPPoEUPnP
Mobilephone monitor Support IphoneIpad3G phonesmartphone
Wireless Standard IEEE 80211bg
Wireless Standard 80211b11Mbps(max) 80211g54Mbps(max)
Wireless Security 64128-bitWEP Encryption
Physical
PanTilt Angle Horizontal270deg amp Vertical 120deg
Infrared Light 10 IR LEDs Night visibility up to 15 Mete
Product size 100(L) x100(W) x125mm(H)
Gross Weight 6465gpcs (packing size196x165x123mm)
Net Weight 2547gpcs (only product)
Power Specification DC 5V25A 18 meter
Power Consumption 5 Watts
Environment
Operate Temper 0deg~ 55degC (14degF~122degF)
Operating Humidity 20 ~ 85 non-condensing
Storage Temper -10degC ~ 60deg (14degF ~140degF)
Storage Humidity 0 ~ 90 non-condensing
PC Requirements
CPU 20GHZ or above (suggested 30GHz)
Memory Size 512MB or above (suggested 10GB)
Display card 64M or above
Supported OS Microsoft Windows XPVistaWindows7
Supported browsers IEfirefoxGoogle
Certification CEFCCRoHS
Warranty Limited 1-year warranty
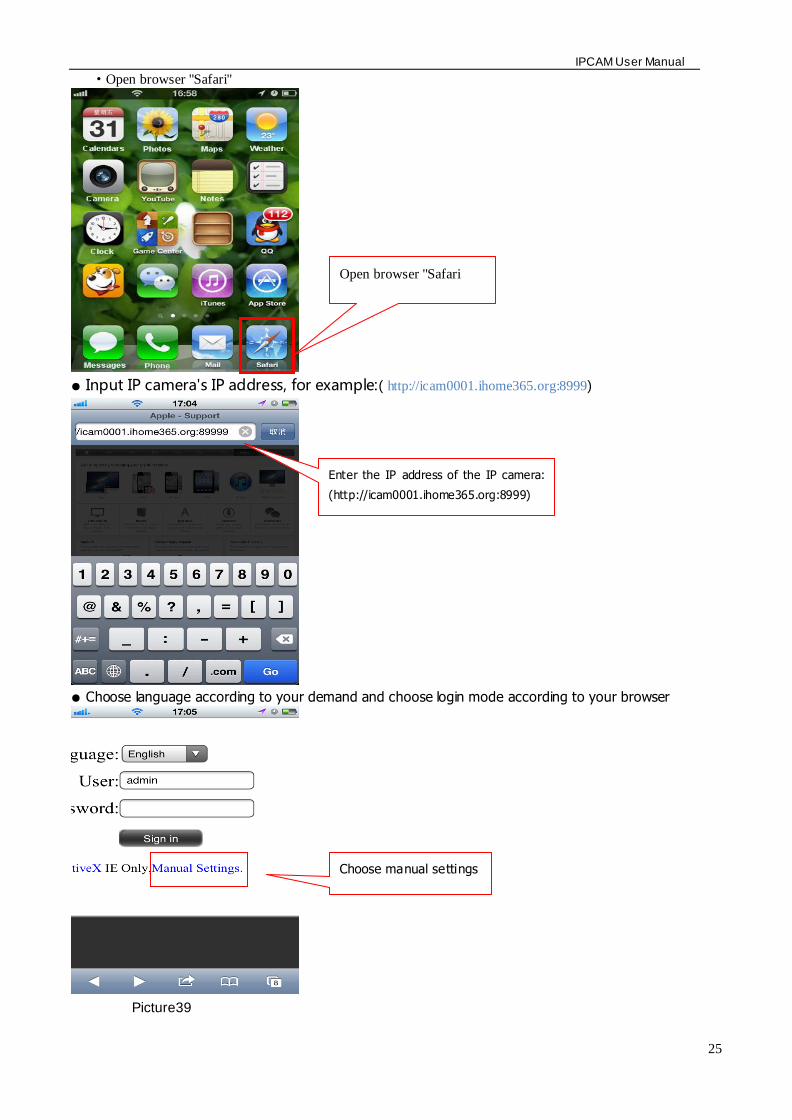
IPCAM User Manual
25
middotOpen browser Safari
Input IP cameras IP address for example( httpicam0001ihome365org8999)
Choose language according to your demand and choose login mode according to your browser
Picture39
Choose manual settings
Open browser Safari
Enter the IP address of the IP camera
(httpicam0001ihome365org8999)
IPCAM User Manual
26
enter your account and password on the login page as shown By defaultadministratorrsquos username is
admin and no password
Select Server Refresh mode landing
Picture42
Input the username and password of
the network camera
Here you can choose between two
modes landing
Here to select the
operating language
Default passwordNo password
IPCAM User Manual
27
Select Server Push mode landing
Picture 43
2 Now we take Android system device as example
Open menu and firstly open the browser and input IP camera s IP address in the
browser for example(httpicam0001ihome365org8999)
Picture 44
Input IP cameras username and password and click sign in and then enter into
browser model to choose login-in interface
Open menu
IPCAM User Manual
28
Picture 45
62 Install client-side software to access IPCamera
There are many client software support IP camera several third-party software support our IP cameras too
The following are our manufacture software setup process(the Android version)
1 Pls get the install applications in the CD or you can download from the website
httpsplaygooglecomstoresearchq=reecamampc=apps Choose the right
①installation file-ipcameraapk
running environment Android version 16 or above
Note Please ensure that mobile phones can connect to the Internet before install
② Install method
21 Insert SD card into Android mobile phone
22 Connect the cellphone to computer via USB data cable
23 Choose the USB connection model on your cellphone you can see the SD driver in ldquomy computerrdquo
24 Copy the ipcameraapk into SD card
25 Disconnect the device pls find the ipcameraapk in ldquoFile Managementrdquo and run it
26 The ipcamera application will be show up on the home screen after you successfully installed
③Software operating processes
First ensure that the Internet open WIFI connection the search in the Play in The Googl Android
application reecam
Open the WiFi
connection
Download and install
the application
Search reecam
IPCAM User Manual
29
middotYou can edit the camera modify camere configuration and delete camera operation
Click here to add
a video camera
Select to add to the
client camera
Refresh LAN cameras
View or change the
configuration of the
camera the camera
name at random
IP address
Http port
The default password is blank
Camera name
Prev iew camera
Preview the
camera screen
save the camera
Editor has added
cameras
Edit camera
configuration
Delete the camera Edit camera of the
configuration
IPCAM User Manual
30
middotFor the camera added to the camera list you can watch camera in real time
Control cameras PTZ and set swith-on and switch-off of the cameras audio int
ercom and video
Picture 51
2 The IPCamera setting process for iPhone iPad
Firmware requirements compatible with iPhone iPod touch and iPad
Systerm requirements Requires iOS 42 or above
You can download the genuine
software
(ipcameraapp) form the App Store
httpitunesapplecomcnappreecamid479468959mt=8
middotSoftware operating process is as follows
Continue to add
the camera
Add external network
camera domain
Cameras have
been added
Audiointercom video switch
A list of cameras and
video can be switched to
view
Fingers sliding PTZ control
Click on the picture to stop
rotation
IPCAM User Manual
31
Open the App Store search
reecam
Download and install
reecam
The run has been
installed good reecam
program
Click to add cameras
Search reecam
IPCAM User Manual
32
Fill in the domain address
or IP address
Fill in the Http port of the
camera login user name
and password click next
to open the camera
Completed please
click here
Preview videoclick on the
next save
Save the camera added
Selected camera to
view images
Click image to expand
more cameras
operating functions
IPCAM User Manual
33
7 Other setting
71 Network Setting
711 Basic Network Settings
If the router that the IP camera connect has DHCP function you can choice ldquoObain IP from DHCP Serverrdquo
else fill in the network parameters manually
Http Port In most cases you can leave this value as 80 however if your Internet
Service Provider blocks this port you may switch to another port number such as 85808088889000 Etcs
(Range from 0 to 65535 pay attention to the same segment of multiple devices must set up different port The
port t canrsquot have any conflict with other software or equipment
a Search tools modification in LAN
Figure58
brdquoFor administorrdquo ldquoBasic network settingrdquo -Change the port
Figure59
712 WIFI Setting
1) Please enter the wireless net setting page of the wireless Router to find out SSID
Channel(less than 10) Encryption Authentication as below
Selec IP Camera clickright mouse button choice network configurat ion
Set port number
Set Network IP
Set Http Port Number
IPCAM User Manual
34
Figure 61
As Administrator to Login camera open wireless LAN Settings page fill in every
Setting (ensure keep the same as routerrsquos ) and then pulled out of the cable wireless network function can be
used For example as shown in belows
Figure62
Pls click the scan buttom twice
IPCAM User Manual
35
Figure 63
713 Adhoc point to point Wireless connection Setting
1) Open the basic network setting interfacecheck the device status
Picture 64
2) Open the wireless lan setting interface choose Adhoc for network type you
can define SSID such as 001
remember the IP address of
IP camera and Http port
Click the Settings Ip Camera will
restart and save
Double click to choose
Fill the encryption and
routers and key in the
same way
IPCAM User Manual
36
Picture 65
3) Unplug the RJ45 from IP camera Use laptop or other devices which are with
wifi function( include smart phoneipad and so on) searching the SSID you defined
on proccess 2then make a connection
Picture 66
middotClick wireless network and check the link status of ip camera Please note IP
address of your connected laptop must be the subset of your ip camera if not
please reset the ip address of your laptop manually
Picture 67
4) Now we can use the ip camera tool or enter ip address of camera derectly in
browser blank to visit
1 visit by ip camera tool
Picture 68
IPCAM User Manual
37
2Enter ip address in the browser
Enter user name and password in the login interface
Picture 69
Click ldquoSign inrdquoand vis it
Picture 70
IPCAM User Manual
38
72 Multi-Device Settings
Add cameras in LAN
In the Multi-Device Settings page you can see all devices searched in LAN The 1
St Device is this device in default You can add more cameras list in LAN for monitoring This Web software
supports up to 9 IP Cameras online simultaneous ly Click ldquoThe 2ND
Devicerdquo and Double click the item in the ldquoDevice List in LANrdquo AliasHost and Http Port
will fill in automatically Enter the correct username and password then click ldquoaddrdquoAdd
more cameras in the same way At last please donrsquot forget the ldquo settingrdquo Button
Picture 71
Add cameras in the Internet
Firstly make sure the camera added can access in the Internet with the IP address or
DDNS domain Like this http2191332001669999or httpIPcamdyndnsorg9999You can enter the
Host 219133200166 Http port 9999 or Host IPcamdyndnsorg Http port 9999 Enter the correct
username and password then click ldquoaddrdquo Add more cameras in the
same way
Picture 72
IPCAM User Manual
39
Picture 73
73 MSN Settings
Fill in your MSN account and password then add account which need to receive
IPCAMrsquoS ip address to IPCAM‟ S MSN list (Picture 67)click submit then yoursquod better
restart IP camera After it login your MSN to add IPCAMrsquos MSN account to MSN List that
you can receive IPCAMrsquos ip address
Picture 74
First login and click add contacts choose Add Contact then fill IPCAMrsquos MSN account in instant
messaging address click next then send offers
Aplly for MSN account and passworf for IP cam
Add about 10 MSN Accout
IPCAM User Manual
40
Figure75
Next
Figure76
Figure77
When IPCAMrsquos MSN account shows online you can chat with it input path command url camera
account will show its IP address in chatting box promptly as below
IPCAM User Manual
41
Picture 78
You can input the IP address to browser then can browse ip camera as below
Figure79
AttentionYou should fill MSN account in IPCAM first
74 DDNS Service Settings
DDNS Service The system supports protocols from some DDNS providers Dyndnsorg System support
DDNS such as topipcamorgpeanut shell3322orgDynDNS
provided IP
IPCAM User Manual
42
User and Password the user name and password used when applying for the domain
name (details 432)
DDNS Host the Domain Name
741 Factory DDNS
Device had distributed one DDNS to every productwhich was sticked the bottom
of the product Such as
manufacturer had already give every device a DDNS address which is unique Users only need to fill in this
DDNS IP ADDRESS and port in the browser then they can monitor remote IP camera
Picture 80 Factory DDNS
Note When use the domain name access to the camera and UPNP is not successful you must set port
mapping function on routers
742 The third part DDNS
Users can use not only Factory DDSN but also can use third part DDNS System Such as domain name
wwwdyndnsorg The only thing the user need to do is to apply a free DDNS and then fill in ldquoset boxrdquo as below
Save this setting and this DDNS can be used
DDNS Hostname
Factory DDNS
IPCAM User Manual
43
Note the third party domain name is the realization of analytical way input the domain in the browser it will
keep this string of characters If the port of the device isnrsquot 80 then need to add colon and port number For
example httpwell888dyndnsorg8999
75 Mail and FTP Service
1)Configure the E-mail box to receive and send mails The E-mail box is used for receiving
the images sent after alarm and the system IP address after successful dial-up
Note When Alarm Service Settings-gt Send Mail on Alarm is check the Mail
Service takes effect
Picture82
Configure the E-mail box to receive and send mails The E-mail box is used for receiving the images sent
after alarm and the system IP address after successful dial-up
Sender This device use the sender mailbox to send mails
Receiver To receive the mail from the Sender You can set up to 4 receiver mailbox
SMTP Server the SMTP server for the sender mailbox
Need Authentication if the sender mailbox need authentication you should check it then
input the SMTP username amp Password
Mail test Please set the Mail parameter and click Submit first There are Mail test result
Picture 83
video Local storage in PC after alarm monitoring
IPCAM User Manual
44
Gmail also set as the same It only needs you to fill in correct SMTP Sever address user and password
Picture 84
Mail notes Internet IP address In this option When Internet IP and port have changed IP Will be sent via
1Can not connect to the server
2Network Error Please try later
3Server Error
4Incorrect user or password
5The sender is denied by the server Maybe the server need to authenticate the user please check it
and try again
6The receiver is denied by the server Maybe because of the anti-spam privacy of the server
7The message is denied by the server Maybe because of the anti-spam privacy of the server
8The server does not support the authentication mode used by the device
Report Internet IP by Mail When ipcam port or Internet IP changed it will send the internet IP by
mail(for example IPCAM s url is http119123207969002) Make sure the port is map to the router
correctly by UPNP or Virtual Map function
2) FTP Server use and settings
middotIf you already have an FTP Server (ipcam com)and email ipcam you can fill the
parameters as below
Picture 85
IPCAM User Manual
45
middotFTP Server of LAN as below
1 Create an account
2 Step by step setting until finish it
Picture 88
IPCAM User Manual
46
3Start Server
Continue to finish it
Picture 89
4IPCAMrsquoS account can be used
Picture 90
Save path
This is a FTP
server address
IPCAM User Manual
47
5 IP camerarsquos FTP Server set like this
Picture 91
6 Set up and complete testing is successfulwhen it alarms IP camera will upload
pictures to the FTP server Settings of main directory path (as shown )
Picture 92
FTP Server the FTP server address
FTP port the port usually is 21
FTP Mode support standard(POST) mode and passive(PASV) mode
Upload Image Now it will upload image now when checkbox is not checked When checked you can
input upload interval(Seconds)
76 Motion Detection
Enter Alarm Service Settings page to configure Motion Detection function
1) Motion Detect Armed
Each alarm triggers in the protection of time the device will take various measures to alarm
IO linkage alarm output relay closure external alarm device began to alarm
IPCAM User Manual
48
Send E-mail alarm informatio
Transmit pictures to the FTP server and can set the time interval of sending pictures
2) Alarm t ime Settings
Only in the alarm period detection device to alarm will only have alarm action All the time (not check the
schedule) also can alarm within specified time For the specified time alarm firstly need to set up the system
time time zone and then to choose period of alarm in the state of alarm setting as shown in Picture 19
Picture93 Alarm of time Settings interface
Motion Detect Armed
When you enable motion detect armed the camera can be triggered to send email alerts
and record images In the camera monitoring page the green icon turn to red and an
alert sound you will hear
Motion Detect Sensibility
You can choose from low to high 10 level alarm sensitivity The greater the number the higher the
sensitivity
Alarm Input Armed
IO PINS1) Output(+5V) 2) Output 3) Alarm input 4) Input (GND)
Input Pins The input pins can be used for 1-way external sensor input(pin3 and pin4) For example
you may connect a Person Infrared Sensor (PIR) to it for motion detection When external sensor
triggered IPCAM can be programmed to send an email with picture or control the internal relay output
IPCAM User Manual
49
Picture94
IO Linkage on Alarm
Enable IO linkage on alarmPin1 will output +5V when alarm triggered and output LOW
when alarm release automatically
Switch onoff buttons control Pin1 output manually
Send Mail on Alarm
Sent picture and mail inform to customers e-mail after alarmed(firstly you should finish
the Mail Service Settings)
Picture 95
Upload Image on Alarm
Enable upload image on alarm and set upload interval(Seconds)
Tick send to your setted mails
IPCAM User Manual
50
Picture 96
REC automatically and save to PC
When you enable motion detect and open the camera monitoring page on the PC If
there is an alarm triggered REC will start automatically for several seconds and save to
the PC
Picture 97
REC save to pcrsquos position
Picture 98
Storage path can be changed
After Setting up later when have the
alarm the image will send to
designated email and FTP server
IPCAM User Manual
51
77 IP cameras Time amp Date setting and PTZ Setting
If IP camera connected with Internet it can automatically check the time amp date via running NTP Server And
need to choose properly IP cameras Time zone Otherwise it need PC Time to check IP camera time amp Date
Pre-set and Speed of PT
78 UPGRADE DEVICE FIRMWARE
Picture 101 Firmware upgrade
IP CAMERA has two kinds of programme One is system firmware another is application firmware It can be
upgraded separately
79 BACKUP AND RESTORE SETTING
Click Set in the Backup will lead to a BIN file and choose this file to restore setting
The huger the Number is The
slower it will be
IPCAM User Manual
52
8 APPENDIX
81 REGISTER AND APPLY FOR DDNS SERVICE
1Users use DDNS management system first timeUsers need to apply account to manage
and inquire the domain state
Step1 enter httpwwwdyndnscom and Create Account( Fill in Domain Name dyndnsorg then Click
Add)
Figure103
Step2 enter your information
Figure104
IPCAM User Manual
53
Figure105
Step3 After a minute you will receive an E-mail from DynDNS Support and it will give you a
confirmation address
(eg httpsaccountdyncomemlcreateconflILHMZHRje5oF_6YXTYv1A
Figure106
IPCAM User Manual
54
Step4 Open the link to active your Domain Name as belowLogin in your account after it is activated
Figure107
Step5 Check all the DDNS serviceswe choose the 14-day-trial
Figure108
Step6 Click the linkand user will see as below
IPCAM User Manual
55
middotenter your information
Figure109
Step7 Now you obtained a Dynamic Domain Name(Figure 105)and can use it in the DDNS Service
Settings(details 74)
Figure110
IPCAM User Manual
56
2For DDNS which is applied successfully you can fill in the IP CAMERA When set successfully the status
of IP will be shown as blows
picture 111
picture 112
3How to set DDNS on line
The first wayMenu rdquostartrdquo- ldquorunrdquomdashgt Input CMDClink rdquoenterrdquoIt can check DDNS Statas
via As shown below
Picture 113
IPCAM User Manual
57
Through the PING command this dynamic domain name can be back in the network response information It
proves that the domain name has been online
If the domain name update not success Possible reasons
(1) DDNS parameter is not correct (2) may cause DNS address configuration is wrong
82 Some special application for IPCAMERA
IPCamUse some grammar parameter control and Use IPCam
useruser
pwdpassword
priThe current access (1 visitors 23 operator managers)
resolutionImage resolution(832024 0qvga32640480 vga)
ratemage transmission speed and scope 0-23
brightnessbrightness0~255
contrastcontrast0~6
mode
Mode 050 hz For
60 hz 2 outdoor
flip
Flip rotation 0 primitive 1 vertical reverses 2 horizontal 3 vertical flip + horizontal
821 The flow media player VLC player and mplayer can real-time broadcast ipcamera and send
of streaming media format video data
(Grammar parametersvideostreamasfuser=amppwd=ampresolution=amprate=)
As shown Picture 113 rdquoIpcamrdquo
Picture 114
IPCAM User Manual
58
From the following picture we can view that Ipcam local IP address ishttp19216811118999
WAN IP Address is httpwell888dyndnsorg8999 we can inputrdquoIPcamrdquorsquoS IP address to
open in the player
Picture 115
the CLC media player open play position
Picture 116
LAN play address
Picture 117
IPCAM User Manual
59
Picture 118
Open the Internet play position
Picture 119
As shown in the following picture It can see the ipcamera send video streaming format
Size 640X480
User
IPCAM User Manual
60
Picture 120
83 Frequently Asked Questions
Note1) Any question you would meet please check Network connections firstly
2)Check the working status revealed by the indicators on the network server hub exchange and
network card If abnormal check the network connections
831 I have forgotten the administrator username andor password
To reset the administrator username and password Press and hold down the RESET
BUTTON for 5 seconds Release the power button and the username and password
will be reset back to the factory default administrator username and password
Default administrator username admin
Default administrator password No password
832 IP Address configuration
Check whether IP address of the IP Camera server shares the same subnet as your
work station Click My Computer gt Control PanelgtNetwork amp Dial-up Connections gt
LAN gt Attributes gtInternet Protocols (TCPIP) and check IP Address and Subnet
Mask Make sure they are in the same subnet when configuring IP Camera IP
address manuallyUnable to access IP Camera via web browser
833 Network Configuration
Double Check to ensure that your HTTP server software is configured and running
properly If you are running any firewall software make sure it is allowing inbound
connections to port 80Also if you happen to be using a cableDSL router make sure
IPCAM User Manual
61
you are set up port forwarding properly ( consult your router is documentation for more
information ) If none of these seem to be the problem it is also possible that your
ISP is blocking inbound connections to port 80 ndashmany IPSs have done this because
of internet worms such as Code Red If this is the case you bdquoll have to setup your
HTTP server on an alternate port (such as 8080)
834 No Monitoring picture
It has four reasons Images of the abnormal factors
1If its not use Directx function and lead to not normal to display the color imagePlease
install DirectX and open the start menu then input the command
Picture 121
You use the DirectX function and it will expedite the DirectDrawDirect3D and AGP if its can not maybe the
connect issues or hardware not read it
2The issues of hardware canrsquot support the card expedite image
3The antivirus software will influence the network it will be stoped or closedIf you install fireproof software
please close it and try again
4 ActiveX controller is not installed correctly
If its not image on the first time to use and will display to the user through the ActiveXIf its can not
display of the image maybe it fail of install about this issues please follow as
1Install ldquoIP Camera Toolrdquo ActiveX control at the same time
2Please install ActiveX control and keep the security settings for IE browser
835 Problems with network bandwidth
The image frame rate is subjected to the following factors 1network bandwidth 2 PC
performancenetwork environment and display preference setting (brightness theme
etc) 3 the number of visitors (Too many visitors will slow down the image frame rate) 4
choice of switch or hub (Use a switch for multiple IP Camera Servers rather than a HUB)
The Device use MJEPT Compression it needs good network bandwidth If it is too narrow it will lead to slowly
browser Typical video parameter occupy network bandwidth as blows
640x48030fps 40 Megabits ~ 50 Megabits
320x24030fps 12 Megabits ~ 16 Megabits
IPCAM User Manual
62
middot836 Why pop-up the prompt ldquoFail to connect to the devicehelliprdquo
This prompt only appeared in the case of using multiple cameras
Enter the Multi-Device Settings page(login as administrator) to check the
Device setting is correct or not
When one of the multiple cameras disconnected the color changed to
yellow and pop-up the promptldquoFail to connect to the devicehelliprdquo
Picture 122
837 Canrsquot access the IPCAM in the internet
There are some reasons
1 ActiveX controller is not installed correctly(see more details 514)
2 The port IPCAM used is blocked by Firewall or Anti-virus software Please change a
port number and try again
3 Port mapping is not success You can do port mapping by two ways
Enter setting page of the router which IPCAM connect with to enable UPnP function
Enter IPCAM ldquoUPnP Settingsrdquo to enable UPnP and make sure the state is ldquoUPnP
successrdquo
‟ s IP
and port to the Virtual map list
When use ADSL the IP is dynamic You should set DDNS(see more details 74 amp 80)
and also make sure port mapping success
84 Operate common problem solving
IP camera tool canrsquot find the camera
Except of the camera broken
1 Make sure the cable connector no problem recommend connector
(AMP)it is with international standard Another note IPCAMrsquos data
transmission channel require higher than computerrsquos so maybe the
IPCAM User Manual
63
computer can run normally but IPCAM canrsquot Please press heavily when making the cable connector
2 Confirm the power supply normally First check whether power indication
light turn on or not If it is onthen check the yellow light on RJ45 Port
(power indication light) and green light (network indication light) are on or
notIf they are onso power supply and cable runs normally
3 Confirm all the firwall and antivirus software are closeThe firewall often
block unrecognized data so if the firewall is running so maybe the IPCAM
TOOL canrsquot find the deviceSuggest to close firewall and antivirus
software temporarily before searching
How to solve the camera blank screen
1 Check if you are using the wrong power adaptorplease use original one
2 Close antivirus software
How to solve the camera canrsquot login by Internet
1 Check if you set DDNS success or not
2 Check the current IPCAMrsquos port number is the same as routerrsquosThey need to keep same
Canrsquot view the monitoring picture
1 Reason canrsquot connect with network
SolutionCheck if the network connect well exclude cable fault and PC virus
cause network fault until can be used between PC and PING
2 ReasonIP address occupy by other device
Solution Choose automatic gain
3 Reason IP address located within different subnet
Solution Check IPCAMrsquoS ip address and subnet mask address and gateway settings
4 ReasonWeb port has been modified
Solutioncontact network administrator to obtain port information
5 Reasonunknown
SolutionPress reset button to factory default statethen reconnectingsysten
default to gain ip address automaticsubnet mask is 2552552550
85 Default Parameters
middotDefault network Parameters
IP address dynamic obtain
Subnet mask 2552552550
Gateway dynamic obtain
DDNS Factory provide
middotUsername and password
Default administrator username admin
Default administrator password No password
IPCAM User Manual
64
86 Technical Parameters
ITEM IP CAM (NIP-02BGPWA2)
Image Sensor
Mage sensor 15 Color CMOS Sensor
Display 640 x 480 (300K Pixels)
Lens f36mm F24 (IR Lens)
Miniillumination 05 Lux
Lens Lens Type Glass Lens
Viewing Angle 60 Degree
Audio Microphone Audio of two way
Domain name Server MSN server DDNS server
Video
Image Compression MJPEG
Image Frame Rate 15 FPS(VGA)30FPS(QVGA)
Resolution 640 x 480(VGA) 320 x 240(QVGA)
Flip Mirror Images rtical Horizontal
mode 50Hz 60Hz or Outdoor
Video Parameters Brightness Contrast
Communication
Ethernet One 10100Mbps RJ-45
Supported Protocol HTTPDHCPIPTCPUDPFTPSMTPDDNSPPPoEUPnP
Mobilephone monitor Support IphoneIpad3G phonesmartphone
Wireless Standard IEEE 80211bg
Wireless Standard 80211b11Mbps(max) 80211g54Mbps(max)
Wireless Security 64128-bitWEP Encryption
Physical
PanTilt Angle Horizontal270deg amp Vertical 120deg
Infrared Light 10 IR LEDs Night visibility up to 15 Mete
Product size 100(L) x100(W) x125mm(H)
Gross Weight 6465gpcs (packing size196x165x123mm)
Net Weight 2547gpcs (only product)
Power Specification DC 5V25A 18 meter
Power Consumption 5 Watts
Environment
Operate Temper 0deg~ 55degC (14degF~122degF)
Operating Humidity 20 ~ 85 non-condensing
Storage Temper -10degC ~ 60deg (14degF ~140degF)
Storage Humidity 0 ~ 90 non-condensing
PC Requirements
CPU 20GHZ or above (suggested 30GHz)
Memory Size 512MB or above (suggested 10GB)
Display card 64M or above
Supported OS Microsoft Windows XPVistaWindows7
Supported browsers IEfirefoxGoogle
Certification CEFCCRoHS
Warranty Limited 1-year warranty
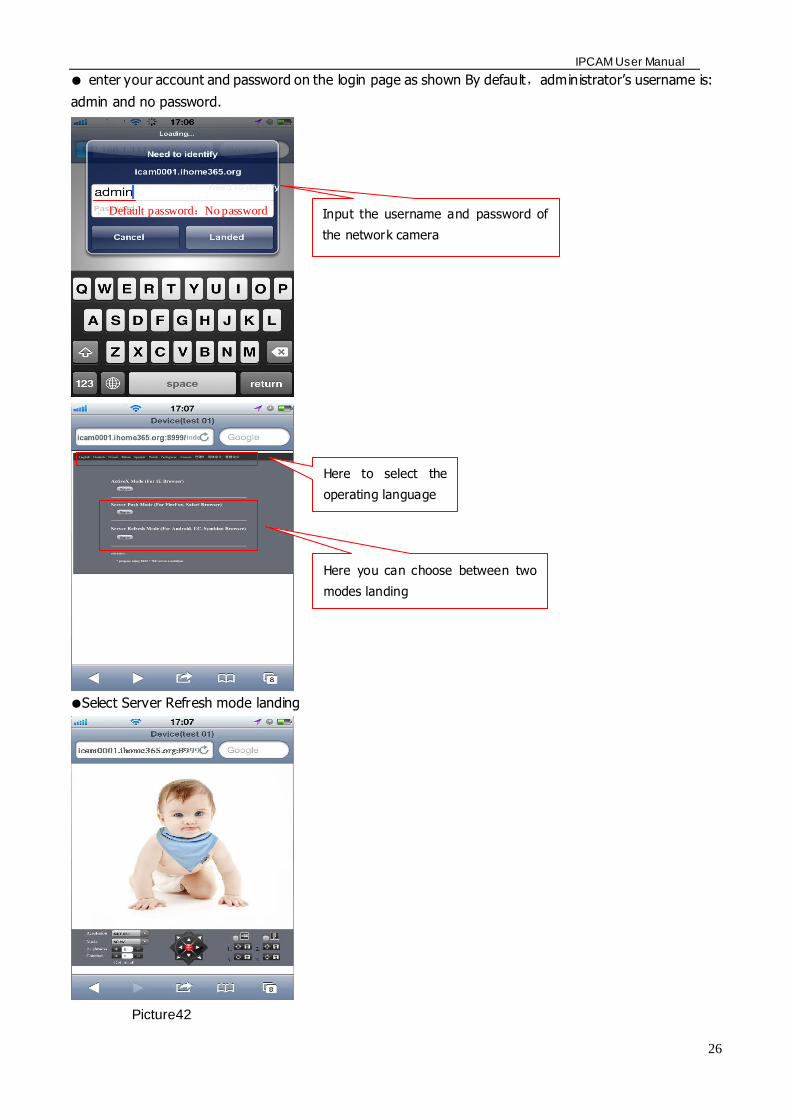
IPCAM User Manual
27
Select Server Push mode landing
Picture 43
2 Now we take Android system device as example
Open menu and firstly open the browser and input IP camera s IP address in the
browser for example(httpicam0001ihome365org8999)
Picture 44
Input IP cameras username and password and click sign in and then enter into
browser model to choose login-in interface
Open menu
IPCAM User Manual
28
Picture 45
62 Install client-side software to access IPCamera
There are many client software support IP camera several third-party software support our IP cameras too
The following are our manufacture software setup process(the Android version)
1 Pls get the install applications in the CD or you can download from the website
httpsplaygooglecomstoresearchq=reecamampc=apps Choose the right
①installation file-ipcameraapk
running environment Android version 16 or above
Note Please ensure that mobile phones can connect to the Internet before install
② Install method
21 Insert SD card into Android mobile phone
22 Connect the cellphone to computer via USB data cable
23 Choose the USB connection model on your cellphone you can see the SD driver in ldquomy computerrdquo
24 Copy the ipcameraapk into SD card
25 Disconnect the device pls find the ipcameraapk in ldquoFile Managementrdquo and run it
26 The ipcamera application will be show up on the home screen after you successfully installed
③Software operating processes
First ensure that the Internet open WIFI connection the search in the Play in The Googl Android
application reecam
Open the WiFi
connection
Download and install
the application
Search reecam
IPCAM User Manual
29
middotYou can edit the camera modify camere configuration and delete camera operation
Click here to add
a video camera
Select to add to the
client camera
Refresh LAN cameras
View or change the
configuration of the
camera the camera
name at random
IP address
Http port
The default password is blank
Camera name
Prev iew camera
Preview the
camera screen
save the camera
Editor has added
cameras
Edit camera
configuration
Delete the camera Edit camera of the
configuration
IPCAM User Manual
30
middotFor the camera added to the camera list you can watch camera in real time
Control cameras PTZ and set swith-on and switch-off of the cameras audio int
ercom and video
Picture 51
2 The IPCamera setting process for iPhone iPad
Firmware requirements compatible with iPhone iPod touch and iPad
Systerm requirements Requires iOS 42 or above
You can download the genuine
software
(ipcameraapp) form the App Store
httpitunesapplecomcnappreecamid479468959mt=8
middotSoftware operating process is as follows
Continue to add
the camera
Add external network
camera domain
Cameras have
been added
Audiointercom video switch
A list of cameras and
video can be switched to
view
Fingers sliding PTZ control
Click on the picture to stop
rotation
IPCAM User Manual
31
Open the App Store search
reecam
Download and install
reecam
The run has been
installed good reecam
program
Click to add cameras
Search reecam
IPCAM User Manual
32
Fill in the domain address
or IP address
Fill in the Http port of the
camera login user name
and password click next
to open the camera
Completed please
click here
Preview videoclick on the
next save
Save the camera added
Selected camera to
view images
Click image to expand
more cameras
operating functions
IPCAM User Manual
33
7 Other setting
71 Network Setting
711 Basic Network Settings
If the router that the IP camera connect has DHCP function you can choice ldquoObain IP from DHCP Serverrdquo
else fill in the network parameters manually
Http Port In most cases you can leave this value as 80 however if your Internet
Service Provider blocks this port you may switch to another port number such as 85808088889000 Etcs
(Range from 0 to 65535 pay attention to the same segment of multiple devices must set up different port The
port t canrsquot have any conflict with other software or equipment
a Search tools modification in LAN
Figure58
brdquoFor administorrdquo ldquoBasic network settingrdquo -Change the port
Figure59
712 WIFI Setting
1) Please enter the wireless net setting page of the wireless Router to find out SSID
Channel(less than 10) Encryption Authentication as below
Selec IP Camera clickright mouse button choice network configurat ion
Set port number
Set Network IP
Set Http Port Number
IPCAM User Manual
34
Figure 61
As Administrator to Login camera open wireless LAN Settings page fill in every
Setting (ensure keep the same as routerrsquos ) and then pulled out of the cable wireless network function can be
used For example as shown in belows
Figure62
Pls click the scan buttom twice
IPCAM User Manual
35
Figure 63
713 Adhoc point to point Wireless connection Setting
1) Open the basic network setting interfacecheck the device status
Picture 64
2) Open the wireless lan setting interface choose Adhoc for network type you
can define SSID such as 001
remember the IP address of
IP camera and Http port
Click the Settings Ip Camera will
restart and save
Double click to choose
Fill the encryption and
routers and key in the
same way
IPCAM User Manual
36
Picture 65
3) Unplug the RJ45 from IP camera Use laptop or other devices which are with
wifi function( include smart phoneipad and so on) searching the SSID you defined
on proccess 2then make a connection
Picture 66
middotClick wireless network and check the link status of ip camera Please note IP
address of your connected laptop must be the subset of your ip camera if not
please reset the ip address of your laptop manually
Picture 67
4) Now we can use the ip camera tool or enter ip address of camera derectly in
browser blank to visit
1 visit by ip camera tool
Picture 68
IPCAM User Manual
37
2Enter ip address in the browser
Enter user name and password in the login interface
Picture 69
Click ldquoSign inrdquoand vis it
Picture 70
IPCAM User Manual
38
72 Multi-Device Settings
Add cameras in LAN
In the Multi-Device Settings page you can see all devices searched in LAN The 1
St Device is this device in default You can add more cameras list in LAN for monitoring This Web software
supports up to 9 IP Cameras online simultaneous ly Click ldquoThe 2ND
Devicerdquo and Double click the item in the ldquoDevice List in LANrdquo AliasHost and Http Port
will fill in automatically Enter the correct username and password then click ldquoaddrdquoAdd
more cameras in the same way At last please donrsquot forget the ldquo settingrdquo Button
Picture 71
Add cameras in the Internet
Firstly make sure the camera added can access in the Internet with the IP address or
DDNS domain Like this http2191332001669999or httpIPcamdyndnsorg9999You can enter the
Host 219133200166 Http port 9999 or Host IPcamdyndnsorg Http port 9999 Enter the correct
username and password then click ldquoaddrdquo Add more cameras in the
same way
Picture 72
IPCAM User Manual
39
Picture 73
73 MSN Settings
Fill in your MSN account and password then add account which need to receive
IPCAMrsquoS ip address to IPCAM‟ S MSN list (Picture 67)click submit then yoursquod better
restart IP camera After it login your MSN to add IPCAMrsquos MSN account to MSN List that
you can receive IPCAMrsquos ip address
Picture 74
First login and click add contacts choose Add Contact then fill IPCAMrsquos MSN account in instant
messaging address click next then send offers
Aplly for MSN account and passworf for IP cam
Add about 10 MSN Accout
IPCAM User Manual
40
Figure75
Next
Figure76
Figure77
When IPCAMrsquos MSN account shows online you can chat with it input path command url camera
account will show its IP address in chatting box promptly as below
IPCAM User Manual
41
Picture 78
You can input the IP address to browser then can browse ip camera as below
Figure79
AttentionYou should fill MSN account in IPCAM first
74 DDNS Service Settings
DDNS Service The system supports protocols from some DDNS providers Dyndnsorg System support
DDNS such as topipcamorgpeanut shell3322orgDynDNS
provided IP
IPCAM User Manual
42
User and Password the user name and password used when applying for the domain
name (details 432)
DDNS Host the Domain Name
741 Factory DDNS
Device had distributed one DDNS to every productwhich was sticked the bottom
of the product Such as
manufacturer had already give every device a DDNS address which is unique Users only need to fill in this
DDNS IP ADDRESS and port in the browser then they can monitor remote IP camera
Picture 80 Factory DDNS
Note When use the domain name access to the camera and UPNP is not successful you must set port
mapping function on routers
742 The third part DDNS
Users can use not only Factory DDSN but also can use third part DDNS System Such as domain name
wwwdyndnsorg The only thing the user need to do is to apply a free DDNS and then fill in ldquoset boxrdquo as below
Save this setting and this DDNS can be used
DDNS Hostname
Factory DDNS
IPCAM User Manual
43
Note the third party domain name is the realization of analytical way input the domain in the browser it will
keep this string of characters If the port of the device isnrsquot 80 then need to add colon and port number For
example httpwell888dyndnsorg8999
75 Mail and FTP Service
1)Configure the E-mail box to receive and send mails The E-mail box is used for receiving
the images sent after alarm and the system IP address after successful dial-up
Note When Alarm Service Settings-gt Send Mail on Alarm is check the Mail
Service takes effect
Picture82
Configure the E-mail box to receive and send mails The E-mail box is used for receiving the images sent
after alarm and the system IP address after successful dial-up
Sender This device use the sender mailbox to send mails
Receiver To receive the mail from the Sender You can set up to 4 receiver mailbox
SMTP Server the SMTP server for the sender mailbox
Need Authentication if the sender mailbox need authentication you should check it then
input the SMTP username amp Password
Mail test Please set the Mail parameter and click Submit first There are Mail test result
Picture 83
video Local storage in PC after alarm monitoring
IPCAM User Manual
44
Gmail also set as the same It only needs you to fill in correct SMTP Sever address user and password
Picture 84
Mail notes Internet IP address In this option When Internet IP and port have changed IP Will be sent via
1Can not connect to the server
2Network Error Please try later
3Server Error
4Incorrect user or password
5The sender is denied by the server Maybe the server need to authenticate the user please check it
and try again
6The receiver is denied by the server Maybe because of the anti-spam privacy of the server
7The message is denied by the server Maybe because of the anti-spam privacy of the server
8The server does not support the authentication mode used by the device
Report Internet IP by Mail When ipcam port or Internet IP changed it will send the internet IP by
mail(for example IPCAM s url is http119123207969002) Make sure the port is map to the router
correctly by UPNP or Virtual Map function
2) FTP Server use and settings
middotIf you already have an FTP Server (ipcam com)and email ipcam you can fill the
parameters as below
Picture 85
IPCAM User Manual
45
middotFTP Server of LAN as below
1 Create an account
2 Step by step setting until finish it
Picture 88
IPCAM User Manual
46
3Start Server
Continue to finish it
Picture 89
4IPCAMrsquoS account can be used
Picture 90
Save path
This is a FTP
server address
IPCAM User Manual
47
5 IP camerarsquos FTP Server set like this
Picture 91
6 Set up and complete testing is successfulwhen it alarms IP camera will upload
pictures to the FTP server Settings of main directory path (as shown )
Picture 92
FTP Server the FTP server address
FTP port the port usually is 21
FTP Mode support standard(POST) mode and passive(PASV) mode
Upload Image Now it will upload image now when checkbox is not checked When checked you can
input upload interval(Seconds)
76 Motion Detection
Enter Alarm Service Settings page to configure Motion Detection function
1) Motion Detect Armed
Each alarm triggers in the protection of time the device will take various measures to alarm
IO linkage alarm output relay closure external alarm device began to alarm
IPCAM User Manual
48
Send E-mail alarm informatio
Transmit pictures to the FTP server and can set the time interval of sending pictures
2) Alarm t ime Settings
Only in the alarm period detection device to alarm will only have alarm action All the time (not check the
schedule) also can alarm within specified time For the specified time alarm firstly need to set up the system
time time zone and then to choose period of alarm in the state of alarm setting as shown in Picture 19
Picture93 Alarm of time Settings interface
Motion Detect Armed
When you enable motion detect armed the camera can be triggered to send email alerts
and record images In the camera monitoring page the green icon turn to red and an
alert sound you will hear
Motion Detect Sensibility
You can choose from low to high 10 level alarm sensitivity The greater the number the higher the
sensitivity
Alarm Input Armed
IO PINS1) Output(+5V) 2) Output 3) Alarm input 4) Input (GND)
Input Pins The input pins can be used for 1-way external sensor input(pin3 and pin4) For example
you may connect a Person Infrared Sensor (PIR) to it for motion detection When external sensor
triggered IPCAM can be programmed to send an email with picture or control the internal relay output
IPCAM User Manual
49
Picture94
IO Linkage on Alarm
Enable IO linkage on alarmPin1 will output +5V when alarm triggered and output LOW
when alarm release automatically
Switch onoff buttons control Pin1 output manually
Send Mail on Alarm
Sent picture and mail inform to customers e-mail after alarmed(firstly you should finish
the Mail Service Settings)
Picture 95
Upload Image on Alarm
Enable upload image on alarm and set upload interval(Seconds)
Tick send to your setted mails
IPCAM User Manual
50
Picture 96
REC automatically and save to PC
When you enable motion detect and open the camera monitoring page on the PC If
there is an alarm triggered REC will start automatically for several seconds and save to
the PC
Picture 97
REC save to pcrsquos position
Picture 98
Storage path can be changed
After Setting up later when have the
alarm the image will send to
designated email and FTP server
IPCAM User Manual
51
77 IP cameras Time amp Date setting and PTZ Setting
If IP camera connected with Internet it can automatically check the time amp date via running NTP Server And
need to choose properly IP cameras Time zone Otherwise it need PC Time to check IP camera time amp Date
Pre-set and Speed of PT
78 UPGRADE DEVICE FIRMWARE
Picture 101 Firmware upgrade
IP CAMERA has two kinds of programme One is system firmware another is application firmware It can be
upgraded separately
79 BACKUP AND RESTORE SETTING
Click Set in the Backup will lead to a BIN file and choose this file to restore setting
The huger the Number is The
slower it will be
IPCAM User Manual
52
8 APPENDIX
81 REGISTER AND APPLY FOR DDNS SERVICE
1Users use DDNS management system first timeUsers need to apply account to manage
and inquire the domain state
Step1 enter httpwwwdyndnscom and Create Account( Fill in Domain Name dyndnsorg then Click
Add)
Figure103
Step2 enter your information
Figure104
IPCAM User Manual
53
Figure105
Step3 After a minute you will receive an E-mail from DynDNS Support and it will give you a
confirmation address
(eg httpsaccountdyncomemlcreateconflILHMZHRje5oF_6YXTYv1A
Figure106
IPCAM User Manual
54
Step4 Open the link to active your Domain Name as belowLogin in your account after it is activated
Figure107
Step5 Check all the DDNS serviceswe choose the 14-day-trial
Figure108
Step6 Click the linkand user will see as below
IPCAM User Manual
55
middotenter your information
Figure109
Step7 Now you obtained a Dynamic Domain Name(Figure 105)and can use it in the DDNS Service
Settings(details 74)
Figure110
IPCAM User Manual
56
2For DDNS which is applied successfully you can fill in the IP CAMERA When set successfully the status
of IP will be shown as blows
picture 111
picture 112
3How to set DDNS on line
The first wayMenu rdquostartrdquo- ldquorunrdquomdashgt Input CMDClink rdquoenterrdquoIt can check DDNS Statas
via As shown below
Picture 113
IPCAM User Manual
57
Through the PING command this dynamic domain name can be back in the network response information It
proves that the domain name has been online
If the domain name update not success Possible reasons
(1) DDNS parameter is not correct (2) may cause DNS address configuration is wrong
82 Some special application for IPCAMERA
IPCamUse some grammar parameter control and Use IPCam
useruser
pwdpassword
priThe current access (1 visitors 23 operator managers)
resolutionImage resolution(832024 0qvga32640480 vga)
ratemage transmission speed and scope 0-23
brightnessbrightness0~255
contrastcontrast0~6
mode
Mode 050 hz For
60 hz 2 outdoor
flip
Flip rotation 0 primitive 1 vertical reverses 2 horizontal 3 vertical flip + horizontal
821 The flow media player VLC player and mplayer can real-time broadcast ipcamera and send
of streaming media format video data
(Grammar parametersvideostreamasfuser=amppwd=ampresolution=amprate=)
As shown Picture 113 rdquoIpcamrdquo
Picture 114
IPCAM User Manual
58
From the following picture we can view that Ipcam local IP address ishttp19216811118999
WAN IP Address is httpwell888dyndnsorg8999 we can inputrdquoIPcamrdquorsquoS IP address to
open in the player
Picture 115
the CLC media player open play position
Picture 116
LAN play address
Picture 117
IPCAM User Manual
59
Picture 118
Open the Internet play position
Picture 119
As shown in the following picture It can see the ipcamera send video streaming format
Size 640X480
User
IPCAM User Manual
60
Picture 120
83 Frequently Asked Questions
Note1) Any question you would meet please check Network connections firstly
2)Check the working status revealed by the indicators on the network server hub exchange and
network card If abnormal check the network connections
831 I have forgotten the administrator username andor password
To reset the administrator username and password Press and hold down the RESET
BUTTON for 5 seconds Release the power button and the username and password
will be reset back to the factory default administrator username and password
Default administrator username admin
Default administrator password No password
832 IP Address configuration
Check whether IP address of the IP Camera server shares the same subnet as your
work station Click My Computer gt Control PanelgtNetwork amp Dial-up Connections gt
LAN gt Attributes gtInternet Protocols (TCPIP) and check IP Address and Subnet
Mask Make sure they are in the same subnet when configuring IP Camera IP
address manuallyUnable to access IP Camera via web browser
833 Network Configuration
Double Check to ensure that your HTTP server software is configured and running
properly If you are running any firewall software make sure it is allowing inbound
connections to port 80Also if you happen to be using a cableDSL router make sure
IPCAM User Manual
61
you are set up port forwarding properly ( consult your router is documentation for more
information ) If none of these seem to be the problem it is also possible that your
ISP is blocking inbound connections to port 80 ndashmany IPSs have done this because
of internet worms such as Code Red If this is the case you bdquoll have to setup your
HTTP server on an alternate port (such as 8080)
834 No Monitoring picture
It has four reasons Images of the abnormal factors
1If its not use Directx function and lead to not normal to display the color imagePlease
install DirectX and open the start menu then input the command
Picture 121
You use the DirectX function and it will expedite the DirectDrawDirect3D and AGP if its can not maybe the
connect issues or hardware not read it
2The issues of hardware canrsquot support the card expedite image
3The antivirus software will influence the network it will be stoped or closedIf you install fireproof software
please close it and try again
4 ActiveX controller is not installed correctly
If its not image on the first time to use and will display to the user through the ActiveXIf its can not
display of the image maybe it fail of install about this issues please follow as
1Install ldquoIP Camera Toolrdquo ActiveX control at the same time
2Please install ActiveX control and keep the security settings for IE browser
835 Problems with network bandwidth
The image frame rate is subjected to the following factors 1network bandwidth 2 PC
performancenetwork environment and display preference setting (brightness theme
etc) 3 the number of visitors (Too many visitors will slow down the image frame rate) 4
choice of switch or hub (Use a switch for multiple IP Camera Servers rather than a HUB)
The Device use MJEPT Compression it needs good network bandwidth If it is too narrow it will lead to slowly
browser Typical video parameter occupy network bandwidth as blows
640x48030fps 40 Megabits ~ 50 Megabits
320x24030fps 12 Megabits ~ 16 Megabits
IPCAM User Manual
62
middot836 Why pop-up the prompt ldquoFail to connect to the devicehelliprdquo
This prompt only appeared in the case of using multiple cameras
Enter the Multi-Device Settings page(login as administrator) to check the
Device setting is correct or not
When one of the multiple cameras disconnected the color changed to
yellow and pop-up the promptldquoFail to connect to the devicehelliprdquo
Picture 122
837 Canrsquot access the IPCAM in the internet
There are some reasons
1 ActiveX controller is not installed correctly(see more details 514)
2 The port IPCAM used is blocked by Firewall or Anti-virus software Please change a
port number and try again
3 Port mapping is not success You can do port mapping by two ways
Enter setting page of the router which IPCAM connect with to enable UPnP function
Enter IPCAM ldquoUPnP Settingsrdquo to enable UPnP and make sure the state is ldquoUPnP
successrdquo
‟ s IP
and port to the Virtual map list
When use ADSL the IP is dynamic You should set DDNS(see more details 74 amp 80)
and also make sure port mapping success
84 Operate common problem solving
IP camera tool canrsquot find the camera
Except of the camera broken
1 Make sure the cable connector no problem recommend connector
(AMP)it is with international standard Another note IPCAMrsquos data
transmission channel require higher than computerrsquos so maybe the
IPCAM User Manual
63
computer can run normally but IPCAM canrsquot Please press heavily when making the cable connector
2 Confirm the power supply normally First check whether power indication
light turn on or not If it is onthen check the yellow light on RJ45 Port
(power indication light) and green light (network indication light) are on or
notIf they are onso power supply and cable runs normally
3 Confirm all the firwall and antivirus software are closeThe firewall often
block unrecognized data so if the firewall is running so maybe the IPCAM
TOOL canrsquot find the deviceSuggest to close firewall and antivirus
software temporarily before searching
How to solve the camera blank screen
1 Check if you are using the wrong power adaptorplease use original one
2 Close antivirus software
How to solve the camera canrsquot login by Internet
1 Check if you set DDNS success or not
2 Check the current IPCAMrsquos port number is the same as routerrsquosThey need to keep same
Canrsquot view the monitoring picture
1 Reason canrsquot connect with network
SolutionCheck if the network connect well exclude cable fault and PC virus
cause network fault until can be used between PC and PING
2 ReasonIP address occupy by other device
Solution Choose automatic gain
3 Reason IP address located within different subnet
Solution Check IPCAMrsquoS ip address and subnet mask address and gateway settings
4 ReasonWeb port has been modified
Solutioncontact network administrator to obtain port information
5 Reasonunknown
SolutionPress reset button to factory default statethen reconnectingsysten
default to gain ip address automaticsubnet mask is 2552552550
85 Default Parameters
middotDefault network Parameters
IP address dynamic obtain
Subnet mask 2552552550
Gateway dynamic obtain
DDNS Factory provide
middotUsername and password
Default administrator username admin
Default administrator password No password
IPCAM User Manual
64
86 Technical Parameters
ITEM IP CAM (NIP-02BGPWA2)
Image Sensor
Mage sensor 15 Color CMOS Sensor
Display 640 x 480 (300K Pixels)
Lens f36mm F24 (IR Lens)
Miniillumination 05 Lux
Lens Lens Type Glass Lens
Viewing Angle 60 Degree
Audio Microphone Audio of two way
Domain name Server MSN server DDNS server
Video
Image Compression MJPEG
Image Frame Rate 15 FPS(VGA)30FPS(QVGA)
Resolution 640 x 480(VGA) 320 x 240(QVGA)
Flip Mirror Images rtical Horizontal
mode 50Hz 60Hz or Outdoor
Video Parameters Brightness Contrast
Communication
Ethernet One 10100Mbps RJ-45
Supported Protocol HTTPDHCPIPTCPUDPFTPSMTPDDNSPPPoEUPnP
Mobilephone monitor Support IphoneIpad3G phonesmartphone
Wireless Standard IEEE 80211bg
Wireless Standard 80211b11Mbps(max) 80211g54Mbps(max)
Wireless Security 64128-bitWEP Encryption
Physical
PanTilt Angle Horizontal270deg amp Vertical 120deg
Infrared Light 10 IR LEDs Night visibility up to 15 Mete
Product size 100(L) x100(W) x125mm(H)
Gross Weight 6465gpcs (packing size196x165x123mm)
Net Weight 2547gpcs (only product)
Power Specification DC 5V25A 18 meter
Power Consumption 5 Watts
Environment
Operate Temper 0deg~ 55degC (14degF~122degF)
Operating Humidity 20 ~ 85 non-condensing
Storage Temper -10degC ~ 60deg (14degF ~140degF)
Storage Humidity 0 ~ 90 non-condensing
PC Requirements
CPU 20GHZ or above (suggested 30GHz)
Memory Size 512MB or above (suggested 10GB)
Display card 64M or above
Supported OS Microsoft Windows XPVistaWindows7
Supported browsers IEfirefoxGoogle
Certification CEFCCRoHS
Warranty Limited 1-year warranty
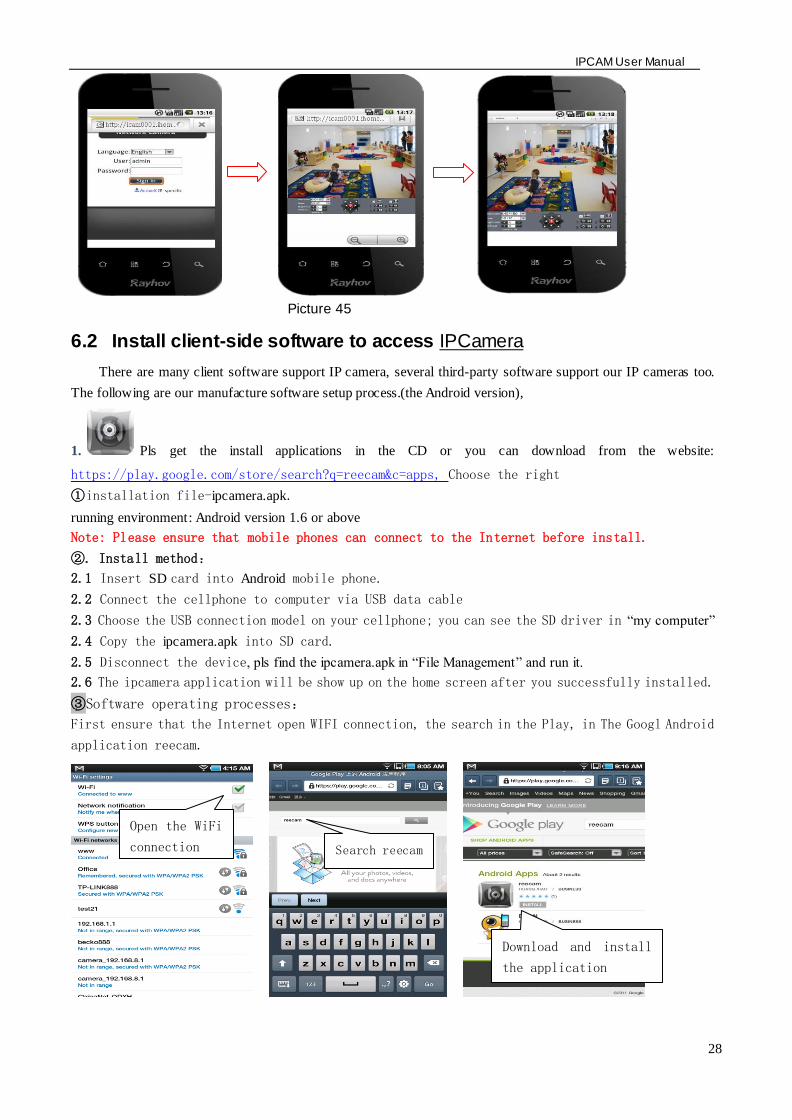
IPCAM User Manual
29
middotYou can edit the camera modify camere configuration and delete camera operation
Click here to add
a video camera
Select to add to the
client camera
Refresh LAN cameras
View or change the
configuration of the
camera the camera
name at random
IP address
Http port
The default password is blank
Camera name
Prev iew camera
Preview the
camera screen
save the camera
Editor has added
cameras
Edit camera
configuration
Delete the camera Edit camera of the
configuration
IPCAM User Manual
30
middotFor the camera added to the camera list you can watch camera in real time
Control cameras PTZ and set swith-on and switch-off of the cameras audio int
ercom and video
Picture 51
2 The IPCamera setting process for iPhone iPad
Firmware requirements compatible with iPhone iPod touch and iPad
Systerm requirements Requires iOS 42 or above
You can download the genuine
software
(ipcameraapp) form the App Store
httpitunesapplecomcnappreecamid479468959mt=8
middotSoftware operating process is as follows
Continue to add
the camera
Add external network
camera domain
Cameras have
been added
Audiointercom video switch
A list of cameras and
video can be switched to
view
Fingers sliding PTZ control
Click on the picture to stop
rotation
IPCAM User Manual
31
Open the App Store search
reecam
Download and install
reecam
The run has been
installed good reecam
program
Click to add cameras
Search reecam
IPCAM User Manual
32
Fill in the domain address
or IP address
Fill in the Http port of the
camera login user name
and password click next
to open the camera
Completed please
click here
Preview videoclick on the
next save
Save the camera added
Selected camera to
view images
Click image to expand
more cameras
operating functions
IPCAM User Manual
33
7 Other setting
71 Network Setting
711 Basic Network Settings
If the router that the IP camera connect has DHCP function you can choice ldquoObain IP from DHCP Serverrdquo
else fill in the network parameters manually
Http Port In most cases you can leave this value as 80 however if your Internet
Service Provider blocks this port you may switch to another port number such as 85808088889000 Etcs
(Range from 0 to 65535 pay attention to the same segment of multiple devices must set up different port The
port t canrsquot have any conflict with other software or equipment
a Search tools modification in LAN
Figure58
brdquoFor administorrdquo ldquoBasic network settingrdquo -Change the port
Figure59
712 WIFI Setting
1) Please enter the wireless net setting page of the wireless Router to find out SSID
Channel(less than 10) Encryption Authentication as below
Selec IP Camera clickright mouse button choice network configurat ion
Set port number
Set Network IP
Set Http Port Number
IPCAM User Manual
34
Figure 61
As Administrator to Login camera open wireless LAN Settings page fill in every
Setting (ensure keep the same as routerrsquos ) and then pulled out of the cable wireless network function can be
used For example as shown in belows
Figure62
Pls click the scan buttom twice
IPCAM User Manual
35
Figure 63
713 Adhoc point to point Wireless connection Setting
1) Open the basic network setting interfacecheck the device status
Picture 64
2) Open the wireless lan setting interface choose Adhoc for network type you
can define SSID such as 001
remember the IP address of
IP camera and Http port
Click the Settings Ip Camera will
restart and save
Double click to choose
Fill the encryption and
routers and key in the
same way
IPCAM User Manual
36
Picture 65
3) Unplug the RJ45 from IP camera Use laptop or other devices which are with
wifi function( include smart phoneipad and so on) searching the SSID you defined
on proccess 2then make a connection
Picture 66
middotClick wireless network and check the link status of ip camera Please note IP
address of your connected laptop must be the subset of your ip camera if not
please reset the ip address of your laptop manually
Picture 67
4) Now we can use the ip camera tool or enter ip address of camera derectly in
browser blank to visit
1 visit by ip camera tool
Picture 68
IPCAM User Manual
37
2Enter ip address in the browser
Enter user name and password in the login interface
Picture 69
Click ldquoSign inrdquoand vis it
Picture 70
IPCAM User Manual
38
72 Multi-Device Settings
Add cameras in LAN
In the Multi-Device Settings page you can see all devices searched in LAN The 1
St Device is this device in default You can add more cameras list in LAN for monitoring This Web software
supports up to 9 IP Cameras online simultaneous ly Click ldquoThe 2ND
Devicerdquo and Double click the item in the ldquoDevice List in LANrdquo AliasHost and Http Port
will fill in automatically Enter the correct username and password then click ldquoaddrdquoAdd
more cameras in the same way At last please donrsquot forget the ldquo settingrdquo Button
Picture 71
Add cameras in the Internet
Firstly make sure the camera added can access in the Internet with the IP address or
DDNS domain Like this http2191332001669999or httpIPcamdyndnsorg9999You can enter the
Host 219133200166 Http port 9999 or Host IPcamdyndnsorg Http port 9999 Enter the correct
username and password then click ldquoaddrdquo Add more cameras in the
same way
Picture 72
IPCAM User Manual
39
Picture 73
73 MSN Settings
Fill in your MSN account and password then add account which need to receive
IPCAMrsquoS ip address to IPCAM‟ S MSN list (Picture 67)click submit then yoursquod better
restart IP camera After it login your MSN to add IPCAMrsquos MSN account to MSN List that
you can receive IPCAMrsquos ip address
Picture 74
First login and click add contacts choose Add Contact then fill IPCAMrsquos MSN account in instant
messaging address click next then send offers
Aplly for MSN account and passworf for IP cam
Add about 10 MSN Accout
IPCAM User Manual
40
Figure75
Next
Figure76
Figure77
When IPCAMrsquos MSN account shows online you can chat with it input path command url camera
account will show its IP address in chatting box promptly as below
IPCAM User Manual
41
Picture 78
You can input the IP address to browser then can browse ip camera as below
Figure79
AttentionYou should fill MSN account in IPCAM first
74 DDNS Service Settings
DDNS Service The system supports protocols from some DDNS providers Dyndnsorg System support
DDNS such as topipcamorgpeanut shell3322orgDynDNS
provided IP
IPCAM User Manual
42
User and Password the user name and password used when applying for the domain
name (details 432)
DDNS Host the Domain Name
741 Factory DDNS
Device had distributed one DDNS to every productwhich was sticked the bottom
of the product Such as
manufacturer had already give every device a DDNS address which is unique Users only need to fill in this
DDNS IP ADDRESS and port in the browser then they can monitor remote IP camera
Picture 80 Factory DDNS
Note When use the domain name access to the camera and UPNP is not successful you must set port
mapping function on routers
742 The third part DDNS
Users can use not only Factory DDSN but also can use third part DDNS System Such as domain name
wwwdyndnsorg The only thing the user need to do is to apply a free DDNS and then fill in ldquoset boxrdquo as below
Save this setting and this DDNS can be used
DDNS Hostname
Factory DDNS
IPCAM User Manual
43
Note the third party domain name is the realization of analytical way input the domain in the browser it will
keep this string of characters If the port of the device isnrsquot 80 then need to add colon and port number For
example httpwell888dyndnsorg8999
75 Mail and FTP Service
1)Configure the E-mail box to receive and send mails The E-mail box is used for receiving
the images sent after alarm and the system IP address after successful dial-up
Note When Alarm Service Settings-gt Send Mail on Alarm is check the Mail
Service takes effect
Picture82
Configure the E-mail box to receive and send mails The E-mail box is used for receiving the images sent
after alarm and the system IP address after successful dial-up
Sender This device use the sender mailbox to send mails
Receiver To receive the mail from the Sender You can set up to 4 receiver mailbox
SMTP Server the SMTP server for the sender mailbox
Need Authentication if the sender mailbox need authentication you should check it then
input the SMTP username amp Password
Mail test Please set the Mail parameter and click Submit first There are Mail test result
Picture 83
video Local storage in PC after alarm monitoring
IPCAM User Manual
44
Gmail also set as the same It only needs you to fill in correct SMTP Sever address user and password
Picture 84
Mail notes Internet IP address In this option When Internet IP and port have changed IP Will be sent via
1Can not connect to the server
2Network Error Please try later
3Server Error
4Incorrect user or password
5The sender is denied by the server Maybe the server need to authenticate the user please check it
and try again
6The receiver is denied by the server Maybe because of the anti-spam privacy of the server
7The message is denied by the server Maybe because of the anti-spam privacy of the server
8The server does not support the authentication mode used by the device
Report Internet IP by Mail When ipcam port or Internet IP changed it will send the internet IP by
mail(for example IPCAM s url is http119123207969002) Make sure the port is map to the router
correctly by UPNP or Virtual Map function
2) FTP Server use and settings
middotIf you already have an FTP Server (ipcam com)and email ipcam you can fill the
parameters as below
Picture 85
IPCAM User Manual
45
middotFTP Server of LAN as below
1 Create an account
2 Step by step setting until finish it
Picture 88
IPCAM User Manual
46
3Start Server
Continue to finish it
Picture 89
4IPCAMrsquoS account can be used
Picture 90
Save path
This is a FTP
server address
IPCAM User Manual
47
5 IP camerarsquos FTP Server set like this
Picture 91
6 Set up and complete testing is successfulwhen it alarms IP camera will upload
pictures to the FTP server Settings of main directory path (as shown )
Picture 92
FTP Server the FTP server address
FTP port the port usually is 21
FTP Mode support standard(POST) mode and passive(PASV) mode
Upload Image Now it will upload image now when checkbox is not checked When checked you can
input upload interval(Seconds)
76 Motion Detection
Enter Alarm Service Settings page to configure Motion Detection function
1) Motion Detect Armed
Each alarm triggers in the protection of time the device will take various measures to alarm
IO linkage alarm output relay closure external alarm device began to alarm
IPCAM User Manual
48
Send E-mail alarm informatio
Transmit pictures to the FTP server and can set the time interval of sending pictures
2) Alarm t ime Settings
Only in the alarm period detection device to alarm will only have alarm action All the time (not check the
schedule) also can alarm within specified time For the specified time alarm firstly need to set up the system
time time zone and then to choose period of alarm in the state of alarm setting as shown in Picture 19
Picture93 Alarm of time Settings interface
Motion Detect Armed
When you enable motion detect armed the camera can be triggered to send email alerts
and record images In the camera monitoring page the green icon turn to red and an
alert sound you will hear
Motion Detect Sensibility
You can choose from low to high 10 level alarm sensitivity The greater the number the higher the
sensitivity
Alarm Input Armed
IO PINS1) Output(+5V) 2) Output 3) Alarm input 4) Input (GND)
Input Pins The input pins can be used for 1-way external sensor input(pin3 and pin4) For example
you may connect a Person Infrared Sensor (PIR) to it for motion detection When external sensor
triggered IPCAM can be programmed to send an email with picture or control the internal relay output
IPCAM User Manual
49
Picture94
IO Linkage on Alarm
Enable IO linkage on alarmPin1 will output +5V when alarm triggered and output LOW
when alarm release automatically
Switch onoff buttons control Pin1 output manually
Send Mail on Alarm
Sent picture and mail inform to customers e-mail after alarmed(firstly you should finish
the Mail Service Settings)
Picture 95
Upload Image on Alarm
Enable upload image on alarm and set upload interval(Seconds)
Tick send to your setted mails
IPCAM User Manual
50
Picture 96
REC automatically and save to PC
When you enable motion detect and open the camera monitoring page on the PC If
there is an alarm triggered REC will start automatically for several seconds and save to
the PC
Picture 97
REC save to pcrsquos position
Picture 98
Storage path can be changed
After Setting up later when have the
alarm the image will send to
designated email and FTP server
IPCAM User Manual
51
77 IP cameras Time amp Date setting and PTZ Setting
If IP camera connected with Internet it can automatically check the time amp date via running NTP Server And
need to choose properly IP cameras Time zone Otherwise it need PC Time to check IP camera time amp Date
Pre-set and Speed of PT
78 UPGRADE DEVICE FIRMWARE
Picture 101 Firmware upgrade
IP CAMERA has two kinds of programme One is system firmware another is application firmware It can be
upgraded separately
79 BACKUP AND RESTORE SETTING
Click Set in the Backup will lead to a BIN file and choose this file to restore setting
The huger the Number is The
slower it will be
IPCAM User Manual
52
8 APPENDIX
81 REGISTER AND APPLY FOR DDNS SERVICE
1Users use DDNS management system first timeUsers need to apply account to manage
and inquire the domain state
Step1 enter httpwwwdyndnscom and Create Account( Fill in Domain Name dyndnsorg then Click
Add)
Figure103
Step2 enter your information
Figure104
IPCAM User Manual
53
Figure105
Step3 After a minute you will receive an E-mail from DynDNS Support and it will give you a
confirmation address
(eg httpsaccountdyncomemlcreateconflILHMZHRje5oF_6YXTYv1A
Figure106
IPCAM User Manual
54
Step4 Open the link to active your Domain Name as belowLogin in your account after it is activated
Figure107
Step5 Check all the DDNS serviceswe choose the 14-day-trial
Figure108
Step6 Click the linkand user will see as below
IPCAM User Manual
55
middotenter your information
Figure109
Step7 Now you obtained a Dynamic Domain Name(Figure 105)and can use it in the DDNS Service
Settings(details 74)
Figure110
IPCAM User Manual
56
2For DDNS which is applied successfully you can fill in the IP CAMERA When set successfully the status
of IP will be shown as blows
picture 111
picture 112
3How to set DDNS on line
The first wayMenu rdquostartrdquo- ldquorunrdquomdashgt Input CMDClink rdquoenterrdquoIt can check DDNS Statas
via As shown below
Picture 113
IPCAM User Manual
57
Through the PING command this dynamic domain name can be back in the network response information It
proves that the domain name has been online
If the domain name update not success Possible reasons
(1) DDNS parameter is not correct (2) may cause DNS address configuration is wrong
82 Some special application for IPCAMERA
IPCamUse some grammar parameter control and Use IPCam
useruser
pwdpassword
priThe current access (1 visitors 23 operator managers)
resolutionImage resolution(832024 0qvga32640480 vga)
ratemage transmission speed and scope 0-23
brightnessbrightness0~255
contrastcontrast0~6
mode
Mode 050 hz For
60 hz 2 outdoor
flip
Flip rotation 0 primitive 1 vertical reverses 2 horizontal 3 vertical flip + horizontal
821 The flow media player VLC player and mplayer can real-time broadcast ipcamera and send
of streaming media format video data
(Grammar parametersvideostreamasfuser=amppwd=ampresolution=amprate=)
As shown Picture 113 rdquoIpcamrdquo
Picture 114
IPCAM User Manual
58
From the following picture we can view that Ipcam local IP address ishttp19216811118999
WAN IP Address is httpwell888dyndnsorg8999 we can inputrdquoIPcamrdquorsquoS IP address to
open in the player
Picture 115
the CLC media player open play position
Picture 116
LAN play address
Picture 117
IPCAM User Manual
59
Picture 118
Open the Internet play position
Picture 119
As shown in the following picture It can see the ipcamera send video streaming format
Size 640X480
User
IPCAM User Manual
60
Picture 120
83 Frequently Asked Questions
Note1) Any question you would meet please check Network connections firstly
2)Check the working status revealed by the indicators on the network server hub exchange and
network card If abnormal check the network connections
831 I have forgotten the administrator username andor password
To reset the administrator username and password Press and hold down the RESET
BUTTON for 5 seconds Release the power button and the username and password
will be reset back to the factory default administrator username and password
Default administrator username admin
Default administrator password No password
832 IP Address configuration
Check whether IP address of the IP Camera server shares the same subnet as your
work station Click My Computer gt Control PanelgtNetwork amp Dial-up Connections gt
LAN gt Attributes gtInternet Protocols (TCPIP) and check IP Address and Subnet
Mask Make sure they are in the same subnet when configuring IP Camera IP
address manuallyUnable to access IP Camera via web browser
833 Network Configuration
Double Check to ensure that your HTTP server software is configured and running
properly If you are running any firewall software make sure it is allowing inbound
connections to port 80Also if you happen to be using a cableDSL router make sure
IPCAM User Manual
61
you are set up port forwarding properly ( consult your router is documentation for more
information ) If none of these seem to be the problem it is also possible that your
ISP is blocking inbound connections to port 80 ndashmany IPSs have done this because
of internet worms such as Code Red If this is the case you bdquoll have to setup your
HTTP server on an alternate port (such as 8080)
834 No Monitoring picture
It has four reasons Images of the abnormal factors
1If its not use Directx function and lead to not normal to display the color imagePlease
install DirectX and open the start menu then input the command
Picture 121
You use the DirectX function and it will expedite the DirectDrawDirect3D and AGP if its can not maybe the
connect issues or hardware not read it
2The issues of hardware canrsquot support the card expedite image
3The antivirus software will influence the network it will be stoped or closedIf you install fireproof software
please close it and try again
4 ActiveX controller is not installed correctly
If its not image on the first time to use and will display to the user through the ActiveXIf its can not
display of the image maybe it fail of install about this issues please follow as
1Install ldquoIP Camera Toolrdquo ActiveX control at the same time
2Please install ActiveX control and keep the security settings for IE browser
835 Problems with network bandwidth
The image frame rate is subjected to the following factors 1network bandwidth 2 PC
performancenetwork environment and display preference setting (brightness theme
etc) 3 the number of visitors (Too many visitors will slow down the image frame rate) 4
choice of switch or hub (Use a switch for multiple IP Camera Servers rather than a HUB)
The Device use MJEPT Compression it needs good network bandwidth If it is too narrow it will lead to slowly
browser Typical video parameter occupy network bandwidth as blows
640x48030fps 40 Megabits ~ 50 Megabits
320x24030fps 12 Megabits ~ 16 Megabits
IPCAM User Manual
62
middot836 Why pop-up the prompt ldquoFail to connect to the devicehelliprdquo
This prompt only appeared in the case of using multiple cameras
Enter the Multi-Device Settings page(login as administrator) to check the
Device setting is correct or not
When one of the multiple cameras disconnected the color changed to
yellow and pop-up the promptldquoFail to connect to the devicehelliprdquo
Picture 122
837 Canrsquot access the IPCAM in the internet
There are some reasons
1 ActiveX controller is not installed correctly(see more details 514)
2 The port IPCAM used is blocked by Firewall or Anti-virus software Please change a
port number and try again
3 Port mapping is not success You can do port mapping by two ways
Enter setting page of the router which IPCAM connect with to enable UPnP function
Enter IPCAM ldquoUPnP Settingsrdquo to enable UPnP and make sure the state is ldquoUPnP
successrdquo
‟ s IP
and port to the Virtual map list
When use ADSL the IP is dynamic You should set DDNS(see more details 74 amp 80)
and also make sure port mapping success
84 Operate common problem solving
IP camera tool canrsquot find the camera
Except of the camera broken
1 Make sure the cable connector no problem recommend connector
(AMP)it is with international standard Another note IPCAMrsquos data
transmission channel require higher than computerrsquos so maybe the
IPCAM User Manual
63
computer can run normally but IPCAM canrsquot Please press heavily when making the cable connector
2 Confirm the power supply normally First check whether power indication
light turn on or not If it is onthen check the yellow light on RJ45 Port
(power indication light) and green light (network indication light) are on or
notIf they are onso power supply and cable runs normally
3 Confirm all the firwall and antivirus software are closeThe firewall often
block unrecognized data so if the firewall is running so maybe the IPCAM
TOOL canrsquot find the deviceSuggest to close firewall and antivirus
software temporarily before searching
How to solve the camera blank screen
1 Check if you are using the wrong power adaptorplease use original one
2 Close antivirus software
How to solve the camera canrsquot login by Internet
1 Check if you set DDNS success or not
2 Check the current IPCAMrsquos port number is the same as routerrsquosThey need to keep same
Canrsquot view the monitoring picture
1 Reason canrsquot connect with network
SolutionCheck if the network connect well exclude cable fault and PC virus
cause network fault until can be used between PC and PING
2 ReasonIP address occupy by other device
Solution Choose automatic gain
3 Reason IP address located within different subnet
Solution Check IPCAMrsquoS ip address and subnet mask address and gateway settings
4 ReasonWeb port has been modified
Solutioncontact network administrator to obtain port information
5 Reasonunknown
SolutionPress reset button to factory default statethen reconnectingsysten
default to gain ip address automaticsubnet mask is 2552552550
85 Default Parameters
middotDefault network Parameters
IP address dynamic obtain
Subnet mask 2552552550
Gateway dynamic obtain
DDNS Factory provide
middotUsername and password
Default administrator username admin
Default administrator password No password
IPCAM User Manual
64
86 Technical Parameters
ITEM IP CAM (NIP-02BGPWA2)
Image Sensor
Mage sensor 15 Color CMOS Sensor
Display 640 x 480 (300K Pixels)
Lens f36mm F24 (IR Lens)
Miniillumination 05 Lux
Lens Lens Type Glass Lens
Viewing Angle 60 Degree
Audio Microphone Audio of two way
Domain name Server MSN server DDNS server
Video
Image Compression MJPEG
Image Frame Rate 15 FPS(VGA)30FPS(QVGA)
Resolution 640 x 480(VGA) 320 x 240(QVGA)
Flip Mirror Images rtical Horizontal
mode 50Hz 60Hz or Outdoor
Video Parameters Brightness Contrast
Communication
Ethernet One 10100Mbps RJ-45
Supported Protocol HTTPDHCPIPTCPUDPFTPSMTPDDNSPPPoEUPnP
Mobilephone monitor Support IphoneIpad3G phonesmartphone
Wireless Standard IEEE 80211bg
Wireless Standard 80211b11Mbps(max) 80211g54Mbps(max)
Wireless Security 64128-bitWEP Encryption
Physical
PanTilt Angle Horizontal270deg amp Vertical 120deg
Infrared Light 10 IR LEDs Night visibility up to 15 Mete
Product size 100(L) x100(W) x125mm(H)
Gross Weight 6465gpcs (packing size196x165x123mm)
Net Weight 2547gpcs (only product)
Power Specification DC 5V25A 18 meter
Power Consumption 5 Watts
Environment
Operate Temper 0deg~ 55degC (14degF~122degF)
Operating Humidity 20 ~ 85 non-condensing
Storage Temper -10degC ~ 60deg (14degF ~140degF)
Storage Humidity 0 ~ 90 non-condensing
PC Requirements
CPU 20GHZ or above (suggested 30GHz)
Memory Size 512MB or above (suggested 10GB)
Display card 64M or above
Supported OS Microsoft Windows XPVistaWindows7
Supported browsers IEfirefoxGoogle
Certification CEFCCRoHS
Warranty Limited 1-year warranty
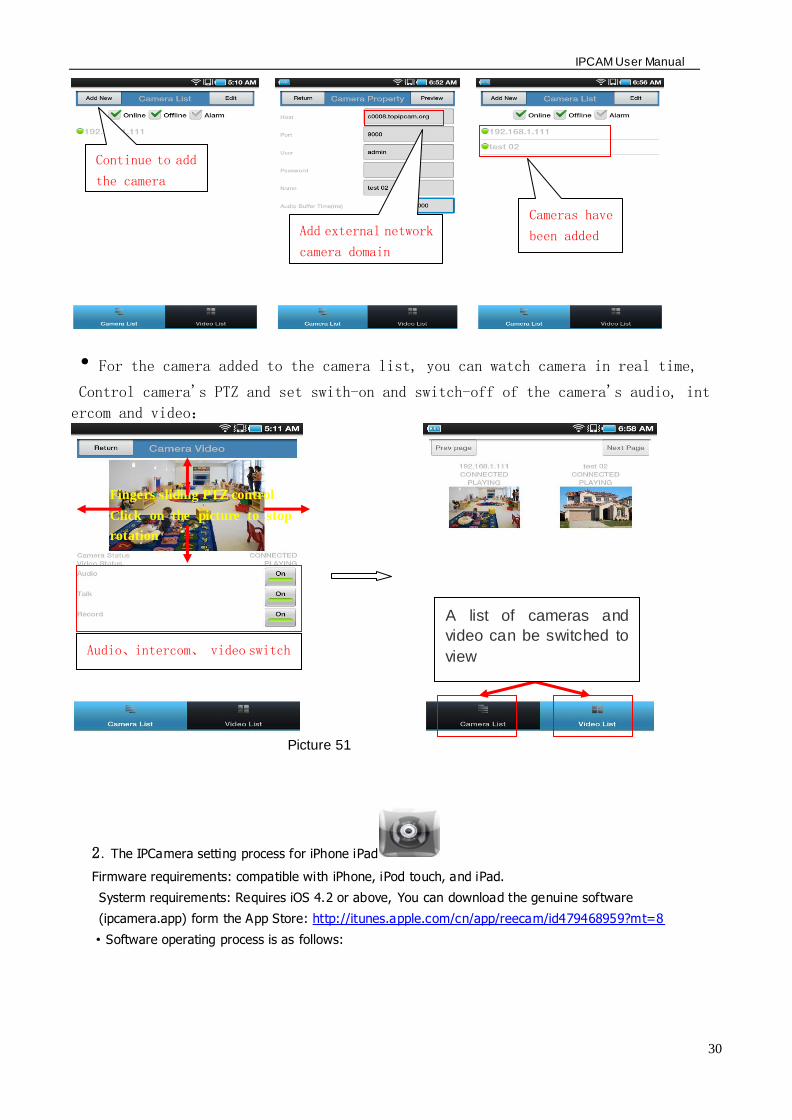
IPCAM User Manual
30
middotFor the camera added to the camera list you can watch camera in real time
Control cameras PTZ and set swith-on and switch-off of the cameras audio int
ercom and video
Picture 51
2 The IPCamera setting process for iPhone iPad
Firmware requirements compatible with iPhone iPod touch and iPad
Systerm requirements Requires iOS 42 or above
You can download the genuine
software
(ipcameraapp) form the App Store
httpitunesapplecomcnappreecamid479468959mt=8
middotSoftware operating process is as follows
Continue to add
the camera
Add external network
camera domain
Cameras have
been added
Audiointercom video switch
A list of cameras and
video can be switched to
view
Fingers sliding PTZ control
Click on the picture to stop
rotation
IPCAM User Manual
31
Open the App Store search
reecam
Download and install
reecam
The run has been
installed good reecam
program
Click to add cameras
Search reecam
IPCAM User Manual
32
Fill in the domain address
or IP address
Fill in the Http port of the
camera login user name
and password click next
to open the camera
Completed please
click here
Preview videoclick on the
next save
Save the camera added
Selected camera to
view images
Click image to expand
more cameras
operating functions
IPCAM User Manual
33
7 Other setting
71 Network Setting
711 Basic Network Settings
If the router that the IP camera connect has DHCP function you can choice ldquoObain IP from DHCP Serverrdquo
else fill in the network parameters manually
Http Port In most cases you can leave this value as 80 however if your Internet
Service Provider blocks this port you may switch to another port number such as 85808088889000 Etcs
(Range from 0 to 65535 pay attention to the same segment of multiple devices must set up different port The
port t canrsquot have any conflict with other software or equipment
a Search tools modification in LAN
Figure58
brdquoFor administorrdquo ldquoBasic network settingrdquo -Change the port
Figure59
712 WIFI Setting
1) Please enter the wireless net setting page of the wireless Router to find out SSID
Channel(less than 10) Encryption Authentication as below
Selec IP Camera clickright mouse button choice network configurat ion
Set port number
Set Network IP
Set Http Port Number
IPCAM User Manual
34
Figure 61
As Administrator to Login camera open wireless LAN Settings page fill in every
Setting (ensure keep the same as routerrsquos ) and then pulled out of the cable wireless network function can be
used For example as shown in belows
Figure62
Pls click the scan buttom twice
IPCAM User Manual
35
Figure 63
713 Adhoc point to point Wireless connection Setting
1) Open the basic network setting interfacecheck the device status
Picture 64
2) Open the wireless lan setting interface choose Adhoc for network type you
can define SSID such as 001
remember the IP address of
IP camera and Http port
Click the Settings Ip Camera will
restart and save
Double click to choose
Fill the encryption and
routers and key in the
same way
IPCAM User Manual
36
Picture 65
3) Unplug the RJ45 from IP camera Use laptop or other devices which are with
wifi function( include smart phoneipad and so on) searching the SSID you defined
on proccess 2then make a connection
Picture 66
middotClick wireless network and check the link status of ip camera Please note IP
address of your connected laptop must be the subset of your ip camera if not
please reset the ip address of your laptop manually
Picture 67
4) Now we can use the ip camera tool or enter ip address of camera derectly in
browser blank to visit
1 visit by ip camera tool
Picture 68
IPCAM User Manual
37
2Enter ip address in the browser
Enter user name and password in the login interface
Picture 69
Click ldquoSign inrdquoand vis it
Picture 70
IPCAM User Manual
38
72 Multi-Device Settings
Add cameras in LAN
In the Multi-Device Settings page you can see all devices searched in LAN The 1
St Device is this device in default You can add more cameras list in LAN for monitoring This Web software
supports up to 9 IP Cameras online simultaneous ly Click ldquoThe 2ND
Devicerdquo and Double click the item in the ldquoDevice List in LANrdquo AliasHost and Http Port
will fill in automatically Enter the correct username and password then click ldquoaddrdquoAdd
more cameras in the same way At last please donrsquot forget the ldquo settingrdquo Button
Picture 71
Add cameras in the Internet
Firstly make sure the camera added can access in the Internet with the IP address or
DDNS domain Like this http2191332001669999or httpIPcamdyndnsorg9999You can enter the
Host 219133200166 Http port 9999 or Host IPcamdyndnsorg Http port 9999 Enter the correct
username and password then click ldquoaddrdquo Add more cameras in the
same way
Picture 72
IPCAM User Manual
39
Picture 73
73 MSN Settings
Fill in your MSN account and password then add account which need to receive
IPCAMrsquoS ip address to IPCAM‟ S MSN list (Picture 67)click submit then yoursquod better
restart IP camera After it login your MSN to add IPCAMrsquos MSN account to MSN List that
you can receive IPCAMrsquos ip address
Picture 74
First login and click add contacts choose Add Contact then fill IPCAMrsquos MSN account in instant
messaging address click next then send offers
Aplly for MSN account and passworf for IP cam
Add about 10 MSN Accout
IPCAM User Manual
40
Figure75
Next
Figure76
Figure77
When IPCAMrsquos MSN account shows online you can chat with it input path command url camera
account will show its IP address in chatting box promptly as below
IPCAM User Manual
41
Picture 78
You can input the IP address to browser then can browse ip camera as below
Figure79
AttentionYou should fill MSN account in IPCAM first
74 DDNS Service Settings
DDNS Service The system supports protocols from some DDNS providers Dyndnsorg System support
DDNS such as topipcamorgpeanut shell3322orgDynDNS
provided IP
IPCAM User Manual
42
User and Password the user name and password used when applying for the domain
name (details 432)
DDNS Host the Domain Name
741 Factory DDNS
Device had distributed one DDNS to every productwhich was sticked the bottom
of the product Such as
manufacturer had already give every device a DDNS address which is unique Users only need to fill in this
DDNS IP ADDRESS and port in the browser then they can monitor remote IP camera
Picture 80 Factory DDNS
Note When use the domain name access to the camera and UPNP is not successful you must set port
mapping function on routers
742 The third part DDNS
Users can use not only Factory DDSN but also can use third part DDNS System Such as domain name
wwwdyndnsorg The only thing the user need to do is to apply a free DDNS and then fill in ldquoset boxrdquo as below
Save this setting and this DDNS can be used
DDNS Hostname
Factory DDNS
IPCAM User Manual
43
Note the third party domain name is the realization of analytical way input the domain in the browser it will
keep this string of characters If the port of the device isnrsquot 80 then need to add colon and port number For
example httpwell888dyndnsorg8999
75 Mail and FTP Service
1)Configure the E-mail box to receive and send mails The E-mail box is used for receiving
the images sent after alarm and the system IP address after successful dial-up
Note When Alarm Service Settings-gt Send Mail on Alarm is check the Mail
Service takes effect
Picture82
Configure the E-mail box to receive and send mails The E-mail box is used for receiving the images sent
after alarm and the system IP address after successful dial-up
Sender This device use the sender mailbox to send mails
Receiver To receive the mail from the Sender You can set up to 4 receiver mailbox
SMTP Server the SMTP server for the sender mailbox
Need Authentication if the sender mailbox need authentication you should check it then
input the SMTP username amp Password
Mail test Please set the Mail parameter and click Submit first There are Mail test result
Picture 83
video Local storage in PC after alarm monitoring
IPCAM User Manual
44
Gmail also set as the same It only needs you to fill in correct SMTP Sever address user and password
Picture 84
Mail notes Internet IP address In this option When Internet IP and port have changed IP Will be sent via
1Can not connect to the server
2Network Error Please try later
3Server Error
4Incorrect user or password
5The sender is denied by the server Maybe the server need to authenticate the user please check it
and try again
6The receiver is denied by the server Maybe because of the anti-spam privacy of the server
7The message is denied by the server Maybe because of the anti-spam privacy of the server
8The server does not support the authentication mode used by the device
Report Internet IP by Mail When ipcam port or Internet IP changed it will send the internet IP by
mail(for example IPCAM s url is http119123207969002) Make sure the port is map to the router
correctly by UPNP or Virtual Map function
2) FTP Server use and settings
middotIf you already have an FTP Server (ipcam com)and email ipcam you can fill the
parameters as below
Picture 85
IPCAM User Manual
45
middotFTP Server of LAN as below
1 Create an account
2 Step by step setting until finish it
Picture 88
IPCAM User Manual
46
3Start Server
Continue to finish it
Picture 89
4IPCAMrsquoS account can be used
Picture 90
Save path
This is a FTP
server address
IPCAM User Manual
47
5 IP camerarsquos FTP Server set like this
Picture 91
6 Set up and complete testing is successfulwhen it alarms IP camera will upload
pictures to the FTP server Settings of main directory path (as shown )
Picture 92
FTP Server the FTP server address
FTP port the port usually is 21
FTP Mode support standard(POST) mode and passive(PASV) mode
Upload Image Now it will upload image now when checkbox is not checked When checked you can
input upload interval(Seconds)
76 Motion Detection
Enter Alarm Service Settings page to configure Motion Detection function
1) Motion Detect Armed
Each alarm triggers in the protection of time the device will take various measures to alarm
IO linkage alarm output relay closure external alarm device began to alarm
IPCAM User Manual
48
Send E-mail alarm informatio
Transmit pictures to the FTP server and can set the time interval of sending pictures
2) Alarm t ime Settings
Only in the alarm period detection device to alarm will only have alarm action All the time (not check the
schedule) also can alarm within specified time For the specified time alarm firstly need to set up the system
time time zone and then to choose period of alarm in the state of alarm setting as shown in Picture 19
Picture93 Alarm of time Settings interface
Motion Detect Armed
When you enable motion detect armed the camera can be triggered to send email alerts
and record images In the camera monitoring page the green icon turn to red and an
alert sound you will hear
Motion Detect Sensibility
You can choose from low to high 10 level alarm sensitivity The greater the number the higher the
sensitivity
Alarm Input Armed
IO PINS1) Output(+5V) 2) Output 3) Alarm input 4) Input (GND)
Input Pins The input pins can be used for 1-way external sensor input(pin3 and pin4) For example
you may connect a Person Infrared Sensor (PIR) to it for motion detection When external sensor
triggered IPCAM can be programmed to send an email with picture or control the internal relay output
IPCAM User Manual
49
Picture94
IO Linkage on Alarm
Enable IO linkage on alarmPin1 will output +5V when alarm triggered and output LOW
when alarm release automatically
Switch onoff buttons control Pin1 output manually
Send Mail on Alarm
Sent picture and mail inform to customers e-mail after alarmed(firstly you should finish
the Mail Service Settings)
Picture 95
Upload Image on Alarm
Enable upload image on alarm and set upload interval(Seconds)
Tick send to your setted mails
IPCAM User Manual
50
Picture 96
REC automatically and save to PC
When you enable motion detect and open the camera monitoring page on the PC If
there is an alarm triggered REC will start automatically for several seconds and save to
the PC
Picture 97
REC save to pcrsquos position
Picture 98
Storage path can be changed
After Setting up later when have the
alarm the image will send to
designated email and FTP server
IPCAM User Manual
51
77 IP cameras Time amp Date setting and PTZ Setting
If IP camera connected with Internet it can automatically check the time amp date via running NTP Server And
need to choose properly IP cameras Time zone Otherwise it need PC Time to check IP camera time amp Date
Pre-set and Speed of PT
78 UPGRADE DEVICE FIRMWARE
Picture 101 Firmware upgrade
IP CAMERA has two kinds of programme One is system firmware another is application firmware It can be
upgraded separately
79 BACKUP AND RESTORE SETTING
Click Set in the Backup will lead to a BIN file and choose this file to restore setting
The huger the Number is The
slower it will be
IPCAM User Manual
52
8 APPENDIX
81 REGISTER AND APPLY FOR DDNS SERVICE
1Users use DDNS management system first timeUsers need to apply account to manage
and inquire the domain state
Step1 enter httpwwwdyndnscom and Create Account( Fill in Domain Name dyndnsorg then Click
Add)
Figure103
Step2 enter your information
Figure104
IPCAM User Manual
53
Figure105
Step3 After a minute you will receive an E-mail from DynDNS Support and it will give you a
confirmation address
(eg httpsaccountdyncomemlcreateconflILHMZHRje5oF_6YXTYv1A
Figure106
IPCAM User Manual
54
Step4 Open the link to active your Domain Name as belowLogin in your account after it is activated
Figure107
Step5 Check all the DDNS serviceswe choose the 14-day-trial
Figure108
Step6 Click the linkand user will see as below
IPCAM User Manual
55
middotenter your information
Figure109
Step7 Now you obtained a Dynamic Domain Name(Figure 105)and can use it in the DDNS Service
Settings(details 74)
Figure110
IPCAM User Manual
56
2For DDNS which is applied successfully you can fill in the IP CAMERA When set successfully the status
of IP will be shown as blows
picture 111
picture 112
3How to set DDNS on line
The first wayMenu rdquostartrdquo- ldquorunrdquomdashgt Input CMDClink rdquoenterrdquoIt can check DDNS Statas
via As shown below
Picture 113
IPCAM User Manual
57
Through the PING command this dynamic domain name can be back in the network response information It
proves that the domain name has been online
If the domain name update not success Possible reasons
(1) DDNS parameter is not correct (2) may cause DNS address configuration is wrong
82 Some special application for IPCAMERA
IPCamUse some grammar parameter control and Use IPCam
useruser
pwdpassword
priThe current access (1 visitors 23 operator managers)
resolutionImage resolution(832024 0qvga32640480 vga)
ratemage transmission speed and scope 0-23
brightnessbrightness0~255
contrastcontrast0~6
mode
Mode 050 hz For
60 hz 2 outdoor
flip
Flip rotation 0 primitive 1 vertical reverses 2 horizontal 3 vertical flip + horizontal
821 The flow media player VLC player and mplayer can real-time broadcast ipcamera and send
of streaming media format video data
(Grammar parametersvideostreamasfuser=amppwd=ampresolution=amprate=)
As shown Picture 113 rdquoIpcamrdquo
Picture 114
IPCAM User Manual
58
From the following picture we can view that Ipcam local IP address ishttp19216811118999
WAN IP Address is httpwell888dyndnsorg8999 we can inputrdquoIPcamrdquorsquoS IP address to
open in the player
Picture 115
the CLC media player open play position
Picture 116
LAN play address
Picture 117
IPCAM User Manual
59
Picture 118
Open the Internet play position
Picture 119
As shown in the following picture It can see the ipcamera send video streaming format
Size 640X480
User
IPCAM User Manual
60
Picture 120
83 Frequently Asked Questions
Note1) Any question you would meet please check Network connections firstly
2)Check the working status revealed by the indicators on the network server hub exchange and
network card If abnormal check the network connections
831 I have forgotten the administrator username andor password
To reset the administrator username and password Press and hold down the RESET
BUTTON for 5 seconds Release the power button and the username and password
will be reset back to the factory default administrator username and password
Default administrator username admin
Default administrator password No password
832 IP Address configuration
Check whether IP address of the IP Camera server shares the same subnet as your
work station Click My Computer gt Control PanelgtNetwork amp Dial-up Connections gt
LAN gt Attributes gtInternet Protocols (TCPIP) and check IP Address and Subnet
Mask Make sure they are in the same subnet when configuring IP Camera IP
address manuallyUnable to access IP Camera via web browser
833 Network Configuration
Double Check to ensure that your HTTP server software is configured and running
properly If you are running any firewall software make sure it is allowing inbound
connections to port 80Also if you happen to be using a cableDSL router make sure
IPCAM User Manual
61
you are set up port forwarding properly ( consult your router is documentation for more
information ) If none of these seem to be the problem it is also possible that your
ISP is blocking inbound connections to port 80 ndashmany IPSs have done this because
of internet worms such as Code Red If this is the case you bdquoll have to setup your
HTTP server on an alternate port (such as 8080)
834 No Monitoring picture
It has four reasons Images of the abnormal factors
1If its not use Directx function and lead to not normal to display the color imagePlease
install DirectX and open the start menu then input the command
Picture 121
You use the DirectX function and it will expedite the DirectDrawDirect3D and AGP if its can not maybe the
connect issues or hardware not read it
2The issues of hardware canrsquot support the card expedite image
3The antivirus software will influence the network it will be stoped or closedIf you install fireproof software
please close it and try again
4 ActiveX controller is not installed correctly
If its not image on the first time to use and will display to the user through the ActiveXIf its can not
display of the image maybe it fail of install about this issues please follow as
1Install ldquoIP Camera Toolrdquo ActiveX control at the same time
2Please install ActiveX control and keep the security settings for IE browser
835 Problems with network bandwidth
The image frame rate is subjected to the following factors 1network bandwidth 2 PC
performancenetwork environment and display preference setting (brightness theme
etc) 3 the number of visitors (Too many visitors will slow down the image frame rate) 4
choice of switch or hub (Use a switch for multiple IP Camera Servers rather than a HUB)
The Device use MJEPT Compression it needs good network bandwidth If it is too narrow it will lead to slowly
browser Typical video parameter occupy network bandwidth as blows
640x48030fps 40 Megabits ~ 50 Megabits
320x24030fps 12 Megabits ~ 16 Megabits
IPCAM User Manual
62
middot836 Why pop-up the prompt ldquoFail to connect to the devicehelliprdquo
This prompt only appeared in the case of using multiple cameras
Enter the Multi-Device Settings page(login as administrator) to check the
Device setting is correct or not
When one of the multiple cameras disconnected the color changed to
yellow and pop-up the promptldquoFail to connect to the devicehelliprdquo
Picture 122
837 Canrsquot access the IPCAM in the internet
There are some reasons
1 ActiveX controller is not installed correctly(see more details 514)
2 The port IPCAM used is blocked by Firewall or Anti-virus software Please change a
port number and try again
3 Port mapping is not success You can do port mapping by two ways
Enter setting page of the router which IPCAM connect with to enable UPnP function
Enter IPCAM ldquoUPnP Settingsrdquo to enable UPnP and make sure the state is ldquoUPnP
successrdquo
‟ s IP
and port to the Virtual map list
When use ADSL the IP is dynamic You should set DDNS(see more details 74 amp 80)
and also make sure port mapping success
84 Operate common problem solving
IP camera tool canrsquot find the camera
Except of the camera broken
1 Make sure the cable connector no problem recommend connector
(AMP)it is with international standard Another note IPCAMrsquos data
transmission channel require higher than computerrsquos so maybe the
IPCAM User Manual
63
computer can run normally but IPCAM canrsquot Please press heavily when making the cable connector
2 Confirm the power supply normally First check whether power indication
light turn on or not If it is onthen check the yellow light on RJ45 Port
(power indication light) and green light (network indication light) are on or
notIf they are onso power supply and cable runs normally
3 Confirm all the firwall and antivirus software are closeThe firewall often
block unrecognized data so if the firewall is running so maybe the IPCAM
TOOL canrsquot find the deviceSuggest to close firewall and antivirus
software temporarily before searching
How to solve the camera blank screen
1 Check if you are using the wrong power adaptorplease use original one
2 Close antivirus software
How to solve the camera canrsquot login by Internet
1 Check if you set DDNS success or not
2 Check the current IPCAMrsquos port number is the same as routerrsquosThey need to keep same
Canrsquot view the monitoring picture
1 Reason canrsquot connect with network
SolutionCheck if the network connect well exclude cable fault and PC virus
cause network fault until can be used between PC and PING
2 ReasonIP address occupy by other device
Solution Choose automatic gain
3 Reason IP address located within different subnet
Solution Check IPCAMrsquoS ip address and subnet mask address and gateway settings
4 ReasonWeb port has been modified
Solutioncontact network administrator to obtain port information
5 Reasonunknown
SolutionPress reset button to factory default statethen reconnectingsysten
default to gain ip address automaticsubnet mask is 2552552550
85 Default Parameters
middotDefault network Parameters
IP address dynamic obtain
Subnet mask 2552552550
Gateway dynamic obtain
DDNS Factory provide
middotUsername and password
Default administrator username admin
Default administrator password No password
IPCAM User Manual
64
86 Technical Parameters
ITEM IP CAM (NIP-02BGPWA2)
Image Sensor
Mage sensor 15 Color CMOS Sensor
Display 640 x 480 (300K Pixels)
Lens f36mm F24 (IR Lens)
Miniillumination 05 Lux
Lens Lens Type Glass Lens
Viewing Angle 60 Degree
Audio Microphone Audio of two way
Domain name Server MSN server DDNS server
Video
Image Compression MJPEG
Image Frame Rate 15 FPS(VGA)30FPS(QVGA)
Resolution 640 x 480(VGA) 320 x 240(QVGA)
Flip Mirror Images rtical Horizontal
mode 50Hz 60Hz or Outdoor
Video Parameters Brightness Contrast
Communication
Ethernet One 10100Mbps RJ-45
Supported Protocol HTTPDHCPIPTCPUDPFTPSMTPDDNSPPPoEUPnP
Mobilephone monitor Support IphoneIpad3G phonesmartphone
Wireless Standard IEEE 80211bg
Wireless Standard 80211b11Mbps(max) 80211g54Mbps(max)
Wireless Security 64128-bitWEP Encryption
Physical
PanTilt Angle Horizontal270deg amp Vertical 120deg
Infrared Light 10 IR LEDs Night visibility up to 15 Mete
Product size 100(L) x100(W) x125mm(H)
Gross Weight 6465gpcs (packing size196x165x123mm)
Net Weight 2547gpcs (only product)
Power Specification DC 5V25A 18 meter
Power Consumption 5 Watts
Environment
Operate Temper 0deg~ 55degC (14degF~122degF)
Operating Humidity 20 ~ 85 non-condensing
Storage Temper -10degC ~ 60deg (14degF ~140degF)
Storage Humidity 0 ~ 90 non-condensing
PC Requirements
CPU 20GHZ or above (suggested 30GHz)
Memory Size 512MB or above (suggested 10GB)
Display card 64M or above
Supported OS Microsoft Windows XPVistaWindows7
Supported browsers IEfirefoxGoogle
Certification CEFCCRoHS
Warranty Limited 1-year warranty
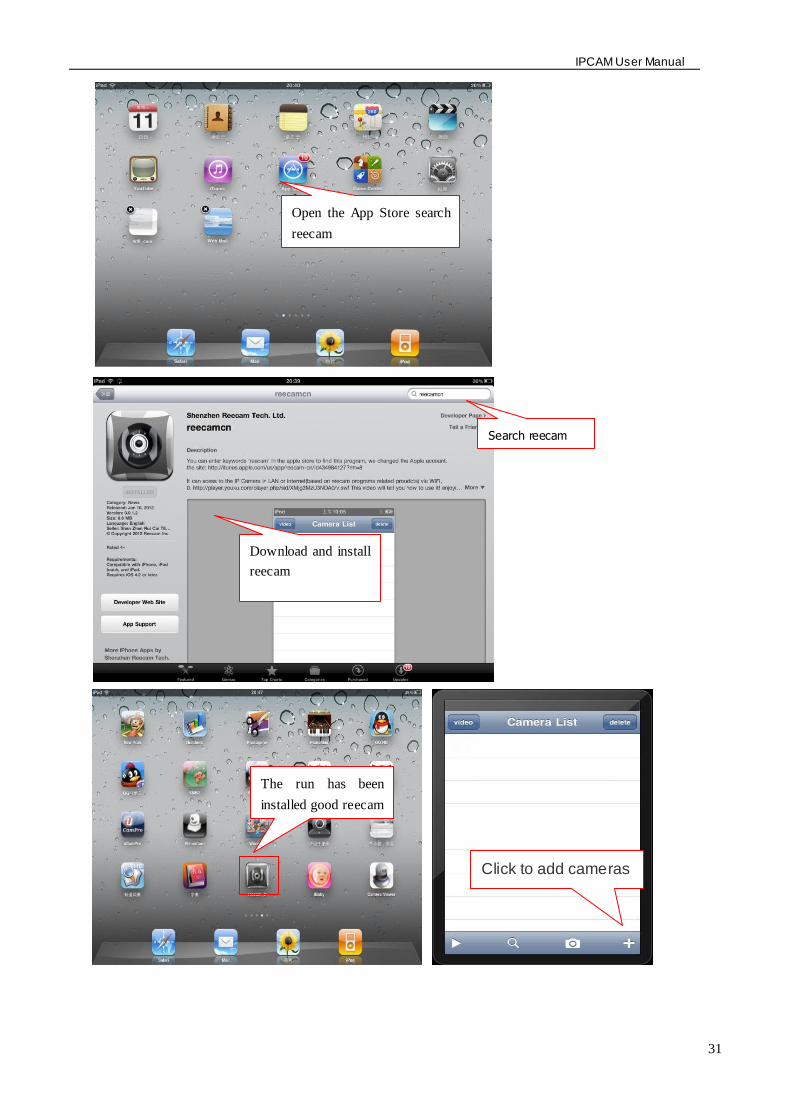
IPCAM User Manual
31
Open the App Store search
reecam
Download and install
reecam
The run has been
installed good reecam
program
Click to add cameras
Search reecam
IPCAM User Manual
32
Fill in the domain address
or IP address
Fill in the Http port of the
camera login user name
and password click next
to open the camera
Completed please
click here
Preview videoclick on the
next save
Save the camera added
Selected camera to
view images
Click image to expand
more cameras
operating functions
IPCAM User Manual
33
7 Other setting
71 Network Setting
711 Basic Network Settings
If the router that the IP camera connect has DHCP function you can choice ldquoObain IP from DHCP Serverrdquo
else fill in the network parameters manually
Http Port In most cases you can leave this value as 80 however if your Internet
Service Provider blocks this port you may switch to another port number such as 85808088889000 Etcs
(Range from 0 to 65535 pay attention to the same segment of multiple devices must set up different port The
port t canrsquot have any conflict with other software or equipment
a Search tools modification in LAN
Figure58
brdquoFor administorrdquo ldquoBasic network settingrdquo -Change the port
Figure59
712 WIFI Setting
1) Please enter the wireless net setting page of the wireless Router to find out SSID
Channel(less than 10) Encryption Authentication as below
Selec IP Camera clickright mouse button choice network configurat ion
Set port number
Set Network IP
Set Http Port Number
IPCAM User Manual
34
Figure 61
As Administrator to Login camera open wireless LAN Settings page fill in every
Setting (ensure keep the same as routerrsquos ) and then pulled out of the cable wireless network function can be
used For example as shown in belows
Figure62
Pls click the scan buttom twice
IPCAM User Manual
35
Figure 63
713 Adhoc point to point Wireless connection Setting
1) Open the basic network setting interfacecheck the device status
Picture 64
2) Open the wireless lan setting interface choose Adhoc for network type you
can define SSID such as 001
remember the IP address of
IP camera and Http port
Click the Settings Ip Camera will
restart and save
Double click to choose
Fill the encryption and
routers and key in the
same way
IPCAM User Manual
36
Picture 65
3) Unplug the RJ45 from IP camera Use laptop or other devices which are with
wifi function( include smart phoneipad and so on) searching the SSID you defined
on proccess 2then make a connection
Picture 66
middotClick wireless network and check the link status of ip camera Please note IP
address of your connected laptop must be the subset of your ip camera if not
please reset the ip address of your laptop manually
Picture 67
4) Now we can use the ip camera tool or enter ip address of camera derectly in
browser blank to visit
1 visit by ip camera tool
Picture 68
IPCAM User Manual
37
2Enter ip address in the browser
Enter user name and password in the login interface
Picture 69
Click ldquoSign inrdquoand vis it
Picture 70
IPCAM User Manual
38
72 Multi-Device Settings
Add cameras in LAN
In the Multi-Device Settings page you can see all devices searched in LAN The 1
St Device is this device in default You can add more cameras list in LAN for monitoring This Web software
supports up to 9 IP Cameras online simultaneous ly Click ldquoThe 2ND
Devicerdquo and Double click the item in the ldquoDevice List in LANrdquo AliasHost and Http Port
will fill in automatically Enter the correct username and password then click ldquoaddrdquoAdd
more cameras in the same way At last please donrsquot forget the ldquo settingrdquo Button
Picture 71
Add cameras in the Internet
Firstly make sure the camera added can access in the Internet with the IP address or
DDNS domain Like this http2191332001669999or httpIPcamdyndnsorg9999You can enter the
Host 219133200166 Http port 9999 or Host IPcamdyndnsorg Http port 9999 Enter the correct
username and password then click ldquoaddrdquo Add more cameras in the
same way
Picture 72
IPCAM User Manual
39
Picture 73
73 MSN Settings
Fill in your MSN account and password then add account which need to receive
IPCAMrsquoS ip address to IPCAM‟ S MSN list (Picture 67)click submit then yoursquod better
restart IP camera After it login your MSN to add IPCAMrsquos MSN account to MSN List that
you can receive IPCAMrsquos ip address
Picture 74
First login and click add contacts choose Add Contact then fill IPCAMrsquos MSN account in instant
messaging address click next then send offers
Aplly for MSN account and passworf for IP cam
Add about 10 MSN Accout
IPCAM User Manual
40
Figure75
Next
Figure76
Figure77
When IPCAMrsquos MSN account shows online you can chat with it input path command url camera
account will show its IP address in chatting box promptly as below
IPCAM User Manual
41
Picture 78
You can input the IP address to browser then can browse ip camera as below
Figure79
AttentionYou should fill MSN account in IPCAM first
74 DDNS Service Settings
DDNS Service The system supports protocols from some DDNS providers Dyndnsorg System support
DDNS such as topipcamorgpeanut shell3322orgDynDNS
provided IP
IPCAM User Manual
42
User and Password the user name and password used when applying for the domain
name (details 432)
DDNS Host the Domain Name
741 Factory DDNS
Device had distributed one DDNS to every productwhich was sticked the bottom
of the product Such as
manufacturer had already give every device a DDNS address which is unique Users only need to fill in this
DDNS IP ADDRESS and port in the browser then they can monitor remote IP camera
Picture 80 Factory DDNS
Note When use the domain name access to the camera and UPNP is not successful you must set port
mapping function on routers
742 The third part DDNS
Users can use not only Factory DDSN but also can use third part DDNS System Such as domain name
wwwdyndnsorg The only thing the user need to do is to apply a free DDNS and then fill in ldquoset boxrdquo as below
Save this setting and this DDNS can be used
DDNS Hostname
Factory DDNS
IPCAM User Manual
43
Note the third party domain name is the realization of analytical way input the domain in the browser it will
keep this string of characters If the port of the device isnrsquot 80 then need to add colon and port number For
example httpwell888dyndnsorg8999
75 Mail and FTP Service
1)Configure the E-mail box to receive and send mails The E-mail box is used for receiving
the images sent after alarm and the system IP address after successful dial-up
Note When Alarm Service Settings-gt Send Mail on Alarm is check the Mail
Service takes effect
Picture82
Configure the E-mail box to receive and send mails The E-mail box is used for receiving the images sent
after alarm and the system IP address after successful dial-up
Sender This device use the sender mailbox to send mails
Receiver To receive the mail from the Sender You can set up to 4 receiver mailbox
SMTP Server the SMTP server for the sender mailbox
Need Authentication if the sender mailbox need authentication you should check it then
input the SMTP username amp Password
Mail test Please set the Mail parameter and click Submit first There are Mail test result
Picture 83
video Local storage in PC after alarm monitoring
IPCAM User Manual
44
Gmail also set as the same It only needs you to fill in correct SMTP Sever address user and password
Picture 84
Mail notes Internet IP address In this option When Internet IP and port have changed IP Will be sent via
1Can not connect to the server
2Network Error Please try later
3Server Error
4Incorrect user or password
5The sender is denied by the server Maybe the server need to authenticate the user please check it
and try again
6The receiver is denied by the server Maybe because of the anti-spam privacy of the server
7The message is denied by the server Maybe because of the anti-spam privacy of the server
8The server does not support the authentication mode used by the device
Report Internet IP by Mail When ipcam port or Internet IP changed it will send the internet IP by
mail(for example IPCAM s url is http119123207969002) Make sure the port is map to the router
correctly by UPNP or Virtual Map function
2) FTP Server use and settings
middotIf you already have an FTP Server (ipcam com)and email ipcam you can fill the
parameters as below
Picture 85
IPCAM User Manual
45
middotFTP Server of LAN as below
1 Create an account
2 Step by step setting until finish it
Picture 88
IPCAM User Manual
46
3Start Server
Continue to finish it
Picture 89
4IPCAMrsquoS account can be used
Picture 90
Save path
This is a FTP
server address
IPCAM User Manual
47
5 IP camerarsquos FTP Server set like this
Picture 91
6 Set up and complete testing is successfulwhen it alarms IP camera will upload
pictures to the FTP server Settings of main directory path (as shown )
Picture 92
FTP Server the FTP server address
FTP port the port usually is 21
FTP Mode support standard(POST) mode and passive(PASV) mode
Upload Image Now it will upload image now when checkbox is not checked When checked you can
input upload interval(Seconds)
76 Motion Detection
Enter Alarm Service Settings page to configure Motion Detection function
1) Motion Detect Armed
Each alarm triggers in the protection of time the device will take various measures to alarm
IO linkage alarm output relay closure external alarm device began to alarm
IPCAM User Manual
48
Send E-mail alarm informatio
Transmit pictures to the FTP server and can set the time interval of sending pictures
2) Alarm t ime Settings
Only in the alarm period detection device to alarm will only have alarm action All the time (not check the
schedule) also can alarm within specified time For the specified time alarm firstly need to set up the system
time time zone and then to choose period of alarm in the state of alarm setting as shown in Picture 19
Picture93 Alarm of time Settings interface
Motion Detect Armed
When you enable motion detect armed the camera can be triggered to send email alerts
and record images In the camera monitoring page the green icon turn to red and an
alert sound you will hear
Motion Detect Sensibility
You can choose from low to high 10 level alarm sensitivity The greater the number the higher the
sensitivity
Alarm Input Armed
IO PINS1) Output(+5V) 2) Output 3) Alarm input 4) Input (GND)
Input Pins The input pins can be used for 1-way external sensor input(pin3 and pin4) For example
you may connect a Person Infrared Sensor (PIR) to it for motion detection When external sensor
triggered IPCAM can be programmed to send an email with picture or control the internal relay output
IPCAM User Manual
49
Picture94
IO Linkage on Alarm
Enable IO linkage on alarmPin1 will output +5V when alarm triggered and output LOW
when alarm release automatically
Switch onoff buttons control Pin1 output manually
Send Mail on Alarm
Sent picture and mail inform to customers e-mail after alarmed(firstly you should finish
the Mail Service Settings)
Picture 95
Upload Image on Alarm
Enable upload image on alarm and set upload interval(Seconds)
Tick send to your setted mails
IPCAM User Manual
50
Picture 96
REC automatically and save to PC
When you enable motion detect and open the camera monitoring page on the PC If
there is an alarm triggered REC will start automatically for several seconds and save to
the PC
Picture 97
REC save to pcrsquos position
Picture 98
Storage path can be changed
After Setting up later when have the
alarm the image will send to
designated email and FTP server
IPCAM User Manual
51
77 IP cameras Time amp Date setting and PTZ Setting
If IP camera connected with Internet it can automatically check the time amp date via running NTP Server And
need to choose properly IP cameras Time zone Otherwise it need PC Time to check IP camera time amp Date
Pre-set and Speed of PT
78 UPGRADE DEVICE FIRMWARE
Picture 101 Firmware upgrade
IP CAMERA has two kinds of programme One is system firmware another is application firmware It can be
upgraded separately
79 BACKUP AND RESTORE SETTING
Click Set in the Backup will lead to a BIN file and choose this file to restore setting
The huger the Number is The
slower it will be
IPCAM User Manual
52
8 APPENDIX
81 REGISTER AND APPLY FOR DDNS SERVICE
1Users use DDNS management system first timeUsers need to apply account to manage
and inquire the domain state
Step1 enter httpwwwdyndnscom and Create Account( Fill in Domain Name dyndnsorg then Click
Add)
Figure103
Step2 enter your information
Figure104
IPCAM User Manual
53
Figure105
Step3 After a minute you will receive an E-mail from DynDNS Support and it will give you a
confirmation address
(eg httpsaccountdyncomemlcreateconflILHMZHRje5oF_6YXTYv1A
Figure106
IPCAM User Manual
54
Step4 Open the link to active your Domain Name as belowLogin in your account after it is activated
Figure107
Step5 Check all the DDNS serviceswe choose the 14-day-trial
Figure108
Step6 Click the linkand user will see as below
IPCAM User Manual
55
middotenter your information
Figure109
Step7 Now you obtained a Dynamic Domain Name(Figure 105)and can use it in the DDNS Service
Settings(details 74)
Figure110
IPCAM User Manual
56
2For DDNS which is applied successfully you can fill in the IP CAMERA When set successfully the status
of IP will be shown as blows
picture 111
picture 112
3How to set DDNS on line
The first wayMenu rdquostartrdquo- ldquorunrdquomdashgt Input CMDClink rdquoenterrdquoIt can check DDNS Statas
via As shown below
Picture 113
IPCAM User Manual
57
Through the PING command this dynamic domain name can be back in the network response information It
proves that the domain name has been online
If the domain name update not success Possible reasons
(1) DDNS parameter is not correct (2) may cause DNS address configuration is wrong
82 Some special application for IPCAMERA
IPCamUse some grammar parameter control and Use IPCam
useruser
pwdpassword
priThe current access (1 visitors 23 operator managers)
resolutionImage resolution(832024 0qvga32640480 vga)
ratemage transmission speed and scope 0-23
brightnessbrightness0~255
contrastcontrast0~6
mode
Mode 050 hz For
60 hz 2 outdoor
flip
Flip rotation 0 primitive 1 vertical reverses 2 horizontal 3 vertical flip + horizontal
821 The flow media player VLC player and mplayer can real-time broadcast ipcamera and send
of streaming media format video data
(Grammar parametersvideostreamasfuser=amppwd=ampresolution=amprate=)
As shown Picture 113 rdquoIpcamrdquo
Picture 114
IPCAM User Manual
58
From the following picture we can view that Ipcam local IP address ishttp19216811118999
WAN IP Address is httpwell888dyndnsorg8999 we can inputrdquoIPcamrdquorsquoS IP address to
open in the player
Picture 115
the CLC media player open play position
Picture 116
LAN play address
Picture 117
IPCAM User Manual
59
Picture 118
Open the Internet play position
Picture 119
As shown in the following picture It can see the ipcamera send video streaming format
Size 640X480
User
IPCAM User Manual
60
Picture 120
83 Frequently Asked Questions
Note1) Any question you would meet please check Network connections firstly
2)Check the working status revealed by the indicators on the network server hub exchange and
network card If abnormal check the network connections
831 I have forgotten the administrator username andor password
To reset the administrator username and password Press and hold down the RESET
BUTTON for 5 seconds Release the power button and the username and password
will be reset back to the factory default administrator username and password
Default administrator username admin
Default administrator password No password
832 IP Address configuration
Check whether IP address of the IP Camera server shares the same subnet as your
work station Click My Computer gt Control PanelgtNetwork amp Dial-up Connections gt
LAN gt Attributes gtInternet Protocols (TCPIP) and check IP Address and Subnet
Mask Make sure they are in the same subnet when configuring IP Camera IP
address manuallyUnable to access IP Camera via web browser
833 Network Configuration
Double Check to ensure that your HTTP server software is configured and running
properly If you are running any firewall software make sure it is allowing inbound
connections to port 80Also if you happen to be using a cableDSL router make sure
IPCAM User Manual
61
you are set up port forwarding properly ( consult your router is documentation for more
information ) If none of these seem to be the problem it is also possible that your
ISP is blocking inbound connections to port 80 ndashmany IPSs have done this because
of internet worms such as Code Red If this is the case you bdquoll have to setup your
HTTP server on an alternate port (such as 8080)
834 No Monitoring picture
It has four reasons Images of the abnormal factors
1If its not use Directx function and lead to not normal to display the color imagePlease
install DirectX and open the start menu then input the command
Picture 121
You use the DirectX function and it will expedite the DirectDrawDirect3D and AGP if its can not maybe the
connect issues or hardware not read it
2The issues of hardware canrsquot support the card expedite image
3The antivirus software will influence the network it will be stoped or closedIf you install fireproof software
please close it and try again
4 ActiveX controller is not installed correctly
If its not image on the first time to use and will display to the user through the ActiveXIf its can not
display of the image maybe it fail of install about this issues please follow as
1Install ldquoIP Camera Toolrdquo ActiveX control at the same time
2Please install ActiveX control and keep the security settings for IE browser
835 Problems with network bandwidth
The image frame rate is subjected to the following factors 1network bandwidth 2 PC
performancenetwork environment and display preference setting (brightness theme
etc) 3 the number of visitors (Too many visitors will slow down the image frame rate) 4
choice of switch or hub (Use a switch for multiple IP Camera Servers rather than a HUB)
The Device use MJEPT Compression it needs good network bandwidth If it is too narrow it will lead to slowly
browser Typical video parameter occupy network bandwidth as blows
640x48030fps 40 Megabits ~ 50 Megabits
320x24030fps 12 Megabits ~ 16 Megabits
IPCAM User Manual
62
middot836 Why pop-up the prompt ldquoFail to connect to the devicehelliprdquo
This prompt only appeared in the case of using multiple cameras
Enter the Multi-Device Settings page(login as administrator) to check the
Device setting is correct or not
When one of the multiple cameras disconnected the color changed to
yellow and pop-up the promptldquoFail to connect to the devicehelliprdquo
Picture 122
837 Canrsquot access the IPCAM in the internet
There are some reasons
1 ActiveX controller is not installed correctly(see more details 514)
2 The port IPCAM used is blocked by Firewall or Anti-virus software Please change a
port number and try again
3 Port mapping is not success You can do port mapping by two ways
Enter setting page of the router which IPCAM connect with to enable UPnP function
Enter IPCAM ldquoUPnP Settingsrdquo to enable UPnP and make sure the state is ldquoUPnP
successrdquo
‟ s IP
and port to the Virtual map list
When use ADSL the IP is dynamic You should set DDNS(see more details 74 amp 80)
and also make sure port mapping success
84 Operate common problem solving
IP camera tool canrsquot find the camera
Except of the camera broken
1 Make sure the cable connector no problem recommend connector
(AMP)it is with international standard Another note IPCAMrsquos data
transmission channel require higher than computerrsquos so maybe the
IPCAM User Manual
63
computer can run normally but IPCAM canrsquot Please press heavily when making the cable connector
2 Confirm the power supply normally First check whether power indication
light turn on or not If it is onthen check the yellow light on RJ45 Port
(power indication light) and green light (network indication light) are on or
notIf they are onso power supply and cable runs normally
3 Confirm all the firwall and antivirus software are closeThe firewall often
block unrecognized data so if the firewall is running so maybe the IPCAM
TOOL canrsquot find the deviceSuggest to close firewall and antivirus
software temporarily before searching
How to solve the camera blank screen
1 Check if you are using the wrong power adaptorplease use original one
2 Close antivirus software
How to solve the camera canrsquot login by Internet
1 Check if you set DDNS success or not
2 Check the current IPCAMrsquos port number is the same as routerrsquosThey need to keep same
Canrsquot view the monitoring picture
1 Reason canrsquot connect with network
SolutionCheck if the network connect well exclude cable fault and PC virus
cause network fault until can be used between PC and PING
2 ReasonIP address occupy by other device
Solution Choose automatic gain
3 Reason IP address located within different subnet
Solution Check IPCAMrsquoS ip address and subnet mask address and gateway settings
4 ReasonWeb port has been modified
Solutioncontact network administrator to obtain port information
5 Reasonunknown
SolutionPress reset button to factory default statethen reconnectingsysten
default to gain ip address automaticsubnet mask is 2552552550
85 Default Parameters
middotDefault network Parameters
IP address dynamic obtain
Subnet mask 2552552550
Gateway dynamic obtain
DDNS Factory provide
middotUsername and password
Default administrator username admin
Default administrator password No password
IPCAM User Manual
64
86 Technical Parameters
ITEM IP CAM (NIP-02BGPWA2)
Image Sensor
Mage sensor 15 Color CMOS Sensor
Display 640 x 480 (300K Pixels)
Lens f36mm F24 (IR Lens)
Miniillumination 05 Lux
Lens Lens Type Glass Lens
Viewing Angle 60 Degree
Audio Microphone Audio of two way
Domain name Server MSN server DDNS server
Video
Image Compression MJPEG
Image Frame Rate 15 FPS(VGA)30FPS(QVGA)
Resolution 640 x 480(VGA) 320 x 240(QVGA)
Flip Mirror Images rtical Horizontal
mode 50Hz 60Hz or Outdoor
Video Parameters Brightness Contrast
Communication
Ethernet One 10100Mbps RJ-45
Supported Protocol HTTPDHCPIPTCPUDPFTPSMTPDDNSPPPoEUPnP
Mobilephone monitor Support IphoneIpad3G phonesmartphone
Wireless Standard IEEE 80211bg
Wireless Standard 80211b11Mbps(max) 80211g54Mbps(max)
Wireless Security 64128-bitWEP Encryption
Physical
PanTilt Angle Horizontal270deg amp Vertical 120deg
Infrared Light 10 IR LEDs Night visibility up to 15 Mete
Product size 100(L) x100(W) x125mm(H)
Gross Weight 6465gpcs (packing size196x165x123mm)
Net Weight 2547gpcs (only product)
Power Specification DC 5V25A 18 meter
Power Consumption 5 Watts
Environment
Operate Temper 0deg~ 55degC (14degF~122degF)
Operating Humidity 20 ~ 85 non-condensing
Storage Temper -10degC ~ 60deg (14degF ~140degF)
Storage Humidity 0 ~ 90 non-condensing
PC Requirements
CPU 20GHZ or above (suggested 30GHz)
Memory Size 512MB or above (suggested 10GB)
Display card 64M or above
Supported OS Microsoft Windows XPVistaWindows7
Supported browsers IEfirefoxGoogle
Certification CEFCCRoHS
Warranty Limited 1-year warranty
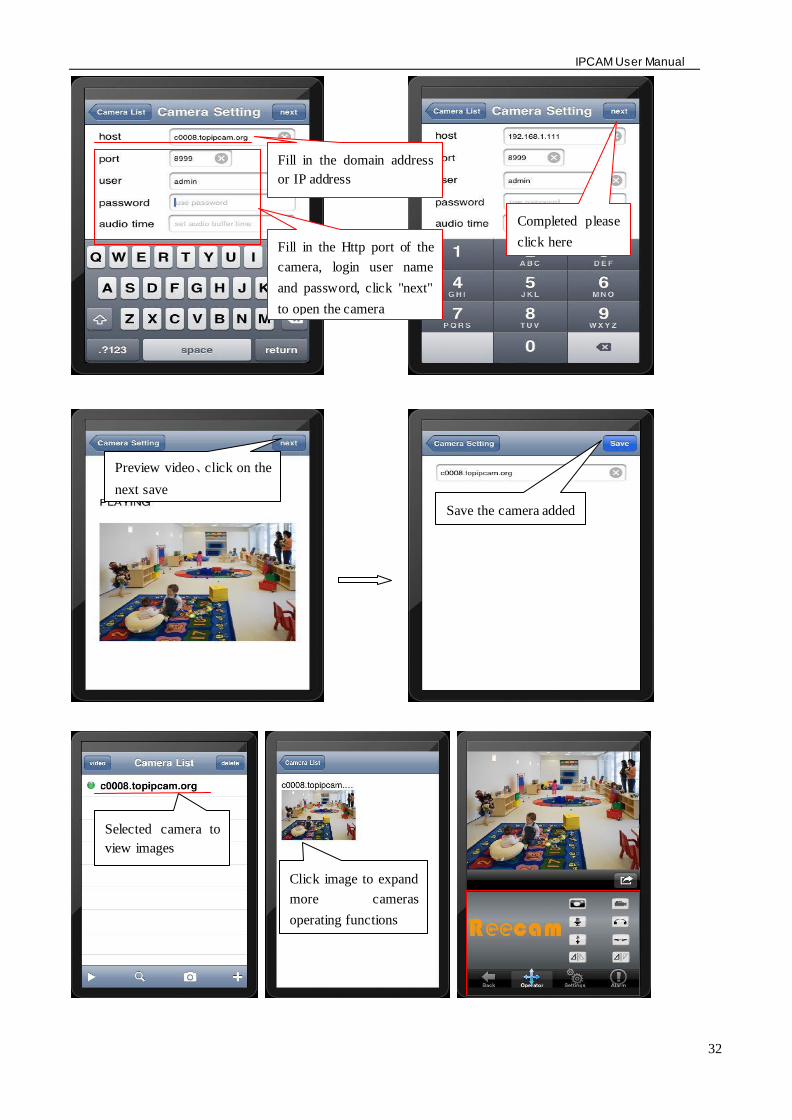
IPCAM User Manual
32
Fill in the domain address
or IP address
Fill in the Http port of the
camera login user name
and password click next
to open the camera
Completed please
click here
Preview videoclick on the
next save
Save the camera added
Selected camera to
view images
Click image to expand
more cameras
operating functions
IPCAM User Manual
33
7 Other setting
71 Network Setting
711 Basic Network Settings
If the router that the IP camera connect has DHCP function you can choice ldquoObain IP from DHCP Serverrdquo
else fill in the network parameters manually
Http Port In most cases you can leave this value as 80 however if your Internet
Service Provider blocks this port you may switch to another port number such as 85808088889000 Etcs
(Range from 0 to 65535 pay attention to the same segment of multiple devices must set up different port The
port t canrsquot have any conflict with other software or equipment
a Search tools modification in LAN
Figure58
brdquoFor administorrdquo ldquoBasic network settingrdquo -Change the port
Figure59
712 WIFI Setting
1) Please enter the wireless net setting page of the wireless Router to find out SSID
Channel(less than 10) Encryption Authentication as below
Selec IP Camera clickright mouse button choice network configurat ion
Set port number
Set Network IP
Set Http Port Number
IPCAM User Manual
34
Figure 61
As Administrator to Login camera open wireless LAN Settings page fill in every
Setting (ensure keep the same as routerrsquos ) and then pulled out of the cable wireless network function can be
used For example as shown in belows
Figure62
Pls click the scan buttom twice
IPCAM User Manual
35
Figure 63
713 Adhoc point to point Wireless connection Setting
1) Open the basic network setting interfacecheck the device status
Picture 64
2) Open the wireless lan setting interface choose Adhoc for network type you
can define SSID such as 001
remember the IP address of
IP camera and Http port
Click the Settings Ip Camera will
restart and save
Double click to choose
Fill the encryption and
routers and key in the
same way
IPCAM User Manual
36
Picture 65
3) Unplug the RJ45 from IP camera Use laptop or other devices which are with
wifi function( include smart phoneipad and so on) searching the SSID you defined
on proccess 2then make a connection
Picture 66
middotClick wireless network and check the link status of ip camera Please note IP
address of your connected laptop must be the subset of your ip camera if not
please reset the ip address of your laptop manually
Picture 67
4) Now we can use the ip camera tool or enter ip address of camera derectly in
browser blank to visit
1 visit by ip camera tool
Picture 68
IPCAM User Manual
37
2Enter ip address in the browser
Enter user name and password in the login interface
Picture 69
Click ldquoSign inrdquoand vis it
Picture 70
IPCAM User Manual
38
72 Multi-Device Settings
Add cameras in LAN
In the Multi-Device Settings page you can see all devices searched in LAN The 1
St Device is this device in default You can add more cameras list in LAN for monitoring This Web software
supports up to 9 IP Cameras online simultaneous ly Click ldquoThe 2ND
Devicerdquo and Double click the item in the ldquoDevice List in LANrdquo AliasHost and Http Port
will fill in automatically Enter the correct username and password then click ldquoaddrdquoAdd
more cameras in the same way At last please donrsquot forget the ldquo settingrdquo Button
Picture 71
Add cameras in the Internet
Firstly make sure the camera added can access in the Internet with the IP address or
DDNS domain Like this http2191332001669999or httpIPcamdyndnsorg9999You can enter the
Host 219133200166 Http port 9999 or Host IPcamdyndnsorg Http port 9999 Enter the correct
username and password then click ldquoaddrdquo Add more cameras in the
same way
Picture 72
IPCAM User Manual
39
Picture 73
73 MSN Settings
Fill in your MSN account and password then add account which need to receive
IPCAMrsquoS ip address to IPCAM‟ S MSN list (Picture 67)click submit then yoursquod better
restart IP camera After it login your MSN to add IPCAMrsquos MSN account to MSN List that
you can receive IPCAMrsquos ip address
Picture 74
First login and click add contacts choose Add Contact then fill IPCAMrsquos MSN account in instant
messaging address click next then send offers
Aplly for MSN account and passworf for IP cam
Add about 10 MSN Accout
IPCAM User Manual
40
Figure75
Next
Figure76
Figure77
When IPCAMrsquos MSN account shows online you can chat with it input path command url camera
account will show its IP address in chatting box promptly as below
IPCAM User Manual
41
Picture 78
You can input the IP address to browser then can browse ip camera as below
Figure79
AttentionYou should fill MSN account in IPCAM first
74 DDNS Service Settings
DDNS Service The system supports protocols from some DDNS providers Dyndnsorg System support
DDNS such as topipcamorgpeanut shell3322orgDynDNS
provided IP
IPCAM User Manual
42
User and Password the user name and password used when applying for the domain
name (details 432)
DDNS Host the Domain Name
741 Factory DDNS
Device had distributed one DDNS to every productwhich was sticked the bottom
of the product Such as
manufacturer had already give every device a DDNS address which is unique Users only need to fill in this
DDNS IP ADDRESS and port in the browser then they can monitor remote IP camera
Picture 80 Factory DDNS
Note When use the domain name access to the camera and UPNP is not successful you must set port
mapping function on routers
742 The third part DDNS
Users can use not only Factory DDSN but also can use third part DDNS System Such as domain name
wwwdyndnsorg The only thing the user need to do is to apply a free DDNS and then fill in ldquoset boxrdquo as below
Save this setting and this DDNS can be used
DDNS Hostname
Factory DDNS
IPCAM User Manual
43
Note the third party domain name is the realization of analytical way input the domain in the browser it will
keep this string of characters If the port of the device isnrsquot 80 then need to add colon and port number For
example httpwell888dyndnsorg8999
75 Mail and FTP Service
1)Configure the E-mail box to receive and send mails The E-mail box is used for receiving
the images sent after alarm and the system IP address after successful dial-up
Note When Alarm Service Settings-gt Send Mail on Alarm is check the Mail
Service takes effect
Picture82
Configure the E-mail box to receive and send mails The E-mail box is used for receiving the images sent
after alarm and the system IP address after successful dial-up
Sender This device use the sender mailbox to send mails
Receiver To receive the mail from the Sender You can set up to 4 receiver mailbox
SMTP Server the SMTP server for the sender mailbox
Need Authentication if the sender mailbox need authentication you should check it then
input the SMTP username amp Password
Mail test Please set the Mail parameter and click Submit first There are Mail test result
Picture 83
video Local storage in PC after alarm monitoring
IPCAM User Manual
44
Gmail also set as the same It only needs you to fill in correct SMTP Sever address user and password
Picture 84
Mail notes Internet IP address In this option When Internet IP and port have changed IP Will be sent via
1Can not connect to the server
2Network Error Please try later
3Server Error
4Incorrect user or password
5The sender is denied by the server Maybe the server need to authenticate the user please check it
and try again
6The receiver is denied by the server Maybe because of the anti-spam privacy of the server
7The message is denied by the server Maybe because of the anti-spam privacy of the server
8The server does not support the authentication mode used by the device
Report Internet IP by Mail When ipcam port or Internet IP changed it will send the internet IP by
mail(for example IPCAM s url is http119123207969002) Make sure the port is map to the router
correctly by UPNP or Virtual Map function
2) FTP Server use and settings
middotIf you already have an FTP Server (ipcam com)and email ipcam you can fill the
parameters as below
Picture 85
IPCAM User Manual
45
middotFTP Server of LAN as below
1 Create an account
2 Step by step setting until finish it
Picture 88
IPCAM User Manual
46
3Start Server
Continue to finish it
Picture 89
4IPCAMrsquoS account can be used
Picture 90
Save path
This is a FTP
server address
IPCAM User Manual
47
5 IP camerarsquos FTP Server set like this
Picture 91
6 Set up and complete testing is successfulwhen it alarms IP camera will upload
pictures to the FTP server Settings of main directory path (as shown )
Picture 92
FTP Server the FTP server address
FTP port the port usually is 21
FTP Mode support standard(POST) mode and passive(PASV) mode
Upload Image Now it will upload image now when checkbox is not checked When checked you can
input upload interval(Seconds)
76 Motion Detection
Enter Alarm Service Settings page to configure Motion Detection function
1) Motion Detect Armed
Each alarm triggers in the protection of time the device will take various measures to alarm
IO linkage alarm output relay closure external alarm device began to alarm
IPCAM User Manual
48
Send E-mail alarm informatio
Transmit pictures to the FTP server and can set the time interval of sending pictures
2) Alarm t ime Settings
Only in the alarm period detection device to alarm will only have alarm action All the time (not check the
schedule) also can alarm within specified time For the specified time alarm firstly need to set up the system
time time zone and then to choose period of alarm in the state of alarm setting as shown in Picture 19
Picture93 Alarm of time Settings interface
Motion Detect Armed
When you enable motion detect armed the camera can be triggered to send email alerts
and record images In the camera monitoring page the green icon turn to red and an
alert sound you will hear
Motion Detect Sensibility
You can choose from low to high 10 level alarm sensitivity The greater the number the higher the
sensitivity
Alarm Input Armed
IO PINS1) Output(+5V) 2) Output 3) Alarm input 4) Input (GND)
Input Pins The input pins can be used for 1-way external sensor input(pin3 and pin4) For example
you may connect a Person Infrared Sensor (PIR) to it for motion detection When external sensor
triggered IPCAM can be programmed to send an email with picture or control the internal relay output
IPCAM User Manual
49
Picture94
IO Linkage on Alarm
Enable IO linkage on alarmPin1 will output +5V when alarm triggered and output LOW
when alarm release automatically
Switch onoff buttons control Pin1 output manually
Send Mail on Alarm
Sent picture and mail inform to customers e-mail after alarmed(firstly you should finish
the Mail Service Settings)
Picture 95
Upload Image on Alarm
Enable upload image on alarm and set upload interval(Seconds)
Tick send to your setted mails
IPCAM User Manual
50
Picture 96
REC automatically and save to PC
When you enable motion detect and open the camera monitoring page on the PC If
there is an alarm triggered REC will start automatically for several seconds and save to
the PC
Picture 97
REC save to pcrsquos position
Picture 98
Storage path can be changed
After Setting up later when have the
alarm the image will send to
designated email and FTP server
IPCAM User Manual
51
77 IP cameras Time amp Date setting and PTZ Setting
If IP camera connected with Internet it can automatically check the time amp date via running NTP Server And
need to choose properly IP cameras Time zone Otherwise it need PC Time to check IP camera time amp Date
Pre-set and Speed of PT
78 UPGRADE DEVICE FIRMWARE
Picture 101 Firmware upgrade
IP CAMERA has two kinds of programme One is system firmware another is application firmware It can be
upgraded separately
79 BACKUP AND RESTORE SETTING
Click Set in the Backup will lead to a BIN file and choose this file to restore setting
The huger the Number is The
slower it will be
IPCAM User Manual
52
8 APPENDIX
81 REGISTER AND APPLY FOR DDNS SERVICE
1Users use DDNS management system first timeUsers need to apply account to manage
and inquire the domain state
Step1 enter httpwwwdyndnscom and Create Account( Fill in Domain Name dyndnsorg then Click
Add)
Figure103
Step2 enter your information
Figure104
IPCAM User Manual
53
Figure105
Step3 After a minute you will receive an E-mail from DynDNS Support and it will give you a
confirmation address
(eg httpsaccountdyncomemlcreateconflILHMZHRje5oF_6YXTYv1A
Figure106
IPCAM User Manual
54
Step4 Open the link to active your Domain Name as belowLogin in your account after it is activated
Figure107
Step5 Check all the DDNS serviceswe choose the 14-day-trial
Figure108
Step6 Click the linkand user will see as below
IPCAM User Manual
55
middotenter your information
Figure109
Step7 Now you obtained a Dynamic Domain Name(Figure 105)and can use it in the DDNS Service
Settings(details 74)
Figure110
IPCAM User Manual
56
2For DDNS which is applied successfully you can fill in the IP CAMERA When set successfully the status
of IP will be shown as blows
picture 111
picture 112
3How to set DDNS on line
The first wayMenu rdquostartrdquo- ldquorunrdquomdashgt Input CMDClink rdquoenterrdquoIt can check DDNS Statas
via As shown below
Picture 113
IPCAM User Manual
57
Through the PING command this dynamic domain name can be back in the network response information It
proves that the domain name has been online
If the domain name update not success Possible reasons
(1) DDNS parameter is not correct (2) may cause DNS address configuration is wrong
82 Some special application for IPCAMERA
IPCamUse some grammar parameter control and Use IPCam
useruser
pwdpassword
priThe current access (1 visitors 23 operator managers)
resolutionImage resolution(832024 0qvga32640480 vga)
ratemage transmission speed and scope 0-23
brightnessbrightness0~255
contrastcontrast0~6
mode
Mode 050 hz For
60 hz 2 outdoor
flip
Flip rotation 0 primitive 1 vertical reverses 2 horizontal 3 vertical flip + horizontal
821 The flow media player VLC player and mplayer can real-time broadcast ipcamera and send
of streaming media format video data
(Grammar parametersvideostreamasfuser=amppwd=ampresolution=amprate=)
As shown Picture 113 rdquoIpcamrdquo
Picture 114
IPCAM User Manual
58
From the following picture we can view that Ipcam local IP address ishttp19216811118999
WAN IP Address is httpwell888dyndnsorg8999 we can inputrdquoIPcamrdquorsquoS IP address to
open in the player
Picture 115
the CLC media player open play position
Picture 116
LAN play address
Picture 117
IPCAM User Manual
59
Picture 118
Open the Internet play position
Picture 119
As shown in the following picture It can see the ipcamera send video streaming format
Size 640X480
User
IPCAM User Manual
60
Picture 120
83 Frequently Asked Questions
Note1) Any question you would meet please check Network connections firstly
2)Check the working status revealed by the indicators on the network server hub exchange and
network card If abnormal check the network connections
831 I have forgotten the administrator username andor password
To reset the administrator username and password Press and hold down the RESET
BUTTON for 5 seconds Release the power button and the username and password
will be reset back to the factory default administrator username and password
Default administrator username admin
Default administrator password No password
832 IP Address configuration
Check whether IP address of the IP Camera server shares the same subnet as your
work station Click My Computer gt Control PanelgtNetwork amp Dial-up Connections gt
LAN gt Attributes gtInternet Protocols (TCPIP) and check IP Address and Subnet
Mask Make sure they are in the same subnet when configuring IP Camera IP
address manuallyUnable to access IP Camera via web browser
833 Network Configuration
Double Check to ensure that your HTTP server software is configured and running
properly If you are running any firewall software make sure it is allowing inbound
connections to port 80Also if you happen to be using a cableDSL router make sure
IPCAM User Manual
61
you are set up port forwarding properly ( consult your router is documentation for more
information ) If none of these seem to be the problem it is also possible that your
ISP is blocking inbound connections to port 80 ndashmany IPSs have done this because
of internet worms such as Code Red If this is the case you bdquoll have to setup your
HTTP server on an alternate port (such as 8080)
834 No Monitoring picture
It has four reasons Images of the abnormal factors
1If its not use Directx function and lead to not normal to display the color imagePlease
install DirectX and open the start menu then input the command
Picture 121
You use the DirectX function and it will expedite the DirectDrawDirect3D and AGP if its can not maybe the
connect issues or hardware not read it
2The issues of hardware canrsquot support the card expedite image
3The antivirus software will influence the network it will be stoped or closedIf you install fireproof software
please close it and try again
4 ActiveX controller is not installed correctly
If its not image on the first time to use and will display to the user through the ActiveXIf its can not
display of the image maybe it fail of install about this issues please follow as
1Install ldquoIP Camera Toolrdquo ActiveX control at the same time
2Please install ActiveX control and keep the security settings for IE browser
835 Problems with network bandwidth
The image frame rate is subjected to the following factors 1network bandwidth 2 PC
performancenetwork environment and display preference setting (brightness theme
etc) 3 the number of visitors (Too many visitors will slow down the image frame rate) 4
choice of switch or hub (Use a switch for multiple IP Camera Servers rather than a HUB)
The Device use MJEPT Compression it needs good network bandwidth If it is too narrow it will lead to slowly
browser Typical video parameter occupy network bandwidth as blows
640x48030fps 40 Megabits ~ 50 Megabits
320x24030fps 12 Megabits ~ 16 Megabits
IPCAM User Manual
62
middot836 Why pop-up the prompt ldquoFail to connect to the devicehelliprdquo
This prompt only appeared in the case of using multiple cameras
Enter the Multi-Device Settings page(login as administrator) to check the
Device setting is correct or not
When one of the multiple cameras disconnected the color changed to
yellow and pop-up the promptldquoFail to connect to the devicehelliprdquo
Picture 122
837 Canrsquot access the IPCAM in the internet
There are some reasons
1 ActiveX controller is not installed correctly(see more details 514)
2 The port IPCAM used is blocked by Firewall or Anti-virus software Please change a
port number and try again
3 Port mapping is not success You can do port mapping by two ways
Enter setting page of the router which IPCAM connect with to enable UPnP function
Enter IPCAM ldquoUPnP Settingsrdquo to enable UPnP and make sure the state is ldquoUPnP
successrdquo
‟ s IP
and port to the Virtual map list
When use ADSL the IP is dynamic You should set DDNS(see more details 74 amp 80)
and also make sure port mapping success
84 Operate common problem solving
IP camera tool canrsquot find the camera
Except of the camera broken
1 Make sure the cable connector no problem recommend connector
(AMP)it is with international standard Another note IPCAMrsquos data
transmission channel require higher than computerrsquos so maybe the
IPCAM User Manual
63
computer can run normally but IPCAM canrsquot Please press heavily when making the cable connector
2 Confirm the power supply normally First check whether power indication
light turn on or not If it is onthen check the yellow light on RJ45 Port
(power indication light) and green light (network indication light) are on or
notIf they are onso power supply and cable runs normally
3 Confirm all the firwall and antivirus software are closeThe firewall often
block unrecognized data so if the firewall is running so maybe the IPCAM
TOOL canrsquot find the deviceSuggest to close firewall and antivirus
software temporarily before searching
How to solve the camera blank screen
1 Check if you are using the wrong power adaptorplease use original one
2 Close antivirus software
How to solve the camera canrsquot login by Internet
1 Check if you set DDNS success or not
2 Check the current IPCAMrsquos port number is the same as routerrsquosThey need to keep same
Canrsquot view the monitoring picture
1 Reason canrsquot connect with network
SolutionCheck if the network connect well exclude cable fault and PC virus
cause network fault until can be used between PC and PING
2 ReasonIP address occupy by other device
Solution Choose automatic gain
3 Reason IP address located within different subnet
Solution Check IPCAMrsquoS ip address and subnet mask address and gateway settings
4 ReasonWeb port has been modified
Solutioncontact network administrator to obtain port information
5 Reasonunknown
SolutionPress reset button to factory default statethen reconnectingsysten
default to gain ip address automaticsubnet mask is 2552552550
85 Default Parameters
middotDefault network Parameters
IP address dynamic obtain
Subnet mask 2552552550
Gateway dynamic obtain
DDNS Factory provide
middotUsername and password
Default administrator username admin
Default administrator password No password
IPCAM User Manual
64
86 Technical Parameters
ITEM IP CAM (NIP-02BGPWA2)
Image Sensor
Mage sensor 15 Color CMOS Sensor
Display 640 x 480 (300K Pixels)
Lens f36mm F24 (IR Lens)
Miniillumination 05 Lux
Lens Lens Type Glass Lens
Viewing Angle 60 Degree
Audio Microphone Audio of two way
Domain name Server MSN server DDNS server
Video
Image Compression MJPEG
Image Frame Rate 15 FPS(VGA)30FPS(QVGA)
Resolution 640 x 480(VGA) 320 x 240(QVGA)
Flip Mirror Images rtical Horizontal
mode 50Hz 60Hz or Outdoor
Video Parameters Brightness Contrast
Communication
Ethernet One 10100Mbps RJ-45
Supported Protocol HTTPDHCPIPTCPUDPFTPSMTPDDNSPPPoEUPnP
Mobilephone monitor Support IphoneIpad3G phonesmartphone
Wireless Standard IEEE 80211bg
Wireless Standard 80211b11Mbps(max) 80211g54Mbps(max)
Wireless Security 64128-bitWEP Encryption
Physical
PanTilt Angle Horizontal270deg amp Vertical 120deg
Infrared Light 10 IR LEDs Night visibility up to 15 Mete
Product size 100(L) x100(W) x125mm(H)
Gross Weight 6465gpcs (packing size196x165x123mm)
Net Weight 2547gpcs (only product)
Power Specification DC 5V25A 18 meter
Power Consumption 5 Watts
Environment
Operate Temper 0deg~ 55degC (14degF~122degF)
Operating Humidity 20 ~ 85 non-condensing
Storage Temper -10degC ~ 60deg (14degF ~140degF)
Storage Humidity 0 ~ 90 non-condensing
PC Requirements
CPU 20GHZ or above (suggested 30GHz)
Memory Size 512MB or above (suggested 10GB)
Display card 64M or above
Supported OS Microsoft Windows XPVistaWindows7
Supported browsers IEfirefoxGoogle
Certification CEFCCRoHS
Warranty Limited 1-year warranty
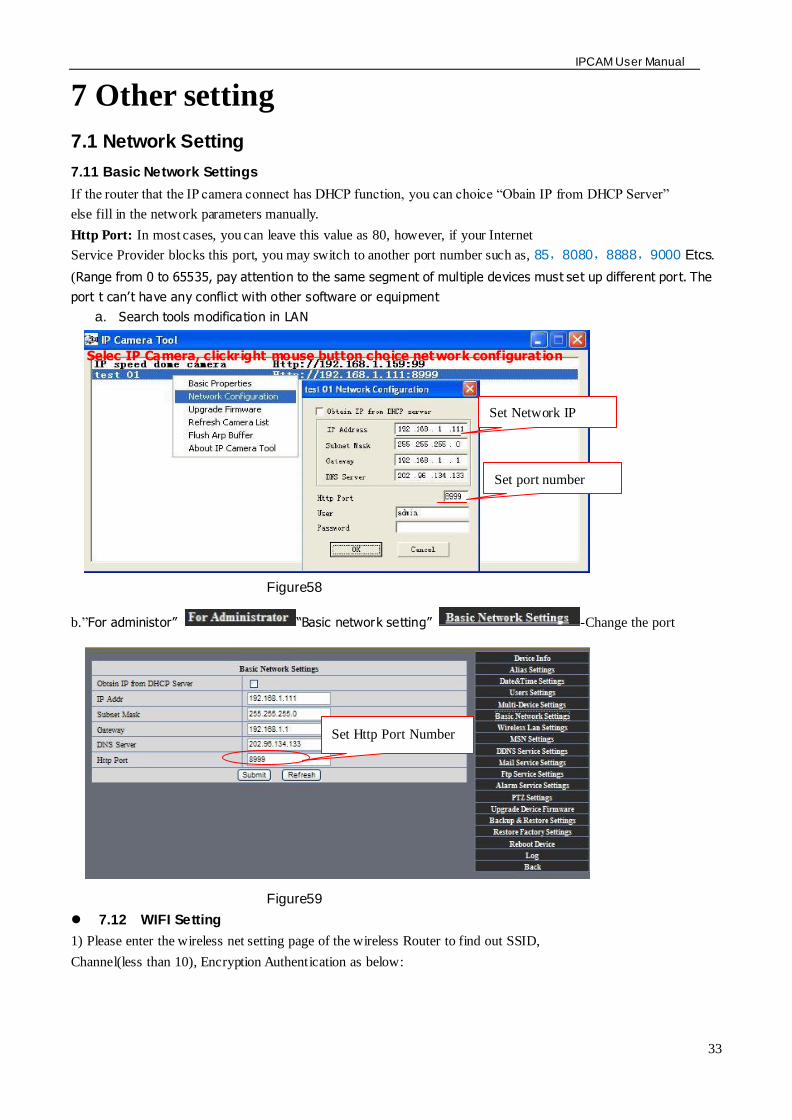
IPCAM User Manual
33
7 Other setting
71 Network Setting
711 Basic Network Settings
If the router that the IP camera connect has DHCP function you can choice ldquoObain IP from DHCP Serverrdquo
else fill in the network parameters manually
Http Port In most cases you can leave this value as 80 however if your Internet
Service Provider blocks this port you may switch to another port number such as 85808088889000 Etcs
(Range from 0 to 65535 pay attention to the same segment of multiple devices must set up different port The
port t canrsquot have any conflict with other software or equipment
a Search tools modification in LAN
Figure58
brdquoFor administorrdquo ldquoBasic network settingrdquo -Change the port
Figure59
712 WIFI Setting
1) Please enter the wireless net setting page of the wireless Router to find out SSID
Channel(less than 10) Encryption Authentication as below
Selec IP Camera clickright mouse button choice network configurat ion
Set port number
Set Network IP
Set Http Port Number
IPCAM User Manual
34
Figure 61
As Administrator to Login camera open wireless LAN Settings page fill in every
Setting (ensure keep the same as routerrsquos ) and then pulled out of the cable wireless network function can be
used For example as shown in belows
Figure62
Pls click the scan buttom twice
IPCAM User Manual
35
Figure 63
713 Adhoc point to point Wireless connection Setting
1) Open the basic network setting interfacecheck the device status
Picture 64
2) Open the wireless lan setting interface choose Adhoc for network type you
can define SSID such as 001
remember the IP address of
IP camera and Http port
Click the Settings Ip Camera will
restart and save
Double click to choose
Fill the encryption and
routers and key in the
same way
IPCAM User Manual
36
Picture 65
3) Unplug the RJ45 from IP camera Use laptop or other devices which are with
wifi function( include smart phoneipad and so on) searching the SSID you defined
on proccess 2then make a connection
Picture 66
middotClick wireless network and check the link status of ip camera Please note IP
address of your connected laptop must be the subset of your ip camera if not
please reset the ip address of your laptop manually
Picture 67
4) Now we can use the ip camera tool or enter ip address of camera derectly in
browser blank to visit
1 visit by ip camera tool
Picture 68
IPCAM User Manual
37
2Enter ip address in the browser
Enter user name and password in the login interface
Picture 69
Click ldquoSign inrdquoand vis it
Picture 70
IPCAM User Manual
38
72 Multi-Device Settings
Add cameras in LAN
In the Multi-Device Settings page you can see all devices searched in LAN The 1
St Device is this device in default You can add more cameras list in LAN for monitoring This Web software
supports up to 9 IP Cameras online simultaneous ly Click ldquoThe 2ND
Devicerdquo and Double click the item in the ldquoDevice List in LANrdquo AliasHost and Http Port
will fill in automatically Enter the correct username and password then click ldquoaddrdquoAdd
more cameras in the same way At last please donrsquot forget the ldquo settingrdquo Button
Picture 71
Add cameras in the Internet
Firstly make sure the camera added can access in the Internet with the IP address or
DDNS domain Like this http2191332001669999or httpIPcamdyndnsorg9999You can enter the
Host 219133200166 Http port 9999 or Host IPcamdyndnsorg Http port 9999 Enter the correct
username and password then click ldquoaddrdquo Add more cameras in the
same way
Picture 72
IPCAM User Manual
39
Picture 73
73 MSN Settings
Fill in your MSN account and password then add account which need to receive
IPCAMrsquoS ip address to IPCAM‟ S MSN list (Picture 67)click submit then yoursquod better
restart IP camera After it login your MSN to add IPCAMrsquos MSN account to MSN List that
you can receive IPCAMrsquos ip address
Picture 74
First login and click add contacts choose Add Contact then fill IPCAMrsquos MSN account in instant
messaging address click next then send offers
Aplly for MSN account and passworf for IP cam
Add about 10 MSN Accout
IPCAM User Manual
40
Figure75
Next
Figure76
Figure77
When IPCAMrsquos MSN account shows online you can chat with it input path command url camera
account will show its IP address in chatting box promptly as below
IPCAM User Manual
41
Picture 78
You can input the IP address to browser then can browse ip camera as below
Figure79
AttentionYou should fill MSN account in IPCAM first
74 DDNS Service Settings
DDNS Service The system supports protocols from some DDNS providers Dyndnsorg System support
DDNS such as topipcamorgpeanut shell3322orgDynDNS
provided IP
IPCAM User Manual
42
User and Password the user name and password used when applying for the domain
name (details 432)
DDNS Host the Domain Name
741 Factory DDNS
Device had distributed one DDNS to every productwhich was sticked the bottom
of the product Such as
manufacturer had already give every device a DDNS address which is unique Users only need to fill in this
DDNS IP ADDRESS and port in the browser then they can monitor remote IP camera
Picture 80 Factory DDNS
Note When use the domain name access to the camera and UPNP is not successful you must set port
mapping function on routers
742 The third part DDNS
Users can use not only Factory DDSN but also can use third part DDNS System Such as domain name
wwwdyndnsorg The only thing the user need to do is to apply a free DDNS and then fill in ldquoset boxrdquo as below
Save this setting and this DDNS can be used
DDNS Hostname
Factory DDNS
IPCAM User Manual
43
Note the third party domain name is the realization of analytical way input the domain in the browser it will
keep this string of characters If the port of the device isnrsquot 80 then need to add colon and port number For
example httpwell888dyndnsorg8999
75 Mail and FTP Service
1)Configure the E-mail box to receive and send mails The E-mail box is used for receiving
the images sent after alarm and the system IP address after successful dial-up
Note When Alarm Service Settings-gt Send Mail on Alarm is check the Mail
Service takes effect
Picture82
Configure the E-mail box to receive and send mails The E-mail box is used for receiving the images sent
after alarm and the system IP address after successful dial-up
Sender This device use the sender mailbox to send mails
Receiver To receive the mail from the Sender You can set up to 4 receiver mailbox
SMTP Server the SMTP server for the sender mailbox
Need Authentication if the sender mailbox need authentication you should check it then
input the SMTP username amp Password
Mail test Please set the Mail parameter and click Submit first There are Mail test result
Picture 83
video Local storage in PC after alarm monitoring
IPCAM User Manual
44
Gmail also set as the same It only needs you to fill in correct SMTP Sever address user and password
Picture 84
Mail notes Internet IP address In this option When Internet IP and port have changed IP Will be sent via
1Can not connect to the server
2Network Error Please try later
3Server Error
4Incorrect user or password
5The sender is denied by the server Maybe the server need to authenticate the user please check it
and try again
6The receiver is denied by the server Maybe because of the anti-spam privacy of the server
7The message is denied by the server Maybe because of the anti-spam privacy of the server
8The server does not support the authentication mode used by the device
Report Internet IP by Mail When ipcam port or Internet IP changed it will send the internet IP by
mail(for example IPCAM s url is http119123207969002) Make sure the port is map to the router
correctly by UPNP or Virtual Map function
2) FTP Server use and settings
middotIf you already have an FTP Server (ipcam com)and email ipcam you can fill the
parameters as below
Picture 85
IPCAM User Manual
45
middotFTP Server of LAN as below
1 Create an account
2 Step by step setting until finish it
Picture 88
IPCAM User Manual
46
3Start Server
Continue to finish it
Picture 89
4IPCAMrsquoS account can be used
Picture 90
Save path
This is a FTP
server address
IPCAM User Manual
47
5 IP camerarsquos FTP Server set like this
Picture 91
6 Set up and complete testing is successfulwhen it alarms IP camera will upload
pictures to the FTP server Settings of main directory path (as shown )
Picture 92
FTP Server the FTP server address
FTP port the port usually is 21
FTP Mode support standard(POST) mode and passive(PASV) mode
Upload Image Now it will upload image now when checkbox is not checked When checked you can
input upload interval(Seconds)
76 Motion Detection
Enter Alarm Service Settings page to configure Motion Detection function
1) Motion Detect Armed
Each alarm triggers in the protection of time the device will take various measures to alarm
IO linkage alarm output relay closure external alarm device began to alarm
IPCAM User Manual
48
Send E-mail alarm informatio
Transmit pictures to the FTP server and can set the time interval of sending pictures
2) Alarm t ime Settings
Only in the alarm period detection device to alarm will only have alarm action All the time (not check the
schedule) also can alarm within specified time For the specified time alarm firstly need to set up the system
time time zone and then to choose period of alarm in the state of alarm setting as shown in Picture 19
Picture93 Alarm of time Settings interface
Motion Detect Armed
When you enable motion detect armed the camera can be triggered to send email alerts
and record images In the camera monitoring page the green icon turn to red and an
alert sound you will hear
Motion Detect Sensibility
You can choose from low to high 10 level alarm sensitivity The greater the number the higher the
sensitivity
Alarm Input Armed
IO PINS1) Output(+5V) 2) Output 3) Alarm input 4) Input (GND)
Input Pins The input pins can be used for 1-way external sensor input(pin3 and pin4) For example
you may connect a Person Infrared Sensor (PIR) to it for motion detection When external sensor
triggered IPCAM can be programmed to send an email with picture or control the internal relay output
IPCAM User Manual
49
Picture94
IO Linkage on Alarm
Enable IO linkage on alarmPin1 will output +5V when alarm triggered and output LOW
when alarm release automatically
Switch onoff buttons control Pin1 output manually
Send Mail on Alarm
Sent picture and mail inform to customers e-mail after alarmed(firstly you should finish
the Mail Service Settings)
Picture 95
Upload Image on Alarm
Enable upload image on alarm and set upload interval(Seconds)
Tick send to your setted mails
IPCAM User Manual
50
Picture 96
REC automatically and save to PC
When you enable motion detect and open the camera monitoring page on the PC If
there is an alarm triggered REC will start automatically for several seconds and save to
the PC
Picture 97
REC save to pcrsquos position
Picture 98
Storage path can be changed
After Setting up later when have the
alarm the image will send to
designated email and FTP server
IPCAM User Manual
51
77 IP cameras Time amp Date setting and PTZ Setting
If IP camera connected with Internet it can automatically check the time amp date via running NTP Server And
need to choose properly IP cameras Time zone Otherwise it need PC Time to check IP camera time amp Date
Pre-set and Speed of PT
78 UPGRADE DEVICE FIRMWARE
Picture 101 Firmware upgrade
IP CAMERA has two kinds of programme One is system firmware another is application firmware It can be
upgraded separately
79 BACKUP AND RESTORE SETTING
Click Set in the Backup will lead to a BIN file and choose this file to restore setting
The huger the Number is The
slower it will be
IPCAM User Manual
52
8 APPENDIX
81 REGISTER AND APPLY FOR DDNS SERVICE
1Users use DDNS management system first timeUsers need to apply account to manage
and inquire the domain state
Step1 enter httpwwwdyndnscom and Create Account( Fill in Domain Name dyndnsorg then Click
Add)
Figure103
Step2 enter your information
Figure104
IPCAM User Manual
53
Figure105
Step3 After a minute you will receive an E-mail from DynDNS Support and it will give you a
confirmation address
(eg httpsaccountdyncomemlcreateconflILHMZHRje5oF_6YXTYv1A
Figure106
IPCAM User Manual
54
Step4 Open the link to active your Domain Name as belowLogin in your account after it is activated
Figure107
Step5 Check all the DDNS serviceswe choose the 14-day-trial
Figure108
Step6 Click the linkand user will see as below
IPCAM User Manual
55
middotenter your information
Figure109
Step7 Now you obtained a Dynamic Domain Name(Figure 105)and can use it in the DDNS Service
Settings(details 74)
Figure110
IPCAM User Manual
56
2For DDNS which is applied successfully you can fill in the IP CAMERA When set successfully the status
of IP will be shown as blows
picture 111
picture 112
3How to set DDNS on line
The first wayMenu rdquostartrdquo- ldquorunrdquomdashgt Input CMDClink rdquoenterrdquoIt can check DDNS Statas
via As shown below
Picture 113
IPCAM User Manual
57
Through the PING command this dynamic domain name can be back in the network response information It
proves that the domain name has been online
If the domain name update not success Possible reasons
(1) DDNS parameter is not correct (2) may cause DNS address configuration is wrong
82 Some special application for IPCAMERA
IPCamUse some grammar parameter control and Use IPCam
useruser
pwdpassword
priThe current access (1 visitors 23 operator managers)
resolutionImage resolution(832024 0qvga32640480 vga)
ratemage transmission speed and scope 0-23
brightnessbrightness0~255
contrastcontrast0~6
mode
Mode 050 hz For
60 hz 2 outdoor
flip
Flip rotation 0 primitive 1 vertical reverses 2 horizontal 3 vertical flip + horizontal
821 The flow media player VLC player and mplayer can real-time broadcast ipcamera and send
of streaming media format video data
(Grammar parametersvideostreamasfuser=amppwd=ampresolution=amprate=)
As shown Picture 113 rdquoIpcamrdquo
Picture 114
IPCAM User Manual
58
From the following picture we can view that Ipcam local IP address ishttp19216811118999
WAN IP Address is httpwell888dyndnsorg8999 we can inputrdquoIPcamrdquorsquoS IP address to
open in the player
Picture 115
the CLC media player open play position
Picture 116
LAN play address
Picture 117
IPCAM User Manual
59
Picture 118
Open the Internet play position
Picture 119
As shown in the following picture It can see the ipcamera send video streaming format
Size 640X480
User
IPCAM User Manual
60
Picture 120
83 Frequently Asked Questions
Note1) Any question you would meet please check Network connections firstly
2)Check the working status revealed by the indicators on the network server hub exchange and
network card If abnormal check the network connections
831 I have forgotten the administrator username andor password
To reset the administrator username and password Press and hold down the RESET
BUTTON for 5 seconds Release the power button and the username and password
will be reset back to the factory default administrator username and password
Default administrator username admin
Default administrator password No password
832 IP Address configuration
Check whether IP address of the IP Camera server shares the same subnet as your
work station Click My Computer gt Control PanelgtNetwork amp Dial-up Connections gt
LAN gt Attributes gtInternet Protocols (TCPIP) and check IP Address and Subnet
Mask Make sure they are in the same subnet when configuring IP Camera IP
address manuallyUnable to access IP Camera via web browser
833 Network Configuration
Double Check to ensure that your HTTP server software is configured and running
properly If you are running any firewall software make sure it is allowing inbound
connections to port 80Also if you happen to be using a cableDSL router make sure
IPCAM User Manual
61
you are set up port forwarding properly ( consult your router is documentation for more
information ) If none of these seem to be the problem it is also possible that your
ISP is blocking inbound connections to port 80 ndashmany IPSs have done this because
of internet worms such as Code Red If this is the case you bdquoll have to setup your
HTTP server on an alternate port (such as 8080)
834 No Monitoring picture
It has four reasons Images of the abnormal factors
1If its not use Directx function and lead to not normal to display the color imagePlease
install DirectX and open the start menu then input the command
Picture 121
You use the DirectX function and it will expedite the DirectDrawDirect3D and AGP if its can not maybe the
connect issues or hardware not read it
2The issues of hardware canrsquot support the card expedite image
3The antivirus software will influence the network it will be stoped or closedIf you install fireproof software
please close it and try again
4 ActiveX controller is not installed correctly
If its not image on the first time to use and will display to the user through the ActiveXIf its can not
display of the image maybe it fail of install about this issues please follow as
1Install ldquoIP Camera Toolrdquo ActiveX control at the same time
2Please install ActiveX control and keep the security settings for IE browser
835 Problems with network bandwidth
The image frame rate is subjected to the following factors 1network bandwidth 2 PC
performancenetwork environment and display preference setting (brightness theme
etc) 3 the number of visitors (Too many visitors will slow down the image frame rate) 4
choice of switch or hub (Use a switch for multiple IP Camera Servers rather than a HUB)
The Device use MJEPT Compression it needs good network bandwidth If it is too narrow it will lead to slowly
browser Typical video parameter occupy network bandwidth as blows
640x48030fps 40 Megabits ~ 50 Megabits
320x24030fps 12 Megabits ~ 16 Megabits
IPCAM User Manual
62
middot836 Why pop-up the prompt ldquoFail to connect to the devicehelliprdquo
This prompt only appeared in the case of using multiple cameras
Enter the Multi-Device Settings page(login as administrator) to check the
Device setting is correct or not
When one of the multiple cameras disconnected the color changed to
yellow and pop-up the promptldquoFail to connect to the devicehelliprdquo
Picture 122
837 Canrsquot access the IPCAM in the internet
There are some reasons
1 ActiveX controller is not installed correctly(see more details 514)
2 The port IPCAM used is blocked by Firewall or Anti-virus software Please change a
port number and try again
3 Port mapping is not success You can do port mapping by two ways
Enter setting page of the router which IPCAM connect with to enable UPnP function
Enter IPCAM ldquoUPnP Settingsrdquo to enable UPnP and make sure the state is ldquoUPnP
successrdquo
‟ s IP
and port to the Virtual map list
When use ADSL the IP is dynamic You should set DDNS(see more details 74 amp 80)
and also make sure port mapping success
84 Operate common problem solving
IP camera tool canrsquot find the camera
Except of the camera broken
1 Make sure the cable connector no problem recommend connector
(AMP)it is with international standard Another note IPCAMrsquos data
transmission channel require higher than computerrsquos so maybe the
IPCAM User Manual
63
computer can run normally but IPCAM canrsquot Please press heavily when making the cable connector
2 Confirm the power supply normally First check whether power indication
light turn on or not If it is onthen check the yellow light on RJ45 Port
(power indication light) and green light (network indication light) are on or
notIf they are onso power supply and cable runs normally
3 Confirm all the firwall and antivirus software are closeThe firewall often
block unrecognized data so if the firewall is running so maybe the IPCAM
TOOL canrsquot find the deviceSuggest to close firewall and antivirus
software temporarily before searching
How to solve the camera blank screen
1 Check if you are using the wrong power adaptorplease use original one
2 Close antivirus software
How to solve the camera canrsquot login by Internet
1 Check if you set DDNS success or not
2 Check the current IPCAMrsquos port number is the same as routerrsquosThey need to keep same
Canrsquot view the monitoring picture
1 Reason canrsquot connect with network
SolutionCheck if the network connect well exclude cable fault and PC virus
cause network fault until can be used between PC and PING
2 ReasonIP address occupy by other device
Solution Choose automatic gain
3 Reason IP address located within different subnet
Solution Check IPCAMrsquoS ip address and subnet mask address and gateway settings
4 ReasonWeb port has been modified
Solutioncontact network administrator to obtain port information
5 Reasonunknown
SolutionPress reset button to factory default statethen reconnectingsysten
default to gain ip address automaticsubnet mask is 2552552550
85 Default Parameters
middotDefault network Parameters
IP address dynamic obtain
Subnet mask 2552552550
Gateway dynamic obtain
DDNS Factory provide
middotUsername and password
Default administrator username admin
Default administrator password No password
IPCAM User Manual
64
86 Technical Parameters
ITEM IP CAM (NIP-02BGPWA2)
Image Sensor
Mage sensor 15 Color CMOS Sensor
Display 640 x 480 (300K Pixels)
Lens f36mm F24 (IR Lens)
Miniillumination 05 Lux
Lens Lens Type Glass Lens
Viewing Angle 60 Degree
Audio Microphone Audio of two way
Domain name Server MSN server DDNS server
Video
Image Compression MJPEG
Image Frame Rate 15 FPS(VGA)30FPS(QVGA)
Resolution 640 x 480(VGA) 320 x 240(QVGA)
Flip Mirror Images rtical Horizontal
mode 50Hz 60Hz or Outdoor
Video Parameters Brightness Contrast
Communication
Ethernet One 10100Mbps RJ-45
Supported Protocol HTTPDHCPIPTCPUDPFTPSMTPDDNSPPPoEUPnP
Mobilephone monitor Support IphoneIpad3G phonesmartphone
Wireless Standard IEEE 80211bg
Wireless Standard 80211b11Mbps(max) 80211g54Mbps(max)
Wireless Security 64128-bitWEP Encryption
Physical
PanTilt Angle Horizontal270deg amp Vertical 120deg
Infrared Light 10 IR LEDs Night visibility up to 15 Mete
Product size 100(L) x100(W) x125mm(H)
Gross Weight 6465gpcs (packing size196x165x123mm)
Net Weight 2547gpcs (only product)
Power Specification DC 5V25A 18 meter
Power Consumption 5 Watts
Environment
Operate Temper 0deg~ 55degC (14degF~122degF)
Operating Humidity 20 ~ 85 non-condensing
Storage Temper -10degC ~ 60deg (14degF ~140degF)
Storage Humidity 0 ~ 90 non-condensing
PC Requirements
CPU 20GHZ or above (suggested 30GHz)
Memory Size 512MB or above (suggested 10GB)
Display card 64M or above
Supported OS Microsoft Windows XPVistaWindows7
Supported browsers IEfirefoxGoogle
Certification CEFCCRoHS
Warranty Limited 1-year warranty
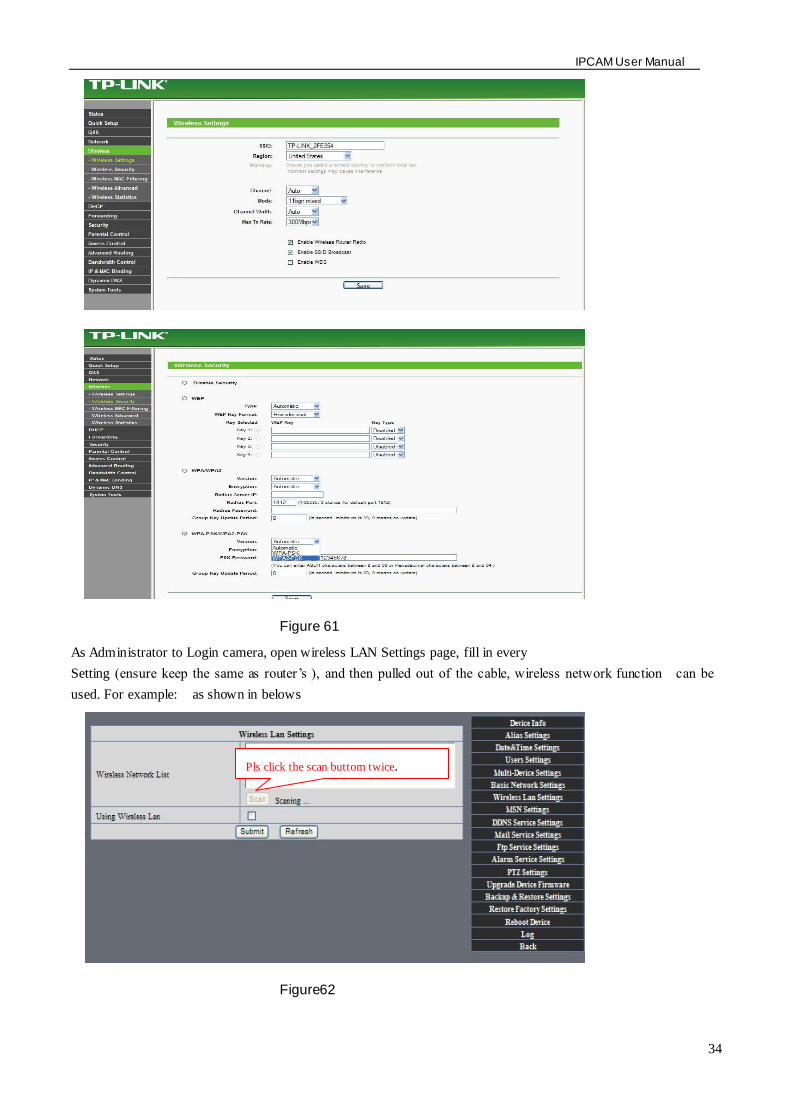
IPCAM User Manual
35
Figure 63
713 Adhoc point to point Wireless connection Setting
1) Open the basic network setting interfacecheck the device status
Picture 64
2) Open the wireless lan setting interface choose Adhoc for network type you
can define SSID such as 001
remember the IP address of
IP camera and Http port
Click the Settings Ip Camera will
restart and save
Double click to choose
Fill the encryption and
routers and key in the
same way
IPCAM User Manual
36
Picture 65
3) Unplug the RJ45 from IP camera Use laptop or other devices which are with
wifi function( include smart phoneipad and so on) searching the SSID you defined
on proccess 2then make a connection
Picture 66
middotClick wireless network and check the link status of ip camera Please note IP
address of your connected laptop must be the subset of your ip camera if not
please reset the ip address of your laptop manually
Picture 67
4) Now we can use the ip camera tool or enter ip address of camera derectly in
browser blank to visit
1 visit by ip camera tool
Picture 68
IPCAM User Manual
37
2Enter ip address in the browser
Enter user name and password in the login interface
Picture 69
Click ldquoSign inrdquoand vis it
Picture 70
IPCAM User Manual
38
72 Multi-Device Settings
Add cameras in LAN
In the Multi-Device Settings page you can see all devices searched in LAN The 1
St Device is this device in default You can add more cameras list in LAN for monitoring This Web software
supports up to 9 IP Cameras online simultaneous ly Click ldquoThe 2ND
Devicerdquo and Double click the item in the ldquoDevice List in LANrdquo AliasHost and Http Port
will fill in automatically Enter the correct username and password then click ldquoaddrdquoAdd
more cameras in the same way At last please donrsquot forget the ldquo settingrdquo Button
Picture 71
Add cameras in the Internet
Firstly make sure the camera added can access in the Internet with the IP address or
DDNS domain Like this http2191332001669999or httpIPcamdyndnsorg9999You can enter the
Host 219133200166 Http port 9999 or Host IPcamdyndnsorg Http port 9999 Enter the correct
username and password then click ldquoaddrdquo Add more cameras in the
same way
Picture 72
IPCAM User Manual
39
Picture 73
73 MSN Settings
Fill in your MSN account and password then add account which need to receive
IPCAMrsquoS ip address to IPCAM‟ S MSN list (Picture 67)click submit then yoursquod better
restart IP camera After it login your MSN to add IPCAMrsquos MSN account to MSN List that
you can receive IPCAMrsquos ip address
Picture 74
First login and click add contacts choose Add Contact then fill IPCAMrsquos MSN account in instant
messaging address click next then send offers
Aplly for MSN account and passworf for IP cam
Add about 10 MSN Accout
IPCAM User Manual
40
Figure75
Next
Figure76
Figure77
When IPCAMrsquos MSN account shows online you can chat with it input path command url camera
account will show its IP address in chatting box promptly as below
IPCAM User Manual
41
Picture 78
You can input the IP address to browser then can browse ip camera as below
Figure79
AttentionYou should fill MSN account in IPCAM first
74 DDNS Service Settings
DDNS Service The system supports protocols from some DDNS providers Dyndnsorg System support
DDNS such as topipcamorgpeanut shell3322orgDynDNS
provided IP
IPCAM User Manual
42
User and Password the user name and password used when applying for the domain
name (details 432)
DDNS Host the Domain Name
741 Factory DDNS
Device had distributed one DDNS to every productwhich was sticked the bottom
of the product Such as
manufacturer had already give every device a DDNS address which is unique Users only need to fill in this
DDNS IP ADDRESS and port in the browser then they can monitor remote IP camera
Picture 80 Factory DDNS
Note When use the domain name access to the camera and UPNP is not successful you must set port
mapping function on routers
742 The third part DDNS
Users can use not only Factory DDSN but also can use third part DDNS System Such as domain name
wwwdyndnsorg The only thing the user need to do is to apply a free DDNS and then fill in ldquoset boxrdquo as below
Save this setting and this DDNS can be used
DDNS Hostname
Factory DDNS
IPCAM User Manual
43
Note the third party domain name is the realization of analytical way input the domain in the browser it will
keep this string of characters If the port of the device isnrsquot 80 then need to add colon and port number For
example httpwell888dyndnsorg8999
75 Mail and FTP Service
1)Configure the E-mail box to receive and send mails The E-mail box is used for receiving
the images sent after alarm and the system IP address after successful dial-up
Note When Alarm Service Settings-gt Send Mail on Alarm is check the Mail
Service takes effect
Picture82
Configure the E-mail box to receive and send mails The E-mail box is used for receiving the images sent
after alarm and the system IP address after successful dial-up
Sender This device use the sender mailbox to send mails
Receiver To receive the mail from the Sender You can set up to 4 receiver mailbox
SMTP Server the SMTP server for the sender mailbox
Need Authentication if the sender mailbox need authentication you should check it then
input the SMTP username amp Password
Mail test Please set the Mail parameter and click Submit first There are Mail test result
Picture 83
video Local storage in PC after alarm monitoring
IPCAM User Manual
44
Gmail also set as the same It only needs you to fill in correct SMTP Sever address user and password
Picture 84
Mail notes Internet IP address In this option When Internet IP and port have changed IP Will be sent via
1Can not connect to the server
2Network Error Please try later
3Server Error
4Incorrect user or password
5The sender is denied by the server Maybe the server need to authenticate the user please check it
and try again
6The receiver is denied by the server Maybe because of the anti-spam privacy of the server
7The message is denied by the server Maybe because of the anti-spam privacy of the server
8The server does not support the authentication mode used by the device
Report Internet IP by Mail When ipcam port or Internet IP changed it will send the internet IP by
mail(for example IPCAM s url is http119123207969002) Make sure the port is map to the router
correctly by UPNP or Virtual Map function
2) FTP Server use and settings
middotIf you already have an FTP Server (ipcam com)and email ipcam you can fill the
parameters as below
Picture 85
IPCAM User Manual
45
middotFTP Server of LAN as below
1 Create an account
2 Step by step setting until finish it
Picture 88
IPCAM User Manual
46
3Start Server
Continue to finish it
Picture 89
4IPCAMrsquoS account can be used
Picture 90
Save path
This is a FTP
server address
IPCAM User Manual
47
5 IP camerarsquos FTP Server set like this
Picture 91
6 Set up and complete testing is successfulwhen it alarms IP camera will upload
pictures to the FTP server Settings of main directory path (as shown )
Picture 92
FTP Server the FTP server address
FTP port the port usually is 21
FTP Mode support standard(POST) mode and passive(PASV) mode
Upload Image Now it will upload image now when checkbox is not checked When checked you can
input upload interval(Seconds)
76 Motion Detection
Enter Alarm Service Settings page to configure Motion Detection function
1) Motion Detect Armed
Each alarm triggers in the protection of time the device will take various measures to alarm
IO linkage alarm output relay closure external alarm device began to alarm
IPCAM User Manual
48
Send E-mail alarm informatio
Transmit pictures to the FTP server and can set the time interval of sending pictures
2) Alarm t ime Settings
Only in the alarm period detection device to alarm will only have alarm action All the time (not check the
schedule) also can alarm within specified time For the specified time alarm firstly need to set up the system
time time zone and then to choose period of alarm in the state of alarm setting as shown in Picture 19
Picture93 Alarm of time Settings interface
Motion Detect Armed
When you enable motion detect armed the camera can be triggered to send email alerts
and record images In the camera monitoring page the green icon turn to red and an
alert sound you will hear
Motion Detect Sensibility
You can choose from low to high 10 level alarm sensitivity The greater the number the higher the
sensitivity
Alarm Input Armed
IO PINS1) Output(+5V) 2) Output 3) Alarm input 4) Input (GND)
Input Pins The input pins can be used for 1-way external sensor input(pin3 and pin4) For example
you may connect a Person Infrared Sensor (PIR) to it for motion detection When external sensor
triggered IPCAM can be programmed to send an email with picture or control the internal relay output
IPCAM User Manual
49
Picture94
IO Linkage on Alarm
Enable IO linkage on alarmPin1 will output +5V when alarm triggered and output LOW
when alarm release automatically
Switch onoff buttons control Pin1 output manually
Send Mail on Alarm
Sent picture and mail inform to customers e-mail after alarmed(firstly you should finish
the Mail Service Settings)
Picture 95
Upload Image on Alarm
Enable upload image on alarm and set upload interval(Seconds)
Tick send to your setted mails
IPCAM User Manual
50
Picture 96
REC automatically and save to PC
When you enable motion detect and open the camera monitoring page on the PC If
there is an alarm triggered REC will start automatically for several seconds and save to
the PC
Picture 97
REC save to pcrsquos position
Picture 98
Storage path can be changed
After Setting up later when have the
alarm the image will send to
designated email and FTP server
IPCAM User Manual
51
77 IP cameras Time amp Date setting and PTZ Setting
If IP camera connected with Internet it can automatically check the time amp date via running NTP Server And
need to choose properly IP cameras Time zone Otherwise it need PC Time to check IP camera time amp Date
Pre-set and Speed of PT
78 UPGRADE DEVICE FIRMWARE
Picture 101 Firmware upgrade
IP CAMERA has two kinds of programme One is system firmware another is application firmware It can be
upgraded separately
79 BACKUP AND RESTORE SETTING
Click Set in the Backup will lead to a BIN file and choose this file to restore setting
The huger the Number is The
slower it will be
IPCAM User Manual
52
8 APPENDIX
81 REGISTER AND APPLY FOR DDNS SERVICE
1Users use DDNS management system first timeUsers need to apply account to manage
and inquire the domain state
Step1 enter httpwwwdyndnscom and Create Account( Fill in Domain Name dyndnsorg then Click
Add)
Figure103
Step2 enter your information
Figure104
IPCAM User Manual
53
Figure105
Step3 After a minute you will receive an E-mail from DynDNS Support and it will give you a
confirmation address
(eg httpsaccountdyncomemlcreateconflILHMZHRje5oF_6YXTYv1A
Figure106
IPCAM User Manual
54
Step4 Open the link to active your Domain Name as belowLogin in your account after it is activated
Figure107
Step5 Check all the DDNS serviceswe choose the 14-day-trial
Figure108
Step6 Click the linkand user will see as below
IPCAM User Manual
55
middotenter your information
Figure109
Step7 Now you obtained a Dynamic Domain Name(Figure 105)and can use it in the DDNS Service
Settings(details 74)
Figure110
IPCAM User Manual
56
2For DDNS which is applied successfully you can fill in the IP CAMERA When set successfully the status
of IP will be shown as blows
picture 111
picture 112
3How to set DDNS on line
The first wayMenu rdquostartrdquo- ldquorunrdquomdashgt Input CMDClink rdquoenterrdquoIt can check DDNS Statas
via As shown below
Picture 113
IPCAM User Manual
57
Through the PING command this dynamic domain name can be back in the network response information It
proves that the domain name has been online
If the domain name update not success Possible reasons
(1) DDNS parameter is not correct (2) may cause DNS address configuration is wrong
82 Some special application for IPCAMERA
IPCamUse some grammar parameter control and Use IPCam
useruser
pwdpassword
priThe current access (1 visitors 23 operator managers)
resolutionImage resolution(832024 0qvga32640480 vga)
ratemage transmission speed and scope 0-23
brightnessbrightness0~255
contrastcontrast0~6
mode
Mode 050 hz For
60 hz 2 outdoor
flip
Flip rotation 0 primitive 1 vertical reverses 2 horizontal 3 vertical flip + horizontal
821 The flow media player VLC player and mplayer can real-time broadcast ipcamera and send
of streaming media format video data
(Grammar parametersvideostreamasfuser=amppwd=ampresolution=amprate=)
As shown Picture 113 rdquoIpcamrdquo
Picture 114
IPCAM User Manual
58
From the following picture we can view that Ipcam local IP address ishttp19216811118999
WAN IP Address is httpwell888dyndnsorg8999 we can inputrdquoIPcamrdquorsquoS IP address to
open in the player
Picture 115
the CLC media player open play position
Picture 116
LAN play address
Picture 117
IPCAM User Manual
59
Picture 118
Open the Internet play position
Picture 119
As shown in the following picture It can see the ipcamera send video streaming format
Size 640X480
User
IPCAM User Manual
60
Picture 120
83 Frequently Asked Questions
Note1) Any question you would meet please check Network connections firstly
2)Check the working status revealed by the indicators on the network server hub exchange and
network card If abnormal check the network connections
831 I have forgotten the administrator username andor password
To reset the administrator username and password Press and hold down the RESET
BUTTON for 5 seconds Release the power button and the username and password
will be reset back to the factory default administrator username and password
Default administrator username admin
Default administrator password No password
832 IP Address configuration
Check whether IP address of the IP Camera server shares the same subnet as your
work station Click My Computer gt Control PanelgtNetwork amp Dial-up Connections gt
LAN gt Attributes gtInternet Protocols (TCPIP) and check IP Address and Subnet
Mask Make sure they are in the same subnet when configuring IP Camera IP
address manuallyUnable to access IP Camera via web browser
833 Network Configuration
Double Check to ensure that your HTTP server software is configured and running
properly If you are running any firewall software make sure it is allowing inbound
connections to port 80Also if you happen to be using a cableDSL router make sure
IPCAM User Manual
61
you are set up port forwarding properly ( consult your router is documentation for more
information ) If none of these seem to be the problem it is also possible that your
ISP is blocking inbound connections to port 80 ndashmany IPSs have done this because
of internet worms such as Code Red If this is the case you bdquoll have to setup your
HTTP server on an alternate port (such as 8080)
834 No Monitoring picture
It has four reasons Images of the abnormal factors
1If its not use Directx function and lead to not normal to display the color imagePlease
install DirectX and open the start menu then input the command
Picture 121
You use the DirectX function and it will expedite the DirectDrawDirect3D and AGP if its can not maybe the
connect issues or hardware not read it
2The issues of hardware canrsquot support the card expedite image
3The antivirus software will influence the network it will be stoped or closedIf you install fireproof software
please close it and try again
4 ActiveX controller is not installed correctly
If its not image on the first time to use and will display to the user through the ActiveXIf its can not
display of the image maybe it fail of install about this issues please follow as
1Install ldquoIP Camera Toolrdquo ActiveX control at the same time
2Please install ActiveX control and keep the security settings for IE browser
835 Problems with network bandwidth
The image frame rate is subjected to the following factors 1network bandwidth 2 PC
performancenetwork environment and display preference setting (brightness theme
etc) 3 the number of visitors (Too many visitors will slow down the image frame rate) 4
choice of switch or hub (Use a switch for multiple IP Camera Servers rather than a HUB)
The Device use MJEPT Compression it needs good network bandwidth If it is too narrow it will lead to slowly
browser Typical video parameter occupy network bandwidth as blows
640x48030fps 40 Megabits ~ 50 Megabits
320x24030fps 12 Megabits ~ 16 Megabits
IPCAM User Manual
62
middot836 Why pop-up the prompt ldquoFail to connect to the devicehelliprdquo
This prompt only appeared in the case of using multiple cameras
Enter the Multi-Device Settings page(login as administrator) to check the
Device setting is correct or not
When one of the multiple cameras disconnected the color changed to
yellow and pop-up the promptldquoFail to connect to the devicehelliprdquo
Picture 122
837 Canrsquot access the IPCAM in the internet
There are some reasons
1 ActiveX controller is not installed correctly(see more details 514)
2 The port IPCAM used is blocked by Firewall or Anti-virus software Please change a
port number and try again
3 Port mapping is not success You can do port mapping by two ways
Enter setting page of the router which IPCAM connect with to enable UPnP function
Enter IPCAM ldquoUPnP Settingsrdquo to enable UPnP and make sure the state is ldquoUPnP
successrdquo
‟ s IP
and port to the Virtual map list
When use ADSL the IP is dynamic You should set DDNS(see more details 74 amp 80)
and also make sure port mapping success
84 Operate common problem solving
IP camera tool canrsquot find the camera
Except of the camera broken
1 Make sure the cable connector no problem recommend connector
(AMP)it is with international standard Another note IPCAMrsquos data
transmission channel require higher than computerrsquos so maybe the
IPCAM User Manual
63
computer can run normally but IPCAM canrsquot Please press heavily when making the cable connector
2 Confirm the power supply normally First check whether power indication
light turn on or not If it is onthen check the yellow light on RJ45 Port
(power indication light) and green light (network indication light) are on or
notIf they are onso power supply and cable runs normally
3 Confirm all the firwall and antivirus software are closeThe firewall often
block unrecognized data so if the firewall is running so maybe the IPCAM
TOOL canrsquot find the deviceSuggest to close firewall and antivirus
software temporarily before searching
How to solve the camera blank screen
1 Check if you are using the wrong power adaptorplease use original one
2 Close antivirus software
How to solve the camera canrsquot login by Internet
1 Check if you set DDNS success or not
2 Check the current IPCAMrsquos port number is the same as routerrsquosThey need to keep same
Canrsquot view the monitoring picture
1 Reason canrsquot connect with network
SolutionCheck if the network connect well exclude cable fault and PC virus
cause network fault until can be used between PC and PING
2 ReasonIP address occupy by other device
Solution Choose automatic gain
3 Reason IP address located within different subnet
Solution Check IPCAMrsquoS ip address and subnet mask address and gateway settings
4 ReasonWeb port has been modified
Solutioncontact network administrator to obtain port information
5 Reasonunknown
SolutionPress reset button to factory default statethen reconnectingsysten
default to gain ip address automaticsubnet mask is 2552552550
85 Default Parameters
middotDefault network Parameters
IP address dynamic obtain
Subnet mask 2552552550
Gateway dynamic obtain
DDNS Factory provide
middotUsername and password
Default administrator username admin
Default administrator password No password
IPCAM User Manual
64
86 Technical Parameters
ITEM IP CAM (NIP-02BGPWA2)
Image Sensor
Mage sensor 15 Color CMOS Sensor
Display 640 x 480 (300K Pixels)
Lens f36mm F24 (IR Lens)
Miniillumination 05 Lux
Lens Lens Type Glass Lens
Viewing Angle 60 Degree
Audio Microphone Audio of two way
Domain name Server MSN server DDNS server
Video
Image Compression MJPEG
Image Frame Rate 15 FPS(VGA)30FPS(QVGA)
Resolution 640 x 480(VGA) 320 x 240(QVGA)
Flip Mirror Images rtical Horizontal
mode 50Hz 60Hz or Outdoor
Video Parameters Brightness Contrast
Communication
Ethernet One 10100Mbps RJ-45
Supported Protocol HTTPDHCPIPTCPUDPFTPSMTPDDNSPPPoEUPnP
Mobilephone monitor Support IphoneIpad3G phonesmartphone
Wireless Standard IEEE 80211bg
Wireless Standard 80211b11Mbps(max) 80211g54Mbps(max)
Wireless Security 64128-bitWEP Encryption
Physical
PanTilt Angle Horizontal270deg amp Vertical 120deg
Infrared Light 10 IR LEDs Night visibility up to 15 Mete
Product size 100(L) x100(W) x125mm(H)
Gross Weight 6465gpcs (packing size196x165x123mm)
Net Weight 2547gpcs (only product)
Power Specification DC 5V25A 18 meter
Power Consumption 5 Watts
Environment
Operate Temper 0deg~ 55degC (14degF~122degF)
Operating Humidity 20 ~ 85 non-condensing
Storage Temper -10degC ~ 60deg (14degF ~140degF)
Storage Humidity 0 ~ 90 non-condensing
PC Requirements
CPU 20GHZ or above (suggested 30GHz)
Memory Size 512MB or above (suggested 10GB)
Display card 64M or above
Supported OS Microsoft Windows XPVistaWindows7
Supported browsers IEfirefoxGoogle
Certification CEFCCRoHS
Warranty Limited 1-year warranty
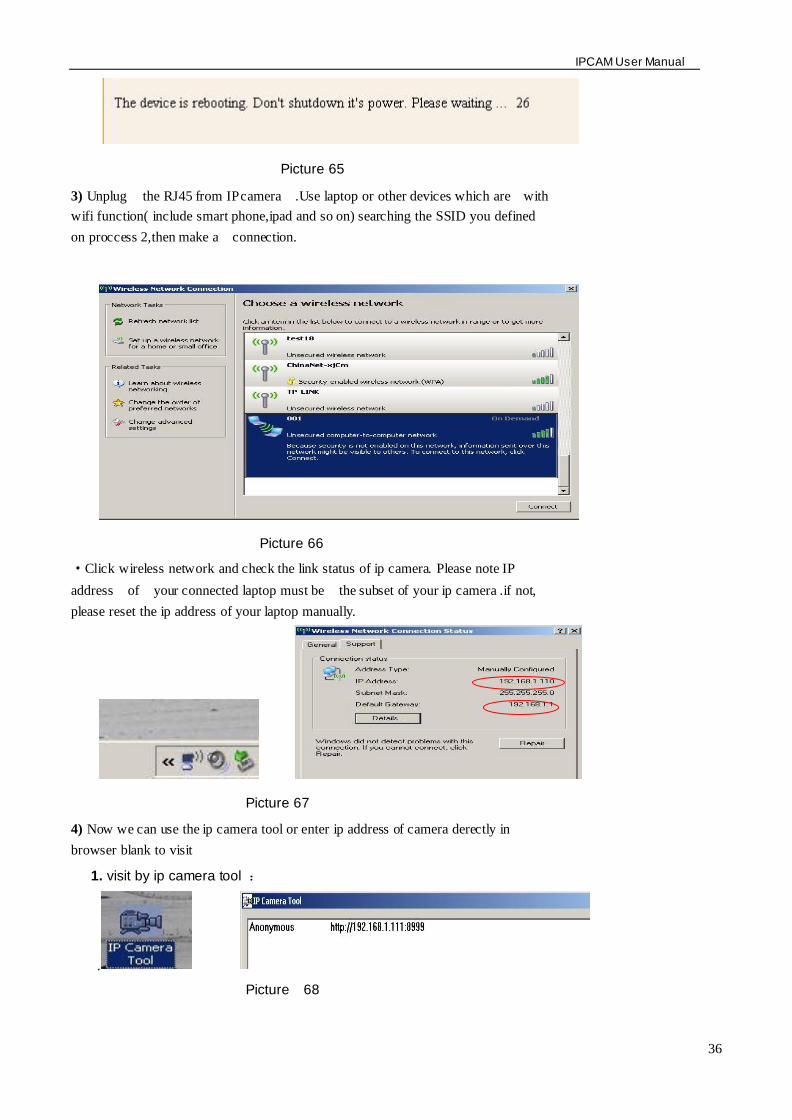
IPCAM User Manual
36
Picture 65
3) Unplug the RJ45 from IP camera Use laptop or other devices which are with
wifi function( include smart phoneipad and so on) searching the SSID you defined
on proccess 2then make a connection
Picture 66
middotClick wireless network and check the link status of ip camera Please note IP
address of your connected laptop must be the subset of your ip camera if not
please reset the ip address of your laptop manually
Picture 67
4) Now we can use the ip camera tool or enter ip address of camera derectly in
browser blank to visit
1 visit by ip camera tool
Picture 68
IPCAM User Manual
37
2Enter ip address in the browser
Enter user name and password in the login interface
Picture 69
Click ldquoSign inrdquoand vis it
Picture 70
IPCAM User Manual
38
72 Multi-Device Settings
Add cameras in LAN
In the Multi-Device Settings page you can see all devices searched in LAN The 1
St Device is this device in default You can add more cameras list in LAN for monitoring This Web software
supports up to 9 IP Cameras online simultaneous ly Click ldquoThe 2ND
Devicerdquo and Double click the item in the ldquoDevice List in LANrdquo AliasHost and Http Port
will fill in automatically Enter the correct username and password then click ldquoaddrdquoAdd
more cameras in the same way At last please donrsquot forget the ldquo settingrdquo Button
Picture 71
Add cameras in the Internet
Firstly make sure the camera added can access in the Internet with the IP address or
DDNS domain Like this http2191332001669999or httpIPcamdyndnsorg9999You can enter the
Host 219133200166 Http port 9999 or Host IPcamdyndnsorg Http port 9999 Enter the correct
username and password then click ldquoaddrdquo Add more cameras in the
same way
Picture 72
IPCAM User Manual
39
Picture 73
73 MSN Settings
Fill in your MSN account and password then add account which need to receive
IPCAMrsquoS ip address to IPCAM‟ S MSN list (Picture 67)click submit then yoursquod better
restart IP camera After it login your MSN to add IPCAMrsquos MSN account to MSN List that
you can receive IPCAMrsquos ip address
Picture 74
First login and click add contacts choose Add Contact then fill IPCAMrsquos MSN account in instant
messaging address click next then send offers
Aplly for MSN account and passworf for IP cam
Add about 10 MSN Accout
IPCAM User Manual
40
Figure75
Next
Figure76
Figure77
When IPCAMrsquos MSN account shows online you can chat with it input path command url camera
account will show its IP address in chatting box promptly as below
IPCAM User Manual
41
Picture 78
You can input the IP address to browser then can browse ip camera as below
Figure79
AttentionYou should fill MSN account in IPCAM first
74 DDNS Service Settings
DDNS Service The system supports protocols from some DDNS providers Dyndnsorg System support
DDNS such as topipcamorgpeanut shell3322orgDynDNS
provided IP
IPCAM User Manual
42
User and Password the user name and password used when applying for the domain
name (details 432)
DDNS Host the Domain Name
741 Factory DDNS
Device had distributed one DDNS to every productwhich was sticked the bottom
of the product Such as
manufacturer had already give every device a DDNS address which is unique Users only need to fill in this
DDNS IP ADDRESS and port in the browser then they can monitor remote IP camera
Picture 80 Factory DDNS
Note When use the domain name access to the camera and UPNP is not successful you must set port
mapping function on routers
742 The third part DDNS
Users can use not only Factory DDSN but also can use third part DDNS System Such as domain name
wwwdyndnsorg The only thing the user need to do is to apply a free DDNS and then fill in ldquoset boxrdquo as below
Save this setting and this DDNS can be used
DDNS Hostname
Factory DDNS
IPCAM User Manual
43
Note the third party domain name is the realization of analytical way input the domain in the browser it will
keep this string of characters If the port of the device isnrsquot 80 then need to add colon and port number For
example httpwell888dyndnsorg8999
75 Mail and FTP Service
1)Configure the E-mail box to receive and send mails The E-mail box is used for receiving
the images sent after alarm and the system IP address after successful dial-up
Note When Alarm Service Settings-gt Send Mail on Alarm is check the Mail
Service takes effect
Picture82
Configure the E-mail box to receive and send mails The E-mail box is used for receiving the images sent
after alarm and the system IP address after successful dial-up
Sender This device use the sender mailbox to send mails
Receiver To receive the mail from the Sender You can set up to 4 receiver mailbox
SMTP Server the SMTP server for the sender mailbox
Need Authentication if the sender mailbox need authentication you should check it then
input the SMTP username amp Password
Mail test Please set the Mail parameter and click Submit first There are Mail test result
Picture 83
video Local storage in PC after alarm monitoring
IPCAM User Manual
44
Gmail also set as the same It only needs you to fill in correct SMTP Sever address user and password
Picture 84
Mail notes Internet IP address In this option When Internet IP and port have changed IP Will be sent via
1Can not connect to the server
2Network Error Please try later
3Server Error
4Incorrect user or password
5The sender is denied by the server Maybe the server need to authenticate the user please check it
and try again
6The receiver is denied by the server Maybe because of the anti-spam privacy of the server
7The message is denied by the server Maybe because of the anti-spam privacy of the server
8The server does not support the authentication mode used by the device
Report Internet IP by Mail When ipcam port or Internet IP changed it will send the internet IP by
mail(for example IPCAM s url is http119123207969002) Make sure the port is map to the router
correctly by UPNP or Virtual Map function
2) FTP Server use and settings
middotIf you already have an FTP Server (ipcam com)and email ipcam you can fill the
parameters as below
Picture 85
IPCAM User Manual
45
middotFTP Server of LAN as below
1 Create an account
2 Step by step setting until finish it
Picture 88
IPCAM User Manual
46
3Start Server
Continue to finish it
Picture 89
4IPCAMrsquoS account can be used
Picture 90
Save path
This is a FTP
server address
IPCAM User Manual
47
5 IP camerarsquos FTP Server set like this
Picture 91
6 Set up and complete testing is successfulwhen it alarms IP camera will upload
pictures to the FTP server Settings of main directory path (as shown )
Picture 92
FTP Server the FTP server address
FTP port the port usually is 21
FTP Mode support standard(POST) mode and passive(PASV) mode
Upload Image Now it will upload image now when checkbox is not checked When checked you can
input upload interval(Seconds)
76 Motion Detection
Enter Alarm Service Settings page to configure Motion Detection function
1) Motion Detect Armed
Each alarm triggers in the protection of time the device will take various measures to alarm
IO linkage alarm output relay closure external alarm device began to alarm
IPCAM User Manual
48
Send E-mail alarm informatio
Transmit pictures to the FTP server and can set the time interval of sending pictures
2) Alarm t ime Settings
Only in the alarm period detection device to alarm will only have alarm action All the time (not check the
schedule) also can alarm within specified time For the specified time alarm firstly need to set up the system
time time zone and then to choose period of alarm in the state of alarm setting as shown in Picture 19
Picture93 Alarm of time Settings interface
Motion Detect Armed
When you enable motion detect armed the camera can be triggered to send email alerts
and record images In the camera monitoring page the green icon turn to red and an
alert sound you will hear
Motion Detect Sensibility
You can choose from low to high 10 level alarm sensitivity The greater the number the higher the
sensitivity
Alarm Input Armed
IO PINS1) Output(+5V) 2) Output 3) Alarm input 4) Input (GND)
Input Pins The input pins can be used for 1-way external sensor input(pin3 and pin4) For example
you may connect a Person Infrared Sensor (PIR) to it for motion detection When external sensor
triggered IPCAM can be programmed to send an email with picture or control the internal relay output
IPCAM User Manual
49
Picture94
IO Linkage on Alarm
Enable IO linkage on alarmPin1 will output +5V when alarm triggered and output LOW
when alarm release automatically
Switch onoff buttons control Pin1 output manually
Send Mail on Alarm
Sent picture and mail inform to customers e-mail after alarmed(firstly you should finish
the Mail Service Settings)
Picture 95
Upload Image on Alarm
Enable upload image on alarm and set upload interval(Seconds)
Tick send to your setted mails
IPCAM User Manual
50
Picture 96
REC automatically and save to PC
When you enable motion detect and open the camera monitoring page on the PC If
there is an alarm triggered REC will start automatically for several seconds and save to
the PC
Picture 97
REC save to pcrsquos position
Picture 98
Storage path can be changed
After Setting up later when have the
alarm the image will send to
designated email and FTP server
IPCAM User Manual
51
77 IP cameras Time amp Date setting and PTZ Setting
If IP camera connected with Internet it can automatically check the time amp date via running NTP Server And
need to choose properly IP cameras Time zone Otherwise it need PC Time to check IP camera time amp Date
Pre-set and Speed of PT
78 UPGRADE DEVICE FIRMWARE
Picture 101 Firmware upgrade
IP CAMERA has two kinds of programme One is system firmware another is application firmware It can be
upgraded separately
79 BACKUP AND RESTORE SETTING
Click Set in the Backup will lead to a BIN file and choose this file to restore setting
The huger the Number is The
slower it will be
IPCAM User Manual
52
8 APPENDIX
81 REGISTER AND APPLY FOR DDNS SERVICE
1Users use DDNS management system first timeUsers need to apply account to manage
and inquire the domain state
Step1 enter httpwwwdyndnscom and Create Account( Fill in Domain Name dyndnsorg then Click
Add)
Figure103
Step2 enter your information
Figure104
IPCAM User Manual
53
Figure105
Step3 After a minute you will receive an E-mail from DynDNS Support and it will give you a
confirmation address
(eg httpsaccountdyncomemlcreateconflILHMZHRje5oF_6YXTYv1A
Figure106
IPCAM User Manual
54
Step4 Open the link to active your Domain Name as belowLogin in your account after it is activated
Figure107
Step5 Check all the DDNS serviceswe choose the 14-day-trial
Figure108
Step6 Click the linkand user will see as below
IPCAM User Manual
55
middotenter your information
Figure109
Step7 Now you obtained a Dynamic Domain Name(Figure 105)and can use it in the DDNS Service
Settings(details 74)
Figure110
IPCAM User Manual
56
2For DDNS which is applied successfully you can fill in the IP CAMERA When set successfully the status
of IP will be shown as blows
picture 111
picture 112
3How to set DDNS on line
The first wayMenu rdquostartrdquo- ldquorunrdquomdashgt Input CMDClink rdquoenterrdquoIt can check DDNS Statas
via As shown below
Picture 113
IPCAM User Manual
57
Through the PING command this dynamic domain name can be back in the network response information It
proves that the domain name has been online
If the domain name update not success Possible reasons
(1) DDNS parameter is not correct (2) may cause DNS address configuration is wrong
82 Some special application for IPCAMERA
IPCamUse some grammar parameter control and Use IPCam
useruser
pwdpassword
priThe current access (1 visitors 23 operator managers)
resolutionImage resolution(832024 0qvga32640480 vga)
ratemage transmission speed and scope 0-23
brightnessbrightness0~255
contrastcontrast0~6
mode
Mode 050 hz For
60 hz 2 outdoor
flip
Flip rotation 0 primitive 1 vertical reverses 2 horizontal 3 vertical flip + horizontal
821 The flow media player VLC player and mplayer can real-time broadcast ipcamera and send
of streaming media format video data
(Grammar parametersvideostreamasfuser=amppwd=ampresolution=amprate=)
As shown Picture 113 rdquoIpcamrdquo
Picture 114
IPCAM User Manual
58
From the following picture we can view that Ipcam local IP address ishttp19216811118999
WAN IP Address is httpwell888dyndnsorg8999 we can inputrdquoIPcamrdquorsquoS IP address to
open in the player
Picture 115
the CLC media player open play position
Picture 116
LAN play address
Picture 117
IPCAM User Manual
59
Picture 118
Open the Internet play position
Picture 119
As shown in the following picture It can see the ipcamera send video streaming format
Size 640X480
User
IPCAM User Manual
60
Picture 120
83 Frequently Asked Questions
Note1) Any question you would meet please check Network connections firstly
2)Check the working status revealed by the indicators on the network server hub exchange and
network card If abnormal check the network connections
831 I have forgotten the administrator username andor password
To reset the administrator username and password Press and hold down the RESET
BUTTON for 5 seconds Release the power button and the username and password
will be reset back to the factory default administrator username and password
Default administrator username admin
Default administrator password No password
832 IP Address configuration
Check whether IP address of the IP Camera server shares the same subnet as your
work station Click My Computer gt Control PanelgtNetwork amp Dial-up Connections gt
LAN gt Attributes gtInternet Protocols (TCPIP) and check IP Address and Subnet
Mask Make sure they are in the same subnet when configuring IP Camera IP
address manuallyUnable to access IP Camera via web browser
833 Network Configuration
Double Check to ensure that your HTTP server software is configured and running
properly If you are running any firewall software make sure it is allowing inbound
connections to port 80Also if you happen to be using a cableDSL router make sure
IPCAM User Manual
61
you are set up port forwarding properly ( consult your router is documentation for more
information ) If none of these seem to be the problem it is also possible that your
ISP is blocking inbound connections to port 80 ndashmany IPSs have done this because
of internet worms such as Code Red If this is the case you bdquoll have to setup your
HTTP server on an alternate port (such as 8080)
834 No Monitoring picture
It has four reasons Images of the abnormal factors
1If its not use Directx function and lead to not normal to display the color imagePlease
install DirectX and open the start menu then input the command
Picture 121
You use the DirectX function and it will expedite the DirectDrawDirect3D and AGP if its can not maybe the
connect issues or hardware not read it
2The issues of hardware canrsquot support the card expedite image
3The antivirus software will influence the network it will be stoped or closedIf you install fireproof software
please close it and try again
4 ActiveX controller is not installed correctly
If its not image on the first time to use and will display to the user through the ActiveXIf its can not
display of the image maybe it fail of install about this issues please follow as
1Install ldquoIP Camera Toolrdquo ActiveX control at the same time
2Please install ActiveX control and keep the security settings for IE browser
835 Problems with network bandwidth
The image frame rate is subjected to the following factors 1network bandwidth 2 PC
performancenetwork environment and display preference setting (brightness theme
etc) 3 the number of visitors (Too many visitors will slow down the image frame rate) 4
choice of switch or hub (Use a switch for multiple IP Camera Servers rather than a HUB)
The Device use MJEPT Compression it needs good network bandwidth If it is too narrow it will lead to slowly
browser Typical video parameter occupy network bandwidth as blows
640x48030fps 40 Megabits ~ 50 Megabits
320x24030fps 12 Megabits ~ 16 Megabits
IPCAM User Manual
62
middot836 Why pop-up the prompt ldquoFail to connect to the devicehelliprdquo
This prompt only appeared in the case of using multiple cameras
Enter the Multi-Device Settings page(login as administrator) to check the
Device setting is correct or not
When one of the multiple cameras disconnected the color changed to
yellow and pop-up the promptldquoFail to connect to the devicehelliprdquo
Picture 122
837 Canrsquot access the IPCAM in the internet
There are some reasons
1 ActiveX controller is not installed correctly(see more details 514)
2 The port IPCAM used is blocked by Firewall or Anti-virus software Please change a
port number and try again
3 Port mapping is not success You can do port mapping by two ways
Enter setting page of the router which IPCAM connect with to enable UPnP function
Enter IPCAM ldquoUPnP Settingsrdquo to enable UPnP and make sure the state is ldquoUPnP
successrdquo
‟ s IP
and port to the Virtual map list
When use ADSL the IP is dynamic You should set DDNS(see more details 74 amp 80)
and also make sure port mapping success
84 Operate common problem solving
IP camera tool canrsquot find the camera
Except of the camera broken
1 Make sure the cable connector no problem recommend connector
(AMP)it is with international standard Another note IPCAMrsquos data
transmission channel require higher than computerrsquos so maybe the
IPCAM User Manual
63
computer can run normally but IPCAM canrsquot Please press heavily when making the cable connector
2 Confirm the power supply normally First check whether power indication
light turn on or not If it is onthen check the yellow light on RJ45 Port
(power indication light) and green light (network indication light) are on or
notIf they are onso power supply and cable runs normally
3 Confirm all the firwall and antivirus software are closeThe firewall often
block unrecognized data so if the firewall is running so maybe the IPCAM
TOOL canrsquot find the deviceSuggest to close firewall and antivirus
software temporarily before searching
How to solve the camera blank screen
1 Check if you are using the wrong power adaptorplease use original one
2 Close antivirus software
How to solve the camera canrsquot login by Internet
1 Check if you set DDNS success or not
2 Check the current IPCAMrsquos port number is the same as routerrsquosThey need to keep same
Canrsquot view the monitoring picture
1 Reason canrsquot connect with network
SolutionCheck if the network connect well exclude cable fault and PC virus
cause network fault until can be used between PC and PING
2 ReasonIP address occupy by other device
Solution Choose automatic gain
3 Reason IP address located within different subnet
Solution Check IPCAMrsquoS ip address and subnet mask address and gateway settings
4 ReasonWeb port has been modified
Solutioncontact network administrator to obtain port information
5 Reasonunknown
SolutionPress reset button to factory default statethen reconnectingsysten
default to gain ip address automaticsubnet mask is 2552552550
85 Default Parameters
middotDefault network Parameters
IP address dynamic obtain
Subnet mask 2552552550
Gateway dynamic obtain
DDNS Factory provide
middotUsername and password
Default administrator username admin
Default administrator password No password
IPCAM User Manual
64
86 Technical Parameters
ITEM IP CAM (NIP-02BGPWA2)
Image Sensor
Mage sensor 15 Color CMOS Sensor
Display 640 x 480 (300K Pixels)
Lens f36mm F24 (IR Lens)
Miniillumination 05 Lux
Lens Lens Type Glass Lens
Viewing Angle 60 Degree
Audio Microphone Audio of two way
Domain name Server MSN server DDNS server
Video
Image Compression MJPEG
Image Frame Rate 15 FPS(VGA)30FPS(QVGA)
Resolution 640 x 480(VGA) 320 x 240(QVGA)
Flip Mirror Images rtical Horizontal
mode 50Hz 60Hz or Outdoor
Video Parameters Brightness Contrast
Communication
Ethernet One 10100Mbps RJ-45
Supported Protocol HTTPDHCPIPTCPUDPFTPSMTPDDNSPPPoEUPnP
Mobilephone monitor Support IphoneIpad3G phonesmartphone
Wireless Standard IEEE 80211bg
Wireless Standard 80211b11Mbps(max) 80211g54Mbps(max)
Wireless Security 64128-bitWEP Encryption
Physical
PanTilt Angle Horizontal270deg amp Vertical 120deg
Infrared Light 10 IR LEDs Night visibility up to 15 Mete
Product size 100(L) x100(W) x125mm(H)
Gross Weight 6465gpcs (packing size196x165x123mm)
Net Weight 2547gpcs (only product)
Power Specification DC 5V25A 18 meter
Power Consumption 5 Watts
Environment
Operate Temper 0deg~ 55degC (14degF~122degF)
Operating Humidity 20 ~ 85 non-condensing
Storage Temper -10degC ~ 60deg (14degF ~140degF)
Storage Humidity 0 ~ 90 non-condensing
PC Requirements
CPU 20GHZ or above (suggested 30GHz)
Memory Size 512MB or above (suggested 10GB)
Display card 64M or above
Supported OS Microsoft Windows XPVistaWindows7
Supported browsers IEfirefoxGoogle
Certification CEFCCRoHS
Warranty Limited 1-year warranty
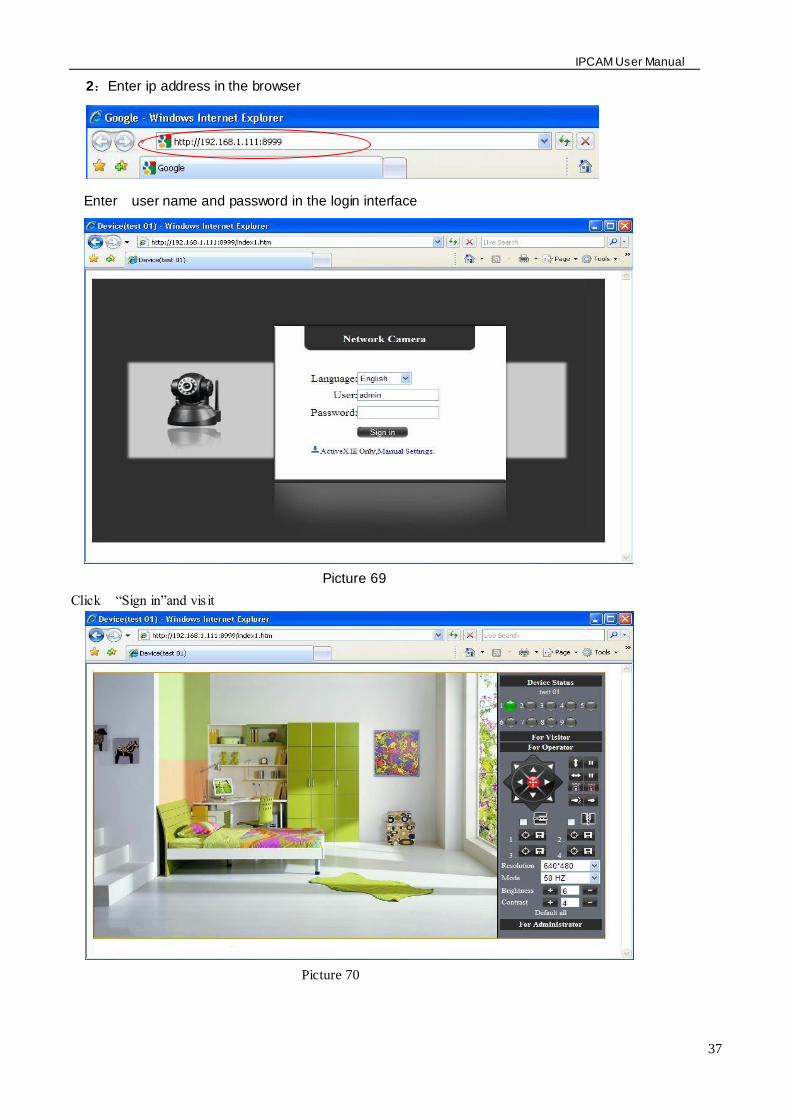
IPCAM User Manual
37
2Enter ip address in the browser
Enter user name and password in the login interface
Picture 69
Click ldquoSign inrdquoand vis it
Picture 70
IPCAM User Manual
38
72 Multi-Device Settings
Add cameras in LAN
In the Multi-Device Settings page you can see all devices searched in LAN The 1
St Device is this device in default You can add more cameras list in LAN for monitoring This Web software
supports up to 9 IP Cameras online simultaneous ly Click ldquoThe 2ND
Devicerdquo and Double click the item in the ldquoDevice List in LANrdquo AliasHost and Http Port
will fill in automatically Enter the correct username and password then click ldquoaddrdquoAdd
more cameras in the same way At last please donrsquot forget the ldquo settingrdquo Button
Picture 71
Add cameras in the Internet
Firstly make sure the camera added can access in the Internet with the IP address or
DDNS domain Like this http2191332001669999or httpIPcamdyndnsorg9999You can enter the
Host 219133200166 Http port 9999 or Host IPcamdyndnsorg Http port 9999 Enter the correct
username and password then click ldquoaddrdquo Add more cameras in the
same way
Picture 72
IPCAM User Manual
39
Picture 73
73 MSN Settings
Fill in your MSN account and password then add account which need to receive
IPCAMrsquoS ip address to IPCAM‟ S MSN list (Picture 67)click submit then yoursquod better
restart IP camera After it login your MSN to add IPCAMrsquos MSN account to MSN List that
you can receive IPCAMrsquos ip address
Picture 74
First login and click add contacts choose Add Contact then fill IPCAMrsquos MSN account in instant
messaging address click next then send offers
Aplly for MSN account and passworf for IP cam
Add about 10 MSN Accout
IPCAM User Manual
40
Figure75
Next
Figure76
Figure77
When IPCAMrsquos MSN account shows online you can chat with it input path command url camera
account will show its IP address in chatting box promptly as below
IPCAM User Manual
41
Picture 78
You can input the IP address to browser then can browse ip camera as below
Figure79
AttentionYou should fill MSN account in IPCAM first
74 DDNS Service Settings
DDNS Service The system supports protocols from some DDNS providers Dyndnsorg System support
DDNS such as topipcamorgpeanut shell3322orgDynDNS
provided IP
IPCAM User Manual
42
User and Password the user name and password used when applying for the domain
name (details 432)
DDNS Host the Domain Name
741 Factory DDNS
Device had distributed one DDNS to every productwhich was sticked the bottom
of the product Such as
manufacturer had already give every device a DDNS address which is unique Users only need to fill in this
DDNS IP ADDRESS and port in the browser then they can monitor remote IP camera
Picture 80 Factory DDNS
Note When use the domain name access to the camera and UPNP is not successful you must set port
mapping function on routers
742 The third part DDNS
Users can use not only Factory DDSN but also can use third part DDNS System Such as domain name
wwwdyndnsorg The only thing the user need to do is to apply a free DDNS and then fill in ldquoset boxrdquo as below
Save this setting and this DDNS can be used
DDNS Hostname
Factory DDNS
IPCAM User Manual
43
Note the third party domain name is the realization of analytical way input the domain in the browser it will
keep this string of characters If the port of the device isnrsquot 80 then need to add colon and port number For
example httpwell888dyndnsorg8999
75 Mail and FTP Service
1)Configure the E-mail box to receive and send mails The E-mail box is used for receiving
the images sent after alarm and the system IP address after successful dial-up
Note When Alarm Service Settings-gt Send Mail on Alarm is check the Mail
Service takes effect
Picture82
Configure the E-mail box to receive and send mails The E-mail box is used for receiving the images sent
after alarm and the system IP address after successful dial-up
Sender This device use the sender mailbox to send mails
Receiver To receive the mail from the Sender You can set up to 4 receiver mailbox
SMTP Server the SMTP server for the sender mailbox
Need Authentication if the sender mailbox need authentication you should check it then
input the SMTP username amp Password
Mail test Please set the Mail parameter and click Submit first There are Mail test result
Picture 83
video Local storage in PC after alarm monitoring
IPCAM User Manual
44
Gmail also set as the same It only needs you to fill in correct SMTP Sever address user and password
Picture 84
Mail notes Internet IP address In this option When Internet IP and port have changed IP Will be sent via
1Can not connect to the server
2Network Error Please try later
3Server Error
4Incorrect user or password
5The sender is denied by the server Maybe the server need to authenticate the user please check it
and try again
6The receiver is denied by the server Maybe because of the anti-spam privacy of the server
7The message is denied by the server Maybe because of the anti-spam privacy of the server
8The server does not support the authentication mode used by the device
Report Internet IP by Mail When ipcam port or Internet IP changed it will send the internet IP by
mail(for example IPCAM s url is http119123207969002) Make sure the port is map to the router
correctly by UPNP or Virtual Map function
2) FTP Server use and settings
middotIf you already have an FTP Server (ipcam com)and email ipcam you can fill the
parameters as below
Picture 85
IPCAM User Manual
45
middotFTP Server of LAN as below
1 Create an account
2 Step by step setting until finish it
Picture 88
IPCAM User Manual
46
3Start Server
Continue to finish it
Picture 89
4IPCAMrsquoS account can be used
Picture 90
Save path
This is a FTP
server address
IPCAM User Manual
47
5 IP camerarsquos FTP Server set like this
Picture 91
6 Set up and complete testing is successfulwhen it alarms IP camera will upload
pictures to the FTP server Settings of main directory path (as shown )
Picture 92
FTP Server the FTP server address
FTP port the port usually is 21
FTP Mode support standard(POST) mode and passive(PASV) mode
Upload Image Now it will upload image now when checkbox is not checked When checked you can
input upload interval(Seconds)
76 Motion Detection
Enter Alarm Service Settings page to configure Motion Detection function
1) Motion Detect Armed
Each alarm triggers in the protection of time the device will take various measures to alarm
IO linkage alarm output relay closure external alarm device began to alarm
IPCAM User Manual
48
Send E-mail alarm informatio
Transmit pictures to the FTP server and can set the time interval of sending pictures
2) Alarm t ime Settings
Only in the alarm period detection device to alarm will only have alarm action All the time (not check the
schedule) also can alarm within specified time For the specified time alarm firstly need to set up the system
time time zone and then to choose period of alarm in the state of alarm setting as shown in Picture 19
Picture93 Alarm of time Settings interface
Motion Detect Armed
When you enable motion detect armed the camera can be triggered to send email alerts
and record images In the camera monitoring page the green icon turn to red and an
alert sound you will hear
Motion Detect Sensibility
You can choose from low to high 10 level alarm sensitivity The greater the number the higher the
sensitivity
Alarm Input Armed
IO PINS1) Output(+5V) 2) Output 3) Alarm input 4) Input (GND)
Input Pins The input pins can be used for 1-way external sensor input(pin3 and pin4) For example
you may connect a Person Infrared Sensor (PIR) to it for motion detection When external sensor
triggered IPCAM can be programmed to send an email with picture or control the internal relay output
IPCAM User Manual
49
Picture94
IO Linkage on Alarm
Enable IO linkage on alarmPin1 will output +5V when alarm triggered and output LOW
when alarm release automatically
Switch onoff buttons control Pin1 output manually
Send Mail on Alarm
Sent picture and mail inform to customers e-mail after alarmed(firstly you should finish
the Mail Service Settings)
Picture 95
Upload Image on Alarm
Enable upload image on alarm and set upload interval(Seconds)
Tick send to your setted mails
IPCAM User Manual
50
Picture 96
REC automatically and save to PC
When you enable motion detect and open the camera monitoring page on the PC If
there is an alarm triggered REC will start automatically for several seconds and save to
the PC
Picture 97
REC save to pcrsquos position
Picture 98
Storage path can be changed
After Setting up later when have the
alarm the image will send to
designated email and FTP server
IPCAM User Manual
51
77 IP cameras Time amp Date setting and PTZ Setting
If IP camera connected with Internet it can automatically check the time amp date via running NTP Server And
need to choose properly IP cameras Time zone Otherwise it need PC Time to check IP camera time amp Date
Pre-set and Speed of PT
78 UPGRADE DEVICE FIRMWARE
Picture 101 Firmware upgrade
IP CAMERA has two kinds of programme One is system firmware another is application firmware It can be
upgraded separately
79 BACKUP AND RESTORE SETTING
Click Set in the Backup will lead to a BIN file and choose this file to restore setting
The huger the Number is The
slower it will be
IPCAM User Manual
52
8 APPENDIX
81 REGISTER AND APPLY FOR DDNS SERVICE
1Users use DDNS management system first timeUsers need to apply account to manage
and inquire the domain state
Step1 enter httpwwwdyndnscom and Create Account( Fill in Domain Name dyndnsorg then Click
Add)
Figure103
Step2 enter your information
Figure104
IPCAM User Manual
53
Figure105
Step3 After a minute you will receive an E-mail from DynDNS Support and it will give you a
confirmation address
(eg httpsaccountdyncomemlcreateconflILHMZHRje5oF_6YXTYv1A
Figure106
IPCAM User Manual
54
Step4 Open the link to active your Domain Name as belowLogin in your account after it is activated
Figure107
Step5 Check all the DDNS serviceswe choose the 14-day-trial
Figure108
Step6 Click the linkand user will see as below
IPCAM User Manual
55
middotenter your information
Figure109
Step7 Now you obtained a Dynamic Domain Name(Figure 105)and can use it in the DDNS Service
Settings(details 74)
Figure110
IPCAM User Manual
56
2For DDNS which is applied successfully you can fill in the IP CAMERA When set successfully the status
of IP will be shown as blows
picture 111
picture 112
3How to set DDNS on line
The first wayMenu rdquostartrdquo- ldquorunrdquomdashgt Input CMDClink rdquoenterrdquoIt can check DDNS Statas
via As shown below
Picture 113
IPCAM User Manual
57
Through the PING command this dynamic domain name can be back in the network response information It
proves that the domain name has been online
If the domain name update not success Possible reasons
(1) DDNS parameter is not correct (2) may cause DNS address configuration is wrong
82 Some special application for IPCAMERA
IPCamUse some grammar parameter control and Use IPCam
useruser
pwdpassword
priThe current access (1 visitors 23 operator managers)
resolutionImage resolution(832024 0qvga32640480 vga)
ratemage transmission speed and scope 0-23
brightnessbrightness0~255
contrastcontrast0~6
mode
Mode 050 hz For
60 hz 2 outdoor
flip
Flip rotation 0 primitive 1 vertical reverses 2 horizontal 3 vertical flip + horizontal
821 The flow media player VLC player and mplayer can real-time broadcast ipcamera and send
of streaming media format video data
(Grammar parametersvideostreamasfuser=amppwd=ampresolution=amprate=)
As shown Picture 113 rdquoIpcamrdquo
Picture 114
IPCAM User Manual
58
From the following picture we can view that Ipcam local IP address ishttp19216811118999
WAN IP Address is httpwell888dyndnsorg8999 we can inputrdquoIPcamrdquorsquoS IP address to
open in the player
Picture 115
the CLC media player open play position
Picture 116
LAN play address
Picture 117
IPCAM User Manual
59
Picture 118
Open the Internet play position
Picture 119
As shown in the following picture It can see the ipcamera send video streaming format
Size 640X480
User
IPCAM User Manual
60
Picture 120
83 Frequently Asked Questions
Note1) Any question you would meet please check Network connections firstly
2)Check the working status revealed by the indicators on the network server hub exchange and
network card If abnormal check the network connections
831 I have forgotten the administrator username andor password
To reset the administrator username and password Press and hold down the RESET
BUTTON for 5 seconds Release the power button and the username and password
will be reset back to the factory default administrator username and password
Default administrator username admin
Default administrator password No password
832 IP Address configuration
Check whether IP address of the IP Camera server shares the same subnet as your
work station Click My Computer gt Control PanelgtNetwork amp Dial-up Connections gt
LAN gt Attributes gtInternet Protocols (TCPIP) and check IP Address and Subnet
Mask Make sure they are in the same subnet when configuring IP Camera IP
address manuallyUnable to access IP Camera via web browser
833 Network Configuration
Double Check to ensure that your HTTP server software is configured and running
properly If you are running any firewall software make sure it is allowing inbound
connections to port 80Also if you happen to be using a cableDSL router make sure
IPCAM User Manual
61
you are set up port forwarding properly ( consult your router is documentation for more
information ) If none of these seem to be the problem it is also possible that your
ISP is blocking inbound connections to port 80 ndashmany IPSs have done this because
of internet worms such as Code Red If this is the case you bdquoll have to setup your
HTTP server on an alternate port (such as 8080)
834 No Monitoring picture
It has four reasons Images of the abnormal factors
1If its not use Directx function and lead to not normal to display the color imagePlease
install DirectX and open the start menu then input the command
Picture 121
You use the DirectX function and it will expedite the DirectDrawDirect3D and AGP if its can not maybe the
connect issues or hardware not read it
2The issues of hardware canrsquot support the card expedite image
3The antivirus software will influence the network it will be stoped or closedIf you install fireproof software
please close it and try again
4 ActiveX controller is not installed correctly
If its not image on the first time to use and will display to the user through the ActiveXIf its can not
display of the image maybe it fail of install about this issues please follow as
1Install ldquoIP Camera Toolrdquo ActiveX control at the same time
2Please install ActiveX control and keep the security settings for IE browser
835 Problems with network bandwidth
The image frame rate is subjected to the following factors 1network bandwidth 2 PC
performancenetwork environment and display preference setting (brightness theme
etc) 3 the number of visitors (Too many visitors will slow down the image frame rate) 4
choice of switch or hub (Use a switch for multiple IP Camera Servers rather than a HUB)
The Device use MJEPT Compression it needs good network bandwidth If it is too narrow it will lead to slowly
browser Typical video parameter occupy network bandwidth as blows
640x48030fps 40 Megabits ~ 50 Megabits
320x24030fps 12 Megabits ~ 16 Megabits
IPCAM User Manual
62
middot836 Why pop-up the prompt ldquoFail to connect to the devicehelliprdquo
This prompt only appeared in the case of using multiple cameras
Enter the Multi-Device Settings page(login as administrator) to check the
Device setting is correct or not
When one of the multiple cameras disconnected the color changed to
yellow and pop-up the promptldquoFail to connect to the devicehelliprdquo
Picture 122
837 Canrsquot access the IPCAM in the internet
There are some reasons
1 ActiveX controller is not installed correctly(see more details 514)
2 The port IPCAM used is blocked by Firewall or Anti-virus software Please change a
port number and try again
3 Port mapping is not success You can do port mapping by two ways
Enter setting page of the router which IPCAM connect with to enable UPnP function
Enter IPCAM ldquoUPnP Settingsrdquo to enable UPnP and make sure the state is ldquoUPnP
successrdquo
‟ s IP
and port to the Virtual map list
When use ADSL the IP is dynamic You should set DDNS(see more details 74 amp 80)
and also make sure port mapping success
84 Operate common problem solving
IP camera tool canrsquot find the camera
Except of the camera broken
1 Make sure the cable connector no problem recommend connector
(AMP)it is with international standard Another note IPCAMrsquos data
transmission channel require higher than computerrsquos so maybe the
IPCAM User Manual
63
computer can run normally but IPCAM canrsquot Please press heavily when making the cable connector
2 Confirm the power supply normally First check whether power indication
light turn on or not If it is onthen check the yellow light on RJ45 Port
(power indication light) and green light (network indication light) are on or
notIf they are onso power supply and cable runs normally
3 Confirm all the firwall and antivirus software are closeThe firewall often
block unrecognized data so if the firewall is running so maybe the IPCAM
TOOL canrsquot find the deviceSuggest to close firewall and antivirus
software temporarily before searching
How to solve the camera blank screen
1 Check if you are using the wrong power adaptorplease use original one
2 Close antivirus software
How to solve the camera canrsquot login by Internet
1 Check if you set DDNS success or not
2 Check the current IPCAMrsquos port number is the same as routerrsquosThey need to keep same
Canrsquot view the monitoring picture
1 Reason canrsquot connect with network
SolutionCheck if the network connect well exclude cable fault and PC virus
cause network fault until can be used between PC and PING
2 ReasonIP address occupy by other device
Solution Choose automatic gain
3 Reason IP address located within different subnet
Solution Check IPCAMrsquoS ip address and subnet mask address and gateway settings
4 ReasonWeb port has been modified
Solutioncontact network administrator to obtain port information
5 Reasonunknown
SolutionPress reset button to factory default statethen reconnectingsysten
default to gain ip address automaticsubnet mask is 2552552550
85 Default Parameters
middotDefault network Parameters
IP address dynamic obtain
Subnet mask 2552552550
Gateway dynamic obtain
DDNS Factory provide
middotUsername and password
Default administrator username admin
Default administrator password No password
IPCAM User Manual
64
86 Technical Parameters
ITEM IP CAM (NIP-02BGPWA2)
Image Sensor
Mage sensor 15 Color CMOS Sensor
Display 640 x 480 (300K Pixels)
Lens f36mm F24 (IR Lens)
Miniillumination 05 Lux
Lens Lens Type Glass Lens
Viewing Angle 60 Degree
Audio Microphone Audio of two way
Domain name Server MSN server DDNS server
Video
Image Compression MJPEG
Image Frame Rate 15 FPS(VGA)30FPS(QVGA)
Resolution 640 x 480(VGA) 320 x 240(QVGA)
Flip Mirror Images rtical Horizontal
mode 50Hz 60Hz or Outdoor
Video Parameters Brightness Contrast
Communication
Ethernet One 10100Mbps RJ-45
Supported Protocol HTTPDHCPIPTCPUDPFTPSMTPDDNSPPPoEUPnP
Mobilephone monitor Support IphoneIpad3G phonesmartphone
Wireless Standard IEEE 80211bg
Wireless Standard 80211b11Mbps(max) 80211g54Mbps(max)
Wireless Security 64128-bitWEP Encryption
Physical
PanTilt Angle Horizontal270deg amp Vertical 120deg
Infrared Light 10 IR LEDs Night visibility up to 15 Mete
Product size 100(L) x100(W) x125mm(H)
Gross Weight 6465gpcs (packing size196x165x123mm)
Net Weight 2547gpcs (only product)
Power Specification DC 5V25A 18 meter
Power Consumption 5 Watts
Environment
Operate Temper 0deg~ 55degC (14degF~122degF)
Operating Humidity 20 ~ 85 non-condensing
Storage Temper -10degC ~ 60deg (14degF ~140degF)
Storage Humidity 0 ~ 90 non-condensing
PC Requirements
CPU 20GHZ or above (suggested 30GHz)
Memory Size 512MB or above (suggested 10GB)
Display card 64M or above
Supported OS Microsoft Windows XPVistaWindows7
Supported browsers IEfirefoxGoogle
Certification CEFCCRoHS
Warranty Limited 1-year warranty
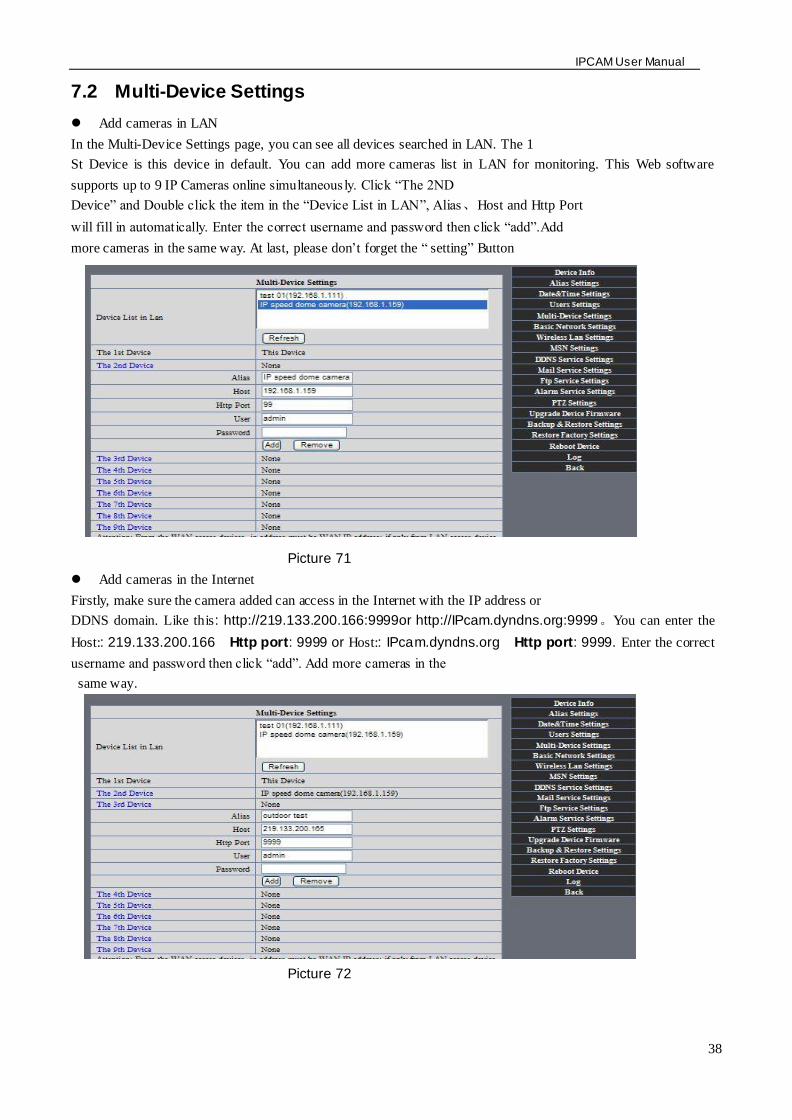
IPCAM User Manual
39
Picture 73
73 MSN Settings
Fill in your MSN account and password then add account which need to receive
IPCAMrsquoS ip address to IPCAM‟ S MSN list (Picture 67)click submit then yoursquod better
restart IP camera After it login your MSN to add IPCAMrsquos MSN account to MSN List that
you can receive IPCAMrsquos ip address
Picture 74
First login and click add contacts choose Add Contact then fill IPCAMrsquos MSN account in instant
messaging address click next then send offers
Aplly for MSN account and passworf for IP cam
Add about 10 MSN Accout
IPCAM User Manual
40
Figure75
Next
Figure76
Figure77
When IPCAMrsquos MSN account shows online you can chat with it input path command url camera
account will show its IP address in chatting box promptly as below
IPCAM User Manual
41
Picture 78
You can input the IP address to browser then can browse ip camera as below
Figure79
AttentionYou should fill MSN account in IPCAM first
74 DDNS Service Settings
DDNS Service The system supports protocols from some DDNS providers Dyndnsorg System support
DDNS such as topipcamorgpeanut shell3322orgDynDNS
provided IP
IPCAM User Manual
42
User and Password the user name and password used when applying for the domain
name (details 432)
DDNS Host the Domain Name
741 Factory DDNS
Device had distributed one DDNS to every productwhich was sticked the bottom
of the product Such as
manufacturer had already give every device a DDNS address which is unique Users only need to fill in this
DDNS IP ADDRESS and port in the browser then they can monitor remote IP camera
Picture 80 Factory DDNS
Note When use the domain name access to the camera and UPNP is not successful you must set port
mapping function on routers
742 The third part DDNS
Users can use not only Factory DDSN but also can use third part DDNS System Such as domain name
wwwdyndnsorg The only thing the user need to do is to apply a free DDNS and then fill in ldquoset boxrdquo as below
Save this setting and this DDNS can be used
DDNS Hostname
Factory DDNS
IPCAM User Manual
43
Note the third party domain name is the realization of analytical way input the domain in the browser it will
keep this string of characters If the port of the device isnrsquot 80 then need to add colon and port number For
example httpwell888dyndnsorg8999
75 Mail and FTP Service
1)Configure the E-mail box to receive and send mails The E-mail box is used for receiving
the images sent after alarm and the system IP address after successful dial-up
Note When Alarm Service Settings-gt Send Mail on Alarm is check the Mail
Service takes effect
Picture82
Configure the E-mail box to receive and send mails The E-mail box is used for receiving the images sent
after alarm and the system IP address after successful dial-up
Sender This device use the sender mailbox to send mails
Receiver To receive the mail from the Sender You can set up to 4 receiver mailbox
SMTP Server the SMTP server for the sender mailbox
Need Authentication if the sender mailbox need authentication you should check it then
input the SMTP username amp Password
Mail test Please set the Mail parameter and click Submit first There are Mail test result
Picture 83
video Local storage in PC after alarm monitoring
IPCAM User Manual
44
Gmail also set as the same It only needs you to fill in correct SMTP Sever address user and password
Picture 84
Mail notes Internet IP address In this option When Internet IP and port have changed IP Will be sent via
1Can not connect to the server
2Network Error Please try later
3Server Error
4Incorrect user or password
5The sender is denied by the server Maybe the server need to authenticate the user please check it
and try again
6The receiver is denied by the server Maybe because of the anti-spam privacy of the server
7The message is denied by the server Maybe because of the anti-spam privacy of the server
8The server does not support the authentication mode used by the device
Report Internet IP by Mail When ipcam port or Internet IP changed it will send the internet IP by
mail(for example IPCAM s url is http119123207969002) Make sure the port is map to the router
correctly by UPNP or Virtual Map function
2) FTP Server use and settings
middotIf you already have an FTP Server (ipcam com)and email ipcam you can fill the
parameters as below
Picture 85
IPCAM User Manual
45
middotFTP Server of LAN as below
1 Create an account
2 Step by step setting until finish it
Picture 88
IPCAM User Manual
46
3Start Server
Continue to finish it
Picture 89
4IPCAMrsquoS account can be used
Picture 90
Save path
This is a FTP
server address
IPCAM User Manual
47
5 IP camerarsquos FTP Server set like this
Picture 91
6 Set up and complete testing is successfulwhen it alarms IP camera will upload
pictures to the FTP server Settings of main directory path (as shown )
Picture 92
FTP Server the FTP server address
FTP port the port usually is 21
FTP Mode support standard(POST) mode and passive(PASV) mode
Upload Image Now it will upload image now when checkbox is not checked When checked you can
input upload interval(Seconds)
76 Motion Detection
Enter Alarm Service Settings page to configure Motion Detection function
1) Motion Detect Armed
Each alarm triggers in the protection of time the device will take various measures to alarm
IO linkage alarm output relay closure external alarm device began to alarm
IPCAM User Manual
48
Send E-mail alarm informatio
Transmit pictures to the FTP server and can set the time interval of sending pictures
2) Alarm t ime Settings
Only in the alarm period detection device to alarm will only have alarm action All the time (not check the
schedule) also can alarm within specified time For the specified time alarm firstly need to set up the system
time time zone and then to choose period of alarm in the state of alarm setting as shown in Picture 19
Picture93 Alarm of time Settings interface
Motion Detect Armed
When you enable motion detect armed the camera can be triggered to send email alerts
and record images In the camera monitoring page the green icon turn to red and an
alert sound you will hear
Motion Detect Sensibility
You can choose from low to high 10 level alarm sensitivity The greater the number the higher the
sensitivity
Alarm Input Armed
IO PINS1) Output(+5V) 2) Output 3) Alarm input 4) Input (GND)
Input Pins The input pins can be used for 1-way external sensor input(pin3 and pin4) For example
you may connect a Person Infrared Sensor (PIR) to it for motion detection When external sensor
triggered IPCAM can be programmed to send an email with picture or control the internal relay output
IPCAM User Manual
49
Picture94
IO Linkage on Alarm
Enable IO linkage on alarmPin1 will output +5V when alarm triggered and output LOW
when alarm release automatically
Switch onoff buttons control Pin1 output manually
Send Mail on Alarm
Sent picture and mail inform to customers e-mail after alarmed(firstly you should finish
the Mail Service Settings)
Picture 95
Upload Image on Alarm
Enable upload image on alarm and set upload interval(Seconds)
Tick send to your setted mails
IPCAM User Manual
50
Picture 96
REC automatically and save to PC
When you enable motion detect and open the camera monitoring page on the PC If
there is an alarm triggered REC will start automatically for several seconds and save to
the PC
Picture 97
REC save to pcrsquos position
Picture 98
Storage path can be changed
After Setting up later when have the
alarm the image will send to
designated email and FTP server
IPCAM User Manual
51
77 IP cameras Time amp Date setting and PTZ Setting
If IP camera connected with Internet it can automatically check the time amp date via running NTP Server And
need to choose properly IP cameras Time zone Otherwise it need PC Time to check IP camera time amp Date
Pre-set and Speed of PT
78 UPGRADE DEVICE FIRMWARE
Picture 101 Firmware upgrade
IP CAMERA has two kinds of programme One is system firmware another is application firmware It can be
upgraded separately
79 BACKUP AND RESTORE SETTING
Click Set in the Backup will lead to a BIN file and choose this file to restore setting
The huger the Number is The
slower it will be
IPCAM User Manual
52
8 APPENDIX
81 REGISTER AND APPLY FOR DDNS SERVICE
1Users use DDNS management system first timeUsers need to apply account to manage
and inquire the domain state
Step1 enter httpwwwdyndnscom and Create Account( Fill in Domain Name dyndnsorg then Click
Add)
Figure103
Step2 enter your information
Figure104
IPCAM User Manual
53
Figure105
Step3 After a minute you will receive an E-mail from DynDNS Support and it will give you a
confirmation address
(eg httpsaccountdyncomemlcreateconflILHMZHRje5oF_6YXTYv1A
Figure106
IPCAM User Manual
54
Step4 Open the link to active your Domain Name as belowLogin in your account after it is activated
Figure107
Step5 Check all the DDNS serviceswe choose the 14-day-trial
Figure108
Step6 Click the linkand user will see as below
IPCAM User Manual
55
middotenter your information
Figure109
Step7 Now you obtained a Dynamic Domain Name(Figure 105)and can use it in the DDNS Service
Settings(details 74)
Figure110
IPCAM User Manual
56
2For DDNS which is applied successfully you can fill in the IP CAMERA When set successfully the status
of IP will be shown as blows
picture 111
picture 112
3How to set DDNS on line
The first wayMenu rdquostartrdquo- ldquorunrdquomdashgt Input CMDClink rdquoenterrdquoIt can check DDNS Statas
via As shown below
Picture 113
IPCAM User Manual
57
Through the PING command this dynamic domain name can be back in the network response information It
proves that the domain name has been online
If the domain name update not success Possible reasons
(1) DDNS parameter is not correct (2) may cause DNS address configuration is wrong
82 Some special application for IPCAMERA
IPCamUse some grammar parameter control and Use IPCam
useruser
pwdpassword
priThe current access (1 visitors 23 operator managers)
resolutionImage resolution(832024 0qvga32640480 vga)
ratemage transmission speed and scope 0-23
brightnessbrightness0~255
contrastcontrast0~6
mode
Mode 050 hz For
60 hz 2 outdoor
flip
Flip rotation 0 primitive 1 vertical reverses 2 horizontal 3 vertical flip + horizontal
821 The flow media player VLC player and mplayer can real-time broadcast ipcamera and send
of streaming media format video data
(Grammar parametersvideostreamasfuser=amppwd=ampresolution=amprate=)
As shown Picture 113 rdquoIpcamrdquo
Picture 114
IPCAM User Manual
58
From the following picture we can view that Ipcam local IP address ishttp19216811118999
WAN IP Address is httpwell888dyndnsorg8999 we can inputrdquoIPcamrdquorsquoS IP address to
open in the player
Picture 115
the CLC media player open play position
Picture 116
LAN play address
Picture 117
IPCAM User Manual
59
Picture 118
Open the Internet play position
Picture 119
As shown in the following picture It can see the ipcamera send video streaming format
Size 640X480
User
IPCAM User Manual
60
Picture 120
83 Frequently Asked Questions
Note1) Any question you would meet please check Network connections firstly
2)Check the working status revealed by the indicators on the network server hub exchange and
network card If abnormal check the network connections
831 I have forgotten the administrator username andor password
To reset the administrator username and password Press and hold down the RESET
BUTTON for 5 seconds Release the power button and the username and password
will be reset back to the factory default administrator username and password
Default administrator username admin
Default administrator password No password
832 IP Address configuration
Check whether IP address of the IP Camera server shares the same subnet as your
work station Click My Computer gt Control PanelgtNetwork amp Dial-up Connections gt
LAN gt Attributes gtInternet Protocols (TCPIP) and check IP Address and Subnet
Mask Make sure they are in the same subnet when configuring IP Camera IP
address manuallyUnable to access IP Camera via web browser
833 Network Configuration
Double Check to ensure that your HTTP server software is configured and running
properly If you are running any firewall software make sure it is allowing inbound
connections to port 80Also if you happen to be using a cableDSL router make sure
IPCAM User Manual
61
you are set up port forwarding properly ( consult your router is documentation for more
information ) If none of these seem to be the problem it is also possible that your
ISP is blocking inbound connections to port 80 ndashmany IPSs have done this because
of internet worms such as Code Red If this is the case you bdquoll have to setup your
HTTP server on an alternate port (such as 8080)
834 No Monitoring picture
It has four reasons Images of the abnormal factors
1If its not use Directx function and lead to not normal to display the color imagePlease
install DirectX and open the start menu then input the command
Picture 121
You use the DirectX function and it will expedite the DirectDrawDirect3D and AGP if its can not maybe the
connect issues or hardware not read it
2The issues of hardware canrsquot support the card expedite image
3The antivirus software will influence the network it will be stoped or closedIf you install fireproof software
please close it and try again
4 ActiveX controller is not installed correctly
If its not image on the first time to use and will display to the user through the ActiveXIf its can not
display of the image maybe it fail of install about this issues please follow as
1Install ldquoIP Camera Toolrdquo ActiveX control at the same time
2Please install ActiveX control and keep the security settings for IE browser
835 Problems with network bandwidth
The image frame rate is subjected to the following factors 1network bandwidth 2 PC
performancenetwork environment and display preference setting (brightness theme
etc) 3 the number of visitors (Too many visitors will slow down the image frame rate) 4
choice of switch or hub (Use a switch for multiple IP Camera Servers rather than a HUB)
The Device use MJEPT Compression it needs good network bandwidth If it is too narrow it will lead to slowly
browser Typical video parameter occupy network bandwidth as blows
640x48030fps 40 Megabits ~ 50 Megabits
320x24030fps 12 Megabits ~ 16 Megabits
IPCAM User Manual
62
middot836 Why pop-up the prompt ldquoFail to connect to the devicehelliprdquo
This prompt only appeared in the case of using multiple cameras
Enter the Multi-Device Settings page(login as administrator) to check the
Device setting is correct or not
When one of the multiple cameras disconnected the color changed to
yellow and pop-up the promptldquoFail to connect to the devicehelliprdquo
Picture 122
837 Canrsquot access the IPCAM in the internet
There are some reasons
1 ActiveX controller is not installed correctly(see more details 514)
2 The port IPCAM used is blocked by Firewall or Anti-virus software Please change a
port number and try again
3 Port mapping is not success You can do port mapping by two ways
Enter setting page of the router which IPCAM connect with to enable UPnP function
Enter IPCAM ldquoUPnP Settingsrdquo to enable UPnP and make sure the state is ldquoUPnP
successrdquo
‟ s IP
and port to the Virtual map list
When use ADSL the IP is dynamic You should set DDNS(see more details 74 amp 80)
and also make sure port mapping success
84 Operate common problem solving
IP camera tool canrsquot find the camera
Except of the camera broken
1 Make sure the cable connector no problem recommend connector
(AMP)it is with international standard Another note IPCAMrsquos data
transmission channel require higher than computerrsquos so maybe the
IPCAM User Manual
63
computer can run normally but IPCAM canrsquot Please press heavily when making the cable connector
2 Confirm the power supply normally First check whether power indication
light turn on or not If it is onthen check the yellow light on RJ45 Port
(power indication light) and green light (network indication light) are on or
notIf they are onso power supply and cable runs normally
3 Confirm all the firwall and antivirus software are closeThe firewall often
block unrecognized data so if the firewall is running so maybe the IPCAM
TOOL canrsquot find the deviceSuggest to close firewall and antivirus
software temporarily before searching
How to solve the camera blank screen
1 Check if you are using the wrong power adaptorplease use original one
2 Close antivirus software
How to solve the camera canrsquot login by Internet
1 Check if you set DDNS success or not
2 Check the current IPCAMrsquos port number is the same as routerrsquosThey need to keep same
Canrsquot view the monitoring picture
1 Reason canrsquot connect with network
SolutionCheck if the network connect well exclude cable fault and PC virus
cause network fault until can be used between PC and PING
2 ReasonIP address occupy by other device
Solution Choose automatic gain
3 Reason IP address located within different subnet
Solution Check IPCAMrsquoS ip address and subnet mask address and gateway settings
4 ReasonWeb port has been modified
Solutioncontact network administrator to obtain port information
5 Reasonunknown
SolutionPress reset button to factory default statethen reconnectingsysten
default to gain ip address automaticsubnet mask is 2552552550
85 Default Parameters
middotDefault network Parameters
IP address dynamic obtain
Subnet mask 2552552550
Gateway dynamic obtain
DDNS Factory provide
middotUsername and password
Default administrator username admin
Default administrator password No password
IPCAM User Manual
64
86 Technical Parameters
ITEM IP CAM (NIP-02BGPWA2)
Image Sensor
Mage sensor 15 Color CMOS Sensor
Display 640 x 480 (300K Pixels)
Lens f36mm F24 (IR Lens)
Miniillumination 05 Lux
Lens Lens Type Glass Lens
Viewing Angle 60 Degree
Audio Microphone Audio of two way
Domain name Server MSN server DDNS server
Video
Image Compression MJPEG
Image Frame Rate 15 FPS(VGA)30FPS(QVGA)
Resolution 640 x 480(VGA) 320 x 240(QVGA)
Flip Mirror Images rtical Horizontal
mode 50Hz 60Hz or Outdoor
Video Parameters Brightness Contrast
Communication
Ethernet One 10100Mbps RJ-45
Supported Protocol HTTPDHCPIPTCPUDPFTPSMTPDDNSPPPoEUPnP
Mobilephone monitor Support IphoneIpad3G phonesmartphone
Wireless Standard IEEE 80211bg
Wireless Standard 80211b11Mbps(max) 80211g54Mbps(max)
Wireless Security 64128-bitWEP Encryption
Physical
PanTilt Angle Horizontal270deg amp Vertical 120deg
Infrared Light 10 IR LEDs Night visibility up to 15 Mete
Product size 100(L) x100(W) x125mm(H)
Gross Weight 6465gpcs (packing size196x165x123mm)
Net Weight 2547gpcs (only product)
Power Specification DC 5V25A 18 meter
Power Consumption 5 Watts
Environment
Operate Temper 0deg~ 55degC (14degF~122degF)
Operating Humidity 20 ~ 85 non-condensing
Storage Temper -10degC ~ 60deg (14degF ~140degF)
Storage Humidity 0 ~ 90 non-condensing
PC Requirements
CPU 20GHZ or above (suggested 30GHz)
Memory Size 512MB or above (suggested 10GB)
Display card 64M or above
Supported OS Microsoft Windows XPVistaWindows7
Supported browsers IEfirefoxGoogle
Certification CEFCCRoHS
Warranty Limited 1-year warranty
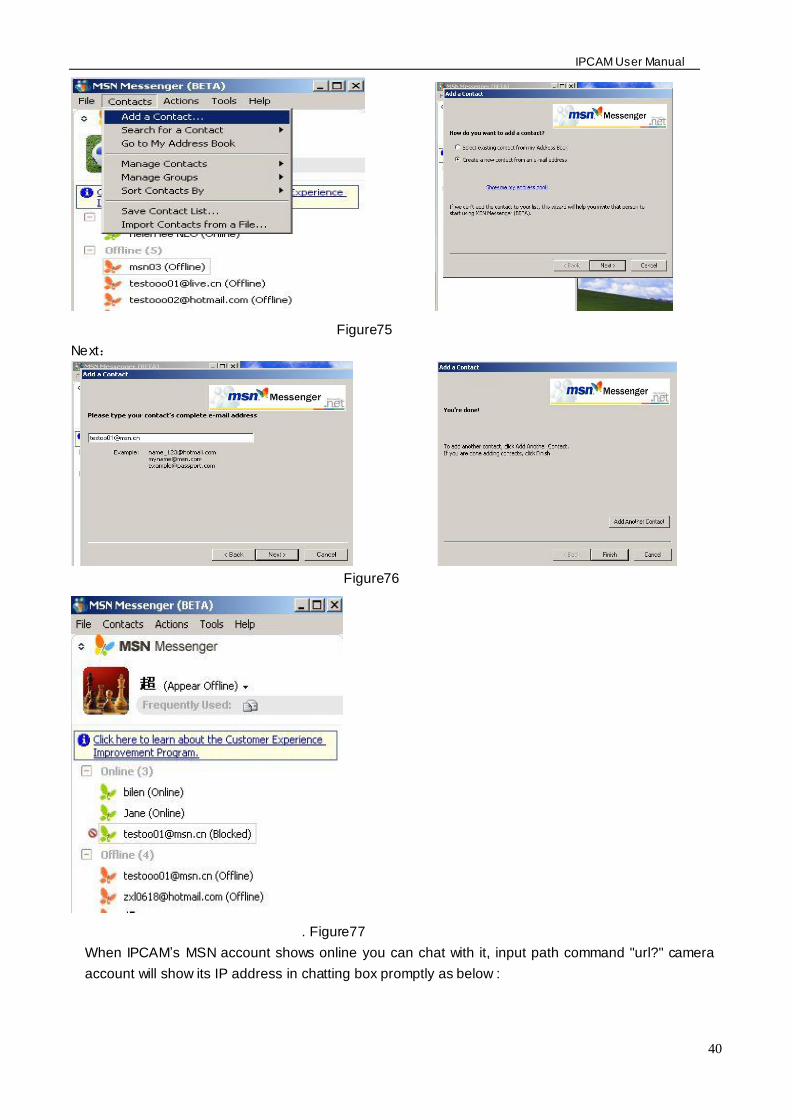
IPCAM User Manual
40
Figure75
Next
Figure76
Figure77
When IPCAMrsquos MSN account shows online you can chat with it input path command url camera
account will show its IP address in chatting box promptly as below
IPCAM User Manual
41
Picture 78
You can input the IP address to browser then can browse ip camera as below
Figure79
AttentionYou should fill MSN account in IPCAM first
74 DDNS Service Settings
DDNS Service The system supports protocols from some DDNS providers Dyndnsorg System support
DDNS such as topipcamorgpeanut shell3322orgDynDNS
provided IP
IPCAM User Manual
42
User and Password the user name and password used when applying for the domain
name (details 432)
DDNS Host the Domain Name
741 Factory DDNS
Device had distributed one DDNS to every productwhich was sticked the bottom
of the product Such as
manufacturer had already give every device a DDNS address which is unique Users only need to fill in this
DDNS IP ADDRESS and port in the browser then they can monitor remote IP camera
Picture 80 Factory DDNS
Note When use the domain name access to the camera and UPNP is not successful you must set port
mapping function on routers
742 The third part DDNS
Users can use not only Factory DDSN but also can use third part DDNS System Such as domain name
wwwdyndnsorg The only thing the user need to do is to apply a free DDNS and then fill in ldquoset boxrdquo as below
Save this setting and this DDNS can be used
DDNS Hostname
Factory DDNS
IPCAM User Manual
43
Note the third party domain name is the realization of analytical way input the domain in the browser it will
keep this string of characters If the port of the device isnrsquot 80 then need to add colon and port number For
example httpwell888dyndnsorg8999
75 Mail and FTP Service
1)Configure the E-mail box to receive and send mails The E-mail box is used for receiving
the images sent after alarm and the system IP address after successful dial-up
Note When Alarm Service Settings-gt Send Mail on Alarm is check the Mail
Service takes effect
Picture82
Configure the E-mail box to receive and send mails The E-mail box is used for receiving the images sent
after alarm and the system IP address after successful dial-up
Sender This device use the sender mailbox to send mails
Receiver To receive the mail from the Sender You can set up to 4 receiver mailbox
SMTP Server the SMTP server for the sender mailbox
Need Authentication if the sender mailbox need authentication you should check it then
input the SMTP username amp Password
Mail test Please set the Mail parameter and click Submit first There are Mail test result
Picture 83
video Local storage in PC after alarm monitoring
IPCAM User Manual
44
Gmail also set as the same It only needs you to fill in correct SMTP Sever address user and password
Picture 84
Mail notes Internet IP address In this option When Internet IP and port have changed IP Will be sent via
1Can not connect to the server
2Network Error Please try later
3Server Error
4Incorrect user or password
5The sender is denied by the server Maybe the server need to authenticate the user please check it
and try again
6The receiver is denied by the server Maybe because of the anti-spam privacy of the server
7The message is denied by the server Maybe because of the anti-spam privacy of the server
8The server does not support the authentication mode used by the device
Report Internet IP by Mail When ipcam port or Internet IP changed it will send the internet IP by
mail(for example IPCAM s url is http119123207969002) Make sure the port is map to the router
correctly by UPNP or Virtual Map function
2) FTP Server use and settings
middotIf you already have an FTP Server (ipcam com)and email ipcam you can fill the
parameters as below
Picture 85
IPCAM User Manual
45
middotFTP Server of LAN as below
1 Create an account
2 Step by step setting until finish it
Picture 88
IPCAM User Manual
46
3Start Server
Continue to finish it
Picture 89
4IPCAMrsquoS account can be used
Picture 90
Save path
This is a FTP
server address
IPCAM User Manual
47
5 IP camerarsquos FTP Server set like this
Picture 91
6 Set up and complete testing is successfulwhen it alarms IP camera will upload
pictures to the FTP server Settings of main directory path (as shown )
Picture 92
FTP Server the FTP server address
FTP port the port usually is 21
FTP Mode support standard(POST) mode and passive(PASV) mode
Upload Image Now it will upload image now when checkbox is not checked When checked you can
input upload interval(Seconds)
76 Motion Detection
Enter Alarm Service Settings page to configure Motion Detection function
1) Motion Detect Armed
Each alarm triggers in the protection of time the device will take various measures to alarm
IO linkage alarm output relay closure external alarm device began to alarm
IPCAM User Manual
48
Send E-mail alarm informatio
Transmit pictures to the FTP server and can set the time interval of sending pictures
2) Alarm t ime Settings
Only in the alarm period detection device to alarm will only have alarm action All the time (not check the
schedule) also can alarm within specified time For the specified time alarm firstly need to set up the system
time time zone and then to choose period of alarm in the state of alarm setting as shown in Picture 19
Picture93 Alarm of time Settings interface
Motion Detect Armed
When you enable motion detect armed the camera can be triggered to send email alerts
and record images In the camera monitoring page the green icon turn to red and an
alert sound you will hear
Motion Detect Sensibility
You can choose from low to high 10 level alarm sensitivity The greater the number the higher the
sensitivity
Alarm Input Armed
IO PINS1) Output(+5V) 2) Output 3) Alarm input 4) Input (GND)
Input Pins The input pins can be used for 1-way external sensor input(pin3 and pin4) For example
you may connect a Person Infrared Sensor (PIR) to it for motion detection When external sensor
triggered IPCAM can be programmed to send an email with picture or control the internal relay output
IPCAM User Manual
49
Picture94
IO Linkage on Alarm
Enable IO linkage on alarmPin1 will output +5V when alarm triggered and output LOW
when alarm release automatically
Switch onoff buttons control Pin1 output manually
Send Mail on Alarm
Sent picture and mail inform to customers e-mail after alarmed(firstly you should finish
the Mail Service Settings)
Picture 95
Upload Image on Alarm
Enable upload image on alarm and set upload interval(Seconds)
Tick send to your setted mails
IPCAM User Manual
50
Picture 96
REC automatically and save to PC
When you enable motion detect and open the camera monitoring page on the PC If
there is an alarm triggered REC will start automatically for several seconds and save to
the PC
Picture 97
REC save to pcrsquos position
Picture 98
Storage path can be changed
After Setting up later when have the
alarm the image will send to
designated email and FTP server
IPCAM User Manual
51
77 IP cameras Time amp Date setting and PTZ Setting
If IP camera connected with Internet it can automatically check the time amp date via running NTP Server And
need to choose properly IP cameras Time zone Otherwise it need PC Time to check IP camera time amp Date
Pre-set and Speed of PT
78 UPGRADE DEVICE FIRMWARE
Picture 101 Firmware upgrade
IP CAMERA has two kinds of programme One is system firmware another is application firmware It can be
upgraded separately
79 BACKUP AND RESTORE SETTING
Click Set in the Backup will lead to a BIN file and choose this file to restore setting
The huger the Number is The
slower it will be
IPCAM User Manual
52
8 APPENDIX
81 REGISTER AND APPLY FOR DDNS SERVICE
1Users use DDNS management system first timeUsers need to apply account to manage
and inquire the domain state
Step1 enter httpwwwdyndnscom and Create Account( Fill in Domain Name dyndnsorg then Click
Add)
Figure103
Step2 enter your information
Figure104
IPCAM User Manual
53
Figure105
Step3 After a minute you will receive an E-mail from DynDNS Support and it will give you a
confirmation address
(eg httpsaccountdyncomemlcreateconflILHMZHRje5oF_6YXTYv1A
Figure106
IPCAM User Manual
54
Step4 Open the link to active your Domain Name as belowLogin in your account after it is activated
Figure107
Step5 Check all the DDNS serviceswe choose the 14-day-trial
Figure108
Step6 Click the linkand user will see as below
IPCAM User Manual
55
middotenter your information
Figure109
Step7 Now you obtained a Dynamic Domain Name(Figure 105)and can use it in the DDNS Service
Settings(details 74)
Figure110
IPCAM User Manual
56
2For DDNS which is applied successfully you can fill in the IP CAMERA When set successfully the status
of IP will be shown as blows
picture 111
picture 112
3How to set DDNS on line
The first wayMenu rdquostartrdquo- ldquorunrdquomdashgt Input CMDClink rdquoenterrdquoIt can check DDNS Statas
via As shown below
Picture 113
IPCAM User Manual
57
Through the PING command this dynamic domain name can be back in the network response information It
proves that the domain name has been online
If the domain name update not success Possible reasons
(1) DDNS parameter is not correct (2) may cause DNS address configuration is wrong
82 Some special application for IPCAMERA
IPCamUse some grammar parameter control and Use IPCam
useruser
pwdpassword
priThe current access (1 visitors 23 operator managers)
resolutionImage resolution(832024 0qvga32640480 vga)
ratemage transmission speed and scope 0-23
brightnessbrightness0~255
contrastcontrast0~6
mode
Mode 050 hz For
60 hz 2 outdoor
flip
Flip rotation 0 primitive 1 vertical reverses 2 horizontal 3 vertical flip + horizontal
821 The flow media player VLC player and mplayer can real-time broadcast ipcamera and send
of streaming media format video data
(Grammar parametersvideostreamasfuser=amppwd=ampresolution=amprate=)
As shown Picture 113 rdquoIpcamrdquo
Picture 114
IPCAM User Manual
58
From the following picture we can view that Ipcam local IP address ishttp19216811118999
WAN IP Address is httpwell888dyndnsorg8999 we can inputrdquoIPcamrdquorsquoS IP address to
open in the player
Picture 115
the CLC media player open play position
Picture 116
LAN play address
Picture 117
IPCAM User Manual
59
Picture 118
Open the Internet play position
Picture 119
As shown in the following picture It can see the ipcamera send video streaming format
Size 640X480
User
IPCAM User Manual
60
Picture 120
83 Frequently Asked Questions
Note1) Any question you would meet please check Network connections firstly
2)Check the working status revealed by the indicators on the network server hub exchange and
network card If abnormal check the network connections
831 I have forgotten the administrator username andor password
To reset the administrator username and password Press and hold down the RESET
BUTTON for 5 seconds Release the power button and the username and password
will be reset back to the factory default administrator username and password
Default administrator username admin
Default administrator password No password
832 IP Address configuration
Check whether IP address of the IP Camera server shares the same subnet as your
work station Click My Computer gt Control PanelgtNetwork amp Dial-up Connections gt
LAN gt Attributes gtInternet Protocols (TCPIP) and check IP Address and Subnet
Mask Make sure they are in the same subnet when configuring IP Camera IP
address manuallyUnable to access IP Camera via web browser
833 Network Configuration
Double Check to ensure that your HTTP server software is configured and running
properly If you are running any firewall software make sure it is allowing inbound
connections to port 80Also if you happen to be using a cableDSL router make sure
IPCAM User Manual
61
you are set up port forwarding properly ( consult your router is documentation for more
information ) If none of these seem to be the problem it is also possible that your
ISP is blocking inbound connections to port 80 ndashmany IPSs have done this because
of internet worms such as Code Red If this is the case you bdquoll have to setup your
HTTP server on an alternate port (such as 8080)
834 No Monitoring picture
It has four reasons Images of the abnormal factors
1If its not use Directx function and lead to not normal to display the color imagePlease
install DirectX and open the start menu then input the command
Picture 121
You use the DirectX function and it will expedite the DirectDrawDirect3D and AGP if its can not maybe the
connect issues or hardware not read it
2The issues of hardware canrsquot support the card expedite image
3The antivirus software will influence the network it will be stoped or closedIf you install fireproof software
please close it and try again
4 ActiveX controller is not installed correctly
If its not image on the first time to use and will display to the user through the ActiveXIf its can not
display of the image maybe it fail of install about this issues please follow as
1Install ldquoIP Camera Toolrdquo ActiveX control at the same time
2Please install ActiveX control and keep the security settings for IE browser
835 Problems with network bandwidth
The image frame rate is subjected to the following factors 1network bandwidth 2 PC
performancenetwork environment and display preference setting (brightness theme
etc) 3 the number of visitors (Too many visitors will slow down the image frame rate) 4
choice of switch or hub (Use a switch for multiple IP Camera Servers rather than a HUB)
The Device use MJEPT Compression it needs good network bandwidth If it is too narrow it will lead to slowly
browser Typical video parameter occupy network bandwidth as blows
640x48030fps 40 Megabits ~ 50 Megabits
320x24030fps 12 Megabits ~ 16 Megabits
IPCAM User Manual
62
middot836 Why pop-up the prompt ldquoFail to connect to the devicehelliprdquo
This prompt only appeared in the case of using multiple cameras
Enter the Multi-Device Settings page(login as administrator) to check the
Device setting is correct or not
When one of the multiple cameras disconnected the color changed to
yellow and pop-up the promptldquoFail to connect to the devicehelliprdquo
Picture 122
837 Canrsquot access the IPCAM in the internet
There are some reasons
1 ActiveX controller is not installed correctly(see more details 514)
2 The port IPCAM used is blocked by Firewall or Anti-virus software Please change a
port number and try again
3 Port mapping is not success You can do port mapping by two ways
Enter setting page of the router which IPCAM connect with to enable UPnP function
Enter IPCAM ldquoUPnP Settingsrdquo to enable UPnP and make sure the state is ldquoUPnP
successrdquo
‟ s IP
and port to the Virtual map list
When use ADSL the IP is dynamic You should set DDNS(see more details 74 amp 80)
and also make sure port mapping success
84 Operate common problem solving
IP camera tool canrsquot find the camera
Except of the camera broken
1 Make sure the cable connector no problem recommend connector
(AMP)it is with international standard Another note IPCAMrsquos data
transmission channel require higher than computerrsquos so maybe the
IPCAM User Manual
63
computer can run normally but IPCAM canrsquot Please press heavily when making the cable connector
2 Confirm the power supply normally First check whether power indication
light turn on or not If it is onthen check the yellow light on RJ45 Port
(power indication light) and green light (network indication light) are on or
notIf they are onso power supply and cable runs normally
3 Confirm all the firwall and antivirus software are closeThe firewall often
block unrecognized data so if the firewall is running so maybe the IPCAM
TOOL canrsquot find the deviceSuggest to close firewall and antivirus
software temporarily before searching
How to solve the camera blank screen
1 Check if you are using the wrong power adaptorplease use original one
2 Close antivirus software
How to solve the camera canrsquot login by Internet
1 Check if you set DDNS success or not
2 Check the current IPCAMrsquos port number is the same as routerrsquosThey need to keep same
Canrsquot view the monitoring picture
1 Reason canrsquot connect with network
SolutionCheck if the network connect well exclude cable fault and PC virus
cause network fault until can be used between PC and PING
2 ReasonIP address occupy by other device
Solution Choose automatic gain
3 Reason IP address located within different subnet
Solution Check IPCAMrsquoS ip address and subnet mask address and gateway settings
4 ReasonWeb port has been modified
Solutioncontact network administrator to obtain port information
5 Reasonunknown
SolutionPress reset button to factory default statethen reconnectingsysten
default to gain ip address automaticsubnet mask is 2552552550
85 Default Parameters
middotDefault network Parameters
IP address dynamic obtain
Subnet mask 2552552550
Gateway dynamic obtain
DDNS Factory provide
middotUsername and password
Default administrator username admin
Default administrator password No password
IPCAM User Manual
64
86 Technical Parameters
ITEM IP CAM (NIP-02BGPWA2)
Image Sensor
Mage sensor 15 Color CMOS Sensor
Display 640 x 480 (300K Pixels)
Lens f36mm F24 (IR Lens)
Miniillumination 05 Lux
Lens Lens Type Glass Lens
Viewing Angle 60 Degree
Audio Microphone Audio of two way
Domain name Server MSN server DDNS server
Video
Image Compression MJPEG
Image Frame Rate 15 FPS(VGA)30FPS(QVGA)
Resolution 640 x 480(VGA) 320 x 240(QVGA)
Flip Mirror Images rtical Horizontal
mode 50Hz 60Hz or Outdoor
Video Parameters Brightness Contrast
Communication
Ethernet One 10100Mbps RJ-45
Supported Protocol HTTPDHCPIPTCPUDPFTPSMTPDDNSPPPoEUPnP
Mobilephone monitor Support IphoneIpad3G phonesmartphone
Wireless Standard IEEE 80211bg
Wireless Standard 80211b11Mbps(max) 80211g54Mbps(max)
Wireless Security 64128-bitWEP Encryption
Physical
PanTilt Angle Horizontal270deg amp Vertical 120deg
Infrared Light 10 IR LEDs Night visibility up to 15 Mete
Product size 100(L) x100(W) x125mm(H)
Gross Weight 6465gpcs (packing size196x165x123mm)
Net Weight 2547gpcs (only product)
Power Specification DC 5V25A 18 meter
Power Consumption 5 Watts
Environment
Operate Temper 0deg~ 55degC (14degF~122degF)
Operating Humidity 20 ~ 85 non-condensing
Storage Temper -10degC ~ 60deg (14degF ~140degF)
Storage Humidity 0 ~ 90 non-condensing
PC Requirements
CPU 20GHZ or above (suggested 30GHz)
Memory Size 512MB or above (suggested 10GB)
Display card 64M or above
Supported OS Microsoft Windows XPVistaWindows7
Supported browsers IEfirefoxGoogle
Certification CEFCCRoHS
Warranty Limited 1-year warranty
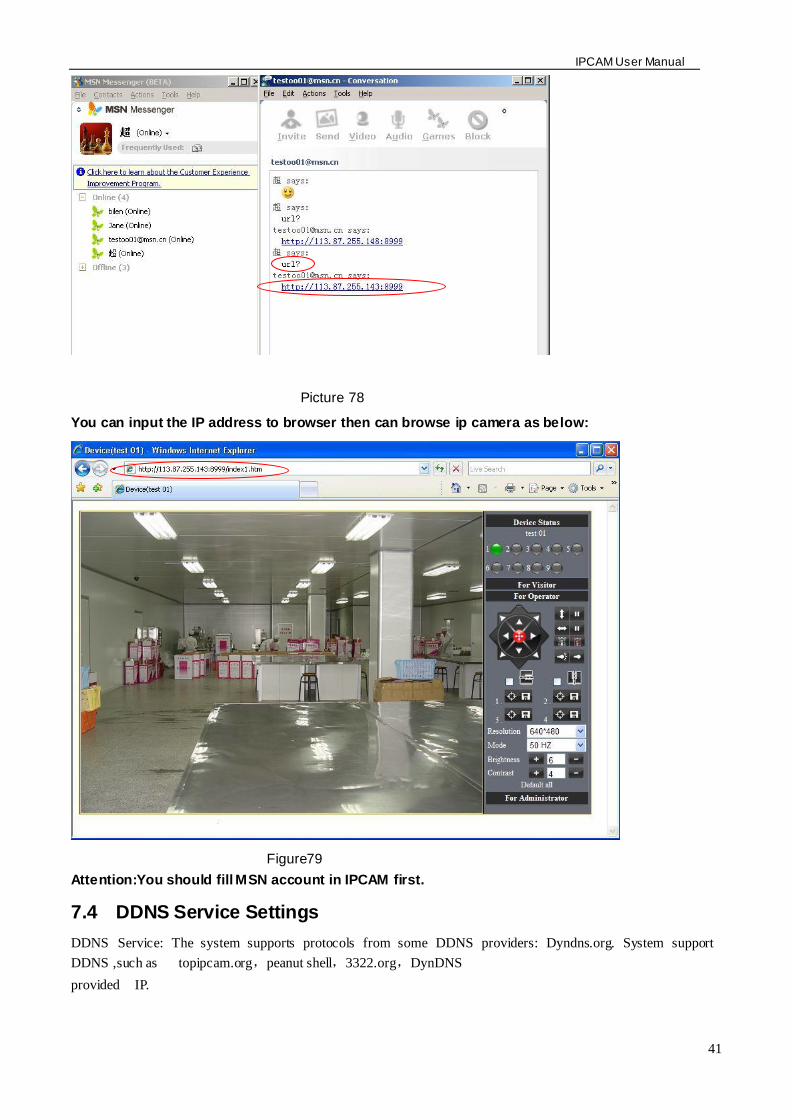
IPCAM User Manual
41
Picture 78
You can input the IP address to browser then can browse ip camera as below
Figure79
AttentionYou should fill MSN account in IPCAM first
74 DDNS Service Settings
DDNS Service The system supports protocols from some DDNS providers Dyndnsorg System support
DDNS such as topipcamorgpeanut shell3322orgDynDNS
provided IP
IPCAM User Manual
42
User and Password the user name and password used when applying for the domain
name (details 432)
DDNS Host the Domain Name
741 Factory DDNS
Device had distributed one DDNS to every productwhich was sticked the bottom
of the product Such as
manufacturer had already give every device a DDNS address which is unique Users only need to fill in this
DDNS IP ADDRESS and port in the browser then they can monitor remote IP camera
Picture 80 Factory DDNS
Note When use the domain name access to the camera and UPNP is not successful you must set port
mapping function on routers
742 The third part DDNS
Users can use not only Factory DDSN but also can use third part DDNS System Such as domain name
wwwdyndnsorg The only thing the user need to do is to apply a free DDNS and then fill in ldquoset boxrdquo as below
Save this setting and this DDNS can be used
DDNS Hostname
Factory DDNS
IPCAM User Manual
43
Note the third party domain name is the realization of analytical way input the domain in the browser it will
keep this string of characters If the port of the device isnrsquot 80 then need to add colon and port number For
example httpwell888dyndnsorg8999
75 Mail and FTP Service
1)Configure the E-mail box to receive and send mails The E-mail box is used for receiving
the images sent after alarm and the system IP address after successful dial-up
Note When Alarm Service Settings-gt Send Mail on Alarm is check the Mail
Service takes effect
Picture82
Configure the E-mail box to receive and send mails The E-mail box is used for receiving the images sent
after alarm and the system IP address after successful dial-up
Sender This device use the sender mailbox to send mails
Receiver To receive the mail from the Sender You can set up to 4 receiver mailbox
SMTP Server the SMTP server for the sender mailbox
Need Authentication if the sender mailbox need authentication you should check it then
input the SMTP username amp Password
Mail test Please set the Mail parameter and click Submit first There are Mail test result
Picture 83
video Local storage in PC after alarm monitoring
IPCAM User Manual
44
Gmail also set as the same It only needs you to fill in correct SMTP Sever address user and password
Picture 84
Mail notes Internet IP address In this option When Internet IP and port have changed IP Will be sent via
1Can not connect to the server
2Network Error Please try later
3Server Error
4Incorrect user or password
5The sender is denied by the server Maybe the server need to authenticate the user please check it
and try again
6The receiver is denied by the server Maybe because of the anti-spam privacy of the server
7The message is denied by the server Maybe because of the anti-spam privacy of the server
8The server does not support the authentication mode used by the device
Report Internet IP by Mail When ipcam port or Internet IP changed it will send the internet IP by
mail(for example IPCAM s url is http119123207969002) Make sure the port is map to the router
correctly by UPNP or Virtual Map function
2) FTP Server use and settings
middotIf you already have an FTP Server (ipcam com)and email ipcam you can fill the
parameters as below
Picture 85
IPCAM User Manual
45
middotFTP Server of LAN as below
1 Create an account
2 Step by step setting until finish it
Picture 88
IPCAM User Manual
46
3Start Server
Continue to finish it
Picture 89
4IPCAMrsquoS account can be used
Picture 90
Save path
This is a FTP
server address
IPCAM User Manual
47
5 IP camerarsquos FTP Server set like this
Picture 91
6 Set up and complete testing is successfulwhen it alarms IP camera will upload
pictures to the FTP server Settings of main directory path (as shown )
Picture 92
FTP Server the FTP server address
FTP port the port usually is 21
FTP Mode support standard(POST) mode and passive(PASV) mode
Upload Image Now it will upload image now when checkbox is not checked When checked you can
input upload interval(Seconds)
76 Motion Detection
Enter Alarm Service Settings page to configure Motion Detection function
1) Motion Detect Armed
Each alarm triggers in the protection of time the device will take various measures to alarm
IO linkage alarm output relay closure external alarm device began to alarm
IPCAM User Manual
48
Send E-mail alarm informatio
Transmit pictures to the FTP server and can set the time interval of sending pictures
2) Alarm t ime Settings
Only in the alarm period detection device to alarm will only have alarm action All the time (not check the
schedule) also can alarm within specified time For the specified time alarm firstly need to set up the system
time time zone and then to choose period of alarm in the state of alarm setting as shown in Picture 19
Picture93 Alarm of time Settings interface
Motion Detect Armed
When you enable motion detect armed the camera can be triggered to send email alerts
and record images In the camera monitoring page the green icon turn to red and an
alert sound you will hear
Motion Detect Sensibility
You can choose from low to high 10 level alarm sensitivity The greater the number the higher the
sensitivity
Alarm Input Armed
IO PINS1) Output(+5V) 2) Output 3) Alarm input 4) Input (GND)
Input Pins The input pins can be used for 1-way external sensor input(pin3 and pin4) For example
you may connect a Person Infrared Sensor (PIR) to it for motion detection When external sensor
triggered IPCAM can be programmed to send an email with picture or control the internal relay output
IPCAM User Manual
49
Picture94
IO Linkage on Alarm
Enable IO linkage on alarmPin1 will output +5V when alarm triggered and output LOW
when alarm release automatically
Switch onoff buttons control Pin1 output manually
Send Mail on Alarm
Sent picture and mail inform to customers e-mail after alarmed(firstly you should finish
the Mail Service Settings)
Picture 95
Upload Image on Alarm
Enable upload image on alarm and set upload interval(Seconds)
Tick send to your setted mails
IPCAM User Manual
50
Picture 96
REC automatically and save to PC
When you enable motion detect and open the camera monitoring page on the PC If
there is an alarm triggered REC will start automatically for several seconds and save to
the PC
Picture 97
REC save to pcrsquos position
Picture 98
Storage path can be changed
After Setting up later when have the
alarm the image will send to
designated email and FTP server
IPCAM User Manual
51
77 IP cameras Time amp Date setting and PTZ Setting
If IP camera connected with Internet it can automatically check the time amp date via running NTP Server And
need to choose properly IP cameras Time zone Otherwise it need PC Time to check IP camera time amp Date
Pre-set and Speed of PT
78 UPGRADE DEVICE FIRMWARE
Picture 101 Firmware upgrade
IP CAMERA has two kinds of programme One is system firmware another is application firmware It can be
upgraded separately
79 BACKUP AND RESTORE SETTING
Click Set in the Backup will lead to a BIN file and choose this file to restore setting
The huger the Number is The
slower it will be
IPCAM User Manual
52
8 APPENDIX
81 REGISTER AND APPLY FOR DDNS SERVICE
1Users use DDNS management system first timeUsers need to apply account to manage
and inquire the domain state
Step1 enter httpwwwdyndnscom and Create Account( Fill in Domain Name dyndnsorg then Click
Add)
Figure103
Step2 enter your information
Figure104
IPCAM User Manual
53
Figure105
Step3 After a minute you will receive an E-mail from DynDNS Support and it will give you a
confirmation address
(eg httpsaccountdyncomemlcreateconflILHMZHRje5oF_6YXTYv1A
Figure106
IPCAM User Manual
54
Step4 Open the link to active your Domain Name as belowLogin in your account after it is activated
Figure107
Step5 Check all the DDNS serviceswe choose the 14-day-trial
Figure108
Step6 Click the linkand user will see as below
IPCAM User Manual
55
middotenter your information
Figure109
Step7 Now you obtained a Dynamic Domain Name(Figure 105)and can use it in the DDNS Service
Settings(details 74)
Figure110
IPCAM User Manual
56
2For DDNS which is applied successfully you can fill in the IP CAMERA When set successfully the status
of IP will be shown as blows
picture 111
picture 112
3How to set DDNS on line
The first wayMenu rdquostartrdquo- ldquorunrdquomdashgt Input CMDClink rdquoenterrdquoIt can check DDNS Statas
via As shown below
Picture 113
IPCAM User Manual
57
Through the PING command this dynamic domain name can be back in the network response information It
proves that the domain name has been online
If the domain name update not success Possible reasons
(1) DDNS parameter is not correct (2) may cause DNS address configuration is wrong
82 Some special application for IPCAMERA
IPCamUse some grammar parameter control and Use IPCam
useruser
pwdpassword
priThe current access (1 visitors 23 operator managers)
resolutionImage resolution(832024 0qvga32640480 vga)
ratemage transmission speed and scope 0-23
brightnessbrightness0~255
contrastcontrast0~6
mode
Mode 050 hz For
60 hz 2 outdoor
flip
Flip rotation 0 primitive 1 vertical reverses 2 horizontal 3 vertical flip + horizontal
821 The flow media player VLC player and mplayer can real-time broadcast ipcamera and send
of streaming media format video data
(Grammar parametersvideostreamasfuser=amppwd=ampresolution=amprate=)
As shown Picture 113 rdquoIpcamrdquo
Picture 114
IPCAM User Manual
58
From the following picture we can view that Ipcam local IP address ishttp19216811118999
WAN IP Address is httpwell888dyndnsorg8999 we can inputrdquoIPcamrdquorsquoS IP address to
open in the player
Picture 115
the CLC media player open play position
Picture 116
LAN play address
Picture 117
IPCAM User Manual
59
Picture 118
Open the Internet play position
Picture 119
As shown in the following picture It can see the ipcamera send video streaming format
Size 640X480
User
IPCAM User Manual
60
Picture 120
83 Frequently Asked Questions
Note1) Any question you would meet please check Network connections firstly
2)Check the working status revealed by the indicators on the network server hub exchange and
network card If abnormal check the network connections
831 I have forgotten the administrator username andor password
To reset the administrator username and password Press and hold down the RESET
BUTTON for 5 seconds Release the power button and the username and password
will be reset back to the factory default administrator username and password
Default administrator username admin
Default administrator password No password
832 IP Address configuration
Check whether IP address of the IP Camera server shares the same subnet as your
work station Click My Computer gt Control PanelgtNetwork amp Dial-up Connections gt
LAN gt Attributes gtInternet Protocols (TCPIP) and check IP Address and Subnet
Mask Make sure they are in the same subnet when configuring IP Camera IP
address manuallyUnable to access IP Camera via web browser
833 Network Configuration
Double Check to ensure that your HTTP server software is configured and running
properly If you are running any firewall software make sure it is allowing inbound
connections to port 80Also if you happen to be using a cableDSL router make sure
IPCAM User Manual
61
you are set up port forwarding properly ( consult your router is documentation for more
information ) If none of these seem to be the problem it is also possible that your
ISP is blocking inbound connections to port 80 ndashmany IPSs have done this because
of internet worms such as Code Red If this is the case you bdquoll have to setup your
HTTP server on an alternate port (such as 8080)
834 No Monitoring picture
It has four reasons Images of the abnormal factors
1If its not use Directx function and lead to not normal to display the color imagePlease
install DirectX and open the start menu then input the command
Picture 121
You use the DirectX function and it will expedite the DirectDrawDirect3D and AGP if its can not maybe the
connect issues or hardware not read it
2The issues of hardware canrsquot support the card expedite image
3The antivirus software will influence the network it will be stoped or closedIf you install fireproof software
please close it and try again
4 ActiveX controller is not installed correctly
If its not image on the first time to use and will display to the user through the ActiveXIf its can not
display of the image maybe it fail of install about this issues please follow as
1Install ldquoIP Camera Toolrdquo ActiveX control at the same time
2Please install ActiveX control and keep the security settings for IE browser
835 Problems with network bandwidth
The image frame rate is subjected to the following factors 1network bandwidth 2 PC
performancenetwork environment and display preference setting (brightness theme
etc) 3 the number of visitors (Too many visitors will slow down the image frame rate) 4
choice of switch or hub (Use a switch for multiple IP Camera Servers rather than a HUB)
The Device use MJEPT Compression it needs good network bandwidth If it is too narrow it will lead to slowly
browser Typical video parameter occupy network bandwidth as blows
640x48030fps 40 Megabits ~ 50 Megabits
320x24030fps 12 Megabits ~ 16 Megabits
IPCAM User Manual
62
middot836 Why pop-up the prompt ldquoFail to connect to the devicehelliprdquo
This prompt only appeared in the case of using multiple cameras
Enter the Multi-Device Settings page(login as administrator) to check the
Device setting is correct or not
When one of the multiple cameras disconnected the color changed to
yellow and pop-up the promptldquoFail to connect to the devicehelliprdquo
Picture 122
837 Canrsquot access the IPCAM in the internet
There are some reasons
1 ActiveX controller is not installed correctly(see more details 514)
2 The port IPCAM used is blocked by Firewall or Anti-virus software Please change a
port number and try again
3 Port mapping is not success You can do port mapping by two ways
Enter setting page of the router which IPCAM connect with to enable UPnP function
Enter IPCAM ldquoUPnP Settingsrdquo to enable UPnP and make sure the state is ldquoUPnP
successrdquo
‟ s IP
and port to the Virtual map list
When use ADSL the IP is dynamic You should set DDNS(see more details 74 amp 80)
and also make sure port mapping success
84 Operate common problem solving
IP camera tool canrsquot find the camera
Except of the camera broken
1 Make sure the cable connector no problem recommend connector
(AMP)it is with international standard Another note IPCAMrsquos data
transmission channel require higher than computerrsquos so maybe the
IPCAM User Manual
63
computer can run normally but IPCAM canrsquot Please press heavily when making the cable connector
2 Confirm the power supply normally First check whether power indication
light turn on or not If it is onthen check the yellow light on RJ45 Port
(power indication light) and green light (network indication light) are on or
notIf they are onso power supply and cable runs normally
3 Confirm all the firwall and antivirus software are closeThe firewall often
block unrecognized data so if the firewall is running so maybe the IPCAM
TOOL canrsquot find the deviceSuggest to close firewall and antivirus
software temporarily before searching
How to solve the camera blank screen
1 Check if you are using the wrong power adaptorplease use original one
2 Close antivirus software
How to solve the camera canrsquot login by Internet
1 Check if you set DDNS success or not
2 Check the current IPCAMrsquos port number is the same as routerrsquosThey need to keep same
Canrsquot view the monitoring picture
1 Reason canrsquot connect with network
SolutionCheck if the network connect well exclude cable fault and PC virus
cause network fault until can be used between PC and PING
2 ReasonIP address occupy by other device
Solution Choose automatic gain
3 Reason IP address located within different subnet
Solution Check IPCAMrsquoS ip address and subnet mask address and gateway settings
4 ReasonWeb port has been modified
Solutioncontact network administrator to obtain port information
5 Reasonunknown
SolutionPress reset button to factory default statethen reconnectingsysten
default to gain ip address automaticsubnet mask is 2552552550
85 Default Parameters
middotDefault network Parameters
IP address dynamic obtain
Subnet mask 2552552550
Gateway dynamic obtain
DDNS Factory provide
middotUsername and password
Default administrator username admin
Default administrator password No password
IPCAM User Manual
64
86 Technical Parameters
ITEM IP CAM (NIP-02BGPWA2)
Image Sensor
Mage sensor 15 Color CMOS Sensor
Display 640 x 480 (300K Pixels)
Lens f36mm F24 (IR Lens)
Miniillumination 05 Lux
Lens Lens Type Glass Lens
Viewing Angle 60 Degree
Audio Microphone Audio of two way
Domain name Server MSN server DDNS server
Video
Image Compression MJPEG
Image Frame Rate 15 FPS(VGA)30FPS(QVGA)
Resolution 640 x 480(VGA) 320 x 240(QVGA)
Flip Mirror Images rtical Horizontal
mode 50Hz 60Hz or Outdoor
Video Parameters Brightness Contrast
Communication
Ethernet One 10100Mbps RJ-45
Supported Protocol HTTPDHCPIPTCPUDPFTPSMTPDDNSPPPoEUPnP
Mobilephone monitor Support IphoneIpad3G phonesmartphone
Wireless Standard IEEE 80211bg
Wireless Standard 80211b11Mbps(max) 80211g54Mbps(max)
Wireless Security 64128-bitWEP Encryption
Physical
PanTilt Angle Horizontal270deg amp Vertical 120deg
Infrared Light 10 IR LEDs Night visibility up to 15 Mete
Product size 100(L) x100(W) x125mm(H)
Gross Weight 6465gpcs (packing size196x165x123mm)
Net Weight 2547gpcs (only product)
Power Specification DC 5V25A 18 meter
Power Consumption 5 Watts
Environment
Operate Temper 0deg~ 55degC (14degF~122degF)
Operating Humidity 20 ~ 85 non-condensing
Storage Temper -10degC ~ 60deg (14degF ~140degF)
Storage Humidity 0 ~ 90 non-condensing
PC Requirements
CPU 20GHZ or above (suggested 30GHz)
Memory Size 512MB or above (suggested 10GB)
Display card 64M or above
Supported OS Microsoft Windows XPVistaWindows7
Supported browsers IEfirefoxGoogle
Certification CEFCCRoHS
Warranty Limited 1-year warranty
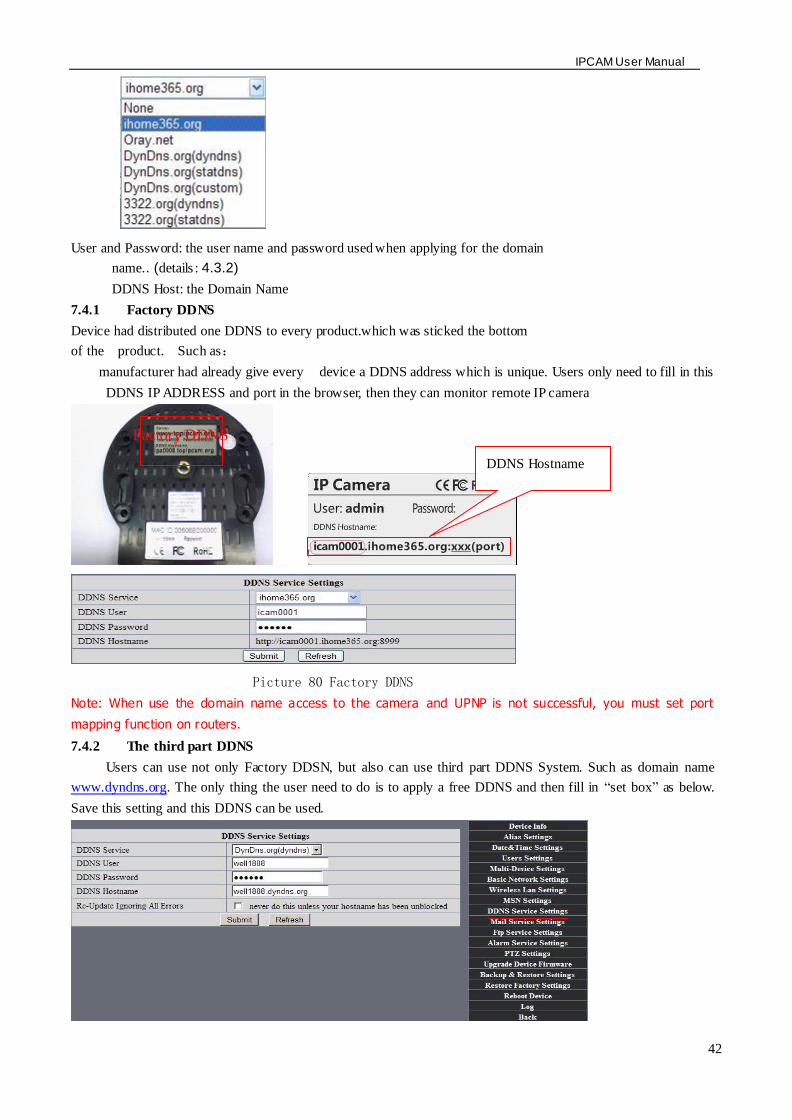
IPCAM User Manual
42
User and Password the user name and password used when applying for the domain
name (details 432)
DDNS Host the Domain Name
741 Factory DDNS
Device had distributed one DDNS to every productwhich was sticked the bottom
of the product Such as
manufacturer had already give every device a DDNS address which is unique Users only need to fill in this
DDNS IP ADDRESS and port in the browser then they can monitor remote IP camera
Picture 80 Factory DDNS
Note When use the domain name access to the camera and UPNP is not successful you must set port
mapping function on routers
742 The third part DDNS
Users can use not only Factory DDSN but also can use third part DDNS System Such as domain name
wwwdyndnsorg The only thing the user need to do is to apply a free DDNS and then fill in ldquoset boxrdquo as below
Save this setting and this DDNS can be used
DDNS Hostname
Factory DDNS
IPCAM User Manual
43
Note the third party domain name is the realization of analytical way input the domain in the browser it will
keep this string of characters If the port of the device isnrsquot 80 then need to add colon and port number For
example httpwell888dyndnsorg8999
75 Mail and FTP Service
1)Configure the E-mail box to receive and send mails The E-mail box is used for receiving
the images sent after alarm and the system IP address after successful dial-up
Note When Alarm Service Settings-gt Send Mail on Alarm is check the Mail
Service takes effect
Picture82
Configure the E-mail box to receive and send mails The E-mail box is used for receiving the images sent
after alarm and the system IP address after successful dial-up
Sender This device use the sender mailbox to send mails
Receiver To receive the mail from the Sender You can set up to 4 receiver mailbox
SMTP Server the SMTP server for the sender mailbox
Need Authentication if the sender mailbox need authentication you should check it then
input the SMTP username amp Password
Mail test Please set the Mail parameter and click Submit first There are Mail test result
Picture 83
video Local storage in PC after alarm monitoring
IPCAM User Manual
44
Gmail also set as the same It only needs you to fill in correct SMTP Sever address user and password
Picture 84
Mail notes Internet IP address In this option When Internet IP and port have changed IP Will be sent via
1Can not connect to the server
2Network Error Please try later
3Server Error
4Incorrect user or password
5The sender is denied by the server Maybe the server need to authenticate the user please check it
and try again
6The receiver is denied by the server Maybe because of the anti-spam privacy of the server
7The message is denied by the server Maybe because of the anti-spam privacy of the server
8The server does not support the authentication mode used by the device
Report Internet IP by Mail When ipcam port or Internet IP changed it will send the internet IP by
mail(for example IPCAM s url is http119123207969002) Make sure the port is map to the router
correctly by UPNP or Virtual Map function
2) FTP Server use and settings
middotIf you already have an FTP Server (ipcam com)and email ipcam you can fill the
parameters as below
Picture 85
IPCAM User Manual
45
middotFTP Server of LAN as below
1 Create an account
2 Step by step setting until finish it
Picture 88
IPCAM User Manual
46
3Start Server
Continue to finish it
Picture 89
4IPCAMrsquoS account can be used
Picture 90
Save path
This is a FTP
server address
IPCAM User Manual
47
5 IP camerarsquos FTP Server set like this
Picture 91
6 Set up and complete testing is successfulwhen it alarms IP camera will upload
pictures to the FTP server Settings of main directory path (as shown )
Picture 92
FTP Server the FTP server address
FTP port the port usually is 21
FTP Mode support standard(POST) mode and passive(PASV) mode
Upload Image Now it will upload image now when checkbox is not checked When checked you can
input upload interval(Seconds)
76 Motion Detection
Enter Alarm Service Settings page to configure Motion Detection function
1) Motion Detect Armed
Each alarm triggers in the protection of time the device will take various measures to alarm
IO linkage alarm output relay closure external alarm device began to alarm
IPCAM User Manual
48
Send E-mail alarm informatio
Transmit pictures to the FTP server and can set the time interval of sending pictures
2) Alarm t ime Settings
Only in the alarm period detection device to alarm will only have alarm action All the time (not check the
schedule) also can alarm within specified time For the specified time alarm firstly need to set up the system
time time zone and then to choose period of alarm in the state of alarm setting as shown in Picture 19
Picture93 Alarm of time Settings interface
Motion Detect Armed
When you enable motion detect armed the camera can be triggered to send email alerts
and record images In the camera monitoring page the green icon turn to red and an
alert sound you will hear
Motion Detect Sensibility
You can choose from low to high 10 level alarm sensitivity The greater the number the higher the
sensitivity
Alarm Input Armed
IO PINS1) Output(+5V) 2) Output 3) Alarm input 4) Input (GND)
Input Pins The input pins can be used for 1-way external sensor input(pin3 and pin4) For example
you may connect a Person Infrared Sensor (PIR) to it for motion detection When external sensor
triggered IPCAM can be programmed to send an email with picture or control the internal relay output
IPCAM User Manual
49
Picture94
IO Linkage on Alarm
Enable IO linkage on alarmPin1 will output +5V when alarm triggered and output LOW
when alarm release automatically
Switch onoff buttons control Pin1 output manually
Send Mail on Alarm
Sent picture and mail inform to customers e-mail after alarmed(firstly you should finish
the Mail Service Settings)
Picture 95
Upload Image on Alarm
Enable upload image on alarm and set upload interval(Seconds)
Tick send to your setted mails
IPCAM User Manual
50
Picture 96
REC automatically and save to PC
When you enable motion detect and open the camera monitoring page on the PC If
there is an alarm triggered REC will start automatically for several seconds and save to
the PC
Picture 97
REC save to pcrsquos position
Picture 98
Storage path can be changed
After Setting up later when have the
alarm the image will send to
designated email and FTP server
IPCAM User Manual
51
77 IP cameras Time amp Date setting and PTZ Setting
If IP camera connected with Internet it can automatically check the time amp date via running NTP Server And
need to choose properly IP cameras Time zone Otherwise it need PC Time to check IP camera time amp Date
Pre-set and Speed of PT
78 UPGRADE DEVICE FIRMWARE
Picture 101 Firmware upgrade
IP CAMERA has two kinds of programme One is system firmware another is application firmware It can be
upgraded separately
79 BACKUP AND RESTORE SETTING
Click Set in the Backup will lead to a BIN file and choose this file to restore setting
The huger the Number is The
slower it will be
IPCAM User Manual
52
8 APPENDIX
81 REGISTER AND APPLY FOR DDNS SERVICE
1Users use DDNS management system first timeUsers need to apply account to manage
and inquire the domain state
Step1 enter httpwwwdyndnscom and Create Account( Fill in Domain Name dyndnsorg then Click
Add)
Figure103
Step2 enter your information
Figure104
IPCAM User Manual
53
Figure105
Step3 After a minute you will receive an E-mail from DynDNS Support and it will give you a
confirmation address
(eg httpsaccountdyncomemlcreateconflILHMZHRje5oF_6YXTYv1A
Figure106
IPCAM User Manual
54
Step4 Open the link to active your Domain Name as belowLogin in your account after it is activated
Figure107
Step5 Check all the DDNS serviceswe choose the 14-day-trial
Figure108
Step6 Click the linkand user will see as below
IPCAM User Manual
55
middotenter your information
Figure109
Step7 Now you obtained a Dynamic Domain Name(Figure 105)and can use it in the DDNS Service
Settings(details 74)
Figure110
IPCAM User Manual
56
2For DDNS which is applied successfully you can fill in the IP CAMERA When set successfully the status
of IP will be shown as blows
picture 111
picture 112
3How to set DDNS on line
The first wayMenu rdquostartrdquo- ldquorunrdquomdashgt Input CMDClink rdquoenterrdquoIt can check DDNS Statas
via As shown below
Picture 113
IPCAM User Manual
57
Through the PING command this dynamic domain name can be back in the network response information It
proves that the domain name has been online
If the domain name update not success Possible reasons
(1) DDNS parameter is not correct (2) may cause DNS address configuration is wrong
82 Some special application for IPCAMERA
IPCamUse some grammar parameter control and Use IPCam
useruser
pwdpassword
priThe current access (1 visitors 23 operator managers)
resolutionImage resolution(832024 0qvga32640480 vga)
ratemage transmission speed and scope 0-23
brightnessbrightness0~255
contrastcontrast0~6
mode
Mode 050 hz For
60 hz 2 outdoor
flip
Flip rotation 0 primitive 1 vertical reverses 2 horizontal 3 vertical flip + horizontal
821 The flow media player VLC player and mplayer can real-time broadcast ipcamera and send
of streaming media format video data
(Grammar parametersvideostreamasfuser=amppwd=ampresolution=amprate=)
As shown Picture 113 rdquoIpcamrdquo
Picture 114
IPCAM User Manual
58
From the following picture we can view that Ipcam local IP address ishttp19216811118999
WAN IP Address is httpwell888dyndnsorg8999 we can inputrdquoIPcamrdquorsquoS IP address to
open in the player
Picture 115
the CLC media player open play position
Picture 116
LAN play address
Picture 117
IPCAM User Manual
59
Picture 118
Open the Internet play position
Picture 119
As shown in the following picture It can see the ipcamera send video streaming format
Size 640X480
User
IPCAM User Manual
60
Picture 120
83 Frequently Asked Questions
Note1) Any question you would meet please check Network connections firstly
2)Check the working status revealed by the indicators on the network server hub exchange and
network card If abnormal check the network connections
831 I have forgotten the administrator username andor password
To reset the administrator username and password Press and hold down the RESET
BUTTON for 5 seconds Release the power button and the username and password
will be reset back to the factory default administrator username and password
Default administrator username admin
Default administrator password No password
832 IP Address configuration
Check whether IP address of the IP Camera server shares the same subnet as your
work station Click My Computer gt Control PanelgtNetwork amp Dial-up Connections gt
LAN gt Attributes gtInternet Protocols (TCPIP) and check IP Address and Subnet
Mask Make sure they are in the same subnet when configuring IP Camera IP
address manuallyUnable to access IP Camera via web browser
833 Network Configuration
Double Check to ensure that your HTTP server software is configured and running
properly If you are running any firewall software make sure it is allowing inbound
connections to port 80Also if you happen to be using a cableDSL router make sure
IPCAM User Manual
61
you are set up port forwarding properly ( consult your router is documentation for more
information ) If none of these seem to be the problem it is also possible that your
ISP is blocking inbound connections to port 80 ndashmany IPSs have done this because
of internet worms such as Code Red If this is the case you bdquoll have to setup your
HTTP server on an alternate port (such as 8080)
834 No Monitoring picture
It has four reasons Images of the abnormal factors
1If its not use Directx function and lead to not normal to display the color imagePlease
install DirectX and open the start menu then input the command
Picture 121
You use the DirectX function and it will expedite the DirectDrawDirect3D and AGP if its can not maybe the
connect issues or hardware not read it
2The issues of hardware canrsquot support the card expedite image
3The antivirus software will influence the network it will be stoped or closedIf you install fireproof software
please close it and try again
4 ActiveX controller is not installed correctly
If its not image on the first time to use and will display to the user through the ActiveXIf its can not
display of the image maybe it fail of install about this issues please follow as
1Install ldquoIP Camera Toolrdquo ActiveX control at the same time
2Please install ActiveX control and keep the security settings for IE browser
835 Problems with network bandwidth
The image frame rate is subjected to the following factors 1network bandwidth 2 PC
performancenetwork environment and display preference setting (brightness theme
etc) 3 the number of visitors (Too many visitors will slow down the image frame rate) 4
choice of switch or hub (Use a switch for multiple IP Camera Servers rather than a HUB)
The Device use MJEPT Compression it needs good network bandwidth If it is too narrow it will lead to slowly
browser Typical video parameter occupy network bandwidth as blows
640x48030fps 40 Megabits ~ 50 Megabits
320x24030fps 12 Megabits ~ 16 Megabits
IPCAM User Manual
62
middot836 Why pop-up the prompt ldquoFail to connect to the devicehelliprdquo
This prompt only appeared in the case of using multiple cameras
Enter the Multi-Device Settings page(login as administrator) to check the
Device setting is correct or not
When one of the multiple cameras disconnected the color changed to
yellow and pop-up the promptldquoFail to connect to the devicehelliprdquo
Picture 122
837 Canrsquot access the IPCAM in the internet
There are some reasons
1 ActiveX controller is not installed correctly(see more details 514)
2 The port IPCAM used is blocked by Firewall or Anti-virus software Please change a
port number and try again
3 Port mapping is not success You can do port mapping by two ways
Enter setting page of the router which IPCAM connect with to enable UPnP function
Enter IPCAM ldquoUPnP Settingsrdquo to enable UPnP and make sure the state is ldquoUPnP
successrdquo
‟ s IP
and port to the Virtual map list
When use ADSL the IP is dynamic You should set DDNS(see more details 74 amp 80)
and also make sure port mapping success
84 Operate common problem solving
IP camera tool canrsquot find the camera
Except of the camera broken
1 Make sure the cable connector no problem recommend connector
(AMP)it is with international standard Another note IPCAMrsquos data
transmission channel require higher than computerrsquos so maybe the
IPCAM User Manual
63
computer can run normally but IPCAM canrsquot Please press heavily when making the cable connector
2 Confirm the power supply normally First check whether power indication
light turn on or not If it is onthen check the yellow light on RJ45 Port
(power indication light) and green light (network indication light) are on or
notIf they are onso power supply and cable runs normally
3 Confirm all the firwall and antivirus software are closeThe firewall often
block unrecognized data so if the firewall is running so maybe the IPCAM
TOOL canrsquot find the deviceSuggest to close firewall and antivirus
software temporarily before searching
How to solve the camera blank screen
1 Check if you are using the wrong power adaptorplease use original one
2 Close antivirus software
How to solve the camera canrsquot login by Internet
1 Check if you set DDNS success or not
2 Check the current IPCAMrsquos port number is the same as routerrsquosThey need to keep same
Canrsquot view the monitoring picture
1 Reason canrsquot connect with network
SolutionCheck if the network connect well exclude cable fault and PC virus
cause network fault until can be used between PC and PING
2 ReasonIP address occupy by other device
Solution Choose automatic gain
3 Reason IP address located within different subnet
Solution Check IPCAMrsquoS ip address and subnet mask address and gateway settings
4 ReasonWeb port has been modified
Solutioncontact network administrator to obtain port information
5 Reasonunknown
SolutionPress reset button to factory default statethen reconnectingsysten
default to gain ip address automaticsubnet mask is 2552552550
85 Default Parameters
middotDefault network Parameters
IP address dynamic obtain
Subnet mask 2552552550
Gateway dynamic obtain
DDNS Factory provide
middotUsername and password
Default administrator username admin
Default administrator password No password
IPCAM User Manual
64
86 Technical Parameters
ITEM IP CAM (NIP-02BGPWA2)
Image Sensor
Mage sensor 15 Color CMOS Sensor
Display 640 x 480 (300K Pixels)
Lens f36mm F24 (IR Lens)
Miniillumination 05 Lux
Lens Lens Type Glass Lens
Viewing Angle 60 Degree
Audio Microphone Audio of two way
Domain name Server MSN server DDNS server
Video
Image Compression MJPEG
Image Frame Rate 15 FPS(VGA)30FPS(QVGA)
Resolution 640 x 480(VGA) 320 x 240(QVGA)
Flip Mirror Images rtical Horizontal
mode 50Hz 60Hz or Outdoor
Video Parameters Brightness Contrast
Communication
Ethernet One 10100Mbps RJ-45
Supported Protocol HTTPDHCPIPTCPUDPFTPSMTPDDNSPPPoEUPnP
Mobilephone monitor Support IphoneIpad3G phonesmartphone
Wireless Standard IEEE 80211bg
Wireless Standard 80211b11Mbps(max) 80211g54Mbps(max)
Wireless Security 64128-bitWEP Encryption
Physical
PanTilt Angle Horizontal270deg amp Vertical 120deg
Infrared Light 10 IR LEDs Night visibility up to 15 Mete
Product size 100(L) x100(W) x125mm(H)
Gross Weight 6465gpcs (packing size196x165x123mm)
Net Weight 2547gpcs (only product)
Power Specification DC 5V25A 18 meter
Power Consumption 5 Watts
Environment
Operate Temper 0deg~ 55degC (14degF~122degF)
Operating Humidity 20 ~ 85 non-condensing
Storage Temper -10degC ~ 60deg (14degF ~140degF)
Storage Humidity 0 ~ 90 non-condensing
PC Requirements
CPU 20GHZ or above (suggested 30GHz)
Memory Size 512MB or above (suggested 10GB)
Display card 64M or above
Supported OS Microsoft Windows XPVistaWindows7
Supported browsers IEfirefoxGoogle
Certification CEFCCRoHS
Warranty Limited 1-year warranty
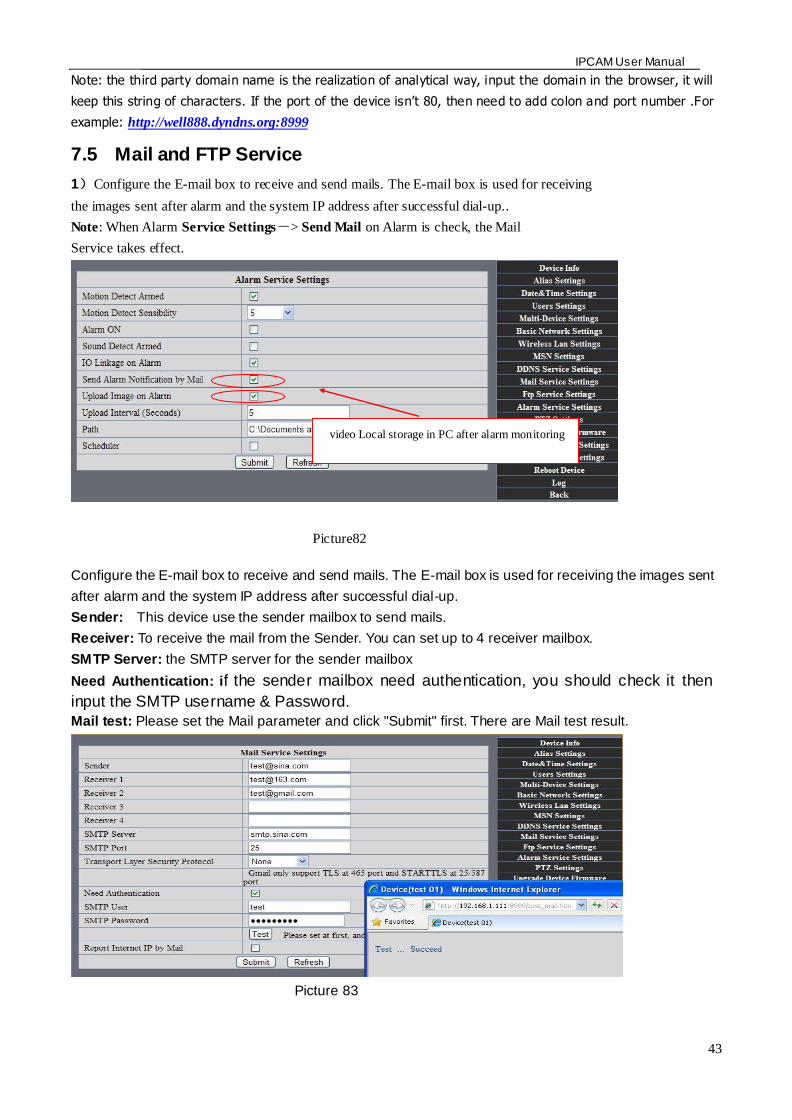
IPCAM User Manual
43
Note the third party domain name is the realization of analytical way input the domain in the browser it will
keep this string of characters If the port of the device isnrsquot 80 then need to add colon and port number For
example httpwell888dyndnsorg8999
75 Mail and FTP Service
1)Configure the E-mail box to receive and send mails The E-mail box is used for receiving
the images sent after alarm and the system IP address after successful dial-up
Note When Alarm Service Settings-gt Send Mail on Alarm is check the Mail
Service takes effect
Picture82
Configure the E-mail box to receive and send mails The E-mail box is used for receiving the images sent
after alarm and the system IP address after successful dial-up
Sender This device use the sender mailbox to send mails
Receiver To receive the mail from the Sender You can set up to 4 receiver mailbox
SMTP Server the SMTP server for the sender mailbox
Need Authentication if the sender mailbox need authentication you should check it then
input the SMTP username amp Password
Mail test Please set the Mail parameter and click Submit first There are Mail test result
Picture 83
video Local storage in PC after alarm monitoring
IPCAM User Manual
44
Gmail also set as the same It only needs you to fill in correct SMTP Sever address user and password
Picture 84
Mail notes Internet IP address In this option When Internet IP and port have changed IP Will be sent via
1Can not connect to the server
2Network Error Please try later
3Server Error
4Incorrect user or password
5The sender is denied by the server Maybe the server need to authenticate the user please check it
and try again
6The receiver is denied by the server Maybe because of the anti-spam privacy of the server
7The message is denied by the server Maybe because of the anti-spam privacy of the server
8The server does not support the authentication mode used by the device
Report Internet IP by Mail When ipcam port or Internet IP changed it will send the internet IP by
mail(for example IPCAM s url is http119123207969002) Make sure the port is map to the router
correctly by UPNP or Virtual Map function
2) FTP Server use and settings
middotIf you already have an FTP Server (ipcam com)and email ipcam you can fill the
parameters as below
Picture 85
IPCAM User Manual
45
middotFTP Server of LAN as below
1 Create an account
2 Step by step setting until finish it
Picture 88
IPCAM User Manual
46
3Start Server
Continue to finish it
Picture 89
4IPCAMrsquoS account can be used
Picture 90
Save path
This is a FTP
server address
IPCAM User Manual
47
5 IP camerarsquos FTP Server set like this
Picture 91
6 Set up and complete testing is successfulwhen it alarms IP camera will upload
pictures to the FTP server Settings of main directory path (as shown )
Picture 92
FTP Server the FTP server address
FTP port the port usually is 21
FTP Mode support standard(POST) mode and passive(PASV) mode
Upload Image Now it will upload image now when checkbox is not checked When checked you can
input upload interval(Seconds)
76 Motion Detection
Enter Alarm Service Settings page to configure Motion Detection function
1) Motion Detect Armed
Each alarm triggers in the protection of time the device will take various measures to alarm
IO linkage alarm output relay closure external alarm device began to alarm
IPCAM User Manual
48
Send E-mail alarm informatio
Transmit pictures to the FTP server and can set the time interval of sending pictures
2) Alarm t ime Settings
Only in the alarm period detection device to alarm will only have alarm action All the time (not check the
schedule) also can alarm within specified time For the specified time alarm firstly need to set up the system
time time zone and then to choose period of alarm in the state of alarm setting as shown in Picture 19
Picture93 Alarm of time Settings interface
Motion Detect Armed
When you enable motion detect armed the camera can be triggered to send email alerts
and record images In the camera monitoring page the green icon turn to red and an
alert sound you will hear
Motion Detect Sensibility
You can choose from low to high 10 level alarm sensitivity The greater the number the higher the
sensitivity
Alarm Input Armed
IO PINS1) Output(+5V) 2) Output 3) Alarm input 4) Input (GND)
Input Pins The input pins can be used for 1-way external sensor input(pin3 and pin4) For example
you may connect a Person Infrared Sensor (PIR) to it for motion detection When external sensor
triggered IPCAM can be programmed to send an email with picture or control the internal relay output
IPCAM User Manual
49
Picture94
IO Linkage on Alarm
Enable IO linkage on alarmPin1 will output +5V when alarm triggered and output LOW
when alarm release automatically
Switch onoff buttons control Pin1 output manually
Send Mail on Alarm
Sent picture and mail inform to customers e-mail after alarmed(firstly you should finish
the Mail Service Settings)
Picture 95
Upload Image on Alarm
Enable upload image on alarm and set upload interval(Seconds)
Tick send to your setted mails
IPCAM User Manual
50
Picture 96
REC automatically and save to PC
When you enable motion detect and open the camera monitoring page on the PC If
there is an alarm triggered REC will start automatically for several seconds and save to
the PC
Picture 97
REC save to pcrsquos position
Picture 98
Storage path can be changed
After Setting up later when have the
alarm the image will send to
designated email and FTP server
IPCAM User Manual
51
77 IP cameras Time amp Date setting and PTZ Setting
If IP camera connected with Internet it can automatically check the time amp date via running NTP Server And
need to choose properly IP cameras Time zone Otherwise it need PC Time to check IP camera time amp Date
Pre-set and Speed of PT
78 UPGRADE DEVICE FIRMWARE
Picture 101 Firmware upgrade
IP CAMERA has two kinds of programme One is system firmware another is application firmware It can be
upgraded separately
79 BACKUP AND RESTORE SETTING
Click Set in the Backup will lead to a BIN file and choose this file to restore setting
The huger the Number is The
slower it will be
IPCAM User Manual
52
8 APPENDIX
81 REGISTER AND APPLY FOR DDNS SERVICE
1Users use DDNS management system first timeUsers need to apply account to manage
and inquire the domain state
Step1 enter httpwwwdyndnscom and Create Account( Fill in Domain Name dyndnsorg then Click
Add)
Figure103
Step2 enter your information
Figure104
IPCAM User Manual
53
Figure105
Step3 After a minute you will receive an E-mail from DynDNS Support and it will give you a
confirmation address
(eg httpsaccountdyncomemlcreateconflILHMZHRje5oF_6YXTYv1A
Figure106
IPCAM User Manual
54
Step4 Open the link to active your Domain Name as belowLogin in your account after it is activated
Figure107
Step5 Check all the DDNS serviceswe choose the 14-day-trial
Figure108
Step6 Click the linkand user will see as below
IPCAM User Manual
55
middotenter your information
Figure109
Step7 Now you obtained a Dynamic Domain Name(Figure 105)and can use it in the DDNS Service
Settings(details 74)
Figure110
IPCAM User Manual
56
2For DDNS which is applied successfully you can fill in the IP CAMERA When set successfully the status
of IP will be shown as blows
picture 111
picture 112
3How to set DDNS on line
The first wayMenu rdquostartrdquo- ldquorunrdquomdashgt Input CMDClink rdquoenterrdquoIt can check DDNS Statas
via As shown below
Picture 113
IPCAM User Manual
57
Through the PING command this dynamic domain name can be back in the network response information It
proves that the domain name has been online
If the domain name update not success Possible reasons
(1) DDNS parameter is not correct (2) may cause DNS address configuration is wrong
82 Some special application for IPCAMERA
IPCamUse some grammar parameter control and Use IPCam
useruser
pwdpassword
priThe current access (1 visitors 23 operator managers)
resolutionImage resolution(832024 0qvga32640480 vga)
ratemage transmission speed and scope 0-23
brightnessbrightness0~255
contrastcontrast0~6
mode
Mode 050 hz For
60 hz 2 outdoor
flip
Flip rotation 0 primitive 1 vertical reverses 2 horizontal 3 vertical flip + horizontal
821 The flow media player VLC player and mplayer can real-time broadcast ipcamera and send
of streaming media format video data
(Grammar parametersvideostreamasfuser=amppwd=ampresolution=amprate=)
As shown Picture 113 rdquoIpcamrdquo
Picture 114
IPCAM User Manual
58
From the following picture we can view that Ipcam local IP address ishttp19216811118999
WAN IP Address is httpwell888dyndnsorg8999 we can inputrdquoIPcamrdquorsquoS IP address to
open in the player
Picture 115
the CLC media player open play position
Picture 116
LAN play address
Picture 117
IPCAM User Manual
59
Picture 118
Open the Internet play position
Picture 119
As shown in the following picture It can see the ipcamera send video streaming format
Size 640X480
User
IPCAM User Manual
60
Picture 120
83 Frequently Asked Questions
Note1) Any question you would meet please check Network connections firstly
2)Check the working status revealed by the indicators on the network server hub exchange and
network card If abnormal check the network connections
831 I have forgotten the administrator username andor password
To reset the administrator username and password Press and hold down the RESET
BUTTON for 5 seconds Release the power button and the username and password
will be reset back to the factory default administrator username and password
Default administrator username admin
Default administrator password No password
832 IP Address configuration
Check whether IP address of the IP Camera server shares the same subnet as your
work station Click My Computer gt Control PanelgtNetwork amp Dial-up Connections gt
LAN gt Attributes gtInternet Protocols (TCPIP) and check IP Address and Subnet
Mask Make sure they are in the same subnet when configuring IP Camera IP
address manuallyUnable to access IP Camera via web browser
833 Network Configuration
Double Check to ensure that your HTTP server software is configured and running
properly If you are running any firewall software make sure it is allowing inbound
connections to port 80Also if you happen to be using a cableDSL router make sure
IPCAM User Manual
61
you are set up port forwarding properly ( consult your router is documentation for more
information ) If none of these seem to be the problem it is also possible that your
ISP is blocking inbound connections to port 80 ndashmany IPSs have done this because
of internet worms such as Code Red If this is the case you bdquoll have to setup your
HTTP server on an alternate port (such as 8080)
834 No Monitoring picture
It has four reasons Images of the abnormal factors
1If its not use Directx function and lead to not normal to display the color imagePlease
install DirectX and open the start menu then input the command
Picture 121
You use the DirectX function and it will expedite the DirectDrawDirect3D and AGP if its can not maybe the
connect issues or hardware not read it
2The issues of hardware canrsquot support the card expedite image
3The antivirus software will influence the network it will be stoped or closedIf you install fireproof software
please close it and try again
4 ActiveX controller is not installed correctly
If its not image on the first time to use and will display to the user through the ActiveXIf its can not
display of the image maybe it fail of install about this issues please follow as
1Install ldquoIP Camera Toolrdquo ActiveX control at the same time
2Please install ActiveX control and keep the security settings for IE browser
835 Problems with network bandwidth
The image frame rate is subjected to the following factors 1network bandwidth 2 PC
performancenetwork environment and display preference setting (brightness theme
etc) 3 the number of visitors (Too many visitors will slow down the image frame rate) 4
choice of switch or hub (Use a switch for multiple IP Camera Servers rather than a HUB)
The Device use MJEPT Compression it needs good network bandwidth If it is too narrow it will lead to slowly
browser Typical video parameter occupy network bandwidth as blows
640x48030fps 40 Megabits ~ 50 Megabits
320x24030fps 12 Megabits ~ 16 Megabits
IPCAM User Manual
62
middot836 Why pop-up the prompt ldquoFail to connect to the devicehelliprdquo
This prompt only appeared in the case of using multiple cameras
Enter the Multi-Device Settings page(login as administrator) to check the
Device setting is correct or not
When one of the multiple cameras disconnected the color changed to
yellow and pop-up the promptldquoFail to connect to the devicehelliprdquo
Picture 122
837 Canrsquot access the IPCAM in the internet
There are some reasons
1 ActiveX controller is not installed correctly(see more details 514)
2 The port IPCAM used is blocked by Firewall or Anti-virus software Please change a
port number and try again
3 Port mapping is not success You can do port mapping by two ways
Enter setting page of the router which IPCAM connect with to enable UPnP function
Enter IPCAM ldquoUPnP Settingsrdquo to enable UPnP and make sure the state is ldquoUPnP
successrdquo
‟ s IP
and port to the Virtual map list
When use ADSL the IP is dynamic You should set DDNS(see more details 74 amp 80)
and also make sure port mapping success
84 Operate common problem solving
IP camera tool canrsquot find the camera
Except of the camera broken
1 Make sure the cable connector no problem recommend connector
(AMP)it is with international standard Another note IPCAMrsquos data
transmission channel require higher than computerrsquos so maybe the
IPCAM User Manual
63
computer can run normally but IPCAM canrsquot Please press heavily when making the cable connector
2 Confirm the power supply normally First check whether power indication
light turn on or not If it is onthen check the yellow light on RJ45 Port
(power indication light) and green light (network indication light) are on or
notIf they are onso power supply and cable runs normally
3 Confirm all the firwall and antivirus software are closeThe firewall often
block unrecognized data so if the firewall is running so maybe the IPCAM
TOOL canrsquot find the deviceSuggest to close firewall and antivirus
software temporarily before searching
How to solve the camera blank screen
1 Check if you are using the wrong power adaptorplease use original one
2 Close antivirus software
How to solve the camera canrsquot login by Internet
1 Check if you set DDNS success or not
2 Check the current IPCAMrsquos port number is the same as routerrsquosThey need to keep same
Canrsquot view the monitoring picture
1 Reason canrsquot connect with network
SolutionCheck if the network connect well exclude cable fault and PC virus
cause network fault until can be used between PC and PING
2 ReasonIP address occupy by other device
Solution Choose automatic gain
3 Reason IP address located within different subnet
Solution Check IPCAMrsquoS ip address and subnet mask address and gateway settings
4 ReasonWeb port has been modified
Solutioncontact network administrator to obtain port information
5 Reasonunknown
SolutionPress reset button to factory default statethen reconnectingsysten
default to gain ip address automaticsubnet mask is 2552552550
85 Default Parameters
middotDefault network Parameters
IP address dynamic obtain
Subnet mask 2552552550
Gateway dynamic obtain
DDNS Factory provide
middotUsername and password
Default administrator username admin
Default administrator password No password
IPCAM User Manual
64
86 Technical Parameters
ITEM IP CAM (NIP-02BGPWA2)
Image Sensor
Mage sensor 15 Color CMOS Sensor
Display 640 x 480 (300K Pixels)
Lens f36mm F24 (IR Lens)
Miniillumination 05 Lux
Lens Lens Type Glass Lens
Viewing Angle 60 Degree
Audio Microphone Audio of two way
Domain name Server MSN server DDNS server
Video
Image Compression MJPEG
Image Frame Rate 15 FPS(VGA)30FPS(QVGA)
Resolution 640 x 480(VGA) 320 x 240(QVGA)
Flip Mirror Images rtical Horizontal
mode 50Hz 60Hz or Outdoor
Video Parameters Brightness Contrast
Communication
Ethernet One 10100Mbps RJ-45
Supported Protocol HTTPDHCPIPTCPUDPFTPSMTPDDNSPPPoEUPnP
Mobilephone monitor Support IphoneIpad3G phonesmartphone
Wireless Standard IEEE 80211bg
Wireless Standard 80211b11Mbps(max) 80211g54Mbps(max)
Wireless Security 64128-bitWEP Encryption
Physical
PanTilt Angle Horizontal270deg amp Vertical 120deg
Infrared Light 10 IR LEDs Night visibility up to 15 Mete
Product size 100(L) x100(W) x125mm(H)
Gross Weight 6465gpcs (packing size196x165x123mm)
Net Weight 2547gpcs (only product)
Power Specification DC 5V25A 18 meter
Power Consumption 5 Watts
Environment
Operate Temper 0deg~ 55degC (14degF~122degF)
Operating Humidity 20 ~ 85 non-condensing
Storage Temper -10degC ~ 60deg (14degF ~140degF)
Storage Humidity 0 ~ 90 non-condensing
PC Requirements
CPU 20GHZ or above (suggested 30GHz)
Memory Size 512MB or above (suggested 10GB)
Display card 64M or above
Supported OS Microsoft Windows XPVistaWindows7
Supported browsers IEfirefoxGoogle
Certification CEFCCRoHS
Warranty Limited 1-year warranty
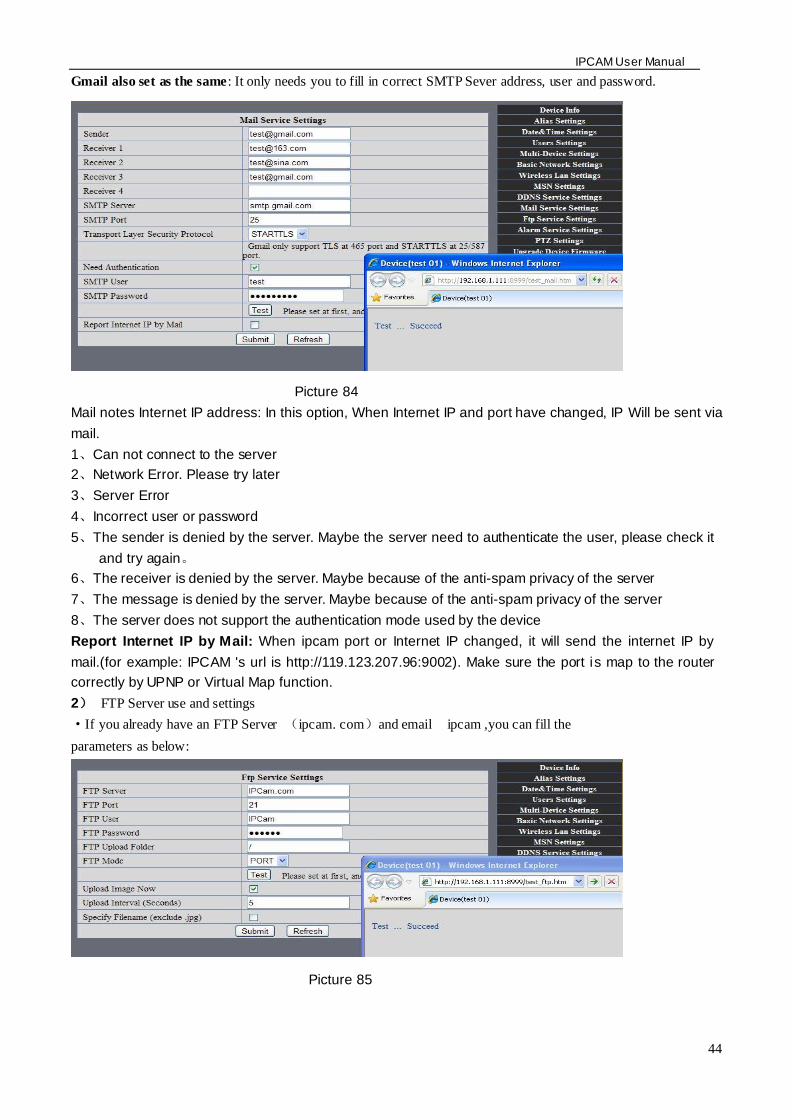
IPCAM User Manual
45
middotFTP Server of LAN as below
1 Create an account
2 Step by step setting until finish it
Picture 88
IPCAM User Manual
46
3Start Server
Continue to finish it
Picture 89
4IPCAMrsquoS account can be used
Picture 90
Save path
This is a FTP
server address
IPCAM User Manual
47
5 IP camerarsquos FTP Server set like this
Picture 91
6 Set up and complete testing is successfulwhen it alarms IP camera will upload
pictures to the FTP server Settings of main directory path (as shown )
Picture 92
FTP Server the FTP server address
FTP port the port usually is 21
FTP Mode support standard(POST) mode and passive(PASV) mode
Upload Image Now it will upload image now when checkbox is not checked When checked you can
input upload interval(Seconds)
76 Motion Detection
Enter Alarm Service Settings page to configure Motion Detection function
1) Motion Detect Armed
Each alarm triggers in the protection of time the device will take various measures to alarm
IO linkage alarm output relay closure external alarm device began to alarm
IPCAM User Manual
48
Send E-mail alarm informatio
Transmit pictures to the FTP server and can set the time interval of sending pictures
2) Alarm t ime Settings
Only in the alarm period detection device to alarm will only have alarm action All the time (not check the
schedule) also can alarm within specified time For the specified time alarm firstly need to set up the system
time time zone and then to choose period of alarm in the state of alarm setting as shown in Picture 19
Picture93 Alarm of time Settings interface
Motion Detect Armed
When you enable motion detect armed the camera can be triggered to send email alerts
and record images In the camera monitoring page the green icon turn to red and an
alert sound you will hear
Motion Detect Sensibility
You can choose from low to high 10 level alarm sensitivity The greater the number the higher the
sensitivity
Alarm Input Armed
IO PINS1) Output(+5V) 2) Output 3) Alarm input 4) Input (GND)
Input Pins The input pins can be used for 1-way external sensor input(pin3 and pin4) For example
you may connect a Person Infrared Sensor (PIR) to it for motion detection When external sensor
triggered IPCAM can be programmed to send an email with picture or control the internal relay output
IPCAM User Manual
49
Picture94
IO Linkage on Alarm
Enable IO linkage on alarmPin1 will output +5V when alarm triggered and output LOW
when alarm release automatically
Switch onoff buttons control Pin1 output manually
Send Mail on Alarm
Sent picture and mail inform to customers e-mail after alarmed(firstly you should finish
the Mail Service Settings)
Picture 95
Upload Image on Alarm
Enable upload image on alarm and set upload interval(Seconds)
Tick send to your setted mails
IPCAM User Manual
50
Picture 96
REC automatically and save to PC
When you enable motion detect and open the camera monitoring page on the PC If
there is an alarm triggered REC will start automatically for several seconds and save to
the PC
Picture 97
REC save to pcrsquos position
Picture 98
Storage path can be changed
After Setting up later when have the
alarm the image will send to
designated email and FTP server
IPCAM User Manual
51
77 IP cameras Time amp Date setting and PTZ Setting
If IP camera connected with Internet it can automatically check the time amp date via running NTP Server And
need to choose properly IP cameras Time zone Otherwise it need PC Time to check IP camera time amp Date
Pre-set and Speed of PT
78 UPGRADE DEVICE FIRMWARE
Picture 101 Firmware upgrade
IP CAMERA has two kinds of programme One is system firmware another is application firmware It can be
upgraded separately
79 BACKUP AND RESTORE SETTING
Click Set in the Backup will lead to a BIN file and choose this file to restore setting
The huger the Number is The
slower it will be
IPCAM User Manual
52
8 APPENDIX
81 REGISTER AND APPLY FOR DDNS SERVICE
1Users use DDNS management system first timeUsers need to apply account to manage
and inquire the domain state
Step1 enter httpwwwdyndnscom and Create Account( Fill in Domain Name dyndnsorg then Click
Add)
Figure103
Step2 enter your information
Figure104
IPCAM User Manual
53
Figure105
Step3 After a minute you will receive an E-mail from DynDNS Support and it will give you a
confirmation address
(eg httpsaccountdyncomemlcreateconflILHMZHRje5oF_6YXTYv1A
Figure106
IPCAM User Manual
54
Step4 Open the link to active your Domain Name as belowLogin in your account after it is activated
Figure107
Step5 Check all the DDNS serviceswe choose the 14-day-trial
Figure108
Step6 Click the linkand user will see as below
IPCAM User Manual
55
middotenter your information
Figure109
Step7 Now you obtained a Dynamic Domain Name(Figure 105)and can use it in the DDNS Service
Settings(details 74)
Figure110
IPCAM User Manual
56
2For DDNS which is applied successfully you can fill in the IP CAMERA When set successfully the status
of IP will be shown as blows
picture 111
picture 112
3How to set DDNS on line
The first wayMenu rdquostartrdquo- ldquorunrdquomdashgt Input CMDClink rdquoenterrdquoIt can check DDNS Statas
via As shown below
Picture 113
IPCAM User Manual
57
Through the PING command this dynamic domain name can be back in the network response information It
proves that the domain name has been online
If the domain name update not success Possible reasons
(1) DDNS parameter is not correct (2) may cause DNS address configuration is wrong
82 Some special application for IPCAMERA
IPCamUse some grammar parameter control and Use IPCam
useruser
pwdpassword
priThe current access (1 visitors 23 operator managers)
resolutionImage resolution(832024 0qvga32640480 vga)
ratemage transmission speed and scope 0-23
brightnessbrightness0~255
contrastcontrast0~6
mode
Mode 050 hz For
60 hz 2 outdoor
flip
Flip rotation 0 primitive 1 vertical reverses 2 horizontal 3 vertical flip + horizontal
821 The flow media player VLC player and mplayer can real-time broadcast ipcamera and send
of streaming media format video data
(Grammar parametersvideostreamasfuser=amppwd=ampresolution=amprate=)
As shown Picture 113 rdquoIpcamrdquo
Picture 114
IPCAM User Manual
58
From the following picture we can view that Ipcam local IP address ishttp19216811118999
WAN IP Address is httpwell888dyndnsorg8999 we can inputrdquoIPcamrdquorsquoS IP address to
open in the player
Picture 115
the CLC media player open play position
Picture 116
LAN play address
Picture 117
IPCAM User Manual
59
Picture 118
Open the Internet play position
Picture 119
As shown in the following picture It can see the ipcamera send video streaming format
Size 640X480
User
IPCAM User Manual
60
Picture 120
83 Frequently Asked Questions
Note1) Any question you would meet please check Network connections firstly
2)Check the working status revealed by the indicators on the network server hub exchange and
network card If abnormal check the network connections
831 I have forgotten the administrator username andor password
To reset the administrator username and password Press and hold down the RESET
BUTTON for 5 seconds Release the power button and the username and password
will be reset back to the factory default administrator username and password
Default administrator username admin
Default administrator password No password
832 IP Address configuration
Check whether IP address of the IP Camera server shares the same subnet as your
work station Click My Computer gt Control PanelgtNetwork amp Dial-up Connections gt
LAN gt Attributes gtInternet Protocols (TCPIP) and check IP Address and Subnet
Mask Make sure they are in the same subnet when configuring IP Camera IP
address manuallyUnable to access IP Camera via web browser
833 Network Configuration
Double Check to ensure that your HTTP server software is configured and running
properly If you are running any firewall software make sure it is allowing inbound
connections to port 80Also if you happen to be using a cableDSL router make sure
IPCAM User Manual
61
you are set up port forwarding properly ( consult your router is documentation for more
information ) If none of these seem to be the problem it is also possible that your
ISP is blocking inbound connections to port 80 ndashmany IPSs have done this because
of internet worms such as Code Red If this is the case you bdquoll have to setup your
HTTP server on an alternate port (such as 8080)
834 No Monitoring picture
It has four reasons Images of the abnormal factors
1If its not use Directx function and lead to not normal to display the color imagePlease
install DirectX and open the start menu then input the command
Picture 121
You use the DirectX function and it will expedite the DirectDrawDirect3D and AGP if its can not maybe the
connect issues or hardware not read it
2The issues of hardware canrsquot support the card expedite image
3The antivirus software will influence the network it will be stoped or closedIf you install fireproof software
please close it and try again
4 ActiveX controller is not installed correctly
If its not image on the first time to use and will display to the user through the ActiveXIf its can not
display of the image maybe it fail of install about this issues please follow as
1Install ldquoIP Camera Toolrdquo ActiveX control at the same time
2Please install ActiveX control and keep the security settings for IE browser
835 Problems with network bandwidth
The image frame rate is subjected to the following factors 1network bandwidth 2 PC
performancenetwork environment and display preference setting (brightness theme
etc) 3 the number of visitors (Too many visitors will slow down the image frame rate) 4
choice of switch or hub (Use a switch for multiple IP Camera Servers rather than a HUB)
The Device use MJEPT Compression it needs good network bandwidth If it is too narrow it will lead to slowly
browser Typical video parameter occupy network bandwidth as blows
640x48030fps 40 Megabits ~ 50 Megabits
320x24030fps 12 Megabits ~ 16 Megabits
IPCAM User Manual
62
middot836 Why pop-up the prompt ldquoFail to connect to the devicehelliprdquo
This prompt only appeared in the case of using multiple cameras
Enter the Multi-Device Settings page(login as administrator) to check the
Device setting is correct or not
When one of the multiple cameras disconnected the color changed to
yellow and pop-up the promptldquoFail to connect to the devicehelliprdquo
Picture 122
837 Canrsquot access the IPCAM in the internet
There are some reasons
1 ActiveX controller is not installed correctly(see more details 514)
2 The port IPCAM used is blocked by Firewall or Anti-virus software Please change a
port number and try again
3 Port mapping is not success You can do port mapping by two ways
Enter setting page of the router which IPCAM connect with to enable UPnP function
Enter IPCAM ldquoUPnP Settingsrdquo to enable UPnP and make sure the state is ldquoUPnP
successrdquo
‟ s IP
and port to the Virtual map list
When use ADSL the IP is dynamic You should set DDNS(see more details 74 amp 80)
and also make sure port mapping success
84 Operate common problem solving
IP camera tool canrsquot find the camera
Except of the camera broken
1 Make sure the cable connector no problem recommend connector
(AMP)it is with international standard Another note IPCAMrsquos data
transmission channel require higher than computerrsquos so maybe the
IPCAM User Manual
63
computer can run normally but IPCAM canrsquot Please press heavily when making the cable connector
2 Confirm the power supply normally First check whether power indication
light turn on or not If it is onthen check the yellow light on RJ45 Port
(power indication light) and green light (network indication light) are on or
notIf they are onso power supply and cable runs normally
3 Confirm all the firwall and antivirus software are closeThe firewall often
block unrecognized data so if the firewall is running so maybe the IPCAM
TOOL canrsquot find the deviceSuggest to close firewall and antivirus
software temporarily before searching
How to solve the camera blank screen
1 Check if you are using the wrong power adaptorplease use original one
2 Close antivirus software
How to solve the camera canrsquot login by Internet
1 Check if you set DDNS success or not
2 Check the current IPCAMrsquos port number is the same as routerrsquosThey need to keep same
Canrsquot view the monitoring picture
1 Reason canrsquot connect with network
SolutionCheck if the network connect well exclude cable fault and PC virus
cause network fault until can be used between PC and PING
2 ReasonIP address occupy by other device
Solution Choose automatic gain
3 Reason IP address located within different subnet
Solution Check IPCAMrsquoS ip address and subnet mask address and gateway settings
4 ReasonWeb port has been modified
Solutioncontact network administrator to obtain port information
5 Reasonunknown
SolutionPress reset button to factory default statethen reconnectingsysten
default to gain ip address automaticsubnet mask is 2552552550
85 Default Parameters
middotDefault network Parameters
IP address dynamic obtain
Subnet mask 2552552550
Gateway dynamic obtain
DDNS Factory provide
middotUsername and password
Default administrator username admin
Default administrator password No password
IPCAM User Manual
64
86 Technical Parameters
ITEM IP CAM (NIP-02BGPWA2)
Image Sensor
Mage sensor 15 Color CMOS Sensor
Display 640 x 480 (300K Pixels)
Lens f36mm F24 (IR Lens)
Miniillumination 05 Lux
Lens Lens Type Glass Lens
Viewing Angle 60 Degree
Audio Microphone Audio of two way
Domain name Server MSN server DDNS server
Video
Image Compression MJPEG
Image Frame Rate 15 FPS(VGA)30FPS(QVGA)
Resolution 640 x 480(VGA) 320 x 240(QVGA)
Flip Mirror Images rtical Horizontal
mode 50Hz 60Hz or Outdoor
Video Parameters Brightness Contrast
Communication
Ethernet One 10100Mbps RJ-45
Supported Protocol HTTPDHCPIPTCPUDPFTPSMTPDDNSPPPoEUPnP
Mobilephone monitor Support IphoneIpad3G phonesmartphone
Wireless Standard IEEE 80211bg
Wireless Standard 80211b11Mbps(max) 80211g54Mbps(max)
Wireless Security 64128-bitWEP Encryption
Physical
PanTilt Angle Horizontal270deg amp Vertical 120deg
Infrared Light 10 IR LEDs Night visibility up to 15 Mete
Product size 100(L) x100(W) x125mm(H)
Gross Weight 6465gpcs (packing size196x165x123mm)
Net Weight 2547gpcs (only product)
Power Specification DC 5V25A 18 meter
Power Consumption 5 Watts
Environment
Operate Temper 0deg~ 55degC (14degF~122degF)
Operating Humidity 20 ~ 85 non-condensing
Storage Temper -10degC ~ 60deg (14degF ~140degF)
Storage Humidity 0 ~ 90 non-condensing
PC Requirements
CPU 20GHZ or above (suggested 30GHz)
Memory Size 512MB or above (suggested 10GB)
Display card 64M or above
Supported OS Microsoft Windows XPVistaWindows7
Supported browsers IEfirefoxGoogle
Certification CEFCCRoHS
Warranty Limited 1-year warranty
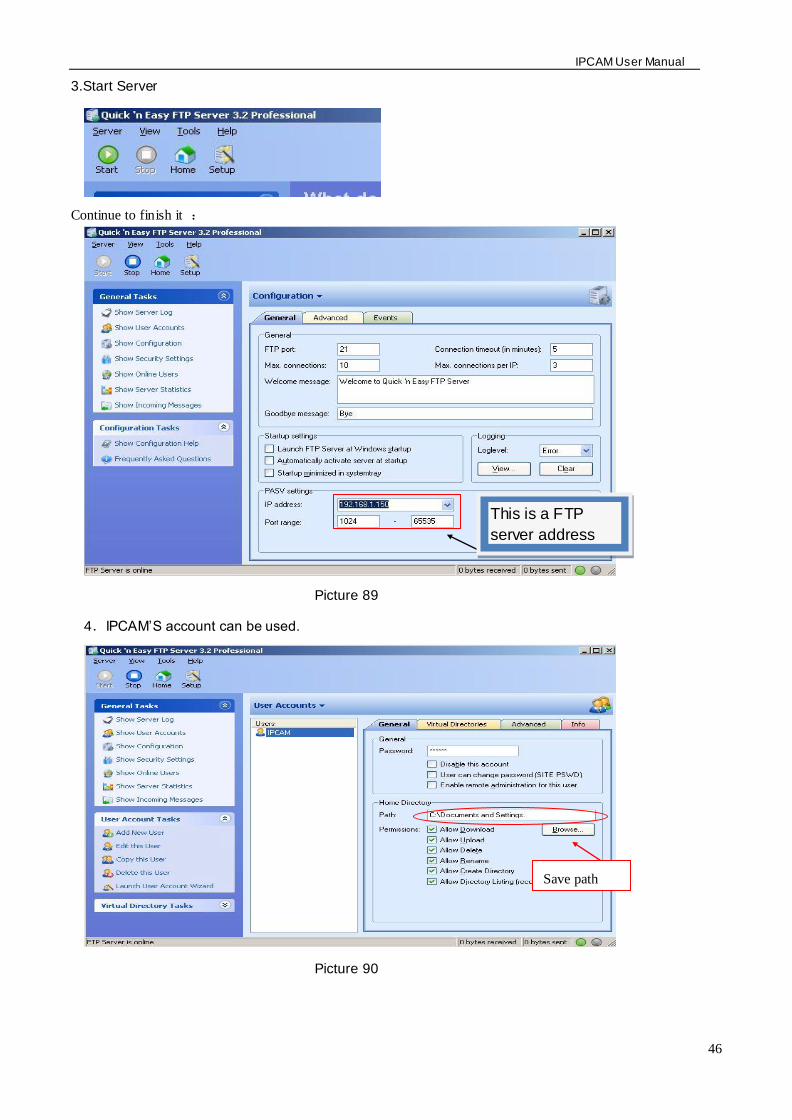
IPCAM User Manual
46
3Start Server
Continue to finish it
Picture 89
4IPCAMrsquoS account can be used
Picture 90
Save path
This is a FTP
server address
IPCAM User Manual
47
5 IP camerarsquos FTP Server set like this
Picture 91
6 Set up and complete testing is successfulwhen it alarms IP camera will upload
pictures to the FTP server Settings of main directory path (as shown )
Picture 92
FTP Server the FTP server address
FTP port the port usually is 21
FTP Mode support standard(POST) mode and passive(PASV) mode
Upload Image Now it will upload image now when checkbox is not checked When checked you can
input upload interval(Seconds)
76 Motion Detection
Enter Alarm Service Settings page to configure Motion Detection function
1) Motion Detect Armed
Each alarm triggers in the protection of time the device will take various measures to alarm
IO linkage alarm output relay closure external alarm device began to alarm
IPCAM User Manual
48
Send E-mail alarm informatio
Transmit pictures to the FTP server and can set the time interval of sending pictures
2) Alarm t ime Settings
Only in the alarm period detection device to alarm will only have alarm action All the time (not check the
schedule) also can alarm within specified time For the specified time alarm firstly need to set up the system
time time zone and then to choose period of alarm in the state of alarm setting as shown in Picture 19
Picture93 Alarm of time Settings interface
Motion Detect Armed
When you enable motion detect armed the camera can be triggered to send email alerts
and record images In the camera monitoring page the green icon turn to red and an
alert sound you will hear
Motion Detect Sensibility
You can choose from low to high 10 level alarm sensitivity The greater the number the higher the
sensitivity
Alarm Input Armed
IO PINS1) Output(+5V) 2) Output 3) Alarm input 4) Input (GND)
Input Pins The input pins can be used for 1-way external sensor input(pin3 and pin4) For example
you may connect a Person Infrared Sensor (PIR) to it for motion detection When external sensor
triggered IPCAM can be programmed to send an email with picture or control the internal relay output
IPCAM User Manual
49
Picture94
IO Linkage on Alarm
Enable IO linkage on alarmPin1 will output +5V when alarm triggered and output LOW
when alarm release automatically
Switch onoff buttons control Pin1 output manually
Send Mail on Alarm
Sent picture and mail inform to customers e-mail after alarmed(firstly you should finish
the Mail Service Settings)
Picture 95
Upload Image on Alarm
Enable upload image on alarm and set upload interval(Seconds)
Tick send to your setted mails
IPCAM User Manual
50
Picture 96
REC automatically and save to PC
When you enable motion detect and open the camera monitoring page on the PC If
there is an alarm triggered REC will start automatically for several seconds and save to
the PC
Picture 97
REC save to pcrsquos position
Picture 98
Storage path can be changed
After Setting up later when have the
alarm the image will send to
designated email and FTP server
IPCAM User Manual
51
77 IP cameras Time amp Date setting and PTZ Setting
If IP camera connected with Internet it can automatically check the time amp date via running NTP Server And
need to choose properly IP cameras Time zone Otherwise it need PC Time to check IP camera time amp Date
Pre-set and Speed of PT
78 UPGRADE DEVICE FIRMWARE
Picture 101 Firmware upgrade
IP CAMERA has two kinds of programme One is system firmware another is application firmware It can be
upgraded separately
79 BACKUP AND RESTORE SETTING
Click Set in the Backup will lead to a BIN file and choose this file to restore setting
The huger the Number is The
slower it will be
IPCAM User Manual
52
8 APPENDIX
81 REGISTER AND APPLY FOR DDNS SERVICE
1Users use DDNS management system first timeUsers need to apply account to manage
and inquire the domain state
Step1 enter httpwwwdyndnscom and Create Account( Fill in Domain Name dyndnsorg then Click
Add)
Figure103
Step2 enter your information
Figure104
IPCAM User Manual
53
Figure105
Step3 After a minute you will receive an E-mail from DynDNS Support and it will give you a
confirmation address
(eg httpsaccountdyncomemlcreateconflILHMZHRje5oF_6YXTYv1A
Figure106
IPCAM User Manual
54
Step4 Open the link to active your Domain Name as belowLogin in your account after it is activated
Figure107
Step5 Check all the DDNS serviceswe choose the 14-day-trial
Figure108
Step6 Click the linkand user will see as below
IPCAM User Manual
55
middotenter your information
Figure109
Step7 Now you obtained a Dynamic Domain Name(Figure 105)and can use it in the DDNS Service
Settings(details 74)
Figure110
IPCAM User Manual
56
2For DDNS which is applied successfully you can fill in the IP CAMERA When set successfully the status
of IP will be shown as blows
picture 111
picture 112
3How to set DDNS on line
The first wayMenu rdquostartrdquo- ldquorunrdquomdashgt Input CMDClink rdquoenterrdquoIt can check DDNS Statas
via As shown below
Picture 113
IPCAM User Manual
57
Through the PING command this dynamic domain name can be back in the network response information It
proves that the domain name has been online
If the domain name update not success Possible reasons
(1) DDNS parameter is not correct (2) may cause DNS address configuration is wrong
82 Some special application for IPCAMERA
IPCamUse some grammar parameter control and Use IPCam
useruser
pwdpassword
priThe current access (1 visitors 23 operator managers)
resolutionImage resolution(832024 0qvga32640480 vga)
ratemage transmission speed and scope 0-23
brightnessbrightness0~255
contrastcontrast0~6
mode
Mode 050 hz For
60 hz 2 outdoor
flip
Flip rotation 0 primitive 1 vertical reverses 2 horizontal 3 vertical flip + horizontal
821 The flow media player VLC player and mplayer can real-time broadcast ipcamera and send
of streaming media format video data
(Grammar parametersvideostreamasfuser=amppwd=ampresolution=amprate=)
As shown Picture 113 rdquoIpcamrdquo
Picture 114
IPCAM User Manual
58
From the following picture we can view that Ipcam local IP address ishttp19216811118999
WAN IP Address is httpwell888dyndnsorg8999 we can inputrdquoIPcamrdquorsquoS IP address to
open in the player
Picture 115
the CLC media player open play position
Picture 116
LAN play address
Picture 117
IPCAM User Manual
59
Picture 118
Open the Internet play position
Picture 119
As shown in the following picture It can see the ipcamera send video streaming format
Size 640X480
User
IPCAM User Manual
60
Picture 120
83 Frequently Asked Questions
Note1) Any question you would meet please check Network connections firstly
2)Check the working status revealed by the indicators on the network server hub exchange and
network card If abnormal check the network connections
831 I have forgotten the administrator username andor password
To reset the administrator username and password Press and hold down the RESET
BUTTON for 5 seconds Release the power button and the username and password
will be reset back to the factory default administrator username and password
Default administrator username admin
Default administrator password No password
832 IP Address configuration
Check whether IP address of the IP Camera server shares the same subnet as your
work station Click My Computer gt Control PanelgtNetwork amp Dial-up Connections gt
LAN gt Attributes gtInternet Protocols (TCPIP) and check IP Address and Subnet
Mask Make sure they are in the same subnet when configuring IP Camera IP
address manuallyUnable to access IP Camera via web browser
833 Network Configuration
Double Check to ensure that your HTTP server software is configured and running
properly If you are running any firewall software make sure it is allowing inbound
connections to port 80Also if you happen to be using a cableDSL router make sure
IPCAM User Manual
61
you are set up port forwarding properly ( consult your router is documentation for more
information ) If none of these seem to be the problem it is also possible that your
ISP is blocking inbound connections to port 80 ndashmany IPSs have done this because
of internet worms such as Code Red If this is the case you bdquoll have to setup your
HTTP server on an alternate port (such as 8080)
834 No Monitoring picture
It has four reasons Images of the abnormal factors
1If its not use Directx function and lead to not normal to display the color imagePlease
install DirectX and open the start menu then input the command
Picture 121
You use the DirectX function and it will expedite the DirectDrawDirect3D and AGP if its can not maybe the
connect issues or hardware not read it
2The issues of hardware canrsquot support the card expedite image
3The antivirus software will influence the network it will be stoped or closedIf you install fireproof software
please close it and try again
4 ActiveX controller is not installed correctly
If its not image on the first time to use and will display to the user through the ActiveXIf its can not
display of the image maybe it fail of install about this issues please follow as
1Install ldquoIP Camera Toolrdquo ActiveX control at the same time
2Please install ActiveX control and keep the security settings for IE browser
835 Problems with network bandwidth
The image frame rate is subjected to the following factors 1network bandwidth 2 PC
performancenetwork environment and display preference setting (brightness theme
etc) 3 the number of visitors (Too many visitors will slow down the image frame rate) 4
choice of switch or hub (Use a switch for multiple IP Camera Servers rather than a HUB)
The Device use MJEPT Compression it needs good network bandwidth If it is too narrow it will lead to slowly
browser Typical video parameter occupy network bandwidth as blows
640x48030fps 40 Megabits ~ 50 Megabits
320x24030fps 12 Megabits ~ 16 Megabits
IPCAM User Manual
62
middot836 Why pop-up the prompt ldquoFail to connect to the devicehelliprdquo
This prompt only appeared in the case of using multiple cameras
Enter the Multi-Device Settings page(login as administrator) to check the
Device setting is correct or not
When one of the multiple cameras disconnected the color changed to
yellow and pop-up the promptldquoFail to connect to the devicehelliprdquo
Picture 122
837 Canrsquot access the IPCAM in the internet
There are some reasons
1 ActiveX controller is not installed correctly(see more details 514)
2 The port IPCAM used is blocked by Firewall or Anti-virus software Please change a
port number and try again
3 Port mapping is not success You can do port mapping by two ways
Enter setting page of the router which IPCAM connect with to enable UPnP function
Enter IPCAM ldquoUPnP Settingsrdquo to enable UPnP and make sure the state is ldquoUPnP
successrdquo
‟ s IP
and port to the Virtual map list
When use ADSL the IP is dynamic You should set DDNS(see more details 74 amp 80)
and also make sure port mapping success
84 Operate common problem solving
IP camera tool canrsquot find the camera
Except of the camera broken
1 Make sure the cable connector no problem recommend connector
(AMP)it is with international standard Another note IPCAMrsquos data
transmission channel require higher than computerrsquos so maybe the
IPCAM User Manual
63
computer can run normally but IPCAM canrsquot Please press heavily when making the cable connector
2 Confirm the power supply normally First check whether power indication
light turn on or not If it is onthen check the yellow light on RJ45 Port
(power indication light) and green light (network indication light) are on or
notIf they are onso power supply and cable runs normally
3 Confirm all the firwall and antivirus software are closeThe firewall often
block unrecognized data so if the firewall is running so maybe the IPCAM
TOOL canrsquot find the deviceSuggest to close firewall and antivirus
software temporarily before searching
How to solve the camera blank screen
1 Check if you are using the wrong power adaptorplease use original one
2 Close antivirus software
How to solve the camera canrsquot login by Internet
1 Check if you set DDNS success or not
2 Check the current IPCAMrsquos port number is the same as routerrsquosThey need to keep same
Canrsquot view the monitoring picture
1 Reason canrsquot connect with network
SolutionCheck if the network connect well exclude cable fault and PC virus
cause network fault until can be used between PC and PING
2 ReasonIP address occupy by other device
Solution Choose automatic gain
3 Reason IP address located within different subnet
Solution Check IPCAMrsquoS ip address and subnet mask address and gateway settings
4 ReasonWeb port has been modified
Solutioncontact network administrator to obtain port information
5 Reasonunknown
SolutionPress reset button to factory default statethen reconnectingsysten
default to gain ip address automaticsubnet mask is 2552552550
85 Default Parameters
middotDefault network Parameters
IP address dynamic obtain
Subnet mask 2552552550
Gateway dynamic obtain
DDNS Factory provide
middotUsername and password
Default administrator username admin
Default administrator password No password
IPCAM User Manual
64
86 Technical Parameters
ITEM IP CAM (NIP-02BGPWA2)
Image Sensor
Mage sensor 15 Color CMOS Sensor
Display 640 x 480 (300K Pixels)
Lens f36mm F24 (IR Lens)
Miniillumination 05 Lux
Lens Lens Type Glass Lens
Viewing Angle 60 Degree
Audio Microphone Audio of two way
Domain name Server MSN server DDNS server
Video
Image Compression MJPEG
Image Frame Rate 15 FPS(VGA)30FPS(QVGA)
Resolution 640 x 480(VGA) 320 x 240(QVGA)
Flip Mirror Images rtical Horizontal
mode 50Hz 60Hz or Outdoor
Video Parameters Brightness Contrast
Communication
Ethernet One 10100Mbps RJ-45
Supported Protocol HTTPDHCPIPTCPUDPFTPSMTPDDNSPPPoEUPnP
Mobilephone monitor Support IphoneIpad3G phonesmartphone
Wireless Standard IEEE 80211bg
Wireless Standard 80211b11Mbps(max) 80211g54Mbps(max)
Wireless Security 64128-bitWEP Encryption
Physical
PanTilt Angle Horizontal270deg amp Vertical 120deg
Infrared Light 10 IR LEDs Night visibility up to 15 Mete
Product size 100(L) x100(W) x125mm(H)
Gross Weight 6465gpcs (packing size196x165x123mm)
Net Weight 2547gpcs (only product)
Power Specification DC 5V25A 18 meter
Power Consumption 5 Watts
Environment
Operate Temper 0deg~ 55degC (14degF~122degF)
Operating Humidity 20 ~ 85 non-condensing
Storage Temper -10degC ~ 60deg (14degF ~140degF)
Storage Humidity 0 ~ 90 non-condensing
PC Requirements
CPU 20GHZ or above (suggested 30GHz)
Memory Size 512MB or above (suggested 10GB)
Display card 64M or above
Supported OS Microsoft Windows XPVistaWindows7
Supported browsers IEfirefoxGoogle
Certification CEFCCRoHS
Warranty Limited 1-year warranty
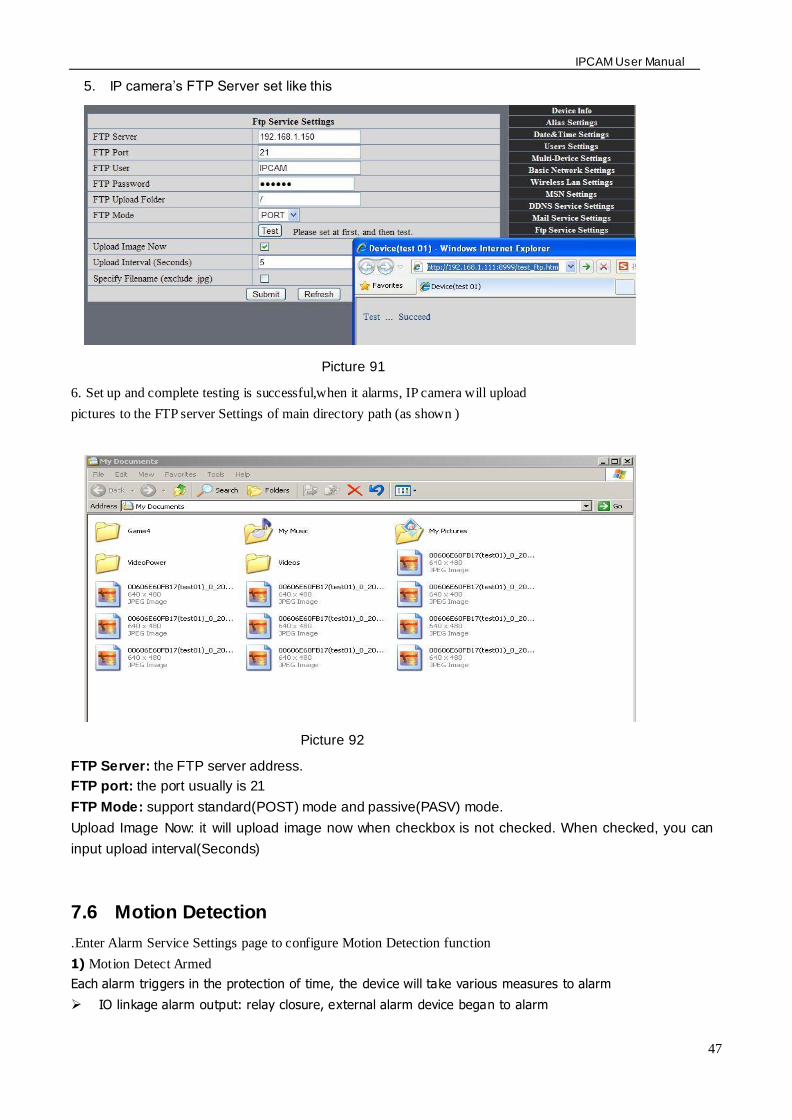
IPCAM User Manual
52
8 APPENDIX
81 REGISTER AND APPLY FOR DDNS SERVICE
1Users use DDNS management system first timeUsers need to apply account to manage
and inquire the domain state
Step1 enter httpwwwdyndnscom and Create Account( Fill in Domain Name dyndnsorg then Click
Add)
Figure103
Step2 enter your information
Figure104
IPCAM User Manual
53
Figure105
Step3 After a minute you will receive an E-mail from DynDNS Support and it will give you a
confirmation address
(eg httpsaccountdyncomemlcreateconflILHMZHRje5oF_6YXTYv1A
Figure106
IPCAM User Manual
54
Step4 Open the link to active your Domain Name as belowLogin in your account after it is activated
Figure107
Step5 Check all the DDNS serviceswe choose the 14-day-trial
Figure108
Step6 Click the linkand user will see as below
IPCAM User Manual
55
middotenter your information
Figure109
Step7 Now you obtained a Dynamic Domain Name(Figure 105)and can use it in the DDNS Service
Settings(details 74)
Figure110
IPCAM User Manual
56
2For DDNS which is applied successfully you can fill in the IP CAMERA When set successfully the status
of IP will be shown as blows
picture 111
picture 112
3How to set DDNS on line
The first wayMenu rdquostartrdquo- ldquorunrdquomdashgt Input CMDClink rdquoenterrdquoIt can check DDNS Statas
via As shown below
Picture 113
IPCAM User Manual
57
Through the PING command this dynamic domain name can be back in the network response information It
proves that the domain name has been online
If the domain name update not success Possible reasons
(1) DDNS parameter is not correct (2) may cause DNS address configuration is wrong
82 Some special application for IPCAMERA
IPCamUse some grammar parameter control and Use IPCam
useruser
pwdpassword
priThe current access (1 visitors 23 operator managers)
resolutionImage resolution(832024 0qvga32640480 vga)
ratemage transmission speed and scope 0-23
brightnessbrightness0~255
contrastcontrast0~6
mode
Mode 050 hz For
60 hz 2 outdoor
flip
Flip rotation 0 primitive 1 vertical reverses 2 horizontal 3 vertical flip + horizontal
821 The flow media player VLC player and mplayer can real-time broadcast ipcamera and send
of streaming media format video data
(Grammar parametersvideostreamasfuser=amppwd=ampresolution=amprate=)
As shown Picture 113 rdquoIpcamrdquo
Picture 114
IPCAM User Manual
58
From the following picture we can view that Ipcam local IP address ishttp19216811118999
WAN IP Address is httpwell888dyndnsorg8999 we can inputrdquoIPcamrdquorsquoS IP address to
open in the player
Picture 115
the CLC media player open play position
Picture 116
LAN play address
Picture 117
IPCAM User Manual
59
Picture 118
Open the Internet play position
Picture 119
As shown in the following picture It can see the ipcamera send video streaming format
Size 640X480
User
IPCAM User Manual
60
Picture 120
83 Frequently Asked Questions
Note1) Any question you would meet please check Network connections firstly
2)Check the working status revealed by the indicators on the network server hub exchange and
network card If abnormal check the network connections
831 I have forgotten the administrator username andor password
To reset the administrator username and password Press and hold down the RESET
BUTTON for 5 seconds Release the power button and the username and password
will be reset back to the factory default administrator username and password
Default administrator username admin
Default administrator password No password
832 IP Address configuration
Check whether IP address of the IP Camera server shares the same subnet as your
work station Click My Computer gt Control PanelgtNetwork amp Dial-up Connections gt
LAN gt Attributes gtInternet Protocols (TCPIP) and check IP Address and Subnet
Mask Make sure they are in the same subnet when configuring IP Camera IP
address manuallyUnable to access IP Camera via web browser
833 Network Configuration
Double Check to ensure that your HTTP server software is configured and running
properly If you are running any firewall software make sure it is allowing inbound
connections to port 80Also if you happen to be using a cableDSL router make sure
IPCAM User Manual
61
you are set up port forwarding properly ( consult your router is documentation for more
information ) If none of these seem to be the problem it is also possible that your
ISP is blocking inbound connections to port 80 ndashmany IPSs have done this because
of internet worms such as Code Red If this is the case you bdquoll have to setup your
HTTP server on an alternate port (such as 8080)
834 No Monitoring picture
It has four reasons Images of the abnormal factors
1If its not use Directx function and lead to not normal to display the color imagePlease
install DirectX and open the start menu then input the command
Picture 121
You use the DirectX function and it will expedite the DirectDrawDirect3D and AGP if its can not maybe the
connect issues or hardware not read it
2The issues of hardware canrsquot support the card expedite image
3The antivirus software will influence the network it will be stoped or closedIf you install fireproof software
please close it and try again
4 ActiveX controller is not installed correctly
If its not image on the first time to use and will display to the user through the ActiveXIf its can not
display of the image maybe it fail of install about this issues please follow as
1Install ldquoIP Camera Toolrdquo ActiveX control at the same time
2Please install ActiveX control and keep the security settings for IE browser
835 Problems with network bandwidth
The image frame rate is subjected to the following factors 1network bandwidth 2 PC
performancenetwork environment and display preference setting (brightness theme
etc) 3 the number of visitors (Too many visitors will slow down the image frame rate) 4
choice of switch or hub (Use a switch for multiple IP Camera Servers rather than a HUB)
The Device use MJEPT Compression it needs good network bandwidth If it is too narrow it will lead to slowly
browser Typical video parameter occupy network bandwidth as blows
640x48030fps 40 Megabits ~ 50 Megabits
320x24030fps 12 Megabits ~ 16 Megabits
IPCAM User Manual
62
middot836 Why pop-up the prompt ldquoFail to connect to the devicehelliprdquo
This prompt only appeared in the case of using multiple cameras
Enter the Multi-Device Settings page(login as administrator) to check the
Device setting is correct or not
When one of the multiple cameras disconnected the color changed to
yellow and pop-up the promptldquoFail to connect to the devicehelliprdquo
Picture 122
837 Canrsquot access the IPCAM in the internet
There are some reasons
1 ActiveX controller is not installed correctly(see more details 514)
2 The port IPCAM used is blocked by Firewall or Anti-virus software Please change a
port number and try again
3 Port mapping is not success You can do port mapping by two ways
Enter setting page of the router which IPCAM connect with to enable UPnP function
Enter IPCAM ldquoUPnP Settingsrdquo to enable UPnP and make sure the state is ldquoUPnP
successrdquo
‟ s IP
and port to the Virtual map list
When use ADSL the IP is dynamic You should set DDNS(see more details 74 amp 80)
and also make sure port mapping success
84 Operate common problem solving
IP camera tool canrsquot find the camera
Except of the camera broken
1 Make sure the cable connector no problem recommend connector
(AMP)it is with international standard Another note IPCAMrsquos data
transmission channel require higher than computerrsquos so maybe the
IPCAM User Manual
63
computer can run normally but IPCAM canrsquot Please press heavily when making the cable connector
2 Confirm the power supply normally First check whether power indication
light turn on or not If it is onthen check the yellow light on RJ45 Port
(power indication light) and green light (network indication light) are on or
notIf they are onso power supply and cable runs normally
3 Confirm all the firwall and antivirus software are closeThe firewall often
block unrecognized data so if the firewall is running so maybe the IPCAM
TOOL canrsquot find the deviceSuggest to close firewall and antivirus
software temporarily before searching
How to solve the camera blank screen
1 Check if you are using the wrong power adaptorplease use original one
2 Close antivirus software
How to solve the camera canrsquot login by Internet
1 Check if you set DDNS success or not
2 Check the current IPCAMrsquos port number is the same as routerrsquosThey need to keep same
Canrsquot view the monitoring picture
1 Reason canrsquot connect with network
SolutionCheck if the network connect well exclude cable fault and PC virus
cause network fault until can be used between PC and PING
2 ReasonIP address occupy by other device
Solution Choose automatic gain
3 Reason IP address located within different subnet
Solution Check IPCAMrsquoS ip address and subnet mask address and gateway settings
4 ReasonWeb port has been modified
Solutioncontact network administrator to obtain port information
5 Reasonunknown
SolutionPress reset button to factory default statethen reconnectingsysten
default to gain ip address automaticsubnet mask is 2552552550
85 Default Parameters
middotDefault network Parameters
IP address dynamic obtain
Subnet mask 2552552550
Gateway dynamic obtain
DDNS Factory provide
middotUsername and password
Default administrator username admin
Default administrator password No password
IPCAM User Manual
64
86 Technical Parameters
ITEM IP CAM (NIP-02BGPWA2)
Image Sensor
Mage sensor 15 Color CMOS Sensor
Display 640 x 480 (300K Pixels)
Lens f36mm F24 (IR Lens)
Miniillumination 05 Lux
Lens Lens Type Glass Lens
Viewing Angle 60 Degree
Audio Microphone Audio of two way
Domain name Server MSN server DDNS server
Video
Image Compression MJPEG
Image Frame Rate 15 FPS(VGA)30FPS(QVGA)
Resolution 640 x 480(VGA) 320 x 240(QVGA)
Flip Mirror Images rtical Horizontal
mode 50Hz 60Hz or Outdoor
Video Parameters Brightness Contrast
Communication
Ethernet One 10100Mbps RJ-45
Supported Protocol HTTPDHCPIPTCPUDPFTPSMTPDDNSPPPoEUPnP
Mobilephone monitor Support IphoneIpad3G phonesmartphone
Wireless Standard IEEE 80211bg
Wireless Standard 80211b11Mbps(max) 80211g54Mbps(max)
Wireless Security 64128-bitWEP Encryption
Physical
PanTilt Angle Horizontal270deg amp Vertical 120deg
Infrared Light 10 IR LEDs Night visibility up to 15 Mete
Product size 100(L) x100(W) x125mm(H)
Gross Weight 6465gpcs (packing size196x165x123mm)
Net Weight 2547gpcs (only product)
Power Specification DC 5V25A 18 meter
Power Consumption 5 Watts
Environment
Operate Temper 0deg~ 55degC (14degF~122degF)
Operating Humidity 20 ~ 85 non-condensing
Storage Temper -10degC ~ 60deg (14degF ~140degF)
Storage Humidity 0 ~ 90 non-condensing
PC Requirements
CPU 20GHZ or above (suggested 30GHz)
Memory Size 512MB or above (suggested 10GB)
Display card 64M or above
Supported OS Microsoft Windows XPVistaWindows7
Supported browsers IEfirefoxGoogle
Certification CEFCCRoHS
Warranty Limited 1-year warranty
IPCAM User Manual
53
Figure105
Step3 After a minute you will receive an E-mail from DynDNS Support and it will give you a
confirmation address
(eg httpsaccountdyncomemlcreateconflILHMZHRje5oF_6YXTYv1A
Figure106
IPCAM User Manual
54
Step4 Open the link to active your Domain Name as belowLogin in your account after it is activated
Figure107
Step5 Check all the DDNS serviceswe choose the 14-day-trial
Figure108
Step6 Click the linkand user will see as below
IPCAM User Manual
55
middotenter your information
Figure109
Step7 Now you obtained a Dynamic Domain Name(Figure 105)and can use it in the DDNS Service
Settings(details 74)
Figure110
IPCAM User Manual
56
2For DDNS which is applied successfully you can fill in the IP CAMERA When set successfully the status
of IP will be shown as blows
picture 111
picture 112
3How to set DDNS on line
The first wayMenu rdquostartrdquo- ldquorunrdquomdashgt Input CMDClink rdquoenterrdquoIt can check DDNS Statas
via As shown below
Picture 113
IPCAM User Manual
57
Through the PING command this dynamic domain name can be back in the network response information It
proves that the domain name has been online
If the domain name update not success Possible reasons
(1) DDNS parameter is not correct (2) may cause DNS address configuration is wrong
82 Some special application for IPCAMERA
IPCamUse some grammar parameter control and Use IPCam
useruser
pwdpassword
priThe current access (1 visitors 23 operator managers)
resolutionImage resolution(832024 0qvga32640480 vga)
ratemage transmission speed and scope 0-23
brightnessbrightness0~255
contrastcontrast0~6
mode
Mode 050 hz For
60 hz 2 outdoor
flip
Flip rotation 0 primitive 1 vertical reverses 2 horizontal 3 vertical flip + horizontal
821 The flow media player VLC player and mplayer can real-time broadcast ipcamera and send
of streaming media format video data
(Grammar parametersvideostreamasfuser=amppwd=ampresolution=amprate=)
As shown Picture 113 rdquoIpcamrdquo
Picture 114
IPCAM User Manual
58
From the following picture we can view that Ipcam local IP address ishttp19216811118999
WAN IP Address is httpwell888dyndnsorg8999 we can inputrdquoIPcamrdquorsquoS IP address to
open in the player
Picture 115
the CLC media player open play position
Picture 116
LAN play address
Picture 117
IPCAM User Manual
59
Picture 118
Open the Internet play position
Picture 119
As shown in the following picture It can see the ipcamera send video streaming format
Size 640X480
User
IPCAM User Manual
60
Picture 120
83 Frequently Asked Questions
Note1) Any question you would meet please check Network connections firstly
2)Check the working status revealed by the indicators on the network server hub exchange and
network card If abnormal check the network connections
831 I have forgotten the administrator username andor password
To reset the administrator username and password Press and hold down the RESET
BUTTON for 5 seconds Release the power button and the username and password
will be reset back to the factory default administrator username and password
Default administrator username admin
Default administrator password No password
832 IP Address configuration
Check whether IP address of the IP Camera server shares the same subnet as your
work station Click My Computer gt Control PanelgtNetwork amp Dial-up Connections gt
LAN gt Attributes gtInternet Protocols (TCPIP) and check IP Address and Subnet
Mask Make sure they are in the same subnet when configuring IP Camera IP
address manuallyUnable to access IP Camera via web browser
833 Network Configuration
Double Check to ensure that your HTTP server software is configured and running
properly If you are running any firewall software make sure it is allowing inbound
connections to port 80Also if you happen to be using a cableDSL router make sure
IPCAM User Manual
61
you are set up port forwarding properly ( consult your router is documentation for more
information ) If none of these seem to be the problem it is also possible that your
ISP is blocking inbound connections to port 80 ndashmany IPSs have done this because
of internet worms such as Code Red If this is the case you bdquoll have to setup your
HTTP server on an alternate port (such as 8080)
834 No Monitoring picture
It has four reasons Images of the abnormal factors
1If its not use Directx function and lead to not normal to display the color imagePlease
install DirectX and open the start menu then input the command
Picture 121
You use the DirectX function and it will expedite the DirectDrawDirect3D and AGP if its can not maybe the
connect issues or hardware not read it
2The issues of hardware canrsquot support the card expedite image
3The antivirus software will influence the network it will be stoped or closedIf you install fireproof software
please close it and try again
4 ActiveX controller is not installed correctly
If its not image on the first time to use and will display to the user through the ActiveXIf its can not
display of the image maybe it fail of install about this issues please follow as
1Install ldquoIP Camera Toolrdquo ActiveX control at the same time
2Please install ActiveX control and keep the security settings for IE browser
835 Problems with network bandwidth
The image frame rate is subjected to the following factors 1network bandwidth 2 PC
performancenetwork environment and display preference setting (brightness theme
etc) 3 the number of visitors (Too many visitors will slow down the image frame rate) 4
choice of switch or hub (Use a switch for multiple IP Camera Servers rather than a HUB)
The Device use MJEPT Compression it needs good network bandwidth If it is too narrow it will lead to slowly
browser Typical video parameter occupy network bandwidth as blows
640x48030fps 40 Megabits ~ 50 Megabits
320x24030fps 12 Megabits ~ 16 Megabits
IPCAM User Manual
62
middot836 Why pop-up the prompt ldquoFail to connect to the devicehelliprdquo
This prompt only appeared in the case of using multiple cameras
Enter the Multi-Device Settings page(login as administrator) to check the
Device setting is correct or not
When one of the multiple cameras disconnected the color changed to
yellow and pop-up the promptldquoFail to connect to the devicehelliprdquo
Picture 122
837 Canrsquot access the IPCAM in the internet
There are some reasons
1 ActiveX controller is not installed correctly(see more details 514)
2 The port IPCAM used is blocked by Firewall or Anti-virus software Please change a
port number and try again
3 Port mapping is not success You can do port mapping by two ways
Enter setting page of the router which IPCAM connect with to enable UPnP function
Enter IPCAM ldquoUPnP Settingsrdquo to enable UPnP and make sure the state is ldquoUPnP
successrdquo
‟ s IP
and port to the Virtual map list
When use ADSL the IP is dynamic You should set DDNS(see more details 74 amp 80)
and also make sure port mapping success
84 Operate common problem solving
IP camera tool canrsquot find the camera
Except of the camera broken
1 Make sure the cable connector no problem recommend connector
(AMP)it is with international standard Another note IPCAMrsquos data
transmission channel require higher than computerrsquos so maybe the
IPCAM User Manual
63
computer can run normally but IPCAM canrsquot Please press heavily when making the cable connector
2 Confirm the power supply normally First check whether power indication
light turn on or not If it is onthen check the yellow light on RJ45 Port
(power indication light) and green light (network indication light) are on or
notIf they are onso power supply and cable runs normally
3 Confirm all the firwall and antivirus software are closeThe firewall often
block unrecognized data so if the firewall is running so maybe the IPCAM
TOOL canrsquot find the deviceSuggest to close firewall and antivirus
software temporarily before searching
How to solve the camera blank screen
1 Check if you are using the wrong power adaptorplease use original one
2 Close antivirus software
How to solve the camera canrsquot login by Internet
1 Check if you set DDNS success or not
2 Check the current IPCAMrsquos port number is the same as routerrsquosThey need to keep same
Canrsquot view the monitoring picture
1 Reason canrsquot connect with network
SolutionCheck if the network connect well exclude cable fault and PC virus
cause network fault until can be used between PC and PING
2 ReasonIP address occupy by other device
Solution Choose automatic gain
3 Reason IP address located within different subnet
Solution Check IPCAMrsquoS ip address and subnet mask address and gateway settings
4 ReasonWeb port has been modified
Solutioncontact network administrator to obtain port information
5 Reasonunknown
SolutionPress reset button to factory default statethen reconnectingsysten
default to gain ip address automaticsubnet mask is 2552552550
85 Default Parameters
middotDefault network Parameters
IP address dynamic obtain
Subnet mask 2552552550
Gateway dynamic obtain
DDNS Factory provide
middotUsername and password
Default administrator username admin
Default administrator password No password
IPCAM User Manual
64
86 Technical Parameters
ITEM IP CAM (NIP-02BGPWA2)
Image Sensor
Mage sensor 15 Color CMOS Sensor
Display 640 x 480 (300K Pixels)
Lens f36mm F24 (IR Lens)
Miniillumination 05 Lux
Lens Lens Type Glass Lens
Viewing Angle 60 Degree
Audio Microphone Audio of two way
Domain name Server MSN server DDNS server
Video
Image Compression MJPEG
Image Frame Rate 15 FPS(VGA)30FPS(QVGA)
Resolution 640 x 480(VGA) 320 x 240(QVGA)
Flip Mirror Images rtical Horizontal
mode 50Hz 60Hz or Outdoor
Video Parameters Brightness Contrast
Communication
Ethernet One 10100Mbps RJ-45
Supported Protocol HTTPDHCPIPTCPUDPFTPSMTPDDNSPPPoEUPnP
Mobilephone monitor Support IphoneIpad3G phonesmartphone
Wireless Standard IEEE 80211bg
Wireless Standard 80211b11Mbps(max) 80211g54Mbps(max)
Wireless Security 64128-bitWEP Encryption
Physical
PanTilt Angle Horizontal270deg amp Vertical 120deg
Infrared Light 10 IR LEDs Night visibility up to 15 Mete
Product size 100(L) x100(W) x125mm(H)
Gross Weight 6465gpcs (packing size196x165x123mm)
Net Weight 2547gpcs (only product)
Power Specification DC 5V25A 18 meter
Power Consumption 5 Watts
Environment
Operate Temper 0deg~ 55degC (14degF~122degF)
Operating Humidity 20 ~ 85 non-condensing
Storage Temper -10degC ~ 60deg (14degF ~140degF)
Storage Humidity 0 ~ 90 non-condensing
PC Requirements
CPU 20GHZ or above (suggested 30GHz)
Memory Size 512MB or above (suggested 10GB)
Display card 64M or above
Supported OS Microsoft Windows XPVistaWindows7
Supported browsers IEfirefoxGoogle
Certification CEFCCRoHS
Warranty Limited 1-year warranty
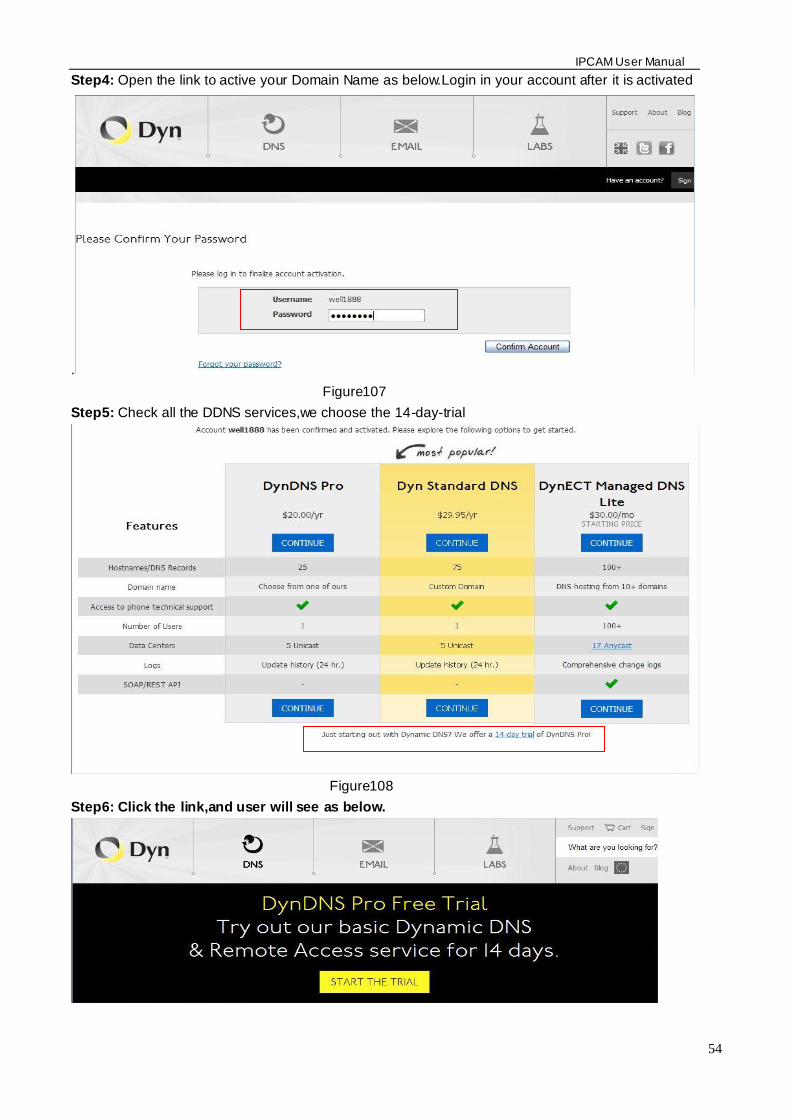
IPCAM User Manual
54
Step4 Open the link to active your Domain Name as belowLogin in your account after it is activated
Figure107
Step5 Check all the DDNS serviceswe choose the 14-day-trial
Figure108
Step6 Click the linkand user will see as below
IPCAM User Manual
55
middotenter your information
Figure109
Step7 Now you obtained a Dynamic Domain Name(Figure 105)and can use it in the DDNS Service
Settings(details 74)
Figure110
IPCAM User Manual
56
2For DDNS which is applied successfully you can fill in the IP CAMERA When set successfully the status
of IP will be shown as blows
picture 111
picture 112
3How to set DDNS on line
The first wayMenu rdquostartrdquo- ldquorunrdquomdashgt Input CMDClink rdquoenterrdquoIt can check DDNS Statas
via As shown below
Picture 113
IPCAM User Manual
57
Through the PING command this dynamic domain name can be back in the network response information It
proves that the domain name has been online
If the domain name update not success Possible reasons
(1) DDNS parameter is not correct (2) may cause DNS address configuration is wrong
82 Some special application for IPCAMERA
IPCamUse some grammar parameter control and Use IPCam
useruser
pwdpassword
priThe current access (1 visitors 23 operator managers)
resolutionImage resolution(832024 0qvga32640480 vga)
ratemage transmission speed and scope 0-23
brightnessbrightness0~255
contrastcontrast0~6
mode
Mode 050 hz For
60 hz 2 outdoor
flip
Flip rotation 0 primitive 1 vertical reverses 2 horizontal 3 vertical flip + horizontal
821 The flow media player VLC player and mplayer can real-time broadcast ipcamera and send
of streaming media format video data
(Grammar parametersvideostreamasfuser=amppwd=ampresolution=amprate=)
As shown Picture 113 rdquoIpcamrdquo
Picture 114
IPCAM User Manual
58
From the following picture we can view that Ipcam local IP address ishttp19216811118999
WAN IP Address is httpwell888dyndnsorg8999 we can inputrdquoIPcamrdquorsquoS IP address to
open in the player
Picture 115
the CLC media player open play position
Picture 116
LAN play address
Picture 117
IPCAM User Manual
59
Picture 118
Open the Internet play position
Picture 119
As shown in the following picture It can see the ipcamera send video streaming format
Size 640X480
User
IPCAM User Manual
60
Picture 120
83 Frequently Asked Questions
Note1) Any question you would meet please check Network connections firstly
2)Check the working status revealed by the indicators on the network server hub exchange and
network card If abnormal check the network connections
831 I have forgotten the administrator username andor password
To reset the administrator username and password Press and hold down the RESET
BUTTON for 5 seconds Release the power button and the username and password
will be reset back to the factory default administrator username and password
Default administrator username admin
Default administrator password No password
832 IP Address configuration
Check whether IP address of the IP Camera server shares the same subnet as your
work station Click My Computer gt Control PanelgtNetwork amp Dial-up Connections gt
LAN gt Attributes gtInternet Protocols (TCPIP) and check IP Address and Subnet
Mask Make sure they are in the same subnet when configuring IP Camera IP
address manuallyUnable to access IP Camera via web browser
833 Network Configuration
Double Check to ensure that your HTTP server software is configured and running
properly If you are running any firewall software make sure it is allowing inbound
connections to port 80Also if you happen to be using a cableDSL router make sure
IPCAM User Manual
61
you are set up port forwarding properly ( consult your router is documentation for more
information ) If none of these seem to be the problem it is also possible that your
ISP is blocking inbound connections to port 80 ndashmany IPSs have done this because
of internet worms such as Code Red If this is the case you bdquoll have to setup your
HTTP server on an alternate port (such as 8080)
834 No Monitoring picture
It has four reasons Images of the abnormal factors
1If its not use Directx function and lead to not normal to display the color imagePlease
install DirectX and open the start menu then input the command
Picture 121
You use the DirectX function and it will expedite the DirectDrawDirect3D and AGP if its can not maybe the
connect issues or hardware not read it
2The issues of hardware canrsquot support the card expedite image
3The antivirus software will influence the network it will be stoped or closedIf you install fireproof software
please close it and try again
4 ActiveX controller is not installed correctly
If its not image on the first time to use and will display to the user through the ActiveXIf its can not
display of the image maybe it fail of install about this issues please follow as
1Install ldquoIP Camera Toolrdquo ActiveX control at the same time
2Please install ActiveX control and keep the security settings for IE browser
835 Problems with network bandwidth
The image frame rate is subjected to the following factors 1network bandwidth 2 PC
performancenetwork environment and display preference setting (brightness theme
etc) 3 the number of visitors (Too many visitors will slow down the image frame rate) 4
choice of switch or hub (Use a switch for multiple IP Camera Servers rather than a HUB)
The Device use MJEPT Compression it needs good network bandwidth If it is too narrow it will lead to slowly
browser Typical video parameter occupy network bandwidth as blows
640x48030fps 40 Megabits ~ 50 Megabits
320x24030fps 12 Megabits ~ 16 Megabits
IPCAM User Manual
62
middot836 Why pop-up the prompt ldquoFail to connect to the devicehelliprdquo
This prompt only appeared in the case of using multiple cameras
Enter the Multi-Device Settings page(login as administrator) to check the
Device setting is correct or not
When one of the multiple cameras disconnected the color changed to
yellow and pop-up the promptldquoFail to connect to the devicehelliprdquo
Picture 122
837 Canrsquot access the IPCAM in the internet
There are some reasons
1 ActiveX controller is not installed correctly(see more details 514)
2 The port IPCAM used is blocked by Firewall or Anti-virus software Please change a
port number and try again
3 Port mapping is not success You can do port mapping by two ways
Enter setting page of the router which IPCAM connect with to enable UPnP function
Enter IPCAM ldquoUPnP Settingsrdquo to enable UPnP and make sure the state is ldquoUPnP
successrdquo
‟ s IP
and port to the Virtual map list
When use ADSL the IP is dynamic You should set DDNS(see more details 74 amp 80)
and also make sure port mapping success
84 Operate common problem solving
IP camera tool canrsquot find the camera
Except of the camera broken
1 Make sure the cable connector no problem recommend connector
(AMP)it is with international standard Another note IPCAMrsquos data
transmission channel require higher than computerrsquos so maybe the
IPCAM User Manual
63
computer can run normally but IPCAM canrsquot Please press heavily when making the cable connector
2 Confirm the power supply normally First check whether power indication
light turn on or not If it is onthen check the yellow light on RJ45 Port
(power indication light) and green light (network indication light) are on or
notIf they are onso power supply and cable runs normally
3 Confirm all the firwall and antivirus software are closeThe firewall often
block unrecognized data so if the firewall is running so maybe the IPCAM
TOOL canrsquot find the deviceSuggest to close firewall and antivirus
software temporarily before searching
How to solve the camera blank screen
1 Check if you are using the wrong power adaptorplease use original one
2 Close antivirus software
How to solve the camera canrsquot login by Internet
1 Check if you set DDNS success or not
2 Check the current IPCAMrsquos port number is the same as routerrsquosThey need to keep same
Canrsquot view the monitoring picture
1 Reason canrsquot connect with network
SolutionCheck if the network connect well exclude cable fault and PC virus
cause network fault until can be used between PC and PING
2 ReasonIP address occupy by other device
Solution Choose automatic gain
3 Reason IP address located within different subnet
Solution Check IPCAMrsquoS ip address and subnet mask address and gateway settings
4 ReasonWeb port has been modified
Solutioncontact network administrator to obtain port information
5 Reasonunknown
SolutionPress reset button to factory default statethen reconnectingsysten
default to gain ip address automaticsubnet mask is 2552552550
85 Default Parameters
middotDefault network Parameters
IP address dynamic obtain
Subnet mask 2552552550
Gateway dynamic obtain
DDNS Factory provide
middotUsername and password
Default administrator username admin
Default administrator password No password
IPCAM User Manual
64
86 Technical Parameters
ITEM IP CAM (NIP-02BGPWA2)
Image Sensor
Mage sensor 15 Color CMOS Sensor
Display 640 x 480 (300K Pixels)
Lens f36mm F24 (IR Lens)
Miniillumination 05 Lux
Lens Lens Type Glass Lens
Viewing Angle 60 Degree
Audio Microphone Audio of two way
Domain name Server MSN server DDNS server
Video
Image Compression MJPEG
Image Frame Rate 15 FPS(VGA)30FPS(QVGA)
Resolution 640 x 480(VGA) 320 x 240(QVGA)
Flip Mirror Images rtical Horizontal
mode 50Hz 60Hz or Outdoor
Video Parameters Brightness Contrast
Communication
Ethernet One 10100Mbps RJ-45
Supported Protocol HTTPDHCPIPTCPUDPFTPSMTPDDNSPPPoEUPnP
Mobilephone monitor Support IphoneIpad3G phonesmartphone
Wireless Standard IEEE 80211bg
Wireless Standard 80211b11Mbps(max) 80211g54Mbps(max)
Wireless Security 64128-bitWEP Encryption
Physical
PanTilt Angle Horizontal270deg amp Vertical 120deg
Infrared Light 10 IR LEDs Night visibility up to 15 Mete
Product size 100(L) x100(W) x125mm(H)
Gross Weight 6465gpcs (packing size196x165x123mm)
Net Weight 2547gpcs (only product)
Power Specification DC 5V25A 18 meter
Power Consumption 5 Watts
Environment
Operate Temper 0deg~ 55degC (14degF~122degF)
Operating Humidity 20 ~ 85 non-condensing
Storage Temper -10degC ~ 60deg (14degF ~140degF)
Storage Humidity 0 ~ 90 non-condensing
PC Requirements
CPU 20GHZ or above (suggested 30GHz)
Memory Size 512MB or above (suggested 10GB)
Display card 64M or above
Supported OS Microsoft Windows XPVistaWindows7
Supported browsers IEfirefoxGoogle
Certification CEFCCRoHS
Warranty Limited 1-year warranty
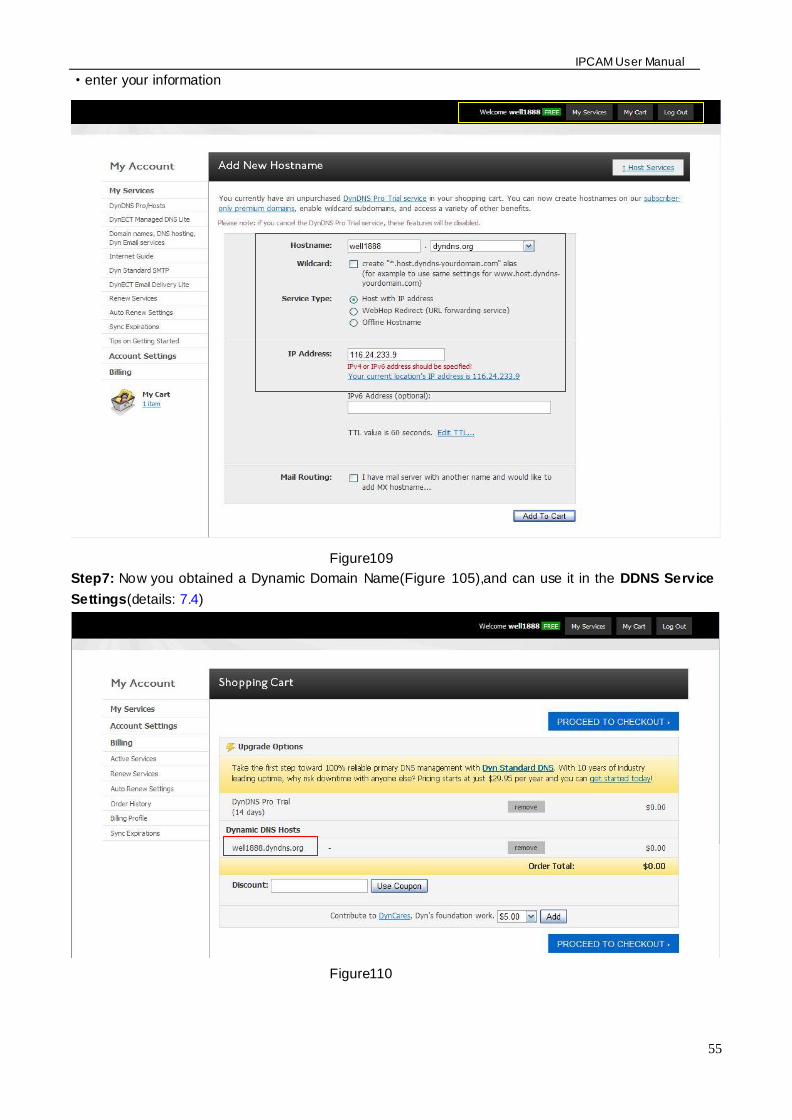
IPCAM User Manual
55
middotenter your information
Figure109
Step7 Now you obtained a Dynamic Domain Name(Figure 105)and can use it in the DDNS Service
Settings(details 74)
Figure110
IPCAM User Manual
56
2For DDNS which is applied successfully you can fill in the IP CAMERA When set successfully the status
of IP will be shown as blows
picture 111
picture 112
3How to set DDNS on line
The first wayMenu rdquostartrdquo- ldquorunrdquomdashgt Input CMDClink rdquoenterrdquoIt can check DDNS Statas
via As shown below
Picture 113
IPCAM User Manual
57
Through the PING command this dynamic domain name can be back in the network response information It
proves that the domain name has been online
If the domain name update not success Possible reasons
(1) DDNS parameter is not correct (2) may cause DNS address configuration is wrong
82 Some special application for IPCAMERA
IPCamUse some grammar parameter control and Use IPCam
useruser
pwdpassword
priThe current access (1 visitors 23 operator managers)
resolutionImage resolution(832024 0qvga32640480 vga)
ratemage transmission speed and scope 0-23
brightnessbrightness0~255
contrastcontrast0~6
mode
Mode 050 hz For
60 hz 2 outdoor
flip
Flip rotation 0 primitive 1 vertical reverses 2 horizontal 3 vertical flip + horizontal
821 The flow media player VLC player and mplayer can real-time broadcast ipcamera and send
of streaming media format video data
(Grammar parametersvideostreamasfuser=amppwd=ampresolution=amprate=)
As shown Picture 113 rdquoIpcamrdquo
Picture 114
IPCAM User Manual
58
From the following picture we can view that Ipcam local IP address ishttp19216811118999
WAN IP Address is httpwell888dyndnsorg8999 we can inputrdquoIPcamrdquorsquoS IP address to
open in the player
Picture 115
the CLC media player open play position
Picture 116
LAN play address
Picture 117
IPCAM User Manual
59
Picture 118
Open the Internet play position
Picture 119
As shown in the following picture It can see the ipcamera send video streaming format
Size 640X480
User
IPCAM User Manual
60
Picture 120
83 Frequently Asked Questions
Note1) Any question you would meet please check Network connections firstly
2)Check the working status revealed by the indicators on the network server hub exchange and
network card If abnormal check the network connections
831 I have forgotten the administrator username andor password
To reset the administrator username and password Press and hold down the RESET
BUTTON for 5 seconds Release the power button and the username and password
will be reset back to the factory default administrator username and password
Default administrator username admin
Default administrator password No password
832 IP Address configuration
Check whether IP address of the IP Camera server shares the same subnet as your
work station Click My Computer gt Control PanelgtNetwork amp Dial-up Connections gt
LAN gt Attributes gtInternet Protocols (TCPIP) and check IP Address and Subnet
Mask Make sure they are in the same subnet when configuring IP Camera IP
address manuallyUnable to access IP Camera via web browser
833 Network Configuration
Double Check to ensure that your HTTP server software is configured and running
properly If you are running any firewall software make sure it is allowing inbound
connections to port 80Also if you happen to be using a cableDSL router make sure
IPCAM User Manual
61
you are set up port forwarding properly ( consult your router is documentation for more
information ) If none of these seem to be the problem it is also possible that your
ISP is blocking inbound connections to port 80 ndashmany IPSs have done this because
of internet worms such as Code Red If this is the case you bdquoll have to setup your
HTTP server on an alternate port (such as 8080)
834 No Monitoring picture
It has four reasons Images of the abnormal factors
1If its not use Directx function and lead to not normal to display the color imagePlease
install DirectX and open the start menu then input the command
Picture 121
You use the DirectX function and it will expedite the DirectDrawDirect3D and AGP if its can not maybe the
connect issues or hardware not read it
2The issues of hardware canrsquot support the card expedite image
3The antivirus software will influence the network it will be stoped or closedIf you install fireproof software
please close it and try again
4 ActiveX controller is not installed correctly
If its not image on the first time to use and will display to the user through the ActiveXIf its can not
display of the image maybe it fail of install about this issues please follow as
1Install ldquoIP Camera Toolrdquo ActiveX control at the same time
2Please install ActiveX control and keep the security settings for IE browser
835 Problems with network bandwidth
The image frame rate is subjected to the following factors 1network bandwidth 2 PC
performancenetwork environment and display preference setting (brightness theme
etc) 3 the number of visitors (Too many visitors will slow down the image frame rate) 4
choice of switch or hub (Use a switch for multiple IP Camera Servers rather than a HUB)
The Device use MJEPT Compression it needs good network bandwidth If it is too narrow it will lead to slowly
browser Typical video parameter occupy network bandwidth as blows
640x48030fps 40 Megabits ~ 50 Megabits
320x24030fps 12 Megabits ~ 16 Megabits
IPCAM User Manual
62
middot836 Why pop-up the prompt ldquoFail to connect to the devicehelliprdquo
This prompt only appeared in the case of using multiple cameras
Enter the Multi-Device Settings page(login as administrator) to check the
Device setting is correct or not
When one of the multiple cameras disconnected the color changed to
yellow and pop-up the promptldquoFail to connect to the devicehelliprdquo
Picture 122
837 Canrsquot access the IPCAM in the internet
There are some reasons
1 ActiveX controller is not installed correctly(see more details 514)
2 The port IPCAM used is blocked by Firewall or Anti-virus software Please change a
port number and try again
3 Port mapping is not success You can do port mapping by two ways
Enter setting page of the router which IPCAM connect with to enable UPnP function
Enter IPCAM ldquoUPnP Settingsrdquo to enable UPnP and make sure the state is ldquoUPnP
successrdquo
‟ s IP
and port to the Virtual map list
When use ADSL the IP is dynamic You should set DDNS(see more details 74 amp 80)
and also make sure port mapping success
84 Operate common problem solving
IP camera tool canrsquot find the camera
Except of the camera broken
1 Make sure the cable connector no problem recommend connector
(AMP)it is with international standard Another note IPCAMrsquos data
transmission channel require higher than computerrsquos so maybe the
IPCAM User Manual
63
computer can run normally but IPCAM canrsquot Please press heavily when making the cable connector
2 Confirm the power supply normally First check whether power indication
light turn on or not If it is onthen check the yellow light on RJ45 Port
(power indication light) and green light (network indication light) are on or
notIf they are onso power supply and cable runs normally
3 Confirm all the firwall and antivirus software are closeThe firewall often
block unrecognized data so if the firewall is running so maybe the IPCAM
TOOL canrsquot find the deviceSuggest to close firewall and antivirus
software temporarily before searching
How to solve the camera blank screen
1 Check if you are using the wrong power adaptorplease use original one
2 Close antivirus software
How to solve the camera canrsquot login by Internet
1 Check if you set DDNS success or not
2 Check the current IPCAMrsquos port number is the same as routerrsquosThey need to keep same
Canrsquot view the monitoring picture
1 Reason canrsquot connect with network
SolutionCheck if the network connect well exclude cable fault and PC virus
cause network fault until can be used between PC and PING
2 ReasonIP address occupy by other device
Solution Choose automatic gain
3 Reason IP address located within different subnet
Solution Check IPCAMrsquoS ip address and subnet mask address and gateway settings
4 ReasonWeb port has been modified
Solutioncontact network administrator to obtain port information
5 Reasonunknown
SolutionPress reset button to factory default statethen reconnectingsysten
default to gain ip address automaticsubnet mask is 2552552550
85 Default Parameters
middotDefault network Parameters
IP address dynamic obtain
Subnet mask 2552552550
Gateway dynamic obtain
DDNS Factory provide
middotUsername and password
Default administrator username admin
Default administrator password No password
IPCAM User Manual
64
86 Technical Parameters
ITEM IP CAM (NIP-02BGPWA2)
Image Sensor
Mage sensor 15 Color CMOS Sensor
Display 640 x 480 (300K Pixels)
Lens f36mm F24 (IR Lens)
Miniillumination 05 Lux
Lens Lens Type Glass Lens
Viewing Angle 60 Degree
Audio Microphone Audio of two way
Domain name Server MSN server DDNS server
Video
Image Compression MJPEG
Image Frame Rate 15 FPS(VGA)30FPS(QVGA)
Resolution 640 x 480(VGA) 320 x 240(QVGA)
Flip Mirror Images rtical Horizontal
mode 50Hz 60Hz or Outdoor
Video Parameters Brightness Contrast
Communication
Ethernet One 10100Mbps RJ-45
Supported Protocol HTTPDHCPIPTCPUDPFTPSMTPDDNSPPPoEUPnP
Mobilephone monitor Support IphoneIpad3G phonesmartphone
Wireless Standard IEEE 80211bg
Wireless Standard 80211b11Mbps(max) 80211g54Mbps(max)
Wireless Security 64128-bitWEP Encryption
Physical
PanTilt Angle Horizontal270deg amp Vertical 120deg
Infrared Light 10 IR LEDs Night visibility up to 15 Mete
Product size 100(L) x100(W) x125mm(H)
Gross Weight 6465gpcs (packing size196x165x123mm)
Net Weight 2547gpcs (only product)
Power Specification DC 5V25A 18 meter
Power Consumption 5 Watts
Environment
Operate Temper 0deg~ 55degC (14degF~122degF)
Operating Humidity 20 ~ 85 non-condensing
Storage Temper -10degC ~ 60deg (14degF ~140degF)
Storage Humidity 0 ~ 90 non-condensing
PC Requirements
CPU 20GHZ or above (suggested 30GHz)
Memory Size 512MB or above (suggested 10GB)
Display card 64M or above
Supported OS Microsoft Windows XPVistaWindows7
Supported browsers IEfirefoxGoogle
Certification CEFCCRoHS
Warranty Limited 1-year warranty
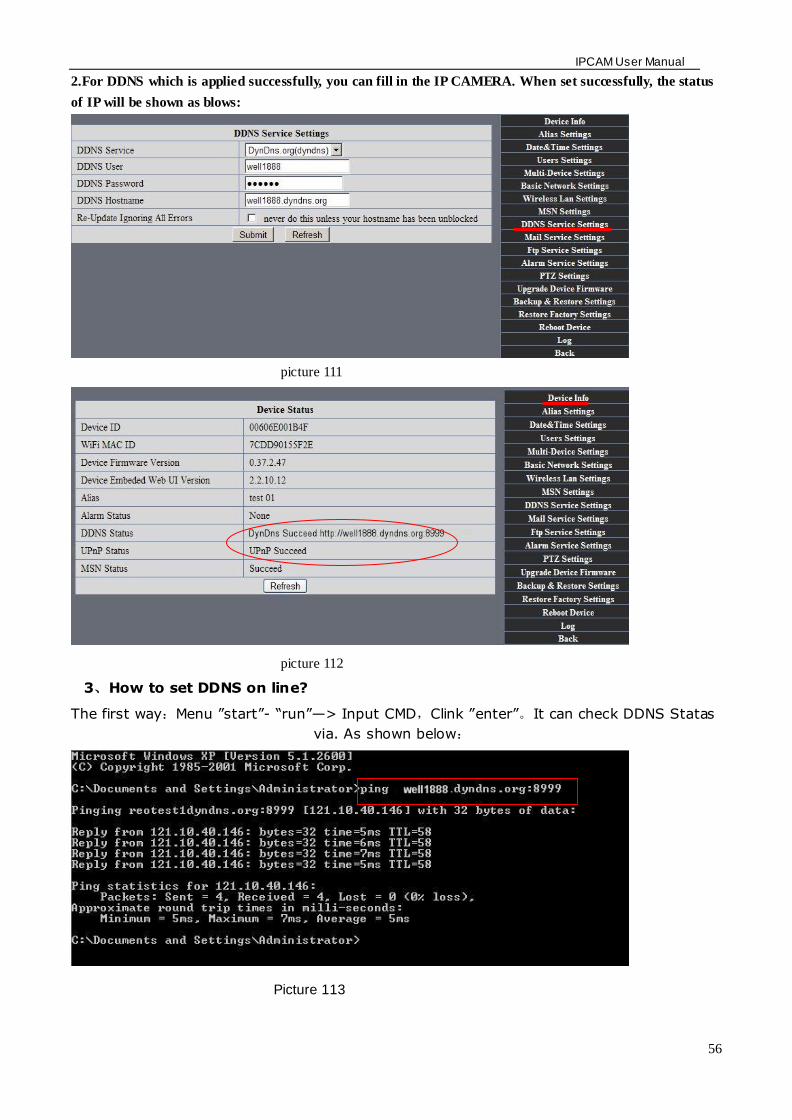
IPCAM User Manual
56
2For DDNS which is applied successfully you can fill in the IP CAMERA When set successfully the status
of IP will be shown as blows
picture 111
picture 112
3How to set DDNS on line
The first wayMenu rdquostartrdquo- ldquorunrdquomdashgt Input CMDClink rdquoenterrdquoIt can check DDNS Statas
via As shown below
Picture 113
IPCAM User Manual
57
Through the PING command this dynamic domain name can be back in the network response information It
proves that the domain name has been online
If the domain name update not success Possible reasons
(1) DDNS parameter is not correct (2) may cause DNS address configuration is wrong
82 Some special application for IPCAMERA
IPCamUse some grammar parameter control and Use IPCam
useruser
pwdpassword
priThe current access (1 visitors 23 operator managers)
resolutionImage resolution(832024 0qvga32640480 vga)
ratemage transmission speed and scope 0-23
brightnessbrightness0~255
contrastcontrast0~6
mode
Mode 050 hz For
60 hz 2 outdoor
flip
Flip rotation 0 primitive 1 vertical reverses 2 horizontal 3 vertical flip + horizontal
821 The flow media player VLC player and mplayer can real-time broadcast ipcamera and send
of streaming media format video data
(Grammar parametersvideostreamasfuser=amppwd=ampresolution=amprate=)
As shown Picture 113 rdquoIpcamrdquo
Picture 114
IPCAM User Manual
58
From the following picture we can view that Ipcam local IP address ishttp19216811118999
WAN IP Address is httpwell888dyndnsorg8999 we can inputrdquoIPcamrdquorsquoS IP address to
open in the player
Picture 115
the CLC media player open play position
Picture 116
LAN play address
Picture 117
IPCAM User Manual
59
Picture 118
Open the Internet play position
Picture 119
As shown in the following picture It can see the ipcamera send video streaming format
Size 640X480
User
IPCAM User Manual
60
Picture 120
83 Frequently Asked Questions
Note1) Any question you would meet please check Network connections firstly
2)Check the working status revealed by the indicators on the network server hub exchange and
network card If abnormal check the network connections
831 I have forgotten the administrator username andor password
To reset the administrator username and password Press and hold down the RESET
BUTTON for 5 seconds Release the power button and the username and password
will be reset back to the factory default administrator username and password
Default administrator username admin
Default administrator password No password
832 IP Address configuration
Check whether IP address of the IP Camera server shares the same subnet as your
work station Click My Computer gt Control PanelgtNetwork amp Dial-up Connections gt
LAN gt Attributes gtInternet Protocols (TCPIP) and check IP Address and Subnet
Mask Make sure they are in the same subnet when configuring IP Camera IP
address manuallyUnable to access IP Camera via web browser
833 Network Configuration
Double Check to ensure that your HTTP server software is configured and running
properly If you are running any firewall software make sure it is allowing inbound
connections to port 80Also if you happen to be using a cableDSL router make sure
IPCAM User Manual
61
you are set up port forwarding properly ( consult your router is documentation for more
information ) If none of these seem to be the problem it is also possible that your
ISP is blocking inbound connections to port 80 ndashmany IPSs have done this because
of internet worms such as Code Red If this is the case you bdquoll have to setup your
HTTP server on an alternate port (such as 8080)
834 No Monitoring picture
It has four reasons Images of the abnormal factors
1If its not use Directx function and lead to not normal to display the color imagePlease
install DirectX and open the start menu then input the command
Picture 121
You use the DirectX function and it will expedite the DirectDrawDirect3D and AGP if its can not maybe the
connect issues or hardware not read it
2The issues of hardware canrsquot support the card expedite image
3The antivirus software will influence the network it will be stoped or closedIf you install fireproof software
please close it and try again
4 ActiveX controller is not installed correctly
If its not image on the first time to use and will display to the user through the ActiveXIf its can not
display of the image maybe it fail of install about this issues please follow as
1Install ldquoIP Camera Toolrdquo ActiveX control at the same time
2Please install ActiveX control and keep the security settings for IE browser
835 Problems with network bandwidth
The image frame rate is subjected to the following factors 1network bandwidth 2 PC
performancenetwork environment and display preference setting (brightness theme
etc) 3 the number of visitors (Too many visitors will slow down the image frame rate) 4
choice of switch or hub (Use a switch for multiple IP Camera Servers rather than a HUB)
The Device use MJEPT Compression it needs good network bandwidth If it is too narrow it will lead to slowly
browser Typical video parameter occupy network bandwidth as blows
640x48030fps 40 Megabits ~ 50 Megabits
320x24030fps 12 Megabits ~ 16 Megabits
IPCAM User Manual
62
middot836 Why pop-up the prompt ldquoFail to connect to the devicehelliprdquo
This prompt only appeared in the case of using multiple cameras
Enter the Multi-Device Settings page(login as administrator) to check the
Device setting is correct or not
When one of the multiple cameras disconnected the color changed to
yellow and pop-up the promptldquoFail to connect to the devicehelliprdquo
Picture 122
837 Canrsquot access the IPCAM in the internet
There are some reasons
1 ActiveX controller is not installed correctly(see more details 514)
2 The port IPCAM used is blocked by Firewall or Anti-virus software Please change a
port number and try again
3 Port mapping is not success You can do port mapping by two ways
Enter setting page of the router which IPCAM connect with to enable UPnP function
Enter IPCAM ldquoUPnP Settingsrdquo to enable UPnP and make sure the state is ldquoUPnP
successrdquo
‟ s IP
and port to the Virtual map list
When use ADSL the IP is dynamic You should set DDNS(see more details 74 amp 80)
and also make sure port mapping success
84 Operate common problem solving
IP camera tool canrsquot find the camera
Except of the camera broken
1 Make sure the cable connector no problem recommend connector
(AMP)it is with international standard Another note IPCAMrsquos data
transmission channel require higher than computerrsquos so maybe the
IPCAM User Manual
63
computer can run normally but IPCAM canrsquot Please press heavily when making the cable connector
2 Confirm the power supply normally First check whether power indication
light turn on or not If it is onthen check the yellow light on RJ45 Port
(power indication light) and green light (network indication light) are on or
notIf they are onso power supply and cable runs normally
3 Confirm all the firwall and antivirus software are closeThe firewall often
block unrecognized data so if the firewall is running so maybe the IPCAM
TOOL canrsquot find the deviceSuggest to close firewall and antivirus
software temporarily before searching
How to solve the camera blank screen
1 Check if you are using the wrong power adaptorplease use original one
2 Close antivirus software
How to solve the camera canrsquot login by Internet
1 Check if you set DDNS success or not
2 Check the current IPCAMrsquos port number is the same as routerrsquosThey need to keep same
Canrsquot view the monitoring picture
1 Reason canrsquot connect with network
SolutionCheck if the network connect well exclude cable fault and PC virus
cause network fault until can be used between PC and PING
2 ReasonIP address occupy by other device
Solution Choose automatic gain
3 Reason IP address located within different subnet
Solution Check IPCAMrsquoS ip address and subnet mask address and gateway settings
4 ReasonWeb port has been modified
Solutioncontact network administrator to obtain port information
5 Reasonunknown
SolutionPress reset button to factory default statethen reconnectingsysten
default to gain ip address automaticsubnet mask is 2552552550
85 Default Parameters
middotDefault network Parameters
IP address dynamic obtain
Subnet mask 2552552550
Gateway dynamic obtain
DDNS Factory provide
middotUsername and password
Default administrator username admin
Default administrator password No password
IPCAM User Manual
64
86 Technical Parameters
ITEM IP CAM (NIP-02BGPWA2)
Image Sensor
Mage sensor 15 Color CMOS Sensor
Display 640 x 480 (300K Pixels)
Lens f36mm F24 (IR Lens)
Miniillumination 05 Lux
Lens Lens Type Glass Lens
Viewing Angle 60 Degree
Audio Microphone Audio of two way
Domain name Server MSN server DDNS server
Video
Image Compression MJPEG
Image Frame Rate 15 FPS(VGA)30FPS(QVGA)
Resolution 640 x 480(VGA) 320 x 240(QVGA)
Flip Mirror Images rtical Horizontal
mode 50Hz 60Hz or Outdoor
Video Parameters Brightness Contrast
Communication
Ethernet One 10100Mbps RJ-45
Supported Protocol HTTPDHCPIPTCPUDPFTPSMTPDDNSPPPoEUPnP
Mobilephone monitor Support IphoneIpad3G phonesmartphone
Wireless Standard IEEE 80211bg
Wireless Standard 80211b11Mbps(max) 80211g54Mbps(max)
Wireless Security 64128-bitWEP Encryption
Physical
PanTilt Angle Horizontal270deg amp Vertical 120deg
Infrared Light 10 IR LEDs Night visibility up to 15 Mete
Product size 100(L) x100(W) x125mm(H)
Gross Weight 6465gpcs (packing size196x165x123mm)
Net Weight 2547gpcs (only product)
Power Specification DC 5V25A 18 meter
Power Consumption 5 Watts
Environment
Operate Temper 0deg~ 55degC (14degF~122degF)
Operating Humidity 20 ~ 85 non-condensing
Storage Temper -10degC ~ 60deg (14degF ~140degF)
Storage Humidity 0 ~ 90 non-condensing
PC Requirements
CPU 20GHZ or above (suggested 30GHz)
Memory Size 512MB or above (suggested 10GB)
Display card 64M or above
Supported OS Microsoft Windows XPVistaWindows7
Supported browsers IEfirefoxGoogle
Certification CEFCCRoHS
Warranty Limited 1-year warranty
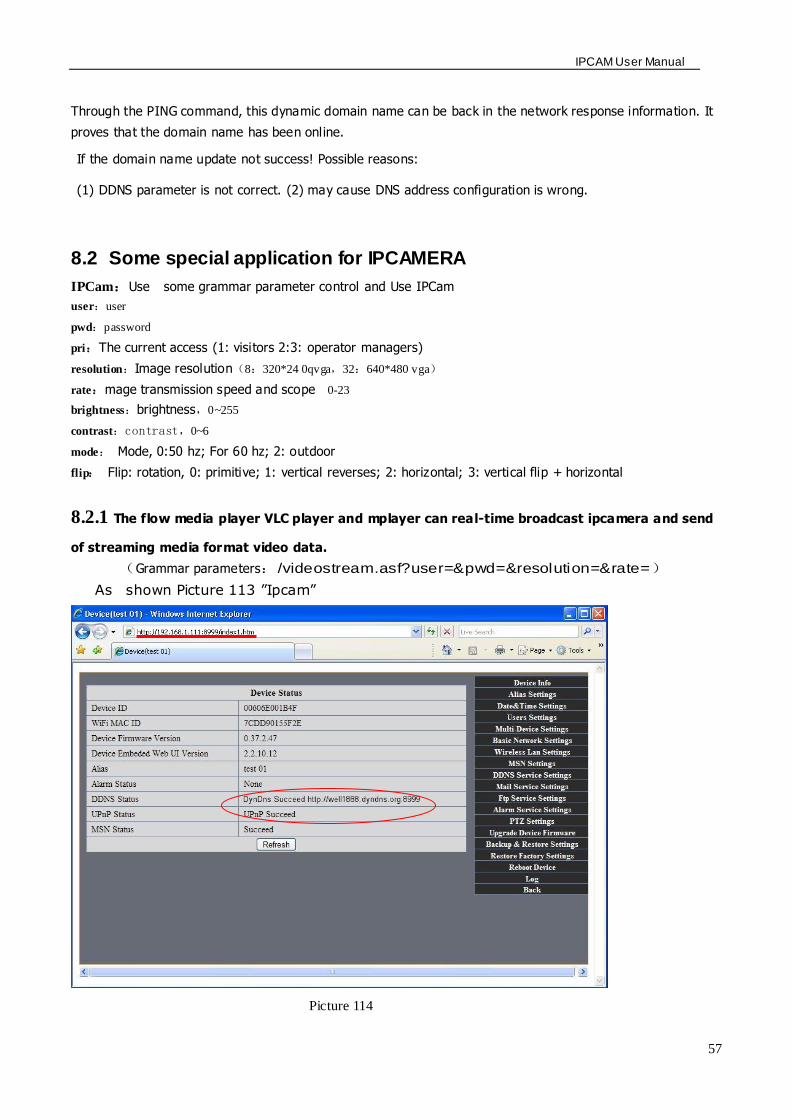
IPCAM User Manual
57
Through the PING command this dynamic domain name can be back in the network response information It
proves that the domain name has been online
If the domain name update not success Possible reasons
(1) DDNS parameter is not correct (2) may cause DNS address configuration is wrong
82 Some special application for IPCAMERA
IPCamUse some grammar parameter control and Use IPCam
useruser
pwdpassword
priThe current access (1 visitors 23 operator managers)
resolutionImage resolution(832024 0qvga32640480 vga)
ratemage transmission speed and scope 0-23
brightnessbrightness0~255
contrastcontrast0~6
mode
Mode 050 hz For
60 hz 2 outdoor
flip
Flip rotation 0 primitive 1 vertical reverses 2 horizontal 3 vertical flip + horizontal
821 The flow media player VLC player and mplayer can real-time broadcast ipcamera and send
of streaming media format video data
(Grammar parametersvideostreamasfuser=amppwd=ampresolution=amprate=)
As shown Picture 113 rdquoIpcamrdquo
Picture 114
IPCAM User Manual
58
From the following picture we can view that Ipcam local IP address ishttp19216811118999
WAN IP Address is httpwell888dyndnsorg8999 we can inputrdquoIPcamrdquorsquoS IP address to
open in the player
Picture 115
the CLC media player open play position
Picture 116
LAN play address
Picture 117
IPCAM User Manual
59
Picture 118
Open the Internet play position
Picture 119
As shown in the following picture It can see the ipcamera send video streaming format
Size 640X480
User
IPCAM User Manual
60
Picture 120
83 Frequently Asked Questions
Note1) Any question you would meet please check Network connections firstly
2)Check the working status revealed by the indicators on the network server hub exchange and
network card If abnormal check the network connections
831 I have forgotten the administrator username andor password
To reset the administrator username and password Press and hold down the RESET
BUTTON for 5 seconds Release the power button and the username and password
will be reset back to the factory default administrator username and password
Default administrator username admin
Default administrator password No password
832 IP Address configuration
Check whether IP address of the IP Camera server shares the same subnet as your
work station Click My Computer gt Control PanelgtNetwork amp Dial-up Connections gt
LAN gt Attributes gtInternet Protocols (TCPIP) and check IP Address and Subnet
Mask Make sure they are in the same subnet when configuring IP Camera IP
address manuallyUnable to access IP Camera via web browser
833 Network Configuration
Double Check to ensure that your HTTP server software is configured and running
properly If you are running any firewall software make sure it is allowing inbound
connections to port 80Also if you happen to be using a cableDSL router make sure
IPCAM User Manual
61
you are set up port forwarding properly ( consult your router is documentation for more
information ) If none of these seem to be the problem it is also possible that your
ISP is blocking inbound connections to port 80 ndashmany IPSs have done this because
of internet worms such as Code Red If this is the case you bdquoll have to setup your
HTTP server on an alternate port (such as 8080)
834 No Monitoring picture
It has four reasons Images of the abnormal factors
1If its not use Directx function and lead to not normal to display the color imagePlease
install DirectX and open the start menu then input the command
Picture 121
You use the DirectX function and it will expedite the DirectDrawDirect3D and AGP if its can not maybe the
connect issues or hardware not read it
2The issues of hardware canrsquot support the card expedite image
3The antivirus software will influence the network it will be stoped or closedIf you install fireproof software
please close it and try again
4 ActiveX controller is not installed correctly
If its not image on the first time to use and will display to the user through the ActiveXIf its can not
display of the image maybe it fail of install about this issues please follow as
1Install ldquoIP Camera Toolrdquo ActiveX control at the same time
2Please install ActiveX control and keep the security settings for IE browser
835 Problems with network bandwidth
The image frame rate is subjected to the following factors 1network bandwidth 2 PC
performancenetwork environment and display preference setting (brightness theme
etc) 3 the number of visitors (Too many visitors will slow down the image frame rate) 4
choice of switch or hub (Use a switch for multiple IP Camera Servers rather than a HUB)
The Device use MJEPT Compression it needs good network bandwidth If it is too narrow it will lead to slowly
browser Typical video parameter occupy network bandwidth as blows
640x48030fps 40 Megabits ~ 50 Megabits
320x24030fps 12 Megabits ~ 16 Megabits
IPCAM User Manual
62
middot836 Why pop-up the prompt ldquoFail to connect to the devicehelliprdquo
This prompt only appeared in the case of using multiple cameras
Enter the Multi-Device Settings page(login as administrator) to check the
Device setting is correct or not
When one of the multiple cameras disconnected the color changed to
yellow and pop-up the promptldquoFail to connect to the devicehelliprdquo
Picture 122
837 Canrsquot access the IPCAM in the internet
There are some reasons
1 ActiveX controller is not installed correctly(see more details 514)
2 The port IPCAM used is blocked by Firewall or Anti-virus software Please change a
port number and try again
3 Port mapping is not success You can do port mapping by two ways
Enter setting page of the router which IPCAM connect with to enable UPnP function
Enter IPCAM ldquoUPnP Settingsrdquo to enable UPnP and make sure the state is ldquoUPnP
successrdquo
‟ s IP
and port to the Virtual map list
When use ADSL the IP is dynamic You should set DDNS(see more details 74 amp 80)
and also make sure port mapping success
84 Operate common problem solving
IP camera tool canrsquot find the camera
Except of the camera broken
1 Make sure the cable connector no problem recommend connector
(AMP)it is with international standard Another note IPCAMrsquos data
transmission channel require higher than computerrsquos so maybe the
IPCAM User Manual
63
computer can run normally but IPCAM canrsquot Please press heavily when making the cable connector
2 Confirm the power supply normally First check whether power indication
light turn on or not If it is onthen check the yellow light on RJ45 Port
(power indication light) and green light (network indication light) are on or
notIf they are onso power supply and cable runs normally
3 Confirm all the firwall and antivirus software are closeThe firewall often
block unrecognized data so if the firewall is running so maybe the IPCAM
TOOL canrsquot find the deviceSuggest to close firewall and antivirus
software temporarily before searching
How to solve the camera blank screen
1 Check if you are using the wrong power adaptorplease use original one
2 Close antivirus software
How to solve the camera canrsquot login by Internet
1 Check if you set DDNS success or not
2 Check the current IPCAMrsquos port number is the same as routerrsquosThey need to keep same
Canrsquot view the monitoring picture
1 Reason canrsquot connect with network
SolutionCheck if the network connect well exclude cable fault and PC virus
cause network fault until can be used between PC and PING
2 ReasonIP address occupy by other device
Solution Choose automatic gain
3 Reason IP address located within different subnet
Solution Check IPCAMrsquoS ip address and subnet mask address and gateway settings
4 ReasonWeb port has been modified
Solutioncontact network administrator to obtain port information
5 Reasonunknown
SolutionPress reset button to factory default statethen reconnectingsysten
default to gain ip address automaticsubnet mask is 2552552550
85 Default Parameters
middotDefault network Parameters
IP address dynamic obtain
Subnet mask 2552552550
Gateway dynamic obtain
DDNS Factory provide
middotUsername and password
Default administrator username admin
Default administrator password No password
IPCAM User Manual
64
86 Technical Parameters
ITEM IP CAM (NIP-02BGPWA2)
Image Sensor
Mage sensor 15 Color CMOS Sensor
Display 640 x 480 (300K Pixels)
Lens f36mm F24 (IR Lens)
Miniillumination 05 Lux
Lens Lens Type Glass Lens
Viewing Angle 60 Degree
Audio Microphone Audio of two way
Domain name Server MSN server DDNS server
Video
Image Compression MJPEG
Image Frame Rate 15 FPS(VGA)30FPS(QVGA)
Resolution 640 x 480(VGA) 320 x 240(QVGA)
Flip Mirror Images rtical Horizontal
mode 50Hz 60Hz or Outdoor
Video Parameters Brightness Contrast
Communication
Ethernet One 10100Mbps RJ-45
Supported Protocol HTTPDHCPIPTCPUDPFTPSMTPDDNSPPPoEUPnP
Mobilephone monitor Support IphoneIpad3G phonesmartphone
Wireless Standard IEEE 80211bg
Wireless Standard 80211b11Mbps(max) 80211g54Mbps(max)
Wireless Security 64128-bitWEP Encryption
Physical
PanTilt Angle Horizontal270deg amp Vertical 120deg
Infrared Light 10 IR LEDs Night visibility up to 15 Mete
Product size 100(L) x100(W) x125mm(H)
Gross Weight 6465gpcs (packing size196x165x123mm)
Net Weight 2547gpcs (only product)
Power Specification DC 5V25A 18 meter
Power Consumption 5 Watts
Environment
Operate Temper 0deg~ 55degC (14degF~122degF)
Operating Humidity 20 ~ 85 non-condensing
Storage Temper -10degC ~ 60deg (14degF ~140degF)
Storage Humidity 0 ~ 90 non-condensing
PC Requirements
CPU 20GHZ or above (suggested 30GHz)
Memory Size 512MB or above (suggested 10GB)
Display card 64M or above
Supported OS Microsoft Windows XPVistaWindows7
Supported browsers IEfirefoxGoogle
Certification CEFCCRoHS
Warranty Limited 1-year warranty
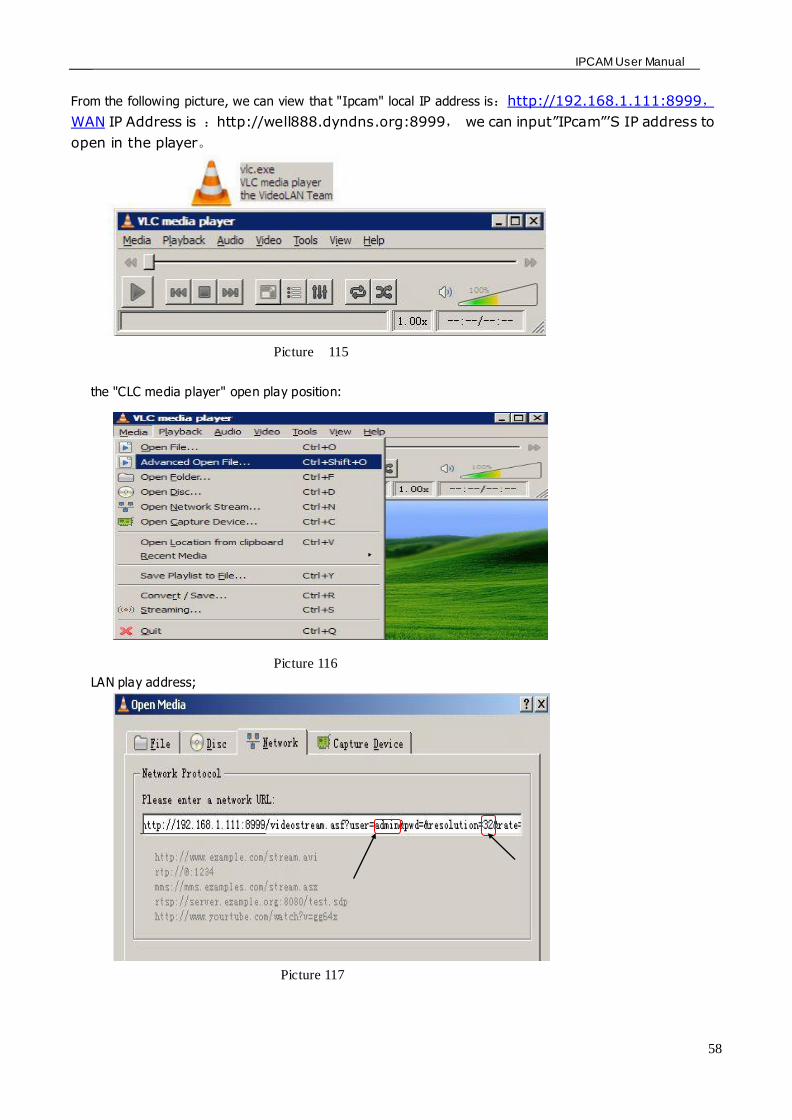
IPCAM User Manual
58
From the following picture we can view that Ipcam local IP address ishttp19216811118999
WAN IP Address is httpwell888dyndnsorg8999 we can inputrdquoIPcamrdquorsquoS IP address to
open in the player
Picture 115
the CLC media player open play position
Picture 116
LAN play address
Picture 117
IPCAM User Manual
59
Picture 118
Open the Internet play position
Picture 119
As shown in the following picture It can see the ipcamera send video streaming format
Size 640X480
User
IPCAM User Manual
60
Picture 120
83 Frequently Asked Questions
Note1) Any question you would meet please check Network connections firstly
2)Check the working status revealed by the indicators on the network server hub exchange and
network card If abnormal check the network connections
831 I have forgotten the administrator username andor password
To reset the administrator username and password Press and hold down the RESET
BUTTON for 5 seconds Release the power button and the username and password
will be reset back to the factory default administrator username and password
Default administrator username admin
Default administrator password No password
832 IP Address configuration
Check whether IP address of the IP Camera server shares the same subnet as your
work station Click My Computer gt Control PanelgtNetwork amp Dial-up Connections gt
LAN gt Attributes gtInternet Protocols (TCPIP) and check IP Address and Subnet
Mask Make sure they are in the same subnet when configuring IP Camera IP
address manuallyUnable to access IP Camera via web browser
833 Network Configuration
Double Check to ensure that your HTTP server software is configured and running
properly If you are running any firewall software make sure it is allowing inbound
connections to port 80Also if you happen to be using a cableDSL router make sure
IPCAM User Manual
61
you are set up port forwarding properly ( consult your router is documentation for more
information ) If none of these seem to be the problem it is also possible that your
ISP is blocking inbound connections to port 80 ndashmany IPSs have done this because
of internet worms such as Code Red If this is the case you bdquoll have to setup your
HTTP server on an alternate port (such as 8080)
834 No Monitoring picture
It has four reasons Images of the abnormal factors
1If its not use Directx function and lead to not normal to display the color imagePlease
install DirectX and open the start menu then input the command
Picture 121
You use the DirectX function and it will expedite the DirectDrawDirect3D and AGP if its can not maybe the
connect issues or hardware not read it
2The issues of hardware canrsquot support the card expedite image
3The antivirus software will influence the network it will be stoped or closedIf you install fireproof software
please close it and try again
4 ActiveX controller is not installed correctly
If its not image on the first time to use and will display to the user through the ActiveXIf its can not
display of the image maybe it fail of install about this issues please follow as
1Install ldquoIP Camera Toolrdquo ActiveX control at the same time
2Please install ActiveX control and keep the security settings for IE browser
835 Problems with network bandwidth
The image frame rate is subjected to the following factors 1network bandwidth 2 PC
performancenetwork environment and display preference setting (brightness theme
etc) 3 the number of visitors (Too many visitors will slow down the image frame rate) 4
choice of switch or hub (Use a switch for multiple IP Camera Servers rather than a HUB)
The Device use MJEPT Compression it needs good network bandwidth If it is too narrow it will lead to slowly
browser Typical video parameter occupy network bandwidth as blows
640x48030fps 40 Megabits ~ 50 Megabits
320x24030fps 12 Megabits ~ 16 Megabits
IPCAM User Manual
62
middot836 Why pop-up the prompt ldquoFail to connect to the devicehelliprdquo
This prompt only appeared in the case of using multiple cameras
Enter the Multi-Device Settings page(login as administrator) to check the
Device setting is correct or not
When one of the multiple cameras disconnected the color changed to
yellow and pop-up the promptldquoFail to connect to the devicehelliprdquo
Picture 122
837 Canrsquot access the IPCAM in the internet
There are some reasons
1 ActiveX controller is not installed correctly(see more details 514)
2 The port IPCAM used is blocked by Firewall or Anti-virus software Please change a
port number and try again
3 Port mapping is not success You can do port mapping by two ways
Enter setting page of the router which IPCAM connect with to enable UPnP function
Enter IPCAM ldquoUPnP Settingsrdquo to enable UPnP and make sure the state is ldquoUPnP
successrdquo
‟ s IP
and port to the Virtual map list
When use ADSL the IP is dynamic You should set DDNS(see more details 74 amp 80)
and also make sure port mapping success
84 Operate common problem solving
IP camera tool canrsquot find the camera
Except of the camera broken
1 Make sure the cable connector no problem recommend connector
(AMP)it is with international standard Another note IPCAMrsquos data
transmission channel require higher than computerrsquos so maybe the
IPCAM User Manual
63
computer can run normally but IPCAM canrsquot Please press heavily when making the cable connector
2 Confirm the power supply normally First check whether power indication
light turn on or not If it is onthen check the yellow light on RJ45 Port
(power indication light) and green light (network indication light) are on or
notIf they are onso power supply and cable runs normally
3 Confirm all the firwall and antivirus software are closeThe firewall often
block unrecognized data so if the firewall is running so maybe the IPCAM
TOOL canrsquot find the deviceSuggest to close firewall and antivirus
software temporarily before searching
How to solve the camera blank screen
1 Check if you are using the wrong power adaptorplease use original one
2 Close antivirus software
How to solve the camera canrsquot login by Internet
1 Check if you set DDNS success or not
2 Check the current IPCAMrsquos port number is the same as routerrsquosThey need to keep same
Canrsquot view the monitoring picture
1 Reason canrsquot connect with network
SolutionCheck if the network connect well exclude cable fault and PC virus
cause network fault until can be used between PC and PING
2 ReasonIP address occupy by other device
Solution Choose automatic gain
3 Reason IP address located within different subnet
Solution Check IPCAMrsquoS ip address and subnet mask address and gateway settings
4 ReasonWeb port has been modified
Solutioncontact network administrator to obtain port information
5 Reasonunknown
SolutionPress reset button to factory default statethen reconnectingsysten
default to gain ip address automaticsubnet mask is 2552552550
85 Default Parameters
middotDefault network Parameters
IP address dynamic obtain
Subnet mask 2552552550
Gateway dynamic obtain
DDNS Factory provide
middotUsername and password
Default administrator username admin
Default administrator password No password
IPCAM User Manual
64
86 Technical Parameters
ITEM IP CAM (NIP-02BGPWA2)
Image Sensor
Mage sensor 15 Color CMOS Sensor
Display 640 x 480 (300K Pixels)
Lens f36mm F24 (IR Lens)
Miniillumination 05 Lux
Lens Lens Type Glass Lens
Viewing Angle 60 Degree
Audio Microphone Audio of two way
Domain name Server MSN server DDNS server
Video
Image Compression MJPEG
Image Frame Rate 15 FPS(VGA)30FPS(QVGA)
Resolution 640 x 480(VGA) 320 x 240(QVGA)
Flip Mirror Images rtical Horizontal
mode 50Hz 60Hz or Outdoor
Video Parameters Brightness Contrast
Communication
Ethernet One 10100Mbps RJ-45
Supported Protocol HTTPDHCPIPTCPUDPFTPSMTPDDNSPPPoEUPnP
Mobilephone monitor Support IphoneIpad3G phonesmartphone
Wireless Standard IEEE 80211bg
Wireless Standard 80211b11Mbps(max) 80211g54Mbps(max)
Wireless Security 64128-bitWEP Encryption
Physical
PanTilt Angle Horizontal270deg amp Vertical 120deg
Infrared Light 10 IR LEDs Night visibility up to 15 Mete
Product size 100(L) x100(W) x125mm(H)
Gross Weight 6465gpcs (packing size196x165x123mm)
Net Weight 2547gpcs (only product)
Power Specification DC 5V25A 18 meter
Power Consumption 5 Watts
Environment
Operate Temper 0deg~ 55degC (14degF~122degF)
Operating Humidity 20 ~ 85 non-condensing
Storage Temper -10degC ~ 60deg (14degF ~140degF)
Storage Humidity 0 ~ 90 non-condensing
PC Requirements
CPU 20GHZ or above (suggested 30GHz)
Memory Size 512MB or above (suggested 10GB)
Display card 64M or above
Supported OS Microsoft Windows XPVistaWindows7
Supported browsers IEfirefoxGoogle
Certification CEFCCRoHS
Warranty Limited 1-year warranty
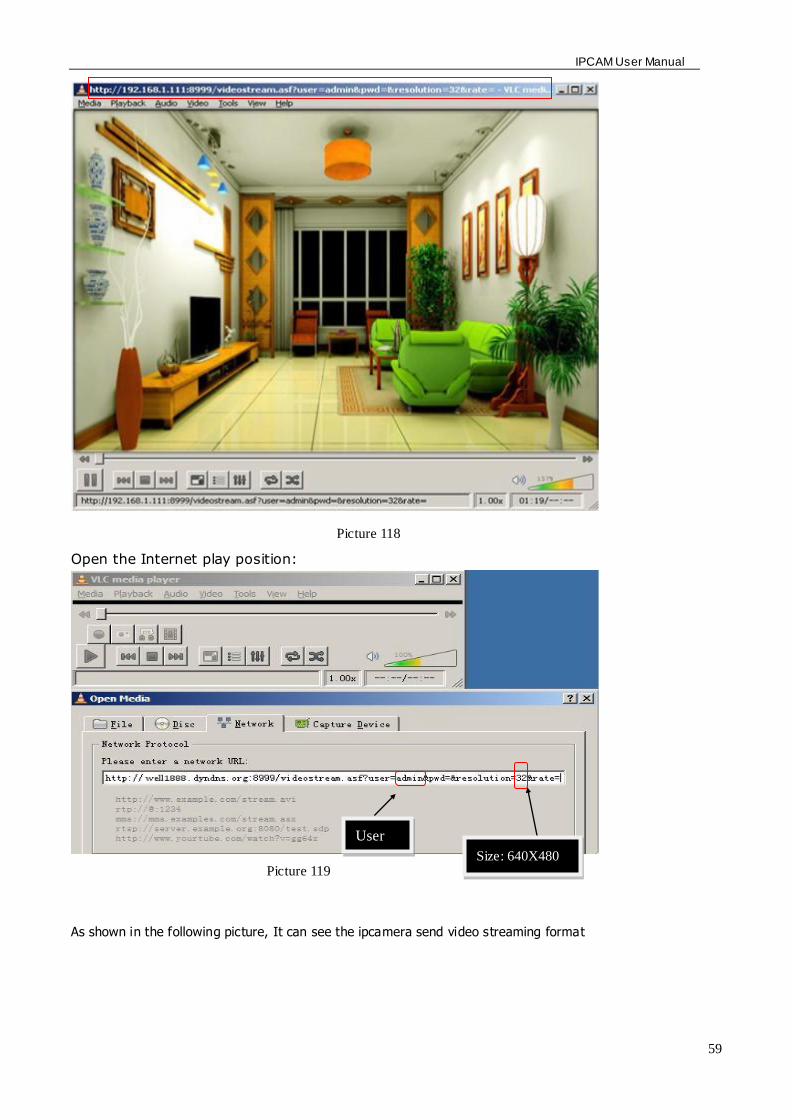
IPCAM User Manual
59
Picture 118
Open the Internet play position
Picture 119
As shown in the following picture It can see the ipcamera send video streaming format
Size 640X480
User
IPCAM User Manual
60
Picture 120
83 Frequently Asked Questions
Note1) Any question you would meet please check Network connections firstly
2)Check the working status revealed by the indicators on the network server hub exchange and
network card If abnormal check the network connections
831 I have forgotten the administrator username andor password
To reset the administrator username and password Press and hold down the RESET
BUTTON for 5 seconds Release the power button and the username and password
will be reset back to the factory default administrator username and password
Default administrator username admin
Default administrator password No password
832 IP Address configuration
Check whether IP address of the IP Camera server shares the same subnet as your
work station Click My Computer gt Control PanelgtNetwork amp Dial-up Connections gt
LAN gt Attributes gtInternet Protocols (TCPIP) and check IP Address and Subnet
Mask Make sure they are in the same subnet when configuring IP Camera IP
address manuallyUnable to access IP Camera via web browser
833 Network Configuration
Double Check to ensure that your HTTP server software is configured and running
properly If you are running any firewall software make sure it is allowing inbound
connections to port 80Also if you happen to be using a cableDSL router make sure
IPCAM User Manual
61
you are set up port forwarding properly ( consult your router is documentation for more
information ) If none of these seem to be the problem it is also possible that your
ISP is blocking inbound connections to port 80 ndashmany IPSs have done this because
of internet worms such as Code Red If this is the case you bdquoll have to setup your
HTTP server on an alternate port (such as 8080)
834 No Monitoring picture
It has four reasons Images of the abnormal factors
1If its not use Directx function and lead to not normal to display the color imagePlease
install DirectX and open the start menu then input the command
Picture 121
You use the DirectX function and it will expedite the DirectDrawDirect3D and AGP if its can not maybe the
connect issues or hardware not read it
2The issues of hardware canrsquot support the card expedite image
3The antivirus software will influence the network it will be stoped or closedIf you install fireproof software
please close it and try again
4 ActiveX controller is not installed correctly
If its not image on the first time to use and will display to the user through the ActiveXIf its can not
display of the image maybe it fail of install about this issues please follow as
1Install ldquoIP Camera Toolrdquo ActiveX control at the same time
2Please install ActiveX control and keep the security settings for IE browser
835 Problems with network bandwidth
The image frame rate is subjected to the following factors 1network bandwidth 2 PC
performancenetwork environment and display preference setting (brightness theme
etc) 3 the number of visitors (Too many visitors will slow down the image frame rate) 4
choice of switch or hub (Use a switch for multiple IP Camera Servers rather than a HUB)
The Device use MJEPT Compression it needs good network bandwidth If it is too narrow it will lead to slowly
browser Typical video parameter occupy network bandwidth as blows
640x48030fps 40 Megabits ~ 50 Megabits
320x24030fps 12 Megabits ~ 16 Megabits
IPCAM User Manual
62
middot836 Why pop-up the prompt ldquoFail to connect to the devicehelliprdquo
This prompt only appeared in the case of using multiple cameras
Enter the Multi-Device Settings page(login as administrator) to check the
Device setting is correct or not
When one of the multiple cameras disconnected the color changed to
yellow and pop-up the promptldquoFail to connect to the devicehelliprdquo
Picture 122
837 Canrsquot access the IPCAM in the internet
There are some reasons
1 ActiveX controller is not installed correctly(see more details 514)
2 The port IPCAM used is blocked by Firewall or Anti-virus software Please change a
port number and try again
3 Port mapping is not success You can do port mapping by two ways
Enter setting page of the router which IPCAM connect with to enable UPnP function
Enter IPCAM ldquoUPnP Settingsrdquo to enable UPnP and make sure the state is ldquoUPnP
successrdquo
‟ s IP
and port to the Virtual map list
When use ADSL the IP is dynamic You should set DDNS(see more details 74 amp 80)
and also make sure port mapping success
84 Operate common problem solving
IP camera tool canrsquot find the camera
Except of the camera broken
1 Make sure the cable connector no problem recommend connector
(AMP)it is with international standard Another note IPCAMrsquos data
transmission channel require higher than computerrsquos so maybe the
IPCAM User Manual
63
computer can run normally but IPCAM canrsquot Please press heavily when making the cable connector
2 Confirm the power supply normally First check whether power indication
light turn on or not If it is onthen check the yellow light on RJ45 Port
(power indication light) and green light (network indication light) are on or
notIf they are onso power supply and cable runs normally
3 Confirm all the firwall and antivirus software are closeThe firewall often
block unrecognized data so if the firewall is running so maybe the IPCAM
TOOL canrsquot find the deviceSuggest to close firewall and antivirus
software temporarily before searching
How to solve the camera blank screen
1 Check if you are using the wrong power adaptorplease use original one
2 Close antivirus software
How to solve the camera canrsquot login by Internet
1 Check if you set DDNS success or not
2 Check the current IPCAMrsquos port number is the same as routerrsquosThey need to keep same
Canrsquot view the monitoring picture
1 Reason canrsquot connect with network
SolutionCheck if the network connect well exclude cable fault and PC virus
cause network fault until can be used between PC and PING
2 ReasonIP address occupy by other device
Solution Choose automatic gain
3 Reason IP address located within different subnet
Solution Check IPCAMrsquoS ip address and subnet mask address and gateway settings
4 ReasonWeb port has been modified
Solutioncontact network administrator to obtain port information
5 Reasonunknown
SolutionPress reset button to factory default statethen reconnectingsysten
default to gain ip address automaticsubnet mask is 2552552550
85 Default Parameters
middotDefault network Parameters
IP address dynamic obtain
Subnet mask 2552552550
Gateway dynamic obtain
DDNS Factory provide
middotUsername and password
Default administrator username admin
Default administrator password No password
IPCAM User Manual
64
86 Technical Parameters
ITEM IP CAM (NIP-02BGPWA2)
Image Sensor
Mage sensor 15 Color CMOS Sensor
Display 640 x 480 (300K Pixels)
Lens f36mm F24 (IR Lens)
Miniillumination 05 Lux
Lens Lens Type Glass Lens
Viewing Angle 60 Degree
Audio Microphone Audio of two way
Domain name Server MSN server DDNS server
Video
Image Compression MJPEG
Image Frame Rate 15 FPS(VGA)30FPS(QVGA)
Resolution 640 x 480(VGA) 320 x 240(QVGA)
Flip Mirror Images rtical Horizontal
mode 50Hz 60Hz or Outdoor
Video Parameters Brightness Contrast
Communication
Ethernet One 10100Mbps RJ-45
Supported Protocol HTTPDHCPIPTCPUDPFTPSMTPDDNSPPPoEUPnP
Mobilephone monitor Support IphoneIpad3G phonesmartphone
Wireless Standard IEEE 80211bg
Wireless Standard 80211b11Mbps(max) 80211g54Mbps(max)
Wireless Security 64128-bitWEP Encryption
Physical
PanTilt Angle Horizontal270deg amp Vertical 120deg
Infrared Light 10 IR LEDs Night visibility up to 15 Mete
Product size 100(L) x100(W) x125mm(H)
Gross Weight 6465gpcs (packing size196x165x123mm)
Net Weight 2547gpcs (only product)
Power Specification DC 5V25A 18 meter
Power Consumption 5 Watts
Environment
Operate Temper 0deg~ 55degC (14degF~122degF)
Operating Humidity 20 ~ 85 non-condensing
Storage Temper -10degC ~ 60deg (14degF ~140degF)
Storage Humidity 0 ~ 90 non-condensing
PC Requirements
CPU 20GHZ or above (suggested 30GHz)
Memory Size 512MB or above (suggested 10GB)
Display card 64M or above
Supported OS Microsoft Windows XPVistaWindows7
Supported browsers IEfirefoxGoogle
Certification CEFCCRoHS
Warranty Limited 1-year warranty
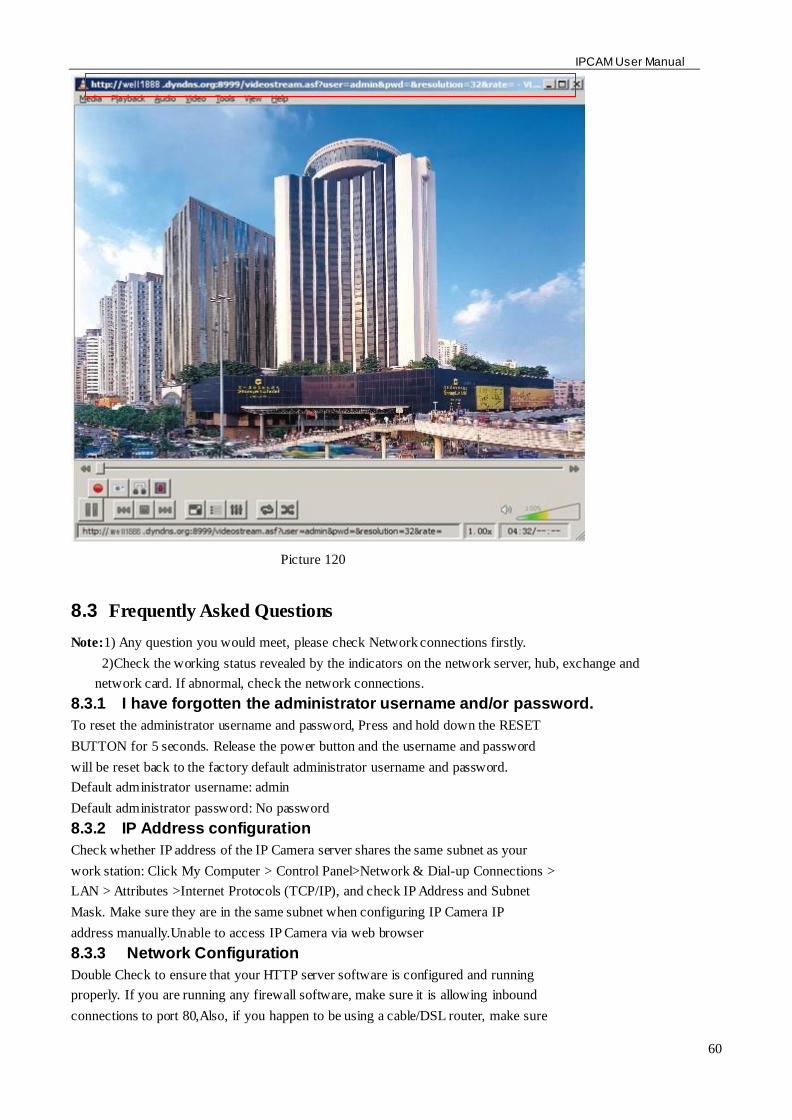
IPCAM User Manual
60
Picture 120
83 Frequently Asked Questions
Note1) Any question you would meet please check Network connections firstly
2)Check the working status revealed by the indicators on the network server hub exchange and
network card If abnormal check the network connections
831 I have forgotten the administrator username andor password
To reset the administrator username and password Press and hold down the RESET
BUTTON for 5 seconds Release the power button and the username and password
will be reset back to the factory default administrator username and password
Default administrator username admin
Default administrator password No password
832 IP Address configuration
Check whether IP address of the IP Camera server shares the same subnet as your
work station Click My Computer gt Control PanelgtNetwork amp Dial-up Connections gt
LAN gt Attributes gtInternet Protocols (TCPIP) and check IP Address and Subnet
Mask Make sure they are in the same subnet when configuring IP Camera IP
address manuallyUnable to access IP Camera via web browser
833 Network Configuration
Double Check to ensure that your HTTP server software is configured and running
properly If you are running any firewall software make sure it is allowing inbound
connections to port 80Also if you happen to be using a cableDSL router make sure
IPCAM User Manual
61
you are set up port forwarding properly ( consult your router is documentation for more
information ) If none of these seem to be the problem it is also possible that your
ISP is blocking inbound connections to port 80 ndashmany IPSs have done this because
of internet worms such as Code Red If this is the case you bdquoll have to setup your
HTTP server on an alternate port (such as 8080)
834 No Monitoring picture
It has four reasons Images of the abnormal factors
1If its not use Directx function and lead to not normal to display the color imagePlease
install DirectX and open the start menu then input the command
Picture 121
You use the DirectX function and it will expedite the DirectDrawDirect3D and AGP if its can not maybe the
connect issues or hardware not read it
2The issues of hardware canrsquot support the card expedite image
3The antivirus software will influence the network it will be stoped or closedIf you install fireproof software
please close it and try again
4 ActiveX controller is not installed correctly
If its not image on the first time to use and will display to the user through the ActiveXIf its can not
display of the image maybe it fail of install about this issues please follow as
1Install ldquoIP Camera Toolrdquo ActiveX control at the same time
2Please install ActiveX control and keep the security settings for IE browser
835 Problems with network bandwidth
The image frame rate is subjected to the following factors 1network bandwidth 2 PC
performancenetwork environment and display preference setting (brightness theme
etc) 3 the number of visitors (Too many visitors will slow down the image frame rate) 4
choice of switch or hub (Use a switch for multiple IP Camera Servers rather than a HUB)
The Device use MJEPT Compression it needs good network bandwidth If it is too narrow it will lead to slowly
browser Typical video parameter occupy network bandwidth as blows
640x48030fps 40 Megabits ~ 50 Megabits
320x24030fps 12 Megabits ~ 16 Megabits
IPCAM User Manual
62
middot836 Why pop-up the prompt ldquoFail to connect to the devicehelliprdquo
This prompt only appeared in the case of using multiple cameras
Enter the Multi-Device Settings page(login as administrator) to check the
Device setting is correct or not
When one of the multiple cameras disconnected the color changed to
yellow and pop-up the promptldquoFail to connect to the devicehelliprdquo
Picture 122
837 Canrsquot access the IPCAM in the internet
There are some reasons
1 ActiveX controller is not installed correctly(see more details 514)
2 The port IPCAM used is blocked by Firewall or Anti-virus software Please change a
port number and try again
3 Port mapping is not success You can do port mapping by two ways
Enter setting page of the router which IPCAM connect with to enable UPnP function
Enter IPCAM ldquoUPnP Settingsrdquo to enable UPnP and make sure the state is ldquoUPnP
successrdquo
‟ s IP
and port to the Virtual map list
When use ADSL the IP is dynamic You should set DDNS(see more details 74 amp 80)
and also make sure port mapping success
84 Operate common problem solving
IP camera tool canrsquot find the camera
Except of the camera broken
1 Make sure the cable connector no problem recommend connector
(AMP)it is with international standard Another note IPCAMrsquos data
transmission channel require higher than computerrsquos so maybe the
IPCAM User Manual
63
computer can run normally but IPCAM canrsquot Please press heavily when making the cable connector
2 Confirm the power supply normally First check whether power indication
light turn on or not If it is onthen check the yellow light on RJ45 Port
(power indication light) and green light (network indication light) are on or
notIf they are onso power supply and cable runs normally
3 Confirm all the firwall and antivirus software are closeThe firewall often
block unrecognized data so if the firewall is running so maybe the IPCAM
TOOL canrsquot find the deviceSuggest to close firewall and antivirus
software temporarily before searching
How to solve the camera blank screen
1 Check if you are using the wrong power adaptorplease use original one
2 Close antivirus software
How to solve the camera canrsquot login by Internet
1 Check if you set DDNS success or not
2 Check the current IPCAMrsquos port number is the same as routerrsquosThey need to keep same
Canrsquot view the monitoring picture
1 Reason canrsquot connect with network
SolutionCheck if the network connect well exclude cable fault and PC virus
cause network fault until can be used between PC and PING
2 ReasonIP address occupy by other device
Solution Choose automatic gain
3 Reason IP address located within different subnet
Solution Check IPCAMrsquoS ip address and subnet mask address and gateway settings
4 ReasonWeb port has been modified
Solutioncontact network administrator to obtain port information
5 Reasonunknown
SolutionPress reset button to factory default statethen reconnectingsysten
default to gain ip address automaticsubnet mask is 2552552550
85 Default Parameters
middotDefault network Parameters
IP address dynamic obtain
Subnet mask 2552552550
Gateway dynamic obtain
DDNS Factory provide
middotUsername and password
Default administrator username admin
Default administrator password No password
IPCAM User Manual
64
86 Technical Parameters
ITEM IP CAM (NIP-02BGPWA2)
Image Sensor
Mage sensor 15 Color CMOS Sensor
Display 640 x 480 (300K Pixels)
Lens f36mm F24 (IR Lens)
Miniillumination 05 Lux
Lens Lens Type Glass Lens
Viewing Angle 60 Degree
Audio Microphone Audio of two way
Domain name Server MSN server DDNS server
Video
Image Compression MJPEG
Image Frame Rate 15 FPS(VGA)30FPS(QVGA)
Resolution 640 x 480(VGA) 320 x 240(QVGA)
Flip Mirror Images rtical Horizontal
mode 50Hz 60Hz or Outdoor
Video Parameters Brightness Contrast
Communication
Ethernet One 10100Mbps RJ-45
Supported Protocol HTTPDHCPIPTCPUDPFTPSMTPDDNSPPPoEUPnP
Mobilephone monitor Support IphoneIpad3G phonesmartphone
Wireless Standard IEEE 80211bg
Wireless Standard 80211b11Mbps(max) 80211g54Mbps(max)
Wireless Security 64128-bitWEP Encryption
Physical
PanTilt Angle Horizontal270deg amp Vertical 120deg
Infrared Light 10 IR LEDs Night visibility up to 15 Mete
Product size 100(L) x100(W) x125mm(H)
Gross Weight 6465gpcs (packing size196x165x123mm)
Net Weight 2547gpcs (only product)
Power Specification DC 5V25A 18 meter
Power Consumption 5 Watts
Environment
Operate Temper 0deg~ 55degC (14degF~122degF)
Operating Humidity 20 ~ 85 non-condensing
Storage Temper -10degC ~ 60deg (14degF ~140degF)
Storage Humidity 0 ~ 90 non-condensing
PC Requirements
CPU 20GHZ or above (suggested 30GHz)
Memory Size 512MB or above (suggested 10GB)
Display card 64M or above
Supported OS Microsoft Windows XPVistaWindows7
Supported browsers IEfirefoxGoogle
Certification CEFCCRoHS
Warranty Limited 1-year warranty
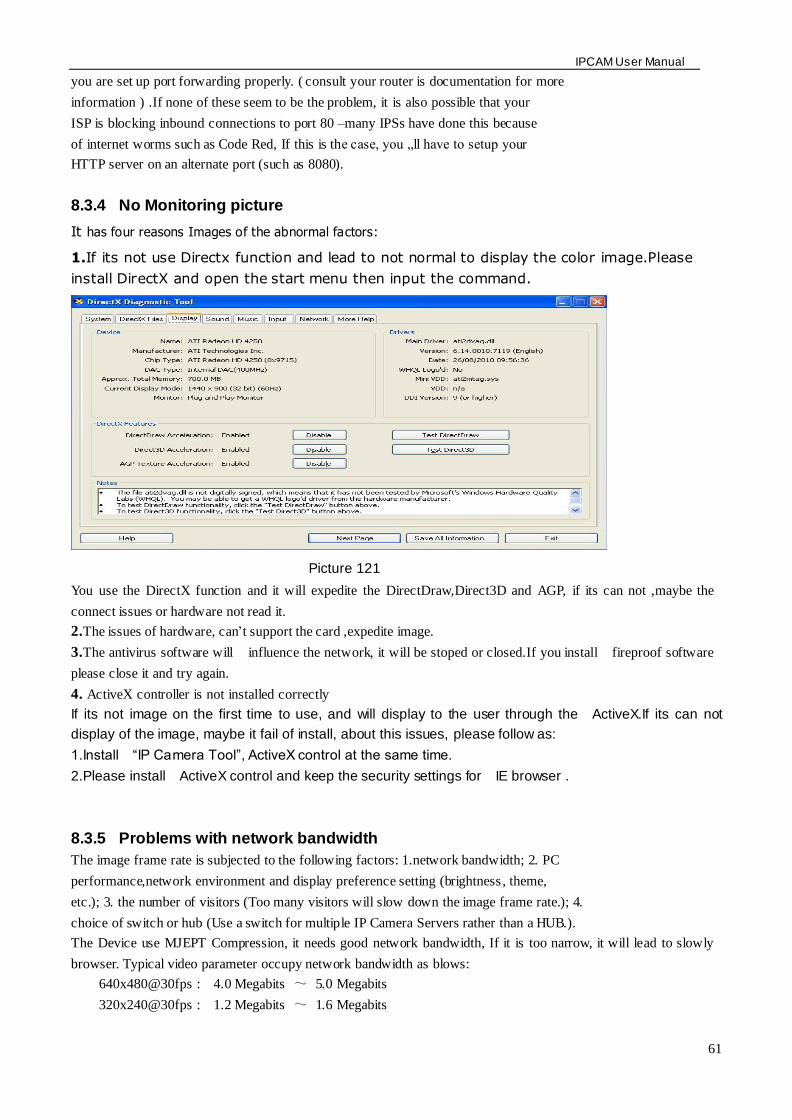
IPCAM User Manual
64
86 Technical Parameters
ITEM IP CAM (NIP-02BGPWA2)
Image Sensor
Mage sensor 15 Color CMOS Sensor
Display 640 x 480 (300K Pixels)
Lens f36mm F24 (IR Lens)
Miniillumination 05 Lux
Lens Lens Type Glass Lens
Viewing Angle 60 Degree
Audio Microphone Audio of two way
Domain name Server MSN server DDNS server
Video
Image Compression MJPEG
Image Frame Rate 15 FPS(VGA)30FPS(QVGA)
Resolution 640 x 480(VGA) 320 x 240(QVGA)
Flip Mirror Images rtical Horizontal
mode 50Hz 60Hz or Outdoor
Video Parameters Brightness Contrast
Communication
Ethernet One 10100Mbps RJ-45
Supported Protocol HTTPDHCPIPTCPUDPFTPSMTPDDNSPPPoEUPnP
Mobilephone monitor Support IphoneIpad3G phonesmartphone
Wireless Standard IEEE 80211bg
Wireless Standard 80211b11Mbps(max) 80211g54Mbps(max)
Wireless Security 64128-bitWEP Encryption
Physical
PanTilt Angle Horizontal270deg amp Vertical 120deg
Infrared Light 10 IR LEDs Night visibility up to 15 Mete
Product size 100(L) x100(W) x125mm(H)
Gross Weight 6465gpcs (packing size196x165x123mm)
Net Weight 2547gpcs (only product)
Power Specification DC 5V25A 18 meter
Power Consumption 5 Watts
Environment
Operate Temper 0deg~ 55degC (14degF~122degF)
Operating Humidity 20 ~ 85 non-condensing
Storage Temper -10degC ~ 60deg (14degF ~140degF)
Storage Humidity 0 ~ 90 non-condensing
PC Requirements
CPU 20GHZ or above (suggested 30GHz)
Memory Size 512MB or above (suggested 10GB)
Display card 64M or above
Supported OS Microsoft Windows XPVistaWindows7
Supported browsers IEfirefoxGoogle
Certification CEFCCRoHS
Warranty Limited 1-year warranty


![MFC‒J870N Windows8 (1) (InternetExplorer Safari ) (2 ...1 ( lan)( lan) ip ip ( ) ip ip lan (1) ip [ ] [ ] [ ] [ok]](https://static.fdocuments.us/doc/165x107/5e71d52e4c8f4929404a3a6d/mfcaj870n-windows8-1-internetexplorer-safari-2-1-lan-lan-ip-ip.jpg)