
IP Cameras/NVRs/DVRs Secure Activation Procedure · IP Cameras/NVRs/DVRs Secure Activation...
23
IP Cameras/NVRs/DVRs Secure Activation Procedure 04/09/16 Page 1 of 23 Summary To ensure the highest level of protection, W Box Technologies has launched a new login procedure that requires users to create a new password for the admin account upon the first login to all devices. The password must contain 8 to 16 characters, combining numbers, lowercase letters, uppercase letters, and special characters. At least two types of the above-mentioned characters are required to activate the device. The system will check the password strength; “Risky” passwords will not be accepted. This document also discusses the new Unlock Pattern feature, which prompts the admin user to create an on-screen design to use in place of a password. Firmware Upgrade Device Firmware with Secure Activation Chart The following products are affected: Device Type WBOX Part # New FW Version IP Camera 0E-13BF40 5.3.0 IP Camera 0E-21BF40 IP Camera 0E-21DF28 IP Camera 0E-21BVF2812 IP Camera 0E-13DVF2812 IP Camera 0E-21DVF2812 IP Camera 0E-13DF28 IP Camera 0E-31BF40 IP Camera 0E-31DF28 IP Camera 0E-31BVF2812 IP Camera 0E-31DVF2812 NVR 0E-41TP1UN 3.4.2 NVR 0E-82TP1UN NVR 0E-162TP15UN DVR 0E-41T1UD 2.2.17 DVR 0E-82T1UD DVR 0E-162T1UD DVR 0E-4500GMD 3.1.4 DVR 0E-81TMD DVR 0E-161TMD
Transcript of IP Cameras/NVRs/DVRs Secure Activation Procedure · IP Cameras/NVRs/DVRs Secure Activation...

IP Cameras/NVRs/DVRs Secure Activation Procedure
04/09/16 Page 1 of 23
Summary To ensure the highest level of protection, W Box Technologies has launched a new login procedure that requires users to create a new password for the admin account upon the first login to all devices. The password must contain 8 to 16 characters, combining numbers, lowercase letters, uppercase letters, and special characters. At least two types of the above-mentioned characters are required to activate the device. The system will check the password strength; “Risky” passwords will not be accepted.
This document also discusses the new Unlock Pattern feature, which prompts the admin user to create an on-screen design to use in place of a password.
Firmware Upgrade
Device Firmware with Secure Activation Chart The following products are affected:
Device Type WBOX Part # New FW Version IP Camera 0E-13BF40
5.3.0
IP Camera 0E-21BF40 IP Camera 0E-21DF28 IP Camera 0E-21BVF2812 IP Camera 0E-13DVF2812 IP Camera 0E-21DVF2812 IP Camera 0E-13DF28 IP Camera 0E-31BF40 IP Camera 0E-31DF28 IP Camera 0E-31BVF2812 IP Camera 0E-31DVF2812 NVR 0E-41TP1UN
3.4.2 NVR 0E-82TP1UN NVR 0E-162TP15UN DVR 0E-41T1UD
2.2.17 DVR 0E-82T1UD DVR 0E-162T1UD DVR 0E-4500GMD
3.1.4 DVR 0E-81TMD DVR 0E-161TMD

IP Cameras/NVRs/DVRs Secure Activation Procedure
04/09/16 Page 2 of 23
Firmware Upgrade Strategy NVRs DVRs IP Cameras Action
0E-41TP1UN 0E-82TP1UN 0E-162TP15UN
0E-4500GMD 0E-81TMD 0E-161TMD
0E-41T1UD 0E-82T1UD 0E-162T1UD
0E-13BF40 0E-21BF40 0E-21DF28 0E-21BVF2812 0E-13DVF2812 0E-21DVF2812
0E-13DF28 0E-31BF40 0E-31DF28 0E-31BVF2812 0E-31DVF2812
Pre-v3.4.2 Pre-v2.2.17 Pre-v3.1.4 v5.3.0 Mandatory upgrade of NVR/DVR to new firmware
v3.4.2 v2.2.17 v3.1.4 Pre-v5.3.0 Recommend upgrading IP camera to
new firmware
v5.3.0 No action needed
Pre-v3.4.2 Pre-v2.2.17 Pre-v3.1.4 Pre-v5.3.0 Recommend upgrading both NVR/DVR and IP camera to new firmware1
Upgraded Firmware Link
Upgrade your DVR/NVR or IP Camera by downloading and installing the latest firmware from www.wboxtech.com/video.html.
IMPORTANT NOTE:
Default passwords carry a security risk and are not acceptable, therefore in order to activate your device and to achieve the strongest security password setting, a Factory Default procedure must be performed immediately after the firmware has been upgraded. Also, since default passwords are no longer accepted, a password must be created to activate your device(s).
1 Non-upgraded firmware can use old login method: Default user name is admin and password is wbox123.
Immediately change the default user name and password to protect against unauthorized access.

IP Cameras/NVRs/DVRs Secure Activation Procedure
04/09/16 Page 3 of 23
Post Firmware Upgrade Steps Once the device firmware has been upgraded, complete the Factory Default procedure, create a strong password (recommended), and activate your device (in one of three ways).
I. Perform a Factory Default Procedure (Mandatory) The Factory Default procedure resets the NVR/DVR/IPC to the new state that the device was in when it was first shipped from the factory. Perform the Factory Default procedure using one of the following two methods: WARNING! THIS PROCEDURE WILL ERASE ALL CURRENT SETTINGS. • Using a Web Browser (IPC or NVR/DVR)
1. Open a Web browser on your PC.
2. Input the IP address of the IPC, NVR, or DVR you want to revert to factory default settings.
3. Press ENTER button to display the login interface.
4. Input the user name and password.
5. Click the LOGIN button.
NOTES: The default IP address is 192.168.1.64 (IP cameras with new firmware) or 192.0.0.64 (IP cameras with old firmware or DVRs and NVRs).
The default user name is admin, and password is wbox123.
6. Navigate to CONFIGURATION > SYSTEM > MAINTENANCE (tab).
7. In the “Default” section, click the DEFAULT button.
8. At “System will reboot after restoring the default settings. Continue?” prompt, do the following:
- Click the OK button to proceed. The system will erase all data and reboot the device.

IP Cameras/NVRs/DVRs Secure Activation Procedure
04/09/16 Page 4 of 23
• Using Local NVR/DVR
1. Turn NVR/DVR on to display the login prompt.
2. Input the user name and password.
3. Click the LOGIN button.
4. Go to MENU > MAINTENANCE > DEFAULT (tab).
5. In the “Default” section, click the DEFAULT button.
6. At “System will reboot after restoring the default settings. Continue?” prompt, do the following:
- Click the OK button to proceed. The system will erase all data and reboot the device.
II. Perform the New Secure Activation Procedure Cameras/NVRs/DVRs starting with firmware v5.3.0/3.4.2/2.2.17 or 3.1.4 will no longer have a default password. The user must activate the device by creating a password for the admin account, which can be done in one of three ways (see Options for Creating a Password for the Admin Account, page 4).
• Password Strength Levels
It is recommended that passwords be composed of three or more different kinds of characters: numbers, uppercase letters, lowercase letters, and special characters (such as $, @, etc.). The firmware will identify the password strength and alert you to its level of protection through an on-screen, color-coded strength level indicator light.

IP Cameras/NVRs/DVRs Secure Activation Procedure
04/09/16 Page 5 of 23
STRENGTH LEVEL DESCRIPTION
Level 0 (Risky) Device will not accept a Level 0 password
(e.g., sildhleb)
Password length is fewer than eight characters, contains only one kind of character, is the same as the user name, and/or is the mirror writing of the user name. This type of password will not be accepted.
Level 1 (Weak) Device will accept a Level 1 password
(e.g., 57kcseli)
Password contains two kinds of characters. The combination is number + lowercase letter or number + uppercase letter, and the password length is at least eight characters. This type of password will be accepted.
Level 2 (Medium) Device will accept a Level 2 password
(e.g., KMggbRDb)
Password contains two kinds of characters. The combination is neither number + lowercase letter nor number + uppercase letter, and the password length is at least eight characters. This type of password will be accepted.
Level 3 (Strong) Device will accept a Level 3 password
(e.g., xTC59?$m)
Password contains more than three kinds of characters, and the password length is at least eight characters. This type of password will be accepted.
NOTE 1: The on-line strength level indicator light colors can vary by activation process,
model number, and device type. Typical: Risky = No Color, Weak = Pink, Medium = Yellow, Strong = Green.
NOTE 2: PASSWORD CHARACTERS ALLOWED (ASCII Only): • Lowercase ASCII Letters
a b c d e f g h I j k l m n o p q r s t u v w x y z • Uppercase ASCII Letters
A B C D E F G H I J K L M N O P Q R S T U V W X Y Z • Numerals
0 1 2 3 4 5 6 7 8 9 • Special Characters
. - _ : / @ , ? ! ‘ ( ) $ & “ [ ] { } # % ^ * + = \ | < >

IP Cameras/NVRs/DVRs Secure Activation Procedure
04/09/16 Page 6 of 23
• Options for Creating a Password for the Admin Account
- Option 1: W Box Device Search Tool Activation on PC
1. Launch the latest version of the W Box Device Search Tool software (visit http://www.wboxtech.com/video/html).
> The software will display all W Box devices on the network.
> A new field named “Security” will display whether the camera/NVR/DVR is active or not (Figure 1, see page 5).
2. If the camera/NVR/DVR is “inactive,” highlight the camera/NVR/DVR and enter a new password into the “New Password” field on the bottom right of the screen (Figure 2, see page 6). See Password Strength Levels, page 3, for guidelines.
> The password strength will be displayed, accompanied by an on-screen color indicator light1:
* Level 0 – Risky (no indicator): Not acceptable * Level 1 – Weak (pink indicator): Acceptable * Level 2 – Medium (yellow indicator): Acceptable * Level 3 – Strong (green indicator): Acceptable
> Bar length indicates strength level.
> Activation will not be allowed unless the password is of acceptable strength (Figure 4, see page 7) (Figure 5, see page 7) (Figure 6, see page 8). If the password is unacceptable strength (“Risky,” Figure 2, see page 6), a warning box will be displayed (Figure 3, see page 6).
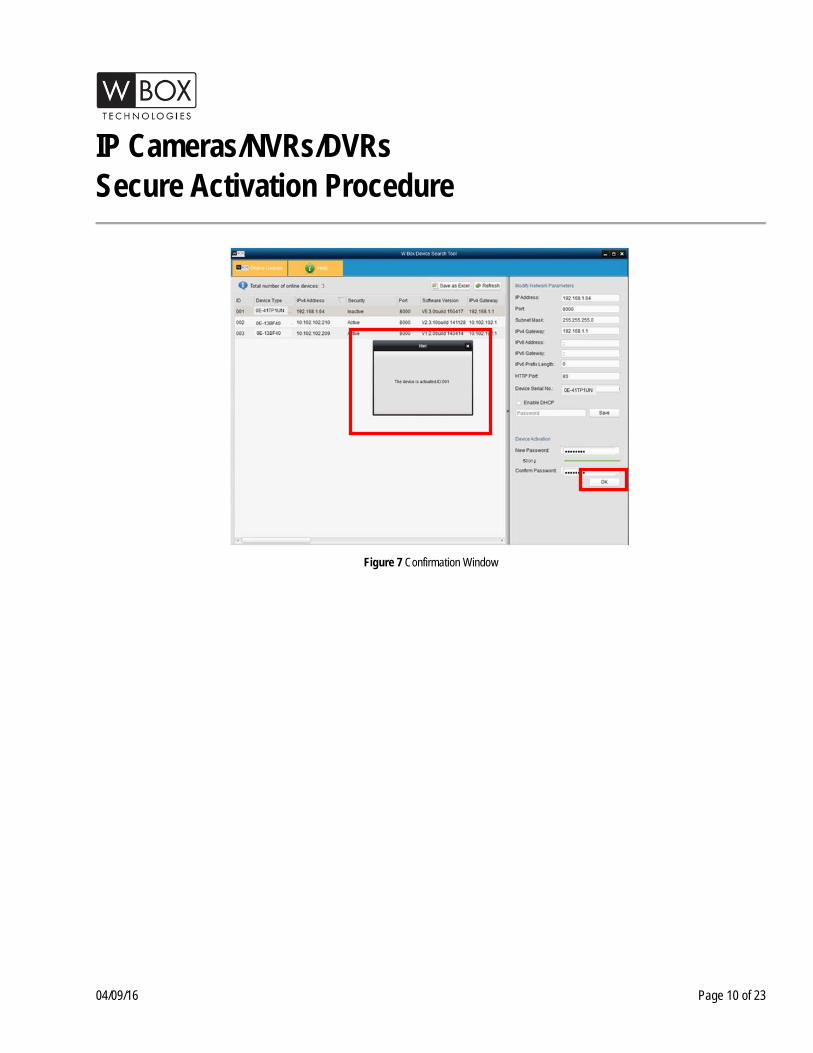
3. Retype the password into the “Confirm Password” field.
4. After the password has been entered and confirmed, press the OK button to display the pop-up confirmation window (Figure 7, see page 8).
5. Press the “X” in the top right corner of the pop-up confirmation window to dismiss the window.
1 The on-screen strength level indicator light colors can vary by activation process, model number, and device type.

IP Cameras/NVRs/DVRs Secure Activation Procedure
04/09/16 Page 7 of 23
Figure 1 Security Field
Figure 2 Password Field with “Risky” Unacceptable Password
Risky Password
“Strength Meter” does not light

IP Cameras/NVRs/DVRs Secure Activation Procedure
04/09/16 Page 8 of 23
Figure 3 “Risky” Unacceptable Password Warning Message
Figure 4 Password Field with Weak Strength Password
Password strength is shown with a color indicator
A message indicates that the password
must meet minimum requirements
Valid password range [8-16]. You can use a combination of numbers, lowercase, uppercase and special characters for your password with at least two kinds of them contained.

IP Cameras/NVRs/DVRs Secure Activation Procedure
04/09/16 Page 9 of 23
Figure 5 Password Field with Medium Strength Password
Figure 6 Password Field with Strong Strength Bar
IP Cameras/NVRs/DVRs Secure Activation Procedure
04/09/16 Page 10 of 23
Figure 7 Confirmation Window
IP Cameras/NVRs/DVRs Secure Activation Procedure
04/09/16 Page 11 of 23
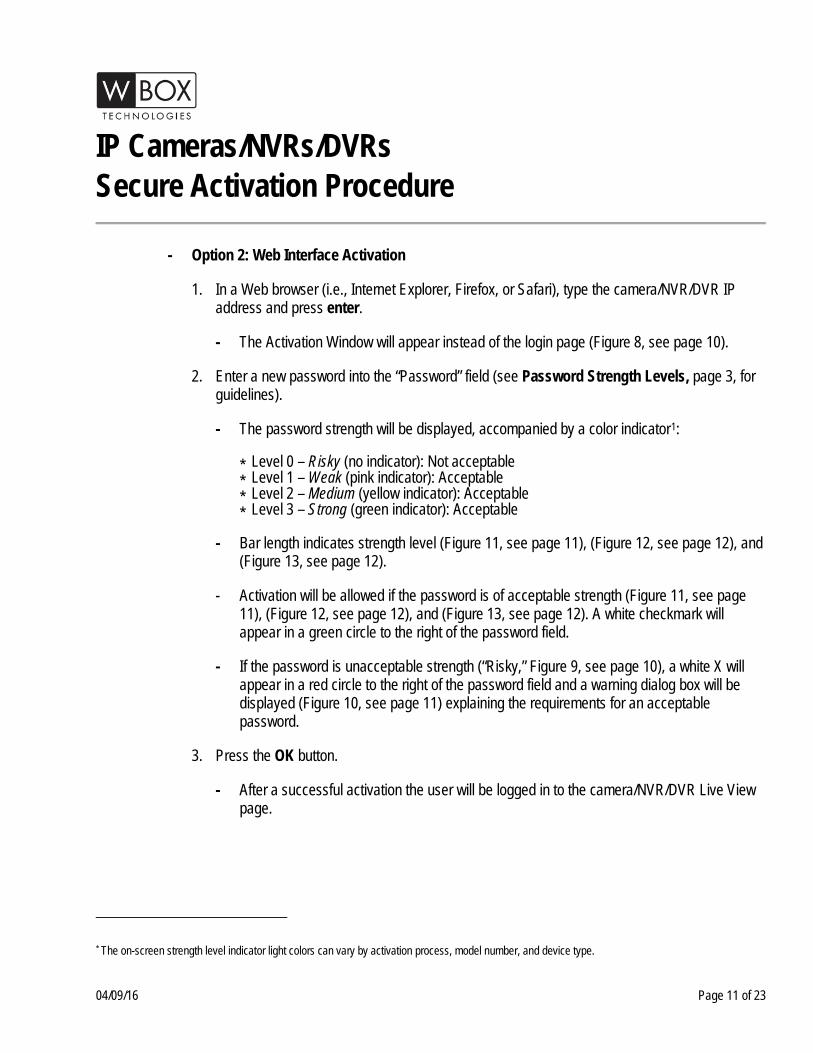
- Option 2: Web Interface Activation
1. In a Web browser (i.e., Internet Explorer, Firefox, or Safari), type the camera/NVR/DVR IP address and press enter.
- The Activation Window will appear instead of the login page (Figure 8, see page 10).
2. Enter a new password into the “Password” field (see Password Strength Levels, page 3, for guidelines).
- The password strength will be displayed, accompanied by a color indicator1:
* Level 0 – Risky (no indicator): Not acceptable * Level 1 – Weak (pink indicator): Acceptable * Level 2 – Medium (yellow indicator): Acceptable * Level 3 – Strong (green indicator): Acceptable
- Bar length indicates strength level (Figure 11, see page 11), (Figure 12, see page 12), and (Figure 13, see page 12).
- Activation will be allowed if the password is of acceptable strength (Figure 11, see page 11), (Figure 12, see page 12), and (Figure 13, see page 12). A white checkmark will appear in a green circle to the right of the password field.
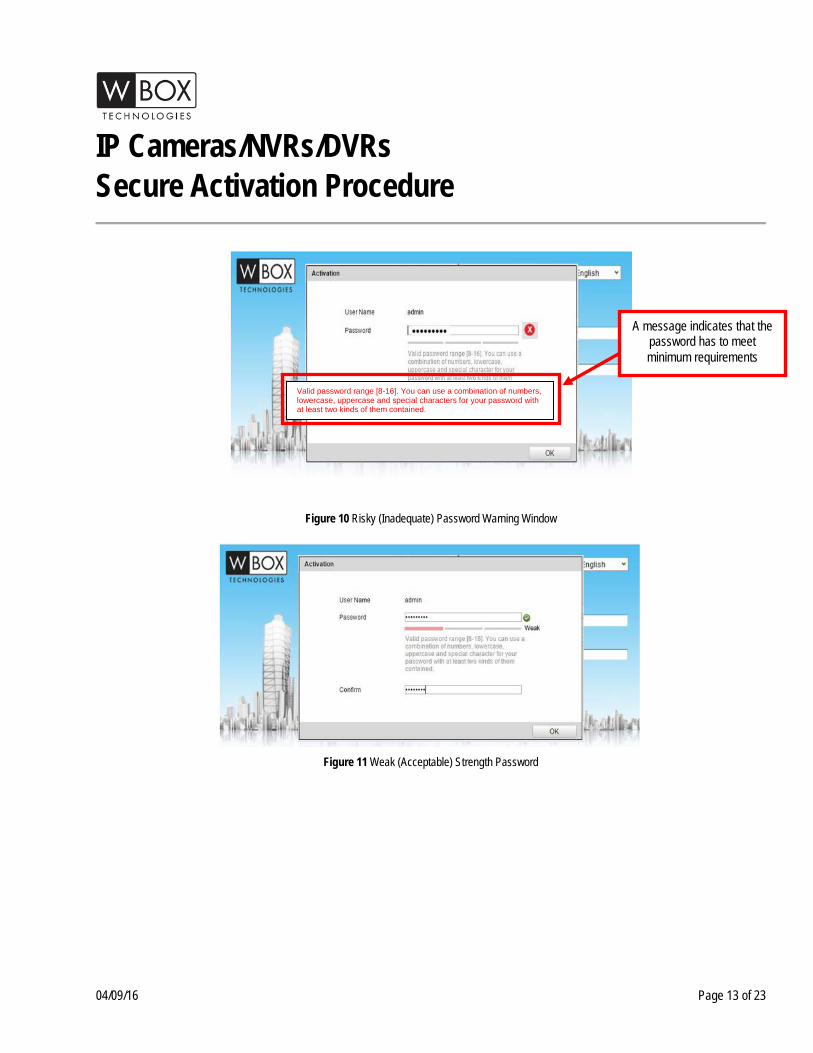
- If the password is unacceptable strength (“Risky,” Figure 9, see page 10), a white X will appear in a red circle to the right of the password field and a warning dialog box will be displayed (Figure 10, see page 11) explaining the requirements for an acceptable password.
3. Press the OK button.
- After a successful activation the user will be logged in to the camera/NVR/DVR Live View page.
* The on-screen strength level indicator light colors can vary by activation process, model number, and device type.

IP Cameras/NVRs/DVRs Secure Activation Procedure
04/09/16 Page 12 of 23
Figure 8 Activation Window
Figure 9 Risky (Inadequate) Password Strength
“Strength Meter” does not light
IP Cameras/NVRs/DVRs Secure Activation Procedure
04/09/16 Page 13 of 23
Figure 10 Risky (Inadequate) Password Warning Window
Figure 11 Weak (Acceptable) Strength Password
Valid password range [8-16]. You can use a combination of numbers, lowercase, uppercase and special characters for your password with at least two kinds of them contained.
A message indicates that the password has to meet minimum requirements

IP Cameras/NVRs/DVRs Secure Activation Procedure
04/09/16 Page 14 of 23
Figure 12 Medium (Acceptable) Strength Password
Figure 13 Strong (Acceptable) Strength Password
IP Cameras/NVRs/DVRs Secure Activation Procedure
04/09/16 Page 15 of 23
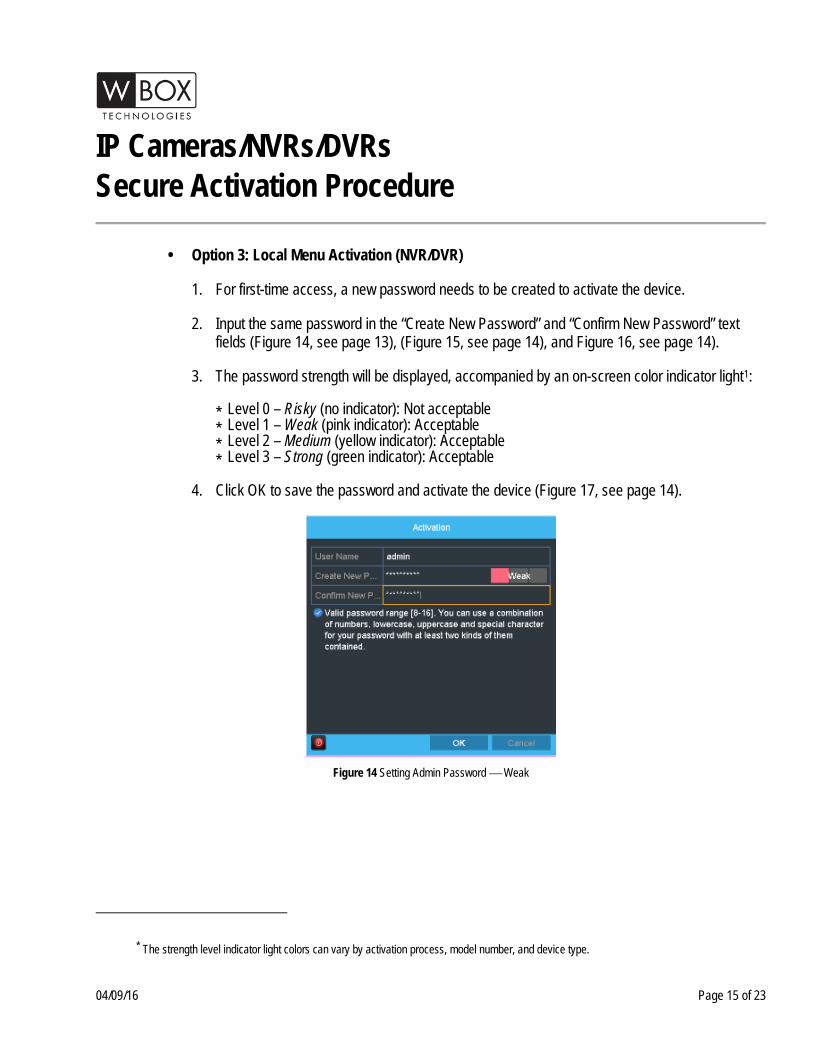
• Option 3: Local Menu Activation (NVR/DVR)
1. For first-time access, a new password needs to be created to activate the device.
2. Input the same password in the “Create New Password” and “Confirm New Password” text fields (Figure 14, see page 13), (Figure 15, see page 14), and Figure 16, see page 14).
3. The password strength will be displayed, accompanied by an on-screen color indicator light1:
* Level 0 – Risky (no indicator): Not acceptable * Level 1 – Weak (pink indicator): Acceptable * Level 2 – Medium (yellow indicator): Acceptable * Level 3 – Strong (green indicator): Acceptable
4. Click OK to save the password and activate the device (Figure 17, see page 14).
Figure 14 Setting Admin Password Weak
* The strength level indicator light colors can vary by activation process, model number, and device type.

IP Cameras/NVRs/DVRs Secure Activation Procedure
04/09/16 Page 16 of 23
Figure 15 Setting Admin Password — Medium
Figure 16 Setting Admin Password — Strong
Figure 17 Device Activated
IP Cameras/NVRs/DVRs Secure Activation Procedure
04/09/16 Page 17 of 23
Plug-and-Play NVRs With the introduction of the new secure activation procedure, the interaction between NVRs with the Plug and Play feature and IP cameras has slightly changed. There have been some questions and concerns regarding this issue, and this technical bulletin will provide solutions for three different scenarios that can occur.
• Scenario 1: Manually Connecting a Camera with New Firmware (v5.3.0) to an NVR1 with Previous Firmware
(Pre-v3.4.2)
1. Activate the camera (see New Secure Activation Procedure, page 3).
2. Change the camera’s IP address to 192.168.254.x (e.g., 192.168.254.2, 192.168.254.3, etc.) to add the camera manually to the NVR.
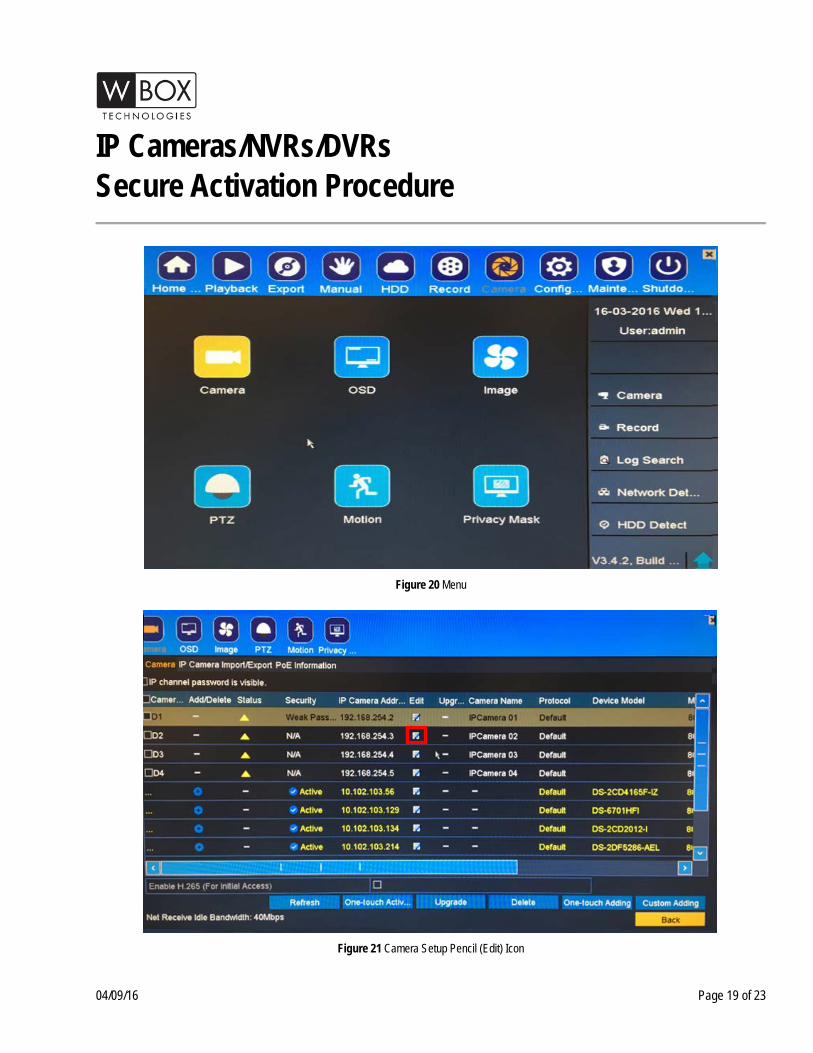
3. On the NVR go to MENU > CAMERA SETUP.
4. Press the Pencil (edit) icon next to the channel number (e.g., D1, D2, etc.).
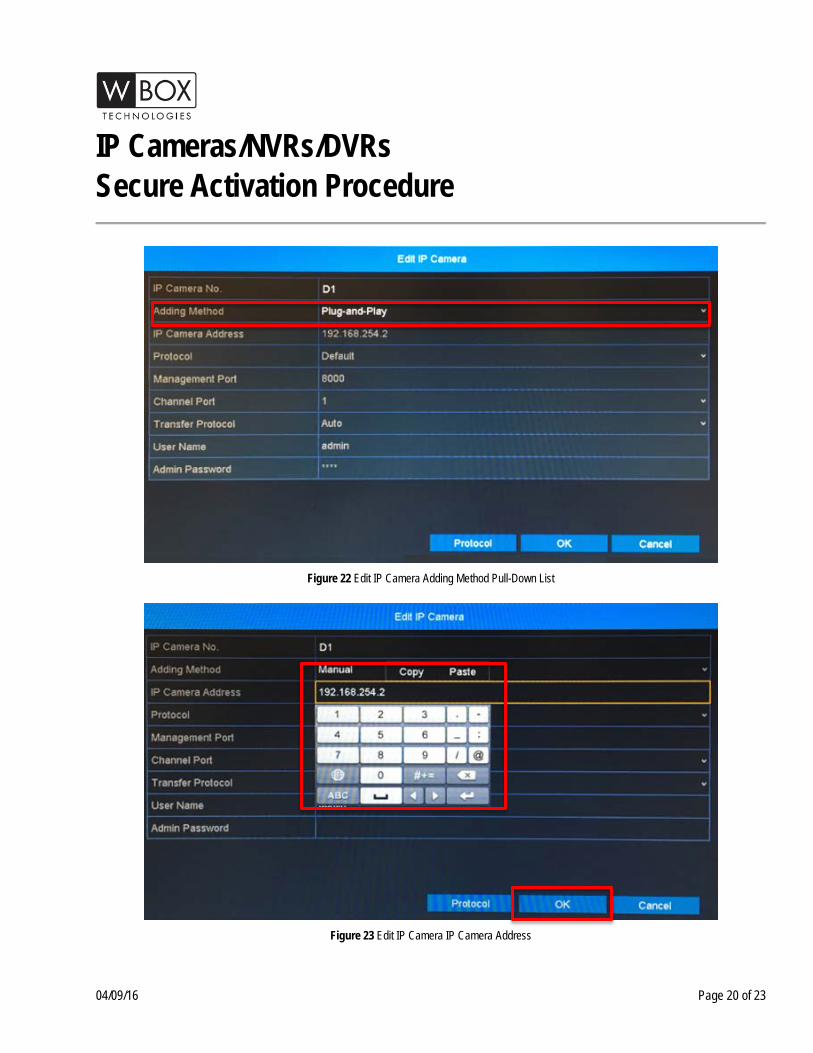
5. Change the ADDING METHOD to MANUAL.
6. Enter the camera’s IP address, username, and password.
7. Press APPLY.
1 0E-41TP1UN, 0E-82TP1UN, or 0E-162TP15UN (v3.0.8 Build 151103 or Below)

IP Cameras/NVRs/DVRs Secure Activation Procedure
04/09/16 Page 18 of 23
Figure 18 Device Search
Figure 19 Network Settings
IP Cameras/NVRs/DVRs Secure Activation Procedure
04/09/16 Page 19 of 23
Figure 20 Menu
Figure 21 Camera Setup Pencil (Edit) Icon
IP Cameras/NVRs/DVRs Secure Activation Procedure
04/09/16 Page 20 of 23
Figure 22 Edit IP Camera Adding Method Pull-Down List
Figure 23 Edit IP Camera IP Camera Address

IP Cameras/NVRs/DVRs Secure Activation Procedure
04/09/16 Page 21 of 23
• Scenario 2: Automatically Connecting a Camera with Previous Firmware (v5.2.0 Build 151105) to an NVR1 with New Firmware (v3.4.2)
NOTE: While upgrading the camera to the latest firmware is highly recommended, NVRs running new v3.4.2 firmware can still use Plug and Play with IP cameras running older firmware, as explained in this procedure.
1. Activate the NVR (see New Secure Activation Procedure, page 3).
2. Change the camera password back to the factory default, wbox123.
3. Plug the camera into the NVR’s built-in PoE switch.
4. The NVR will recognize and connect to the camera automatically, using the camera’s default user name (admin) and password (wbox123).
• Scenario 3: Connecting a Camera with New Firmware (v5.3.0) to an NVR1 with New Firmware (v3.4.2) Use one the following three methods: - Option 1: Activate the NVR (see New Secure Activation Procedure, page 3) then connect the
unactivated camera to the built-in POE switch. The NVR will activate the camera and assign its password to the camera.
- Option 2: Activate the NVR and the camera separately using the same password for both (see New
Secure Activation Procedure, page 3). After activating the devices, plug the cameras into the NVR and the Plug and Play feature will connect to the cameras and, after exiting the menu, will populate the cameras on the screen.
- Option 3: Activate the camera and the NVR using different passwords (see New Secure Activation
Procedure, page 3). After activation, manually add the cameras (see Manually Connecting a Camera…, page 15).
1 0E-41TP1UN, 0E-82TP1UN, or 0E-162TP15UN (v.3.4.2)

IP Cameras/NVRs/DVRs Secure Activation Procedure
04/09/16 Page 22 of 23
Unlock Pattern The new secure activation strategy forces users to create a strong password, which may be complicated and hard to remember. Users might tend to forget their password after a period of time, which would cause a lot of support line calls. Unlock Pattern mode has been implemented in NVRs to help users create a secondary, easier to remember credential, without sacrificing login security. An unlock pattern is just an additional authorization option for users to access the local menu. It is highly secure since users can use this pattern to access only the local menu. Also, this function can be disabled, if desired.
1. Once the NVR has been activated, the Admin user will be prompted (Figure 24, see page 21) to configure
an unlock pattern for device login. The unlock pattern is a confidential design that can be used in place of a password.
2. Hold down the left mouse button and draw a pattern among the nine dots on the screen. Release the mouse button when the pattern is done (Figure 25, see page 21).
3. Draw the same pattern again to confirm it. When the two patterns match, the pattern is successfully configured (Figure 26 and Figure 27, see page 21).
4. After the pattern has been configured, draw the pre-defined pattern to unlock the system and enter the menu operation (Figure 28, see page 21).
NOTES: Connect at least four dots to draw the pattern, with each dot connected only once.
If the two patterns are different, you must set the pattern again. If you have forgotten your pattern, you can still log in using one of
the following procedures (pattern will remain functional for future login attempts): - Option 1: Select the Forget My Pattern option to bypass the
pattern prompt and display the normal login dialog box.
- Option 2: Select the Switch User option to bypass the pattern prompt and display the normal login dialog box.

IP Cameras/NVRs/DVRs Secure Activation Procedure
04/09/16 Page 23 of 23
Figure 24 Set Unlock Pattern Figure 25 Draw the Pattern Figure 26 Draw Pattern Again
Figure 27 Draw the Pattern to Match Figure 28 Draw Unlock Pattern To Log In


![900.0570 Rev1.01 HJZTP HJZTPX Joystick Controller1].0570_Rev1.01_HJZTP_HJZTPX...900.0570 –September 2005 – Rev. 1.01 HJZTP/HJZTPX Joystick Controller for PTZ Cameras, DVRs, and](https://static.fdocuments.us/doc/165x107/5a9773f97f8b9ab6188ce064/pdf9000570-rev101-hjztp-hjztpx-joystick-10570rev101hjztphjztpx9000570.jpg)

