IP CAMERA - Unifore Security -...
30
User’s Manual IP CAMERA MODEL: HI-SILICON SOLUTION K20140516 Rev. 1.01 Product Color:
Transcript of IP CAMERA - Unifore Security -...
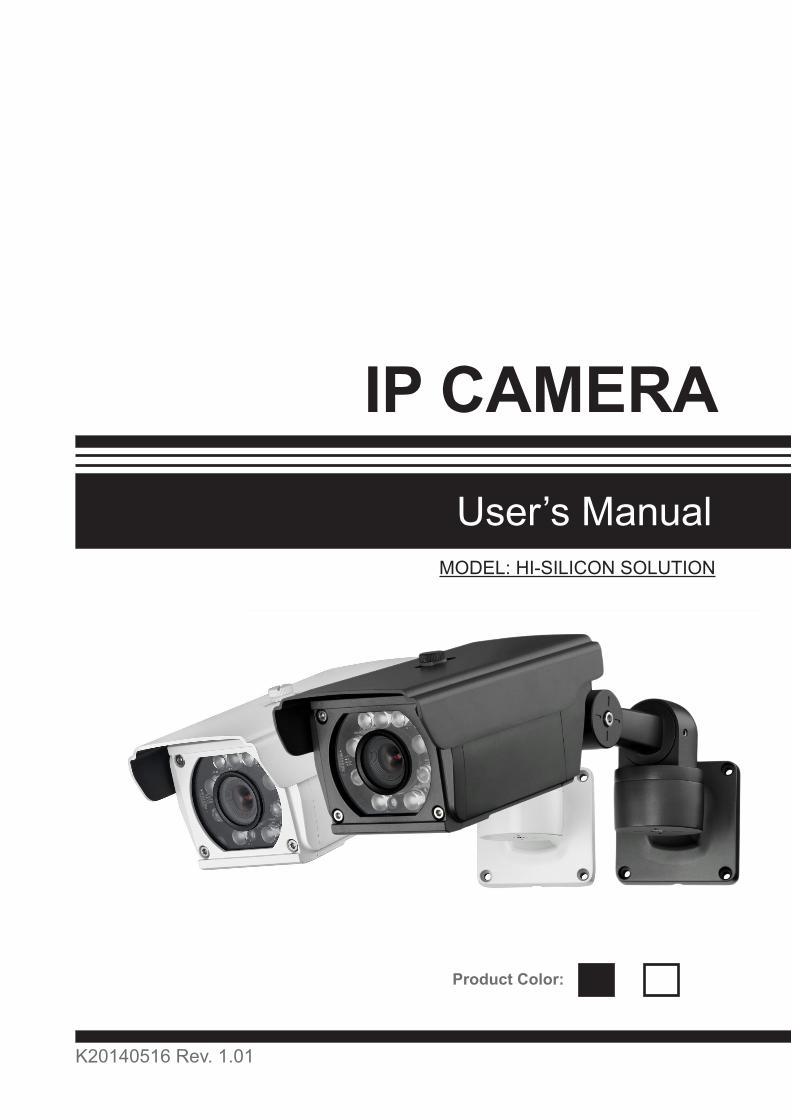
User’s Manual
IP CAMERA
MODEL: HI-SILICON SOLUTION
K20140516 Rev. 1.01
Product Color:
Overview
Megapixel IP camera is a professional-series fixed network camera featuring superb image quality and exceptional bandwidth efficiency. It is especially suitable for wide open spaces such as building entrances and airports, or applications requiring accurate identification, such as human faces in banks or vehicle license plates in parking lots.
This is standard IP camera which with its own webserver for remotely access, view and control. It supports multiply network protocols including t RTSP, TFP, PPPOE, UPnP, TCP/IP, HTTP, TCP, SMTP, FTP, DHCP, DNS, DDNS, NTP. Different from traditional IP cameras, it can support P2P function, which enable users perform remotely view without hassle configuration of DDNS. By the way, Unifore can provide smartphone apps (Android, iPhone, iPad) for cloud monitoring. Offering free CMS software for multiply IP cameras management.
Supports H.264 compression technology, drastically reducing file sizes and conserving valuable network bandwidth. The streams can also be individually configured to meet different needs or bandwidth constraints, thereby further reducing bandwidth and storage requirements. Users can receive multiple streams simultaneously in different resolutions, frame rates and image qualities for viewing on different platforms.
Thanks to its day and night function achieved by a built-in removable IR-cut filter, the IP Camera is able to maintain clear images 24 hours a day.
Read before useThe use of surveillance devices may be prohibited by law in your country. The Network Camera is not only a high-performance web-ready camera but can also be part of a flexible surveillance system. It is the user’s responsibility to ensure that the operation of such devices is legal before installing this unit for its intended use.
It is important to first verify that all contents received are complete according to the Package Contents listed below. Take note of the warnings in the Quick Installation Guide before the Network Camera is installed; then carefully read and follow the instructions in the Installation chapter to avoid damage due to faulty assembly and installation. This also ensures the product is used properly as intended.
The Network Camera is a network device and its use should be straightforward for those who have basic networking knowledge. It is designed for various applications including video sharing, general security/surveillance, etc.
Installation
1.1 Safety Cautions1) This camera may be damaged by electrical and physical shock.Use regulated 12V DC, 1.5 -2A power supply. Do not throw or drop it onto floor.2) This camera can be used outdoor. But if it is used outdoor, it is required to use the sunvisor and avoid direct light from the sun. Do not use it under water.3) In case it is installed at high location, be sure to mount securely to prevent the unit from falling below.4) In case the unit fails, DO NOT try to disassemble the product.Contact or consult the distributor or an authorized technician for after-sales service.Warranty void for the product disassembled without an authorization from the distributor or an authorized technician.5) All responsibility by using this unit is on the user.
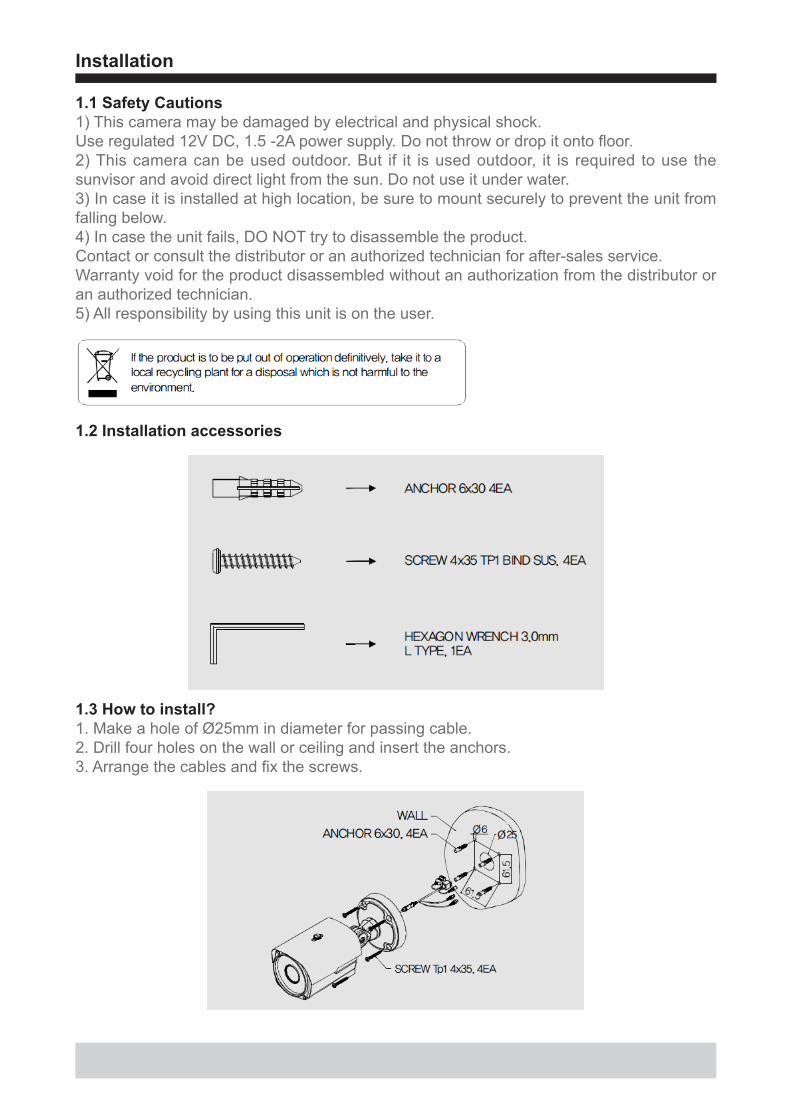
1.2 Installation accessories
1.3 How to install?1. Make a hole of Ø25mm in diameter for passing cable.2. Drill four holes on the wall or ceiling and insert the anchors.3. Arrange the cables and fix the screws.
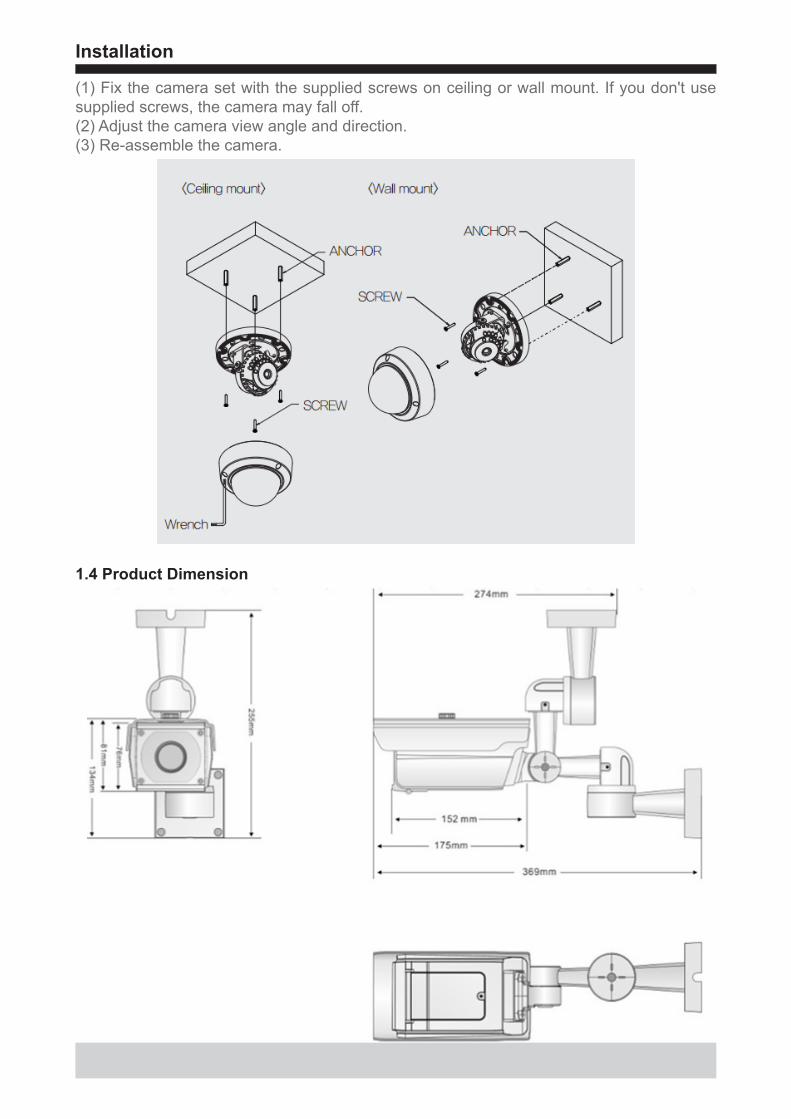
(1) Fix the camera set with the supplied screws on ceiling or wall mount. If you don't use supplied screws, the camera may fall off.(2) Adjust the camera view angle and direction.(3) Re-assemble the camera.
Installation
1.4 Product Dimension
Installation and network
2.1 InstallationOn the assumption that User PC and the camera are used under static IP, andthe camera is to be directly connected with User PC or Local Network.The installation procedure is to be;1) Connect the camera and PC with LAN Cable.2) Power on camera.• Use regulated 12V DC, 1A• Use PoE(Power Over Ethernet) : The cable includes data and power, so it'seasy to install the camera. So, you can save time to install and cost. When youconnect the camera with PoE and DC adaptor, Only PoE is used.3) Wait about 2 minute after power on camera, the system will be booted.
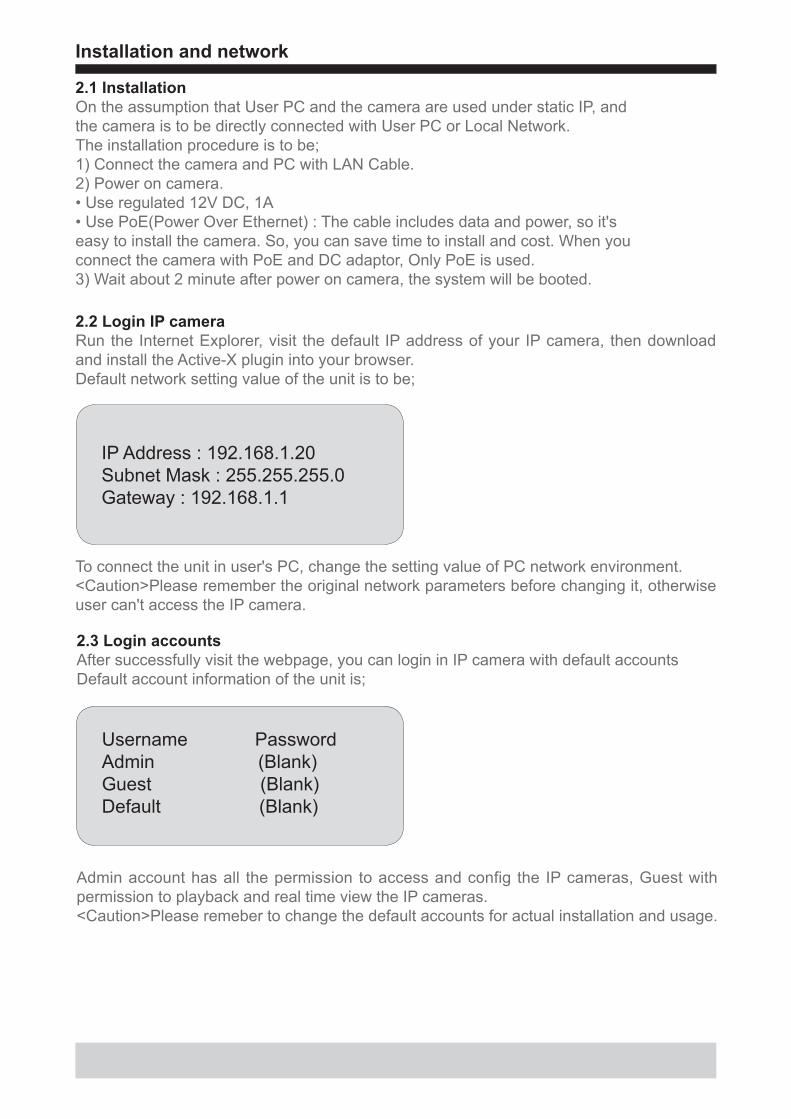
2.2 Login IP cameraRun the Internet Explorer, visit the default IP address of your IP camera, then download and install the Active-X plugin into your browser.Default network setting value of the unit is to be;
IP Address : 192.168.1.20Subnet Mask : 255.255.255.0Gateway : 192.168.1.1
To connect the unit in user's PC, change the setting value of PC network environment.<Caution>Please remember the original network parameters before changing it, otherwise user can't access the IP camera.
2.3 Login accountsAfter successfully visit the webpage, you can login in IP camera with default accountsDefault account information of the unit is;
Username PasswordAdmin (Blank)Guest (Blank)Default (Blank)
Admin account has all the permission to access and config the IP cameras, Guest with permission to playback and real time view the IP cameras.<Caution>Please remeber to change the default accounts for actual installation and usage.
Installation and network
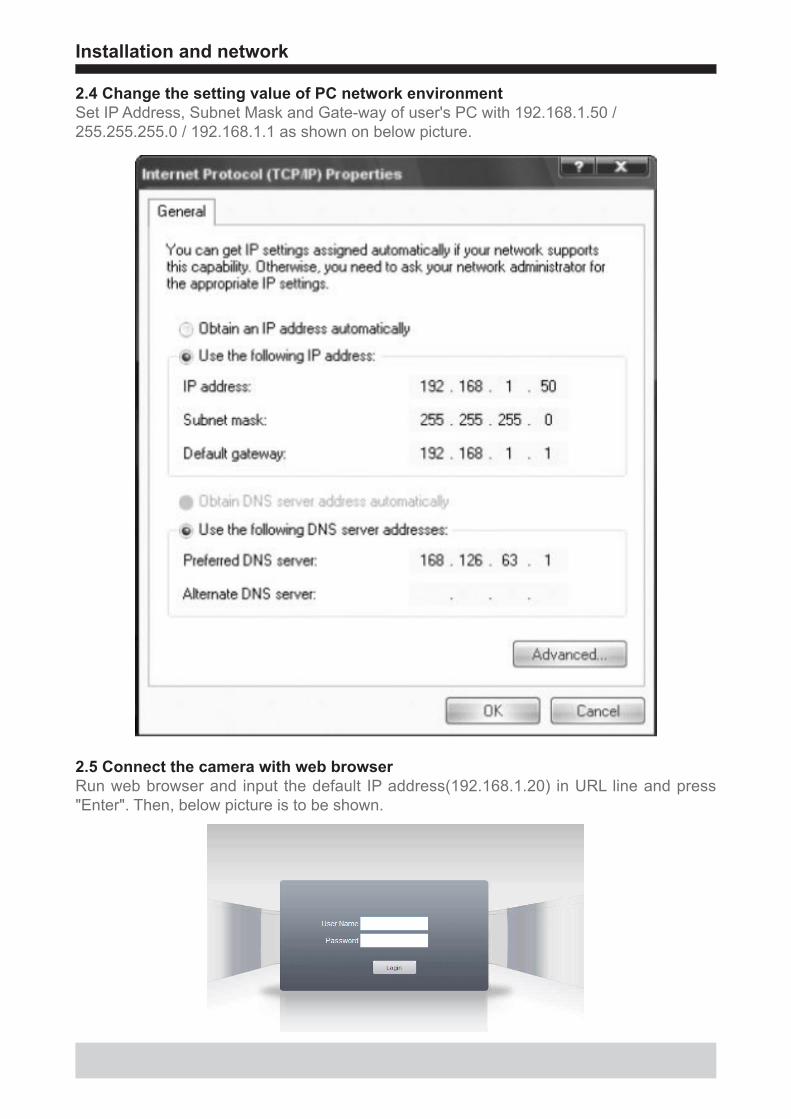
2.4 Change the setting value of PC network environmentSet IP Address, Subnet Mask and Gate-way of user's PC with 192.168.1.50 /255.255.255.0 / 192.168.1.1 as shown on below picture.
2.5 Connect the camera with web browserRun web browser and input the default IP address(192.168.1.20) in URL line and press "Enter". Then, below picture is to be shown.
Installation and network
2.6 PreviewAfter login into IP camera with account, it will pop-up preview [Bit rate type] selectionLocal view: choose main stream to display resolution:[1920x1080P]/[1280x960]/[1280x720] Remote view: choose sub stream to display resolution:[704x576]/[352x288]
2.7 Complete InstallationUpon installation, Web Viewer appears and image of camera is to be seen
q Channel Selection w Preveiw Window e Full screen viewr First View t Connect all Video y Disconnect all Videou Snapshot i All Channel Record o Stop All Channel Recorda Mute s Pan/Tilt Rotation d Preset/Tourf Color Adjustment
q
w
e r t y u i o a
s
d
f
Configuration
3.1 Setup (config) IP cameraClick [DeviceCfg], it will pop-up configuration window as below:
q w e r t
q Record w Alarm e System r GUI (Graphic User Interface) t Information
3.2 Record[Record] allows user to choose the appropriate recording modes, and Record function including: device record and snapshot settings
Figure 1: Record
Record
[Length] to set the length of each recording file between 1-120min, defaultis 60min[PreRecord] to record 1-30s before motion happens (time length may slight different due to bit rate) [Record control] set recode types: timing, manual& stop
• Timing: Record according to the set video type (regular, detect and alarm) and time period.• Manual: Click the button and the according channels recording no matter the channel in any status.• Stop: Click the stop button and the according channel stops recording no matter the channel in any status.
[Period] Set the time section of common recording, The recording will start only in the set range[Record type] Set recording type: regular, detect or alarm.• Regular: Perform the regular recording in the set time section. The video file type is “R”. • Detect: Trigger the “motion detect”, “camera mask”or “video loss” signal. When above alarm is set as opening recording, the “detection recording” state is on. The video file type is “M”. • Alarm: Trigger the external alarm signalin the set time section. When above alarm is set as opening recording, the “detection recording” state is on. The video file type is “A”.
Figure 2: Snapshot
SnapShot
3.3 SnapshotSetup snapshot parameters for different channels.At firsttime it's set for 24hours snapshot continuously, pls go to Main Menu->Record->Snapshot Storage for appropriate settings.
Remark: Device installed with TF card and set partition, Snapshot should more than 1G, then device can normally take snapshot.
[PreSnapshot] to take picture of 1-30 pcs before recording happens, default is 5 pcs.[Record] Set record type, "Timing" ,"Manual" and "Stop"• Timing: Take snapshoots according to the set types (regular, detect and alarm) and time period.• Manual: No matter what is the current status, once choose "manual" ,it will have snapshot at related channels. • Stop: No matter what is the current status, once choose "stop", it will stop snapshot.
[Period] Set normal record period, it only startup Snapshot Storage at set period. [Record type] Set snapshop type: regular, detect or alarm.• Regular: Take pictures in the set time section. The video file type is “R”. • Detect: snapshot at set period when motion detect, video blind and video loss which are preset for snapshot enable. • Alarm: Take pictures when alarm input receives signal.
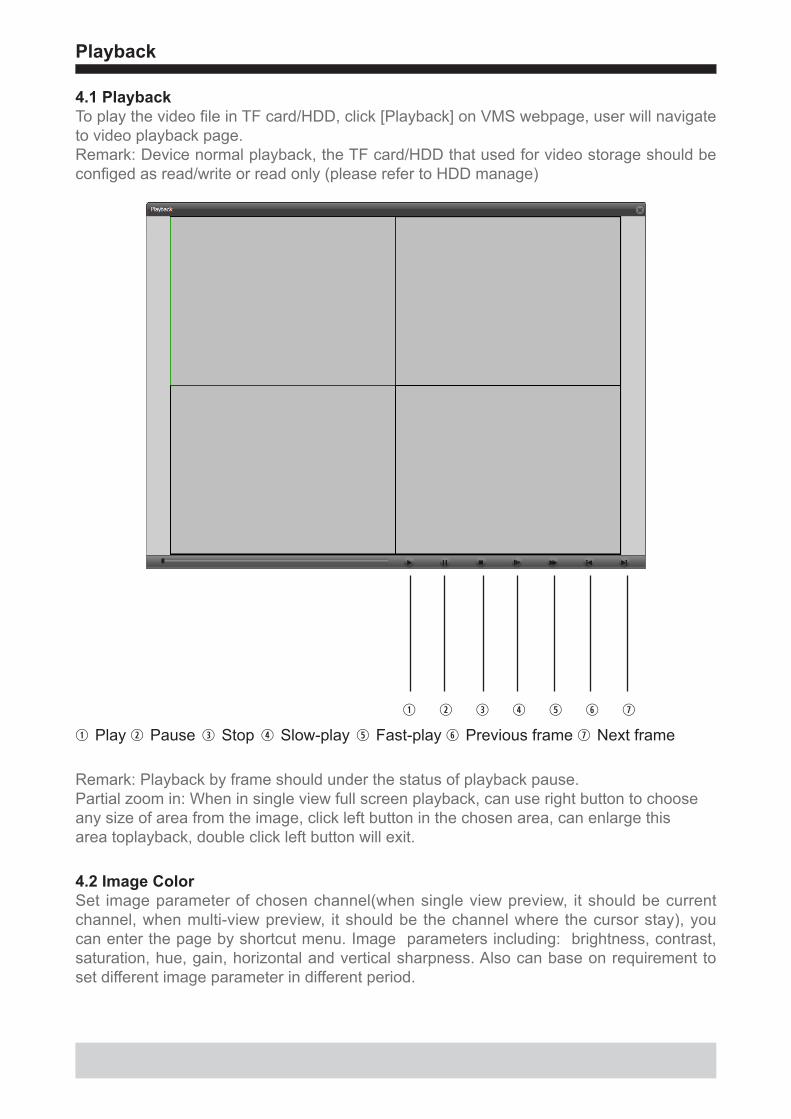
4.1 PlaybackTo play the video file in TF card/HDD, click [Playback] on VMS webpage, user will navigate to video playback page.Remark: Device normal playback, the TF card/HDD that used for video storage should be configed as read/write or read only (please refer to HDD manage)
q w e r t y u
q Play w Pause e Stop r Slow-play t Fast-play y Previous frame u Next frame
Remark: Playback by frame should under the status of playback pause.Partial zoom in: When in single view full screen playback, can use right button to choose any size of area from the image, click left button in the chosen area, can enlarge this area toplayback, double click left button will exit.
4.2 Image ColorSet image parameter of chosen channel(when single view preview, it should be current channel, when multi-view preview, it should be the channel where the cursor stay), you can enter the page by shortcut menu. Image parameters including: brightness, contrast, saturation, hue, gain, horizontal and vertical sharpness. Also can base on requirement to set different image parameter in different period.
Playback
Alarm Function
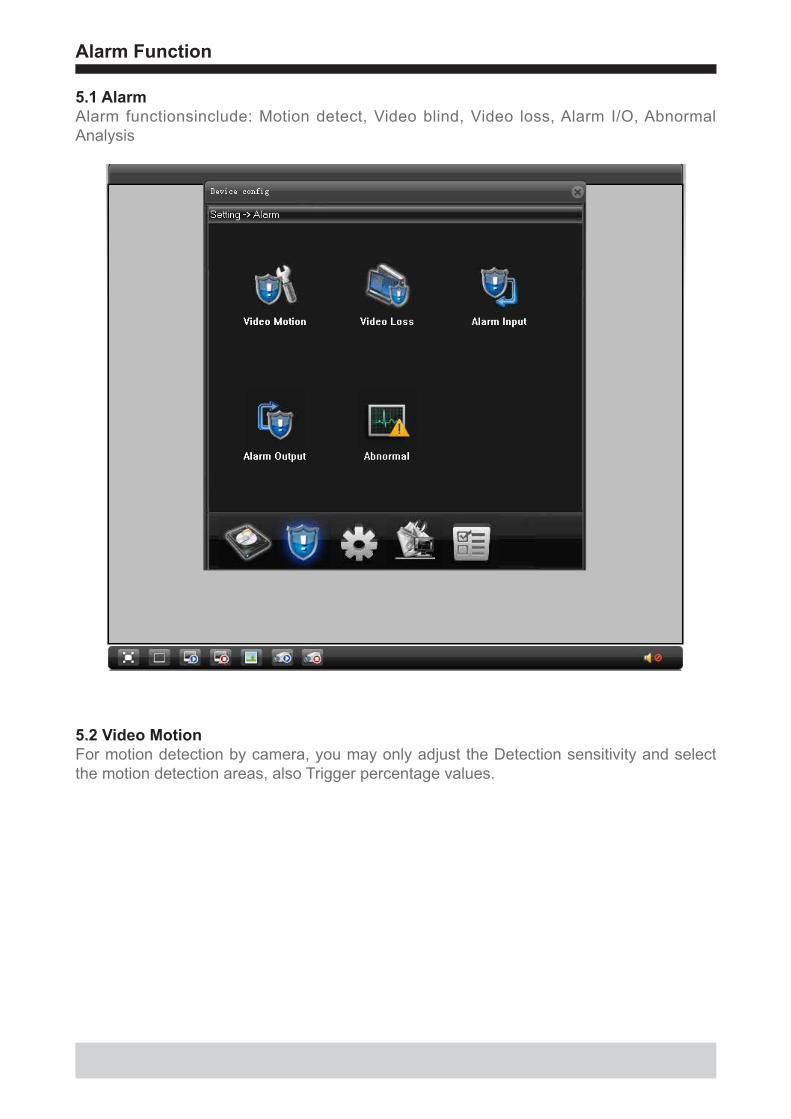
5.1 AlarmAlarm functionsinclude: Motion detect, Video blind, Video loss, Alarm I/O, Abnormal Analysis
5.2 Video MotionFor motion detection by camera, you may only adjust the Detection sensitivity and select the motion detection areas, also Trigger percentage values.
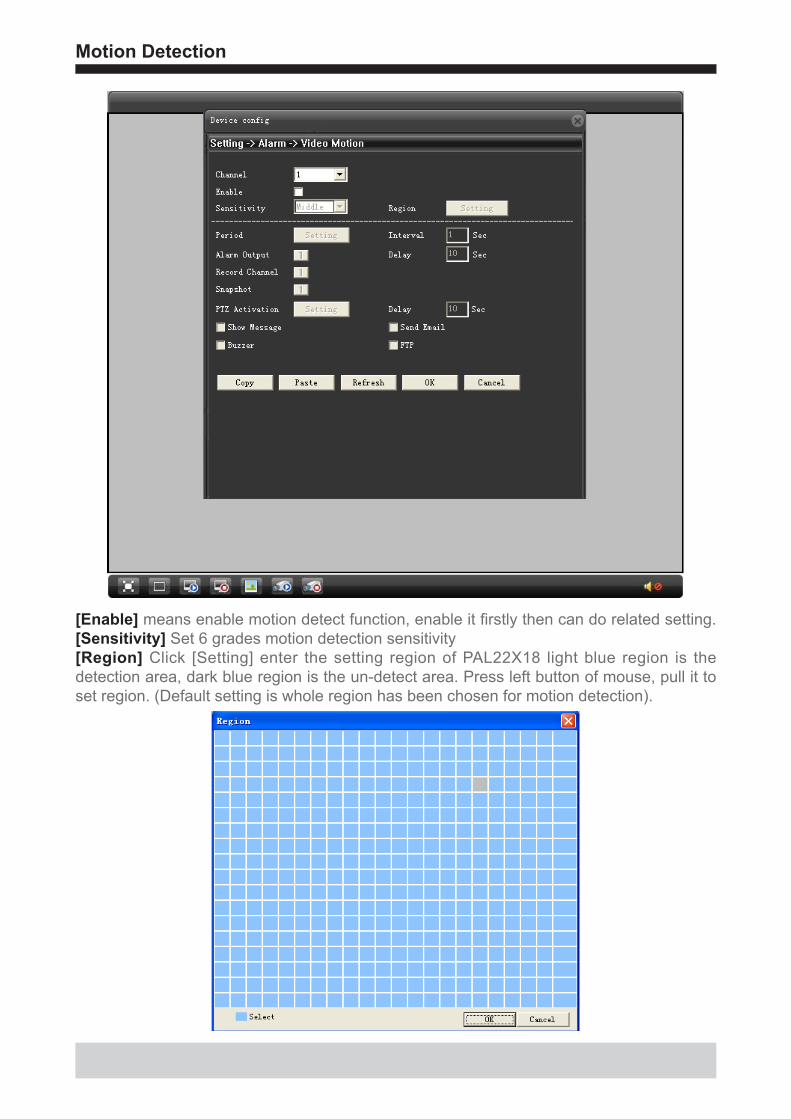
[Enable] means enable motion detect function, enable it firstly then can do related setting.[Sensitivity] Set 6 grades motion detection sensitivity[Region] Click [Setting] enter the setting region of PAL22X18 light blue region is the detection area, dark blue region is the un-detect area. Press left button of mouse, pull it to set region. (Default setting is whole region has been chosen for motion detection).
Motion Detection
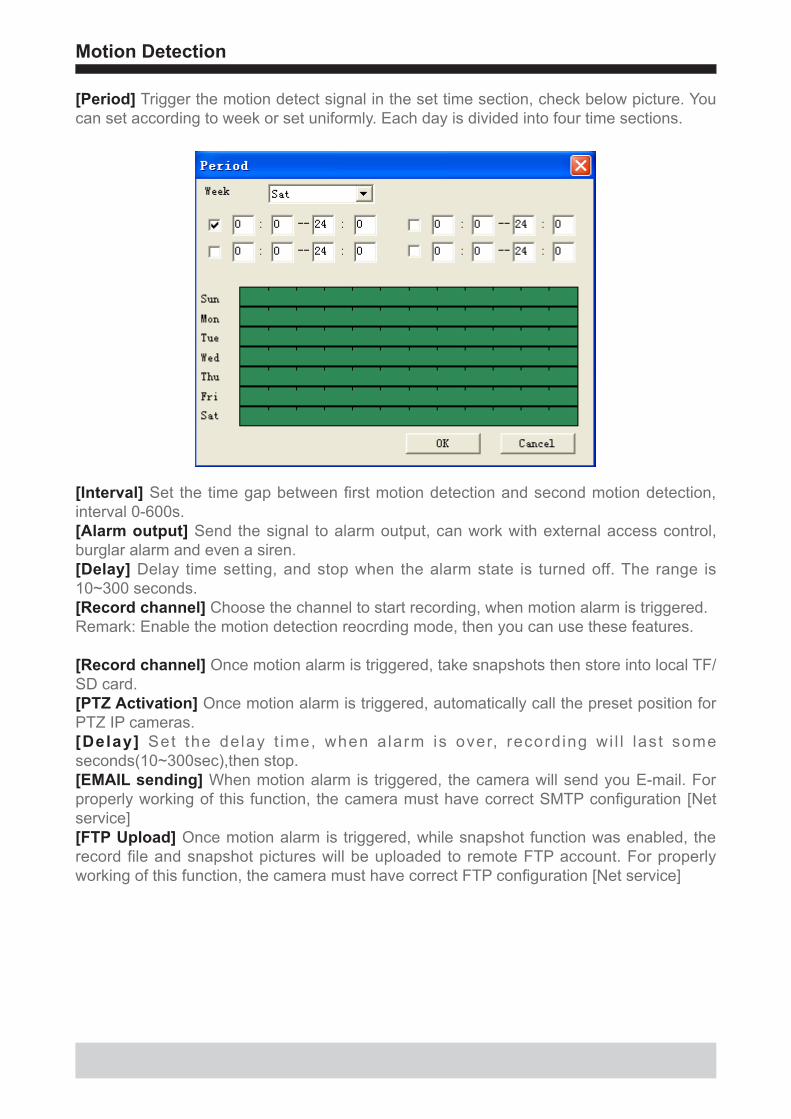
[Period] Trigger the motion detect signal in the set time section, check below picture. You can set according to week or set uniformly. Each day is divided into four time sections.
Motion Detection
[Interval] Set the time gap between first motion detection and second motion detection, interval 0-600s.[Alarm output] Send the signal to alarm output, can work with external access control, burglar alarm and even a siren.[Delay] Delay time setting, and stop when the alarm state is turned off. The range is 10~300 seconds.[Record channel] Choose the channel to start recording, when motion alarm is triggered.Remark: Enable the motion detection reocrding mode, then you can use these features.
[Record channel] Once motion alarm is triggered, take snapshots then store into local TF/SD card.[PTZ Activation] Once motion alarm is triggered, automatically call the preset position for PTZ IP cameras.[Delay] Set the delay t ime, when a larm is over, record ing wi l l last some seconds(10~300sec),then stop.[EMAIL sending] When motion alarm is triggered, the camera will send you E-mail. For properly working of this function, the camera must have correct SMTP configuration [Net service][FTP Upload] Once motion alarm is triggered, while snapshot function was enabled, the record file and snapshot pictures will be uploaded to remote FTP account. For properly working of this function, the camera must have correct FTP configuration [Net service]
Video Loss
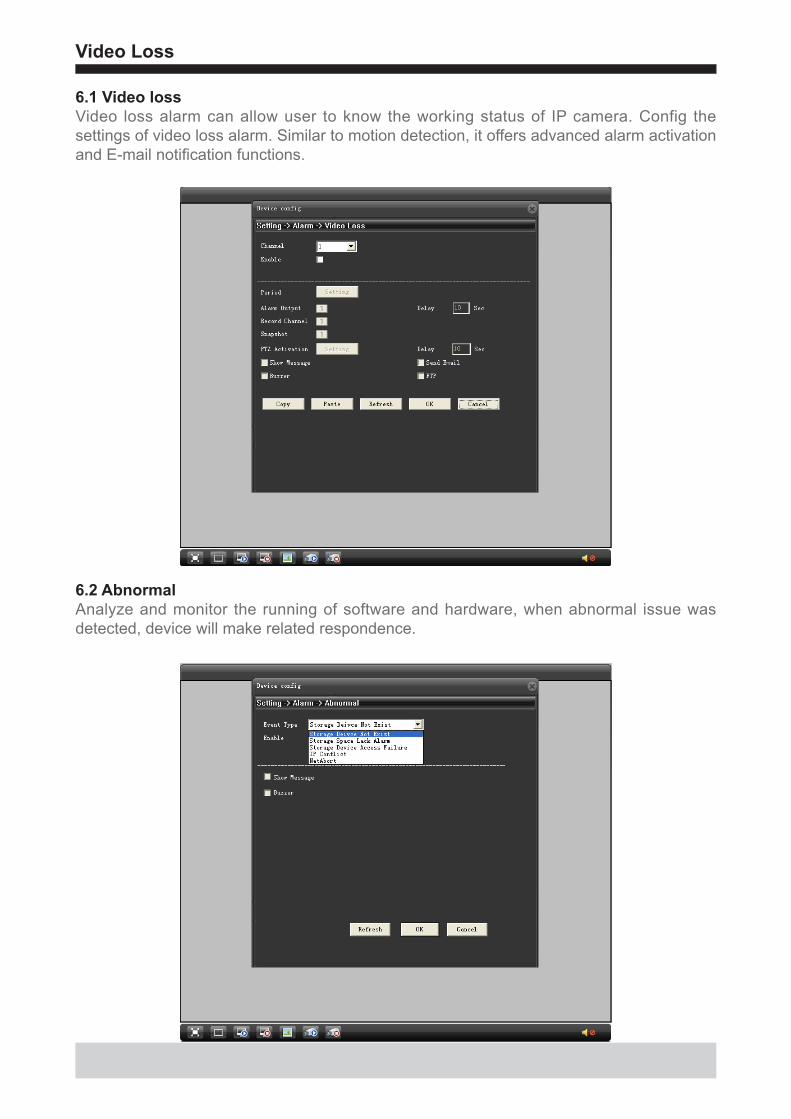
6.1 Video lossVideo loss alarm can allow user to know the working status of IP camera. Config the settings of video loss alarm. Similar to motion detection, it offers advanced alarm activation and E-mail notification functions.
6.2 AbnormalAnalyze and monitor the running of software and hardware, when abnormal issue was detected, device will make related respondence.
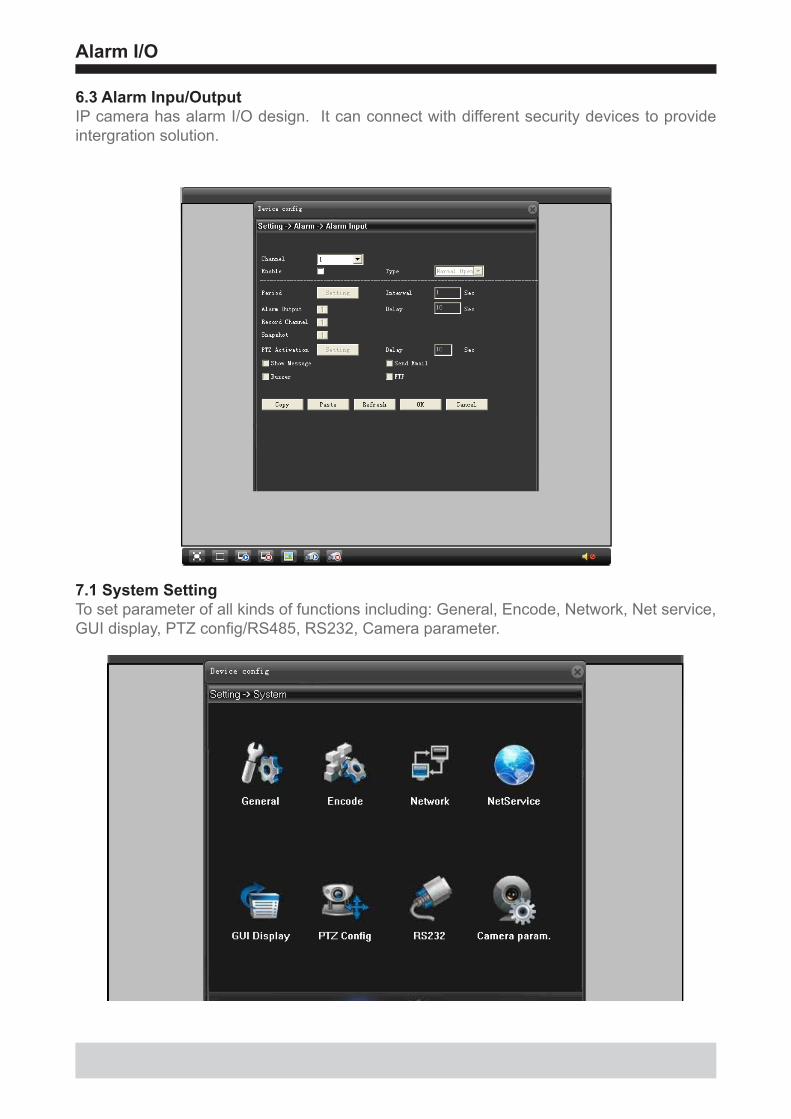
6.3 Alarm Inpu/OutputIP camera has alarm I/O design. It can connect with different security devices to provide intergration solution.
Alarm I/O
7.1 System SettingTo set parameter of all kinds of functions including: General, Encode, Network, Net service, GUI display, PTZ config/RS485, RS232, Camera parameter.
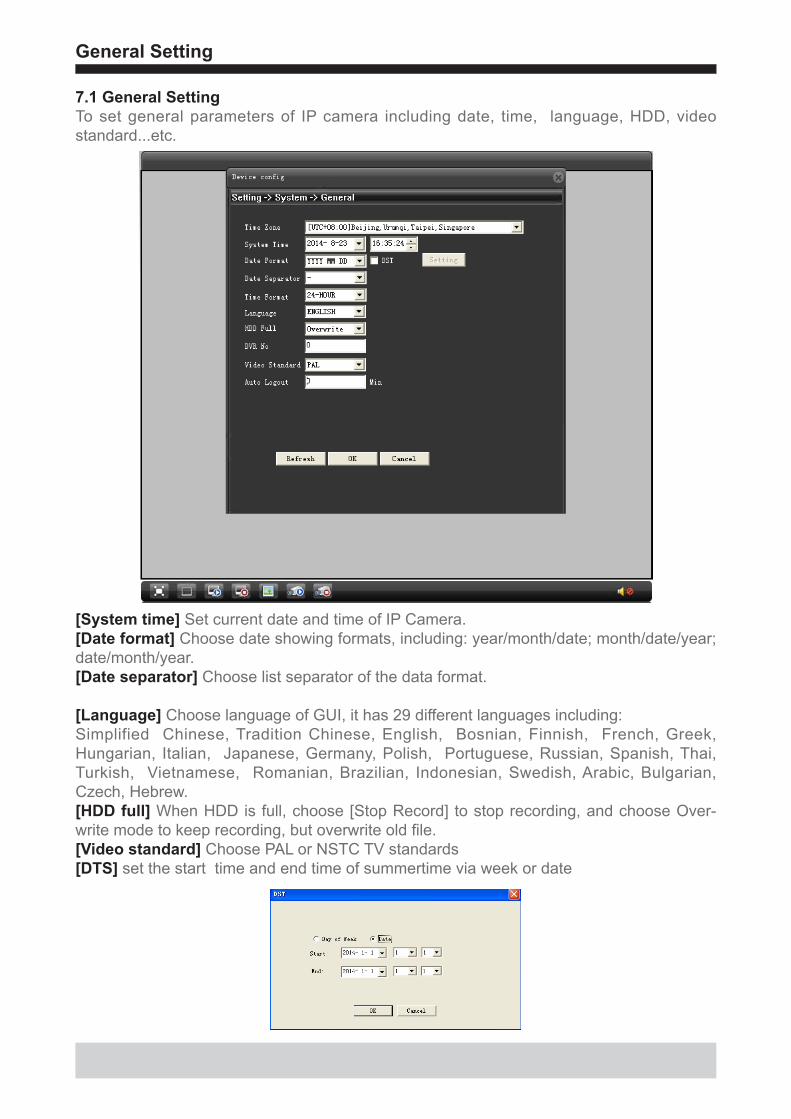
7.1 General SettingTo set general parameters of IP camera including date, time, language, HDD, video standard...etc.
[System time] Set current date and time of IP Camera.[Date format] Choose date showing formats, including: year/month/date; month/date/year; date/month/year.[Date separator] Choose list separator of the data format.
[Language] Choose language of GUI, it has 29 different languages including:Simplified Chinese, Tradition Chinese, English, Bosnian, Finnish, French, Greek, Hungarian, Italian, Japanese, Germany, Polish, Portuguese, Russian, Spanish, Thai, Turkish, Vietnamese, Romanian, Brazilian, Indonesian, Swedish, Arabic, Bulgarian, Czech, Hebrew.[HDD full] When HDD is full, choose [Stop Record] to stop recording, and choose Over-write mode to keep recording, but overwrite old file.[Video standard] Choose PAL or NSTC TV standards[DTS] set the start time and end time of summertime via week or date
General Setting
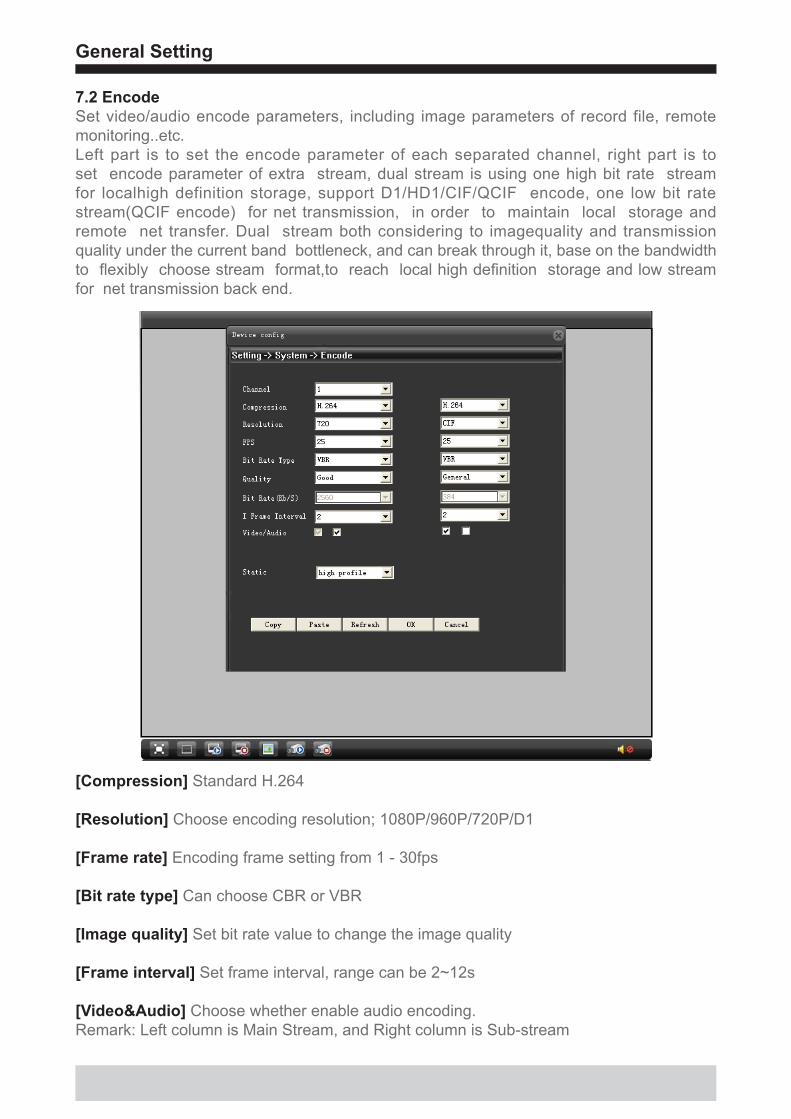
7.2 EncodeSet video/audio encode parameters, including image parameters of record file, remote monitoring..etc. Left part is to set the encode parameter of each separated channel, right part is to set encode parameter of extra stream, dual stream is using one high bit rate stream for localhigh definition storage, support D1/HD1/CIF/QCIF encode, one low bit rate stream(QCIF encode) for net transmission, in order to maintain local storage and remote net transfer. Dual stream both considering to imagequality and transmission quality under the current band bottleneck, and can break through it, base on the bandwidth to flexibly choose stream format,to reach local high definition storage and low stream for net transmission back end.
General Setting
[Compression] Standard H.264
[Resolution] Choose encoding resolution; 1080P/960P/720P/D1
[Frame rate] Encoding frame setting from 1 - 30fps
[Bit rate type] Can choose CBR or VBR
[Image quality] Set bit rate value to change the image quality
[Frame interval] Set frame interval, range can be 2~12s
[Video&Audio] Choose whether enable audio encoding.Remark: Left column is Main Stream, and Right column is Sub-stream
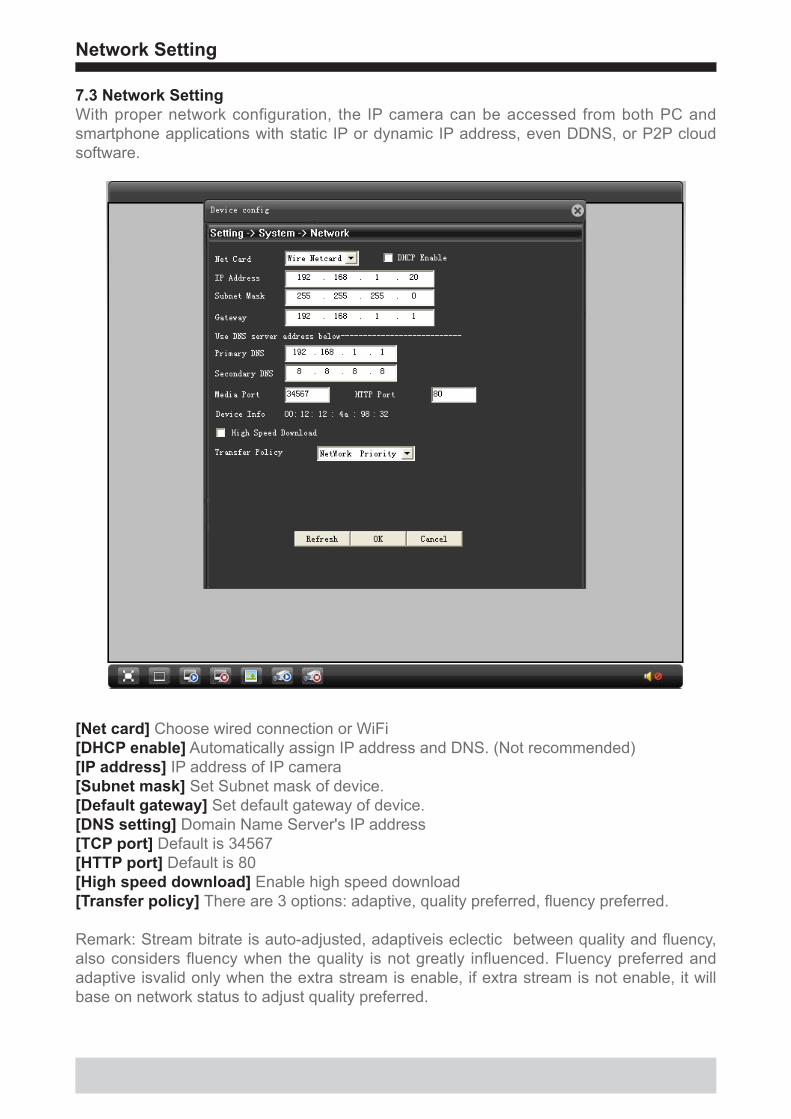
7.3 Network SettingWith proper network configuration, the IP camera can be accessed from both PC and smartphone applications with static IP or dynamic IP address, even DDNS, or P2P cloud software.
Network Setting
[Net card] Choose wired connection or WiFi [DHCP enable] Automatically assign IP address and DNS. (Not recommended)[IP address] IP address of IP camera[Subnet mask] Set Subnet mask of device.[Default gateway] Set default gateway of device.[DNS setting] Domain Name Server's IP address[TCP port] Default is 34567[HTTP port] Default is 80[High speed download] Enable high speed download[Transfer policy] There are 3 options: adaptive, quality preferred, fluency preferred.
Remark: Stream bitrate is auto-adjusted, adaptiveis eclectic between quality and fluency, also considers fluency when the quality is not greatly influenced. Fluency preferred and adaptive isvalid only when the extra stream is enable, if extra stream is not enable, it will base on network status to adjust quality preferred.
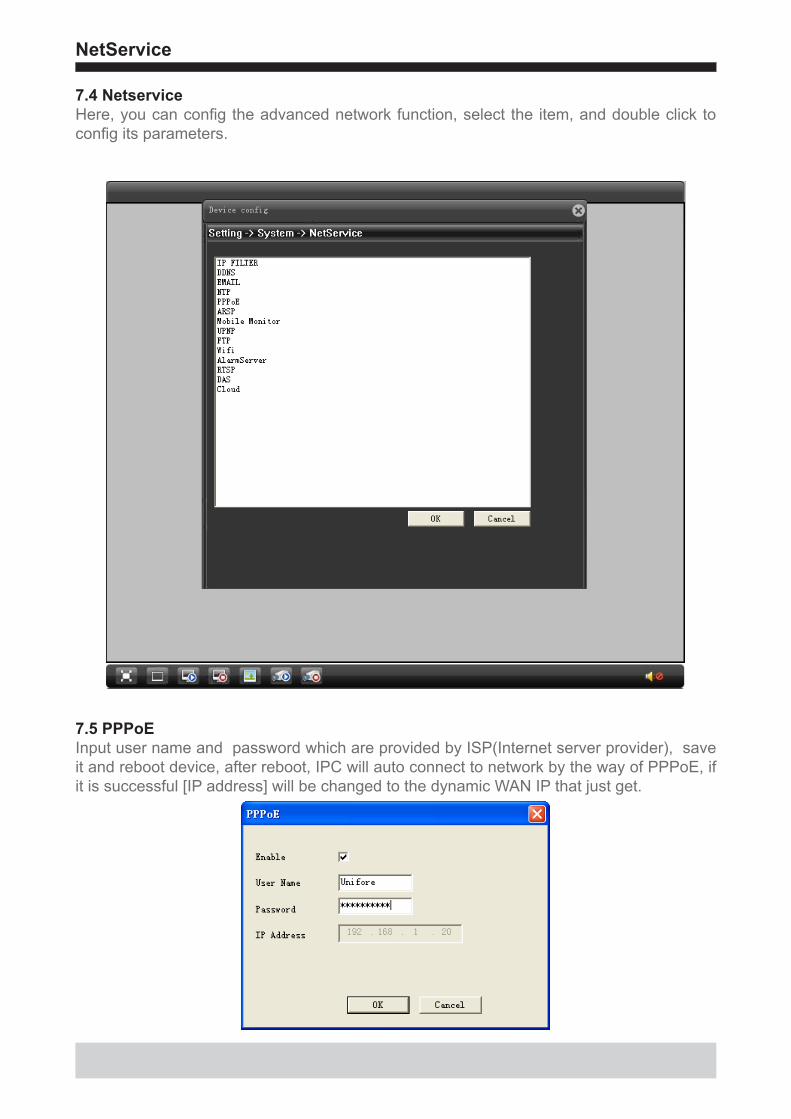
7.4 NetserviceHere, you can config the advanced network function, select the item, and double click to config its parameters.
NetService
7.5 PPPoE Input user name and password which are provided by ISP(Internet server provider), save it and reboot device, after reboot, IPC will auto connect to network by the way of PPPoE, if it is successful [IP address] will be changed to the dynamic WAN IP that just get.
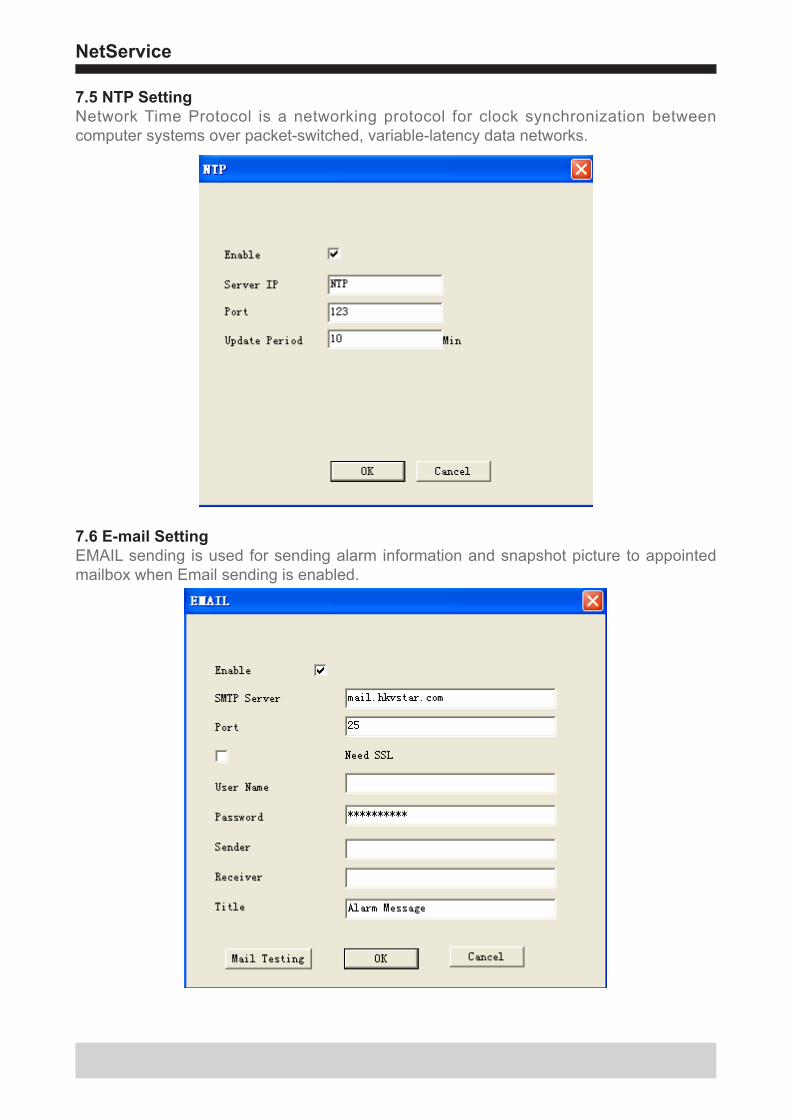
7.5 NTP SettingNetwork Time Protocol is a networking protocol for clock synchronization between computer systems over packet-switched, variable-latency data networks.
NetService
7.6 E-mail SettingEMAIL sending is used for sending alarm information and snapshot picture to appointed mailbox when Email sending is enabled.
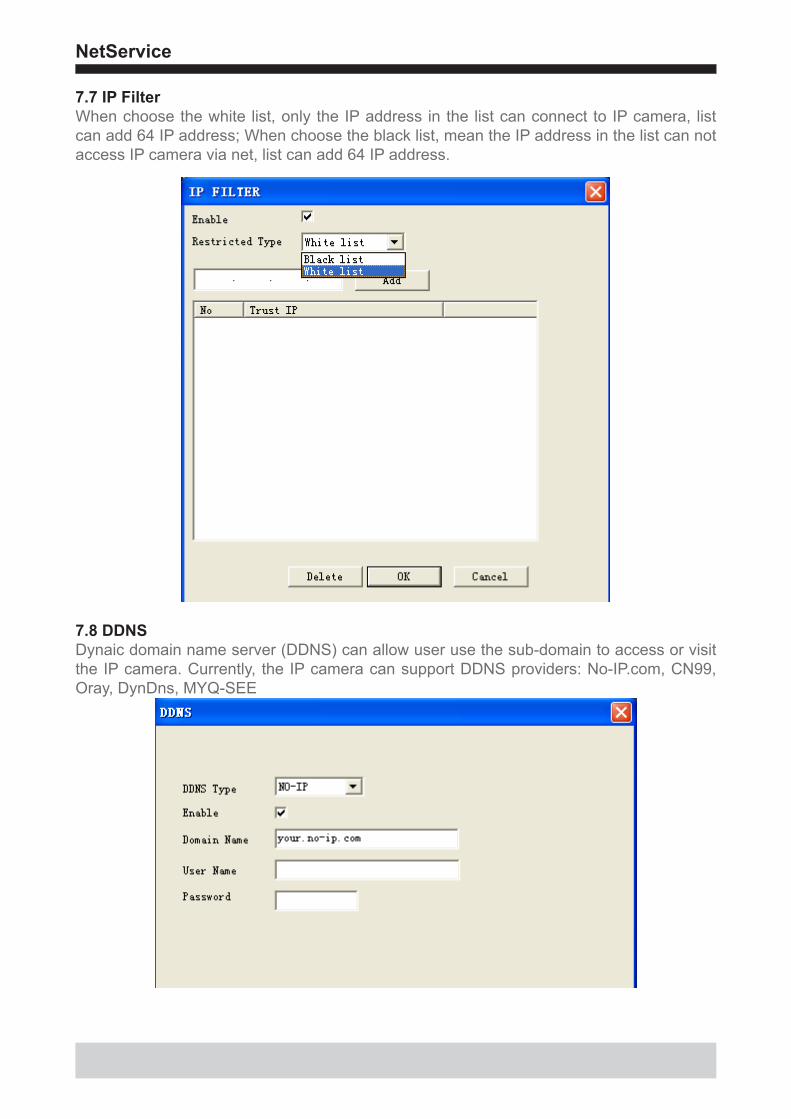
7.7 IP FilterWhen choose the white list, only the IP address in the list can connect to IP camera, list can add 64 IP address; When choose the black list, mean the IP address in the list can not access IP camera via net, list can add 64 IP address.
NetService
7.8 DDNSDynaic domain name server (DDNS) can allow user use the sub-domain to access or visit the IP camera. Currently, the IP camera can support DDNS providers: No-IP.com, CN99, Oray, DynDns, MYQ-SEE
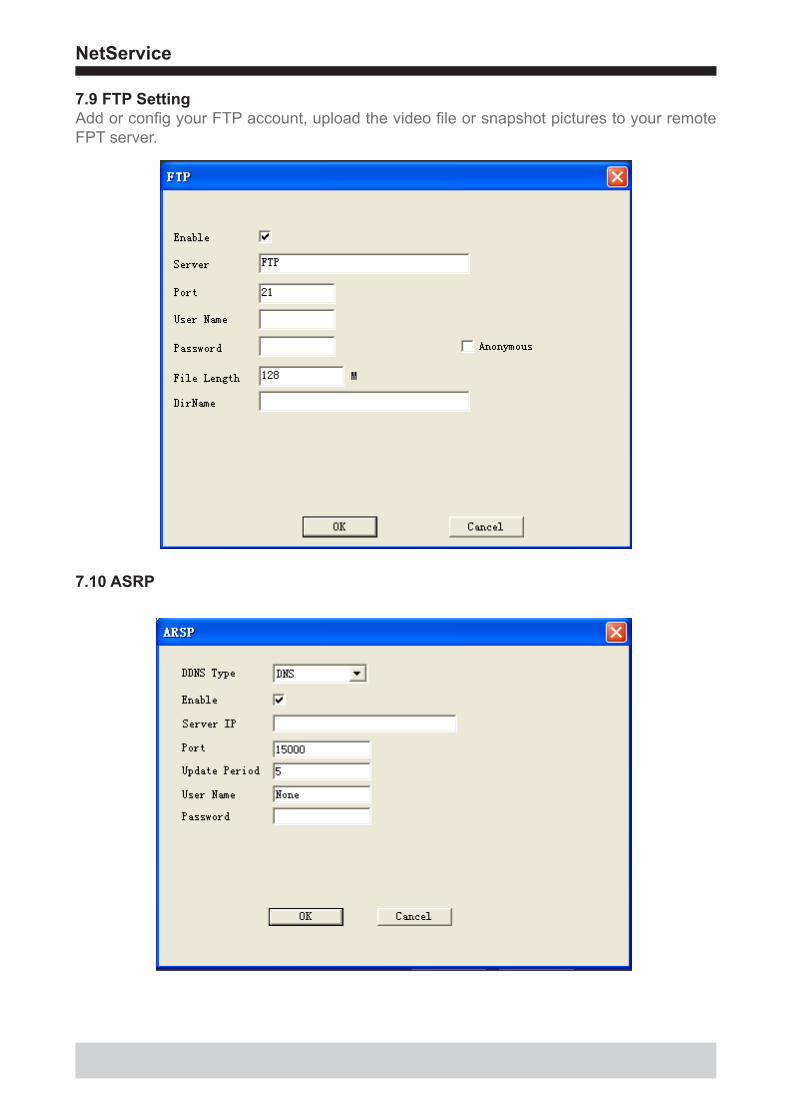
7.9 FTP SettingAdd or config your FTP account, upload the video file or snapshot pictures to your remote FPT server.
NetService
7.10 ASRP
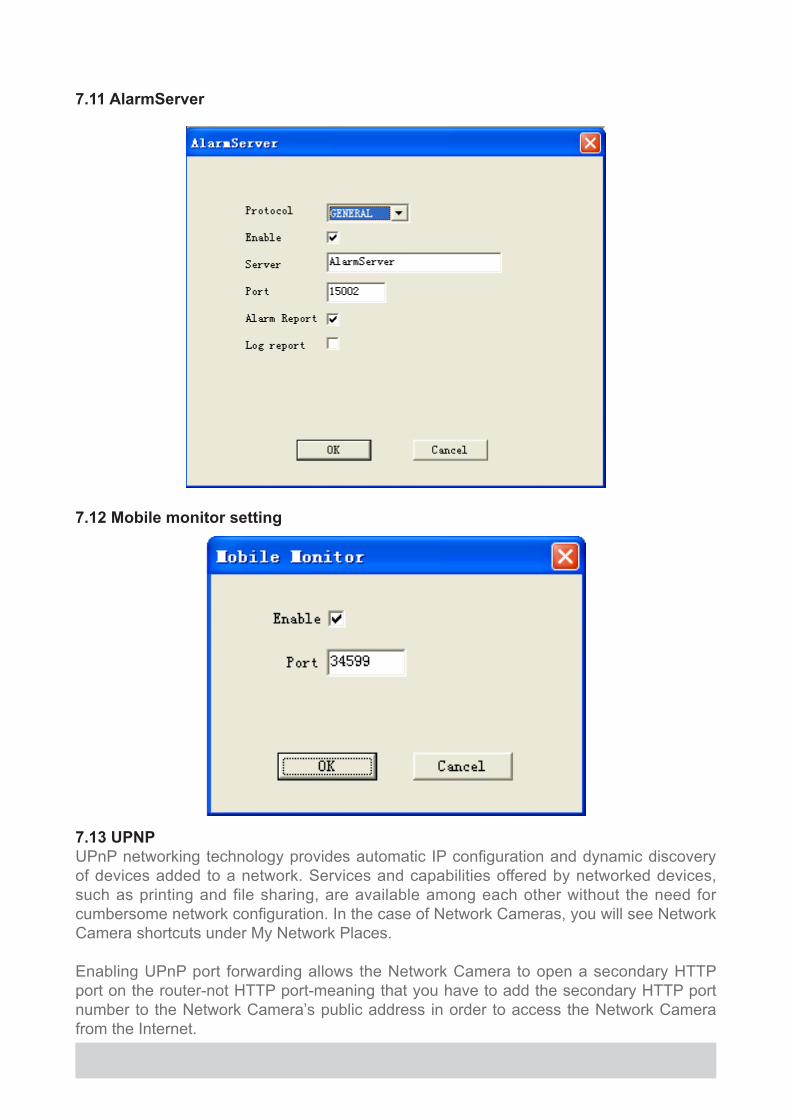
7.11 AlarmServer
7.12 Mobile monitor setting
7.13 UPNPUPnP networking technology provides automatic IP configuration and dynamic discovery of devices added to a network. Services and capabilities offered by networked devices, such as printing and file sharing, are available among each other without the need for cumbersome network configuration. In the case of Network Cameras, you will see Network Camera shortcuts under My Network Places.
Enabling UPnP port forwarding allows the Network Camera to open a secondary HTTP port on the router-not HTTP port-meaning that you have to add the secondary HTTP port number to the Network Camera’s public address in order to access the Network Camera from the Internet.
NetService
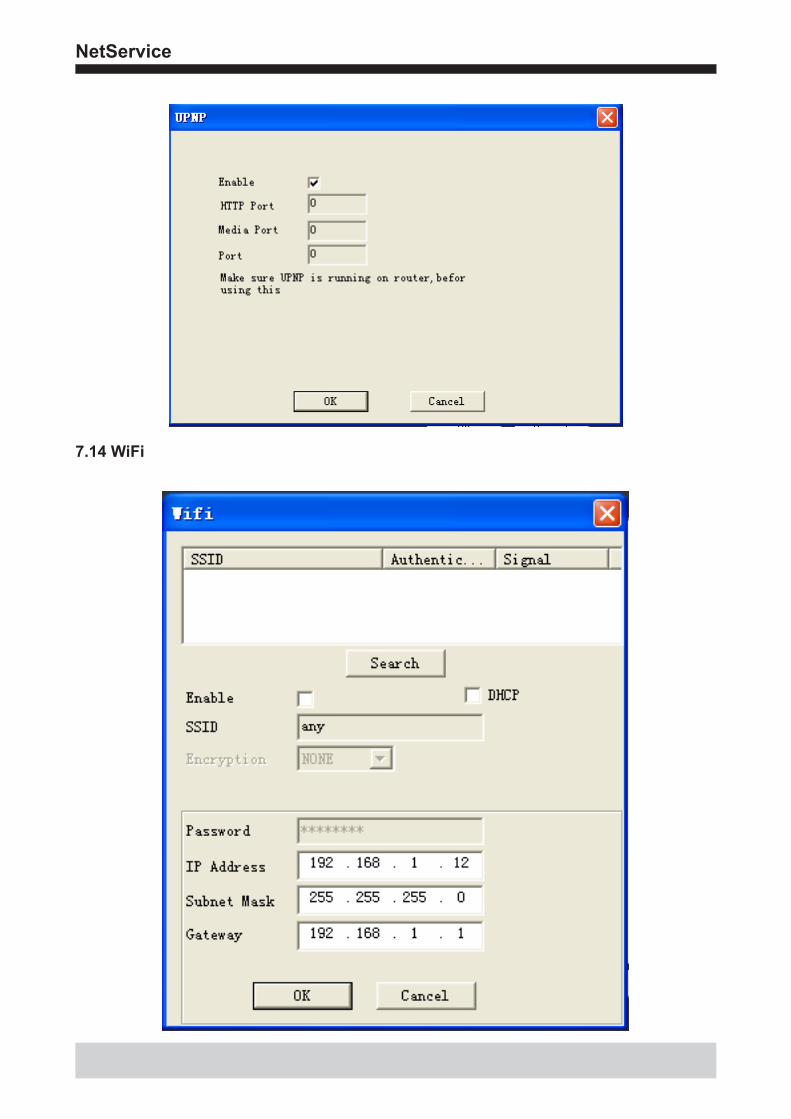
7.14 WiFi
GUI (Graphic User Interface)
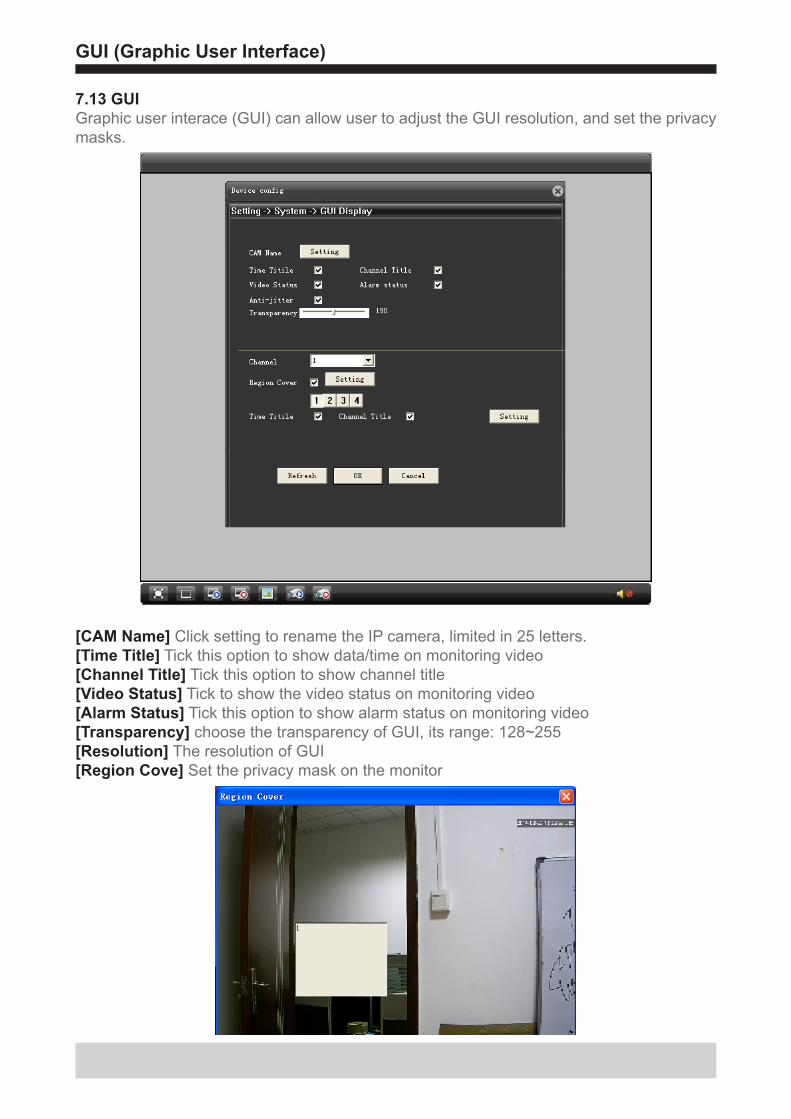
7.13 GUIGraphic user interace (GUI) can allow user to adjust the GUI resolution, and set the privacy masks.
[CAM Name] Click setting to rename the IP camera, limited in 25 letters.[Time Title] Tick this option to show data/time on monitoring video[Channel Title] Tick this option to show channel title[Video Status] Tick to show the video status on monitoring video[Alarm Status] Tick this option to show alarm status on monitoring video[Transparency] choose the transparency of GUI, its range: 128~255[Resolution] The resolution of GUI[Region Cove] Set the privacy mask on the monitor
Camera Parameters
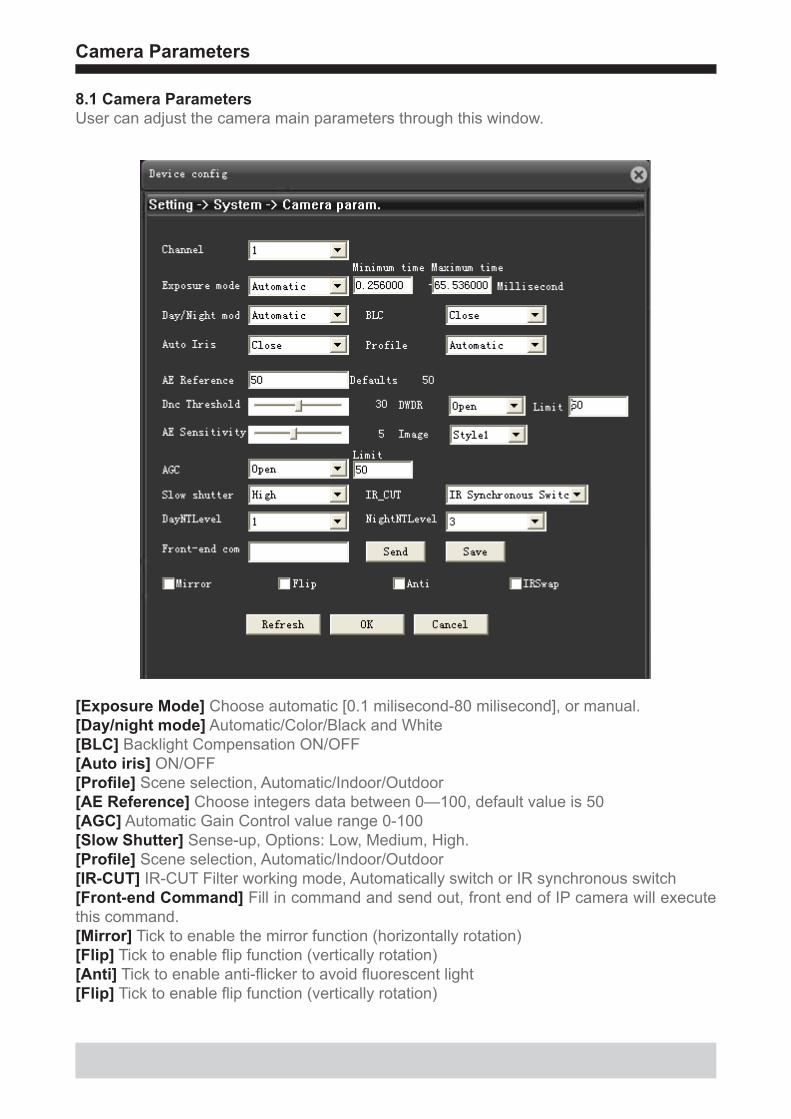
8.1 Camera ParametersUser can adjust the camera main parameters through this window.
[Exposure Mode] Choose automatic [0.1 milisecond-80 milisecond], or manual.[Day/night mode] Automatic/Color/Black and White[BLC] Backlight Compensation ON/OFF[Auto iris] ON/OFF[Profile] Scene selection, Automatic/Indoor/Outdoor[AE Reference] Choose integers data between 0—100, default value is 50[AGC] Automatic Gain Control value range 0-100[Slow Shutter] Sense-up, Options: Low, Medium, High.[Profile] Scene selection, Automatic/Indoor/Outdoor[IR-CUT] IR-CUT Filter working mode, Automatically switch or IR synchronous switch[Front-end Command] Fill in command and send out, front end of IP camera will execute this command. [Mirror] Tick to enable the mirror function (horizontally rotation)[Flip] Tick to enable flip function (vertically rotation)[Anti] Tick to enable anti-flicker to avoid fluorescent light[Flip] Tick to enable flip function (vertically rotation)
Advanced
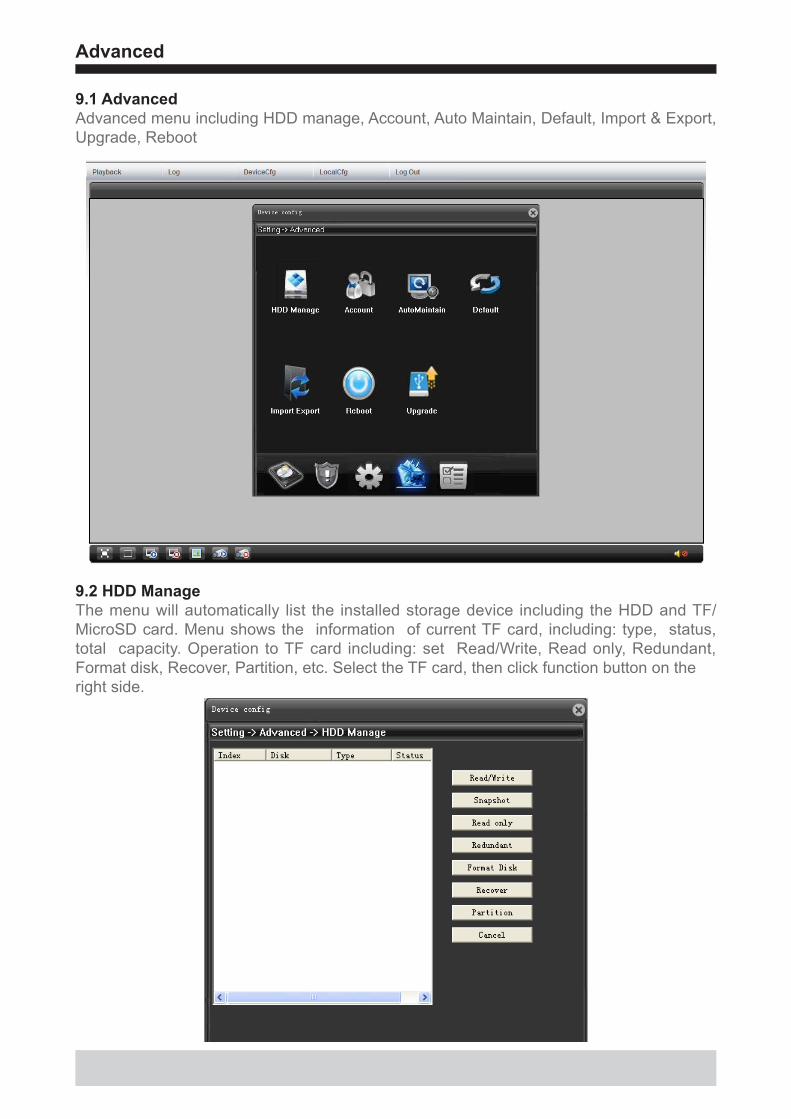
9.1 AdvancedAdvanced menu including HDD manage, Account, Auto Maintain, Default, Import & Export, Upgrade, Reboot
9.2 HDD ManageThe menu will automatically list the installed storage device including the HDD and TF/MicroSD card. Menu shows the information of current TF card, including: type, status, total capacity. Operation to TF card including: set Read/Write, Read only, Redundant, Format disk, Recover, Partition, etc. Select the TF card, then click function button on the right side.
Advanced
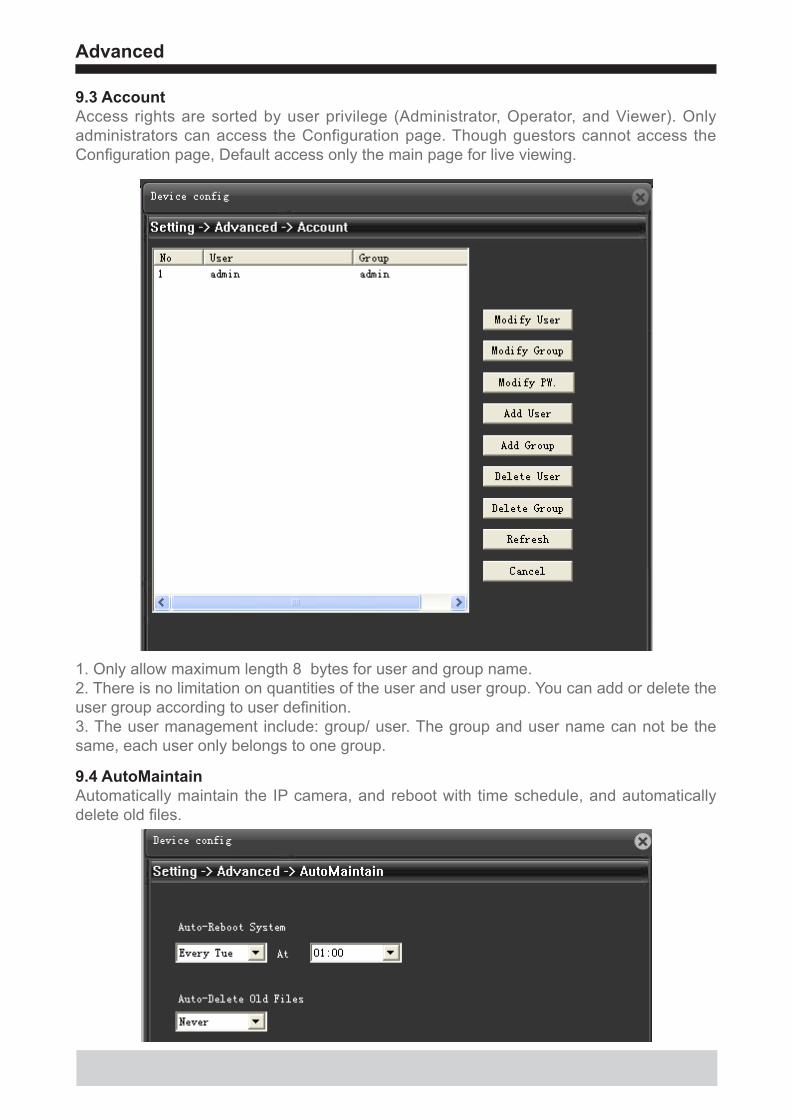
9.3 AccountAccess rights are sorted by user privilege (Administrator, Operator, and Viewer). Only administrators can access the Configuration page. Though guestors cannot access the Configuration page, Default access only the main page for live viewing.
1. Only allow maximum length 8 bytes for user and group name.2. There is no limitation on quantities of the user and user group. You can add or delete the user group according to user definition.3. The user management include: group/ user. The group and user name can not be the same, each user only belongs to one group.
9.4 AutoMaintainAutomatically maintain the IP camera, and reboot with time schedule, and automatically delete old files.
Advanced
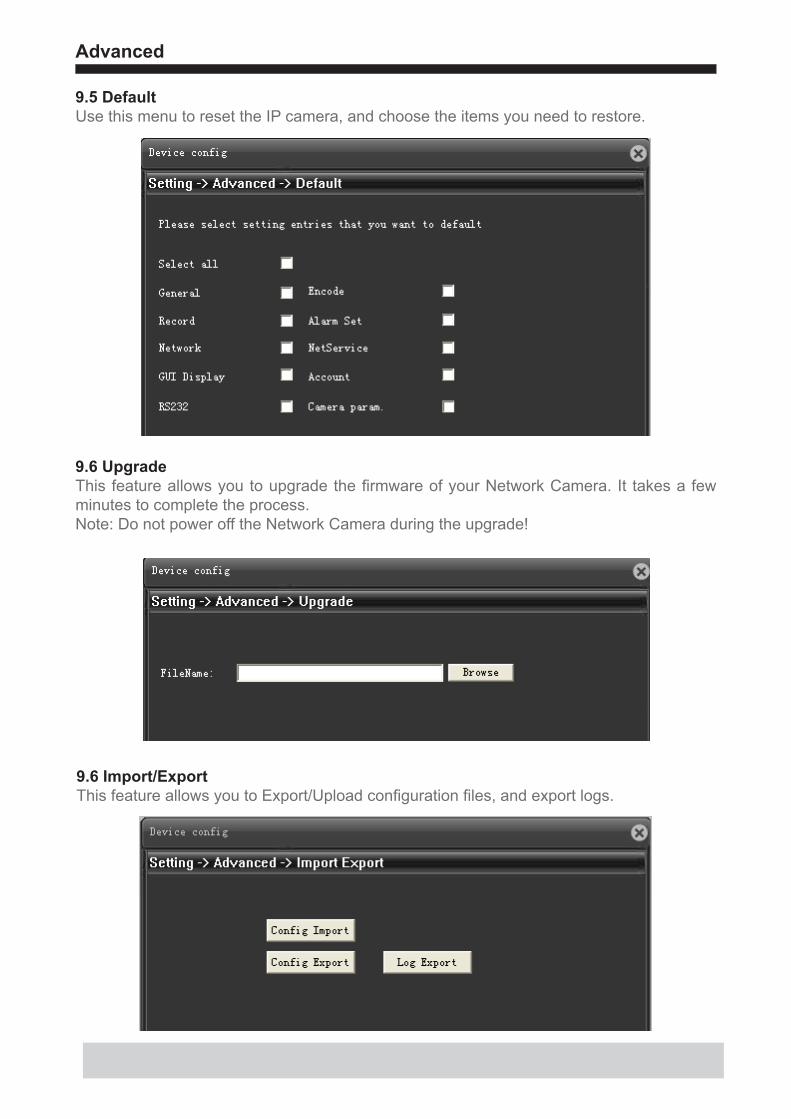
9.5 DefaultUse this menu to reset the IP camera, and choose the items you need to restore.
9.6 UpgradeThis feature allows you to upgrade the firmware of your Network Camera. It takes a few minutes to complete the process. Note: Do not power off the Network Camera during the upgrade!
9.6 Import/ExportThis feature allows you to Export/Upload configuration files, and export logs.