Intuit Field Service Management ES - Corrigo
40
Corrigo Field Service Management Mobile Client for BlackBerry -- User’s Guide 1 Intuit Field Service Management ES Intuit Field Service Management ES Mobile Client for BlackBerry User’s Guide
Transcript of Intuit Field Service Management ES - Corrigo

Corrigo Field Service Management Mobile Client for BlackBerry -- User’s Guide 1
Intuit Field Service Management ES
Intuit Field Service Management ES
Mobile Client
for
BlackBerry
User’s Guide

Contents
Corrigo Field Service Management Mobile Client for BlackBerry -- User’s Guide 2
This documentation and related computer software program (hereinafter referred to as the “Documentation”) is for the end user's
informational purposes only and is subject to change or withdrawal by Corrigo Incorporated at any time.
THIS DOCUMENTATION MAY NOT BE COPIED, TRANSFERRED, REPRODUCED, DISCLOSED OR DUPLICATED,
IN WHOLE OR IN PART, WITHOUT THE PRIOR WRITTEN CONSENT OF CORRIGO. THIS DOCUMENTATION IS
PROPRIETARY INFORMATION OF CORRIGO AND PROTECTED BY THE COPYRIGHT LAWS OF THE UNITED
STATES AND INTERNATIONAL TREATIES.
TO THE EXTENT PERMITTED BY APPLICABLE LAW, CORRIGO PROVIDES THIS DOCUMENTATION “AS IS”
WITHOUT WARRANTY OF ANY KIND, INCLUDING WITHOUT LIMITATION, ANY IMPLIED WARRANTIES OF
MERCHANTABILITY, FITNESS FOR A PARTICULAR PURPOSE OR NONINFRINGEMENT. IN NO EVENTWILL
CORRIGO BE LIABLE TO THE END USER OR ANY THIRD PARTY FOR ANY LOSS OR DAMAGE, DIRECT OR
INDIRECT, FROM THE USE OF THIS DOCUMENTATION, INCLUDING WITHOUT LIMITATION, LOST PROFITS,
BUSINESS INTERRUPTION, GOODWILL OR LOST DATA, EVEN IF CORRIGO IS EXPRESSLY ADVISED OF SUCH
LOSS OR DAMAGE.
THE USE OF ANY PRODUCT REFERENCED IN THIS DOCUMENTATION AND THIS DOCUMENTATION IS
GOVERNED BY THE APPLICABLE END USER'S LICENSE AGREEMENT.
The manufacturer of this documentation is Corrigo Incorporated.
Provided with “Restricted Rights” as set forth in 48 C.F.R. Section 12.212, 48 C.F.R. Sections 52.227-19(c)(1) and (2) or
DFARS Section 252.227.7013(c)(1)(ii) or applicable successor provisions.
© 2007-2009 Corrigo Incorporated, 8245 SW Tualatin Sherwood Rd.Tualatin, OR 97062. All rights reserved. All product names referenced herein belong to their respective companies.
Version 6.10 JRP 7/30/2010 12:45 PM

Contents
Corrigo Field Service Management Mobile Client for BlackBerry -- User’s Guide 3
Contents
OVERVIEW ................................................................................................................................................................ 5
NAVIGATING FIELD SERVICE MANAGEMENT ............................................................................................................. 5 USING THIS GUIDE ..................................................................................................................................................... 6 SYSTEM REQUIREMENTS ............................................................................................................................................ 6 INSTALLING THE APPLICATION ON THE MOBILE DEVICE ........................................................................................... 7 ACCESSING THE APPLICATION ................................................................................................................................... 7
Logging In ............................................................................................................................................................. 7 Logging Off ........................................................................................................................................................... 8
MY WORK .................................................................................................................................................................. 9
OVERVIEW ................................................................................................................................................................. 9 VIEWING A LIST OF MY WORK ................................................................................................................................ 10 VIEWING DETAIL OF A WORK ORDER ....................................................................................................................... 11
ON THE WORK ORDER ........................................................................................................................................ 13
OVERVIEW ............................................................................................................................................................... 13 RESPONDING TO A NEW WORK ORDER ASSIGNMENT ............................................................................................... 13 UNDERSTANDING WORK ORDER STATUS ................................................................................................................. 13 CHANGING A WORK ORDER STATUS ........................................................................................................................ 15 FLAGGING A WORK ORDER FOR ASSISTANCE ........................................................................................................... 15 ENTERING AND VIEWING NOTES .............................................................................................................................. 15 VIEWING WORK HISTORY FOR THE CUSTOMER ....................................................................................................... 16 TRACKING EQUIPMENT AT A CUSTOMER’S SITE ...................................................................................................... 16
COMPLETING A WORK ORDER ASSIGNMENT ............................................................................................ 19
OVERVIEW ............................................................................................................................................................... 19 PROBLEM DISPOSITION ............................................................................................................................................ 19 ENTERING WORK DONE DESCRIPTION ..................................................................................................................... 20 SETTING STATUS TO COMPLETE ............................................................................................................................... 20 CREATING AN INVOICE ............................................................................................................................................. 21
ADDITIONAL FEATURES ..................................................................................................................................... 23
SEARCHING FOR WORK ORDERS ............................................................................................................................... 23 UPDATING INFORMATION ON YOUR MOBILE DEVICE ............................................................................................... 23 CONTACTING CUSTOMERS ....................................................................................................................................... 23 COLLECTING PAYMENT ON AN INVOICE ................................................................................................................... 24 RECEIVING ALERTS .................................................................................................................................................. 24 WORKING OFFLINE .................................................................................................................................................. 25
Creating an Offline List ....................................................................................................................................... 25
SUPERVISOR INFORMATION ............................................................................................................................. 27

Contents
Corrigo Field Service Management Mobile Client for BlackBerry -- User’s Guide 4
OVERVIEW ............................................................................................................................................................... 27 MONITORING YOUR TEAM’S WORKLOAD ................................................................................................................ 27 USING TEAM WORK ................................................................................................................................................. 27
Filtering Workload Lists ..................................................................................................................................... 28 Viewing Individual Workloads ............................................................................................................................ 28 Searching for Team Work orders ........................................................................................................................ 29 Reassigning an Order .......................................................................................................................................... 29
CONFIGURING FIELD SERVICE MANAGEMENT ......................................................................................................... 31 CREATING A WORK ORDER ...................................................................................................................................... 32 CREATING A WORK ORDER FOR A NEW CUSTOMER ................................................................................................. 34
TIME CARD .............................................................................................................................................................. 35
OVERVIEW ............................................................................................................................................................... 35 PUNCHING IN AND OUT FOR YOUR SHIFT................................................................................................................. 35 STARTING / ENDING A BREAK .................................................................................................................................. 36 VIEWING YOUR TIME CARD INFORMATION ............................................................................................................. 37 ADDING TIME TO YOUR TIME CARD ......................................................................................................................... 38
TROUBLESHOOTING ............................................................................................................................................ 40
Mobile Device Does Not Work ............................................................................................................................ 40 User ID or Password is Rejected ........................................................................................................................ 40 Technical Support: .............................................................................................................................................. 40

Corrigo Field Service Management Mobile Client for BlackBerry -- User’s Guide v
Intuit Field Service Management ES Mobile Java Client User’s Guide for BlackBerry
Overview
This guide explains how to use the Field Service Management Mobile Java Client on the BlackBerry handset. A BlackBerry handset is referred to as the “mobile device” throughout this guide. The following assumptions apply to the use of this guide:
• You have Internet access on your mobile device.
• You have a valid URL, user ID, and password for Field Service Management.
• You have the basic skills needed to operate your mobile device (please refer to your device user guide if necessary).
Navigating Field Service Management
Launching the Application Menu: To view a list of options from any screen within Field Service
Management, click the trackwheel, or press the menu key (on trackball devices only), to launch the Application Menu:
Figure 1: Example of Application Menu on the My Work screen
Note: The options available on the Application Menu vary depending upon which screen is displayed.

Overview
Corrigo Field Service Management Mobile Client for BlackBerry -- User’s Guide 6
To Select: When you select a screen item or menu option, you launch the program or action it represents.
To select a screen or menu item, scroll to highlight it. Once highlighted:
Press Enter to select the item <or> Click the trackwheel or trackball to select the item.
Note: Another way to select a Field Service Management screen item is to
launch the Application Menu (press the Menu key on trackball devices, or press the wheel on trackwheel devices), then scroll to Select and click the trackball or trackwheel.
To Return to a Previous Screen: Press the escape key.
Using This Guide
Highlight: To highlight a screen or menu item on your mobile device, move the cursor (using the trackwheel or trackball) until the item borders change color.
Click: To “click” means press the trackwheel or trackball.
Configuration: Since Field Service Management can be configured to fit your company needs, screens on your mobile device may appear slightly different than examples in this guide.
Terminology: Since your company can customize Field Service Management software by changing specific words and phrases used on the screens, some terms used in this guide may not match terms on your screens. For example, this guide occasionally uses the phrase Work Order (WO), but your company may use a phrase such as Service Ticket (ST).
Application Menu: On each Field Service Management screen, an Application Menu of options can be displayed by clicking the wheel on trackwheel devices or
pressing the Menu key on trackball devices. System Administrator: Person at your company who manages your Field Service Management
program.
System Requirements
Primary hardware requirement: Field Service Management Mobile Java Client for BlackBerry can be used with the BlackBerry handsets that can support operating system 4.1 or higher. For a current list of devices supported please refer http://enterprisesuite.intuit.com/products/field-service-management/?fsmes_info=technical#fsmes_info_tabs to download the current device listing.

Overview
Corrigo Field Service Management Mobile Client for BlackBerry -- User’s Guide 7
Installing the Application on the Mobile Device
Follow the steps below to install Field Service Management on your mobile device:
• Open browser in your mobile device
• Press menu and choose “Go to…”
• Type “http://qbes.mobile.corrigo.com”
• You will get a screen with a box to enter you company name. Put cursor in the box and type the company name you use to login to Field Service Management. Press Continue
• A screen that shows the application name, version will appear. Press Download button in that screen
• When prompted to reboot the device, press Reboot for the installation to complete successfully
Accessing the Application
Logging In
1. Turn on your mobile device. Highlight the Field Service Management icon and click the trackwheel or trackball. Note: Field Service Management icon may appear inside an application directory instead of on the Home Screen.
Figure 2: Highlighted Field Service Management Icon on Home Screen
2. The version screen will open, followed by the login screen.

Overview
Corrigo Field Service Management Mobile Client for BlackBerry -- User’s Guide 8
Figure 3: Login screen
3. Enter login information (which you can obtain from your system administrator). Use the trackwheel or trackball to move between fields.
4. Press Enter when done. After some update messages, your My Work screen will appear.
Setting Up Auto Login: You can configure your mobile device to bypass the login screen when you turn it on or when you select the Field Service Management icon. To configure auto login:
1. While at the login screen, select Login Options from the Application Menu
<or>
While at the My Work screen, select Settings from the Application Menu, then select Login Options.
2. Highlight “Automatically login me in next time”, then press Space to select. This will allow you to log in next time without entering your User ID, Password, and Company. Selecting “Launch app when device restarts” will automatically start Field Service Management and log you in when you turn on your mobile device.
3. Access the Application Menu, then select Save.
Caution: Do Not change the server path unless directed by your system administrator.
Note: You may see a notice that states “Your company requires that this application starts whenever your device is restarted. This login setting will be enabled. Please press ‘continue’”. If you see this message, your system administrator has overridden your settings and requires auto login.
Logging Off
• To log off, select Exit from the Application Menu. Answer “Yes” when prompted.

My Work
Corrigo Field Service Management Mobile Client for BlackBerry -- User’s Guide 9
(Alternative: Press escape until you are prompted “Are you sure you want to exit this application?” Answer “Yes”).
My Work
Overview
Figure 4: My Work screen
The My Work screen appears upon login. This is a list of work assigned to you, organized in categories. The lists that may be shown on the mobile device are configurable so you may not see all these lists when you log in to the application.
Category Explanation Helpful to Know
Waiting for Pickup
These work orders have been assigned to you and are waiting for your acknowledgement.
To acknowledge these work orders, change the status to either Picked Up or Rejected.
Picked Up These are the work orders for which you have taken responsibility.
Work orders that have been cancelled or are On Hold are not tallied here.
Completed These are the work orders you have completed.
Once completed, a work order is no longer tallied in the Picked Up category.

My Work
Corrigo Field Service Management Mobile Client for BlackBerry -- User’s Guide 10
Category Explanation Helpful to Know
Appts (appointments)
These are work orders with set appointment times, or work orders that require a call to the customer.
Unscheduled or Needs to be Scheduled work orders do not appear here. Work orders can be tallied in this and other categories at the same time.
Rejected These are work orders that you cannot or choose not to accept.
The dispatcher and supervisor will see that these work orders have been rejected.
Non-Primary Work
These are work orders where you have been assigned as a secondary tech.
To post times on these work orders, select menu and mark en route, start/end work order time from the non-primary work list or from a non-primary work order details page.
Emergency These are high priority work orders that require a response.
This category appears on the My Work screen if emergency work orders exist. Your company may use a term other than emergency to describe category.
Viewing a List of My Work
Select any category on My Work to access a screen listing individual work orders in that category.
Figure 5: List of work orders Waiting for Pickup

My Work
Corrigo Field Service Management Mobile Client for BlackBerry -- User’s Guide 11
A summary of Detail for the highlighted work order appears at the bottom of the screen. As you scroll through the list, the Detail will change as the highlighted work order changes. The types of information fields that appear on this list depend on which My Work category you choose. Your company can customize this screen to fit its business needs by selecting which information fields will appear.
Viewing Detail of a Work order
To view the Detail of a work order:
1. Select a category of work orders from your My Work screen. If you are starting work for the day, you would typically select the Waiting for Pickup category to see new work orders assigned to you.
2. Scroll to the work order you want on a list.
3. Select the work order. A screen containing work order Detail will appear.
Not all available Detail fields may appear on your screen. Which fields appear depends upon the way your company has chosen to configure Field Service Management.
Many of the fields can be selected and modified from the mobile device. Some of the critical fields which may appear in Work Order Detail are listed in the following table:
Detail Field Description Helpful to Know
WO#: Number used to identify work order and invoice (if an invoice is created)
May be labeled…
• Service Ticket (ST#)
• Service Request (SR#)
• Service Order (SO#)
• Work Order (WO#)
Status: Describes the current state of the work order to the dispatcher and field supervisor
Select this field to change work order status. Options available depend upon the current status of the work order.
Customer: Name of customer (select this field to view Customer Detail)
May be labeled…
• Client
• Guest
• Resident
• Tenant
• Customer
Customer Detail: Screen containing name, phone number, You can…

My Work
Corrigo Field Service Management Mobile Client for BlackBerry -- User’s Guide 12
Detail Field Description Helpful to Know
and email address of Customer Contact (to view this screen, select Customer name from the Work Order Detail screen)
• Call customer from your mobile device by selecting phone number
• Email customer from mobile device by selecting email address
Flagged Reason: Work Order flag reflects if you need assistance, parts, information, etc.
Field appears in Work Order Detail when a flag is set.
ETA: Estimated Time of Arrival You may enter your ETA from the mobile device to inform the dispatcher of when you’ll arrive.
Problem Description:
Description of problem from dispatcher, based on customer’s comments
Selecting this field displays a list of work order tasks. Select each task and mark Done as you complete it.
Work Done Description
Notes that summarize how work order was completed
You enter notes here that can be used to create an invoice and to help service techs who work on site in the future.
Equipment: Equipment on customer site for which you want to track a service history
Selecting this field allows you to choose and enter Detail on existing equipment, or to add new equipment.
Invoice: Reflects invoice amount once an invoice is created. You can create an invoice from the mobile device.
Select this field to create an invoice.
Notes: Any notes attached to the work order. You can add notes from the mobile device by selecting Add New Note from the Application Menu while viewing a note.
(Custom Fields) Fields created by your company to fit the needs of its work flow.
Since these fields are created by your company, they can have any name and description. See your system administrator to learn more.

On the Work order
Corrigo Field Service Management Mobile Client for BlackBerry -- User’s Guide 13
On the Work order
Overview
You will interact with Field Service Management at several key stages as you work. This section will outline the most common points during a work cycle that you will need to use your mobile device.
Typically you will begin any interaction from your My Work screen.
Note: Not all of the fields described in this section will appear on your mobile device. Your company can customize Field Service Management to fit its business needs. The screens you see on your mobile device have been organized by your company to fit the work flow you normally encounter.
Responding to a New Work order Assignment
My Work organizes your work order assignments so that you can effectively respond to and process them. To respond to a new work order assignment:
5. Select the Waiting for Pickup category from your My Work screen.
6. Scroll to the work order you want and select it.
7. Scroll to the Status field on the Detail screen and select it (if the Status field doesn’t appear on the Detail screen, press the “S” key). A list of work order statuses will appear.
8. Change the status of work order appropriately. Some typical choices:
• Select Pickup if you want to accept responsibility but are not on site.
• Select Pickup and Start if you are on site and ready to begin.
• Select Reject if you cannot accept the work order.
Understanding Work order Status
As you progress through your work, you will need to update the status of the work order. This will inform the dispatcher and field supervisor about your progress. The following table is a summary of the statuses available:
Status Options Description Available When the Current
Status Is…
Pick Up Accept responsibility for a work order, though not in a position to begin work
• Waiting for Pickup

On the Work order
Corrigo Field Service Management Mobile Client for BlackBerry -- User’s Guide 14
Status Options Description Available When the Current
Status Is…
En Route Traveling to a work order • Picked Up
• Work Started
• Paused
Start Begin work • Picked Up
• En Route
• Paused
Pick Up and Start Accept responsibility for a work order and begin work
• Waiting for Pickup
Pause Halt work temporarily (for example, lunch break)
• En Route
• Work Started
Set Flag/ Remove Flag
Continue working, but alert dispatcher and field supervisor to a need or concern (select a reason from a pop-up options list)
• Waiting for Pickup
• Picked Up
• En Route
• Work Started
• Paused
• On Hold
Reject Cannot accept a work order (dispatcher and field supervisor will see rejection)
• Waiting for Pickup
On Hold / Re-Open
Cannot continue work and need assistance (select a reason from a pop-up options list)
• Waiting for pickup
• Picked Up
• En Route
• Work Started
• Paused
• On Hold
• Complete
Cancel /Re-Open Close the work order without completing it. (select a reason from a pop-up options list)
• Waiting for pickup
• Picked Up
• En Route
• Work Started
• Paused
• On Hold
Complete Work order finished • En Route
• Work Started
• Paused
• On Hold

On the Work order
Corrigo Field Service Management Mobile Client for BlackBerry -- User’s Guide 15
Changing a Work order Status
To change a work order’s status:
1. Go to the Detail screen of the work order you want to change (see Viewing Detail of a Work order or Searching for Work orders in this guide for additional information).
2. Scroll to the Status field on the Detail screen and select it (if the Status field doesn’t appear on the Detail screen, press the “S” key). A list of work order statuses will appear.
3. Select Status from list of options.
Flagging a Work order for Assistance
You may need to alert your supervisor about an important work order condition while you continue work. To do this, set a flag for that particular work order:
1. Go to the Detail screen of the work order you want to change.
2. Scroll to the Status field on the Detail screen and select it (if the Status field doesn’t appear on the Detail screen, press the “S” key). A list of work order statuses will appear.
3. Select Set Flag from list of options. A list of flag Reasons will appear.
4. Select a Reason.
5. Enter Notes to inform dispatcher and supervisor why you need assistance.
6. Select Save from the Application Menu. Your dispatcher and supervisor will be able to view flags set on your work orders.
Entering and Viewing Notes
While you are working, you may encounter situations that you need to describe to your dispatcher, field supervisor, or service techs who may work on that site in the future. You can enter notes into Field Service Management that will become immediately available to anyone with access to your work order information.
To enter notes:
1. Go to the Detail screen of the work order you want to change.
2. Scroll to and select the Notes field on the Detail screen of your current work order.
3. If no note exists for this work order, you will be at a screen where you can enter a note.

On the Work order
Corrigo Field Service Management Mobile Client for BlackBerry -- User’s Guide 16
4. If notes already exist for this work order, you will be able to view them. To add a note, select Add New Note from the Application Menu.
5. After you have entered the note, select Save from the Application Menu.
Viewing Work History for the Customer
You may need to see Detail of work that has been completed previously at that customer site. To view a history of work at that site:
1. On the Detail screen for an order, scroll to the address field for that customer’s site.
2. If there is work history for this customer, an “H” will highlight. Select this field.
Figure 6: Work History “H” Highlighted
3. If records for several previous work orders exist for this customer, a list will appear. Select a work order to view it. If there is only one previous work order, Detail of that order will appear.
4. When you are done viewing Detail, press escape (or access the Application Menu and select Back).
Tracking Equipment at a Customer’s Site
You may want to track the service history of equipment located at the work order site for a customer. To track equipment:
1. Go to the Detail screen of the customer’s work order. Scroll to the Equipment field.
2. If equipment has already been entered for that site, a brief description of the equipment will be listed. If not, the field will contain the label “N/A”. Select this field.

On the Work order
Corrigo Field Service Management Mobile Client for BlackBerry -- User’s Guide 17
3. If equipment exists: The Equipment Attribute screen will appear. Review Detail by scrolling to each field and selecting it. If you are updating information, enter the new Detail, then select Save from the Application Menu.
Removing Equipment: You can also remove equipment by selecting Remove from the Application Menu on the Equipment Attribute screen.
4. To add new equipment :
• If no previous equipment had been added: Select the “N/A” label, choose the type of equipment to add (if listed), or choose Create New Equipment from the Application Menu.
• If previously tracked equipment is listed: Select Change Equipment from the Application Menu. To add new equipment, access the Application Menu again and select Create New Equipment.
Figure 7: Create New Equipment Option on Menu
5. Once Create New Equipment is selected, a list of equipment models will appear (this list has been customized by your company). Scroll and select the type of equipment you want to add.
6. The Enter New Equipment Attributes screen will appear. The attributes listed will vary according to which type of equipment you select.

On the Work order
Corrigo Field Service Management Mobile Client for BlackBerry -- User’s Guide 18
Figure 8: Sample Equipment Attribute Screen
7. Enter a name for the equipment.
8. Scroll to each field, select it, then enter attributes. Select Save from the Application Menu for each attribute as you complete entry.
9. At the Enter New Equipment Attributes screen, select Save from the Application Menu.
Checking Equipment History: You can also view the history of equipment that has been added at this site by selecting “H” next to the Equipment field on the work order Detail screen.

Completing a Work order Assignment
Corrigo Field Service Management Mobile Client for BlackBerry -- User’s Guide 19
Completing a Work order Assignment
Overview
Once you have completed your work, there are several steps you need to take to close out the work order in Field Service Management.
Problem Disposition
Whether you have completed the entire work order or just one or more tasks within the work order, you can mark the work you have completed as Done within Field Service Management.
1. On the Detail screen for the completed work order, scroll to the Problem Description field.
2. If you cannot select the field, then there is only one task associated with this work order and the problem disposition will be marked Done when you change the work order status to Complete (see Setting Status to Complete in this guide).
3. If you can select the field, then there are multiple tasks associated with this work order. Select the field to see a list of tasks. A list of descriptions of work order tasks will appear.
4. As you complete a task, select it in the Multi-item list to reach the Edit Line Item screen.
Figure 9: Problem Disposition screen (Edit Line Item)
5. Select Disposition. The Set Disposition screen will appear.
6. Select from the options available: Done <or> None (ongoing)
7. Return to Multi-item screen to dispose of additional tasks, or return to the Detail screen (by pressing escape)
Completing a Work order Assignment
Corrigo Field Service Management Mobile Client for BlackBerry -- User’s Guide 20
Entering Work Done Description
When you have completed the work order, enter notes into the system to describe the work you did.
1. From the Detail screen for the work order, select Work Done Description.
2. Enter a description of the work you have completed. This information can be used to create an invoice and for reference on future service visits.
3. Select Save from the Application Menu when done.
Setting Status to Complete
When you have finished your work order, you need to change the status of the work order to Complete.
1. Go to the Detail screen for the order you want to complete.
2. Scroll to the Status field on the Detail screen and select it (if the Status field doesn’t appear on the Detail screen, press the “S” key). A list of work order statuses will appear.
3. Select Complete from the list.
4. You may be asked “Has Equipment been repaired for this work order?”. If so, select Yes or No from the options list. Follow directions from the Tracking Equipment at a Customer’s Site section of this guide if you select Yes.
5. The Work Done Description screen may appear. Follow instructions from the Entering Work Done Description section of this guide if you need to enter a Work Done Description.
6. The Complete Work Order screen will appear (the name of screen will vary by company).

Completing a Work order Assignment
Corrigo Field Service Management Mobile Client for BlackBerry -- User’s Guide 21
Figure 10: Entering Repair Codes
7. Scroll to Repair Code and select, if the option is available. The Repair Category screen will appear. Select a Repair Category.
8. On the next screen, you may be asked to select a Repair Code. If so, scroll to the appropriate code and select it. You will be returned to the Complete Work Order screen.
9. Select Complete WO from the Application Menu. The work order status will be changed to Complete.
Creating an Invoice
Depending upon your company’s business practice, you may need to create an invoice at the customer’s site. To create an invoice from your mobile device:
1. From the Detail screen for the work order, select Invoice.
2. Scroll to Add New Line Item and select.
3. Select a category from :
• Labor
• Parts
• Miscellaneous
• Price List
4. If you are entering a Price List item or Price List group: Select Search from the Application Menu to find your Price List item or group. Follow prompts and select Price List item/group from list.

Completing a Work order Assignment
Corrigo Field Service Management Mobile Client for BlackBerry -- User’s Guide 22
Figure 11: Searching for Price List Items
5. Enter the quantity, Description, and Rate for the line item.
6. Select Save when the line item is completed. Continue until all line items are entered.
7. Scroll to Discount and Tax fields and select if necessary. Enter a percentage or set amount.
8. Select Save from the Application Menu as tax and/or discount are entered.
Note: The discount percentage you enter will be taken on the full invoice amount unless you have selected individual items for discount.
9. Scroll to any other invoice fields you may need to change. Select and edit. Select Save from the Application Menu when completed.
Line items now support individual tax and discount call outs. Tax codes and rates are inherited from the service location, or from the customer if a tax rate is not defined at the service location level.

Additional Features
Corrigo Field Service Management Mobile Client for BlackBerry -- User’s Guide 23
10. On the Invoice screen, scroll to Invoice Status and select.
11. Select Prepared from the Invoice Status screen. Select Save from the Application Menu when completed. The invoice is now complete.
Additional Features
Searching for Work orders
You may need to find a specific work order. Field Service Management allows you to search by Work Order #, Customer, and Requestor (contact) from your mobile device (your mobile application may use different terminology). To search for a work order (work order):
1. While on the My Work screen, launch the Application Menu.
2. Scroll to Find WO and select (this description may read Find ST, Find SO, or Find SR on your mobile device).
3. Enter search criteria under WO Number, Customer, or Requestor.
How to Search: Entering a partial search string will retrieve a list of work orders containing that string. For example, entering the string “pizza” in the customer field would return a list of all customers that have a name containing the word “pizza”.
4. Select Search from the Application Menu.
5. Select the work order you seek from the list of results.
Updating Information on your Mobile Device
Information entered by the dispatcher is sent to your mobile device at regular time intervals (length of interval is set by your system administrator). If you want to check for or send updates immediately, you can refresh your device:
• Launch the Application Menu and select Refresh (this option is available on all top-level screens)
Contacting Customers
Field Service Management enables you to call or email a customer directly from your mobile device. To call or email:
1. Go to the Detail screen of a work order for the customer you need to contact.
2. Scroll to and select the Customer field. The customer Detail screen will appear.

Additional Features
Corrigo Field Service Management Mobile Client for BlackBerry -- User’s Guide 24
3. To call the customer from your mobile device: Select the phone number.
4. To email the customer from your mobile device: Select the email address. Follow prompts.
Collecting Payment on an Invoice
Depending upon your company’s business flow, you may need to collect payment from the customer. Field Service Management allows you to enter payment collection through your mobile device.
To collect payment:
1. Go to the Detail screen of the work order for which you need to collect payment.
2. Scroll to the Invoice field and select.
3. With the Invoice screen displayed, select Pay Invoice from the Application Menu.
4. On Pay Invoice (1 of 3) scroll to the payment option and select it by pressing the Space key.
5. Click then select Next from the Application Menu.
6. On Pay Invoice (2 of 3), scroll to and enter the information requested.
7. Click then select Next.
8. On Pay Invoice (3 of 3), select Email Receipt from the Application Menu if the customer would like a receipt emailed.
9. When you are finished, select Done from the Application Menu.
Receiving Alerts
When situations arise that require your attention, you may receive alerts if your user profile is configured for alerts. Typically alerts are sent when emergency work is assigned to you. Depending upon your user profile, you can also receive alerts:
• To remind you of appointment times
• When work is assigned to you
• If work is re-assigned
• If your work is cancelled
• If your appointments are approaching overdue
• If work orders assigned to others are:

Additional Features
Corrigo Field Service Management Mobile Client for BlackBerry -- User’s Guide 25
o Flagged
o Overdue
o Missed appointments
Typically an alert will come to your mobile device as a pop-up screen showing a summary of work order (work order) information. You can select View Detail, or select Dismiss, from the alert screen. To View or Dismiss:
• Highlight View Details on the Alert screen. Scroll to toggle between View Detail and Dismiss. Click to select your action.
Figure 12: Example of a Flagged work order alert screen
You can also receive alerts via email. See your system administrator and supervisor for more information about receiving alerts.
Working Offline
Occasionally you may travel to areas that are outside the service range of your mobile device. Field Service Management allows you to perform most of your tasks offline. When you re-enter a service area, Field Service Management will update with the dispatch center all the information you entered while offline.
Creating an Offline List
If you know you will be entering an area where your mobile device will not have service, you can download information for selected work orders to your device so that it will be available to you when your device is offline.

Additional Features
Corrigo Field Service Management Mobile Client for BlackBerry -- User’s Guide 26
Note: Simply opening the Detail screen of a work order also downloads information for that specific work order so that it can be available offline.
To Create an Offline List:
1. While on your My Work screen, select Settings from the Application menu.
2. Select Offline List from the Settings screen.
3. Select individual work orders by scrolling to them and pressing Space
<or>
Select an option from the Application Menu. Options available include:
• Select (or Unselect) All
• Select Emergency
• Select Waiting for Pick Up
• Select Picked Up
Figure 13: Application Menu options from Offline List
4. Select Save from the Application Menu to download work order information to your mobile device for selected work orders.

Supervisor Information
Corrigo Field Service Management Mobile Client for BlackBerry -- User’s Guide 27
Supervisor Information
Overview
Mobile users who have a Field Service Management role of field supervisor or manager are able to view and take critical actions with regard to the work of others within a team (to learn more about user roles and team assignments, see your system administrator).
Monitoring your Team’s Workload
Several features within Field Service Management allow you to stay informed about the progress of your team’s work orders. The main screen for monitoring and managing work orders is the Team Work screen.
To access the Team Work screen, launch the Application Menu from your My Work screen and select Team Work (option available only to field supervisors or managers).
Key management categories on the Team Work screen:
• Unassigned: Lists any work orders from your dispatch center that have not yet been assigned to a tech. You can review and assign these orders from your mobile device
• Flagged: Lists orders that have been flagged by techs or a dispatcher. Techs will flag orders if they require assistance but are still working on the work order.
• On Hold: Lists orders placed On Hold because an issue has arisen in which the tech cannot continue work. Only a supervisor can Re-Open a work order that has been placed On Hold.
Other categories include: Waiting for Pickup, Picked Up, Completed Today, Cancelled Today.
You can also stay informed about the progress of your team’s work through Alerts. As a supervisor, you can be alerted through your mobile device to the following team issues:
• Flagged orders
• Overdue work orders
• Missed appointments
Alerts can be configured to send a message directly to Field Service Management on your mobile device as well as to your email account.
Using Team Work
The Team Work Screen lists work orders sorted according to status. This screen can be filtered to view workloads by team or dispatch center. Select categories on this screen to view lists of work orders or techs.

Supervisor Information
Corrigo Field Service Management Mobile Client for BlackBerry -- User’s Guide 28
To access this screen:
1. From your My Work screen, launch the Application Menu and select Team Work.
2. A screen summarizing the work assigned to your team(s) will appear.
3. Select a status category to view a list of individual orders
<or>
Select View Workload to see a list of techs and the number of work orders assigned to each of them.
Figure 14: Team Work screen with work grouped by work order status
Filtering Workload Lists
To filter the Team Work list for a particular service team or dispatch center:
1. Select Set Team Filter from the Application Menu.
2. Select the team or dispatch center you want to view.
Note: You can also filter a list of work orders of a particular status by selecting a status category from the Team Work screen, then selecting Team Filter from the Application Menu. For example, select Waiting for Pickup from the Team Work screen, then filter the list that appears.
Viewing Individual Workloads
To view a list of techs by the amount of work assigned to them:
1. While on the Team Work screen, select View Workload.

Supervisor Information
Corrigo Field Service Management Mobile Client for BlackBerry -- User’s Guide 29
2. Select Apply Filter from the Application Menu.
3. Scroll to either Less Than or Greater Than and select by pressing Space.
Select Less Than to see a list of techs assigned less than a certain number of work orders (work order count). <OR>
Select Greater Than to see a list of techs assigned more than a certain work order count.
4. Scroll to Count field and enter work order count.
5. Select Apply Filter from the Application Menu.
For Example: If you want to view a list of techs with less than 2 work orders assigned to them, select Less Than, then enter a Count of 2.
Searching for Team Work orders
As a supervisor, you can use the Field Service Management search function to find orders that belong to your team members. See Searching for Work orders in this guide for information on how to search.
Reassigning an Order
As a supervisor or manager, you typically make decisions to balance your team’s workload so that all work orders can be completed timely and efficiently. By evaluating the workload and location of each tech from your mobile device, you can act on decisions and reassign orders if necessary.
To reassign a work order:
1. From the Team Work screen, select a status category of work orders, or select View Workload, and then select a tech.
2. Select the work order you want to reassign.
3. From the Application Menu, select Edit Assignment. The Edit Assignment screen will appear.

Supervisor Information
Corrigo Field Service Management Mobile Client for BlackBerry -- User’s Guide 30
Figure 15: Edit Assignment screen displaying primary, secondary and all available techs
4. From the Edit Assignment screen, select Change Sort from the Application Menu to change the sort order
<or> Select Change Team from the Application Menu to select a new team to view
5. Select the Tech whom you want to un-assign and select Remove from the menu
Figure 16: Edit Assignment screen showing the option to remove assignment
6. Select one of the techs from the available techs listed below in Edit Assignment screen and select Make Primary or Make Secondary depending on how you want to make the assignment

Supervisor Information
Corrigo Field Service Management Mobile Client for BlackBerry -- User’s Guide 31
Figure 17: Edit Assignment screen showing the option to make another tech as a secondary
7. Once you are done with reassigning select Save from the menu
Figure 18: Edit Assignment screen showing option to save reassignment
8. You will then be given the option to view work order Detail or return to the previous screen
Note: You can also reassign a work order from the Detail screen of the work order.
Configuring Field Service Management
You can configure Field Service Management to fit your work flow needs. The mobile device screens and function can be changed in several ways:
• My Work screen: Status fields that appear on this list can be added / removed. Also, you can configure the fields on the summary preview screen for each status category.

Supervisor Information
Corrigo Field Service Management Mobile Client for BlackBerry -- User’s Guide 32
• Note: Emergency orders will always appear on the My Work screen
• My Work Detail: More than 20 fields are available for display on the Detail screen. Fields can be added / removed as well as arranged within the Detail list.
• Information Updates: Configure how frequently work order information and GPS fix is updated.
• Auto Login: Configure all users to be automatically logged securely into Field Service Management without having to type in login information.
In addition, mobile device users can be configured to:
• Receive Alerts regarding their work (see Receiving Alerts in this guide)
• Work on specific teams
• Be assigned work from specific dispatch centers
• Be listed in searches according to the skills they have
Categorizing mobile users by team, dispatch center, and skill will help you sort and assign work more easily. See your system administrator for Detail on how to configure users and mobile devices.
Creating a Work order
Your business practices may require you to create work orders in the field. Field Service Management allows you to do this from your mobile device. To create a work order:
1. From your My Work screen, select Create New WO from the Application Menu. The Search Customer screen will appear.
2. Scroll to the criteria by which you want to search and select it by pressing Space.
3. Scroll to the search entry field and enter at least two characters of the name, number, address, etc.
Supervisor Information
Corrigo Field Service Management Mobile Client for BlackBerry -- User’s Guide 33
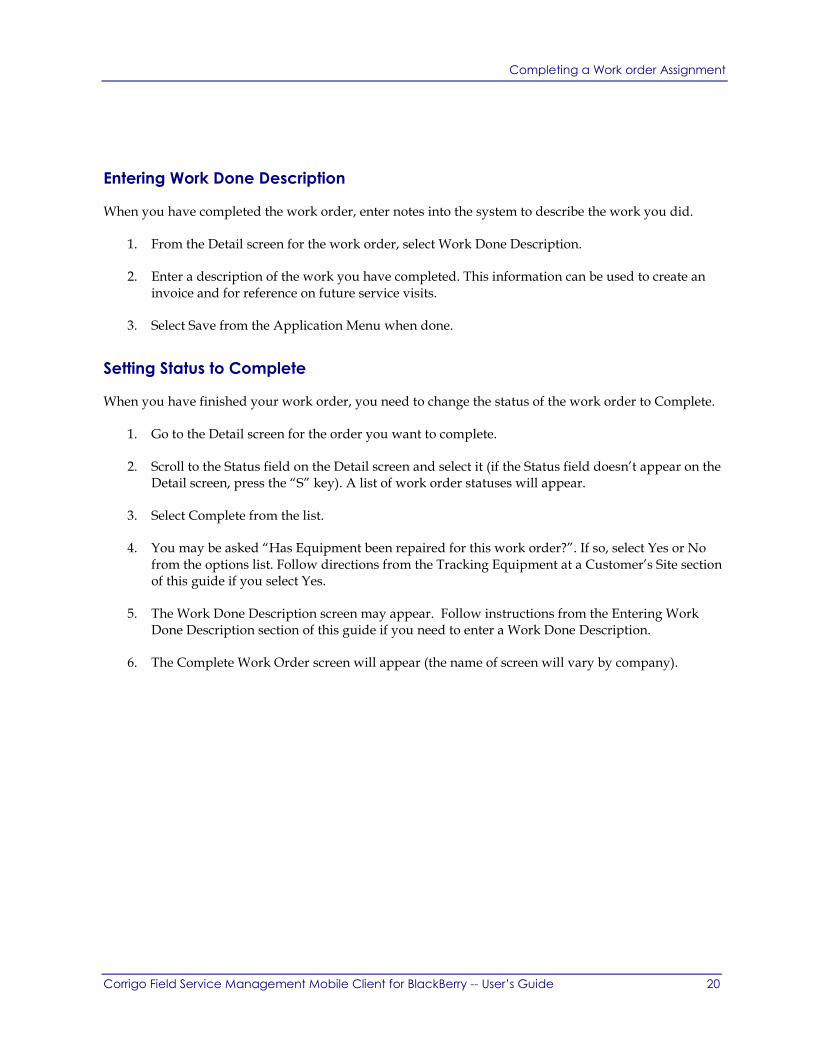
Figure 19: Search Customer while creating a work order
4. Press enter or select Search. Select your customer from the Search Results.
5. Select WO Subtype (Request is the most common).
6. Select a problem category from the Set Category screen.
7. Select which Service to perform for the problem, then enter a Description and select Save from the Application Menu.
8. The Review and Confirm screen will appear. After reviewing information, select Create New WO from the Application Menu.
9. Select Refresh from the Application Menu to update the work order data and make information available to the dispatch center.
Tip: If you need to create a work order for a customer who your company has already serviced, you can save time by copying the details of the previous work order.
Go to the Detail screen of the customer’s previous work order, then select Copy WO from the Application Menu (your screen may use a different term). Update relevant information on the Review and Confirm screen, then select Create New WO from the Application Menu. An offline work order will be created on your device. You can update this new order with the dispatch center by selecting Refresh from the Application Menu.
This method can also be used to create work orders on your mobile device when you are out of range of service.

Supervisor Information
Corrigo Field Service Management Mobile Client for BlackBerry -- User’s Guide 34
Creating a Work order for a New Customer
There could be situation where a Tech received an emergency call in the weekend for a new customer. In order to create a work order, that customer needs to be created first. Here are the steps to create a new customer:
1. From your My Work screen, select Create New WO from the Application Menu. The Search Customer screen will appear. You can search to see if the customer is already in the system. If not you can select ‘New Customer’ from the menu in Search Customer screen or the search results screen.
Figure 20: New Customer Menu from Customer search and results screen
2. Selecting New Customer menu will navigate you to the Create New Customer screen as shown below. You can fill in the fields and click on New Customer button.
3. Clicking on New Customer button will create the new customer and proceed with the work order creation flow as described in the section above.

Time Card
Corrigo Field Service Management Mobile Client for BlackBerry -- User’s Guide 35
Time Card
Overview
This Section applies to companies that use the Time Card module to track shift time.
The Time Card feature on your mobile device is designed to track your shift time. Depending upon how your company has configured its Time Card module settings, your shift time will either be tracked by Punch In / Punch Out hours, or hours spent on Work Orders.
Note: If your company tracks shift time based on the hours you spend working in Work Orders (known as the Work Order Feeds Time Card method), the only Time Card option available on your mobile device will be to view your Time Card hours. See Viewing Your Time Card Information below.
Punching In and Out for Your Shift
If your company has selected the Punch In / Punch Out method, your shift will start based on one of two scenarios, depending upon your company’s configuration:
• You automatically start or end your shift when you log into or out of Field Service Management.
• You must manually start your shift after logging into Field Service Management
If you need to manually start each shift from your mobile device, then:
• From your My Work Screen, select the application menu after logging into Field Service Management.
• If you see the option Start Shift, then you must manually start your shift by selecting this option. To end a shift, select End Shift from the same menu.
Figure 21: Manually starting a shift

Time Card
Corrigo Field Service Management Mobile Client for BlackBerry -- User’s Guide 36
Starting / Ending a Break
Your company may also configure the Time Card module to track break time. If your company has chosen this configuration, then you must manually start and end each break from your mobile device. To start your break:
• From your My Work Screen, select the application menu.
• If you see the option Start Break, then you must manually start your Break by selecting this option.
Figure 22: Starting a break from the mobile device
To end your break, select End Break or End Shift from the application menu on your My Work screen.
Figure 23: End break by selecting End Break or End Shift from the application menu
Time Card
Corrigo Field Service Management Mobile Client for BlackBerry -- User’s Guide 37
Viewing Your Time Card Information
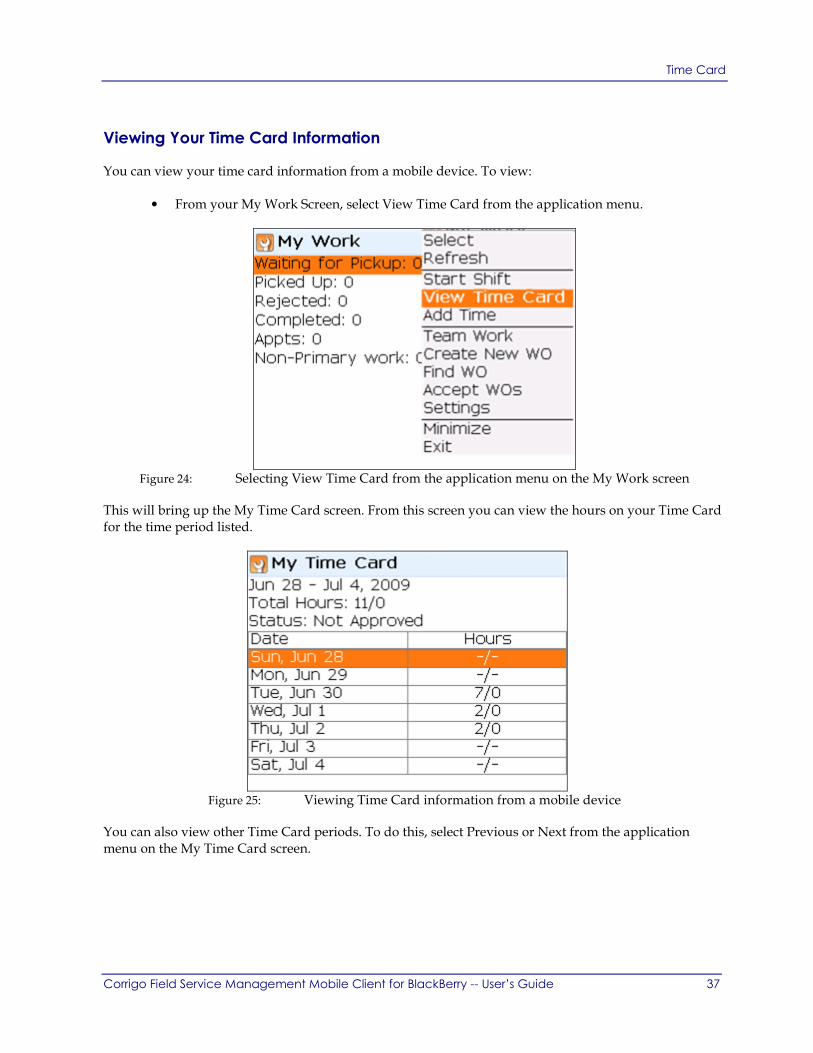
You can view your time card information from a mobile device. To view:
• From your My Work Screen, select View Time Card from the application menu.
Figure 24: Selecting View Time Card from the application menu on the My Work screen
This will bring up the My Time Card screen. From this screen you can view the hours on your Time Card for the time period listed.
Figure 25: Viewing Time Card information from a mobile device
You can also view other Time Card periods. To do this, select Previous or Next from the application menu on the My Time Card screen.

Time Card
Corrigo Field Service Management Mobile Client for BlackBerry -- User’s Guide 38
Figure 26: Select Previous or Next from the application menu to view other Time Card periods
Adding Time to your Time Card
You can add time to your time card from a mobile device. You can add time from 2 places:
1. My work screen�Add Time
Figure 27: Add Time Menu from My Work Screen

Time Card
Corrigo Field Service Management Mobile Client for BlackBerry -- User’s Guide 39
2. My Time Card screen�Add Time
Figure 28: Add Time from My Time Card screen
On clicking ‘Add Time’ you will be navigated to a screen as shown below where you can enter a start and end time or duration.
Figure 29: Add Time to Time Card

Troubleshooting
Corrigo Field Service Management Mobile Client for BlackBerry -- User’s Guide 40
Troubleshooting
Check this list if you are having trouble with your mobile device or the application.
Mobile Device Does Not Work
If the mobile device does not seem to be working or you are unable to access Field Service Management, try these solutions:
• Check to see if the device is turned on. If it is not, press and hold the Power key for more than one second.
• Check that the battery is properly installed.
• Check to see if the battery is low. If it is, recharge or replace the battery.
• Try placing a call to check that you are in a valid service coverage area. Alternatively, check to see if you can access other applications on your mobile device. If you can access other applications but not Field Service Management call Technical Support. The signal strength icon appears at the top of the display. More bars next to the antenna indicate a stronger signal.
Important: If you travel outside of your service area or service is otherwise interrupted, you will be unable to download or upload information until service is reestablished. Therefore, it is important that you download the work orders you need while you have service coverage. Read Working Offline in this guide.
User ID or Password is Rejected
Contact your system administrator
Technical Support:
Phone
Intuit Field Service Management: 877-517-2871 (toll-free)