
IntrotoX(rayPole&Figures -...
45
1 Intro to Xray Pole Figures 27750, Texture, Microstructure & Anisotropy A.D. (Tony) Rolle> Last revised: 23 rd Jan. ‘16
Transcript of IntrotoX(rayPole&Figures -...

1
Intro to X-‐ray Pole Figures
27-‐750, Texture, Microstructure & Anisotropy
A.D. (Tony) Rolle>
Last revised: 23rd Jan. ‘16

Objectives • DefiniAon and explanaAon of the pole figure. • Provide informaAon on how to measure x-‐ray pole figures. • Explain the stereographic and equal area projecAons. • Explain the defocussing correcAon. • Explain how pole figures of single orientaAons relate to
stereographic projecAons. • Explain how to compute a pole figure based on the
orientaAon matrix. • Spherical angle grid, area element and normalizaAon of
pole figure data. • Define and explain the inverse pole figure. • ComputaAon of an inverse pole figure
2

In Class Questions: 1
• How is an x-‐ray pole figure measured? • Why does it not provide complete orientaAon informaAon for a polycrystalline sample?
• How can one construct a pole figure for a single orientaAon?
• Why does a pole figure for a single orientaAon provide the complete orientaAon (by contrast to the single crystal case)?
• Why does an experimental pole figure not correspond to a theoreAcal one at the edges?
3

In Class Questions: 2
• How does the stereographic projecAon work? • How does the equal area projecAon work? • Given an orientaAon (e.g. the orientaAon matrix), how do you calculate the posiAons of the poles in a pole figure?
• How do you compute an inverse pole figure? • How does one normalize the data for a pole figure to obtain “mulAples of a random density (MRD)”?
4

Pole Figure: De;inition • A pole figure (in the context of texture) is a map of a selected set of crystal plane normals plo>ed with respect
to the sample frame. Think of the rows (not columns) in the orientaAon matrix, which define the coordinates of each crystal axis with respect to the sample frame.
• This definiAon refers to plane normals because of the standard use of x-‐ray diffracAon to measure pole figures; crystal direc?ons can equally well be treated.
• Since each plane normal is plo>ed by itself, there is no informaAon in the resulAng plot about direcAons lying in that plane. Therefore pole figures represent a projec?on of the texture informaAon.
• Each chosen crystal direcAon is generally specified as a low-‐index plane normal, e.g. {100}, {110}, {001}. • Crystal symmetry is generally assumed to apply such that all equivalent plane normals sharing the same
Miller indices are shown. For cubic materials, obviously, plane normals and direcAons are coincident but this is not the case for lower symmetry Bravais la`ces.
• Since unit vectors represenAng direcAons with respect to a common origin live on a sphere, it is natural to transform the coordinates to spherical angles such as azimuth (longitude) and declinaAon (co-‐laAtude). This makes it more clear that, for each crystallite, its 3-‐parameter orientaAon (e.g. Euler angles) is reduced (projected) to only two (2) parameters.
• Only the upper hemisphere is plo>ed, by convenAon. The resulAng diagram is ocen called a stereogram, although this implies something about the choice of projec?on (see later slides).
• If only a few disAnct orientaAons are displayed, mulAple poles can be plo>ed on the same diagram as a discrete pole figure.
• When many crystallites are included in the dataset, which have variable orientaAon, it is impracAcable to have more than one pole. Also it is necessary to bin the data and convert points to densiAes. For display purposes, contour plots are the easiest way to understand the result.
5

6
Crystal Directions on the Sphere • Uses the inclinaAon of the
normal to the crystallographic plane: the points are the intersecAon of each crystal direcAon with a (unit radius) sphere.
• This is an orthographic projecAon to illustrate the physical direcAons, not a stereographic projecAon.

7
Projection from Sphere to Plane • The measured pole figure exists on
the surface of a (hemi-‐)sphere. To make figures for publicaAon one must project the informaAon onto a flat page. This is a tradiAonal problem in cartography. We exploit just two of the many poss ib le projecAon methods.
• ProjecAon of spherical informaAon onto a flat surface – Equal area projecAon, or,
Schmid projecAon – Equiangular projecAon, or,
Wulff projecAon, more common in crystallography
[Cullity]
8
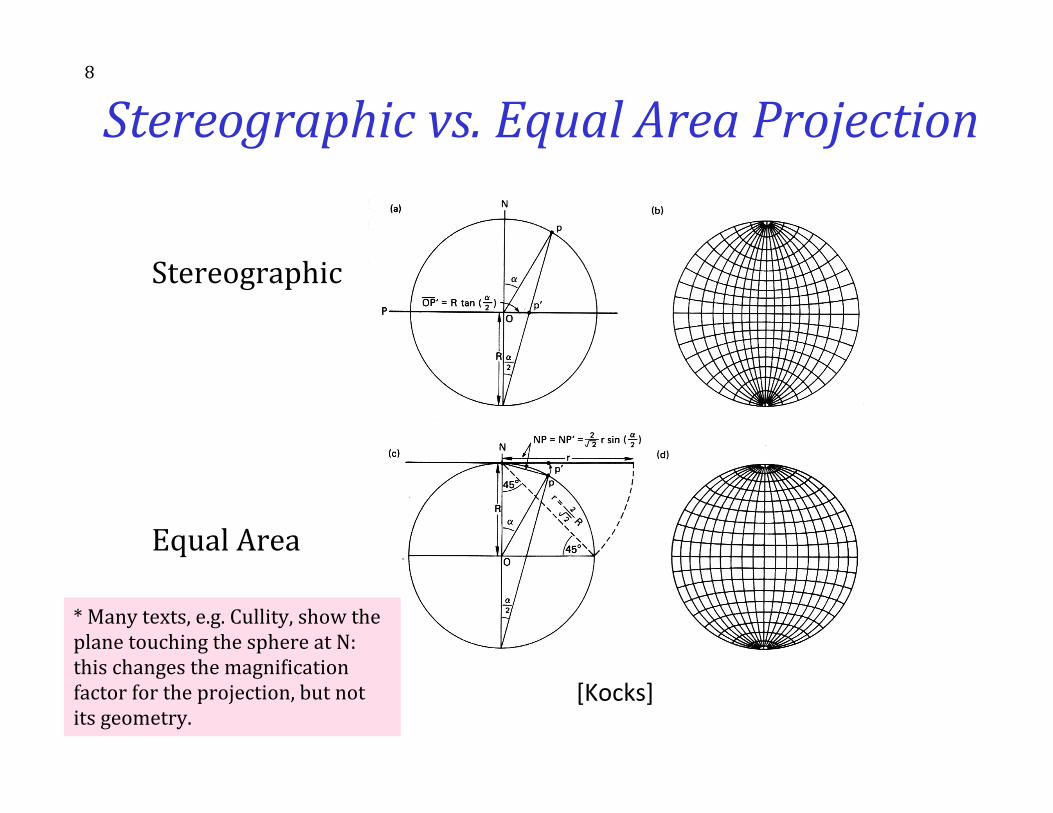
Stereographic vs. Equal Area Projection
Stereographic Equal Area
[Kocks]
* Many texts, e.g. Cullity, show the plane touching the sphere at N: this changes the magniGication factor for the projection, but not its geometry.

9
Stereographic Projections • Connect a line from the South pole to the point on the surface of the
sphere. The intersecAon of the line with the equatorial plane defines the project point. The equatorial plane is the projecAon plane. The radius from the origin (center) of the sphere, r, where R is the radius of the sphere, and α is the angle from the North Pole vector to the point to be projected (co-‐la?tude), is given by:
r = R tan(α/2) • Given spherical coordinates (α,ψ), where the longitude is ψ (as
before), the Cartesian coordinates on the projecAon are therefore: (x,y) = r(cosψ, sinψ) = R tan(α/2)(cosψ, sinψ)
• To obtain the spherical angles from [uvw], we calculate the co-‐laAtude and longitude angles as:
cosα = w tanψ = v/u
!Careful: Use ATAN2(v,u), and remember the difference between atan2(x,y) in excel, and atan2(y,x) in fortran and c++!
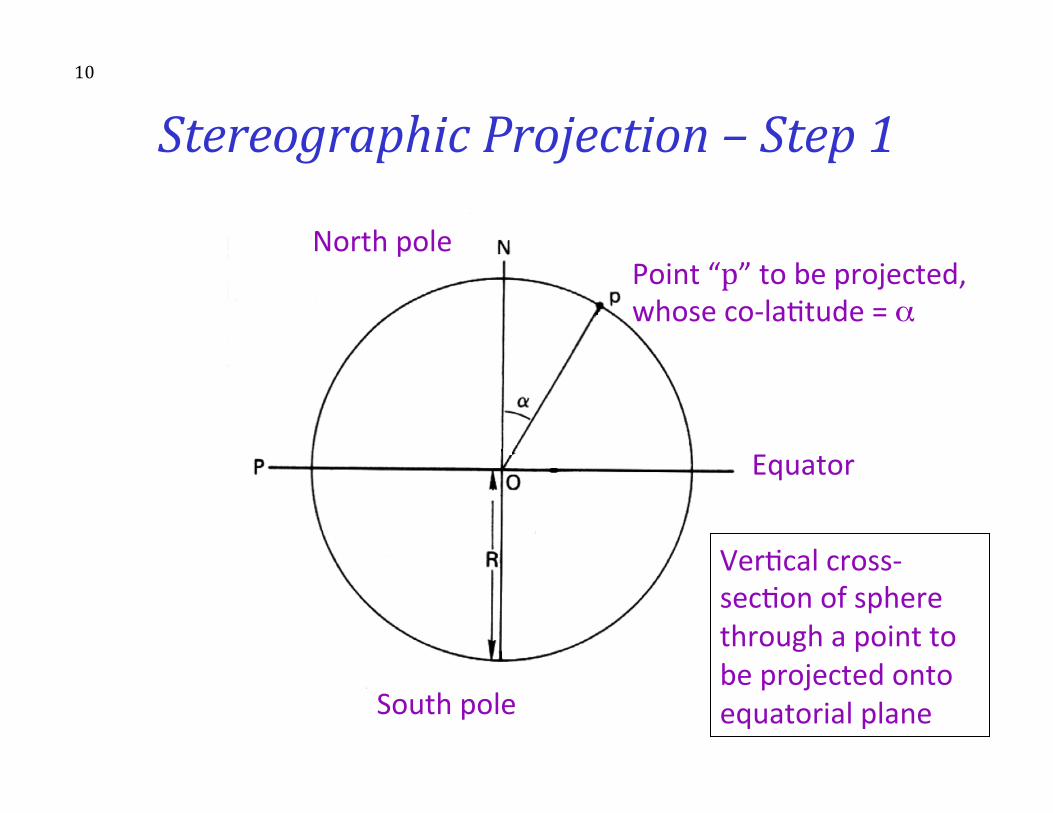
Stereographic Projection – Step 1 10
North pole
Equator
Point “p” to be projected, whose co-‐laAtude = α
South pole
VerAcal cross-‐secAon of sphere through a point to be projected onto equatorial plane
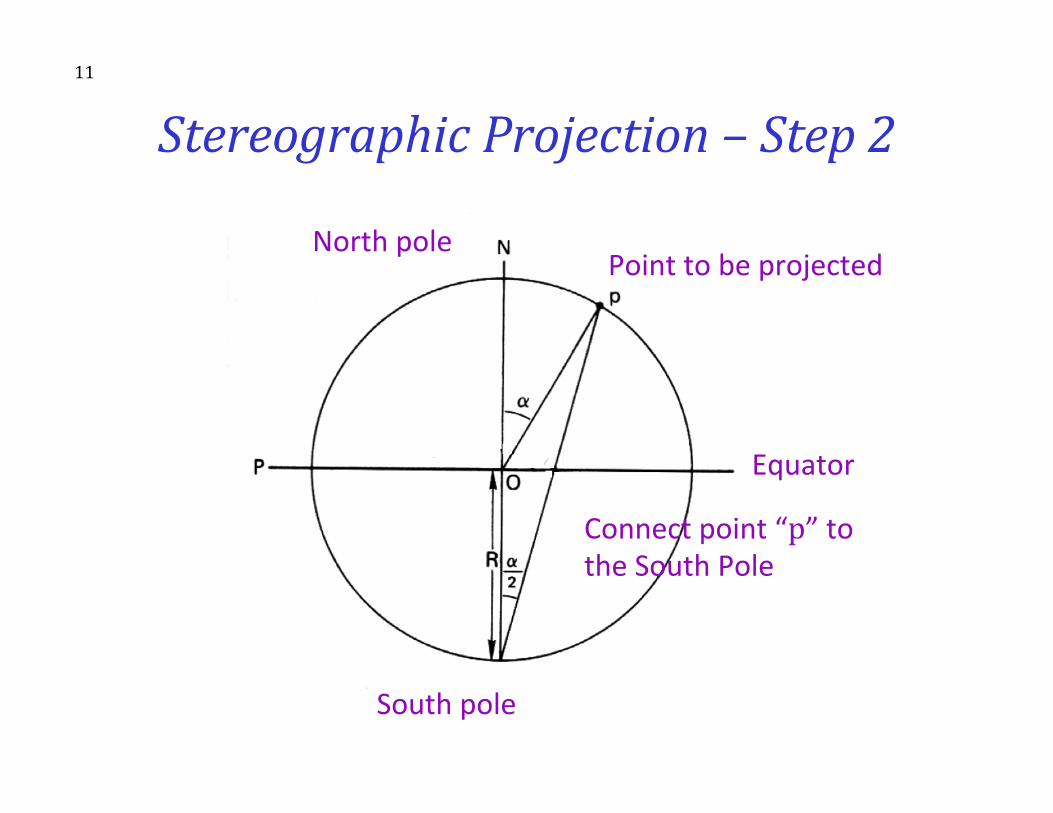
Stereographic Projection – Step 2 11
North pole
Equator
Point to be projected
Connect point “p” to the South Pole
South pole

Stereographic Projection – Step 3 12
North pole
Equator
Point to be projected
IdenAfy projected point p’ on the equatorial plane
South pole

Stereographic Projection – Step 4 13
North pole
Equator
Point to be projected
Compute radius of projected point p’ on the equatorial plane
South pole

Stereographic Projection – Step 5 14
O
p’
Radius = R tan(α/2) φ
p’ = Rtan(α/2)[cos(φ),sin(φ)]
Longitude of the projected point = φ

15
Texture Component → Pole Figure • To calculate where a texture component shows up in a pole figure, there are various operaAons that must
be performed. • The key concept is that of thinking of the pole figure as a set of crystal plane normals (e.g. {100}, or {111})
in the reference configuraAon (“cube component”) and applying the orientaAon as a transforma?on to that pole (or set of poles) to find its posiAon with respect to the sample frame.
• Step 1: write the crystallographic pole (plane normal) of interest as a unit vector; e.g. (111) = 1/√3(1,1,1) = h. In general, you will repeat this for all symmetrically equivalent poles (so for cubics, one would also calculate {-‐1,1,1}, {1,-‐1,1} etc.). In the future, we will use a set of symmetry operators to obtain all the symmetry related copies of a given pole.
• Step 2: apply the inverse transformaAon (passive rotaAon), g-‐1, to obtain the coordinates of the pole (Miller indices, normalized, crystal axes) in the pole figure (direcAon in sample axes): h’ = g-‐1h (pre-‐mulAply the vector by, e.g. the transpose of the orientaAon matrix, g, that represents the orientaAon; Rodrigues vectors or unit quaternions can also be used).
• Step 3: convert the rotated pole into spherical angles (to help visualize the result, and to simplify Step 4) where Θ is the co-‐laAtude and φ is the longitude: Θ = cos-‐1(h’z), φ = tan-‐1(h’y/h’x). Remember -‐ use ATAN2(h’y,h’x) in your program or spreadsheet and be careful about the order of the arguments!
• Step 4: project the pole onto a point, p, in the plane (stereographic or equal-‐area): px = tan(Θ/2) cosφ; py = tan(Θ/2) sinφ. [corrected sine and cosine for py and px components 25 i 08] The previous slide explains where this formula comes from.
• Note: why do we use the inverse transformaAon (passive rotaAon)?! One way to understand this is to recall that the orientaAon is, by convenAon (in materials science), wri>en as an axis transformaAon from sample axes to crystal axes. To construct a pole figure, we need to transform a known crystal direcAon (i.e. the plane normal) to the sample frame so that we know its coefficients in the la>er system.

Texture Component → Pole Figure: pseudo code
16
• Repeat these steps for each crystallographically equivalent pole, where the sphere (and projecAon circle) have unit radius -‐
• Step 1: write the crystallographic pole (plane normal) of interest as a unit vector; e.g. h = 1/√3(1,1,1)
• Step 2: transform pole to sample ref. frame: h’ = g-‐1h
• Step 3: convert the transformed pole into spherical angles: Θ = cos-‐1(h’z), φ = tan-‐1(h’y/h’x)
• Step 4: stereographic projecAon of the pole onto a point: px = tan(Θ/2) cosφ; py = tan(Θ/2) sinφ.

Matlab help 17
• Matrix mulAplicaAon in Matlab can be accomplished several different ways.
• For matrices of the same dimensions, one can simply use “*”, as in “A * B”, where A and B are, say, 3x3 matrices. There is a funcAon mmult(A,B) that accomplishes the same mulAplicaAon.
• To get the inverse of a transformaAon/rotaAon matrix, =A-‐1 or (in Matlab) “A^-‐1”, one only needs the transpose. The transpose of a matrix can be wri>en as “A’” where the apostrophe signifies transpose.
• To lec mulAply a vector by a 3x3 matrix (matrix on the lec, vector on the right) one needs a column vector. However, if one enters a vector as h=[1,1,1], for example, the result (“h”) is a row vector. The fix is to use the transpose of the vector, thus: “hnew = A * h’”.

18
Standard (001) Projection

19
Equal Area Projection • Connect a line from the North Pole to the point to be
projected. Rotate that line onto the plane tangent to the North Pole (which is the projecAon plane). The radius, r, of the projected point from the North Pole, where R is the radius of the sphere, and α is the angle from the North Pole vector (co-‐laAtude) to the point to be projected, is given by:
r = 2R sin(α/2) • Given spherical coordinates (α,ψ), where the longitude is ψ
(as before), the Cartesian coordinates on the projecAon are therefore: (x,y) = r(cosψ, sinψ) = 2R sin(α/2)(cosψ, sinψ)
Concept Params. Euler Normalize Vol.Frac. Cartesian Polar Components

20
Standard Stereographic Projections
• Pole figures are familiar diagrams. Standard Stereographic projecAons provide maps of low index direcAons and planes.
• PFs of single crystals can be derived from SSTs by deleAng all except one Miller index.
• Construct {100}, {110} and {111} PFs for cube component.

21
Cube Component = {001}<100>
{110}
{100}
{111}
Think of the θ-‐2θ setting as acting as a ;ilter on the standard stereographic projection,

22
How to Measure Texture
• X-‐ray diffracAon; pole figures; measures average texture at a surface (µms penetraAon); projecAon (2 angles).
• Neutron diffracAon; type of data depends on neutron source; measures average texture in bulk (cms penetraAon in most materials) ; projecAon (2 angles).
• Electron [back sca>er] diffracAon; easiest [to automate] in scanning electron microscopy (SEM); local surface texture (nms penetraAon in most materials); complete orientaAon (3 angles).
• OpAcal microscopy: opAcal acAvity (plane of polarizaAon); limited informaAon (one angle).

23
Texture: Quantitative Description • Three (3) parameters needed to describe the orientaAon [of a crystal relaAve to the embedding body or its environment].
• Most common: 3 [rotaAon] Euler angles. • Most experimental methods [X-‐ray and neutron pole figures included] do not measure all 3 angles, so orienta?on distribu?on must be calculated.
• Best mathemaAcal representaAon for graphing, illustraAng symmetry: Rodrigues-‐Frank vectors.
• Best mathemaAcal representaAon for calculaAons: quaternions.

24
X-‐ray Pole Figures • X-‐ray pole figures are the most common source of texture
informaAon; cheapest, easiest to perform. They have the advantage of providing an average texture over a reasonably large surface area (~1mm2), compared to EBSD. For a grain size finer than about 100 µm, this means that thousands of grains are included in the measurement, which ensures staAsAcal viability.
• Pole figure:= variaAon in diffracted intensity with respect to direcAon in the specimen.
• RepresentaAon:= map in projecAon of diffracted intensity. • Each PF is equivalent to a geographic map of a hemisphere (North
pole in the center). • Map of the density of a specific crystal direc?on w.r.t. sample
reference frame. More concretely, it is the frequency of occurrence of a given crystal plane normal per unit spherical area. Think of a (spherical) pin cushion with each pin represen?ng the normal to {hkl}.

25
PF apparatus • From Wenk’s chapter in Kocks
book. • Fig. 20: showing path
difference between adjacent planes leading to destrucAve or construcAve interference. The path length condiAon for construcAve interference is the basis for the Bragg equaAon: 2 d sinθ = n λ
• Fig. 21: pole figure goniometer for use with x-‐ray sources.
[Kocks]

26
Pole Figure measurement • PF measured with 5-‐axis goniometer. • 2 axes used to set Bragg angle (choose a specific crystallographic plane with θ/
2θ), which determines the Miller indices associated with the PF. These seXngs remain constant during the measurement of a given pole figure.
• Third axis Alts specimen plane w.r.t. the focusing plane (co-‐laAtude angle in the PF, i.e. distance from North Pole). Although this angle can be as large as 90°, no diffracted intensity will be measured with the plane of the beams parallel to the surface: this limits the maximum Alt angle at which PFs can be measured in reflecAon to about 80°.
• Fourth axis spins the specimen about its normal (longitude angle in the PF). • Fich axis (opAonal) oscillates the Specimen under the beam in order to
maximize the number of grains included in the measurement. • For texture calculaAon, at least 2 PFs required and 3 are preferable even for
materials with high crystal symmetry. • N.B. deviaAons of relaAve intensiAes in a standard θ/2θ scan from powder file
indicate texture but only on a qualitaAve basis.

27
Pole Figure Example
• If the goniometer is set for {100} reflecAons, then all direcAons in the sample that are parallel to <100> direcAons will exhibit diffracAon.
Note the convenAon with the RD poinAng up, TD to the right, and ND out of the plane. This is an unfortunate convenAon because it is a lec-‐handed set of axes!
[Bunge]

28
Practical Aspects • Typical to measure three PFs for the 3 lowest values of
Miller indices (smallest available angles of Bragg peaks). • Why?
– Small Bragg angles correspond to normals coincident with symmetry elements of the crystal, which means fewer symmetry-‐related poles, and, consequently, greater dynamic range of intensity (peak to valley).
– A single PF does not uniquely determine orientaAon(s), texture components because only the plane normal is measured, but not direcAons in the plane (2 out of 3 parameters).
– MulAple PFs required for calculaAon of OrientaAon DistribuAon – The lowest index reflecAons have the smallest Bragg angles and
are therefore the easiest to measure, with the highest intensiAes.

29
Corrections to Measured Data • Random texture [=uniform dispersion of orientaAons] means same
intensity in all direcAons. • Background count must be subtracted, just as in convenAonal x-‐ray
diffracAon analysis. • X-‐ray beam becomes defocused at large Alt angles (> ~60°); measured
intensity even from a sample with random texture decreases towards edge of PF because less of the diffracted beam intersects with, or is captured by the detector.
• Defocusing correcAon required to increase the intensity towards the edge of the PF. (Despite the uncertainty associated with this correcAon, it is be>er to measure in reflecAon out to as large a Alt as possible, in preference to trying to combine reflecAon and transmission figures.)
• Acer these correcAons have been applied, the dataset must be normalized in order that the average intensity is equal to unity (similar to, although not the same as, making sure that a probability distribuAon has unit area under the curve).
• Units: mulAples of a random density (MRD). To be explained …

30
Defocussing • The combinaAon of the θ-‐2θ
se`ng and the Alt of the specimen face out of the focusing plane spreads out the beam on the specimen surface.
• Above a certain spread, not all the diffracted beam enters the detector.
• Therefore, at large Alt angles, the intensity decreases for purely geometrical reasons.
• This loss of intensity must be compensated for, using the defocussing correc?on.
[Kocks]

31
Defocusing Correction • No defocusing correcAon needed at small Alts, χ, because all the diffracted
beam enters the detector. The correcAon becomes more important with decreasing 2θ and narrower receiving slit.
• Best procedure involves measuring the intensity from a reference sample with random texture.
• If such a reference sample is not available, one may have to correct the available defocusing curves in order to opAmize the correcAon. This will be explained again in the context of using mtex or popLA.
[Kocks]

32
popLA and the Defocussing Correction
demo (from Cu1S40, smoothed a bit: UFK)1111000.00 999. 999. 999. 999. 999. 999. 999. 999. 999. 982.94 939.04 870.59 759.37 650.83 505.65 344.92 163.37 2.19
100.00 100.00 100.00 100.00 100.00 100.00 100.00 100.00 100.00 100.00 99.00 96.00 92.00 83.00 72.00 54.00 32.00 13.00 .00
051015202530354045505560657075808590
051015202530354045505560657075808590
Tilt Angles
Tilt Angles
At each tilt angle, the data is multiplied by 1000/value
Values for correcting background
Values for correcting data
If you change the DFB file, always plot the curves to check them visually!
33
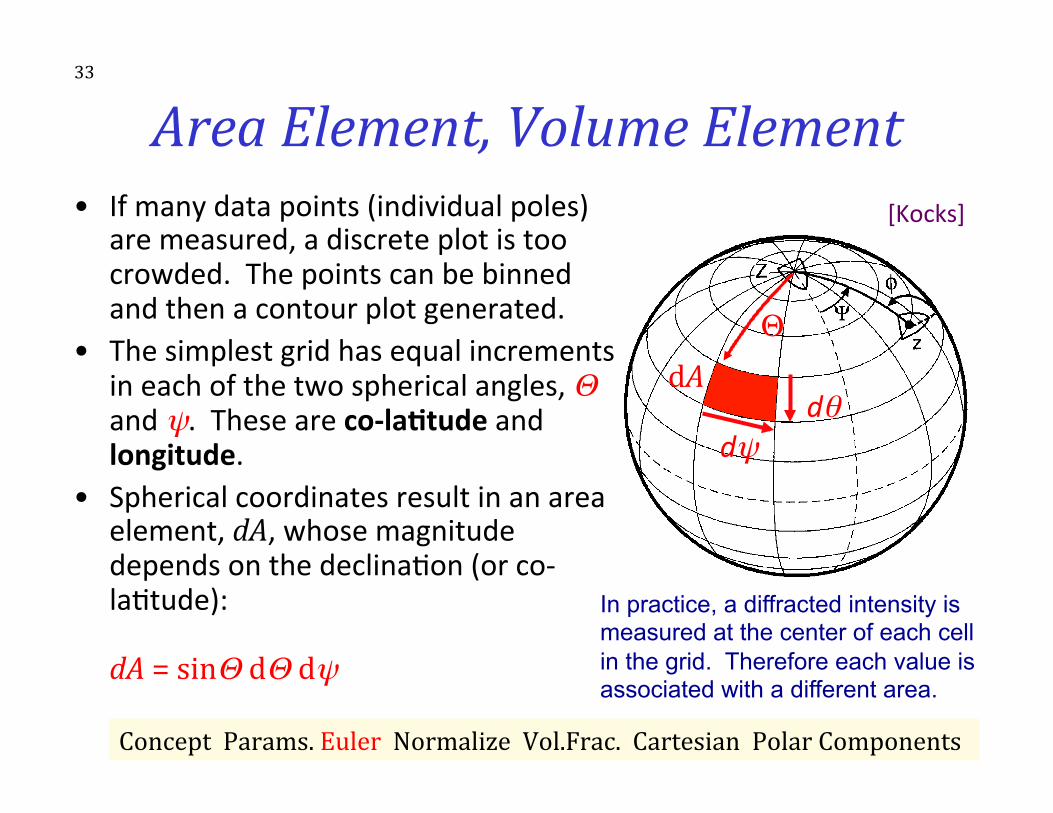
Area Element, Volume Element • If many data points (individual poles)
are measured, a discrete plot is too crowded. The points can be binned and then a contour plot generated.
• The simplest grid has equal increments in each of the two spherical angles, Θ and ψ. These are co-‐laFtude and longitude.
• Spherical coordinates result in an area element, dA, whose magnitude depends on the declinaAon (or co-‐laAtude): dA = sinΘ dΘ dψ
Θ dA
Concept Params. Euler Normalize Vol.Frac. Cartesian Polar Components
dψ dθ
[Kocks]
In practice, a diffracted intensity is measured at the center of each cell in the grid. Therefore each value is associated with a different area.

34
Normalization • NormalizaAon is the operaAon that ensures that “random”
is equivalent to an intensity of one. • This is achieved by integraAng the un-‐normalized intensity, f’(θ,ψ), over the full area of the pole figure, and dividing each value by the result, taking account of the solid area. Thus, the normalized intensity, f(θ,ψ), must saAsfy the following equaAon, where the 2π accounts for the area of a hemisphere:
€
12π
f Θ,ψ( )sinΘdΘdψ∫ =1
Note that in popLA files, intensity levels are represented by i4 integers, so the random level = 100. Also, in .EPF data sets, the outer few rings (typically, Θ > 80°) are empty because they are unmeasurable; therefore the integraAon for normalizaAon excludes these empty outer rings.

Inverse Pole Figure: De;inition • An inverse pole figure (in the context of texture) is a map of a selected set of sample direcAons
plo>ed with respect to the crystal frame. Think of the columns (not rows) in the orientaAon matrix, which define the coordinates of each sample axis with respect to the crystal frame.
• In general, only the 1, 2 & 3 (RD, TD, ND) direcAons are plo>ed. • The sample direcAons are generally notated with Miller indices, e.g. [100], [010], [001]. • Sample symmetry is ignored because these 3 sample direcAons are (almost) never equivalent. • Since unit vectors represenAng direcAons with respect to a common origin live on a sphere, it is
natural to transform the coordinates to spherical angles such as azimuth (longitude) and declinaAon (co-‐laAtude). This makes it more clear that, for each crystallite, its 3-‐parameter orientaAon (e.g. Euler angles) is reduced (projected) to only two (2) parameters.
• Only the upper hemisphere is plo>ed, by convenAon. The resulAng diagram is ocen called a stereogram, although this implies something about the choice of projec?on (see later slides).
• If only a few disAnct orientaAons are displayed, mulAple poles can be plo>ed on the same diagram as a discrete inverse pole figure.
• When many crystallites are included in the dataset it is necessary to bin the data and convert points to densiAes. For display purposes, contour plots are the easiest way to understand the result.
• Because orientaAons are reduced (projected) to a single direcAon, the space required to display a unique result depends on the crystal symmetry. For cubics, only the Standard Stereographic Triangle (SST) is needed. See the Kocks book for lower symmetry cases.
35

Inverse Pole Figures 36
• The figure above shows an example of a set of Inverse Pole Figures, derived from a sample of rolled copper (“DEMO” as found in the demonstraAon dataset for popLA). From lec to right, we see the distribuAon of the ND, TD and RD, respecAvely, with respect to the crystal reference frame. The cubic crystal symmetry of copper means that we only need one unit triangle to represent the distribuAon. Thus the Standard Stereographic Triangle (SST) is the fundamental zone for inverse pole figures for cubic materials. The (experimental) pole figures for this dataset are shown to the right.

37
Inverse Pole Figure -‐ Procedure • To calculate where a sample direcAon appears in an inverse pole figure, there are various operaAons that
must be performed. • The key concept is that of thinking of the inverse pole figure as a set of sample direcAons (e.g. RD, or ND)
in the reference configuraAon and applying the orientaAon as a transforma?on to that direcAon (here one only needs to deal with a single direcAon, in contrast to the Pole Figure case) to find its posiAon with respect to the sample frame.
• Step 1: write the sample direcAon of interest as a unit vector; e.g. ND≡[001] = h. • Step 2: apply the transformaAon (passive rotaAon), g (not g-‐1, or gT), to obtain the coordinates of the
sample direcAon in the inverse pole figure (in crystal axes): h’ = gh (pre-‐mulAply the vector by, e.g. the orientaAon matrix, g, that represents the orientaAon; Rodrigues vectors or quaternions can also be used).
• Step 3: convert the rotated direcAon into spherical angles (to help visualize the result, and to simplify Step 4) where Θ is the co-‐laAtude and φ is the longitude: Θ = cos-‐1(h’z), φ = tan-‐1(h’y/h’x). Remember -‐ use ATAN2(h’y , h’x) in your program or spreadsheet and be careful about the order of the arguments!
• Step 4: project the direcAon onto a point, p, in the plane (stereographic or equal-‐area): px = tan(Θ/2) cosφ; py = tan(Θ/2) sinφ. The previous slide explains where this formula comes from. The axes of the inverse pole figure are x=100 and y=010. (CauAon -‐ this is simple and obvious for cubics. For low symmetry crystals, these are Cartesian x and y, which may or may not correspond to the a and b crystal axes. The locaAon of Cartesian x and y for hexagonal systems requires parAcular care!)
• Note: why do we use the transformaAon (passive rotaAon)?! One way to understand this is to recall that the orientaAon is, by convenAon (in materials science), wri>en as an axis transformaAon from sample axes to crystal axes. For the inverse pole figure, we are transforming a sample direcAon into crystal axes so we can use the orientaAon matrix directly.

38
Summary • The pole figure is explained as a plot in which poles of crystal
planes are projected (stereographic or equal area) onto a circular plot with the sample axes as the reference frame. If data is taken from an experiment or a large number of poles are binned, contour plots are displayed.
• A method to compute the posiAons of poles in such a figure is described, based on transforming the coefficients of a crystal plane normal to the sample frame.
• The typical reflecFon mode for measuring pole figures with x-‐ray diffracAon is described, along with the need for a defocussing correcAon and normalizaAon to obtain units of mulAples of a random density (MRD).
• The inverse pole figure is described in which sample direcAons are plo>ed in the crystal frame (also as a stereographic or equal area projecAon), along with the calculaAon method.

39
Supplemental Slides
• The following slides contain revision material about Miller indices from the first two lectures.

40
Miller Indices • Cubic system: direcAons, [uvw], are equivalent to planes,
(hkl). • Miller indices for a plane specify reciprocals of intercepts
on each axis.

41
Miller <-‐> vectors
• Miller indices [integer representaAon of direcAon cosines] can be converted to a unit vector, n: {similar for [uvw]}.
€
n = (h,k,l)h2 + k 2 + l2

42
Miller indices of a pole Miller indices are a convenient way to represent a direcFon or a plane normal in a crystal, based on integer mulFples of the repeat distance parallel to each axis of the unit cell of the crystal laIce. This is simple to understand for cubic systems with equiaxed Cartesian coordinate systems but is more complicated for systems with lower crystal symmetry. DirecFons are simply defined by the set of mulAples of la`ce repeats in each direcAon. Plane normals are defined in terms of reciprocal intercepts on each axis of the unit cell. In cubic materials only, plane normals are parallel to direcAons with the same Miller indices.
When a plane is wri>en with parentheses, (hkl), this indicates a parAcular plane normal: by contrast when it is wri>en with curly braces, {hkl}, this denotes a the family of planes related by the crystal symmetry. Similarly a direcAon wri>en as [uvw] with square brackets indicates a parAcular direcAon whereas wriAng within angle brackets , <uvw> indicates the family of direcAons related by the crystal symmetry.

43
Miller Index De;inition of Texture Component
• The commonest method for specifying a texture component is the plane-‐direcAon.
• Specify the crystallographic plane normal that is parallel to the specimen normal (e.g. the ND) and a crystallographic direcAon that is parallel to the long direcAon (e.g. the RD).
(hkl) // ND, [uvw] // RD, or (hkl)[uvw]

44
Direction Cosines
• DefiniAon of direc?on cosines: • The components of a unit vector are equal to the cosines of the angle between the vector and each (orthogonal, Cartesian) reference axis.
• We can use axis transforma?ons to describe vectors in different reference frames (room, specimen, crystal, slip system….)

45
Euler Angles, Animated
e1=Xsample=RD
e2=Ysample=TD
e3=Zsample=ND
e’1
e’2
φ1
Φ
e”2
e”3
e’3=
=e”1
ycrystal=e”’2
φ2
xcrystal=e”’1
zcrystal=e”’3= [010]
[100]
[001]