Introduction to AutoCAD for Civil Engineering - SDC Publications
14
Introduction to AutoCAD 2010 for Civil Engineering Applications Learning to use AutoCAD for Civil Engineering Projects Nighat Yasmin Clemson University SDC www.SDCpublications.com Schroff Development Corporation PUBLICATIONS
Transcript of Introduction to AutoCAD for Civil Engineering - SDC Publications

Introduction to AutoCAD 2010 for
Civil Engineering Applications
Learning to use AutoCAD for Civil Engineering Projects
Nighat Yasmin Clemson University
SDC
www.SDCpublications.com
Schroff Development Corporation
PUBLICATIONS

Introduction to AutoCAD for Civil Engineering Applications 269
10. Drainage Basin
10.1. Objectives
• Understand water cycle • Basics of drainage basin • AutoCAD and drainage basin delineation

270 Introduction to AutoCAD for Civil Engineering Applications
10.2. Introduction Hydrology is a Greek word, and it means the study of water. In the engineering community, hydrology is the scientific study of the movement, distribution, and quality of water throughout the earth. Hydrology addresses both the hydrologic cycle and water resources.
10.3. Hydrologic cycle The hydrologic cycle, also known as the water cycle, is the continuous movement of the water above, on, and below the earth’s surface. Hence, there is no beginning or ending point to this cycle. In the various stages of this cycle, water is available in one of the three different possible states: liquid, vapor, and ice. The most simplified representation of the hydrologic cycle is as follows. The major driving force of the hydrologic cycle is the sun. It heats the water in the oceans, lakes, rivers, streams, etc. and causes some of it to evaporate. The vapor rises into the air where cooler temperatures cause it to condense into clouds. These clouds drift over the land and the vapors fall as precipitation (rain, hail, snow, fog, etc.). The rainwater flows into lakes, rivers, or aquifers. The water in lakes, rivers, and aquifers then either evaporates back to the atmosphere or eventually flows back to the ocean, completing the cycle. Figure 10-1 shows a water cycle.
Figure 10-1

Drainage Basin 271
The hydrological cycle can be affected by the environmental effect and by humans. The following list shows some of the human factors affecting the water cycle.
• Agriculture • Alteration of the chemical composition of the atmosphere • Construction of dams • Deforestation and afforestation • Removal of groundwater from wells • Water abstraction from rivers • Urbanization
10.4. Terminology Refer to the Figure 10-1 for the terms discussed in this section.
• Condensation: Condensation is the transformation of water vapor to liquid water (as seen with the droplets in the air that produce clouds and fog).
• Precipitation: Precipitation is the process of condense water vapor falling to the earth’s surface. Generally, precipitation occurs as rain. It also occurs as snow, hail, fog drip, and sleet.
• Interception: Interception is the precipitation that is interrupted by plant foliage. Part of the intercepted precipitation will reach the ground surface and the remaining part will evaporate back to the atmosphere.
• Runoff: Runoff is the method by which water moves across the land. This includes both surface runoff and channel runoff. As water flows, it may infiltrate into the ground, evaporate into the air, become stored in lakes or reservoirs, or be extracted for agricultural or other human uses.
• Snowmelt: Snowmelt is the runoff produced by the melting snow. • Groundwater: Groundwater is the water found below the ground surface. It may be
available as soil moisture, in the liquid form, or frozen form. • Infiltration: Infiltration is the percolation of the water from the ground surface into
the ground. Once infiltrated, the water becomes soil moisture or groundwater. • Subsurface flow: Subsurface flow is the underground flow of water. It may return to
the surface as a spring or by the extraction using pumps. • Advection: Advection is the movement of water (in solid, liquid, or vapor states)
through the atmosphere. Without advection, water that evaporated over the oceans could not precipitate over the land.
• Evaporation: Evaporation is the transformation of water from a liquid to a gaseous state.
• Transpiration: Transpiration is the evaporation of water from the plants. • Evapotranspiration: Evaporation and transpiration are collectively known as
evapotranspiration. • Sublimation: Sublimation is the transformation of water from a solid (ice) to
gaseous (vapor) state. • Water table: Water table is the underground water level at which the ground water
pressure is equal to the atmospheric pressure.

272 Introduction to AutoCAD for Civil Engineering Applications
10.5. Watershed or Drainage basin A watershed is the area of land that drains into a stream at a given location; that is, it is an area of land bounded by a hydrologic system. Generally, a watershed is defined in terms of a point or outlet and all the land area that sheds (pours) water to the outlet during a rainstorm. Using the concept that “water runs downhill,” a watershed is defined by all points enclosed within an area from which the rain falling at these points will contribute water to the outlet. Figure 10-2 represents the delineation of a watershed boundary. Watersheds come in all shapes and sizes and cross county, state, and national boundaries.
Figure 10-2
A drainage basin is a region of land where the precipitation’s water flows downhill into a river, lake, dam, or ocean. The drainage basin includes both the channels and the land from which water drains into those channels. Each drainage basin is separated topographically from adjacent basins by a ridge, hill, or mountain, which is known as a water divide. The dashed line is the main water divide of the hydrographic basin as shown in Figure 10-2. In North America, watershed refers to the drainage basin itself. The terms catchments, catchment area, catchment basin, drainage area, river basin, and water basin are also used to represent the same concept. In hydrology, the drainage basin is a logical unit of focus for studying the movement of water within the hydrological cycle, because the majority of water that discharges from the basin outlet originated as the precipitation falling on the basin. A portion of the water that enters the groundwater system beneath the drainage basin may flow towards the outlet of another drainage basin because groundwater flow directions do not always match those of their overlying drainage network. Measurement of the discharge of water from a basin may be made by a stream gauge located at the basin’s outlet.

Drainage Basin 273
10.6. Watershed characteristics
10.6.1. Drainage area The drainage area (A) is probably the single most important watershed characteristic for a hydrologic design. It reflects the volume of water that can be generated from rainfall. The drainage area is used to indicate the potential for rainfall to provide a volume of water. It is common in hydrologic design to assume a constant depth of rainfall occurring uniformly over the watershed. Under this assumption, the volume of the water available for the runoff would be the product of rainfall depth and the drainage area. Thus the drainage area is required as input to models ranging from simple linear prediction equations to complex computer models.
10.6.2. Watershed length The length (L) of a watershed is the second greatest characteristic of interest. While the length increases as the drainage increases, the length of a watershed is important in hydrologic computations. Watershed length is usually defined as the distance measured along the main channel from the watershed outlet to the basin divide. Since the channel does not extend to the basin divide, it is necessary to extend a line from the end of the channel to the basin divide following a path where the greatest volume of water would travel. The straight-line distance from the outlet point on the watershed divide is not usually used to compute L because the travel distance of floodwaters is conceptually the length of interest. Thus, the length is measured along the principal flow path. Since it will be used for hydrologic calculations, this length is more appropriately labeled the hydrologic length. The length is usually used in computing as a time parameter, which is a measure of the travel time of water through the watershed.
10.6.3. Watershed slope Flood magnitudes reflect the momentum of the runoff. Slope is an important factor in the momentum. Both watershed and channel slope may be of interest. Watershed slope reflects the rate of change of elevation with respect to distance along the principal flow path. Typically, the principal flow path is delineated, and the watershed slope (S) is computed as the difference in elevation (ΔE) between the end points of the principal flow path divided by the hydrologic length of the flow path (L). The elevation difference, ΔE, may not necessarily be the maximum elevation difference within the watershed since the point of highest elevation may occur along a side boundary of the watershed rather than at the end of the principal flow path.
10.6.4. Miscellaneous Some of the other important watershed factors are listed here.
• Land cover and use • Surface roughness • Soil characteristics
o Texture o Soil structure

274 Introduction to AutoCAD for Civil Engineering Applications
o Soil moisture o Hydrologic soil groups
10.7. Major steps in a watershed delineation The major steps in watershed delineation process are listed below. Step 1: Mark the centerline of a channel by joining the Vs. For a channel, the tip of the V is upstream. Step 2: Show the direction of flow. A channel flows from a higher elevation (upstream) to the lower elevation (downstream). Step 3: Delineate the watershed boundary by connecting the ridge lines in the elevation contour lines map. For a ridge, the tip of the V or U is downstream. Step 4: Choose and label the point of the watershed outlet. The outlet is usually a monitoring location or hydraulic structure.
10.8. Watershed delineation using AutoCAD As mentioned before, the two major steps in watershed delineation is the selection of the outlet point and drawing the lines perpendicular to the contour line. In AutoCAD this delineation can be marked using the following steps.
1. Launch AutoCAD 2010. 2. Contour map
• Open the contour map. • Create a layer for the contour labels and make it the current layer. • Label the index contour using the Text, Background Mask, and the Rotate
commands, Figure 10-3.
Figure 10-3

Drainage Basin 275
3. Center line • Create a layer for the center line of the channel. Change its color and
lineweight. Make it the current layer. • A channel flows from the higher elevation to the lower elevation. From Chapter
10, the contour lines cross the streambed upstream by creating V with the bottom of the V’s pointing upstream.
• Draw the centerlines for the channel, Figure 10-4. o Activate the Polyline command. o Draw a polyline through the bottom of Vs as shown in Figure 10-4.
Figure 10-4
4. Direction of the flow • Create a layer for the direction of the flow in the channel. Change its color and
lineweight. Make it the current layer • Show the direction of the flow for the channels using the quick leader. Use first
part of the qleader command to draw arrows. • Label the channel as shown in Figure 10-5.
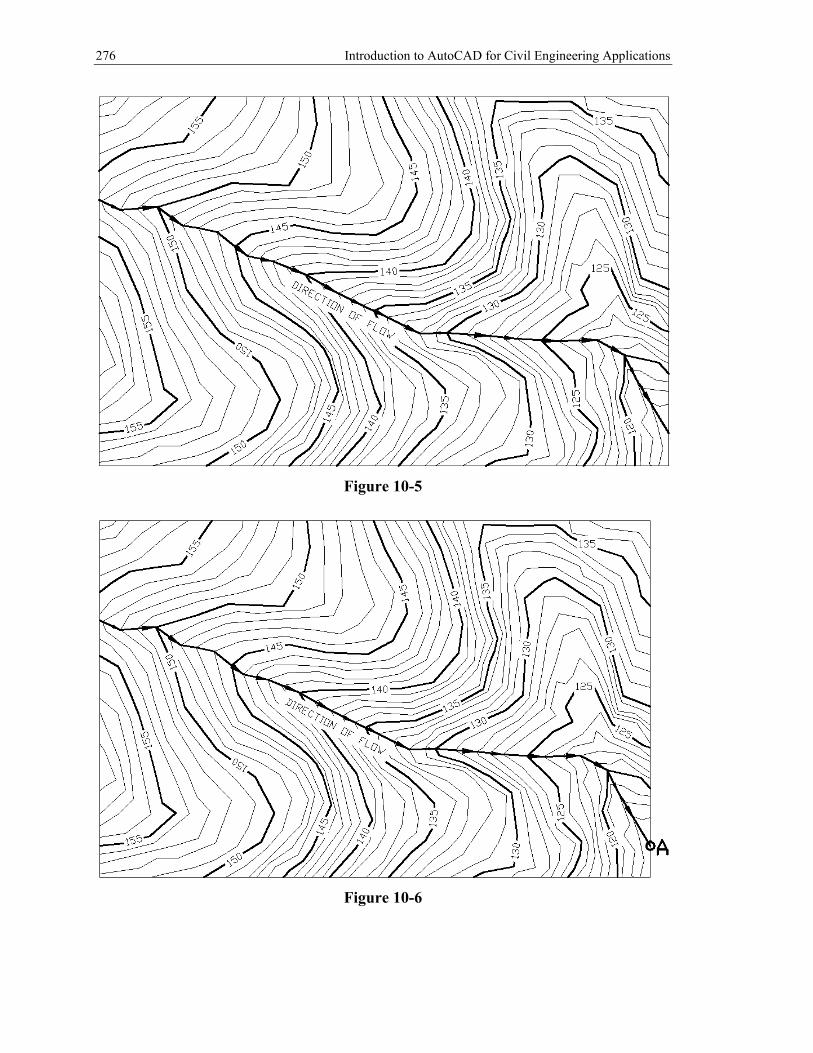
5. Outlet point
• Create a layer for the outlet. Change its color and lineweight. Make it the current layer.
• In Figure 10-6, point A, the intersection of the channel and the edge of the contour map is selected as the outlet point for the watershed.
• Draw a point at the outlet and label it.
276 Introduction to AutoCAD for Civil Engineering Applications
Figure 10-5
Figure 10-6

Drainage Basin 277
6. Delineate the watershed • Create a layer for the watershed boundary. Change its color and lineweight.
Make it the current layer. • The contour lines cross the ridge downstream by creating V’s or U’s pointing
downstream. • Draw the boundary lines for the channel.
o Activate the Polyline command. o Draw a polyline through the bottom of Us as shown in Figure 10-7.
Figure 10-7
7. Hatch the watershed • Create a layer for the watershed hatch. Change its color and lineweight. Make it
the current layer. o Activate the Hatch command and hatch the watershed, using the pattern
GRASS and the scale of 40, Figure 10-8.

278 Introduction to AutoCAD for Civil Engineering Applications
Figure 10-8
8. Channel length • Create a layer for the channel length and the watershed area. Change its color
and lineweight. Make it the current layer. • Find the length of the channel in feet (length of the channel’s center line). The
easiest and the fastest method is the property sheet. • Set the drawing units to be engineering as follow. (i) From the Format menu,
select the Units option. This will open Drawing Units dialog box. (ii) In the Drawing Units dialog box, under the Length panel, select the Engineering units, Figure 10-9a.
Figure 10-9a
• Select the centerline of the channel and open its property sheet, Figure 10-9b. • The last entry in the Geometry panel is the length of the channel.

Drainage Basin 279
Figure 10-9b
9. Watershed area • The area of the watershed can be obtained using one of the two techniques.
(a) Using the Property sheet o Select the boundary of the watershed. o Open its property sheet. o The second last entry in the Geometry panel is the area of the watershed. o The area is in square feet.
(b) Using the Inquiry command o Select the Tools dropdown menu, select the Inquiry option, and select
the Area option, Figure 10-10a. o The prompt shown in Figure 10-10b will appear.
Figure 10-10a

280 Introduction to AutoCAD for Civil Engineering Applications
o Use the down arrow and choose the Object option for the closed polyline.
Figure 10-10b
o Click on the watershed boundary (make sure the boundary is represented by a single closed polyline).
o The area information will appear on the screen. o Press the Esc key to exit the command.
• Convert the area into acres using the conversion factor of
1 Acres = 43560 sq. ft.
Figure 10-10c
10. Display the length and area on the drawing • Draw a table, Figure 10-11. • Show the length as a text on the drawing. • Show the area as a text on the drawing.

Drainage Basin 281
Figure 10-11