INTRODUCTION TO ACTIONS AND HIRING - University of Kentucky · PDF fileUnder ActionType, click...
27
INTRODUCTION TO ACTIONS AND HIRING Overview of Personnel Administration Actions Business officers and personnel administrators use the Personnel Administration Actions (PA40) functionality to carry out a variety of required processes at UK. More specifically, these users select Actions via PA40 to carry out hiring and rehiring, transfers, additional assignments, separations, and other processes that change individual assignments. Users can think of PA40 Actions as the means for connecting a person (employee) to a specific position. Because of the built-in relationships, the position is tied to a specific employee group and subgroup and is described by a job. The position has a relationship with a particular organizational unit. Regardless of the Action selected, the user will follow a general process or pattern for PA40. Actions are carried out through a series of Infotypes, screens that display for user review and data entry. These Infotypes appear in a logical order, prompting the user to enter and save data as required. Infotypes that appear in Actions cover personal data, payroll data, organizational assignments, dates, work schedules, and address information. Additional Infotypes are included for faculty members and hospital hires. Other background Infotypes are created in the Actions process.
Transcript of INTRODUCTION TO ACTIONS AND HIRING - University of Kentucky · PDF fileUnder ActionType, click...

INTRODUCTION TO ACTIONS AND HIRING
Overview of Personnel Administration Actions Business officers and personnel administrators use the Personnel Administration Actions (PA40) functionality to carry out a variety of required processes at UK. More specifically, these users select Actions via PA40 to carry out hiring and rehiring, transfers, additional assignments, separations, and other processes that change individual assignments. Users can think of PA40 Actions as the means for connecting a person (employee) to a specific position. Because of the built-in relationships, the position is tied to a specific employee group and subgroup and is described by a job. The position has a relationship with a particular organizational unit. Regardless of the Action selected, the user will follow a general process or pattern for PA40. Actions are carried out through a series of Infotypes, screens that display for user review and data entry. These Infotypes appear in a logical order, prompting the user to enter and save data as required. Infotypes that appear in Actions cover personal data, payroll data, organizational assignments, dates, work schedules, and address information. Additional Infotypes are included for faculty members and hospital hires. Other background Infotypes are created in the Actions process.

___________________________________________ INTRODUCTION TO ACTIONS AND HIRING, last updated November 24, 2008 Page 2 of 27
Tips and Reminders • Be sure to begin with a blank Person ID field when executing:
o New Hires o Re-hires/Reinstates o Changes in Positions/Transfers o Additional Assignments
• Enter the Start date before initiating any Action.
• Remember to key names in correct format. Names entered with all lower case letters cause
difficulties in searching and matching.
• When creating the Personal Data (0002) Infotype for a new hire, users must carefully examine any pop-up information concerning a student ID that already exists and avoid creating duplicate IDs.
• Save! Save! Save! In the event of an interruption during the New Hire Action, users should
make every effort to save Infotypes 0000, 0002, and 0001.
• Required fields are denoted with a check mark ( ). These fields must be completed before continuing.
• The Business Officer role includes the ability to create and maintain cost distribution (0027) for staff and student employees, as well as part-time faculty members.
• Cost distribution records for the full-time faculty are updated by FES processes. • Refer to Faculty Specifics section for instructions on overloads and supplements.

___________________________________________ INTRODUCTION TO ACTIONS AND HIRING, last updated November 24, 2008 Page 3 of 27
HR Cost Objects and Cost Distribution Information End-users who are authorized to carry out Personnel Administration Actions need understanding of cost objects and cost distribution functionality in IRIS. The cost object processed against earnings or deductions is based upon hierarchy logic. The following points help to explain the hierarchy:
• Each employee is linked to an organizational unit via a position. This relationship can be found on Organizational Assignment (0001).
• Each organizational unit is linked to what is called a home (or default) Cost Center (this
is a 1:1 link). This Cost Center displays on the employee record on Organizational Assignment (0001).
• Positions are linked to cost distribution through Cost Distribution (1018). This allows
for multiple cost objects with percentage breakdowns.
• All positions should have a 1018 record.
• Employees can be linked to a cost distribution through Cost Distribution (0027). Again, this allows for multiple cost objects with percentage breakdowns. The cost distribution on 0027 overrides the distribution assigned to the position.
• A Cost Distribution (0027) record is not required for all employees.
• Additional payments are entered through Recurring Payments (0014) and Additional
Payments (0015). Payments entered on these Infotypes can be directly linked to a single cost object, if desired (not required).
Illustrations of Cost Distribution and Payroll Processing EE #10111111– John Doe • John is linked to a position 50999999; therefore he is related to Dept ABC. Dept ABC is
linked to Cost Center 1099999999. If payroll processed at this point
, with only the link to Dept ABC, all cost would be charged to CC 1099999999. This is not a likely scenario.
• Position 50999999 has a cost distribution on 1018 of 70% going to Cost Center 1088888888 and 30% going to Cost Center 1077777777.
If payroll processed at this point,
the 1018 would override the home cost center, and cost would be charged 70% to CC 1088888888 and 30% to CC 1077777777. This is the most probable scenario.

___________________________________________ INTRODUCTION TO ACTIONS AND HIRING, last updated November 24, 2008 Page 4 of 27
• John Doe, EE #10111111, has a distribution on 0027 with 60% going to Cost Center 1055555555 and 40% going to Cost Center 1044444444.
If payroll processed at this point,
the 0027 would override the 1018 cost centers, and cost would be charged 60% to CC 1055555555 and 40% to CC 1044444444.
• John Doe has an Additional Payment of $1,000. This payment is charged to Cost Center 1022222222. The distribution on 0027 still exists.
If payroll processed at this point,
the $1,000 payment would be charged to Cost Center 1022222222. All other costs would follow the distribution on 0027 - 60% to CC 1055555555 and 40% to CC 1044444444.
Note that the progression of overrides will hold true with any combination of the above. Salaries and benefits follow the same cost distribution; there is no override specific to benefits.
___________________________________________ INTRODUCTION TO ACTIONS AND HIRING, last updated November 24, 2008 Page 5 of 27
Instructions for Hiring Actions
Main Campus Create Assignment (PA40)
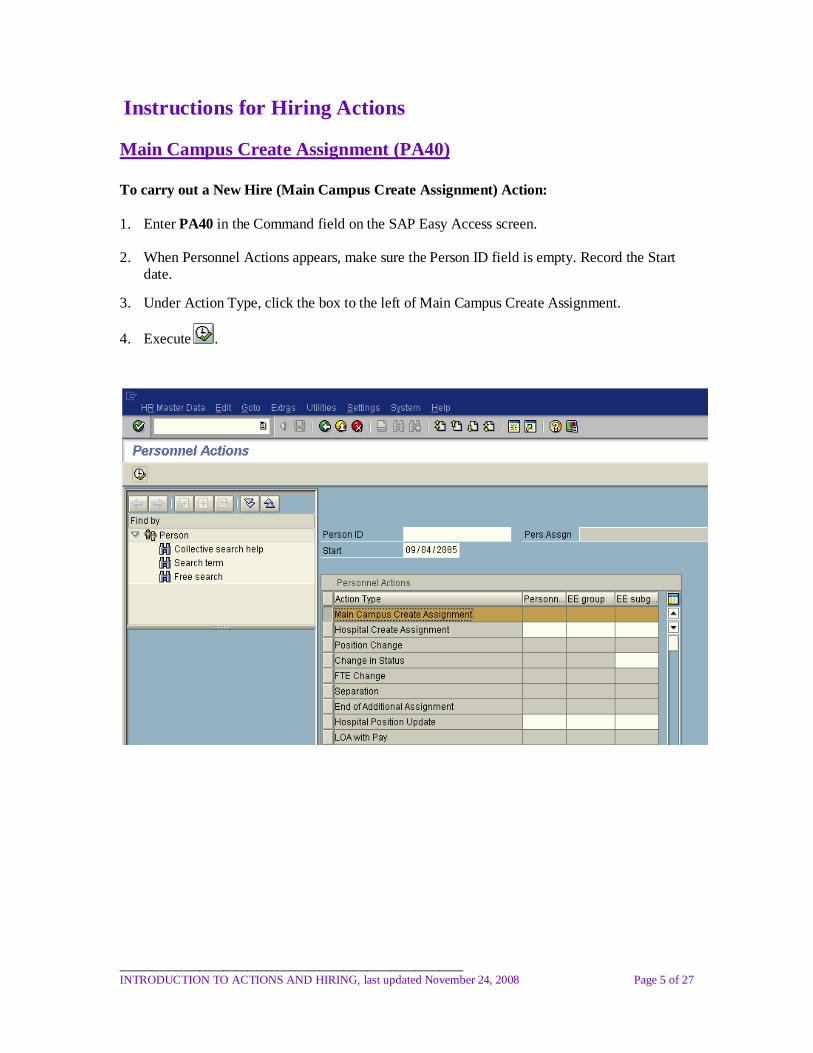
To carry out a New Hire (Main Campus Create Assignment) Action: 1. Enter PA40 in the Command field on the SAP Easy Access screen. 2. When Personnel Actions appears, make sure the Person ID field is empty. Record the Start
date.
3. Under Action Type, click the box to the left of Main Campus Create Assignment.
4. Execute .

___________________________________________ INTRODUCTION TO ACTIONS AND HIRING, last updated November 24, 2008 Page 6 of 27
5. The Employee Recognition box will appear.
Complete the following fields:
Last Name First Name
Date of Birth Gender Social Security Number
Social Security Number can be used alone for a more accurate search.
6. Click in the bottom left corner of the pop up screen.
7. If the search did not yield a match, the Query screen will appear next.
8. Click .
NOTE: The system checks to determine if the new hire has an existing student record. If an exact match exists, a pop-up will prompt you to select the student. The selection ensures that the same ID number (student) will be used for the employee’s Person ID.
If there is a partial match, you must examine the data carefully and decide to either use the same number or create a new one.
Careful attention will help to avoid the creation of duplicate IDs.

___________________________________________ INTRODUCTION TO ACTIONS AND HIRING, last updated November 24, 2008 Page 7 of 27
9. This will bring up the Create Actions (0000).
10. The Pers No. field will be highlighted. Do not enter anything in this field! The Personnel Number will be automatically generated by the Hiring Action. Press the tab key.

___________________________________________ INTRODUCTION TO ACTIONS AND HIRING, last updated November 24, 2008 Page 8 of 27
11. Click the icon to the right of the Reason for Action field. The following screen will appear.
12. Double-click on the appropriate Reason for Action code. Create Actions will display the numeric code in the Reason for Action field.
13. Tab to the Position field and enter the position number, if known.
14. To search for the position, click the icon to the right of the Position field.

___________________________________________ INTRODUCTION TO ACTIONS AND HIRING, last updated November 24, 2008 Page 9 of 27
15. Press Enter. This message will appear:
Click in the bottom left corner of the pop-up screen.

___________________________________________ INTRODUCTION TO ACTIONS AND HIRING, last updated November 24, 2008 Page 10 of 27
16. The remaining fields will be populated with default values. A message will also appear at the bottom of the screen prompting the user to save entries.

___________________________________________ INTRODUCTION TO ACTIONS AND HIRING, last updated November 24, 2008 Page 11 of 27
17. Click at the top of the screen. This will save the record and bring up Create Personal Data (0002).
A message will appear to indicate that a new record has been created.
18. If the initial search was completed by using only the Social Security Number, that field will be populated. The remaining fields should be completed:
Last name First name Middle name (if known) Suffix (optional) Birth date Gender Marital Status (if available)
Be sure to properly format the employee’s name (The system is case-sensitive.).
If the marital status is “married,” Family Member/Dependents (0021) will appear. Complete
the Infotype, if the spouse’s information is known. Otherwise, click on the Next Record icon to proceed.

___________________________________________ INTRODUCTION TO ACTIONS AND HIRING, last updated November 24, 2008 Page 12 of 27
19. When all information has been entered, click at the top of the screen. This will save the records and bring up Create Organizational Assignment (0001).
A message will appear to indicate that a new record has been created.
20. Press Enter. Default values will populate the remaining fields. A message will also appear at the bottom of the screen prompting the user to save entries.
NOTE: If message “Additional Relationship needed” appears, contact the Compensation Office for assistance. (This is an additional relationship required for proper charges to GL Accounts in FI.)

___________________________________________ INTRODUCTION TO ACTIONS AND HIRING, last updated November 24, 2008 Page 13 of 27
21. Click at the top of the screen. This will save the record and bring up Create Addresses (0006).
A message will appear to indicate that a new record has been created.
22. Complete the following fields:
Address Line 1 City/County (DO NOT ENTER THE COUNTY) State/Zip Code
Click the icon to the right of the County field to search for the county of residence. This code is used for health insurance purposes and must be accurate.
Check to see that the Mail Code (org unit) field is correct. The employee’s the pay statement
will be delivered to the org unit listed.
23. When all required fields are completed, click at the top of the screen.
A message will appear to indicate that a new record has been created.

___________________________________________ INTRODUCTION TO ACTIONS AND HIRING, last updated November 24, 2008 Page 14 of 27
24. Create Planned Working Time (0007) follows. Enter the Employment percent (FTE).
Also verify the information in the Work schedule rule and Working time boxes. Changes to the work schedule should be made here.
Enter and save .
The Employment percent is the FTE of the employee. It is directly tied to the Personnel Subarea field and can only be entered for valid ranges. See table below for valid combinations:
PSA Code PSA Text Min Max 0001 Reg FT 100 100 0002 Reg PT-Faculty 20 99.99 0003 Reg PT >.74 75 99.99 0004 Reg PT .50-.74 50 74.99 0005 Reg PT .20-.49 20 49.99 0006 Temp FT 100 100 0007 Temp PT >.20 20 99.99 0011 Unpaid 0.07 100 0012 Non-Service 0.07 100 0013 Temp PT <.20 0.07 19.99 0014 Phased Retiree 50 50

___________________________________________ INTRODUCTION TO ACTIONS AND HIRING, last updated November 24, 2008 Page 15 of 27
25. Create Basic Pay (0008) appears next. The hourly/monthly pay amount must be entered from the approved Salary Recommendation Form.
After entering the pay amount, press the Enter key to populate the annual salary field. If you receive an error/warning, verify that the pay amount entered is correct. If the pay is outside of the range for the grade level of the position, double-check the pay rate. If the pay is correct, enter past the record and save the Infotype. If the amount is incorrect, press Enter, and then re-enter the pay amount.
• For exempt monthly assignments, the pay rate must be entered as a monthly amount.
• For non-exempt biweekly assignments, the pay rate must be entered as an hourly rate.
• For Graduate Student assignments, the pay rate must be entered as a biweekly pay amount.
• In some instances the Base Pay should be $0. For example, Fellowships and Faculty with Summer Assignments should have $0 for Base Pay. Save the 0008 record with 0. Then enter the amount the employee should receive, using Recurring Payments (0014) or Additional Payments (0015).
Verify information and save .

___________________________________________ INTRODUCTION TO ACTIONS AND HIRING, last updated November 24, 2008 Page 16 of 27
26. Change Date Specifications (0041) will then appear. In most instances, the dates listed are default dates and should not be changed. Double-check the current hire date on rehire actions.
If the date is incorrect, contact the Compensation Office for assistance. Click to save.

___________________________________________ INTRODUCTION TO ACTIONS AND HIRING, last updated November 24, 2008 Page 17 of 27
27. Create Additional Personal Data (0077) comes next. Record the Ethnic Origin. If the
employee’s Veteran Status is known, enter the information. Press Enter and save .
28. This completes the New Hire Action. The Personnel Actions screen will appear with a message at the bottom of the screen indicating that the record has been created.

___________________________________________ INTRODUCTION TO ACTIONS AND HIRING, last updated November 24, 2008 Page 18 of 27
29. Use ZHR_PAR to create the PAR, obtain required signatures, and forward PAR and all other required documents to the Compensation Office.
Hospital Create Assignment (PA40)
To carry out a New Hire (Hospital Create Assignment) Action: 1. Enter PA40 in the Command field on the SAP Easy Access screen. 2. When Personnel Actions appears, make sure the Person ID field is empty. Record the Start
date.
3. Under Action Type, click the selection button to the left of Hospital Create Assignment.
4. Click the execute button at the left of the screen.
5. Follow the same steps through all Infotypes as described for Main Campus Create Assignment.
6. An additional Infotype - Hospital Salary (9002) - will appear. In the Employee Experience As of month/yr field, enter the “As of” date to capture experience. For example, if an employee hired on September 1, 2006, has five years of experience, the “As of” date would be 09/01/2001.
In the Education (for nurses only) field, select correct degree choice, and then save .
7. The Person: Change Profile Infotype will appear. Click on the icon.
8. Work through remaining Infotypes, verifying and saving information. After entering the employee’s ethnic origin and veteran status (if known) on Additional Personal Data (0077),
save .
This completes the New Hire Action. The Personnel Actions screen will appear with a message that the record has been created.
9. Use ZHR_PAR to create the PAR, obtain required signatures, and forward PAR and all other required documents to the Compensation Office.

___________________________________________ INTRODUCTION TO ACTIONS AND HIRING, last updated November 24, 2008 Page 19 of 27
Faculty Hire Action (PA40)
To carry out a Faculty Hire Action:
1. Enter PA40 in the Command field on the SAP Easy Access screen. 2. When Personnel Actions appears, make sure the Person ID field is empty. Record the Start
date.
3. Under Action Type, click the selection button to the left of Main Campus Create Assignment.
4. Execute .
5. Complete Employee Recognition Screen fields and continue. 6. In the Query box, choose New Employee.
7. On Actions (0000), enter Faculty Hire as the Reason for Action.
8. Key the position number and press Enter. Click the continue icon on the Default Value
Pop-up Box, if it appears, and save .
9. Continue to enter and save through each Infotype.
10. Enter marital status if known on Create Personal Data (0002).
11. On Organizational Assignment (0001), verify that the Contract field value is Faculty.
12. On Create Addresses (0006), remember to enter the County field and check the Mail Code (org unit) field.
13. On Basic Pay (0008), enter correct Wage Type:
• If receiving a new administrative stipend that is part of base pay, use 1110; other salary is included in 1010;
• Enter 1210 if the new faculty hire is part-time (without benefits); • Use 1010 with an Amount of zero, when the hire is VA faculty receiving all salary from
VA.
14. On Basic Pay (0008), enter the monthly salary in the Amount field and save . Deferred Pay Reminders: For a nine-month appointment, the amount is calculated by dividing the contracted salary by 9. For example, $90,000/9 = $10,000. For a ten-month appointment, the amount is calculated by dividing the contracted salary by 10. For example, $90,000/10 = $9,000.

___________________________________________ INTRODUCTION TO ACTIONS AND HIRING, last updated November 24, 2008 Page 20 of 27
Note that the Annual Salary will appear overstated. The True Annual Salary will be calculated.
15. For nine-month faculty hires, the Action Start date must be 08/01 of each fiscal year. If the
true hire date is 08/15, however, adjust on Change Date Specifications (0041).
16. The final Infotype is Create Contract Elements (0016). Select the correct contract type and
save . This completes the Action.

___________________________________________ INTRODUCTION TO ACTIONS AND HIRING, last updated November 24, 2008 Page 21 of 27
17. After completing the PA40 Action, use ZHR_PAR to create the PAR and obtain required
signatures. Forward PAR and all other required documents to the Compensation Office.

___________________________________________ INTRODUCTION TO ACTIONS AND HIRING, last updated November 24, 2008 Page 22 of 27
Creating and Printing a Payroll Authorization Record (ZHR_PAR)To create and print a Payroll Authorization Record (PAR):
1. Enter transaction ZHR_PAR in the Command field on the SAP Easy Access screen.
2. This transaction is created for a single day. Enter the PAR date in field next to the Key Date field. Be sure that the date entered correlates to the Start date of an Action or effective date for other data entered against the employee.
3. Next enter the Personnel Number and click the Execute icon. The Print screen will
appear.
4. Click the Print Immediately checkbox. Then click the icon to print the PAR on
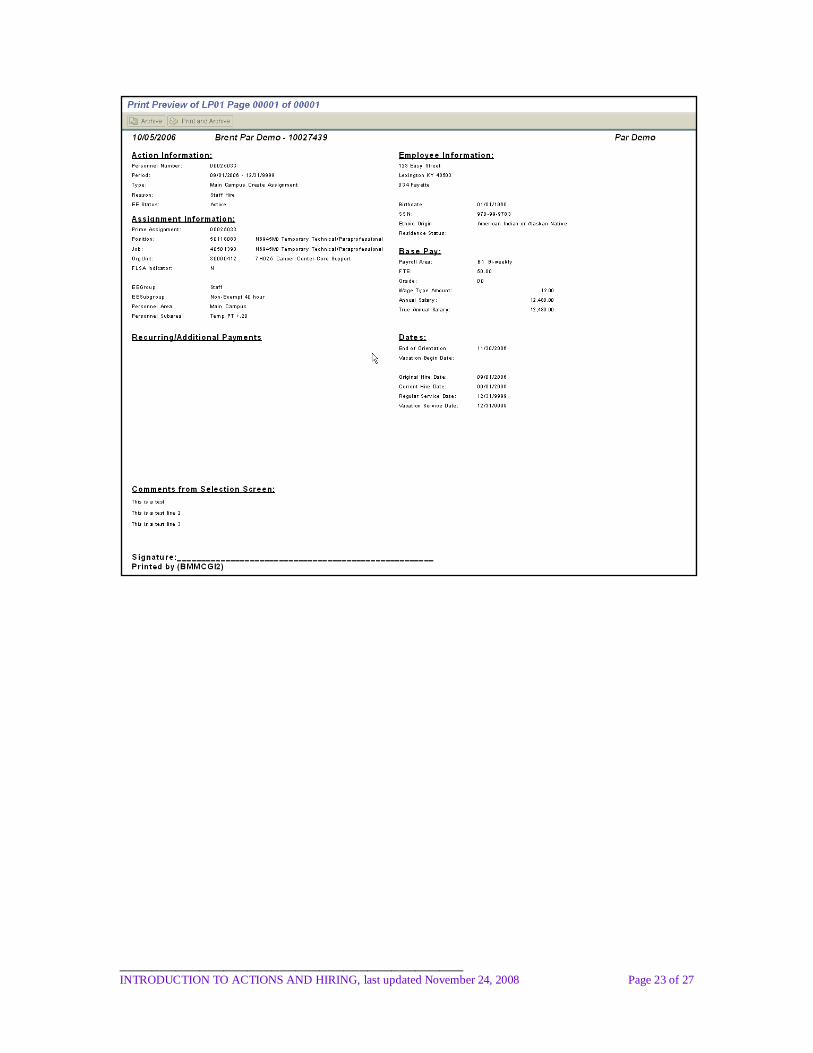
your default printer. 5. To preview the PAR before printing, select the icon. The PAR will
display for review.
___________________________________________ INTRODUCTION TO ACTIONS AND HIRING, last updated November 24, 2008 Page 23 of 27

___________________________________________ INTRODUCTION TO ACTIONS AND HIRING, last updated November 24, 2008 Page 24 of 27
Rehire/Reinstate (PA40)
• At the time of the IRIS HR/Payroll implementation, only the records of active employees (those paid in 2006) were converted. These step-by-step instructions assume that the rehired/reinstated employee has an existing record in the system.
Business officers and personnel administrators who are responsible for rehiring/reinstating former UK employees must be mindful of the following:
• In the event that no record is found, proceed with the Action as though the individual is a new employee. In the ZHR_PAR transaction, note prior employment in the Comments line.
To rehire/reinstate a former UK employee: 1. Enter PA40 in the Command field of the SAP Easy Access screen.
2. On PA40, make sure the Person ID field is blank. 3. In the Start Date field, enter the date the employee is returning to UK.
4. Select the appropriate Action – Main Campus Create Assignment or Hospital Create
Assignment – and click on the selection button to the left of the chosen Action. Execute .
5. The Employee Recognition box will appear.
Complete the following fields:
Last Name First Name Date of Birth Gender Social Security Number
Not all fields have to be entered. If you want to search by Last Name or SSN only, just enter
those values. SSN is the most effective search with no other fields entered. Continue .

___________________________________________ INTRODUCTION TO ACTIONS AND HIRING, last updated November 24, 2008 Page 25 of 27
6. This pop-up box will appear next.
Click once on the employee name and continue . 7. The system will then prompt you for the type of Action you are trying to accomplish.
Select the Rehiring of Employee option. Otherwise, you will create an unnecessary PERNR. The Action will be deleted by Compensation and you will have to start over on the process.
If unsure about which option to select, contact Compensation for assistance.

___________________________________________ INTRODUCTION TO ACTIONS AND HIRING, last updated November 24, 2008 Page 26 of 27
8. Copy Actions (0000) will then be called. Note that the Action Type Rehire/Reinstate will appear, as illustrated in the example below. Select the correct Reason for Action code, based on determination of “rehire” or “reinstate.”

___________________________________________ INTRODUCTION TO ACTIONS AND HIRING, last updated November 24, 2008 Page 27 of 27
9. Next change the position to the correct position number for the rehired employee. Save this screen and continue the Action like all others.
10. Continue the Rehire process. The following Infotypes will be called during the Action:
0002 Personal Data 0001 Organizational Assignment 0006 Addresses 0007 Planned Working Time 0008 Basic Pay 0041 Date Specifications
Faculty Rehires will also have the following Infotype:
0016 Contract Elements
Hospital Hires will also have the following Infotypes:
9002 Hospital Salary
0024 Skills
11. Use ZHR_PAR to create the PAR. Record appropriate comment about employee being a rehire and print two copies. Obtain signatures and attach all necessary documentation before submitting to the Compensation Office.
![actions cards - ESL kids Labeslkidslab.com/flashcards/set1/actions can/actions cards small... · Microsoft PowerPoint - actions cards [Compatibility Mode] Author: Kissy Created Date:](https://static.fdocuments.us/doc/165x107/5aefac977f8b9a8c308c4c53/actions-cards-esl-kids-canactions-cards-smallmicrosoft-powerpoint-actions.jpg)
![Wide range and fast delivery - SMC ETech · PDF file3 ISO Cylinder, Series Variations and Index Double acting, Single rod Standard Series ActionType Bore size [mm] 8 25032 40 50 63](https://static.fdocuments.us/doc/165x107/5a81a61d7f8b9a9d308d6c5a/wide-range-and-fast-delivery-smc-etech-iso-cylinder-series-variations-and-index.jpg)


![SYLLABUS [DRAFT] FOR B.A. [ECONOMICS] UNDER · PDF fileUNDER VINOBA BHAVE UNIVERSITY HAZARIBAGH. ... Monopoly: Price and Output Determination ... [ECONOMICS] UNDER SEMESTER SYSTEM](https://static.fdocuments.us/doc/165x107/5a76d41f7f8b9a63638d8a03/syllabus-draft-for-ba-economics-under-under-vinoba-bhave-university.jpg)