Introduction of E-Portfolio System - Home - MyePortfolio@UTM
25
Introduction of E-Portfolio System E-Portfolio is an online compilation of documents that is flexible and is based on artifact evidences of which students are directly involved in a continuous reflection process towards their own learning, the progress of their achievement on knowledge, technical and generic skills as well as their personal, academic and career development planning. UTM is the first university in the country that has developed an e-Portfolio system for its student to record their academic progress and learning reflection. The project was started in 2005 as one of the tools to monitor and assess the acquirement of UTM Graduate Attributes among its students. HOW TO USE EPORTFOLIO SYSTEM 1. Please login using your ACID account at http://elearn1.utm.my . Your ACID account can check on this site http://acid.utm.my . 2. Click on the eportfolio.utm.my link at the right of your elearning site. The image link as state below
Transcript of Introduction of E-Portfolio System - Home - MyePortfolio@UTM

Introduction of E-Portfolio System
E-Portfolio is an online compilation of documents that is flexible and is based on artifact evidences of
which students are directly involved in a continuous reflection process towards their own learning, the
progress of their achievement on knowledge, technical and generic skills as well as their personal,
academic and career development planning.
UTM is the first university in the country that has developed an e-Portfolio system for its student to
record their academic progress and learning reflection. The project was started in 2005 as one of the
tools to monitor and assess the acquirement of UTM Graduate Attributes among its students.
HOW TO USE EPORTFOLIO SYSTEM
1. Please login using your ACID account at http://elearn1.utm.my. Your ACID account can check on this site http://acid.utm.my.
2. Click on the eportfolio.utm.my link at the right of your elearning site. The image link as state below

Content
Profile
Your profile area stores your contact and personal information. This is the area in Eportfolio where
you can start building up a picture of your interests, achievements, aims and when you are ready to
do so, share them with other users.
Each of the Profile fields can be considered as separate Artifacts which may be independently added
to a Page.
Edit Profile
Under the Profile tab you will find four tabs: About me, Contact information, Messaging, and
General. Each allows you to include different information about yourself.
Figure 1: Profile Page
About me
Fields within the profile area include:
First Name and Last Name: These fields are locked for editing according to AUB settings for
Mahara
Introduction: You may wish to write a brief introduction about yourself. The information you
enter here will be search-able by other users
Contact information
Here you can add various contact details such as postal address, any external Blogs you may have
and website addresses.
These fields blocked by
administrator
Enter Matric ID
Enter anything name and replace
full name, display to all users
except site administrators and
staff.

Messaging
Include details of any Instant messaging service you may use, such as Skype or MSN.
General
Indicate your profession and industry where relevant.
Please ensure to Save Profile before progressing. To ensure that your information has been saved,
look for a message that says “Profile saved successfully”, above the Profile title.
Profile Pictures
The Profile Icons area allows you to upload images to use within your profile and create Page
Eportfolio Views. Your icons may be a picture of you or an avatar image of your choice. You may
upload up to five profile icons here, and choose one to be displayed as your default icon at any one
time.
Figure 2: Upload your Profile Pictures
Your icons must be between 16x16 and 1024x1024pixels in size.
Click on the Browse button to navigate to your picture then click Open. You can enter a title or name
of your picture if you wish. Once you have selected your picture click Upload. If you have more than
one icon loaded you can choose which picture to make your default. Your default image will appear
on your Profile page.
Browse and navigate
picture then enter Title
or name of picture

My Résumé
The résumé area allows you to build digital résumés or CVs which can be tailored and shared with
different audiences. It is entirely optional which of the fields you complete and which of those you then
make available through Eportfolio’s Pages structure. When adding information to any of these fields
remember to click on the Save button.
Figure 3: Insert all content your Resume Information
Introduction tab in My Résumé includes:
Cover Letter: Use this space to introduce yourself or provide supplementary information
related to the purpose and audience with whom you are sharing your résumé
Personal information: These optional fields allow you to include additional information about
yourself.
Education &Employment tab includes Education History and Employment History.
Achievements tab includes Certifications, Accreditations and Awards, Books and
publications and Professional Memberships. To add details to any of these sections, click on Add
to expand to an area in which to add your details. After each entry remember to click Save. Entries
display in reverse chronological order.
Goals: The Goals tab is divided into Personal, Academic and Careers sections. Using the HTML
editor within each box you can provide information relating to your goals so that you may add them to
a Eportfolio Pages.

Skills: The Skills tab is also divided into Personal, Academic and Work sections. Using the HTML
editor within each box you can provide information relating to your skills so that you may add them to
a Eportfolio Pages.
Interests: Here you can detail personal and/or professional interests. When adding information to
any of these fields, remember to click Save.
My Files
The Files area is a repository and document store for folders and files to use within your portfolio.
To upload a file, follow the steps below:
Step 1: Check the box concerning the terms & conditions agreement that and confirm that you are not
infringing copyright
Step 2: Click on Browse. Locate your file and click on Open. The file is automatically added to Files.
Step 3: After uploading your file, you can optionally create folders to organize your files. Type the
name of the folder and click on Create folder
Figure 4: Insert your artefacts/files.
How to manage your Files
Step 1: Folders are listed first then files. To start organizing your files into the folders, you can click
and drag them into the appropriate folder.
Step 2
Step 3
Ex: When you upload your
file, drag file to folder you
have done created

Step 2: Both folders and files are considered Artefacts and as such can be added to a Eportfolio
Page. You may create any number of folders or sub folders. To view which sub-folders and
files sit within a folder, click on the folder name. Use the Home link to return to the top level
folder directory.
Step 3: Files and folders can be rearranged by dragging and dropping them to other folders. A
suitably named and organized filing structure will help with the long term organization and
retrieval of your Artefacts.
Step 4: Later on, you will find that some folders are automatically created by the system such as
„Blogfiles‟. This folder includes files that are uploaded via a Blog posting. Deleting a file here
will remove it from your Blog posting.
NOTE: If you attempt to upload a file with the same name as an existing file in your repository area, a
number will be added to the name of the new file.
Edit a file / folder
Now that the file is uploaded, you can see it listed with an Edit and a Delete link. Click on Edit to be
able to edit the following information.
Name - You can add a title to your file, otherwise it will default to the existing file name
Description – You may choose to give your file a description. This description will appear
next to the file if you ever add it to a View
Tags – You can add tags to Artefacts and Eportfolio Pages when you create within
Epotfolio. Tags allow you to include a user defined classification scheme for your Artefacts
and Views. You can add individual words, or phrases. Multiple tags can be added and must
be separated by a comma. For EXAMPLE if your Artefacts was a Biology assignment you
might add the following tags: Biology, Assignment, Semester 1
TIP: When you next go to upload an Artefact, you can click on Show my tags to view a list of all tags
you have previously used. This can save time if you need to frequently upload Artefacts with the
same tags. Simply click on any relevant existing tags, and they will be added to your new Artefact.
Over time your tags list will develop into a comprehensive list of keywords for your Artefacts and will
aid the search process.
Click Edit

My Journal
A web log or Journal is a journal-like that allows you to record your thoughts and experiences. By
adding your Journal to a Eportfolio Page you can allow others users to place feedback and
comments, allowing you to create a dialogue with your audience.
Figure 5: Your Journal / Blog Information
Creating a Blog is a two stage process.
Step 1: New Journal Entry must be created and given a title and description.
Step 2: Then, you can add Journal posts to your Journal. Think of the first stage as rather like
creating a wrapper or container in which you can begin to add your creative writing, reflective
thoughts and comments through Journal posts.
Setting to enabled
multiple journals
Click Create
Journal
Create a Journal
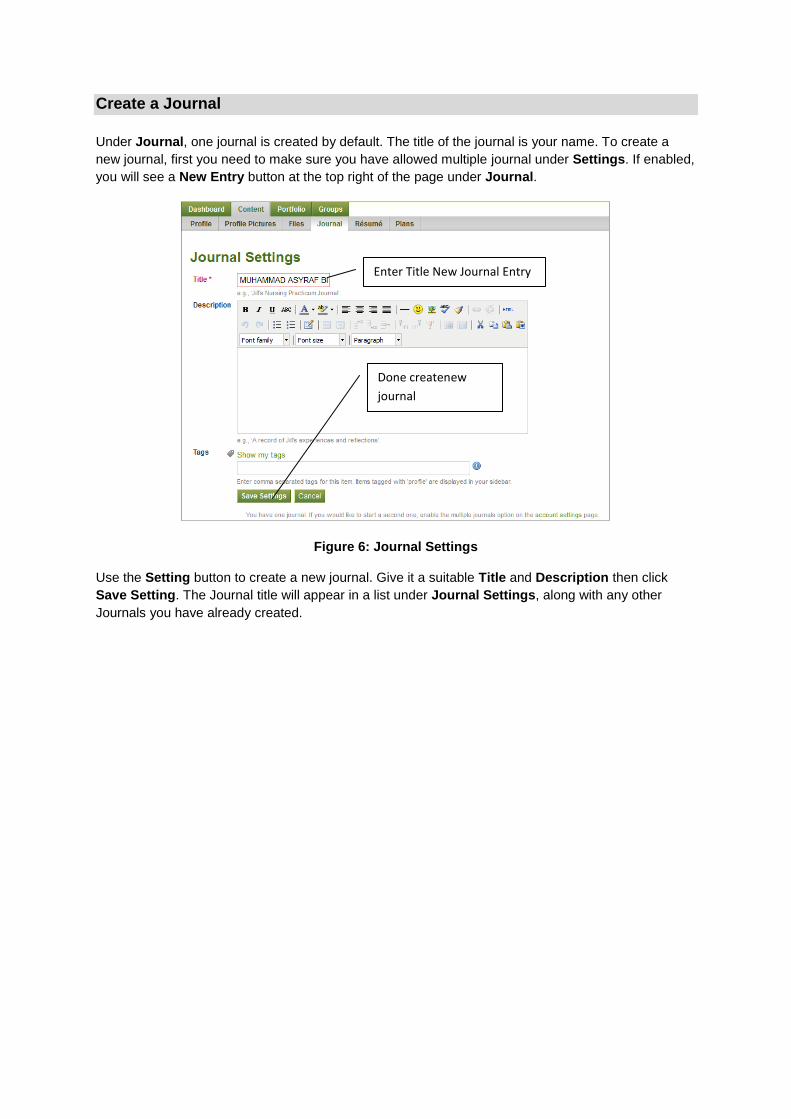
Under Journal, one journal is created by default. The title of the journal is your name. To create a
new journal, first you need to make sure you have allowed multiple journal under Settings. If enabled,
you will see a New Entry button at the top right of the page under Journal.
Figure 6: Journal Settings
Use the Setting button to create a new journal. Give it a suitable Title and Description then click
Save Setting. The Journal title will appear in a list under Journal Settings, along with any other
Journals you have already created.
Enter Title New Journal Entry
Done createnew
journal

Add a Journal post
Click on the Journal's title and select New Entry. Give your Journal post a title and in the HTML editor
add your thoughts.
Figure 7: New Journal Entry
You can add Tags to Journals and Journal posts you create within Eportfolio System.
Upload a File
You may upload or attach files to a Journal posting. Files added to a Journal posting are automatically
stored within your file repository area in a folder called „Jornalfiles‟ and contribute to your file storage
quota.
Add a file from My Files: If you have already uploaded files to the Files area, you can quickly
associate them with a Journal post. Click on Add a file, and then click on Select next to the file you
want to attach.

How to Upload Images in Journal Post
Step 1
Embed an image to a Blog post: If you attach an image to a Journal post, you can then embed it
into the body of the post. Before you do anything else, open the image from Files and copy its URL.
Position your cursor at the place in your Blog post where you would like the image to appear. Click on
the image icon in the HTML editor.
Step 2
Paste the URL of the image then click Insert. You can also embed an image as a link from another
website. You can either enter in the URL of the image or drag and drop the image from the website
into the HTML editor.
Please ensure you have appropriate copyright permissions to use the image. For best results images
should be no more than 400 x 400 pixels and have less than 5 pixels of padding on each side.
Save as draft
If you would like to come back to your Journal posting at a later time to add or modify it, you can hold
off from publishing it by saving it as a draft by ticking the Draft checkbox.

Save post
Step 1: When you have completed your posting and you are happy with it, select Save entry. If the
Journal post has been marked as draft, it will appear as Draft and can be published later. If
the Blog post has not been marked as draft, it will appear as Published. In both cases the full
Blog post will be displayed, along with its title and date and time of which it was posted. The
parent title of the Blog to which it belongs is indicated in bolder type at the top of the screen.
Step 2: Whilst a Journal itself is considered an artifact, so are any individual Blog postings you create.
This means that both Blogs and individual Blog posts can be added to a View. Remember
that until you add it to a View, your Blog remains visible only to you.
NOTE: Saving and publishing your post means that it is saved and stored in Journal area. It does not
mean that other users can yet read it. Until you decide to make it available by adding it to a
Eportfolio Pages and assigning access rights, nobody else will be able to see or comment on it.
View Journal
To View your Journals and Journal posts, go to Journal, for a list of Journals. Click on a Journal title
for a list of Journal posts associated with that Journal.
Journal comments
Step1: When reading another person‟s Journal, via a Eportfolio Pages, you may be able to submit
comments on their posts.
Step 2: To comment on another user‟s Journal, open the corresponding Eportfolio Pages, click on
the Journal‟s name or title, click on the post name and select the Place Feedback option at the
bottom of the screen.
Currently this will only work if a user has chosen to display Recent Blog Posts in their Eportfolio
Pages. This displays a list up to a maximum of 10 most recent posts, by title. Other users with access
rights to the Eportfolio Pages can click on a title and submit Public or Private Blog Comments
(Feedback). Public Feedback may be seen by other users who have access to the Eportfolio
Pages. Private Feedback is only visible to the Eportfolio Pages owner. An Eportfolio Pages owner
may choose to make your public feedback private, but not vice versa.
TIP: To edit your Blog description, view the Blog list in My Blogs, click on Settings next to the blog‟s
name or click on the title of the blog then select Settings. You can now amend the title or description
of your Blog.

My Portfolio Pages
How to Use Portfolio Pages
1. Once you have prepared a résumé, you will need to add it to a Portfolio Pages in order to
share it with other people, such as potential employers.
2. It might be useful to consider the My Portfolio section of Eportfolio System as your main
personal repository of resources and information. In here, you can begin to add content to
your e-Portfolio, in the shape of uploaded resources, or Artifacts, Journal within Eportfolio
System and store them in Files and Journals. When you decide to start sharing selected
Artifacts, you can use Portfolio Pages to begin packaging them up for presentation.
3. Under Portfolio tab, you have several tabs: Pages, Collections, Share and Export.
4. When you click on the Portfolio tab, you're taken to Pages. Under Pages, you can see two
views that are created by default:
a. Dashboard page: Your dashboard page is what you see on the homepage when you first
log in. Only you have access to it.
b. Profile page: Your profile page is what others see when they click on your name or
profile icon.
5. Before you create additional pages and decide if you want to share them or not, you might
consider start adding Artifacts.
Portfolio Pages
A Portfolio Pages is a collection of artifacts, encompassing selected files, résumé details and
Journals of your choice. A portfolio pages can be kept private or shared with any number of groups or
individuals as you wish. You may create as many different Portfolio Pages as you like and reuse
your artifacts, even giving them different titles for different audiences. Portfolio Pages can also be
used to submit work for feedback or assessment to a course group.
How to Use
1. When you click on the Pages tab, by default you will see two pages: The Dashboard Page
and the Profile Page. Your dashboard page is what you see on the homepage when you first
log in. Only you have access to it.

2. What you need to do is click Create Page button to create a new page.
Create Pages
Create Page launches a three step process by which you can create a collection of your artefacts as
Pages. Prior to creating Pages, you will find it easier to have uploaded a sample of different artefacts
with which to experiment when designing your first layout.
Create Page Step One: Content
1. To add a block, choose the relevant content type from the menu and select by clicking and
holding your mouse button or pointer down. Drag the block into the grey line into your View
layout.
2. You can also choose to change the theme of your Page by choosing one of the existing
themes under the Theme drop-down menu in the middle of the page
Content Types
In order to make full use of artifacts that you have uploaded to Files area and any Journal posts
or résumé information, you will need to start adding them to Pages. When you begin to create a
Page you will be presented with six different menu tabs containing various „blocks‟ with which
information can be dragged into and arranged in your Page.
Content Types: External Content
1. External feeds allow you to link in content from other websites by including an RSS or ATOM
Feed.
How to embed images, videos, or files in view:
2. External Video allows you to embed and directly link to externally hosted videos and requires
no uploading to the Eportfolio System file store area. The supported video hosting sites are:
YouTube, Google Video, TeacherTube, Scivee.
a. To add an External Video, click, drag and drop the External Video box to the below
View Layout b. A window will pop up. Type in the title for the external video and valid URL of that video's
location.

c. Alter the width and height accordingly based on your personal preference d. Once done click Save.
3. Google Apps is a set of joined applications based on and around Google Docs and Gmail
accounts. It should be remembered that Google Apps builds upon the facilities of Google
Documents and other Google web based applications.
4. Embedly provides a platform and suite of tools to make embedding and previewing links
simple. Embed.ly helps users manage embed codes from more than 100 Websites and APIs,
including YouTube, Flickr, Ustream, Picassa, Hulu, Twitpic, Quantcast, and CrunchBase.
a. Drag in the Embed.ly block to your page.
b. Configure the block to suit your needs. Change the title and almost certainly change the
size.
c. Make sure you embed code URL correctly.
d. Once done click Save.
Content Types: Files, Images and Video
A. File(s) to Download: Select files for people to download from your View
Step 1: To share file(s) with guests of your Page, click, drag and drop the File(s) to
download box into the View Layout below
Step 2: The configure window will open. Give a title to the file you are allowing viewers to
download
Step 3: Under Files, choose from My Files, Group Files, and Site Files. Site Files are files
that the Eportfolio System administrator has made public on the site and allowed you
to access them. This folder is by default empty. Group Files are public files uploaded
by any group you are a member of. Under My Files, you can select one of the files
that are already uploaded or upload a file from your computer
To upload a file from your computer, check the Upload box. Then click Browse and
choose a file that is saved on your computer.
Step 4: Once you have selected the file(s) you wish to share, click Save.
B. A Folder: Provide the contents of one of your folders from the files storage area. If the folder
contains many files and documents, it would be better not to present individually the files in
your view. Use this option for better presentation.

Step 1: To add a folder from your files, simply click, drag and drop the A Folder box into your
View Layout below
Step 2: The configure window will open. Give the folder a title and choose the folder you wish
to add to your Page. Then click Save.
C. Some HTML: Share HTML files that you have uploaded to your file store. To add an HTML to
your page.
Step 1: Click, drag and drop the Some HTML box into your View Layout below
Step 2: The configure window will open. Give a title for the HTML you are uploading.
Step 3: Check the upload box if you wish to upload an HTML from your files. Then click
Browse and choose an HTML from your files
Step 4: Once you have chosen an HTML, click Save to save and continue.
D. An Image: Embed a single image from your folder. To add an image from your files.
Step 1: Click, drag and drop the An Image box into the View Layout below.
Step 2: The configure window will open. Give your image a title.
Step 3: Check the upload box if you wish to upload a image from your files. Click Browse
and search for the image file you are looking to upload
Step 4: If you wish to show the description along with the image, simply check the “Show
Description” box in the configure window.
Step 5: Adjust the width as fit or simple leave it blank if you wish to keep the default size.
Step 6: Once done, click Save to save the image to your view and continue.
E. Embedded Media: Embed multimedia objects, for example, a video file. This can be used as
an alternative, or in addition, to linking to externally hosted videos To add an embedded
media,
Step 1: Click, drag and drop the Embedded Media box into the View Layout below
Step 2: The configure window will open. Give your shared media a title.
Step 3: Check the upload box if you look to upload an embedded media from your files. Click
the Browse button to search for the media you wish to upload.
Step 4: Adjust the height and width of the media you uploaded, and click Save to continue
F. Image Gallery: Embed a more image from your folder. To add any image from your files.
Step 1: Click, drag and drop the Image Gallery box into the View Layout below

Step 2: The configure window will open. Give your Image Gallery a title.
Step 3: You can choose whether displays all from one of your folder or individual images you
have done uploaded from your files.
Step 4: Select whether all your images is Thumbnails or Slideshow
Step 5: Once done, click Save to save the images gallery to your page and continue.
Content Types: General
A. Creative Commons License:
Step 1: Click, drag and drop the Creative Commons License box into the View Layout
below
Step 2: The configure window will open. Give your License a title. Then choose whether you
wish to allow commercial uses of your work, or to allow others to modify your work. If
you are unsure of the options. Click the “?” mark next to each No option for a
description of the options you have.
Step 3: Once you figure out what restrictions you wish to have on your Commons License,
click Save to continue.
B. Navigation: To display a collection of Pages as a simple navigation
Step 1: Click, drag and drop the Navigation box into the View Layout below
Step 2: The configure window will open. Provide the Block Title a name, otherwise the title of
the collection will be used
Step 3: Choose which collection you want to insert the navigation for from the drop-down
menu
Step 4: Click on the Save button

C. Your plans: Display plans from your plan lists.
Step 1: Click, drag and drop the Your Plans box into the View Layout below
Step 2: The configure window will open. Give your plan a title then choose which plan you
want to display
Step 3: Click on the Save button.
D. Recent Forum Posts:
Step 1: Click, drag and drop the Recent Forum Posts into the View Layout below
Step 2: The configure window will open. The block‟s default title is “Recent Forum Posts”,
change that if you wish then choose the group of which you want to display forum
posts.
Step 3: Choose the number of posts to show. It has to be between 1 and 100
Step 4: Click on the Save button
E. Text Box:
Step 1: This has a number of versatile uses. It can be used to simply include some extra text
or information that doesn‟t readily fit into any of the other content types‟ Blocks. It can
also be used to include html and sometimes embed html objects from other sites.
TIP: If you have html experience, try experimenting with adding your own content or source
code from other sites
F. Facebook Like:
Step 1: Click, drag and drop the Facebook Like into the View Layout below
Step 2: The configure window will open. Give your plan a title then choose which plan you
want to display such as Layout, verb to display, color scheme and align.
Step 3: Click on the Save button
G. Twitter Tweet
Step 1: Click, drag and drop the Twitter Tweet into the View Layout below
Step 2: The configure window will open. Give your plan a title then choose which plan you
want to display.
Step 3: Add twitter text that people will include in their Tweet when they share from your
website.
Step 4: Click on the Save button

Content Types: Journals
This section allows you to add various aspects of any Journals which you have created within
Eportfolio System.
You can display your Eportfolio Journals in three main ways:
1. Display your entire Journal – this will display the whole of your Journal. This is okay if you
only have a small number of Journal Posts, but can look unwieldy on the page if there are a
lot. To add your Journal into your page, click the item and drag it into the layout area. When
you drag it, the Journal configure window opens. Fill the following fields:
a. Set a block title: You can choose to type a descriptive word that will appear above your
block. You can choose to keep it blank. In this case the title of the block will be the same
as the title of your journal b. Choose the journal: If you have created more than one journal. You can choose to
share only one in this specific view. Select the appropriate radio button c. Posts per page: displays the number of posts you would like to see in every page of your
page. d. More Options: If you allow other users to copy this Page, you may choose how this block
will be copied
2. Display a single Journal post – Display one Journal post within your Page. When you drag it
into your layout, the same configuration steps need to be filled. The only difference is that you
will be choosing which journal post you need to display and not which journal. 3. Display recent Blog posts – This will display the last 10 Journal posts, with titles as hyperlinks
to the full text. This is a useful option if you have a regularly updated Journal; as you update
it, your readers will see the most recent 10 Journal posts updated when they next access your
Page.
TIP: If you have two or three Journal posts within a Journal which you would like to include in a
Page but do not wish to post the entire Journal, try adding an individual „Display one Blog post‟ for
each post you would like to include. Journal posts can also be reused in several Pages and given
different titles for different audiences.

Content Types: Profile
You can choose elements of your Profile to display in a Page. This information is taken directly from
your Profile area. You can include the following blocks:
1. Contact Information: Include one or more elements of your Contact Information
2. Profile Information: Include one or more elements of your Profile Information
Step 1: Simply click, drag and drop either the Contact Information or Profile Information
boxes into the View Layout below
Step 2: This will prompt a configure window to open
Step 3: For Profile Information: Choose a title. Select whether to show your First and/or
Last name or neither. Choose if you wish to show your email address or not. In the
section “Introduction Text”, add any information about yourself or your Page
Step 4: To upload a picture to your profile: In the configure window for Profile, under Profile
Pictures click the Upload one link which is typed in green. This will cause another
browser to open. In that new window browse for the profile icon you are looking for,
give it a title and click Upload
Step 5: Once you have your profile information as you like, click Save to continue.

Content Types: Résumé
The options for including your Résumé to a Page include:
1. Your Entire Résumé: A quick way to display your entire Résumé
2. One Résumé Field: Display any Résumé field
Create Page Step Two: Details
Step two involves assigning your Page a title, description and assigning any relevant tags. The
Description you add in the HTML editor will appear in the finished version of your Page, so you may
wish to change your font to match the theme of your Page.
When you have finished the description, click Edit Layout to progress to Layout settings

Create Page Step Three: Layout Setting
You can control how many columns your Page would have by clicking on the Edit Layout menu. You
can have from one up to 5 columns.
Once you have your layout as you like, click Save.
Tip to build your Resume in Eportfolio System
TIP: If you wish to create a Page with the main purpose of sharing and possibly printing a Résumé,
add Your Entire Résumé block and set the View Layout to be one column width. This will provide a
simple and clear layout for your Résumé. This can be either printed out to share with employers, or
access can be granted for them to view online.

Create Page Step Four: Display Page
Displays the entire Create Page you have created.
Once you have Portfolio Pages as you like, click Done.
Display portfolio page you
have created.

Create View Step Five: Share/Access
Step 1: Click Share Page menu
Step 2: Once you have designed a layout and added content to your Page and edited the details of
the Page, which you are happy to share, the next stage is to assign access rights. This stage
is optional though, and it may be that you wish to simply save your work and assign access at
a later stage. In which case you can save your work and it will default to being visible only to
you. There are several types of access which can be assigned to a Page:
1. Add Public: This allows you to make a Page publicly available via a URL. Your Page can
then be shared with anybody you wish by giving them the URL of your Page, and it's viewable
at the same time by all logged in users.
2. Add Logged in users: This allows you to make a Page available to all logged in users of
Eportfolio System. This will provide access to your Page to anybody who has a login for
Eportfolio System.
3. Add Friends: This allows you to make a Page available to everyone in your Friends list. New
friends by default will have access to your Page.
4. Add Groups: This allows you to associate your Page with a Eportfolio System group and its
members.
5. Add individual users: This allows you to assign access to individual users of Eportfolio
System
You can add combinations of the above and further refine access rights by assigning start and end
dates for specific people or groups. For example, you could give access rights to a tutor for the
duration of a project or assignment and also give access to people in your friends list for the duration
of the term.

My Pages summary
Once you have created some Pages, select Portfolio Pages which displays an alphabetical list of all
the Pages you have created. Each Page will have a summary pane containing the following
information:
1. Page Title – whichever title you assigned to your Page
2. Edit Content and Layout – This lists any artefacts contained in your Page. Artefacts are
taken to be any files that have been uploaded and added to the Page and any Résumé
details or Jornal posts included in the Page. It will not list details of any external videos or
RSS feeds which have been included. This function is equivalent to Create View Step One
3. Symbol for Delete a Page.
Edit a View: If you have created a Page and wish to go back to make changes to it, select Pages
and choose Edit Content and Layout. Remember to click Done to save any edits you make to a
Page.
Information
1. To look at other users‟ Pages you will need to check the profiles of existing friends or other
users of Eportfolio System. Remember that you can only see a Page if the owner has granted
you access or if the Page is publicly available. To search your friends‟ profiles choose My
Friends and click on a name to view their profile. This will include a list of any Pages that you
have access rights to; if you do not have access rights you will see the statement: "Views:
None that you can see "
2. To look at a Page, click on the title to expand. You can get an overview of all of your friends‟
Pages by clicking on My Friends. This will display an alphabetical list of your friends and an
associated list of all of their Pages to which you have access.
3. To search other users who are not friends, choose Find Friends and click on a name to view
their profile. This will include a list of any Pages that you have access rights to; if you do not
have access rights you will see the statement: "Views: None that you can see "
Page Title
Edit Content
and Layout

Page Feedback panel
At the bottom of each Page, to which you have been assigned access, there is a menu of options with
which you can interact with a specific Page. The options are:
1. Place feedback: Click on the Place feedback link at the bottom of a Page to post a comment
for the Page owner. You have the option to make any feedback private or making it public by
checking the Make public box. This will make any feedback visible to all people with access
to the Page. To submit, select Place feedback and a message will be sent to the Page
owner.
TIP: A Page owner can optional to change any public feedback that has been placed to
private
2. Report objectionable material: Should you find material in a Page that you consider
offensive, there is a mechanism in place to flag this. Select Report objectionable material at
the bottom of the Page and include a reason why you are raising it. Select Notify site
administrator and a message will be sent to the Eportfolio System administrator.
3. Print: To print out a Page simply click the Print link at the bottom of the Page. This can be
useful if you require a printed document of yours or a students‟ Page
4. Add Page to watchlist: To keep up to date with changes to Pages of which you have
access, rather than having to visit and revisit the Page, select Add Page to watchlist at the
bottom of the Page to receive notifications via Eportfolio System each time the Page is
amended. Should you wish to remove this from your watchlist, go back to the relevant Page
(see Search for Pages for how to do this) and click Remove Page from watchlist