Introduction EXTRANET - Zendesk · system software which ENTSO-E is implementing across it’s...
102
April 2016-v4 EXTRANET AT ENTSO-E Introduction Work Instructions Policy and Procedures
Transcript of Introduction EXTRANET - Zendesk · system software which ENTSO-E is implementing across it’s...

April 2016-v4
EXTRANET AT ENTSO-E
Introduction
Work Instructions
Policy and Procedures

What is SharePoint?
Web site Database
Libraries
+
Microsoft SharePoint 2013 is a collaborative, document management
system software which ENTSO-E is implementing across it’s Internet,
Extranet and Intranet platforms.
Lists
Calendars
Collaboration

SharePoint – centralisation for collaboration
Drafting Team
Working Group
Work Committee
Corporate Affairs
Assembly Approval
Drafting Team
Working Group
Work Committee
Corporate Affairs
Assembly Approval
SharePoint centralises document life-cycle management and essential group
activities, and allows real-time collaboration to remove editing and versioning
errors, reduce email traffic and save time.
A document is sent
by email seeking
modifications
and/or approval
After 2 days the
document is in 5
mailboxes and
probably in 5
different versions.
In SharePoint, a document remains in one central
place, with access to edit and approve it.
SharePoint – personalisation
Knowledge Tree
SDC
WG1 TF1
SOC
WG2 TF2
MC
WG3 TF3
SharePoint
Extranet
SDC
TF1
TF3
TF1 Meeting
SharePointExtranet
SOC
WG2
TF3
SOC Events
SharePoint Extranet
MC
TF3
WG3
TF3 Tasks
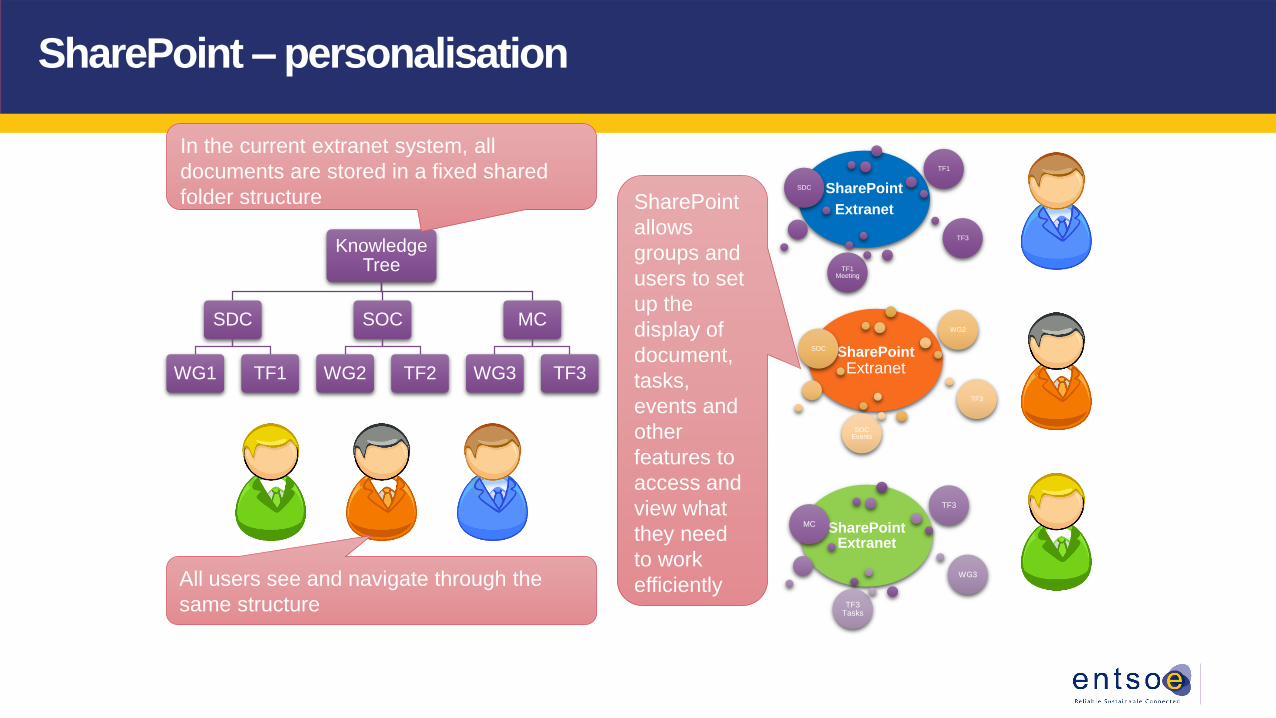
In the current extranet system, all
documents are stored in a fixed shared
folder structure
All users see and navigate through the
same structure
SharePoint
allows
groups and
users to set
up the
display of
document,
tasks,
events and
other
features to
access and
view what
they need
to work
efficiently

Connecting to SharePoint
Please remember to always include the entsoe\
domain name and backslash when typing in
your username

The ENTSO-E extranet structure – Level 1
Each button clicks through
to a Level 2 site
Level 2
Level 1:
The ENTSOE
extranet home
site/page
High level
documents &
calendar
This site is
managed by
Corporate
Affairs

The ENTSO-E extranet structure – Level 2
Level 2:
Assembly
Board
Secretariat
Expert Groups
LRG, SDC,
SOC, MC, R&D
Network Codes
These sites are
managed by the
Secretariat

The ENTSO-E extranet structure – Level 3
Level 3:
ENTSO-E
Working Group,
Taskforce, Expert
Group, Sub- and
Ad-hoc Group
sites
These sites are
mainly managed
by Member Site
Owners and
sometimes the
Secretariat

Extranet roles and responsibilities
There are 3 levels of access rights:
Owners: are responsible for their site/s.
Can change the structure of their site, and can add pages, change the site settings and appearance. Owners also have Contributor rights. In a site all contributors and owners have access to all libraries (including restricted). Owner access is assigned by the Extranet Administrator (this is the Service Desk at ENTSO-E).
Contributors: can manage documents and other site items.
Contributors can upload and edit documents and items, create tasks and calendar events but cannot change the site structure or appearance. Contributor access is assigned by the Site Owner.
Visitors: can read all site information (documents and other items)
This is the default access right, given at the creation of each Extranet user profile.
Visitors have read-only permission for all sites, so they can view pages and items, open items and documents, and download documents. They cannot add nor modify any items or documents.
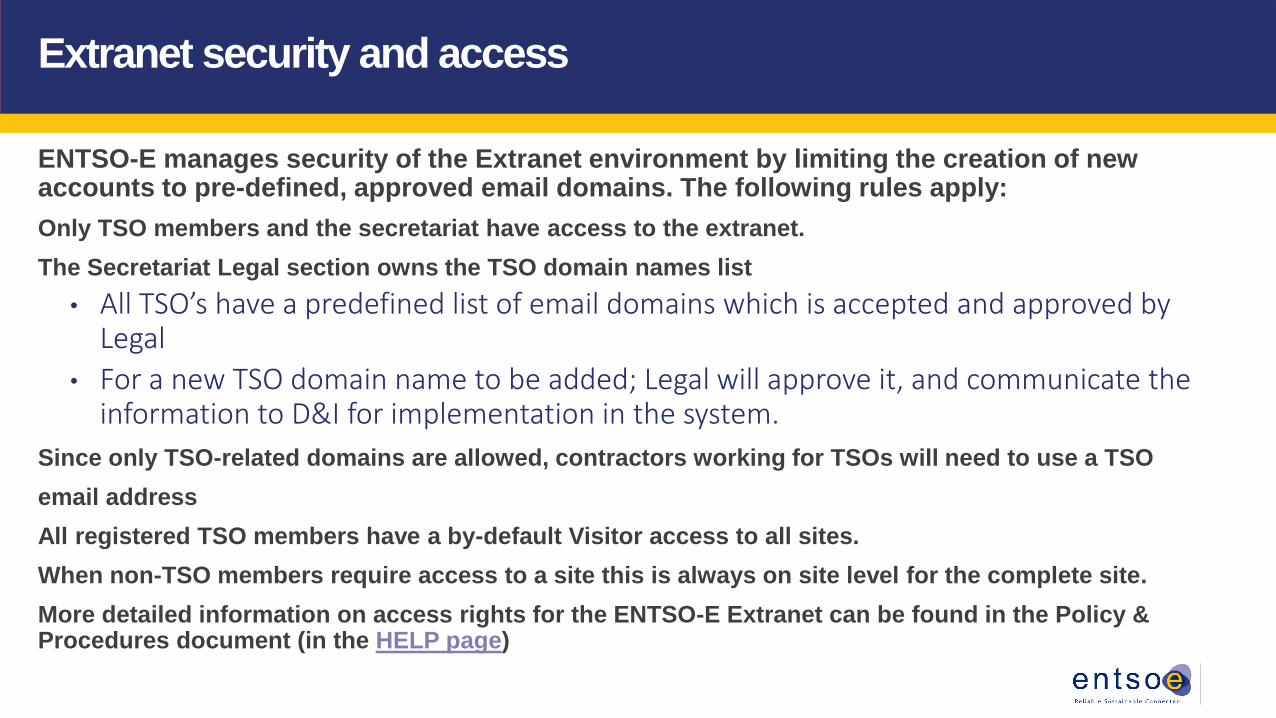
Extranet security and access
ENTSO-E manages security of the Extranet environment by limiting the creation of new accounts to pre-defined, approved email domains. The following rules apply:
Only TSO members and the secretariat have access to the extranet.
The Secretariat Legal section owns the TSO domain names list
• All TSO’s have a predefined list of email domains which is accepted and approved by Legal
• For a new TSO domain name to be added; Legal will approve it, and communicate the information to D&I for implementation in the system.
Since only TSO-related domains are allowed, contractors working for TSOs will need to use a TSO
email address
All registered TSO members have a by-default Visitor access to all sites.
When non-TSO members require access to a site this is always on site level for the complete site.
More detailed information on access rights for the ENTSO-E Extranet can be found in the Policy & Procedures document (in the HELP page)

Document management principles – metadata
One main SharePoint benefit is document management.
To enable efficient document management within SharePoint requires attention and discipline when creating, naming and uploading documents.
Each new document is assigned a series of metadata (descriptions) at the time of creation, and all edits and changes are recorded, which then allows efficient search, retrieval and modifiable display of all documents.
An example of naming, metadata and modification history:
Name: 140809_RDC_Agenda
Type: Agenda
Work area: RDC
Author: civanov
Date of creation: 09/08/2014
Modified date: 03/09/2014
Modified by: John Smith

Document naming – principles
The naming conventions are to be respected for all secretariat related documents referring to meetings, decisions and session files.
For other documents, the naming conventions should be respected as far as this has an added value, as it provides useful information about the context of the document.
For more “permanent” documents, such as policies, processes, procedures and user guides, no naming conventions apply.
GENERAL RULE
The document name consists of
3 parts:
Date (yymmdd)
Work Area (abbreviation)
Title (free text)
EXAMPLES
140925_WGTYNDP2016_Minutes
140813_SOC (meeting)
140712_BD_Decisions_vFinal

HOW TO… Work Instructions
for Visitors
for Contributors
for Site Owners

What’s inside…
Introduction to basic SharePoint features & functions
Navigation
Document Libraries
Document Management
Tasks
Events & Calendars
Surveys

The basic SharePoint features used at ENTSO-E
Document libraries: Each site will in principal, have it’s own library, which replaces a main
folder. Each library has metadata and sort fields, such as date, author, document type,
modified date etc. Libraries can thus be sorted and searched to create unique views of the
documents you need to see.
Document management: A series of functions and procedures for users to read,
upload/download, create, modify and collaborate on documents. The system records the
entire life-cycle of the document and can be configured for alerts, archiving etc.
Tasks: Tasks help small groups and project teams to assign and track tasks. The tasks lists
and/or timelines can be displayed, which allows team members to easily update their own
task evolution and track overall progress.

The basic SharePoint features used at ENTSO-E
Events & calendars:
Records coming events and milestones in a calendar display on each site. The Level 1 site
displays a consolidated calendar of events from the 10 ENTSO-E bodies’ calendars.
Alerts:
A user can be notified by email when there is a change to either an entire library or one or
more particular documents; or when items change in any other type of list such as events
or tasks.
Surveys:
This feature can be used to develop simply surveys, collate responses and export results to
Excel.

FOR VISITORS
Let’s start with the Work Instructions
… for Visitors
which are also valid for Contributors & Site Owners

What you will see on an ENTSO-E extranet site…
Site headerQuick
Launch
Menu to
display
links to
libraries,
other
related
Extranet
sites,
external
websites
etc.
A major part of a SharePoint site will compose of a set of display areas that give
access to the site’s libraries, calendar, events etc. These display areas are called
Web Parts and are put in place by the Site Owner.
Web Parts,
to display
libraries,
features
Site name

First level navigation on the ENTSO-E site header
Go back
to Level 1
home site
View all the level
2 and 3 sites
Navigate between site levels
and click through to sites
Access the
HELP Page
ENTSO-E document
template library
Global search
window for
documents on all
site levels

The SharePoint search function
Photo-session
SharePoint contains a full text search-engine that searches
item names, metadata and document contents
The same
search exists
within each
library

Advanced search
When the
first search
results page
is displayed,
you can then
further refine
the results
through the
metadata
displayed in
the left side
menu.

The page ribbon – if you are a Visitor
When on a site, you can display the PAGE ribbon which shows the features and functions
available at that level, but you can only use functions available under your user access rights.
Back to
navigation panel
Click here to display
the page ribbon
You see many functions; but
only those which are accessible
with your rights are clickable

The page ribbon – if you are a Contributor
Back to
navigation panel
Click here to display
the page ribbon
You see many functions; but only
those which are accessible with your
rights are clickable
When on a site, you can display the PAGE ribbon which shows the features and functions
available at that level, but you can only use functions available under your user access rights.

Finding, reading and downloading documents
All ENTSO-E Extranet users can read and download documents, except some restricted
documents which may be accessible only to pre-defined groups. There are a number of
ways to find, read and download…
• Search, find: type the subject, date or other
known criteria in the search or find a file windows.
In the results list, click on the document of
your choice to open it. You can then
save it to your desktop.
• Within a library list: click directly on a document to open
it and then save it to your desktop, OR select the
document, open the file ribbon and click on Download a
Copy to save it directly to your desktop.
• Pdfs will open automatically in a viewing
window when you click on them.
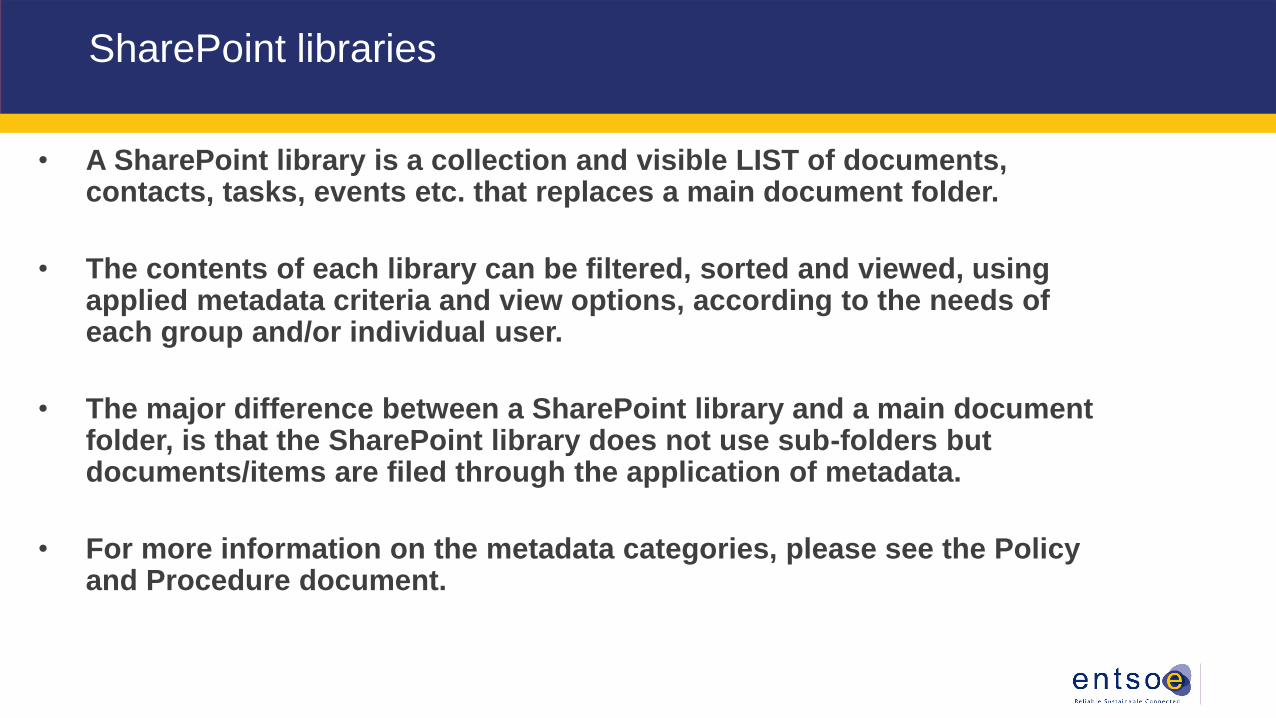
• A SharePoint library is a collection and visible LIST of documents, contacts, tasks, events etc. that replaces a main document folder.
• The contents of each library can be filtered, sorted and viewed, using applied metadata criteria and view options, according to the needs of each group and/or individual user.
• The major difference between a SharePoint library and a main document folder, is that the SharePoint library does not use sub-folders but documents/items are filed through the application of metadata.
• For more information on the metadata categories, please see the Policy and Procedure document.
SharePoint libraries

The library ribbon
Library RibbonWhen you are in a
LIBRARY, click to
display the Library
ribbon
Back to the
navigation
panel
You can see many functions; but only
those which are accessible with your
rights will be clickable

Libraries with NO FOLDERS
SharePoint Site
Primary Folder
SharePoint Library
Free-standing documents are
managed with metadata & views. No
folders are needed.
A network drive can be
replaced by a SharePoint siteA main folder can be
replaced by a Library
The rest of the documents are
stored in a list with metadata
NOT with sub-folders
Network Drive
Sub Folders
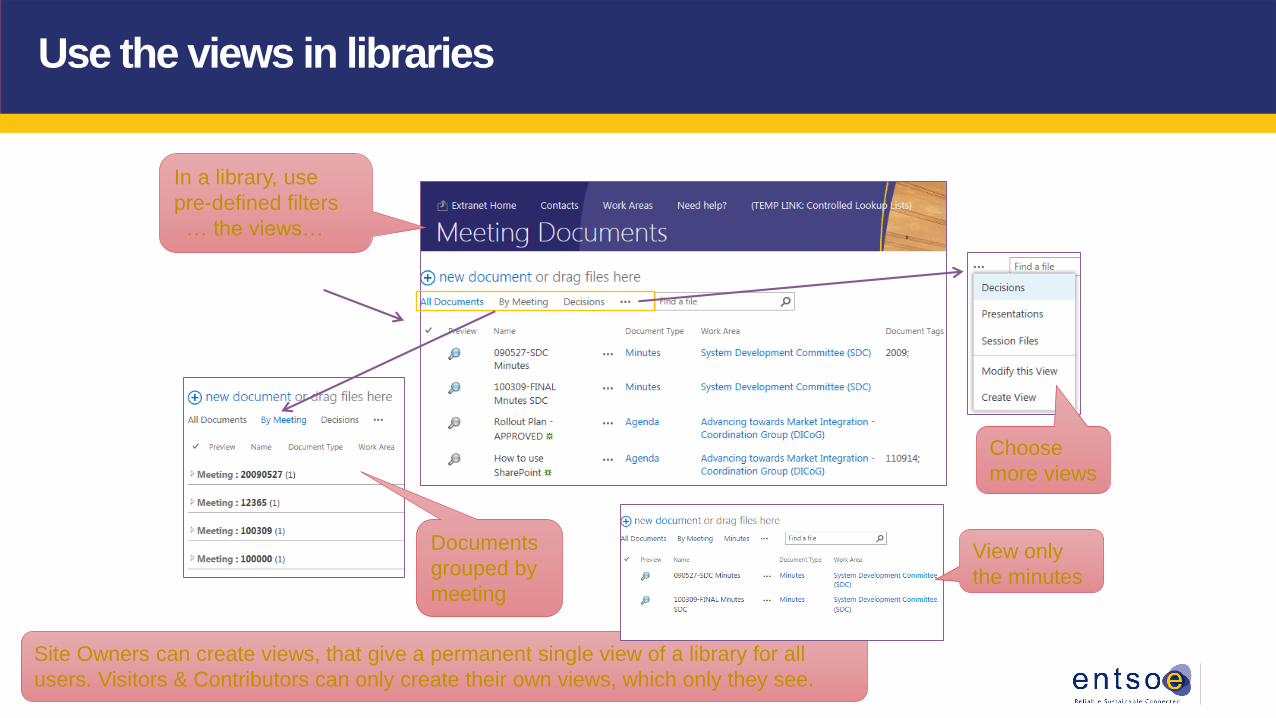
Use the views in libraries
In a library, use
pre-defined filters
… the views…
Choose
more views
Documents
grouped by
meeting
Site Owners can create views, that give a permanent single view of a library for all
users. Visitors & Contributors can only create their own views, which only they see.
View only
the minutes

Filtering and sorting in the libraries to view what you want
Documents are
stored in lists
In the same way as Excel, SharePoint libraries use sorting and filtering of items:
• Filtering – reduce lists to view only those items of interest to you – permanent list vies
• Sorting – arrange items in alphabetical, date or other chosen order – temporary list ordering
Select the
value you
want to
filter
Deselect the value
to deactivate filters
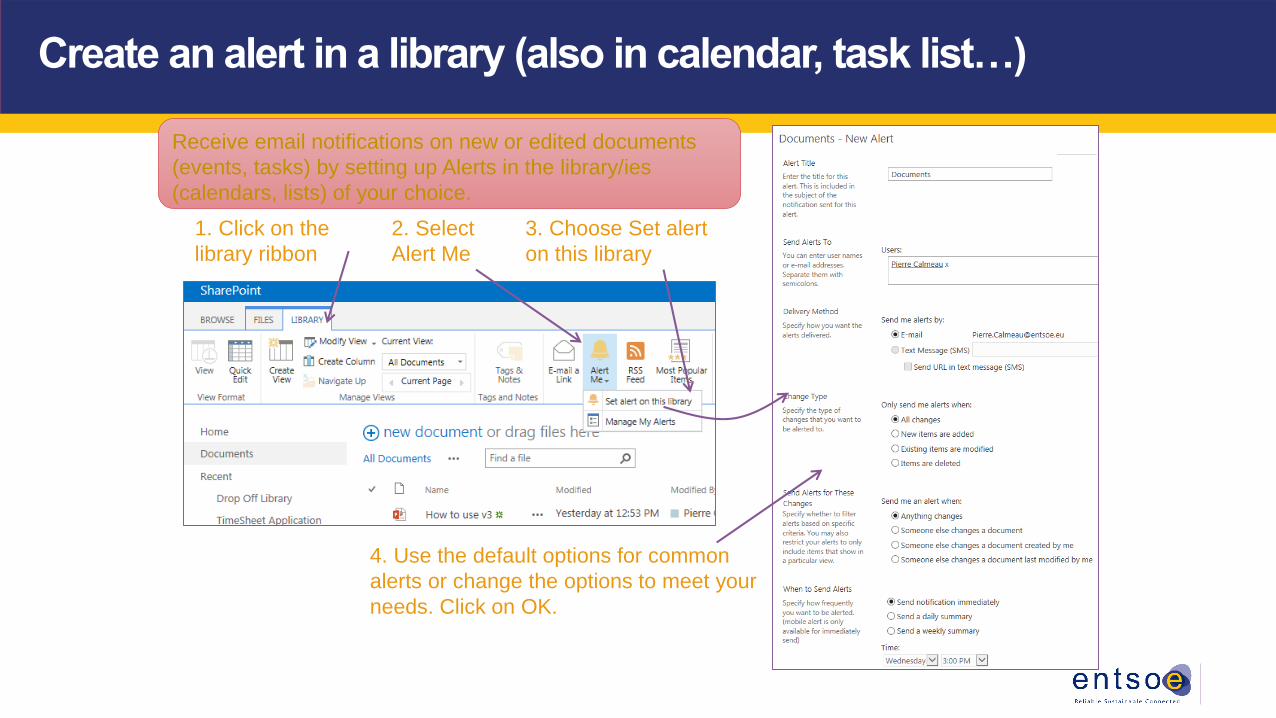
Create an alert in a library (also in calendar, task list…)
Receive email notifications on new or edited documents
(events, tasks) by setting up Alerts in the library/ies
(calendars, lists) of your choice.
1. Click on the
library ribbon
2. Select
Alert Me
3. Choose Set alert
on this library
4. Use the default options for common
alerts or change the options to meet your
needs. Click on OK.

Create an alert on a document (event, task…)
If you want to be informed of any changes to a document (event, task…) or its status, you
can set up an alert to received email notification.
1. Select the document for which you want to
receive an alert
2. In the File ribbon, select Alert Me and then Set
alert on this document
3. Confirm the alert details

Need MORE INFORMATION?
October 2014
Contributors & Owners, please continue with the following slides

FOR CONTRIBUTORS
Let’s continue with the Work Instructions
… for Contributors
which are also valid for Site Owners

Creating and uploading new documents
All new documents must be created on your desktop and then uploaded to SharePoint. Please do not attempt to create documents directly in SharePoint.
The corresponding ENTSO-E Word or PowerPoint template should be used according to document type and audience.
Naming conventions should be respected as described earlier (see Document naming – principles).
All metadata and document information fields should be filled when uploading to permit consistent tracking, sorting and searching for all.
HOW TOs on document creation and uploading follow in the next slide.
If you regularly create ENTSO-E
documents, download the templates you
normally use to a folder on your desktop.
This will simplify the extranet document
creation process.

Document naming – in more detail
For Meetings:
• Exception: for meetings, the name only consists of 2 parts: date & work area (no title required)
• the date is the date of the actual meeting
• the value you fill in the metadata field ‘’Meeting’’ is the same as the date in the name document
• don’t use the numbering of meetings: it is no more 1st , 2nd, 15th meeting, but 140901_Staff
For Minutes, Decisions, Session Files related to AS, BD, SOC, SDC, MC, RDC, LRG:
• yymmdd_area_name of the document_vFINAL(i.eg. 140821_BD_Decisions_vFINAL) / name of the document = title
• if the meeting is for two days, date is set up as follows: 140821-22_BD_Decisions_vFINAL

Document naming – in more detail
For documents with special titles:
• yymmdd_area_name of the document (i.e. 140821_BD_Cover note on Network Codes summary)
• the date is the date of creation of the file, when the document is final, a new document is created (uploaded) with the date of finalisation
For letters:
• yymmdd_area_from to_title of the letter
• the date is the date of letter coming to ENTSO-E or being sent or for incoming the date of the arrival(i.e. 140821_LT_ENTSO-E to ACER_HVDC network code)

Create a new document with an ENTSO-E template
ENTSO-E has a set of document templates to be used when creating new documents.
1. Click on ENTSO-E Templates on the
site’s top banner
2. Within the template library, select the
template you need. Select Download to
save a copy to your desktop.
3. Click on the name of the template you need to open a copy to begin work
on, and then save it to your desktop with the new document name.
OR

OWA – Office Web Applications
New feature to work in the cloud and create documents easily is now available via our new application OWA. You now have the possibility to open extranet documents in the cloud.
Office Web Applications (OWA) will allow users to open office documents from SharePoint in the cloud Office software which will take away the Operation System compatibilities.
Supported Document types are:
• Word
• Excel
• PowerPoint
• OneNote
How does it work?
To open a document in the cloud, click on the three dots next to your document. In the window, click again on the three dots, then choose 'Edit in browser' (see screenshot below).

OWA- Office Web Application

OWA – Office Web Applications
Why edit documents in the cloud?Documents edited in the cloud are saved automatically - do not look for a save button, there isn't one. If your internet connection stops or if your computer crashes, no worries: your changes will be saved.nb: for Excel and PowerPoint there is no ‘Save’ button inside the file.
Additionally, you can now create documents directly in the Extranet (instead of saving them first on your machine, and then uploading them).
This feature is currently only available in the new added libraries but will be generalised.
How does it work?Click on 'new document' and a window will pop up
with a choice of application (see picture above).
Select an application, enter the name of your document and... start writing.
Documents are saved automatically.

Create a new document with an ENTSO-E template
Once you have named and
saved the first version of your
document on your desktop and
are ready to share it on the
Extranet, you can upload it to
your SharePoint library
destination.
3. Fill metadata
4. Save
1. From within the destination
SharePoint library, click on + or new
document
2. Select the document to be uploaded from
your desktop environment via Browse

Upload a document from your desktop – browse
3. Complete the
metadata
4. Save
1. From within the destination
SharePoint library, click on + or new
document
2. Select the document you want to upload, from
your desktop environment via Browse

Upload a document from your desktop – drag and drop
1. Choose the desktop document
2. Drag the document to the
open SharePoint library
3. Check it’s saved
4. Open Document properties pane5. Fill metadata and save
To begin with, open both the document’s desktop placement drive/folder and the SharePoint
destination library. Then proceed from Step 1. Please note that the metadata fields will not
appear, so you will need to fill the metadata through a separate action… Step 4 onwards.

Use Explorer to upload multiple documents
If you need to upload a group of documents to a library – NO MORE THAN 50 AT A TIME - you can open Explorer through
SharePoint, to drag and drop these documents from your desktop.
1. Open the destination
SharePoint library and click
on the library ribbon
2. Select Open
with Explorer
SharePoint library
3. With both windows open side-by-side, select, drag and drop a set of files into the
SharePoint library. Please be careful NOT TO TRANSFER FOLDERS, ONLY FILES
Network drive folder

Fill metadata on multiple uploaded documents
3. Use the Fill
handle to copy
the metadata
down the list
Your library now appears like an
Excel sheet
… and drag each value down
to fill the same metadata for
each document
When you transfer multiple files, the metadata fields do not open so you need to
go back in and manually update the metadata after the file transfer is complete.
1. Open the library
ribbon and then
select Quick Edit
2. Now
select and
fill the
metadata

Create a link to an existing document
1. Go to the original document that
you want to link in your library
2. Copy the URL from that original
document
3. Go to the destination library, click on the
file ribbon, select New Document, and click
on Link to a Document
When you want to add a document in your library, which already exists in another library,
you should NOT MAKE A COPY, but you instead, create a LINK to that document.

4. Type in the document
name
5. Paste the URL that you just
copied from the original
document
6. Click on OK to save
Create a link to an existing document
7. The link appears as a
shortcut in the library

Check Out and Check In documents –Check Out
Check Out a document
Check Out allows you to reserve a documentThe green arrow indicates
that a document is checked
out and by whom
If you need to work for a longer time on a document, you should select and Check Out the
document, before opening it for editing. This prevents other users from working on it.
Check Out is possible on all document types.
After Check Out, work on the file and save the document periodically. Updates are saved to the
Extranet, but not yet visible to others. If you lose your connection while editing, just reconnect
and resave the document.
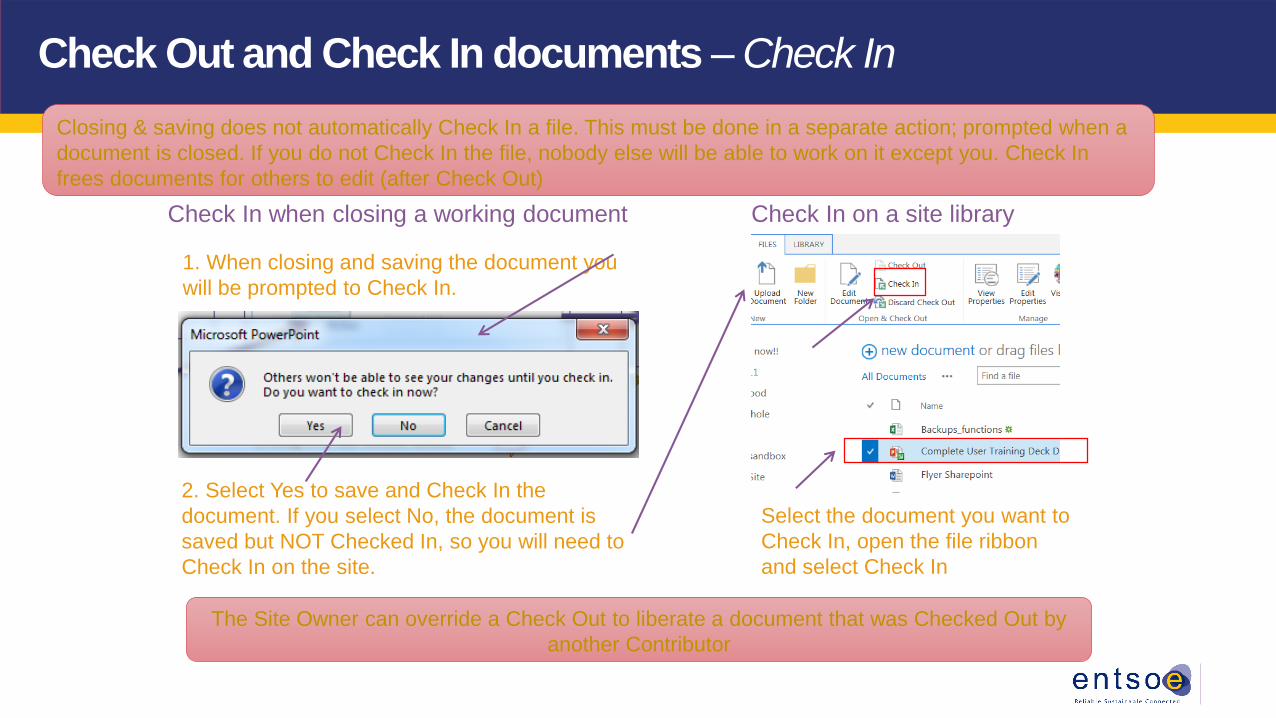
Check Out and Check In documents –Check In
Check In on a site library
The Site Owner can override a Check Out to liberate a document that was Checked Out by
another Contributor
Closing & saving does not automatically Check In a file. This must be done in a separate action; prompted when a
document is closed. If you do not Check In the file, nobody else will be able to work on it except you. Check In
frees documents for others to edit (after Check Out)
Check In when closing a working document
1. When closing and saving the document you
will be prompted to Check In.
2. Select Yes to save and Check In the
document. If you select No, the document is
saved but NOT Checked In, so you will need to
Check In on the site.
Select the document you want to
Check In, open the file ribbon
and select Check In

Check Out and Check In of multiple documents
If you need to work on a set of documents and want to reserve them for your use only, then
you can select multiple documents and Check them In or Out in a single action.
1. Within the library, select all the
documents you want to Check In or
Out
2. From the file ribbon,
select Check In or Check
Out
3. Confirm the
action
Versioning – some principles
• To keep track of the changes on a document, versioning can be applied.
• The standard rule is to work with minor versions until the document is finalised; the final document will be a major version.
• Only major versions will be visible for all visitors; minor versions are only visible for contributors.
• By default, libraries have NO VERSIONING applied, which means that the history of the document is not saved, so there is no possibility to recover a previously saved version.
The preferred VERSIONING must be selected and applied by the Site Owner for each librarysee How To for Owners for work instructions
Be aware that there might be some issues (e.g. lost of previous versions)while working with versioning in SharePoint !

Create a “light” PDF
Best practice is to publish a PDF format for the web, which is not too heavy. Therefore, when
creating PDFs you should print to PDF, in a “light” format, following the instructions below.
1. Go to the Print file option, when you are editing the Word, Excel or
PowerPoint document
2. Select the PDF printer, you have on your PC
3. Via the Printer Properties, go to Advanced and in the option Print
Quality, select 300 dpi
4. Verify if the content is still sufficiently clear & readable

Collaborative co-authoring on MS Office documents
Collaboration means that more than one person can work together on the same document at the same
time.
You need to work in Office 2010 or 2013 for real-time collaboration.
• For Word documents, changes can be tracked, if you activate the tracking within
the document, to see who did what.
• For PowerPoint, the changes made by different people are merged, but cannot be
tracked. So you cannot see who did what.
• For Excel, no collaboration is possible. Different people can only work in turn on the
same file, one-by-one, saving and closing the document before the next person can
work on it.

Collaboration on Word Documents
How collaboration with several people on the same Word document works:
• You start working on a Word
document, as normal.
• From the moment that other
people start working on that same
document, you will be notified
through a small icon on the
bottom of the page.
• You can see WHO is working on
the document by clicking on the icon.

Collaboration on Word Documents
1. In the text, you can see WHO is working on WHICH
paragraphs by the name in front of the paragraph.
2. Click on the
“refresh” button,
to see the
changes.
3. If you save the document,
YOUR modifications are
uploaded and other colleague’s
modifications are integrated.
So, the newly displayed
version contains the updates
from ALL collaborators.
4. When someone leaves the
document, you will be notified

Collaboration on Word Documents – Use Track Changes
In order to see, who changed which text, you have to activate “Track Changes”
1. Click on Review in the top bar in Word, and
then Track Changes
2. To prevent that another
person turns off the Track
Changes, you can protect
this with a password
3. Some settings
you can apply on
HOW the
changes are
displayed on
your computer

To reserve a part in the Word document
If you are collaborating on a Word document with several people, anyone can
modify any part of the document. If you do not want any one else to modify a
specific part, you can block access to this part.
1. Select the part you want to reserve
2. Click on the right-mouse button, and
3. Click on Block Authors
4.Everyone can see that you have
reserved that part of the text

To reserve a part in the Word document
5. To free this part of reserved text, click again on Block Authors

Collaboration on PowerPoint documents
After opening a PowerPoint
file… if you see this icon to
save the file, you know that
you can work on the file with
several people and all your
modifications will be merged
with those of the others.
Collaborating on PowerPoint means that several people can open (and EDIT) the same
PowerPoint document, at the same time. All changes made will be merged after saving the
document. However, it is NOT POSSIBLE to track or see who did which changes.

Collaboration on Excel documents
1. If you edit an Excel document, which
another person is working on, you will receive
the following pop-up.
2. You can choose to open it as Read Only or to be notified
when ‘Greet Volders’ has finished working on the file.
Collaborating on EXCEL documents is not possible, when opening the file local, by
clicking on its title but if we use the OWA app, collaborating in EXCEL is then
possible.

OWA in EXCEL
To open a document in the cloud,
click on the three dots next to your
document. In the window click
again on the three dots,
then choose 'Edit in browserThis
functionality works with the
following applications: Word,
Excel, PowerPoint and OneNote

Restore a document
If you accidentally delete a document, it can be restored
All documents that are deleted, are not “really” deleted, but put into the recycle bin.
This makes it possible to “restore” a document from this recycle bin.
By default a document stays 30 days in the recycle bin.
HOW TO restore a document is explained on the next slide.
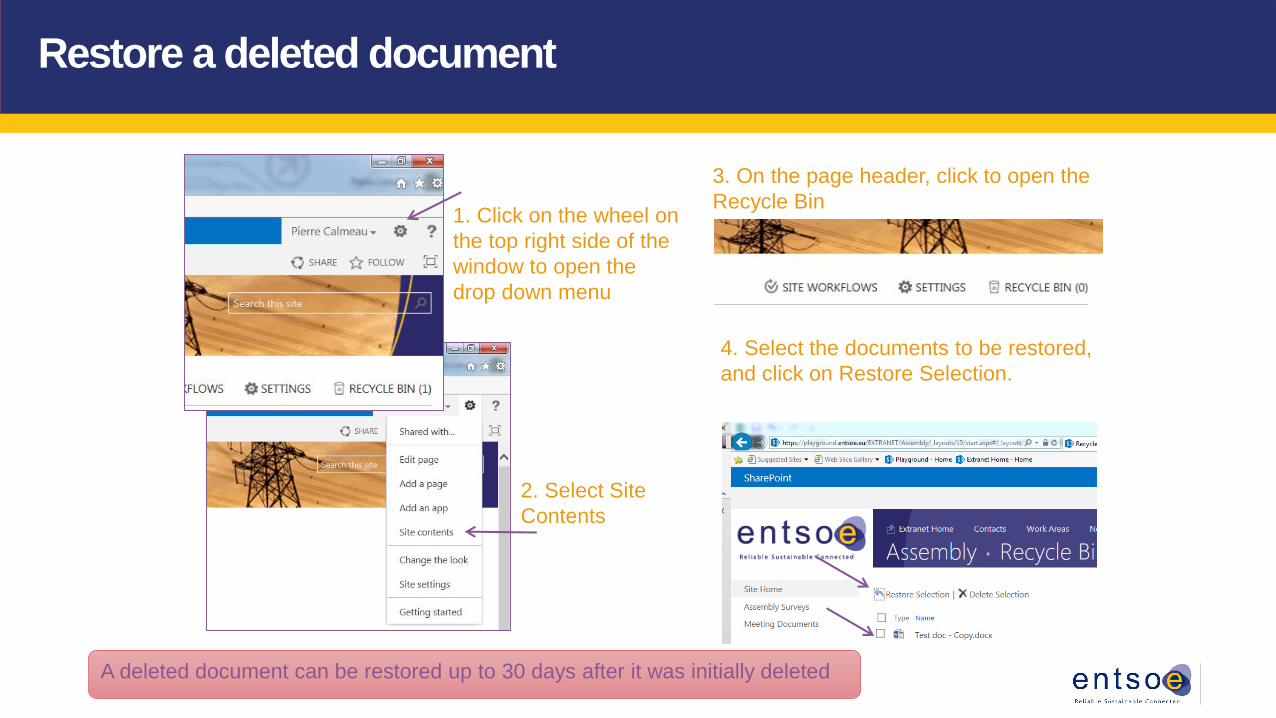
Restore a deleted document
A deleted document can be restored up to 30 days after it was initially deleted
1. Click on the wheel on
the top right side of the
window to open the
drop down menu
2. Select Site
Contents
3. On the page header, click to open the
Recycle Bin
4. Select the documents to be restored,
and click on Restore Selection.

Edit metadata quickly on multiple documents
Use the Fill handle
to copy fast
Your library
appears like an
excel sheet
You can now fill in
metadata….
…and drag
it down
If you upload multiple documents, particularly through drag and drop, then this
function will help you update the metadata rapidly.

Tasks
Tasks help small groups or teams assign and track work or lead small projects.
SharePoint tasks have the same functionality as the tasks in Microsoft Outlook, but are managed in SharePoint.
Only Site Owners can create new task libraries or remove them.
Contributors can add and edit tasks on existing task lists
Visitors can view task lists
For a Task list to be permanently visible on a site, the Site Owner must insert a Web Part (display area) on the site homepage.
If this has not been done, to see and edit a task list, you must do the following:
1. While on the site for which you want to view/edit tasks,
click on the wheel and select Site Contents.
2. Then click on the tasks icon,
to create the task list.

Create a task and add it to the timeline
The tasks timeline can be displayed
in the task display window on the
site home if one has been set up (the Site Owner can do this).
2. Fill in all task properties, including who the
task is assigned to, and save it
1. Go to the tasks library and
click on new task
3. Open the
tasks ribbon
and select the
task you just
created
2. Select Add to Timeline and your
task will appear

Task views
There are a lot of pre-defined
views in tasks lists that you
can choose from
Calendars
Calendars are specific web-parts that can be used to plan meetings and other activities, known as “events.”
These events can be displayed both in a calendar and in a list of events.
The list with events only contains upcoming events (not a record of past events).
SharePoint calendars can also be linked to individual Outlook calendars.
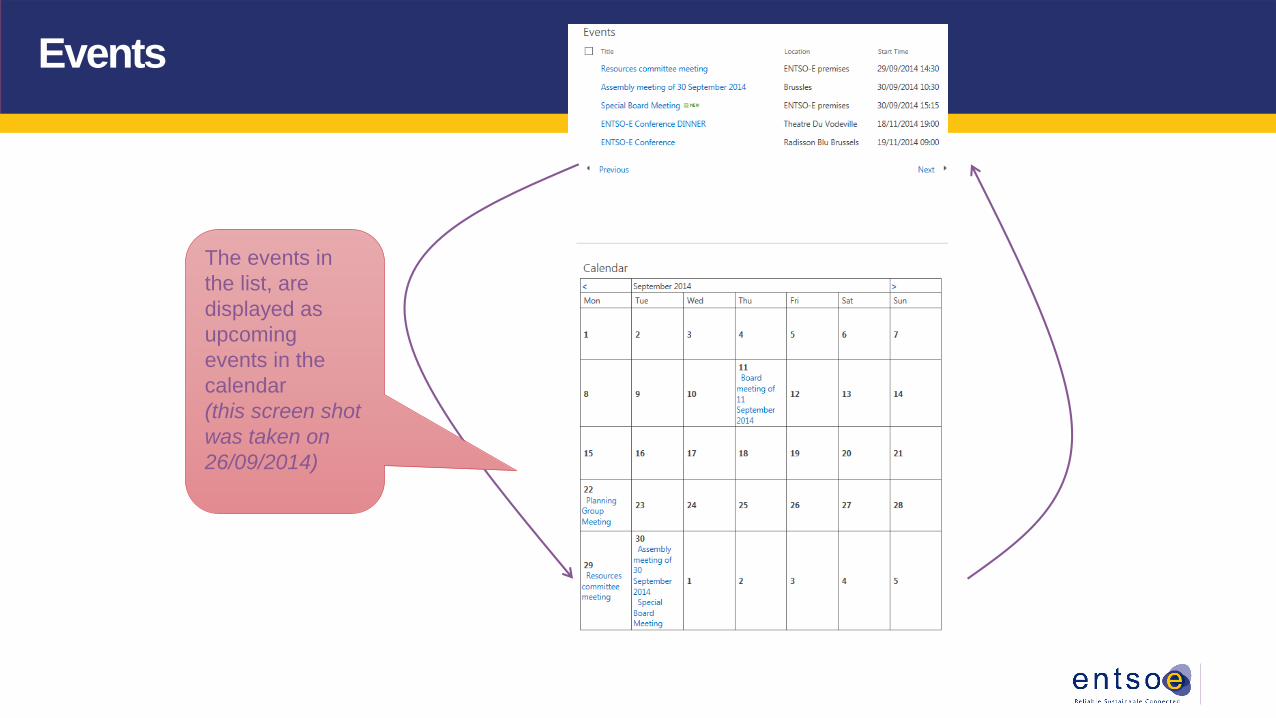
Events
The events in
the list, are
displayed as
upcoming
events in the
calendar
(this screen shot
was taken on
26/09/2014)

Create an event and add it to a calendar
4. Fill in
event
properties,
including
start and end
date. Save it.
5. The event
is now visible
in the
calendar
1. Select the
wheel, then
Site
Contents
2. Click on the
calendar icon
to open the
events list
3. Select the events ribbon and
click on New Event
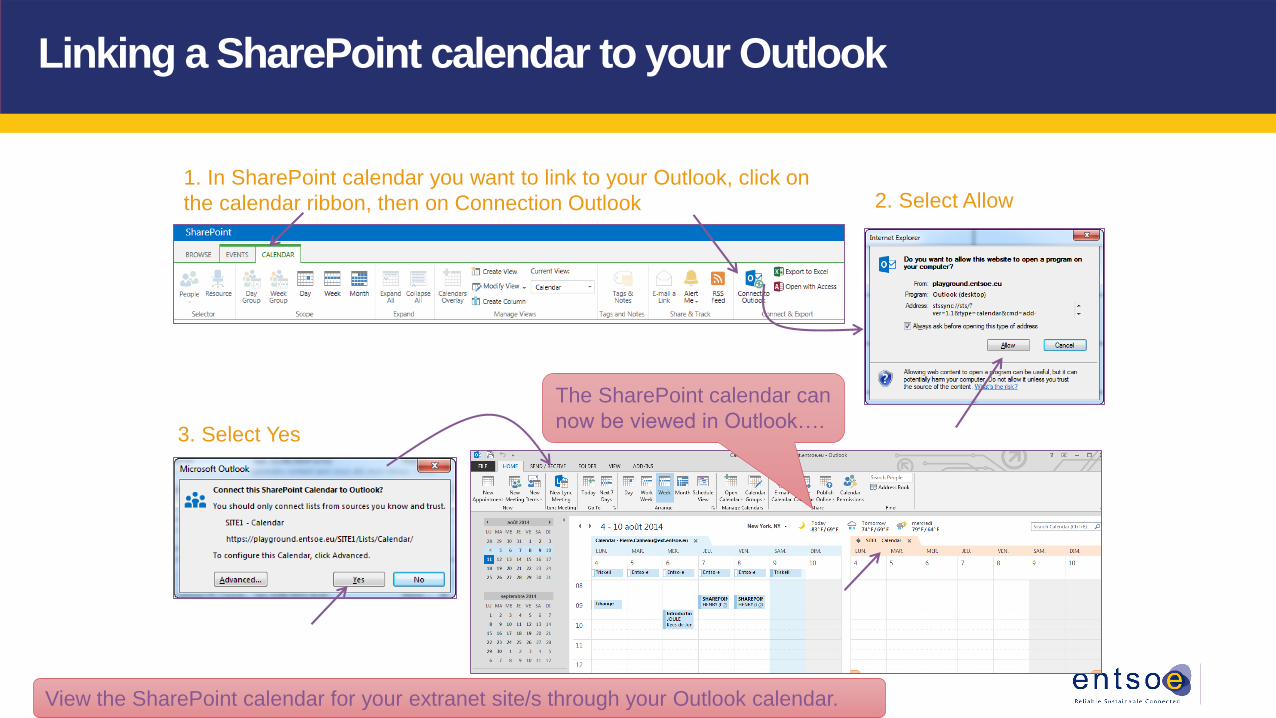
Linking a SharePoint calendar to your Outlook
The SharePoint calendar can
now be viewed in Outlook….
View the SharePoint calendar for your extranet site/s through your Outlook calendar.
1. In SharePoint calendar you want to link to your Outlook, click on
the calendar ribbon, then on Connection Outlook 2. Select Allow
3. Select Yes

Need MORE INFORMATION?
October 2014
Owners, please continue with the following slides

FOR OWNERS
And to end ….
HOW TO … for OWNERS

Site Owner role and responsibilities
Only Site Owners can change the structure, settings, or appearance of the homepage site and create new libraries, calendars, task lists or surveys.
Site Owners control and manage which users have access to that site’s content and have to assign the Contributors to their site.
When creating a new site, there must always be a nominated Site Owner and a Back-Up Owner who are responsible for that site and its contents.
• The Level 1 Site Owner is Secretariat Corporate Affairs.
• Level 2 Site Owners are Secretariat staff or managers.
• Level 3 Site Owners are mainly TSO members, while some of these sites are owned by Secretariat staff or managers.

Create a new site, delete a redundant site or modify an existing site
Only the ENTSO-E extranet Administrators, subject to approval from Corporate Affairs, can create a new site or delete a redundant extranet site.
It is important that both site creation and deletion be centrally managed to ensure:
Data security, life-cycles and correct user access rights
Consistency of ENTSO-E site templates and respect of the look and feel
Correct placement of new sites within the ENTSO-E structure
Major site modifications may also need Administrator intervention and/or Secretariat approval if they are out of scope of the regular SharePoint features
Current and potential Site Owners can get more information on the site/creation/modification procedure in the Procedures document.

Create a document library
As needed, you can use existing
templates to create libraries quickly
1. Click on
the wheel
and select
Site
Contents
2. Via “add an app,” select library
3. Enter a name for the
library and select
Create
4. The new library will be visible on the Site Contents page
5. The library is now ready for documents to be added
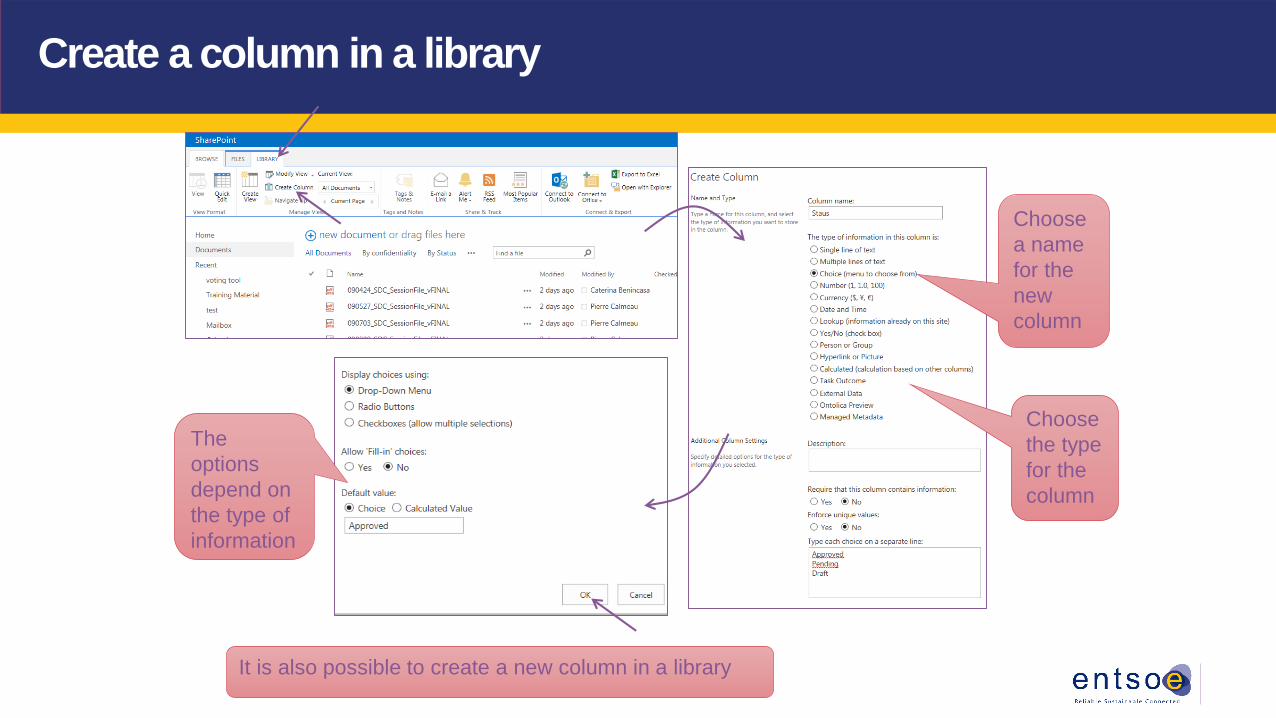
Create a column in a library
It is also possible to create a new column in a library
Choose
a name
for the
new
column
Choose
the type
for the
column
The
options
depend on
the type of
information

Delete / edit a column in a library
It is possible to edit or delete a column in a library
Choose the
column to edit
Edit and
save (OK)
or Delete

Create a standard library view
Name of
the view
Reserved
for Site
Owner
Choose the fields
you need
Choose the
fields order
Reserved
for Site
Owner
Create a
filter

Create a standard library view (options)

Versioning – activate settings
4. If you select the option
for Major and Minor
versions, the Minor
versions can be hidden
to Visitors. This is useful if you want to
collaborate on a document,
the Minor versions are
visible for all Contributors
and only the Major versions
are visible for all users.
5. You can also indicate how many
versions want you keep. Try to
limit this to avoid system overload
1. To activate versioning, select the
library ribbon, then library settings
By default, document libraries do not apply Versioning. The option must be
chosen for each library by the Site Owner.
2. Select
Version
settings
3. Indicate
which
type of
version
you want

Versioning – view history
To see the history, go to
Version History
A new version appears automatically each time a document is edited and saved.
If you activated the Major and Minor
versions, you have to create the Major
versions manually, by clicking on
Publish a Major Version

Versioning – delete old versions
You can Delete All Versions or you can delete only the Minor Versions
You can also delete the old versions manually.

Create a library link in the “quick launch” (left-hand menu)
Links in the left menu can be modified, for “quick launch” making them easily visible to all users
Firstly,
click on
EDIT link
First way: drag
and drop items
from a library
It is also
possible to
delete links
Second way: create a
link manually from a site
or a web site
IMPORTANT:
Save to finish

Create an events calendar
1. Click on
the wheel
and select
Site
Contents
2. Via “add an app,” select calendar
3. Enter a name for the
calendar and select
Create
4. The new calendar will
be visible on the Site
Contents page
5. The calendar is now
ready for events to be added

Create a task library
1. Click on
the wheel
and select
Site
Contents
2. Via “add an app,” select tasks
3. Enter a name for the task library
and select Create
4. The new library will
now be visible on the
Site Contents page
5. The task library is now
ready for Tasks to be
created

Create a new survey – initial survey setup
If you need to collect information, you can use the survey function
The survey is now
created…
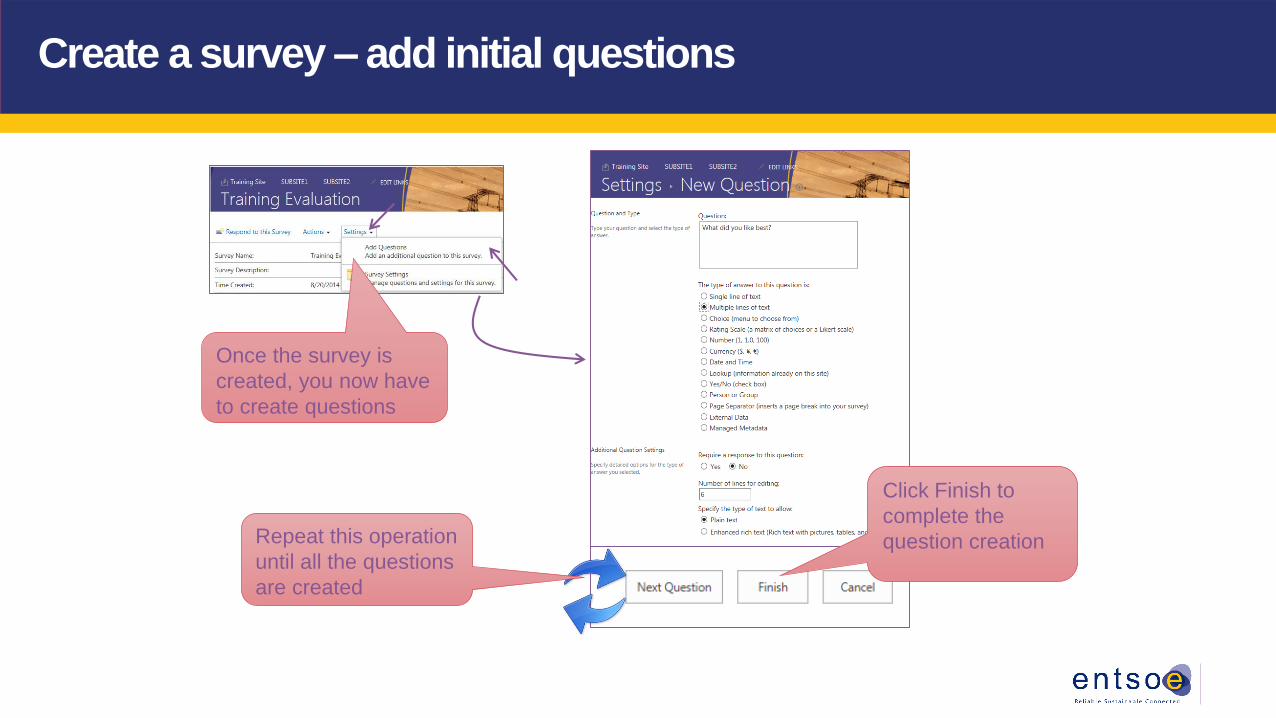
Create a survey – add initial questions
Once the survey is
created, you now have
to create questions
Repeat this operation
until all the questions
are created
Click Finish to
complete the
question creation

Create a survey – edit or delete a question
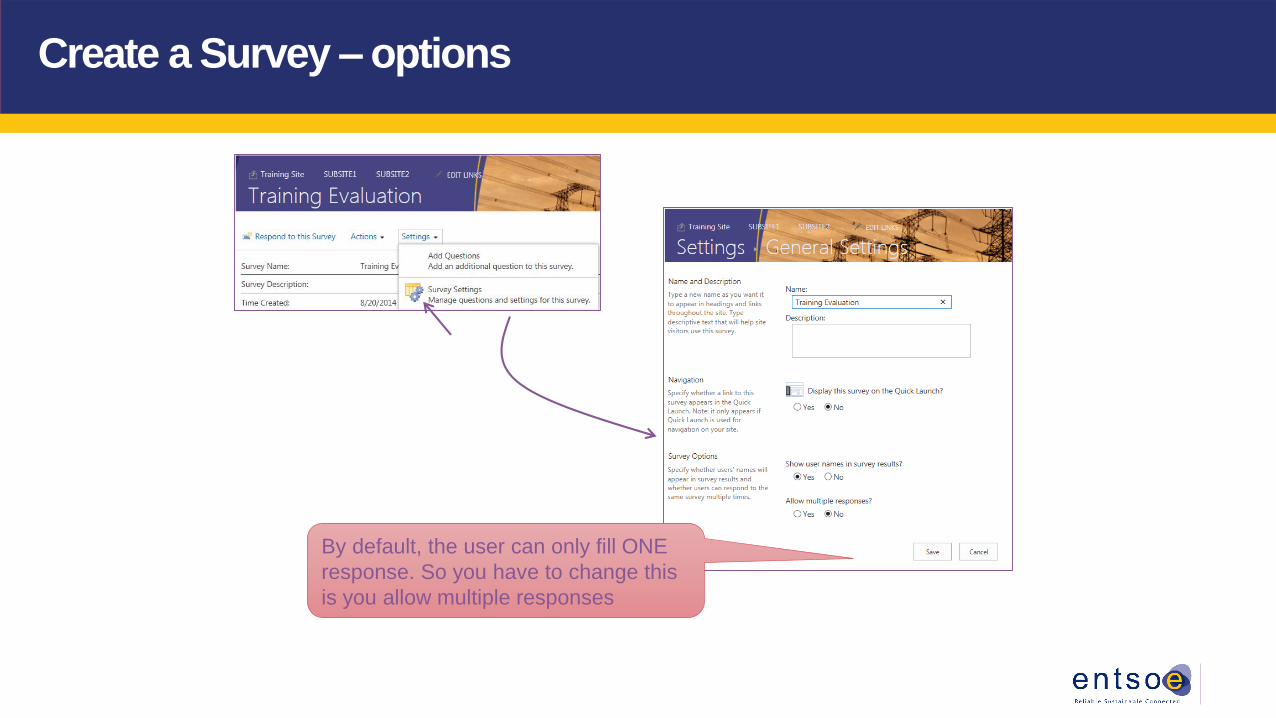
Create a Survey – options
By default, the user can only fill ONE
response. So you have to change this
is you allow multiple responses

Export survey results to Excel
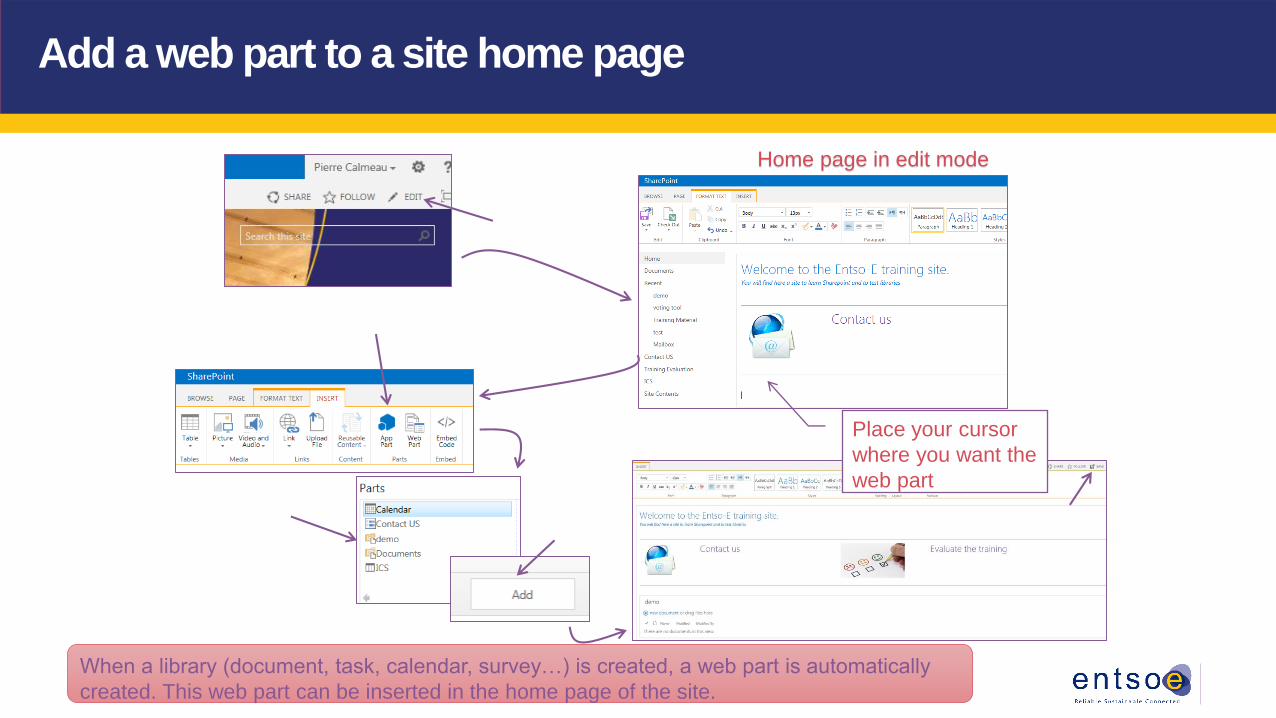
Add a web part to a site home page
Home page in edit mode
When a library (document, task, calendar, survey…) is created, a web part is automatically
created. This web part can be inserted in the home page of the site.
Place your cursor
where you want the
web part

Grant and manage access rights on a specific site
All identified SharePoint users have default read/Visitor access to the Extranet. However, some parts of sites can be secured.
For these sites, the identified Site Owner and Backup Owner are responsible for granting and revoking all user access, by assigning the Contributors to their sites.
The initial list of Contributors is defined by the secretariat at the moment of a site’s creation. Please note that the list of “Contributors” is in the list named “Collaborators.” A group is named NN/MMM Collaborators. (NN = L2 site abbreviation, MMM = L3 site-abbreviation)
The work instruction for HOW to grant and manage access to your site is explained in the next slides.

Managing access rights for your site
1. On the site, click
on the wheel
2. Then on Site
settings3. Choose Site Permissions and you
will see the different groups,
assigned to your site
4. You can click on the Collaborators
group to add or remove names.
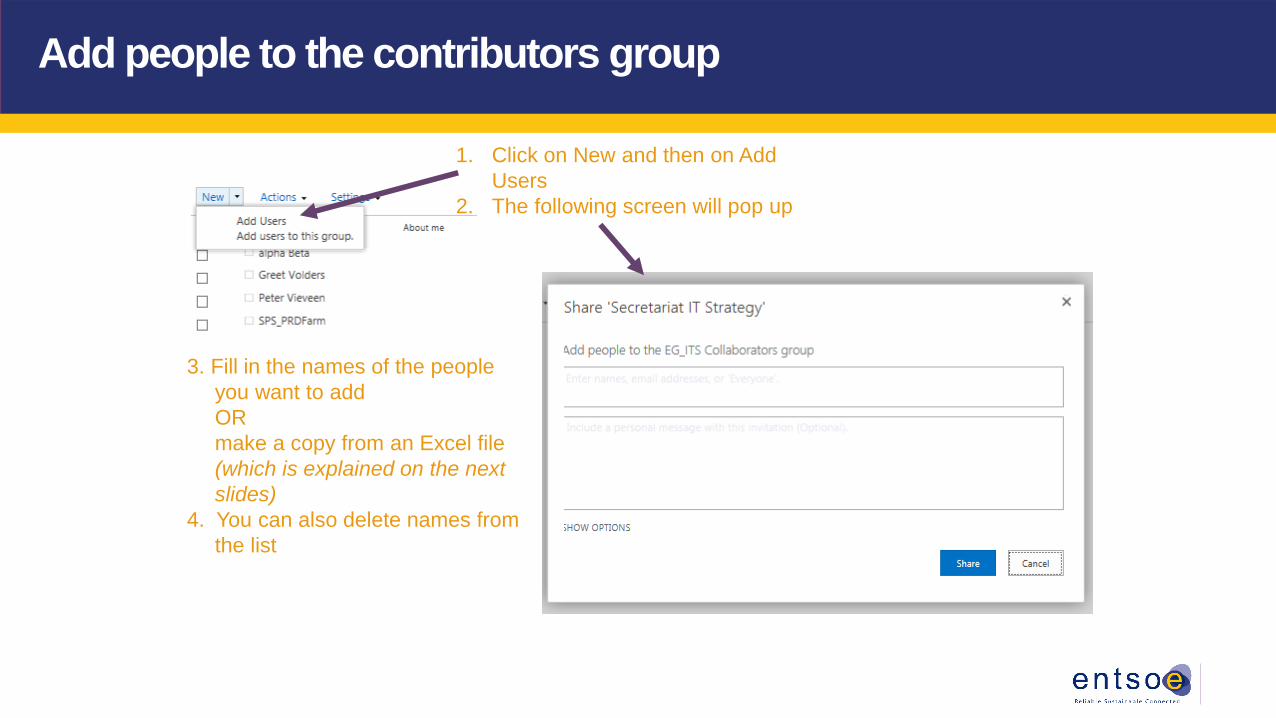
Add people to the contributors group
3. Fill in the names of the people
you want to add
OR
make a copy from an Excel file
(which is explained on the next
slides)
4. You can also delete names from
the list
1. Click on New and then on Add
Users
2. The following screen will pop up

Grant contributors’ right to people
1. On the Permissions ribbon, select Grant
Permissions
2. Fill in the names of the people you want to add
You can also grant contributors’ rights to people, without adding them to the
contributors group.

Create users from an Excel list
1. Select the
names in
the Excel
file
2. PASTE these
names in a new
Excel file,
choosing PASTE
SPECIAL,
and Transpose
The steps on the next 4 slides explain how to copy a list of names in EXCEL into a string
of names, separated with “;” and upload that in the area of your “site permissions”.
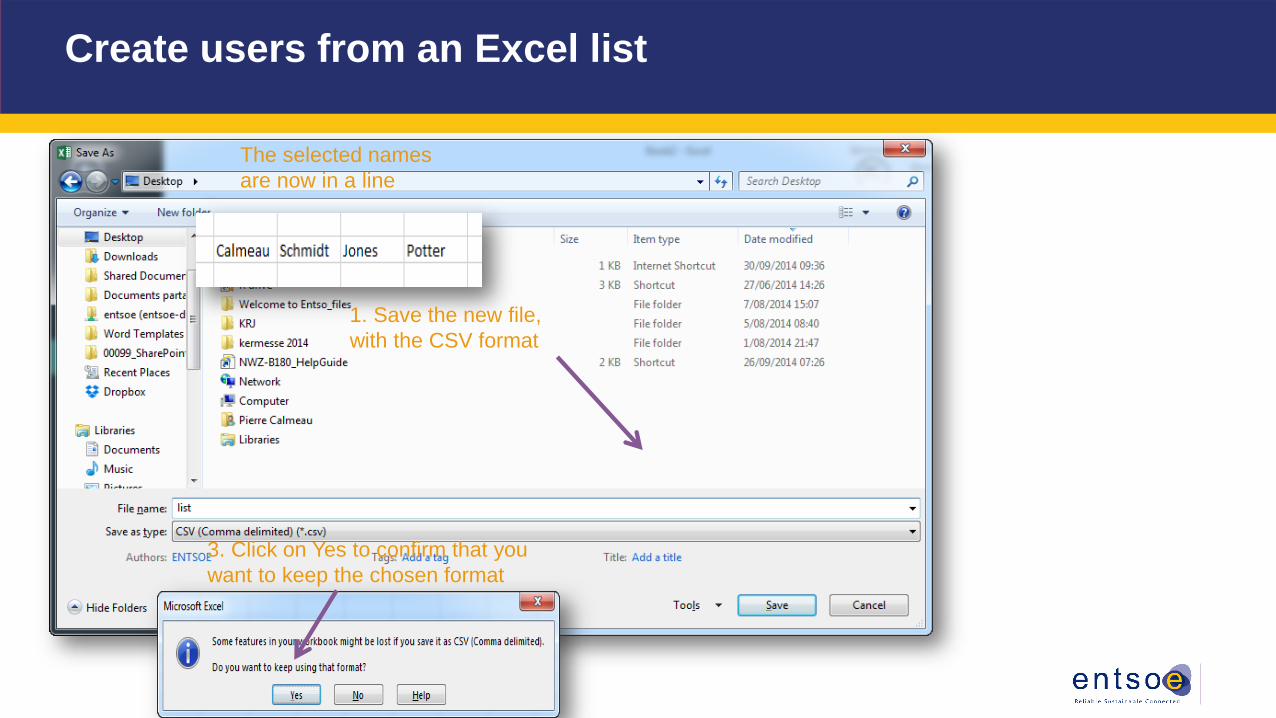
The selected names
are now in a line
1. Save the new file,
with the CSV format
Create users from an Excel list
3. Click on Yes to confirm that you
want to keep the chosen format
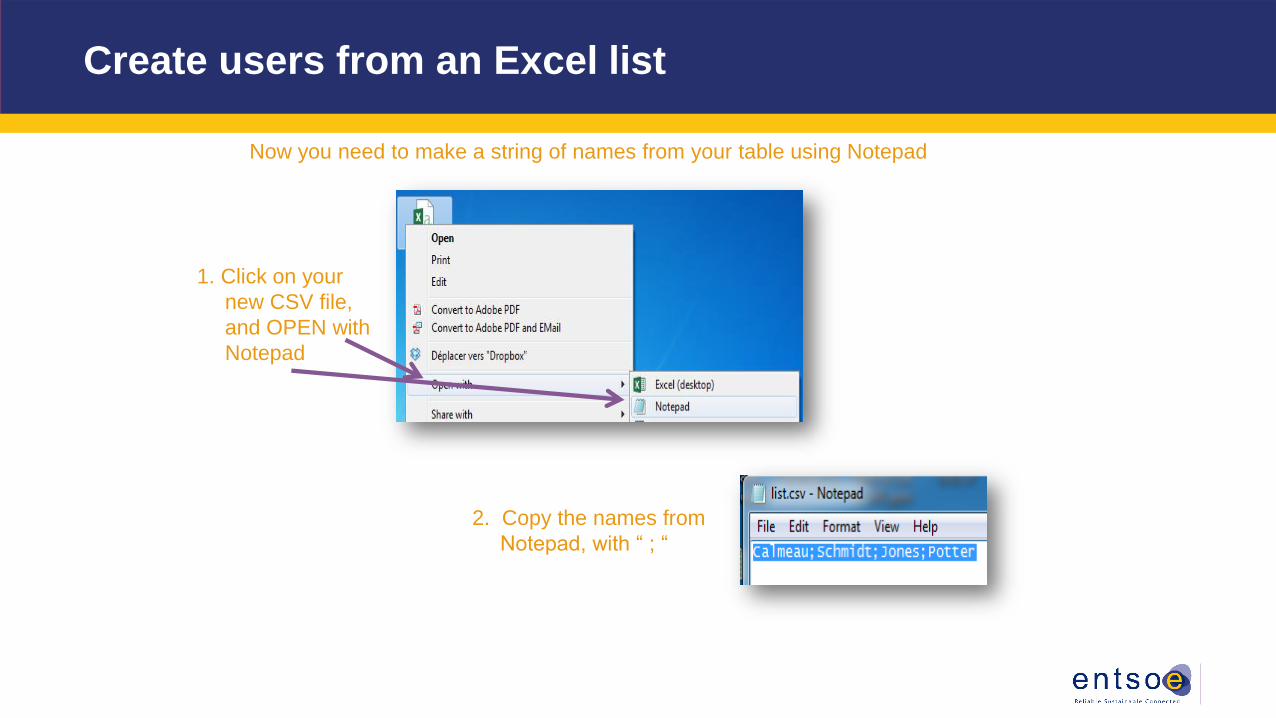
Now you need to make a string of names from your table using Notepad
2. Copy the names from
Notepad, with “ ; “
1. Click on your
new CSV file,
and OPEN with
Notepad
Create users from an Excel list

1. Paste the list of
names into the
group you
created in
SharePoint
2. The names
underlined in red
indicate there is a
problem with those
names.
3. Click on the red
names to solve the
problems (correct
names)
4. Save the list of
people, by clicking
on “Share”
Create users from an Excel list