Introduction 2 3 COMOS Creating material in COMOS 4 ... · Introduction 2 Definitions 3 Creating...
72
COMOS Lifecycle Material Management Operating Manual 05/2016 V 10.2 A5E37098606-AA General information 1 Introduction 2 Definitions 3 Creating material in COMOS 4 Importing material from external sources 5 Material documentation and order requests 6 Administration 7 References 8
Transcript of Introduction 2 3 COMOS Creating material in COMOS 4 ... · Introduction 2 Definitions 3 Creating...

COMOS
LifecycleMaterial Management
Operating Manual
05/2016 V 10.2A5E37098606-AA
General information 1
Introduction 2
Definitions 3
Creating material in COMOS 4Importing material from external sources 5Material documentation and order requests 6
Administration 7
References 8

Legal informationWarning notice system
This manual contains notices you have to observe in order to ensure your personal safety, as well as to prevent damage to property. The notices referring to your personal safety are highlighted in the manual by a safety alert symbol, notices referring only to property damage have no safety alert symbol. These notices shown below are graded according to the degree of danger.
DANGERindicates that death or severe personal injury will result if proper precautions are not taken.
WARNINGindicates that death or severe personal injury may result if proper precautions are not taken.
CAUTIONindicates that minor personal injury can result if proper precautions are not taken.
NOTICEindicates that property damage can result if proper precautions are not taken.If more than one degree of danger is present, the warning notice representing the highest degree of danger will be used. A notice warning of injury to persons with a safety alert symbol may also include a warning relating to property damage.
Qualified PersonnelThe product/system described in this documentation may be operated only by personnel qualified for the specific task in accordance with the relevant documentation, in particular its warning notices and safety instructions. Qualified personnel are those who, based on their training and experience, are capable of identifying risks and avoiding potential hazards when working with these products/systems.
Proper use of Siemens productsNote the following:
WARNINGSiemens products may only be used for the applications described in the catalog and in the relevant technical documentation. If products and components from other manufacturers are used, these must be recommended or approved by Siemens. Proper transport, storage, installation, assembly, commissioning, operation and maintenance are required to ensure that the products operate safely and without any problems. The permissible ambient conditions must be complied with. The information in the relevant documentation must be observed.
TrademarksAll names identified by ® are registered trademarks of Siemens AG. The remaining trademarks in this publication may be trademarks whose use by third parties for their own purposes could violate the rights of the owner.
Disclaimer of LiabilityWe have reviewed the contents of this publication to ensure consistency with the hardware and software described. Since variance cannot be precluded entirely, we cannot guarantee full consistency. However, the information in this publication is reviewed regularly and any necessary corrections are included in subsequent editions.
Siemens AGDivision Process Industries and DrivesPostfach 48 4890026 NÜRNBERGGERMANY
A5E37098606-AAⓅ 04/2016 Subject to change
Copyright © Siemens AG 2016.All rights reserved

Table of contents
1 General information......................................................................................................................................7
2 Introduction...................................................................................................................................................9
3 Definitions...................................................................................................................................................11
4 Creating material in COMOS......................................................................................................................13
4.1 Creating material from P&ID data..........................................................................................134.1.1 Detailing the material.............................................................................................................134.1.2 Assigning further components................................................................................................14
4.2 Creating material from isometry data.....................................................................................14
5 Importing material from external sources...................................................................................................17
5.1 CSV import.............................................................................................................................175.1.1 Operating sequence of the CSV import.................................................................................175.1.2 Importing CSV files................................................................................................................17
5.2 Import from PDMS.................................................................................................................185.2.1 Basic principles for imports from PDMS/E3D.........................................................................185.2.2 Operating modes....................................................................................................................18
6 Material documentation and order requests...............................................................................................19
6.1 Structure of material documentation and order requests.......................................................19
6.2 Open "Material Management Assistant"................................................................................20
6.3 Creating material documentation...........................................................................................20
6.4 Editing the material documentation settings..........................................................................216.4.1 Creating MTO documents and package groups....................................................................216.4.2 Editing filter settings...............................................................................................................216.4.3 Editing the text field settings..................................................................................................226.4.4 Display the delta for the amount values between two selected revisions..............................22
6.5 Produce order requests..........................................................................................................23
6.6 Managing documents ............................................................................................................24
6.7 Updating the document packages..........................................................................................25
7 Administration.............................................................................................................................................27
7.1 Preparing the configuration object.........................................................................................277.1.1 Creating the configuration object...........................................................................................277.1.2 Creating a group folder for documents...................................................................................277.1.3 Configuring general settings..................................................................................................287.1.3.1 Configuring folders.................................................................................................................287.1.3.2 Defining units for summation..................................................................................................297.1.4 Configuring MTO creation from isometry data.......................................................................307.1.4.1 Configuring the principles for MTO creation from isometry data............................................307.1.4.2 Defining filters for creation of MTO objects............................................................................33
Material ManagementOperating Manual, 05/2016 V 10.2, A5E37098606-AA 3
7.1.4.3 Assigning attributes................................................................................................................337.1.4.4 Configuring the creation of the summation key......................................................................347.1.4.5 Defining a reference value for establishing quantities............................................................357.1.5 Configuring a CSV import......................................................................................................367.1.6 Configuring MTO creation from P&ID data............................................................................367.1.6.1 Configuring the principles for MTO creation from P&ID data.................................................367.1.6.2 Defining filters for creation of MTO objects............................................................................377.1.6.3 Assigning attributes................................................................................................................377.1.6.4 Configuring the creation of the summation key......................................................................387.1.6.5 Defining rules for estimating flanges......................................................................................387.1.7 Configuring settings for MTO documents...............................................................................397.1.7.1 Configuring general settings..................................................................................................397.1.7.2 Defining authorization for users.............................................................................................407.1.7.3 Configuring the creation of MTO documents.........................................................................417.1.7.4 Configuring filters for objects in MTO documents..................................................................417.1.7.5 Assigning material lists...........................................................................................................427.1.7.6 Configuring the grouping of documents.................................................................................427.1.7.7 Editing text fields of MTO documents....................................................................................437.1.8 Configuring orders..................................................................................................................437.1.8.1 Configuring general settings..................................................................................................437.1.8.2 Configuring the creation of MPR documents.........................................................................447.1.8.3 Creating additional columns for MPR documents..................................................................447.1.8.4 Editing text fields of MTO documents....................................................................................457.1.9 Configuring delta documents.................................................................................................467.1.10 Configuring manual estimation of P&ID data.........................................................................46
7.2 Material lists...........................................................................................................................477.2.1 Types of material lists............................................................................................................477.2.2 Creating material lists.............................................................................................................47
7.3 Configuring the display of the quantity data delta between revision......................................48
7.4 Creating and managing the MTO set of rules........................................................................49
7.5 Configuring a CSV import......................................................................................................507.5.1 Structure of a CSV file............................................................................................................507.5.2 Editing configurations for the CSV import..............................................................................527.5.3 Algorithm for generating a COMOS path name.....................................................................52
8 References.................................................................................................................................................55
8.1 exportMTO file........................................................................................................................55
8.2 MTOExportSettings.dat..........................................................................................................57
8.3 User interface reference.........................................................................................................588.3.1 "Estimated" tab.......................................................................................................................588.3.2 "Configuration for CSV import" object....................................................................................588.3.3 "Pipe Details" tab...................................................................................................................598.3.3.1 "P&ID estimation" tab.............................................................................................................608.3.3.2 "Manual estimation" tab.........................................................................................................608.3.4 "MTO Documents" tab...........................................................................................................618.3.5 "MPR documents" tab............................................................................................................628.3.6 "Status" window.....................................................................................................................648.3.7 Tabs of the configuration object.............................................................................................658.3.7.1 "COMOS MTO" tab................................................................................................................65
Table of contents
Material Management4 Operating Manual, 05/2016 V 10.2, A5E37098606-AA
8.3.7.2 "MTO estimation" tab.............................................................................................................678.3.7.3 "MTO documents" tab............................................................................................................70
Table of contents
Material ManagementOperating Manual, 05/2016 V 10.2, A5E37098606-AA 5

Table of contents
Material Management6 Operating Manual, 05/2016 V 10.2, A5E37098606-AA

General information 1NoteOnly use COMOS Material Management within a working layer
Use COMOS Material Management only within one working layer. Because the release mechanism of working layers does not consider MTO data, you may experience data loss if you work with several working layers.
Products of third-party providersPDMS is a product of the AVEVA company and is hereinafter referred to as PDMS for short (without the company name).
Material ManagementOperating Manual, 05/2016 V 10.2, A5E37098606-AA 7

General information
Material Management8 Operating Manual, 05/2016 V 10.2, A5E37098606-AA

Introduction 2COMOS features a Material Management Assistant, which you can use to create revision-based material documentation and order requests. The quantity-related and type-related data for the Material Management Assistant is called MTO data (Material Take Off).
You can also take MTO-related data from the following COMOS sources:
● P&IDs
● Isometries
You can also take MTO-related data from the following external sources:
● AVEVA PDMS (XML)
● Other third-party software (CSV)
Material ManagementOperating Manual, 05/2016 V 10.2, A5E37098606-AA 9
Introduction
Material Management10 Operating Manual, 05/2016 V 10.2, A5E37098606-AA

Definitions 3MTO (Material Take Off)
MTO refers to quantity and type-relevant data
MPR (Material Purchase Request)MPR refers to data relevant to order requests.
MTO documentMTO documents contain quantity-related and type-related data that is used as the basis for order requests. Depending on the objective, a distinction is made between the following MTO types:
● EstimatedMaterial that was created as follows:
– Through manual creation
– From one or more P&IDs
– Through a CSV import
● CurrentMaterial produced during planning. Material that was created as follows:
– From isometries
– Through an import from PDMS
– Through a CSV import
● ReleasedMaterial that was created as follows:
– After release of an isometry
– Through an import from PDMS
– Through a CSV import
MTO master documentThe MTO master document contains all the information that is made available by COMOS for orders. In particular, the MTO master document contains the current material stock
It is part of the MTO document package.
MPR documentMPR documents contain data shown in the form of order requests.
Material ManagementOperating Manual, 05/2016 V 10.2, A5E37098606-AA 11

Document keyA document key identifies a specific MTO document package or an MPR document package and is permitted to occur only once.
Definitions
Material Management12 Operating Manual, 05/2016 V 10.2, A5E37098606-AA

Creating material in COMOS 44.1 Creating material from P&ID data
You can take material information from one or more P&IDs. Once extracted, you can then add further specifications for the material.
RequirementThe configuration object has been configured by an administrator to allow materials to be created. See also chapter Configuring MTO creation from P&ID data (Page 36).
Procedure1. Call up the "Plugins > Basic > Material Management Assistant" menu command.
2. Select the "Estimated" tab. See also chapter "Estimated" tab (Page 58).
3. Drag&drop the desired object from the Navigator into the "P&ID document/Query/Node/Pipe" field.
4. To show material that is already available, click on the "Refresh" button.
5. To collect unavailable material or to update available material, click on the "Collect" button.
ResultThe material is collected and stored in the Navigator in folders under the respective pipe.
In addition, the result is shown in the list on the "Estimated" tab. See also chapter "Estimated" tab (Page 58).
4.1.1 Detailing the materialTo specify material in more detail, assign pipe spec components to the MTO objects.
RequirementYou have already extracted information about material from one or more P&IDs. See also chapter Creating material from P&ID data (Page 13).
Procedure1. On the "Estimated" tab, right-click on the name of a pipe in the list.
2. Select the entry "Show details for pipe:" in the context menu.The "P&ID estimation" tab is displayed.
Material ManagementOperating Manual, 05/2016 V 10.2, A5E37098606-AA 13

3. To display all available pipe spec parts, click the "Refresh" button.The available pipe spec parts for the material that were found on the P&ID are shown.
4. In the "Selected quantity" column, enter the number of MTO objects that you wish to assign per pipe.
5. In order to update and create the objects below the pipes, click the "Apply quantities" button.
ResultQuantity-specific and pipe spec-specific components are assigned to MTO objects. If no MTO object exists, a new one is created.
4.1.2 Assigning further componentsOn the "Pipe Details > P&ID estimation" tab, you can assign only objects that are present on P&IDs. See also chapter Detailing the material (Page 13).
If you wish to assign an object which is not present on the respective P&ID, use the "Manual Estimation" tab.
Procedure1. Open the "Pipe Details > Manual Estimation" tab.
All pipe spec components suitable for the respective pipe are displayed as a list.
2. In the edit field under each pipe spec component, enter the desired quantity for each of those components.
3. To add a pipe component of the list, click the "Add" button.
4. To create the associated objects below the respective pipe, click the "Apply quantities" button.
4.2 Creating material from isometry data
Requirement● The configuration object has been configured by an administrator to allow materials to be
created. See also chapter Configuring MTO creation from isometry data (Page 30).
● Pipe spec mapping has been carried out for all relevant objects.
Procedure1. Select the object in the navigator whose subobjects are to be used to create the material.
2. Select the "MTO > Collect Material" command from the context menu.
Creating material in COMOS4.2 Creating material from isometry data
Material Management14 Operating Manual, 05/2016 V 10.2, A5E37098606-AA

Result● The "Status" window opens. See also chapter "Status" window (Page 64).
● The current isometry object is used as the starting point for identifying the higher-level collecting folder.The "Current" and "Released" folders are created here and this is where the MTO objects are stored.
● Separate MTO objects are created for the planned material underneath the selected objects based on the settings in the configuration object. These objects are then sorted into the "Current" or "Released" folder, depending on where they belong.
Creating material in COMOS4.2 Creating material from isometry data
Material ManagementOperating Manual, 05/2016 V 10.2, A5E37098606-AA 15

Creating material in COMOS4.2 Creating material from isometry data
Material Management16 Operating Manual, 05/2016 V 10.2, A5E37098606-AA

Importing material from external sources 55.1 CSV import
5.1.1 Operating sequence of the CSV import1. Importing a CSV file
See also chapter Importing CSV files (Page 17).
2. Creating an MTO documentSee also chapter Open "Material Management Assistant" (Page 20).
3. Creating an MPR documentSee also chapter Produce order requests (Page 23).
5.1.2 Importing CSV files
Requirement● An administrator has configured the CSV import. See also chapter Configuring a CSV
import (Page 50).
● If MTO objects are to be created below an owner that is specified in the CSV file, the "Configuration for CSV import" object must be created and configured. See also chapter "Configuration for CSV import" object (Page 58).
Procedure1. Choose how the owner of the created MTO objects is to be selected. You have the following
options:
– Open the context menu for an object in the navigator and click on the "MTO > CSV import - owner by subsection" command.The owner of the MTO objects is identified on the basis of the information in the "Owner" column of the CSV file.
– In the context menu for an object in the Navigator, click on the "MTO > CSV import - owner by selection" command.The owner of the MTO objects is the object for which you have executed the command.
The "Select directory" window opens.
2. Select a folder where the CSV files are located.
3. Click "OK".
Material ManagementOperating Manual, 05/2016 V 10.2, A5E37098606-AA 17

Result● The "Status" window opens. See also chapter "Status" window (Page 64).
● All the CSV files within the selected directory are imported.
– "CSV import - owner by subsection" command: The material is created in the navigator in accordance with the configuration of the subsection specified in the CSV file.
– "CSV import - owner by selection" command: The material is created underneath the object that you used to select the command.
● The Logfile.xml file is created in the directory from which you imported. Among other things, this log file describes any errors that occurred during the import.
5.2 Import from PDMS
5.2.1 Basic principles for imports from PDMS/E3D
RequirementTo compile a selection set in PDMS/E3D and transfer it to COMOS, install and activate the COSMOS PDMS interface.
You can find additional information on this topic in the "3D Integration Administration" manual, keyword "Activating COMOS PDMS Interface".
Transferring MTO data from PDMS/E3D to COMOSThe starting point for the operation is PDMS/E3D. For this purpose, PDMS/E3D provides a form which can be used to generate the selection set. Material files are generated for all objects in this selection set. These files are evaluated. The result of this evaluation is written to XML files. These XML files can be read into COMOS.
Selection options in PDMS/E3DWhen creating the XML files, you can make an assignment in PDMS/E3D of whether engineering material (current) or released material (released) is involved.The XML files are then stored in the corresponding folders. COMOS creates the MTO objects.
5.2.2 Operating modes
Importing material from external sources5.2 Import from PDMS
Material Management18 Operating Manual, 05/2016 V 10.2, A5E37098606-AA

Material documentation and order requests 66.1 Structure of material documentation and order requests
Material Documentation (MTO)
Order Requests (MPR)
Material ManagementOperating Manual, 05/2016 V 10.2, A5E37098606-AA 19

6.2 Open "Material Management Assistant"You can open the Material Management Assistant in the following ways:
● "Plugins > Basic" menu
● Context menu of an object in the Navigator specified by the administrator: "MTO > Collect Material" commandIn this case, expressions that the administrator has defined in the configuration object are used and evaluated for the selected object. The values transmitted are transferred to the Material Management Assistant.Effects for MTO:The following expressions from the "MTO Documents" tab of the configuration object are applied:
– "Filter" control group, "Value" column See also chapter "Configuring filters for objects in MTO documents (Page 41)".
– "Text fields" control group, "Value" columnSee also chapter "Editing text fields of MTO documents (Page 43)".
Effects for MPR:The following expression from the "MPR Documents" tab of the configuration object is applied:"Text fields" control group, "Value" columnSee also chapter "Editing text fields of MTO documents (Page 45)".
6.3 Creating material documentationA document group contains the package group in which the MTO documents are located.
RequirementThe "Material Management Assistant" is open.
See chapter Open "Material Management Assistant" (Page 20).
Procedure1. Open the "MTO Documents" tab in the "Material Management Assistant".
2. Click the "Produce a new MTO document group" button.The properties of the document group are displayed in the right-hand area of the "Material Management Assistant"
3. Optional: In the "MTO level" list, select another MTO level for which documents are to be created.
4. Optional: Drag&drop another object into the "Start object" field.This object will be used to collect material in the query of the selected MTO levels.
5. Click the "Produce a document group" button.
6. Edit the other settings for the document group. See chapter Editing the material documentation settings (Page 21).
Material documentation and order requests6.3 Creating material documentation
Material Management20 Operating Manual, 05/2016 V 10.2, A5E37098606-AA

6.4 Editing the material documentation settings
6.4.1 Creating MTO documents and package groups
Procedure1. Select the "Package compositions" entry in the "Settings level" list in the properties of a
document group.
2. Click the "Add new document" button.An input screen opens on the right-hand side.If the administrator has already defined the MTO documents and package groups in the configuration object, these will automatically be created in the "Material Management Assistant". You cannot edit these documents.
3. In order to create an MTO document that contains material data, activate the "Contains data" option.
4. If a document is intended to be a master document, activate the "Is master" option.
5. Enter a name in the "Name" column to identify the document internally.The name must be clear.Example: "Doc1"
6. Enter the name of the document as it should be displayed in the "Material Management Assistant" in the "Document Name" column.Example: "CoverSheet"
7. Enter the label and the description.
8. Select the package index from the "Group" list. All documents with the same package index are filed in the same package group.
9. Select a report template in the "Report" list.
10.Click the "Apply" button.
ResultThe MTO document created is displayed in the table.
6.4.2 Editing filter settings
Procedure1. Select the "Filter Settings" entry in the "Settings level" list in the properties of a document
group.
2. Select an MTO document in the "Filter Settings for MTO" list.
3. Click the "Add new filter" button.An input screen opens on the right-hand side.
Material documentation and order requests6.4 Editing the material documentation settings
Material ManagementOperating Manual, 05/2016 V 10.2, A5E37098606-AA 21

4. Enter the name of a column in "Column" in the material lists.The filter will be used for this column of the material lists.
5. Enter an operator in the "Operation" column.
6. If the administrator has not pre-defined a value, enter a script call or the Nested Name of an attribute in the "Value column".
ResultThe filter settings are saved for the selected MTO document.
6.4.3 Editing the text field settingsYou can define the fields to be displayed on the specified documents. For instance, you could enter the author.
Procedure1. Select the "Text field settings" entry in the "Settings level" list in the properties of a document
group.
2. Select an MTO document in the "Text field settings for document" list.
3. Click the "Add new text field" button.
4. An input screen opens on the right-hand side.
5. Enter the name that is to be displayed for the text field in the "Field name" field.
6. If the administrator has not pre-defined any values, enter the text field contents in the "Value" column.
6.4.4 Display the delta for the amount values between two selected revisions.You can check any two released revisions of any MTO document containing data for differing amount values. The results are saved in a temporary delta document.
Prerequisite● The "Users may create delta documents" option is activated in the configuration object on
the "MTO documents" tab.
● The report template and the CSV separators are defined in the configuration object on the "Delta Documents" tab.
Material documentation and order requests6.4 Editing the material documentation settings
Material Management22 Operating Manual, 05/2016 V 10.2, A5E37098606-AA

Procedure1. Open the "MTO Documents" tab in the "Material Management Assistant".
2. Drag&drop an MTO document from the "MTO Documents" control group in the "MTO documents" field of the "Delta Documents" control group.
3. Define which revisions are to be compared.
4. Click the "Create PDF delta" button to save the results in a PDF file.
5. Click the "Create CSV delta" button to save the results in a CSV file.
6.5 Produce order requests
PrerequisiteThe "Material Management Assistant" is open.
See chapter Open "Material Management Assistant" (Page 20).
Procedure1. Call up the "Plugins > Basic > Material Management Assistant" menu command.
2. Click the "MPR Documents" tab.
3. Make the required settings here:
– If you do not wish to use the set of rules for component margins that is displayed, select another set of rules from the "Codes" standard table.
– If you want a document revision to be applied automatically as soon as the MPR document has been created, activate the "Create revision" option.
– If you wish to assign document keys for a new MPR document, activate the "New MPR" option.
– If you wish to update an MPR document, activate the "update MPR with key" option. In this case, you can load a saved MPR revision using the standard table. If new keys are available in the "MTO key" list, you can select them and add them to the "Key list" using the "Add keys" button.
– When creating a new MPR document, assign a key to the first empty key list using the "Add key" button. In order to select a document key from a list of MTO keys that have not been used up until now, click on the "MTO key" standard table. To subsequently apply a key displayed in the key list under "MTO key", click on the "Add key" button.Example: If you want to produce an order list for a whole unit, but have already applied MTO document packages to the different subunits, you need to include the keys of all the MTO documents used in the key list.
– If you are defining a text field and wish to fill it with a particular value, edit the fields "Text" and "Value".
4. To display the elements that can be ordered in the order list, click on the "Refresh" button.
Material documentation and order requests6.5 Produce order requests
Material ManagementOperating Manual, 05/2016 V 10.2, A5E37098606-AA 23
5. If you wish to correct the data shown in the "Margin" column to bring it into line with the margins in accordance with the specified "Codes", you can edit these fields.
6. In order to create the MTO documents in accordance with the default settings, click on the "Create document" button.
ResultThe documents are created.
The documents are saved once the action is complete.
6.6 Managing documents
Opening a document1. Open the "MTO Documents" or "MPR Documents" tab in the Material Management
Assistant.
2. Double-click on a document in the "MTO documents" or "MPR documents" control group.
Revising a document1. Open the "MTO Documents" or "MPR Documents" tab in the Material Management
Assistant.
2. Open the context menu of a process in the "MTO documents" or "MPR documents" control group.
3. Click the "Revision <document key>" entry.You can only revision a process if the version at the time of the last revision status has changed.
Delete document1. Open the "MTO Documents" or "MPR Documents" tab in the Material Management
Assistant.
2. Open the context menu of a process in the "MTO documents" or "MPR documents" control group.
3. Click the "Delete <document key>" entry.You can only delete an MTO process if it is not part of an MPR process.
Material documentation and order requests6.6 Managing documents
Material Management24 Operating Manual, 05/2016 V 10.2, A5E37098606-AA

6.7 Updating the document packages
Procedure1. Open the "MTO Documents" or "MPR Documents" tab in the Material Management
Assistant.
2. Open the context menu of a document package in the "MTO documents" or "MPR documents" control group.
3. Click the "Update <document key>" entry.
Material documentation and order requests6.7 Updating the document packages
Material ManagementOperating Manual, 05/2016 V 10.2, A5E37098606-AA 25

Material documentation and order requests6.7 Updating the document packages
Material Management26 Operating Manual, 05/2016 V 10.2, A5E37098606-AA

Administration 77.1 Preparing the configuration object
In the configuration object, you set, among other things, the base objects for working with the "Material Management Assistant" and define conditions for collecting material.
The configuration must exist uniquely per project and be configured so that the "Material Management Assistant" is functional.
See alsoTabs of the configuration object (Page 65)
7.1.1 Creating the configuration object
RequirementYou are working in an engineering project.
Procedure1. In the "Base objects" tab of the Navigator, navigate to the following node:
"@30 > M28 > A10 > A10 > A10 Material management configuration"
2. Drag&drop the object under any engineering object.Exception: Project root
3. Open the "Process engineering > Pipe Spec Designer" category in the project properties.
4. Drag&drop the configuration object from the engineering view to the "MTO configuration" field.
5. Confirm your entries.
See alsoTabs of the configuration object (Page 65)
7.1.2 Creating a group folder for documentsYou must create a collecting folder for documents. MTO documents and MRP documents are created here as you work.
Material ManagementOperating Manual, 05/2016 V 10.2, A5E37098606-AA 27

Procedure1. In the "Base objects" tab of the Navigator, navigate to the following node:
"@20 > A60 > A20 > A10 > A20 Document group"
2. Drag&drop the object below any object in the engineering view.
7.1.3 Configuring general settings
7.1.3.1 Configuring foldersIn order to create MTO and MPR documents and collect objects, you must define the base objects of the folders.
Base objects are already pre-defined in the database.
RequirementYou have created a group folder in the engineering view. See also chapter Creating a group folder for documents (Page 27).
Procedure1. Open the "Attributes > General" tab in the properties of the configuration object.
Edit the "Folder" control group.
2. In order to define a base object template for the MTO folders, navigate to the following base object:"@30 > M28 > A10 > A30 > A70 Material folder"This object is created in the engineering view under pipes and is used to collect the MTO objects.
3. Drag&drop the object to the "Base object for revision folder" field.
4. In order to define the node under which the report templates are located, navigate to the following base object:"@30 > M28 > A80 Documents".
5. Drag&drop the object to the "Base object for MTO/PO report templates" field.
6. Navigate to the group folder for documents that you have created in the engineering view. See also chapter Creating a group folder for documents (Page 27).
7. Drag&drop the object to the "Engineering object for MTO/PO documents" field.
Administration7.1 Preparing the configuration object
Material Management28 Operating Manual, 05/2016 V 10.2, A5E37098606-AA

8. Navigate to the following base object:"@30 > M00 > A90 > A10 Document groups according to IEC 61355"
9. Drag&drop the object to the following fields:
– "Base object for MTO document packages"References the base object template for the MTO document packages. The document packages are created in the group folder for MTO packages and contain all documents of the respective package.
– "Base object for MPR document packages"References the base object template for the MPR document packages. The packages are created in the group folder for MPR packages (see "MTO/PO documents") and contain all documents of the respective package.
7.1.3.2 Defining units for summationIn order for units to be correctly displayed and converted, you must configure the assignment of the units.
Procedure1. Open the "Attributes > General" tab in the properties of the configuration object.
Edit the "Basic units for summation" control group.
2. Enter the units to be displayed at MTO objects into the "MTO unit" column.
3. Enter the name of the respective unit of the collected objects that is stored in the unit system into the "Unit group" column.Example: If a value is specified in "kg" in isometry data, P&ID data, or in CSV, enter the following in the "Unit group" column: "E20.AA130"You can find additional information on this topic in the "Administration" manual, keyword "Configuring units".
4. Enter the respective unit that is specified in the isometry data, P&ID data, or in CSV into the "Unit" column.
ResultThe values in this table determine the unit that will be entered in the properties of a created MTO object.
If you subsequently change the unit in the properties, the value is converted.
Administration7.1 Preparing the configuration object
Material ManagementOperating Manual, 05/2016 V 10.2, A5E37098606-AA 29

7.1.4 Configuring MTO creation from isometry data
7.1.4.1 Configuring the principles for MTO creation from isometry data
Procedure1. Open the "Attributes > COMOS MTO" tab in the properties of the configuration object.
See also chapter "COMOS MTO" tab (Page 65).
2. Navigate to the base object for pipes.Standard: "@30 > M00 > A35 > A10 > A40 Pipe"
3. Drag&drop the object to the "Base object for pipes" field.
4. Navigate to the following base object:"@30 > M28 > A10 > A20 > A20 MTO object for engineering/released MTO"
5. Drag&drop the object to the "Base object for MTO objects" field.
6. Navigate to a base object whose engineering objects are to act as a collection point for MTO objects. See below, "How the folder collection point works" section.
7. Drag&drop the object to the "Base object for folder collection point" field.
8. Navigate to a base object with the "MTO > Collect material" command available in the context menu of its engineering objects.
9. Drag&drop the object to the "Base object for starting the isometry import" field.
10.Optionally, enter the Nested Name of an attribute of the engineering objects that displays the status of the object in the "Attribute name for status" field.The attribute must have the value "Current" or "Released".Once created, an MTO object is sorted into the relevant folder according to the attribute value.
Classification in folder
Condition
"Current" ● If the attribute value of the attribute specified in the configuration object in the "Attribute name for status" field has the value "Current".
● If no entry is available in the "Attribute name for status" field and no revisions have been made to the isometry of the planned material or the revision has not been released.
"Released" ● If the attribute value of the attribute specified in the configuration object in the "Attribute name for status" field has the value "Released".
● If no entry is available in the "Status for attribute name" field, but revisions have been made to the isometry of the planned material and released.
How the folder collection point worksIf you collect material, a "Current" or "Released" folder is created under the superior folder collection point. The MTO objects are created in these folders.
Administration7.1 Preparing the configuration object
Material Management30 Operating Manual, 05/2016 V 10.2, A5E37098606-AA

All objects under the folder collection point are considered during the summation of the quantities.
Example: Unit as folder collection pointYou have dragged the base object of a unit into the "Base object for folder collection point" field.
All units have the folder collection point function in the engineering view.
If you collect material at subunit A, a "Current" or "Released" folder containing the MTO objects is created underneath the unit.
Material with the same summation key is merged.
MTO objects of subunit A in the "Current" or "Released" folder:
Material Quantity Summation keyValves (valve 1, valve 2) 3 ABCReducers (reducer 1) 3 CDE
If you subsequently collect material at subunit B, the material with the same summation key of subunit B is merged. However, material is not merged together for subunit A and B.
MTO objects of subunit A and subunit B in the "Current" or "Released" folder:
Material Quantity Summation keyValves (valve 1, valve 2) 3 ABCReducers (reducer 1) 3 CDEValve (valve 3) 1 ABCReducers (reducer 2) 3 CDE
Administration7.1 Preparing the configuration object
Material ManagementOperating Manual, 05/2016 V 10.2, A5E37098606-AA 31

Example: Subunit as folder collection pointYou have dragged the base object of a subunit into the "Base object for folder collection point" field.
All subunits have the folder collection point function in the engineering view.
If you collect materials at subunit A, a "Current" or "Released" folder containing the MTO objects is created underneath subunit A.
Material with the same summation key is merged.
MTO objects of subunit A in the "Current" or "Released" folder:
Material Quantity Summation keyValves (valve 1, valve 2) 3 ABCReducers (reducer 1) 3 CDE
If you subsequently collect material at subunit B, the material with the same summation key is merged under subunit B.
MTO objects of subunit B in the "Current" or "Released" folder:
Material Quantity Summation keyValve (valve 3) 1 ABCReducers (reducer 2) 3 CDE
Administration7.1 Preparing the configuration object
Material Management32 Operating Manual, 05/2016 V 10.2, A5E37098606-AA

7.1.4.2 Defining filters for creation of MTO objectsYou can define filters which control the selection of material for creating MTO objects. If no filter is defined, MTO objects are created for all objects below the node for which you have executed the "Collect material" command.
Procedure1. Open the "Attributes > COMOS MTO" tab in the properties of the configuration object.
See also chapter "COMOS MTO" tab (Page 65).Edit the "Object identification" control group.
2. Write the nested name of an attribute of the isometry objects in the "Attribute" column.
3. In the "Condition" column, write a condition that the attribute must fulfill in order for the condition to be true. Keep in mind the possible operators. See chapter "COMOS MTO" tab (Page 65).If you choose the "set" or "unset" value, the "Value" column is omitted.
4. Write a comparison value in the "Value" column.
5. Optional: Define additional filters.
ResultIf the condition of all defined filters for an isometry object is true, an MTO object is created when material is collected.
7.1.4.3 Assigning attributesYou can assign attributes of isometry objects to MTO object attributes.
Procedure1. Open the "Attributes > COMOS MTO" tab in the properties of the configuration object.
See also chapter "COMOS MTO" tab (Page 65).Edit the "Attribute list" control group.
2. In the "Isometry attribute" column, write the nested name of the attribute whose value is to be transferred to the MTO object.
3. In the "MTO attribute" column, write the nested name of the MTO object attribute in which the value is to be entered.
ResultThe value of the attribute in the "Isometry attribute" column is transferred to the attribute in the "MTO attribute" column when material is collected.
Administration7.1 Preparing the configuration object
Material ManagementOperating Manual, 05/2016 V 10.2, A5E37098606-AA 33

7.1.4.4 Configuring the creation of the summation keyTo create a summation key from the properties of an isometry object, you can define a set of rules. The summation key must identify the object uniquely. This is necessary so that objects that are assumed to be of the same type can be merged to form a single MTO object and the quantities can be added together as early as the collection of planned objects.
Structure principle of the summation keyOption 1: Comparing two values with one another
Possible values:
● Nested Name of attributes
● Script call
Compare "Expression A" with "Expression B" based on the condition.
● If the comparison is true, the summation key receives the value from the "True value" column.
● If the comparison is wrong, the summation key receives the value from the "Wrong value" column.
Option 2: Using a fixed expression
Write a fixed value with quotation marks in the "Expression A" column. All additional columns are omitted.
The fixed value is used as a summation key.
Option 3: Verifying the existence of an attribute
Write the Nested Name of an attribute in the "Expression A" column and the "Set" or "Unset" value in the "Condition" column. The "Expression B" column is omitted.
● If the comparison is true, the summation key receives the value from the "True value" column.
● If the comparison is wrong, the summation key receives the value from the "Wrong value" column.
Option 4: Using a variable expression
Possible values:
● Nested Name of attributes
● Script calls
Enter a value only in the "Expression A" column. Only the "Expression A" column is evaluated and used as a summation key.
Administration7.1 Preparing the configuration object
Material Management34 Operating Manual, 05/2016 V 10.2, A5E37098606-AA

ProcedureTo configure the setting of the summation key, follow these steps:
1. Open the "Attributes > COMOS MTO" tab in the properties of the configuration object.Edit the "Summation key" control group.
2. Create entries in the "Summation key" control group. In doing so, observe the structure principle of the summation key.Keep in mind which values are allowed. See also chapter "COMOS MTO" tab (Page 65).
Examples of entries in the "Summation key" control group
Expression A Condition Expression B True value Wrong valueY00T00001.Y00A00002 Y00T00003.Y00A00744 Y00T00003.Y00A00744AA02
set Y00T00003.Y00A00744AA02
""
Explanation of the example entries
Summation key = component type + nominal diameter 1 + nominal diameter 2 (if available)
Example of a summation key: REDU10080
Effect of the example entries
When material is collected, all reducers with the same nominal diameters are merged to form a single MTO object and their quantities are added together.
7.1.4.5 Defining a reference value for establishing quantitiesYou can define whether the material quantity is to be determined using the number of parts or the length.
● If you do not enter anything in this table, the number of parts of all pipes is added together.
● If you define conditions, the values of the attribute you have specified in the "Attribute" column are added together for all objects.
You can define several conditions. If a condition is not fulfilled, the subsequent ones are checked. If none of the conditions are fulfilled, the pipe is not included in the quantity.
Procedure1. Open the "Attributes > COMOS MTO" tab in the properties of the configuration object.
Edit the "Quantities" control group.
2. Enter a value in the "Expression" column.
3. Enter an operand in the "Condition" column.The operand compares the expression with the value.
Administration7.1 Preparing the configuration object
Material ManagementOperating Manual, 05/2016 V 10.2, A5E37098606-AA 35

4. Enter a comparison value in the "Value" column.
5. Enter the Nested Name of an attribute in the "Attribute" column.The value of the attribute is read out and added to the values of other objects. The sum of these values gives the total quantity.The attribute must contain the length of the pipe.
ResultWhen the quantities are calculated, the values of the attribute in the "Value" column are added.
See also"COMOS MTO" tab (Page 65)
7.1.5 Configuring a CSV importYou can specify at which engineering objects the "MTO > CSV import" is to be available.
If no base object is specified here, the command is available at all objects.
Procedure1. Open the "Attributes > CSV import" tab in the properties of the configuration object.
2. Navigate to a base object with the "MTO > CSV import" command available in the context menu of its engineering objects.
3. Drag&drop the object to the "Base object for starting the CSV import" field.
7.1.6 Configuring MTO creation from P&ID data
7.1.6.1 Configuring the principles for MTO creation from P&ID data
Procedure1. Open the "Attributes > MTO estimation" tab in the properties of the configuration object.
See also chapter "MTO estimation" tab (Page 67).
2. Navigate to the base object for pipes.Default: "@30 > M00 > A50| > A10 > A40| > A10 > A10"
3. Drag&drop the object to the "Base object for pipes" field.
4. Navigate to the following base object:"@30 > M28 > A10 > A20 > A10 MTO object for estimation material"
5. Drag&drop the object to the "Base object for MTO objects" field.
Administration7.1 Preparing the configuration object
Material Management36 Operating Manual, 05/2016 V 10.2, A5E37098606-AA

6. Enter the nested name of the attribute that specifies the main nominal diameter at P&ID objects.Standard: "Y00T00003.Y00A00744"The value is applied in the properties of the MTO object.
7. Enter the nested name of the attribute that specifies the outlet nominal diameter at P&ID objects.Standard: "Y00T00003.Y00A00744AA02"The value is applied in the properties of the MTO object.
7.1.6.2 Defining filters for creation of MTO objectsYou can define filters which control the selection of material for creating MTO objects. If no filter is defined, MTO objects are created for all objects below the node under which you collect material.
Procedure1. Open the "Attributes > MTO estimation" tab in the properties of the configuration object.
Edit the "Object identification" control group.See also chapter "MTO estimation" tab (Page 67).
2. Write the nested name of an attribute of the P&ID objects in the "Attribute" column.
3. Write an operator in the "Condition" column. Permitted operators: See chapter "MTO estimation" tab (Page 67).If you choose the "set" or "unset" value, the "Value" column is omitted.
4. Write a comparison value in the "Value" column.
5. Optional: Define additional filters.
ResultIf the condition of all defined filters for a P&ID object is true, an MTO object is created when the material is collected.
7.1.6.3 Assigning attributesYou can assign attributes of P&ID objects to MTO object attributes.
Procedure1. Open the "Attributes > MTO estimation" tab in the properties of the configuration object.
See also chapter "MTO estimation" tab (Page 67).Edit the "Attribute list" control group.
2. In the "P&ID attribute" column, write the nested name of the attribute whose value is to be transferred to the MTO object.
3. In the "MTO attribute" column, write the nested name of the MTO object attribute in which the value is to be entered.
Administration7.1 Preparing the configuration object
Material ManagementOperating Manual, 05/2016 V 10.2, A5E37098606-AA 37

ResultThe value of the attribute in the "P&ID attribute" column is transferred to the attribute in the "MTO attribute" column when material is collected.
7.1.6.4 Configuring the creation of the summation keyTo create a summation key from the properties of an isometry object, you define a set of rules. The summation key must identify the object uniquely. This is necessary so that objects that are assumed to be of the same type can be merged to form a single MTO object and the quantities can be totaled already when collecting planned objects.
Structure principle of the summation keySee chapter Configuring the creation of the summation key (Page 34).
Procedure1. Open the "Attributes > MTO estimation" tab in the properties of the configuration object.
2. Create entries in the "Summation key" control group. In doing so, observe the structure principle of the summation key. See also chapter Configuring the creation of the summation key (Page 34).Every row of the table is evaluated and forms a partial key.Keep in mind which values are allowed. See also chapter "MTO estimation" tab (Page 67).
7.1.6.5 Defining rules for estimating flangesYou can define rules that enable COMOS to include flanges in the estimation for specific P&ID objects.
Procedure1. Open the "Attributes > MTO estimation" tab in the properties of the configuration object.
Edit the "Conditions for flange estimation" control group.See also chapter "MTO estimation" tab (Page 67).
2. In the "Expression" column, write an expression whose value is to be queried. The value is compared with the entry in the "Value " column.
3. Write an operand in the "Condition" column.
4. Write a comparison value in the "Value" column.
Administration7.1 Preparing the configuration object
Material Management38 Operating Manual, 05/2016 V 10.2, A5E37098606-AA

ExampleCompare an attribute value with a value specified in this table.
Column Entry"Expression" Requirement: You have created an attribute that describes the connection type
of the component at the P&ID objects.You can find additional information on this topic in the "COMOS Platform Admin‐istration" manual, keyword "Creating an attribute".Y00T00135.<Attribute name>
"Operator" ="Value" "Flanged"
ResultIf a query yields the value "true", a flange is estimated for the P&ID object.
7.1.7 Configuring settings for MTO documents
7.1.7.1 Configuring general settings
Procedure1. Open the "Attributes > MTO documents" tab in the properties of the configuration object.
See also chapter "MTO documents" tab (Page 70).Edit the "General settings" control group.
2. In the "Name for MTO document package" field, enter how the name of a new document package is to be be constructed.Example:"PM." + Text(1) + "-" + Filter(1) + "-" + group
Component of the entry Description"PM." Fixed valueText(1) Reference to the "Text fields" table
The first value of the table is used"-" Fixed valueFilter(1) Reference to the "Filter list" table
The first value of the table is used"-" Fixed valuegroup Reference to the value in the "Group" column of the MTO
document package in the Material Management AssistantThe index of a package is automatically added at the end of the name.This results in the following names for MTO document packages: "PM.L10-B1-1", "PM.L10-B1-2", "PM.L10-B1-3", etc.
Administration7.1 Preparing the configuration object
Material ManagementOperating Manual, 05/2016 V 10.2, A5E37098606-AA 39

3. In the "Document key" field, enter how the document key of a new document is to be constructed.Example:"MTO-" + Text(1) + "-" + Text(1)
Component of the entry Description"MTO-" Fixed valueFilter(1) Reference to the "Filter list" table
The first value of the table is used."-" Fixed valueText(1) Reference to the "Text fields" table
The first value of the table is used.This example results in the following entry In the "Document key" field on the "Material Management Assistant > MTO Documents" tab: "MTO-B1-L10"
4. Enter an expression in the "User context" field.If you call the "Material Management Assistant" from the Navigator via the context menu, the user context is evaluated depending on the selected object.The user context is appended to each document process. Effect:
– The "Documents" tab displays only the document processes which have the same user context as that determined at the object in the Navigator.
– The "MPR documents" tab displays only those MTO keys of the documents which have the same user context as that determined at the object in the Navigator.
Example: If the user context is owner.name, only those documents which have the name of the selected object in the Navigator as user context are displayed.
5. Navigate to a base object with the "MTO > Create MTO document" command available in the context menu of its engineering objects.
6. Drag&drop the object to the "Base object for creating MTO documents" field.
7.1.7.2 Defining authorization for users
Procedure1. Open the "Attributes > MTO documents" tab in the properties of the configuration object.
See also chapter "MTO documents" tab (Page 70).Edit the "Settings for authorization" control group.
2. Activate the options of the functionalities you want to unlock for the user in the "Material Management Assistant".
Administration7.1 Preparing the configuration object
Material Management40 Operating Manual, 05/2016 V 10.2, A5E37098606-AA

7.1.7.3 Configuring the creation of MTO documentsSet up which MTO documents are to be part of a document package.
NoteSpecify at least one document
Enter data for at least one document. One line is provided for each document.
Procedure1. Open the "Attributes > MTO documents" tab in the properties of the configuration object.
See also chapter "MTO documents" tab (Page 70).Edit the "Documents" control group.
2. In the "Master" column, select whether or not the document is to be a master document.A master document must exist for each document package.
3. Enter a name in the "Name" column to identify the document internally. The name must be clear.Example: "Doc1"
4. Enter the name of the document as it is to be displayed in the "Material Management Assistant" in the "Document Name" column. If several package groups are specified, one name can be used for several package groups.Example: "CoverSheet"
5. Optional: Enter the label and the description.
6. Enter the name of a report template in the "Report" column. You can find suitable report templates on the "Base objects" tab in the Navigator under the following node: "@30 > M28 > A80 Documents".
7. Enter a number for the package index in the "Package group" column. All documents with the same package index are filed in the same package group.Example: "1" or "2"
8. In the "XML" column, specify whether an XML file containing material data is to be created for the MTO document.
9. Confirm your entries.
Example
Master Name Document name Label Description Report Package group XMLYes Doc1 DAT Material Assem‐
bly List GroupMTO.002 1 Yes
No Doc2 CoverSheet MTO.001 1 No
7.1.7.4 Configuring filters for objects in MTO documentsYou can set which objects are to be displayed within the material lists in MTO documents.
Administration7.1 Preparing the configuration object
Material ManagementOperating Manual, 05/2016 V 10.2, A5E37098606-AA 41

Procedure1. Open the "Attributes > MTO documents" tab in the properties of the configuration object.
Edit the "Filter" control group.
2. Enter the MTO document for which the filter is defined in the "Document" column. Use the name that you have entered in the "Name" column in the "Documents" control group.See also chapter Configuring the creation of MTO documents (Page 41).
3. Enter the name of a column in the material lists in "Column". The filter will be used for this column of the material lists.
4. Enter an operator in the "Condition" column.
5. Optional: Enter a script call or the nested name of an attribute in the "Value" column. If you do not enter a value, the user enters the value in the "Material Management Assistant" on the "MTO documents" tab.If you enter a value: If the user starts to create MTO documents via the context menu of an object in the Navigator, the value is evaluated and transferred to the "Material Management Assistant".
7.1.7.5 Assigning material listsSpecify the material lists on which the creation of MTO documents is based.
RequirementYou have created material lists for estimated material, planned material, and released material. See chapter Creating material lists (Page 47).
Procedure1. Open the "Attributes > MTO documents" tab in the properties of the configuration object.
Edit the "Material list" control group.
2. Select a material list on the "Units" tab in the Navigator.
3. Drag&drop this into the appropriate edit field of the "Material list" control group.
4. Repeat these steps for the remaining material lists.
7.1.7.6 Configuring the grouping of documentsYou can have the display of MTO documents grouped by a column of the material list.
Procedure1. Open the "Attributes > MTO documents" tab in the properties of the configuration object.
Edit the "Grouping" control group.
2. Enter the name in the "Documents" column to identify the document internally. The value must be identical to one of the names in the "Documents" control group in the "Name" column.
Administration7.1 Preparing the configuration object
Material Management42 Operating Manual, 05/2016 V 10.2, A5E37098606-AA
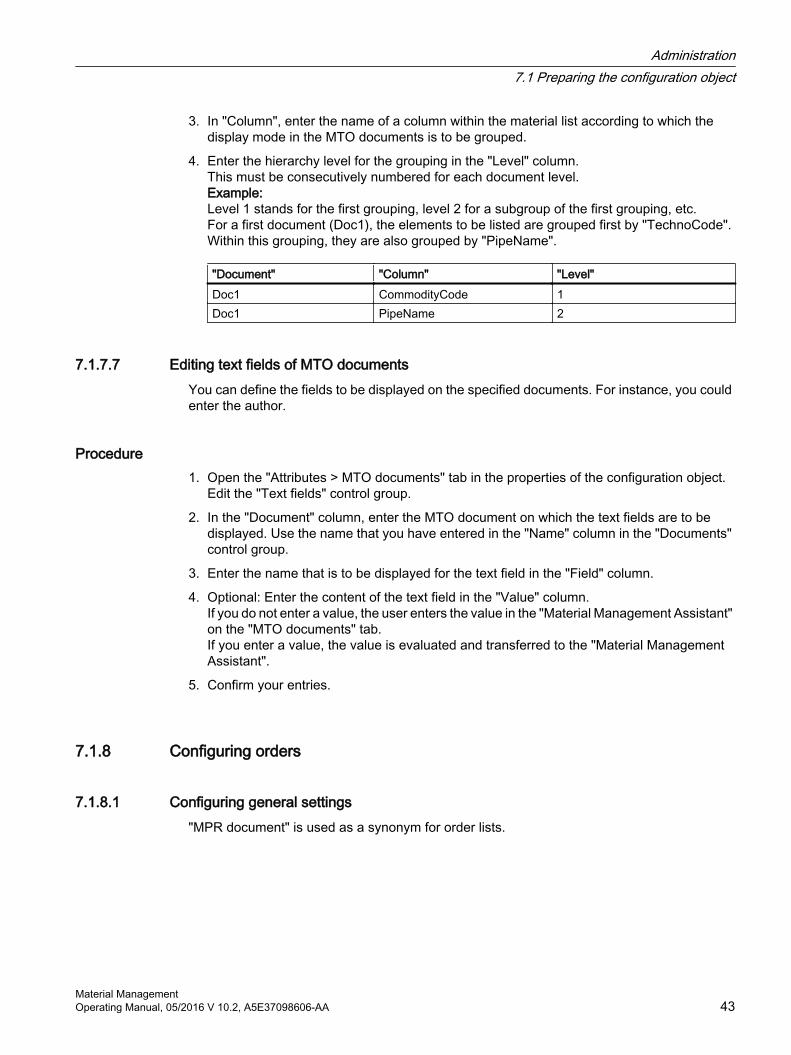
3. In "Column", enter the name of a column within the material list according to which the display mode in the MTO documents is to be grouped.
4. Enter the hierarchy level for the grouping in the "Level" column. This must be consecutively numbered for each document level.Example:Level 1 stands for the first grouping, level 2 for a subgroup of the first grouping, etc.For a first document (Doc1), the elements to be listed are grouped first by "TechnoCode". Within this grouping, they are also grouped by "PipeName".
"Document" "Column" "Level"Doc1 CommodityCode 1Doc1 PipeName 2
7.1.7.7 Editing text fields of MTO documentsYou can define the fields to be displayed on the specified documents. For instance, you could enter the author.
Procedure1. Open the "Attributes > MTO documents" tab in the properties of the configuration object.
Edit the "Text fields" control group.
2. In the "Document" column, enter the MTO document on which the text fields are to be displayed. Use the name that you have entered in the "Name" column in the "Documents" control group.
3. Enter the name that is to be displayed for the text field in the "Field" column.
4. Optional: Enter the content of the text field in the "Value" column.If you do not enter a value, the user enters the value in the "Material Management Assistant" on the "MTO documents" tab.If you enter a value, the value is evaluated and transferred to the "Material Management Assistant".
5. Confirm your entries.
7.1.8 Configuring orders
7.1.8.1 Configuring general settings"MPR document" is used as a synonym for order lists.
Administration7.1 Preparing the configuration object
Material ManagementOperating Manual, 05/2016 V 10.2, A5E37098606-AA 43

Procedure1. Open the "Attributes > Orders" tab in the properties of the configuration object.
Edit the "General settings" control group.
2. In the "MPR package name" field, enter how the name of a new MPR package is to be constructed. See chapter Configuring general settings (Page 39).
3. In the "Document key" field, enter how the document key of a new document is to be constructed.See chapter Configuring general settings (Page 39).
4. In the "Summation column" field, enter the name of a column in the material list from which basic material is to be added up and merged.Example: Order no.
5. Complete the "MPR package ID" field. The MRP package ID is constructed like the document key. See chapter Configuring general settings (Page 39).This entry forms the name of the MPR documents.
6. In order to allow users to revise the MPR documents, activate the "Allow revision" option.
7. Confirm your entries.
7.1.8.2 Configuring the creation of MPR documentsSet up which MPR documents are to be part of an MPR document package.
NoteSpecify at least one document
Enter data for at least one document. One line is provided for each document.
NoteCreate at least one XML file
Create an XML file for at least one document of an MPR document package.
Procedure1. Open the "Attributes > Orders" tab in the properties of the configuration object.
Edit the "Documents" control group.
2. Additional steps: See chapter Configuring the creation of MTO documents (Page 41).
7.1.8.3 Creating additional columns for MPR documentsYou can expand the table of documents to be ordered on the "MPR Documents" tab in the "Material Management Assistant" by any number of columns.
Administration7.1 Preparing the configuration object
Material Management44 Operating Manual, 05/2016 V 10.2, A5E37098606-AA

Procedure1. Open the "Attributes > Orders" tab in the properties of the configuration object.
Edit the "Additional columns" control group.
2. In "Column name", enter the name of the column that you wish to create.
– To create a column that adopts the values of a column from the material list, write the column name here exactly as it is entered in the material list.
– To create an empty column, enter any column name.
3. In the "Editable" column, specify whether the column is to be enabled for editing by the user.
– Value "No": Column cannot be edited.
– Value "Yes": Column can be edited.
4. In the "Quantity relevant" column, enter whether the contents of the column are to be taken into consideration when the material is calculated.
– Value "No": Material quantity is ignored.
– Value "Yes": Material quantity is taken into consideration.
If the user enters a positive value in the column created in the "Material Management Assistant", it is added to the material quantity.If the user enters a negative value in the column created in the "Material Management Assistant", it is subtracted from the material quantity.
7.1.8.4 Editing text fields of MTO documentsYou can define the fields to be displayed on an MPR document. For instance, you could enter the author.
Procedure1. Open the "Attributes > Orders" tab in the properties of the configuration object.
Edit the "Text fields" control group.
2. Enter the name that is to be displayed for the text field in the "Name" column.Example: "Author"
3. Optional: Enter the content of the text field in the "Value" column.If you do not enter a value, the user enters the value in the "Material Management Assistant" on the "MPR documents" tab.If you enter a value, the value is evaluated and transferred to the "Material Management Assistant".
4. Confirm your entries.
Administration7.1 Preparing the configuration object
Material ManagementOperating Manual, 05/2016 V 10.2, A5E37098606-AA 45

7.1.9 Configuring delta documents
PrerequisiteYou have created a report for delta documents in the engineering view.
Base object: "@30 > M28 > A80 > MTO.004 MTO delta list"
Procedure1. Open the "Attributes > Delta documents" tab in the properties of the configuration object.
2. Drag&drop the delta list from the "Units" tab to the "Report for delta documents" field.
3. In the "CSV separator" field, enter the character used as a separator in CSV files.
4. In the "Export folder" field, specify the folder to which delta documents are to be exported by default when they are created.
7.1.10 Configuring manual estimation of P&ID dataOnly the components that were extracted from the P&ID are listed on the "PID estimation" tab. However, you can also add parts that are not listed on the P&ID during manual estimation.
Example: Elbows
Procedure1. In the "Standard GTypes" control group, enter the component types that are to be displayed
to the user on the "Manual estimation" tab during manual estimation. See also chapter "Assigning further components (Page 14)".
2. To call a component type from a standard table, click in an empty field.The standard table contains the stored component types.Example: "ELBO – fitting elbow" or "Tube – implied tube".Optional: To distinguish between component types of COMOS and PDMS, change the standard table of the component types.
– For PDMS pipe specs: "Y10 > M23 > A10 > Y10M23N00002 GTYPE"
– For COMOS pipe specs: "Y10 > M23 > A10 > Y10M23N00001 Function code"
The user can view additional selectable manufacturer devices on the "Manual estimation" tab.
3. In the "Additional columns" control group, define additional columns that are also to be displayed on the "PID estimation" tab.The information displayed in the columns is purely informative and always refers to the component in the pipe spec. The file extension here is either a script call or an attribute name.
4. Enter a column name.
Administration7.1 Preparing the configuration object
Material Management46 Operating Manual, 05/2016 V 10.2, A5E37098606-AA

5. Enter an attribute name or a script call in the "Expression" column.Example: "Owner.Owner.Name". This evaluates 2 levels of the owner and states the name of the upper owner.
6. Enter the width of the column in pixels.Example: "100"
7.2 Material lists
7.2.1 Types of material lists
Material list Description"Parts list" Groups materials based on their pipe."Unit list" Groups the material based on the unit in which it is located."Delta list" Calculates the difference between the following documents:
● Difference between successive revisions or between the most recently released and currently pending revisions of an MTO document
● Difference between currently pending revisions of the following MTO types:– Estimated MTO and Current MTO– Estimated MTO and Released MTO– Current MTO and Released MTO
7.2.2 Creating material listsMaterial lists form the basis for creating MTO documents. Material lists contain all data that will be transferred to the MTO documents on the basis of filters. You may create a material list for each MTO level.
Procedure1. In the Navigator, select the following object in the base data:
"@20 > A70 > Y20 > M28 MTO (Material Management)".Below this object, you will find predefined material lists for the different MTO levels.
2. Drag&drop a material list to the engineering project.
3. You have the option of adding one or more columns to the material list.Do not delete any of the predefined columns.
4. Save the material list.
Administration7.2 Material lists
Material ManagementOperating Manual, 05/2016 V 10.2, A5E37098606-AA 47

5. Open the "Attributes > MTO documents" tab of the configuration object.
6. Drag&drop the material list you have created from the Navigator to the corresponding field of the "Material lists" control group.
ResultWhen you select the corresponding entry from the "MTO level" list on the "MTO documents" tab of the "Material Management Assistant", material is taken from the material list that you have created and linked.
See alsoTypes of material lists (Page 47)
Assigning material lists (Page 42)
7.3 Configuring the display of the quantity data delta between revisionYou can check if the quantity data for the current revision of an MTO document has changed by comparing it against a revision that has already been released. To have the deviations in an MTO document displayed, edit the report template of the MTO document in the base project.
Procedure1. In the base project, define two new columns in the "MTOContent" and "MTOTitle" sub
reports:
– Column for the delta values:The deviating quantity in the MTO document is specified here.
– Column for the status:In the MTO document, it is specified here whether a material group has been added or removed or whether there was no change.
2. Specify how these values are to be determined in the script in the report template of the MTO document.Example:Dim DeltaValueDim DeltaStatusDeltaValue = CurrentItem.GetAttributeValue("DeltaValue")DeltaStatus = CurrentItem.GetAttributeValue("DeltaStatus")
ResultIf you execute a revision, the columns containing the corresponding information are additionally output in the MTO document.
Administration7.3 Configuring the display of the quantity data delta between revision
Material Management48 Operating Manual, 05/2016 V 10.2, A5E37098606-AA

7.4 Creating and managing the MTO set of rulesSets of rules are needed to automatically calculate additions for the estimated quantities. The selection of the appropriate rules for a component is based on the properties of the component. These properties include the number of parts, the nominal diameter, and the type.
Sets of rules can be created or managed in the standard tables.
ProcedureTo create an MTO set of rules, proceed as follows:
1. Select the menu command "Administrator > Base data > Standard tables".
2. Activate the "Base" option.
3. To edit the MTO rulesets, open the following object:"Y10 > M28 > A10 > A10 > Y10M28N00002 MTO ruleset".
The table entries have the following meanings:
Column Description"Name" Numbering increasing sequentially without gaps"Description" Name of ruleset
Example: "L09-10/5 %""Value 1" Component type
Example: "TUBE".If a component type is not listed in the ruleset, enter "ELSE".
"Value 2" Maximum nominal diameterExample: "50.0"
"Value 3" Maximum quantityExample: "10.0"
"Value 4" Margin in %Example: "10"
"Value 5" RoundingExample: "6". This example involves a number that is divisible by the value "6".
"Value 6" Cumulative number of partsExample: "0"
Example
Name Description Value 1 Value 2 Value 3 Value 4 Value 5 Value 600001 L09-10/5 % TUBE 50.0 10.0 0 6 000002 L09-10/5 % TUBE 50.0 200.0 10 6 000003 L09-10/5 % ELSE 10.0 99999.0 0 1 0
During MPR document creation, the user selects the name of a set of rules. The rule from the list described here is applied to the component and its number of parts.
Administration7.4 Creating and managing the MTO set of rules
Material ManagementOperating Manual, 05/2016 V 10.2, A5E37098606-AA 49

A percentage margin is calculated and then rounded to a value divisible by a specified number. In addition, a supplementary margin is added. The result represents the margin for a component.
7.5 Configuring a CSV import
7.5.1 Structure of a CSV fileTo import CSV files, they must have the following structure. The separator between the individual entries in the CSV file must be a semicolon.
ExampleThis is a representation of the CSV file in Microsoft Excel.
Administration7.5 Configuring a CSV import
Material Management50 Operating Manual, 05/2016 V 10.2, A5E37098606-AA
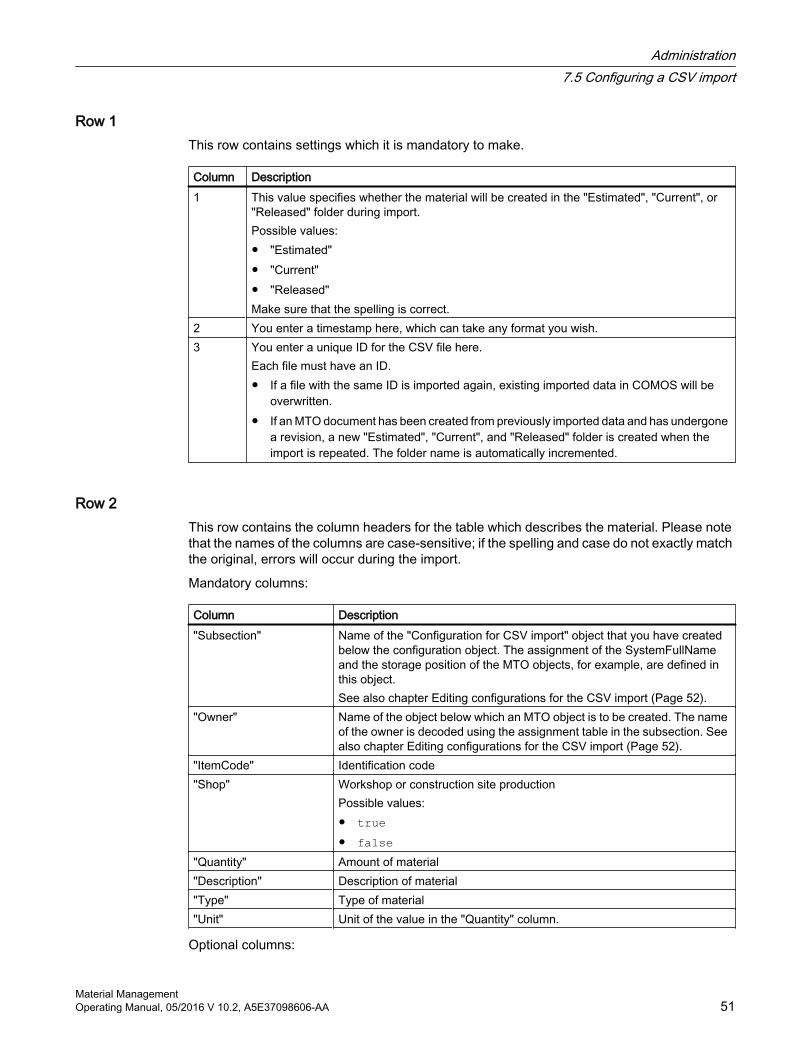
Row 1This row contains settings which it is mandatory to make.
Column Description1 This value specifies whether the material will be created in the "Estimated", "Current", or
"Released" folder during import.Possible values:● "Estimated"● "Current"● "Released"Make sure that the spelling is correct.
2 You enter a timestamp here, which can take any format you wish.3 You enter a unique ID for the CSV file here.
Each file must have an ID.● If a file with the same ID is imported again, existing imported data in COMOS will be
overwritten.● If an MTO document has been created from previously imported data and has undergone
a revision, a new "Estimated", "Current", and "Released" folder is created when the import is repeated. The folder name is automatically incremented.
Row 2This row contains the column headers for the table which describes the material. Please note that the names of the columns are case-sensitive; if the spelling and case do not exactly match the original, errors will occur during the import.
Mandatory columns:
Column Description"Subsection" Name of the "Configuration for CSV import" object that you have created
below the configuration object. The assignment of the SystemFullName and the storage position of the MTO objects, for example, are defined in this object.See also chapter Editing configurations for the CSV import (Page 52).
"Owner" Name of the object below which an MTO object is to be created. The name of the owner is decoded using the assignment table in the subsection. See also chapter Editing configurations for the CSV import (Page 52).
"ItemCode" Identification code"Shop" Workshop or construction site production
Possible values:● true● false
"Quantity" Amount of material"Description" Description of material"Type" Type of material"Unit" Unit of the value in the "Quantity" column.
Optional columns:
Administration7.5 Configuring a CSV import
Material ManagementOperating Manual, 05/2016 V 10.2, A5E37098606-AA 51

You can create as many other columns as you wish. The header of every additional column must contain the exact name of an attribute which is already available at the base object of the MTO object and whose value you want to enter via the CSV import.
Row 3 - nThe material being imported is described here. Each row corresponds to one component.
7.5.2 Editing configurations for the CSV importConfigurations for the CSV import are objects that are used to provide various settings for the CSV import. They have the following purposes:
● Derivation of the path where an MTO object is to be created from the name of the owner specified in the "Owner" column in the CSV file.
● Completion of the owner structure of the MTO object corresponding to the information in the "Owner" column.
● Creation of the MTO object.
Procedure1. Create a "Configuration for CSV import" object using the context menu below the
configuration object.
2. Open the "Attributes > General settings" tab. See also chapter "Configuration for CSV import" object (Page 58).
3. Drag&drop a base object to the "Base object for revision folder" field.See also chapter Configuring folders (Page 28).
4. Drag&drop the following base object to the "Base object for MTO objects" field:"@30 > M28 > A10 > A20 > A20 MTO object for engineering/released MTO"
5. Enter the required settings in the "Name mapping for MTO owner" table. See also chapters "Configuration for CSV import" object (Page 58) and Algorithm for generating a COMOS path name (Page 52).
7.5.3 Algorithm for generating a COMOS path name
IntroductionThe path to the MTO object to be created is determined as follows:
● COMOS beaks down the information in the "Owner" column of the CSV file into its name part using the "Name mapping for revision folder" table for the "Configuration for CSV import" object.
● From the name parts, the interface derives the path to the correct node in the tree structure where an MTO object is to be created.
Administration7.5 Configuring a CSV import
Material Management52 Operating Manual, 05/2016 V 10.2, A5E37098606-AA

See also chapter "Configuration for CSV import" object (Page 58).
AlgorithmThe following steps are performed when executing the mapping table:
COMOS extracts the SystemFullname from the information in the "Owner" column. The interface processes the individual mapping entries, starting with the one on the far left.
● First name part: COMOS evaluates the start index and the number of characters of the associated mapping entry.
● Last name part: The mapping entry on the right is evaluated.
● Next to last name part: The second mapping entry from the right is evaluated.And so on.
The following algorithm is executed for each mapping entry:
1. COMOS checks what is entered in the "Data item" row:
– Name of a String Parameter:A corresponding COMOS node does not exist for the name part. Continue with step 2.
– Name or label of a COMOS object:If there is one: The prefix and postfix are removed from the part of the name.The remainder of the string represents the name or the label of an MTO object. It is copied to the path list.
– Nothing entered: COMOS continues with step 2.
2. If the "Data item" row is empty or contains a String Parameter, a check is made whether the "Fixed name" row has been configured:
– "Fixed name" not set: The processing of the mapping table is aborted for the object.
– "Fixed name" set: The entered or resulting string is written to the path list.
Once all mapping entries have been processed, the sequence of the entries in the path list is reversed.
Result● The string entered in the path list produces the path to the MTO object to be created.
● If the object does not exist, the mapping table returns all information needed to create it. The name part of the last mapping entry is written to the "Name" property of the COMOS object.
● If the owner structure of the object you are looking for is incomplete: The mapping table provides all information needed to complete the owner structure, provided that a base object has been specified for every hierarchy level.
Administration7.5 Configuring a CSV import
Material ManagementOperating Manual, 05/2016 V 10.2, A5E37098606-AA 53

Administration7.5 Configuring a CSV import
Material Management54 Operating Manual, 05/2016 V 10.2, A5E37098606-AA

References 88.1 exportMTO file
The "exportMTO" file must meet the following conditions:
● A value must be available for at least the <elementRef> or <elementName> nodes.
● All the nodes listed in the example must be available.
NotePay attention the file name
In order for the file to be recognized, it must be named as follows:
exportMTO_<YYMMDD>_<HHMMSS>.xml
Example<headerBlock> <batchData> <batchDataName>Date</ batchDataName > <batchDataValue>July 14, 2011</ batchDataValue > </batchData> … <batchData> <batchDataName>User</ batchDataName > <batchDataValue>a_user1</ batchDataValue > </batchData></headerBlock>
<dataBlock> <pipeData> <comosStatus>0</comosStatus> <elementRef>17385/44062</elementRef> <elementName>/P1M1T1/Z003</elementName> <comosUID>A2N66274WE</comosUID> <curRelStat>R</curRelStat> <materialFile> D:\MTOExport\MaterialFiles\_P1M1T1_Z003_material.txt </materialFile> <revision>ABC</revision> <pdmsStatus>0</pdmsStatus> </pipeData> … <pipeData> … </pipeData></dataBlock>
Material ManagementOperating Manual, 05/2016 V 10.2, A5E37098606-AA 55

Tag Description<batchDataName> Name of the batch attribute.<batchDataValue> Value of the batch attribute.<pipeData> Contains the data of a pipe for which an XML file containing the MTO-related
data is being created.<comosStatus> Completed automatically while data is being transferred from AVEVA PDMS
to COMOS. If an entry is made prior to transfer, the <pipeData> block is skip‐ped, because it is deemed to have already been processed.Possible values:0: MTO transfer to COMOS successful1: MTO transfer to COMOS not successful2: The "current" status has been applied automatically.4: Material files have been created automatically8: Material file damaged16: <elementName> determined using <elementRef>.32: <comosUID> determined using <elementRef>.64: <elementRef> determined using <elementName>.128: <elementRef> points to a ZONE or PIPE. For all PIPES in this ZONE or SITE new <pipeData> nodes have been created in this XML file.
<elementRef> Reference number for a pipe from AVEVA PDMS. Has to belong to the same object as the entry in <elementName>. If a ZONE or SITE from PDMS is specified instead of a PIPE , a separate node <pipeData> is created for each of the pipes covered.
<elementName> Name of a pipe from AVEVA PDMS. Has to belong to the same object as the entry in <elementRef>. If a ZONE or SITE from AVEVA PDMS is specified instead of a PIPE , a separate node <pipeData> is created for each of the pipes covered.
<comosUID> UID of the object from COMOS that is linked to the pipe in AVEVA PDMS which is described in <pipeData> .
<curRelStat> Possible values:● C● R
If the value R is entered, a value for <revision> must also be present.If the tag is empty, a value of C is applied.
<materialFile> Path to the material file that is to be used. If this is empty, a material file is created automatically for the referenced pipe.
<revision> Name of revisionWill be ignored for material with the status C .
<pdmsStatus> Value = -1: The current node <pipeData> is skipped.If this is empty, a value of 0 is applied and set. The transfer continues.
References8.1 exportMTO file
Material Management56 Operating Manual, 05/2016 V 10.2, A5E37098606-AA
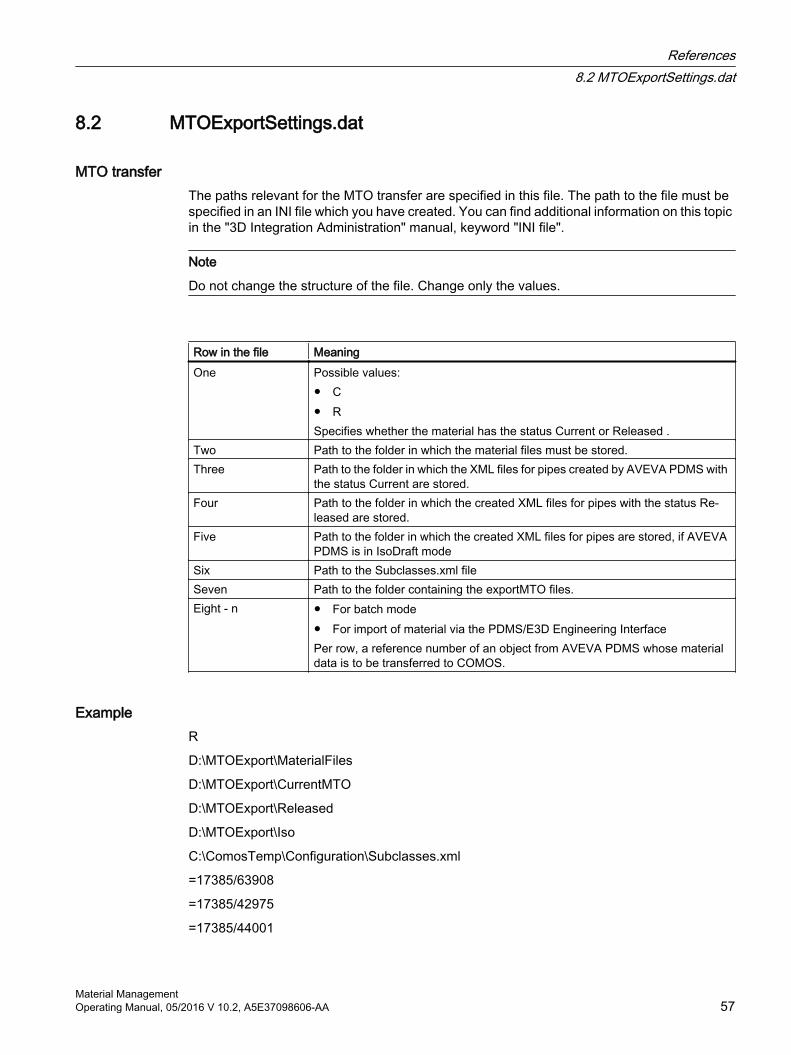
8.2 MTOExportSettings.dat
MTO transferThe paths relevant for the MTO transfer are specified in this file. The path to the file must be specified in an INI file which you have created. You can find additional information on this topic in the "3D Integration Administration" manual, keyword "INI file".
Note
Do not change the structure of the file. Change only the values.
Row in the file MeaningOne Possible values:
● C● RSpecifies whether the material has the status Current or Released .
Two Path to the folder in which the material files must be stored.Three Path to the folder in which the XML files for pipes created by AVEVA PDMS with
the status Current are stored.Four Path to the folder in which the created XML files for pipes with the status Re‐
leased are stored.Five Path to the folder in which the created XML files for pipes are stored, if AVEVA
PDMS is in IsoDraft modeSix Path to the Subclasses.xml fileSeven Path to the folder containing the exportMTO files.Eight - n ● For batch mode
● For import of material via the PDMS/E3D Engineering InterfacePer row, a reference number of an object from AVEVA PDMS whose material data is to be transferred to COMOS.
ExampleR
D:\MTOExport\MaterialFiles
D:\MTOExport\CurrentMTO
D:\MTOExport\Released
D:\MTOExport\Iso
C:\ComosTemp\Configuration\Subclasses.xml
=17385/63908
=17385/42975
=17385/44001
References8.2 MTOExportSettings.dat
Material ManagementOperating Manual, 05/2016 V 10.2, A5E37098606-AA 57

8.3 User interface reference
8.3.1 "Estimated" tabWhen you call the "Plugins > Basic > Material Management Assistant" menu command, the following control elements are available on the "Estimated" tab:
"Status" control groupThe "Status" control group is shown when you click on the "Collect" button.
See also chapter "Status" window (Page 64).
"PID" control group
Control element Description"P&ID document/Query/Node" field You drag an object from which material is to be created to this
field."Refresh" button Updates the list with the material that is already available."Collect" button Creates material from the object that you dragged to the "P&ID
document/Query/Node" field.
List with available materialDisplays the available material. The pipes are color-coded to indicate whether pipe spec mapping has been carried out for the associated components.
Color DescriptionRed Pipe spec mapping has not been carried out for any of the components.Orange Pipe spec mapping has not been carried out for at least one of the components.Green Pipe spec mapping has been carried out for all of the components.White There is no material associated with the pipe.
See alsoCreating material from P&ID data (Page 13)
8.3.2 "Configuration for CSV import" objectYou create the object in the engineering view using the context menu of the configuration object.
The object has the "Attribute > General settings" tab
References8.3 User interface reference
Material Management58 Operating Manual, 05/2016 V 10.2, A5E37098606-AA

"Base objects" control group
Field Description"Base object for revision folder" Base object of the owner of the MTO object in the Navigator.
If the folder specified as the owner in the CSV file does not exist in COMOS, it is created.
"Base object for MTO object" Base object of the MTO object being created.
Table "Name mapping for revision folder"
Row name Function Comment"Prefix" The prefix in the "Owner" column. Used to break down the specification in the
"Owner" column of the CSV file."Postfix" The postfix in the "Owner" col‐umn.
"Data item" The basis for generating names.For example: "U2L" Meaning: unit tree, level 2, label. Stands for the label of the object at the second level of the unit tree.
"Start index" The insertion point for the Sys‐temFullName within the full spec‐ification in the "Owner" column of the CSV file.
"Number of char‐acters"
The length of a data item at the corresponding hierarchy level.
"Base object" Only used to complete the owner structure of the MTO object or to create the MTO object."Base object from
structure"
"Fixed name" The name of a COMOS object used to structure the COMOS da‐ta.
Only used to generate a path to a COMOS ob‐ject.
The table columns represent the hierarchy levels of the objects in the Navigator.
8.3.3 "Pipe Details" tab
When you call the "Plugins > Basic > Material Management Assistant" menu command, the following control elements are available on the "Pipe Details" tab
Control element Description"Pipe" field You drag&drop a pipe to this field. If you select the "Show details for pipe:" command in the
context menu of a pipe on the "Estimated" tab, the pipe is automatically entered in the field."Refresh" button The available pipe spec parts for the selected material are shown."Status" control group See also chapter "Status" window (Page 64).
References8.3 User interface reference
Material ManagementOperating Manual, 05/2016 V 10.2, A5E37098606-AA 59

8.3.3.1 "P&ID estimation" tabThis tab lists components that were collected on a P&ID.
Table
Column Description"Description" Description of the pipe spec component"Type" Component type"ND1" Main nominal diameter"ND2" Branch nominal diameter"Unit" Unit under which the component is located"P&ID quantity" Number of the components installed on the P&ID"Selected quantity" Number of the estimated MTO objects that are actually required
"Apply quantities" buttonUpdates and creates MTO objects below the pipes in the Navigator.
8.3.3.2 "Manual estimation" tab
"Additional objects" fieldYou drag an object from which you additionally wish to create material to this field.
"Add" buttonAdds the component to the table.
TableShows all components that are located on the pipe as well as the components that you added manually.
If you expand the rows underneath a component, you can enter a quantity for each required nominal diameter.
"Apply quantities" buttonUpdates MTO objects that already exist below the pipes in the Navigator and creates new MTO objects with the quantity entered, if you have added others.
See also"Estimated" tab (Page 58)
References8.3 User interface reference
Material Management60 Operating Manual, 05/2016 V 10.2, A5E37098606-AA

8.3.4 "MTO Documents" tabYou manage MTO documents on this tab.
"MTO documents" control groupContains a tree view of the MTO documents.
Level Description1 Process level. Arises when you create new MTO documents.2 Package level. Contains all packages of a process.3 Document level. Contains all documents of a package.
The displayed documents differ according to how you called the Material Management Assistant:
● When you open the Material Management Assistant via the "Plugins" menu, you will see all MTO documents.
● When you open the Material Management Assistant via the context menu of an object from the Navigator, you will see only those documents with the same user context as that determined for the object.
The tree view Is updated when the following actions take place:
● when you open the Material Management Assistant
● when you create documents
● when you delete documents
Metadata for the current MTO documentContains information on the currently selected node in the "MTO documents" control group. Different information is shown for the various levels.
"Status" tabIndicates whether the creation of MTO documents was successful. See also chapter "Status" window (Page 64).
References8.3 User interface reference
Material ManagementOperating Manual, 05/2016 V 10.2, A5E37098606-AA 61

8.3.5 "MPR documents" tabWhen you call the "Plugins > Basic > Material Management Assistant" menu command, two secondary tabs are available on the "MPR Documents" tab:
● "Settings level" tabControls the creation of MPR documents.
● "Status" tabIndicates whether the creation of MPR documents was successful. See also chapter "Status" window (Page 64).
The "Settings level" tab is described below.
"Document settings" control group
Control element Description"Codes" list Lists a set of rules that the administrator has created for calculation of ad‐
ditions."Key" field Cannot be edited. Here the document key used in accordance with the
administrator's configuration settings is displayed."Package name" field Cannot be edited. Here the package name used in accordance with the
administrator configuration settings is displayed."Package label" field Here the "MPR package ID" used in accordance with the administrator
configuration settings is displayed.
"Text fields" control groupHere you can change the attributes of text fields.
Column Description"Text" References the text field in the respective document.
Example "E-Mail""Value" This value is shown in the document.
Example: "[email protected]"
"Used document keys" control groupHere you use the keys of the MTO documents. An MTO key can only be used once within an MPR document.
Control element Description"New MPR" option Creates a new MPR document."Update MPR with key" option
Updates an MPR document.Select an MPR revision whose key is to be used from a list.
"MTO key" list List for displaying MTO keys that have not been used up until now.
References8.3 User interface reference
Material Management62 Operating Manual, 05/2016 V 10.2, A5E37098606-AA

Control element Description"Add keys" button Use this button to add document keys.
When a new MPR document is created, at least one key must be assigned to the initially empty "Key list" using the "Add keys" button.
"Key list" For an existing MPR document, shows the key linked to the current MPR document.
"MPR documents" control groupContains a tree view of the MPR documents.
Level Description1 Process level. Arises when you create new MPR documents.2 Document level. Contains all documents of a process.
The displayed documents differ according to how you called the Material Management Assistant:
● When you open the Material Management Assistant via the "Plugins" menu, you will see all MPR documents.
● When you open the Material Management Assistant via the context menu of an object from the Navigator, you will see only those documents with the same user context as that determined for the object. See also chapter ""MTO documents" tab (Page 70)".
Is updated when the following actions take place:
● when you open the Material Management Assistant
● you create documents
● you delete documents
"Current MPR document" control groupThis table contains metadata for the current MPR document.
"Used objects" control groupIf you click "Refresh", this is filled with material.
Control element Description"Discard changes" button Updates the contents of the "Used objects" control group and resets edited
values in the columns back to the original values."Filter for order quantity" list
Filters the objects in the "Used objects" control group according to whether they are in stock or need to be ordered or shows all of the material.
References8.3 User interface reference
Material ManagementOperating Manual, 05/2016 V 10.2, A5E37098606-AA 63

Control element Description"Refresh" button Updates the contents of the order list according to the configuration settings."Create revision" option Activated: A document revision is applied to an MPR document as soon as
it is created. The revision is assigned the "released" status."Create document" button Creates MPR documents in accordance with the default settings.
Table 8-1 Order list
Column DescriptionOptions column Option activated: Material is considered when ordering.
Option deactivated: Material is not considered when ordering. Following an update, it reappears in the order list.
"Description" Description text."Planned quantity" Planned quantity."Addition" Field that can be edited. Here you can make manual corrections to additions
which have been calculated in accordance with the settings of the used "Codes".
"Total purchase quantity" Total purchase quantity."Order quantity" Current purchase quantity.
8.3.6 "Status" windowThe window opens when you execute one of the following commands via the context menu in the Navigator:
● "MTO > Collect Material"
● "CSV import > Owner by subsection"
● "CSV import > Owner by selection"
Control element Description"File name" field If you want to save the status history for the current process in an
XML file, you enter a path and file name in this field.Button "..." If you want to save the status history for the current process in an
XML file, you select a storage location and enter a file name here."Save" button Creates the specified XML file and saves the status in the file.List The individual task packages that COMOS executes for the cur‐
rent process are listed here.COMOS first checks whether the settings for the process are cor‐rect. If the settings are not correct, COMOS aborts the process. Otherwise, the program continues and creates the documents in accordance with the default settings.You can recognize from the symbols displayed whether a task was executed successfully or an error occurred. Warnings, suc‐cess messages or informative tips may be shown underneath the tasks. You can open created documents or navigate to individual objects.
References8.3 User interface reference
Material Management64 Operating Manual, 05/2016 V 10.2, A5E37098606-AA

8.3.7 Tabs of the configuration object
8.3.7.1 "COMOS MTO" tabOn this tab, configure the creation of MTO objects from isometry data.
See also chapter Configuring MTO creation from isometry data (Page 30).
Field Description"Base object for pipes" Mandatory field. For defining a base object template for
pipes on isometries. COMOS searches for material un‐der the engineering objects.
"Base object for MTO objects" Mandatory field. For defining a base object template for creating new MTO objects.
"Base object for folder collection point" Mandatory field. Base object for engineering objects un‐der which MTO objects are to be merged and added up.
"Base object for starting the isometry import" Optional field. Base object of the engineering objects with the "MTO > Collect material" command available in the context menu.If no base object is specified here, the command is available at all objects.
"Attribute name for status" Optional field. Attribute name of an attribute at the plan‐ned material, which specifies whether the material is "Current" or "Released". A folder with this name is cre‐ated and the created MTO object is sorted according to the attribute value.
References8.3 User interface reference
Material ManagementOperating Manual, 05/2016 V 10.2, A5E37098606-AA 65

"Object identification" control group
Column Description"Attribute" A script call or attribute of the P&ID object that is to be retrieved."Condition" Condition which the attribute must fulfill.
The following operators can be used:● "="● ">"● "<"● ">="● "<="● "<>" (unequal)● "like"● "set": checks whether the specified attribute exists● "unset": checks whether the specified attribute is missing
"Value" Comparison value.Possible values:● Fixed values in quotation marks● Nested name of an attribute● Script call
"Attributes list" control group
Column Description"MTO attribute" Nested name of an attribute of MTO objects."Isometry attribute" Nested name of an attribute of isometry objects.
References8.3 User interface reference
Material Management66 Operating Manual, 05/2016 V 10.2, A5E37098606-AA

"Summation key" control group
Column Description"Expression A" Possible values
● Nested name of an attribute● Fixed value with quotation marks● Script call
"Condition" Possible operators:● "="● ">"● "<"● ">="● "<="● "<>" (unequal)● "like"● "set": checks whether the specified attribute exists● "unset": checks whether the specified attribute does not exist
"Expression B" Possible values● Nested name of attributes● Script call
"True value" You can enter a value in the following format:● Fixed value with quotation marks● Nested name of an attribute● Script call
"Wrong value" You can enter a value in the following format:● Fixed value with quotation marks● Nested name of an attribute● Script call
See also chapter Configuring the creation of the summation key (Page 34).
8.3.7.2 "MTO estimation" tabOn this tab, configure the creation of MTO objects from P&ID data.
See also chapter Configuring MTO creation from P&ID data (Page 36).
Field Description"Base object for pipes" Mandatory field. For defining a base object template for
pipes on isometries. COMOS searches for material un‐der the engineering objects.
"Base object for MTO objects" Mandatory field. For defining a base object template for creating new MTO objects.
References8.3 User interface reference
Material ManagementOperating Manual, 05/2016 V 10.2, A5E37098606-AA 67

Field Description"Attribute name for inlet nominal diameter" Nested name of the attribute for the P&ID object that
describes the main nominal diameter."Attribute name for outlet nominal diameter" Nested name of the attribute at the P&ID object that the
branch nominal diameter describes.
"Object identification" control group
Control element Description"Only objects with imple‐mentation" option
Activated: Additional elements of the "Object identification" control group are deactivated.You can find more information on this topic in the "Operation" manual, keyword "Requests and implementations".
"Attribute" column A script call or attribute of the P&ID object that is to be retrieved. "Condition" column The following operators can be used:
● "="● ">"● "<"● ">="● "<="● "<>" (unequal)● "like"● "set": checks whether the specified attribute exists● "unset": checks whether the specified attribute is missing
"Value" column Comparison value.Possible values:● Fixed values in quotation marks● Nested name of an attribute● Script call
"Attributes list" control group
Column Description"MTO attribute" Nested name of an attribute of MTO objects."P&ID attribute" Nested name of an attribute of P&ID objects.
References8.3 User interface reference
Material Management68 Operating Manual, 05/2016 V 10.2, A5E37098606-AA

"Summation key" control group
Column Description"Expression A" Possible values:
● Nested name of an attribute● Fixed value with quotation marks● Script call
"Condition" Possible operators:● "="● ">"● "<"● ">="● "<="● "<>" (unequal)● "like"● "set": checks whether the specified attribute exists● "unset": checks whether the specified attribute does not exist
"Expression B" Possible values● Nested name of attributes● Scripts
"True value" You can enter a value in the following format:● Fixed value with quotation marks● Nested name of an attribute● Script call
"Wrong value" You can enter a value in the following format:● Fixed value with quotation marks● Nested name of an attribute● Script call
References8.3 User interface reference
Material ManagementOperating Manual, 05/2016 V 10.2, A5E37098606-AA 69

Rules for estimating flangesSee also chapter Defining rules for estimating flanges (Page 38).
Column Description"Expression" The "Expression" column is compared with the "Value" column.
Possible values:● Nested name of attributes● Script call
"Condition" Possible operators:● "="● "like"● "set": checks whether the specified attribute exists● "unset": checks whether the specified attribute does not exist
"Value" Fixed value with quotation marks.
8.3.7.3 "MTO documents" tab
"General settings" control groupSee also chapter Configuring general settings (Page 39).
Field Description"Name for MTO document pack‐age"
Mandatory field.Possible values:● Fixed values in quotation marks● Attributes of the "MTO documents" tab● Operands
"Document key" Mandatory field.● Fixed values in quotation marks● Attribute name of the "MTO documents" tab● Operands
"User context" Possible values: ● Script call● Attribute name
"Base object for creating MTO documents"
Optional field.
References8.3 User interface reference
Material Management70 Operating Manual, 05/2016 V 10.2, A5E37098606-AA

"Documents" control groupSee also chapter Configuring the creation of MTO documents (Page 41).
Column Description"Master" Mandatory field.
Possible values:● "Yes": The document serves as master.● "No": The document does not serve as master.
"Name" Mandatory field. Name for identifying a document internally."Document name" Name of the document displayed in the "Material Management As‐
sistant"."Label" -"Description" -"Report" Mandatory field. Report template of the document."Package group" Mandatory field.
If documents in this column have the same entry, they are sorted into the same package group.
"XML" Possible values:● Yes● No
References8.3 User interface reference
Material ManagementOperating Manual, 05/2016 V 10.2, A5E37098606-AA 71

References8.3 User interface reference
Material Management72 Operating Manual, 05/2016 V 10.2, A5E37098606-AA