Introduction 1 6 - Pioneer Electronics USA...Introduction Congratulations on the purchase of your...
37
Introduction Congratulations on the purchase of your new Pioneer CD-ROM Drive! The unit is packaged with floppy disks that contain device drivers necessary for installing the Pioneer CD-ROM Drive to your IBM-PC or compatible computer. The device drivers allow the CD-ROM Drive and the computer to communicate and exchange data. On the next page is a SET UP & DRIVER INSTALLATION OVERVIEW which explains step-by-step how to install the device driver software and how to use your CD-ROM Drive. In this manual, "Drive" means Single CD-ROM Drive, CD-ROM Writer and CD-ROM Changer. Sentences with the single disc mark “ ” are explanations relating to the Single CD-ROM Drive and CD-ROM Writer. Sentences with the multi-disc mark “ ” are explanations relevant to the CD-ROM Changer. Please be sure to carefully review the instructions in this manual prior to installing the software device drivers. Here is a summary of each chapter: Chapter 1 includes the Introduction to this Manual, a brief summary of the following chapters and an overview of the setup and installation of your driver. Chapter 2 includes Pre-Installation Notes. These notes reference how to make a back-up of your driver diskettes, include recommendations, explains typing conventions used in this manual and provides tips for the user of IBM-PC or compatible computers. Chapter 3 is an Inspection Checklist for the IBM-PC and Compatibles Driver Diskette. Chapter 4 outlines the Macintosh Driver Installation Process. Chapter 5 has Questions and Answers that will provide assistance with the operation and set up of your new Pioneer CD-ROM Drive.
Transcript of Introduction 1 6 - Pioneer Electronics USA...Introduction Congratulations on the purchase of your...

Introduction
Congratulations on the purchase of your new Pioneer CD-ROM Drive! The unit is packaged with floppy
disks that contain device drivers necessary for installing the Pioneer CD-ROM Drive to your IBM-PC or
compatible computer. The device drivers allow the CD-ROM Drive and the computer to communicate
and exchange data. On the next page is a SET UP & DRIVER INSTALLATION OVERVIEW which
explains step-by-step how to install the device driver software and how to use your CD-ROM Drive.
In this manual, "Drive" means Single CD-ROM Drive, CD-ROM Writer and CD-ROM Changer.
Sentences with the single disc mark “1
” are explanations relating to the Single CD-ROM Drive and
CD-ROM Writer. Sentences with the multi-disc mark “6
” are explanations relevant to the CD-ROM
Changer.
Please be sure to carefully review the instructions in this manual prior to installing the software device
drivers. Here is a summary of each chapter:
Chapter 1 includes the Introduction to this Manual, a brief summary of the following
chapters and an overview of the setup and installation of your driver.
Chapter 2 includes Pre-Installation Notes. These notes reference how to make a back-up of
your driver diskettes, include recommendations, explains typing conventions
used in this manual and provides tips for the user of IBM-PC or compatible
computers.
Chapter 3 is an Inspection Checklist for the IBM-PC and Compatibles Driver Diskette.
Chapter 4 outlines the Macintosh Driver Installation Process.
Chapter 5 has Questions and Answers that will provide assistance with the operation and
set up of your new Pioneer CD-ROM Drive.

Set-Up & Driver Installation Overview
1) Install a SCSI host adapter (interface card) in the IBM PC or compatible computer. For proper
installation of the host adapter, please refer to the interface card manual.
2) With the computer power turned OFF, connect the Pioneer Drive to the computer SCSI interface
card using the proper SCSI cable.
3) Set the SCSI ID number on the CD-ROM Drive. When it is the only device attached to an IBM or
compatible computer, the factory-set SCSI ID at 0 should work fine. Otherwise, set the SCSI ID to a
number that is not used by any other device on the SCSI bus.
4) Power-ON the Pioneer CD-ROM Drive.
5) Power-ON the computer. Verify you computer is free of any virus and back-up the driver diskettes
included with the Pioneer CD-ROM Drive.
6) Launch the Installer program included on the driver diskette. This program allows you to do a full
or custom installation of the software drivers. See Chapters 3 & 4 for details.
7) Reboot your computer. Follow the "Operations Check" for IBM-PC and compatibles or for
Macintosh. You are ready to use your Pioneer CD-ROM Drive. If you encounter any difficulties, refer to
Troubleshooting Appendices at the back of this manual.

Pre-Installation Notes
Back Up Diskettes
The license agreement that is enclosed with your Pioneer product allows you to make a backup copy of
the driver diskettes, in case your originals become lost, damaged or corrupted. We strongly recommend
that you take this precautionary step before you proceed with the installation of your software device
drivers. Please be sure to verify your computer is free of any virus before making your backup copy.
Your DOS operating system comes with a utility such as a [DISKCOPY] and/or [COPY] command which
you can use to make a duplicate disk. Follow the instructions in your DOS manual. Once the files have
been backed up, it is a good idea to date and label the disk.
6
IBM-PC & Compatibles Users, Check SCSI Host Adapter
Make sure the SCSI host adapter (interface card) you are using supports multiple Logical Unit Numbers,
(“LUNs”). A LUN is an address assignment which allocates a separate drive letter to each of the 6 CD-
ROM discs.
Example:
Floppy Drives ≡ Drive Letters A and B
Hard Drive ≡ Drive Letter C
CD-ROM Discs ≡ Drive Letters D,E,F,G,H and I
Most SCSI host adapters do support multiple LUNs, but we recommend you check the card's
documentation or call the manufacturer to verify that your interface card will meet this requirement.

Conventions used in this manual
This Installation Guide uses the following conventions to help you interpret and follow the information
provided as you install and use the device driver software:
Characteristic and/or Key Comment / Definition
Bold Type represents a command which you must type. To carry out a command,type the bold-faced word(s) then press [ENTER].Example: If you are instructed to type A:, type A, type : (colon), thenpress the [ENTER] key.
[ ] Square Square brackets are used to surround the key name or key sequencewhich you must press to execute a given command. (DO NOT type thesquare brackets.)
[Function Keys] appear as bold faced text in square brackets.Example: Pressing the [F1] key will bring up the On-Line Help.
Italics Italics are used to emphasize a point.
Bold Italics are used when referencing another section in this book
BOLD SMALL CAPS indicate Menu Titles.
ALL CAPS indicate a menu selection.Example: Select INSTALL from the QUICK INSTALL MENU.
[ENTER] indicates the ENTER key is to be pressed to confirm a menu selection.Some instructions in this manual simply state [ENTER] withoutinstructing you to press the key. In those instances, the word Press isunderstood.
√ The check mark is used to indicate a helpful hint or to note additionaland pertinent information.

DOS / WINDOWS 3.1 Device Driver Installation
Inspection Checklist/PC
Pioneer CD-ROM Drives for DOS & WINDOWS 3.1 (not for WINDOWS 95 and WINDOWS NT) are
packaged with a floppy disk containing software device drivers for IBM-PC and compatible computers.
The disk contains a Setup Program; a file to load and remove the MPC control utility; DRDUTL, a
program that changes the device driver working mode; and DISC, a program that exchanges drive letters.
Also included on the disk is XDISC(*6), a program for use with Pioneer six disc changers that allows
assignment of one drive letter to each daisy-chained Pioneer CD-ROM Changer. You do not need
XDISC to use the Pioneer Single CD-ROM Drive/Writer or to daisy chain several Single CD-ROM units.
Before you proceed with the installation, verify that you have the necessary files on the diskette.
Please be sure to read and then follow these steps in order:
• Exit your current computer application and go to the DOS prompt.
• Insert the diskette into the “A” or “B” drive.
• Type DIR A:\ or DIR B:\ where A or B is the letter of the drive into which the diskette has
been placed. Press [ENTER]. The following files should be listed in the directory on the
screen:
SETUP.EXE PC-AT (Directory)
NOTE: On the PC98 system, the files SETUP98.EXE, MANUAL_J.TXT and PC-98
(Directory) will be displayed.
• At the C:\ prompt, type DIR A:\PC-AT (or if you are using the B: drive, type DIR B:\PC-
AT) and [ENTER]. The following file names should be listed on the screen:
RD600.SYS DRD60PS.SYSDRD60ASP.SYS MPC.COMMPCRMV.COM DISC.EXEDRDUTL.EXE XDISC.EXE
If your disk does not contain all of the files listed above, please contact your Authorized Pioneer Dealer
or call the Pioneer Bulletin Board System using your computer, modem and computer software to obtain
current drivers. (See Appendix D, Pioneer Technical Resource Numbers.) After you’ve verified the
contents of the disk, proceed to the next page, Installation instructions.

Installation
Installing software drivers so you can use your Pioneer CD-ROM Drive with your computer is easy! This
flow chart details the installation process. NOTE: Launch the Setup Program from DOS, not WINDOWS.
If you launch the Setup Program from WINDOWS, the installation may not finish correctly.
DOS
⇓
Insert the IBM-PC & Compatible Driver Diskette into the floppy drive on your computer.
⇓
At the DOS Prompt, type A: (B:) to change to the drive you are installing the software from.
Press [ENTER].
⇓
At the A:\ or B:\ DOS Prompt, type SETUP and [ENTER]. This will begin the Setup Program.
Note: The screen may go blank for a few seconds while the program loads.
(See the following pages for details about using the Setup Program.)
⇓
Once the program has finished loading, the message Installation is completed will appear.
⇓
Reboot your computer.
⇓
You are ready to use your Drive. (See page 3-8, Using your Pioneer CD-ROM Drive.)
When the Setup Program is launched, the screen will display the Program Start and Default Setting
screen (see figure below).
************************************************************************
******* PIONEER CD-ROM DEVICE DRIVER SETUP PROGRAM Ver.2.23A *******
******* Copyright 1995 PIONEER ELECTRONIC CORPORATION *******
************************************************************************
This program starts an installation in the following conditions.
[1] Boot Drive : C:
[2] Install Directory : C:\PIONEER
[3] Device Driver (**) : for ASPI manager type

< Start Up >
| |
| Do you start an installation on this condition? |
| (Y/N): [Y]. If you have any change, select N. |
| |
(**) <Selectable device drivers list>
* for ASPI manager type (DRD60ASP.SYS)
* for Future Domain interface type (DRD600.SYS)
* for IBM SCSI adapter/A type (DRD60PS.SYS)
<Quit: ESC key, HELP: F1 key>
Figure 1(?) - DOS/WINDOWS - Install Default Settings
These default settings are suitable for most computer configurations. To accept the INSTALL parameters
press [ENTER] from the START UP menu.
If you need to change the settings, type N and [ENTER]. The screen will change to the SETUP menu.
************************************************************************
******* PIONEER CD-ROM DEVICE DRIVER SETUP PROGRAM Ver.2.23A *******
******* Copyright 1995 PIONEER ELECTRONIC CORPORATION *******
************************************************************************
This program starts an installation in the following conditions.
[1] Boot Drive : C:
[2] Install Directory : C:\PIONEER
[3] Device Driver (**) : for ASPI manager type
< Main Menu >
| |
| Select a change item. (1-3): [1] |
| |
(**) <Selectable device drivers list>
* for ASPI manager type (DRD60ASP.SYS)
* for Future Domain interface type (DRD600.SYS)
* for IBM SCSI adapter/A type (DRD60PS.SYS)
<Quit: ESC key, HELP: F1 key>
Figure 2(?) - DOS/WINDOWS - Select Change Item

Change Boot Drive
If you wish to change the drive from which MS-DOS will boot, type 1 to select CHANGE BOOT DRIVE.
The default boot drive (c:\) will be displayed (see figure below).
To change the default drive form C to another drive, type in the letter which corresponds to the drive you
wish to change to and press [ENTER].
< [1] Change Boot Drive >
| |
| Boot Drive : [C] |
| |
| |
Figure 3(?) - DOS/WINDOWS - Change Boot Drive
Change Install Directory
The Install Directory is the directory path the driver files will be copied to. The default directory path is
C:\PIONEER. To change the directory path, type 2 to select CHANGE INSTALL DIRECTORY. This
will display the current Install Directory path and ask for the new directory path (see figure below). Type
in the name of the new directory path and press [Enter]. The directory path is now changed and you will
be returned to the SETUP MENU.)
< [2] Change Install Directory >
| |
| Install Directory: |
| current —> C:\PIONEER |
| change —> |
| |
| |
Figure 4(?) - DOS/WINDOWS - Change Install Directory

Change Device Driver
ASPI Manager Type is the default device driver setting. (This is the driver for the adapter that is
connected to the CD-ROM drive.) Using the numerical keys or arrow keys to change the driver, type in
or scroll to the number of the replacement driver and press [ENTER].
< [3] Change Device Driver >
| |
| Select a device driver. (1-3): [1] |
| 1. for ASPI manager type (most popular) |
| 2. for Future Domain interface type |
| 3. for IBM SCSI adapter/A type |
| |
Figure 5(?) - DOS/WINDOWS - Change Device Driver
The parameters are now changed and you are returned to the SETUP MENU. To continue with theinstallation, press [ENTER].
NOTE: At anytime during the Setup Program you may abort the installation by pressing the [ESC] key
repeatedly until the QUIT menu appears. For On-Line Help, press the [f1] at anytime. The HELP
screen may be scrolled by using the arrow keys. To quilt HELP, press [ESC] or the [f1] keys
After the driver files have been copied, the Setup Program will ask you if you would like to have the
files CONFIG.SYS and AUTOEXEC.BAT rewritten (see Figure 6(?)). If you trust the changes made by
Set Up Program, type Y and press [ENTER]. The original versions of CONFIG.SYS and
AUTOEXEC.BAT are saved as backup files and will now have the extension .DRM. If you do not wish
the Setup. If you do not wish the Setup Program to make the changes to these files for you, type N and
[ENTER]. Your CONFIG.SYS and AUTOEXEC.BAT files will remain unchanged.
< Rewrite Files >
| |
| Do you rewrite CONFIG.SYS and AUTOEXEC.BAT ? (Y/N): [Y] |
| |
Figure 6(?) - DOS/WINDOWS - Rewrite Files

The installation is now complete. On the screen will appear the following alert message (Figure 7(?)
below).
NOTE: If you selected not to have Setup Program change your CONFIG.SYS and AUTOEXEC.BAT
files, the message in Figure 7(?) will change slightly to indicate those files were unchanged.
************************************************************************
******* PIONEER CD-ROM DEVICE DRIVER SETUP PROGRAM Ver.2.23A *******
******* Copyright 1995 PIONEER ELECTRONIC CORPORATION *******
************************************************************************
Installation is completed.
Setup Program altered CONFIG.SYS and AUTOEXEC.BAT as follows.
CONFIG.SYS :
---> (altered)
DEVICE=C:\PIONEER\DRD60ASP.SYS /D:MSCD001 /C:CDP
Previous CONFIG.SYS has been saved to CONFIG.DRM.
AUTOEXEC.BAT :
---> (altered)
C:\DOS\MSCDEX.EXE /D:MSCD001
Previous AUTOEXEC.BAT has been saved to CONFIG.DRM.
A:\>
Figure 7(?) - DOS/WINDOWS - Installation completed
NOTE: If you selected not to have the Setup Program rewrite the CONFIG.SYS and AUTOEXEC.BAT
files, refer to the following example to edit the files yourself. The Device Name MSCD??? in the
CONFIG.SYS file should match the MSCD??? Device Name in AUTOEXEC.BAT. Refer to the example
of MSCD001 in the example below:
CONFIG.SYS:
LASTDRIVE=Z
x:\install-dir\DRD60XXX.SYS /D:MSCD??? /C:CDP
AUTOEXEC.BAT:
x:\xxx\MSCDEX.EXE /D:MSCD???

Operations Check
You will have completed a successful installation when:
• The Pioneer software drivers are installed;
• The CD-ROM Drive is correctly connected to your computer; and
• Messages similar to those below appear on your monitor during boot up:
PIONEER CD-ROM DEVICE DRIVER VER x.xx
for MSCDEX Ver. x.xx - IBM PC-XT/AT/AX PS/2/55, Future Domain
Copyright (c) Pioneer Electronic Corporation. 1990-199x
Portion (c) 1986-199x Future Domain Corporation
Inquiry ID=0 : PIONEER CD-ROM DRxxxX XXXX
The LDP/CDP Device Driver for SCSI model Ver. 1.03
Copyright (c) Pioneer Electronic Corporation. 1990,1991
C:\>DOS\MSCDEX.EXE /D:MSCD001
MSCDEX Version 2.23
Copyright (C) Microsoft Corp. 1986-1993. All rights reserved.
Drive E: = Drive MSCD001 unit 0
Figure 10 - DOS/WINDOWS - Operations Check on Boot-Up
Note: If the messages scroll by too quickly to read, you can pause the screen by quickly pressing [CTRL
+ S]. To continue with the boot up, press any key.
Note: A different starting drive letter can be selected using the Command Line switch /L: in
Device line. See APPENDIX for more information.
Note: Depending on your specific computer configuration, additional lines may be interspersed and some
of the lines in the Operations Check Screen may vary from those described above.

Using Your Pioneer CD-ROM Drive
You are now ready to use the Pioneer CD-ROM Drive connected to your computer system.
For use under DOS follow the instructions shown on the left side of the chart. For use under WINDOWS
3.1, follow the instructions on the right:
DOS WINDOWS 3.1
⇓ ⇓1
Place the CD-ROM disc in the traylabel side UP
6
Place the CD-ROM discs in themagazine trays label side Down
1
Place the CD-ROM disc in the tray labelside UP
6
Place the CD-ROM discs in themagazine trays label side Down
⇓ ⇓Turn on the Pioneer CD-ROM Drive. Turn on the Pioneer CD-ROM Drive.
⇓ ⇓Restart your computer. Restart your computer.
⇓ ⇓To access CD-ROM Disc from DOS To access CD-ROM disc from WINDOWS
3.1⇓ ⇓
At the DOS Prompt, type the drive letter youwish to access as shown in the followingexample:
Double Click on the File Manager in theMain Program group.
C:\>E: ([ENTER].) CD-ROM icons appear at the top of the FileManager Window, next to the original driverletters.
⇓ ⇓Type DIR ([ENTER]) Double Click on the icon to access the disc.
Figure 11 - DOS/WINDOWS - Using the Pioneer CD-ROM Drive
Installing More Than One Pioneer CD-ROM Drive
Two or more Pioneer drives can be installed on one SCSI chain by using the Pioneer device drivers for
IBM-PCs and compatibles that ship with the unit. Use a 50 Pin SCSI ribbon cable to connect internal
drives. Make sure the drives in the middle of the chain are not terminated and the last drive is
terminated. Assign each drive it’s own specific SCSI ID number.

The Pioneer device drivers contain an Auto SCSI ID Search feature that automatically finds the Pioneer
drives on the SCSI chain and assigns the correct number of drive letters for the number of discs installed.
(ex. for the DR-U124X, set the SCSI ID using pins on the back of the unit. The number of discs installed,
of course, is always one.) NOTE: Any combination of single or six-disc Pioneer CD-ROM drives can be
daisy chained: DR-U124X, DRM-624X, etc.
Using XDisc to Assign Single Drive Letters to Each DriveA special utility, XDISC.EXE, is included on the Pioneer Driver Diskette. It was written to allow a
single drive letter to be assigned to Pioneer six-disc changers. If you edit the CONFIG.SYS file and then
launch XDISC, one drive letter will be assigned for each Pioneer CD-ROM drive installed on the SCSI
Chain. When daisy chaining only Single Disc Drives, XDISC is not needed.
To daisy chain three drives, for example: a DR-U124X, a Pioneer DRM-624X and a Pioneer DRM-602X,
and to assign each drive a single drive letter, edit the CONFIG.SYS Pioneer Device Driver line to
include an /N: parameter switch set to 0 for each drive.
DEVICE= C:\PIONEER\DRD600.SYS /D:MSCD001 /N: 0,0,0 /C:CDP
Then, activate XDISC by typing C:\Pioneer\Xdisc. Once XDISC is launched, type XDISC F 3 to access
the third disc in the changer assigned drive letter “F”. NOTE: Do not set 0 and other numbers together as
/N: settings. To use XDISC the /N: switch must be set to all 0s.
Multi Player Control (MPC) Program
NOTE: MPC DOES NOT WORK FOR THE CD-ROM WRITER.
MPC for DOS
The Multi Player Control v1.2 is a memory resident “audio” remote control program for the Pioneer CD-
ROM Drive. Multi Player Control operates the Pioneer CD-ROM Drive as a CD Player during execution
of most programs on a PC. Multi Player Control consists of one file to make it resident in memory and
another program to remove it from memory. Use MPC.COM to install Multi Player Control Program and
use MPCRMV.COM to remove it from memory.
Install MPC by typing C:\ PIONEER\MPC.COM. Once installed, MPC can be activated anytime by
pressing (at the same time) the [ALT+ HYPHEN] keys. Within this program, you can select the disc
and/or track number, instruct the unit to play, pause, or eject the disc, and you can control the volume.
Use the arrow key to select functions, and press the space key or enter key to execute a selected
function. Use the [ESC] key to close the MPC window. Type C:\ PIONEER\MPCRMV.COM to

remove the program.
Direct commands can be sent to the player from within MPC. Select the Command function to activate
the command window. Type a specific mnemonic command string such as TR3SEPL [ENTER]. This
will cause the drive to search (SE) to Track 3 (TR3) and Play (PL). To turn Key Lock ON and disable
the eject button on the front of the player, send the command 1KL [ENTER] (where 1=ON and KL=Key
Lock). To turn Key Lock off, send the command 0KL [ENTER]. When a command is sent and received
by the player, an R will be transmitted from the player confirming receipt and execution of the
command. Pioneer LaserFacts Document #32170 contains a complete list of CDP commands to control
the CD-ROM Drive. See Appendix C, Pioneer LaserFacts System for instructions on how to obtain the
document list.
Calling MPC within Windows 3.1
The MPC program may be used in Windows. Run Program Manager and open the MS-DOS Prompt icon.
Read instructions and press [ALT+ENTER] to open a DOS window within Windows 3.1. This window
can be moved and made smaller. Within that Window, press [ALT+ HYPHEN] to bring up MPC. Press
[ESC] at any point to put MPC away. Type EXIT to return to Windows.
MPC for DOS Error Message:
“Device Driver Not installed. MPC Program is not resident”
MPC.COM will not install if the device driver is not installed or if the /C:CDP switch has not been
included in the Pioneer device driver line. Check the Pioneer device driver line in CONFIG.SYS to
make sure that the Pioneer driver has been loaded and the /C:CDP switch is at the end of the device
driver line. Install the driver if it has not been installed, and/or type in /C:CDP at the end of the device
driver line if it is missing.
Failure to Remove MPC Program
If, for some reason, the MPC program is not removed after you type C:\Pioneer\MPCRMV.COM, the
next time the machine is boot up, the system will default to MPC not active, i.e., the next time the
machine is restarted, MPC will not appear.
Disc Exchange (DISC) Program
This program exchanges CD-ROM drive letters. Type C:\PIONEER\DISC E: F: to exchange drive E
with drive F. Type DISC DeviceName -R to return the order of discs to the original state (ex. Device

Name is MSCD001).

Driver Utility (DRDUTL) Program
Use this utility program ONLY when your application program requests to change the mode of a
DRD600 series CD-ROM Device Driver.
Type C:\PIONEER\DRDUTL E: MODE:{ON/OFF} to change the mode of Device Driver.
MODE DEFAULT
------------------------------------------------
CHKDSK OFF
SEEK ON
VDRTRY ON

Questions and Answers
Here are answers to some commonly asked questions about Pioneer CD-ROM Drives.
What if there is no sound audible?The disc is probably outputting Compressed Audio. This data needs to be transferred from the unit to the
host computer for decompression and conversion to audio. Make sure you have a sound card installed to
handle these tasks. If you do have a sound card installed and are still unable to hear compressed audio,
check with the sound card manufacturer or disc publisher.
If the audio is CD-DA (Compact Disc-Digital Audio), it will be output through the headphone jack on
the front of the unit, or through the audio connector on the back of the unit to an amplifier and speakers,
powered speakers, or a sound board. To test that these connections have all been made properly, insert a
compact audio disc (CD) into the disc tray, make sure the drivers are properly installed, then use MPC
or Media Player under Windows to play the CD in the Drive.
Will a combination sound card/SCSI interface card work with Pioneer CD-ROM Drives?A sound card with a SCSI interface included will work fine with Pioneer drives, as long as the SCSI
card is ASPI compliant. Install the ASPI Manager that ships with the SCSI interface card, then install
ASPI compatible drivers, Pioneer DRD60ASP.SYS. If possible, make sure the card is compatible with a
50 pin SCSI connector.
Can I use a Pioneer CD-ROM Drive with a sound card?You can use the Pioneer units with any sound card as long as the card is supported by the actual
software on the CD-ROM disc that you are using. Remember, if the CD-ROM disc uses compressed
audio, you will need a sound card. Contact the CD-ROM disc publisher or distributor to find out what
sound cards the product supports before you purchase a CD-ROM disc that includes compressed audio.
What should I do if the BUSY light flashes at one second intervals and the drive does not respond tocommands?
This is a visual indicator from the drive that something is affecting the CD-ROM Drive’s ability to
perform. It may be a mechanical problem. Call Pioneer End-User Technical Support for more
information. See Appendix D, Pioneer Technical Resource Numbers.
What should I do if the disc tray/magazine will not eject from the unit?
There are two possible causes of this symptom. One is that the software has locked the disc into the
machine and will not let the user eject the disc. The other is that the user has set the last jumper pin or
Dip Switch to Eject Disable position, thereby disabling the eject switch on the front panel. In either
case, to remove the disc, make sure that the last jumper switch or Dip Switch is in the Eject Enable

position. Then turn your system OFF and back ON. This should allow the front panel eject button to
work.
Note: If the disc still does not eject, call Pioneer End-User Technical Support. See Appendix D, Pioneer
Technical Resource Numbers.
What should I do if the CD-ROM Changer always inserts the first or same disc, no matter whichdisc the software has been instructed to use?
The software package was probably written to work with a Single CD-ROM Drive. Try placing the disc
in the first slot and then reinstall the application. Contact the software manufacturer to see if a version of
the software exists that supports multiple subunits.
If you are using an ASPI compatible host adapter, the ASPI Manager may require an /L: or /ET:
statement to enable access to multiple logical units. Refer to the documentation accompanying the host
adapter or contact the host adapter manufacturer.

Troubleshooting IBM-PC DOS/WINDOWS Driver Installation
If the Pioneer CD-ROM Drive does not respond after running through the Operations Check on page 3-7
of this Software Installation Guide, note any error messages that may appear in the Inquiry ID line on
boot up. Error messages and how to correct them are described on individual pages of this Appendix as
indicated below. If you do need to call for Pioneer End-User CD-ROM Technical Support, please be
prepared to describe any error messages and the contents of the CONFIG.SYS and AUTOEXEC.BAT
files in your system (See Appendix D, Pioneer Technical Resource Numbers). This will help Pioneer
Industrial Representatives solve your problem more quickly.
Page No.
1. Driver Error Messages
• SCSI interface card can’t communicate with drive A-2
• Time-out during selection phase A-4
• Time-out waiting for initial bus free phase status phase or data phase A-5
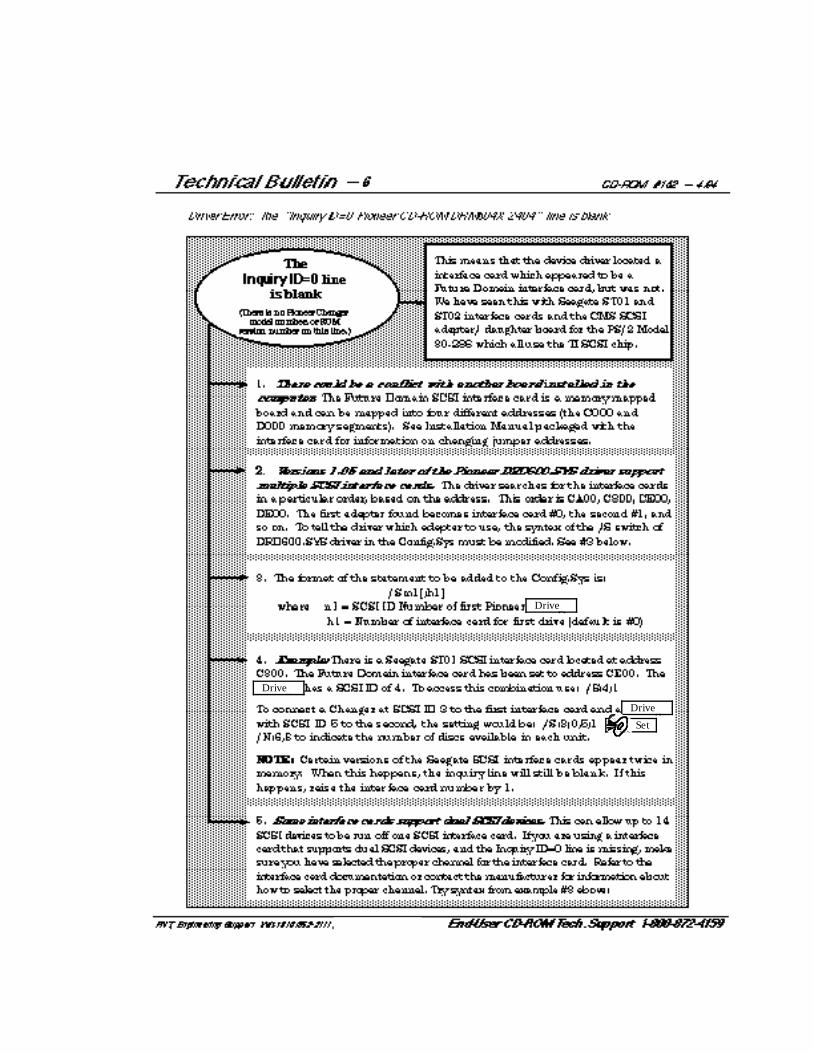
• Characters on the Inquiry “ID=0” line are jumbled A-5
• The "Inquiry ID=0 Pioneer CD-ROM DR . . . . . ." line is blank A-6
2. MSCDEX Error Messages
• CDR101 Not Ready Reading Drive D A-7
• CDR 103 Disk is not ISO 9660 or High Sierra A-8
• Device Driver Not Found A-8
• Incorrect DOS Version A-9
3. DOS Error Message
• Invalid Drive Specification A-9
4. Hardware Issues. What to do if.......
• The tray will not eject from the Drive A-10
• The BUSY light flashes at one-second intervals and the drive does not
respond to commands A-11
• Boot problems A-11

3. Power down the computer and check to make sure theSCSI cables are securely attached within the computer.
1. Verify that the Pioneer CD-ROM Drive has been turnedON
2. Make sure you are using the SCSI Cable that goes withyour interface card.
For information about the correct cable to use with otherSCSI Cards, contact the SCSI interface card manufactureror dealer.


4. Make sure both ends of the SCSI chain are terminated.The interface card is considered the first device on the chain and typically isterminated by the manufacturer. If the Pioneer drive is the only device on thechain or if it is the last device on a chain, make sure termination is ON. If it is inthe middle of a SCSI chain, turn termination OFF. The third jumper from the lefton the back panel sets termination. Open is OFF, jumpered is ON.
This means the driver could notlocate the drive on the SCSI bus.The device driver was, however,able to locate the interface card.
1. Verify that the Pioneer CD-ROM Drive is turned ON.
2. Has the SCSI ID number set on the back of the Pioneerdriver been changed since the software drivers were installed?If so, go into the CONFIG.SYS and after D:MSCD000 statemententer /S:1, or the number from 0-7 that the changer SCSI IDhas been set to. Make sure there is no other device on theSCSI bus with the same SCSI ID number.
3. Verify that the correct cable is connected to both the interface cardin the PC and to the Pioneer Drive.
For information about the correct cable to use with other SCSIinterface cards, contact the manufacturer or dealer.

Drive
Drive
1. Check termination. If the Pioneer drive isnly device or the lastdevice on the SCSI Chain, termination should be ON. If it is in themiddle of a SCSI Chain, termination should be OFF. The thirdjumper from the left on the back of the unit sets the termination.When the pin is open, termination is OFF and when the pin isjumpered termination is ON.
1. Pow er dow n the computer and re-seat the cable. Makesure it is securely attached. If the problem persists, replacethe cable.
2. Check termination. If Pioneer drive is the only device orthe last device on the SCSI chain, termination should be ON. Ifit is in the middle of a SCSI chain, termination should be OFF.
2. Power down the computer and the drive, disconnect the cable fromthe back of the computer and restart. If you get an error message thatreads “Time Out During Selection Phase”, you may have a bad cable or a poorconnection. Reseat the cable or change it and try again.
Drive
Drive
Drive6 Set

Verify that the disc is in the player label side up1
6 Verify that the discs are in the player label side down1.
Also check to make sure the disc is not scratched and that it does not have a loy of finger prints on it. If thedisc has finger prints on it, it can be cleaned by drawing a soft cloth from the center hole to the edge of thedisc; never use a circular motion. Excessive scratches may make the disc unreadable.
DR

Drive
Drive
Drive

63. If s o me, b ut no t al l s i x dri v e l e t t ers are av ai l ab l e ,p l ace an / N: s t at ement o n t he Pi o neer Dev i ce Dri v er l i ne i nCONFIG. SY SAfter the MSCD001, add a statement that reads; /N:6 (Refer to Appendix C for acomplete description of parameters available in the Device Driver Line in theConfig.Sys.)

Technical Bulletin — 10 CD-ROM #162 — 4/94
PNT, Engineering Support West 310/952-2111; East 201/327-6400 End-User CD-ROM Tech. Support 1-800-872-4159
Cartridge will noteject from the
Changer
1. There are two possible causes of this symptom. One is that thesoftware has locked the magazine into the machine and will not let the usereject it. The other is that the user has set the last DIP switch UP/ON so ithas disabled the EJECT button on the front panel.
2. In either case, to remove the magazine, make sure the last DIPswitch is DOWN, then turn the Pioneer Changer OFF and back ON. Thisshould allow the front panel EJECT button to work. NOTE: The DRM-602Xprovides a light on the front panel of the unit that indicates if the EJECTbutton is disabled, locking the magazine.
1. Use the most current version of the driver. Current Pioneer CD-ROMChanger drivers are available on the Pioneer Electronic Bulletin Board. See Appendix E, Pioneer Technical Resource Numbers
3. If a disc tray is stuck, refusing to allow the magazine to eject,contact Pioneer Technical Support or Pioneer Service.
The drive always insertsthe first or the same disc,no matter which disc the
software has beeninstructed to use
3. The software package was probably written to work with a singleCD-ROM. Try placing the disc in the first slot and then re-install theapplication. If this works, contact the software manufacturer to see if aversion of the software exists that supports multiple sub-units.
2. Contact ASPI interface card manufacturer for information about ASPIManager Switches. The ASPI Manager may require /L: statement or /ET:statement to enable a number of logical units.
Hardware Issues: Cartridge will not eject from the ChangerThe Changer always inserts the first or the same disc
The Changer always inserts the first or the same disc, no matter which disc the software has been instructed to use

Technical Bulletin — 11 CD-ROM #162 — 4/94
PNT, Engineering Support West 310/952-2111; East 201/327-6400 End-User CD-ROM Tech. Support 1-800-872-4159
BUSY light Flashesat one-second
intervals
1. This is a visual indicator from the drive that something iswrong with the drive, affecting its ability to perform. It may be amechanical problem. Or, the drive may be in test mode.
2. Make sure the switch for Test Mode is DOWN/OFF. Refer toOperating Instructions. For almost all DOS applications, only theterminator switch on the DRM-602X should be up. All others on theDRM602X and all switches on the DRM604X should be down.
1. It you are not booting from a SCSI hard drive using this SCSIinterface card card, and if there is a boot ROM on the interfacecard, the boot ROM should be removed or disabled using softwareoptions.
2. If booting from a SCSI Hard drive, make sure the SCSI IDs donot conflict and that termination on the SCSI interface card isdisabled. Consult documentation for interface card manufacturer.NOTE: The hard drive should be terminated as the first device on thechain and if the the Pioneer Changer is the only other device on the line,it should also be terminated.
Boot problems or theunit only accesses
Drive D
3. Verify that the Pioneer Changer is functioning properly. Refer toTB #168 to run a Self-Test on the unit and to TB #169 to run an AudioPlay test. These documents are available as 32 169 & 32 170 on thePioneer LaserFacts System; see Appendix F.
Hardware Issues: The BUSY light flashes and one-scond intervalsBoot problems or the unit only accesses Drive D
Drive

Installation Overview for IBM-PC & Compatibles
Device Driver & MSCDEX FileThe INSTALL program adds a line to the CONFIG.SYS file which tells the system to load the device
driver that is correct for the SCSI host adapter installed in the computer and it adds or modifies a line in
the computer’s AUTOEXEC.BAT file to access MSCDEX (Microsoft CD Extensions).
Device Driver Loaded into CONFIG.SYSThe device driver line in the CONFIG.SYS indicates the Directory and PATH where it is located, as
well as the SCSI ID number of the CD-ROM Drive, and it installs the CDP commands. The
CONFIG.SYS file should look similar to this:
DEVICE = C:\PIONEER\DRD600.SYS /D:MSCD001 /C:CDP
The device driver allows communication to take place between a computer system and a peripheral
device. It is loaded when the system is booted. Pioneer supplies the following three device drivers for
use with several common SCSI host adapters:
1. DRD600.SYS
This device driver works with the Future Domain SCSI host adapters (the TMC and MCS
series) and with the Pioneer DD-C5002 SCSI host adapter.
2. DRD60PS.SYS
This device driver works with the IBM SCSI host adapters for PS/2s.
3. DRD60ASP.SYS
This device driver works with any ASPI compatible host adapter. NOTE: When using an ASPI
compatible host adapter, obtain the ASPI Manager file from the host adapter manufacturer or distributor.
Install the ASPI Manager before you run the Pioneer Driver Installation Program. During the
INSTALLATION procedure, indicate the type of SCSI host adapter installed in your computer, i.e., ASPI
Compatible, DD-C5002, FUTURE DOMAIN, or IBM. (The default is Future Domain.) The INSTALL
program then loads the proper driver into the CONFIG.SYS file. (See page B-2 for a description of the
Device Driver Command Line Switches and page B-3 for a description of the MSCDEX Command Line
Switches.)

Device Driver command line switches:
DEVICE = C:\DEV\DRD600.SYS /D:MSCD000 /C:CDP
Switch Description Example
/D:
(device name)
Specifies the device name of the CD-ROM device.
This name MUST agree with the device name declared
in MSCDEX.
/D:MSCD000
/N:n1[,n2] Specifies the number of CD-ROM discs that are in the
magazine.
This is installed automatically with Version 2.0 and
above of the drivers. You may not see this switch in the
device driver line.
/N:1
/C:
(device name)
Specifies the device name of the character device for
CDP control.
/C:CDP
/S:n1[;h1][,n2[;h2]] Specifies the SCSI ID and the host adapter number of
the Pioneer Drive unit.
This must be the same SCSI ID as the one set by the dip
switches. This is installed automatically with Version 2.0
and above of the drivers. You may not see this switch in
the device driver line.
/S:0
/B or /E Specifies whether or not the device driver should load in
a look ahead buffer for prefetch.
B -> Conventional Memory
E -> Expanded Memory
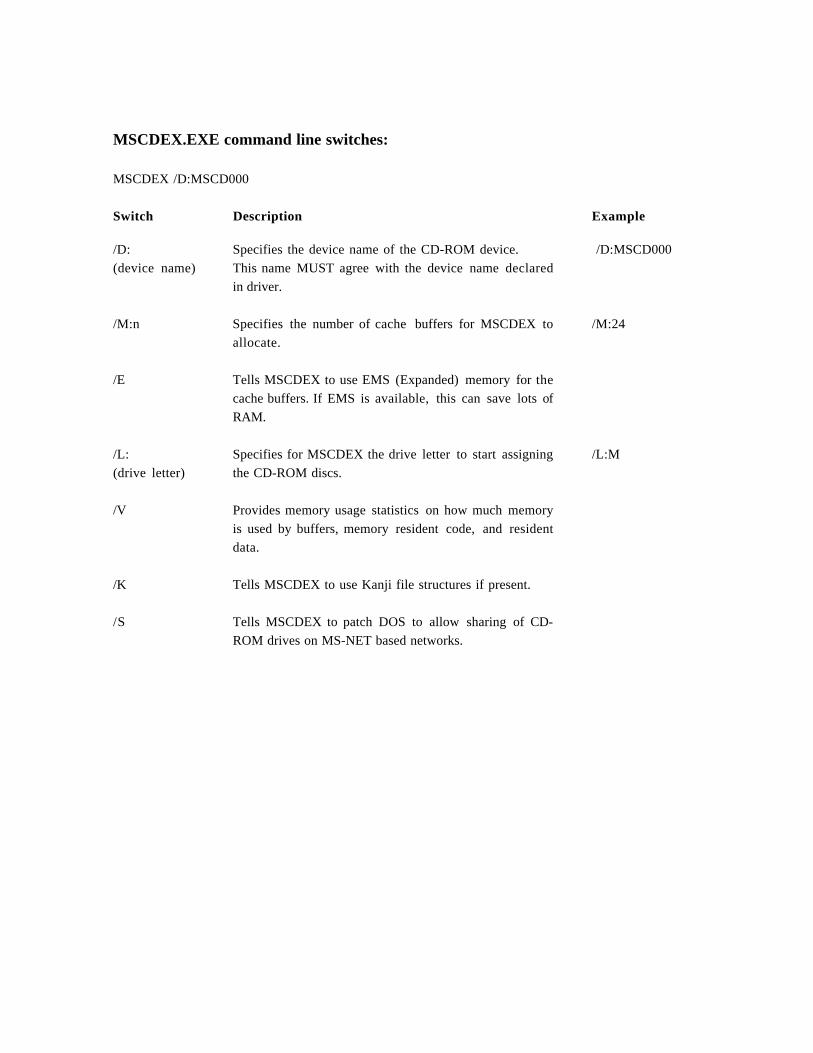
MSCDEX.EXE command line switches:
MSCDEX /D:MSCD000
Switch Description Example
/D:
(device name)
Specifies the device name of the CD-ROM device.
This name MUST agree with the device name declared
in driver.
/D:MSCD000
/M:n Specifies the number of cache buffers for MSCDEX to
allocate.
/M:24
/E Tells MSCDEX to use EMS (Expanded) memory for the
cache buffers. If EMS is available, this can save lots of
RAM.
/L:
(drive letter)
Specifies for MSCDEX the drive letter to start assigning
the CD-ROM discs.
/L:M
/V Provides memory usage statistics on how much memory
is used by buffers, memory resident code, and resident
data.
/K Tells MSCDEX to use Kanji file structures if present.
/S Tells MSCDEX to patch DOS to allow sharing of CD-
ROM drives on MS-NET based networks.

Initialization
Rebooting the computer after installation will initialize the changes made to your AUTOEXEC.BAT and
CONFIG.SYS files enabling your PC to recognize and communicate with the Pioneer CD-ROM Drive.
To initialize the Drives, follow these steps:
1. Exit all applications you are running.
2. Turn the power OFF to your system, to your changer, and to any other external SCSI
devices.
3. Turn the power back ON to the Drive, to any other external SCSI devices and to your
computer system.

Pioneer LaserFacts System
Pioneer New Media Technologies, Inc., has placed a full library of technical resource materials on a
Pioneer LaserFacts System. This is a FAX retrieval system that makes technical documents available
24-hours per day.
Please refer to the LaserFacts Directory of Documents to obtain the number of the document you wish to
order. You can obtain a Directory by calling the LaserFacts line or by calling End-User CD-ROM
Technical Support. See Appendix D, Pioneer Technical Resource Numbers.
To use the Pioneer LaserFacts System, follow these easy steps:
1. Call: 1-310-952-2309 from your FAX phone.
When you call the Pioneer LaserFacts System from your FAX phone, your documents will
be FAXed to you immediately; you can request up to three (3) documents at one time.
2. Respond to the system’s voice instructions.
Enter a five-digit Document Number from the Pioneer LaserFacts Document Directory to
indicate the document you wish to receive. If you do not have a directory to identify a
specific Document Number, follow the menu options and have the directory FAXed to you.
By responding to other menu options, you can access some of the most frequently requested
documents without entering a document number.
3. Hang up and wait for documents to be FAXed.
Your documents will be sent immediately when you call from your FAX phone.

Pioneer Technical Resource Numbers
US CUSTOMERSThis Software Driver Installation Guide should be your first reference if questions should arise during the
installation of your Pioneer CD-ROM drive. If your question is not answered or you find that you need
more assistance, Pioneer offers these other valuable resources for you to contact. (These Pioneer
Technical Resource Numbers are effective as of January 1995.):
Driver Installation, Hardware Set-Up and Configurations, and Troubleshooting(800) 872-4159 - PIONEER INDUSTRIAL PRODUCTS REPRESENTATIVE
You may receive help from one of our representatives who will review your problem step-by-step and
help you to resolve it quickly and easily.
Software Drivers(310) 835-7980 - PIONEER BULLETIN BOARD
The latest software drivers for Pioneer CD-ROM products may be downloaded using your computer, a
modem and modem software.
Technical Documents and Updates(310) 952-2309 - PIONEER LASERFACTS SYSTEM
Technical Documents are available 24-hours a day. Documents with the latest information will transmit
directly to your telecopier (FAX) machine. Please refer to Appendix C for more information about this
Pioneer System.
EUROPE CUSTOMERSPlease refer to the addresses and telephone numbers below for the Pioneer facility in your area.
Europe Pioneer Electronic Europe N.V. BBS: 32-3-570-0880
Phone: 32-3-570-0511
Fax: 32-3-570-0894
Austria Pioneer Electronic Europe Phone: 43-1-522-2116
Fax: 43-1-522-2116 20
Gen.vertr.Pioneer Fa.Hans Lurf Phone: 43-1-6164-580-0
Fax: 43-1-6164-580-40
Belgium Pioneer Belgium Phone: 32-3-570-0500
Fax: 32-3-570-0884
Denmark Pioneer Electronics Denmark BBS: 45-4252-4866
Phone: 45-4252-6066
Fax: 45-4252-6459

Finland Ukokaupat Oy Phone: 358-0521-788
Fax: 358-0521-4702
France Pioneer Setton Phone: 33-1-4760-7999
Fax: 33-1-4760-7988
Germany Pioneer Electronics Deutschland BBS: 49-2156-911-900 Anal
49-2156-911-901 ISDN
Phone: 49-2154-913-0
Fax: 49-2154-429-670
Greece Christos Axarlis Phone: 30-1-3815-483
Fax: 30-1-3807-978
Iceland Hljombaer Phone: 354-562-5999
Fax: 354-552-5324
Ireland Audio Vision Import Phone: 353-1-4504-855
Fax: 353-1-4504-870
Italy Pioneer Electronics Italia Phone: 39-02-50-741
Fax: 39-02-656-6439
Norway Pioneer Electronics Norge BBS: 47-22-222-442
Phone: 47-22-222-212
Fax: 47-22- 223-320
Portugal SETRON Soc. de Equip. Electronicos Phone: 351-1-868-2407
Fax: 351-1-868-7175
Spain Pioneer Electronics Espana Phone: 34-3-729-0966
Fax: 34-3-729-0505
Sweden Pioneer Electronic Svenska BBS: 46-8-771-0822
Phone: 46-8-609-9141
Fax: 46-8-771-9250
Switzerland SACOM Data Phone: 41-32-51-5111
Fax: 41-32-51-7375
The NetherLands Pioneer Electronics Holland Phone:
31-36-538-7777
Fax: 31-36-536-5511

United Kingdom Pioneer High Fidelity(G.B) BBS: 44-1753-789-755
Phone: 44-1753-789-789
Fax: 44-1753-664-010