INTRODUCING PREVCO’S NEW VACUUM PORT … Bottom 1-threaded and 2 ... Double check that the endcaps...
9
6/25/2014 1 INTRODUCING PREVCO’S NEW VACUUM PORT ADAPTOR PREVCO’s new Vacuum Port Adaptor (VPA) is the latest product in PREVCO’s line of subsea housing support equipment. This small assembly provides a key link between our industry standard, portable Vacuum/N2 Backfill kit and a PREVCO Dual Seal Pressure Relief Valve (PRV). Functionally it allows housing evacuation and nitrogen backfilling through PREVCO’s field proven PRV without the need to remove & replace the PRV. This insures that a housing can be sealed with an internal vacuum and that any backfilling gas is not mixed with atmospheric air when the PRV is replaced. PREVCO has just completed prototype evaluation and testing of this design and production units are now available. PREVCO Part Number: 02085-001 VPA ASSEMBLY Thumb Wheel Hose Fitting
Transcript of INTRODUCING PREVCO’S NEW VACUUM PORT … Bottom 1-threaded and 2 ... Double check that the endcaps...

6/25/2014 1
INTRODUCING PREVCO’S NEW VACUUM PORT ADAPTOR
PREVCO’s new Vacuum Port Adaptor (VPA) is the latest product in PREVCO’s line of subsea housing support equipment. This small assembly provides a key link between our industry standard, portable Vacuum/N2 Backfill kit and a PREVCO Dual Seal Pressure Relief Valve (PRV). Functionally it allows housing evacuation and nitrogen backfilling through PREVCO’s field proven PRV without the need to remove & replace the PRV. This insures that a housing can be sealed with an internal vacuum and that any backfilling gas is not mixed with atmospheric air when the PRV is replaced. PREVCO has just completed prototype evaluation and testing of this design and production units are now available.
PREVCO Part Number: 02085-001
VPA ASSEMBLY
(a 3’ flexible hose is supplied with the VPA)
Thumb Wheel
Hose Fitting

6/25/2014 2
VPA Bottom
1-threaded and 2- Blind Holes in PREVCO PRV Poppet
Valve
Large O-Ring
PRV Bottom Flange
Threaded Hole

6/25/2014 3
OPERATING INSTRUCTIONS 1. Inspect, clean and lubricate large o-ring.
2. Place the VPA on a PREVCO PRV. Push down on blue VPA housing until housing bottoms out on PRV bottom flange.

6/25/2014 4
3. Push the thumb wheel down and rotate clockwise to engage the threaded hole in the center of the PRV 2-
3 turns or until a slight resistance is felt. Do not over-tighten.
4. Pull the thumb wheel up to open the PRV poppet. The spring will hold the poppet open.

6/25/2014 5
5. Using the PREVCO Vacuum/N2 Backfill Kit, begin evacuation.
Avoid side loads to VPA housing that would cause the housing to tilt during evacuation and backfill.
6. When evacuation is complete close ballcock valve
6/25/2014 6
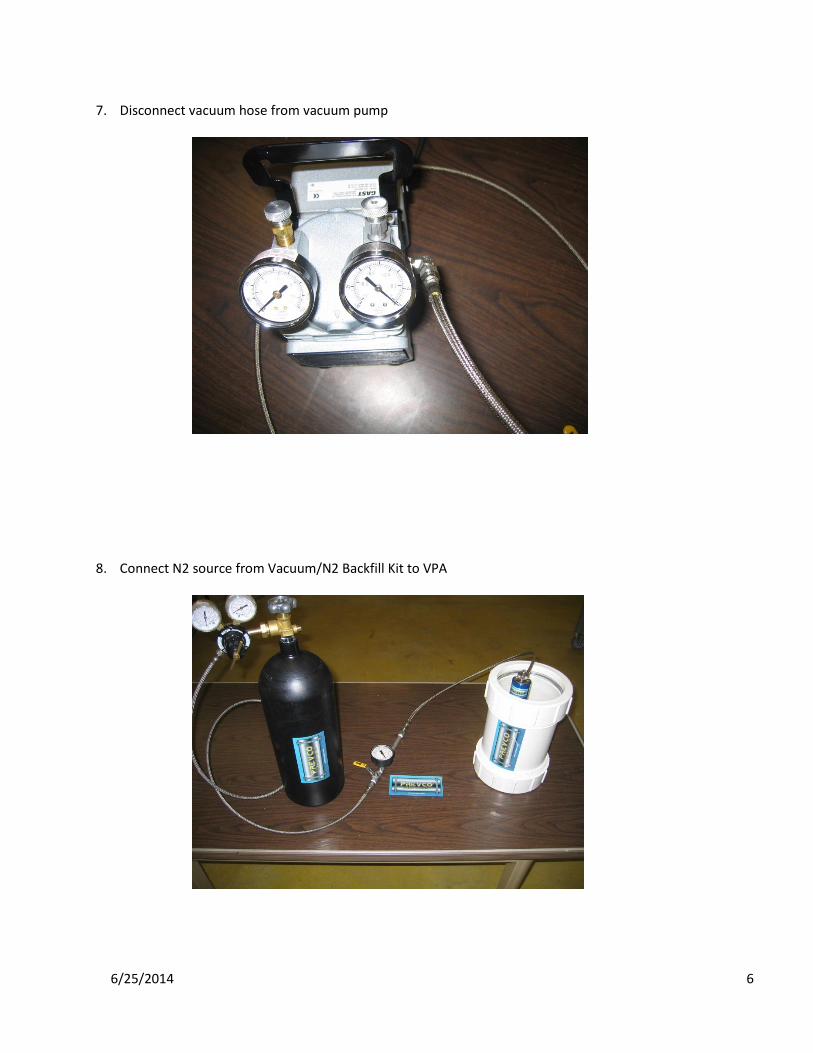
7. Disconnect vacuum hose from vacuum pump
8. Connect N2 source from Vacuum/N2 Backfill Kit to VPA

6/25/2014 7
9. Open ballcock valve.
US Model
Euro Model

6/25/2014 8
10. Backfill with dry nitrogen according to the following procedure.
1. Assuming you’ve just completed the Vacuum Leak Check Procedure above and the housing remains under vacuum, then; 2. Remove the hose from the right side of the vacuum pump and leave it attached to the gage / valve manifold assembly. 3. Double check that the endcaps and all assembly hardware is fully assembled and that the endcap closure method is secure and tight and be sure that your housing can support some internal pressure inside the housing (note, the endcaps closures on PREVCO housings are designed to withstand internal pressure for this purpose). 4. Ensure the nitrogen-purging regulator is securely tightened to the nitrogen bottle. (Start with the regulator adjusted to zero. Back out the pressure-adjusting handle on the regulator, counter clockwise.) 5. Attach the free end of the hose (was attached to the vacuum pump previously) to the regulator. 6. Once the vacuum leak test procedure is completed satisfactorily, open the HP valve on the nitrogen source and slowly turn the pressure adjusting handle clockwise to purge the hose before attaching it to the gage / valve manifold assembly. (DANGER! use as low a pressure, as the regulator will allow ~5psi is best.) 7. Now attach the loose end of the hose to the gage / valve manifold assembly and tighten. 8. Slowly open the valve on the gage / valve manifold assembly and watch the gage as the vacuum decreases allowing nitrogen to fill the pressure vessel. (DANGER!! do not allow the nitrogen pressure inside the vessel to exceed a maximum of +5 psi.) 9. Close the valve on the gage / valve assembly once a positive pressure has been obtained. (DANGER!! do not allow the pressure to exceed a maximum of 5 PSI.) 10. Close the valves on the HP nitrogen source and the manifold 11. Remove the hose from the gage / valve assembly. 12. With the valve closed, remove the gage / valve manifold assembly from the vent plug port on the end cap, and install and tighten the vent plug just after nitrogen finishes escaping from the pressure vessel. 13. Remove the hose from the regulator. 14. Stow all items in the storage case for future use.
After you’ve finished evacuating and back filling: 1. Unscrew the thumb wheel, allowing the poppet valve to return to its normally closed position. 2. Remove the VPA from the PRV and you’re done!

6/25/2014 9
Note: If you are using the Vacuum Port Adaptor and do not have a Prevco Vacuum Kit, you may need to fabricate a manifold similar to the one shown below and procure a short length of ¼” hose with female 37 degree flare fittings on each end.