INTRAVENOUS INFUSIONS AND RELATED TASKS
59
U.S. ARMY MEDICAL DEPARTMENT CENTER AND SCHOOL FORT SAM HOUSTON, TEXAS 78234-6100 INTRAVENOUS INFUSIONS AND RELATED TASKS SUBCOURSE MD0553 EDITION 100
Transcript of INTRAVENOUS INFUSIONS AND RELATED TASKS

U.S. ARMY MEDICAL DEPARTMENT CENTER AND SCHOOL FORT SAM HOUSTON, TEXAS 78234-6100
INTRAVENOUS INFUSIONS AND RELATED
TASKS SUBCOURSE MD0553 EDITION 100

DEVELOPMENT
This subcourse is approved for resident and correspondence course instruction. It reflects the current thought of the Academy of Health Sciences and conforms to printed Department of the Army doctrine as closely as currently possible. Development and progress render such doctrine continuously subject to change.
ADMINISTRATION
For comments or questions regarding enrollment, student records, or shipments, contact the Nonresident Instruction Branch at DSN 471-5877, commercial (210) 221-5877, toll-free 1-800-344-2380; fax: 210-221-4012 or DSN 471-4012, e-mail [email protected], or write to: COMMANDER AMEDDC&S ATTN MCCS HSN 2105 11TH STREET SUITE 4192 FORT SAM HOUSTON TX 78234-5064 Approved students whose enrollments remain in good standing may apply to the Nonresident Instruction Branch for subsequent courses by telephone, letter, or e-mail. Be sure your social security number is on all correspondence sent to the Academy of Health Sciences.
CLARIFICATION OF TRAINING LITERATURE TERMINOLOGY When used in this publication, words such as "he," "him," "his," and "men" are intended to include both the masculine and feminine genders, unless specifically stated otherwise or when obvious in context. .

TABLE OF CONTENTS Lesson Paragraph Introduction Universal Body Substance Precautions 1 Initiate an Intravenous Infusion and Manage a Patient with an IV 1-1--1-6 Section I. Initiate an Intravenous Infusion 1-1--1-4 Section II. Manage a Patient with an Intravenous Infusion 1-5--1-6 Exercises 2 Obtain a Blood Specimen 2-1--2-4 Exercises 3 Initiate Treatment for Anaphylactic Shock 3-1--3-3 Exercises Appendix, Surgical Instrument and Supply Set, Individual.
MD0553 i

CORRESPONDENCE COURSE OF THE ACADEMY OF HEALTH SCIENCES, UNITED STATES ARMY
SUBCOURSE MD0553
INTRAVENOUS INFUSIONS AND RELATED TASKS
INTRODUCTION
The medical soldier caring for patients provides a valuable service to his comrades. He must meet high standards with integrity, dignity, calm thinking, and careful study. The purpose of this subcourse is to provide you with a working knowledge of the procedures discussed herein; however, you must receive guidance and hands-on supervision to become proficient at the procedures described. Subcourse Components: The subcourse instructional material consists of the following:
Universal Body Substance Precautions. Lesson 1, Initiate an Intravenous Infusion and Manage a Patient With an IV. Lesson 2, Obtain a Blood Specimen. Lesson 3, Initiate Treatment for Anaphylactic Shock. Appendix, Surgical Instrument and Supply Set, Individual.
Study Suggestions: Here are some suggestions that may be helpful to you in completing this subcourse: --Read and study each lesson carefully. --Complete the subcourse lesson by lesson. After completing each lesson, work the exercises at the end of the lesson, marking your answers in this booklet. --After completing each set of lesson exercises, compare your answers with those on the solution sheet that follows the exercises. If you have answered an exercise incorrectly, check the reference cited after the answer on the solution sheet to determine why your response was not the correct one. Credit Awarded: To receive credit hours, you must be officially enrolled and complete an examination furnished by the Nonresident Instruction Branch at Fort Sam Houston, Texas. Upon successful completion of the examination for this subcourse, you will be awarded 5 credit hours.
MD0553 ii

You can enroll by going to the web site http://atrrs.army.mil and enrolling under "Self Development" (School Code 555). A listing of correspondence courses and subcourses available through the Nonresident Instruction Section is found in Chapter 4 of DA Pamphlet 350-59, Army Correspondence Course Program Catalog. The DA PAM is available at the following website: http://www.usapa.army.mil/pdffiles/p350-59.pdf.
MD0553 iii

UNIVERSAL BODY SUBSTANCE PRECAUTIONS
Prevention of Transmission of Human Immunodeficiency Virus and Other Blood-Borne Pathogens in Health Care Settings
Only blood, semen, vaginal secretions, and possibly breast milk have been implicated in transmission of human immunodeficiency virus (HIV), hepatitis B virus (HBV), and other blood-borne pathogens. Blood is the single most important source of transmission of blood-borne pathogens in health care settings. Infection control efforts must focus on preventing exposures to blood. Although the risk is unknown, universal precautions also apply to tissues and to cerebrospinal fluid, synovial fluid, pleural fluid, peritoneal fluid, and amniotic fluid. Universal precautions do not apply to feces, nasal secretions, sputum, sweat, tears, urine, and vomitus unless they contain visible blood. Although universal precautions do not apply to these body substances, the wise nurse wears gloves for protection from other infections. Precautions are used for all patients. (Reason: It is impossible to know which patients are infected with such conditions as HIV, HBV, or other infectious agents.) Gloves are worn whenever the health care worker may come in contact with blood, body fluids containing blood, and other body fluids to which universal precautions apply. (Reason: Diseases can be carried in the body substances.) Wear gloves at all times if you have any break in the skin of your hands. If you have an exudative condition, such as weeping dermatitis, you must be evaluated before working with patients and patient care equipment. (Reason: You may be at great risk of contracting a disease; you might also spread disease.) Change gloves after each contact with a client. (Reason: The gloves may be contaminated.) Wash your hands and skin surfaces immediately and thoroughly if they are contaminated with blood or body fluids. (Reason: Proper washing will help to stop the spread of infection.) Wear a gown or apron when clothing could become soiled. (Reason: To prevent spread of infection to yourself or others.)
MD0553 1

MD0553 2
Wear a mask and eye protection if splashing is possible. Hospital protocol will determine what type of eye protection is required for each specific case. (Reason: Infection could enter your body through the mucous membranes of your mouth or nose or through your eyes.) Dispose of sharp objects carefully. Do not recap or break needles. Needles and sharp objects are placed in a special container after use. (Reason: There is a possibility of accidental finger stick. It is important to protect yourself and housekeeping personnel.) If you have an on-the-job accident that causes a break in the skin, notify your nursing supervisor immediately. (Reason: Immediate precautions must be taken to protect you.) Special care is taken of a deceased patient's body. (Reason: To prevent leakage of body substances. It is safer to assume that all patients are infectious.) All health care workers who perform or assist in vaginal or cesarean delivery should wear gloves and gowns when handling the placenta or the infant until blood and amniotic fluid have been removed from the infant's skin. Gloves should be worn until after postdelivery care of the umbilical cord. Pregnant health care workers are not known to be at greater risk of contracting HIV infection than health care workers who are not pregnant; however, if a health care worker develops HIV infection during pregnancy, the infant is at risk. Because of this risk, pregnant health care workers should be especially familiar with and strictly adhere to precautions to minimize the risk of HIV transmission. (Adapted from Centers for Disease Control: Recommendations for prevention of HIV transmission in health care settings. MMWR 36: Suppl. 25: 1987. Centers for Disease Control: Update: Universal precautions for prevention or transmission of human immunodeficiency virus, hepatitis B virus, and other blood-borne pathogens in health-care settings. MMWR 37: 24, 1988)
End of Universal Body Substance Precautions

LESSON ASSIGNMENT LESSON 1 Initiate an Intravenous (IV) Infusion and Manage a
Patient with an IV. TEXT ASSIGNMENT Paragraphs 1-1 through 1-6. LESSON OBJECTIVES After completing this lesson, you should be able to: 1-1. Determine when you would administer an IV. 1-2. Determine the various types of solutions that are used in IV therapy. 1-3. Determine the material and/or equipment you will need to administer an IV. 1-4. Identify the various parts of the IV set. 1-5. Determine the procedures for inspecting the IV set. 1-6. Determine the procedures for removing air from the tube. 1-7. Determine the procedures for choosing a site for an IV. 1-8. Determine the procedures for administering an IV injection. 1-9. Determine the procedures for taping and securing the needle at the site. 1-10. Determine the procedures for calculating the rate of flow. 1-11. Determine the procedures for documenting IV therapy. 1-12. Determine the procedures for using a stainless steel needle for the IV injection as opposed to an over-the-needle catheter.
MD0553 1-1

1-13. Determine the procedures for replacing an IV solution bag or bottle. 1-14. Determine the procedures for replacing an IV tubing. 1-15. Determine the procedures for replacing a dressing at the tubing site. 1-16. Identify the following complications in IV therapy. a. Infiltration. b. Phlebitis. c. Circulatory overload. d. Air embolism. e. Infections. 1-17. Determine the intervention in procedures to follow for each of the complications listed above. 1-18. Determine the preventive procedures to follow for each of the complications listed above. 1-19. Determine the procedures to follow for disturbances of IV therapy. 1-20. Calculate IV flow rate. SUGGESTION After completing the assignment, complete the exercises of this lesson. These exercises will help you achieve the lesson objectives.
MD0553 1-2

LESSON 1
INITIATE AN INTRAVENOUS INFUSION AND MANAGE A PATIENT WITH AN INTRAVENOUS
Section I. INITIATE AN INTRAVENOUS INFUSION
1-1. GENERAL A casualty may be suffering from severe blood loss, severe burns, extreme vomiting, extreme diarrhea, heat injuries (heat stroke or heat exhaustion), or numerous other emergency situations. When such situations occur, it may be necessary to replace or maintain the supply of body fluids, electrolytes (body salts), and some nutrients or to administer necessary medication. Normally, adjustments in diet and the fluids that a person takes in can correct a mild loss of fluids and electrolytes; however, the casualty may be on the verge of shock or already in shock. In such instances, you must be prepared to initiate an intravenous (IV) infusion to restore lost fluids and electrolytes such as sodium, potassium, calcium, or chloride, or to administer medications. The gauge of the needle used ranges from a small size of 20 to a large size of 12. A thick solution or the need for a rapid infusion of fluids requires a larger bore and a larger vein. 1-2. SOLUTIONS USED IN INTRAVENOUS INFUSION THERAPY a. Dextran Solution. This solution has physical properties similar to plasma. It is used to increase the blood volume lost from trauma, hemorrhage, burns, or anesthesia. b. Dextrose 5 percent in One-Half Strength Normal Saline Solution (D5/0.45 percent NaCl). This solution is used to correct excessive fluid loss and to provide calories and sodium chloride. c. Dextrose in Water Solution. Dextrose in water (D5W) solution is used to treat dehydration, to supply calories for energy, and to supply water for body needs. d. Normal Saline Solution. Normal saline (0.9 percent NaCl) solution is used to correct excessive fluid loss or to correct excessive acid or alkalinity in body fluids. e. Ringer's Lactate Solution. Ringer's lactate (RL) solution resembles the electrolyte structure of normal blood serum. It is used to treat dehydration and to restore normal fluid after extracellular shift (for example, in burns and infections). This is the solution that the aidman (medical specialist) carries in the field. f. Other Solutions. Other solutions or concentrations may be used depending upon the patient or condition.
MD0553 1-3

NOTE: 1,000 cc of any IV solution that contains 5 percent dextrose supplies approximately 170 calories. 1-3. PROCEDURE FOR INITIATING AN INTRAVENOUS The following description of procedures for initiating an IV can be applied in a clinical or field environment. Two types of needles will be discussed which you may use when initiating an IV. a. Determine Need for an Intravenous. Usually you will be directed to administer an IV by the doctor's orders or supervisor's directive. In the field environment, you may have to rely upon your individual judgment for administering an IV. If a soldier has lost considerable blood or you suspect shock, you will administer an IV. In the field environment, you will usually have Ringer's lactate solution as part of your supply. b. Perform Patient Care Handwash. (1) In the hospital, you will wash your hands using an antimicrobial soap. (2) In the field, you will use the best handwash possible that the situation permits. c. Obtain Required Equipment. (1) Solution in bag or bottle. (a) Use only solutions labeled as specifically prepared for IV therapy. (b) Veins in the arms are usually the most accessible and easy to find for intravenous infusions. For short-term therapy, the left hand is used when the patient is right-handed and vice versa. For long-term therapy, alternate arms are used. (c) Check to verify that you have the right solution. Compare the label on the solution container with the patient's record and provider's order; check the type of solution, amount, route, hours of administration, and rate of flow. Sometimes in the hospital, the pharmacy will prepare the IV for you. (2) Intravenous injection set. (a) There are several types of needles. The synthetic catheter/needles and stainless steel needles are two types that are commonly used.
MD0553 1-4

(b) The advantage of the synthetic catheter/needle is the flexibility of the catheter while it is in the vein. This increases stability and reduces the possibility of infiltration (see figure 1-1). We will discuss this needle first in this lesson. This is also the needle found in your aidman's kit. See Annex A for contents of the Surgicial Instrument and Supply Set, Individual. (c) The stainless steel needles (known as wing-tipped needles or "butterflies") are used for short-term therapy or when the IV site must be changed frequently. Although this type of needle is safer and less traumatic for the patient, it is more likely to become dislodged or puncture the vein (see figure 1-2). The procedures for using this needle are at the end of the lesson.
Figure 1-1. Catheter/needle and straight needle.
Figure 1-2. Wing-tipped needle.
MD0553 1-5

(3) One roll each of one-inch wide adhesive tape, 1/4-inch wide adhesive tape, and, if available, transparent IV site adhesive tape. (4) Constricting band. (5) Gauze sponge (2 by 2- inch). (6) Antiseptic sponge. In the field situation, this is usually a cotton alcohol swab. (7) Arm board, if required for stabilization. (8) Waterproof pad to protect area under site. d. Inspect Equipment for Defects and/or Contamination. This is an important step. Using contaminated equipment or solution can cause life-threatening infections in your patients. (1) Intervenous solution bag or bottle. (a) Check the fluid in the bag or bottle for discoloration, condensation, and sedimentation. (b) Check the bottle or plastic bag for cracks, scratches, and leaks. If IV solution comes in a plastic bag, gently squeeze it to make defects more visible. Be sure to check the expiration date. (2) Intravenous injection set (see figure 1-3). This set includes the tubing, drip chamber, clamps, and needle adapter. Examine this set carefully. It may include a catheter/needle unit or the catheter needle may be issued separately. (a) Inspect package for tears, rips, or watermarks that may indicate contamination of contents. (b) Inspect the needle adapter, drip chamber, and spike for discoloration, cracks, and holes. (c) Release the clamp, slide it six to eight inches below the drip chamber, and reclamp. (d) Inspect the catheter/needle for burrs or other flaws.
MD0553 1-6

Figure 1-3. Intravenous injection set. e. Prepare Equipment. (1) If using bag solution: (a) Remove the protective covers from the spike and from the tube on the end of the bag. (b) Insert the spike into the end of the solution container tube with one quick motion. Make sure the spike is inserted to the hub. Do not touch the end of the tube or the spike at any time. (2) If using bottle solution: (a) Remove the protective metal cap and diaphragm. Avoid cutting your fingers on the edges of the cap. Do not touch or contaminate the sterile surface when you open the bottle.
MD0553 1-7

(b) Swab the stopper with alcohol pad. (c) Push the spike firmly into the rubber stopper. If there is no sound that indicates a release of the vacuum, DO NOT use the fluid. It may be contaminated. (3) Hang the bag or bottle above the level of the patient's heart. (4) With tubing clamp closed, squeeze the drip chamber until it is half full of solution. This allows the solution to flow properly. (5) Air entering the bloodstream is rapidly transported to the heart. Depending on the amount of air injected, the patient may or may not experience serious complications, including cardiac arrest. Remove air from the tubing as follows (see figure 1-4):
Figure 1-4. Removing air from the tubing. (a) Hold the end of the tubing over a basin or other container to collect any fluid that may run out as you clear the tubing. (b) Hold the tubing above the bottom of the bag or bottle; then remove the protective cover from the needle adapter and hold it for later use. Be careful not to touch the end of the adapter or allow it to touch any non-sterile surface. (c) Release the clamp on tubing.
MD0553 1-8

(d) Gradually lower the tubing and allow the fluid to run through the tubing until the solution reaches the end of the adapter. This forces the air out of the tubing. (e) Clamp the tubing to prevent air from re-entering the tubing. (f) Replace the protective cover. (6) Tear off three four-inch pieces of one-inch tape and one three-inch piece of 1/4-inch tape and hang on the side of the bag or bottle or another readily accessible location. f. Prepare the Patient for Procedure. Identify the patient and tell him what you are going to do. (1) If performing this procedure in other than a field environment, identify the patient as follows: (a) Ask the patient his name. (b) Check the identification band and bed card. (2) Prepare the patient by explaining: (a) Why the IV therapy is needed. (b) How much discomfort there will be. (c) How the venipuncture is performed. (d) How therapy will limit activities. (e) Why the needle and flow clamp are not to be manipulated. (f) How to call the nurse should help be required. g. Select Infusion Site. Select the most distal and accessible vein of an uninjured arm or hand (see figure 1-5). Veins in the arm are usually accessible and easy to find. Consideration for choosing an infusion site includes:
MD0553 1-9

Figure 1-5. Preferred sites for an IV.
(1) Longevity of therapy. (a) Short term. When possible, use the left hand if the patient is right-handed. Use the right hand if the patient is left-handed. (b) Long term. Alternate arms when changing sites. (2) Avoid sites over joints. Sites over joints are hard to stabilize. Selecting these areas may cause the catheter or needle to dislodge or the fluid to infiltrate. (3) Patient's condition. Avoid veins in infected, injured, or irritated areas. Using sites in close proximity to such areas increases the chances of contamination and infection. h. Prepare Infusion Site. (1) Place waterproof pad under arm selected. (2) Apply a constricting band two to three inches above the site you have chosen. (3) Palpate the vein selected. (4) Cleanse the skin of the site you have selected. Use the same procedures you have been taught to cleanse the site of an injection (spiral motion from the center outward).
MD0553 1-10

i. Don Gloves. If you have not done so, put on non-sterile or sterile gloves. j. Insert Catheter/Needle into Vein. Follow the procedure below to insert the over-the-needle catheter. (1) Remove the protective cover from the catheter/needle, being careful not to touch the catheter/needle. (2) Touching only the catheter/needle hub, rotate catheter in needle to make sure it moves freely. Do not move catheter up and down on the needle. (3) Place your thumb about one inch directly below the injection site. Pull the skin taut using a firm downward pressure of the thumb over the vein. (4) Hold the flash chamber firmly between thumb and forefinger (figure 1-6). (5) With the catheter/needle in the bevel up position, position the needle at about a 20 to 30 degree angle and sharply pierce the skin slightly to the side of the vein (see figure 1-7). If the point of insertion is slightly to the side of the vein, there is less chance of pushing it completely through the vein.
Figure 1-6. Inserting the over-the-needle catheter.
Figure 1-7. Angle of insertion of the needle.
MD0553 1-11
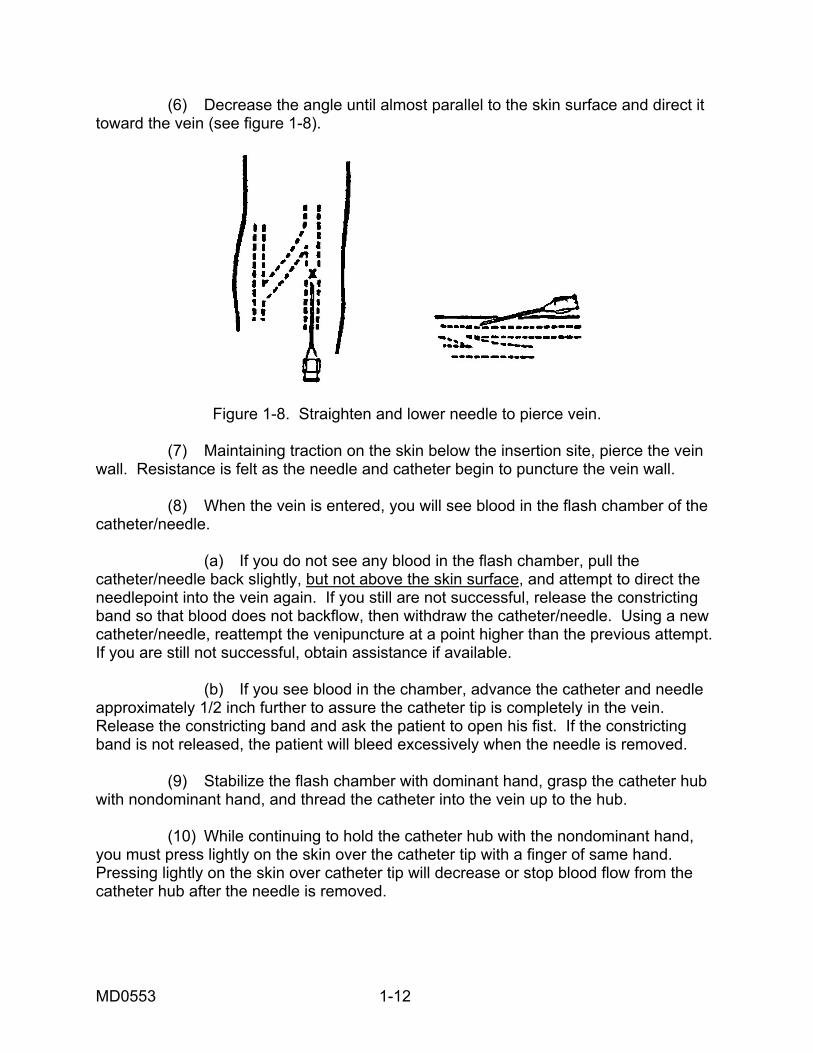
(6) Decrease the angle until almost parallel to the skin surface and direct it toward the vein (see figure 1-8).
Figure 1-8. Straighten and lower needle to pierce vein.
(7) Maintaining traction on the skin below the insertion site, pierce the vein wall. Resistance is felt as the needle and catheter begin to puncture the vein wall. (8) When the vein is entered, you will see blood in the flash chamber of the catheter/needle. (a) If you do not see any blood in the flash chamber, pull the catheter/needle back slightly, but not above the skin surface, and attempt to direct the needlepoint into the vein again. If you still are not successful, release the constricting band so that blood does not backflow, then withdraw the catheter/needle. Using a new catheter/needle, reattempt the venipuncture at a point higher than the previous attempt. If you are still not successful, obtain assistance if available. (b) If you see blood in the chamber, advance the catheter and needle approximately 1/2 inch further to assure the catheter tip is completely in the vein. Release the constricting band and ask the patient to open his fist. If the constricting band is not released, the patient will bleed excessively when the needle is removed. (9) Stabilize the flash chamber with dominant hand, grasp the catheter hub with nondominant hand, and thread the catheter into the vein up to the hub. (10) While continuing to hold the catheter hub with the nondominant hand, you must press lightly on the skin over the catheter tip with a finger of same hand. Pressing lightly on the skin over catheter tip will decrease or stop blood flow from the catheter hub after the needle is removed.
MD0553 1-12

(11) With the dominant hand, remove the needle from the catheter and lay aside, taking care to avoid placing it where you, the patient, or others may be stuck before it is properly discarded. (12) Remove the protective guard from the needle adapter on the tubing and connect adapter quickly and tightly onto the catheter hub. (13) Release the tubing clamp to begin the flow. After the hub is taped, you will adjust the flow to the prescribed rate. k. Tape and Secure Site. Tape and secure the site in accordance with (IAW) local standard operating procedure (SOP). One method is described below. (1) Place the strip of 1/4-inch tape under the hub, sticky side up. (Use the tape that you placed on the bottle or bag earlier.) (2) Criss-cross the ends and secure to the skin (see figure 1-9). (3) Cover the insertion site with a sterile dressing (2 x 2 gauze or clear IV site adhesive) and tape it down (see figure 1-10).
Figure 1-9. Secure hub.
Figure 1-10. Cover insertion site with sterile dressing and tape it down.
MD0553 1-13

(4) Retrieve and dispose of needle in biohazard container. (5) Clean the area around the site as needed to remove any blood. (6) When the area is cleaned and you are no longer at risk for contamination by the patient's blood, your gloves may be removed to facilitate taping and adjustment of the tubing. (7) Loop the tubing on the extremity and secure it again with tape (see figure 1-11). The loop prevents pull on the catheter, which could dislodge if the patient moves around. (8) Apply an armboard to immobilize or support the arm as needed.
Figure 1-11. Loop and secure tubing.
l. Readjust Flow. Calculate the flow according to the prescribed order as follows: (1) Check the package to determine the number of drops per milliliter of IV fluid, which the IV set has been designed to deliver. The package will have a statement identifying the number of drops it will take to deliver one milliliter (cc) of fluid, for example: "Set will deliver 10 drops of IV fluid per milliliter." (2) Determine total IV dosage and total time patient is to receive IV dosage by the doctor's orders. The orders will state a total dosage in milliliters and total time in hours during which IV fluid is to be administered or the number of ml of fluid per hour. (a) EXAMPLE: 1,000 ml over four hours. (b) EXAMPLE: 250 ml per hour
MD0553 1-14

(3) Determine the number of milliliters of IV fluid to be administered per minute by dividing the total IV dosage by the total minutes during which IV fluid is to be administered. (a) EXAMPLE: 1,000 ml / 240 minutes = 4.2 ml per minute (b) EXAMPLE: 250 ml / 60 minutes = 4.2 ml per minute (4) Determine the number of drops per minute of IV fluid to be administered by multiplying the milliliters of IV fluid required per minute by the number of drops of IV fluid per milliliter delivered by the tubing used. Round off drops per minute to the nearest whole number.
EXAMPLE: 4.2 ml of IV fluid per minute x 10 drops of IV fluid per ml = 42 drops per minute.
(5) Using the tubing clamp, adjust the rate of flow to equal the number of drops per minute you have calculated. You may count the number of drops delivered in 15 seconds and multiply by four. m. Clear the Area. Clear the area of used supplies and equipment and make the patient comfortable. n. Document Intervenous Therapy. The dressing covering of the needle is used to document when therapy started and time of each change of dressing. The dressing should be changed every twenty-four hours to keep the site clean and to prevent irritation and contamination. The directions for labeling the dressing bag or bottle and medical records are as follows: (1) Dressing. (a) Cut one piece of adhesive tape, and place it on a flat surface. Do not write on the dressing, as it will irritate the venipuncture site. You may also use the tab of the edge of the transparent adhesive site cover to label the dressing. (b) Write the following data on the tape or tab: 1 Initials of person initiating the IV. 2 The date and time the IV was started. 3 Gauge of catheter/needle used. (c) Place the labeled tape over the dressing.
MD0553 1-15
(2) Container (bag or bottle). Label bag or bottle once the infusion is started and with each change of solution. The bag or bottle should be changed every 24 hours, even if not all the fluid is used, to prevent irritation or contamination. (a) Write the information required by your facility's local policy on a label or piece of tape. This may include: 1 Patient's name, identification number, and room number. 2 Drip rate. 3 Date and time container was hung. 4 Initials of the person hanging the container. (b) Place the labeled tape on the bag or bottle. (c) Prepare and attach a timing label as follows: 1 Place a piece of adhesive tape vertically on the container. 2 On the tape, write the approximate time the solution level should reach each volume mark on the container (usually at each 100 cc mark). This will involve mathematical computation. Write the time the container should be empty at the bottom of the label. (d) Label the tubing IAW local policy or as follows: 1 Wrap a strip of tape around the tubing, leaving a tab. 2 Mark your initials and the date and time the tubing was last changed on the tab. (3) Medical records. Record the following in the nursing notes or field medical card: (a) Date and time IV was started. (b) Amount and type of solution. (c) Rate of infusion. (d) Type and gauge of needle and cannula set. (e) Insertion site.
MD0553 1-16

(f) Patient's condition. (g) Your name. (h) If patient has an intake and output (I&O) form, complete the proper areas. o. Perform Handwash. Perform a patient care handwash. p. Record Treatment and Observations. Record information on the patient's record (Field Medical Card or Nursing Notes) as applicable. 1-4. ALTERNATE PROCEDURE FOR ADMINISTERING INTERVENOUS WITH
STAINLESS STEEL NEEDLE a. Select and prepare the infusion site the same way as with the over-the-needle catheter indicated above and don gloves. b. Holding the needle by pinching the two wings together with your thumb and forefinger introduce the needle into the vein you have selected using the technique described in paragraph 1-3j. c. Confirm puncture of the vein by watching the needle tubing for blood return. d. While exerting a gentle lifting pressure, advance the needle in the vein up to the wings. Lifting the needle helps to prevent the needle from piercing the opposite wall of the vein. e. Release the constricting band and ask the patient to open his fist. f. Hang the solution container above the level of the heart. g. Tape the needle into position and cover site as described above.
Section II. MANAGE A PATIENT WITH AN INTRAVENOUS INFUSION 1-5. GENERAL After initiating the IV, it is necessary to maintain the infusion and manage the IV patient in a manner that will ensure recovery. This requires that the medical specialist strictly adhere to aseptic procedures and techniques while managing the IV patient.
MD0553 1-17

1-6. PROCEDURES TO FOLLOW IN MANAGING A PATIENT WITH AN INTRAVENOUS INFUSION
The following are some procedures you will perform as you manage the patient with an IV. a. Replace the Intervenous Solution Container. Adhere to strict aseptic techniques throughout the replacement procedure. (1) Perform a patient care hand wash. (2) Select and prepare the new solution. Check the provider's orders or check with the supervisor. (3) Clamp the tubing shut to prevent air from entering the tubing during the replacement procedure. (4) Remove protective cover from the port of the new container. (5) With the old container upside down, remove the spike from the nearly empty bag. (6) Insert the spike in the new container and hang it on the IV stand. (7) Adjust the flow rate according to the directive. (8) Document solution container according to the procedures provided in Section I. b. Replace the Intervenous Tubing. Tubing should be changed every 48 hours IAW local policy. It is advisable to change the tubing at the same time you are changing the bag/bottle. The more often you open the closed system, the greater the chance for contamination. (1) Perform a patient care hand wash and don gloves. (2) Use the clamp to turn off the infusion. (3) Disconnect the old tubing from the bottle, cover the open end, and hang it on the IV pole hook or tape it to the pole. Hanging the tubing on the hook will help to prevent backflow into the tubing. (4) Spike and prime the new tubing.
MD0553 1-18

(5) Attach the new tubing to the catheter/needle using the following procedures. (a) Place sterile gauze under the catheter/needle hub. The sterile gauze is used to prevent contamination of the catheter and tubing during the procedure. (b) Remove the protective cap from the new tubing adapter and grasp the new tubing between the fingers on one hand. Be careful not to contaminate the adapter during the process. (c) Grasp the catheter hub with a sterile gauze pad between the thumb and forefinger and carefully disconnect the old tubing adapter with the other hand. (d) Quickly, connect the adapter to the needle hub. (6) Secure the tubing and dressing to the arm. (7) Clean the area of any contamination and dispose of equipment and used tubing. Remove gloves and discard. c. Change the Dressing. Follow the procedures below to change the dressing. (Dressings should be changed every 24 hours or IAW local policy.) (1) Obtain the following equipment: (a) Adhesive tape. (b) Antiseptic swab. (c) Some 2-inch by 2-inch sterile gauze pads. (2) Perform a patient care hand wash and don gloves. (3) Hold the needle hub steady while loosening and removing the old dressing. Discard the old dressing. To help prevent catheter/needle dislodgement, ask the patient not to move until the new dressing has been secured. (4) Clean the skin around the infusion site with an antiseptic swab. Check for infection and inflammation. (5) Secure the hub and new dressing to the arm. (6) Remove and discard gloves. (7) Label the dressing and document your actions.
MD0553 1-19

d. Discontinue the Infusion. Follow the procedures below to discontinue an infusion. (1) Obtain the following equipment: (a) Waterproof pad. (b) Adhesive tape and 2 x 2 inch sterile gauze pads or a self-adhesive bandage. (2) Place the pad under the patient's arm. (3) Perform a patient care hand wash and don gloves. (4) Remove the tape and dressing. When removing the tape and dressing, take care not to dislodge the needle. (5) Clamp the tubing. This stops the flow of solution and keeps it from leaking into the tissue as the needle is removed or from soiling the bed linens after removal. (6) Place an antiseptic sponge over the injection site and pull the needle out smoothly without hesitation, following the course of the vein. If the needle is removed by twisting, raising, or lowering it, it could damage the vein. (7) Immediately apply pressure with gauze for approximately one minute and then apply a small, dry pressure dressing. A self-adhesive bandage may be used or use the 2 x 2 inch gauze secured in place with a piece of tape. (8) Remove the equipment. Dispose of the bottle/bag tubing and needle according to SOP. e. Check for Complications of Intervenous Therapy. (1) Infiltration. Infiltration is an accumulation of fluids in the tissue surrounding the venipuncture site. (a) Cause of the infiltration. Infiltration is caused when the catheter/needle becomes dislodged or penetrates through the vein allowing IV fluid to leak into surrounding tissue. (b) Signs and symptoms of infiltration. 1 Solution is flowing at a sluggish rate or not at all. 2 Infusion site is cool and pale.
MD0553 1-20

3 Infusion site or extremity is swollen. 4 Patient complains of pain, tenderness, burning, or irritation at the infusion site. 5 Fluid leaking around infusion site. 6 Absence of blood backflow, when IV bag/bottle is lowered below IV site. (c) Intervention measures for infiltration. 1 If flow is sluggish, pullback on the catheter a bit and rotate it or elevate and depress the catheter a bit. If elevating the catheter helps, a small piece of gauze may be placed under the needle to hold it in position. The level of the catheter may be resting against the side of the vein and this will help to free it. 2 If this does not correct the flow, or if infiltration has occurred, stop infusion and notify supervisor. You may be directed to remove the IV and restart it in an alternate location. 3 Apply cold pack to site if infiltration has occurred within one-half hour. A cold pack will help reduce the pain and swelling. 4 Apply warm, wet compresses to promote absorption if infiltration has occurred more than thirty minutes earlier. A warm, wet compress stimulates circulation, promoting the absorption of the infiltrated solutions into surrounding tissues. 5 Document observations and actions for future reference. (d) Preventive measures against infiltration. 1 Use splint for stability and to prevent dislodging of the IV catheter/needle. 2 Tape the catheter/needle securely. (2) Phlebitis. Phlebitis is an inflammation of the wall of the vein. (a) Associated problems. Problems associated with phlebitis include thrombophlebitis and thrombosis. 1 Thrombophlebitis is an inflammation of the vein accompanied by the formation of a clot.
MD0553 1-21

2 Thrombosis is a formation of a clot in a blood vessel without accompanying inflammation. (b) Phlebitis can be caused by the following: 1 Injury to vein during venipuncture or from later needle movement. 2 Irritation to vein caused by: a Long-term therapy. b Infusion of irritating or incompatible additive. c Use of vein that is too small to handle the amount or type of solution. d Sluggish flow rate which allows clot to form at end of needle. e Infection. (c) Signs and symptoms of phlebitis. 1 Swelling and redness around venipuncture site. 2 Tenderness of tissue around venipuncture site. 3 A yellowish, foul-smelling discharge from venipuncture site. 4 A sluggish flow rate. (d) Intervention measures against phlebitis. 1 When phlebitis is noted, report your observations to the supervisor. Trained personnel will then remove the IV and restart it in an alternate location and initiate proper care for the inflammation. 2 Document observations and actions. (e) Prevention measures against phlebitis. 1 Keep the infusion flowing at the prescribed rate. 2 Stabilize the catheter/needle with correct taping and a splint.
MD0553 1-22

3 Select a large vein when irritating drugs and fluids are given. 4 Maintain strict aseptic techniques. 5 Change catheters and tubing every 48 to 72 hours or IAW local policy. 6 Change bags, bottles, and dressings every 24 hours or IAW local policy. (3) Circulatory overload. Circulatory overload is a state of increased blood volume. (a) Causes of circulatory overload. 1 Fluid is infused too fast. 2 Too much fluid is infused. CAUTION: Circulatory overload can occur in any patient who receives an excess of fluid. It is not confined to elderly, pediatric, or debilitated patients. (b) Signs and symptoms of circulatory overload. 1 Rise in blood pressure. 2 Dilation of veins with neck veins sometimes visibly engorged. 3 Rapid pulse, rapid breathing, shortness of breath, and rales. Rales is an abnormal crackling or rattling sound heard upon listening to sound within the chest. 4 Wide variance between fluid input and urine output. (c) Intervention measures for circulatory overload. 1 Slow the infusion to keep open (TKO). 2 Raise the head of the patient's bed to assist with respiratory effort. 3 Notify your supervisor, immediately.
MD0553 1-23

(d) Preventive measures against circulatory overload. 1 Monitor the urine output. An I&O Worksheet (DD Form 3630) is required for all IV patients. A record of liquid input and output (including IV therapy) is maintained on this worksheet. 2 Check the flowrate at frequent intervals to ensure the desired rate is being maintained. (4) Air embolism. Air embolism is an obstruction of a blood vessel by air carried via the bloodstream. (a) Causes of air embolism. 1 Allowing the solution to run dry. 2 Air bubbles in the IV tubing. 3 Disconnected tubing. (b) Signs and symptoms of air embolism. 1 Abrupt drop in blood pressure. 2 Chest pain. 3 Weak, rapid pulse. 4 Cyanosis. (A blue-gray discoloration of the skin caused by inadequate perfusion of oxygen.) 5 Loss of consciousness. (c) Intervention measures for air embolism. 1 Notify supervisor immediately. 2 Administer oxygen if allowed. 3 Turn the patient on his left side and lower the head of the bed so the air bubbles can float to and remain in the right atrium. The risk of serious effects of an air embolism increases if the embolism passes to the left side of the heart.
MD0553 1-24

(d) Preventive measures against air embolism. 1 Clear all air from tubing before attaching it to the patient. 2 Monitor solutions closely and change before they are empty. 3 Check to see that all connections are secure. (5) Infection. Infection is the state or condition in which the body or a part of it is invaded by a pathogenic agent (microorganism or virus), which under favorable conditions, multiplies and produces effects which are injurious. Localized infection is usually accompanied by inflammation, but inflammation may occur without infection. (a) Causes of infections. 1 Poor aseptic techniques. a Unsterile venipuncture techniques. b Contamination of equipment during manufacture. c Failure to keep the site clean or to change IV equipment regularly. 2 Transmission from another infected part of the body to the infusion site. 3 Introduction of contaminants while irrigating or manipulating an occluded, leaking, or infiltrated catheter. (b) Signs and symptoms of infection. 1 Swelling, redness, and soreness around the infusion site. 2 A yellowish, foul-smelling discharge from the venipuncture site. 3 Rise in temperature and pulse. (c) Intervention measures for suspected infection. 1 Report observations to the supervisor. 2 Save IV equipment for possible laboratory analysis IAW local policy. 3 Document all observations and actions.
MD0553 1-25

(d) Preventive measures against infection. 1 Use rigid aseptic techniques when initiating and maintaining an IV infusion. 2 Anchor the catheter/needle firmly with tape. 3 Check vein at least once each shift for evidence of tenderness or signs of inflammation. (6) Disturbance of infusion. This is any disturbance or failure of the infusion apparatus to deliver proper prescribed solution infusion rate. (a) Signs of disturbance in the infusion. 1 Flow rate slowing down or speeding up. 2 Solution flow stopping. (b) Intervention measures for a disturbance of infusion. 1 Frequent observations of flow rate and equipment. 2 If flow rate disturbance is noted, attempt to locate the following causes and follow-up action. a Solution container is empty. Stop flow and notify supervisor. b Drip chamber is less than half-full. Squeeze drip chamber until half full. c Control clamp is closed. Readjust clamp to restore prescribed drip rate and notify supervisor. d Defect in equipment. Report defect immediately to supervisor. e Tubing is kinked or caught under patient. Untangle the line or reposition patient so that the solution flows through the tube at the prescribed rate. Monitor for correct flow and rate. f Catheter is bent or compressed in the vein. Reposition the extremity and splint area if necessary.
Continue with Exercises
MD0553 1-26

EXERCISES, LESSON 1 INSTRUCTIONS. Answer the following exercises by writing the answer in the space provided at the end of the item or by choosing the correct answer. After you have completed all of these items, turn to "Solutions to Exercises" at the end of the lesson and check your answers. 1. Administration of an IV is indicated when a casualty is on the verge of shock or already in shock. a. True. b. False. 2. Which of the following solutions is/are used in IV therapy? a. Dextran. b. Normal saline, 0.9 percent. c. Ringer's lactated. d. All of the above. 3. In deciding on an infusion site, you select the: a. Most distal and accessible vein of an uninjured arm or hand. b. Site over a joint. c. Vein in an infected area. 4. To prepare an infusion site, you: a. Place waterproof pad under arm selected. b. Apply a constricting band two to three inches above the site selected. c. Palpate the vein selected. d. All of the above.
MD0553 1-27

5. At what approximate degree angle should you insert an over-the-needle catheter? a. 0--10. b. 10--20. c. 20--30. d. 30--40. 6. How often should the dressing over an IV needle be changed? a. Every shift. b. Every 24 hours. c. Every 48 hours. d. Every 72 hours. 7. Why do you clamp the tubing shut during the replacement procedure? a. To prevent air from entering the tubing. b. To adjust the flow rate. 8. Infiltration is: a. Injury to vein during venipuncture or from later needle movement. b. A state of increased blood volume. c. An accumulation of fluids in the tissue surrounding the venipuncture site. d. An obstruction of a blood vessel by air.
Check Your Answers on Next Page
MD0553 1-28

SOLUTIONS TO EXERCISES, LESSON 1 1. a (para 1-1) 2. d (paras 1-2a, d, e) 3. a (para 1-3g) 4. d (paras 1-3h(1), (2), (3)) 5. c (para 1-3j(5)) 6. b (para 1-3n) 7. a (para 1-6a(3)) 8. c (para 1-6e(1))
End of Lesson 1
MD0553 1-29

LESSON ASSIGNMENT LESSON 2 Obtain a Blood Specimen. TEXT ASSIGNMENT Paragraphs 2-1 through 2-4. LESSON OBJECTIVES 2-1. Identify the advantages and disadvantages of the Vacutainer® system of obtaining a blood specimen. 2-2. Identify the procedures of obtaining a blood specimen with a Vacutainer®. 2-3. Identify the procedures of obtaining a blood specimen with a syringe. 2-4. Determine the best site to obtain a blood specimen. 2-5. Identify the procedures for submitting a blood specimen to the laboratory. SUGGESTION After completing the assignment, complete the exercises of this lesson. These exercises will help you achieve the lesson objectives.
MD0553 2-1

LESSON 2
OBTAIN A BLOOD SPECIMEN 2-1. GENERAL Venipuncture is the act of puncturing a vein with a needle, usually for the purpose of withdrawing a specimen of blood. This may be accomplished by using either a needle and syringe or by using the Vacutainer® system. a. The Vacutainer® is a blood-drawing system using a double-ended needle, a plastic holder, and vacuum tubes. The tubes may be empty or they may contain a measured amount of anticoagulant or other material. b. Since most blood specimens do not need to be sterile, the stopper on the glass tube is not sterile. However, the needle that is inserted into the vein must be sterile to avoid the spread of infection. The Vacutainer® is not used when a sterile blood specimen is needed such as that needed for a blood culture. (1) Vacutainer® system advantages. (a) Provides a rapid way to collect several blood specimens from the same patient. (b) Enables filling of several tubes to obtain multiple samples with only one needle stick. (2) Vacutainer® system disadvantages. (a) Vacuum tube makes it impossible to draw back on the plunger to determine if the needle is in the vein. If the vacuum is broken in the tube, another tube must be used. (b) The amount of suction created by the Vacutainer® can collapse a small or fragile vein. 2-2. TERMS The following are terms used in this section with comments that may help you understand the procedures for obtaining a blood specimen. a. Palpate. To feel or to examine with the fingertips. b. Antecubital Fossa. Hollow or depressed area in the joint between arm and forearm.
MD0553 2-2

c. Median Cubital Vein. First choice for venipuncture (in antecubital fossa). d. Cephalic Vein. Second choice for venipuncture (lateral portion of forearm). e. Basilic Vein. Least desirable for venipuncture (inside of forearm). f. Anticoagulant. A substance which prevents or reduces clotting of the blood. Patients receiving anticoagulents tend to bleed longer than others. g. Hematoma. A collection of blood under the skin. These are the most common complications resulting from venipuncture attempts. 2-3. PROCEDURE FOR OBTAINING A BLOOD SPECIMEN a. Verify Request to Obtain Blood Specimen. The following may be used to verify an order to obtain a blood specimen. (1) Therapeutic Documentation Care Plan (Non-medication), DA Form 4677. (2) Provider's orders. (3) Supervisor's directive. b. Gather Equipment. Collect the following equipment (see figure 2-1). (1) Blood specimen tube. Obtain the proper blood specimen tube based upon your supervisor's directive, ward SOP, or laboratory SOP. The type of tube needed will depend on the specific test to be performed. Some tests require a blood specimen that has not been allowed to clot. In this case, a blood specimen tube containing a powdered or liquid anticoagulant is used. If coagulated (clotted) blood is acceptable, other types of tubes are used. Many laboratories use a color code for tubes or bottles required for different tests. (2) Vacutainer®. The Vacutainer® consists of a plastic holder into which a sterile disposable double-ended needle is inserted. A vacuum tube with a rubber stopper slips into the barrel of the holder. The needle should not penetrate the stopper until the vein end of the double-ended needle has been inserted into the vein. After the needle enters the vein, the tube is pushed the remaining distance into the barrel. The vacuum in the tube will withdraw blood from the vein. (3) Constricting band or tourniquet. Constricting bands commonly used are made of soft, flat, or round, latex rubber. Commercial types of constricting bands have a Velcro fastening device.
MD0553 2-3

Figure 2-1. Vacutainer® system. (4) Vacutainer® needle. There are two types of needles available for use with Vacutainers®. One is designed for drawing single specimens, the other for use in drawing multiple blood samples. A rubber sheath covers the shaft of the multiple needle. As the needle is removed from the rubber stoppered tube, the sheath slips back to cover and seal the end of the needle, preventing blood from dripping into the holder. (5) Antiseptic sponge or pledget such as Betadine or alcohol. These are used to clean the skin before the venipuncture is done. Betadine has been demonstrated to be more effective in reducing the number of skin pathogens than alcohol. (6) Other items. Other items include a protective pad, sterile 2-inch by 2-inch gauze sponge(s), a self-adhesive bandage, a rubber band, and labels to identify the blood specimen tube(s). c. Label Specimen Tube(s). Stamp the label with the patient's addressograph plate or clearly write the patient's identifying information on the label and apply it to the specimen tube. The following information should be printed on the label. (1) Name of patient. (2) Hospitalization number. (3) Social Security number. (4) Date and time specimen was drawn. (5) Other data as required by local SOP. d. Perform Handwash. Perform patient care handwash.
MD0553 2-4
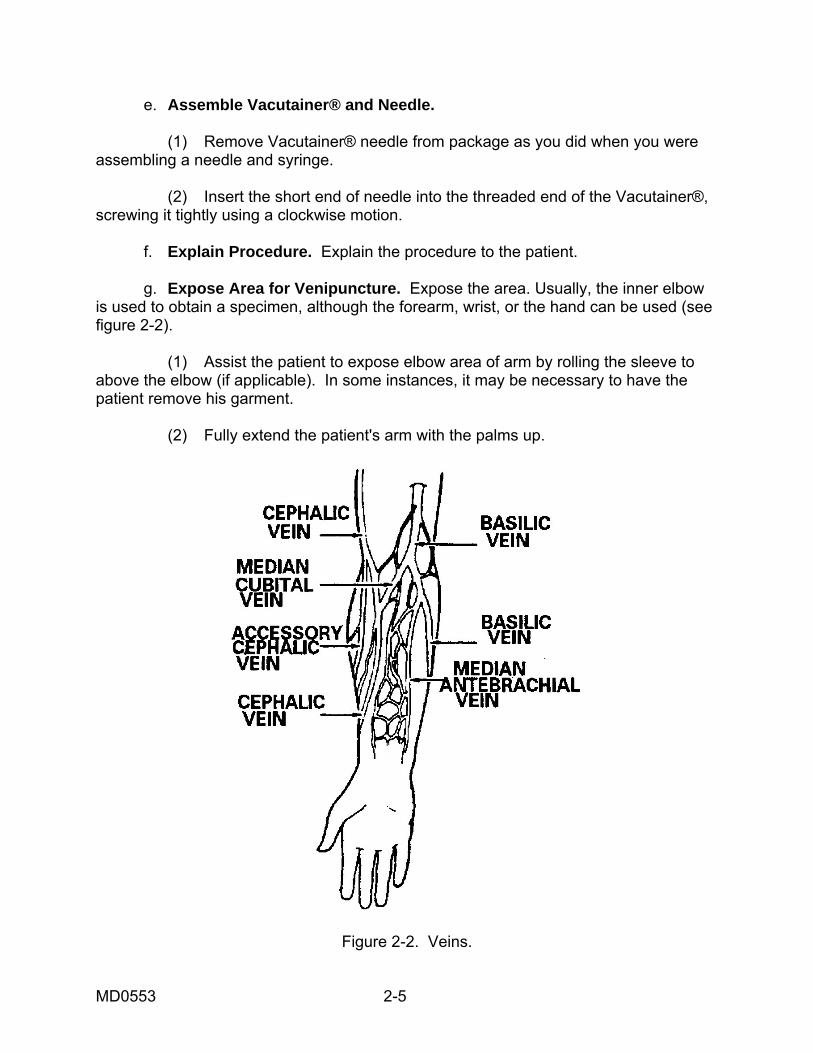
e. Assemble Vacutainer® and Needle. (1) Remove Vacutainer® needle from package as you did when you were assembling a needle and syringe. (2) Insert the short end of needle into the threaded end of the Vacutainer®, screwing it tightly using a clockwise motion. f. Explain Procedure. Explain the procedure to the patient. g. Expose Area for Venipuncture. Expose the area. Usually, the inner elbow is used to obtain a specimen, although the forearm, wrist, or the hand can be used (see figure 2-2). (1) Assist the patient to expose elbow area of arm by rolling the sleeve to above the elbow (if applicable). In some instances, it may be necessary to have the patient remove his garment. (2) Fully extend the patient's arm with the palms up.
Figure 2-2. Veins.
MD0553 2-5

h. Select Vein for Venipuncture. Select the vein as follows: (1) Palpate or feel the arm by using your fingers to locate an appropriate vein. (2) Select one of the prominent veins in the antecubital fossa of the arm. The antecubital fossa is the hollow or depressed area located in the joint between the arm and the forearm. (a) The median cubital vein, though not always visible, is usually large and palpable. Since it is well supported and the least apt to roll (or move away from pressure), it is the vein of choice for venipuncture. (b) The second choice is the cephalic vein. The basilic vein, though oftentimes the most prominent, is apt to be the least desirable because it tends to roll easily, making venipuncture difficult. i. Position Protective Pad. Place the protective pad under the patient's extended elbow and forearm to protect his clothing and the work surface. j. Prepare Sponge and Pledget (Sponge) for Use. Open the betadine or alcohol pledget (sponge) and 2-inch by 2-inch gauze and place the open package within easy reach. k. Apply Constricting Band. Use the following procedures to apply the band. (1) Place the constricting band around the limb approximately two inches above the proposed venipuncture site (see figure 2-3).
Figure 2-3. Constricting bands.
MD0553 2-6
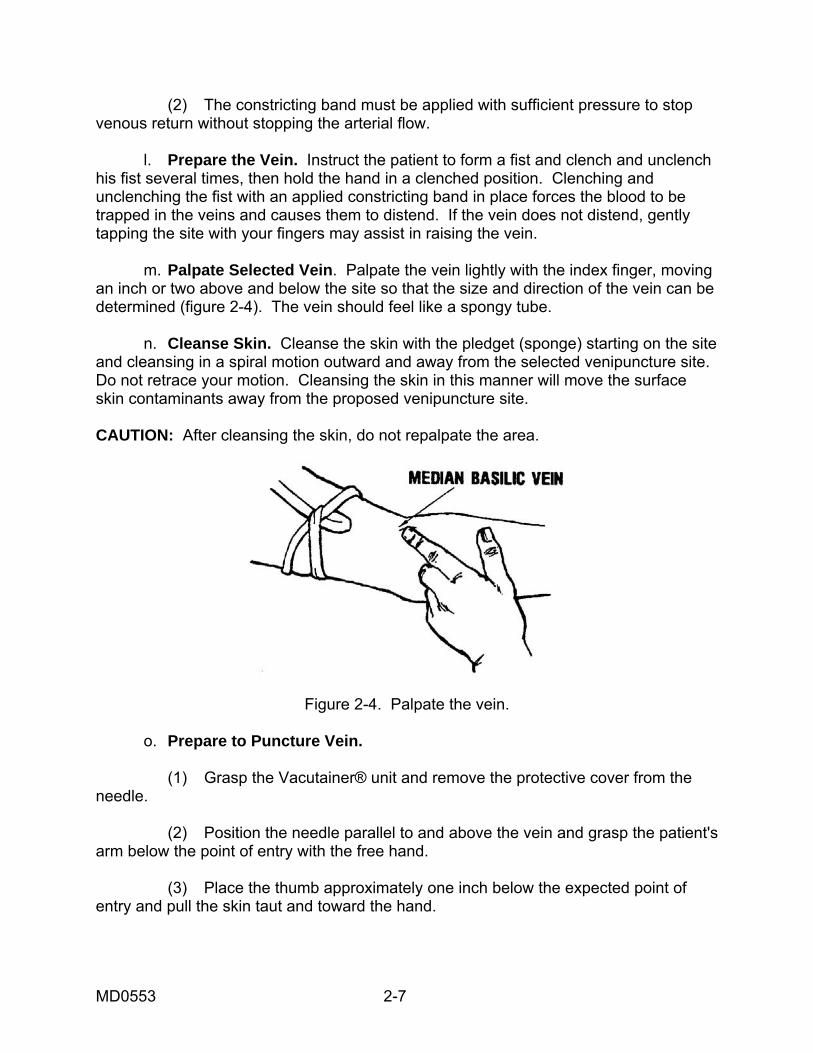
(2) The constricting band must be applied with sufficient pressure to stop venous return without stopping the arterial flow. l. Prepare the Vein. Instruct the patient to form a fist and clench and unclench his fist several times, then hold the hand in a clenched position. Clenching and unclenching the fist with an applied constricting band in place forces the blood to be trapped in the veins and causes them to distend. If the vein does not distend, gently tapping the site with your fingers may assist in raising the vein. m. Palpate Selected Vein. Palpate the vein lightly with the index finger, moving an inch or two above and below the site so that the size and direction of the vein can be determined (figure 2-4). The vein should feel like a spongy tube. n. Cleanse Skin. Cleanse the skin with the pledget (sponge) starting on the site and cleansing in a spiral motion outward and away from the selected venipuncture site. Do not retrace your motion. Cleansing the skin in this manner will move the surface skin contaminants away from the proposed venipuncture site. CAUTION: After cleansing the skin, do not repalpate the area.
Figure 2-4. Palpate the vein. o. Prepare to Puncture Vein. (1) Grasp the Vacutainer® unit and remove the protective cover from the needle. (2) Position the needle parallel to and above the vein and grasp the patient's arm below the point of entry with the free hand. (3) Place the thumb approximately one inch below the expected point of entry and pull the skin taut and toward the hand.
MD0553 2-7

p. Puncture Vein. Puncture the vein in the following manner. (1) Place the needle bevel up in line with the vein and pierce the skin at approximately a 15 to 45 degree angle. (Entering the vein with the bevel down will cause painful tearing of the skin. Entering with the bevel up causes the sharp tip to pierce the skin first, paving the way for the rest of the needle.) (2) Decrease the angle until almost parallel to the skin surface and direct it toward the vein, piercing the vein wall. (a) A faint "give" will be felt when the vein is entered and the tube will begin filling with blood. (b) If venipuncture is unsuccessful, pull the needle back slightly (not above the skin surface) and attempt to direct the needlepoint into the vein again. (c) If the venipuncture is still unsuccessful, release the constricting band, place a 2-inch by 2-inch sponge lightly over the venipuncture site, quickly withdraw the needle, and immediately apply firm pressure over the site. (3) Once the needle is withdrawn from under the skin surface, do not reuse it. If a second attempt at venipuncture is required, notify the supervisor, obtain a needle, and repeat the procedure. q. Collect Specimen. When you have successfully punctured the vein, complete the following steps to collect the blood sample. (1) Hold the Vacutainer® unit and needle steady with your dominant hand. If the unit and needle are not held steady while pushing in the tube, the needle may either slip out of the vein or puncture the opposing vein wall. (2) Place the tips of the index and middle fingers behind the flange of the Vacutainer®. Push the tube all the way into the Vacutainer® with your thumb until the needle completely punctures the rubber stopper. (3) If the needle is in the vein, the vacuum will draw the blood into the tube. (4) Instruct the patient to relax and unclench his fist after the needle has entered the vein. Release the constricting band when the tube is full. (5) Carefully pull the tube downward, off the tube end of the needle and out of the Vacutainer®. Make sure to stabilize the Vacutainer® and needle with your other hand during the process. If more than one specimen is needed, push another tube onto the needle; continue exchanging the tubes until the required number have been filled.
MD0553 2-8

NOTE: After venipuncture technique has been mastered and manual dexterity is present, either hand may be used in completing blood drawing as long as the needle is securely stablized. (6) After obtaining the blood required and the last tube is approximately two-thirds full of blood or blood stops, prepare to withdraw the needle. r. Withdraw Needle. Withdraw the needle in the following manner. (1) Release the constricting band by pulling on the long, looped end of the tubing or pull the Velcro® fasteners open. Never withdraw the needle prior to removing the constricting band as this will cause blood to be forced out of the venipuncture site with resulting blood loss and/or hematoma formation. (2) Place the sterile 2-inch by 2-inch sponge lightly over the venipuncture site. (3) Withdraw the needle smoothly and quickly and immediately apply firm manual pressure over the venipuncture site with the 2-inch by 2-inch sponge. Keeping the patient's arm fully extended will minimize leakage around and through the venipuncture site. This aids in the prevention of bruising and hematoma formation. (4) Instruct the patient to elevate the arm slightly; keep the arm fully extended and continue to apply firm manual pressure to site for two to three minutes. (a) If the patient is unable to apply pressure and elevate the site, the pressure and elevation must be done by the medical specialist. (b) Continued bleeding is a complication of a patient receiving anticoagulant therapy. Anticoagulants are usually given to prevent the development of blood clots in the circulatory system. Anticoagulant patients may bleed longer than other patients. Manual pressure for a longer time will be required to stop the bleeding. (c) A hematoma is a swelling caused by the collection of blood under the skin or in damaged tissues caused by an injured or broken blood vessel. They are the most common complication of routine venipuncture for withdrawing blood. They may result from puncturing and exiting the other side of the vein or from incomplete insertion of the needle into the vein. Hematomas can also result from continued application of the constricting band after a successful or unsuccessful attempt has been made to draw blood. Hematomas most frequently result from insufficient time spent in applying pressure following venipuncture and from flexing the arm.
MD0553 2-9

s. Remove Specimen Tube from Vacutainer®. Pull the tube out of the Vacutainer® and remove the needle from the holder using an approved safety device such as a toothed grip on the sharps disposal box. Do not recap the needle. If the specimen tube contains an anticoagulant or other fixing agent (as evidenced by white powder particles or liquid in tube), gently invert tube several times to mix it with the blood. Label all tubes promptly with patient identification and other information as required by local SOP. t. Apply Bandage. Apply a self-adhesive bandage to the venipuncture site after the bleeding has stopped. Self-adhesive bandages do not take the place of pressure. u. Provide for Patient's Safety and Comfort. Provide for patient's safety and comfort as follows: (1) Remove protective pad. (2) Assist patient to roll down sleeve, if applicable. (3) Assist patient to assume a position of comfort, if applicable. (4) Place personal items and call-light within easy reach, if applicable. (5) Raise siderails, if applicable. v. Dispose of and/or Store Equipment. Take care of equipment storage/disposal as follows: (1) Collect all equipment and dispose or store IAW local SOP. (2) Do not recap needle at any time; dispose of it in an approved, puncture-proof container as close to the work area as possible. w. Perform Handwash. Perform patient care handwash. x. Check Completeness of Laboratory Request. Obtain completed laboratory request from the supervisor and check the request. (There may be many lab request slips that are used for requesting specific blood tests). All slips must be checked for minimum information as given: (1) Complete patient identification. (2) Requesting provider's signature. (3) Ward number, clinic, or dispensary designation.
MD0553 2-10

(4) Date and time of specimen collection. (5) Test(s) requested. (6) Admission diagnosis or type of surgery in the "REMARKS" section, if applicable. (7) "URGENCY" box completed. y. Forward Specimen to Laboratory. Prepare the specimen, request for transport, and forward to laboratory IAW local policy. z. Report and Record. Report accomplishment of procedure to the supervisor and document the date, time, type of specimen collected, and the disposition of the specimen on appropriate records IAW local policy.. 2-4. OBTAIN A BLOOD SPECIMEN WITH AN ASSEMBLED SYRINGE An alternate method of drawing blood is to use an assembled needle and syringe. a. Either a straight needle or a butterfly device may be used. The size of the syringe will be determined by the amount of blood required. The syringe volume should not exceed 20 cc; the vacuum created during collection of the blood sample with a larger syringe may cause the vein to collapse. Smaller volume syringes should be used with pediatric patients or others with fragile veins. b. After placing the constricting band and penetrating the vein, with the needle as described above, slowly pull back on the plunger to withdraw the required amount of blood. Excessive vacuum will be created if the plunger is pulled back too forcefully, and the vein may collapse. c. If the blood volume required is greater than the volume of the syringe, the filled syringe may be removed from the needle and a new one attached. The process described above will be continued until the required volume is obtained. Extreme care must be taken to assure the needle is stabilized during blood drawing and syringe exchange. d. If you have used a needle and syringe to obtain the blood, you will need to transfer the specimen into the tubes. Insert the needle into the rubber stopper of the tube, and the vacuum will draw the specimen in and fill the tube. Transfer must be done promptly to prevent clotting of the blood in the syringe. Label tubes as in the instructions above.
Continue with Exercises
MD0553 2-11

EXERCISES, LESSON 2 INSTRUCTIONS: Answer the following exercises by writing the answer in the space provided. After you have completed all of these items, turn to "Solutions to Exercises" at the end of the lesson and check your answers. 1. List the three parts of the Vacutainer® system. _____________________________________________________________ _____________________________________________________________ _____________________________________________________________ 2. List the steps required to obtain a blood specimen with a Vacutainer®. (Begin after the Vacutainer® and needle have been assembled.) _____________________________________________________________ _____________________________________________________________ _____________________________________________________________ _____________________________________________________________ _____________________________________________________________ _____________________________________________________________ _____________________________________________________________ _____________________________________________________________ _____________________________________________________________ _____________________________________________________________ _____________________________________________________________ _____________________________________________________________ _____________________________________________________________ _____________________________________________________________ _____________________________________________________________ _____________________________________________________________
MD0553 2-12

3. Describe the steps to follow to position and insert a needle in a vein to obtain a blood sample. _____________________________________________________________ _____________________________________________________________ _____________________________________________________________ _____________________________________________________________ _____________________________________________________________ 4. What items must be included on the Laboratory Request slip? _____________________________________________________________ _____________________________________________________________ _____________________________________________________________ _____________________________________________________________ _____________________________________________________________ _____________________________________________________________ 5. List the steps to follow to obtain a blood sample with an assembled syringe. _____________________________________________________________ _____________________________________________________________ _____________________________________________________________ _____________________________________________________________ _____________________________________________________________
Check Your Answers on Next Page
MD0553 2-13

SOLUTIONS TO EXERCISES, LESSON 2 1. Double-ended needle, Plastic holder Vacuum tubes marked with a guideline (para 2-1a) 2. Expose area for venipuncture. Select vein. Position protective pad. Prepare pledget (sponge) for use. Apply constricting band. Palpate selected vein. Cleanse the skin. Position needle. Puncture vein. Collect specimen. Withdraw the needle. Remove specimen tube from vacutainer. Apply self-adhesive bandage. Provide for patient's safety and comfort. Dispose of and/or store equipment. Perform patient care handwash. (para 2-3) 3. Position the needle directly in line with the vein and grasp the patient's arm below the point of entry with the free hand. Place the thumb approximately one-inch below the expected point of entry and pull the skin taut and toward the hand. Place the needle bevel up in line with the vein and pierce the skin approximately at a 15 to 45 degree angle. Decrease the angle until almost parallel to the skin surface and direct it towards the vein. Pierce the vein wall. (para 2-3o)
MD0553 2-14

4. The Laboratory Request form should contain the following: Complete patient identification. Requesting physician's signature. Ward number, clinic, or dispensary designation. Date and time of specimen collection. Test(s) requested. "URGENCY" box completed. (para 2-3x) 5. Syringe volume should not exceed 20 cc. Place constricting band and penetrate vein as with Vacutainer. Pull plunger back slowly. Filled syringe may be removed from needle and a new one attached. Insert the needle into the rubber stopper of the tube to transfer the specimen into the tube. (para 2-4a, b, c, d)
MD0553 2-15
End of Lesson 2

LESSON ASSIGNMENT LESSON 3 Initiate Treatment for Anaphylactic Shock. TASK ASSIGNMENT Paragraphs 3-1 through 3-3. LESSON OBJECTIVES After completing the assignment, you should be able
to: 3-1. Determine the causes of anaphylactic shock. 3-2. Identify signs and symptoms of anaphylactic shock. 3-3. Describe steps in treating anaphylactic shock. SUGGESTION After completing the assignment, complete the exercises at the end of this lesson. These exercises will help you achieve the lesson objectives.
MD0553 3-1

LESSON 3
INITIATE TREATMENT FOR ANAPHYLACTIC SHOCK
3-1. GENERAL Anaphylaxis is an unusual or exaggerated allergic reaction, usually to drugs or insect bites. The patient with an anaphylactic reaction may quickly develop symptoms of shock. In this discussion, "anaphylaxis" and "anaphylactic shock" are used interchangeably. The most common drug that brings on anaphylactic shock is penicillin, though any drug is a potential source of anaphylactic shock. "Anaphylaxis" is derived from "ana," meaning without, and "phylaxis," meaning protection. Hence, the casualty is without protection from the poison or drug. In anaphylaxis, the release of histamine is profound, causing the bronchial tree to constrict and go into spasm. 3-2. CAUSES OF ANAPHYLACTIC SHOCK Anaphylactic shock may be caused by one or more of the following: a. Injections. The injection of drugs to which one is sensitive, especially antibiotics and vaccines. b. Ingestion. Eating foods to which one is sensitive, such as shellfish or berries. c. Insect Stings. Stings of insects to which one is especially sensitive, such as the bee, wasp, yellow jacket, or hornet. d. Inhalation. Breathing chemicals, dusts, or pollens or other materials to which one is sensitive. 3-3. TREATMENT PROCEDURES TO FOLLOW FOR ANAPHYLACTIC SHOCK a. Introduction. Anaphylaxis may occur immediately or up to 30 minutes or more after the patient is exposed to the foreign substance. In general, the sooner this reaction occurs following exposure, the more severe the signs and symptoms of the reaction. All patients receiving medication should be observed for at least 15 minutes following administration to identify developing reactions. The steps below should be followed if your patient develops an anaphylactic reaction. b. Survey the Casualty. Before you can do anything for the patient, you must determine what type of reaction he is having. Follow the basic procedures for surveying the casualty--check the airway and pulse first.
MD0553 3-2

c. Identify Signs and Symptoms of Anaphylactic Shock. The medical specialist should identify the following signs and symptoms of anaphylactic shock in the casualty. (1) Difficulty in respiration, wheezing, coughing, and a sense of suffocation or anxiety. (2) Weak, rapid, or imperceptible pulse. (3) Decreased blood pressure. (4) Cyanosis (blueness) around the lips. In persons with dark skin, the inside of the lips will appear gray, indicating a lack of oxygen. (5) Flushing, burning, or itching sensation of the skin. Hives or red patches may be present. The redness of the skin is caused by a congestion of capillaries. Itching will often be present on the palms of the hands, between the fingers, or in the ear canals. (6) Dizziness. Dizziness is caused by a lack of oxygen caused by difficulty in breathing. (7) Vomiting, convulsions, and abdominal cramps. These signs are caused by the response of the victim's muscular and neurological systems. d. Treat Anaphylactic Shock. The medical specialist will immediately treat anaphylactic shock as follows: (1) Maintain the airway as necessary. (2) Assist in ventilation, if proper equipment is available. (3) Administer oxygen, if available. (4) Monitor blood pressure every five to 15 minutes. Leave the blood pressure cuff on the patient. Continue to monitor the blood pressure until it is up--stable and patient is free of respiratory distress. (5) Start an IV, preferably using Ringer's lactate or 0.9 percent NaCl (normal saline) solution. (6) Perform cardiopulmonary resuscitation (CPR) if necessary for cardiac or respiratory arrest.
MD0553 3-3

e. Transport. Unless contradictory to local policy, start supportive treatment and transport as soon as possible. (1) Administer epinephrine, if available, only under the supervision of the physician, physician assistant, nurse practitioner, or by local protocol. A 1:1,000 solution is given intramuscularly or subcutaneously; the usual dosage for an adult is 0.4--0.5 ml. Pediatric doseage is determined by weight and should be ordered by a physician, physician assistant, or nurse practitioner. (2) If signs and symptoms worsen or recur, the administration of up to four additional injections of epinephrine may be necessary. These injections may be administered every 15 minutes. (3) Epinephrine is the drug of choice to relieve the symptoms of acute hypersensitivity reaction to drugs and of other acute allergic reactions; but, in patients suffering from shock from other causes, epinephrine may accentuate the underlying disorder. Therefore, care must be taken to perform an accurate assessment of the patient before administering epinephrine. f. Record Treatment. Record treatment in the health record. If you can determine what drug or food caused the anaphylactic shock, enter that into the record and flag the record appropriately. g. Evacuate Casualty. If you did not evacuate the patient earlier to a comprehensive medical treatment facility (MTF), do so at this time. As symptoms will return in about 20 per cent of patients experiencing an anaphylactic reaction, the doctor may require admission for observation and further treatment.
Continue with Exercises
MD0553 3-4

EXERCISES, LESSON 3 INSTRUCTIONS: Answer the following exercises by writing the answer in the space provided. After you have completed all of these items, turn to "Solutions to Exercises" at the end of the lesson and check your answers. 1. List four causes of anaphylactic shock. ________________________________________________________________ ________________________________________________________________ ________________________________________________________________ ________________________________________________________________ 2. List five of the signs and symptoms of anaphylactic shock. ________________________________________________________________ ________________________________________________________________ ________________________________________________________________ ________________________________________________________________ ________________________________________________________________ 3. What are the procedures for treating a patient with anaphylactic shock? ________________________________________________________________ ________________________________________________________________ ________________________________________________________________ ________________________________________________________________
Check Your Answers on Next Page
MD0553 3-5

SOLUTIONS TO EXERCISES, LESSON 3 1. Injections such as penicillin and tetanus antitoxin. Ingestion of foods such as shellfish or berries. Insect stings of bee, wasp, yellow jacket, and hornet. Inhalation of dust and pollen. (para 3-2) 2. Difficulty in respiration, wheezing, coughing, and a sense of suffocation. Weak, rapid, or imperceptible pulse. Cyanosis or blueness around the lips. Flushing, burning, or itching sensation of the skin. Dizziness. Vomiting, convulsions, and abdominal cramps. (para 3-3) 3. Maintain the airway. Assist in ventilation if equipment is available. Monitor blood pressure every five to 15 minutes. Start an IV, preferably using Ringer's lactate or 0.9 percent NaC1 solution. Perform CPR if necessary. (para 3-3d(1))p.
End of Lesson 3
MD0553 3-6

APPENDIX
SURGICAL INSTRUMENT AND SUPPLY SET, INDIVIDUAL
NSN NOMENCLATURE ACC UI ALLOW NOTESMEDICATIONS
6505010171625 ACETAMINOPHEN TABS50S L BT 2 P 6510009268882 ADHESIVE TAPE SURG 1" D PG 0.25 P 6510010601639 ADHESIVE TAPE SURG 1" L PG 1 P 6505009269083 ATROPINE INJ 0.7ML D EA 10 P 6505013155357 ATTAPULGITE TABS 12S L PG 2 P 6545011611928 BAG PROT CS13X11X24IN D EA 1 P 6510009137909 BAND ADH .75X3 IN300S D BX 0.1 P 6135008357210 BATTERY NONREC1.5V12S D PG 1 P 6505014337370 CALCIUM CARBONATE TAB L BT 1 P 6505010235011 CLOTRIMAZOLE CRM 15GR L TU 2 PF 6505012740951 DIAZEPAM INJ 2ML UNIT D EA 5 PQ 6505002999535 DIBUCAINE OINT 1OZ L PG 2 P 6505001168350 DIPHENHYDRAMINE CAPS L BT 1 P 6505009820288 ERYTHROMYCIN OPH OINT D TU 2 P 6545008536309 FIRST AID KIT EYE DRS D EA 4 P 6545008536309 FIRST AID KIT EYE DRS D EA 0 P 6505009262095 HYDROCORTISONE CRM1OZ L TU 4 PF 6505012149061 IBUPROFEN TABS 100S L BT 1 P 6505013025530 MORPHINE SULF INJ10MG D EA 5 PR 6510010100307 PAD POV-IOD IMPRE100S D PG 0.2 P 6505004917557 POVIDONE-IODINE CLEA L BT 1 PF 6505001490098 PSEUDOEPH HCL TAB 24S L CO 4 P 6505014623022 RINGER'S INJ LACTATED H PG 0.16 P 6505014623025 RINGER'S INJ LACTATED L PG 0.25 P
OTHER EQUIPMENT 6515006878052 AIRWAY PHARY 100MM10S L PG 0.16 6515009582232 AIRWAY PHARYN 80MM12S L BX 0.16 8105008377754 BAG PLAS 6IN X 6IN G MX 1 6510002011755 BANDAGE 37X37X52IN D EA 18 6510009355823 BANDAGE ELAS 6"X4.5YD L PG 0.25 6510000583047 BANDAGE GAU4-1/2"100S L PG 0.03 7210009356666 BLANKET LIGHT WEIGHT D EA 2 6545011617145 CASE MED SET NYLON D EA 1 6515010390164 CASE SPHYGMOMANOMETER L EA 1 6545001133722 CASE7-1/2X4-1/2X2-3/4 D EA 1 6515012392494 CATHETER&NDL 14GA 200 L PG 1 6515013156227 CATHETER/NDL 18GA 50S L PG 1 6515003245500 DEPRESSOR TONGUE 100S D PG 0.2 6530012496670 DISPOSAL CONTAINER 40 L PG 1 6510002017425 DRESS FLD 11-3/4 IN D EA 2
MD0553 A-1

SURGICAL INSTRUMENT AND SUPPLY SET, INDIVIDUAL (continued) NSN NOMENCLATURE ACC UI ALLOW NOTES
6510002017430 DRESS FLD 7-1/2X8 IN D EA 2 6510014081920 DRESSING CHEST WOUND L PG 0.4 6510001594883 DRESSING FIRST AID D EA 12 6230002648261 FLASHLIGHT 3VOLT DC D EA 1 6515003333600 FORCEPS DRESSING 5.5" L EA 1 6515003349500 FORCEPS HEMO 9" PEAN L EA 1 6515003344900 FORCEPS HEMO HALSTED L EA 1 6515003345600 FORCEPS HEMO STR 5"LG L EA 1 6515003379900 FORCEPS TISSUE 5.5"LG D EA 1 6510002020800 GAUZE 18X3" 12S L PG 1 6515002267692 GLOVE EXAM LARGE 100S D PG 0.06 6515001150032 INTRAVENOUS INJ SE48S V PG 1 6515013139633 KNIFE GENERAL SURG100 L PG 1 5110012799332 MULTI-TOOL FOLDING PO G EA 1 6510011077575 PAD COT 6.35X5.39CM50 D PG 1 6510001110708 PAD NONADH4.125X3.125 D PG 1 7520009357135 PEN BALL-POINT BLACK G DZ 1 6515009357138 SCISSORS BANDAGE7.25" D EA 1 6515003651820 SCISSORS BLUNT/SHARP L EA 1 6515014521743 SHEILD EYE2-1/8X2-5/8 L PG 1 6515010394884 SPHYGMOMANOMETER L EA 1 6515012254681 SPLINT UNIV 36X4.5"12 D PG 1 6510007219808 SPONGE SURG 4X4" 1200 D PG 0.02 6515009354088 STETHOSCOPE ADULT SZ D EA 1 6515001491405 THERMOMETER CLIN ORAL L EA 2 6515011467794 TOURNIQUET ADULT14X1" L EA 1 6532014462594 VEST SYSTEM COMBAT D EA 1
End of Appendix
MD0553 A-2
SURGICAL INSTRUMENT AND SUPPLY SET, INDIVIDUAL (Continued)