Intermediate Word · Web viewMicrosoft WordArt allows you to turn text into a picture in Word. You...
99
INTERMEDIATE WORD 2003 Table of Contents Page LESSON 1: FORMATTING TEXT....................................1 Selecting Text 1 Font Effects 2 Underline Styles 3 Using the Reviewing Toolbar 4 Character Spacing 8 Text Effects 9 F4 Function Key 11 Format Painter 11 LESSON 2: PARAGRAPH FORMATTING..............................13 Adjusting Indentation on the Ruler 15 Tab Stop Types 17 Adding a Tab Stop 17 Editing a Tab Stop 18 Borders and Shading 20 Columns 24 LESSON 3: GRAPHIC OBJECTS IN A DOCUMENT.....................26 Drop Caps 26 Adding a Text Box 28 Formatting a Text Box 28 Changing Text Direction 31 Drawing Toolbar 34 Clip Art 43 The Picture Toolbar 46 Creating a Watermark 47 WordArt 49
Transcript of Intermediate Word · Web viewMicrosoft WordArt allows you to turn text into a picture in Word. You...

INTERMEDIATE WORD 2003
Table of Contents
Page
LESSON 1: FORMATTING TEXT.................................................................................... 1
Selecting Text 1 Font Effects 2 Underline Styles3 Using the Reviewing Toolbar 4 Character Spacing 8 Text Effects 9 F4 Function Key 11 Format Painter 11
LESSON 2: PARAGRAPH FORMATTING.................................................................13
Adjusting Indentation on the Ruler 15 Tab Stop Types 17 Adding a Tab Stop 17 Editing a Tab Stop 18 Borders and Shading 20 Columns 24
LESSON 3: GRAPHIC OBJECTS IN A DOCUMENT................................................26
Drop Caps 26 Adding a Text Box 28 Formatting a Text Box 28 Changing Text Direction 31 Drawing Toolbar 34 Clip Art 43 The Picture Toolbar 46 Creating a Watermark 47 WordArt 49
LESSON 4: CUSTOMIZING WORD............................................................................52
Default File Locations 52 Adding and Removing Toolbars 55 Customizing Toolbars 56
LESSON 5: USING MACROS........................................................................................ 59

Creating a Macro 59
LESSON 6: GIVE IT A TRY!.........................................................................................64
LESSON 7: DELETING FILES......................................................................................66
NICE TO KNOW.................................................................................................................. 67
Selecting Text Using the Mouse 67 Selecting Text Using the Keyboard 68 Keyboard Shortcuts 69 Function Keys 70 SHIFT + Function Keys71
This workbook may be reproduced in whole or in part by an employee of the Department of Health and Human Services. All other reproduction is prohibited unless written permission is obtained from the Training Institute.

NOTES
LESSON 1: FORMATTING TEXT
OBJECTIVES: Select text.Discuss character-formatting options.Employ the F4 function key and Format Painter.
Selecting Text
OVERVIEW
In order to make changes to the document, you will most likely have to select or highlight text. Clicking and dragging over the text will do this. However, there are other ways that can save you time.
STEPS
1. To select a word, hold the I-Beam pointer on the word and double-click.
2. To select a sentence, hold down the CTRL key and click once anywhere on a sentence.
3. To select a line, move your mouse to the Selection Area (left margin of
your page) so that it becomes a white arrow . Click once beside the line.
4. To select a paragraph, double click in the Selection Area to the left of the paragraph or triple click in the paragraph.
5. To select long sections of text, use the SHIFT + DOWN ARROW method. Place the cursor at the beginning of the selection, hold down the SHIFT key and press the DOWN ARROW to the end of the selection.
6. To select a document, click EDIT on the menu bar, click SELECT ALL (or use CTRL + A). To use the mouse, triple click in the selection area.
Intermediate Word 2003 Page 1
Helpful Hint:
When text is selected, anything you type on the keyboard will replace the selection.

NOTES
Font Effects
OVERVIEW
There are several options available to change the look of a font. Font effects allow you to shadow, outline, or put a line through text, along with other choices.
STEPS
1. Select the text to be changed, and click FORMAT, FONT. Be sure you are on the FONT tab.
Page 2 Intermediate Word 2003
Helpful Hint:
To change the default font of all new documents, make the desired font choices and click DEFAULT FONT. Click OK to accept the change.
Font

NOTES2. Click in the check box beside the effect to be applied. To remove an
effect, click to remove the checkmark.
3. Click OK.
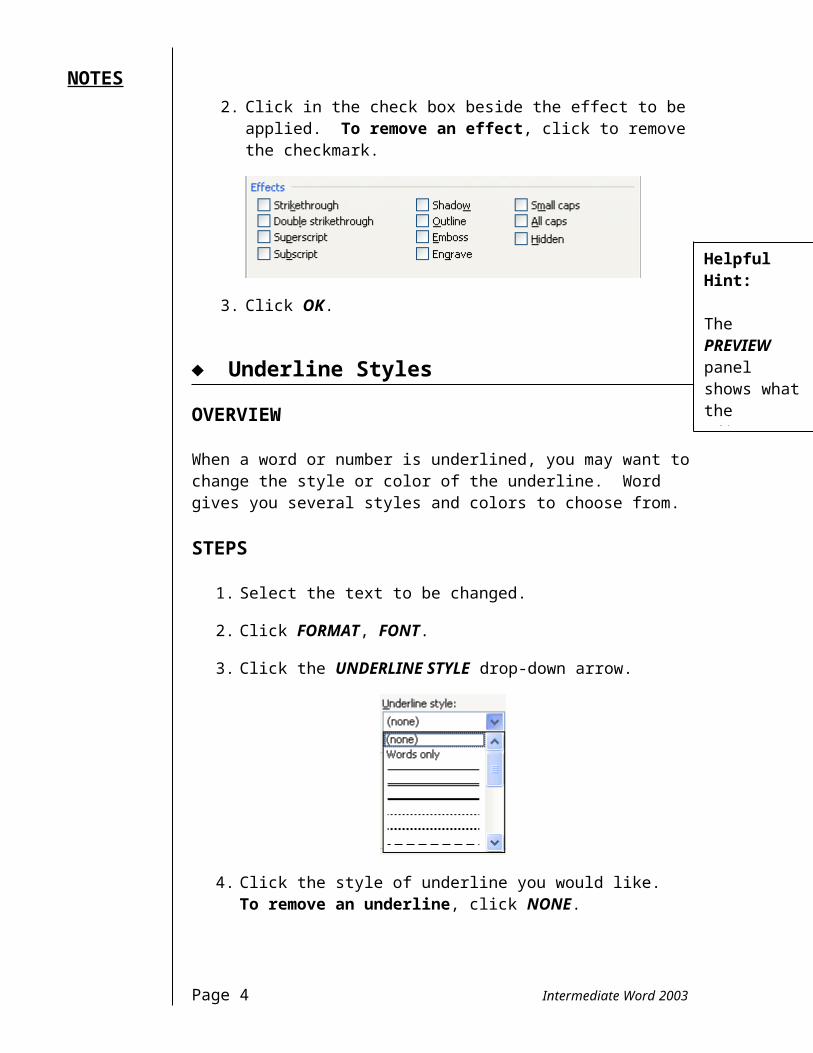
Underline Styles
OVERVIEW
When a word or number is underlined, you may want to change the style or color of the underline. Word gives you several styles and colors to choose from.
STEPS
1. Select the text to be changed.
2. Click FORMAT, FONT.
3. Click the UNDERLINE STYLE drop-down arrow.
4. Click the style of underline you would like. To remove an underline, click NONE.
Intermediate Word 2003 Page 3
Helpful Hint:
The PREVIEW panel shows what the adjustments would look like.

NOTES5. Click the UNDERLINE COLOR drop-down arrow.
6. Click the color to be applied.
7. Click OK.
Using the Reviewing Toolbar
OVERVIEW
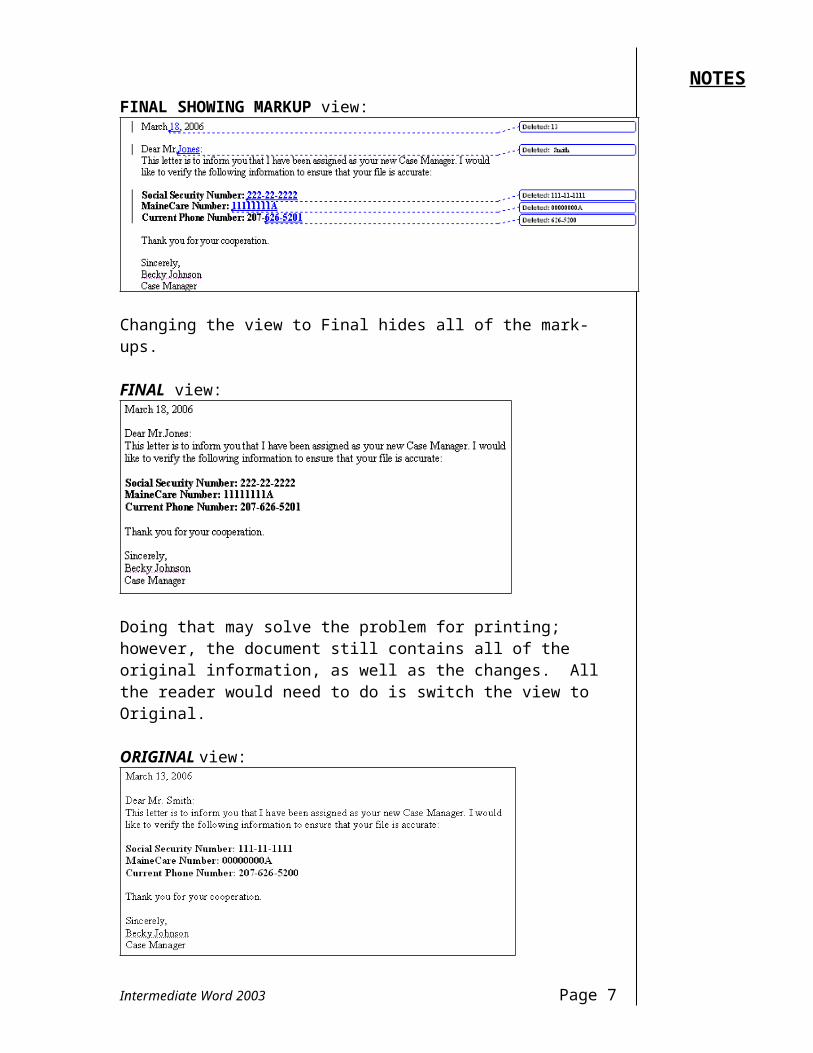
Microsoft Word 2003 automatically displays changes that are made to documents that you work in. It is extremely important to Accept All Changes made in a document before sending it as an e-mail attachment, publishing it to the web, or distributing it. If you do not accept all of the changes, then others have the ability to see these changes.
You created the following letter to send out to a client:
You want to send the letter to a different client, so you use Save As and change the information. The next time you open the letter, you see this:
Page 4 Intermediate Word 2003
NOTESFINAL SHOWING MARKUP view:
Changing the view to Final hides all of the mark-ups.
FINAL view:
Doing that may solve the problem for printing; however, the document still contains all of the original information, as well as the changes. All the reader would need to do is switch the view to Original.
ORIGINAL view:
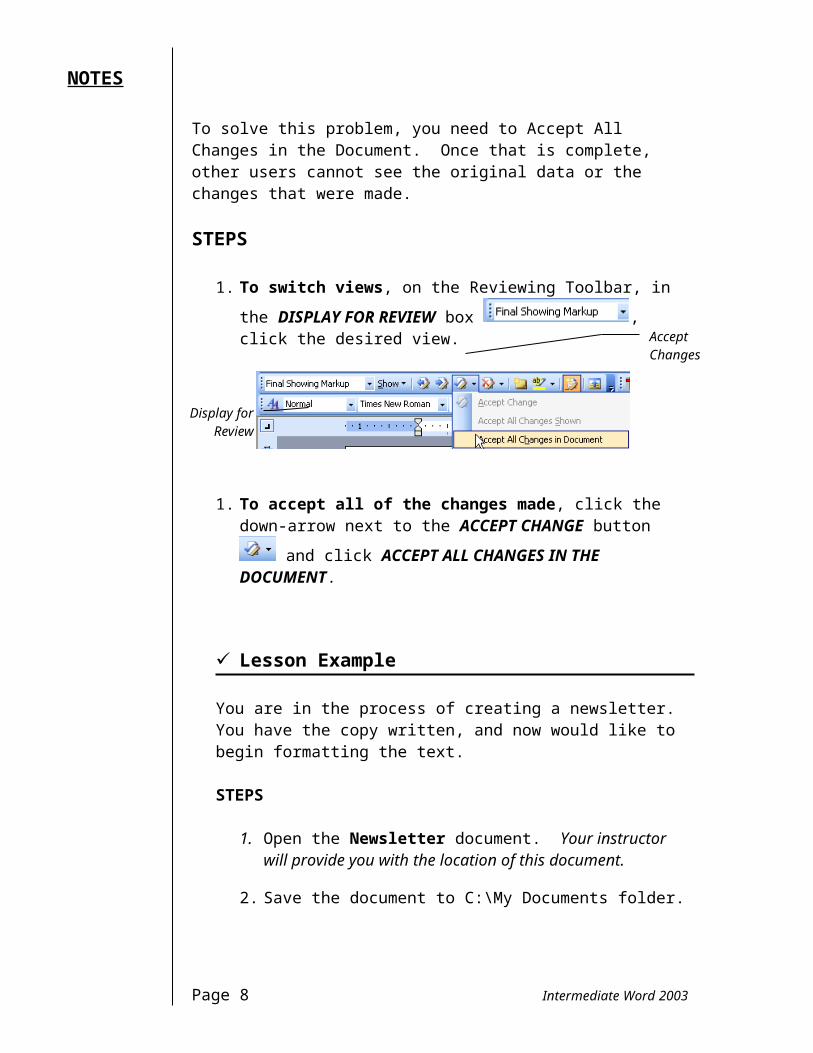
To solve this problem, you need to Accept All Changes in the Document. Once that is complete, other users cannot see the original data or the changes that were made.
STEPS
Intermediate Word 2003 Page 5

NOTES
1. To switch views, on the Reviewing Toolbar, in the DISPLAY FOR
REVIEW box , click the desired view.
1. To accept all of the changes made, click the down-arrow next to the
ACCEPT CHANGE button and click ACCEPT ALL CHANGES IN THE DOCUMENT.
Lesson Example
You are in the process of creating a newsletter. You have the copy written, and now would like to begin formatting the text.
STEPS
1. Open the Newsletter document. Your instructor will provide you with the location of this document.
2. Save the document to C:\My Documents folder.
3. Click the down-arrow next to the ACCEPT CHANGE button and click ACCEPT ALL CHANGES IN THE DOCUMENT.
4. On the Reviewing Toolbar, in the DISPLAY FOR REVIEW box, click the FINAL view.
5. Select the Scheduling Process text.
6. Click FORMAT, FONT.
7. Increase the font size to 20 points, and click to place checkmarks beside the SHADOW and SMALL CAPS font effects. Click OK.
8. Select the text Course Schedule.
9. Click FORMAT, FONT.
10. Click the UNDERLINE STYLE drop-down arrow and select the DOUBLE LINE style.
Page 6 Intermediate Word 2003
Display for Review
Accept Changes

NOTES11. Click the UNDERLINE COLOR drop-down arrow and select
GREEN. Click OK.
12. Save your changes.
EXERCISE:
1) Modify the Lab Locations text by increasing the font size to 16 points and adding the Engrave and All Caps effects.
2) Underline the text Confirmation with a wavy, blue line.
3) On Your Own: Select the text Cancellations and modify the font by bolding, resizing to 18 points, and applying the Outline effect.
4) Apply the underline of your choice (style and color) to the Late Policy text.
5) Save your changes.
Intermediate Word 2003 Page 7
NOTES
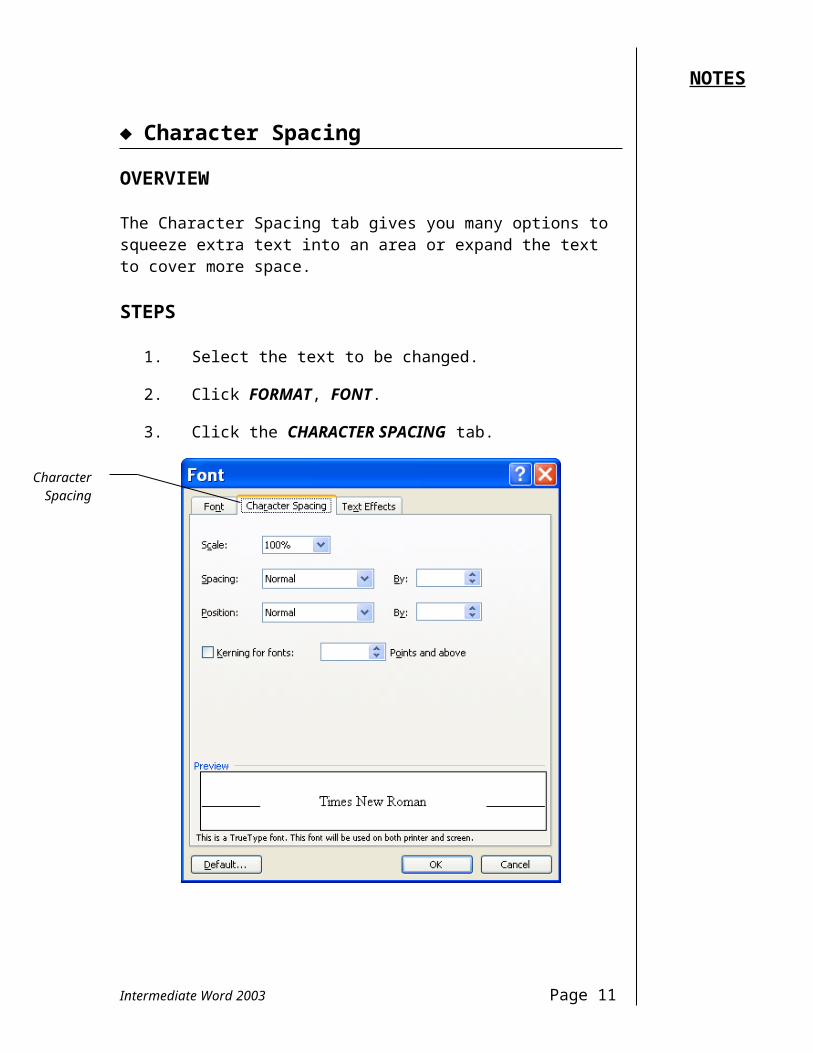
Character Spacing
OVERVIEW
The Character Spacing tab gives you many options to squeeze extra text into an area or expand the text to cover more space.
STEPS
1. Select the text to be changed.
2. Click FORMAT, FONT.
3. Click the CHARACTER SPACING tab.
4. To stretch or compress text horizontally, click the SCALE drop-down arrow, and click a percentage.
5. To expand or condense the space in between characters, click the SPACING drop-down arrow and select EXPANDED or
Page 8 Intermediate Word 2003
Character Spacing
NOTESCONDENSED. Then click the BY up or down arrow to select a point size.
6. To raise or lower text within a line, click the POSITION drop down arrow and select RAISED or LOWERED. Then click the up or down arrow to adjust the points.
7. To automatically adjust the amount of space within certain combinations of characters, click the checkbox beside KERNING FOR FONTS. Then click the up or down arrow to adjust the points.
8. Click OK.
Text Effects
OVERVIEW
If you have a document that will be read or viewed on a monitor, you may want to apply animation to the text.
STEPS
1. Select the text to be changed, and click FORMAT, FONT.
2. Click the TEXT EFFECTS tab.
Intermediate Word 2003 Page 9
Did You Know?
You can apply these effects to graphics by selecting the graphic and clicking FORMAT, FONT, TEXT EFFECTS, and selecting the effect you would like.
Text Effects

NOTES3. Click the style of your choice from ANIMATIONS. To remove
an animation, click NONE.
4. Click OK.
Lesson Example
You would like to change the spacing of your text and apply animation to your text.
STEPS
1. Select the Scheduling Process text.
2. Click FORMAT, FONT and click the CHARACTER SPACING tab.
3. Click the SPACING drop down box and select EXPANDED.
4. Expand the character spacing by 2.5 points. Click OK.
5. Select the Lab Locations text.
6. Click FORMAT, FONT and click the TEXT EFFECTS tab.
7. Select the MARCHING RED ANTS text effect. Click OK.
8. Save your changes.
EXERCISE:
1) Select the (DHHS) text in the Lab Locations section and raise its position 6 points. Do the same for (Riverview) in the same section.
2) Apply a Blinking Background animation to the Confirmation text.
3) On Your Own: Condense the Cancellations text by 1 point.
4) Apply the Las Vegas Lights animation to the Late Policy text.
5) Save your changes.
Page 10 Intermediate Word 2003

NOTES
F4 Function Key
OVERVIEW
You can use the F4 key to repeat the last single function that was performed. For example, if you just bolded text and need to bold another area, select the text you want to bold, and press F4.
STEPS
1. Click or select the area where you want to repeat the previous action, and press the F4 key.
2. Repeat Step 1 as long as you want that particular action performed.
Format Painter
OVERVIEW
If you add multiple formats to text and want to copy the format to other text throughout your document, you can use the Format Painter. For example, the format of the word overview above is Bold, All Caps, 14 point. You can copy the format and apply it to other words or phrases.
STEPS
1. Click anywhere within the text that is already formatted.
2. Double-click the FORMAT PAINTER button .
3. Click on the text to format.
4. Continue to click on text until all the text you wish to format is changed.
5. Click the FORMAT PAINTER button to turn it off.
Intermediate Word 2003 Page 11
Did You Know?
Clicking once on the Format Painter button on allows you to copy the format only once, and then it shuts itself off.
Helpful Hint:
F4 does not only repeat formatting changes, but any previous action. For example, if the last action performed was a deletion, F4 will delete!
NOTESLesson Example
You determine that your formatting is too busy and decide to make the headings more consistent.
STEPS
1. Select the Course Schedule text, and click FORMAT, FONT.
2. Click the UNDERLINE STYLE drop-down arrow, and click NONE. Click OK.
3. Select Confirmation, and press the F4 function key on your keyboard.
4. With Confirmation still selected, click the BOLD button in the Formatting toolbar, click the FONT SIZE drop-down and select 16, and click the FONT COLOR drop-down and choose INDIGO.
5. Click the FORMAT PAINTER button in the Standard toolbar.
6. Place your cursor in the left margin beside the Course Schedule text and click.
7. Save your changes.
EXERCISE:
1) With your cursor in the Course Schedule, double click the FORMAT PAINTER and change all of the headings.
2) Turn off the FORMAT PAINTER when finished.
3) Delete (DHHS) after Portland in the Lab Locations section.
4) Use F4 to delete (Riverview).
5) On Your Own: Change the font of the first paragraph to Garamond, 14 points.
6) Use the FORMAT PAINTER or F4 to copy this to all remaining paragraphs (not headings).
7) Save your changes.
Page 12 Intermediate Word 2003

NOTES
LESSON 2: PARAGRAPH FORMATTING
OBJECTIVES: Adjust paragraph indentation, spacing, and breaks.Discuss tab stops.Apply borders and shading.Arrange text into columns.
OVERVIEW
There are several options that allow you to make adjustments to a paragraph. For example, you may want to indent the paragraph, or adjust the spacing within or around the paragraph. You may also want to be sure that one line of a paragraph is not on a page by itself. If desired, you may apply these options to a new document, and they will stay in effect for every paragraph until you decide to change them.
STEPS
1. Click anywhere within the paragraph to be formatted. To format multiple paragraphs, select them with the mouse.
2. Click FORMAT, PARAGRAPH. Be sure you are on the INDENTS AND SPACING tab.
Intermediate Word 2003 Page 13
Indents and Spacing

NOTES3. To change alignment, click the down arrow by ALIGNMENT
and click the alignment style you prefer (left, centered, right, or justified).
4. To change indentation, click the arrows to increase or decrease LEFT or RIGHT indentation.
5. For SPECIAL indentation, select either FIRST LINE (only the top line of the paragraph) or HANGING (all but the first line of the paragraph), then click the BY up and down arrows to choose the amount to indent.
6. To change the spacing before or after the selected paragraph(s), click the up or down arrow to select an appropriate point size next to BEFORE or AFTER.
7. To change spacing between the lines of the paragraph, click the drop-down arrow beside LINE SPACING and select from the list.
8. To make sure the at least two lines of a selected paragraph(s) appear on a page, click the LINE AND PAGE BREAKS tab.
9. Check to be sure WIDOW/ORPHAN CONTROL is checked. If not, click to place a checkmark in the box.
10. To force selected lines or paragraphs to remain together, click to place checkmarks next to KEEP LINES TOGETHER or KEEP WITH NEXT (for paragraphs).
Page 14 Intermediate Word 2003
Helpful Hint:
Leaving the checkmark out of SUPPRESS LINE NUMBERS or DON'T HYPHENATE will not add line numbers or hyphenation to the document.
Line and Page Breaks

NOTES11. To turn line numbering or hyphenation off, click the box beside
SUPPRESS LINE NUMBERS or DON’T HYPHENATE.
12. Click OK.
Adjusting Indentation on the Ruler
OVERVIEW
Not only can you set indentation through Format, Paragraph, you may adjust the indentation for a particular section by simply using the indentation markers on the ruler.
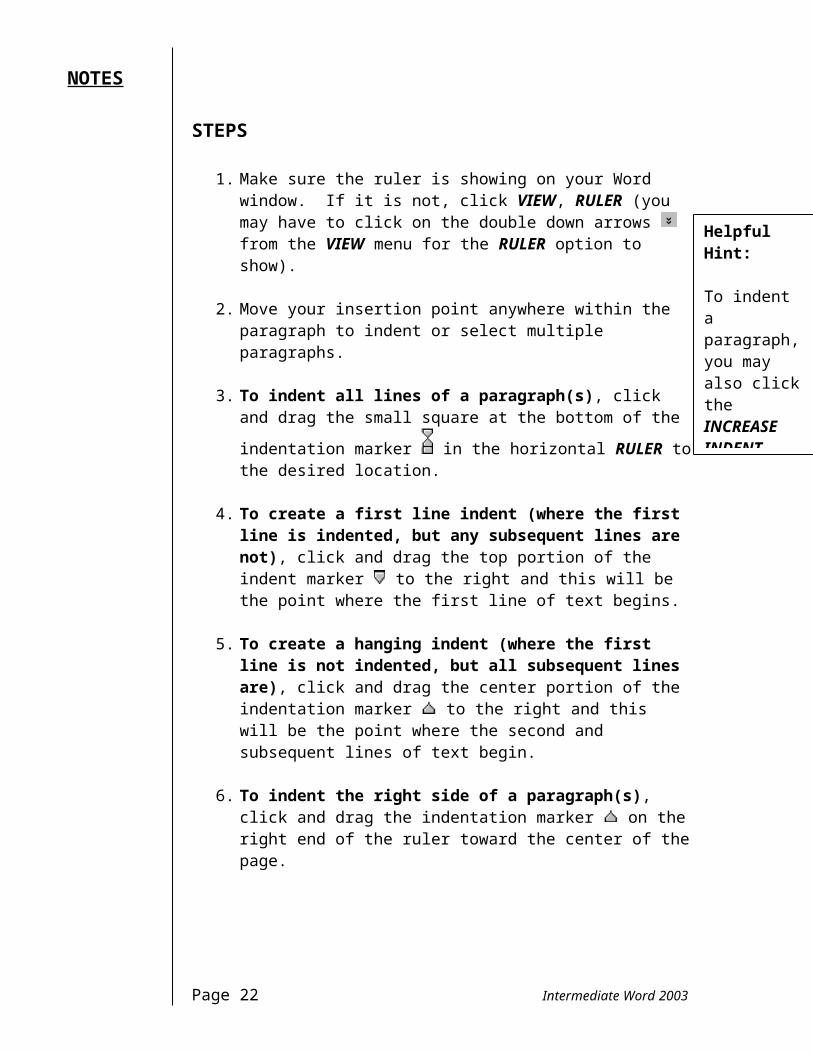
STEPS
1. Make sure the ruler is showing on your Word window. If it is not, click VIEW, RULER (you may have to click on the double down arrows from the VIEW menu for the RULER option to show).
2. Move your insertion point anywhere within the paragraph to indent or select multiple paragraphs.
3. To indent all lines of a paragraph(s), click and drag the small square
at the bottom of the indentation marker in the horizontal RULER to the desired location.
4. To create a first line indent (where the first line is indented, but any subsequent lines are not), click and drag the top portion of the indent marker to the right and this will be the point where the first line of text begins.
5. To create a hanging indent (where the first line is not indented, but all subsequent lines are), click and drag the center portion of the indentation marker to the right and this will be the point where the second and subsequent lines of text begin.
6. To indent the right side of a paragraph(s), click and drag the indentation marker on the right end of the ruler toward the center of the page.
Intermediate Word 2003 Page 15
Helpful Hint:
To indent a paragraph, you may also click the INCREASE INDENT
button in the Formatting toolbar.

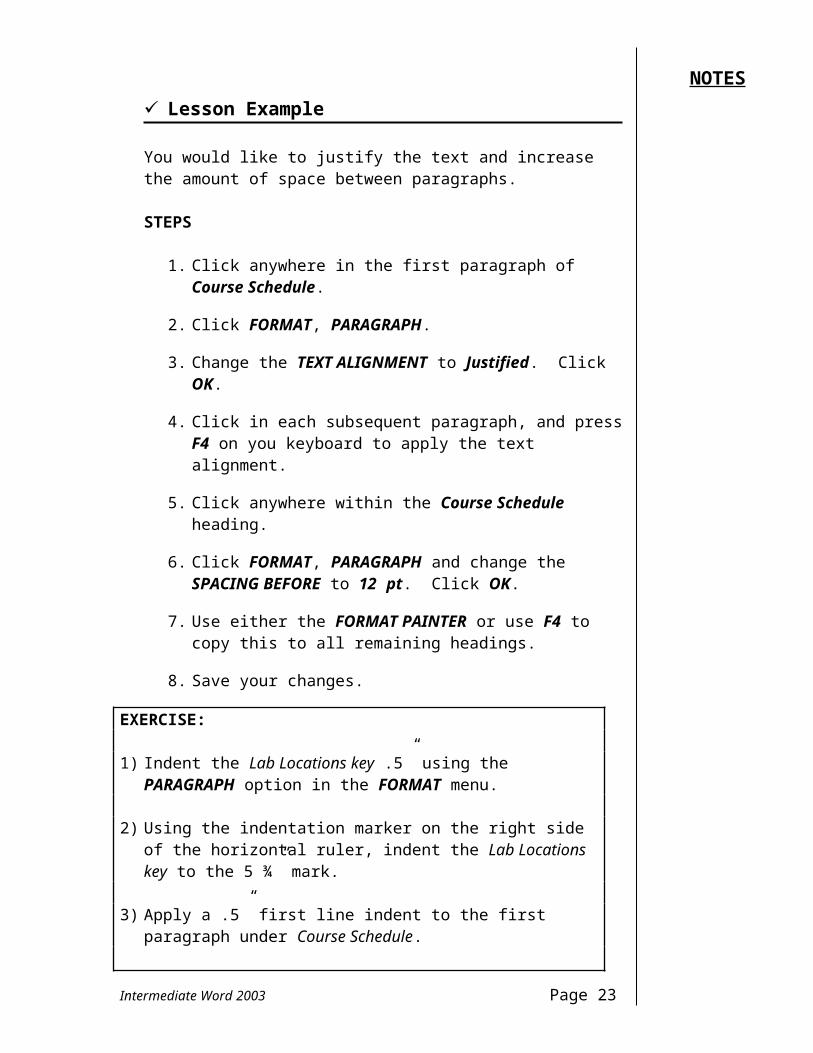
NOTES Lesson Example
You would like to justify the text and increase the amount of space between paragraphs.
STEPS
1. Click anywhere in the first paragraph of Course Schedule.
2. Click FORMAT, PARAGRAPH.
3. Change the TEXT ALIGNMENT to Justified. Click OK.
4. Click in each subsequent paragraph, and press F4 on you keyboard to apply the text alignment.
5. Click anywhere within the Course Schedule heading.
6. Click FORMAT, PARAGRAPH and change the SPACING BEFORE to 12 pt. Click OK.
7. Use either the FORMAT PAINTER or use F4 to copy this to all remaining headings.
8. Save your changes.
EXERCISE:
1) Indent the Lab Locations key .5” using the PARAGRAPH option in the FORMAT menu.
2) Using the indentation marker on the right side of the horizontal ruler, indent the Lab Locations key to the 5 ¾” mark.
3) Apply a .5” first line indent to the first paragraph under Course Schedule.
5) On Your Own: Use F4 to repeat the indentation on all remaining paragraphs (not headings).
6) Adjust the left indentation of the Lab Locations key to 1”.
7) Save your changes.
Page 16 Intermediate Word 2003

NOTES
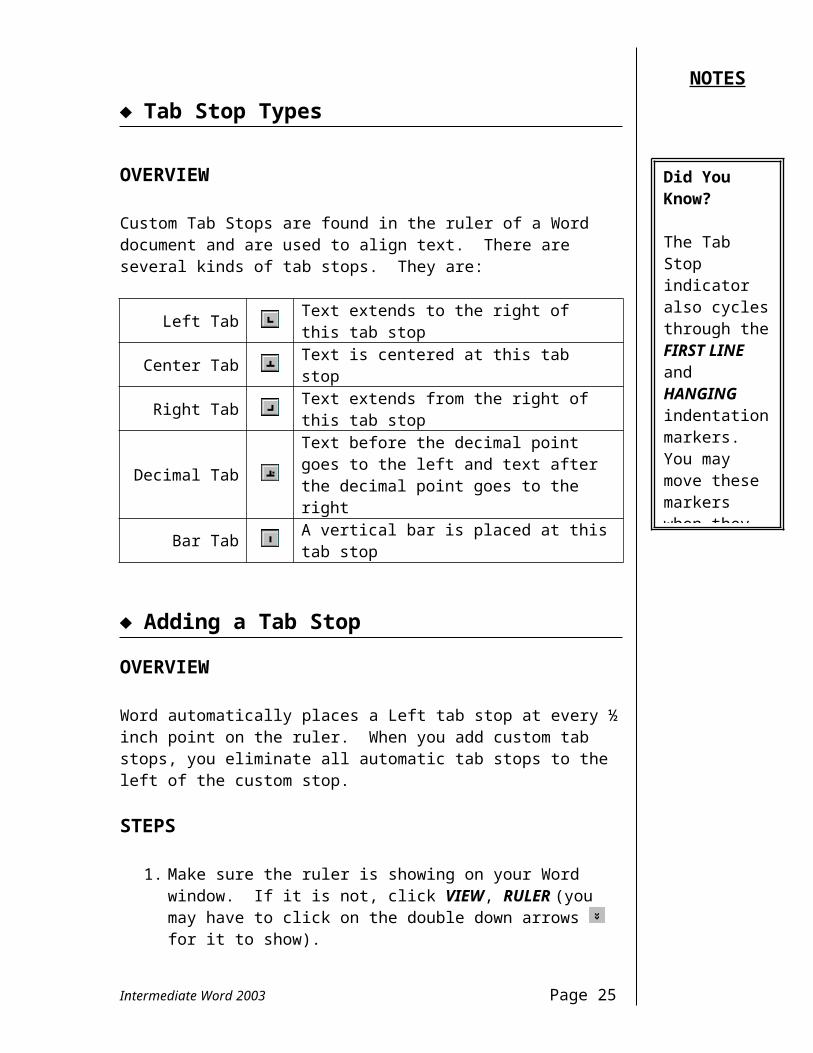
Tab Stop Types
OVERVIEW
Custom Tab Stops are found in the ruler of a Word document and are used to align text. There are several kinds of tab stops. They are:
Left Tab Text extends to the right of this tab stop
Center Tab Text is centered at this tab stop
Right Tab Text extends from the right of this tab stop
Decimal Tab Text before the decimal point goes to the left and text after the decimal point goes to the right
Bar Tab A vertical bar is placed at this tab stop
Adding a Tab Stop
OVERVIEW
Word automatically places a Left tab stop at every ½ inch point on the ruler. When you add custom tab stops, you eliminate all automatic tab stops to the left of the custom stop.
STEPS
1. Make sure the ruler is showing on your Word window. If it is not, click VIEW, RULER (you may have to click on the double down arrows for it to show).
2. Click anywhere in the paragraph where you want to apply custom tab stops. To apply the tab stops to multiple paragraphs, select them with the mouse.
3. Click the tab stop indicator to the left of the horizontal ruler, until it displays the type of tab stop to insert. Continual clicking here will cycle through all types of stops.
4. Click the horizontal ruler at the location you want to place the tab stop.
Intermediate Word 2003 Page 17
Did You Know?
The Tab Stop indicator also cycles through the FIRST LINE and HANGING indentation markers. You may move these markers when they are displayed by clicking the desired location on the ruler.

NOTES5. To use the new tab stop, move your insertion point if necessary, and
press TAB on your keyboard.
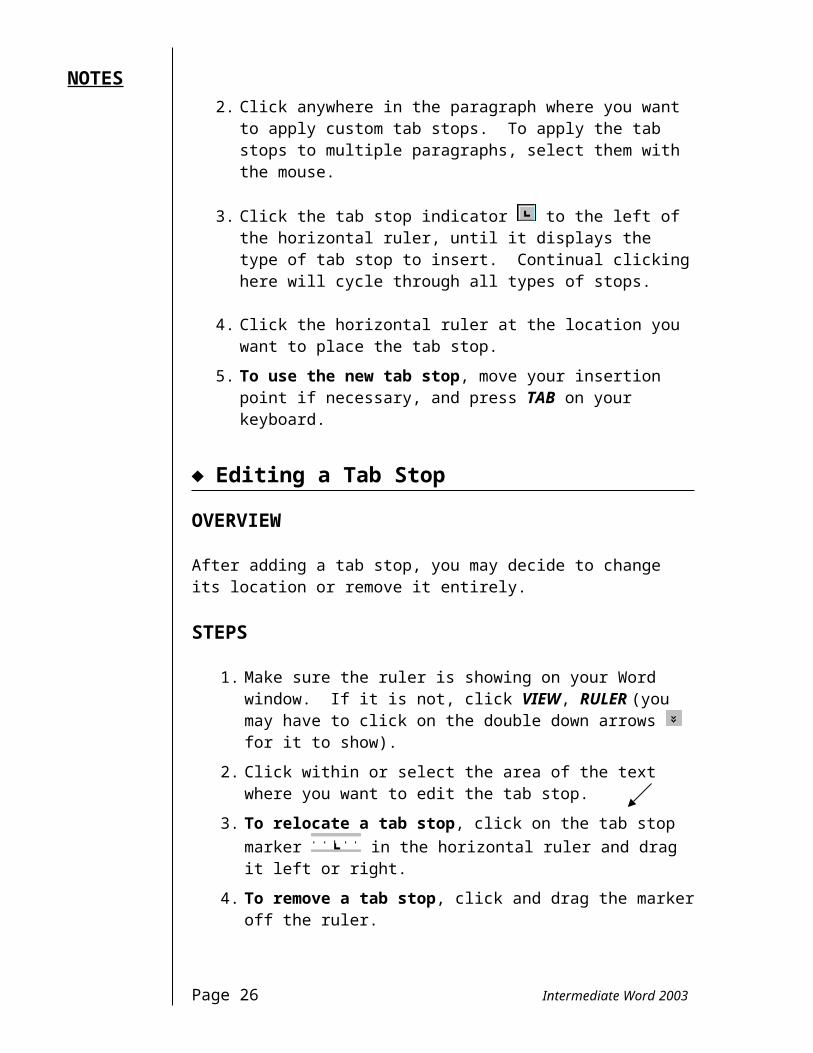
Editing a Tab Stop
OVERVIEW
After adding a tab stop, you may decide to change its location or remove it entirely.
STEPS
1. Make sure the ruler is showing on your Word window. If it is not, click VIEW, RULER (you may have to click on the double down arrows for it to show).
2. Click within or select the area of the text where you want to edit the tab stop.
3. To relocate a tab stop, click on the tab stop marker in the horizontal ruler and drag it left or right.
4. To remove a tab stop, click and drag the marker off the ruler.
5. To delete all tab stops, click FORMAT on the Menu bar, click TABS. In the TABS dialog box, click CLEAR ALL and OK.
Lesson Example
You would like to add a new section to your document that includes information that needs to be aligned appropriately.
STEPS
1. Press CTRL + END to move your insertion point to the end of the document and press the ENTER key two times.
2. Click the CENTER alignment button in the Formatting toolbar, and type Class Costs.
3. Press ENTER two times and click the ALIGN LEFT button.
4. Check that your Tab Stop indicator is set to a Left Tab, and click at the 1.5” mark on the ruler to set a Left tab stop.
5. Click the tab stop indicator to the left of the ruler three times to get a Decimal tab stop.
6. Click at the 4” mark on the ruler to set the Decimal tab stop.
Page 18 Intermediate Word 2003
NOTES7. Press the TAB key and type Class Title.
8. Press TAB and type Material Cost. Press ENTER.
9. Pressing TAB before the Titles and Costs, and ENTER to move to the next line, type the following information.
Class Title Material Cost
Stress Management $12.00
Introduction to Computers 5.00
Multitasking 7.50
10. Select the entire section of Class Titles and Material Costs, and move the 1.5” left tab to the 1” mark, by clicking and dragging the tab marker in the ruler.
11. Save your changes.
EXERCISE:
1) Click anywhere in the Material Cost label, and delete the 4” tab stop.
2) Insert a Right tab stop to line up the Material Cost label with the costs below (approx. 4.25”).
3) Click in the Class Costs title left align the text.
4) Place a center tab stop at the 3” mark on the ruler and press TAB.
5) On Your Own: Place the cursor beneath the Class Costs section and press the enter key two times.
6) Remove the previous tab stops.
7) Add a Center tab stop at the 1” mark and a Right tab stop at the 3.5” mark.
8) Press the tab key and type the following:
Lab Location Maximum CapacityP 12B 15S 9C 10
Intermediate Word 2003 Page 19

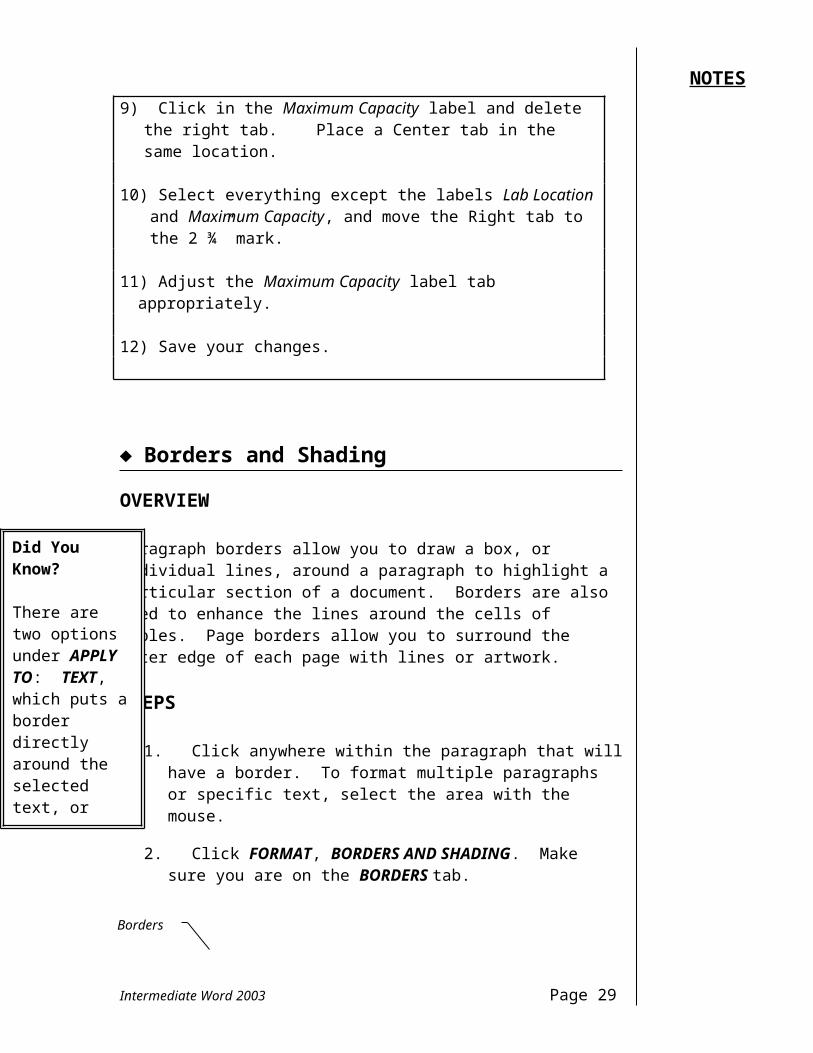
NOTES9) Click in the Maximum Capacity label and delete the right tab.
Place a Center tab in the same location.
10) Select everything except the labels Lab Location and Maximum Capacity, and move the Right tab to the 2 ¾” mark.
11) Adjust the Maximum Capacity label tab appropriately.
12) Save your changes.
Borders and Shading
OVERVIEW
Paragraph borders allow you to draw a box, or individual lines, around a paragraph to highlight a particular section of a document. Borders are also used to enhance the lines around the cells of tables. Page borders allow you to surround the outer edge of each page with lines or artwork.
STEPS
1. Click anywhere within the paragraph that will have a border. To format multiple paragraphs or specific text, select the area with the mouse.
2. Click FORMAT, BORDERS AND SHADING. Make sure you are on the BORDERS tab.
3. Click the type of SETTING, STYLE, COLOR, and WIDTH.
Page 20 Intermediate Word 2003
Did You Know?
There are two options under APPLY TO: TEXT, which puts a border directly around the selected text, or PARAGRAPH, which places the border around the entire paragraph(s) along the margins.
Borders

NOTES4. If you do not choose a particular setting, click the diagram or
associated buttons , , , to apply the border to the appropriate sides.
5. To add a border around the perimeter of the page, click the PAGE BORDER tab and click on the SETTING, STYLE, COLOR, WIDTH, and ART options.
6. To add shading or color to the background of a selected paragraph(s), click the SHADING tab.
7. Click the desired FILL color, and select from the available PATTERNS.
8. Click OK.
Lesson Example
Intermediate Word 2003 Page 21
Page Border
Shading

NOTESYou want to bring more emphasis to the lab locations by applying a border around them.
STEPS
1. Click anywhere in the Lab Locations key and click FORMAT, BORDERS AND SHADING.
2. Click the BOX SETTING, DARK RED COLOR, and 3 PT WIDTH. Click OK.
3. Save your changes.
EXERCISE:
1) Click FORMAT, BORDERS AND SHADING, and select the PAGE BORDER tab.
2) Click the ART dropdown list and apply the PAGE BORDER ART of your choice.
3) On Your Own: Select the entire Class Costs section, and apply a Shadow border with a Double-Line style and Light Orange shading.
4) With the text still selected, adjust your right and left margins to bring the border closer to the text.
5) Save your changes.
Page 22 Intermediate Word 2003
NOTES
Columns
OVERVIEW
The Columns feature allows you to format text into multiple columns on the page, looking similar to what you see in a newspaper.
STEPS
1. Select the text you want to put into columns.
2. Click FORMAT, then COLUMNS.
3. Click the number of columns you want. Make sure APPLY TO: reads SELECTED TEXT.
4. To add a vertical line between columns, click the check box beside LINE BETWEEN.
5. Click OK.
6. To divide text evenly among columns, move your insertion point to the end of the columnar text.
7. Click INSERT, BREAK, CONTINUOUS (under SECTION BREAK), OK.
8. To begin a new column, press ENTER to get to a blank line, click INSERT, BREAK, COLUMN BREAK, OK.
Intermediate Word 2003 Page 23
Helpful Hint:
Rather than using the Format menu, you may click the COLUMNS button
in the Standard toolbar, then click the number of columns you want.
Did You Know?
In Normal view, you will not see columns on your screen.
Did You Know?
It is possible to apply the Columns format before typing any text; however, you will also need to insert section breaks if the entire document will not be in columns.
NOTES9. To continue a document without the columns, press ENTER to
get to a blank line with your cursor at the left margin, click FORMAT, COLUMNS, ONE COLUMN, then change APPLY TO: to THIS POINT FORWARD. Click OK.
Lesson Example
You believe that your newsletter can be more easily read if in columns.
STEPS
1. Select all of the text except the Class Costs and Lab Size sections.
2. Click FORMAT, COLUMNS, and choose two columns.
3. Click the checkbox to add a LINE BETWEEN columns. Click OK.
4. If needed, put a page break after the text.
5. Put the cursor before Confirmation and click INSERT, BREAK, COLUMN BREAK. Click ok.
6. Save your changes.
EXERCISE:
1) Select the Lab Location key and adjust the margins and text as necessary.
2) On Your Own: Remove the line between columns.
3) Save your changes.
Page 24 Intermediate Word 2003
Did You Know?
If your columns include a column break, you can no longer divide the text evenly among columns.

NOTES
LESSON 3: GRAPHIC OBJECTS IN A DOCUMENT
OBJECTIVES: Experiment with Drop Caps.Create and edit Text Boxes.Insert and modify Clip Art.Utilize the tools on the Drawing Toolbar.
Drop Caps
OVERVIEW
If you would like to put emphasis on a paragraph, you may choose to use a drop cap. This is often used in the first paragraph of books, reports, or newsletters.
STEPS
1. Click within the paragraph that will include a drop cap.
2. Click FORMAT on the Menu Bar, and then click DROP CAP.
3. Click the POSITION you want, choose the desired FONT, and indicate how many LINES TO DROP using the up and down arrows. Click OK.
Intermediate Word 2003 Page 25
Did You Know?
The Drop Cap initial is no longer text; it is treated as a picture.
NOTES Lesson Example
You would like to try a Drop Cap in your newsletter.
STEPS
1. Click anywhere within the first paragraph under Course Schedule.
2. Click FORMAT, DROP CAP.
3. Click DROPPED under POSITION. Click OK.
4. Save your changes.
EXERCISE:
1) Click in the next paragraph, and use the F4 key to repeat the Drop Cap.
2) Add a Drop Cap to the paragraph under Lab Locations that uses the Script MT Bold font, and drops 2 lines.
3) On Your Own: Apply a Drop Cap to the paragraph under Confirmation using the font of your choice, and dropping 2 lines.
4) Save your changes.
Page 26 Intermediate Word 2003
NOTES
Adding a Text Box
Text boxes allow you to create a section of text that you can manipulate much like a picture, including effects and even text direction.
STEPS
1. Click the TEXT BOX button on the Drawing toolbar. If you do not see the Drawing toolbar, click VIEW, TOOLBAR, DRAWING.
2. Click and drag your mouse to create a rectangle in the document window.
3. Type the desired text.
4. To edit the text in a text box, click to place the insertion point within the box, and edit just as you would normal text.
5. To move a text box, click and drag the border of the box with the
mouse pointer to the desired location.
6. To delete a text box, click the border of the box with the mouse pointer, and press DELETE on your keyboard.
Formatting a Text Box
OVERVIEW
When you add a text box, it is created with default settings including a font, border, and background. These are all options that can be changed as you like.
STEPS
1. With the text box selected, click FORMAT, TEXT BOX. You may also right-click the text box, and click FORMAT TEXT BOX.
2. To change the background color and border options, click the COLORS AND LINES tab.
Intermediate Word 2003 Page 27
Helpful Hint:
When you use the Drawing toolbar, Word automatically creates a Drawing Canvas. To turn off this feature, click TOOLS, OPTIONS. On the General tab, remove the check from AUTOMATICALLY CREATE DRAWING CANVAS WHEN INSERTING AUTOSHAPES and then click OK.

NOTES
3. Click the down arrows to select FILL COLOR, LINE COLOR, LINE STYLE, etc. Set the COLOR TRANSPARENCY by sliding the bar or click the up arrow.
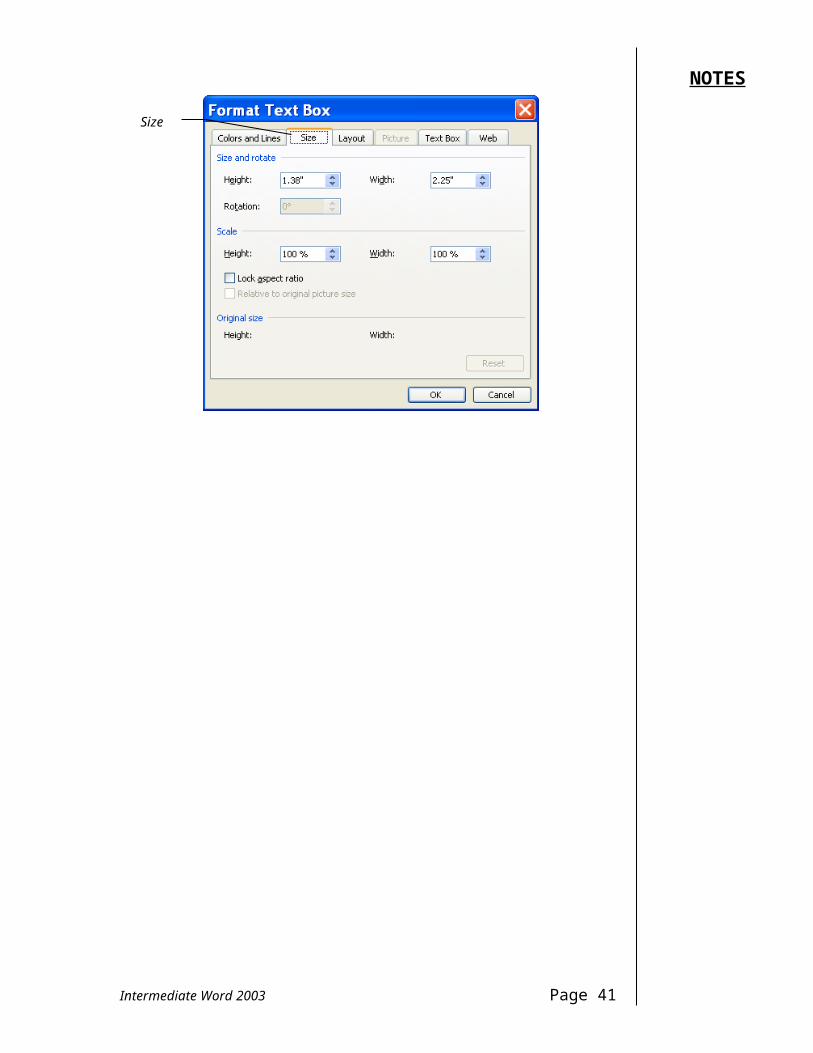
4. To adjust the size of the text box, click on the SIZE tab. You may adjust the size either by changing the inches in HEIGHT and WIDTH or by the SCALE options.
Page 28 Intermediate Word 2003
Did You Know?
You can change the size of a text box by clicking and dragging the white handles that appear once you click the border of the text box.
Colors and Lines
Size

NOTES
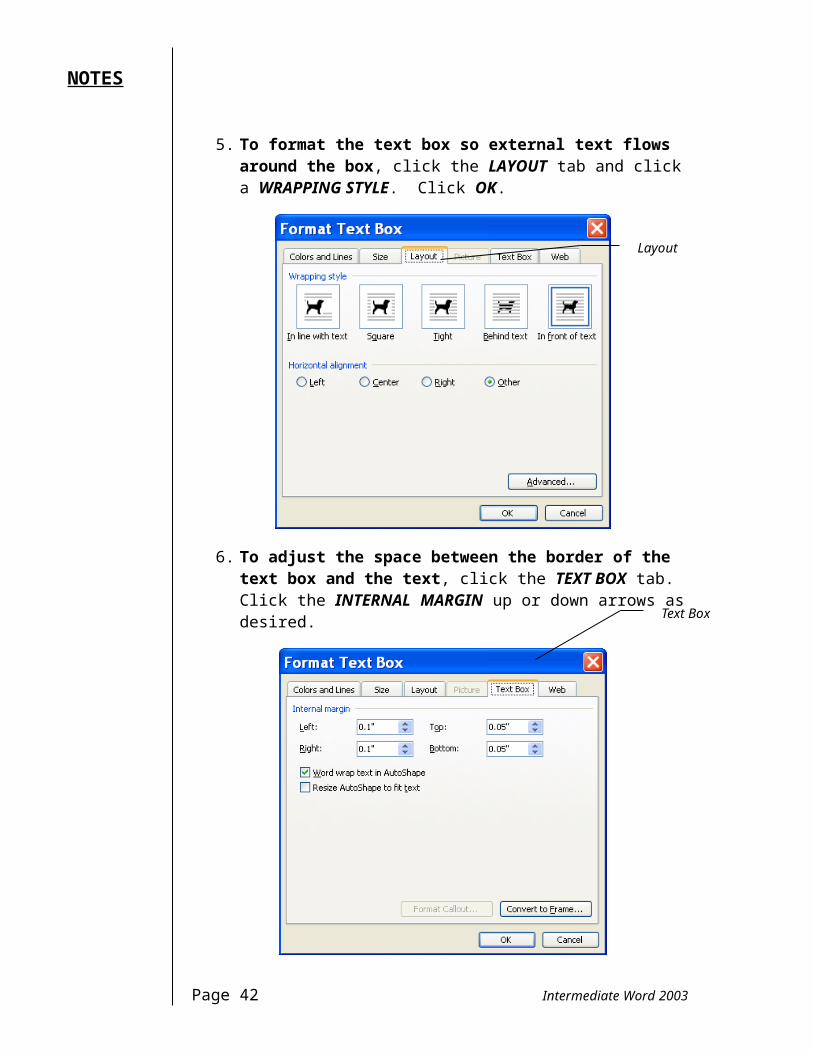
5. To format the text box so external text flows around the box, click the LAYOUT tab and click a WRAPPING STYLE. Click OK.
6. To adjust the space between the border of the text box and the text, click the TEXT BOX tab. Click the INTERNAL MARGIN up or down arrows as desired.
Intermediate Word 2003 Page 29
Layout
Text Box
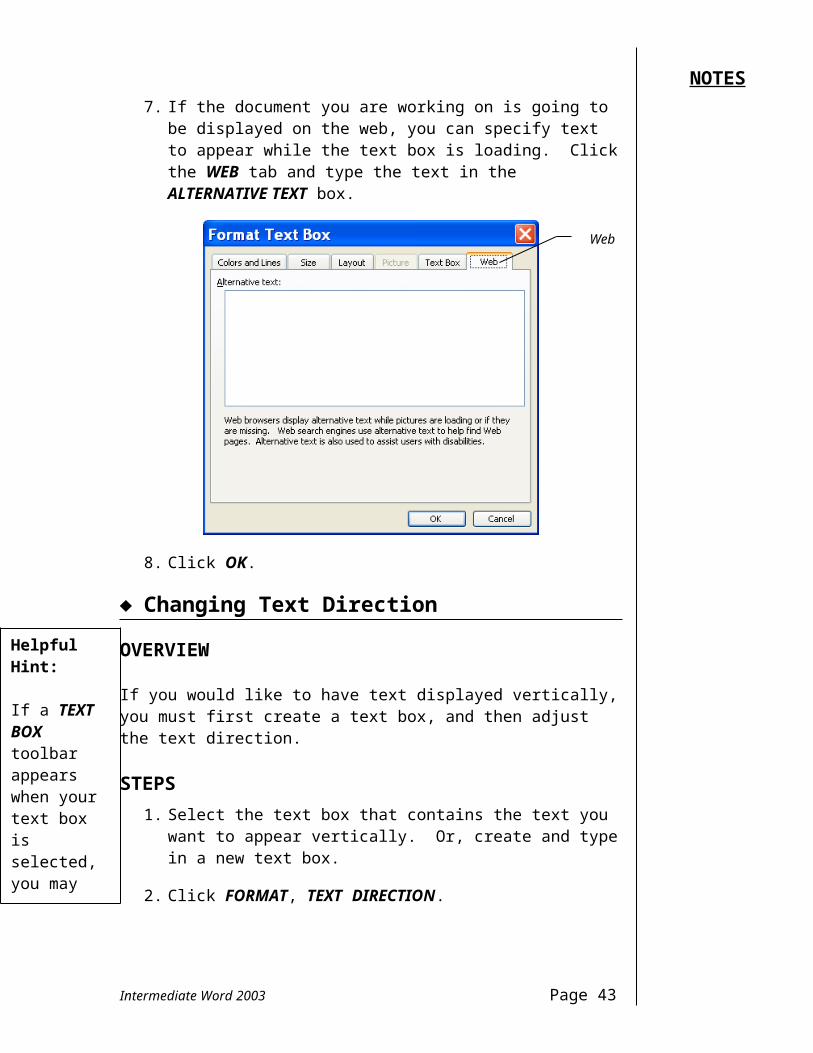
NOTES7. If the document you are working on is going to be displayed on the
web, you can specify text to appear while the text box is loading. Click the WEB tab and type the text in the ALTERNATIVE TEXT box.
8. Click OK.
Changing Text Direction
OVERVIEW
If you would like to have text displayed vertically, you must first create a text box, and then adjust the text direction.
STEPS1. Select the text box that contains the text you want to appear vertically.
Or, create and type in a new text box.
2. Click FORMAT, TEXT DIRECTION.
Page 30 Intermediate Word 2003
Helpful Hint:
If a TEXT BOX toolbar appears when your text box is selected, you may use the CHANGE TEXT DIRECTION button to rotate text.
Web

NOTES
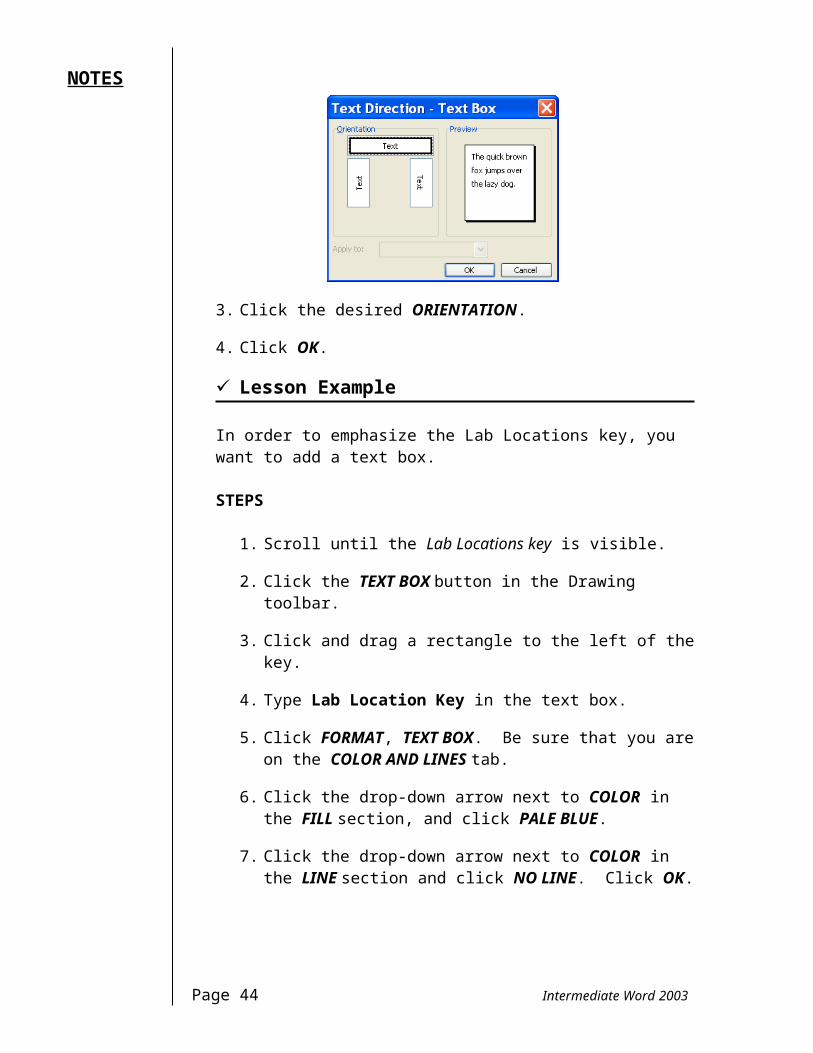
3. Click the desired ORIENTATION.
4. Click OK.
Lesson Example
In order to emphasize the Lab Locations key, you want to add a text box.
STEPS
1. Scroll until the Lab Locations key is visible.
2. Click the TEXT BOX button in the Drawing toolbar.
3. Click and drag a rectangle to the left of the key.
4. Type Lab Location Key in the text box.
5. Click FORMAT, TEXT BOX. Be sure that you are on the COLOR AND LINES tab.
6. Click the drop-down arrow next to COLOR in the FILL section, and click PALE BLUE.
7. Click the drop-down arrow next to COLOR in the LINE section and click NO LINE. Click OK.
Intermediate Word 2003 Page 31

NOTES
EXERCISE:
1) Bold and Center the text in the text box.
2) Click FORMAT, TEXT DIRECTION and change the direction of the text in the text box so the word lab is on the bottom.
3) Resize the text box so all of the text fits on one line.
4) On Your Own: Insert a text box between the Cancellations and Late Policy sections.
5) Type IMPORTANT!
6) Format the text (font, size, color, style, direction) and the box (fill, line, size) to your liking.
7) Save your changes.
Page 32 Intermediate Word 2003

NOTES
Drawing Toolbar
OVERVIEW
The Drawing Toolbar allows you to actually create and format drawings within Microsoft Word Document.
Button Description
Click to select an option to adjust drawing objects
Select drawing objects
Click to select a shape
Line Tool
Arrow
Rectangle
Oval
Text Box
Insert WordArt
Insert Diagram or Organizational Chart
Insert Clip Art
Insert Picture
Fill Color
Line Color
Font Color
Line Style
Dash Style
Arrow Style
Shadow
3-D
Intermediate Word 2003 Page 33

NOTESHELPFUL DRAWING TIPS
1. To view the Drawing toolbar, click the DRAWING button on the Standard toolbar. Click the button again to remove the toolbar.
2. To create a drawing object, click the tool to select it and then click and drag to place the object within the document.
3. To keep the drawing tool on, double-click the tool. Click and drag to place the drawing object on the slide, then click and drag again to place the shape in another location.
4. To turn off the drawing tool, double-click the tool again or press the ESC key on your keyboard.
5. To draw an AutoShape, click the AUTOSHAPES button in the Drawing toolbar, point to the category and then click the AutoShape.
6. Point to the location on the document where you would like to place the shape, then click and drag to draw the shape.
7. To draw a perfect square, circle, or straight line, hold down the SHIFT key when drawing the object.
8. To resize an object, click the object to select it, then click and drag one of the resizing handles with your double-sided arrow mouse
pointer .
9. To move an object, click and drag when the mouse is in the shape of a four-headed arrow .
10. To change the layering of objects, click the object, then click DRAW, ORDER. Click the appropriate option. .
11. To group multiple shapes together, click on the first shape.
Page 34 Intermediate Word 2003
Places object in the top position
Places object in the bottom position
Moves object forward one level
Moves object back one level
Brings object in front of text
Sends object behind text

NOTES
12. Hold down the SHIFT key and click on the other shapes.
13. Click the DRAW button.
14. Click GROUP.
15. To delete an object, click the object, then press the DELETE key. To delete several, hold down the SHIFT key as you click on several objects, then press the DELETE key.
16. To change the color, click on the arrow to the right of the FILL
COLOR button and then MORE FILL COLORS.
17. Click the STANDARD tab to select from the color palette.
18. In the STANDARD color palette, click the color you want, and then click OK.
19. To change the fill effects, click on the arrow to the right of the FILL
COLOR button and then FILL EFFECTS.
Intermediate Word 2003 Page 35

NOTES20. To apply a gradient effect, click on the GRADIENT tab.
21. Choose ONE COLOR, TWO COLORS, OR PRESET.
22. Make your color choices by clicking on the COLOR 1, COLOR 2, or PRESET COLORS drop-down boxes.
23. You may set a TRANSPARENCY level by either sliding the bar or changing the % up and down arrows.
24. In the SHADING STYLES section, choose a style.
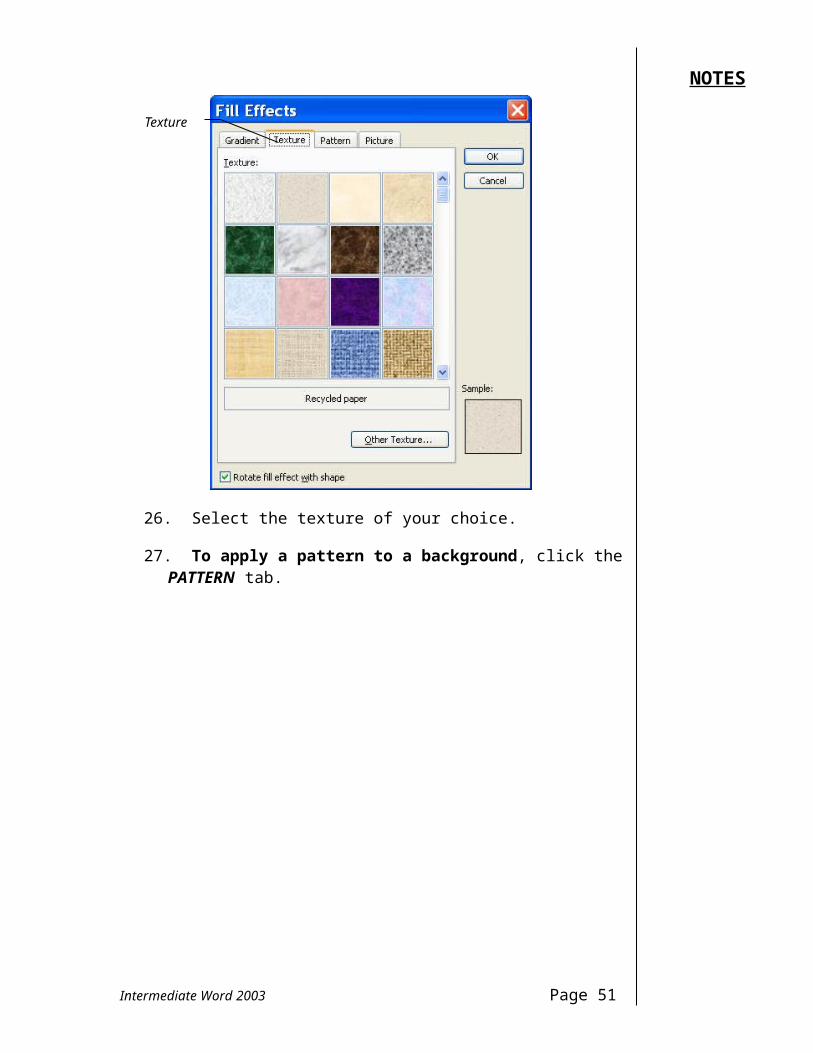
25. To apply a texture effect, click the TEXTURE tab.
Page 36 Intermediate Word 2003
Gradient

NOTES
26. Select the texture of your choice.
27. To apply a pattern to a background, click the PATTERN tab.
Intermediate Word 2003 Page 37
Texture
NOTES
28. Select the FOREGROUND and BACKGROUND colors and the PATTERN desired
29. To add a picture to an item, click the PICTURE tab.
Page 38 Intermediate Word 2003
Pattern

NOTES
30. Click SELECT PICTURE, and browse to find the picture.
31. After selecting the picture file, click INSERT and click OK.
32. To change the line color, click the arrow to the right of the LINE COLOR button and then MORE LINE COLORS.
33. Click the STANDARD tab to select from the color palette.
34. In the STANDARD color palette, click the color you want, and then click OK.
35. To change the color of text, select the text.
36. Click the arrow to the right of the FONT COLOR button.
37. Click on the color of your choice.
38. To change a LINE STYLE , DASH STYLE , or ARROW STYLE , click the appropriate button.
39. Click on the style of your choice.
40. To add a shadow, click the SHADOW STYLE button.
Intermediate Word 2003 Page 39
Picture

NOTES41. Click on the style of your choice.
42. To add a 3-D style, click the 3-D STYLE button.
43. Click on the style of your choice.
44. Many objects may be rotated in different angles. Place your cursor on the green circle, and move your object in any direction.
Lesson Example
You would like to add drawn objects to the newsletter.
STEPS
1. If necessary, open the Drawing toolbar by clicking the DRAWING button in the Standard toolbar.
2. Draw a line at the bottom of the page by clicking the LINE tool, then holding the SHIFT key while clicking and dragging the line.
3. Change the thickness by clicking the LINE STYLE button and selecting 3PT.
4. Click the LINE COLOR drop-down arrow, and choose LAVENDER.
5. Save your changes.
Page 40 Intermediate Word 2003
Free Rotate button

NOTES
EXERCISE:
1) Click AUTOSHAPES and draw an octagon over the Lab Location and Maximum Capacity..
2) Format the octagon fill color to be Rose with a 2¼ pt line and Shadow Style 2.
3) Click DRAW, ORDER and send the octagon behind the text.
4) Move and resize the oval to surround the text evenly.
5) On Your Own: Draw a square in any blank area of the newsletter.
6) Format the line and fill as desired.
7) Save your changes.
Intermediate Word 2003 Page 41
NOTES
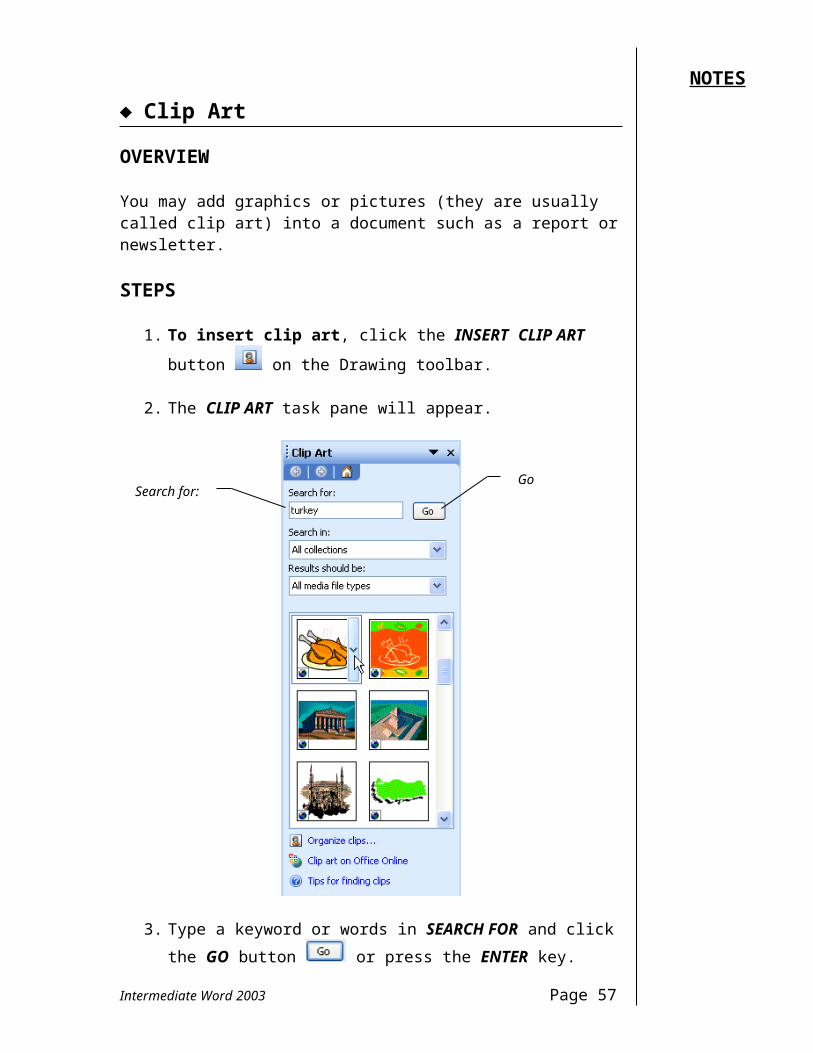
Clip Art
OVERVIEW
You may add graphics or pictures (they are usually called clip art) into a document such as a report or newsletter.
STEPS
1. To insert clip art, click the INSERT CLIP ART button on the Drawing toolbar.
2. The CLIP ART task pane will appear.
3. Type a keyword or words in SEARCH FOR and click the GO button
or press the ENTER key.
4. Scroll through the selection of clips and click the picture you want to insert.
Page 42 Intermediate Word 2003
Search for:Go
NOTES5. To resize clip art, click to select the picture, then click and drag a
resizing handle with the double-sided arrow mouse pointer .
6. To move clip art, click to select the picture, then click and drag from the middle of the picture when the mouse changes to a four-headed arrow . Release the mouse button at the new location.
Lesson Example
It is time to add some clip art to the newsletter.
STEPS
1. Place your insertion point in the empty line above the Lab Locations section.
2. Click the INSERT CLIP ART button in the Drawing toolbar.
3. Type books in SEARCH FOR and click the GO button or press the ENTER key.
4. Scroll through the clips and click the picture you want to insert.
5. Resize the clip art by clicking and dragging a corner RESIZING HANDLE toward the center of the picture.
6. Save your changes.
Intermediate Word 2003 Page 43
Helpful Hint:
To resize clip art proportionately, choose a corner handle.
Resizing Handle
NOTES
EXERCISE:
1) Above the Cancellations section, add the clip art of your choice.
2) Resize the clip art as necessary.
3) On Your Own: Add a Question Mark clip art to the bottom of the newsletter.
4) Resize the picture.
5) Save your changes.
6) Close the CLIP ART task pane.
Page 44 Intermediate Word 2003
NOTES
The Picture Toolbar
OVERVIEW
Aside from simply resizing and moving your clip art, you may manipulate it with the Picture toolbar.
Button Description
Allows you to insert a picture file from a browser
Color opens a drop-down menu that includes Automatic, Grayscale, Black & White, and WashoutMore Contrast
Less Contrast
More Brightness
Less Brightness
Crop allows you to remove some of the picture
Rotate left 90° rotates the picture at 90° increments
Line Style opens the available options for lines
Compress Pictures reduces resolution and deletes cropped areas of the pictureText Wrapping determines how surrounding text reacts to the picture
Format Picture opens a dialog box containing all of the formatting options for your picture
Set Transparent Color allows you to choose one color to make transparent in the picture
Reset Picture restores the picture to its original state
Intermediate Word 2003 Page 45

NOTESSTEPS
1. Insert the clip art of your choice.
2. Click to select the picture.
3. If the Picture toolbar does not open automatically, click VIEW, TOOLBARS, PICTURE.
Creating a Watermark
OVERVIEW
If you would like a graphic to appear behind your text, you can create a watermark from any graphic object.
STEPS
1. Insert the clip art of your choice.
2. To make the graphic a watermark, select it, and click the COLOR
button in the Picture toolbar.
3. Click WASHOUT.
4. To format the graphic so text flows on top of it, click TEXT WRAPPING on the Picture toolbar.
5. Select the BEHIND TEXT option.
6. If necessary, click and drag the picture to move it to the appropriate location.
Page 46 Intermediate Word 2003
Helpful Hint:
To have a watermark on each page, click VIEW, HEADER AND FOOTER before inserting the clip art. Follow the remaining steps.
Helpful Hint:
Right-click the graphic to select FORMAT, PICTURE.
Helpful Hint:
If “behind text” does not initially work, repeat the steps.

NOTESLesson Example
You would like to make the Question Marks clip a watermark.
STEPS
1. Click to select the Question Marks clip. If the Picture toolbar does not appear, right-click any toolbar button, and click PICTURE.
2. Click COLOR, WASHOUT.
3. Format the clip art to go behind the text by clicking the TEXT WRAPPING button in the Picture toolbar, and selecting BEHIND TEXT.
4. Place the clip art in the section concerning the website near the end of the document.
5. Save your changes.
EXERCISE:
1) Format the Books clip to appear in Black & White, and wrap the text tight.
2) Move the clip art up into the second Course Schedule paragraph.
3) On Your Own: Make your other piece of clip art a washout, and move it behind the Confirmation text.
4) Save your changes.
Intermediate Word 2003 Page 47

NOTES
WordArt
OVERVIEW
Microsoft WordArt allows you to turn text into a picture in Word. You can be creative in formatting text into many shapes and styles.
STEPS
1. Click the INSERT WORDART button on the Drawing Toolbar.
2. Select a style. Click OK.
3. Type in the word(s) you want to use. Click OK.
Page 48 Intermediate Word 2003
Did You Know?
If you select a word or phrase that is already typed before clicking the WORD ART button, Word will assume that is the text you want in Word Art. It will allow you to edit this text, and it will not delete the original text from the document.

NOTES4. When you select the WORDART object the toolbar will appear.
Choose the options you want to use (style, size, position, etc.).
Button Name Description
Insert WordArt Makes creative text
Edit Text Edits your text
WordArt Gallery Changes your WordArt style
Format WordArt Changes the format, layout, size, etc. of your text
WordArt Shape Changes the shape of your text
Text Wrapping Adjusts the position of WordArt
Same Letter Heights Makes lowercase and uppercase letters the same height
Vertical Text Rotates text vertically
Alignment Click to justify, left, right, or center text
Character Spacing Adjusts the spacing of the text
5. Click outside the object to return to your document.
6. To edit the text or formatting, double click the object.
7. To resize, click the WordArt, then click and drag on the resizing
handles with the double-sided arrow mouse pointer .
8. To move WordArt, click to select the picture and click the text
wrapping tool Select TIGHT. Click and drag from the middle of the picture when the mouse changes to a four-headed arrow . Release the mouse button at the new location.
Intermediate Word 2003 Page 49

NOTES Lesson Example
To draw attention to your newsletter, Word Art will be used.
STEPS
1. Select the Scheduling Process text at the top of the newsletter.
2. Click the WORDART button in the DRAWING toolbar.
3. Click the style located in the second column, second row. Click OK twice.
4. Click the TEXT WRAPPING tool and select TIGHT.
5. Move the WordArt to the top of the document.
6. Click and drag a RESIZING HANDLE to increase the WordArt size, so it spans the top of the page.
7. Save your changes.
EXERCISE:
1) Change the fill and line color of your Word Art.
2) Change the Word Art shape.
3) On Your Own: Edit the Text to read Registration.
4) Return to the WordArt Gallery to pick a different style.
5) Save your changes.
Page 50 Intermediate Word 2003

NOTES
LESSON 4: CUSTOMIZING WORD
OBJECTIVES: Define default file locations.Create and modify toolbars.
Default File Locations
OVERVIEW
You have the capability in Word to have documents save in a particular drive and folder rather than always going to C:\My Documents.
STEPS
1. Click TOOLS, OPTIONS.
2. Click the FILE LOCATIONS tab.
3. Ensure that the FILE TYPE selected is DOCUMENTS, and click the MODIFY button.
Intermediate Word 2003 Page 51
Did You Know?
Changing the default SAVE AS locations also updates the location for where Word retrieves files when opening them.
Modify
NOTES4. In the MODIFY LOCATION dialog box, click the LOOK IN drop-
down arrow, and click the desired drive.
5. Double-click through the folders and subfolders until you have selected the folder that you would like for your default.
6. To create a new folder, be sure that the drive or folder in which the new folder will be located is displayed in the LOOK IN text box.
Click the NEW FOLDER button , type a name for the new folder, and click OK.
7. Click OK to set the default file location.
8. Click OK again to close the MODIFY LOCATION dialog box.
Page 52 Intermediate Word 2003
Look in:

NOTES Lesson Example
To make it more efficient for you to save in Word, you would like to change the default file location.
STEPS
1. Click TOOLS, OPTIONS.
2. Click the FILE LOCATIONS tab.
3. Ensure that the FILE TYPE selected is DOCUMENTS, and click the MODIFY button.
4. In the MODIFY LOCATION dialog box, click the MY DOCUMENTS icon on the left.
5. Click the NEW FOLDER button and type Word. Click OK.
6. Click OK to set the default.
7. Click OK again to close the MODIFY LOCATION dialog box.
8. Click FILE, SAVE AS, and verify that the default location has changed to the Word folder.
EXERCISE:
1) Change the default file location for Word documents to C:\My Documents\My Folder.
2) Delete the Word folder.
3) On Your Own: Change the default file location back to C:\My Documents.
4) Delete the My Folder folder.
Intermediate Word 2003 Page 53

NOTES
Adding and Removing Toolbars
OVERVIEW
You may show, hide and move toolbars in Word 2003. The most common toolbars are the STANDARD and FORMATTING toolbars. There are many other toolbars that you may turn on as needed.
Toolbars can also take on two forms: floating or docked. Toolbars anchored to the top, bottom, or along the sides of the window are considered “docked”. Toolbars located anywhere else on the screen are called “floating” toolbars. Floating toolbars have a Title Bar that names the toolbar; docked toolbars do not.
STEPS
1. Click VIEW, TOOLBARS. The toolbars that are currently on will have a next to them.
2. To remove a toolbar from the screen, click the name (it will have a in front of it).
3. To add a toolbar to the screen, click the name.
4. To move a toolbar, click and drag the vertical gray line to the left of the toolbar (the pointer will
change to a ).
5. To quickly dock a toolbar, double-click the TITLE BAR or any empty gray area of the toolbar.
6. You can view buttons that do not fit in the allotted space by clicking on the single arrow at the end of any Toolbar.
Page 54 Intermediate Word 2003
Did You Know?
By default, the STANDARD and FORMATTING toolbars show on the same row. You may change this by clicking TOOLS, CUSTOMIZE, OPTIONS, and removing the first checkmark.
Helpful Hint:
Right clicking in the gray toolbar area also allows you to see the toolbar drop-down list. Click on the toolbar name to turn it on or off.

NOTES
Customizing Toolbars
OVERVIEW
Microsoft Word allows you to add and remove buttons from existing toolbars.
STEPS
1. To add a new tool, click VIEW, TOOLBARS, CUSTOMIZE.
2. Click the COMMANDS tab.
3. Click the appropriate CATEGORY and scroll through the COMMANDS to find the tool you want.
4. Click and drag the new button up to the toolbar.
5. To remove a tool, while in CUSTOMIZE, click and drag the tool off the current toolbar.
6. To change a toolbar icon, click on the existing toolbar button that you wish to change.
7. In the CUSTOMIZE dialog box, click MODIFY SELECTION
.
8. Be sure that DEFAULT STYLE is checked (if not, click to select it, and click Modify Selection again).
9. Point to CHANGE BUTTON IMAGE, and click the icon you would like.
Intermediate Word 2003 Page 55
Did You Know?
When two tools have the same name, but one has an ellipses (…), the one with ellipses opens the associated dialog box while the other just performs the default function.
Helpful Hint:
If you click the drop-down arrow at the end of any toolbar and click ADD OR REMOVE BUTTONS you may display or hide toolbar buttons.
Commands
NOTES10. When finished adding and removing buttons, click CLOSE.
11. To reset the original toolbar settings, click VIEW, TOOLBARS, CUSTOMIZE, TOOLBARS.
12. Click the toolbar to reset, click RESET, and click CLOSE.
Page 56 Intermediate Word 2003
Reset
NOTES Lesson Example
You would like to create a custom toolbar with several tools you often use.
STEPS
1. Turn off the Formatting toolbar.
2. Make the Standard toolbar float.
3. Turn on the Tables and Borders toolbar and dock it if necessary.
4. Go to VIEW, TOOLBARS, CUSTOMIZE.
5. Select the COMMANDS tab if necessary.
6. Add the Page Setup tool from the File Category to the Tables and Borders toolbar.
EXERCISE:
1) Remove the Hyperlink button from the Standard toolbar.
2) Reset the Standard toolbar.
3) On Your Own: Make the Tables and Borders toolbar float.
4) Reset the Tables and Borders toolbar and turn it off.
Intermediate Word 2003 Page 57
NOTES
LESSON 5: USING MACROS
OBJECTIVES: Create, edit, and delete macros.
Creating a Macro
OVERVIEW
Macros are a time saving benefit found in Microsoft Office products. They allow you to record a series of actions that are frequently performed. You can then play back those actions with a simple click of the mouse or keystroke.
STEPS
1. Click TOOLS, MACRO, RECORD NEW MACRO.
2. Type a MACRO NAME (without using spaces) in the dialog box.
3. To assign the macro to a toolbar, click TOOLBARS.
Page 58 Intermediate Word 2003
Did You Know?
You can only choose one assignment, TOOLBAR or KEYBOARD, from this initial screen.
Helpful Hint:
Double-clicking REC in the Status bar will initiate a new Macro process.
Macro name:
Toolbar

NOTES
4. Click the macro button in the COMMANDS section and drag it to a toolbar.
5. To change the default name of the macro, right mouse click the marco button on the toolbar.
6. In the NAME box, delete the words Normal.NewMacros., and leave the name that you assigned.
Intermediate Word 2003 Page 59
Helpful Hint:
Avoid simply closing the MACRO RECORDING TOOLBAR. This does not stop the macro from recording and the next time you attempt to create a new macro, the toolbar will not appear.
Commands
Macro button
Name
Change Button Image

NOTES7. Click CHANGE BUTTON IMAGE.
8. Select a new BUTTON IMAGE.
9. Click CLOSE. The macro recorder will be on.
10. Perform the actions you want recorded in the macro. Notice the small
macro toolbar that appears.
11. Click the STOP button to end recording of the macro.
12. To use the macro, click the toolbar button. You may also go to TOOLS, MACRO, MACROS.
13. Select the desired macro from the pop-up menu and press RUN.
14. To delete a macro, click TOOLS, MACRO, MACROS.
15. Click the name of the macro to delete and click the DELETE button.
16. Click YES to confirm the deletion and the CLOSE button to exit the MACROS dialog box.
Page 60 Intermediate Word 2003
Helpful Hint:
You can press ALT + F8 to jump to the MACROS window.
Run
Delete

NOTES17. Remove the macro button from the toolbar by going to VIEW,
TOOLBARS, CUSTOMIZE.
18. Click the macro and drag it off the toolbar. Click the CLOSE button.
Lesson Example
You would like to add a macro that will add a footer with the filename and page number to any document.
STEPS
1. Click TOOLS, MACRO, RECORD NEW MACRO.
2. Type Footer for the MACRO NAME.
3. Assign the macro to the TOOLBAR.
4. On the COMMANDS tab of the CUSTOMIZE window, select the macro and drag it to the Standard toolbar.
5. Right click the macro button and delete Normal.NewMacros. from the NAME, leaving only the name Footer.
6. Click CHANGE BUTTON IMAGE and select an image.
7. Close the CUSTOMIZE window. The macro recorder will appear.
8. Click VIEW, HEADER AND FOOTER.
9. Click the SWITCH BETWEEN HEADER AND FOOTER button in the Header and Footer toolbar to move to the footer.
10. Click the INSERT AUTOTEXT drop-down and choose FILENAME AND PATH.
11. Press the TAB key twice to move to the right of the footer.
12. Type Page, press the SPACEBAR, and click the INSERT PAGE NUMBER button on the Header and Footer toolbar.
13. Click the CLOSE button on the Header and Footer toolbar.
14. Click the STOP button on the Macro toolbar to stop recording the macro.
Intermediate Word 2003 Page 61

NOTES15. Open the Wellness document and save it to C:\My Documents
folder.
16. Press the Footer macro button on the toolbar.
17. Press PRINT PREVIEW to view the macro.
18. Click CLOSE and SAVE the changes.
EXERCISE:
1) Select the title Wellness at Work, and start the process of recording a new macro named Format.
2) Assign the macro to TOOLBARS and drag the button in the Formatting toolbar.
3) Change the button NAME to Format.
4) Select CHANGE BUTTON IMAGE and select an image.
5) CLOSE the CUSTOMIZE window.
6) With the macro recorder running, apply the following:
18-point font size, Italic, Red
7) Stop the macro recorder and SAVE the changes to the Wellness document.
8) Select the heading Your Work Habits and click the FORMAT button.
9) Delete the Format macro by going to TOOLS, MACRO, MACROS.
10) Select Format and press the DELETE key. Click YES at the prompt and CLOSE the MACROS window.
11) On Your Own: Delete the Footer macro.
12) Remove the Footer and the Format buttons from the toolbars.
Page 62 Intermediate Word 2003

NOTES
LESSON 6: GIVE IT A TRY!
OBJECTIVE: Practice the lessons learned in class.
EXERCISE:
Refer to Lesson 1 for assistance
1) In the Wellness document, select the text Your Work Habits and change the font size to 16. Apply bold, dark blue, All Caps, with a thick, red underline.
2) Use the Format Painter to apply this formatting to Your Work Environment, Your Equipment, and Don’t Forget to Stretch.
3) In the same heading, select the text Stretch and apply expanded character spacing of 3 points.
4) Return to the top of the document, and add the text effects of your choice to the title text.
Refer to Lesson 2 for assistance
5) Add 12 points of space before the heading Your Work Habits.
6) Use F4 to repeat this on the following three headings.
7) Go to a blank line at the bottom of the document and apply a left tab stop at 2” and a right tab stop at 5.5”.
8) Type the following using the tab stops:
Morning Stretch 10:15 amAfternoon Stretch 2:30 pm
9) Select the text you just typed and move the left margin to 1½ and the right tab to 4.
10) Apply an artistic page border to the document.
11) Select the entire document and format it into 2 columns.
12) Save your changes.
Intermediate Word 2003 Page 63

NOTESRefer to Lesson 3 for assistance
13) Go to the end of the document and delete the Morning and Afternoon stretches.
14) Apply a 2-line Drop Cap to the first paragraph after Your Work Habits using the font of your choice.
15) Use F4 to repeat the drop cap in the first paragraph after each heading.
16) Add a text box anywhere in the document with the phrase Stay Healthy! in it.
17) Rotate the text to read top to bottom, and format the size, shape, line, and fill as you like.
18) Add the clip art of your choice to the document.
19) Add WordArt in any style to replace the Wellness at Work title.
Refer to Lesson 4 for assistance
20) Turn off the Drawing toolbar.
21) Add the Envelopes and Labels tool from the Tools category to the Standard Toolbar.
22) Make the Formatting toolbar float.
23) Turn on the Drawing toolbar, and dock the Formatting toolbar.
24) Reset the Standard toolbar.
Refer to Lesson 5 for assistance
25) Record a macro named Columns that runs using the TOOLBARS to select an entire document and apply 3-column formatting with no line between columns.
26) Delete the macro and remove it from the toolbar.
Page 64 Intermediate Word 2003

NOTES
LESSON 7: DELETING FILES
OBJECTIVE: Maintain organized file directories.
STEPS
1. Close all open documents.
2. Select OPEN from the FILE MENU.
3. Click once on the name of the file to be deleted. Or, use the CTRL or SHIFT keys to select multiple files.
4. Press the DELETE key on your keyboard. Click YES.
5. Click CANCEL to close the window.
Lesson Example
The Newsletter has gone to the printer and a slight change was made there. You want to delete the original file.
STEPS
1. Close all open documents.
2. Click FILE, OPEN.
3. Click the Newsletter document, and press DELETE on your keyboard. Click YES.
4. Close the window.
EXERCISE:
1) Delete the Wellness document.
2) Close the Open dialog box.
3) Shut down your computer.
Intermediate Word 2003 Page 65

NICE TO KNOW
Selecting Text Using the Mouse
To select Do this
Any amount of text Drag over the text.
A word Double-click the word.
A graphic Click the graphic.
A line of text Move the pointer to the left of the line until it changes to a right-pointing arrow, and then click.
Multiple lines of text Move the pointer to the left of the lines until it changes to a right-pointing arrow, and then drag up or down.
A sentence Hold down CTRL, and then click anywhere in the sentence.
A paragraph Move the pointer to the left of the paragraph until it changes to a right-pointing arrow, and then double-click. Or triple-click anywhere in the paragraph.
Multiple paragraphs Move the pointer to the left of the paragraphs until it changes to a right-pointing arrow, and then double-click and drag up or down.
A large block of text Click at the beginning of the selection, hold down the shift key, scroll to the end of the selection and let go of the shift key.
An entire document Move the pointer to the left of any document text until it changes to a right-pointing arrow, and then triple-click.
Intermediate Word Page 66

Selecting Text Using the Keyboard
Press To extend a selection
SHIFT+RIGHT ARROW One character to the right
SHIFT+LEFT ARROW One character to the left
CTRL+SHIFT+RIGHT ARROW To the end of a word
CTRL+SHIFT+LEFT ARROW To the beginning of a word
SHIFT+END To the end of a line
SHIFT+HOME To the beginning of a line
SHIFT+DOWN ARROW One line down
SHIFT+UP ARROW One line up
CTRL+SHIFT+DOWN ARROW To the end of a paragraph
CTRL+SHIFT+UP ARROW To the beginning of a paragraph
SHIFT+PAGE DOWN One screen down
SHIFT+PAGE UP One screen up
CTRL+SHIFT+HOME To the beginning of a document
CTRL+SHIFT+END To the end of a document
ALT+CTRL+SHIFT+PAGE DOWN To the end of a window
CTRL+A To include the entire document
Intermediate Word Page 67

Keyboard Shortcuts
Press To
CTRL+SHIFT+F Change the font
CTRL+SHIFT+P Change the font size
CTRL+SHIFT+> Increase the font size
CTRL+SHIFT+< Decrease the font size
CTRL+] Increase the font size by 1 point
CTRL+[ Decrease the font size by 1 point
CTRL+D Font Dialog Box
SHIFT+F3 Change the case of letters
CTRL+SHIFT+A Format letters as all capitals
CTRL+B Apply bold formatting
CTRL+U Apply an underline
CTRL+SHIFT+W Underline words but not spaces
CTRL+SHIFT+D Double-underline text
CTRL+I Apply italic formatting
CTRL+SHIFT+K Format letters as small capitals
CTRL+1 Single-space lines
CTRL+2 Double-space lines
CTRL+5 Set 1.5 line spacing
CTRL+E Center a paragraph
CTRL+J Justify a paragraph
CTRL+L Left align a paragraph
CTRL+R Right align a paragraph
Page 68 Intermediate Word

Function Keys
Press To
F1 Get online Help or the Office Assistant
F2 Move text or graphics
F3 Insert an AutoText entry (after Word displays the entry)
F4 Repeat the last action
F5 Choose the GO TO command (EDIT menu)
F6 Go to next pane or frame
F7 Choose the SPELLING command (TOOLS menu)
F8 Extend a selection
F9 Update selected fields
F10 Activate the menu bar
F11 Go to the next field
F12 Choose the SAVE AS command (FILE menu)
Intermediate Word Page 69

SHIFT + Function Keys
Press To
SHIFT+F1 Start context-sensitive Help or reveal formatting
SHIFT+F2 Copy text
SHIFT+F3 Change the case of letters
SHIFT+F4 Repeat a FIND or GO TO action
SHIFT+F5 Move to a previous revision
SHIFT+F6 Go to the previous pane or frame
SHIFT+F7 Choose the THESAURUS command (TOOLS menu, LANGUAGE submenu)
SHIFT+F8 Shrink a selection
SHIFT+F9 Switch between a field code and its result
SHIFT+F10 Display a shortcut menu
SHIFT+F11 Go to the previous field
SHIFT+F12 Choose the SAVE command (FILE menu)
Page 70 Intermediate Word