INTERIOR DESIGN STUDIO - JIMS · BBA.ID-IV-SEM INTERIOR DESIGN STUDIO . ... which can be adjusted...
110
Jagannath Institute of Management Sciences Lajpat Nagar BBA.ID-IV-SEM INTERIOR DESIGN STUDIO
-
Upload
truongminh -
Category
Documents
-
view
213 -
download
0
Transcript of INTERIOR DESIGN STUDIO - JIMS · BBA.ID-IV-SEM INTERIOR DESIGN STUDIO . ... which can be adjusted...

Jagannath Institute of Management Sciences
Lajpat Nagar
BBA.ID-IV-SEM
INTERIOR DESIGN STUDIO

UNIT- I
ROLE OF INTERIOR DESIGNER
LEGAL RESPONSIBILITIES OF INTERIOR DESIGNER An interior designer evaluates and designs interior living and work spaces to make them
functional, appealing and well-suited to an owner's needs. As a designer, you must create
decorative layouts for homes, office complexes, medical facilities, restaurants, stores, places of
worship, airports and hotels. A job may include creating color palettes, selecting appropriate
furniture, and accessorizing the space with fabrics, wall hangings, window treatments, light
fixtures and flooring. An interior designer must communicate effectively with clients to make
sure the design fits the owner's style and purpose.
Meeting with Clients
A major part of an interior designer's responsibilities involves meeting with clients to discuss decorating needs, room layout plans, and the functionality of a room or building. You must have effective communication skills so you can understand what a client wants and successfully design a room to meet his criteria. Some clients already have a thorough understanding of what they want, while others are looking for advice and suggestions to help them create a stylish space. Most of your communication happens during on-site meetings, so both you and the client can visualize the space and discuss patterns, materials, colors, fabrics and furnishings.
Plan the Space
Once you see the living or work space and understand the owner's intentions, you must make a plan for designing and decorating the area. An interior designer is more than an interior decorator; the job requires mapping out the space to determine furniture location and overall room design. Interior designers often use design software to analyze square footage and create efficient layouts. The software also allows you to compare color palettes, add furnishings,and visually evaluate fabrics and patterns before you actually purchase those materials. The results from the software programs are often shared with clients.
Purchase Furnishings
An interior designer purchases furnishings, schedules delivery and coordinates installation. Even though the owner is responsible for the cost associated with the purchases and services, interior designers are responsible for the legwork necessary to get the items ordered. A major responsibility includes taking measurements to make sure appliances, work desks, light fixtures, decorative furnishings, televisions and other accessories fit in the space. If the furnishings don't work in the area, you must return and reorder until the client is happy with the outcome. Some clients want to be a part of every purchase and every decorating decision, while others leave the decision-making up to the designer.
Furnish the Area
Some interior designers do the labor of painting, hanging wallpaper, installing flooring and renovating, while others hire other professionals to do the work. The workload is usually discussed with the client before services are provided, so budgets and expenses can be determined. If you choose to do the work yourself, you're responsible for making sure that the quality meets the client's expectations. Arranging furniture and installing appliances are strenuous tasks, so make sure you have the manpower to put everything in place.
Interior Design Contract Law & Legal Definition
An interior design contract (“Contract”) is a legal document which spells out the terms of a relationship between an interior designer and a client. Professional organizations of interior designers highly recommend that everyone who embarks on an interior design project obtain a contract and review the contract carefully. Many interior designers maintain basic contracts which can be adjusted to fit minor jobs, and a contract can also be customized for a project with the assistance of a lawyer, as might be the case with major projects such as completing the interior design scheme for a hotel or office building. In an interior design contract, a number of stipulations are spelled out. The Contract clearly lays out the scope of the project and the responsibilities of the interior designer, and it establishes deadlines for various stages of the project. Interior design contracts also include a discussion of the fees involved, including an explanation of the estimate for the project, and the types of expenses which may arise while the project is completed.
INTERIOR DESIGNER V/S INTERIOR DECORATOR
An interior designer is usually involved with a building project from the beginning, perhaps even working with the architect. His job is to help create functional interior space by understanding how the inhabitants will use each room. He may consider light, sound and other design aspects but is also well versed in building codes and structural considerations. Because of this, in most states, designers need official training and a license.

• An interior decorator isn't involved with the design of the building or the layout of the interior space. He is focused entirely on the furniture, colors, textiles and textures of a room. His job is to capture the personality and style of the residents and express it in their space. A decorator doesn't need any official training to adopt the title.
The Designer Client Relationship: Learning to Identify, Assess, and Articulate Client Needs
In my first year interior design studio I often find myself spending substantial class
sessions on clarifying students‟ views of what design entails, and the responsibilities that
interior designers undertake with each project. Students often show immense surprise when they
hear about designers‟ responsibilities towards their clients health, safety and well-being. The
oversimplified view of design that students bring to the program may be attributed to the role of
television (Waxman and Clemons, 2007). To offset the inaccurate perceptions fostered by
television programs, it is essential, among other things, to inculcate an awareness of the value of
the field of interior design.
This paper describes the design project developed for this introductory studio as an
attempt to introduce students to an important aspect of professional practice in interior design,
the relationship between designers and their clients. The project exposes students to various
aspects of professional practice involving clients including, seeking clients, interviewing clients,
aligning designer sensibilities with client preferences, communicating with clients, and
presenting themselves as professionals.
The Design Project
The final project undertaken in the Introduction to Interior Design Lecture/Lab class
attempts to expose students to the designer-client relationship as integral to professional
practice in the field of interior design. The project involves the redesign of a living, dining and
kitchen space in their client‟s residence. The project is kept flexible in terms of budget and
structural concerns since the underlying aim is to understand the design process and relationship
with clients.
This section will discuss the steps undertaken in the project over a period of seven weeks
and the corresponding learning outcomes expected at each step. The lab class meets for 2 hours
and 40 minutes once a week after a 50 minute lecture. Students are encouraged to work during
the designated lab time. Step 1: Project Introduction

Students receive handouts listing the goals of the project, requirements, timeline,
and grading criteria. Step 2: Designer Pitches
Each student is given about one minute to pitch their strengths as a designer to the rest of
the class. The instruction they receive for this stage is that they should, in 2-3 sentences, tell their
peers why somebody should hire them as a designer for their project. The instructor comments
on students‟ pitches helping them refine terms, and strengthen the portrayal of their abilities. Students talk about being good listeners, their patience, their preferred design styles, experience in interior design or related fields, their cultural background, and other topics.
The learning outcomes expected from this step include:
1. Identifying and presenting one‟s personal design style
2. Identifying and presenting one‟s strengths as they apply to the practice of interior design
3. Developing communication abilities
4. Recognizing the competition they will encounter when they enter the field Most importantly students are expected to identify the variety of skills that are associated with and required to effectively establish themselves in interior design. Step 3: Designer Selection
Each student in class selects one of their peers to be their designer. Students are
encouraged to select designers based on the pitches and not based on friendships. The learning
outcomes expected from this step include identifying the implications of a variety of strengths to
the design process and the varied needs that clients bring to a project. Step 4: Designer-Client Meeting
Each designer meets their respective clients for 20-30 minutes and are encouraged to give
some thought to the questions they should ask their client to clearly understand the clients‟ needs
and preferences. The instructor interjects meetings to guide designers regarding the questions
they ask. Clients provide their respective designers with a measured drawing of their living,
dining and kitchen space on graph paper. Graph paper is selected as the medium for drawing
because most students in the class have not taken the architectural drafting class. The graph
paper gives students an idea of scale and proportion.
The learning outcomes desired from this step include understanding the right questions to
ask clients, learning to conduct a professional meeting, establishing contact and rapport with
clients, and assimilating information gained from clients‟ answers.
All the above steps are completed in the first week. The following steps are
undertaken over the ensuing six weeks of the semester.

Step 5: Programmatic Requirements
Each designer prepares a list of programmatic requirements based on the information
gained from clients. Students are expected to learn programming criteria and presenting the
same. Step 6: Concept Statement
Designers develop concept statements for their clients‟ projects. They are encouraged to
reflect their clients‟ social and personal lifestyle and aesthetic preferences in the development
of their design concepts. Learning outcomes expected for this step include developing design
concepts that are conducive to the clients‟ needs, preferences, and lifestyle; and communicating
conceptual ideas to clients. Step 7: Develop Schematic Design
The instructor guides students through the space planning and furniture layout of their
clients‟ spaces, especially the living and dining space. Students are asked to design the
transition spaces adjacent to the kitchen but are not required to detail the layout of the kitchen
since this is beyond the scope of a project at this level. Students are expected to learn space
planning, design considerations and translating client needs. They are encouraged to think about
their design decisions and justify the same based on their client‟s needs. Step 8: Client Meeting
A formal meeting is scheduled between the designers and their respective clients during
a class session, usually the 3rd
session of this project. Designers discuss their schematic designs
with their clients and get their responses on the direction being taken. The learning outcome desired at this step is the ability to communicate design ideas to clients. Step 9: Client Meeting Summary
Each designer writes a client meeting summary based on their meeting with the client.
The intention behind including this step in the project is to explain the importance of
documentation to students. Step 10: Design Development
Based on the feedback from clients each student further develops their designs and
proceeds to selection of finishes for the spaces. Designers select flooring, wall finish, ceiling
finish, drapery, furniture, upholstery, artwork, accessories, lighting fixtures, and other salient
elements for their designs. Students are expected to learn the design process and justifications for
selection of a variety of finishes. Step 11: Presentation Drawings
Each designer prepares a set of presentation drawings including floor plan, elevations,
and perspectives. They prepare presentation boards with their drawings, inspiration photographs,
and materials selected for their clients‟ space. Since most students have not taken drafting or
perspective drawing classes prior to this class, the drawings may be sketched or drawn on graph
paper. The instructor presents a brief lecture on the basics of one-point perspectives and students
are encouraged to attempt the same. Students are also encouraged to explore ways of making
their presentations more appealing to clients by including color on their drawings, and organizing
their boards to appeal to the viewer. Students learn to create title blocks, organize boards, present
material samples, and techniques for design communication. Step 12: Dress for Success Lecture
The Department of Family and Consumer Sciences, where interior design is located, also
includes Apparel Design and Merchandizing. An instructor from this area gives a lecture to
students about dressing for professional meetings, interviews and presentations. Students learn
to be conscious of the way they present themselves and are expected to dress professionally for
the next stage of the project, oral presentations to jury and peers. Step 13: Oral Presentations
Each designer presents their design to a panel comprised of an invited interior
designer from the area, the instructor and their client. Students get approximately 5 minutes to
present salient aspects of their design. They get feedback from the panel on their design
decisions and answer questions. The invited designer and instructor refer to the client
regarding the requirements that were presented to the designer.
The learning outcomes desired at this stage include developing communication abilities
and learning to “tell a story” as they present their designs and material selections to the panel and
their peers. Students learn to identify the salient features of their designs, justify design
decisions, and speak before a panel. They are also taught to understand the difference between
critique and criticism, and therefore be confident about their decisions while identifying the
constructive comments from the critique they receive. Step 14: Peer Evaluation
Each student, as the client, is required to write an evaluation for their designers. This
evaluation factors into the instructor‟s evaluation of the designs. The clients are asked to
answer three questions:
1. Does the design cater to the requirements and preferences you presented to
your designer? 2. Did the designer communicate ideas professionally and clearly?
3. Would you hire this designer again or recommend this designer to others?

Through this step students are expected to learn to assess designs and design abilities of
their peers. The evaluations are not shared with designers so that clients may freely express their
opinions regarding their designers.
Summary of Desired Learning Outcomes
As discussed with each step above, certain learning outcomes are desired through this
seven week project. It is essential to consolidate and summarize these learning outcomes. Presenting Oneself
Several students approach me at the beginning of the semester with their fear of speaking
to an audience. I present them opportunities, through various steps of this process, for varied
forms of oral communication. They present their strengths as designers during designer pitches,
communicate with clients one-on-one during various meetings, and finally present their projects
to peers and a jury. Establishing Relationships with Clients
Since this is the first semester of the program, most students are not acquainted with
their classmates. Through this project they learn to establish relationships with clients they may
be meeting for the first time. I encourage them to try and understand their clients‟ personal and
social lifestyle to effectively conceptualize and develop the ideal design to suit their client. Asking the Right Questions
An important aspect of this project is to teach students to format their questions to the
client so they may get the appropriate information for their designs. Often I quiz the designers
about their clients lifestyle, asking questions like, how often does your client shop for groceries,
how often do they entertain and how many guests, do they barbeque in the backyard or sit around
a formal table setting, and what are their regular activities. This helps students to understand the
extent to which clients‟ lifestyles influence design decisions. Translating Information
Students undertake several steps to acquire information and opinions from clients.
Other stages of the project are geared towards teaching students to assimilate and translate the
information they acquire into design decisions. Having identified their client‟s social and
personal lifestyle, students learn to make the ideal design decisions to support the lifestyle. Responsibility
Students take responsibility as a designer and as a client. They are expected to be present
in class on the days of scheduled meetings, and bring the assigned work for discussion that day.
I give the clients the option to fire their designers if the designer is being highly irresponsible. I

encourage students to learn to resolve the issue of irresponsibility from their designers or their
clients. Students identify that interior design is a profession and they are expected to act as
professionals who are not remunerated if they do not produce assigned work in the stipulated
time frame.
Challenges Faced
Although designed at the introductory level, this project is ambitious in the outcomes it
seeks. It also provides several challenges to the students which add to the learning experience
and hopefully prepare them for the remainder of their program and the profession. Varying Aesthetic Sensibilities
Students are often selected by clients who have extremely different preferences and
aesthetic sensibilities than them. As designers they are faced with the challenge of aligning their
design judgment with the clients‟ insistence, desires, and likes. One student once brought a 400
square foot living, dining and kitchen space and asked her designer to create the lobby of the
Bellagio in Las Vegas in that space. Other designers are challenged by color and fabric choices
presented by their clients that do not align with their personal judgment. Posing as a Client
Since the project involves design students posing as clients for their classmates, one of
the challenges in the project is to get students to answer their designers‟ questions as a client
would. Often clients are found giving too much direction to the client and making design
decisions for them. The instructor interjects such meetings and requests the client to hold back
design ideas. Consulting the Client
One of the questions that I encourage the designers to ask themselves is how often they
need to consult their client. Often, I find designers consulting their client after every decision.
The designer will select the sofa for the client and get that approved before they proceed to select
the coffee table for the space. This might be a consequence of the designers and clients being in
the same room. I encourage designers to consolidate a certain amount of work and present a
design scheme to their clients.
Future Research
Informal conversations with students and my evaluation of their projects indicated that
most learning outcomes desired through this project are being met. However, it is essential to
evaluate whether the learning outcomes are being met at each stage through research. As an
extension, it will be interesting to evaluate how students who took this project respond to

projects in their future studios versus those who took a traditionally set up design project with hypothetical clients.
It would also be appropriate to introduce projects based on the same concept at other
levels in the design program. This will allow the program to assess whether the introductory
studio is the most appropriate stage in the program to introduce this aspect of professional
practice in interior design.
One of the challenges students face in the project is acting as clients and not giving too
much design direction to their respective designers. Another challenge is for designers to resist
getting every decision approved by the client since they are all in the same room. It will be
appropriate to attempt a similar project with clients from another studio, preferably a higher level
studio or even from the community. One of the reasons the project uses clients from the class is
to provide certain uniqueness to every project. Finding 24 clients from the community, as 24 is
the class size, may be difficult but the idea needs to be explored and evaluated to assess its
appropriateness.
Conclusion
This paper discussed the design project developed for the lab associated with the
Introduction to Interior Design class. The goal of the project is to help students understand the
relationship between designers and clients in the industry, and develop communication abilities.
Through several steps of the project undertaken over seven weeks, students learn to present
themselves, ask the right questions to assess client needs, translate client needs into design
decisions, and communicate their design ideas.
Code of Conduct & Ethics The European Council of Interior Architects and Designers Code of Conduct was adopted by
the Society of British and International Design in September 2009. The international code is now
shared by nineteen countries in Europe as is translated in 6 languages. For the purpose of this
Code, the interior designer is he or she who is a member of the professional organisation SBID,
and/or his or her firm, associates or employees, or the member who is an employee or
collaborator in an organisation that is professionally involved with interior design or education,
research, training or practice thereof. For the sake of readability the feminine form is omitted in
the following articles.
1. General responsibility 1.1 Compliance to general ethics The interior designer shall act in a
way that contributes to the honor and dignity of the profession. He shall abide by the Codes of
ethics and Conduct and laws in force in the countries and jurisdictions where he provides
professional services. 1.2 Competence The interior designer shall strive to continually improve
his professional knowledge and skill. He shall accept appointments only that are within his
competence of performance. 1.3 Avoiding conflicts of interest The interior designer shall only
assume or accept a position in which his personal interests will not bring him in conflict with
his professional duty.
2. Responsibility to the society The interior designer accepts a professional obligation to
further the social, cultural and environmental standards of the community. He takes into account
the consequences of his professional activity to the health, safety and wellbeing of all those who
may reasonably be expected to use or enjoy the product of his work.
3 Responsibility to the Client 3.1 Commitment and loyalty The interior designer shall act in his Client‘s interests within the limits of his professional duties. 3.2 Scope of work, agreement and
contract The interior designer shall undertake professional work only if the scope of work,
conditions, responsibilities, liabilities and limitations thereof, remuneration (fee) or method of
calculation thereof and the duration of the contract are clearly agreed in writing. 3.3
Remuneration The interior designer shall when undertaking a mission see that the
compensation for the work is relevant to the scope and importance of the performed work, and
he will only accept additional financial profits or any other profits from third parties that are
agreed upon in advance by the Client. 3.4 Transparency The interior designer shall ensure that
his practice has appropriate and effective internal procedures and administration as to enable
him to function efficiently and he will keep the Client informed of the progress of work

undertaken on the Client‘s behalf and of any issues that may affect its quality or cost. Administration with regard to the project will be available for perusal by the Client upon
request. 3.5 Confidentiality The interior designer shall respect at all times the confidence of
those for whom he works and not without prior consent disclose those confidential matters.
4 Responsibility to the profession 4.1 Fellowship The interior designer shall promote an open
and professional debate on all aspects of the profession. He is not to criticize unfairly or attempt
to discredit a colleague or his work in public. 4.2 Loyalty and competition The interior designer
investigates, before accepting a commission, if the same commission has not been granted to a
colleague. If such is the case, the successor enters in consultation with the colleague. The
interior designer, who is commissioned to alter an existing building or interior, enables fraternal
consultation with the original designer, before starting his work. The original designer will not
oppose the commission as such. 4.3 Collaboration and succession The interior designer shall
provide his associates and employees with a suitable working environment, compensate them
fairly, and facilitate their professional development. He will see to it that they will keep up with
these rules of Conduct. 4.4 Originality The interior designer acknowledges the part colleagues
or employees may have had in the design. He shall not accept instructions from his client which
knowingly involve plagiarism, nor shall he consciously act in any manner involving plagiarism.
5 Publicity 5.1 Fairness The interior designer is free to communicate or promote his work and
his expertise and experience. Any advertising or publicity material must contain only truthful
factual statements. It shall be fair to clients and other designers, and in accordance with the
dignity of the profession. 5.2 Originality The interior designer shall only promote professional
works or activities as designed by him and/or his collaborators. He shall not tolerate that his
name is connected with the realization of a design that has been changed in such a way that it
is no longer essentially the original work of the interior architect. 5.3 Competition A member
may only take part in or serve on the jury of competitions when these are held in compliance
with national and international rules as approved by our professional organizations.
6 Compliance and Sanctions All matters concerning non-observance of this Code of Conduct
and Professional Ethics shall be considered by the national organizations Board and/or
Committee of Ethics, who may issue a caution or a disciplinary comment or may bar the
individual from membership. A complaint against an interior designer can be brought forward by
a colleague, a client of the defendant, or by somebody who has another professional
relationship with the defendant.

The By-laws of the Society provide that a member may be reprimanded, suspended, or expelled if the member has breached any of the By-laws or any provisions of the Code of Ethics and Professional Conduct.
The Code of Ethics and Professional Conduct that follows applies to all members involved in the profession of interior design.
A member may be held responsible for the failure of any person associated with the member in the practice of interior design to comply with the Code of Ethics and Professional Conduct.
A member shall not instruct others to carry out on the member’s behalf, either with or without compensation, acts which if carried out by the member would constitute a violation of the Code of Ethics and Professional Conduct.
Applicability A. Integrity, Objectivity, Competence & Disclosure
1. A member shall not make misleading, deceptive, or false statements or claims about his or
her professional qualifications, experience, abilities, or performance.
2. A member shall not permit his or her name to be used in conjunction with a design or project
in which the member was not personally or actively involved.
3. A member shall not give or permit any public endorsement of any building material or service
by means of a statement to which the member’s name is attached or with which the member’s
portrait is displayed.
4. A member shall ensure that any interior design services provided to a client conform with
all applicable laws and regulations.
5. A member shall disclose to his or her client any direct or indirect financial interests which
the member may have in the client’s project.
6. A member shall divulge to his or her client the complete method by which the compensation
the member will receive is determined in connection with a project and the manner by which
this compensation will be paid.
7. A member shall not accept or be party to accepting any financial or other inducement in
addition to remuneration for professional services rendered for a client on a project.
8. A member shall conform to all laws, regulations and By-laws relating to the profession of interior
design and shall not engage in any conduct involving fraud, deceit, misrepresentation, or
dishonesty in professional or business activity.
9. A member shall not claim to represent the Society without express prior authorization to do
so from the Board of Management or an authorized representative of the Society. A member
representing the Society shall be precluded from personal promotion in connection therewith.

10. A member shall clearly identify with his or her name and/or professional seal any work done by
the member for a client. A member of the Society shall not affix his or her professional seal to
a working drawing or specification that has not been prepared by the member or under the
member’s supervision.
11. A member shall not perform any professional interior design services until retained and in
receipt of the client’s instructions.
12. Except for pro bono services, a member shall only provide services in return for fees
that appropriately reclect the services rendered.
13. Pro bono services are those services rendered without fee or reward of any kind, for the public
good, including services for impecunious clients who require the services to avoid hardship.
B. Responsibilities to Clients and Colleagues
1. A member shall not disclose any confidential information obtained in the course of a
professional engagement except with the consent of the client.
2. A member shall not disclose any confidential information that comes to his or her attention in
connection with disciplinary proceedings or otherwise in carrying out his or her official
responsibilities. However, this prohibition shall not restrict the exchange of information within
a duly constituted investigative or disciplinary body.
3. A member shall not discriminate against any business associate, employee, employer, or
applicant because of race, religion, sex, national origin, age, handicap, or sexual orientation.
4. A member shall recognize and respect the professional contributions of employees and business
associates.
5. A member shall not knowingly plagiarize the design or infringe the copyright of another designer.
6. A member shall not deliberately make any statement which injures the reputation, prospects,
or business of another designer.
7. When a designer has entered into a contract with or has been employed by the client, a
member shall not knowingly interfere with the performance of the contract or the rendering of
any services by the designer or the designer’s sub-contractors.
8. When a designer has entered into a contract with or has been employed by a client, a member
shall not knowingly in any way become engaged by or enter into any contract with the client,
unless the member has received notice in writing that the client has terminated the contract
with or has dismissed the designer initially involved.
9. If a member is requested to act as a critic, expert witness or arbitrator in a dispute between any
client and another member, the member shall not become involved personally in commenting on
the situation, but shall advise that the matter be referred to the Board of Governors of the
Society who, if requested, will investigate and pass judgment on the situation, or appoint an
arbitrator or arbitrators to do so.

C. Advertising
1. C-1. A member may display his or her name and illustrations of the member’s work at
the member’s place of business.
2. C-2. A member may erect a sign bearing his or her name and address on work he or she
has under construction.
3. C-3. A member may promote or advertise his or her abilities and that he or she is a member
of the Society provided that:
1. (a) the advertising preserves the public interest by reporting accurate and
factual information which neither exaggerates nor misleads; 2. (b) the advertising does not impair the dignity of the profession; 3. (c) statements do not contain direct or indirect criticisms of other interior designers; 4. (d) fees are neither quoted nor implied; and 5. (e) the member complies with the By-laws of the Society.
Professional and Associate Members of the International Interior Design Association
shall conduct their Interior Design practice in a manner that will encourage the
respect of clients, fellow Interior Designers, the Interior Design industry and the
general public. It is the individual responsibility of every Professional and Associate
Member of IIDA to abide by the Code of Professional Ethics and Conduct, Bylaws,
Policies and Position Statements of the Association.The terms used in this Code
shall be defined in the same manner in which they are defined in the Bylaws,
Policies and Position Statements of the Association.

Unit II- BANK INTERIORS
There are pundits in the financial industry who believe branches are dead. Most financial
marketers, however, acknowledge that branches are not going away anytime soon, and
that teller-based transactions will continue to occur — at least to some extent — for the foreseeable future. If your financial institution is among those sustaining its
investment in branches, then there are some critical questions your senior leadership
team should address:
When you build a branch, is it designed strategically? Or do you simply duplicate what
you‘ve always done?
Why do you use the layout(s) you use? What design decisions were made and why?
If you only need 2-3 tellers 90% of the time, then why do you put in 8+ teller stations?
Do you follow branch trends and study best practices? Or do you just hire some local architect to make something that looks and feels like a bank should?
Reality Check: Financial institutions are lousy retailers. They make many retail mistakes, starting with the basic layout of their branches. Among the many lessons banks and credit unions could learn from retailers is the
maxim, ―Put the milk in the back of the store.‖ The underlying rationale is intuitive:
Drive consumers past everything else you sell as they make their way to the one
thing they need most often.
“Put the milk in the back of the store.” Duh, right?
Despite the fact that this expression is practically a cliché, the vast majority of financial
institutions completely ignore it. They put their tellers (the ―milk,‖ as it were)
everywhere except for where they should — even including right by the front entrance!
This article examines the advantages of applying this basic retail principle and why
financial marketers should locate teller/transaction areas in the back of their branches.
Three different floor plans are presented, each demonstrating common flaws financial
institutions make when designing their branches, followed by two examples where the ―milk is in the back of the store.‖
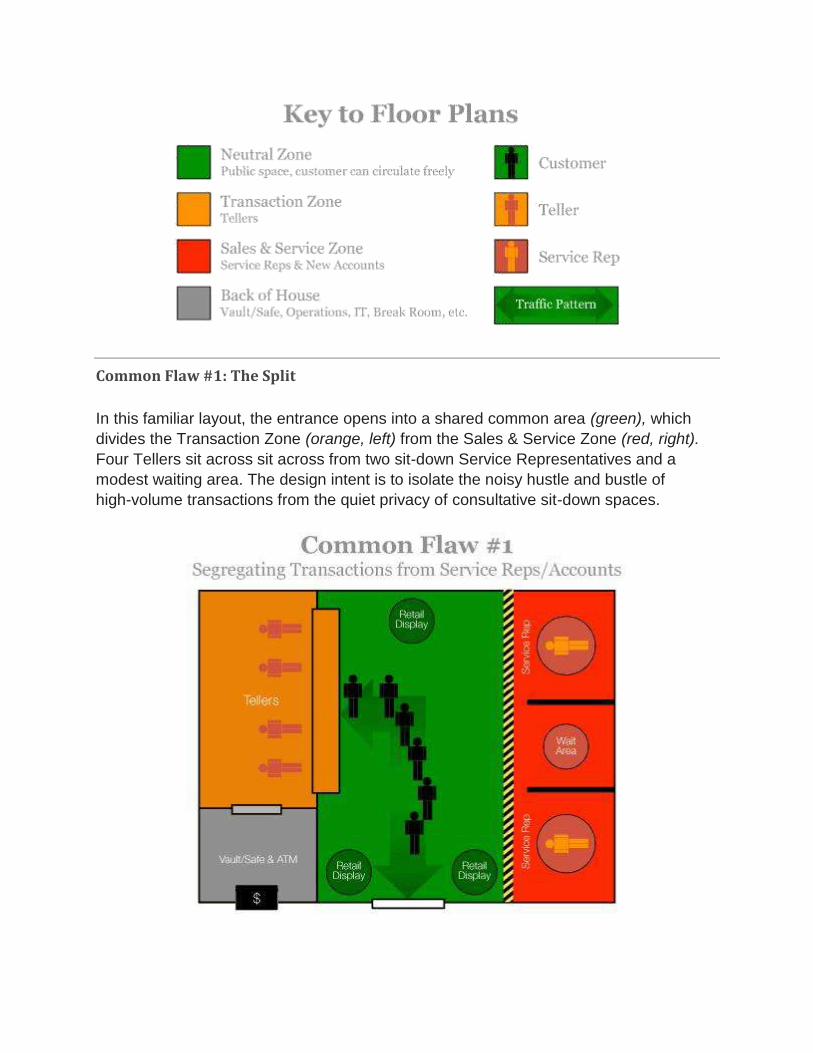
Common Flaw #1: The Split
In this familiar layout, the entrance opens into a shared common area (green), which
divides the Transaction Zone (orange, left) from the Sales & Service Zone (red, right).
Four Tellers sit across sit across from two sit-down Service Representatives and a
modest waiting area. The design intent is to isolate the noisy hustle and bustle of
high-volume transactions from the quiet privacy of consultative sit-down spaces.

Design Flaw: Unfortunately, the reality is that customers perceive an implicit barrier
(indicated by the black-and-yellow strip) between the neutral public area and the Sales &
Service Zone. Customers trust that as long as they stay in the green zone, a Sales Rep won‘t sling sales pitches at them. Customers who need something know to step
inside the red zone. Everyone else knows to stay out, and avert eye contact with
―those people who just want you to open another account.‖
Security Flaw: Bad guys always like to keep an eye on their exit while committing their
crimes. This layout gives robbers excellent field of vision. They can easily scan the teller
area and their escape route in one casual glance.
Merchandising Flaw: Retail Displays are placed near the entrance/exit where people are moving too quickly to pause or notice. This is a high-speed, high-traffic zone, not a ―dwell zone.‖ People aren‘t going to linger here. Anyone who stops to absorb marketing messages would be subject to the ‗butt brush factor.‘
Common Flaw #2: The Straight Shot
In this example, the emphasis is on convenience, enabling customers to get to-and-from the Transaction Zone quickly and without obstruction.

Design Flaw: The ―milk‖ may be in the back of the store…er, branch… but it‘s a
straight shot: customers walk in, conduct their transaction, then leave. The very instant
customers enter the branch, they are focused on the queue, then zeroed-in on the
tellers. On the way out, the only thing that has their attention is the exit. They get tunnel
vision, so they never notice the Service Reps off in the periphery.
Security Flaw: Think about it…if customers can get in-and-out easily, so can robbers.
Merchandising Flaw: Customers may love this kind of branch because it makes
things easy for them. Of course grocers could give shoppers an unobstructed path to
the milk fridge too…but they don‘t.
Again, it‘s not generally very effective to situate marketing near entrances/exits. The
message has to be very short and extremely simple — no creative abstractions or
complex concepts.

AN EXAMPLE OF THE STRAIGHT SHOT FLOOR PLAN
Common Flaw #3: L-Shape
This layout is frequently used by financial institutions who believe it is important to have
8-10 teller stations available for those 1-4 peak days in a month (typically Fridays)
when transaction volume is at its highest. This results in a long row of teller stations
dominating the entire branch.

Design Flaw: Service Reps are tucked around a corner, so there are no opportunities
for engagement. Customers could walk past the Sales & Service Zone a hundred
times without knowing what goes on back there. How would customers know you offer
home loans when they can’t even see you have a mortgage rep?
There may be the capacity to staff six teller stations, but how often will all six be staffed? What will customers think when they see employees at only two stations? They‘ll think
you look sad and abandoned, like airline counters on the graveyard shift. And God
forbid a queue develops while you‘ve only got two staffers manning your massive
teller operation; customers will moan about how woefully understaffed you are.
Security Flaw: The closer you put tellers to an exit, the more likely you are to
get robbed. In this layout, a robber could practically keep one foot out the door
while passing his note.
Merchandising Flaw: With this floor plan layout, don‘t be surprised if customers think
of you as nothing more than a check-cashing store. No matter what you try to tell
customers, the design of your branch says exactly what you‘re about: processing
transactions.
When tellers are near the entrance, you run out of space for retail displays, further limiting cross-selling opportunities.
There is one common problem shared by each of these three flawed branch layouts: Branch visitors must make a conscious decision and a deliberate effort to engage
with Service Representatives. Service Reps are left twiddling their thumbs, passively
waiting for a Customer to voluntarily upgrade themselves to a Prospect by stepping
across the ―barrier‖ and venturing into the Sales & Service Zone.
Situating your teller area in the back of your branches allows you to integrate Service Reps into the experience. ―But just placing tellers at the back of a branch is not
enough,‖ points out Paul Seibert, a principal at EHS Design and one of the world‘s
foremost authorities on branch architecture. ―The experience must be engineered to
properly expose products, services and staff to customers as they move along the path
to the teller area, and then back out towards the door.‖
If people are coming in to conduct costly transactions in your branches, why not make
them say ―hi‖ to your friendly, personal employees and pass by a few of your marketing
messages? It’s only fair, isn’t it? When you move tellers to the back of branches, you

not only create opportunities for positive interactions, you give yourself more space for marketing.
What‘s more are the security benefits you‘ll realize when situating your Transaction Zone in the back of branches. If you want to minimize your risk of robbery, move your
tellers as far from the entrance/exit as possible. Robbers prefer the shortest possible
path between the teller area and their exit, and, preferably, to keep an eye on both
locations at the same time. Putting obstacles and people in front of robbers is good
security. Putting smiles and promotions in front of consumers is good business.
The concept is known as SafeCatch. Developed by the FBI in partnership with EHS
Design, SafeCatch requires customers and potential robbers to follow the same
path, but each have very different psychological experiences. ―Customers feel they
are the center of attention and well-served, while robbers experience vulnerability
and loss of anonymity as they move through the branch,‖ Seibert says. ―When
properly implemented, SafeCatch reduces robberies by as much as 70%.‖
The Open Floor Plan
This layout takes customers looking to conduct transactions on a journey to the back
of the branch. Along the way, customers must navigate a path that passes both
Service Reps and Retail Displays, giving the financial institution more flexibility,
security and cross-selling opportunities.

Design
Advantages: If you equip your sit-down desks with the proper technology, Service
Reps can pick customers out of the queue whenever customers start to line up. For
instance, a Service Rep who might spot someone holding a check can say, ―Sir, if
you‘re just here to make a deposit, I can help you with that.‖ Shifting some of the
transactional workload onto Service Reps during peak hours is a great way to reduce
the number of teller stations you need. But Service Reps can only assist in this
capacity if juxtaposed along the queue. Do it right and you won‘t ever need 6-8 teller
stations again.
EHS Design‘s Seibert endorses this solution. ―Over the past ten years we have seen the
size of teller lines shrink from an average of 6-8 down to three or four,‖ Seibert says. ―Managers and service representatives are getting out of their offices and working the line to help alleviate any crunches in the teller area.‖
Merchandising & Cross-Selling: Savvy retailers don‘t cave to every consumer desire,
yet banks often build their branches to suit customers without giving any consideration
to the organization‘s strategic objectives. What you need to do is carefully craft the
experience. You must engineer where customers go and what they see, because every
time you get them to engage with one of your employees or retail messages — even
briefly — it helps fuel potential cross-selling opportunities.

Security: Acknowledging people with a smile and a friendly greeting isn‘t just a nice
thing to do, it‘s the FBI‘s favorite technique for deterring robberies. Simply saying
―hello‖ to a would-be robber cuts your robbery risk significantly. Robbers hate making
eye contact with employees because they don‘t want to be noticed. When bad guys
realize they have to engage with your peppy, proactive employees on the way to rob
your tellers, they‘ll probably decide to move on down the street and rob your competitor
instead — you know, the branch that isolates staff and offers robbers an easy getaway. EXAMPLE OF AN OPEN FLOOR PLAN W/TELLERS IN THE BACK OF THE BRANCH
Using a U-Shaped Traffic Pattern
A greeter warmly welcomes people as they enter. Customers ―bounce‖ off Service Reps and branded retail displays as they make their way back to the teller area.

Design Advantages: The Greeter, which replaces one of the tellers, is not a new
fulltime position. The existing branch staff are reassigned and rotated into the Greeter
position following a regular schedule. This means no one gets stuck with the same
job all the time.
Most financial institutions improperly deploy Greeters. If a Greeter doesn‘t have the right
training and equipment, they become little more than a smiley, feckless lump. But if you
use Greeters strategically and effectively, they will be able to intercept a significant
number of those customers who don‘t need to travel all the way back to the Transaction
Zone. With some sly design, you can create a Greeter Zone that won‘t look like
someone is missing when the station is unstaffed.
The growing trend of online+mobile has put the number of in-branch transactions on an
irreversible decline, so it‘s smart to cut the size of your teller activities. In the U-shaped
illustration, giving the Greeter and both Service Reps the right tools enables them to
act like three additional tellers during peak hours. This is another reason you no longer
need branches that accommodate an army of tellers.
Merchandising & Cross-Selling: A good Greeter can really help you build positive
customer relationships. If they regularly assist customers with cashless transactions, there
will inevitably be opportunities to teach people about alternative delivery channels.

If the Greeter position is staffed by someone trained as a Service Rep, then they will be
able to assist customers with their needs, or, alternatively, walk a customer over and
introduce them to another Service Rep.
The U-shaped layout provides the greatest potential for retail marketing. Customers
must look at no fewer than four walls before reaching the teller area. Plus there‘s one
more wall behind the tellers when they get there. Every one of these walls represents
a retailing opportunity.
If you want to put a corporate identity display in your branches, there‘s no place better
than on the wall behind the Greeter. Financial institutions frequently waste the space
behind tellers with a large logo and slogan. But the ―teller backwall‖ (as its officially
called) is premium real estate. Why put a logo there when customers already know
where they are? The teller backwall should almost always be used for eye-catching
digital displays that present the financial institution‘s most attractive, most popular
and most profitable products.
Security: There is no single robbery prevention technique more effective than a
dedicated Greeter. Also, the U-shaped layout means robbers can‘t see their exit during
the heist (“Are the cops waiting for me outside?”) and they have a long, circuitous route
out of the branch after they‘ve got the loot. They have to loop all the way around the
greeter backwall during their getaway.
[Please note: These examples are rough illustrations intended to illustrate concepts.
They do not take into consideration factors such as location, size, technologies,
products/services nor the commercial context of a branch — all which significantly
impact design decisions.]


UNIT III- STUDIO APPARTMENT
A studio apartment, also known as a studio flat , efficiency apartment or bachelor
apartment, is a small apartment which combines living room, bedroom, and
kitchenette into a single room.
Design
These kinds of apartments typically consist of one large room which serves as the living, dining, and bedroom. Kitchen facilities may either be located in the central room, or in a small separate room, and the bathroom is usually in its own smaller room.
Cost
Studio, efficiency, and bachelor style apartments all tend to be the smallest apartments with the lowest rents in a given area, usually ranging around 300 to 450 square feet (25–45 square metres) in the United States, but considerably smaller in countries such as Japan, South Korea, and several European capitals.
What Is the Difference Between a Studio & a Single Apartment?
If you're looking at renting an apartment, you may want to know more about the
differences between studio and single apartments. New renters typically gravitate to
these smaller, lower-end kinds of apartments because they have neither the need nor
the funds for a larger residence. The defining difference between studios and singles is
that a single apartment always has a separate bedroom while a studio almost never
does. Additionally, a single apartment is always larger, more functional and more
expensive than a comparable studio apartment.
The Apartment
An apartment is a self-contained, usually private residence. It is almost always in a larger building. These buildings are a common sight in towns and cities where the population is dense. Apartment dwellers, called “tenants,” do not own their portion of the building nor any underlying land, and instead lease the apartment from the real estate developer who actually owns the building.
Studio Apartment
In residential real estate, a ―studio‖ apartment refers to a living space where the sleeping area and living area are combined into one central room. There are no other major rooms, only the occasional alcove. If a studio has a kitchen, it is a part of the

central room, while sometimes separated by a counter. Some studio apartments have no proper kitchen at all, in which case the tenant usually has access to a common kitchen. Many studio apartments have their own private bathroom, which is usually set off in its own small room. Some share a common bathroom with other studios.
Single Apartment
A ―single‖ apartment refers to an apartment that has a single bedroom. It is also known as a ―one-bedroom‖ apartment. Single apartments usually have a full kitchen, either fully apart from the main living room or separated from it by a counter, as well as a dining area, which is typically an extension of the living room. There is almost always a separate full bathroom. Single apartments may have nooks or occasionally a den, but generally there are no major rooms other than the living room, bedroom and kitchen.
Comparison
Studio apartments are the smallest and cheapest type of apartment to rent at a given location. They appeal to people who have no money to rent a larger place, to minimalists, to long-distance commuters and to people who otherwise spend very little time at the apartment. Studios vary widely with respect to size, cost and amenities, but they are at the bottom of the totem pole when it comes to other apartment types. Single apartments are ideally suited for individuals and couples. The separate sleeping area of a single apartment permits tenants greater privacy and control over their living environment. Singles are highly functional and usually offer enough space to live comfortably and host guests.
Difference between studio apartment and one bedroom
A one bedroom apartment most commonly is referred to a single apartment. A basic one bedroom apartment has a bedroom, a kitchen, a living room and a bathroom. Some of the one bedroom apartments are also known to feature a fireplace, a balcony, a yard and two level storage spaces, etc. However, these features vary from apartment to apartment and are extra features.

On the other hand, a studio apartment refers to a single large room that features a kitchen and a bathroom. A studio apartment is basically a self contained unit and houses everything in the single room space except the bathroom. It is a typically a large room, with different areas of the room employed for varied uses. For instance, a corner of the room may be designed as a living area, a corner may be designed as a kitchen, and the space in between may be designed as the living room. In addition, the areas are generally with the use of partial walls or dividers. The distinct difference between one bedroom apartment and a studio apartment is that the one bedroom apartment features separate spaces for the bedroom area, living room area and the kitchen area. However, a studio apartment has a single large multipurpose room which serves as the bedroom, the kitchen and as well as the living room. The only similarity between both of them is that they feature a separate space for the bathroom. Besides this, a one bedroom apartment is different from a studio apartment in every aspect. As a one room apartment tends to be large in size than a studio apartment, it wears a higher price tag or rent rate in comparison to the studio apartment. In addition, the utility bills of a studio apartment are much lower than a one bedroom apartment.

What Does "Studio Apartment" Mean?
Definition
A studio apartment consists of a single room plus a bathroom. The single room of the apartment must function as the kitchen, living room and bedroom. The kitchen area or "kitchenette" may be divided from the main living area, or simply be a counter and cabinets along one wall. A studio must be arranged for sleeping, eating and dining areas. The bathroom will be the only separate room in a studio apartment.
Considerations
Studio apartments can be a choice for singles, students, retired individuals and those who spend a lot of time away from home, but need someplace to sleep once in a while. Studio apartments are usually low-cost and have low utilities. In a city, studios can often be found near universities and public transportation. Studios appeal to someone who wants to live inexpensively and simply.
No Matches Found. Please try your search again.
Size
The Dimensions Guide website states that studio apartments in the U.S. are typically 500 to 600 square feet in size. They can be as small as 300 square feet. There are also luxury studio apartments ranging up to thousands of square feet. Luxury studio apartments meet the definition by having a single large room, but are more often referred to as loft apartments.
Function
A studio apartment needs to be well organized to make living in one comfortable. Furniture like a futon sofa that serves multiple purposes helps use the room efficiently. A dining table that folds to a small space also works well in a studio. Cleaning a studio apartment is fast, if the apartment is not too cluttered.
Alternative
Those who feel a single-room studio apartment is a little too small may be able to find a one-bedroom apartment at a similar price. Anyone looking for a low-cost apartment to rent should consider both studio and one-bedroom apartments. In a building where larger apartments or floors were subdivided into smaller apartments, the line between studio and one-bedroom apartments may be blurred.

Stuck in a One-Room Studio? Make it Fresh! Do you live in a studio or efficiency apartment and need ideas on how to make it feel more cohesive, yet functional? With so little space and often overlapping public and private areas, studio apartments are some of the most challenging spaces to design! I‟ve collected some smart solutions for making the most of a small space that I thought I‟d share with you.
Multipurpose furniture is key: Look for furniture that will be useful in more than one way. A bed with room for storage underneath is a simple start. Small ottomans are also nice because they can be used as a footrest or extra seating for when you have guests over. Ottomans can also be „storage cubes‟ that open up – good for storing blankets or books. Murphy beds, which are beds that can be folded against the wall during the day, free up floor space in seconds! And, today‟s Murphy beds have so many options you can truly have an office, a bed and armoire all in one unit!
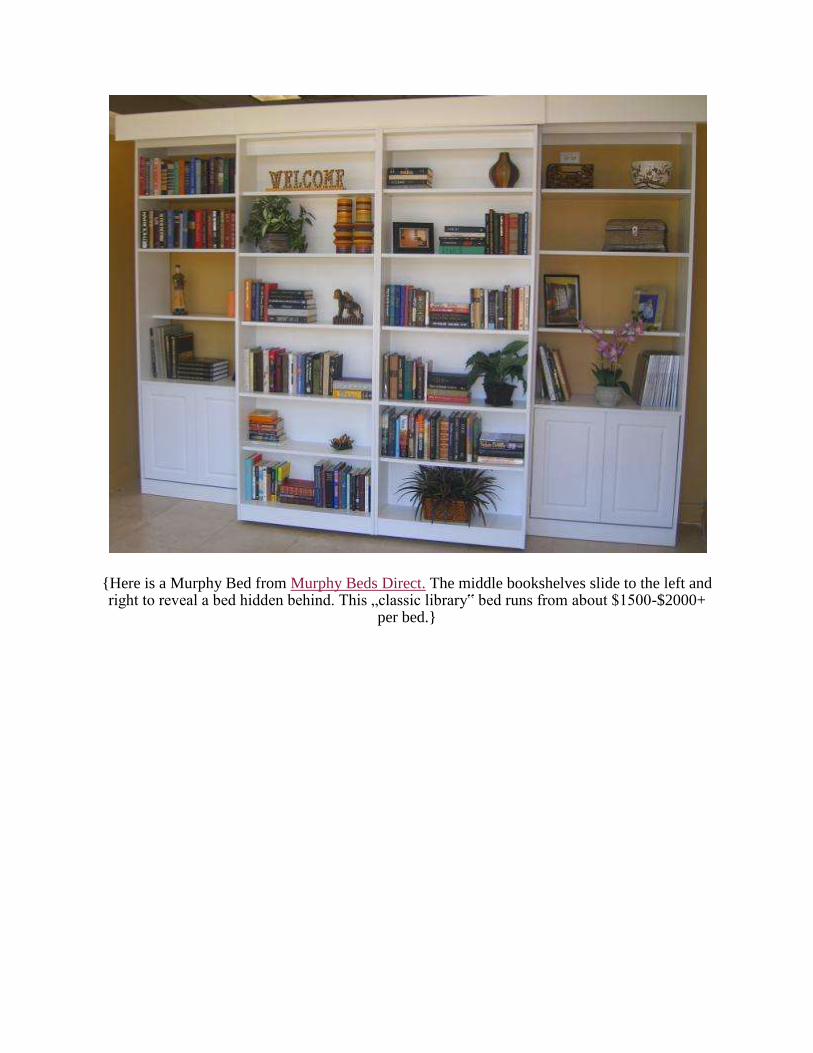
{Here is a Murphy Bed from Murphy Beds Direct. The middle bookshelves slide to the left and right to reveal a bed hidden behind. This „classic library‟ bed runs from about $1500-$2000+
per bed.}

{Here is another example of a Murphy bed that is very simple. You can see what they look like
when unfolded.}
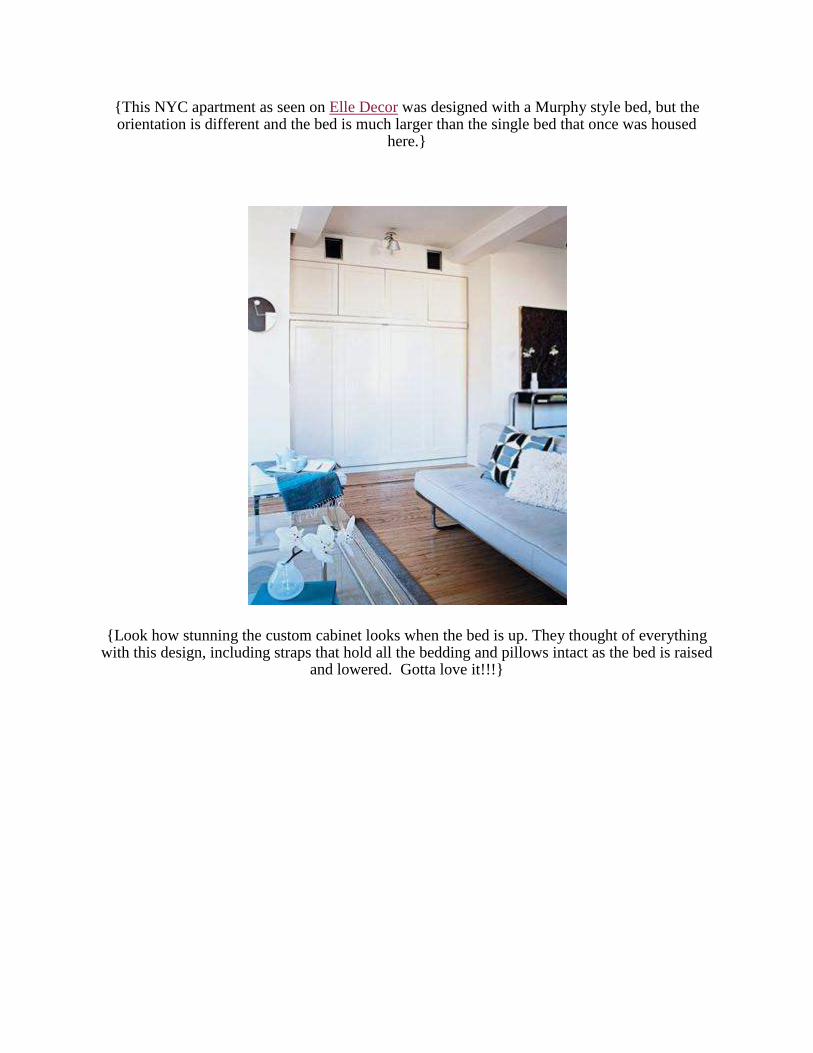
{This NYC apartment as seen on Elle Decor was designed with a Murphy style bed, but the orientation is different and the bed is much larger than the single bed that once was housed
here.}
{Look how stunning the custom cabinet looks when the bed is up. They thought of everything with this design, including straps that hold all the bedding and pillows intact as the bed is raised
and lowered. Gotta love it!!!}

{Working with the shape of the room, this owner added a couch at the end of their bed, which serves two functions – it provides seating and a place to put your shoes on in the morning}
Room dividers add privacy: If your studio, like most, is an open room, consider adding
a room divider such as a shoji screen or bookcase to create a feeling of separation in the space without totally closing one area off.

{The headboard in this studio apartment acts like a screen that divides the sleeping space from the rest of the room.}

{This is a really clever idea as seen on Apartment Therapy‟s website – adding a partial wall! It clearly separates public/private areas but does not close either space off entirely.}
Add storage when necessary: In a small apartment, storage is critical! If there is a
lack of storage, one solution would be to add a closet. Find an area or corner where there is space for cabinets or shelving and get to work.
{A strategically designed and organized closet may create more storage than you think. Here is an example from The Closet Factory.}

Stick with simple and cohesive color scheme: For small spaces, it is important to stick
with a simple color scheme so that the space feels pulled together.


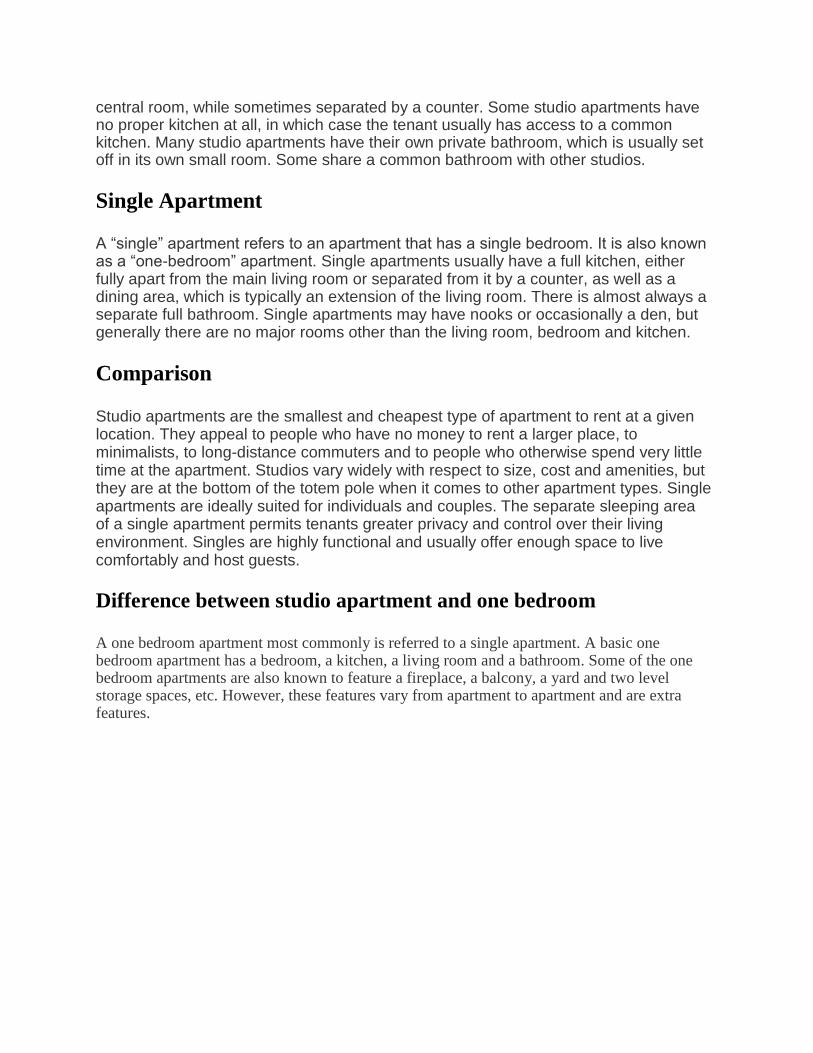
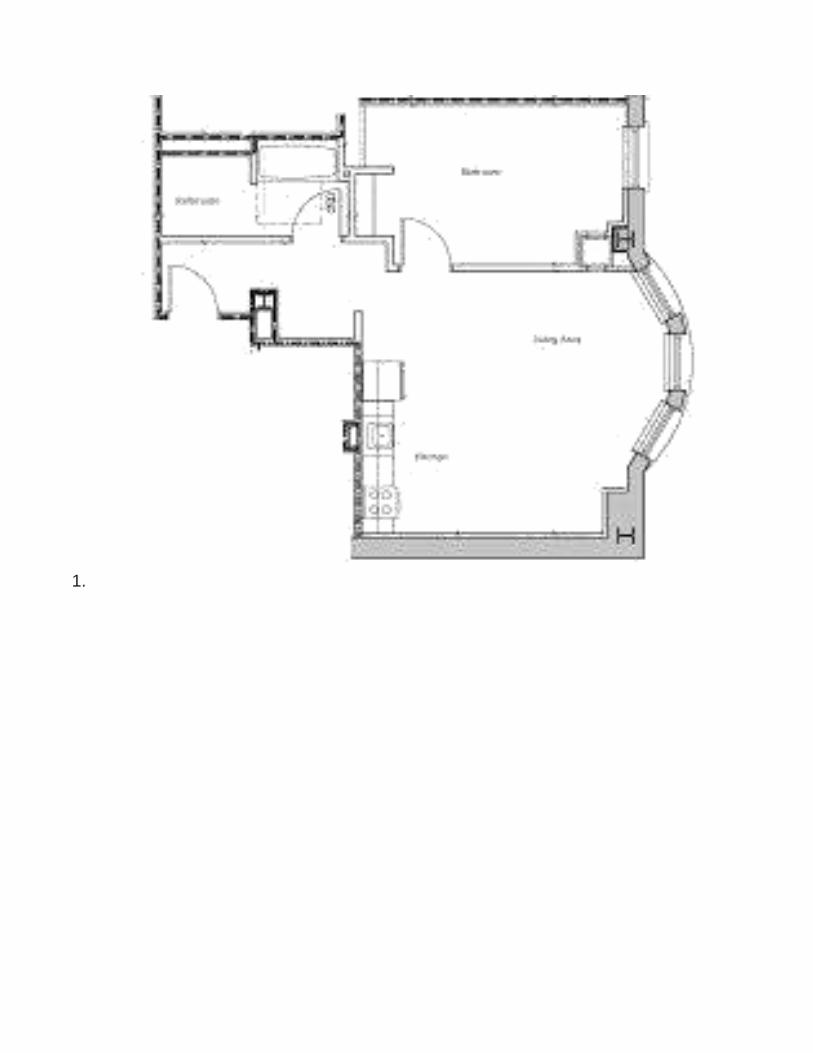
1.

One Bedroom One Bath 820 Sq. Ft. Living Area*
One Bedroom, One Bath 751 Sq. Ft. Living Area*
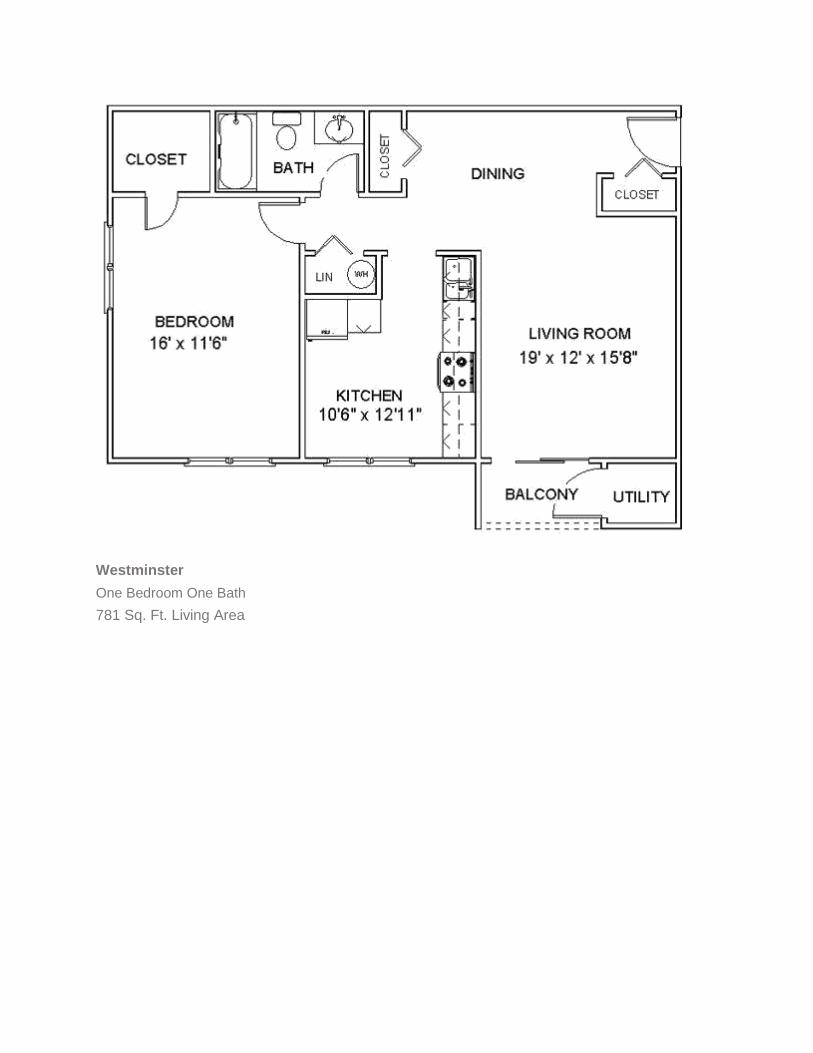
Westminster One Bedroom One Bath 781 Sq. Ft. Living Area
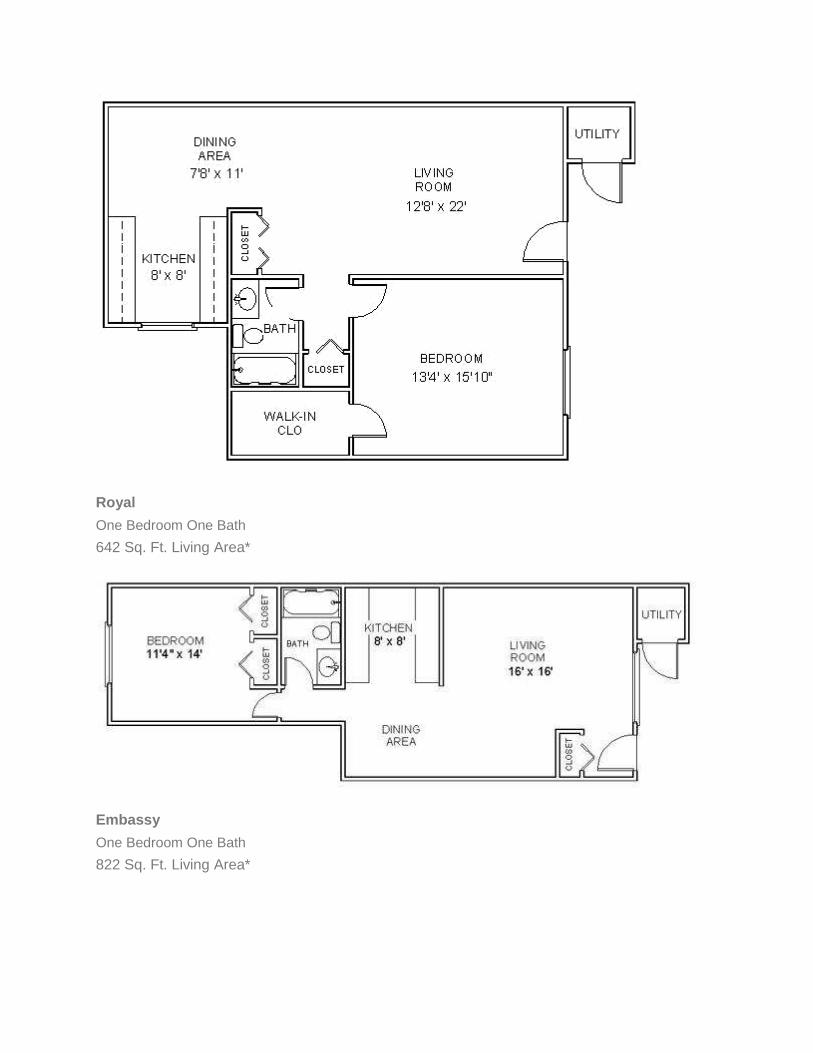
Royal One Bedroom One Bath 642 Sq. Ft. Living Area* Embassy One Bedroom One Bath 822 Sq. Ft. Living Area*

*All square footage is approximate and may vary. Does not include balcony or utility room.


LEVEL1

LEVEL 2

UNIT III- STUDIO APPARTMENT
A studio apartment, also known as a studio flat , efficiency apartment or bachelor
apartment, is a small apartment which combines living room, bedroom, and
kitchenette into a single room.
Design
These kinds of apartments typically consist of one large room which serves as the living, dining, and bedroom. Kitchen facilities may either be located in the central room, or in a small separate room, and the bathroom is usually in its own smaller room.
Cost
Studio, efficiency, and bachelor style apartments all tend to be the smallest apartments with the lowest rents in a given area, usually ranging around 300 to 450 square feet (25–45 square metres) in the United States, but considerably smaller in countries such as Japan, South Korea, and several European capitals.
What Is the Difference Between a Studio & a Single Apartment?
If you're looking at renting an apartment, you may want to know more about the
differences between studio and single apartments. New renters typically gravitate to
these smaller, lower-end kinds of apartments because they have neither the need nor
the funds for a larger residence. The defining difference between studios and singles is
that a single apartment always has a separate bedroom while a studio almost never
does. Additionally, a single apartment is always larger, more functional and more
expensive than a comparable studio apartment.
The Apartment
An apartment is a self-contained, usually private residence. It is almost always in a larger building. These buildings are a common sight in towns and cities where the population is dense. Apartment dwellers, called “tenants,” do not own their portion of the building nor any underlying land, and instead lease the apartment from the real estate developer who actually owns the building.
Studio Apartment
In residential real estate, a “studio” apartment refers to a living space where the sleeping area and living area are combined into one central room. There are no other major

rooms, only the occasional alcove. If a studio has a kitchen, it is a part of the
central room, while sometimes separated by a counter. Some studio apartments have no proper kitchen at all, in which case the tenant usually has access to a common kitchen. Many studio apartments have their own private bathroom, which is usually set off in its own small room. Some share a common bathroom with other studios.
Single Apartment
A “single” apartment refers to an apartment that has a single bedroom. It is also known as a “one-bedroom” apartment. Single apartments usually have a full kitchen, either fully apart from the main living room or separated from it by a counter, as well as a dining area, which is typically an extension of the living room. There is almost always a separate full bathroom. Single apartments may have nooks or occasionally a den, but generally there are no major rooms other than the living room, bedroom and kitchen.
Comparison
Studio apartments are the smallest and cheapest type of apartment to rent at a given location. They appeal to people who have no money to rent a larger place, to minimalists, to long-distance commuters and to people who otherwise spend very little time at the apartment. Studios vary widely with respect to size, cost and amenities, but they are at the bottom of the totem pole when it comes to other apartment types. Single apartments are ideally suited for individuals and couples. The separate sleeping area of a single apartment permits tenants greater privacy and control over their living environment. Singles are highly functional and usually offer enough space to live comfortably and host guests.
Difference between studio apartment and one bedroom
A one bedroom apartment most commonly is referred to a single apartment. A basic one bedroom apartment has a bedroom, a kitchen, a living room and a bathroom. Some of the one bedroom apartments are also known to feature a fireplace, a balcony, a yard and two level storage spaces, etc. However, these features vary from apartment to apartment and are extra features.

On the other hand, a studio apartment refers to a single large room that features a kitchen and a bathroom. A studio apartment is basically a self contained unit and houses everything in the single room space except the bathroom. It is a typically a large room, with different areas of the room employed for varied uses. For instance, a corner of the room may be designed as a living area, a corner may be designed as a kitchen, and the space in between may be designed as the living room. In addition, the areas are generally with the use of partial walls or dividers. The distinct difference between one bedroom apartment and a studio apartment is that the one bedroom apartment features separate spaces for the bedroom area, living room area and the kitchen area. However, a studio apartment has a single large multipurpose room which serves as the bedroom, the kitchen and as well as the living room. The only similarity between both of them is that they feature a separate space for the bathroom. Besides this, a one bedroom apartment is different from a studio apartment in every aspect. As a one room apartment tends to be large in size than a studio apartment, it wears a higher price tag or rent rate in comparison to the studio apartment. In addition, the utility bills of a studio apartment are much lower than a one bedroom apartment.

What Does "Studio Apartment" Mean?
Definition
A studio apartment consists of a single room plus a bathroom. The single room of the apartment must function as the kitchen, living room and bedroom. The kitchen area or "kitchenette" may be divided from the main living area, or simply be a counter and cabinets along one wall. A studio must be arranged for sleeping, eating and dining areas. The bathroom will be the only separate room in a studio apartment.
Considerations
Studio apartments can be a choice for singles, students, retired individuals and those who spend a lot of time away from home, but need someplace to sleep once in a while. Studio apartments are usually low-cost and have low utilities. In a city, studios can often be found near universities and public transportation. Studios appeal to someone who wants to live inexpensively and simply.
No Matches Found. Please try your search again.
Size
The Dimensions Guide website states that studio apartments in the U.S. are typically 500 to 600 square feet in size. They can be as small as 300 square feet. There are also luxury studio apartments ranging up to thousands of square feet. Luxury studio apartments meet the definition by having a single large room, but are more often referred to as loft apartments.
Function
A studio apartment needs to be well organized to make living in one comfortable. Furniture like a futon sofa that serves multiple purposes helps use the room efficiently. A dining table that folds to a small space also works well in a studio. Cleaning a studio apartment is fast, if the apartment is not too cluttered.
Alternative
Those who feel a single-room studio apartment is a little too small may be able to find a one-bedroom apartment at a similar price. Anyone looking for a low-cost apartment to rent should consider both studio and one-bedroom apartments. In a building where larger apartments or floors were subdivided into smaller apartments, the line between studio and one-bedroom apartments may be blurred.

Stuck in a One-Room Studio? Make it Fresh! Do you live in a studio or efficiency apartment and need ideas on how to make it feel more cohesive, yet functional? With so little space and often overlapping public and private areas, studio apartments are some of the most challenging spaces to design! I‘ve collected some smart solutions for making the most of a small space that I thought I‘d share with you.
Multipurpose furniture is key: Look for furniture that will be useful in more than one way. A bed with room for storage underneath is a simple start. Small ottomans are also nice because they can be used as a footrest or extra seating for when you have guests over. Ottomans can also be ‗storage cubes‘ that open up – good for storing blankets or books. Murphy beds, which are beds that can be folded against the wall during the day, free up floor space in seconds! And, today‘s Murphy beds have so many options you can truly have an office, a bed and armoire all in one unit!

{Here is a Murphy Bed from Murphy Beds Direct. The middle bookshelves slide to the left and right to reveal a bed hidden behind. This ‗classic library‘ bed runs from about $1500-$2000+
per bed.}

{Here is another example of a Murphy bed that is very simple. You can see what they look like
when unfolded.}

{This NYC apartment as seen on Elle Decor was designed with a Murphy style bed, but the orientation is different and the bed is much larger than the single bed that once was housed
here.}
{Look how stunning the custom cabinet looks when the bed is up. They thought of everything with this design, including straps that hold all the bedding and pillows intact as the bed is raised
and lowered. Gotta love it!!!}

{Working with the shape of the room, this owner added a couch at the end of their bed, which serves two functions – it provides seating and a place to put your shoes on in the morning}
Room dividers add privacy: If your studio, like most, is an open room, consider adding
a room divider such as a shoji screen or bookcase to create a feeling of separation in the space without totally closing one area off.

{The headboard in this studio apartment acts like a screen that divides the sleeping space from the rest of the room.}

{This is a really clever idea as seen on Apartment Therapy‘s website – adding a partial wall! It clearly separates public/private areas but does not close either space off entirely.}
Add storage when necessary: In a small apartment, storage is critical! If there is a
lack of storage, one solution would be to add a closet. Find an area or corner where there is space for cabinets or shelving and get to work.
{A strategically designed and organized closet may create more storage than you think. Here is an example from The Closet Factory.}

Stick with simple and cohesive color scheme: For small spaces, it is important to stick
with a simple color scheme so that the space feels pulled together.

1.

One Bedroom One Bath 820 Sq. Ft. Living Area*
One Bedroom, One Bath 751 Sq. Ft. Living Area*

Westminster One Bedroom One Bath 781 Sq. Ft. Living Area

Royal One Bedroom One Bath 642 Sq. Ft. Living Area* Embassy One Bedroom One Bath 822 Sq. Ft. Living Area*
*All square footage is approximate and may vary. Does not include balcony or utility room.


LEVEL1

LEVEL 2
CASE STUDY

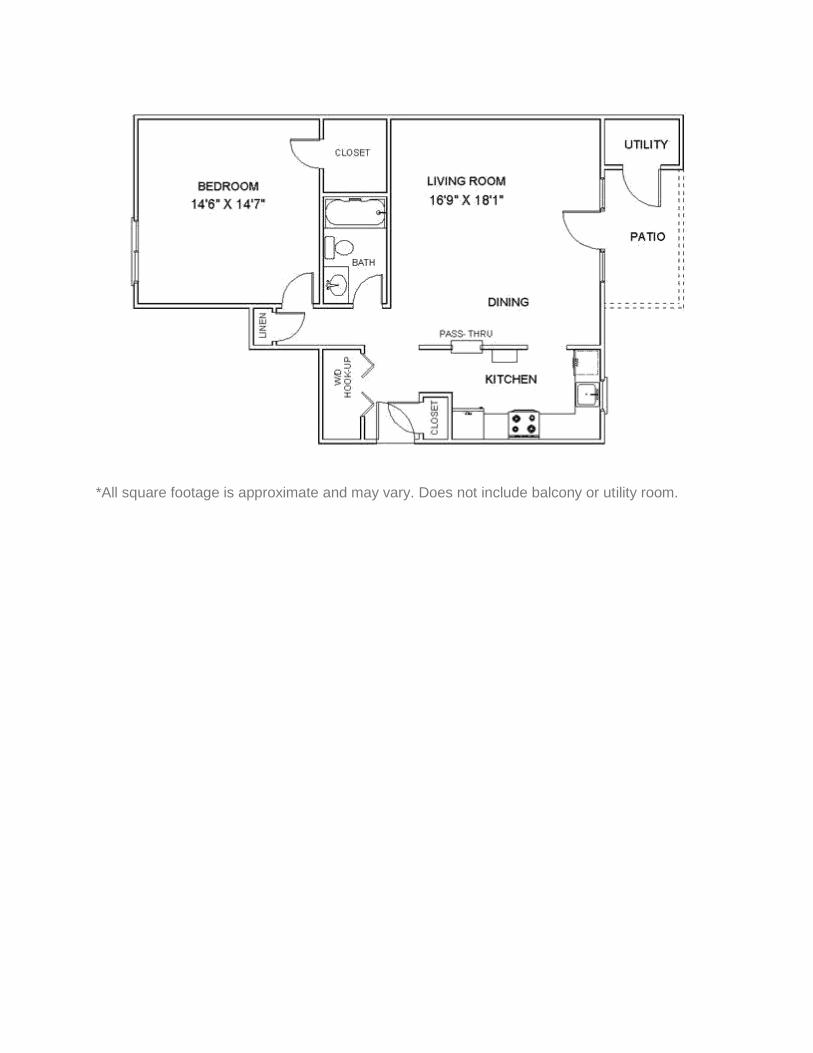
URBAN LOFT FOR A YOUNG COUPLE: Floor Plan - The approximate square footage is 928
sq ft. The apartment design was designed for a young couple in an urban setting. The
requirements included meeting plumbing wall requirements, detail plans of the master bedroom
layout according to ADA codes, and interview the young couple regarding their needs and
preferences. The concept of the apartment's design was a Godiva chocolate bar. The space is
chunky, sleek, geometric, and dark.

COCO CHANEL TWO STORY APARTMENT: FIrst Floor Apartment - The approximate square
footage of each floor of the two story apartment is 980.5 sq ft. The space is a two story rooftop
apartment on the top of a 12 story building located in Manhattan, NY. The design is for the icon
fashion designer Coco Chanel. The space will be used for business guests and entertaining
purposes. Incorporated in the design is inspiration from Coco Chanel's elegant black fabrics,
pearls and scarlet red lipstick that made her into the fashion icon she has become.

COCO CHANEL TWO STORY APARTMENT: Second Floor Plan - The approximate square
footage of each floor of the two story apartment is 980.5 sq ft. The space is a two story rooftop
apartment on the top of a 12 story building located in Manhattan, NY. The design is for the icon
fashion designer Coco Chanel. The space will be used for business guests and entertaining
purposes. Incorporated in the design is inspiration from Coco Chanel's elegant black fabrics,
pearls and scarlet red lipstick that made her into the fashion icon she has become.

COCO CHANEL TWO STORY APARTMENT: Facade and Model Photos - The approximate
square footage of each floor of the two story apartment is 980.5 sq ft. The space is a two story
rooftop apartment on the top of a 12 story building located in Manhattan, NY. The design is for
the icon fashion designer Coco Chanel. The space will be used for business guests and
entertaining purposes. Incorporated in the design is inspiration from Coco Chanel's elegant
black fabrics, pearls and scarlet red lipstick that made her into the fashion icon she has become.

COCO CHANEL TWO STORY APARTMENT: Kitchen and Dining Perpspectives and
Specifications - The approximate square footage of each floor of the two story apartment is
980.5 sq ft. The space is a two story rooftop apartment on the top of a 12 story building
located in Manhattan, NY. The design is for the icon fashion designer Coco Chanel. The space
will be used for business guests and entertaining purposes. Incorporated in the design is
inspiration from Coco Chanel's elegant black fabrics, pearls and scarlet red lipstick that made
her into the fashion icon she has become.

COCO CHANEL TWO STORY APARTMENT: Master Bedroom Perspective and Specifications
- The approximate square footage of each floor of the two story apartment is 980.5 sq ft. The
space is a two story rooftop apartment on the top of a 12 story building located in Manhattan,
NY. The design is for the icon fashion designer Coco Chanel. The space will be used for
business guests and entertaining purposes. Incorporated in the design is inspiration from Coco
Chanel's elegant black fabrics, pearls and scarlet red lipstick that made her into the fashion icon
she has become.

UNIT IV- COMMERCIAL SPACE- RESTAURANT
RESTAURANT PLAINING Opening a new restaurant is a challenging endeavor for would-be restaurateurs. Plus, the process of selecting the right seating layout is equally important and challenging because there's literally an endless combination of possible seating layouts. Regardless of how your venue may be set up, you could use our free restaurant seating guidelines to help you decide how to set-up your restaurant's seating capacity. Moreover, if you're short on time, please call our seating experts. We would be happy to help you plan your layout, and select the right restaurant chairs & tables.
Chair & Table Spacing Tips & Suggestions
14 sq. ft per person for spacious dining (allows for table, chair, and aisle)
12 sq. ft per person for caferteria or restaurant style seating
10 sq. ft per person for banquet, institutional, or close seating
Allow 18 inches for person seated from edge of table to back of chair
Diagonal seating saves floor space
Duece tables and wall spacing saves the most space
Min. 42 " between squared tables for chairs back to back leaves 6 " to push out.
Min. 60 " between squared tables for chairs back to back leaves 26 " service out
Min. 54" between round tables service space. Main traffic aisles need to be larger
24 " between corners of diagonal tables for customer access - no aisle
30 " between corners of diagonal tables for customer access - narrow aisle
Where space is limited, booths require only 8 sq. ft. per person including aisle allowance

Required Table to Chair ratios Dimensions for compfortable seating may need to be adjusted when considering special seating options such as arm rests, over-size seating, etc.
Square Tables
Table Size Number of Seats
24 X 24 2
30 X 30 2-4
36 X 36 4
42 X 42 8
Rectangular Tables
Table Size Number of Seats
24 X 30 2
24 X 42 4
24 X 48 4
30 X 42 4
30 X 48 4
Round Tables
Table Size Number of Seats
24 1-4
30 2-4
36 3-4
42 4-5
48 5-6
54 6-7
60 6-8

Determining Adequate Table Size The industry standard for adequate table room is 300 square inches per diner. For example, for fast food and standard cafe dining, an average table dimension might be 30" X 42", or 1260 square inches. Divide that number by the previously mentioned 300 square inches per diner, and you theoretically have sufficient table space for four persons.
However, there are other factors involved in determining this figure, such as the menu and dining style. Some menus require more square inches to accomodate more utensils, plates, and service. Another example would be in the case of cafeteria trays being used. A family-style dining experience, or ethnic dining such as Mexican or Asian, require room for more plates. Table size is a critical factor in determining the likelyhood your customers will have a pleasant and comfortable dining experience. Tables that are too small will drive customers away with terrible reviews of your establishment.
As a restaurant owner or manager, your desire is to be able to have seating and table space which accomodates the most people, without having a crowded room. Also, a well-designed combination of sizes of tables can decrease wait time for diners. Traffic flow is also a critical consideration, since congestion in high-traffic areas will increase noise, accidents, and slow down your overall turn-over. Below, we have designed a few examples of seating layouts as a starting block for your design process.


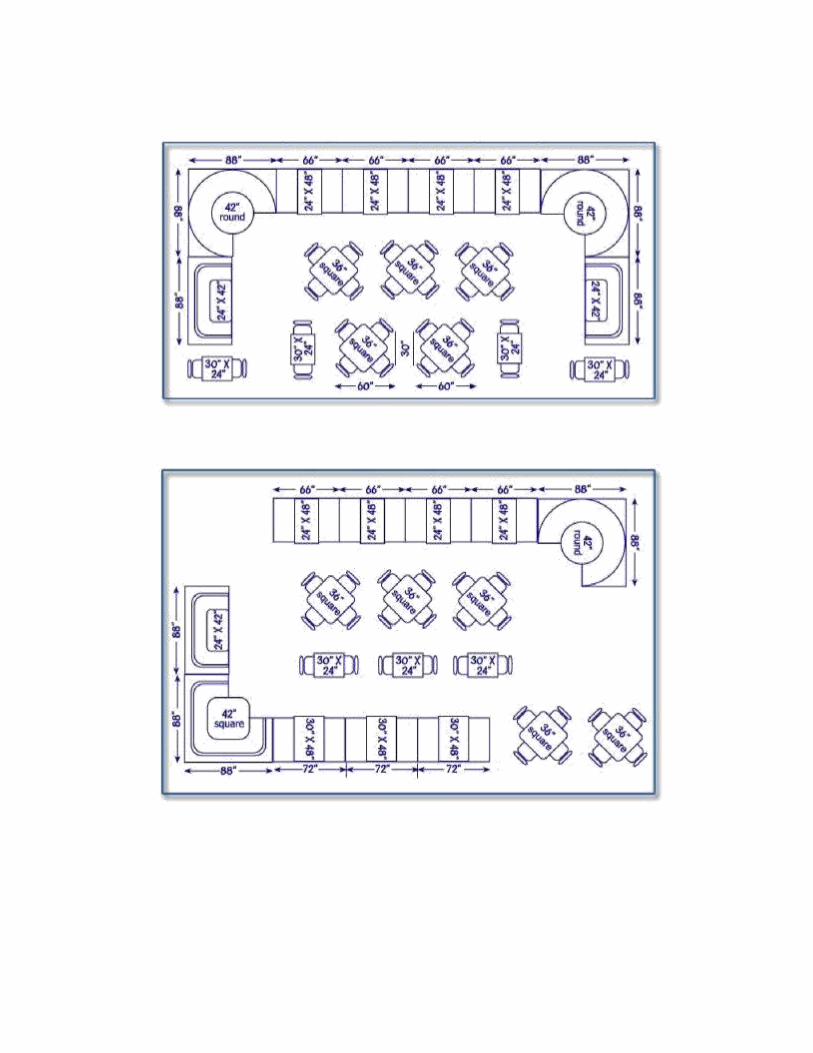

Restaurant Design
The type of furniture you purchase for your restaurant sets the tone and
the mood in the dining room. A nice restaurant serving dinner will do well
with warm tone wooden tables and chairs. If chairs have no cushions,
make sure they are contoured for optimal comfort.
Some diners prefer booths regardless of the level of formality of the
meal. Have a booth section even if it is small.
Think about the color scheme you want in your restaurant and use the
same color scheme or set of matching colors for everything. For example,
the wallpaper or paints, the tablecloths, the napkins, the seat cushions,
the booths, the waiter clothing all must harmonize.
Restaurant Efficiency
Packing tables too close together results in bad service. When waitresses
and bussers cannot reach a water glass, they are in the position of either
leaving the glass empty, reaching across the table, or asking the guest to
hand them the glass. To offer the best service, you must leave enough
room between tables so that employees can walk around each table
when the restaurant is full.
In general, assume 15 square feet of space per diner in the restaurant.
Banquet dining may require less, as little as 10 square feet per person. For
best service, 20 square feet per person is good but in order to make a profit
you may need to figure 18 or 15 square feet per person. Calculate the
square footage in the dining room of the restaurant, then figure how many
people you can fit if you allow, for example, 18 square feet per diner.
Most tables in the restaurant should fit four people comfortably. It is acceptable to have some small tables for deuces, and necessary to have or

be able to put together tables to accommodate large parties.
When purchasing furniture for the restaurant, budget in more than you
need. It is good to have extra chairs and tables in case of damage or if
you need extra on a given night for a large group of customers.
Another aspect of restaurant design and efficiency to keep in mind is how
many times do you expect to turn the table? This will have a bearing on
how many people you can feed and how much money you can make.
On a dinner shift that lasts from 5 p.m. to 9 p.m., deuces will likely take 2
hours for a two or three course meal. Larger parties are more likely to take
longer, as will people celebrating anniversaries, birthday, and holidays.
These calculations are vital to being prepared to serve people, not run out
of supplies, and not have supplies spoil because they never got sold.
Remember that people who come to dine are there to have a nice time, as
well. In general, they must be allowed to sit for as long as they like. Do not
make the mistake of being overzealous and pushing people out the door
with rushed service. Rushed service is bad service, and will result in diners
not returning.
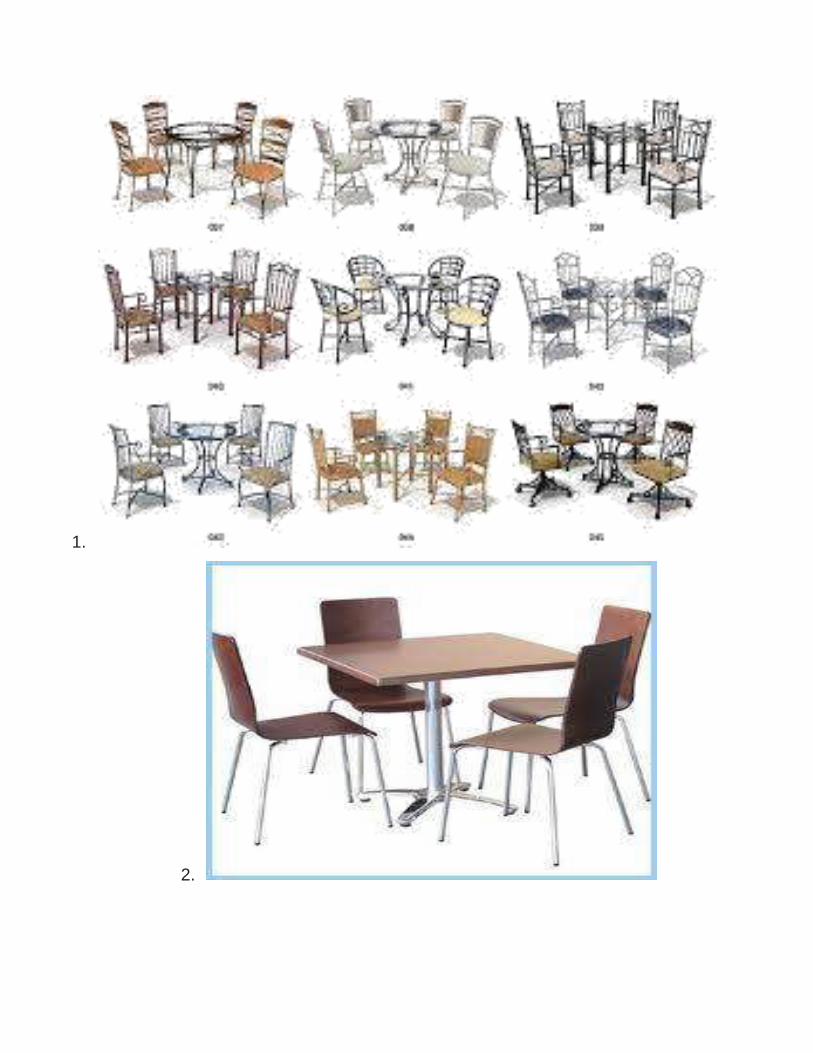
1.
2.


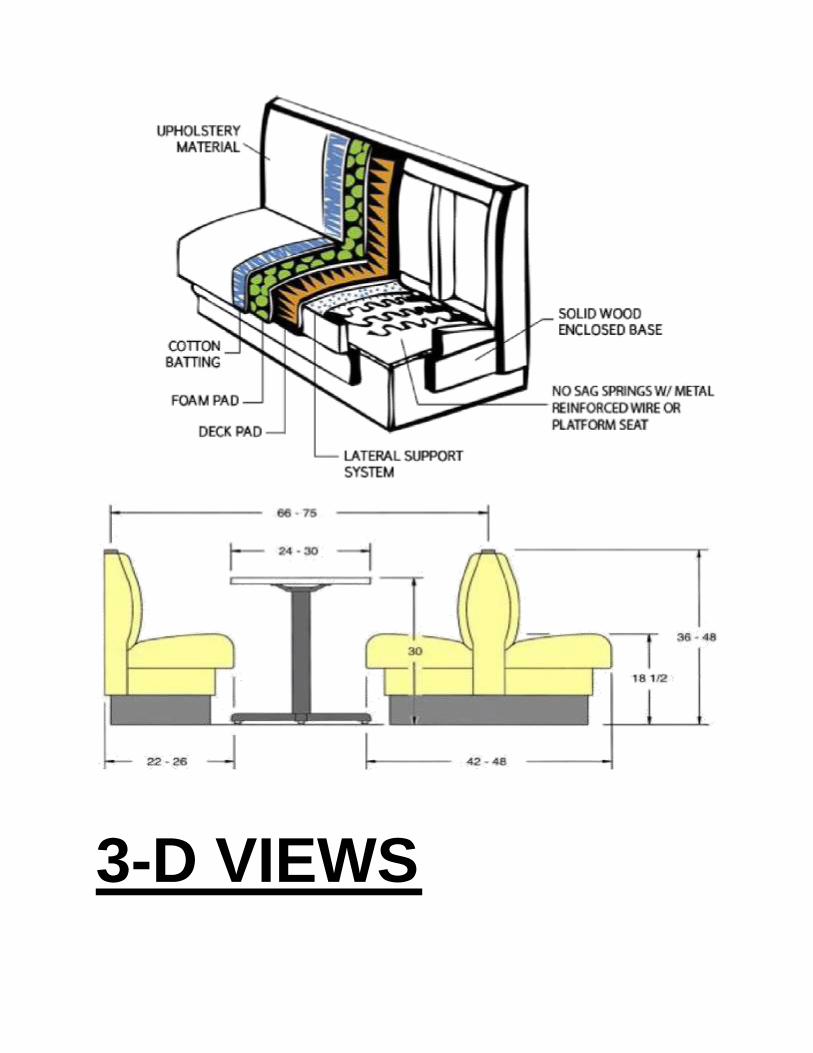
3-D VIEWS


BUBBLE DIAGRAM

LOGO

As a food service establishment, you want to ―Wow!‖ your patrons with an organized, sophisticated dining room layout, but you also need it to be space efficient and easy to navigate for employees. How do you fulfill such high standards? There are several key ideas and measurements you‘ll want to keep in mind to offer your guests the most comfortable and durable booth seating available on the market!
Though the task may seem daunting at first, there is no need to fear. We have just what you're looking for—a wide selection of sturdy and stylish dining room booths from American Tables & Seating, and a plan to help you space them. You‘ll find exactly what you need in order to match the character and atmosphere of your restaurant, bar, or diner! In order to pick the right seating, however, there are some important factors to consider first.
Why Booths?
Because they bring warmth and privacy to the front of the house, restaurant booths are an excellent addition to any dining room. They give your patrons the opportunity to relax and enjoy their meal in comfort. And despite their higher initial cost, which may be intimidating to some, a dining booth actually provides one of the most cost-efficient and space-efficient layouts for a dining room. For example, a 4 person booth covers little more than 3,000 square inches of floor space, whereas a 4 person table and chair set can exceed 5,000 square inches. This equates to 30% more revenue when seating a packed house. Booth seating is a really great way to help save floor space AND help save your bottom line!

Booth Spacing
In order to save that floor space, you need a plan for spacing! Your restaurant booth dimensions can help dictate the spacing of your seating. A standard layout allows the table edge to align vertically with the outer edge of the booth seat. This allows for a comfortable 16‖-18‖ seating depth. The following size chart can help to determine your specific spacing needs. Keep in mind, the standard top cap is 2‖ wide on all ATS booths.
30” wide tables: booths require 72” from center to center of top caps 24” wide tables: booths require only 66” between the center top caps
It‘s important to note that when paring a 24‖ table with a seating booth, cantilever table bases are your best bet for a foundation. Cantilever table bases are anchored to the wall underneath the table, which offers strong support without sacrificing valuable leg room for your guests. Check out the diagram below for the many different booth seats and spacing combinations you can have in your dining room. The shaded circles represent 10‖ plates, so you can get a real idea of spacing within the booths for guests!


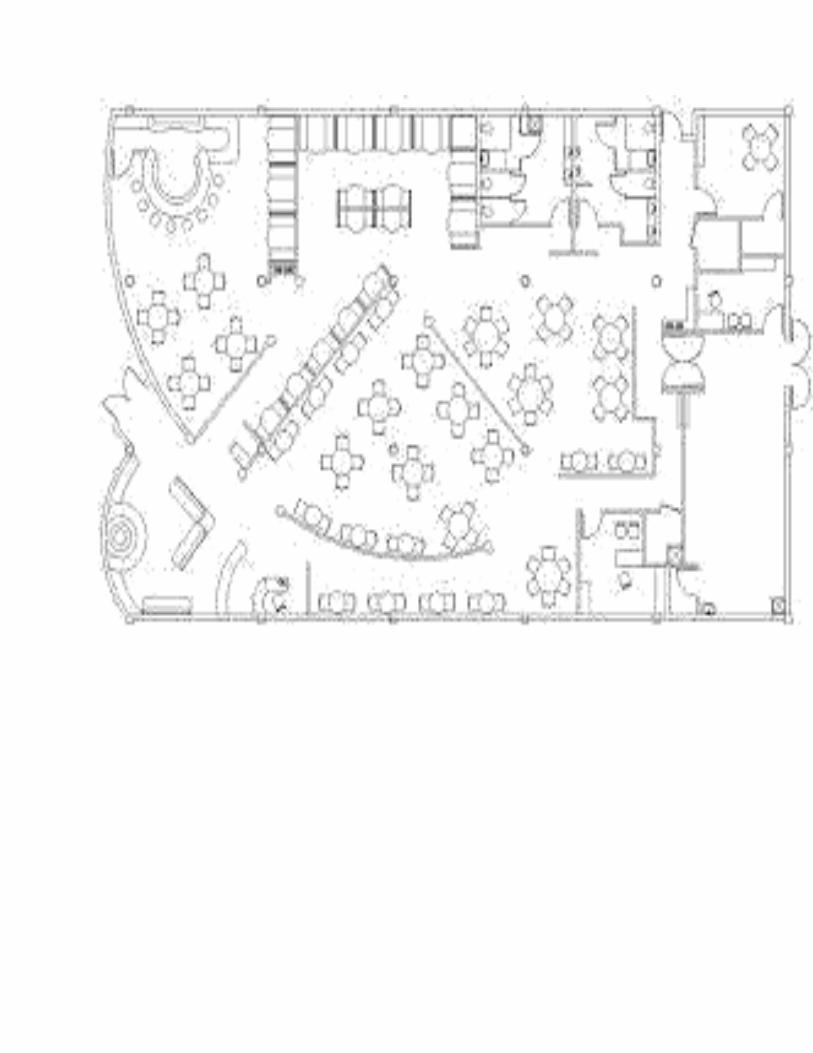

Chair & Table Spacing Tips & Suggestions
14 sq. ft per person for spacious dining (allows for table, chair, and aisle)
12 sq. ft per person for caferteria or restaurant style seating
10 sq. ft per person for banquet, institutional, or close seating
Allow 18 inches for person seated from edge of table to back

of chair
Diagonal seating saves floor space
Deuce tables and wall spacing saves the most space
Min. 42 " between squared tables for chairs back to back leaves 6 " to push out.
Min. 60 " between squared tables for chairs back to back leaves 26 " service out
Min. 54" between round tables service space. Main traffic aisles need to be larger