inTerFacing & sT abilier Free TuTorials Interfacing ... fileinTerFacing & Fabric sTabiliZer: 4 Free...
21
INTERFACING & FABRIC STABILIZER: 4 FREE TUTORIALS FOR SUPPORTING FABRIC, THREAD, & EMBELLISHMENTS IN QUILT ART 1 QUILTINGDAILY.COM ©F+W Media INTERFACING & STABILIZER 4 FREE TUTORIALS Quilting Daily Interfacing & Fabric Stabilizer Guide 4 FREE TUTORIALS FOR SUPPORTING FABRIC, THREAD, & EMBELLISHMENTS IN QUILT ART 1 Invisible Strength: Working with Water-Soluble Stabilizers PATRICIA BOLTON 2 Simpply Blown Away: Working with Vanishing Muslin (Thermogauze) PATRICIA BOLTON 3 Terrific Texture with Water-Soluble Stabilizers WENDY BUTLER BERNS 4 Star Maker: Heavenly Results from a Space Age Material VICKIE HALLMARK 1 2 4 3
Transcript of inTerFacing & sT abilier Free TuTorials Interfacing ... fileinTerFacing & Fabric sTabiliZer: 4 Free...

interfacing & fabric stabilizer: 4 free tutorials for supporting fabric, thread, & embellishments in quilt art
1 Q u i lt i n g D A i lY. c o m
©F+W media
interFAcing & stAbilizer 4 Free tutoriAlsQuilting Daily
Interfacing & Fabric Stabilizer Guide
4 Free TuTorials For supporTing Fabric, Thread, & embellishmenTs in QuilT arT
1 Invisible Strength: Working with Water-Soluble Stabilizers
patrIcIa bolton
2 Simpply Blown Away: Working with Vanishing Muslin (Thermogauze)
patrIcIa bolton
3 Terrific Texture with Water-Soluble Stabilizers
Wendy butler bernS
4 Star Maker: Heavenly Results from a Space Age Material
VIckIe Hallmark
1 2
43

interfacing & fabric stabilizer: 4 free tutorials for supporting fabric, thread, & embellishments in quilt art
2 Q u i lt i n g D A i lY. c o m
©F+W media
interFAcing & stAbilizer 4 Free tutoriAlsQuilting Dailya fabric stabilizer doesn’t look like
much in the package or on the bolt. But it can literally become the
supporting role in your most complex or ethereal fiber art adventures. You can use stabilizer for embroidery, for shoring up delicate fabrics for stitching, and even
use fabric interfacing as part of your quilt design.
In our new eBook, Interfacing & Fabric Stabilizer Guide: 4 Free Tutorials for Supporting Fabric, Thread, & Embellishments in Quilt Art, you will learn the most common types of stabilizers and how to use them.
In “Invisible Strength: Working with Water-Soluble Stabilizers,” Pokey Bolton explains the characteristics and uses for different kinds of water-soluble or wash-away stabilizer.
InterFacInG & FabrIc
StabIlIzer GuIde4 F ree T uTorials For supporTing Fa bri c, Threa d,
& embellishm enTs in QuilT arT
ediTor Vivika hansen denegre online ediTor cate coulacos prato
creative services diVision arT direcTor larissa davis phoTographers larry stein Korday studiosProjects and information are for inspiration and personal use only. F+W Media is not re-sponsible for any liability arising from errors, omissions, or mistakes contained in this eBook, and readers should proceed cautiously, espe-cially with respect to technical information. F+W Media grants permission to pho-tocopy any patterns published in this issue for personal use only.
There are heat-activated stabilizers, too. In “Simply Blown Away: Working with Vanishing Muslin,” Pokey describes the advantages and applications of using this material with a heat gun.
Wendy Butler Berns explains how to use water-soluble stabilizer with thread and fabric in “Terrific Texture with Water-Soluble Stabilizers.
Finally, in “Star Maker: Heavenly Results from a Space Age Material,” Vickie Hallmark shows you how to take advantage of the properties of fabric interfacing by pairing it with surface design techniques, creating an art quilt where the interfacing takes center stage.
There are so many creative ways to use stabilizers in quilt art. All you need is a project and our expert advice.
Warmly,
ViVika Hansen Denegre
Editor
With a swipe of your fi nger you’ll have access to:
� e latest posts, free patterns, and eBooks
Over 100 how-to videos
Tips and techniques from industry leading experts
*Apple, iPad, iPhone, iPod touch, and iTunes are trademarks of Apple Inc., registered in the U.S. and
other countries. App Store is a service mark of Apple Inc. Non-US residents: if the above link does
not work for you, feel free to browse our selection of Apps from within the Apple App Store itself
by searching for “Interweave”.
Take Quilting Daily on the go with the FREE Mobile app for
your iPhone or iPod Touch.
Get your FREE Quilting Daily app atwww.QuiltingDaily.com/app

interfacing & fabric stabilizer: 4 free tutorials for supporting fabric, thread, & embellishments in quilt art
3 Q u i lt i n g D A i lY. c o m
©F+W media
interFAcing & stAbilizer 4 Free tutoriAlsQuilting Daily
invisible strength
working with water-soluble stabilizers
by Patricia bolton
AdApted from Quilting Arts mAgAzine Winter 2006
interfacing & fabric stabilizer: 4 free tutorials for supporting fabric, thread, & embellishments in quilt art
4 Q u i lt i n g D A i lY. c o m
©F+W media
interFAcing & stAbilizer 4 Free tutoriAlsQuilting Daily
a matter of choice
A stabilizer is traditionally meant to
be used for the sewing portion of your
project, and just like sewing pins,
taken out when you’re done. Here
again, there are choices. Stabilizers can
be categorized into four types:
• those that wash away in either hot
or cold water;
• those that dissolve with heat;
• those that can be torn away;
• those that can be cut away.
expert advice
Since art quilters are famous for
conjuring up inventive uses for
materials and tools, I thought it
would be fun to ask three artists to
put stabilizers into action. These three
artists said they use water-soluble
stabilizers more often than any other
type. This is not to say they don’t use
other stabilizers; it’s just that many of
these artists free-motion stitch their
own designs and want no trace of
the stabilizer in their artwork when
it’s finished. With cut- or tear-away
stabilizers, there’s often a smidgeon of
the stabilizer remaining after “removal.”
This is fine if it can be hidden on
the back side of the fabric, but as
many fiber artists work with novelty
fabrics and sheers, cut- and tear-away
stabilizers aren’t usually an option
because they can make their presence
known like a pesky bra strap through
a silk blouse. Furthermore, heat-away
stabilizers aren’t often suitable for
synthetic fabrics such as organzas or
synthetic chiffons, because these fabrics
are sensitive to heat and will possibly
warp, melt, and/or vanish entirely when
exposed to a hot iron or heat gun.
the benefits of water
With water-soluble stabilizers you can:
• create thread motifs such as three-
dimensional flowers or leaves;
• make new fabrics from scratch with
threads and scraps;
• make three-dimensional objects
such as thread bowls and vessels.
Also, as most water-soluble stabilizers
look like clear plastic or are opaque,
you can trace, stamp, paint, transfer,
or sketch a motif on the stabilizer to
use as a guide for stitching.
note: It’s always a good idea to keep
a sketchbook to insert samples and jot
down notes when working with anything
new to you. Create small samples with
water-soluble stabilizers and tape them
in a notebook for future reference.
heidi LundFiber artist Heidi Lund of Washington
state is known for her award-winning
art quilts and Bernina Fashion
Show garments. Many of her quilts
(including the cover quilt for the 2007
Quilting Arts Calendar) incorporate
delicate thread designs that she
appliqués onto her art quilts.
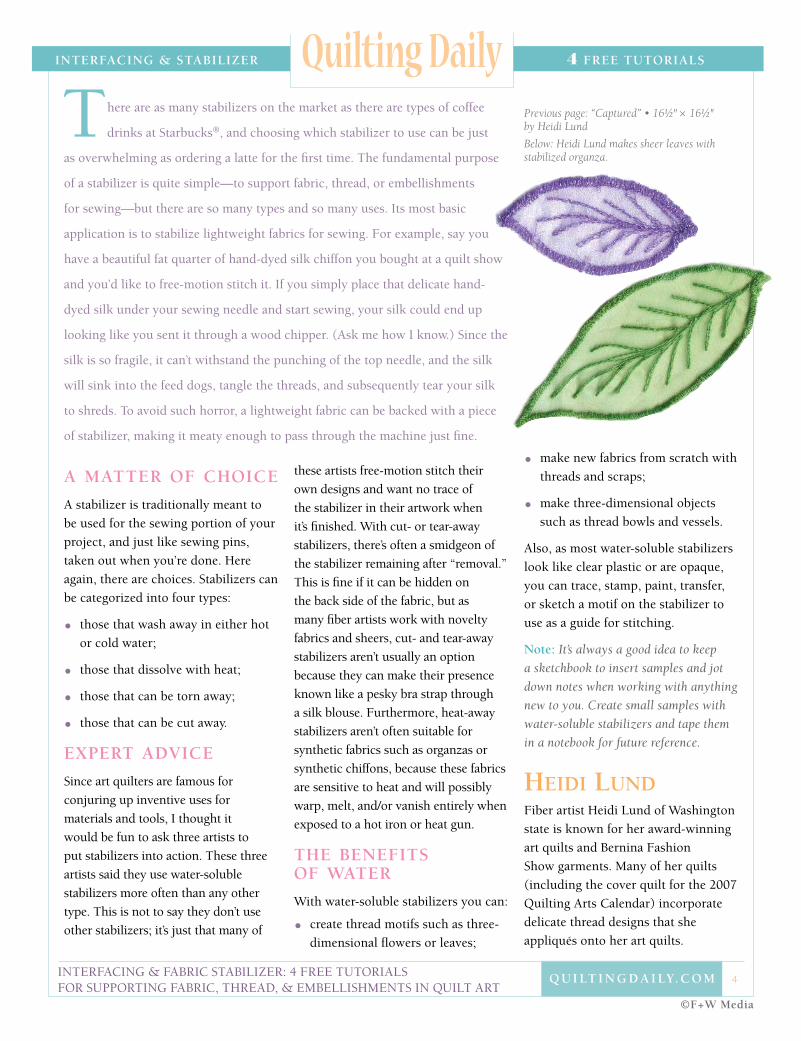
Previous page: “Captured” • 161⁄2" × 161⁄2" by Heidi Lund
Below: Heidi Lund makes sheer leaves with stabilized organza.
There are as many stabilizers on the market as there are types of coffee
drinks at Starbucks®, and choosing which stabilizer to use can be just
as overwhelming as ordering a latte for the first time. The fundamental purpose
of a stabilizer is quite simple —to support fabric, thread, or embellishments
for sewing—but there are so many types and so many uses. Its most basic
application is to stabilize lightweight fabrics for sewing. For example, say you
have a beautiful fat quarter of hand-dyed silk chiffon you bought at a quilt show
and you’d like to free-motion stitch it. If you simply place that delicate hand-
dyed silk under your sewing needle and start sewing, your silk could end up
looking like you sent it through a wood chipper. (Ask me how I know.) Since the
silk is so fragile, it can’t withstand the punching of the top needle, and the silk
will sink into the feed dogs, tangle the threads, and subsequently tear your silk
to shreds. To avoid such horror, a lightweight fabric can be backed with a piece
of stabilizer, making it meaty enough to pass through the machine just fine.
interfacing & fabric stabilizer: 4 free tutorials for supporting fabric, thread, & embellishments in quilt art
5 Q u i lt i n g D A i lY. c o m
©F+W media
interFAcing & stAbilizer 4 Free tutoriAlsQuilting Daily“I like the Solvy® products from Sulky
of America® above all else,” says Heidi.
“They’re readily available online and
at my local fabric store, and I love
that I can just run out and get more if
I don’t have any on hand. I put water-
soluble stabilizers to the test and
found for stability, ease of rinsing out,
performance, and softness, the Sulky
products work best for me.”
Although there are a number of Solvy
products available, there are three
types of water-soluble stabilizers that
look like clear
plastic film:
• Regular Solvy®
• Super Solvy® (Twice as thick as
Regular Solvy.)
• Ultra Solvy® (Four times as thick as
regular Solvy.)
Sulky of America® also makes Water-
soluble Paper Solvy®, sheets of 81⁄2”
× 11” paper that can be run through
your printer, stitched, and then
dissolved with water.
projects
Here are Heidi’s projects for getting
started with water-soluble stabilizers.
Free-motion stitching a
design onto a quilt sandwich
1. Draw a design onto a water-soluble
stabilizer (such as Solvy), and then
lay that design on a quilt sandwich
(i.e. top fabric, batting, and
backing fabric).
2. Drop the feed dogs on your
machine and stitch around the
design.
3. Take your stitched design to the
sink and rinse out the stabilizer.
Free-motion stitching dimensional shapes onto tulle or organza fabrics
1. Draw your design onto the Solvy.
2. Place the Solvy on top of your
organza piece and put it in the hoop.
3. Free-motion stitch around the
outline of the shape and continue
sewing in a grid-like fashion across
the shape. (This grid provides a
base for the threads to lock after
the water-soluble stabilizer has
been rinsed out.)
4. When the grid is completed, use
either a straight or satin stitch to
fill in the shape(s).
5. Cut away as much of the stabilizer
as you can, then rinse out the rest
with water. Allow your piece to dry
overnight.
6. Once dry your piece is ready to
be appliquéd and embellished.
color CODIng
Sulky of America has color-coded their stabilizer products to distinguish the types:
•Blue: Water-soluble
• Green: Tear-away
• Purple: Cut-away
• Red: Heat-away
different types OF stabilizers CAn HeLP yOU:
•Back lightweight fabrics for sewing;
• Create motifs completely out of thread, such as computer embroidery designs that can later be appliquéd;
• Make your very own, one-of-a-kind lacy fabrics out of threads;
• Fashion your own exotic, textured fabric out of threads, fabric snippets, yarns, and embellishments by sandwiching them between two pieces of water-soluble stabilizer;
• Add stiffness to pieces (for example, fabric postcards, artist trading cards, fabric books, fabric bowls, and fabric vases), much like interfacing but permanent.
M A T e R I A L S
• (2) 8" × 8" pieces of cotton fabric
• Batting
• 8" × 8" piece of Solvy
• Pen
• Sewing machine with free-motion capabilities
• Thread
•Fabric scissors
A D D I T I O n A L M A T e R I A L S
•8" × 8" piece of Solvy
•8" × 8" piece of organza
• Hoop (Heidi suggests a spring hoop)
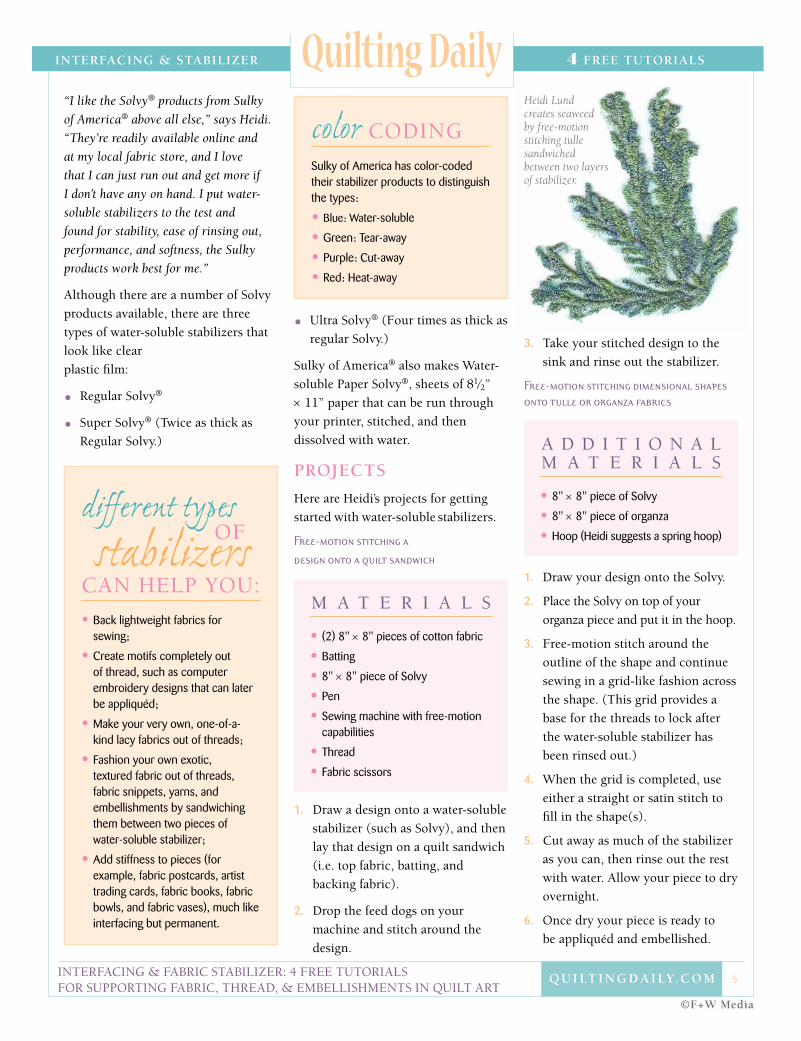
Heidi Lund creates seaweed by free-motion stitching tulle sandwiched between two layers of stabilizer.
interfacing & fabric stabilizer: 4 free tutorials for supporting fabric, thread, & embellishments in quilt art
6 Q u i lt i n g D A i lY. c o m
©F+W media
interFAcing & stAbilizer 4 Free tutoriAlsQuilting Daily
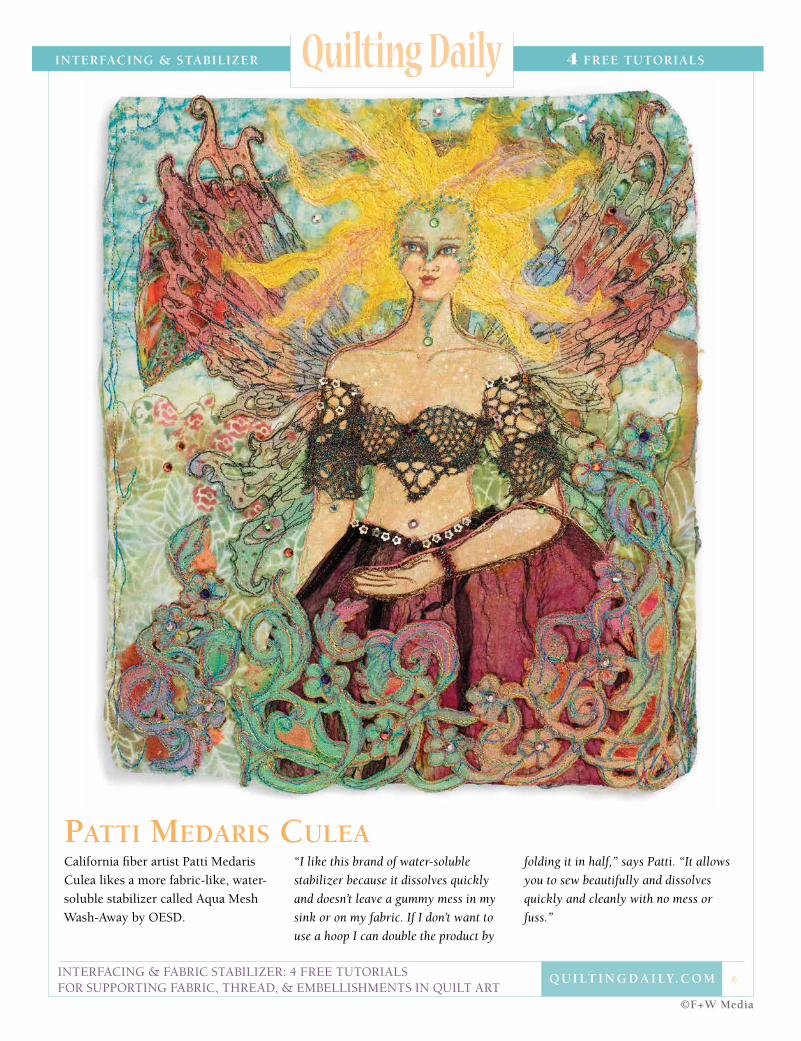
California fiber artist Patti Medaris
Culea likes a more fabric-like, water-
soluble stabilizer called Aqua Mesh
Wash-Away by OeSD.
“I like this brand of water-soluble
stabilizer because it dissolves quickly
and doesn’t leave a gummy mess in my
sink or on my fabric. If I don’t want to
use a hoop I can double the product by
folding it in half,” says Patti. “It allows
you to sew beautifully and dissolves
quickly and cleanly with no mess or
fuss.”
patti medaris cuLea
interfacing & fabric stabilizer: 4 free tutorials for supporting fabric, thread, & embellishments in quilt art
7 Q u i lt i n g D A i lY. c o m
©F+W media
interFAcing & stAbilizer 4 Free tutoriAlsQuilting Daily“The downside is that it’s a bit filmy,
making it hard to see through for
tracing,” says Patti. Hence, she uses a
light table if she’s tracing an intricate
design.
For her fairy example Patti drew her
wings and border on paper. Using a
light box, she traced the pattern onto
Aqua Mesh Wash-Away. She then
sandwiched four layers of synthetic
organza between the top and bottom
layers of the water-soluble stabilizer
(the top stabilizer having the drawn
image on it). With the feed dogs
down, she free-motion stitched the
design. The piece was roughly cut
around the edges, and then the water-
soluble stabilizer was dissolved. When
dry, Patti used a soldering iron with a
very fine tip and burned out sections
of the organza to expose the design.
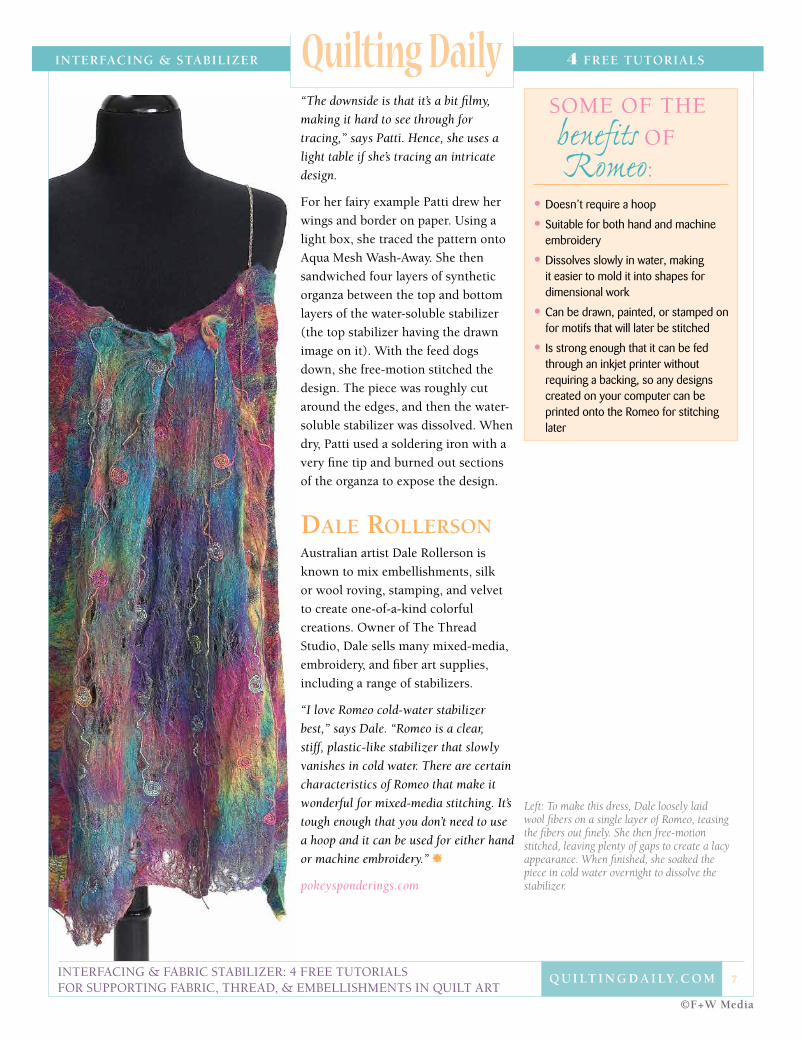
daLe roLLersonAustralian artist Dale Rollerson is
known to mix embellishments, silk
or wool roving, stamping, and velvet
to create one-of-a-kind colorful
creations. Owner of The Thread
Studio, Dale sells many mixed-media,
embroidery, and fiber art supplies,
including a range of stabilizers.
“I love Romeo cold-water stabilizer
best,” says Dale. “Romeo is a clear,
stiff, plastic-like stabilizer that slowly
vanishes in cold water. There are certain
characteristics of Romeo that make it
wonderful for mixed-media stitching. It’s
tough enough that you don’t need to use
a hoop and it can be used for either hand
or machine embroidery.”
pokeysponderings.com
SOMe OF THe
benefits OF
Romeo:
•Doesn’t require a hoop
• Suitable for both hand and machine embroidery
• Dissolves slowly in water, making it easier to mold it into shapes for dimensional work
• Can be drawn, painted, or stamped on for motifs that will later be stitched
• Is strong enough that it can be fed through an inkjet printer without requiring a backing, so any designs created on your computer can be printed onto the Romeo for stitching later
Left: To make this dress, Dale loosely laid wool fibers on a single layer of Romeo, teasing the fibers out finely. She then free-motion stitched, leaving plenty of gaps to create a lacy appearance. When finished, she soaked the piece in cold water overnight to dissolve the stabilizer.

There is such a deluge of stabilizers on the market
today, the choice can be a little overwhelming
for someone wanting to take a stab at creating their own
machine-embroidered designs. And although there are a
number of manufacturers and makes, essentially it boils
down to four types of stabilizers, each designed for a
specific use and with a different removal method.
interfacing & fabric stabilizer: 4 free tutorials for supporting fabric, thread, & embellishments in quilt art
8 Q u i lt i n g D A i lY. c o m
©F+W media
interFAcing & stAbilizer 4 Free tutoriAlsQuilting Daily
There are wash-away stabilizers that rinse out in either hot
or cold water, cut-away stabilizers, tear-away stabilizers,
and stabilizers that vanish completely when heat is
applied. I often use vanishing muslin (otherwise known
Above: “Three Little Dandelions” • 6” × 8” Three small flower embroideries were thread-painted using Thermogauze as the stabilizer. Once the Thermogauze was burned away, the flowers were then appliquéd to a piece of hand-dyed fabric.
simply blown awayWorKing WiTh Vanishing muslin (Thermogauze)
by Patricia bolton
AdApted from Quilting Arts mAgAzine summer 2006
M A T e R I A L S
•Indian printing block (shown) or a rubber stamp with a deeply etched and fairly simply design
•8" × 8" piece of Thermogauze
•Rubber stamp ink (I prefer Sta–zOn® as it dries instantly.)
•Sewing machine with free-motion capabilities
•Machine threads
•Heat gun or iron (If using an iron, have two sheets of parchment paper or backing paper from WonderUnder® handy.)
•Soft-bristled paintbrush or old toothbrush
•Embroidery scissors
interfacing & fabric stabilizer: 4 free tutorials for supporting fabric, thread, & embellishments in quilt art
9 Q u i lt i n g D A i lY. c o m
©F+W media
interFAcing & stAbilizer 4 Free tutoriAlsQuilting Daily
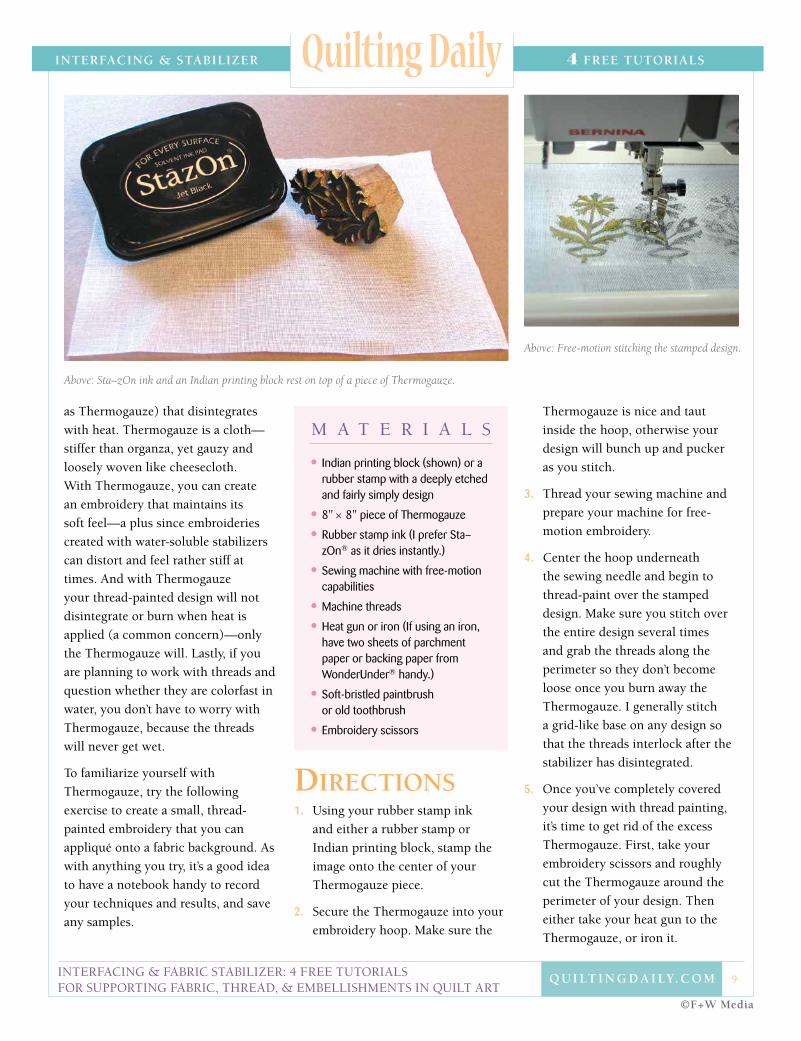
as Thermogauze) that disintegrates
with heat. Thermogauze is a cloth––
stiffer than organza, yet gauzy and
loosely woven like cheesecloth.
With Thermogauze, you can create
an embroidery that maintains its
soft feel––a plus since embroideries
created with water-soluble stabilizers
can distort and feel rather stiff at
times. And with Thermogauze
your thread-painted design will not
disintegrate or burn when heat is
applied (a common concern)—only
the Thermogauze will. Lastly, if you
are planning to work with threads and
question whether they are colorfast in
water, you don’t have to worry with
Thermogauze, because the threads
will never get wet.
To familiarize yourself with
Thermogauze, try the following
exercise to create a small, thread-
painted embroidery that you can
appliqué onto a fabric background. As
with anything you try, it’s a good idea
to have a notebook handy to record
your techniques and results, and save
any samples.
directions1. Using your rubber stamp ink
and either a rubber stamp or
Indian printing block, stamp the
image onto the center of your
Thermogauze piece.
2. Secure the Thermogauze into your
embroidery hoop. Make sure the
Thermogauze is nice and taut
inside the hoop, otherwise your
design will bunch up and pucker
as you stitch.
3. Thread your sewing machine and
prepare your machine for free-
motion embroidery.
4. Center the hoop underneath
the sewing needle and begin to
thread-paint over the stamped
design. Make sure you stitch over
the entire design several times
and grab the threads along the
perimeter so they don’t become
loose once you burn away the
Thermogauze. I generally stitch
a grid-like base on any design so
that the threads interlock after the
stabilizer has disintegrated.
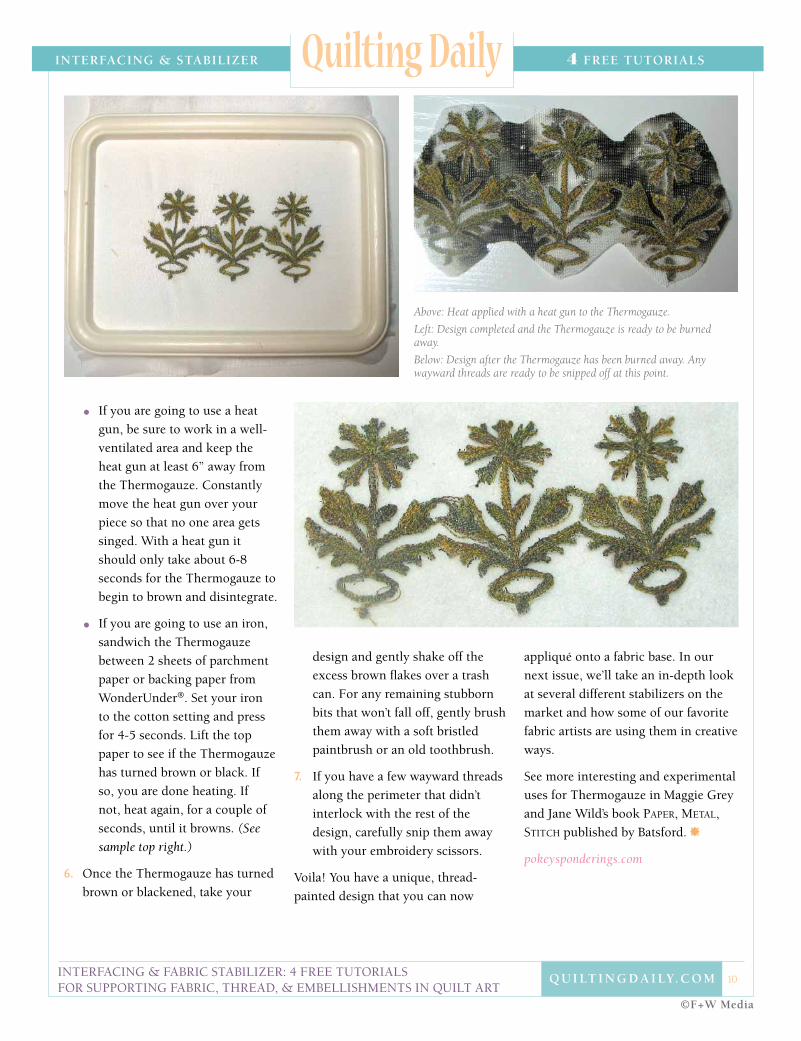
5. Once you’ve completely covered
your design with thread painting,
it’s time to get rid of the excess
Thermogauze. First, take your
embroidery scissors and roughly
cut the Thermogauze around the
perimeter of your design. Then
either take your heat gun to the
Thermogauze, or iron it.
Above: Sta–zOn ink and an Indian printing block rest on top of a piece of Thermogauze.
Above: Free-motion stitching the stamped design.
interfacing & fabric stabilizer: 4 free tutorials for supporting fabric, thread, & embellishments in quilt art
10 Q u i lt i n g D A i lY. c o m
©F+W media
interFAcing & stAbilizer 4 Free tutoriAlsQuilting Daily
• If you are going to use a heat
gun, be sure to work in a well-
ventilated area and keep the
heat gun at least 6” away from
the Thermogauze. Constantly
move the heat gun over your
piece so that no one area gets
singed. With a heat gun it
should only take about 6-8
seconds for the Thermogauze to
begin to brown and disintegrate.
• If you are going to use an iron,
sandwich the Thermogauze
between 2 sheets of parchment
paper or backing paper from
WonderUnder®. Set your iron
to the cotton setting and press
for 4-5 seconds. Lift the top
paper to see if the Thermogauze
has turned brown or black. If
so, you are done heating. If
not, heat again, for a couple of
seconds, until it browns. (See
sample top right.)
6. Once the Thermogauze has turned
brown or blackened, take your
design and gently shake off the
excess brown flakes over a trash
can. For any remaining stubborn
bits that won’t fall off, gently brush
them away with a soft bristled
paintbrush or an old toothbrush.
7. If you have a few wayward threads
along the perimeter that didn’t
interlock with the rest of the
design, carefully snip them away
with your embroidery scissors.
Voila! you have a unique, thread-
painted design that you can now
appliqué onto a fabric base. In our
next issue, we’ll take an in-depth look
at several different stabilizers on the
market and how some of our favorite
fabric artists are using them in creative
ways.
See more interesting and experi mental
uses for Thermo gauze in Maggie grey
and Jane Wild’s book PaPer, Metal,
stitcH published by Batsford.
pokeysponderings.com
Above: Heat applied with a heat gun to the Thermogauze.
Left: Design completed and the Thermogauze is ready to be burned away.
Below: Design after the Thermogauze has been burned away. Any wayward threads are ready to be snipped off at this point.

interfacing & fabric stabilizer: 4 free tutorials for supporting fabric, thread, & embellishments in quilt art
11 Q u i lt i n g D A i lY. c o m
©F+W media
interFAcing & stAbilizer 4 Free tutoriAlsQuilting Daily
terrific texturewith water-soluble stabilizers
by WenDy butler berns
AdApted from Quilting Arts mAgAzine fAll 2004
interfacing & fabric stabilizer: 4 free tutorials for supporting fabric, thread, & embellishments in quilt art
12 Q u i lt i n g D A i lY. c o m
©F+W media
interFAcing & stAbilizer 4 Free tutoriAlsQuilting Daily
How do water-soluble stabilizers
work? essentially they are transparent
sheets of glue that dissolve when
water is applied. After free-motion
stitching a motif (such as strands
of hair), the glue keeps the thread
design intact and the rest of the sheet
dissolves when water is applied,
resulting in a lacy piece of “fabric.”
coLLaging embeLLishments directLy onto your quiLt top
1. gather your collage objects.
2. Stabilize the base fabric, in this
case the quilt top, with a tear-away
stabilizer or an iron-on stabilizer
on the back of the fabric. (I prefer
an iron-on stabilizer so that it will
stay in place while I am stitching.)
3. Place the collage items in a
pleasing design on your stabilized
base fabric.
4. Lay a piece of water-soluble
stabilizer over your design and pin
it securely with straight pins. your
piece of water-soluble stabilizer
should be larger than your base
fabric by a few inches on all sides.
5. Using various colored and metallic
threads in your sewing machine,
randomly free-motion stitch over
the whole design.
6. When done, remove the water-
soluble stabilizer by first spraying
your collage with water until it is
saturated. Then sandwich your
piece between two muslin press
cloths, placing one cloth under
your quilt and the other on top of
the water-soluble stabilizer. Using
a hot iron, begin dissolving the
water-soluble stabilizer. Move the
press cloth around as needed, and
do not use any spot on the press
cloth twice.
7. After the stabilizer is completely
dissolved, press as necessary to
remove excess moisture. Then
allow your piece to dry.
Maybe you’ve dreamt of creating an underwater scene with
fish peeping out of wispy strands of seaweed. Or perhaps
you want to quilt a princess with long, flowing locks that simply fly
off the quilt. Don’t know how you’ll accomplish replicating wispy
seaweed or hair that is incredibly life-like? Look no further. By
using water-soluble stabilizers such as Sulky Solvy, you can create
dimensional texture with thread, and later appliqué it onto your
quilt. you can even collage items onto a quilt surface or create a free-
standing collage with embellishments, bits of thread, fabric scraps,
and free-motion stitching.
M A T e R I A L S
•Water-soluble stabilizer (I prefer Sulky Solvy)
•Iron-on stabilizer for base fabric
•A variety of collage items
•Specialty threads and embellishments
•Water sprayer
•Iron
•Muslin press cloths
•Straight pins
•Sewing machine with the ability to free-motion stitch

interfacing & fabric stabilizer: 4 free tutorials for supporting fabric, thread, & embellishments in quilt art
13 Q u i lt i n g D A i lY. c o m
©F+W media
interFAcing & stAbilizer 4 Free tutoriAlsQuilting Daily
creating a stand-aLone coLLage
1. gather your collage objects of
choice.
2. Using a base of water-soluble
stabilizer a few inches larger than
your finished collage will be, place
your collage objects onto the
stabilizer. your finished piece will
have a lacy effect if the objects are
sparsely spaced; if placed close
together, you will create a more
densely textured fabric.
3. Place a second piece of stabilizer
over the collage items and
thoroughly pin all layers together.
4. As before, use free-motion
stitching and a variety of specialty
threads to stitch through all layers.
Be sure to intersect your stitching
lines throughout the collage
surface so that everything will
hold securely when the stabilizer
is removed. As you work on your
collage, be aware that the piece will
pucker and shrink as you continue
stitching.
5. Once you have completed
stitching, you can dissolve the
stabilizer by spraying and pressing
it as in step 6 of the first process.
If you prefer, you can dip the piece
into a sink of water and gently
manipulate it to help dissolve the
stabilizer.
6. To remove any remaining moisture,
press your collage between muslin
press cloths or lay it flat to air dry.
7. When your collage is sufficiently
dried, you can stitch it to your
As you prepare your collage, be inventive. Use your leftover threads, thin strips or snippets of fabrics—anything that can get wet and that you can stitch through. Your design can be stitched directly onto the quilt top or made as a stand-alone collage that can be added later to the surface of your quilt.

interfacing & fabric stabilizer: 4 free tutorials for supporting fabric, thread, & embellishments in quilt art
14 Q u i lt i n g D A i lY. c o m
©F+W media
interFAcing & stAbilizer 4 Free tutoriAlsQuilting Daily
MOVe OVeR VidalAccomplished art quilter Christine Fries has used water-soluble stabilizers
to create the effect of wind-swept hair. In “Miranda: The Tempest,”
Christine created the long red hair by making a sandwich with two layers
of tulle net between two pieces of water-soluble stabilizer. She then
mounted the sandwich in an embroidery hoop and free-motion stitched
using many shades of thread colors. When done, she took the sandwich
out of the hoop, dissolved the stabilizer in running water, dried the hair
between two towels, and ironed it while still damp. She then appliquéd
it onto Miranda’s head form. The resulting image of a forlorn Miranda on
the windy, rocky shores is incredibly life-like.
quilt top with free-motion
stitching. Do enough stitching to
assure that no part of the collage
can snag on anything. To prevent
puckering when attaching your
collage to the quilt top, you will
want to place a piece of stabilizer
behind the area where the collage
piece will be stitched. My choice
of stabilizer is Décor Craft Pellon
fusible stabilizer.
wendybutlerberns.com

interfacing & fabric stabilizer: 4 free tutorials for supporting fabric, thread, & embellishments in quilt art
15 Q u i lt i n g D A i lY. c o m
©F+W media
interFAcing & stAbilizer 4 Free tutoriAlsQuilting Daily

interfacing & fabric stabilizer: 4 free tutorials for supporting fabric, thread, & embellishments in quilt art
16 Q u i lt i n g D A i lY. c o m
©F+W media
interFAcing & stAbilizer 4 Free tutoriAlsQuilting Daily
every dressmaker knows the utility of interfacing for
stabilizing fabrics, and many embroiderers apply non-
woven interfacing as a permanent stabilizer behind
heavy stitching. Recently, I constructed several quilts
using interfacing instead of conventional fabric for the
surface layer and even for the backing and batting
as well. experimenting with the interfacing surface,
I have found that this product offers an interesting
compromise between fabric and paper.
The advantages of interfacing are easy to enumerate.
Readily available from local sources, it comes in a variety
of thicknesses, from tissue thin to thick and semi-rigid.
Its pristine white surface can be colored with everything
from watercolor methods to conventional handwriting
or even computer printing. Because this non-woven
polyester and rayon fabric does not fray, raw edges
formed with detailed cutting and burning can be used
for direct or reverse appliqué and intriguing edge finishes.
The soft, matte surface is especially effective when
embellished with hard, shiny glass and metal. Soft but
firm, the fabric stitches like butter and resists distortion.
The synthetic fibers also release my inhibitions about
which products I can use on the surface—I no longer
confine myself to fabric paints and markers, and feel
free to experiment with the extensive paper art supplies
available.
star makerheavenly results from a space-age material
by Vickie HallMark
M A T e R I A L S
• Heavy-weight interfacing (I prefer Pellon®.)
• Plastic drop cloth or sheeting to protect your work surface
• Fabric paints of choice (fluid acrylics and acrylic inks work well)
• Foam paintbrushes
• Coarse salt
• Commercial rubber and/or hand-carved eraser stamps
• Fabric markers: Zig™ or Fabrico™ (or other archival, acid-free, pigment or dye markers)
• Gel pens, 3-D pens, or metallic pens for accents
• Tsukineko® Fantastix™ for blending
• Freezer paper
• Metallic foil and adhesive
• Shiva® Paintstiks®, Prismacolor®, or Lyra colored pencils
• Rubbing plates or any textured item
• Wood-burning tool with a fine point (or stencil cutter or soldering iron)
• Small, damp sponge
• Glass from an old photo frame for a burning surface (an 8" × 10" or 11" × 14" piece works well)
• Water-soluble stabilizer, such as Romeo
• Sewing machine
• Embroidery threads, yarns, and beads
Previous page: Detail of “Aphrodite”
neil Armstrong walked on the moon when I
was in sixth grade, and from that point on I
was hooked on the heavens. Although my career path
remained firmly earthbound, decades later the celestial
song still calls to me. For “Kamea,” a book of stitched
pages, the seven planets of the ancient heavens offered
a plethora of mystical design inspiration, as well as the
perfect application for a novel material that I’ve been
exploring: interfacing.

Above: The back side of “Aphrodite,” depicting the attributes of this planet. Details include hand stitching, hand lettering, and stamping.
interfacing & fabric stabilizer: 4 free tutorials for supporting fabric, thread, & embellishments in quilt art
17 Q u i lt i n g D A i lY. c o m
©F+W media
interFAcing & stAbilizer 4 Free tutoriAlsQuilting Dailypainting1. Protect your work surface with
plastic and then spread out a
length of interfacing.
2. To get past the blank white canvas
of bare interfacing, paint it with a
watercolor technique. Dilute the
paint with water by at least 3 to 1
and use a foam brush to apply it
randomly.
3. Begin with a range of related colors
and lay down large color blocks
on the surface, adding copious
amounts of extra water with the
foam brush. Squish the brush into
the cloth to push the colors into
one another, forcing the paint to
flow across the cloth.
4. Add highlights in the open areas,
especially contrasting colors, and
lighter or darker values.
5. Once you have a pleasing coverage,
scatter coarse salt over the surface.
The salt absorbs water, which
carries the paint pigment with
it. After an hour or so, check the
patterning to determine if you
need to add even more salt in
some areas. Allow the fabric to
dry completely. The result is a
striated and speckled surface. Don’t
agonize over this painting stage;
trust the salt to make the resultant
fabric exciting and realize that
further surface design will alter the
background even more.
note: Complete drying of the fabric will
take overnight or longer because of the
high water saturation.
6. you need to remove the salt and
cure the paint before proceeding. It
is important to cure the paint first,
to protect it against the washing
process when removing the salt.
Traditionally, heat setting is the
method of choice and it will work
in this situation, if done with care.
First, brush the excess salt from
the surface, cover it with a pressing
cloth, and set it by ironing. Choose
a temperature for synthetic fibers
that will prevent distortion of the
fabric, but this lower temperature
means that a longer time should be
spent applying heat to all areas of
the cloth. even after heat setting, I
find that some pigment will be lost
in the repeated rinsing required to
remove the salt, so I only use this
time-intensive heat-set process
as an emergency tool. A more
efficient curing process is to paint
a selection of fabrics prior to need

interfacing & fabric stabilizer: 4 free tutorials for supporting fabric, thread, & embellishments in quilt art
18 Q u i lt i n g D A i lY. c o m
©F+W media
interFAcing & stAbilizer 4 Free tutoriAlsQuilting Daily
and leave them to cure at room
temperature for several weeks
before rinsing.
note: It is important to use a pressing
cloth to protect your iron from the
corrosive salt.
7. Submerge the interfacing
repeatedly in clear, warm water,
taking care to keep the fabric as
flat as possible. To eliminate excess
water, lay the saturated interfacing
on an old towel, cover it with
another towel, and gently press by
hand to squeeze it dry; then press
it or let it air dry.
note: If you fold interfacing it can be
difficult or even impossible to remove the
creases. Therefore, I store my painted
interfacing flat or rolled.
surface design• I chose imagery that relates to the
mystical attributes of each of the
seven ancient planets, following
guidelines used for constructing
planetary talismans that would
normally be metal amulets.
• I hand carved erasers into zodiac
symbol stamps to pattern the
surface, because each planet rules
one or more houses of the zodiac.
• I used commercial alphabet stamps
to add the greek planetary name
on one side and the Roman name
on the reverse. The mathematical
magic square numbers were also
stamped.
• Bullet-tipped Tsukineko Fantastix
were used for blending paint (or
markers) along the edges of hand-
cut, freezer-paper stencils. The
freezer-paper stencils, used to
delineate mountains and clouds
representing the realms of earth
and air, were ironed to the surface
first. Whenever I desire more
definition or want to shift the
underlying fabric color, I add paint
or ink in this fashion.
• For the personality traits controlled
by each planet, I wrote directly
on the surface with markers or
pens. Mercury’s wings were drawn
freehand with markers and shaded
Above: “Aphrodite” • 15" × 101⁄2" • A decorative, hand-cut leaf edge, beading, and chain stitch embroidery embellish this page.

interfacing & fabric stabilizer: 4 free tutorials for supporting fabric, thread, & embellishments in quilt art
19 Q u i lt i n g D A i lY. c o m
©F+W media
interFAcing & stAbilizer 4 Free tutoriAlsQuilting Daily
with the blending stick. I use fabric
markers, as well as those marked as
archival, acid-free, with pigment or
dye inks to give a broader range of
colors.
note: Interfacing is more forgiving than
either fabric or paper—markers can
be easily blended for a short time after
adding them to the surface, and mistakes
can be removed or at least softened
with a damp cloth. It is important to
be careful in areas where a crisp line
or image is required, as smudging can
occur.
• I like to build up layers of designs
on the surface. experiment with
unusual pens such as gel, 3-D, or
metallic pens to add fine details.
• I also use paint sticks and colored
pencils over rubbing plates.
• Metallic foils can add bright
accents, such as the planet names
that were stamped with foil
adhesive. Fine details such as these
are better added at the final stages,
after cutting and assembly.
heat cutting1. Use a freezer-paper stencil ironed
into place as a guide for cutting
complex shapes. I often cut with
an X-Acto™ knife and cutting
mat first, but then I use a wood-
burning tool (or similar tool) with
a fine tip to heat cut a decorative
edge (see the next step). In the
pieces shown here, I made use of a
mock deckled edge with tears and
holes to evoke aged paper, as well
as a purely decorative freehand
leaf edging. Other cutouts, such as
the zodiac symbols, were burned
freehand with a deliberate intent to
look imperfect and ancient.
2. Place the fabric on a sheet of
picture glass (bind the sharp edges
with masking tape for safety) and
draw the hot tip slowly along the
surface of the fabric, pressing to
burn completely through.
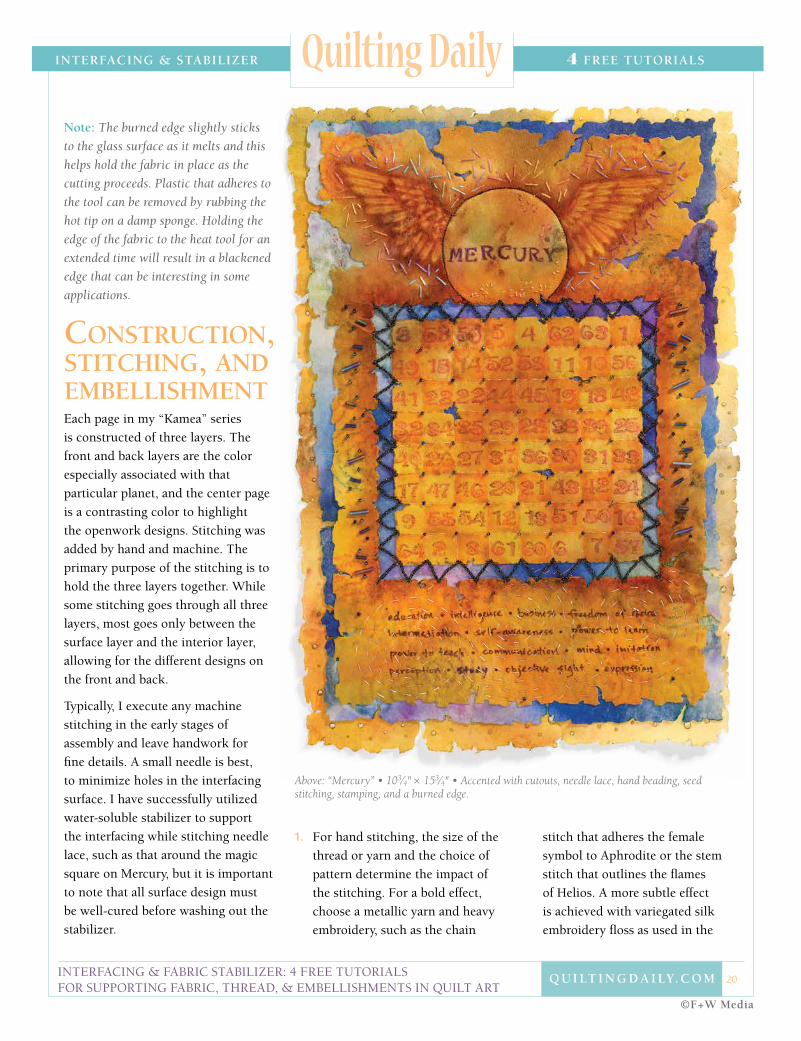
Above: “Mercury” • 103⁄4" × 153⁄4" • Accented with cutouts, needle lace, hand beading, seed stitching, stamping, and a burned edge.
cauTion: burning polymer interfacing releases acrid fumes that are irritating and potentially harmful. Work in a well-ventilated area or outdoors, and wear a respirator.
interfacing & fabric stabilizer: 4 free tutorials for supporting fabric, thread, & embellishments in quilt art
20 Q u i lt i n g D A i lY. c o m
©F+W media
interFAcing & stAbilizer 4 Free tutoriAlsQuilting Dailynote: The burned edge slightly sticks
to the glass surface as it melts and this
helps hold the fabric in place as the
cutting proceeds. Plastic that adheres to
the tool can be removed by rubbing the
hot tip on a damp sponge. Holding the
edge of the fabric to the heat tool for an
extended time will result in a blackened
edge that can be interesting in some
applications.
construction, stitching, and embeLLishmenteach page in my “Kamea” series
is constructed of three layers. The
front and back layers are the color
especially associated with that
particular planet, and the center page
is a contrasting color to highlight
the openwork designs. Stitching was
added by hand and machine. The
primary purpose of the stitching is to
hold the three layers together. While
some stitching goes through all three
layers, most goes only between the
surface layer and the interior layer,
allowing for the different designs on
the front and back.
Typically, I execute any machine
stitching in the early stages of
assembly and leave handwork for
fine details. A small needle is best,
to minimize holes in the interfacing
surface. I have successfully utilized
water-soluble stabilizer to support
the interfacing while stitching needle
lace, such as that around the magic
square on Mercury, but it is important
to note that all surface design must
be well-cured before washing out the
stabilizer.
1. For hand stitching, the size of the
thread or yarn and the choice of
pattern determine the impact of
the stitching. For a bold effect,
choose a metallic yarn and heavy
embroidery, such as the chain
stitch that adheres the female
symbol to Aphrodite or the stem
stitch that outlines the flames
of Helios. A more subtle effect
is achieved with variegated silk
embroidery floss as used in the
Above: “Mercury” • 103⁄4" × 153⁄4" • Accented with cutouts, needle lace, hand beading, seed stitching, stamping, and a burned edge.
interfacing & fabric stabilizer: 4 free tutorials for supporting fabric, thread, & embellishments in quilt art
21 Q u i lt i n g D A i lY. c o m
©F+W media
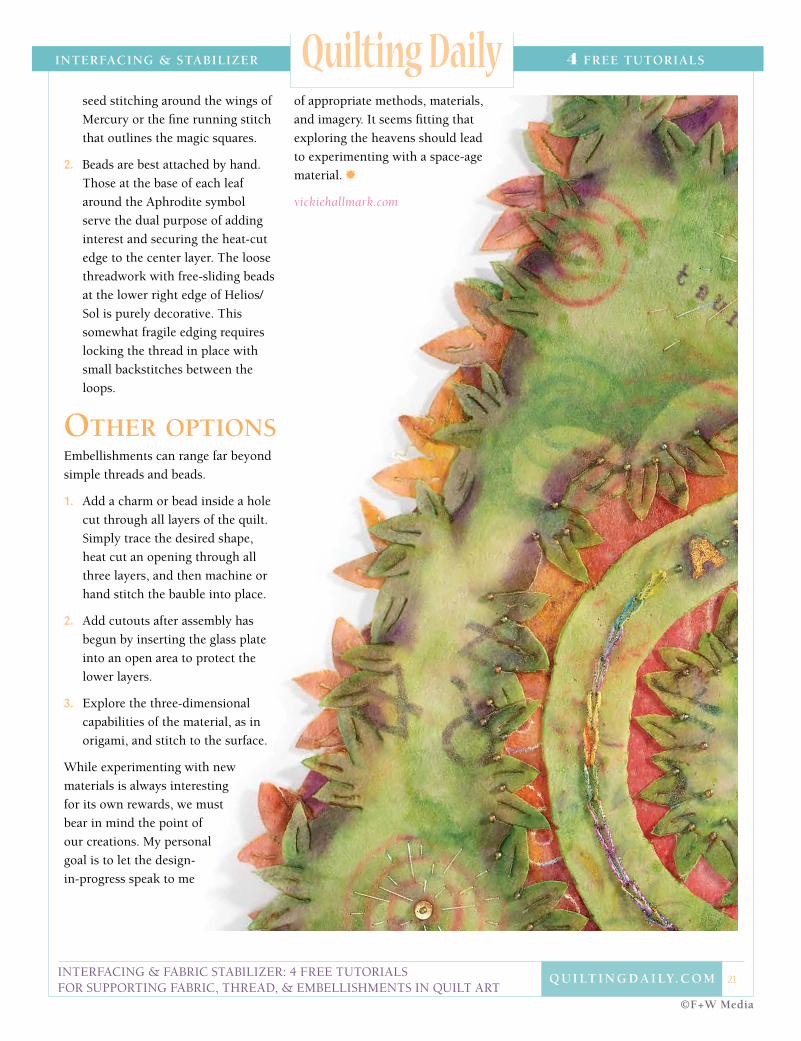
interFAcing & stAbilizer 4 Free tutoriAlsQuilting Dailyseed stitching around the wings of
Mercury or the fine running stitch
that outlines the magic squares.
2. Beads are best attached by hand.
Those at the base of each leaf
around the Aphrodite symbol
serve the dual purpose of adding
interest and securing the heat-cut
edge to the center layer. The loose
threadwork with free-sliding beads
at the lower right edge of Helios/
Sol is purely decorative. This
somewhat fragile edging requires
locking the thread in place with
small backstitches between the
loops.
other optionsembellishments can range far beyond
simple threads and beads.
1. Add a charm or bead inside a hole
cut through all layers of the quilt.
Simply trace the desired shape,
heat cut an opening through all
three layers, and then machine or
hand stitch the bauble into place.
2. Add cutouts after assembly has
begun by inserting the glass plate
into an open area to protect the
lower layers.
3. explore the three-dimensional
capabilities of the material, as in
origami, and stitch to the surface.
While experimenting with new
materials is always interesting
for its own rewards, we must
bear in mind the point of
our creations. My personal
goal is to let the design-
in-progress speak to me
of appropriate methods, materials,
and imagery. It seems fitting that
exploring the heavens should lead
to experimenting with a space-age
material.
vickiehallmark.com