Interface Overview Download & Processing -...
17
Interface Overview Download & Processing This chapter contains: Overview of Interface Introduction to Interface Download & Processing Directions for Download & Processing Overview of Interface The interface process between The Host Reservation System, or GDS, and Trams, is a means by which invoice and ticketing data entered in the Passenger Name Record (PNR) is automatically transmitted to the back office system. The interface commands used to control the interface between the GDS and Trams are similar to the entries already used in the office to control the transmission of messages to various printers (e.g., ticket, invoice/itinerary, boarding pass and hardcopy). Once the interface option is enabled by the GDS, an interface record or image is created every time a sales agent drives a ticket or an invoice. Specific accounting, client, vendor and booking information from the PNR is downloaded to Trams Back Office and becomes available for accounting, tracking and reporting needs. The interface record created by driving the invoice is stored by the Host GDS on an Interface Queue, much like the ticketing queue. Instead of retrieving the data on queue back to the workstation to update, or to the printer to print, the record is downloaded to Trams as a file for Trams to read. Trams Back Office Interface Utilities Setup Trams does not control what is included in the interface record. The data captured is directly related to how it is entered in the PNR. What TBO does with the data can be controlled by default options established in Utilities|Setup. These options determine how TBO handles the information received from the interface record. Not all options in Utilities|Setup relate to interface. Please refer to the Utilities chapter in the manual or the Helpfiles for directions on setting up the Trams Back Office program prior to commencing interface. Introduction to Interface Download/Process The accounting data being interfaced, the paper trail, the office work flow, and available personnel are all important parts of successful interface. Interface is an interaction between the front and back office systems, including human resources. Follow the steps outlined until the staff is proficient with Interface. Develop a daily routine, and teach at least one other person in the office how to handle Interface. Interface is an interactive process that requires coordination between the Host Reservation System, the Windows Interface program and Trams. Let's go over some terminology that we use at Trams for the different parts of the Interface procedures. Download involves Trams retrieving the interface records. In Trams Back Office this can be directly from the interface cable or a file. As the records are downloaded, Trams reformats the records and places them in a separate file for processing. When records are retrieved from the source directory, the files are deleted and the directory is emptied. It's important when reading across a network that full file permissions are enabled for the client workstation downloading the records. Process is a procedure that merges the Interface records into the Trams database. Each invoice is tracked by Client, Vendor and Sales agent. Bookings within an invoice would all have the same client, but may have different vendors or sales agents. The process procedure matches each invoice item to the proper client, vendor and sales agent for reporting and accounting purposes. The procedure also generates any error messages related to the new data being received, and allows operator intervention for undefined profiles. You do not need to create Profiles prior to interface. Trams can create new profiles during the Interface Process. 1
Transcript of Interface Overview Download & Processing -...

Interface Overview Download & Processing
This chapter contains:
Overview of Interface
Introduction to Interface Download & Processing
Directions for Download & Processing
Overview of Interface The interface process between The Host Reservation System, or GDS, and Trams, is a means by which invoice and ticketing data entered in the Passenger Name Record (PNR) is automatically transmitted to the back office system. The interface commands used to control the interface between the GDS and Trams are similar to the entries already used in the office to control the transmission of messages to various printers (e.g., ticket, invoice/itinerary, boarding pass and hardcopy).
Once the interface option is enabled by the GDS, an interface record or image is created every time a sales agent drives a ticket or an invoice. Specific accounting, client, vendor and booking information from the PNR is downloaded to Trams Back Office and becomes available for accounting, tracking and reporting needs.
The interface record created by driving the invoice is stored by the Host GDS on an Interface Queue, much like the ticketing queue. Instead of retrieving the data on queue back to the workstation to update, or to the printer to print, the record is downloaded to Trams as a file for Trams to read.
Trams Back Office Interface Utilities Setup Trams does not control what is included in the interface record. The data captured is directly related to how it is entered in the PNR. What TBO does with the data can be controlled by default options established in Utilities|Setup. These options determine how TBO handles the information received from the interface record. Not all options in Utilities|Setup relate to interface. Please refer to the Utilities chapter in the manual or the Helpfiles for directions on setting up the Trams Back Office program prior to commencing interface.
Introduction to Interface Download/Process The accounting data being interfaced, the paper trail, the office work flow, and available personnel are all important parts of successful interface. Interface is an interaction between the front and back office systems, including human resources. Follow the steps outlined until the staff is proficient with Interface. Develop a daily routine, and teach at least one other person in the office how to handle Interface. Interface is an interactive process that requires coordination between the Host Reservation System, the Windows Interface program and Trams. Let's go over some terminology that we use at Trams for the different parts of the Interface procedures.
Download involves Trams retrieving the interface records. In Trams Back Office this can be directly from the interface cable or a file. As the records are downloaded, Trams reformats the records and places them in a separate file for processing.
When records are retrieved from the source directory, the files are deleted and the directory is emptied. It's important when reading across a network that full file permissions are enabled for the client workstation downloading the records.
Process is a procedure that merges the Interface records into the Trams database. Each invoice is tracked by Client, Vendor and Sales agent. Bookings within an invoice would all have the same client, but may have different vendors or sales agents. The process procedure matches each invoice item to the proper client, vendor and sales agent for reporting and accounting purposes. The procedure also generates any error messages related to the new data being received, and allows operator intervention for undefined profiles. You do not need to create Profiles prior to interface. Trams can create new profiles during the Interface Process.
1

Capturing Interface Records involves the images to file option configured by the GDS Vendor. If interface has been configured by the host in this manner, then be sure to ask them how to start, stop and review the utility or print server software they use to capture the records. It's also important to know the EXACT path and directory or file name for Trams to download the files.
Host Print Server, Pro Printer and Host Print Modules, are utility programs used by the GDS vendor to enable the Host system to communicate with Host printers, including the interface device. If configured to capture to file, there are formats for the file as well as a location or path and file name to the interface records.
Network Access and File sharing is a feature of the local hardware network. This option must be enabled in order for Trams to download records that are captured to a workstation on the network, versus Interface Download and Process records captured to the local hard drive where the download is handled. For our examples we'll assume the records are captured to the SAME workstation and hard drive where the Trams download is handled.
Windows Interface Utility or Trams Interface Utility is the program that captures interface records via a cable. The program is configured to match the serial port communication protocol configured at the GDS controller. The program may launch at startup or can be controlled manually.
Capturing Interface Records There are two ways to capture Interface records - Images to File and Interface via Cable.
Images to File If the GDS Vendor has configured interface to file, then capturing records to a file has already been set up. It's still important to know the EXACT path and directory or file name for Trams to download the files. Please check directly with the GDS Vendor for the location of the file, as well as the procedures for troubleshooting. Standard settings are explained in the specific GDS section of the Trams Interface Guides. Check the interface queue to verify that records are leaving the Host and available in the local interface file. Go to a GDS workstation and start the transmission of records.
Download Interface Records into TBO The download utility can be configured for multiple GDS systems and run outside of Trams Back Office from Start|Programs|Trams Back Office|Download. High volume agencies can create shortcuts for each download configuration and run them simultaneously, or as 'real-time' interface to the same or different workstations. Since all records are routed to a single log for processing, simultaneous downloads should be tested and used only after processing procedures are well established in the agency.
Step 1: From Windows go to Start|Programs|Trams Back Office|Download.
2
Step 2: Select the correct database Alias - the default is Trams. The database Alias should NEVER be blank. Refer to the specific GDS section of the Interface Guide for specifics about the screen options listed here. Select the appropriate GDS. Scroll through a list of reservation systems with the down arrow.
Note: Sabre and Worldspan have 2 options for GDS field. Check the folder for the file structure captured by the GDS. If multiple records exist, one per transaction, use Sabre or Worldspan as appropriate. If a single logair.dat or pnrdata.txt file exist, use Sabre Net or Worldspan Images to Disk as appropriate.
Note: Any agency having a conflict with the Client Remarks field of a booking being interfaced to a UDID field, can ignore UDID formats in the Client Remarks field of a booking by entering -NU in the Option field on the Download Screen.
Note for Worldspan Agencies: There is a -D option to the Interface Download screen to make the dash following the 5SA, 5OA, 5FJ, 5LF, and 5FF entries in Worldspan optional. If not wanting to specifically identify an SA or OA entry as agent-related, then enter -D in the Options Field on the screen and the dash (-) after the SA and OA entry will not be required. There is a chance, based on the entry made if no dash (-) is present, that the name SANDY could be read as "SA", an override of the Original Sales Agent.
Note to Apollo Agencies: To ignore e-mail updates in Apollo interface, enter -NE (No E-mail).
Step 3: Click the PNR File Path button to locate the directory where the interface files reside. If using the default settings when installing Trams, the path should read:
C:\Spool
If records are captured by the GDS vendor, or to a different workstation, then the PNR File Path may look considerably different. (Refer to the GDS section of this interface guide for more information about settings specific to the GDS platform.)
Note: Changes to the PNR File Path on the Interface/Download screen are now only saved if the user logs in as SYSDBA. A non-SYSDBA user can change the path when logged in, but when closing the Interface/Download screen or logging out of TBO, those changes are not saved. All changes to the GDS PNR File Path can only be done by the systems SYSDBA User.
Note: Do not check Process Res.txt or Lanyon Format. Wait for New Records is used by high volume agencies to enable a 'real-time' interface. The download screen can be left open to read new messages from the file path as soon as they are created.
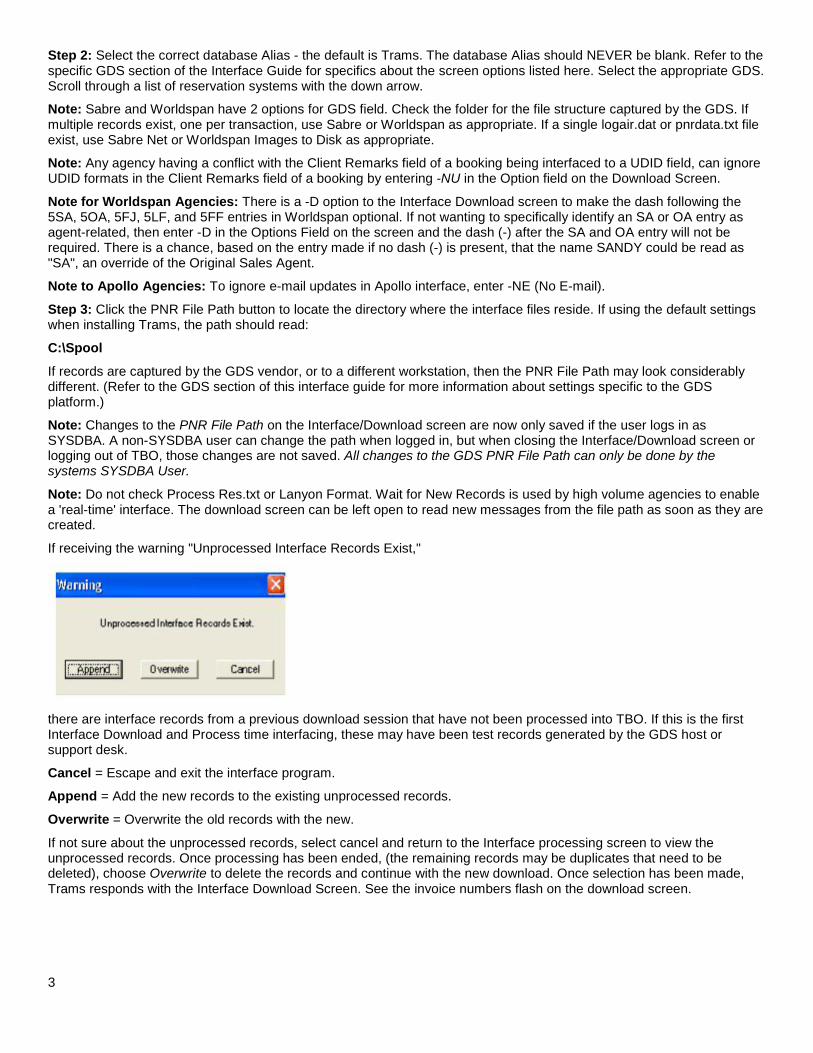
If receiving the warning "Unprocessed Interface Records Exist,"
there are interface records from a previous download session that have not been processed into TBO. If this is the first Interface Download and Process time interfacing, these may have been test records generated by the GDS host or support desk.
Cancel = Escape and exit the interface program.
Append = Add the new records to the existing unprocessed records.
Overwrite = Overwrite the old records with the new.
If not sure about the unprocessed records, select cancel and return to the Interface processing screen to view the unprocessed records. Once processing has been ended, (the remaining records may be duplicates that need to be deleted), choose Overwrite to delete the records and continue with the new download. Once selection has been made, Trams responds with the Interface Download Screen. See the invoice numbers flash on the download screen.
3

Trams receives all records from the Destination directory and responds with a Record count of Received and Verified. There may be a difference between the number of records received and verified. Usually this is attributed to invalid invoices or invoices that do not contain accountable segments.
INTERFACE REPORTS
Step 4: Run Interface reports to use when reconciling invoices or investigating the download session. We would advise this on every session until user is comfortable with the TBO interface and front office formats. The reports are an excellent training tool for both front and back office staff.
First run the Invoice List. From the TBO main menu, select Reports|Interface|Invoice List. (A Print Invoice List button is also located to the Interface Processing Screen so that the Invoice List can be printed prior to processing.) The Invoice List shows the valid invoice data received by TBO during the download process. The report shows how TBO interpreted the data entered in the PNR. Remember, how data is entered and invoices are driven, is directly related to how TBO interprets the PNR. The invoices are not yet available in the TBO database. This is a report of the invoices downloaded in to Trams during this session. Select Print Log from the report menu bar to print this report.
4

Note: TBO shows the foreign currency value and currency code for comm track transactions on the Interface Invoice List report.
DOWNLOAD ERROR LOG
Step 5: Next run the Download Error Log. Go to Reports|Interface|Download Error Log. Enter the date/s for the report. This report shows which interface records were received and rejected by TBO during the download session. If a record was rejected, the booking agent should research the PNR formats to correct and re-run the invoice. Agencies unable or who have a diverse sales staff may purchase or create scripts to make interface more seamless to their sales agents. It's also possible that the rejected records were boarding passes, or itineraries or PNRs that did not contain accounting information, and can be ignored. High volume agencies may want to research quality control procedures to ensure 100% accuracy prior to downloading or processing records into TBO. Select Print from the report menu bar to print this report. Process the data received. From the TBO main menu go to Interface|Process.
Process Interface Records During the processing, Trams Back Office tries to match up information received from the interface record with information stored in TBO. There are three types of profiles - client, vendor and agent - that must match before the invoice is processed by TBO. Clients, vendors, and sales agent profile identification is critical to the accurate accounting of a transaction.
Automatic or Ignore All When Processing Creates a Processing Error Log When there is a mature database, selecting Automatic for processing or Ignore All from the first error dialog box, creates a Processing Error Log that can be printed and processed later. (The processing of E-Ticket refunds is ignored during Automatic Interface Processing.) During the process procedure, TBO reads and logs the records to the correct client, agent and vendor, as it creates a TBO invoice for accounting and reporting.
- Delete Record deletes a selected interface record.
- Print Pending prints the unprocessed record list as shown in the display.
- Print Invoice List prints out the invoice list prior to processing without going to Reports|Interface|Invoice List. (When there is a new or empty database, it's easier to work through each interfaced record with access to invoice and ticket hard copies.)
- View Source views the native Interface record sent by the GDS. Be better able to make decisions on what to do with a specific record that is generating the error prompt.
5

- Import from File option is used for importing data from other back office systems, website captured data, when converting to Trams Back Office, or can be used to import records for a Host/IC setup.
- Print Log prints the Processing Error Log
- Automatic allows TBO to process all records without stopping for errors. Records with errors remain unprocessed and errors are reported on the Processing Error Log.
- Print Invoice prints a TBO invoice of each processed record.
Note: Trams recommends that the back office operator have access to the invoice, tickets and cash receipts for proper accountability, and to maintain the integrity of the TBO. Go to Reports|Interface|Processing Error Log to review reported processing errors.
Client Profiles The reservation system has a client account number format that TBO reads as interface ID. The same client number that printed on the invoice or ticket can interface to TBO as the account number. (See the GDS specific guide for more information.) Each Interface ID must be unique to a single billing entity. A House Account may be created to track "walk-in" clients, but this method cannot capture valuable marketing information. TBO recommends a separate profile for every billing entity. While profiles serve as client ledger cards, they also serve as reporting units and client mailing lists. Profiles don't need to be created in TBO prior to the first interface, but spend some extra processing time as the database is being built. If the message No Match on Client Interface ID during processing of new clients is received, TBO builds the profile for each new client through processing the invoice.
If there is converted data from another back office system, then it's important to know the procedures required to restore the converted data to TBO. Put off the first interface session until after the Interface Download & Process converted data has been restored to create the TBO database.
No Match On Client ID The message, No Match On Client ID prompts when TBO does not find an identical Client Interface ID to the alphanumeric code that appears between the brackets [xxxxxxxxxx]. This occurs for various reasons. If there is no code within the brackets, [] Trams did not detect a customer number in the Interface record.
For inactive Profiles a Warning Message appears: Matching xxxxx Profile is Marked Inactive - Continue? Select OK to process the invoice to the inactive profile, and later, update the profile to active status. If Cancel is selected, a prompt allows the operator to Modify by selecting a different Profile or create a new Profile.
This screen shows an ID [1234567890] in brackets next to the name. This is the Customer ID the agent entered in the PNR. TBO did not find an exact match. Select Modify to search for the client by Name.
Select Modify By selecting Modify, Trams continues processing the Interface record, for input at each step of the procedure. The client type and name are the only fields available to modify. TBO defaults to Leisure. To modify the Client Type, click the drop-down key to see the choices. Click Corporate in the Client Type field. By selecting Corporate without modifying the Client Name, TBO interprets the Client Name differently. This is not an optional default. If the client's name or spelling is in question, enter a few letters of the client's last name for a broader search. Next click the Client Name and move to the Profile query screen. From there, search for the correct profile.
6

NO MATCHING PROFILES FOUND DURING THE CLIENT NAME SEARCH
Create a New Client Profile Click Yes and TBO to go to a new Client Profile screen. The information for the new client moves to the profile screen in TBO. The No option returns to the previous screen. The information from the Interface record moves to the New Client Profile screen. TBO does a good job at translating ALL CAPS GDS entries into upper and lower case, but occasionally edit the information captured from the front office. Notice the Interface ID and address information is entered automatically. This came directly from the address and phone entries in the PNR. Click OK to save the profile to return to the Interface processing screen to continue processing the rest of the record (s).
Query Client Profiles Click Query to start the search for the correct client profile. Click the down arrow in the 'argument' field prior to the name to select the name search criteria. If TBO does not find a match by Client type and name there is a prompt, Create a New Profile? If TBO finds a probable match, there is a selection box. Highlight the customer name and click Select to move back to the processing screen.
Click Select to choose a name from the list and save to return to the Interface processing screen to continue processing the rest of the record (s). If the correct name is not on the list, click Reset. Try the search with just a few letters of the name. Perhaps there is a misspelling?
Note: Run a list of clients and vendors often as the mailing list grows. It is easy to create a duplicate profile as the staff adjusts to the disciplines of interface. Go to Reports|Client|Lists and Labels. Also use the Processing Error Log to update any existing Profiles with incorrect or missing Interface ID's.
Invoice Notes - During interface processing for a void record, we added the ability for an invoice to automatically show as a
voided invoice without user intervention if all other bookings in the invoice are already voided. There is a prompt, Confirm Void Invoice prompt screen. For a single booking invoice containing an air ticket, nothing more need be
7

done and the invoice is automatically voided. For an invoice containing multiple bookings, those booking would have had to been manually voided prior to the start of interface processing, for the invoice to be automatically voided.
Processing of the void record must be the last non-voided booking in the invoice, for the invoice to void automatically without having to re-query the invoice after processing and manually voiding. To implement this feature, check that Utilities|Setup|Global Defaults/ Interface/Mailmerge Prompt Tab has Allow Voids set to Prompt. Allow Voids = PROMPT.
-- During interface processing, single payments are now created for each booking in the PNR invoice being processed even if the CC No. is the same. This allows for easier voiding of tickets during processing when each ticket has its own payment attached. Also multiple tickets contained in a single invoice are listed separately on a customer's credit card statement. So an invoice with two $500 tickets in it, $1000 total invoice amount, is shown on the credit card statement as one item with ticket number for the first $500 ticket, and as a second item with ticket number for the second $500 ticket.
Vendor Profiles ARC/BSP vendors, plus car and hotel vendors, are booked directly through the reservation system have an industry standard ID assigned through the reservation system. As these transactions are processed in TBO, allow Trams to create the vendor profile. Group several vendors together through the Vendor profile, or the invoice group field. (See the Profile section in the manual for a full description of field options.) TBO recommends tracking these vendors by property. ARC/BSP vendor profiles build by TBO include the airline code automatically. Include both the Interface ID and the airline code when building these vendors manually.
Trams maintains a table of ARC/BSP vendors, complete with address information. This table is used to create the ARC/BSP profile the first time the vendor is sold. Non-ARC/BSP vendors are also identified in Trams by Interface ID, but there is no industry standard at this time. The GDS may have restrictions on how these codes are entered within the booking or accounting line. (See the GDS section of this guide for more information.) It is important to coordinate with the front office staff before deciding on how these vendors should be identified.
Unlike Client Profiles, TBO searches for the Interface ID first and then the Vendor phone number and thirdly, the Vendor name for an exact match. Due to the flexibility allowed in the building of PNRs, it is important to establish standards used for the agency.
Note: TBO matches Vendor Profiles by phone number when the Vendor name and/or Interface ID do not match during interface processing, because the Vendor name and/or Interface ID has changed but the phone number hasn't. A message is added to the Error Processing Log during interface processing when a Vendor Profile has been matched by phone number.
When the name and the Interface ID changes, it's usually because a hotel property changes chains, and the name and ID would be changed but not the phone or address. Users need to be aware of the change so they can decide if they want to change the name and ID of the existing profile or create a new profile for the property.
Note: -- Trams matches Non-ARC/BSP airline bookings to any vendor profile with a matching interface ID. So a ticket sold on United Airlines, but not processed through ARC/BSP can be added to a single United Airlines vendor Profile if the Interface ID matches.
No Match On Vendor Name or ID There is a No Match on Vendor Name or ID prompt when TBO cannot find a profile for this vendor by Interface ID, phone number or name.
This screen shows an automated Vendor code received by the GDS at confirmation.
8

If nothing is entered between the [brackets], the booking may have been entered as a passive segment without a vendor code. If there is an id between the brackets, but no name, the agent may not have entered a vendor name, just the code. Select Modify and continue.
Select Modify The system now, by default, only shows matching vendors based on Name, State and Zip. Manually uncheck either or both to see matches just on name. The check boxes are enabled if the corresponding address field is populated in the Vendor Profile that is being processed from the GDS PNR. If there is no State or Zip Code in the record being processed then those options are dimmed and the match is on Name only.
When the database has multiple vendors with the same name such as "Southwest" and no location identification in the name, the match can be based on the Name and a part of the address. This should alleviate the problem of common vendor names being picked by name only and putting the booking under the incorrect vendor profile. TBO searches for the exact spelling of the Vendor Name. If the spelling is questionable, use only the first few letters of the name to broaden the search. Click OK to begin the search.
TBO may want to attach to an existing profile with a similar name when clicking OK. To prevent that, click the New button to go straight to a new Vendor Profile screen.
No matching Profiles Found during the Vendor Name Search
Create New Vendor Profile Clicking Yes navigates to a new Client Profile Screen. The information for the new vendor moves to the profile screen in TBO. When selecting No, return to the previous screen. If there is not a vendor profile in TBO, create a new one now by clicking OK.
9

The information from the Interface record moves to the new Vendor Profile screen. TBO does a good job at capturing address and phone details from automated Car and Hotel Vendors. Passive segments may require editing. The TBO operator would want to modify this record and assign an interface ID unique to this hotel. Any future passive hotels with using this same Interface ID will also interface to that profile automatically. (Refer to the Front Office formats used to account for the vendor transaction, to ensure proper translation by TBO.) Notice the Interface ID is entered automatically. The next time this property is booked using the same Interface ID, TBO will not require intervention. Using the mouse, click OK to save the profile.
Alternate Interface ID Some agencies interface from multiple GDS systems. Add an alternate interface ID to a vendor profile by selecting the Marketing Tab. By adding an alternate interface ID, TBO finds a match on either of the Interface ID's attached to the profile.
Query Option The Query option searches vendor profiles for a match. A query of Vendor profiles is also initiated by changing the Vendor Name on this query screen or from the Modify screen. Click Query to begin. Because of the spelling of the Vendor name, this sample shows [No Matching Profiles Found.] If the query is successful, highlight the vendor and click with the mouse. If the query is too narrow or not successful, click Reset to begin another search.
Sales Agent Profiles Trams Back Office receives the original booking agent from the Interface Record and captures the agent as the primary or inside agent on the invoice. The Agent ID as it is translated from the reservation system must match the Agent Interface ID in TBO. This ID is often referred to as the "agent sine" and is defined in the agencies GDS profile. To review these agent sines before beginning interface. TBO reads alphanumeric sines. Non-booking agents that are tracked on an invoice can have an Interface ID unrelated to the automatic agent id used to designate the booking agent. (See the GDS section of the addendum for additional tracking options.) TBO allows up to 9 agents on a single booking. These are used to track inside and outside agents, promotions and commission splits.
No Match On Agent ID There is a No Match On Agent ID prompt when TBO has no record of this agent in a sales agent profile. The Agent ID that Trams captured from the Interface record appears between the brackets. If there is not an agent ID, Trams did not detect an agent in the record. This sometimes occurs when records are retrieved from another agency or when bookings were created by the Airline Reservations Center and are taken over by the agency. Click Modify to search by a different ID or to create a new Sales Agent profile.
Trams Back Office has no match on the Interface ID of the Agent displayed. This is probably a new agent with GDS agent sine of TG. When selecting Modify, a prompt comes up to search for the agent by name. Even though the Agent ID is displayed, enter the agent name to search for the agent.
10

If clicking the Agent ID button, query for agents. If the down arrow is clicked in the window, similar names of agents appear. By default, TBO assumes the agent name and agent ID are the same. If profiles use first names for agent names, or other criteria, add the first letter of the agent name and click the down arrow to find an existing agent.
Record Not Found by Agent ID Search
Enter a New Profile? To create a new Sales Agent profile, click Yes. Edit the Sales Agent name at this time. All other profile information can be modified later. Click OK to save the profile.
If the Agent profile exists in Trams but you are not sure what the correct Agent ID is, highlight the Agent ID and press Delete. Click Agent ID and move to the Query screen. Click Query to see a list of Sales Agents.
Search for Existing Agent by Agent ID To search for an existing agent profile by agent ID, right click in the Agent field. A drop down list displays. Select search by ID and click OK.
Processing Errors TBO accepts only valid invoices through the Interface Download (with a few exceptions). Invoices without valid segment information, Itineraries, Voids and Full Invoice refunds are rejected during the download procedure. Valid invoices with missing or duplicate information is available for modification in the Process procedure.
Invalid ARC Number
This error means this ARC/BSP number is not setup in the Branch Utilities. From the main menu, go to Utilities|Setup|Branches. Click the Add/Modify ARC/BSP button, and add the missing ARC/BSP number.
11

Duplicate or Invalid Invoice Number Trams Back Office does not allow duplicate invoice numbers within the same branch. A Duplicate Invoice Number prompt may appear for various reasons. Trams does not allow duplicate invoice numbers.
- The invoice may have been manually entered. - The invoice number was previously used in error. - The invoice was previously downloaded and resubmitted.
There are several options.
1. First, select View Source and note the details of the invoice such as passenger names and travel dates. Then select Abort and go to the Invoice|Query tab and search for the invoice number. If the record to be processed is a true duplicate invoice, and the user does not want to process the record, it can be deleted during the next download.
2) Select Ignore to move to the next record. The Ignore and Ignore All option does not remove the record(s) from the process log. The record remains and is reported on the Processing Log.
3) Modify proceeds with the processing of this record and permits the entry of a new Invoice number.
A Select Invoice Number prompt appears.
4) Enter the Invoice Number. By deleting the number in the Invoice No field, and clicking OK, TBO automatically assigns the next invoice number in the system. Or keep the same invoice number and capture the record to a different branch.
Duplicate Ticket Number A Duplicate Ticket Number prompt appears for various reasons.
1. The ticket may have been manually entered.
2. The ticket was previously downloaded.
Click OK to accept the duplicate ticket number and continue processing records.
Invalid Ticket Numbers TBO displays a slightly different message if an invalid ticket numbers exist. Verify the correct ticket number and select modify to input the appropriate number.
Processing Void Ticket If Global Defaults is set to Prompt for void tickets, the ticket is voided without intervention if it's the only booking on the invoice. If there are multiple bookings, then the user will be given the option to void manually.
Unable to Void Ticket when the form of payment isn't a CC is another void type that needs intervention when the Global defaults is set to Prompt.
12

Select Modify to edit the Sale Invoice that contains the tickets to be voided.
Unprocessed Interface Records If a download is attempted again, without processing all of the previous records, TBO responds with Unprocessed Interface Records Exist.
If records were ignored during processing, they have not been removed from the Processing Log. They remain available until the next time the download is started. They can be kept or deleted from this screen. If choosing Append, add new records to the existing records in the processing log. If choosing Overwrite, replace (delete) existing records in the processing log with new records. Choose Cancel to check the Interface|Process Log to check before continuing with the new download.
Interface Troubleshooting of Errors in Downloading Clicking on download may result in an error message. Following each example are some common reasons and solutions to investigate:
Error: 32 (0)
This error often means that the spool file is empty; or rather there are no records to download. Be sure records have left the GDS queue and reside in the appropriate folder.
Error: Path Not Found 3(0) FileName: C:\spool\;Proc: FOpen() C:\spool\
This error also often means that the spool file is empty; or rather there are no records to download. Be sure records have left the GDS queue and reside in the appropriate folder. It does not mean that the spool folder can't be found, but the file within the spool folder isn't available. If reading from a network folder, there may not be a connection or permission to read, write and delete the records.
Automatic Interface Download & Processing Setup with Windows Task Scheduler Set up automatic interface download and processing procedures using Windows Task Scheduler:
13
Steps to Set Up Automatic Interface Download 1. Set up a user profile/login that will specifically be used for the automated download and processing routines. For assistance with user profile set see the help file section under Utilities|User Profile. The log in and password will be used in subsequent steps.
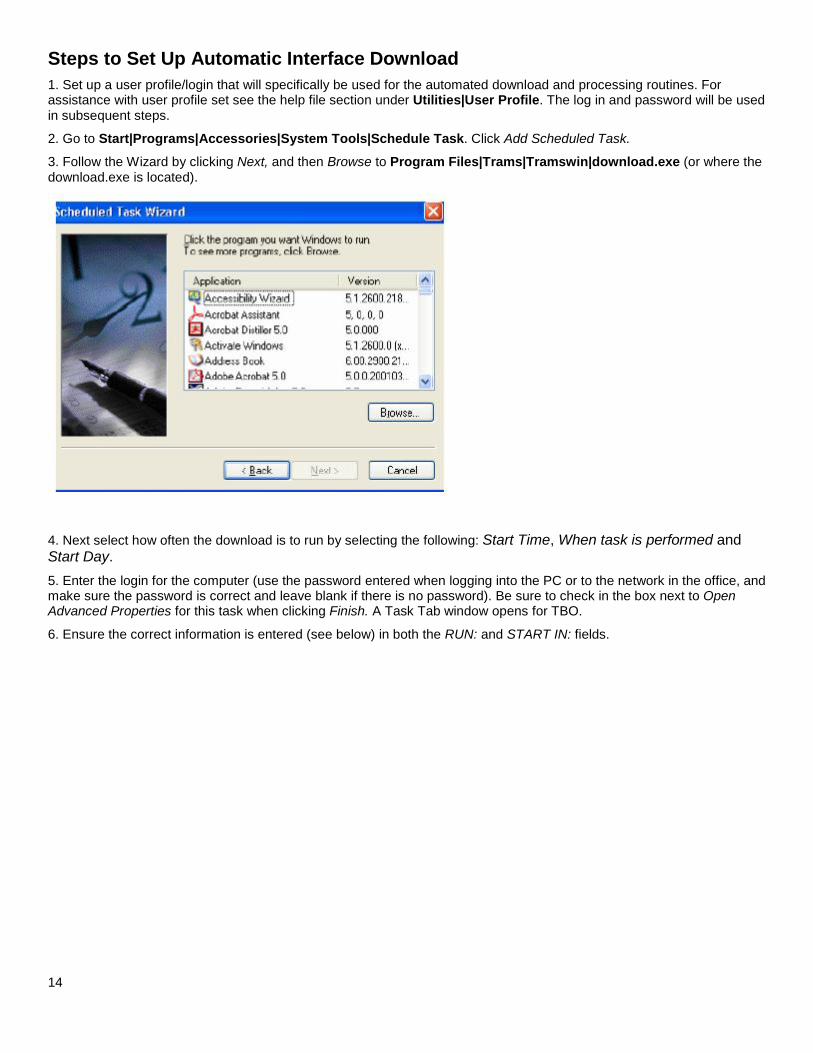
2. Go to Start|Programs|Accessories|System Tools|Schedule Task. Click Add Scheduled Task.
3. Follow the Wizard by clicking Next, and then Browse to Program Files|Trams|Tramswin|download.exe (or where the download.exe is located).
4. Next select how often the download is to run by selecting the following: Start Time, When task is performed and Start Day. 5. Enter the login for the computer (use the password entered when logging into the PC or to the network in the office, and make sure the password is correct and leave blank if there is no password). Be sure to check in the box next to Open Advanced Properties for this task when clicking Finish. A Task Tab window opens for TBO. 6. Ensure the correct information is entered (see below) in both the RUN: and START IN: fields.
14

Run: Enter the Trams Interface Download command-line (here's an example):
"C:\Program Files\Trams\Tramswin\download.exe" -username Interface -password ********* -alias Trams -CRS 2 -path c:\spool -auto
COMMAND-LINE PARAMETERS FOR EXAMPLE ABOVE
"C:\Program Files\Trams\Tramswin\download.exe" - Path to where the download.exe resides
-username Interface - User log in name
-password ******** - User password
-alias Trams - Database Alias Name
-CRS 2 - GDS System
-crs <crs no>
0=Amadeus
1=Apollo/Galileo
2=Sabre
5=Worldspan
-path c:\spool - Path to where the interface records reside
-auto - Auto download 2 12/5/2005
DOWNLOAD OPTIONS AVAILABLE TO USE IN THE COMMAND-LINE PARAMETER
-J (Read Apollo Itin)
-NU (Ignore Remarks UDIDs - all GDS)
-D (Dash optional on MS code entries - Worldspan related)
15

-NG (Ignore CC guarantee - All GDS)
-NE (Ignore e-mail updates - All GDS)
-NC (No default comm. Track FOP - All GDS)
-RC (Ignore hotel rate code - All GDS)
-NM (Worldspan specific - ignores the NM- name entry in the WS H record and reads the name from the A/1.1 level instead)
"C:\Program Files\Trams\Tramswin\download.exe -username JUDITH -password authorized -alias Trams -CRS 1 -J -NG -path c:\MIR -auto"
Important: All command line parameters after C:\Program Files\Trams\Tramswin\download.exe must have a space- (dash) before the option and "C:\Program Files\Trams\Tramswin\download.exe” must have the quotes around it.
ADDITIONAL TRAMS INTERFACE DOWNLOAD COMMAND LINE EXAMPLES WHICH CAN BE ENTERED IN THE SCHEDULER TASK SCREEN
"C:\Program Files\Trams\Tramswin\download.exe -username MIEKE -password mieke -alias Trams45 -CRS 2 -path c:\Sabre2\spool -auto"
"C:\Program Files\Trams\Tramswin\download.exe -username JUDITH -password authorized -alias Trams -CRS 5 -path c:\wspan\tairs –auto
** auto download from file works only with folders containing individual records (multiple files)
Start In: This area is defaulted to the .exe file browsed to in Step 2. Make sure it is correct.
7) Select the Schedule Tab|Advanced:
Create a separate Download Schedule for each CRS and database.
Note: To further clarify, using this method does not utilize a user license for processing. If using Interface|Download|Wait for New Records and Interface|Process|Automatic Process options within TBO, then a user license is utilized which may become more of an issue if interfacing with all 4 GDS's concurrently.
Steps to Set Up Automated Interface Processing in Windows Scheduler 16
Follow the steps above for setting up a Scheduled Task. In the Run Line enter (an example):
"C:\Program Files\Trams\Tramswin\Tramswin.exe" -username SYSDBA -password ******* -alias Trams -autointerface
If there are no records to process, the task will open and then close. If there are records to process the task will auto process and close, leaving the errors to be handled manually.
Steps to Set Up Automated Import from File in Windows Scheduler Follow the steps above for setting up a Scheduled Task. In the Run Line enter (an example):
Example: "C:\Program Files (x86)\Trams\Tramswin\tramswin.exe" -username SYSDBA -password xxxxxxx -alias TRAMS -interfacefromfile C:\INTERFACE\IMPORT.TXT
The parameter entry must specify the file path and file name. Example: -interfacefromfile C:\INTERFACE\IMPORT.TXT and would be added to the standard, required parameters. The specified file (import.txt in this example) will be deleted from the specified folder after importing it. Once the file has been imported, it is ready to be processed (same processing routine used with download/process).
17