INTERCOOLED SUPERCHARGER SYSTEM 2004 Chevrolet SSR...
56
Step-by-step instructions for installing the best in supercharger systems. Installation Instructions for: Radix INTERCOOLED SUPERCHARGER SYSTEM 2004 Chevrolet SSR Truck Magnuson Products Inc 1990 Knoll Drive, Ventura, CA. 93003 (805) 289-0044 * (805) 677-4897 fax magnusonproducts.com * magnacharger.com ATTENTION! Y our MAGNA CHARGER intercooler kit is sensitive to corrosion! Take care of if by using 50/50 anti-freeze with de-ionized water. 89-89-60-010 Rev H
Transcript of INTERCOOLED SUPERCHARGER SYSTEM 2004 Chevrolet SSR...
Step-by-step instructions for installing the best in supercharger systems.
Installation Instructions for:
RadixINTERCOOLED SUPERCHARGER SYSTEM
2004Chevrolet SSR Truck
Magnuson Products Inc1990 Knoll Drive, Ventura, CA. 93003(805) 289-0044 * (805) 677-4897 fax
magnusonproducts.com * magnacharger.com
ATTENTION!Your MAGNA CHARGER intercooler kit
is sensitive to corrosion! Take care of if by using 50/50
anti-freeze with de-ionized water.89-89-60-010 Rev H

INSTALLATION MANUALMagna ChargerRadix Intercooled Supercharger SystemGM 4.8, 5.3 & 6.0 liter engines
We encourage you to read this manual thoroughly before you begin work, for a few reasons:
A quick parts check to make certain your kit is complete (See shipper parts list in this manual). If youdiscover shipping damage or shortage, please call our office immediately.
Take a look at exactly what you are going to need in terms of tools, time, and experience.
Review our limited warranty with care.
Make sure to have 91 or higher octane fuel in the tank.
When unpacking the supercharger kit lift the supercharger assembly by the black plasticbypass actuator. This is from the factory and can be altered if used as a lifting point!
DO NOTpre-set
Tools Required
� Safety glasses
Metric wrench set
1/4” drill bit
1/4”, 3/8”, & 1/2” drive metric socket set ( standard and deep )
8mm hex (Allen) wrench
3/8” and 1/2” drive foot pound and inch pound torque wrenches
Belt tensioner wrench or 1/2” breaker bar
7/32” socket
Drill and 5/16” drill bit
Phillips and flat head screwdrivers
Fuel quick disconnect tools (included in kit)
E5 internal Torx socket
Small or angled 3/8” drill motor
Drain pan
Compressed air
�
�
�
�
�
�
�
�
�
�
�
�
�
�
7/12Page 2
2003-2004 Chevy SSR Supercharger Installation Instructions magnacharger.com

Important
Our Magna Charger kits are designed for stock engines, with stock components, in good mechanicalcondition only. Installation on worn or damaged engines is not recommended and may result in enginefailure, for which we naturally can't be responsible . Magna Charger is not responsible for the engine orconsequential damages.
Aftermarket engine re-calibration devices that modify fuel and spark curve (i.e.. programmers) are notrecommended and may cause engine damage or failure. If you have any questions, call us!
Relieve the fuel system pressure before servicing fuel system components inorder to reduce the risk of fire and personal injury. After relieving the system pressure, a small amountof fuel may be released when servicing the fuel lines or connections. In order to reduce the risk ofpersonal injury, cover the regulator and fuel line fittings with a shop towel before disconnecting. Thiswill catch any fuel that may leak out. Place the towel in an approved container when the job iscomplete, and of course, no smoking.
Magna Charger strongly recommends the following:
Clean your engine compartment before starting any engine disassembly.
Caution:
�
�
�
�
�
You must have a clean fuel filter - check and replace as needed before installation.
You must have a clean air filter -
OE type / Stock spark plugs and stock plug gap is recommended.
Start with and use only 91 octane fuel or higher.
replace every 10,000 miles.
Please remember to follow all safety rules that apply when working, including:
Wear eye protection at all times.
Do not work on a hot engine.
Be careful around fuel - use shop towels to catch any spills and dispose of
towels properly.
�
�
�
After you finish your installation and road test your vehicle, please fill out andmail the limited warranty card, so we can add you to our files (this is importantfor your protection).
7/12Page 3
2003-2004 Chevy SSR Supercharger Installation Instructions magnacharger.com
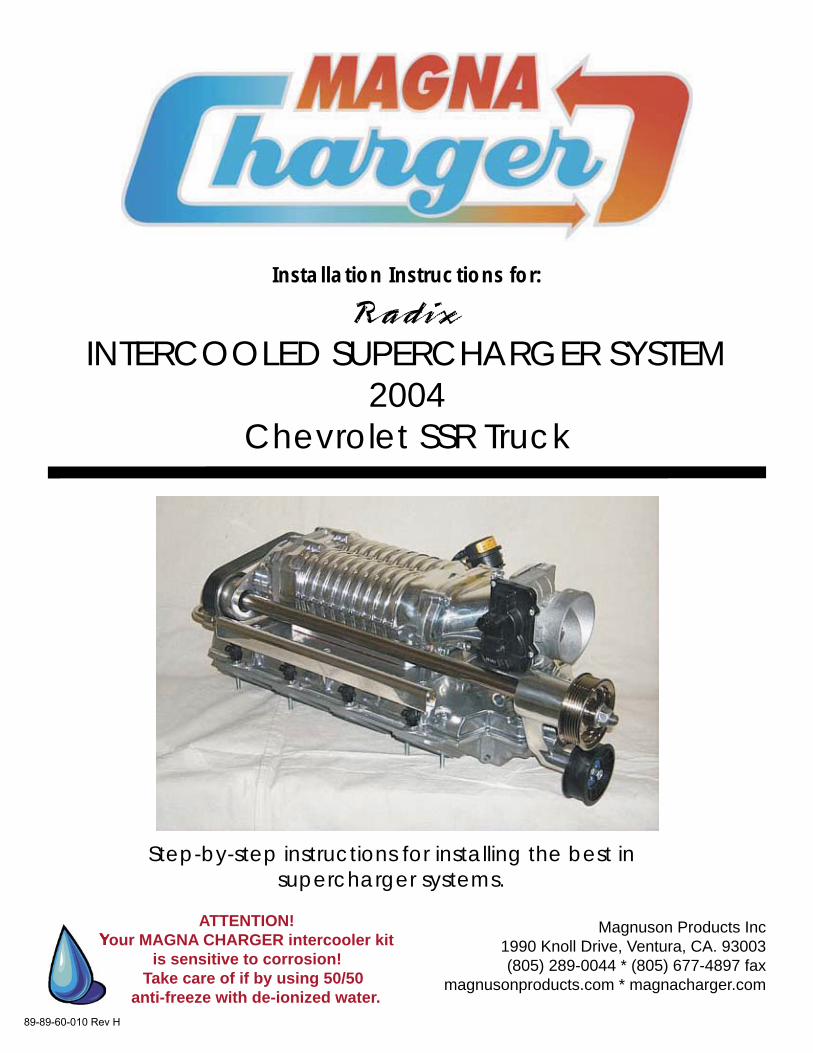
1. Under the right (passenger side) rearcorner of the vehicle, remove the twobattery access panel bolts with a 10mmsocket wrench.
2. With a 8mm wrench disconnect thenegative (-) battery cable and wrap theterminal end with electrical tape. Ensurethat the cable is far enough away from thebattery that it does not accidently touch thebattery and make contact during theinstallation.
3. On the right (passenger) side of theintake manifold, locate the fuel pressuretest port. CAUTION! The fuel in thesystem is under pressure! Relieve thepressure in the fuel system by depressingthe check valve with a screwdriver andcollecting the fuel with a shop towel.
4. Relieve the pressure in the fuel tankby removing the fuel filler cap.
7/12Page 4
2003-2004 Chevy SSR Supercharger Installation Instructions magnacharger.com

5. Here is the new fuel pump and itscomponents. Note the male and female fuellines.
Connectorhole
6. On the back face of the transmissioncross member, unclip the electricalconnector and gray harness clip from theirmounting positions.
7. Measuring 1/2” up from the bottom edgeand 2” over from the connector hole, markand drill two 1/4” holes 3” apart.
8. Using the two mounting clamps and selftapping screws, mount the fuel pump to thecross member using a 10mm socketwrench.Note that the end of the pump with theelectrical terminals is pointed towards theleft (driver) side.
7/12Page 5
2003-2004 Chevy SSR Supercharger Installation Instructions magnacharger.com
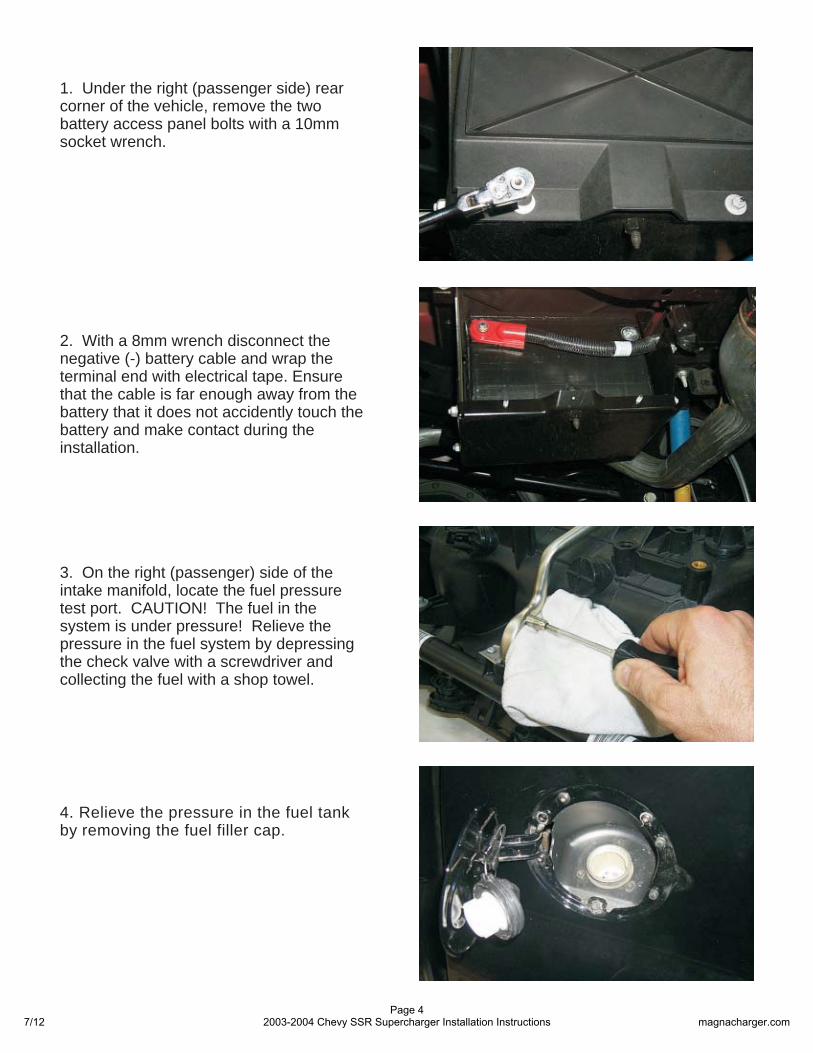
9. On the front surface of the fuel tank,facing the transmission cross member isthe vehicle fuel filter.
10. Squeeze the blue release triggers torelease the fuel line connector on the “OUT”nipple of the filter.
11. Remove the blue release trigger fromthe “OUT” nipple on the fuel filter.
12. Install the blue release trigger on themale pump connector. Insert the male fuelline into the female connector previouslyremoved from the “OUT” nipple on the filter.
Fuel filter
7/12Page 6
2003-2004 Chevy SSR Supercharger Installation Instructions magnacharger.com

15. Here is the wiring harness for the newfuel pump. Note the different connections.
16. On the pump connections, strip theinsulation back 1/4” and crimp on the ringterminals supplied.
14. Here is the completed fuel lineconnections at the fuel filter. Use the tiestraps supplied to secure the fuel lines asnecessary.
13. Install the female fuel line from thepump on the “OUT” nipple of the fuel filter.
Female line
Male line
Pump connections+ Power connection
-Ground connection
7/12Page 7
2003-2004 Chevy SSR Supercharger Installation Instructions magnacharger.com
1 . When the engine is cool, remove theradiator reservoir cap.8
Do not remove thecap if the engine is still hot or seriousinjury may result.
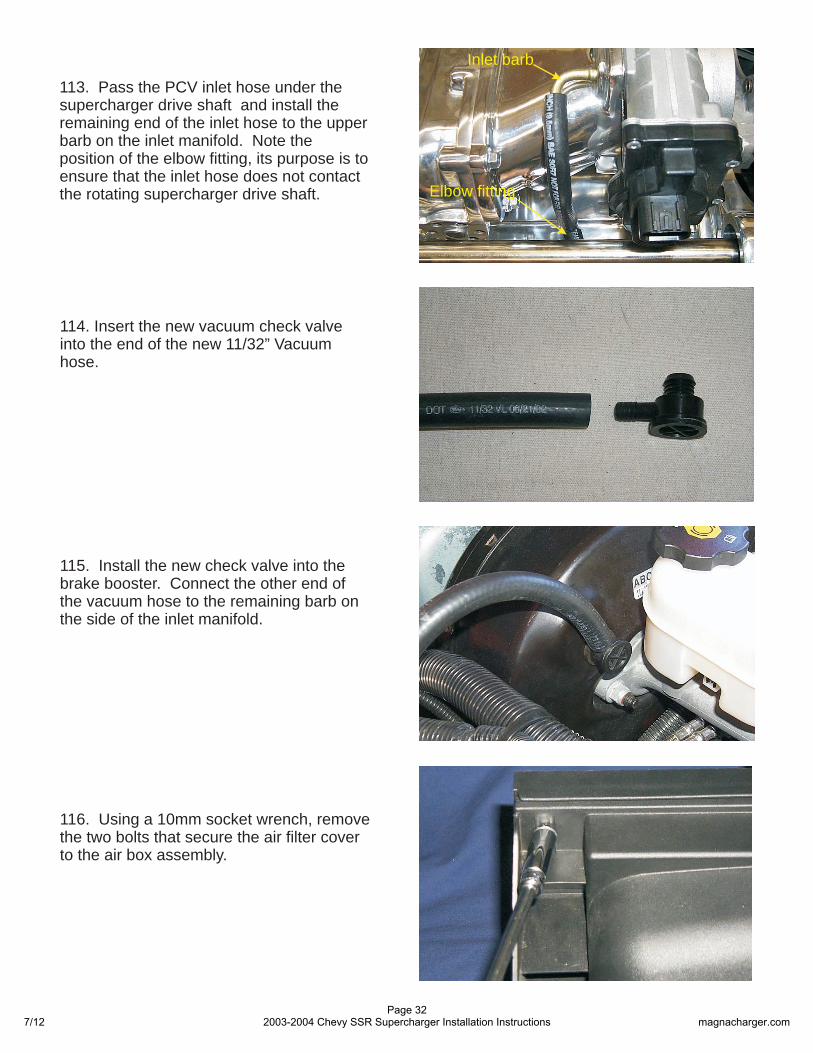
20. Remove the engine cover’s threefasteners with a 8mm socket wrench.
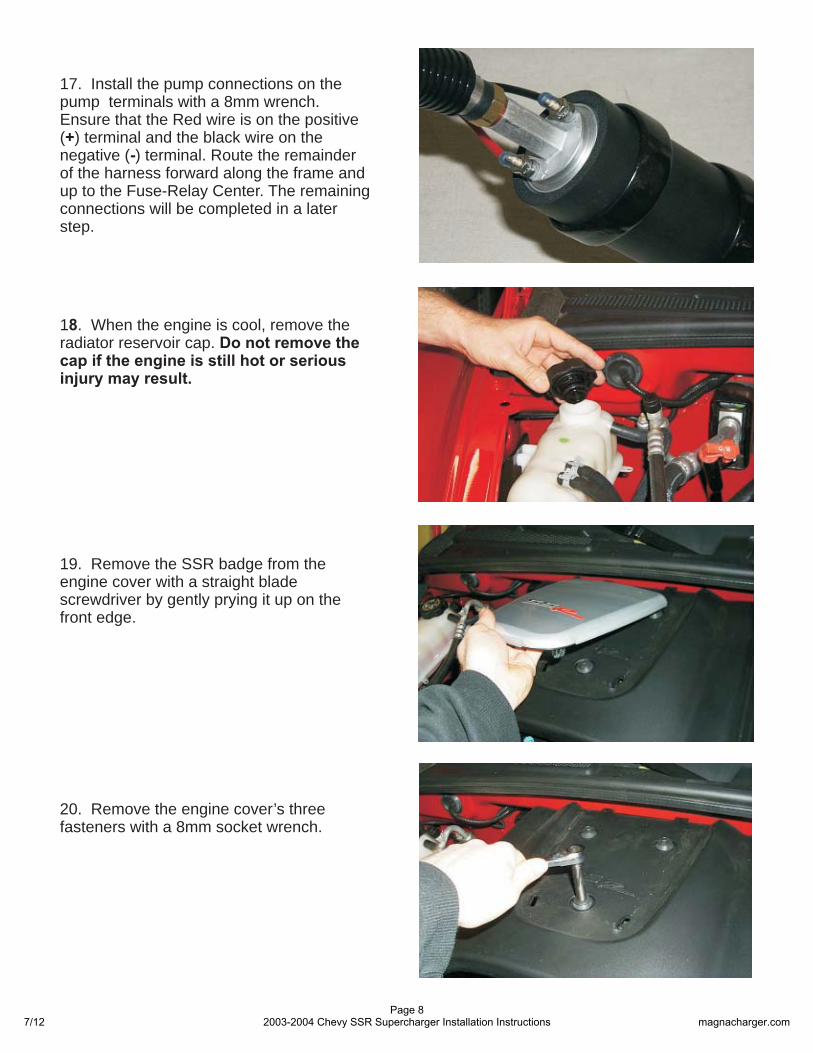
17. Install the pump connections on thepump terminals with a 8mm wrench.Ensure that the Red wire is on the positive( ) terminal and the black wire on thenegative ( ) terminal. Route the remainderof the harness forward along the frame andup to the Fuse-Relay Center. The remainingconnections will be completed in a laterstep.
+-
19. Remove the SSR badge from theengine cover with a straight bladescrewdriver by gently prying it up on thefront edge.
7/12Page 8
2003-2004 Chevy SSR Supercharger Installation Instructions magnacharger.com

21. Remove the engine cover completely,as it and the SSR badge will not be reused.
23. Unplug the Mass Air Flow meter (MAF)connector by pulling out the gray releasetrigger and the squeezing the connector.
24. Remove the two plastic push-lockrivets from the air filter apron. Do this bygently prying the center of the rivet up witha straight blade screwdriver and thenremoving the rivets completely.
22. Loosen the air filter bellows clamp andthe Mass Air Flow meter (MAF) clamp witha 8mm nut driver.
MAFClamp
7/12Page 9
2003-2004 Chevy SSR Supercharger Installation Instructions magnacharger.com
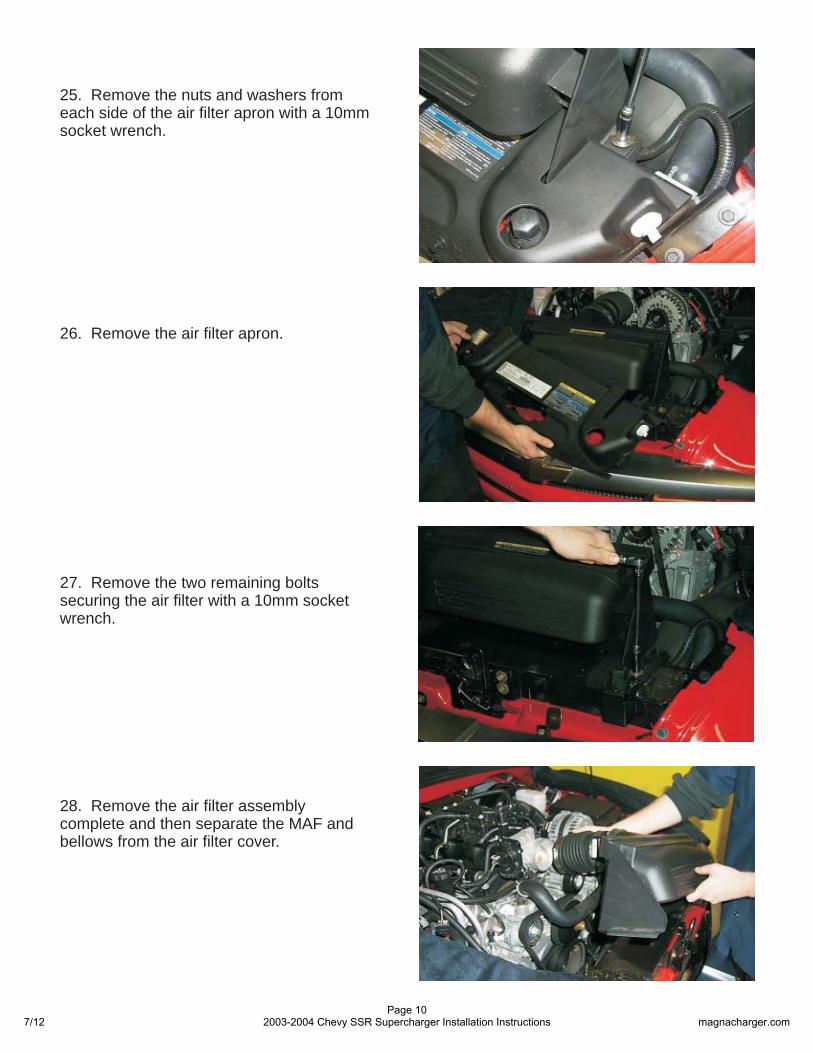
25. Remove the nuts and washers fromeach side of the air filter apron with a 10mmsocket wrench.
26. Remove the air filter apron.
27. Remove the two remaining boltssecuring the air filter with a 10mm socketwrench.
28. Remove the air filter assemblycomplete and then separate the MAF andbellows from the air filter cover.
7/12Page 10
2003-2004 Chevy SSR Supercharger Installation Instructions magnacharger.com

30. Using a long pair of pliers, remove thecoolant hoses from the bottom of thethrottle body.
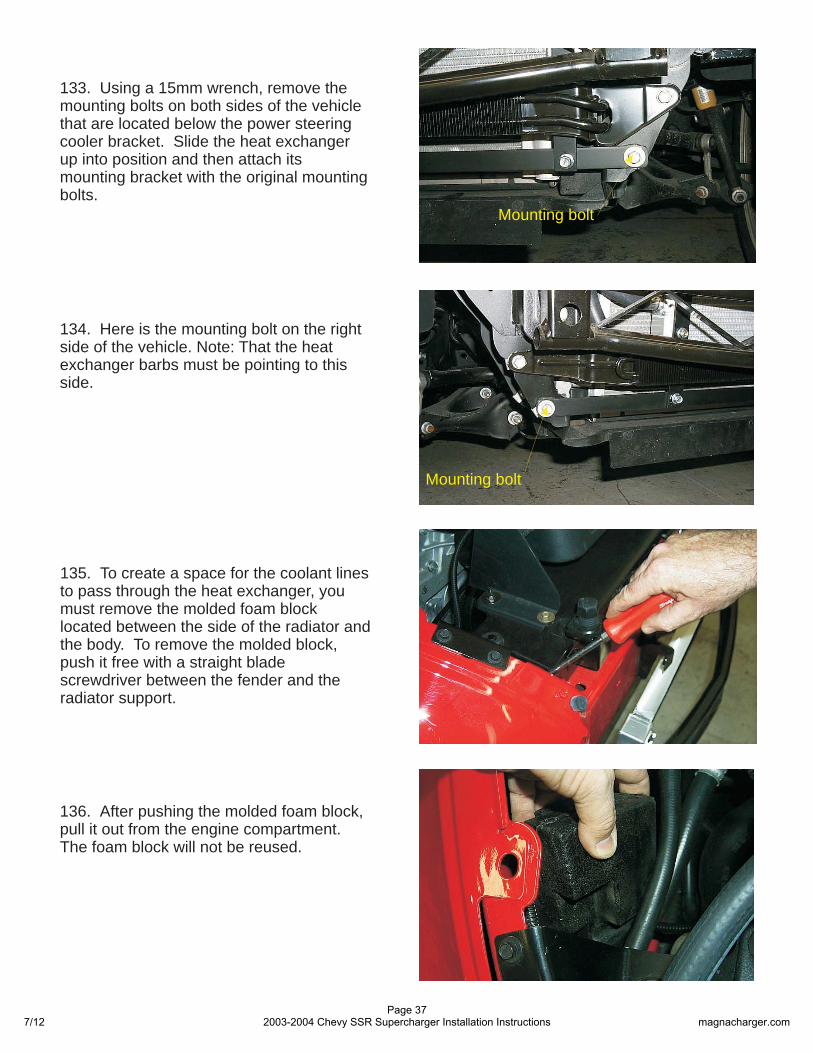
31. Remove the PCV vent hose from theintake manifold on passenger side.
32 pen the large electrical harnessretainer clip, then using a 10mm socketwrench remove the bolts holding the plasticwire harness retainer to the intake manifold.
. O
29. As it will be necessary to drain thecooling system and most SSR trucks haveno drain on the radiator, loosen the twobolts that secure the thermostat assemblywith a 10mm socket wrench. Catch thecoolant in a drain pan for reuse. Re-tightenthe thermostat bolts after draining iscomplete.
7/12Page 11
2003-2004 Chevy SSR Supercharger Installation Instructions magnacharger.com
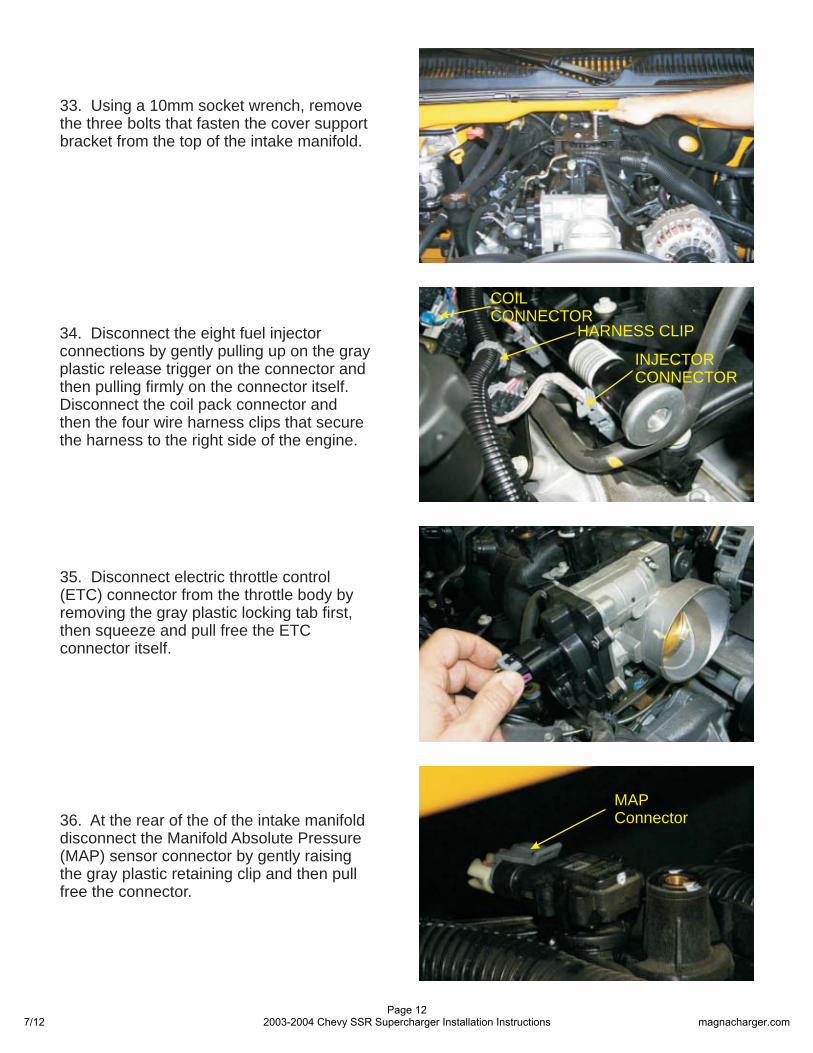
34. Disconnect the eight fuel injectorconnections by gently pulling up on the grayplastic release trigger on the connector andthen pulling firmly on the connector itself.Disconnect the coil pack connector andthen the four wire harness clips that securethe harness to the right side of the engine.
3 .5 Disconnect electric throttle control(ETC) connector from the throttle body byremoving the gray plastic locking tab first,then squeeze and pull free the ETCconnector itself.
3 .6 At the rear of the of the intake manifolddisconnect the Manifold Absolute Pressure(MAP) sensor connector by gently raisingthe gray plastic retaining clip and then pullfree the connector.
COILCONNECTOR
HARNESS CLIP
INJECTORCONNECTOR
MAPConnector
33. Using a 10mm socket wrench, removethe three bolts that fasten the cover supportbracket from the top of the intake manifold.
7/12Page 12
2003-2004 Chevy SSR Supercharger Installation Instructions magnacharger.com
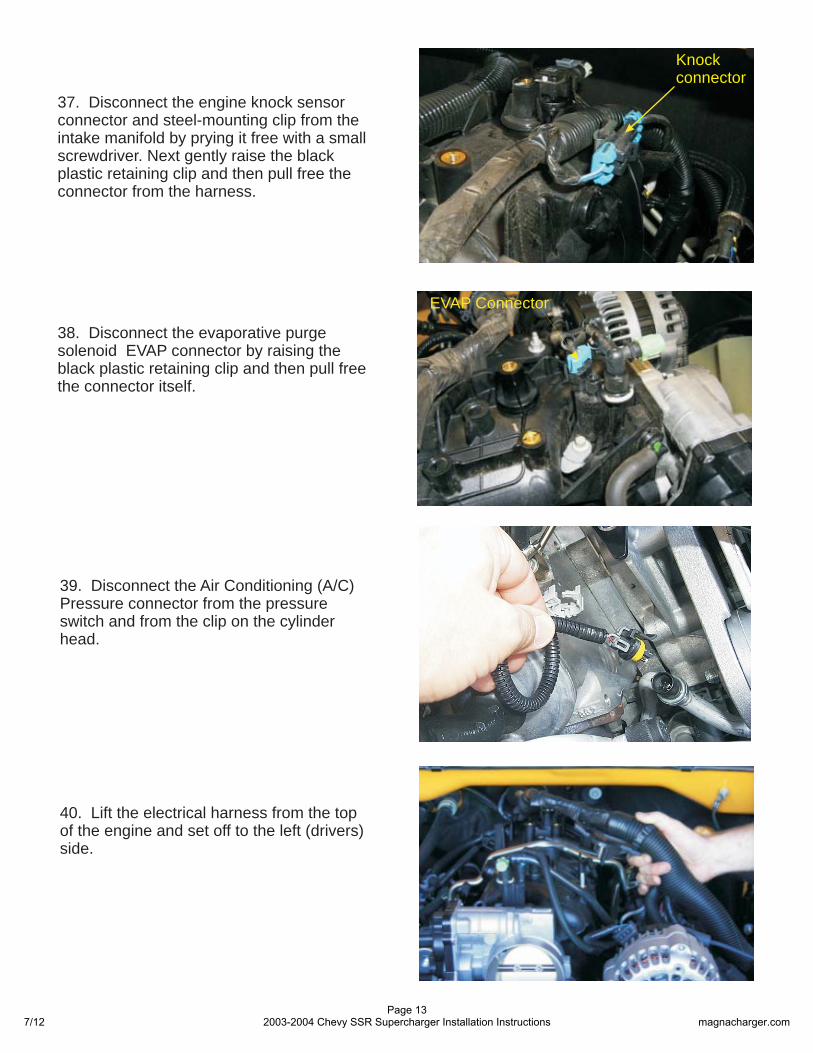
3 .8 Disconnect the evaporative purgesolenoid EVAP connector by raising theblack plastic retaining clip and then pull freethe connector itself.
EVAP Connector
3 .7 Disconnect the engine knock sensorconnector and steel-mounting clip from theintake manifold by prying it free with a smallscrewdriver. Next gently raise the blackplastic retaining clip and then pull free theconnector from the harness.
Knockconnector
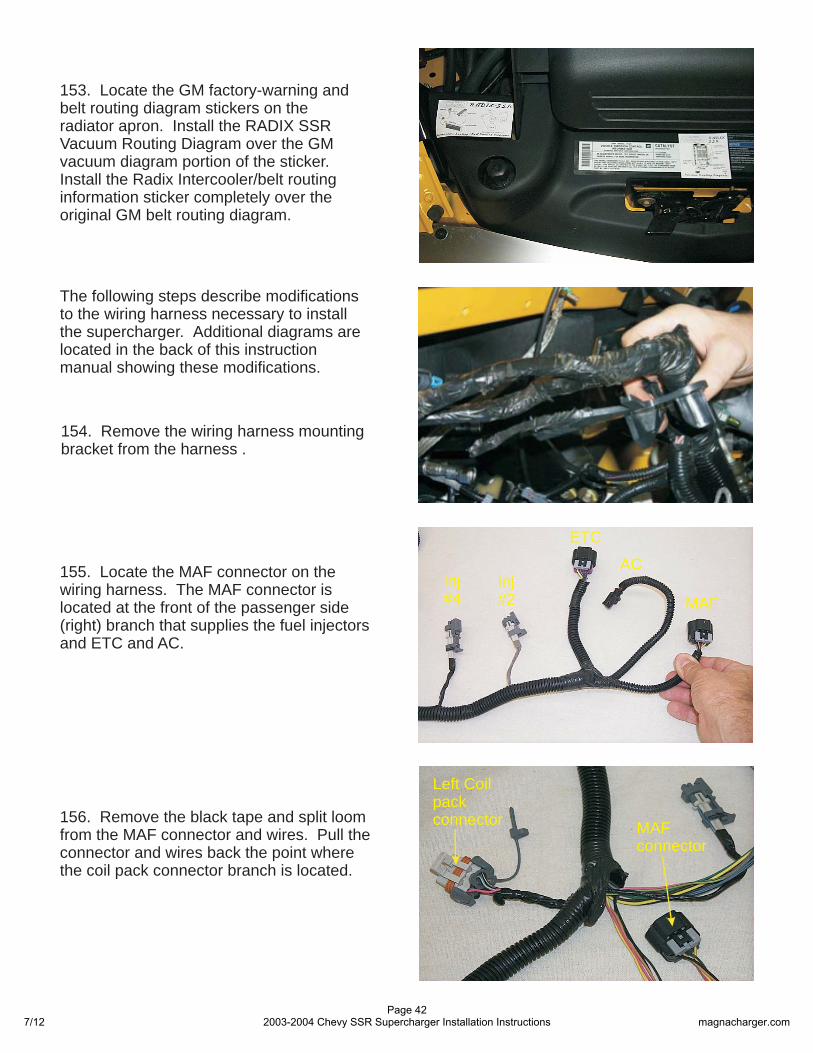
39. Disconnect the Air Conditioning (A/C)Pressure connector from the pressureswitch and from the clip on the cylinderhead.
40 ift the electrical harness from the topof the engine and set off to the left (drivers)side.
. L
7/12Page 13
2003-2004 Chevy SSR Supercharger Installation Instructions magnacharger.com
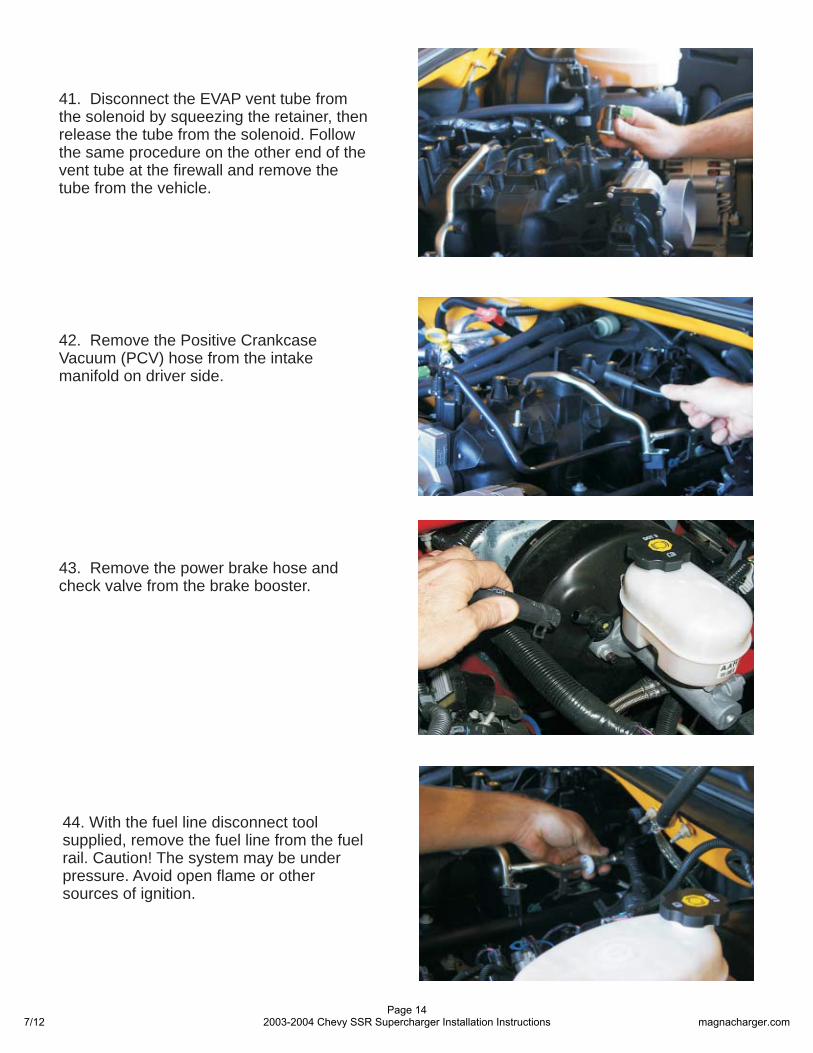
4 .3 Remove the power brake hose andcheck valve .from the brake booster
42 Remove the Positive CrankcaseVacuum (PCV) hose from the intakemanifold on driver side.
.
41 sconnect the EVAP vent tube fromthe solenoid by squeezing the retainer, thenrelease the tube from the solenoid. Followthe same procedure on the other end of thevent tube at the firewall and remove thetube from the vehicle.
. Di
4 .4 With the fuel line disconnect toolsupplied, remove the fuel line from the fuelrail. Caution! The system may be underpressure. Avoid open flame or othersources of ignition.
7/12Page 14
2003-2004 Chevy SSR Supercharger Installation Instructions magnacharger.com

4 .7 Using a vacuum cleaner, remove anydirt or debris from the intake port area. (Becareful not to get any dirt in the intakeports).
4 .6 Carefully remove the intake manifoldassembly and set aside.
4 .5 Using a 8mm socket wrench removethe ten intake manifold bolts.
4 .8 Cover the intake ports with tape orclean rags to keep dirt and objects fromentering the engine. (Remember, be clean).
7/12Page 15
2003-2004 Chevy SSR Supercharger Installation Instructions magnacharger.com
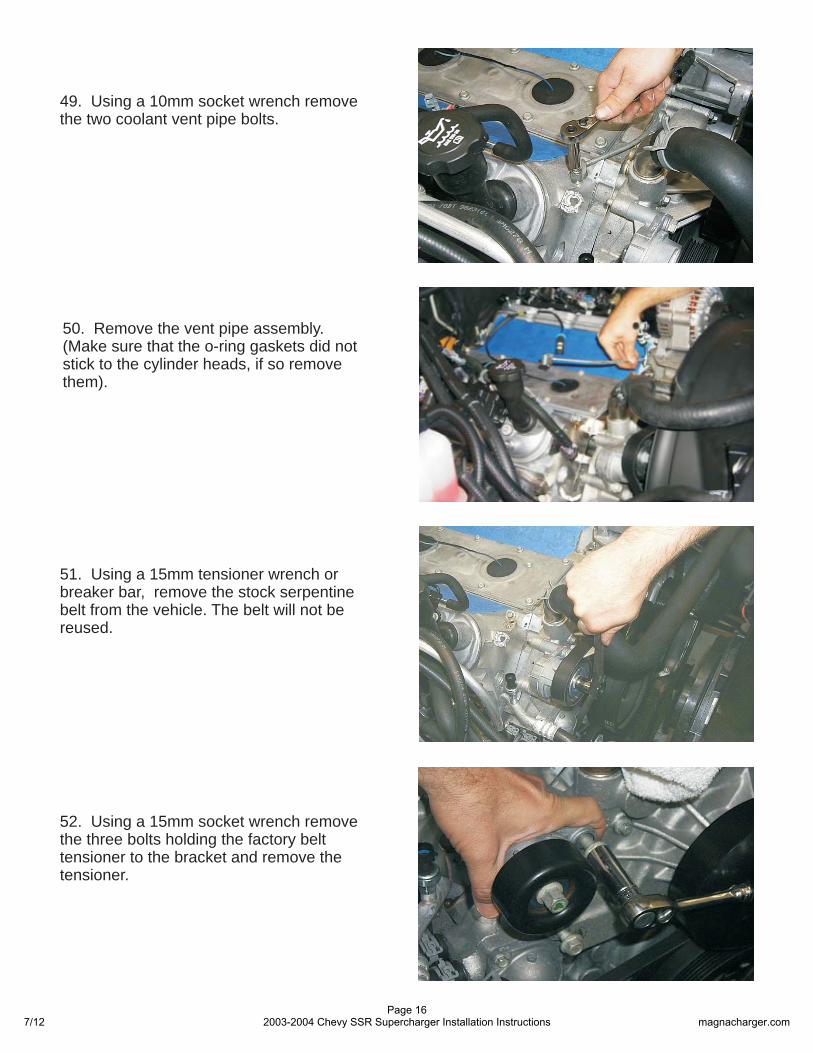
50 Remove the vent pipe assembly.(Make sure that the o-ring gaskets did notstick to the cylinder heads, if so removethem).
.
51 Using a 15mm tensioner wrench orbreaker bar, remove the stock serpentinebelt from the vehicle. The belt will not bereused.
.
4 .9 Using a 10mm socket wrench removethe two coolant vent pipe bolts.
5 .2 Using a 15mm socket wrench removethe three bolts holding the factory belttensioner to the bracket and remove thetensioner.
7/12Page 16
2003-2004 Chevy SSR Supercharger Installation Instructions magnacharger.com

5 .4 Disconnect the positive (+) batterycable from the back of the alternator with a10mm wrench. Use a 15mm socket wrenchremove the two bolts holding the alternatorto the alternator bracket and then removethe alternator.
56. For clarity this mount is shownremoved from the engine. Using a markingpen and a straight edge, mark a line asshown on the top surface of the of thealternator mount. Start the line at the left(driver’s) rear corner of the idler mount andthen to the right rear corner of the alternatormount. Continue the line at an angle for adistance of about 1-1/4” to the back edge ofthe casting behind the alternator mount.Using a suitable grinder and eye protection,remove the material up to the line.
55. It will be necessary to make clearanceon the alternator mount casting for the newmanifold to fit properly. The new manifoldshould not touch the alternator mount.These modifications can be easily donewith the mount in place.
Remove thismaterial
5 .3 Disconnect the positive ( ) batterycable from the back of the alternator with a10mm wrench.
+
7/12Page 17
2003-2004 Chevy SSR Supercharger Installation Instructions magnacharger.com
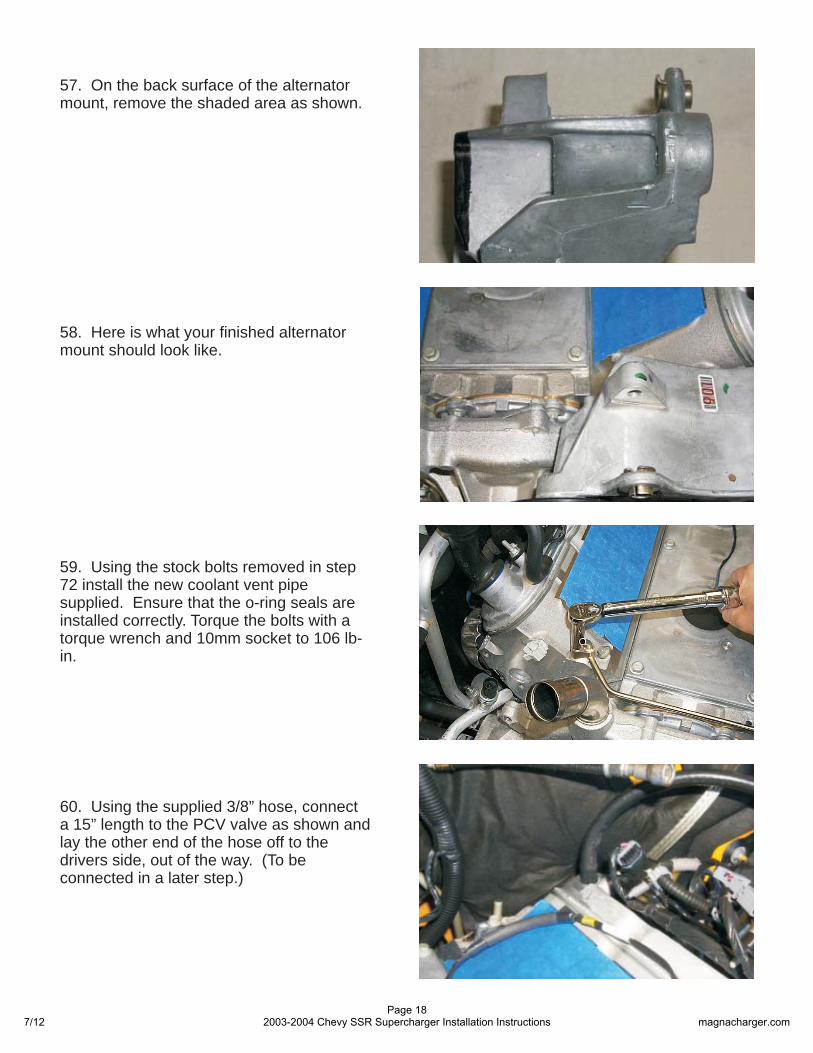
5 .9 Using the stock bolts removed in step72 install the new coolant vent pipesupplied. Ensure that the o-ring seals areinstalled correctly. Torque the bolts with atorque wrench and 10mm socket to 106 lb-in.
60. Using the supplied 3/8” hose, connecta 15” length to the PCV valve as shown andlay the other end of the hose off to thedrivers side, out of the way. (To beconnected in a later step.)
58. Here is what your finished alternatormount should look like.
57. On the back surface of the alternatormount, remove the shaded area as shown.
7/12Page 18
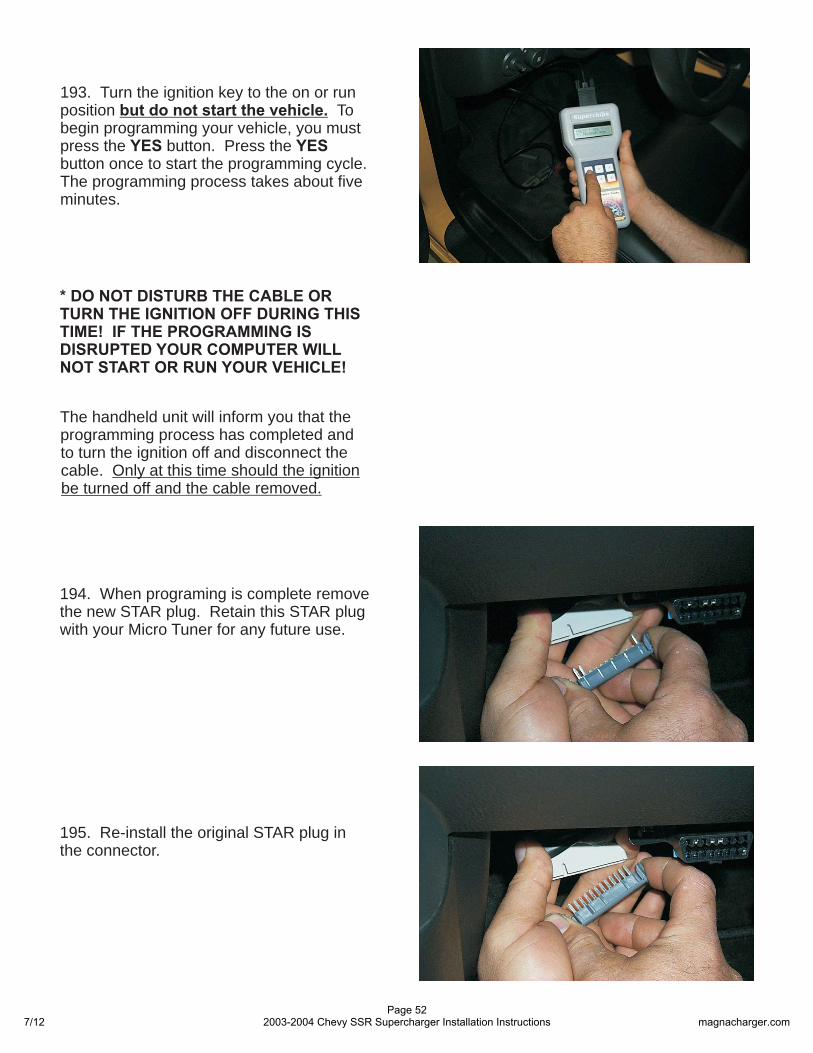
2003-2004 Chevy SSR Supercharger Installation Instructions magnacharger.com
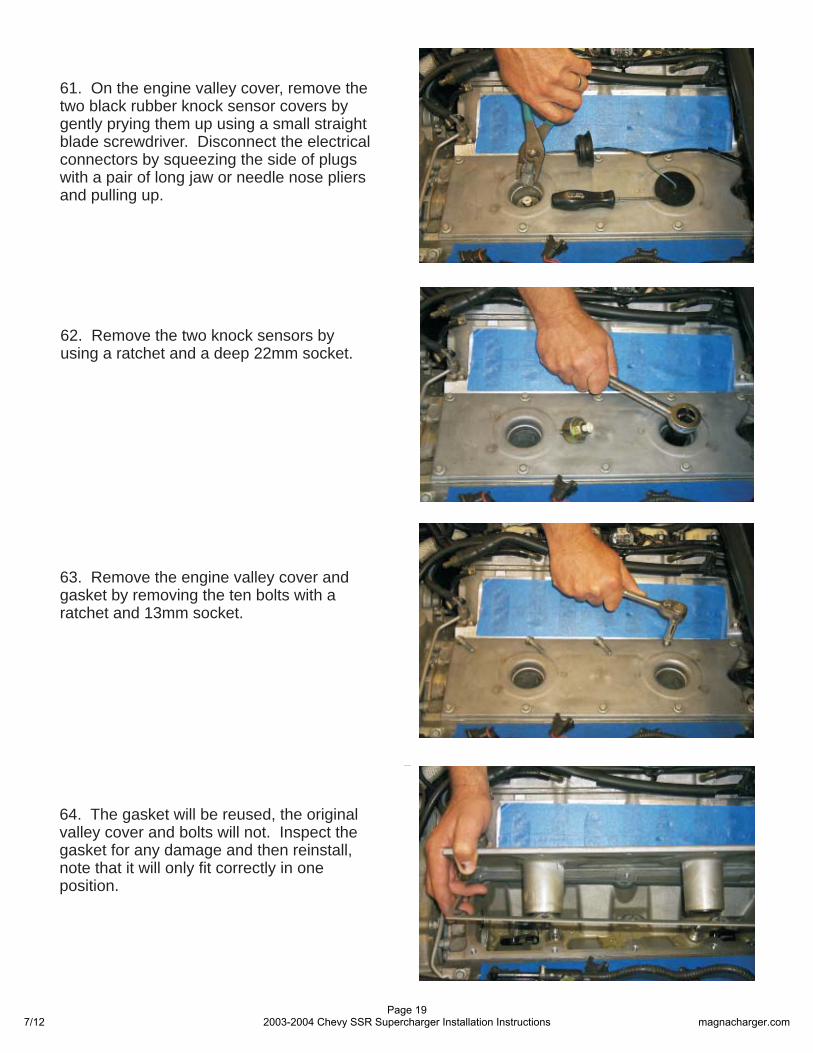
62. Remove the two knock sensors byusing a ratchet and a deep 22mm socket.
63. Remove the engine valley cover andgasket by removing the ten bolts with aratchet and 13mm socket.
64. The gasket will be reused, the originalvalley cover and bolts will not. Inspect thegasket for any damage and then reinstall,note that it will only fit correctly in oneposition.
61 On the engine valley cover, remove thetwo black rubber knock sensor covers bygently prying them up using a small straightblade screwdriver. Disconnect the electricalconnectors by squeezing the side of plugswith a pair of long jaw or needle nose pliersand pulling up.
.
7/12Page 19
2003-2004 Chevy SSR Supercharger Installation Instructions magnacharger.com
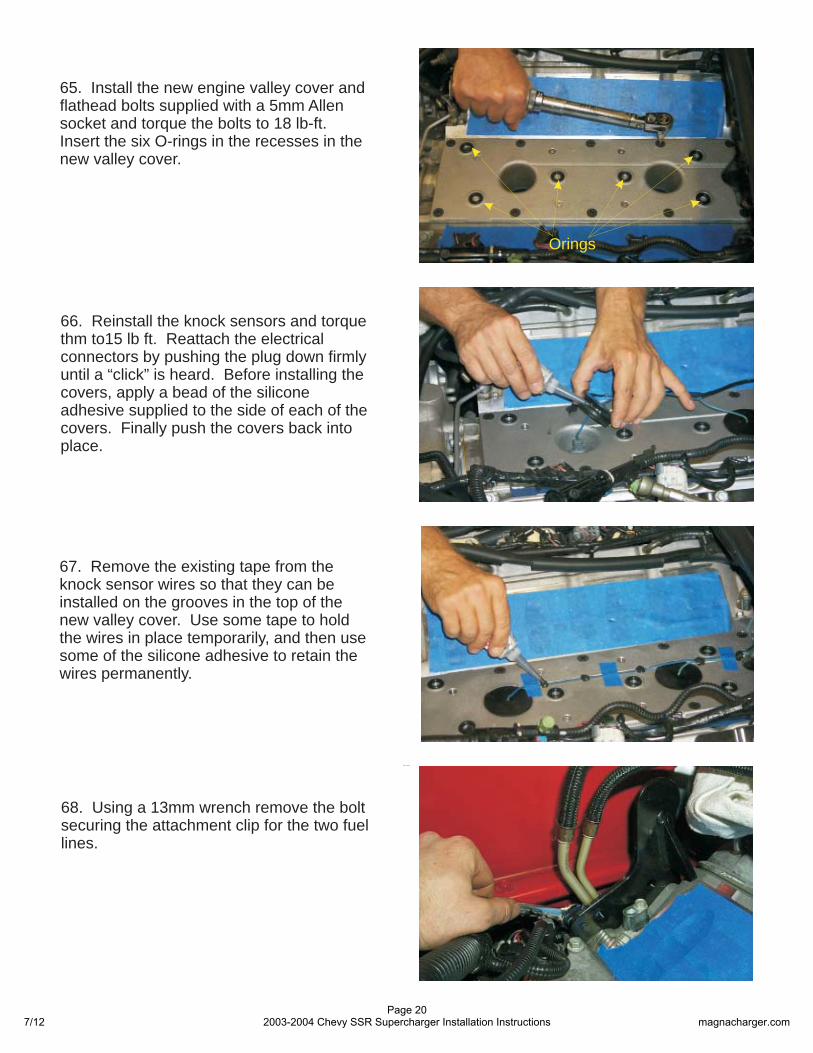
6 .6 Reinstall the knock sensors and torquethm to15 lb ft. Reattach the electricalconnectors by pushing the plug down firmlyuntil a “click” is heard. Before installing thecovers, apply a bead of the siliconeadhesive supplied to the side of each of thecovers. Finally push the covers back intoplace.
6 .7 Remove the existing tape from theknock sensor wires so that they can beinstalled on the grooves in the top of thenew valley cover. Use some tape to holdthe wires in place temporarily, and then usesome of the silicone adhesive to retain thewires permanently.
6 .8 Using a 13mm wrench remove the boltsecuring the attachment clip for the two fuellines.
65. Install the new engine valley cover andflathead bolts supplied with a 5mm Allensocket and torque the bolts to 18 lb-ft.Insert the six O-rings in the recesses in thenew valley cover.
Orings
7/12Page 20
2003-2004 Chevy SSR Supercharger Installation Instructions magnacharger.com
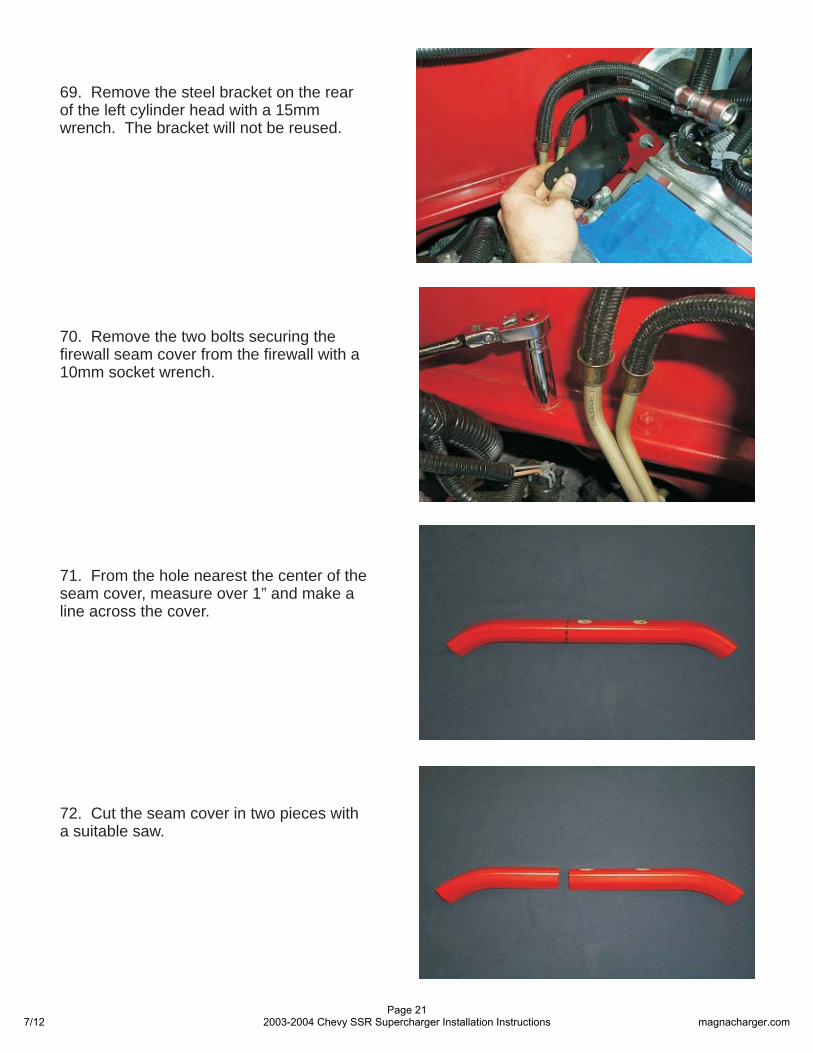
71. From the hole nearest the center of theseam cover, measure over 1” and make aline across the cover.
72. Cut the seam cover in two pieces witha suitable saw.
70. Remove the two bolts securing thefirewall seam cover from the firewall with a10mm socket wrench.
69. Remove the steel bracket on the rearof the left cylinder head with a 15mmwrench. The bracket will not be reused.
7/12Page 21
2003-2004 Chevy SSR Supercharger Installation Instructions magnacharger.com

75. The original water pump outlet tube willneed to be replaced. Remove the outlet bycutting it off. Use a suitable hacksaw andcut it off approximately 1” above the waterpump casting.
76
The object is to reduce thediameter of the stub by collapsing it not tocut it.
. Remove the remaining stub of theoutlet in the pump casting by collapsing itwithin itself.
Use a dull chisel or wide drift with ahammer to drive one side of the stub acrossand down to the other side. Take care notto damage or scratch the outlet bore of thewater pump casting.
74. Remove the upper radiator hose at theupper water pump outlet.
Bend here
73. Reinstall the longer piece of the seamcover with its fasteners in the originallocation.
7/12Page 22
2003-2004 Chevy SSR Supercharger Installation Instructions magnacharger.com
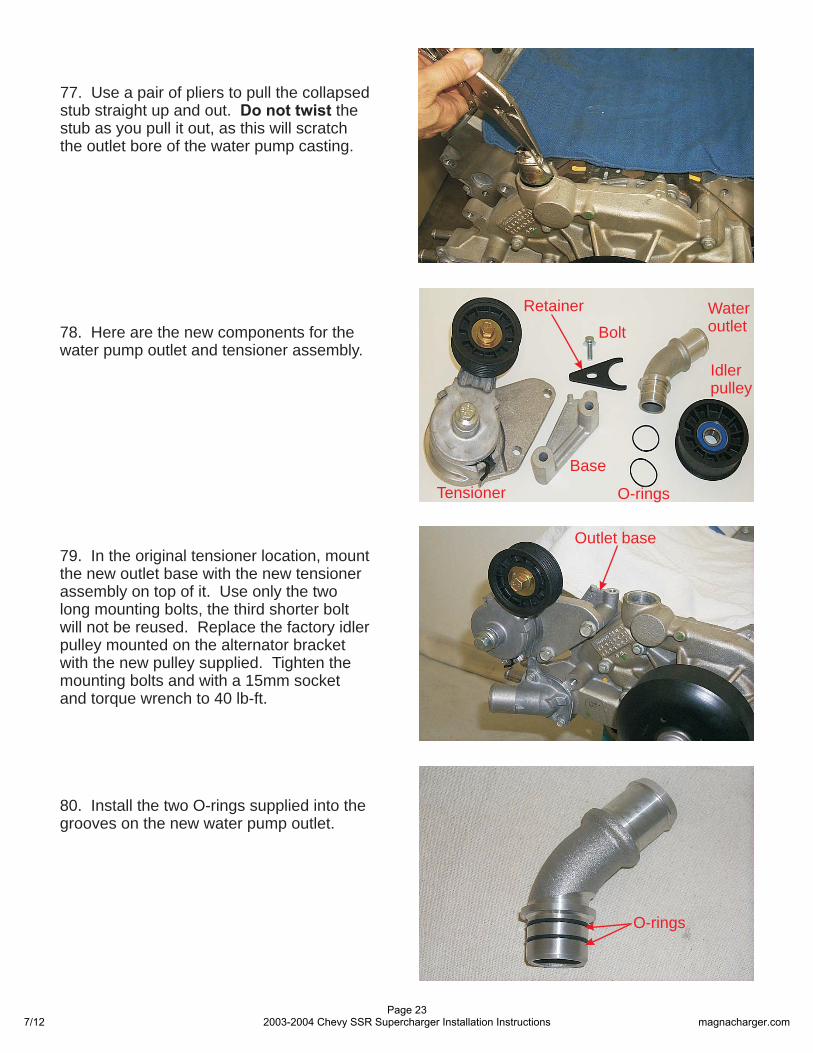
78. Here are the new components for thewater pump outlet and tensioner assembly.
80. Install the two O-rings supplied into thegrooves on the new water pump outlet.
79. In the original tensioner location, mountthe new outlet base with the new tensionerassembly on top of it. Use only the twolong mounting bolts, the third shorter boltwill not be reused. Replace the factory idlerpulley mounted on the alternator bracketwith the new pulley supplied. Tighten themounting bolts and with a 15mm socketand torque wrench to 40 lb-ft.
Outlet base
O-rings
77. Use a pair of pliers to pull the collapsedstub straight up and out. thestub as you pull it out, as this will scratchthe outlet bore of the water pump casting.
Do not twist
Retainer
Bolt
Wateroutlet
O-rings
Base
Tensioner
Idlerpulley
7/12Page 23
2003-2004 Chevy SSR Supercharger Installation Instructions magnacharger.com
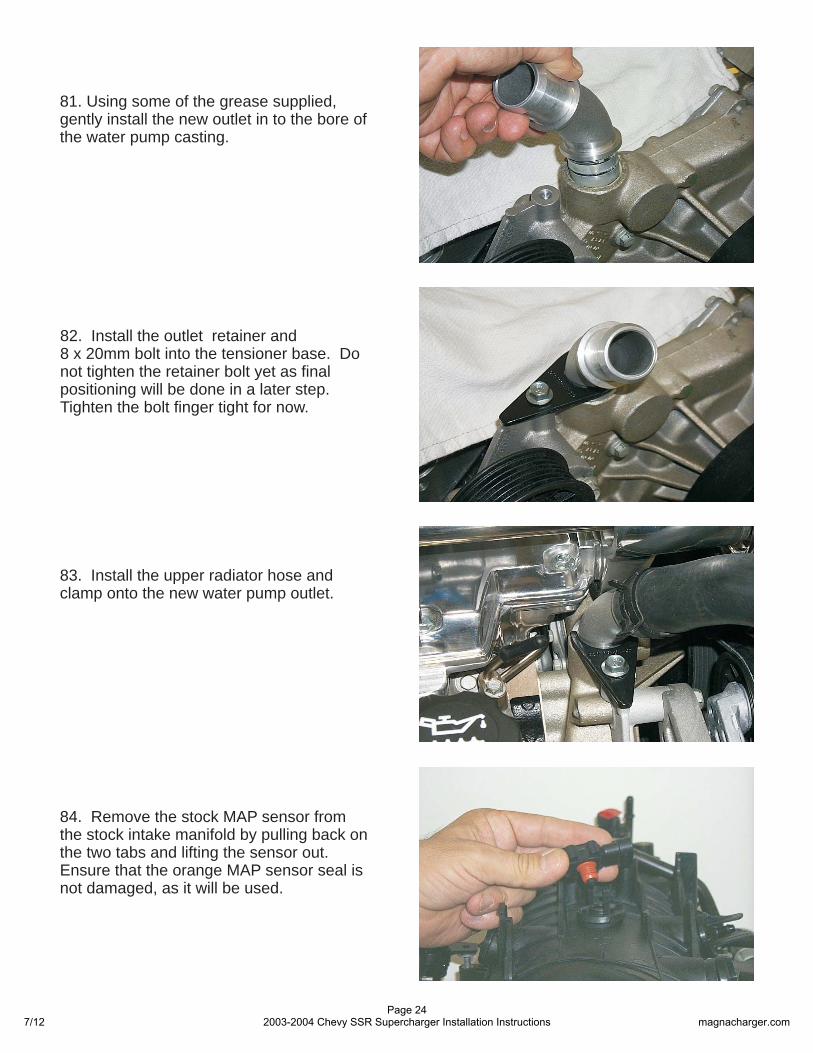
82. Install the outlet retainer and8 x 20mm bolt into the tensioner base. Donot tighten the retainer bolt yet as finalpositioning will be done in a later step.Tighten the bolt finger tight for now.
83. Install the upper radiator hose andclamp onto the new water pump outlet.
84 Remove the stock MAP sensor fromthe stock intake manifold by pulling back onthe two tabs and lifting the sensor out.Ensure that the orange MAP sensor seal isnot damaged, as it will be used.
.
81. Using some of the grease supplied,gently install the new outlet in to the bore ofthe water pump casting.
7/12Page 24
2003-2004 Chevy SSR Supercharger Installation Instructions magnacharger.com
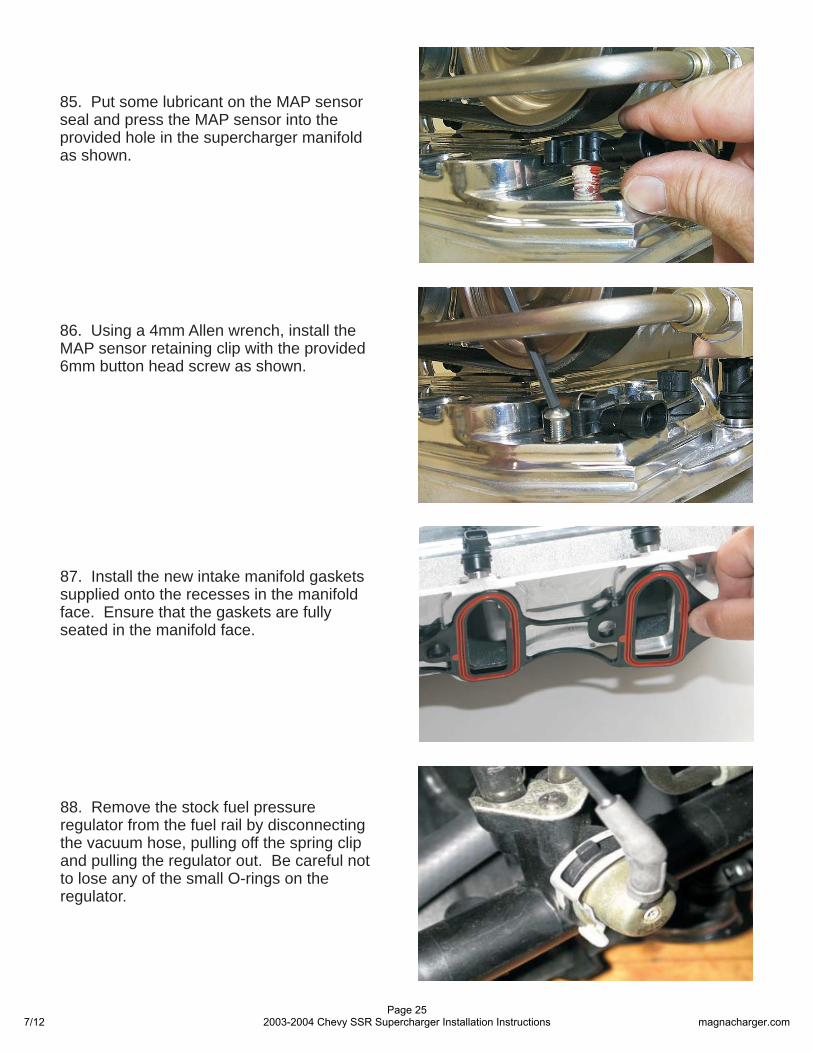
87. Install the new intake manifold gasketssupplied onto the recesses in the manifoldface. Ensure that the gaskets are fullyseated in the manifold face.
86 Using a 4mm Allen wrench, install theMAP sensor retaining clip with the provided6mm button head screw as shown.
.
88. Remove the stock fuel pressureregulator from the fuel rail by disconnectingthe vacuum hose, pulling off the spring clipand pulling the regulator out. Be careful notto lose any of the small O-rings on theregulator.
85 ut some lubricant on the MAP sensorseal and press the MAP sensor into theprovided hole in the supercharger manifoldas shown.
. P
7/12Page 25
2003-2004 Chevy SSR Supercharger Installation Instructions magnacharger.com

90. Using a small amount of grease or oillubricate the two O-rings on the fuelpressure regulator and push it into the newsupplied fuel manifold as shown.
91. Using a pair of C-clip pliers install thenew supplied C-clip into the fuel manifold asshown. (Make sure that the clip seats intothe machined grove in the manifold.)
92 Apply a small amount of grease to thenew supplied fuel manifold O-ring and set inthe machined recessed area on the newdriver’s side fuel rail as shown.
.
89. Make sure that the two O-rings and thescreen filter is complete as shown.
7/12Page 26
2003-2004 Chevy SSR Supercharger Installation Instructions magnacharger.com
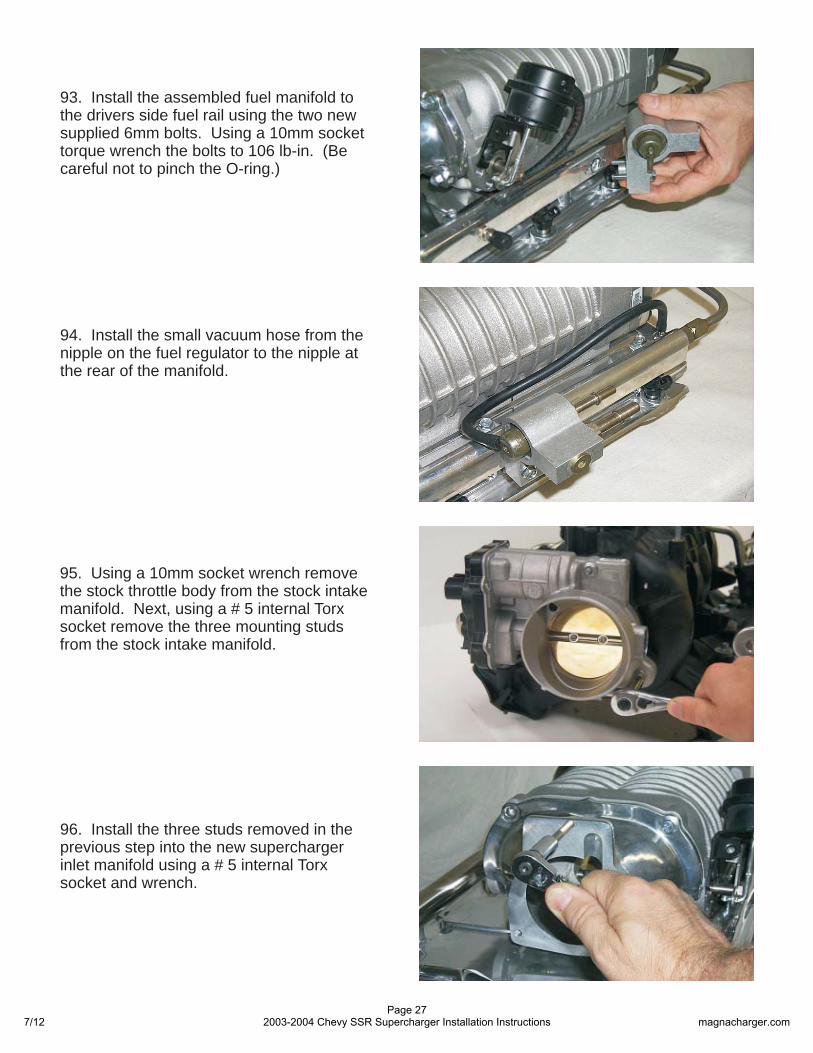
94. Install the small vacuum hose from thenipple on the fuel regulator to the nipple atthe rear of the manifold.
95 Using a 10mm socket wrench removethe stock throttle body from the stock intakemanifold. Next, using a # 5 internal Torxsocket remove the three mounting studsfrom the stock intake manifold.
.
96 Install the three studs removed in theprevious step into the new superchargerinlet manifold using a # 5 internal Torxsocket and wrench.
.
93 Install the assembled fuel manifold tothe drivers side fuel rail using the two newsupplied 6mm bolts. Using a 10mm sockettorque wrench the bolts to 106 lb-in. (Becareful not to pinch the O-ring.)
.
7/12Page 27
2003-2004 Chevy SSR Supercharger Installation Instructions magnacharger.com
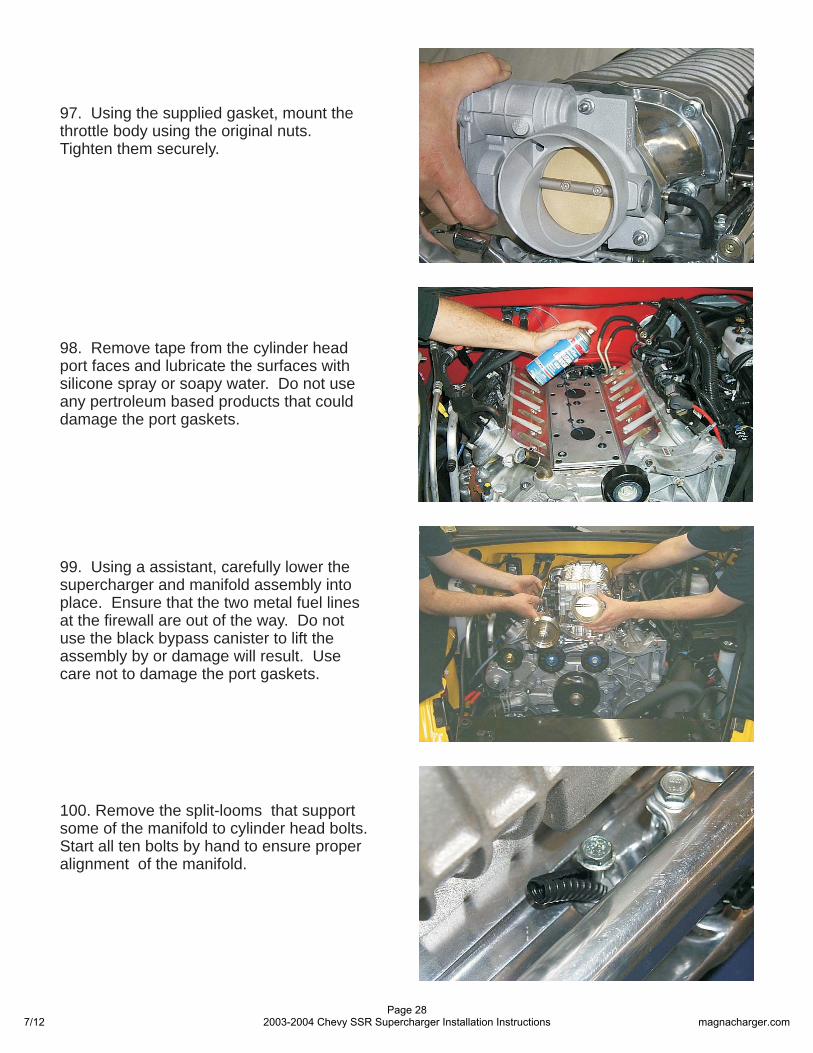
98. Remove tape from the cylinder headport faces and lubricate the surfaces withsilicone spray or soapy water. Do not useany pertroleum based products that coulddamage the port gaskets.
99
Ensure that the two metal fuel linesat the firewall are out of the way. Do notuse the black bypass canister to lift theassembly by or damage will result.
. Using a assistant, carefully lower thesupercharger and manifold assembly intoplace.
Usecare not to damage the port gaskets.
97. Using the supplied gasket, mount thethrottle body using the original nuts.Tighten them securely.
100. Remove the split-looms that supportsome of the manifold to cylinder head bolts.Start all ten bolts by hand to ensure properalignment of the manifold.
7/12Page 28
2003-2004 Chevy SSR Supercharger Installation Instructions magnacharger.com

102 Push the fuel line connectors on tothe fuel manifold. Ensure that the fuel lineis pushed all the way on. Pull on theconnectors to check that they are secure,you should not be able to remove theconnector unless you use the removal tool.
.
103 Remove the EVAP solenoid from thestock manifold with a 10mm socket wrench.
.
104. Install the purge solenoid on the newmounting bracket with its original mountingbolt tightened securely.
Mounting bracket
101. Torque all ten bolts that secure themanifold to the cylinder heads graduallyand evenly to a torque of 89 lb-in. Use a10mm socket and torque wrench.
7/12Page 29
2003-2004 Chevy SSR Supercharger Installation Instructions magnacharger.com

10 . Insert the EVAP connector supplied6 inthe remaining end of the 5/16” hose andsecure it with a #4 clamp.
EVAPConnector
#4 clamp 5/16”
10 . From the remaining length of 3/8hose cut a ” length and install it on onebarb of the new 3/8” “T” connectorConnect the hose previously installed on
in step 5 to the opposite barb.Attach the purge solenoid hose to the lowerbarb.
7 ”5
.
valve cover 9
3/8” “T”Fitting
Hose to PCV connectionat valve cover
Purge solenoid
108. Here is the EVAP and PCV hoseconnections on the left side of theengine.
Barb on inetmanifold
PCV onvalve cover
#4 clamp
#4 clamp
3/8”hose 5/16” hose
EVAP atfirewall
105. From the length of 3/8” hose, cut a 9”length and insert one end on the large barbof the mounting bracket. On the small barbof the solenoid insert one end of the 15”length of 5/16” hose and secure it with awith a #4 clamp.
3/8” hose 5/16” hose
#4 clamp
7/12Page 30
2003-2004 Chevy SSR Supercharger Installation Instructions magnacharger.com
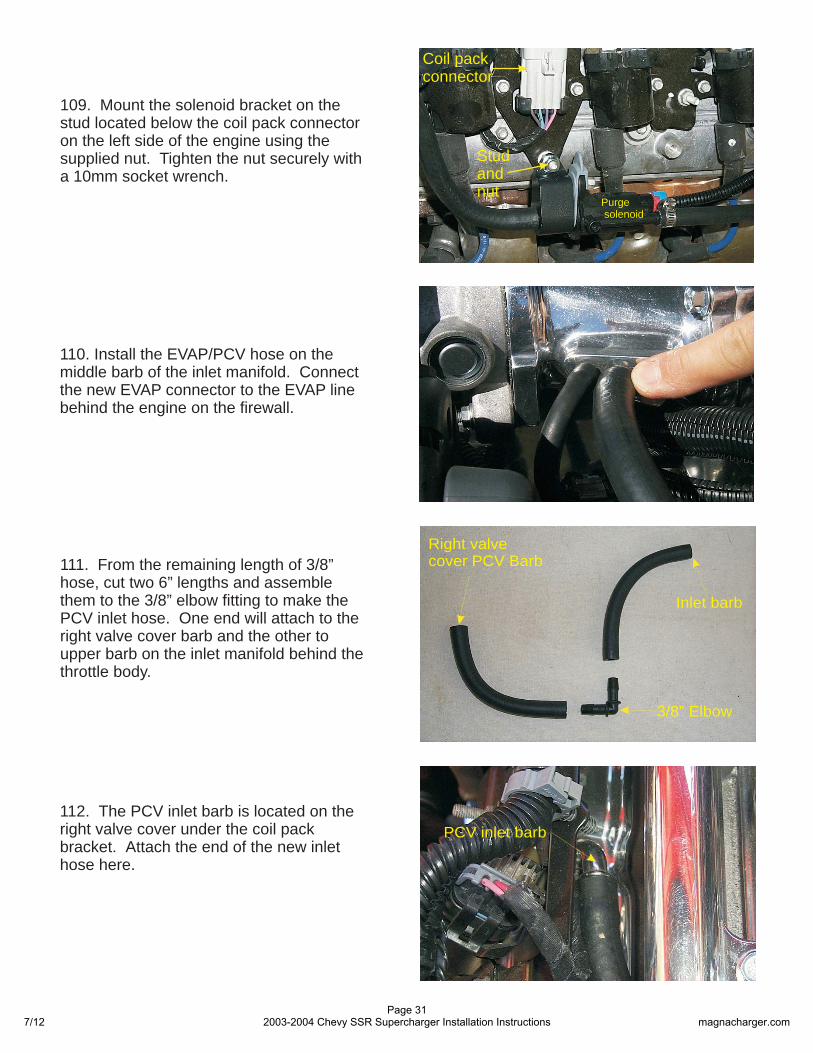
110. Install the EVAP/PCV hose on themiddle barb of the inlet manifold. Connectthe new EVAP connector to the EVAP linebehind the engine on the firewall.
111. From the remaining length of 3/8”hose, cut two 6” lengths and assemblethem to the 3/8” elbow fitting to make thePCV inlet hose. One end will attach to theright valve cover barb and the other toupper barb on the inlet manifold behind thethrottle body.
3/8” Elbow
Right valvecover PCV Barb
Inlet barb
112. The PCV inlet barb is located on theright valve cover under the coil packbracket. Attach the end of the new inlethose here.
PCV inlet barb
109. Mount the solenoid bracket on thestud located below the coil pack connectoron the left side of the engine using thesupplied nut. Tighten the nut securely witha 10mm socket wrench.
Coil packconnector
Studandnut
Purgesolenoid
7/12Page 31
2003-2004 Chevy SSR Supercharger Installation Instructions magnacharger.com
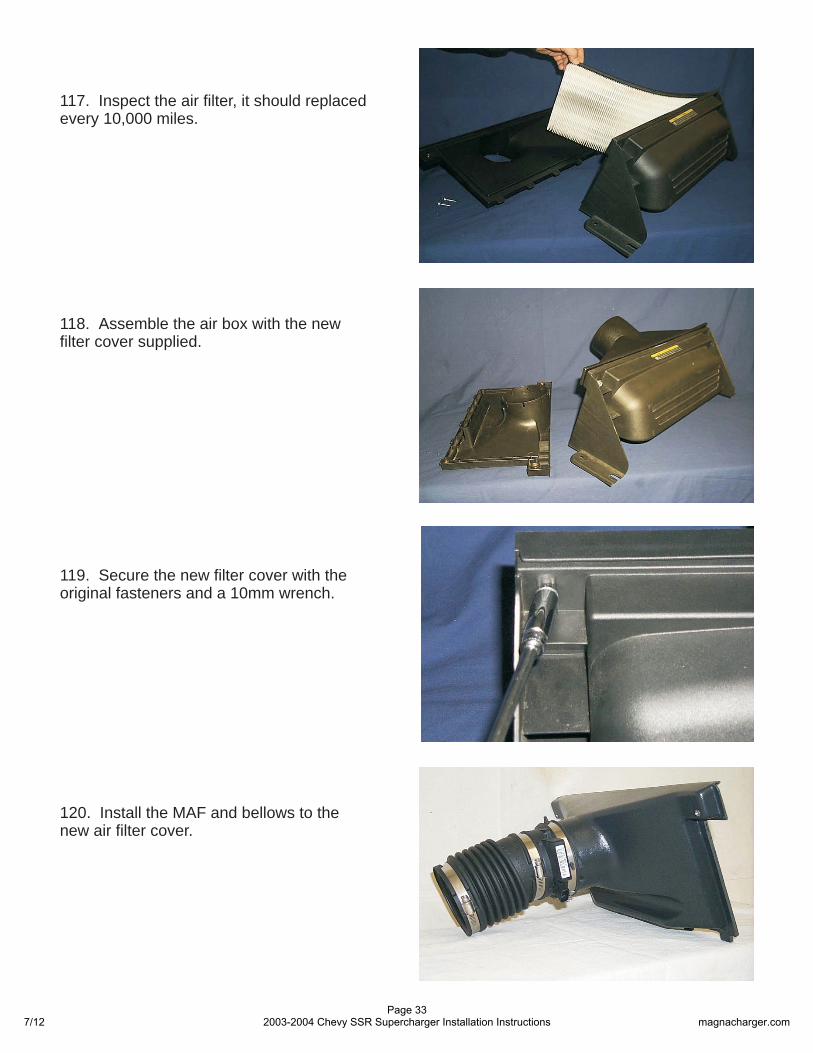
114. Insert the new vacuum check valveinto the end of the new 11/32” Vacuumhose.
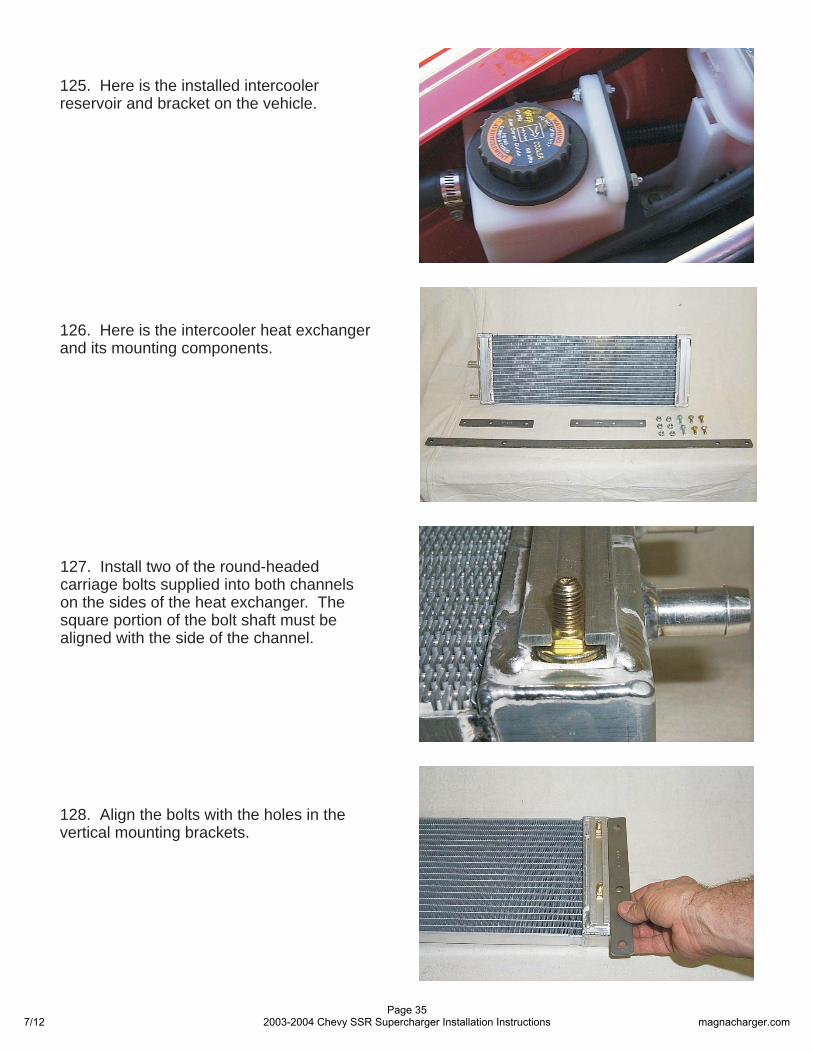
116. Using a 10mm socket wrench, removethe two bolts that secure the air filter coverto the air box assembly.
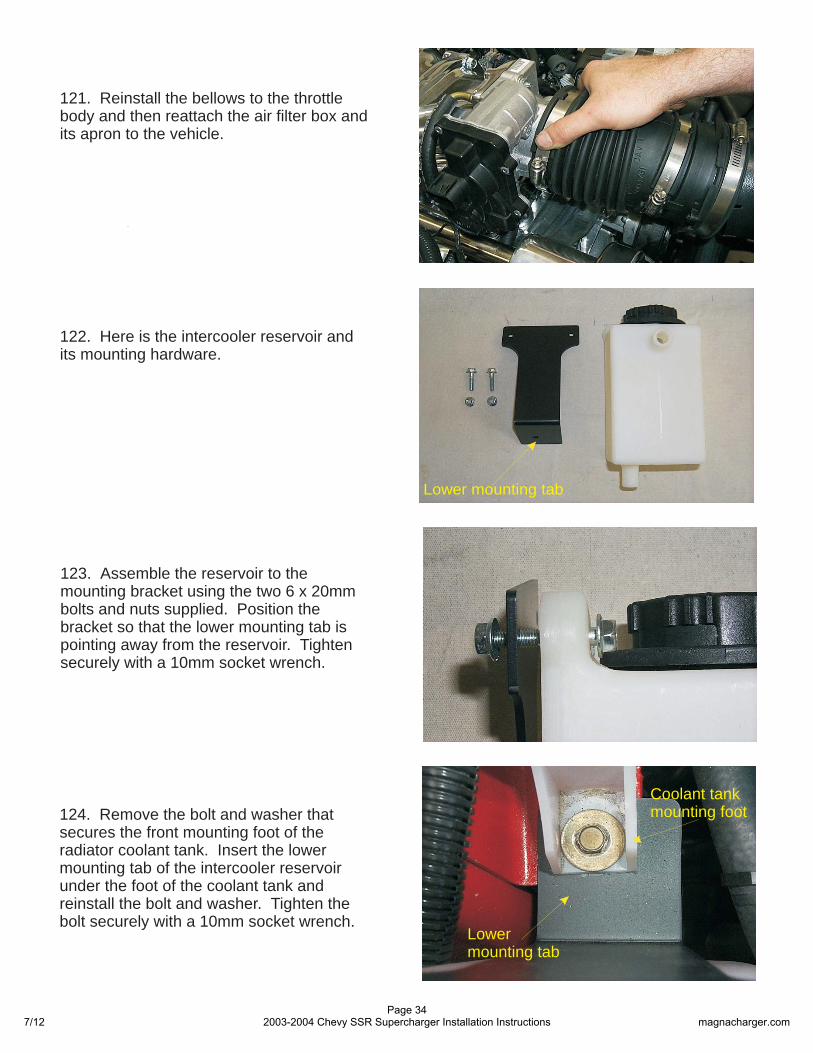
115. Install the new check valve into thebrake booster. Connect the other end ofthe vacuum hose to the remaining barb onthe side of the inlet manifold.
113 Pass the PCV inlet hose under thesupercharger drive shaft and i
Note theposition of the elbow fitting, its purpose is toensure that the inlet hose does not contactthe rotating supercharger drive shaft.
nstall theremaining end of the inlet hose to the upperbarb on the inlet manifold.
.
Inlet barb
Elbow fitting
7/12Page 32
2003-2004 Chevy SSR Supercharger Installation Instructions magnacharger.com
1 .19 Secure the new filter cover with theoriginal fasteners and a 10mm wrench.
1 . A18 ssemble the air box with the newfilter cover supplied.
1 .20 Install the MAF and bellows to thenew air filter cover.
1 .17 Inspect the air filter, it should replacedevery 10,000 miles.
7/12Page 33
2003-2004 Chevy SSR Supercharger Installation Instructions magnacharger.com
Lower mounting tab
122. Here is the intercooler reservoir andits mounting hardware.
123. Assemble the reservoir to themounting bracket using the two 6 x 20mmbolts and nuts supplied. Position thebracket so that the lower mounting tab ispointing away from the reservoir. Tightensecurely with a 10mm socket wrench.
124. Remove the bolt and washer thatsecures the front mounting foot of theradiator coolant tank. Insert the lowermounting tab of the intercooler reservoirunder the foot of the coolant tank andreinstall the bolt and washer. Tighten thebolt securely with a 10mm socket wrench.
Lowermounting tab
Coolant tankmounting foot
1 .21 Reinstall the bellows to the throttlebody and then reattach the air filter box andits apron to the vehicle.
7/12Page 34
2003-2004 Chevy SSR Supercharger Installation Instructions magnacharger.com
126. Here is the intercooler heat exchangerand its mounting components.
127. Install two of the round-headedcarriage bolts supplied into both channelson the sides of the heat exchanger. Thesquare portion of the bolt shaft must bealigned with the side of the channel.
128. Align the bolts with the holes in thevertical mounting brackets.
125. Here is the installed intercoolerreservoir and bracket on the vehicle.
7/12Page 35
2003-2004 Chevy SSR Supercharger Installation Instructions magnacharger.com

130. Install the cross member to thevertical brackets with the 8 x 20mm boltssupplied. Tighten securely with a 13mmwrench.
8 X 20mmbolt
131. Here is the completed heat exchangerready for installation. Note: That the heatexchanger barbs and long end of the crossmember are on the right side.
Rightside
132. Install the heat exchanger assemblyby sliding the complete assembly up fromunderneath the vehicle between the powersteering cooler and the A/C condenser.The nose of the vehicle has been removedfor clarity only. You do not have to removethe nose to install the heat exchanger.
129. Torque the mounting nuts to 18 ft-lbswith a 13mm torque wrench.
7/12Page 36
2003-2004 Chevy SSR Supercharger Installation Instructions magnacharger.com
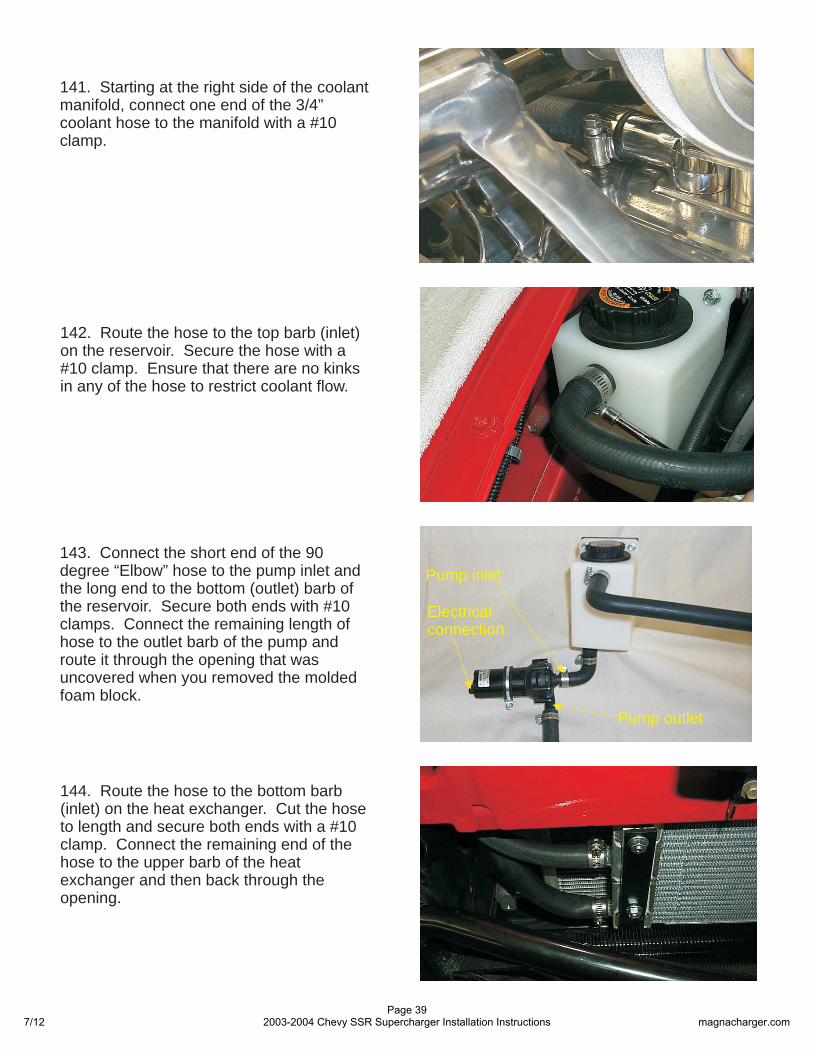
134. Here is the mounting bolt on the rightside of the vehicle. Note: That the heatexchanger barbs must be pointing to thisside.
Mounting bolt
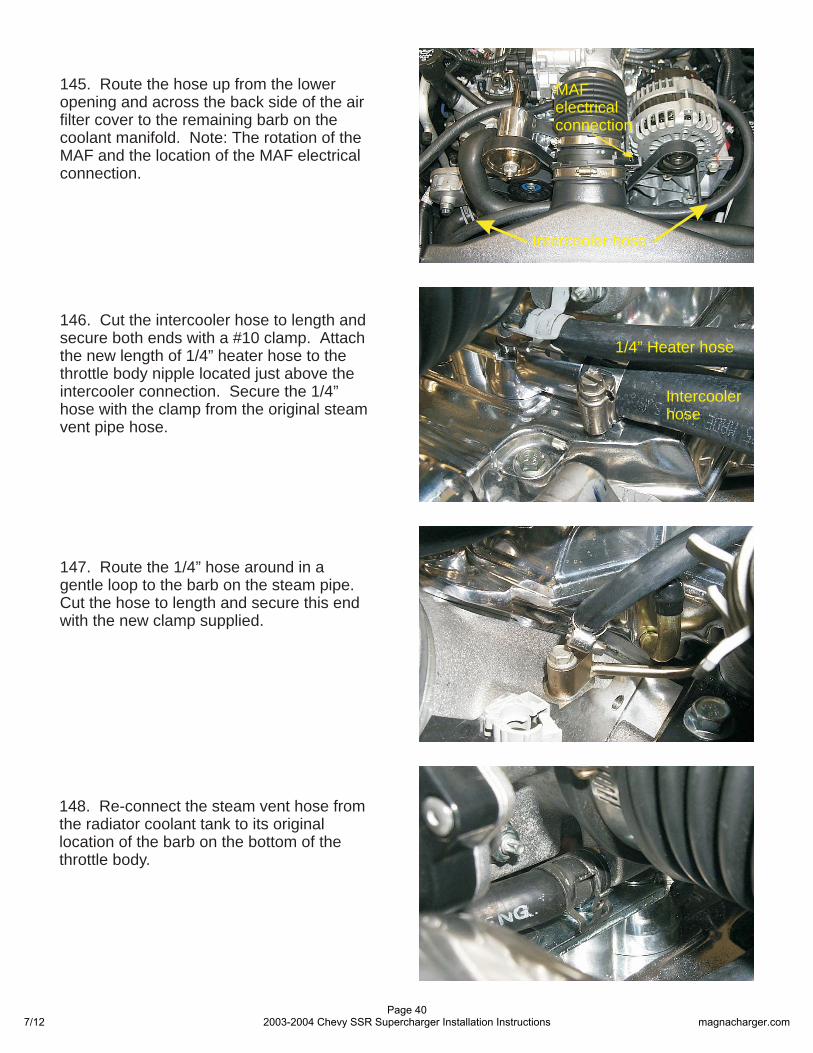
135. To create a space for the coolant linesto pass through the heat exchanger, youmust remove the molded foam blocklocated between the side of the radiator andthe body. To remove the molded block,push it free with a straight bladescrewdriver between the fender and theradiator support.
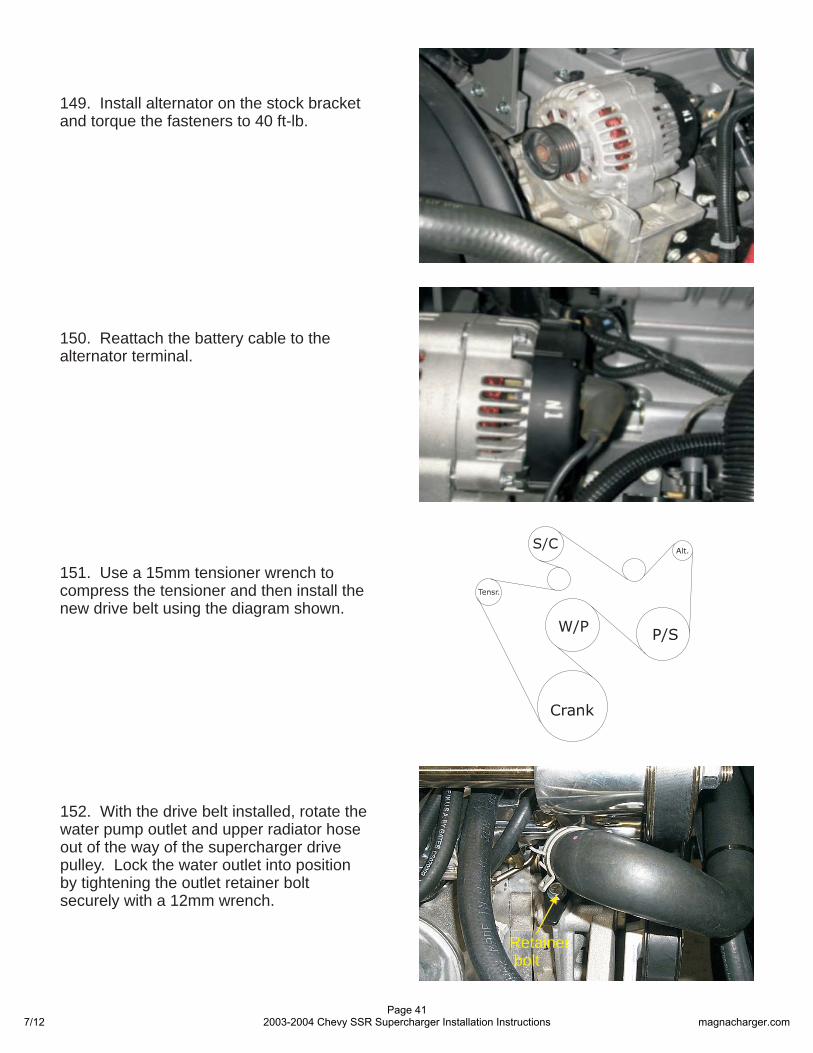
136. After pushing the molded foam block,pull it out from the engine compartment.The foam block will not be reused.
133. Using a 15mm wrench, remove themounting bolts on both sides of the vehiclethat are located below the power steeringcooler bracket. Slide the heat exchangerup into position and then attach itsmounting bracket with the original mountingbolts.
Mounting bolt
7/12Page 37
2003-2004 Chevy SSR Supercharger Installation Instructions magnacharger.com

1 . Here is the intercooler pump,mounting clamp, hardware, wiring andreservoir to hose.
38
pump
140. From underneath the vehicle on theright side locate the elongated hole.Approximately 1” back from the hole drill a1/4” hole to mount the pump. Place themounting clamp around the pump body andthen pass the new 6 x 20mm bolt throughthe pump mounting clamp and then throughthe hole. Secure the bolt with the new nutand tighten securely with a 10mm wrench.
Pump
1 . The intercooler pump will mount in theengine compartment next
to the battery cable junction box. Note heelongated hole in the panel.
39right side of the
: T
Junction box
Pump
HoleMounting boltand clamp
137. Removing the molded foam blockcreates a opening between the radiator andthe fender well for the intercooler coolantlines to pass. The line from the pump to theheat exchanger and from the heatexchanger to the coolant manifold will passthrough this opening.
Intercooler linespass through here
7/12Page 38
2003-2004 Chevy SSR Supercharger Installation Instructions magnacharger.com
1 .42 Route the hose to the top barb (inlet)on the reservoir. Secure the hose with a#10 clamp. Ensure that there are no kinksin any of the hose to restrict coolant flow.
1 .44 Route the hose to the bottom barb(inlet) on the heat exchanger. Cut the hoseto length and secure both ends with a #10clamp. Connect the remaining end of thehose to the upper barb of the heatexchanger and then back through theopening.
1 .43 Connect the short end of the 90degree “Elbow” hose to the pump inlet andthe long end to the bottom (outlet) barb ofthe reservoir. Secure both ends with #10clamps. Connect the remaining length ofhose to the outlet barb of the pump androute it through the opening that wasuncovered when you removed the moldedfoam block.
Pump inlet
Pump outlet
Electricalconnection
141. Starting at the right side of the coolantmanifold, connect one end of the 3/4”coolant hose to the manifold with a #10clamp.
7/12Page 39
2003-2004 Chevy SSR Supercharger Installation Instructions magnacharger.com
1 .46 Cut the intercooler hose to length andsecure both ends with a #10 clamp. Attachthe new length of 1/4” heater hose to thethrottle body nipple located just above theintercooler connection. Secure the 1/4”hose with the clamp from the original steamvent pipe hose.
Intercoolerhose
1/4” Heater hose
1 .48 Re-connect the steam vent hose fromthe radiator coolant tank to its originallocation of the barb on the bottom of thethrottle body.
1 .47 Route the 1/4” hose around in agentle loop to the barb on the steam pipe.Cut the hose to length and secure this endwith the new clamp supplied.
Intercooler hose
MAFelectricalconnection
1 .45 Route the hose up from the loweropening and across the back side of the airfilter cover to the remaining barb on thecoolant manifold. Note: The rotation of theMAF and the location of the MAF electricalconnection.
7/12Page 40
2003-2004 Chevy SSR Supercharger Installation Instructions magnacharger.com
151 Use a 15mm tensioner wrench tocompress the tensioner and then install thenew drive belt using the diagram shown.
.
152. With the drive belt installed, rotate thewater pump outlet and upper radiator hoseout of the way of the supercharger drivepulley. Lock the water outlet into positionby tightening the outlet retainer boltsecurely with a 12mm wrench.
1 .50 Reattach the battery cable to thealternator terminal.
149. Install alternator on the stock bracketand torque the fasteners to 40 ft-lb.
Retainerbolt
7/12Page 41
2003-2004 Chevy SSR Supercharger Installation Instructions magnacharger.com
156 Remove the black tape and split loomfrom the MAF connector and wires. Pull theconnector and wires back the point wherethe coil pack connector branch is located.
.
Left Coilpackconnector
MAFconnector
154 Remove the wiring harness mountingbracket from the harness .
.
155 Locate the MAF connector on thewiring harness. The MAF connector islocated at the front of the passenger side(right) branch that supplies the fuel injectorsand ETC and AC.
.
MAF
AC
ETC
Inj#2
Inj#4
The following steps describe modificationsto the wiring harness necessary to installthe supercharger. Additional diagrams arelocated in the back of this instructionmanual showing these modifications.
1 .53 Locate the
theoriginal GM belt routing diagram.
GM factory-warning andbelt routing diagram stickers on theradiator apron. Install the RADIX SSRVacuum Routing Diagram over the GMvacuum diagram portion of the sticker.Install the Radix Intercooler/belt routinginformation sticker completely over
7/12Page 42
2003-2004 Chevy SSR Supercharger Installation Instructions magnacharger.com
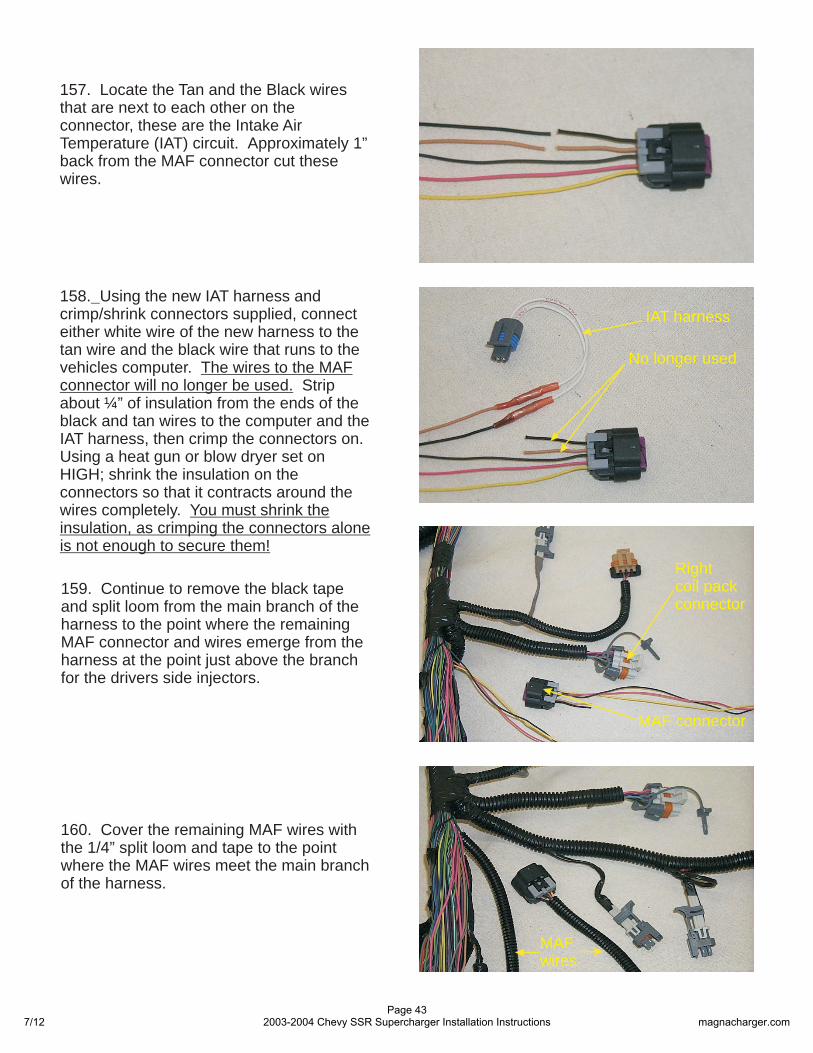
160 Cover the remaining MAF wires withthe 1/4” split loom and tape to the pointwhere the MAF wires meet the main branchof the harness.
.
MAFwires
158. Using the new IAT harness andcrimp/shrink connectors supplied, connecteither white wire of the new harness to thetan wire and the black wire that runs to thevehicles computer.
Stripabout ¼” of insulation from the ends of theblack and tan wires to the computer and theIAT harness, then crimp the connectors on.Using a heat gun or blow dryer set onHIGH; shrink the insulation on theconnectors so that it contracts around thewires completely.
The wires to the MAFconnector will no longer be used.
You must shrink theinsulation, as crimping the connectors aloneis not enough to secure them!
159 Continue to remove the black tapeand split loom from the main branch of theharness to the point where the remainingMAF connector and wires emerge from theharness at the point just above the branchfor the drivers side injectors.
.
No longer used
IAT harness
Rightcoil packconnector
MAF connector
157 Locate the Tan and the Black wiresthat are next to each other on theconnector, these are the Intake AirTemperature (IAT) circuit. Approximately 1”back from the MAF connector cut thesewires.
.
7/12Page 43
2003-2004 Chevy SSR Supercharger Installation Instructions magnacharger.com
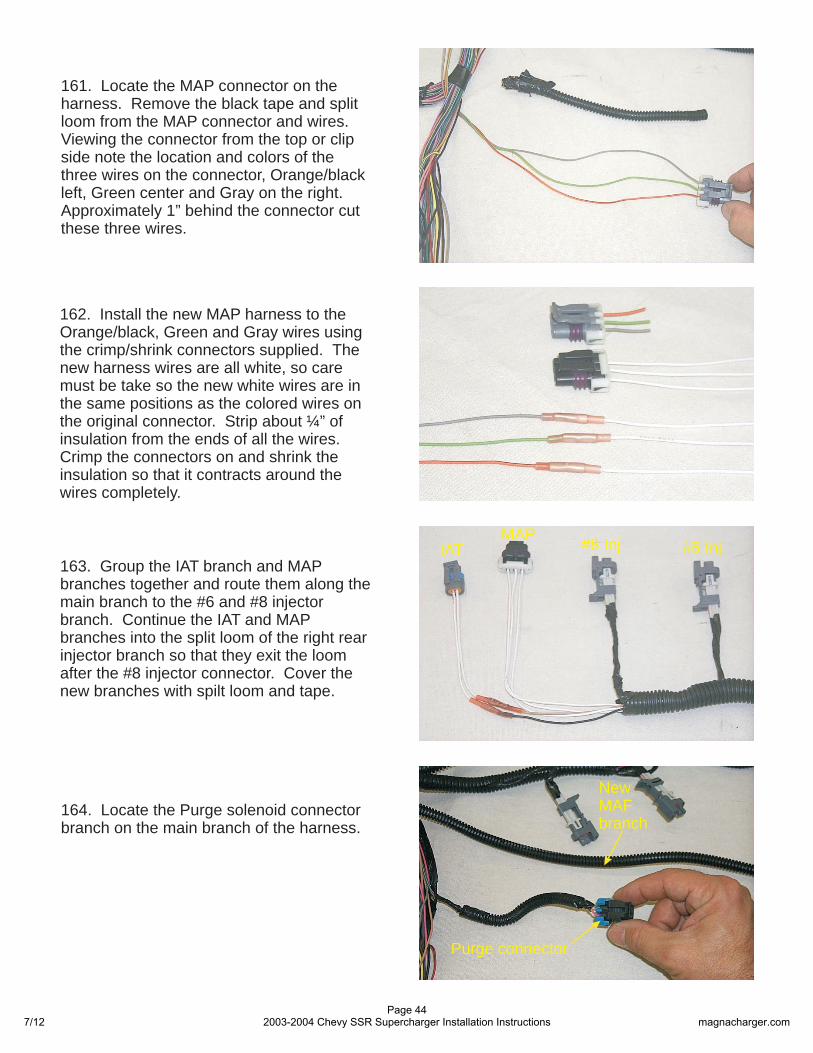
164 Locate the Purge solenoid connectorbranch on the main branch of the harness.
.
NewMAFbranch
163. Group the IAT branch and MAPbranches together and route them along themain branch to the #6 and #8 injectorbranch. Continue the IAT and MAPbranches into the split loom of the right rearinjector branch so that they exit the loomafter the #8 injector connector. Cover thenew branches with spilt loom and tape.
1 . Install the new MAP harness to theOrange/black, Green and Gray wires usingthe crimp/shrink connectors supplied.
Strip about ¼” ofinsulation from the ends of all the wires.Crimp the connectors on and shrink theinsulation so that it contracts around thewires completely.
62
Thenew harness wires are all white, so caremust be take so the new white wires are inthe same positions as the colored wires onthe original connector.
161 Locate the MAP connector on theharness. Remove the black tape and splitloom from the MAP connector and wires.Viewing the connector from the top or clipside note the location and colors of thethree wires on the connector, Orange/blackleft, Green center and Gray on the right.Approximately 1” behind the connector cutthese three wires.
.
Purge connector
#8 Inj #6 InjMAP
IAT
7/12Page 44
2003-2004 Chevy SSR Supercharger Installation Instructions magnacharger.com
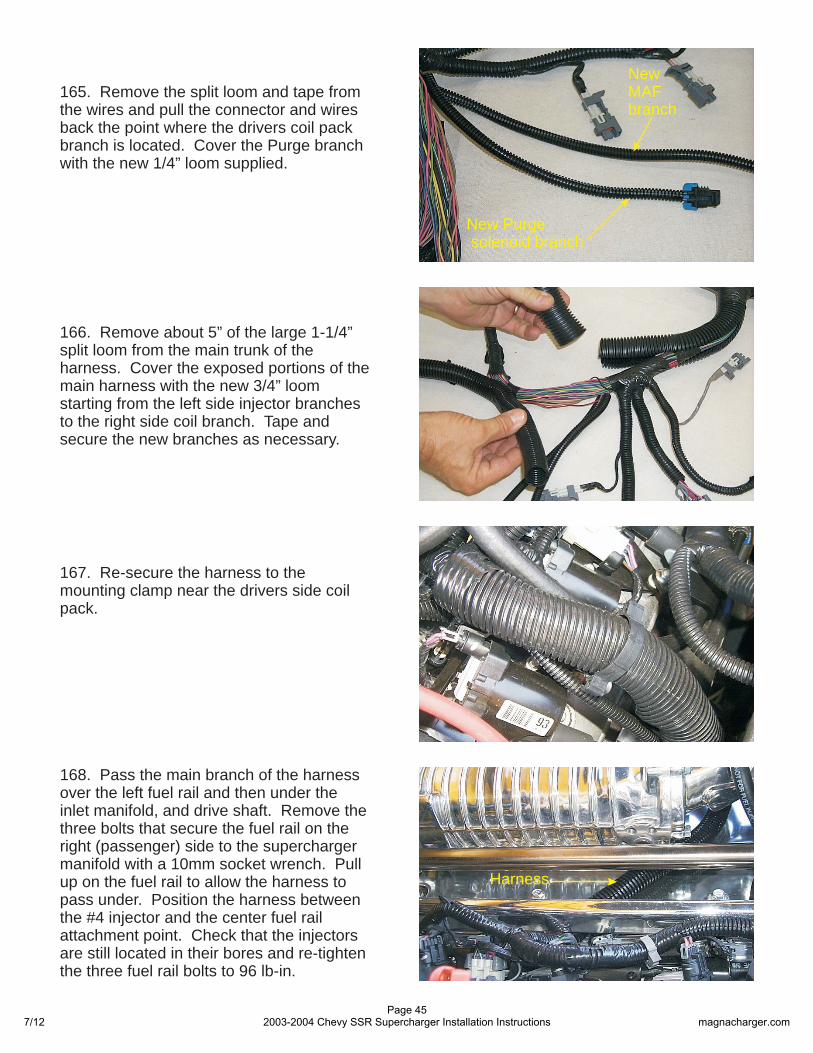
165. Remove the split loom and tape fromthe wires and pull the connector and wiresback the point where the drivers coil packbranch is located. Cover the Purge branchwith the new 1/4” loom supplied.
New Purgesolenoid branch
NewMAFbranch
166 Remove about 5” of the large 1-1/4”split loom from the main trunk of theharness. Cover the exposed portions of themain harness with the new 3/4” loomstarting from the left side injector branchesto the right side coil branch. Tape andsecure the new branches as necessary.
.
167. Re-secure the harness to themounting clamp near the drivers side coilpack.
1 Pass the main branch of the harnessover the left fuel rail and then under theinlet manifold, and drive shaft.
Position the harness betweenthe #4 injector and the center fuel railattachment point. Check that the injectorsare still located in their bores and re-tightenthe three fuel rail bolts to 96 lb-in.
68.
Remove thethree bolts that secure the fuel rail on theright (passenger) side to the superchargermanifold with a 10mm socket wrench. Pullup on the fuel rail to allow the harness topass under.
Harness
7/12Page 45
2003-2004 Chevy SSR Supercharger Installation Instructions magnacharger.com
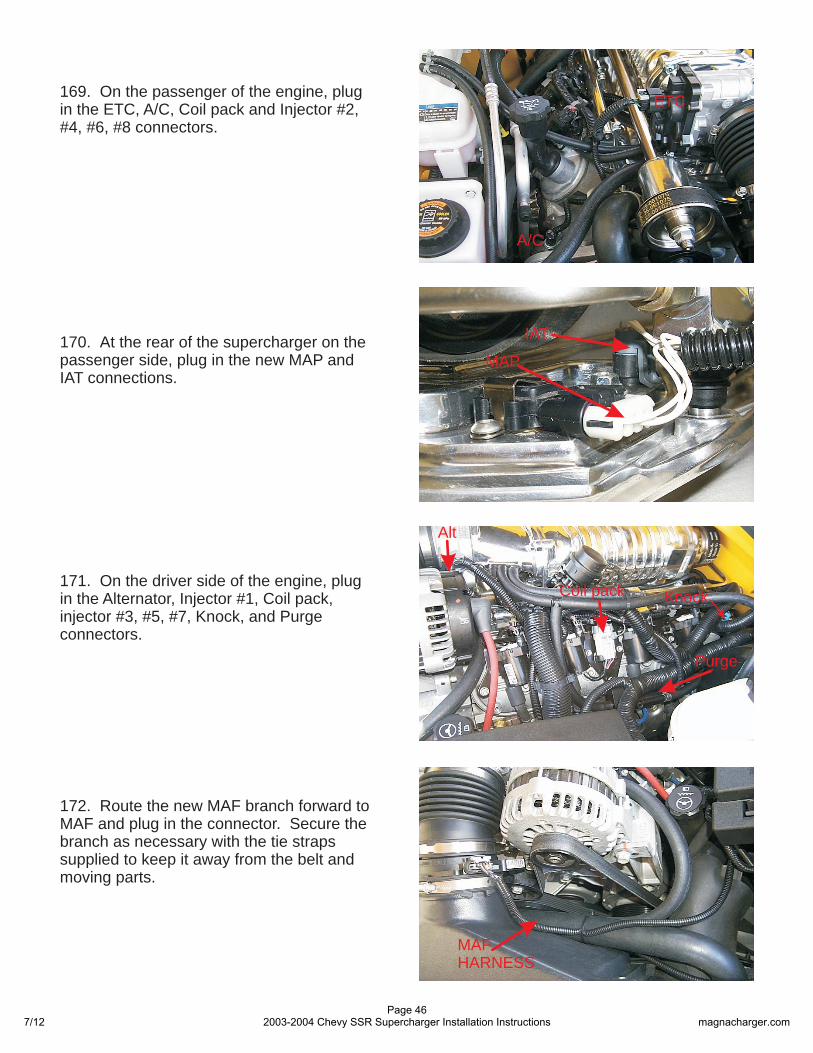
169. On the passenger of the engine, plugin the ETC, A/C, Coil pack and Injector #2,#4, #6, #8 connectors.
170. At the rear of the supercharger on thepassenger side, plug in the new MAP andIAT connections.
171. On the driver side of the engine, plugin the Alternator, Injector #1, Coil pack,injector #3, #5, #7, Knock, and Purgeconnectors.
172. Route the new MAF branch forward toMAF and plug in the connector. Secure thebranch as necessary with the tie strapssupplied to keep it away from the belt andmoving parts.
MAP
IAT
A/C
ETC
Alt
Coil pack
Purge
MAFHARNESS
Knock
7/12Page 46
2003-2004 Chevy SSR Supercharger Installation Instructions magnacharger.com

174. Locate the relay mounting stud on thedriver side next to the windshield washerreservoir. Remove the nut with a 10mmsocket wrench. Place the wireswith the ring connectors from both relays onthe stud and then place the intercooler relayon the stud and secure it with the nut.
BLACK
173. Locate the harness anchor just behindand above the Fuse/Relay center andmount the Fuel Pump Relay with a tie strapat this point.
175. Route the intercooler harness andconnector across the front of the engine bytie strapping it to the intercooler hosebehind the air box. Plug the harnessconnector into the end of the intercoolerpump.
176. Lift the cover off the FUSE/RELAYCENTER and set aside for re-installation.
I/CPump
Harness
Stud
Windshieldwasherreservoir
I/C Relay
7/12Page 47
2003-2004 Chevy SSR Supercharger Installation Instructions magnacharger.com
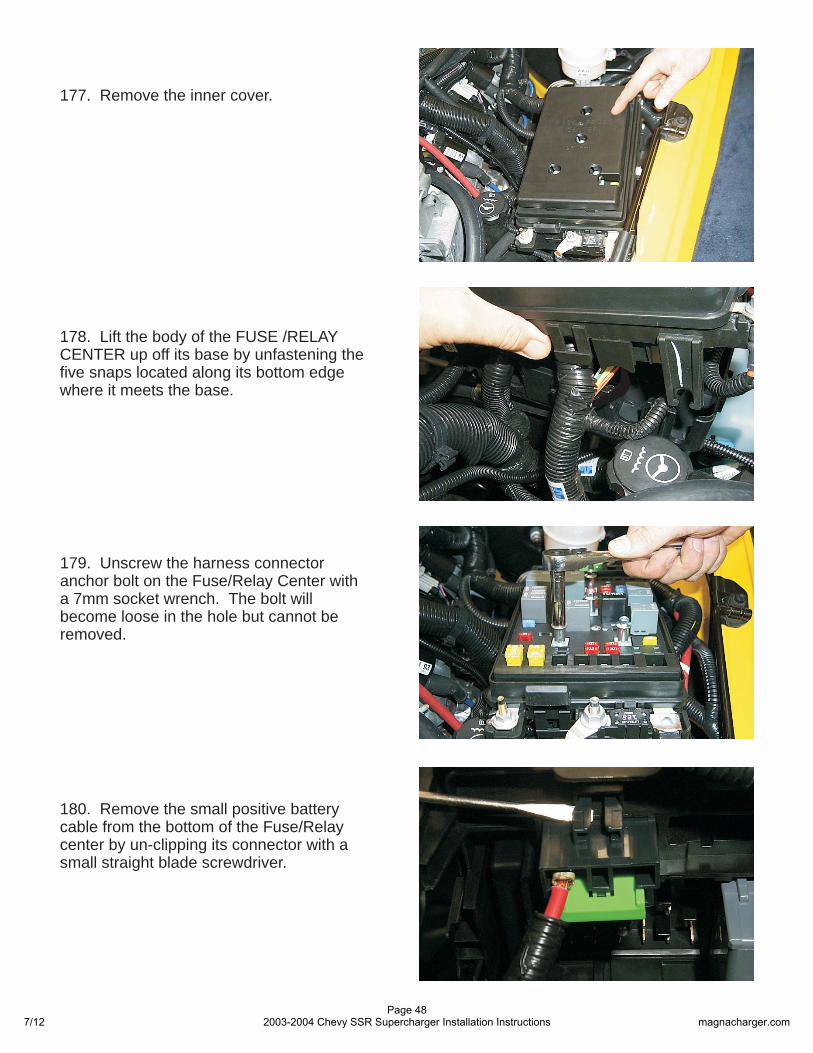
179. Unscrew the harness connectoranchor bolt on the Fuse/Relay Center witha 7mm socket wrench. The bolt willbecome loose in the hole but cannot beremoved.
178. Lift the body of the FUSE /RELAYCENTER up off its base by unfastening thefive snaps located along its bottom edgewhere it meets the base.
177. Remove the inner cover.
180. Remove the small positive batterycable from the bottom of the Fuse/Relaycenter by un-clipping its connector with asmall straight blade screwdriver.
7/12Page 48
2003-2004 Chevy SSR Supercharger Installation Instructions magnacharger.com
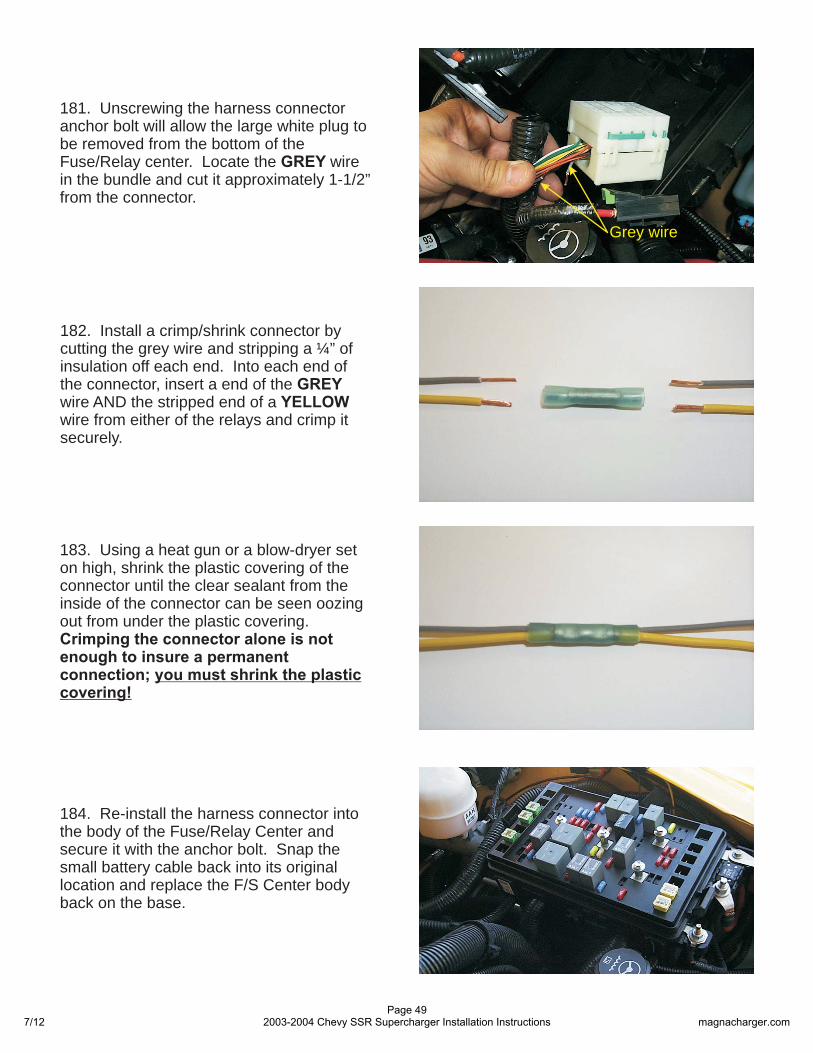
183. Using a heat gun or a blow-dryer seton high, shrink the plastic covering of theconnector until the clear sealant from theinside of the connector can be seen oozingout from under the plastic covering.Crimping the connector alone is notenough to insure a permanentconnection; you must shrink the plasticcovering!
182. Install a crimp/shrink connector bycutting the grey wire and stripping a ¼” ofinsulation off each end. Into each end ofthe connector, insert a end of thewire AND the stripped end of awire from either of the relays and crimp itsecurely.
GREYYELLOW
181. Unscrewing the harness connectoranchor bolt will allow the large white plug tobe removed from the bottom of theFuse/Relay center. Locate the wirein the bundle and cut it approximately 1-1/2”from the connector.
GREY
Grey wire
184. Re-install the harness connector intothe body of the Fuse/Relay Center andsecure it with the anchor bolt. Snap thesmall battery cable back into its originallocation and replace the F/S Center bodyback on the base.
7/12Page 49
2003-2004 Chevy SSR Supercharger Installation Instructions magnacharger.com

186. Remove the tape from the batterynegative ( ) cable and re-install it on to thebattery with a 8mm wrench.
-
185. Remove the bolt that secures thelarge battery cable to the terminal atthe Fuse/Relay center with a 7mm socketwrench. Attach the fused power supplywires of the two new relays by passing thebolt through the ring connectors. Tightenthe bolt securely.
RED
Replace the inner and topcovers on the FUSE/RELAY center.
187. Replace the battery access panel andbolts. Secure them with a 10mm socketwrench.
188. Refill radiator and then fill theintercooler system with a 50/50 mixture ofcoolant and distilled or de-ionized wateronly. Check system periodically for fluidlevel.
7/12Page 50
2003-2004 Chevy SSR Supercharger Installation Instructions magnacharger.com
189. Vehicle Programing Instructions For the Micro Tuner
IMPORTANT! To ensure trouble-free programming of your vehicle’s computer:* Make sure the vehicle’s battery is sufficiently charged.* Turn off all accessories & close doors to prevent unnecessary drain on the battery.* Do not attempt to program your vehicle while a battery charger is connected.* Improper battery voltage will result in failure of the programming process.* Do not disconnect the cable or turn off the ignition during programming.* Apply emergency brake to disable daytime running lights.* Reconnect battery ground (-) cable.
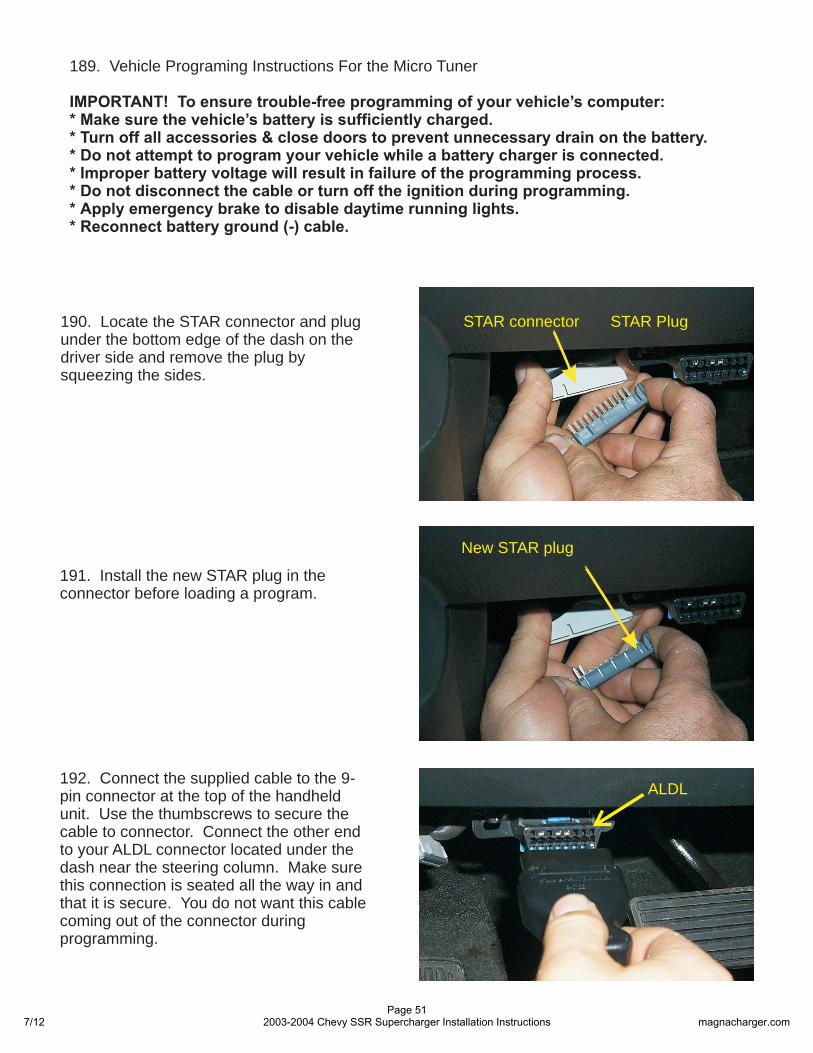
1 .90 Locate the STAR connector and plugunder the bottom edge of the dash on thedriver side and remove the plug bysqueezing the sides.
191. Install the new STAR plug in theconnector before loading a program.
192. Connect the supplied cable to the 9-pin connector at the top of the handheldunit. Use the thumbscrews to secure thecable to connector. Connect the other endto your ALDL connector located under thedash near the steering column. Make surethis connection is seated all the way in andthat it is secure. You do not want this cablecoming out of the connector duringprogramming.
ALDL
STAR connector STAR Plug
New STAR plug
7/12Page 51
2003-2004 Chevy SSR Supercharger Installation Instructions magnacharger.com
193. Turn the ignition key to the on or runposition Tobegin programming your vehicle, you mustpress the button. Press thebutton once to start the programming cycle.The programming process takes about fiveminutes.
YES YES
but do not start the vehicle.
The handheld unit will inform you that theprogramming process has completed andto turn the ignition off and disconnect thecable. Only at this time should the ignitionbe turned off and the cable removed.
* DO NOT DISTURB THE CABLE ORTURN THE IGNITION OFF DURING THISTIME! IF THE PROGRAMMING ISDISRUPTED YOUR COMPUTER WILLNOT START OR RUN YOUR VEHICLE!
194. When programing is complete removethe new STAR plug. Retain this STAR plugwith your Micro Tuner for any future use.
195. Re-install the original STAR plug inthe connector.
7/12Page 52
2003-2004 Chevy SSR Supercharger Installation Instructions magnacharger.com

Fill holes
196. Start the vehicle for 5 seconds andshut off, once again check for fuel leaksand fan-supercharger belt alignment.Check radiator and intercooler reservoir.
197. Test drive vehicle for the first fewmiles under normal driving conditions,listen for any noises, vibrations, enginemissfire or anything that does not seemnormal. The supercharger does have aslight whining noise under boost conditions,which is normal. Check & bleed intercoolerreservoir as needed.
198. After the initial test drive graduallywork the vehicle to wide open throttle runs,listen for any engine detonation (Pinging), Ifengine detonation is present let up on thethrottle immediately. Most detonationcauses are low octane gasoline still in thetank.
Please enjoy your “Magna Charged”performance responsibly.
IN THE NEWS...IN THE NEWS...IN THE INTHE NEWS...IN THE NEWS...IN THENEWS. . . IN THE NEWS. . . IN THENEWS...IN THE NEWS....NEWS...IN THENEWS. . . IN THE NEWS. . . IN THENEWS.. . . IN THE NEWS.. . IN THENEWS. . . IN THE NEWS. . . IN THENEWS. . . IN THE NEWS. . . IN THENEWS.. . . IN THE NEWS.. . IN THENEWS. . . IN THE NEWS. . . IN THE
Ventura, CA (November 21, 2002) MagnaCharger, manufacturer of superchargers andsupercharger systems for foreign anddomestic vehicles, was presented theprestigious award at the annual SpecialtyEquipment Market Association Show(SEMA) in Las Vegas, Nevada.
Sponsored by General Motors Corporation,the 2002 SEMA Design Award for the “MostI n n o v a t i v e P r o d u c t ”was awarded to Magna Charger andrecognized by the all-star team of judges fortheir outstanding and innovative designachievement. The criteria used by the judgesincluded innovation, technical achievement,quality and workmanship.
The award was presented for the Radix®Intercooled supercharger system, designedfor the Chevrolet, GMC and Cadillac, 4.8L,5.3L and 6.0L General Motors Trucks andSUV's including the new H2.
In the event that the vehicle needs to bereturned to its original calibration, follow thedirections as described in the previoussteps. The handheld unit will prompt youthat you have already modified the vehicle’scomputer. Use the STAR plug as describedand select YES to return you vehicle’scomputer back to the stock calibration.Wait for the handheld to finish, thendisconnect cable and STAR plug asdirected.
If you have questions about your vehiclesperformance, please check with yourinstallation facility or call Magna Charger at(805) 289-0044, Monday through Friday,8am to 4:30pm.
7/12Page 53
2003-2004 Chevy SSR Supercharger Installation Instructions magnacharger.com
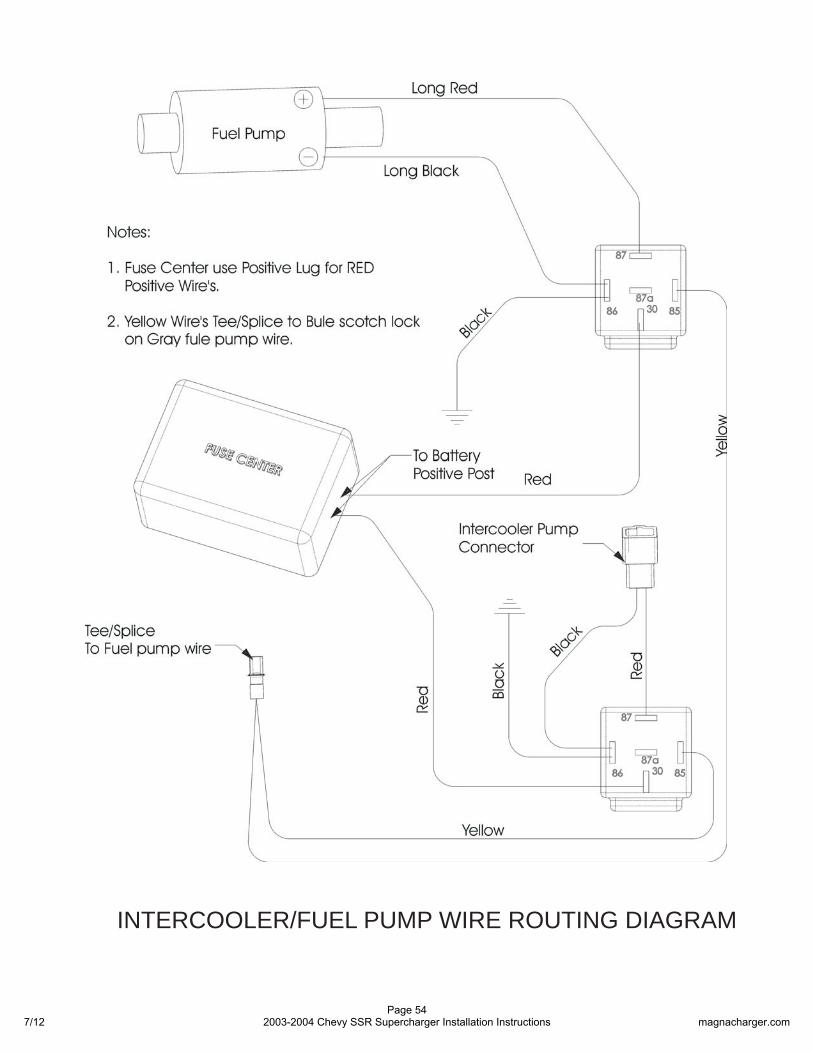
INTERCOOLER/FUEL PUMP WIRE ROUTING DIAGRAM
7/12Page 54
2003-2004 Chevy SSR Supercharger Installation Instructions magnacharger.com

MAF / IAT
A/C
E-T/C
INJ-6 INJ-8
R-Coil
Knock Sensors
To Starter
C/PO/P
Purge
INJ-7INJ-5INJ-3
L-Coil
INJ-1
Alt.
Clamp
Clamp
Alt.
INJ-1
L-Coil
INJ-3 INJ-5 INJ-7
Purge
O/P C/P
To Starter
Knock Sensors
R-Coil
INJ-8INJ-6
E-T/C
A/C
StockConfiguration
Super ChargerConfiguration
Legend:
MAF
IAT
MAP
MAP
MAF Mass Air Flow Sensor
A/C Air Conditioning
E-T/C Electronic Throttle Control
INJ-X Fuel Injector Connectors
R-Coil Passenger Side Coils
MAP Manifold Absolute Pressure Sensor
Purge EVAP Purge Solenoid
O/P Oil Pressure Sensor
C/P Crank Position Sensor
Alt. Alternator
L-Coil Drivers Side Coils
INJ-4INJ-2
INJ-4INJ-2
7/12Page 55
2003-2004 Chevy SSR Supercharger Installation Instructions magnacharger.com

To Intercooler
To ReservoirReservoir
Pump
Heat Exchanger
Intercooler
D.S.
P.S.
Intercooler plumbing diagram
7/12Page 56
2003-2004 Chevy SSR Supercharger Installation Instructions magnacharger.com