interactive pen display Installation Guide & User’s Manual ... · Wacom behält sich das Recht...
180
DTF-720 interactive pen display Installation Guide & User’s Manual Installations- und Benutzerhandbuch Guide d'installation et Manuel d'utilisation
Transcript of interactive pen display Installation Guide & User’s Manual ... · Wacom behält sich das Recht...
DTF-720
interactive pen display
Installation Guide & User’s ManualInstallations- und BenutzerhandbuchGuide d'installation et Manuel d'utilisation
DTF720_front.fm Page -1 Monday, December 22, 2008 10:07 AM

Wacom DTF-720 interactive pen display Installation Guide & User’s ManualVersion 2.2, Rev G2309Copyright
Wacom Co., Ltd., 2009All rights reserved. No part of this manual may be reproduced except for your express personal use. Wacom reserves the right to revise this publication without obligation to provide notification of such changes. Wacom does its best to provide current and accurate information in this manual. However, Wacom reserves the right to change any specifications and product configurations at its discretion, without prior notice and without obligation to include such changes in this manual.The above year indicates when this manual was prepared. However, the date of release to the users of the “manual” is simultaneous with the introduction into the market of the applicable Wacom product.
DuoSwitch is a trademark, and Wacom is a registered trademark of Wacom Co., Ltd.Microsoft, Windows, and Vista are either registered trademarks or trademarks of Microsoft Corporation in the United States and/or other countries. Apple, the Apple logo, and Macintosh are trademarks of Apple Computer, Inc., registered in the U.S. and other countries. Any additional company and product names mentioned in this documentation may be trademarked and/or registered as trademarks. Mention of third-party products is for informational purposes only and constitutes neither an endorsement nor a recommendation. Wacom assumes no responsibility with regard to the performance or use of these products.
Wacom DTF-720 Interactive Pen DisplayInstallations- und BenutzerhandbuchVersion 2.2, Rev G2309Copyright
Wacom Co., Ltd., 2009Alle Rechte vorbehalten. Kein Teil dieses Handbuchs darf außer für Ihren eigenen Bedarf vervielfältigt werden. Wacom behält sich das Recht vor, ohne vorherige Ankündigung Änderungen an diesem Dokument durchzuführen. Wacom ist stets bestrebt, in diesem Handbuch nur aktuelle und exakte Informationen zu veröffentlichen. Dennoch behält sich Wacom das Recht vor, Spezifikationen und Produktkonfigurationen nach eigenem Ermessen ohne vorherige Mitteilung und ohne Aufnahme in dieses Handbuch zu ändern.Das oben angegebene Jahr zeigt an, wann dieses Benutzerhandbuch erstellt wurde. Das Datum der Veröffentlichung des Benutzerhandbuchs für die Anwender entspricht jedoch dem Datum der Markteinführung des entsprechenden Wacom Produkts.
DuoSwitch ist eine Marke und Wacom ist eine eingetragene Marke von Wacom Co., Ltd.Microsoft, Windows und Vista sind eingetragene Marken oder Marken der Microsoft Corporation in den USA und/oder anderen Ländern. Apple, das Apple-Logo und Macintosh sind Marken von Apple Computer, Inc. in den USA und anderen Ländern. Alle weiteren in diesem Handbuch erwähnten Firmen- und Produktnamen können Marken und/oder eingetragene Marken sein. Die Erwähnung von Produkten von Drittherstellern dient Informationszwecken und stellt weder eine Billigung noch eine Empfehlung dar. Wacom übernimmt keinerlei Verantwortung hinsichtlich der Leistung und der Verwendung dieser Produkte.
DTF-720 Interactive Pen Display de WacomGuide d'installation et Manuel d'utilisationVersion 2.2, Rev G2309Copyright
Wacom Co., Ltd., 2009Tous droits réservés. La reproduction totale ou partielle du présent manuel est interdite, sauf pour votre usage personnel. Wacom se réserve le droit de modifier la présente publication sans avertissement préalable. Wacom tente, dans la mesure du possible, de fournir des informations à jour et précises dans le présent manuel. Toutefois, Wacom se réserve le droit de modifier toute caractéristique et configuration du produit, sans avertissement préalable et sans obligation d'intégrer ces modifications dans le présent manuel.L'année indiquée ci-dessus est l'année au cours de laquelle ce manuel a été élaboré. Cependant, la diffusion du « manuel » auprès des utilisateurs interviendra à la même date que la mise sur le marché du produit Wacom correspondant.
DuoSwitch est une marque commerciale et Wacom est une marque déposée de Wacom Co., Ltd.Microsoft, Windows et Vista sont des marques commerciales, déposées ou non, de Microsoft Corporation aux États-Unis et/ou dans d'autres pays. Apple, le logo Apple et Macintosh sont des marques commerciales d'Apple Computer, Inc., déposées aux États-Unis et dans d'autres pays. Tout autre nom de société et de produit mentionné dans la présente documentation peut être une marque commerciale, déposée ou non. Les produits de fabricants tiers ne sont mentionnés qu'à titre d'information et ne constituent en aucun cas un engagement ou une recommandation de notre part. Wacom décline toute responsabilité quant aux performances ou à l'utilisation de ces produits.
DTF720_front.fm Page 0 Monday, December 22, 2008 10:07 AM

DTF-720
interactive pen display
Installation Guide & User’s Manual
DTF720_Manual.fm Page -1 Monday, December 22, 2008 10:13 AM

DTF720_Manual.fm Page 0 Monday, December 22, 2008 10:13 AM

Introduction and overview Page 1
INTRODUCTION AND OVERVIEW
The Wacom
®
DTF-720 interactive pen display combines the benefits of a Liquid Crystal Display (LCD) with the control, comfort, and productivity of Wacom’s cordless, battery-free pen technology. This gives you a direct pen-on-screen interface for your computer.
The basic components of the DTF-720 include a Wacom pen tablet internally mounted behind a 17.0" diagonal TFT color display, and a Wacom pen.
The DTF-720 also comes equipped with a VGA pass-thru (RGB-O
UT
) port, enabling you to simultaneously connect a VGA monitor or projector to the pen display.
This manual describes how to install the DTF-720 hardware and software. It also describes how to use the DTF-720 and pen.
Please follow all instructions carefully.The computer treats the DTF-720 as two separate devices (the display and the pen tablet).
Therefore, the installation process is completed in two stages:
•
First install the DTF-720 as a display.
•
Then install the DTF-720 as a pen tablet.
Both stages require hardware and software installations and adjustments.
Please follow all instructions carefully.
IMPORTANT:
You MUST install the Wacom pen tablet driver software for correct pen-on-screen functionality.
To learn about using the Pen Tablet control panel to customize your pen display tablet and pen settings on Windows or Macintosh computers, see
Customizing
on page 19.
The following kinds of information are not included with this product: information about your specific computer hardware or operating system, or information about your application software. Your best source for this information is the set of manuals and discs that came with your hardware, operating system, or application.
DTF720_Manual.fm Page 1 Monday, December 22, 2008 10:13 AM
PrecautionsPage 2
PRECAUTIONS
To ensure the safe usage of your product, be sure to follow all instructions, cautions, and warnings found within this manual. Failure to do so could cause the loss of data or damage to your computer. Failure to do so could also void your warranty, in which case Wacom shall have no responsibility to repair or replace the product.
PHYSICAL LOCATION
ENVIRONMENT
W
ARNING
This symbol indicates an item that, if disregarded, may lead to loss of human life or serious injury.
C
AUTION
This symbol indicates an item that, if disregarded, may lead to human injury or damage to personal property.
Exercise due care and diligence whenever engaging in a described action.
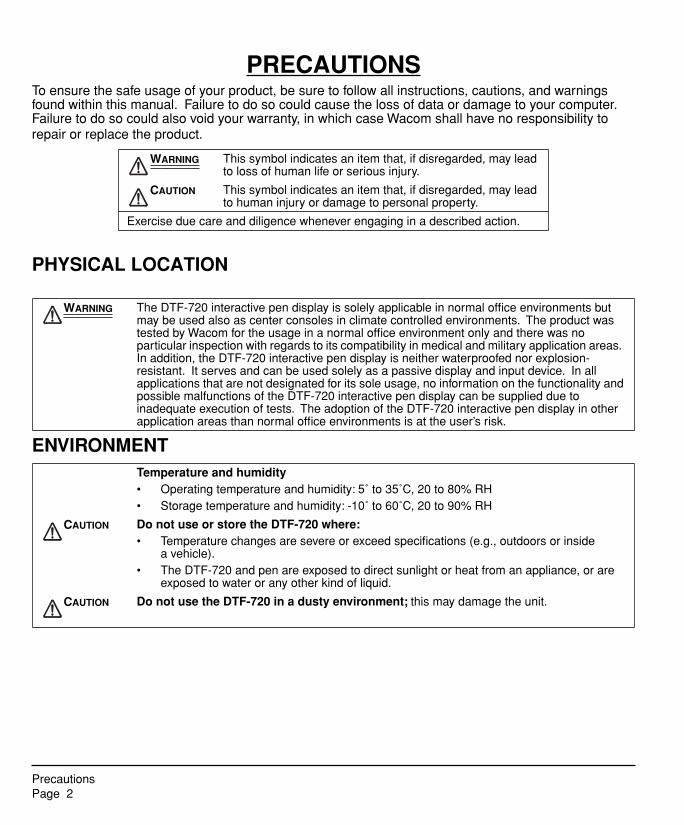
W
ARNING
The DTF-720 interactive pen display is solely applicable in normal office environments but may be used also as center consoles in climate controlled environments. The product was tested by Wacom for the usage in a normal office environment only and there was no particular inspection with regards to its compatibility in medical and military application areas. In addition, the DTF-720 interactive pen display is neither waterproofed nor explosion-resistant. It serves and can be used solely as a passive display and input device. In all applications that are not designated for its sole usage, no information on the functionality and possible malfunctions of the DTF-720 interactive pen display can be supplied due to inadequate execution of tests. The adoption of the DTF-720 interactive pen display in other application areas than normal office environments is at the user’s risk.
Temperature and humidity
• Operating temperature and humidity: 5˚ to 35˚C, 20 to 80% RH• Storage temperature and humidity: -10˚ to 60˚C, 20 to 90% RH
C
AUTION
Do not use or store the DTF-720 where:
• Temperature changes are severe or exceed specifications (e.g., outdoors or inside a vehicle).
• The DTF-720 and pen are exposed to direct sunlight or heat from an appliance, or are exposed to water or any other kind of liquid.
C
AUTION
Do not use the DTF-720 in a dusty environment;
this may damage the unit.
DTF720_Manual.fm Page 2 Monday, December 22, 2008 10:13 AM

Precautions Page 3
USAGE
HANDLING
W
ARNING
Only use the power adapter that came with the DTF-720.
If a different type of power adapter is used, the DTF-720 will not work properly or may be damaged.
Using a different type of power adapter also has the potential to result in fire.
Use of a different power adapter will void your warranty.
C
AUTION
Be sure to use a grounded power source when applying power to the DTF-720.
C
AUTION
Do not connect or disconnect the video or power cables while the DTF-720 or your computer are turned on;
this may damage the display or computer video card. In this case, Wacom shall have no responsibility to repair or replace the product.
C
AUTION
This product is for use with a VGA video card;
using an inappropriate video card may damage the DTF-720.
C
AUTION
Do not block the rear panel ventilation holes;
this may overheat and damage the unit.
When not using the DTF-720 for long periods of time, unplug the power adapter from the AC outlet.
W
ARNING
High Voltage. Do not open or disassemble the DTF-720 pen display. There is a risk of electrical shock when the casing is open.
This will also void your warranty and Wacom shall have no responsibility to repair or replace the product.
W
ARNING
If the LCD screen has been damaged, DO NOT touch any liquid that may be leaking from it;
this liquid is an irritant. In case of contact with skin, eyes, or mouth, rinse immediately with running water for at least 15 minutes or more. If contact is made with the eyes or mouth, also consult a physician.
W
ARNING
– LAMP(S) INSIDE THIS PRODUCT CONTAIN MERCURY AND MUST BE RECYCLED OR DISPOSED OF ACCORDING TO LOCAL, STATE OR FEDERAL LAWS.
The DTF-720 pen display has a backlight which contains mercury (Hg).
Be sure to dispose of properly, and to manage any disposal of this unit in accordance with your local ordinances and laws.
W
ARNING
Prevent children from swallowing the pen tip or side switch.
The pen tip or side switch may accidentally be pulled out if children are biting on them.
C
AUTION
Do not disassemble the pen.
This may cause the device to malfunction. In this case, Wacom shall have no responsibility to repair or replace the product.
C
AUTION
Do not scratch the display screen.
Avoid placing sharp objects on the display screen surface.
C
AUTION
When adjusting the tilt angle of the DTF-720, be careful to avoid catching your finger in the gap of the movable portion of the stand.
C
AUTION
Do not lift the DTF-720 by the stand; this may damage the stand mechanism.
When lifting or moving the DTF-720, always do so by grasping the main body casing.
C
AUTION
Avoid intensive shock or vibration to the DTF-720 or the pen.
Hitting or dropping the DTF-720 may damage the display screen or other components.
Hg
DTF720_Manual.fm Page 3 Monday, December 22, 2008 10:13 AM

PrecautionsPage 4
C
AUTION
Do not put heavy articles on the pen display or push against it with a strong force;
this may damage the display screen or bend the stand.
C
AUTION
Do not place heavy articles on the DTF-720 cabling, repeatedly bend the cables sharply, or apply heavy stress to the cable connectors;
this may damage the unit or cabling.
C
AUTION
If the pen tip becomes sharp or angular, it may damage the coating on the display screen.
Please replace the pen tip if necessary.
C
AUTION
Do not use any organic solvent (e.g., alcohol) or even mild detergent to clean the display screen. Use of these cleaners can damage the coating on the screen. Please note that damage of this kind is not covered by the manufacturer's warranty.
• To clean the display screen, use an anti-static cloth or a slightly damp cloth. When cleaning, apply only a light amount of pressure to the display screen and do not make the surface wet.
• To clean the DTF-720 casing or pen, use a soft cloth with mild detergent (such as dish washing liquid) diluted with water.
• Before cleaning, always disconnect your product from the AC power source.
C
AUTION
Do not expose the DTF-720 to high voltage electrostatic discharges or to a build-up of an electrostatic charge on the LCD screen.
This may result in temporary discoloration and blotching of the display. If discolorations occur, leave the display on and the discolorations should disappear within a few hours.
Reuse, recycling and recovery.
You are urged to recycle this product when replacing it with a newer product or when it has outlived its useful life by bringing it to an appropriate collection point for recyclable materials in your community or region. By doing this, you can help improve the environment of your community as well as minimize the potential negative effects created, should any hazardous substance that may possibly be present within waste material reach the environment during the disposal process.Within the European Union, users are required not to dispose of Waste Electrical and Electronic Equipment (WEEE) as unsorted municipal waste, according to the Directive 2002/96/EC of the European Parliament and of the Council of 27 January 2003, or the corresponding local laws of the Member States. Products for which this is applicable will be marked with the WEEE symbol shown at the beginning of this note unless this is not feasible because of the size or the function of the product. Wacom products are subject to the Directive 2002/96/EC and therefore you should always collect them separately and bring them to the appropriate collection point in your community or region.
Wacom pen display products comply with the European Union RoHS Directive 2002/95/EC (RoHS Directive).
DTF720_Manual.fm Page 4 Monday, December 22, 2008 10:13 AM
Contents Page 5
CONTENTS
Introduction and overview . . . . . . . . . . . . . . . . . . . . . . . . . . . . . . . . . . . . . . . . 1Precautions . . . . . . . . . . . . . . . . . . . . . . . . . . . . . . . . . . . . . . . . . . . . . . . . . . . . 2
Physical location . . . . . . . . . . . . . . . . . . . . . . . . . . . . . . . . . . . . . . . . . . . . . . 2Environment . . . . . . . . . . . . . . . . . . . . . . . . . . . . . . . . . . . . . . . . . . . . . . . . . 2Usage . . . . . . . . . . . . . . . . . . . . . . . . . . . . . . . . . . . . . . . . . . . . . . . . . . . . . . 3Handling . . . . . . . . . . . . . . . . . . . . . . . . . . . . . . . . . . . . . . . . . . . . . . . . . . . . 3
Your new DTF-720 . . . . . . . . . . . . . . . . . . . . . . . . . . . . . . . . . . . . . . . . . . . . . . . 7
Package contents . . . . . . . . . . . . . . . . . . . . . . . . . . . . . . . . . . . . . . . . . . . . . 7Interactive pen display components . . . . . . . . . . . . . . . . . . . . . . . . . . . . . . . 8
Front view . . . . . . . . . . . . . . . . . . . . . . . . . . . . . . . . . . . . . . . . . . . . . . . 8Rear view . . . . . . . . . . . . . . . . . . . . . . . . . . . . . . . . . . . . . . . . . . . . . . . 9
Installation . . . . . . . . . . . . . . . . . . . . . . . . . . . . . . . . . . . . . . . . . . . . . . . . . . . . 10
System requirements . . . . . . . . . . . . . . . . . . . . . . . . . . . . . . . . . . . . . . . . . 10Step 1: LCD monitor installation . . . . . . . . . . . . . . . . . . . . . . . . . . . . . . . . . 11
LCD monitor cabling diagram . . . . . . . . . . . . . . . . . . . . . . . . . . . . . . . 12Step 2: Pen tablet installation . . . . . . . . . . . . . . . . . . . . . . . . . . . . . . . . . . . 14
USB cable installation . . . . . . . . . . . . . . . . . . . . . . . . . . . . . . . . . . . . 14Pen tablet cabling diagram . . . . . . . . . . . . . . . . . . . . . . . . . . . . . . . . . 14Software installation . . . . . . . . . . . . . . . . . . . . . . . . . . . . . . . . . . . . . . 15
Working with your DTF-720 . . . . . . . . . . . . . . . . . . . . . . . . . . . . . . . . . . . . . . 16
Setting up your work area . . . . . . . . . . . . . . . . . . . . . . . . . . . . . . . . . . . . . 16Using the pen . . . . . . . . . . . . . . . . . . . . . . . . . . . . . . . . . . . . . . . . . . . . . . . 17
Pen components . . . . . . . . . . . . . . . . . . . . . . . . . . . . . . . . . . . . . . . . . 17Pen operations . . . . . . . . . . . . . . . . . . . . . . . . . . . . . . . . . . . . . . . . . . . . . . 18
Customizing . . . . . . . . . . . . . . . . . . . . . . . . . . . . . . . . . . . . . . . . . . . . . . . . . . . 19
Opening the control panel . . . . . . . . . . . . . . . . . . . . . . . . . . . . . . . . . . . . . 19Control panel overview . . . . . . . . . . . . . . . . . . . . . . . . . . . . . . . . . . . . . . . . 20
Customizing the pen . . . . . . . . . . . . . . . . . . . . . . . . . . . . . . . . . . . . . . 20Calibrating the DTF-720 . . . . . . . . . . . . . . . . . . . . . . . . . . . . . . . . . . . 22Customizing the Pop-up Menu . . . . . . . . . . . . . . . . . . . . . . . . . . . . . . 23
Control panel details . . . . . . . . . . . . . . . . . . . . . . . . . . . . . . . . . . . . . . . . . . 24Adjusting double-click . . . . . . . . . . . . . . . . . . . . . . . . . . . . . . . . . . . . . 24Customizing the side switch button functions . . . . . . . . . . . . . . . . . . . 24
Adjusting the display . . . . . . . . . . . . . . . . . . . . . . . . . . . . . . . . . . . . . . . . . 28Factory presets, auto-sync, and user settings . . . . . . . . . . . . . . . . . . . 28On screen display (OSD) settings . . . . . . . . . . . . . . . . . . . . . . . . . . . . 28Adjusting pitch and phase . . . . . . . . . . . . . . . . . . . . . . . . . . . . . . . . . . 31Power saving . . . . . . . . . . . . . . . . . . . . . . . . . . . . . . . . . . . . . . . . . . . . 32
DTF720_Manual.fm Page 5 Monday, December 22, 2008 10:13 AM
ContentsPage 6
Troubleshooting . . . . . . . . . . . . . . . . . . . . . . . . . . . . . . . . . . . . . . . . . . . . . . . 33
Testing the DTF-720 . . . . . . . . . . . . . . . . . . . . . . . . . . . . . . . . . . . . . . . . . . 33Display troubleshooting . . . . . . . . . . . . . . . . . . . . . . . . . . . . . . . . . . . . . . . 35
General display problems . . . . . . . . . . . . . . . . . . . . . . . . . . . . . . . . . . 35VGA problems . . . . . . . . . . . . . . . . . . . . . . . . . . . . . . . . . . . . . . . . . . . 36
Pen tablet troubleshooting . . . . . . . . . . . . . . . . . . . . . . . . . . . . . . . . . . . . . 37General problems . . . . . . . . . . . . . . . . . . . . . . . . . . . . . . . . . . . . . . . . 37Windows-specific problems . . . . . . . . . . . . . . . . . . . . . . . . . . . . . . . . 41Macintosh-specific problems . . . . . . . . . . . . . . . . . . . . . . . . . . . . . . . . 41
Technical support options . . . . . . . . . . . . . . . . . . . . . . . . . . . . . . . . . . . . . 42Obtaining driver downloads . . . . . . . . . . . . . . . . . . . . . . . . . . . . . . . . . . . . 43
Appendix . . . . . . . . . . . . . . . . . . . . . . . . . . . . . . . . . . . . . . . . . . . . . . . . . . . . . 44
Caring for the DTF-720 . . . . . . . . . . . . . . . . . . . . . . . . . . . . . . . . . . . . . . . 44Cleaning . . . . . . . . . . . . . . . . . . . . . . . . . . . . . . . . . . . . . . . . . . . . . . . 44Replacing the pen tip . . . . . . . . . . . . . . . . . . . . . . . . . . . . . . . . . . . . . 45
Using an alternate mount or stand . . . . . . . . . . . . . . . . . . . . . . . . . . . . . . . 46Pen and digital ink capabilities in Windows Vista . . . . . . . . . . . . . . . . . . . . 47
About the Windows Vista Tablet PC Input Panel . . . . . . . . . . . . . . . . . 48Uninstalling the DTF-720 . . . . . . . . . . . . . . . . . . . . . . . . . . . . . . . . . . . . . . 49Product specifications . . . . . . . . . . . . . . . . . . . . . . . . . . . . . . . . . . . . . . . . 50
General specifications . . . . . . . . . . . . . . . . . . . . . . . . . . . . . . . . . . . . . 50Display . . . . . . . . . . . . . . . . . . . . . . . . . . . . . . . . . . . . . . . . . . . . . . . . 50Pen tablet . . . . . . . . . . . . . . . . . . . . . . . . . . . . . . . . . . . . . . . . . . . . . . 51Power adapter . . . . . . . . . . . . . . . . . . . . . . . . . . . . . . . . . . . . . . . . . . . 51Pen (model FP-320) . . . . . . . . . . . . . . . . . . . . . . . . . . . . . . . . . . . . . . 51
Ordering parts and accessories . . . . . . . . . . . . . . . . . . . . . . . . . . . . . . . . . 51Radio and television interference . . . . . . . . . . . . . . . . . . . . . . . . . . . . . . . . 52
Federal Communications Commission (FCC) notice . . . . . . . . . . . . . 52Industry Canada (Canada only) . . . . . . . . . . . . . . . . . . . . . . . . . . . . . 53CE declaration . . . . . . . . . . . . . . . . . . . . . . . . . . . . . . . . . . . . . . . . . . 53
License and Warranty (Europe, Africa and Middle East) . . . . . . . . . . . . . . 54
DTF720_Manual.fm Page 6 Monday, December 22, 2008 10:13 AM
Your new DTF-720 Page 7
YOUR NEW DTF-720
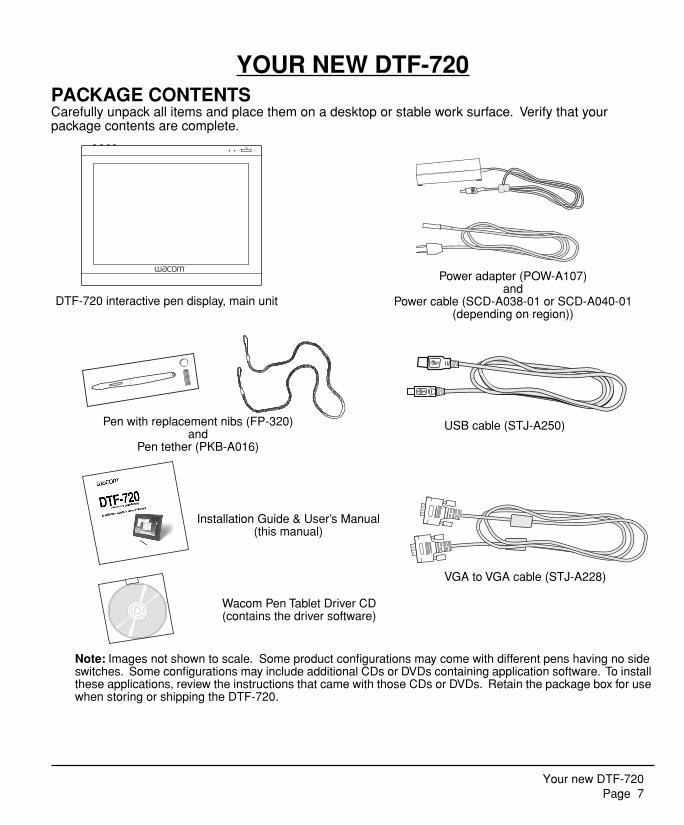
PACKAGE CONTENTS
Carefully unpack all items and place them on a desktop or stable work surface. Verify that your package contents are complete.
Note:
Images not shown to scale. Some product configurations may come with different pens having no side switches. Some configurations may include additional CDs or DVDs containing application software. To install these applications, review the instructions that came with those CDs or DVDs. Retain the package box for use when storing or shipping the DTF-720.
DTF-720 interactive pen display, main unit
Power adapter (POW-A107)and
Power cable (SCD-A038-01 or SCD-A040-01 (depending on region))
USB cable (STJ-A250)
VGA to VGA cable (STJ-A228)
Pen with replacement nibs (FP-320)and
Pen tether (PKB-A016)
Installation Guide & User’s Manual (this manual)
Wacom Pen Tablet Driver CD (contains the driver software)
DTF720_Manual.fm Page 7 Monday, December 22, 2008 10:13 AM

Your new DTF-720Page 8
INTERACTIVE PEN DISPLAY COMPONENTS
Your product has many features and components with which you will want to become familiar.
FRONT VIEW
The display and tablet sensor function as an integrated output and input device. The display supports resolutions up to 1280 x 1024 pixels at 16.7 million colors. The tablet sensor reports pen coordinates, pressure, and switch information.
On Screen Display (OSD) controlsThese controls, located on the upper edge of the tablet, enable you to adjust a variety of display settings. See Adjusting the display on page 28 for more information.
Power LEDLights blue when power has been supplied to the DTF-720 and a video signal is present.Glows orange when no video signal is detected by the DTF-720. (e.g., Your computer is turned off, starting up, or has entered a power management mode in which video signals are not sent.)
Power switchTurns power to the unit on or off.
Status LEDLights blue when the pen is in the active area of the pen display tablet and the pen tip is pressed. Note that the USB cable must also be plugged into an active USB port before the LED will light.
Integrated display and tablet
Use the integrated USB ports (one located on each side of the unit) to connect a USB device (e.g., a USB Flash Drive or a USB remote controller).
Be sure to fully install the DTF-720 hardware and software before connecting any other devices to the unit.
DTF720_Manual.fm Page 8 Monday, December 22, 2008 10:13 AM

Your new DTF-720 Page 9
REAR VIEW
Important:
Always store the pen display on a stable surface or in its original packing carton when not in use. Be sure to adjust the stand to the low tilt position before packaging the DTF-720. If you do not close the stand, the notched mechanism may be damaged during transportation and storage.
Do not lift the unit by the stand; this may damage the stand mechanism. When lifting or moving the DTF-720, always do so by grasping the main body casing.
Video, USB, and power connectors
Kensington security slotAllows easy attachment of a security cable.
Pen tether attachment pointIf you will be using the pen tether, connect it to the attachment point located on the left or right side of the unit.
Stand adjustment leverPull this lever to adjust the stand. Release the lever to lock the stand in place.
CAUTION Be careful to avoid catching your finger in the gap of the movable portion of the stand.
StandThe stand can be used to adjust the tilt angle of the unit.
Pen storage compartment
DTF720_Manual.fm Page 9 Monday, December 22, 2008 10:13 AM

InstallationPage 10
INSTALLATION
SYSTEM REQUIREMENTS
Before installing the DTF-720, make sure your computer meets the following minimum system requirements:
•
PC.
Windows Vista
™
, XP, XP x64, or 2000. VGA video connector, available USB port, and CD-ROM drive.
•
Macintosh.
OS X, v10.4.0 or greater. VGA video connector, available USB port, and CD-ROM drive.
Notes:
Th
e
DTF-720 can be used alone or with another display. You may connect a second VGA device such as a monitor or LCD projector to the DTF-720
RGB-O
UT
port. When using this port, the second device will mirror the image on the DTF-720. Complete the DTF-720 installation before connecting a projection device to the unit.Depending on the capabilities of your video card and operating system, you may be able to set up the DTF-720 as a mirrored, extended, or independent display. Refer to your video card documentation for more information on its capabilities.When you are working with more than one monitor, the DTF-720 will map to the monitors based upon how your system is configured. By default, if you are in mirror mode, the pen tablet will map to the entire space on each display or monitor. Please refer to your hardware and operating system documentation for details on configuring your computer and operating system for use with multiple monitors.
There are two primary steps to the installation process:
• Step 1: LCD monitor installation
• Step 2: Pen tablet installation
Be sure to follow ALL instructions carefully.
DTF720_Manual.fm Page 10 Monday, December 22, 2008 10:13 AM

Installation Page 11
STEP 1: LCD MONITOR INSTALLATIONIn the first stage of the installation process, the DTF-720 is installed as a monitor on your system. As you work through the first stage of the installation process, please refer to the LCD monitor cabling diagram on the following page when making cable connections.
Important: Do not connect the USB data cable until instructed to do so.
• Turn off your computer.
Caution: Never connect or disconnect the video or power cables while your computer or DTF-720 are powered on – this can damage the display or video card.
• If your computer has only one analog (VGA) video connector, you will need to unplug your previous monitor or add a second VGA card.
• Connect the power adapter to the DTF-720. Then connect the adapter’s power cable and plug the adapter into an AC outlet. See – B – and – C –
• Turn on the DTF-720. The power LED will light orange.
• Plug one end of the VGA cable into the DTF-720. Plug the other end of the cable into the VGA connector on your computer’s video card. See – A – in the connection diagram on page 12. Be sure to tighten the thumbscrews on the connectors.
VGA connector
DTF720_Manual.fm Page 11 Monday, December 22, 2008 10:13 AM

InstallationPage 12
LCD MONITOR CABLING DIAGRAM
DTF-720, rear view
– B – DC IN (12V)
– A – VGA cable
Video card
Rear panel of your computer
RGB-IN
Do not attach the USB data cable until instructed to do so.
Power adapter – C – To AC outlet
CAUTION Use only the power adapter that came with the DTF-720; use of an improper power adapter may damage the unit.Do not connect or disconnect the video or power cables while the DTF-720 or your computer are turned on – this can damage the display or computer video card.Make sure that the display refresh rate does not exceed 75 Hz.
RGB-OUT
VGA port
The RGB-OUT port is used to connect a second VGA device such as a projector or monitor that mirrors the pen display. Be sure to fully install the DTF-720 hardware and software before connecting a projection device to the unit. Do not connect or disconnect any cable while the DTF-720 or your computer are turned on.
DTF720_Manual.fm Page 12 Monday, December 22, 2008 10:13 AM

Installation Page 13
• Next, turn on your computer.
For Windows systems: The DTF-720 will automatically install as a default monitor.
• As necessary, configure the display control panel settings for the proper size and color resolution. The maximum (native) resolution of the DTF-720 is 1280 x 1024 pixels. The display size and color resolution may be constrained by the capabilities of your video card. See the video card manufacturer’s documentation for details.
Windows: If you are using the DTF-720 as a secondary monitor, you may first need to enable the DTF-720 in your Display Properties control panel.
• To fine-tune the display, please refer to Adjusting the display, beginning on page 28 for more information.
• After the LCD monitor portion of the DTF-720 is working to your satisfaction, move on to Step 2: Pen tablet installation to install the pen tablet portion of the DTF-720. For troubleshooting tips, see page 33.
Notes: Each DTF-720 LCD panel is produced under very stringent quality standards. Production techniques cannot guarantee an absolutely perfect TFT display, and some panels may exhibit a certain number of pixels that show an incorrect color. See the specifications on page 50 for more information.If an image has fine striping (such as screen stripes), it may appear to flicker or display a moiré pattern.Do not apply excessive pressure on the display surface, it may cause the appearance of a moiré or pooling pattern. If this occurs, use less pressure on the display screen when working with the pen.When a still image is displayed for a long period of time, an after-image may remain for a short time. To prevent this, Wacom recommends using a screen saver or other power management feature.
Important: To extend the life of the backlight, set your computer’s power management to turn off the display when it is not in use for extended periods of time.
DTF720_Manual.fm Page 13 Monday, December 22, 2008 10:13 AM

InstallationPage 14
STEP 2: PEN TABLET INSTALLATIONUSB CABLE INSTALLATION Plug the square end of the USB cable into the DTF-720 port labeled USB. Plug the other end into an available USB port on your computer or on a USB hub attached to your computer. See – D – in the diagram below.
PEN TABLET CABLING DIAGRAM
DTF-720, rear view
To USB port
Your computer
– D –
USB port
To power adapter. See page 12.
To video connection. See page 12.
DTF720_Manual.fm Page 14 Monday, December 22, 2008 10:13 AM

Installation Page 15
SOFTWARE INSTALLATION
IMPORTANT: You MUST install the Wacom pen tablet driver software for correct pen-on-screen functionality.
To install the tablet software:
• Save your work and close all open applications. Temporarily disable any virus protection programs.
• Insert the Wacom Pen Tablet Driver CD into your computer’s CD-ROM drive. If the software installer menu does not automatically display, double-click on the INSTALL icon located on the CD.
• Click on the INSTALL TABLET link and follow the prompts to install the driver software.
• Reactivate your virus protection program.
• After the software installation has been completed, make sure you can use your pen on the DTF-720 display to move the screen cursor.
When you place the pen tip on the display screen, the screen cursor should immediately jump to a corresponding position approximately beneath the pen tip. Lift the pen tip and place it on the display screen surface in a different location – the screen cursor should again jump to the new position. This is known as absolute positioning, and enables you to position the screen cursor without having to drag your pen across the display screen surface.
• Be sure to check the Read Me file for updated information. If you have trouble installing the DTF-720, see the Troubleshooting section beginning on page 33.
Notes:For Windows Vista, driver installation automatically activates the new pen input functions available within Windows Vista and Office 2007 (except for Windows Vista Home Basic).For Windows Vista, XP, and Macintosh OS X, user-specific preferences are supported. After logging in, each user can customize their personal settings in the Pen Tablet control panel. Switching to another user will automatically load the settings for that user.To uninstall the tablet driver, see Uninstalling the DTF-720 on page 49.
Next, adjust the pen display tablet calibration to precisely align the screen cursor to the pen tip. See Calibrating the DTF-720 on page 22.
DTF720_Manual.fm Page 15 Monday, December 22, 2008 10:13 AM
Working with your DTF-720Page 16
WORKING WITH YOUR DTF-720As you work with the DTF-720 interactive pen display you can rest your hand lightly on the display screen, just as if it were a drawing board or sheet of paper.
Because the DTF-720 surface will be a little higher than your desk, consider adjusting the height of your desk or chair to assure comfortable use of the device.
SETTING UP YOUR WORK AREATo minimize fatigue, organize your work area so you can work comfortably. Position the DTF-720, the pen, and your keyboard so they are easily accessible without unnecessary reaching. The pen display and any other displays should be positioned so you can view them comfortably with a minimum of eyestrain.
Here are some other points to keep in mind:
• Take short breaks between tasks to stretch and relax your muscles.
• Use a gentle grip when working with the pen.
• Alternate tasks throughout the day.
• Maintain a good posture at all times. Minimize awkward postures and repetitive movements that cause discomfort. Change your position if you feel any discomfort due to your work position.
• Alternate between different modes of use.
Note: Wacom makes no representation, promise or guarantee that Wacom products will cure or prevent, in whole or in part, mouse-induced repetitive stress symptoms, injuries or conditions. Individual results may vary. Always obtain competent medical advice to determine the most appropriate treatment for your specific situation.
Tips:• Be careful that you do not pull the cables out of their connections by accidentally moving the DTF-720 too
far from the computer.• The pen tether can be used to ensure your pen stays with your pen display tablet. Simply loop one end of
the tether through the tether hole located on the pen, and the other end of the tether through the tether connection point located on the left or right side of the tablet.
• The DTF-720 can also be mounted to articulated arms or other third-party stands meeting the VESA 75 specification for display stands. For details, see Using an alternate mount or stand on page 46.
DTF720_Manual.fm Page 16 Monday, December 22, 2008 10:13 AM
Working with your DTF-720 Page 17
USING THE PENThe Wacom pen is cordless, battery-free, and senses the amount of pressure you apply to the tip. Hold the pen like you would a normal pen or pencil. Make sure the programmable DuoSwitch is in a convenient location where you can toggle it with your thumb or forefinger, but not accidentally press it while writing or drawing. As you work, you can rest your hand lightly on the DTF-720 display screen, just as if it were a drawing board or sheet of paper. You can tilt the pen in any way that feels most comfortable for drawing.
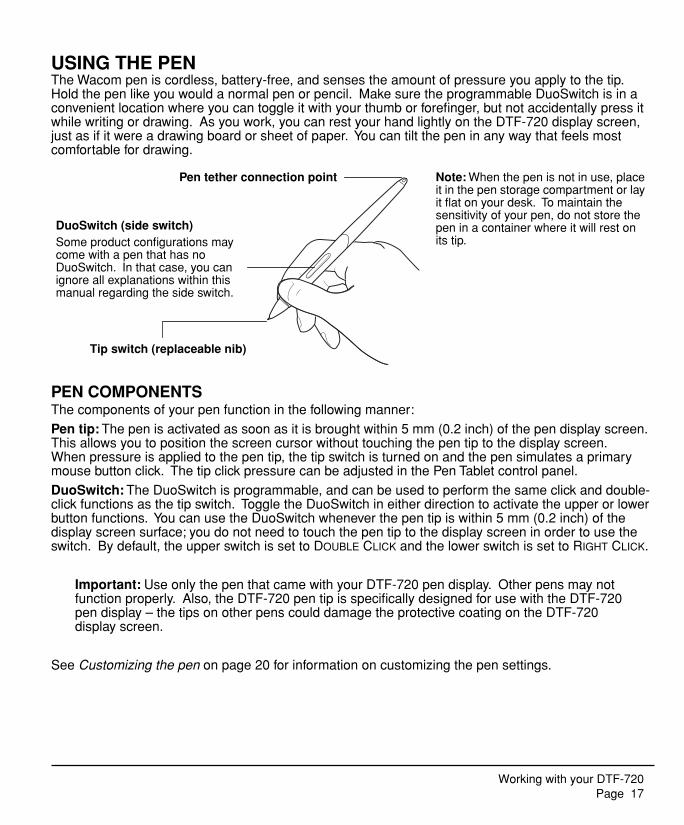
PEN COMPONENTSThe components of your pen function in the following manner:
Pen tip: The pen is activated as soon as it is brought within 5 mm (0.2 inch) of the pen display screen. This allows you to position the screen cursor without touching the pen tip to the display screen. When pressure is applied to the pen tip, the tip switch is turned on and the pen simulates a primary mouse button click. The tip click pressure can be adjusted in the Pen Tablet control panel.
DuoSwitch: The DuoSwitch is programmable, and can be used to perform the same click and double-click functions as the tip switch. Toggle the DuoSwitch in either direction to activate the upper or lower button functions. You can use the DuoSwitch whenever the pen tip is within 5 mm (0.2 inch) of the display screen surface; you do not need to touch the pen tip to the display screen in order to use the switch. By default, the upper switch is set to DOUBLE CLICK and the lower switch is set to RIGHT CLICK.
Important: Use only the pen that came with your DTF-720 pen display. Other pens may not function properly. Also, the DTF-720 pen tip is specifically designed for use with the DTF-720 pen display – the tips on other pens could damage the protective coating on the DTF-720 display screen.
See Customizing the pen on page 20 for information on customizing the pen settings.
Pen tether connection point
DuoSwitch (side switch)Some product configurations may come with a pen that has no DuoSwitch. In that case, you can ignore all explanations within this manual regarding the side switch.
Tip switch (replaceable nib)
Note: When the pen is not in use, place it in the pen storage compartment or lay it flat on your desk. To maintain the sensitivity of your pen, do not store the pen in a container where it will rest on its tip.
DTF720_Manual.fm Page 17 Monday, December 22, 2008 10:13 AM
Working with your DTF-720Page 18
PEN OPERATIONSPointing and selecting: Move the pen above the DTF-720 display screen to position the screen cursor. The pen tip needs to be within 5 mm (0.2 inch) of the display screen surface; you do not need to touch the display surface to move the screen cursor. The cursor jumps to the location where you place the pen (absolute positioning). Press the pen tip on the display screen to make a selection.
Note: You must calibrate the pen display tablet to correctly align the screen cursor with the pen tip. (See Calibrating the DTF-720 on page 22.) If the screen cursor does not jump to a position close to the pen tip when you place the pen on the display screen, then the pen tablet driver may not be installed or is not loading. Install the pen tablet driver software if necessary. Otherwise, see Troubleshooting, beginning on page 33.
Clicking: Tap the display screen once with the pen tip, or touch the pen to the display screen with enough pressure to register a click.
Windows tip: You can make navigating with the pen easier by configuring Windows to select when the pen is over an icon and to launch the icon with a single click. To turn on this feature first open a folder.For Windows Vista, from the ORGANIZE pull-down menu choose FOLDER AND SEARCH OPTIONS. From the GENERAL tab select SINGLE-CLICK TO OPEN AN ITEM (POINT TO SELECT).
For other Windows versions, from the TOOLS pull-down menu choose FOLDER OPTIONS.... From the GENERAL tab select SINGLE-CLICK TO OPEN AN ITEM (POINT TO SELECT).
Double-clicking: Press the upper side switch, or quickly tap the display screen twice in the same place with the pen tip. Double-clicking is easier when the pen is perpendicular to the tablet screen. To fine-tune the double-click area, see Adjusting double-click on page 24.
Dragging: Select an object, then slide the pen tip across the display screen to move the object.
Using the side switch: The pen is equipped with a DuoSwitch. This switch has two programmable functions that can be selected by rocking the switch in either direction. You can use the DuoSwitch whenever the pen tip is within 5 mm (0.2 inch) of the display screen surface; you do not need to touch the pen tip to the display surface in order to use the switch. The upper switch is set to DOUBLE CLICK, and the lower switch is set to RIGHT CLICK by default.
Drawing and writing with pressure sensitivity: The pen responds to the nuance and inflection of your hand movements, enabling you to create natural-looking pen and brush strokes within applications that support this feature. To draw and write with pressure, select a pressure-sensitive tool from your application’s tool palette. As you work on the screen surface, use various amounts of downward pressure on the tip of the pen. Press lightly for thin lines or softer color. Press harder for thick lines or dense color.
DTF720_Manual.fm Page 18 Monday, December 22, 2008 10:13 AM

Customizing Page 19
CUSTOMIZINGAfter you master the basics of using your pen on the DTF-720 interactive pen display, you may want to customize the way the pen works. The Pen Tablet control panel makes it easy to customize the DTF-720 and pen.
OPENING THE CONTROL PANELTo open the control panel, use the DTF-720 pen on the pen display tablet:
Windows. Click on the Windows START button and choose ALL PROGRAMS. (For Windows 2000, choose the PROGRAMS group.) Then select TABLET and choose the PEN TABLET PROPERTIES option.
Macintosh. Open SYSTEM PREFERENCES from either the Dock, the Apple menu, or from the APPLICATIONS folder. Then click on the PEN TABLET icon.
After opening the control panel, see Control panel overview on page 20.
Notes: For Windows Vista, XP, and Macintosh OS X, user-specific preferences are supported. After logging in, each user can customize their personal settings in the Pen Tablet control panel. Switching to another user will automatically load the settings for that user.When more than one Wacom tablet is installed on a single computer, any changes made in the Pen Tablet control panel will be applied only to the tablet that was last used before opening the control panel.
DTF720_Manual.fm Page 19 Monday, December 22, 2008 10:13 AM
CustomizingPage 20
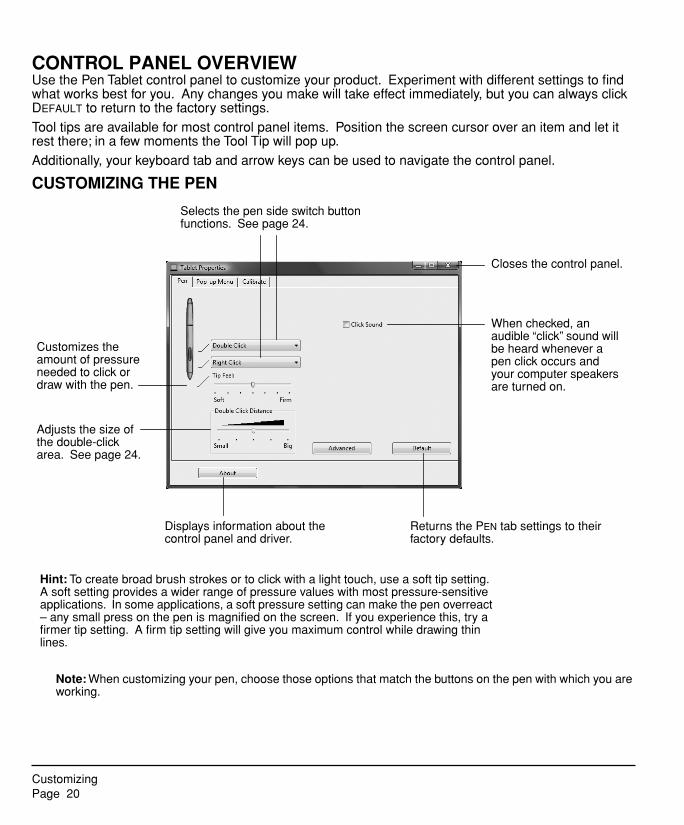
CONTROL PANEL OVERVIEWUse the Pen Tablet control panel to customize your product. Experiment with different settings to find what works best for you. Any changes you make will take effect immediately, but you can always click DEFAULT to return to the factory settings.
Tool tips are available for most control panel items. Position the screen cursor over an item and let it rest there; in a few moments the Tool Tip will pop up.
Additionally, your keyboard tab and arrow keys can be used to navigate the control panel.
CUSTOMIZING THE PEN
Note: When customizing your pen, choose those options that match the buttons on the pen with which you are working.
Returns the PEN tab settings to their factory defaults.
Closes the control panel.
Customizes the amount of pressure needed to click or draw with the pen.
Adjusts the size of the double-click area. See page 24.
Selects the pen side switch button functions. See page 24.
When checked, an audible “click” sound will be heard whenever a pen click occurs and your computer speakers are turned on.
Displays information about the control panel and driver.
Hint: To create broad brush strokes or to click with a light touch, use a soft tip setting. A soft setting provides a wider range of pressure values with most pressure-sensitive applications. In some applications, a soft pressure setting can make the pen overreact – any small press on the pen is magnified on the screen. If you experience this, try a firmer tip setting. A firm tip setting will give you maximum control while drawing thin lines.
DTF720_Manual.fm Page 20 Monday, December 22, 2008 10:13 AM
Customizing Page 21
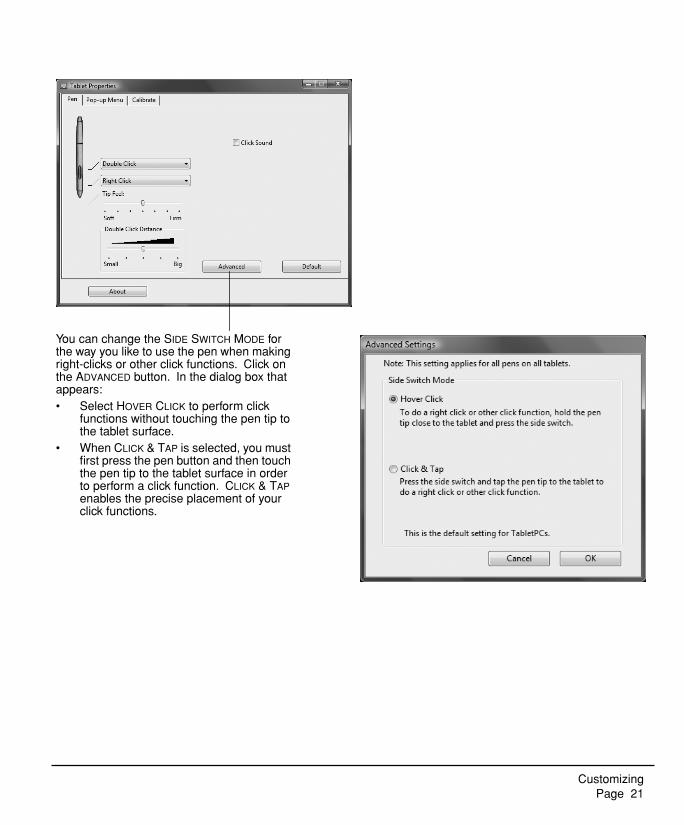
You can change the SIDE SWITCH MODE for the way you like to use the pen when making right-clicks or other click functions. Click on the ADVANCED button. In the dialog box that appears:• Select HOVER CLICK to perform click
functions without touching the pen tip to the tablet surface.
• When CLICK & TAP is selected, you must first press the pen button and then touch the pen tip to the tablet surface in order to perform a click function. CLICK & TAP enables the precise placement of your click functions.
DTF720_Manual.fm Page 21 Monday, December 22, 2008 10:13 AM

CustomizingPage 22
CALIBRATING THE DTF-720You must calibrate the pen display tablet in order to align the screen cursor position with the position of the pen on the display screen. This is required to adjust for parallax caused by the display screen cover glass and coating. Set the DTF-720 in its working position, then follow the procedure below.
Important: Make sure the display is properly adjusted before calibrating the tablet. See Adjusting pitch and phase on page 31, and Adjusting the display beginning on page 28.
• In the Pen Tablet control panel, select the CALIBRATE tab.
• If you are working with multiple monitors, select the MONITOR corresponding to the DTF-720 display. (Only monitors that are set to one of the resolutions supported by the DTF-720 will appear in the list.)
• Click on the CALIBRATE... button to activate the calibration screen.
• Hold the pen and position your head as you normally do when working with the pen display. Use the pen tip to click on the center of the crosshairs in the upper-left corner.
• Then click on the center of the crosshairs that are displayed in the lower-right corner.
• Test the alignment by positioning the pen at a few different points on the display. Click OK to accept the calibration. Click TRY AGAIN to recalibrate.Be sure to read the directions in the calibration screen for detailed instructions and additional options. The calibration setting applies to all applications.
Crosshairs
Adjustment pattern for pitch and phase. See Adjusting pitch and phase on page 31 for details.
Notes: If you prefer to see the screen cursor slightly offset from the actual position of the pen tip, calibrate by clicking on a spot showing that offset from the crosshairs. For example, to have the screen cursor appear 1/10th of an inch above and to the left of the pen tip, calibrate by clicking on a spot 1/10th of an inch below and to the right of the crosshairs.To calibrate two pen displays, first touch the pen to pen display #1 and open the control panel without touching the pen to pen display #2. In the control panel, select the correct monitor and calibrate pen display #1. Close the control panel, touch the pen to pen display #2, and again open the control panel without touching the pen to pen display #1. Select the correct monitor and calibrate pen display #2.
DTF720_Manual.fm Page 22 Monday, December 22, 2008 10:13 AM

Customizing Page 23
CUSTOMIZING THE POP-UP MENUUse the POP-UP MENU tab to define the available functions on the Pop-up Menu list.
To display the Pop-up Menu, set a pen button to the POP-UP MENU function. Whenever you press that button, the Pop-up Menu is displayed. Select from available items in the Pop-up Menu by clicking on them. To close the Pop-up Menu without making a selection, click outside of the Pop-up Menu.
Displays a list of functions that have been added to the Pop-up Menu. To change the order of an item, drag it to a new location. Double-click on an item to make edits.
Select a button function to add to the Pop-up Menu list. See page 24.
Removes the selected item from the list.
Sets the FONT and FONT SIZE of the Pop-up Menu.
Returns all tab settings to their default values.Important: This action will delete all Pop-up Menu items that have been defined.
DTF720_Manual.fm Page 23 Monday, December 22, 2008 10:13 AM
CustomizingPage 24
CONTROL PANEL DETAILSADJUSTING DOUBLE-CLICKDouble-clicking with the pen tip can be made easier by expanding the tap area that accepts a double-click (the double-click distance), or by using the pen’s side switch to automatically double-click when pressed. A large double-click distance may cause a delay at the beginning of your brushstrokes in some drawing applications. If you notice such effects, try setting a smaller double-click distance and using the side switch to double-click.
Hint: Press the upper switch to double-click. This is easier than tapping twice with the pen tip.
CUSTOMIZING THE SIDE SWITCH BUTTON FUNCTIONSYou can set the pen’s DuoSwitch to simulate a variety of functions. Just select an option from the pull-down menu for either the upper or lower side switch. Your changes take effect immediately. When you bring the pen tip within 5 mm (0.2 inch) of the pen display tablet surface without touching the tablet and press the side switch, the selected function occurs. The following list describes the available options.
CLICK. Default setting for the pen tip. Simulates a primary mouse button click.
DOUBLE CLICK. Default setting for the upper position of the side switch. Simulates a double-click. For easier double-clicking, use this function instead of tapping twice with your pen tip.
MIDDLE CLICK. Simulates a middle mouse button click.
RIGHT CLICK. Default setting for the lower position of the side switch. Simulates a right mouse button click, which displays a context menu.
CLICK LOCK. Simulates holding down the primary mouse button. Press the side switch once to initiate click lock. Press the switch again to release click lock. Click lock is useful for dragging objects or selecting blocks of text.
4TH CLICK (BACK). Simulates a 4th mouse button click, which on Windows systems typically issues the BACK command in browser applications.
5TH CLICK (FORWARD). Simulates a 5th mouse button click, which typically issues the FORWARD command in browser applications.
DTF720_Manual.fm Page 24 Monday, December 22, 2008 10:13 AM

Customizing Page 25
PAN/SCROLL. Enables you to position a document or image in any direction within the active pane by pressing a pen switch set for PAN/SCROLL and then sliding the pen tip across the DTF-720 display screen.
TABLET PC INPUT PANEL. (Tablet PCs and Windows Vista systems that support the Tablet PC Input Panel.) Opens the Tablet PC Input Panel when you press a tool button set to this function.
JOURNAL. (Windows Vista and Tablet PC systems that include Microsoft Journal.) Opens Microsoft Journal.
POP-UP MENU. Displays a Pop-up Menu on your screen. See Customizing the Pop-up Menu on page 23 for more information.
ERASE. Sets a button so that when the button is pressed, the pen tip will act like an eraser in applications that support the ERASE function.
INK TOGGLE. (Macintosh.) Toggles the Ink ANYWHERE function of Inkwell on and off. Inkwell automatically recognizes and converts your handwriting into text and inserts it into a document. Note that Ink must be turned on for this function to work. See your Macintosh help for information on working with Inkwell.
MODE TOGGLE.... Toggles between the pen tracking mode (pen mode) and mouse mode. The tracking mode you select determines the relationship between pen movement and cursor movement.
When you select PAN/SCROLL, you are prompted to set a scrolling speed that will be used in applications that do not support grabber hand (pixel-level) panning within a document or image.A slower setting reduces the scroll rate and is useful for close-up and detail work where you need precise control of the image.
The Mouse Mode Details dialog box will appear when you first set a tool button to MODE TOGGLE....• With the pen display tablet correctly calibrated in
pen mode, the screen cursor should always follow the physical pen tip on the screen. This is the default setting.
• When toggled to your computer’s mouse settings (mouse mode), the screen cursor is not directly “linked” to the pen tip and is positioned like a mouse, requiring a “pick up and slide” motion to move the cursor on the screen. On multiple display systems, mouse mode will allow you to access the other display(s) with your pen.
DTF720_Manual.fm Page 25 Monday, December 22, 2008 10:13 AM

CustomizingPage 26
MODIFIER.... Enables you to assign modifier key(s) (such as SHIFT, ALT, or CTRL for Windows, or SHIFT, OPTION, COMMAND, and CONTROL for Macintosh). Many applications use modifier keys to constrain the size or placement of objects.
KEYSTROKE.... Enables you to simulate keystrokes. Selecting this option displays the DEFINE KEYSTROKE dialog box where you can enter a keystroke or keystroke sequence to play back.
In addition to choosing one or more modifier key options, you can select the CLICK box if you want a mouse click to occur whenever you press the tool button.
You can manually enter a keystroke or keystroke combination in the KEYS entry box. Keystroke combinations can include letters, numbers, function keys (such as F3) and modifier keys (such as SHIFT, ALT, or CTRL for Windows, or SHIFT, OPTION, COMMAND, and CONTROL for Macintosh).You can also select special keystrokes or keystroke combinations from the ADD SPECIAL drop-down menu.After defining a keystroke sequence, click OK.
Important: Because the ENTER (Windows) and RETURN (Macintosh) keys can be selected as a defined keystroke, they cannot be used to select OK. You must use your pen to click on the OK button.
If prompted, enter a name for the keystroke definition. the name will be displayed with the respective control or in the Pop-up Menu list, as applicable.
Clears the keystroke entry box.
Deletes only the last entry in the keystroke entry box.
DTF720_Manual.fm Page 26 Monday, December 22, 2008 10:13 AM
Customizing Page 27
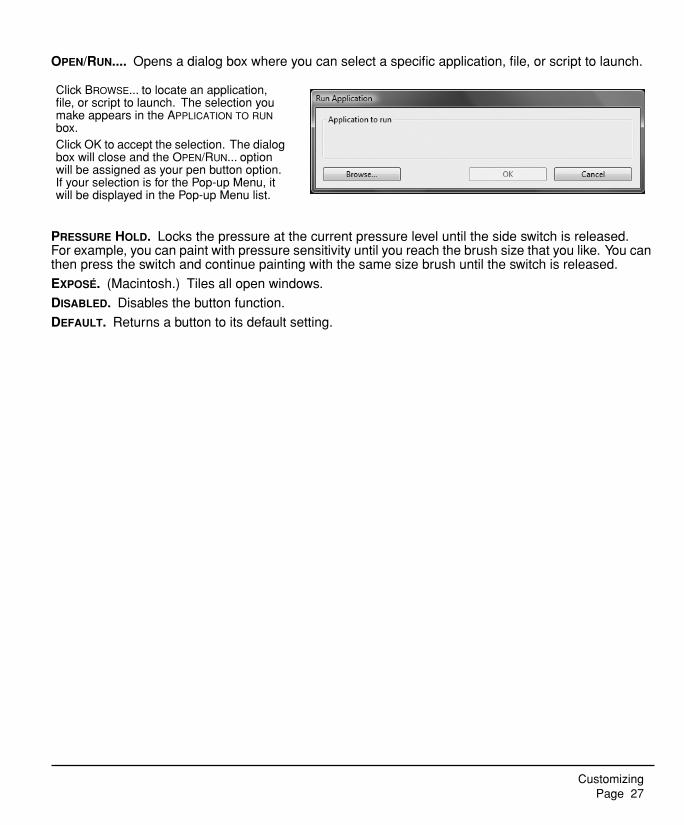
OPEN/RUN.... Opens a dialog box where you can select a specific application, file, or script to launch.
PRESSURE HOLD. Locks the pressure at the current pressure level until the side switch is released. For example, you can paint with pressure sensitivity until you reach the brush size that you like. You can then press the switch and continue painting with the same size brush until the switch is released.
EXPOSÉ. (Macintosh.) Tiles all open windows.
DISABLED. Disables the button function.
DEFAULT. Returns a button to its default setting.
Click BROWSE... to locate an application, file, or script to launch. The selection you make appears in the APPLICATION TO RUN box.Click OK to accept the selection. The dialog box will close and the OPEN/RUN... option will be assigned as your pen button option. If your selection is for the Pop-up Menu, it will be displayed in the Pop-up Menu list.
DTF720_Manual.fm Page 27 Monday, December 22, 2008 10:13 AM

CustomizingPage 28
ADJUSTING THE DISPLAYFACTORY PRESETS, AUTO-SYNC, AND USER SETTINGSFactory presets: For optimal display quality, set your video card to the DTF-720’s native resolution of 1280 x 1024 pixels. See page 50 for signal specifications.
Auto-sync: The DTF-720 attempts to automatically synchronize to the incoming signal. Auto-sync will function when the horizontal frequency is between 30 to 80 kHz and the vertical frequency is between 50 to 75 Hz. If the DTF-720 does not automatically synchronize with the incoming signal, you can use the On Screen Display (OSD) RESET AUTO ADJUST option to initiate display synchronization. Further screen display adjustments can be manually made using the OSD controls.
User settings: When you manually set the display using the OSD function, the settings are stored within the DTF-720 for use the next time the unit receives a similar signal. This is applicable to all display modes.
ON SCREEN DISPLAY (OSD) SETTINGSThe OSD function enables you to adjust and optimize a variety of display settings at the touch of a button. The OSD controls are located on the upper left edge of the unit.
The basic process for working with the OSD is as follows:
• Press the MENU button to open the OSD main menu.
• Use the + or – buttons to select an option. When the option you want to adjust is highlighted, press the ENTER button. The current settings and adjustment sub-menu for that option will appear.
• Use the + or – buttons to adjust the option settings.
• After making your changes, press the ENTER button to save. To exit, press the MENU button.
Note: All settings are automatically saved when the OSD menu closes. If you make changes to the display appearance and cannot return to the original settings, use the RESET RECALL option to return the DTF-720 to its original factory defaults.
Menu buttonOpens or closes the OSD menu.
Selection buttonsUse these buttons to select an option that can be activated when you press the ENTER button. After activating a selected option, press the + button to increase a selected item value, and press the – button to decrease it.
ENTER buttonActivates or deactivates the selected OSD menu option.
+ –
DTF720_Manual.fm Page 28 Monday, December 22, 2008 10:13 AM

Customizing Page 29
When you open the OSD menu, the following options are displayed as icons:
CONTRAST. Select to increase or decrease image contrast.
BRIGHTNESS. Select to increase or decrease image brightness.
PHASE. Select to reduce or eliminate horizontal distortion lines. To automatically adjust, use the RESET option.
PITCH. Select to reduce or eliminate vertical distortion lines.To automatically adjust, use the RESET option.
RESET. Provides two options: Use AUTO ADJUST to reset only the image parameters.Use RECALL to reset all screen options to the factory default.
Selecting the EXIT icon exits the RESET window without resetting anything.
VERTICAL CENTER. Select to move the screen image up or down.To automatically adjust, use the RESET option.
HORIZONTAL CENTER. Select to move the screen image left or right.To automatically adjust, use the RESET option.
MENU POSITION. Select to move the OSD menu around the display screen.
DTF720_Manual.fm Page 29 Monday, December 22, 2008 10:13 AM
CustomizingPage 30
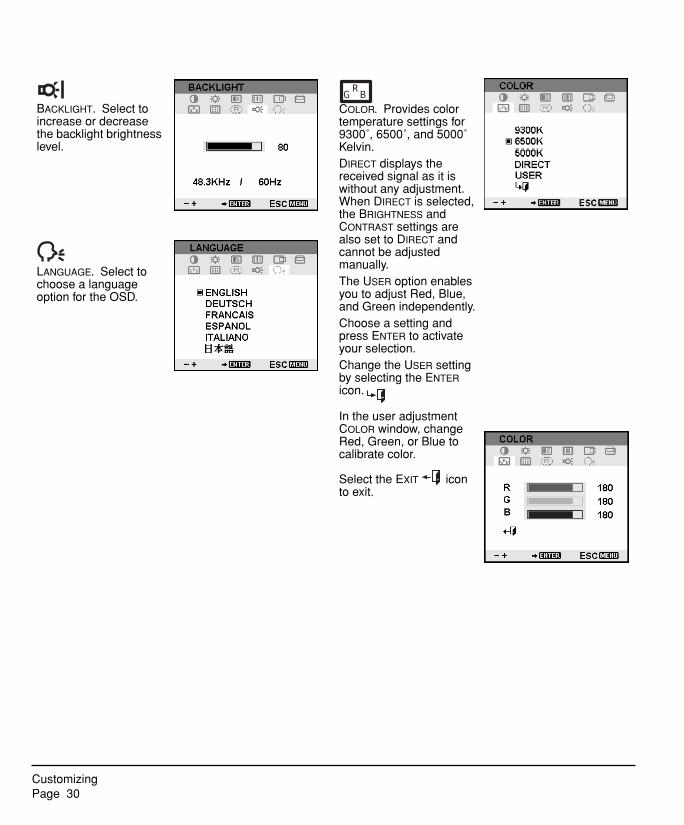
BACKLIGHT. Select to increase or decrease the backlight brightness level.
COLOR. Provides color temperature settings for 9300˚, 6500˚, and 5000˚ Kelvin.DIRECT displays the received signal as it is without any adjustment. When DIRECT is selected, the BRIGHTNESS and CONTRAST settings are also set to DIRECT and cannot be adjusted manually.The USER option enables you to adjust Red, Blue, and Green independently.Choose a setting and press ENTER to activate your selection.Change the USER setting by selecting the ENTER icon.
In the user adjustment COLOR window, change Red, Green, or Blue to calibrate color.
Select the EXIT icon to exit.
LANGUAGE. Select to choose a language option for the OSD.
DTF720_Manual.fm Page 30 Monday, December 22, 2008 10:13 AM

Customizing Page 31
ADJUSTING PITCH AND PHASESome computers and video cards may not allow the auto-sync function to fully work when the DTF-720 is first connected. If some portion of text appears blurred, adjust pitch and phase by following the procedure below. For crisp images, set the resolution of your video card to 1280 x 1024.
• In the Pen Tablet control panel, select the CALIBRATE tab.
• If you are working with multiple displays, be sure the display corresponding to the DTF-720 is selected in the MONITOR menu.
• Click on the CALIBRATE... button to activate the calibration screen.
• Using the OSD controls, open the OSD Menu and select the PITCH icon. Then adjust the pitch level so that the pattern of fine vertical stripes displays evenly. (For details on changing the OSD settings, see On screen display (OSD) settings on page 28.)
• In the OSD Menu, select the PHASE icon. Adjust the phase level so that the adjustment pattern shows clearly.
• After completing these adjustments, press the ENTER and MENU buttons to exit the OSD Menu.Click on the CANCEL button or press ESC to exit the calibration screen.
Adjustment pattern for pitch and phase.
DTF720_Manual.fm Page 31 Monday, December 22, 2008 10:13 AM
CustomizingPage 32
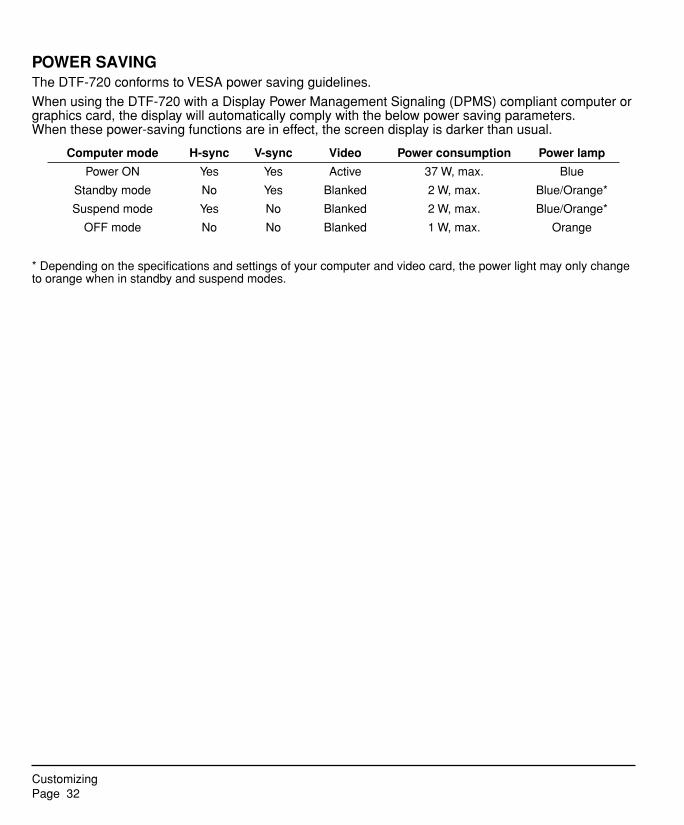
POWER SAVINGThe DTF-720 conforms to VESA power saving guidelines.
When using the DTF-720 with a Display Power Management Signaling (DPMS) compliant computer or graphics card, the display will automatically comply with the below power saving parameters. When these power-saving functions are in effect, the screen display is darker than usual.
* Depending on the specifications and settings of your computer and video card, the power light may only change to orange when in standby and suspend modes.
Computer mode H-sync V-sync Video Power consumption Power lamp
Power ON Yes Yes Active 37 W, max. Blue
Standby mode No Yes Blanked 2 W, max. Blue/Orange*
Suspend mode Yes No Blanked 2 W, max. Blue/Orange*
OFF mode No No Blanked 1 W, max. Orange
DTF720_Manual.fm Page 32 Monday, December 22, 2008 10:13 AM

Troubleshooting Page 33
TROUBLESHOOTINGMost of the time your pen display tablet will work flawlessly. But if you are having trouble, Wacom recommends you do the following:
1. If the Wacom tablet driver failed to load properly, first perform the recommended action in any error message that may appear on your screen. If that does not solve the problem, continue with the troubleshooting procedures in this chapter.
2. If the DTF-720 does not function properly, refer to the troubleshooting section below. See also Display troubleshooting on page 35, or look in the Pen tablet troubleshooting on page 37. Your problem may be described there and you can try the solution offered.
3. Open the Wacom pen display Read Me file for updated information.
4. If you are having a compatibility conflict between the DTF-720 and a new hardware or software product, see Obtaining driver downloads on page 43 for information on downloading an updated software driver. Wacom periodically updates the software driver to maintain compatibility with new products.
5. Check the FAQs (Frequently Asked Questions) on the Wacom web site for your region.
6. If you have tried the suggestions in this manual and still cannot resolve the problem, then contact Wacom for Technical Support. See the Read Me file for information on where to obtain support for your region.
TESTING THE DTF-7201. If the DTF-720’s power LED does not light, check the following:
• First verify that the green light on the power adapter is on. If the light is not on, check that the power cable is properly connected to the power adapter and to an active AC outlet.
• Check that the power adapter cable is securely connected to the DTF-720 and that the DTF-720 power switch is turned on. The DTF-720 power LED will glow orange or blue whenever the DTF-720 is on.
Important: Use only the AC adapter that came with your pen display. Other adapters may cause damage to your product.
2. If there is no display:
• Make sure that your computer is turned on. The power LED will light blue when the proper video signal is received, and orange if there is no video signal or if the computer is in a power saving mode.
• Verify that the DTF-720 is connected to an active VGA connector.
• Check that your video card has been properly installed and is functional. If you have another display that is compatible with your video card, you can connect that display to the card in order to verify that the video card is operating correctly.
DTF720_Manual.fm Page 33 Monday, December 22, 2008 10:13 AM

TroubleshootingPage 34
3. Verify that the tablet and pen are working:
• Press the pen tip against the display and verify that the status LED lights blue.
• If the LED does not light, verify that the DTF-720’s USB cable is plugged into an active USB port. If the DTF-720 is plugged into a USB hub, try plugging the DTF-720 directly into the USB port on your computer.
• Be sure that the USB port to which you are connecting has not been disabled. It may be necessary to check your system BIOS setting to verify that you have connected the DTF-720 to an active USB port.
• The status LED will light blue when the DTF-720 is registered as a USB device and the pen tip is pressed against the display.
4. Check the pen. If you cannot make a selection on the display screen with the pen:
• Test the pen by pressing the pen tip against the surface of the pen display tablet. The tablet status LED should light blue.
• Now, without applying pressure to the pen tip but keeping the pen within 5 mm (0.2 inch) of the pen display tablet surface, press the side switch. The status LED should again light blue.
• If the status LED does not light blue for these tests, be sure you are using the correct pen that came with your DTF-720.
If you are still having problems, you may have a defective pen or pen display.
DTF720_Manual.fm Page 34 Monday, December 22, 2008 10:13 AM
Troubleshooting Page 35
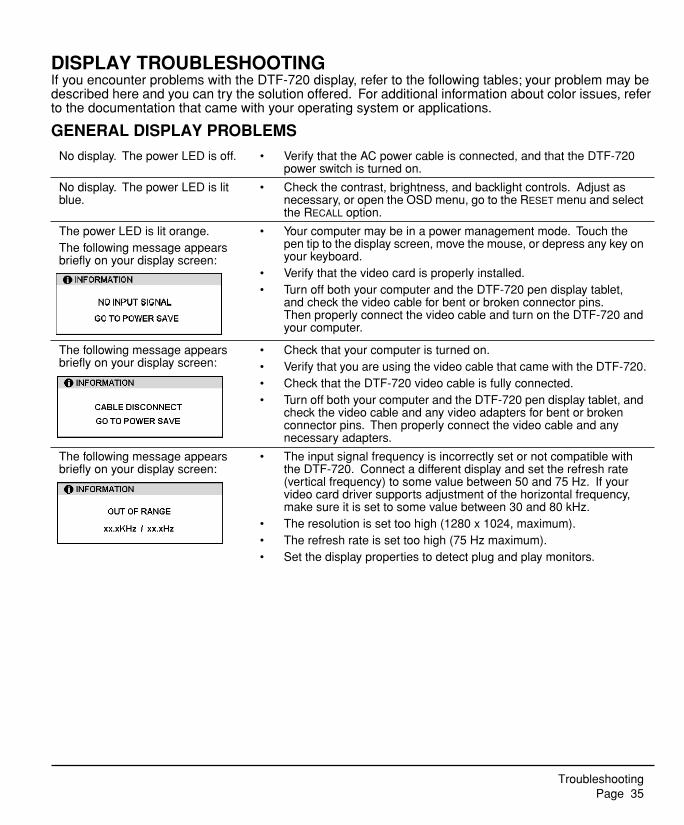
DISPLAY TROUBLESHOOTINGIf you encounter problems with the DTF-720 display, refer to the following tables; your problem may be described here and you can try the solution offered. For additional information about color issues, refer to the documentation that came with your operating system or applications.
GENERAL DISPLAY PROBLEMS
No display. The power LED is off. • Verify that the AC power cable is connected, and that the DTF-720 power switch is turned on.
No display. The power LED is lit blue.
• Check the contrast, brightness, and backlight controls. Adjust as necessary, or open the OSD menu, go to the RESET menu and select the RECALL option.
The power LED is lit orange.The following message appears briefly on your display screen:
• Your computer may be in a power management mode. Touch the pen tip to the display screen, move the mouse, or depress any key on your keyboard.
• Verify that the video card is properly installed.• Turn off both your computer and the DTF-720 pen display tablet,
and check the video cable for bent or broken connector pins. Then properly connect the video cable and turn on the DTF-720 and your computer.
The following message appears briefly on your display screen:
• Check that your computer is turned on.• Verify that you are using the video cable that came with the DTF-720.• Check that the DTF-720 video cable is fully connected.• Turn off both your computer and the DTF-720 pen display tablet, and
check the video cable and any video adapters for bent or broken connector pins. Then properly connect the video cable and any necessary adapters.
The following message appears briefly on your display screen:
• The input signal frequency is incorrectly set or not compatible with the DTF-720. Connect a different display and set the refresh rate (vertical frequency) to some value between 50 and 75 Hz. If your video card driver supports adjustment of the horizontal frequency, make sure it is set to some value between 30 and 80 kHz.
• The resolution is set too high (1280 x 1024, maximum).• The refresh rate is set too high (75 Hz maximum).• Set the display properties to detect plug and play monitors.
DTF720_Manual.fm Page 35 Monday, December 22, 2008 10:13 AM

TroubleshootingPage 36
VGA PROBLEMS
The image appears multiple times on the display.
• Do not extend the video cable. Do not use an input selector switch box.
When a still image is displayed for a long period of time without refreshing the screen, an after-image remains for a short period of time.
• Use a screen saver or other power management feature.
Color quality is inaccurate. • Open the OSD menu, go to the RESET menu and select the RECALL option.
• Any changes to the contrast setting should be made in small increments as changes in contrast may affect color accuracy.
The color white does not display as white.
• Verify that the display is operating at the factory default settings. If that is not sufficient, then adjust color as necessary. For details on color management, refer to your operating system and application documentation.
• Verify that the video cable and connector are fully connected.
The display ripples or flickers. • Open the OSD menu, go to the RESET menu, and select the AUTO ADJUST option. Then, if necessary, manually adjust pitch and phase.
• Verify that the display adapter or video card matches the specifications for the DTF-720.
• Adjust the refresh rate in the Display Properties control panel.
The display is not clear. Text or other portions of the screen appear blurred.
• Set the display resolution of your video card to 1280 x 1024.• Turn off the DTF-720, then turn it back on.• Open the OSD menu, go to the RESET menu, and select the AUTO
ADJUST option. If necessary, manually adjust the brightness, pitch, and phase settings.
The display and LCD panel are not lined up. The display size is not correct.
• Open the OSD menu, go to the RESET menu, and select the AUTO ADJUST option.
• As necessary, adjust pitch and phase, and horizontal and vertical position. Note that some video cards may not show the display in proper sizing.
The display ripples or shows a moiré pattern. The display color is not even.
• Open the OSD menu, go to the RESET menu, and select the AUTO ADJUST option. If this does not solve the problem, go to the RESET menu and select the RECALL option to set the display back to the factory default settings.
• As necessary, adjust pitch and phase.
DTF720_Manual.fm Page 36 Monday, December 22, 2008 10:13 AM

Troubleshooting Page 37
PEN TABLET TROUBLESHOOTINGIf you encounter problems with the DTF-720 interactive pen display, refer to the following tables. Your problem may be described here, and you can try the solution offered. Be sure you refer to the DTF-720 Read Me file for the latest information.
For additional information, visit Wacom’s web site at http://www.wacom.com/productsupport and follow the links to the FAQs.
GENERAL PROBLEMS
The computer does not have an available USB port.
Check if there is an available USB port on a USB hub. If not available, you will need to add a USB hub or USB card.
A USB device plugged into one of the pen display’s integrated USB ports does not function.
1. Make sure the pen display itself is properly connected to a working USB port on your computer.
2. Then be sure the pen display is powered on and that the power LED lights blue. The DTF-720 contains a powered USB hub and the integrated USB ports will not work when the power is off.
3. If the USB device does not work, try plugging it into a USB port directly on your computer.
4. If your USB device is still not functioning properly, please contact the manufacturer for that particular device.
The pen display power LED is off.
Make sure the pen display power switch is turned on.
Check that the AC power adapter is plugged into both the pen display and an active power outlet.
Use only the power adapter that came with the pen display; other adapters may cause damage to your product.
The pen works only in mouse mode, and does not draw or write with pressure sensitivity.
The tablet driver software was not installed or did not load properly. Make sure the tablet driver software is installed and functioning. Install the pen tablet driver software in accordance with the instructions found in the Installation section of this manual.
The pen does not draw or write with pressure sensitivity.
Some applications require that you turn on the pressure capabilities within the application or selected tool before the pen will respond as a pressure-sensitive tool.
Verify also that your application supports pressure sensitivity.
Clicking is difficult. Open the Pen Tablet control panel and go to the Pen tab. Try using a lighter TIP FEEL.
The pen selects everything or will not stop drawing.
Open the Pen Tablet control panel and go to the PEN tab. Move the TIP FEEL slider toward FIRM. If this does not help, see Testing the DTF-720 on page 33.
DTF720_Manual.fm Page 37 Monday, December 22, 2008 10:13 AM

TroubleshootingPage 38
Double-clicking is difficult. Be sure you are quickly tapping the display screen twice in the same place on the pen display tablet’s active area. Wacom recommends using the side switch to double-click.
Open the Pen Tablet control panel and go to the PEN tab. Try increasing the DOUBLE CLICK DISTANCE or using a lighter TIP FEEL.
Windows: Try setting your system to launch programs with a single click. See Pen operations on page 18.
You notice a delay at the beginning of pen strokes.
Open the Pen Tablet control panel and go to the PEN tab. Try decreasing the DOUBLE CLICK DISTANCE.
You have to press hard with the pen when clicking, drawing, or writing.
Open the Pen Tablet control panel and go to the PEN tab. Move the TIP FEEL slider toward SOFT.
The pen tip does not function.
Be sure you are using the pen that originally came with your pen display tablet. Other pens may not function properly on the DTF-720 pen display.
Make sure the status LED lights blue when the tip is pressed. If the LED does not light, verify that the USB cable is plugged into an active port on your computer or on a USB hub.
If the LED still does not light, you may have defective hardware (see Troubleshooting on page 33).
The side switch does not work.
Be sure you are using the pen that originally came with your pen display tablet. Other pens may not function properly on the DTF-720 pen display.
Be sure you press the side switch when the pen tip is within 5 mm (0.2 inch) of the pen display’s active area – do this without pressing down on the pen tip.
From the Pen Tablet control panel, verify that the side switch is set to the proper function you are expecting to occur.
Make sure the status LED lights blue when you press the side switch. If the LED does not light, verify that the USB cable is plugged into an active USB port on your computer or on a USB hub; the LED will not light if the USB cable is not plugged into an active port.
If the LED does not light, you may have defective hardware (see Troubleshooting on page 33).
DTF720_Manual.fm Page 38 Monday, December 22, 2008 10:13 AM

Troubleshooting Page 39
The pen tip and screen cursor do not properly line up.
Open the Pen Tablet control panel and select the CALIBRATE tab. Continue with Calibrating the DTF-720 on page 22.
The screen cursor moves but it does not jump to the pen tip location when the pen is placed on the display screen, and it does not follow the pen tip when the pen is moved across the display.
Make sure the Wacom tablet driver has loaded properly by opening the Pen Tablet control panel. If the driver did not load you will see an error message. If an error message appears, reboot your computer. If the problem persists, refer to the Installation instructions and reinstall the Wacom tablet software. (For Macintosh, you must restart your computer after installing the Wacom tablet driver for proper tablet operation.)
If you have customized the side switch on your pen to toggle between pen mode and mouse mode, make sure that your pen display is operating in pen mode. See Customizing the side switch button functions, beginning on page 24.
When using the pen display tablet on a multiple monitor system, you cannot use the pen to control the other monitor(s).
You can use your pen to control the other monitors in mouse mode. To use mouse mode, first set the pen’s DuoSwitch to MODE TOGGLE.... Then use the switch to toggle between pen mode and mouse mode.
The line you are drawing does not line up with the location of the screen cursor.
To function properly, some applications require that the pen is set to pen mode. Make sure the pen has not been toggled to mouse mode.
If the pen is set to pen mode and the problem still exists, then you may have a corrupted preferences file. Follow the instructions in the next tip to create a new preferences file.
DTF720_Manual.fm Page 39 Monday, December 22, 2008 10:13 AM

TroubleshootingPage 40
You suspect the pen tablet preferences may be corrupted, or want to make certain that all settings are at their factory defaults.
Delete the pen tablet preferences as follows:
Windows: Click the START icon and select ALL PROGRAMS. Then select TABLET and TABLET PREFERENCE FILE UTILITY. In the dialog box that appears, click on the REMOVE MY PREFERENCE FILE button to delete the preferences for the current user. To delete preferences for multiple users on Windows Vista or XP systems, click on the REMOVE ALL PREFERENCE FILES button. Note that administrator rights are required to delete preferences for all users. Relaunch any currently open tablet-aware applications that you may be running.
Macintosh: For a single user, delete the tablet preferences by first choosing your HOME folder from the GO menu. Then open your home LIBRARY folder. Within your home LIBRARY folder, open the PREFERENCES folder and delete the COM.WACOM.WACOMTABLET.PREFS file. Log out, then log back in. When the tablet driver loads it will create a new preferences file with the factory defaults.
For multiple users, delete all tablet preferences by first opening the main APPLICATIONS folder. Then open the WACOM TABLET folder and run the REMOVE WACOM TABLET utility. When the utility starts, click on the REMOVE ALL PREFERENCE FILES button. The tablet driver will be restarted, creating new preferences files with the factory defaults.
Recalibrate the tablet.Note: Do not manually remove the WACOM TABLET.PREFPANE file from the main LIBRARY PREFERENCEPANES folder. This file is only to be removed when uninstalling the tablet software driver, and then only when using the REMOVE WACOM TABLET utility.
The computer does not go to sleep.
When you are not using the pen, remove it from the pen display surface or the pen display will continue to send data, keeping the computer awake.
The screen cursor jumps back when using your regular mouse or trackball.
When the pen is not in use, place it in the pen storage compartment or at some location near the pen display, but not on the display. Leaving your pen on the display may interfere with screen cursor positioning when using other input devices.
The screen cursor moves erratically or jumps around on the display screen when another tablet is connected to your computer.
The tablet portion of the DTF-720 emits electromagnetic waves at a certain frequency. If another tablet is too closely placed to the DTF-720 it may interfere with screen cursor positioning. If this occurs, move the tablet further away from the DTF-720.
DTF720_Manual.fm Page 40 Monday, December 22, 2008 10:13 AM

Troubleshooting Page 41
WINDOWS-SPECIFIC PROBLEMS
MACINTOSH-SPECIFIC PROBLEMS
After changing right- and left-handed settings in the computer’s mouse control panel, the pen tip no longer functions properly.
Restart Windows for your Wacom tool settings to be correctly recognized.
At startup, a dialog box appears telling you that either the driver failed to load or the tablet preferences have not yet been created.
The pen display was not detected at startup. Make sure the USB interface cable is securely connected to an active USB port on your computer or to a USB hub. Make sure that the pen display power LED is on. If this does not correct the problem, see Troubleshooting on page 33.
From the GO menu, select the UTILITIES folder and launch the SYSTEM PROFILER. Select USB from the HARDWARE section of the CONTENTS list. A Wacom USB pen display model should be listed. If a pen display model is not listed, check the pen display’s USB cable connection or try plugging the pen display into a different USB port.
If this does not help, contact Wacom for Technical Support. See Technical support options on page 42.
Inkwell does not work correctly with the pen display.
There may be a problem with the Inkwell preferences. Remove the damaged preference files as follows. They will be recreated when you enable handwriting recognition.
1. From the Apple menu, choose SYSTEM PREFERENCES. From the System Preferences menu, choose SHOW ALL and select INK. Then turn off handwriting recognition.
2. From the GO menu, choose your HOME. Open the LIBRARY and PREFERENCES folders. Then remove the following preferences:
• com.apple.ink.framework.plist
• com.apple.ink.inkpad.plist
• com.apple.ink.inkpad.sketch
3. Go back to SYSTEM PREFERENCES and INK, and then enable handwriting recognition.
4. Test the Inkwell function using your Wacom pen display tablet and pen.
5. If this procedure does not resolve your problem with Inkwell, contact Apple Support for further assistance. Wacom is not the software manufacturer for Inkwell and we are limited in our abilities to support a third party software application.
DTF720_Manual.fm Page 41 Monday, December 22, 2008 10:13 AM
TroubleshootingPage 42
TECHNICAL SUPPORT OPTIONSIf you have a problem with your DTF-720 interactive pen display, first check the appropriate Installation section in this guide to make sure the unit is installed correctly. Then review the Troubleshooting procedures.
If you cannot find the answer in this guide, you may find updated information about your problem in the appropriate Read Me file for your platform (located on the Wacom Pen Tablet Driver CD). You can also check the product FAQs (Frequently Asked Questions) on the Wacom web site for your region.
If you have an Internet connection you can download the latest software drivers from the Wacom web site for your region. See Obtaining driver downloads on page 43.
If you cannot solve the problem and you think your Wacom product is not working properly, contact the Wacom support staff for the area where your product was purchased. See the Wacom tablet Read Me file, located on the Wacom Pen Tablet Driver CD, for contact information.
When you call, you should be at your computer with the following information available:
• This manual.
• Pen display tablet serial number. (Look at the label on the back of the unit.)
• Driver version number. (See the Wacom Pen Tablet Driver CD or the Pen Tablet control panel.)
• The make and model of your computer, and operating system version number.
• The make, model, and connection type of your video card.
• A list of peripheral devices attached to your computer.
• The software application and version you were using when the problem occurred.
• The exact wording of any error message that appeared on your screen.
• What happened and what you were doing when the problem occurred.
• How you tried to solve the problem.
DTF720_Manual.fm Page 42 Monday, December 22, 2008 10:13 AM

Troubleshooting Page 43
OBTAINING DRIVER DOWNLOADSWacom periodically updates the pen tablet software driver to maintain compatibility with new products. If you are having a compatibility problem between your DTF-720 pen display and a new hardware or software product, it may be helpful to download a new Wacom tablet software driver (when available) from the Internet.
USA, Canada, Central and South America
Europe, Middle East and Africa
Japan
Asia Pacific (English)
China
Korea
Taiwan
Worldwide Web: http://www.wacom.com/productsupport Driver downloads.
Worldwide Web: http://www.wacom.eu Software updates.
Anonymous FTP Site: ftp://ftp.wacom.eu/pub/ Software updates.
Worldwide Web: http://tablet.wacom.co.jp Software updates. (Japanese)
Worldwide Web: http://www.wacom-asia.com Software updates. (English)
Worldwide Web: http://www.wacom.com.cn Software updates. (Simplified Chinese)
Worldwide Web: http://www.wacomkorea.com Software updates. (Korean)
Worldwide Web: http://www.wacom.com.tw Software updates. (Traditional Chinese)
DTF720_Manual.fm Page 43 Monday, December 22, 2008 10:13 AM
AppendixPage 44
APPENDIXCARING FOR THE DTF-720Keep the pen and the DTF-720 LCD screen surface clean. Dust and dirt particles can stick to the pen and cause excessive wear to the display screen surface. Regular cleaning will help prolong the life of your LCD screen surface and pen. Keep the DTF-720 and the pen in a clean, dry place and avoid extremes in temperature. Room temperature is best. The DTF-720 and pen are not made to come apart. Taking apart the product will void your warranty.
Important: Take care to never spill liquids onto the pen display or pen. Be especially careful of getting the display, or pen buttons and tip wet – they contain sensitive electronic parts that will fail if liquids enter them.
CLEANINGTo clean the DTF-720 casing or the pen, use a soft, damp cloth; you can also dampen the cloth using a very mild soap diluted with water. Do not use paint thinner, benzine, alcohol, or other solvents to clean the unit casing or pen.
To clean the display screen, use an anti-static cloth or a slightly damp cloth. When cleaning, apply only a light amount of pressure to the display screen and do not make the surface wet. Do not use detergent to clean the display screen; this may damage the coating on the screen. Please note that damage of this kind is not covered by the manufacturer’s warranty.
DTF720_Manual.fm Page 44 Monday, December 22, 2008 10:13 AM

Appendix Page 45
REPLACING THE PEN TIPThe pen tip (nib) will wear with normal use. Excessive pressure will cause the nib to wear sooner. A worn nib may damage the coating on the DTF-720 display screen. To avoid this, periodic tip replacement is recommended.
When the nib gets too short or develops a sharp edge, you can replace it with one of the extra nibs that came with the pen.
Important: When the pen is not in use, place it in the pen storage compartment or lay it flat on your desk. To maintain the sensitivity of your pen, do not store the tool in a container where it will rest on its tip.
To remove the old nib:Clasp it with a Wacom nib removal tool, pair of tweezers, needle-nosed plier, or similar instrument and pull the old nib straight out of the pen.
To insert a new nib:Slide it straight into the barrel of the pen. Firmly push the nib until it stops. The new nib will slide into the correct position.
WARNING Prevent children from swallowing the pen tip or side switch. The pen tip (nib) or side switch may accidentally be pulled out if children are biting on them.
DTF720_Manual.fm Page 45 Monday, December 22, 2008 10:13 AM

AppendixPage 46
USING AN ALTERNATE MOUNT OR STANDIf you will be using the DTF-720 in an installation that requires the use of an alternate mounting platform, you can remove the adjustable stand from the unit and mount the pen display onto any mount arm or stand conforming to the VESA 75 standard.
Mounting screws that are 4 mm wide with a 0.7 mm pitch (M4 Regular), with a screw clearance depth of 15 mm are required. Exceeding the clearance depth of 15 mm will damage the DTF-720 internal components.
To remove the adjustable stand and attach the DTF-720 to a different mounting platform:
1. Turn off your computer and power off the DTF-720. Then disconnect all cables from between the unit and your computer.
2. Protect the display screen surface by spreading a soft cloth onto a flat table and placing the DTF-720 face down on the cloth.
3. Remove the four screws and lift the adjustable stand assembly away from the body of the unit.
4. Using the appropriate screws for your mounting platform, firmly attach the DTF-720 to the alternate mounting platform.
5. Refer to the Installation instructions, beginning on page 10, and reattach the cabling.
CAUTION When attaching the DTF-720 onto an alternate mounting platform, be sure to follow all instructions in the documentation supplied by the platform manufacturer. If improperly installed, the unit could fall, resulting in damage to the unit or physical injury.
DTF720_Manual.fm Page 46 Monday, December 22, 2008 10:13 AM

Appendix Page 47
PEN AND DIGITAL INK CAPABILITIES IN WINDOWS VISTAMicrosoft Windows Vista provides extensive support for pen and touch input. When using DTF-720 with a computer running Windows Vista, your experience is enhanced by powerful note taking, handwriting recognition, fast navigation, and other digital inking options designed to give you quick, intuitive results with the Wacom pen.
• Note taking. Use your Wacom pen to jot notes and capture quick sketches in Windows Journal. Journal simulates a physical notebook, but with the advantages of digital note taking – you can choose from a variety of pen, marker, and highlighter tools. Journal also includes a powerful search engine that can even locate your handwritten content.
• Handwriting recognition. Because Windows Vista includes powerful handwriting recognition capabilities, you can use your Wacom pen to quickly enter handwritten information anywhere the computer accepts typed input. You can convert your handwritten content to typed text at any time.
• Gestures. Use your Wacom pen to make simple gestural movements on the pen display to trigger customizable actions for navigation, editing, and other functions. To customize your gestures, select the FLICKS tab in the PEN AND INPUT DEVICES control panel.
• Digital Ink in Microsoft Office 2007. Use your Wacom pen to full advantage with the enhanced digital mark-up and inking tools available in Microsoft Office 2007 applications running on Windows Vista. Found on the REVIEW tab within applicable applications, these tools provide a consistent set of inking options. For quick access, you can add specific inking tools to the Quick Access Toolbar located at the top of each application.
Note that the following workarounds in the pen tablet driver improve drawing performance in Vista:
• The Vista Pen Flicks and ‘press-and-hold-to-right-click’ features are disabled in graphics applications using the Wintab API.
• There is no pressure sensitivity in Journal and other Vista Ink features when both the Flicks and ‘press-and-hold-to-right-click’ features are disabled in the Vista PEN AND INPUT DEVICES control panel.
DTF720_Manual.fm Page 47 Monday, December 22, 2008 10:13 AM

AppendixPage 48
ABOUT THE WINDOWS VISTA TABLET PC INPUT PANELThe Windows Vista Tablet PC Input Panel enables you to use handwriting or an on-screen keyboard to directly enter text with your Wacom pen. There are a number of ways to launch the Input Panel:
• Click on the Input Panel icon which appears when you move the screen cursor into a text entry area.
• Click on the Input Panel tab, located by default on the left edge of the display screen.
• Click on the Tablet PC Input Panel icon located on the Windows taskbar. If the icon is not visible, right-click on the taskbar, select TOOLBARS, and TABLET PC INPUT PANEL.
To customize the Input Panel:
1. First open the Input Panel and then click on TOOLS in the menu bar.
2. Select OPTIONS to open the Input Panel Options dialog box.
3. Customize the Input Panel settings for the way you like to work.
To learn more about using your Wacom pen in Microsoft Windows Vista and Office 2007, study the documentation that came with your system and Microsoft Office applications. Be sure to take advantage of the Windows Vista training tools, including the Tablet PC tutorial, available from Microsoft.
You can visit also the Wacom web site at www.wacom.com/vista for additional information on working with your Wacom pen in Windows Vista.
DTF720_Manual.fm Page 48 Monday, December 22, 2008 10:13 AM

Appendix Page 49
UNINSTALLING THE DTF-720Follow the appropriate procedure below to remove the Wacom tablet software and the DTF-720 from your system.
Windows: 1. Click on the Windows START button and open the CONTROL PANEL.
2. In the CONTROL PANEL window for
• Windows Vista: click on UNINSTALL A PROGRAM. In the dialog box that appears, choose the PEN TABLET option and click on the UNINSTALL button.
• Windows XP or XP x64: select ADD OR REMOVE PROGRAMS. In the ADD OR REMOVE PROGRAMS window, choose PEN TABLET and click on the REMOVE button.
• Windows 2000: double-click on the ADD/REMOVE PROGRAMS icon. In the dialog box that appears, choose the PEN TABLET option and click on the ADD/REMOVE... button.
3. Follow the prompts to remove the tablet driver. (If prompted, enter your administrator login name and password.)
4. When the driver has been removed, shut down your system, power off your computer, and turn off the DTF-720. When your computer and the DTF-720 are off, disconnect the DTF-720 from your computer.
Macintosh: 1. From the GO menu, choose APPLICATIONS and open the WACOM TABLET folder.
2. Double-click on the REMOVE TABLET icon and select the REMOVE TABLET SOFTWARE button. Enter your administrator login name and password.
3. After the removal is completed, click OK.
4. Shut down your computer and turn off the DTF-720. When your computer and the DTF-720 are off, disconnect the DTF-720 from your computer.
DTF720_Manual.fm Page 49 Monday, December 22, 2008 10:13 AM
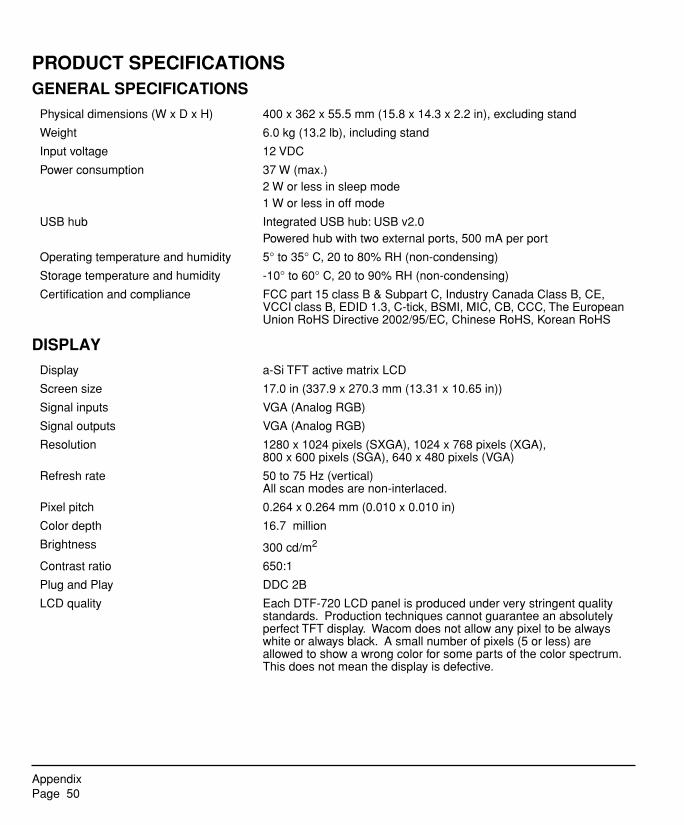
AppendixPage 50
PRODUCT SPECIFICATIONSGENERAL SPECIFICATIONS
DISPLAY
Physical dimensions (W x D x H) 400 x 362 x 55.5 mm (15.8 x 14.3 x 2.2 in), excluding stand
Weight 6.0 kg (13.2 lb), including stand
Input voltage 12 VDC
Power consumption 37 W (max.)2 W or less in sleep mode1 W or less in off mode
USB hub Integrated USB hub: USB v2.0Powered hub with two external ports, 500 mA per port
Operating temperature and humidity 5° to 35° C, 20 to 80% RH (non-condensing)
Storage temperature and humidity -10° to 60° C, 20 to 90% RH (non-condensing)
Certification and compliance FCC part 15 class B & Subpart C, Industry Canada Class B, CE, VCCI class B, EDID 1.3, C-tick, BSMI, MIC, CB, CCC, The European Union RoHS Directive 2002/95/EC, Chinese RoHS, Korean RoHS
Display a-Si TFT active matrix LCD
Screen size 17.0 in (337.9 x 270.3 mm (13.31 x 10.65 in))
Signal inputs VGA (Analog RGB)
Signal outputs VGA (Analog RGB)
Resolution 1280 x 1024 pixels (SXGA), 1024 x 768 pixels (XGA), 800 x 600 pixels (SGA), 640 x 480 pixels (VGA)
Refresh rate 50 to 75 Hz (vertical)All scan modes are non-interlaced.
Pixel pitch 0.264 x 0.264 mm (0.010 x 0.010 in)
Color depth 16.7 million
Brightness 300 cd/m2
Contrast ratio 650:1
Plug and Play DDC 2B
LCD quality Each DTF-720 LCD panel is produced under very stringent quality standards. Production techniques cannot guarantee an absolutely perfect TFT display. Wacom does not allow any pixel to be always white or always black. A small number of pixels (5 or less) are allowed to show a wrong color for some parts of the color spectrum. This does not mean the display is defective.
DTF720_Manual.fm Page 50 Monday, December 22, 2008 10:13 AM

Appendix Page 51
PEN TABLET
POWER ADAPTER
PEN (MODEL FP-320)
ORDERING PARTS AND ACCESSORIESTo purchase parts and accessories, refer to the Wacom tablet Read Me file and see who to call for your region.
You can also do the following:
• To purchase parts and accessories in the USA or Canada, call 1.888.884.1870 (toll-free) or visit Wacom’s web site at http://www.WacomDirect.com (USA only).
• To purchase parts and accessories in Europe, call +49 (0)180.500.03.75 or send an email to [email protected]. Or, visit http://www.wacom-shop.net. You can also contact your local dealer, distributor, or technical support using the appropriate number for your region.
• To purchase parts and accessories in other countries, please contact your local dealer or distributor.
Please note that not all parts and accessories may be available in all regions.
Reading technology Electromagnetic resonance method
Active area 337.9 x 270.3 mm (13.31 x 10.65 in)
Resolution 20 lpmm (0.05 mm) (508 lpi (0.002 in))
Accuracy ±0.5 mm (±0.02 in), average
Reading height 5 mm (0.2 in)
Maximum report rate 100 points/sec.
Pressure levels 512 levels
Communication interface USB
Input voltage 100 to 240 VAC, 50/60 Hz
Output voltage 12 VDC, 5.0 A
Pressure levels 512
Pen tip travel 0.2 mm (0.008 in) or less
Physical dimensions (L x D) 146.5 x 12.5 mm (5.77 x 0.49 in)
Weight 12 g (0.42 oz), approximately
Side switch type Rocker switch
DTF720_Manual.fm Page 51 Monday, December 22, 2008 10:13 AM

AppendixPage 52
RADIO AND TELEVISION INTERFERENCEThe equipment described in this manual generates, uses, and can radiate radio-frequency energy. If it is not installed and used properly – that is, in strict accordance with applicable instructions – it may cause interference with radio and television reception.
FEDERAL COMMUNICATIONS COMMISSION (FCC) NOTICEThis device complies with Part 15 of the FCC Rules. Operation is subject to the following two conditions: (1) this device may not cause harmful interference, and (2) this device must accept any interference received, including interference that may cause undesired operation.This equipment has been tested and found to comply with the limits for a Class B digital device, pursuant to Part 15 of FCC Rules. These limits are designed to provide reasonable protection against harmful interference in a residential installation.This equipment generates, uses and can radiate radio frequency energy and, if not installed and used in accordance with the instructions, may cause harmful interference to radio communications. However, there is no guarantee that interference will not occur in a particular installation.You can determine whether the equipment is causing interference by powering it off. If the interference stops, it was probably caused by the equipment.If the equipment does cause interference to radio or television reception, you may be able to correct the interference by using one or more of the following measures:• Rotate the television or radio antenna until the interference stops.• Move the equipment farther away from the television or radio.• Plug the equipment and computer into an outlet that is on a different circuit from the television or radio.
If necessary, consult your Wacom dealer or an experienced radio/television technician for help.Changes or modifications to this product not authorized by Wacom could void the FCC Certification and negate your authority to operate the product.
DTF720_Manual.fm Page 52 Monday, December 22, 2008 10:13 AM

Appendix Page 53
INDUSTRY CANADA (CANADA ONLY)Industry Canada, Class B“This Class (B) digital apparatus complies with Canadian ICES-003”“Cet appareil numerique de la classe (B) est conforme a la norme NMB-003 du Canada.”
CE DECLARATIONThe DTF-720 / DTF-720A pen display tablet has been tested and found to comply to the following harmonized European Norms:• EN 55022: 2006, Class B• EN 55024: 1998+A1: 2001+A2: 2003
IEC 61000-4-2: 2001IEC 61000-4-3: 2006IEC 61000-4-4: 2004IEC 61000-4-5: 2005IEC-61000-4-6: 2006IEC 61000-4-8: 2001IEC 61000-4-11: 2004
• EN 61000-3-2: 2006• EN 61000-3-3: 1995+A1: 2001+A2: 2005Based on the results of these tests, Wacom declares that the above mentioned device conforms to the Directive 2004/108/EC.
DTF720_Manual.fm Page 53 Monday, December 22, 2008 10:13 AM

AppendixPage 54
License and Warranty (Europe, Africa and Middle East)
Software License AgreementImportant Notice to CustomersThis product contains copyrighted computer programs (“software”) which are the inalienable intellectual property of Wacom Europe GmbH (“Wacom”). This software is both integrated within the product and also contained on the accompanying data carrier. The purchase of this product from your dealer does not include Wacom's software and the associated rights of usage. Wacom grants you, the user, the right to use the software solely in accordance with the conditions of this software license agreement. By purchasing this product you agree to the terms of this license.
Entitlement to Use the SoftwareWacom grants the customer a personal, non-exclusive license to use the software solely in combination with this product and for the proper operation of this product. This license may be transferred only in connection with this product.The use of this software includes solely the permanent or temporary, complete or partial copying of the software by means of loading, displaying, executing, transmitting or saving for the purpose of executing the commands and data it contains or of observing, examining or testing the functions of the software.The customer may not license, lease or loan the software to a third party, nor allow a third party to access the software in any other way. The customer may not without prior written authorization from Wacom copy, modify, transmit or edit the software, apart from the actions of copying necessary to create a backup copy and for the purposes outlined in section 2 above.The customer may not decompile the software; if the software contains interfaces to software which is not supplied by Wacom, Wacom shall make the necessary information available to the customer upon request, provided that the customer can prove his/her entitlement to use the software and that he/she agrees to pay the copying and postage costs.
Limited WarrantyWacom warrants to you as the original end-user that the product hardware is free from defects in materials and workmanship under normal use and service, i.e. in sole usage within normal office environments, for a period of TWO (2) YEARS after the date of purchase (excluding consumable items such as the pen nibs), provided that they are unused at the time of such purchase. Wacom further warrants to you the accompanying data media against defects in materials and workmanship for a period of SIX (6) MONTHS after the date of purchase.The Software is licensed and distributed “AS IS”. Wacom makes no warranties, expressed or implied, with respect to its quality, performance, merchantability and fitness for a particular purpose (including related manuals and documentation). Wacom cannot guarantee you uninterrupted service or the correction of any errors.Upon discovery of a defect in the product, except in the Software, within the applicable Warranty Period, you should return them in the original packaging to the place of your original purchase, together with your name, address, telephone number, a description of the problem and a copy of the original invoice. You are responsible for any loss or damage to the product resulting from such transportation. Wacom’s sole obligation and entire liability under this warranty shall be, at Wacom’s option, either the repair or the replacement of product or parts thereof that prove defective and that were returned within the applicable Warranty Period.
DTF720_Manual.fm Page 54 Monday, December 22, 2008 10:13 AM

Appendix Page 55
Wacom shall have no responsibility to repair or replace the product if (a), in the opinion of Wacom, the failure of the product has resulted from accident, abuse, misuse, negligence, misapplication, or unauthorized modification or repair, or (b) the product has been handled or stored other than in accordance with Wacom’s storage instructions, or (c) the failure is due to normal wear and tear, or (d) you fail to fulfill your obligations as described above.In case that any claim presented under warranty is found upon investigation to be either outside the duration or the scope of this warranty, or in case that the product is found to be not defective, then the cost of such investigation and repair shall be borne by you.Any descriptions, drawings, specifications, samples, models, bulletins, or similar material, used in connection with the sale of the product, shall not be construed as an express warranty that the product will conform or comply with your requirements.Should any provision of this agreement be declared invalid, that provision shall be treated as separate from the agreement, and the agreement shall remain in force without limitation in all other respects.If this product is found to be defective, the purchaser may be entitled to institute legal proceedings against the seller on grounds of liability for deficiency. The statutory rights indicated with regard to the seller are not limited in any way by this warranty. Rather, this warranty affords the purchaser rights in addition to those indicated in the present text. This limited warranty shall apply if the seller's corporate domicile is in the European Union or in Iceland, Norway, Jersey, Switzerland, Russia, the Ukraine, Rumania, Bulgaria, Croatia, Serbia, Tunisia, Turkey, Syria, the Lebanon, Jordan, Israel, Egypt, the United Arab Emirates, Iran or South Africa.This Limited Warranty and Liability is governed by the laws of the Federal Republic of Germany.Should you have any questions about this Agreement, or if you desire to contact Wacom for any reason, please contact in writing:
Wacom Europe GmbHEuropark Fichtenhain A947807 KrefeldGERMANY
DTF720_Manual.fm Page 55 Monday, December 22, 2008 10:13 AM

AppendixPage 56
DTF720_Manual.fm Page 56 Monday, December 22, 2008 10:13 AM
DTF-720
Interactive Pen Display
Installations- und Benutzerhandbuch
DTF720_Manual.fm Page -1 Monday, December 22, 2008 12:29 PM

DTF720_Manual.fm Page 0 Monday, December 22, 2008 12:29 PM

Einführung und Übersicht Seite 1
EINFÜHRUNG UND ÜBERSICHT
Das Wacom
®
DTF-720 Interactive Pen Display vereint in sich die Vorzüge eines LCD-Bildschirms (Liquid Crystal Display) und die Kontrolle, den Komfort sowie die Produktivität, die die kabel- und batterielose Stifttechnologie von Wacom bietet. Dadurch erhalten Sie eine Schnittstelle zu Ihrem Computer, die Sie direkt mit dem Stift auf dem Bildschirm bedienen können.
Zu den Grundkomponenten des DTF-720 gehören ein Wacom-Stifttablett, das von innen hinter ein TFT-Farbdisplay mit 17 Zoll Bildschirmdiagonale montiert ist, sowie ein Wacom-Stift.
Das DTF-720 ist darüber hinaus mit einem VGA-Durchgangsanschluss (RGB-A
USGANG
) ausgestattet, sodass Sie gleichzeitig einen VGA-Bildschirm oder Projektor an das Pen Display anschließen können.
Im vorliegenden Handbuch wird die Installation der Hardware und Software für das DTF-720 beschrieben. Die Verwendung des DTF-720 und des Stiftes werden darin ebenfalls beschrieben.
Halten Sie sich genau an die Anweisungen.Der Computer behandelt das DTF-720 als zwei getrennte Geräte (Display und Stifttablett).
Deshalb wird der Installationsvorgang in zwei Stufen durchgeführt:
•
Installieren Sie das DTF-720 zuerst als Bildschirm
•
und danach als Stifttablett.
In beiden Phasen sind eine Hard- und Softwareinstallation sowie entsprechende Anpassungen durchzuführen.
Halten Sie sich genau an die Anweisungen.
WICHTIG:
Sie MÜSSEN die Treibersoftware für das Wacom Stifttablett installieren, damit der Stift auf dem Bildschirm richtig funktioniert.
Informationen zum Anpassen der Einstellungen für das Pen Display Tablet und den Stift auf Windows- oder Macintosh-Computern über das Stifttablett-Kontrollfeld finden Sie unter
Konfigurieren
auf Seite 19.
Die folgenden Informationen sind in diesem Produkt nicht enthalten: Informationen zu Ihrer Computerhardware und Ihrem Betriebssystem sowie Informationen zu Ihren Anwendungsprogrammen. Die beste Informationsquelle hierfür sind die Handbücher und Datenträger, die mit Ihrer Hardware, dem Betriebssystem bzw. der Anwendung geliefert wurden.
DTF720_Manual.fm Page 1 Monday, December 22, 2008 12:29 PM
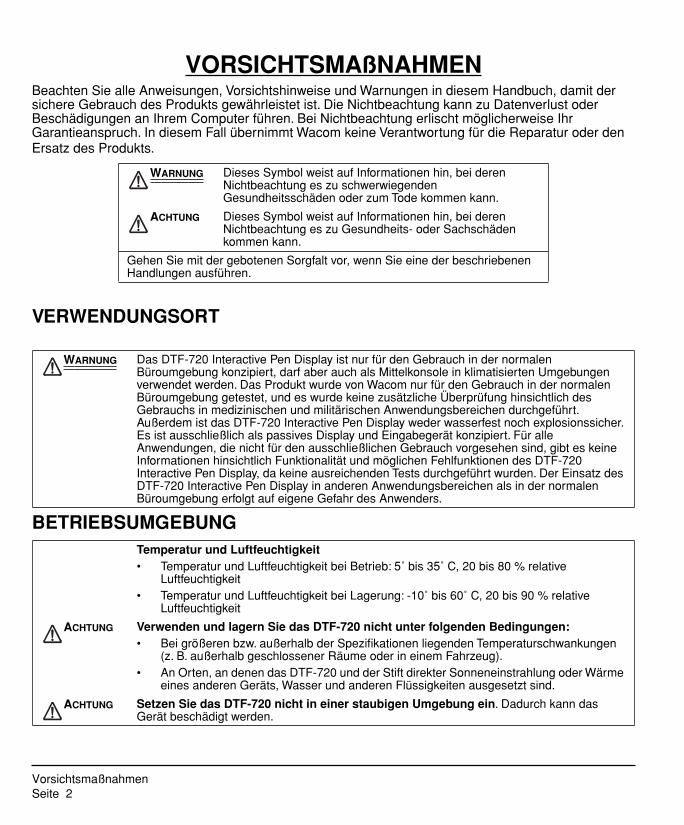
VorsichtsmaßnahmenSeite 2
VORSICHTSMAßNAHMEN
Beachten Sie alle Anweisungen, Vorsichtshinweise und Warnungen in diesem Handbuch, damit der sichere Gebrauch des Produkts gewährleistet ist. Die Nichtbeachtung kann zu Datenverlust oder Beschädigungen an Ihrem Computer führen. Bei Nichtbeachtung erlischt möglicherweise Ihr Garantieanspruch. In diesem Fall übernimmt Wacom keine Verantwortung für die Reparatur oder den Ersatz des Produkts.
VERWENDUNGSORT
BETRIEBSUMGEBUNG
W
ARNUNG
Dieses Symbol weist auf Informationen hin, bei deren Nichtbeachtung es zu schwerwiegenden Gesundheitsschäden oder zum Tode kommen kann.
A
CHTUNG
Dieses Symbol weist auf Informationen hin, bei deren Nichtbeachtung es zu Gesundheits- oder Sachschäden kommen kann.
Gehen Sie mit der gebotenen Sorgfalt vor, wenn Sie eine der beschriebenen Handlungen ausführen.
W
ARNUNG
Das DTF-720 Interactive Pen Display ist nur für den Gebrauch in der normalen Büroumgebung konzipiert, darf aber auch als Mittelkonsole in klimatisierten Umgebungen verwendet werden. Das Produkt wurde von Wacom nur für den Gebrauch in der normalen Büroumgebung getestet, und es wurde keine zusätzliche Überprüfung hinsichtlich des Gebrauchs in medizinischen und militärischen Anwendungsbereichen durchgeführt. Außerdem ist das DTF-720 Interactive Pen Display weder wasserfest noch explosionssicher. Es ist ausschließlich als passives Display und Eingabegerät konzipiert. Für alle Anwendungen, die nicht für den ausschließlichen Gebrauch vorgesehen sind, gibt es keine Informationen hinsichtlich Funktionalität und möglichen Fehlfunktionen des DTF-720 Interactive Pen Display, da keine ausreichenden Tests durchgeführt wurden. Der Einsatz des DTF-720 Interactive Pen Display in anderen Anwendungsbereichen als in der normalen Büroumgebung erfolgt auf eigene Gefahr des Anwenders.
Temperatur und Luftfeuchtigkeit
• Temperatur und Luftfeuchtigkeit bei Betrieb: 5˚ bis 35˚ C, 20 bis 80 % relative Luftfeuchtigkeit
• Temperatur und Luftfeuchtigkeit bei Lagerung: -10˚ bis 60˚ C, 20 bis 90 % relative Luftfeuchtigkeit
A
CHTUNG
Verwenden und lagern Sie das DTF-720 nicht unter folgenden Bedingungen:
• Bei größeren bzw. außerhalb der Spezifikationen liegenden Temperaturschwankungen (z. B. außerhalb geschlossener Räume oder in einem Fahrzeug).
• An Orten, an denen das DTF-720 und der Stift direkter Sonneneinstrahlung oder Wärme eines anderen Geräts, Wasser und anderen Flüssigkeiten ausgesetzt sind.
A
CHTUNG
Setzen Sie das DTF-720 nicht in einer staubigen Umgebung ein
. Dadurch kann das Gerät beschädigt werden.
DTF720_Manual.fm Page 2 Monday, December 22, 2008 12:29 PM

Vorsichtsmaßnahmen Seite 3
VERWENDUNG
HANDHABUNG
W
ARNUNG
Verwenden Sie nur das Netzteil, das mit dem DTF-720 ausgeliefert wurde.
Wird ein anderes Netzteil verwendet, funktioniert das DTF-720 nicht ordnungsgemäß oder kann beschädigt werden.
Bei Einsatz eines anderen Netzgeräts besteht darüber hinaus auch Brandgefahr.
Für den Fall, dass ein anderes Netzgerät verwendet wird, erlischt der Garantieanspruch.
A
CHTUNG
Verwenden Sie für die Stromversorgung des DTF-720 ausschließlich eine geerdete Stromquelle.
A
CHTUNG
Schließen Sie das Bildschirm- und das Netzkabel nicht an und ziehen Sie diese auch nicht ab, wenn das DTF-720 bzw. Ihr Computer noch eingeschaltet sind.
Dadurch können das Display oder die Grafikkarte des Computers beschädigt werden. In diesem Fall übernimmt Wacom keine Verantwortung für die Reparatur oder den Ersatz des Produkts.
A
CHTUNG
Dieses Gerät ist auf den Einsatz einer VGA-Grafikkarte ausgelegt.
Der Einsatz einer nicht geeigneten Grafikkarte kann zu Beschädigungen des DTF-720 führen.
A
CHTUNG
Bedecken Sie die Lüftungsöffnungen an der Rückseite des Geräts nicht.
Das Gerät kann dadurch überhitzen und beschädigt werden.
Wenn Sie längere Zeit nicht mit dem DTF-720 arbeiten, ziehen Sie den Netzteilstecker aus der Steckdose.
W
ARNUNG
Hochspannung. Öffnen oder zerlegen Sie niemals das DTF-720 Pen Display. Bei offenem Gehäuse besteht die Gefahr eines Stromschlags.
Darüber hinaus erlischt dadurch Ihr Garantieanspruch, und Wacom übernimmt keinerlei Verantwortung für die Reparatur oder den Ersatz des Produkts.
W
ARNUNG
Wenn der LCD-Bildschirm beschädigt ist, berühren Sie KEINESFALLS eventuell austretende Flüssigkeit.
Die Flüssigkeit verursacht Hautreizungen. Wenn sie dennoch mit Haut, Augen oder Mund in Berührung kommt, spülen Sie die betreffende Stelle sofort mindestens 15 Minuten lang unter fließendem Wasser ab. Suchen Sie bei Kontakt mit Augen und Mund außerdem einen Arzt auf.
W
ARNUNG
– LAMPEN IN DIESEM PRODUKT ENTHALTEN QUECKSILBER UND MÜSSEN GEMÄSS KOMMUNAL-, LANDES- ODER STAATSGESETZEN RECYCELT ODER ENTSORGT WERDEN.
Die Hintergrundbeleuchtung des DTF-720 Pen Display enthält Quecksilber (Hg).
Stellen Sie sicher, dass sie ordnungsgemäß entsorgt wird, und dass eine Entsorgung des Geräts entsprechend der örtlich geltenden Bestimmungen und Gesetze erfolgt.
W
ARNUNG
Bewahren Sie den Stift und Zubehörteile außerhalb der Reichweite von Kindern auf.
Wenn Kinder auf den Stift beißen, besteht die Gefahr, dass sich die Spitze oder der Seitenschalter lösen.
A
CHTUNG
Nehmen Sie den Stift nicht auseinander.
Dies verursacht möglicherweise Fehlfunktionen des Geräts. In diesem Fall übernimmt Wacom keine Verantwortung für die Reparatur oder den Ersatz des Produkts.
A
CHTUNG
Achten Sie darauf, dass der Bildschirm nicht verkratzt wird.
Stellen Sie keine scharfen Gegenstände auf die Oberfläche des Bildschirms.
A
CHTUNG
Verstellen Sie den Neigungswinkel am DTF-720 mit Vorsicht: in dem Spalt zwischen dem umklappbaren Teil des Standfußes könnten Sie leicht Ihre Finger einklemmen.
Hg
DTF720_Manual.fm Page 3 Monday, December 22, 2008 12:29 PM
VorsichtsmaßnahmenSeite 4
A
CHTUNG
Heben Sie das DTF-720 nicht am Standfuß hoch, da dies den Ständermechanismus beschädigen könnte.
Wenn Sie das DTF-720 heben oder transportieren möchten, fassen Sie das Gerät bitte stets am Gehäuse an.
A
CHTUNG
Vermeiden Sie heftige Erschütterungen des DTF-720 oder des Stiftes.
Wenn Sie das DTF-720 heftigen Stößen aussetzen oder es fallen lassen, können der Bildschirm und andere Bauteile beschädigt werden.
A
CHTUNG
Stellen Sie keine schweren Gegenstände auf das Pen Display, und stoßen Sie nicht mit Gewalt dagegen.
Dadurch kann der Bildschirm beschädigt oder der Standfuß verbogen werden.
A
CHTUNG
Stellen Sie keine schweren Gegenstände auf die Kabel des DTF-720, knicken Sie die Kabel nicht wiederholt, und üben Sie keinen starken Druck auf die Kabelanschlüsse aus.
Dadurch können das Gerät oder die Kabel beschädigt werden.
A
CHTUNG
Wenn die Stiftspitze scharf oder kantig wird, kann die Oberfläche des Bildschirms beschädigt werden.
Ersetzen Sie die Stiftspitze gegebenenfalls.
A
CHTUNG
Verwenden Sie zum Reinigen des Bildschirms weder organische Lösungsmittel (z. B. Alkohol) noch milde Reinigungsmittel. Durch diese Mittel kann die Beschichtung des Bildschirms beschädigt werden. Beachten Sie, dass derartige Schäden nicht unter die Garantiebestimmungen des Herstellers fallen.
• Reinigen Sie den Display-Bildschirm mit einem antistatischen oder leicht angefeuchteten Tuch. Üben Sie bei der Reinigung nur minimalen Druck auf den Bildschirm aus, und achten Sie darauf, dass die Oberfläche nicht durchnässt wird.
• Verwenden Sie zur Reinigung des DTF-720-Gehäuses und des Stiftes ein weiches Tuch und ein mildes Reinigungsmittel (z. B. Geschirrspülmittel), das mit Wasser verdünnt wurde.
• Trennen Sie das Gerät vor der Reinigung immer von der Stromversorgung.
A
CHTUNG
Setzen Sie das DTF-720 niemals elektrostatischen Entladungen mit hoher Spannung oder dem Aufbau von elektrostatischer Ladung am LCD-Bildschirm aus.
Dadurch können am Display vorübergehend Fehlfarben und Flecken entstehen. Wenn Fehlfarben auftreten, lassen Sie das Display eingeschaltet. Die Fehlfarben sind nach wenigen Stunden wieder verschwunden.
Wiederverwendung, Recycling und Reparatur.
Wenn Sie das Gerät durch ein neueres austauschen oder die Nutzungsdauer des Geräts abgelaufen ist, sind Sie aufgefordert, das Produkt bei der nächsten Recycling-Sammelstelle abzugeben. Entsprechende Sammelstellen stehen in jeder Gemeinde zur Verfügung. Sie leisten dadurch einen aktiven Beitrag zum Umweltschutz in Ihrer Gemeinde und tragen dazu bei, dass keinerlei in dem Gerät vorhandene Schadstoffe bei der Entsorgung in die Umwelt gelangen.Gemäß EG-Richtlinie 2002/96/EC, die am 27. Januar 2003 vom Europäischen Parlament und vom Europarat erlassen wurde (WEEE), und laut Vorschriften in den einzelnen Mitgliedsstaaten ist die Entsorgung von Elektro- und Elektronikschrott im normalen Hausmüll untersagt. Produkte, auf die diese Richtlinie zutrifft, sind mit dem Symbol zur Kennzeichnung von Elektro- und Elektronikgeräten am Anfang dieses Hinweises versehen, es sei denn, diese Kennzeichnung ist aufgrund des Formats oder der Funktion des Produkts nicht möglich. Wacom Produkte unterliegen der Richtlinie 2002/96/EG. Die Geräte sollten daher stets getrennt gesammelt und der entsprechenden Entsorgungsstelle in Ihrer Region oder Gemeinde zugeführt werden.
Wacom Pen Display Produkte entsprechen der Richtlinie 2002/95/EG zur Beschränkung der Verwendung bestimmter gefährlicher Stoffe in Elektro- und Elektronikgeräten.
DTF720_Manual.fm Page 4 Monday, December 22, 2008 12:29 PM
Inhalt Seite 5
INHALT
Einführung und Übersicht . . . . . . . . . . . . . . . . . . . . . . . . . . . . . . . . . . . . . . . . 1Vorsichtsmaßnahmen . . . . . . . . . . . . . . . . . . . . . . . . . . . . . . . . . . . . . . . . . . . . 2
Verwendungsort . . . . . . . . . . . . . . . . . . . . . . . . . . . . . . . . . . . . . . . . . . . . . . 2Betriebsumgebung . . . . . . . . . . . . . . . . . . . . . . . . . . . . . . . . . . . . . . . . . . . . 2Verwendung . . . . . . . . . . . . . . . . . . . . . . . . . . . . . . . . . . . . . . . . . . . . . . . . . 3Handhabung . . . . . . . . . . . . . . . . . . . . . . . . . . . . . . . . . . . . . . . . . . . . . . . . . 3
Das Gerät . . . . . . . . . . . . . . . . . . . . . . . . . . . . . . . . . . . . . . . . . . . . . . . . . . . . . . 7
Packungsinhalt . . . . . . . . . . . . . . . . . . . . . . . . . . . . . . . . . . . . . . . . . . . . . . . 7Komponenten des Interactive Pen Display . . . . . . . . . . . . . . . . . . . . . . . . . . 8
Vorderansicht . . . . . . . . . . . . . . . . . . . . . . . . . . . . . . . . . . . . . . . . . . . . 8Rückansicht . . . . . . . . . . . . . . . . . . . . . . . . . . . . . . . . . . . . . . . . . . . . . . 9
Installation . . . . . . . . . . . . . . . . . . . . . . . . . . . . . . . . . . . . . . . . . . . . . . . . . . . . 10
Systemvoraussetzungen . . . . . . . . . . . . . . . . . . . . . . . . . . . . . . . . . . . . . . 10Schritt 1: Installieren des LCD-Bildschirms . . . . . . . . . . . . . . . . . . . . . . . . 11
Kabeldiagramm für den LCD-Bildschirm . . . . . . . . . . . . . . . . . . . . . . . 12Schritt 2: Installieren des Stifttabletts . . . . . . . . . . . . . . . . . . . . . . . . . . . . . 14
Anbringung des USB-Kabels . . . . . . . . . . . . . . . . . . . . . . . . . . . . . . 14Kabeldiagramm für das Stifttablett . . . . . . . . . . . . . . . . . . . . . . . . . . . 14Softwareinstallation . . . . . . . . . . . . . . . . . . . . . . . . . . . . . . . . . . . . . . . 15
Arbeiten mit dem DTF-720 . . . . . . . . . . . . . . . . . . . . . . . . . . . . . . . . . . . . . . . 16
Einrichten des Arbeitsbereiches . . . . . . . . . . . . . . . . . . . . . . . . . . . . . . . . . 16Verwenden des Stiftes . . . . . . . . . . . . . . . . . . . . . . . . . . . . . . . . . . . . . . . . 17
Komponenten des Stiftes . . . . . . . . . . . . . . . . . . . . . . . . . . . . . . . . . . 17Bedienen des Stiftes . . . . . . . . . . . . . . . . . . . . . . . . . . . . . . . . . . . . . . . . . 18
Konfigurieren . . . . . . . . . . . . . . . . . . . . . . . . . . . . . . . . . . . . . . . . . . . . . . . . . . 19
Öffnen des Kontrollfeldes . . . . . . . . . . . . . . . . . . . . . . . . . . . . . . . . . . . . . . 19Übersicht über das Kontrollfeld . . . . . . . . . . . . . . . . . . . . . . . . . . . . . . . . . 20
Anpassen des Stiftes . . . . . . . . . . . . . . . . . . . . . . . . . . . . . . . . . . . . . 20Kalibrieren des DTF-720 . . . . . . . . . . . . . . . . . . . . . . . . . . . . . . . . . . . 22Anpassen des Popup-Menüs . . . . . . . . . . . . . . . . . . . . . . . . . . . . . . . 23
Details des Kontrollfeldes . . . . . . . . . . . . . . . . . . . . . . . . . . . . . . . . . . . . . . 24Anpassen des Doppelklicks . . . . . . . . . . . . . . . . . . . . . . . . . . . . . . . . 24Anpassen der Funktionsbelegung des Seitenschalters . . . . . . . . . . . 24
Einstellen des Displays . . . . . . . . . . . . . . . . . . . . . . . . . . . . . . . . . . . . . . . 28Standardeinstellungen, Auto-Sync und Benutzereinstellungen . . . . . 28On Screen Display (OSD)-Einstellungen . . . . . . . . . . . . . . . . . . . . . . 28Pitch- und Phase-Einstellungen . . . . . . . . . . . . . . . . . . . . . . . . . . . . . 31Energiesparmaßnahmen . . . . . . . . . . . . . . . . . . . . . . . . . . . . . . . . . . . 32
DTF720_Manual.fm Page 5 Monday, December 22, 2008 12:29 PM

InhaltSeite 6
Fehlerbehebung . . . . . . . . . . . . . . . . . . . . . . . . . . . . . . . . . . . . . . . . . . . . . . . 33
Testen des DTF-720 . . . . . . . . . . . . . . . . . . . . . . . . . . . . . . . . . . . . . . . . . . 33Fehlerbehebung für das Display . . . . . . . . . . . . . . . . . . . . . . . . . . . . . . . . 35
Allgemeine Display-Probleme . . . . . . . . . . . . . . . . . . . . . . . . . . . . . . . 35VGA-Probleme . . . . . . . . . . . . . . . . . . . . . . . . . . . . . . . . . . . . . . . . . . 36
Fehlerbehebung für das Stifttablett . . . . . . . . . . . . . . . . . . . . . . . . . . . . . . 37Allgemeine Probleme . . . . . . . . . . . . . . . . . . . . . . . . . . . . . . . . . . . . . 37Windows-spezifische Probleme . . . . . . . . . . . . . . . . . . . . . . . . . . . . . 41Macintosh-spezifische Probleme . . . . . . . . . . . . . . . . . . . . . . . . . . . . 41
Optionen für den technischen Kundendienst . . . . . . . . . . . . . . . . . . . . . . . 42Abrufen von Treiber-Downloads . . . . . . . . . . . . . . . . . . . . . . . . . . . . . . . . . 43
Anhang . . . . . . . . . . . . . . . . . . . . . . . . . . . . . . . . . . . . . . . . . . . . . . . . . . . . . . . 44
Pflege des DTF-720 . . . . . . . . . . . . . . . . . . . . . . . . . . . . . . . . . . . . . . . . . . 44Reinigen . . . . . . . . . . . . . . . . . . . . . . . . . . . . . . . . . . . . . . . . . . . . . . . 44Austauschen der Stiftspitze . . . . . . . . . . . . . . . . . . . . . . . . . . . . . . . . . 45
Verwenden alternativer Ständer oder Halterungen . . . . . . . . . . . . . . . . . . 46Stift- und Freihandfunktionen in Windows Vista . . . . . . . . . . . . . . . . . . . . . 47
Informationen zum Tablet PC-Eingabebereich in Windows Vista . . . . 48Deinstallieren des DTF-720 . . . . . . . . . . . . . . . . . . . . . . . . . . . . . . . . . . . . 49Technische Daten . . . . . . . . . . . . . . . . . . . . . . . . . . . . . . . . . . . . . . . . . . . . 50
Allgemeine Spezifikationen . . . . . . . . . . . . . . . . . . . . . . . . . . . . . . . . . 50Display . . . . . . . . . . . . . . . . . . . . . . . . . . . . . . . . . . . . . . . . . . . . . . . . 50Stifttablett . . . . . . . . . . . . . . . . . . . . . . . . . . . . . . . . . . . . . . . . . . . . . . 51Netzgerät . . . . . . . . . . . . . . . . . . . . . . . . . . . . . . . . . . . . . . . . . . . . . . 51Stift (Modell FP-320) . . . . . . . . . . . . . . . . . . . . . . . . . . . . . . . . . . . . . . 51
Bestellen von Teilen und Zubehör . . . . . . . . . . . . . . . . . . . . . . . . . . . . . . . 51Störungen des Radio- und Fernsehempfangs . . . . . . . . . . . . . . . . . . . . . . 52
FCC-Hinweis (Federal Communications Commission) . . . . . . . . . . . . 52Industry Canada (nur Kanada) . . . . . . . . . . . . . . . . . . . . . . . . . . . . . . 53CE-Erklärung . . . . . . . . . . . . . . . . . . . . . . . . . . . . . . . . . . . . . . . . . . . 53
Lizenz- und Garantiebestimmungen (Europa, Afrika und Naher Osten) . . 54
DTF720_Manual.fm Page 6 Monday, December 22, 2008 12:29 PM
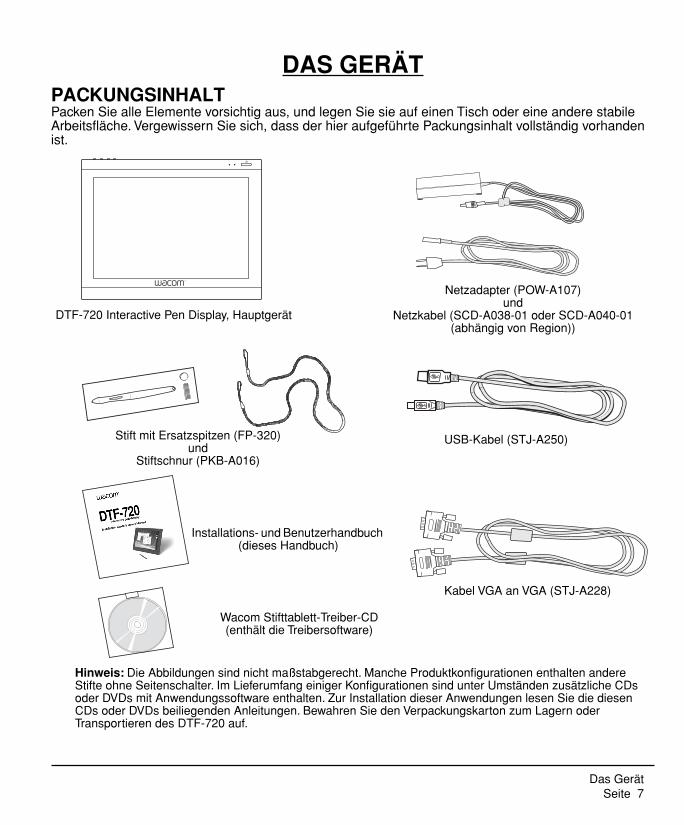
Das Gerät Seite 7
DAS GERÄT
PACKUNGSINHALT
Packen Sie alle Elemente vorsichtig aus, und legen Sie sie auf einen Tisch oder eine andere stabile Arbeitsfläche. Vergewissern Sie sich, dass der hier aufgeführte Packungsinhalt vollständig vorhanden ist.
Hinweis:
Die Abbildungen sind nicht maßstabgerecht. Manche Produktkonfigurationen enthalten andere Stifte ohne Seitenschalter. Im Lieferumfang einiger Konfigurationen sind unter Umständen zusätzliche CDs oder DVDs mit Anwendungssoftware enthalten. Zur Installation dieser Anwendungen lesen Sie die diesen CDs oder DVDs beiliegenden Anleitungen. Bewahren Sie den Verpackungskarton zum Lagern oder Transportieren des DTF-720 auf.
DTF-720 Interactive Pen Display, Hauptgerät
Netzadapter (POW-A107)und
Netzkabel (SCD-A038-01 oder SCD-A040-01 (abhängig von Region))
USB-Kabel (STJ-A250)
Kabel VGA an VGA (STJ-A228)
Stift mit Ersatzspitzen (FP-320)und
Stiftschnur (PKB-A016)
Installations- und Benutzerhandbuch (dieses Handbuch)
Wacom Stifttablett-Treiber-CD (enthält die Treibersoftware)
DTF720_Manual.fm Page 7 Monday, December 22, 2008 12:29 PM
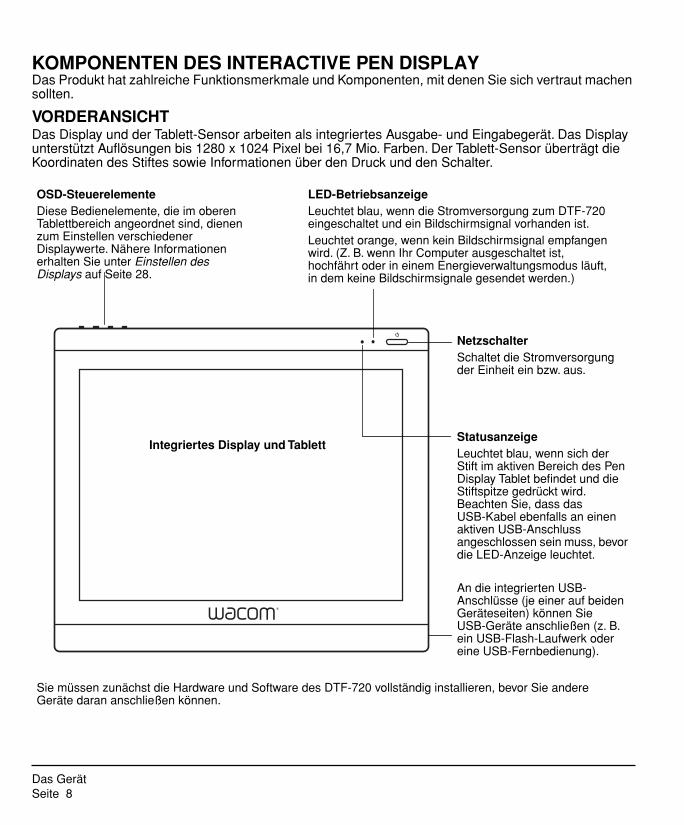
Das GerätSeite 8
KOMPONENTEN DES INTERACTIVE PEN DISPLAY
Das Produkt hat zahlreiche Funktionsmerkmale und Komponenten, mit denen Sie sich vertraut machen sollten.
VORDERANSICHT
Das Display und der Tablett-Sensor arbeiten als integriertes Ausgabe- und Eingabegerät. Das Display unterstützt Auflösungen bis 1280 x 1024 Pixel bei 16,7 Mio. Farben. Der Tablett-Sensor überträgt die Koordinaten des Stiftes sowie Informationen über den Druck und den Schalter.
OSD-SteuerelementeDiese Bedienelemente, die im oberen Tablettbereich angeordnet sind, dienen zum Einstellen verschiedener Displaywerte. Nähere Informationen erhalten Sie unter Einstellen des Displays auf Seite 28.
LED-BetriebsanzeigeLeuchtet blau, wenn die Stromversorgung zum DTF-720 eingeschaltet und ein Bildschirmsignal vorhanden ist.Leuchtet orange, wenn kein Bildschirmsignal empfangen wird. (Z. B. wenn Ihr Computer ausgeschaltet ist, hochfährt oder in einem Energieverwaltungsmodus läuft, in dem keine Bildschirmsignale gesendet werden.)
NetzschalterSchaltet die Stromversorgung der Einheit ein bzw. aus.
StatusanzeigeLeuchtet blau, wenn sich der Stift im aktiven Bereich des Pen Display Tablet befindet und die Stiftspitze gedrückt wird. Beachten Sie, dass das USB-Kabel ebenfalls an einen aktiven USB-Anschluss angeschlossen sein muss, bevor die LED-Anzeige leuchtet.
Integriertes Display und Tablett
An die integrierten USB-Anschlüsse (je einer auf beiden Geräteseiten) können Sie USB-Geräte anschließen (z. B. ein USB-Flash-Laufwerk oder eine USB-Fernbedienung).
Sie müssen zunächst die Hardware und Software des DTF-720 vollständig installieren, bevor Sie andere Geräte daran anschließen können.
DTF720_Manual.fm Page 8 Monday, December 22, 2008 12:29 PM

Das Gerät Seite 9
RÜCKANSICHT
Wichtig:
Stellen Sie das Pen Display immer auf eine stabile Unterlage oder lagern Sie es im Karton der Originalverpackung. Stellen Sie sicher, dass der Standfuß auf den niedrigsten Neigungswinkel eingestellt ist, bevor Sie das DTF-720 verpacken. Wenn Sie den Standfuß nicht schließen, kann möglicherweise während des Transports oder der Lagerung der Feststellmechanismus beschädigt werden.
Heben Sie das Gerät nicht am Standfuß an, da dies den Ständermechanismus beschädigen könnte. Wenn Sie das DTF-720 heben oder transportieren möchten, fassen Sie das Gerät bitte stets am Gehäuse an.
Video-, USB- und Stromanschlüsse
Kensington-SicherheitsschlitzErmöglicht das mühelose Anbringen eines Sicherheitskabels.
Verbindungspunkt für StiftschnurWenn Sie die Stiftschnur benutzen möchten, müssen Sie diese an der Aufhängung links oder rechts vom Gerät anbringen.
Einstellhebel des StandfußesZiehen Sie an diesem Hebel, um den Standfuß wie gewünscht einzustellen. Lassen Sie den Hebel wieder los, damit der Ständer in der gewünschten Position fixiert wird.
ACHTUNG Passen Sie auf, dass Ihr Finger nicht in den beweglichen Zwischenraum der Aufstellvorrichtung gerät.
AufstellvorrichtungMithilfe des Standfußes kann der Neigungswinkel des Geräts verstellt werden.
Stiftfach
DTF720_Manual.fm Page 9 Monday, December 22, 2008 12:29 PM
InstallationSeite 10
INSTALLATION
SYSTEMVORAUSSETZUNGEN
Stellen Sie vor der Installation des DTF-720 sicher, dass Ihr Computer die folgenden Mindestsystemanforderungen erfüllt:
•
PC:
Windows Vista
™
, XP, XP x64 oder 2000. VGA-Bildschirmanschluss, verfügbarer USB-Anschluss und CD-ROM-Laufwerk.
•
Macintosh:
OS X, v10.4.0 oder höher. VGA-Bildschirmanschluss, verfügbarer USB-Anschluss und CD-ROM-Laufwerk.
Hinweise:
Da
s
DTF-720 kann geräteunabhängig oder mit einem anderen Display benutzt werden. Falls gewünscht, können Sie einen zweiten VGA-Bildschirm wie etwa einen Bildschirm oder einen LCD-Projektor an den
RGB-A
USGANG des DTF-720 anschließen. Bei Nutzung dieses Anschlusses werden die Anzeigedaten des DTF-720 auf dem zweiten Gerät gespiegelt. Führen Sie die Installation des DTF-720 vollständig durch, bevor Sie ein Projektionsgerät an das Gerät anschließen.Je nach Leistungsfähigkeit der Grafikkarte und des Betriebssystems kann das DTF-720 als gespiegeltes, erweitertes oder unabhängiges Display eingerichtet werden. Nähere Informationen zur Leistungsfähigkeit der Grafikkarte finden Sie in der Dokumentation zur Grafikkarte.Wenn Sie mit mehreren Bildschirmen arbeiten, erfolgt die Projektion vom DTF-720 auf die Bildschirme gemäß der Konfiguration Ihres Systems. Wenn Sie sich im Spiegelmodus befinden, wird das Stifttablett auf den gesamten Bereich jedes Displays oder Bildschirms projiziert. Nähere Informationen über die Konfiguration Ihres Computers und Betriebssystems für die Verwendung mit mehreren Bildschirmen finden Sie in der Dokumentation zu Ihrer Hardware und Ihrem Betriebssystem.
Der Installationsvorgang ist in zwei Hauptschritte gegliedert:
• Schritt 1: Installieren des LCD-Bildschirms
• Schritt 2: Installieren des Stifttabletts
Befolgen Sie alle Anweisungen sorgfältig.
DTF720_Manual.fm Page 10 Monday, December 22, 2008 12:29 PM

Installation Seite 11
SCHRITT 1: INSTALLIEREN DES LCD-BILDSCHIRMSIn der ersten Phase des Installationsvorgangs installieren Sie das DTF-720 als Bildschirm auf Ihrem System. Wenn Sie während der ersten Phase der Installation Kabelverbindungen herstellen, können Sie sich am Kabeldiagramm für den LCD-Bildschirm auf der folgenden Seite orientieren.
Wichtig: Schließen Sie das USB-Datenkabel erst an, wenn Sie dazu aufgefordert werden.
• Schalten Sie Ihren Computer aus.
Vorsicht: Das Video- oder das Netzkabel darf weder angeschlossen noch abgezogen werden, während Ihr Computer oder das DTF-720 eingeschaltet sind – dadurch könnten das Display oder die Grafikkarte beschädigt werden.
• Wenn Ihr Computer nur über einen analogen VGA-Bildschirmanschluss verfügt, müssen Sie den derzeit angeschlossenen Bildschirm ausstecken oder eine zweite VGA-Karte hinzufügen.
• Schließen Sie das Netzteil an das DTF-720 an. Schließen Sie dann das Netzkabel des Adapters an, und schließen Sie den Adapter an eine Steckdose an. Siehe – B – und – C –
• Schalten Sie das DTF-720 ein. Die LED-Betriebsanzeige leuchtet orange.
• Verbinden Sie ein Ende des VGA-Kabels mit dem DTF-720. Verbinden Sie das andere Ende des Kabels mit dem VGA-Anschluss der Grafikkarte im Computer. Siehe – A – im Verkabelungsdiagramm auf Seite 12. Ziehen Sie die Schrauben an den Steckern an.
VGA-Anschluss
DTF720_Manual.fm Page 11 Monday, December 22, 2008 12:29 PM

InstallationSeite 12
KABELDIAGRAMM FÜR DEN LCD-BILDSCHIRM
DTF-720, Rückansicht
– B – DC IN (12 V)
– A – VGA-Kabel
Grafikkarte
Rückseite des Computers
RGB-EINGANG
Schließen Sie das USB-Datenkabel erst an, wenn Sie dazu aufgefordert werden.
Netzgerät – C – Netzanschluss
ACHTUNG Verwenden Sie nur das im Lieferumfang des DTF-720 enthaltene Netzgerät. Der Einsatz eines ungeeigneten Netzgeräts kann das Gerät beschädigen.Schließen Sie das Bildschirm- oder das Netzkabel nicht an und ziehen Sie diese auch nicht ab, wenn das DTF-720 bzw. Ihr Computer eingeschaltet ist. Dadurch können das Display oder die Grafikkarte des Computers beschädigt werden.Stellen Sie sicher, dass die Bildwiederholfrequenz 75 Hz nicht übersteigt.
RGB-AUSGANG
VGA-
Der RGB-AUSGANG dient zum Anschluss eines zweiten VGA-Geräts, wie z. B. Projektor oder Bildschirm, auf dem das Bild des Pen Display gespiegelt wird. Sie müssen zunächst die Hardware und Software des DTF-720 vollständig installieren, bevor Sie ein Projektions-gerät an das Gerät anschließen. Es dürfen keine Kabel angeschlossen oder abgezogen werden, solange das DTF-720 oder Ihr Computer eingeschaltet sind.
DTF720_Manual.fm Page 12 Monday, December 22, 2008 12:29 PM
Installation Seite 13
• Schalten Sie danach Ihren Computer ein.
Für Windows-Systeme: Das DTF-720 wird automatisch als Standardmonitor installiert.
• Konfigurieren Sie gegebenenfalls in der Systemsteuerung die Einstellungen für die Anzeige hinsichtlich der richtigen Größe und Farbauflösung. Die maximale (geräteeigene) Auflösung des DTF-720 beträgt 1280 x 1024 Pixel. Die Größe der Anzeige und die Farbauflösung kann durch die Eigenschaften Ihrer Grafikkarte eingeschränkt werden. Nähere Informationen hierzu finden Sie in der Herstellerdokumentation der Grafikkarte.
Windows: Wenn Sie das DTF-720 als zweiten Bildschirm verwenden, müssen Sie das DTF-720 zunächst in der Systemsteuerung in den Eigenschaften für die Anzeige aktivieren.
• Weitere Informationen zur Feinabstimmung der Anzeige finden Sie unter Einstellen des Displays ab Seite 28.
• Wenn der LCD-Bildschirm des DTF-720 zufriedenstellend arbeitet, fahren Sie bei Schritt 2: Installieren des Stifttabletts fort, um das Stifttablett des DTF-720 zu installieren. Tipps zur Fehlerbehebung finden Sie unter Seite 33.
Hinweise: Jedes einzelne DTF-720 LCD-Display wird unter Einhaltung strenger Qualitätsstandards hergestellt. Herstellungsbedingt kann kein absolut perfektes TFT-Display garantiert werden, und bei manchen Displays kann eine bestimmte Anzahl von Pixel eine falsche Farbe haben. Weitere Informationen finden Sie in den technischen Daten auf Seite 50.Wenn ein Bild feine Streifen aufweist (wie Bildschirmstreifen), ist ein Flimmern oder ein Moiré-Muster zu sehen.Üben Sie keinen übermäßigen Druck auf die Display-Oberfläche aus. Dadurch kann ein Moiré- oder Pooling-Muster entstehen. Wenn ein solches Muster auftritt, sollten Sie bei der Arbeit mit dem Stift weniger stark auf den Bildschirm drücken.Wird über einen längeren Zeitraum ein statisches Bild angezeigt, könnte kurzfristig ein so genanntes Nachbild zurückbleiben. Zur Vermeidung dieses Problems empfiehlt Wacom den Einsatz eines Bildschirmschoners oder einer Energieverwaltungsfunktion.
Wichtig: Um die Lebensdauer der Hintergrundbeleuchtung zu verlängern, sollten Sie die Energieverwaltung Ihres Computers so einstellen, dass das Display bei längerer Nichtbenutzung ausgeschaltet wird.
DTF720_Manual.fm Page 13 Monday, December 22, 2008 12:29 PM

InstallationSeite 14
SCHRITT 2: INSTALLIEREN DES STIFTTABLETTSANBRINGUNG DES USB-KABELS Verbinden Sie das quadratische Ende des USB-Kabels mit dem DTF-720-Anschluss, der mit USB gekennzeichnet ist. Schließen Sie das andere Kabelende an einen freien USB-Anschluss des Computers oder an einen Hub an, der direkt am Computer angeschlossen ist. Siehe – D – im Diagramm unten.
KABELDIAGRAMM FÜR DAS STIFTTABLETT
DTF-720, Rückansicht
Zum USB-Anschluss
Ihr Computer
– D –
USB-Anschluss
Zum Netzgerät. (Siehe „Seite 12“).
Zum Videoanschluss. (Siehe „Seite 12“).
DTF720_Manual.fm Page 14 Monday, December 22, 2008 12:29 PM
Installation Seite 15
SOFTWAREINSTALLATION
WICHTIG: Sie MÜSSEN die Treibersoftware für das Wacom Stifttablett installieren, damit der Stift auf dem Bildschirm richtig funktioniert.
So installieren Sie die Tablettsoftware:
• Speichern Sie Ihre Arbeit, und schließen Sie alle Anwendungen. Deaktivieren Sie vorübergehend alle Virenschutzprogramme.
• Legen Sie die Treiber-CD für das Wacom Stifttablett in das CD-ROM-Laufwerk Ihres Computers ein. Wenn das Installationsmenü nicht automatisch angezeigt wird, doppelklicken Sie auf das Installationssymbol auf der CD-ROM.
• Klicken Sie auf die Verknüpfung TABLETT INSTALLIEREN, und befolgen Sie die Anweisungen zur Installation der Treibersoftware.
• Aktivieren Sie das Virenschutzprogramm erneut.
• Überprüfen Sie nach der Installation der Software, ob Sie den Bildschirmcursor mit dem Stift auf dem DTF-720-Display bewegen können.
Wenn Sie die Stiftspitze auf den Bildschirm setzen, sollte der Bildschirmcursor sofort an die entsprechende Stelle unter der Stiftspitze springen. Heben Sie die Stiftspitze an, und platzieren Sie sie auf eine andere Stelle der Bildschirmoberfläche. Der Bildschirmcursor sollte an die neue Position springen. Dies wird als absolute Positionierung bezeichnet und ermöglicht Ihnen, den Bildschirmcursor zu positionieren, ohne den Stift über die Bildschirmoberfläche des Displays zu ziehen.
• Lesen Sie unbedingt die Liesmich-Datei, damit Sie über die neuesten Entwicklungen informiert sind. Falls bei der Installation des DTF-720 Probleme auftreten, lesen Sie den Abschnitt Fehlerbehebung ab Seite 33.
Hinweise:In Windows Vista werden durch die Treiberinstallation die neuen Stifteingabefunktionen von Windows Vista und Office 2007 (mit Ausnahme von Windows Vista Home Basic) automatisch aktiviert.Bei Windows Vista, Windows XP und Macintosh OS X werden benutzerspezifische Einstellungen unterstützt. Nach der Anmeldung kann jeder Benutzer seine persönlichen Einstellungen im Kontrollfeld für das Stifttablett anpassen. Nach dem Wechseln zu einem anderen Benutzer werden die Einstellungen für diesen Benutzer automatisch geladen.Zur Deinstallation des Tablett-Treibers siehe Deinstallieren des DTF-720 auf Seite 49.
Kalibrieren Sie als Nächstes das Pen Display Tablet so, dass die Position des Bildschirmcursors genau mit der Position der Stiftspitze übereinstimmt. Siehe Kalibrieren des DTF-720 auf Seite 22.
DTF720_Manual.fm Page 15 Monday, December 22, 2008 12:29 PM

Arbeiten mit dem DTF-720Seite 16
ARBEITEN MIT DEM DTF-720Bei der Arbeit mit dem DTF-720 Interactive Pen Display können Sie Ihre Hand auf dem Bildschirm wie auf einem Zeichenbrett oder einem Blatt Papier leicht auflegen.
Da die Oberfläche des DTF-720 etwas höher liegt als Ihr Schreibtisch, sollten Sie die Höhe von Schreibtisch oder Tisch so anpassen, dass Sie bequem mit dem Gerät arbeiten können.
EINRICHTEN DES ARBEITSBEREICHESRichten Sie Ihren Arbeitsbereich so ein, dass Sie bequem arbeiten können, damit Sie nicht so schnell ermüden. Platzieren Sie das DTF-720, den Stift und die Tastatur so, dass sie mühelos erreichbar sind. Wählen Sie für das Pen Display und andere Displays eine günstige Position, die Ihre Augen nicht überanstrengt.
Beachten Sie darüber hinaus auch Folgendes:
• Legen Sie kurze Pausen für muskelentspannende Dehnübungen ein.
• Halten Sie den Stift beim Arbeiten locker in der Hand.
• Sorgen Sie für Abwechslung in Ihren täglichen Tätigkeiten.
• Achten Sie stets auf eine bequeme Haltung. Vermeiden Sie unbequeme Sitzhaltungen und monotone Bewegungen. Ändern Sie die Arbeitsposition, wenn sie unbequem wird.
• Wechseln Sie zwischen den verschiedenen Arbeitsmodi ab.
Hinweis: Wacom kann in keiner Weise versprechen oder garantieren, dass Wacom Produkte zur vollständigen oder teilweisen Heilung oder Vorbeugung von durch das Arbeiten mit der Maus entstehende RSI (Repetitive Stress Injury)-Symptome, -Verletzungen oder -Zustände beitragen können. Die Ergebnisse können je nach Benutzer variieren. Wenden Sie sich an einen Arzt, wenn Sie kompetente medizinische Hilfe für eine spezifische Situation benötigen.
Tipps:• Bewegen Sie das DTF-720 nicht zu weit vom Computer weg, damit die Kabel nicht versehentlich aus den
Anschlüssen gezogen werden.• Mit der Stiftschnur sorgen Sie dafür, dass Ihr Stift stets am Display-Tablett bedienbereit ist. Ziehen Sie ein
Schnurende einfach durch die Stiftöffnung hindurch und das andere Schnurende durch die Öse links oder rechts vom Tablett.
• Das DTF-720 kann auch auf einem Gelenkarm oder auf Ständern von Drittanbietern befestigt werden, die die VESA 75-Spezifikation für Displayständer erfüllen. Weitere Informationen finden Sie unter Verwenden alternativer Ständer oder Halterungen auf Seite 46.
DTF720_Manual.fm Page 16 Monday, December 22, 2008 12:29 PM

Arbeiten mit dem DTF-720 Seite 17
VERWENDEN DES STIFTESDer Wacom-Stift ist kabellos, besitzt keine Batterien und reagiert auf den Druck, den Sie auf die Stiftspitze ausüben. Halten Sie den Stift wie einen normalen Kugelschreiber oder Bleistift. Sorgen Sie dafür, dass Sie den programmierbaren DuoSwitch zwar bequem mit dem Daumen oder Zeigefinger erreichen, aber nicht versehentlich beim Zeichnen oder Schreiben drücken können. Bei der Arbeit können Sie eine Hand leicht auf dem DTF-720-Display wie auf einem Zeichenbrett oder einem Blatt Papier aufstützen. Neigen Sie den Stift beim Zeichnen in der für Sie bequemsten Position.
KOMPONENTEN DES STIFTESDie Komponenten des Stiftes funktionieren folgendermaßen:
Stiftspitze: Der Stift wird aktiviert, sobald er sich etwa 5 mm über dem Bildschirm des Pen Display befindet. Dadurch können Sie den Bildschirmcursor platzieren, ohne das Tablett mit der Stiftspitze berühren zu müssen. Wenn Druck auf die Stiftspitze ausgeübt wird, wird die Spitzentaste aktiviert. Dies hat die gleiche Wirkung wie ein Klick mit der primären Maustaste. Der Druck der Spitze beim Klicken kann im Kontrollfeld des Stifttabletts angepasst werden.
DuoSwitch: Der DuoSwitch ist belegbar. Mit ihm können dieselben Klick- und Doppelklick-Funktionen wie mit der Stifttaste ausgeführt werden. Aktivieren Sie die Funktionen des oberen oder des unteren Schalters, indem Sie den DuoSwitch in die entsprechende Richtung stellen. Sie können den DuoSwitch immer dann verwenden, wenn die Stiftspitze nicht mehr als 5 mm von der Bildschirmoberfläche entfernt ist. Sie müssen die Stiftspitze nicht auf den Bildschirm aufsetzen, um den Schalter zu verwenden. Standardmäßig ist für den oberen Schalter DOPPELKLICK und für den unteren RECHTER MAUSKLICK festgelegt.
Wichtig: Verwenden Sie nur den Stift, der mit Ihrem DTF-720 Pen Display geliefert wurde. Andere Stifte funktionieren möglicherweise nicht ordnungsgemäß. Die Stiftspitze des DTF-720 wurde darüber hinaus speziell für die Verwendung mit dem DTF-720 Pen Display entwickelt – die Spitzen anderer Stifte können die schützende Beschichtung des DTF-720 Display beschädigen.
Weitere Hinweise zum individuellen Anpassen der Stifteinstellungen finden Sie unter Anpassen des Stiftes auf Seite 20.
Verbindungspunkt für Stiftschnur
DuoSwitch (Seitenschalter)Bei manchen Produktkonfigurationen ist kein DuoSwitch vorgesehen. Ignorieren Sie alle Erläuterungen in diesem Handbuch zu dem Seitenschalter, wenn dies bei Ihrem Gerät zutrifft.
Spitzentaste (austauschbare Spitze)
Hinweis: Wenn der Stift nicht in Gebrauch ist, setzen Sie ihn in die Stiftablage oder legen ihn flach auf den Tisch. Stellen Sie den Stift nie in einem Behälter oder anderswo auf seiner Spitze aufrecht ab, damit seine Druckempfindlichkeit erhalten bleibt.
DTF720_Manual.fm Page 17 Monday, December 22, 2008 12:29 PM

Arbeiten mit dem DTF-720Seite 18
BEDIENEN DES STIFTESZeigen und Auswählen: Bewegen Sie den Stift über den DTF-720-Bildschirm, um den Bildschirmcursor zu positionieren. Der Stift darf dabei nicht mehr als 5 mm von der Bildschirmoberfläche des Display entfernt sein. Sie müssen die Displayoberfläche jedoch nicht berühren, um den Bildschirmcursor zu verschieben. Der Cursor springt auf die Position, auf die Sie den Stift setzen (absolute Positionierung). Sie können eine Auswahl vornehmen, indem Sie mit der Stiftspitze auf den Bildschirm drücken.
Hinweis: Sie müssen das Pen Display Tablet erst kalibrieren, damit die Position des Bildschirmcursors genau mit der Position der Stiftspitze übereinstimmt. (Siehe Kalibrieren des DTF-720 auf Seite 22.) Wenn der Bildschirmcursor nicht an eine Stelle nahe der Stiftspitze springt, wenn Sie mit dem Stift den Bildschirm berühren, ist der Stifttablett-Treiber möglicherweise noch nicht installiert oder nicht geladen. Installieren Sie falls nötig die Software für den Stifttablett-Treiber. Lesen Sie anderenfalls unter Fehlerbehebung ab Seite 33 nach.
Klicken: Tippen Sie den Bildschirm einmal kurz mit der Stiftspitze an, oder drücken Sie den Stift fest genug auf den Bildschirm, um einen Klick zu erzeugen.
Windows: Sie können das Navigieren mit dem Stift vereinfachen, indem Sie Windows so konfigurieren, dass ein Element markiert wird, wenn sich der Stift darüber bewegt. Durch einfaches Klicken wird das Element dann geöffnet (bzw. gestartet). Um diese Funktion zu aktivieren, müssen Sie zuerst einen Ordner öffnen.Windows Vista: Wählen Sie im Menü ORGANISIEREN die Option ORDNER- UND SUCHOPTIONEN. Wählen Sie auf der Registerkarte ALLGEMEIN die Option ÖFFNEN DURCH EINFACHEN KLICK (MARKIEREN DURCH ZEIGEN).
Andere Windows-Versionen: Wählen Sie im Menü EXTRAS die Option ORDNEROPTIONEN. Wählen Sie auf der Registerkarte ALLGEMEIN die Option ÖFFNEN DURCH EINFACHEN KLICK (MARKIEREN DURCH ZEIGEN).
Doppelklicken: Drücken Sie auf den oberen Seitenschalter, oder berühren Sie den Bildschirm zweimal an der gleichen Stelle mit der Stiftspitze. Sie können leichter doppelklicken, wenn Sie den Stift senkrecht auf das Tablett halten. Zur Feineinstellung des Doppelklickbereichs lesen Sie die Erläuterungen unter Anpassen des Doppelklicks auf Seite 24.
Ziehen: Markieren Sie ein Objekt. Lassen Sie dann die Stiftspitze über den Bildschirm gleiten, um das Objekt zu verschieben.
Verwenden des Seitenschalters: Der Stift verfügt über einen DuoSwitch. Dieser Schalter hat zwei programmierbare Funktionen, die sich durch Drücken des Schalters nach oben bzw. nach unten auswählen lassen. Sie können den DuoSwitch immer dann verwenden, wenn die Stiftspitze nicht mehr als 5 mm von der Oberfläche des Bildschirms entfernt ist. Sie müssen die Stiftspitze nicht auf die Displayoberfläche aufsetzen, um den Schalter zu verwenden. Standardmäßig ist für den oberen Schalter DOPPELKLICK und für den unteren RECHTER MAUSKLICK festgelegt.
Zeichnen und Schreiben mit Druckempfindlichkeit: Der Stift reagiert auf jede Nuance und Bewegung Ihrer Hand, so dass in den Anwendungen, die diese Funktion unterstützen, natürlich wirkende Stift- und Pinselstriche entstehen. Für druckempfindliches Zeichnen und Schreiben wählen Sie ein druckempfindliches Werkzeug in der Werkzeugpalette des Grafikprogramms aus. Üben Sie beim Arbeiten auf der Bildschirmoberfläche unterschiedlich starken Druck auf die Stiftspitze aus. Drücken Sie leichter auf, um dünne Linien oder weichere Farben zu erzeugen. Drücken Sie fester auf, um dicke Linien oder mehr Farbdeckung zu erhalten.
DTF720_Manual.fm Page 18 Monday, December 22, 2008 12:29 PM

Konfigurieren Seite 19
KONFIGURIERENWenn Sie die Grundlagen des Umgangs mit dem Stift auf dem DTF-720 Interactive Pen Display beherrschen, können Sie die Arbeitsweise des Stiftes an Ihre Bedürfnisse anpassen. Mit dem Stifttablettkontrollfeld ist die Anpassung des DTF-720 und des Stiftes einfach und problemlos zu handhaben.
ÖFFNEN DES KONTROLLFELDESVerwenden Sie den Stift des DTF-720 auf dem Pen Display-Tablett, um das Tablettkontrollfeld zu öffnen:
Windows: Klicken Sie auf START und wählen Sie ALLE PROGRAMME (Windows 2000: PROGRAMME). Wählen Sie dann TABLETT und die Option STIFTTABLETT-EIGENSCHAFTEN.
Macintosh: Öffnen Sie SYSTEMEINSTELLUNGEN im Apple-Menü, im Dock-Menü oder im Ordner PROGRAMME. Klicken Sie dann auf das Symbol PEN TABLET.
Lesen Sie nach Öffnen des Kontrollfeldes weiter unter Übersicht über das Kontrollfeld auf Seite 20.
Hinweise: Bei Windows Vista, Windows XP und Macintosh OS X werden benutzerspezifische Einstellungen unterstützt. Nach der Anmeldung kann jeder Benutzer seine persönlichen Einstellungen im Kontrollfeld für das Stifttablett anpassen. Nach dem Wechseln zu einem anderen Benutzer werden die Einstellungen für diesen Benutzer automatisch geladen.Wenn auf einem Computer mehrere Wacom Tabletts installiert sind, gelten die im Kontrollfeld Stifttablett-Eigenschaften vorgenommenen Änderungen nur für das Tablett, das vor dem Öffnen des Kontrollfeldes zuletzt verwendet wurde.
DTF720_Manual.fm Page 19 Monday, December 22, 2008 12:29 PM
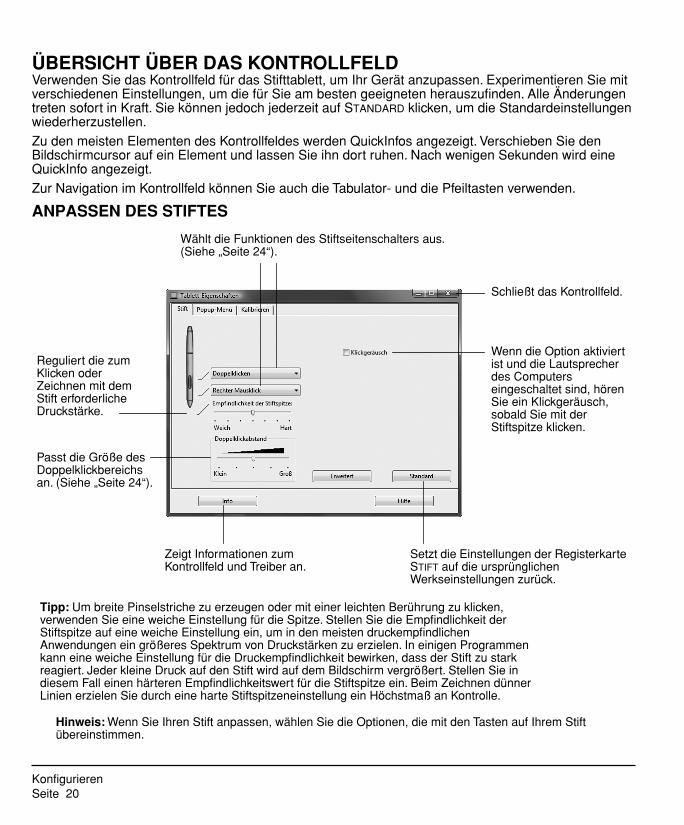
KonfigurierenSeite 20
ÜBERSICHT ÜBER DAS KONTROLLFELDVerwenden Sie das Kontrollfeld für das Stifttablett, um Ihr Gerät anzupassen. Experimentieren Sie mit verschiedenen Einstellungen, um die für Sie am besten geeigneten herauszufinden. Alle Änderungen treten sofort in Kraft. Sie können jedoch jederzeit auf STANDARD klicken, um die Standardeinstellungen wiederherzustellen.
Zu den meisten Elementen des Kontrollfeldes werden QuickInfos angezeigt. Verschieben Sie den Bildschirmcursor auf ein Element und lassen Sie ihn dort ruhen. Nach wenigen Sekunden wird eine QuickInfo angezeigt.
Zur Navigation im Kontrollfeld können Sie auch die Tabulator- und die Pfeiltasten verwenden.
ANPASSEN DES STIFTES
Hinweis: Wenn Sie Ihren Stift anpassen, wählen Sie die Optionen, die mit den Tasten auf Ihrem Stift übereinstimmen.
Setzt die Einstellungen der Registerkarte STIFT auf die ursprünglichen Werkseinstellungen zurück.
Schließt das Kontrollfeld.
Reguliert die zum Klicken oder Zeichnen mit dem Stift erforderliche Druckstärke.
Passt die Größe des Doppelklickbereichs an. (Siehe „Seite 24“).
Wählt die Funktionen des Stiftseitenschalters aus. (Siehe „Seite 24“).
Wenn die Option aktiviert ist und die Lautsprecher des Computers eingeschaltet sind, hören Sie ein Klickgeräusch, sobald Sie mit der Stiftspitze klicken.
Zeigt Informationen zum Kontrollfeld und Treiber an.
Tipp: Um breite Pinselstriche zu erzeugen oder mit einer leichten Berührung zu klicken, verwenden Sie eine weiche Einstellung für die Spitze. Stellen Sie die Empfindlichkeit der Stiftspitze auf eine weiche Einstellung ein, um in den meisten druckempfindlichen Anwendungen ein größeres Spektrum von Druckstärken zu erzielen. In einigen Programmen kann eine weiche Einstellung für die Druckempfindlichkeit bewirken, dass der Stift zu stark reagiert. Jeder kleine Druck auf den Stift wird auf dem Bildschirm vergrößert. Stellen Sie in diesem Fall einen härteren Empfindlichkeitswert für die Stiftspitze ein. Beim Zeichnen dünner Linien erzielen Sie durch eine harte Stiftspitzeneinstellung ein Höchstmaß an Kontrolle.
DTF720_Manual.fm Page 20 Monday, December 22, 2008 12:29 PM

Konfigurieren Seite 21
Sie können die Einstellungen für SEITENSCHALTERMODUS ändern und so das Verhalten des Stiftes bei Rechtsklicks oder anderen Klickfunktionen anpassen. Klicken Sie auf die Schaltfläche ERWEITERT. Gehen Sie im daraufhin angezeigten Dialogfeld wie folgt vor:• Wählen Sie SCHWEBEKLICK, wenn Klick-
Funktionen ausgeführt werden sollen, ohne dass die Stiftspitze die Tablettoberfläche berührt.
• Wenn Sie KLICKEN & TIPPEN gewählt haben, müssen Sie zunächst die Stifttaste drücken und dann mit der Stiftspitze die Tablettoberfläche berühren, um eine Klick-Funktion auszuführen. KLICKEN & TIPPEN ermöglicht die exakte Platzierung der Klick-Funktionen.
DTF720_Manual.fm Page 21 Monday, December 22, 2008 12:29 PM

KonfigurierenSeite 22
KALIBRIEREN DES DTF-720Sie müssen das Pen Display Tablet kalibrieren, um die Bildschirmposition des Cursors mit der Position des Stiftes auf dem Bildschirm abzustimmen. Dies ist notwendig, um die durch die Glasauflage des Bildschirms verursachte Brechung auszugleichen. Stellen Sie das DTF-720 in Arbeitsposition auf, und gehen Sie wie unten erläutert vor.
Wichtig: Stellen Sie sicher, dass das Display vor dem Kalibrieren des Tabletts korrekt eingestellt ist. Siehe Pitch- und Phase-Einstellungen auf Seite 31 und Einstellen des Displays ab Seite 28.
• Wählen Sie im Kontrollfeld des Stifttabletts die Registerkarte KALIBRIEREN.
• Wenn Sie mit mehreren Bildschirmen arbeiten, wählen Sie unter MONITOR die für das DTF-720-Display zutreffenden Optionen aus. (Nur Bildschirme, die mit einer vom DTF-720 unterstützten Auflösung arbeiten, werden in der Liste angezeigt.)
• Klicken Sie auf die Schaltfläche KALIBRIEREN, um das Kalibrierungsfenster aufzurufen.
• Halten Sie den Stift und Ihren Kopf wie gewohnt. Klicken Sie mit der Stiftspitze auf die Mitte des Fadenkreuzes in der linken oberen Ecke.
• Klicken Sie danach auf die Mitte des Fadenkreuzes in der rechten unteren Ecke.
• Testen Sie die Ausrichtung, indem Sie den Stift auf verschiedene Punkte des Displays setzen. Klicken Sie auf OK, um die Kalibrierung anzunehmen. Klicken Sie auf ERNEUT VERSUCHEN, um erneut zu kalibrieren.Detaillierte Anweisungen und Hinweise auf zusätzliche Optionen erhalten Sie im Kalibrierungsfenster. Die Kalibrierungs-einstellungen beziehen sich auf alle Anwendungen.
Fadenkreuz
Testbild für Phase und Pitch (nur VGA) Weitere Informationen finden Sie unter Pitch- und Phase-Einstellungen auf Seite 31.
Hinweise: Wenn Sie den Cursor lieber im Verhältnis zur Stiftspitze leicht versetzt verwenden möchten, klicken Sie auf einen Punkt, der den gewünschten Abstand zum Fadenkreuz darstellt. Wenn Sie z. B. den Bildschirmcursor 2,5 mm über und links von der Stiftspitze verwenden möchten, klicken Sie auf einen Punkt 2,5 mm unter und rechts neben der Stiftspitze.Zum Kalibrieren von zwei Pen Display berühren Sie mit dem Stift zuerst Pen Display Nr. 1, und öffnen Sie das Kontrollfeld, ohne Pen Display Nr. 2 mit dem Stift zu berühren. Wählen Sie im Kontrollfeld den richtigen Bildschirm aus, und kalibrieren Sie Pen Display Nr. 1. Schließen Sie das Kontrollfeld, berühren Sie Pen Display Nr. 2 mit dem Stift, und öffnen Sie das Kontrollfeld erneut, ohne Pen Display Nr. 1 mit dem Stift zu berühren. Wählen Sie den richtigen Bildschirm aus, und kalibrieren Sie Pen Display Nr. 2.
DTF720_Manual.fm Page 22 Monday, December 22, 2008 12:29 PM
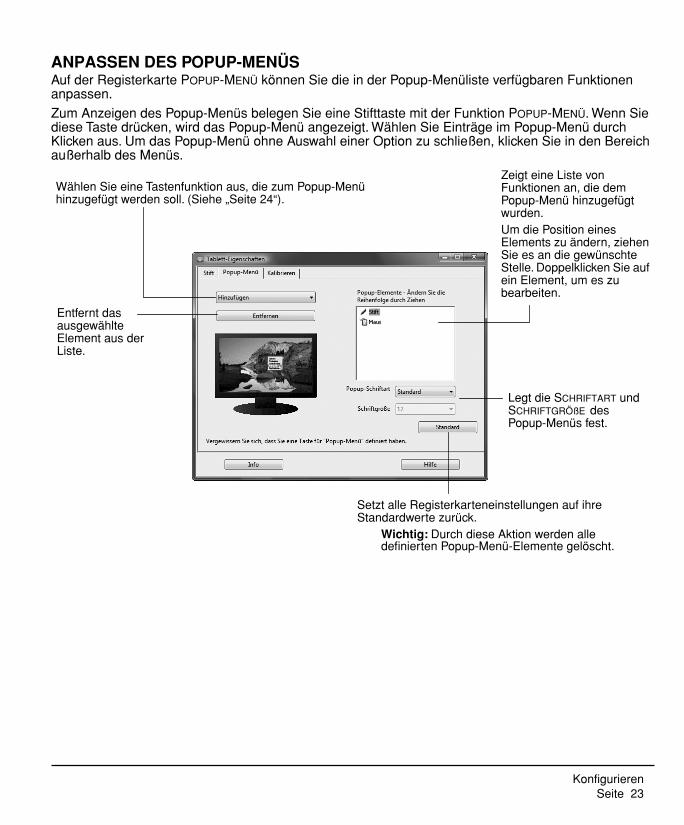
Konfigurieren Seite 23
ANPASSEN DES POPUP-MENÜSAuf der Registerkarte POPUP-MENÜ können Sie die in der Popup-Menüliste verfügbaren Funktionen anpassen.
Zum Anzeigen des Popup-Menüs belegen Sie eine Stifttaste mit der Funktion POPUP-MENÜ. Wenn Sie diese Taste drücken, wird das Popup-Menü angezeigt. Wählen Sie Einträge im Popup-Menü durch Klicken aus. Um das Popup-Menü ohne Auswahl einer Option zu schließen, klicken Sie in den Bereich außerhalb des Menüs.
Zeigt eine Liste von Funktionen an, die dem Popup-Menü hinzugefügt wurden. Um die Position eines Elements zu ändern, ziehen Sie es an die gewünschte Stelle. Doppelklicken Sie auf ein Element, um es zu bearbeiten.
Wählen Sie eine Tastenfunktion aus, die zum Popup-Menü hinzugefügt werden soll. (Siehe „Seite 24“).
Entfernt das ausgewählte Element aus der Liste.
Legt die SCHRIFTART und SCHRIFTGRÖßE des Popup-Menüs fest.
Setzt alle Registerkarteneinstellungen auf ihre Standardwerte zurück.
Wichtig: Durch diese Aktion werden alle definierten Popup-Menü-Elemente gelöscht.
DTF720_Manual.fm Page 23 Monday, December 22, 2008 12:29 PM

KonfigurierenSeite 24
DETAILS DES KONTROLLFELDESANPASSEN DES DOPPELKLICKSEs gibt zwei Möglichkeiten, das Doppelklicken mit der Stiftspitze zu vereinfachen: Erweitern Sie entweder den Bereich, innerhalb dessen ein Doppelklick erkannt wird (d. h. den Doppelklickabstand), oder stellen Sie den Seitenschalter so ein, dass er automatisch einen Doppelklick auslöst, sobald er betätigt wird. Ein großer Doppelklickabstand kann den Beginn von Pinselstrichen in einigen Grafikanwendungen verzögern. Stellen Sie in diesem Fall einen kleineren Doppelklickabstand ein, und verwenden Sie die Seitentaste zum Doppelklicken.
Tipp: Zum Doppelklicken drücken Sie den oberen Stiftschalter. Das Drücken einer Stifttaste ist einfacher, als zweimal mit der Stiftspitze zu tippen.
ANPASSEN DER FUNKTIONSBELEGUNG DES SEITENSCHALTERSSie können den DuoSwitch am Stift auf die Simulation verschiedener Funktionen einstellen. Wählen Sie im Pulldown-Menü einfach eine Option für den oberen bzw. unteren Seitenschalter aus. Die Änderung wird sofort wirksam. Wenn Sie die Stiftspitze 5 mm oder näher über die Oberfläche des Pen Display Tablet halten, ohne das Tablett zu berühren, und den Seitenschalter drücken, wird die ausgewählte Funktion ausgeführt. In der folgenden Liste sind die verfügbaren Optionen aufgeführt.
KLICKEN. Standardeinstellung für die Spitze des Stifts. Simuliert einen Klick mit der primären Maustaste.
DOPPELKLICKEN. Standardeinstellung für die obere Position der Seitentaste. Simuliert einen Doppelklick. Verwenden Sie diese Funktion, statt zwei Mal mit der Stiftspitze zu tippen, um das Doppelklicken zu erleichtern.
MITTLERER MAUSKLICK. Diese Option simuliert einen mittleren Mausklick.
RECHTER MAUSKLICK. Standardeinstellung für die untere Position der Seitentaste. Simuliert das Klicken mit der rechten Maustaste, das zur Anzeige eines Kontextmenüs führt.
DAUERKLICK. Simuliert das Gedrückthalten der primären Maustaste. Drücken Sie die Seitentaste ein Mal, um einen Dauerklick auszulösen. Drücken Sie die Taste erneut, um den Dauerklick abzustellen. Der Dauerklick ist für das Ziehen von Objekten oder Markieren von Textabschnitten nützlich.
4. KLICKEN (ZURÜCK). Simuliert das Klicken mit der vierten Maustaste. Bei Windows-Systemen wird damit normalerweise der Webbrowser-Befehl ZURÜCK ausgelöst.
5. KLICKEN (WEITER).Simuliert das Klicken mit der fünften Maustaste. Bei Windows-Systemen wird damit normalerweise der Webbrowser-Befehl WEITER ausgelöst.
DTF720_Manual.fm Page 24 Monday, December 22, 2008 12:29 PM

Konfigurieren Seite 25
VERSCHIEBEN/BILDLAUF. Ermöglicht das Verschieben des jeweiligen Dokuments oder Bildes in jeder beliebigen Richtung innerhalb des aktiven Fensterbereichs durch Drücken des mit VERSCHIEBEN/BILDLAUF konfigurierten Stiftschalters und anschließendem Bewegen der Stiftspitze über den DTF-720-Bildschirm.
TABLET PC-EINGABEBEREICH. (Tablet PCs und Windows Vista-Systeme, die den Tablet PC-Eingabebereich unterstützen) Öffnet den Tablet PC-Eingabebereich, wenn Sie die mit dieser Funktion konfigurierte Stifttaste drücken.
WINDOWS-JOURNAL. (Tablet PC- und Windows Vista-Systeme mit Microsoft Journal) Öffnet das Microsoft Journal.
POPUP-MENÜ. Zeigt ein Popup-Menü auf Ihrem Bildschirm an. Nähere Informationen erhalten Sie unter Anpassen des Popup-Menüs auf Seite 23.
RADIEREN. Bei gedrückter Taste verhält sich die Stiftspitze in Anwendungen, die die RADIERFUNKTION unterstützen, wie ein Radierer.
TINTE EIN/AUS. (Macintosh.) Schaltet die Funktion INK ANYWHERE von Inkwell ein und aus. Inkwell erkennt Ihre Handschrift automatisch, wandelt sie in Text um und fügt sie in das Dokument ein. Beachten Sie, dass die Tintenfunktion eingeschaltet sein muss, damit diese Funktion ausgeführt werden kann. Informationen über die Arbeit mit Inkwell finden Sie in der Macintosh-Hilfe.
MODUSWECHSEL... Schaltet zwischen der Stiftnachführung (Stiftmodus) und dem Mausmodus um. Der gewählte Nachführungsmodus bestimmt das Verhältnis zwischen Stiftbewegung und Cursorbewegung.
Wenn Sie VERSCHIEBEN/BILDLAUF wählen, werden Sie aufgefordert, für Anwendungen, die das Schwenken mit der Greifhand (auf Pixelebene) innerhalb eines Dokuments oder Bildes unterstützen, eine Bildlaufgeschwindigkeit festzulegen.Eine langsame Einstellung vermindert den Bildlauf und eignet sich besonders für Detailarbeiten, bei denen Sie ein größeres Maß an Kontrolle benötigen, um genau arbeiten zu können.
Das Dialogfeld Details Mausmodus wird angezeigt, wenn Sie zum ersten Mal eine Werkzeugtaste auf MODUSWECHSEL... einstellen.• Bei korrekt kalibriertem Pen Display Tablet im
Stiftmodus sollte der Bildschirmcursor immer der Stiftspitze auf dem Bildschirm folgen. Dies ist die Standardeinstellung.
• Im Mausmodus ist der Bildschirmcursor nicht direkt mit der Stiftspitze verbunden und wird wie eine Maus positioniert, d. h. das Werkzeug muss aufgenommen und gezogen werden, um den Bildschirmcursor zu bewegen. Bei Systemen mit mehreren Displays kann im Mausmodus über den Stift auf die anderen Displays zugegriffen werden.
DTF720_Manual.fm Page 25 Monday, December 22, 2008 12:29 PM

KonfigurierenSeite 26
ZUSATZTASTE.... Ermöglicht die Zuweisung von Zusatztasten (wie UMSCHALTTASTE, ALT oder STRG bei Windows-Systemen oder UMSCHALTTASTE, WAHLTASTE, BEFEHLSTASTE und CTRL bei Macintosh-Systemen). In vielen Anwendungen wird mithilfe der Zusatztasten die Größe und die Platzierung von Objekten beschränkt.
TASTENANSCHLAG.... Ermöglicht die Simulation von Tastenanschlägen. Bei Auswahl dieser Option wird das Dialogfeld TASTENANSCHLAG DEFINIEREN angezeigt, in dem Sie einen Tastenanschlag oder eine Tastenkombination eingeben können, der bzw. die durch die Taste ausgelöst werden soll.
Zusätzlich zu einer oder mehreren Zusatztastenoptionen können Sie das Feld KLICKEN markieren, falls jedes Drücken der Werkzeugtaste einem Mausklick entsprechen soll.
Im Eingabefeld TASTEN können Sie einen Tastenanschlag oder eine Tastenkombination manuell eingeben. Tastenkombinationen können aus Buchstaben, Zahlen oder Funktionstasten (z. B. F3) und Zusatztasten (z. B. UMSCHALTTASTE, ALT-TASTE oder STRG-TASTE bei Windows-Systemen bzw. UMSCHALTTASTE, WAHLTASTE, BEFEHLSTASTE und CTRL-TASTE bei Macintosh-Systemen) bestehen.Sie können im Dropdown-Menü SPEZIELL HINZUFÜGEN auch spezielle Tastenanschläge oder Tastenkombinationen auswählen.Klicken Sie nach dem Definieren einer Tastenkombination auf OK.
Wichtig: Da die EINGABETASTE als definierter Tastenanschlag ausgewählt werden kann, lässt sie sich nicht zum Auswählen von OK verwenden. Zum Klicken auf die Schaltfläche OK müssen Sie Ihren Stift verwenden.
Geben Sie einen Namen für die Tastenanschlagdefinition ein, wenn Sie dazu aufgefordert werden. Der Name wird mit dem entsprechenden Steuerelement bzw. in der Popup-Menüliste angezeigt.
Löscht die Informationen im Eingabefeld für Tastenanschläge.
Löscht nur den letzten Eintrag im Eingabefeld für Tastenanschläge.
DTF720_Manual.fm Page 26 Monday, December 22, 2008 12:29 PM

Konfigurieren Seite 27
ÖFFNEN/AUSFÜHREN.... Öffnet ein Dialogfeld, in dem Sie eine bestimmte Anwendung, eine Datei oder ein Skript auswählen können, die bzw. das gestartet werden soll.
DRUCKFESTHALTEFUNKTION. Hält den Druck so lange auf der aktuellen Druckstufe, bis der Seitenschalter losgelassen wird. Sie können beispielsweise druckempfindlich zeichnen, bis Sie die gewünschte Pinselbreite erreicht haben. Anschließend können Sie die Taste drücken und mit dem Zeichnen in derselben Pinselbreite so lange fortfahren, bis Sie die Taste loslassen.
EXPOSÉ. (Macintosh) Zeigt alle offenen Fenster als Kacheln an.
DEAKTIVIERT. Deaktiviert die Tastenfunktion.
STANDARD. Stellt die Standardeinstellung für die jeweilige Taste wieder her.
Klicken Sie auf DURCHSUCHEN, um die Anwendung, die Datei oder das Skript zu suchen, die bzw. das gestartet werden soll. Ihre Auswahl wird im Feld AUSZUFÜHRENDE ANWENDUNG angezeigt.Klicken Sie auf OK, um die Auswahl zu bestätigen. Das Dialogfeld wird geschlossen, und der Taste wird die Option ÖFFNEN/AUSFÜHREN zugeordnet. Wenn Ihre Auswahl für das Popup-Menü gilt, wird sie in der Popup-Menüliste angezeigt.
DTF720_Manual.fm Page 27 Monday, December 22, 2008 12:29 PM

KonfigurierenSeite 28
EINSTELLEN DES DISPLAYSSTANDARDEINSTELLUNGEN, AUTO-SYNC UND BENUTZEREINSTELLUNGENWerkseitige Einstellungen: Um eine optimale Anzeigequalität zu erzielen, stellen Sie für die Grafikkarte die native Auflösung des DTF-720 von 1280 x 1024 Pixel ein. Informationen zu Eingangssignalspezifikationen finden Sie auf Seite 50.
Auto-Sync: Das DTF-720 synchronisiert sich automatisch mit dem eingehenden Signal. Die Auto-Sync-Funktion ist aktiv, wenn die Horizontalfrequenz zwischen 30 und 80 kHz und die Vertikalfrequenz zwischen 50 und 75 Hz liegt. Wenn das DTF-720 sich nicht automatisch mit dem eingehenden Signal synchronisiert, können Sie mit der OSD (On Screen Display)-Menüoption ZURÜCKSETZEN - AUTOMATISCH ANPASSEN die Synchronisierung der Anzeige vornehmen. Mit den Steuerelementen des OSD-Menüs können Sie weitere Einstellungen manuell anpassen.
Benutzereinstellungen: Wenn Sie die Anzeige manuell über die OSD-Funktion einstellen, werden die Einstellungen im DTF-720 gespeichert und beim nächsten ähnlichen eingehenden Signal verwendet. Dies gilt für alle Display-Modi.
ON SCREEN DISPLAY (OSD)-EINSTELLUNGENMit der OSD-Funktion können Sie zahlreiche Einstellungen für die Anzeige durch einfaches Drücken eines Schalters anpassen und verbessern. Die OSD-Bedienelemente befinden sind oben links am Gerät.
Grundprinzip beim Arbeiten mit dem OSD-Menü:
• Drücken Sie auf die MENÜTASTE, um das OSD-Hauptfenster zu öffnen.
• Verwenden Sie die Tasten + oder –, um eine Option auszuwählen. Wenn die Option, deren Einstellung Sie ändern möchten, markiert ist, drücken Sie die EINGABEtaste. Die aktuellen Einstellungen sowie ein Untermenü für diese Option werden angezeigt.
• Verwenden Sie die Tasten + oder –, um die Einstellungen anzupassen.
• Drücken Sie zum Übernehmen Ihrer Änderungen die EINGABETASTE. Drücken Sie zum Beenden die MENÜTASTE.
Hinweis: Wenn das OSD-Menü geschlossen wird, werden alle Einstellungen automatisch gespeichert. Wenn Sie Änderungen an der Darstellung der Anzeige vorgenommen haben und nicht mehr zu den ursprünglichen Einstellungen zurückkehren können, können Sie mit der Option ZURÜCKSETZEN - WIEDERHERSTELLEN die ursprünglichen Standardeinstellungen von DTF-720 wiederherstellen.
Menütaste Öffnet oder schließt das OSD-Menü.
AuswahltastenMit diesen Tasten wählen Sie eine Option, die durch Drücken der EINGABETASTE aktiviert wird. Nach Auswahl einer Option kann mit der Taste + der Wert für das ausgewählte Element erhöht und mit der Taste – verringert werden.
EINGABEtasteAktiviert oder deaktiviert die im OSD-Menü ausgewählte Option.
+ –
DTF720_Manual.fm Page 28 Monday, December 22, 2008 12:29 PM
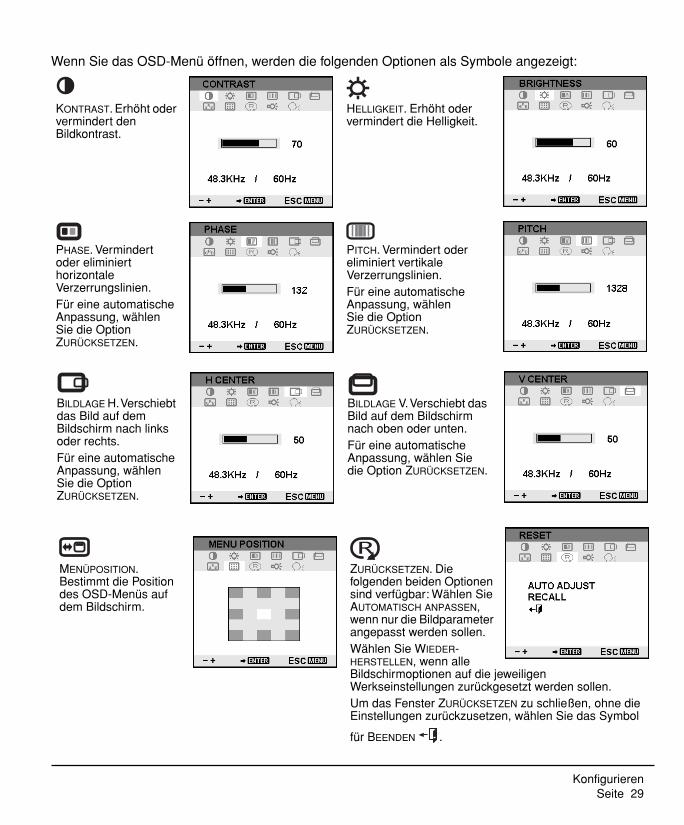
Konfigurieren Seite 29
Wenn Sie das OSD-Menü öffnen, werden die folgenden Optionen als Symbole angezeigt:
KONTRAST. Erhöht oder vermindert den Bildkontrast.
HELLIGKEIT. Erhöht oder vermindert die Helligkeit.
PHASE. Vermindert oder eliminiert horizontale Verzerrungslinien. Für eine automatische Anpassung, wählen Sie die Option ZURÜCKSETZEN.
PITCH. Vermindert oder eliminiert vertikale Verzerrungslinien.Für eine automatische Anpassung, wählen Sie die Option ZURÜCKSETZEN.
ZURÜCKSETZEN. Die folgenden beiden Optionen sind verfügbar: Wählen Sie AUTOMATISCH ANPASSEN, wenn nur die Bildparameter angepasst werden sollen.Wählen Sie WIEDER-HERSTELLEN, wenn alle Bildschirmoptionen auf die jeweiligen Werkseinstellungen zurückgesetzt werden sollen.Um das Fenster ZURÜCKSETZEN zu schließen, ohne die Einstellungen zurückzusetzen, wählen Sie das Symbol
für BEENDEN .
BILDLAGE V. Verschiebt das Bild auf dem Bildschirm nach oben oder unten.Für eine automatische Anpassung, wählen Sie die Option ZURÜCKSETZEN.
BILDLAGE H. Verschiebt das Bild auf dem Bildschirm nach links oder rechts.Für eine automatische Anpassung, wählen Sie die Option ZURÜCKSETZEN.
MENÜPOSITION. Bestimmt die Position des OSD-Menüs auf dem Bildschirm.
DTF720_Manual.fm Page 29 Monday, December 22, 2008 12:29 PM

KonfigurierenSeite 30
HINTERGRUNDLICHT. Erhöht oder vermindert die Helligkeit des Hintergrunds.
FARBE. Bietet Farbtemperatureinstellungen für 9300˚, 6500˚ und 5000˚ Kelvin.DIRECT zeigt das empfangene Signal unverändert ohne weitere Einstellungen an. Bei der Auswahl von DIRECT wird für die Menüpunkte für HELLIGKEIT und KONTRAST ebenfalls die Einstellung DIRECT gewählt, und es sind keine manuellen Anpassungen mehr möglich.Mit der Option BENUTZER können die Farben Rot, Blau und Grün separat eingestellt werden.Wählen Sie eine Einstellung aus, und drücken Sie die EINGABETASTE, damit die Auswahl aktiviert wird.Um die Einstellung für BENUTZER zu verändern, wählen Sie das Symbol für EINGABE.
Ändern Sie im Fenster für die Benutzeranpassungen die Einstellungen für Rot, Grün oder Blau.Um das Fenster zu verlassen, wählen Sie das
Symbol für BEENDEN .
SPRACHE. Ermöglicht die Auswahl der OSD-Sprache.
DTF720_Manual.fm Page 30 Monday, December 22, 2008 12:29 PM

Konfigurieren Seite 31
PITCH- UND PHASE-EINSTELLUNGENBei manchen Computern und Grafikkarten wird die Auto-Sync-Funktion möglicherweise nicht korrekt ausgeführt, wenn das DTF-720 zum ersten Mal angeschlossen wird. Wenn Bereiche des Texts verschwommen sind, passen Sie die Einstellungen für den horizontalen und vertikalen Punktabstand (Pitch und Phase) folgendermaßen an. Um gestochen scharfe Bilder zu erhalten, stellen Sie die Auflösung für die Grafikkarte auf 1280 x 1024 ein.
• Wählen Sie im Kontrollfeld des Stifttabletts die Registerkarte KALIBRIEREN.
• Wenn Sie mit mehreren Displays arbeiten, muss im Menü MONITOR das dem DTF-720 entsprechende Display ausgewählt sein.
• Klicken Sie auf die Schaltfläche KALIBRIEREN, um das Kalibrierungsfenster aufzurufen.
• Öffnen Sie mit Hilfe der Bedienelemente das OSD-Menü, und wählen Sie das Symbol für PITCH. Passen Sie den horizontalen Punktabstand an, so dass das Muster der feinen vertikalen Streifen gleichmäßig angezeigt wird. (Nähere Informationen zum Ändern der OSD-Einstellungen finden Sie unter On Screen Display (OSD)-Einstellungen auf Seite 28.)
• Wählen Sie im OSD-Menü das Symbol für PHASE aus. Stellen Sie den Phasenwert so ein, dass das Testmuster klar angezeigt wird.
• Wenn Sie die Einstellungen angepasst haben, drücken Sie die EINGABETASTE und anschließend die MENÜTASTE, um das OSD-Menü zu verlassen.Klicken Sie auf die Schaltfläche ABBRECHEN, oder drücken Sie die ESC-Taste, um das Fenster für die Bildschirmkalibrierung zu schließen.
Testbild für Phase und Pitch (nur VGA)
DTF720_Manual.fm Page 31 Monday, December 22, 2008 12:29 PM

KonfigurierenSeite 32
ENERGIESPARMAßNAHMENDas DTF-720 entspricht den Richtlinien zur Einsparung von Energie nach VESA.
Bei Verwendung des DTF-720 in Kombination mit einem Computer, der Display Power Management Signaling (DPMS) unterstützt, bzw. einer entsprechenden Grafikkarte, entspricht der Bildschirm folgenden Energiesparparametern. Sind diese Energiesparfunktionen in Kraft, ist der Bildschirm dunkler als gewöhnlich.
* Je nach den spezifischen Einstellungen Ihres Computers und der Grafikkarte kann die Betriebsanzeige auch nur im Standby- und Suspend-Modus orange leuchten.
Computermodus H-Sync V-Sync Video Leistungsverbrauch LED-Betriebsanzeige
EIN Ja Ja Aktiv max. 37 W Blau
Standby-Modus Nein Ja Leer max. 2 W Blau/Orange*
Suspend-Modus Ja Nein Leer max. 2 W Blau/Orange*
AUS Nein Nein Leer max. 1 W Orange
DTF720_Manual.fm Page 32 Monday, December 22, 2008 12:29 PM

Fehlerbehebung Seite 33
FEHLERBEHEBUNGIn der Regel arbeitet Ihr Pen Display Tablet einwandfrei. Sollten trotzdem einmal Probleme auftreten, empfiehlt Ihnen Wacom folgende Maßnahmen:
1. Falls der Wacom Tabletttreiber nicht ordnungsgemäß geladen wurde, befolgen Sie zunächst die Anweisungen in den Fehlermeldungen auf dem Bildschirm. Wenn sich das Problem auf diesem Weg nicht lösen lässt, lesen Sie die Anleitungen zur Fehlerbehebung in diesem Kapitel.
2. Wenn das DTF-720 nicht richtig funktioniert, schlagen Sie im folgenden Abschnitt für die Fehlerbehebung nach. Siehe auch Fehlerbehebung für das Display auf Seite 35, oder lesen Sie unter Fehlerbehebung für das Stifttablett auf Seite 37 nach. Vielleicht wird Ihr Problem dort beschrieben, und Sie können es mit dem erwähnten Lösungsvorschlag beheben.
3. Öffnen Sie die Liesmich-Datei für das Pen Display, in der Sie die aktuellsten Informationen finden.
4. Informationen zum Herunterladen eines aktualisierten Softwaretreibers bei Kompatibilitätskonflikten zwischen dem DTF-720 und einem neuen Hardware- oder Softwareprodukt finden Sie unter Abrufen von Treiber-Downloads auf Seite 43. Wacom aktualisiert die Softwaretreiber regelmäßig, um die Kompatibilität mit neuen Produkten zu gewährleisten.
5. Lesen Sie die FAQ-Seite (häufig gestellte Fragen) auf der Wacom Website für Ihre Region.
6. Wenn Sie anhand der Vorschläge in diesem Handbuch das Problem nicht lösen können, nehmen Sie Kontakt zum technischen Kundendienst von Wacom auf. Informationen darüber, wo Sie Unterstützung für Ihre Region erhalten, finden Sie in der Liesmich-Datei.
TESTEN DES DTF-7201. Prüfen Sie Folgendes nach, wenn die LED-Betriebsanzeige des DTF-720 nicht leuchtet:
• Überprüfen Sie zunächst, ob das grüne Licht am Netzadapter aufleuchtet. Ist dies nicht der Fall, überprüfen Sie, ob das Netzkabel ordnungsgemäß mit dem Netzadapter und einer Strom führenden Netzsteckdose verbunden ist.
• Überprüfen Sie, ob das Netzgerätkabel fest am DTF-720 angeschlossen und der Netzschalter des DTF-720 eingeschaltet ist. Die LED-Betriebsanzeige des DTF-720 leuchtet orange oder blau, sobald das DTF-720 eingeschaltet ist.
Wichtig: Verwenden Sie nur den Netzadapter, der mit dem Pen Display geliefert wurde. Bei Verwendung anderer Netzteile könnte Ihr Produkt beschädigt werden.
2. Falls keine Anzeige erfolgt:
• Vergewissern Sie sich, dass der Computer eingeschaltet ist. Die LED-Betriebsanzeige leuchtet blau, wenn ein ordnungsgemäßes Grafiksignal empfangen wird, und orange, wenn kein Grafiksignal vorhanden ist oder der Computer sich in einem Energiesparmodus befindet.
• Überprüfen Sie, ob das DTF-720 mit einem aktiven VGA-Anschluss verbunden ist.
• Überprüfen Sie, ob die Grafikkarte ordnungsgemäß installiert ist und funktioniert. Wenn Sie über ein weiteres Anzeigegerät verfügen, das mit der Grafikkarte kompatibel ist, können Sie dieses Gerät an die Karte anschließen und prüfen, ob die Grafikkarte korrekt funktioniert.
DTF720_Manual.fm Page 33 Monday, December 22, 2008 12:29 PM

FehlerbehebungSeite 34
3. Überprüfen Sie, ob das Tablett und der Stift funktionieren:
• Drücken Sie die Spitze des Stiftes auf das Display, und kontrollieren Sie, ob die LED-Statusanzeige blau leuchtet.
• Wenn die LED-Anzeige nicht leuchtet, überprüfen Sie, ob das USB-Kabel des DTF-720 mit einem aktiven USB-Anschluss verbunden ist. Ist das DTF-720 an einem USB-Hub angeschlossen, versuchen Sie das Problem zu lösen, indem Sie das DTF-720 direkt an einen USB-Anschluss des Computers anschließen.
• Vergewissern Sie sich, dass der USB-Anschluss, den sie verwenden, nicht deaktiviert ist. Möglicherweise müssen Sie in den BIOS-Einstellung des Systems prüfen, ob das DTF-720 an einen aktiven USB-Anschluss angeschlossen wurde.
• Die LED-Statusanzeige leuchtet blau, wenn das DTF-720 als USB-Gerät registriert ist und die Stiftspitze gegen das Display gedrückt wird.
4. Überprüfen Sie den Stift. Wenn Sie mit dem Stift keine Auswahl auf dem Bildschirm vornehmen können:
• Testen Sie den Stift, indem Sie die Stiftspitze auf die Oberfläche des Pen Display Tablet drücken. Die LED-Statusanzeige des Tabletts sollte blau leuchten.
• Halten Sie nun die Stiftspitze, ohne Druck auszuüben, innerhalb eines Bereichs von 5 mm über der Oberfläche des Pen Display Tablets, und drücken Sie den Seitenschalter. Die LED-Statusanzeige an Ihrem Tablett muss wieder blau aufleuchten.
• Wenn die LED-Statusanzeige bei diesen Tests nicht blau leuchtet, stellen Sie sicher, dass Sie mit dem im Lieferumfang des DTF-720 enthaltenen Stift arbeiten.
Falls die Probleme weiterhin bestehen, sind Stift oder Pen Display möglicherweise defekt.
DTF720_Manual.fm Page 34 Monday, December 22, 2008 12:29 PM

Fehlerbehebung Seite 35
FEHLERBEHEBUNG FÜR DAS DISPLAYWenn Probleme mit dem DTF-720-Display auftreten, sehen Sie in den folgenden Tabellen nach. Möglicherweise wird ihr Problem dort beschrieben und kann mit dem angegebenen Lösungsvorschlag behoben werden. Weitere Informationen zu Farbproblemen finden Sie in der Dokumentation zum Betriebssystem bzw. zu den Anwendungen.
ALLGEMEINE DISPLAY-PROBLEME
Keine Anzeige. Die LED-Betriebsanzeige leuchtet nicht auf.
• Stellen Sie sicher, dass das Netzkabel richtig eingesteckt und der Netzschalter am DTF-720 eingeschaltet ist.
Keine Anzeige. Die LED-Betriebsanzeige leuchtet blau.
• Prüfen Sie die Einstellungen für Kontrast, Helligkeit und Hintergrundbeleuchtung. Führen Sie die notwenigen Änderungen durch, oder öffnen Sie das OSD-Menü, wechseln Sie zum Menü ZURÜCKSETZEN, und wählen Sie die Option WIEDERHERSTELLEN.
Die LED-Betriebsanzeige leuchtet orange.Die folgende Meldung wird kurz am Bildschirm angezeigt:
• Der Computer befindet sich möglicherweise in einem Energieverwaltungsmodus. Berühren Sie den Bildschirm mit der Stiftspitze, bewegen Sie die Maus, oder drücken Sie eine Taste auf der Tastatur.
• Stellen Sie sicher, dass die Grafikkarte richtig installiert ist.• Schalten Sie den Computer und das DTF-720 Pen Display Tablet
aus, und prüfen Sie, ob Anschlussstifte am Grafikkabel verbogen oder abgebrochen sind. Schließen Sie danach das Grafikkabel ordnungsgemäß an, und schalten Sie das DTF-720 sowie den Computer ein.
Die folgende Meldung wird kurz am Bildschirm angezeigt:
• Überprüfen Sie, ob der Computer eingeschaltet ist.• Vergewissern Sie sich, dass Sie das mit DTF-720 mitgelieferte
Bildschirmkabel verwenden.• Stellen Sie sicher, dass das Bildschirmkabel des DTF-720 richtig
angeschlossen ist.• Schalten Sie den Computer und das DTF-720 Pen Display Tablett
aus, und prüfen Sie, ob Anschlussstifte am Grafikkabel oder an Videoadaptern verbogen oder abgebrochen sind. Schließen Sie dann das Bildschirmkabel und die entsprechenden Adapter ordnungsgemäß an.
Die folgende Meldung wird kurz am Bildschirm angezeigt:
• Die Eingangssignalfrequenz ist falsch eingestellt oder mit dem DTF-720 nicht kompatibel. Schließen Sie ein anderes Display an, und setzen Sie die Wiederholfrequenz (vertikale Frequenz) auf einen Wert zwischen 50 und 75 Hz. Wenn der Grafikkartentreiber die Anpassung der horizontalen Frequenz unterstützt, stellen Sie diese auf einen Wert zwischen 30 und 80 kHz ein.
• Die Auflösung ist zu hoch eingestellt (max. 1280 x 1024).• Die Wiederholfrequenz ist auf einen zu hohen Wert eingestellt
(maximal 75 Hz).• Stellen Sie die Anzeigeeigenschaften so ein, dass Ihr System
Plug & Play-Bildschirme erkennt.
DTF720_Manual.fm Page 35 Monday, December 22, 2008 12:29 PM

FehlerbehebungSeite 36
VGA-PROBLEME
Das Bild wird mehrfach im Display angezeigt.
• Ziehen Sie nicht am Bildschirmkabel. Verwenden Sie keinen Umschalter für die Eingabeauswahl.
Wenn ein sich nicht bewegendes Bild für eine lange Zeit am Bildschirm angezeigt wird, ohne dass die Anzeige aktualisiert wird, kann für kurze Zeit ein so genanntes Nachbild bleiben.
• Setzen Sie einen Bildschirmschoner oder eine andere Funktion zur Energieverwaltung ein.
Die Farbqualität ist ungenau. • Öffnen Sie das OSD-Menü, wechseln Sie zum Menü ZURÜCKSETZEN, und wählen Sie die Option WIEDERHERSTELLEN.
• Änderungen an der Kontrasteinstellung sollten nur in kleinen Schritten erfolgen, da Kontraständerungen die Farbgenauigkeit beeinflussen können.
Die Farbe Weiß wird nicht weiß angezeigt.
• Überprüfen Sie, ob das Display mit den Standardeinstellungen korrekt arbeitet. Bleibt das Problem weiterhin bestehen, passen Sie die Farben wie erforderlich an. Einzelheiten zur Farbverwaltung finden Sie in der Dokumentation zum Betriebssystem und den Anwendungen.
• Stellen Sie sicher, dass Bildschirmkabel und -stecker richtig angeschlossen sind.
Die Anzeige läuft wellenförmig oder flimmert.
• Öffnen Sie das OSD-Menü, wechseln Sie zum Menü ZURÜCKSETZEN, und wählen Sie die Option AUTOMATISCH ANPASSEN. Passen Sie den horizontalen und vertikalen Punktabstand (Pitch und Phase) gegebenenfalls manuell an.
• Stellen Sie sicher, dass der Display-Adapter bzw. die Grafikkarte den Spezifikationen für das DTF-720 entspricht.
• Passen Sie die Wiederholfrequenz in der Systemsteuerung in den Eigenschaften für die Anzeige an.
Die Anzeige ist unscharf. Text- oder andere Bereiche des Bildschirms sind verschwommen.
• Stellen Sie die Auflösung für die Grafikkarte auf 1280 x 1024 ein.• Schalten Sie das DTF-720 aus und anschließend wieder ein.• Öffnen Sie das OSD-Menü, wechseln Sie zum Menü ZURÜCKSETZEN,
und wählen Sie die Option AUTOMATISCH ANPASSEN. Passen Sie die Helligkeit sowie den horizontalen und vertikalen Punktabstand (Pitch und Phase) gegebenenfalls manuell an.
Das Display und die LCD-Anzeige sind nicht abgeglichen. Die Anzeigegröße ist nicht korrekt.
• Öffnen Sie das OSD-Menü, wechseln Sie zum Menü ZURÜCKSETZEN, und wählen Sie die Option AUTOMATISCH ANPASSEN.
• Passen Sie gegebenenfalls den horizontalen und vertikalen Punktabstand (Pitch und Phase) sowie die horizontale und vertikale Position an. Beachten Sie, dass bei bestimmten Grafikkarten die Anzeige nicht in der richtigen Größe dargestellt wird.
Die Anzeige läuft wellenförmig oder weist ein Moiré-Muster auf. Die Farbe der Anzeige ist nicht gleichmäßig.
• Öffnen Sie das OSD-Menü, wechseln Sie zum Menü ZURÜCKSETZEN, und wählen Sie die Option AUTOMATISCH ANPASSEN. Wenn das Problem dadurch nicht behoben ist, wechseln Sie zum Menü ZURÜCKSETZEN und wählen Sie die Option WIEDERHERSTELLEN, um das Display auf seine werkseitigen Einstellungen zurückzusetzen.
• Passen Sie gegebenenfalls den horizontalen und vertikalen Punktabstand (Pitch und Phase) an.
DTF720_Manual.fm Page 36 Monday, December 22, 2008 12:29 PM
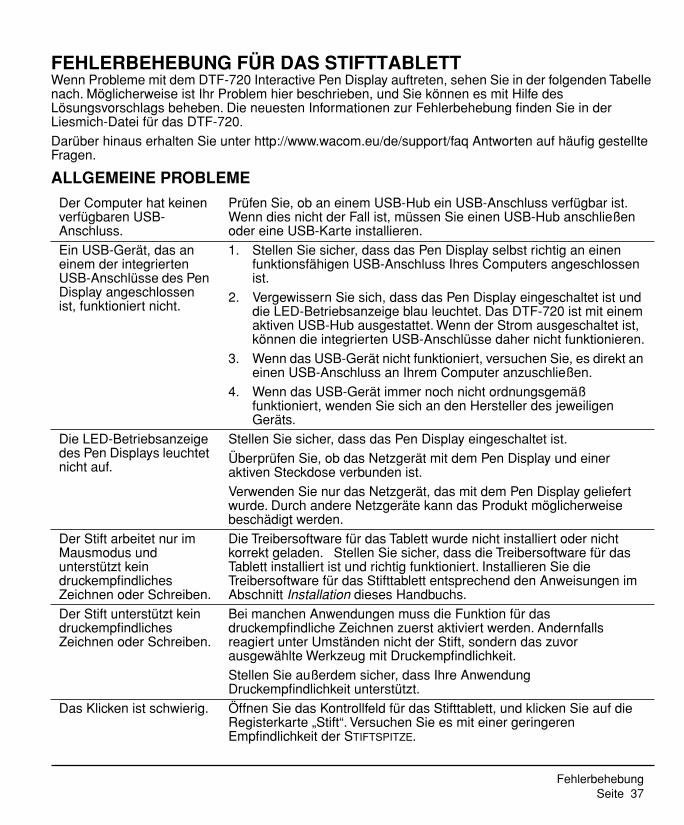
Fehlerbehebung Seite 37
FEHLERBEHEBUNG FÜR DAS STIFTTABLETTWenn Probleme mit dem DTF-720 Interactive Pen Display auftreten, sehen Sie in der folgenden Tabelle nach. Möglicherweise ist Ihr Problem hier beschrieben, und Sie können es mit Hilfe des Lösungsvorschlags beheben. Die neuesten Informationen zur Fehlerbehebung finden Sie in der Liesmich-Datei für das DTF-720.
Darüber hinaus erhalten Sie unter http://www.wacom.eu/de/support/faq Antworten auf häufig gestellte Fragen.
ALLGEMEINE PROBLEME
Der Computer hat keinen verfügbaren USB-Anschluss.
Prüfen Sie, ob an einem USB-Hub ein USB-Anschluss verfügbar ist. Wenn dies nicht der Fall ist, müssen Sie einen USB-Hub anschließen oder eine USB-Karte installieren.
Ein USB-Gerät, das an einem der integrierten USB-Anschlüsse des Pen Display angeschlossen ist, funktioniert nicht.
1. Stellen Sie sicher, dass das Pen Display selbst richtig an einen funktionsfähigen USB-Anschluss Ihres Computers angeschlossen ist.
2. Vergewissern Sie sich, dass das Pen Display eingeschaltet ist und die LED-Betriebsanzeige blau leuchtet. Das DTF-720 ist mit einem aktiven USB-Hub ausgestattet. Wenn der Strom ausgeschaltet ist, können die integrierten USB-Anschlüsse daher nicht funktionieren.
3. Wenn das USB-Gerät nicht funktioniert, versuchen Sie, es direkt an einen USB-Anschluss an Ihrem Computer anzuschließen.
4. Wenn das USB-Gerät immer noch nicht ordnungsgemäß funktioniert, wenden Sie sich an den Hersteller des jeweiligen Geräts.
Die LED-Betriebsanzeige des Pen Displays leuchtet nicht auf.
Stellen Sie sicher, dass das Pen Display eingeschaltet ist.
Überprüfen Sie, ob das Netzgerät mit dem Pen Display und einer aktiven Steckdose verbunden ist.
Verwenden Sie nur das Netzgerät, das mit dem Pen Display geliefert wurde. Durch andere Netzgeräte kann das Produkt möglicherweise beschädigt werden.
Der Stift arbeitet nur im Mausmodus und unterstützt kein druckempfindliches Zeichnen oder Schreiben.
Die Treibersoftware für das Tablett wurde nicht installiert oder nicht korrekt geladen. Stellen Sie sicher, dass die Treibersoftware für das Tablett installiert ist und richtig funktioniert. Installieren Sie die Treibersoftware für das Stifttablett entsprechend den Anweisungen im Abschnitt Installation dieses Handbuchs.
Der Stift unterstützt kein druckempfindliches Zeichnen oder Schreiben.
Bei manchen Anwendungen muss die Funktion für das druckempfindliche Zeichnen zuerst aktiviert werden. Andernfalls reagiert unter Umständen nicht der Stift, sondern das zuvor ausgewählte Werkzeug mit Druckempfindlichkeit.
Stellen Sie außerdem sicher, dass Ihre Anwendung Druckempfindlichkeit unterstützt.
Das Klicken ist schwierig. Öffnen Sie das Kontrollfeld für das Stifttablett, und klicken Sie auf die Registerkarte „Stift“. Versuchen Sie es mit einer geringeren Empfindlichkeit der STIFTSPITZE.
DTF720_Manual.fm Page 37 Monday, December 22, 2008 12:29 PM

FehlerbehebungSeite 38
Der Stift wählt alles aus oder zeichnet unaufhörlich.
Öffnen Sie das Kontrollfeld Stifttablett-Eigenschaften und klicken Sie auf die Registerkarte STIFT. Ziehen Sie den Schieberegler für die STIFTEMPFINDLICHKEIT auf HART. Wenn dies nicht hilft, lesen Sie weiter unter Testen des DTF-720 auf Seite 33.
Probleme beim Doppelklicken.
Sie müssen das Tablett zwei Mal an derselben Stelle auf dem aktiven Bereich des Pen Display Tablets antippen. Wacom empfiehlt, den Seitenschalter zum Doppelklicken zu verwenden.
Öffnen Sie das Kontrollfeld Stifttablett-Eigenschaften und klicken Sie auf die Registerkarte STIFT. Erhöhen Sie den DOPPELKLICKABSTAND, oder verwenden Sie eine geringere EMPFINDLICHKEIT DER STIFTSPITZE.
Windows: Stellen Sie Ihr System so ein, dass Programme mit einem einfachen Klick aufgerufen werden. Siehe Bedienen des Stiftes auf Seite 18.
Beim Beginn von Stiftstrichen bemerken Sie eine Verzögerung.
Öffnen Sie das Kontrollfeld Stifttablett-Eigenschaften und klicken Sie auf die Registerkarte STIFT. Versuchen Sie, einen niedrigeren DOPPELKLICKABSTAND einzustellen.
Beim Klicken, Zeichnen oder Schreiben muss ich den Stift fest aufdrücken.
Öffnen Sie das Kontrollfeld Stifttablett-Eigenschaften und klicken Sie auf die Registerkarte STIFT. Ziehen Sie den Schieberegler für die EMPFINDLICHKEIT DER STIFTSPITZE auf WEICH.
Die Spitze des Stiftes funktioniert nicht.
Stellen Sie sicher, dass Sie mit dem Stift arbeiten, der ursprünglich mit dem Pen Display Tablet geliefert wurde. Andere Stifte können möglicherweise nicht mit dem DTF-720 Pen Display verwendet werden.
Achten Sie darauf, ob die LED-Statusanzeige beim Drücken auf die Stiftspitze blau aufleuchtet. Wenn die LED-Anzeige nicht leuchtet, überprüfen Sie, ob das USB-Kabel mit einem aktiven USB-Anschluss am Computer oder mit einem USB-Hub verbunden ist.
Wenn die LED-Anzeige noch immer nicht leuchtet, ist möglicherweise die Hardware defekt (siehe Fehlerbehebung auf Seite 33).
Die Seitentaste funktioniert nicht.
Stellen Sie sicher, dass Sie mit dem Stift arbeiten, der ursprünglich mit dem Pen Display Tablet geliefert wurde. Andere Stifte können möglicherweise nicht mit dem DTF-720 Pen Display verwendet werden.
Der Seitenschalter muss gedrückt werden, wenn sich die Stiftspitze nicht mehr als 5 mm über dem aktiven Bereich des Pen Display befindet. Drücken Sie dabei nicht gleichzeitig die Stiftspitze auf das Tablett.
Vergewissern Sie sich im Kontrollfeld des Stifttabletts, dass der Seitenschalter mit der gewünschten Funktion belegt ist.
Achten Sie darauf, dass die LED-Statusanzeige beim Drücken des Seitenschalters blau aufleuchtet. Wenn die LED nicht leuchtet, überprüfen Sie, ob das USB-Kabel an einem aktiven USB-Anschluss Ihres Computers oder an einem USB-Hub angeschlossen ist. Ist das USB-Kabel nicht mit einem aktiven Anschluss verbunden, leuchtet auch die LED nicht auf.
Wenn die LED-Anzeige nicht leuchtet, ist möglicherweise die Hardware defekt (siehe Fehlerbehebung auf Seite 33).
DTF720_Manual.fm Page 38 Monday, December 22, 2008 12:29 PM

Fehlerbehebung Seite 39
Die Spitze des Stiftes und der Bildschirmcursor laufen nicht völlig synchron.
Öffnen Sie das Kontrollfeld des Stifttabletts, und wählen Sie die Registerkarte KALIBRIEREN. Fahren Sie mit Kalibrieren des DTF-720 auf Seite 22 fort.
Der Bildschirmcursor bewegt sich, springt jedoch nicht an die Stelle, an der die Stiftspitze den Bildschirm berührt. Außerdem folgt er nicht der Stiftspitze, wenn der Stift über die Anzeige bewegt wird.
Stellen Sie sicher, dass der Wacom-Tablett-Treiber ordnungsgemäß geladen wurde, indem Sie das Kontrollfeld des Stifttabletts öffnen. Wenn der Treiber nicht geladen wurde, wird eine Fehlermeldung angezeigt. Wenn eine Fehlermeldung angezeigt wird, starten Sie den Computer neu. Wenn das Problem weiterhin auftritt, lesen Sie die Anweisung zur Installation, und installieren die Wacom-Tablettsoftware erneut. (Bei einem Macintosh müssen Sie den Computer nach der Installation des Wacom Tablett-Treibers neu starten, damit das Tablett ordnungsgemäß funktioniert.)
Wenn Sie den Seitenschalter am Stift so angepasst haben, dass Sie vom Stiftmodus zum Mausmodus wechseln können, stellen Sie sicher, dass das Pen Display im Stiftmodus arbeitet. Siehe Anpassen der Funktionsbelegung des Seitenschalters ab Seite 24.
Wenn das Pen Display Tablet auf einem System mit mehreren Bildschirmen verwendet wird, können Sie mit dem Stift die anderen Bildschirme nicht bedienen.
Sie können die anderen Bildschirme jedoch mit dem Stift im Mausmodus bedienen. Um in den Mausmodus zu gelangen, stellen Sie zuerst den DuoSwitch auf MODUSWECHSEL.... Wechseln Sie dann mit dem Schalter vom Stiftmodus zum Mausmodus.
Linien werden nicht genau dort gezeichnet, wo sich der Bildschirmcursor befindet.
In einigen Programmen muss der Stift auf Stiftmodus eingestellt sein, um richtig zu funktionieren. Stellen Sie sicher, dass der Stift nicht auf Mausmodus eingestellt ist.
Wenn der Stift auf Stiftmodus eingestellt ist und das Problem dennoch auftritt, ist möglicherweise Ihre Voreinstellungsdatei beschädigt. Gehen Sie vor, wie im nächsten Tipp beschrieben, um eine neue Voreinstellungsdatei zu erstellen.
DTF720_Manual.fm Page 39 Monday, December 22, 2008 12:29 PM

FehlerbehebungSeite 40
Sie vermuten, dass die Stifttablettvoreinstellungen beschädigt sind, oder möchten alle Einstellungen auf die Standardeinstellungen zurücksetzen.
Löschen Sie die Stifttablettvoreinstellungen wie folgt:
Windows: Klicken Sie auf START und wählen Sie ALLE PROGRAMME. Klicken Sie dann auf TABLETT und TABLETT-VOREINSTELLUNGSDATEI-DIENSTPROGRAMM. Klicken Sie im daraufhin eingeblendeten Dialogfeld auf die Schaltfläche MEINE VOREINSTELLUNGSDATEI ENTFERNEN, um die Voreinstellungen für den aktuellen Benutzer zu löschen. Um die Voreinstellungen für mehrere Benutzer auf einer Windows Vista- oder XP-Systemplattform zu löschen, klicken Sie auf die Schaltfläche ALLE VOREINSTELLUNGSDATEIEN ENTFERNEN. Beachten Sie, dass zum Löschen der Voreinstellungen für alle Benutzer Administratorrechte erforderlich sind. Starten Sie alle derzeit geöffneten und u. U. ausgeführten Anwendungen neu, die das Tablett erkennen.
Macintosh: Löschen Sie für einen einzelnen Benutzer die Tablettvoreinstellungen, indem Sie zuerst im Menü GEHE ZU auf PRIVAT klicken. Öffnen Sie den Ordner LIBRARY. Öffnen Sie im Ordner LIBRARY den Ordner PREFERENCES und löschen Sie die Datei COM.WACOM.WACOMTABLET.PREFS. Melden Sie sich ab und dann wieder an. Beim Laden des Tabletttreibers wird eine neue Voreinstellungsdatei mit den Standardeinstellungen erzeugt.
Bei mehreren Benutzern löschen Sie alle Tablettvoreinstellungen, indem Sie den Ordner PROGRAMME öffnen. Öffnen Sie danach den WACOM ORDNER TABLETT und führen Sie das Dienstprogramm WACOM TABLETT ENTFERNEN aus. Wenn das Dienstprogramm gestartet wurde, klicken Sie auf die Schaltfläche ALLE VOREINSTELLUNGEN ENTFERNEN. Der Tabletttreiber wird neu gestartet und es werden neue Voreinstellungsdateien mit den Standardeinstellungen erzeugt.
Kalibrieren Sie das Tablett erneut.Hinweis: Entfernen Sie die Datei WACOM TABLET.PREFPANE aus dem Hauptordner LIBRARY PREFERENCEPANES nicht manuell. Diese Datei darf nur beim Deinstallieren des Softwaretreibers für das Tablett und auch dann nur mit dem Dienstprogramm WACOM TABLETT ENTFERNEN entfernt werden.
Der Computer schaltet nicht in den Ruhezustand um.
Entfernen Sie den Stift von der Oberfläche des Pen Display, wenn er nicht benutzt wird. Andernfalls sendet das Pen Display weiterhin Daten und verhindert den Ruhezustand des Computers.
Der Bildschirmcursor springt bei Verwendung von normaler Maus oder Trackball zurück.
Wenn der Stift nicht in Gebrauch ist, setzen Sie ihn in das Stiftfach, oder legen Sie ihn in der Nähe des Pen Display, aber nicht auf dem Display ab. Wenn Sie einen Stift auf dem Display lassen, kann es bei der Arbeit mit anderen Eingabegeräten zu Reaktionen des Bildschirmcursors kommen.
Der Bildschirmcursor bewegt sich unregelmäßig oder springt willkürlich, wenn ein weiteres Tablett an den Computer angeschlossen wird.
Das Tablett des DTF-720 sendet elektromagnetische Wellen einer bestimmten Frequenz aus. Wenn sich ein anderes Tablett zu nahe am DTF-720 befindet, kann es die Positionierung des Bildschirmcursors stören. Falls dies auftritt, bewegen Sie das Tablett weiter vom DTF-720 weg.
DTF720_Manual.fm Page 40 Monday, December 22, 2008 12:29 PM

Fehlerbehebung Seite 41
WINDOWS-SPEZIFISCHE PROBLEME
MACINTOSH-SPEZIFISCHE PROBLEME
Nach einer Änderung von rechts- und linkshändiger Mausbedienung in der Systemsteuerung des Computers funktioniert die Stiftspitze nicht mehr richtig.
Starten Sie Windows erneut, damit die Werkzeugeinstellungen korrekt erkannt werden.
Beim Start erhalten Sie die Meldung, dass entweder der Treiber nicht geladen werden konnte oder noch keine Voreinstellungen für das Tablett existieren.
Das Pen Display wurde beim Start nicht gefunden. Überprüfen Sie, ob das USB-Schnittstellenkabel sicher mit einem aktiven USB-Anschluss am Computer oder mit einem USB-Hub verbunden ist. Überprüfen Sie, ob die LED-Betriebsanzeige des Pen Display leuchtet. Wenn Ihr Problem damit nicht behoben ist, lesen Sie Fehlerbehebung auf Seite 33.Wählen Sie im Menü GEHE ZU den Ordner DIENSTPROGRAMME, und starten Sie den SYSTEM PROFILER. Wählen Sie in der Liste INHALT unter HARDWARE den Eintrag USB. Daraufhin sollte auf der rechten Seite ein Wacom USB Pen Display aufgeführt sein. Wenn kein Pen Display aufgeführt ist, prüfen Sie die USB-Kabelverbindung des Pen Display, oder schließen Sie es an einen anderen USB-Anschluss an.Falls sich das Problem dadurch nicht beheben lässt, wenden Sie sich an den technischen Kundendienst von Wacom. Siehe Optionen für den technischen Kundendienst auf Seite 42.
Inkwell funktioniert mit dem Pen Display nicht korrekt.
Dieses Problem kann auf beschädigte Inkwell-Voreinstellungsdateien zurückzuführen sein. Entfernen Sie die beschädigten Voreinstellungsdateien. Diese werden beim Aktivieren der Handschrifterkennung neu erstellt. Gehen Sie wie folgt vor:1. Wählen Sie im Apple-Menü die Option SYSTEMEINSTELLUNGEN. Wählen
Sie im Menü SYSTEMEINSTELLUNGEN die Option ALLE EINBLENDEN und dann INK. Schalten Sie die Handschrifterkennung aus.
2. Wählen Sie im Menü GEHE ZU die Option PRIVAT. Öffnen Sie die Ordner LIBRARY und PREFERENCES. Löschen Sie folgende Voreinstellungen:
• com.apple.ink.framework.plist
• com.apple.ink.inkpad.plist
• com.apple.ink.inkpad.sketch
3. Kehren Sie zu SYSTEMEINSTELLUNGEN und INK zurück und aktivieren Sie die Handschrifterkennung.
4. Testen Sie die Inkwell-Funktion mit dem Wacom Pen Display Tablet und Stift.
5. Wenn diese Vorgehensweise das Problem mit Inkwell nicht behebt, wenden Sie sich an den Apple-Kundendienst. Wacom ist nicht der Hersteller der Inkwell-Software. Wir können nur sehr eingeschränkt Unterstützung für Software von Drittanbietern bieten.
DTF720_Manual.fm Page 41 Monday, December 22, 2008 12:29 PM

FehlerbehebungSeite 42
OPTIONEN FÜR DEN TECHNISCHEN KUNDENDIENSTWenn Sie Schwierigkeiten mit dem DTF-720 Interactive Pen Display haben, sehen Sie zunächst im Abschnitt Installation dieses Handbuchs nach, damit Sie sicherstellen können, dass das Gerät richtig installiert ist. Überprüfen Sie anschließend die Verfahren zur Fehlerbehebung.
Wenn Ihnen die Informationen in diesem Handbuch nicht weiter helfen, finden Sie die Lösung zu Ihrem Problem möglicherweise in der entsprechenden Liesmich-Datei für Ihre Plattform (auf der Wacom Stifttablett-Treiber-CD). Außerdem können Sie die Wacom Website für Ihre Region besuchen und dort die FAQ-Informationen zum jeweiligen Produkt lesen.
Benutzer mit einer Internetverbindung können die neuesten Softwaretreiber von der Wacom Website für Ihre Region herunterladen. Siehe Abrufen von Treiber-Downloads auf Seite 43.
Wenn Sie das Problem nicht lösen können und denken, dass Ihr Wacom Produkt nicht richtig funktioniert, wenden Sie sich an die Mitarbeiter des Wacom Kundendiensts für das Land, in dem Sie das Produkt erworben haben. Kontaktinformationen finden Sie in der Liesmich-Datei für das Wacom Tablett. Diese befindet sich auf der Wacom Stifttablett-Treiber-CD.
Wenn Sie uns anrufen, sollten Sie sich an Ihrem Computer befinden und folgende Informationen bzw. Unterlagen griffbereit haben:
• Dieses Handbuch.
• Seriennummer des Pen Display Tablets. (Sehen Sie auf dem Etikett auf der Rückseite des Geräts nach.)
• Nummer der Treiberversion (auf der Wacom-Stifttablett-Treiber-CD oder im Kontrollfeld für das Stifttablett).
• Hersteller und Modell Ihres Computers und Versionsnummer des Betriebssystems.
• Ausführung, Modell und Anschlusstyp Ihrer Grafikkarte.
• Liste der am Computer angeschlossenen Peripheriegeräte.
• Anwendung (einschl. Versionsnummer), bei der das Problem auftrat.
• Den genauen Wortlaut aller auf dem Bildschirm angegebenen Fehlermeldungen.
• Was passiert ist und was Sie gerade getan haben, als das Problem auftrat.
• Wie Sie versucht haben, das Problem zu beheben.
DTF720_Manual.fm Page 42 Monday, December 22, 2008 12:29 PM

Fehlerbehebung Seite 43
ABRUFEN VON TREIBER-DOWNLOADSWacom aktualisiert die Softwaretreiber für das Stifttablett regelmäßig, um die Kompatibilität mit neuen Produkten zu gewährleisten. Bei Kompatibilitätsproblemen zwischen Ihrem DTF-720 Pen Display und einem neuen Hardware- oder Softwareprodukt empfiehlt es sich, einen neuen Softwaretreiber für das Wacom Tablett (falls verfügbar) aus dem Internet herunterzuladen.
USA, Kanada, Mittel- und Südamerika
Europa, Naher Osten und Afrika
Japan
Südostasien (Englisch)
China
Korea
Taiwan
Internet: http://www.wacom.com/productsupport Treiber-Downloads
Internet: http://www.wacom.eu Softwareaktualisierungen
Anonyme FTP-Seite: ftp://ftp.wacom.eu/pub/ Softwareaktualisierungen
Internet: http://tablet.wacom.co.jp Softwareaktualisierungen (Japanisch)
Internet: http://www.wacom-asia.com Softwareaktualisierungen (Englisch)
Internet: http://www.wacom.com.cn Softwareaktualisierungen (Chinesisch, vereinfacht)
Internet: http://www.wacomkorea.com Softwareaktualisierungen (Koreanisch)
Internet: http://www.wacom.com.tw Softwareaktualisierungen (Chinesisch, traditionell)
DTF720_Manual.fm Page 43 Monday, December 22, 2008 12:29 PM

AnhangSeite 44
ANHANGPFLEGE DES DTF-720Halten Sie den Stift und die DTF-720 LCD-Bildschirmoberfläche sauber. Staub- und Schmutzpartikel können am Stift kleben bleiben und die Bildschirmoberfläche stark abnutzen. Durch regelmäßiges Reinigen wird die Lebensdauer der LCD-Bildschirmoberfläche und des Stiftes verlängert. Bewahren Sie das DTF-720 und den Stift an einem sauberen, trocken Platz auf, und vermeiden Sie starke Temperaturschwankungen. Zimmertemperatur ist am besten geeignet. Das DTF-720 und der Stift sollten nicht auseinander genommen werden. Wenn Sie das Gerät auseinander bauen, erlischt Ihr Garantieanspruch.
Wichtig: Das Pen Display oder der Stift sollten nie mit Flüssigkeiten in Berührung kommen. Dies gilt besonders für das Display, die Stifttasten und die Stiftspitze. Alle diese Komponenten enthalten empfindliche elektronische Teile, die keinesfalls feucht werden dürfen, da sie sonst ihren Dienst versagen.
REINIGENVerwenden Sie ein weiches, feuchtes Tuch, um das Gehäuse und den Stift des DTF-720 zu reinigen. Sie können das Tuch auch mit sehr mildem Seifenwasser befeuchten. Verwenden Sie keine Farbverdünner, Benzin, Alkohol oder andere Lösungsmittel, um das Gehäuse des Geräts oder den Stift zu reinigen.
Reinigen Sie den Bildschirm mit einem antistatischen oder leicht angefeuchteten Tuch. Üben Sie bei der Reinigung nur minimalen Druck auf den Bildschirm aus, und achten Sie darauf, dass die Oberfläche nicht durchnässt wird. Verwenden Sie zum Reinigen des Bildschirms kein Reinigungsmittel, da dadurch die Beschichtung des Bildschirms beschädigt werden kann. Beachten Sie, dass derartige Schäden nicht unter die Garantiebestimmungen des Herstellers fallen.
DTF720_Manual.fm Page 44 Monday, December 22, 2008 12:29 PM
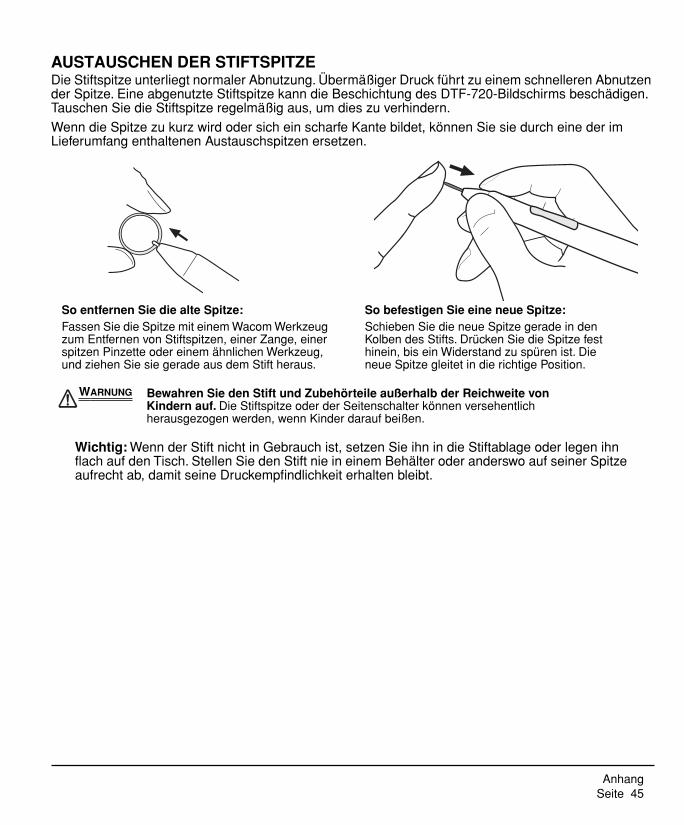
Anhang Seite 45
AUSTAUSCHEN DER STIFTSPITZEDie Stiftspitze unterliegt normaler Abnutzung. Übermäßiger Druck führt zu einem schnelleren Abnutzen der Spitze. Eine abgenutzte Stiftspitze kann die Beschichtung des DTF-720-Bildschirms beschädigen. Tauschen Sie die Stiftspitze regelmäßig aus, um dies zu verhindern.
Wenn die Spitze zu kurz wird oder sich ein scharfe Kante bildet, können Sie sie durch eine der im Lieferumfang enthaltenen Austauschspitzen ersetzen.
Wichtig: Wenn der Stift nicht in Gebrauch ist, setzen Sie ihn in die Stiftablage oder legen ihn flach auf den Tisch. Stellen Sie den Stift nie in einem Behälter oder anderswo auf seiner Spitze aufrecht ab, damit seine Druckempfindlichkeit erhalten bleibt.
So entfernen Sie die alte Spitze:Fassen Sie die Spitze mit einem Wacom Werkzeug zum Entfernen von Stiftspitzen, einer Zange, einer spitzen Pinzette oder einem ähnlichen Werkzeug, und ziehen Sie sie gerade aus dem Stift heraus.
So befestigen Sie eine neue Spitze:Schieben Sie die neue Spitze gerade in den Kolben des Stifts. Drücken Sie die Spitze fest hinein, bis ein Widerstand zu spüren ist. Die neue Spitze gleitet in die richtige Position.
WARNUNG Bewahren Sie den Stift und Zubehörteile außerhalb der Reichweite von Kindern auf. Die Stiftspitze oder der Seitenschalter können versehentlich herausgezogen werden, wenn Kinder darauf beißen.
DTF720_Manual.fm Page 45 Monday, December 22, 2008 12:29 PM

AnhangSeite 46
VERWENDEN ALTERNATIVER STÄNDER ODER HALTERUNGENWenn der Einsatz des DTF-720 eine andere Halterung erfordert, können Sie den verstellbaren Standfuß vom Gerät abmontieren und das Pen Display an eine Wandhalterung oder einen Ständer montieren, die bzw. der dem Vesa-Standard 75 entspricht.
Es sind Befestigungsschrauben mit 4 mm Breite, 0,7 mm Gewindesteigung (M4 Normal) und 15 mm Schraubtiefe erforderlich. Wenn die Schraubtiefe von 15 mm überstiegen wird, werden interne Komponenten des DTF-720 beschädigt.
So entfernen Sie den verstellbaren Standfuß und befestigen den DTF-720 an einer anderen Halterung:
1. Schalten Sie den Computer aus, und trennen Sie das DTF-720 vom Netz. Ziehen Sie anschließend alle Kabel zwischen dem Gerät und dem Computer ab.
2. Schützen Sie die Oberfläche des Bildschirms, indem Sie ein weiches Tuch auf einem ebenen Tisch ausbreiten und das DTF-720 mit der Oberfläche nach unten darauf legen.
3. Entfernen Sie die vier Schrauben, und heben Sie die Aufstellvorrichtung vom Gerät.
4. Schrauben Sie das DTF-720 mit geeigneten Schrauben fest an der alternativen Halterung an.
5. Lesen Sie die Anweisungen zur Installation ab Seite 10, und schließen Sie die Kabel erneut an.
ACHTUNG Wenn Sie das DTF-720 an einer anderen Halterung befestigen möchten, halten Sie sich an die Anweisungen in der Dokumentation des Halterungsherstellers. Wenn die Einheit nicht richtig montiert ist, kann sie fallen, und es können Schäden am Gerät oder Verletzungen verursacht werden.
DTF720_Manual.fm Page 46 Monday, December 22, 2008 12:29 PM

Anhang Seite 47
STIFT- UND FREIHANDFUNKTIONEN IN WINDOWS VISTAMicrosoft Windows Vista bietet umfangreiche Unterstützung für die Stift- und Toucheingabe. So finden Sie für Ihren DTF-720 unter Windows Vista leistungsfähige Funktionen zum Speichern von Notizen, zur Handschrifterkennung und zur schnellen Navigation sowie zusätzliche Stiftoptionen, mit denen Sie Ihren Wacom Stift schnell und intuitiv einsetzen und optimale Ergebnisse erzielen können.
• Notizen. Mit Ihrem Wacom Stift können Sie in Windows-Journal Notizen machen und Skizzen zeichnen. Journal funktioniert wie ein herkömmliches Notizbuch, nutzt aber die Vorteile digitaler Notizen. Sie können aus einer Vielzahl von Stift- und Markierungswerkzeugen auswählen. Darüber hinaus verfügt Windows-Journal über eine leistungsfähige Suchmaschine, die auch handgeschriebene Texte durchsuchen kann.
• Handschrifterkennung. Dank der leistungsfähigen Windows Vista-Funktionen zur Handschrifterkennung können Sie mit Ihrem Wacom Stift überall dort, wo der Computer die Eingabe von Inhalten erlaubt, schnell und einfach handgeschriebene Informationen eingeben. Handgeschriebener Text kann jederzeit in „gedruckten“ Text umgewandelt werden.
• Stiftbewegungen. Sie können mit Ihrem Wacom Stift durch einfache Stiftbewegungen auf dem Pen Display frei konfigurierbare Navigations-, Bearbeitungs- und andere Aktionen auslösen. Klicken Sie zum Konfigurieren von Stiftbewegungen im Dialogfeld STIFT- UND EINGABEGERÄTE auf die Registerkarte BEWEGUNGEN.
• Stiftunterstützung in Microsoft Office 2007. Die in Microsoft Office 2007-Anwendungen unter Windows Vista zur Verfügung stehenden erweiterten Werkzeuge für das digitale Schreiben und Zeichnen ermöglichen eine optimale Ausschöpfung des Potenzials Ihres Wacom Stiftes. Diese Werkzeuge, die Sie auf der Registerkarte ÜBERARBEITEN der jeweiligen Anwendung finden, bieten alle einen einheitlichen Satz von Optionen für den Umgang mit digitalen Stiften. Die Stift- und Freihandfunktionen, auf die Sie häufiger zugreifen, können Sie der Symbolleiste für den Schnellzugriff am oberen Rand der einzelnen Anwendungen hinzufügen.
Beachten Sie, dass die folgenden Problemlösungen in den Treiber des Stifttabletts implementiert wurden, um die Zeichnungsleistung in Vista zu verbessern:
• Die Vista-Funktionen Stiftbewegungen und Gedrückthalten für Rechtsklick sind in den meisten Grafikanwendungen mit Wintab-API deaktiviert.
• In der Funktion Journal und in anderen Vista Freihand-Funktionen ist die Druckempfindlichkeit deaktiviert, wenn im Vista-Kontrollfeld STIFT- UND EINGABEGERÄTE die Funktionen Bewegungen und Gedrückthalten für Rechtsklick deaktiviert sind.
DTF720_Manual.fm Page 47 Monday, December 22, 2008 12:29 PM
AnhangSeite 48
INFORMATIONEN ZUM TABLET PC-EINGABEBEREICH IN WINDOWS VISTAMithilfe Ihres Wacom Stiftes und des Tablet PC-Eingabebereichs können Sie Text per Handschrift oder Bildschirmtastatur direkt eingeben. Der Eingabebereich kann auf verschiedene Art und Weise gestartet werden:
• Klicken Sie auf das Symbol „Eingabebereich“. Dieses wird angezeigt, wenn Sie den Bildschirmcursor in einen Texteingabebereich verschieben.
• Klicken Sie auf die Registerkarte „Eingabebereich“. Diese befindet sich standardmäßig am linken Rand des Bildschirms.
• Klicken Sie auf das Symbol „Tablet PC-Eingabebereich“ in der Windows-Taskleiste. Wenn das Symbol nicht sichtbar ist, klicken Sie mit der rechten Maustaste auf die Taskleiste und wählen Sie SYMBOLLEISTEN, TABLET PC-EINGABEBEREICH.
So passen Sie den Eingabebereich an:
1. Öffnen Sie den Eingabebereich und klicken Sie dann in der Menüleiste auf EXTRAS.
2. Wählen Sie OPTIONEN, um das Dialogfeld EINGABEBEREICHOPTIONEN zu öffnen.
3. Passen Sie die Einstellungen für den Eingabebereich Ihren Vorstellungen entsprechend an.
Weitere Informationen über die Verwendung des Wacom Stiftes in Microsoft Windows Vista und Office 2007 finden Sie in der Dokumentation zu Ihrem System und zu den Microsoft Office-Anwendungen. Nutzen Sie auch die Trainingstools für Windows Vista, wie z. B. das von Microsoft angebotene Tablet PC-Lernprogramm.
Die Wacom Website unter www.wacom.com/vista bietet ebenfalls Informationen zum Arbeiten mit Ihrem Wacom Stift auf Windows Vista-Systemen.
DTF720_Manual.fm Page 48 Monday, December 22, 2008 12:29 PM
Anhang Seite 49
DEINSTALLIEREN DES DTF-720Führen Sie die im Folgenden beschriebenen Schritte aus, um die Wacom-Tablettsoftware und das DTF-720 aus dem System zu entfernen.
Windows:1. Klicken Sie auf die Windows-Schaltfläche START, und öffnen Sie dann die SYSTEMSTEUERUNG.
2. Im Fenster SYSTEMSTEUERUNG für
• Windows Vista: Klicken Sie auf PROGRAMM DEINSTALLIEREN. Wählen Sie im daraufhin angezeigten Dialogfeld die Option STIFTTABLETT, und klicken Sie auf die Schaltfläche DEINSTALLIEREN.
• Windows XP oder XP x64: Wählen Sie SOFTWARE. Wählen Sie im Fenster SOFTWARE den Eintrag STIFTTABLETT, und klicken Sie dann auf die Schaltfläche ENTFERNEN.
• Windows 2000: Doppelklicken Sie auf das Symbol SOFTWARE. Wählen Sie im daraufhin angezeigten Dialogfeld die Option STIFTTABLETT, und klicken Sie auf die Schaltfläche SOFTWARE....
3. Folgen Sie den Bildschirmanweisungen, um den Tabletttreiber zu entfernen. (Geben Sie auf die entsprechende Aufforderung hin Ihren Administrator-Anmeldenamen und das Kennwort ein.)
4. Wenn der Treiber entfernt wurde, fahren Sie Ihr System herunter, und schalten Sie den Computer und das DTF-720 aus. Lösen Sie dann die Kabelverbindungen zwischen DTF-720 und Computer.
Macintosh:1. Wählen Sie im Menü GEHE ZU die Option PROGRAMME, und öffnen Sie den Ordner WACOM
TABLETT.
2. Doppelklicken Sie auf das Symbol für das Dienstprogramm TABLETT ENTFERNEN, und klicken Sie auf die Schaltfläche TABLETT-SOFTWARE ENTFERNEN. Geben Sie Ihren Administrator-Anmeldenamen und Ihr Kennwort ein.
3. Wenn der Vorgang abgeschlossen ist, klicken Sie auf OK.
4. Fahren Sie den Computer herunter, und schalten Sie das DTF-720 aus. Lösen Sie dann die Kabelverbindungen zwischen DTF-720 und Computer.
DTF720_Manual.fm Page 49 Monday, December 22, 2008 12:29 PM

AnhangSeite 50
TECHNISCHE DATENALLGEMEINE SPEZIFIKATIONEN
DISPLAY
Abmessungen (B x H x T) 400 x 362 x 55,5 mm (ohne Standfuß)
Gewicht 6,0 kg (mit Standfuß)
Eingangsspannung 12 V Gleichstrom
Leistungsverbrauch Max. 37 W2 W oder weniger im Standby-Modus1 W oder weniger, wenn ausgeschaltet
USB-Hub Integrierter USB-Hub: USB v2.0USB-Hub mit eigener Stromversorgung und zwei externen Anschlüssen, 500 mA pro Anschluss
Temperatur und Luftfeuchtigkeit bei Betrieb
5˚ bis 35˚ C, 20 bis 80 % relative Luftfeuchtigkeit (nicht kondensierend)
Temperatur und Luftfeuchtigkeit bei Lagerung
-10˚ bis 60˚ C, 20 bis 90 % relative Luftfeuchtigkeit (nicht kondensierend)
Zertifizierung und Konformität FCC Teil 15 Klasse B u. Unterabschnitt C, Industry Canada Klasse B, CE, VCCI Klasse B, EDID 1.3, C-tick, BSMI, MIC, CB, CCC, Richtlinie 2002/95/EG zur Beschränkung der Verwendung bestimmter gefährlicher Stoffe in Elektro- und Elektronikgeräten, RoHS China, RoHS Korea
Display a-Si TFT-Aktiv-Matrix-LCD
Bildschirmgröße 17,0 Zoll (337,9 x 270,3 mm)
Signaleingänge VGA (Analog RGB)
Signalausgänge VGA (Analog RGB)
Auflösung 1280 x 1024 Pixel (SXGA), 1024 x 768 Pixel (XGA), 800 x 600 Pixel (SGA), 640 x 480 Pixel (VGA)
Wiederholfrequenz 50 bis 75 Hz (vertikal)Alle Anzeigemodi ohne Zeilensprung (non-interlaced).
Bildpunktgröße 0,264 x 0,264 mm
Farbtiefe 16,7 Millionen
Helligkeit 300 cd/m2
Kontrastverhältnis 650:1
Plug & Play DDC 2B
LCD-Qualität Jedes einzelne DTF-720 LCD-Display wird unter Einhaltung strenger Qualitätsstandards hergestellt. Herstellungsbedingt kann kein absolut perfektes TFT-Display garantiert werden. Wacom lässt nicht zu, dass ein einziges Pixel nur weiß oder nur schwarz ist. Eine geringe Anzahl Pixel (5 und weniger) dürfen für bestimmte Teile des Farbspektrums eine falsche Farbe aufweisen. Dies bedeutet nicht, dass die Anzeige fehlerhaft ist.
DTF720_Manual.fm Page 50 Monday, December 22, 2008 12:29 PM

Anhang Seite 51
STIFTTABLETT
NETZGERÄT
STIFT (MODELL FP-320)
BESTELLEN VON TEILEN UND ZUBEHÖRTeile und Zubehör können Sie unter den entsprechenden Telefonnummern für Ihr Land bestellen, die in der Liesmich-Datei aufgelistet sind.
Es bestehen auch folgende Möglichkeiten:
• Wenn Sie Teile und Zubehör in den USA und Kanada bestellen möchten, rufen Sie gebührenfrei an unter +1-888-884-1870, oder besuchen Sie die Wacom Website unter http://www.WacomDirect.com (nur USA).
• Wenn Sie Teile und Zubehör in Europa erwerben möchten, rufen Sie uns an unter +49 (0)180 500 0375, oder senden Sie eine E-Mail an [email protected]. Oder besuchen Sie die Wacom Website unter http://www.wacom-shop.net. Sie können sich auch an Ihren örtlichen Händler, Vertriebspartner oder technischen Kundendienst wenden.
• Um Ersatzteile und Zubehör in anderen Ländern zu bestellen, wenden Sie sich an Ihren Fachhändler oder Vertriebspartner vor Ort.
Sämtliche Teile und Zubehörkomponenten sind eventuell nicht in allen Ländern erhältlich.
Lesetechnik Elektromagnetisches Resonanzverfahren
Aktive Fläche 337,9 x 270,3 mm
Auflösung 20 lpmm (0,05 mm)
Genauigkeit ±0,5 mm, Durchschnitt
Lesehöhe 5 mm
Maximale Übertragungsrate 100 Punkte/s
Druckstufen 512 Stufen
Kommunikationsschnittstelle USB
Eingangsspannung 100 bis 240 V Wechselstrom, 50/60 Hz
Ausgangsspannung 12 V Gleichstrom, 5,0 A
Druckstufen 512
Verschiebbarkeit der Stiftspitze ca. 0,2 mm
Größe (L x T) 146,5 x 12,5 mm
Gewicht ca. 12 g
Typ des Seitenschalters Doppelseitenschalter
DTF720_Manual.fm Page 51 Monday, December 22, 2008 12:29 PM
AnhangSeite 52
STÖRUNGEN DES RADIO- UND FERNSEHEMPFANGSDas in diesem Handbuch beschriebene Gerät erzeugt und nutzt Hochfrequenzenergie und strahlt diese unter Umständen ab. Falls es nicht genau nach den Anweisungen installiert und verwendet wird, kann es zu Funkstörungen kommen.
FCC-HINWEIS (FEDERAL COMMUNICATIONS COMMISSION)Dieses Gerät hält die Bestimmungen von Teil 15 der FCC-Vorschriften ein. Der Betrieb des Geräts unterliegt den beiden folgenden Bedingungen: (1) Dieses Gerät darf keine schädlichen Störungen verursachen, und (2) dieses Gerät muss empfangene Störungen akzeptieren, einschließlich Störungen, die zu einem unerwünschten Betrieb führen können.Dieses Gerät wurde getestet und entspricht einem Digitalgerät der Grenzwertklasse B gemäß Teil 15 der FCC-Vorschriften. Diese Grenzwerte wurden festgelegt, um wirksamen Schutz gegen schädliche Störungen von Hausinstallationen zu gewährleisten.Dieses Gerät erzeugt und nutzt Hochfrequenzenergie und strahlt diese unter Umständen ab. Bei unsachgemäßer Installation und Verwendung können Störungen des Radio- und Fernsehempfangs auftreten. Ferner können solche Störungen auch unter ganz bestimmten Installationsbedingungen nicht ausgeschlossen werden.Um festzustellen, ob das Gerät die Störungen verursacht, schalten Sie es aus. Falls anschließend keine weiteren Störungen auftreten, lag es vermutlich am Gerät.Wenn das Gerät den Radio- oder Fernsehempfang stört, können Sie eine oder mehrere der folgenden Maßnahmen ergreifen, um das Problem zu beseitigen:• Drehen Sie die Empfangsantenne, bis die Störungen aufhören.• Installieren Sie das Gerät in größerer Entfernung vom Fernseher oder Radio.• Schließen Sie das Gerät an eine Steckdose an, die zu einem anderen Stromkreis gehört als die des
Fernsehers oder Radios.
Falls erforderlich, erkundigen Sie sich bei Ihrem Wacom Händler oder einem Radio/TV-Fachmann nach weiteren Möglichkeiten der Fehlerbehebung.Veränderungen an diesem Produkt, die nicht ausdrücklich von Wacom genehmigt wurden, können dazu führen, dass die FCC-Zulassung ungültig wird und Ihre Berechtigung zum Betrieb des Gerätes erlischt.
DTF720_Manual.fm Page 52 Monday, December 22, 2008 12:29 PM

Anhang Seite 53
INDUSTRY CANADA (NUR KANADA)Industry Canada, Class B“This Class (B) digital apparatus complies with Canadian ICES-003”“Cet appareil numerique de la classe (B) est conforme a la norme NMB-003 du Canada.”
CE-ERKLÄRUNGDas DTF-720 / DTF-720A Pen Display-Tablett wurde geprüft und entspricht folgenden harmonisierten europäischen Normen:• EN 55022: 2006, Class B• EN 55024: 1998+A1: 2001+A2: 2003
IEC 61000-4-2: 2001IEC 61000-4-3: 2006IEC 61000-4-4: 2004IEC 61000-4-5: 2005IEC-61000-4-6: 2006IEC 61000-4-8: 2001IEC 61000-4-11: 2004
• EN 61000-3-2: 2006• EN 61000-3-3: 1995+A1: 2001+A2: 2005
Aufgrund der Ergebnisse dieser Tests erklärt Wacom, dass das oben genannte Gerät den Anforderungen gemäß der Richtlinie 2004/108/EC entspricht.
DTF720_Manual.fm Page 53 Monday, December 22, 2008 12:29 PM
AnhangSeite 54
Lizenz- und Garantiebestimmungen (Europa, Afrika und Naher Osten)
SoftwarelizenzvereinbarungWichtige KundeninformationZum Lieferumfang dieses Produkts gehören urheberrechtlich geschützte Computerprogramme („Software“), die das unveräußerliche geistige Eigentum der Wacom Europe GmbH („Wacom“) sind. Diese Software ist ein integraler Bestandteil des Produkts und auch auf dem dazugehörigen Datenträger enthalten. Der Erwerb dieses Produkts von Ihrem Händler schließt die Software von Wacom und die entsprechenden Nutzungsrechte nicht ein. Wacom räumt Ihnen – dem Benutzer – das Recht ein, die Software ausschließlich entsprechend den in dieser Lizenzvereinbarung genannten Bedingungen zu nutzen. Durch den Erwerb des Produkts stimmen Sie den vorliegenden Lizenzbedingungen zu.
Berechtigung zur Nutzung der SoftwareWacom erteilt dem Benutzer eine persönliche, einfache Lizenz zur Nutzung der Software ausschließlich in Verbindung mit diesem Produkt und zum ordnungsgemäßen Betrieb des Produkts. Diese Lizenz darf ausschließlich in Verbindung mit diesem Produkt übertragen werden.Die Nutzung dieser Software schließt das dauerhafte oder vorübergehende Kopieren der Software ausschließlich durch Laden, Anzeigen, Ausführen, Übertragen oder Speichern zum Zweck des Ausführens der Befehle und der enthaltenen Daten sowie zum Beobachten, Untersuchen oder Testen der Softwarefunktionen ein.Der Kunde darf die Software nicht an Dritte lizenzieren, verpachten oder ausleihen oder ihnen in irgendeiner anderen Weise Zugriff auf die Software ermöglichen. Der Kunde darf die Software ohne vorherige schriftliche Genehmigung von Wacom nicht kopieren, verändern, übertragen oder bearbeiten. Die einzige Ausnahme hiervon sind die zum Anfertigen von Sicherungskopien notwendigen Kopiervorgänge sowie die in Abschnitt 2 umrissenen Zwecke.Der Kunde darf die Software nicht dekompilieren. Falls die Software Schnittstellen zu anderen, von Wacom nicht unterstützten Programmen enthält, stellt Wacom dem Kunden die erforderlichen Informationen auf Anfrage zur Verfügung, sofern dieser seine Berechtigung zur Nutzung der Software nachweisen kann und sich zur Übernahme der Kopier- und Versandkosten bereit erklärt.
Beschränkte GarantieWacom garantiert Ihnen als Erstkäufer, dass die Produkthardware bei normaler Nutzung, d. h. bei ausschließlichem Gebrauch in der normalen Büroumgebung, für einen Garantiezeitraum von ZWEI (2) JAHREN ab Verkaufsdatum frei von Material- und Verarbeitungsfehlern ist, vorausgesetzt, dass sie zum Zeitpunkt des Kaufes unbenutzt war. Davon ausgenommen sind Verbrauchsmaterialien wie z. B. Stiftspitzen. Wacom übernimmt darüber hinaus für einen Zeitraum von SECHS (6) MONATEN ab Kaufdatum die Garantie, dass die mitgelieferten Datenträger frei von Material- und Verarbeitungsfehlern sind.Die Software wird „wie besehen“ lizenziert und vertrieben. Wacom übernimmt weder ausdrücklich noch stillschweigend eine Garantie in Bezug auf die Qualität, Leistung und Marktfähigkeit der Software sowie für ihre Eignung für einen bestimmten Zweck. Dies gilt auch für die zugehörige Dokumentation. Ebenso wenig kann Wacom einen störungsfreien Betrieb oder die Behebung eventuell auftretender Fehler garantieren.Bei Feststellung eines Fehlers am Produkt, ausgenommen der Software, innerhalb des Garantiezeitraumes muss es in der Originalverpackung zusammen mit Ihrem Namen, Ihrer Anschrift, Telefonnummer, einer Beschreibung des Problems und einer Kopie der Originalrechnung an den ursprünglichen Erwerbsort zurückgegeben werden. Für einen eventuellen Verlust oder eine Beschädigung des Produktes während dieses Transportes haftet der Kunde. Gemäß dieser Garantie ist Wacom nur dazu verpflichtet, das Produkt oder Teile, das bzw. die nachweislich defekt ist bzw. sind, bei Einsendung innerhalb des Garantiezeitraumes nach eigenem Ermessen entweder zu reparieren oder zu ersetzen.
DTF720_Manual.fm Page 54 Monday, December 22, 2008 12:29 PM

Anhang Seite 55
Wacom ist nicht verpflichtet, das Produkt zu reparieren oder zu ersetzen, wenn nach Meinung von Wacom (a) das Versagen des Produktes auf Unfall, Missbrauch, falsche Benutzung, Nachlässigkeit oder unerlaubte Änderung oder Reparatur zurückzuführen ist oder (b) das Produkt nicht gemäß den Anweisungen von Wacom behandelt oder aufbewahrt wurde oder (c) das Versagen auf normale Abnutzung zurückzuführen ist oder (d) der Kunde seinen Verpflichtungen gemäß den oben genannten Bedingungen nicht nachgekommen ist.Falls die Überprüfung irgendeines Anspruches, der unter dieser Garantie erhoben wird, ergibt, dass er außerhalb des zulässigen Zeitraumes oder Garantieumfangs liegt oder das Produkt nicht defekt ist, gehen die Kosten einer solchen Überprüfung und Reparatur zu Lasten des Kunden.Jegliche Beschreibungen, Zeichnungen, Spezifikationen, Muster, Modelle, Mitteilungen oder ähnliches Material, die im Zusammenhang mit dem Verkauf des Produktes herausgegeben werden, können nicht als ausdrückliche Garantie ausgelegt werden, dass das Produkt den Anforderungen des Kunden entspricht oder sie erfüllt.Sollten bestimmte Bestimmungen dieses Vertrags als ungültig erklärt werden, werden solche Bestimmungen als getrennt vom Vertrag behandelt, und die übrigen Bestimmungen des Vertrags bleiben ohne Einschränkung in Kraft.Falls dieses Produkt für fehlerhaft befunden wird, kann der Käufer berechtigt sein, ein Gerichtsverfahren gegen den Verkäufer wegen Mängelhaftung anzustrengen. Die gesetzlichen Rechte, die dem Käufer zustehen, werden durch diese Garantie in keiner Weise eingeschränkt. Vielmehr gewährt diese Garantie dem Käufer Rechte, die über die in dem vorliegenden Text aufgeführten hinausgehen. Diese beschränkte Garantie gilt, wenn sich der Firmensitz in der Europäischen Union oder in Island, Norwegen, Jersey, der Schweiz, Russland, der Ukraine, Rumänien, Bulgarien, Kroatien, Serbien, Tunesien, der Türkei, Syrien, dem Libanon, Jordanien, Israel, Ägypten, den Vereinigten Arabischen Emiraten, dem Iran oder Südafrika befindet.Diese beschränkte Garantie und Haftung unterliegt dem Recht der Bundesrepublik Deutschland.Sollten Sie Fragen zu dieser Vereinbarung haben oder aus anderen Gründen mit Wacom Kontakt aufnehmen wollen, wenden Sie sich bitte schriftlich an uns:
Wacom Europe GmbHEuropark Fichtenhain A947807 KrefeldDEUTSCHLAND
DTF720_Manual.fm Page 55 Monday, December 22, 2008 12:29 PM

AnhangSeite 56
DTF720_Manual.fm Page 56 Monday, December 22, 2008 12:29 PM

DTF-720
Interactive Pen Display
Guide d'installation et Manuel d'utilisation
DTF720_Manual.fm Page -1 Monday, December 22, 2008 12:36 PM

DTF720_Manual.fm Page 0 Monday, December 22, 2008 12:36 PM
Introduction et présentation Page 1
INTRODUCTION ET PRÉSENTATION
Le DTF-720 Interactive Pen Display de Wacom
®
allie les avantages d'un écran LCD (Liquid Crystal Display) au confort, au contrôle et à la productivité qu'offre la technologie Wacom de stylets sans pile et sans fil. Vous disposez ainsi d'une interface directe stylet-écran pour votre ordinateur.
Le DTF-720 comprend un pen tablet Wacom intégré derrière un écran couleur TFT de 17 pouces ainsi qu'un stylet Wacom.
Le DTF-720 est équipé d'un port VGA intermédiaire (
SORTIE
RVB) qui permet de connecter simultanément un projecteur ou un moniteur VGA à la tablette graphique.
Ce manuel décrit l'installation logicielle et matérielle du DTF-720. Il décrit également le fonctionnement du DTF-720 et du stylet.
Veuillez suivre attentivement toutes les instructions.L'ordinateur considère le DTF-720 comme deux périphériques distincts (l'écran et le Pen Tablet).
Par conséquent, l'installation se déroule en deux étapes :
•
Installez tout d'abord le DTF-720 en tant qu'écran.
•
Puis installez le DTF-720 en tant que tablette à stylet.
Ces deux étapes impliquent une installation et une configuration matérielle et logicielle.
Veuillez suivre attentivement toutes les instructions.
IMPORTANT :
vous DEVEZ installer le logiciel pilote du pen tablet Wacom pour un fonctionnement correct de la relation stylet-écran.
Pour savoir comment utiliser le panneau de configuration du pen tablet pour personnaliser les paramètres du pen display et du stylet sur les ordinateurs fonctionnant sous Windows ou Macintosh, reportez-vous à la section
Personnalisation
à la page 19.
Les informations suivantes ne sont pas fournies avec ce produit : informations concernant votre configuration matérielle spécifique et votre système d'exploitation, ou informations concernant vos applications logicielles. Pour obtenir ces informations, consultez les manuels et les disques fournis avec votre matériel, votre système d'exploitation et vos applications.
DTF720_Manual.fm Page 1 Monday, December 22, 2008 12:36 PM

PrécautionsPage 2
PRÉCAUTIONS
Pour garantir une utilisation sûre de votre produit, respectez lez avertissements et les instructions contenus dans ce manuel. Sinon, vous risquez de perdre des données ou d'endommager votre ordinateur. Le non-respect de ces indications pourrait entraîner l'annulation de votre garantie. Si cela se produit, Wacom ne sera en aucun cas tenue de réparer ou de remplacer le produit.
EMPLACEMENT PHYSIQUE
ENVIRONNEMENT
A
VERTISSEMENT
Ce symbole signale une information essentielle qui doit être prise en compte sous peine de blessure grave, voire mortelle.
A
TTENTION
Ce symbole signale une information importante qui doit être prise en compte sous peine de blessure ou de dommages matériels.
Lorsque vous entreprenez une des actions décrites, prenez toutes les précautions nécessaires.
A
VERTISSEMENT
Le DTF-720 Interactive Pen Display est conçu pour être utilisé dans un environnement de bureau normal, mais il peut également être utilisé comme console centrale dans des environnements climatisés. Ce produit a été testé par Wacom pour une utilisation dans un environnement de bureau normal uniquement. Aucune recherche particulière n'a été réalisée quant à son adéquation au secteur médical ou militaire. En outre, le DTF-720 Interactive Pen Display ne résiste ni à l'eau, ni aux explosions. Il s'utilise exclusivement en tant qu'écran passif et périphérique d'entrée. Dans toutes les applications non spécifiquement conçues pour son utilisation, aucune information concernant la fonctionnalité et les éventuels dysfonctionnements du DTF-720 Interactive Pen Display ne peut être fournie, en raison du manque de tests. L'application du DTF-720 Interactive Pen Display dans d'autres domaines qu'un environnement de bureau normal se fait au risque de l'utilisateur.
Température et humidité
• Température et humidité de fonctionnement : 5 ˚C à 35 ˚C, 20 à 80 % d'humidité relative• Température et humidité de stockage : -10 ˚C à 60 ˚C, 20 à 90 % d'humidité relative
A
TTENTION
N’utilisez pas et ne stockez pas le DTF-720 dans les conditions suivantes :
• En cas de variations de température importantes ou hors des limites spécifiées (par exemple à l'extérieur ou dans un véhicule).
• En cas d'exposition directe du DTF-720 et du stylet à la lumière du soleil, à une source de chaleur, à de l'eau ou à tout autre liquide.
A
TTENTION
N'utilisez pas le DTF-720 dans un environnement poussiéreux.
Vous risquez d'endommager l'appareil.
DTF720_Manual.fm Page 2 Monday, December 22, 2008 12:36 PM

Précautions Page 3
UTILISATION
MANIPULATION
A
VERTISSEMENT
N'utilisez que l'adaptateur secteur fourni avec votre DTF-720.
Si un autre type d'alimentation secteur est utilisé, le DTF-720 ne peut pas fonctionner correctement ou risque d'être endommagé.
L'utilisation d'un autre type d'adaptateur risque de provoquer un incendie.
Ce faisant, vous perdriez votre droit à la garantie.
A
TTENTION
Veillez à utiliser une source d'alimentation mise à la terre lorsque vous mettez le DTF-720 sous tension.
A
TTENTION
Ne connectez/déconnectez pas le câble vidéo ni le câble d'alimentation lorsque le DTF-720 ou l'ordinateur est sous tension.
Vous risqueriez d'endommager l'écran ou la carte vidéo de l'ordinateur. Si cela se produit, Wacom ne sera en aucun cas tenue de réparer ou de remplacer le produit.
A
TTENTION
Ce produit est destiné à être utilisé avec une carte vidéo VGA.
L'utilisation d'une carte vidéo inappropriée est susceptible d'endommager votre DTF-720.
A
TTENTION
Ne bloquez pas les aérations situées sur le panneau arrière.
Vous risqueriez de créer une surchauffe et d'endommager l'appareil.
Lorsque vous n'utilisez pas le DTF-720 au cours d'une longue période, débranchez l'adaptateur de la prise secteur.
A
VERTISSEMENT
Haute tension. N'ouvrez ni ne démontez en aucun cas le DTF-720 Pen Display. Un risque de choc électrique est présent lorsque le boîtier est ouvert.
Le cas échéant, votre garantie sera annulée et Wacom ne sera pas tenue de réparer ou de remplacer le produit.
A
VERTISSEMENT
Si l'écran LCD est endommagé, un liquide peut se répandre. Ne le touchez pas :
ce liquide est irritant. En cas de contact avec la peau, les yeux ou la bouche, rincez immédiatement avec de l'eau sous le robinet pendant au moins 15 minutes. Si le liquide entre en contact avec les yeux ou la bouche, consultez un médecin.
A
VERTISSEMENT
– LA/LES LAMPE(S) DE CET APPAREIL CONTIENNENT DU MERCURE. ELLES DOIVENT ÊTRE RECYCLÉES OU MISES AU REBUT CONFORMÉMENT AUX LÉGISLATIONS LOCALES, DES ÉTATS OU FÉDÉRALES.
Le DTF-720 Pen Display est équipé d'un rétroéclairage contenant du mercure (Hg).
Veillez à mettre cet appareil au rebut conformément aux lois et réglementations locales.
A
VERTISSEMENT
Veillez à ce que les enfants n'avalent pas la pointe du stylet ou le bouton latéral.
Ces deux éléments risquent de se détacher accidentellement si un enfant les mord.
A
TTENTION
Ne démontez pas le stylet.
Cela risquerait d'entraîner son dysfonctionnement. Si cela se produit, Wacom ne sera en aucun cas tenue de réparer ou de remplacer le produit.
A
TTENTION
Ne rayez pas la surface de l'écran.
Évitez de placer des objets pointus ou tranchants sur la surface.
A
TTENTION
Lors du réglage de l'inclinaison du DTF-720, évitez de vous coincer les doigts dans l'espace situé dans la partie mobile du socle.
A
TTENTION
Ne soulevez pas le DTF-720 par son socle. Cela pourrait endommager le mécanisme du socle.
Lorsque vous soulevez ou déplacez le DTF-720, prenez toujours l'appareil par le boîtier.
Hg
DTF720_Manual.fm Page 3 Monday, December 22, 2008 12:36 PM

PrécautionsPage 4
A
TTENTION
Évitez de soumettre le DTF-720 ou le stylet à des chocs et des vibrations violentes.
Si vous heurtez ou laissez tomber le DTF-720, vous risquez d’endommager la surface de l'écran ou d'autres composants.
A
TTENTION
Évitez de placer des objets lourds sur le pen display ou d'y exercer une pression importante.
Vous risqueriez d'endommager la surface de l'écran ou de courber le socle.
A
TTENTION
Ne placez pas d'objets lourds sur les câbles du DTF-720, ne pliez pas brutalement les câbles de manière répétée et ne soumettez pas les connecteurs des câbles à une forte tension
au risque d'endommager l'appareil ou son câblage.
A
TTENTION
Si la pointe du stylet devient coupante ou angulaire, elle risque d'endommager la pellicule protectrice de l'écran.
Remplacez la pointe du stylet si nécessaire.
A
TTENTION
N'utilisez pas de dissolvant organique (à base d'alcool) ni même de détergent doux pour nettoyer l'écran. L'emploi de ces produits risque d'endommager la pellicule protectrice du verre. Notez que ce type de dommage n'est pas couvert par la garantie du fabricant.
• Pour nettoyer l'écran, utilisez un chiffon antistatique ou légèrement humide. Pendant le nettoyage, n'exercez qu'une pression légère sur l'écran et ne le mouillez pas.
• Pour nettoyer le boîtier du DTF-720 ou du stylet, utilisez un chiffon doux imprégné d'un détergent doux (tel que du produit à laver la vaisselle) dilué dans de l’eau.
• Avant de nettoyez le produit, débranchez toujours l'alimentation secteur.
A
TTENTION
N'exposez pas votre DTF-720 à des décharges électrostatiques de haute tension ou à une accumulation de charge électrostatique sur l'écran LCD.
Vous risqueriez de décolorer ou de tâcher définitivement l'écran. Si des décolorations se produisent, laissez l'écran allumé et elles devraient disparaître en quelques heures.
Réutilisation, recyclage et récupération.
Une fois en fin de vie ou après son remplacement par un produit plus récent, il est fortement conseillé de recycler ce produit en le déposant dans un point de collecte de matériaux recyclables de votre région. Ce faisant, vous aiderez à protéger l'environnement et minimiserez les effets négatifs causés par d'éventuels écoulements de substances dangereuses lors de la mise au rebut.Au sein de l'Union européenne, il est interdit aux utilisateurs de jeter les déchets des équipements électriques et électroniques (DEEE) avec les ordures ménagères courantes, conformément à la Directive 2002/96/CE du Parlement européen et du Conseil en date du 27 janvier 2003, ou aux lois équivalentes des États membres. Les produits concernés sont dotés du symbole DEEE illustré au début de cette remarque, sauf impossibilité due à la taille ou à la fonction du produit. Les produits Wacom sont soumis à la Directive 2002/96/CE et doivent donc être mis au rebut séparément, dans un point de collecte de votre région.
Les produits Pen Display de Wacom sont conformes à la directive européenne RoHS 2002/95/CE.
DTF720_Manual.fm Page 4 Monday, December 22, 2008 12:36 PM

Table des matières Page 5
TABLE DES MATIÈRES
Introduction et présentation . . . . . . . . . . . . . . . . . . . . . . . . . . . . . . . . . . . . . . . 1
Précautions . . . . . . . . . . . . . . . . . . . . . . . . . . . . . . . . . . . . . . . . . . . . . . . . . . . . 2
Emplacement physique . . . . . . . . . . . . . . . . . . . . . . . . . . . . . . . . . . . . . . . . 2Environnement . . . . . . . . . . . . . . . . . . . . . . . . . . . . . . . . . . . . . . . . . . . . . . . 2Utilisation . . . . . . . . . . . . . . . . . . . . . . . . . . . . . . . . . . . . . . . . . . . . . . . . . . . 3Manipulation . . . . . . . . . . . . . . . . . . . . . . . . . . . . . . . . . . . . . . . . . . . . . . . . . 3
Votre nouveau DTF-720 . . . . . . . . . . . . . . . . . . . . . . . . . . . . . . . . . . . . . . . . . . . 7
Contenu de l'emballage . . . . . . . . . . . . . . . . . . . . . . . . . . . . . . . . . . . . . . . . 7Composants de l'Interactive Pen Display . . . . . . . . . . . . . . . . . . . . . . . . . . . 8
Vue avant . . . . . . . . . . . . . . . . . . . . . . . . . . . . . . . . . . . . . . . . . . . . . . . 8Vue arrière . . . . . . . . . . . . . . . . . . . . . . . . . . . . . . . . . . . . . . . . . . . . . . . 9
Installation . . . . . . . . . . . . . . . . . . . . . . . . . . . . . . . . . . . . . . . . . . . . . . . . . . . . 10
Configuration requise . . . . . . . . . . . . . . . . . . . . . . . . . . . . . . . . . . . . . . . . . 10Étape 1 : installation de l'écran LCD . . . . . . . . . . . . . . . . . . . . . . . . . . . . . . 11
Schéma de câblage de l'écran LCD . . . . . . . . . . . . . . . . . . . . . . . . . . 12Étape 2 : installation du pen tablet . . . . . . . . . . . . . . . . . . . . . . . . . . . . . . . 14
Installation du câble USB . . . . . . . . . . . . . . . . . . . . . . . . . . . . . . . . . 14Schéma de connexion de la tablette . . . . . . . . . . . . . . . . . . . . . . . . . . 14Installation du logiciel . . . . . . . . . . . . . . . . . . . . . . . . . . . . . . . . . . . . . 15
Utilisation du DTF-720 . . . . . . . . . . . . . . . . . . . . . . . . . . . . . . . . . . . . . . . . . . . 16
Configuration de la zone de travail . . . . . . . . . . . . . . . . . . . . . . . . . . . . . . . 16Utilisation du stylet . . . . . . . . . . . . . . . . . . . . . . . . . . . . . . . . . . . . . . . . . . . 17
Composants du stylet . . . . . . . . . . . . . . . . . . . . . . . . . . . . . . . . . . . . . 17Fonctionnement du stylet . . . . . . . . . . . . . . . . . . . . . . . . . . . . . . . . . . . . . . 18
Personnalisation . . . . . . . . . . . . . . . . . . . . . . . . . . . . . . . . . . . . . . . . . . . . . . . 19
Ouverture du panneau de configuration . . . . . . . . . . . . . . . . . . . . . . . . . . . 19Présentation du panneau de configuration . . . . . . . . . . . . . . . . . . . . . . . . . 20
Personnalisation du stylet . . . . . . . . . . . . . . . . . . . . . . . . . . . . . . . . . . 20Étalonnage du DTF-720 . . . . . . . . . . . . . . . . . . . . . . . . . . . . . . . . . . . 22Personnalisation du menu contextuel . . . . . . . . . . . . . . . . . . . . . . . . . 23
Panneau de configuration . . . . . . . . . . . . . . . . . . . . . . . . . . . . . . . . . . . . . . 24Paramétrage du double-clic . . . . . . . . . . . . . . . . . . . . . . . . . . . . . . . . 24Personnalisation des fonctions du bouton latéral . . . . . . . . . . . . . . . . 24
Réglage de l'écran . . . . . . . . . . . . . . . . . . . . . . . . . . . . . . . . . . . . . . . . . . . 28Pré-réglages usine, Auto-Sync et paramètres utilisateurs . . . . . . . . . 28Paramètres de l'affichage à l'écran (OSD) . . . . . . . . . . . . . . . . . . . . . 28Réglage du pas et de la phase . . . . . . . . . . . . . . . . . . . . . . . . . . . . . . 31Économie d'énergie . . . . . . . . . . . . . . . . . . . . . . . . . . . . . . . . . . . . . . 32
DTF720_Manual.fm Page 5 Monday, December 22, 2008 12:36 PM
Table des matièresPage 6
Dépannage . . . . . . . . . . . . . . . . . . . . . . . . . . . . . . . . . . . . . . . . . . . . . . . . . . . . 33
Test du DTF-720 . . . . . . . . . . . . . . . . . . . . . . . . . . . . . . . . . . . . . . . . . . . . 33Dépannage de l'écran . . . . . . . . . . . . . . . . . . . . . . . . . . . . . . . . . . . . . . . . 35
Problèmes généraux liés à l'écran . . . . . . . . . . . . . . . . . . . . . . . . . . . 35Problèmes liés au mode VGA . . . . . . . . . . . . . . . . . . . . . . . . . . . . . . . 36
Dépannage du pen tablet . . . . . . . . . . . . . . . . . . . . . . . . . . . . . . . . . . . . . . 37Problèmes généraux . . . . . . . . . . . . . . . . . . . . . . . . . . . . . . . . . . . . . . 37Problèmes spécifiques à Windows . . . . . . . . . . . . . . . . . . . . . . . . . . . 41Problèmes spécifiques à Macintosh . . . . . . . . . . . . . . . . . . . . . . . . . . 41
Options d'assistance technique . . . . . . . . . . . . . . . . . . . . . . . . . . . . . . . . . 42Téléchargements de pilotes . . . . . . . . . . . . . . . . . . . . . . . . . . . . . . . . . . . . 43
Annexes . . . . . . . . . . . . . . . . . . . . . . . . . . . . . . . . . . . . . . . . . . . . . . . . . . . . . . 44
Entretien du DTF-720 . . . . . . . . . . . . . . . . . . . . . . . . . . . . . . . . . . . . . . . . . 44Nettoyage . . . . . . . . . . . . . . . . . . . . . . . . . . . . . . . . . . . . . . . . . . . . . . 44Remplacement de la pointe du stylet . . . . . . . . . . . . . . . . . . . . . . . . . 45
Utilisation d'un support ou d'un socle différent . . . . . . . . . . . . . . . . . . . . . . 46Possibilités relatives au stylet et à l'encrage numérique dans Windows Vista . . . . . . . . . . . . . . . . . . . . . . . . . . . . . . . . . . . . . . . . . . 47
À propos du Panneau de saisie Tablet PC de Windows Vista . . . . . . . 48Désinstallation du DTF-720 . . . . . . . . . . . . . . . . . . . . . . . . . . . . . . . . . . . . 49Caractéristiques du produit . . . . . . . . . . . . . . . . . . . . . . . . . . . . . . . . . . . . 50
Caractéristiques générales . . . . . . . . . . . . . . . . . . . . . . . . . . . . . . . . . 50Écran . . . . . . . . . . . . . . . . . . . . . . . . . . . . . . . . . . . . . . . . . . . . . . . . . . 50Tablette à stylet . . . . . . . . . . . . . . . . . . . . . . . . . . . . . . . . . . . . . . . . . . 51Adaptateur secteur . . . . . . . . . . . . . . . . . . . . . . . . . . . . . . . . . . . . . . . 51Stylet (modèle FP-320) . . . . . . . . . . . . . . . . . . . . . . . . . . . . . . . . . . . . 51
Commande de pièces et d'accessoires . . . . . . . . . . . . . . . . . . . . . . . . . . . 51Interférences radio et télévision . . . . . . . . . . . . . . . . . . . . . . . . . . . . . . . . . 52
Avertissement de la Commission fédérale des communications (FCC) . . . . . . . . . . . . . . . . . . . . . . . . . . . . . . . . . . . . 52Industrie Canada (Canada uniquement) . . . . . . . . . . . . . . . . . . . . . . . 53Déclaration CE . . . . . . . . . . . . . . . . . . . . . . . . . . . . . . . . . . . . . . . . . . 53
Licence et garantie (Europe, Afrique et Moyen-Orient) . . . . . . . . . . . . . . . . . . . . . . . . . . . . . . . 54
DTF720_Manual.fm Page 6 Monday, December 22, 2008 12:36 PM

Votre nouveau DTF-720 Page 7
VOTRE NOUVEAU DTF-720
CONTENU DE L'EMBALLAGE
Déballez soigneusement tous les éléments et placez-les sur un bureau ou sur toute autre surface de travail stable. Vérifiez que rien ne manque dans l'emballage.
Remarque :
les illustrations ne sont pas à l'échelle. Certaines configurations de produits incluent un stylet sans boutons latéraux. Certaines configurations incluent des CD ou des DVD supplémentaires contenant des applications. Pour les installer, consultez les instructions accompagnant les CD ou les DVD. Conservez la boîte d'emballage du produit. Elle vous servira pour le rangement et le transport de votre DTF-720.
DTF-720 Interactive Pen Display, unité principale
Adaptateur secteur (POW-A107)et
Câble d'alimentation (SCD-A038-01 ou SCD-A040-01 (selon la région))
Câble USB (STJ-A250)
Câble VGA-VGA (STJ-A228)
Stylet avec pointes de rechange (FP-320)et
Amarre stylet (PKB-A016)
Guide d'installation et manuel d'utilisation (le présent manuel)
CD du pilote de la tablette à stylet de Wacom (contient le pilote)
DTF720_Manual.fm Page 7 Monday, December 22, 2008 12:36 PM

Votre nouveau DTF-720Page 8
COMPOSANTS DE L'INTERACTIVE PEN DISPLAY
Ce produit est doté de nombreux composants et fonctionnalités que vous devrez découvrir.
VUE AVANT
L'écran et le radar de la tablette fonctionnent comme des périphériques d'entrée/sortie intégrés. L'écran prend en charge des résolutions allant jusqu'à 1280 x 1024 pixels avec 16,7 millions de couleurs. Le radar de la tablette indique les coordonnées du stylet, sa pression et les informations concernant le bouton latéral.
Commandes de l'affichage à l'écran (OSD)Ces commandes, situées sur le bord supérieur de la tablette, vous permettent de régler différents paramètres d'affichage. Pour plus d'informations, reportez-vous à la section Réglage de l'écran, page 28.
Voyant d'alimentationÉmet une lumière bleue lorsque le DTF-720 est sous tension et que le signal vidéo est présent.Émet une lumière orange lorsque le DTF-720 ne détecte aucun signal vidéo. (par exemple, lorsque votre ordinateur est éteint, en phase de démarrage ou en mode de gestion d'alimentation et aucun signal vidéo n'est émis).
Interrupteur d'alimentationMet l'appareil sous tension et hors tension.
Voyant d'étatÉmet une lumière bleue lorsque le stylet se trouve dans la zone active de la tablette et que vous appuyez sur la pointe du stylet. Remarque : le câble USB doit également être branché sur un port USB actif, sinon la LED ne s'allume pas.
Tablette et écran intégrés
Branchez un périphérique USB (lecteur flash USB ou télécommande USB, par exemple) sur un des ports USB intégrés (situés de part et d'autre de l'appareil).
Vous devez avoir entièrement terminé l'installation matérielle et logicielle du DTF-720 avant d'y connecter tout autre périphérique.
DTF720_Manual.fm Page 8 Monday, December 22, 2008 12:36 PM

Votre nouveau DTF-720 Page 9
VUE ARRIÈRE
Important :
lorsque vous n'utilisez pas votre pen display, posez-le sur une surface stable ou rangez-le dans son emballage d'origine. Assurez-vous que le socle est en position d'inclinaison basse avant d'emballer le DTF-720. Si vous ne rabattez pas le socle, le mécanisme pourrait s'endommager pendant le transport et le stockage.
Ne soulevez pas l'appareil par son socle. Cela pourrait endommager le mécanisme du socle. Lorsque vous soulevez ou déplacez le DTF-720, prenez toujours l'appareil par le boîtier.
Prises vidéo, USB et alimentation
Verrou KensingtonPermet de fixer aisément un câble de sécurité.
Point de fixation de l'amarre styletSi vous utilisez l'amarre du stylet, attachez-la au point de fixation situé à gauche ou à droite de l'unité.
Levier de réglage du socleTirez sur ce levier pour ajuster le socle. Relâchez le levier pour bloquer le socle.
ATTENTION Évitez de vous coincer les doigts dans l'espace situé dans la partie mobile du socle.
SocleLe socle permet d'ajuster l'angle d'inclinaison de l'appareil.
Range-stylet
DTF720_Manual.fm Page 9 Monday, December 22, 2008 12:36 PM
InstallationPage 10
INSTALLATION
CONFIGURATION REQUISE
Avant de procéder à l'installation du DTF-720, assurez-vous que votre ordinateur répond à la configuration minimale suivante :
•
PC.
Windows Vista
™
, XP, XP x64 ou 2000. Connecteur vidéo VGA, port USB disponible et lecteur de CD-ROM.
•
Macintosh.
OS X, v10.4.0 ou ultérieure. Connecteur vidéo VGA, port USB disponible et lecteur de CD-ROM.
Remarques :
l
e
DTF-720 peut être utilisé seul ou avec un autre écran. Vous pouvez connecter un deuxième périphérique VGA, tel qu'un moniteur ou un projecteur LCD sur la
SORTIE
RVB
du DTF-720. Lorsqu'il est connecté sur ce port, le deuxième périphérique affiche l'image présentée par le DTF-720. Terminez l'installation du DTF-720 avant de connecter un périphérique de projection à l'unité.Selon les possibilités de votre carte vidéo et de votre système d'exploitation, vous pouvez configurer le DTF-720 comme écran en miroir, complémentaire ou indépendant. Pour plus d'informations sur les possibilités de votre carte vidéo, consultez la documentation qui l'accompagne.Lorsque vous utilisez plusieurs moniteurs, le DTF-720 sélectionnera les correspondances en fonction de la configuration de votre système. En mode miroir, l'affichage sélectionné par défaut par la tablette correspond à la totalité de la zone de travail sur chaque écran ou moniteur. Pour plus d'informations concernant la configuration de votre ordinateur et de votre système d'exploitation en vue de l'utilisation de plusieurs moniteurs, consultez la documentation du matériel et du système d'exploitation.
L'installation comprend deux étapes principales :
• Étape 1 : installation de l'écran LCD
• Étape 2 : installation du pen tablet
Veuillez suivre attentivement TOUTES les instructions.
DTF720_Manual.fm Page 10 Monday, December 22, 2008 12:36 PM

Installation Page 11
ÉTAPE 1 : INSTALLATION DE L'ÉCRAN LCDAu cours de cette première étape, le DTF-720 sera installé en tant que moniteur sur votre système. Pendant la procédure d’installation, reportez-vous au Schéma de câblage de l'écran LCD, à la page suivante, pour effectuer le branchement des câbles.
Important : ne branchez pas le câble de données USB avant d'y être invité.
• Mettez votre ordinateur hors tension.
Attention : ne connectez/déconnectez jamais les câbles vidéo ou d'alimentation lorsque l'ordinateur ou le DTF-720 sont sous tension. Vous risqueriez d'endommager l'écran ou la carte vidéo.
• Si votre ordinateur ne possède qu'un connecteur vidéo analogique (VGA), vous devez débrancher l'écran précédemment utilisé ou ajouter une deuxième carte VGA.
• Connectez l'adaptateur secteur au DTF-720. Connectez ensuite le câble d'alimentation de l'adaptateur et branchez ce dernier sur une prise secteur. Voir – B – et – C –
• Mettez le DTF-720 sous tension. Le voyant de mise sous tension s'allume en orange.
• Branchez une extrémité du câble VGA au DTF-720. Branchez l'autre extrémité du câble au connecteur VGA de la carte vidéo de l'ordinateur. Voir – A – dans le schéma de connexion de la page 12. Veillez à resserrer les vis à oreilles sur les connecteurs.
Connecteur VGA
DTF720_Manual.fm Page 11 Monday, December 22, 2008 12:36 PM
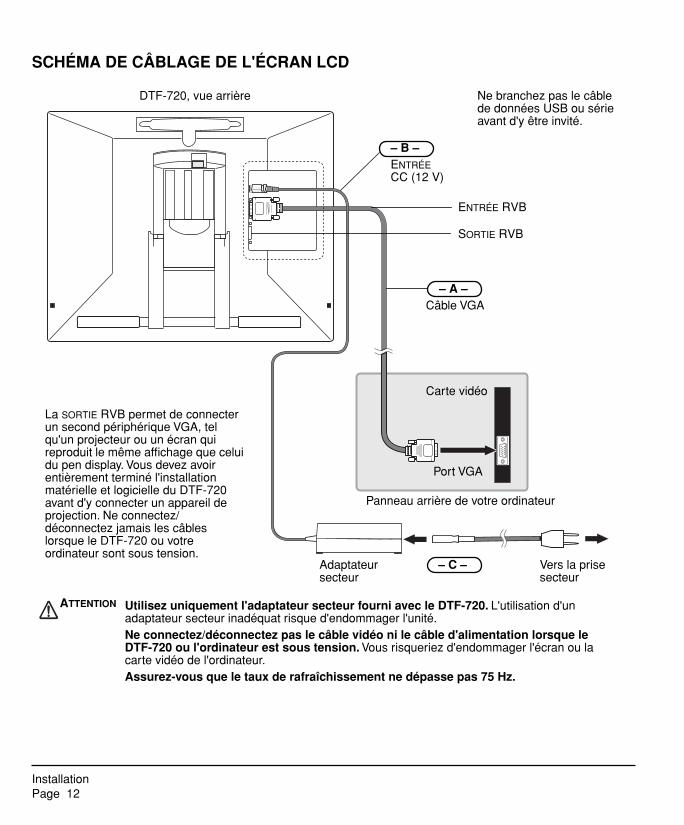
InstallationPage 12
SCHÉMA DE CÂBLAGE DE L'ÉCRAN LCD
DTF-720, vue arrière
– B – ENTRÉE CC (12 V)
– A – Câble VGA
Carte vidéo
Panneau arrière de votre ordinateur
ENTRÉE RVB
Ne branchez pas le câble de données USB ou série avant d'y être invité.
Adaptateur secteur
– C – Vers la prise secteur
ATTENTION Utilisez uniquement l'adaptateur secteur fourni avec le DTF-720. L'utilisation d'un adaptateur secteur inadéquat risque d'endommager l'unité.Ne connectez/déconnectez pas le câble vidéo ni le câble d'alimentation lorsque le DTF-720 ou l'ordinateur est sous tension. Vous risqueriez d'endommager l'écran ou la carte vidéo de l'ordinateur.Assurez-vous que le taux de rafraîchissement ne dépasse pas 75 Hz.
SORTIE RVB
Port VGA
La SORTIE RVB permet de connecter un second périphérique VGA, tel qu'un projecteur ou un écran qui reproduit le même affichage que celui du pen display. Vous devez avoir entièrement terminé l'installation matérielle et logicielle du DTF-720 avant d'y connecter un appareil de projection. Ne connectez/déconnectez jamais les câbles lorsque le DTF-720 ou votre ordinateur sont sous tension.
DTF720_Manual.fm Page 12 Monday, December 22, 2008 12:36 PM

Installation Page 13
• Mettez ensuite votre ordinateur sous tension.
Pour les systèmes Windows : le DTF-720 est installé automatiquement comme écran par défaut.
• Si nécessaire, configurez le moniteur afin d'obtenir une taille et une résolution de couleurs appropriées. La résolution maximale (native) du DTF-720 est de 1 280 x 1 024 pixels. La taille d'affichage et la résolution de couleurs peuvent être limitées par les capacités de votre carte vidéo. Pour plus d'informations, consultez la documentation du fabricant de la carte vidéo.
Windows : si vous utilisez le DTF-720 comme écran secondaire, vous devez d'abord l'activer dans la fenêtre Propriétés de l'affichage du panneau de configuration.
• Pour effectuer un réglage plus fin de l'écran, reportez-vous à Réglage de l'écran, page 28 pour plus d'informations.
• Après avoir réglé l'écran LCD du DTF-720 comme vous le souhaitez, passez à la section Étape 2 : installation du pen tablet pour installer le pen tablet. Pour obtenir des conseils sur le dépannage, reportez-vous à la page 33.
Remarques : Chacune des tablettes LCD DTF-720 répond à des normes de qualité extrêmement rigoureuses. Les techniques de production ne peuvent pas garantir que votre écran TFT sera absolument parfait ; certaines tablettes peuvent présenter un certain nombre de pixels associés à une mauvaise couleur. Pour plus d'informations, reportez-vous aux spécifications à la page 50.Si une image présente de fines rayures, elle peut scintiller ou afficher un moirage.N'appliquez pas de pression excessive sur l'écran, car vous risquez de faire apparaître un effet moiré. Si cela se produit, appliquez une pression moins forte sur l'écran à l'aide de votre stylet.Lorsqu'une image reste affichée à l'écran pendant une longue période, une image après mise à jour peut rester quelques instants à l'écran. Pour éviter que cela ne se produise, Wacom vous conseille d'utiliser un économiseur d'écran ou un autre outil de gestion de l'alimentation.
Important : pour prolonger la durée de vie du rétroéclairage, configurez la gestion de l'alimentation de manière à ce que l'affichage se désactive en cas d'inutilisation prolongée.
DTF720_Manual.fm Page 13 Monday, December 22, 2008 12:36 PM
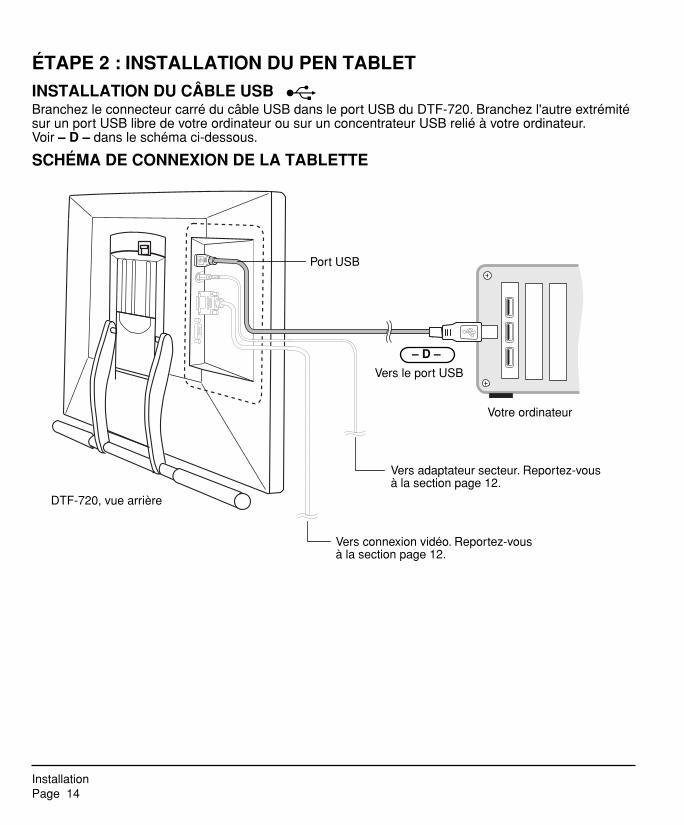
InstallationPage 14
ÉTAPE 2 : INSTALLATION DU PEN TABLETINSTALLATION DU CÂBLE USB Branchez le connecteur carré du câble USB dans le port USB du DTF-720. Branchez l'autre extrémité sur un port USB libre de votre ordinateur ou sur un concentrateur USB relié à votre ordinateur. Voir – D – dans le schéma ci-dessous.
SCHÉMA DE CONNEXION DE LA TABLETTE
DTF-720, vue arrière
Vers le port USB
Votre ordinateur
– D –
Port USB
Vers adaptateur secteur. Reportez-vous à la section page 12.
Vers connexion vidéo. Reportez-vous à la section page 12.
DTF720_Manual.fm Page 14 Monday, December 22, 2008 12:36 PM

Installation Page 15
INSTALLATION DU LOGICIEL
IMPORTANT : vous DEVEZ installer le logiciel pilote du pen tablet Wacom pour un fonctionnement correct de la relation stylet-écran.
Pour installer le logiciel de la tablette, procédez comme suit :
• Enregistrez votre travail et fermez toutes les applications. Désactivez temporairement tout programme de protection anti-virus.
• Insérez le CD du pilote du pen tablet Wacom dans le lecteur de CD-ROM de votre ordinateur. Si le menu d'installation du logiciel ne s'affiche pas automatiquement, double-cliquez sur l'icône INSTALLER du CD.
• Cliquez sur le lien INSTALLER LA TABLETTE et suivez les instructions qui s'affichent pour installer le pilote.
• Réactivez votre antivirus.
• Lorsque l'installation logicielle est terminée, vérifiez que vous pouvez déplacer le curseur à l'écran du DTF-720 à l'aide du stylet.
Lorsque vous placez la pointe du stylet sur l'écran, le curseur doit se placer immédiatement à l'endroit correspondant à l'écran. Soulevez la pointe du stylet et placez-la à un autre point de l'écran. Le curseur doit encore une fois se placer au nouvel emplacement. Cette technique se nomme positionnement absolu, elle vous permet de placer le curseur sans avoir à faire glisser le stylet sur l'écran.
• Lisez attentivement le fichier Lisez-moi pour obtenir des informations mises à jour. En cas de problème lors de l'installation du DTF-720, reportez-vous à la section Dépannage, à la page 33.
Remarques :Pour Windows Vista, l'installation du pilote active automatiquement les nouvelles fonctions de saisie à l'aide du stylet disponibles dans Windows Vista et Office 2007 (sauf pour Windows Vista Home Basic).Pour Windows Vista, XP et Macintosh OS X, les préférences utilisateurs sont prises en charge. Après avoir ouvert une session, chaque utilisateur peut personnaliser ses propres paramètres dans le panneau de configuration du Pen Tablet. Le basculement vers un autre utilisateur charge automatiquement ses paramètres personnels.Pour désinstaller le pilote de la tablette, reportez-vous à la Désinstallation du DTF-720, page 49.
Étalonnez ensuite le pen display de manière à aligner avec précision le curseur à l'écran sur la pointe du stylet. Reportez-vous à la section Étalonnage du DTF-720, page 22.
DTF720_Manual.fm Page 15 Monday, December 22, 2008 12:36 PM

Utilisation du DTF-720Page 16
UTILISATION DU DTF-720Lorsque vous utilisez le DTF-720 Interactive Pen Display, vous pouvez appuyer votre main sur l'écran, comme s'il s'agissait d'une planche à dessin ou d'une feuille de papier.
La surface du DTF-720 se trouve légèrement au-dessus du bureau. Veillez donc à régler la hauteur de votre bureau ou de votre chaise de manière à pouvoir utiliser l'appareil en toute facilité.
CONFIGURATION DE LA ZONE DE TRAVAILPour réduire la fatigue, organisez votre espace de travail de manière à travailler confortablement. Placez le DTF-720, le stylet et votre clavier de façon à faciliter leur accès. Placez le pen display et les autres écrans éventuels de manière à les voir avec un minimum de fatigue oculaire.
Autres conseils utiles :
• Faites de brèves pauses entre deux tâches afin de vous étirer et de détendre vos muscles.
• Ne serrez pas votre stylet trop fort.
• Alternez les tâches pendant la journée.
• Conservez une posture correcte en permanence. Évitez les positions ou mouvements répétitifs inconfortables. Changez de position si votre posture de travail est inconfortable.
• Passez d'un mode d'utilisation à un autre.
Remarque : Wacom ne peut en aucun cas garantir que les produits Wacom empêcheront ou soigneront, en partie ou dans leur intégralité, les symptômes et lésions causées par le travail répétitif avec une souris. Le développement de tels symptômes varie selon les individus. Il est conseillé de consulter un médecin afin de déterminer le traitement le plus approprié à votre situation.
Conseils :• Veillez à ne pas déconnecter les câbles si vous éloignez le DTF-720 de l'ordinateur.• L'amarre du stylet permet de ne pas séparer le stylet de la tablette. Attachez la boucle de l'amarre à
l'orifice prévu à cet effet sur le stylet, et l'autre extrémité au point de fixation de l'amarre situé à gauche ou à droite de la tablette.
• Le DTF-720 peut également être monté sur des bras articulés ou sur des socles d'autres marques conformes à la norme VESA 75 relative aux socles d'écrans. Pour plus de détails, reportez-vous à la section Utilisation d'un support ou d'un socle différent à la page 46.
DTF720_Manual.fm Page 16 Monday, December 22, 2008 12:36 PM
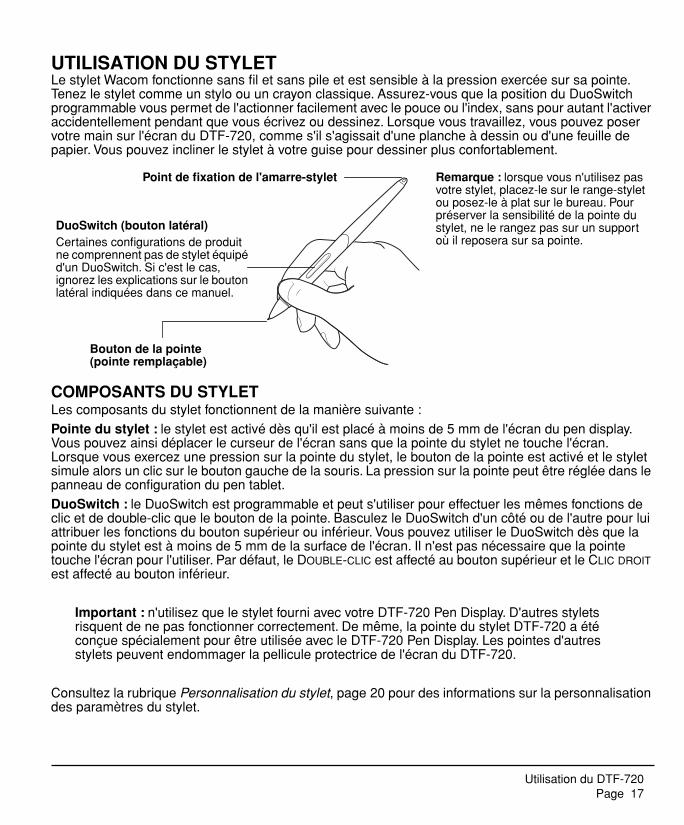
Utilisation du DTF-720 Page 17
UTILISATION DU STYLETLe stylet Wacom fonctionne sans fil et sans pile et est sensible à la pression exercée sur sa pointe. Tenez le stylet comme un stylo ou un crayon classique. Assurez-vous que la position du DuoSwitch programmable vous permet de l'actionner facilement avec le pouce ou l'index, sans pour autant l'activer accidentellement pendant que vous écrivez ou dessinez. Lorsque vous travaillez, vous pouvez poser votre main sur l'écran du DTF-720, comme s'il s'agissait d'une planche à dessin ou d'une feuille de papier. Vous pouvez incliner le stylet à votre guise pour dessiner plus confortablement.
COMPOSANTS DU STYLETLes composants du stylet fonctionnent de la manière suivante :
Pointe du stylet : le stylet est activé dès qu'il est placé à moins de 5 mm de l'écran du pen display. Vous pouvez ainsi déplacer le curseur de l'écran sans que la pointe du stylet ne touche l'écran. Lorsque vous exercez une pression sur la pointe du stylet, le bouton de la pointe est activé et le stylet simule alors un clic sur le bouton gauche de la souris. La pression sur la pointe peut être réglée dans le panneau de configuration du pen tablet.
DuoSwitch : le DuoSwitch est programmable et peut s'utiliser pour effectuer les mêmes fonctions de clic et de double-clic que le bouton de la pointe. Basculez le DuoSwitch d'un côté ou de l'autre pour lui attribuer les fonctions du bouton supérieur ou inférieur. Vous pouvez utiliser le DuoSwitch dès que la pointe du stylet est à moins de 5 mm de la surface de l'écran. Il n'est pas nécessaire que la pointe touche l'écran pour l'utiliser. Par défaut, le DOUBLE-CLIC est affecté au bouton supérieur et le CLIC DROIT est affecté au bouton inférieur.
Important : n'utilisez que le stylet fourni avec votre DTF-720 Pen Display. D'autres stylets risquent de ne pas fonctionner correctement. De même, la pointe du stylet DTF-720 a été conçue spécialement pour être utilisée avec le DTF-720 Pen Display. Les pointes d'autres stylets peuvent endommager la pellicule protectrice de l'écran du DTF-720.
Consultez la rubrique Personnalisation du stylet, page 20 pour des informations sur la personnalisation des paramètres du stylet.
Point de fixation de l'amarre-stylet
DuoSwitch (bouton latéral)Certaines configurations de produit ne comprennent pas de stylet équipé d'un DuoSwitch. Si c'est le cas, ignorez les explications sur le bouton latéral indiquées dans ce manuel.
Bouton de la pointe (pointe remplaçable)
Remarque : lorsque vous n'utilisez pas votre stylet, placez-le sur le range-stylet ou posez-le à plat sur le bureau. Pour préserver la sensibilité de la pointe du stylet, ne le rangez pas sur un support où il reposera sur sa pointe.
DTF720_Manual.fm Page 17 Monday, December 22, 2008 12:36 PM
Utilisation du DTF-720Page 18
FONCTIONNEMENT DU STYLETPointage et sélection : déplacez le stylet au-dessus de l'écran du DTF-720 pour positionner le curseur à l'écran. La pointe du stylet doit se trouver à moins de 5 mm de la surface de l'écran. Il n'est pas nécessaire de toucher cette surface pour déplacer le curseur. Le curseur se déplace immédiatement vers l'endroit où vous posez le stylet (positionnement absolu). Appuyez la pointe du stylet sur l'écran pour effectuer une sélection.
Remarque : vous devez étalonner le pen display pour aligner correctement le curseur à l'écran et la pointe du stylet. (reportez-vous à la section Étalonnage du DTF-720, page 22). Si le curseur à l'écran ne se place pas près de la pointe du stylet lorsque vous posez le stylet sur l'écran, il se peut que le pilote du pen tablet ne soit pas installé ou chargé. Si nécessaire, installez le pilote du pen tablet. Sinon, reportez-vous à la Dépannage, page 33.
Clic : pour générer un clic, appuyez brièvement la pointe du stylet sur l'écran ou touchez l'écran avec le stylet avec suffisamment de pression.
Conseil pour Windows : vous pouvez faciliter la navigation avec le stylet en configurant Windows de telle sorte que la sélection soit possible lorsque le stylet est placé au-dessus d'une icône et l'activation possible à l'aide d'un seul clic. Pour activer cette fonction, ouvrez d'abord un dossier.Pour Windows Vista, ouvrez le menu déroulant ORGANISER et choisissez Options des dossiers et de recherche. Dans l'onglet GÉNÉRAL, sélectionnez L'OPTION OUVRIR LES ÉLÉMENTS PAR SIMPLE CLIC (SÉLECTION PAR POINTAGE).
Pour les autres versions de Windows, ouvrez le menu déroulant OUTILS et choisissez OPTIONS DES DOSSIERS. Dans l'onglet GÉNÉRAL, sélectionnez l'option OUVRIR LES ÉLÉMENTS PAR SIMPLE CLIC (SÉLECTION PAR POINTAGE).
Double-clic : appuyez sur le bouton latéral supérieur ou appuyez la pointe du stylet rapidement et à deux reprises au même endroit de l'écran. Le double-clic est plus facile à générer lorsque le stylet est perpendiculaire à l'écran de la tablette. Pour affiner la zone de double-clic, reportez-vous à la section Paramétrage du double-clic, page 24.
Glisser : sélectionnez un objet, puis faites glisser la pointe du stylet sur la surface de l'écran pour déplacer l'objet.
Utilisation du bouton latéral : le stylet est équipé d'un DuoSwitch. Ce bouton possède deux fonctions programmables que vous pouvez sélectionner en faisant basculer le commutateur dans un sens ou dans l'autre. Vous pouvez utiliser le DuoSwitch dès que la pointe du stylet est à moins de 5 mm de la surface de la tablette. Il n'est pas nécessaire que la pointe touche la surface de l'écran pour l'utiliser. Par défaut, le DOUBLE-CLIC est affecté au bouton supérieur et le CLIC DROIT est affecté au bouton inférieur.
Dessin et écriture avec sensibilité à la pression : le stylet répond avec précision aux mouvements de votre main, vous permettant ainsi de créer des traits et des coups de pinceau à l'aspect naturel dans les applications qui prennent en charge ces fonctions. Pour dessiner et écrire avec une sensibilité à la pression, sélectionnez un outil approprié dans la palette d'outils de votre application. À mesure que vous travaillez sur la surface de l'écran, modifiez la pression exercée sur la pointe du stylet. Appuyez légèrement pour obtenir des traits fins ou des couleurs plus douces. Appuyez fort pour obtenir des traits épais ou des couleurs saturées.
DTF720_Manual.fm Page 18 Monday, December 22, 2008 12:36 PM
Personnalisation Page 19
PERSONNALISATIONUne fois que vous maîtrisez les principes de base de l'utilisation du stylet sur votre DTF-720 Interactive Pen Display, vous pouvez personnaliser son mode de fonctionnement. Le panneau de configuration de du Pen Tablet permet de personnaliser sans difficulté les réglages du DTF-720 et du stylet.
OUVERTURE DU PANNEAU DE CONFIGURATIONPour ouvrir le panneau de configuration de la tablette, utilisez le stylet DTF-720 et la tablette :
Windows. Cliquez sur le bouton DÉMARRER de Windows et sélectionnez TOUS LES PROGRAMMES (Sous Windows 2000, sélectionnez PROGRAMMES.) Sélectionnez ensuite TABLETTE et choisissez l'option PROPRIÉTÉS DU PEN Tablet.
Macintosh. Ouvrez PRÉFÉRENCES SYSTÈME à partir du Dock, du menu Pomme ou du dossier APPLICATIONS. Cliquez ensuite sur l'icône PEN TABLET.
Une fois le panneau de configuration ouvert, reportez-vous à la section Présentation du panneau de configuration, page 20.
Remarques : Pour Windows Vista, XP et Macintosh OS X, les préférences utilisateurs sont prises en charge. Après avoir ouvert une session, chaque utilisateur peut personnaliser ses propres paramètres dans le panneau de configuration du Pen Tablet. Le basculement vers un autre utilisateur charge automatiquement ses paramètres personnels.Si plusieurs tablettes Wacom sont installées sur l'ordinateur, les modifications apportées dans le panneau de configuration Propriétés du pen tablet s'appliquent uniquement au dernier pen tablet utilisé avant l'ouverture du panneau de configuration.
DTF720_Manual.fm Page 19 Monday, December 22, 2008 12:36 PM

PersonnalisationPage 20
PRÉSENTATION DU PANNEAU DE CONFIGURATIONUtilisez le panneau de configuration du pen tablet pour personnaliser votre produit. Essayez différents réglages afin de trouver celui qui vous convient le mieux. Toute modification prend immédiatement effet, mais vous pouvez toujours cliquer sur PAR DÉFAUT pour rétablir les valeurs par défaut.
Des info-bulles sont disponibles pour la plupart des éléments du panneau de configuration. Placez le curseur sur un élément de l'écran pour que l'info-bulle correspondante s'affiche.
En outre, les touches de direction et de tabulation du clavier permettent de naviguer dans le panneau de configuration.
PERSONNALISATION DU STYLET
Remarque : lorsque vous réglez les paramètres de votre stylet, choisissez les options qui correspondent aux boutons du stylet que vous utilisez.
Rétablit les paramètres par défaut de l'onglet STYLET.
Ferme le panneau de configuration.
Personnalise la pression nécessaire à la réalisation d'un clic ou d'un dessin à l'aide du stylet.
Règle la taille de la zone de double-clic. Reportez-vous à la section page 24.
Sélectionne les fonctions du bouton latéral du stylet. Reportez-vous à la section page 24.
Lorsque cette case est activée, vous entendez un « clic » audible lorsque vous effectuez un clic avec le stylet (à condition que les haut-parleurs de l'ordinateur soient allumés).
Affiche des informations à propos du panneau de configuration et du pilote.
Conseil : pour créer de larges coups de pinceau ou pour cliquer avec un toucher léger, optez pour un toucher de pointe léger. Si vous choisissez un réglage relativement souple, vous obtiendrez une sensibilité régulière et agréable dans la plupart des applications sensibles à la pression. Dans certaines applications, un réglage de pression doux peut entraîner une réaction exagérée du stylet, une légère pression sur le stylet étant multipliée à l'écran. Dans ce cas, essayez un réglage du toucher de la pointe plus ferme. Un réglage ferme vous permettra d'avoir un contrôle optimal de vos tracés fins.
DTF720_Manual.fm Page 20 Monday, December 22, 2008 12:36 PM
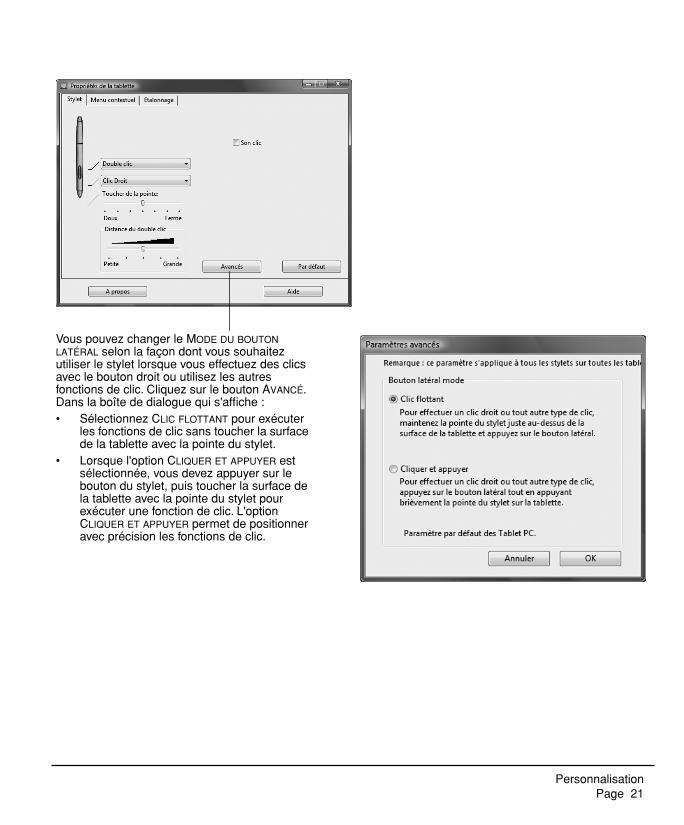
Personnalisation Page 21
Vous pouvez changer le MODE DU BOUTON LATÉRAL selon la façon dont vous souhaitez utiliser le stylet lorsque vous effectuez des clics avec le bouton droit ou utilisez les autres fonctions de clic. Cliquez sur le bouton AVANCÉ. Dans la boîte de dialogue qui s'affiche :• Sélectionnez CLIC FLOTTANT pour exécuter
les fonctions de clic sans toucher la surface de la tablette avec la pointe du stylet.
• Lorsque l'option CLIQUER ET APPUYER est sélectionnée, vous devez appuyer sur le bouton du stylet, puis toucher la surface de la tablette avec la pointe du stylet pour exécuter une fonction de clic. L'option CLIQUER ET APPUYER permet de positionner avec précision les fonctions de clic.
DTF720_Manual.fm Page 21 Monday, December 22, 2008 12:36 PM

PersonnalisationPage 22
ÉTALONNAGE DU DTF-720Il est nécessaire d’étalonner la tablette pour aligner la position du curseur à l’écran sur celle du stylet sur l'écran. Cet étalonnage est nécessaire pour corriger l'erreur de parallaxe créée par la feuille calque transparente et la pellicule de protection de l'écran. Placez le DTF-720 dans sa position de travail, puis suivez la procédure ci-dessous.
Important : assurez-vous que l'écran est correctement réglé avant d'étalonner la tablette. Reportez-vous aux sections Réglage du pas et de la phase, page 31, et Réglage de l'écran, page 28.
• Dans le panneau de configuration du pen tablet, sélectionnez l'onglet ÉTALONNER.
• Si vous utilisez plusieurs moniteurs, sélectionnez le MONITEUR correspondant à l'écran du DTF-720. (Seuls les moniteurs réglés sur l'une des résolutions prises en charge par le DTF-720 apparaissent dans la liste.)
• Cliquez sur le bouton ÉTALONNER... pour afficher la fenêtre d'étalonnage.
• Tenez le stylet et installez-vous comme vous le faites habituellement pour utiliser le pen display. Avec la pointe du stylet, cliquez au centre du réticule dans le coin supérieur gauche.
• Cliquez ensuite au centre du réticule qui apparaît dans le coin inférieur droit.
• Vérifiez l'alignement en plaçant le stylet sur différents points de l'écran. Cliquez sur OK pour accepter l'étalonnage. Cliquez sur RÉESSAYER pour effectuer un nouvel étalonnage.Lisez les indications figurant dans la fenêtre d'étalonnage : elles fournissent des instructions détaillées et des options supplémentaires. Le paramètre d’étalonnage est valable pour toutes les applications.
Réticule
Motif de réglage du pas et de la phase. Reportez-vous à la section Réglage du pas et de la phase, page 31 pour plus de détails.
Remarques : Si vous préférez que le curseur à l'écran soit légèrement décalé par rapport à la position réelle de la pointe du stylet, étalonnez-le en cliquant à l'endroit correspondant au décalage, à partir du réticule. Par exemple, pour faire apparaître le curseur à l'écran deux millimètres au-dessus et à gauche de la pointe du stylet, étalonnez-le en cliquant sur un point situé deux millimètres en dessous et à droite du réticule.Pour étalonner deux pen display, touchez le pen display n˚1 avec le stylet, puis ouvrez le panneau de configuration sans toucher le pen display n˚2 avec le stylet. Dans le panneau de configuration, sélectionnez l'écran approprié et étalonnez le pen display n˚1. Fermez le panneau de configuration, touchez le pen display n˚2 avec le stylet, puis ouvrez à nouveau le panneau de configuration sans toucher le pen display n˚1 avec le stylet. Sélectionnez le moniteur approprié et étalonnez le pen display n˚2.
DTF720_Manual.fm Page 22 Monday, December 22, 2008 12:36 PM

Personnalisation Page 23
PERSONNALISATION DU MENU CONTEXTUELDéfinissez les fonctions disponibles dans la liste des menus contextuels sous l'onglet MENU CONTEXTUEL.
Vous pouvez configurer l'un des boutons du stylet de façon à pouvoir accéder au MENU CONTEXTUEL. Lorsque vous appuyez sur ce bouton, le menu contextuel s'affiche. Pour sélectionner une des options disponibles dans le menu contextuel, cliquez sur l'option en question. Pour fermer le menu contextuel sans y sélectionner d'option, effectuez un clic hors du menu.
Affiche la liste des fonctions ajoutées au menu contextuel. Pour déplacer un élément, glissez-le à l'endroit souhaité. Double-cliquez sur un élément pour le modifier.
Sélectionnez une fonction du bouton à ajouter à la liste du menu contextuel. Reportez-vous à la section page 24.
Permet de supprimer l'élément sélectionné dans la liste.
Définit la POLICE et la TAILLE DE LA POLICE du menu contextuel.
Rétablit tous les paramètres par défaut de l'onglet.Important : cette action supprimera toutes les options du menu contextuel qui ont été définies.
DTF720_Manual.fm Page 23 Monday, December 22, 2008 12:36 PM
PersonnalisationPage 24
PANNEAU DE CONFIGURATIONPARAMÉTRAGE DU DOUBLE-CLICFacilitez la production du double-clic à l'aide de la pointe du stylet en agrandissant la zone acceptant un double-clic (la distance de double-clic) ou en affectant la fonction de double-clic au bouton latéral. Une distance de double-clic importante peut retarder l'affichage des traits de pinceau dans certaines applications de dessin. Si vous constatez un tel problème, essayez de définir une distance de double-clic inférieure et d'utiliser le bouton latéral pour l'exécution du double-clic.
Conseil : appuyez sur le bouton supérieur pour double-cliquer. Cette opération est plus aisée que si vous tentez d'appuyer deux fois sur la tablette avec la pointe du stylet.
PERSONNALISATION DES FONCTIONS DU BOUTON LATÉRALVous pouvez paramétrer le DuoSwitch du stylet pour qu'il simule différentes fonctions. Il suffit de sélectionner une option dans le menu déroulant associé au bouton latéral supérieur ou inférieur. Les modifications apportées sont immédiatement appliquées. La fonction sélectionnée s'exécute lorsque vous approchez la pointe du stylet à moins de 5 mm de la surface du pen display et que vous appuyez sur le bouton latéral. La liste suivante décrit les options disponibles.
CLIC. Paramètre par défaut de la pointe du stylet. Simule un clic du bouton gauche de la souris.
DOUBLE-CLIC. configuration par défaut pour la position supérieure du bouton latéral. Permet de simuler un double-clic. Pour produire un double-clic plus aisément, utilisez cette fonction au lieu de frapper deux fois la tablette avec la pointe du stylet.
CLIC CENTRE. Cette option simule un clic à l'aide du bouton médian de la souris.
CLIC DROIT. configuration par défaut pour la position inférieure du bouton latéral. Permet de simuler un clic avec le bouton droit de la souris, pour afficher un menu contextuel.
CLIC MAINTENU. Permet de simuler le maintien du bouton gauche de la souris en position enfoncée. Une première pression du bouton latéral enclenche le maintien du clic. La deuxième pression a pour effet de relâcher le clic. Le clic maintenu s'avère particulièrement utile pour le déplacement d'objets ou la sélection de blocs de texte.
4E CLIC (ARRIÈRE). Permet de simuler un quatrième clic de souris, qui exécute habituellement la commande PRÉCÉDENTE dans les applications de navigation (sous Windows).
5E CLIC (AVANT). Permet de simuler un cinquième clic de souris, qui exécute habituellement la commande SUIVANT dans les applications de navigation.
DTF720_Manual.fm Page 24 Monday, December 22, 2008 12:36 PM

Personnalisation Page 25
PANORAMIQUE/DÉFILEMENT. Permet de positionner un document ou une image librement à l'intérieur du panneau actif en appuyant sur le bouton latéral du stylet affecté à la fonction PANORAMIQUE/DÉFILEMENT et en faisant glisser la pointe du stylet à travers l'écran du DTF-720.
PANNEAU DE SAISIE TABLET PC. (Systèmes Tablet PC et Windows Vista qui prennent en charge le Panneau de saisie Tablet PC.) Lorsque vous appuyez sur le bouton d'outil associé à cette fonction, le Panneau de saisie Tablet PC s'ouvre.
JOURNAL. (Systèmes Windows Vista et Tablet PC qui incluent Microsoft Journal.) Ouvre Microsoft Journal.
MENU CONTEXTUEL. Permet d'afficher un menu contextuel à l'écran. Pour plus d'informations, reportez-vous à la section Personnalisation du menu contextuel, page 23.
GOMMER. Paramètre un bouton pour que son actionnement permette d'utiliser la pointe du stylet comme gomme dans les applications qui prennent en charge la fonction GOMME.
BASCULEMENT D'ENCRE. (Macintosh) Permet d'activer et de désactiver la fonction Encre PARTOUT dans l'Encrier. Inkwell reconnaît et convertit automatiquement votre écriture en texte, puis l'insère dans un document. Pour ce faire, la fonction Ink doit être activée. Reportez-vous à l'aide de Macintosh pour plus d'informations sur l'utilisation d'Inkwell.
BASCULEMENT DE MODE... Permet de basculer entre le mode de suivi du stylet (mode Stylet) et le mode Souris. Le mode de suivi sélectionné détermine la relation entre le mouvement du stylet et celui du curseur à l'écran.
Lorsque vous sélectionnez PANORAMIQUE/DÉFILEMENT, vous êtes invité à définir la vitesse de défilement à utiliser dans les applications qui ne prennent pas en charge l'effet panoramique avec la main de placement (au niveau du pixel) dans un document ou une image.Une valeur plus lente réduit la vitesse de défilement, ce qui est utile pour un travail de près, minutieux, qui nécessite un contrôle précis de l'image.
La boîte de dialogue Vitesse de la souris apparaît la première fois que vous définissez un bouton d'outil en BASCULEMENT DE MODE...• Si le pen display est correctement étalonné en
mode Stylet, le curseur à l’écran doit toujours suivre la pointe du stylet sur la tablette. Il s'agit de la configuration par défaut.
• Lorsque vous basculez vers les fonctions de la souris de votre ordinateur (mode Souris), le curseur à l'écran n'est pas directement « associé » à la pointe du stylet. Il se positionne alors comme le pointeur d'une souris ordinaire et vous devez le faire glisser pour le déplacer sur l'écran. Sur un système à plusieurs écrans, vous pouvez accéder aux autres écrans à l'aide de votre stylet lorsque le mode Souris est actif.
DTF720_Manual.fm Page 25 Monday, December 22, 2008 12:36 PM
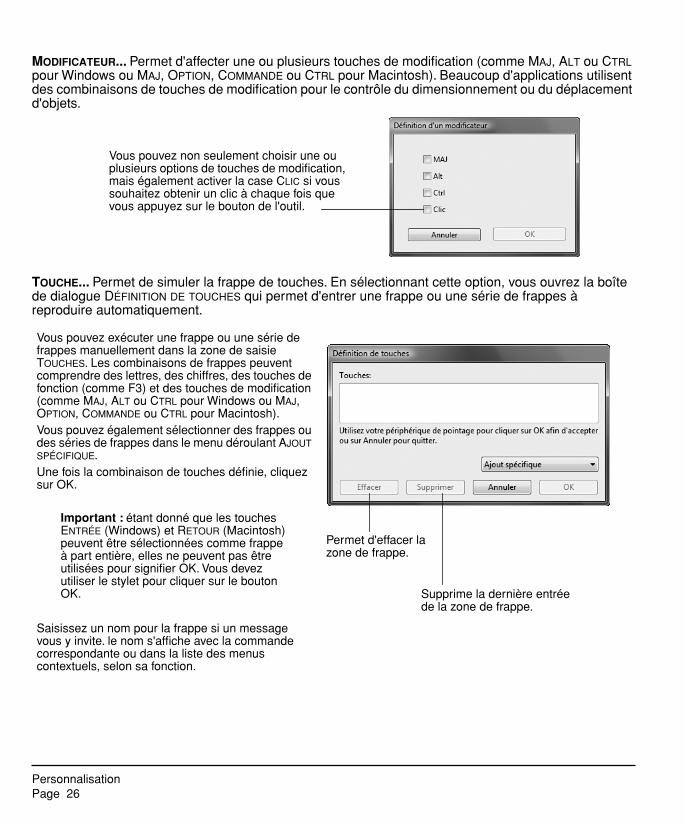
PersonnalisationPage 26
MODIFICATEUR... Permet d'affecter une ou plusieurs touches de modification (comme MAJ, ALT ou CTRL pour Windows ou MAJ, OPTION, COMMANDE ou CTRL pour Macintosh). Beaucoup d'applications utilisent des combinaisons de touches de modification pour le contrôle du dimensionnement ou du déplacement d'objets.
TOUCHE... Permet de simuler la frappe de touches. En sélectionnant cette option, vous ouvrez la boîte de dialogue DÉFINITION DE TOUCHES qui permet d'entrer une frappe ou une série de frappes à reproduire automatiquement.
Vous pouvez non seulement choisir une ou plusieurs options de touches de modification, mais également activer la case CLIC si vous souhaitez obtenir un clic à chaque fois que vous appuyez sur le bouton de l'outil.
Vous pouvez exécuter une frappe ou une série de frappes manuellement dans la zone de saisie TOUCHES. Les combinaisons de frappes peuvent comprendre des lettres, des chiffres, des touches de fonction (comme F3) et des touches de modification (comme MAJ, ALT ou CTRL pour Windows ou MAJ, OPTION, COMMANDE ou CTRL pour Macintosh).Vous pouvez également sélectionner des frappes ou des séries de frappes dans le menu déroulant AJOUT SPÉCIFIQUE.Une fois la combinaison de touches définie, cliquez sur OK.
Important : étant donné que les touches ENTRÉE (Windows) et RETOUR (Macintosh) peuvent être sélectionnées comme frappe à part entière, elles ne peuvent pas être utilisées pour signifier OK. Vous devez utiliser le stylet pour cliquer sur le bouton OK.
Saisissez un nom pour la frappe si un message vous y invite. le nom s'affiche avec la commande correspondante ou dans la liste des menus contextuels, selon sa fonction.
Permet d'effacer la zone de frappe.
Supprime la dernière entrée de la zone de frappe.
DTF720_Manual.fm Page 26 Monday, December 22, 2008 12:36 PM

Personnalisation Page 27
OUVRIR/EXÉCUTER... Permet d'ouvrir une boîte de dialogue pour sélectionner l'application, le fichier ou le script à lancer.
PRESSION MAINTENUE. Permet de verrouiller la pression au niveau actuel tant que le bouton latéral est enfoncé. Vous pouvez, par exemple, peindre en utilisant la sensibilité à la pression jusqu'à obtention de la taille de pinceau souhaitée. Appuyez ensuite sur le bouton et poursuivez le coloriage à l'aide du même pinceau jusqu'au relâchement du bouton.
EXPOSÉ. (Macintosh.) Dispose toutes les fenêtres ouvertes en mosaïque.
DÉSACTIVÉ. Permet de désactiver la fonction du bouton.
PAR DÉFAUT. Rétablit les paramètres par défaut d'un bouton.
Cliquez sur PARCOURIR... pour rechercher l'application, le fichier ou le script à lancer. Votre sélection s'affiche dans la zone APPLICATION À EXÉCUTER.Cliquez sur OK pour confirmer la sélection. La boîte de dialogue se ferme et l'option OUVRIR/EXÉCUTER... est définie comme option du bouton du stylet. Si vous avez sélectionné le menu contextuel, celui-ci s'affichera dans la liste des menus contextuels.
DTF720_Manual.fm Page 27 Monday, December 22, 2008 12:36 PM

PersonnalisationPage 28
RÉGLAGE DE L'ÉCRANPRÉ-RÉGLAGES USINE, AUTO-SYNC ET PARAMÈTRES UTILISATEURSPré-réglages usine : pour une qualité d'image optimale, réglez votre carte vidéo à la résolution native du DTF-720, 1 280 x 1 024 pixels. Consultez les propriétés du signal d'entrée à la page 50.
Auto-Sync : le DTF-720 tente de procéder à une synchronisation automatique avec le signal d'entrée. L'option auto-sync ne fonctionne que lorsque la fréquence horizontale est comprise entre 30 et 80 kHz et la fréquence verticale entre 50 et 75 Hz. Si le DTF-720 ne se synchronise pas automatiquement sur le signal d'entrée, vous pouvez utiliser l'option RESTAUR RÉGLAGE AUTO sur le menu d'affichage à l'écran (OSD). Les commandes de l'affichage à l'écran permettent de procéder à des réglages manuels supplémentaires de l'affichage.
Paramètres utilisateurs : lorsque vous réglez manuellement l'affichage à l'aide de cette fonction, les paramètres sont enregistrés par le DTF-720 pour être de nouveau utilisés lorsqu'un signal similaire est perçu. Ceci s'applique à tous les modes d'affichage.
PARAMÈTRES DE L'AFFICHAGE À L'ÉCRAN (OSD)Cette fonction vous permet de régler et d'optimiser toute une série de paramètres à l'aide d'un simple bouton. Les commandes de l'affichage à l'écran sont situées sur le bord supérieur gauche de l'appareil.
Utilisation de l'affichage à l'écran :
• Appuyez sur le bouton MENU pour ouvrir le menu principal de l'affichage à l'écran.
• Utilisez les boutons + ou - pour sélectionner une option. Lorsque l'option que vous souhaitez régler apparaît en surbrillance, appuyez sur le bouton ENTRÉE. Le sous-menu affichant les paramètres actuels et les réglages de cette option apparaît.
• Utilisez les boutons + ou - pour régler les paramètres de l'option.
• Une fois les modifications effectuées, appuyez sur le bouton ENTRÉE pour les enregistrer. Pour quitter l'affichage à l'écran, appuyez sur le bouton MENU.
Remarque : tous les paramètres sont enregistrés automatiquement lors de la fermeture de l'affichage à l'écran. Si vous apportez des modifications à l'aspect de l'affichage et que vous ne parvenez pas à rétablir les paramètres d'origine, utilisez l'option RESTAUR. - RAPPEL pour restaurer les paramètres par défaut du DTF-720.
Bouton MenuOuvre ou ferme le menu de l'affichage à l'écran.
Boutons de sélectionUtilisez ces boutons pour sélectionner une option que vous pouvez activer ensuite en appuyant sur le bouton ENTRÉE. Une fois l'option activée, appuyez sur le bouton + pour augmenter la valeur de l'élément sélectionné et sur – pour la diminuer.
Bouton ENTRÉE
Active ou désactive l'option sélectionnée dans le menu de l'affichage à l'écran.
+ –
DTF720_Manual.fm Page 28 Monday, December 22, 2008 12:36 PM
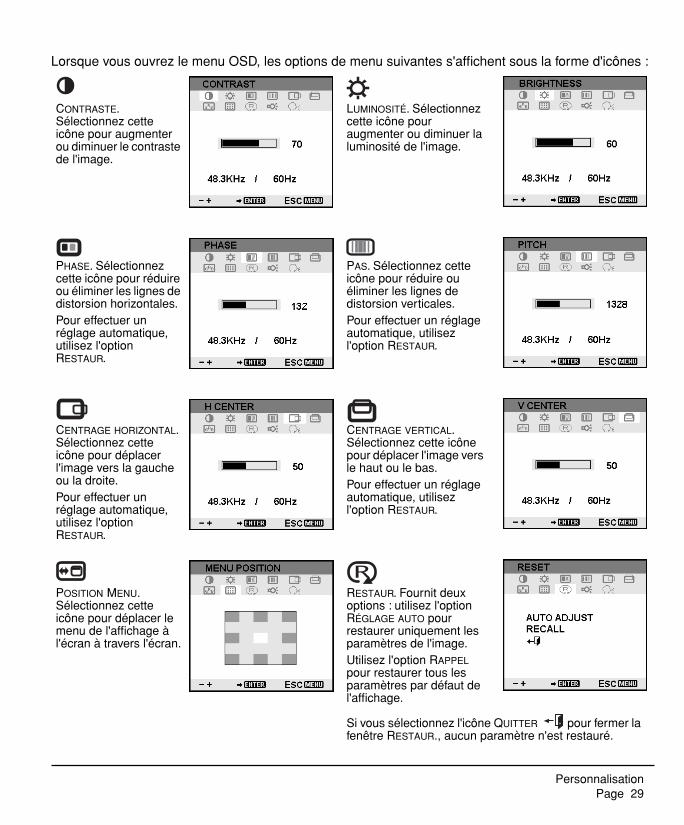
Personnalisation Page 29
Lorsque vous ouvrez le menu OSD, les options de menu suivantes s'affichent sous la forme d'icônes :
CONTRASTE. Sélectionnez cette icône pour augmenter ou diminuer le contraste de l'image.
LUMINOSITÉ. Sélectionnez cette icône pour augmenter ou diminuer la luminosité de l'image.
PHASE. Sélectionnez cette icône pour réduire ou éliminer les lignes de distorsion horizontales. Pour effectuer un réglage automatique, utilisez l'option RESTAUR.
PAS. Sélectionnez cette icône pour réduire ou éliminer les lignes de distorsion verticales.Pour effectuer un réglage automatique, utilisez l'option RESTAUR.
RESTAUR. Fournit deux options : utilisez l'option RÉGLAGE AUTO pour restaurer uniquement les paramètres de l'image.Utilisez l'option RAPPEL pour restaurer tous les paramètres par défaut de l'affichage.
Si vous sélectionnez l'icône QUITTER pour fermer la fenêtre RESTAUR., aucun paramètre n'est restauré.
CENTRAGE VERTICAL. Sélectionnez cette icône pour déplacer l'image vers le haut ou le bas.Pour effectuer un réglage automatique, utilisez l'option RESTAUR.
CENTRAGE HORIZONTAL. Sélectionnez cette icône pour déplacer l'image vers la gauche ou la droite.Pour effectuer un réglage automatique, utilisez l'option RESTAUR.
POSITION MENU. Sélectionnez cette icône pour déplacer le menu de l'affichage à l'écran à travers l'écran.
DTF720_Manual.fm Page 29 Monday, December 22, 2008 12:36 PM

PersonnalisationPage 30
RÉTRO-ÉCLAIRAGE. Sélectionnez cette icône pour augmenter ou diminuer le niveau du rétro-éclairage.
COULEUR. Permet d'obtenir les valeurs de température de couleurs suivantes :9 300˚, 6 500˚ et 5 000˚ Kelvin.L'option DIRECT permet d'afficher le signal reçu tel quel, sans aucun réglage. Lorsque l'option DIRECT est sélectionnée, les paramètres LUMINOSITÉ et CONTRASTE sont également réglés sur DIRECT et ne peuvent pas être réglés manuellement.L'option UTILISATEUR vous permet de régler indépendamment les valeurs Rouge, Bleu et Vert.Sélectionnez un paramètre et appuyez sur ENTRÉE pour activer votre choix.Modifiez le paramètre UTILISATEUR en sélectionnant l'icône ENTRÉE.
Dans la fenêtre COULEUR sous Régl Utilisat, modifiez le rouge, le vert ou le bleu pour calibrer la couleur.Sélectionnez l'icône
QUITTER pour fermer la fenêtre.
LANGUE. Sélectionnez la langue de votre choix pour le menu de l'affichage à l'écran.
DTF720_Manual.fm Page 30 Monday, December 22, 2008 12:36 PM

Personnalisation Page 31
RÉGLAGE DU PAS ET DE LA PHASECertains ordinateurs et cartes vidéo ne prennent pas entièrement en charge la fonction auto-sync lorsque le DTF-720 est connecté en premier. Si certaines portions de texte sont indistinctes, réglez le pas et la phase en suivant la procédure décrite ci-dessous. Pour obtenir une image nette, définissez la résolution de la carte vidéo du DTF-720 sur 1280 x 1024.
• Dans le panneau de configuration du pen tablet, sélectionnez l'onglet ÉTALONNER.
• Si vous utilisez plusieurs écrans, assurez-vous que l'écran correspondant au DTF-720 est sélectionné dans la liste déroulante MONITEUR.
• Cliquez sur le bouton ÉTALONNER... pour afficher la fenêtre d'étalonnage.
• A l'aide des commandes de l'affichage à l'écran, ouvrez le menu correspondant et sélectionnez l'icône PAS. Réglez ensuite le niveau du pas afin que le motif de fines rayures verticales soit uniforme. (Pour plus de détails sur la modification des paramètres OSD, reportez-vous à la section Paramètres de l'affichage à l'écran (OSD), page 28.)
• Dans le menu OSD, sélectionnez l'icône PHASE. Réglez le niveau de phase de manière à ce que le motif de réglage s'affiche clairement.
• Une fois ces réglages effectués, appuyez sur les boutons ENTRÉE et MENU pour quitter le menu de l'affichage à l'écran.Pour quitter la fenêtre d'étalonnage, cliquez sur le bouton ANNULER ou appuyez sur la touche ÉCHAP.
Motif de réglage du pas et de la phase.
DTF720_Manual.fm Page 31 Monday, December 22, 2008 12:36 PM

PersonnalisationPage 32
ÉCONOMIE D'ÉNERGIELe DTF-720 est conforme aux exigences de VESA en matière d'économie d'énergie.
Lorsque vous utilisez le DTF-720 avec un ordinateur ou une carte vidéo conforme à la norme DPMS (Display Power Management Signaling), l'écran adopte automatiquement les paramètres de gestion de l'énergie ci-dessous : Lorsque ces fonctions d'économie d'énergie sont activées, l'écran est plus sombre qu'à l'accoutumée.
* Selon les caractéristiques techniques et paramètres de votre ordinateur et de votre carte vidéo, le voyant d'alimentation peut être systématiquement orange dans les modes veille et sommeil.
Mode ordinateur H-sync V-sync Vidéo Consommation électrique
Voyant d'alimentation
Marche Oui Oui Active 37 W, max. Bleu
Veille Non Oui Supprimée 2 W max. Bleu/Orange*
Mode sommeil Oui Non Supprimée 2 W max. Bleu/Orange*
Arrêt Non Non Supprimée 1 W max. Orange
DTF720_Manual.fm Page 32 Monday, December 22, 2008 12:36 PM

Dépannage Page 33
DÉPANNAGEVotre pen display devrait fonctionner sans le moindre problème. Toutefois, si vous rencontrez des difficultés, procédez comme suit :
1. Si le pilote de la tablette Wacom n'a pas été chargé correctement, effectuez tout d'abord la procédure conseillée dans le message d'erreur affiché à l'écran. Si le problème persiste, reportez-vous aux procédures de dépannage décrites dans ce chapitre.
2. Reportez-vous à la section ci-dessous si le matériel du DTF-720 ne fonctionne pas correctement. Reportez-vous également à la section Dépannage de l'écran, page 35 ou consultez la section Dépannage du pen tablet, page 37. Si votre problème y est décrit, vous pouvez appliquer la solution proposée.
3. Consultez le fichier Lisez-moi du pen display Wacom pour obtenir des informations mises à jour.
4. En cas de problème de compatibilité entre le DTF-720 et un nouveau matériel ou logiciel, reportez-vous à la section Téléchargements de pilotes, à la page 43, pour savoir comment télécharger un pilote mis à jour. Wacom met régulièrement à jour le pilote afin d'assurer la compatibilité avec les nouveaux produits.
5. Consultez la page FAQ (foire aux questions) sur le site Wacom de votre pays.
6. Si vous avez suivi les indications fournies dans ce manuel et que le problème persiste, contactez le service d'assistance technique de Wacom. Consultez le fichier Lisez-moi pour obtenir des informations sur l'assistance disponible dans votre pays.
TEST DU DTF-7201. Si le voyant du DTF-720 ne s'allume pas, vérifiez les points suivants :
• Tout d'abord, vérifiez que le voyant vert de l'adaptateur secteur est allumé. Si ce n'est pas le cas, vérifiez que le câble d'alimentation est bien raccordé à l'adaptateur secteur et à une prise secteur alimentée.
• Vérifiez que le câble de l'adaptateur secteur est correctement connecté au câble d'alimentation du DTF-720 et que l'interrupteur du DTF-720 est en position de mise sous tension. Le voyant d'alimentation du DTF-720 devient orange ou bleu lorsque le DTF-720 est sous tension.
Important : n'utilisez que l'adaptateur secteur fourni avec votre pen display. L'utilisation d'autres adaptateurs risquerait d'endommager le produit.
2. Si rien ne s'affiche à l'écran, procédez comme suit :
• Vérifiez que l'ordinateur est sous tension. Le voyant est bleu lorsque l'appareil reçoit un signal vidéo adéquat. Il est orange s'il ne détecte pas de signal vidéo ou si l'ordinateur est en mode veille.
• Vérifiez que le DTF-720 est branché sur un connecteur VGA actif.
• Vérifiez que votre carte vidéo a été correctement installée et qu'elle fonctionne. Si vous disposez d'un autre écran compatible avec votre carte vidéo, connectez-le à la carte pour vérifier si cette dernière fonctionne correctement.
DTF720_Manual.fm Page 33 Monday, December 22, 2008 12:36 PM

DépannagePage 34
3. Vérifiez que la tablette et le stylet fonctionnent :
• Appuyez la pointe de celui-ci sur la tablette et vérifiez que le voyant d'état s'allume en bleu.
• Si le voyant ne s'allume pas, vérifiez que le câble USB du DTF-720 est branché sur un port USB actif. Si le DTF-720 est relié à un concentrateur USB, essayez de le brancher directement sur le port USB de votre ordinateur.
• Assurez-vous que le port USB utilisé n'est pas désactivé. Il peut être nécessaire de vérifier la configuration du BIOS de votre système pour vous assurer que le DTF-720 est bien connecté à un port USB actif.
• Le voyant d'état est bleu lorsque le DTF-720 est détecté en tant que périphérique USB et que la pointe du stylet exerce une pression sur l'écran.
4. Vérifiez le stylet. Si vous ne parvenez pas à effectuer de sélection sur l'écran à l'aide du stylet, procédez comme suit :
• Vérifiez le stylet en appuyant la pointe sur le pen display. L'indicateur d'état doit s'allumer en bleu.
• Sans exercer de pression sur la pointe du stylet, mais en la maintenant à moins de 5 mm de la surface du pen display, appuyez sur le bouton latéral. Le voyant d'état doit de nouveau s'allumer en bleu.
• Si le voyant ne passe pas au bleu lors de ces tests, assurez-vous que vous utilisez bien le stylet fourni avec le DTF-720.
Si le problème persiste, votre pen display ou votre stylet est peut-être défectueux.
DTF720_Manual.fm Page 34 Monday, December 22, 2008 12:36 PM

Dépannage Page 35
DÉPANNAGE DE L'ÉCRANEn cas de problème avec l'écran du DTF-720, consultez les tableaux suivants. Le problème que vous rencontrez y est peut-être répertorié : vous pouvez alors tenter de le résoudre à l'aide de la solution proposée. Pour en savoir plus sur les problèmes relatifs à la couleur, reportez-vous à la documentation qui accompagne le système d'exploitation et vos applications.
PROBLÈMES GÉNÉRAUX LIÉS À L'ÉCRAN
Aucun affichage. Le voyant d'alimentation est éteint.
• Vérifiez que le câble d'alimentation en courant alternatif est connecté et que l'interrupteur d'alimentation du DTF-720 est en position de mise sous tension.
Aucun affichage. Le voyant d'alimentation s'allume en bleu.
• Vérifiez les commandes du contraste, de la luminosité et du rétro-éclairage. Effectuez les réglages nécessaires ou ouvrez le menu de l'affichage à l'écran, accédez au menu RESTAUR. et sélectionnez l'option RAPPEL.
Le voyant d'alimentation s'allume en orange.Le message suivant apparaît brièvement à l'écran :
• Votre ordinateur est peut-être en mode de gestion de l'alimentation. Touchez l'écran avec la pointe du stylet, déplacez la souris ou appuyez sur une touche du clavier.
• Assurez-vous que la carte vidéo est correctement installée.• Eteignez votre ordinateur et le DTF-720 pen display et vérifiez
qu'aucune broche du câble vidéo n'est pliée ou cassée. Ensuite, branchez correctement le câble vidéo et remettez le DTF-720 et l'ordinateur sous tension.
Le message suivant apparaît brièvement à l'écran :
• Vérifiez que l'ordinateur est sous tension.• Vérifiez si vous utilisez le câble vidéo fourni avec le DTF-720.• Assurez-vous que le câble vidéo du DTF-720 est correctement
raccordé.• Mettez l'ordinateur et la tablette DTF-720 hors tension, puis vérifiez
que les broches du connecteur du câble vidéo et des adaptateurs vidéo ne sont ni tordues ni cassées. Ensuite, connectez correctement le câble vidéo et les adaptateurs nécessaires.
Le message suivant apparaît brièvement à l'écran :
• La définition de la fréquence du signal d'entrée est mauvaise ou incompatible avec le DTF-720. Connectez un autre écran et définissez le taux de rafraîchissement (fréquence verticale) sur une valeur comprise entre 50 et 75 Hz. Si le pilote de votre carte vidéo prend en charge le réglage de la fréquence horizontale, assurez-vous qu'elle est définie sur une valeur comprise entre 30 et 80 kHz.
• La résolution définie est trop élevée (1 280 x 1 024 au maximum).• Le taux de rafraîchissement défini est trop élevé (75 Hz au
maximum).• Définissez les propriétés de l'affichage pour que les moniteurs
plug-and-play soient détectés.
DTF720_Manual.fm Page 35 Monday, December 22, 2008 12:36 PM

DépannagePage 36
PROBLÈMES LIÉS AU MODE VGA
L'image apparaît plusieurs fois sur l'écran.
• Ne prolongez pas le câble vidéo. N'utilisez pas de boîtier de commutation avec sélecteur d'entrée.
Lorsqu'une image est affichée pendant une longue période sans que l'écran ne soit réactualisé, une image après mise à jour reste quelques instants à l'écran.
• Utilisez un économiseur d'écran ou un autre outil de gestion de l'alimentation.
La couleur est inexacte. • Ouvrez le menu de l'affichage à l'écran, accédez au menu RESTAUR., puis sélectionnez l'option RAPPEL.
• Toute modification au réglage du contraste doit s'effectuer par petits incréments car celles-ci peuvent affecter l'exactitude des couleurs.
La couleur blanche n'apparaît pas en blanc.
• Vérifiez que l'écran fonctionne avec les paramètres d'usine par défaut. Si le problème persiste, réglez la couleur. Pour obtenir plus de détails sur la gestion des couleurs, veuillez vous reporter à la documentation de votre système d'exploitation et de vos applications.
• Assurez-vous que le câble vidéo et les connecteurs sont correctement raccordés.
L'affichage ondule ou tremble. • Ouvrez le menu de l'affichage à l'écran, accédez au menu RESTAUR. et sélectionnez l'option RÉGLAGE AUTO. Réglez ensuite, si nécessaire, le pas et la phase manuellement.
• Assurez-vous que l'adaptateur de l'écran et la carte vidéo sont adaptés au DTF-720.
• Réglez le taux de rafraîchissement dans les Propriétés d'affichage du panneau de configuration.
L'affichage n'est pas clair. Le texte ou d'autres portions de l'écran sont flous.
• Définissez la résolution de la carte vidéo du DTF-720 sur 1 280 x 1 024.
• Éteignez le DTF-720 et rallumez-le.• Ouvrez le menu de l'affichage à l'écran, accédez au menu RESTAUR.
et sélectionnez l'option RÉGLAGE AUTO. Réglez ensuite, si nécessaire, la luminosité, le pas et la phase manuellement.
L'écran et la tablette LCD ne sont pas alignés. La taille d'affichage n'est pas correcte.
• Ouvrez le menu de l'affichage à l'écran, accédez au menu RESTAUR. et sélectionnez l'option RÉGLAGE AUTO.
• Si nécessaire, réglez le pas et la phase ainsi que la position horizontale et verticale. Notez que certaines cartes vidéo modifient la taille d'affichage.
L'affichage ondule ou présente un moirage. La couleur de l'affichage n'est pas homogène.
• Ouvrez le menu de l'affichage à l'écran, accédez au menu RESTAUR. et sélectionnez l'option RÉGLAGE AUTO. Si le problème persiste, accédez au menu RESTAUR. et sélectionnez l'option RAPPEL pour rétablir les paramètres par défaut de l'écran.
• Si nécessaire, réglez le pas et la phase.
DTF720_Manual.fm Page 36 Monday, December 22, 2008 12:36 PM

Dépannage Page 37
DÉPANNAGE DU PEN TABLETSi vous rencontrez des problèmes avec le DTF-720 Interactive Pen Display, reportez-vous aux tableaux suivants. Si le problème rencontré y est mentionné, essayez la solution proposée. Pensez également à consulter le fichier Lisez-moi du DTF-720 pour obtenir des informations de dépannage de dernière minute.
Pour plus d'informations, visitez le site Web de Wacom à l'adresse suivante : http://www.wacom-europe.com/int/support/index.asp?lang=fr et sélectionnez FAQ.
PROBLÈMES GÉNÉRAUX
L'ordinateur n'a pas de port USB disponible.
Vérifiez qu’il existe bien un port USB disponible sur un concentrateur USB. Si ce n'est pas le cas, vous devrez ajouter un concentrateur USB ou une carte USB.
Un périphérique USB branché sur l'un des ports USB intégrés du pen display ne fonctionne pas.
1. Assurez-vous que le pen display est bien connecté à un port USB en état de marche de votre ordinateur.
2. Assurez-vous également que le pen display est sous tension et que les voyants sont bleus. Le DTF-720 contient un concentrateur USB et des ports USB intégrés qui ne fonctionnent pas lorsque l'alimentation est coupée.
3. Si le périphérique USB ne fonctionne pas, essayez de le brancher directement à un port USB de votre ordinateur.
4. Si le périphérique USB ne fonctionne toujours pas, contactez le fabricant de ce périphérique.
Le voyant d'alimentation du pen display est éteint.
Assurez-vous que l'interrupteur d'alimentation du pen display est en position de mise sous tension.
Vérifiez que l'adaptateur secteur est branché sur le pen display et sur une prise de courant qui fonctionne.
Utilisez uniquement l'adaptateur secteur fourni avec le pen display, sans quoi vous risquez d'endommager le produit.
Le stylet fonctionne uniquement en mode Souris et ne permet pas d'utiliser la fonction de sensibilité à la pression pour les travaux de dessin ou d'écriture.
Le pilote de la tablette n'est pas installé ou ne s'est pas chargé correctement. Vérifiez que le pilote de la tablette est installé et fonctionne correctement. Installez le pilote logiciel du pen tablet en suivant les instructions fournies à la section Installation de ce manuel.
Le stylet ne permet pas d'utiliser la fonction de sensibilité à la pression pour les travaux de dessin ou d'écriture.
Dans certaines applications, il est nécessaire d'activer les fonctions de pression pour que le stylet soit sensible à la pression.
Vérifiez également que votre application prend en charge la fonction de sensibilité à la pression.
La production d'un clic est difficile.
Ouvrez le panneau de configuration Propriétés de la tablette et cliquez sur l'onglet Stylet. Essayez d'utiliser un TOUCHER DE LA POINTE plus doux.
DTF720_Manual.fm Page 37 Monday, December 22, 2008 12:36 PM

DépannagePage 38
Le stylet sélectionne tout ou ne s’arrête pas de tracer.
Ouvrez le panneau de configuration Propriétés de la tablette et cliquez sur l'onglet STYLET. Déplacez la glissière TOUCHER DE LA POINTE vers FERME. Si le problème persiste, reportez-vous à la section Test du DTF-720, page 33.
La production d'un double-clic est difficile.
Vérifiez que vous appuyez rapidement le stylet à deux reprises et au même endroit sur la surface active du pen display. Wacom vous recommande d’utiliser le bouton latéral pour effectuer un double-clic.
Ouvrez le panneau de configuration Propriétés de la tablette et cliquez sur l'onglet STYLET. Essayez d'augmenter la DISTANCE DU DOUBLE-CLIC ou utilisez un TOUCHER DE LA POINTE plus doux.
Sous Windows : essayez de paramétrer votre système pour qu'il démarre les programmes sur un simple clic. Reportez-vous à la section Fonctionnement du stylet, page 18.
Vous remarquez un retard d'affichage à l'écran lorsque vous commencez à dessiner.
Ouvrez le panneau de configuration Propriétés de la tablette et cliquez sur l'onglet STYLET. Essayez de diminuer la DISTANCE DU DOUBLE-CLIC.
Vous devez appuyer fermement avec le stylet lorsque vous cliquez, que vous dessinez ou que vous écrivez.
Ouvrez le panneau de configuration Propriétés de la tablette et cliquez sur l'onglet STYLET. Déplacez la glissière TOUCHER DE LA POINTE vers DOUX.
La pointe du stylet ne fonctionne pas.
Assurez-vous que vous utilisez le stylet fourni avec votre tablette. Il se peut que les autres stylets ne fonctionnent pas correctement avec le DTF-720 Pen Display.
Assurez-vous que le voyant d'état s'allume en bleu lorsque vous appuyez sur la pointe. Si le voyant ne s'allume pas, vérifiez que le câble USB est raccordé à un port actif de l'ordinateur ou à un concentrateur USB.
Si le voyant d'état ne s'allume toujours pas, il se peut que votre matériel soit défectueux (reportez-vous à la section Dépannage, page 33).
DTF720_Manual.fm Page 38 Monday, December 22, 2008 12:36 PM
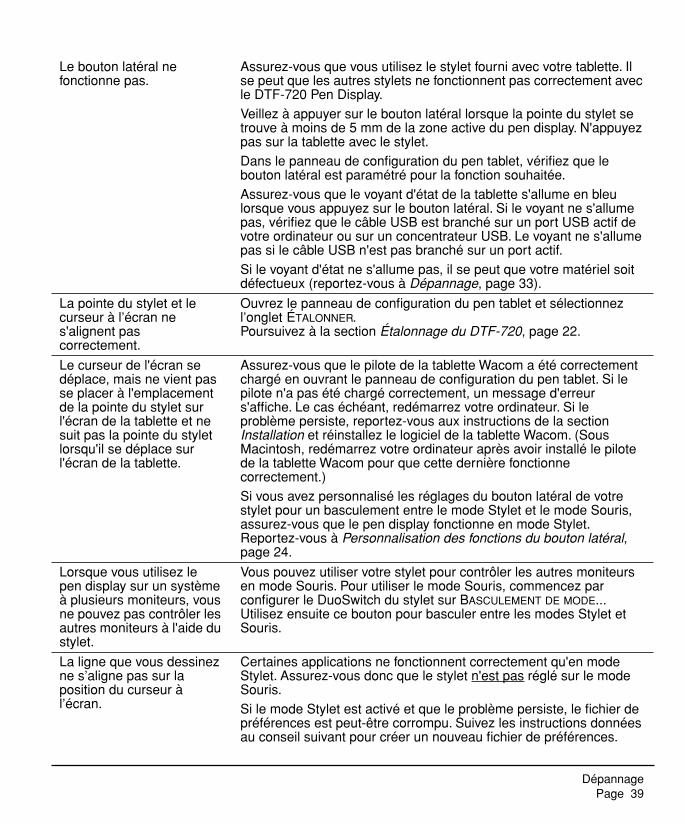
Dépannage Page 39
Le bouton latéral ne fonctionne pas.
Assurez-vous que vous utilisez le stylet fourni avec votre tablette. Il se peut que les autres stylets ne fonctionnent pas correctement avec le DTF-720 Pen Display.
Veillez à appuyer sur le bouton latéral lorsque la pointe du stylet se trouve à moins de 5 mm de la zone active du pen display. N'appuyez pas sur la tablette avec le stylet.
Dans le panneau de configuration du pen tablet, vérifiez que le bouton latéral est paramétré pour la fonction souhaitée.
Assurez-vous que le voyant d'état de la tablette s'allume en bleu lorsque vous appuyez sur le bouton latéral. Si le voyant ne s'allume pas, vérifiez que le câble USB est branché sur un port USB actif de votre ordinateur ou sur un concentrateur USB. Le voyant ne s'allume pas si le câble USB n'est pas branché sur un port actif.
Si le voyant d'état ne s'allume pas, il se peut que votre matériel soit défectueux (reportez-vous à Dépannage, page 33).
La pointe du stylet et le curseur à l’écran ne s'alignent pas correctement.
Ouvrez le panneau de configuration du pen tablet et sélectionnez l’onglet ÉTALONNER. Poursuivez à la section Étalonnage du DTF-720, page 22.
Le curseur de l'écran se déplace, mais ne vient pas se placer à l'emplacement de la pointe du stylet sur l'écran de la tablette et ne suit pas la pointe du stylet lorsqu'il se déplace sur l'écran de la tablette.
Assurez-vous que le pilote de la tablette Wacom a été correctement chargé en ouvrant le panneau de configuration du pen tablet. Si le pilote n'a pas été chargé correctement, un message d'erreur s'affiche. Le cas échéant, redémarrez votre ordinateur. Si le problème persiste, reportez-vous aux instructions de la section Installation et réinstallez le logiciel de la tablette Wacom. (Sous Macintosh, redémarrez votre ordinateur après avoir installé le pilote de la tablette Wacom pour que cette dernière fonctionne correctement.)
Si vous avez personnalisé les réglages du bouton latéral de votre stylet pour un basculement entre le mode Stylet et le mode Souris, assurez-vous que le pen display fonctionne en mode Stylet. Reportez-vous à Personnalisation des fonctions du bouton latéral, page 24.
Lorsque vous utilisez le pen display sur un système à plusieurs moniteurs, vous ne pouvez pas contrôler les autres moniteurs à l'aide du stylet.
Vous pouvez utiliser votre stylet pour contrôler les autres moniteurs en mode Souris. Pour utiliser le mode Souris, commencez par configurer le DuoSwitch du stylet sur BASCULEMENT DE MODE... Utilisez ensuite ce bouton pour basculer entre les modes Stylet et Souris.
La ligne que vous dessinez ne s’aligne pas sur la position du curseur à l’écran.
Certaines applications ne fonctionnent correctement qu'en mode Stylet. Assurez-vous donc que le stylet n'est pas réglé sur le mode Souris.
Si le mode Stylet est activé et que le problème persiste, le fichier de préférences est peut-être corrompu. Suivez les instructions données au conseil suivant pour créer un nouveau fichier de préférences.
DTF720_Manual.fm Page 39 Monday, December 22, 2008 12:36 PM

DépannagePage 40
Vous pensez que les préférences du pen tablet sont corrompues ou vous voulez vous assurer que tous les paramètres sont réglés sur leur valeur par défaut.
Supprimez les préférences du pen tablet comme suit :
Windows : cliquez sur l'icône DÉMARRER, puis sélectionnez TOUS LES PROGRAMMES. Ensuite, sélectionnez TABLETTE et UTILITAIRE DES FICHIERS DE PRÉFÉRENCES DE LA TABLETTE. Dans la boîte de dialogue qui s'affiche, cliquez sur le bouton SUPPRIMER MON FICHIER PRÉFÉRENCES pour supprimer les préférences de l'utilisateur actuel. Pour supprimer les préférences de plusieurs utilisateurs sous Windows Vista ou Windows XP, cliquez sur le bouton SUPPRIMER TOUS LES FICHIERS PRÉFÉRENCES. Notez que vous devez disposer de droits d'administrateur pour pouvoir supprimer les préférences de tous les utilisateurs. Relancez toutes les applications relatives à la tablette en cours d'utilisation.
Sous Macintosh : dans le cas d'un utilisateur unique, supprimez les préférences de la tablette en sélectionnant le dossier DÉPART dans le menu ALLER. Ensuite, ouvrez le dossier BIBLIOTHÈQUE. Dans le dossier BIBLIOTHÈQUE, ouvrez le dossier PREFERENCES et supprimez le fichier COM.WACOM.WACOMTABLET.PREFS. Déconnectez-vous, puis reconnectez-vous. Lorsque le pilote de la tablette se charge, il crée un nouveau fichier de préférences comportant les paramètres par défaut.
Dans le cas d'utilisateurs multiples, supprimez toutes les préférences de la tablette : ouvrez le dossier principal APPLICATIONS. Ouvrez ensuite le dossier TABLETTE WACOM et exécutez l'utilitaire SUPPRIMER LA TABLETTE WACOM. Au démarrage de l'utilitaire, cliquez sur le bouton SUPPRIMER TOUS LES FICHIERS PRÉFÉRENCES. Le pilote de la tablette redémarre, créant de nouveaux fichiers de préférences avec les paramètres par défaut.
Réétalonnez la tablette.Remarque : ne supprimez pas manuellement le fichier WACOM TABLET.PREFPANE du dossier principal BIBLIOTHÈQUE PREFERENCE PANES. Ce fichier ne doit être supprimé que lorsque vous désinstallez le pilote de la tablette, et uniquement à l'aide de l'utilitaire SUPPRIMER LA TABLETTE WACOM.
L'ordinateur ne se met pas en veille.
Si vous n'utilisez pas le stylet, retirez-le de la surface du pen display. Si vous ne le faites pas, le pen display continuera à envoyer des données, empêchant l'ordinateur de se mettre en veille.
Le curseur de l'écran revient en arrière lors de l’utilisation de la souris ou de la trackball.
Lorsque vous n'utilisez pas le stylet, rangez-le dans son logement ou posez-le à côté du pen display (ne posez pas le stylet sur l'écran). Si vous laissez le stylet sur l'écran, vous risquez de perturber le positionnement du curseur à l'écran lorsque vous utilisez d'autres périphériques de saisie.
Le curseur se déplace de manière irrégulière ou par bonds lorsqu'une autre tablette est connectée à votre ordinateur.
La tablette du DTF-720 émet des ondes électromagnétiques à une certaine fréquence. Si une autre tablette est placée trop près du DTF-720, il est possible qu'elle interfère avec la position du curseur à l'écran. Si tel est le cas, éloignez la tablette du DTF-720.
DTF720_Manual.fm Page 40 Monday, December 22, 2008 12:36 PM
Dépannage Page 41
PROBLÈMES SPÉCIFIQUES À WINDOWS
PROBLÈMES SPÉCIFIQUES À MACINTOSH
Après avoir modifié les paramètres pour gaucher et droitier du panneau de configuration de la souris de l'ordinateur, la pointe du stylet ne fonctionne plus correctement.
Redémarrez Windows pour que les paramètres de votre outil Wacom soient correctement détectés.
Au démarrage, une boîte de dialogue s'affiche et signale que le pilote n'a pas pu être chargé ou que les préférences de la tablette n'ont pas encore été créées.
Le pen display n'a pas été détecté au démarrage. Assurez-vous que le câble d'interface USB est correctement connecté à un port USB actif de l'ordinateur ou à un concentrateur USB. Assurez-vous que le voyant d'alimentation du pen display est allumé. Si le problème persiste, reportez-vous à la section Dépannage, page 33.
Dans le menu ALLER, sélectionnez le dossier UTILITAIRES, puis lancez l'icône INFORMATIONS SYSTÈME. Sélectionnez USB dans la section MATÉRIEL de la liste TABLE DES MATIÈRES. Un modèle de pen display USB Wacom doit apparaître dans la liste. Si aucun pen display USB ne figure dans la liste, vérifiez la connexion au niveau du câble du pen display ou branchez le pen display sur un autre port USB.
Si cela ne change rien au problème, contactez l'assistance technique de Wacom. Reportez-vous à la section Options d'assistance technique, page 42.
L'Encrier ne fonctionne pas correctement avec le pen display.
Le problème est peut-être dû aux préférences d'Inkwell. Supprimez les fichiers de préférence endommagés comme indiqué ci-dessous. Ils seront créés à nouveau lorsque vous activerez la reconnaissance d'écriture.1. Sélectionnez PRÉFÉRENCES SYSTÈME dans le menu Pomme, puis TOUT
AFFICHER et INK. Ensuite, désactivez la reconnaissance d'écriture.2. Dans le menu ALLER, sélectionnez le dossier DÉPART. Ouvrez les dossiers
BIBLIOTHÈQUE et PREFERENCES. Ensuite, supprimez les préférences suivantes :
• com.apple.ink.framework.plist
• com.apple.ink.inkpad.plist
• com.apple.ink.inkpad.sketch
3. Retournez aux options PRÉFÉRENCES SYSTÈME et INK, puis activez la reconnaissance d'écriture.
4. Testez la fonction de l'Encrier à l'aide de votre pen display Wacom et du stylet.
5. Si cette procédure n'a pas permis de résoudre le problème, contactez l'assistance technique d'Apple. Wacom n'a pas créé ou programmé la fonction Inkwell et nos capacités d'assistance pour l'application d'un tiers sont limitées.
DTF720_Manual.fm Page 41 Monday, December 22, 2008 12:36 PM

DépannagePage 42
OPTIONS D'ASSISTANCE TECHNIQUESi vous rencontrez un problème avec votre DTF-720 Interactive Pen Display, consultez tout d'abord la section Installation concernée de ce guide pour vous assurer que l'installation a été effectuée correctement. Reportez-vous ensuite aux procédures Dépannage.
Si vous ne trouvez pas de solution dans ce guide, elle figure peut-être dans le fichier Lisez-moi adapté à votre plate-forme (que vous trouverez sur le CD du pilote du pen tablet Wacom). Consultez également la page FAQ (Foire aux questions) sur le site Wacom de votre pays.
Si vous êtes connecté à Internet, vous pouvez télécharger les pilotes les plus récents sur le site Wacom de votre pays. Reportez-vous à la section Téléchargements de pilotes, page 43.
Si le problème persiste et que vous pensez que votre produit Wacom est défectueux, contactez le service d'assistance de Wacom dans la région où vous avez acheté le produit. Vous trouverez les coordonnées dans le fichier Lisez-moi de la tablette Wacom, sur le CD du pilote de la tablette à stylet.
Lorsque vous contactez Wacom, tenez-vous à proximité de votre ordinateur et veillez à disposer des informations ou éléments suivants :
• le présent manuel ;
• le numéro de série de la tablette (indiqué sur l'étiquette située au dos de l'appareil) ;
• le numéro de version du pilote (reportez-vous au CD du pilote de la tablette à stylet Wacom ou au panneau de configuration de la tablette à stylet) ;
• la marque et le modèle de votre ordinateur, ainsi que le numéro de version de votre système d'exploitation ;
• la marque, le modèle et le type de connexion de votre carte vidéo ;
• une liste des périphériques branchés sur votre ordinateur ;
• le nom et la version de l'application logicielle que vous utilisiez lorsque le problème s'est produit ;
• la transcription exacte de tout message d'erreur qui s'est affiché à l'écran.
• ce qui s'est passé et ce que vous étiez en train de faire lorsque le problème est survenu.
• la manière dont vous avez tenté de résoudre le problème.
DTF720_Manual.fm Page 42 Monday, December 22, 2008 12:36 PM
Dépannage Page 43
TÉLÉCHARGEMENTS DE PILOTESWacom met régulièrement à jour le pilote du pen display afin d'assurer la compatibilité avec les nouveaux produits. Si vous rencontrez un problème de compatibilité entre votre DTF-720 Pen Display et un nouveau matériel ou logiciel, il peut être utile de télécharger un nouveau pilote (si disponible) pour votre Pen Tablet Wacom.
États-Unis, Canada, Amérique centrale et Amérique du Sud
Europe, Moyen-Orient et Afrique
Japon
Asie Pacifique (anglais)
Chine
Corée
Taïwan
Site Web : http://www.wacom.com/productsupport Téléchargement de pilotes
Site Web : http://www.wacom.eu Mises à jour logicielles
Site FTP anonyme : ftp://ftp.wacom.eu/pub/ Mises à jour logicielles
Site Web : http://tablet.wacom.co.jp Mises à jour logicielles (en japonais)
Site Web : http://www.wacom-asia.com Mises à jour logicielles (en anglais)
Site Web : http://www.wacom.com.cn Mises à jour logicielles (en chinois simplifié)
Site Web : http://www.wacomkorea.com Mises à jour logicielles (en coréen)
Site Web : http://www.wacom.com.tw Mises à jour logicielles (en chinois non simplifié)
DTF720_Manual.fm Page 43 Monday, December 22, 2008 12:36 PM

AnnexesPage 44
ANNEXESENTRETIEN DU DTF-720Veillez à la propreté du stylet et de la surface de l'écran LCD de la tablette DTF-720. La poussière et les saletés peuvent adhérer à votre stylet et entraîner l'usure de la surface de l'écran. Un nettoyage régulier contribuera à prolonger la durée de vie de la surface de votre écran LCD et de votre stylet. Conservez le DTF-720 et son stylet dans un endroit propre et sec, en évitant les températures trop élevées ou trop basses. La température ambiante est celle qui convient le mieux. Le DTF-720 et son stylet ne sont pas faits pour être démontés. Ne démontez pas la tablette, au risque de rendre la garantie caduque.
Important : veillez à ne jamais renverser de liquides sur le pen display ou le stylet. Veillez tout particulièrement à protéger l'écran, les boutons et la pointe du stylet de l'humidité : leurs composants électroniques sensibles cesseront de fonctionner si du liquide pénètre à l'intérieur.
NETTOYAGEPour nettoyer le boîtier du DTF-720 ou le stylet, utilisez un chiffon doux et humide. Vous pouvez également tremper légèrement le chiffon dans une eau savonneuse diluée avec beaucoup d'eau. N'utilisez pas de diluant, de benzène, d'alcool ou autres solvants pour nettoyer le boîtier, le socle ou le stylet.
Pour nettoyer l'écran, utilisez un chiffon antistatique ou légèrement humide. Pendant le nettoyage, n'exercez qu'une pression légère sur l'écran et ne le mouillez pas. N'utilisez pas de détergent pour nettoyer l'écran. Vous risqueriez d'endommager son revêtement. Veuillez noter que ce type de dommage n'est pas couvert par la garantie du fabricant.
DTF720_Manual.fm Page 44 Monday, December 22, 2008 12:36 PM

Annexes Page 45
REMPLACEMENT DE LA POINTE DU STYLETLa pointe du stylet finit par s'user à la suite d'une utilisation normale. Une pression excessive peut user prématurément la pointe. L'utilisation d'une pointe usée risque d'endommager la pellicule protectrice de l'écran du DTF-720. Pour éviter que cela ne se produise, remplacez régulièrement la pointe du stylet.
Lorsque la pointe est usée ou que l'un de ses bords devient coupant, vous pouvez la remplacer par une des pointes supplémentaires fournies avec le stylet.
Important : lorsque vous n'utilisez pas votre stylet, placez-le sur le range-stylet ou posez-le à plat sur le bureau. Pour préserver la sensibilité de votre stylet, ne le rangez pas sur un support où il reposera sur sa pointe.
Pour enlever l’ancienne pointe :Saisissez-la à l'aide d'un outil d'extraction de pointe Wacom, d'une pince à épiler, d'une pince fine ou d'un instrument de ce type, et retirez-la du stylet en tirant bien droit.
Pour insérer une nouvelle pointe :Faites ensuite glisser la nouvelle pointe tout droit dans le cylindre du stylet. Poussez fermement la pointe jusqu’à ce qu’elle se bloque. La nouvelle pointe glissera dans la position correcte.
AVERTISSEMENT Veillez à ce que les enfants n'avalent pas la pointe du stylet ou le bouton latéral. La pointe du stylet et le bouton latéral peuvent se détacher du stylet si les enfants tentent de les mordre.
DTF720_Manual.fm Page 45 Monday, December 22, 2008 12:36 PM

AnnexesPage 46
UTILISATION D'UN SUPPORT OU D'UN SOCLE DIFFÉRENTSi vous devez utiliser le DTF-720 dans une installation nécessitant une plate-forme de montage différente, retirez le socle réglable de l'unité et montez-la sur n'importe quel bras ou socle conforme à la norme VESA 75.
Des vis de montage d'un diamètre de 4 mm, d'un pas de 0,7 mm (M4 normal) et d'une profondeur de 15 mm sont requises. En cas de profondeur supérieure à 15 mm, les composants internes du DTF-720 seront endommagés.
Pour démonter le socle réglable et fixer le DTF-720 à une autre plate-forme :
1. Mettez l'ordinateur et le DTF-720 hors tension. Déconnectez ensuite tous les câbles reliant l'appareil et l'ordinateur.
2. Protégez la surface de l'écran en recouvrant une surface plane d'un chiffon doux et en plaçant la surface de l'écran du DTF-720 contre ce chiffon.
3. Retirez les quatre vis et soulevez le socle réglable pour le détacher de l'appareil.
4. En utilisant les vis adaptées à votre plate-forme de montage, attachez solidement le DTF-720 à l'autre plate-forme.
5. Reportez-vous aux instructions de la section Installation commençant à la page 10 pour relier le câble.
ATTENTION Lorsque vous montez le DTF-720 sur une plate-forme différente, veillez à suivre toutes les instructions de la documentation fournie par le fabricant de la plate-forme. S'il est mal installé, l'appareil est susceptible de tomber et de provoquer ainsi des dommages ou des blessures physiques.
DTF720_Manual.fm Page 46 Monday, December 22, 2008 12:36 PM

Annexes Page 47
POSSIBILITÉS RELATIVES AU STYLET ET À L'ENCRAGE NUMÉRIQUE DANS WINDOWS VISTAMicrosoft Windows Vista propose une assistance complète pour la saisie à l'aide du stylet et du Touch Ring. Lorsque vous utilisez le DTF-720 avec un ordinateur équipé de Windows Vista, votre expérience s'enrichit d'une prise de notes efficace, de la reconnaissance de l'écriture manuscrite, d'une navigation rapide et d'autres options d'encrage numérique conçues pour fournir des résultats rapides et intuitifs avec le stylet Wacom.
• Prise de notes. Utilisez le stylet Wacom pour prendre des notes et capturer des croquis rapides dans Windows Journal. Journal simule un bloc-notes physique, mais avec les avantages de la prise de notes numérique. Vous avez le choix entre de nombreux stylets, marqueurs et surligneurs. Journal inclut également un puissant moteur de recherche, capable de localiser même votre contenu manuscrit.
• Reconnaissance de l'écriture manuscrite. Dans la mesure où Windows Vista inclut de puissantes fonctions de reconnaissance de l'écriture, vous pouvez vous servir du stylet Wacom pour saisir rapidement des informations manuscrites partout où l'ordinateur accepte une entrée dactylographiée. Vous pouvez à tout moment convertir votre contenu manuscrit en texte dactylographié.
• Mouvements. Utilisez le stylet Wacom pour associer des gestes simples sur le pen display au déclenchement d'actions personnalisables pour la navigation, l'édition et d'autres fonctions. Pour personnaliser vos gestes, sélectionnez l'onglet RACCOURCIS dans le panneau de configuration STYLET ET PÉRIPHÉRIQUES D'ENTRÉE.
• Encre numérique dans Microsoft Office 2007. Utilisez le stylet Wacom pour profiter pleinement des outils avancés de balisage et d'encrage numériques disponibles dans les applications Microsoft Office 2007 qui tournent sur Windows Vista. Ces outils, accessibles sous l'onglet RÉVISION dans les applications concernées, fournissent un ensemble d'options d'encrage cohérent. Pour un accès rapide, vous pouvez ajouter des outils d'encrage spécifiques à la barre d'accès rapide située au-dessus de chaque application.
Remarque : les solutions suivantes du pilote du pen tablet améliorent les dessins sous Vista :
• Les raccourcis et la fonction « appui et maintien du bouton droit » de la souris dans Vista sont désactivés dans les applications graphiques utilisant l'API Wintab.
• Lorsque les raccourcis et la fonction « appui et maintien du bouton droit » de la souris sont désactivés dans le panneau de configuration STYLET ET PÉRIPHÉRIQUES D'ENTRÉE de Vista, la sensibilité à la pression ne fonctionne pas avec Journal ni avec d'autres fonctions d'encrage de Vista.
DTF720_Manual.fm Page 47 Monday, December 22, 2008 12:36 PM

AnnexesPage 48
À PROPOS DU PANNEAU DE SAISIE TABLET PC DE WINDOWS VISTALe panneau de saisie Tablet PC de Windows Vista vous permet d'utiliser l'écriture ou un clavier virtuel pour saisir du texte directement avec le stylet Wacom. Il existe plusieurs façons de lancer le panneau de saisie :
• Cliquez sur l'icône Panneau de saisie qui apparaît lorsque vous déplacez le curseur de l'écran dans une zone de saisie de texte.
• Cliquez sur l'onglet Panneau de saisie, situé par défaut sur le bord gauche de l'écran.
• Cliquez sur l'icône Panneau de saisie Tablet PC, située dans la barre des tâches Windows. Si l'icône n'est pas visible, cliquez avec le bouton droit dans la barre des tâches, sélectionnez BARRES D'OUTILS, puis PANNEAU DE SAISIE TABLET PC.
Pour personnaliser le panneau de saisie :
1. Ouvrez d'abord le panneau de saisie, puis cliquez sur OUTILS dans la barre de menus.
2. Sélectionnez OPTIONS pour ouvrir la boîte de dialogue des options du panneau de saisie.
3. Personnalisez le panneau de saisie en fonction de votre manière de travailler.
Pour plus d'informations sur l'utilisation du stylet Wacom dans Microsoft Windows Vista et Office 2007, lisez la documentation fournie avec votre système et les applications Microsoft Office. Profitez des outils de formation de Windows Vista, notamment le tutoriel sur le Tablet PC, disponibles chez Microsoft.
Visitez également le site Web de Wacom (www.wacom.com/vista) pour un complément d'informations sur l'utilisation du stylet Wacom dans Windows Vista.
DTF720_Manual.fm Page 48 Monday, December 22, 2008 12:36 PM
Annexes Page 49
DÉSINSTALLATION DU DTF-720Suivez la procédure ci-dessous pour retirer le DTF-720 et supprimer son logiciel de votre système.
Windows : 1. Cliquez sur le bouton DÉMARRER de Windows et sélectionnez PANNEAU DE CONFIGURATION.
2. Dans la fenêtre PANNEAU DE CONFIGURATION de
• Windows Vista : cliquez sur DÉSINSTALLATION D'UN PROGRAMME. Dans la boîte de dialogue qui apparaît, choisissez l'option PEN TABLET et cliquez sur le bouton DÉSINSTALLER.
• Windows XP ou XP x64 : sélectionnez AJOUT/SUPPRESSION DE PROGRAMMES. Dans la fenêtre AJOUTER OU SUPPRIMER DES PROGRAMMES, sélectionnez PEN TABLET, puis cliquez sur le bouton SUPPRIMER.
• Windows 2000 : double-cliquez sur l'icône AJOUT/SUPPRESSION DE PROGRAMMES. Dans la boîte de dialogue qui apparaît, choisissez l'option PEN TABLET et cliquez sur le bouton AJOUTER/SUPPRIMER...
3. Suivez les instructions à l'écran pour supprimer le pilote de la tablette. (Saisissez votre nom d'utilisateur et votre mot de passe en tant qu'administrateur si vous y êtes invité).
4. Une fois le pilote supprimé, arrêtez votre système, mettez votre ordinateur hors tension, puis éteignez le DTF-720. Lorsque l'ordinateur et la tablette DTF-720 sont hors tension, déconnectez le DTF-720 de l'ordinateur.
Macintosh : 1. Dans le menu ALLER, sélectionnez APPLICATIONS, puis ouvrez le dossier TABLETTE WACOM.
2. Double-cliquez sur l'icône REMOVE TABLET et sélectionnez le bouton SUPPRIMER LOGICIEL TABLETTE. Saisissez votre nom d'utilisateur et votre mot de passe en tant qu'administrateur.
3. Cliquez ensuite sur OK.
4. Arrêtez votre ordinateur et mettez le DTF-720 hors tension. Lorsque l'ordinateur et la tablette DTF-720 sont hors tension, déconnectez le DTF-720 de l'ordinateur.
DTF720_Manual.fm Page 49 Monday, December 22, 2008 12:36 PM

AnnexesPage 50
CARACTÉRISTIQUES DU PRODUITCARACTÉRISTIQUES GÉNÉRALES
ÉCRAN
Dimensions (l x P x H) 400 x 362 x 55,5 mm (15,8 x 14,3 x 2,2 in), hors feutres du pied
Poids 6 kg, socle compris
Tension d’entrée 12 V CC
Consommation électrique 37 W max.2 W ou moins en veille1 W ou moins, si éteint
Concentrateur USB Concentrateur USB intégré : USB v2.0Concentrateur alimenté, deux ports externes, 500 mA par port
Température et humidité de fonctionnement
5 ˚C à 35 ˚C, 20 à 80 % HR (sans condensation)
Température et humidité de stockage -10 ˚C à +60 ˚C, 20 à 90 % HR (sans condensation)
Certifications et homologations FCC section 15 classe B et sous-section C, Industrie Canada, classe B, CE, VCCI classe B, EDID 1.3, C-tick, BSMI, MIC, CB, CCC, la directive européenne RoHS 2002/95/CE, RoHS chinoise, RoHS coréene
Écran LCD TFT à matrice active a-Si
Dimensions de l'écran 17 pouces (337,9 x 270,3 mm)
Entrées de signal VGA (RVB analogique)
Sorties de signal VGA (RVB analogique)
Résolution 1280 x 1024 pixels (SXGA), 1024 x 768 pixels (XGA), 800 x 600 pixels (SGA), 640 x 480 pixels (VGA)
Fréquence de rafraîchissement de 50 à 75 Hz (vertical)Tous les modes de balayage sont progressifs.
Pas du pixel 0,264 x 0,264 mm
Profondeur de couleur 16,7 millions
Luminosité 300 cd/m2
Rapport de contraste 650:1
Plug-and-play DDC 2B
Qualité LCD Chacune des tablettes LCD DTF-720 répond à des normes de qualité extrêmement rigoureuses. Les techniques de production ne peuvent pas garantir la perfection absolue de votre écran TFT. Wacom n'accepte pas de pixels toujours blancs ou toujours noirs. Un petit nombre de pixels (5 ou moins) peut représenter une couleur incorrecte pour certaines parties du spectre lumineux. Cela ne signifie pas que l’affichage est défectueux.
DTF720_Manual.fm Page 50 Monday, December 22, 2008 12:36 PM
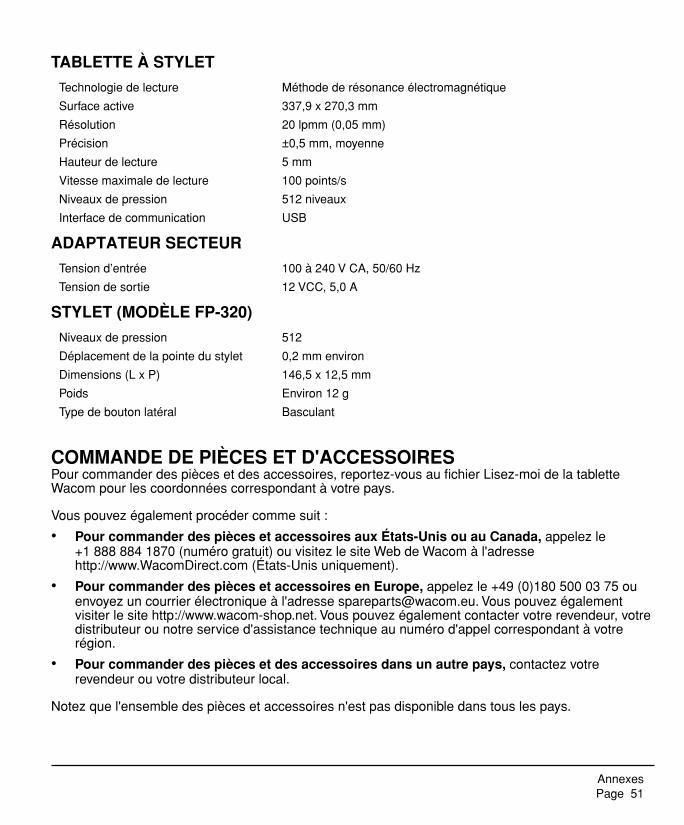
Annexes Page 51
TABLETTE À STYLET
ADAPTATEUR SECTEUR
STYLET (MODÈLE FP-320)
COMMANDE DE PIÈCES ET D'ACCESSOIRESPour commander des pièces et des accessoires, reportez-vous au fichier Lisez-moi de la tablette Wacom pour les coordonnées correspondant à votre pays.
Vous pouvez également procéder comme suit :
• Pour commander des pièces et accessoires aux États-Unis ou au Canada, appelez le +1 888 884 1870 (numéro gratuit) ou visitez le site Web de Wacom à l'adresse http://www.WacomDirect.com (États-Unis uniquement).
• Pour commander des pièces et accessoires en Europe, appelez le +49 (0)180 500 03 75 ou envoyez un courrier électronique à l'adresse [email protected]. Vous pouvez également visiter le site http://www.wacom-shop.net. Vous pouvez également contacter votre revendeur, votre distributeur ou notre service d'assistance technique au numéro d'appel correspondant à votre région.
• Pour commander des pièces et des accessoires dans un autre pays, contactez votre revendeur ou votre distributeur local.
Notez que l'ensemble des pièces et accessoires n'est pas disponible dans tous les pays.
Technologie de lecture Méthode de résonance électromagnétique
Surface active 337,9 x 270,3 mm
Résolution 20 lpmm (0,05 mm)
Précision ±0,5 mm, moyenne
Hauteur de lecture 5 mm
Vitesse maximale de lecture 100 points/s
Niveaux de pression 512 niveaux
Interface de communication USB
Tension d’entrée 100 à 240 V CA, 50/60 Hz
Tension de sortie 12 VCC, 5,0 A
Niveaux de pression 512
Déplacement de la pointe du stylet 0,2 mm environ
Dimensions (L x P) 146,5 x 12,5 mm
Poids Environ 12 g
Type de bouton latéral Basculant
DTF720_Manual.fm Page 51 Monday, December 22, 2008 12:36 PM

AnnexesPage 52
INTERFÉRENCES RADIO ET TÉLÉVISIONL'équipement décrit dans le présent manuel génère, utilise et peut émettre des fréquences radio. S'il n'est pas installé et utilisé correctement, à savoir dans le respect strict des règles applicables, il peut provoquer des interférences et brouiller la réception radio et télévision.
AVERTISSEMENT DE LA COMMISSION FÉDÉRALE DES COMMUNICATIONS (FCC)Cet appareil est conforme à la section 15 de la réglementation FCC. Son fonctionnement est soumis aux deux conditions suivantes : (1) cet appareil ne peut causer d'interférences néfastes, et (2) il doit accepter la réception de toutes interférences, y compris celles susceptibles de perturber son fonctionnement.Ce produit a été vérifié et réceptionné conformément aux prescriptions relatives aux appareils numériques de classe B, selon la section 15 de la réglementation FCC. Ces prescriptions sont destinées à fournir, dans le cas d'une installation domestique, un niveau de protection approprié contre de telles interférences.L'équipement décrit dans le présent manuel génère, utilise et peut émettre des fréquences radio. S'il n'est pas installé et utilisé correctement, il risque d'entraîner des interférences dans la réception radio et télévision. L'absence d'interférences n'est toutefois pas garantie dans certaines installations.Vous pouvez déterminer si votre matériel provoque des interférences en l'éteignant. Si les interférences cessent, elles sont probablement provoquées par le matériel.Si votre matériel perturbe la réception des signaux de radio ou de télévision, les mesures suivantes peuvent aider à résoudre ce problème :• Modifiez l'orientation de l'antenne du téléviseur ou de la radio jusqu'à ce que les interférences cessent.• Éloignez davantage le matériel du téléviseur ou de la radio.• Branchez l'ordinateur et le matériel sur une prise secteur appartenant à un circuit différent de celui du
téléviseur ou de la radio.
Le cas échéant, consultez votre revendeur Wacom agréé ou un technicien radio/télévision expérimenté.Tout changement ou modification apporté à ce produit et non autorisé par Wacom peut rendre la certification FCC nulle et non avenue et entraîner l'expiration de l'autorisation d'exploitation du produit.
DTF720_Manual.fm Page 52 Monday, December 22, 2008 12:36 PM
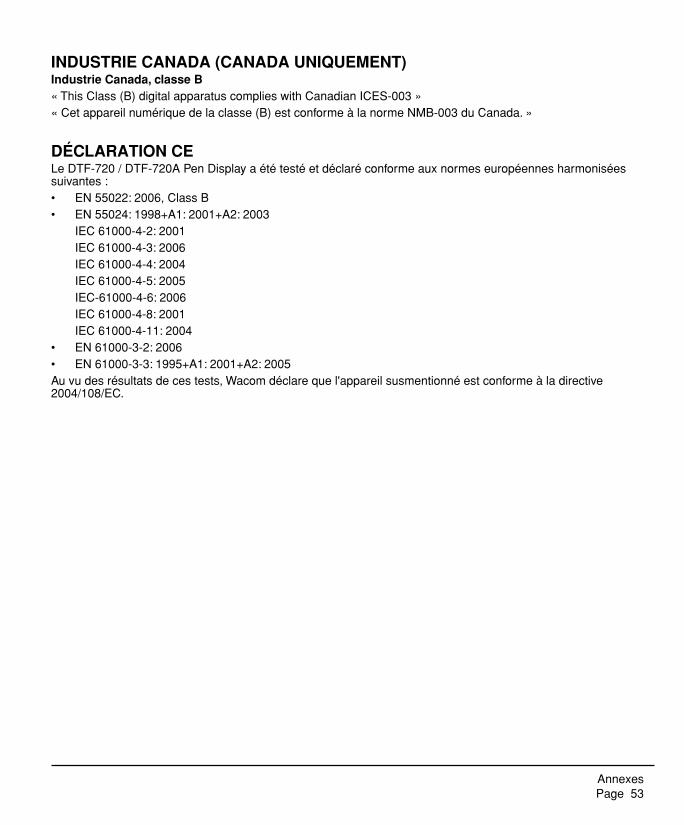
Annexes Page 53
INDUSTRIE CANADA (CANADA UNIQUEMENT)Industrie Canada, classe B« This Class (B) digital apparatus complies with Canadian ICES-003 »« Cet appareil numérique de la classe (B) est conforme à la norme NMB-003 du Canada. »
DÉCLARATION CELe DTF-720 / DTF-720A Pen Display a été testé et déclaré conforme aux normes européennes harmonisées suivantes :• EN 55022: 2006, Class B• EN 55024: 1998+A1: 2001+A2: 2003
IEC 61000-4-2: 2001IEC 61000-4-3: 2006IEC 61000-4-4: 2004IEC 61000-4-5: 2005IEC-61000-4-6: 2006IEC 61000-4-8: 2001IEC 61000-4-11: 2004
• EN 61000-3-2: 2006• EN 61000-3-3: 1995+A1: 2001+A2: 2005Au vu des résultats de ces tests, Wacom déclare que l'appareil susmentionné est conforme à la directive 2004/108/EC.
DTF720_Manual.fm Page 53 Monday, December 22, 2008 12:36 PM

AnnexesPage 54
Licence et garantie (Europe, Afrique et Moyen-Orient)
Contrat de licenceNote importante destinée aux utilisateursCe produit contient des programmes informatiques protégés par des droits d'auteur (« logiciel ») qui sont la propriété intellectuelle inaliénable de Wacom Europe GmbH (« Wacom »). Ce logiciel est à la fois intégré au produit et contenu dans le support de données joint. L'achat de ce produit chez votre revendeur n'inclut pas le logiciel Wacom ni les droits associés à son utilisation. Wacom ne vous accorde le droit, en tant qu'utilisateur, d'utiliser le logiciel qu'en accord avec les conditions présentées dans ce contrat de licence. En achetant ce produit, vous vous engagez à respecter les dispositions de ce contrat.
Autorisation d'utilisation du logicielWacom accorde au client l'utilisation personnelle et non-exclusive du logiciel uniquement dans le cadre de l'utilisation et d'un fonctionnement correct du présent produit. Ce contrat ne peut être transféré qu'en liaison avec ce produit.L'utilisation de ce logiciel n'autorise la copie permanente ou temporaire, complète ou partielle du logiciel par chargement, affichage, exécution, transmission et inscription que dans le but d'exécuter les commandes et de traiter les données qu'il contient ou dans le but d'observer, d'examiner ou de tester les fonctions du logiciel.Le client n'est pas autorisé à accorder une licence, à louer ni à prêter le logiciel à un tiers ni à autoriser un tiers à accéder au logiciel de quelque manière que ce soit. Le client ne peut, sans l'autorisation écrite préalable de Wacom, copier, modifier ou transmettre le logiciel, à l'exception des actions de copie nécessaires à la création d'une copie de sauvegarde et pour les raisons décrites dans la section 2 ci-dessus.Le client n'est pas autorisé à décompiler le logiciel si celui-ci contient des interfaces logicielles qui ne sont pas fournies par Wacom. Wacom fera parvenir au client les informations nécessaires sur demande, à condition que le client puisse prouver son intention d'utiliser le logiciel et de payer les frais postaux et les frais de copie.
Garantie limitéeWacom garantit aux utilisateurs de ce produit que ce dernier est exempt de tout défaut matériel ou de main-d'œuvre dans des conditions d'utilisation et d'entretien normales, c'est-à-dire uniquement pour un usage dans un environnement de bureau normal. La garantie de ce produit est prise en charge pendant une période de DEUX (2) ANS à compter de la date d'achat (à l'exception des consommables tels que les pointes de stylet), pour autant que le produit ait été acheté neuf. Wacom vous garantit en outre les supports de données joints contre tout défaut matériel et de main-d'œuvre, pendant une période de SIX (6) MOIS à compter de la date d'achat.Le logiciel fait l'objet d'une licence et d'une distribution « EN L'ÉTAT ». Wacom ne fournit aucune garantie, explicite ou implicite, quant à sa qualité, ses performances, sa commercialisation et son adéquation à un but particulier (y compris les manuels et la documentation joints). Wacom ne peut vous garantir une utilisation ininterrompue ou la correction d'éventuelles erreurs.En cas de découverte d'une défectuosité dans le produit pendant la période de garantie en vigueur, à l'exception du logiciel, retournez-le dans son emballage d'origine au lieu d'achat d'origine, en y joignant votre nom, votre adresse, votre numéro de téléphone, une description du problème et une copie de la facture originale. Vous êtes responsable de toute perte ou dommage subi par le produit pendant ce transport. La seule obligation et responsabilité de Wacom consistera, à la discrétion de Wacom, soit à remplacer, soit à réparer les pièces ou le produit défectueux renvoyés au cours de la période de garantie.
DTF720_Manual.fm Page 54 Monday, December 22, 2008 12:36 PM

Annexes Page 55
Wacom ne sera pas tenu de réparer ou de remplacer le produit si (a) selon Wacom, la défaillance du produit résulte d'un accident, d'une utilisation abusive ou incorrecte, d'une négligence, d'une utilisation inappropriée ou d'une modification ou réparation non autorisée, ou (b) si le produit a été manipulé ou stocké contrairement aux instructions de Wacom en matière de stockage, ou (c) si la défaillance est due à une usure normale ou (d) si vous ne respectez pas les obligations décrites ci-dessus.Au cas où l'examen d'une plainte soumise dans le cadre de la garantie démontre que cette plainte tombe en dehors de la période ou de la portée de cette garantie, ou au cas où le produit s'avère fonctionner correctement, les frais de cet examen et des réparations seront à votre charge.Les descriptions, dessins, caractéristiques, échantillons, modèles, bulletins ou autres matériels utilisés dans le cadre de la vente du produit ne constituent pas une garantie explicite de la conformité du produit à vos exigences.En cas d'invalidation d'une des dispositions du présent contrat, la disposition en question sera considérée comme étant distincte du reste du contrat, dont les autres dispositions resteront effectives sans limitation.Si le produit est défectueux, l'acheteur sera en droit d'engager des démarches judiciaires contre le vendeur du fait de la responsabilité de ce dernier pour les défectuosités du produit. Ces droits légaux vis-à-vis du vendeur ne sont limités d'aucune façon par la présente garantie. Au contraire, la présente garantie confère à l'acheteur des droits supplémentaires en sus de ceux indiqués dans le présent document. Cette garantie limitée est applicable dans le cas où le siège social du vendeur est établi dans l'Union européenne ou dans l'un des pays suivants : Islande, Norvège, Jersey, Suisse, Russie, Ukraine, Roumanie, Bulgarie, Croatie, Serbie, Tunisie, Turquie, Syrie, Liban, Jordanie, Israël, Égypte, Émirats Arabes Unis, Iran ou Afrique du Sud.La présente garantie et responsabilité limitée est régie par les lois de la République fédérale d'Allemagne.Pour toute question concernant cet Accord ou si vous désirez contacter Wacom pour quelque raison que ce soit, veuillez envoyer un courrier écrit à l'une des adresses suivantes :
Wacom Europe GmbHEuropark Fichtenhain A947807 KrefeldALLEMAGNE
DTF720_Manual.fm Page 55 Monday, December 22, 2008 12:36 PM

AnnexesPage 56
DTF720_Manual.fm Page 56 Monday, December 22, 2008 12:36 PM

Annexes Page 57
DTF720_Manual.fm Page 57 Monday, December 22, 2008 12:36 PM

AnnexesPage 58
DTF720_Manual.fm Page 58 Monday, December 22, 2008 12:36 PM
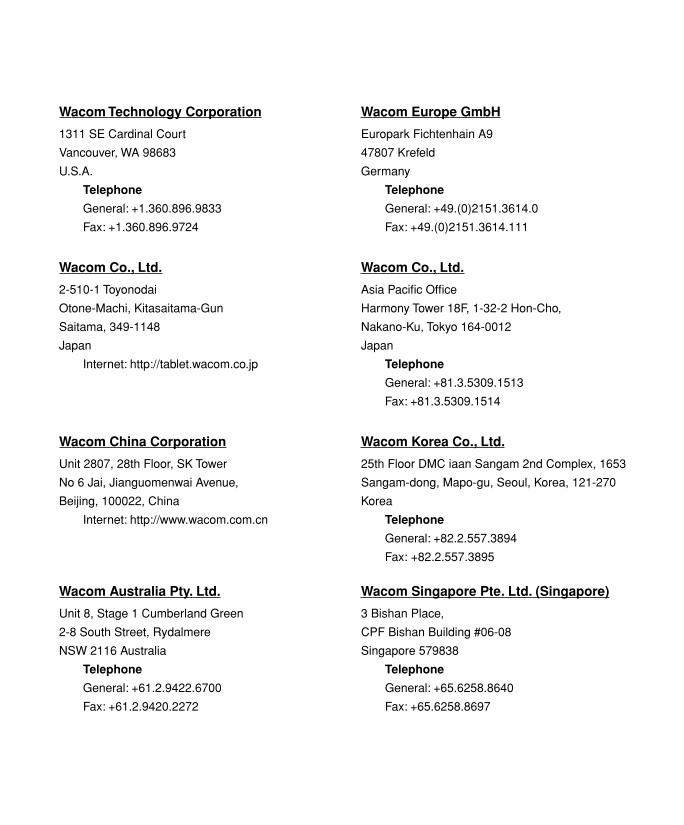
Wacom Technology Corporation Wacom Europe GmbH
1311 SE Cardinal Court Europark Fichtenhain A9
Vancouver, WA 98683 47807 Krefeld
U.S.A. Germany
Telephone Telephone
General: +1.360.896.9833 General: +49.(0)2151.3614.0
Fax: +1.360.896.9724 Fax: +49.(0)2151.3614.111
Wacom Co., Ltd. Wacom Co., Ltd.
2-510-1 Toyonodai Asia Pacific Office
Otone-Machi, Kitasaitama-Gun Harmony Tower 18F, 1-32-2 Hon-Cho,
Saitama, 349-1148 Nakano-Ku, Tokyo 164-0012
Japan Japan
Internet: http://tablet.wacom.co.jp
Telephone
General: +81.3.5309.1513
Fax: +81.3.5309.1514
Wacom China Corporation Wacom Korea Co., Ltd.
Unit 2807, 28th Floor, SK Tower 25th Floor DMC iaan Sangam 2nd Complex, 1653
No 6 Jai, Jianguomenwai Avenue, Sangam-dong, Mapo-gu, Seoul, Korea, 121-270
Beijing, 100022, China Korea
Internet: http://www.wacom.com.cn
Telephone
General: +82.2.557.3894
Fax: +82.2.557.3895
Wacom Australia Pty. Ltd. Wacom Singapore Pte. Ltd. (Singapore)
Unit 8, Stage 1 Cumberland Green 3 Bishan Place,
2-8 South Street, Rydalmere CPF Bishan Building #06-08
NSW 2116 Australia Singapore 579838
Telephone Telephone
General: +61.2.9422.6700 General: +65.6258.8640
Fax: +61.2.9420.2272 Fax: +65.6258.8697
DTF720_backcover.fm Page 1 Wednesday, December 10, 2008 3:26 PM

interactive pen display
Installation Guide & User’s ManualInstallations- und BenutzerhandbuchGuide d'installation et Manuel d'utilisation
WACOM Co., Ltd. UM-0331 (C)
DTF-720
DTF720_backcover.fm Page 2 Wednesday, December 10, 2008 3:26 PM