Integrating Autodesk Mayas muscle simulation with...
23
Integrating Autodesk Mayas muscle simulation with Kinect motion capture Creative Compiter Graphics Jessica Axelsson & David Svenvall 2014 Thesis in Computer Science VT14, 15 hp Degree of Bachelor of Science in Computer Science with a major in Computer Graphics Creative Computer Graphics Supervisor: Torsten Jonsson Examinator: Julia Åhlen
Transcript of Integrating Autodesk Mayas muscle simulation with...
Integrating Autodesk Mayas muscle simulation with Kinect motion capture
Creative Compiter Graphics
Jessica Axelsson & David Svenvall
2014
Thesis in Computer Science VT14, 15 hp Degree of Bachelor of Science in Computer Science with a major in Computer Graphics
Creative Computer Graphics
1.
Supervisor: Torsten Jonsson Examinator: Julia Åhlen
2.

Integrating maya muscle simulation in motion capture by
Jessica Axelsson & David Svenvall
Akademin för teknik och miljö Högskolan i Gävle
S-801 76 Gävle, Sweden
Email:

Abstract In most of the animation pipelines today, motion capture and different simulations e.g. Autodesk Maya Muscle is used to get a more realistic feel of an animation. The main goal of this Thesis is to make a character appear and move in as natural a way as possible and exploring different methods on receiving a good result. It will answer different question on how to record movement and using that data together with a system that simulates muscles. To complete this process we will record using a Microsoft Kinect Camera, which is originally hardware for Xbox movement software. For our muscle simulation we used Autodesk Maya Muscle, where we built a muscle system. This will be research through finding information on each subject separately and trough experiments combing the two together

Contents
1. Introduction ............................................................................................................... 1
2. Purpose ...................................................................................................................... 1
3. Theoretical background and related work ............................................................. 2
4. Limitations ................................................................................................................. 3
5. Method ....................................................................................................................... 4
5.1 Concept ............................................................................................................................. 4
5.2 Modeling and texturing the 3d Model .............................................................................. 4
5.3 Rigging ............................................................................................................................. 6
5.3.1 Human IK .............................................................................................................. 7
5.3.2 When using Human IK for Maya muscles ............................................................. 7
5.4 Skinning ............................................................................................................................ 8
5.4.1 Weight Painting ..................................................................................................... 8
5.5 Maya Muscle .................................................................................................................... 8
5.5.1 The muscle rigging process. .................................................................................. 8
5.6 Motion capture ................................................................................................................. 9
5.6.1 The mocap process. ............................................................................................... 9
5.6.2 Cleanup in motion builder ................................................................................... 11
5.7 Combining the Mocap animation with Maya Muscle .................................................... 11
6. Result ........................................................................................................................ 11
7. Illustrated result of the project .............................................................................. 13
8. Conclusion and Discussion ..................................................................................... 14
9. References ................................................................................................................ 16
1
1. Introduction The use of CG (Creative Graphics) characters in film productions more and more frequent and attempts for blending CG with real life footage is an ongoing research. The goal for many is to erase the line between reality and fiction. When the use of CG characters increases, the audience is becoming more aware of the quality and therefore realism is a new topic when evolving these techniques. In this field, acting performance is shown through capturing the actor’s movements, body language and facial expression, then transferring this data onto a CG character using Motion Capture.
In the movie industry there are several different methods used for animation production, one of the most used techniques is Motion Capture. Motion Capture is a recording of motion of a real life person with a camera or motion sensors. The position in X, Y and Z-axes are calculated and transformed into 3D space and further applied to a CG characters rig. The RGB-D (Red, Green, Blue and Depth) cameras are becoming more common with this technique. With an infrared sensor, that calculates the z-depth of an image and records red, green, blue and depth. This technique speeds up the workflow significantly compared to animating manually frame by frame [1].
To further increase realism to the character several muscle systems have been developed, by adding muscle, body fat and skin makes the appearance, movement, facial and body expressions seems more natural. Theoretically, a muscle system is what it sounds like, it is a system of splines or shapes that are applied to a 3D model, in this case a Character. These shapes are then scripted or programed to work similar to how biological muscles normally work e.g., how the muscles squash and stretch or how they react when a character stops abruptly.
These muscle systems are rarely used from the bottom up in its original constructions, in industry the muscle systems are usually used as a base, and then reconstructed depending on what the industry needs. Thus some companies makes muscle systems from scratch, that are so advanced so that there is no need to manually adjust how the muscle reacts, instead they go through different mathematical calculations that makes the muscle react automatically towards different forces like gravity.
In this project we will use a RGBD camera for motion capture and Autodesk Maya Muscle for the muscles system. Further on we will combine these two techniques and see how the pipeline is structured for this procedure.
2. Purpose The focus of the research is the process of making character more realistic, combine modeling with muscle (Autodesk Maya) and motion capture using a Kinect camera and Autodesk Motion Builder[2, 3, 4]. We will record body movements and facial expressions with the Kinect camera and transfer them to a CG character made with the muscle system in Maya. The objective is to see how the whole process works and how accurate and natural the results you obtain by using this camera. Furthermore, we will compare different techniques for motion captures and motion capture combined with manual key framing. We will also explore how anatomical correct you must be to build muscles to get natural movements, not only in the muscles but also in the topology of the 3D model.
The objective is to see how the whole process is built up, seeing what obstacles that exist in the pipeline, and if there is any other alternatives that make the process easier or faster. The research will specifically answer: • How the pipeline structure is built up when making a character appears and move
in a realistic way.

2
• Study workflow, obstacles etc. Specifically the use of standard functions in Maya and Kinect Mocap.
3. Theoretical background and related work There are many different ways of creating a character, but at the start of the process is similar for the most. As mention by Eric Keller and Paul Gaboury in [5] that a most adaptable base mesh is important to support the upcoming procedures in the work flow and also that it is important to have a simple base model that has the basic proportions and is not to complex. After a base model is done the next step is sculpting the base model for more detail with different 3d brushes that have different effects when sculpting parts for the body. When the sculpt is finished the next procedure is retoping, that makes the model work better with animation and applying textures, otherwise the model will have some disadvantages.
An animation pipeline follows different structures. Johannes Saam in [6] shows two examples; a linear pipeline, where the pipeline follows specific structure from start till finish. A linear pipeline is made of four different stages. Modeling, Rigging, Skinning and Animation, but in some projects there will be many changes in the process between making the virtual skeleton and attaching muscles and tissue simulations. The virtual skeleton joints have to be complete, in order to finish the muscles and generate tissue simulation. When that is the condition, the linear pipeline goes to nonlinear pipeline, jumping back and forth between the rigging and skinning stage, depending on the result wanted.
For the process of rigging there is a feature in Autodesk Maya called HumanIK that is a real time retargeting technology with full-body inverse kinematics. It generates a rig for both biped and quadruped characters, with a named skeleton hierarchy. This process is automated and can use existing animations, it enhances realism and is very time saving [7].
When producing realistic muscles and skin simulations to improve an animation, there are many characteristics to think about for a realistic skin deformation. Some of the characteristics mentioned by Gray et.al. [8] are general position and relationship of the bone and skin, how the skin is affected by muscles tension and relaxation, vibration of muscles, skin penetration and how muscle and bone move beneath the surface of the skin. All of these characteristics improves and creates realistic muscle and skin simulations. Smooth skinning as described in [9] is used on parts of the body not affected by muscles and for the muscles there are different kinds of skinning only for muscles called sticky bind. The muscles can move on a straight line, around a joint and bone, which give a realistic result but is not as accurate as real life muscles. The muscles are dynamic with gravity and mass that create a jiggling in the muscle as a secondary motion and it moves on the influence of the bone and is seen under the skin that is following the muscles [6]. How the skin moves above the muscles is just as important for a natural result, it should not stretch or be compressed when the muscle move underneath [10, 11].
Modeling with muscles is a very time consuming process because the steps are made manually for each character you make. The steps you can reuse are the skeleton hierarchy and the rig controllers, however when placing the joints, modeling muscles and binding the skin you need to consider the shape of the character. Therefore you cannot automate this process [12]. Many studies have been made to come up with a solution to this problem and to find other ways to obtain similar results [13].
The human body consists of over 650 muscles where between 25-40 of these muscles are seen on the surface of the skin therefore it is only necessary to make the muscles that are visual and have an impact on the skin [14]. The muscles that were made in Autodesk Maya consist of spherical shapes. The ends are attached to the control skeleton in a straight line. The muscle is a NURBS curve that is controlled by
3
cluster on circles along the muscle so that the shape, length, scale and position can be altered [6].
Motion capture or “Mocap” is described in [15], it is capturing of the motions of an actor to enhance the animation of a 3D character, the motion that is captured is transferred onto a 3D characters rig. It is a tool to make the animation seem more natural and realistic. The most common technique for motion capture used in the industry is the use of markers or sensors. In later years a technique has been developed, marker less motion capture. Due to the cost and complexity of the traditional mocap systems like the optical and magnetic systems this new technology using infrared cameras are more common with mainstream users. It is not as detailed but instead, it offers what it originally was made for, interactive use, fast response and efficient data processing at a very low cost.
There is little or no education in this area, however in [16] shows that in New Zealand at the School of Art and Design, AUT University started an education in motion capture because this filed was growing in the New Zealand industry and also in use in the entire animation industry. Though motion capture records real live motion some alterations using key frame animation may be necessary for some errors or to make small adjustments to the movements.
Motion capture derives from “rotoscoping” where animators used real footage as a reference and then draw on top of this to get the pose right. A problem with this new method is when to use motion capture and when to use traditional key frame animation; some even think it is no longer animation. The industry is becoming increasingly oriented towards realistic animation as when a CG character is used with live action or replaces an actor as stuntman. Although in fully animated films, cartoons or with a fantasy character maybe it is more effective to use key framed animation. Most companies combine both methods for the most realistic result. The challenge in animation is facial expression, due to the number of muscles and subconscious movements there are a great deal of work for the animator which can become more effective and not so time consuming with motion capture [17].
As we can read in [18] the Kinect camera was launched in 2010 and is originally created to take the videogame experience to another level. This technique for capturing motion consists of an Infrared projector, Infrared camera and a RGB camera. There is a depth sensor that is a combination of the IR projector and IR camera that produces a depth map. The filmed environment is seen as a dot pattern, which is reformed in 3D. The depth map is shown as a gray scale image where light values are far away from the camera and dark values are close to the camera. Although this technique is not very precise, “The depth values produced by the Kinect sensor are sometimes inaccurate because the calibration between the IR projector and the IR camera becomes invalid.” Using this for motion capture takes it a step further. When the depth map is produced, Kinect skeletal tracking tracks out infrared body parts from the depth image, puts out assumed joints for the body parts and from the joints builds a skeleton. The skeleton can then be applied to a 3d character in a motion capture program in real-time.
Research on using more than one camera is shown in [15, 19] where conclusions are made that using two cameras with a 180-degree angle presents the best result. Other examples on improving the result are to use near and far clip planes to isolate the person from the background.
4. Limitations The research will be focusing on the purpose of the project, combining Maya Muscle with Kinect Motion Capture and not focus on time-consuming rendering and sculpting. The research will also not go in to a detailed comparison of what motion capture software is the best as we will use Autodesk Maya as a base of the project to
4
keep it so simple as possible. We will mainly use the tools that already are built into the software, other open source and demo software.
The research will use complete vanilla programs and no modified or innovated scripts to make any process easier or more complex. These limitations will be made just to get more focused on this specific pipeline of techniques, to see what is good and what is bad and also see the how Maya muscle simulation influences the realism of an animation compared to a normal skin rig and also the process of applying the muscle system to a motion captured animation. We will be investigating how specifically Kinect motion capture and Mayas original muscle system works together, without modification of the basic software.
5. Method
5.1 Concept
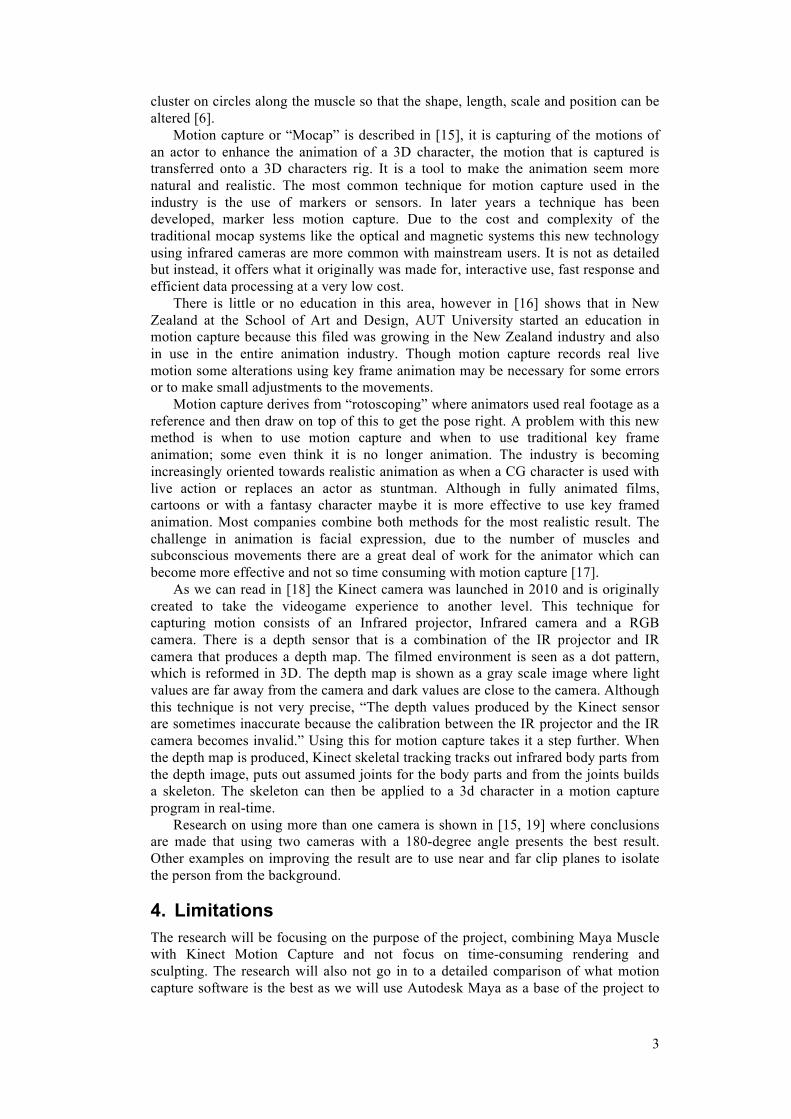
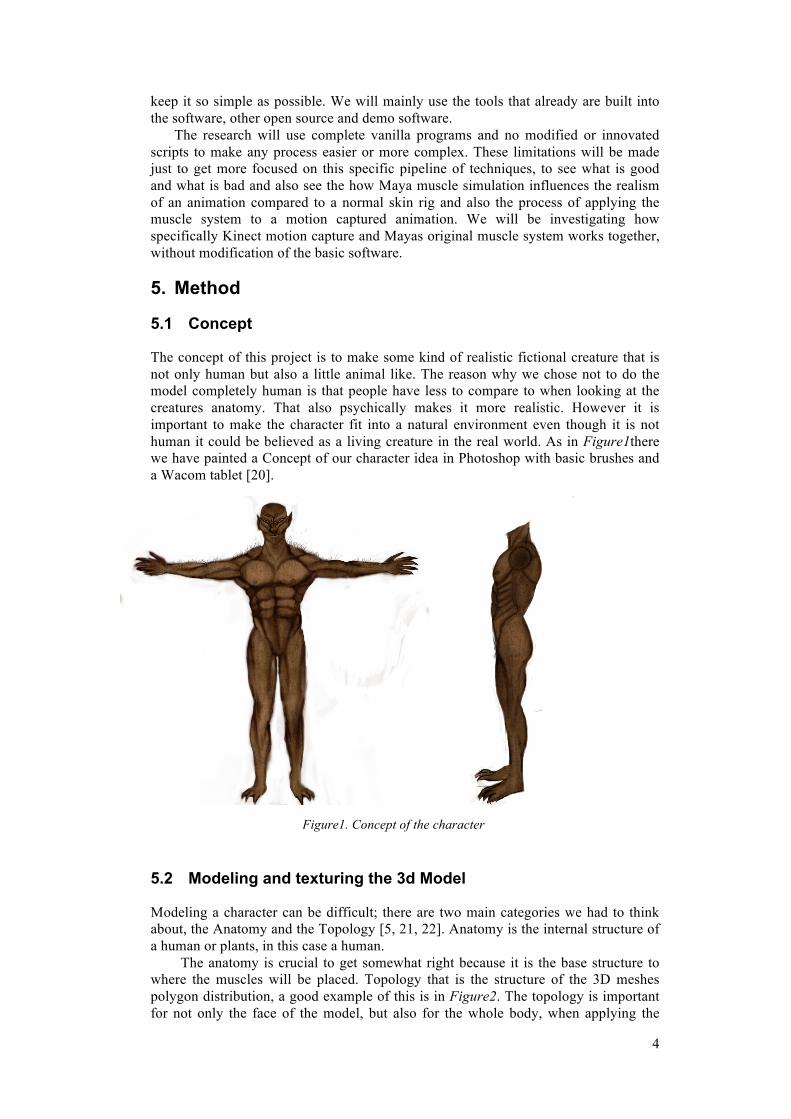
The concept of this project is to make some kind of realistic fictional creature that is not only human but also a little animal like. The reason why we chose not to do the model completely human is that people have less to compare to when looking at the creatures anatomy. That also psychically makes it more realistic. However it is important to make the character fit into a natural environment even though it is not human it could be believed as a living creature in the real world. As in Figure1there we have painted a Concept of our character idea in Photoshop with basic brushes and a Wacom tablet [20].
5.2 Modeling and texturing the 3d Model
Modeling a character can be difficult; there are two main categories we had to think about, the Anatomy and the Topology [5, 21, 22]. Anatomy is the internal structure of a human or plants, in this case a human.
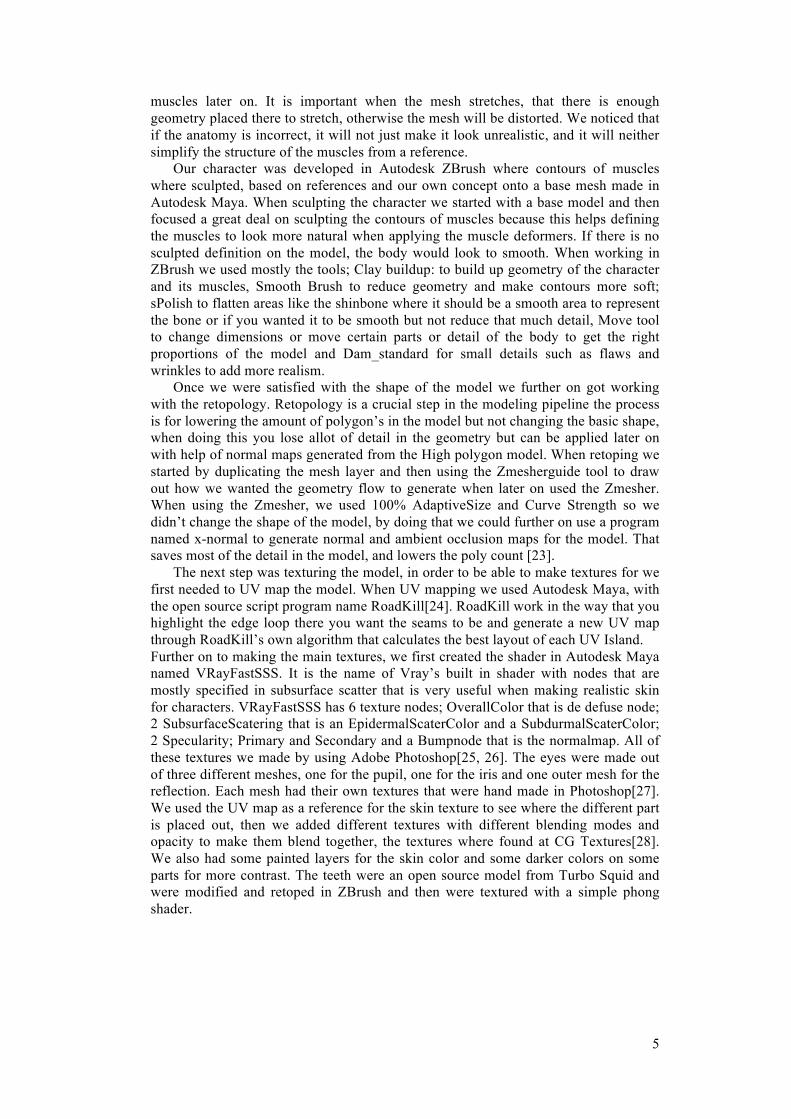
The anatomy is crucial to get somewhat right because it is the base structure to where the muscles will be placed. Topology that is the structure of the 3D meshes polygon distribution, a good example of this is in Figure2. The topology is important for not only the face of the model, but also for the whole body, when applying the
Figure1. Concept of the character
5
muscles later on. It is important when the mesh stretches, that there is enough geometry placed there to stretch, otherwise the mesh will be distorted. We noticed that if the anatomy is incorrect, it will not just make it look unrealistic, and it will neither simplify the structure of the muscles from a reference.
Our character was developed in Autodesk ZBrush where contours of muscles where sculpted, based on references and our own concept onto a base mesh made in Autodesk Maya. When sculpting the character we started with a base model and then focused a great deal on sculpting the contours of muscles because this helps defining the muscles to look more natural when applying the muscle deformers. If there is no sculpted definition on the model, the body would look to smooth. When working in ZBrush we used mostly the tools; Clay buildup: to build up geometry of the character and its muscles, Smooth Brush to reduce geometry and make contours more soft; sPolish to flatten areas like the shinbone where it should be a smooth area to represent the bone or if you wanted it to be smooth but not reduce that much detail, Move tool to change dimensions or move certain parts or detail of the body to get the right proportions of the model and Dam_standard for small details such as flaws and wrinkles to add more realism.
Once we were satisfied with the shape of the model we further on got working with the retopology. Retopology is a crucial step in the modeling pipeline the process is for lowering the amount of polygon’s in the model but not changing the basic shape, when doing this you lose allot of detail in the geometry but can be applied later on with help of normal maps generated from the High polygon model. When retoping we started by duplicating the mesh layer and then using the Zmesherguide tool to draw out how we wanted the geometry flow to generate when later on used the Zmesher. When using the Zmesher, we used 100% AdaptiveSize and Curve Strength so we didn’t change the shape of the model, by doing that we could further on use a program named x-normal to generate normal and ambient occlusion maps for the model. That saves most of the detail in the model, and lowers the poly count [23].
The next step was texturing the model, in order to be able to make textures for we first needed to UV map the model. When UV mapping we used Autodesk Maya, with the open source script program name RoadKill[24]. RoadKill work in the way that you highlight the edge loop there you want the seams to be and generate a new UV map through RoadKill’s own algorithm that calculates the best layout of each UV Island. Further on to making the main textures, we first created the shader in Autodesk Maya named VRayFastSSS. It is the name of Vray’s built in shader with nodes that are mostly specified in subsurface scatter that is very useful when making realistic skin for characters. VRayFastSSS has 6 texture nodes; OverallColor that is de defuse node; 2 SubsurfaceScatering that is an EpidermalScaterColor and a SubdurmalScaterColor; 2 Specularity; Primary and Secondary and a Bumpnode that is the normalmap. All of these textures we made by using Adobe Photoshop[25, 26]. The eyes were made out of three different meshes, one for the pupil, one for the iris and one outer mesh for the reflection. Each mesh had their own textures that were hand made in Photoshop[27]. We used the UV map as a reference for the skin texture to see where the different part is placed out, then we added different textures with different blending modes and opacity to make them blend together, the textures where found at CG Textures[28]. We also had some painted layers for the skin color and some darker colors on some parts for more contrast. The teeth were an open source model from Turbo Squid and were modified and retoped in ZBrush and then were textured with a simple phong shader.
6
5.3 Rigging
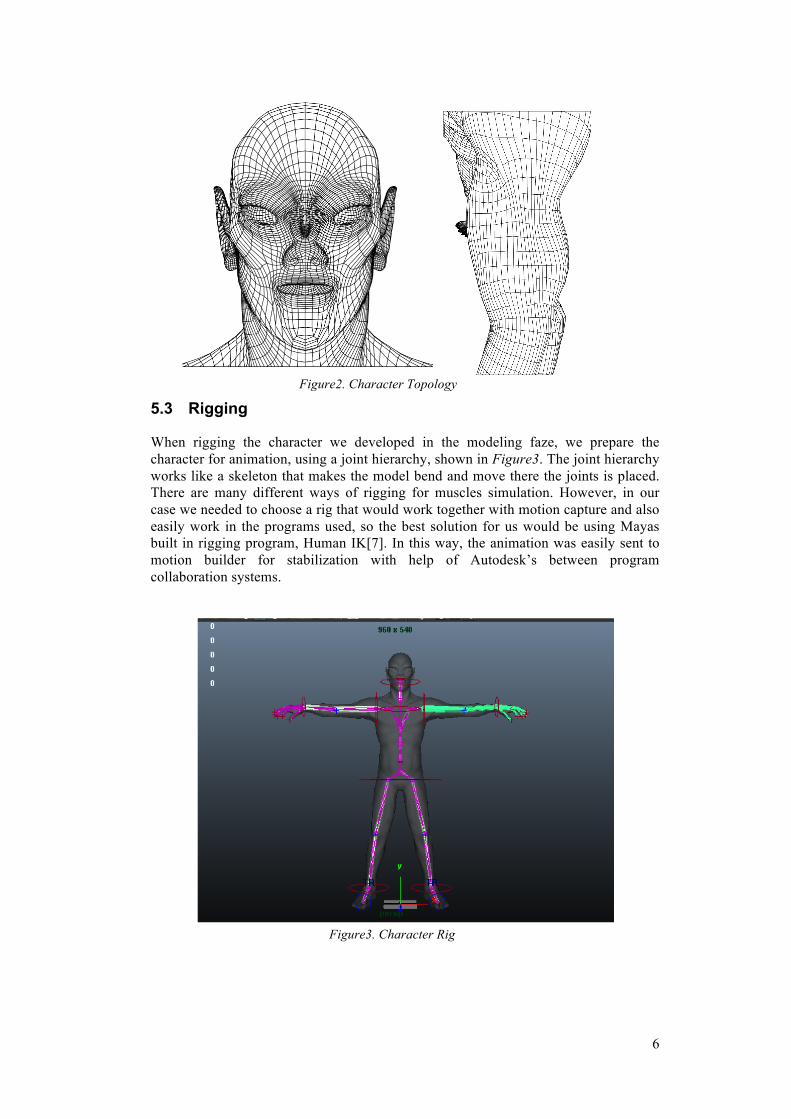
When rigging the character we developed in the modeling faze, we prepare the character for animation, using a joint hierarchy, shown in Figure3. The joint hierarchy works like a skeleton that makes the model bend and move there the joints is placed. There are many different ways of rigging for muscles simulation. However, in our case we needed to choose a rig that would work together with motion capture and also easily work in the programs used, so the best solution for us would be using Mayas built in rigging program, Human IK[7]. In this way, the animation was easily sent to motion builder for stabilization with help of Autodesk’s between program collaboration systems.
Figure2. Character Topology
Figure3. Character Rig
7
5.3.1 Human IK
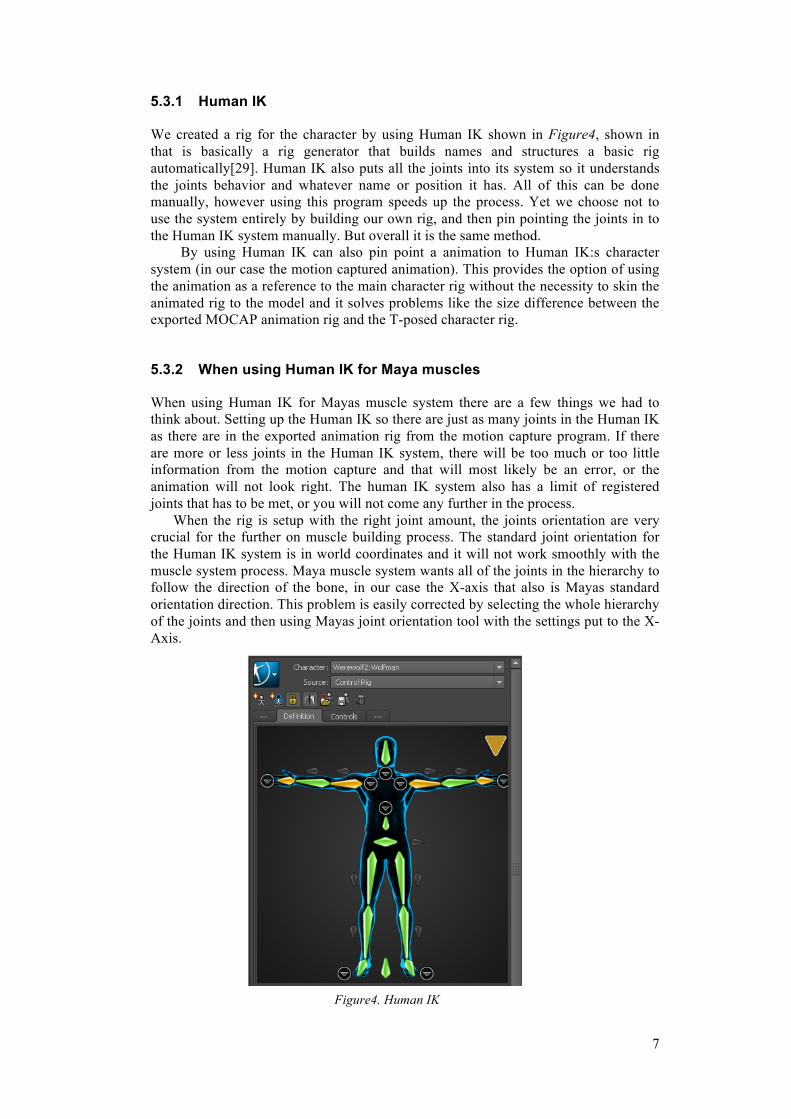
We created a rig for the character by using Human IK shown in Figure4, shown in that is basically a rig generator that builds names and structures a basic rig automatically[29]. Human IK also puts all the joints into its system so it understands the joints behavior and whatever name or position it has. All of this can be done manually, however using this program speeds up the process. Yet we choose not to use the system entirely by building our own rig, and then pin pointing the joints in to the Human IK system manually. But overall it is the same method.
By using Human IK can also pin point a animation to Human IK:s character system (in our case the motion captured animation). This provides the option of using the animation as a reference to the main character rig without the necessity to skin the animated rig to the model and it solves problems like the size difference between the exported MOCAP animation rig and the T-posed character rig.
5.3.2 When using Human IK for Maya muscles
When using Human IK for Mayas muscle system there are a few things we had to think about. Setting up the Human IK so there are just as many joints in the Human IK as there are in the exported animation rig from the motion capture program. If there are more or less joints in the Human IK system, there will be too much or too little information from the motion capture and that will most likely be an error, or the animation will not look right. The human IK system also has a limit of registered joints that has to be met, or you will not come any further in the process.
When the rig is setup with the right joint amount, the joints orientation are very crucial for the further on muscle building process. The standard joint orientation for the Human IK system is in world coordinates and it will not work smoothly with the muscle system process. Maya muscle system wants all of the joints in the hierarchy to follow the direction of the bone, in our case the X-axis that also is Mayas standard orientation direction. This problem is easily corrected by selecting the whole hierarchy of the joints and then using Mayas joint orientation tool with the settings put to the X-Axis.
Figure4. Human IK
8
5.4 Skinning
When we completed the rig of the character we started the skinning process. When skinning the model, simply said, you parent the joints to the models geometry and that makes the model move. For this project, the skinning method that will be used is smooth binding and then weight painting. In this case, we used a standard binding method first to the model before binding the muscles because the muscles will just control a selected area of the geometry, which leaves areas that are not influences by the muscles that are replaced by in our case a smooth bind. Smooth bind is also used because later on, the weight paint of the smooth bind can be translated over to Maya muscle systems weights.
5.4.1 Weight Painting
The method we used for making joints influence the correct geometry is weight painting. Weight painting is basically a black and white texture there Black makes the joint influence the most and white influences the least, you can also smooth the texture by making the values gray just in-between.
5.5 Maya Muscle
Muscle systems with muscle, body fat and skin have been around the industry in many years and the development is still going on. The muscle system used in this project is Autodesk Mayas own muscle system Maya muscle and will be applied to our own character rig developed in human IK. The muscle system is built up by so called spline deformers that squash and stretch depending on the location of the end vertices that are attached to for instance a joint. The deformers also have an attribute editor there you can change how much the muscles wobble or also parameters that choose the strength of squash and stretch. When applying Maya muscle to the characters joints you first have to put capsules along the joints hierarchy axes that enables the attachment and also translates the smooth bind to the muscle systems weighting. When this process is finished, there are two different ways of adding muscle spline deformers, the one used in this project is the simple muscle builder. When using the simple muscle builder muscles are added by selecting two joints, choosing the size and with and position of the muscle and then generating the muscle between the joints. When the muscle is generated the muscle can be sculpted and positioned as needed. After the muscle is positioned it can be mirrored over two the other side.
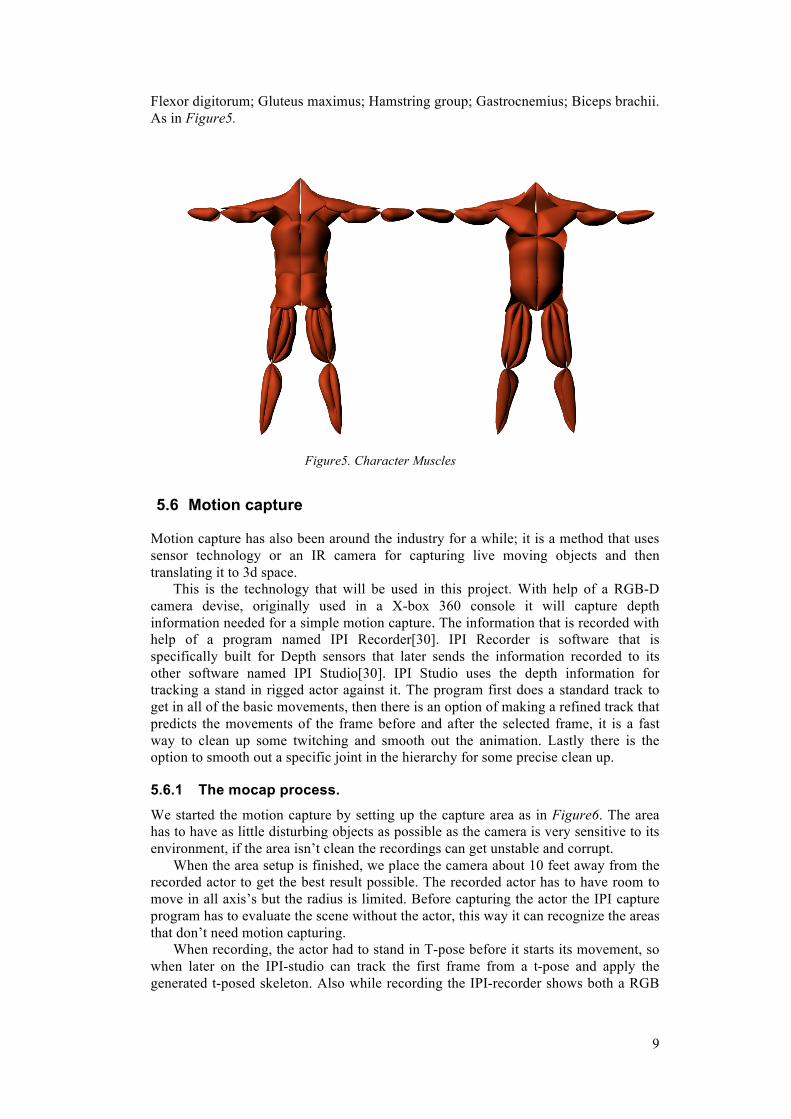
5.5.1 The muscle rigging process. When we have a finished applying the Human IK rig, smooth binded and weight painted to the model. We started the muscle rigging process by first selecting the joint hierarchy and using the “Convert smooth skin to Muscle system” option. When doing this it saves us time by first generating capsules and binding them with the same limitations as the smooth binding had, this is instead of doing the whole smooth binding procedure two times so the next step would be just concentrating on only the muscles. Further on we applied each muscle with the simple muscle builder by choosing two joints and generating the muscle spline deformer between them. We did not model every single muscle in the body. We started by modeling a muscle system with several muscles but then realized that it was unnecessary to create that many, therefore we made a more simple version, there we made the muscles that only had an impact on the skin. Each muscle was modeled by reference and only placed on the left side of the character that later on got mirrored over to the right side which saved time. The muscle chosen were: Trapezius; Latissimus dorsi; Deltoids; Triceps brachii;
9
Flexor digitorum; Gluteus maximus; Hamstring group; Gastrocnemius; Biceps brachii. As in Figure5.
5.6 Motion capture
Motion capture has also been around the industry for a while; it is a method that uses sensor technology or an IR camera for capturing live moving objects and then translating it to 3d space.
This is the technology that will be used in this project. With help of a RGB-D camera devise, originally used in a X-box 360 console it will capture depth information needed for a simple motion capture. The information that is recorded with help of a program named IPI Recorder[30]. IPI Recorder is software that is specifically built for Depth sensors that later sends the information recorded to its other software named IPI Studio[30]. IPI Studio uses the depth information for tracking a stand in rigged actor against it. The program first does a standard track to get in all of the basic movements, then there is an option of making a refined track that predicts the movements of the frame before and after the selected frame, it is a fast way to clean up some twitching and smooth out the animation. Lastly there is the option to smooth out a specific joint in the hierarchy for some precise clean up.
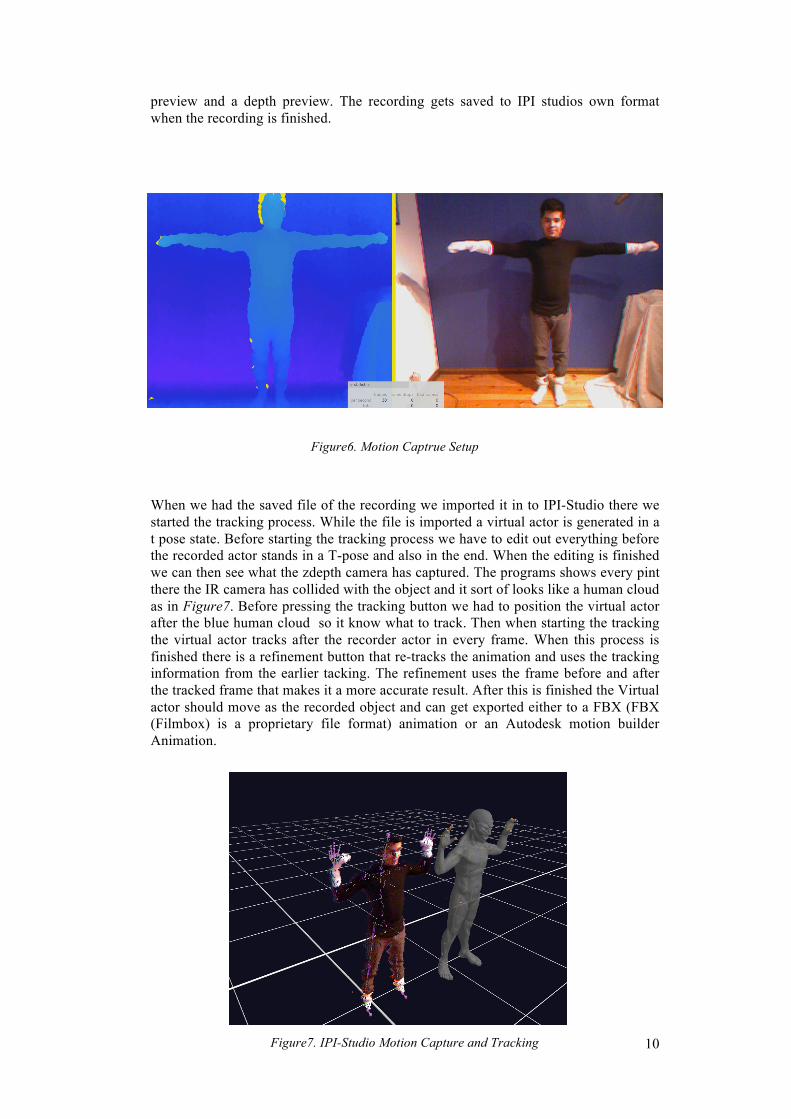
5.6.1 The mocap process. We started the motion capture by setting up the capture area as in Figure6. The area has to have as little disturbing objects as possible as the camera is very sensitive to its environment, if the area isn’t clean the recordings can get unstable and corrupt.
When the area setup is finished, we place the camera about 10 feet away from the recorded actor to get the best result possible. The recorded actor has to have room to move in all axis’s but the radius is limited. Before capturing the actor the IPI capture program has to evaluate the scene without the actor, this way it can recognize the areas that don’t need motion capturing.
When recording, the actor had to stand in T-pose before it starts its movement, so when later on the IPI-studio can track the first frame from a t-pose and apply the generated t-posed skeleton. Also while recording the IPI-recorder shows both a RGB
Figure5. Character Muscles
10
preview and a depth preview. The recording gets saved to IPI studios own format when the recording is finished.
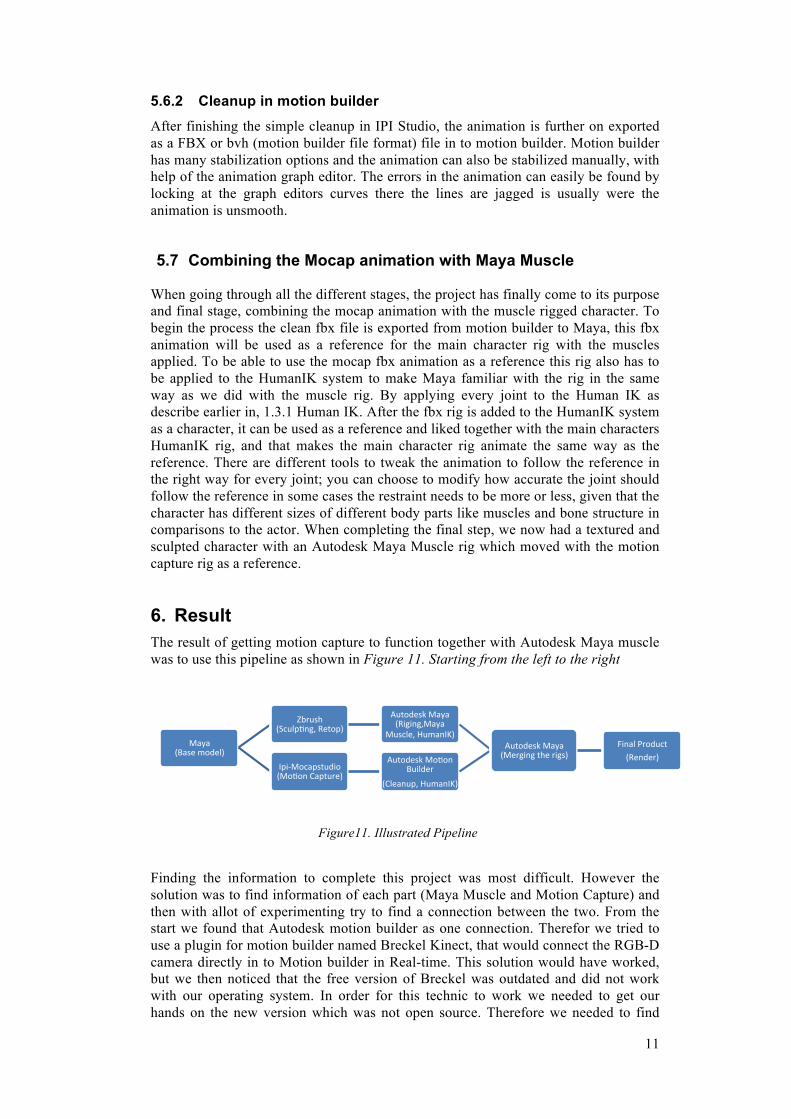
When we had the saved file of the recording we imported it in to IPI-Studio there we started the tracking process. While the file is imported a virtual actor is generated in a t pose state. Before starting the tracking process we have to edit out everything before the recorded actor stands in a T-pose and also in the end. When the editing is finished we can then see what the zdepth camera has captured. The programs shows every pint there the IR camera has collided with the object and it sort of looks like a human cloud as in Figure7. Before pressing the tracking button we had to position the virtual actor after the blue human cloud so it know what to track. Then when starting the tracking the virtual actor tracks after the recorder actor in every frame. When this process is finished there is a refinement button that re-tracks the animation and uses the tracking information from the earlier tacking. The refinement uses the frame before and after the tracked frame that makes it a more accurate result. After this is finished the Virtual actor should move as the recorded object and can get exported either to a FBX (FBX (Filmbox) is a proprietary file format) animation or an Autodesk motion builder Animation.
Figure6. Motion Captrue Setup
Figure7. IPI-Studio Motion Capture and Tracking
11
Maya (Base model)
Zbrush (Sculp6ng, Retop)
Autodesk Maya (Riging,Maya
Muscle, HumanIK)
Ipi-‐Mocapstudio (Mo6on Capture)
Autodesk Mo6on Builder
(Cleanup, HumanIK)
Autodesk Maya (Merging the rigs)
Final Product (Render)
5.6.2 Cleanup in motion builder After finishing the simple cleanup in IPI Studio, the animation is further on exported as a FBX or bvh (motion builder file format) file in to motion builder. Motion builder has many stabilization options and the animation can also be stabilized manually, with help of the animation graph editor. The errors in the animation can easily be found by locking at the graph editors curves there the lines are jagged is usually were the animation is unsmooth.
5.7 Combining the Mocap animation with Maya Muscle
When going through all the different stages, the project has finally come to its purpose and final stage, combining the mocap animation with the muscle rigged character. To begin the process the clean fbx file is exported from motion builder to Maya, this fbx animation will be used as a reference for the main character rig with the muscles applied. To be able to use the mocap fbx animation as a reference this rig also has to be applied to the HumanIK system to make Maya familiar with the rig in the same way as we did with the muscle rig. By applying every joint to the Human IK as describe earlier in, 1.3.1 Human IK. After the fbx rig is added to the HumanIK system as a character, it can be used as a reference and liked together with the main characters HumanIK rig, and that makes the main character rig animate the same way as the reference. There are different tools to tweak the animation to follow the reference in the right way for every joint; you can choose to modify how accurate the joint should follow the reference in some cases the restraint needs to be more or less, given that the character has different sizes of different body parts like muscles and bone structure in comparisons to the actor. When completing the final step, we now had a textured and sculpted character with an Autodesk Maya Muscle rig which moved with the motion capture rig as a reference.
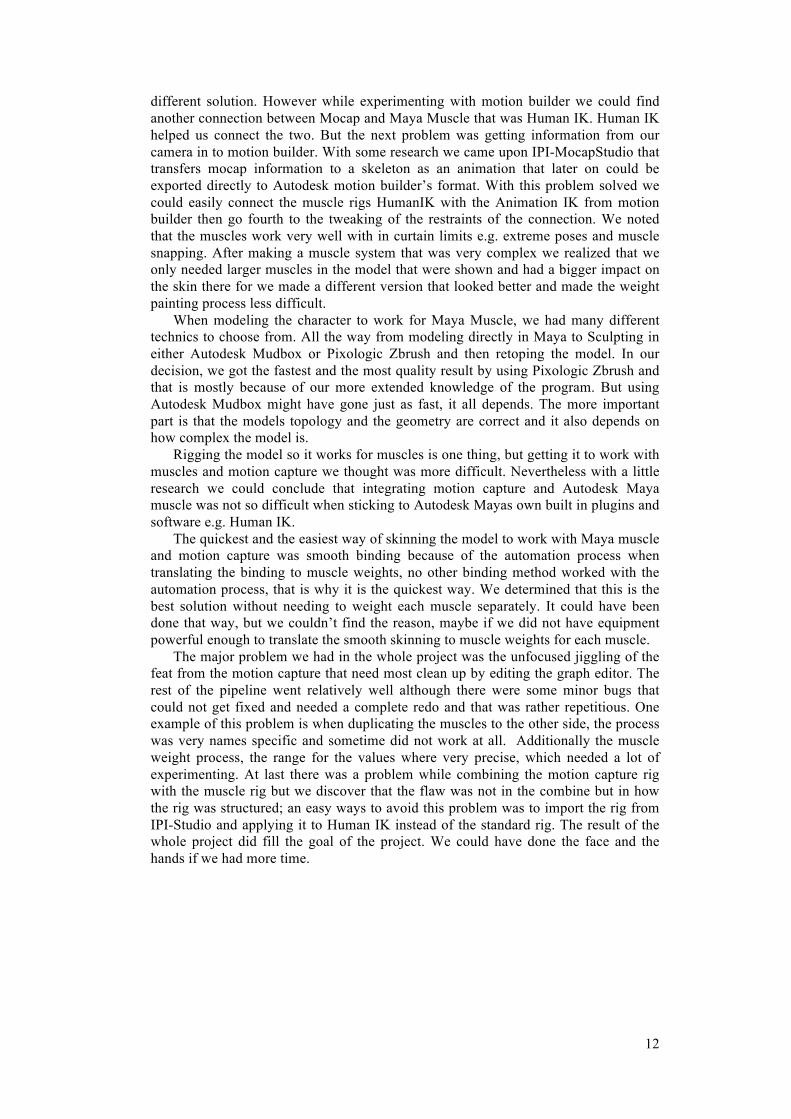
6. Result The result of getting motion capture to function together with Autodesk Maya muscle was to use this pipeline as shown in Figure 11. Starting from the left to the right
Finding the information to complete this project was most difficult. However the solution was to find information of each part (Maya Muscle and Motion Capture) and then with allot of experimenting try to find a connection between the two. From the start we found that Autodesk motion builder as one connection. Therefor we tried to use a plugin for motion builder named Breckel Kinect, that would connect the RGB-D camera directly in to Motion builder in Real-time. This solution would have worked, but we then noticed that the free version of Breckel was outdated and did not work with our operating system. In order for this technic to work we needed to get our hands on the new version which was not open source. Therefore we needed to find
Figure11. Illustrated Pipeline
12
different solution. However while experimenting with motion builder we could find another connection between Mocap and Maya Muscle that was Human IK. Human IK helped us connect the two. But the next problem was getting information from our camera in to motion builder. With some research we came upon IPI-MocapStudio that transfers mocap information to a skeleton as an animation that later on could be exported directly to Autodesk motion builder’s format. With this problem solved we could easily connect the muscle rigs HumanIK with the Animation IK from motion builder then go fourth to the tweaking of the restraints of the connection. We noted that the muscles work very well with in curtain limits e.g. extreme poses and muscle snapping. After making a muscle system that was very complex we realized that we only needed larger muscles in the model that were shown and had a bigger impact on the skin there for we made a different version that looked better and made the weight painting process less difficult.
When modeling the character to work for Maya Muscle, we had many different technics to choose from. All the way from modeling directly in Maya to Sculpting in either Autodesk Mudbox or Pixologic Zbrush and then retoping the model. In our decision, we got the fastest and the most quality result by using Pixologic Zbrush and that is mostly because of our more extended knowledge of the program. But using Autodesk Mudbox might have gone just as fast, it all depends. The more important part is that the models topology and the geometry are correct and it also depends on how complex the model is.
Rigging the model so it works for muscles is one thing, but getting it to work with muscles and motion capture we thought was more difficult. Nevertheless with a little research we could conclude that integrating motion capture and Autodesk Maya muscle was not so difficult when sticking to Autodesk Mayas own built in plugins and software e.g. Human IK.
The quickest and the easiest way of skinning the model to work with Maya muscle and motion capture was smooth binding because of the automation process when translating the binding to muscle weights, no other binding method worked with the automation process, that is why it is the quickest way. We determined that this is the best solution without needing to weight each muscle separately. It could have been done that way, but we couldn’t find the reason, maybe if we did not have equipment powerful enough to translate the smooth skinning to muscle weights for each muscle.
The major problem we had in the whole project was the unfocused jiggling of the feat from the motion capture that need most clean up by editing the graph editor. The rest of the pipeline went relatively well although there were some minor bugs that could not get fixed and needed a complete redo and that was rather repetitious. One example of this problem is when duplicating the muscles to the other side, the process was very names specific and sometime did not work at all. Additionally the muscle weight process, the range for the values where very precise, which needed a lot of experimenting. At last there was a problem while combining the motion capture rig with the muscle rig but we discover that the flaw was not in the combine but in how the rig was structured; an easy ways to avoid this problem was to import the rig from IPI-Studio and applying it to Human IK instead of the standard rig. The result of the whole project did fill the goal of the project. We could have done the face and the hands if we had more time.
13
7. Illustrated result of the project
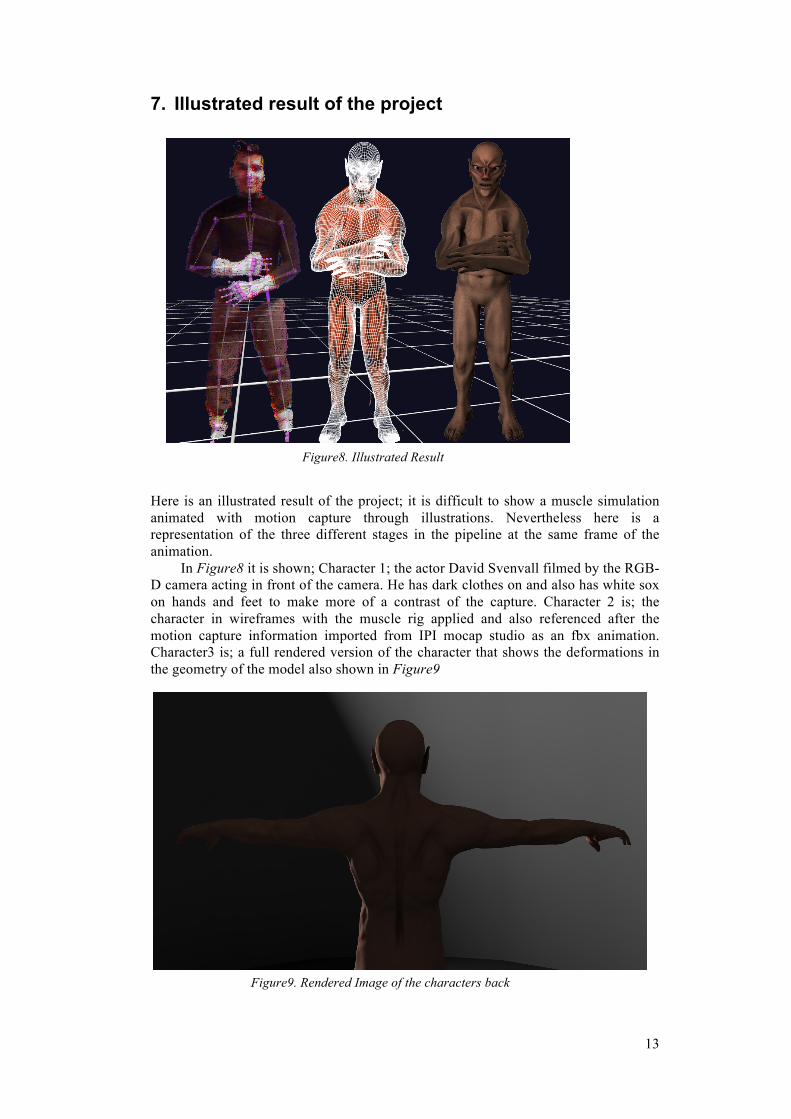
Here is an illustrated result of the project; it is difficult to show a muscle simulation animated with motion capture through illustrations. Nevertheless here is a representation of the three different stages in the pipeline at the same frame of the animation.
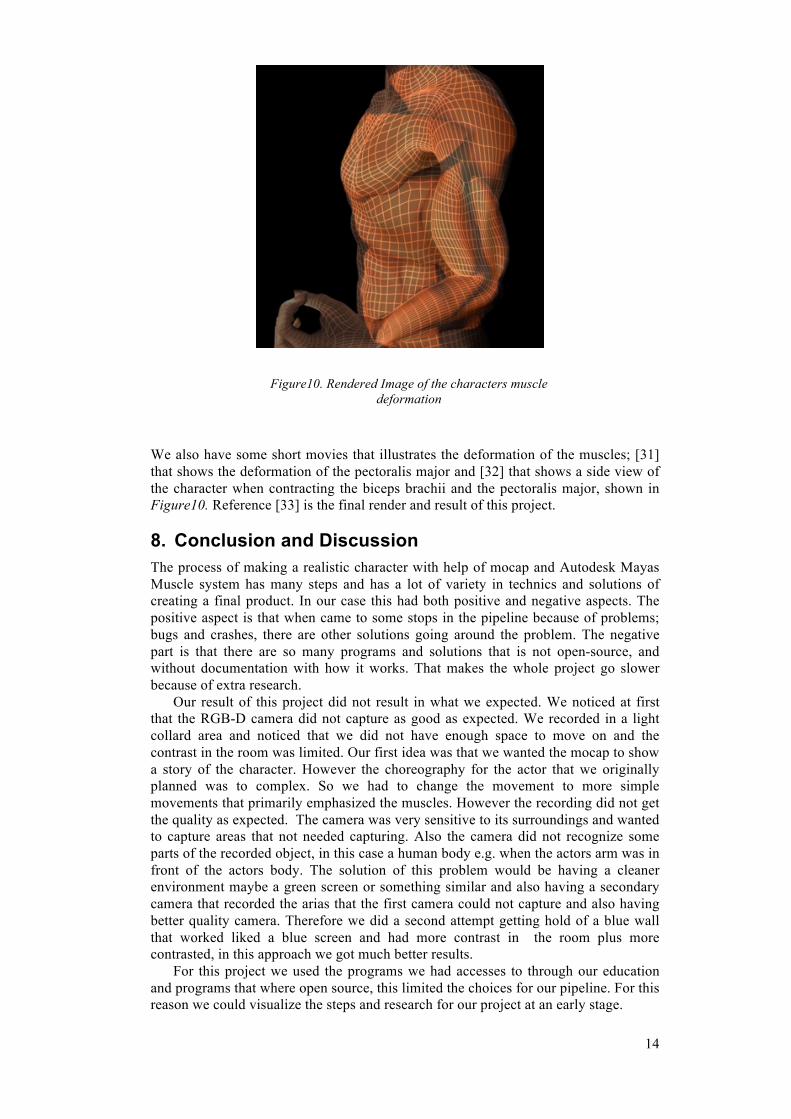
In Figure8 it is shown; Character 1; the actor David Svenvall filmed by the RGB-D camera acting in front of the camera. He has dark clothes on and also has white sox on hands and feet to make more of a contrast of the capture. Character 2 is; the character in wireframes with the muscle rig applied and also referenced after the motion capture information imported from IPI mocap studio as an fbx animation. Character3 is; a full rendered version of the character that shows the deformations in the geometry of the model also shown in Figure9
Figure8. Illustrated Result
Figure9. Rendered Image of the characters back
14
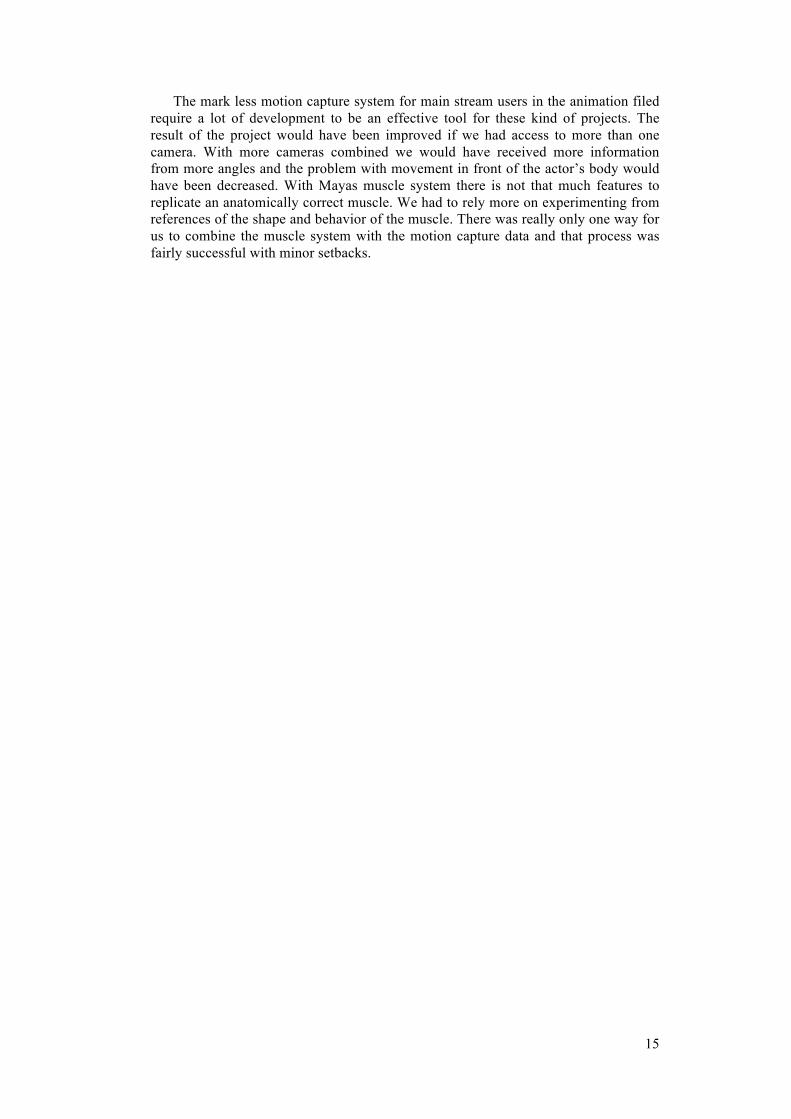
We also have some short movies that illustrates the deformation of the muscles; [31] that shows the deformation of the pectoralis major and [32] that shows a side view of the character when contracting the biceps brachii and the pectoralis major, shown in Figure10. Reference [33] is the final render and result of this project.
8. Conclusion and Discussion The process of making a realistic character with help of mocap and Autodesk Mayas Muscle system has many steps and has a lot of variety in technics and solutions of creating a final product. In our case this had both positive and negative aspects. The positive aspect is that when came to some stops in the pipeline because of problems; bugs and crashes, there are other solutions going around the problem. The negative part is that there are so many programs and solutions that is not open-source, and without documentation with how it works. That makes the whole project go slower because of extra research.
Our result of this project did not result in what we expected. We noticed at first that the RGB-D camera did not capture as good as expected. We recorded in a light collard area and noticed that we did not have enough space to move on and the contrast in the room was limited. Our first idea was that we wanted the mocap to show a story of the character. However the choreography for the actor that we originally planned was to complex. So we had to change the movement to more simple movements that primarily emphasized the muscles. However the recording did not get the quality as expected. The camera was very sensitive to its surroundings and wanted to capture areas that not needed capturing. Also the camera did not recognize some parts of the recorded object, in this case a human body e.g. when the actors arm was in front of the actors body. The solution of this problem would be having a cleaner environment maybe a green screen or something similar and also having a secondary camera that recorded the arias that the first camera could not capture and also having better quality camera. Therefore we did a second attempt getting hold of a blue wall that worked liked a blue screen and had more contrast in the room plus more contrasted, in this approach we got much better results.
For this project we used the programs we had accesses to through our education and programs that where open source, this limited the choices for our pipeline. For this reason we could visualize the steps and research for our project at an early stage.
Figure10. Rendered Image of the characters muscle deformation
15
The mark less motion capture system for main stream users in the animation filed require a lot of development to be an effective tool for these kind of projects. The result of the project would have been improved if we had access to more than one camera. With more cameras combined we would have received more information from more angles and the problem with movement in front of the actor’s body would have been decreased. With Mayas muscle system there is not that much features to replicate an anatomically correct muscle. We had to rely more on experimenting from references of the shape and behavior of the muscle. There was really only one way for us to combine the muscle system with the motion capture data and that process was fairly successful with minor setbacks.
16
9. References [1] S. Duong, M. Choi, ”Interactive Full-Body Motion Capture Using Infrared Sensor Network”, International Journal of Computer Graphics, Volume3, Issue 4, October 2013. pp. 41-56.
[2] Autodesk, Autodesk Maya. [Online], 2014. Available: http://www.autodesk.se/products/maya/overview [3] Microsoft, Microsoft Kinect. [Online], 2014. Available: http://www.xbox.com/en-US/kinect [4] Autodesk, Autodesk Maya. [Online], 2014. Available: http://www.autodesk.com/products/motionbuilder/overview [5] S. Spencer, “ZBrush® Digital Sculpting Human Anatomy” 2010 by Wiley Publishing, Inc., Indianapolis, Indiana. pp. 1-267. [6] J.Saam, ”Muscle and soft tissue simulation within a character pipeline based on Autodesk Maya”, Master Thesis, October 2007, Provided at: http://www.johannessaam.com/MasterThesis.pdf [August 20, 2014]. pp. 9-12. [7] Autodesk, Autdesk Human IK. [Online], 2014. Available: http://gameware.autodesk.com/humanik/features
[8] Z. Gray, M. Hutchington, ”Procedural Muscle and Skin Simulation” Provided at: http://www.fourthdoor.com/muscle/muscleWeb.htm [August 20, 2014]. pp. 1-6.
[9] X. Yang, j. Zhang “Automatic muscle generation for character skin deformation”, Computer Animation and Virtual Worlds, Volume 17, Issue 3-4, July 2006. pp. 293-303.
[10] X. Yang, R. Southern, J.j. Zhang, “Fast simulation of skin sliding”, Computer Animation and Virtual Worlds, Volume 20, Issue 2-3 June, 2009. , pp. 333-342.
[11] X. Yang, j. Zhang “Automatic muscle generation for character skin deformation” Computer Animation and Virtual Worlds, Volume 17, Issue 3-4, July 2006. pp. 293-303.
[12] J. Seo, Y. Seol, D. Wi, Y. Kim, J. Noh, ”Rigging transfer”, Computer Animation and Virtual Worlds, Volume 21, Issue3-4, May 2010. pp. 375-386.
[13] J.Zang, X Yang, Y Zhao, “Bar-net driven skinning for character animation”, Computer Animation and Virtual Worlds, Volume, 18, Issue 4-5, september-december, 2007. pp. 437-446
[14] B. Choe, H. Lee H. Ko, ” Performance-driven muscle-based facial animation”, Computer Animation and Virtual Worlds, Volume 12, Issue 2, May 2001. pp. 67-79.
[15] S. Duong, M. Choi, ”Interactive Full-Body Motion Capture Using Infrared Sensor Network”, International Journal of Computer Graphics, Volume3, Issue 4, October 2013. pp. 41-56.
17
[16] G. Bennet, A. Denton, ”Developing practical models for teaching Motion Capture”, ACM Digital Library, Proceeding Siggarph Asia ´09 Acm Siggaraph Asia 2009 Educators Program, Article No 3, December 2009. pp. 1-5.
[17] K. Christophers, ”Realism in CGI Character Performance: A Comparative Study of the Eveolution of Key-Framed Animation and Motion Capture Systems at Weta Digital Studios M.A. University of the Witwatersrand, Faculty of Humanities (Digital Animation), 2012, August 2012. pp. 6-21
[18] Z. Zeng. “Microsoft Kinect Sensor and Its Effect”, IEEE Xplore, issue april 2012. Provided at: http://ieeexplore.ieee.org/stamp/stamp.jsp?tp=&arnumber=6190806 [August 20, 2014]. pp.4-10
[19] K. Berger, K. Ruhl, Y. Schroeder, C. Bruemmer, A. Scholz, M.Magnor, “Markerless Motion Capture using multiple Color-Depth Sensors” Computer Graphics Lab at TU Braunschweig, publication August. 2011. Provided at: http://www.graphics.tu-bs.de/media/publications/multikinectsMocap.pdf [August 20, 2014]. pp. 1-816. [20] Adobe, Adobe Photoshop. [Online], 2014. Available: http://www.photoshop.com/products/photoshop [21] H. Gray “Anatomy of the Human Body” Bartleby, 2002, Provided at: http://www.bartleby.com/107/ [22] D. Maia, “Topology, Creating clean and evenly distributed topology with diego maia” 3Dtotal eBook Training [23] Youtube, Zbrushworkshop, [Online], 2013, Provided at: http://www.youtube.com/watch?v=CVoFi2mnyhA [24]RoadKill, Open Source [Online], Provided at: http://www.pullin-shapes.co.uk/page8.htm [25] YouTube, [Online], 2011, Provided at: https://www.youtube.com/watch?v=wc4F-OL4y3w&list=PL78F7038E190E22CD&index=5 [26] Digital Tutors, Online Training, [Online], 2014, Provided at: http://www.digitaltutors.com/lesson/39110 [27] Digital Tutors, Online Training, [Online], 2010, Provided at: http://www.digitaltutors.com/tutorial/279-Creating-Realistic-Eyes-in-Photoshop-and-Maya [28] CGTextures, [Online] Provided at: http://www.cgtextures.com/ [29] HumanIK, [Online] Provided at: http://gameware.autodesk.com/humanik/support/tutorials [30] iPi Recorder, iPi Mocap Studio, [Online] Provided at: http://ipisoft.com/download/

18
[31] Dropbox Link, [Online] Provided at: https://www.dropbox.com/s/7zbl6cliqdlcgxq/brests_1.mp4?dl=0 [32] Dropbox Link, [Online] Provided at: https://www.dropbox.com/s/hwaetocem7fg3nr/Example.mp4?dl=0 [33] David Svenvall website, [Online] Provided at: http://www.dfsvenvall.com/assets/Thesis_Final_Render.mp4