Instructions – PMB-01-5106 - HowTopmbhowto.com/manuals/Spark Arrestors/PMB-01-5106.pdf1-Nozzle...
2
Pro Moto Billet | 11461 Lone Star Rd., Nampa, ID, 83651 | 866.466.4762 | ProMotoBillet.com 1 Instructions – PMB-01-5106 Thank you for your purchase! We are confident that you will be pleased with the quality of our product. Parts List: Tools List: 1-Spark Arrestor Base Drill 13/64” Drill Bit 1-Nozzle Flat Screwdriver High-Temp Silicone Sealant 1-Screen Hammer 3-M6 Bolts Allen Wrenches 8-Self-tapping Screws Center Punch NOTE: Read the instructions carefully before starting the installation. If you do not have all the required tools or are not comfortable performing the work involved, have your dealer install the spark arrestor for you. Removal of existing end cap: 1. Remove muffler per manufacturer’s instructions. 2. Using a 13/64” drill bit, drill out the existing rivets holding the stock end cap in place; make sure to remove the head of the rivet. You do not need to drill all the way through the muffler canister, but you must make sure to drill deep enough to remove the head of the rivet. 3. Use a center punch or similar device and a hammer; push the rivets through the existing end cap and into the muffler. 4. Using a sharp utility knife, cut the silicone around the perimeter of the stock end cap. Pull the stock end cap out of the muffler. If you are having problems removing the stock cap, using a heat gun on the canister sleeve may make this easier. If there is packing inside the old end cap move it to the new spark arrestor base. 5. Remove all pieces of the old rivets from the packing material inside of the muffler canister. To install your new spark arrestor: 1. Remove any fiberglass packing from the back of the existing end cap and install it into the back side of your new Pro Moto Billet spark arrestor base. 2. Make sure all pieces of the old rivets from the packing material inside of the muffler canister. 3. Apply a small amount of high temperature RTV silicone sealant (Permatex, Ultra Black 598B or equivalent) around the stepped portion of the new spark arrestor base which will be inserted into the muffler. This will seal the base and prevent vibrations. 4. Install the new spark arrestor base into the muffler making sure that the base is pushed up tight to the edge of the muffler. Install one self-tapping screw at a time by drilling a 13/64” hole at each rivet location. Each time you drill a hole and install a self-tapping screw make sure that the base is pushed up tight to the muffler. We recommend using lubricant for the self-tapping screws. 5. Clean up excess silicone sealant. 6. Insert the spark arrestor screen and then the end cap, use M6 bolts to tighten. 7. Reinstall muffler. 8. You must clean and inspect the screen often. We recommend inspecting it every time you clean your air filter or change your oil.
Transcript of Instructions – PMB-01-5106 - HowTopmbhowto.com/manuals/Spark Arrestors/PMB-01-5106.pdf1-Nozzle...
Pro Moto Billet | 11461 Lone Star Rd., Nampa, ID, 83651 | 866.466.4762 | ProMotoBillet.com 1
Instructions – PMB-01-5106
Thank you for your purchase! We are confident that you will be pleased with the quality of our product. Parts List: Tools List: 1-Spark Arrestor Base Drill 13/64” Drill Bit 1-Nozzle Flat Screwdriver High-Temp Silicone Sealant 1-Screen Hammer 3-M6 Bolts Allen Wrenches 8-Self-tapping Screws Center Punch NOTE: Read the instructions carefully before starting the installation. If you do not have all the required tools or are not comfortable performing the work involved, have your dealer install the spark arrestor for you. Removal of existing end cap: 1. Remove muffler per manufacturer’s instructions.
2. Using a 13/64” drill bit, drill out the existing rivets holding the stock end cap in place; make sure to remove the head of the rivet. You do not need to drill all the way through the muffler canister, but you must make sure to drill deep enough to remove the head of the rivet.
3. Use a center punch or similar device and a hammer; push the rivets through the existing end cap and into the muffler.
4. Using a sharp utility knife, cut the silicone around the perimeter of the stock end cap. Pull the stock end cap out of the muffler. If you are having problems removing the stock cap, using a heat gun on the canister sleeve may make this easier. If there is packing inside the old end cap move it to the new spark arrestor base.
5. Remove all pieces of the old rivets from the packing material inside of the muffler canister.
To install your new spark arrestor: 1. Remove any fiberglass packing from the back of the existing end cap and install it into the back side of
your new Pro Moto Billet spark arrestor base.
2. Make sure all pieces of the old rivets from the packing material inside of the muffler canister.
3. Apply a small amount of high temperature RTV silicone sealant (Permatex, Ultra Black 598B or equivalent) around the stepped portion of the new spark arrestor base which will be inserted into the muffler. This will seal the base and prevent vibrations.
4. Install the new spark arrestor base into the muffler making sure that the base is pushed up tight to the edge of the muffler. Install one self-tapping screw at a time by drilling a 13/64” hole at each rivet location. Each time you drill a hole and install a self-tapping screw make sure that the base is pushed up tight to the muffler. We recommend using lubricant for the self-tapping screws.
5. Clean up excess silicone sealant.
6. Insert the spark arrestor screen and then the end cap, use M6 bolts to tighten.
7. Reinstall muffler.
8. You must clean and inspect the screen often. We recommend inspecting it every time you clean your air filter or change your oil.
Pro Moto Billet | 11461 Lone Star Rd., Nampa, ID, 83651 | 866.466.4762 | ProMotoBillet.com 2
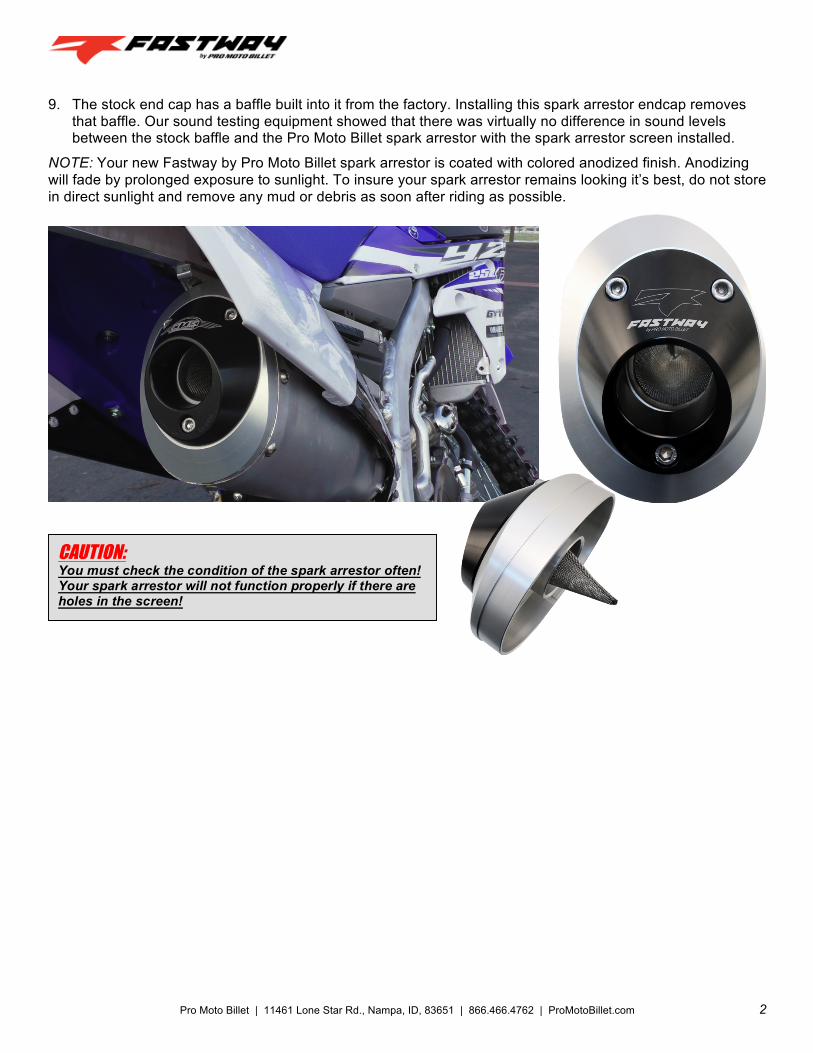
9. The stock end cap has a baffle built into it from the factory. Installing this spark arrestor endcap removes that baffle. Our sound testing equipment showed that there was virtually no difference in sound levels between the stock baffle and the Pro Moto Billet spark arrestor with the spark arrestor screen installed.
NOTE: Your new Fastway by Pro Moto Billet spark arrestor is coated with colored anodized finish. Anodizing will fade by prolonged exposure to sunlight. To insure your spark arrestor remains looking it’s best, do not store in direct sunlight and remove any mud or debris as soon after riding as possible.
CAUTION: You must check the condition of the spark arrestor often! Your spark arrestor will not function properly if there are holes in the screen!