INSTRUCTIONS MANUAL - The Home Depot · PDF fileINSTRUCTIONS MANUAL ... ŸNo coloque el...
8
INSTRUCTIONS MANUAL CAUTION: IMPORTANT SAFETY INSTRUCTIONS BEFORE YOU START Ÿ Decide on appropriate location for your product. Ÿ Remove all plastic bags and dispose of safety out of the reach of children & animals. Ÿ Retain the instructions for future use. WARNING-FOR SAFETY'S SAKE Ÿ This tree is intended for INDOOR USE ONLY. Ÿ Never allow any part of the set to come into contact with a source of heat or flames. Ÿ Always position your tree and cable and any extension leads so that they will not be a hazard to the elderly, pets and children. Ÿ Do not position a Christmas tree or decoration near candles or other sources of heat. Ÿ Always switch off decorative lights overnight or if unattended. Do not over load power sockets or extension cables. Ÿ Caution-Artificial trees have small parts which may pose a choking hazard I detached from the branches. Ÿ It is very important that the light set is NEVER DIRECTLY connected to the mains supply. Ÿ Do not completely cover the LED with decorations and other flammable materials. Ensure adequate airflow around each LED. Ÿ Do not damage the insulation of cable or LED holder. Ÿ Do not secure the wiring of the product with staples or nails. Ÿ Do not close doors or windows on the product as this may damage the wiring insulation. Ÿ Do not unscrew or twist the LED’s Ÿ Ensure table top transformers are positioned on flat, stable, heat resistant surfaces. These instruction are for your proper use and your safety. Pleas read them thoroughly before use and retain for future reference. 7.5FT MELODY HILL MUSICAL TREE INDOOR USE ONLY 1A
Transcript of INSTRUCTIONS MANUAL - The Home Depot · PDF fileINSTRUCTIONS MANUAL ... ŸNo coloque el...

INSTRUCTIONSMANUAL
CAUTION:IMPORTANT SAFETY INSTRUCTIONS
BEFORE YOU START
Ÿ Decide on appropriate location for your product.
Ÿ Remove all plastic bags and dispose of safety out of the reach of children &
animals.
Ÿ Retain the instructions for future use.
WARNING-FOR SAFETY'S SAKE
Ÿ This tree is intended for INDOOR USE ONLY.
Ÿ Never allow any part of the set to come into contact with a source of heat or
flames.
Ÿ Always position your tree and cable and any extension leads so that they will
not be a hazard to the elderly, pets and children.
Ÿ Do not position a Christmas tree or decoration near candles or other sources
of heat.
Ÿ Always switch off decorative lights overnight or if unattended. Do not over
load power sockets or extension cables.
Ÿ Caution-Artificial trees have small parts which may pose a choking hazard I
detached from the branches.
Ÿ It is very important that the light set is NEVER DIRECTLY connected to the
mains supply.
Ÿ Do not completely cover the LED with decorations and other flammable
materials. Ensure adequate airflow around each LED.
Ÿ Do not damage the insulation of cable or LED holder.
Ÿ Do not secure the wiring of the product with staples or nails.
Ÿ Do not close doors or windows on the product as this may damage the wiring
insulation.
Ÿ Do not unscrew or twist the LED’s
Ÿ Ensure table top transformers are positioned on flat, stable, heat resistant
surfaces.
These instruction are for your proper use and your safety.Pleas read them thoroughly before use and retain for future reference.
7.5FT MELODY HILL MUSICAL TREE
INDOOR USE ONLY
1A

Retain carton for storage purposes.
Each carton contains one top section, one middle section,one bottom section ,a tree stand,a music box and a remote.
STORAGE
1.Unfold the tree stand and insert the eye bolts.
Insert bottom section pole into tree stand making
sure it is seated properly (Figure 1). Tighten eye
bolts until bottom section is held securely.
2.Insert the middle section of the tree into the bottom
section.
3.Plug the light string cords from the bottom section
to the middle section. Attention! There are two
different strings for, cord with RED tag should be
plugged together, and cord without tag should be
plugged together.
4.Insert the top section of tree into the upper most
part of middle section. Plug the light string cord of
the top section into the receptacle of the middle
section light strings with separate two(refer step3).
5.Final step is branch shaping. All hinged branches
should fall into lowered position during assembly.
Any branches that remain upright should be gently
lowered by hand (see Figure 3 and 4). Please refer
to Shaping Instructions for proper branch shaping
technique.
Remove all holiday decorations. Gently press tips
back into center branch. Raise all branches to
original upright position taking care not to place
undue pressure on the attached ends of the
branches. When disassembling tree, a twisting
motion will help to separate the sections from each
other. All tree parts can be replaced in carton and
should be stored in a cool, dry place.
HOW TO ASSEMBLE THE TREE
Fig.4
Fig.3
Fig.1
Light String withRED TAG shouldbe plugged together.
Light String with RED TAGshould be plugged together.
Fig.2
2A

HOW TO USE THE MUSIC BOX
OPTION B: Remote Control
MusicReset
NextSong
VOL+VOL-
Light On/Mode/ Off
USBNextSong
ONOFF
Before using the remote
ensure the speaker unit is
sw i t ched on and key
panel is activated.
OPTION A: Main box control
Light Out - Clear
USB IN
Key Control(music)On/Off
USBNext Song
VOL- VOL+ Next Song MusicReset
LightsOn/Mode/Off
Light Out - Multi
PowerOn/Off
1
2 3
USB PLUGStep2.Press button 2 to start the key control of the music box. Music sounds now.
Step3.Press button 3 to play the lighting, keep on press btn3 to swi tch fac t ion o f the lighting, they are,1)Follow to the music2)Steady On3)Flashing alternately4)Quickly flashing both5)Slowly flashing both6)Off
Step4.Connect the USB into the interface to
play the music insides.
Step1.
Start power supply for the music box.
1. Make sure to turn on main power switch to "I" position.
2. Press "ON/OFF" button ONCE to activate the key panel.
3. Wait for 1-2 seconds and RED sensor will light up to
indicate the speaker is ready.
SWITCH ON THE SPEAKER UNIT
SWITCH ON THE LIGHT CHIAN
1.Press "Light ON/MODE/OFF" button once to turn the
light chain ON .2.Press the button again to switch to
other light flashing modes.3.To turn off, press the
button repeatedly until the light chain OFF.
SWITCH ON THE MUSIC
1. Press "NEXT SONG" button to skip the song.
2 Press "VOL+" "VOL-" button to tune the volume.
3. Press “Music Reset”button to skip first song
in the music box.
Mp3 FUNCTION
1. Connect the USB into the interface to play
the music insides.
2. Press "USB NEXT SONG" button to skip the song.
3. Press “ON/OFF” to close the key panel,
4
OPERATION GUIDE1.ON/OFF2.Light On/Mode/Off3.Next Song4.VOL+/VOL-(5.Plug the USB)6.USB Next Song
3A
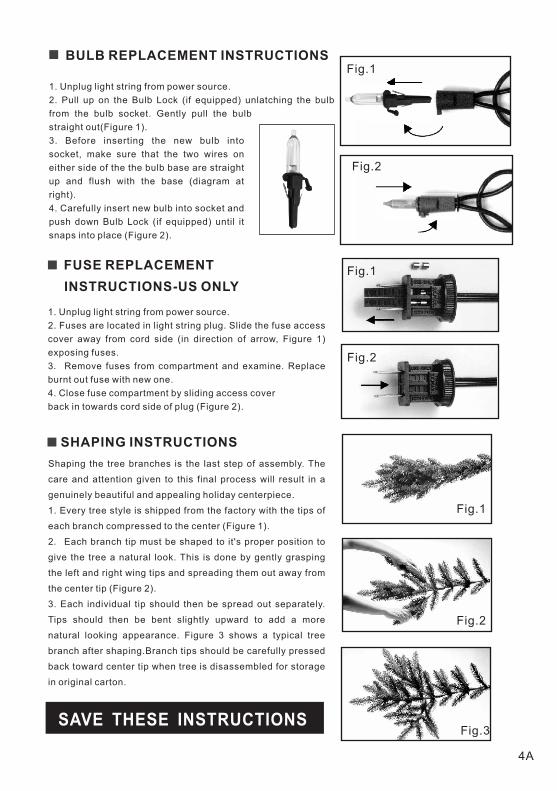
BULB REPLACEMENT INSTRUCTIONS
FUSE REPLACEMENT
1. Unplug light string from power source.
2. Pull up on the Bulb Lock (if equipped) unlatching the bulb
from the bulb socket. Gently pull the bulb
straight out(Figure 1).
3. Before inserting the new bulb into
socket, make sure that the two wires on
either side of the the bulb base are straight
up and flush with the base (diagram at
right).
4. Carefully insert new bulb into socket and
push down Bulb Lock (if equipped) until it
snaps into place (Figure 2).
1. Unplug light string from power source.
2. Fuses are located in light string plug. Slide the fuse access
cover away from cord side (in direction of arrow, Figure 1)
exposing fuses.
3. Remove fuses from compartment and examine. Replace
burnt out fuse with new one.
4. Close fuse compartment by sliding access cover
back in towards cord side of plug (Figure 2).
INSTRUCTIONS-US ONLY
SHAPING INSTRUCTIONS
Shaping the tree branches is the last step of assembly. The
care and attention given to this final process will result in a
genuinely beautiful and appealing holiday centerpiece.
1. Every tree style is shipped from the factory with the tips of
each branch compressed to the center (Figure 1).
2. Each branch tip must be shaped to it's proper position to
give the tree a natural look. This is done by gently grasping
the left and right wing tips and spreading them out away from
the center tip (Figure 2).
3. Each individual tip should then be spread out separately.
Tips should then be bent slightly upward to add a more
natural looking appearance. Figure 3 shows a typical tree
branch after shaping.Branch tips should be carefully pressed
back toward center tip when tree is disassembled for storage
in original carton.
SAVE THESE INSTRUCTIONS
Fig.1
Fig.2
Fig.1
Fig.2
Fig.3
Fig.1
Fig.2
4A
MANUAL DE INSTRUCCIONES
PRECAUCIÓN:INSTRUCCIONES IMPORTANTES
ANTES DE COMENZARŸDecida el lugar adecuado para su producto.
ŸRetire todas las bolsas de plástico y elimínelas de forma segura fuera del alcance de
niños y animales.
ŸConserve las instrucciones para su uso futuro.
ŸTenga en cuenta que para armar este artículo se recomienda que lo hagan dos
personas.
ADVERTENCIA: POR RAZONES DE SEGURIDAD
ŸEste árbol está pensado SOLO PARA SU USO EN INTERIORES.
ŸNunca permita que las partes del conjunto entren en contacto con una fuente de calor o
llamas.
ŸSiempre coloque el árbol y el cable y los cables de extensión de forma que no
representen un peligro para las personas de edad avanzada, las mascotas y los niños.
ŸNo coloque el árbol de Navidad o la decoración cerca de velas u otras fuentes de calor.
ŸSiempre apague las luces decorativas durante la noche o cuando no reciban atención.
No sobrecargue las tomas de corriente o los cables de extensión.
ŸPrecaución: los árboles artificiales tienen piezas pequeñas que pueden presentar un
peligro de asfixia si son separadas de las ramas.
ŸEs muy importante que el juego de luces NUNCA sea conectado DIRECTAMENTE a la
red eléctrica.
ŸNo cubra totalmente el LED con las decoraciones u otros materiales inflamables.
ŸAsegúrese de que exista una ventilación adecuada alrededor de cada LED.
ŸProcure no dañar el aislamiento del cable o del soporte LED.
ŸNo fije el cableado del producto con grapas o clavos.
ŸNo cierre las puertas o ventanas sobre el producto, ya que podría dañar el aislamiento
de los cables.
ŸNo afloje ni retuerza los LED
ŸAsegúrese de que los transformadores de mesa estén colocados sobre superficies
planas, estables y resistentes al calor.
Estas instrucciones son para el uso correcto y para su seguridad.Por favor, lea cuidadosamente antes de utilizar y conserve las instrucciones para futuras referencias.
ÁRBOL MUSICAL MELODY HILL DE 7,5 PIES ISOLO PARA USO EN INTERIORES
1B

Conserve la caja con el propósito de almacenamiento.
Cada caja contiene una sección superior, una sección intermedia, una sección inferior, un árbol de pie, una caja de música y un control remoto.
ALMACENAMIENTO
1.Despliegue el pie del árbol e inserte los pernos de ojo.
Inserte la vara de la sección inferior dentro del pie del
árbol hasta que encaje correctamente (Figura 1). Apriete
los pernos de ojo hasta que la sección inferior quede
firmemente sujeta.
2.Inserte la sección central del árbol en la sección
inferior.
3.Enchufe las guirnaldas de luces de la sección inferior a
la sección central. ¡Atención! Hay dos tipos de cables,
los cables con etiqueta ROJA se deben conectar juntos, y
los cables sin etiqueta se deben conectar juntos .
4.Inserte la sección superior del árbol en la parte más alta
de la sección central. Conecte la guirnalda de luces de la
sección superior en el receptáculo de la guirnalda de
luces de la sección central, las dos por separado (ver
paso 3).
5.El paso final es dar forma a las ramas. Todas las ramas
articuladas debe quedar en la posición más baja durante
el ensamblado. Cualquier rama que quede en posición
vertical debe bajarse suavemente con la mano (ver la
Figura 3 y 4). Consulte las instrucciones para dar forma a
las ramas para lograr una técnica adecuada para
modelarlas.
Quite todas las decoraciones navideñas. Presione
suavemente las puntas hacia el centro de la rama.
Levante todas las ramas hasta la posición vertical
original con cuidado de no ejercer presión indebida en
los extremos unidos de las ramas. Para desarmar el
árbol, un movimiento de torsión ayudará a separar las
secciones una de la otra. Las tres partes del árbol
pueden ser guardadas nuevamente en una caja de
cartón y deben almacenarse en un lugar fresco y seco.
CÓMO ENSAMBLAR EL ÁRBOL
Fig.4
Fig.3
Fig.1
Light String withRED TAG shouldbe plugged together.
Light String with RED TAGshould be plugged together.
Fig.2
2B

4
ENCIENDA LA CADENA DE LUCES
OPCIÓN B:control Remoto
Antes de utilizar el mando
a distancia asegurar la
unidad de altavoz está
encendido y panel de
teclas se activa.
OPCIÓN A:Caja de control principal
Light Out - Clear
USB IN
Key Control On/Off
USBNext Song
VOL- VOL+ Next Song MusicReset
Lights TypeOn/Mode/Off
Light Out - Multi
PowerOn/Off
1
2 3
USB ENCHUFEPaso 2.Botón de 2 Push to iniciar el control de clave de la caja de música. Music En
Step3.
Botón de Press 3 para jugar el
iluminación, a mantener en la
prensa btn3 para cambiar
facción de la iluminación, que
son,
1) Siga a la música
2) Steady On
3) De parpadear forma alterna
4) De parpadear rápidamente
tanto
5) Parpadea lentamente tanto
6) Off
Paso 4.
Conecte el dispositivo USB en la interfaz
para reproducir música en el interior.
Paso 1.
Iniciar fuente de alimentación para la caja de música.
1. Asegúrese que la unidad de altavoz esté encendida y el panel principal
esté activado.
2. Presione una vez el botón "Light ON/MODE/OFF" (“Luces
ENCENDIDO/MODO/APAGADO”) para ENCENDER la cadena de luces.
3. Presione de nuevo el botón para otros modos de luces parpadeantes.
1. Asegúrese que la unidad de altavoz esté encendida y que el panel
principal esté activado.
2. Presione el botón "NEXT SONG" (“SIGUIENTE CANCIÓN”) para
pasar a la siguiente canción.
3 Presione el botón "VOL+" "VOL-" para ajustar el volumen.
4. Presione el botón “Music Reset” (“Reinicio de Música”) para pasar a
la primer canción de la caja de música.
1. Conecte el dispositivo USB en la interfaz para reproducir música en
el interior.
2. Presione el botón "USB NEXT SONG" (“SIGUIENTE CANCIÓN USB”)
para pasar a la siguiente canción.
3. Presione “ON/OFF” (“ENCENDIDO/APAGADO”) para apagar el panel
principal, después retire el USB para mayor seguridad.
GUÍA DE OPERACIÓN PARA LA CAJA DE MÚSICA
1 . C o l o q u e e l i n t e r r u p t o r p r i n c i p a l e n l a p o s i c i ó n " I "
(“ENCENDIDO”).
2. Presione UNA VEZ el botón "key control ON/OFF" (“Control Principal
ENCEDIDO/APAGADO”) para activar el panel principal.
3. Espere 1-2 segundos y se encenderá el sensor ROJO para indicar el
altavoz.
MusicReset
NextSong
VOL+VOL-
Light On/Mode/ Off
USBNextSong
OPERATION GUIDE1.ON/OFF2.Light On/Mode/Off3.Next Song4.VOL+/VOL-(5.Plug the USB)6.USB Next Song
E N C IE N D A LA U N ID A D D E A LTAV OZ
ENCIENDA LA MÚSICA ONOFF
FUNCTION USB
3B

INSTRUCCIONES PARA CAMBIARLAS BOMBILLAS
INSTRUCCIONES PARA CAMBIAR LOS FUSIBLES (SOLAMENTE PARA LOS EE.UU.)
1. Desenchufe la guirnalda de luces de la fuente de alimentación.
2. Tire de la traba de bombillas (si se incluye) para soltar la
bombilla del casquillo. Retire con cuidado la bombilla hacia afuera
(Figura 1).
3. Antes de introducir la nueva bombilla en el
casquillo, asegúrese de que los dos cables a
los lados de la base de la bombilla estén
levantados y al ras de la base
(ver el diagrama de la derecha).
4. Inserte cuidadosamente la nueva bombilla
en el casquillo y oprima la traba de bombillas
hacia abajo (si se incluye) hasta que encaje en
su lugar (Figura 2).
1. Desenchufe la guirnalda de luces de la fuente de alimentación.
2. Los fusibles se encuentran en el enchufe de la guirnalda de
luces. Deslice la cubierta de acceso a los fusibles para apartarla
del lado del cable (en la dirección de la flecha, Figura 1) y poder
ver los fusibles.
3. Retire los fusibles del compartimiento y examínelos. Reemplace
los fusibles quemados por otros nuevos.
4. Para cerrar el compartimiento de fusibles, deslice hacia atrás la
cubierta de acceso, hacia el lado del cable del enchufe (Figura 2).
INSTRUCCIONES PARA DAR FORMA AL ÁRBOL
Dar forma a las ramas del árbol es el último paso en el
ensamblado. El cuidado y la atención en este proceso final se
traducirá en la obtención de una pieza maestra navideña,
verdaderamente hermosa y atractiva.
1. Todos los modelos de árboles vienen de fábrica con las puntas
de las ramas comprimidas hacia el centro (Figura 1).
2. Las puntas de cada rama deben ser llevadas a la posición
adecuada para dar al árbol un aspecto natural. Esto se logra
tomando suavemente las puntas de las ramas ubicadas a la
izquierda y a la derecha y separándolas hacia afuera, lejos de la
punta central (Figura 2).
3. Cada punta individual debe extenderse por separado. Las
puntas las ramas deben doblarse un poco hacia arriba para dar al
árbol un aspecto más natural. La figura 3 muestra una rama de
árbol típica después de haberle dado forma. Las puntas de las
ramas deben ser cuidadosamente presionadas hacia la punta
central cuando se desarme el árbol para su almacenamiento en la
caja original.
GUARDE ESTAS INSTRUCCIONES
Fig.1
Fig.2
Fig.1
Fig.2
Fig.3
Fig.1
Fig.2
4B