Instructions - io · PDF fileRegistration ... Otherwise, contact [email protected] or phone...
23
1 Instructions Registration ...................................................................................................................................... 2 Application (Complete A-C) .......................................................................................................... 4 A. Complete all Fields in the application B. Upload required Documentation C. “Submit for Approval” Logout………………………………………………………….…………………………………………8 Check the Status of the Application……………………………………………………………….9 Application Approval/Denial……………………………………………………………………….11 Accepting a Grant (BEFORE THE EVENT )…………………………………………….…………...11 At the Event……………………………………………………………………………………………16 After the Event: Claim Reimbursement……………………………………………………………………………….17 Follow Up (9 & 18 months)………………………………………………………………Coming Soon Appendix: Information & Documentation Checklist ................................................................................. 22 Application Definitions……………………………………………………………………………....23 International Grant Application System
Transcript of Instructions - io · PDF fileRegistration ... Otherwise, contact [email protected] or phone...

1
Instructions
Registration ...................................................................................................................................... 2
Application (Complete A-C) .......................................................................................................... 4
A. Complete all Fields in the application
B. Upload required Documentation
C. “Submit for Approval”
Logout………………………………………………………….…………………………………………8
Check the Status of the Application……………………………………………………………….9
Application Approval/Denial……………………………………………………………………….11
Accepting a Grant (BEFORE THE EVENT)…………………………………………….…………...11
At the Event……………………………………………………………………………………………16
After the Event:
Claim Reimbursement……………………………………………………………………………….17
Follow Up (9 & 18 months)………………………………………………………………Coming Soon
Appendix:
Information & Documentation Checklist ................................................................................. 22
Application Definitions……………………………………………………………………………....23
International Grant Application System

2
Registration
Https://ieda.force.com
First-time users (to ieda.force.com) must register as a user of the International Grant Application System. Click on “Sign Up” in the lower right corner under the Log In button.
Next, applicants are encouraged to complete ALL fields of the registration form. Applicants need the COMPANY’S TAX ID NUMBER to register. Required fields are noted in red and MUST be completed in order to “Submit” the registration.
Once submitted, applicant will receive this message:
If the contact’s address is the same as the company address, check this box. The system will automatically populate the information.
Complete
column down,
then proceed to
the second
column.
Note: The Contact E-mail provided will be the e-mail where all correspondence regarding this application/grant, will be sent.

3
Applicants will receive an e-mail (to the e-mail provided on the registration form), indicating the registration was received and will be processed within two business days.
If an e-mail similar to the one below is not received, applicants should check the spam/junk folder. Otherwise, contact [email protected] or phone 515.725.3139.
Approved applicants will receive a welcome e-mail providing a link to create a password. If you do not receive this email within two business days, please notify us at [email protected].
INCOMPLETE APPLICATIONS WILL NOT BE CONSIDERED. Please review the Information & Documentation Checklist (in Appendix) before proceeding.

4
Application (See Information & Documentation Checklist (in Appendix) before starting.)
Access the Log In from your “Welcome to the International Trade Grant Application System” e-mail. You will be prompted to create a password prior to your first Log In using the “Change Your Password” screen.
Select Create New Grant Application.
There are three steps required to submit an application:
A. Complete Application Fields B. Required Documentation C. “Submit for Approval”
Complete Applications include both: A. Completed Application B. Uploading support documentation to the Notes & Attachments section
Enter new password.
Select Change Password

5
A. Complete all Fields on Application Fields marked in red are required. You will not be able to save the application without completing these fields.
Additional field definitions are available on the Application Field Definitions page (Appendix).
“After Step 8 of 9: Authorization,” save the application. Applicants will return to the last step after uploading the required documentation. After saving the application, scroll down under the application to the “Notes & Attachments” section (this section only appears under the Application section after saving the applicaton).
A small pop up provides detailed information on the field when hovering over the small question icon next to the field name.
Use the lookup button to search for your Company Account. This will search for the company name used during registration.

6
B. Required Documentation (refer to Information & Documentation Checklist (Appendix) for complete list)
Scroll down the page to the Notes & Attachments section, select Attach File. Multiple files can be attached.
Step #1: Select Choose File and browse to select the first file to upload. The document name should appear next to Choose File to confirm the correct document has been selected.
Step #2: Select Attach File, to attach the file. The name of the file uploaded is shown under the green bar entitled “You have just uploaded the following File” as noted below, to confirm the document was uploaded.
Repeat Steps 1 & 2 for all six documents. The name of each uploaded file should appear under the green bar. When finished, select Done (#3 on the screen).
File name displays here when SELECTED.
File name displays here after UPLOADED.
Confirm that the application has been saved.

7
Return to the Notes & Attachments section to confirm the list of ALL documents uploaded as shown below. This is where you will see the running list of documents uploaded.
NOTE: Be sure to upload ALL required documentation and complete all fields. INCOMPLETE APPLICATIONS WILL NOT BE CONSIDERED. Please review the Information & Documentation Checklist (Appendix) before proceeding.
After uploading all six of the required documents, click on Edit to finalize the application.
Mark each box in the last application section, indicating that the required documents have been uploaded.
Click save after checking the boxes confirming the required documents have been attached.

8
C. Submit for Approval: Applicant(s) must Submit for the application to be processed. Confirm application is complete: A. All fields in the application are completed. B. All SIX required documents are uploaded under Notes & Attachments. C. Select “Submit for Approval”. The following message will pop up to notify applicants that they will not be able to edit the application or documentation once submitted. Click OK.
Log out
Click your name in the upper right corner; a menu should appear allowing you to Logout.

9
Check the status of the Application
Log into https://ieda.force.com
To check the status of the application, click on the Application number.
Once approved, applicants should receive an e-mail with instructions regarding how to accept the grant. The grant must be accepted prior to the event; if the e-mail notification is not received within two weeks of submitting an application or within a week prior to the event, e-mail [email protected] or call 515.725.3139.
Status:
“Pending Approval” - if application has not yet been approved.
“Closed-Approved” if the application has been approved and is now a Grant. Next step is to accept the grant (see next section).

10
Application Approval/Denial After submitting a completed application, applicants receive email notice once the application has been through the approval process. Typically, this process can take up to two weeks. A. Approval Approved applicants will receive e-mail notification indicating the application has been approved. To accept, follow the instructions in the email within 10 days of receiving the email to secure funds.
B. Denial Denied applicants will receive an e-mail indicating the reason for denial. Some examples may include, but are not limited to: 1. Application or documentation was incomplete 2. Event takes place outside the funding period 3. Company is ineligible Details regarding the denial may be requested by e-mail to [email protected].

11
Accepting a Grant (BEFORE THE EVENT) In order to accept a grant, follow the instructions included in the approval e-mail within 10 days of the e-mail date.
First, select the Company Grant tab. Second, click “Go” – this updates the view to show all grants rather than just the most recent.
Select the Grant Number: If your Grant is not listed, return to the Grant Applications tab and click on the Application number. When the application comes up, scroll to the bottom of the page under the Company Grants section where your Grant number should be visible. Select the Grant Number. This will then move it to the Company Grants page.

12
(Note: Grant & GAX will not say “SAMPLE” on it.) Select the printer icon to print.
Scroll to “Notes & Attachments” and click on the Title.
Select View file

13
Sign the Grant Agreement and “GAX” form. Do not complete any information on the GAX form, only sign in the Claimant’s Certification box (middle of form). The GAX form serves as the required signature to the claim applicants submit online following the event.
To return to the Grant, click the grant number.
Scan the signed Grant Agreement & GAX form to upload the electronic file.
In the Company Grant, under Notes & Attachments, click the Attach File button.

14
Click on the Choose File button and select the scanned file.
When selected, the name of the file will appear to the right of the Choose File button. Click the Attach File button to attach the file to the grant.
When the file is attached, the name will appear under the green bar. Click Done.

15
A message indicating the file was uploaded is shown in the yellow bar at the top. The attachment will be listed under Notes & Attachments.
Once the signed Grant Agreement and GAX form have been uploaded, e-mail [email protected] to notify the IEDA that the signed grant has been uploaded. This step must be completed prior to the event.
Log Out

16
At The Event
Grants received for exhibiting at a trade show MUST display the most current Iowa Exporter graphic in a prominent place in the booth. A photo of the overall booth, with this signage visible, must be submitted after the event as part of the claim for reimbursement. Failure to provide this could void the grant. The current Iowa Exporter ID graphic is available in .pdf at iowaeconomicdevelopment.com/IFA in the Resources box. Additional file formats may be provided upon request. E-mail [email protected] to request the desired format. Graphic looks like (this is a partial view of the graphic):

17
After the Event If trade show: Photograph and keep the photo of the booth with the Iowa Exporter graphic visible. Collect the receipts to be considered for reimbursement. Receipts:
- Trade Show: o Booth rental
Booth furnishings (carpet, chairs, tables, utilities for booth, set up of booth at show site – does not include printing of materials for show)
o Shipping of materials to and from show site o Interpreter, if necessary
- Trade Mission: o Shipping of materials to and from destination o Interpreter, if not covered in the event participation fee
Do not submit receipts for airfare, meals and lodging. Airfare is not eligible under the programs. A per diem for one employee, for the duration of the event, will automatically be added if reimbursement has not reached the maximum amount. (U.S. Dept. of State per diem rate for the location event is held.)
Once the recipient has all of the electronic receipts and a photo of your booth (if trade show), it’s time to complete a claim for reimbursement.
1. Log into http://ieda.force.com
2. Select Company Grant tab
18
Under Company Claims section, click “New Company Claim” button.
Select the first expense type:
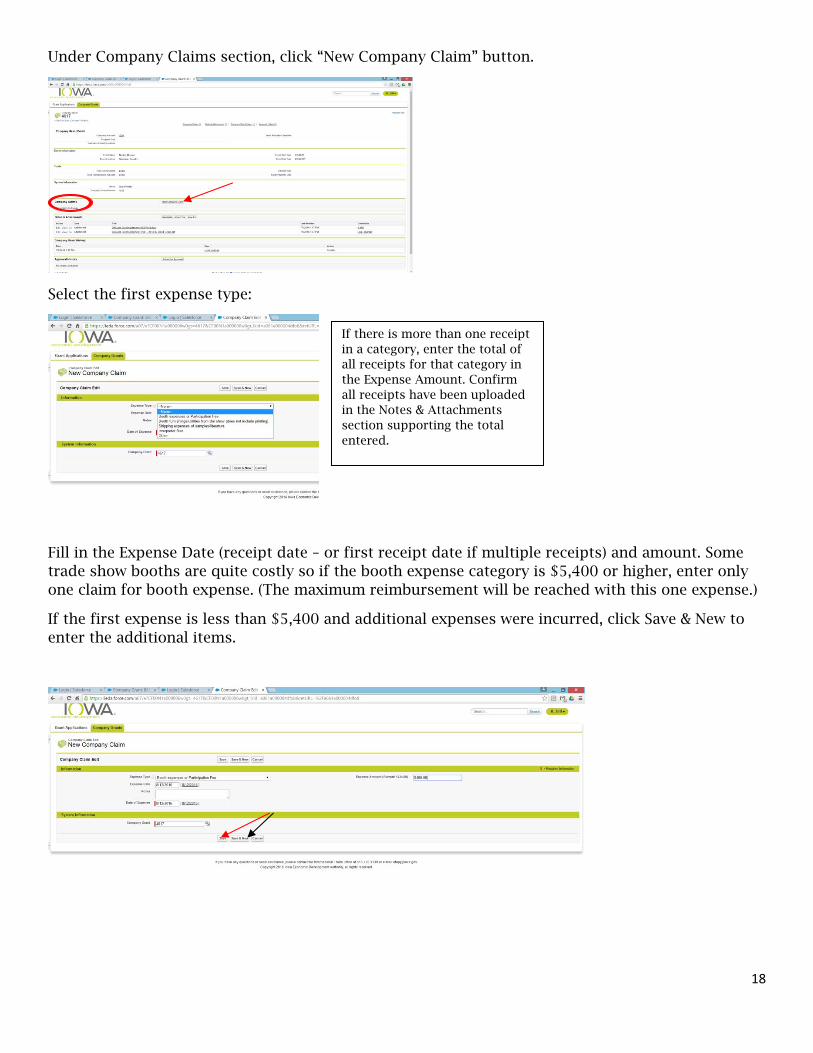
Fill in the Expense Date (receipt date – or first receipt date if multiple receipts) and amount. Some trade show booths are quite costly so if the booth expense category is $5,400 or higher, enter only one claim for booth expense. (The maximum reimbursement will be reached with this one expense.)
If the first expense is less than $5,400 and additional expenses were incurred, click Save & New to enter the additional items.
If there is more than one receipt in a category, enter the total of all receipts for that category in the Expense Amount. Confirm all receipts have been uploaded in the Notes & Attachments section supporting the total entered.

19
Verify the claim is saved in the yellow bar.
Next, upload the receipts for the expenses entered under Notes & Attachments (steps are the same as the Application documents). Expenses without a receipt cannot be reimbursed. Also, if the receipt is in another currency, please note the exchange rate and the total in $USD on each receipt.
The selected file will be displayed to the right of the Choose File button.

20
Click Attach File.
File will then show under the green bar “You have just uploaded the following file.” This will only show the last document uploaded.
Repeat Choose File and Attach File until each file has been uploaded. When finished, click Done.
Confirmation that the documents were uploaded will appear in the top yellow bar. Verify under Notes & Attachments that all of the uploaded documents appear.
Lastly, complete the “Immediate Survey.” This provides the results from the event, which are used to report on the impact of utilizing state/federal funds.
Under the Surveys component, click the Survey Number (Survey Type will be “Immediate”).
Complete the applicable fields. Click on the edit button at the top if the fields aren’t available for editing. Click Save when finished.

21
When finished entering each claim and uploading the receipts, Submit the claim for approval in order for the claim to be processed.
In the Status field, confirm the claim submitted.
This claim is finished and ready to Logout.
Once the claim has been submitted, it will be locked from editing.

22
INFORMATION & DOCUMENTATION CHECKLIST
REQUIRED DOCUMENTATION All six documents are required. Forms 1-3 are available at iowaeconomicdevelopment.com/IFA in the Resources box.
1. Export Assessment form (dated within past 12 months) 2. Certification of Small Business Concern (signed and dated within past six months) 3. Certification of Debarment (signed and dated within past six months) 4. Proof of actual payment (i.e. copy of the check, invoice showing a payment, receipt from organizer, etc.) 5. Product Brochure 6. Event General Information (if DTAP, proof of international focus such as number of international attendees/number of countries represented, etc.)
APPLICATION INFORMATION Company Name Grant Contact Name Funding Opportunity Type: (ETAP, DTAP – program applying for) Total Number of Employees (including parent/subsidiary) Total Number of Employees employed in Iowa Is your company new to exporting (began within last 12 months or rarely exported) If trade show:
Is this your company’s first time exhibiting at this trade show? What percentage of the booth is dedicated to your company’s products?
Cost: If a trade show, booth space cost If trade mission, participation fee If PTAP, cost of contractor Event Name and Location (city/state/country) Event Start Date and End Date (actual show dates, excluding travel or set up) Event Website Name of traveler to the event What are the objectives for exhibiting (multiple choice, can choose more than one): Market Research Immediate sales Exposure to new business contacts Finding sales agent(s) or distributor Finding joint venture partners Finding licensee(s) What country(ies) outside the U.S. will be targeted at this event? Which of these markets will be: New market for our company New products to this market Neither

23
Will exhibiting have a positive or negative minority impact? (Typically, this does not apply.)
Application Field Definitions
Company Account – Type in your company name as used in your registration. When your company appears, select it. Or, use the lookup button to search for your Company Account.
Total Employees – This should include parent company and any other relationships which have a direct impact on your company’s operation decisions. Number of Employees in Iowa – This should be the number of company employees employed in Iowa. Company New to Exporting – Select “yes” if your company has only exported within the last year or has rarely exported as a result of an order. First Time Participating in Event – Select “yes” or “no”.
Receive Other State of Federal Funding – Select “yes” or “no” if you are receiving any other funds to help you participate in this event. (examples include Food Export Association of the Midwest, U.S. Department of Commerce, etc.)
Funding Opportunity type – Select program. (ETAP, DTAP, etc.)
Event Type – Select Event Type. (trade show, trade mission, etc.) Event Name – Enter the official name of the event. Event Website – Enter the full url for the event’s official website. Event Location – Include city, state/province, zip/postal code, country. Will Iowa Staff Travel – Select “yes” or “no”. (An Iowa-based employee isn’t required to staff the event/travel.) Event Start Date & End Date –These must be the official start and end dates of the event. Do not include additional travel or set up days. Booth/Participation Fee – Include estimated booth space rental cost for a trade show or participation fee for a trade mission. % of Booth – Applicable for trade shows only, enter 100 percent if booth is not shared with any other company. If booth will be shared, indicate your company’s percentage of the booth. This is required field, so if you are applying for assistance outside of a trade show, please enter 0. Objectives – Select your objectives for participating and click on the right arrow to add them to the list. Select as many as you wish. Complete remaining steps. When all fields are complete, SAVE at the bottom or top of the form. *** Do NOT use save & new. *** If you have questions regarding the application process, e-mail [email protected].