
Instructions for Windows 7 Users
13
Instructions for Windows 7 Users 1. Open Internet Explorer to the address: https:\\citrix.med.umich.edu 2. If you do not have ActiveX control (Net6 Helper Package) installed you will see the following screen (Figure 1). You will need to Click OK on the message box and immediately click on the yellow banner at the top that states, “This website wants to install the following add-on Citrix Helper Package” Then Select Install ActiveX Control (Figure 2) (If the yellow banner disappeared before you could click on it, click the Back button and the process will start over) If you do not see the yellow banner, you will need to add citrix.med.umich.edu as a trusted site. Go to Appendix A to learn how to add a trusted site. Figure 1
Transcript of Instructions for Windows 7 Users

Instructions for Windows 7 Users
1. Open Internet Explorer to the address: https:\\citrix.med.umich.edu
2. If you do not have ActiveX control (Net6 Helper Package) installed you will see the following
screen (Figure 1). You will need to Click OK on the message box and immediately click on the yellow banner at the top that states, “This website wants to install the following add-on Citrix Helper Package” Then Select Install ActiveX Control (Figure 2) (If the yellow banner disappeared before you could click on it, click the Back button and the process will start over)
If you do not see the yellow banner, you will need to add citrix.med.umich.edu as a trusted site. Go to Appendix A to learn how to add a trusted site.
Figure 1
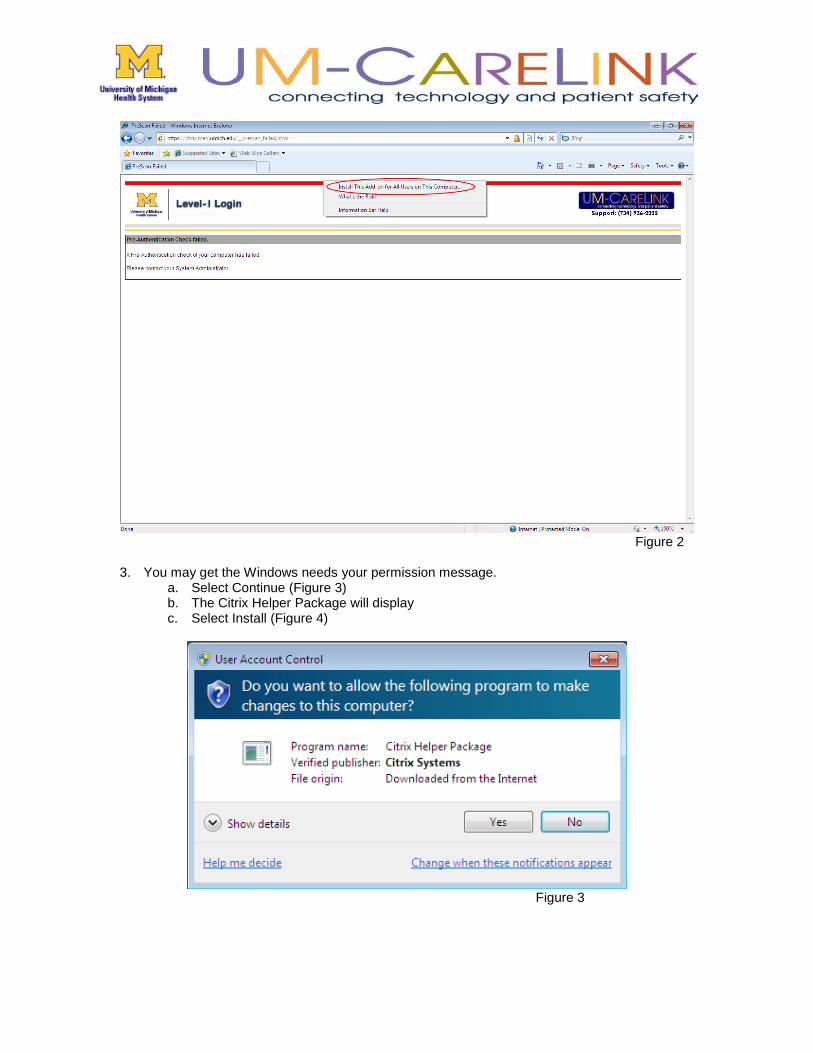
Figure 2 3. You may get the Windows needs your permission message.
a. Select Continue (Figure 3) b. The Citrix Helper Package will display c. Select Install (Figure 4)
Figure 3

Figure 4
4. If you receive this message, you will need to add citrix.med.umich.edu as a trusted site. Go to Appendix A to learn how to add a trusted site.

5. After the installation completes, you will see a Pre-Authentication Scan as shown in Figure 5. Then you will see the Level-I Sign-in screen. Enter Your UMHS Username, followed by your LEVEL-1 (Kerberos) password. If your login fails, you will receive the error, ‘Invalid User Name or Password’
Figure 5

6. When your login is successful, you will be directed to a Level-2 Sign-in screen as shown below. (Figure 6) Enter Your UMHS Username, followed by your LEVEL-2 password. If your login fails, you will receive: ‘ERROR: The supplied credentials were invalid. Please try again or contact your system administrator for help.’
Figure 6

7. After your login is successful, you will be directed to a screen similar to the one below. If your
Pop-up blocker prompts you, you will need to select Always allow Pop-ups from this site (*.med.umich.edu). Steps 1,2 and 3 shown in Figure 7
Figure 7

8. If you do NOT have Java(JRE) installed, you will see the following messages.
An Internet Explorer message stating, ‘The page your are viewing uses Java’ Select OK and you will see another message stating ‘Your browser must have Java enabled to use the Client for Java’ (Figure 8) You will need to install the Java JRE by Clicking on the University of Michigan Logo in the upper left and follow the instructions. (Installation instructions are in Appendix B)
Figure 8

9. After your login is successful, and the OMP-Desktop begins to launch, you may see the
following message. Make sure the box is checked, “Always trust content from this Publisher” and Select Run. Figure 9
Figure 9 10. After you click the Security Warning. The Citrix Desktop will continue to launch and you will
see these windows pop up before the application completely loads. (Figure 10) Do not close these windows until you are completely finished with your work.
Figure 10

11. The OMP Citrix Desktop will come up in a new window and you can begin working in Careweb and UM-Carelink. (Figure 11)
Figure 11
12. When you have finished your work and want to end your session, click on the yellow X in the
upper left. 13. Close the web browser.

Appendix Appendix A Adding a Trusted Site Internet Explorer 7 Back to Top 1. Select Tools Back to Windows 7
Users 2. Select Internet Options 3. Select the Security Tab 4. Select Trusted Sites 5. Select Sites 6. Enter the following URL in the 'Add this Web Site to the Zone' and select Add.
https://citrix.med.umich.edu 7. Select Add 8. Confirm the Website was added 9. Select Close 10. Uncheck Enable Protected Mode (requires restarting Internet Explorer) This Turns OFF
Protected Mode 11. Select OK
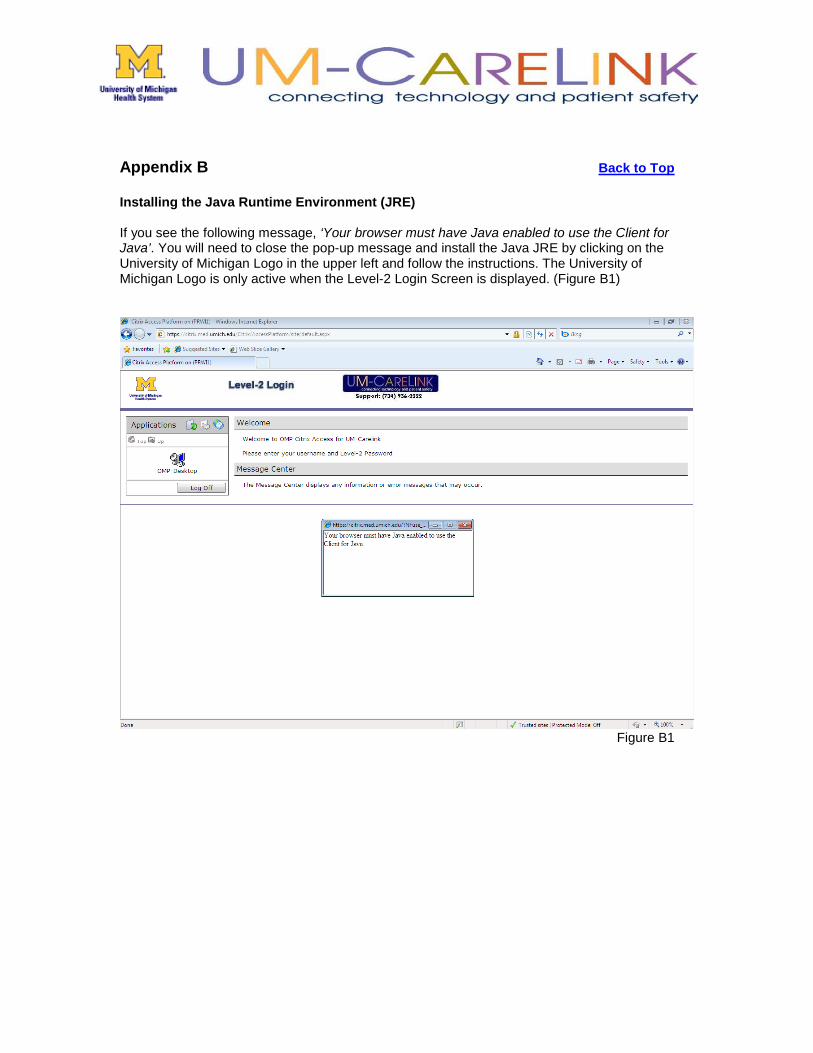
Appendix B Back to Top Installing the Java Runtime Environment (JRE) If you see the following message, ‘Your browser must have Java enabled to use the Client for Java’. You will need to close the pop-up message and install the Java JRE by clicking on the University of Michigan Logo in the upper left and follow the instructions. The University of Michigan Logo is only active when the Level-2 Login Screen is displayed. (Figure B1)
Figure B1

Select “Run”

Select “Yes”
Check Typical setup and Select “Accept”
Click Finish and close “Installing the JRE” browser window. Click the “OMP-Desktop”
Return to Windows 7 instructions
Back to Top Back to Window 7 Users


