INSTRUCTION MANUAL SEMPRIO - Krieghoff
19
INSTRUCTION MANUAL SEMPRIO In-Line Repeater
Transcript of INSTRUCTION MANUAL SEMPRIO - Krieghoff

INSTRUCTION MANUAL SEMPRIOIn-Line Repeater
3
Dear Customer, thank you for your trust in Krieghoff.
Through family traditions, values and identity are created. Since 1886, the Krieghoff family has produced exceptional firearms. We are proud of this tradition, which has proved its worth for generations.
It is the personal experience and intense dialogue with hunters around the world that drives the dynamic innovations and ongoing enhancements of our outstanding hunting weapons.
Our family history is a tradition full of achievement that we are proud of. With the acquisition of one of our firearms, you are now experiencing the results of our traditions and values. We hope you enjoy it.
Dieter Krieghoff Phil Krieghoff
Handling and Service Instructions for theKrieghoff Semprio In-Line Repeater.
CAUTIONRead and understand all instructions before using this or any other firearm. Read, learn, and observe the safety procedures described on page 5. Always point a firearm in a safe direction so that it does not endanger anyone, including yourself. Bullets may range as far as five miles. Do not discharge a gun towards any hard surface, including water, because bullets can ricochet in unpredictable directions. Be certain that anyone you allow to use your firearm understands all of the safety rules and is familiar with the weapon before taking possession of the firearm or shooting it.
ALWAYS TREAT EVERY FIREARM AS IF IT IS LOADED AND READY TO FIRE! NEVER POINT A FIREARM AT ANY PERSON! NEVER POINT A FIREARM AT ANY OBJECT YOU DO NOT INTEND TO SHOOT!
FIREARM SAFETY IS ALWAYS THE RESPONSIBILITY OF THE SHOOTER!
KRIEGHOFF SEMPRIO IN-LINE REPEATER

4 5
I. Gun savety rules 5
II. Take Down
Assembly 9
Disassembly 10
„Click-and-Go“- Sling swivel 12
III. Loading and unloading
Loading and inserting the magazine 13
4+1-Magazine capacity 14
Unloading 16
IV. Krieghoff combi-cocking device
Cocking and uncocking 18
Opening the action 20
V. „Safe-to-Carry“-Position 21
VI. Krieghoff Universal trigger system
Set trigger funtion 23
Set trigger regulation 24
VII. Shooting and repeating 25
VIII. Caliber change
Barrel change 27
Changing the locking bolt head 28
IX. Adjusting the open sight 30
X. FAQ
Maintenance 31
Troubleshooting 31
XI. Data Sheet 33
CONTENTS
VERY IMPORTANT:ANYONE WHO HANDLES THIS FIREARM MUST READ AND FOLLOW THESE INSTRUCTIONS BEFORE USING THIS FIREARM. FIREARM SAFETY IS THE USER’S RESPONSIBILITY! THINK GUN SAFETY!
GENERAL SAFETY CAUTIONS FOR THE USE OF FIREARMS:
• Before using a firearm be sure that you fully understand how to handle and operate a firearm. Read and follow the instructions shown in this manual before using your firearm.
• Always point the muzzle in a safe direction, away from yourself and others.
• Always handle a firearm as if it were loaded and ready to fire.
• Before loading a firearm make sure the barrel is clear of obstructions (for example water, soil, branches, jammed bullets).
• Before firing always check the target and the backstop and make sure that there is no danger for people or property.
• Always keep in mind that bullets can travel up to five miles and can cause serious injury, death or damage to property.
• Never point your firearm at a person or yourself or anything you do not intend to shoot at.
• If you pass a firearm to another person completely unload the weapon and lock open the action.
• Never rely on any mechanical device as a safety.
• Keep your finger off the trigger and outside the trigger guard until you are ready to shoot.
• Keep the action open and the gun unloaded until you are ready to use it.
I. GUN SAFETY RULES

6 7
• Never shoot a rifle straight up in the air or at a high angle of elevation.
• Never touch the trigger of a loaded firearm until you are aiming at the target.
• Think before shooting. Once you pull the trigger, you can not take back the bullet.
• Shooting a firearm is a serious sport. There is no room for joking around or horseplay when handling a firearm.
• Do not use drugs or alcohol when shooting and do not shoot if you are tired or impaired in any way.
• Dispose of unwanted ammunition safely.
• Make sure that nobody is in the ejection area. Ejected shells can cause serious injury.
• Always avoid ricochets. Never shoot at a hard surface such as rock, or a liquid surface such as water.
• Never carry a rifle with a round in the chamber or loaded in any fashion.
• Never enter or leave a vehicle with a loaded firearm. Also never climb a treestand and never climb over obstacles (fences, trees, creeks, hedges etc.) with a loaded firearm.
• Do not use any ammunition other than original high quality commercially manufactured ammunition in good condition.
• The use of improperly reloaded cartridges can cause damage to the firearm and also injury, death or damage to property.
• Use only ammunition that is identical with the caliber of your firearm. Never use ammunition which exceeds industry standard pressure specifications.
• Carry only one caliber of ammunition when shooting to avoid grabbing the wrong ammunition by mistake.
• Make sure your firearm is in top mechanical condition before firing it. Check your firearm over for any visible signs of wear or mechanical problems. Have a gunsmith or other qualified firearms expert check your gun over periodically for mechanical problems.
• Never use a firearm if it fails to function properly. Never force a jammed action as a round may explode causing serious injury, possibly death, or severe damage to your firearm.
• Do not modify this firearm in any way
• Always unload a firearm before laying it down, traveling or storing. Also make sure your firearm is not loaded and open the action.
• You are responsible for making sure the firearm is under your positive control at all times and not accessible by other parties, especially children.
• Lock your firearm at all times when not in use to prevent unauthorized or untrained persons from having access to your firearm.
• Always keep and store the firearm and ammunition in separate locked receptacles out of reach of children and other persons.
• Important – Firearms must be unloaded before cleaning.
• If you sell your firearm make sure that all documents including the owner’s manual will be handed over to the recipient of the firearm.
• Always wear ear protection and protective shooting glasses when shooting.
IF YOU DO NOT FOLLOW THE INSTRUCTIONS AND SAFETY WARNINGS SHOWN ABOVE, THE USE OR HANDLING OF YOUR FIREARM CAN CAUSE SERIOUS INJURY, DEATH, OR DAMAGE TO PROPERTY.
I. GUN SAFETY RULES I. GUN SAFETY RULES

8 9
1. ASSEMBLYMake sure that the locking slide on the left side of the action is pushed towards the muzzle (Fig. 1).
To assemble the Semprio, the barrel unit is placed on to the system. Prior to assembly, tilt the cocking device right into the “service position” and push in, to ensure that the lock head is unlocked (Fig. 2) and fully extended.
Now bring the bolt head and the guide rod into line with the two corresponding holes in the front part (Fig. 3). The front part is pushed without force on the lock carrier and the guide rod until the weapon is completely closed and locked. This way, the two units are connected savely.
II. TAKE DOWN
Fig. 2 Fig. 3
krieghoff.de/semprio-tutorial
Link to the Video-Tutorial:
Fig. 1

10 11
II. TAKE DOWN
While pushing the cocking device forward, pull the barrel assembly all the way to the front (Fig.7).Make sure to pull the barrel assembly by holding on to the forend and not the barrel itself.
Open the system by turning the cocking device from the neutral position (Fig. 4) to the right, into the service position (Fig. 5). Then push it forward (Fig. 6).
2. DISASSEMBLYThe Semprio can be disassembled in a few easy steps to a small pack size.
Finally, the cocking device has to be turned left into the "neutral position" again (Fig. 4).
Pull the release lever on the magazine box backwards (Fig. 8).
Slide the barrel assembly further forward until it completely separates from the frame portion of the rifle (Fig. 9).
II. TAKE DOWN
Fig. 8Fig. 5 Fig. 7 Fig. 9Fig. 6Fig. 4

12 13
3. “CLICK-AND-GO” SLING SWIVELThe “Click-and-Go” sling swivel comes standard on the Semprio In-Line Repeater and is designed with a quick detach button for easy attachment and detachment.
To attach, simply push in the quick detach button and insert the swivel into the swivel socket (Fig. 10 and 11). To detach, simply push in the button and pull the swivel out of the socket while keeping the button pushed in.
For different sling position and use; for example for driven hunts, the swivels can be turned by 90 degrees so that the open loop stays parallel with the barrel.
1. LOADING AND INSERTING THE MAGAZINEAttention! Read and follow the safety instructions before loading the firearm!
To use the magazine, open the gun and insert the magazine in the magazine slot until you hear it click into place (Fig. 12 + 13).
Slight variations in height and to the sides in a locked position are normal.
To remove the magazine, open the gun completely and pull the magazine locking lever located centrally at the front edge of the magazine in the forend towards you (Fig. 14). Now the magazine is unlocked and can be removed.
II. TAKE DOWN III. LOADING AND UNLOADING
Fig. 10
Fig. 11 Fig. 13 Fig. 14Fig. 12

14 15
2. 4+1 MAGAZINE CAPACITYFor magnum caliber, the expanded magazine capacity of 4 + 1 does not apply. Weapons in these calibres can be loaded with 3 + 1. The procedure remains the same.
The caliber .223 allowes for a maximum of 4 cartridges are loaded via the magazine only. No additional cartridge can be loaded directly into the chamber.
• The locking slide on the left side of the action is pulled back while you continue to slowly close the weapon, until the slider clicks into place (Fig. 16).
Follow these steps to load your weapon with an extra cartridge directly into the chamber:
• Load the magazine with the maximum number of cartridges.
• Now close the weapon up to the 4 + 1 marker (Fig. 15).
III. LOADING AND UNLOADING III. LOADING AND UNLOADING
Fig. 17Fig. 16Fig. 15 Fig. 18
• Insert the loaded magazine (Fig. 17). Push the magazine all the way up into the magazine slot until it clicks into place. The locking bolt head is now above the uppermost cartridge.
• Load an extra cartridge into the chamber (Fig. 18).
• Unlock the locking slide again and close the weapon.
• Check the cocking device position, to make sure that the gun is not cocked.

16 17
3. UNLOADINGWhen the action of the gun is closed, a safety interlock prevents the action from opening only by pulling the forend. The action must therefore be opened manually to unload/open the gun.
To do this, swing the cocking device from the neutral position to the right into the service position.
Push the cocking device forward (Fig. 19) and at the same time pull the barrel assembly forward by holding on to the forend. After firing a shot, the shooter unlocks the bolt head by pulling the forend forward (spring-free travel in the forend). When the forend is pulled out beyond this "play" distance, the bolt head releases and the action opens.
The cartridge drawn out of the cartridge chamber is dropped into the palm of the hand held below the ejector window (Fig. 20).
Fig. 19
Fig. 20
III. LOADING AND UNLOADING
Fig. 21
Fig. 22
To remove the magazine, pull the magazine release lever (Fig. 21), which is centered on the front edge of the magazine in the forend. Now the magazine is unlocked and can be removed (Fig. 22).
III. LOADING AND UNLOADING

18 19
The cocking device is uncocked and in a safe position when moved to the rear position, where it protrudes approximately 1/2" behind the top tang (Fig. 23).
The cocking device controls all functions of the action mechanism with the exception of actual pulling of the trigger. To cock the rifle in preparation for immediate firing, push the cocking device all the way forward, until it engages with a slight “click” (Fig. 24).
IV. KRIEGHOFF COMBI-COCKING DEVICE
Fig. 24Fig. 23
1. COCKING AND UNCOCKINGAttention! Only cock the rifle when you are ready to shoot! Always point the rifle in a safe direction away from others and yourself to avoid serious injury or death. Never point the rifle at anything you do not intend to shoot or any hard surfaces such as rocks, concrete or water. Bullets can ricochet and cause serious injury or death.
The Semprio does not have a conventional safety. The Semprio’s cocking device instead acts as the safety. You carry the rifle completely uncocked and manually cock it just prior to firing. The rifle is immediately ready to fire once the cocking device is in its cocked, firing position.
The striker is now disengaged, and in a safe position. In this position there is no possibility of an accidental discharge. The cocking device is shown in the uncocked rear position. The rifle is now uncocked and absolutely safe (Fig. 27).
To uncock the rifle, push forward on the lower part of the cocking device as shown in Figure 26. Release pressure, allowing the cocking device to slide to the rear, uncocked position.
With the cocking device in the forward position and fully engaged, the rifle is ready to be fired (Fig. 25). The cocking device remains in the forward cocked position throughout the repeating firing sequence, until manually moved to the rear, uncocked position.
Fig. 25 Fig. 27Fig. 26
IV. KRIEGHOFF COMBI-COCKING DEVICE

20 21
2. OPENING THE ACTIONTo open the system - for example, to unload the weapon or disassemble it - the system must be opened manually.
Open the action by moving the cocking device from the neutral position to the right, into the service position and holding it forward (Fig. 28). With the cocking device pushed in, pull the barrel forward (Fig. 29).
When the gun is closed again, the cocking slide can be returned to neutral again (Fig. 30).
Fig. 28 Fig. 29 Fig. 30
IV. KRIEGHOFF COMBI-COCKING DEVICE V. “SAFE-TO-CARRY” POSITION
The locking slide on the left side of the action frame is pulled back and thereby the barrel continued to be pushed back until the slider clicks into place (Fig. 32).
After completely unloading the rifle, closethe action until the rear end of the action frame lines up with the engraved rear marker on the cannelured bolt head carrier, as shown inFig. 31.
ATTENTION! WHEN IN HUNTING PARTIES OF MORE THAN ONE PERSON, YOU SHOULD ALWAYS UNLOAD AND CARRY THE SEMPRIO IN THE “SAFE-TO-CARRY” POSITION UNTIL YOU ARE ACTUALLY READY TO TAKE A SHOT.
The „Safe-to-Carry“ position of the Semprio makes it possible to carry the weapon with the cap slightly open. This clearly signals to everyone in your hunting party that the rifle is unloaded.
Although the action is slightly open the “Safe-to-Carry” design minimizes the chance of dirt penetrating the action.
Fig. 32Fig. 31

22 23
The action is now fixed in a recognizable open position. To unlock the gun, the locking slide simply need to be pushed into forward position. The in Line repeating system can now be operated normally again.
Both, in the 4 + 1 position and the safe-to-carry position, the Semprio is secured and save.
V. “SAFE-TO-CARRY” POSITION VI. KRIEGHOFF UNIVERSAL TRIGGER SYSTEM
If the opportunity to shoot passes, unset the set trigger immediately. First, hold the rifle in a safe direction and uncock the rifle, operating the cocking device as previously described (Fig. 34). Gently support the trigger between the thumb and trigger finger to disengage the set trigger (Fig. 35).
The Krieghoff Universal Trigger System provides a clean, crisp trigger pull of approximately 1,250 grams (just under 3 lbs.) and an adjustable set trigger for controlled shooting from a rest.
Engage the set trigger only when intending to use it for an immediate shot by pushing the trigger with your thumb forward until the trigger engages and stays in forward position (Fig. 33).
1. SET TRIGGER FUNCTIONWarning! Make sure that the set trigger is not set prior to loading the firearm. Never engage the set trigger unless you are immediately ready to fire the rifle!Use the set trigger feature only under very controlled circumstances such as shooting from a rest.
Fig. 35Fig. 33 Fig. 34
Possible positions in which the Semprio can be locked

24 25
• To shorten the trigger pull and shortenthe travel of the set trigger, turn the small adjustment screw slightly clockwise. Use a 1.5 mm allen key for that.• To increase set trigger pull and travel:turn the small adjustment screw slightlycounterclockwise. It is important that the adjustment screw remains tight. If the screw turns too easy, it need to be secured in place with some Loctite.
We recommend only a qualified gunsmithperform any and all set trigger adjustments.
The set trigger travel and pull can be adjusted by using a small Allen wrench to turn the set trigger adjustment screw located in the trigger area of the gun.
2. SET TRIGGER REGULATIONPull the trigger back slightly until the set position noticeably disengages with a “click”. The set trigger operation should be practiced repeatedly with an unloaded rifle until you are confident with the procedure.
WARNING! A set trigger will go off at the slightest touch! Use the set trigger feature only under optimal and controlled conditions and only when shooting from a rest! Always point the rifle in a safe direction, away from yourself and others. The rifle must always be unloaded, uncocked and the set trigger not set when making any set trigger adjustments.
Fig. 36
VI. KRIEGHOFF UNIVERSAL TRIGGER SYSTEM VII. SHOOTING AND REPEATING
The empty cartridge is pulled out during forward movement and ejected through the ejector window (Fig. 40).
Pulling the trigger will discharge the rifle. (Fig. 38).
After firing, the Semprio is unlocked and subsequently released by pulling forward on the forearm (Fig. 39). For repeating, simply push the front end of the semprio as far until it stops. Make sure to use the forend as the grip for your repeating hand.
ATTENTION! HOLD THE WEAPON IN A SAFE AND SECURE WAY PRIOR TO FIRING. PAY ATTENTION TO A SUFFICIENT BULLET CATCH.
The weapon is ready to fire by sliding the cocking device from the rear position forward to the front „cocked“ position (Fig. 37).
Fig. 39Fig. 38Fig. 37
26 27
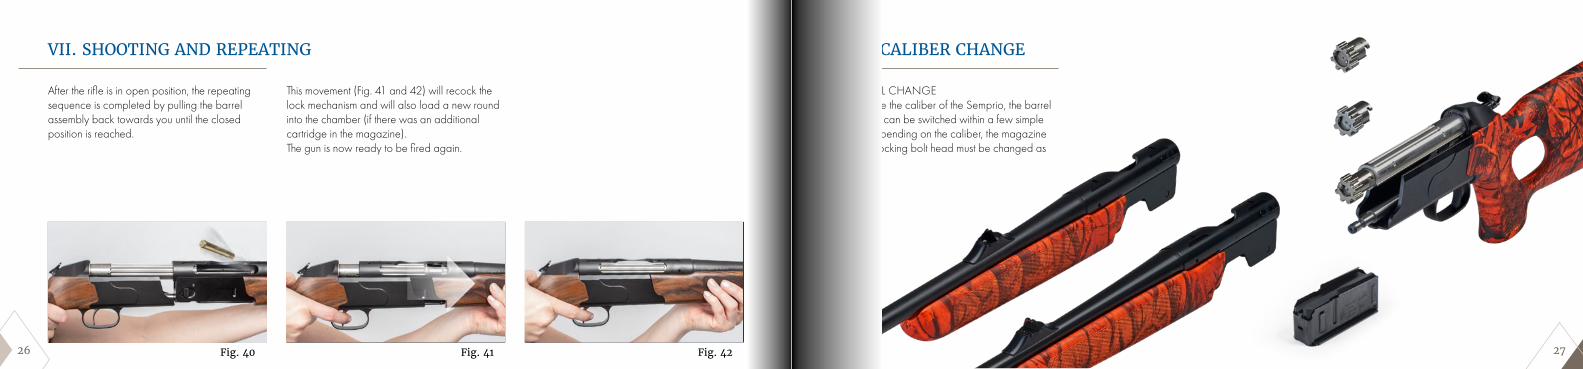
After the rifle is in open position, the repeating sequence is completed by pulling the barrel assembly back towards you until the closed position is reached.
This movement (Fig. 41 and 42) will recock the lock mechanism and will also load a new round into the chamber (if there was an additional cartridge in the magazine).The gun is now ready to be fired again.
Fig. 40 Fig. 41 Fig. 42
VII. SHOOTING AND REPEATING VIII. CALIBER CHANGE
1. BARREL CHANGETo change the caliber of the Semprio, the barrel assembly can be switched within a few simple steps. Depending on the caliber, the magazine and the locking bolt head must be changed as well.

28 29
VIII. CALIBER CHANGE
Reattach the new locking bolt head upon the locking bolt head post in reverse order as shown (Fig. 45).
The locking bolt head clicks firmly into place when inserted correctly.
First, disassemble the rifle into its main components. Then, slide the locking bolt head to the side and off the holding post (Fig. 43). You will feel slight resistance before the locking bolt head comes free. Finally, completely remove the locking bolt head from the rifle (Fig. 44).
2. CHANGING THE LOCKINGBOLT HEADAttention! Depending on the caliber, the replacement of the bolt head and possibly of the magazine is required in addition to the barrel change.
Fig. 45Fig. 44Fig. 43
VIII. CALIBER CHANGE
Each locking bolt head is clearly marked with one or more stars (*) for the caliber group it is intended for. Before inserting the locking bolt head, check to make sure it is marked for the caliber group you intend to use.
* Caliber Group 5 (.223 Rem)** Caliber Group 1 (7x64, .30-06, 8x57IS,
6.5x55 SE, .270 Win.) Caliber Group 2 (.243 Win., .308 Win.) Caliber Group 3 (9.3x62)
*** Caliber Group 4 (.300 Win. Mag., 7mm Rem. Mag.

30 31
Fig. 46
Fig. 47 Fig. 48
The open sights can be easily adjusted with the help of an 1.5 mm Allen wrench.
The horizontal correction of the point of impact is done at the rear sight. To do this, first loosen the Allen screw (Fig. 46).
•If the rifle shoots to the left, the rear sight need to be adjusted to the right.
•If the rifle shoots to the right, the rear sight need to be adjusted to the left.
Tighten the allen screw after every adjustment of the sight. The vertical adjustment of the point of impact is adjusted directly at the front bead, by using a 1.5 mm allen key.
IX. ADJUSTING THE OPEN SIGHT
The vertical adjustment of the point of impact is adjusted directly at the front bead, by using a 1.5mm allen key. (Fig. 47).
• If the gun shoots high, turn the allen screw at the front bead clockwise. This will raise the front bead.
• If the gun shoots low, turn the allen screw counterclockwise. This will lower the front bead.
An adjustment of one click, moves point of impact approximately 1.5 cm at a target distance of 50 m.
When the rifle is closed, the forearm can be pulled to the front about 5 mm against a spring. When released, it slides back to the original position. This “play” is normal and is required to unlock the action after a shot is fired.
After firing a shot or dry firing the rifle, it will open about 5mm automatically. This is absolute normal. In this position the locking head still remains 100% locked.
When firing the rifle, be sure to keep yourhand on the checkered part of the forearmbarrel assembly to avoid injuring yourhand during the in - line repeating movement.
2. TROUBLESHOOTINGBarrel and action do not fit together•The locking bolt head is in the locked
position.•The locking bolt head is not properly inserted
and not fully seated in position.•Safe to carry slide is in rear position.
Action is completely open and cannot beclosed•“Safe to Carry” position is engaged.•Interference from an object or dirt.
Rifle cannot be closed completely•Magazine is not completely seated in the
magazine compartment.• Interference from an object or dirt.
1. MAINTENANCEIn addition to routine gun cleaning and maintenance, the following should be observed:To maintain optimal operation of the in-line action mechanism, the inside of the action frame (Fig. 48) should be lubricated slightly with some gun grease such as Krieghoff Gun glide.
The guide rod should always be lightly oiled. Do not use grease in this area!
X. FAQ

32 33
"Click-and-Go" swivel doesn't engage correctly into the lock bushing
• Leather straps too thick• Button is pressed permanently• Eye position not horizontal orparallel to the weapon• Dirt in the locking bush
Model: Krieghoff Semprio In-Line-Repeater
Serial number locking bolt head:
Serial number barrel:
Caliber:
Barrel length:
Ammunition used for sighting in:
Date of purchase:
Unable to lock rifle• Wrong ammunition loaded.• Wrong locking bolt head installed.•Dirt in the rotation area of the locking bolt
head and corresponding chamber area.
Impossible to cock rifle The cocking device is in service position instead of the operating position required for cocking.
Cannot set the set triggerSet trigger pull needs to be increased andadjusted heavier.= Rifle must be checked at the Krieghofffactory or by a skilled gunsmith.
Rifle uncocks when closed fast= Rifle must be checked at the Krieghoff factory or by a skilled gunsmith.
After firing, rifle is hard to open or will not open at all• Cocking device does not operate properly.
Try to uncock the rifle by using the cocking device as instructed with the help of the service position.
• If rifle fails to open by operating the cocking device, this indicates the last round fired through the rifle caused extremely high pressure and possibly damaged the rifle.
Rifle jams during rapid firing sequence Action was not fully opened to the stop position:which prevented the spent cartridge from being ejected and new cartridge from being chambered.= Uncock and open the rifle, remove the magazineand carefully remove the jammed cartridges.
Rifle fails to fire when trigger is pulled• Rifle was not cocked before firing.• Rifle was not completely closed.• Faulty ammunition caused misfire.
Empty cartridge does not eject when action is opened• Ejector claw is damaged.• Check barrel chamber for rust or debris.
X. FAQX. FAQ XI. DATA SHEET
2020
-07

34 35
NOTES

H. KRIEGHOFF GMBH
HUNTING AND SPORTING ARMSBOSCHSTRASSE 22
89079 ULMGERMANY
krieghoff.de