Instruction Manual DVD-R130 - …static.highspeedbackbone.net/pdf/SamsungDVD-R130Manual.pdf ·...
98
Instruction Manual DVD-R130 www.samsung.com AK68-01002A-00 US
-
Upload
trankhuong -
Category
Documents
-
view
224 -
download
1
Transcript of Instruction Manual DVD-R130 - …static.highspeedbackbone.net/pdf/SamsungDVD-R130Manual.pdf ·...

Instruction Manual
DVD-R130
www.samsung.com
AK68-01002A-00US
01002A-R130-XAA-ENG-01-13 2006.1.23 5:58 PM Page 1

Getti
ng S
tarte
d
2 - English
Warning
TO REDUCE THE RISK OF ELECTRIC SHOCK, DO NOTREMOVE THE COVER(OR BACK). NO USER-SERVICEABLE PARTS ARE INSIDE. REFERSERVICING TO QUALIFIED SERVICE PERSONNEL.
This symbol indicates important instructionsaccompanying the product.
Do not install this equipment in a confined space such as abookcase or similar unit.
WARNING : To prevent damage which may result in fire orelectric shock hazard, do not expose this appliance to rainor moisture.
CAUTION : DVD RECORDERS USE AN INVISIBLELASER BEAM WHICH CAN CAUSE HAZARDOUSRADIATION EXPOSURE IF DIRECTED. BE SURE TO OPERATE RECORDER CORRECTLY ASINSTRUCTED.
CAUTIONTHIS PRODUCT UTILIZES A LASER.USE OF CONTROLS OR ADJUSTMENTS ORPERFORMANCE OF PROCEDURES OTHER THANTHOSE SPECIFIED HEREIN MAY RESULT INHAZARDOUS RADIATION EXPOSURE.DO NOT OPEN COVERS AND DO NOT REPAIRYOURSELF. REFER SERVICING TO QUALIFIEDPERSONNEL.
CAUTIONSCaution: To prevent electric shock, match wide blade ofplug to wide slot, fully insert.Attention: Pour éviter les chocs électriques, introduíre lalame la plus large de la fiche dans la borne correspondantede la prise et pousser jusqu au fond.This product satisfies FCC regulations when shieldedcables and connectors are used to connect the unit to otherequipment. To prevent electromagnetic interference withelectric appliances, such as radios and televisions, useshielded cables and connectors for connections.FCC NOTE (for U.S.A):This equipment has been tested and found to comply withthe limits for a Class B digital device, pursuant to Part 15 of
the FCC Rules. These limits are designed to providereasonable protection against harmful interference in aresidential installation. This equipment generates, usesand can radiate radio frequency energy and, if not installedand used in accordance with the instructions, may causeharmful interference to radio communications. However,there is no guarantee that interference will not occur in aparticular installation. If this equipment does cause harmfulinterference to radio or television reception, which can bedetermined by turning the equipment off and on, the useris encouraged to try to correct the interference by one ormore of the following measures:• Reorient or relocate the receiving antenna.• Increase the separation between the equipment and
receiver.• Connect the equipment into an outlet on a circuit different
from that to which the receiver is connected.• Consult the dealer or an experienced radio/TV technician
for help.
Caution: FCC regulations state that any unauthorizedchanges or modifications to this equipment mayvoid the user's authority to operate it.
This symbol indicates “dangerous voltage”inside the product that presents a risk ofelectric shock or personal injury.
This unit can be used only where the powersupply is AC 120V, 60Hz. It cannot be usedelsewhere.
This DVD Recorder is designed andmanufactured to respond to the RegionManagement Information. If the Region number of a DVD disc doesnot correspond to the Region number ofthis DVD Recorder, the DVD Recordercannot play the disc.
This device is protected by U.S. PatentNos.4,631,603;4,577,216;4,819,098;4,907,093; and 6,516,132.This productincorporates copyright protectiontechnology that is protected by U.S. patentsand other intellectual property rights.Use ofthis copyright protection technology mustbe authorized by Macrovision,and isintended for home and other limited viewinguses only unless otherwise authorized byMacrovision.Reverse engineering ordisassembly is prohibited.
NOTE
01002A-R130-XAA-ENG-01-13 2006.1.23 5:58 PM Page 2

Getting Started
English - 3
Important Safety Instructions
Read these operating instructions carefully before usingthe unit. Follow all the safety instructions listed below.Keep these operating instructions handy for futurereference.
1) Read these instructions.2) Keep these instructions.3) Heed all warnings.4) Follow all instructions.5) Do not use this apparatus near water.6) Clean only with dry cloth.7) Do not block any ventilation openings, Install in
accordance with the manufacturer's instructions.8) Do not install near any heat sources such as
radiators, heat registers, stoves, or other apparatus(including amplifiers) that produce heat.
9) Do not defeat the safety purpose of the polarized orgrounding- type plug. A polarized plug has twoblades with one wider than the other. A grounding-type plug has two blades and a third groundingprong. The wide blade or the third prong areprovided for your safety. if the provided plug doesnot fit into your outlet, consult an electrician forreplacement of the obsolete outlet.
10) Protect the power cord from being walked on orpinched particularly at plugs, conveniencereceptacles, and the point where they exit from theapparatus.
11) Only use attachments/accessories specified by themanufacturer.
12) Use only with the cart, stand, tripod, bracket, ortable specified by the manufacturer, or sold withthe apparatus. When a cart is used, use cautionwhen moving the cart/apparatus combination toavoid injury from tip-over.
13) Unplug this apparatus during lightning storms orwhen unused for long periods of time.
14) Refer all servicing to qualified service personnel.Servicing is required when the apparatus has beendamaged in any way, such as a power-supply cordor plug is damaged, liquid has been spilled orobjects have fallen into the apparatus, theapparatus has been exposed to rain or moisture,does not operate normally, or has been dropped.
Handling Cautions
• Before connecting other components to thisrecorder, be sure to turn them all off.
• Do not move the recorder while a disc is beingplayed, or the disc may be scratched or broken, andthe recorder’s internal parts may be damaged.
• Do not put a flower vase filled with water or anysmall metal objects on the recorder.
Precaution• Be careful not to put your hand into the disc tray.• Do not place anything other than the disc in the disc
tray.• Exterior interference such as lightning and static
electricity can affect normal operation of thisrecorder. If this occurs, turn the recorder off and onagain with the POWER button, or disconnect andthen reconnect the AC power cord to the AC poweroutlet. The recorder will operate normally.
• Be sure to remove the disc and turn off the recorderafter use.
• Disconnect the AC power cord from the AC outletwhen you don’t intend to use the recorder for longperiods of time.
• Clean the disc by wiping in a straight line from theinside to the outside of the disc.
Maintenance of Cabinet
For safety reasons, be sure to disconnect the ACpower cord from the AC outlet.
• Do not use benzene, thinner, or other solvents forcleaning.
• Wipe the cabinet with a soft cloth.
Disc Handling
• Use discs with regularshapes. If an irregular disc(a disc with a specialshape) is used, this DVDRecorder may be damaged.
Holding discs
• Avoid touching the surface of adisc where recording isperformed.
DVD-RAM, DVD-RW and DVD-R
• Clean with an optional DVD-RAM/PDdisc cleaner (LF-K200DCA1 whereavailable).Do not use cleaners or clothsfor CDs to clean DVD-RAM/DVD-RW/DVD-R discs.
DVD-Video, CD
• Wipe off dirt or contamination on the disc with a softcloth.
Cautions on handling discs
• Do not write on the printed side with a ball-point penor pencil.
01002A-R130-XAA-ENG-01-13 2006.1.23 5:58 PM Page 3

Getti
ng S
tarte
d
4 - English
• Only MP3 files with the ".mp3", ".MP3" extensioncan be used.
• For MP3 files recorded with a VBR(Variable BitRates), from 32 Kbps to 320 Kbps, the sound maycut in out.
• Playable bitrate range is from 56Kbps to 320Kbps.• The unit can handle a maximum of 1000 files and
folders.
• Only JPEG files with the ".jpg", ".JPG" extension canbe used.
• The unit can handle a maximum of 1000 files andfolders.
• Maximum size of progressive JPEG is 3M pixels.• MOTION JPEG is not supported.
• Use a 700MB(80 minutes) CD-R/-RW disc.If possible, do not use a 800MB(90 minutes) orabove disc, as the disc may not play back.
• If the CD-R/-RW disc was not recorded as a closedsession, you may experience a delay in the earlyplayback time, and all recorded files may not play.
• Some CD-R/-RW discs may not be playable with thisunit, depending on the device which was used toburn them.For contents recorded on CD-R/-RW media fromCDs for your personal use, playability may varydepending on contents and discs.
DVD-R Disc Playback and Recording
• Once a DVD-R recorded in Video Mode is finalized,it becomes DVD-Video.
• You can record onto the available space on the discand perform editing functions such as giving titles todiscs and programs and erasing programs beforefinalizing.
• When programming is erased from a DVD-R, thatspace does not become available. Once an area ona DVD-R is recorded on, that area is no longeravailable for recording, whether the recording iserased or not.
• It takes about 30 seconds for the unit to completerecording management information after recordingfinishes.
• This product optimizes the DVD-R for eachrecording. Optimizing is carried out when you startrecording after inserting the disc or turning on theunit. Recording onto the disc may becomeimpossible if optimizing is carried out too manytimes.
• Playback may be impossible in some cases due tothe condition of recording.
• This unit can play back DVD-R discs recorded andfinalized with a Samsung DVD video recorder. It maynot be able to play some DVD-R discs depending onthe disc and the condition of the recording.
• Do not use record cleaning sprays or antistatic. Also,do not use volatile chemicals, such as benzene orthinner.
• Do not apply labels or stickers to discs. (Do not usediscs fixed with exposed tape adhesive or leftoverpeeled-off stickers.)
• Do not use scratch-proof protectors or covers.• Do not use discs printed with label printers available
on the market.• Do not load warped or cracked discs.
Disc Storage
Be careful not to harm the disc because the data onthese discs is highly vulnerable to the environment.• Do not keep under direct sunlight.• Keep in a cool ventilated area.• Store vertically.• Keep in a clean protection jacket.• If you move your DVD Recorder suddenly from a
cold place to a warm place, condensation maygenerate on the operating parts and lens and causeabnormal disc playback. When this occurs, do notconnect the plug to the power outlet. Wait for twohours, then insert the disc and try to playback again.It will work properly when condensation hasevaporated.
Disc Specifications
DVD-Video
• A digital versatile disc (DVD) can contain up to 135-minutes of images, 8-language audio and 32 subtitlelanguages. It is equipped with MPEG-2 picturecompression and Dolby 3D surround sound, allowingyou to enjoy vivid and clear theater quality images inthe comfort of your own home.
• When switching from the first layer to the secondlayer of a double-layered DVD Video disc, there maybe momentary distortion in the image and sound.This is not a malfunction of the unit.
• Once a DVD-R/-RW recorded in Video Mode isfinalized, it becomes DVD-Video.
Audio CD
• An audio disc on which 44.1kHz PCM Audio isrecorded
• Plays CD-DA format audio CD-R and CD-RW discs.The unit may not be able to play some CD-R or CD-RW discs due to the condition of the recording.
CD-R/-RW
• Only CD-R discs with MP3 files recorded withISO9660 or JOLIET format can be played back
MP3 CD-R/-RW
JPEG CD-R/-RW
Using CD-R/-RW
01002A-R130-XAA-ENG-01-13 2006.1.23 5:58 PM Page 4

Getting Started
English - 5
DVD-RW Disc Playback and Recording
• Recording and playback can be performed on DVD-RW discs in both the Video and VR Modes.
• Once a DVD-RW recorded in VR Mode or Video modeis finalized, you cannot perform addtional recording.
• Once a DVD-RW recorded in Video Mode is finalized,it becomes DVD-Video.
• In both modes, playback can be performed before andafter finalization, but additional recording, deleting andediting can not be performed after finalization.
• If you want to record the disc in VR Mode and thenrecord in V Mode, be sure to execute Format. Be careful when executing Format because all therecorded data may be lost.
• A DVD-RW blank disc is initialized to VR Mode whenfirst initialized.
• DVD-RW (VR mode)- This is a format that is used for recording data on a
DVD-RW disc. You can record multiple titles, edit,delete, partial delete, create a playlist, etc.
- A disc that is recorded in this mode will not play instandard DVD players.
• DVD-RW (Video mode)- This is a format that is used for recording data on a
DVD-RW or DVD-R disc. The disc can be played byan existing DVD player once it has been finalized.
- If a disc that has been recorded in Video Mode by adifferent maker’s recorder but has not been finalized,it cannot be played or additionally be recorded bythis recorder.
DVD-RAM Disc Playback
• DVD-RAM discs come with or without a cartridge. For this product, we recommend DVD-RAM discs thatcome without cartridges.
• You cannot play a DVD-RAM in most DVD playersdue to compatibility issues.
• Only DVD-RAM standard Version 2.0. discs can beplayed in this unit.
• For cartridge type DVD-RAM discs, remove thecartridge and use the disc only.
Protection
This DVD Recorder can allow you to protect thecontents of your discs, as described below.
• Program-protected: See page 73 “Locking a Title”• Disc-protected: See page 85 “Disc Protection”
DVD-RAM/DVD-RW/DVD-R discs that areincompatible with the DVD-VIDEO format cannot beplayed with this product.
For more information on DVD recording compatibility,consult your DVD-RW/DVD-R manufacturer.
If poor quality DVD-RW/DVD-R discs are used, yourrecordings may fail.
Do not use the following discs!
• LD, CD-G, CD-I, CD-ROM and DVD-ROM discsshould not be used in this product.[Note] Disc types that can be played : CD/CD-R/CD-RW/MP3/JPEG/DVD-Video/DVD-RAM/DVD-RW/ DVD-R. DVD+R/+RW cannot record, but the finalized +R/+RWcan be played.For a DVD-R/DVD-RW disc, which has been recordedin Video Mode on another component, it can play onlywhen finalized.
• Some commercial discs and DVD discs purchasedoutside your region may not be playable with thisproduct. When these discs are played, either “Nodisc." or "Please check the regional code." will bedisplayed.
• If your DVD-RW disc is an illegal copy or is not inDVD video format, it may also not be playable.
High Speed Recording discs can be used in this unit.• Not all brands of discs will be compatible with this
unit. • The latest firmware upgrade to improve recording &
playback quality can be downloaded from our website. (Download Center at www.samsung.com)
• If disc compatibility problems continue, or there is anissue upgrading your recorder, contact the Call Centerat 1-800-SAMSUNG.COPY PROTECTION
• Many DVD discs are encoded with copy protection.Because of this, you should only connect your DVDRecorder directly to your TV, not to a VCR.Connecting to a VCR results in a distorted picturefrom copy-protected DVD discs.
• This product incorporates copyright protectiontechnology that is protected by methods claims ofcertain U.S. patents and other intellectual propertyrights owned by Macrovision Corporation and otherrights owners. Use of this copyright protectiontechnology must be authorized by MacrovisionCorporation, and is intended for home and otherlimited viewing uses only unless otherwiseauthorized by Macrovision Corporation. Reverseengineering or disassembly is prohibited.
Disc compatibility
01002A-R130-XAA-ENG-01-13 2006.1.23 5:58 PM Page 5

Getti
ng S
tarte
d
6 - English
Contents
Getting StartedGetting Started
Warning . . . . . . . . . . . . . . . . . . . . . . . . . . . . . . . . . . .2
Precaution . . . . . . . . . . . . . . . . . . . . . . . . . . . . . . . . .3Important Safety Instructions . . . . . . . . . . . . . . . . . . . . . .3
Handling Cautions . . . . . . . . . . . . . . . . . . . . . . . . . . . . . .3
Maintenance of Cabinet . . . . . . . . . . . . . . . . . . . . . . . . . .3
Disc Handling . . . . . . . . . . . . . . . . . . . . . . . . . . . . . . . . . .3
Disc Storage . . . . . . . . . . . . . . . . . . . . . . . . . . . . . . . . . .4
Disc Specifications . . . . . . . . . . . . . . . . . . . . . . . . . . . . . .4
General Features . . . . . . . . . . . . . . . . . . . . . . . . . . .8
Before Reading the Instruction Manual . . . . . . . . . .9
How to use the DVD Recorder . . . . . . . . . . . . . . . . .9
Description . . . . . . . . . . . . . . . . . . . . . . . . . . . . . . . .11Front Panel . . . . . . . . . . . . . . . . . . . . . . . . . . . . . . . . . .11
Front Panel Display . . . . . . . . . . . . . . . . . . . . . . . . . . . .11
Rear Panel . . . . . . . . . . . . . . . . . . . . . . . . . . . . . . . . . . .12
Unpacking . . . . . . . . . . . . . . . . . . . . . . . . . . . . . . . .12
Accessories . . . . . . . . . . . . . . . . . . . . . . . . . . . . . . . . . .12
Tour of the Remote Control . . . . . . . . . . . . . . . . . . . . . .13
Connecting & Setting UPConnecting & Setting UP
Quick Overview . . . . . . . . . . . . . . . . . . . . . . . . . . . .14
Step 1 : Connecting the Antenna cable . . . . . . . . .15Antenna + DVD Recorder + TV : No Cable box . . . . . .15
Antenna + Cable box + DVD Recorder + TV : Cable box
with many scrambled channels . . . . . . . . . . . . . . . . . . .16
Antenna + DVD Recorder + Cable box +TV : Cable box
with a few scrambled channels . . . . . . . . . . . . . . . . . . .17
Step 2 : Connecting the Video Cable . . . . . . . . . . .18Connecting to a Video input jack . . . . . . . . . . . . . . . . . .18
Connecting to an S-video input jack . . . . . . . . . . . . . . .19
Connecting to Component video input jacks(Y,PB,PR) 20
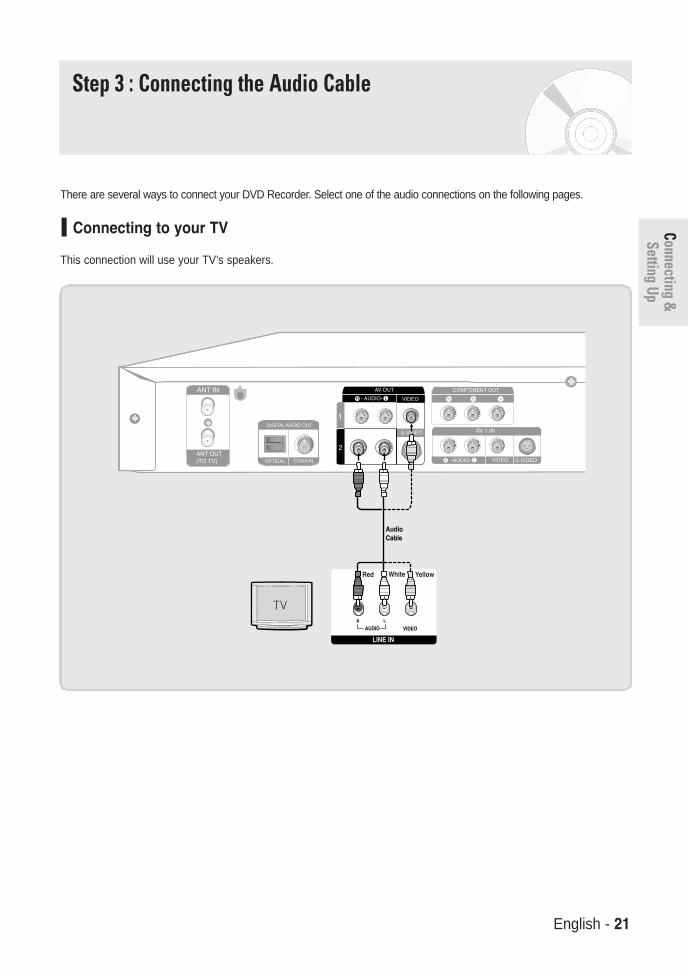
Step 3 : Connecting the Audio cable . . . . . . . . . . . .21
Connecting to your TV . . . . . . . . . . . . . . . . . . . . . . . . . .21
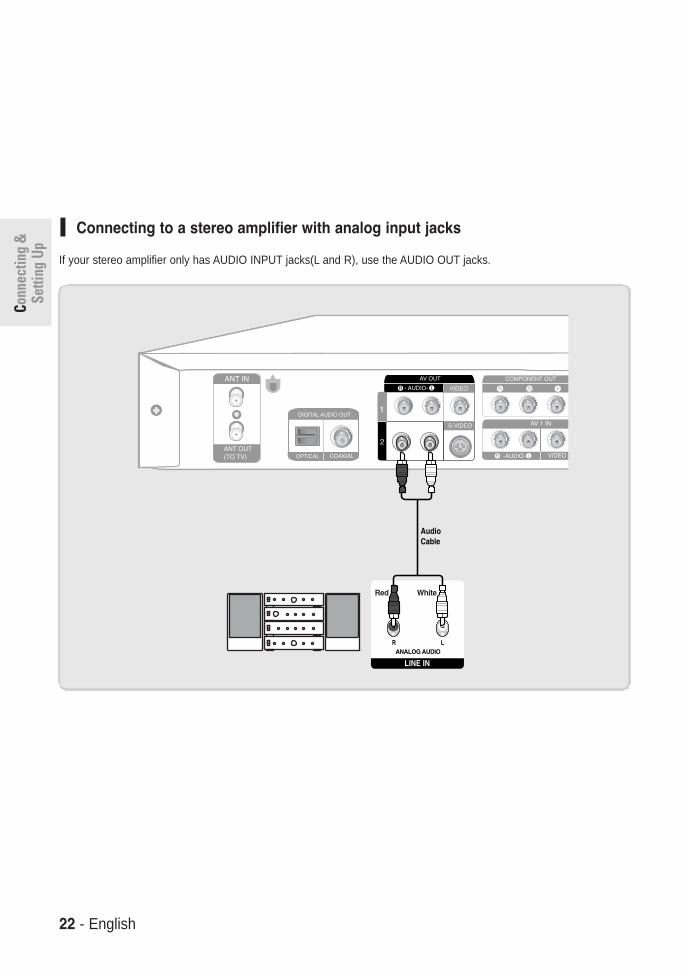
Connecting to a stereo amplifier with analog
input jacks . . . . . . . . . . . . . . . . . . . . . . . . . . . . . . . . . . .22
Connecting to an AV amplifier with a digital
input jack . . . . . . . . . . . . . . . . . . . . . . . . . . . . . . . . . . . .23
Step 4 : Connecting External Devices . . . . . . . . . . .24Connecting a VCR, Set-Top Box(STB)
or DVD Player to the AV 1 IN jacks . . . . . . . . . . . . . . . .24
Connecting a Camcorder to the AV 2 IN jacks . . . . . . .25
Connecting a Camcorder to the DV IN jack . . . . . . . . . .26
Step 5 : Connecting the Power Cord . . . . . . . . . . . .27
Step 6 : Preparing the Remote Control . . . . . . . . . .27
System SetupSystem Setup
Using the Setup Menu . . . . . . . . . . . . . . . . . . . . . . .28
Initial Setup . . . . . . . . . . . . . . . . . . . . . . . . . . . . . . .291. OSD Language Setup . . . . . . . . . . . . . . . . . . . . . . . .29
2. Clock Set . . . . . . . . . . . . . . . . . . . . . . . . . . . . . . . . . .29
3. Channel Set . . . . . . . . . . . . . . . . . . . . . . . . . . . . . . . .31
4. Setting Up the Audio Options . . . . . . . . . . . . . . . . . . .32
5. Setting Up the TV Aspect . . . . . . . . . . . . . . . . . . . . .34
System Setting . . . . . . . . . . . . . . . . . . . . . . . . . . . .35CM Skip Time Setting . . . . . . . . . . . . . . . . . . . . . . . . . . .35
EP Mode Time Setting . . . . . . . . . . . . . . . . . . . . . . . . . .36
Automatic Chapter Creation . . . . . . . . . . . . . . . . . . . . . .36
Quick Recording Setting . . . . . . . . . . . . . . . . . . . . . . . .37
Language Setting . . . . . . . . . . . . . . . . . . . . . . . . . .38
Video (Display) Setting . . . . . . . . . . . . . . . . . . . . . .39
Parental Control . . . . . . . . . . . . . . . . . . . . . . . . . . . .40
RecordingRecording
Before Recording . . . . . . . . . . . . . . . . . . . . . . . . . .43Recordable discs . . . . . . . . . . . . . . . . . . . . . . . . . . . . . .43
Recording Formats . . . . . . . . . . . . . . . . . . . . . . . . . . . .44
Record Mode . . . . . . . . . . . . . . . . . . . . . . . . . . . . . . . . .44
Unrecordable video . . . . . . . . . . . . . . . . . . . . . . . . . . . .44
About INFO button . . . . . . . . . . . . . . . . . . . . . . . . . . . . .45
Checking the available disc space
(Disc Information) . . . . . . . . . . . . . . . . . . . . . . . . . . . . . .45
01002A-R130-XAA-ENG-01-13 2006.1.23 5:58 PM Page 6

Getting Started
English - 7
Recording the current TV program you are
watching . . . . . . . . . . . . . . . . . . . . . . . . . . . . . . . . .45
Recording from External Equipment . . . . . . . . . . . .47
Copying from a Camcorder . . . . . . . . . . . . . . . . . . .48
Making a One Touch Recording (OTR) . . . . . . . . . .49
Setting a Timer Recording . . . . . . . . . . . . . . . . . . . .50
Flexible Recording (for Timer Recording only) . . . .51
Editing the Scheduled Record List . . . . . . . . . . . . .51
Deleting the Scheduled Record List . . . . . . . . . . . .52
Recording the Scheduled Record List . . . . . . . . . . .53
PlaybackPlayback
Before Playing . . . . . . . . . . . . . . . . . . . . . . . . . . . . .54Region code (DVD-Video only) . . . . . . . . . . . . . . . . . . .54
Disc types that can be played . . . . . . . . . . . . . . . . . . . .54
Discs that cannot be played . . . . . . . . . . . . . . . . . . . . . .54
Playing a Disc . . . . . . . . . . . . . . . . . . . . . . . . . . . . .55Using the Disc Menu & Title Menu . . . . . . . . . . . . . . . .56
Using the Search Functions . . . . . . . . . . . . . . . . . . . . . .56
Slow Motion Play . . . . . . . . . . . . . . . . . . . . . . . . . . . . . .57
Step Motion Play . . . . . . . . . . . . . . . . . . . . . . . . . . . . . .57
About ANYKEY . . . . . . . . . . . . . . . . . . . . . . . . . . . . . . .57
Using the Repeat Function . . . . . . . . . . . . . . . . . . . . . .58
Selecting the Subtitle . . . . . . . . . . . . . . . . . . . . . . . . . . .60
Selecting the Audio language . . . . . . . . . . . . . . . . . . . .60
Changing the Camera Angle . . . . . . . . . . . . . . . . . . . . .61
Zooming-In . . . . . . . . . . . . . . . . . . . . . . . . . . . . . . . . . . .61
Using Bookmarks . . . . . . . . . . . . . . . . . . . . . . . . . . . . .62
Using Markers . . . . . . . . . . . . . . . . . . . . . . . . . . . . . . . .63
Playing an Audio CD/MP3 . . . . . . . . . . . . . . . . . . .64Playing an Audio CD (CD-DA)/MP3 . . . . . . . . . . . . . . .64
Playing a Picture CD . . . . . . . . . . . . . . . . . . . . . . . .67
Playing the Title List . . . . . . . . . . . . . . . . . . . . . . . . .68
EditingEditing
Basic Editing (Title List) . . . . . . . . . . . . . . . . . . . . . .72Renaming(Labeling) a Title . . . . . . . . . . . . . . . . . . . . . .72
Locking(Protecting) a Title . . . . . . . . . . . . . . . . . . . . . . .73
Deleting a Title . . . . . . . . . . . . . . . . . . . . . . . . . . . . . . .73
Deleting a Section of a Title . . . . . . . . . . . . . . . . . . . . .74
Advanced Editing (Playlist) . . . . . . . . . . . . . . . . . . .76Creating a Playlist . . . . . . . . . . . . . . . . . . . . . . . . . . . . .76
Playing Entries in the Playlist . . . . . . . . . . . . . . . . . . . .77
Renaming a Playlist Entry . . . . . . . . . . . . . . . . . . . . . . .78
Editing a Scene for the Playlist . . . . . . . . . . . . . . . . . . .79
Copying a Playlist Entry to the Playlist . . . . . . . . . . . . . .82
Deleting a Playlist Entry from the Playlist . . . . . . . . . . . .83
Disc Manager . . . . . . . . . . . . . . . . . . . . . . . . . . . . .84Editing the Disc Name . . . . . . . . . . . . . . . . . . . . . . . . . .84
Disc Protection . . . . . . . . . . . . . . . . . . . . . . . . . . . . . . . .85
Formatting a Disc . . . . . . . . . . . . . . . . . . . . . . . . . . . . . .85
Deleting All Title Lists . . . . . . . . . . . . . . . . . . . . . . . . . . .86
Finalizing a Disc . . . . . . . . . . . . . . . . . . . . . . . . . . . . . . .87
Unfinalizing a Disc (V/VR mode) . . . . . . . . . . . . . . . . .88
Additional InformationAdditional Information
Troubleshooting . . . . . . . . . . . . . . . . . . . . . . . . . . . .89
Solution to Error Message . . . . . . . . . . . . . . . . . . . .93
Specification . . . . . . . . . . . . . . . . . . . . . . . . . . . . . .95
Warranty . . . . . . . . . . . . . . . . . . . . . . . . . . . . . . . . .96
01002A-R130-XAA-ENG-01-13 2006.1.23 5:58 PM Page 7

Getti
ng S
tarte
d
8 - English
General Features
The DVD-R130 allows you to record and play high qualitydigital video on DVD-RW/DVD-R discs. You can recordand edit digital video on DVD-RW/DVD-R discs as if theywere VCR tapes.
High quality digital audio and video recordingand playback
Record up to 8-hours of video or images with a 4.7 GBDVD-RW/DVD-R disc, depending on the recording mode.
Selectable Record Mode
You can set your recorder to one of five different recordingspeeds, each varying in recording quality and length. EPmode yields the most recording time, LP & SP modesprovide less recording time with higher quality recording,and XP mode gives you the highest quality recording.There's also the FR (Flexible Recording) mode that letsyou record with the best picture quality possible for therecording time and remaining space on the disc in timerrecording.
Automated Quality Adjustment for TimerRecording
If FR mode is selected, the video quality is adjustedautomatically so that all video for the scheduled time canbe recorded onto the free disc space. (See page 51.)
Create a DVD video title using a DVD-RW/DVD-Rdisc
With the DVD-R130, you can create your own DVD videotitle on 4.7 GB DVD-RW/DVD-R discs.
Copying data from a digital camcorder usinga DV input jack
Record digital camcorder video onto DVD-RW, DVD-Rdiscs using the DV input jack (IEEE 1394-4pin). (Seepage 48.)
High quality progressive scan
Progressive scanning provides high resolution and flickerfree video.The 10-bit 54-MHz DAC and 2D Y/C Separating Circuitryprovides the highest video playback and recording quality.(See page 20.)
A variety of functions with an easy-to-useuser interface
The integrated menu system and the messaging functionallow you to perform desired operations both easily andconveniently. With a DVD-RW disc, you can edit recordedimages, create a playlist, and edit video in a specificsequence according to your requirements.
01002A-R130-XAA-ENG-01-13 2006.1.23 5:58 PM Page 8

Getting Started
English - 9
How to use the DVDRecorder
Step 1 Select the disc type
Step 2 Format the disc to start recording
This unit can record on the following types of discs.If you want to repeatedly record on the same discor you want to edit the disc after recording, select arewritable DVD-RW type disc.If you want to save recording without any change,choose a non-rewritable DVD-R.
Unlike a VCR, the recorder automatically startsformatting when an unused disc is inserted. This isrequired for the preparation of disc recording.
Using a DVD-RWThis type of disc can be formatted in either DVD-Video format (Video mode) or DVD-Video Recordingformat (VR mode). For an unused disc, a messagethat asks whether to initialize or not is displayed. You can play a Video mode disc in standard DVDplayers. A VR mode disc allows more variedediting.
Using a DVD-RThis type of disc can be formatted in DVD Videoformat.After formatting is complete, you can record on thedisc.You can play this type of disc on various DVDcomponents only when they have been finalized.
Before Reading theInstruction Manual
About the use of this Instruction Manual
1) Be sure to be familiar with Safety Instructions beforeusing this product. (See pages 2~3)
2) If a problem occurs, check the Troubleshooting. (See pages 89~92)
© 2006 Samsung Electronics Co.All rights reserved; No part or whole of this user’s manualmay be reproduced or copied without the prior writtenpermission of Samsung Electronics Co.
Make sure to check the following before reading theuser’s manual.
Copyright
Icons that will be used in manual
Icon Term Definition
This involves a function available
DVD in DVD or DVD-R/DVD-RW discs that have been recorded and finalized in Video Mode.
This involves a function availableRAM in DVD-RAM.
This involves a function availableRW in DVD-RW.
This involves a function availableR in DVD-R.
CDThis involves a function availablein a data CD (CD-R or CD-RW).
This involves a function availableJPEG in a data picture CD(CD-R or
CD-RW).
This involves a function availableMP3 in a data CD(CD-R or CD-RW
on which MP3 is recorded).
This involves a case where a Caution function does not operate or
settings may be cancelled.
This involves tips or instructions NOTE on the page that help each
function operate.
One-Touch A function that can be operatedbutton by using only one button.
ANYKEY A function that can be operated button by using ANYKEY button.
You can only use either the VR or Videomode on a DVD-RW, but not both at thesame time.
You can change the DVD-RW format toanother format by reinitializing. It should be noted that the disc's data willbe lost when changing formats.
NOTE
01002A-R130-XAA-ENG-01-13 2006.1.23 5:58 PM Page 9

Getti
ng S
tarte
d
10 - English
Step 6Finalizing & Playing onother DVD components
To play your DVD on other DVD components,finalizing may be necessary. First, finish all editing andrecording operations, then finalize the disc.
When using a DVD-RW disc in VR Mode
Although finalizing is generally unnecessary whenplaying the disc on a VR Mode compatiblecomponent, a finalized disc should be used forplayback.
When using a DVD-RW disc in Video Mode
The disc should be finalized first to enable playbackon anything other than this recorder. No more editingor recording can be made on the disc once it hasbeen finalized.
When using a DVD-R disc
You should finalize the disc to play it on a componentother than this recorder. You cannot edit or record onthe disc once it has been finalized.
Step 3 Recording
There are two different recording methods, DirectRecording and Timer Recording. Timer recording isclassified as a Date : Once(mm/dd), MON-FRI,Every SAT, etc. as a record mode : XP (high qualitymode), SP (standard quality mode), LP (longrecording mode), and EP (extended mode)according to the record mode. When recording isset in the FR mode, the best quality picture isrecorded with regards to the remaining time on thedisc.
Step 4 Playing
You can select the title you want to play in adisplayed menu and then immediately startplayback.
A DVD consists of sections called titles, and subsections called chapters.
During recording, a title is created between twopoints where you start and stop recording. Chapterswill be created automatically when you finalizerecording on DVD-R / DVD-RW discs in Videomode. The chapter’s length (interval betweenchapters) varies according to the record mode.
Step 5 Editing a recorded disc
Editing on discs is easier than editing on conventionalvideo tapes. The recorder supports many different editfunctions, possible only with DVDs.
With a simple and easy edit menu, you can operatevarious edit functions, such as delete, copy, rename,lock, etc., on a recorded title.
Creating a playlist (DVD-RW in VR mode)
With this recorder, you can create a new playlist onthe same disc and edit it without changing the originalrecording.
01002A-R130-XAA-ENG-01-13 2006.1.23 5:58 PM Page 10

Getting Started
English - 11
Front panel
1. POWERTurns the recorder on and off.
2. AV 2 IN Connect external equipment.
3. DV-IN Connects external digital equipment with a DVjack. (such as a camcorder)
4. DISC TRAYOpens to accept a disc.
5. OPEN/CLOSE Opens and closes the disc tray.
6. DISPLAYDisplays the playing status, time, etc.
7. SEARCHGo to the next title/chapter/track, or goes backto the previous title/chapter/track.
8. STOPStops disc playback.
9. PLAY/PAUSE Plays a disc or pauses playback.
10. P.SCAN Selects the progressive scan mode.
11. REC Starts recording.
12. CH ( )Select TV channels.
Description
Front Panel Display
1. Lights when a disc is loaded.2. Lights in the record mode.3. Lights to indicate the timer record mode.
4. Lights when a DVD-R/-RW/-RAM disc isloaded.
5. Alpha/Numeric display.6. Lights in the progressive scan mode.
01002A-R130-XAA-ENG-01-13 2006.1.23 5:58 PM Page 11

Getti
ng S
tarte
d
12 - English
Rear Panel
1. DIGITAL AUDIO OUT(OPTICAL)Connects to an amplifier having a digital opticalaudio input jack.
2. DIGITAL AUDIO OUT(COAXIAL)Connects to an amplifier having a digital coaxialaudio input jack.
3. AV AUDIO OUTConnect to the audio input of external equipmentusing audio cables.
4. AV VIDEO OUT(good video quality)Connects the input of external equipment using aVideo cable.
5. AV S-VIDEO OUT(better video quality)Connects the input of external equipment usingan S-Video cable.
6. COMPONENT VIDEO OUT(best video quality)Connect to equipment having Component videoinput jacks.
7. AV 1 AUDIO IN Connect the output of external equipment usingaudio cables
8. AV 1 VIDEO IN Connects the output of external equipment usinga video cable.
9. AV 1 S-VIDEO IN Connects the output of external equipment usingan S-Video cable.
10. ANT IN/ANT OUT (TO TV)Connect antenna cables.
The Antenna connection does not passaudio/video signals. To watch a DVD on yourTV, you must connect audio/video cables.
NOTE
AccessoriesCheck for the supplied accessories below.
Unpacking
Video/Audio Cable(AC39-00073A)
RF Cable for TV (AC39-42001J)
Batteries for RemoteControl (AAA Size)
(AC43-12002H)Remote Control(AK59-00055A)
Instruction Manual (AK68-01002A)
Quick Guide (AK68-01013A)
01002A-R130-XAA-ENG-01-13 2006.1.23 5:58 PM Page 12

Getting Started
English - 13
Tour of the Remote Control 12. TITLE LIST/DISC MENU Button Use this to enter the View Recording list/Disc menu.
13. ANYKEY ButtonUse this to view the status of the disc that is being played.
14. REC ButtonUse to make a recording on DVD-RW/-R discs.
15. REC MODE ButtonUse this to set the desired Recording time and picture quality.(XP/SP/LP/EP)
16. SUBTITLE ButtonPress this to switch the DVD’s subtitle language.
17. OPEN/CLOSE ButtonTo open and close the disc tray.
18. ANGLE Button
19. PLAY/PAUSE ButtonPress to play/pause a disc or pause the recording.
20. CH ButtonUse this to select a TV channel.
21. AUDIO ButtonUse this to access various audio functions on a disc.
22. RETURN Button
23. PLAY LIST/TITLE MENU ButtonUse this to return to the Title menu, or to view the recordedPlaylist.
24. CANCEL Button
25. TIMER ButtonPress to directly enter the Timer Recording Mode menu.
26. INFO ButtonThis will display current setting or disc status.
27. REPEAT ButtonAllows you to repeat a title, chapter, track or disc.
28. REPEAT A-B ButtonAllows you to repeat a certain section.
29. ZOOM Button
30. INPUT SEL. ButtonSelects line input signal in external input mode. (Tuner, AV1,AV2 or DV)
1. POWER Button
2. NUMBER Buttons
3. 100+ ButtonPress this to select channel 100 or higher.
4. REVERSE/FORWARD SKIP ButtonsPress to skip a disc backwards or forwards.
5. REVERSE/FORWARD STEP ButtonsPress to play frame by frame.
6. REVERSE/FORWARD SEARCH ButtonsPress to search a disc backwards or forwards.
7. STOP ButtonPress to stop a disc or to stop the recording.
8. CM SKIP ButtonThe unit can be set to automatically skip a portion of theprogram during playback of a DVD disc.
9. MARKER ButtonUse this to bookmark or mark a position while playing a disc.
10. MENU ButtonBrings up the DVD recorder’s setup menu.
11. ENTER/DIRECTION Buttons(UP/DOWN and LEFT/RIGHT Buttons)This button functions as a toggle switch.
1 16
27
2
3
4
6
10
12
11
7
5
28
13
9
1515
14
8
30
18
17
29
19
21
24
20
22
23
25
26
01002A-R130-XAA-ENG-01-13 2006.1.23 5:58 PM Page 13
Conn
ectin
g &
Setti
ng U
p
14 - English
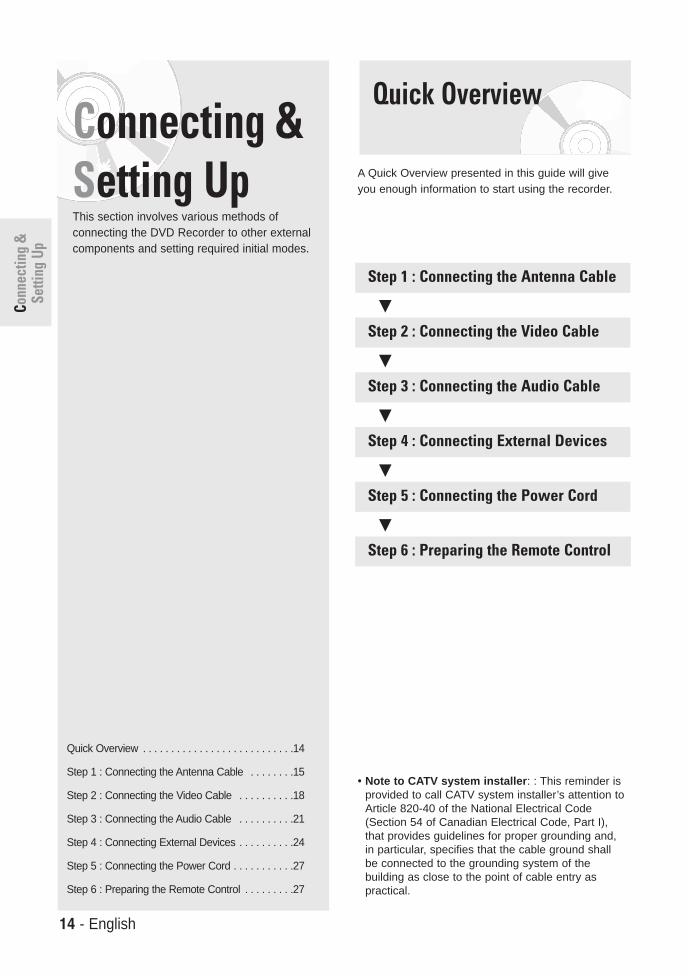
Connecting &Setting UpThis section involves various methods ofconnecting the DVD Recorder to other externalcomponents and setting required initial modes.
Quick Overview
A Quick Overview presented in this guide will giveyou enough information to start using the recorder.
• Note to CATV system installer : : This reminder isprovided to call CATV system installer’s attention toArticle 820-40 of the National Electrical Code(Section 54 of Canadian Electrical Code, Part I),that provides guidelines for proper grounding and,in particular, specifies that the cable ground shallbe connected to the grounding system of thebuilding as close to the point of cable entry aspractical.
Step 1 : Connecting the Antenna Cable
†
Step 2 : Connecting the Video Cable
†
Step 3 : Connecting the Audio Cable
†
Step 4 : Connecting External Devices
†
Step 5 : Connecting the Power Cord
†
Step 6 : Preparing the Remote Control
Quick Overview . . . . . . . . . . . . . . . . . . . . . . . . . . .14
Step 1 : Connecting the Antenna Cable . . . . . . . .15
Step 2 : Connecting the Video Cable . . . . . . . . . .18
Step 3 : Connecting the Audio Cable . . . . . . . . . .21
Step 4 : Connecting External Devices . . . . . . . . . .24
Step 5 : Connecting the Power Cord . . . . . . . . . . .27
Step 6 : Preparing the Remote Control . . . . . . . . .27
01002A-R130-XAA-ENG-14-27 2006.1.23 5:59 PM Page 14
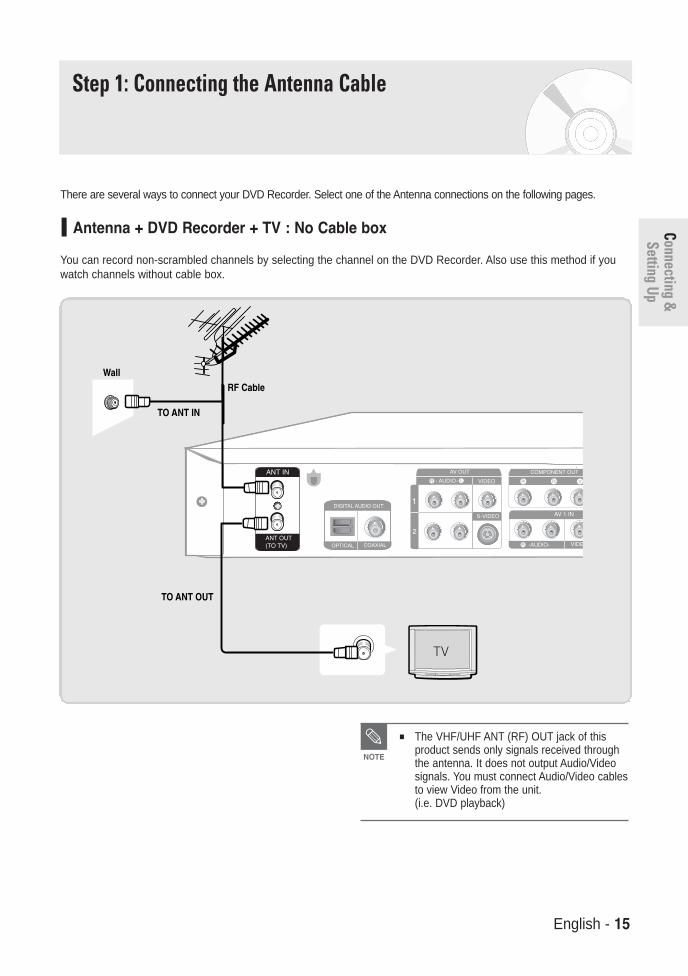
Step 1: Connecting the Antenna Cable
There are several ways to connect your DVD Recorder. Select one of the Antenna connections on the following pages.
Antenna + DVD Recorder + TV : No Cable box
You can record non-scrambled channels by selecting the channel on the DVD Recorder. Also use this method if youwatch channels without cable box.
The VHF/UHF ANT (RF) OUT jack of thisproduct sends only signals received throughthe antenna. It does not output Audio/Videosignals. You must connect Audio/Video cablesto view Video from the unit. (i.e. DVD playback)
NOTE
Connecting &Setting Up
English - 15
01002A-R130-XAA-ENG-14-27 2006.1.23 5:59 PM Page 15

Conn
ectin
g &
Setti
ng U
p
16 - English
Antenna + Cable box + DVD Recorder + TV : Cable box with many scrambledchannels
You can record channels by selecting the channel on the cable box. You cannot record one channel while watchinganother channel. Be sure that the cable box is turned on.
The VHF/UHF ANT (RF) OUT jack of thisproduct sends only signals received throughthe antenna. It does not output Audio/Videosignals. You must connect Audio/Video cablesto view Video from the unit. (i.e. DVD playback)
NOTE
01002A-R130-XAA-ENG-14-27 2006.1.23 5:59 PM Page 16

Connecting &Setting Up
English - 17
Antenna + DVD Recorder + Cable box + TV : Cable box with a few scrambledchannels
You can record non-scrambled channels by selecting the channel on the DVD Recorder. You cannot record scrambledchannels that require a cable box.
The VHF/UHF ANT (RF) OUT jack of thisproduct sends only signals received throughthe antenna. It does not output Audio/Videosignals. You must connect Audio/Video cablesto view Video from the unit. (i.e. DVD playback)
NOTE
01002A-R130-XAA-ENG-14-27 2006.1.23 5:59 PM Page 17
Conn
ectin
g &
Setti
ng U
p
18 - English
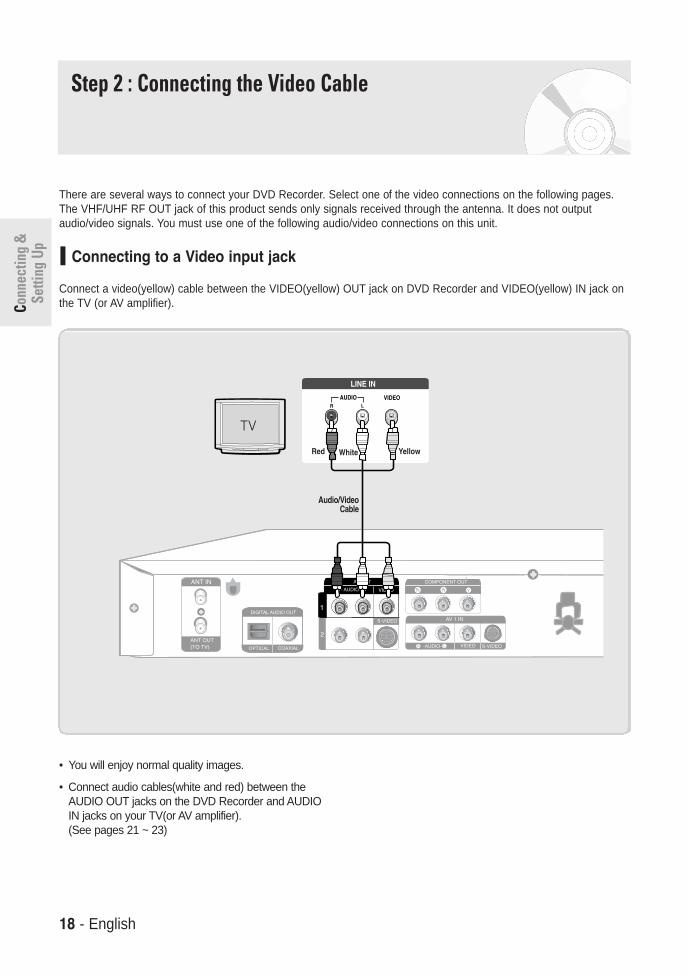
Step 2 : Connecting the Video Cable
There are several ways to connect your DVD Recorder. Select one of the video connections on the following pages.The VHF/UHF RF OUT jack of this product sends only signals received through the antenna. It does not outputaudio/video signals. You must use one of the following audio/video connections on this unit.
Connecting to a Video input jack
Connect a video(yellow) cable between the VIDEO(yellow) OUT jack on DVD Recorder and VIDEO(yellow) IN jack onthe TV (or AV amplifier).
• You will enjoy normal quality images.
• Connect audio cables(white and red) between theAUDIO OUT jacks on the DVD Recorder and AUDIOIN jacks on your TV(or AV amplifier).(See pages 21 ~ 23)
01002A-R130-XAA-ENG-14-27 2006.1.23 5:59 PM Page 18
Connecting &Setting Up
English - 19
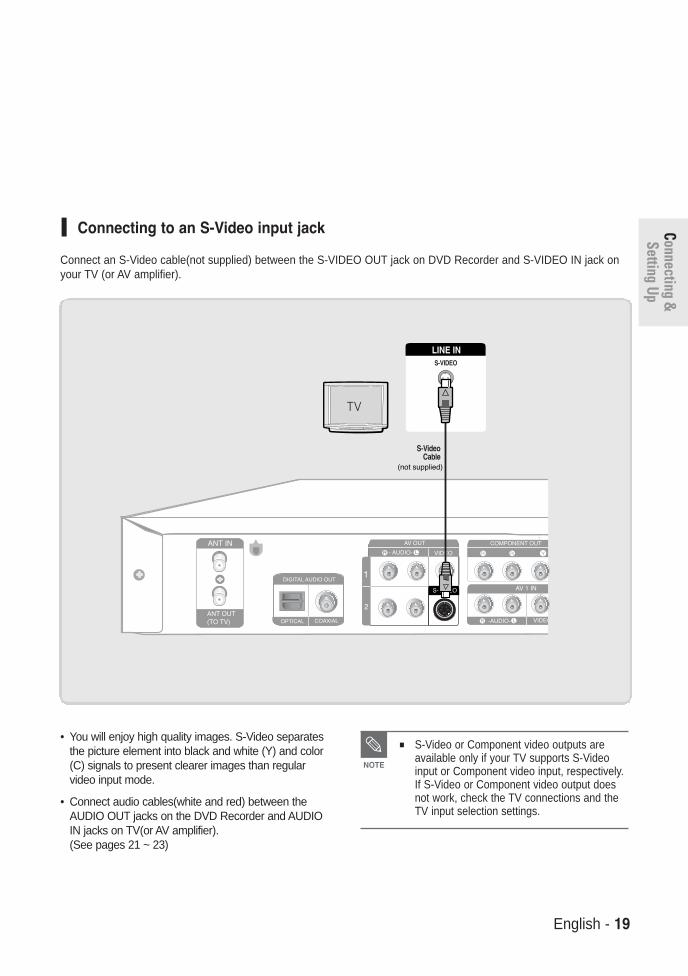
• You will enjoy high quality images. S-Video separatesthe picture element into black and white (Y) and color(C) signals to present clearer images than regularvideo input mode.
• Connect audio cables(white and red) between theAUDIO OUT jacks on the DVD Recorder and AUDIOIN jacks on TV(or AV amplifier).(See pages 21 ~ 23)
Connecting to an S-Video input jack
Connect an S-Video cable(not supplied) between the S-VIDEO OUT jack on DVD Recorder and S-VIDEO IN jack onyour TV (or AV amplifier).
S-Video or Component video outputs areavailable only if your TV supports S-Videoinput or Component video input, respectively.If S-Video or Component video output doesnot work, check the TV connections and theTV input selection settings.
NOTE
01002A-R130-XAA-ENG-14-27 2006.1.23 5:59 PM Page 19
Conn
ectin
g &
Setti
ng U
p
20 - English
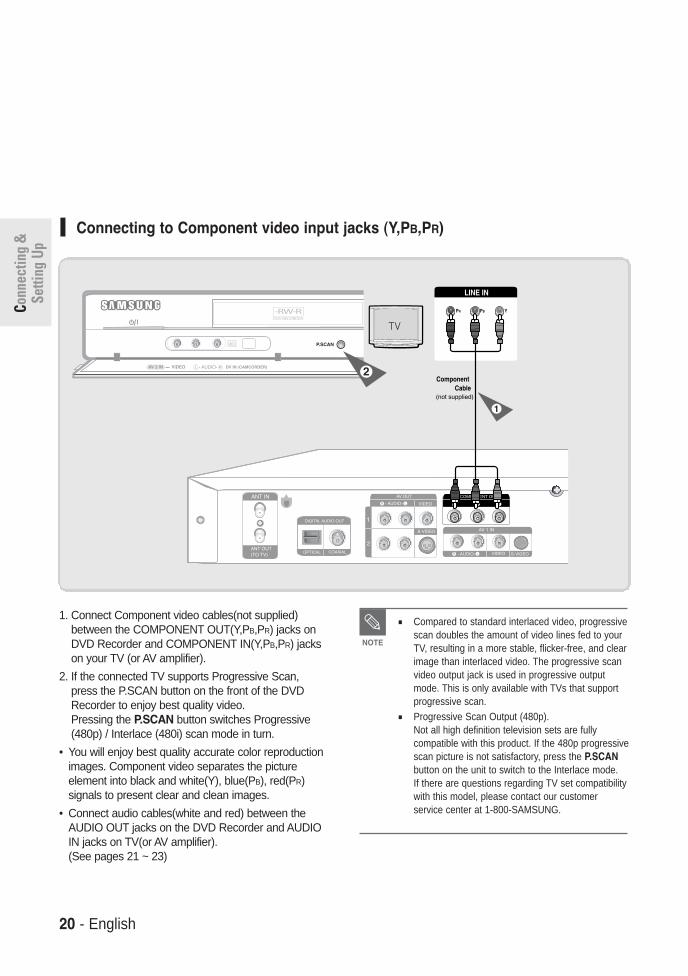
Connecting to Component video input jacks (Y,PB,PR)
1. Connect Component video cables(not supplied)between the COMPONENT OUT(Y,PB,PR) jacks onDVD Recorder and COMPONENT IN(Y,PB,PR) jackson your TV (or AV amplifier).
2. If the connected TV supports Progressive Scan,press the P.SCAN button on the front of the DVDRecorder to enjoy best quality video.Pressing the P.SCAN button switches Progressive(480p) / Interlace (480i) scan mode in turn.
• You will enjoy best quality accurate color reproductionimages. Component video separates the pictureelement into black and white(Y), blue(PB), red(PR)signals to present clear and clean images.
• Connect audio cables(white and red) between theAUDIO OUT jacks on the DVD Recorder and AUDIOIN jacks on TV(or AV amplifier).(See pages 21 ~ 23)
Compared to standard interlaced video, progressivescan doubles the amount of video lines fed to yourTV, resulting in a more stable, flicker-free, and clearimage than interlaced video. The progressive scanvideo output jack is used in progressive outputmode. This is only available with TVs that supportprogressive scan.
Progressive Scan Output (480p).Not all high definition television sets are fullycompatible with this product. If the 480p progressivescan picture is not satisfactory, press the P.SCANbutton on the unit to switch to the Interlace mode.If there are questions regarding TV set compatibilitywith this model, please contact our customerservice center at 1-800-SAMSUNG.
NOTE
01002A-R130-XAA-ENG-14-27 2006.1.23 5:59 PM Page 20
Connecting &Setting Up
English - 21
Step 3 : Connecting the Audio Cable
There are several ways to connect your DVD Recorder. Select one of the audio connections on the following pages.
Connecting to your TV
This connection will use your TV’s speakers.
01002A-R130-XAA-ENG-14-27 2006.1.23 5:59 PM Page 21
Conn
ectin
g &
Setti
ng U
p
22 - English
Connecting to a stereo amplifier with analog input jacks
If your stereo amplifier only has AUDIO INPUT jacks(L and R), use the AUDIO OUT jacks.
01002A-R130-XAA-ENG-14-27 2006.1.23 5:59 PM Page 22

Connecting &Setting Up
English - 23
Connecting to an AV amplifier with a digital input jack
If your AV amplifier has a Dolby Digital or DTS decoder and a digital input jack, use this connection. To enjoy DolbyDigital or DTS sound, you will need to set up the audio settings. (See pages 32~33)
Manufactured under license from DolbyLaboratories. “Dolby” and the double-D symbol aretrademarks of Dolby Laboratories.
“DTS” and “DTS Digital Out” are trademarks ofDigital Theater Systems, Inc.
01002A-R130-XAA-ENG-14-27 2006.1.23 5:59 PM Page 23

Conn
ectin
g &
Setti
ng U
p
24 - English
Step 4 : Connecting External Devices
This allows you to connect your DVD Recorder to other external devices and view or record their outputs.
Connecting a VCR, Set-Top Box(STB) or DVD Player to the AV 1 IN jacks
Connecting a VCR or external device to the AV 1 IN jacks of the DVD Recorder.You can record from connected equipment (VCR, STB or DVD Player).
01002A-R130-XAA-ENG-14-27 2006.1.23 5:59 PM Page 24

Connecting &Setting Up
Connecting a Camcorder to the AV 2 IN jacks
You can also use the AV 2 IN jacks on the front panel of the DVD Recorder. You can record from connectedequipment, such as a camcorder.When an input source is inserted into AV 2 while watching TV, the input will be switched to AV 2 automatically.
English - 25
01002A-R130-XAA-ENG-14-27 2006.1.23 5:59 PM Page 25

Conn
ectin
g &
Setti
ng U
p
26 - English
If the input is not selected automatically, press theINPUT SEL. button on the remote control to selectthe DV input.
Check your camcorder's owner's manual to seehow to use the camcorder in this mode.
NOTE
Connecting a Camcorder to the DV IN jack
If your camcorder has a DV output jack, connect it to the DV input jack of your DVD Recorder.
(See page 48)
01002A-R130-XAA-ENG-14-27 2006.1.23 5:59 PM Page 26

Connecting &Setting Up
English - 27
Step 5 : Connecting thePower Cord
After the current time is set automatically, therecorder will perform Auto Channel Memory forabout 3 minutes. If power is on before finishingthe Auto Channel Memory process, AutoChannel Memory will stop.In this case, do Auto Channel Memory fromMENU(see page 31).
NOTE
After all connections are complete, plug the power cordin the wall outlet.
“Auto” appears in the panel display. This meansthat the current time is being set automatically(Auto Program) through the antenna underconnection and also the channel is being set. The setup may take a few minutes.
When the DVD Recorder operates normally, the current timeis automatically set and displayed in the front panel display.
Step 6 : Preparing theRemote Control
Install Batteries in the Remote Control• Open the battery cover on the back of the remote.• Insert two AAA batteries. Make sure that the polarities
(+ and -) are aligned correctly.• Replace the battery cover.If the remote control does not operate properly:• Check the polarity + - of the batteries (Dry-Cell)• Check if the batteries are drained. • Check if remote sensor is blocked by obstacles.• Check if there is any fluorescent lighting nearby.
Dispose of batteries according to local environmentalregulations. Do not put them in the household trash.
01002A-R130-XAA-ENG-14-27 2006.1.23 5:59 PM Page 27

28 - English
Syst
em S
etup
System Setup
Using the Setup Menu........................................................28
Initial Setup..........................................................................29
System Setting ....................................................................35
Language Setting................................................................38
Video (Display) Setting .......................................................39
Parental Control ..................................................................40
Using the Setup Menu
For ease of use, we recommend that you perform the initialsetup before using the product.
1 With the unit in Stop mode/No Disc mode, press theMENU button on the remote control.Menu items differ depending on the disc type.
2 Select Setup using the ……†† buttons, then press theENTER or √ button.Setup menu will be displayed.
• System Setup of the General Options.- CM Skip Time, EP Mode Time, Chapter Creator, Quick Recording
• Clock Set- Auto Clock Set, Manual Clock Set
• Channel Set- Antenna/ Cable TV, Auto Channel Memory, Chanel Add/ Delete
• Language Setup of the Language Options.- Audio, Subtitle, Disc Menu, On-Screen Menu
• Audio Setup of the Audio Options- Digital Output , DTS, Dynamic Compression
• Video Setup of the Display Options. Use to select which type ofscreen you want to watch and several display options.- TV Aspect, Input Level, Black Level, 3D Noise Reduction
• Parental ControlSetup of the Parental LevelAllows users to set the level necessary to preventchildren from viewing unsuitable movies such as thosewith violence, adult subject matter, etc.- Password, Rating Level,Change Password
Timer RecordDVD-Recorder
Timer Record √√
Scheduled Record List √√
No Disc
Timer Rec.
Setup
SetupDVD-Recorder
No Disc
Timer Rec.
Setup
System √√
Clock Set √√
Channel Set √√
Language √√
Audio √√
Video √√
Parental Control √√
RETURNENTERMOVE EXIT
RETURNENTERMOVE EXIT
01002A-R130-XAA-ENG-28-42 2006.1.23 6:0 PM Page 28

English - 29
1 With the unit in Stop mode/No Disc mode, press theMENU button.
2 Select Setup using the …† buttons, then press theENTER or √ button.
3 Select Clock Set using the …† buttons, then pressthe ENTER or √ button.Clock Set menu will be displayed.
4 Select Auto Clock Set using the …† buttons, thenpress the ENTER or √ button.
1 Press the POWER button.
2 Press a number button to select the language.
Auto Clock Set
If you connected an external Audio System, turn on yourAudio System and select AUX, CD or DVD.The OSD (On-Screen Display) displayed on the screenmay vary depending on conditions such as the disc typeand whether the disc has been inserted or not.
1. OSD Language Setup
After plugging in the recorder, the first time you press thePOWER button, the screen shown below appears.
If the language for the startup screen is not set,the settings may change whenever you turn thepower on or off. Therefore, make sure that youselect the language you want to use.
NOTE
2. Clock Set
This menu is used to set the current time. You need toset the time first to use timer recording.
If you have the antenna connected via Method 2 onpage 16, you have to set the clock manually.See “Manual Clock set” on pages 30.
You must have the antenna/cable connected toset the Auto Clock. See pages 15~17 forAntenna connections(Method 1, 2 and 3).
Method 1 or 3
Method 2
Initial Setup
If you have the antenna connected via Method 1 or 3 onpages 15,17, the DVD Recorder automatically sets theclock by searching for a channel that carries a timesignal and sets your time zone and daylight saving(ifapplicable).
The Menus are slightly different depending onwhether a disc is inserted or not. The menusdescribed on the next few pages are with nodisc in the unit.
The menus are not available during playbackor recording.
NOTE
System SetupPress 1 for English
Touche 2 pour Français
Pulse 3 para Español
MACROVISION DS01
Timer RecordDVD-Recorder
Timer Record √√
Scheduled Record List √√
No Disc
Timer Rec.
Setup
SetupDVD-RecorderNo Disc
Timer Rec.
Setup
Clock SetDVD-Recorder
No Disc
Timer Rec.
Setup
System √√
Clock Set √√
Channel Set √√
Language √√
Audio √√
Video √√
Parental Control √√
Auto Clock Set √√
Manual Clock Set √√
RETURNENTERMOVE EXIT
RETURNENTERMOVE EXIT
RETURNENTERMOVE EXIT
01002A-R130-XAA-ENG-28-42 2006.1.23 6:0 PM Page 29

30 - English
Syst
em S
etup
5 Select the sub menu(Clock Data CH, Time Zoneor Daylight Saving) using the …† buttons, thenpress the ENTER or √ button.
Clock Data CHSelect a channel that carries a time signal using the…† buttons then press the ENTER button.
• Select Auto to set the clock data channel automatically.
Time Zone Select the time zone of your area using the …† buttonsthen press the ENTER or √ button.
• Select Automatic to set the time zone automatically.
Daylight Saving Select Yes, No or Automatic using the …† buttons,then press the ENTER or √ button.
• Select Automatic to set the daylight savingautomatically.
If your clock cannot be set automatically, set the clockmanually.
4 Select Manual Clock Set using the …† buttons,then press the ENTER or √ button.
5 Select the current date and current time (Month,Day, Year, Hour, Minute and AM/PM) using the…†œ √ or number buttons and then press theENTER button.When the current time is stored in memory and thenthe set is powered off, the current time will appear inthe front panel display.
…† : Sets the valueYou can set the value using the number (0~9) buttons.
œ √: Moves to items
Manual Clock Set
To setup, follow steps 1 to 3 in page 29.
Auto Clock SetDVD-Recorder
No Disc
Timer Rec.
Setup
Clock Data CH : Automatic √√
Time Zone : Automatic √√
Daylight Saving : Automatic √√
Clock Data CHDVD-Recorder
No Disc
Timer Rec.
Setup Select channel : Auto
…
†
Manual Clock SetDVD-Recorder
No Disc
Timer Rec.
SetupMonth Day Year Hour Minute AM/PM
01 01 2006 12 00 AM
SUN
Auto Clock SetDVD-Recorder
No Disc
Timer Rec.
Setup
AutomaticAtlanticEasternCentralMountainPacificAlaskaHawaii
Clock Data CH
Time Zone
Daylight Saving
Auto Clock SetDVD-Recorder
No Disc
Timer Rec.
Setup
AutomaticYesNo
Clock Data CH : Automatic √√
Time Zone : Automatic √√
Daylight Saving
…
†
Clock setDVD-Recorder
No Disc
Timer Rec.
Setup
Auto Clock Set √√
Manual Clock Set √√
RETURNENTERMOVE EXIT
RETURNENTERMOVE EXIT
RETURNENTERMOVE EXIT
RETURNENTERMOVE EXIT
RETURNENTERMOVE EXIT
RETURNENTERMOVE EXIT
01002A-R130-XAA-ENG-28-42 2006.1.23 6:0 PM Page 30
English - 31
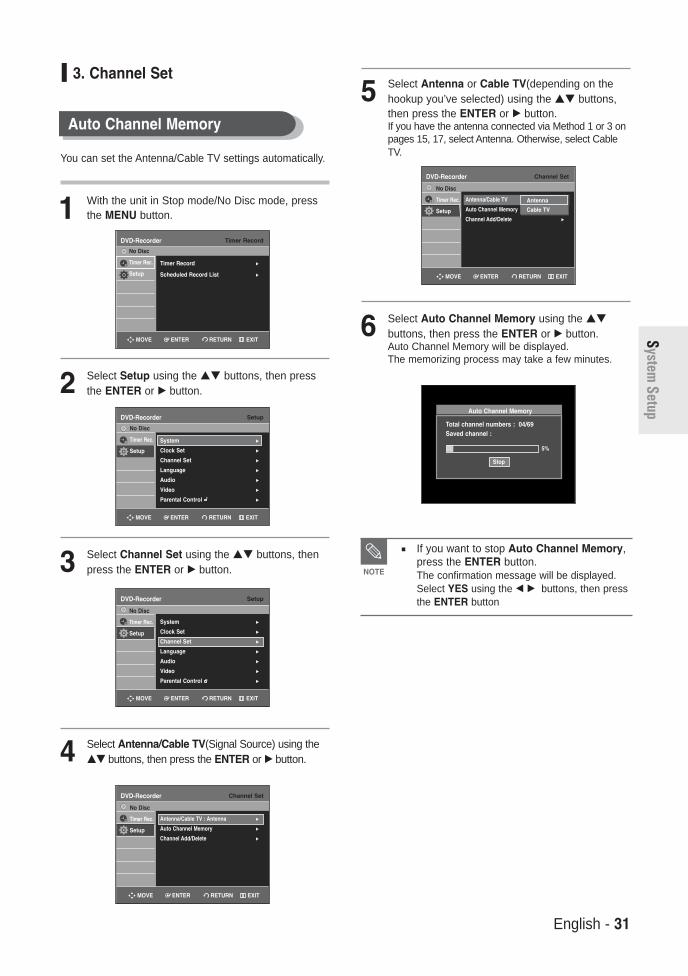
5 Select Antenna or Cable TV(depending on thehookup you’ve selected) using the …† buttons,then press the ENTER or √ button.If you have the antenna connected via Method 1 or 3 onpages 15, 17, select Antenna. Otherwise, select CableTV.
6 Select Auto Channel Memory using the …†
buttons, then press the ENTER or √ button.Auto Channel Memory will be displayed.The memorizing process may take a few minutes.
3. Channel Set
You can set the Antenna/Cable TV settings automatically.
1 With the unit in Stop mode/No Disc mode, pressthe MENU button.
2 Select Setup using the …† buttons, then pressthe ENTER or √ button.
3 Select Channel Set using the …† buttons, thenpress the ENTER or √ button.
4 Select Antenna/Cable TV(Signal Source) using the…† buttons, then press the ENTER or √ button.
Auto Channel Memory
If you want to stop Auto Channel Memory,press the ENTER button.The confirmation message will be displayed.Select YES using the œ √ buttons, then pressthe ENTER button
NOTE
System Setup
Timer RecordDVD-Recorder
Timer Record √√
Scheduled Record List √√
No Disc
Timer Rec.
Setup
SetupDVD-Recorder
No Disc
Timer Rec.
Setup
System √√
Clock Set √√
Channel Set √√
Language √√
Audio √√
Video √√
Parental Control √√
SetupDVD-Recorder
No Disc
Timer Rec.
Setup
System √√
Clock Set √√
Channel Set √√
Language √√
Audio √√
Video √√
Parental Control √√
Channel SetDVD-Recorder
No Disc
Timer Rec.
Setup
Antenna/Cable TV
Auto Channel Memory √√
Channel Add/Delete √√
Antenna
Cable TV
Channel SetDVD-Recorder
No Disc
Timer Rec.
Setup
Antenna/Cable TV : Antenna √√
Auto Channel Memory √√
Channel Add/Delete √√
Auto Channel Memory
Total channel numbers : 04/69Saved channel :
5%
Stop
RETURNENTERMOVE EXIT
RETURNENTERMOVE EXIT
RETURNENTERMOVE EXIT
RETURNENTERMOVE EXIT
RETURNENTERMOVE EXIT
01002A-R130-XAA-ENG-28-42 2006.1.23 6:0 PM Page 31

32 - English
Syst
em S
etup
Manual Channel Set
4 Select Channel Add/Delete using the …†
buttons, then press the ENTER or √ button.
5 Select the channels you want to add or delete onthe “Select channel” screen using the …† ornumber buttons. Then, press the ENTER button.
• Using CH buttons for channel selection allowsthe user to add/delete one channel at a time.
• Using …† buttons for channel selection jumps tothe next channel memorized in Auto ChannelMemory.
6 Select Add or Delete using the œ √ buttons,thenpress the ENTER button.• The message 'Channel is added.' or 'Channel is
deleted.' will be displayed in the center of thescreen.
• Continue to add or delete as many channels as youwant to memorize or delete. This can be used toadd channels not stored automatically due to weaksignal strength.
• Press the RETURN button to return to the previousmenu. Press the MENU button to exit the menu.
4. Setting Up the Audio Options
You can connect the DVD-R130 to an external audioamplifier or a Home Theater system.Allows you to setup the audio device and sound statussettings depending on the audio system in use.
1 With the unit in Stop mode/No Disc mode, pressthe MENU button on the remote control.
2 Select Setup using the …† buttons, then pressthe ENTER or √ button.
3 Select Audio using the …† buttons, then pressthe ENTER or √ button.
To setup, follow steps 1 to 3 in page 31.
Manual Channel Set can be used after you haveperformed Auto Channel Memory.Use the Manual Channel Setting to delete unnecessarychannels after finishing the Auto Channel Memoryprocess.
Channel SetDVD-Recorder
No Disc
Timer Rec.
Setup
Antenna/Cable TV : Antenna √√
Auto Channel Memory √√
Channel Add/Delete √√
Channel Add/DeleteDVD-Recorder
No Disc
Timer Rec.
SetupSelect channel : 9
Add Delete
Timer RecordDVD-Recorder
Timer Record √√
Scheduled Record List √√
No Disc
Timer Rec.
Setup
SetupDVD-Recorder
No Disc
Timer Rec.
Setup
System √√
Clock Set √√
Channel Set √√
Language √√
Audio √√
Video √√
Parental Control √√
SetupDVD-Recorder
No Disc
Timer Rec.
Setup
System √√
Clock Set √√
Channel Set √√
Language √√
Audio √√
Video √√
Parental Control √√
NUMBER0~9
RETURNENTERMOVE EXIT
RETURNENTER EXIT
RETURNENTERMOVE EXIT
RETURNENTERMOVE EXIT
RETURNENTERMOVE EXIT
01002A-R130-XAA-ENG-28-42 2006.1.23 6:0 PM Page 32
English - 33
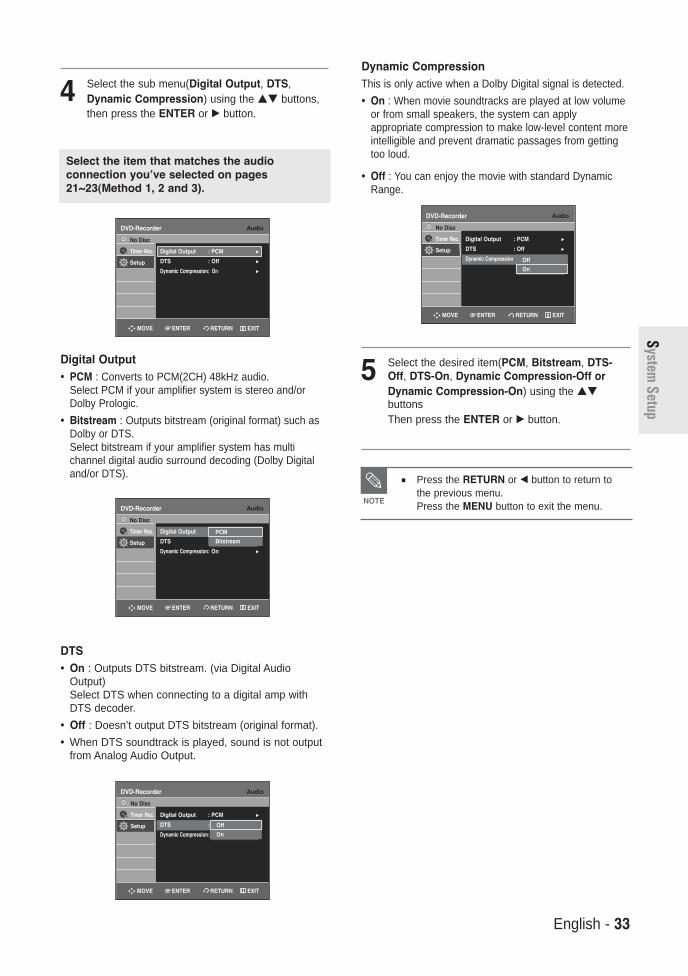
4 Select the sub menu(Digital Output, DTS,Dynamic Compression) using the …† buttons,then press the ENTER or √ button.
Digital Output• PCM : Converts to PCM(2CH) 48kHz audio.
Select PCM if your amplifier system is stereo and/orDolby Prologic.
• Bitstream : Outputs bitstream (original format) such asDolby or DTS.Select bitstream if your amplifier system has multichannel digital audio surround decoding (Dolby Digitaland/or DTS).
DTS • On : Outputs DTS bitstream. (via Digital Audio
Output)Select DTS when connecting to a digital amp withDTS decoder.
• Off : Doesn’t output DTS bitstream (original format).
• When DTS soundtrack is played, sound is not outputfrom Analog Audio Output.
Dynamic Compression This is only active when a Dolby Digital signal is detected.
• On : When movie soundtracks are played at low volumeor from small speakers, the system can applyappropriate compression to make low-level content moreintelligible and prevent dramatic passages from gettingtoo loud.
• Off : You can enjoy the movie with standard DynamicRange.
5 Select the desired item(PCM, Bitstream, DTS-Off, DTS-On, Dynamic Compression-Off orDynamic Compression-On) using the …†buttonsThen press the ENTER or √ button.
Select the item that matches the audioconnection you’ve selected on pages21~23(Method 1, 2 and 3).
Press the RETURN or œ button to return tothe previous menu.Press the MENU button to exit the menu.NOTE
System Setup
AudioDVD-Recorder
No Disc
Timer Rec.
Setup
Digital Output : PCM √√
DTS : Off √√
Dynamic Compression: On √√
AudioDVD-Recorder
No Disc
Timer Rec.
Setup
Digital Output : PCM √√
DTS : Off √√
Dynamic Compression: On √√
PCM
Bitstream
AudioDVD-Recorder
No Disc
Timer Rec.
Setup
Digital Output : PCM √√
DTS : Off √√
Dynamic Compression: On √√
Off
On
AudioDVD-Recorder
No Disc
Timer Rec.
Setup
Digital Output : PCM √√
DTS : Off √√
Dynamic Compression On √√Off
On
RETURNENTERMOVE EXIT
RETURNENTERMOVE EXIT
RETURNENTERMOVE EXIT
RETURNENTERMOVE EXIT
01002A-R130-XAA-ENG-28-42 2006.1.23 6:0 PM Page 33

34 - English
Syst
em S
etup
5. Setting Up the TV Aspect
This allows you to set up the TV screen settings.
1 With the unit in Stop mode/No Disc mode, pressthe MENU button.
2 Select Setup using the …† buttons, then pressthe ENTER or √ button.
3 Select Video using the …† buttons, then pressthe ENTER or √ button.
4 Select TV Aspect using the …† buttons, thenpress the ENTER or √ button.
5 Select the desired item(4:3 Letter Box, 4:3 Pan-Scan or 16:9 Wide) using the …† buttons. Then press the ENTER or √ button.
If you have a 4:3 standard TV • 4:3 Letter Box : Select when you want to see the
total 16:9 ratio screen DVD supplies, even though youhave a TV with a 4:3 ratio screen. Black bars willappear at the top and bottom of the screen.
• 4:3 Pan-Scan : Select this for a conventional size TVwhen you want to see the central portion of the 16:9screen. (Extreme left and right side of movie picturewill be cut off.)
If you have a wide screen TV or 4:3 standard TVwith a wide-screen mode• 16:9 Wide : You can view the full 16:9 picture on your
widescreen TV.
Timer RecordDVD-Recorder
Timer Record √√
Scheduled Record List √√
No Disc
Timer Rec.
Setup
SetupDVD-Recorder
No Disc
Timer Rec.
Setup
System √√
Clock Set √√
Channel Set √√
Language √√
Audio √√
Video √√
Parental Control √√
SetupDVD-Recorder
No Disc
Timer Rec.
Setup
System √√
Clock Set √√
Channel Set √√
Language √√
Audio √√
Video √√
Parental Control √√
VideoDVD-Recorder
No Disc
Timer Rec.
Setup
TV Aspect : 16:9 Wide √√
Input Level : Darker √√
Black Level : 7.5 IRE √√
3D Noise Reduction : Off √√
VideoDVD-Recorder
No Disc
Timer Rec.
Setup
TV Aspect : 16:9 Wide √√
Input Level : Darker √√
Black Level : 7.5 IRE √√
3D Noise Reduction : Off √√
4:3 Letter Box
4:3 Pan-Scan
16:9 Wide
RETURNENTERMOVE EXIT
RETURNENTERMOVE EXIT
RETURNENTERMOVE EXIT
RETURNENTERMOVE EXIT
RETURNENTERMOVE EXIT
01002A-R130-XAA-ENG-28-42 2006.1.23 6:0 PM Page 34

English - 35
System Setting
CM Skip Time Setting
When a program recorded on a DVD-RAM, a DVD-RW,or a DVD-R is played, the unit can be set toautomatically skip a portion of the programcorresponding to a CM(commercial) Skip Time set bythe user.
1 With a disc inserted and the unit in Stop mode, pressthe MENU button on the remote control.
2 Select Setup using the …† buttons, then press theENTER or √ button.You can't use the Setup functions while playing a disc.
3 Select System using the …† buttons, then press theENTER or √ button.System menu will be displayed.
4 Select CM Skip Time using the …† buttons, thenpress the ENTER or √ button.CM Skip Time will be displayed.
5 Select the desired time using the …† buttons, thenpress the ENTER or √ button.
6 If you press the CM SKIP button during playback, thesection corresponding to the set time is skipped, andthen the next section is played.
CM Skip can be performed only duringnormal playback.
When the time set is less than a remainingtime of a current title: The next title isplayed from the beginning.
When the time set is less than a remainingtime of a playlist, the next scene is played.
CM Skip does not work in a still picturemode.
When a set time is less than a remainingtime of a scene, a last title, or a last trackthat is displayed currently, a prohibitionmark appears.
CM Skip releases Repeat (includingRepeat A-B, Chapter, and Title).
CM Skip may not operate with some DVD-Video discs.
NOTE
System Setup
SystemDVD-Recorder
Title List
Playlist
Disc Manager
Timer Rec.
Setup
DVD-RW(VR)
CM Skip Time : 15 Sec √√
EP Mode Time : 6 Hours √√
Chapter Creator : Off √√
Quick Recording : Off √√
SystemDVD-Recorder
Title List
Playlist
Disc Manager
Timer Rec.
Setup
DVD-RW(VR)
CM Skip Time : 15 Sec √√
EP Mode Time : 6 Hours √√
Chapter Creator : Off √√
Quick Recording : Off √√
SystemDVD-Recorder
Title List
Playlist
Disc Manager
Timer Rec.
Setup
DVD-RW(VR)
CM Skip Time : 15 Sec √√
EP Mode Time : 6 Hours √√
Chapter Creator : Off √√
Quick Recording : Off √√
15 Sec
30 Sec
60 Sec
CM SKIP
Title ListDVD-Recorder
Title List √√Title List
Playlist
Disc Manager
Timer Rec.
Setup
DVD-RW(VR)
SetupDVD-Recorder
Title List
Playlist
Disc Manager
Timer Rec.
Setup
DVD-RW(VR)
System √√
Clock Set √√
Channel Set √√
Language √√
Audio √√
Video √√
Parental Control √√
RETURNENTERMOVE EXIT
RETURNENTERMOVE EXIT
RETURNENTERMOVE EXIT
RETURNENTERMOVE EXIT
RETURNENTERMOVE EXIT
01002A-R130-XAA-ENG-28-42 2006.1.23 6:0 PM Page 35
36 - English
Syst
em S
etup
EP Mode Time Setting
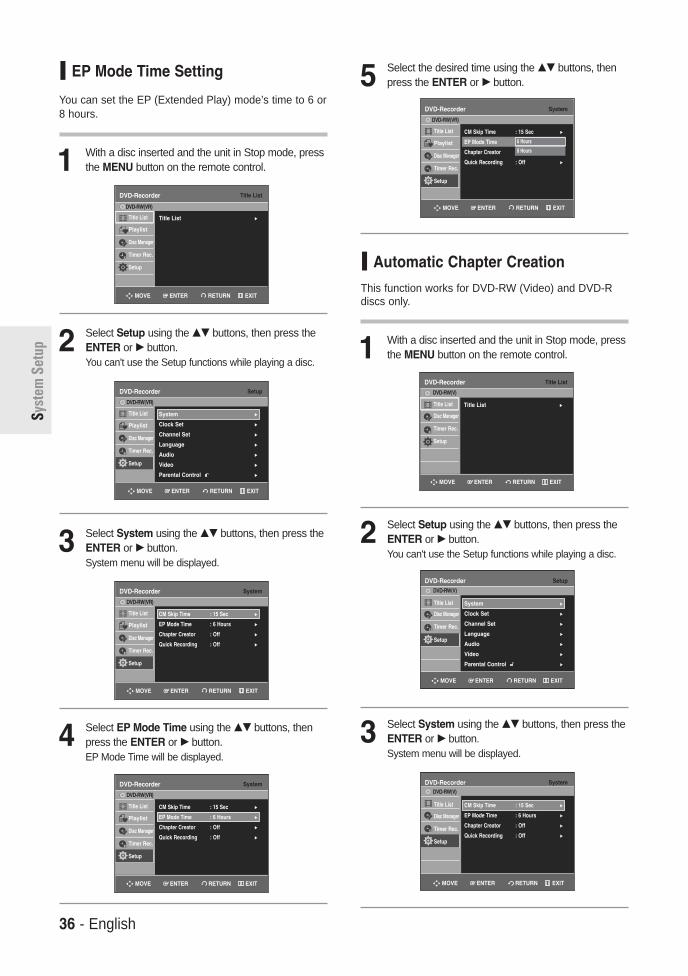
You can set the EP (Extended Play) mode’s time to 6 or8 hours.
1 With a disc inserted and the unit in Stop mode, pressthe MENU button on the remote control.
2 Select Setup using the …† buttons, then press theENTER or √ button.You can't use the Setup functions while playing a disc.
3 Select System using the …† buttons, then press theENTER or √ button.System menu will be displayed.
4 Select EP Mode Time using the …† buttons, thenpress the ENTER or √ button. EP Mode Time will be displayed.
Automatic Chapter Creation
This function works for DVD-RW (Video) and DVD-Rdiscs only.
1 With a disc inserted and the unit in Stop mode, pressthe MENU button on the remote control.
2 Select Setup using the …† buttons, then press theENTER or √ button.You can't use the Setup functions while playing a disc.
3 Select System using the …† buttons, then press theENTER or √ button.System menu will be displayed.
5 Select the desired time using the …† buttons, thenpress the ENTER or √ button.
SetupDVD-Recorder
Title List
Playlist
Disc Manager
Timer Rec.
Setup
DVD-RW(VR)
System √√
Clock Set √√
Channel Set √√
Language √√
Audio √√
Video √√
Parental Control √√
SystemDVD-Recorder
Title List
Playlist
Disc Manager
Timer Rec.
Setup
DVD-RW(VR)
CM Skip Time : 15 Sec √√
EP Mode Time : 6 Hours √√
Chapter Creator : Off √√
Quick Recording : Off √√
SystemDVD-Recorder
Title List
Playlist
Disc Manager
Timer Rec.
Setup
DVD-RW(VR)
CM Skip Time : 15 Sec √√
EP Mode Time : 6 Hours √√
Chapter Creator : Off √√
Quick Recording : Off √√
SetupDVD-Recorder
Title List
Disc Manager
Timer Rec.
Setup
DVD-RW(V)
System √√
Clock Set √√
Channel Set √√
Language √√
Audio √√
Video √√
Parental Control √√
SystemDVD-Recorder
Title List
Disc Manager
Timer Rec.
Setup
DVD-RW(V)
CM Skip Time : 15 Sec √√
EP Mode Time : 6 Hours √√
Chapter Creator : Off √√
Quick Recording : Off √√
SystemDVD-Recorder
Title List
Playlist
Disc Manager
Timer Rec.
Setup
DVD-RW(VR)
CM Skip Time : 15 Sec √√
EP Mode Time : 6 Hours √√
Chapter Creator : Off √√
Quick Recording : Off √√
6 Hours
8 Hours
Title ListDVD-Recorder
Title List √√Title List
Playlist
Disc Manager
Timer Rec.
Setup
DVD-RW(VR)
Title ListDVD-Recorder
Title List √√Title List
Disc Manager
Timer Rec.
Setup
DVD-RW(V)
RETURNENTERMOVE EXIT
RETURNENTERMOVE EXIT
RETURNENTERMOVE EXIT
RETURNENTERMOVE EXIT
RETURNENTERMOVE EXIT
RETURNENTERMOVE EXIT
RETURNENTERMOVE EXIT
RETURNENTERMOVE EXIT
01002A-R130-XAA-ENG-28-42 2006.1.23 6:1 PM Page 36
English - 37
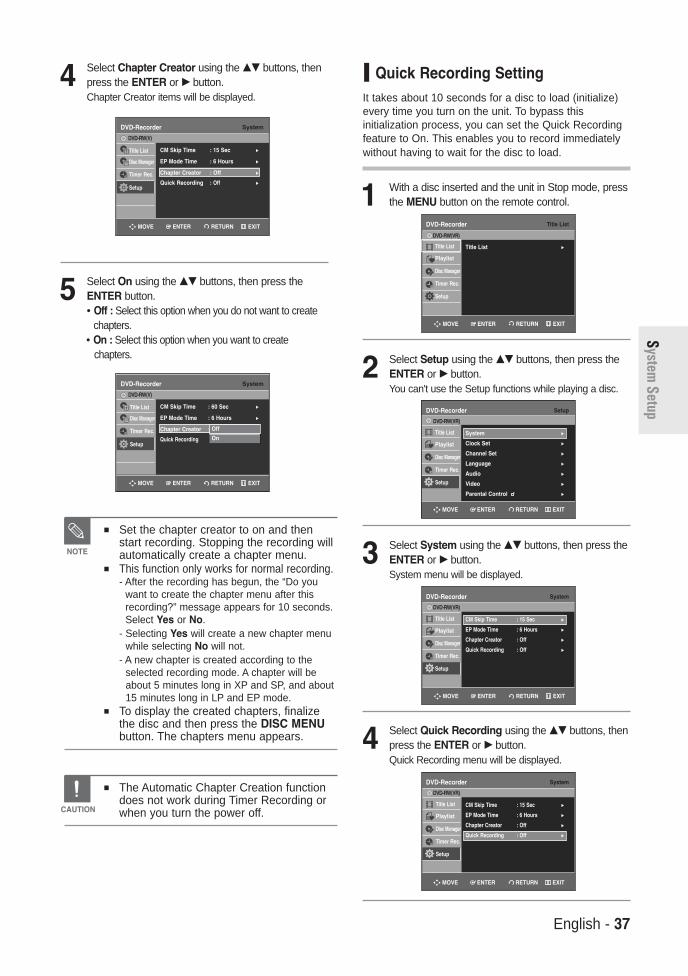
4 Select Chapter Creator using the …† buttons, thenpress the ENTER or √ button. Chapter Creator items will be displayed.
5 Select On using the …† buttons, then press theENTER button.• Off : Select this option when you do not want to create
chapters.• On : Select this option when you want to create
chapters.
Set the chapter creator to on and thenstart recording. Stopping the recording willautomatically create a chapter menu.
This function only works for normal recording.- After the recording has begun, the “Do you
want to create the chapter menu after thisrecording?” message appears for 10 seconds.Select Yes or No.
- Selecting Yes will create a new chapter menuwhile selecting No will not.
- A new chapter is created according to theselected recording mode. A chapter will beabout 5 minutes long in XP and SP, and about15 minutes long in LP and EP mode.
To display the created chapters, finalizethe disc and then press the DISC MENUbutton. The chapters menu appears.
NOTE
The Automatic Chapter Creation functiondoes not work during Timer Recording orwhen you turn the power off.CAUTION
Quick Recording SettingIt takes about 10 seconds for a disc to load (initialize)every time you turn on the unit. To bypass thisinitialization process, you can set the Quick Recordingfeature to On. This enables you to record immediatelywithout having to wait for the disc to load.
1 With a disc inserted and the unit in Stop mode, pressthe MENU button on the remote control.
2 Select Setup using the …† buttons, then press theENTER or √ button.You can't use the Setup functions while playing a disc.
3 Select System using the …† buttons, then press theENTER or √ button.System menu will be displayed.
4 Select Quick Recording using the …† buttons, thenpress the ENTER or √ button.Quick Recording menu will be displayed.
System Setup
Title ListDVD-Recorder
Title List √√Title List
Playlist
Disc Manager
Timer Rec.
Setup
SetupDVD-Recorder
Title List
Playlist
Disc Manager
Timer Rec.
Setup
DVD-RW(VR)
System √√
Clock Set √√
Channel Set √√
Language √√
Audio √√
Video √√
Parental Control √√
SystemDVD-Recorder
Title List
Playlist
Disc Manager
Timer Rec.
Setup
DVD-RW(VR)
CM Skip Time : 15 Sec √√
EP Mode Time : 6 Hours √√
Chapter Creator : Off √√
Quick Recording : Off √√
SystemDVD-Recorder
Title List
Playlist
Disc Manager
Timer Rec.
Setup
DVD-RW(VR)
CM Skip Time : 15 Sec √√
EP Mode Time : 6 Hours √√
Chapter Creator : Off √√
Quick Recording : Off √√
SystemDVD-Recorder
Title List
Disc Manager
Timer Rec.
Setup
DVD-RW(V)
DVD-RW(VR)
CM Skip Time : 15 Sec √√
EP Mode Time : 6 Hours √√
Chapter Creator : Off √√
Quick Recording : Off √√
SystemDVD-Recorder
Title List
Disc Manager
Timer Rec.
Setup
DVD-RW(V)
CM Skip Time : 60 Sec √√
EP Mode Time : 6 Hours √√
Chapter Creator : Off √√
Quick Recording : On √√
Off
On
RETURNENTERMOVE EXIT
RETURNENTERMOVE EXIT
RETURNENTERMOVE EXIT
RETURNENTERMOVE EXIT
RETURNENTERMOVE EXIT
RETURNENTERMOVE EXIT
01002A-R130-XAA-ENG-28-42 2006.1.23 6:1 PM Page 37

38 - English
Syst
em S
etup
3 Select Language using the …† buttons, then press theENTER or √ button.Language setup menu will be displayed.
4 Select the sub menu(Audio, Subtitle, Disc Menu, On-Screen Menu) and press the ENTER or √ buttonusing the …† buttons.• Audio : For the disc audio language.• Subtitle : For the disc subtitles.• Disc Menu : For the disc menu contained on the disc.• On-Screen Menu : For the unit menu of your DVD recorder.
5 Select the desired language using the …† buttons, thenpress the ENTER or √ button.
Press the RETURN or œ button to returnto the previous menu.Press the MENU button to exit the menu.
The selected language will only appear if itis supported on the disc.
NOTE
The Quick Recording is set to Off asdefault.NOTE
Language Setting
5 Select On using the …† buttons, then press theENTER or √ button.
If you set the On-Screen menu, Disc menu, Audio andSubtitle language in advance, they will come upautomatically every time you watch a movie.If the selected language is not recorded on the disc, theoriginal pre-recorded language is selected.
1 With the unit in Stop mode/No Disc mode, press theMENU button on the remote control.
2 Select Setup using the …† buttons, then press theENTER or √ button
System √√
Clock Set √√
Channel Set √√
Language √√
Audio √√
Video √√
Parental Control √√
SetupDVD-Recorder
No Disc
Timer Rec.
Setup
Audio : Original √√
Subtitle : Automatic √√
Disc Menu : English √√
On-Screen Menu : English √√
LanguageDVD-Recorder
No Disc
Timer Rec.
Setup
Audio : Original√√
Subtitle : Automatic √√
Disc Menu : English √√
On-Screen Menu : English √√
LanguageDVD-Recorder
No Disc
Timer Rec.
Setup
OriginalEnglishFrançaisDeutschEspañolItalianoNederlandsKorean
SystemDVD-Recorder
Title List
Playlist
Disc Manager
Timer Rec.
Setup
DVD-RW(VR)
CM Skip Time : 15 Sec √√
EP Mode Time : 6 Hours √√
Chapter Creator : Off √√
Quick Recording : On √√Off
On
Timer RecordDVD-Recorder
Timer Record √√
Scheduled Record List √√
No Disc
Timer Rec.
Setup
System √√
Clock Set √√
Channel Set √√
Language √√
Audio √√
Video √√
Parental Control √√
SetupDVD-Recorder
No Disc
Timer Rec.
Setup
RETURNENTERMOVE EXIT
RETURNENTERMOVE EXIT
RETURNENTERMOVE EXIT
RETURNENTERMOVE EXIT
RETURNENTERMOVE EXIT
RETURNENTERMOVE EXIT
01002A-R130-XAA-ENG-28-42 2006.1.23 6:1 PM Page 38

English - 39
4 Select the sub menu(TV Aspect,Input Level, Black Level, 3D Noise Reduction) using the …†
buttons, then press the ENTER or √ button.
TV Aspect: see page 34
Input Level: Adjusts the level of the input signal.
• Darker : If you feel the screen is too light and youwant to make the screen darker.
• Lighter : If you feel the screen is too dark and youwant to make the screen lighter.
Black Level: Adjusts the black level of the screen.
• 0 IRE : Select this when you want a darker screen.
• 7.5 IRE : Select this when you want a lighter screen.
Video (Display) Setting
This allows you to set up the TV screen settings.
1 With the unit in Stop mode/No Disc mode, press theMENU button on the remote control.
2 Select Setup using the …† buttons, then press theENTER or √ button.
3 Select Video using the …† buttons, then press theENTER or √ button.Video option menu will be displayed.
Black level function is not available in theprogressive scan mode.
NOTE
System Setup
SetupDVD-Recorder
No Disc
Timer Rec.
Setup
System √√
Clock Set √√
Channel Set √√
Language √√
Audio √√
Video √√
Parental Control √√
VideoDVD-Recorder
No Disc
Timer Rec.
Setup
TV Aspect : 16:9 Wide √√
Input Level : Darker √√
Black Level : 7.5 IRE √√
3D Noise Reduction : Off √√
System √√
Clock Set √√
Channel Set √√
Language √√
Audio √√
Video √√
Parental Control √√
SetupDVD-Recorder
No Disc
Timer Rec.
Setup
TV Aspect : 16:9 Wide √√
Input Level : Darker √√
Black Level : 7.5 IRE √√
3D Noise Reduction : Off √√
Darker
Lighter
TV Aspect : 16:9 Wide √√
Input Level : Darker √√
Black Level : 7.5 IRE √√
3D Noise Reduction : Off √√
0 IRE
7.5 IRE
VideoDVD-Recorder
No Disc
Timer Rec.
Setup
VideoDVD-Recorder
No Disc
Timer Rec.
Setup
Timer RecordDVD-Recorder
Timer Record √√
Scheduled Record List √√
No Disc
Timer Rec.
Setup
RETURNENTERMOVE EXIT
RETURNENTERMOVE EXIT
RETURNENTERMOVE EXIT
RETURNENTERMOVE EXIT
RETURNENTERMOVE EXIT
RETURNENTERMOVE EXIT
01002A-R130-XAA-ENG-28-42 2006.1.23 6:1 PM Page 39
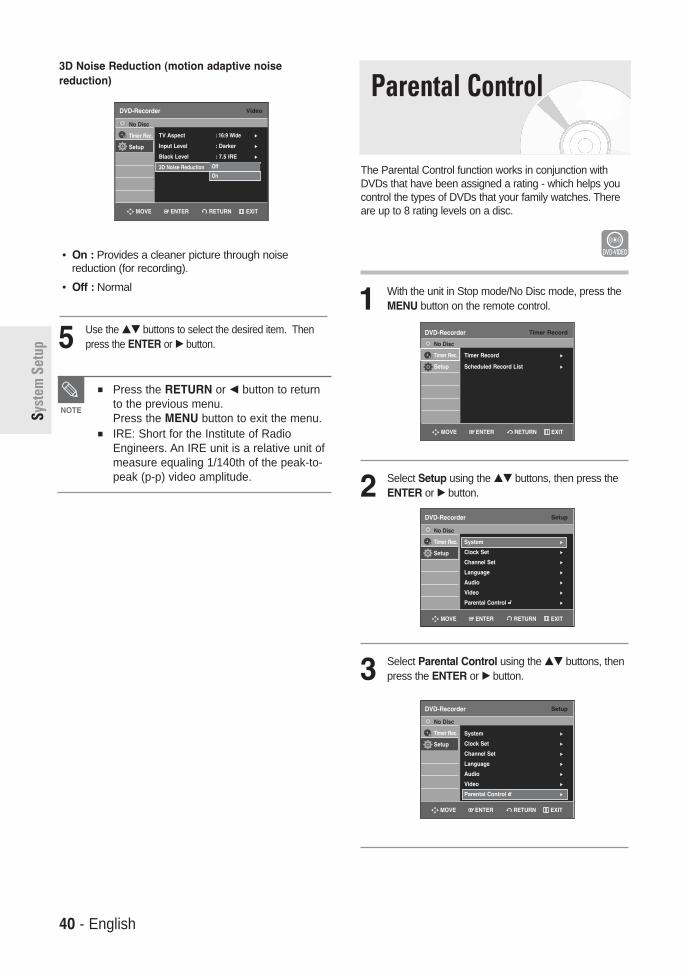
40 - English
Syst
em S
etup
3D Noise Reduction (motion adaptive noisereduction)
• On : Provides a cleaner picture through noisereduction (for recording).
• Off : Normal
5 Use the …† buttons to select the desired item. Thenpress the ENTER or √ button.
The Parental Control function works in conjunction withDVDs that have been assigned a rating - which helps youcontrol the types of DVDs that your family watches. Thereare up to 8 rating levels on a disc.
1 With the unit in Stop mode/No Disc mode, press theMENU button on the remote control.
2 Select Setup using the …† buttons, then press theENTER or √ button.
3 Select Parental Control using the …† buttons, thenpress the ENTER or √ button.
Press the RETURN or œ button to returnto the previous menu.Press the MENU button to exit the menu.
IRE: Short for the Institute of RadioEngineers. An IRE unit is a relative unit ofmeasure equaling 1/140th of the peak-to-peak (p-p) video amplitude.
NOTE
Parental Control
Timer RecordDVD-Recorder
Timer Record √√
Scheduled Record List √√
No Disc
Timer Rec.
Setup
System √√
Clock Set √√
Channel Set √√
Language √√
Audio √√
Video √√
Parental Control √√
SetupDVD-Recorder
No Disc
Timer Rec.
Setup
System √√
Clock Set √√
Channel Set √√
Language √√
Audio √√
Video √√
Parental Control √√
SetupDVD-Recorder
No Disc
Timer Rec.
Setup
TV Aspect : 16:9 Wide √√
Input Level : Darker √√
Black Level : 7.5 IRE √√
3D Noise Reduction : Off √√Off
On
VideoDVD-Recorder
No Disc
Timer Rec.
Setup
RETURNENTERMOVE EXIT
RETURNENTERMOVE EXIT
RETURNENTERMOVE EXIT
RETURNENTERMOVE EXIT
01002A-R130-XAA-ENG-28-42 2006.1.23 6:1 PM Page 40
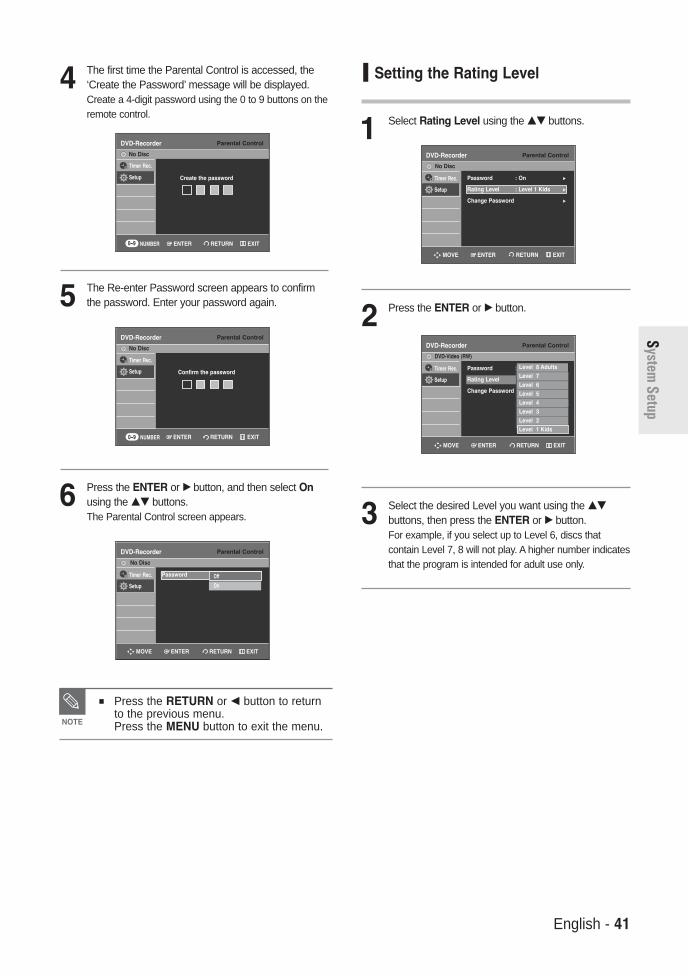
English - 41
4 The first time the Parental Control is accessed, the‘Create the Password’ message will be displayed.Create a 4-digit password using the 0 to 9 buttons on theremote control.
5 The Re-enter Password screen appears to confirmthe password. Enter your password again.
6 Press the ENTER or √ button, and then select Onusing the …† buttons.The Parental Control screen appears.
Setting the Rating Level
1 Select Rating Level using the …† buttons.
2 Press the ENTER or √ button.
3 Select the desired Level you want using the …†
buttons, then press the ENTER or √ button.For example, if you select up to Level 6, discs thatcontain Level 7, 8 will not play. A higher number indicatesthat the program is intended for adult use only.
Press the RETURN or œ button to returnto the previous menu.Press the MENU button to exit the menu.NOTE
System Setup
NUMBER
Parental ControlDVD-Recorder
Timer Rec.
Setup
No Disc
Create the password
NUMBER
Parental ControlDVD-Recorder
Timer Rec.
Setup
No Disc
Confirm the password
Parental ControlDVD-Recorder
Timer Rec.
Setup
No Disc
Password √√Off
On
Parental ControlDVD-Recorder
Timer Rec.
Setup
No Disc
Password : On √√
Rating Level : Level 1 Kids √√
Change Password √√
Parental ControlDVD-Recorder
Timer Rec.
Setup
DVD-Video (RW)
Password : On √√
Rating Level : Level 1 Kids √√
Change Password √√
Level 8 Adults
Level 7
Level 6
Level 5
Level 4
Level 3
Level 2
Level 1 Kids
0~9
0~9
RETURNENTER EXIT
RETURNENTERMOVE EXIT
RETURNENTER EXIT
RETURNENTERMOVE EXIT
RETURNENTERMOVE EXIT
01002A-R130-XAA-ENG-28-42 2006.1.23 6:1 PM Page 41
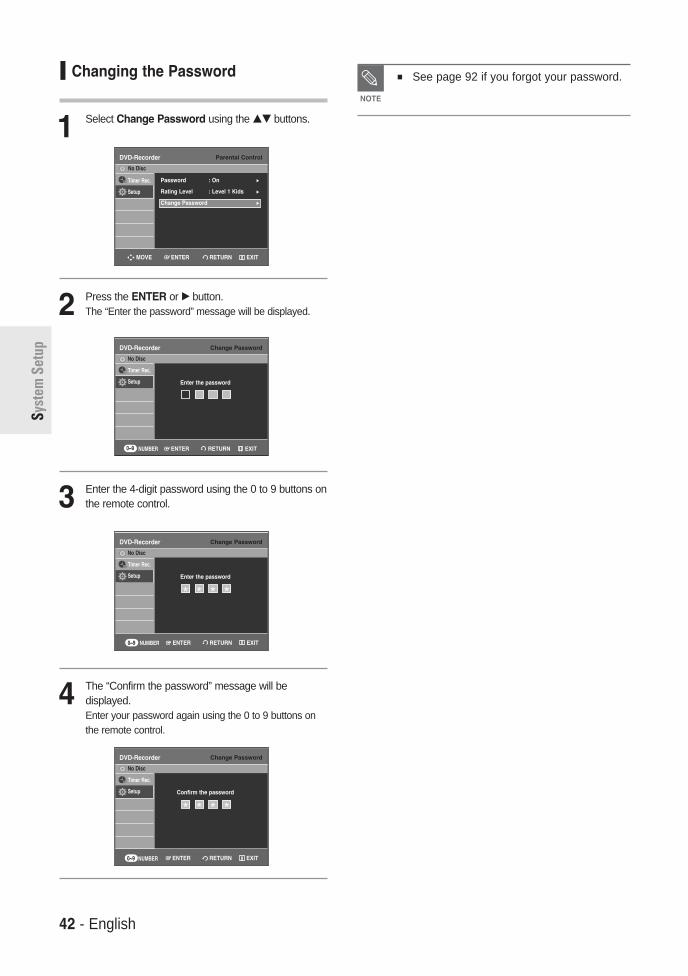
42 - English
Syst
em S
etup
Changing the Password
1 Select Change Password using the …† buttons.
2 Press the ENTER or √ button.The “Enter the password” message will be displayed.
3 Enter the 4-digit password using the 0 to 9 buttons onthe remote control.
4 The “Confirm the password” message will bedisplayed. Enter your password again using the 0 to 9 buttons onthe remote control.
See page 92 if you forgot your password.
NOTE
Parental ControlDVD-Recorder
Timer Rec.
Setup
No Disc
Password : On √√
Rating Level : Level 1 Kids √√
Change Password √√
NUMBER
Change PasswordDVD-Recorder
Timer Rec.
Setup
No Disc
Enter the password
NUMBER
Change PasswordDVD-Recorder
Timer Rec.
Setup
No Disc
Enter the password
* * * *
NUMBER
Change PasswordDVD-Recorder
Timer Rec.
Setup
No Disc
Confirm the password
* * * *
0~9
0~9
0~9
RETURNENTER EXIT
RETURNENTERMOVE EXIT
RETURNENTER EXIT
RETURNENTER EXIT
01002A-R130-XAA-ENG-28-42 2006.1.23 6:1 PM Page 42

English - 43
Recording
Recording
This section shows various DVD recordingmethods.
Before Recording
This unit can record on various types of discs. Beforerecording, read the following instructions and select thedisc type according to your preference.
Recordable discs
This recorder can record on the following discs.
• DVD-RWs are rewritable.• DVD-Rs are non-rewritable
Compatibility between Samsung and Other Companies'Recorders
Disc Types Recording Recording Device Finalizing Additional Recordingformat in Samsung Recorder
VR Mode
V Mode
V Mode
Samsung
Other Company
Samsung
Other Company
Samsung
Other Company
finalizednot finalized
finalized not finalized
finalizednot finalized
finalizednot finalized
finalizednot finalized
Not recordableRecordable
Not recordableRecordable
Not recordableNot recordableNot recordable
RecordableNot recordableNot recordable
Not recordableRecordable
finalizednot finalizedDVD-RW
DVD-R
DVD-RW DVD-R
Before Recording . . . . . . . . . . . . . . . . . . . . . . . . .43
Recording the current TV program
you are watching . . . . . . . . . . . . . . . . . . . . . . . . . .45
Recording from External Equipment . . . . . . . . . . .47
Copying from a Camcorder . . . . . . . . . . . . . . . . . .48
Making a One Touch Recording (OTR) . . . . . . . . .49
Setting a Timer Recording . . . . . . . . . . . . . . . . . . .50
Flexible Recording (for Timer Recording only) . . .51
Editing the Scheduled Record List . . . . . . . . . . . .51
Deleting the Scheduled Record List . . . . . . . . . . .52
Recording the Scheduled Record List . . . . . . . . . .53
Finalize- This closes the DVD-R/-RW and no
additional recording can be done. Unfinalize
- This allows additional recording on aDVD-RW disc originally recorded on theDVD-R130.
- A DVD-RW disc that has been recordedby DAO(Disc At once) in a PC cannot beunfinalized.
- A DVD-RW disc that has been recordedin Video Mode of another manufacturer'srecorder cannot be unfinalized.
- A DVD-R disc cannot be unfinalized.
NOTE
01002A-R130-XAA-ENG-43-52 2006.1.23 6:2 PM Page 43

44 - English
Reco
rdin
g
Recording Formats
Since available functions differ depending on the disctype, select a disc that best fits your preference; Whenyou insert an unused disc, the following messageappears.DVD-RW: When a blank disc is first inserted, the
message “Uninitialized Disc Do you want toinitialize this disc?” will appear. When “Yes” isselected, the disc will be formatted in VRMode.
If you want to format in either VR Mode or Video Mode, refer to Formatting a Disc on pages 85-86.
DVD-R : Formatting the DVD is unnecessary and only VideoMode Recording is supported
DVD-RW(Video mode)/-R
• Chapters will be created automatically when you finalizerecording on DVD-R / DVD-RW discs in Video mode.The chapter’s length (interval between chapters) variesaccording to the recording mode.
• Simple editing (erasing titles/changing title name)
DVD-RW(VR mode)
• This mode allows multiple editing functions (such asdeletion of the whole title, partial deletion of a title, etc.)
• Various editing options using a created Playlist
Record Mode
Select one of four record modes by pressing the RECMODE button repeatedly for the desired recording timeand picture quality while the unit is in Stop mode. In general, picture quality improves as the recordingtime decreases. In FR mode, the most suitable record mode is selectedautomatically according to the remaining time on thedisc and length of the timer recording set.
Unrecordable video
Video with copy protection cannot be recorded on thisDVD Recorder. When the DVD Recorder receives a copyguard signal while recording, recording stops and thefollowing message appears on the screen.
Concerning Copy Control SignalsTV broadcasts that contain copy control signals may haveone of the following three signal types, COPY-Free, Copy-Once and Copy-Never. If you want to record a copy-oncetype program, use DVD-RW with CPRM in VR Mode.
When a “Copy Once” recording has been made, recordingcannot be done anymore.
XP(high quality mode)
SP(standard quality mode)
LP(long recording mode)
EP(extended mode)
FR(Flexible Recording)
Select when the videoquality is important.
Select to record instandard quality.
Select when a longrecording time is required.
Select when a longerrecording time isrequired.
for timer recording onlysee page 51.
Approx. 1 hour about 8 Mbps
Approx. 2 hours about 4 Mbps
Approx. 4 hours about 2 Mbps
Approx. 6 hours/ about 1.2 Mbps Approx. 8 hours/about 0.8 MbpsApprox 60 to 480 MinApprox 0.8 to 8Mbps
Mode Characteristic Recording Times Data Rates
Media Copy-Free Copy-Once Copy-Never
DVD-RW(Ver.1.1) O - -
DVD-RW(Ver.1.1)
with CPRM
VR mode O O* -
Video mode O -
DVD-R O -
Signal type
NoYes
Uninitialized Disc
Do you want to initialize this disc?
You cannot record copy protected movie.
Disc ManagerDVD-Recorder
Title List
Playlist
Disc Manager
Timer Rec.
Setup
DVD-RW(VR)
Disc Name : √√
Disc Protection : Not Protected √√
Disc Format : DVD-VR √√
Disc Finalize √√
Delete All Title Lists √√
Choose the recording format for DVD-RW
DVD-VR DVD-V
RETURNENTERMOVE EXIT
01002A-R130-XAA-ENG-43-52 2006.1.23 6:2 PM Page 44

English - 45
Recording
Check that the disc has enough available space for therecording. Adjust the recording mode.
1 Press the OPEN/CLOSE button and place arecordable disc on the disc tray.
2 Press the OPEN/CLOSE button to close the disc tray.Wait until “LOAD” disappears from the front panel display.
DVD-RWIf an unused DVD-RW disc is inserted, you will beprompted to initialize first. Make your selection usingthe œ √ buttons, then press ENTER.(See page 44)
The INFO function allows you to view the current statusand progress of playback and recording. Depending onthe disc type and status, the displayed screen may bedifferent.
Checking the available disc space(Disc Information)
When recording on a used disc, make sure that there isenough disc space for recording. With DVD-RWs, youcan free up disc space by erasing titles.
• Press the INFO button.The disc information display window appears.Items in the display differ depending on the disc typeor the recording format.
! Disc Type@ Current information display status# Disc Name$ Total Title : Total number of titles% Total Playlist : Total number of Playlists^ Recordable Time : The longest continuous
recording time in each of the recordmodes(approximate)
& Date : Current date* Time : Current time
About the INFO button
Content Protection for Recordable Media (CPRM) CPRM is a mechanism that ties a recording to the media onwhich it is recorded. It is supported by some DVD recorders,but not by many DVD players. Each blank recordable DVDhas a unique 64-bit media ID etched in the BCA. Whenprotected content is recorded onto the disc, it can beencrypted with a 56-bit C2 (Cryptomeria) cipher derived fromthe media ID.During playback, the ID is read from the BCA and used togenerate a key to decrypt the contents of the disc. If the contents of the disc are copied to other media, the ID willbe absent or wrong and the data will not be decryptable.
Recording the current TVprogram you are watching
Before you start
DVD-RW(VR) Disc InfoDisc Name Disc
Total Title 1Total Playlist NoneRecordable Time 01: 12 XPProtection Not ProtectedScreen CH 11 [Mono]JAN 01 2006 SUN 12:00 AM
!#
$%^
& *
@
NoYes
Uninitialized Disc
Do you want to initialize this disc?
01002A-R130-XAA-ENG-43-52 2006.1.23 6:2 PM Page 45

46 - English
Reco
rdin
g
3 Press the CH ( / ) or number ( ~ ) buttonsto select the current program you want to record.
4 Press the REC MODE button repeatedly, (or press the
REC MODE button and then press the ……†† button) toselect the recording speed(quality).
SP LP EP XP
5 Press the REC button.Information concerning the channel is displayed on thescreen and then recording begins. Icon( ) is displayedon the front panel.
To view the current status of the disc and progress of recording :Press the INFO button, and the information about the disc willappear.
Press the INFO button once again to view information about therecording.
To stop recordingPress the STOP ( ) button to stop or finish arecording in progress.
• When using DVD-RW/DVD-R discs, the message‘Updating the information of disc. Please wait for amoment.’ is displayed.
To pause recordingPress the PLAY/PAUSE ( ) button to pauserecording in progress.
Press the PLAY/PAUSE ( ) button again to resumerecording.
You can not change the record mode andthe channel during recording.
Recording will stop automatically if there isno free space left for recording.
Up to 99 titles can be recorded onto adisc.
Recording will stop automatically if a copyprotected image is selected.
If you are using a Cable Box(no antenna),you cannot watch a different cable TVprogram from the one you're recording.
DVD-RW discs must be formatted beforestarting to record. Most new discs are soldunformatted.
Do not use DVD-R authoring discs withthis unit.
NOTE
Record Mode XP (01:11)
Recording : CH10 [Mono]
DVD-RW(VR) Disc InfoDisc Name Disc
Total Title 7Total Playlist NoneRecordable Time 01: 11 XPProtection Not ProtectedScreen Recording : CH 10 [Mono]JAN 01 2006 SUN 12:00 AM
DVD-RW(VR) Recording InfoName JAN/01/2006 12:00 AM
CH 10Recording Title 7Created Time JAN/01/2006 12:00 AMRecording Time 00:00:41JAN 01 2006 SUN 12:00 AM
01002A-R130-XAA-ENG-43-52 2006.1.23 6:2 PM Page 46

English - 47
Recording
Recording from ExternalEquipment
Check that the disc has enough available space for therecording. Adjust the record mode.
1 Press the OPEN/CLOSE button, and place arecordable disc on the disc tray.
2 Press the OPEN/CLOSE button to close the disc tray.Wait until “LOAD” disappears from the front paneldisplay. If an unused DVD-RW disc is inserted, the message“Uninitialized Disc Do you want to initialize this disc?” willappear (See page 44)
3 Press the INPUT SEL. button to select the inputsource according to the connection you made.The front panel display changes in the followingsequence:
Channel Number AV1 AV2 DV
If you’ve connected a digital camcorder, press theINPUT SEL. button to select DV. (See page 48)
4 Press the REC MODE button repeatedly, (or pressthe REC MODE button and then press the ……††button) to select the recording speed(quality).
SP LP EP XP
5 Press the REC button.
To stop recording
Press the STOP ( ) button to stop or finishrecording in progress.
• When using DVD-RW/DVD-R discs, the message‘Updating the information of disc. Please wait for amoment.’ is displayed.Before you start
You can not change the record mode andinput source during recording.
Recording will stop automatically if there isno free space left for recording.
Up to 99 titles can be recorded onto adisc.
Recording will stop automatically if a copyprotected image is selected.
DVD-RW discs must be formatted beforestarting to record. Most new discs are soldunformatted.
Do not use DVD-R authoring discs withthis unit.
NOTE
Record Mode XP (01:11)
01002A-R130-XAA-ENG-43-52 2006.1.23 6:2 PM Page 47

48 - English
Reco
rdin
g
Copying from a Camcorder
Check that the disc has enough available space for therecording. Adjust the record mode. See pages 25~26 tosee how to connect the camcorder to your DVD recorder.
1 Press the OPEN/CLOSE button, and place arecordable disc on the disc tray.
2 Press the OPEN/CLOSE button to close the disc tray.Wait until “LOAD” disappears from the front panel display. If an unused DVD-RW disc is inserted, whether toinitialize or not will be asked first. (See page 44)
3 Press the REC MODE button repeatedly (or pressthe REC MODE button and then press the ……††button) to select the recording speed(quality).
SP LP EP XP
4 Press the INPUT SEL. button to select DV.If the input is set to DV, a playback/record menu thatenables Digital camcorder control appears on the topof the screen.
You may control a Digital Camcorder using the IEEE1394(DV) interface.
5 Select the PLAY ( ) icon on the upper part of thescreen to playback the camcorder and find thestarting position to copy.
6 To start recording, select REC( ) icon in the top side
of the screen using the œ √ buttons, then press theENTER button.
To stop recording
Press the STOP ( ) button to stop or finishrecording in progress.
• When using DVD-RW/DVD-R discs, the message‘Updating the information of disc. Please wait fora moment’ is displayed.
Before you start
You can not change the record mode andinput source while recording.
Recording will stop automatically if there isno free space left for recording.
Up to 99 titles can be recorded onto adisc.
DVD-RW discs must be formatted beforestarting to record. Most new discs are soldunformatted.
Do not use DVD-R authoring discs withthis unit.
To access on-screen controls duringrecording, press the œ or √ buttons.
When copying from a camcorder and theend of the tape is reached (no Video), thescreen may turn blue or purple.
NOTE
√
Record Mode XP (01:11)
SELECTMOVE RETURN
DV
The DV device is connected
01002A-R130-XAA-ENG-43-52 2006.1.23 6:2 PM Page 48

English - 49
Recording
Making a One TouchRecording (OTR)
You can set the DVD Recorder to record in presetincrements by pressing the REC button repeatedly.
1 If you want to record a TV channel, use the CH( / )buttons or number buttons to select a desired channel.If you want to record from a connected externalcomponent, press the INPUT SEL. button to select anappropriate external input(AV1, AV 2 or DV).• CATV channels: 1 to 125• TV channels: 2 to 69
Example 1) Selecting Channel 120+ +
Example 2) Selecting Channel 9+
2 Press the REC button to start recording.
3 Press the REC button to adjust the recording time.
0:30 1:00 1:30 2:00 3:00 4:00off
To view the current status of the disc and the progress ofrecording : Press the INFO button, and information aboutthe disc will appear.
Press the INFO button once again. Then you can checkthe information about the title being recorded
To stop recording
Press the STOP ( ) button. The message “PressSTOP button once more to cancel Timer Record.” isdisplayed.
Press the STOP ( ) button again to stop recording.
The timer counter decreases to 0:00, thenthe DVD Recorder stops recording. After finishing recording, the DVDRecorder will be turned off automatically.
NOTE
Press STOP button once more
to cancel Timer Record.
DVD-RW(VR) Disc InfoDisc Name Disc
Total Title 7Total Playlist NoneRecordable Time 01: 11 XPProtection Not ProtectedScreen Recording : CH 10 [Mono]JAN 01 2006 SUN 12:00 AM
DVD-RW(VR) Recording InfoName JAN/01/2006 12:00 AM
CH 10Recording Title 7Created Time JAN/01/2006 12:00 AMRecording Time 00:00:41 JAN 01 2006 SUN 12:00 AM
01002A-R130-XAA-ENG-43-52 2006.1.23 6:2 PM Page 49

50 - English
Reco
rdin
g
1 Press the OPEN/CLOSE button, and place arecordable disc on the disc tray.
2 Press the OPEN/CLOSE button to close the disctray.Wait until “LOAD” disappears from the front paneldisplay.If an unused DVD-RW disc is inserted, whether toinitialize or not will be asked first. (See page 44.)
3 Press the MENU button in Stop mode.You can also set a timer recording via the TIMER button.
4 Press the ……†† buttons to select Timer Rec., andthen press the ENTER or √ button.
5 Press the ……†† buttons to select Timer Record,and then press the ENTER or √ button.The Timer Record Input items are displayed.
6 Fill in the items using the ……††œ √ buttons. œ √ : Moves to the previous/next item,……†† 0~9 : Sets a value.
Setting a Timer Recording
You need to set the Clock (Setup – Clock Set) beforeproceeding with a timer recording. (See page 29)
• Source: Select the video input source (AV 1, AV 2) or thebroadcasting channel you want to make a timer recordingof. When selecting channels to be recorded, the …† buttonson the remote control can let you select only the channelsthat have been memorized during Auto Channel Memory.For the selection of other channels, use the number buttons.
• Date: Date that the timer recording starts
01/01 MON-FRI01/02 Every SAT
01/30 Every SUN01/31
• Start/End Time: Start and end time of the timerrecording
• Mode (Record mode)XP : Approx. 1 hourSP : Approx. 2 hoursLP : Approx. 4 hoursEP : Approx. 6 hours or 8 hours.FR : See page 51.
7 Press the ENTER button.
• ( ) and Timer Set will appear on the front paneldisplay. This means that a timer recording is set.
• Recording is automatically performed when the set timeis reached.
When you are recording at EP mode on aDVD-RW(V)/-R disc, it may not record the full 6or 8 hours because the unit uses theVBR(Variable Bit Rate) ENCODING system. For example, if you record a Program with a lotof action, it uses a higher bit rate which in turnconsumes more disc memory.
NOTE
If the timer settings overlapThe programs are recorded in order of priority.If timer recording is set for the first programand then again for the second program andboth programs overlap, the following messagewill appear on the screen: ‘This setting isidentical with 1.’ The message shows that thefirst program has priority.After recording of the first program is complete,the second program starts being recorded.
To exit without saving the current settingPress the MENU or TIMER button.
To return to the previous menuPress the RETURN button if you don't want toset a timer recording.
NOTE
Timer RecordDVD-Recorder
Title List
Playlist
Disc Manager
Timer Rec.
Setup
DVD-RW(VR)
Scheduled Record ListDVD-Recorder
DVD-RW(VR) Current Time 12:03 AM
No. Source Date Start End Mode Edit
Source Date Start End Mode
No. 01
Recordable Time : 01:59 SP
CH 11 01/01 12:03 AM 02:03 AM SP
Recordable Time : 01:59 SP
Timer Record √√
Scheduled Record List √√
Scheduled Record ListDVD-Recorder
DVD-RW (RW) Current Time 12:03 AM
No. Source Date Start End Mode Edit
01 CH 11 01/ 01 05:00 AM 07:00 AM SP √√
02 / : : √√
Recordable Time : 01:59 SP
RETURNENTERMOVE EXIT
RETURNENTERMOVE EXIT
RETURNENTERMOVE EXIT
01002A-R130-XAA-ENG-43-52 2006.1.23 6:57 PM Page 50

English - 51
Recording
3 Press the ……†† buttons to select ScheduledRecord List, and then press the ENTER or √button.
4 Press the ……†† buttons to select the number of theScheduled Record List you want to edit, and thenpress the ENTER or √ button.The Edit and Delete items are displayed.
5 Press the ……†† buttons to select Edit, and thenpress the ENTER or √ button.The Timer Record Input item is displayed.
Edit the items you want to modify. See the TimerRecord section for more information on Timer RecordInput items. (See page 50.)
6 Move through the items with the œ √ buttons andchange the settings with …† or number buttonsand press the ENTER button.
7 Press the MENU button after the operation isfinished. The menu screen will disappear.
The timer recording time may differ from theset time depending on the disc and theoverall timer recording status (for example,recording times overlapping, or when theprevious recording ends within 3 minutes ofthe start of the next recording.)
will start blinking if Timer Recording is notready to start.
NOTE
In FR mode, the most suitable record mode is selectedautomatically, according to remaining time on the discand length of the timer recording set.
The FR mode recording setup is the same as TimerRecording setup. When setting the mode in step 6,select FR Mode.(See page 50.)
Flexible Recording (forTimer Recording only)
You can change timer record settings using thescheduled record list menu.
1 Press the MENU button in STOP mode.
2 Press the ……†† buttons to select Timer Rec., andthen press the ENTER or √ button.
Editing the ScheduledRecord List
Timer RecordDVD-Recorder
Title List
Playlist
Disc Manager
Timer Rec.
Setup
DVD-RW(VR)
Timer Record √√
Scheduled Record List √√
Scheduled Record ListDVD-Recorder
DVD-RW(VR) Current Time 12:08 AM
No. Source Date Start End Mode Edit
Source Date Start End Mode
No. 01
Recordable Time: 01:59 SP
CH 11 01/01 05:00 AM 07:00 AM SP
Recordable Time : 01:59 SP
RETURNENTERMOVE EXIT
RETURNENTERMOVE EXIT
Scheduled Record ListDVD-Recorder
DVD-RW (RW) Current Time 12:03 AM
No. Source Date Start End Mode Edit
01 CH 11 01/ 01 05:00 AM 07:00 AM SP √√
02 CH 7 01/03 12:06 AM 02:06 AM SP √√
03 / : : √√
Recordable Time : 01:59 SP
RETURNENTERMOVE EXIT
Scheduled Record ListDVD-Recorder
DVD-RW (RW) Current Time 12:03 AM
No. Source Date Start End Mode Edit
01 CH 11 01/ 01 05:00 AM 07:00 AM SP √√
02 CH 7 01/03 12:06 AM 02:06 AM SP √√
03 / : : √√
Recordable Time : 01:59 SP
RETURNENTERMOVE EXIT
Edit
Delete
01002A-R130-XAA-ENG-43-52 2006.1.23 7:2 PM Page 51
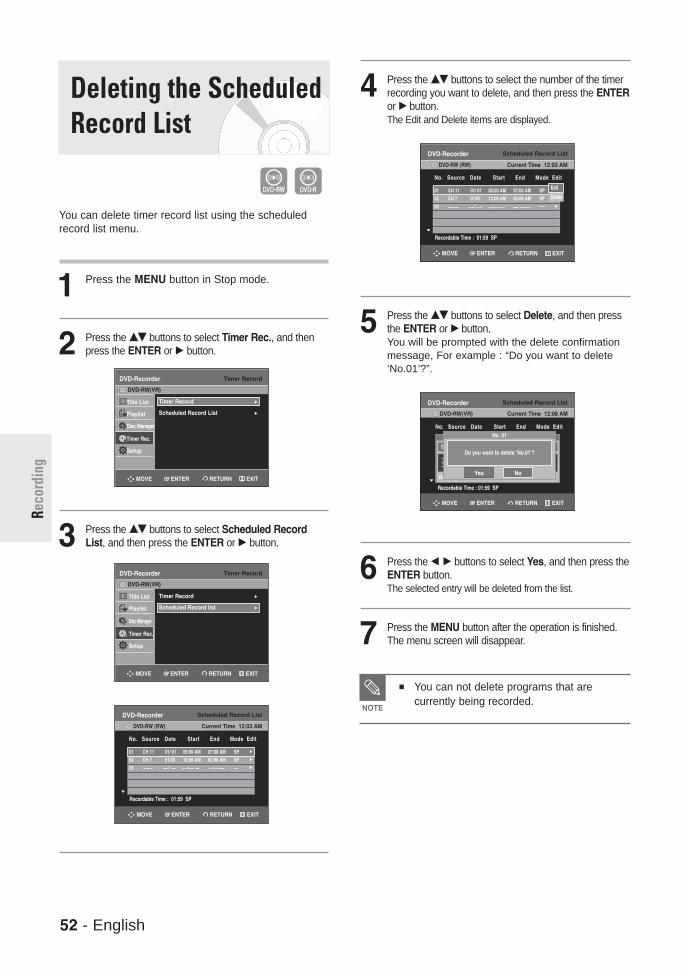
52 - English
Reco
rdin
g
You can delete timer record list using the scheduledrecord list menu.
1 Press the MENU button in Stop mode.
2 Press the ……†† buttons to select Timer Rec., and thenpress the ENTER or √ button.
3 Press the ……†† buttons to select Scheduled RecordList, and then press the ENTER or √ button.
Deleting the ScheduledRecord List
4 Press the ……†† buttons to select the number of the timerrecording you want to delete, and then press the ENTERor √ button.The Edit and Delete items are displayed.
5 Press the ……†† buttons to select Delete, and then pressthe ENTER or √ button.You will be prompted with the delete confirmationmessage, For example : “Do you want to delete‘No.01’?”.
6 Press the œ √ buttons to select Yes, and then press theENTER button.The selected entry will be deleted from the list.
7 Press the MENU button after the operation is finished.The menu screen will disappear.
You can not delete programs that arecurrently being recorded.
NOTE
Timer RecordDVD-Recorder
Title List
Playlist
Disc Manager
Timer Rec.
Setup
DVD-RW(VR)
Timer RecordDVD-Recorder
Title List
Playlist
Disc Manager
Timer Rec.
Setup
DVD-RW(VR)
Timer Record √√
Scheduled Record list √√
Timer Record √√
Scheduled Record List √√
Scheduled Record ListDVD-Recorder
DVD-RW(VR) Current Time 12:08 AM
No. Source Date Start End Mode Edit
Source Date Start End Mode
No. 01
Recordable Time: 01:59 SP
CH 11 01/01 05:00 AM 07:00 AM SP
Recordable Time : 01:59 SP
Do you want to delete ‘No.01’?
No. 01
Yes NoRETURNENTERMOVE EXIT
RETURNENTERMOVE EXIT
RETURNENTERMOVE EXIT
Scheduled Record ListDVD-Recorder
DVD-RW (RW) Current Time 12:03 AM
No. Source Date Start End Mode Edit
01 CH 11 01/ 01 05:00 AM 07:00 AM SP √√
02 CH 7 01/03 12:06 AM 02:06 AM SP √√
03 / : : √√
Recordable Time : 01:59 SP
RETURNENTERMOVE EXIT
Scheduled Record ListDVD-Recorder
DVD-RW (RW) Current Time 12:03 AM
No. Source Date Start End Mode Edit
01 CH 11 01/ 01 05:00 AM 07:00 AM SP √√
02 CH 7 01/03 12:06 AM 02:06 AM SP √√
03 / : : √√
Recordable Time : 01:59 SP
RETURNENTERMOVE EXIT
Edit
Delete
01002A-R130-XAA-ENG-43-52 2006.1.23 7:2 PM Page 52

English - 53
Recording
Recording theScheduled Record List
When the start time in the Scheduled Record List isreached while the unit is powered off, the unit willautomatically power on and start recording.
1 When the scheduled recording is operating, theprogram being recorded will not display on TV.
• Power on TV using the TV remote control.• Power off TV using the TV remote control if you don’t
want to see the program being recorded.
To stop recording
Press the STOP ( ) button. The message “PressSTOP button once more to cancel Timer Record.” isdisplayed.
Press the STOP ( ) button again to stop recording.
If a copy protection signal is received duringrecording, recording will stop.
If there is no free disc space or the disc isnot recordable, recording will not operate.(You can record after replacing the disc.)
NOTE
Press STOP button once more
to cancel Timer Record.
You cannot record copy protected movie.
01002A-R130-XAA-ENG-43-52 2006.1.23 6:2 PM Page 53
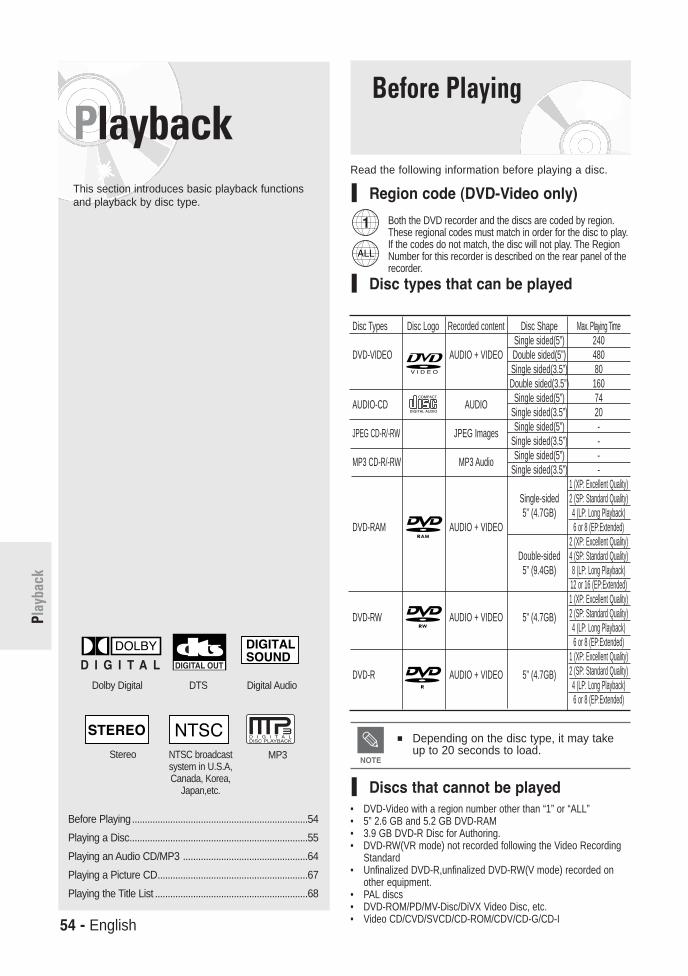
54 - English
Play
back
PlaybackThis section introduces basic playback functionsand playback by disc type.
Before Playing
Read the following information before playing a disc.
Region code (DVD-Video only)
Both the DVD recorder and the discs are coded by region.These regional codes must match in order for the disc to play.If the codes do not match, the disc will not play. The RegionNumber for this recorder is described on the rear panel of therecorder.
Disc types that can be played
Discs that cannot be played• DVD-Video with a region number other than “1” or “ALL”• 5” 2.6 GB and 5.2 GB DVD-RAM• 3.9 GB DVD-R Disc for Authoring.• DVD-RW(VR mode) not recorded following the Video Recording
Standard• Unfinalized DVD-R,unfinalized DVD-RW(V mode) recorded on
other equipment.• PAL discs• DVD-ROM/PD/MV-Disc/DiVX Video Disc, etc.• Video CD/CVD/SVCD/CD-ROM/CDV/CD-G/CD-I
DIGITAL OUTD I G I T A L
Dolby Digital DTS Digital Audio
Stereo MP3NTSC broadcastsystem in U.S.A,Canada, Korea,
Japan,etc.
Before Playing.....................................................................54
Playing a Disc......................................................................55
Playing an Audio CD/MP3 .................................................64
Playing a Picture CD...........................................................67
Playing the Title List ............................................................68
Disc Types Disc Logo Recorded content Disc Shape Max. Playing TimeSingle sided(5”) 240
DVD-VIDEO AUDIO + VIDEO Double sided(5”) 480Single sided(3.5”) 80Double sided(3.5”) 160
AUDIO-CD AUDIO Single sided(5”) 74Single sided(3.5”) 20
JPEG CD-R/-RW JPEG Images Single sided(5”) -Single sided(3.5”) -
MP3 CD-R/-RW MP3 Audio Single sided(5”) -Single sided(3.5”) -
1 (XP: Excellent Quality)Single-sided 2 (SP: Standard Quality)5” (4.7GB) 4 (LP: Long Playback)
DVD-RAM AUDIO + VIDEO 6 or 8 (EP:Extended)2 (XP: Excellent Quality)
Double-sided 4 (SP: Standard Quality)5” (9.4GB) 8 (LP: Long Playback)
12 or 16 (EP:Extended)1 (XP: Excellent Quality)
DVD-RW AUDIO + VIDEO 5” (4.7GB) 2 (SP: Standard Quality)4 (LP: Long Playback)6 or 8 (EP:Extended)
1 (XP: Excellent Quality)
DVD-R AUDIO + VIDEO 5” (4.7GB) 2 (SP: Standard Quality)4 (LP: Long Playback)6 or 8 (EP:Extended)
Depending on the disc type, it may takeup to 20 seconds to load.
NOTE
01002A-R130-XAA-ENG-54-70 2006.1.23 6:4 PM Page 54
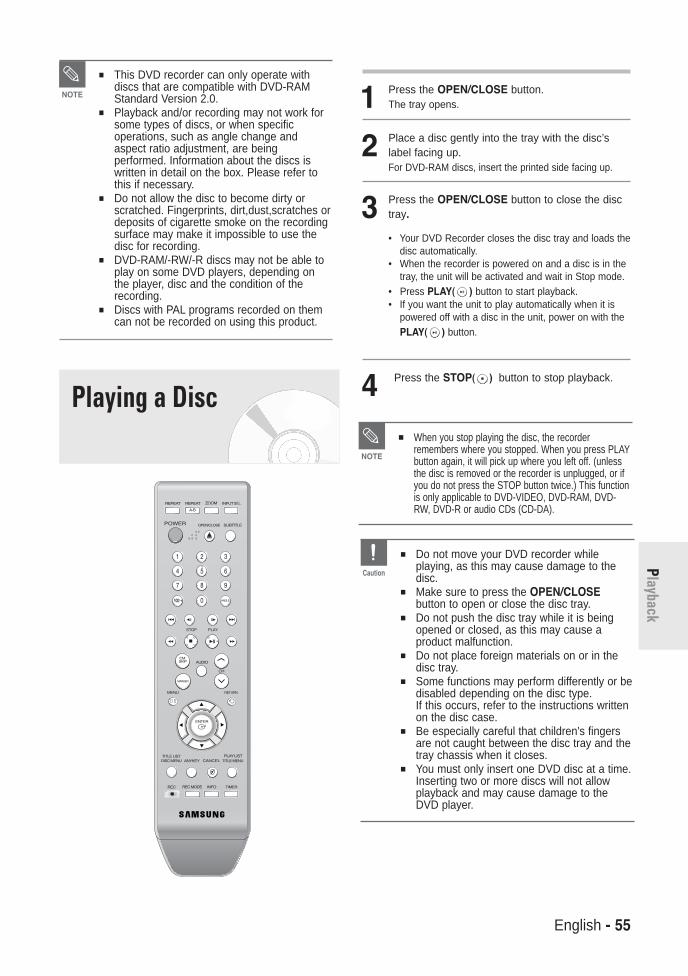
English - 55
Playback
1 Press the OPEN/CLOSE button.The tray opens.
2 Place a disc gently into the tray with the disc’slabel facing up.For DVD-RAM discs, insert the printed side facing up.
3 Press the OPEN/CLOSE button to close the disctray.
• Your DVD Recorder closes the disc tray and loads thedisc automatically.
• When the recorder is powered on and a disc is in thetray, the unit will be activated and wait in Stop mode.
• Press PLAY( ) button to start playback.• If you want the unit to play automatically when it is
powered off with a disc in the unit, power on with thePLAY( ) button.
4 Press the STOP( ) button to stop playback.
This DVD recorder can only operate withdiscs that are compatible with DVD-RAMStandard Version 2.0.
Playback and/or recording may not work forsome types of discs, or when specificoperations, such as angle change andaspect ratio adjustment, are beingperformed. Information about the discs iswritten in detail on the box. Please refer tothis if necessary.
Do not allow the disc to become dirty orscratched. Fingerprints, dirt,dust,scratches ordeposits of cigarette smoke on the recordingsurface may make it impossible to use thedisc for recording.
DVD-RAM/-RW/-R discs may not be able toplay on some DVD players, depending onthe player, disc and the condition of therecording.
Discs with PAL programs recorded on themcan not be recorded on using this product.
NOTE
When you stop playing the disc, the recorderremembers where you stopped. When you press PLAYbutton again, it will pick up where you left off. (unlessthe disc is removed or the recorder is unplugged, or ifyou do not press the STOP button twice.) This functionis only applicable to DVD-VIDEO, DVD-RAM, DVD-RW, DVD-R or audio CDs (CD-DA).
NOTE
Do not move your DVD recorder whileplaying, as this may cause damage to thedisc.
Make sure to press the OPEN/CLOSEbutton to open or close the disc tray.
Do not push the disc tray while it is beingopened or closed, as this may cause aproduct malfunction.
Do not place foreign materials on or in thedisc tray.
Some functions may perform differently or bedisabled depending on the disc type. If this occurs, refer to the instructions writtenon the disc case.
Be especially careful that children's fingersare not caught between the disc tray and thetray chassis when it closes.
You must only insert one DVD disc at a time.Inserting two or more discs will not allowplayback and may cause damage to theDVD player.
Caution
Playing a Disc
01002A-R130-XAA-ENG-54-70 2006.1.23 6:4 PM Page 55
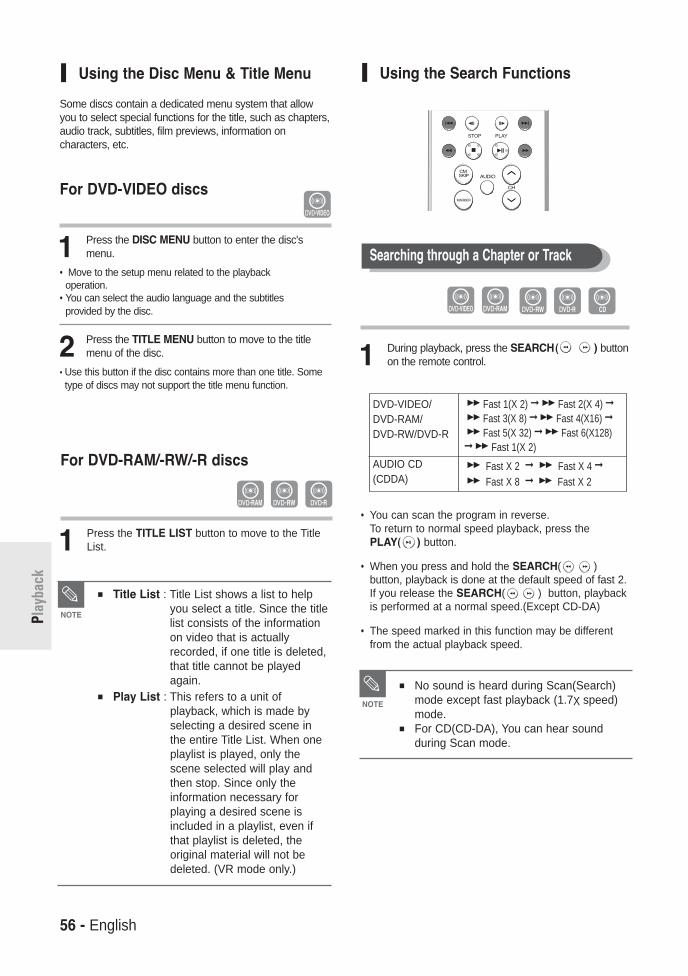
56 - English
Play
back
Using the Search Functions
1 During playback, press the SEARCH( ) buttonon the remote control.
• You can scan the program in reverse.To return to normal speed playback, press thePLAY( ) button.
• When you press and hold the SEARCH( )button, playback is done at the default speed of fast 2. If you release the SEARCH( ) button, playbackis performed at a normal speed.(Except CD-DA)
• The speed marked in this function may be differentfrom the actual playback speed.
Using the Disc Menu & Title Menu
For DVD-VIDEO discs
1 Press the DISC MENU button to enter the disc'smenu.
• Move to the setup menu related to the playback operation.
• You can select the audio language and the subtitlesprovided by the disc.
2 Press the TITLE MENU button to move to the titlemenu of the disc.
• Use this button if the disc contains more than one title. Sometype of discs may not support the title menu function.
Some discs contain a dedicated menu system that allowyou to select special functions for the title, such as chapters, audio track, subtitles, film previews, information on characters, etc.
DVD-VIDEO/DVD-RAM/DVD-RW/DVD-R
AUDIO CD(CDDA)
Fast 1(X 2) Fast 2(X 4)
Fast 3(X 8) Fast 4(X16)
Fast 5(X 32) Fast 6(X128) Fast 1(X 2)
Fast X 2 Fast X 4
Fast X 8 Fast X 2
No sound is heard during Scan(Search)mode except fast playback (1.7X speed) mode.
For CD(CD-DA), You can hear soundduring Scan mode.
NOTE
For DVD-RAM/-RW/-R discs
1 Press the TITLE LIST button to move to the TitleList.
Title List : Title List shows a list to helpyou select a title. Since the titlelist consists of the informationon video that is actuallyrecorded, if one title is deleted,that title cannot be playedagain.
Play List : This refers to a unit ofplayback, which is made byselecting a desired scene inthe entire Title List. When oneplaylist is played, only thescene selected will play andthen stop. Since only theinformation necessary forplaying a desired scene isincluded in a playlist, even ifthat playlist is deleted, theoriginal material will not bedeleted. (VR mode only.)
NOTE
Searching through a Chapter or Track
01002A-R130-XAA-ENG-54-70 2006.1.23 6:4 PM Page 56

English - 57
Playback
Slow Motion Play
1 In Pause mode, press the SEARCH ( ) button onthe remote control.
• If you press the SEARCH( ) button,
Slow 1(1/2) Slow 2(1/4) Slow 3(1/8)
• If you press the SEARCH( ) button,
Slow 1(1/2) Slow 2(1/4) Slow 3(1/8)
• To return to normal speed playback, press the
PLAY( ) button.
Press and hold the SEARCH( ) button during pause,and the disc will play slowly at a 1/2 speed. If the buttonis released, the pause operation will resume.
• During playback, you can search quicklythrough a chapter or track.
1 During playback, press the SKIP( ) button onthe remote control.
• If you press the SKIP( ) button,
it moves to the beginning of the chapter or track or
marker(DVD-RW(VR mode)).
Pressing the button once again within 3 seconds
returns to the beginning of the previous chapter or
track or marker(DVD-RW(VR mode)).
• If you press the SKIP( ) button,
it moves to the next chapter or title or marker(DVD-
RW(VR mode)).
Step Motion Play
1 Press the STEP( ) button on the remotecontrol in the still mode.
• Each time the button is pressed, a new frame will appear.
When STEP( ) is pressed, the previous frame will be activated.
When STEP( ) is pressed, the next frame will be activated.
• To return to normal speed playback, press the PLAY( ) button.
The speed marked in this function may bedifferent from the actual playback speed. NOTE
Searching Chapters or Tracks About ANYKEY
The ANYKEY function allows you to easily search for adesired scene by accessing title, chapter, track, andtime. You can also change the subtitle and audiosettings and set some features including Repeat, Angle,and Zoom.
• If you want to move to a title or chapter to finda desired scene.
1 Press the ANYKEY button during playback.
2 Press the …† buttons to select the Title or Chapter.
3 Press the œ √ buttons or number (0~9) buttonsto select the desired scene and then press theENTER button.
Moving to a scene directly using the ANYKEY
DVD-Video
Title
Chapter
Time
Subtitle
Audio
Repeat
Angle
Zoom
1/2
1/20
00:00:00
Off
ENG D 2CH
Off
1/3
Off
MOVE CHANGE
DVD-Video
Title
Chapter
Time
Subtitle
Audio
Repeat
Angle
Zoom
1/2
1/20
00:00:00
Off
ENG D 2CH
Off
1/3
Off
MOVE CHANGE
01002A-R130-XAA-ENG-54-70 2006.1.23 6:4 PM Page 57
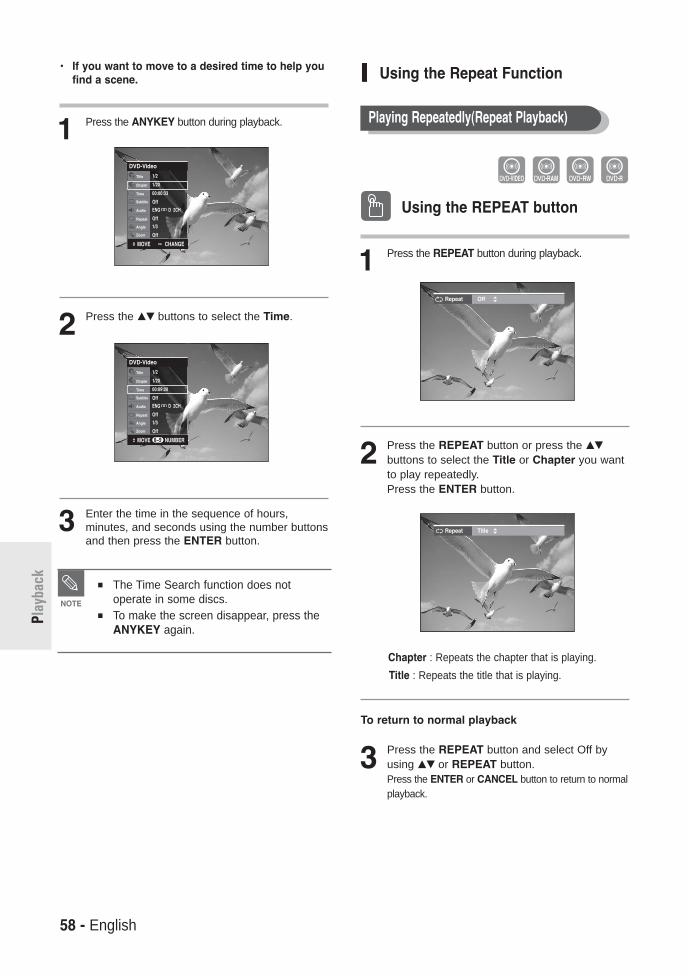
58 - English
Play
back
• If you want to move to a desired time to help youfind a scene.
1 Press the ANYKEY button during playback.
2 Press the …† buttons to select the Time.
3 Enter the time in the sequence of hours,minutes, and seconds using the number buttonsand then press the ENTER button.
The Time Search function does notoperate in some discs.
To make the screen disappear, press theANYKEY again.
NOTE
Using the Repeat Function
Using the REPEAT button
1 Press the REPEAT button during playback.
2 Press the REPEAT button or press the …†
buttons to select the Title or Chapter you wantto play repeatedly.Press the ENTER button.
Chapter : Repeats the chapter that is playing.
Title : Repeats the title that is playing.
To return to normal playback
3 Press the REPEAT button and select Off byusing …† or REPEAT button.Press the ENTER or CANCEL button to return to normalplayback.
Playing Repeatedly(Repeat Playback)
DVD-Video
Title
Chapter
Time
Subtitle
Audio
Repeat
Angle
Zoom
1/2
1/20
00:00:33
Off
ENG D 2CH
Off
1/3
Off
MOVE CHANGE
DVD-Video
Title
Chapter
Time
Subtitle
Audio
Repeat
Angle
Zoom
1/2
1/20
00:09:20
Off
ENG D 2CH
Off
1/3
Off
MOVE NUMBER0~9
Repeat Title
Repeat Off
01002A-R130-XAA-ENG-54-70 2006.1.23 6:4 PM Page 58

English - 59
Playback
Using the ANYKEY button
1 Press the ANYKEY button during playback.
2 Press the …† buttons to select Repeat andpress the √ button to select A-B.
3 Press the ENTER button.
4 Press the ENTER button at the point where youwant the repeat play to start (A) and press itagain at the point where you want the repeatplay to stop (B).Repeat playback of the A-B section starts.
If you set point (B) before five secondshas lapsed, the prohibition mark ( ) willappear.
You can also activate Normal Playback bypressing the CANCEL button.
Audio CDs(CD-DA) and MP3 discs do notsupport the Repeat A-B function.
NOTE
Playing a Certain section Repeatedly(A-B Repeat Playback)Using the ANYKEY button
1 Press the ANYKEY button during playback.
2 Press the …† buttons to select Repeat andpress the œ √ buttons to select the Title orChapter you want to play repeatedly.
3 Press the ENTER button.To make the menu screen disappear, press the ANYKEY or RETURN button.
DVD-RAM, DVD-RW(VR mode),unfinalized DVD-R and unfinalized DVD-RW (Video mode) do not repeat a chapter.
NOTE
DVD-Video
Title
Chapter
Time
Subtitle
Audio
Repeat
Angle
Zoom
1/2
1/20
00:01:05
Off
ENG D 2CH
Title
1/3
Off
MOVE SELECT
DVD-Video
Title
Chapter
Time
Subtitle
Audio
Repeat
Angle
Zoom
1/2
1/20
00:00:33
Off
ENG D 2CH
Off
1/3
Off
MOVE CHANGE
DVD-Video
Title
Chapter
Time
Subtitle
Audio
Repeat
Angle
Zoom
1/2
1/20
00:01:05
Off
ENG D 2CH
A-B
1/3
Off
MOVE SELECT
DVD-Video
Title
Chapter
Time
Subtitle
Audio
Repeat
Angle
Zoom
1/2
1/20
00:00:33
Off
ENG D 2CH
Off
1/3
Off
MOVE CHANGE
01002A-R130-XAA-ENG-54-70 2006.1.23 6:4 PM Page 59

60 - English
Play
back
Selecting the SubtitleSubtitle languages may not work depending on thedisc type. This is only available during playback.
Using the SUBTITLE button
1 Press the SUBTITLE button during playback.
2 Press the SUBTITLE button or …† buttons toselect the desired subtitle language.To make the menu screen disappear, press theCANCEL or RETURN button.
Using the ANYKEY button
1 Press the ANYKEY button during playback.
2 Press the …† buttons to select Subtitle andpress the œ √ buttons to select the desiredsubtitle language.
The subtitle display may be different dependingon the disc type.
If the subtitles overlap, disable the captionfunction on your TV.
Some discs allow you to select the language forthe disc menu only.
NOTE
(VR mode)
Selecting the Audio language
Audio languages may not work depending on the disctype. This is only available during playback.
Using the AUDIO button
1 Press the AUDIO button during playback.
2 Press the AUDIO button or …† buttons toselect the desired audio language.
Using the ANYKEY button
1 Press the ANYKEY button during playback.
2 Press the ……†† buttons to select Audio andpress the œœ √√ buttons to select the desiredaudio language.
(VR mode)
Subtitle Off
DVD-Video
Title
Chapter
Time
Subtitle
Audio
Repeat
Angle
Zoom
1/2
1/20
00:00:10
Off
ENG D 2CH
Off
1/3
Off
MOVE CHANGE
DVD-Video
Title
Chapter
Time
Subtitle
Audio
Repeat
Angle
Zoom
1/2
1/20
00:00:33
Off
ENG D 2CH
Off
1/3
Off
MOVE CHANGE
DVD-Video
Title
Chapter
Time
Subtitle
Audio
Repeat
Angle
Zoom
1/2
1/20
00:00:10
Off
ENG D 2CH
Off
1/3
Off
MOVE CHANGE
DVD-Video
Title
Chapter
Time
Subtitle
Audio
Repeat
Angle
Zoom
1/2
1/20
00:00:33
Off
ENG D 2CH
Off
1/3
Off
MOVE CHANGE
Audio ENG Dolby Digital 2CH
01002A-R130-XAA-ENG-54-70 2006.1.23 6:4 PM Page 60
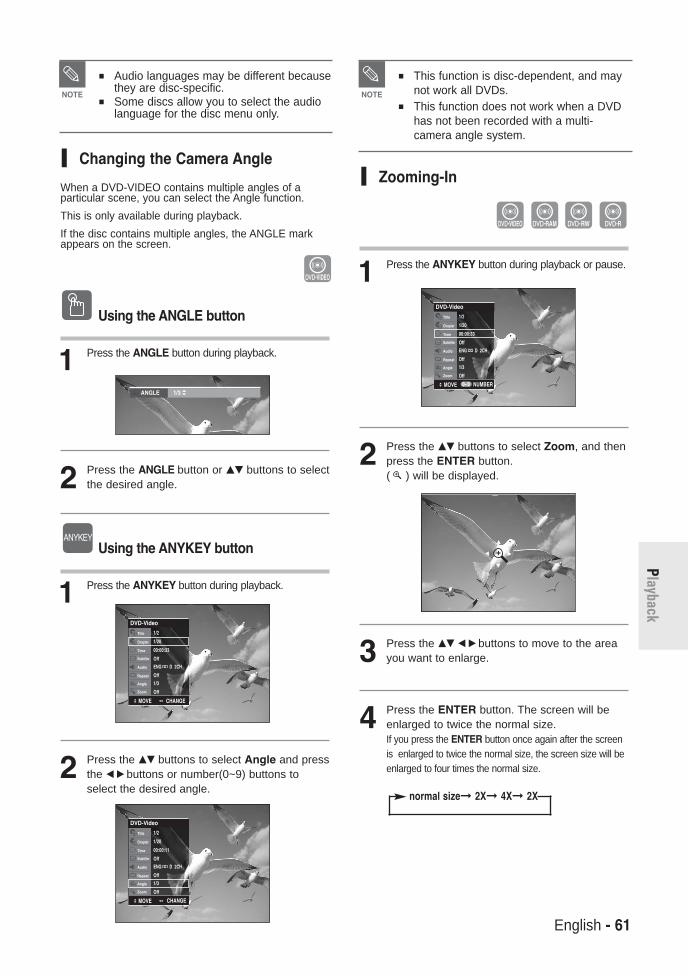
English - 61
Playback
Zooming-In
1 Press the ANYKEY button during playback or pause.
2 Press the …† buttons to select Zoom, and thenpress the ENTER button. ( ) will be displayed.
3 Press the …† œ √ buttons to move to the areayou want to enlarge.
4 Press the ENTER button. The screen will beenlarged to twice the normal size.If you press the ENTER button once again after the screenis enlarged to twice the normal size, the screen size will beenlarged to four times the normal size.
normal size 2X 4X 2X
Changing the Camera Angle
When a DVD-VIDEO contains multiple angles of aparticular scene, you can select the Angle function.
This is only available during playback.
If the disc contains multiple angles, the ANGLE markappears on the screen.
Using the ANGLE button
1 Press the ANGLE button during playback.
2 Press the ANGLE button or …† buttons to selectthe desired angle.
Using the ANYKEY button
1 Press the ANYKEY button during playback.
2 Press the …† buttons to select Angle and pressthe œ √ buttons or number(0~9) buttons toselect the desired angle.
Audio languages may be different becausethey are disc-specific.
Some discs allow you to select the audiolanguage for the disc menu only.
NOTE
This function is disc-dependent, and maynot work all DVDs.
This function does not work when a DVDhas not been recorded with a multi-camera angle system.
NOTE
DVD-Video
Title
Chapter
Time
Subtitle
Audio
Repeat
Angle
Zoom
1/2
1/20
00:00:11
Off
ENG D 2CH
Off
1/3
Off
MOVE
DVD-Video
Title
Chapter
Time
Subtitle
Audio
Repeat
Angle
Zoom
1/2
1/20
00:00:33
Off
ENG D 2CH
Off
1/3
Off
MOVE CHANGE
CHANGE
ANGLE 1/3
DVD-Video
Title
Chapter
Time
Subtitle
Audio
Repeat
Angle
Zoom
1/2
1/20
00:00:33
Off
ENG D 2CH
Off
1/3
Off
MOVE NUMBER0~9
01002A-R130-XAA-ENG-54-70 2006.1.23 6:4 PM Page 61

62 - English
Play
back
Using Bookmarks
This feature lets you bookmark sections of a DVD or DVD-R/-RW(V mode), so you can quickly find them.
1 Press the MARKER button during playback.
2 Press the MARKER button duringplayback.Press the ENTER button when thedesired scene appears.The number 1 is displayed and the scene is memorized.
3 Press the œ √ button to move to the next position.
4 Press the ENTER button when the desiredscene appears.The number 2 is displayed and the scene is memorized.
• Repeat above to bookmark other positions.• You can bookmark up to 10 scenes.
(V mode)
Bookmarking with a DVD-Video/DVD-RAM/DVD-RW(Video mode)/DVD-R disc
When the disc tray is opened and thenclosed, bookmarks will disappear.
The button display may differ dependingon the disc type.
NOTE
Selecting the Audio language
1 Press the MARKER button during playback.
2 Press the œ √ buttons to select a bookmarkedscene.
3 Press the ENTER or PLAY( ) button to startplaying from the selected scene.
1 Press the MARKER button during playback
2 Press the œ √ buttons to select a bookmarkedscene.
3 Press the CANCEL button to delete theselected bookmark.
Playing Back a Bookmark
Clearing a Bookmark
Bookmark - - - - - - - - - --
RETURNSELECTMOVE
Bookmark 1 - - - - - - - - --
CANCELPLAYMOVE RETURN
Bookmark 1 2 - - - - - - - --
Bookmark 1 2 - - - - - - - --
Bookmark 1 2 3 4 5 6 - - - --
Bookmark 1 2 - 4 5 6 - - - --
SELECTMOVE RETURN
CANCELPLAYMOVE RETURN
CANCELPLAYMOVE RETURN
CANCELPLAYMOVE RETURN
01002A-R130-XAA-ENG-54-70 2006.1.23 6:4 PM Page 62
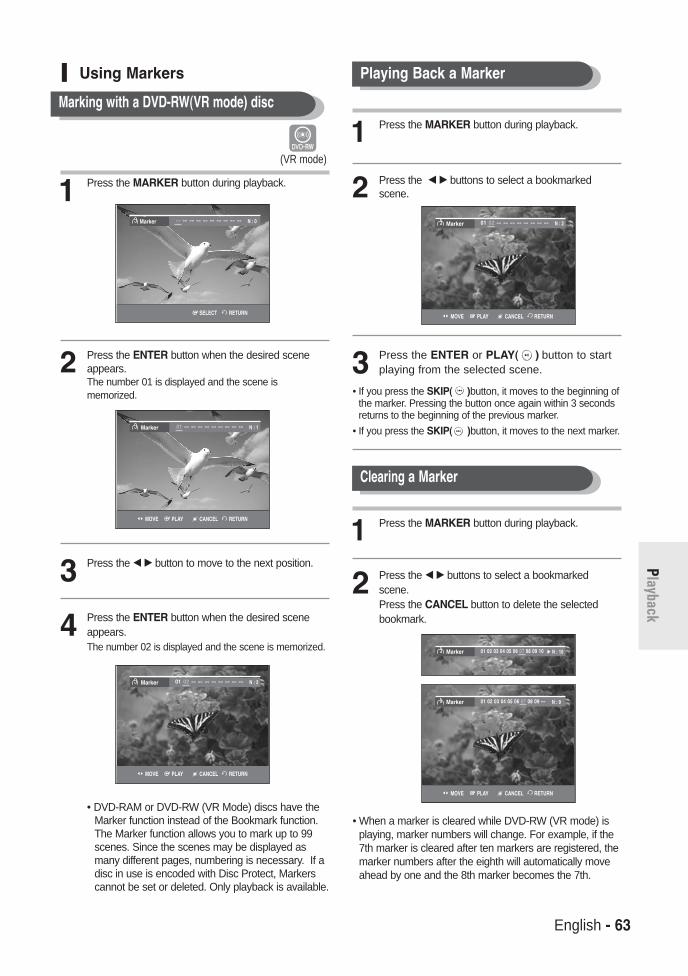
English - 63
Playback
Playing Back a Marker
1 Press the MARKER button during playback.
2 Press the œ √ buttons to select a bookmarkedscene.
3 Press the ENTER or PLAY( ) button to startplaying from the selected scene.
• If you press the SKIP( )button, it moves to the beginning ofthe marker. Pressing the button once again within 3 secondsreturns to the beginning of the previous marker.
• If you press the SKIP( )button, it moves to the next marker.
1 Press the MARKER button during playback.
2 Press the œ √ buttons to select a bookmarkedscene. Press the CANCEL button to delete the selectedbookmark.
• When a marker is cleared while DVD-RW (VR mode) isplaying, marker numbers will change. For example, if the7th marker is cleared after ten markers are registered, themarker numbers after the eighth will automatically moveahead by one and the 8th marker becomes the 7th.
Clearing a Marker
Using Markers
1 Press the MARKER button during playback.
2 Press the ENTER button when the desired sceneappears.The number 01 is displayed and the scene ismemorized.
3 Press the œ √ button to move to the next position.
4 Press the ENTER button when the desired sceneappears.The number 02 is displayed and the scene is memorized.
• DVD-RAM or DVD-RW (VR Mode) discs have theMarker function instead of the Bookmark function.The Marker function allows you to mark up to 99scenes. Since the scenes may be displayed asmany different pages, numbering is necessary. If adisc in use is encoded with Disc Protect, Markerscannot be set or deleted. Only playback is available.
Marking with a DVD-RW(VR mode) disc
(VR mode)
Marker -- -- -- -- -- -- -- -- -- -- N : 0
SELECT RETURN
Marker 01 -- -- -- -- -- -- -- -- -- N : 1
CANCELPLAYMOVE RETURN
Marker 01 02 -- -- -- -- -- -- -- -- N : 2
CANCELPLAYMOVE RETURN
Marker 01 02 -- -- -- -- -- -- -- -- N : 2
CANCELPLAYMOVE RETURN
Marker 01 02 03 04 05 06 07 08 09 10 √√ N : 10
Marker 01 02 03 04 05 06 07 08 09 -- N : 9
CANCELPLAYMOVE RETURN
01002A-R130-XAA-ENG-54-70 2006.1.23 6:4 PM Page 63
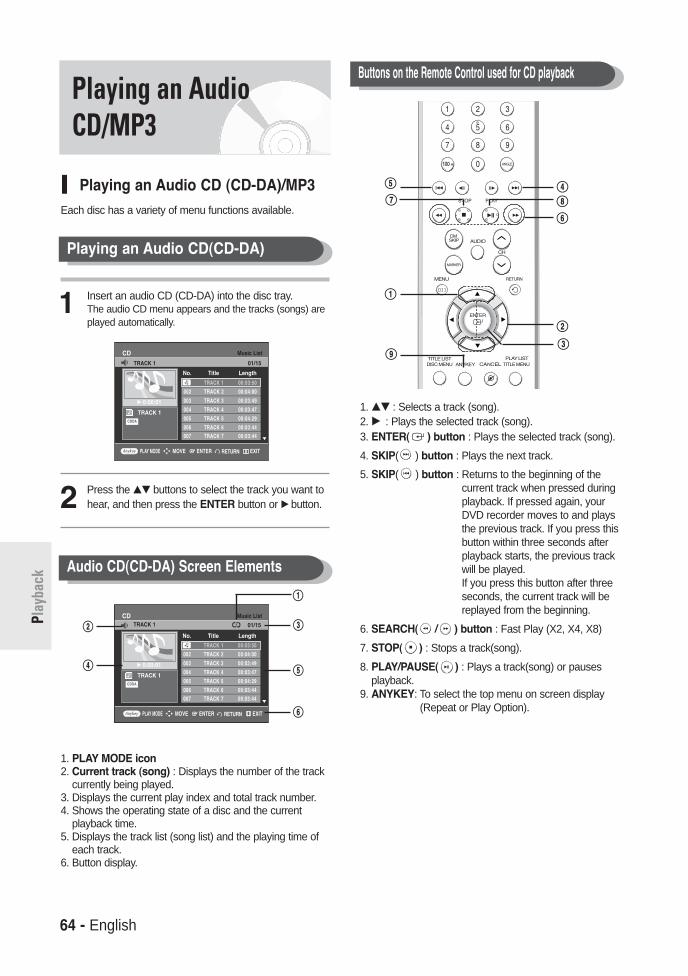
64 - English
Play
back
Playing an Audio CD (CD-DA)/MP3Each disc has a variety of menu functions available.
1 Insert an audio CD (CD-DA) into the disc tray.The audio CD menu appears and the tracks (songs) areplayed automatically.
2 Press the …† buttons to select the track you want tohear, and then press the ENTER button or √ button.
1. PLAY MODE icon2. Current track (song) : Displays the number of the track
currently being played.3. Displays the current play index and total track number.4. Shows the operating state of a disc and the current
playback time.5. Displays the track list (song list) and the playing time of
each track.6. Button display.
Playing an AudioCD/MP3
Playing an Audio CD(CD-DA)
Audio CD(CD-DA) Screen Elements
1. …† : Selects a track (song).2. √√ : Plays the selected track (song).3. ENTER( ) button : Plays the selected track (song).
4. SKIP( ) button : Plays the next track.
5. SKIP( ) button : Returns to the beginning of thecurrent track when pressed duringplayback. If pressed again, yourDVD recorder moves to and playsthe previous track. If you press thisbutton within three seconds afterplayback starts, the previous trackwill be played. If you press this button after threeseconds, the current track will bereplayed from the beginning.
6. SEARCH( / ) button : Fast Play (X2, X4, X8)
7. STOP( ) : Stops a track(song).
8. PLAY/PAUSE( ) : Plays a track(song) or pausesplayback.
9. ANYKEY: To select the top menu on screen display(Repeat or Play Option).
Buttons on the Remote Control used for CD playback
^
*$%
!
&
(#
@
Music ListCD
TRACK 1
√√ 0:00:01
001 TRACK 1 00:03:50
002 TRACK 2 00:04:00
003 TRACK 3 00:03:49
004 TRACK 4 00:03:47
005 TRACK 5 00:04:29
006 TRACK 6 00:03:44007 TRACK 7 00:03:44
No. Title Length
TRACK 1 01/15
CDDA
Music ListCD
TRACK 1
√√ 0:00:01
001 TRACK 1 00:03:50
002 TRACK 2 00:04:00
003 TRACK 3 00:03:49
004 TRACK 4 00:03:47
005 TRACK 5 00:04:29
006 TRACK 6 00:03:44007 TRACK 7 00:03:44
No. Title Length
TRACK 1 01/15
CDDA
@
$
^
%
#
!
ENTERMOVEPLAY MODE EXITRETURN
ENTERMOVEPLAY MODE EXITRETURN
01002A-R130-XAA-ENG-54-70 2006.1.23 6:4 PM Page 64
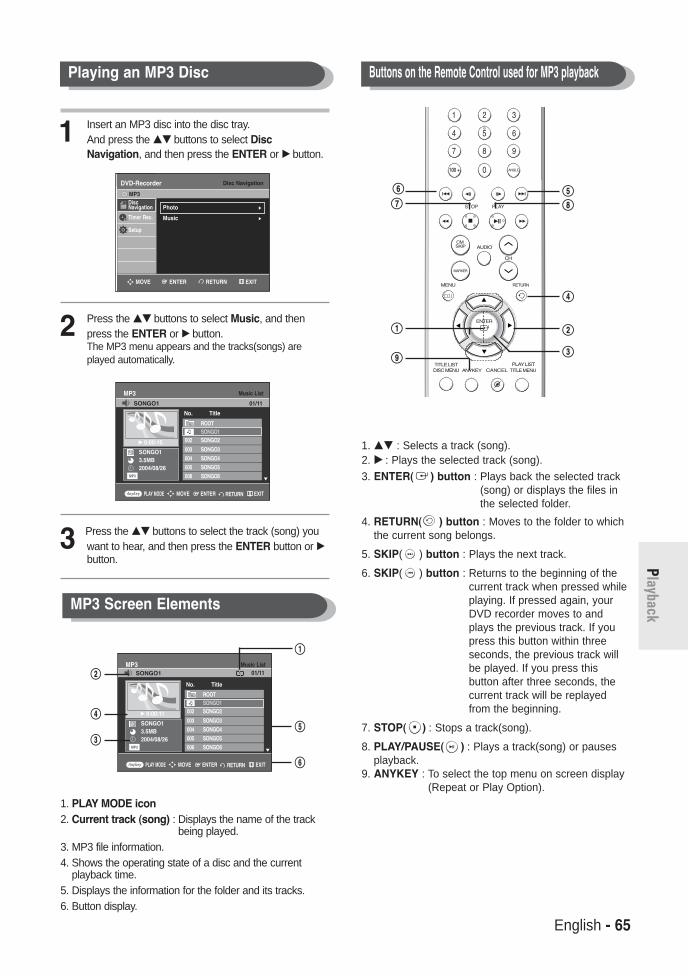
English - 65
Playback
1. …† : Selects a track (song).2. √√ : Plays the selected track (song).
3. ENTER( ) button : Plays back the selected track(song) or displays the files inthe selected folder.
4. RETURN( ) button : Moves to the folder to whichthe current song belongs.
5. SKIP( ) button : Plays the next track.
6. SKIP( ) button : Returns to the beginning of thecurrent track when pressed whileplaying. If pressed again, yourDVD recorder moves to andplays the previous track. If youpress this button within threeseconds, the previous track willbe played. If you press thisbutton after three seconds, thecurrent track will be replayedfrom the beginning.
7. STOP( ) : Stops a track(song).
8. PLAY/PAUSE( ) : Plays a track(song) or pausesplayback.
9. ANYKEY : To select the top menu on screen display(Repeat or Play Option).
Buttons on the Remote Control used for MP3 playback
*%
$
^
&
(#
@!
1 Insert an MP3 disc into the disc tray.And press the …† buttons to select DiscNavigation, and then press the ENTER or √ button.
2 Press the …† buttons to select Music, and thenpress the ENTER or √ button.The MP3 menu appears and the tracks(songs) areplayed automatically.
3 Press the …† buttons to select the track (song) youwant to hear, and then press the ENTER button or √button.
1. PLAY MODE icon2. Current track (song) : Displays the name of the track
being played.3. MP3 file information.4. Shows the operating state of a disc and the current
playback time. 5. Displays the information for the folder and its tracks.6. Button display.
Playing an MP3 Disc
MP3 Screen Elements
!
%
^
Music ListMP3
SONGO13.5MB2004/08/26
√√ 0:00:15
ROOT001 SONGO1002 SONGO2
003 SONGO3
004 SONGO4
005 SONGO5
006 SONGO6
No. Title
SONGO1 01/11
MP3
Music ListMP3
SONGO13.5MB2004/08/26
√√ 0:00:11
ROOT001 SONGO1002 SONGO2
003 SONGO3
004 SONGO4
005 SONGO5
006 SONGO6
No. Title
SONGO1 01/11
MP3
@
$
#
Disc NavigationDVD-Recorder
DiscNavigation
Timer Rec.
Setup
MP3
RETURNENTERMOVE EXIT
Photo √√
Music √√
ENTERMOVEPLAY MODE EXITRETURN
ENTERMOVEPLAY MODE EXITRETURN
01002A-R130-XAA-ENG-54-70 2006.1.23 6:4 PM Page 65

66 - English
Play
back
Play Option Mode
The Play Option can be used with an audio CD in the Playor Stop mode.
1 Press the ANYKEY button in the Stop mode.Play Option will be highlighted.
• During Playback, Repeat Mode will be highlighted.
2-1 Select a desired play option (Normal, Random, Introor Playlist) using the œ √ buttons. Press theENTER button.
• Normal : Tracks on a disc are played in the order inwhich they were recorded on the disc.
• Random : The Random option plays the disc’s tracks inrandom order. After a random list is generatedand played completely, another random list isgenerated and played. Random Play is continued until the play optionis changed.
• Intro : The first 10 seconds of each track will be played. Ifyou want to listen to the music that you haveselected, press the ENTER button or PLAY( )button. The play option will be changed to NormalPlay. When Intro Play is completed, Normal Playis performed.
• Playlist : The Playlist playback option allows you toselect the order in which you want tracks toplay.
Using the REPEAT button
1 Press the REPEAT button during playback.The TRACK repeat mode icon ( ) appears and theselected track is played repeatedly.
2 Press the REPEAT button once more to play theentire disc repeatedly.The DISC repeat mode icon ( ) appears and theinserted disc is played repeatedly.
To return to normal playback
3 Press the REPEAT button repeatedly until therepeat mode icon disappears, or press theCANCEL button.
Using the ANYKEY button
1 Press the ANYKEY button during playback.The play mode window appears.
2 Select the desired repeat mode (TRACK or DISC)using œ √ buttons, and then press the ENTERbutton. For MP3 discs, you can select Folder, Track orDisc.
To return to normal playback
3 Select Off in play mode window using œ √ buttons,and then press the ENTER button.
Playing Repeatedly(Repeat Playback)
Music ListCD
TRACK 1
√√ 0:00:01
001 TRACK 1 00:03:50
002 TRACK 2 00:04:00
003 TRACK 3 00:03:49
004 TRACK 4 00:03:47
005 TRACK 5 00:04:29
006 TRACK 6 00:03:44007 TRACK 7 00:03:44
No. Title Length
TRACK 1 01/15
CDDA
PLAY MODE
Repeat : Off
Play option : Normal
Music ListCD
TRACK 1
»» 0:00:19
001 TRACK 1 00:03:50
002 TRACK 2 00:04:00003 TRACK 3 00:03:49
004 TRACK 4 00:03:47
005 TRACK 5 00:04:29
006 TRACK 6 00:03:44007 TRACK 7 00:03:44
No. Title Length
TRACK 1 01/15
CDDA
Music ListCD
TRACK 1
√√ 0:00:15
001 TRACK 1 00:03:50
002 TRACK 2 00:04:00003 TRACK 3 00:03:49
004 TRACK 4 00:03:47
005 TRACK 5 00:04:29
006 TRACK 6 00:03:44007 TRACK 7 00:03:44
No. Title Length
TRACK 1 01/15
CDDA
Music ListCD
TRACK 1
√√ 0:00:20
001 TRACK 1 00:03:50
002 TRACK 2 00:04:00003 TRACK 3 00:03:49
004 TRACK 4 00:03:47
005 TRACK 5 00:04:29
006 TRACK 6 00:03:44007 TRACK 7 00:03:44
No. Title Length
TRACK 1 01/15
CDDA
PLAY MODE
Repeat : Off
Play option : Normal
ENTERMOVEPLAY MODE EXITRETURN
ENTERMOVEPLAY MODE EXITRETURN
ENTERMOVEPLAY MODE EXITRETURN
ENTERMOVEPLAY MODE EXITRETURN
01002A-R130-XAA-ENG-54-70 2006.1.23 6:4 PM Page 66

English - 67
Playback
To Program Tracks
You can register a maximum of 30 tracks in the playlist.
1 Press the ANYKEY button during playback, thenselect Play option using …† buttons.
2 Select Playlist using the œ √ buttons, and thenpress the ENTER button.The Playlist screen will appear.Select tracks in the order in which you want them toplay using the …† buttons. Press the ENTER button.
3 If you playlisted a wrong track, press the √ button,then press the …† buttons to select wrong track andpress the CANCEL button.The wrong track will be removed.
4 Press the PLAY( ) button to playback the playlist.
1 Insert an JPEG disc into the disc tray.
2 Press the …† buttons to select Disc Navigation, andthen press the ENTER or √ button.
3 Press the …† buttons to select Photo, and thenpress the ENTER or √ button.
4 Press the …† œ √ buttons to select a picture.
• To see the next 8 pictures, press the SKIP( ) button.
• To see the previous 8 pictures, press the SKIP( ) button.
Playing a Picture CD
Music ListCD
TRACK 1
0:00:01
001 TRACK 1 00:03:50
002 TRACK 2 00:04:00
003 TRACK 3 00:03:49
004 TRACK 4 00:03:47
005 TRACK 5 00:04:29
006 TRACK 6 00:03:44007 TRACK 7 00:03:44
No. Title Length
TRACK 1 01/15
CDDA
PLAY MODE
Repeat : Off
Play option : Normal
PlaylistCD07/15
001 TRACK 1
002 TRACK 3
003 TRACK 4
004 TRACK 7
TRACK 1
TRACK 2
TRACK 3
TRACK 4
TRACK 5
TRACK 6
TRACK 7
TRACK 8
CDDA
CDDA
CDDA
CDDA
CDDA
CDDA
CDDA
CDDA
PlaylistCD03/03
001 TRACK 1
002 TRACK 3
003 TRACK 4
TRACK 1
TRACK 2
TRACK 3
TRACK 4
TRACK 5
TRACK 6
TRACK 7
TRACK 8
CDDA
CDDA
CDDA
CDDA
CDDA
CDDA
CDDA
CDDA
ENTERMOVEPLAY MODE EXITRETURN
ENTERMOVEPLAY MODE EXIT
Disc NavigationDVD-Recorder
DiscNavigation
Timer Rec.
Setup
JPEG
RETURNENTERMOVE EXIT
Photo √√
Music √√
Disc NavigationDVD-Recorder
DiscNavigation
Timer Rec.
Setup
JPEG
RETURNENTERMOVE EXIT
Photo √√
Music √√
Photo ListJPEGJPEG01 01/08
ROOT JPEG01 JPEG02 JPEG03
JPEG04 JPEG05 JPEG06 JPEG07
RETURN ENTER MOVE Slide Show EXIT
ENTERMOVEPLAY MODE EXITCANCEL
01002A-R130-XAA-ENG-54-70 2006.1.23 6:4 PM Page 67

68 - English
Play
back
Playing the Title List5-1 If you press the PLAY( ) button, the Slide showscreen will appear.The picture interval (Slide show speed) must be set.
5-2 Press the ENTER button with a picture selected inthe Album screen. Select a display mode (Albumscreen ( ), Slide show ( ), Rotation ( )or Zoom ( )) using the œ √
buttons, then press the ENTER button.
: Returns to the Album screen.: The unit enters slide show mode.Before the slide show can begin, the picture interval(Slide show speed) must be set.
: Each time the ENTER button is pressed, thepicture rotates 90 degrees clockwise.
: Each time the ENTER button is pressed, thepicture is enlarged up to 4X.(Normal 2X 4X 2X Normal)
• Press the ANYKEY button to display or clear menus.
Follow these instructions to play back a scene from theTitle List.
Using the TITLE LIST button
1 Press the TITLE LIST button.The Title List screen is displayed.
2 Press the …† buttons to select an entry you want toplay from Title List, and then press the PLAY( )button.The selected entry (title) will be played back.
3 To stop playing the title, press the STOP( ) button.To return the title list screen, press the TITLE LISTbutton.
DVD-RW(VR)
JPEG01
Title ListDVD-RW(VR)
01 APR/19/2006 12:0 00:00:21 √√
02 APR/19/2006 12:3 00:00:03 √√
03 APR/20/2006 12:0 00:00:15 √√
04 APR/20/2006 12:3 00:00:16 √√
05 APR/21/2006 12:0 00:06:32 √√
06 APR/21/2006 12:3 00:08:16 √√
No. Title Length Edit
APR/19/2006 1/6
APR/19/2006 12:00 AM CH1
APR/19/2006
SP
ENTER PHOTOMOVE RETURN
DVD-RW(VR)
JPEG01
ENTER PHOTOMOVE RETURN
RETURNENTERMOVE EXIT
Slide Show Speed
Slow Normal Fast
01002A-R130-XAA-ENG-54-70 2006.1.23 6:4 PM Page 68

English - 69
Playback
Using the MENU button
1 Press the MENU button.
2 Press the ……†† buttons to select Title List, and thenpress the ENTER or √√ button twice.The Title List screen is displayed.
3 Press the ……†† buttons to select Title, and thenpress the ENTER or √√ button.The Edit menu is displayed on the right.
(Rename, Delete, Edit, Protection : See pages 72~75)
4 Press the …† buttons to select Play to play the titlelist and then press the ENTER button.The selected entry (title) will be played back.
To view the current status of the disc and theprogress of playback : Press the INFO button, andthe information about the disc will appear.
Press the INFO button once again. Then you cancheck the information about the title under playback.
5 To stop playing the title, press the STOP( )button.To return the title list screen, press the TITLE LISTbutton.
You can also play a recorded program bypressing the ANYKEY button duringplayback.
Press the ……†† buttons to select Title. Press the œ √ or number buttons to select to
play the title list and then press the ENTERbutton.
NOTE
Title ListDVD-RW(VR)
01 APR/19/2006 12:0 00:00:21 √√
02 APR/19/2006 12:3 00:00:03 √√
03 APR/20/2006 12:0 00:00:15 √√
04 APR/20/2006 12:3 00:00:16 √√
05 APR/21/2006 12:0 00:06:32 √√
06 APR/21/2006 12:3 00:08:16 √√
No. Title Length Edit
APR/19/2006 1/6
APR/21/2006 12:00 AM CH1
APR/21/2006
SP
Title ListDVD-RW(VR)
01 APR/19/2006 12:0 00:00:21 √√
02 APR/19/2006 12:3 00:00:03 √√
03 APR/20/2006 12:0 00:00:15 √√
04 APR/20/2006 12:3 00:00:16 √√
05 APR/21/2006 12:0 00:06:32 √√
06 APR/21/2006 12:3 00:08:16 √√
No. Title Length Edit
APR/21/2006 5/6
APR/21/2006 12:00 AM CH1
APR/21/2006
SP
Play
Rename
Delete
Edit
Protection
√√ Play
Title ListDVD-Recorder
Title List √√Title List
Playlist
Disc Manager
Timer Rec.
Setup
DVD-RW(VR)
RETURNENTERMOVE EXIT
RETURNENTERMOVE EXIT
RETURNENTERMOVE EXIT
DVD-RW(VR) Playing InfoName APR/01/2006 12:00 AM
CH11Title 5/6Created Time APR/01/2006 12:00 AMLength 00: 01: 43 SPPlaying Time 00: 00: 08Title Protection Not Protected
JAN 01 2006 SUN 12:00 AM
DVD-RW(VR)Title
Time
Subtitle
Audio
Repeat
Zoom
10/19
00: 00: 08
Off
ENG D 2CH
Off
Off
MOVE CHANGE
DVD-RW(VR) Disc InfoDisc Name Disc
Total Title 6Total Playlist 2Recordable Time 00: 28 SPProtection Not ProtectedScreen Playback
JAN 01 2006 SUN 12:00 AM
01002A-R130-XAA-ENG-54-70 2006.1.23 6:4 PM Page 69

70 - English
Play
back
Title List Screen Elements
! Playback screen for recorded entries@ Information window for the selected entry : Title
name, recording date, lock status, record mode# Recorded entry No.$ Recorded entry title% Recording length (i.e., the playing time)^ Title list edit items
Play : Plays the selected entry.Rename : Renames the title of a selected entry.Delete : Deletes the selected entry from the list.Edit : Deletes a section.Protection : Locks or unlocks the selected entry.
& Button display
This may depend on the the disc type. DVD-R/DVD-RW(Video) has limited
editing function.NOTE
RETURNENTERMOVE
Title ListDVD-Recorder
01 APR/19/2006 12:0 00:00:21 √√
02 APR/19/2006 12:3 00:00:03 √√
03 APR/20/2006 12:0 00:00:15 √√
04 APR/20/2006 12:3 00:00:16 √√
05 APR/21/2006 12:0 00:06:32 √√
06 APR/21/2006 12:3 00:08:16 √√
No. Title Length Edit
DVD-RW(VR) 5/6
01/APR/2006 12:00 AM CH1
01/APR/2006
XP
Play
Rename
Delete
Edit
Protection
Title ListDVD-Recorder
01 APR/19/2006 12:0 00:00:21 √√
02 APR/19/2006 12:3 00:00:03 √√
03 APR/20/2006 12:0 00:00:15 √√
04 APR/20/2006 12:3 00:00:16 √√
05 APR/21/2006 12:0 00:06:32 √√
06 APR/21/2006 12:3 00:08:16 √√
No. Title Length Edit
APR/21/2006 5/6
APR/21/2006 12:00 AM CH1
APR/21/2006
SP
!
# $ %
&
^
@
EXITRETURNENTERMOVE EXIT
01002A-R130-XAA-ENG-54-70 2006.1.23 6:4 PM Page 70

English - 71
Editing
Editing
This section introduces basic functions of DVDediting.
Basic Editing (Title List) . . . . . . . . . . . . . . . . . . . . .72
Advance Editing (Playlist) . . . . . . . . . . . . . . . . . . .76
Disc Manager . . . . . . . . . . . . . . . . . . . . . . . . . . . .84
• Title ListA title is a section of recorded video and audio. Title List shows a list to help you select a title. Since the title list consists of the information onstream that is actually recorded, if one title is deleted,that title cannot be played again.
• PlaylistThis refers to a unit of playback, which is made byselecting a desired scene in the entire Title List.When one playlist is played, only the scene selectedby the user will play and then stop. Since only theinformation necessary for playing a desired scene isincluded in a playlist, even if that playlist is deleted,the original recorded title will not be deleted.
Recording or editing might not be completed if anerror such as a sudden power failure occurs.
Please be aware that material that has beendamaged cannot be retrieved.
01002A-R130-XAA-ENG-71-88 2006.1.23 6:6 PM Page 71
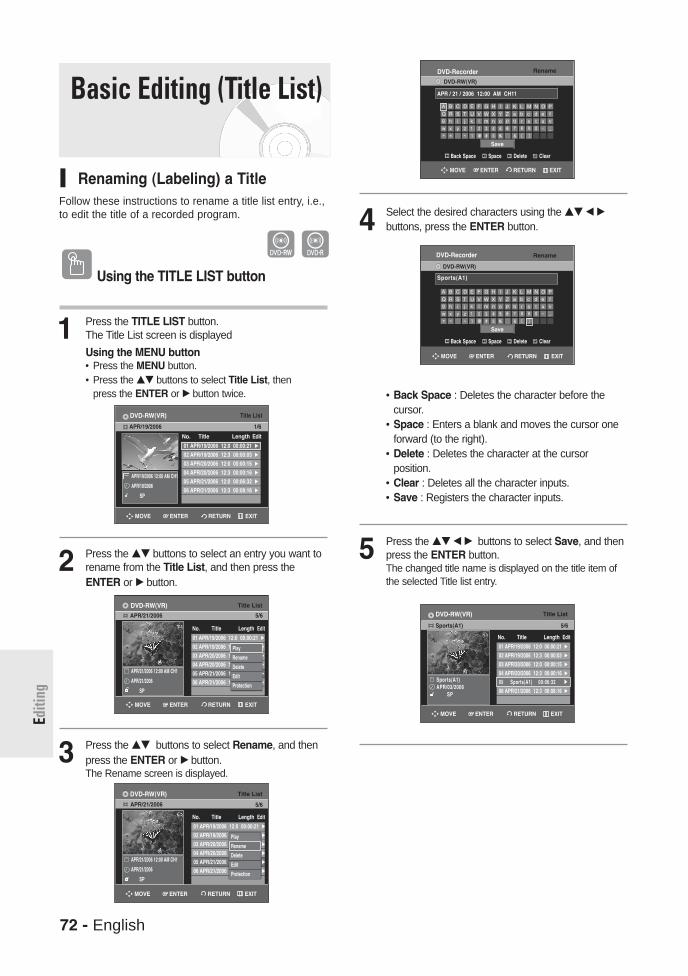
72 - English
Editi
ng
Basic Editing (Title List)
Renaming (Labeling) a TitleFollow these instructions to rename a title list entry, i.e.,to edit the title of a recorded program.
Using the TITLE LIST button
1 Press the TITLE LIST button.The Title List screen is displayed
Using the MENU button• Press the MENU button.• Press the …† buttons to select Title List, then
press the ENTER or √ button twice.
2 Press the …† buttons to select an entry you want torename from the Title List, and then press theENTER or √ button.
3 Press the …† buttons to select Rename, and thenpress the ENTER or √ button.The Rename screen is displayed.
4 Select the desired characters using the …† œ √
buttons, press the ENTER button.
• Back Space : Deletes the character before thecursor.
• Space : Enters a blank and moves the cursor one forward (to the right).
• Delete : Deletes the character at the cursorposition.
• Clear : Deletes all the character inputs.• Save : Registers the character inputs.
5 Press the …† œ √ buttons to select Save, and thenpress the ENTER button.The changed title name is displayed on the title item ofthe selected Title list entry.
RETURNENTERMOVE EXIT
RenameDVD-Recorder
Back Space Space Delete Clear
Save
APR / 21 / 2006 12:00 AM CH11
Rename
Back Space Space Delete Clear
Save
Sports(A1)
Title ListDVD-RW(VR)APR/21/2006 5/6
APR/21/2006 12:00 AM CH1
APR/21/2006
SP
01 APR/19/2006 12:0 00:00:21 √√
02 APR/19/2006 12:3 00:00:03 √√
03 APR/20/2006 12:0 00:00:15 √√
04 APR/20/2006 12:3 00:00:16 √√
05 APR/21/2006 12:0 00:06:32 √√
06 APR/21/2006 12:3 00:08:16 √√
No. Title Length Edit
Play
Rename
Delete
Edit
Protection
Title ListDVD-RW(VR)
APR/21/2006 5/6
APR/21/2006 12:00 AM CH1
APR/21/2006
SP
01 APR/19/2006 12:0 00:00:21 √√
02 APR/19/2006 12:3 00:00:03 √√
03 APR/20/2006 12:0 00:00:15 √√
04 APR/20/2006 12:3 00:00:16 √√
05 APR/21/2006 12:0 00:06:32 √√
06 APR/21/2006 12:3 00:08:16 √√
No. Title Length Edit
Play
Rename
Delete
Edit
Protection
Title ListDVD-RW(VR)
Sports(A1) 5/6
Sports(A1) APR/03/2006
SP
01 APR/19/2006 12:0 00:00:21 √√
02 APR/19/2006 12:3 00:00:03 √√
03 APR/20/2006 12:0 00:00:15 √√
04 APR/20/2006 12:3 00:00:16 √√05 Sports(A1) 00:06:32 √√
06 APR/21/2006 12:3 00:08:16 √√
No. Title Length Edit
Title ListDVD-RW(VR)
01 APR/19/2006 12:0 00:00:21 √√
02 APR/19/2006 12:3 00:00:03 √√
03 APR/20/2006 12:0 00:00:15 √√
04 APR/20/2006 12:3 00:00:16 √√
05 APR/21/2006 12:0 00:06:32 √√
06 APR/21/2006 12:3 00:08:16 √√
No. Title Length Edit
APR/19/2006 1/6
APR/19/2006 12:00 AM CH1
APR/19/2006
SP
RETURNENTERMOVE EXIT
DVD-RW(VR)
DVD-RW(VR)
DVD-Recorder
RETURNENTERMOVE EXIT
RETURNENTERMOVE EXIT
RETURNENTERMOVE EXIT
RETURNENTERMOVE EXIT
01002A-R130-XAA-ENG-71-88 2006.1.23 6:6 PM Page 72
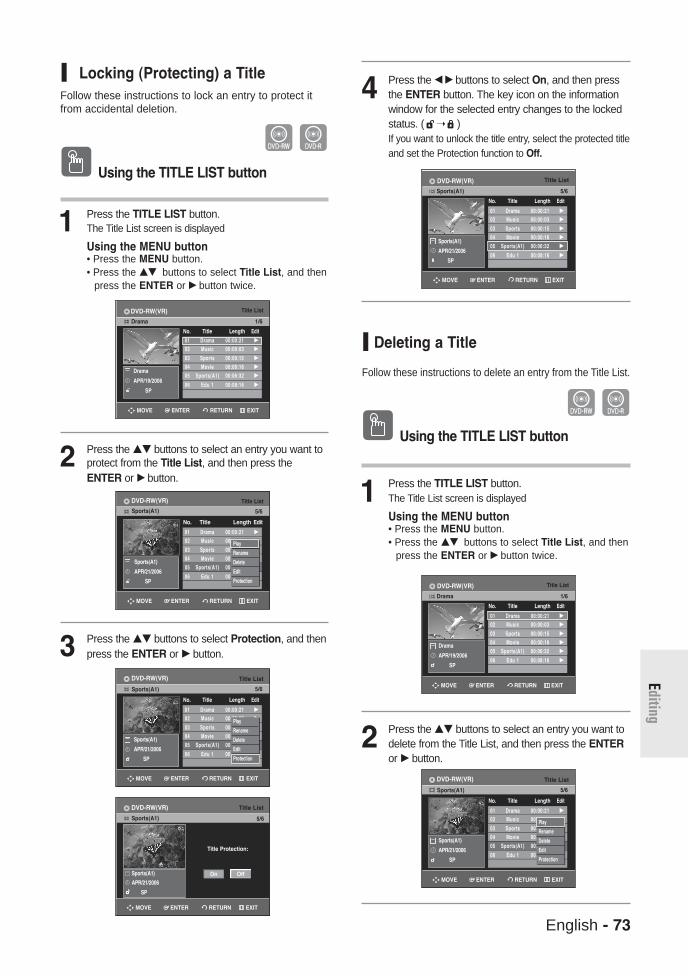
English - 73
Editing
Locking (Protecting) a Title Follow these instructions to lock an entry to protect itfrom accidental deletion.
Using the TITLE LIST button
1 Press the TITLE LIST button.The Title List screen is displayed
Using the MENU button• Press the MENU button.• Press the …† buttons to select Title List, and then
press the ENTER or √ button twice.
2 Press the …† buttons to select an entry you want toprotect from the Title List, and then press theENTER or √ button.
3 Press the …† buttons to select Protection, and thenpress the ENTER or √ button.
4 Press the œ √ buttons to select On, and then pressthe ENTER button. The key icon on the informationwindow for the selected entry changes to the lockedstatus. ( )If you want to unlock the title entry, select the protected titleand set the Protection function to Off.
Deleting a Title
Follow these instructions to delete an entry from the Title List.
Using the TITLE LIST button
1 Press the TITLE LIST button.The Title List screen is displayed
Using the MENU button• Press the MENU button.• Press the …† buttons to select Title List, and then
press the ENTER or √ button twice.
2 Press the …† buttons to select an entry you want todelete from the Title List, and then press the ENTERor √ button.
Title List
Sports(A1) 5/6
Sports(A1)
APR/21/2006
SP
On Off
Title Protection:
Title ListDVD-RW(VR)
01 Drama 00:00:21 √√
02 Music 00:00:03 √√
03 Sports 00:00:15 √√
04 Movie 00:00:16 √√
05 Sports(A1) 00:06:32 √√
06 Edu 1 00:08:16 √√
No. Title Length Edit
Drama 1/6
Drama
APR/19/2006
SP
Title ListDVD-RW(VR)
01 Drama 00:00:21 √√
02 Music 00:00:03 √√
03 Sports 00:00:15 √√
04 Movie 00:00:16 √√
05 Sports(A1) 00:06:32 √√
06 Edu 1 00:08:16 √√
No. Title Length Edit
Sports(A1) 5/6
Sports(A1)
APR/21/2006
SP
Play
Rename
Delete
Edit
Protection
Title ListDVD-RW(VR)
DVD-RW(VR)
01 Drama 00:00:21 √√
02 Music 00:00:03 √√
03 Sports 00:00:15 √√
04 Movie 00:00:16 √√
05 Sports(A1) 00:06:32 √√
06 Edu 1 00:08:16 √√
No. Title Length Edit
Sports(A1) 5/6
Sports(A1)
APR/21/2006
SP
Play
Rename
Delete
Edit
Protection
Title ListDVD-RW(VR)
01 Drama 00:00:21 √√
02 Music 00:00:03 √√
03 Sports 00:00:15 √√
04 Movie 00:00:16 √√
05 Sports(A1) 00:06:32 √√
06 Edu 1 00:08:16 √√
No. Title Length Edit
Sports(A1) 5/6
Sports(A1)
APR/21/2006
SP
Title ListDVD-RW(VR)
01 Drama 00:00:21 √√
02 Music 00:00:03 √√
03 Sports 00:00:15 √√
04 Movie 00:00:16 √√
05 Sports(A1) 00:06:32 √√
06 Edu 1 00:08:16 √√
No. Title Length Edit
Drama 1/6
Drama
APR/19/2006
SP
Title ListDVD-RW(VR)
01 Drama 00:00:21 √√
02 Music 00:00:03 √√
03 Sports 00:00:15 √√
04 Movie 00:00:16 √√
05 Sports(A1) 00:06:32 √√
06 Edu 1 00:08:16 √√
No. Title Length Edit
Sports(A1) 5/6
Sports(A1)
APR/21/2006
SP
Play
Rename
Delete
Edit
Protection
RETURNENTERMOVE EXIT
RETURNENTERMOVE EXIT
RETURNENTERMOVE EXIT
RETURNENTERMOVE EXIT
RETURNENTERMOVE EXIT
RETURNENTERMOVE EXIT
RETURNENTERMOVE EXIT
01002A-R130-XAA-ENG-71-88 2006.1.23 6:6 PM Page 73

74 - English
Editi
ng
3 Press the …† buttons to select Delete, and then pressthe ENTER or √button.
You will be prompted with the confirmation message.DVD-RW(VR mode): Since Playlist is present, themessage “Do you want to delete?(Related playlists maybe deleted.)” is displayed.
DVD-RW(Video mode), DVD-R: Since Playlist is notpresent, the message “Do you want to delete?” isdisplayed.
• The message may be different depending on thetype of disc.
4 Press the œ √ buttons to select Yes, and then pressthe ENTER button
Deleting a Section of a Title
Follow these instructions to delete a section of a Title Listentry.
Using the TITLE LIST button
1 Press the TITLE LIST button.The Title List screen is displayed
Using the MENU button• Press the MENU button.
• Press the …† buttons to select Title List, andthen press the ENTER or √ button twice.
2 Press the …† buttons to select an entry you want toedit from the Title List, and then press the ENTER or√ button.
3 Press the …† buttons to select Edit, and then pressthe ENTER or √ button.
You cannot delete a protected entry. If you want to delete a protected entry, select“Off” in the Title Protection menu.
Once an entry is deleted from the Title List, itcannot be recovered.
Once a DVD-R or DVD-RW is finalized, itcannot be deleted.
With DVD-R, titles are only deleted from themenu, however, the Title remains physicallyon the disc.
NOTE
(VR mode)
Title ListDVD-RW(VR)
01 Drama 00:00:21 √√
02 Music 00:00:03 √√
03 Sports 00:00:15 √√
04 Movie 00:00:16 √√
05 Sports(A1) 00:06:32 √√
06 Edu 1 00:08:16 √√
No. Title Length Edit
Sports(A1) 5/6
Sports(A1)
APR/21/2006
SP
Play
Rename
Delete
Edit
Protection
Title List
Sports(A1) 5/6
Sports(A1)
APR/21/2006
SP
Yes No
Do you want to delete?(Related playlistsmay be deleted.)
DVD-RW(VR)
Title ListDVD-RW(VR)
01 Drama 00:00:21 √√
02 Music 00:00:03 √√
03 Sports 00:00:15 √√
04 Movie 00:00:16 √√
05 Sports(A1) 00:06:32 √√
06 Edu 1 00:08:16 √√
No. Title Length Edit
Drama 1/6
Drama
APR/21/2006
SP
Title ListDVD-RW(VR)
01 Drama 00:00:21 √√
02 Music 00:00:03 √√
03 Sports 00:00:15 √√
04 Movie 00:00:16 √√
05 Sports(A1) 00:06:32 √√
06 Edu 1 00:08:16 √√
No. Title Length Edit
Sports(A1) 5/6
Sports(A1)
APR/21/2006
SP
Play
Rename
Delete
Edit
Protection
Edit Title ListDVD-RW(VR)
Title List No. 05Start End
00:00:00
00:00:00
00:00:00
Start End Delete Return
√√
RETURNENTERMOVE EXIT
RETURNENTERMOVE EXIT
RETURNENTERMOVE EXIT
RETURNENTERMOVE EXIT
RETURNENTERMOVE EXIT
01002A-R130-XAA-ENG-71-88 2006.1.23 6:6 PM Page 74

English - 75
Editing
4 Press the ENTER button at the starting point.The image and starting point time are displayed on thesection deletion starting point window.
Edit Title List Screen Elements
1 Playback bar2 Title List No.3 Section deletion starting point window and time4 Section deletion end point window and time
• Select the start and end points of the section you want to delete using the playback relatedbuttons.
• Playback related buttons ( , , , , , )
5 Press the ENTER button at the end point. The image and end point time are displayed in theSection deletion ending point window.
6 Press the œ √ buttons to select Delete, and then pressthe ENTER button.The message “Do you want to delete?(Deleted part willnot be restored)” is displayed.
7 Press œ √ buttons to select Yes, and then press theENTER button.The selected section is deleted.To return to the Title List screen, press the œ √ buttonsto select Return.
The length of the section to be deleted mustbe at least 5 seconds long.
If the length of the section to be deleted isless than 5 seconds, you will be promptedwith the message “The range is too short.”.
If the end time precedes the starting point,you will be prompted with the message “Endpoint cannot be marked earlier than startpoint”.
The section cannot be deleted when itincludes a still picture.
Press the MENU button after the operationhas finished. The Edit Title List screen will disappear.
NOTE
Edit Title ListDVD-RW(VR)
Title List No. 05Start End
00:00:05
00:00:05
00:00:00
Start End Delete Return
➂ $
Edit Title ListDVD-RW(VR)
Title List No. 05
»»
Start End
00:00:05 00:10:15
00:10:15
Start End Delete Return
Edit Title ListDVD-RW(VR)
Title List No. 05Start End
00:00:05
00:00:05
00:00:00
Start End Delete Return
√√
√√
Edit Title ListDVD-RW(VR)
Title List No. 05Start End
00:00:20
00:00:20
Start End Delete Return
Do you want to delete?
(Deleted part will not be restored.)
Yes No
Edit Title ListDVD-RW(VR)
Title List No. 05
»»
Start End
00:00:05 00:10:15
00:10:15
Start End Delete ReturnRETURNENTERMOVE EXIT
RETURNENTERMOVE EXIT
RETURNENTERMOVE EXIT
RETURNENTERMOVE EXIT
RETURNENTERMOVE EXIT
01002A-R130-XAA-ENG-71-88 2006.1.23 6:6 PM Page 75
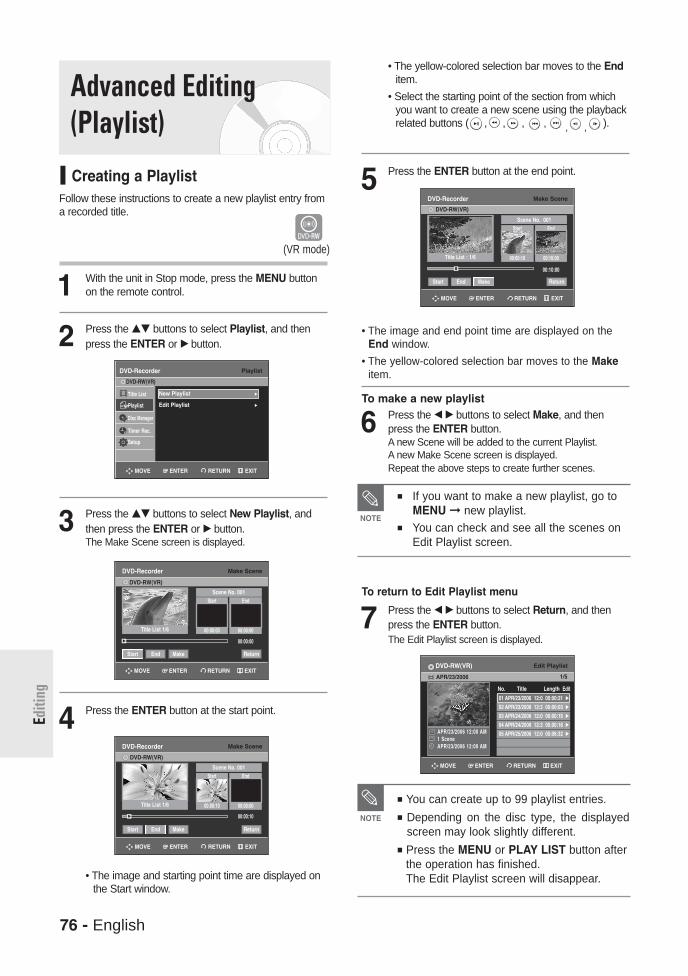
76 - English
Editi
ng
• The yellow-colored selection bar moves to the Enditem.
• Select the starting point of the section from whichyou want to create a new scene using the playbackrelated buttons ( , , , , , , ).
5 Press the ENTER button at the end point.
• The image and end point time are displayed on theEnd window.
• The yellow-colored selection bar moves to the Makeitem.
To make a new playlist
6 Press the œ √ buttons to select Make, and thenpress the ENTER button.A new Scene will be added to the current Playlist.A new Make Scene screen is displayed.Repeat the above steps to create further scenes.
To return to Edit Playlist menu
7 Press the œ √ buttons to select Return, and thenpress the ENTER button. The Edit Playlist screen is displayed.
If you want to make a new playlist, go toMENU new playlist.
You can check and see all the scenes onEdit Playlist screen.
NOTE
You can create up to 99 playlist entries. Depending on the disc type, the displayed
screen may look slightly different. Press the MENU or PLAY LIST button after
the operation has finished. The Edit Playlist screen will disappear.
NOTE
Advanced Editing (Playlist)
Creating a Playlist Follow these instructions to create a new playlist entry froma recorded title.
1 With the unit in Stop mode, press the MENU buttonon the remote control.
2 Press the …† buttons to select Playlist, and thenpress the ENTER or √ button.
3 Press the …† buttons to select New Playlist, andthen press the ENTER or √ button.The Make Scene screen is displayed.
4 Press the ENTER button at the start point.
• The image and starting point time are displayed onthe Start window.
(VR mode)
PlaylistDVD-Recorder
Title List
Playlist
Disc Manager
Timer Rec.
Setup
DVD-RW(VR)
New Playlist √√
Edit Playlist √√
Make SceneDVD-Recorder
DVD-RW(VR)
Scene No. 001
√√
Start End
00:00:10 00:00:00
00:00:10
Start End Make Return
Title List 1/6
Make SceneDVD-Recorder
DVD-RW(VR)
Scene No. 001
Title List 1/6
√√
Start End
00:00:00 00:00:00
00:00:00
Start End Make Return
Edit PlaylistDVD-RW(VR)
APR/23/2006
APR/23/2006 12:00 AM 1 SceneAPR/23/2006 12:00 AM
01 APR/23/2006 12:0 00:00:21 √√
02 APR/23/2006 12:3 00:00:03 √√
03 APR/24/2006 12:0 00:00:15 √√
04 APR/24/2006 12:3 00:00:16 √√
05 APR/25/2006 12:0 00:06:32 √√
No. Title Length Edit
Make SceneDVD-Recorder
DVD-RW(VR)
Scene No. 001
»»
Start End
00:00:10 00:10:00
00:10:00
Start End Make Return
Title List : 1/6
RETURNENTERMOVE EXIT
RETURNENTERMOVE EXIT
RETURNENTERMOVE EXIT
RETURNENTERMOVE EXIT
RETURNENTERMOVE EXIT
1/5
01002A-R130-XAA-ENG-71-88 2006.1.23 6:6 PM Page 76
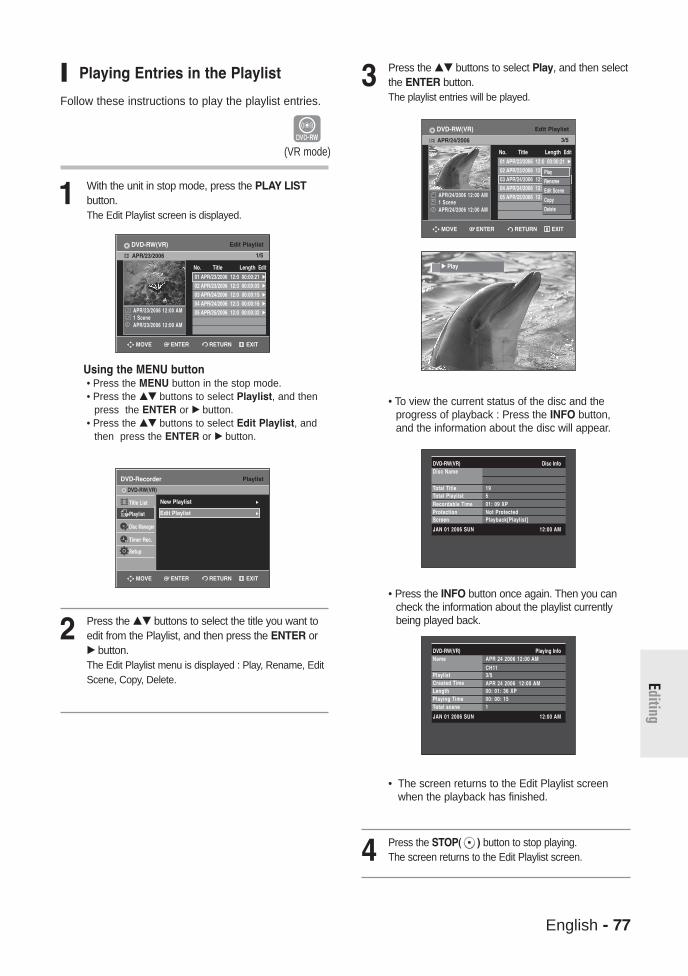
English - 77
Editing
Playing Entries in the Playlist
Follow these instructions to play the playlist entries.
1 With the unit in stop mode, press the PLAY LISTbutton.The Edit Playlist screen is displayed.
Using the MENU button• Press the MENU button in the stop mode.• Press the …† buttons to select Playlist, and then
press the ENTER or √ button.• Press the …† buttons to select Edit Playlist, and
then press the ENTER or √ button.
2 Press the …† buttons to select the title you want toedit from the Playlist, and then press the ENTER or√ button.The Edit Playlist menu is displayed : Play, Rename, EditScene, Copy, Delete.
3 Press the …† buttons to select Play, and then selectthe ENTER button.The playlist entries will be played.
• To view the current status of the disc and theprogress of playback : Press the INFO button,and the information about the disc will appear.
• Press the INFO button once again. Then you can check the information about the playlist currentlybeing played back.
• The screen returns to the Edit Playlist screenwhen the playback has finished.
4 Press the STOP( ) button to stop playing.The screen returns to the Edit Playlist screen.
(VR mode)
PlaylistDVD-Recorder
Title List
Playlist
Disc Manager
Timer Rec.
Setup
DVD-RW(VR)
New Playlist √√
Edit Playlist √√
DVD-RW(VR) Disc InfoDisc Name
Total Title 19Total Playlist 5Recordable Time 01: 09 XPProtection Not ProtectedScreen Playback[Playlist]
JAN 01 2006 SUN 12:00 AM
DVD-RW(VR) Playing InfoName APR 24 2006 12:00 AM
CH11Playlist 3/5Created Time APR 24 2006 12:00 AMLength 00: 01: 36 XPPlaying Time 00: 00: 15Total scene 1
JAN 01 2006 SUN 12:00 AM
√√ Play
RETURNENTERMOVE EXIT
Edit PlaylistDVD-RW(VR)
APR/23/2006
APR/23/2006 12:00 AM 1 SceneAPR/23/2006 12:00 AM
01 APR/23/2006 12:0 00:00:21 √√
02 APR/23/2006 12:3 00:00:03 √√
03 APR/24/2006 12:0 00:00:15 √√
04 APR/24/2006 12:3 00:00:16 √√
05 APR/25/2006 12:0 00:00:32 √√
No. Title Length Edit
RETURNENTERMOVE EXIT
1/5
Edit PlaylistDVD-RW(VR)
APR/24/2006
APR/24/2006 12:00 AM1 SceneAPR/24/2006 12:00 AM
01 APR/23/2006 12:0 00:00:21 √√
02 APR/23/2006 12:3 00:00:03 √√
03 APR/24/2006 12:0 00:00:15 √√
04 APR/24/2006 12:3 00:00:16 √√
05 APR/25/2006 12:0 00:06:32 √√
No. Title Length Edit
RETURNENTERMOVE EXIT
3/5
Play
Rename
Edit Scene
Copy
Delete
01002A-R130-XAA-ENG-71-88 2006.1.23 6:6 PM Page 77
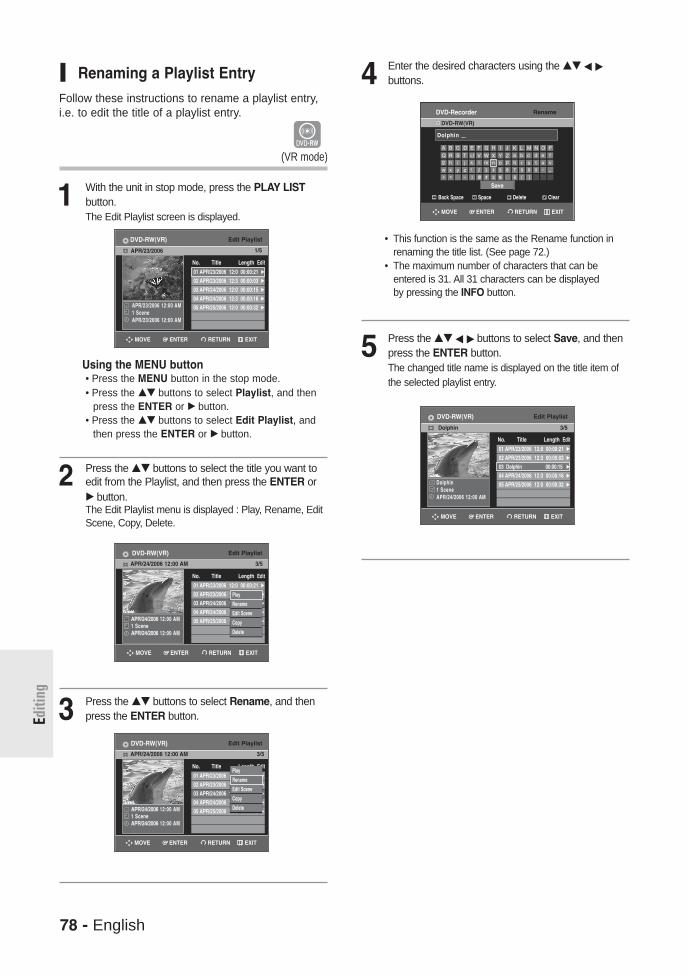
78 - English
Editi
ng
4 Enter the desired characters using the …† œ √buttons.
• This function is the same as the Rename function inrenaming the title list. (See page 72.)
• The maximum number of characters that can beentered is 31. All 31 characters can be displayed by pressing the INFO button.
5 Press the …† œ √ buttons to select Save, and thenpress the ENTER button.The changed title name is displayed on the title item ofthe selected playlist entry.
Renaming a Playlist Entry
Follow these instructions to rename a playlist entry,i.e. to edit the title of a playlist entry.
1 With the unit in stop mode, press the PLAY LISTbutton.The Edit Playlist screen is displayed.
Using the MENU button• Press the MENU button in the stop mode.• Press the …† buttons to select Playlist, and then
press the ENTER or √ button.• Press the …† buttons to select Edit Playlist, and
then press the ENTER or √ button.
2 Press the …† buttons to select the title you want toedit from the Playlist, and then press the ENTER or√ button.The Edit Playlist menu is displayed : Play, Rename, EditScene, Copy, Delete.
3 Press the …† buttons to select Rename, and thenpress the ENTER button.
(VR mode)
Edit PlaylistDVD-RW(VR)
APR/24/2006 12:00 AM 3/5
APR/24/2006 12:00 AM 1 SceneAPR/24/2006 12:00 AM
01 APR/23/2006 12:0 00:00:21 √√
02 APR/23/2006 12:3 00:00:03 √√
03 APR/24/2006 12:0 00:00:15 √√
04 APR/24/2006 12:3 00:00:16 √√
05 APR/25/2006 12:0 00:00:32 √√
No. Title Length EditPlay
Rename
Edit Scene
Copy
Delete
Edit PlaylistDVD-RW(VR)
APR/24/2006 12:00 AM 3/5
APR/24/2006 12:00 AM 1 SceneAPR/24/2006 12:00 AM
01 APR/23/2006 12:0 00:00:21 √√
02 APR/23/2006 12:3 00:00:03 √√
03 APR/24/2006 12:0 00:00:15 √√
04 APR/24/2006 12:3 00:00:16 √√
05 APR/25/2006 12:0 00:00:32 √√
No. Title Length Edit
Play
Rename
Edit Scene
Copy
Delete
RenameDVD-Recorder
DVD-RW(VR)
Save
Dolphin
Edit PlaylistDVD-RW(VR)
Dolphin 3/5
Dolphin 1 SceneAPR/24/2006 12:00 AM
01 APR/23/2006 12:0 00:00:21 √√
02 APR/23/2006 12:3 00:00:03 √√
03 Dolphin 00:00:15 √√
04 APR/24/2006 12:3 00:00:16 √√
05 APR/25/2006 12:0 00:00:32 √√
No. Title Length Edit
Back Space Space Delete Clear
RETURNENTERMOVE EXIT
RETURNENTERMOVE EXIT
RETURNENTERMOVE EXIT
RETURNENTERMOVE EXIT
Edit PlaylistDVD-RW(VR)
APR/23/2006
APR/23/2006 12:00 AM 1 SceneAPR/23/2006 12:00 AM
01 APR/23/2006 12:0 00:00:21 √√
02 APR/23/2006 12:3 00:00:03 √√
03 APR/24/2006 12:0 00:00:15 √√
04 APR/24/2006 12:3 00:00:16 √√
05 APR/25/2006 12:0 00:00:32 √√
No. Title Length Edit
RETURNENTERMOVE EXIT
1/5
01002A-R130-XAA-ENG-71-88 2006.1.23 6:6 PM Page 78
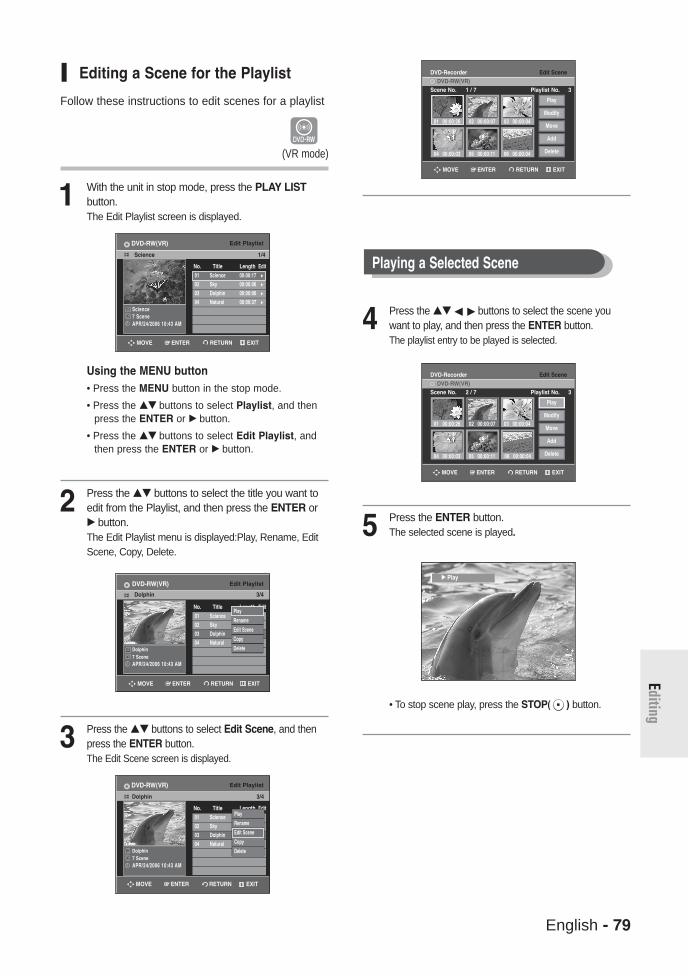
English - 79
Editing
Editing a Scene for the Playlist
Follow these instructions to edit scenes for a playlist
1 With the unit in stop mode, press the PLAY LISTbutton.The Edit Playlist screen is displayed.
Using the MENU button• Press the MENU button in the stop mode.
• Press the …† buttons to select Playlist, and thenpress the ENTER or √ button.
• Press the …† buttons to select Edit Playlist, andthen press the ENTER or √ button.
2 Press the …† buttons to select the title you want toedit from the Playlist, and then press the ENTER or√ button.The Edit Playlist menu is displayed:Play, Rename, EditScene, Copy, Delete.
3 Press the …† buttons to select Edit Scene, and thenpress the ENTER button.The Edit Scene screen is displayed.
4 Press the …† œ √ buttons to select the scene youwant to play, and then press the ENTER button.The playlist entry to be played is selected.
5 Press the ENTER button.The selected scene is played.
• To stop scene play, press the STOP( ) button.
(VR mode)
Playing a Selected Scene
Edit PlaylistDVD-RW(VR)
Dolphin 3/4
01 Science 00:00:17 √√
02 Sky 00:00:06 √√
03 Dolphin 00:00:06 √√
04 Natural 00:00:37 √√
No. Title Length EditPlay
Rename
Edit Scene
Copy
DeleteDolphin7 SceneAPR/24/2006 10:43 AM
Edit PlaylistDVD-RW(VR)
Science 1/4
Science7 SceneAPR/24/2006 10:43 AM
01 Science 00:00:17 √√
02 Sky 00:00:06 √√
03 Dolphin 00:00:06 √√
04 Natural 00:00:37 √√
No. Title Length Edit
Edit PlaylistDVD-RW(VR)
Dolphin 3/4
Dolphin7 SceneAPR/24/2006 10:43 AM
01 Science 00:00:17 √√
02 Sky 00:00:06 √√
03 Dolphin 00:00:06 √√
04 Natural 00:00:37 √√
No. Title Length EditPlay
Rename
Edit Scene
Copy
Delete
Edit SceneDVD-Recorder
Scene No. 1 / 7 Playlist No. 3DVD-RW(VR)
01 00:00:26 02 00:00:07
04 00:00:03 05 00:00:11 06 00:00:04
03 00:00:04
Play
Modify
Move
Add
Delete
Edit SceneDVD-Recorder
Scene No. 2 / 7 Playlist No. 3DVD-RW(VR)
01 00:00:26 02 00:00:07
04 00:00:03 05 00:00:11 06 00:00:04
03 00:00:04
Play
Modify
Move
Add
Delete
√√ Play
RETURNENTERMOVE EXIT
RETURNENTERMOVE EXIT
RETURNENTERMOVE EXIT
RETURNENTERMOVE EXIT
RETURNENTERMOVE EXIT
01002A-R130-XAA-ENG-71-88 2006.1.23 6:6 PM Page 79

80 - English
Editi
ng
4 Press the …† œ √ buttons to select the scene youwant to modify, and then press the ENTER button.
5 Press the …† buttons to select Modify, and thenpress the ENTER button.
6 Press the ENTER button at the start point of thescene.
• The image and starting point time are displayedon the Start window.
• Select the starting or ending point of thesection you want to modify using the playbackrelated buttons ( , , , , , , ).
7 Press the ENTER button at the end point of thescene.
• The image and ending point time are displayed onthe End window.
8 Press the œ √ buttons to select Change, and thenpress the ENTER button.
• The scene you want to modify is changed with theselected section.
Modifying a Scene (Replacing a Scene)
To setup, follow steps 1 to 3 in page 79.
Edit SceneDVD-Recorder
Scene No. 2 / 7 Playlist No. 3DVD-RW(VR)
01 00:00:26 02 00:00:07
04 00:00:03 05 00:00:11 06 00:00:04
03 00:00:04
Play
Modify
Move
Add
Delete
Modify SceneDVD-Recorder
DVD-RW(VR)
Scene No. 002
√√
Start End
00:00:25 00:00:00
00:00:25
Start End Change Cancel
Title List : 5/6
Modify SceneDVD-Recorder
DVD-RW(VR)
Scene No. 002
√√
Start End
00:00:00 00:00:00
00:00:00
Start End Change Cancel
Title List : 5/6
Edit SceneDVD-Recorder
Scene No. 2 / 7 Playlist No. 3DVD-RW(VR)
01 00:00:26
04 00:00:03 05 00:00:11 06 00:00:04
03 00:00:0402 00:00:07
Play
Modify
Move
Add
Delete
Modify SceneDVD-Recorder
DVD-RW(VR)
Scene No. 002Start End
00:00:25 00:00:30
00:00:30
Start End Change Cancel
Title List : 5/6
»»
RETURNENTERMOVE EXIT
RETURNENTERMOVE EXIT
RETURNENTERMOVE EXIT
RETURNENTERMOVE EXIT
RETURNENTERMOVE EXIT
01002A-R130-XAA-ENG-71-88 2006.1.23 6:6 PM Page 80

English - 81
Editing
Moving a Scene (Changing the Position of a Scene)
To setup, follow steps 1 to 3 in page 79.
To setup, follow steps 1 to 3 in page 79.
4 Press the …† œ √ buttons to select the scene youwant to move (change the position), and then pressthe ENTER button.
5 Press the …† buttons to select Move, then press theENTER button.
• A yellow selection window is displayed on the scene tobe moved.
6 Press the …† œ √ buttons to select the position towhich you want to move the selected scene, andthen select the ENTER button.
• The selected scene is moved to the selected position.
4 Press the …† œ √ buttons to select the scene thatwill have a new scene inserted before it, and thenpress the ENTER button.A yellow selection window is displayed on the scene tobe added as the new scene.
5 Press the …† buttons to select Add, then press theENTER button.
6 Press the ENTER button at the starting point of thescene.
• The image and starting point time are displayed onthe Start window.
• Select the end point of the section where you wantto add the new scene using the playback relatedbuttons ( , , , , , , ).
Depending disc type, the displayed screenmay look slightly different.
NOTE
Adding a Scene
Edit SceneDVD-Recorder
Scene No. 3/7 Playlist No. 3DVD-RW(VR)
01 00:00:26 02 00:00:07
04 00:00:03 05 00:00:11 06 00:00:04
03 00:00:04
Play
Modify
Move
Add
Delete
DVD-RW(VR)
Edit SceneDVD-Recorder
DVD-RW(VR)
Edit SceneDVD-Recorder
DVD-RW(VR)
Edit SceneDVD-Recorder
Scene No. 3/7 Playlist No. 3
01 00:00:26 02 00:00:07
04 00:00:03 05 00:00:11 06 00:00:04
03 00:00:04
Play
Modify
Move
Add
Delete
Scene No. 6/7 Playlist No. 3
01 00:00:26 02 00:00:07
04 00:00:03 05 00:00:11 06 00:00:04
03 00:00:04
Play
Modify
Move
Add
Delete
Scene No. 5/7 Playlist No. 3
01 00:00:26 02 00:00:04
04 00:00:11 05 00:00:04 06 00:00:04
03 00:00:03
Play
Modify
Move
Add
Delete
Edit SceneDVD-Recorder
Scene No. 4/7 Playlist No. 3DVD-RW(VR)
01 00:00:26 02 00:00:07
04 00:00:03 05 00:00:11 06 00:00:04
03 00:00:04
Play
Modify
Move
Add
Delete
Add SceneDVD-Recorder
DVD-RW(VR)
Scene No. 004
Title List : 4/6
√√
Start End
00:00:15 00:00:00
Start End Add Cancel
00:00:15
Add SceneDVD-Recorder
DVD-RW(VR)
Scene No. 004
Title List : 4/6
√√
Start End
00:00:00 00:00:00
Start End Add Cancel
00:00:00
RETURNENTERMOVE EXIT
RETURNENTERMOVE EXIT
RETURNENTERMOVE EXIT
RETURNENTERMOVE EXIT
RETURNENTERMOVE EXIT
RETURNENTERMOVE EXIT
RETURNENTERMOVE EXIT
01002A-R130-XAA-ENG-71-88 2006.1.23 6:7 PM Page 81

82 - English
Editi
ng
7 Press the ENTER button at the end point of the scene.
• The image and end point time are displayed in theEnd window.
• To cancel, press the œ √ buttons to select Canceland then press the ENTER button.
8 Press the œ √ buttons to select Add, and then pressthe ENTER button.
• The section you want to add is inserted prior to thescene selected in step 4.
4 Press the …† œ √ buttons to select the scene youwant to delete, and then press the ENTER button.
5 Press the …† buttons to select Delete, and then pressthe ENTER button.
Deleting a Scene
To setup, follow steps 1 to 3 in page 79.
Copying a Playlist Entry to thePlaylist
Using the PLAY LIST button
1 Press the PLAY LIST button.The Edit Playlist screen is displayed.
Using the MENU button• Press the MENU button in the stop mode.• Press the …† buttons to select Playlist, and
then press the ENTER or √ button.• Press the …† buttons to select Edit Playlist,
and then press the ENTER or √ button.
2 Press the …† buttons to select the title you want tocopy to the Playlist, and then press the ENTER or √button.The Edit Playlist menu is displayed : Play, Rename, EditScene, Copy, Delete
3 Press the …† buttons to select Copy, and thenpress the ENTER button.Playlist that has been selected will be copied.
Add SceneDVD-Recorder
DVD-RW(VR)
Scene No. 004
»»
Start End
00:00:15
00:00:35
00:00:35
Start End Add Cancel
DVD-RW(VR)
Edit SceneDVD-Recorder
Edit PlaylistDVD-RW(VR)
Dolphin
Dolphin7 SceneAPR/23/2006 06:43 AM
01 Science 00:00:17 √√
02 Sky 00:00:06 √√
03 Dolphin 00:00:06 √√
04 Natural 00:00:37 √√
No. Title Length EditPlay
Rename
Edit Scene
Copy
Delete
Scene No. 4/8 Playlist No. 3
01 00:00:26 02 00:00:07
04 00:00:20 05 00:00:03 06 00:00:11
03 00:00:04
Play
Modify
Move
Add
Delete
DVD-RW(VR)
Edit SceneDVD-Recorder
Scene No. 2/7 Playlist No. 3
01 00:00:26 02 00:00:07
04 00:00:03 05 00:00:11 06 00:00:04
03 00:00:04
Play
Modify
Move
Add
Delete
DVD-RW(VR)
Edit SceneDVD-Recorder
Scene No. 2/6 Playlist No. 3
01 00:00:26 03 00:00:04
05 00:00:11 06 00:00:04 06 00:00:05
04 00:00:03
Play
Modify
Move
Add
Delete
Title List : 4/6
RETURNENTERMOVE EXIT
RETURNENTERMOVE EXIT
RETURNENTERMOVE EXIT
RETURNENTERMOVE EXITRETURNENTERMOVE EXIT
Edit PlaylistDVD-RW(VR)
Science
Science1 SceneAPR/23/2006 06:43 AM
01 Science 00:00:17 √√
02 Sky 00:00:06 √√
03 Dolphin 00:00:06 √√
04 Natural 00:00:37 √√
No. Title Length Edit
RETURNENTERMOVE EXIT
1/4
Edit PlaylistDVD-RW(VR)
Dolphin
Dolphin7 SceneAPR/23/2006 06:43 AM
01 Science 00:00:17 √√
02 Sky 00:00:06 √√
03 Dolphin 00:00:06 √√
04 Natural 00:00:37 √√
No. Title Length Edit
RETURNENTERMOVE EXIT
3/4
3/4
Play
Rename
Edit Scene
Copy
Delete
01002A-R130-XAA-ENG-71-88 2006.1.23 6:7 PM Page 82

English - 83
Editing
The playlist can contain up to 99 playlistentries (titles).
Press the MENU button after the operationhas finished. The Edit Playlist screen will disappear.
NOTE
Deleting a Playlist Entry from thePlaylist
Using the PLAYLIST button
1 With the unit in Stop mode, press the PLAY LISTbutton.The Edit Playlist screen is displayed.
Using the MENU button• Press the MENU button in the stop mode.• Press the …† buttons to select Playlist, and then
press the ENTER or √ button.• Press the …† buttons to select Edit Playlist, and
then press the ENTER or √ button.
2 Press the …† buttons to select the title you want to editfrom the Playlist, and then press the ENTER or √ button.The Edit Playlist menu is displayed : Play, Rename, EditScene, Copy, Delete.
3 Press the …† buttons to select Delete, and thenpress the ENTER button.
• You will be prompted with the delete confirmationmessage “Do you want to delete?”.
4 Press the œ √ buttons to select Yes, and then pressthe ENTER button.You automatically returned to the Edit Playlist screenafter the deletion operation has finished.
Edit PlaylistDVD-RW(VR)
Dolphin
Dolphin7 SceneAPR/23/2006 06:43 AM
01 Science 00:00:17 √√
02 Sky 00:00:06 √√
03 Dolphin 00:00:06 √√
04 Natural 00:00:37 √√
05 Dolphin 00:00:06 √√
No. Title Length Edit
Edit PlaylistDVD-RW(VR)Natural
Natural1 SceneAPR/23/2006 06:43 AM
01 Science 00:00:17 √√
02 Sky 00:00:06 √√
03 Dolphin 00:00:06 √√
04 Natural 00:00:37 √√
No. Title Length Edit
Edit PlaylistDVD-RW(VR)
Dolphin
Dolphin7 SceneAPR/23/2006 06:43 AM
Yes No
Do you want to delete?
Edit PlaylistDVD-RW(VR)
Dolphin
Dolphin7 SceneAPR/23/2006 06:43 AM
Deleting...(Please wait)
Edit PlaylistDVD-RW(VR)
Science
Science1 SceneAPR/23/2006 06:43 AM
01 Science 00:00:17 √√
02 Sky 00:00:06 √√
03 Dolphin 00:00:06 √√
04 Natural 00:00:37 √√
05 Dolphin 00:00:06 √√
No. Title Length Edit
Edit PlaylistDVD-RW(VR)
Dolphin
Dolphin7 SceneAPR/23/2006 06:43 AM
01 Science 00:00:17 √√
02 Sky 00:00:06 √√
03 Dolphin 00:00:06 √√
04 Natural 00:00:37 √√
05 Dolphin 00:00:06 √√
No. Title Length Edit
Play
Rename
Edit Scene
Copy
Delete
Edit PlaylistDVD-RW(VR)
Dolphin
Dolphin7 SceneAPR/23/2006 06:43 AM
01 Science 00:00:17 √√
02 Sky 00:00:06 √√
03 Dolphin 00:00:06 √√
04 Natural 00:00:37 √√
05 Dolphin 00:00:06 √√
No. Title Length Edit
Play
Rename
Edit Scene
Copy
Delete
RETURNENTERMOVE EXIT
RETURNENTERMOVE EXIT
RETURNENTERMOVE EXIT
RETURNENTERMOVE EXIT
RETURNENTERMOVE EXIT
RETURNENTERMOVE EXIT
RETURNENTERMOVE EXIT
5/5
4/4
5/5
5/5
5/5
1/5
5/5
01002A-R130-XAA-ENG-71-88 2006.1.23 6:7 PM Page 83

84 - English
Editi
ng
Disc Manager
Editing the Disc Name
Follow these instructions to give a name to a disc.
1 With the unit in Stop mode, press the MENU buttonon the remote control.
2 Press the …† buttons to select Disc Manager, thenpress the ENTER or √ button.
3 Press the …† buttons to select Disc Name, thenpress the ENTER or √ button.The Rename screen is displayed.
4 Enter the desired characters using the …† œ √buttons.
• This function is the same as the Rename function inrenaming the title list. (See page 72.)
• The maximum number of characters that can beentered is 31. All 31 characters can be displayed bypressing the INFO button.
5 Press the …† œ √ buttons to select Save, and thenpress the ENTER button.A disc name is given to the disc.
You may need to clear disc protect beforebeginning editing.(see page 85.)
Depending on the kind of disc, the displayedscreen may be different.
NOTE
RenameDVD-Recorder
DVD-RW(VR)
Back Space Space Delete Clear
Save
Disc ManagerDVD-Recorder
Title List
Playlist
Disc Manager
Timer Rec.
Setup
DVD-RW(VR)
Disc Name : √√
Disc Protection : Not Protected √√
Disc Format : DVD-VR √√
Disc Finalize √√
Delete All Title Lists √√
Title ListDVD-Recorder
Title List √√Title List
Playlist
Disc Manager
Timer Rec.
Setup
DVD-RW(VR)
RenameDVD-Recorder
DVD-RW(VR)
Back Space Space Delete Clear
Save
D i s c
Disc ManagerDVD-Recorder
Title List
Playlist
Disc Manager
Timer Rec.
Setup
DVD-RW(VR)
Disc Name : Disc √√
Disc Protection : Not Protected √√
Disc Format : DVD-VR √√
Disc Finalize √√
Delete All Title Lists √√
RETURNENTERMOVE EXIT
RETURNENTERMOVE EXIT
RETURNENTERMOVE EXIT
RETURNENTERMOVE EXIT
RETURNENTERMOVE EXIT
01002A-R130-XAA-ENG-71-88 2006.1.23 6:7 PM Page 84

English - 85
Editing
Disc ProtectionDisc Protection allows you to protect your discs frombeing formatted or deleted due to unintendedoperations
1 With the unit in Stop mode, press the MENU buttonon the remote control.
2 Press the …† buttons to select Disc Manager, andthen press the ENTER or √ button.
3 Press the …† buttons to select Disc Protection,then press the ENTER or √ button.
4 Press the …† buttons to select Protected, thenpress the ENTER button.
Formatting a DiscUse these instructions to format a disc.The disc protection should be cleared.
1 With the unit in Stop mode, press the MENU buttonon the remote control.
2 Press the …† buttons to select Disc Manager, andthen press the ENTER or √ button.
3 Press the …† buttons to select Disc Format, andthen press the ENTER or √ button.
Disc ManagerDVD-Recorder
Title List
Playlist
Disc Manager
Timer Rec.
Setup
DVD-RW(VR)
Disc Name : √√
Disc Protection : Not Protected √√
Disc Format : DVD-VR √√
Disc Finalize √√
Delete All Title Lists √√
Disc ManagerDVD-Recorder
Title List
Playlist
Disc Manager
Timer Rec.
Setup
DVD-RW(VR)
Disc Name : √√
Disc Protection : √√
Disc Format : DVD-VR √√
Disc Finalize √√
Delete All Title Lists √√
Not Protected
Protected
Title ListDVD-Recorder
Title List √√Title List
Playlist
Disc Manager
Timer Rec.
Setup
DVD-RW(VR)
Disc ManagerDVD-Recorder
Title List
Playlist
Disc Manager
Timer Rec.
Setup
DVD-RW(VR)
Disc Name : √√
Disc Protection : Not Protected √√
Disc Format : DVD-VR √√
Disc Finalize √√
Delete All Title Lists √√
Disc ManagerDVD-Recorder
Title List
Playlist
Disc Manager
Timer Rec.
Setup
DVD-RW(VR)
Disc Name : √√
Disc Protection : Not Protected √√
Disc Format : DVD-VR √√
Disc Finalize √√
Delete All Title Lists √√
Title ListDVD-Recorder
Title List √√Title List
Playlist
Disc Manager
Timer Rec.
Setup
DVD-RW(VR)
Disc ManagerDVD-Recorder
Title List
Playlist
Disc Manager
Timer Rec.
Setup
DVD-RW(VR)
Disc Name : √√
Disc Protection : Not Protected √√
Disc Format : DVD-VR √√
Disc Finalize √√
Delete All Title Lists √√
Disc ManagerDVD-Recorder
Title List
Playlist
Disc Manager
Timer Rec.
Setup
DVD-RW(VR)
Disc Name : √√
Disc Protection : Protected √√
Disc Format : DVD-VR √√
Disc Finalize √√
Delete All Title Lists √√
RETURNENTERMOVE EXIT
RETURNENTERMOVE EXIT
RETURNENTERMOVE EXIT
RETURNENTERMOVE EXIT
RETURNENTERMOVE EXIT
RETURNENTERMOVE EXIT
RETURNENTERMOVE EXIT
RETURNENTERMOVE EXIT
01002A-R130-XAA-ENG-71-88 2006.1.23 6:7 PM Page 85
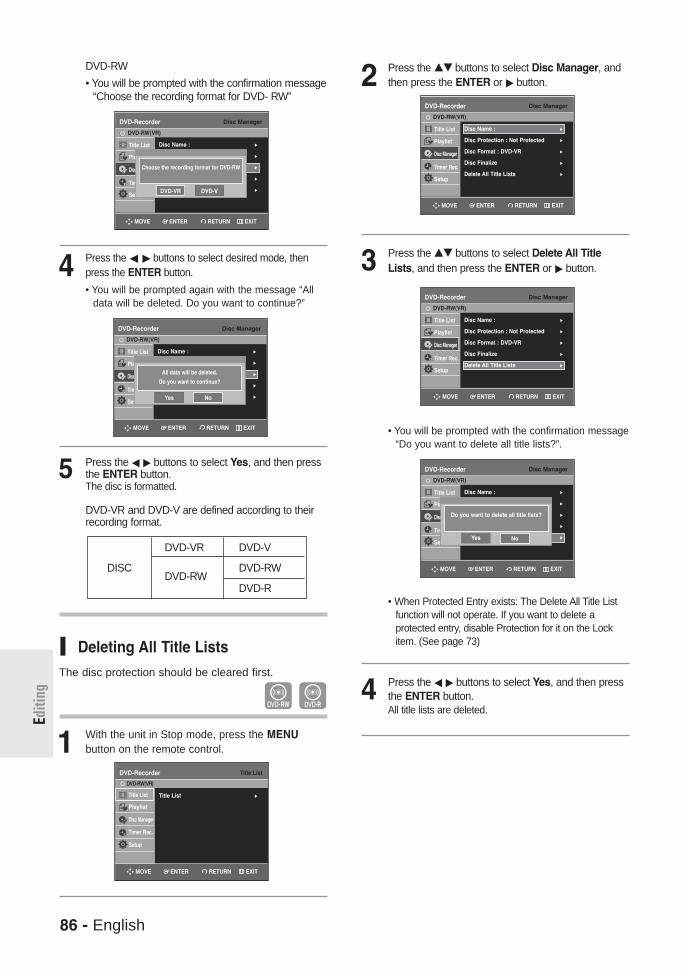
86 - English
Editi
ng
DVD-RW
• You will be prompted with the confirmation message“Choose the recording format for DVD- RW”
4 Press the œ √ buttons to select desired mode, thenpress the ENTER button.
• You will be prompted again with the message “Alldata will be deleted. Do you want to continue?”
5 Press the œ √ buttons to select Yes, and then pressthe ENTER button. The disc is formatted.
DVD-VR and DVD-V are defined according to theirrecording format.
Deleting All Title Lists
The disc protection should be cleared first.
1 With the unit in Stop mode, press the MENUbutton on the remote control.
2 Press the …† buttons to select Disc Manager, andthen press the ENTER or √ button.
3 Press the …† buttons to select Delete All TitleLists, and then press the ENTER or √ button.
• You will be prompted with the confirmation message“Do you want to delete all title lists?”.
• When Protected Entry exists: The Delete All Title Listfunction will not operate. If you want to delete aprotected entry, disable Protection for it on the Lockitem. (See page 73)
4 Press the œ √ buttons to select Yes, and then pressthe ENTER button.All title lists are deleted.
DVD-VR DVD-V
DISC DVD-RWDVD-RW
DVD-R
Disc ManagerDVD-Recorder
Title List
Playlist
Disc Manager
Timer Rec.
Setup
DVD-RW(VR)
Disc Name : √√
Disc Protection : Not Protected √√
Disc Format : DVD-VR √√
Disc Finalize √√
Delete All Title Lists √√
Choose the recording format for DVD-RW
DVD-VR DVD-V
Title ListDVD-Recorder
Title List √√Title List
Playlist
Disc Manager
Timer Rec.
Setup
DVD-RW(VR)
Disc ManagerDVD-Recorder
Title List
Playlist
Disc Manager
Timer Rec.
Setup
DVD-RW(VR)
Disc Name : √√
Disc Protection : Not Protected √√
Disc Format : DVD-VR √√
Disc Finalize √√
Delete All Title Lists √√
Do you want to delete all title lists?
Yes No
Disc ManagerDVD-Recorder
Title List
Playlist
Disc Manager
Timer Rec.
Setup
DVD-RW(VR)
Disc Name : √√
Disc Protection : Not Protected √√
Disc Format : DVD-VR √√
Disc Finalize √√
Delete All Title Lists √√
Disc ManagerDVD-Recorder
Title List
Playlist
Disc Manager
Timer Rec.
Setup
DVD-RW(VR)
Disc Name : √√
Disc Protection : Not Protected √√
Disc Format : DVD-VR √√
Disc Finalize √√
Delete All Title Lists √√
Disc ManagerDVD-Recorder
Title List
Playlist
Disc Manager
Timer Rec.
Setup
DVD-RW(VR)
Disc Name : √√
Disc Protection : Not Protected √√
Disc Format : DVD-VR √√
Disc Finalize √√
Delete All Title Lists √√
All data will be deleted.
Do you want to continue?
Yes No
RETURNENTERMOVE EXIT
RETURNENTERMOVE EXIT
RETURNENTERMOVE EXIT
RETURNENTERMOVE EXIT
RETURNENTERMOVE EXIT
RETURNENTERMOVE EXIT
01002A-R130-XAA-ENG-71-88 2006.1.23 6:7 PM Page 86
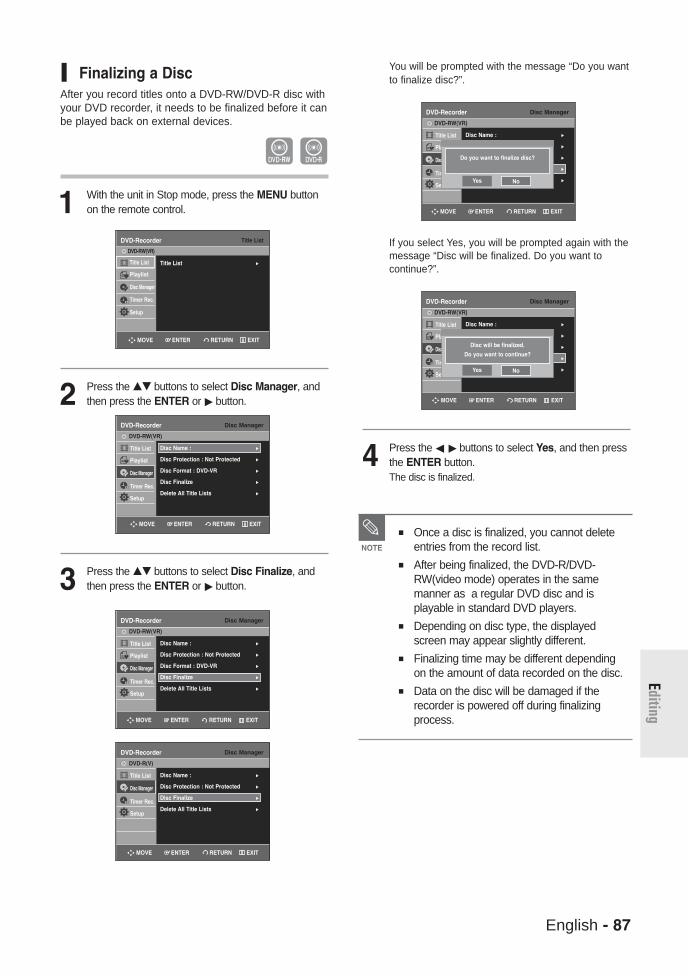
English - 87
Editing
Finalizing a Disc After you record titles onto a DVD-RW/DVD-R disc withyour DVD recorder, it needs to be finalized before it canbe played back on external devices.
1 With the unit in Stop mode, press the MENU buttonon the remote control.
2 Press the …† buttons to select Disc Manager, andthen press the ENTER or √ button.
3 Press the …† buttons to select Disc Finalize, andthen press the ENTER or √ button.
You will be prompted with the message “Do you wantto finalize disc?”.
If you select Yes, you will be prompted again with themessage “Disc will be finalized. Do you want tocontinue?”.
4 Press the œ √ buttons to select Yes, and then pressthe ENTER button.The disc is finalized.
Once a disc is finalized, you cannot deleteentries from the record list.
After being finalized, the DVD-R/DVD-RW(video mode) operates in the samemanner as a regular DVD disc and isplayable in standard DVD players.
Depending on disc type, the displayedscreen may appear slightly different.
Finalizing time may be different dependingon the amount of data recorded on the disc.
Data on the disc will be damaged if therecorder is powered off during finalizingprocess.
NOTE
Disc ManagerDVD-Recorder
Title List
Playlist
Disc Manager
Timer Rec.
Setup
DVD-RW(VR)
Disc Name : √√
Disc Protection : Not Protected √√
Disc Format : DVD-VR √√
Disc Finalize √√
Delete All Title Lists √√
Disc ManagerDVD-Recorder
Title List
Disc Manager
Timer Rec.
Setup
DVD-R(V)
Disc Name : √√
Disc Protection : Not Protected √√
Disc Finalize √√
Delete All Title Lists √√
Disc ManagerDVD-Recorder
Title List
Playlist
Disc Manager
Timer Rec.
Setup
DVD-RW(VR)
Disc Name : √√
Disc Protection : Not Protected √√
Disc Format : DVD-VR √√
Disc Finalize √√
Delete All Title Lists √√
Title ListDVD-Recorder
Title List √√Title List
Playlist
Disc Manager
Timer Rec.
Setup
DVD-RW(VR)
Disc ManagerDVD-Recorder
Title List
Playlist
Disc Manager
Timer Rec.
Setup
DVD-RW(VR)
Disc Name : √√
Disc Protection : Not Protected √√
Disc Format : DVD-VR √√
Disc Finalize √√
Delete All Title Lists √√
Do you want to finalize disc?
Yes No
Disc ManagerDVD-Recorder
Title List
Playlist
Disc Manager
Timer Rec.
Setup
DVD-RW(VR)
Disc Name : √√
Disc Protection : Not Protected √√
Disc Format : DVD-VR √√
Disc Finalize √√
Delete All Title Lists √√
Disc will be finalized.
Do you want to continue?
Yes No
RETURNENTERMOVE EXIT
RETURNENTERMOVE EXIT
RETURNENTERMOVE EXIT
RETURNENTERMOVE EXIT
RETURNENTERMOVE EXIT
RETURNENTERMOVE EXIT
01002A-R130-XAA-ENG-71-88 2006.1.23 6:7 PM Page 87
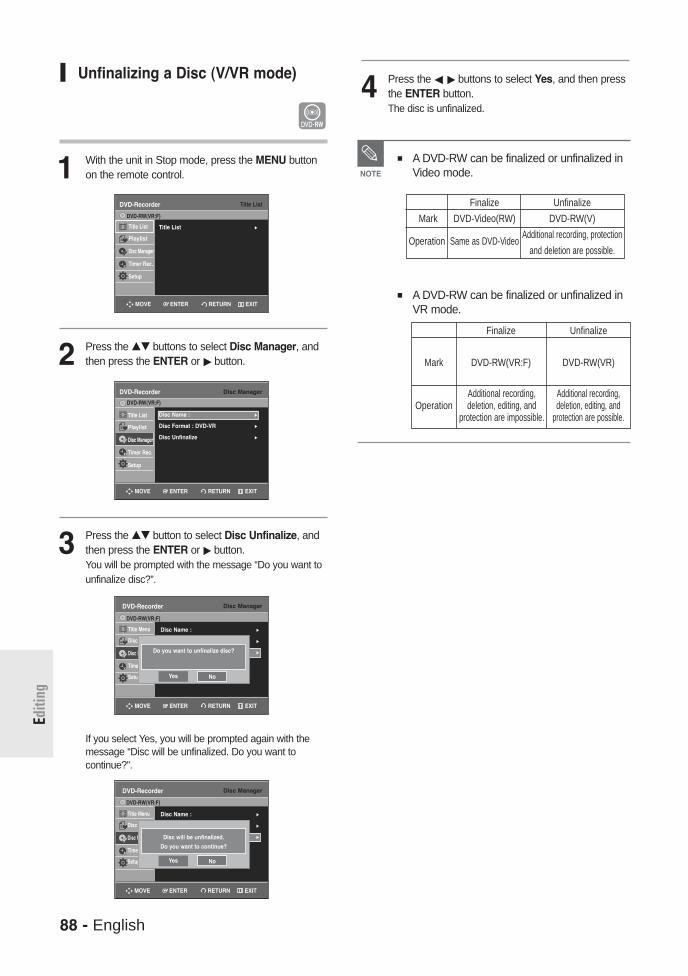
88 - English
Editi
ng
Unfinalizing a Disc (V/VR mode)
1 With the unit in Stop mode, press the MENU buttonon the remote control.
2 Press the …† buttons to select Disc Manager, andthen press the ENTER or √ button.
3 Press the …† button to select Disc Unfinalize, andthen press the ENTER or √ button.You will be prompted with the message “Do you want tounfinalize disc?”.
If you select Yes, you will be prompted again with themessage “Disc will be unfinalized. Do you want tocontinue?”.
4 Press the œ √ buttons to select Yes, and then pressthe ENTER button.The disc is unfinalized.
A DVD-RW can be finalized or unfinalized inVideo mode.
A DVD-RW can be finalized or unfinalized inVR mode.
NOTE
Finalize Unfinalize
Mark DVD-Video(RW) DVD-RW(V)
Operation Same as DVD-VideoAdditional recording, protection
and deletion are possible.
Finalize Unfinalize
Mark DVD-RW(VR:F) DVD-RW(VR)
OperationAdditional recording,deletion, editing, and
protection are impossible.
Additional recording,deletion, editing, and
protection are possible.
Disc ManagerDVD-Recorder
Title List
Playlist
Disc Manager
Timer Rec.
Setup
DVD-RW(VR:F)
Disc Name : √√
Disc Format : DVD-VR √√
Disc Unfinalize √√
Disc ManagerDVD-Recorder
DVD-RW(VR:F)
Disc Name : √√
Disc Format : DVD-VR √√
Disc Unfinalize √√
Title Menu
Disc Menu
Disc Manager
Timer Rec.
Setup
Do you want to unfinalize disc?
Yes No
Disc ManagerDVD-Recorder
DVD-RW(VR:F)
Disc Name : √√
Disc Format : DVD-VR √√
Disc Unfinalize √√
Title Menu
Disc Menu
Disc Manager
Timer Rec.
Setup
Disc will be unfinalized.
Do you want to continue?
Yes No
Title ListDVD-Recorder
Title List √√Title List
Playlist
Disc Manager
Timer Rec.
Setup
DVD-RW(VR:F)
RETURNENTERMOVE EXIT
RETURNENTERMOVE EXIT
RETURNENTERMOVE EXIT
RETURNENTERMOVE EXIT
01002A-R130-XAA-ENG-71-88 2006.1.23 6:7 PM Page 88

English - 89
AdditionalInform
ation
AdditionalInformation
Troubleshooting . . . . . . . . . . . . . . . . . . . . . . . . . . .89
Solutions to Error Message . . . . . . . . . . . . . . . . . .93
Specification . . . . . . . . . . . . . . . . . . . . . . . . . . . . .95
Warranty . . . . . . . . . . . . . . . . . . . . . . . . . . . . . . . .96
Recording is possible for DVD-RW/DVD-R discs only. If a program is copyprotected, it cannot be recorded.
Checkpoint 1
I pressed the REC button but there is no response.
If your product malfunctions, go through thecheckpoints below before contacting a Samsungauthorized service center.
Power
Recording
The DVD recorder requires some timeto initialize and the input will bedisplayed for approx. 10 seconds afterit is turned on.
Checkpoint 1
Check whether the power cord issecurely plugged into the power outlet.
Did you set the DVD recorder channelsettings correctly?
Check the free space on your DVD-RW/DVD-R discs.
Checkpoint 1
Checkpoint 2
Checkpoint 3
The input is displayed for a while when thepower is turned on.
Cannot record TV programs.
Troubleshooting
01002A-R130-XAA-ENG-89-98 2006.1.23 6:8 PM Page 89

90 - English
Addi
tiona
lIn
form
atio
n
Playback
Check whether the disc is insertedcorrectly with the label facing up.
Check the regional code of the DVDdisc.
This DVD recorder cannot play sometypes of discs. (See pages 5, 54.)
Checkpoint 1
Checkpoint 2
Checkpoint 3
Cannot play the disc.
You cannot use this operation or function due to one of the followingreasons:(1) Your DVD disc restricts it.(2) Your DVD disc does not support
this feature (for example: angles)(3) The feature is not available at the
moment.(4) You've requested a title, chapter, or
scan time that is out of range.
Checkpoint 1
icon appears on the screen.
The disc does not support all selectedfunctions. In this case, some settingsconfigured in the settings menu maynot work properly.
Checkpoint 1
Play mode settings are different from the settingsconfigured in the Settings menu.
The aspect ratio is fixed for DVDdiscs. (See page 34.)
Checkpoint 1
Cannot change the aspect ratio.
The angle operation is available onlywhen the disc contains imagescaptured from different angles.
Checkpoint 1
The angle operation does not work while playing aDVD disc.
Audio and subtitle languages are disc-specific. Only the sound and subtitlelanguages contained on the DVD discare available and displayed in the discmenu.
Checkpoint 1
The selected audio and/or subtitle language is notplayed.
01002A-R130-XAA-ENG-89-98 2006.1.23 6:8 PM Page 90

English - 91
AdditionalInform
ation
Video
Sound
Checkpoint 1
Checkpoint 2
Checkpoint 3
Checkpoint 4
No sound.
Are you watching a program in scanmode?If you are playing a program at aspeed other than normal and fast1speed, the sound will not be heard.
Check the connections and settings.
Check whether the disc is damaged.Clean the disc, if necessary.
Check whether the disc is insertedcorrectly with the label facing up.
Checkpoint 1
No audio output.
Check whether you have selectedthe correct digital output options inthe Audio Output Options menu. (See page 32, 33.)
Check whether there is damage to orany foreign material on your disc.
Some low quality discs may not playproperly.
If scenes change from dark to brightsuddenly, the screen may shakevertically temporarily, but this is not afault.
Checkpoint 1
Checkpoint 2
Checkpoint 3
The disc revolves, but no image or bad qualityimages are displayed.
Re-check the recording time and theend time settings again.
Recording will be cancelled, if thepower is disconnected due to apower failure or other similar reason,while recording.
Checkpoint 1
Checkpoint 2
Timer recording does not work properly.
Timer Recording
Check if there is enough space in thedisc for recording.
Check whether the current disc isrecordable or not.Make sure to check before the starttime of recording.
Checkpoint 1
Checkpoint 2
Timer lamp flickers.
01002A-R130-XAA-ENG-89-98 2006.1.23 6:8 PM Page 91
92 - English
Addi
tiona
lIn
form
atio
n
Remote Control Unit
Read the table of contents and thenfind and read the section describingyour problem, and follow theinstructions given.
Turn your DVD recorder off and on.
If the problem still persists, contact anearby Samsung service center.
Checkpoint 1
Checkpoint 2
Checkpoint 3
Other problems
Point the remote control at the remotecontrol sensor on your DVD recorder.Allow for proper distance. Removeobstacles between your DVD recorderand the remote control.
Check whether the batteries areempty.
Checkpoint 1
Checkpoint 2
The remote control doesn't work.
A recorded disc is played with onlythe subtitle and the audio signalwhich were selected during recording.
Checkpoint 1
Is it possible to change a subtitle and an audiosignal on a recorded disc?
Other
Press the ( ) and ( ) buttons onyour DVD recorder simultaneouslywhen the power is on. All settingsincluding the password will revert tothe factory settings. Do not use thisunless absolutely necessary.(Note that this function is possible onlywhen no disc is inserted.)
Checkpoint 1
I forgot my password for parental supervision.
01002A-R130-XAA-ENG-89-98 2006.1.23 6:8 PM Page 92

English - 93
AdditionalInform
ation
Solutions to Error Message
Solution / Explanation
You can’t record the video since it is protected by copyright.
Disc you are using is protected. To record on this disc oruse this function, cancel the disc protection function. Referto page 85.
The disc does not match the regional code for your areaand cannot be played on this device.
Make sure there are no scratches or dirt on the disc.
The disc is PAL format and cannot be played on thisunit.
Make sure there are no scratches or dirt on the disc.
You can’t use the disc because it contains errors fromprevious recordings.Use the disc after formatting.
Error Message
You cannot record a copy protected movie.
You cannot record. This disc is protected.
This disc cannot be formatted (the disc isprotected).
This disc cannot be renamed(the disc is protected).
The disc cannot be finalized (the disc is protected).
This [Menu] is not available (the disc is protected).
The disc cannot be played,Please check the regional code of the disc.
This disc cannot be formatted.Please check the disc.
You could not format the discbecause of error detection.
You could not finalize the discbecause of error detection.
You could not unfinalize the discbecause of error detection.
The disc cannot be played,Please check the TV system.
The disc can be neither played nor recorded.
The disc cannot be played, Please check the disc.
If the disc has invalid information, no more titles can be recorded. Please format the disc beforehand.
Before contacting a Samsung authorized service center, perform the following simple checks.
01002A-R130-XAA-ENG-89-98 2006.1.23 6:8 PM Page 93
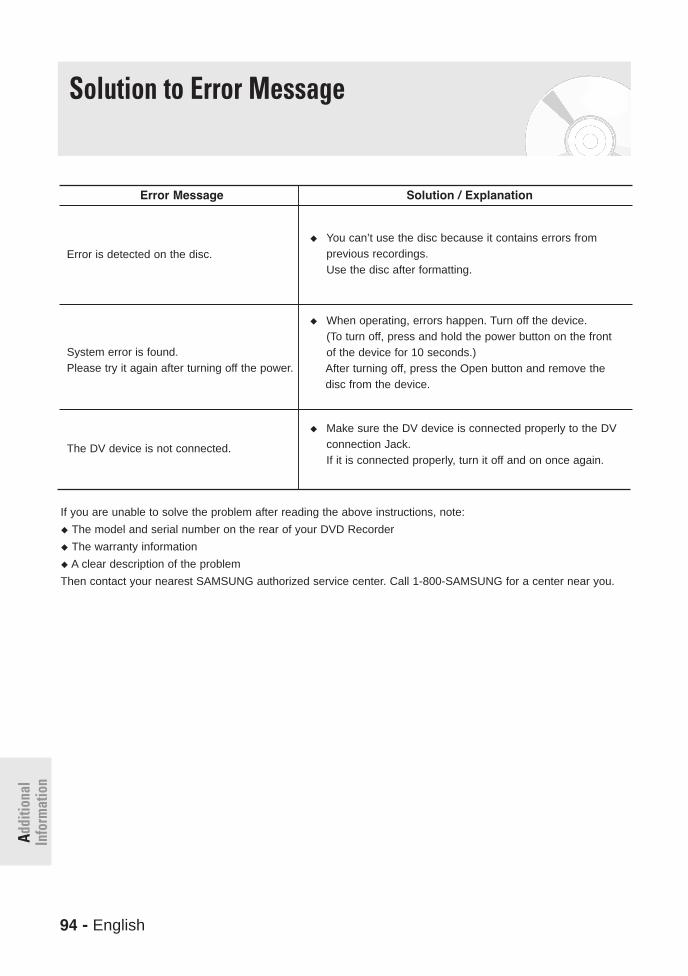
94 - English
Addi
tiona
lIn
form
atio
n
Solution to Error Message
Solution / Explanation
You can’t use the disc because it contains errors fromprevious recordings.Use the disc after formatting.
When operating, errors happen. Turn off the device. (To turn off, press and hold the power button on the frontof the device for 10 seconds.)After turning off, press the Open button and remove thedisc from the device.
Make sure the DV device is connected properly to the DV connection Jack. If it is connected properly, turn it off and on once again.
Error Message
Error is detected on the disc.
System error is found.Please try it again after turning off the power.
The DV device is not connected.
If you are unable to solve the problem after reading the above instructions, note:
The model and serial number on the rear of your DVD Recorder
The warranty information
A clear description of the problem
Then contact your nearest SAMSUNG authorized service center. Call 1-800-SAMSUNG for a center near you.
01002A-R130-XAA-ENG-89-98 2006.1.23 6:8 PM Page 94
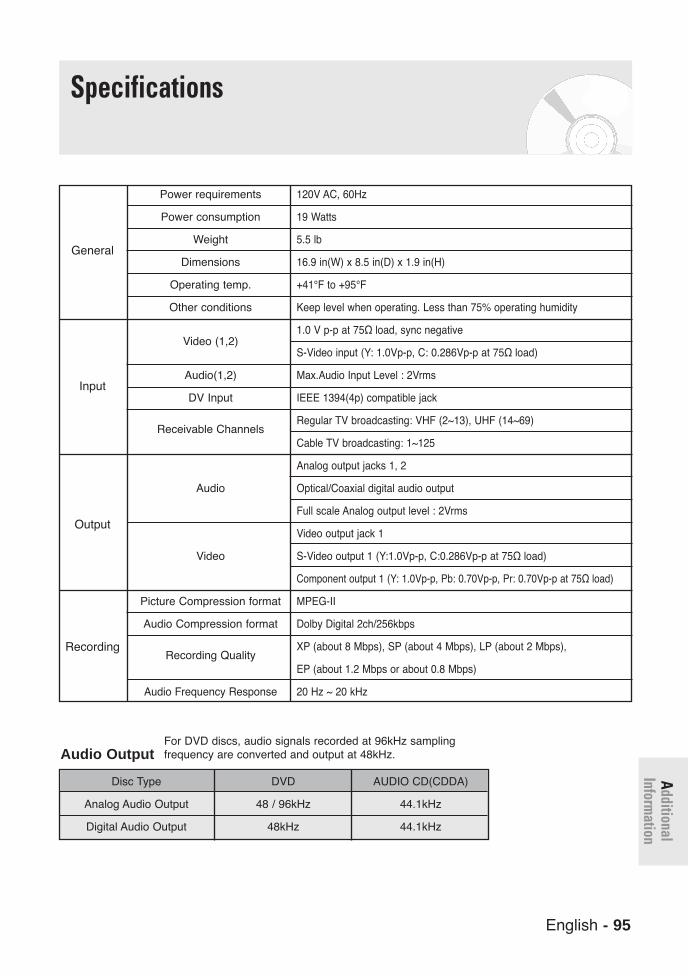
English - 95
AdditionalInform
ation
Specifications
Power requirements
Power consumption
Weight
Dimensions
Operating temp.
Other conditions
Video (1,2)
Audio(1,2)
DV Input
Receivable Channels
Audio
Video
Picture Compression format
Audio Compression format
Recording Quality
Audio Frequency Response
120V AC, 60Hz
19 Watts
5.5 lb
16.9 in(W) x 8.5 in(D) x 1.9 in(H)
+41°F to +95°F
Keep level when operating. Less than 75% operating humidity
1.0 V p-p at 75Ω load, sync negative
S-Video input (Y: 1.0Vp-p, C: 0.286Vp-p at 75Ω load)
Max.Audio Input Level : 2Vrms
IEEE 1394(4p) compatible jack
Regular TV broadcasting: VHF (2~13), UHF (14~69)
Cable TV broadcasting: 1~125
Analog output jacks 1, 2
Optical/Coaxial digital audio output
Full scale Analog output level : 2Vrms
Video output jack 1
S-Video output 1 (Y:1.0Vp-p, C:0.286Vp-p at 75Ω load)
Component output 1 (Y: 1.0Vp-p, Pb: 0.70Vp-p, Pr: 0.70Vp-p at 75Ω load)
MPEG-II
Dolby Digital 2ch/256kbps
XP (about 8 Mbps), SP (about 4 Mbps), LP (about 2 Mbps),
EP (about 1.2 Mbps or about 0.8 Mbps)
20 Hz ~ 20 kHz
General
Input
Output
Recording
DVD
48 / 96kHz
48kHz
Disc Type
Analog Audio Output
Digital Audio Output
AUDIO CD(CDDA)
44.1kHz
44.1kHz
Audio OutputFor DVD discs, audio signals recorded at 96kHz sampling frequency are converted and output at 48kHz.
01002A-R130-XAA-ENG-89-98 2006.1.23 6:10 PM Page 95

Warranty
This SAMSUNG brand product, as supplied and distributed by SAMSUNG ELECTRONICS AMERICA,INC. (SAMSUNG) and delivered new, in the original carton to the original consumer purchaser, iswarranted by SAMSUNG against manufacturing defects in materials and workmanship for the followinglimited warranty period:
One (1) Year Parts / Ninety Days (90) LaborThis limited warranty begins on the original date of purchase, and is valid only on products purchased andused in the United States, and does not include transportation, installation, removal or reinstallation.Warranty repairs must be performed by SAMSUNG’s authorized service center. To receive warrantyservice, the original dated bill of sale must be presented upon request as proof of purchase to SAMSUNGor SAMSUNG’s authorized service center. Transportation to and from the service center is theresponsibility of the purchaser.
SAMSUNG will repair or replace this product, at our option and at no charge with new or reconditionedparts, if found to be defective during the limited warranty period specified above. The product must bereturned during the warranty period with transportation charges prepaid to SAMSUNG’s designated servicecenter. Prior to returning any product for warranty service, the purchaser must contact SAMSUNG forproblem determination and service procedures. SAMSUNG does not warrant uninterrupted or error-freeoperation of the product. All replaced parts and products become the property of SAMSUNG and must be returned to SAMSUNG.Replacement parts and products assume the remaining original warranty, or ninety (90) days, whichever islonger.
This limited warranty covers manufacturing defects in materials and workmanship encountered in normal,noncommercial use of this product and shall not apply to the following, including, but not limited to:damage which occurs in shipment; applications and uses for which this product was not intended; failuresor problems which are caused by products or equipment not supplied by SAMSUNG; accidents, misuse,abuse, neglect, misapplication, fire, water, lightning or other acts of nature; incorrect electrical line voltage,fluctuations or surges; damage caused by improper or faulty installation; improper connection with anyperipheral; product alteration or modification; improper or unauthorized repair; cosmetic damage or exteriorfinish; product with altered serial numbers; failure to follow operating instructions, customer adjustments,maintenance and environmental instructions that are covered and prescribed in the instruction book; use ofnon-SAMSUNG or unauthorized parts, supplies, accessories or equipment which damage this product orresult in service problems; failures or problems due to incompatibility with other equipment.
LIMITED WARRANTY TO ORIGINAL PURCHASER
01002A-R130-XAA-ENG-89-98 2006.1.23 6:8 PM Page 96

Contact SAMSUNG WORLD WIDEIf you have any questions or comments relating to Samsung products, please contact the SAMSUNGcustomer care center.
North America
Latin America
Europe
CIS
Asia Pacific
Middle East & Africa
CANADA 1-800-SAMSUNG (7267864) www.samsung.com/caMEXICO 01-800-SAMSUNG (7267864) www.samsung.com/mxU.S.A 1-800-SAMSUNG (7267864) www.samsung.comARGENTINE 0800-333-3733 www.samsung.com/arBRAZIL 0800-124-421 www.samsung.com/brCHILE 800-726-7864(SAMSUNG) www.samsung.com/clCOSTA RICA 0-800-507-7267 www.samsung.com/latinECUADOR 1-800-10-7267 www.samsung.com/latinEL SALVADOR 800-6225 www.samsung.com/latinGUATEMALA 1-800-299-0013 www.samsung.com/latinJAMAICA 1-800-234-7267 www.samsung.com/latinPANAMA 800-7267 www.samsung.com/latinPUERTO RICO 1-800-682-3180 www.samsung.com/latinREP. DOMINICA 1-800-751-2676 www.samsung.com/latinTRINIDAD & TOBAGO 1-800-7267-864 www.samsung.com/latinVENEZUELA 1-800-100-5303 www.samsung.com/latinBELGIUM 02 201 2418 www.samsung.com/beCZECH REPUBLIC 844 000 844 www.samsung.com/czDENMARK 38 322 887 www.samsung.com/dkFINLAND 09 693 79 554 www.samsung.com/fiFRANCE 08 25 08 65 65 (0,15€/Min) www.samsung.com/frGERMANY 01805 - 121213 (€ 0,12/Min) www.samsung.deHUNGARY 06 40 985 985 www.samsung.com/huITALIA 199 153 153 www.samsung.com/itLUXEMBURG 02 261 03 710 www.samsung.luNETHERLANDS 0900 20 200 88 (€ 0.10/Min) www.samsung.com/nlNORWAY 231 627 22 www.samsung.com/noPOLAND 0 801 801 881 www.samsung.com/plPORTUGAL 80 8 200 128 www.samsung.com/ptSLOVAKIA 0850 123 989 www.samsung.com/skSPAIN 902 10 11 30 www.samsung.com/esSWEDEN 08 585 367 87 www.samsung.com/seU.K 0870 242 0303 www.samsung.com/ukRUSSIA 8-800-200-0400 www.samsung.ruUKRAINE 8-800-502-0000 www.samsung.com/urAUSTRALIA 1300 362 603 www.samsung.com/auCHINA 800-810-5858, 010- 6475 1880 www.samsung.com.cnHONG KONG 2862 6001 www.samsung.com/hk
INDIA3030 8282
www.samsung.com/in1600 1100 11
INDONESIA 0800-112-8888 www.samsung.com/idJAPAN 0120-327-527 www.samsung.com/jpMALAYSIA 1800-88-9999 www.samsung.com/myPHILIPPINES 1800-10-SAMSUNG (7267864) www.samsung.com/phSINGAPORE 1800-SAMSUNG (7267864) www.samsung.com/sg
THAILAND1800-29-3232
www.samsung.com/th02-689-3232
TAIWAN 0800-329-999 www.samsung.com/twVIETNAM 1 800 588 889 www.samsung.com/vnSOUTH AFRICA 0860 7267864 (SAMSUNG) www.samsung.com/zaU.A.E 800SAMSUNG (7267864) www.samsung.com/mea
Region Country Customer Care Center Web Site
01002A-R130-XAA-ENG-89-98 2006.1.23 6:8 PM Page 97
HEADQUARTERS105 Challenger Road, Ridgefield Park, N.J.07660-0511TEL: 1-800-SAMSUNG
SERVICE DIVISION400 Valley Road, Suite 201Mount Arlington, NJ 07856
1-800-SAMSUNG (1-800-7267864)www.samsung.com
US AK68-01002A-00
01002A-R130-XAA-ENG-89-98 2006.1.23 6:8 PM Page 98