Instruction manual 971 SmartRadar LTi · 971 SmartRadar LTi is installed in a hazardous area, the...
58
Instruction manual 971 SmartRadar LTi
Transcript of Instruction manual 971 SmartRadar LTi · 971 SmartRadar LTi is installed in a hazardous area, the...

Instruction manual971 SmartRadar LTi


Instruction manual 971 SmartRadar LTi Page 1
Instruction manual 971 SmartRadar LTi
June 2008
Part no.: 4416.716
Rev. 3
Enraf B.V.
P.O. Box 812
2600 AV Delft
Netherlands
Tel. : +31 15 2701100
Fax : +31 15 2701111
E-mail : [email protected]
Website : http://www.honeywellenraf.com

Page 2
Copyright 2003 - 2008 Enraf B.V. All rights reserved.
Reproduction in any form without the prior consent of Enraf B.V. is not allowed. This manual is for information
only. The contents, descriptions and specifications are subject to change without notice. Enraf B.V. accepts
no responsibility for any errors that may appear in this manual.
The warranty terms and conditions for Enraf products applicable in the country of purchase are available from
your supplier. Please retain them with your proof of purchase.
Preface
Instruction manual 971 SmartRadar LTi Page 3
Preface
This manual is intended for technicians involved in the commissioning and service of the Enraf series
971 SmartRadar LTi gauge.
A description preceding the technical procedures gives the technical information necessary to understand its
functioning. It is recommended to read this description prior to performing any of the procedures.
For installation of the 971 SmartRadar LTi, please refer to the Installation guides of the 971 SmartRadar LTi
and SmartRadar Antennas. This manual describes the commissioning and service of the basic
971 SmartRadar LTi level measurement. Other features such as level alarm output contact, temperature
measurement (spot or average), analog level output and pressure measurement are described in separate
manuals. For an overview, refer to the list of related documents in appendix D.
Legal aspects
The commissioning of and troubleshooting to the instrument may only be conducted by qualified engineers,
trained by Enraf and with knowledge of safety regulations for working in hazardous areas.
The information in this manual is the copyright property of Enraf B.V., Netherlands.
Enraf B.V. disclaims any responsibility for personal injury or damage to equipment caused by:
$ Deviation from any of the prescribed procedures
$ Execution of activities that are not prescribed
$ Neglect of the safety regulations for handling tools and use of electricity
EC declaration of conformity
Refer to the EC declaration of conformity, shipped with the instrument.
Additional information
Please do not hesitate to contact Enraf or its representative if you require any additional information.

Table of contents
Page 4
Table of contents
Preface ........................................................................................................................................................3
1 Introduction ..................................................................................................................................................6
1.1 Principle of measurement.................................................................................................................7
1.2 Configurations ..................................................................................................................................7
1.3 Optional functions.............................................................................................................................9
1.4 Remote monitoring ...........................................................................................................................9
1.5 Approvals (FM, ATEX) .....................................................................................................................9
2 Safety.........................................................................................................................................................10
2.1 Safety aspects of the 971 SmartRadar LTi ....................................................................................10
2.2 Personal safety...............................................................................................................................10
2.3 Safety conventions .........................................................................................................................11
3 Commissioning ..........................................................................................................................................12
3.1 Checks before starting the commissioning.....................................................................................12
3.2 Introduction in programming the 971 SmartRadar LTi ...................................................................12
3.3 Connection of Enraf service tool ....................................................................................................14
3.3.1 Communication via the Enraf field bus line.....................................................................14
3.3.2 Communication via RS-232C or RS-485 ........................................................................15
3.3.3 Communication via HART 7 signal ..................................................................................15
3.3.4 Programming communication parameters ......................................................................16
3.4 Programming the gauge.................................................................................................................18
3.4.1 Selecting dimension and decimal separator ...................................................................19
3.4.2 Level start-up ..................................................................................................................20
3.4.3 Level check .....................................................................................................................22
3.4.4 Zones and threshold settings..........................................................................................23
3.4.5 Alarm settings .................................................................................................................29
3.4.6 Ullage readout.................................................................................................................30
3.4.7 Password protection .......................................................................................................31
3.4.8 Detection algorithm and special settings ........................................................................31
3.4.9 Additional adjustment with measurement on stilling well ................................................34
3.5 Data items ......................................................................................................................................36
4 Service and troubleshooting ......................................................................................................................37
4.1 SmartRadar LTi layout ...................................................................................................................37
4.2 The instrument covers....................................................................................................................38
4.3 Min max diagram............................................................................................................................38
4.4 Alarm loop checking .......................................................................................................................39
4.5 Error codes and status information ................................................................................................40
4.5.1 XPU-2 error code (item EP) of ICU board.......................................................................40
4.5.2 APU warning code (item WC), error code (item EE) and status request (item QR)
of ICU board....................................................................................................................41
4.5.3 DAB error code (item EB) and status request (item QH) of RFB-2/DAB board..............42
4.6 Updating software ..........................................................................................................................43
4.6.1 Replacing software (EPROM) on ICU_HPO board.........................................................43
4.6.2 Replacing software (EPROM) on ICU_HPI board ..........................................................44
4.6.3 Replacing software (EPROM=s) on ICU board................................................................45
4.6.4 Replacing software (EPROM) on RFB-2 / DAB board....................................................45
4.6.5 NOVRAM init...................................................................................................................46
4.6.6 Re-load user parameters ................................................................................................46

Table of contents
Instruction manual 971 SmartRadar LTi Page 5
Appendix A Article and part numbers...............................................................................................47
Appendix B ASCII table....................................................................................................................50
Appendix C PCB layout ....................................................................................................................51
Appendix D Related documents .......................................................................................................52
Index ..........................................................................................................................................................53

Table of contents
Page 6

Introduction
Instruction manual 971 SmartRadar LTi Page 7
1 Introduction
The Enraf 971 SmartRadar LTi is a radar based level gauge. It is designed to measure the product level in
large storage tanks accurately and reliably.
The following options can be added to the basic SmartRadar:
$ One hard alarm output contact, which can be linked to one of the four programmable alarms in the
instrument;
$ An Infra-Red connector for the configuration tool 847 Portable Enraf Terminal;
$ An intrinsically safe output to connect the 977 Tank Side Indicator.
Additional sensors can be connected to the SmartRadar when the optional ICU_HPI board is installed.
This provides the instrument inputs for:
$ Spot temperature element (Pt100);
$ HART channel for: 762 VITO Interface, which is a converter for average product (and vapour)
temperature and/or water bottom measurement (via VITO temperature and/or water probes);
$ HART channel for: pressure transmitters for HIMS configuration or vapour pressure measurement and
for a side mounted water probe.
Standard, the SmartRadar is provided with Enraf field bus transmission for communication with remote tank
gauging systems. Optionally, the following output signals are available:
$ Analog 4-20 mA level output with HART communication for other measured quantities (Enraf field bus
signal also available). This requires the optional ICU_HPO board;
$ RS-232C or RS-485 serial communication (Enraf field bus signal not available). This requires the
optional ICU_RS232/485 board.
Basic
971 SmartRadar LTi
Optional
Hard alarm output contact
Optional
IR connector for 847 PET
(Portable Enraf Terminal)
Optional
I.S. output for 977 TSI
(Tank Side Indicator)
Optional input board
Optional
output board
ICU_HPI board:
- spot temperature element
- HART channel for 762 VITO
- HART channel for P1, P3
ICU_RS232/485 board:
- RS-232C or
- RS-485
ICU_HPO board:
- HART output and/or
- analog 4-20 mA level output
Introduction
Page 8
1.1 Principle of measurement
The radar level gauge is a device that uses high-frequency (10 GHz) electromagnetic waves to determine the
distance from the radar antenna to the product surface. The electro-magnetic wave is sent into the tank and
reflected by the product. As an electro-magnetic wave travels with the speed of light, this measurement can
not simply be done on the basis of time of flight. Instead, the phase difference between the transmitted and
the received signal is measured. The corresponding travelled distance can then be calculated from this phase
relation. This measurement principle is known as synthesized pulse radar (SPR).
In the 971 SmartRadar LTi the microwave signal is generated and led, via the tank separator, to the antenna
(refer to figure 1.1). The radar antenna shapes the beam and sends the signal into the tank. The microwave
signal reflected from the product is then received by the same radar antenna. The digital electronics in the
SmartRadar LTi measure both the transmitted and the reflected signal.
After processing, the measured distance is converted into level data (innage or ullage) and made available for
field communication.
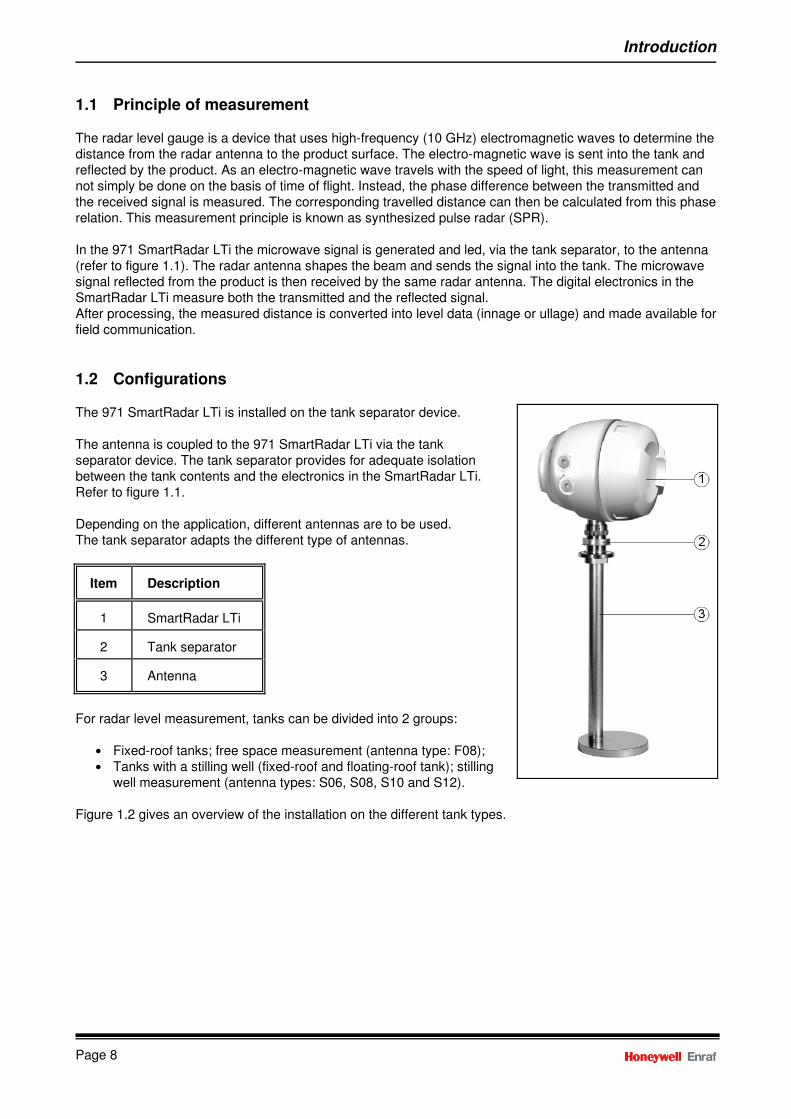
1.2 Configurations
The 971 SmartRadar LTi is installed on the tank separator device.
The antenna is coupled to the 971 SmartRadar LTi via the tank
separator device. The tank separator provides for adequate isolation
between the tank contents and the electronics in the SmartRadar LTi.
Refer to figure 1.1.
Depending on the application, different antennas are to be used.
The tank separator adapts the different type of antennas.
Item
Description
1
SmartRadar LTi
2
Tank separator
3
Antenna
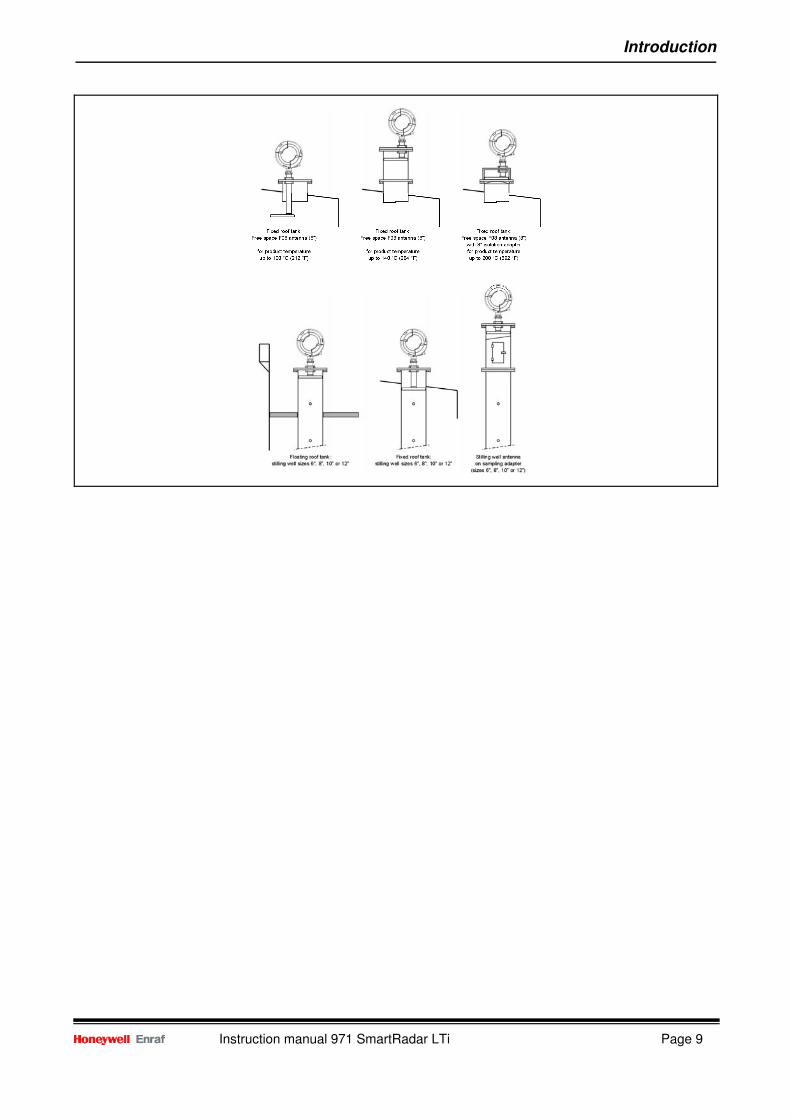
For radar level measurement, tanks can be divided into 2 groups:
$ Fixed-roof tanks; free space measurement (antenna type: F08);
$ Tanks with a stilling well (fixed-roof and floating-roof tank); stilling
well measurement (antenna types: S06, S08, S10 and S12).
Figure 1.2 gives an overview of the installation on the different tank types.
Introduction
Instruction manual 971 SmartRadar LTi Page 9

Introduction
Page 10
1.3 Optional functions
Optional functions can be added in the SmartRadar LTi.
The table below gives an overview of all options and related manuals.
Option
Board
Refer to
Level alarm output relay
(or digital output)
ICU
Instruction manual ICU Hard alarm output contact
(4416.633) Analog level output (4 - 20 mA)
ICU_HPO
Instruction manual Temperature, Water bottom
and Analog output options
(4416.644) Spot temperature measurement
ICU_HPI
Instruction manual Temperature, Water bottom
and Analog output options
(4416.644) Average temperature measurement
and water bottom measurement
via 762 VITO
ICU_HPI
Instruction manual Temperature, Water bottom
and Analog output options
(4416.644) Pressure measurement for mass,
density and/or vapour pressure
via HART protocol
ICU_HPI
Instruction manual HIMS / HTG and
vapour pressure (P3) measurement
(4416.645) Water bottom measurement via
side mounted water probe
ICU_HPI
Instruction manual Temperature, Water bottom
and Analog output options
(4416.644) RS-232C/RS-485 communication
ICU_ RS232/
485
Instruction manual 973 SmartRadar LT
RS-232/485 output communication
(4416.647) Modbus communication
ICU_RS232/
485
Instruction manual ModbusJ protocol Enraf gauges
(4416.513) HART communication
ICU_HPO
Instruction manual 973 SmartRadar LT
HART7
output communication
(4416.646)
1.4 Remote monitoring
Central monitoring of the SmartRadar is possible via tank inventory systems such as Entis Pro.
Remote display can be achieved using the 977 TSI Tank Side Indicator, the 877 FDI field indicator or the
878 CPI panel indicator.
1.5 Approvals (FM, ATEX)
The Enraf 971 SmartRadar LTi is an explosion proof instrument, which is designed to meet requirements of
ATEX, Factory Mutual, and others. Measuring performance and data handling protocol meet API
requirements.

Safety
Instruction manual 971 SmartRadar LTi Page 11
2 Safety
2.1 Safety aspects of the 971 SmartRadar LTi
The housing of the 971 SmartRadar LTi is explosion proof:
$ II 1/2 G EEx de [ib/ia] IIB T4; KEMA 03ATEX1205 X certified by KEMA, Netherlands
$ Class I, Division 1, Groups B, C, D T4, according to ANSI / NFPA 70 (Factory Mutual)
The covers of the SmartRadar LTi are provided with blocking facilities which prevent unauthorised opening.
Optionally, programming the 971 SmartRadar LTi can be done by the 847 PET (Portable Enraf Terminal),
which is an intrinsically safe device and is connected to the SmartRadar LTi via an infra-red coupling.
The emitted microwave energy is far below the accepted limits for exposure of the human body. Depending
on the type of antenna, a maximum radiation of 0.1 mW/cm2 is generated.
2.2 Personal safety
The technician must have basic technical skills to be able to safely commission the equipment. When the
971 SmartRadar LTi is installed in a hazardous area, the technician must work in accordance with (local)
requirements for electrical equipment in hazardous areas.
Warning
Do not use the instrument for anything else than its intended purpose.
Caution
The 971 SmartRadar LTi is an explosion proof instrument with intrinsically safe output/input circuits. Modification to the instrument may only be carried out by trained personnel that is authorised by Enraf.
Failure to adhere to this will invalidate the approval certificate.
Warning
In hazardous areas it is compulsory to use personal protection and safety gear such as: hard hat, fire-resistive overall, safety shoes, safety glasses and working gloves.
Avoid possible generation of static electricity. Use non-sparking tools and explosion-proof testers.
Do not open any of the instrument covers while power is still connected.
Make sure no dangerous quantities of combustible gas mixtures are present in the working area.
Never start working before the work permit has been signed by all parties.
Pay attention to the kind of product in the tank. If any danger for health, wear a gas mask and take all necessary precautions.
Safety
Page 12
2.3 Safety conventions
"Warnings", "Cautions", and "Notes" are used throughout this manual to bring special matters to the
immediate attention of the reader.
$ A Warning concerns danger to the safety of the technician or user
$ A Caution draws attention to an action which may damage the equipment
$ A Note points out a statement deserving more emphasis than the general text, but not requiring a
"Warning" or "Caution"

Commissioning
Instruction manual 971 SmartRadar LTi Page 13
3 Commissioning
3.1 Checks before starting the commissioning
Examine the mechanical and electrical installation after the 971 SmartRadar LTi is installed on the tank.
$ Check the connections of all electrical cabling
$ Check that all ground connections are made
$ Check that non-used cable inlets are sealed with appropriate stopping plugs
$ Close all covers carefully (mind O-rings) and apply power
3.2 Introduction in programming the 971 SmartRadar LTi
The item concept
The 971 SmartRadar LTi gauge is a field-configurable multi-processor instrument. This means that the
instrument can be totally programmed out in the field, or remotely, without opening the gauge.
All parameters, settings, etc. are accessible either via the optional PET (Portable Enraf Terminal) or remotely
with the Enraf service tool via so-called items.
These items all have unique 2-letter indexes which allow easy access and programming. Many indexes
associate with an abbreviation of the item description.
There are three different type of items:
Type of item
Description
Commands
These will force the gauge to execute a special task or function.
Example: EX (exit). After the EX command, the instrument starts initialising and
modified NOVRAM settings become active.
Data requests
Items for request of setup or measuring data from the gauge.
Example: JS will return the jumper setting on the ICU board. Some of the data
items are read-only.
NOVRAM Settings
All parameters which can be programmed and should not be lost after power break
down, are stored in NOVRAM. The NOVRAM is a non-volatile RAM memory which
does not require battery back up.
Data stored in NOVRAM can be protected by a password and/or by the NOVRAM protect jumper
(refer to figure 3.1).
Protection levels are provided for all NOVRAM items, depending on the importance of an item. Protection
level 2 is protected by password 2 (W2) and protection level 1 is protected by password 1 (W1).
If the NOVRAM is protected by the NOVRAM jumper (jumper J4), level 2 data cannot be changed without
opening the gauge. Most data requests and commands are not password protected.
Protection level 1
Access to items which are not directly measurement related data, such as high level alarm (HA), tank
identifier (TI), etc. is protected by password 1 (W1). It is possible to modify these data only after entering the
correct level 1 password W1=XXXXXX, where XXXXXX is the level 1 password.
Password W1 itself can be read protected by means of jumper J6 on the ICU board.

Commissioning
Page 14
Protection level 2
All NOVRAM items which affect the (remote) level reading
(such as reference level (RL) or transmission address (TA))
are protected by password 2 (W2). It is possible to modify
these data only after entering the correct password
W2=XXXXXX , where XXXXXX is the level 2 password.
Additional measurement-related items, such as temperature
items can also be protected by password 2.
Password W2 itself can be read protected by means of jumper
J5 on the ICU board. In protection level 2, the items protected
under protection level 1 can be also modified.
Figure 3.1 shows the jumper position on the ICU board.
The table below gives an overview of the ICU jumper functions.
jumper
function
position @@@@0@@@@
position @@@@1@@@@
J6
read password 1
not protected
protected
J5
read password 2
not protected
protected
J4
NOVRAM
protection disabled
enabled
J3 ) J1
no function
x
x
Indexed items
In general, items have only one setting (i.e. HA+026.0000). Indexed items have more than one setting
(elements). For instance: item OS (obstruction zone start position). Item OS has ten elements, corresponding
with the ten programmable obstruction zones.
OS
OS
OS
OS
OS
OS
OS
OS
OS
OS element 0
element 1
element 2
element 3
element 4
element 5
element 6
element 7
element 8
element 9
Indexed items are requested by the two-character item name, followed by the element number and number of
elements to be requested, separated by dots.
In general:
XX.n.i
where: XX = two-character item name
n = element number (starts with 0)
i = number of elements (can be 1 or more, but maximum is 9)
For example:
OS.0.1 <enter> requests the first obstruction zone start position;
OS.1.1=+012.3400 <enter> programs the second obstruction zone start position.
Note: Although it is possible to program more than one element at the time, it is not recommended. To avoid mistakes, program only one element at the time.

Commissioning
Instruction manual 971 SmartRadar LTi Page 15
3.3 Connection of Enraf service tool
3.3.1 Communication via the Enraf field bus line
By default, the 971 SmartRadar LTi is set on transmission address 00. The 971 SmartRadar LTi, and also
other types of Enraf gauges, can be connected in parallel to the Enraf field bus line. Each instrument must
have its unique transmission address.
The items can be programmed using the Portable Enraf Terminal, which is connected via the optional Infra-
red connector. If this option is not present, items can be programmed remotely.
SmartRadar LTi connected to an 858 CIU
Temporary disconnect the RS-232C connection from the Entis+ (or other host) and connect it to a service PC
where the Enraf service tool is running (refer to figure 3.2a).
Mind the relation for the transmission addresses per transmission line of the 858 CIU:
TL1 (addresses: 00 - 29), TL2 (addresses: 30 - 59), TL3 (addresses: 60 - 99)
The SmartRadar LTi can be connected to the desired transmission line, although its address is still at default.
Thus a SmartRadar LTi with default transmission address 00 can be connected to transmission line 2
(suitable for transmission addresses 30 - 59). Due to the mechanism that the request from the host (Enraf
service tool) is transmitted over all three transmission lines, the SmartRadar LTi receives the commands.
However, when the SmartRadar LTi is connected to transmission line 2 or 3, there is no response.
This concept only works if one new SmartRadar LTi is powered with the default transmission address 00.
Also, there may not be an operational gauge with transmission address 00. If such a gauge exists, do switch
it off temporarily.
Continue with section 3.3.4, programming communication parameters.
SmartRadar LTi connected to an 880 CIU Prime
HostPort 2 from the CIU Prime must be available for the connection of a service PC where the Enraf service
tool is running (refer to figure 3.2b).
To communicate via HostPort 2, the CIU Prime must be configured to CIU 858 emulation mode on
HostPort 2. If HostPort 2 is in use, temporary disconnect it and temporary re-configure the CIU Prime for
CIU 858 emulation via HostPort 2.
This concept only works if one new SmartRadar LTi is powered with the default transmission address 00.
Also, there may not be an operational gauge with transmission address 00. If such a gauge exists, do switch
it off temporarily.
Continue with section 3.3.4, programming communication parameters.
SmartRadar LTi connected to another type of host
Temporary disconnect the Enraf field bus line from the host.
Use a 847 PET (Portable Enraf Terminal) with optional RS-232C PET Interface as protocol converter
between Enraf field bus signal and RS-232C to the service PC where the Enraf service tool is running (refer
to figure 3.2c).
This concept only works if one new SmartRadar LTi is powered with the default transmission address 00.
Also, there may not be an operational gauge with transmission address 00 connected to the Enraf field bus
line. If such a gauge exists, do switch it off temporarily.
Continue with section 3.3.4, programming communication parameters.

Commissioning
Page 16
3.3.2 Communication via RS-232C or RS-485
RS-232C
Connect the RS-232C transmission line from the SmartRadar LTi to a service PC where the Enraf service
tool is running (refer to figure 3.3a). Default baud rate for RS-232C is 19200 baud.
Continue with section 3.3.4, programming communication parameters.
RS-485
Connect the RS-485 transmission line (eventually via an RS-485 / RS-232C converter) to a service PC where
the Enraf service tool is running (refer to figure 3.3b).
Default baud rate for RS-485 is 19200 baud.
When more than one gauge is connected to the same transmission line (multi drop mode), make sure that
only one new SmartRadar LTi is powered with the default transmission address 00. Also, there may not be
an operational gauge with transmission address 00. If such a gauge exists, do switch it off temporarily.
Continue with section 3.3.4, programming communication parameters.
3.3.3 Communication via HART 7777 signal
The SmartRadar LTi can be configured to give a 4 - 20 mA level output. In this mode it is possible to
configure the SmartRadar LTi via the HART 7 communication protocol.
Connect the HART 7 transmission line via a HART
7 modem to a service PC where the Enraf service tool is
running (refer to figure 3.3c).
A maximum of 15 SmartRadar LTi=s with HART 7 output signal can be connected in parallel (multi drop
mode); each gauge having a unique HART 7 communication address from 1 to 15.
When more than one gauge is connected to the same transmission line (multi drop mode), make sure that
only one new SmartRadar LTi is powered with the default communication address 0.
Continue with section 3.3.4, programming communication parameters.

Commissioning
Instruction manual 971 SmartRadar LTi Page 17
3.3.4 Programming communication parameters
Start up the Enraf service tool and make contact with the SmartRadar LTi to be configured.
Enraf service tool Logger:
Go to section: Send items (2). Set the transmission address to >00= <F2> and check the CIU address <F3>. If
necessary, set record type to >BZ= <F4> and set display <F5> to (01/02).
Enraf service tool Ensite:
It is not recommended to make a site scan, as the transmission address is still to be changed.
Therefore, to make contact with the gauge, set the address manually in the port settings.
Select this window by: Set up, Port settings (use the extended setup window).
Check the baud rate setting (1200 baud when communicating via Enraf field bus and HART7 and 19200 baud
when communicating via RS-232C or RS-485) and comport setting.
Go to the line Prefix: and set (check) the desired CIU address and set the transmission address to >00=
<TA=00>.
Note: When communicating via RS-232C / RS-485, default the CIU emulation address is disabled. Hence, delete the part with the CIU address (delete: <CIU=0>). When communicating via HART
7, delete the part with the CIU address (delete: <CIU=0>).
Enraf service tool Engauge:
Select the relevant CIU Prime folder and do: Add gauge (971).
Select: Properties and check / modify the Address (00). Then click tab Verify and continue to enter all
settings.

Commissioning
Page 18
For remote transmission, the items TA and TI must be programmed and items GT and TS should be
checked. All these items reside under protection level 2. Proceed as follows:
Item Name Description
W2= Protection level 2 Enter password 2. Default level 2 password: ENRAF2
TA= Transmission address Two digits. Enter the desired transmission address. If gauges
are connected in parallel to the transmission line, each gauge
must have its unique transmission address.
Mind the address relation when connected to an 858 CIU:
CIU highway Transmission
address (TA) TL 1 00 - 29
TL 2 30 - 59
TL 3 60 - 99
TI= Tank identifier 6 Characters; program the tank name into TI (spaces are not
allowed). This name is used as subdirectory name in the Ensite
service tool to store information (log file, reflection diagram, etc.)
on the hard disk.
GT= Gauge type 1 Character. GT represents the type of instrument.
For 971 SmartRadar LTi, GT is B.
TS= Transmission speed 4 Characters.
For Enraf field bus line TS is 1200 (default) or TS is 2400 baud.
For HART communication, TS remains on 1200 (default).
For RS-232C or RS-485 communication, TS is default 19K2 and
can be set lower to: 9600, 4800, 2400 or 1200 baud.
EX Exit Exit protection level. After the exit command, the 971 SmartRadar LTi will perform a controlled
software reset and all changes made will be effective after start-
up.
Example:
The SmartRadar LTi on tank 102 will get transmission address 42. The gauge should be programmed as
follows:
Item (+setting) Description
W2=ENRAF2 <enter> Enter password 2 (ENRAF2 is default level 2 password)
TA=42 <enter> Transmission address equals to 42
TI=TNK102 <enter> Tank identifier.
GT <enter> Check whether the gauge type item is correct; if not, change it.
TS <enter> Check whether the transmission speed item is correct; if not,
change it.
EX <enter> Exit protection level.
As the transmission address (and perhaps also the baud rate) is changed, the Enraf service tool must be
adapted to the new conditions. That can be done as described earlier, or a >site scan= can be made.

Commissioning
Instruction manual 971 SmartRadar LTi Page 19
3.4 Programming the gauge
The 971 SmartRadar LTi is pre-programmed at the factory. Depending on the application, a number of
additional parameters have to be set.
Note: The items described in this section are typical for the basic 971 SmartRadar LTi. For the optional functions / boards such as: level alarm relay output, spot temperature measurement, average temperature measurement, analog level output and HIMS (Hybrid Inventory Management System) please refer to the applicable option manuals.
Step 1: Collect the required data (such as radar position height, maximum safe fill height,
alarm settings, etc.) on a piece of paper. Refer to 'Commissioning form 971
SmartRadar LTi' supplied with each gauge.
Step 2: Proceed with programming / checking of each item for the standard gauge
without optional functions (level start-up, zones / thresholds and alarm setting).
Step 3: Check the identification code on the label of the 971 SmartRadar LTi to determine
whether the gauge is equipped with one or more optional functions, and program
the items for these options.
In the following sections, the items are listed that as a minimum should be programmed (checked) during
commissioning of the level part of the SmartRadar. Commissioning is divided into the following steps:
Step 1 Selecting dimension and decimal separator (section 3.4.1)
Step 2 Level start-up (section 3.4.2)
Step 3 Level check (section 3.4.3)
Step 4 Zones and threshold settings (section 3.4.4)
Step 5 Level alarm settings (section 3.4.5)
Step 6 Ullage readout (section 3.4.6)
Step 7 Password protection (section 3.4.7)
Step 8 Options (refer to the option manual(s) of the installed options)

Commissioning
Page 20
3.4.1 Selecting dimension and decimal separator
When one or more dimension items are changed, all items with related formats will be automatically changed
and the values will be automatically converted to the new dimension. The same applies for the decimal
separator. The SmartRadar LTi can be completely programmed in another dimension than it is intended to
operate in. Just change the item LD (and any other dimension items).
Item Name Description
W2= Protection level 2 Enter password 2 (default password: ENRAF2)
LD= Level dimension Selects and converts the level dimension. This item contains
one character, which can be:
M : metres; format: sign X X X separator X X X X
F : feet; format: sign X X X X separator X X X
I : inches; format: sign X X X X X separator X X
P : fractions; format: sign X X ' X X " X X
DP= Decimal separator The item DP (decimal separator) can be:
. : point or
, : comma.
EX Exit Exit protection level
Standard formats
There are two standard formats; these formats are:
$ Standard floating point format: sign point M M M M M M M M E sign P P
$ Standard power format [dB]: sign X X X X point X
where: M = mantissa
P = exponent
X = value in decibel

Commissioning
Instruction manual 971 SmartRadar LTi Page 21
3.4.2 Level start-up
Refer to figure 3.4 for level start-up tank
parameters.
To get the level from the gauge without
any compensation enabled, only the
following items should be programmed.
Radar reference:
The radar reference (zero point for the
radar gauge measurement) is the roof
nozzle position (refer to figure 3.4).
If the 971 SmartRadar LTi is equipped
with a stilling well antenna model, item
BD should be programmed. In all other
cases skip this item and start from item
OM.

Commissioning
Page 22
Item Name Description
W2= Protection level 2 Enter password 2 to alter the required settings.
BD= Stilling well diameter Floating point format; units: metres.
This item contains the internal diameter of the stilling well
(only if the SmartRadar LTi is installed on a stilling well).
OM= Radar operational mode This item contains one character, which determines the
operational mode and depends on the antenna.
F for free space measurement;
S for stilling well measurement;
PR= Position radar Format according to item LD. Default: +027.0000 (m).
This item represents the vertical distance from the Radar
reference point to the tank zero (mostly the datum plate). When
not exactly known, estimate the distance within "1 metre (3 ft).
When setting the SmartRadar LTi reference level
(see section 3.4.3), the value in item PR is overwritten.
SF= Maximum safe fill height Format according to item LD. With this item the gauge checks if
the programmed upper measuring range is valid.
The following relation is valid: SF < (PR - AU).
If a conflict is detected, a warning is given (EE: 07901).
AB= Nozzle length Format according to item LD. Default: +000.0000 (m).
Set this item only when the F08 antenna is installed inside the
nozzle. Give in this item the nozzle length. When the antenna is
installed inside the nozzle, a correction is automatically applied.
OR= Offset to roof Format according to item LD. This items represents the average
distance from the radar nozzle to the roof.
The SmartRadar LTi uses this information to determine the
position of double reflections (product surface - roof - product
surface - antenna).
4V= Level calc. decision switch This item contains 10 positions. The 7th position enables or
disables the AdvancedDSP routines:
F enables AdvancedDSP level calculation
- disables AdvancedDSP level calculation
Refer to section >AdvancedDSP level calculation routine= for
information when to enable it, and to section 3.4.8 for other
settings of item 4V.
AC= Averaging constant Two digits, default value: 90.
Averaging constant for output filter of radar innage (item RI) and
radar ullage (item RU) value.
The higher the value for item AC, the more damping on the
radar innage and radar ullage values.
EX Exit After the exit command, the 971 SmartRadar LTi will perform a
controlled software reset, and start up with disabled access to
protected levels.

Commissioning
Instruction manual 971 SmartRadar LTi Page 23
AdvancedDSP level calculation routine
Under certain installation conditions, the product level calculation can be done more accurately when the
AdvancedDSP level calculation routine is enabled. In that case the calculated level is less sensitive for
obstructions in the microwave path, like equalisation holes in stilling well, welding seams and multipath effect
from tank shell.
Note: AdvancedDSP level calculation can only work correctly, when the level in the tank is not moving fast (less than 1 mm/sec).
It is advised to enable AdvancedDSP level calculation with the following antenna installation conditions:
$ F08 antenna : for tanks with H (tank height) between 8 and 12 metres where d (distance
to tank shell) is less than 0.2 x H. d becomes: 0.2 x (H - 5) or larger;
$ S06 .. S12 antennas : always, when in compliance with the stilling well conditions mentioned in the
installation guide SmartRadar Antennas. Thus not when stilling well has
slotted holes, or is much contaminated.
3.4.3 Level check
Refer to figure 3.4. Check if there is a valid level reading. It is no problem if the value is incorrect, as long as
there are no error status messages. Two common error status messages are discussed below.
1) Level reading 999999999 with level status FL. Check error code item EE (this is an indexed item!).
If EE reads 07901, the maximum safe fill height (item SF) is set too high. Request for the AAntenna
minimum ullageA (item AU). The following relation is valid: SF + AU < PR.
Either distance PR is not correct or the maximum safe fill height (SF) is too large for this installation.
2) If there is a AWarning code@ present, check warning code item WC (this is an indexed item!).
If WC reads 07000, the reflected signal is not so strong that its peak rises above a threshold setting.
Lower the product zone threshold (or another zone threshold where the peak is found). Refer to section
3.4.4 for more information on zones and thresholds.
Item Name Description
W2= Protection level 2 Enter password 2 (default password: ENRAF2)
RL= Reference level Format according to item LD. The reference level is the actual level in
the tank (obtained from e.g. manual dip)
EX Exit With the exit command, the actual level value in item RL is written in
NOVRAM. Only then the value of item RL will be used with the
next AR command
W2= Protection level 2 Enter protection level 2 (default password: ENRAF2)
CM Commissioning mode Enter the commissioning mode to accept the reference level
AR Accept reference With this command, the 971 SmartRadar LTi accepts the value
of the reference level and internally re-calculates the distance:
radar position (item PR). After the controlled reset, by the EX
command, the level reading is available.
EX Exit Exit protection level
With this procedure, the 971 SmartRadar LTi now measures the level value, given in item RL, and all relative
level changes will be followed by the instrument.

Commissioning
Page 24
3.4.4 Zones and threshold settings
The tank height is divided into 3 measuring zones: Antenna zone, Product zone and Bottom zone.
In addition, ten obstruction zones can be programmed. Refer to figure 3.5.
Please note that the X-axis from figure 3.5 indicates ullage. The zero point on the X-axis represents the
"Radar reference". This is the nozzle height, with respect to the tank zero, on which the antenna is mounted
(item PR; position radar). Refer also to figure 3.4.
The antenna is located inside the antenna minimum ullage area. In this area, reflections from the antenna will
decrease to almost zero at 0.5 to 2 metres distance from the antenna surface (depending on the antenna).
Figure 3.6 shows a so-called reflection diagram.
The reflection diagram can be made with the Enraf service tool.
Not all reflections in the reflection diagram are selected as possible peak for the product level. A first selection
can be made by the threshold in each of the three zones. The thresholds should be set such that noise is
filtered out. Only the peaks above a threshold setting are selected as possible product peak.
The antenna zone length (item AZ) covers the area where antenna reflections are low but still present.
The antenna zone threshold should cover the most of the antenna reflections.
The antenna zone length does not need to extend till the antenna reflections are completely zero; only
until the higher reflections are covered, such as those which might be expected in the product zone.
Refer to example of reflection diagram in figure 3.6.
Warning
The product reflection in the area AAntenna minimum ullage@ will be indicated as product level
with reduced accuracy and with warning code 07013: >level above measuring range=.
Do not use this area as normal operational area because of the chance for a tank overflow.

Commissioning
Instruction manual 971 SmartRadar LTi Page 25
The area between antenna zone length and the bottom zone is called "product zone". The product zone
threshold can be set with item ZP.
The bottom zone is defined around tank zero. With bottom zone offset (item BZ) the position above tank zero
is defined where the product zone ends and the bottom zone begins. The bottom zone extends three Fourier
distances under tank zero (approximately 0.44 m).
The bottom zone definition is important in applications where the bottom can be seen through the product in
the reflection diagram. At a low product level both the product reflection and the bottom reflection will then be
present and the bottom reflection can be the strongest. In that case the bottom zone offset must be set large
enough to make sure that when the tank is emptying the product peak enters the bottom zone first, before the
bottom reflection enters the bottom zone. The bottom reflection peak enters the bottom zone in the opposite
direction and the peaks merge when the tank gets empty.
The low speed of the radar signal through the liquid column
gives the impression that the bottom looks further away than it
really is. When the tank is emptying the bottom appears to
rise. Figure 3.7 gives an example of such a situation. Item BZ
should be set to a value of 0.6 to 1.0 metres (2' to 3' 4").
When measuring the roof of a (internal) floating roof tank, the
mechanism of searching for a smaller peak in front of a larger
peak in the bottom zone is disabled. By setting the third
element in item 4S (2nd
level calculation decision switch) to >R=
you can declare the floating roof application.
Reflections beyond the bottom zone are ignored for level
detection. The bottom zone threshold can be set with item ZB.

Commissioning
Page 26
Changing the settings for the zones and thresholds should be done, on the basis of information from a
reflection diagram.
It should be common practice at installation of the 971 SmartRadar LTi gauge to make a reflection diagram
and, if necessary, adjust the zones and threshold settings.
Item Name Description
W2= Protection level 2 Enter password 2
AZ= Antenna zone length Format according to item LD. If necessary, the antenna zone
length can be altered.
BZ= Bottom zone offset Format according to item LD. As a default, the bottom zone
starts 0.3 m above tank zero. Item BZ specifies this start
position. If the bottom position is not exactly known, do not alter
item BZ. However, set the bottom zone offset to a larger value
when there is a strong bottom reflection.
ZA= Antenna zone threshold Format according to standard power format (dB). If required,
the threshold of the Antenna zone can be altered with this item.
Be sure to set the threshold above the antenna reflections.
ZP= Product zone threshold Format according to standard power format (dB). The product
zone threshold should be set such that:
$ product reflections are passed, and
$ small meaningless peaks (noise) are suppressed.
It is not meant to block obstructions; these are eliminated (not
selected as product peak) by the peak detection software.
ZB= Bottom zone threshold Format according to standard power format (dB). The bottom
zone threshold should be set such that:
$ product reflections are passed, and
$ small meaningless peaks (noise) are suppressed.
It is not meant to block a bottom reflection; the bottom reflection
will be identified by the peak detection software.
EX Exit Exit protection level
The peak detection software keeps a list of maximum 15 detected peaks above the threshold zones, from
which one of them is the product peak. The number of detected peaks and their position and strength can be
requested by the data items: 5C, 5D and 5E.

Commissioning
Instruction manual 971 SmartRadar LTi Page 27
Item Name Description
FC Freeze RSP data The freeze Radar Signal Processing data is a command that
stores all relevant radar processing data in RAM memory.
Wait approximately 5 seconds before requesting the next
data.
5C Number of peaks above threshold This item contains the number of peaks above the threshold
settings. The maximum number is 15; when more peaks are
detected, only the 15 strongest peaks are listed.
5D.0.1 Position of detected peaks Format according to item LD (indexed item; 15 elements).
Each element contains the distance from the radar reference
position to the detected peak.
5E.0.1 Amplitude of detected peaks Format according to standard power format (dB)
(indexed item; 15 elements).
Each element contains the amplitude of the corresponding
peak in item 5D.
When obstructions are expected and there cannot be made a reflection diagram, these items are very helpful
to select the obstruction zones. However, the best results can be obtained from the information of a reflection
diagram.
Obstruction reflections
Objects that are in the microwave path will cause reflections. All reflections from objects other than the
product surface are called: >obstruction reflections=.
Note: In the reflection diagram you will probably also see second order reflection peaks, found at double distance.
Obstruction reflections can be caused by heating coils, welding seams from tank shell or stilling well, etc.
Special examples of obstruction reflections are the antenna reflection and the bottom reflection.
Obstruction reflections can influence the level measurement:
$ When an obstruction reflection is detected above the zone threshold, it becomes a candidate for the
selection of the level peak. This is not a problem, as the peak detection software can handle this.
$ When the product peak approaches an obstruction peak, the two peaks will influence the calculation of
their positions. The influence starts when the peaks are 0.4 m (16") apart. The obstruction reduces the
accuracy of the calculated level position. In many cases this is a one-side phenomenon, where the
obstruction reflection disappears as the product submerges the reflecting object.
$ The AdvancedDSP level calculation is less sensitive for the presence of an obstruction reflection. But
the inaccuracy of the normally calculated level position may cause a jump of the AdvancedDSP level of
15 mm (19
/32
"). These jumps can be prevented by declaring an obstruction zone around the position of
the obstruction peak.
The SmartRadar LTi software provides for setting of obstruction zones and obstruction threshold for each
zone. This can be used to prevent obstruction reflections from appearing in the list of detected peaks. From
the list of detected peaks the product level peak is selected. As explained above, the peak detection software
can cope with the presence of obstruction reflections without the obstruction zone settings.
However, it is advised to define obstruction area=s around obstruction peaks when the AdvancedDSP level
calculation is used. It is then not required to set obstruction thresholds; only the zone definition is required.

Commissioning
Page 28
Figure 3.8 shows a Reflection Diagram in which an obstruction is found at approximately 8 m level
(6.25 m ullage). The product reflection is found at approximately 3.8 m level (10.44 m ullage).
In this example, the following settings should be selected:
Obstruction zone start at 5.85 m ullage (at least 0.4 m before the obstruction reflection).
Obstruction zone end at 6.65 m ullage (at least 0.4 m after the obstruction reflection).
Obstruction zone threshold at 5 dB.
Item Name Description
W2= Protection level 2 Enter protection level 2
OS.0.1= Obstruction zone 1 start Format according to item LD.
In the above example, obstruction zone 1 start should be
programmed as 5.85 m (OS.0.1=+005.8500)
OE.0.1= Obstruction zone 1 end Format according to item LD.
In the above example, obstruction zone 1 end should be
programmed as 6.65 m (OE.0.1=+006.6500)
OT.0.1= Obstruction zone 1 threshold Format according to standard power format (dB).
In the above example, the threshold of obstruction zone 1 is set
at 5 dB (OT.0.1=+0005.0)
OZ= Enable / disable obstr. zones Ten ASCII characters; either E (enable) or D (disable) the
obstruction zone. For example: OZ=EDDDDDDDDD
enables the first obstruction zone
EX Exit Exit protection level

Commissioning
Instruction manual 971 SmartRadar LTi Page 29
It is advised to use obstruction area=s for recognizable obstruction peaks that stay below the zone threshold
(for instance: welding seams from the tank shell or stilling well, or roof truss). Obstructions from welding
seams can be recognized as they appear at regular intervals. Refer to figure 3.9.
Select the peaks in the reflection diagram, which are known to be caused by an obstruction.
Mark the obstructions with an obstruction zone. The length of the obstruction zone should be at least 0.8 m.
As the bottom reflection and the antenna reflection belong to the obstructions, it is advised to define
obstruction zones in front of the antenna position and the bottom position.
For the AdvancedDSP level calculation, the obstruction threshold should be set below the product threshold
(e.g. at 5 dB).
The reflection diagram in figure 3.9 shows three obstructions at equal distances. It can therefore be assumed
that there is a fourth obstruction (at approximately 11 metres ullage), though not visible in this diagram
because it is submerged. For a clear overview of all obstructions, it is recommended to make a reflection
diagram when the tank is empty.

Commissioning
Page 30
3.4.5 Alarm settings
Refer to figure 3.10. High level alarm (HA) and low level alarm (LA) conditions are transmitted to the host via
the communication lines.
Item Name Description
W2= Protection level 2 Enter password 2 (default password: ENRAF2)
AH= Level alarm hysteresis Format according to item LD. Sets alarm hysteresis
HA= High level alarm Format according to item LD. High level alarm set point.
HH= High high level alarm Format according to item LD. High high level alarm set point.
LA= Low level alarm Format according to item LD. Low level alarm set point.
LL= Low low level alarm Format according to item LD. Low low level alarm set point.
EX Exit Exit protection level

Commissioning
Instruction manual 971 SmartRadar LTi Page 31
3.4.6 Ullage readout
The two items described in this section need only be programmed, when ullage readout is required.
Refer to figure 3.11.
Item Name Description
W2= Protection level 2 Enter password 2 (default password: ENRAF2)
UR= Upper reference Format according to item LD.
The upper reference value is only used when 'Ullage' is to be
read from the 971 SmartRadar LTi gauge. The ullage is then
calculated as: UR - 971 measured level
DE= Level type One ASCII character.
DE = I for innage (default setting)
DE = U for ullage
EX Exit Exit protection level

Commissioning
Page 32
3.4.7 Password protection
Item Name Description
W2= Protection level 2 Enter password 2 (default password: ENRAF2)
W1= Password 1 6 Characters, default value W1=ENRAF1. This password can
be read protected by jumper J6 on the ICU board. If this jumper
is set to position 1, the password can not be read
W2= Password 2 6 Characters, default value W2=ENRAF2. This password can
be read protected by jumper J5 on the ICU board. If this jumper
is set to position 1, the password can not be read
DY= Display selection One ASCII character.
For the 971 SmartRadar LTi (which has no local display) item
DY must be set to N.
EX Exit Exit protection level.
3.4.8 Detection algorithm and special settings
Presentation of the measured level is the result of a two stage process:
$ stage 1: detection
$ stage 2: acceptance
Detection
The detection operates on the last radar signal captured. First peaks are detected that are above the
thresholds (items ZA, ZB and ZP). When there are peaks found, the level peak is selected from the list of
detected peaks (items 5D and 5E).
Special fuzzy logic is built in, to select the level peak from the set of detected peaks. It is important to know
that the fuzzy logic makes use of pattern recognition. Especially at very high levels it looks for patterns with
second or third order echo's. In free-space applications such echo's result from reflections against the roof of
the tank. Knowledge about he position of the roof is therefore important. Therefore, the distance from the
nozzle to the roof must be declared in item OR.
Acceptance
Acceptance operates around an authorised gauge level value and the >low product delay counter= value.
The low product delay counter value can be set with item FI (default value: 99; maximum value: 99).
When an authorised gauge level is present, the value is used as the acceptance criterium for the level peaks
presented by the detection stage.
Successful acceptance of the latest level peak is used to update the authorised gauge level value.
Consecutive rejection of level peaks and / or absence of level peaks over a number of measurements equal
to the number in the low product delay counter, will result in discarding the authorised gauge level value.
When the value is discarded, the last valid value is available as level value over a period of 30 seconds.
When there is no authorised gauge level value, the level peaks presented by the detection stage are used to
built up the evidence needed to arrive at a new authorised gauge level value. A level must be present, at
least intermittent, over a number of measurements equal to the low product delay counter, before it can
become authorised.

Commissioning
Instruction manual 971 SmartRadar LTi Page 33
Item Name Description
W1= Protection level 1 Enter password 1
FI= Low product reflection warning Two digits; default value: 99. The maximum value is 99 and
delay counter then the delay is approximately 1 minute. During the delay, the
last valid measured level is transmitted as the product level.
EX Exit Exit protection level
Reduced accuracy
Obstructions in the tank may produce reflections. When the level reflection is in the neighbourhood of an
obstruction reflection the accuracy of the obtained level reading is reduced. The software provides for
entering data to describe obstruction zones. See items OS, OE, OT and OZ. This can be used to detect that
the level reflection is in an obstruction zone. When in addition level calculation decision switch item 4V
position 2 is set to 'O', a reduced accuracy warning will be set if the level reflection is in an obstruction zone.
When the level is in the bottom zone, a bottom reflection may reduce the accuracy of the level reading. When
the level calculation decision switch item 4V position 1 is set to 'B' , a reduced accuracy warning will be
produced if the level is in the bottom zone.
Peak selection with roof reflector
With light products it is possible to have a reflection from the tank bottom, specially at lower level through the
product. Therefore, there is a routine that in the bottom zone is searched for a smaller peak in front of the
highest peak, which is caused by the bottom.
However, when a roof reflector is used it is impossible to look through the product. That information is given
in item 4S, third position.
Item Name Description
W2= Protection level 2 Enter password 2
4V= Level calculation decision switch Ten characters; default setting: - - - - - - - - - -
Pos. Char. Function
1 B Reduced accuracy if level peak in bottom zone
- No reduced accuracy if level peak in bottom zone
2 O Reduced accuracy if level peak in obstruction zone
- No reduced accuracy if level peak in obstruction
zone
3 D Double reflection detection enabled (always)
4 S Reduced accuracy if level peak detected above the
maximum safe fill height (item SF)
- No reduced accuracy in the above situation
5 P Search for product peak before bottom reflection
(always)
6 - Not used
7 F Enables AdvancedDSP level calculation
- Normal level calculation
8 - 10 - Not used.

Commissioning
Page 34
4S= 2nd
Level calc. decision switch Ten characters; default setting: - - - - - - - - - -
Pos. Char. Function
1 - Normal communication mode
(other settings are used for broadcast mode)
2 P Plain selection of peaks (only for factory testing)
- Intelligent peak selection
3 R Measurement by means of roof reflector
- Measurement direct on product
4 - 10 - Not used
EX Exit Exit protection level.
Possibility of peak selection dilemma after gauge startup
It is theoretically possible after a gauge startup, that two peaks are detected of which the second peak is at a
double distance with respect to the first peak. The second peak might be a second order echo, in which case
the first peak is the level peak. But it is also possible that the first peak is from an obstruction, whilst the
second peak is the level peak.
In that case the first peak is used to present the level, with error code 07014 and level reading >999999999=.
In the course of the time it may become apparent which is the level peak when there is a level change. When
this happens the error is removed and the correct level is presented.
When however the level in the tank does not change, it may take a long time for the situation with error 07014
to persist. That is why the operator can interfere.
With item 4W the operator selects the first peak as level peak; with item 4X the operator selects the second
peak as level peak. In both cases the error 07014 is removed and turned into a warning 07014.
With these commands the operator can inspect the two level values involved in the dilemma and choose the
level value that he judges is the product level.
In addition the operator can cancel the level selection with item 4Y. This will restore the level failure situation
with level reading >999999999= and error code 07014.
In the course of time, when there has been a sufficient level change, the start-up dilemma will be resolved.
From that moment on error 07014 or warning 07014 will disappear, the level will be presented and the
commands 4W, 4X and 4Y will have no effect.
Item Name Description
4W Select first peak With this command, the first peak is used as level peak and error code
07014 is changed to warning code 07014.
Warning code 07014 disappears when there is enough change
in level to determine by the peak selection software that the
selected peak indeed is the product peak.
4X Select second peak This command makes the second peak the level peak and error
code 07014 is changed to warning code 07014.
Warning code 07014 disappears when there is enough change
in level to determine by the peak selection software that the
selected peak indeed is the product peak.
4Y Cancel select peak This command cancels the 4W or 4X commands and the first
peak is used as level peak with error code 07014.
Only possible as long as there is the warning code 07014.
Commissioning
Instruction manual 971 SmartRadar LTi Page 35
3.4.9 Additional adjustment with measurement on stilling well
The propagation speed of the microwave, and hence the level measurement, depends on the inner diameter
of the stilling well. The smaller the diameter, the lower the propagation speed, resulting in a larger measured
radar ullage.
Item BD holds the inner diameter of the stilling well. When the real value of the inner diameter differs from the
setting in item BD, the SmartRadar has a >gain= error in the level measurement.
It is therefore recommended to check the level reading of the SmartRadar LTi with some manual dips at
different static levels over the full operating range.
Note: After commissioning, the AdvancedDSP routines require one complete passage through the full operating level range, before the optimum accurate level reading is obtained.
A level gain error, when present, can be corrected in two ways:
$ ullage correction table
$ adjustment of item BD
For the correction via the ullage correction table, refer to the description of items CW, CL and CS.
The correct value for the stilling well diameter can be calculated with the following equation:
where:
BDnew
: recalculated stilling well diameter [m]
BDorig
: original stilling well diameter [m]
εscale
: scale error (relative gain error)
example: 10 mm gain error on 20 m range: εscale
= 20 / (20 + 0.010) = 0.9995.
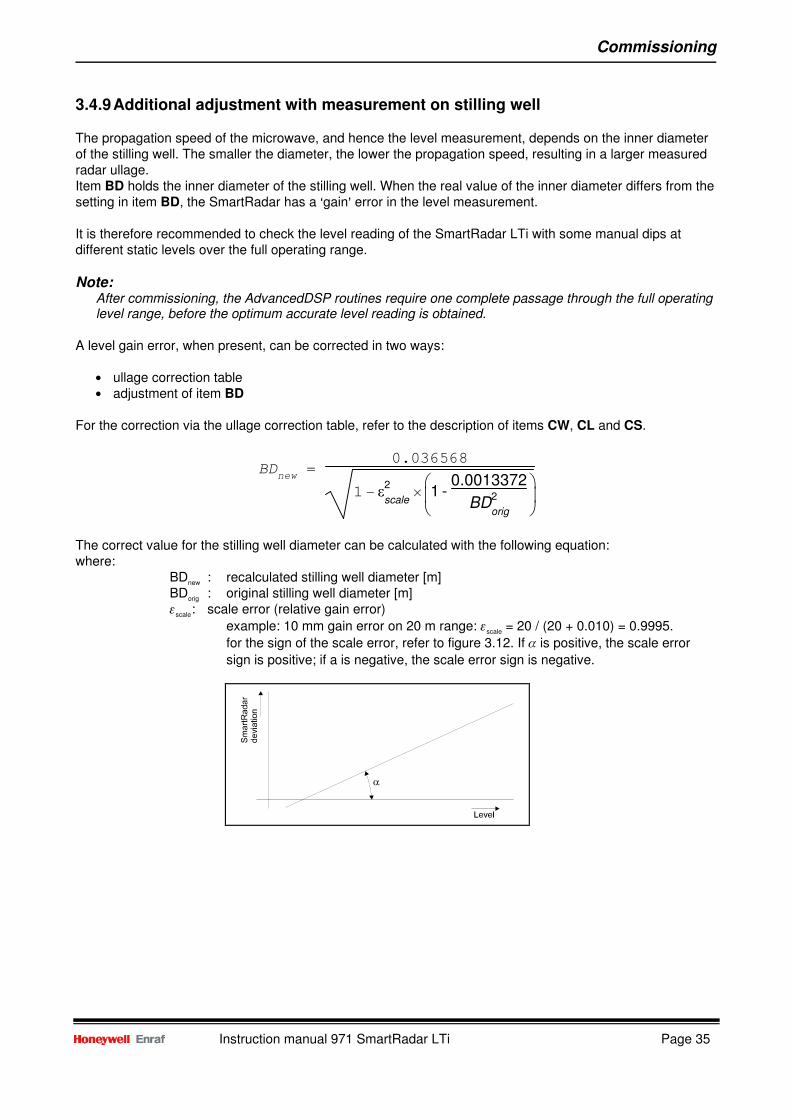
for the sign of the scale error, refer to figure 3.12. If α is positive, the scale error
sign is positive; if a is negative, the scale error sign is negative.
BDnew
= 0.036568
1- ε2
scaleH
1 -0.0013372
BD2
orig

Commissioning
Page 36
An example with an S10 antenna:
Item BD is programmed as 254 mm.
At 19 m level, the deviation of the SmartRadar LTi level is: -2 mm;
At 2 m level, the deviation of the SmartRadar LTi level is: +3 mm.
Note: After the new stilling well diameter is programmed, the SmartRadar LTi must be set to level with the RL
and AR sequence.
Hence, the procedure to follow is:
Item Name Description
W2= Protection level 2 Enter password 2.
BD= Stilling well diameter Recalculated stilling well diameter.
RL= Reference level Reference level from manual measurement.
EX Exit Exit protection level.
W2= Protection level 2 Enter password 2.
CM Commissioning mode Enter commissioning mode to accept the reference level.
AR Accept reference The reference level, given by item RL, will now be accepted as
the radar level.
EX Exit Exit protection level.

Commissioning
Instruction manual 971 SmartRadar LTi Page 37
3.5 Data items
The table below lists a number of data items. They contain measured data, verification data and diagnostic
data.
The verification data can be used to check the peak selection result. The radar status indicates the validity of
the measured data.
The diagnostic data provide low level error information about the instrument (refer to section 4.5).
Item
Description
RD
RI
RU
Measured data
Product reflection signal strength (dB)
Innage (format according to item LD);
the value is preceded by two characters from radar status item QR
Ullage (format according to item LD);
the value is preceded by two characters from radar status item QR
5C
5D
5E
RT
QR
Verification data
Number of detected peaks
Position of detected peaks
(format according to item LD; indexed item, 15 elements)
Amplitude of detected peaks
(standard power format; indexed item, 15 elements)
Internal temperature of 971 SmartRadar LTi
(format according to item TD)
Radar status; refer to section 4.5.2
EB
EE
EP
WC
Diagnostic data
Error DAB request
Error ICU (APU part) request (indexed item, 10 elements)
Error ICU (XPU-2 part) request
Warning code ICU (APU part) (indexed item, 10 elements)

Service and troubleshooting
Page 38
4 Service and troubleshooting
The 971 SmartRadar LTi does not require preventive maintenance.
For mechanical and electrical installation details, refer to the installation guides of the Antennas and the
SmartRadar LTi
Depending on the application, the Antenna may over time become too contaminated for accurate level
measurement. This condition is then signalled by the built-in diagnostics of the 971 SmartRadar LTi. Then a
warning code (WC: 07001) is generated. In that case, the Antenna should be cleaned.
4.1 SmartRadar LTi layout
The SmartRadar LTi housing consists of two sections: the electronic compartment and the terminal
compartment (refer to figure 4.1).
Item
Description
Item
Description
Item
Description
1
Rear cover
5
Front cover
9
Cover blocking devices
2
Terminals
6
ICU_GPS board (supply board)
10
Tank separator coupling
3
RFB-2 /
DAB board
7
ICU_RS232/RS485 board or
ICU_HPO board (optional)
11
Infra-red connector
(optional)
4 ICU board
8
ICU_HPI board (optional)
The electronic compartment can be accessed by removing (unscrewing) the front cover (5).
The terminal compartment can be accessed by opening the rear cover (1).
Service and troubleshooting
Instruction manual 971 SmartRadar LTi Page 39
4.2 The instrument covers
The SmartRadar LTi enclosure is water proof IP67. For this purpose, the covers are fitted with O-rings.
Check the O-rings before closing the instrument.
4.3 Min max diagram
One of the features of the 971 SmartRadar LTi is that the instrument keeps track of the measured reflections.
The minimum and maximum product reflection strength, measured at each Fourier interval, is stored.
Whenever a larger reflection strength is measured at a specific Fourier interval, the previous value is
overwritten. The same is done for the minimum reflection strength value. In this way, a reflection history is
present in the instrument.
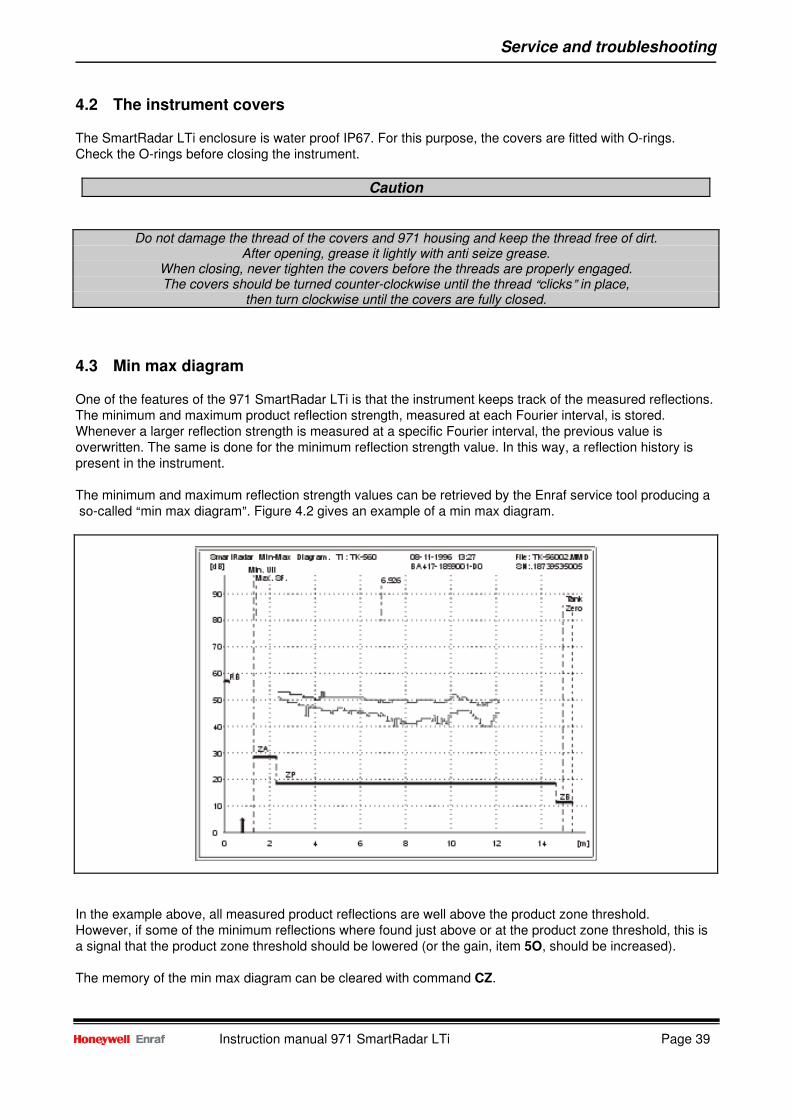
The minimum and maximum reflection strength values can be retrieved by the Enraf service tool producing a
so-called Amin max diagram@. Figure 4.2 gives an example of a min max diagram.
In the example above, all measured product reflections are well above the product zone threshold.
However, if some of the minimum reflections where found just above or at the product zone threshold, this is
a signal that the product zone threshold should be lowered (or the gain, item 5O, should be increased).
The memory of the min max diagram can be cleared with command CZ.
Caution
Do not damage the thread of the covers and 971 housing and keep the thread free of dirt. After opening, grease it lightly with anti seize grease.
When closing, never tighten the covers before the threads are properly engaged. The covers should be turned counter-clockwise until the thread Aclicks@ in place,
then turn clockwise until the covers are fully closed.

Service and troubleshooting
Page 40
Item Name Description
W2= Protection level 2 Enter password 2.
CZ Clear min max diagram Clears all elements of item 4T by writing 30H in them (sets 4T to
default).
EX Exit Exit protection level.
4.4 Alarm loop checking
Normally, level alarms can be verified when the level reaches the low level or high level alarm set point.
The level alarms and, if applicable, the hard alarm contact coupled to one of the level alarms, can be checked
by a Aloop check@ command. This is independent of the actual level value.
The level alarm signalling can be checked in several ways:
$ via the communication line to the host
$ via the hard alarm output contact
When enabled, the alarm test (item AT) can be given. The specified alarm is then toggled for one minute.
Item AT has 8 positions; four character pairs are used to specify the desired alarm for testing: HH, HA, LA
and LL. Each alarm can be tested individually, or the alarms can be tested simultaneously.
Item Name Description
LE Loop check enable The loop check enable item enables or disables the alarm test
with item AT.
$ E : enables alarm test with item AT
$ D : disables alarm test with item AT
If the alarm test is required, check if item LE is set to AE@.
If item LE is set to AD@, change the setting to AE@.
AT= Alarm test The alarm test item toggles the specified level alarm for one
minute. The settings for the alarms to be tested are as follows:
aabbccdd (8 ASCII characters)
where:
aa : HH high high level alarm test
- - no high high level alarm test
bb : HA high level alarm test
- - no high level alarm test
cc : LA low level alarm test
- - no low level alarm test
dd : LL low low level alarm test
- - no low low level alarm test
For example:
AT= - - HALA - -
toggles the high and low level alarm for one minute.
Note: When, as in the above example, a high and low alarm are toggled at the same time, the high alarm prevails over the low alarm on the communication line. It is therefore recommended to check only one alarm at the time.

Service and troubleshooting
Instruction manual 971 SmartRadar LTi Page 41
4.5 Error codes and status information
The 971 SmartRadar LTi is an instrument with error reporting. Detected errors can be requested by the 847
PET (optional) or by the Enraf service tool.
The following items provide the error data of the processor boards:
EB Error request RFB-2 / DAB board
EE Error request ICU board (APU part)
EP Error request ICU board (XPU-2 part)
WC Warning code ICU board (APU part) (not a real error, but a warning that the level may not be
accurate)
These items contain an error (warning) code of the last occurred error condition. The error data can be read
as long as the gauge is not reset.
Besides the error data, data items from level, and optional functions such as temperature and analog level
output, contain one or more status characters which also give valuable information. Most status characters
are bit coded. Appendix B contains an ASCII table for conversion of a status character into bits.
Bits are numbered from 0 to 7 from right to left.
An example for a bit coded status character:
a status character reads: F;
written out in bits (refer to Appendix B): 0100 0110;
(b7=0, b6=1, b5=0, b4=0, b3=0, b2=1, b1=1, b0=0).
Bit 7 is always a '0' and bit 6 is always a '1', to avoid 'control' characters.
Look up the description of the particular error (e.g. QR in section 4.5.2) to find the description of the
meanings allocated to each bit of the character. Only the bits set to '1' represent an actual status.
4.5.1 XPU-2 error code (item EP) of ICU board
The XPU-2 error code is a three-digit number. When the XPU-2 detected an error about a certain item, that
item follows the error code, separated by a space.
For instance: 067 LL : invalid level format in item LL.
Some ICU (XPU-2 part) error codes of item EP are listed below, with suggestions for solving the problem.
For a complete overview, refer to item help in the Enraf service tool.
000 No error
014 NOVRAM operation error Set item 03 to=@>; Check all settings, there may be an error
051 Unknown item Item not known to SmartRadar LTi, check for correct item
056 Wrong protection level First enter protection level 1 or 2
067 Invalid level format Check item LD, then give the setting in the correct level format
075 Invalid density format Check item DI, then give the setting in the correct density format
076 Invalid floating point format Give setting in correct floating point format (refer section to 3.3.1)
082 Invalid password Give the correct password for W1 and W2
089 Invalid pressure format Check item PI, then give setting in the correct pressure format
101 Watchdog reset error The watchdog reset is a sign that there is a serious fault, caused by
interference, or a faulty ICU board
137 No optional board Missing optional board; either not well connected to the ICU board, or
optional board is defective
200 Invalid indexed item format Wrong indexed item format; use points between indexes
201 Invalid indexed item start index Wrong indexed item element number; too large or invalid
202 Invalid indexed item index length Wrong indexed item length; can be between A1@ and A9@
999 Fatal ICU error Serious internal ICU software error; check contents of item 00 and report
to Enraf Delft

Service and troubleshooting
Page 42
4.5.2 APU warning code (item WC), error code (item EE) and status request (item QR) of ICU board
Some ICU (APU part) warning codes of item WC (indexed item of 10 elements) are listed below, with
suggestions for solving the problem. For a complete overview, refer to item help in the Enraf service tool.
00000 No warning
07001 Sensor contaminated Clean the antenna
07005 Top / bottom clipping in raw samples A-channel Lower A-channel gain in item 5O, or enable automatic amplification
07006 Top clipping raw samples A-channel control item 4M
07007 Bottom clipping raw samples A-channel
07013 Level above measuring range Level measured with reduced accuracy and close to antenna!
07014 Ambiguous init situation Select first peak or select second peak command has been issued.
Warning code disappears after peak detection routine has detected a
certain (valid) level change.
07200 Reduced accuracy Not enough points in table or level too close to antenna (within 4 m) for
AdvancedDSP level calculation. This is automatically corrected when
level in tank changes.
07201 A-channel measurement error after start-up This will be solved when the level in the tank reaches the reference
level, or when a new RL level is entered, followed by the AR command
21005 Maximum safe fill (item SF) exceeded Item SF must not be zero and not exceed the range (PR - AU)
Some ICU (APU part) error codes of item EE (indexed item of 10 elements) are listed below, with suggestions
for solving the problem. For a complete overview, refer to item help in the Enraf service tool.
00000 No errors encountered
07000 Low product reflection No product reflection above threshold; check with a reflection diagram
and lower threshold value in item ZP if possible
07005 Top / bottom clipping in raw samples A-channel Lower A-channel gain in item 5O, or enable automatic amplification
07006 Top clipping raw samples A-channel control item 4M
07007 Bottom clipping raw samples A-channel
07009 No peak detected Make a reflection diagram to find the peak (or use items 5C, 5D and 5E)
Set reference level (item RL) in accordance to the product peak and
proceed with accept reference procedure
07014 Ambiguous init situation Select first peak (item 4W) or select second peak (item 4X), after
verification of level by means of manual measurement
07101 Antenna zone out of range The antenna and bottom zone may not overlap; check items AZ and BZ
07102 Antenna zone end before begin Check sign of item AZ (should not be negative)
07103 Antenna zone threshold out of range Item ZA must be between 0 and 90 dB
07104 Product zone threshold out of range Item ZP must be between 0 and 90 dB
07106 Start bottom zone after bottom end Bottom zone (item BZ) must be within measuring range (40 metres).
Check also item PR
07107 Bottom zone threshold out of range Item ZB must be between 0 and 90 dB
07108 Obstruction zone start out of range Obstruction zone start and end must be within measuring range
07109 Obstruction zone end out of range (40 metres). Check also item PR
07110 Obstruction zone position switch Define obstruction zones in consecutive order
07112 Obstruction zone threshold out of range Item OT.n.i must be between 0 and 90 dB
07113 Short measuring range Antenna zone (item AZ) and bottom zone (item BZ) may not overlap
07170 Stilling well diameter out of range Item BD must be between +0.0440 and +0.3353 metres range
07172 Operation mode unknown Item OM must be either >F= or >S=
07173 Antenna mode / Operation mode conflict Wrong type of antenna used (i.e. stilling well antenna on a free space
SmartRadar LTi)
07901 Maximum safe fill (item SF) exceeded Item SF must not be zero and not exceed the range (PR - AU)
18001 Relay error Check item AX, or replace ICU board
21003 Ullage correction table error Check item CL; each level may only be entered once
99999 Value at initialization
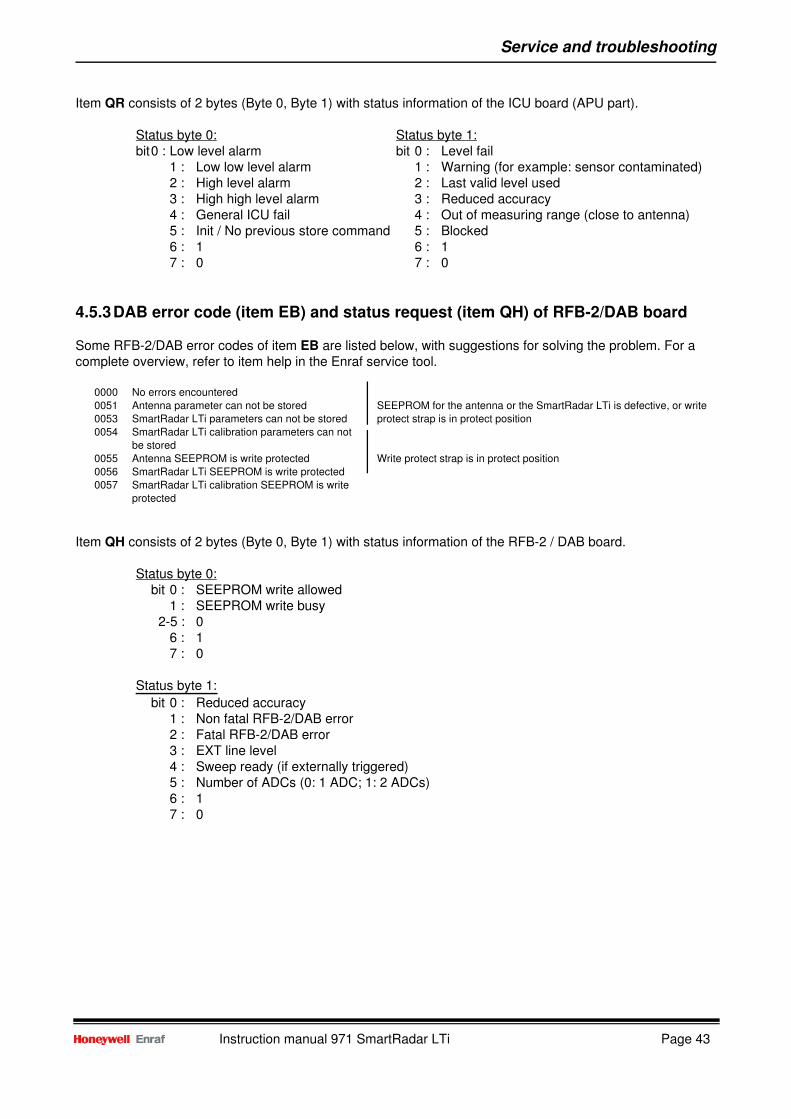
Service and troubleshooting
Instruction manual 971 SmartRadar LTi Page 43
Item QR consists of 2 bytes (Byte 0, Byte 1) with status information of the ICU board (APU part).
Status byte 0: Status byte 1:
bit 0 : Low level alarm bit 0 : Level fail
1 : Low low level alarm 1 : Warning (for example: sensor contaminated)
2 : High level alarm 2 : Last valid level used
3 : High high level alarm 3 : Reduced accuracy
4 : General ICU fail 4 : Out of measuring range (close to antenna)
5 : Init / No previous store command 5 : Blocked
6 : 1 6 : 1
7 : 0 7 : 0
4.5.3 DAB error code (item EB) and status request (item QH) of RFB-2/DAB board
Some RFB-2/DAB error codes of item EB are listed below, with suggestions for solving the problem. For a
complete overview, refer to item help in the Enraf service tool.
0000 No errors encountered
0051 Antenna parameter can not be stored SEEPROM for the antenna or the SmartRadar LTi is defective, or write
0053 SmartRadar LTi parameters can not be stored protect strap is in protect position
0054 SmartRadar LTi calibration parameters can not
be stored
0055 Antenna SEEPROM is write protected Write protect strap is in protect position
0056 SmartRadar LTi SEEPROM is write protected
0057 SmartRadar LTi calibration SEEPROM is write
protected
Item QH consists of 2 bytes (Byte 0, Byte 1) with status information of the RFB-2 / DAB board.
Status byte 0:
bit 0 : SEEPROM write allowed
1 : SEEPROM write busy
2-5 : 0
6 : 1
7 : 0
Status byte 1: bit 0 : Reduced accuracy
1 : Non fatal RFB-2/DAB error
2 : Fatal RFB-2/DAB error
3 : EXT line level
4 : Sweep ready (if externally triggered)
5 : Number of ADCs (0: 1 ADC; 1: 2 ADCs)
6 : 1
7 : 0
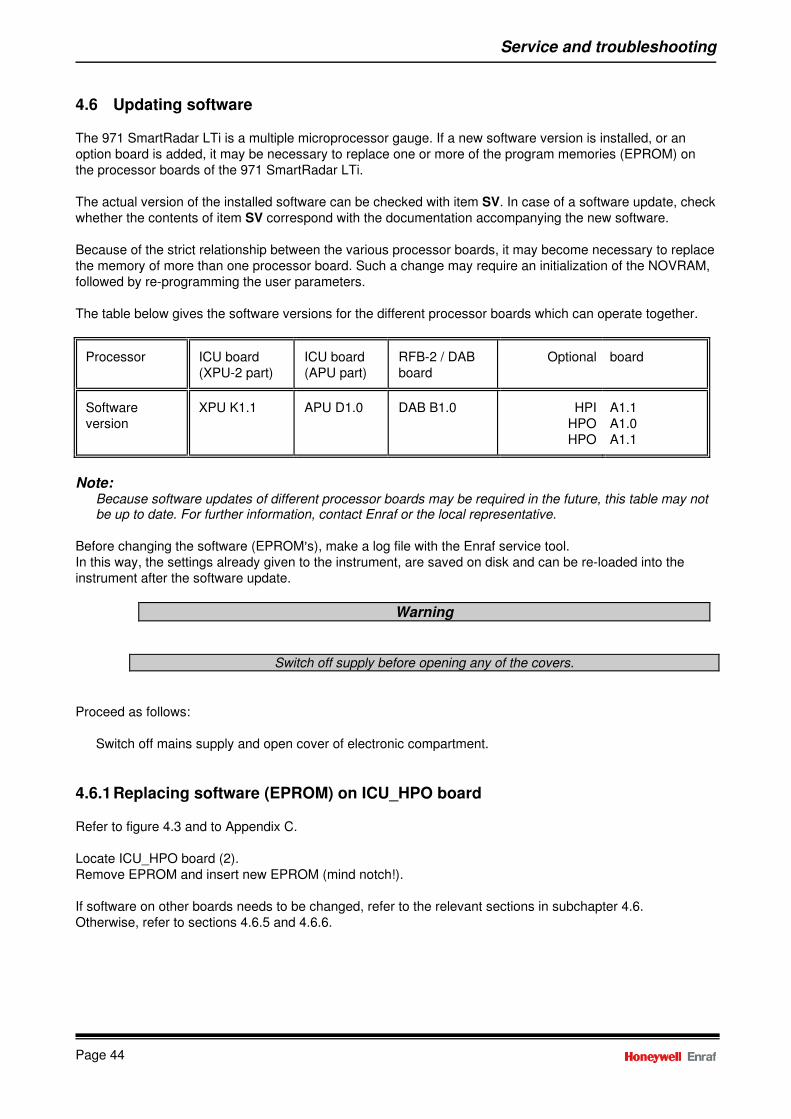
Service and troubleshooting
Page 44
4.6 Updating software
The 971 SmartRadar LTi is a multiple microprocessor gauge. If a new software version is installed, or an
option board is added, it may be necessary to replace one or more of the program memories (EPROM) on
the processor boards of the 971 SmartRadar LTi.
The actual version of the installed software can be checked with item SV. In case of a software update, check
whether the contents of item SV correspond with the documentation accompanying the new software.
Because of the strict relationship between the various processor boards, it may become necessary to replace
the memory of more than one processor board. Such a change may require an initialization of the NOVRAM,
followed by re-programming the user parameters.
The table below gives the software versions for the different processor boards which can operate together.
Processor
ICU board
(XPU-2 part)
ICU board
(APU part)
RFB-2 / DAB
board
Optional
board
Software
version
XPU K1.1
APU D1.0
DAB B1.0
HPI
HPO
HPO
A1.1
A1.0
A1.1
Note: Because software updates of different processor boards may be required in the future, this table may not be up to date. For further information, contact Enraf or the local representative.
Before changing the software (EPROM=s), make a log file with the Enraf service tool.
In this way, the settings already given to the instrument, are saved on disk and can be re-loaded into the
instrument after the software update.
Proceed as follows:
Switch off mains supply and open cover of electronic compartment.
4.6.1 Replacing software (EPROM) on ICU_HPO board
Refer to figure 4.3 and to Appendix C.
Locate ICU_HPO board (2).
Remove EPROM and insert new EPROM (mind notch!).
If software on other boards needs to be changed, refer to the relevant sections in subchapter 4.6.
Otherwise, refer to sections 4.6.5 and 4.6.6.
Warning
Switch off supply before opening any of the covers.

Service and troubleshooting
Instruction manual 971 SmartRadar LTi Page 45
Item
Description
1
Supply board (ICU_GPS)
2
Optional communication board (ICU_RS232/485 or ICU_HPO)
3
Optional interface board (ICU_HPI)
4
ICU board
4.6.2 Replacing software (EPROM) on ICU_HPI board
Refer to figure 4.3 and to Appendix C.
When no optional communication board (ICU_RS232/485 or ICU_HPO) is installed;
Locate ICU_HPI board (3).
Remove EPROM and insert new EPROM (mind notch!).
When an optional communication board (ICU_RS232/485 or ICU_HPO) is installed;
Loosen the 4 Allen head screws, marked AA@ in figure 4.3 (use Allen head key 2.5 mm).
Pull optional communication board away from ICU_HPI board so that it is released from its interconnector
and move it aside.
Locate ICU_HPI board (3).
Remove EPROM and insert new EPROM (mind notch!).
Put optional communication board in place (mind the interconnector!) and secure it with the 4 Allen head
screws.
If software on other boards needs to be changed, refer to the relevant sections in subchapter 4.6.
Otherwise, refer to sections 4.6.5 and 4.6.6.

Service and troubleshooting
Page 46
4.6.3 Replacing software (EPROM====s) on ICU board
Refer to figure 4.3 and to Appendix C.
a) XPU-2 EPROM / NOVRAM:
When no optional interface board (ICU_HPI) is installed;
Locate ICU board (4).
Remove EPROM and insert new EPROM (mind notch!).
Remove NOVRAM and insert new NOVRAM (mind notch!).
When optional interface board (ICU_HPI) is installed;
When optional communication board (ICU_RS232/485 or ICU_HPO) is installed;
Loosen the 4 Allen head screws, marked AA@ in figure 4.3 (use Allen head key 2.5 mm).
Pull optional communication board away from ICU_HPI board so that it is released from its
interconnector and move it aside.
Loosen the 4 Allen head screws, marked AB@ in figure 4.3 (use Allen head key 2.5 mm).
Pull optional interface board away from ICU board so that it is released from its interconnector and
move it to above. Locate ICU board (4).
Remove XPU-2 EPROM and insert new EPROM (mind notch!).
Remove NOVRAM and insert new NOVRAM (mind notch!).
Put ICU_HPI board in place (mind the interconnector!) and secure it with the 4 Allen head screws.
Put optional communication board in place (mind the interconnector!) and secure it with the 4 Allen
head screws.
When no optional communication board (ICU_RS232/485 or ICU_HPO) is installed;
Loosen the 4 Allen head screws, marked AB@ in figure 4.3 (use Allen head key 2.5 mm).
Pull optional interface board away from ICU board so that it is released from its interconnector and
move it to above.
Locate ICU board (4).
Remove XPU-2 EPROM and insert new EPROM (mind notch!).
Remove NOVRAM and insert new NOVRAM (mind notch!).
Put ICU_HPI board in place (mind the interconnector!) and secure it with the 4 Allen head screws.
b) APU EPROM====s:
Loosen the 4 Allen head screws, marked AC@ in figure 4.3 (use Allen head key 2.5 mm).
Pull supply board away from ICU board so that it is released from its interconnector and move it to the
right.
Locate ICU board (4).
Remove APU EPROM=s and insert new APU EPROM=s (APU-L and APU-H) (mind notch!).
Put ICU_GPS board in place (mind the interconnector!) and secure it with the 4 Allen head screws.
If software on the RFB-2 / DAB boards needs to be changed, refer to the next section.
Otherwise, refer to sections 4.6.5 and 4.6.6.
4.6.4 Replacing software (EPROM) on RFB-2 / DAB board
The ICU_GPS board and eventually installed optional boards can remain on the ICU board. However, all
wiring connected to them must be, temporary, disconnected.
$ connectors CN2 and CN4 on ICU_GPS board
$ connectors CN1 and CN2/3 on optional communication board
$ connectors CN2, CN3, CN4 or CN5 on optional interface board
$ connector CN5 on ICU board (blue wires, marked 7 and 8)
$ connector CN6 on ICU board (white wires, marked T , T)
$ connector CN7 or CN8 on ICU board (black wires, marked 5 and 6)
When the optional Infra-Red connector is installed, also disconnect temporary the cable to CN1 on ICU board
(black cable next to XPU-2 jumpers).

Service and troubleshooting
Instruction manual 971 SmartRadar LTi Page 47
Loosen the 4 Allen head screws, marked AD@ in figure 4.3 (use Allen head key 3 mm).
Pull ICU board with mounting plate away from RFB-2 / DAB board so that it is released from its
interconnector
The RFB-2 / DAB board is now visible (refer to Appendix C).
Remove DAB EPROM and insert new DAB EPROM (mind notch!).
Put ICU board with mounting plate in place (mind the interconnector!) and secure it with the 4 Allen head
screws. Insert all connectors which where disconnected.
4.6.5 NOVRAM init
Check whether jumper J4 on the ICU board is set to position A0@ (refer to section 3.2). If the jumper is placed
in position A1@, change it temporary to position A0@.
Close covers and apply power.
If NOVRAM needs to be formatted, proceed as follows:
a) If Infra-Red connector is present:
Issue the command IN on the PET three times in sequence. After the third time the NOVRAM will be
formatted and the message: "NV-data initializing" appears.
Note: Any other command in between the three IN commands, either from the PET or the Enraf field bus, will abort the init procedure. To avoid requests from the Enraf field bus, they can be disconnected temporarily.
When the NOVRAM formatting is ready, the message: "NV-data init completed" will be shown.
Re-enter the items: TA (transmission address)
TI (tank identifier)
TS (transmission speed)
GT (gauge type)
Refer to section 4.6.6 Re-load user parameters.
b) Without Infra-Red connector, hook-up Enraf service tool as described in section 3.3.
Select on the Enraf service tool the feature: send items.
Select transmission address 00, and give the command IN three times in sequence.
When the NOVRAM formatting is ready, the message: "NV-data init completed" will be shown in the
communication window.
Program the required transmission address (item TA) and the required tank identifier (item TI).
Refer to the next section Re-load user parameters.
4.6.6 Re-load user parameters
If not yet done, check whether jumper J4 on the ICU board is set to position A0@ (refer to section 3.2). If the
jumper is placed in position A1@, change it temporary to position A0@. Close covers and apply power.
Proceed as follows:
Re-transmit the log file from the Enraf service tool.
Program all new settings which are required with the updated software.
Set the SmartRadar LTi to the correct level (check by means of a manual measurement) by using the
RL, AR procedure (refer to chapter 3.4.3).
Make a new log file and a reflection diagram with Enraf service tool for future reference.
If jumper J4 on the ICU board was temporary set from position A1@ to position A0@, proceed as follows:
Switch off supply, open electronic compartment cover.
Change jumper J4 to position A1@.
Close cover and apply power.
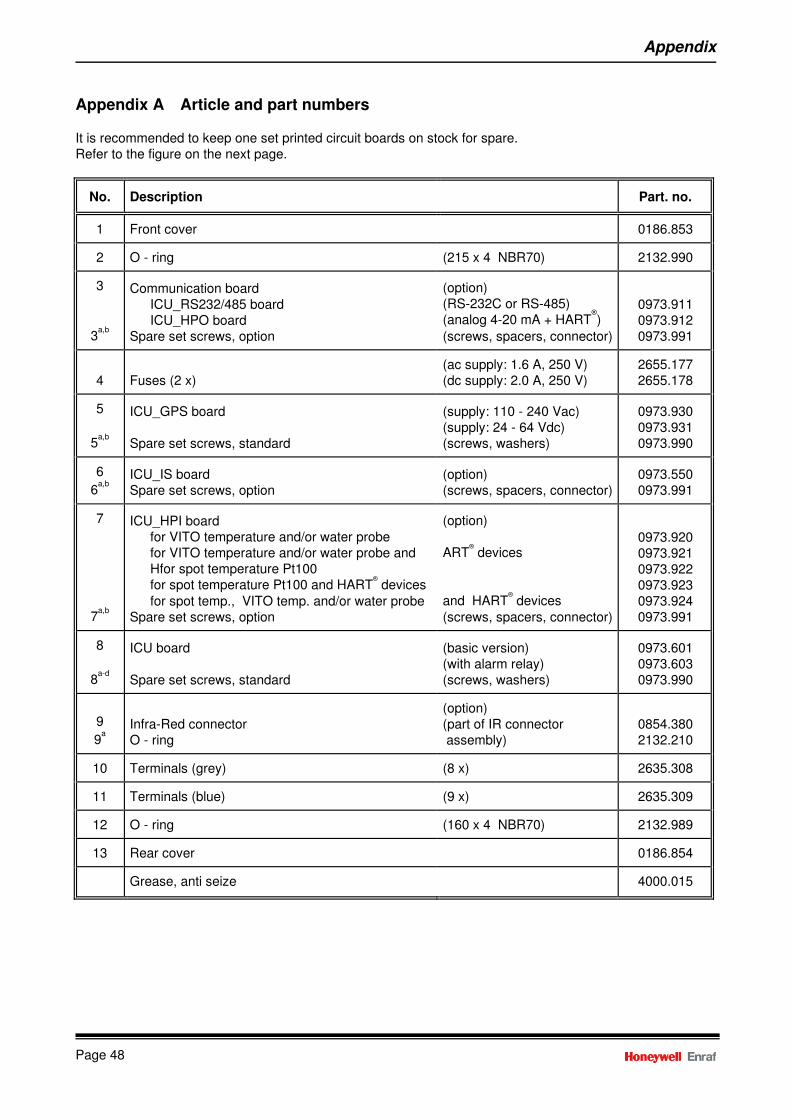
Appendix
Page 48
Appendix A Article and part numbers
It is recommended to keep one set printed circuit boards on stock for spare.
Refer to the figure on the next page.
No. Description
Part. no.
1
Front cover
0186.853
2
O - ring
(215 x 4 NBR70)
2132.990
3
3a,b
Communication board
ICU_RS232/485 board
ICU_HPO board
Spare set screws, option
(option)
(RS-232C or RS-485)
(analog 4-20 mA + HART7)
(screws, spacers, connector)
0973.911
0973.912
0973.991
4
Fuses (2 x)
(ac supply: 1.6 A, 250 V)
(dc supply: 2.0 A, 250 V)
2655.177
2655.178
5
5a,b
ICU_GPS board
Spare set screws, standard
(supply: 110 - 240 Vac)
(supply: 24 - 64 Vdc)
(screws, washers)
0973.930
0973.931
0973.990
6
6a,b
ICU_IS board
Spare set screws, option
(option)
(screws, spacers, connector)
0973.550
0973.991
7
7a,b
ICU_HPI board
for VITO temperature and/or water probe
for VITO temperature and/or water probe and
Hfor spot temperature Pt100
for spot temperature Pt100 and HART7 devices
for spot temp., VITO temp. and/or water probe
Spare set screws, option
(option)
ART7 devices
and HART7 devices
(screws, spacers, connector)
0973.920
0973.921
0973.922
0973.923
0973.924
0973.991
8
8a-d
ICU board
Spare set screws, standard
(basic version)
(with alarm relay)
(screws, washers)
0973.601
0973.603
0973.990
9
9a
Infra-Red connector
O - ring
(option)
(part of IR connector
assembly)
0854.380
2132.210
10 Terminals (grey)
(8 x)
2635.308
11
Terminals (blue)
(9 x)
2635.309
12
O - ring
(160 x 4 NBR70)
2132.989
13
Rear cover
0186.854
Grease, anti seize
4000.015

Appendix
Instruction manual 971 SmartRadar LTi Page 49
The part numbers of the EPROM=s (and NOVRAM) are shown in table below. For software compatibility, refer
to table in section 4.6 (page 43).
EPROM
Part no.
EPROM
Part no.
ICU - APU L&H (set)
0181.302
ICU_HPI
0181.311
ICU - XPU-2
0181.301
ICU_HPO
0181.320
RFB-2 / DAB
0181.309
NOVRAM (ICU - XPU-2)
2518.929
Parts in the 971 SmartRadar LTi can be easily exchanged, with the exception of the RFB-2 / DAB board.
That is because of the calibration of the VCO part and the quartz microwave feed through in the SmartRadar
LTi housing.
Antennas can be changed regardless the type or stem length. When the antenna is changed for another type,
or for the same type but with a different stem length, the antenna calibration parameters in the DAB
SEEPROM must be altered (refer to nearest Enraf office for information about these parameters).
Refer to table on next page for the part numbers. Also the tank separator can be changed.
Tank separator
Part no.
for all antenna models
0873.880
O - ring for enclosure against flange / adapter plate
2132.817
O - ring for enclosure of antenna stem
2132.334

Appendix
Page 50
Antenna type part numbers
Antenna type
Stem length [mm]
Part number
S06
6" stilling well
0050
0300
0500
0800
0873.911
0873.913
0873.915
0873.918
S08
8" stilling well
0050
0300
0500
0800
0873.921
0873.923
0873.925
0873.928
S10
10" stilling well
0050
0300
0500
0800
0873.931
0873.933
0873.935
0873.938
S12
12" stilling well
0050
0300
0500
0800
0873.941
0873.943
0873.945
0873.948
F08
8" free space
0050
0300
0500
0800
0873.971
0873.973
0873.975
0873.978

Appendix
Instruction manual 971 SmartRadar LTi Page 51
Appendix B ASCII table

Appendix
Page 52
Appendix C PCB layout
The x inside the EPROM in the figure above notes the notch on the EPROM. The notch of the EPROM must
fit with the notch of the EPROM socket on the processor board.

Appendix
Instruction manual 971 SmartRadar LTi Page 53
Appendix D Related documents
Installation guide 971 SmartRadar LTi
Installation guide SmartRadar Antennas
Model 971 SmartRadar LTi Safety instructions for installation, commissioning, operation and maintenance
Instruction manual 973 SmartRadar LT Hard alarm output contact
Instruction manual ENSITE service tool
Instruction manual 847 PET
Instruction manual Temperature, Water bottom and Analog output options
Instruction manual HIMS / HTG and vapour pressure (P3) measurement
Instruction manual 973 SmartRadar LT HART7 output communication
Instruction manual 973 SmartRadar LT RS-232/485 output communication
Instruction manual ModbusJ protocol Enraf gauges
Protocol manual SmartRadar
Item documentation Enraf series 854, 873, 877 & 973 gauges

Index
Page 54
Index
Accept reference...........................................22, 35
Acceptance criterium ..........................................31
AdvancedDSP.......................21, 22, 26, 28, 32, 34
Alarm settings .....................................................29
Alarm test............................................................39
Amplitude of detected peaks.........................26, 36
Analog level output ...........................................6, 9
Antenna.....................................................7, 48, 49
zone length ..............................................23, 25
zone threshold .........................................23, 25
Anti seize grease ..........................................38, 47
ASCII table....................................................40, 50
Averaging constant .............................................21
Bottom zone..................................................24, 32
offset ........................................................24, 25
threshold ..................................................24, 25
Cancel select peak .............................................33
Caution................................................................11
CIU................................................................14, 17
CIU Prime ...........................................................14
Clear min max diagram.......................................39
Commissioning mode ...................................22, 35
Decimal separator...............................................19
Detection algorithm.............................................31
Display selection.................................................31
Electronic compartment ......................................37
Element number..................................................13
Enraf field bus line ....................................6, 14, 17
Enraf service tool ..................12, 15, 16, 40, 43, 46
EPROM.............................................43, 45, 48, 51
Error code ...............................................22, 36, 40
Error DAB request ..................................36, 40, 42
Error ICU (APU part) request..................36, 40, 41
Error ICU (XPU-2 part) request ....................36, 40
Exit ................................................................17, 21
Fourier distance ..................................................24
Freeze RSP data ................................................26
Front cover....................................................37, 47
Gain A-channel ...................................................38
Gauge type ...................................................17, 46
Hard alarm output contact ................................6, 9
HART communication...........................6, 9, 15, 17
HART modem .....................................................15
I.S. output..............................................................6
ICU board..........................9, 13, 37, 44, 45, 47, 51
ICU_GPS board......................................37, 44, 47
ICU_HPI board....................6, 9, 37, 44, 45, 47, 51
ICU_HPO board..................6, 9, 37, 44, 45, 47, 51
ICU_RS232/485 board..............6, 9, 37, 44, 45, 47
Indexed items......................................................13
Innage.................................................................30
IR connector .......................................6, 14, 37, 47
Items ...................................................................12
00 ...................................................................40
03 ...................................................................40
4M..................................................................41
4S.............................................................32, 33
4V.............................................................21, 32
4W............................................................33, 41
4X.............................................................33, 41
4Y...................................................................33
5C ............................................................26, 36
5D ......................................................26, 31, 36
5E.......................................................26, 31, 36
5O ............................................................38, 41
AB ..................................................................21
AC..................................................................21
AH..................................................................29
AR................................................22, 35, 41, 46
AT ..................................................................39
AU............................................................21, 41
AX ..................................................................41
AZ ............................................................25, 41
BD..........................................20, 21, 34, 35, 41
BZ ......................................................24, 25, 41
CL ............................................................34, 41
CM ...........................................................22, 35
CS..................................................................34
CW.................................................................34
CZ ............................................................38, 39
DE..................................................................30
DI ...................................................................40
DP..................................................................19
DY..................................................................31
EB ......................................................36, 40, 42
EE ................................................22, 36, 40, 41
EP ............................................................36, 40
EX ..................................................................21
FC ..................................................................26
FI..............................................................31, 32
GT..................................................................46
HA..................................................................29
HH..................................................................29
IN ...................................................................46
LA...................................................................29
LD ............................................................19, 40
LE...................................................................39
LL ...................................................................29
OE............................................................27, 32
OM .....................................................20, 21, 41
OR............................................................21, 31
OS............................................................27, 32
OT......................................................27, 32, 41
OZ............................................................27, 32
PI....................................................................40
PR............................................................21, 41

Index
Instruction manual 971 SmartRadar LTi Page 55
QH .................................................................42
QR ...........................................................36, 42
RD..................................................................36
RI .............................................................21, 36
RL ................................................22, 35, 41, 46
RT ..................................................................36
RU............................................................21, 36
SF ............................................................21, 41
SV ..................................................................43
TA ............................................................17, 46
TI....................................................................46
TS ..................................................................46
UR..................................................................30
W1 .....................................................12, 31, 40
W2 ...............................................13, 17, 31, 40
WC...............................................22, 36, 40, 41
ZA ......................................................25, 31, 41
ZB ............................................................25, 31
ZP ......................................................25, 31, 41
Jumpers ..............................................................13
Level alarm
high ..........................................................29, 39
high high ..................................................29, 39
hysteresis.......................................................29
low ...........................................................29, 39
low low .....................................................29, 39
Level calculation decision switch ..................21, 32
second ...........................................................33
Level dimension ..................................................19
Level type............................................................30
Loop check enable..............................................39
Low product delay counter............................31, 32
Maximum safe fill height .....................................21
Min max diagram ................................................38
Note ....................................................................11
NOVRAM ................................................12, 45, 46
format.............................................................46
initialization ....................................................46
Nozzle length ......................................................21
Number of elements............................................13
Number of peaks above threshold................26, 36
Obstruction .........................................................28
reflections ......................................................26
zone .........................................................26, 32
zone enable ...................................................27
zone end ........................................................27
zone start .......................................................27
zone threshold ...............................................27
Offset to roof .......................................................21
Password 1 ...................................................12, 31
Password 2 ...................................................13, 31
Peak selection dilemma ......................................33
Portable Enraf Terminal ..........6, 10, 12, 14, 40, 46
Position of detected peaks............................26, 36
Position radar ......................................................21
Product reflection signal strength........................36
Product zone.......................................................24
threshold ........................................................25
Protection level 1.................................................12
Protection level 2...........................................13, 17
Radar innage.................................................21, 36
Radar operational mode......................................21
Radar reference ......................................20, 23, 26
Radar Signal Processing ....................................26
Radar status..................................................36, 42
Radar temperature..............................................36
Radar ullage..................................................21, 36
Rear cover ....................................................37, 47
Reduced accuracy ..............................................32
Reference level .............................................22, 35
Reflection diagram. .................................23, 24, 28
RFB-2 / DAB board .................................37, 46, 51
RFB-2 / DAB status request................................42
Roof reflector ................................................32, 33
RS-232C / 485 communication .................6, 15, 17
Safety ..................................................................10
SEEPROM ..........................................................42
Select first peak ..................................................33
Select second peak.............................................33
Software version .................................................43
SPR.......................................................................7
Standard floating point format .............................19
Standard power format .......................................19
Start-up dilemma.................................................33
Stilling well ..........................................................34
diameter ...................................................21, 35
Synthesized pulse radar .......................................7
Tank identifier................................................17, 46
Tank separator................................................7, 48
Temperature
average........................................................6, 9
spot ..............................................................6, 9
Terminals ......................................................37, 47
Thresholds ....................................................23, 38
Transmission address...................................17, 46
Transmission speed......................................17, 46
Ullage..................................................................30
Upper reference ..................................................30
Warning...............................................................11
Warning code ICU (APU part)...........22, 36, 40, 41
Warranty ...............................................................2
Zones ..................................................................23

Honeywell Enraf
Delftechpark 39
2628 XJ Delft
The Netherlands
Tel: +31 (0)15-2701 100
Email: [email protected]
www.honeywellenraf.com
4416716 - Revision 3June 2008© 2008 Honeywell International Inc.