INSTRUCTION AND RECIPE BOOKLET - Cuisinart's … · INSTRUCTION AND RECIPE BOOKLET Handy Prep™...
32
For your safety and continued enjoyment of this product, always read the instruction book carefully before using. INSTRUCTION AND RECIPE BOOKLET Handy Prep ™ 3-Cup Food Processor DFP-3
Transcript of INSTRUCTION AND RECIPE BOOKLET - Cuisinart's … · INSTRUCTION AND RECIPE BOOKLET Handy Prep™...

For your safety and continued enjoyment of this product, always read the instruction book carefully before using.
INSTRUCTION AND RECIPE BOOKLET
Handy Prep™ 3-Cup Food Processor DFP-3
03CU13489 DFP-3 IB REV 3/5/04 12:13 PM Page 1

DFP-3 Capacities:The following can be prepared in a single batch using the 3-cup work bowl. Using thechute attachment for slicing and shredding will allow you to do unlimited amounts.
Food Amount
Sliced or Shredded Cheeses, Fruits or Vegetables 3 cups using work bowl, unlimited using chute attachment
Chopped Fruits and Vegetables For best chopping results, chop 1 cup at a time
Puréed Fruits and Vegetables, Cooked Legumes 3 cups thick purée
Chopped Raw or Cooked Meats, Poultry up to 1/2 pound at a timeor Seafood
Thin Liquid 1-1/2 cups
Thick Liquid 2 cups
Bread/Pizza Dough (may use up to 1-1/2 cups flour in recipe to yield3/4 cup whole grain flour in recipe) a scant 1 pound of dough
Cake Batter 3/4 pound to yield one 8-inch layeror 6 cupcakes
Cookie Dough about 1 pound (12 – 24 cookies)
Cream for Whipping 1 cup to yield 1-1/4 cups whipped cream
Nuts for Nut Butters 1-1/2 cups to yield approximately 3/4 cup
1
03CU13489 DFP-3 IB REV 3/5/04 12:13 PM Page 2

2
IMPORTANTUNPACKINGINSTRUCTIONSThis package contains a Cuisinart® 3-Cup FoodProcessor and the followingstandard parts: a clearwork bowl, chute attach-ment, cover with feed tube,white pusher, metal chop-ping blade, slicing disc andshredding disc, ejectordisc, adapter stem fordiscs, and spatula.
CAUTION: CUTTINGTOOLS HAVE VERYSHARP EDGES. READTHESE INSTRUCTIONSCOMPLETELY BEFOREBEGINNING TO UNPACK.
To avoid injury to yourselfor damage to the 3-CupFood Processor whenunpacking:
1. Place box right side upon floor or low table.
2. Remove instructionbooklet and other printed material.
3. Open unit carton andremove the instructionbooklet and other print-ed material. You willsee an inserted corru-gated box containingthe following parts:
* Adapter stem for discs, a slim white cylinderplaced on the inside ofthe work bowl cover.Remove this stem andplace on workspace.
* Packed upside down youwill find the clear workbowl cover and whitepusher. Hold cover by itsrim and lift it straight up.Unwrap from polybag and remove white pusher.Remove cardboard insert.
4. Remove corrugated boxfrom giftbox and placeon table or other work-space. Carefully open:HANDLE DISCS WITH GREAT CAUTION.THEIR CUTTINGBLADES ARE RAZOR SHARP.
5. The white chute bowlwith the slicing andshredding discs remainsinside the inserted box.Lift the cardboard insertoff of the white chutebowl. Grasp the slicingdisc by the center huband carefully place onwork surface. Lift off thenext cardboard insertand place white chutebowl onto work surfaceto remove the shreddingdisc. Remove the lastcardboard insert andpolybag from white chute bowl. Remove the spatula from the inserted box.
6. The white motor base,clear work bowl, bladeassembly and ejectordisc remain in the box.Remove white ejectordisc from top of workbowl.
7. The motor base andwork bowl assembly arepacked in a foam block.Remove the baseassembly complete withthis foam block. Place on table or workspace.
8. Gently pull base/workbowl assembly out offoam block.
9. Carefully remove card-board insert from insidework bowl.
10. Unwrap base/ workbowl/blade assemblyfrom polybag. BESURE TO REMOVEMETAL CHOPPINGBLADE FIRST BEFORE REMOVING
WORK BOWL FROMMOTOR BASE.
11. Carefully grasp top ofwhite center section ofblade and lift it straightup. DO NOT TOUCHMETAL BLADESWHICH ARE RAZORSHARP. Immediatelyplace metal choppingblade in safe place oncounter or table, wellaway from edge. Now remove cardboard rimfrom around centerstem of work bowl.
12. READ INSTRUCTIONBOOK CAREFULLYBEFORE ASSEM-BLING OR USING 3-CUP FOODPROCESSOR.
13. Save shipping cartonand foam blocks. Youmay want to use themlater to ship processor.
NOTE: Remember toreturn your completedproduct registration card with all informationcarefully filled out.
WHENREMOVING BLADE:CAREFULLY REMOVE THEMETAL BLADE BY GRASP-ING THE CENTER HUB ANDLIFTING IT STRAIGHT UP.NEVER TOUCH THEBLADES, AS THEY ARERAZOR SHARP.
NOTICEThis appliance has a polarized plug (one blade is wider than the other). As a safety feature, thisplug will fit only one way in a polarized outlet. If theplug does not fit fully in theoutlet, reverse the plug. If itstill does not fit, contact aqualified electrician. Do not attempt to defeat this safety feature.
03CU13489 DFP-3 IB REV 3/5/04 12:13 PM Page 3

3
Carefully read all instructions before using this appliance.
IMPORTANT SAFEGUARDSTo reduce risk of injury,always follow these safetyprecautions when usingthis appliance.
Getting Ready
1. Read all instructions.
2. Blades are sharp.Handle them carefully.
3. Always unplug fromoutlet when not in use, before putting on ortaking off parts, andbefore cleaning. Tounplug, grasp plug andpull from electrical out-let. Never pull cord.
4. Do not use outdoors.
5. Do not let cord hangover edge of table orcounter, or touch hotsurfaces.
6. Do not operate anyappliance with dam-aged cord or plug, orafter appliance hasbeen dropped or damaged in any way.Return appliance tonearest authorizedfacility for examinationrepair for electrical or mechanical adjustment.
SAVE THESEINSTRUCTIONS
FOR HOUSEHOLDUSE ONLY
Operation
1. Keep hands as well as spatulas and otherutensils away frommoving blades or discswhile processing food,to prevent possibility ofsevere personal injuryor damage to foodprocessor. A plasticspatula may be used,but only when motor isstopped.
2. Avoid contact withmoving parts. Neverpush food down byhand when slicing orshredding. Always usepusher, or injury mayoccur.
3. Make sure motor hascompletely stoppedbefore removingcover. (If machinedoes not stop within2 seconds, when youturn cover, call 1-800-726-0190 for assis-tance). Do not usemachine.
4. Never store any bladeor disc on motor shaft.To reduce the risk ofinjury, no blade or discshould be placed onmotor shaft exceptwhen the bowl is prop-erly locked in placeand the food processoris in use. Store bladesand discs as you wouldsharp knives, out ofreach of children.
5. Be sure cover issecurely locked inplace before operatingfood processor.
6. Do not try to overrideor tamper with coverinterlock mechanism.Injury may result.
Cleaning
To protect against electrical shock, do notput base in water or otherliquid. If base falls inwater, unplug immediate-ly. DO NOT REACH INTOWATER.
General
1. Close supervision isnecessary when anyappliance is used by ornear children. Do notallow children to usethis appliance.
2. Do not operate this, orany other, motor-drivenappliance while under the influence of alcoholor other substancesthat affect your reaction time or perception.
3. This food processor isUL listed for householduse. Use it only forfood preparation as described in this book.
4. The use of attach-ments not recommend-ed or sold by Cuisinart may cause fire, electri-cal shock or personalinjury, or damage toyour food processor.
5. Maximum rating of 5Amperes is based onattachment that drawsgreatest current. Otherrecommended attach-ments may draw signif-icantly less current.
03CU13489 DFP-3 IB REV 3/5/04 12:13 PM Page 4

TABLE OF CONTENTSImportant Safeguards. . . . . . . . . . . . . . . . . . . . . . . . . . . . . . . . . . . . . . . . . . . . Page 3
Introduction . . . . . . . . . . . . . . . . . . . . . . . . . . . . . . . . . . . . . . . . . . . . . . . . . . . Page 4
The Machine Includes . . . . . . . . . . . . . . . . . . . . . . . . . . . . . . . . . . . . . . . . . . . Page 5
Assembly Instructions . . . . . . . . . . . . . . . . . . . . . . . . . . . . . . . . . . . . . . . . . . . Page 6
The Machine Functions . . . . . . . . . . . . . . . . . . . . . . . . . . . . . . . . . . . . . . . . . . Page 6
Operating Instructions . . . . . . . . . . . . . . . . . . . . . . . . . . . . . . . . . . . . . . . . . . . Page 6
Chopping, Puréeing, Mixing . . . . . . . . . . . . . . . . . . . . . . . . . . . . . . . . . . . . . . . Page 6
Adding Food While Processing. . . . . . . . . . . . . . . . . . . . . . . . . . . . . . . . . . . . . Page 7
Removing Processed Food . . . . . . . . . . . . . . . . . . . . . . . . . . . . . . . . . . . . . . . Page 7
Slicing and Shredding Less Than 3 Cups of Food. . . . . . . . . . . . . . . . . . . . . . . Page 8
Slicing and Shredding More Than 3 Cups of Food . . . . . . . . . . . . . . . . . . . . . . Page 8
Food Prep Guide . . . . . . . . . . . . . . . . . . . . . . . . . . . . . . . . . . . . . . . . . . . . . . . Page 9
Guidelines for Perfect Slices and Uniform Shreds . . . . . . . . . . . . . . . . . . . . . . Page 11
Troubleshooting . . . . . . . . . . . . . . . . . . . . . . . . . . . . . . . . . . . . . . . . . . . . . . . Page 12
Cleaning And Storage . . . . . . . . . . . . . . . . . . . . . . . . . . . . . . . . . . . . . . . . . . Page 12
For Your Safety . . . . . . . . . . . . . . . . . . . . . . . . . . . . . . . . . . . . . . . . . . . . . . . Page 13
Technical Data . . . . . . . . . . . . . . . . . . . . . . . . . . . . . . . . . . . . . . . . . . . . . . . . Page 13
Warranty . . . . . . . . . . . . . . . . . . . . . . . . . . . . . . . . . . . . . . . . . . . . . . . . . . . . Page 14
Recipes . . . . . . . . . . . . . . . . . . . . . . . . . . . . . . . . . . . . . . . . . . . . . . . . . . . . . Page 15
INTRODUCTIONCongratulations on your purchase of the Cuisinart® Handy Prep™ Food Processor. This product is the ultimate food preparation tool, and it comes from the originator of the American food processor, Cuisinart.
The Handy Prep™ handles a variety of food prep tasks. Chop, mix, slice and shred ingredients with the chopping/mixing blade and slicing and shredding discs, or kneadbatches of your favorite bread and pizza dough. Cuisinart has also included a bonusFeed Chute Attachment so you can slice or shred unlimited amounts of ingredients. The Handy Prep™ is easy to use, easy to clean and easy to store.
4
03CU13489 DFP-3 IB REV 3/5/04 12:13 PM Page 5

5
THE MACHINEINCLUDES
1. Motor Base with motor shaft and 3-position controlswitch
2. 3-cup Work Bowlmade of durable shatter-resistant Lexan® plastic.
3. Work Bowl Coverwith feed tube.
4. Pusher that slidesinside the feed tube.
5. Continuous FeedChute for slicing andshredding unlimitedamounts of ingredients.
6. Stainless SteelChopping/MixingBlade
7. Medium ShreddingDisc
8. 2mm Slicing Disc
9. Ejector Disc directssliced or shreddedingredients throughfeed chute attachment.
10. Adapter Stem
11. Spatula
Pusher
3-Cup Work Bowl
Cover with Feed Tube
Housing Base
Spatula
Chopping/Mixing Blade
2mm Slicing Disc
Ejector Disc
Medium Shredding Disc
Continuous Feed Chute
Adapter Stem
03CU13489 DFP-3 IB REV 3/5/04 12:14 PM Page 6
6
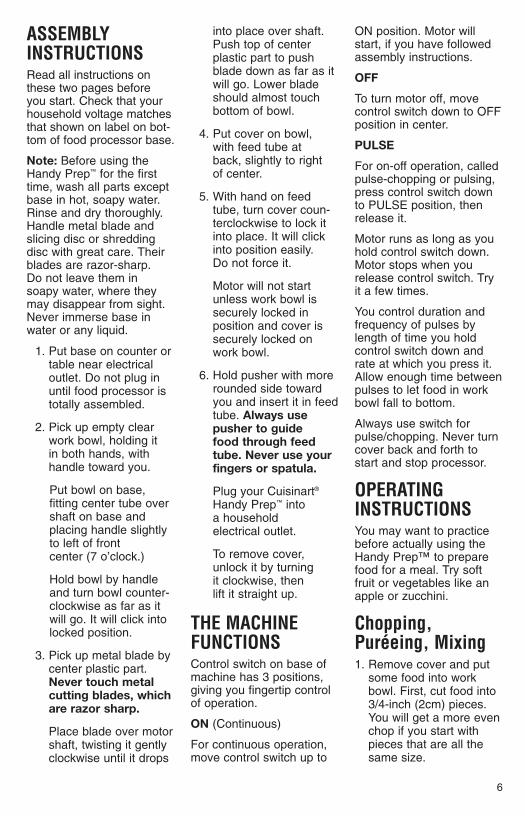
ASSEMBLYINSTRUCTIONSRead all instructions onthese two pages before you start. Check that yourhousehold voltage matchesthat shown on label on bot-tom of food processor base.
Note: Before using theHandy Prep™ for the firsttime, wash all parts exceptbase in hot, soapy water.Rinse and dry thoroughly.Handle metal blade andslicing disc or shreddingdisc with great care. Theirblades are razor-sharp. Do not leave them in soapy water, where theymay disappear from sight. Never immerse base inwater or any liquid.
1. Put base on counter ortable near electricaloutlet. Do not plug inuntil food processor istotally assembled.
2. Pick up empty clearwork bowl, holding it in both hands, withhandle toward you.
Put bowl on base,fitting center tube overshaft on base andplacing handle slightlyto left of front center (7 o’clock.)
Hold bowl by handleand turn bowl counter-clockwise as far as itwill go. It will click intolocked position.
3. Pick up metal blade bycenter plastic part.Never touch metalcutting blades, whichare razor sharp.
Place blade over motorshaft, twisting it gentlyclockwise until it drops
into place over shaft.Push top of centerplastic part to pushblade down as far as itwill go. Lower bladeshould almost touchbottom of bowl.
4. Put cover on bowl, with feed tube at back, slightly to right of center.
5. With hand on feedtube, turn cover coun-terclockwise to lock itinto place. It will clickinto position easily. Do not force it.
Motor will not start unless work bowl is securely locked in position and cover issecurely locked onwork bowl.
6. Hold pusher with morerounded side towardyou and insert it in feedtube. Always usepusher to guide food through feedtube. Never use yourfingers or spatula.
Plug your Cuisinart®
Handy Prep™ into a household electrical outlet.
To remove cover,unlock it by turning it clockwise, then lift it straight up.
THE MACHINE FUNCTIONSControl switch on base ofmachine has 3 positions,giving you fingertip controlof operation.
ON (Continuous)
For continuous operation,move control switch up to
ON position. Motor willstart, if you have followedassembly instructions.
OFF
To turn motor off, movecontrol switch down to OFFposition in center.
PULSE
For on-off operation, calledpulse-chopping or pulsing,press control switch downto PULSE position, thenrelease it.
Motor runs as long as youhold control switch down.Motor stops when yourelease control switch. Tryit a few times.
You control duration andfrequency of pulses bylength of time you holdcontrol switch down andrate at which you press it.Allow enough time betweenpulses to let food in workbowl fall to bottom.
Always use switch forpulse/chopping. Never turncover back and forth tostart and stop processor.
OPERATINGINSTRUCTIONSYou may want to practicebefore actually using theHandy Prep™ to preparefood for a meal. Try softfruit or vegetables like anapple or zucchini.
Chopping,Puréeing, Mixing1. Remove cover and put
some food into workbowl. First, cut food into3/4-inch (2cm) pieces.You will get a more evenchop if you start withpieces that are all thesame size.
03CU13489 DFP-3 IB REV 3/5/04 12:14 PM Page 7

7
Put pieces into workbowl with metal blade inplace. You can put in upto 1 cup of food at atime. If you want toprocess more, do it inbatches.
2. Put on cover and lock it.Insert pusher. Press con-trol switch down toPULSE position, thenrelease it. Repeat two orthree times. Each timeblade stops, let foodpieces drop to bottom ofbowl before pulsingagain. This ensures thatthe blade will chop themat every pulse.
Watch what happens tofood. With pulse/chop-ping technique, you canget an even chop withoutdanger of overprocess-ing. Check texture bylooking through workbowl. Be careful not tooverprocess.
For a coarse chop, pulseonly a few times.
3. If you want a finer chopor purée, move controlswitch up to ON and letmachine run continuous-ly until food is choppedas fine as you want it.Check frequently throughclear cover or bowl toavoid chopping too fine.Use spatula to scrapedown any pieces thatstick to inside of bowl.
Onions and other foodwith a high water contentturn into a smooth puréevery quickly. Do not over-chop — look at food frequently through work bowl.
To purée, follow sameprocedure as for chop-ping, but let machine run
until food is a smoothpurée.
New users are often surprised at how fast theprocessor works. You willquickly get used to itsgreat speed.
These are some conditionsthat affect your results:
• size of pieces you putin bowl – all should beabout the same
• amount of food youprocess – don’t add toomuch at a time
• type of processingyou choose – continuousor pulse/chopping
Adding Food WhileProcessingWhen you want to add liq-uid while machine is run-ning, pour it through openfeed tube. This is especial-ly useful when makingmayonnaise, bread dough,cakes and many otherrecipes. A small hole in thepusher allows you to addliquids in a very slow,steady stream—usefulwhen making sauces likemayonnaise.
When you want to addsmall pieces of food likecheese, meat or garliccloves while machine isrunning, drop them throughopen feed tube.
To prevent spills whenadding flour, sugar andother dry ingredients, usea funnel.
RemovingProcessed FoodBefore removing processedfood, move control switch
to OFF and wait for bladeto stop spinning. Thenremove cover by turning itclockwise. Never try toremove cover and workbowl together; this candamage work bowl.
If blade continues to turnwhen control switch is OFF,unplug machine beforeremoving cover. Do not usemachine any further. Call 1-800-726-0190 immediatelyfor assistance.
After processing liquids,remove work bowl frombase of processor beforeremoving metal blade. Turnhandle of bowl clockwise tounlock bowl from base andlift bowl straight up.
A locking device on metalblade prevents it from mov-ing up on motor shaft whilemachine is in use. If bladeholds bowl in a locked position, jiggle white centersection of blade lightly. Itshould release.
It is important not to letmetal blade fall out of workbowl as you empty it. Hereare three ways to prevent itfrom falling out:
1. Before tilting bowl, usespatula to remove foodfrom around blade.Carefully remove bladeby finger grip on top ofcenter plastic part.
2. Hold top of blade inplace with finger or spat-ula while pouring outprocessed food.
3. Make sure your handsare dry. Insert fingerthrough hole in under-side of bowl and placethumb on rim of bowl.Grip inside of blade shaftfirmly to hold blade inplace.
03CU13489 DFP-3 IB REV 3/5/04 12:14 PM Page 8

8
Slicing AndShredding LessThan 3 Cups Of Food1. Assemble clear work
bowl on base in usual way.
2. Pick up adapter stem.Note that round base is notched at one end.Center section is hexagonal (six-sided)and top section is flat on both sides.
Hold stem firmly by flattop and push it down asfar as it will go on motorshaft.
3. Hold slicing or shreddingdisc with its longer collardown (the side thatreads “THIS SIDEDOWN”). Always handle slicing orshredding discs byrims. Never touchsharp cutting blades.
Slide disc over stem andpush it down until itscenter collar is flush with hexagonal section of stem.
4. Put cover on work bowl,lock it into place andinsert food in feed tube.(If you are slicing, firstcut one end of food flat.Place in feed tube flatside down.) See page 11for guidelines on how toget consistent slices andshreds.
5. Insert pusher. Use mod-erate pressure to pushdown on pusher with one hand while holdingcontrol switch in PULSEposition with other handuntil food is sliced or
shredded. This will onlytake a few seconds.
Wait until disc stopsspinning before removing cover. When it stops, removecover before removingwork bowl. Never try to remove cover andwork bowl together;this could damagework bowl.
6. Remove slicing or shredding disc beforeremoving work bowl. Toremove it, grasp flat topsection of adapter stemand lift it straight up.
Then turn bowl clockwiseto remove it from baseand lift it straight up.
Slicing AndShredding MoreThan 3 CupsOf Food 1. Substitute chute attach-
ment for clear work bowl.
Pick up empty workbowl, holding it in bothhands with handletoward you and chutetoward right. Put bowl onbase, fitting center tubeover motor shaft andplacing handle slightly to left of front center (7 o’clock).
Hold bowl by handle and turn bowl counter-clockwise as far as it will go. It will click intolocked position.
2. Pick up adapter stem.Note that round base isnotched at one end; cen-ter section is hexagonal(six-sided) and top sec-tion is flat on both sides.
Hold stem firmly by flattop and push it down asfar as it will go on motorshaft.
3. Hold ejector disc withside that reads “THISSIDE DOWN” down.Slide ejector disc overadapter stem, pushing it down so it fits overnotched top of roundsection of stem.
4. Hold slicing or shreddingdisc with its longer collardown (the side thatreads “THIS SIDEDOWN.”) Always handle slicing orshredding discs byrims. Never touchsharp cutting blades.
Slide disc over stem andpush it down until itscenter collar is flush with hexagonal section of stem.
5. Put cover on work bowland turn it counterclock-wise to lock it into place.
Place receptacle forprocessed food oncounter under chute. You can use bowls orsaucepans. Those withhigh (up to 6 inches,21cm) straight sideswork best.
6. Put food in feed tube.Remember to cut oneend of food flat if you areslicing, and to insert infeed tube flat side down.
Insert pusher and pushdown on it with one handwhile holding controlswitch in PULSE positionwith other hand. Ejectordisc will direct foodthrough chute into recep-tacle. Total amount offood you can slice or
03CU13489 DFP-3 IB REV 3/5/04 12:14 PM Page 9

9
shred with Handy Prep™
is limited only by size ofreceptacle under chute.You can replace fullreceptacle with emptyone and continue slicingor shredding.
Wait until slicing or shred-ding disc stops spinningbefore you remove cover.When it stops, removecover before trying toremove work bowl. Nevertry to remove cover andwork bowl together; thiscould damage work bowl.
To remove slicing orshredding disc, grasp flattop of adapter stem andpull straight up. You mustremove discs beforeremoving work bowl.
Food Prep GuideYour Cuisinart® Handy Prep™ makes many everyday food preparation tasks much easier and faster. Use these guidelines to get the best food results. For larger amounts(more than 3 cups processed) when slicing and shredding, use the chute attachment.
Food Blade Preparation/Method Results/NotesBread Metal blade Break or cut into 1-inch or Crumbs for fillings/ toppings/crusts. For
smaller pieces. Pulse to buttered bread crumbs, butter bread firstchop, then process until or add melted or softened butter throughcrumbs are desired texture feed tube while processing. For herbed
bread crumbs, chop herbs first.
Butter or Metal blade Chop garlic, herbs or zest Smooth creamy flavored butter or Cream first. Cut butter/cheese into cheese spreads.Cheese, tablespoon size pieces. Flavored Process until smooth;Cheese Dips add liquids last if using.& Spreads
Cheeses, Metal Blade Remove hard rind, cut into “Grated” hard cheese, texture fromHard – 3/4-inch or smaller cubes. With coarse to fine. Process longer forAsiago, machine running, drop through finer texture.Locatelli, feed tube and process “grated” Parmesan, to desired texture. Hard cheese should not beRomano shredded – use chopping
Slicing Disc Have cheese at room temperature. technique for results similar to Remove hard rind. Stand pieces grated/shredded cheeses.in feed tube – use light pressureto slice.
Cheeses, Shredding Disc Chill cheeses. Cut to fit feed Shredded or sliced cheeses suitable forMedium-Hard Slicing Disc tube. Stand cheese in feed salads, pizzas, tacos, casseroles, etc.Such as tube; use light pressure to slice Cheddar, or shred. Swiss, etc.
Cheeses, Soft Shredding Disc Chill (best results, freeze 20 – Do not slice soft cheeses. Shredded Such as 30 minutes) cheese; cut to fit cheeses are suitable for salads, pizzas,Mozzarella feed tube. Stand cheese in tacos, casseroles, etc.
feed tube; use light pressure to shred.
Citrus Peel Metal Blade Remove zest from fresh, washed Chopped citrus zest. For best chop, add & dried citrus using vegetable sugar or salt from recipe when processing. peeler, leaving bitter white pith on fruit. Cut in 1-inch pieces. Pulse to chop, then process until zest is desired texture.
03CU13489 DFP-3 IB REV 3/5/04 12:14 PM Page 10
10
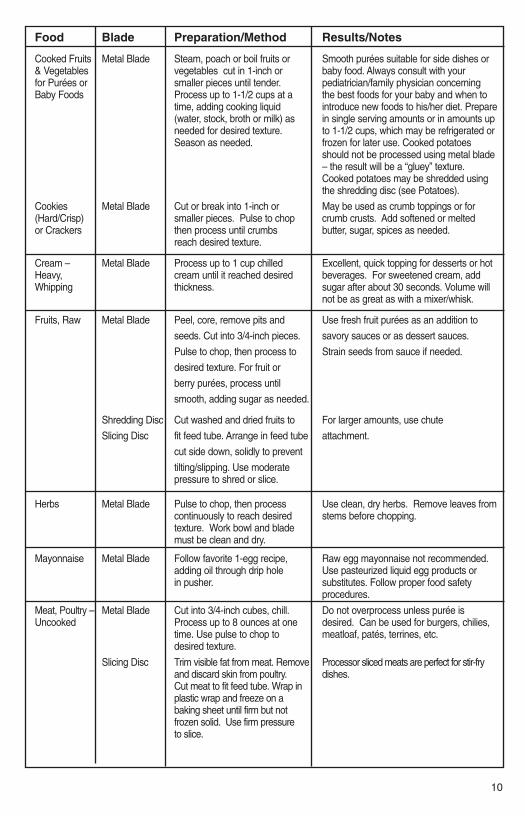
Food Blade Preparation/Method Results/Notes
Cooked Fruits Metal Blade Steam, poach or boil fruits or Smooth purées suitable for side dishes or& Vegetables vegetables cut in 1-inch or baby food. Always consult with yourfor Purées or smaller pieces until tender. pediatrician/family physician concerning Baby Foods Process up to 1-1/2 cups at a the best foods for your baby and when to
time, adding cooking liquid introduce new foods to his/her diet. Prepare (water, stock, broth or milk) as in single serving amounts or in amounts up needed for desired texture. to 1-1/2 cups, which may be refrigerated or Season as needed. frozen for later use. Cooked potatoes
should not be processed using metal blade – the result will be a “gluey” texture. Cooked potatoes may be shredded using the shredding disc (see Potatoes).
Cookies Metal Blade Cut or break into 1-inch or May be used as crumb toppings or for (Hard/Crisp) smaller pieces. Pulse to chop crumb crusts. Add softened or melted or Crackers then process until crumbs butter, sugar, spices as needed.
reach desired texture.
Cream – Metal Blade Process up to 1 cup chilled Excellent, quick topping for desserts or hotHeavy, cream until it reached desired beverages. For sweetened cream, add Whipping thickness. sugar after about 30 seconds. Volume will
not be as great as with a mixer/whisk.
Fruits, Raw Metal Blade Peel, core, remove pits and Use fresh fruit purées as an addition to
seeds. Cut into 3/4-inch pieces. savory sauces or as dessert sauces.
Pulse to chop, then process to Strain seeds from sauce if needed.
desired texture. For fruit or
berry purées, process until
smooth, adding sugar as needed.
Shredding Disc Cut washed and dried fruits to For larger amounts, use chute
Slicing Disc fit feed tube. Arrange in feed tube attachment.
cut side down, solidly to prevent
tilting/slipping. Use moderate pressure to shred or slice.
Herbs Metal Blade Pulse to chop, then process Use clean, dry herbs. Remove leaves from continuously to reach desired stems before chopping. texture. Work bowl and blade must be clean and dry.
Mayonnaise Metal Blade Follow favorite 1-egg recipe, Raw egg mayonnaise not recommended. adding oil through drip hole Use pasteurized liquid egg products or in pusher. substitutes. Follow proper food safety
procedures.
Meat, Poultry – Metal Blade Cut into 3/4-inch cubes, chill. Do not overprocess unless purée is Uncooked Process up to 8 ounces at one desired. Can be used for burgers, chilies,
time. Use pulse to chop to meatloaf, patés, terrines, etc. desired texture.
Slicing Disc Trim visible fat from meat. Remove Processor sliced meats are perfect for stir-fryand discard skin from poultry. dishes.Cut meat to fit feed tube. Wrap inplastic wrap and freeze on a baking sheet until firm but not frozen solid. Use firm pressureto slice.
03CU13489 DFP-3 IB REV 3/5/04 12:14 PM Page 11

11
Guidelines forPerfect Slices andConsistentlyUniform Shreds1. Choose food with care.
Fruits and vegetablesshould be fresh, firm andnot overripe.
2. Prepare food first.Always remove largehard pits and seeds.When slicing, cut oneend flat and place infeed tube cut side down.
3. Pack feed tube carefully.Food should fit snuglybut not so tight that it
prevents pusher frommoving. (Bottom of feed tube is slightly largerthan top. If food is toobig for top, try insertingfrom bottom.)
4. Pack feed tube fordesired results.For small, round slices
Food Blade Preparation/Method Results/NotesMeats, Metal Blade Cut meat into 3/4-inch or smaller Chopped meats can be used for salads orPoultry – cubes/pieces. Pulse to chop to spreads. For Baby/Junior Foods, add brothCooked desired texture. Process up to or other liquid as needed. Always consult
8 ounces at a time. with your pediatrician/family physician con-cerning the best foods for your baby and when to introduce new foods to his/her diet.
Muffins, Metal Blade Use metal blade to “sift” dry Batters for small recipes of muffins andQuick Breads ingredients; remove. Process wet quick breads can be prepared quickly and
ingredients, return dry ingredients with little fuss.to work bowl and pulse to blend.See Cuisinart recipes.
Pastry/ Metal Blade Use recipe, pg 30 or other favorite Can prepare pastry for single crust pie.Pie Crust recipe using recipe method. Repeat for a 2-crust pie, do not double.
Peanut Butter Metal Blade Process up to 1-1/2 cups peanuts Fresh nut butters contain no additional oils, or Nut Butters or other nuts. Pulse to chop sugar or salt unless you choose to add
first, then process continuously them. Nut butters can be kept for several until ground nuts form a ball. months tightly covered and refrigerated.
For chunky-style, add a handful of nuts before processing is completed.
Potatoes, Shredding Disc Trim to fit feed tube as needed. Use chute attachment for largerCooked Slicing Disc Shred or slice using light pressure. amounts.
Potatoes, Raw Shredding Disc Trim as needed to fit feed tube. Use chute attachment for larger amounts.Slicing Disc Shred or slice using medium
pressure.
Vegetables, Metal Blade Peel vegetable & cut into pieces Raw 3/4-inch or smaller. Keep pieces
similar size for most even chop.Pulse to chop, or process to“grind” or “purée. For small itemssuch as garlic or shallots, drop through feed tube while machine is running to chop.
Shredding Disc Peel and cut to fit feed tube. Cut For soft vegetables, use light to moderateSlicing Disc one end flat, place in feed tube flat pressure. For firmer vegetables, use mod-
end down. For cabbage remove erate to medium pressure. and discard core. Do not use shredding disc for cabbage.
Yeast Doughs Metal Blade Process dry ingredients to blend, Makes a scant 1 pound of dough, enough then add yeast mixture/liquid for a single small (8 x 4 x 2-1/2 – inch loaf through feed tube in a steady pan) or free form bread. See recipes for stream as fast as the flour will more ideas.absorb it. After mixture forms ball, process for 46 – 60 seconds to knead.
03CU13489 DFP-3 IB REV 3/5/04 12:14 PM Page 12

12
or short shreds from car-rots, zucchini and otherlong vegetables, cutthem in 4-inch (10cm)lengths; pack them tightly upright. For longslices or shreds, cutthem in 2-inch (5cm)lengths.
5. Adjust pusher pressureto food texture.Never push down hardon pusher.
Use light pressure forsoft fruits and vegetableslike bananas, mush-rooms, strawberries andtomatoes and for allcheeses and pack them horizontally.
Use medium pressure formost food — apples, cel-ery, citrus fruit, potatoes,zucchini. Use firm pres-sure for really hard veg-etables like carrots andyams.
TROUBLESHOOTING These are some problemsthat beginners with a foodprocessor sometimes expe-rience, along with theirsolutions.
Food is unevenlychopped
Try to process less food at one time. Pulse/chop until pieces of food are no larger than 1/2 inch (1.25cm). Then runmachine continuously,checking consistencyoften.
Liquid leaks from bottomof work bowl onto motor base
Remove work bowl frombase as soon as you fin-ish processing. Do not remove metal blade first.When work bowl and
blade are removedtogether, blade dropsdown and forms almost perfect seal against bowl.
Liquid leaks out betweenwork bowl and coverwhen machine is running
Never use more than 1-1/2 cups (360ml) of avery thin liquid. The thicker the liquid, themore you can use. Withthick mixtures like pan-cake or cake batter, forexample, you canprocess as much as 2cups (480ml).
Slices are uneven orslanted
Pack feed tube carefully.Maintain even pressure on pusher.
Carrots or similar foodfalls over in feed tube
Cut food into equallysized pieces, not over 4inches (10cm) long. Useenough pieces to fit feedtube snugly.
Cut carrots in half andinsert one piece point-sidedown and the other stem-side down.
A few pieces of foodremain on top of slicingor shredding disc
You can improve this byraising and lowering(bouncing) pusher whenfood is almost all slicedor shredded.
Cheese spreads out andcollects on top of shred-ding disc
Cheese was not coldenough, or pressure onpusher was too great. Always use light pressurewhen processing cheese.
CLEANING ANDSTORINGKeep your food processorready for use on a kitchencounter. When it’s notbeing used, leave itunplugged. Don’t leave it with cover in locked position; this could damagethe off-on mechanism.
Store blades and discs insafe, convenient place, asyou would sharp knives —out of the reach of children.
All parts except motor baseare dishwasher safe andwe recommend washingthem in the dishwasher ONTHE TOP RACK. Due tointense water heat, wash-ing the work bowl, workbowl cover and accessorieson the bottom rack maycause damage over time.
Insert work bowl upsidedown. Remember whereyou place sharp blades anddiscs, and unload themcarefully.
To simplify cleaning, rinsework bowl, cover, pusherand blade or disc immedi-ately after use so foodwon’t dry on them.
If you wash blades anddiscs by hand, do it careful-ly. Avoid leaving them insoapy water, where theymay disappear from sight.To clean metal blade, fillwork bowl with soapywater, hold blade by itscenter plastic part andmove it up and down oncenter shaft. Use of a sprayattachment is also effec-tive. If necessary, use abrush.
Work bowl is made ofLexan® polycarbonate plas-tic, which is shatter resist-ant and heat resistant.
03CU13489 DFP-3 IB REV 3/5/04 12:14 PM Page 13

Chopping certain foodsmay scratch or cloud workbowl. Among them are rice,whole spices and oils likewintergreen. If you like toprepare your own spiceblends, you may want tokeep a second bowl just forthat purpose.
Base housing is made oftouch plastic with highimpact resistance. Itssmooth surface will looknew for years. Keep asponge handy as you workand wipe spills from base.Wipe in direction awayfrom motor shaft. Do notuse abrasive spray clean-ers on base or pusher.
Four rubber feet on under-side of base keep it frommoving on most work sur-faces when machine is pro-cessing heavy loads. Cleanfeet from time to time; ifrubber surface is not clean,machine may move oncounter. If feet leave spotson counter, spray with spotremover and wipe withdamp sponge. If any traceof spot remains, repeatprocedure and wipe areawith damp sponge andnon-abrasive cleaner.
IMPORTANT: Never storeany blade or disc on motorshaft. No blade or discshould be placed on shaftexcept when work bowl isin place and processor isabout to be used.
FOR YOUR SAFETY Like all powerful electricalappliances, your foodprocessor should be han-dled with care.
Follow these guidelines toprotect yourself and yourfamily from misuse thatcould cause injury.
Handle and store metalblade and discs carefully.Their cutting edges arevery sharp.
Never put adapter stem onmotor shaft until work bowlis securely locked in place.
Always make certain thatadapter stem is down onmotor shaft as far as it will go.
Always insert metal bladein work bowl before puttingingredients in work bowl.
When slicing or shred-ding food, always usepusher. Never put yourfingers or a spatula intofeed tube.
Always wait for blade ordisc to stop spinning beforeyou remove cover fromwork bowl.
Be careful not to let metalblade fall out of work bowlwhen you empty bowl.Remove it before tiltingbowl or hold it in place.
TECHNICAL DATAThe line voltage and frequency approximate foryour machine are shownon label on underside of base.
An automatic temperature-controlled circuit breaker inmotor ensures protectionagainst motor burnout. Ifprocessor runs for excep-tionally long time whenchopping, mixing or knead-ing thick or heavy mixturesin successive batches,motor may overheat. If thishappens, processor willstop. Turn it off and wait formotor to cool off beforeproceeding.
It will usually cool off within10 minutes. In extremecases, it could take anhour.
Safety switches preventmachine from operatingwhen work bowl or cover isnot locked into position.Motor stops within secondswhen control switch isturned off or cover isunlocked. If motor shouldever continue to run, do notattempt to remove cover.Remove plug from outletand immediately notify theCuisinart ConsumerService Center.
13
03CU13489 DFP-3 IB REV 3/5/04 12:14 PM Page 14

WARRANTYCUISINART®
HANDY PREP™
FOOD PROCESSOR LIMITED THREE-YEAR WARRANTY
This warranty supersedes allprevious warranties onCuisinart® Handy Prep™
Food Processors.
This warranty is available toconsumers only. You are aconsumer if you own aCuisinart® Handy Prep™ FoodProcessor that was purchasedat retail for personal, family orhousehold use. Except as otherwise required under applicable state law, this warranty is not available toretailers or other commercialpurchasers or owners.
We warrant that yourCuisinart® Handy Prep™
Food Processor will be free of defects in material andworkmanship under normalhome use for three years fromthe date of original purchase.
However, return of the product registration card does not eliminate the need forthe consumer to maintain theoriginal proof of purchase inorder to obtain the warrantybenefits. In the event that youdo not have proof of purchasedate, the purchase date forpurposes of this warranty willbe the date of manufacture.
We suggest that you completeand return the enclosed product registration cardpromptly to facilitate verification of the date of original purchase.
If your food processor shouldprove to be defective withinthe warranty period, we willrepair it (or, if we think necessary, replace it) withoutcharge to you. To obtain warranty service, please callour Consumer Service Centertoll-free at 800-726-0190 orwrite to:
Cuisinart 150 Milford RoadEast Windsor, NJ 08520
To facilitate the speed andaccuracy of your return, please also enclose $7.00 for shipping and handling ofthe product; under Californialaw, only proof of purchase isrequired. Please also be sureto include a return address,description of the productdefect, product serial number,and any other information pertinent to the product’sreturn. Please pay by check or money order.
NOTE: For added protectionand secure handling of anyCuisinart® product that is beingreturned, we recommend thatyou use a traceable, insureddelivery service. Cuisinart cannot be held responsible for in-transit damage or forpackages that are not delivered to us. Lost and/ordamaged products are notcovered under warranty.
Your Cuisinart® Handy Prep™
Food Processor has beenmanufactured to strict specifications and has beendesigned for use with theCuisinart® Food Processorauthorized accessories andreplacement parts for yourmodel. This warranty expresslyexcludes any defects or dam-ages caused by accessories,replacement parts or repairservice other than those thathave been authorized by Cuisinart.
This warranty does not coverany damage caused by accident, misuse, shipment or other than ordinary household use.
This warranty excludes all inci-dental or consequential dam-ages. Some states do notallow the exclusion of or limita-tion of incidental or conse-quential damages, so the fore-going may not apply to you.
This warranty gives you specif-ic legal rights, and you may
have other rights that varyfrom state to state.
WARNINGOur food processors andaccessories are carefullydesigned and manufacturedwith high-quality materials toassure your satisfaction andsafety when you use them.Although accessories sold bycompanies other thanCuisinart may be compatiblewith your Cuisinart® FoodProcessor, they may also be extremely dangerous and expose the user to serious injury.
We specifically caution you not to use other brand accessories, such as juicers,which permit your processor to operate with exposed cutting or shredding discs.
If you have any questionsabout the safety features of your Cuisinart® FoodProcessor, please call us at the toll-free number thatappears on the above warranty.
14
03CU13489 DFP-3 IB REV 3/5/04 12:14 PM Page 15

GuacamoleServe guacamole with crispy tortilla chips, or use as a sauce or side dish.
Makes about 2 cups
Insert metal blade. Place tomato pieces in work bowl; pulse to chop, 10 to 15 times; remove andreserve. With machine running, drop garlic through feed tube and process until minced, about 10seconds. Scrape work bowl. Add jalapeño and onion to work bowl, pulse to chop, 5 times. Add halfthe avocado pieces, cilantro leaves, lime juice, chili powder, cumin and salt. Pulse 5 times to chopavocado, then process until smooth, about 45 seconds. Add remaining avocado. Pulse until mix-ture is blended, and reaches desired texture for a chunky guacamole, or process until smooth andcreamy, about 1-1/2 minutes. Cover and refrigerate for at least 30 minutes before serving to allowflavors to blend. Serve with tortilla corn chips.
Nutritional information per serving (2 tablespoons):Calories 56 (73% from fat) • carb. 4g • pro. 0g • fat 5g • sat. fat 1g • chol. 0mg
• sod. 23mg • calc. 2mg • fiber 3g
Fresh Tomato & Roasted Pepper Salsa Cruda Roasted Red Peppers add a little something extra to a traditional favorite.
Makes 1-1/2 cups
Insert metal blade. With machine running, drop garlic through feed tube; process 5 seconds tochop. Add half the tomatoes to work bowl. Pulse 5 times to chop, then process to chop finely,about 15 to 20 seconds. Add remaining tomatoes to work bowl along with roasted red pepper,cilantro, green onions, jalapeño pepper, lime juice, cumin and salt. Pulse 10 to 15 times (one second pulses), or process until desired texture is reached. Let stand 30 minutes before serving to allow flavors to blend.
15
1 ripe plum tomato (3-4 ounces), cored,seeded, cut into eighths
1 garlic clove, peeled
1 jalapeño pepper, seeded and halved,cut in 3/4-inch pieces
1/2 ounce red onion (about 1-inch piece),trimmed, cut into 1/2-inch pieces
2 ripe avocados (20-24 ounces total),peeled, pitted, cut into 3/4-inch chunks
2 tablespoons packed cilantro leaves,washed & dried
2 tablespoons fresh lime or lemon juice
1/2 teaspoon chili powder
1/4 teaspoon ground cumin
1/4 teaspoon kosher salt
1 garlic clove, peeled
4 plum tomatoes (12 ounces), cored,seeded, quartered
1/2 roasted red pepper, cut in 1-inchpieces
1/3 cup lightly packed fresh cilantroleaves, washed and dried
1 green onion, trimmed, cut 1-inchpieces
1-2 jalapeño peppers, stemmed, halved,seeded, cut in 1/2-inch pieces
2 tablespoons fresh lime juice
1/2 teaspoon ground cumin
1/4 teaspoon kosher salt
Recipe Notes:Nutritional analyses are based on number of servings indicated. If a recipe produces a rangeof servings, they are based on the highest serving yield for that particular recipe.
03CU13489 DFP-3 IB REV 3/5/04 12:14 PM Page 16

16
Nutritional information per serving (1/4 cup):Calories 8 (7% from fat) • carb 2g • pro. 0g • fat 0g • sat. fat • chol. 0mg
• sod. 58mg • calc. 7mg • fiber 0g
HummusAdd a roasted red pepper and 1 teaspoon herbs de Provence for a variation.
Makes about 2 cups
Insert metal blade. Add parsley to work bowl. Process to chop, 5 seconds; remove and reserve.With machine running, drop garlic through feed tube. Process until finely chopped, about 5 sec-onds. Add chick peas, tahini, lemon juice, water and cumin to work bowl; process until smooth, 1-1/2 to 2 minutes, stopping to scrape work bowl as needed one or two times. With the machinerunning, add the olive oil in a steady stream and process until the mixture is smooth and creamy.Taste and season with kosher salt and freshly ground pepper. Transfer to a bowl, cover and letstand for 30 minutes or longer to allow flavors to blend. Refrigerate if not serving in 30 minutes.
Note: Tahini is a sesame seed paste available most grocery stores.
Nutritional information per serving (2 tablespoons):Calories 30 (38% from fat) • carb. 4g • pro. 2g • fat 1g • sat. fat 0g • chol. 0mg
• sod. 29mg • calc. 16mg • fiber 1g
Herbed Chevre & Sun-dried Tomato TortaMakes about 1-1/2 cups
Insert metal blade. Place sun-dried tomatoes, herbs de Provence, pine nuts and olives in workbowl. Pulse to chop, 5 times. Line a 2-cup bowl or mold with plastic wrap. Spoon the sun-driedtomato mixture into the bottom of the prepared mold; reserve. Wipe the work bowl and metal bladeclean with a paper towel.
Insert the metal blade. With the machine running, drop the garlic through the feed tube andprocess 10 seconds to chop. Scrape the work bowl. Add the herbs, process to chop finely, 15 seconds. Add cheese, salt, pepper and 2 - 3 drops hot sauce, process 20 to 30 seconds to combine.
1/4 cup loosely packed flat parsley leaves
1 clove garlic, peeled
1 can (19 ounces, 540g) chickpeas,rinsed and drained
2 tablespoons tahini (see Note)
2 tablespoons fresh lemon juice
1/4 cup water
1/2 teaspoon ground cumin
1/4 cup extra virgin olive oil
kosher salt and freshly ground black pepperto taste
4 sun-dried tomatoes, oil packed, with 1tablespoon oil
1/2 teaspoon herbs de Provence (or basilor thyme)
1 tablespoon toasted pine nuts
3-4 imported black olives, pitted
1 clove garlic, peeled
1/4 cup mixed fresh herbs, looselypacked (such as parsley, thyme, basil,oregano, marjoram, sage, etc.)
6 ounces cream cheese (may usereduced fat), cut in 1-inch pieces
6 ounces Chevre or other goat cheese,chilled, cut in 1-inch pieces
1/8 teaspoon kosher salt
1/8 teaspoon freshly ground pepper
2 - 3 drops hot sauce such as Tabasco®
to taste
03CU13489 DFP-3 IB REV 3/5/04 12:14 PM Page 17

17
Gently spoon some of the cheese mixture over the bottom of the bowl, pressing down gently.Spoon in the remaining cheese mixture and smooth over the top. Cover with plastic wrap andrefrigerate until ready to use.
To unmold: remove plastic wrap. Arrange fresh herbs or other greens over the exposed “top” of themolded cheese, so that some will come out from the edges. Place a flat plate or server over thebowl and invert so that the “top” becomes the “bottom”. Carefully lift up the bowl and gently removethe plastic wrap. Serve with crackers, pita wedges, bagel chips or baguette slices.
Nutritional information per serving (2 tablespoons):Calories 104 (73% from fat) • carb. 2g • pro. 5g • fat 9g • sat. fat 5g • chol. 16mg
• sod. 165mg • calc. 87mg • fiber 0g
VinaigretteMakes 1-1/2 cups
This basic vinaigrette can be easily changed by using a flavored vinegar or oil, or byadding fresh or dried herbs. Add a touch of sugar for a little sweetness.
Insert metal blade and turn on machine. Drop garlic through feed tube and process until mincedabout 5 seconds. Add vinegar, mustard, salt and pepper to work bowl. While machine is running,pour oil through feed tube in thin stream and process until completely mixed and emulsified, about5 to 10 seconds.
Nutritional information per serving (1 tablespoon):Calories 81 (98% from fat) • carb. 0g • pro. 0g • fat 9g • sat. fat 1g • chol. 0mg
• sod. 43mg • calc. 1mg • fiber 0g
Creamy Ricotta Herb Dressing/DipThis is a good light dressing for potato salad or other fresh vegetable salads. It also
makes a nice dip for fresh crudités.
Makes about 1-1/2 cups
Insert metal blade. With machine running, drop shallots and garlic (if using) through feed tube andprocess to chop, 5 seconds. Scrape work bowl. Add fresh herbs; pulse to chop, 5 times. Add ricotta, yogurt, dry mustard, salt, pepper. Process until creamy and smooth, about 20 seconds.
1 small garlic clove, peeled
1/3 cup wine vinegar
1 tablespoon fresh lemon juice
1 tablespoon Dijon mustard
1/2 teaspoon kosher salt
1/8 teaspoon freshly ground black pepper
1 cup vegetable oil (may use half olive oil)
2 shallots, peeled and halved
1 clove garlic, peeled (optional)
1/4 cup fresh flat-leaf parsley
1 tablespoon fresh tarragon leaves
1 teaspoon fresh thyme leaves
2-3 fresh basil leaves
3/4 cup part skim ricotta cheese
3/4 cup buttermilk or fat free plain yogurt
1/2 teaspoon dry mustard
1/2 teaspoon each kosher salt and freshlyground pepper
03CU13489 DFP-3 IB REV 3/5/04 12:14 PM Page 18

18
Transfer to a resealable container, cover and let stand for at least 30 minutes before using, to allowflavors to blend and develop. Refrigerate unused portions. Will keep about 5 days, refrigerated.
Nutritional information per serving (2 tablespoons):Calories 33 (33% from fat) • carb. 3g • pro. 3g • fat 1g • sat. fat 1g • chol. 86mg
• sod. 86mg • calc. 71mg • fiber 0g
ColeslawShred cabbage in just seconds using your Handy Prep™.
Makes about 6 cups
Assemble processor with chute attachment, ejector disc and slicing disc. Slice cabbage throughchute into large bowl. Insert shredding disc, and shred carrots through chute into bowl. Toss cab-bage and carrots with remaining ingredients.
Nutritional information per serving (3/4 cup): Calories 73 (55% from fat) • carb. 7g • pro. 1g • fat 4g • sat. fat 1g • chol. 1mg
• sod. 109mg • calc. 45mg • fiber 2g
Asian Carrot SaladThis salad goes nicely with grilled seafood or chicken.
Makes 4 – 6 servings
Assemble processor with chute attachment, ejector disc and slicing shredding disc. Shred carrots.Insert slicing disc, slice onion and red pepper. Toss vegetables to combine; reserve.
Switch to clear work bowl. Insert metal blade. Place peanuts in work bowl. Pulse to chop, 5 times;remove and reserve. With machine running, drop garlic and ginger through feed tube, process 5seconds to chop. Add cilantro and pepper flakes to work bowl, pulse to chop, 5 times; scrape workbowl. Add vinegar and soy sauce to work bowl. Process to blend, 5 seconds. With machine run-ning, add oils in a steady stream; process until dressing is emulsified, 5 to 10 seconds. Add dress-ing to carrot mixture and toss to combine. Let salad stand 15 to 20 minutes before serving to allowflavors to blend.
1 small head green cabbage (1-1/2pounds), cut to fit feed tube
1 medium carrot (3 ounces), trimmed,peeled, and cut to fit feed tube
1/2 cup reduced fat mayonnaise
2 tablespoons vinegar
kosher salt and freshly ground blackpepper to taste
1 pound carrots, trimmed & peeled, cutto fit feed tube horizontally
1 small red onion (2-3 ounces), peeled,halved vertically
1 small red bell pepper, stemmed,cored, seeded, cut to fit feed tube
1/4 cup roasted unsalted peanuts
1 small clove garlic, peeled
2 slices fresh ginger root, each aboutthe size of a quarter
1 tablespoon fresh cilantro leaves
1/4 teaspoon pepper flakes
2 tablespoons rice vinegar
1 teaspoon low-sodium soy sauce
2 tablespoons vegetable oil
1 tablespoon Asian (toasted) sesame oil
03CU13489 DFP-3 IB REV 3/5/04 12:14 PM Page 19

19
Nutritional information per serving:Calories 126 (57% from fat) • carb. 12g • pro. 3g • fat 9g • sat. fat 1g • chol. 0mg
• sod. 342mg • calc. 30mg • fiber 3g
Marinated Cucumber SaladMakes about 3 cups
Assemble processor with chute attachment, ejector disc and slicing disc. Slice cucumbers intobowl. Slice onion into bowl. Toss cucumbers and onion with remaining ingredients and let sit for 30 minutes to allow flavors to combine.
Drain before serving.
*You may vary the salad by using flavored vinegar such as raspberry, or changing the herb.
Nutritional information per serving (1/2 cup): Calories 38 (0% from fat) • carb. 9g • pro. 2g • fat 0g • sat. fat 0g • chol. 0mg
• sod. 667mg • calc. 35mg • fiber 2g
Potatoes au GratinTo make Potatoes au Gratin for a larger group, double or triple the recipe using
the chute attachment and ejector disc.
Makes 6 servings.
Preheat oven to 375°F. Generously butter 9-inch square or other 10-cup baking dish.
Insert shredding disc and shred cheese using medium pressure; remove and reserve. Insert metalblade and turn on machine. Drop garlic through feed tube, and process until minced about 5 seconds.
Bring evaporated milk, cream and garlic to simmer in small pot.
Assemble processor with chute attachment, ejector disc and slicing disc. Slice potatoes. Make an even layer of half the potato slices in bottom of baking dish. Sprinkle with salt, pepper and half the cheese. Add remaining potatoes in layer over cheese season and pour hot cream mixtureover top. Bake until potatoes are tender, liquid is absorbed, and top is browned – about 1 hour.Sprinkle remaining cheese on top, 5 minutes before end of cooking.
Nutritional information per serving:Calories 279 (44% from fat) • carb. 28mg • pro. 11g • fat 14g • sat. fat 8g • chol. 48mg
• sod. 126mg • calc. 337mg • fiber 2g
3 medium cucumbers (1-1/2 poundstotal), peeled, halved lengthwise,seeded, ends cut flat, cut to fit feedtube
1/2 medium red onion, peeled
1/4 cup white wine vinegar *
1 tablespoon kosher salt
1 tablespoon granulated sugar
1 teaspoon dried dill*
freshly ground black pepper to taste
4 ounces Swiss, Gruyère or cheddarcheese
1 small garlic clove, peeled
1 cup evaporated fat free milk
1/2 cup heavy cream
1-1/2 pounds russet potatoes (mediumsized), peeled, halved lengthwise,ends cut flat
kosher salt and freshly ground blackpepper to taste
03CU13489 DFP-3 IB REV 3/5/04 12:14 PM Page 20

20
Savory Sweet Potato & Carrot BakeFull of beta carotenes, this pleasant alternative to traditional sweet potato dishes is
particularly good with turkey, pork or game dishes.
Preheat oven to 325° F. Brush a 6-cup shallow oval or other similar sized baking dish with 1 table-spoon melted butter.
Assemble processor with chute attachment, ejector disc and shredding disc. Place medium bowlunder chute opening. Use firm pressure to shred sweet potatoes, carrots and cheese. Reserve.
Place clear work bowl on food processor base. Insert metal blade. Place bread, walnuts and butterin work bowl. Process until mixture is coarse crumbs, about 30 seconds; reserve. Place egg, eggwhite, flour, milk, sugar, thyme, sage, salt, hot sauce, and remaining butter in work bowl. Processuntil smooth and blended, 20 seconds. Pour over sweet potato/carrot mixture in bowl and stir tocombine. Arrange in prepared baking dish and pat to even thickness. Top evenly with butteredcrumb mixture. Bake in preheated 325° F oven for 1-1/2 hours, until vegetables are tender andcrumb topping is golden brown and crispy. Serve hot.
Nutritional information per serving:Calories 214 (42% from fat) • carb 25g • pro. 7g • fat 10g • sat. fat 5g • chol. 49mg
• sod. 228mg • calc. 131mg • fiber 3g
Meatloaf with Mushrooms & HerbsFor a change, use a combination of turkey breast and lean pork loin.
Makes 4 servings
1 tablespoon unsalted butter, melted
3/4 pound sweet potatoes or yams,peeled, cut to fit feed tube
3/4 pound carrots, peeled, cut to fit feedtube
2 ounces sharp white cheddar cheese,cut to fit feed tube
2 slices good quality white bread (2ounces), torn into pieces
2 tablespoons walnuts
3 tablespoons unsalted butter, cut into1/2-inch pieces, divided
1 large egg
1 large egg white
1/3 cup all-purpose flour
1/2 cup evaporated fat free milk
1/2 teaspoon thyme
1/2 teaspoon rubbed sage
1/2 teaspoon kosher salt
1/4 hot sauce such as Tabasco®
cooking spray
1/4 cup flat parsley leaves, looselypacked
2 slices good quality bread, broken intopieces
1 small onion (3 ounces), peeled andquartered
3 - 4 mushrooms (2 ounces), cleaned andquartered
1 teaspoon Italian herb blend or herbsde Provence
1 teaspoon kosher salt
1/2 teaspoon freshly ground pepper
1 large egg
1/4 cup reduced fat milk
2 tablespoons sodium free tomato paste
1/2 pound cold boneless beef chuck orround, cut into 3/4-inch cubes
1/4 pound cold boneless pork, cut into3/4-inch cubes
1/4 pound cold boneless veal, cut into3/4-inch cubes
03CU13489 DFP-3 IB REV 3/5/04 12:14 PM Page 21

21
Preheat oven to 400° F. Lightly coat a 7-1/2 x 3-3/4 x 2-1/4 -inch loaf pan with cooking spray.
Insert metal blade. Place parsley and bread in work bowl; pulse 5 times, then process until breadis medium coarse crumbs, about 20 seconds. Add onion, mushrooms, herbs, salt, and pepper towork bowl. Pulse to chop finely, 10 to 15 times. Remove and transfer to a medium bowl. Placeegg, milk and tomato paste in work bowl. Process to blend, 5 seconds; add to onion mixture andstir. Place beef cubes in work bowl. Pulse to chop finely, 15 to 20 long pulses. Add to mixture inbowl. Place pork and veal cubes in work bowl. Pulse to chop finely, 15 to 20 long pulses. Add tobowl. Stir meats into vegetable/crumb mixture until completely combined. Spoon into prepared loaf pan and press to compact. Bake in preheated 400° F oven for 40 to 45 minutes, until top isbrowned and internal temperature measures 160° - 170° F when tested with an instant read ther-mometer. Let meatloaf stand in pan for 10 minutes. Drain if necessary, remove, slice and serve.Alternatively, meat can be shaped into meatballs of desired size and baked until browned andinternal temperature measures 160°-170° F. Use with your favorite tomato sauce or brown gravy.
Nutritional information per serving:Calories 196 (26% from fat) • carb. 12g • pro. 24g • fat 6g • sat. fat 2g • chol. 57mg
• sod. 465mg • calc. 59mg • fiber 1g
Ginger Chicken & Vegetable Stir-FryThe hard part of stir-fries is the preparation – with the DFP-3 it is simple and quick.
Makes 2 - 3 servings
Freeze chicken until hard to the touch but still easily pierced with tip of sharp knife, about 20 to 30minutes. Meanwhile, prepare vegetables. Insert metal blade and turn on machine. Drop garlic andginger through feed tube and process until minced, about 10 seconds. Remove and reserve.Insert shredding disc. Pack carrots in feed tube and shred. Remove and reserve. Insert slicing discand slice remaining vegetables separately. Remove and reserve. Slice semi-frozen chicken. Tosschicken with 1-1/2 teaspoons cornstarch. Stir together remaining cornstarch and water; reserve.Combine broth, soy sauce, and sesame oil; reserve.
Heat work or large stick free skillet over high heat. Add 1-2 tablespoons of vegetable oil. Stir-frychicken, in batches if necessary, until firm. Remove and reserve as done. Add more oil betweenbatches as necessary. Add remaining vegetable oil to wok or skillet, reduce heat to medium-highand cook ginger and garlic, stirring, until fragrant, about 15 seconds. Add carrots and stir-fry for 15 seconds. Add remaining vegetables and stir-fry until just tender, about 1 minute. Return chickento skillet along with broth mixture. Raise heat and cook until bubbling. Lower heat and stir in cornstarch mixture, cook just until thickened. Season to taste and serve immediately.
1/2 pound trimmed boneless, skinlesschicken breast, cut to fit feed tube*
1 medium garlic clove, peeled
1 1/2-inch piece fresh ginger, peeled
2 carrots (about 4 ounces) peeled, cutto fit feed tube horizontally
4 ounces mushrooms, stems trimmed
4 medium scallions, trimmed and cutinto 2-inch lengths
1 small zucchini (about 4 ounces, cut tofit feed tube vertically)
1 medium red pepper (about 5 ounces),cored, seeded, cut to fit feed tube
3 teaspoons cornstarch, divided
1-1/2 teaspoons water
1/3 cup chicken broth
1-1/2 tablespoons less sodium soy sauce
1 teaspoon sesame oil
4 tablespoons vegetable oil
03CU13489 DFP-3 IB REV 3/5/04 12:14 PM Page 22
22
* Substitute 1/2 pound of well-trimmed pork loin or beef flank steak for the chicken. Trim, freezeand slice as described for chicken.
Nutritional information per serving (3 servings):Calories 342 (58% from fat) • carb. 12g • pro. 24g • fat 22g • sat. fat 2g • chol. 58mg
• sod. 455mg • calc. 33mg • fiber 3g
PizzaYou can prepare a pizza easily from start to finish without cleaning with work bowl between steps.First, grate and shred cheeses and reserve. Second, prepare the dough, residual cheese in thework bowl will just add flavor. Then slice or shred any toppings such as vegetables and cookedmeats. (If you use raw meats, you will have to wash and dry the work bowl and blades used.)Finally prepare your sauce. Remember – go from dry to wet. Pizza toppings can be as creative asyour individual taste. But remember, too much of any topping will make your pizza wet and soggy,no matter how long it is baked.
Pizza Dough
Makes 14 ounces dough to make:
One 15-inch pizza -or-
Two 8 -10-inch pizzas -or-
Four 5 - 6-inch pizzas
Combine yeast, sugar and warm water in a 1-cup liquid measure with pour spout. Stir to combineand let stand until the mixture is foamy, about 5 minutes. (Note: If the mixture does not becomefoamy, the yeast is not active, discard and begin again with fresh yeast.)
Insert metal blade. Place flour, salt and oil in work bowl. Process 5 seconds to combine. Scrapework bowl. Add cold water to yeast mixture; stir. With the machine running, add the yeast mixturein a steady stream, as fast as the flour will absorb it. When the mixture forms a ball, process forone minute to knead. Remove dough, dust lightly with flour and place in a 1-quart resealable foodstorage bag. Press out air and seal. Let dough rise in a warm, draft-free place until doubled in size,about 1 hour.
Nutritional information per serving:Calories 203 (17% from fat) • carb. 36g • pro. 5g • fat 4g • sat. fat 1g • chol. 0mg
• sod. 295mg • calc. 8mg • fiber 1g
3/4 teaspoon active dry yeast
1/4 teaspoon granulated sugar
1/4 cup warm water (105°-110°F, testusing instant read thermometer)
1-1/2 cups all-purpose flour
1/2 teaspoon salt
1 tablespoon olive oil
1/4 cup cold water
1 clove garlic, peeled
1 can (14 – 15 ounces) tomatoes inthick juice/sauce
3 tablespoons sodium-free tomatopaste
1/2 teaspoon basil
1/2 teaspoon oregano
1/4 teaspoon thyme
1/4 teaspoon red pepper flakes (optional, for a spicier sauce)
03CU13489 DFP-3 IB REV 3/5/04 12:14 PM Page 23

23
Quick & Simple Pizza SauceMakes 2 cups sauce (use 1/2 cup for each 15-inch pizza), sauce may be frozen
Insert metal blade. With machine running, drop garlic through feed tube and process 5 seconds.Scrape work bowl. Add tomatoes with juice, tomato paste, basil, oregano, thyme, and red pepperflakes if using. Pulse 10 to 15 times to chop and blend sauce. If sauce is too chunky for your taste,process until desired consistency is reached.
Cook’s Tip: Freeze remaining sauce in ?-cup portions to have ready to make pizzas.
Nutritional information per serving:Calories 8 (3% from fat) • carb. 2g • pro. 0g • fat 0g • sat. fat 0g • chol. 0mg
• sod. 35mg • calc. 8mg • fiber 1g
White Wheat BaguetteThis bread has a crunchy, crispy crust with a dense chewy interior.
Makes one baguette, about 12 ounces.
Stir yeast and sugar into warm water in a 1-cup liquid measuring cup with pour spout.Let standuntil foamy, 3 to 5 minutes.
Place both flours and salt in work bowl fitted with metal blade, process 10 seconds to combine.Add cold milk to foamy yeast mixture and stir to blend with a fork. With the machine running, addthe liquid in a steady stream, as fast as he flour absorbs it. Process until dough forms a ball, thenprocess 45 seconds longer to knead dough. (If too dry, add cold water, one teaspoon at a time,processing 10 seconds after each addition. If too wet/sticky, add bread/all-purpose flour one table-spoon at a time, processing 10 seconds after each addition.) Remove dough, shape into a ball,and dust lightly with 1 teaspoon of flour. Place in a resealable 1-quart food storage bag, press outair, and seal tightly. Let dough rise in a warm, draft-free spot, until doubled in volume, about 1 hour.
Punch dough down to deflate; let rest 10 minutes. Roll dough into a rectangle, the roll up from thelong side jelly-roll style. Pinch seam and ends to seal. Roll to length of about 12 to 14 inches.Place on a parchment lined baking sheet and dust loaf lightly with remaining flour. Cover looselywith a sheet of plastic wrap that has been coated lightly with cooking spray. Let rise in a warm,draft-free spot, until doubled in volume, about 1 hour.
About 15 minutes before baking, preheat oven to 425° F. Use a serrated knife to make 4 diagonalslits about 1/4-inch deep across the loaf. Place in oven and bake until browned and crusty, about20 to 25 minutes. Bread will sound hollow when tapped. Transfer to a rack to cool. For best results,allow to cool for 20 to 30 minutes before slicing.
Nutritional information per 2-ounce serving:Calories 122 (8% from fat) • carb. 23g • pro. 5g • fat 1g • sat. fat 0g • chol. 2mg
• sod. 308mg • calc. 37mg • fiber 2g
2-1/4 teaspoons active dry yeast (1 packet)
1/4 teaspoon granulated sugar
3 tablespoons warm (110° F) water
1 cup bread or all-purpose flour
1/2 cup whole wheat flour
3/4 teaspoon salt
1/2 cup cold lowfat milk
3 teaspoons flour for dusting, divided
03CU13489 DFP-3 IB REV 3/5/04 12:14 PM Page 24
24
Cherry Walnut Cinnamon BunsYou may substitute chopped dried apricots for the cherries and almonds for the walnuts.
Makes 9 buns, about 2-1/2 inches each.
Stir yeast and 1 teaspoon of the granulated sugar into warm water in a 1-cup liquid measure withpour spout. Let stand until foamy, 5 to 10 minutes. Insert metal blade. Place the brown sugar andcinnamon in work bowl and process 10 seconds. Add walnuts and pulse to chop, 5 times; removeand reserve. Add 1/2 cup cold milk to yeast mixture and stir to blend.
Place flour, remaining granulated sugar, cream cheese and salt in work bowl; process 10 seconds.With machine running, add yeast mixture in a steady stream, as fast as the flour will absorb it.Process until dough forms a ball, then process 45 seconds to knead dough. Remove dough andgather into a ball – dough will be slightly sticky. Dust lightly with flour and place in a 1-quart reseal-able food storage bag; press out air and seal tightly. Let dough rise in a warm, draft-free place,until doubled in volume, about 1 hour. Place cherries in a small, heatproof bowl and cover with 1/2cup boiling water. Let stand 15 minutes. Drain and pat dry. Lightly coat an 8-inch square bakingpan with cooking spray.
Punch dough down to deflate; let rest 10 minutes. On a lightly floured surface, roll the dough into arectangle 14 x 7-inches. Brush dough with melted butter all the way to the short sides, but leavinga 1/2-inch border on each of the long sides. Sprinkle the buttered area evenly with the brownsugar/walnut mixture; distribute the drained and dried cherries evenly over the sugared area.Brush unbuttered edges with water. Roll from one long side jelly-roll style. Pinch seam to seal.Use a serrated knife to cut the roll into 9 pieces, each about 1-1/2 inches in length. Place the rollsin the prepared pan, cut side up. Cover with plastic wrap and place in a warm, draft-free place, untilnearly doubled in volume, about 1 hour. Fifteen minutes before baking, preheat oven to 350°F.
When ready, brush tops with remaining tablespoon milk. Bake in preheated 350°F oven for 25 to30 minutes until golden brown and puffed. Let cool on a rack for 15 minutes. Drizzle withPowdered Sugar Glaze. Serve warm. (May be made ahead – do not glaze. Reheat, covered withfoil in a 225°F oven for 20 to 30 minutes, then glaze and serve.)
Powdered Sugar Glaze
Insert metal blade in work bowl. Place powdered sugar, vanilla and 2 teaspoons of the milk in work bowl. Process until smooth, about 15 to 20 seconds. If too thick to drizzle, add remaining teaspoon milk.
Nutritional information per bun:Calories 172 (22% from fat) • carb. 30g • pro. 4g • fat 4g • sat. fat 2g • chol. 7mg
• sod. 47mg • calc. 39mg • fiber 1g
3/4 teaspoon active dry yeast
2 tablespoons warm (110° F) water
4 teaspoons granulated sugar, divided
3 tablespoons packed brown sugar
1 teaspoon ground cinnamon
1/4 cup walnut halves
1-1/2 cups all-purpose flour
1 tablespoon lowfat cream cheese
1/8 teaspoon salt
1/2 cup + 1 tablespoon lowfat milk
1/4 cup dried tart cherries (may substituteraisins)
1/2 cup boiling water
1-1/2 tablespoons unsalted butter, meltedcooking spray
Powdered sugar glaze (recipe fol-lows)
1/3 cup powdered sugar
1/2 teaspoon vanilla extract
2-3 teaspoons lowfat milk
03CU13489 DFP-3 IB REV 3/5/04 12:14 PM Page 25

25
Lemon Macadamia Nut BreadMakes 10 slices (about 3/4-inch thick)
Our quick and easy version of a classic favorite. For a change, try the Orange Ginger version.
Glaze:
3 tablespoons fresh lemon juice
1/4 cup granulated sugar
Preheat oven to 350° F. Lightly coat a 7-1/2 x 3-3/4 x 2-1/4 -inch loaf pan with cooking spray.
Insert the metal blade. Place the flour, baking powder and salt in the work bowl and process 5 sec-onds; remove and reserve. Cut the lemon peel into 1-inch pieces and place in work bowl with 1/4cup of the sugar. Process until zest is finely chopped about 1 minute. Add remaining 1/4 cup sugarand butter; process until creamy, 20 to 30 seconds. Add egg, process 10 seconds; scrape workbowl. Add yogurt; process 10 seconds – mixture will look slightly curdled. Spoon flour mixture thenmacadamia nuts over creamed mixture. Pulse until flour just disappears, 5 to 6 pulses. Do not over process. Spoon into prepared pan and level top. Bake in preheated 350° F oven for 35 to 40 minutes, until bread is light golden brown and a tester comes out clean when inserted in thecenter. While bread is baking, stir lemon juice and sugar for glaze together until sugar is dissolved.Spoon the glaze over the hot bread a little at a time, allowing the glaze to absorb before addingmore. Let stand until glaze is completely absorbed, then remove from pan and let cool completelyon a wire rack. This bread is actually better the second day. Wrap tightly in plastic wrap to store.
Orange Ginger Variation:Use orange zest and orange juice in place of lemon. Substitute crystallized ginger thathas been cut in 1/2-inch pieces for the nuts. For more orange flavor, add 1/3 teaspoonorange flower water (available in specialty food shops) to batter when adding yogurt.
Nutritional information per serving:Calories 164 (39% from fat) • carb. 23g • pro. 2g • fat 7g • sat. fat 3g • chol. 31mg
• sod. 79mg • calc. 13mg • fiber 1g
Bread:
cooking spray
3/4 cup all-purpose flour
1/2 teaspoon baking powder
1/4 teaspoon salt
2 strips lemon zest/peel, 2 x 1/2-inch,bitter white pith removed
1/2 cup granulated sugar
3 tablespoons unsalted butter, cut in1/2-inch pieces
1 large egg
2 tablespoons fat free plain yogurt
1/3 cup unsalted, lightly toastedmacadamia nuts
03CU13489 DFP-3 IB REV 3/5/04 12:14 PM Page 26

26
Cranberry Pistachio Scones
Cranberry Pistachio Scones are very good served with clotted cream or butter and mar-malade. You may substitute walnuts, pecans, almonds, or hazelnuts for the pistachios.
Makes 8 scones
Pour the boiling water over the cranberries in a small heatproof bowl. Let stand 10 minutes toplump. Preheat oven to 375° F. Line a baking sheet with parchment paper. Drain cranberries andpat dry, reserve.
Insert the metal blade. Place the brown sugar in the work bowl. Pulse to break up, 10 times. Addflour, baking powder and salt. Process to blend, 10 seconds. Add cold butter pieces, process untilmixture resembles a coarse meal, 30 seconds. Add yogurt, cranberries and pistachios to workbowl. Pulse until just incorporated, about 5 to 10 pulses. Turn dough out onto a lightly floured worksurface. With lightly floured hands, turn dough to knead, 4 times. (Press dough flat, fold, press flatagain, repeat for a total of 4 times.) Roll dough into a circle, 7 inches in diameter, 3/4-inch high.Use a serrated knife or pizza cutter to cut dough into 8 wedges. Place the wedges on the preparedbaking sheet in a circle with the wedges about 1/2-inch apart. Brush lightly with milk and sprinklelightly with granulated sugar. Bake in preheated oven for 25 to 30 minutes, until golden and firm,but not dry. Let cool on a rack for 10 minutes before serving.
Nutritional information per serving:Calories 192 (38% from fat) • carb. 26g • pro. 4g • fat 8g • sat. fat 4g • chol. 16mg
• sod. 108mg • calc. 43mg • fiber 1g
Fluffy Buttermilk BiscuitsHot fluffy biscuits for breakfast or dinner are easy with the Little Pro.
Makes eight 2-inch biscuits
Preheat oven to 425°F. Line a baking sheet with parchment paper.
Insert metal blade. Place flour, baking powder, baking soda, and salt in work bowl. Process 5 seconds. Add butter and shortening to work bowl. Pulse 10 times, the process until the mixtureresemble coarse corn meal, about 30 seconds. Scrape work bowl. Drizzle buttermilk over flour mixture. Process until the mixture just forms clumps, about 5 seconds, do not let form a ball. Turn out onto a lightly floured surface. With floured hands gather and press into a ball. Flatten,fold and turn 4 times to knead. Roll out into an 8 x 4-inch rectangle. Use a floured 2-inch round biscuit/cookie cutter to cut into 8 biscuits. Place on parchment lined baking sheet and brush withmilk. Bake until puffed and lightly browned, 10 to 12 minutes. Fluffy biscuits are best served hot or warm.
1/3 cup dried cranberries
1/2 cup boiling water
2 tablespoons packed brown sugar
1-1/3 cups all-purpose flour
2 teaspoons baking powder
1/8 teaspoon salt
4 tablespoons cold unsalted butter, cutinto 1/2-inch pieces
2/3 cup fat free vanilla yogurt
1/4 cup shelled pistachios
milk for brushing
granulated sugar for sprinkling
1-1/8 cups all-purpose flour
1-1/4 teaspoons baking powder
1/4 teaspoon baking soda
1/4 teaspoon salt
4 tablespoons cold unsalted butter, cutin 1/2-inch pieces
5 tablespoons buttermilk
2 teaspoons milk
03CU13489 DFP-3 IB REV 3/5/04 12:14 PM Page 27

27
Nutritional information per serving (1 biscuit):Calories 120 (46% from fat) • carb. 14g • pro. 2g • fat 6g • sat. fat 4g • chol. 16mg
• sod. 155mg • calc. 17mg • fiber 0g
Double Chocolate Brownies with WalnutsRich, fudgy and very satisfying, these yummy brownies take just minutes to prepare in
your Cuisinart® Food Processor.
Makes 25 brownies, each about 1-1/2 inches square.
Preheat oven to 350° F. Brush an 8-inch square baking pan with some of the melted butter. Fold asheet of aluminum foil so that it is 8 inches wide by 15 inches long. Place it in the baking pan sothat the long ends extend over two opposite sides of the pan and fold the excess down the outsideedge. Brush the foil bottom and sides.
Place the unsweetened chocolate and espresso powder in the work bowl of the processor. Usinglong pulses, pulse to chop the chocolate, 10 times. With the machine running, add the hot butterthrough the feed tube in a steady stream and process until chocolate is melted. Scrape work bowland lid. Add sugars to work bowl. Process until smooth, about 10 seconds. Place eggs and vanillain a liquid measuring cup with pour spout, stir with a fork to blend. With the machine running, addthe egg mixture in a steady stream, process 10 seconds. Scrape the work bowl. Place the flour,nuts and chocolate morsels on top of the chocolate mixture. Pulse until just combined, 4 to 6times. Do not over process. Transfer the mixture to the prepared baking pan. Use a spatula tosmooth the top. Bake in the preheated 350° F oven for about 35 to 40 minutes, until top is some-what shiny and just beginning to crack. Cool on a rack for 10 minutes, then loosen the foil sidesand use them to lift the brownies out of the pan. Cool completely on a rack before cutting. Cut into 25 squares.
Nutritional information per serving (1 brownie):Calories 120 (55% from fat) • carb. 13g • pro. 1g • fat 8g • sat. fat 4g • chol. 28mg
• sod. 7mg • calc. 11mg • fiber 1g
Chocolate CupcakesQuick comfort food.
Makes 6 cupcakes.
8 tablespoons unsalted butter, meltedand hot
3 ounces unsweetened chocolate, cutinto 1/2 -inch pieces
1 teaspoon instant espresso powder
1/2 cup granulated sugar
1/2 cup packed dark or light brown sugar
2 large eggs
1 teaspoon pure vanilla extract
1/3 cup all-purpose flour
1/3 cup walnut halves and pieces
1/3 cup milk chocolate morsels
cooking spray
1/2 cup all-purpose flour
1/4 teaspoon salt
1/8 teaspoon baking powder
1 ounce unsweetened chocolate, cut in1/2-inch pieces
1/2 cup sugar
3 tablespoons water
2 tablespoons unsalted butter
3 tablespoons buttermilk
1/2 teaspoon pure vanilla extract
1 large egg
03CU13489 DFP-3 IB REV 3/5/04 12:14 PM Page 28

28
Preheat oven to 350° F. Lightly coat six 1/2-cup muffin/cupcake tins with cooking spray.
Insert metal blade. Place flour, salt and baking powder in work bowl; process 5 seconds. Remove and reserve.
Pulse/chop chocolate and 1/4 cup sugar 8 times, then process until chopped finely, about 45 sec-onds. Bring water and butter to boil in small saucepan or in the microwave. With machine running,pour liquid through feed tube and process 15 seconds, until smooth. Stir together buttermilk, eggand vanilla extract. With machine running, add to chocolate mixture, 5 seconds. Scrape work bowl.Add reserved dry ingredients; process until just blended, about 10 seconds. Do not over process.
Divide batter among tins and bake until toothpick inserted in center comes out clean, 20 to 25 min-utes. Cool in tins for 10 minutes. Gently loosen cupcakes and remove from tin. Transfer to wireracks to cool completely before frosting. Frost with chocolate frosting if desired.
Nutritional information per cupcake (unfrosted):Calories 177 (37% from fat) • carb. 26g • pro. 3g • fat 8g • sat. fat 4g • chol. 46mg
• sod. 123mg • calc. 19mg • fiber 1g
Chocolate Frosting Makes about 3/4 cup
Insert metal blade. Place powdered sugar and cocoa in work bowl. Pulse to sift, 10 times. Add butter. Process 10 seconds. Combine 2-1/2 tablespoons of the milk with vanilla. With machinerunning, add milk mixture in a steady stream. Process until smooth and creamy, adding additionalmilk 1 teaspoon at a time until frosting is of spreading consistency.
Nutritional information per serving:Calories 160 (34% from fat) • carb. 27g • pro. 1g • fat 7g • sat. fat 4g • chol. 17mg
• sod. 6mg • calc. 15mg • fiber 1g
Apple Streusel Pie
For the pastry:
1-1/2 cups powdered sugar
1/4 cup unsweetened cocoa powder
3 tablespoons unsalted butter, cut in1/2-inch pieces, at room temperature
2-3 tablespoons milk
1/2 teaspoon pure vanilla extract
pinch salt
1-1/4 cups all-purpose flour
1 tablespoon granulated sugar
1/4 teaspoon salt
1/2 cup (1 stick / 4 ounces) cold unsaltedbutter, cut in 1/2-inch pieces
2 tablespoons cold vegetable shorten-ing, cut in 1/2-inch pieces
3-4 tablespoons ice cold water
03CU13489 DFP-3 IB REV 3/5/04 12:14 PM Page 29

29
For the streusel topping:
For the apple filling:
For the pastry:
Insert the metal blade. Place the flour, sugar and salt in the work bowl. Pulse to combine, 3 times.Add cold butter and shortening. Pulse until the mixture resembles coarse crumbs, but still hassmall pieces of butter visible, 15 one-second pulses. Sprinkle the mixture with 3 tablespoons of theice water and process just until it begins to clump together. If the mixture seems too dry, add justenough of the remaining water to form the clumps. Turn the dough out onto work surface and forma ball. Flatten into a disc, 6 inches in diameter. Cover and refrigerate at least 30 minutes beforerolling out.
For the Streusel Topping:
Insert the metal blade. Pulse to break up the brown sugar, 4 to 5 times. Add flour, oatmeal andsugar to work; pulse 5 times. Add cold butter pieces and nuts, pulse 15 one-second pulses.Transfer to a small bowl and work the mixture with fingers until it is large crumbs. Reserve.
For the Apple Filling:
Assemble the white chute bowl fitted with the slicing disc. Arrange a bowl under the chute. Add thelemon juice to the bowl. Place the apple quarters in the feed tube. Use medium pressure to slice.Toss the apples in the juice to coat. Add sugar, flour, spices, and raisins or cranberries if using.Toss apples gently but thoroughly to combine.
To assemble and bake the pie:
Arrange rack in lower third of oven. Preheat oven to 400°F. Dust the chilled dough lightly with flourand place on a lightly floured surface. Roll the dough into a 15-inch round, rolling from one edge tothe opposite edge, rotating the dough as you go, and adding just enough flour to keep it from stick-ing to the counter or pin. Do not roll back and forth. When it has been rolled to size, gently fold it inhalf, then in half again. Lift carefully and center in a 9-inch pie plate. Unfold, and let the pastry set-tle into the pan. Trim edges to an even ?-inch overhang. Brush rim of pastry with water and fold in;press and seal. Use fingers or fork to crimp decoratively. Fill evenly with apple mixture, pressingapple mixture lightly to remove air pockets. Top evenly with streusel topping. Place pie on rack inpreheated oven (may place foil or baking sheet on rack underneath to catch drips). Bake in pre-heated 400° F oven until browned and bubbly, about 55 to 60 minutes. If crust or topping appearsto brown to quickly, cover loosely with a sheet of foil. Let cool for at least 1 hour on a rack beforeserving.
1-1/2 tablespoons fresh lemon juice
2 pounds apples (see note), peeled,cored and quartered
2/3 cup granulated sugar
1/4 cup all-purpose flour
1 teaspoon cinnamon
1/2 teaspoon ginger
1/4 teaspoon freshly ground nutmeg
1/2 cup raisins or dried cranberries(optional)
1/2 cup packed brown sugar
1/2 cup all-purpose flour
1/2 cup rolled oats (old-fashioned, notquick cooking)
5 tablespoons cold unsalted butter, cutin 1/2-inch pieces
1/2 cup walnut halves/pieces
03CU13489 DFP-3 IB REV 3/5/04 12:14 PM Page 30

30
Nutritional information per serving (one slice):Calories 387 (41% from fat) • carb. 42g • pro. 4g • fat 18g • sat. fat 9g • chol. 34mg
• sod. 55mg • calc. 26mg • fiber 3g
Creamy Cheesecake with Walnut Crumb Crust
Makes one 8-inch cheesecake, 6 to 8 servings
Preheat oven to 375° F.
Insert the metal blade. Place the broken graham crackers in the work bowl and pulse to break up,10 times. Add walnuts and cinnamon to work bowl, pulse 12 to 15 times. With machine running,drop butter through the feed tube and process until the mixture is coarse buttered crumbs.Reserve 1/4 cup of the crumb mixture and press the remaining crumbs into the bottom of an 8-inchspringform or cheesecake pan. Bake for 7 minutes. Remove and let cool completely (may place infreezer to speed cooling process). When cool, wrap pan with heavy duty aluminum foil so that itcomes up the sides of the pan.
Wipe work bowl and blade clean with a paper towel. Place cream cheese and sugar in work bowl.Process until smooth, 15 to 20 seconds. Scrape work bowl. Add eggs, vanilla and almond extractsto work bowl. Process until smooth, 20 seconds. Scrape work bowl. Add sour cream to work bowl.Process until blended, 20 seconds. Pour the cheesecake batter into the cooled, wrapped pan.Sprinkle the reserved crumb mixture evenly over the top. Place in an aluminum baking pan that isat least 10 inches in diameter. Add hot water to the pan to a depth of 1/2 inch. Bake in the pre-heated oven for 1 hour and 30 minutes. Cheesecake will be lightly colored, sides will be firm, butcenter will be jiggly. Remove from the pan of hot water and remove foil. Place on a wire rack tocool completely, then wrap in plastic wrap and refrigerate at least 8 hours or overnight beforeunmolding. Serve in wedges.
Nutritional information per serving (based on 8 servings):Calories 283 (40% from fat) • carb. 34g • pro. 8g • fat 13g • sat. fat 6g • chol. 76mg
• sod. 372mg • calc. 157mg • fiber 1g
15 2-1/2 -inch low fat graham crackersquares, broken in quarters
1/8 cup walnuts
1/2 teaspoon ground cinnamon
1-1/2 tablespoons unsalted butter, cut into 6pieces
12 ounces lowfat cream cheese, cut in 1-inch pieces
2/3 cup sugar
2 large eggs
1-1/2 teaspoons pure vanilla extract
1/2 teaspoon almond extract
2/3 cup fat free sour cream
03CU13489 DFP-3 IB REV 3/5/04 12:14 PM Page 31

Cuisinart offers an extensive assortment of top quality products to make life in the kitchen easier than ever. Try some of our other countertop appliances and
cookware, and Savor the Good Life®.
www.cuisinart.com
Coffeemakers FoodProcessors
Toaster Ovens Blenders Cookware Ice CreamMakers
© 2003 Cuisinart Cuisinart® is a registered trademark of
Cuisinart
150 Milford Road
East Windsor, NJ 08520
Printed in China
03CU13489
IB-4495A
03CU13489 DFP-3 IB REV 3/5/04 12:14 PM Page 32