Insteon Wi-Fi Cameras Owner’s Manualcache.insteon.com/documentation/75790-en-06302016.pdf ·...
60
Insteon Wi-Fi Cameras Owner’s Manual
Transcript of Insteon Wi-Fi Cameras Owner’s Manualcache.insteon.com/documentation/75790-en-06302016.pdf ·...

Insteon Wi-Fi CamerasOwner’s Manual
Contents
Getting StartedWi-Fi Camera 4
Overview Installation 5Mounting 6
Insteon app for iPhone, iPad and iPod touchConfigure a Camera for Wired Ethernet 8Configure a Camera for Wi-Fi 13Add an Already Configured Camera 18Add a Remote Camera 21Advanced Camera Configuration 23
Insteon app for AndroidConfigure a Camera for Wired Ethernet 27Configure a Camera for Wi-Fi 31
Setup without Insteon HubConfigure a Camera for Wired Ethernet 37Configure a Camera for Wi-Fi 42
Web Browser InterfaceWeb Interface 49Firmware Update 51
Factory Reset
AppendixSpecifications 55Troubleshooting 57Certifications and Warnings 58Declaration of Conformity 59Product Warranty 60
3
Everything you need to quickly get up and running.
Getting Started
4
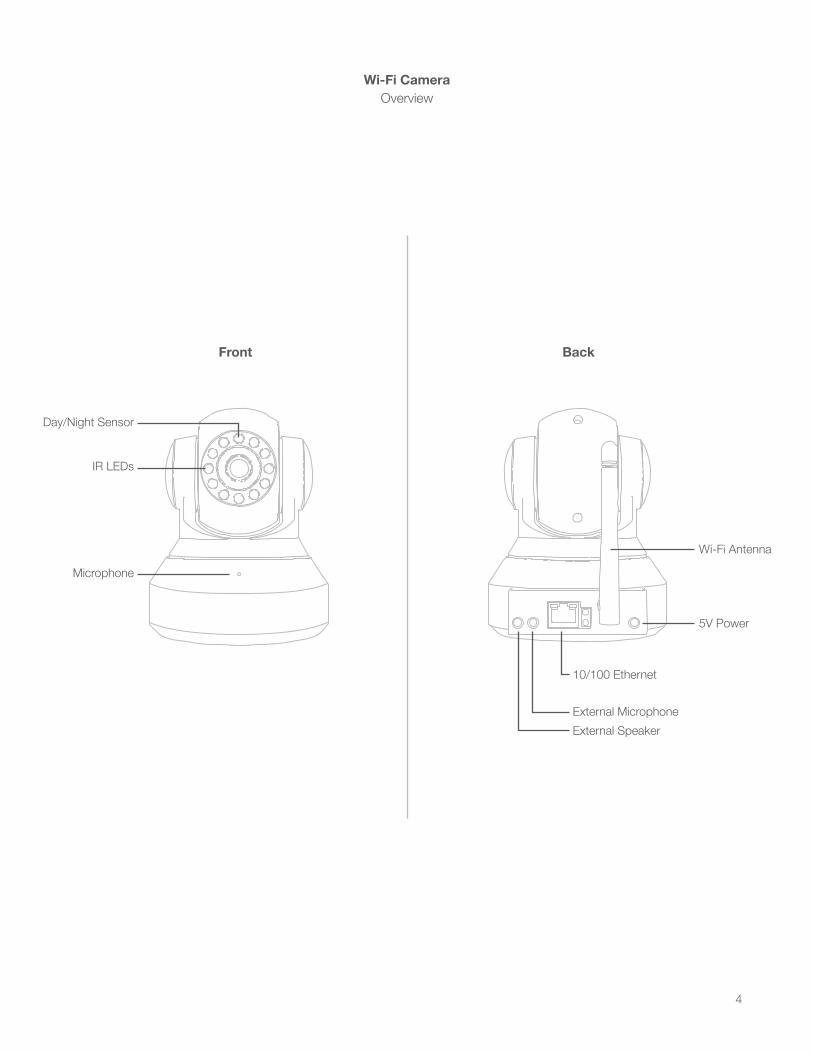
BackFront
OverviewWi-Fi Camera
Microphone
10/100 Ethernet
External MicrophoneExternal Speaker
IR LEDs
5V Power
Wi-Fi Antenna
Day/Night Sensor
5
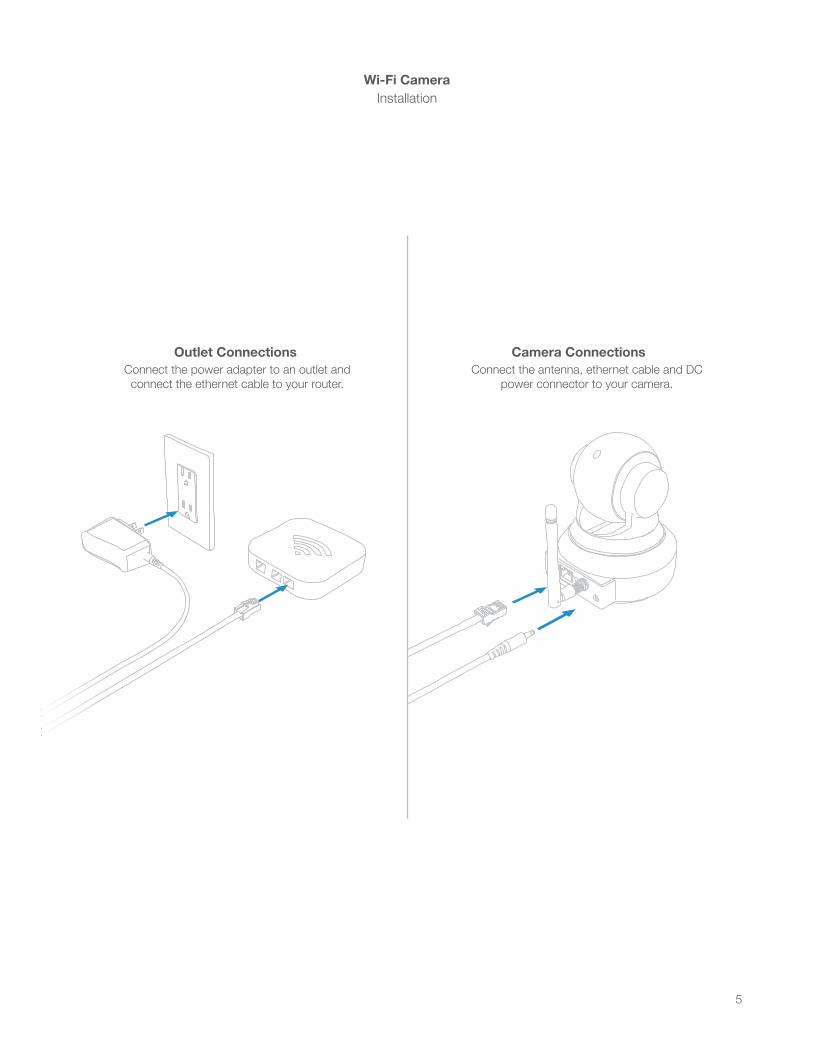
Camera ConnectionsOutlet Connections
Installation
Connect the antenna, ethernet cable and DC power connector to your camera.
Connect the power adapter to an outlet and connect the ethernet cable to your router.
Wi-Fi Camera
6
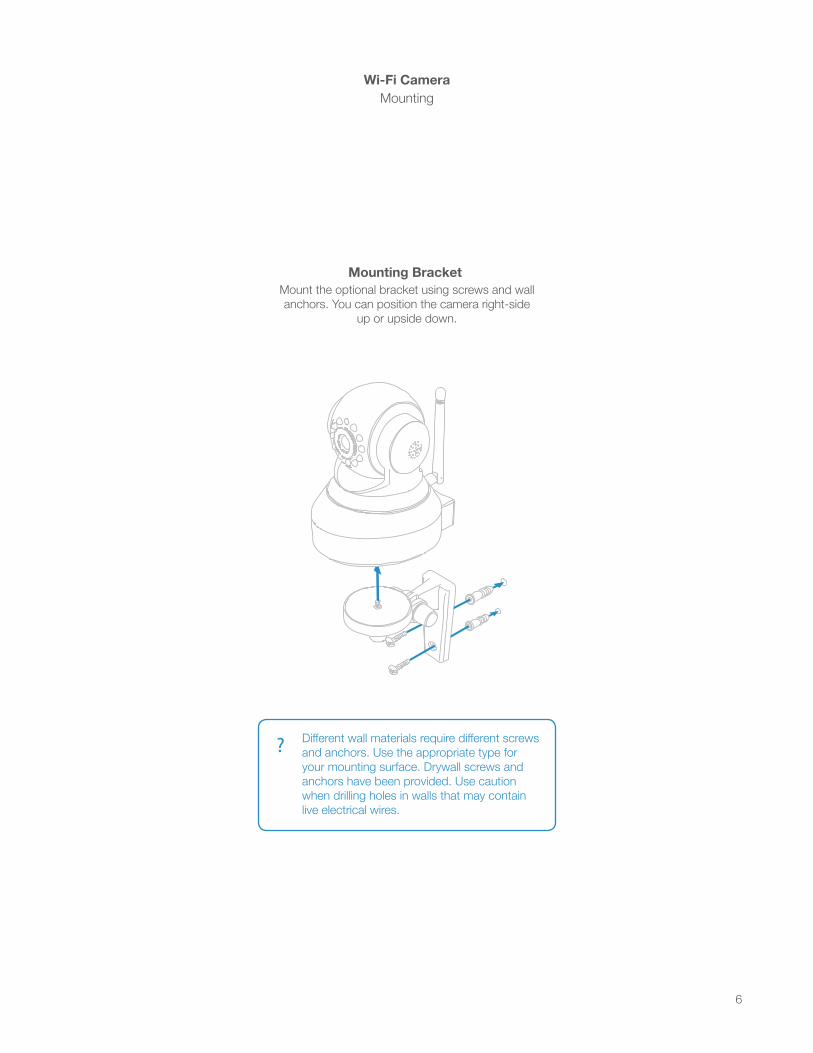
Mounting Bracket
Mounting
Mount the optional bracket using screws and wall anchors. You can position the camera right-side
up or upside down.
? Different wall materials require different screws and anchors. Use the appropriate type for your mounting surface. Drywall screws and anchors have been provided. Use caution when drilling holes in walls that may contain live electrical wires.
Wi-Fi Camera
7
Use the Insteon app to configure and control your Insteon Wi-Fi Camera. The Insteon app requires Insteon Hub (2242-222) or (2245-222).
Insteon app for iPhone, iPad and iPod touch

8
Configure a Camera for Wired EthernetiPhone, iPad and iPod touch
Launch the Insteon App.
Tap Camera. Select the camera that you would like to configure.
Tap Add a Device.Tap the drawer icon or swipe from the right edge of the display to
open the drawer.
If you have not already done so, connect your camera to power and your router using the supplied ethernet cable.
It can take up to two minutes for your camera to complete its startup process.
When ready, tap Next.
9
Configure a Camera for Wired EthernetiPhone, iPad and iPod touch
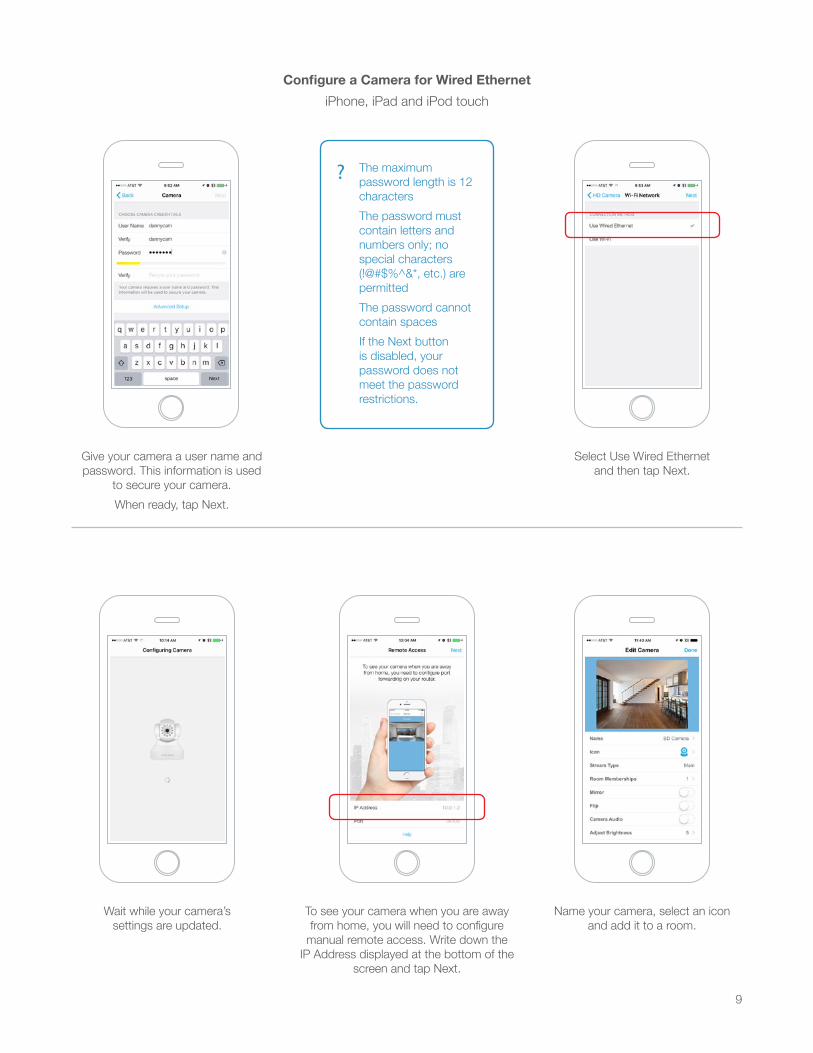
Give your camera a user name and password. This information is used
to secure your camera.When ready, tap Next.
To see your camera when you are away from home, you will need to configure
manual remote access. Write down the IP Address displayed at the bottom of the
screen and tap Next.
Wait while your camera’s settings are updated.
Select Use Wired Ethernet and then tap Next.
Name your camera, select an icon and add it to a room.
? The maximum password length is 12 charactersThe password must contain letters and numbers only; no special characters (!@#$%^&*, etc.) are permittedThe password cannot contain spacesIf the Next button is disabled, your password does not meet the password restrictions.
10
Configure a Camera for Wired EthernetiPhone, iPad and iPod touch
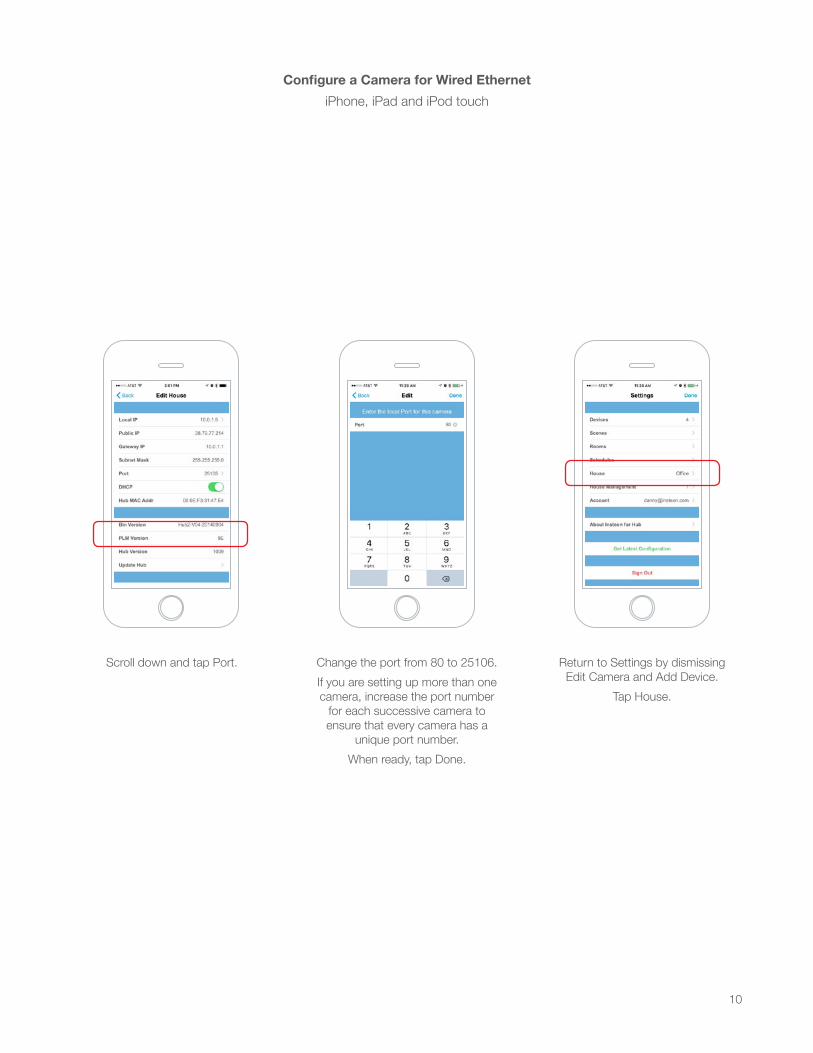
Scroll down and tap Port. Return to Settings by dismissing Edit Camera and Add Device.
Tap House.
Change the port from 80 to 25106.If you are setting up more than one camera, increase the port number
for each successive camera to ensure that every camera has a
unique port number.When ready, tap Done.
11
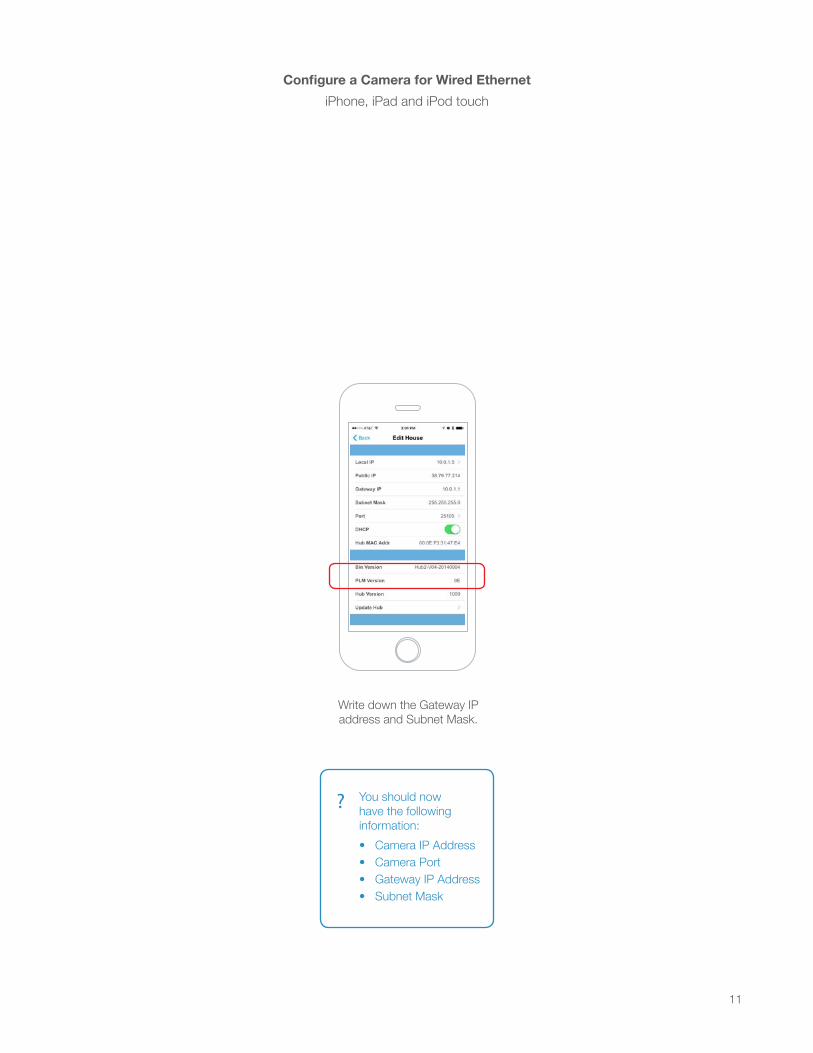
? You should now have the following information:• Camera IP Address• Camera Port• Gateway IP Address• Subnet Mask
Configure a Camera for Wired EthernetiPhone, iPad and iPod touch
Write down the Gateway IP address and Subnet Mask.

12
Download and launch the Camera Setup Assistant from
your Mac or PC.insteon.com/csa
Assign a Static IP AddressMac or PC
Right-click (or control-click) on a Mac) and select Network
Configuration.
Uncheck Obtain IP from DHCP Server. IP Address, Subnet Mask,
Gateway and DNS Server will auto-populate.
Enter your camera password and click OK. It may take up to two minutes for your
camera to restart.Visit insteon.com/remoteaccess for
instructions on configuring remote access.
? If the fields are empty, enter the information gathered throughout this document. Use Gateway IP Address for both Gateway and DNS Server addresses.
You’re done setting up your Insteon Wi-Fi Camera.

13
Configure a Camera for Wi-FiiPhone, iPad and iPod touch
Launch the Insteon App
Tap Camera Select the camera that you would like to configure
Tap Add a DeviceTap the drawer icon or swipe from the right edge of the display to open
the drawer
If you have not already done so, connect your camera to power and your router using the supplied ethernet cable.
It can take up to two minutes for your camera to complete its startup process.
When ready, tap Next.
14
Configure a Camera for Wi-FiiPhone, iPad and iPod touch
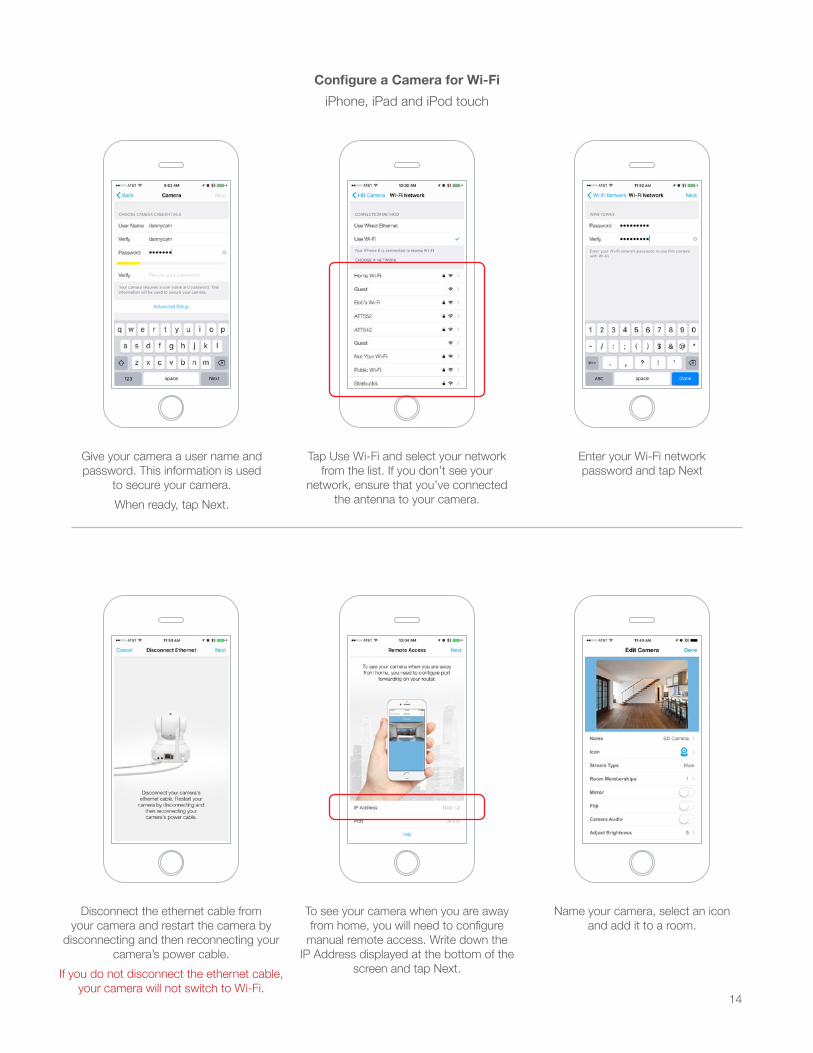
Give your camera a user name and password. This information is used
to secure your camera. When ready, tap Next.
Disconnect the ethernet cable from your camera and restart the camera by
disconnecting and then reconnecting your camera’s power cable.
If you do not disconnect the ethernet cable, your camera will not switch to Wi-Fi.
Enter your Wi-Fi network password and tap Next
Tap Use Wi-Fi and select your network from the list. If you don’t see your
network, ensure that you’ve connected the antenna to your camera.
To see your camera when you are away from home, you will need to configure
manual remote access. Write down the IP Address displayed at the bottom of the
screen and tap Next.
Name your camera, select an icon and add it to a room.

15
Configure a Camera for Wi-FiiPhone, iPad and iPod touch
Scroll down and tap Port. Return to Settings by dismissing Edit Camera and Add Device.
Tap House.
Change the port from 80 to 25106.If you are setting up more than one camera, increase the port number
for each successive camera to ensure that every camera has a
unique port number.When ready, tap Done.
16
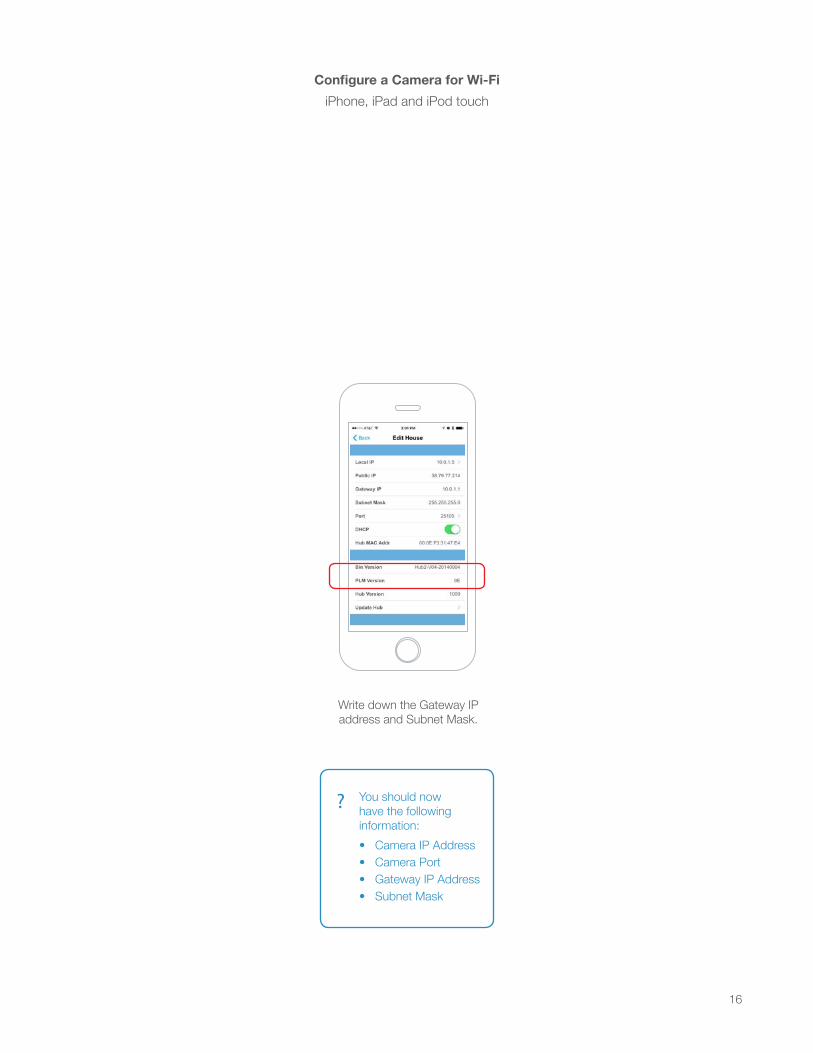
? You should now have the following information:• Camera IP Address• Camera Port• Gateway IP Address• Subnet Mask
Configure a Camera for Wi-FiiPhone, iPad and iPod touch
Write down the Gateway IP address and Subnet Mask.
17
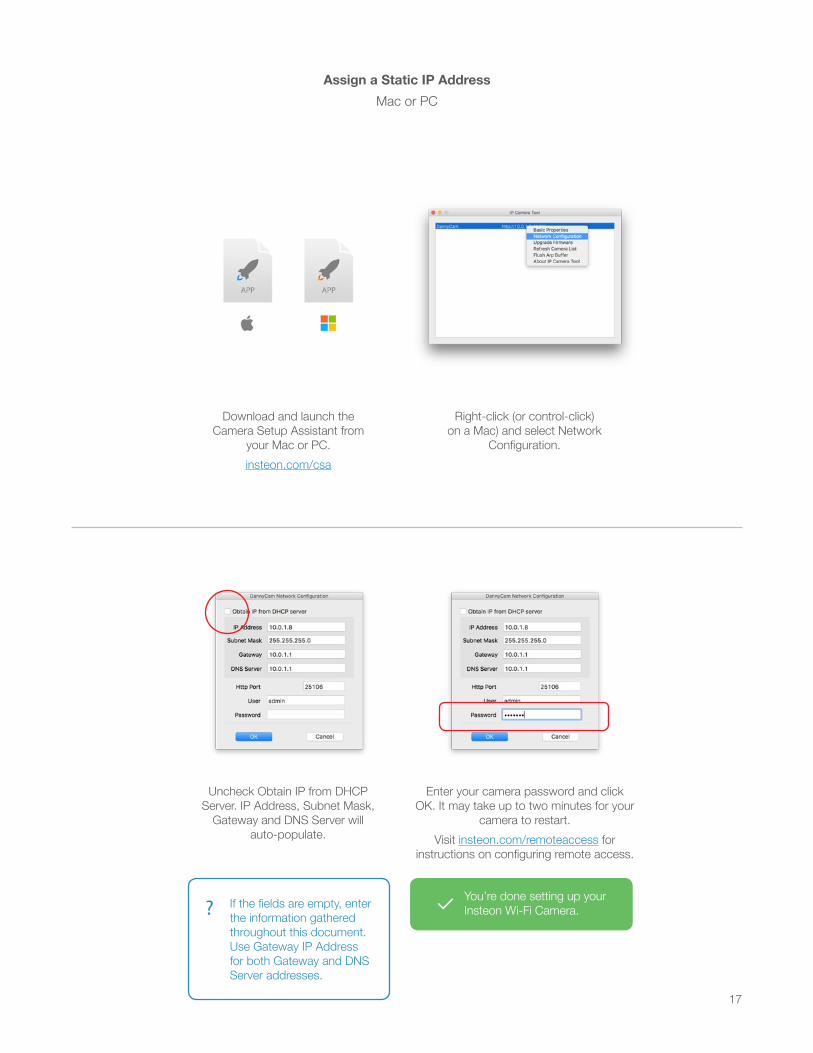
Download and launch the Camera Setup Assistant from
your Mac or PC.insteon.com/csa
Assign a Static IP AddressMac or PC
Right-click (or control-click) on a Mac) and select Network
Configuration.
Uncheck Obtain IP from DHCP Server. IP Address, Subnet Mask,
Gateway and DNS Server will auto-populate.
Enter your camera password and click OK. It may take up to two minutes for your
camera to restart.Visit insteon.com/remoteaccess for
instructions on configuring remote access.
? If the fields are empty, enter the information gathered throughout this document. Use Gateway IP Address for both Gateway and DNS Server addresses.
You’re done setting up your Insteon Wi-Fi Camera.

18
Add an Already Configured CameraiPhone, iPad and iPod touch
Add an already configured camera if you have already setup an Insteon Wi-Fi Camera using its web browser
interface or would like to re-add a camera that was previously configured using the Insteon app.
Launch the Insteon App Tap Add a DeviceTap the drawer icon or swipe from the right edge of the display to open
the drawer
19
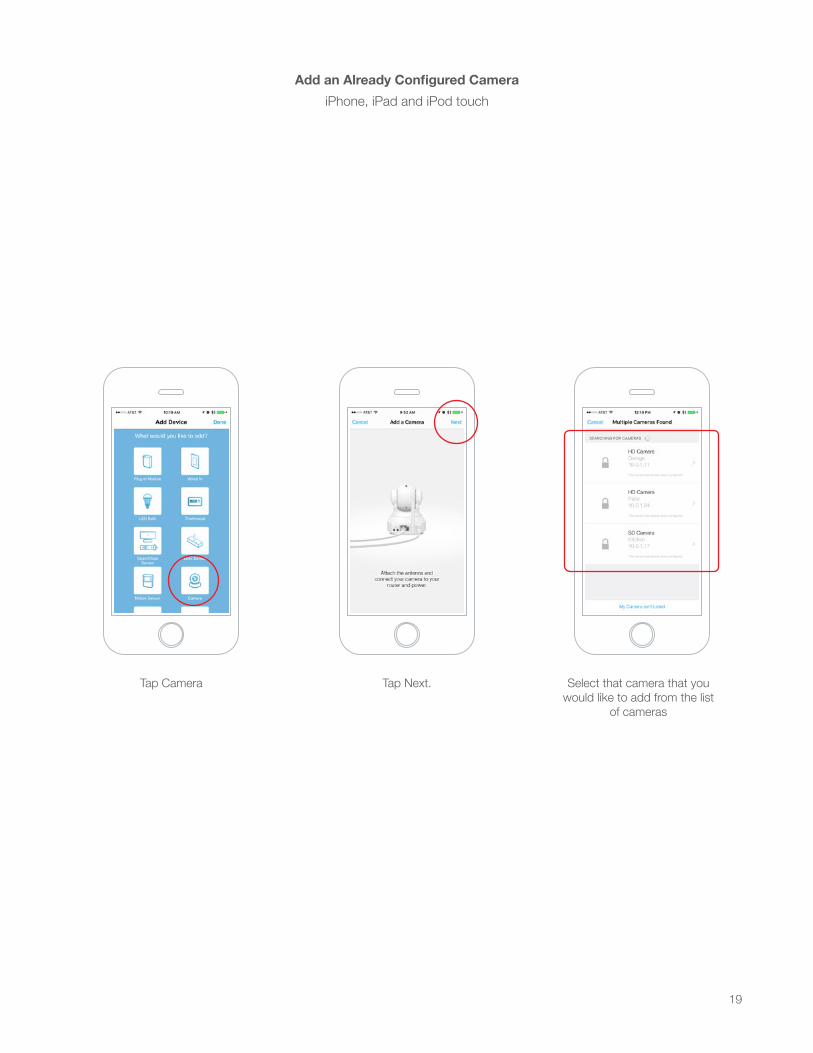
Add an Already Configured CameraiPhone, iPad and iPod touch
Tap Camera Select that camera that you would like to add from the list
of cameras
Tap Next.
20
Add an Already Configured CameraiPhone, iPad and iPod touch
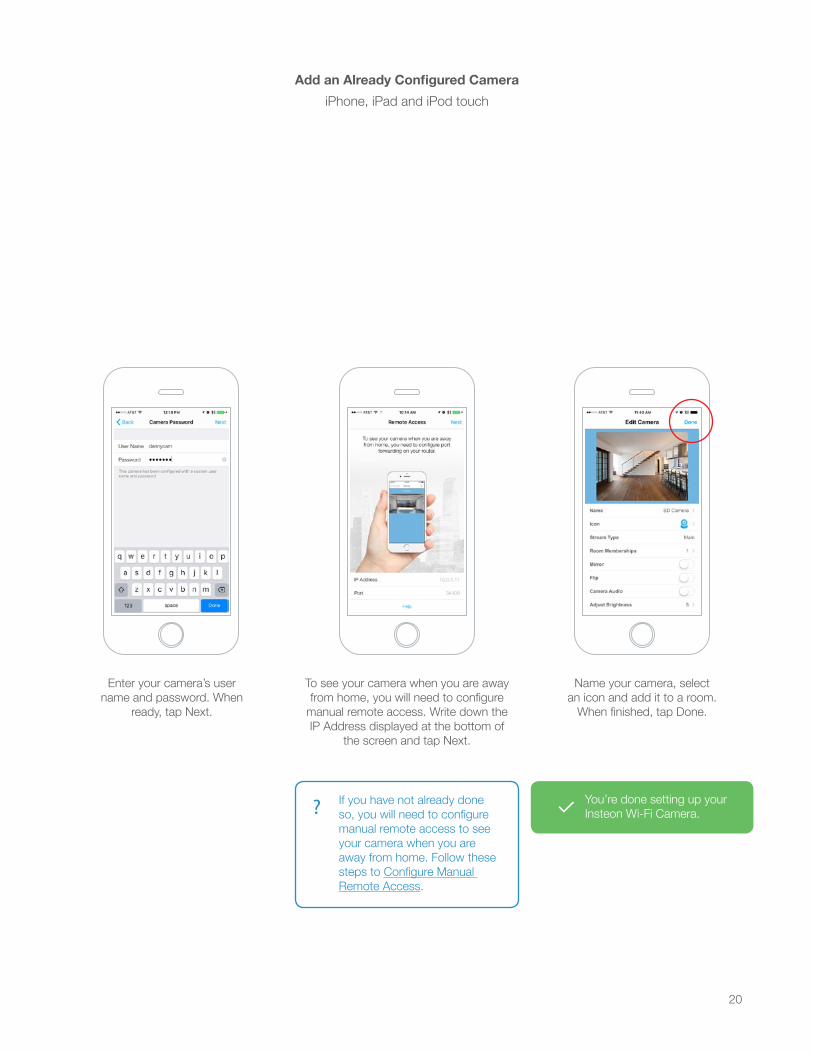
Enter your camera’s user name and password. When
ready, tap Next.
Name your camera, select an icon and add it to a room.
When finished, tap Done.
To see your camera when you are away from home, you will need to configure
manual remote access. Write down the IP Address displayed at the bottom of
the screen and tap Next.
You’re done setting up your Insteon Wi-Fi Camera.? If you have not already done
so, you will need to configure manual remote access to see your camera when you are away from home. Follow these steps to Configure Manual Remote Access.

21
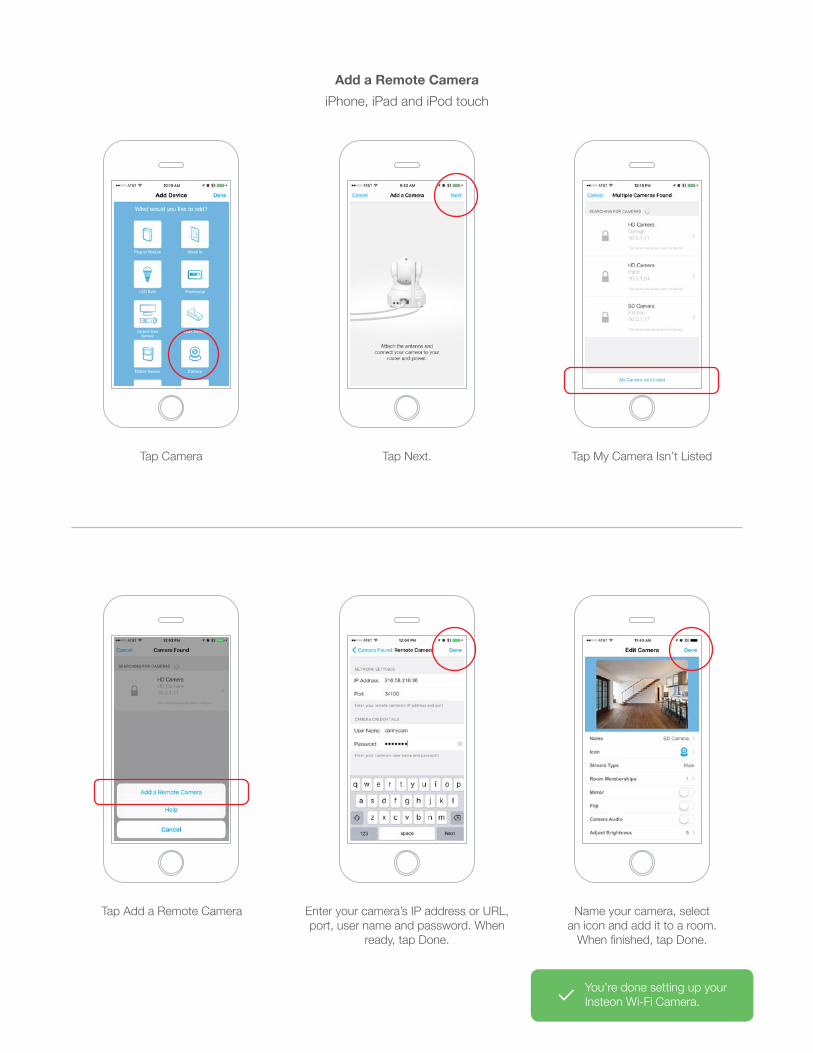
Add a Remote CameraiPhone, iPad and iPod touch
Add a remote camera if your camera has been previously setup and is not located on your local network.
Launch the Insteon App Tap Add a DeviceTap the drawer icon or swipe from the right edge of the display to open
the drawer
22
Add a Remote CameraiPhone, iPad and iPod touch
Tap Camera Tap My Camera Isn’t ListedTap Next.
Tap Add a Remote Camera Name your camera, select an icon and add it to a room.
When finished, tap Done.
Enter your camera’s IP address or URL, port, user name and password. When
ready, tap Done.
You’re done setting up your Insteon Wi-Fi Camera.
23
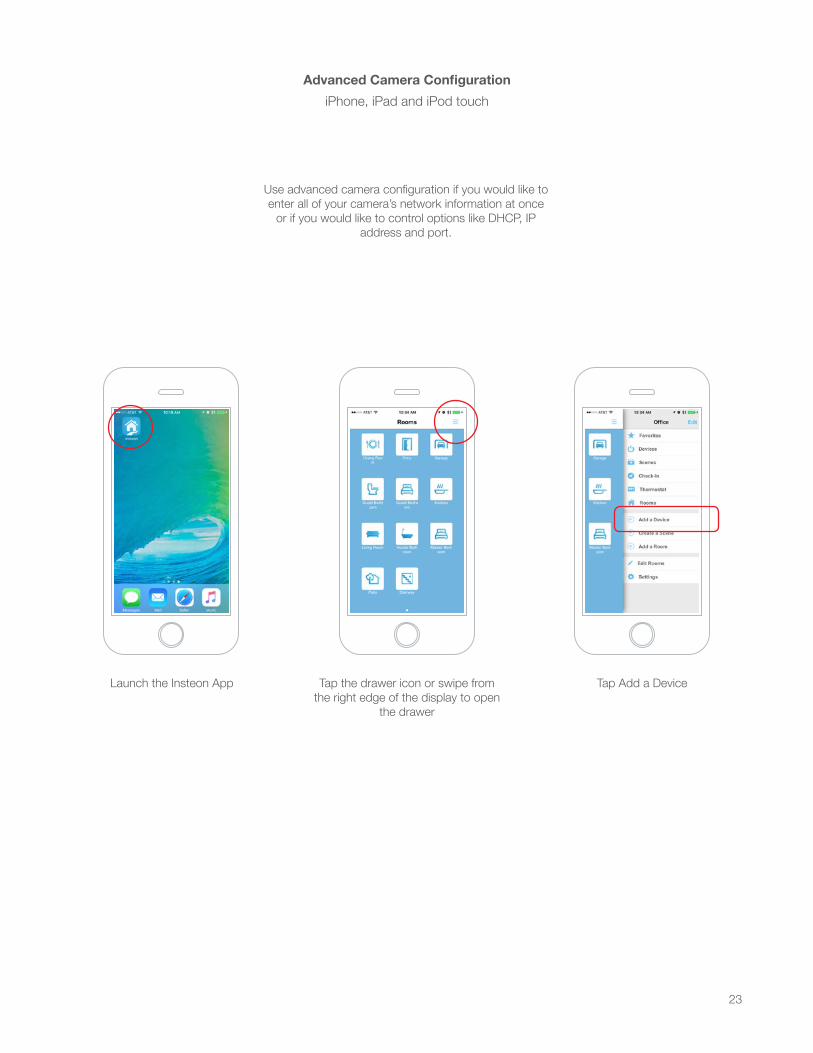
Advanced Camera ConfigurationiPhone, iPad and iPod touch
Use advanced camera configuration if you would like to enter all of your camera’s network information at once
or if you would like to control options like DHCP, IP address and port.
Launch the Insteon App Tap Add a DeviceTap the drawer icon or swipe from the right edge of the display to open
the drawer
24
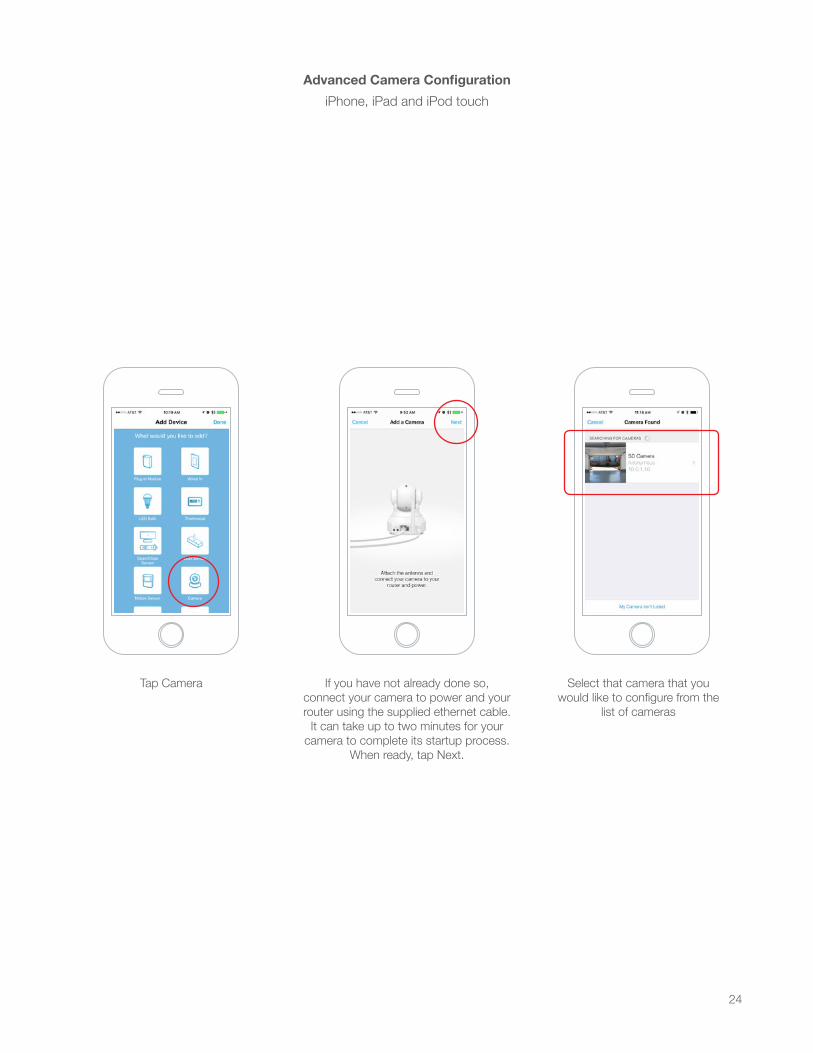
Advanced Camera ConfigurationiPhone, iPad and iPod touch
Tap Camera Select that camera that you would like to configure from the
list of cameras
If you have not already done so, connect your camera to power and your router using the supplied ethernet cable.
It can take up to two minutes for your camera to complete its startup process.
When ready, tap Next.
25
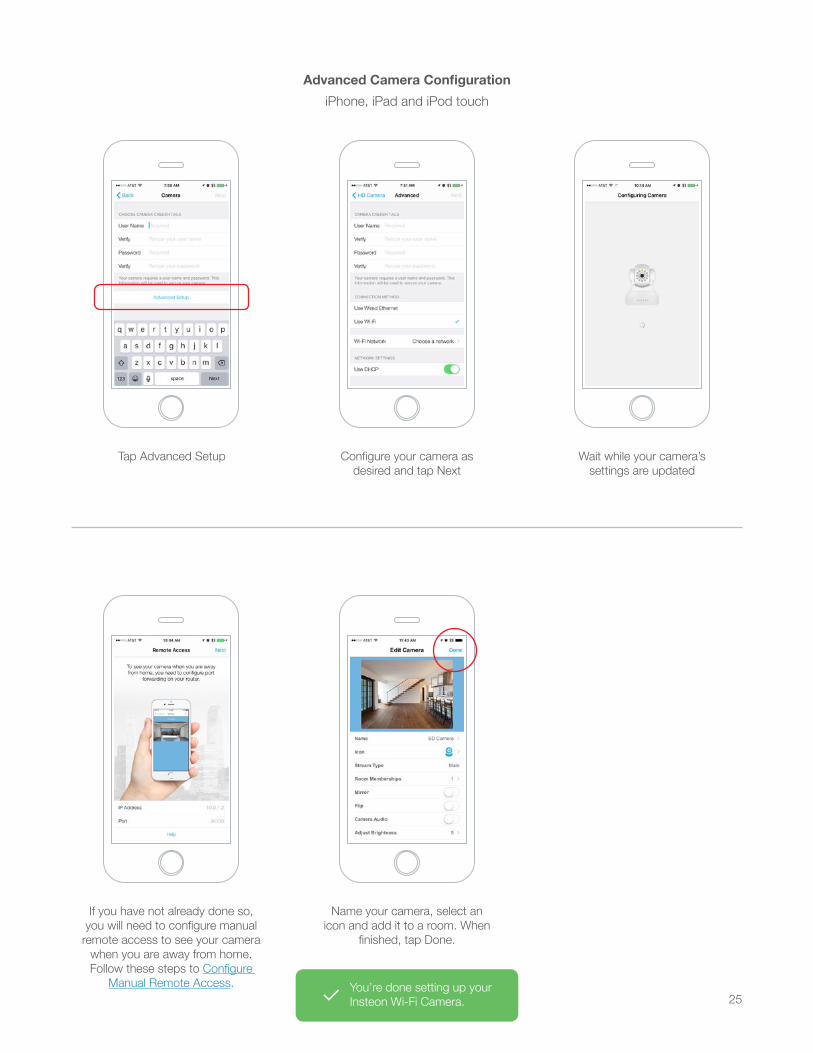
Advanced Camera ConfigurationiPhone, iPad and iPod touch
Tap Advanced Setup
If you have not already done so, you will need to configure manual
remote access to see your camera when you are away from home. Follow these steps to Configure
Manual Remote Access.
Wait while your camera’s settings are updated
Configure your camera as desired and tap Next
Name your camera, select an icon and add it to a room. When
finished, tap Done.
You’re done setting up your Insteon Wi-Fi Camera.
26
Use the Insteon app to configure and control your Insteon Wi-Fi Camera. The Insteon app requires Insteon Hub (2242-222) or (2245-222).
Insteon app for Android
27
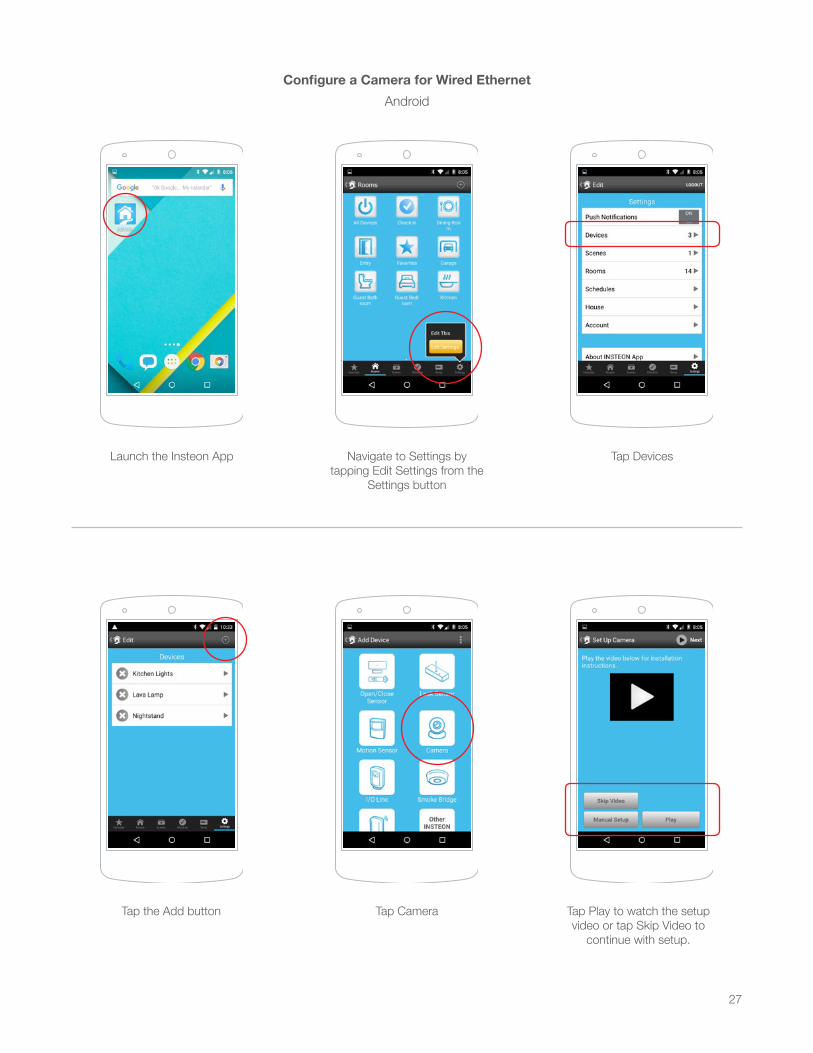
Configure a Camera for Wired EthernetAndroid
Launch the Insteon App
Tap the Add button Tap Play to watch the setup video or tap Skip Video to
continue with setup.
Tap DevicesNavigate to Settings by tapping Edit Settings from the
Settings button
Tap Camera
28
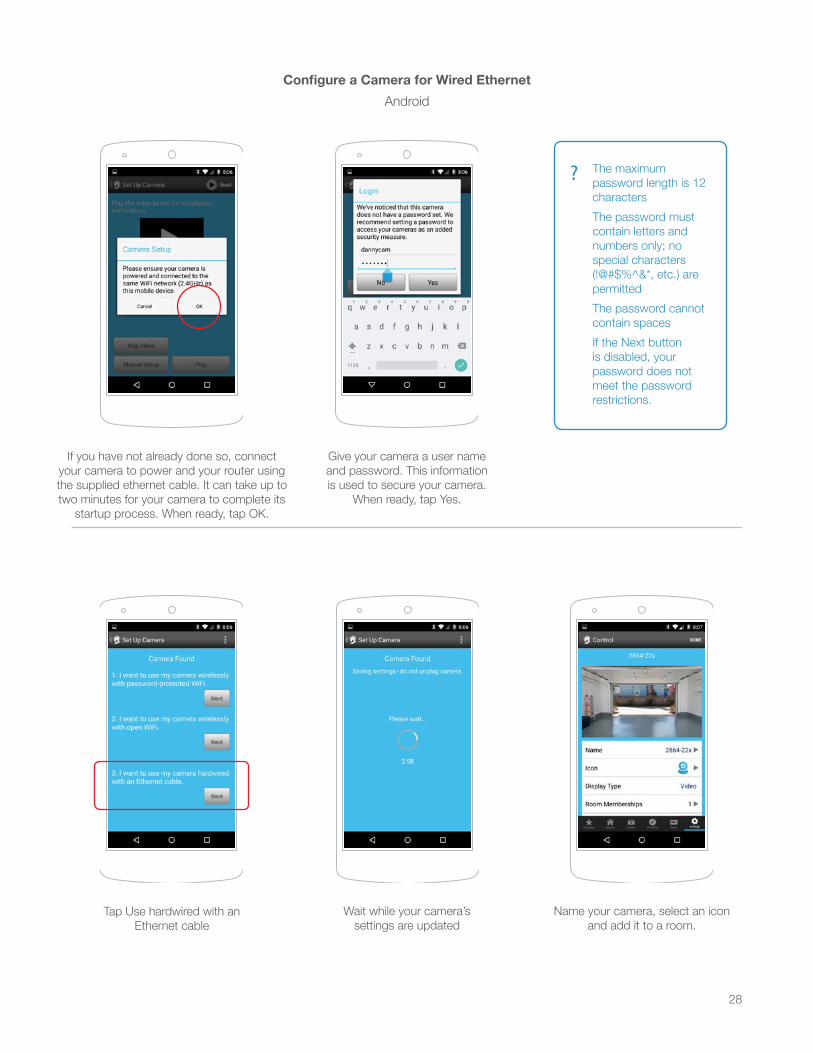
Configure a Camera for Wired EthernetAndroid
If you have not already done so, connect your camera to power and your router using the supplied ethernet cable. It can take up to two minutes for your camera to complete its
startup process. When ready, tap OK.
Wait while your camera’s settings are updated
Tap Use hardwired with an Ethernet cable
Give your camera a user name and password. This information is used to secure your camera.
When ready, tap Yes.
Name your camera, select an icon and add it to a room.
? The maximum password length is 12 charactersThe password must contain letters and numbers only; no special characters (!@#$%^&*, etc.) are permittedThe password cannot contain spacesIf the Next button is disabled, your password does not meet the password restrictions.
29
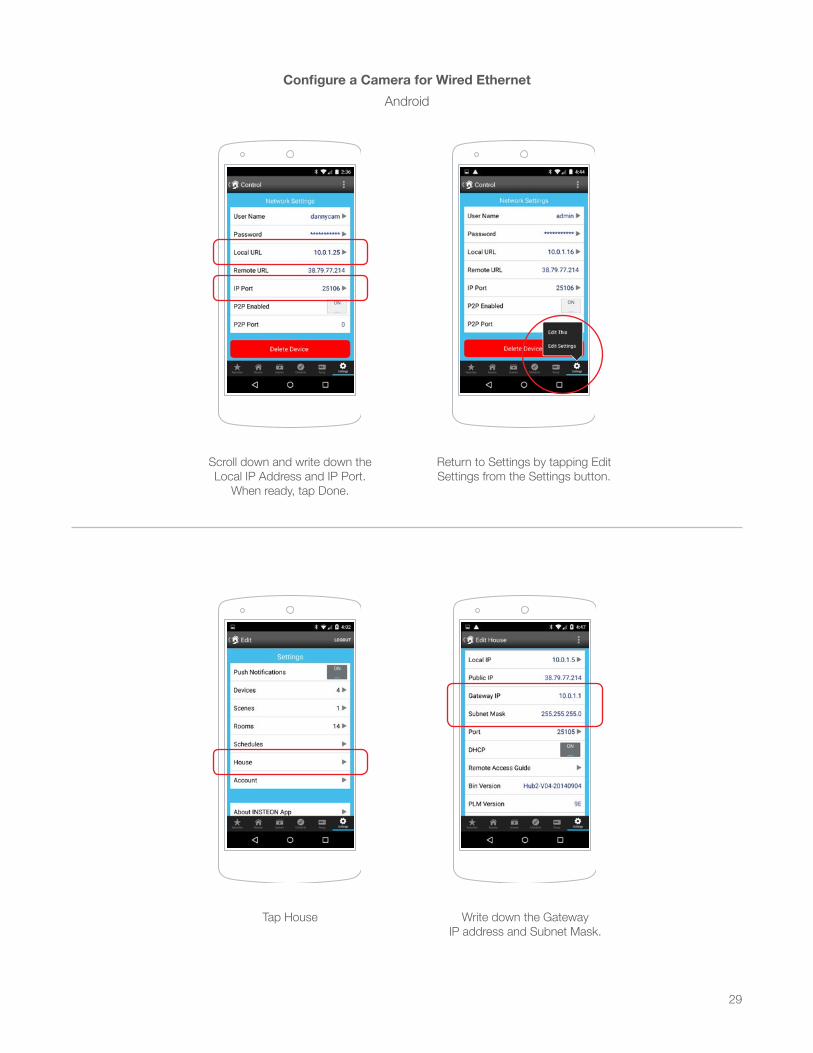
Configure a Camera for Wired EthernetAndroid
Return to Settings by tapping Edit Settings from the Settings button.
Write down the Gateway IP address and Subnet Mask.
Tap House
Scroll down and write down the Local IP Address and IP Port.
When ready, tap Done.

30
Download and launch the Camera Setup Assistant from
your Mac or PC.insteon.com/csa
Assign a Static IP AddressMac or PC
Right-click (or control-click) on a Mac) and select Network
Configuration.
Uncheck Obtain IP from DHCP Server. IP Address, Subnet Mask,
Gateway and DNS Server will auto-populate.
Enter your camera password and click OK. It may take up to two minutes for your
camera to restart.Visit insteon.com/remoteaccess for
instructions on configuring remote access.
? If the fields are empty, enter the information gathered throughout this document. Use Gateway IP Address for both Gateway and DNS Server addresses.
You’re done setting up your Insteon Wi-Fi Camera.
31
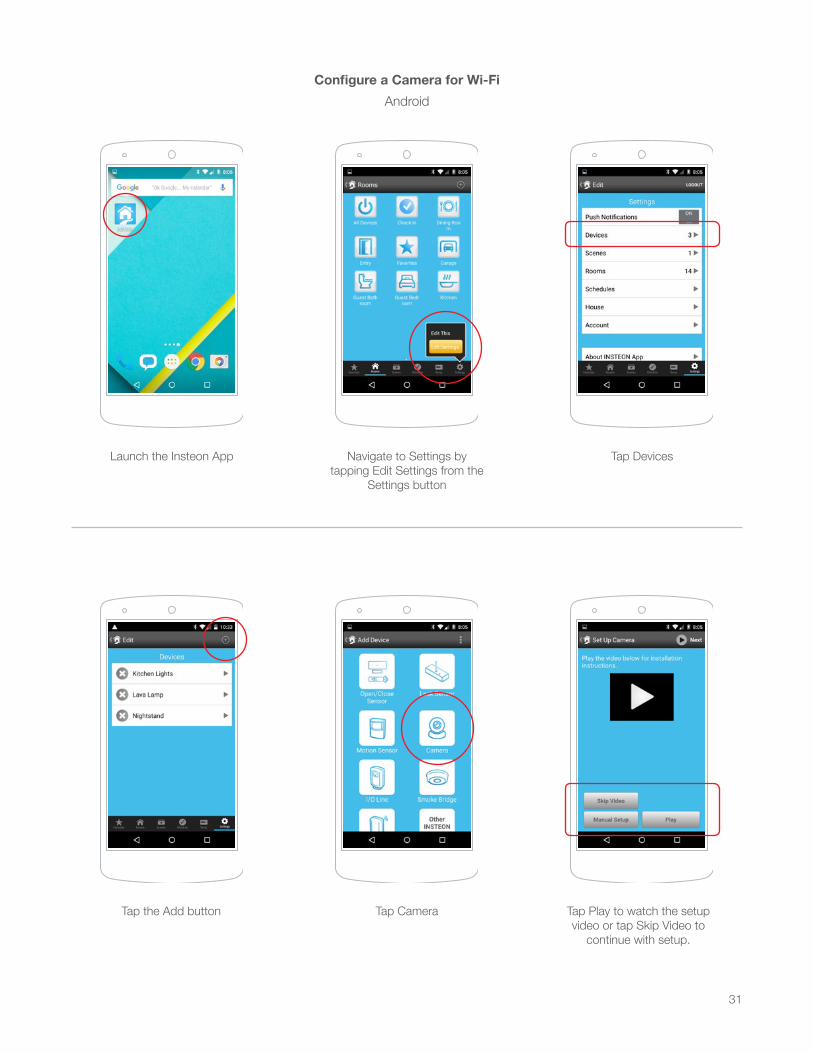
Configure a Camera for Wi-FiAndroid
Launch the Insteon App
Tap the Add button Tap Play to watch the setup video or tap Skip Video to
continue with setup.
Tap DevicesNavigate to Settings by tapping Edit Settings from the
Settings button
Tap Camera
32
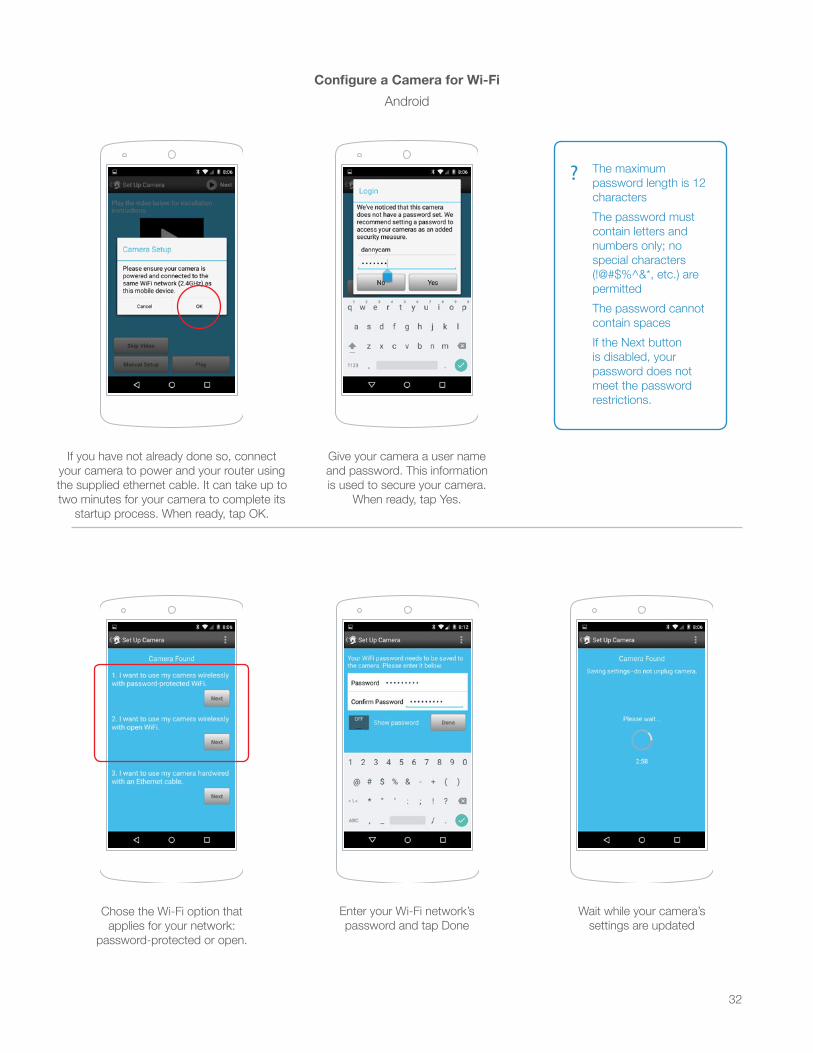
Configure a Camera for Wi-FiAndroid
If you have not already done so, connect your camera to power and your router using the supplied ethernet cable. It can take up to two minutes for your camera to complete its
startup process. When ready, tap OK.
Enter your Wi-Fi network’s password and tap Done
Chose the Wi-Fi option that applies for your network:
password-protected or open.
Give your camera a user name and password. This information is used to secure your camera.
When ready, tap Yes.
Wait while your camera’s settings are updated
? The maximum password length is 12 charactersThe password must contain letters and numbers only; no special characters (!@#$%^&*, etc.) are permittedThe password cannot contain spacesIf the Next button is disabled, your password does not meet the password restrictions.
33
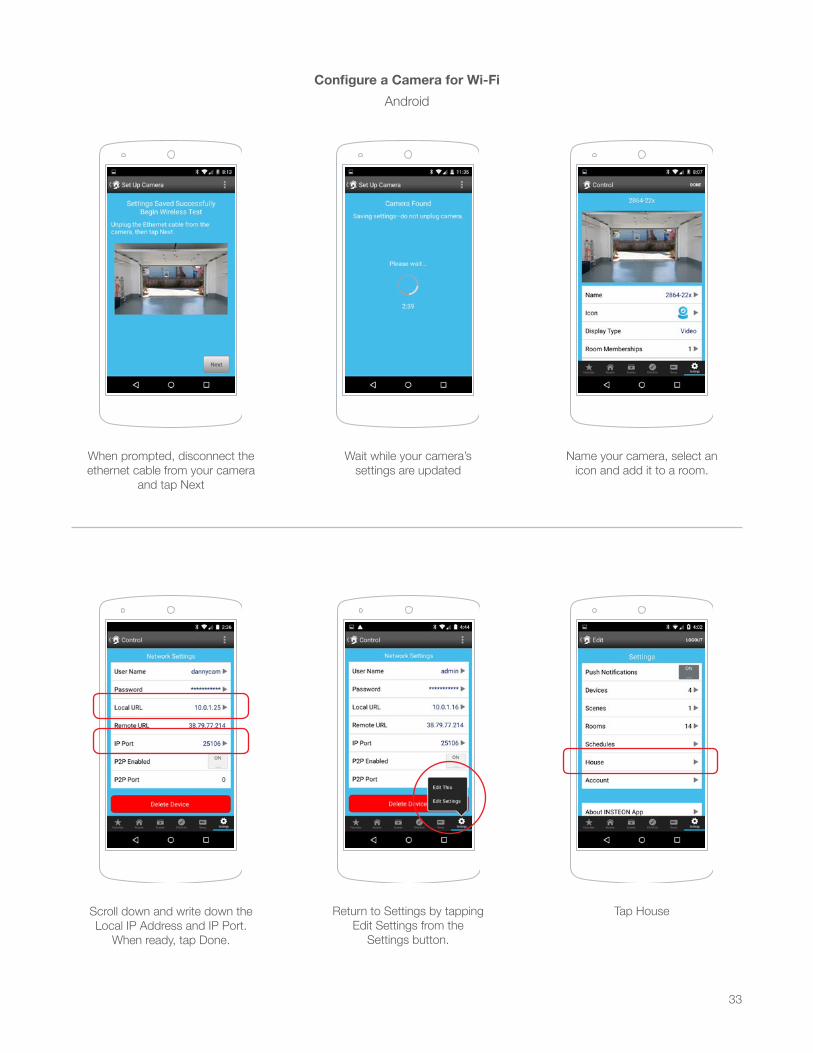
Configure a Camera for Wi-FiAndroid
Wait while your camera’s settings are updated
Return to Settings by tapping Edit Settings from the
Settings button.
Scroll down and write down the Local IP Address and IP Port.
When ready, tap Done.
Name your camera, select an icon and add it to a room.
Tap House
When prompted, disconnect the ethernet cable from your camera
and tap Next
34
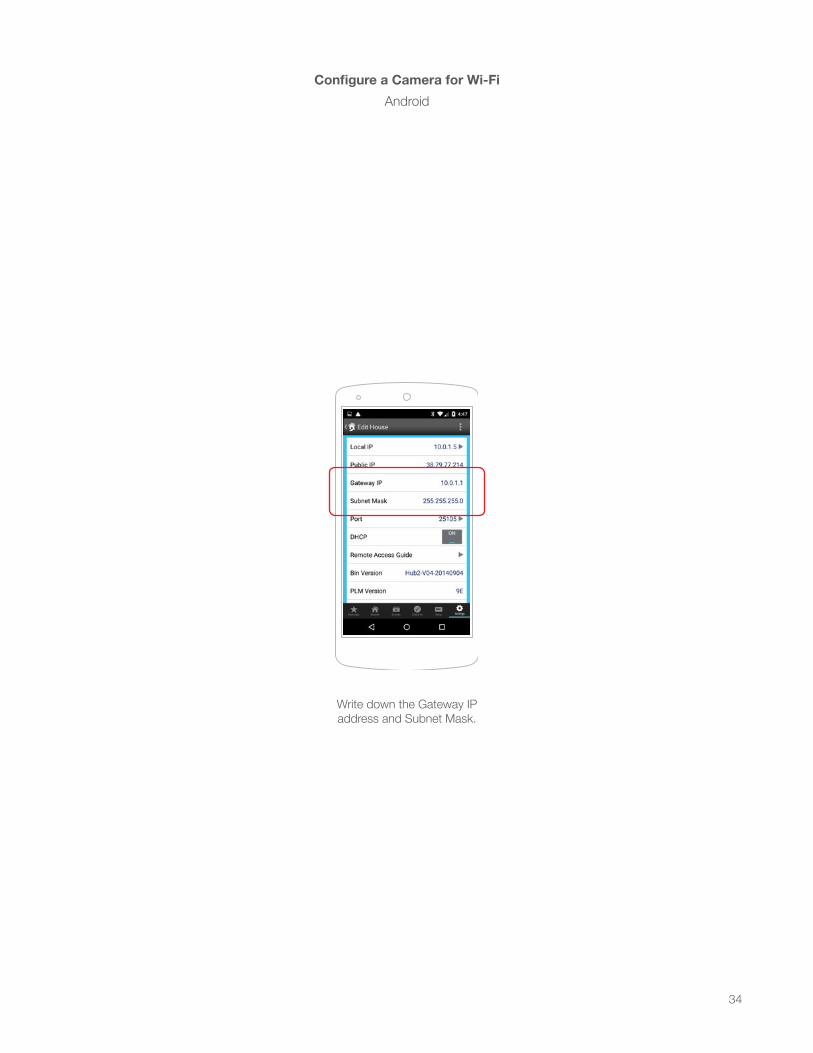
Configure a Camera for Wi-FiAndroid
Write down the Gateway IP address and Subnet Mask.

35
Download and launch the Camera Setup Assistant from
your Mac or PC.insteon.com/csa
Assign a Static IP AddressMac or PC
Right-click (or control-click) on a Mac) and select Network
Configuration.
Uncheck Obtain IP from DHCP Server. IP Address, Subnet Mask,
Gateway and DNS Server will auto-populate.
Enter your camera password and click OK. It may take up to two minutes for your
camera to restart.Visit insteon.com/remoteaccess for
instructions on configuring remote access.
? If the fields are empty, enter the information gathered throughout this document. Use Gateway IP Address for both Gateway and DNS Server addresses.
You’re done setting up your Insteon Wi-Fi Camera.

36
If you don’t have Insteon Hub and the Insteon app, you can setup your Wi-Fi Camera from your Mac or PC.
Setup without Insteon Hub
37
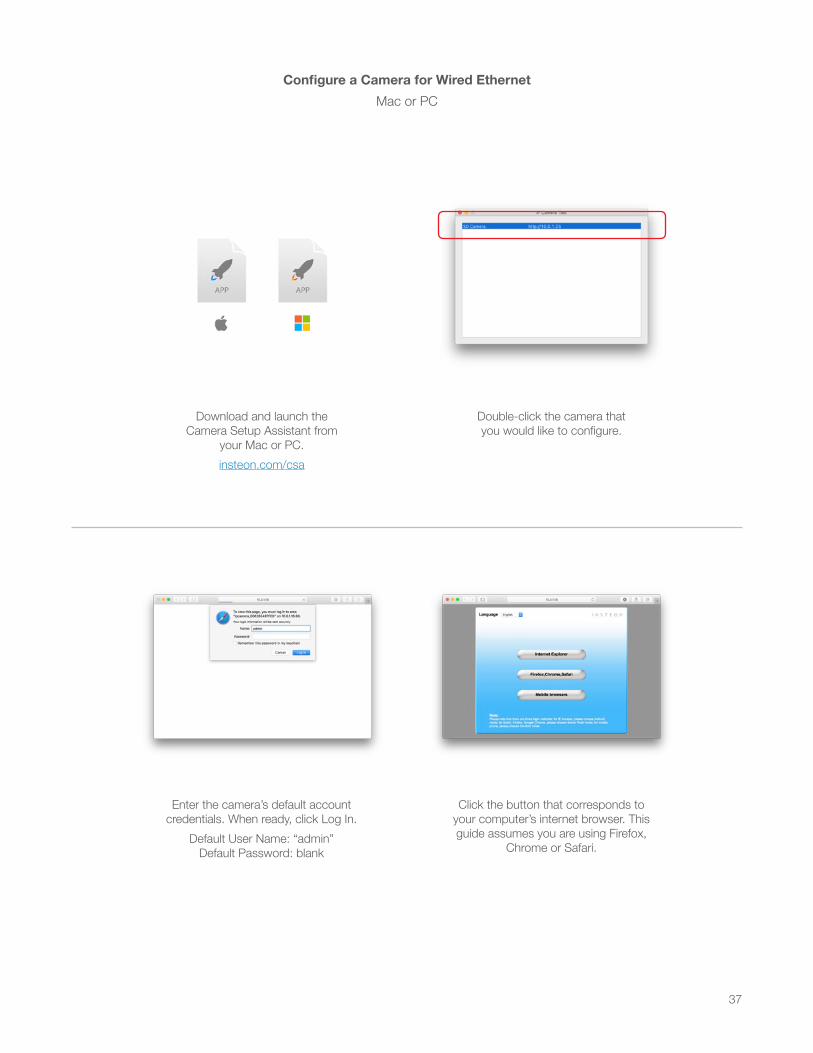
Download and launch the Camera Setup Assistant from
your Mac or PC.insteon.com/csa
Configure a Camera for Wired EthernetMac or PC
Double-click the camera that you would like to configure.
Enter the camera’s default account credentials. When ready, click Log In.
Default User Name: “admin” Default Password: blank
Click the button that corresponds to your computer’s internet browser. This guide assumes you are using Firefox,
Chrome or Safari.

38
Click Device Management
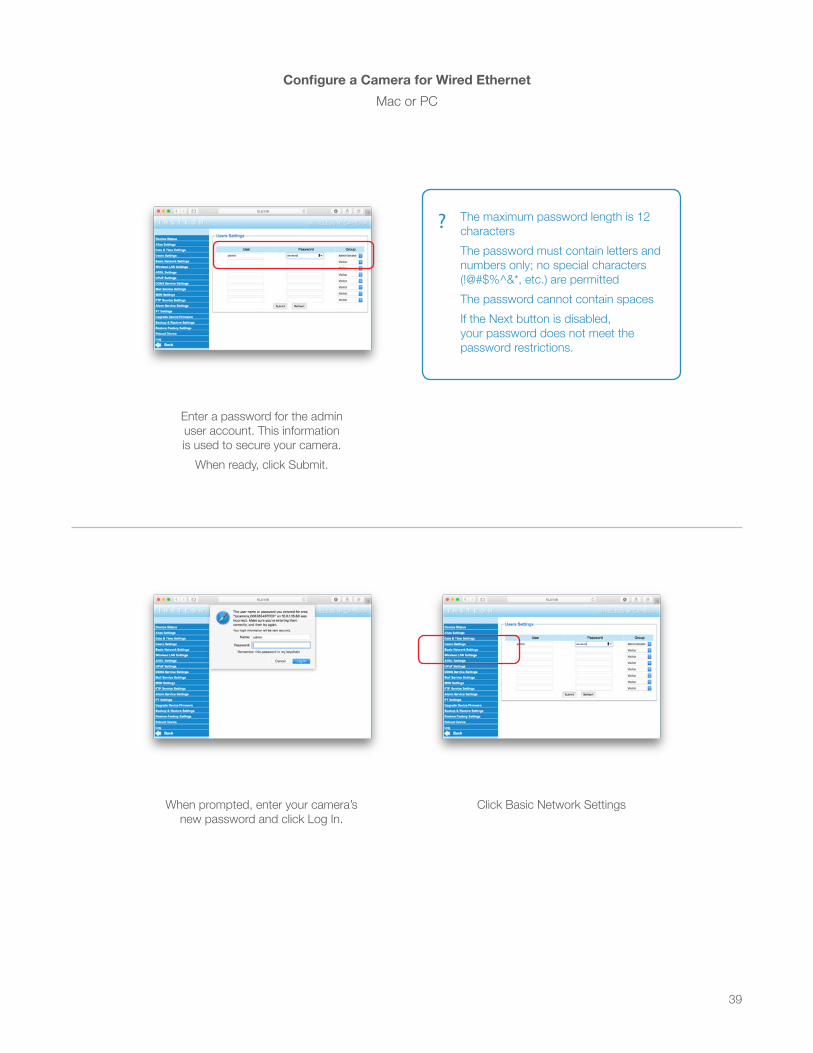
Configure a Camera for Wired EthernetMac or PC
Click Alias Settings
Give your camera a name. When ready, click Submit.
Click Users Settings
39
Enter a password for the admin user account. This information is used to secure your camera.
When ready, click Submit.
Configure a Camera for Wired EthernetMac or PC
When prompted, enter your camera’s new password and click Log In.
Click Basic Network Settings
? The maximum password length is 12 charactersThe password must contain letters and numbers only; no special characters (!@#$%^&*, etc.) are permittedThe password cannot contain spacesIf the Next button is disabled, your password does not meet the password restrictions.

40
Change the port from 80 to 25106.If you are setting up more than one
camera, increase the port number for each successive camera to ensure that every camera has a unique port number.
When ready, click Submit.
Configure a Camera for Wired EthernetMac or PC
Close your browser and return to the Insteon Camera Setup Assistant.
Write down the IP address displayed to the right of the camera name.
Right-click (or control-click on a Mac) and select Network Configuration.
Uncheck Obtain IP from DHCP Server. IP Address, Subnet Mask, Gateway and DNS Server should
auto-populate.
? If the fields are empty, enter the information gathered throughout this document. Use Gateway IP Address for both Gateway and DNS Server addresses.
41
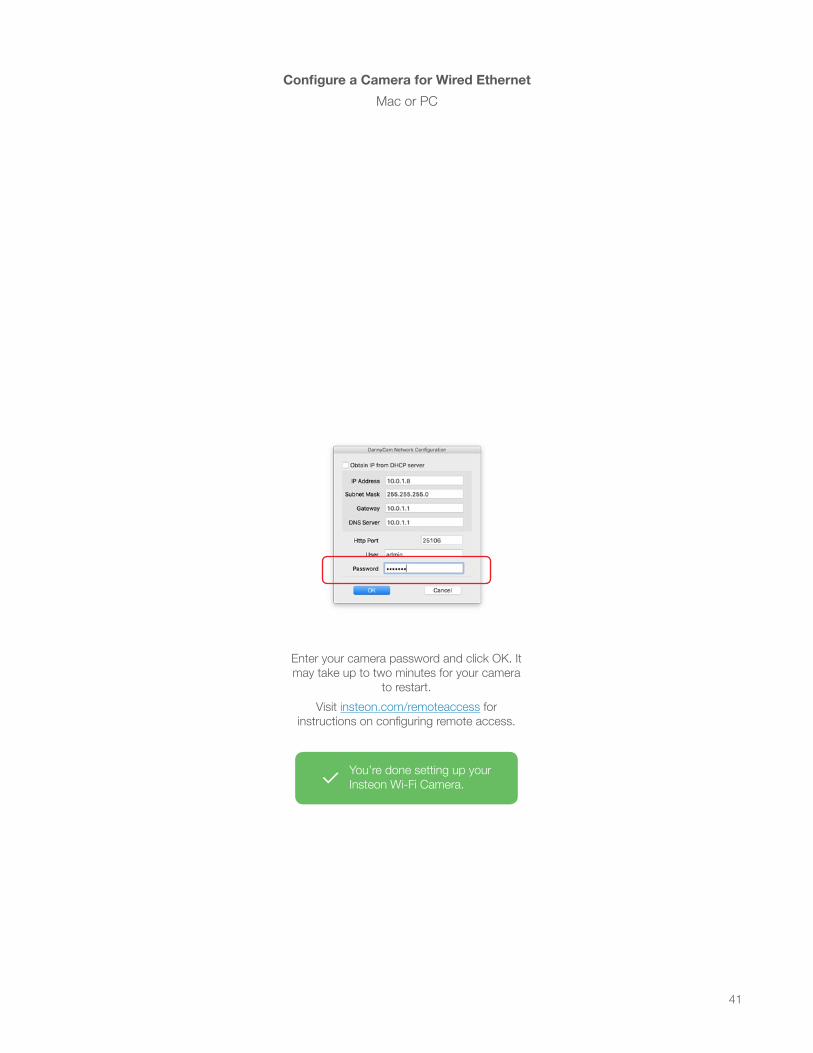
Configure a Camera for Wired EthernetMac or PC
Enter your camera password and click OK. It may take up to two minutes for your camera
to restart.Visit insteon.com/remoteaccess for
instructions on configuring remote access.
You’re done setting up your Insteon Wi-Fi Camera.

42
Download and launch the Camera Setup Assistant from
your Mac or PC.insteon.com/csa
Configure a Camera for Wi-FiMac or PC
Double-click the camera that you would like to configure.
Enter the camera’s default account credentials. When ready, click Log In.
Default User Name: “admin” Default Password: blank
Click the button that corresponds to your computer’s internet browser. This guide assumes you are using Firefox,
Chrome or Safari.
43
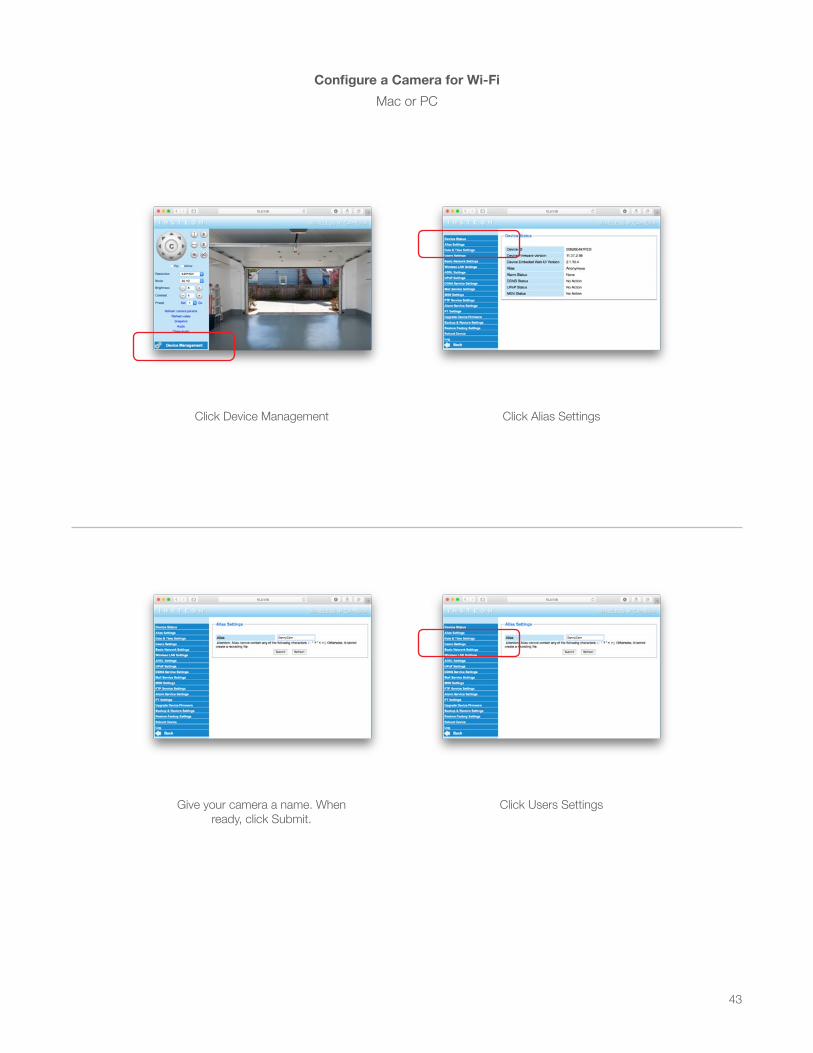
Click Device Management
Configure a Camera for Wi-FiMac or PC
Click Alias Settings
Give your camera a name. When ready, click Submit.
Click Users Settings
44
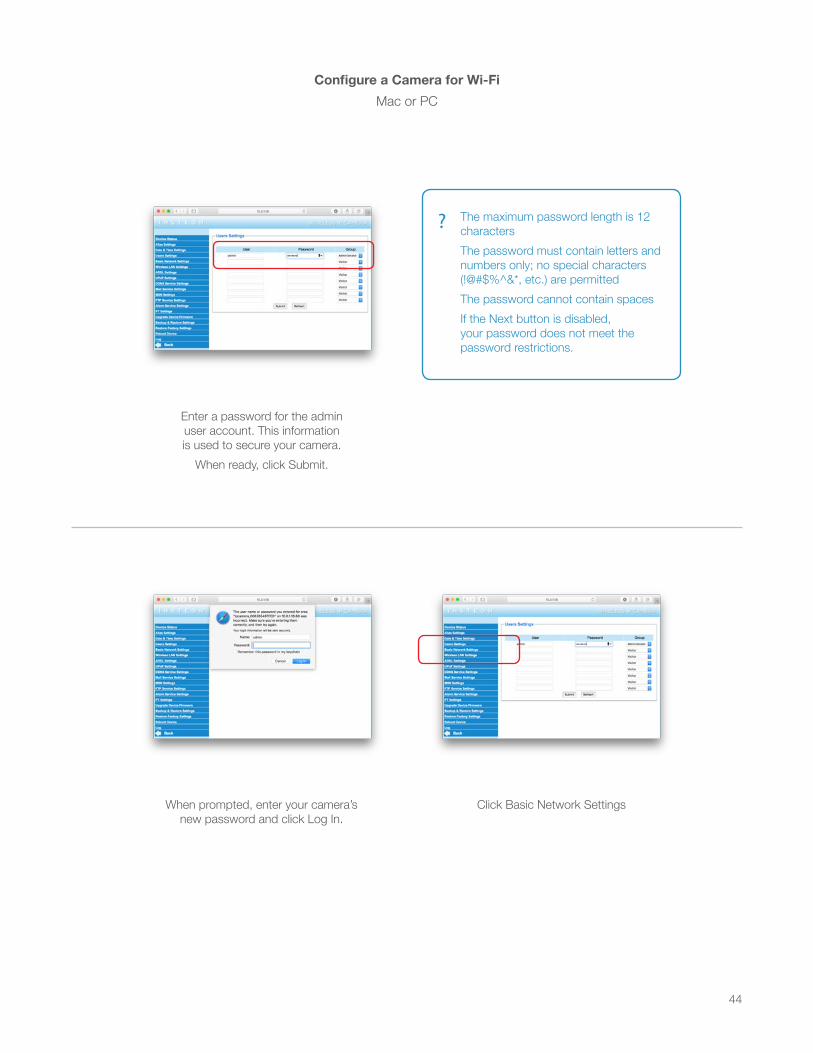
Enter a password for the admin user account. This information is used to secure your camera.
When ready, click Submit.
Configure a Camera for Wi-FiMac or PC
When prompted, enter your camera’s new password and click Log In.
Click Basic Network Settings
? The maximum password length is 12 charactersThe password must contain letters and numbers only; no special characters (!@#$%^&*, etc.) are permittedThe password cannot contain spacesIf the Next button is disabled, your password does not meet the password restrictions.
45
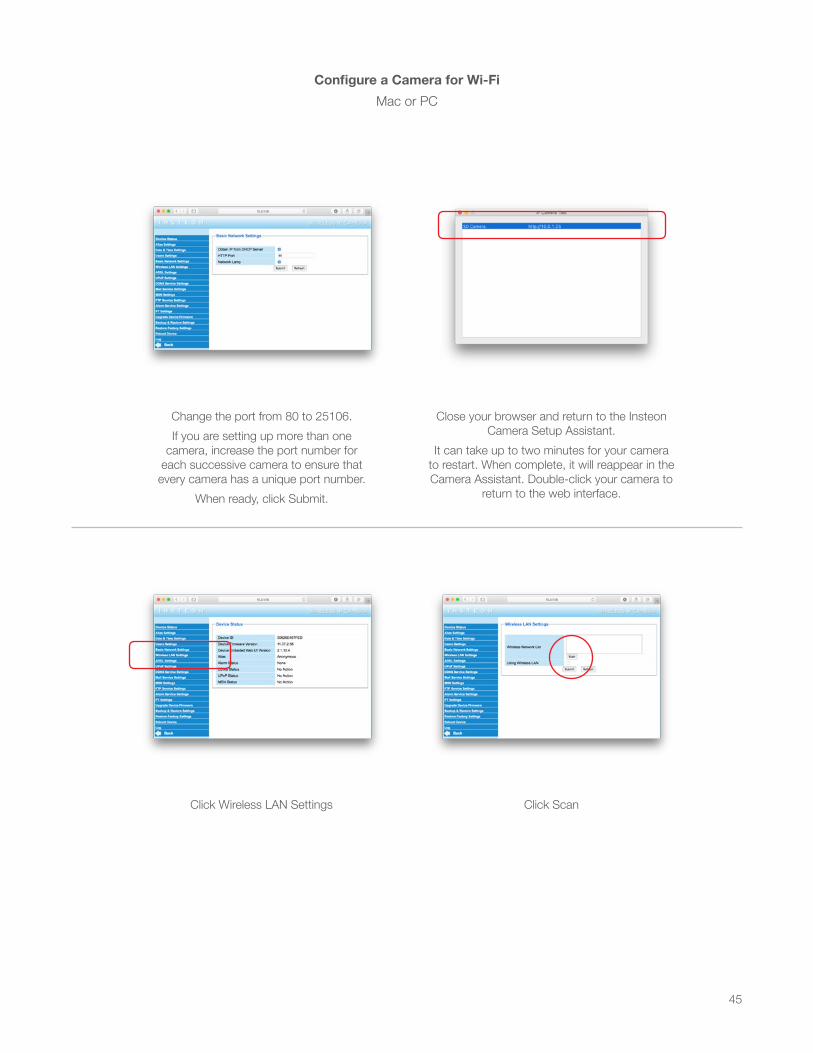
Change the port from 80 to 25106.If you are setting up more than one
camera, increase the port number for each successive camera to ensure that every camera has a unique port number.
When ready, click Submit.
Configure a Camera for Wi-FiMac or PC
Close your browser and return to the Insteon Camera Setup Assistant.
It can take up to two minutes for your camera to restart. When complete, it will reappear in the Camera Assistant. Double-click your camera to
return to the web interface.
Click Wireless LAN Settings Click Scan
46
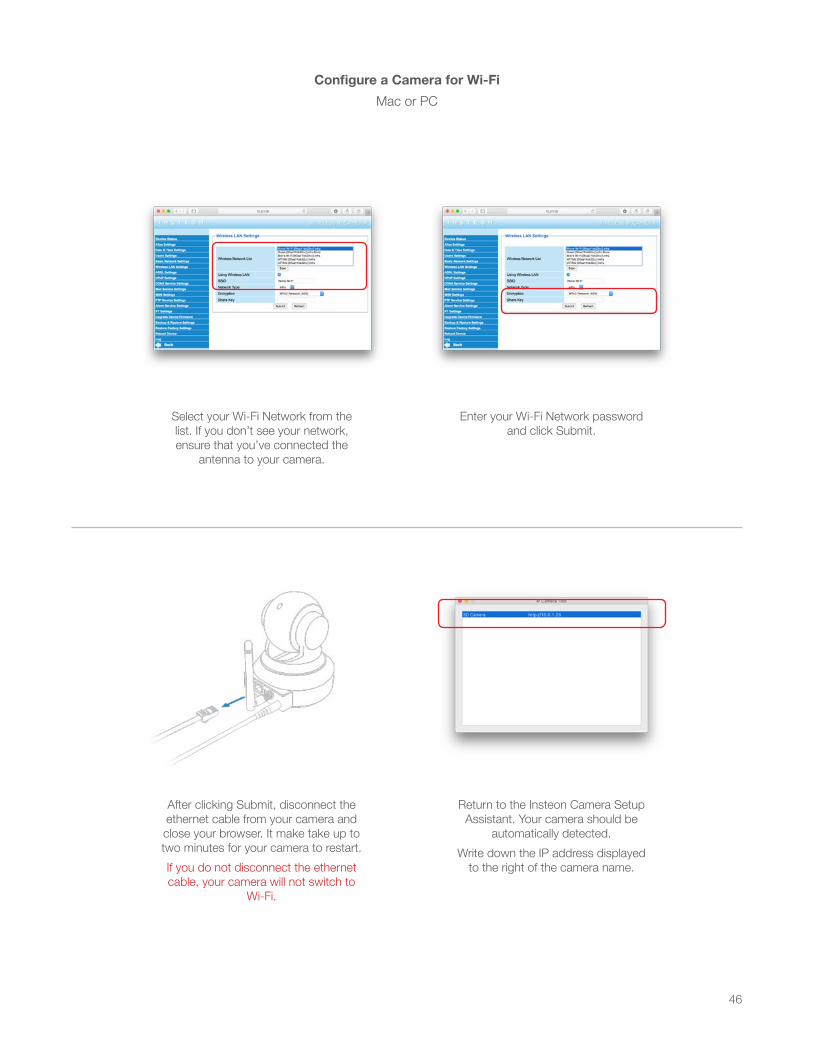
Select your Wi-Fi Network from the list. If you don’t see your network, ensure that you’ve connected the
antenna to your camera.
Configure a Camera for Wi-FiMac or PC
Enter your Wi-Fi Network password and click Submit.
After clicking Submit, disconnect the ethernet cable from your camera and close your browser. It make take up to two minutes for your camera to restart.If you do not disconnect the ethernet cable, your camera will not switch to
Wi-Fi.
Return to the Insteon Camera Setup Assistant. Your camera should be
automatically detected.Write down the IP address displayed
to the right of the camera name.
47
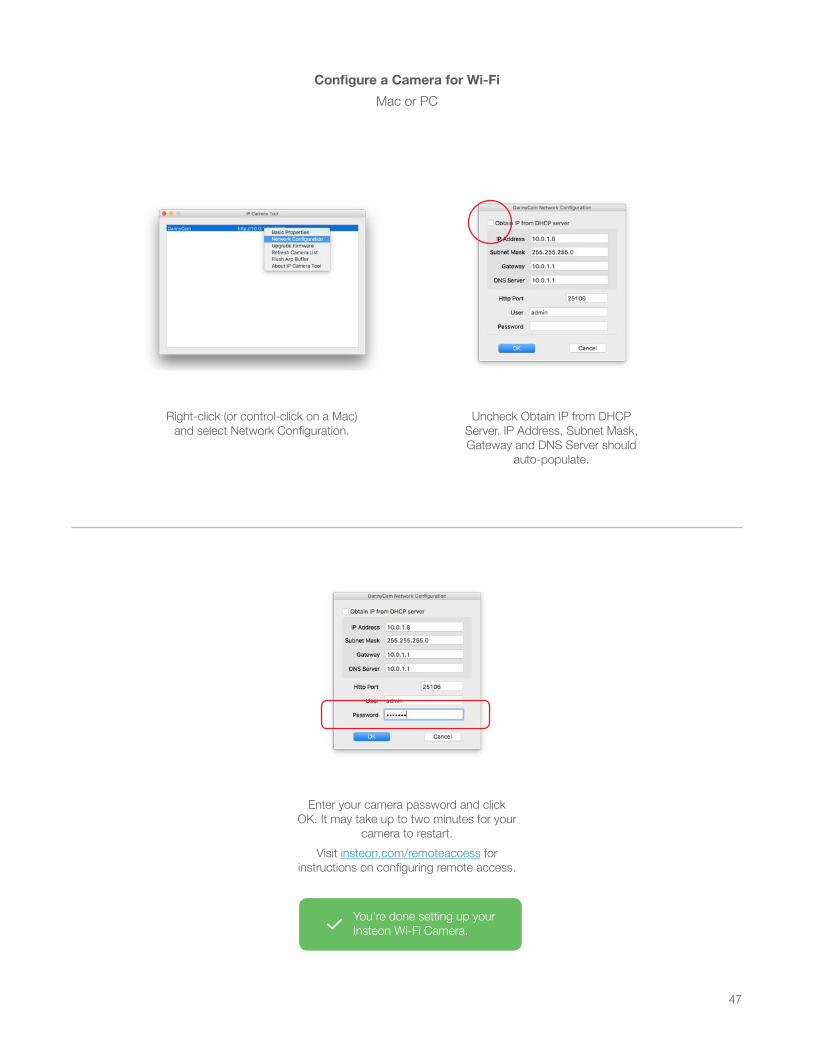
Right-click (or control-click on a Mac) and select Network Configuration.
Configure a Camera for Wi-FiMac or PC
Uncheck Obtain IP from DHCP Server. IP Address, Subnet Mask, Gateway and DNS Server should
auto-populate.
Enter your camera password and click OK. It may take up to two minutes for your
camera to restart.Visit insteon.com/remoteaccess for
instructions on configuring remote access.
You’re done setting up your Insteon Wi-Fi Camera.
48
Use the web browser interface to configure advanced settings on your camera.
Web Browser Interface
49
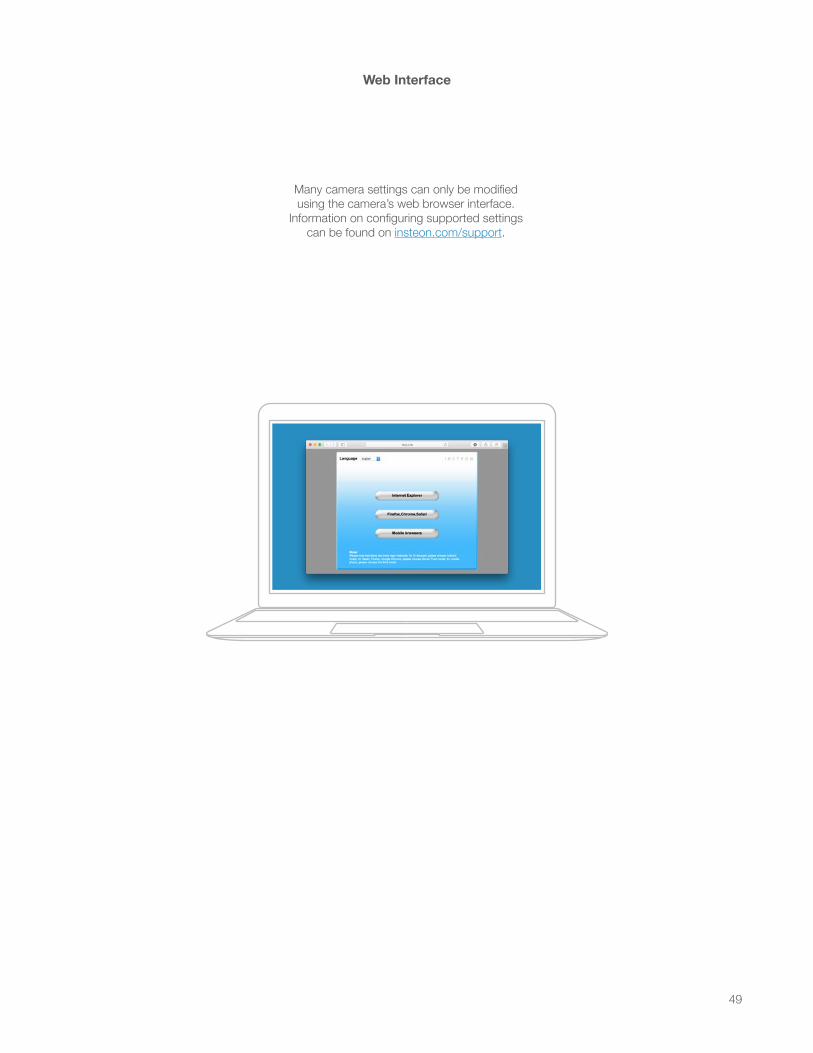
Web Interface
Many camera settings can only be modified using the camera’s web browser interface.
Information on configuring supported settings can be found on insteon.com/support.
50
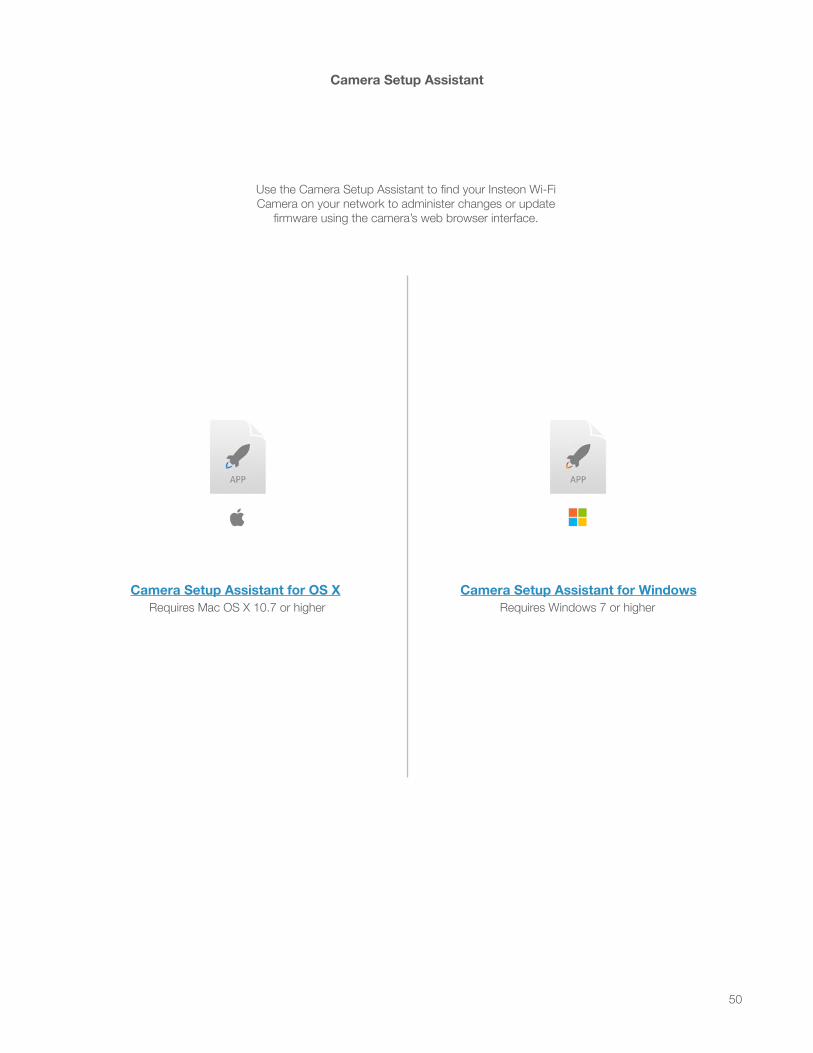
Camera Setup Assistant for WindowsCamera Setup Assistant for OS X
Camera Setup Assistant
Requires Windows 7 or higherRequires Mac OS X 10.7 or higher
Use the Camera Setup Assistant to find your Insteon Wi-Fi Camera on your network to administer changes or update
firmware using the camera’s web browser interface.
51
Firmware UpdateFor detailed firmware update instructions,
visit insteon.com/camera-firmware

52
Restore all settings by performing a factory reset. Configured users, passwords, network settings and more are all erased and restored to factory defaults.
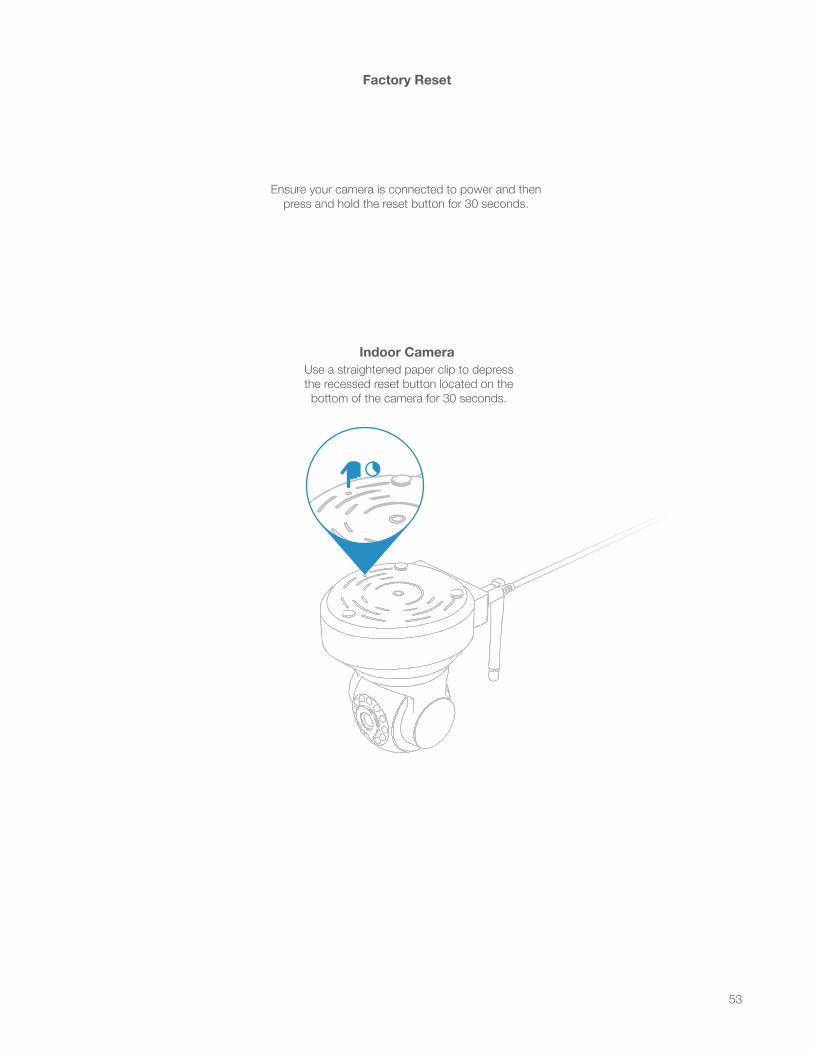
Factory Reset
53
Indoor Camera
Factory Reset
Use a straightened paper clip to depress the recessed reset button located on the bottom of the camera for 30 seconds.
Ensure your camera is connected to power and then press and hold the reset button for 30 seconds.

54
Everything else you might need to know about your Insteon product.
Appendix
55
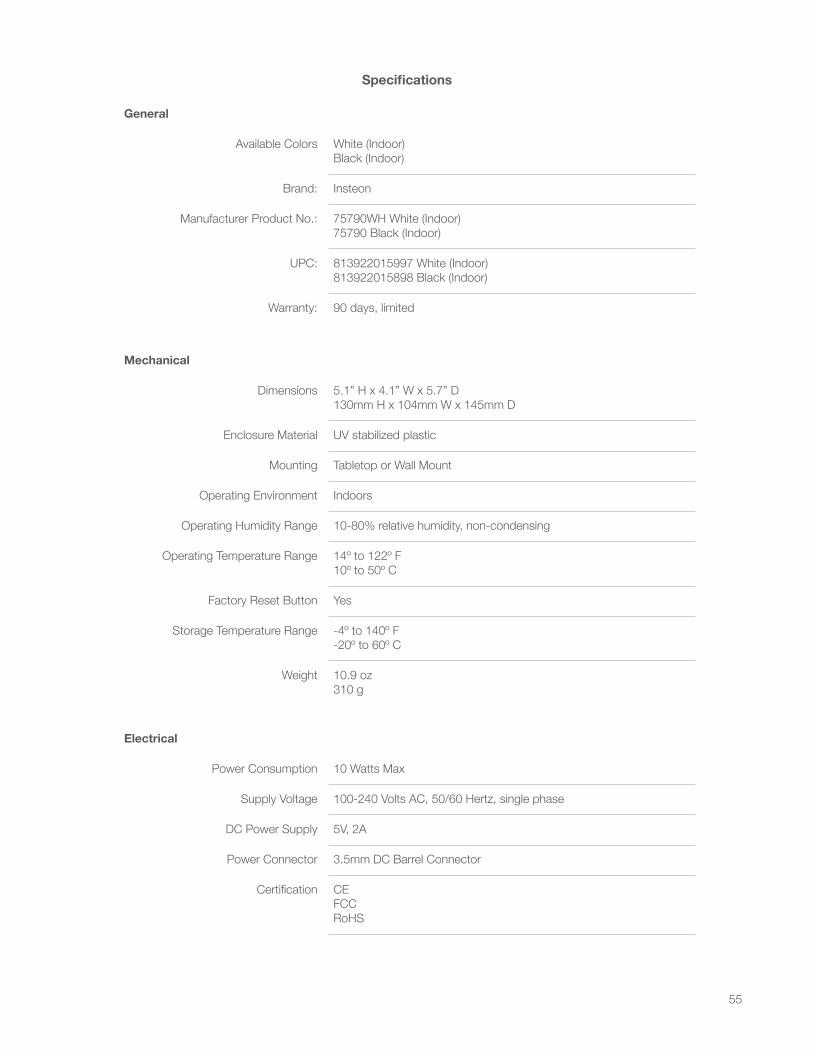
Specifications
General
Available Colors White (Indoor) Black (Indoor)
Brand: Insteon
Manufacturer Product No.: 75790WH White (Indoor) 75790 Black (Indoor)
UPC: 813922015997 White (Indoor) 813922015898 Black (Indoor)
Warranty: 90 days, limited
Mechanical
Dimensions 5.1” H x 4.1” W x 5.7” D 130mm H x 104mm W x 145mm D
Enclosure Material UV stabilized plastic
Mounting Tabletop or Wall Mount
Operating Environment Indoors
Operating Humidity Range 10-80% relative humidity, non-condensing
Operating Temperature Range 14º to 122º F 10º to 50º C
Factory Reset Button Yes
Storage Temperature Range -4º to 140º F -20º to 60º C
Weight 10.9 oz 310 g
Electrical
Power Consumption 10 Watts Max
Supply Voltage 100-240 Volts AC, 50/60 Hertz, single phase
DC Power Supply 5V, 2A
Power Connector 3.5mm DC Barrel Connector
Certification CE FCC RoHS
56
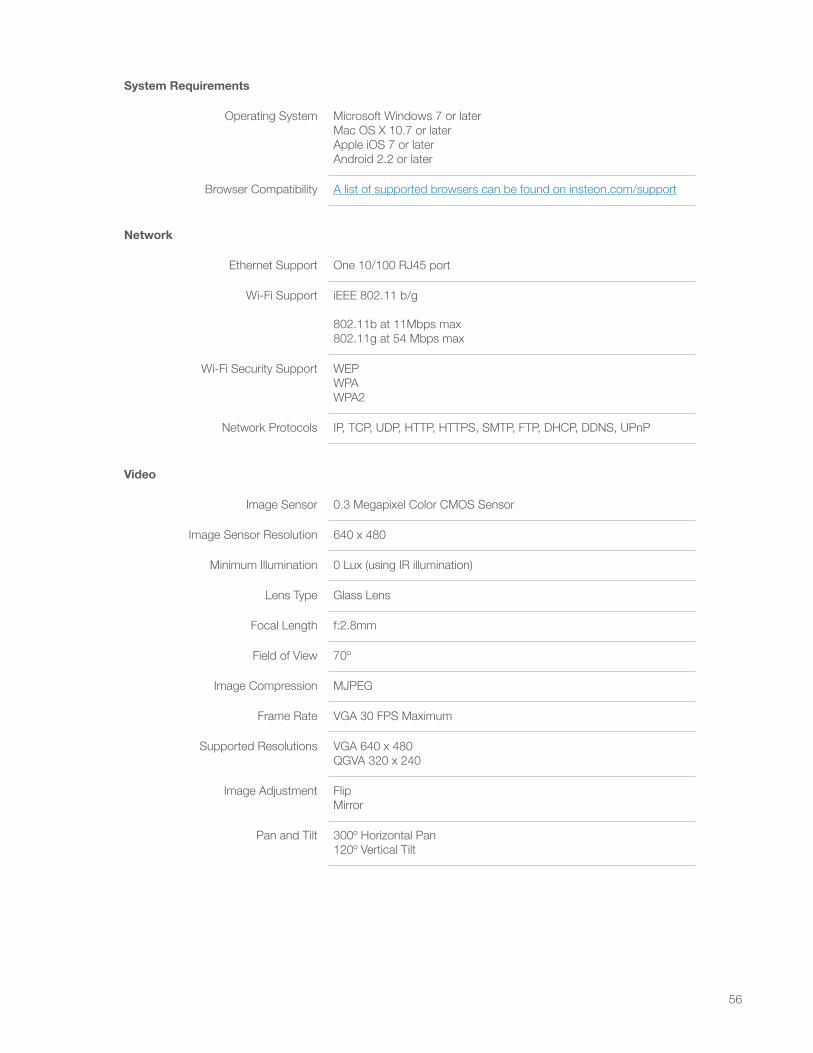
System Requirements
Operating System Microsoft Windows 7 or later Mac OS X 10.7 or later Apple iOS 7 or later Android 2.2 or later
Browser Compatibility A list of supported browsers can be found on insteon.com/support
Network
Ethernet Support One 10/100 RJ45 port
Wi-Fi Support iEEE 802.11 b/g 802.11b at 11Mbps max 802.11g at 54 Mbps max
Wi-Fi Security Support WEP WPA WPA2
Network Protocols IP, TCP, UDP, HTTP, HTTPS, SMTP, FTP, DHCP, DDNS, UPnP
Video
Image Sensor 0.3 Megapixel Color CMOS Sensor
Image Sensor Resolution 640 x 480
Minimum Illumination 0 Lux (using IR illumination)
Lens Type Glass Lens
Focal Length f:2.8mm
Field of View 70º
Image Compression MJPEG
Frame Rate VGA 30 FPS Maximum
Supported Resolutions VGA 640 x 480 QGVA 320 x 240
Image Adjustment Flip Mirror
Pan and Tilt 300º Horizontal Pan 120º Vertical Tilt
57
TroubleshootingFor detailed troubleshooting information,
visit insteon.com/support
58
Certifications and Warnings
This equipment has been tested and found to comply with the limits for a Class B digital device, pursuant to Part 15 of the FCC Rules. These limits are designed to provide reasonable protection against harmful interference when the equipment is operated in a commercial environment. This equipment generates, uses, and can radiate radio frequency energy and, if not installed and used in accordance with the installation manual, may cause harmful interference to radio communications. Operation of this equipment in a residential area is likely to cause harmful interference, in which case the user will be required to correct the interference at his own expense.
FCC Caution
Any changes or modification not expressly approved by the party responsible for compliance could void the user’s authority to operate this equipment.
This equipment complies with FCC radiation exposure limits set forth for an uncontrolled environment. This equipment should be installed and operated with a minimum distance of 20cm between the radiator & your body.
This transmitter must not be co-located or operating in conjunction with any other antenna or transmitter.
CE Mark Warning
This is a Class B product. In a domestic environment, this product may cause radio interference, in which case the user may be required to take adequate measures.

59
Declaration of Conformity
In 2002, the European Union introduced the Directive on Waste Electrical and Electronic Equipment (WEEE). The main aim of the Directive is to ensure that WEEE is collected and treated separately. WEEE may contain hazardous substances that should not end-up in the (human) environment because it can have adverse effects on it.Furthermore, WEEE is a vast source of raw materials. With the ever-rising worldwide demand for new equipment and the ever-decreasing volume of raw materials in nature, letting this potential source of such materials go to waste is unacceptable. If equipment is collected separately, the equipment can be recycled and up to 85 to 90% of the equipment can be reused as new material, saving the use of virgin raw materials and energy of producing these. Separate collection and treatment of WEEE will thus decrease CO2 emissions as well. For the above reasons, Insteon expects end-users to dispose of the material in an environmentally friendly way through separate collection and treatment. Electrical and Electronic Equipment is labeled with the following ‘crossed out wheeled bin’ symbol indicating that the equipment should be disposed of, by the end-user, separate from other types of waste. End-users should contact their dealer/distributor or our company on disposal, collection and recycling options in their country.
60
Product Warranty
Limited Warranty
Seller warrants to the original consumer purchaser of this product that, for a period of 90 days from the date of purchase, this product will be free from defects in material and workmanship and will perform in substantial conformity to the description of the product in this Owner’s Manual. This warranty shall not apply to defects or errors caused by misuse or neglect. If the product is found to be defective in material or workmanship, or if the product does not perform as warranted above during the warranty period, Seller will either repair it, replace it, or refund the purchase price, at its option, upon receipt of the product at the address below, postage prepaid, with proof of the date of purchase and an explanation of the defect or error. The repair, replacement, or refund that is provided for above shall be the full extent of Seller’s liability with respect to this product. For repair or replacement during the warranty period, call 866-243-8022 with the Model # and Revision # of the device to receive an RMA# and send the product, along with all other required materials to:
Insteon ATTN: Receiving 16542 Millikan Ave. Irvine, CA 92606-5027
Limitations
The above warranty is in lieu of and Seller disclaims all other warranties, whether oral or written, express or implied, including any warranty or merchantability or fitness for a particular purpose. Any implied warranty, including any warranty of merchantability or fitness for a particular purpose, which may not be disclaimed or supplanted as provided above shall be limited to the two-year of the express warranty above. No other representation or claim of any nature by any person shall be binding upon Seller or modify the terms of the above warranty and disclaimer.
Home automation devices have the risk of failure to operate, incorrect operation, or electrical or mechanical tampering. For optimal use, manually verify the device state. Any home automation device should be viewed as a convenience, but not as a sole method for controlling your home.
In no event shall Seller be liable for special, incidental, consequential, or other damages resulting from possession or use of this device, including without limitation damage to property and, to the extent permitted by law, personal injury, even if Seller knew or should have known of the possibility of such damages. Some states do not allow limitations on how long an implied warranty lasts and/or the exclusion or limitation of damages, in which case the above limitations and/or exclusions may not apply to you. You may also have other legal rights that may vary from state to state.
Protected under U.S. and foreign patents (see www.insteon.com/patents) ©2016 Insteon
Rev 06.30.16